

Page 1

Select the entry where you want to insert the cut entries.
cut entries will be pasted above this selected entry.)
(Note: The
From the
from your keyboard.
Edit
menu drop down list, select
Paste
or enter INSERT
To Duplicate File Entries In Your List:
Select the entries that you want to duplicate.
From the
the CTRL key.
Select the entry where you want to insert the cut entries.
Edit
menu select
Copy,
or enter INSERT while holding down
(Note: The
cut entries will be pasted above this selected entry.)
From the
keyboard.
Edit
menu select
Paste,
or enter INSERT from your
To Delete Entries From Your List
Select the file entries that you want to delete.
From the
Edit
menu select
Cut,
or enter DELETE from your keyboard.
To Clear All The Entries From The List
From the
down the CTRL key.
Edit
menu select
Clear All
or enter DELETE while holding
Faxing Stapled Files
You can fax all the stapled files displayed in the
The files will be faxed in the order displayed. The fax can be sent to a
single recipient or list of recipients that exists in the
a name or list of names that you enter. New names or lists can also be
saved to the
below describe the most common faxing situation. Your system has
many additional fax capabilities which are fully explained in the
Book
chapter of this manual.
Address Book
as soon as you enter them. The steps listed
Stapler’s
Address Book
main window.
or to
Address
To fax all the stapled files listed in the
Select
Select
The
File
from the menu bar of the
Fax All
Fax Send
from the drop down list.
dialog box will appear. The dialog box displays the fax
Stapler
Stapler
window.
window.
Faxing Documents 10 - 13
Page 2
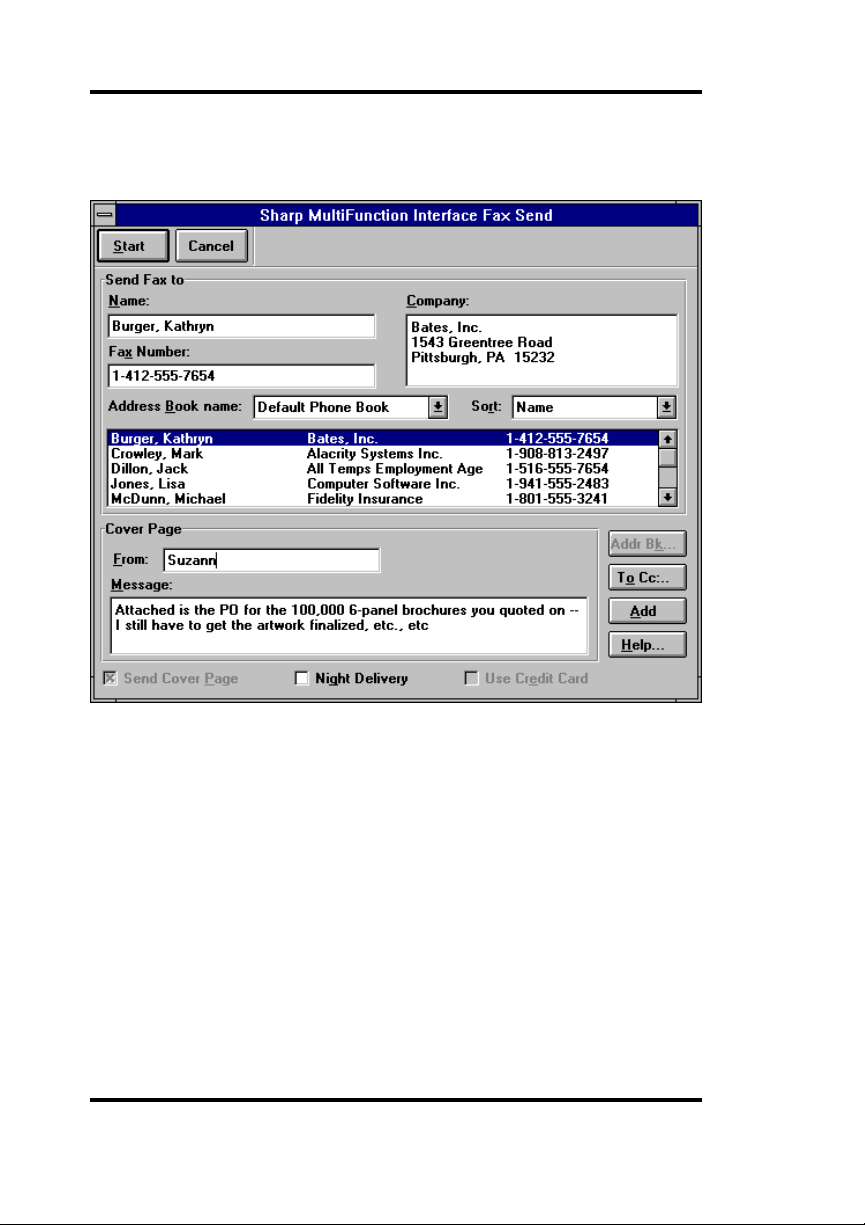
phone book and provides for specifying a cover sheet and accompanying message, as well as a
option for routine fax traffic.
Night Delivery
and
Use Credit Card
Select the Address Book
Select the
Book
Address Book
drop down list.
Addressing the Fax
You can address the fax you are sending by entering new
information in the
selecting an entry from a
Create a New Entry
Enter the
comma (e.g. Smith, Edward H.).
Enter the
in the
the
in the
Name
of the recipient, last name first, separated by a
Fax Number.
Fax Line Settings
Local Country Code
Fax Line Settings
Faxing Documents 10 - 14
you want to use from the
Name, Company
Address Book
If you have entered a
field in the
. If you have entered a
field in the
and
Fax Number
.
Local Country Code
Control Panel,
Local Area Code
Control Panel
Address
fields or by
you must enter
, you must enter
Page 3

the
Area Code
to insert a pause of approximately two (2) seconds in the dialing
sequence. Enter a 'W' to make the system wait for a second dial
tone before proceeding.
for local and long distance calls. Use a comma
(Note: The Phone Number entry should
be all digits, not 1-800-ABCDEFG. Hyphens and parentheses
are valid characters and may be used in the Phone Number
entry. The first invalid character will terminate the dialing string.)
If desired, enter a
To add the new entry to the
in the
Address Book
If you do not add the entry to the
entered will only be used for the current fax and not be saved.
Company
drop down list box, select the ADD button.
name and address.
Address Book
currently displayed
Address Book
, the information
Select an Entry from the Address Book
Select the address book that you wish to use from the
Book
drop down list.
Click the mouse on the desired entry in the address book. (If
necessary, you can sort the entries in the address book from the
Address Book
that are enclosed in square brackets “[ ]” are lists of multiple
recipients.
submenu by using the Addr Bk button.) Entries
Address
Including a Cover Page
If you want to send a cover page with your fax, check the
Cover Page
You can choose either a
Cover Page
page is a cover page format developed by Your system. A
custom
letterhead.
box. This enables the
standard
feature found in the
cover page combines this standard information with your
Cover Page
or a
custom
Control Panel
information box.
cover page in the
. A
standard
Send
cover
Enter the sender’s name in the
Enter the message in the
up to 12 lines long and contain up to 960 characters. Press
to start a new line.
From
Message
field.
field. The message can be
Night Delivery
Check this box if you want your fax delivered at night.
Faxing Documents 10 - 15
Enter
Page 4

Use Credit Card
Check this box if you want your fax charged to your credit card.
Select the START button.
The fax operation will begin, and proceed in the background,
leaving your personal computer free for other tasks.
Printing Stapled Files
You can print all the stapled files displayed in the
The files will be printed in the order displayed.
Stapler’s
main window.
To print all the stapled files listed in the
Select
Select
The
Enter the number of collated copies desired in the
In the
To print selected pages, check the
selection in the
tively in the order in which the files are displayed.
Select OK to print or CANCEL to return to the
the files.
File
from the menu bar of the
Print All
Print
Pages
from the drop down list.
dialog box will appear.
group box, select
From/To
fields. The pages are numbered consecu-
Stapler
Stapler
window.
window.
Copies
All
to print all the stapled files.
From
radio button. Enter the page
Stapler
without printing
Saving Stapled Files as an .ALA File
You can save all the stapled files displayed in the
as an .ALA file. The files will be saved in the order displayed.
Select
Select
The
File
from the menu bar of the
Save All As
Save As
from the drop down list.
dialog box will appear.
Stapler
Stapler
window.
main window
field.
Faxing Documents 10 - 16
Page 5

Naming the File
Select the drive where the document is to be stored from the
drop down list.
Drives
Scroll through the
symbol) where you want to store the document.
when changing drives, you will be looking at the last directory used.
If you wish to get to the root directory, it is necessary to make that
selection by scrolling to the top of the directory list and clicking on
the topmost file folder symbol.)
Select .ALA in the
Directories
Save File as Type box.
box to select the directory (file folder
(Please note that
Enter a Document Description
In the
Description
when searching for the document. You may use up to 127 characters
to describe the file.
edit field, enter text which is suitable for you to use
Append To File
Check this option box to have the fax appended to the (".ALA") file
you have selected.
Select the OK button
This saves the file and returns you to the
Stapler
Faxing Documents 10 - 17
window.
Page 6

Setting up the Fax
Select
File
from the menu bar of the
Stapler
window.
Select
The
and descriptions of its functions follows:
Fax Setup
Fax Settings
from the drop down list.
dialog box will appear. An example of this window
Page Size
Select the size of the pages to be faxed from the
down list.
Resolution
Select the desired resolution from the
Fine
resolution transmits the facsimile at 200 x 200 dots per
inch. Use
transmission.
horizontal x 100 vertical dots per inch. Use
to reduce transmission time.
mended.
Fine
resolution for the highest quality facsimile
Standard
resolution transmits the facsimile at 200
Resolution
Fine
mode is strongly recom-
Page Size
drop down list.
Standard
drop
resolution
Orientation
This setting is not used by
Faxing Documents 10 - 18
Stapler.
Page 7

Transmission
Select
faxing or printing a document that contains graphics. The transmission time will be reduced, however there may be some loss of quality
in the faxed or printed image.
Economy
if you want to reduce the transmission time when
Select the
you want to retain the best quality in the faxed or printed image.
However, the transmission time will be increased if this option is
selected.
Click on the OK button.
Standard
option if your document contains graphics and
Setting up the Printer
Select
Select
When the
File
from the menu bar of the
Printer Setup
Printer Setup
from the drop down list.
dialog box appears:
Stapler
window.
Select the printer you wish to use.
Select the paper tray from the
Select the paper size from the
Select OK to use this printer setup.
Paper Source
Paper Size
drop down list
drop down list.
Faxing Documents 10 - 19
Page 8

Receiving Faxes
Introduction
The
Inbox
enables you to manage the facsimiles that are received in the
Inbox
. The
Inbox
enables you to view, print and save faxes, and also
append faxes to other image documents. In addition, it maintains a
complete record of all your incoming fax traffic.
Features
Receives faxes in the background, without degrading the
responsiveness of your system.
Provides for electronic filing and indexing of all received
facsimiles, for instant retrieval via the
where you filed the document.
Print any or all received facsimiles, fast, on plain paper.
Automatic scaling of facsimiles to the printer's paper length and
width. Long facsimiles are converted to multiple-page
facsimiles, making certain that no information is lost.
Prints collated copies of multiple page faxes to eliminate trips
to the copier.
Maintains a log of all received facsimiles.
Finder
even if you forget
Activating the Inbox
Select the
group. Then minimize the
triangle in the upper right corner of the
To be assured that you are aware that a new facsimile has been received
the
Inbox
application window, click on the
corner of your window and select the
Inbox
The
strongly recommend that you select the
option
your software refer to the
Inbox
icon from the
icon should always be visible on your desktop. From the
icon, click on the icon, and check the
Inbox
must be active if you are to receive faxes. Therefore we
when installing your software. (For information on installing
Installing Your Software
Sharp Multifunction Interface
Inbox
to an icon by clicking on the small down
Inbox
window.
System
menu in the upper left hand
Always On Top
Always On Top
Load Inbox with Windows
option or from the
chapter of this manual.)
Receiving Faxes 11 - 1
option.
program
Inbox
Page 9

The Inbox Window
The
Inbox
window enables you to view, print, save or delete incoming
faxes. If the
after it receives a fax. It will continue to blink until the
Inbox
is minimized the icon will start blinking immediately
Available Information on Incoming Faxes
The
Inbox
window displays the following information about faxes that
have been distributed to you:
the
date and time
the facsimile identification of the sending fax machine (if it was
transmitted);
the number of pages received;
the fax was received;
Inbox
is maximized.
the status of the facsimile.
The following
Complete
viewed, printed or saved.
Incomplete
viewed, printed or saved.
Recovered
entered incorrectly. (This is usually due to an error while
receiving a fax). The system has automatically rebuilt the log
entry. Information in the
facsimile may be incomplete.
Viewed
status messages
- the fax was received successfully and is not yet
- the entire fax was not received and is not yet
- The log information for the facsimile has been
- the facsimile has been viewed but not printed or saved.
Receiving Faxes 11 - 2
are displayed:
Activity Log
may be incomplete. The
Page 10

Printed
Saved
Printing a Fax
Select
The
Print
Fax Inbox Print
- the facsimile was printed but not saved.
- the facsimile has been saved.
from the
File
menu or click on the PRINT button.
dialog box will appear.
The entries in the
Print Selected
clicking on them in the
Print Unprinted
Printed
Print All
status.
Fax Inbox Print
- Prints only the faxes that were highlighted by
- Prints all faxes that do not have a status of
in the
Inbox
window.
- Prints all the faxes in the
Delete After Printing
automatically delete each fax from the
(Note: Use this option with care. Certain printer problems cannot
be detected, and may cause an unprinted fax to be deleted. If
you want to later Save or View these faxes, do not use this
option.)
Copies
that you want to print.
Click on the PRINT button to print.
- Enter the number of collated copies of each facsimile
Setting up your Printer
Select
File
from the menu bar of the
dialog box are defined below:
Inbox
window.
Inbox
window, regardless of
- Check this box if you want the to
Inbox
after it is printed.
Inbox
window.
Receiving Faxes 11 - 3
 Loading...