

Page 1

MODEL
FO-1650
FO-1850
FACSIMILE
OPERATION MANUAL
1.INSTALLATION
2.INITIAL SETTINGS
3.FAX OPERATIONS
4.USING THE ANSWERING MACHINE
5.MAKING COPIES
6.MAKING TELEPHONE CALLS
7.SPECIAL FUNCTIONS
8.OPTIONAL SETTINGS
9.PRINTING OUT REPORTS AND LISTS
10.MAINTENANCE
11.TROUBLESHOOTING
SPECIFICATIONS
QUICK REFERENCE GUIDE
INDEX
Page 2

WARNING
NOTE
FCC Regulations state that any unauthorized changes or modifications to this
equipment not expressly approved by the manufacturer could void the user’s authority to
operate this equipment.
This equipment has been tested and found to comply with the limits for a Class B
Note:
digital device, pursuant to Part 15 of the FCC Rules.
These limits are designed to provide reasonable protection against harmful interference in
a residential installation.
This equipment generates, uses and can radiate radio frequency energy and, if not installed
and used in accordance with the instructions, may cause harmful interference to radio
communications. However, there is no guarantee that interference will not occur in a
particular installation. If this equipment does cause harmful interference to radio or
television reception, which can be determined by turni ng the equipment off and on, the
user is encouraged to try to correct the interference by one or more of the following
measures:
Reorient or relocate the receiving antenna.
Increase the separation between the equipment and the receiver.
Connect the equipment into an outlet on a circuit different from that to which the receiver
is connected.
Consult the dealer or an experienced radio/TV technician for help.
The laser component of the UX-1000/1100 is rated Class 1 and complies with 21
CFR 1040.10 and 1040.11 of the CDRH standards. This means that the machine does
not produce hazardous laser radiation.
ABOUT THE TELEPHONE CONSUMER PROTECTION ACT OF 1991
"The Telephone Consumer Protection Act of 1991 makes it unlawful for any person to use
a computer or other electronic device to send any message via a telephone facsimile
machine unless such message clearly contains in a margin at the top or bottom of each
transmitted page or on the first page of the transmission the following information:
(1) The date and time of transmission.
(2) Identification of either the business, business entity or individual sending the message.
(3) Telephone number of either the sending machine, business, business entity or
individual.
In order to program this information into your facsimile machine, please refer to the
appropriate instructions in the operation manual."
As an ENERGY STARSM partner, SHARP has deter-
E
mined that this product meets the
guidelines for energy efficiency.
NERGY STAR
SM
FOR YOUR RECORDS
Please record the model number and serial number below, for easy reference, in case of loss
or theft. These numbers are located on the rear side of the unit.
Space is also provided for other relevant information.
Model Number____________________________________________________________
Serial Number ____________________________________________________________
Date of Purchase __________________________________________________________
Place of Purchase _________________________________________________________
Page 3

INTRODUCTION
Welcome to the FO-1650/1850 and thank you for choosing Sharp! The
FO-1650/1850 combines a fascimile and answering machine into a single unit,
allowing you to engage in both fax and voice communications with convenience
and economy. In addition, the FO-1650/1850 features plain paper printing and the
ability to be connected to a personal computer.
This manual gi ve s yo u ea sy -to-follow in st ru ctions for installing and usin g th e
FO-1650/1850. The Table of Contents will show you where instructions for using
each feature are located. While you may not need to read every section in detail at
first, we recommend you at least look over them briefly.
If you have any questions or problems which cannot be solved by reading this
manual, please contact your Sharp dealer.
Important:
This facsimil e machine is not designed for use on a line which has call waiting,
••••
call forwardi ng , and some other sp ec ia l se rv ic es offered by your t el ep ho ne
company. If you attempt to use the fax machine in conjunction with any of these
services, you may exp er ie nc e er ro rs during transmi ssio n and reception of
facsimile messages.
This fax machine is no t co m pa t i bl e with digital tele ph on e sy st em s . N o ot he r fax
••••
machines may be connected to the same line.
Note: The illustrations in this manual show the FO-1650.
INTRODUCTION i
Page 4

INTRODUCTION
Important safety information
If any of your telephon e equipment i s not oper ating prope rly, you s hould imm ediately
•
remove it from you r te le ph on e li ne , as it m ay cau se har m to th e te le phone network.
The socket-outlet shall be installed near the equipment and shall be easily accessi-
•
ble.
Never install telephone wirin g during a lightni ng sto rm .
•
Never insta ll teleph one jacks in wet loca tions u nless the jack is sp ecifical ly desig ned
•
for wet locations.
Never touch unin sula ted te leph one w ires or term ina ls unl ess the te leph one li ne ha s
•
been disconnected at the network interface.
Use caution when installing or modifying telephone lines.
•
Avoid using a teleph one (other than a co rdless type) durin g an electrical sto rm. There
•
may be a remote risk of electric shock from lightning.
Do not use a telephone to report a gas leak in the vicinity of the leak.
•
Do not install or use the machine near water, or when you are wet. Take care not to
•
spill any liquid s on the machine.
ii INTRODUCTION
Page 5

TABLE OF CONTENTS
1 INSTALLATION
Unpacking Check List . . . . . . . . . . . . . . . . . . . . . . 1-1
Installing the Imaging Film . . . . . . . . . . . . . . . . . . . 1-2
Connections . . . . . . . . . . . . . . . . . . . . . . . . . . . 1-6
Attachments . . . . . . . . . . . . . . . . . . . . . . . . . . . 1-8
Loading Printing Paper . . . . . . . . . . . . . . . . . . . . . 1-9
2 INITIAL SETTINGS
Setup Guide . . . . . . . . . . . . . . . . . . . . . . . . . . . 2-1
A Look at the Operation Panel . . . . . . . . . . . . . . . . . 2-2
Entering Your Name and Fax Number . . . . . . . . . . . . . 2-4
Entering Letters for Names . . . . . . . . . . . . . . . . . . . 2-5
Setting the Date and Time . . . . . . . . . . . . . . . . . . . 2-7
Selecting the Reception Mode . . . . . . . . . . . . . . . . . 2-8
Answering Machine Set-up . . . . . . . . . . . . . . . . . . . 2-9
Distinctive Ringing . . . . . . . . . . . . . . . . . . . . . . . . 2-17
Storing Numbers for Automatic Dialing . . . . . . . . . . . . . 2-20
Volume Adjustment . . . . . . . . . . . . . . . . . . . . . . . 2-24
3 FAX OPERATIONS
Sending Documents . . . . . . . . . . . . . . . . . . . . . . . 3-1
Receiving Documents . . . . . . . . . . . . . . . . . . . . . . 3-11
4 USING THE ANSWERING MACHINE
Operating the Answering Machine . . . . . . . . . . . . . . . 4-1
Remote Operations . . . . . . . . . . . . . . . . . . . . . . . 4-5
Other Functions . . . . . . . . . . . . . . . . . . . . . . . . . 4-13
5 MAKING COPIES
6 MAKING TELEPHONE CALLS
7 SPECIAL FUNCTIONS
Caller ID . . . . . . . . . . . . . . . . . . . . . . . . . . . . . 7-1
Anti Junk Fax . . . . . . . . . . . . . . . . . . . . . . . . . . 7-5
Memory . . . . . . . . . . . . . . . . . . . . . . . . . . . . . 7-6
iii
Page 6

TABLE OF CONTENTS
Broadcasting . . . . . . . . . . . . . . . . . . . . . . . . . . 7-8
Polling . . . . . . . . . . . . . . . . . . . . . . . . . . . . . . 7-10
Timer Operations . . . . . . . . . . . . . . . . . . . . . . . . 7-13
Entering and Using Programs . . . . . . . . . . . . . . . . . 7-15
Reminder Function . . . . . . . . . . . . . . . . . . . . . . . 7-20
PC Link Function . . . . . . . . . . . . . . . . . . . . . . . . 7-22
8 OPTIONAL SETTINGS
9 PRINTING OUT REPORTS AND LISTS
10 MAINTENANCE
11 TROUBLESHOOTING
Problems and Solutions . . . . . . . . . . . . . . . . . . . . . 11-1
Messages and Signals . . . . . . . . . . . . . . . . . . . . . 11-3
Clearing Paper Jams . . . . . . . . . . . . . . . . . . . . . . 11-5
SPECIFICATIONS
FCC REGULATORY INFORMATION
QUICK REFERENCE GUIDE
INDEX
iv
Page 7
1 INSTALLATION
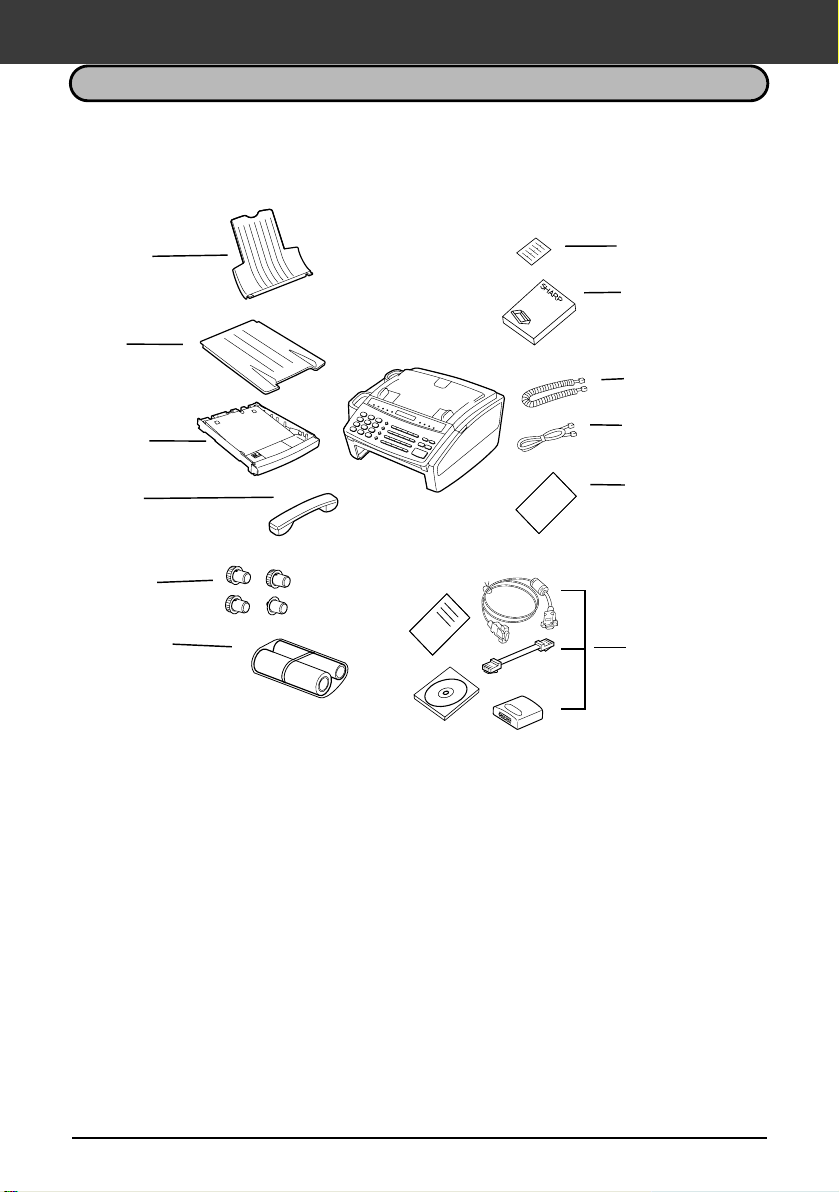
UNPACKING CHECKLIST
After unpackin g yo ur fax , mak e su re you have all the item s sho wn be low. If any are
missing, contact your dealer or retailer.
Received
document
tray
Paper tray
cover
Paper tray
Handset
3 gears and
1 flange
Imaging film
Points to keep in mind when setting up
Rapid key labe ls
Operation
manual
Handset cord
Telephone
line cord
Sample sharp
printing paper
(with the FO-1850
only)
Multifunction
interface kit
(with the FO-1850
only)
(two cables, PC
interface box,
CD-ROM,setup
instructions)
♦
The fax must be inst a ll ed on a le vel surface.
♦
Keep the fax away from ai r co nditioners, he at ers, direct sunl ig ht, and dust.
♦
If the fax is moved from a cold to a warm place, it is possible that condensation
may form on the reading glass, preventing proper scanning of documents for
transmission. To remove the condensation, turn on the power and wait
approximately two hours before using the fax.
♦
If your area expe riences a high incidence of lightning or power surges, we
recommend tha t yo u in stall surge prot ec tors for the powe r an d te le ph on e li nes.
Surge protectors can be purchased at most telephone specialty stores.
INSTALLATION 1-1
Page 8
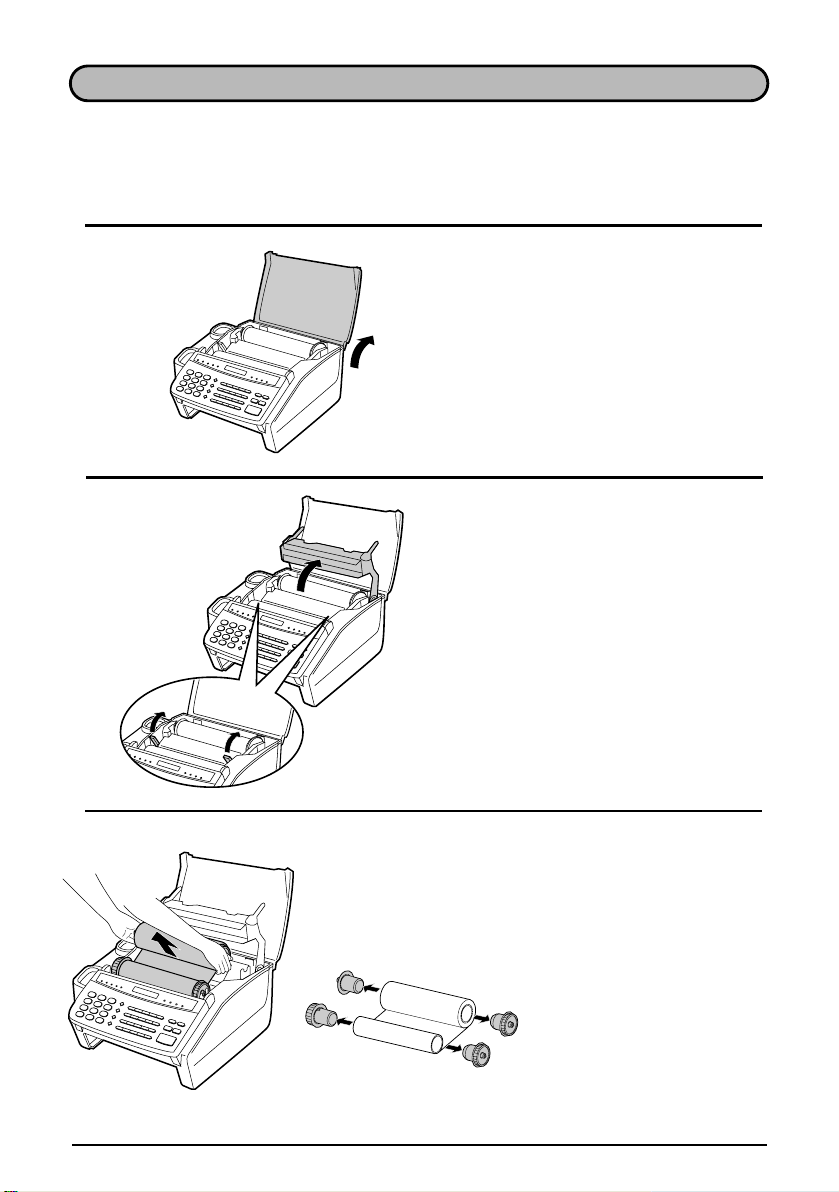
INSTALLING THE IMAGING FILM
The printer unit in your fax creates printed tex t and images by applying heat to the
imaging film, which causes toner to be transferred from the film to the page. Follow
the steps below to install or replace the imaging film.
1
2
Grasp the finger hold on the right side of
the printing compartment cover, and pull
up to open the cover.
Push back the gree n le ve rs on ea ch sid e
of the printing comp artment, and ro ta te
the printing head frame up and to the
rear.
••••
Caution! The printing head (the strip of
metal on the unders id e of the frame)
applies heat to th e pr inting film. It may
be hot if a docum en t ha s just been
printed.
3
If you are replac ing the imaging f il m ,
take the old film out of the printin g co m partment and remove the three gears
and the flange from the ends of the
spools.
1-2 INSTALLATION
Page 9
INSTALLING THE IMAGING FILM
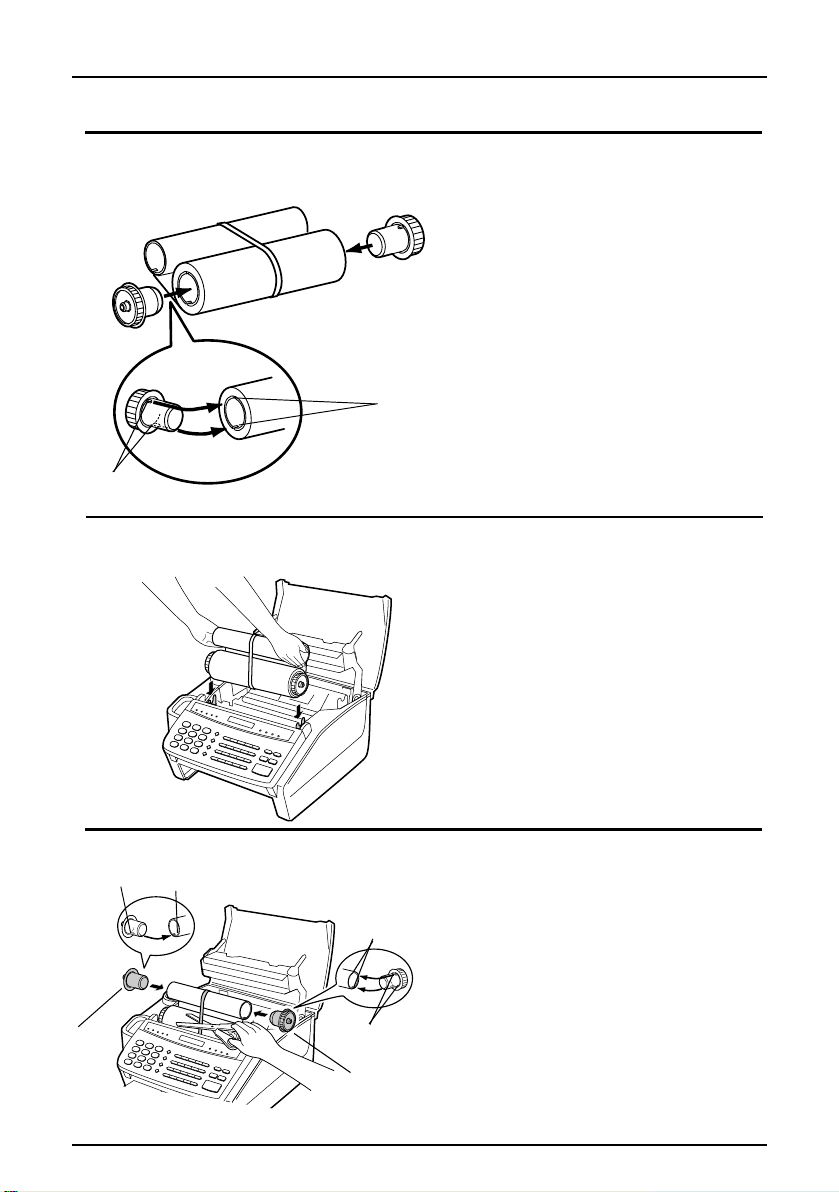
4
2 tabs
5
Take the new fil m out of its package,
and insert two of the gears provid ed wi th
the fax into the en ds of th e sp ool with
film. Make sure that the two tabs on the
gears fit properly into the slots in the
ends of the spool.
••••
Do not yet remove the band which
holds the spools together.
2 slots
Hold the empt y sp oo l so that the end
with only one slot is on the left, and
lower the spools int o th e fr on t of the printing compartment. The gears in the ends
of the spool with film should fit into the
slots on each side of the printing compartment.
Flange
6
1 tab
1 slot
Cut the band whic h ho ld s th e sp ools together with scissors, and remove it. Insert the remaining gear into the right end
2 slots
2 tabs
Gear
of the empty spool and the flange into
the left end of the empty spool. Make
sure the tabs on the gear and the flange
fit into the slo ts in the ends of the spool
(the gear has two tabs and the flange
has one tab).
INSTALLATION 1-3
Page 10
INSTALLING THE IMAGING FILM
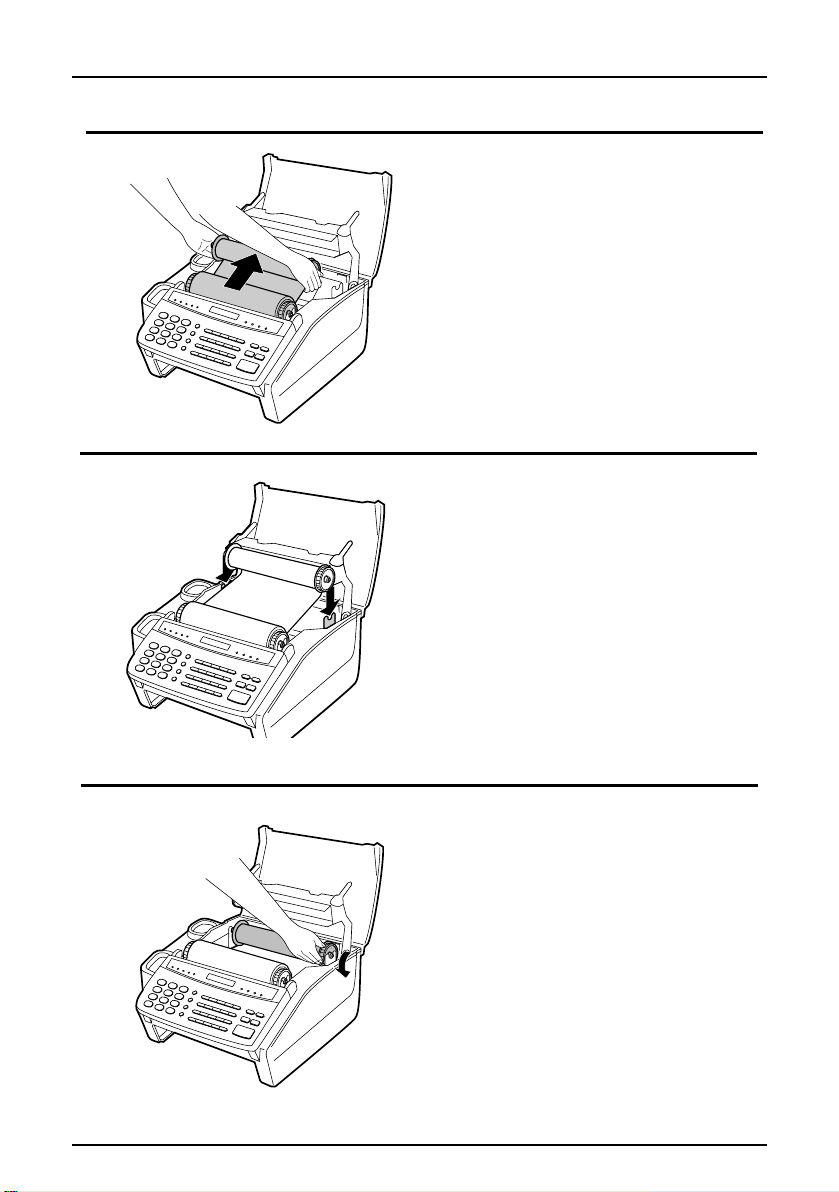
7
8
Pull the empty sp oo l to w ar d th e back of
the compartment, unwinding the film as
you pull.
Insert the emp ty spo ol int o th e ba ck of
the compartment so that the gear and
the flange fit into the slots on the sides
of the compart m en t.
••••
Make sure that the gear engages with
the gear below it.
9
Wind the film slightly (rotate the gear on
the right side of the empty spool) so that
there is no slack in the film. Make sure
that both edges of the film wind onto the
spool evenly.
1-4 INSTALLATION
Page 11
INSTALLING THE IMAGING FILM
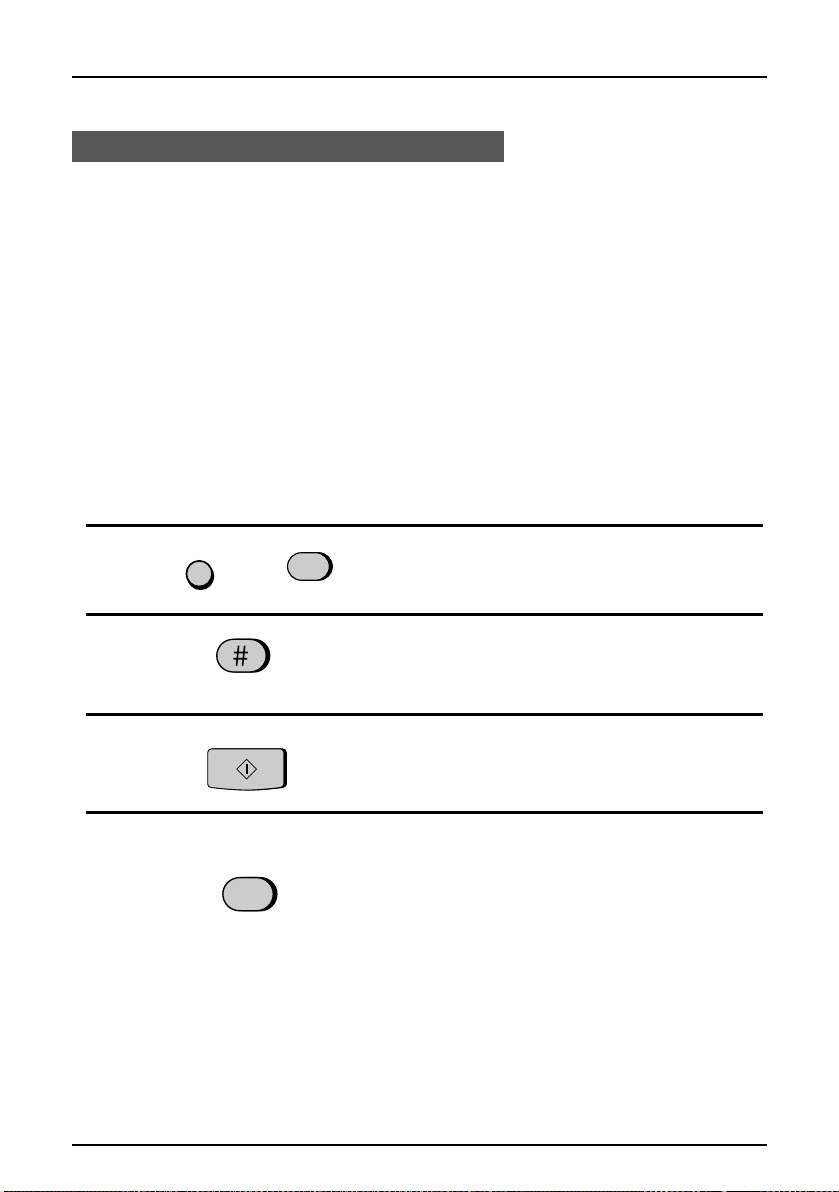
10
11
FUNCTION
6
START
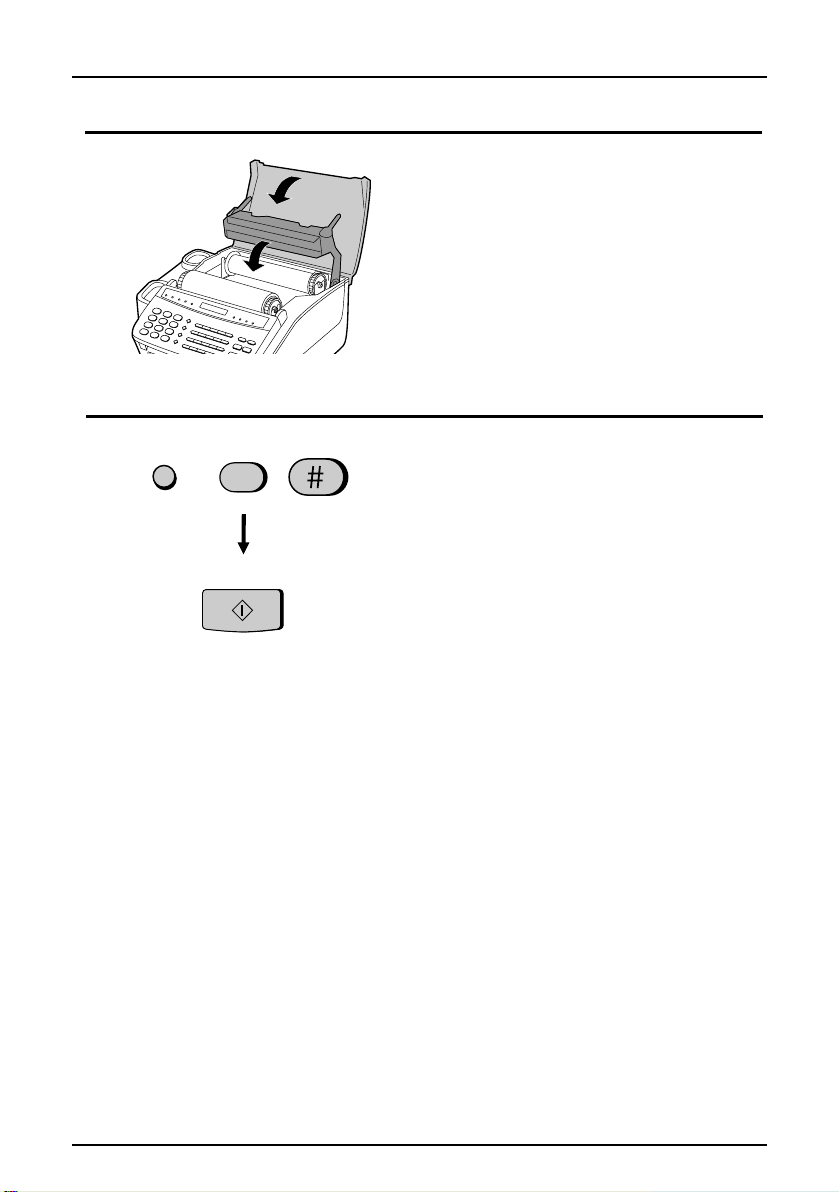
Rotate the printing head frame back
down, and press down on the "
mark in the center of the frame unt il the
frame clicks int o pl ac e. Close the printi ng
compartment cover.
If you replace d the film, initialize the new
film by pressing the
the "6" key, and the "#" key on the operation panel. Make sure that "INITIALIZE
FILM" appear s in the display, an d th en
press the
this step if yo u in st al led the initial sa m ple
roll of film.)
••••
You must initialize FO-16CR film to
make it wind to the star ti ng position for
printing. If this is not done, the first
pages you print w il l co m e out blank.
Note that initialization will not be possible if the paper tray is not in the fax.
START
FUNCTION
key. (Do not perform
PUSH
key,
"
When to replace the imaging film
The sample roll of imaging film provided with your fax is capable of printing
approximately 90 pages of letter size paper. When it is used up, "FILM END " will
appear in the display. Replace it with the following imaging film, which is available
at your dealer or retailer.
FO-16CR Imaging Film
One roll of FO- 16 CR im ag in g fi lm is cap ab le of printing appro xi m at el y 660 pages of
letter size paper.
Caution!
The text of documents printed with the imaging film is visible on the used film. If
confidential information has been printed, dispose of the film appropriately.
INSTALLATION 1-5
Page 12
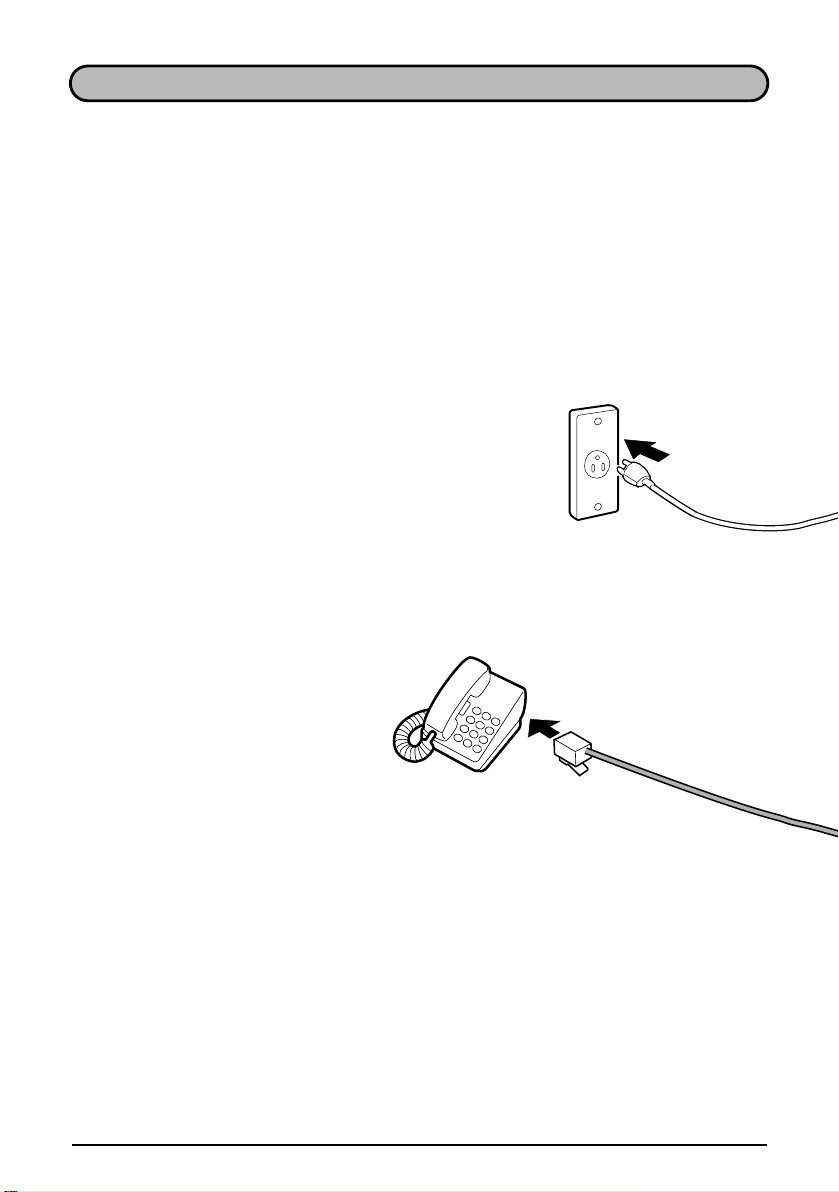
CONNECTIONS
Connect the power cord, telephone line, an d handset as shown below. If desired,
you can also connect an extension telephone to your fax.
♦
You can use an extension phone connected to the fax to make and receive calls
like any other extension phone on your line. For details on receiving faxes from
an extension phone, see "Receiving Documents" in Chapter 3.
Plug the power cord int o a 12 0 V,
60 Hz, grounded (3-prong) outlet.
Caution: Do not plug the
power cord into an y other kind
of outlet. This will damage the
machine and is not cov ered
under the warra n ty.
Extension
telephone
If you want to connect an extension phone to the fax, first remove the seal covering the
"TEL. SET" jack on the fa x, and
then insert the en d of the ext en sion phone line into the jack.
AC outlet
1-6 INSTALLATION
Page 13
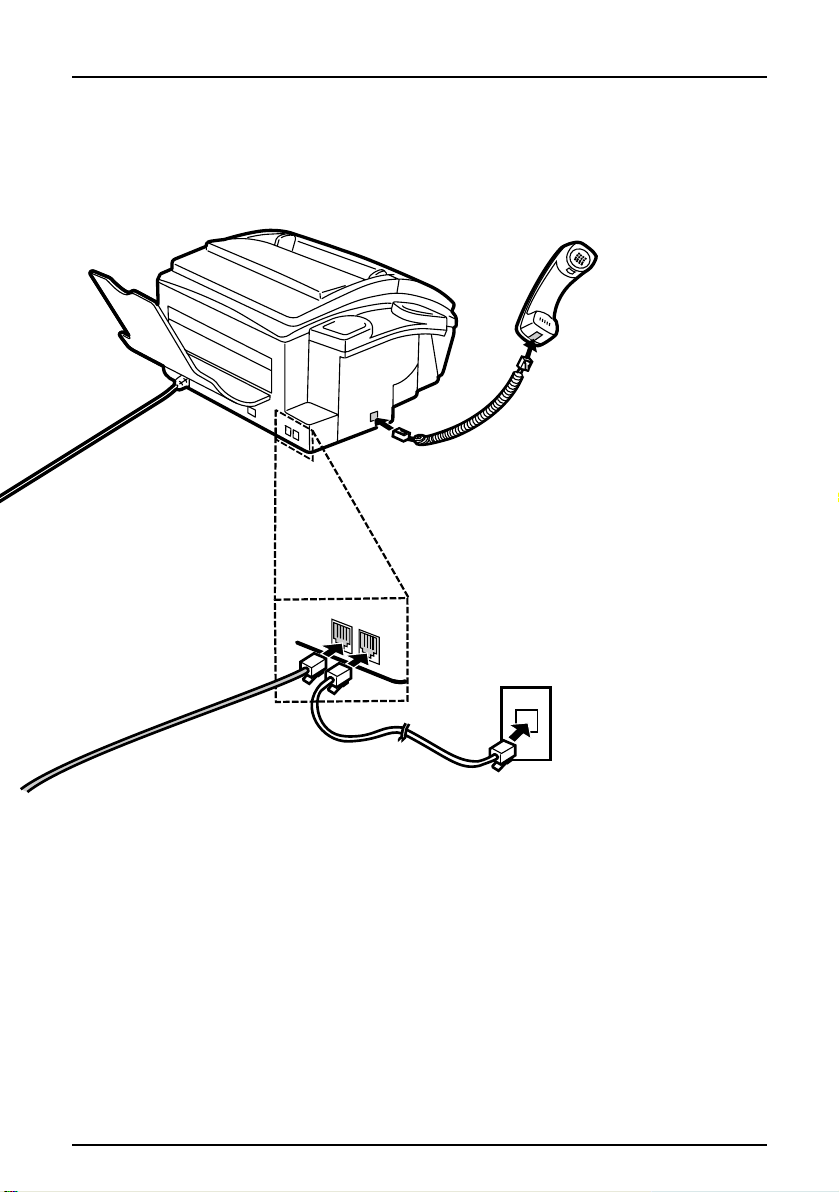
CONNECTIONS
Use the handse t to make
ordinary phone calls, or to
transmit and re ceive documents manually.
Handset
Insert one end of t he tel ep ho ne
line cord into the "TEL. LINE" jack.
Insert the othe r en d in to a sta nd ard (RJ11C) single-line telephone
wall jack.
Note: Be sure to insert the tele-
T
E
L
.
S
T
E
T
L
phone line cord into the "TEL.
LINE" jack. Do not inse rt it in to the
E
L.
IN
E
"TEL. SET" jack (th e "TEL. SET"
jack is only used for co nn ec ti ng an
extension phone).
Wall jack
Comments:
Your fax is set for touc h-tone dialing. If you are on a pulse dial (r o ta ry ) line, you
••••
must set the fax for pulse dialing by changing Option Setting 8. This procedure is
described in Chap te r 8, "O pt io nal Settings".
FO-1650 only: If you intend to use a computer fax modem on the same phone
••••
line as your fax, see "PC Link Function" in Chapter 7 for a explanation of how
you can connect yo ur com p uter to your fax . If you wa nt to us e a computer fax
modem on the same lin e bu t do not wa nt to us e th e se tup described in "P C Lin k
Function", you must set Option Setting 10 to "NO" as described in Chapter 8,
"Optional Set tings".
FO-1850 only: To use your fax with a c omputer, you must connect it to the
••••
computer and install the fax software. Instructions for this are included in the
Multifunction interface kit.
INSTALLATION 1-7
Page 14
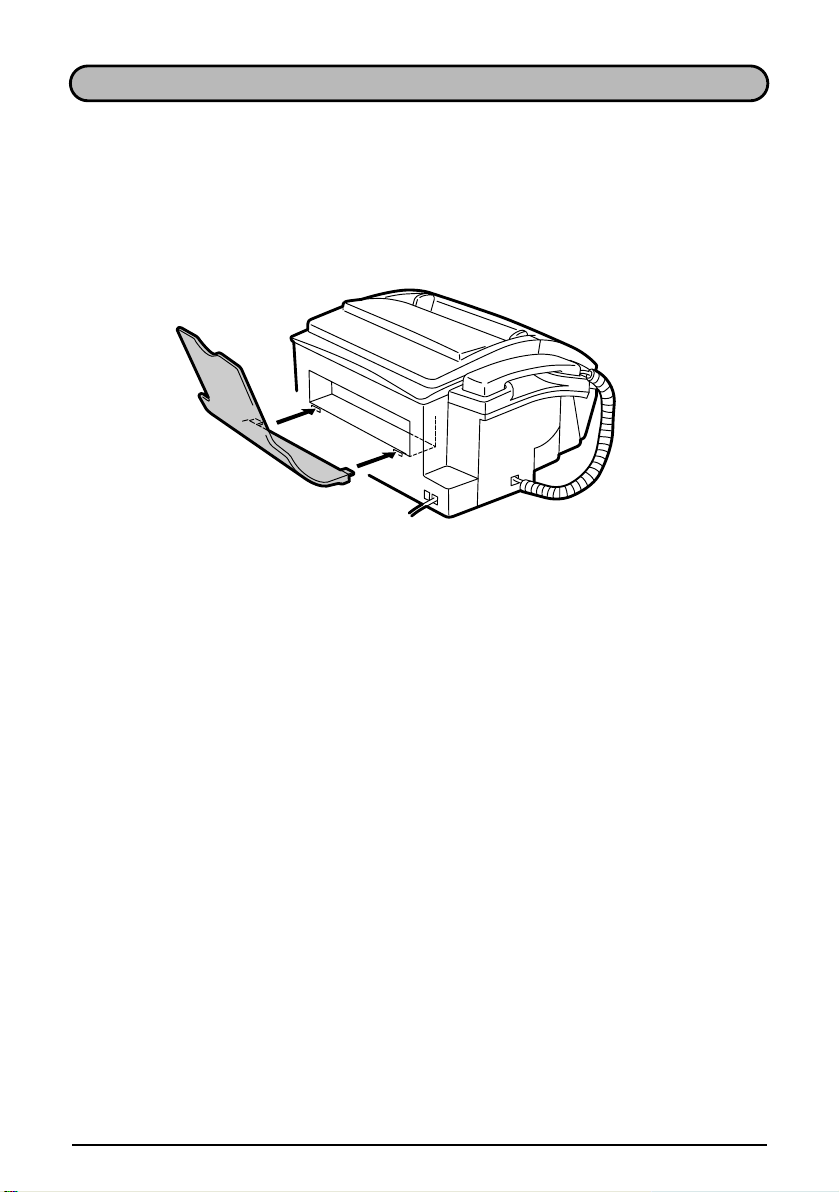
ATTACHMENTS
Attach the recei ve d do cu m en t tray by inserting the tabs into the ho le s at the r ea r of
the fax.
1-8 INSTALLATION
Page 15
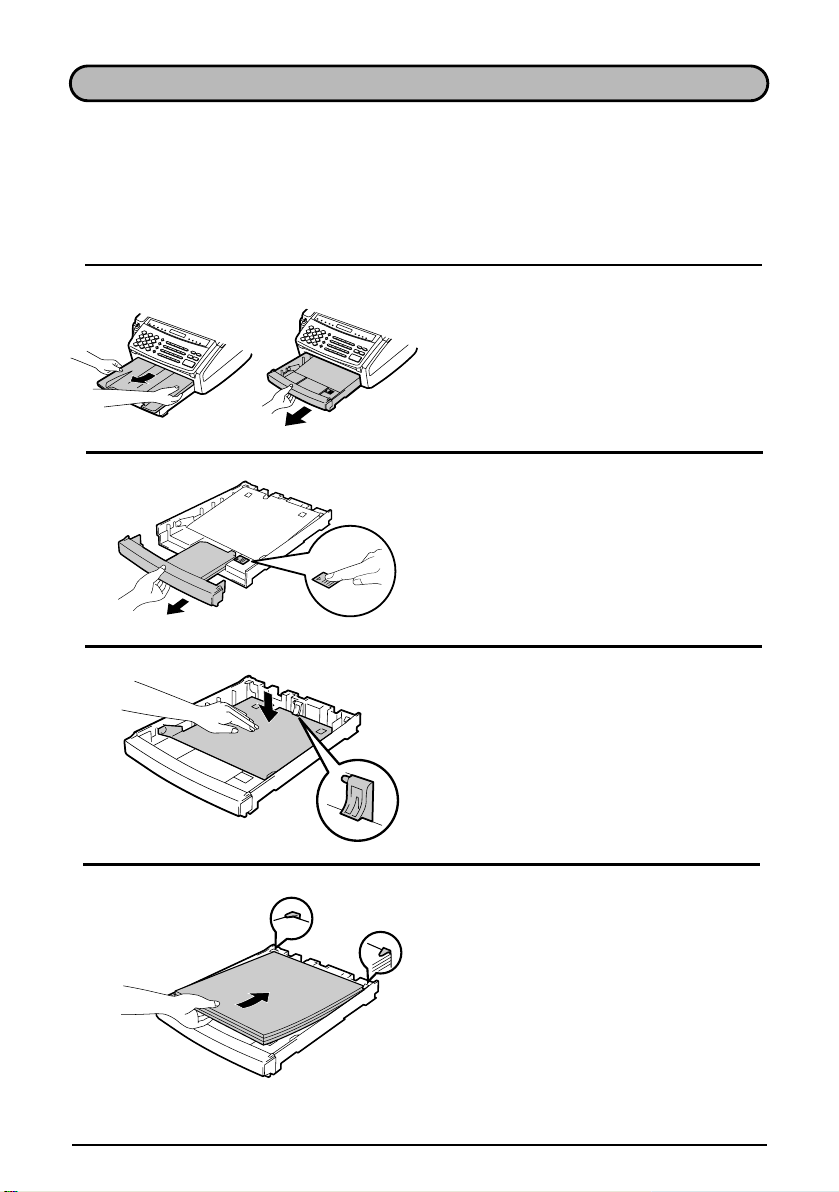
LOADING PRINTING PAPER
The paper tra y ho ld s th e pa pe r on which received doc um e nt s and copies are
printed. Up to 300 sheets of letter or legal size paper from 16 to 24 lbs. (60 to 90
g/m2) can be loaded in the tray. For the best res ul ts , we re co m m en d th at you use
Sharp FO-16NA (letter size) or Sharp FO-16NB (legal size) paper.
1
2
3
If the paper tray is in the fax machine, remove the cover. Grasp the end of the paper tray, lift it slightly, and pull it out of
the fax machine.
••••
Important: You must remove the
paper tray from the fax machine to
add paper.
If you are goin g to loa d le gal size paper,
press the catch as shown, and pull out
the tray extender.
Push the pressure plate down until it
locks into posit io n .
4
Fan the paper and then place it in the paper tray, print side up. Make sure the corners of the paper go under the holder s,
and then shake the tray gently to
straighten the pa pe r.
INSTALLATION 1-9
Page 16
LOADING PRINTING PAPER
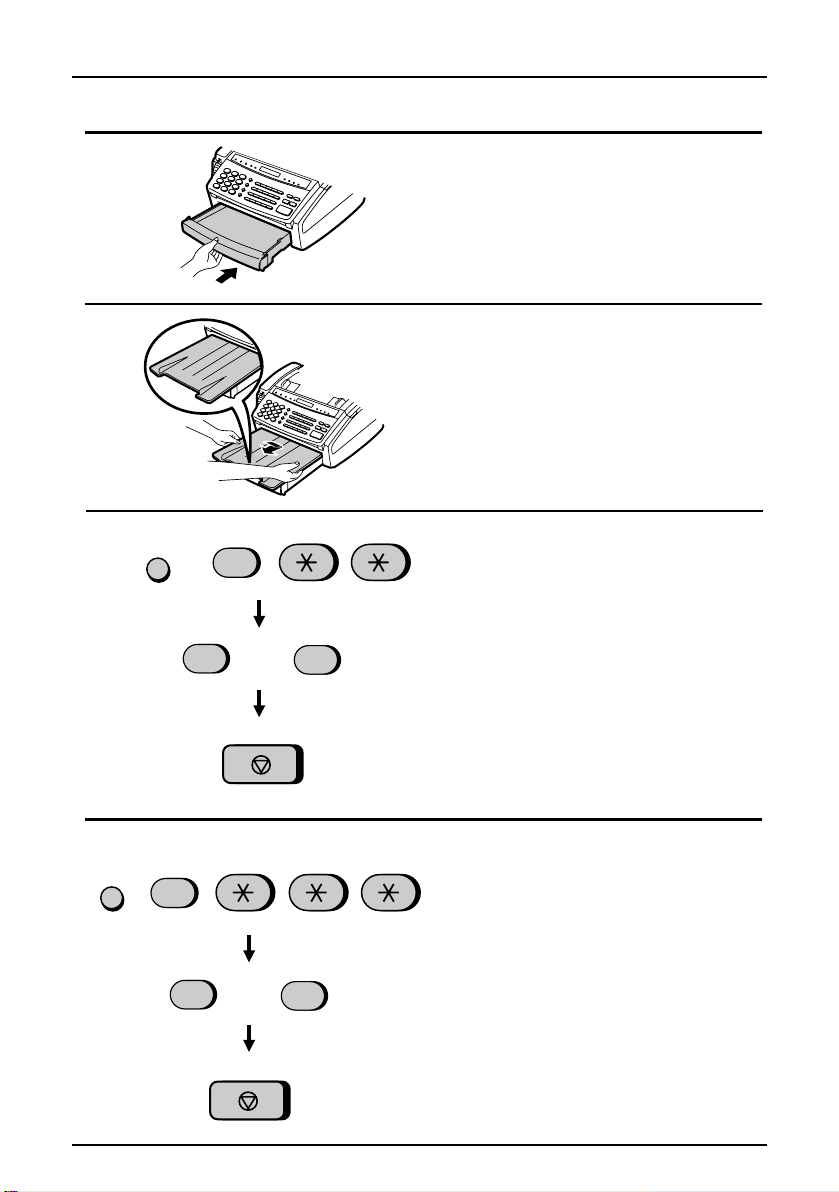
5
6
7
FUNCTION
1
6
or
STOP
Insert the pape r tr ay int o th e fa x m achine, makin g sure it clicks into place.
Replace the pape r tr ay cov er .
••••
The paper tray c over also serves as a
tray for original documents which
come out of the fax after scanning for
transmission or copying. You can pull
out the cover as neede d to ens ure that
it catches the documents.
Your fax has been set at the factory to
scale the size of the printed image to letter size paper. If yo u ha ve loa de d legal
size paper, you must change this setting
to legal. To ch an ge the setting, press the
FUNCTION
2
"
key twice, and th en press "1" to select
letter, or "
ished, press th e
change this setting every time you
change the pape r si ze .
" key, the "6" key, the "*"
2
" to select lega l. When fin-
STOP
key. Be sure to
8
FUNCTION
6
or
1
STOP
2
Your fax has been set at the factory to
print on regula r pa pe r. If you have
loaded Sharp FO-16NA or FO-16NB paper, you must change this sett in g to
"HIGH QUALITY". To chang e th e se tting, press the "
key, the "*" key three times, and then
press "1" to select regular, or "2" to select Sharp high quality paper. When finished, press th e
change this setting again if you change
back to regular paper.
1-10 INSTALLATION
FUNCTION
STOP
key. Be sure to
" key, the "6"
Page 17

2 INITIAL SETTINGS
SETUP GUIDE
Before you can begin using your fax, there are some settings which must be made
with the keys on the operation panel. Some of the settings are required for basic
use of your fax, others may or may not be necessary depending on how you want to
use the fax. The procedures for making the settings are described in this chapter in
the order shown below (with the exception of Caller ID).
Required settings:
♦
Entering your nam e an d fax/telephon e nu m be r in the fax
♦
Setting the fax to the cur re nt dat e an d ti m e
♦
Selecting the re ce ption mode
♦
Answering machine set-up
Settings which may be necessary:
♦
Distinctive ringing: If you subscribe to a distinctive ringing service from your
telephone com pa ny (this is a service which all ow s you to us e se ve ra l di fferent
devices, each with its own phone number and ringing pattern, on one line), you
may want to select ringing patterns for the fax and/or the built-in answering
machine.
♦
Caller ID: If you subscribe to a Caller ID service from your telephone company,
the fax will displa y and retain infor m ation which the t el ep ho ne com p an y provides
about each call. To use this feature, reset Option Setting 13 as described in
Chapter 8, "Optional Settings". For information on using Caller ID, see "Caller ID"
in Chapter 7.
Other settings:
♦
Storing numbers for automatic dialing: Automatic dialing allows you to dial a full
fax or phone number by simply pressing a Rapid Key, or by pressing the
DIAL
key and entering a 2- di gi t nu m be r . To us e au to m atic dialing, yo u mus t
store the desire d fax and phone num be rs in th e fa x.
♦
Volume adjustment: Adjustment of the volume of the speaker, handset, and
ringer.
INITIAL SETTINGS 2-1
SPEED
Page 18
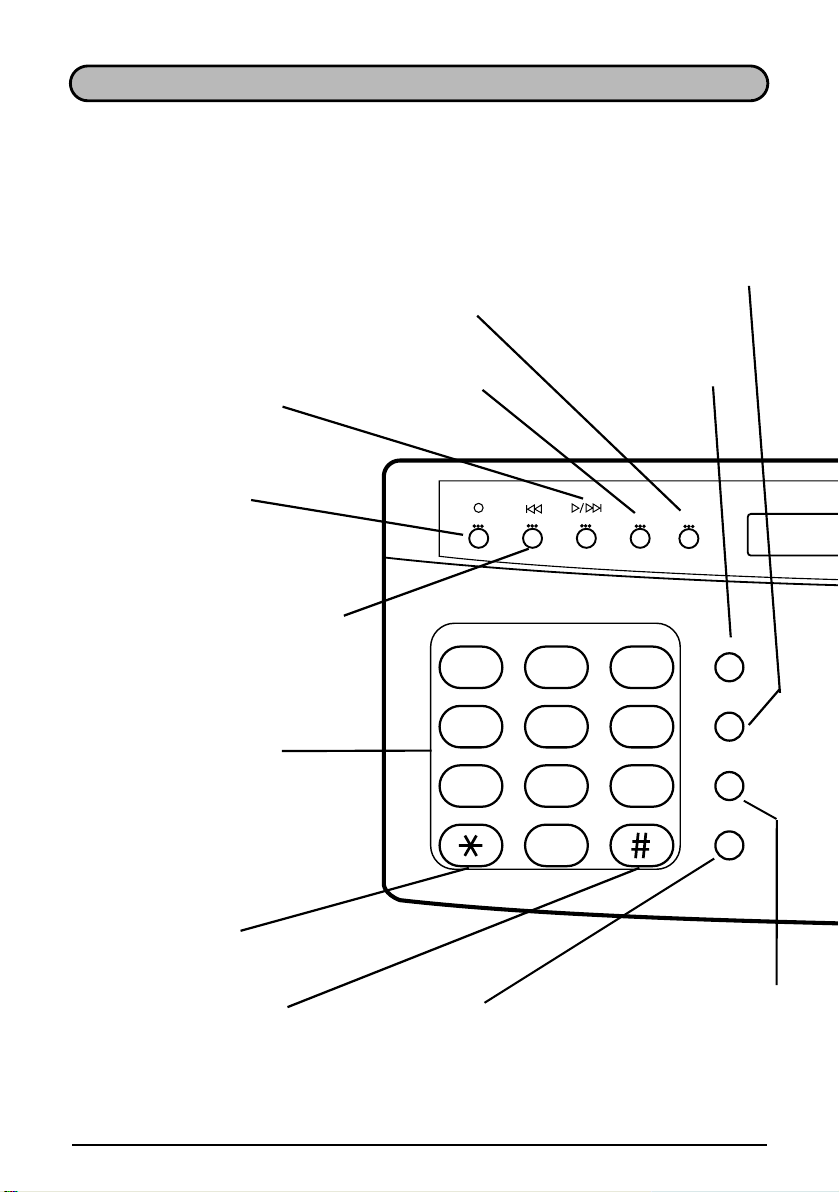
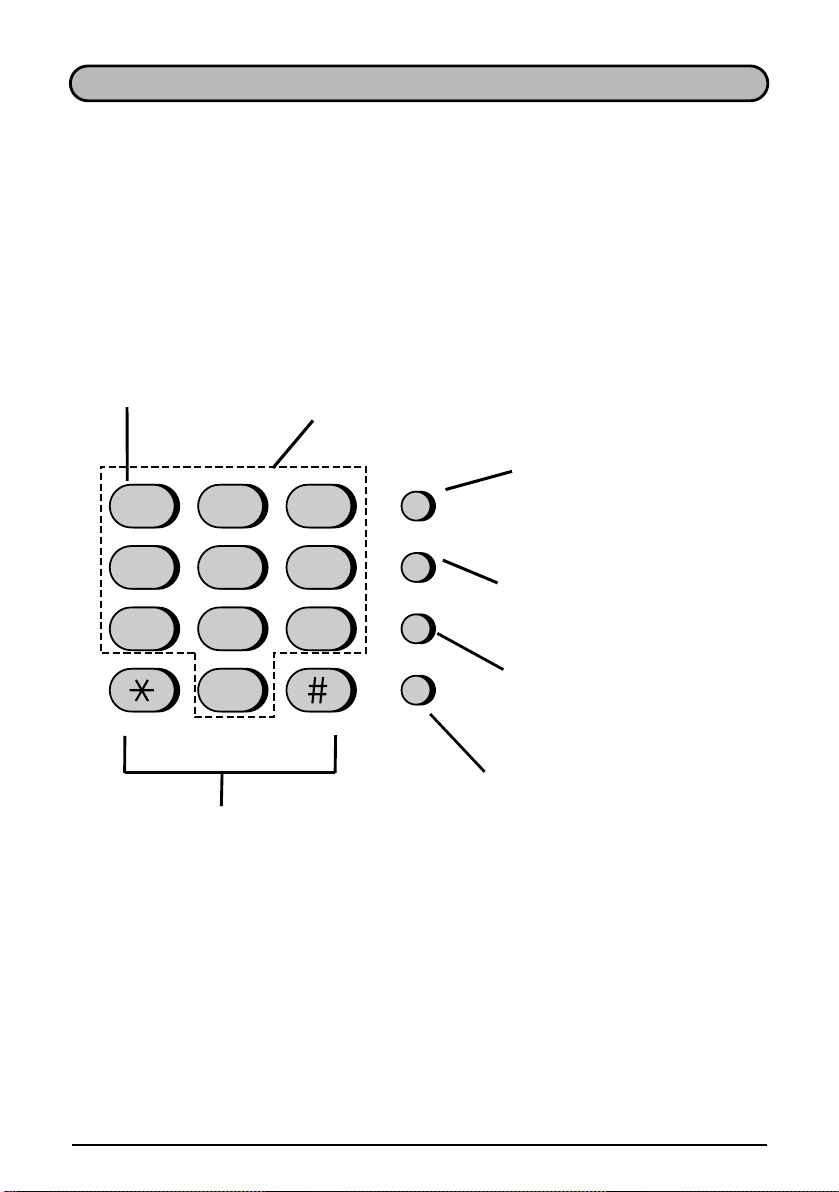
A LOOK AT THE OPERATION PANEL
Before you make the settings, take a moment to familiarize yourself with the
operation panel.
PLAY/SKIP key
Press this key to play
recorded messages.
During playback, press it
to skip forwa rd to the next
message.
REC/MEMO key
Press this key to rec ord
a phone conversa ti on
or a message.
REPEAT key
Press this key to
repeat playback of a
message.
Number keys
Use these keys to di al
numbers, and enter
numbers and le tters
during number/name
storing procedures.
REMINDER key
Press this key to send a fa x
and/or voice message to
another party or you rs el f at
a preset time.
DELETE key
Press this key to erase
recorded messages.
REC/MEMO
12
GHI
4
PRS
7
SLOW PLAY
REDIAL key
Press this key to
automatica lly redial
the last number
dialed.
SPEED DIAL key
Press this key to dial
a 2-digit Speed Dial
number.
REPEAT
PLAY/SKIP
ABC
JKL
5
TUV
8
OPER
0
DELETE
DEF
3
MNO
6
WXY
9
FAST PLAY
REMINDER
SPEED DIAL
REDIAL
HOLD/SEARCH
SPEAKER
SLOW PLAY key
Press this key to
reduce the speed of
message playback.
FAST PLAY key
Press this key to
increase the sp ee d of
message play ba ck .
SPEAKER key
Press this key to dial a
number without picking
up the handset.
2-2 INITIAL SETTINGS
HOLD/SEARCH key
Press this key to search
for an automatic di aling
number, or, during a
phone conversa ti on,
press it to put the ot her
party on hold.
Page 19
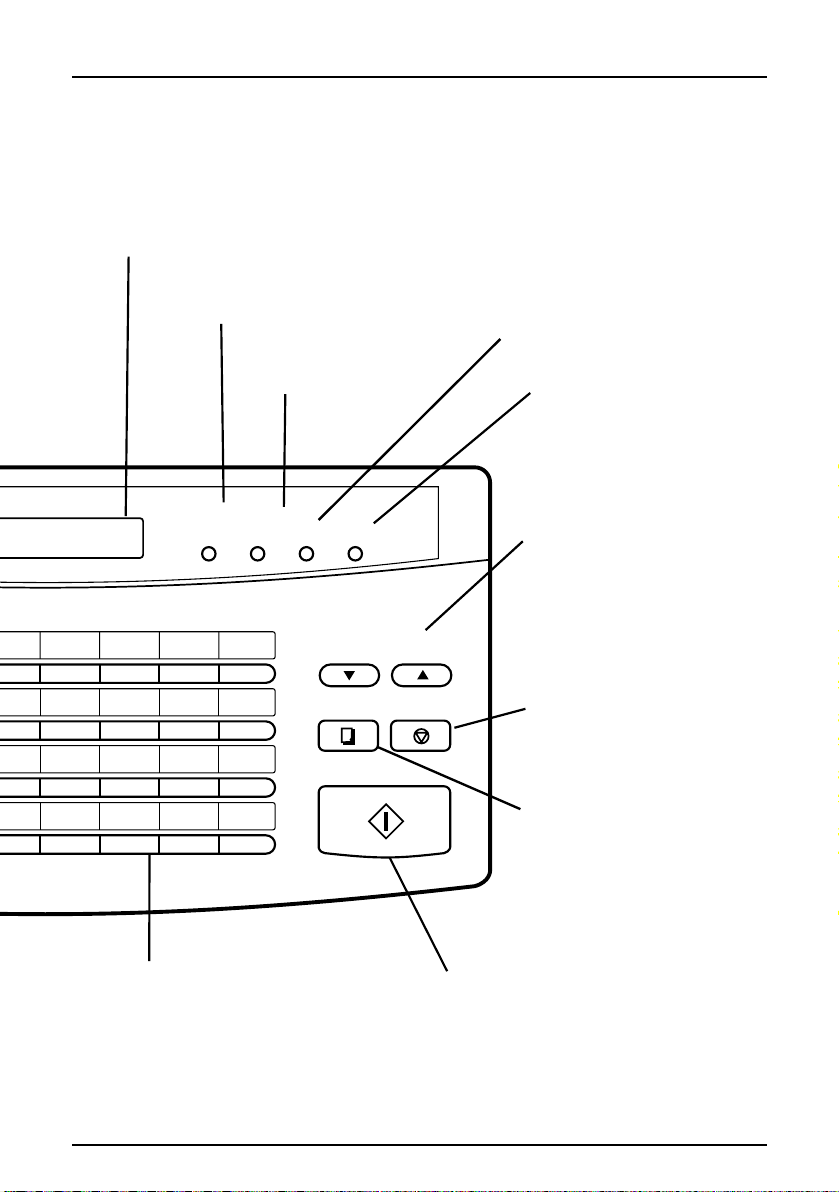
Display
This displays v arious
messages during operation
and programmin g.
RECEPTION MODE key
Press this key to select the
mode of reception.
FUNCTION key
Press this key to select
various specia l fu nc ti on s.
RECEPTION
MODE
FUNCTION
RESOLUTION
DOWN UP
MEMORY
VOLUME
A LOOK AT THE OPERATION PANEL
RESOLUTION key
Press this key to adjust the
resolution an d contrast
before send in g or cop yi ng
a document.
MEMORY key
Press this key to sca n a
document into memory
before transmitting it.
VOLUME keys
Press these keys to adjust the
volume of the handset when
the handset is lif te d, the
volume of the speaker when
the SPEAKER key has been
pressed, or th e vo lu m e of the
ringer at all othe r ti m es .
16/P1 19/G2
17/P2 18/G1
Rapid Dial Keys
Press one of these keys to
dial a fax or voice number
automatically. (Note that you
must attach the Rapid Key
labels.)
20/POLL
COPY/HELP
STOP
STOP key
Press this key to sto p
operations before
START
they are completed.
COPY/HELP key
When a documen t is in th e
feeder, press this key to make
a copy. At any othe r time,
press this key to print out the
Help List, a quick reference
guide to the oper ation of your
fax.
START key
Press this key to sen d
or receive a docu ment.
INITIAL SETTINGS 2-3
Page 20
ENTERING YOUR NAME AND FAX NUMBER
To have your nam e an d fa x/ telephone num be r (c al le d th e "Sender’s name" and
"Sender’s number") printed at the top of every page you transmit, program them by
pressing the panel keys as shown below.
♦
You must progra m your na m e an d fa x nu m be r in or d er to co m pl y with the
Consumer Protection Act of 1991 (see inside of front cover).
♦
If you enter an inc or rect number or le tt er, press the
move the cursor bac k to the mistake, then ente r th e co rr ec t nu m be r or letter. (To
3
7
SPEAKER
Press the keys sho wn at left. "ENTRY
MODE" will appear in the display.
Press the "#" key 2 times. "OWN NUMBER SET" will ap pear in the display.
Press the
Enter your fax number (max. of 20 digits) by pressing the number keys. (To in-
4
sert a space between digits, press the
#
"
" key. To insert a "+", press the "*"
key.)
Press the
Enter your name by pressing the appropriate number keys as shown on the following page. Press each key repeatedly
until the desired letter appears in the display. (Max. of 24 characters.)
move the cursor forward, press the
1
FUNCTION
3
2
3
START
4
5
5
5
5
6
START
7
7
4 4 4
2
2
7 7 7 7
SPEAKER
1
(Example)
7 7
2
HOLD/SEARCH
key.)
START
START
key to
key.
key.
7 7
7
START
(Example: "SHARP")
STOP
Press the
STOP
key.
2-4 INITIAL SETTINGS
START
key and then the
Page 21
ENTERING LETTERS FOR NAMES
Names are programmed by pressing the number keys. You will notice that letters
are marked above each of the number keys "2" through "9". To enter a letter (or
number), press the appropriate key one or more times until the letter appears in the
display (the num be r wil l ap pe ar first, followe d by the letters in the orde r m ar ke d
above the key). The keys used for entering letters and editing are shown below.
Letters and nu mb er s
To enter a letter or nu m be r, press
Space
Press this key twice to
enter a space.
ABC DEF
123
GHI JKL MNO
456
PRS TUV WXY
789
SLOW PLAY FAST PLAY
OPER
0
the appropriate key repeatedly until
the desired number/letter appears
in the display (t he num b er appears
first, then the letters in the order
marked above the key).
Delete
Press this key to delete the
SPEED DIAL
REDIAL
HOLD/SEARCH
SPEAKER
letter highli gh ted by the cursor
(if the cursor is to the right of
the last letter entered, it will
backspace and delete the last
letter).
Shift
Press this key once to change
case (press it again to change
back).
Cursor left
Press this key to move the
cursor to the left .
Cursor right
Symbols
Press either key r ep ea te dl y un ti l th e
desired symbol appears (see the
symbol list on the following page).
Press this key to move the
cursor to the right.
Comments:
Enter "Q" with the "7" key, and "Z" with the "9" key (these are not marked on the
••••
machine).
To enter two letters in succession which require using the same key, press the
••••
SPEAKER key once after ent ering the first le tt er , th en enter the secon d le tt er .
To change one indivi du al letter to anoth er, move the cursor t o th at let te r an d
••••
enter the desired letter. The new letter will simply replace the old one.
INITIAL SETTINGS 2-5
Page 22
ENTERING LETTERS FOR NAMES
Symbol list
To enter a symbol from the list below, press the "#" key or t he "*" key repeatedly unt il
the desired sym bo l ap pe ars.
→ ←
#
*
. / ! " # $ % & ’ ( ) + + , - : ; < = > ? @ [ ¥ ] ^ _ p { | }
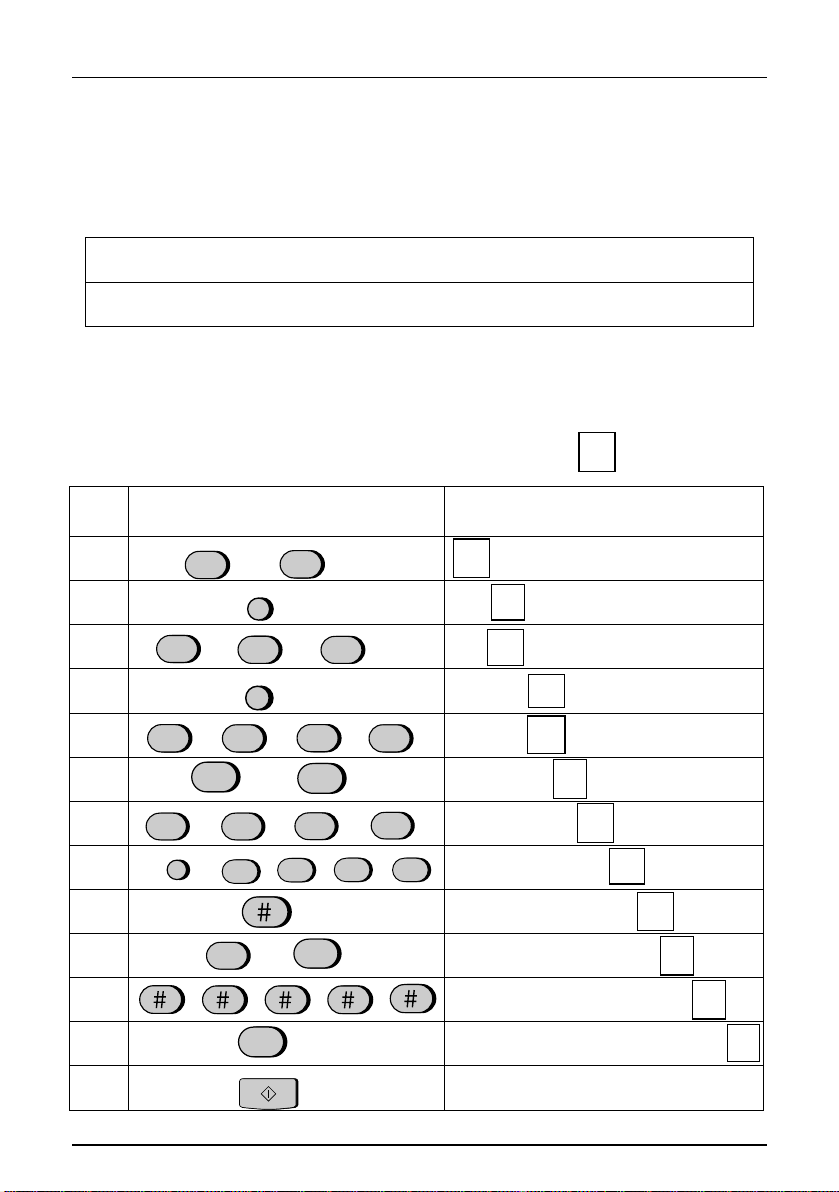
Example
The following is an exa m pl e of ent ering the name "ABC Co. #1" .
♦
The cursor in the display is indicated below by a rectangle:
Step Press these keys: Display
SPEAKER
ABC
2
ABC
2
ABC
2
6
ABC
MNO
6
2
ABC
ABC
ABC
2
1
2
2
ABC
2
ABC
2
MNO6MNO
6
A
A
A
B
A
B
B
A
A
A
B
B
C
C
C
ABC
ABC
2
ABC
2
ABC
2
REDIAL
ABC
2
SPEAKER
1
MNO
1
2
3
4
5
6
7
8
C
C
→ ←
o
A
A
A
ABC Co
10
11
12
13
9
1
1
1
START
2-6 INITIAL SETTINGS
B
C
BC
B
CCo
o
C
Co
.
.
.
#
#
.
1
Page 23
SETTING THE DATE AND TIME
The date and tim e ap pe ar in th e di splay and report s, and ar e pri nt ed at th e to p of
every page you transmit. Set the date and time by pressing the keys on the
operation panel as shown below.
♦
To correct a mis ta ke , pr es s the
the mistake, and then enter the correct number.
1
FUNCTION
SPEED DIAL
3
2
3
4
START
0
1
(Example: Janu ar y)
5
0
5
(Example: the 5th)
6
9
6
(Example: 1996)
key to move the cursor back to
Press the keys sho wn at left. "ENTRY
MODE" will appear in the display.
Press the keys show n at lef t. "DATE &
TIME SET" will appear in the display.
Press the
Enter a 2-digit num be r fo r th e m on th
("01" for January, "02" for February, "12"
for December, etc.).
Enter a 2-digit nu mbe r fo r th e da y (" 01 "
to "31").
Enter the last 2 digits of the year. (Note:
In the year 2000, "00" will appear for the
year.)
START
key.
7
9
0
(Example: 9:25)
5
2
8
or
9
START
STOP
Enter a 2-digit nu mbe r for the hour ("01"
to "12") and a 2-di gi t nu m be r fo r th e m in ute "00" to "59").
Press "*" to select A.M., or "#" to select
P.M.
key.
START
key and then the
Press the
STOP
INITIAL SETTINGS 2-7
Page 24

SELECTING THE RECEPTION MODE
Your fax has three modes for r e ce iv ing incoming ca ll s and faxes:
TAD mode:
machine to answer all calls. Voice messages will be recorded, and fax messages
will be received automatically. ("TAD" stands for "Telephone Answering Device".)
TEL mode:
and fax messages on the same line. You must answer all calls, including fax
messages, usin g th e fax’s handset or an ex te ns io n phone connecte d to the sam e
line.
FAX mode:
line. The fax will answer all calls and receive incoming fax messages automatically.
Select this mode when you are out and want the built-in answering
Select this mode whe n yo u are in and want to rece iv e both voice calls
Select this mode whe n yo u only want to receiv e fa x m es sa ge s on you r
Setting the reception mode
Set the mode of recepti on with the
RECEPTION
MODE
FUNCTION
TAD mode cannot be se lected unless a ge ne ra l ou tg oi ng message has
Note:
been recorded as described in "Answering Machine Set-up" in this chapter.
RESOLUTION
RECEPTION MODE
••••
To select TAD , pr es s the key until
"GENERAL OGM PLAY" appears in
the display ("TAD" will app ear af te r th e
general outgoi ng me ss ag e pl ay s).
••••
To select TEL, pr ess the key until
"TEL" appears in the display.
••••
To select FAX, pr es s th e key until
"FAX" appears in the display.
key on the panel.
FO-1850 only: Selecting the receiving unit
If you have connected the FO-1850 to a personal computer with the provided PC
interface box, yo u can choose whether to have incoming fa xes received by the
FO-1850 or by your computer. The initial setting is "FAX" (reception by the
FO-1850). T o ch an ge the setting, foll ow th e st eps below.
For detailed inf or m ation on how faxes w il l be rec ei ve d if you cho os e re ce pt io n by
your computer , see "PC reception" in "Receiving Doc um e nts" in Chapter 3.
1
2
FUNCTION
1
or
2
Press the
key. "RECEIVE UNIT" will appear in the
display.
Press "1" (FAX) to select the FO-18 50 ,
or "2" (PC) to select your comput e r .
FUNCTION
key and the "#"
2-8 INITIAL SETTINGS
Page 25

ANSWERING MACHINE SET-UP
About the answering machine
The FO-1650/1850’s built-in answering machine allows you to receive both voice
messages and fax transmissions while you are out. Up to 24 minutes of voice
messages can be recorded when no documents are stored in memory (memory
capacity will vary depending on current memory features in use).
When the recept io n m od e is set to T. A.D . , th e answering mach in e w il l au to m at ic al ly
answer incoming calls and play your outgoing message (this is your recorded
greeting which informs callers that they can leave a message or send a fax). Voice
callers can leav e a message, and fax transmissions will be received automatically.
The built-in answering machine has four different "boxes" in which voice mes sages
from callers can be recorded. This allows individuals in your office or members of
your family to each receive their own private messages. A passcode can be
programme d fo r ea ch box to pr ev en t ot her people from listening to or erasi ng
messages.
The General Box is fo r ge ne ra l us e, and Boxes 1, 2, and 3 ar e ea ch for personal
use. An outgoing me ss ag e fo r th e G en eral Box must be recor de d, and an outgoing
message must also be recorded for each personal box used.
When the answering machine answers a call, the caller will hear the general
outgoing message. If the caller wants to leave a message in the General Box, they
should wait for the be ep and then speak. If th e ca ll er wants to send a fax to the
General Box, they sho ul d pr es s th ei r Sta r t key . By pr es si ng the ir Start key after
speaking, the caller can leave a voice message and send a fax without having to
place a separate telephone call.
If the caller wants to leave a message in a personal box, they must enter the
number of the bo x (" 1" for Box 1, "2" for Box 2, or "3" for Box 3) by pre ssin g th e
appropriate key on their telephone before the beep. The outgoing message fo r the
selected box wil l pl ay , an d th e ca ll er can then leave a mes sa ge or pr es s th ei r Start
key to send a fax.
When a fax is sent to a personal box, it will not be printed out immediately. Instead,
it will print out w he n yo u pl ay bac k th e m es sa ge s le ft in th e bo x. I f yo u pr ogram a
passcode for the bo x, you will be able to re ce iv e co nfidential fax es . Whe n a fa x is
sent to the General Box, it will be printed out immedi ately unless a passc od e ha s
been programmed fo r the General Box, in which case it will be printed out after
message play ba ck .
Note: To leave a message in a pe rs on al box , the caller must be on a tou ch - t on e
phone.
INITIAL SETTINGS 2-9
Page 26
ANSWERING MACHINE SET-UP
Recording an outgoing message
To use the built-in answering machine, you must first record a general outgoing
message. This must be done even if you only intend to use personal boxes. An
outgoing message for each personal box used must also be recorded. A personal
box cannot be accessed if it does not have an outgoing message.
The following is an ex am p le of a general outgoi ng me ss ag e:
"Hello, this is th e Jo ne s fa m il y. We are not at home rig ht now . If yo u w ou ld lik e to
leave a general me ss ag e, ple as e sp eak after the beep . If you wo ul d li ke to leave a
private message, press "1" for John, "2" for Jane, or "3" for Billy before the beep. If
you would like to send a fax, press your facsimile Start button."
The following is an example of an outgoing message for a personal box:
"This is Jane’s personal box. Please leave a message after the beep."
1
2
3
4
FUNCTION
START
0
(Example)
Press the keys sho wn at left. "T.A.D.
0
SETTINGS" will appe ar in the display.
Press the "#" key. OGM RECORDING
will appear in the display.
Press the
Press a numeric key to select the outgoing message yo u want to record:
••••
"0": General outgoing message
••••
"1": Box 1 outgoing message
••••
"2": Box 2 outgoing message
••••
"3": Box 3 outgoing message
••••
"4": Transfer outgoing message
(This is used for the Transfer funct io n,
which is described in "O th er
Functions" in Chapter 4.)
START
key.
2-10 INITIAL SETTINGS
Page 27
ANSWERING MACHINE SET-UP
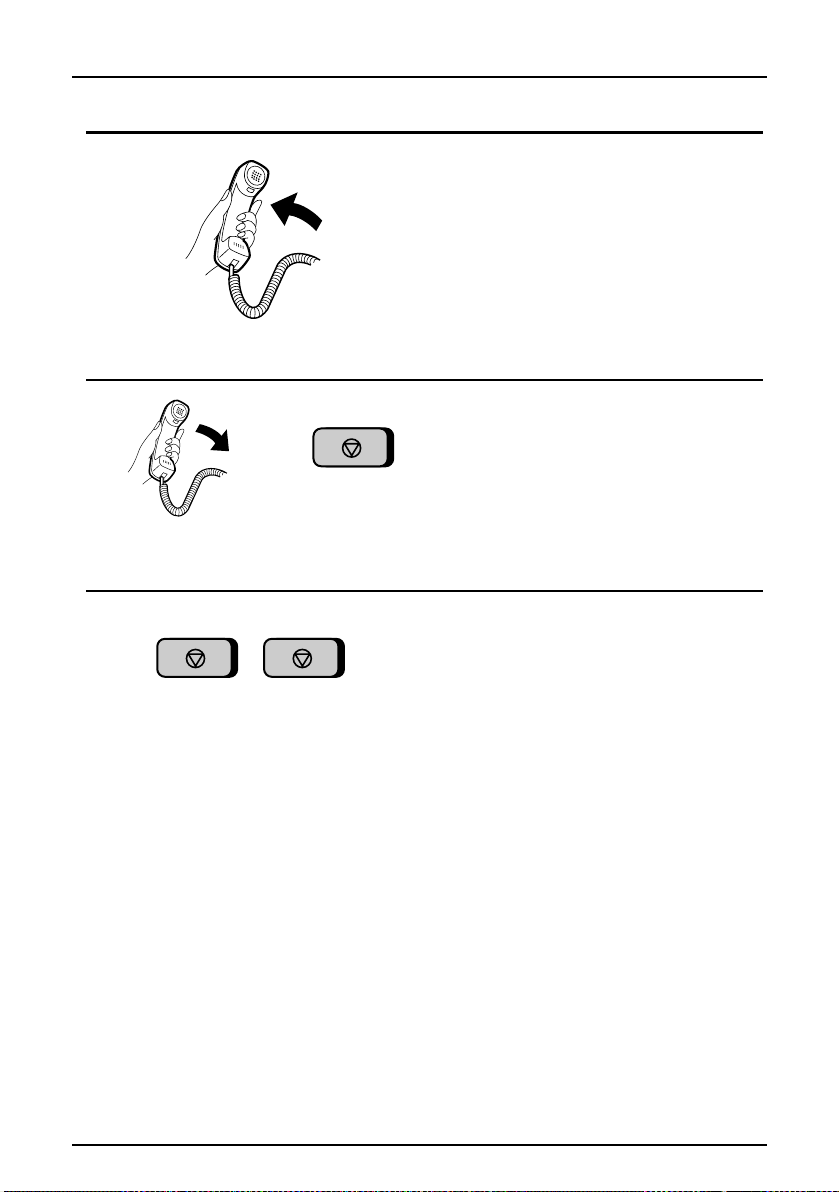
5
6
STOP
or
7
STOP STOP
Pick up the handse t an d sp ea k in to it.
••••
The general outgoing message can be
up to 60 seconds long. A personal
outgoing message can be up to 30
seconds long.
••••
While recording, the display will show
the time remaining to re cord .
When finished , re pl ac e th e ha nd se t or
press the
••••
If your message exceeds the ti m e li m it
or more than 6 seconds of silence is
detected, reco rd in g w il l st op
automatically.
Go back to Step 4 to record an outgoing
message for another box, or pres s the
STOP
and time display.
STOP
key.
key twice to return to the date
To listen to or erase an outgoing message
To listen to or erase an outgoing message, follow Steps 1 through 4 of the above
procedure to select the message, and then pre s s the
DELETE
or the
key twice. Note that the general outgoing message cannot be erased. If you need
to change it, sim p ly rep ea t the recording pr oc ed ure.
Note: If an extension phone is connected to the FO-1650/1850, an outgoing mes-
sage cannot be re co rd ed , pl ay ed , or deleted while th e ex te ns io n ph one is being used (while LINE IS IN USE appears in the disp lay).
to erase it. To return to the date and time display, press the
PLAY/SKIP
key to listen to it,
STOP
INITIAL SETTINGS 2-11
Page 28
ANSWERING MACHINE SET-UP
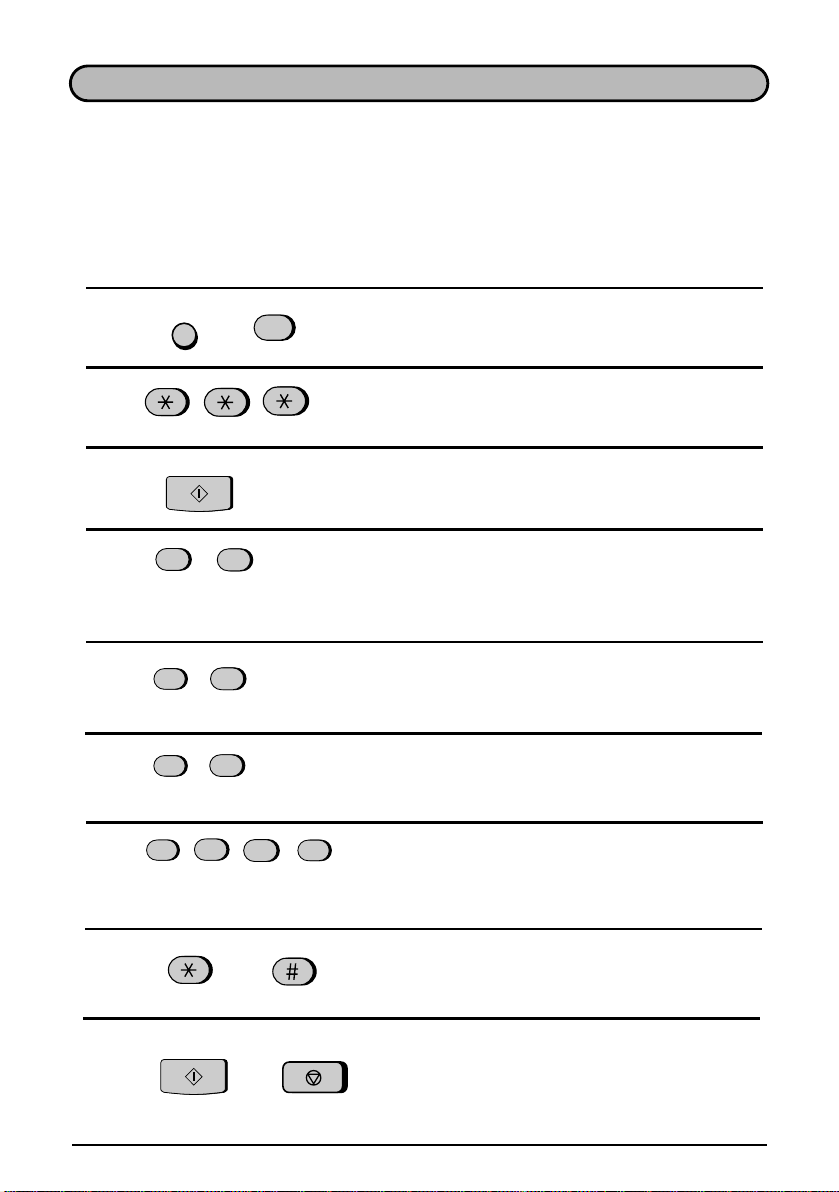
Programming a passcode
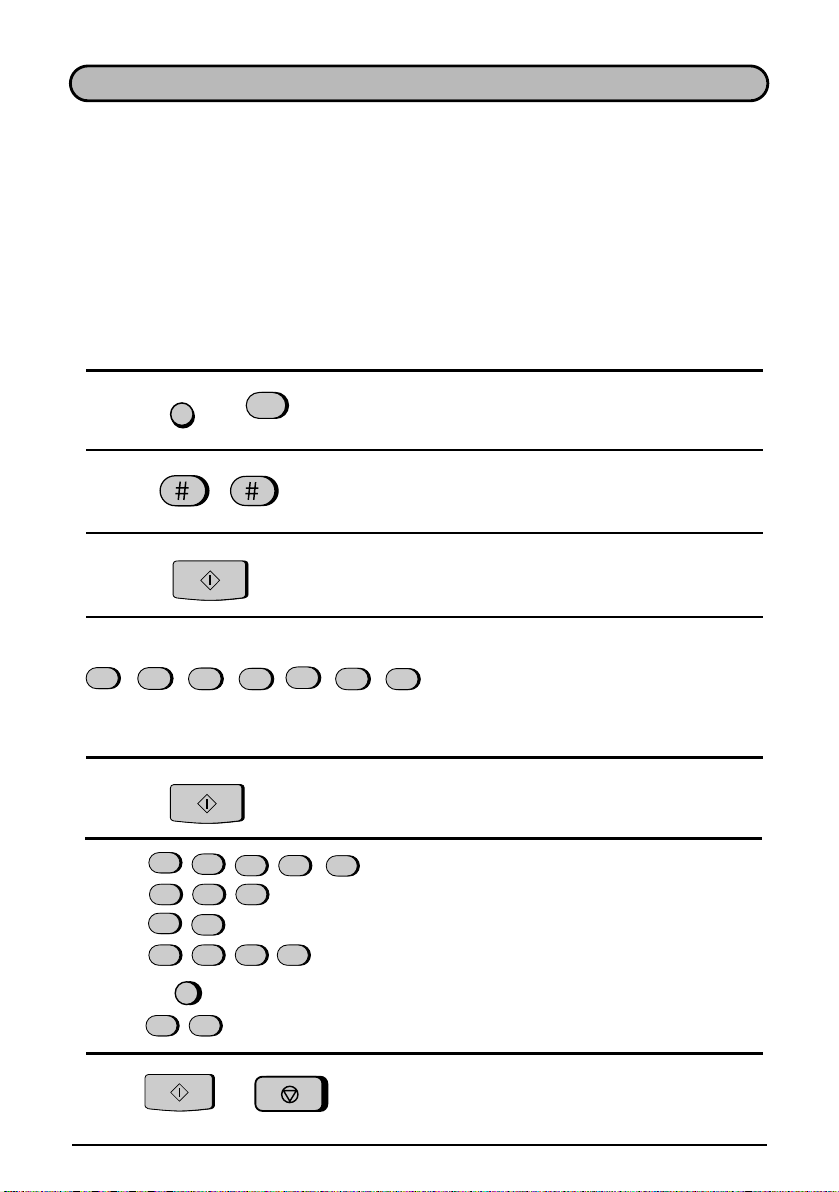
A 3-digit passcode can be programmed for each of the boxes. If this is done, the
passcode must be entered before messages in the box can be listened to or
erased. Program a new passcode or clear a previously programmed passcode by
pressing the panel keys as shown below.
♦
The numbers "1" , "2", and "3" cannot be selected for the first digit of the
passcode.
1
FUNCTION
0
2
3
or
1 2
4
1
(Example)
5
4 5
6
START
6
(Example)
STOP
Press the keys sho wn at left. "T.A.D.
SETTINGS" will appe ar in the display.
Press the keys sho wn at left. "BOX
PASSCODE" will appear in the display.
Press "1" to enter a passco de , or "2" to
clear a previously programmed
passcode.
Enter the number of the box for which
you want to program or clear a
passcode by pressin g th e ap propriate
numeric key.
If you are clearing a passcode, go to
Step 6.
Enter a 3-digit pa ss co de by pr es si ng the
number keys.
key.
START
key and then the
Press the
STOP
Note: To ensure conf i de ntiality, pass co des cannot be chec ked. If you have forgot-
ten a passcode, clear it and program a new one.
2-12 INITIAL SETTINGS
Page 29
ANSWERING MACHINE SET-UP
Fax reception in boxes
As explained at the be gi nning of this sect io n, a cal le r ca n pr es s th ei r Start key after
accessing a box to send a fax to that box. In this case, the fax will not be printed out
until you listen to the messages in the box. If you don’t want to receive faxes in
boxes, you can turn this function off. When the function is turned off, all faxes will
be printed out as soo n as t he y ar e re ce iv ed , le av in g m ore memory avail ab le for
voice messages.
Follow the step s below to turn the Fax box functi on on or off (it has been turned on
at the factor y) .
1
FUNCTION
0
2
3
or
1 2
4
STOP
Press the keys sho wn at left. "T.A.D.
SETTINGS" will appe ar in the display.
Press the keys shown at left. "FAX BOX"
will appear in the display.
Press "1" to turn the Fax box fu nc ti on
on, or "2" to turn it off.
Press the
STOP
key.
INITIAL SETTINGS 2-13
Page 30
ANSWERING MACHINE SET-UP
Setting ICM time
Incoming messages (ICMs) are the messages which ca llers leave for you on the
built-in answering machine. The answering machine is set at the factory to allow
each caller a maximum of 4 minutes to leave a message. If desired, you can
change this set ti ng to 15 , 30, or 60 seconds.
1
FUNCTION
0
2
3
4
(Example)
4
STOP
Press the keys sho wn at left. "T.A.D.
SETTINGS" will appe ar in the display.
Press the keys sho wn at left. "ICM RECORD TIME" wil l ap pe ar in the display.
Press a numeric key to select the desired ICM recording time:
••••
"1": 15 seconds
••••
"2": 30 seconds
••••
"3": 60 seconds
••••
"4": 4 minutes
Press the
STOP
key.
2-14 INITIAL SETTINGS
Page 31

ANSWERING MACHINE SET-UP
Fax reception on TAD failure
If the memory for recording incoming messages becomes full while you are out, the
answering mac hi ne will no longer be able to re co rd me ss ag es . Th e O N TAD
FAILURE setting is used to choose the response of the machine to incoming calls
when this happens:
♦
Automatic fax re ception "NO": The FO-1650/1850 will answer after 20 rings, after
which it will wait to receive a remote command. Most callers will hang up before
it answers; however, when you call the FO-1650/1850 from a remote location,
you can wait until it answers, liste n to your messages, and then erase them (see
"Remote operations" in Chapte r 4).
♦
Automatic fax reception "YES": The reception mode will switch to
allowing the FO-1650/1850 to continue to receive faxes automatically. With this
setting, you can still use the remote commands to listen to your messages and
erase the message memory (see "Remote operations").
Automatic fax re ception is set to NO at the factory be fore shipping. If you want to
set it to YES, press the panel keys as follows:
1
FUNCTION
0
2
3
or
1 2
4
STOP
Press the keys sho wn at left. "T.A.D.
SETTINGS" will appe ar in the display.
Press the keys shown at left. "ON TAD
FAILURE" will ap pe ar in the display.
Press "1" to turn automa ti c fa x re ce pt io n
on, or "2" to turn it off.
Press the
STOP
key.
FAX
mode,
INITIAL SETTINGS 2-15
Page 32

ANSWERING MACHINE SET-UP
Calling Party Control detection
When a caller hangs up, the central telephone exchange will issue a signal called a
Calling Party Control (CPC) signal. The built-in answering machine has been set to
detect this signal, and this allows it to immediately stop recording when a caller
hangs up, thereby saving memory space and freeing yo u from having to listen to
long periods of silence when you play back your messages.
However, if you are a subscriber to such telephone services as Call Waiting or Call
Forwarding, signals used by these services may be mistaken for a CPC signal,
causing the mach ine to hang up durin g a ca ll . In this case, follow the steps below to
turn off CPC detection.
Note: CPC detection may not operate properly in some telephone exchanges. For
this reason, periods of silence and /or telephone co m pa ny sig na ls ma y be recorded even if CPC detection is turned on.
1
FUNCTION
0
2
3
1
4
or
STOP
2
Press the keys sho wn at left. "T.A.D.
SETTINGS" will appe ar in the display.
Press the keys shown at left. "CPC DETECTION" wil l ap pe ar in the display.
Press "1" to turn CPC detect io n on , or
"2" to turn it off.
Press the
STOP
key.
2-16 INITIAL SETTINGS
Page 33

DISTINCTIVE RINGING
Distinctive ringing in FAX mode
Distinctiv e ri ng in g is a service offer ed by so m e lo ca l telephone com pa nies which
allows you to use up to four different telephon e numbers, each with a different
ringing patter n, on your regular single line. If you subscribe to a distinctive ringing
service, you ca n se t yo ur fax to automatically answer wh en it de tects one of those
ringing patterns, thereby allowing you to us e the number corresponding to that
pattern as an exclusive fax number.
Important:
To use distinct iv e ri nging, you must sub sc ri be t o a di st in ctive ringing se rv ic e fr om
••••
your local phon e company. Do not make this setting if you do not subscribe to a
distinctive ri ng ing service.
Your fax may not be compatible with some distinctive ringing services.
••••
When using this f ea tu re , you must set the reception mode of you r fa x to FAX as
described in "Receiving a Document" in Chapter 3. When your designated fax
number is dial ed , yo ur f ax will aut om a tically answer and begin recept io n after two
rings. Note that other devices on the same line will also ring until your fax answers.
If one of your othe r nu m be r s is dial ed , th e fax will ring; howev er , it will not ans w er .
To use distinct iv e ri nging, select on e of t he rin gi ng patterns below for your fax by
pressing the panel keys as shown on the following page. The selections are as
follows:
1. RING PATTERN 1: Two short rings.
2. RING PATTERN 2: One short, one long, and one short ring.
3. RING PATTERN 3: Two sh or t rings and one long rin g.
4. STANDARD RING: Your sta nd ar d (n or m al ) ri ng in g pa ttern.
5. OFF SETTING: Answer all ringin g pa tt er ns (th is tur ns
distinctive ringing off).
Your fax has been set to "5" at the factory.
INITIAL SETTINGS 2-17
Page 34

DISTINCTIVE RINGING
1
FUNCTION
4
2
3
1
(Example)
4
STOP
Distinctive ringing in TAD mode
Press the keys show n at lef t . "O PTI O N
SETTING" will appear in the displa y.
Press the keys show n at lef t . "DISTINCTIVE RING" will appear in the display.
Select a ringing pattern by entering the
appropriate number ("1" to "5" as shown
in the list on the pr ev io us pag e).
Press the
STOP
key.
You can also use distinctive ringing with the built-in answering machine. By turning
on the TAD distinctive ringing se tt in g as sho w n on the f ol lo win g page, each ringi ng
pattern will be assigned to a message box as follo ws when the reception mode of
the fax is set to TAD .
STANDARD PATTERN: GENERAL BOX
PATTERN 1: BOX 1
PATTERN 2: BOX 2
PATTERN 3: BOX 3
Each box is accessed by calling the number of its ringing pattern. For example, if a
caller dials th e nu m be r co rr es po nding to ringing pattern 2, the an swe r i ng ma ch in e
will answer, the outgoing message for Box 2 will play, and the caller can then leave
a message in Box 2. Fax tr a ns m is si on s can be received w it h an y of the ringing
patterns.
2-18 INITIAL SETTINGS
Page 35

DISTINCTIVE RINGING
♦
Note that the abov e as si gn m en t of ringing patte rn s to box es is no t af fe cted by
the distinctiv e ri ng in g se tting for FAX mode desc ri be d on the previous page . The
above assignment is effective when the fax is in TAD mode, and the selection
made for FAX mode is ef fective when the fax is in FAX mode.
An outgoing message must be recorded for each box us ed with distinctive ringing.
If an outgoing message is not recorded for a box, the answering machine will not
answer when the corresponding number is dialed. However, if you have selected
that ringing pa tt ern for fax recept io n in FAX mo de as de sc ri be d on the pre vi ou s
page, the fax wi ll ans wer that patter n an d re ce iv e a document just lik e it does in
FAX mode.
As an example, you co uld have the answering machine ans w er onl y th e standard
ringing pattern by recording an outgoing message only for the General Box. The
other patterns would be left free, so you could use one of them for fax reception as
described on the previous page, and another for a computer modem or other
device.
To turn distinct i ve r in gi ng in TAD m od e on , press the panel ke ys as fo ll ows :
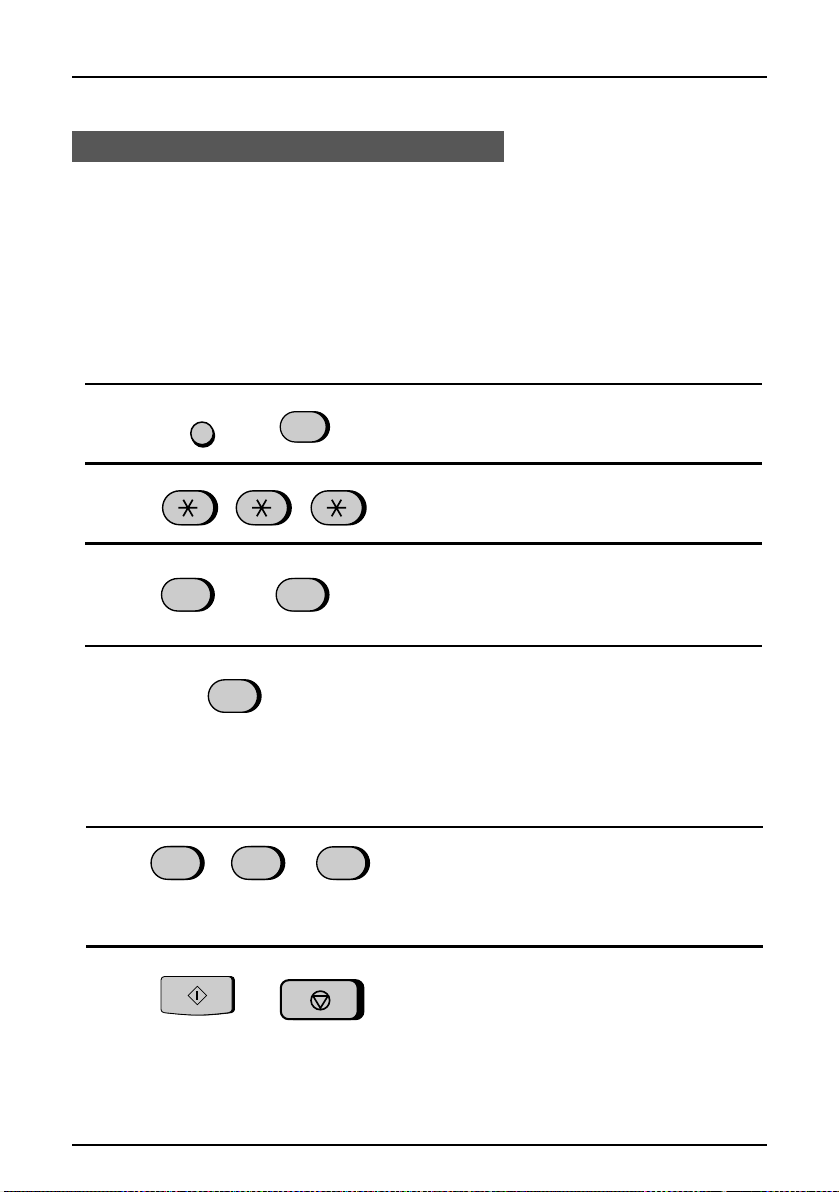
1
FUNCTION
0
2
or
1
2
3
STOP
Press the keys show n at lef t . "DISTINCTIVE RING" will appear in the display.
Press "1" to turn distinctive ringing in
TAD mode on, or "2" to turn it off.
Press the
STOP
key.
INITIAL SETTINGS 2-19
Page 36

STORING NUMBERS FOR AUTOMATIC DIALING
Automatic dia li ng is a qu ic k an d co nv en ie nt way of dialing wh ic h is don e by eit he r
pressing a Rapid Key (Rapid Key Dialing), or pressing the
entering a 2-digit number (Speed Dialing). It can be used for both fax transmissions
and voice calls.
To use automat ic dia li ng , yo u m us t fi rs t st or e the full number in yo ur fax and ass ig n
a 2-digit Speed Dial number to it. You can also enter a name which appears in the
display when the number is dialed. Up to 99 numbers can be stored.
♦
Speed Dial number s f ro m "01 " to "20" ca n be use d fo r bo th Ra pi d Key Dial in g
and Speed Dialing; Spee d D ia l nu m be rs from "21" to "99" can on ly be us ed for
Speed Dialing.
♦
To allow easy iden ti fi ca ti on of th e R ap id Keys , at ta ch eac h strip of Rapid Key
labels above the appropriate row of Rapid Keys. The arrangement of the keys is
shown in "Operation Panel" at the beginning of this chapter. Each time you store
a number for Rapid Key Dialing, write the name of the party above the
appropriate key.
Storing numbers
Comments:
SPEED DIAL
key and
You may need to add a pause between certain digits in the number to allow time
••••
for connection. For example, if you are on a PBX telephone system that requires
an access number to be dialed (such as "9") to access an outside line, you will
need to enter a pause between the access number and the telephone/fax
number of the other party. Pauses are entered by pressing the REDIAL key (2
seconds per pause). If necessary, several pauses can be entered in a row.
To enter letters for names or correct a mistake, see "Entering letters for names"
••••
in this chapter.
1
FUNCTION
3
2
Press the keys shown at left. "FAX/TEL.
# MODE" will appe ar in the display.
Press "1" to select SET.
1
2-20 INITIAL SETTINGS
Page 37

STORING NUMBERS FOR AUTOMATIC DIALING
3
0
1
(Example)
4
5
5
5
1
5
START
3
2
(Example)
6
GHI
DEF
ABC
3
2
…………
4
WXY
9
(Example)
Enter a 2-digit number (from "01" to
"99") by pressing th e nu m ber keys. This
will be the Speed Dial nu mbe r .
Enter the fax or voice num b er by pressing the number keys (max. of 32 digits in-
4
cluding pauses).
Press the
Enter the name of the locat io n or party
by pressing number keys as described
in "Entering Letters for Names" in this
chapter (max. of 20 characters). If you
don’t want to ente r a na m e, ski p th is
step.
START
key.
7
8
Step 3 or
START
STOP
Press the
Return to Step 3 to store another number, or press
ber will be used for Rapid Key Dialing,
you can write the name on the label
above the appropriate Rapid Key.
START
STOP
key.
to exit. If the num-
INITIAL SETTINGS 2-21
Page 38

STORING NUMBERS FOR AUTOMATIC DIALING
Clearing numbers
Note: You cannot clear a number if it is used in a program or timer operation, or if it
is included in a Grou p Key . Fi rs t cl ea r th e nu m be r from the operat io n or
group, then perform the following clearing procedure. To check where the
number is used, print out the "Program/Group List and/or the "Timer List" as
described in Chap te r 7.
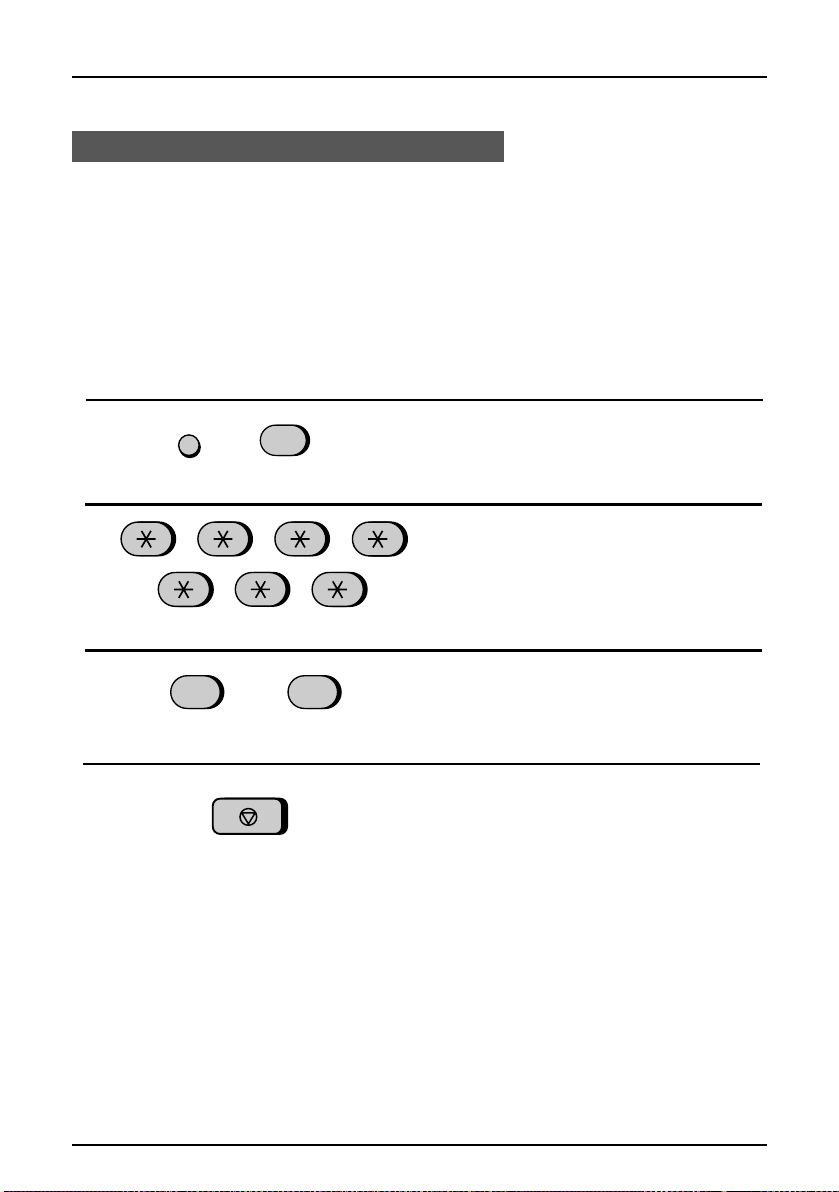
1
2
3
4
5
FUNCTION
2
0
START
Step 3 or
1
3
STOP
(Example)
Press the keys show n at lef t. "FAX/TEL.
# MODE" will appear in the display.
Press "2" to select CLEAR.
Enter the Speed Dial number that you
want to clear by pre ss in g th e nu m be r
keys.
Press the
Return to Step 3 to clear another number, or press
START
STOP
key.
to exit.
Making changes
To make changes in a number previously stored, repeat the storing procedure.
Select the code nu m be r fo r w hi ch you wa nt to m ak e ch an ge s in Step 3, and then
change the numbe r an d/ or name when they ap pe ar in the display (Step s 4 an d 6,
respectively).
Numbers and letters are changed as described in "Entering letters for names" in
this chapter.
♦
A lithium batte r y ke ep s automatic dial ing numbers in memory
Your fax uses a lithi um ba tt ery to keep automatic dialing numb ers and other
programmed data in memory when the power is turned off. Battery power is
consumed primarily when the power is off. With the power kept continuously off, the
life of the battery is about 5 years. If the battery di es, have your dealer or retailer
replace it. Do not try to replace it yo ur self.
2-22 INITIAL SETTINGS
Page 39

STORING NUMBERS FOR AUTOMATIC DIALING
Storing Numbers in Group Keys
Group Keys allo w you to di al a group of fax num bers by simply pr es si ng the
appropriate Group Key once. They are convenient for the Broadcasting function,
which is used to transmit a document to a group of fax machines.
Rapid Keys 18/G1 and 19/G2 can be progr am med as Group Keys. To pr ogram or
clear a Group Key , fo ll ow th e st ep s be low. Note that one key can no t be
simultaneo usly pr o gr am m e d as bot h a R ap id Key an d a G roup Key.
♦
Up to 20 fax numbers can be stored in one Group Key.
♦
Only Speed Dial numbers can be stored in a Group Key. Full numbers cannot be
stored.
♦
A Group Key cannot be cleared if it is being used in a programmed Broadcasting
operation. First clear the programmed operation as described in "Entering and
Using Programs" in Chapter 5, then clear the key. If you need to check which
program the key is used in, print out the Program and Group List as described in
Chapter 7.
FUNCTION
1
7
Press the keys sho wn at left. "GROUP
ENTRY MODE" will appear in the display.
4
5
2
3
6
1
18/G1
1
0
START
Step 3 or
or
2
(Example)
0
(Example)
STOP
Press "1" to program a Group Key, or
"2" to clear a Group Key.
Press a Group Key (Rapid Key 18/G1 or
19/G2) to select it. If you ar e cl earing the
key, go to Step 5.
2
Enter the Speed Dial numbers of the receiving machines.
Press the
Return to Step 3 to program or clear another Group Key, or press
START
key.
STOP
to exit.
INITIAL SETTINGS 2-23
Page 40

VOLUME ADJUSTMENT
You can adjust the vol um e of th e sp eaker, handset , an d ri ng er using the UP and
DOWN
Speaker
The speaker has thre e volume levels: HIGH, MIDDLE, and LOW. To adjust the
volume of the speak er, press the
key until the desired level appears in the display. Press the
to turn the speaker off.
Handset
The handset receiver has two volume levels: HIGH and MIDDLE. To adjust the
volume of the handset receiver, lift the handset and then press the
key until the desired level appears in the display.
Ringer
The ringer has fo ur vol um e level s: HI G H, M IDD L E, LO W , an d O FF . To adj us t th e
volume of the ring er, press the
the display (make sure the
not lifted). The fax will ring at th e ne w volum e lev el eac h ti m e yo u ch an ge t he lev el .
If you select OFF, press the
keys on the operat ion panel.
SPEAKER
UP
or
SPEAKER
START
key and then press the UP or
SPEAKER
DOWN
key until the desi re d level appears in
has not been pressed and the handset is
key to confirm your selection.
UP
or
key again
DOWN
DOWN
2-24 INITIAL SETTINGS
Page 41

3 FAX OPERATIONS
SENDING DOCUMENTS
Transmittable documents
Your fax can transmit most standard office documents. Specific guidelines are as
follows:
Size and weight
The size and weight of documents which you can load in the document feeder
depend on whether you load one sheet at a time or several sheets at once.
One sheet at a time:
14 lbs. 36 lbs.
(52 g/m2)
(157 g/m
2
)
5.0"
(128 mm)
5.8"
(
148 mm
)
Several sheets at once:
14 lbs. 20 lbs.
(52 g/m2)
The area of the document which is scanned by the fax is slightly smaller
Note:
than the actual docum e nt size. The scannin g wid t h is 8. 3 in ch es , an d th e
scanning length is the length of the document minus 0.32 inches.
(80 g/m
2
)
5.0"
(128 mm)
5.8"
(148 mm)
Other restrictions
♦
Documents written in yellow, greenish yellow, or light blue ink cannot be
transmitted , as the scanner does not re co gnize these colors .
♦
Ink, glue, and co rr ec ti ng fluid on documen t s must be dry before the y are
transmitted.
♦
All clips, staples, and pins must be removed from documents before
transmission. I f th es e ar e no t removed, they ma y da m ag e th e fa x.
39.4"
(1.0 m)
8.5"
(216 mm)
14"
(356 mm)
8.5"
(216 mm)
♦
Documents whic h are patched, tap ed , to rn , sm a ll er than the minimu m siz e,
carbon backed, or easily smudged should be photocopied, and the copy used for
transmission.
FAX OPERATIONS 3-1
Page 42

SENDING DOCUMENTS
Loading the document
Up to 20 pages can be placed in the feeder at one time. The pages will be
automatica ll y fe d in to the fax sta rting from the pa ge on th e bo tt om .
♦
If you need to send or co py mo re tha n 20 pag es , place the additional pages
gently and carefully in the feeder just before the last page is scanned. Do not try
to force them in, as this may cause double-feeding or jamming.
♦
If your document consists of several large or thick pages which must be loaded
one at a time, inse rt eac h pa ge int o th e fe eder as the previo us pag e is bei ng
scanned. Inser t ge ntly to prevent do ub le -feeding.
1
2
3
Important:
If you need to remove the document from the feeder before transmission or copying,
first open th e operation panel by pulli ng the front edge up (grasp it at th e "PANEL
RELEASE" mark), and then remove the document. If you try to pull the document out
without openin g the operation pa nel, you may damag e the feeder mech an is m .
Adjust the document guides to the width
of your document.
Place the document face down and push
it gently into the document feeder. The
top edge of the docu m en t should enter
the fax first.
••••
The feeder will draw the leading edge
of the document into the fax. READY
TO SEND will appear in th e di sp lay.
You can now either m ak e re so lution
and/or contras t settings as described in
the following section, or dial the other
party as described in the section, "Dialing
and transmission".
3-2 FAX OPERATIONS
Page 43

SENDING DOCUMENTS
Optional transmission settings
If desired, there are several transmission se ttings which you ca n m ak e be fo re
dialing and tran sm i t t in g th e document.
To make the settings, the document must first be lo aded in the feeder.
Note:
Resolution
Your fax has four r esol ution settings . If you do no t m ake a setting, the fax will
automatically send the document in STANDARD resolution.
STANDARD: Use STANDARD for ordinary documents. This setting
gives you the fast es t an d m os t ec on om i ca l tr ansmission.
FINE: Use FINE for impro ve d re pr oduction, especi al ly with
documents cont aining small letters or fine drawings.
SUPER FINE: Use SUPER FINE when you need the highest quality of
reproduction.
HALF TONE: Use HALF TONE for phot og ra ph s an d il lu strations. The
original will be reproduced in 64 shades of gray.
In order to transmit in FINE or SUPER FINE resolution, the receiving fax
Note:
machine must als o ha ve tha t re solution. If it do es n’ t, you r fa x wil l
automaticall y step down to the next best available setting.
Contrast
The contrast is no rmally set to AUTO, which mean s that the fax automa ti cally
controls the contrast, but for faint documents you can change the setting to DARK.
Setting the resolution and contrast
RESOLUTION
key one or
RECEPTION
MODE
FUNCTION
RESOLUTION
MEMORY
Press the
more times until the desired resolution
and contrast set tings appear in th e di splay.
••••
The first time you mov e th ro ug h th e
list of resolut io n se ttings, the cont ra st
setting AUTO will appear next to each
resolution setting. The second time
you move through the list, the contrast
setting DARK will appear.
FAX OPERATIONS 3-3
Page 44

SENDING DOCUMENTS
Cover Sheet
You can have your fax gen erate a cover shee t an d se nd it as the last page of th e
transmission. The cover sheet includes the date and time, the sender’s name and
number, and the receiver’s name and number if an automatic dialing number is
used. The total num be r of pag es sent is ind ic at ed on th e bottom.
♦
Your name and number must be progr am m e d in ord er for them to appe ar on the
cover sheet. (See "En te r i ng Your Nam e an d Fa x N umber" in Chapter 2. )
To include a cover sheet with each transmission, set Option Setting 14 to "YES" as
described in Chap te r 8, "O pt io na l Settings". Note th at onc e Option Setting 14 is set
to "YES", cover sheets will be automatically included with every transmission until
you change the setting to "NO".
When the cover sheet function is turned on, you can also select a message which
will appear as a head er at the top of the cov er she et . To do so , follow the steps
below. Note that the message se le ct io n is onl y effective for on e tr ansmission.
1
2
Example
FUNCTION
1
5
(Example)
Press the keys s hown at left. "COVER
SHEET HEAD" will appear in th e di sp la y.
Select a message by entering a number
1
from "
" to "4" as shown below:
"1": URGENT
2
"
": IMPORTANT
"3": CONFIDENTIAL
4
"
": PLS. DISTRIBUTE
3-4 FAX OPERATIONS
Page 45

SENDING DOCUMENTS
Batch Page Numbering
This setting is used to change the page numbering of the transmitted document
from simple num be ring ("P.1", "P.2" , et c.) to batch number ing, which means t ha t a
slash and the tota l nu m be r of pag es bei ng sent are added af te r ea ch page number
(for example, "P. 1/ 5" , "P.2/5", etc.). Thi s al lo w s th e re ce iv er to ch ec k fo r an y
missing pages.
key.
do not
include the cover sheet in the total
Press the keys s hown at left. "PAGE
COUNTER SET" will appear in the display.
Enter the total number of pages ("01" to
"99") by pressing the number keys .
♦
If you are sending a cover sheet,
number of pages. Your fax will adjust the number to include the cover sheet
automatically.
♦
If you need to canc el a batch number entry, remove the document from the
feeder or press the
♦
If the number of pages actually transmitted does not coincide with the batch
number entered, the alarm will sound and PAGE COUNT ERROR will appear in
the display. "PAGE E" will also appear in the "NOTE" column of the Transaction
Report if it has been set to print out.
1
FUNCTION
STOP
2
1
0
(Example)
FAX OPERATIONS 3-5
Page 46

SENDING DOCUMENTS
Dialing and transmission
Once you have loaded the document and made any desired transmission settings,
you are ready to dia l the number of the receiving fax machine and transmit the
document. Th ere are several w ay s of dia li ng , an d yo u ca n select the one wh ic h
best suits yo ur n ee ds .
Normal Dialing
With Normal Dial ing, you pick up the handset (or press the
dial as you would to make a telephone call. If the recei v ing machine is set to
receive faxes manually (this means that the receiving party first answers your call
vocally, and the n presses their Start key to begin fax reception), you can talk with
them before sending the fax.
1
SPEAKER
Pick up the handset or press the
SPEAKER
SPEAKER
key. Listen for th e di al ton e.
key) and
or
2
3
ABC DEF
123
GHI JKL MNO
456
PRS TUV WXY
789
OPER
0
Beep
Dial the number of the receiving machine by pressing the number keys.
Wait for the conn ection. Depending on
the setting of the receiving machine, you
will either hear a facsimile reception tone
or the other pers on will ans wer.
••••
If the other part y answers, ask them to
press their Start key (if you pressed
the SPEAKER key, pick up the handset to speak with them). This causes
the receiving m ac hi ne to is su e a re ception tone.
3-6 FAX OPERATIONS
Page 47

SENDING DOCUMENTS
4
START
When you hear the reception tone, press
START
the
you used it.
••••
When transmi ss io n is comp leted, the
fax will beep.
key. Replace the handset if
Direct Keypad Dialing
If you do not need to talk with the other party before sending the fax, you can just
dial; it isn’t necessary to pick up the handset or press the
♦
Direct Keypad Dialing is a form of automatic dialing, so if you need to insert a
pause between any digits of the number, press the
information on pauses, see "Storing Numbers for Automatic Dialing" in Chapter
2.)
1
ABC DEF
123
GHI JKL MNO
456
PRS TUV WXY
789
OPER
Enter the number of the receiving machine by pressin g th e number keys.
SPEAKER
REDIAL
key.
key. (For more
0
2
START
Check the displa y. If the number of the
receiving machine shown is correct,
press the
••••
If it is not correc t, pre ss the STOP key
to backspace and clear one digit at a
time, and then re- enter the correct
digit(s).
START
key.
FAX OPERATIONS 3-7
Page 48

SENDING DOCUMENTS
Rapid Key Dialing
If the number you want to dial has been stored for automatic dialing as a Speed
Dial number from "01" to "20" (see "Storing Numbers for Automatic Dialing" in
Chapter 2), yo u ca n di al it by pre ss in g th e co rresponding Rap id Key.
01 02 03 04 05
06 07 08 09 10
11 12 13 14 15
16/P1 19/G2
17/P2 18/G1
20/POLL
Press the Rapid Key co rresponding to
the desired Speed Dial number.
••••
The name of the re ce iv in g pa rt y w il l ap pear in the display. If no name was
stored, the fax nu m be r wil l ap pe ar. (If
the name or number is incorrect, pre ss
the STOP key.)
••••
The document will be automatically
Example: To dial Speed
Dial number "02" , press
Rapid Key 02.
transmitted onc e th e co nnection is
made.
Speed Dialing
Speed Dialing can be used to dial any number which has been stored for automatic
dialing (see "Storing Numbers for Automatic Dialing" in Chapter 2).
1
Press the
enter the two digits of the Spee d D ial
SPEED DIAL
2
START
ABC DEF
123
GHI JKL MNO
456
PRS TUV WXY
789
OPER
0
number by pressing the number keys.
••••
To enter numbers 1 through 9, first enter 0 and then the number.
Check the displa y. If the name or num ber shown is corr e ct , press the
key. (If not, press the
then repeat Step 1.)
3-8 FAX OPERATIONS
SPEED DIAL
STOP
key and then
START
key and
Page 49

SENDING DOCUMENTS
Using the HOLD/SEARCH key
If you don’t remember the Rapid Key or Speed Dial number in which you have
stored a particular fax number, you can search for the number by following the
steps below. Once you have found the number, you can dial it and transmit the
loaded document by simply pressing the
START
key.
1
HOLD/SEARCH
1
2
ABC
12
GHI
4
JKL
5
DEF
3
MNO
6
3
or
Press the
then the "1" key.
Enter the first lett er of the stored name
by pressing the appropriate number key
(the key below the marked letter) one or
more times unti l th e le tter appears in the
display. If the name begins with a special characte r or num b er , press "
••••
If you don’t remember the first letter,
go to Step 3 (you will scrol l thro ug h
the list from the beginning).
••••
If a name wasn’t stored for the num-
ber, press "0". This will cause num-
bers, not names, to appear when you
scroll.
Press the "#" key or the "*" key to scroll
through the names (numbers if you
pressed "
name appears in the display.
••••
If no names have b ee n st ored that be-
gin with the entere d le tter, you will
scroll from the next name, in alphabeti-
cal order, in the li st . If no names/num-
bers have been stored at all, NO
DATA will appear.
HOLD/SEARCH
0
"). Stop when the desired
key and
1
".
FAX OPERATIONS 3-9
Page 50

SENDING DOCUMENTS
4
START
Press the
will be automatically transmitted once
the connection is made.
START
key. The document
Redialing
Automatic redialing
If you use automatic dialing (including Direct Keypad Dialing) and the line is busy,
your fax will auto m at ic al ly red ia l th e nu m be r. Up to 2 redialing at te m pt s w il l be
made at intervals of 5 minutes.
♦
To stop automatic redialing, press the
♦
If desired, you can cha ng e th e nu m be r of times the fax redials to any number
from 0 to 15 with Option Setting 4, and the interval at which redialing is done to
any number of minu tes from 1 to 15 with O pt io n Set ti ng 3. See Ch ap te r 8,
"Optional Set tings".
STOP
key.
Using the REDIAL key
You can press the
document, proc ee d from Step 3 of Norma l Dia li ng . Note that the speaker wi ll be
automatically activated, so you do not need to pick up the handset immediately.
REDIAL
key to redial the last number dialed. To send a
3-10 FAX OPERATIONS
Page 51

Using FAX mode
RECEIVING DOCUMENTS
When the reception mode is set to FAX (press the
"FAX" appears in the display), your fax automatically answers all calls on 4 rings
and receives the incoming documents.
♦
You can change the num b er of rings on which th e fa x answers incomi ng cal ls by
changing Option Setting 2 (see Chapter 8, "Optional Settings"). Any number
from 1 to 5 can be selected. Note, however, that reception of auto-dialed fa xes
may not be possible from certain fax machines if you select a large number of
rings.
♦
If you pick up the ha nd se t before your fax an sw e rs , yo u can talk to the othe r
party and/or receive a document as described below in "Using TEL mode". For
example, with the fax set to answer on 4 rings, you can receive both voice calls
and fax messages in FAX mode by answering before the fourth ring, but still
have the fax answer calls automatically at times when you are unable to respond
personally.
Note: If you are usin g di st in ctive ringing, you r fa x w il l an sw e r in coming calls af te r
two rings regard le ss of th e setting of Option Setting 2.
RECEPTION MODE
key until
Using TEL mode
When the reception mode is set to TEL (press the
"TEL" appears in the display), you must answer all calls (including fax
transmissions) using the fax’s handset or an extension phone connected to the
same line.
RECEPTION MODE
key until
Receiving documents on your fax machine
When your fax r in gs , pi ck up th e handset.
••••
If you hear a fax tone, wait until
RECEIVING appears in the display,
and then replace the handset.
••••
If the other part y fi rs t ta lk s to you and
then wants to send a fax, press the
START key after speaking (press your
START key before the sender presses
their Start key). Repl ac e th e ha nd set.
FAX OPERATIONS 3-11
Page 52

RECEIVING DOCUMENTS
Note: If you have set Option Setting 10 to "OFF" and you hear a fax tone when
you pick up the handset, you must press the START key to begin reception.
Receiving documents on an extension phone
If you hear a soft fax tone when you answer an extension phone, wait until your fax
answers (the extension phone will go dead if it is connected to your fax, or you will
hear pronounced high-pitched fax tones if the phone is connected to a separate
wall jack), and then hang up. Your fax will automatically receive the document.
Note: If your fax doe s no t re sp on d w it hi n 5 se conds, noise on th e li ne ma y be p re -
venting it from de te ct ing the fax tone. In thi s ca se , m an ua ll y ac ti va te fax r eception as described in the following paragraph.
If the other part y fi rs t ta lk s to you and the n w an ts to se nd a doc um e nt , press "
"*" and "*" if you are on a touch tone phone. If you are on a pulse dial phone, set
the handset down (do not hang up), walk over to the fax, pick up the handset, and
press the
Note: Your fax will not accept the signal to begin reception ("5", "*", and "*") if a
START
document is load ed in its feeder.
key.
5
",
Comments:
If you have set Option Setting 10 to "OFF" and hear a fax tone when you answer
••••
the extension phone, you must press "5", "*", and "*" if you are on a tou ch - t on e
phone, or walk over to the fax, pick up the han ds et , and press the START key if
you are on a pulse dial phone.
The code used to ac tivate fax reception from a touch-tone extension phone ("5",
••••
"*", and "*") can be changed if desir ed. See Option Setting 5 ("Tel/Fax Remote
Number") in Chapter 8, "Optional Settings".
If you do not intend to use the code for activating fax reception, you can turn
••••
detection of the code off by resetting Option Setting 6. This will ensure that the
fax never mistakenly attempts to begin reception if it detects a signal similar to
"5", "*", and "*" while you are talking on an extension phone.
3-12 FAX OPERATIONS
Page 53

RECEIVING DOCUMENTS
Optional reception settings
2 in 1 Print
To save paper , yo u can have the size of your incomin g faxes reduced by 55 % . Th is
will allow you to r ecei ve , for example, a 2-page document on on e pa ge (note that
this may not be po ss ib le if th e do cu m en t pa ge s are longer than yo ur pr i nt in g
paper). To turn on this function, follow the st eps below.
FUNCTION
1
6
Press the keys sho wn at left. "2 IN 1
PRINT" will appear in the display.
2
3
1
or
STOP
2
Press "1" to turn on the functi on , or "2"
to turn it off.
Press the
STOP
key.
Reception Ratio
Your fax has been set at the factory to automatically re duce the size of received
documents to fit the size of the printing paper. Th is ensures that data on the edges
of the documen t ar e no t cut off. If desire d, you can turn this fun ct io n of f an d have
received documents printed at full size.
Note: If a document is too long to fit on the printing paper, the remainder will be
printed on a second page. In this case, the cut-off point may occur in the
middle of a line .
Note: Automatic reduction may not be possible if the received document is too
large, contains too many fine graphics or images, or is sent at high resolution. In this case, the remainder of the document will be printed on a second
page.
FUNCTION
1
6
Press the keys shown at left. "RECEPTION RATIO" wil l appear in the disp la y.
2
3
1
or
STOP
2
Press "1" to turn automati c reduction on,
or "2" to turn it off.
Press the
STOP
key.
FAX OPERATIONS 3-13
Page 54

RECEIVING DOCUMENTS
PC reception (only for FO-1850)
If you have connected the FO-1850 to a personal computer with the provided PC
interface box and have set the RECEIVE UNIT setting to "PC" as described in "
Selecting the Reception Mode" in Chapter 2, faxes will be received as follows
depending on the reception mode of the FO-1850:
♦
If the FO-1850 is set to FAX reception mode, an incoming call will be
automatica ll y an swe r e d af te r th e number of rings set in yo ur fax sof t wa re . Th e
fax will be received by your computer (make sure your fax software is running).
If your comput er is tu rn ed off or th e fax software is not run ni ng , th e FO - 18 50 will
receive the fax.
♦
If the FO-1850 is set to TEL reception mode , yo u m us t fi rs t an sw e r a ca ll by
picking up the FO-1850’s handset. If the call is an auto-dialed fax transmission
(you will hear a fax tone), your computer will automatically begin reception. If the
other party spea ks to you and then wants to send a fax, you must initiate fax
reception manually with the fax software.
♦
If the FO-1850 is set to TAD reception mode, th e OGM will play before the
computer beg in s fa x re ce ption (voice calle r s will be ab le to leave a message ). If
your computer is not turned on or the fax software is not running, the FO-1850
will receive the fax.
♦
If the FO-1850 is set to TAD rece pt io n m od e and th e FAX BOX set ti ng is YES,
faxes sent to personal boxes will be received by the FO-1850. The FO-1850 will
also receive faxes sent to the Gen er al Box if a General Box passc od e ha s be en
programmed.
For informati on on ho w t o re ce iv e fa xe s w it h yo ur Mu ltifunction In te rface software,
refer to your Multifunction Interface software manual.
If the RECEIVE UNIT setting is set to FAX, fa xes will be received by the FO-1850
only. FAX, TEL, and TAD reception modes will function as explained in "Reception
Mode" in Chapte r 2.
Note: Scanning, pr inting, and PC faxing can take place in all modes.
3-14 FAX OPERATIONS
Page 55

4 USING THE ANSWERING MACHINE
OPERATING THE ANSWERING MACHINE
Activating the answering machine
Activate the answering machine before you go out as follows:
Press the
or two times to set the reception mode to
RECEPTION
MODE
FUNCTION RESOLUTION
Note: If the memory is full from messages previously recorded, MEMORY IS FULL
will appear in the display. To set the reception mode to T.A.D., you must
first erase some or all of the stored messages.
When the reception mode is set to T.A.D., the FO-1650/1850 will answer incoming
calls after tw o ri ng s if it ha s re ce iv ed at least one incom in g m es sag e , or af t er f ou r
rings if no messages are received. (For more information, see "Toll Saver" in
"Remote Operations" in this chapter.)
Note: In T.A.D. mode, the machine will automatically switch to fax reception if it de-
tects a period of silence longer than six seconds af ter answering a call. For
this reason, if a caller pauses for this length of time while leaving a message, they will be cut off.
T.A.D.
••••
Each outgoing message will play (you
can stop playback by pressing the
STOP key).
••••
If no general outgoing message has
been recorded, an alarm will sound
and the receptio n m od e w il l ch an ge t o
TEL. Record a genera l ou tg oi ng
message as descri be d in "Ans w er in g
Machine Set-up" in Chapter 2.
RECEPTION MODE
key one
Listening to received messages
When you return , th e di splay will show the number of mess ag es rec or ded in each
box. Listen to th em as f ol lo ws:
1
PLAY/SKIP
Press the
••••
If you only want to li sten to new
messages (messages not previously
listened to), continue to hold the
PLAY/SKIP key down for at least two
seconds.
PLAY/SKIP
key.
USING THE ANSWERING MACHINE 4-1
Page 56

OPERATING THE ANSWERING MACHINE
2
1
(Example)
3
5
7
8
(Example)
4
REPEAT
PLAY/SKIP
If you want to listen to the messages in a
personal box, enter the number of that
box by pressing the appropriate number
key.
If the box (gener al or pe rs on al ) ha s a
passcode, enter the passcode by pressing the appropriate number keys.
The messages will play.
••••
As each message plays, the date and
time of recording will appear briefly in
the display. If no messages were
received, NO MESSAGES will appear.
••••
To listen to a message a second time,
press the REPEAT key befo re
playback of that message ends.
••••
To move back to th e pr ev io us
message, pres s th e REPEAT ke y
within 3 seconds of the beginning of
the current messa ge .
••••
To skip forward to the next message,
press the PLAY/SKIP key.
••••
SLOW PLAY
FAST PLAY
To increase playback speed, press
the FAST PLAY key. To decrease
playback speed , pr es s th e SLOW
PLAY key.
4-2 USING THE ANSWERING MACHINE
Page 57

OPERATING THE ANSWERING MACHINE
Note: Playback will stop if you receive a call, lift the handset, press the STOP key,
or open the paper compartment cover.
Erasing received messages
It is important to erase received m essa ge s af te r yo u listen to them to ens ure that
the memory does no t become full. This is done as follows:
••••
Erasing gene ral messages: To erase
all messages in the General Box,
DELETE
press and hold dow n the DELETE key
for at least 2 seconds. If the General
Box has a passcode, press the
DELETE key and then enter the
passcode.
••••
Erasing personal messages: To
erase all messages in a personal box,
press the DELETE key (do not hold it
down), enter the nu m be r of the box,
and then enter its passcode (if it has
one).
••••
Erasing a single message: To erase
only a single message, press the
DELETE key while the message is
being played.
Using the REC/MEMO key
You can use the
messages for other users of the FO-1650/1850. These will be recorded in the
General Box, and played back together with any incoming messages in that box
when the
REC/MEMO
PLAY/SKIP
REC/MEMO
key to record te le ph on e co nv ersations and
key is pressed.
••••
Recording messages: To record a
message, pres s th e REC/MEMO ke y
for at least 1 seco nd, and then pick up
the handset and sp ea k in to it. When
you have finishe d sp eaking, replac e
the handset or pre ss the STOP key.
USING THE ANSWERING MACHINE 4-3
Page 58

OPERATING THE ANSWERING MACHINE
REC/MEMO
Note: To comply with fe de ra l an d lo cal regulation s re ga rd in g re co rding a tele-
phone call, start the recording process and then inform the caller that you
are recording the call.
••••
Recording phone conversations: To
record a phone co nversation, hold
down the REC/MEMO key duri ng the
conversation you want to record.
When you are finished, release the
key.
Date and time of ICMs
You can check the da te and tim e of yo ur received messa ge s by pre ss in g th e panel
keys as shown below.
♦
The dates and times are also shown in the Message List, which can be printed
out as described in Chapter 9.
1
2
FUNCTION
Press the keys sho wn at left. "T.A.D.
0
SETTINGS" will appe ar in the display.
Press the keys sho wn at left. "ICM CO NFIRMATION" will appear in the display.
3
START
4
or
5
Note: The recorded da tes and times are cle ared each time you erase the mes-
sages.
STOP
Press the
messages recorded will appear in the
display.
Press "#" or "*" one or more times to
show the date and time of each of the
messages.
••••
The message nu m be r w il l ap pe ar first,
and then the date an d ti m e se ve ra l
seconds later .
Press the
START
STOP
key. The number of
key.
4-4 USING THE ANSWERING MACHINE
Page 59

REMOTE OPERATIONS
You can call the FO-1650/1850 from any touch-tone telephone and play back your
messages using the remote commands. You can also use these commands to
change the rece pt io n m od e an d ot her settings.
Remote code number
When you call the FO -1 65 0/1850, you mus t en te r th e pa ss co de for the box you
want to listen to, or a remote code num b er if the box does not have a passcode .
One remote code number can be pr og ra m m ed , an d it is used to access all box es
which do not have passcodes. This prevents unauthorized people from listening to
your messages. You ca n us e an y 3-digit numbe r as the rem o te code number.
The remote code number has been set to "001" at the factory. If you want to
change it, pres s the panel keys as sh own below.
1
FUNCTION
Press the keys sho wn at left. "T.A.D.
SETTINGS" will appe ar in the display.
0
2
3
2
4
START
2
2
(Example)
STOP
Press the keys show n at lef t . "REM O TE
CODE" will appear in the display.
Enter a 3-digit nu mbe r by pre ss in g th e
number keys.
key.
START
key and then the
Press the
STOP
USING THE ANSWERING MACHINE 4-5
Page 60

REMOTE OPERATIONS
Toll Saver
When you call the FO-1650/1850 to listen to your messages, it will answer after two
rings if it has received at least one message in any of the boxes, or after four rings
if no messages are received.
This allows you to save money on telephone charges, particularly if you are calling
long distance. If the machine does not answer after the second ring, you can simply
hang up before it answers, saving yourself the cost of that call.
If you do not want to us e th e To ll Save r fu nc ti on , yo u ca n tu rn it off by followin g th e
steps below. In this case, the FO-1650/1850 will answer after the number of rings
set with Option Setting 2 (see Chapter 8), the ring setting for FAX reception mode.
1
FUNCTION
Press the keys sho wn at left. "T.A.D.
SETTINGS" will appe ar in the display.
0
2
3
2
(Example)
4
STOP
Press the keys sho wn at left. "TOLL
SAVER" will appear in the display.
Press "1" to turn Toll Saver on, or "2" to
turn it off.
Press the
STOP
key.
4-6 USING THE ANSWERING MACHINE
Page 61

REMOTE OPERATIONS
Retrieving your messages
Follow the steps below to listen to your messages from a remote location. Note that
you can only access one box per call; if you want to access more than one box, you
must make a separate call for each box.
Note: You can also access the FO - 16 50 / 1 85 0 fo r re m ot e op er ation when the re-
ception mode is se t to FAX. In thi s ca se , call the FO-1650/1850, press th e
"#" key immediately after it answers (before you hear the fax tone), and then
continue from Step 2 below.
1
2
2
(Example)
3
5
2
2
(Example)
Call the FO-1650 /1850 from a touchtone telephone. When your outgoing
message begi ns, press the "
the telephone.
••••
You will hear a short beep, and the
outgoing mess ag e will stop.
Enter the number of the box you want to
listen to. If you want to li st en to th e G en eral Box, skip this step.
Enter the box’s pa ss co de , or you r remote code number if the box does not
have a passcode. When finished, press
"#" on the telephone.
••••
You will hear a series of beeps equal
to the number of messages recorded
in the box, or one lo ng beep if four or
more messages have been received.
The machine will then play back the
messages, beeping once at the end of
each message. When all messages
have been played back, you will hear
a long beep.
#
" key on
USING THE ANSWERING MACHINE 4-7
Page 62

REMOTE OPERATIONS
••••
If no messages have been received in
the box, you will hea r a sh or t beep.
You can either hang up, or perform
any of the operations described in the
following section "Other remote
operations".
4
2
5
0
0
6
3
While the messages are playing, you
can do any of the following:
••••
Repeat: To listen to a message a
second time, press "2" and "#" on the
telephone before that message ends.
To move back to the pr evious
message, press "2" and "#" within the
first 3 seconds of the current messag e.
••••
Skip forward: To skip forward to the
next message, press "5" and "#" on
the telephone.
••••
Stop: To stop play ba ck , pr es s "0" and
"#" on the telephone. After this, you
can enter any of the com m a nd s
described in the following section,
"Other remot e op erations".
••••
Play new messages: To listen to only
your new messages, first stop
playback by pressing "0" and "#", and
then press "6" and "#".
••••
Erase a message: To erase the
message you are cu rrently listening to,
press "3" and "#" before it ends.
4-8 USING THE ANSWERING MACHINE
Page 63

REMOTE OPERATIONS
5
33
7
When you have finished listen in g to your
messages, you can do any of the foll owing:
••••
Erase all messages: To eras e al l of
the messages in the box, press "3",
"3", and "#".
••••
Repeat playba ck: To listen to your
messages again, press "7" and "#".
••••
Perform other operat io ns : You can
enter any of the com m a nd s de sc ri be d
in the following section, "Other remote
operations".
••••
Hang up: If you do not erase your
messages first, they will be saved and
any new messages will be recorded
after them. If yo u wan t th e
FO-1650/1850 to resume normal
operation immediately, press "*"
twice before hanging up (in some
cases, particularly when the Transfer
function is used, th e FO-1650/1850
may not accept new calls for one or
two minutes afte r yo u hang up unless
you first press "*" twice).
Comments:
When a remote command is accepted by the machine, you will hear one beep. If
••••
an incorrect command is entered, you will hear four beeps. In the latter case,
re-enter the correct command.
When entering a command, do not pause longer than 10 seconds between each
••••
digit. If you do, a 4- beep error signa l wil l be iss ue d an d th e di gi ts entered up to
that point will be disregarded. In this case, re-enter the command from the
beginning.
If you make two errors (causing t wo 4-beep signals to be iss ue d) wh il e en te ri ng
••••
your remote code number, the line will be disconnected. This prevents
unauthorized peo pl e fr om at te m pt in g to gue ss you r re m ot e co de num b er.
If you pause for lo ng er t ha n 60 secon ds bef ore entering a comm a nd , you will be
••••
disconnected.
USING THE ANSWERING MACHINE 4-9
Page 64

REMOTE OPERATIONS
Other remote operations
After listening to your messages, you can do any of the operations described below
by pressing the appropriate keys on th e te le ph one.
Note: The following commands cannot be entered while messages are being
played back. If you do not want to wait until playback ends to enter a command, first stop playback by pressing "0" and "#", and then enter the command.
Changing the fax reception mode
Select a new reception mode by pressing the keys as foll ows :
••••
8
1
(Example)
T.A.D. mode: "8", "1", and "#".
••••
FAX mode: "8", "2", and "#".
••••
TEL mode: "8", "3", and "#".
Recording a new outgoing message
Note: A new outgoing message can only be recorded for the box you selected at
the beginning of th e re m ot e op eration proced ure.
1
Press "4" and "*" on the telephone.
4
2
4-10 USING THE ANSWERING MACHINE
When you hear a shor t beep, speak into
the telephone to record the new message.
••••
The message (including the general
outgoing message) can be up to 15
seconds long. A fter 15 second s ( o r
earlier if the ma chine detects silence
after you finish spe ak in g) , yo u wil l
hear a beep, and th e new message
will be played back.
Page 65

REMOTE OPERATIONS
Turning the Transfer function on or off
(The Transfer function is described in the following section, "Other functions".)
9
1
1
(Example)
To turn Transfer on: Press "
#
"
("0" for the General Box) and "#".
To turn Transfer off: Press "9", "2", and
#
"
Changing the transfer telephone number
1
9
0
2
5
6
4
1
1
3
(Example)
4
Press "9", "0", and "#" on the telephon e.
After you hear a short beep, enter the
new telephone nu m ber. When finish ed ,
press "#".
••••
Recording a new transfer message
1
9
3
Press "9", "3", and "#" on the telephon e.
9
", "1", and
", followed by the number of the box
" on the telephone.
To insert a pause between any two
digits of the number, press "*".
2
When you hear a shor t beep, speak into
the telephone to record the new message.
••••
The time for the transfer message is
fixed at 15 second s. After 15 secon ds
(or earlier if the ma ch in e de te ct s
silence after yo u fi ni sh spe a king), you
will hear a beep , and the new
message will be played back
automatically.
USING THE ANSWERING MACHINE 4-11
Page 66

REMOTE OPERATIONS
Recording a "Memo"
You can leave a "memo" for yourself or other users of the machine. It will be
recorded in the Ge ne ra l Box , and played back when m es sa ge s in tha t box are
listened to.
1
2
3
0
Press "*" and "#" on the telephone.
When you hear a shor t beep, speak into
the telephone to record the memo.
When you are finished, press "0" and "#".
••••
If the FO-1650/1850 detects a certain
period of silenc e, it w il l st op r ecording
automatically.
4-12 USING THE ANSWERING MACHINE
Page 67

OTHER FUNCTIONS
Transfer function
The Transfer fu nc ti on is us ed to m ak e th e FO - 16 50 /1 85 0 automatically call yo u at a
specified number every time it receives an incoming message in a selected box.
This allows you to hear your messag es im m ed ia tely after the y co me in, even when
you are at a remote location.
When you answer the telephone, you will hear your recorded message telling you
that the call is a tr an sf er cal l. Ente r "
your remote co de num b er if the box has no pas sc od e) , an d "#". The FO-1650/1850
will then play back your messages. You can also perform any of the remote
operations described in the previous section.
Note: When you hang up after a transfer call, the FO-1650/1850 will not immedi-
ately resume normal operation. If you want the FO-1650/1850 to accept
calls immediately after a transfer call, enter "*" twi c e before hanging up (if
you want to hang up du ri ng me ss ag e pl ay ba ck , fi rs t en te r " 0" and " #" to
stop playback, th en enter "*" twice) .
Programming the transfer number
To use the Transfer function, you must first give the FO-1650/1850 the number to
call (the transfer number). This is done by pressing the panel keys as follows:
#
", the box number, the box’s passcode (or
1
FUNCTION
0
2
3
4
5
5 5
START
START
1
5
2
(Example)
STOP
3
Press the keys sho wn at left. "T.A.D.
SETTINGS" will appe ar in the display.
Press the keys sho wn at left. "TRANSFER # ENTRY" will appe ar in the display.
key.
START
START
key.
key and then the
Press the
Enter a transfer num b er (max. of 32 dig-
4
its including pauses) by pressing the
number keys.
Press the
STOP
USING THE ANSWERING MACHINE 4-13
Page 68

OTHER FUNCTIONS
Note: If needed, you ca n ch ange the transfe r nu m be r from a remote lo ca ti on . See
"Other remote operations" in the previous section, "Remote operations".
Recording the transfer message
The transfer message plays when you answer the telephone, and informs you that
the call is a transfer call. It can be up to 15 seconds long. To record a transfer
message, follow the steps described in "Recording an outgoing message" in
"Answering Machine Set-up" in Chapter 2. The following is an example:
"Hello. This is a transfer call for (YOUR NAME). Enter your remote code number
now."
Note: If needed, you can record the transfer message from a remote location. See
"Other remote operations" in the previous section, "Remote operations".
Turning the Transfer function on and off
1
2
3
4
5
FUNCTION
1
STOP
or
1
0
2
(Example)
Press the keys sho wn at left. "T.A.D.
SETTINGS" will appe ar in the display.
Press the keys sho wn at left. "TRANSFER FUNC" will appear in the display.
Press "1" to turn the Transfer function
on, or "2" to turn it off. (If you pressed
2
"
", go to Step 5.)
Enter the number of the box for which
you want the Transfer function to operate (for the General Box, enter "
Press the
STOP
key.
0
").
4-14 USING THE ANSWERING MACHINE
Page 69

OTHER FUNCTIONS
Note: If needed, you can turn the Transfer function on or off from a remote loca-
tion. See "Other remote operations" in the previous section, "Remote operations".
Override Ringing
This function all ow s selec ted callers usin g a to uc h- to ne telephone to override the
answering machine’s outgoing message and caus e the FO-1650/1850 to make a
special ringing sound, alerting you that they ar e calling. This is useful when yo u are
near the machi ne but only want to talk wit h ce rt ain callers, tak in g all other calls on
the answering machine.
Programming the override code
To override the answering machine, your callers must enter a 3-digit override code
from their telephone. This code has been set to "009" at the factory. If you want to
change it, pres s the panel keys as sh own below.
Important!
Make sure the overr ide code is different from the remot e code or any passcodes
••••
programmed for boxes.
1
FUNCTION
0
2
3
4
5
START
5
4
(Example)
STOP
Press the keys sho wn at left. "T.A.D.
SETTINGS" will appe ar in the display.
Press the keys show n at lef t. "OVERRIDE CODE" will appear in the display.
Enter a 3-digit co de num b er by pressing
the number keys.
key.
START
key and then the
Press the
STOP
USING THE ANSWERING MACHINE 4-15
Page 70

OTHER FUNCTIONS
Overriding the answering machine
Your callers sho ul d fo ll ow th e steps below to override the answering machine.
1
2
5
45
(Example)
3
Your caller calls the FO-1650/1850 from
a touch-tone te le ph on e. W he n th e ou tg oing message begi ns , they should press
the "#" key on their telephone.
••••
The caller will hear a short beep, and
the outgoing me ss ag e wil l stop.
The caller should enter the override
code and "#" by pressing the appropriate
keys on their telephone.
••••
If an incorrect code is entered, the
caller will hear four beeps. He or she
must re-enter the correct code within
60 seconds or the line will be
disconnected.
The FO-1650/1850 will make a special
ringing sound. Pick up the handset to answer the call. (Note that an extension
telephone connected to the same line
will not ring.)
••••
If you do not answer within 30
seconds, the outgoing message will
play again and the caller can then
leave a message.
4-16 USING THE ANSWERING MACHINE
Page 71

5 MAKING COPIES
Your fax can also be used to make copies. Single and multiple copies (up to 99 per
original) can be made, enabling your fax to double as an office copier.
♦
The default resolution for copying is SUPER FINE.
♦
If you are making multiple copies of more than one original, you can choose
whether to have the copies sorted (SORT COPY) or not sorted (MULTI COPY).
The following example shows how the copies are ordered in each case when 3
copies each of 3 originals are made.
C
Originals
Not sorted
(MULTI COPY)
Sorted
(SORT COPY)
B
A
C
B
A
1
C
B
A
C
B
A
Load the document(s) face down.
••••
If desired, adj us t th e re so lu ti on and
A
A
A
B
B
B
C
C
C
contrast with the RESOLUTION key.
2
COPY/HELP
Press the
••••
If you are only ma king one copy of the
COPY/HELP
key.
original (or of each original) and don’t
want to make a reduction or
enlargement set ti ng , press the START
key twice. Copying will begin. If you
are only making one cop y an d wan t to
make a reductio n or enl argement
setting, pres s the START key once
and go to Step 5.
MAKING COPIES 5-1
Page 72

MAKING COPIES
3
or
1
2
4
1
2
(Example)
5
2
(Example)
Press "1" (MULTI COPY) if you don’t
want the copies sorted, or "2" (SORT
COPY) if you want them so rt ed.
Enter the desired number of copies with
the number keys .
••••
If the desired number of copies is from
1 to 9, enter "0" fi rst.
••••
If you don’t want to make a reduction
or enlargeme nt set ti ng, press the
START key. Copying w il l be gi n.
Set the amount of reduction or enlargement by entering a number from "
"5" as shown below. Copying will begin.
1
: AUTO (automati c size adj us tm e nt to
match the size of the pr in ti ng pap er )
2
: 50%
3
: 100% (no reduction or enlargement)
4
: 125%
5
: 135%
1
" to
Note: If you place a larg e number of originals in the feeder, the memory may be-
come full before al l of them can be scanne d (M EM OR Y IS FUL L w il l ap pe ar
in the display). If this happens, press the START key to copy the originals
which have been scanned, and then repeat the copy procedure for the remaining originals, including the original whi c h was being scanned when the
memory became full.
5-2 MAKING COPIES
Page 73

MAKING COPIES
Copy Cut-off
When making a copy, your fax has been set at the factory to not print the remaining
part of a document if the document is longer than the printing paper. If you want
your fax to always print the remaining part of the document on a second page,
follow the steps below.
1
FUNCTION
6
2
or
1
3
STOP
2
Press the keys sho wn at left. "COPY
CUT-OFF" will appear in the display.
Press "1" to turn copy cut-of f on (th e re maining part of th e do cu m en t w il l no t be
printed), or "
ing part will be printed on a second
page).
Press the
2
" to turn it off (the rem a in -
STOP
key.
MAKING COPIES 5-3
Page 74

MAKING COPIES
Notes
5-4 MAKING COPIES
Page 75

6 MAKING TELEPHONE CALLS
Your fax can be used like a regular telephone to make and receive voice calls.
♦
To make or receive a phone call, the power must be on.
1
SPEAKER
Pick up the handset or press the
SPEAKER
key. Listen for th e di al ton e.
or
2
3
ABC DEF
123
GHI JKL MNO
456
PRS TUV WXY
789
OPER
0
Dial the number us ing one of the following methods:
••••
Normal Dialing: Enter the full
telephone num be r with the numeric
keys.
••••
Rapid Key Dialing: Press the
appropriate Rap id Key.
••••
Speed Dialing: Press the SPEED
DIAL key, and enter the 2- di gi t Spe ed
Dial number with the numeric keys.
Speak with the othe r pa rty when they answer.
••••
If you pressed the SPEAKER key,
pick up the handse t.
Note: While the handset of the fax is lifted (off hook), an extension phone con-
nected direct ly to th e fa x cannot be used to sp ea k w it h th e ot her party.
MAKING TELEPHONE CALLS 6-1
Page 76

MAKING TELEPHONE CALLS
Using the HOLD/SEARCH key
You can use the
number. First search for the number as described in "Using the
key" in "Sending Docu m en ts " in t hi s ch ap te r, and then pick up the handset or press
SPEAKER
the
press the
HOLD/SEARCH
key to search for a Rap id Key or Spee d Dia l
HOLD/SEARCH
key. The number wi ll be di al ed automatically after you do so (do no t
START
key).
Redial
The last number called can be redialed by pressing the
necessary to pick up the handset or press the
party answers, pick up the handset.
SPEAKER
REDIAL
key (it is not
key). When the other
Hold
You can put the othe r pa rt y on hol d du ri ng a con ve rs at io n by pre ssin g th e
HOLD/SEARCH
handset back in the cradle without breaking the connection. When you are ready to
speak with them aga in , pi ck up th e ha ndset. If you did no t pu t the handset back in
the cradle, pres s the
key. When this is done, they cannot hear yo u. You ca n put the
HOLD/SEARCH
key one more time.
6-2 MAKING TELEPHONE CALLS
Page 77

7 SPECIAL FUNCTIONS
CALLER ID
If you subscribe to a caller iden ti fi cation service fro m you r te le ph on e company, you
can set your fax to display the name and number of the caller while the fax rings.
The fax will also store information about unanswerered calls which you can view in
the display or print out as a list. This allows you to screen your calls as they come
in, and makes it easy to respond to callers who do not leave messages.
To use the Caller ID func ti on , set Opt io n Set ti ng 13 to YES and en te r your area
code as descri bed in Chapter 8, "Optional Settings".
Important:
To use this func tion, you must subscribe to a caller identification service from
••••
your telephon e company.
The FO-1650/1850 may not be compatible with some caller identification
••••
services.
How Caller ID operates
When you receiv e a ca ll , th e na m e an d phone number of the cal le r w il l al te rn ately
appear in the display, beginning just before the second ring. The information will
continue to be di sp la yed until you pick up th e ha nd se t, or until the fax an sw e rs
automatically if it is in TAD or FAX mode .
Note: Some caller ID services may not provide the name of the caller. In this case,
only the phone nu mber will appear .
Display messages
One of the follo win g m es sa ge s wil l ap pe ar while the fax ring s if caller information is
not available.
NO SERVICE No caller informat ion was received from your
telephone company. Make sure that the
telephone com p any has activate d yo ur service.
CALLER-ID ERROR Noise on the telephone line prevented
reception of caller information.
OUT OF AREA The call was made from an area which does
not have a caller identification service, or the
caller’s service is not compatible with that of
your local ph on e co m pa n y .
PRIVATE CALL Caller information was not provided by the
telephone company at the caller’s request.
SPECIAL FUNCTIONS 7-1
Page 78

CALLER ID
Viewing the caller list
If you subscribe to a calle r ID se rv ice an d ha ve set Opti on Sett in g 13 to YES, yo ur
fax will keep information on the most recent 20 unanswered calls you have
received. (Note that if the caller sends a fax or leaves a voice message, information
on that call will not be stored.) You can view this information, which consists of the
name and number of eac h caller, in the Caller ID List.
♦
After you have rec ei ve d 20 unanswered calls , ea ch new ca ll wi ll del et e th e ol dest
call.
Follow the steps below to view the Caller ID List in the display. If desired, you can
immediately dial a number when it appears.
To print out the list, see Chapter 9, "Printing Out Reports and List".
1
HOLD/SEARCH
2
2
or
3
START
4
STOP
Press the keys show n at lef t. "R EVIEW ING CALLS" will appear in the display.
Press the "#" to scroll thro ugh the list
from the most recent call, or the "*" key
to scroll through the list from the oldest
call.
If you want to dial one of the numbers in
the list, scroll through the list until the
number appears in the display.
••••
If you want to send a fax, first load the
document and th en press the START
key.
••••
If you want to make a voice call, pick
up the handset or press the
SPEAKER key. Dialing wil l begin
automatically . (If you pressed th e
SPEAKER key, pick up the hand se t
when the other party answers.)
Press the
ished viewing the list.
STOP
key when you have f in -
7-2 SPECIAL FUNCTIONS
Page 79

CALLER ID
To delete calls from the caller list
If you want to delete a single call from the caller list, press the "0" key while the cal l
appears in the di sp lay. If you want to delete all calls fr om the list, hold the "
0
" key
down for at least 3 seconds while you are viewing any number in the list.
Priority Call
If desired, you can set your fax to make a special ringin g sound when you receive a
call from a desi gn at ed phone number . Th is lets you know imme di at el y w ho is
calling without having to look at the display. To use this function, enter the desired
phone number by fo ll ow i ng the ste ps below (only one phon e nu m ber can be
entered).
Note: This function cannot be used if you are using Distinctive Ringing.
5
FUNCTION
1
5
1
or
Press the keys sho wn at left. "PRIOR-
3
ITY CALL #" will appe ar in the display.
Press "1" to enter a number, or "2" to
2
clear a number . (I f yo u pressed "2", go
to Step 4.)
Enter the phone num be r, including the
2
3
5
4
area code, by pressing the number keys
5
5
(the number m us t be 10 di gi ts lon g) .
1
2
3
5
(Example)
4
START
STOP
Press the
STOP
key.
START
key and then the
SPECIAL FUNCTIONS 7-3
Page 80

CALLER ID
Direct Call
If desired, you can allow a designated phone number to access a personal box
directly when the answering machine is activated. In this case, when the caller
calls, he or she wil l im m e di at ely hear the outgo in g m es sa ge of the personal box
instead of that of th e ge neral box. You can de si gn at e one phone number fo r ea ch
personal box.
Note: This function cannot be used if you are using Distinctive Ringing.
5
FUNCTION
1
5
1
START
0
or
2
2
(Example)
3
4
STOP
5
(Example)
1
Press the keys show n at lef t. "DIRECT
CALL #" will appear in the display.
Press "1" to enter a number, or "2" to
clear a number . (I f yo u pressed "2", go
to Step 5.)
Enter the number of the personal box to
be accessed directly.
Enter the phone num be r, including the
5
5
area code, by pressing the number keys
(the number m us t be 10 di gi ts lon g) .
key.
START
key and then the
Press the
STOP
1
2
3
4
5
5
Preventing voice calls
With Caller ID turned on, you can use the Anti Junk Fax function described in the
following section to prevent voice calls as well as fax receptions (the Anti Junk Fax
function can normally only prevent faxes).
In this case, when a vo ice call or a fax transmission comes in from a number you
have specified as a "Junk Number", your fax will break the connection as soon as it
receives the ca ll in g ph on e nu m be r fr om th e caller ID servi ce ( be fo r e the sec on d
ring).
To use this function, set Option Setting 11 to YES as described in Chapter 8,
"Optional Set ti ng s" , an d th en enter the number in th e Anti Junk Number Li st as
described in "Anti Junk Fax" in the following section of this chapter.
Note: This function cannot be used if you are using Distinctive Ringing.
7-4 SPECIAL FUNCTIONS
Page 81

ANTI JUNK FAX
The Anti Junk Fax function allows you to block reception of faxes from parties
which you specify. This saves pa per by not print in g ou t un w an ted "junk" faxes .
To use this function, first turn it on by setting Option Setting 11 to YES as described
in Chapter 8, and then enter the fax numbers from which you do not want to receive
faxes as shown bel ow. If you are using th e C al le r ID fu nc ti on as de sc ri be d in the
previous section, you can also enter voice numbers.
Comments:
Up to 5 numbers can be ent ered in the Anti Junk Number List.
••••
The Anti Junk function will not operate for a number which has also been store d
••••
as a Priority Call or Direct Call number.
To clear a numbe r from the Anti Junk Nu m be r Li st, you need to know th e 1- di gi t
••••
number which ident if ie s it . If you hav e fo rg ot te n this number, prin t ou t th e Anti
Junk Number List as de sc ri be d in Chapter 7.
•••• FO-1850 only: When you have selected fax reception by your computer, An ti
Junk Fax will not operate unless you are using Caller ID.
1
2
3
4
5
6
FUNCTION
5
Step 3 or
3
or
1
2
1
(Example)
2
1
5
5
START
STOP
3
(Example)
Press the keys sho wn at left. "STORE
JUNK FAX #" will appear in th e di splay.
Press "1" to store a numbe r in the Anti
Junk Number List, or "2" to clear a number from the list.
Storing:
to "5". This number identifies the
fax/voice number you will store in the
next step.
Clearing:
tifies the fax/ voice number yo u w an t to
clear, and go to Ste p 5.
Enter the fax/vo ic e nu m be r (m a x. of 20
4
digits).
Press the
Return to Step 3 to enter (or clear) another number, or press
Enter a 1-digit number from "1"
Enter the number which iden-
START
key.
STOP
to exit.
SPECIAL FUNCTIONS 7-5
Page 82

MEMORY
Your fax has a memory which can be used to temporarily store both incoming and
outgoing documents.
♦
When no voice messages (including outgoing messages) have been recorded,
approximately 34 pages of average content can be held in memory if they are all
going to be transmitted (24 pages if Option Setting 16 is set to YES), or 31
pages if they are all re ce iv ed (29 pag es if Opt io n Set ti ng 16 is set to YES). Les s
pages can be held if any were scanned using fine or halftone resolution.
Sending documents from memory
With this function, the original document is scanned immediately, stored in memory,
and then transm i tted once the conn ec ti on to th e receiving machi ne is m ad e. T hi s is
convenient when transmitting to places wher e the line is often busy, as it save s you
from waitin g to pic k up t he ori gi na l do cu m en t an d fr ee s the feeder for other
operations. After transmission, the document will be cleared from memory.
♦
Only one memory transmission can be set at a time.
♦
The amount of memory currently occupied appears as a percentage in the
display while the document is being scanned.
1
2
MEMORY
Load the document(s).
••••
Set the resoluti on and /o r co ntrast if desired.
Press the
1
3
01
(Example)
7-6 SPECIAL FUNCTIONS
Enter the number of the rec ei ving ma chine using one of the following methods:
••••
Press a Rapid Key.
••••
Press the SPEED DIAL key an d en te r
a Speed Dial number.
••••
Enter a full telephone number by
pressing the number keys.
MEMORY
key and then "1".
Page 83

MEMORY
4
START
Press the
Speed Dial number or a ful l nu m be r.
••••
The document will be scanned and
stored in memory . You r fax will then
dial the receiving machine and transmit the document (r edialling will be
done automatically if necessary).
START
key if you entere d a
If the memory becomes full...
If the memory becomes full while the document is being scanned, MEMORY IS
FULL will appear in the display.
♦
Press the
up to that point in mem o ry . Th e re m aini ng pag es will be ej ec te d fr om th e fe eder.
After transmis si on , the memory will be cl eared and you can tr an sm i t the
remaining pages . You wi ll also ne ed to transmit th e pa ge whic h w as bei ng
scanned when the m emory filled up.
♦
Press the
START
STOP
key if you want to tr an sm it the pages whi ch hav e be en sto r e d
key if you want to cancel the entire transmission.
Substitute reception into memory
This is a back-up function which is automatically activated if your fax runs out of
paper, the printing ribbon ne ed s re pl ac em e nt , or the paper jams .
When you have received a document in memory, FAX RX IN MEMORY will appear
in the display, alternating with OUT OF PAPER, FILM END, or PAPER JAM. When
you add paper, replace the imaging film, or clear the jam, the stored documents will
automatica ll y print out.
♦
If you received doc um e nt s in memory becaus e th e fax ran out of paper , be sur e
to add paper whi c h is the same size as the paper previously used. If not, the
document prin t-out size may no t m at ch the siz e of the printing pape r.
SPECIAL FUNCTIONS 7-7
Page 84

BROADCASTING
This function allows you to send the same document to as many as 20 different
locations with just one operation. First store the document in memory, then enter
the numbers of t he rec ei vi ng ma ch in es . Th e document will be tr a ns m it te d to eac h
location.
♦
You can only use Rapi d Key s or Spee d Dia l nu m be r s to di al the num b ers of the
receiving machi nes.
1
2
MEMORY
Load the document(s).
Press the
MEMORY
key and then "2".
2
3
2
2
01
(Example)
Dial the receiving machines (maximum
of 20) using one or bot h of the following
methods:
••••
Enter one or more Spee d Dia l nu m bers by pressing the number keys.
••••
Press one or more Rapi d Key s.
4
7-8 SPECIAL FUNCTIONS
START
Press the
••••
Set the resoluti on and /o r co ntrast if desired.
START
key.
Page 85

BROADCASTING
5
START
Press the
begin.
••••
A Transactio n R ep or t is aut om a tically
printed out afte r Bro ad ca st ing is com pleted. Check the "Note" column of
the report to see if any of th e lo ca ti ons
are marked "Busy " or hav e a co m m un ication error code. If so, send the document to those locations again.
START
key. Transmission will
Broadcasting using a Group Key
If the fax machines to which you want to broadcast have all been programmed into
one Group Key, yo u ca n pe rf orm the broadca st in g operation usin g th e fo llowing
simplified procedure:
1
Load the document(s).
••••
Make any desired transmission settings (resolution, contrast, etc.).
2
18/G1
(Example)
Press the appropriate Group Key. Transmission will begin.
SPECIAL FUNCTIONS 7-9
Page 86

POLLING
Polling allows you to request another fax machine to send a document to your fax
machine. In ot he r w or ds , th e receiving fax mac hi ne , not the transmi tt in g fa x
machine, initiates the transmission. You can use your fax to both poll and be polled
by others.
Setting the polling key
To use the polling fu nc ti on, you must first re se t Rap id Key 20 /PO L L fo r us e as a
polling key. This is done by resetting Opt io n Set ting 12, as describe d in Ch ap te r 8,
"Optional Set ti ng s" .
Polling others
1
SPEED DIAL
0
(Example)
1
2
POLL
20
Note for FO-1850 only: Polled documents will be received by the FO-1850
regardless of the RECEIVE UNIT setting.
Dial the fax machine you want to poll using one of the following methods:
••••
Pick up the handset (o r press the
SPEAKER key) and dial the full number. Wait for the fax answerback tone.
••••
Press the SPEED key and enter a 2digit Speed Dial number.
••••
Enter the full number using the numeric keys.
Press Rapid Key 20/POLL.
••••
If you used the han ds et , re pl ac e it
when POLLING appe ar s in t he displ ay .
Reception will begin.
7-10 SPECIAL FUNCTIONS
Page 87

POLLING
Being polled (Polling Standby)
To let another fa x m ac hi ne pol l yo ur fax, simply set th e re ce ption mode to FAX, an d
load the docum en t( s) to be sent.
Transmissi on will t ake place when the othe r fa x m ac hi ne calls your fax and
activates polling. Automatic reception is possible while your fax is on polling
standby.
Note for FO-1850 only:
UNIT to your PC as descri be d in "R ec ep ti on Mo de " in Chap te r 2.
This function w il l no t op er ate if you have set RECE IVE
Polling Security
Polling Security allows you to prevent unauthorized polling of your fax. When this
function is tur ne d on , polling will only tak e pl ac e when the fax number of the pol ling
fax machine has been entered in your fax’s list of permitted fax numbers (called
"passcode numbers"). The number of the polling fax must also be programmed in
itself for identi fi ca tion.
Turning Polling Security on and off
1
2
3
FUNCTION
1
or
3
2
Press the keys sho wn at left. "ENTRY
MODE" will appear in the display.
Press the "#" key 3 times. "SECURITY
SELECT" will appear in the display.
Press "1" to turn polling security on, or
2
"
" to turn it off.
4
START
STOP
Press the
STOP
key.
START
key and then the
SPECIAL FUNCTIONS 7-11
Page 88

POLLING
Storing and clearing fax numbers for polling permission
You can store up t o 10 fax num b ers in your fax’s li st of permitted n umbers.
1
FUNCTION
3
2
3
or
1
2
4
0
5
5
5 5
1
(Example)
2 3
1
(Example)
Press the keys sho wn at left. "ENTRY
MODE" will appear in the display.
Press the "*" key 4 times. "PASSCODE
# MODE" will appear in the display.
Press "1" to store a numb e r, or "2" to
clear a number.
Storing:
"01" to "10". This nu m be r id en ti fi es the
fax number you will store in the next
step.
Clearing:
tifies the fax number you want to clear,
and go to Step 6.
Enter the fax number (max. of 20 digits).
4
Enter a 2-digit number from
Enter the number which iden-
6
7
Step 4 or
7-12 SPECIAL FUNCTIONS
START
STOP
Press the
Return to Step 4 to enter (or clear) another number, or press
START
key.
STOP
to exit.
Page 89

TIMER OPERATIONS
The Timer functio n allows you to set a transmission and/or polling operation to be
performe d au to m at ic al ly at a time you specif y. On e tr ansmission operation and one
polling operation can be set at any one time, and the times they will be performed
can be specified up to 24 hours in advance.
You can use thi s function, for example, to take advantage of lower nighttime
telephone rates without having to be there when the operation is performed.
Note: Only a Speed Dial number can be used to dial the receiving machine.
Setting a timer operation
1
FUNCTION
1
2
or
3
Press the keys show n at lef t . "TI M ER
MODE" will appear in the display.
Press "#" to set a transmi ss io n op eration
(SEND MODE), or "
operation (POLLING MODE).
Press "1" to select SET.
" to set a polling
*
1
4
0
9
2
5
(Example: 9:25)
5
or
Enter the time at wh ic h yo u wan t th e op eration to take place (2 digits for the
hour and 2 digits for the minute).
Press "
lect P.M.
" to select A.M., or "
*
#
" to se-
6
START
Press the
SPECIAL FUNCTIONS 7-13
START
key.
Page 90

TIMER OPERATIONS
7
8
9
10
0
START
RESOLUTION
START
5
(Example)
STOP
Enter the Speed Dial number of the receiving fax machine.
Press the
If this is a transm i ss io n op er ation, you
can adjust the resolution and/or contrast
(skip this step if yo u do n’ t w an t to ).
Press the
STOP
eration, load the document in the feeder
sometime before the specified time of
transmission.
START
START
key. If this is a transmission op-
key.
key and then the
To cancel an operation
If you need to cancel an operation after it has been set, follow the steps below.
1
FUNCTION
1
2
or
3
2
4
START
STOP
Press the keys show n at lef t . "TI M ER
MODE" will appear in the display.
Press "#" to cancel a transmission operation, or "
tion.
Press "2" to select CLEAR.
Press the
STOP
*
key.
7-14 SPECIAL FUNCTIONS
" to cancel a polling opera-
START
key and then the
Page 91

ENTERING AND USING PROGRAMS
If you freque nt ly perform the sam e op eration involv in g th e same party, you can
program all the steps of the operation into one Program Key. This allows you to
perform the op eration by simply pre ss in g th at key.
♦
Rapid Keys 16/P1 and 17/P2 can be used as Program Keys. However, a key
cannot be used if it is al re ad y be ing used for Rapid Key Di al in g.
♦
Only Speed Dial num be rs can be us ed to en te r fa x numbers of receiv in g
machines in the Program Keys. Full numbers cannot be entered.
♦
If the program is for a re gu lar transmissio n or pol li ng ope ra ti on , a ti m er set ti ng
can be included to hav e the operation pe rformed autom a ti ca ll y at a selected time.
♦
To clear a mista ke , pr es s th e
Initial procedure
To program an operation, first perform the following procedure. After you have
completed it, go t o th e pr oc ed ure for the specif ic ope r a ti on you want to program.
STOP
key.
1
FUNCTION
7
2
Press the keys show n at lef t. "PRG. ENTRY MODE" will appear in the display.
Press "1" to select SET.
1
3
16/P1
4
ABC
DEF
3
2
or
17/P2
GHI
4
…………
WXY
9
Press a Program Key ("
17/P2
") to select it.
"
Enter a name for the pr og ra m (m ax . of
20 characters). (See "Entering Letters
for Names" in Chapter 2).
Skip this step if you don’t want to enter a
name.
SPECIAL FUNCTIONS 7-15
16/P1
" or
Page 92

ENTERING AND USING PROGRAMS
5
START
6
or
7
START
Transmission
(Continued from "Initial procedure".)
8
or
1
2
Press the
Press the "#" key or the "*" until the desired operatio n appears in the display.
The operations will appear in the following order:
•
Transmission ("SEND")
•
Polling
•
Broadcasting
Press the
tinue with the specific procedure for your
operation (see the following pages).
Press "1" if you want the document to be
scanned into mem ory and then trans m it ted, or "
be transmitted directly from the feeder.
(Note: If you select "2", you can incl ud e
a timer setting in th e pr og ra m .)
••••
If you pressed "1", go to Step 12. If
you pressed "2" and don’t want to
make a timer setting, go to Step 11.
START
START
2
" if you want the do cu m en t to
key.
key and then con-
9
10
11
0
9
or
START
2
5
(Example: 9:25)
Enter the time at wh ic h yo u wan t th e op eration to take place (2 digits for the
hour and 2 digits for the minute).
Press "*" to select A.M., or "#" to select
P.M.
Press the
7-16 SPECIAL FUNCTIONS
START
key.
Page 93

ENTERING AND USING PROGRAMS
12
2
13
14
15
Polling
(Continued from "Initial procedure".)
8
RESOLUTION
START
0
5
START
9
2
(Example: 9:25)
(Example)
STOP
5
Enter the Speed Dial number of the receiving fax machine.
key.
START
START
key.
RESOLUTION
key and then the
key
Press the
If desired, set the resolution and/or contrast by pressing the
(otherwi se , sk ip this step).
Press the
STOP
Enter the time at wh ic h yo u wan t th e op eration to take place (2 digits for the
hour and 2 digits for the minute).
If you don’t want to ma ke a tim e r se tting,
go to Step 10.
9
10
11
12
START
2
START
or
5
Press "*" to select A.M., or "#" to select
P.M.
key.
START
START
key.
key and then the
(Example)
STOP
Press the
Enter the Speed Dial number of the receiving fax machine.
Press the
STOP
SPECIAL FUNCTIONS 7-17
Page 94

ENTERING AND USING PROGRAMS
Broadcasting
(Continued from "Initial procedure".)
8
2
3
9
10
11
Clearing a Program Key
To clear a Program key, follow these steps:
1
START
FUNCTION
5
5
START
RESOLUTION
7
(Example)
STOP
Enter the Speed Dial numbers of the receiving machines.
key.
START
START
key.
RESOLUTION
key and then the
key
Press the
If desired, set the resolution and/or contrast by pressing the
(otherwi se , sk ip this step).
Press the
STOP
Press the keys show n at lef t. "PRG. ENTRY MODE" will appear in the display.
2
Press "2" to select CLEAR.
2
3
4
7-18 SPECIAL FUNCTIONS
16/P1
START
(Example)
STOP
Press the Program Key you want to
clear.
Press the
STOP
key.
START
key and then the
Page 95

ENTERING AND USING PROGRAMS
Using a Program Key
A programmed operation is performed as follows:
1
2
A maximum of 2 timer operations can be set at any one time, including both
Note:
timer operations set by pressing a Program Key and operations set as described in "Timer Operations" in this chapter.
16/P1
(Example)
Load the document.
Press the approp ri at e Pro gram Key.
To cancel a programmed timer opera ti on
If a Program Key has been pressed for a timer operation and you need to cancel
the operation before it is performed, follow these steps:
1
2
16/P1
START
(Example)
Press the Program Key.
Press the
START
key.
SPECIAL FUNCTIONS 7-19
Page 96

REMINDER FUNCTION
The Reminder function allows you to send either a voice message, fax message, or
both to another person or yourself at a preset time. If the reminder is for another
person, your fax will call the other machine and transmit the message when the
selected time arrives. If the reminder is for you, your fax will prompt you to press
the
REMINDER
Only one reminder (voice message, fax, or both) can be set at one time.
♦
The reminder can be set up to one year in advance.
♦
Setting a reminder
key to play and/or prin t ou t the message.
1
2
3
4
5
6
5
REMINDER
0
5
(Example: May 15th)
0
5
9
(Example: 9:25)
or
START
1
5
Press the
Enter two digits for the month ("01" to
1
5
2
5
3
2
"12") and two digits for the day ("01" to
"31").
Enter two digits for the ho ur ("0 1" to
"12"), and two digits for the minute ("00"
to "59").
Press "*" to select A.M., or "#" to select
P.M.
Press the
If the reminder is for another person, enter his or her telephone or fax number
(max. 32 digits). (Skip this step if the re-
4
minder is for you. )
REMINDER
START
key.
key.
(Example)
7-20 SPECIAL FUNCTIONS
Page 97

REMINDER FUNCTION
7
8
9
START
START
REMINDER
or
START
Press the
To record a voice message, pick up the
handset and speak into it. When finished, replace th e ha ndset or press the
STOP
want to send a fax message.)
If you are only sending a voice message, press the
If you are send in g a fa x m es sa ge, press
the
the resolution if desired, and then press
the
The document will be scanned and
••••
stored in memory .
START
key. (Skip this step if you only
START
START
key.
REMINDER
key, load the document, set
key again.
key.
When the selected time arrives
If the reminder is for you, the fax will beep repeatedly for 60 seconds when the
selected time arrives and "PRESS REM INDER" will app ear in the displ ay. Pre ss
the
REMINDER
key to play the voice message and/or print out the fax message.
If the reminder is for another person, your fax will call his or her number and then
play the voice message and/or transmit the fax message. If the line is busy or no
one answers, 2 redialing attempts will be made at in tervals of 5 minutes.
It will not be possi bl e fo r a vo ic e m es sa ge to be rec orded in an answer i ng
Note:
machine.
To check or cancel a reminder message
To check a remin de r m es sa ge before it is sent, press the
then press "1". The set date and time will appear, followed by the telephone or fax
number of the re ce iving party if the rem i nd er is fo r an ot he r person. Press the
START
To cancel a reminder messsage, press the
key to play the recorded message and/or print the document.
REMINDER
REMINDER
key and then press "2".
key and
SPECIAL FUNCTIONS 7-21
Page 98

PC LINK FUNCTION
Note: This section ap pl ies only to the FO- 16 50.
If you have a personal computer with a fax modem and fax software, you can
connect the computer to your fax with a regular te lephone cord and set your fax to
PC Mode (PC mode is a special mode for operation with a computer). This will
allow you to use the fax as a si m pl e sc an ne r an d pr inter. It is also th e mos t
convenient se tu p if you wa nt to us e a co m pu ter for fax operations on the same
phone line as your fax machine.
Important:
To use your fax as a scanner, your fax software must have a manual reception function.
Connecting your fax to your computer
Plug one end of the telephone cord into your computer modem’s
jack (
the
the seal covering the
the jack for an exte ns io n ph on e if it has one), and pl ug the other end into
not
TEL. SET
jack on your fax (not the
TEL. SET
jack.
TEL. LINE
jack). If necessary, first remove
telephone line
If your computer fax modem has an extension
phone jack, you can connect an extension phone
to it.
Modem
TEL.
TEL.
SET
LINE
The
TEL. LINE
jack should be
connected to the
EXT.
PHONE
TEL.
LINE
wall jack.
Setting your fax to PC MODE
To use your fax as a pr in te r or scanner, you m us t se t it t o PC MOD E. We also
recommend tha t yo u keep the fax mach in e se t to PC M OD E if yo u wil l be
performing fax op erations with your computer.
To use PC MODE, your computer modem must be connected to your fax as
♦
shown above.
1
FUNCTION
To set the fax to PC Mode, press the
FUNCTION
"PC" will appear next to the time in the
••••
key and then the "#" key.
display.
7-22 SPECIAL FUNCTIONS
Page 99

PC LINK FUNCTION
2
FUNCTION
Note: If you will be performing fax operations with your computer but do not set
the fax machine to PC MODE, you must set Option Setting 10 to "NO" (see
Chapter 8, "Opt io na l Set ti ngs").
To turn PC Mode off, press the
key and then the "#" key once
TION
again.
The reception mode ("FAX", "TEL", or
••••
"TAD") will appear ne xt to th e ti m e in
the display.
FUNC-
Receiving documents in PC Mode
The current reception mode setting (FAX, TEL, or TAD) is effective while you are in
PC Mode. If you ne ed to ch an ge t he rec ep ti on mode, press th e
key once to make the current reception mode appear in the display, and
MODE
then press it again to change the setting.
Important:
PC Mode, the fax will not begin reception automatically when you hear a fax tone.
To receive a fax, you must press the
up a touch-tone extension phone connected to the same line, begin fax reception
by pressing "5" , "
If you want to rec ei ve inc om i ng fax es in yo ur com p ut er, set the recept io n m ode of
your fax to TEL so that it will not answer. Or, set the reception mode to FAX and set
Option Setting 2 (N u mber of Rings to Answer) to a number grea te r th an the num b er
of rings on which yo ur computer ans wers. In this case, you r co m pu t e r w il l no rm a ll y
answer first, but your fax will still answer if your computer is turned off or fails to
answer for some reason.
If you answer a call by picking up the fax’s handset when the fax is in
START
", and "*" (or the current se tt in g of Op ti on Sett in g 5).
*
key. If you answer a call by picking
RECEPTION
Using your fax as a scanner
To scan a document into your computer from your fax, follow the steps below. The
document will be received by your computer as if it had received a fax, and after
that you can use yo ur fax software t o pr oc es s it as de si red.
1
FUNCTION
Make sure the fax is set to PC Mo de
(press the
"
" key). "PC" will appear ne xt to th e
#
time in the disp la y.
FUNCTION
key and then the
SPECIAL FUNCTIONS 7-23
Page 100

PC LINK FUNCTION
2
3
4
START
Load the document.
If desired, press the
••••
key to make a resolution and/or contrast setting.
Press the
Start your fax software on your computer
(if it is not already running) and select
manual recep ti on . The document wil l be
scanned and sent to your computer.
START
RESOLUTION
key.
Using your fax as a printer
To have your fax pr int out a documen t whi ch you hav e pr epared with your fax
software, follow th e steps below.
1
FUNCTION
Make sure the fax is set to PC Mo de
(press the
the "
time in the disp la y.
FUNCTION
" key). "PC" will appear ne xt to th e
#
key and then
2
3
START
Send the document by manual transmission with your fax software on your computer. If your software does not have a
manual transmission function, enter any
number in your software’s auto-dial
phonebook that is not a real phone number (such as "
that number .
Wait until "LINE IS IN USE" appe ars in
your fax’s display, and then pres s the
START
document.
key. Your fax will print ou t th e
7-24 SPECIAL FUNCTIONS
" or "6#"), and then dial
##
 Loading...