

Page 1
MODEL
FO-1470
OPERATION MANUAL
FACSIMILE
1. Installation
2. Sending Documents
3. Receiving Documents
4. Making Copies
5. Making Telephone Calls
6. Answering Machine Hookup
7. Special Functions
8. Printing Lists
9. Maintenance
10. Troubleshooting
Page 2

CAUTION: For a complete electrical disconnection pull out the mains plug.
VORSICHT: Zur vollständigen elektrischen Trennung vom Netz den Netzstecker ziehen.
ATTENTION: Pour obtenir une mise hors-circuit totale, débrancher la pr ise de courant secteur.
AVISO: Para una desconexión eléctrica completa, desenchufar el enchufe del tomacorriente.
VARNING: För att helt koppla från strömmen, dra ut stickproppen.
ATTENZIONE: Per un totale scollegamento elettrico rimuovere la spina di corrente.
"The mains outlet (socket-outlet) shall be installed near the equipment and shall be easily accessible."
"De aansluiting op de stroomvoorziening (stopkontakt) moet nabij het apparaat zijn aangebracht en moet
gemakkelijk bereikbaar zijn."
Ett nätuttag (vägguttag) bör befinna sig nära utrustningen och vara lätt att tillgå.
La presa di corrente deve essere installata vicino all'apparecchio, e deve essere facilmente accessibile.
El tomacorriente principal se debe encontrar cerca del aparato y debe ser fácil de acceder a él.
"Die Netzsteckdose (Wandsteckdose) sollte in der Nähe des Geräts installiert werden und leicht zugänglich sein."
Stikkontakten skal være placeret nær faxen og være let tilgængelig.
Pääpistoke (pistokkeen poisto) tulee asentaa lähelle laitetta ja tulee olla helposti poistettavissa.
Stikkontakten må være montert i nærheten av utstyret og den må være lett tilgjengelig.
La prise de courant principale (d'alimentation) doit être située près de l'appareil et facilement accessible.
This equipment complies with the requirements of Directive 1999/5/EC.
Dieses Gerät entspricht den Anforderungen der EU-Richtlinie 1999/5/EG.
Cet appareil est conforme aux exigences de la directive 1999/5/CE.
Este aparato satisface las exigencias de las Directiva 1999/5/CE.
Quest’apparecchio è conforme ai requisiti delle direttiva 1999/5/CE.
Dit apparaat voldoet aan de eisen van de richtlijn 1999/5/EG.
Este equipamento obedece às exigências da directiva 1999/5/CE.
Η συσκευή αυτή ανταποκρίνεται στις απαιτήσεις των οδηγια 1999/5/ΕK.
Denna utrustning uppfyller kraven enligt direktiv 1999/5/EC.
Dette udstyr overholder kravene i direktiv 1999/5/EF.
Dette produktet oppfyller kravene i direktiv 1999/5/EC.
Tämä laite täyttää direktiivi 1999/5/EY.
Detta är en faxapparat som fungerar i ett svenskt, norskt, finskt, danskt och portugisiskt analogt offentligt kopplat telenät enligt CTR21 standard.
Dette er et faksprodukt som fungerer i svenske, norske, finske, danske og portugisiske analoge offentlige telekommunikasjonsnett som følger CTR21-standard.
Tämä on telekopiolaite, joka toimii Ruotsin, Norjan, Suomen, Tanskan ja Portugalin CTR21-standardin mukaisissa julkisissa analogisissa puhelinverkoissa.
Dette er et faksimileprodukt, der fungerer i offentlige svenske, norske, finske, danske og por tugisiske analoge
telefonnet, der følger CTR21 standarden.
Este é um aparelho de fax que funciona nas redes telefónicas analógicas públicas comutadas na Suécia,
Noruega, Finlândia, Dianamarca e Portugal, que respeitam a norma CTR21.
This is a facsimile product operating in Swedish, Norwegian, Finnish, Danish and Portuguese analogue public
switched telephone networks which follow the CTR21 Standard.
Page 3

1
Table of Contents
Table of Contents 1
Quick Reference Guide 3
SVERIGE . . . . . . . . . . . . . . . . . . . . . . . . . . . . . . . . . . . . . . . . . . . . . . 3
NORGE . . . . . . . . . . . . . . . . . . . . . . . . . . . . . . . . . . . . . . . . . . . . . . 12
SUOMI . . . . . . . . . . . . . . . . . . . . . . . . . . . . . . . . . . . . . . . . . . . . . . . 21
DANMARK . . . . . . . . . . . . . . . . . . . . . . . . . . . . . . . . . . . . . . . . . . . . 30
PORTUGUÊS. . . . . . . . . . . . . . . . . . . . . . . . . . . . . . . . . . . . . . . . . . 39
ENGLISH . . . . . . . . . . . . . . . . . . . . . . . . . . . . . . . . . . . . . . . . . . . . . 48
Introduction 57
Important safety information . . . . . . . . . . . . . . . . . . . . . . . . . . . . . . . 59
1. Installation 60
Unpacking Checklist . . . . . . . . . . . . . . . . . . . . . . . . . . . . . . . . . . . . . 60
A Look at the Operation Panel . . . . . . . . . . . . . . . . . . . . . . . . . . . . . 61
Connections . . . . . . . . . . . . . . . . . . . . . . . . . . . . . . . . . . . . . . . . . . . 63
Loading the Imaging Film . . . . . . . . . . . . . . . . . . . . . . . . . . . . . . . . . 65
Loading Printing Paper . . . . . . . . . . . . . . . . . . . . . . . . . . . . . . . . . . . 69
Entering Your Name and Fax Number . . . . . . . . . . . . . . . . . . . . . . . 71
Setting the Date and Time . . . . . . . . . . . . . . . . . . . . . . . . . . . . . . . . 73
Setting the Reception Mode . . . . . . . . . . . . . . . . . . . . . . . . . . . . . . . 75
Volume Adjustment . . . . . . . . . . . . . . . . . . . . . . . . . . . . . . . . . . . . . 76
Setting the Display Language. . . . . . . . . . . . . . . . . . . . . . . . . . . . . . 78
2. Sending Documents 79
Transmittable Documents. . . . . . . . . . . . . . . . . . . . . . . . . . . . . . . . . 79
Loading the Document . . . . . . . . . . . . . . . . . . . . . . . . . . . . . . . . . . . 80
Adjusting the Resolution and Contrast . . . . . . . . . . . . . . . . . . . . . . . 82
Sending a Fax by Normal Dialling . . . . . . . . . . . . . . . . . . . . . . . . . . 84
Sending a Fax by Automatic Dialling . . . . . . . . . . . . . . . . . . . . . . . . 86
3. Receiving Documents 95
Using TEL/FAX Mode. . . . . . . . . . . . . . . . . . . . . . . . . . . . . . . . . . . . 95
Using FAX Mode . . . . . . . . . . . . . . . . . . . . . . . . . . . . . . . . . . . . . . . 97
Using TEL Mode. . . . . . . . . . . . . . . . . . . . . . . . . . . . . . . . . . . . . . . . 99
Page 4

Table of Contents
2
Optional Reception Settings . . . . . . . . . . . . . . . . . . . . . . . . . . . . . . 101
Substitute Reception to Memory . . . . . . . . . . . . . . . . . . . . . . . . . . . 104
4. Making Copies 105
5 Making Telephone Calls 107
6. Answering Machine Hookup 110
Connecting an Answering Machine . . . . . . . . . . . . . . . . . . . . . . . . 110
Optional A.M. Mode Settings . . . . . . . . . . . . . . . . . . . . . . . . . . . . . 112
7. Special Functions 115
Caller ID (Requires Subscription to Service) . . . . . . . . . . . . . . . . . 115
Broadcasting . . . . . . . . . . . . . . . . . . . . . . . . . . . . . . . . . . . . . . . . . . 119
Cover Sheet . . . . . . . . . . . . . . . . . . . . . . . . . . . . . . . . . . . . . . . . . . 122
Batch Page Numbering. . . . . . . . . . . . . . . . . . . . . . . . . . . . . . . . . . 124
Blocking Reception of Unwanted Faxes . . . . . . . . . . . . . . . . . . . . . 125
Sending Documents From Memory . . . . . . . . . . . . . . . . . . . . . . . . 127
Polling (Requesting a Fax Transmission) . . . . . . . . . . . . . . . . . . . . 129
Timer Operations . . . . . . . . . . . . . . . . . . . . . . . . . . . . . . . . . . . . . . 132
Entering and Using Programs . . . . . . . . . . . . . . . . . . . . . . . . . . . . . 134
8. Printing Lists 138
9. Maintenance 142
10. Troubleshooting 143
Problems and Solutions . . . . . . . . . . . . . . . . . . . . . . . . . . . . . . . . . 143
Messages and Signals . . . . . . . . . . . . . . . . . . . . . . . . . . . . . . . . . . 148
Clearing Paper Jams . . . . . . . . . . . . . . . . . . . . . . . . . . . . . . . . . . . 151
Index 153
Page 5
3
SVERIGE
Snabbguide
Installation
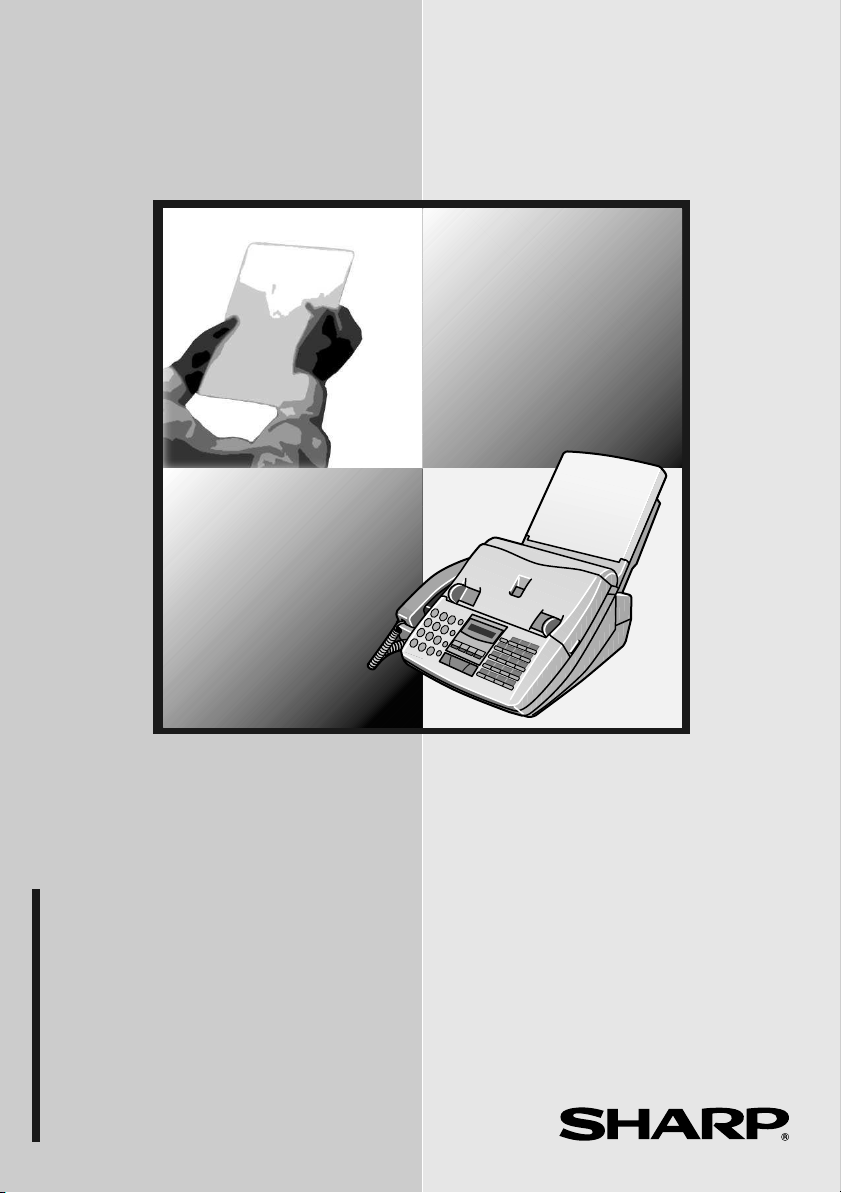
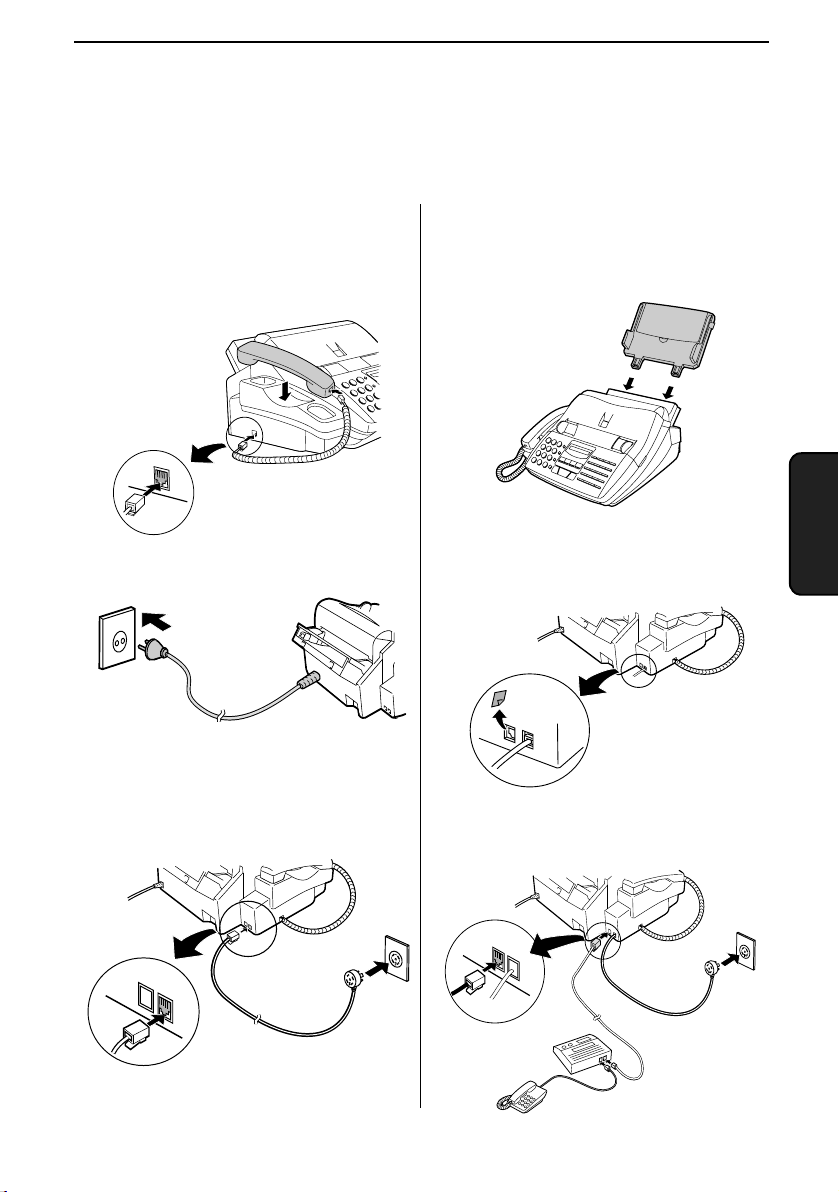
1. Anslut telefonluren och placera den på
klykan.
2. Stick in nätkabeln i en 220 -230 V, 50 Hz,
jordad (2-stift) eluttag.
3.
För in ena änden av kabeln i
anslutningskontakten på maskinens
baksida som är markerad med
TEL.
LINE
. För in andra änden i telefonuttaget
på väggen.
4. Montera pappersfacket
5. En sidoapparat eller en telefonsvarare
kan anslutas till faxen.
Ta bort säkerhetstejpen på
TEL.SET
kontakten.
Anslut sidoapparaten eller
telefonsvararen till
TEL.SET
kontakten.
TE
L.
SE
T
TE
L.
LIN
E
TEL.
SET
TEL.
LINE
♦ Obs:
Filmrullen och papperet måste laddas innan du kan mata in ditt
namn och nummer samt datum och tid i maskinen.
Page 6

Snabbguide
4
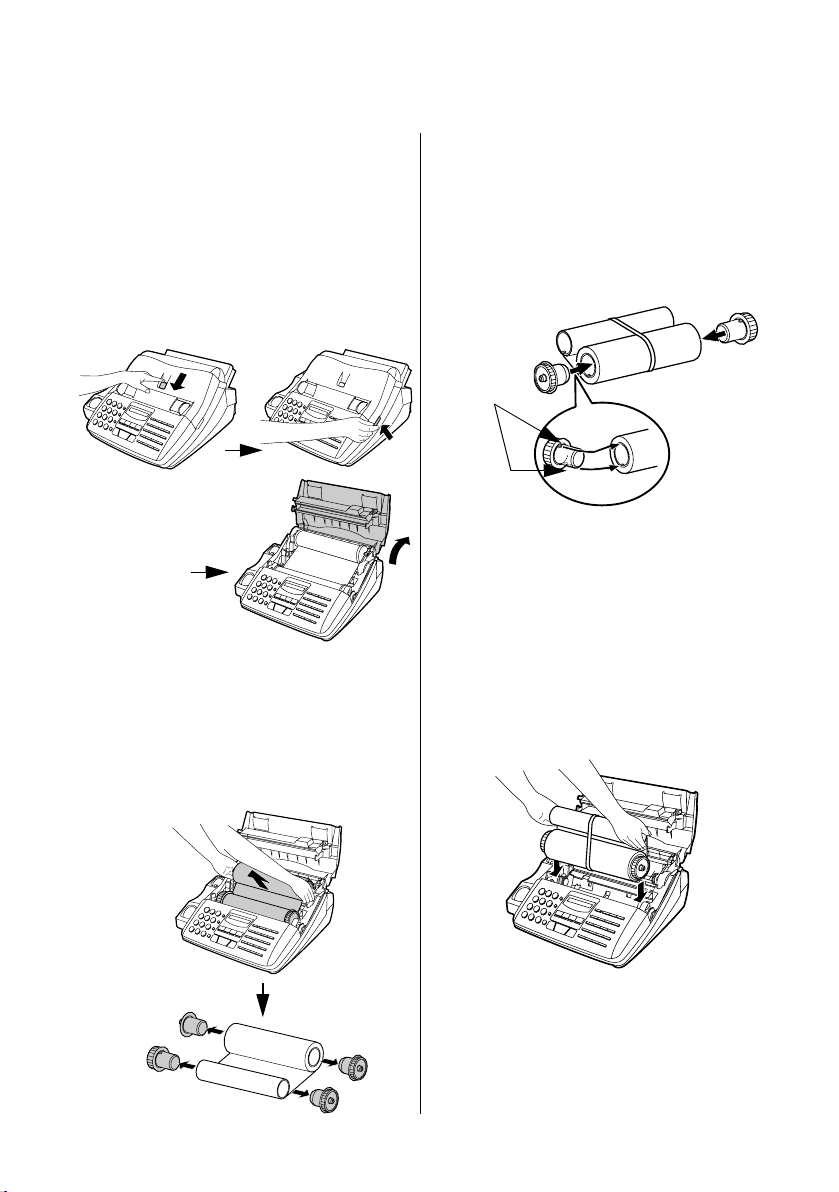
Laddning av filmrullen
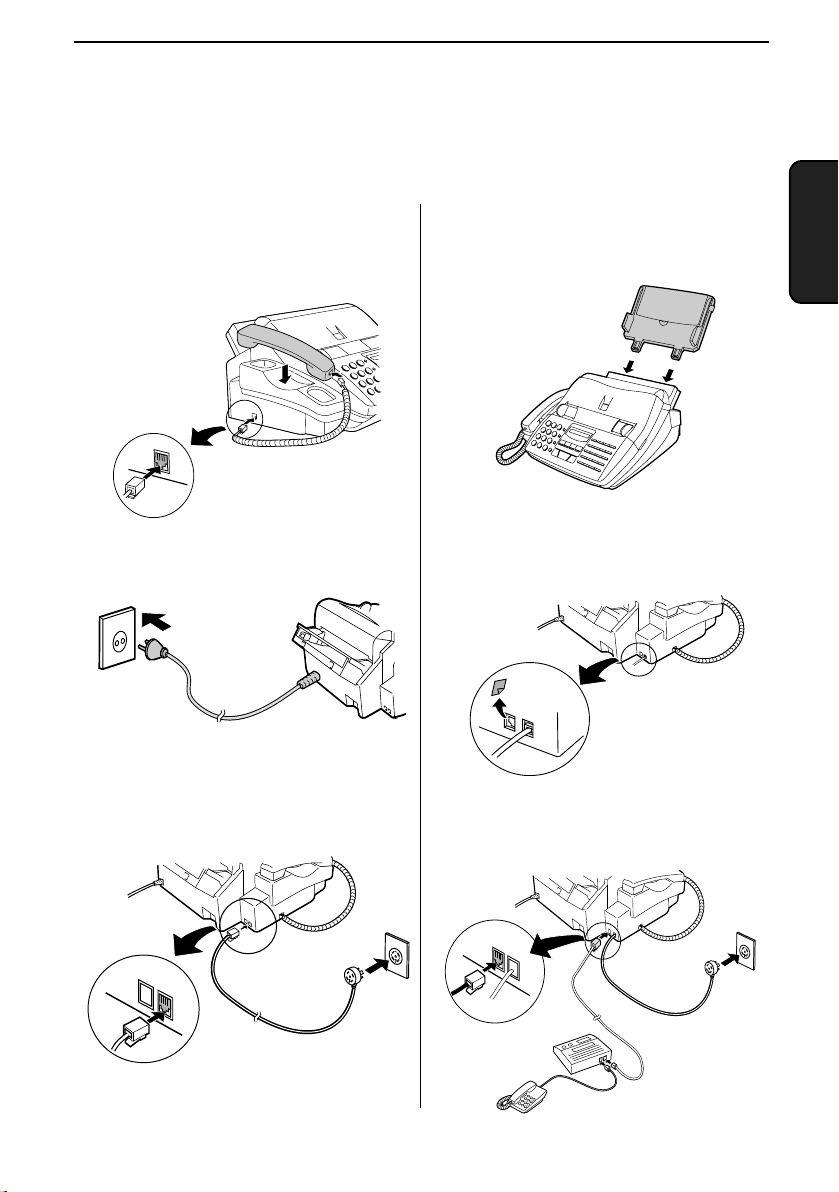
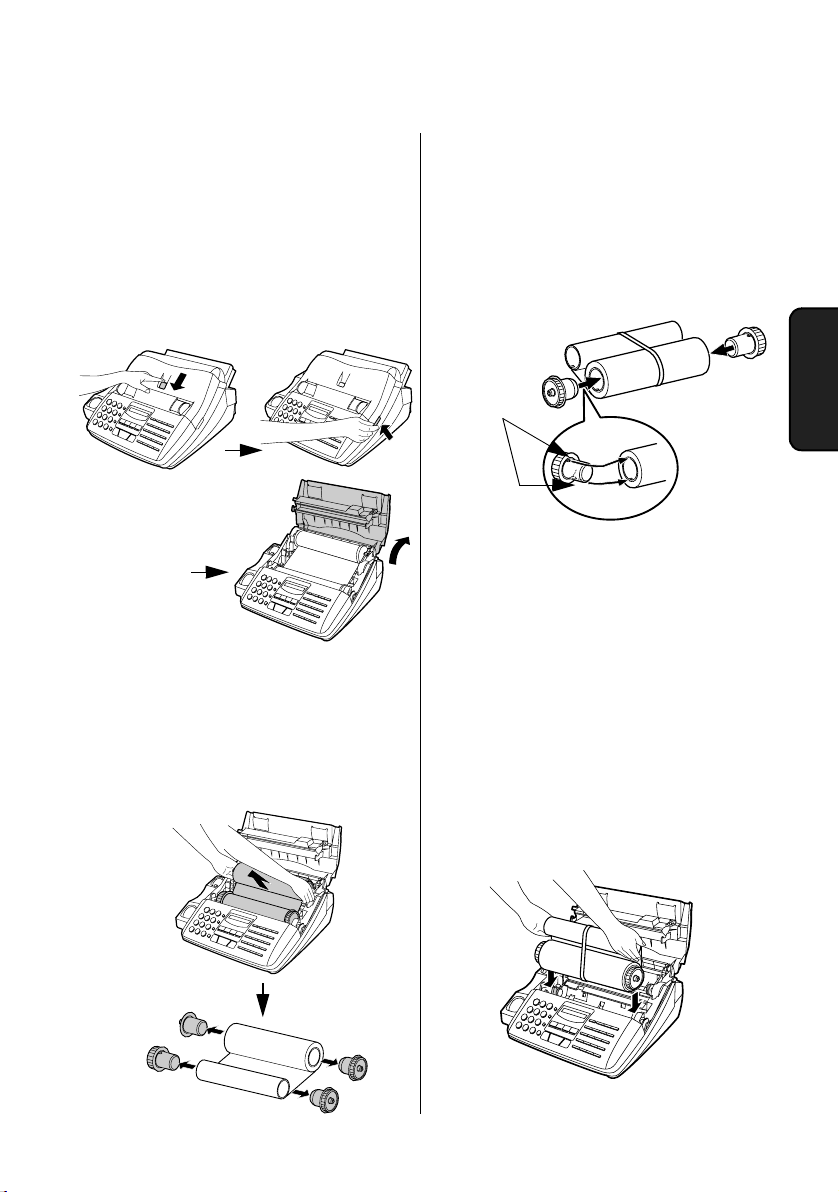
1. Tryck på knappen markerad med OPEN
och öppna skrivarfackets lock.
• Varning!
Skrivhuvudet (metallremsan på lockets
undersida) överför värme till
skrivarpapperet. Den kan vara varm om
ett dokument just skrivits ut.
2. Om du byter ut filmrullen skall du ta ut
den gamla rullen ur skrivarfacket och ta
bort de tre (3) gröna kugghjulen och den
gröna flänsen från spolarnas ändar.
KASTA INTE BORT DE GRÖNA
KUGGHJULEN OCH DEN GRÖNA
FLÄNSEN!
3.
Ta ut den nya filmen ur sin förpackning
och för in två av kugghjulen som
medföljer faxapparaten i ändarna av
spolen med film. Se till att de två
flikarna på kugghjulen passar in exakt i
spåren i ändarna på spolen.
• Ta ännu inte bort banden som håller
samman spolarna.
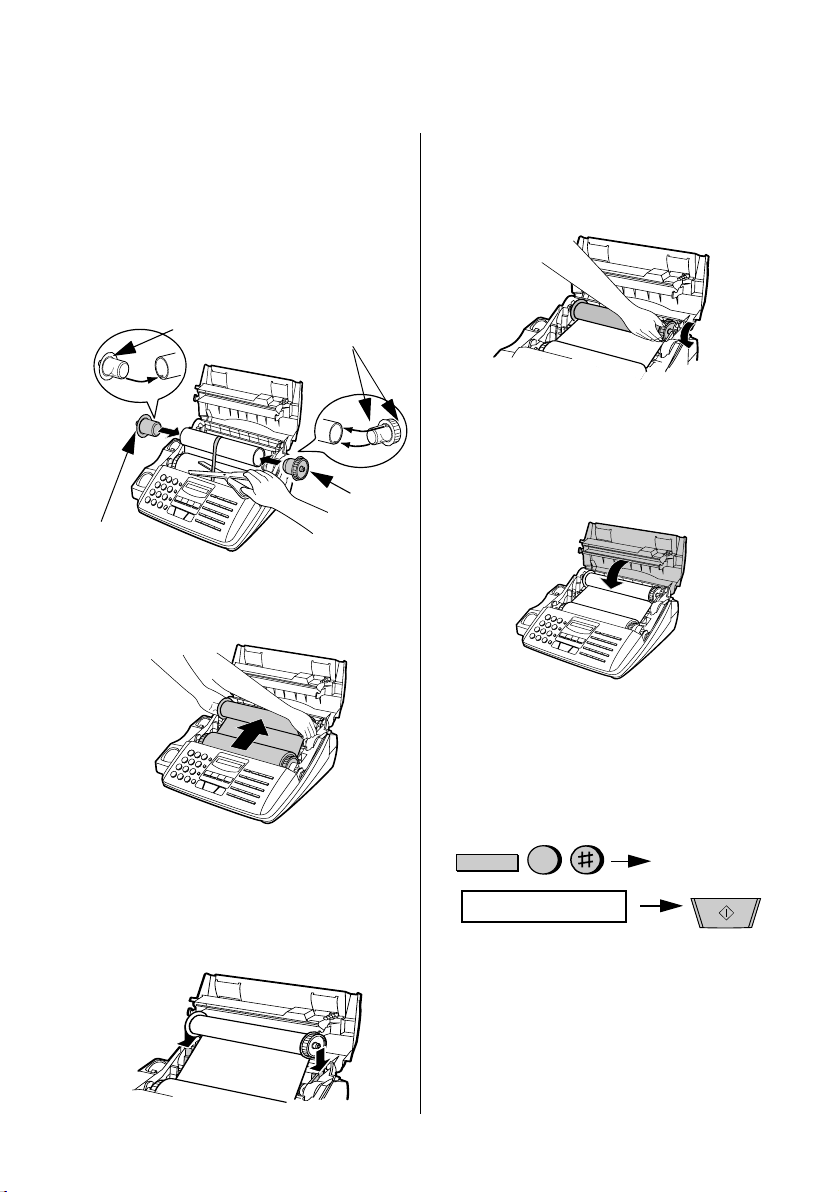
4. Håll den tomma spolen så att änden
med ett spår är riktad till vänster och
sänk ner spolarna i framdelen av
skrivarfacket. Kugghjulen i ändarna av
spolen med film skall passa in i spåren
på båda sidorna av skrivarfacket.
2 flikar
Page 7
Snabbguide
5
SVERIGE
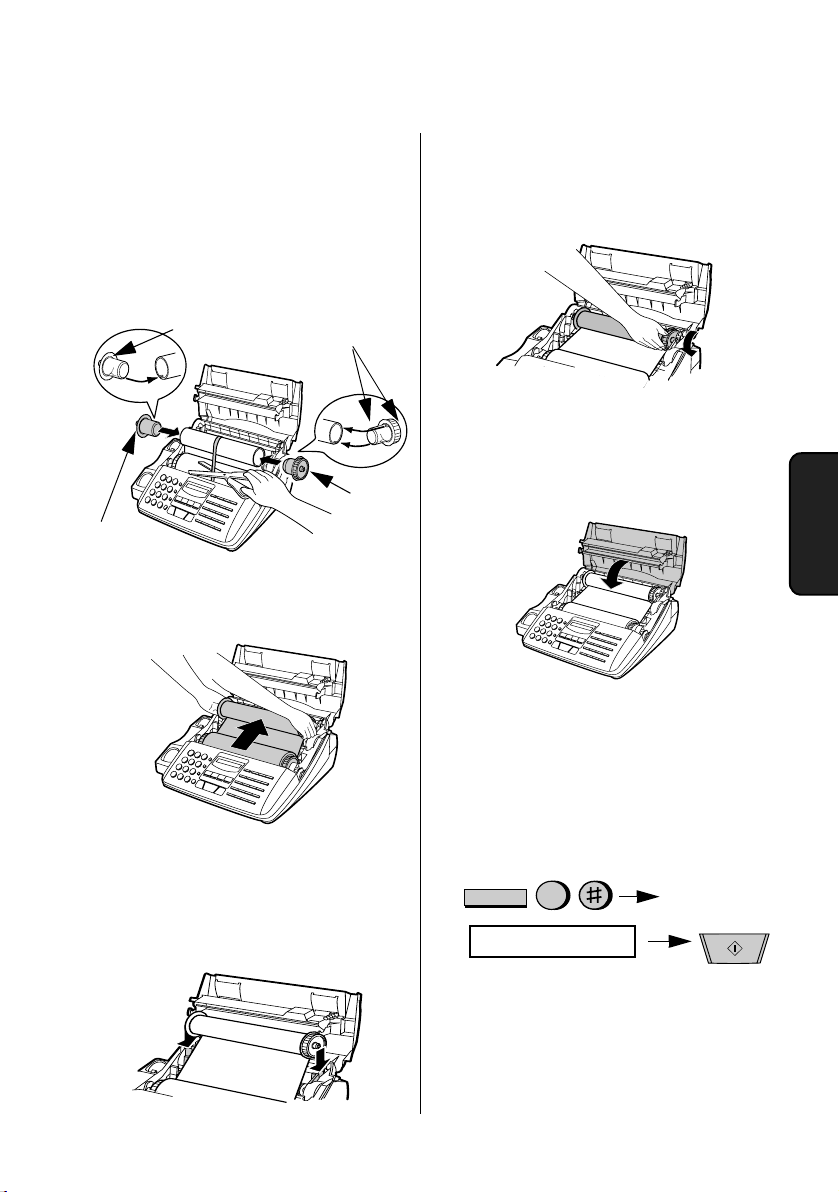
5. Skär av bandet som håller samman
spolarna med en sax och ta bort det.
För in det kvarvarande kugghjulet i
höger sida på den tomma spolen och
flänsen på den andra sidan av spolen.
Se till att flikarna på kugghjulen och
flänsen passar in i spåren i spolarnas
ändar (kugghjulet har två flikar och
flänsen har en flik).
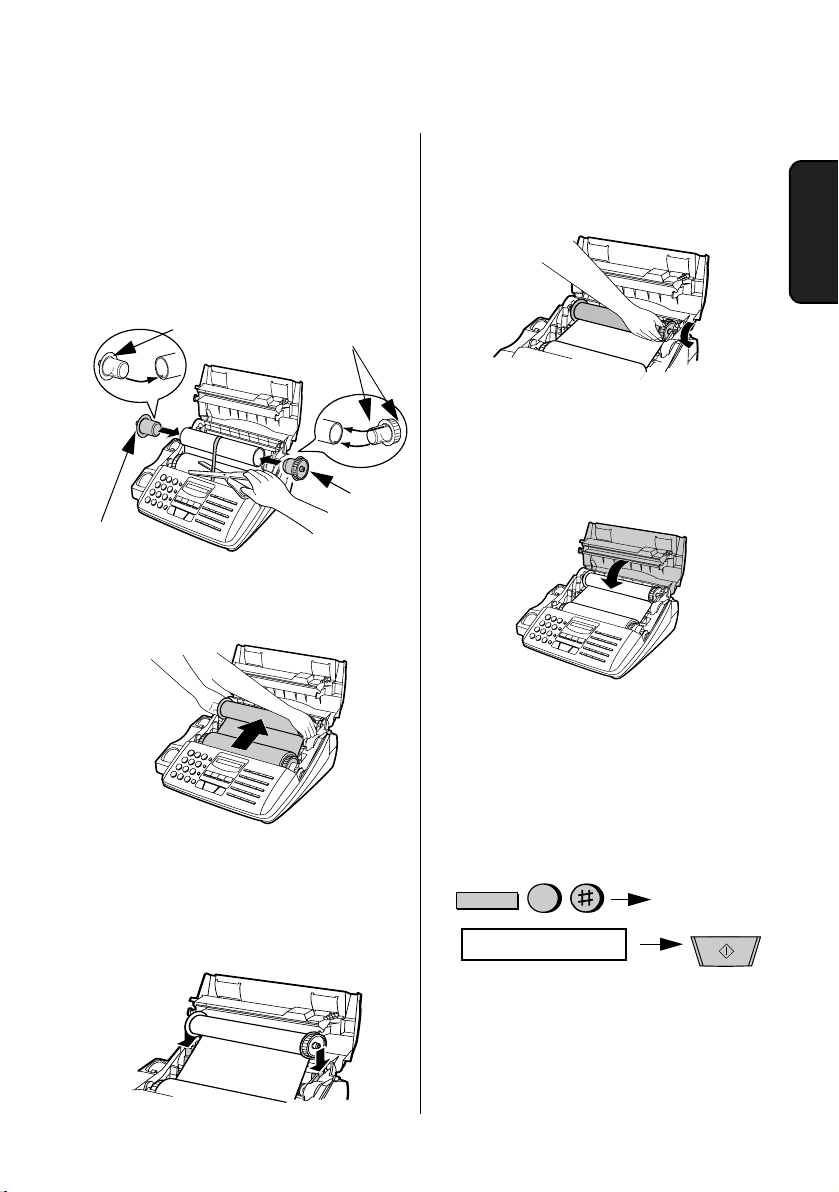
6. Drag den tomma spolen bakåt i
skrivarfacket och rulla upp filmen
medan du drar.
1 flik
2 flikar
Fläns
7.För in den tomma spolen i fackets
bakre del så att kugghjulet och flänsen
passar i spåren på fackets sidor.
•
Se till att kugghjulet griper i det
underliggande kugghjulet.
9. Stäng skrivarfackets lock och kontrollera
att det hakar på plats.
• Varning!
Stäng locket långsamt så att du inte
klämmer fingrarna.
10. Ladda papper i papperskassetten och
tryck därefter på följande knappar för att
initialisera filmen.
• Obs:
Papperet måste först vara laddat
innan filmen kan initialiseras. För att
ladda papper, se Laddning av
skrivarpapper.
8. Spänn filmen något (vrid på kugghjulet
på höger sida av den tomma spolen) så
att filmen inte är ospänd. Se till att
filmens båda kanter rullas upp jämnt på
spolen.
FUNCTION
6
STARTA UPP FILM
START
Kugghjul
Page 8
Snabbguide
6
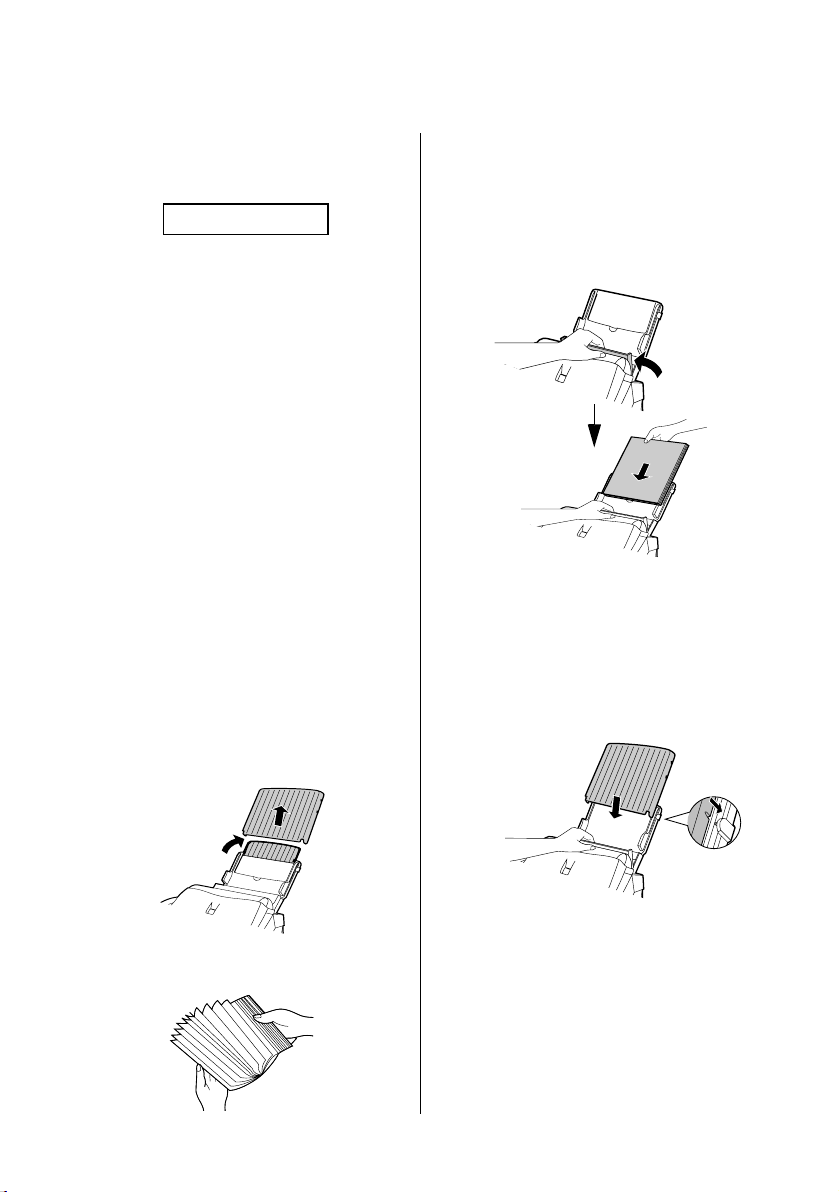
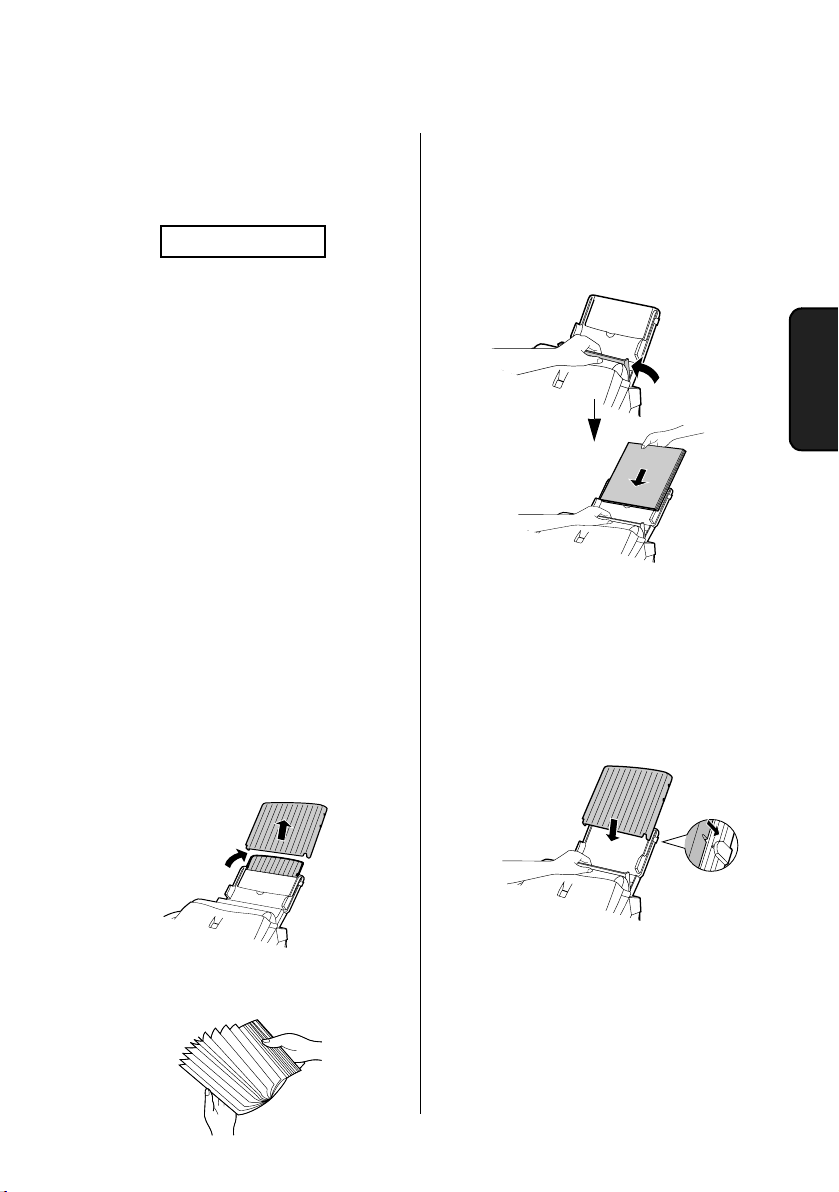
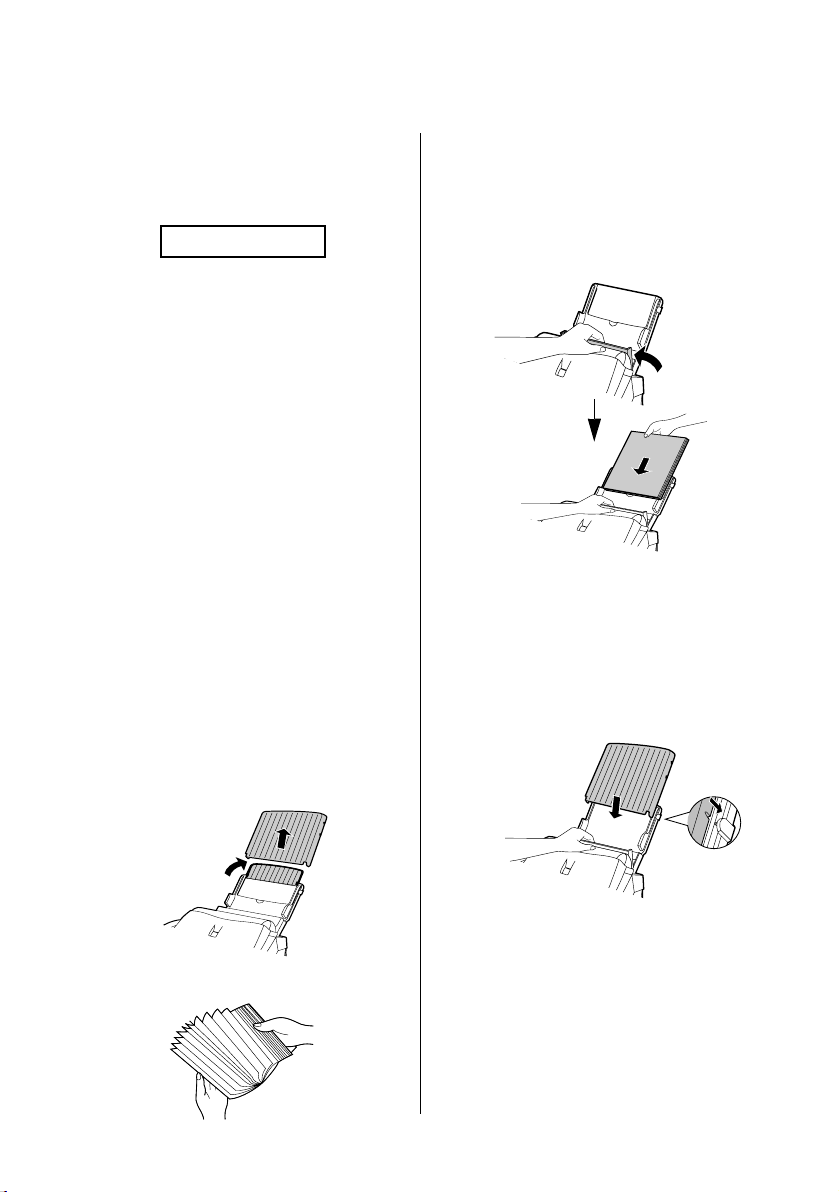
2. Lufta pappret och se till att buntens
kanter är jämna.
3. Drag pappersplattan mot dig och lägg in
en bunt papper i facket med utskriftssidan
nedåt.
•
Om papper är kvar i facket tar man bort
detta och lägger samman detta med det
nya papperet till en bunt innan det läggs i
facket.
4. Lägg tillbaka locket på papperskassetten.
Viktigt:
Se till att papperslocket är
tillbakasatt innan du sätter tillbaka
pappersutlösningsplattan. Om papper är
kvar i facket tar man bort detta och lägger
samman detta med det nya papperet till
en bunt innan det läggs i facket.
När skall filmrullen bytas ut
Byt filmrullen när displayen visar:
Använd följande filmrulle vilken kan köpas
i din butik eller detaljhandlare:
Sharp FO-15CR Imaging Film
Varning!
Texten som skrivits ut med filmrullen är
läsbar på den använda filmen. Om
konfidentiell information har skrivits ut
skall filmen behandlas på lämpligt sätt.
FILM SLUT
Ladda papper
Pappersfacket rymmer 200 blad A4papper (max. 75g/m²).
Varning!
Återanvänd inte papper som redan körts i
fax eller kopieringsmaskin.
1. Ta bort pappersskyddet om detta är kvar
på papperskassetten.
Obs:
Om följande alternerande
meddelanden visas på displayen när
man gör en kopia eller mottager ett fax,
skall man kontrollera papperskassetten.
Om facket är tomt skall man fylla på
papper och därefter trycka på
START
knappen. Om det finns papper skall man
kontrollera att det ligger korrekt och
därefter trycka på
START
knappen.
Page 9
Snabbguide
7
SVERIGE
5. Din fax är fabriksinställd på att skriva ut
med normal kontrast. Beroende av den
papperstyp som du använder kan du
erhålla bättre kvalitet genom att ändra
inställningen till LIGHT. Tryck på dessa
knappar:
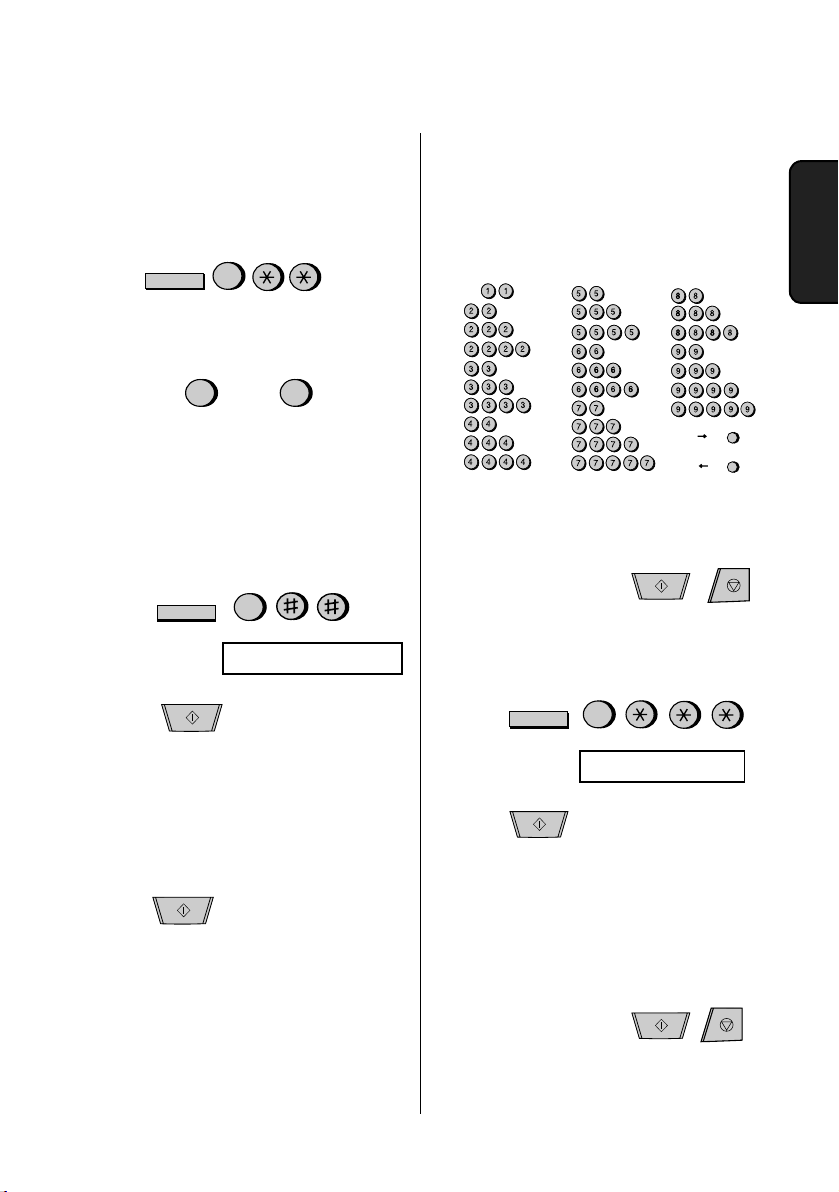
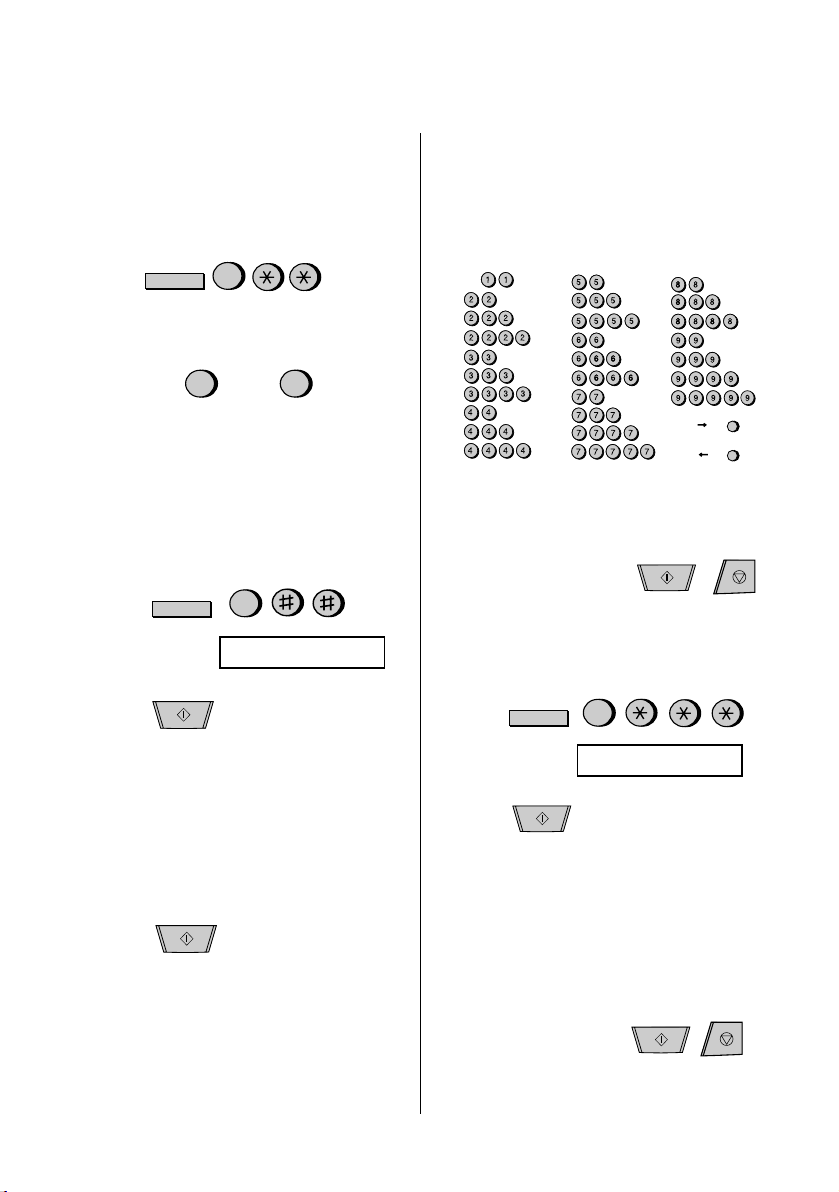
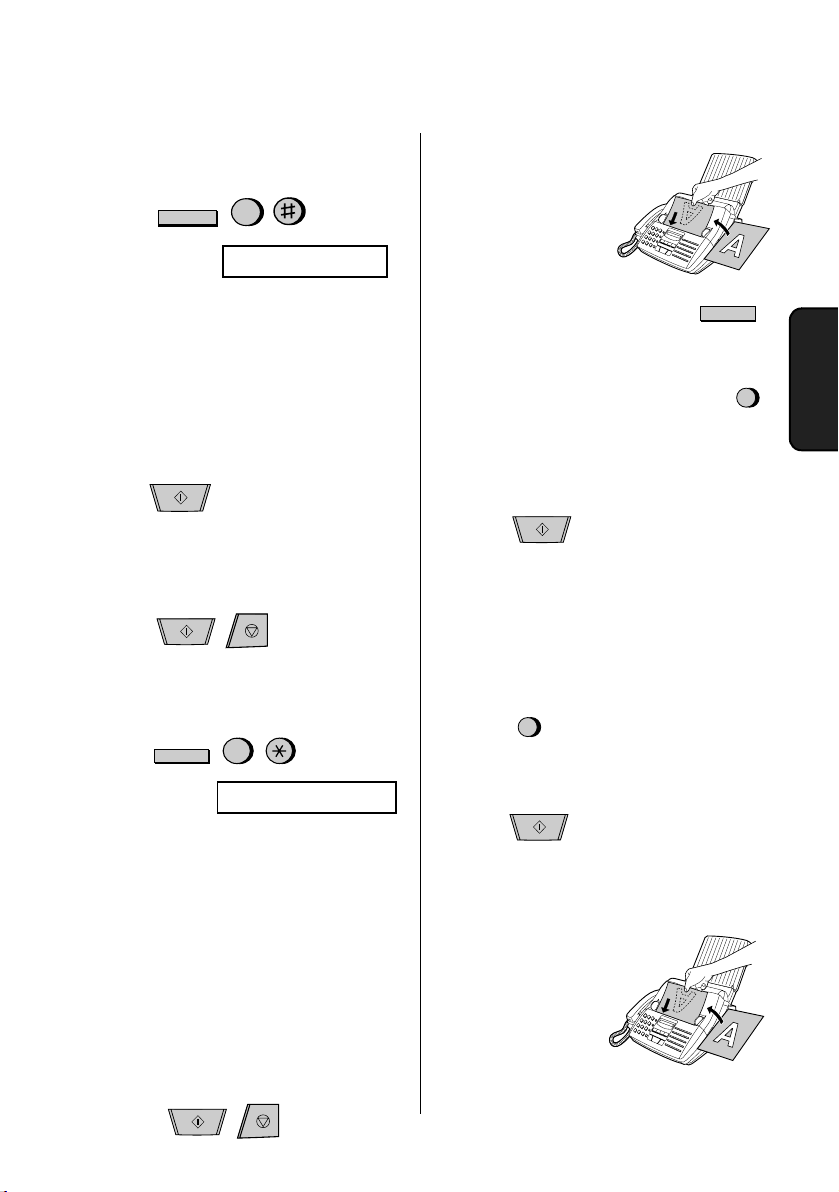
Mata in ditt namn och
faxnummer
1. Tryck:
Displayen visar:
2. Tryck:
3. Mata in ditt faxnummer (max. 20 siffror)
med siffertangenterna.
•
För mellanslag, använd #.
•
Om du gör fel, tryck
SPEED DIAL
för att
backa tillbaka och korrigera felet.
4. Tryck:
5. Mata in ditt namn med respektive tangent
som visas nedan.
•
Skall samma bokstav skrivas två gånger,
tryck
SPEAKER
efter den första
bokstaven.
FUNCTION
6
Tryck på 1 för att välja NORMAL eller 2
för att välja LIGHT.
Tryck på STOP knappen för att återvända
till datum och tid i displayen.
el.
NORMAL LJUST
1
2
3
FUNCTION
ANGE EGET NUMMER
START
START
• REDIAL
ger stora bokstäver. Tryck #
eller * för att bläddra genom symboler
och specialtecken
.
6. Tryck...
när du är färdig:
Mata in datum och klockslag
1. Tryck:
Displayen visar:
2. Tryck:
3. Mata in två siffror för datum (01-31).
4. Mata in två siffror för månad (01-12).
5. Mata in fyra siffror för år ( T.ex. 2001).
6. Mata in två siffror för timme (00-23) och
två siffror för minut (00-59).
7. Tryck...
när du är färdig:
A =
B =
C =
D =
E =
F =
G =
H =
I =
J =
K =
L =
M =
N =
O =
P =
Q =
R =
S =
T =
U =
V =
W =
X =
Y =
Z =
SPACE =
SPEAKER
SEARCH
=
=
m ove
m ove
R
START
ANGE DATUM & TID
3
FUNCTION
STOP
START
STOP
START
Page 10
Snabbguide
8
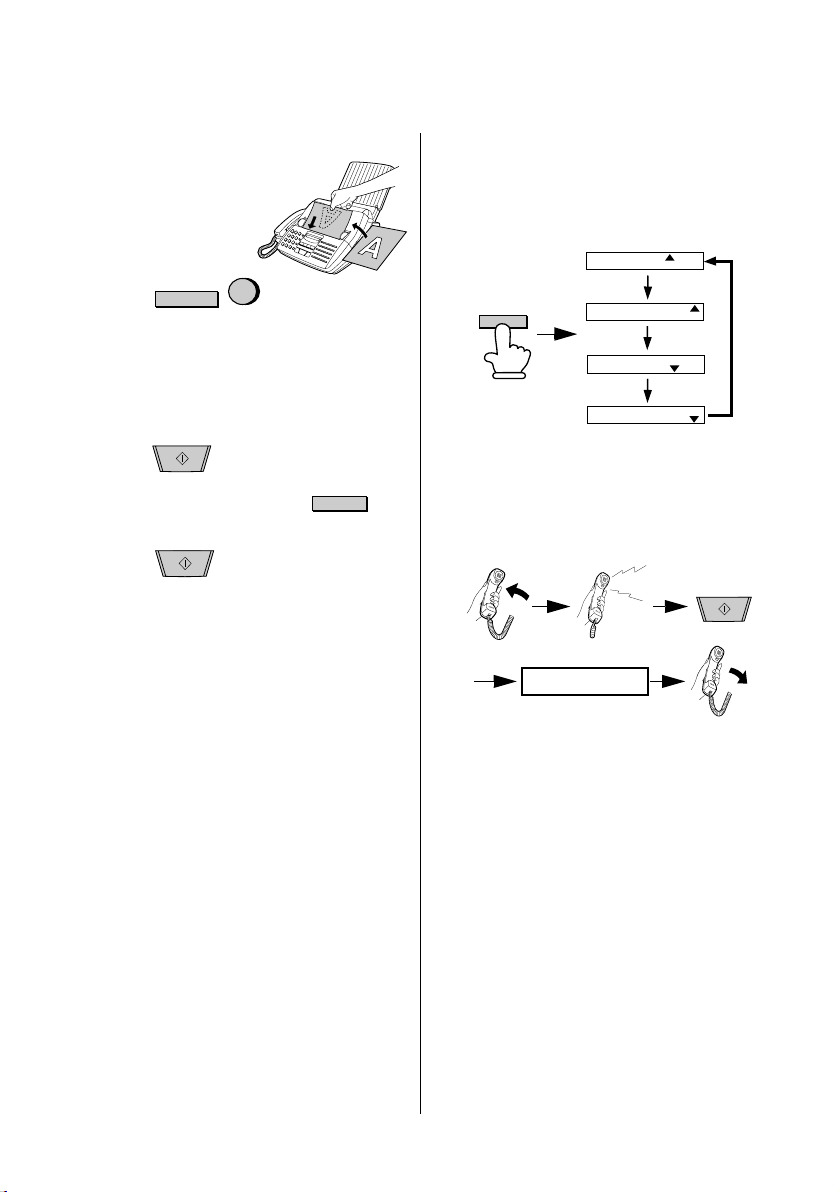
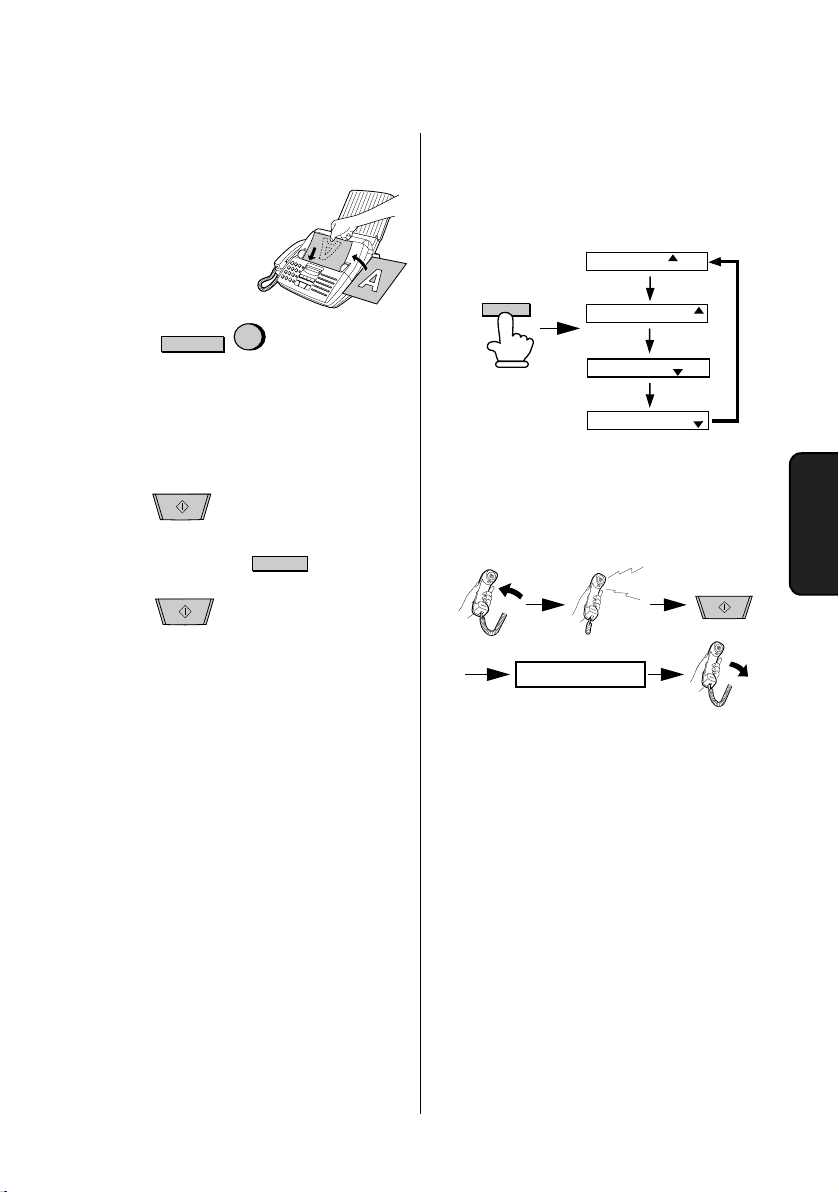
Sända fax
Placera dokumenten
(max. 20 blad) i
dokumentmataren
med den skrivna sidan
nedåt.
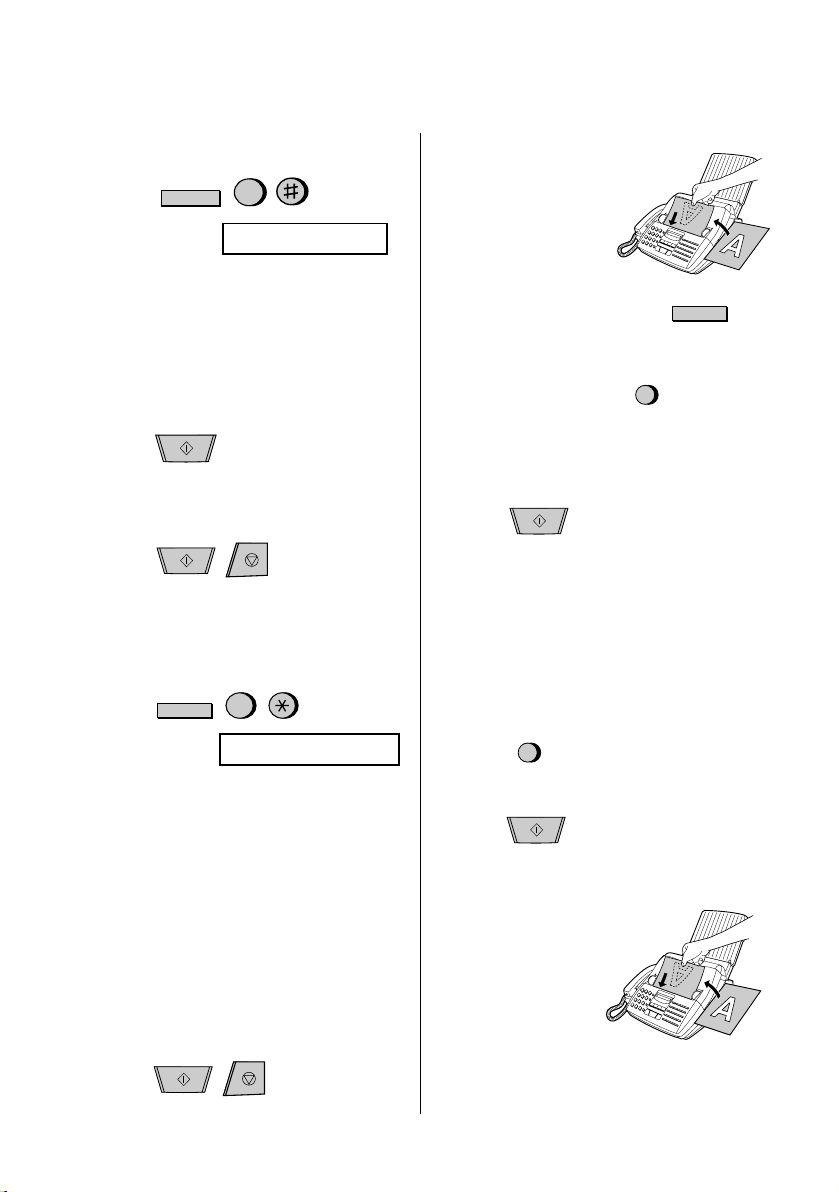
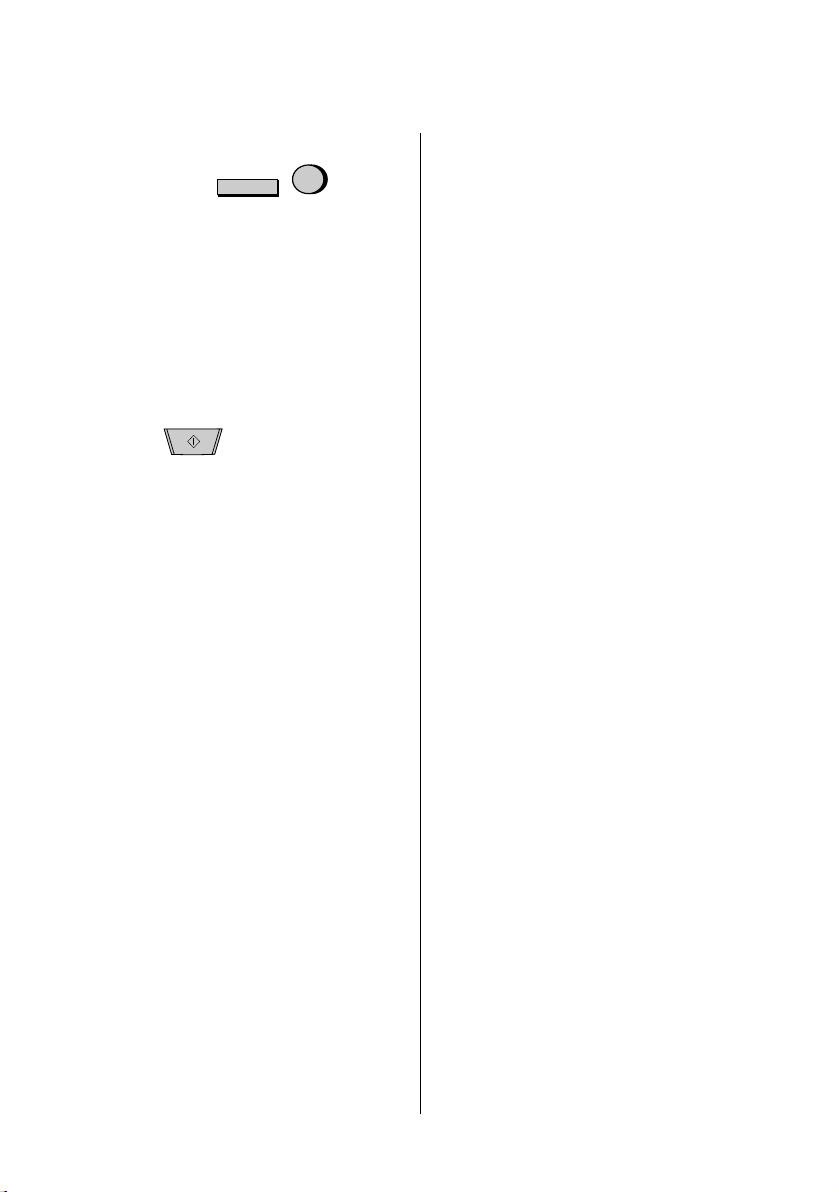
Spara och rensa kortnummer
1. Tryck:
Displayen visar:
2. Tryck 1 för att spara kortnummer eller 2
för att rensa kortnummer.
3. Välj en snabbtangent eller mata in ett tvåsiffrigt kortnummer (
00-99
) (om du rensar
ett kortnummer, gå till steg 7).
4. Mata in hela fax/telefonnumret.
5. Tryck:
6. Mata in kortnumrets namn på samma sätt
som du matade in ditt eget namn (se
ovan)
7. Tryck:
Normal uppringning
1. Lyft luren eller tryck
2. Slå faxnumret
3. Vänta på ton ( svarar det, be personen
trycka ner sin START-knapp).
4. Tryck:
Uppringning med snabbtangent
Välj respektive snabbtangent
Uppringningen börjar automatiskt.
Uppringning med kortnummer
1. Tryck:
2. Välj det tvåsiffriga kortnumret.
3. Tryck:
Justera upplösning och/eller
kontrast om önskvärt.
3
FUNCTION
START
START
STOP
FAX/TE L N R
Spara nummer på
grupptangenter
1. Tryck:
Displayen visar:
2. Tryck 1 för att programmera en
grupptangent, eller 2 för att rensa en
grupptangent.
3. Tryck en grupptangent (en av
snabbtangenterna 18/G1 eller 19/G2).
(om du rensar ett gruppnummer, gå till
steg 5)
4. Använd en eller båda sätten att mata in
faxnummer som skall sparas på
grupptangenten.
Välj snabbtangent.
Använd siffertangenterna för att mata in
kortnummer.
5. Tryck:
GRUPP-VAL
FUNCTION
7
START
STOP
RESOLUTION
SPEAKER
2. Tryck på lämplig gruppknapp.
Överföringen kommer att starta.
Gruppsändning med grupptangent
1. Ladda dokumenten
START
SPEED
DIAL
START
Page 11
Snabbguide
9
SVERIGE
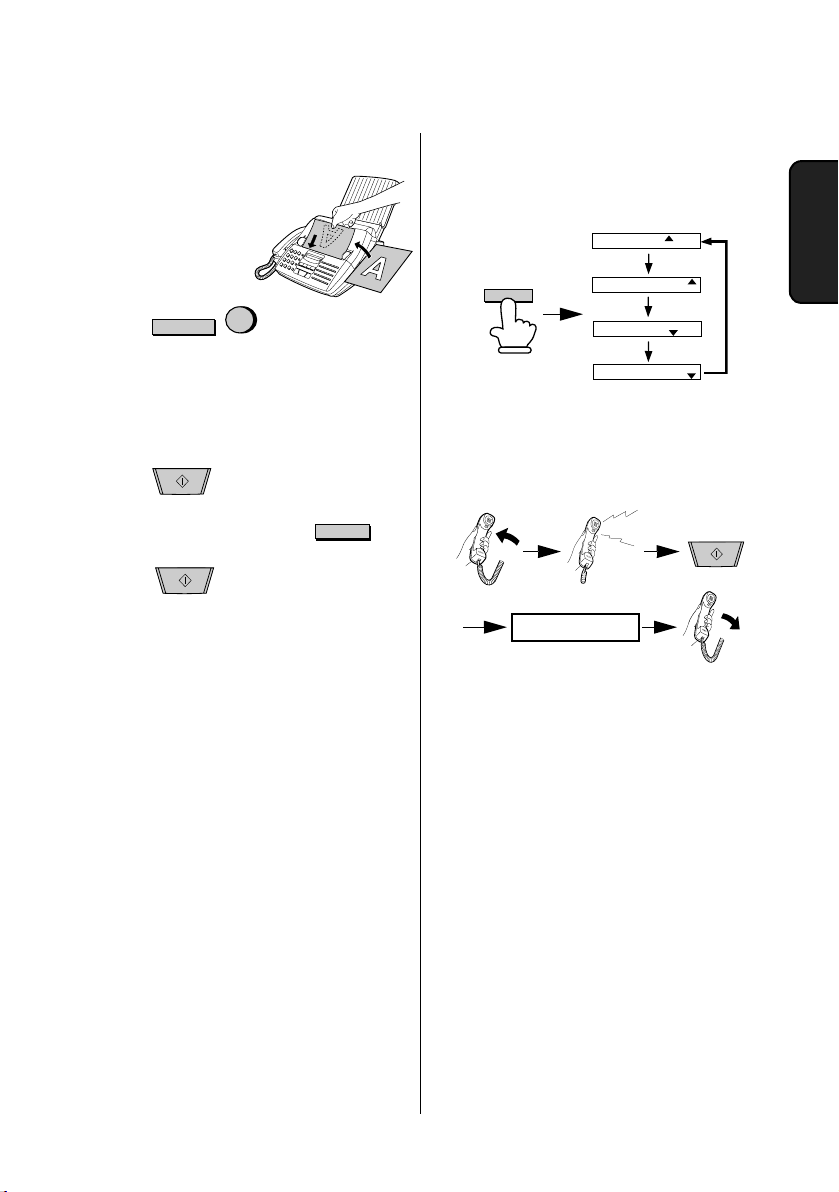
Ta emot fax
Tr y c k RECEPTION MODE tills displayen
visar önskat läge för mottagning.
2. Tryck:
3. Slå numret till mottagarna enligt en eller
båda följande sätten:
Välj en eller flera snabbtangenter.
Välj ett eller flera kortnummer med
siffertangenterna.
4. Tryck:
5. Justera upplösningen om
så önskas.
6. Tryck:
START
START
RESOLUTION
Gruppsändning (sända ett dokument till
flera mottagare)
1. Ladda dokumenten
2
MEMORY
RECEPTION
MODE
FAX
TEL
TEL/FAX A.M.
FAX
TEL
TEL/FAX A.M.
FAX
TEL
TEL/FAX A.M.
FAX
TEL
TEL/FAX A.M.
05 - NOV 10:30
05 - NOV 10:30
05 - NOV 10:30
05 - NOV 10:30
TEL/FAX läge: Detta läge används för att
kunna ta emot både fax och telefonsamtal.
Faxen känner av om inkommande samtal är
ett röstsamtal, (även manuella fax) eller ett
inkommande fax.
A.M. läge: Använd detta läge när en
telefonsvarare är tillkopplad och dessutom
påslagen.
Beep
TA R EM O T
START
FAX läge: Faxen svarar automatiskt efter
inställt antal signaler och tar emot det
inkommande dokumentet.
TEL läge:
Page 12
Snabbguide
10
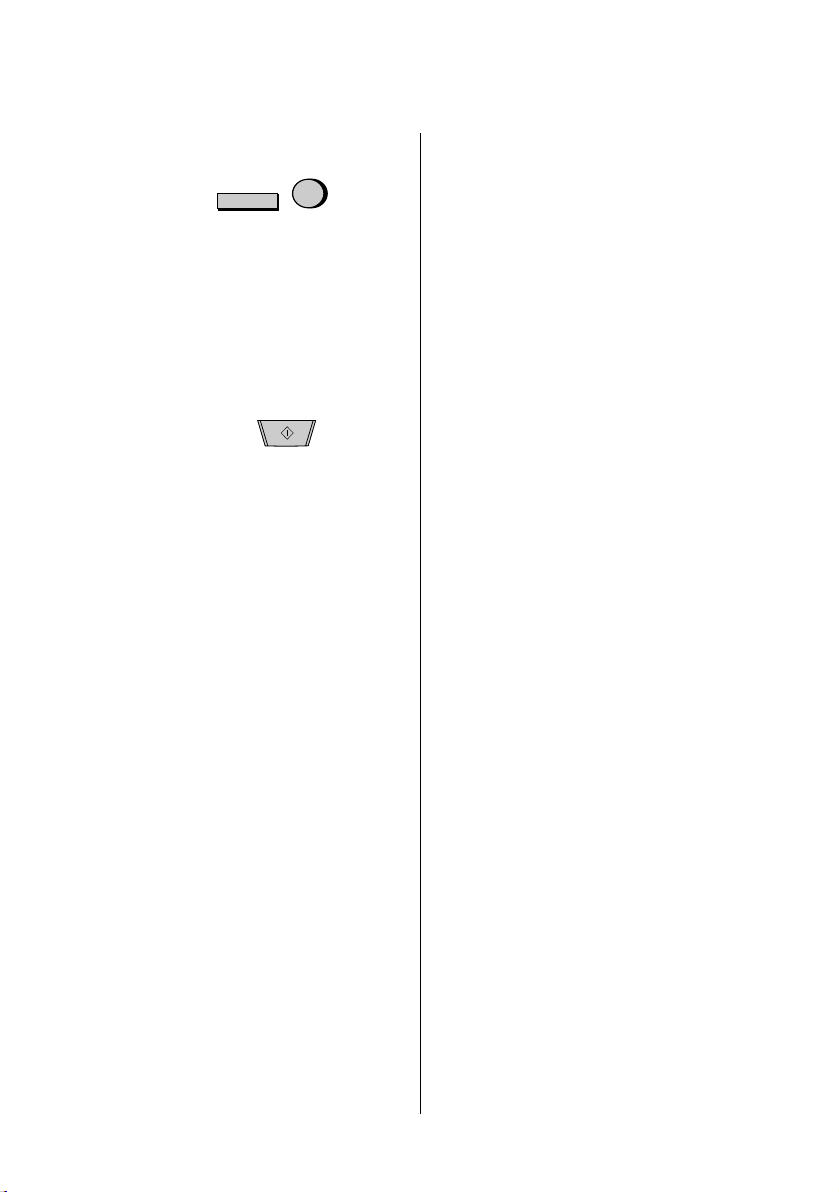
Användarinställningar
1. Tryck följande
tangenter:
2. Tryck # för att bläddra genom
inställningar (använd * för att bläddra
bakåt).
3. När önskad inställning visas, mata in
valet för inställningen: (se nedan) med
siffertangenterna.
4. Har valet matats in visas inställningen.
Tryck... för att komma tillbaka till datum
och klockslag
Inställningar
INSTÄLLNING FÖR UPPLÖSNING
Bestämmer läge för upplösning vid
dokumentsändning. Tryck 1 (JA) för FIN
upplösning eller 2 (NEJ) för STANDARD
upplösning.
ANTAL SIGNALER
Bestämmer hur många signaler som skall
gå fram innan faxen svarar på inkommande
samtal i FAX-läge och TEL/FAX-läge. Mata
in antal signaler från 1 till 5.
ÅTERUPPRINGNING, TID
Bestämmer hur länge faxen skall vänta
innan den återuppringer vid upptagen linje.
Mata in 01 för 1 minut, 02 för 2 minuter,
osv., upp till max. 15 minuter.
ÅTERUPPRINGNING, ANTAL
Bestämmer antal gånger faxen skall
återuppringa. Mata in antal gånger från 00
till 10.
FJÄRRSTYRNINGSKOD
Bestämmer fjärrstyrningskod som via
sidoapparat (följt av **) aktiverar
mottagning av fax. Mata in en siffra mellan 0
och 9.
FJÄRRSTYRNINGSSTART
Tr y c k 1 för att aktivera mottagning via
sidoapparat genom att använda
ovanstående FJÄRRSTYRNINGSKOD.
Tr y c k 2 för att inaktivera fjärrstyrningsstart.
SÄNDNINGSRAPPORT
Bestämmer när en sändningsrapport skall
skrivas ut. Tryck en siffra enligt följande:
1: Efter varje sändning eller mottagning.
2: Efter fel, tidsinställning eller
minnessändning.
3: Endast efter sändning.
4: Endast efter fel.
5: Aldrig.
SUB – RINGTID
Bestämmer längden på pseudoringningen
som anger röstsamtal i TEL/FAX-läge. Tryck
1 för 15 sekunder, 2 för 30 sekunder, 3 för
60 sekunder, eller 4 för 120 sekunder.
TYST AVKÄNNINGSTID
Om faxen känner av tystnad efter att en
telefonsvarare tagit emot samtalet, tar faxen
över och påbörjar mottagning.
Telefonsvararen skall vara ansluten och
A.M-läge aktivt. Bestämmer tyst
avkänningstid i sekunder. Mata in en siffra
från 01 till 10 eller mata in 00 för att
inaktivera funktionen.
STARTTID FÖR TYST AVKÄNNINGSTID
Fördröjer den tysta avkänningstidens
startfunktion. Mata in två siffror för antal
sekunder (00 till 15).
FUNCTION
START
4
Page 13

Snabbguide
11
SVERIGE
LINJEHALL – TID
Denna inställning kan användas för att få
faxapparaten att automatiskt svara ett
inställt antal sekunder efter det en
telefonsvarare som är ansluten till
faxapparaten har svarat. Ställ in antalet
sekunder genom att mata in ett 3-siffrigt
nummer (001 till 255), eller mata in 000 för
att stänga av funktionen.
AUTOMATISK MOTTAGNING
Om telefonsvararen inte svarar innan 5
signaler, svarar faxen automatiskt i A.Mläge. Tryck 1 för att aktivera funktionen.
Tryck 2 för att inaktivera funktionen.
SPRÅK
Byter språk i display, rapporter och listor.
Tryck START, sedan * eller # tills önskat
språk visas i displayen, tryck START igen.
TELEFONVÄXEL
Är faxen ansluten till en telefonväxel gäller
följande: Tryck 1 för JA, och ange
anslutningsläge till extern linje (1 för ID, eller
2 för TID). Om du valt ID, matar du in ditt
VXL ID nummer och trycker därefter på
START knappen.
FAXSIGNAL – START
Hörs en högfrekvent ton när man svarar på
ett samtal kan mottagning påbörjas
automatiskt, tryck 1 för att aktivera. Tryck 2
för att inaktivera (funktionen bör inaktiveras
om ett dator-faxmodem är anslutet till
samma linje).
KONTROLL AV SPÄRRAT NUMMER
Tryck 1 för att förhindra mottagning av fax
från spärrade nummer. Tryck 2 för fri
mottagning av alla nummer.
HÄMT/POLLING
Tryck 1 för att aktivera snabbtangent 15/
POLL -HÄMTA. Tryck 2 för att använda
snabbtangent som vanlig tangent.
NR-PRESENTATION
Om du är abonnent på en telefon ID service
och önskar använda telefon ID funktionen,
trycker du på 1. För att stänga av telefon ID,
trycker du på 2. (Obs: Denna inställning är
inte tillgänglig i alla länder.)
AUTOMATISKT TÄCKBLAD
Tryck 1 för att automatiskt sända täckblad
vid slutet av varje faxsändning. Tryck 2 för
att inaktivera funktionen.
AUTOMATISK AKTIVITETSRAPPORT
Tryck 1 för att automatiskt skriva ut en
rapport efter var 30:e aktivitet. (Rapporten
kan skrivas ut när det passar). Tryck 2 för att
inaktivera utskrift.
ECM LÄGE
Tryck 1 för att automatiskt korrigera
störningar före utskrift, under överföring
eller mottagning. Observera att båda
faxarna måste ha ECM-läge. Tryck 2 för att
inaktivera funktionen.
Page 14

12
Sammenfattet bruksanvisning
Installasjon
1. Kople til telefonhøreren og plasser den på
holderen.
2. Plugg strømkabelen inn i en 220-230 V,
50 Hz, jordet (2 pinner) AC stikkontakt.
3. Før den ene enden av telefonkabelen inn
i kontakten på baksiden av maskinen
merket TEL. LINE. Før den andre enden
inn i en telefon-veggkontakt.
4. Monter papirskuffen.
5. Kople et biapparat eller en telefonsvarer
til faxapparatet hvis du ønsker det:
Fjern forseglingen som dekker TEL. SET
jakken på siden av faxapparatet.
Kople biapparatet eller telefonsvareren til
TEL. SET jakken på faxapparatet.
TE
L.
SE
T
TE
L.
LIN
E
TEL.
SET
TEL.
LINE
♦ Merk: Filmen for bildene og papiret må settes inn før du kan legge inn ditt
navn og telefonnummer, samt dato og klokkeslett i maskinen..
Page 15
Sammenfattet bruksanvisning
13
NORGE
Innsetting av film for bilder
1. Trykk utløseren som er merket med
OPEN og lukk opp dekslet for
skriverhuset.
• Forsiktig!
Skrivehodet (metallstripen på undersiden
av dekslet) påfører varme til skrivefilmen.
Det kan være varmt hvis man nettopp har
skrevet ut et dokument.
2.Hvis du bytter ut filmen for bilder, må du ta
den gamle filmen ut av skriverhuset og
fjerne de tre (3) grønne tannhjulene og
den grønne flensen fra enden av spolene.
IKKE KAST DE GRØNNE
TANNHJULENE OG DEN GRØNNE
FLENSEN!!
3.
Ta den nye filmen ut av emballasjen og
sett to av tannhjulene som fulgte med
faxapparatet inn i endene av spolen
med filmen. Kontroller at de to tappene
på tannhjulene passer nøyaktig inn i
sporene i endene av spolene.
• Ikke fjern båndet som holder spolene
sammen.
4.Hold den tomme spolen slik at enden med
bare et spor er på venstre side, og senk
spolene ned i fronten av skriverhuset.
Tannhjulene i endene av spolen med film
skal passe inn i sporene på hver side av
skriverhuset.Du kan legge opptil 200 ark
A4 papir (maks. 75 g/m²) i papirskuffen.
2 tapper
Page 16
Sammenfattet bruksanvisning
14
5. Klipp av båndet som holder sammen
spolene med en saks og fjern det. Før
det gjenværende tannhjulet inn i den
høyre enden av den tomme spolen og
flensen inn i venstre ende av den
tomme spolen. Kontroller at tappene på
tannhjulet og flensen passer inn i
sporene i endene av spolen (tannhjulet
har to tapper, og flensen har en tapp).
6. Trekk den tomme spolen mot baksiden
av skriverhuset, spol av filmen ettersom
du trekker.
1 tapp
2 tapper
Flens
Tannhjul
7.
Sett den tomme spolen inn bak i
skriverhuset, slik at tannhjulet og
flensen passer inn i sporene på sidene
av huset.
• Kontroller at tannhjulet griper inn i
tannhjulet under seg.
9. Lukk skriverdekslet, pass på at det klikker
på plass..
• Forsiktig!
Lukk dekslet sakte, slik at du ikke
klemmer fingrene dine.
10.Legg papir i papirskuffen og trykk
deretter følgende taster for å initialisere
filmen.
• Merk: Papiret må være lagt i før filmen
kan initialiseres. Vedrørende ilegging av
papir, se
Innlegging av papir.
8. Spol filmen litt (roter tannhjulet på
høyre side av den tomme spolen) slik
at filmen ikke er slakket. Kontroller at
begge kanter av filmen spoles jevnt
opp på spolen.
FUNCTION
6
INITIALIS. FILM
START
Page 17
Sammenfattet bruksanvisning
15
NORGE
2. Lag en vifte av papiret og dunk deretter
kanten mot en flat overflate for å få en
jevn stabel..
3.Trekk papirutløserplaten mot deg og før
papirstabelen inn i skuffen med siden det
skal skrives på vendt ned.
• Hvis det finnes gjenværende papir i
skuffen, må du ta det ut og legge det
sammen med det nye papiret til en
eneste stabel før du legger inn dette.
4. Sett papirdekslet på papirskuffen igjen.
Viktig: Pass på å sette papirdekslet på
igjen før du setter på plass
papirutløserplaten. Hvis det finnes
gjenværende papir i skuffen, må du ta det
ut og legge det sammen med det nye
papiret til en eneste stabel før du legger
inn dette.
Når må film for bilder byttes
ut?
Bytt ut filmen for bilder når displayet viser:
Bruk følgende film for bilder, som du kan
få kjøpt hos din forhandler eller detaljist:
Sharp FO-15CR billedfilm
Forsiktig!
Teksten i dokumenter som skrives ut
med film for bilder er synlig på den
brukte filmen. Hvis du har skrevet ut
fortrolig informasjon, må du destruere
filmen på egnet måte.
FILM SLUTT
Innlegging av papir i
papirskuffen
Du kan legge opptil 200 ark A4 papir
(maks. 75 g/m²) i papirskuffen.
Forsiktig!
Bruk ikke den blanke siden av et ark som
det allerede er skrevet på.
1.Fjern papirdekslet hvis det er satt på
papirskuffen.
Merk: Kontroller papirskuffen hvis
displayet viser følgende alternerende
meldinger når du tar en kopi eller mottar
en fax.. Hvis skuffen er tom, må du legge
inn papir og trykke START tasten. Hvis
det finnes papir i skuffen, må du
kontrollere at det er satt korrekt inn og
deretter trykke START tasten.
Page 18
Sammenfattet bruksanvisning
16
5. Faxapparatet ditt er innstilt på fabrikken til
å skrive ut med normal kontrast. Alt etter
hvilken type papir du har lagt inn, kan det
tenkes at du får bedre skrivekvalitet ved å
endre innstillingen til LIGHT (mindre
kontrast). Trykk disse tastene:
Innlegging av navn og
nummer
1. Trykk:
Displayet viser:
2. Trykk:
3. Legg inn ditt faxnummer (maks. 20 siffer)
ved å trykke talltastene.
• Trykk # tasten for å legge inn et
mellomrom mellom sifre.
• Hvis du gjør en feil, kan du trykke SPEED
DIAL tasten for å gå tilbake og slette
feilen.
4. Trykk:
5. Legg inn ditt navn ved å trykke passende
talltaster slik som vist nedenunder.
• For å legge inn to bokstaver
etterhverandre, når disse krever bruken
av samme tast, må du trykke SPEAKER
tasten etter å ha lagt inn første bokstav.
FUNCTION
6
Trykk 1 for å velge NORMAL eller 2 for å
velge LIGHT.
Trykk STOP tasten for å vende tilbake til
visning av dato og klokkeslett.
or
NORMAL LYS
1
2
3
FUNCTION
SETT EGET TLF NR
START
START
• Trykk REDIAL tasten for å endre. Trykk #
eller * for å rulle gjennom symboler og
spesielle tegn.
6. Trykk: når du er ferdig.
Innstilling av dato og klokke
1. Trykk:
Displayet viser:
2. Trykk:
3. Legg inn to siffer for dagen (01 til 31).
4. Legg inn to siffer for måneden (01 til 12).
5. Legg inn fire siffer for året (Eks.: 2001)
6. Legg inn to siffer for time (00 til 23) og to
siffer for minutt (00 til 59).
7. Når du er ferdig,
trykker du:
A =
B =
C =
D =
E =
F =
G =
H =
I =
J =
K =
L =
M =
N =
O =
P =
Q =
R =
S =
T =
U =
V =
W =
X =
Y =
Z =
SPACE =
SPEAKER
SEARCH
=
=
m ove
m ove
R
START
SETT DATO&TID
3
FUNCTION
STOP
START
STOP
START
Page 19
Sammenfattet bruksanvisning
17
NORGE
Sending av fax
Legg dokumentet
(opptil 20 sider) med
forsiden vendt ned i
dokumentmateren.
Lagring og sletting av
automatisk valg-numre
1. Trykk:
Displayet viser:
2. Trykk 1 for å lagre et nummer eller 2 for å
slette et nummer.
3. Trykk en hurtig-tast eller legg inn et
tosifret hurtigvalg-nummer (fra 00 til 99).
(Hvis du vil slette et nummer, må du gå
videre til punkt 7.)
4. Legg inn hele fax-/telefonnummeret.
5. Trykk:
6. Legg inn navnet på stedet ved å trykke
talltaster. (Se tabellen for innlegging av
bokstaver i
Innlegging av navn og
nummer
.)
7. Trykk:
Normalt valg
1. Løft opp telefonhøreren eller trykk
2. Velg faxnummeret.
3. Vent til du hører mottakssignalet (hvis en
person svarer, må du be ham/henne
trykke Start-tasten).
4. Trykk:
Valg med hurtig-tast
Trykk den passende hurtig-tast.
Overføringen starter automatisk.
Hurtig-valg
1.Trykk:
2. Legg inn det tosifrede hutigvalgnummeret.
3. Trykk:
Juster oppløsningen og/eller
kontrasten hvis du ønsker det.
3
FUNCTION
START
START
STOP
FAKS/TEL # MODUS
Lagring av faxnummer i
gruppe-taster
1. Trykk:
Displayet viser:
2. TTrykk 1 for å programmere en gruppetast, eller 2 for å slette en gruppe-tast.
3. Trykk en gruppe-tast (en av hurtigtastene 18/G1 eller 19/G2). (Hvis du vil
slette en gruppe-tast, kan du gå videre til
punkt 5.)
4. Use one or both of the following methods
to enter the fax numbers that you want to
store in the Group Key:
Press Rapid Keys.
Press number keys to enter Speed Dial
numbers.
5. Trykk:
GRUPPE - VALG
START
STOP
RESOLUTION
SPEED
DIAL
START
2. Trykk den aktuelle gruppetast.
Overføringen starter.
kringkasting ved hjelp av gruppe-tast
1. Last dokumentet (dokumentene)
FUNCTION
7
SPEAKER
START
Page 20
Sammenfattet bruksanvisning
18
Mottak av fax
Trykk RECEPTION MODE tasten helt til
pilen i displayet peker på ønsket
mottaksmodus.
2. Trykk:
3. Velg mottakerapparatene ved hjelp av en
eller begge de metoder som beskrives
nedenunder:
Trykk en eller flere hurtig-taster.
Legg inn et eller flere hurtigvalg-nummer
med talltastene.
4. Trykk:
5. Juster oppløsningen hvis
du ønsker det:
6. Trykk:
START
START
RESOLUTION
Kringkasting (sending av et dokument til
flere adressater)
1. Last dokumentet
(dokumentene)
2
MEMORY
RECEPTION
MODE
FAX
TEL
TEL/FAX A.M.
FAX
TEL
TEL/FAX A.M.
FAX
TEL
TEL/FAX A.M.
FAX
TEL
TEL/FAX A.M.
05 - NOV 10:30
05 - NOV 10:30
05 - NOV 10:30
05 - NOV 10:30
TEL/FAX mode: Denne modus er praktisk
for mottak av både fax og telefonsamtaler.
Når det kommer et anrop, registrerer
faxapparatet om det er en telefonoppringing
(inkl. manuelt valgt faxoverføring) eller
automatisk valgt fax.
A.M. mode: Velg denne modus når det er
koplet telefonsvarer til faxapparatet, og
telefonsvareren er slått på.
Beep
MOTTAR
START
FAX mo de : Faxapparatet svarer automatisk
etter det forhåndsinnstilte antall
ringesignaler og mottar det inngående
dokumentet.
TEL mode:
Page 21

Sammenfattet bruksanvisning
19
NORGE
Innstilling av opsjoner
1. Trykk disse tastene:
2. Trykk # tasten for å rulle gjennom
innstillingene (trykk * tasten for å rulle
bakover).
3. Legg inn valgt innstilling når den ønskede
innstilling vises (se nedenunder), ved å
trykke talltastene.
4. Når du har lagt inn et valg, vises neste
innstilling. For å vende tilbake til dato- og
klokke-displayet, må du trykke:
Innstillinger
PRIORITERT FIN OPPLØSNING
Denne opsjonen innstiller standard
oppløsning for overføring av dokumenter.
Trykk 1 (JA) for å innstille standard
oppløsning til FIN, eller 2 (NEI) for å innstille
den på STANDARD.
ANTALL RINGESIGNALER
Denne opsjonen innstiller antallet
ringesignaler faxapparatet skal vente før det
svarer på inngående anrop i FAX og TEL/
FAX mottaksmodus. Legg inn et nummer fra
1 til 5.
INTERVALL FOR GJENTATT ANROP
Denne opsjonen innstiller den tid
faxapparatet venter mellom automatisk
gjentatte anrop når linjen er opptatt. Legg
inn 01 for 1 minutt, 02 for 2 minutter, etc.,
opp til maks. 15 minutter.
ANTALL GJENTAGELSER AV ANROP
Denne opsjonen innstiller maks. antall
ganger faxapparatet automatisk skal gjenta
anropet når linjen er opptatt. Legg inn et
vilkårlig tall fra 00 til 10.
TEL/FAX FJERNNUMMER
Denne opsjonen innstiller det nummeret du
kan presse på et biapparat (fulgt av **) for
å aktivere faxmottaket. Legg inn et vilkårlig
tall fra 0 til 9.
AUTOMATISK MOTTAK
Trykk 1 hvis du ønsker å kunne aktivere
faxmottaket fra et biapparat med det
ovenfor nevnte TEL/FAX FJERNNUMMER.
Trykk 2 for å deaktivere fjernmottak.
OVERFØRINGSPROTOKOLL
Denne opsjonen innstiller betingelsene for
når det skal skrives ut overføringsprotokoll.
Trykk en talltast fra 1 til 5 på følgende måte:
1: Etter hver overføring og etter hvert
mottak.
2: Etter feil, timer- eller minne-overføring.
3: Kun etter overføringer.
4: Kun etter feil.
5: Aldri.
VARIGHET PSEUDO-ANROP
Denne opsjonen innstiiller varigheten av det
spesielle ringesignalet som varsler deg om
telefonoppringninger i TEL/ FAX
mottaksmodus. Trykk 1 for 15 sekunder, 2
for 30 sekunder, 3 for 60 sekunder eller 4 for
120 sekunder.
TAUS IDENTIFISERINGSTID
Når en telefonsvarer er koplet til
faxapparatet og mottaksmodus er innstilt på
A.M., overtar faxapparatet linjen og starter
mottaket hvis den indentifiserer en viss tid
med taushet etter at telefonsvareren mottar
anropet. Denne opsjonen innstiller
taushetens varighet i sekunder. Legg inn et
tall fra 01 til 10, eller legg inn 00 for å
deaktivere funksjonen.
STARTTID TAUS IDENTIFISERING
Bruk denne funksjonen hvis du behøver å
utsette starten av den ovenfor nevnte tause
identifiseringstid. Legg inn et tosifret tall for
antall sekunder utsettelsen skal var (00 til
15).
FUNCTION
START
4
Page 22

Sammenfattet bruksanvisning
20
OFF HOOK HOLD
Denne innstillingen kan brukes når man
ønsker at faxapparatet automatisk skal
overta linjen et innstilt antall sekunder etter
at telefonsvareren som er koplet til
faxapparatet svarer. Innstill antall sekunder
ved å legge inn et tresifret tall (001 til 255),
eller legg inn 000 for å deaktivere
funksjonen.
VALG AUTOMATISK MOTTAK
Trykk 1 for å la faxapparatet svare
automatisk etter 5 ringesignaler i A.M.
modus hvis telefonsvareren som er tilkoplet
faxapparatet ikke har svart innen den tid.
Trykk 2 for å deaktivere funksjonen.
SPRÅKVALG
Bruk denne funksjonen for å forandre det
språk som brukes i display, protokoller og
lister. Trykk START tasten, trykk * eller # til
det ønskede språket vises på displayet og
trykk deretter START tasten en gang til.
PBX-TILKOPLING
Bruk denne innstillingen hvis ditt faxapparat
er tilkoplet en PBX. Trykk 1 for å velge JA,
og velg deretter modus for tilkopling til
ekstern linje (1 for ID, eller 2 for
TIDSPAUSE). Hvis du velger ID, må du
legge inn ditt PBX ID nummer og deretter
trykke START tasten.
MOTTAK AV FAXSIGNAL
Trykk 1 for at faxapparatet skal starte
mottaket når du hører et lavt faxsignal etter
å ha tatt telefonen. Trykk 2 for å deaktivere
funksjonen (deaktiver funksjonen hvis du
bruker et faxmodem for datamaskin på
samme linjen).
KONTROLL AV SKRAPNUMMER
Trykk 1 for å sperre mottaket av faxnummer
som er ført inn i "anti-skrap" nummerlisten.
Trykk 2 for å frigi mottak av alle nummer.
AVS PØRRING
Trykk 1 for å bruke hurtig-tast 15/POLL som
avspøringstast. Trykk 2 for å bruke den som
en regulær hurtig-tast.
RINGERS ID
Hvis du abbonerer en anroper ID service og
ønsker å bruke Caller ID funksjonen, må du
trykke 1. For å deaktivere Caller ID, må du
trykke 2. (Merk: Denne innstillingen står ikke
til disposisjon i alle land.)
AUTOMATISK TITTELBLAD
Trykk 1 for å få faxapparatet til å generere et
tittelblad automatisk og sende det som siste
side av alle overføringer. Trykk 2 for å
deaktivere funksjonen.
AUTOMATISK UTSKRIFT
Trykk 1 for at faxapparatet automatisk skal
skrive ut hendelsesprotokoll etter hver 30.
operasjon. (Listen kan fortsatt skrives ut
manuelt når man ønsker det.) Trykk 2 for å
deaktivere automatisk utskrift.
ECM-MODUS
Trykk 1 for at faxapparatet skal korrigere
eventuelle forstyrrelser på en faxoverføring
eller på et mottak før faxet skrives ut ved
slutten av mottaket (vær oppmerksom på at
det andre faxapparatet også må ha ECMmodus). Trykk 2 for å deaktivere funksjonen.
Page 23
21
SUOMI
Pikaohjeisto
Asennus
1. Liitä kuuloke ja aseta se kuulokkeen
kannattimeen.
2. Kytke virtajohto 220-230 V, 50 Hz
maadoitettuun AC-pistorasiaan
.
3. Kytke linjajohdon toinen pää koneen
takana olevaan olevaan pistukkaan, jossa
on merkintä TEL. LINE. Kytke toinen pää
seinässä olevaan puhelimen pistukkaan.
4. Kiinnitä paperiteline.
5. Liitä faksiin halutessasi rinnakkaispuhelin
tai puhelinvastaaja:
Poista faksin kyljessä olevan TEL. SET jakkikoskettimen peittävä suojus.
Kytke rinnakkaispuhelin tai
puhelinvastaaja faksin TEL. SET jakkikoskettimeen.
TE
L.
SET
TE
L.
LIN
E
TEL.
SET
TEL.
LIN
E
♦ Huom: Värinauhan on oltava paikoillaan ja paperitelineessä on oltava
paperia, ennen kuin voit syöttää koneeseen nimesi ja numerosi sekä
päivämäärän ja kellonajan.
Page 24
Pikaohjeisto
22
Värinauhan lataaminen
1. Paina sanalla OPEN merkittyä laukaisinta
ja avaa tulostuslokeron kansi.
• Varo !
Tu l o s t u s p ää (metallinen rima kannen
alapuolella) johtaa tulostusnauhaan
lämpöä. Se on kuuma tuiostuksen
jälkeen.
2. Kun haluat vaihtaa värinauhan, ota vanha
nauha ulos lokerosta ja poista kolme (3)
vihreää hammaspyörää ja vihreä laippa
rullien päistä.
ÄLÄ HEITÄ VIHREITÄ
HAMMASPYÖRIÄ JA VIHREÄÄ
LAIPPAA POIS!
3.
Ota uusi nauha pakkauksesta ja aseta
kaksi hammaspy
örää täyden rullan
p
äihin. Varmista, että hammaspyörissä
olevat kaksi tappia menevät rullan
päässä oleviin uriin.
• Älä vielä poista rullia toisissaan
pitelevää hihnaa.
4.
Pidä tyhjää rullaa niin, että vain yhden
uran sisältävä pääty on vasemmalla ja
laske rullat tulostuslokeron etuosaan.
Rullan päissä olevien hammaspyörien
tulisi sopia lokeron kummallakin
puolella oleviin uriin.
2 tappia
Page 25
Pikaohjeisto
23
SUOMI
5. Katkaise rullia toisissaan pitävä hihna
saksilla ja ota se pois. Aseta kolmas
hammaspyörä tyhjän rullan oikeaan
reunaan ja laippa tyhjän rullan
vasempaan päähän. Varmista, että
hammaspyörän ja laipan tapit menevät
rullan päissä oleviin uriin
(hammaspyörässä on kaksi tappia ja
laipassa yksi tappi).
6. Ved ä tyhjää rullaa lokeron takaosaa
kohti ja kelaa nauhaa auki rullaa
vetäessäsi.
1 tappi
2 tappia
Laippa
Hammas
pyörä
7.
Aseta tyhjä rulla lokeron takaosaan
niin, että hammaspyörä ja laippa
asettuvat lokeron reunoilla oleviin uriin.
• Varmista, että hammaspyörä osuu sen
alla olevaan hammaspyörään.
9. Sulje lokeron kansi; varmista, että se
lukittuu paikoilleen.
• Varo!
Sulje kansi hitaasti, jotta et jätä
vahingossa sormiasi sen väliin.
10. Laita paperia paperitelineeseen ja
alusta nauha painamalla seuraavia
painikkeita.
• Huom: Koneessa on oltava paperia,
ennen kuin nauha voidaan alustaa.
Paperin lataamiseen liittyvät tiedot löydät
kohdasta Paperin laittaminen
paperitelineeseen.
8. Kelaa nauhaa hieman (pyöritä tyhjän
rullan oikealla puolella olevaa
hammaspyörää), jotta nauha asettuu
kireälle. Varmista, että nauhan
molemmat reunat kelautuvat rullaan
tasaisesti.
FUNCTION
6
INITIALIZE FILM
START
Page 26
Pikaohjeisto
24
2.Tuuleta papereita ja tasaa nippu.
3. Vedä paperin avauslevyä itseäsi kohti ja
aseta paperipino telineeseen,
tulostuspuoli alaspäin.
• Jos telineellä on vielä paperia, ota se pois
ja laita samaan pinoon uusien
papereiden kanssa, ennen kuin laitat ne
telineeseen.
4. Aseta kansi paperitelineeseen.
Tärkeää: Muista laittaa kansi
paikoilleen, ennen kuin asetat paperin
avauslevyn alas. Jos telineessä on vielä
paperia, ota se pois ja laita samaan
pinoon uusien papereiden kanssa, ennen
kuin lisäät paperia.
Milloin värinauha on
vaihdettava
Vaihda värinauha, kun näyttöön tulee
teksti:
Käytä seuraavaa värinauha, jonka saat
jälleenmyyjältä:
Sharp FO-15CR
värinauha
Varo!
Tulostettavien asiakirjojen teksti näkyy
käytetyssä nauhassa. Jos tulostat
luottamuksellia tietoja, hävitä nauha
huolellisesti.
FILM END
Paperin Iaittaminen
paperitelineeseen
Telineeseen mahtuu enintään 200 arkkia
A4-kokoisia papereita (enint. 75 g/m²).
Varo!
Älä käytä papereita, joiden toiselle
puolelle on jo tulostettu tekstiä.
1. Poista paperitelineen kansi, jos se on
paperitelineellä.
Huom: Jos näytössä näkyvät seuraavat
vaihtelevat ilmoitukset kopioidessasi tai
vastaanottaessasi faksia, tarkista
paperiteline. Jos teline on tyhjä, lisää
paperia ja paina START-painiketta. Jos
telineessä on paperia, varmista, että
paperit ovat hyvin paikoillaan ja paina
sitten START-painiketta.
Page 27

Pikaohjeisto
25
SUOMI
5. Faksilaitteesi tulostuksen kontrasti on
säädetty tehtaalla normaaliksi.
Lataamastasi paperityypistä riippuen
tulostuksen laatu saattaa parantua, jos
vaihdat asetuksen vaaleammaksi
(LIGHT). Paina näitä näppäimiä:
Oman nimen ja numeron
syöttö
1. Paina:
Näyttöön ilmestyy:
2. Paina:
3. Syötä faksinumerosi (enintään 20
merkkiä) painamalla numeronäppäimiä.
• Paina #-näppäintä, kun numeroiden väliin
on jätettävä tyhjä kohta.
• Jos teet virheen, paina SPEED DIAL -
näppäintä, jolloin pääset takaisinpäin ja
saat korjattua virheen.
4. Paina:
5. Syötä nimesi painamalla vastaavia
numeronäppäimiä alla kuvatulla tavalla.
• Kun sinun on kirjoitettava peräkkäin kaksi
kirjainta, jotka näppäillääm samalla
näppäimellä, paina SPEAKERnäppäintä, kun olet syöttänyt
ensimmäisen kirjaimen.
FUNCTION
6
Paina 1, jos haluat valita NORMAL tai 2,
jos haluat valita LIGHT.
Paina STOP -näppäintä, jolloin
päivämäärä ja kellonaika ilmestyvät
takaisin näyttöön.
tai
NORMAL LIGHT
1
2
3
FUNCTION
OWN NUMBER SET
START
START
• Kun haluat muuttaa kirjasintasoa, paina
REDIAL-näppäintä. Paina # tai *, kun
haluat vierittää tietyn symbolin tai
erikoismerkin kohdalle.
6. Kun olet valmis, paina
Päivämäärän ja kellonajan
asettaminen
1. Paina:
Näyttöön ilmestyy:
2. Paina:
3. Syötä päivän kaksi numeroa (01-31).
4. Syötä kuukauden kaksi numeroa
(01-12).
5. Syötä vuosiluvun neljä numeroa (esim:
2001)
5. Syötä tuntien (00-23) ja minuuttien kaksi
numeroa (00-59).
7. Kun olet valmis, paina:
A =
B =
C =
D =
E =
F =
G =
H =
I =
J =
K =
L =
M =
N =
O =
P =
Q =
R =
S =
T =
U =
V =
W =
X =
Y =
Z =
SPACE =
SPEAKER
SEARCH
=
=
m ove
m ove
R
START
DATE & TIME SET
3
FUNCTION
STOP
START
STOP
START
Page 28

Pikaohjeisto
26
Faksien lähettäminen
Aseta asiakirja
(enintään 20 sivua)
teksti puoli alaspäin
asiakirjojen
syöttötelineeseen.
Automaattisesti valittavien
numerojen tallennus ja poisto
1. Paina:
Näyttöön ilmestyy:
2. Paina 1, kun haluat tallentaa numeron tai
2, kun haluat poistaa numeron.
3. Paina pikanäppäintä tai syötä
kaksinumeroinen pikavalintanumero
(00 - 99). (Jos haluat poistaa numeron,
siirry vaiheeseen 7).
4. Syötä koko puhelin/faksinumero.
5. Paina:
6. Syötä nimi painamalla numeronäppäimiä.
(Kirjainten syöttöön liittyvät tiedot löydät
kohdasta Oman nimen ja numeron
syöttö
.)
7. Paina:
Numeron tavallinen valinta
1.Nosta kuuloke tai paina
2. Näppäile faksinumero.
3. Odota vastaanottoääntä (jos joku henkilö
vastaa, pyydä häntä painamaan
käynnistysnäppäintä (start).
4. Paina:
Valinta pikanäppäintä painamalla
Paina sopivaa pikanäppäintä. Lähetys alkaa
automaattisesti.
Pikavalinta
1.Paina:
2. Syötä kaksinumeroinen
lyhytvalintanumero.
3. Paina:
Säädä erottelutarkkuutta ja/
tai kontrastia, jos tarpeellista.
3
FUNCTION
START
START
STOP
FAX/TEL # MODE
Numeroiden tallentaminen
ryhmänäppäimiin
1. Paina:
Näyttöön ilmestyy:
2. Paina 1, kun haluat ohjelmoida
ryhmänäppäinen tai 2, kun haluat nollata
ryhmänäppäimen.
3. Paina ryhmänäppäintä (yhtä
pikanäppäimistä 18/G1 tai 19/G2). (Jos
haluat nollata ryhmänäppäimen, siirry
vaiheeseen 5.)
4. Käytä yhtä tai molempia seuraavista
menetelmistä, kun haluat syöttää
faksinumerot, jotka haluat tallentaa
ryhmänäppäimeen:
Paina pikanäppäimiä.
Paina numeronäppäimiä, kun haluat
syöttää lyhytvalintanumeroita.
5. Paina:
GROUP ENTRY MODE
FUNCTION
7
START
STOP
RESOLUTION
SPEAKER
START
SPEED
DIAL
START
2. Paina tarvitsemaasi ryhmänäppäintä.
Lähetys käynnistyy.
Yleislähetys ryhmänäppäimen avulla
1. Lataa asiakirja(t)
Page 29
Pikaohjeisto
27
SUOMI
Faksien vastaanotto
Paina RECEPTION MODE -näppäintä,
kunnes näytössä oleva nuoli soittaa haluamaasi vastaanottotapaa.
2. Paina:
3. Valitse vastaanottajien numerot
käyttämällä yhtä tai molempia seuraavista
menetelmistä :
Paina yhtä tai useampaa pikanäppäintä.
Syötä yksi tai useampi lyhytvalintanumero
numeronäppäinten avulla.
4. Paina:
5. Säädä halutessasi
erottelutarkkuutta:
6. Paina:
START
START
RESOLUTION
Sarjalähetys (asiakirjan lähettäminen
useampaan kohteeseen)
1. Lataa asiakirja(t)
2
MEMORY
RECEPTION
MODE
FAX
TEL
TEL/FAX A.M.
FAX
TEL
TEL/FAX A.M.
FAX
TEL
TEL/FAX A.M.
FAX
TEL
TEL/FAX A.M.
05 - NOV 10:30
05 - NOV 10:30
05 - NOV 10:30
05 - NOV 10:30
TEL/FAX mode: Tämä käyttötapa on
sopiva, kun halutaan vastaanottaa sekä fakseja ja tavallisia puheluita. Kun puhelu tulee,
faksilaite tunnistaa, onko kyseessä tavallinen puhelu (mukaanlukien käsin valitut
faksilähetykset) vai automaattisesti valittu
faksi.
A.M. mode: Valitse tämä tila, kun faksiin on
liitetty puhelinvastaaja ja puhelinvastaaja on
kytketty päälle.
Beep
RECEIVING
START
FAX mode: Faksilaite vastaa automaattis-
esti ennalta asetettujen soittokertojen kuluttua ja vastaanottaa lähetetyn asiakirjan.
TEL mode:
Page 30
Pikaohjeisto
28
Valinnaiset asetteet
1. Paina näitä
näppäimiä:
2. Paina #, kun haluat vierittää tietyn
asetteen kohdalle (kun haluat vierittää
taaksepäin, paina *-näppäintä).
3. Kun haluamasi asete tulee esiin, syötä
haluamasi vaihtoehdot (katso alhaalla)
painamalla numeronäppäimiä.
4. Kun olet päättänyt syötön, esiin tulee
seuraava asete. Kun haluat palata
päivämäärän ja kellonajan näyttöön,
paina:
Asetteet
FINE RESOLUTION PRIORITY
(erottelutarkkuus)
Tämän vaihtoehdon avulla asetetaan lähetettävien asiakirjojen erottelutarkkuuden oletusarvo. Paina 1 (KYLLÄ), jos haluat asettaa
tarkkuuden hienoksi (FINE) tai 2 (EI), jos
haluat asettaa sen normaaliksi (STANDARD).
NUMBER OF RINGS
(soittojen lukumäärä)
Tämän avulla säädetään soittojen lukumäärä, joiden ajan faksilaite odottaa,
kunnes se vastaa tulevaan soittoon FAX ja
TEL/FAX -vastaanottotiloissa. Syötä numero
1 - 5.
RECALL INTERVALL
(uudelleenvalinnan väli)
Tämän avulla säädetään, kuinka kauan faksilaite odottaa, kunnes numero valitaan
automaattisesti uudelleen, kun numero oli
varattu. Syötä 01, kun haluat ajan olevan 1
minuutin, 02, kun haluat ajan olevan 2 minuuttia, jne.; pisin mahdollinen aika on 15 minuuttia.
RECALL TIMES (uudelleenvalintakerrat)
Tämän avulla asetetaan, kuinka monta kertaa faksilaitteesi valitsee numeron
automaattisesti uudelleen, jos numero on
varattu. Syötä numero 00 - 10.
TEL/FAX REMOTE NUMBER
(puh/faksikaukonumero)
Tämän avulla valitaan numero, jota voit
painaa rinnakkaispuhelimessa (esim. 5**),
jotta saat aktivoitua faksien vastaanoton.
Syötä numero 0 - 9
REMOTE RECEPTION
(kaukovastaanotto)
Paina 1, jos haluat mahdollistaa faksien vastaanoton aktivoinnin rinnakkaispuhelimesta
käsin käyttämällä edellä mainittua TEL/FAX
REMOTE-numeroa. Paina 2, kun haluat kytkeä toiminnon pois päältä.
TRANSACTION REPORT
Tämän avulla asetetaan ehdot, joiden vallitessa tapahtumaraportti tulostetaan. Paina
numeronäppäintä 1 - 5:
1, jos haluat tapahtumaraportin: Jokaisen
lähetyksen ja vastaanoton jälkeen.
2: Virheen, ajastimen tai muistissa olevan
lähetyksen jälkeen.
3: Ainoastaan lähetysten jälkeen.
4: Ainoastaan virheiden jälkeen.
5. Ei koskaan.
PSEUDO RING DURATION
(valesoittoäänen kesto)
Tämän avulla asetetaan erityisen soittoäänen kesto, jonka avulla voit tunnistaa
tavalliset puhelut TEL/ FAX -vastaanottotilassa. Paina 1, jos haluat soiton kestävän 15
sekuntia, 2, jos haluat sen kestävän 30
sekuntia, 3, jos haluat sen kestävän 60
sekuntia tai 4, jos haluat sen kestävän 120
sekuntia.
QUIET DETECT TIME
(hiljaisuuden tunnistus)
Kun faksiin on kytketty puhelinvastaaja ja
vastaanottotila on A.M, faksilaite kytkeytyy
päälle ja aloittaa vastaanoton, jos se havaitsee tietynmittaisen tauon sen jälkeen, kun
puhelinvastaaja vastaa puheluun. Tauon
kesto asetetaan sekunteina. Syötä numero
01 - 10 tai 00, jos haluat kytkeä toiminnon
pois päältä.
FUNCTION
START
4
Page 31

Pikaohjeisto
29
SUOMI
QUIET DETECT START TIME
(tunnistuksen alkamisajankohta)
Käytä tätä, jos sinun on viivytettävä edellä
mainittua Quiet Detect Time -toiminnon
käynnistymistä. Syötä kaksinumeroinen
luku, joka ilmoittaa viivytyksen keston
sekunteina (00 - 15).
OFF HOOK HOLD
(vastaajan toiminta-aika)
Asetuksen avulla voit säätää faksin käynnistymään automaattisesti tietyn ajan
kuluessa (sekunteina) siitä, kun faksiin kytketty puhelinvastaaja vastaa. Aseta sekunnit
syöttämällä 3-numeroinen luku (001 - 255),
tai syötä 000, jos haluat kytkeä toiminnon
pois päältä.
SELECT AUTO RECEIVE
(automaattisen vastaanoton valinta)
Paina 1, jotta saat faksilaitteen vastaamaan
puheluun 5 soiton jälkeen A.M.-tilassa, jos
faksilaitteeseen kytketty puhelinvastaaja ei
mene päälle ennen sitä. Saat kytkettyä
toiminnon pois päältä painamalla 2.
LANGUAGE SELECT (kielen valinta)
Käytä tätä, kun haluat muuttaa näytössä,
raportteissa ja luetteloissa käytetyn kielen.
Paina START-näppäintä, paina * tai #,
kunnes haluamasi kieli ilmestyy näyttöön ja
paina sitten START-näppäintä uudelleen.
PBX CONNECTION (vaihdekytkentä)
Käytä tätä asetetta, jos faksilaitteesi on liitetty
PBX:ään. Valitse
KYLLÄ
painamalla 1 ja valitse sitten tila ulkopuoliseen linjaan liittämistä
varten (
1
= VAIHDENO, tai 2 = KATKOS). Jos
valitsit ID:n, syötä PBX ID numero ja paina
sitten
START
-painiketta.
FAX SIGNAL RECEIVE
(faksin signnaalin tunnistus)
Paina 1, jolloin faksilaitteesi aloittaa vastaanoton automaattisesti, jos kuuluu pehmeä faksiääni, kun puheluun on vastattu.
Paina 2, jos haluat kytkeä toiminnon pois
päältä (kytke toiminto pois päältä, jos käytät
tietokoneen faksimodeemia samalla linjalla).
JUNK NUMBER CHECK
(kielletyn numeron tarkistus)
Paina 1, kun haluat estää vastaanoton Anti
Junk Number-luetteloon syötetyistä faksinumeroista. Paina 2, jolloin vastaanotto kaikista
numeroista on mahdollista.
POLLING (pollaus)
Paina 1, jolloin voit käyttää pikanäppäintä
15/POLL pollausnäppäimenä. Paina 2, kun
haluat käyttää sitä tavallisena näppäimenä.
CALLER ID (soittajan tunnus)
Jos olet liittynyt on Caller ID -palveluun ja
haluat käyttää Caller ID-toimintoa, paina 1.
Voit kytkeä Caller ID:n pois päältä painamalla 2. (Huom: Tämä asetus ei ole voimassa
kaikissa maissa.)
AUTO COVER SHEET
(automaattinen kansilehti)
Paina 1, kun haluat faksilaitteen luovan
automaattisesti kansilehden ja lähettävän
sen kunkin lähetyksen viimeisenä sivuna.
Paina 2, kun haluat kytkeä toiminnon pois
päältä.
AUTO PRINT OUT
(raportin automaattinen tulostus)
Paina 1, kun haluat faksisi tulostavan toimintoraportin (Activity Report) joka 30. käytön
jälkeen. (Luettelo voidaan silti tulostaa haluttaessa milloin tahansa.) Paina 2, kun haluat
kytkeä automaattitulostuksen pois päältä.
ECM MODE (virheenkorjaustila)
Paina 1, kun haluat faksin korjaavan kaikki
faksin lähettämisessä tai vastaanottamisessa esiintyneet säröt, ennen kuin faksi
tulostetaan vastaanottopuolella (huomaa,
että toisenkin faksilaitteen on oltava virheenkorjaustilassa). Saat kytkettyä toiminnon
pois päältä painamalla 2.
Page 32

30
Kortfattet reference-guide
Installering
1. Tilslut telefonen og anbring den på
holderen.
2. Stik netstikket i en 220-230 V, 50 Hz,
jordet (2-bens) AC stikdåse.
3. Tilslut den ene ende af telefonkablet til
bøsningen på bagsiden af maskinen
markeret med TEL. LINE. Den anden
ende placeres i telefonstikdåsen på
væggen.
4. Anbring papirbakken.
5. Hvis det ønskes, kan der tilsluttes en
ekstra telefon eller en telefonsvarer til
telefaxen: Fjern afdækningen som
dækker TEL. SET bøsningen på siden af
telefaxmaskinen.
Tilslut en ekstratelefon eller telefonsvarer
til TEL. SET bøsningen på siden af
telefaxmaskinen.
TEL.
SE
T
TEL.
LIN
E
TEL.
SET
TEL.
LINE
♦ Obs
: Filmen og papiret skal isættes hhv. ilægges før De kan indtaste
Deres navn, telefaxnummer, dato og klokkeslæt i maskinen.
Page 33

Kortfattet reference-guide
31
DANMARK
Isætning af filmen
1. Tryk på udløseren markeret med OPEN
og åben dækslet.
• Giv agt!
Printhovedet (metalstrimlen på
undersiden af dækslet) overfører varme til
filmen. Den kan være varm, hvis der
netop er udskrevet et dokument.
2. Når De udskifter filmen, tages den gamle
film, og de tre grønne tandhjul og den
grønne flange fjernes fra enderne af
spolerne.
BORTKAST IKKE DE GRØNNE
TANDHJUL OG DEN GRØNNE
FLANGE!
3.
Tag den nye film ud af indpakningen, og
isæt to af
grønne tandhjul, i enderne af
den fulde filmspole. Kontroller, at de to
tapper på tandhjulene passer korrekt
ind i slidserne for enden af spolen.
• Fjern endnu ikke båndet som holder
spolerne sammen.
4.
Hold den tomme spole således, at
enden med kun en slids befinder sig til
venstre, og indsæt spolerne på
forsiden af printrummet. Tandhjulene
for enderne af den fyldte spole skal
passe ind i slidserne på hver side.
2 tapper
Page 34

Kortfattet reference-guide
32
5. Klip båndet, der holder spolerne
sammen over med en saks, og fjern
det. Isæt det tiloversblevne tandhjul i
den højre ende af den tomme spole og
flangen i den venstre ende på den
tomme spole. Kontroller, at tappene på
tandhjulet og flangen passer ind i
slidserne for enderne af spolen
(tandhjulet har to tappe og flangen har
en tap).
6. Tr æk den tomme spole henimod
bagsiden af printrummet, således at
filmen spoles af medens De trækker.
1 tap
2 tapper
Flange
Tandhjul
7.
Isæt den tomme spole i den bageste
del af printrummet, således at
tandhjulet og flangen passer ind i
slidserne.
• Kontroller, at det øverste tandhjul passer
ind i det nederste tandhjul.
9. Luk dækslet for printrummet, og
kontroller, at det klikker på plads..
• Giv agt!
Luk afdækningen langsomt,
så
De ikke
klemmer fingrene.
10. Læg papir i papirbakken og tryk på de
følgende taster for at initialisere filmen.
• Obs: Der skal ilægges papir før filmen
kan initialiseres. Vedr. ilægning af papir,
se
Ilægning af printpapir, side 33.
8. Spol filmen en smule (roter tandhjulet
på højre side af den tomme spole)
således at der ikke er noget slip i
filmen. Kontroller, at begge sider af
filmen spoles ens på spolen.
FUNCTION
6
INITIALIZE FILM
START
Page 35

Kortfattet reference-guide
33
DANMARK
2. Spred papiret vifteformet, og bank derpå
kanten mod en plan flade for at sampe
stablen.
3. Træk papirudløseren ind mod Dem og
læg papirstablen i bakken, med printsiden
nedad.
• Hvis der resterer papir i bakken, tages
det ud og samles til en enkelt stabel
sammen med det nye papir før ilægning
af det nye papir.
4. Anbring igen papirafdækningen på
papirbakken.
Vigtigt: Anbring papirafdækningen før
papirudløserpladen trykkes ned.
Hvornår skal filmen udskiftes
Udskift filmen når displayet viser:
Anvend følgende film, der kan købes hos
Deres forhandler eller detailhandler:
Sharp FO-15CR Imaging Film
Giv agt!
Teksten på de med billedfilmen
udskrevne dokumenter er synlige på
den anvendte film. Hvis fortrolig
information er blevet udskrevet, skal
filmen destrueres hensigtsmæssigt.
FILM END
Ilægning af papir i papirbakken
Der kan ilægges op til 200 ark A4 papir
(maks. 75 g/m²) i papirbakken.
Giv agt!
Udskriv ikke på bagsiden af papir, hvorpå
der allerede er printet.
1.Fjern papirafdækningen, hvis den er
anbragt på papirbakken.
Obs: Hvis de følgende meddelelser vises
skiftevis i displayet ved kopiering eller
modtagelse af en telefax, kontrolleres
papirbakken. Hvis bakken er tom,
lægges papir i og tryk på START tasten.
Er der papir i bakken, kontrolleres, at det
er lagt korrekt i, og derpå trykkes START
tasten.
Page 36

Kortfattet reference-guide
34
5.Deres telefaxmaskine er fra fabrikkens
side indstillet til at udskrive med normal
kontrast. Afhængig af det ilagte papir,
kan De få en lysere kvalitet udskrift ved
at skifte indstillingen til LIGHT.
Tryk disse taster:
Indtastning af Deres navn og
telefaxnummer
1. Tryk:
Displayet viser:
2. Tryk:
3. Indtast Deres telefaxnummer (maks. 20
cifre) ved at trykke på ciffertasterne.
• For at indføre et mellemrum mellem cifre,
trykkes # tasten.
• Hvis De laver en fejl, trykkes SPEED
DIAL tasten for at rykke tilbage og slette
fejlen.
4. Tryk:
5. Indtast Deres navn ved at trykke de
respektive ciffertaster, som vist nedenfor.
• For at indtaste to bogstaver efter
hinanden, som kræver den samme tast,
trykkes på SPEAKER tasten efter at have
indtastet det første bogstav.
FUNCTION
6
Tryk på 1 for at vælge NORMAL eller 2 for
at vælge LIGHT.
Tr yk p å STOP tasten for at vende tilbage
til dato- og klokkeslætdisplayet.
or
NORMAL LIGHT
1
2
3
FUNCTION
OWN NUMBER SET
START
START
• For at skifte mellem store og små
bogstaver, trykkes REDIAL tasten. Tryk
på # eller * for at rulle gennem symboler
og specialtegn.
6. Hvis De er færdig,
trykkes på:
Indstilling af dato og
klokkeslæt
1. Tryk:
Displayet viser:
2. Tryk:
3. Indtast to cifre for dagen (01 til 31).
4. Indtast to cifre for måneden (01 til 12).
5. Indtast fire cifre for året (eks.: 2001)
5. Indtast to cifre for timetallet (00 til 23) og
to cifre for minuttallet (00 til 59)
7. Hvis De er færdig,
trykkes på:
A =
B =
C =
D =
E =
F =
G =
H =
I =
J =
K =
L =
M =
N =
O =
P =
Q =
R =
S =
T =
U =
V =
W =
X =
Y =
Z =
SPACE =
SPEAKER
SEARCH
=
=
m ove
m ove
R
START
DATE & TIME SET
3
FUNCTION
STOP
START
STOP
START
Page 37

Kortfattet reference-guide
35
DANMARK
Afsendelse af telefaxer
Anbring Deres
dokument (indtil 20
sider) med tekstsiden
nedad i
dokumentindføringen.
Lagring og sletning af
automatisk nummeropkald
1. Tryk:
Displayet viser:
2. Tryk på 1 for at lagre et nummer eller 2 for
at slette et nummer.
3. Tryk en hurtigtast eller indtast et 2-cifret
kortnummer (fra 00 til 99). (Hvis De vil
slette et nummer, gå til 7.)
4. Indtast hele telefax-/telefonnummeret.
5. Tryk:
6. Indtast navnet på abonnenten ved at
trykke på ciffertasterne. (Referer til
indtastningstabellen for bogstaver i
(
Indtastning af Deres navn og
telefaxnummer
. Side 34).
7. Tryk:
Almindeligt opkald
1. Løft telefonen eller tryk
2. Indtast telefaxnummeret.
3. Vent på kvitteringstonen (hvis en person
svarer), bed dem trykke på deres
starttast).
4. Tryk:
Hurtigtast opkald
Tryk den respektive hurtigtast. Overførslen
starter automatisk.
Kortnummer opkald
1.Tryk:
2. Indtast det 2-cifrede kortnummer.
3. Tryk:
Indstil opløsningen og/eller
kontrasten hvis ønsket.
3
FUNCTION
START
START
STOP
FAX/TEL # MODE
Lagring af numre i
gruppetaster
1. Tryk:
Displayet viser:
2. Tryk 1 for at programmere en gruppetast,
eller 2 for at slette en gruppetast.
3. Tryk på en gruppetast (en af hurtigtasterne 18/G1 eller 19/G2). (Hvis De
ønsker at slette en gruppetast, gå til trin
5.)
4. Benyt en eller begge af de følgende
metoder for at indtaste telefaxnumre, som
De ønsker at lagre i gruppetasten:
Tryk hurtigtaster.
Tryk ciffertaster for at indtaste kortnumre.
5. Tryk:
GROUP ENTRY MODE
FUNCTION
7
START
STOP
2.Tryk på den respektive gruppetast.
Overførslen starter automatisk.
RESOLUTION
SPEAKER
START
SPEED
DIAL
START
Gruppetelefax ved anvendelse af en
gruppetast
1. Læg dokumenter(ne) i
Page 38

Kortfattet reference-guide
36
Modtagelse af telefax
Tr yk p å RECEPTION MODE indtil pilen på
displayet peger på den ømskede
modtageposition.
2. Tryk:
3. Kald den modtagende maskine ved at
benytte en eller begge de følgende
metoder:
Tryk en eller flere hurtigtaster.
Indtast en eller flere kortnumre med
ciffertasterne.
4. Tryk:
5. Hvis det ønskes, indstil
opløsning:
6. Tryk:
START
START
RESOLUTION
2
MEMORY
RECEPTION
MODE
FAX
TEL
TEL/FAX A.M.
FAX
TEL
TEL/FAX A.M.
FAX
TEL
TEL/FAX A.M.
FAX
TEL
TEL/FAX A.M.
05 - NOV 10:30
05 - NOV 10:30
05 - NOV 10:30
05 - NOV 10:30
TEL/FAX position: Denne position er
egnet til at modtage både telefax- og
taleopkald. Hvis der kommer et taleopkald,
detekterer telefaxmaskinen hvadenten det
er et taleopkald (inklusive manuelt opkaldte
telefaxoverførsler), eller et automatisk
opkald fra en telefax.
A.M.
position: Vælg denne position hvis en
felefonsvarer er tilsluttet til telefaxmaskinen
og der er tændt for telefonsvareren.
Beep
RECEIVING
START
FA X position: telefaxmaskinen svarer
automatisk på det forud indstillede antal
ringetoner og modtager det indkommende
dokument.
TEL
position:
Gruppetelefaxforsendelse (sende et
dokument til mange abonnenter)
1.Læg dokumenter(ne) i.
Page 39

Kortfattet reference-guide
37
DANMARK
Valgfri indstilling
1. Tryk disse taster:
2. Tryk på # tasten for at rulle gennem
indstillingerne (for at rulle i modsat
retning, trykkes * tasten).
3. Når de indstillinger der ønskes ændret,
fremkommer. Indtastes et valg for
indstillingen (se nedenfor) ved at trykke
på ciffertasterne.
4. Efter indtastning af valget, fremkommer
næste indstilling. For at returnere til datoog klokkeslætvisningen, trykkes:
Indstillinger
FINE RESOLUTION PRIORITY
(FINOPLØSNINGSPRIORITET)
Denne indstilling indstiller default-opløsningen for forsendelse af dokumenter. Tryk på
1 (JA) for at ændre default-indstillingen til
fin, eller 2 (NEJ) for at indstille STANDARD.
NUMBER OF RINGS
(ANTAL OPKALD)
Denne indstilling indstiller antallet af opkald
som telefaxen afventer, før den svarer på et
indkommende opkald i FAX eller TEL/FAX
modtagepositionerne. Indtast et ciffer fra 1
til 5.
RECALL INTERVALL
(GENOPKALDSINTERVAL)
Denne indstilling indstiller det tidsrum, som
Deres telefaxmaskine venter mellem
automatiske genopkald, når linien er
optaget. Indtast 01 for 1 minut, 02 for 2
minutter, etc., op til maksimalt 15 minutter.
RECALL TIMES (ANTAL GENOPKALD)
Indstiller det maksimale antal gange Deres
telefaxmaskine genopkalder et nummer,
hvis linien er optaget. Indtast et vilkårligt tal
fra 00 til 10.
TEL/FAX REMOTE NUMBER (TEL/FAX
FJERNSTYRINGSNUMMER)
Indstiller det nummer, som De kan trykke på
en ekstratelefon fulgt af ** for at aktivere
telefaxmodtagelse. Indtast et vilkårligt ciffer
fra 0 til 9.
REMOTE RECEPTION
(FJERNSTYRET MODTAGELSE)
Tr yk p å 1, hvis De ønsker at kunne aktivere
telefaxmodtagelse fra en ekstratelefon ved
at anvende ovenstående TEL/FAX
REMOTE NUMBER. Tryk 2 for at slukke for
fjernstyret modtagelse.
TRANSACTION REPORT
(TRANSAKTIONSRAPPORT)
Dette indstiller betingelserne under hvilke
en transaktionsrapport udskrives. Tryk på
en ciffertast fra 1 til 5
1: Efter hver transmission og modtagelse.
2: Efter en fejl, timer eller hukommelses
transmission.
3: Kun efter transmission.
4: Kun efter fejl.
5: Aldrig.
PSEUDO RING DURATION
(PSEUDO OPKALDSVARIGHED)
Denne indstilling indstiller varigheden af
den specielle ringetone, som gør Dem
opmærksom på taleopkald i TEL/FAX modtagemodien. Tryk 1 for 15 sekunder, 2 for 30
sekunder, 3 for 60 sekunder, eller 4 for 120
sekunder.
QUIET DETECT TIME
(PAUSETIDSDETEKTERING)
Hvis en telefonsvarer er tilsluttet til telefaxmaskinen og modtagepositionen er indstillet
til A.M., vil telefaxmaskinen overtage linien
og begynde modtagelse, hvis det detekterer
en pause af en vis varighed efter at telefonsvareren har svaret på et opkald. Dette
indstiller pausens varighed i sekunder. Indtast et nummer fra 01 til 10, eller indtast 00
for at slukke for funktionen.
FUNCTION
START
4
Page 40

Kortfattet reference-guide
38
QUIET DETECT START TIME (STARTTID
FOR PAUSETIDSDETEKTERING)
Benyt dette, hvis De har brug for en forsinkelse af starten på den ovenstående
funktion pausetidsdetektering. Indtast et
tociftret tal for antallet af sekunder, som forsinkelsen (00 til 15) skal vare.
OFF HOOK HOLD
(HOLD VED LØFTET RØR)
Denne indstilling bruges til at få overfører
opkaldet, fra telefonsvareren tiltelefaxen,
inden for et forud indstillet tidsrum. (Det
totale antal sekunder telefonsvareren skal
holde linien). Indstil antallet af sekunder
ved at indtaste et 3-cifret tal (001 til 255),
eller indtast 000 for at afbryde denne
funktion.
SELECT AUTO RECEIVE (VALG AF
AUTOMATISK MODTAGELSE)
Tr yk p å 1 for at få Deres telefaxmaskine til
automatisk at svare på et opkald efter 5
ringetoner i A.M. modien, hvis en telefonsvarer, der er tilsluttet til telefaxmaskinen,
ikke når at svare indenfor dette tidsrum.
Tr yk p å 2 for at afbryde funktionen.
LANGUAGE SELECT (VALG AF SPROG)
Benyt dette for at ændre sproget, der anvendes i displayet, rapporter og lister. Tryk
på START tasten, tryk på * eller # indtil det
ønskede sprog vises på displayet, og tryk
derpå igen START tasten.
PBX CONNECTION
(
Tilsluttet privat omstilling
)
Benyt denne indstilling hvis Deres telefaxmaskine er tilsluttet en privat omstilling. Tryk
på
1
for at vælge JA, og vælg derefter måden
for forbindelse til en ekstern linje (
1
for ID,
eller
2
for FLASH). Hvis De har valgt ID, indtast Deres gennemvalgs nummer og tryk
derpå
START
tasten.
FAX SIGNAL RECEIVE
(
FAX-SIGNAL MODTAGELSE
)
Tr yk p å 1 for at få Deres telefaxmaskine til
automatisk at begynde modtagelsen, hvis
den registrerer en telefax opkalde tone efter
modtagelse af et opkald. Tryk på 2 for at
afbryde funktionen (afbryd funktionen, hvis
De anvender et PC telefaxmodem på samme
linje).
JUNK NUMBER CHECK
(CHECK FOR JUNK NUMRE)
Tryk på 1 for at blokere modtagelse fra telefaxnumre, der er indtastet i anti junk telefaxnummerlisten. Tryk på 2 for at tillade
modtagelse fra alle telefaxnumre.
POLLING
Tryk på 1 for at benytte hurtigtast 15/POLL
som pollingtast. Tryk på 2 for at benytte den
som en hurtigtast.
CALLER ID (OPKALDER ID)
Hvis De abonnerer på en opkalder ID
service og ønsker at anvende denne
opkalder ID funktion, trykkes 1. For at
afbryde opkalder ID funktionen, trykkes 2.
(Obs: Denne indstilling findes ikke i visse
lande.)
AUTO COVER SHEET
(AUTOMATISK FORSIDE)
Tryk på 1 for at få telefaxmaskinen til
automatisk at generere en forside og sende
den som den sidste side i hver overførsel.
Tryk på 2 for at afbryde funktionen.
AUTO PRINT OUT
(AUTOMATISK UDSKRIFT)
Tryk på 1 for at få Deres telefaxmaskine til
automatisk at udskrive en aktivitetsrapport
efter hver 30. operation. (Listen kan stadig
udskrives ved behov.) Tryk på 2 for at
afbryde den automatiske udskrift.
ECM MODE (ECM POSITION)
Tryk 1 (Ja), for korrektion af fejl der skyldes
forstyrrelser på telefax-transmissioner og
modtagelser før udskrivning. ECM virker
kun hvis modtager og afsender maskiner
har denne funktion. Tryk på 2 for at afbryde
funktionen.
Page 41

39
PORTUGUÊS
Guia de referência rápida
Instalação
1. Ligue o auscultador e pouse-o no
respectivo descanso.
2. Ligue o cabo de alimentação eléctrica a
uma tomada de 220-230 V, 50 Hz, com
ligação à terra (2 terminais) AC
.
3. Introduza uma extremidade do fio da
linha telefónica na tomada existente na
parte de trás do aparelho identificado
com TEL. LINE. Insira a outra
extremidade na tomada de parede.
4. Monte o tabuleiro para o papel.
5. Se assim o entender ligue um telefone de
extensão ou um atendedor ao fax:
Retire a protecção que cobre a tomada
TEL. SET na parte de trás do aparelho
de fax.
Ligue um telefone de extensão ou um
atendedor à tomada TEL. SET do fax.
TEL.
SE
T
TEL.
LIN
E
TE
L.
SET
TE
L.
LINE
♦ Nota: A película para imagem e o papel têm de estar colocados antes de
introduzir o nome, o número, a data e a hora no aparelho.
Page 42

Guia de referência rápida
40
Colocação da película para
imagem
1. Carregue no manípulo de abertura
identificado com OPEN e abra a tampa
do compartimento de impressão.
• Cuidado!
A cabeça de impressão (a fita de metal na
parte inferior da tampa) aplica calor sobre a
filme de impressão. Poderá estar quente se
tiver acabado de imprimir um documento.
2. Quando estiver a substituir a película
para imagem, retire o filme antigo do
compartimento de impressão e
desencaixe as três (3) rodas dentadas
verdes e o flange verde das
extremidades das bobinas.
NÃO DEITE FORA AS RODAS DENTA-
DAS VERDES E O FLANGE VERDE!
3.
Tire o filme novo da respectiva
embalagem e introduza duas das rodas
dentadas fornecidas com o fax em
cada uma das extremidades da bobina
com o filme. Assegure-se de que as
linguetas existentes nas rodas
dentadas encaixam devidamente nas
ranhuras que se encontram nas
extremidades da bobina.
• Não retire ainda a fita que segura as
bobinas juntas.
4.
Pegue na bobina vazia de maneira a
que a ponta que tem apenas uma
lingueta fique do lado esquerdo e
ponha as bobinas dentro da parte
frontal do compartimento de
impressão. As rodas dentadas nas
extremidades da bobina com o filme
terão, por sua vez, que encaixar nas
ranhuras de cada lado do
compartimento de impressão.
2 linguetas
Page 43

Guia de referência rápida
41
PORTUGUÊS
5. Corte com uma tesoura a fita que
mantém as bobinas juntas e descole-a.
Insira a terceira roda dentada do lado
direito da bobina vazia e o flange do lado
esquerdo dessa mesma bobina.
Certifique-se de que as linguetas
existentes na roda dentada e no flange
encaixam nas ranhuras que se
encontram nas extremidades da bobina
(a roda dentada possui duas linguetas,
enquanto que o flange possui uma).
6. Puxe a bobina vazia no sentido da
retaguarda do compartimento,
desenrolando o filme à medida que vai
puxando.
1lingueta
2 linguetas
Flange
Roda
dentada
7.Introduza a bobina vazia na parte traseira
do compartimento, de forma a que a roda
dentada e o flange encaixem nas
respectivas ranhuras dos dois lados do
compartimento.
• Assegure-se de que a roda dentada
engrena na roda dentada que se
encontra por baixo dela.
9. Feche a tampa do compartimento de
impressão. Ela só estará bem fechada
depois de ouvir um estalido.
• Cuidado!
Feche a tampa devagar para não entalar
os dedos.
10. Coloque papel no tabuleiro e depois
carregue nas seguintes teclas para
inicializar o filme..
• Nota: Tem de haver papel no tabuleiro
antes de inicializar o filme. Para saber
como colocar papel no tabuleiro, veja
Colocar papel no tabuleiro de papel.
8. Enrole o filme um pouco (gire a roda
dentada do lado direito da bobina
vazia), por forma a que o filme fique
esticado. Atenção que os rebordos do
filme, quer de um lado, quer do outro,
têm que coincidir com os respectivos
rebordos da bobina.
FUNCTION
6
INITIALIZE FILM
START
Page 44

Guia de referência rápida
42
2. Ventile o papel e bata depois com uma
das extremidades contra um superfície
direita para endireitar a resma.
3. Puxe o prato de libertação do papel para
si e meta a resma de papel no tabuleiro,
com a face a imprimir virada para baixo.
• Se quando abrir o tabuleiro houver ainda
papel junte-o ao papel novo, para obter
uma resma uniforme, antes de a colocar
no tabuleiro.
4. Substitua a tampa para o papel no
tabuleiro.
Importante: Não esquecer que a tampa
para o papel tem de ser substituída antes
de recolocar o prato de libertação do
papel. Se quando abrir o tabuleiro houver
ainda papel junte-o ao papel novo, para
obter uma resma uniforme, antes de a
colocar no tabuleiro.
Quando é que se deve substituir a película para imagem
Substitua a película para imagem quando
aparecer no display:
Utilize película para imagem com a
seguinte designação, que poderá
encontrar no seu agente ou revendedor
autorizado:
Película para imagem Sharp FO-15CR
Cuidado!
O texto dos documentos impressos
usando a película para imagem fica
marcado no filme usado. Se porven-tura
tiver imprimido informação que considere
confidencial, destrua o filme de modo
conveniente.
FILM END
Colocar papel no tabuleiro de
papel
Pode colocar até a um máximo de 200
folhas de papel A4 (máx. 75 g/m²) no
tabuleiro de papel.
1. Retire a tampa para o papel se estiver
montada no tabuleiro.
Nota: Se no display forem exibidas
alternadamente as seguintes
mensagens ao fazer uma fotocópia ou ao
receber um fax, verifique o tabuleiro para
o papel. Se o tabuleiro estiver vazio,
meta papel e depois carregue na tecla
START. Se houver papel, verifique se
está colocado correctamente depois
carregue na tecla START.
Page 45

Guia de referência rápida
43
PORTUGUÊS
5. O aparelho de fax vem regulado de
fábrica para imprimir com contraste
normal. Dependendo do tipo de papel
que use, pode acontecer que a
qualidade de impressão melhore
alterando o contraste para LIGHT.
Pressione estas teclas ::
Introduzir o seu nome e
número
1. Prima:
O display mostra:
2. Prima:
3. Introduza o seu número de fax (máx. de
20 dígitos) pressionando as respectivas
teclas numéricas.
• Para introduzir um espaço entre os
dígitos, prima a tecla #.
• Se errar prima a tecla SPEED DIAL para
voltar atrás e corrigir o erro.
4. Prima:
5. Introduza o seu nome através das
respectivas teclas numéricas tal como
abaixo exemplificado.
• Para introduzir duas letras de seguida
que requerem a mesma tecla prima a
tecla SPEAKER depois de introduzir a
primeira letra.
FUNCTION
6
Pressione 1 para seleccionar NORMAL
ou 2 para seleccionar LIGHT.
Pressione a tecla STOP para regressar ao
display de acerto da data e da hora.
or
NORMAL LIGHT
1
2
3
FUNCTION
OWN NUMBER SET
START
START
• Para mudar de maiúsculas para
minúsculas e vice-versa, prima a tecla
REDIAL. Prima # ou * para folhear os
símbolos e caracteres especiais.
6. Quando terminar
prima:
Acertar a data e a hora
1. Prima:
O display mostra:
2. Prima:
3.Introduza dois dígitos para o dia (01 a 31).
4. Introduza dois dígitos para o mês (01 a 12).
5. Introduza quatro dígitos para o ano
(ex: 2001)
6. Introduza dois dígitos para a hora
(00 a 23) e dois dígitos para os minutos
(00 a 59).
7. Quando terminar
prima:
A =
B =
C =
D =
E =
F =
G =
H =
I =
J =
K =
L =
M =
N =
O =
P =
Q =
R =
S =
T =
U =
V =
W =
X =
Y =
Z =
SPACE =
SPEAKER
SEARCH
=
=
m ove
m ove
R
START
DATE & TIME SET
3
FUNCTION
STOP
START
STOP
START
Page 46

Guia de referência rápida
44
5. Prima:
Enviar faxes
Coloque o seu
documento (até um
máximo de 20
páginas) virado com
o rosto para baixo no
alimentador.
Memorizar e apagar números
de marcação automática
1. Prima:
O display mostra:
2. Prima 1 para memorizar o número ou 2
para apagar o número.
3. Prima uma tecla rápida ou introduza um
número de 2 dígitos de marcação rápida
(de 00 a 99). (Para apagar um número,
prossiga até ao passo 7.)
4. Introduza o número de fax/telefone
completo.
5. Prima:
6. Introduza o nome da localização
premindo as teclas numéricas. (Consulte
a tabela de introdução de letras em
Introduzir o seu nome e número
.)
7. Prima:
Marcação normal
1. Levante o auscultador ou prima
2. Marque o número de fax.
3. Aguarde até ouvir o som de recepção (se
alguém responder peça-lhe para premir a
tecla de Start).
4. Prima:
Marcação por tecla rápida
Prima a tecla rápida pretendida. A transmissão inicia-se imediatamente.
Marcação rápida
1.Prima:
2. Introduza um número de marcação
rápida de 2 dígitos.
3. Prima:
Ajuste a resolução e/ou o
contraste se necessário.
3
FUNCTION
START
STOP
FAX/TEL # MODE
Memorizar números em teclas
de grupo
1. Prima:
O display mostra:
2.Prima 1 para programar uma tecla de
grupo ou 2 para apagar a tecla de grupo.
3. Prima uma tecla de grupo (uma das
teclas rápidas 18/G1 ou 19/G2). (Se
pretende apagar uma tecla de grupo
prossiga para o passo 5.)
4. Utilize um ou ambos os métodos a seguir
indicados para introduzir os números de
fax que pretende memorizar na tecla de
grupo:
Prima as teclas rápidas.
Prima as teclas numéricas para introduzir
os números de marcação rápida.
GROUP ENTRY MODE
FUNCTION
7
START
STOP
RESOLUTION
START
SPEED
DIAL
START
2. Pressione a tecla de grupo apropriada.
Te m in ício a transmissão.
Difusão com uma tecla de grupo
1. Carregue os documento(s)
START
SPEAKER
Page 47

Guia de referência rápida
45
PORTUGUÊS
Receber faxes
Prima a tecla RECEPTION MODE até a
seta no display apontar para o modo de
recepção pretendido.
2. Prima:
3. Marque os números de quem pretende
enviar o fax utilizando um ou ambos os
métodos a seguir indicados:
Prima uma ou mais teclas rápidas.
Introduza um ou mais números de
marcação rápida com as teclas
numéricas.
4. Prima:
5. Se necessário ajuste a
resolução:
6. Prima:
START
START
RESOLUTION
Difusão (enviar um documento para múltiplos destinatários)
1. Carregue os documento(s)
2
MEMORY
RECEPTION
MODE
FAX
TEL
TEL/FAX A.M.
FAX
TEL
TEL/FAX A.M.
FAX
TEL
TEL/FAX A.M.
FAX
TEL
TEL/FAX A.M.
05 - NOV 10:30
05 - NOV 10:30
05 - NOV 10:30
05 - NOV 10:30
Modo TEL/FAX: Este modo é o mais adequado para receber tanto chamadas de fax
como de voz. Quando entra uma chamada
o fax detecta se é uma chamada de voz
(incluindo as transmissões de fax com marcação manual) ou um fax marcado automaticamente.
Modo A.M.: Seleccione este modo se um
atendedor automático estiver ligado ao
aparelho de fax e se encontrar activo.
Beep
RECEIVING
START
Modo FAX: o fax atende automaticamente
após o número de toques predefinido e
recebe o documento.
Modo TEL:
Page 48

Guia de referência rápida
46
Definições opcionais
1. Prima estas teclas:
2. Prima a tecla # para se deslocar através
das definições (para se deslocar para
trás prima a tecla *).
3. Quando a definição pretendida aparecer
introduza a selecção para a definição
(ver em baixo) premindo as teclas
numéricas.
4. Depois de introduzir uma selecção
aparece a definição subsequente. Para
voltar ao display da data e da hora,
prima:
Definições
FINE RESOLUTION PRIORITY
(PRIORIDADE ALTA RESOLUÇÃO)
esta opção define a resolução por defeito
para transmitir documentos. Prima 1 (YES)
para definir a resolução por defeito como
FINE, ou 2 (NO) para a definir como STANDARD.
NUMBER OF RINGS
(NÚMERO DE TOQUES)
Define o número de toques que o aparelho
de fax aguarda até responder a uma chamada nos modos de recepção FAX e TEL/
FAX. Introduza um número de 1 a 5.
RECALL INTERVALL
(INTERVALO DE REMARCAÇÃO)
Define o período de tempo que o aparelho
de fax aguarda entre as remarcações
automáticas quando uma linha está ocupada. Introduza
01
para 1 minuto, 02 para 2
minutos, etc., até ao máximo de 15 minutos.
RECALL TIMES
(NÚMERO DE REMARCAÇÕES)
Define o número máximo de vezes que o
seu fax tenta fazer a remarcação
automática quando a linha está ocupada.
Introduza um número de 00 a 10.
TEL/FAX REMOTE NUMBER
(NÚMERO REMOTO DE TEL/FAX)
Define o número que pode premir numa
extensão (seguido de **) para activar a
recepção de fax. Introduza um número de 0
a 9.
REMOTE RECEPTION
(RECEPÇÃO REMOTA)
Prima 1 se quiser ter a possibilidade de
activar o fax a partir de uma extensão
através do acima descrito TEL/FAX
REMOTE NUMBER. Prima 2 para desligar
a recepção remota.
TRANSACTION REPORT
(RELATÓRIO DE ENVIO)
Define a condição na qual um relatório de
transacção deve ser impresso. Prima uma
tecla numérica de 1 a 5 da seguinte forma:
1: Após cada transmissão e recepção.
2: Após um erro, transmissão a partir do
temporizador ou da memória.
3: Apenas após as transmissões.
4: Apenas em caso de erro.
5: Nunca.
PSEUDO RING DURATION
(DURAÇÃO DO PSEUDO-TOQUE)
Define a duração do toque especial de
alerta para chamadas de voz quando o
aparelho está em modo de recepção TEL/
FAX. Prima 1 para 15 segundos, 2 para 30
segundos, 3 para 60 segundos, ou 4 para
120 segundos.
QUIET DETECT TIME (TEMPO DE
DETECÇÃO DE SILÊNCIO)
Quando se encontra conectado um atendedor ao fax e o modo de recepção está
definido ara A.M., o fax activa e inicia a
recepção se detectar a existência de uma
determinada duração de silêncio depois do
atendedor ter atendido a chamada. Esta
função define a duração do silêncio em
segundos. Introduza um número de 01 a
10, ou introduza 00 para desligar a função.
FUNCTION
START
4
Page 49

Guia de referência rápida
47
PORTUGUÊS
QUIET DETECT START TIME (INÍCIO
TEMPO DE DETECÇÃO DE SILÊNCIO)
Utilize esta função caso necessite de
atrasar o início da função Quite Detect
Time acima descrita. Introduza um número
de dois dígitos para o tempo em segundos
que deve demorar o atraso (00 a 15).
OFF HOOK HOLD
(ESPERA DEPOIS DE ATENDER)
Esta definição pode ser usada para o fax
ligar automaticamente ao fim de um
período regulável de alguns segundos,
depois de um atendedor responder. Regule
os segundos introduzindo um número de 3
algarismos (de 001 a 255), ou introduza
000 para desactivar esta função.
SELECT AUTO RECEIVE
(SELECÇÃO RECEPÇÃO AUTOMÁTICA)
Prima 1 para o seu fax atender automaticamente uma chamada após 5 toques no
modo A.M., se o atendedor que está
conectado ao fax não atender antes de passar esse período de tempo. Prima 2 para
desligar a função.
LANGUAGE SELECT
(
SELECÇÃO DO IDIOMA
)
Utilize esta função para alterar o idioma utilizado no seu display, nos relatórios e nas listas. Prima a tecla
START
, prima * ou # até
aparecer o idioma pretendido no display, e
prima de seguida novamente a tecla
START
.
PBX CONNECTION (LIGAÇÃO PBX)
Utilize esta definição se o seu fax estiver
ligado a um PBX. Prima 1 para seleccionar
YES e seleccione de seguida o modo para
a ligação a uma linha exterior (1 para ID, ou
2 para FLASH).
Se tiver seleccionado ID,
introduza o número de ID da central
telefónica e depois carregue na tecla
START.
FAX SIGNAL RECEIVE
(RECEPÇÃO SINAL DE FAX)
Prima 1 para que o seu fax inicie automaticamente a recepção se ouvir o tom de soft
fax depois de atender uma chamada. Prima
2 para desligar a função (desligue a função
se utilizar um fax modem de computador na
mesma linha).
JUNK NUMBER CHECK (
VERIFICAÇÃO DE
NÚMEROS INDESEJADOS
)
Prima 1 para bloquear a recepção de
números de fax introduzidos na lista de
números não autorizados. Prima 2 para permitir a recepção de todos os números.
POLLING (PUXAR DOCUMENTOS)
Prima 1 para utilizar a tecla rápida 15/POLL
como uma tecla para puxar documentos .
Carregue em 2 para a poder utilizar como
tecla rápida normal.
CALLER ID (ID NÚMERO)
Se aderir ao serviço de identificação do
número de chamada e pretender usar essa
função, pressione 1. Para desactivar esta
função, pressione 2. (Nota: Esta função não
se encontra disponível nalguns países.)
AUTO COVER SHEET
(FOLHA DE ROSTO AUTOMÁTICA)
Carregue em 1 para o aparelho de fax criar
automaticamente uma folha de rosto e
enviá-la no final de cada transmissão. Carregue em 2 para desactivar esta função.
AUTO PRINT OUT
(IMPRESSÃO AUTOMÁTICA)
Carregue em 1 para que o aparelho de fax
imprima automaticamente um Relatório de
actividades ao fim de cada 30 operações.
(Todavia, existe a possibilidade de imprimir
esse relatório a qualquer momento, se
assim se desejar.) Carregue em
2
para des-
activar a função de impressão automática.
ECM MODE (MODO ECM)
Carregue em 1 para que o aparelho de fax
corrija todas as interferências durante um
envio ou recepção de um fax, antes de o
documento ser impresso no terminal receptor (atenção que, para este efeito, o
aparelho de fax com o qual se estabelece a
comunicação também tem de dispor do
modo de correcção dos erros (ECM). Prima
2 para desligar a função.
Page 50

48
Quick Reference Guide
Installation
1. Connect the handset and place it on the
handset rest.
2. Plug the power lead into a 220-230 V, 50
Hz, earthed (2-prong) AC outlet.
3. Insert one end of the line cord into the
socket on the back of the machine
marked TEL. LINE. Insert the other end
into a wall telephone socket.
4. Attach the paper tray.
5. If desired, connect an extension
telephone or answering machine to the
fax:
Remove the seal covering the TEL. SET
socket on the back of the fax.
Connect an extension telephone
telephone or answering machine to the
TEL. SET socket on the fax.
TE
L.
SE
T
TE
L.
LIN
E
TEL.
SET
TEL.
LIN
E
♦ Note: The imaging film and paper must be loaded before your name and
number and the date and time can be entered in the machine.
Page 51

Quick Reference Guide
49
ENGLISH
Loading the Imaging Film
1. Press the release marked OPEN and
open the print compartment cover.
• Caution!
The printing head (the strip of metal on
the underside of the cover) applies heat
to the printing film. It may be hot if a
document has just been printed.
2. If you are replacing the imaging film,
take the old film out of the printing
compartment and remove the three (3)
green gears and the green flange from
the ends of the spools
.
DO NOT DISCARD THE GREEN GEARS
AND THE GREEN FLANGE!
3. Take the new film out of its package,
and insert two of the gears provided
with the fax into the ends of the spool
with film. Make sure that the two tabs
on the gears fit properly into the slots in
the ends of the spool.
• Do not yet remove the band which
holds the spools together.
4.
Hold the empty spool so that the end
with only one slot is on the left, and
lower the spools into the front of the
printing compartment. The gears in the
ends of the spool with film should fit
into the slots on each side of the
printing compartment.
2 tabs
Page 52

Quick Reference Guide
50
5. Cut the band which holds the spools
together with scissors, and remove it.
Insert the remaining gear into the right
end of the empty spool and the flange
into the left end of the empty spool.
Make sure the tabs on the gear and the
flange fit into the slots in the ends of
the spool (the gear has two tabs and
the flange has one tab).
6. Pull the empty spool toward the back of
the compartment, unwinding the film as
you pull.
1 tab
2 tabs
Flange
Gear
7.
Insert the empty spool into the back of
the compartment so that the gear and
the flange fit into the slots on the sides
of the compartment.
• Make sure that the gear engages with the
gear below it.
9. Close the print compartment cover,
making sure it clicks into place.
• Caution!
Close the cover slowly to make sure it
doesn't pinch your fingers.
10. Load paper in the paper tray and then
press the following keys to initialize the
film.
• Note: Paper must be loaded before the
film can be initialized. To load paper, see
Loading the Printing Paper.
8. Wind the film slightly (rotate the gear
on the right side of the empty spool) so
that there is no slack in the film. Make
sure that both edges of the film wind
onto the spool evenly.
FUNCTION
6
INITIALIZE FILM
START
Page 53

Quick Reference Guide
51
ENGLISH
2. Fan the paper, and then tap the edge
against a flat surface to even the stack.
3. Pull the paper release plate toward you
and insert the stack of paper into the tray,
print side down.
• If paper remains in the tray, take it out and
combine it into a single stack with the
new paper before adding the new paper.
4. Replace the paper cover on the paper
tray.
Important: Be sure to replace the
paper cover before you put back the
paper release plate down.
If paper
remains in the tray, take it out and
combine it into a single stack with the
new paper before adding the new paper.
When to replace the imaging
film
Replace the imaging film when the display
shows:
Use the following imaging film, which is
available from your dealer or retailer:
Sharp FO-15CR Imaging Film
Caution!
The text of documents printed with the
imaging film is visible on the used film.
If confidential information has been
printed, dispose of the film
appropriately.
FILM END
Loading Paper in the Paper
Tray
You can load up to 200 sheets of A4
paper (max. 75 g/m2) in the paper tray.
Caution!
Do not use the blank side of paper that
has already been printed on.
1. Remove the paper cover if it is on the
paper tray.
Note: If the display shows the
following alternating messages when
making a copy or receiving a fax,
check the paper tray. If the tray is
empty, add paper and then press the
START key. If there is paper, make
sure it is inserted correctly and then
press the START key.
Page 54

Quick Reference Guide
52
5. Your fax has been set at the factory to
print at normal contrast. Depending on
the type of paper you have loaded, you
may find that you obtain better print
quality by changing the setting to
LIGHT. Press these keys:
Entering Your Name and
Number
1. Press:
Display shows:
2. Press:
3. Enter your fax number (max. of 20 digits)
by pressing the number keys.
• To insert a space between digits, press
the # key.
• If you make a mistake, press the SPEED
DIAL key to backspace and clear the
mistake.
4. Press:
5. Enter your name by pressing the
appropriate number keys as shown
below.
• To enter two letters in succession that
require the same key, press the
SPEAKER key after entering the first
letter.
FUNCTION
6
Press 1 to select NORMAL or 2 to select
LIGHT.
Press the STOP key to return to the date
and time display.
or
NORMAL LIGHT
1
2
3
FUNCTION
OWN NUMBER SET
START
START
• To change case, press the REDIAL key.
Press # or * to scroll through symbols
and special characters.
6. When finished, press:
Setting the Date and Time
1. Press:
Display shows:
2. Press:
3. Enter two digits for the day (01 to 31).
4. Enter two digits for the month (01 to 12).
5. Enter four digits for the year (Ex: 2001)
6. Enter two digits for the hour (00 to 23)
and two digits for the minute (00 to 59).
7. When finished, press:
A =
B =
C =
D =
E =
F =
G =
H =
I =
J =
K =
L =
M =
N =
O =
P =
Q =
R =
S =
T =
U =
V =
W =
X =
Y =
Z =
SPACE =
SPEAKER
SEARCH
=
=
m ove
m ove
R
START
DATE & TIME SET
3
FUNCTION
STOP
START
STOP
START
Page 55

Quick Reference Guide
53
ENGLISH
Sending Faxes
Place your document
(up to 20 pages) face
down in the document
feeder.
Storing and Clearing Auto Dial
Numbers
1. Press:
Display shows:
2. Press 1 to store a number or 2 to clear a
number.
3. Press a Rapid Key or enter a 2-digit
Speed Dial number (from 00 to 99). (If you
are clearing a number, go to Step 7.)
4. Enter the full fax/telephone number.
5. Press:
6. Enter the name of the location by
pressing number keys. (Refer to the letter
entry table in
Entering Your Name and
Number.)
7. Press:
Normal Dialling
1. Lift the handset or press
2. Dial the fax number.
3. Wait for the reception tone (if a person
answers, ask them to press their Start
key).
4. Press:
Rapid Key Dialling
Press the appropriate Rapid Key.
Transmission will begin automatically.
Speed Dialling
1. Press:
2. Enter the 2-digit Speed Dial number.
3. Press:
Adjust the resolution and/or
contrast if desired.
3
FUNCTION
START
START
STOP
FAX/TEL # MODE
Storing Numbers in Group
Keys
1. Press:
Display shows:
2. Press 1 to program a Group Key, or 2 to
clear a Group Key.
3. Press a Group Key (one of Rapid Keys
18/G1 or 19/G2). (If you are clearing a
Group Key, go to Step 5.)
4. Use one or both of the following methods
to enter the fax numbers that you want to
store in the Group Key:
Press Rapid Keys.
Press number keys to enter Speed Dial
numbers.
5. Press:
GROUP ENTRY MODE
FUNCTION
7
START
STOP
RESOLUTION
SPEAKER
START
SPEED
DIAL
START
2. Press the appropriate Group Key.
Transmission will begin.
Broadcasting using a Group Key
1.
Load the document(s)
Page 56

Quick Reference Guide
54
Receiving Faxes
Press the RECEPTION MODE key until the
arrow in the display points to the desired
reception mode.
2. Press:
3. Dial the receiving machines using one or
both of the following methods:
Press one or more Rapid Keys.
Enter one or more Speed Dial numbers
with the numeric keys.
4. Press:
5. If desired, adjust the resolution:
6. Press:
START
START
RESOLUTION
Broadcasting (sending a document to
multiple destinations)
1.
Load the document(s)
2
MEMORY
RECEPTION
MODE
FAX
TEL
TEL/FAX A.M.
FAX
TEL
TEL/FAX A.M.
FAX
TEL
TEL/FAX A.M.
FAX
TEL
TEL/FAX A.M.
05 - NOV 10:30
05 - NOV 10:30
05 - NOV 10:30
05 - NOV 10:30
Beep
RECEIVING
START
TEL/FAX mode: This mode is convenient
for receiving both faxes and voice calls.
When a call comes in, the fax will detect
whether it is a voice call (including manually
dialled fax transmissions), or an
automatically dialled fax.
A.M. mode: Select this mode when an
answering machine is connected to the fax
and the answering machine is turned on.
FAX mo de: The fax machine automatically
answers on the preset number of rings and
receives the incoming document.
TEL mode:
Page 57

Quick Reference Guide
55
ENGLISH
Option Settings
1. Press these keys:
2. Press the # key to scroll through the
settings (to scroll backwards, press the *
key).
3. When the desired setting appears, enter
a selection for the setting (see below) by
pressing the number keys.
4. After entering a selection, the subsequent
setting appears. To return to the date and
time display, press:
Settings
FINE PRIORITY
This option sets the default resolution for
transmitting documents. Press 1 (YES) to
set the default resolution to FINE, or 2 (NO)
to set it to STANDARD.
NUMBER OF RINGS
This sets the number of rings the fax
machine waits before answering an
incoming call in FAX and TEL/FAX
reception modes. Enter a number from 2 to
5.
RECALL INTERVAL
This sets the amount of time your fax will
wait between automatic redials when the
line is busy. Enter 01 for 1 minute, 02 for 2
minutes, etc., up to a maximum of 15
minutes.
RECALL TIMES
This sets the maximum number of times
your fax will automatically redial if the line is
busy. Enter any number from 00 to 10.
TEL/FAX REMOTE NUMBER
This sets the number that you can press on
an extension phone (followed by **) to
activate fax reception. Enter any number
from 0 to 9.
REMOTE RECEPTION
Press 1 if you want to be able to activate fax
reception from an extension phone using
the above TEL/FAX REMOTE NUMBER.
Press 2 to turn remote reception off.
TRANSACTION REPORT
This sets the condition under which a
transaction report is printed. Press a
number key from 1 to 5 as follows:
1: After every transmission and reception.
2: After an error, timer or memory
transmission.
3: Only after transmissions.
4: Only after errors.
5: Never.
PSEUDO RING DURATION
This sets the duration of the special ringing
sound that alerts you to voice calls in TEL/
FAX reception mode. Press 1 for 15
seconds, 2 for 30 seconds, 3 for 60
seconds, or 4 for 120 seconds.
QUIET DETECT TIME
When an answering machine is connected
to the fax and the reception mode is set to
A.M., the fax will take over the line and
begin reception if it detects a certain
duration of silence after the answering
machine answers a call. This sets the
duration of silence in seconds. Enter a
number from 01 to 10, or enter 00 to turn off
the function.
QUIET DETECT START TIME
Use this if you need to delay the start of the
above Quite Detect Time function. Enter a
two-digit number for the number of seconds
of the delay (00 to 15).
OFF HOOK HOLD
This setting can be used to make the fax
automatically take over the line a set
number of seconds after an answering
machine connected to the fax answers. Set
the number of seconds by entering a 3-digit
number (001 to 255), or enter 000 to turn off
the function.
FUNCTION
START
4
Page 58

Quick Reference Guide
56
SELECT AUTO RECEIVE
Press 1 to have your fax automatically
answer a call after 5 rings in A.M. mode if
an answering machine connected to the fax
fails to answer before that time. Press 2 to
turn off the function.
LANGUAGE SELECT
Use this to change the language used in the
display, reports and lists. Press the START
key, press * or # until the desired language
appears in the display, and then press the
START key again.
PBX CONNECTION
Use this setting if your fax is connected to a
PBX. Press 1 to select YES, and then select
the mode for connection to an outside line
(1 for ID, or 2 for FLASH). If you selected ID,
enter your PBX ID number and then press
the START key.
FAX SIGNAL RECEIVE
Press 1 to have your fax automatically begin
reception if you hear a soft fax tone after
answering a call. Press 2 to turn the
function off (turn the function off if you use a
computer fax modem on the same line).
JUNK NUMBER CHECK
Press 1 to block reception from fax numbers
entered in the Anti Junk Number List. Press
2 to allow reception from all numbers.
POLLING
Press 1 to use Rapid Key 15/POLL as a
polling key. Press 2 to use it as a regular
Rapid Key.
CALLER ID
If you subscribe to a Caller ID service and
want to use the Caller ID function, Press 1.
To turn Caller ID off, press 2. (Note: This
setting is not available in some countries.)
AUTO COVER SHEET
Press 1 to have the fax automatically
generate a cover sheet and send it as the
last page of each transmission. Press 2 to
turn the function off.
AUTO PRINT OUT
Press 1 to have your fax automatically print
out an Activity Report once every 30
operations. (The list can still be printed out
on demand when desired.) Press 2 to turn
off automatic print out.
ECM MODE
Press 1 to have the fax machine correct any
distortions in a fax transmission or reception
before printing the fax at the receiving end
(note that the other fax machine must also
have ECM mode). Press 2 to turn off the
function.
Page 59

57
Introduction
*Based on ITU-T Test Chart #1 at standard resolution in Sharp special mode,
excluding time for protocol signals (i.e., ITU-T phase C time only).
Automatic dialling Rapid Key Dialling: 38 numbers
Speed Dialling: 61 numbers
Imaging film Initial starter roll (included with machine):
Approx. 60 A4 size pages
Replacement roll:
FO-15CR (One roll yields approx. 500
A4 size pages)
Memory size* 512 KB (approx. 30 average pages with ECM
function off)
Modem speed 14,400 bps with Automatic Fall back to
2,400 bps.
Transmission time* Approx. 6 seconds
Resolution Horizontal: 8 pels/mm
Vertical:
Standard: 3.85 lines/mm
Fine /Halftone: 7.7 lines/mm
Super fine: 15.4 lines/mm
Automatic document
feeder
20 pages max.
Recording system Thermal transfer recording
Halftone (grayscale) 64 levels
Display 7 x 5 dots, 1 line by 16-digit display
Welcome, and thank you for
choosing a Sharp facsimile
machine! The features and
specifications of your new Sharp
fax are shown below.
Page 60

58
As a part of our policy of continuous improvement, SHARP reserves the right to
make design and specification changes for product improvement without prior
notice. The performance specification figures indicated are nominal values of
production units. There may be some deviations from these values in individual
units.
Paper tray capacity 200 sheets
Compression scheme MR, MH, MMR
Applicable telephone line Public switched telephone network
Compatibility ITU-T (CCITT) G3 mode
Input document size Automatic feeding:
Width: 148 to 216 mm
Length: 128 to 297 mm
Manual feeding:
Width: 148 to 216 mm
Length: 128 to 1000 mm
Effective scanning width 210 mm max.
Effective printing width 204 mm average
Contrast control Automatic/Dark selectable
Reception modes TEL/FAX, TEL, FAX, A.M. (Note: A.M. mode
is for connecting an answering machine)
Copy function Single/Multi/Sort (99 copies/page)
Telephone function Yes (cannot be used if power fails)
Power requirements 220-230 V AC, 50 Hz
Operating temperature 5 - 35°C
Humidity Maximum: 80% RH
Power consumption Standby: 2.6 W
Maximum: 115 W
Dimensions Width: 365 mm
Depth: 482 mm (with attachments)
Height: 270 mm (with attachments)
Weight Approx. 4.8 kg
Page 61

59
Important safety information
Be sure to save these instructions!
When using your facsimile equipment, basic safety precautions should always be
followed to reduce the risk of fire, electric shock and injury to persons, including the
following:
♦Do not disassemble this machine or attempt any procedures not described in this
manual. Refer all servicing to qualified service personnel.
♦This machine must only be connected to a 220-230 V, 50 Hz, earthed (2-prong)
outlet. Connecting it to any other kind of outlet will damage the machine and
invalidate the warranty.
♦Do not install or use the machine near water, or when you are wet. For example,
do not use the machine near a bath tub, wash bowl, kitchen sink or laundry tub, in
a wet basement, or near a swimming pool. Take care not to spill any liquids on the
machine.
♦Unplug the machine from the telephone socket and then the power outlet and
consult a qualified service representative if any of the following situations occur:
- Liquid has been spilled into the machine or the machine has been
exposed to rain or water.
- The machine produces odors, smoke, or unusual noises.
- The power cord is frayed or damaged.
- The machine has been dropped or the housing damaged.
♦Do not allow anything to rest on the power lead, and do not install the machine
where people may walk on the power lead.
♦Never insert objects of any kind into slots or openings on the machine. This could
create a risk of fire or electric shock. If an object falls into the machine that you
cannot safely remove, unplug the machine and consult a qualified service
representative.
♦Do not place this machine on an unstable cart, stand or table. The machine could
be seriously damaged if it falls.
♦Avoid using a telephone (other than a cordless type) during an electrical storm.
There may be a remote risk of electric shock from lightning.
♦Do not use a telephone to report a gas leak in the vicinity of the leak.
♦The socket-outlet must be installed near the equipment and must be easily
accessible.
Page 62

60
1. Installation
Unpacking Checklist
Paper tray cover
Paper tray
3 gears and
1 flange
Sample
imaging film
Telephone
line cord
Handset
Operation
manual
Rapid key
labels
Handset
lead
Points to keep in mind when setting up
Do not place the
machine in direct
sunlight.
Do not place the
machine near
heaters or air
conditioners.
If any are missing,
contact your dealer
or retailer.
Before setting up,
make sure you have
all of the following
items.
Keep dust away
from the machine.
Keep the area around
the machine clear.
About condensation
If the machine is moved from a cold to a warm place, it is possible that condensation
may form on the scanning glass, preventing proper scanning of documents for
transmission. To remove the condensation, turn on the power and wait
approximately two hours before using the machine.
Page 63

A Look at the Operation Panel
61
1. Installation
REDIAL key
Press this key to automatically
redial the last number dialed.
SPEED DIAL key
Press this key to dial a fax or voice
number using an abbreviated
2-digit Speed Dial number.
RECEPTION MODE key
Press this key to select the mode of
reception.
Display
This displays messages and
prompts during operation and
programming.
VOLUME key
Press this key to adjust the volume
of the speaker when the
SPEAKER key has been pressed,
or the volume of the ringer at all
other times.
A Look at the Operation Panel
1
2
3
4
REDIAL
SEARCH
SPEAKER
123
456
789
0
GHI JKL MNO
TUV WXYZPQRS
SPEED
DIAL
ABC DEF
DOWN
RECEPTION
MODE
FUNCTION
MEMORY
RESOLUTION
UP
VOLUME
START
PANEL RELEASE
STOP
COPY/
HELP
SHIFT
01 02 03
20 21 22
0504 06 07
2423 25 26
0908 10 11
2827 29 30
1312 14 15/POLL
3231 33 34
17/P216/P1 18/G1
3635 37
19/G2
38
21 3 64 7
5
141516 9 8101213 11
TEL FAX
TEL/FAX A.M.
R
MEMORY key
Press this key to scan a document
into memory before transmitting it.
Rapid Dial Keys
Press one of these keys to dial a
fax number automatically. To dial
the bottom number on a Rapid key,
press the SHIFT key before
pressing the Rapid key.
RESOLUTION key
Press this key to adjust the
resolution for faxing or copying.
STOP key
Press this key to cancel an
operation before it is completed.
Panel release
Grasp this finger hold and pull
toward you to open the operation
panel.
5
6
7
8
9
10
Page 64

A Look at the Operation Panel
62
START key
Press this key to begin
transmission when using Speed
Dialling, Direct Keypad Dialling, or
Normal Dialling.
COPY/HELP key
When a document is in the feeder,
press this key to make a copy of a
document. At any other time, press
this key to print out the Help List, a
quick reference guide to the
operation of your fax machine.
FUNCTION key
Press this key to select various
special functions.
SPEAKER key
Press this key to listen to the line
and fax tones through the speaker
when faxing a document.
Note: This is not a
speakerphone. You must pick up
the handset to talk with the other
party.
SEARCH/R key
Press this key to search for an
auto-dial number, or, during a
phone conversation, press this key
to put the other party on hold.
Number keys
Use these keys to dial numbers,
and enter numbers and letters
when storing auto-dial numbers.
12
13
14
15
16
11
Page 65

Connections
63
1. Installation
Connections
Make sure the handset
lead goes into the
unmarked socket on the
side of the machine!
Use the handset to make ordinary
phone calls, or to transmit and receive
faxes manually.
Connecting the power lead
Plug the power lead into a 220-230 V,
50 Hz, earthed AC outlet.
Caution!
The mains outlet (socket outlet)
should be installed near the
equipment and be easily accessable.
The machine does not have a
power on/off switch, so the
power is turned on and off by
simply plugging in or unplugging
the power lead.
Note: If your area experiences a high
incidence of lightning or power
surges, we recommend that you
install surge protectors for the power
and telephone lines. Surge protectors
can be purchased at most telephone
specialty stores.
Connecting the Handset
Connect the handset as shown and
place it on the handset rest.
♦The ends of the handset lead are
identical, so they will go into either
socket.
Page 66

Connections
64
Connecting the telephone
line cord
Insert one end of the line cord into the
socket on the back of the machine
marked TEL. LINE. Insert the other
end into a wall telephone socket.
TEL.
SET
TEL.
LINE
Be sure to insert the line into the
TEL. LINE socket. Do not insert
it into the TEL. SET socket.
Attachments
Insert the paper tray into the back of
the fax as shown.
Extension phone (optional)
If desired, you can connect an
extension phone to the TEL. SET
socket on the fax.
♦To connect an answering machine
to your fax, see Chapter 6,
Answering Machine Hookup
(page
110).
1 Remove the seal covering the TEL.
SET socket.
TE
L
.
SET
T
EL
.
L
IN
E
2 Connect the extension phone line
to the TEL. SET socket.
Page 67

Loading the Imaging Film
65
1. Installation
Loading the Imaging Film
Your fax uses a roll of imaging film to create printed text and images. The print head
in the fax applies heat to the imaging film to transfer ink to the paper. Follow the
steps below to load or replace the film.
1 Press the release marked OPEN
and open the print compartment
cover.
When replacing the film, use a
roll of Sharp UX-15CR imaging
film. One roll can print about 500
A4-size pages.
The initial starter roll of
imaging film included with
your fax can print about 60
A4-size pages.
Caution!
The printing head (the strip of metal
on the underside of the cover)
applies heat to the printing film. It
may be hot if a document has just
been printed.
2 If you are replacing the imaging
film, take the old film out of the
printing compartment and remove
the three (3) green gears and the
green flange from the ends of the
spools.
DO NOT DISCARD THE GREEN
GEARS AND THE GREEN
FLANGE!
Page 68

Loading the Imaging Film
66
3 Take the new film out of its
package, and insert two of the
gears provided with the fax into the
ends of the spool with film. Make
sure that the two tabs on the gears
fit properly into the slots in the ends
of the spool.
• Do not yet remove the band which
holds the spools together.
5 Cut the band which holds the
spools together with scissors, and
remove it. Insert the remaining
gear into the right end of the empty
spool and the flange into the left
end of the empty spool. Make sure
the tabs on the gear and the flange
fit into the slots in the ends of the
spool (the gear has two tabs and
the flange has one tab).
2 tabs
4 Hold the empty spool so that the
end with only one slot is on the left,
and lower the spools into the front
of the printing compartment. The
gears in the ends of the spool with
film should fit into the slots on each
side of the printing compartment.
1 tab
2 tabs
Flange
Gear
6 Pull the empty spool toward the
back of the compartment,
unwinding the film as you pull.
Page 69

Loading the Imaging Film
67
1. Installation
8 Wind the film slightly (rotate the
gear on the right side of the empty
spool) so that there is no slack in
the film. Make sure that both edges
of the film wind onto the spool
evenly.
7 Insert the empty spool into the back
of the compartment so that the gear
and the flange fit into the slots on
the sides of the compartment.
• Make sure that the gear engages
with the gear below it.
9 Close the print compartment cover,
making sure it clicks into place.
Caution!
Close the cover slowly to make
sure it doesn't pinch your fingers.
10 Load paper in the paper tray and
then press the following keys to
initialize the film.
Note: Paper must be loaded before
the film can be initialized. To load
paper, see Loading the Printing
Paper
.
FUNCTION
6
INITIALIZE FILM
START
Page 70

Loading the Imaging Film
68
When to replace the imaging
film
Replace the imaging film when the
display shows:
FILM END
Use the following imaging film, which
is available from your dealer or
retailer:
Sharp FO-15CR Imaging Film
Caution!
The text of documents printed with
the imaging film is visible on the used
film. If confidential information has
been printed, dispose of the film
appropriately.
Page 71

Loading Printing Paper
69
1. Installation
Loading Printing Paper
The paper tray holds the paper on which received documents and copies are
printed. Up to 200 sheets of A4 size paper from 60 to 75 g/m2 can be loaded in the
tray. Less sheets can be loaded when using heavier paper. The maximum allowed
paper weight is 90 g/m2.
Note: When receiving or copying documents, do not allow more than 100 pages to
collect in the received document outlet. Otherwise, the outlet may become
obstructed, causing paper jams.
Caution!
Do not use the blank side of paper that has already been printed on.
1 Remove the paper cover if it is on
the paper tray.
2 Fan the paper, and then tap the
edge against a flat surface to even
the stack.
3 Pull the paper release plate toward
you and insert the stack of paper
into the tray, print side down.
• If paper remains in the tray, take it
out and combine it into a single
stack with the new paper before
adding the new paper.
Page 72

Loading Printing Paper
70
SET PAPER &
PRESS START KEY
PRINT CONTRAST
5 Your fax has been set at the factory
to print at normal contrast.
Depending on the type of paper
you have loaded, you may find that
you obtain better print quality by
changing the setting to LIGHT.
Press these keys:
Press 1 to select NORMAL or 2 to
select LIGHT.
or
NORMAL LIGHT
COPY CUT-OFF
1 2
STOP
4 Replace the paper cover on the
paper tray.
Important: Be sure to replace the
paper cover before you put back
the paper release plate down.
Note: If the display shows the
following alternating messages when
making a copy or receiving a fax,
check the paper tray. If the tray is
empty, add paper and then press the
START key. If there is paper, make
sure it is inserted correctly and then
press the START key.
Press the STOP key to return to
the date and time display.
Press
twice
FUNCTION
6
Page 73

Entering Your Name and Fax Number
71
1. Installation
Entering Your Name and Fax Number
3 key
# key
FUNCTION key
STOP key
123
456
789
0
Note: The imaging film and printing
paper must be loaded before your
name and fax number can be
entered.
Once you enter this information,
it will automatically appear at the
top of each fax page you send.
START key
1 Press these keys:
3
FUNCTION
Press
twice
OWN NUMBER SET
2 Press the START key.
ENTER FAX #
START
Before you can begin using your
fax, you must enter your name
and fax (telephone) number. You
also need to set the date and time.
The display will show:
Page 74

Entering Your Name and Fax Number
72
3 Enter your fax number by pressing
the number keys (max. of 20
digits).
(Example)
•
To insert a space between digits,
press the # key.To insert a "+",
press the * key.
• If you make a mistake, press the
SPEED DIAL key to backspace
and clear the mistake.
ENTER YOUR NAME
4 Press the START key to enter the
fax number in memory.
START
A =
B =
C =
D =
E =
F =
G =
H =
I =
J =
K =
L =
M =
N =
O =
P =
Q =
R =
S =
T =
U =
V =
W =
X =
Y =
Z =
SPACE =
SPEAKER
SEARCH
=
=
m ove
m ove
R
• To enter two letters in succession
that require the same key, press
the SPEAKER key after entering
the first letter.
(The SPEAKER key moves the
cursor forward, and the SEARCH/
R key moves the cursor backward.)
• To clear a mistake, press the
SPEED DIAL key.
•
To change case, press the REDIAL
key.
• To enter one of the following
symbols, press the # key or the *
key repeatedly:
. / ! " # $ % & ’ ( )
* + , - : ; < = > ?
@ [ ¥ ] ^ _ ' { | }
→ ←
(Note: Characters particular to the
selected display language will
appear at the end of the symbol
list.)
SECURITY SELECT
STOP
Cursor: A dark square mark in the
display that indicates where a
START
number or letter will be entered.
6 Press the START key.
SPEAKER
1
2
4
3
4
2
4
4
1
1
5 Enter your name by pressing
number keys for each letter as
shown in the chart below. Up to 24
characters can be entered.
Example:
SHARP = 77777 444 22 7777
77
The display will show:
The display will show:
Page 75

Setting the Date and Time
73
1. Installation
Setting the Date and Time
The date and time appear in the display and are printed at the top of every
page you fax.
1 Press these keys:
123
456
789
0
Note: The imaging film and printing
paper must be loaded before the date
and time can be set.
3 key
**** key
FUNCTION key
STOP keySTART key
Set the date and time by
pressing the keys on the
operation panel as shown
below.
2 Press the START key.
3 Enter a two-digit number for the
day (“01” to “31”).
DATE & TIME SET
START
• The currently set date will appear
in the display.
Example: the 5th
5
• To correct a mistake, press the
SPEED DIAL key to move the
cursor back to the mistake and
then enter the correct number.
4 Enter a two-digit number for the
month (“01” for January, “02” for
February, “12” for December, etc.).
Example: January
10
The display will show:
3
FUNCTION
Press
3 times
0
5 Enter the year (four digits).
Example: 2001
2 0 0 1
Page 76

Setting the Date and Time
74
8 Press the STOP key to return to
the date and time display.
6 Enter a two-digit number for the
hour (“00” to “23”) and a two-digit
number for the minute (“00” to
“59”).
7 Press the START key to start the
clock.
Example: 9:25
2
5
0
9
START
STOP
STORE JUNK #
The display will show:
Note: The time setting will change
automatically at the beginning and
end of summertime.
Page 77

Setting the Reception Mode
75
1. Installation
Setting the Reception Mode
Your fax has four modes for receiving incoming calls and faxes:
RECEPTION MODE key
Setting the reception mode
Press the RECEPTION MODE key
until the arrow in the display points to
the desired mode.
RECEPTION
MODE
123
456
789
0
FAX
TEL
TEL/FAX A.M.
FAX
TEL
TEL/FAX A.M.
FAX
TEL
TEL/FAX A.M.
FAX
TEL
TEL/FAX A.M.
05 - NOV 10:30
05 - NOV 10:30
05 - NOV 10:30
05 - NOV 10:30
TEL mode:
This is the most convenient mode for
receiving phone calls. You can also
receive faxes; however, all calls must
first be answered by picking up the
fax's handset or an extension phone
connected to the same line.
FAX mode:
Select this mode when you only want
to receive faxes on your line. The fax
machine will automatically answer all
calls on two rings and receive
incoming faxes.
TEL/FAX mode:
This mode is convenient for receiving
both faxes and voice calls. When a
call comes in, the fax will detect
whether it is a voice call (including
manually dialled fax transmissions),
or an automatically dialled fax. If it is a
voice call, the fax will make a special
ringing sound to alert you to answer.
If it is an automatically dialled fax
transmission, reception will begin
automatically.
A.M. mode:
Use this mode only if you have
connected an answering machine to
the fax (see Chapter 6). Select this
mode when you go out to receive
voice messages in your answering
machine and faxes on your fax
machine.
For more information on receiving
faxes in TEL FAX and TEL/FAX
modes, see Chapter 3,
Receiving
Documents
(page 95). For more
information on using A.M. mode, see
Chapter 6,
Answering Machine
Hookup
(page 110).
Page 78

Volume Adjustment
76
Volume Adjustment
You can adjust the volume of the speaker and ringer using the UP and DOWN keys.
2 Press the UP or DOWN key.
3 When the display shows the
desired volume level, press the
SPEAKER key to turn off the
speaker.
SPEAKER: HIGH
SPEAKER: MIDDLE
SPEAKER: LOW
or
Speaker
1 Press the SPEAKER key.
DOWN key
UP key
123
456
789
0
SPEAKER
SPEAKER
DOWN
UP
Ringer
1 Press the UP or DOWN key. (Make
sure the SPEAKER key has not
been pressed.)
RINGER: HIGH
RINGER: MIDDLE
RINGER: LOW
RINGER: OFF OK ?
2 If you selected RINGER: OFF OK?,
press the START key.
The ringer will ring once at the
selected level, then the date and time
will reappear in the display.
START
or
DOWN
UP
Page 79

77
6. Answering
Machine
PBX Settings
If the fax machine is connected to a PBX, you must set it for PBX operation. Press
the keys on the operation panel as follows:
1 Press these keys:
3 Set the mode for connecting calls
from the PBX to an outside line.
Enter 1 for ID, or 2 for FLASH.
(Refer to your PBX manual or
consult your supplier for the correct
setting.)
• If you selected FLASH, go directly
to Step 6.
PBX CONNECTION
FUNCTION
4
Press
8 times
2 Press 1 (YES) if the machine is
connected to a PBX. Press 2 (NO)
if it is connected to a regular public
line.
or
YES NO
1 2
ID:
FLASH:
1
2
Note: The ID number is automatically
dialled for access to the public line
when Rapid Key or Speed Dialling is
used. Do not store it as part of the
number when storing a Rapid Key or
Speed Dialling number.)
5 Press the START key.
6 Press the STOP key to return to the
date and time display.
4 If you selected ID in Step 3, enter
your PBX ID number (maximum of
3 digits).
STOP
(Example)
6
START
Page 80

Setting the Display Language
78
Setting the Display Language
If desired, you can change the language used in the display, reports and lists. Press
the keys on the operation panel as follows:
2 Press the START key.
3 Press the # or * key until the
desired language appears in the
display.
STOP
4 Press the START key.
.1 Press these keys:
LANGUAGE SELECT
FUNCTION
4
Press
9 times
or
START
START
• The machine will beep and the
display will change to the selected
language.
5 Press the STOP key to return to the
date and time display.
Page 81

79
2. Sending
Documents
2. Sending Documents
Transmittable Documents
Loading several pages at once:
Minimum size
Maximum size
Minimum weight
Maximum weight
Minimum size Maximum size
Minimum weight
Maximum weight
140 mm
148 mm
216 mm
1000 mm
52 g/m²
52 g/m²
140 mm
148 mm
297 mm
216 mm
157 g/m²
80 g/m²
Note: Letters or graphics on the
edges of a document will not be
scanned.
4 mm
4 mm
5 mm
5 mm
Other restrictions
♦The scanner cannot recognize
yellow, greenish yellow, or light
blue ink.
♦Ink, glue, and correcting fluid on
documents must be dry before they
pass through the document feeder.
♦All clips, staples, and pins must be
removed from documents before
loading in the feeder. If these are
not removed, they may damage the
machine.
♦Documents which are patched,
taped, torn, smaller than the
minimum size, carbon backed,
easily smudged, or have a slippery
coated surface should be
photocopied, and the copy loaded
in the feeder.
♦If the leading edge of the document
is bent or curves up, straighten it
before placing the document in the
feeder.
Size and weight
The size and weight of documents
that you can load in the document
feeder depend on whether you load
one page at a time or several pages
at once.
Loading one page at a time:
Letters in the
shaded area
will not be
scanned.
Page 82

Loading the Document
80
Loading the Document
Up to 20 pages can be placed in the feeder at one time. The pages will
automatically feed into the machine starting from the bottom page.
♦If you need to send or copy more than 20 pages, place the additional pages gently
and carefully in the feeder just before the last page is scanned. Do not try to force
them in, as this may cause double-feeding or jamming.
♦If your document consists of several large or thick pages which must be loaded
one at a time, insert each page into the feeder as the previous page is being
scanned. Insert gently to prevent double-feeding.
1 Adjust the document guides to the
width of your document.
2 Place the document face down and
push it gently into the document
feeder. The top edge of the
document should enter the
machine first.
READY TO SEND
• The feeder will draw the leading
edge of the document into the
machine. The display will show:
RESOLUTION
3 Adjust the resolution and/or
contrast settings (if desired) as
explained in
Resolution and
Contraston
on page 28, then dial
the receiving machine as explained
in
Sending a Fax by Normal Diallng
on page 30.
Page 83

Loading the Document
81
2. Sending
Documents
Removing a document from
the feeder
Important!
Do not try to remove a document
without opening the operation panel.
This may damage the feeder
mechanism.
1 Grasp the finger hold and pull up to
open the operation panel.
2 Remove the document.
3 Close the operation panel.
• Press down on both front corners
of the panel to make sure it clicks
into place.
If you need to remove a
document from the feeder,
open the operation panel.
Page 84

Adjusting the Resolution and Contrast
82
Adjusting the Resolution and Contrast
If desired, you can adjust the resolution and contrast before sending a document.
Resolution settings
STANDARD Use STANDARD for
ordinary documents.
This setting gives you
the fastest and most
economical
transmission.
FINE Use FINE for
documents containing
small letters or fine
drawings.
SUPER FINE Use SUPER FINE for
documents containing
very small letters or
very fine drawings.
HALF TONE Use HALF TONE for
photographs and
illustrations. The
original will be
reproduced in 64
shades of gray.
You must adjust the settings
each time you don’t want to use
the default settings.
The default resolution
setting is STANDARD
and the default
contrast setting is
AUTO.
Contrast settings
AUTO Use AUTO for normal
documents.
DARK Use DARK for faint
documents.
1 Load the document(s).
Note: The resolution and contrast settings are only effective for sending a
document. They are not effective for receiving a document.
• The document must be loaded
before the resolution and contrast
can be adjusted.
Page 85

Adjusting the Resolution and Contrast
83
2. Sending
Documents
STANDARD :AUTO
FINE :AUTO
SUPER FINE :AUTO
HALF TONE :AUTO
STANDARD :DARK
FINE :DARK
SUPER FINE :DARK
HALF TONE :DARK
2 Press the RESOLUTION key one
or more times until the desired
resolution and contrast settings
appear in the display.
• The first time you move through the
list of resolution settings, the
contrast setting AUTO will appear
next to each resolution setting. The
second time you move through the
list, the contrast setting DARK will
appear.
RESOLUTION
Note: In order to transmit in SUPER
FINE resolution, the receiving fax
machine must also have that
resolution. If it doesn’t, your machine
will automatically step down to the
next best available setting.
Changing the default
resolution
If desired, you can change the default
resolution for faxing documents to
FINE. Follow the steps below.
1 Press these keys:
FINE PRIORITY
4
FUNCTION
2 Press 1 (YES) to set the default
resolution to FINE, or 2 (NO) to set
it to STANDARD.
3 Press the STOP key to return to the
date and time display.
or
YES NO
1 2
STOP
Page 86

Sending a Fax by Normal Dialling
84
READY TO SEND
or
Sending a Fax by Normal Dialling
With Normal Dialling, you pick up the handset (or press the SPEAKER key) and dial
by pressing the number keys.
♦If a person answers, you can talk with them through the handset before sending
the fax. (If you pressed the SPEAKER key, you must pick up the handset to talk.)
♦Normal Dialling allows you to listen to the line and make sure the other fax
machine is responding.
RESOLUTION
SPEAKER
1 Load the document(s).
• Set the resolution and/or contrast if
desired.
2 Pick up the handset or press the
SPEAKER key. Listen for the dial
tone.
3 Dial the number of the receiving
machine by pressing the number
keys.
2
5
8
GHI
JKL
MNO
TUV
WXYZ
PQRS
ABC
DEF
1
4
7
3
6
9
4 Wait for the connection. Depending
on the setting of the receiving
machine, you will either hear a
facsimile reception tone or the
other person will answer.
Beep
• If the other party answers, ask
them to press their Start key (if you
pressed the SPEAKER key, pick
up the handset to speak with
them). This causes the receiving
machine to issue a reception tone.
Page 87

Sending a Fax by Normal Dialling
85
2. Sending
Documents
Using the REDIAL key
You can press the REDIAL key to
redial the last number dialed. To send
a document, press the START key
when you hear the fax tone after the
connection is established. Note that
the speaker is automatically activated
when you press the REDIAL key.
5 When you hear the reception tone,
press the START key. Replace the
handset if you used it.
START
• When transmission is completed,
the fax will beep once.
Page 88

Sending a Fax by Automatic Dialling
86
Rapid Keys
When you store a number in a Rapid
Key, write the name of the party on
the label.
Speed Dial numbers
01 through 38 are for
Rapid Key (one-touch)
Dialling.
Speed Dial numbers 39
through 99 are for
dialling with the SPEED
DIAL key.
SPEED
DIAL
01
20
9
3
123
456
789
0
SPEED DIAL key
Sending a Fax by Automatic Dialling
START
You can dial a fax or telephone number by simply pressing a Rapid Key, or by
pressing the SPEED DIAL key and entering a two-digit number.
♦To use Automatic Dialling, you must first store the full fax or telephone number in
your fax machine.
♦When you store a fax or telephone number, you select a two-digit Speed Dial
number for it. 99 Speed Dial numbers are available.
Page 89

Sending a Fax by Automatic Dialling
87
2. Sending
Documents
Storing fax and telephone
numbers for Automatic
Dialling
1 Press these keys:
2 Press the 1 key to select SET.
4 Enter the fax or voice number by
pressing the number keys.
(Note: A space cannot be entered.)
FAX/TEL # MODE
1=SET,2=CLEAR
(Example)
1
1
0
3
FUNCTION
3 Enter a two-digit Speed Dial
number by pressing the number
keys (01 to 38 for Rapid Key
Dialling, 39 to 99 for Speed
Dialling).
2
5
8
GHI
JKL
MNO
TUV
WXYZ
PQRS
ABC
DEF
1
4
7
3
6
9
• To clear a mistake, press the
SPEED DIAL key.
• If a pause is required between any
of the digits to access a special
service or an outside line, press the
REDIAL key (two seconds per
pause). The pause will appear as a
hyphen. Several pauses can be
entered in a row.
• If you are on a PBX, do not enter
the access code for the public line.
If the number is within your PBX,
enter an R before the number.
• Press the SEARCH/R key to enter
a space between digits.
5 Press the START key.
START
FAX/TEL # SET
ENTER SPEED #
Page 90

Sending a Fax by Automatic Dialling
88
2 Press 2 to select CLEAR.
3 Enter the Speed Dial number that
you want to clear by pressing the
number keys.
(Example)
Clearing auto-dial numbers
1 Press these keys:
2
10
7 Press the START key.
8 Return to Step 3 to store another
number, or press the STOP key to
return to the date and time display.
Step 3 or
START
STOP
3
FUNCTION
• To clear a mistake, press the
SPEED DIAL key.
• To enter two letters in succession
that require the same key, press
the SPEAKER key after entering
the first letter.
SPEAKER
A =
B =
C =
D =
E =
F =
G =
H =
I =
J =
K =
L =
M =
N =
O =
P =
Q =
R =
S =
T =
U =
V =
W =
X =
Y =
Z =
SPACE =
SPEAKER
SEARCH
=
=
m ove
m ove
R
4 Press the START key.
5 Return to Step 3 to clear another
number, or press the STOP key to
return to the date and time display.
Step 3 or
START
STOP
FAX/TEL # MODE
1=SET,2=CLEAR
6 Enter the name of the party by
pressing the number keys as
shown below. (If you don’t want to
enter a name, go directly to Step
7.)
Example:
SHARP = 77777 444 22 7777
77
Page 91

Sending a Fax by Automatic Dialling
89
2. Sending
Documents
Making changes
To make changes in a number
previously stored, repeat the
programming procedure. Select the
Rapid Key or Speed Dial number for
which you want to make changes in
Step 3, and then change the number
and/or name when they appear in the
display in Steps 4 and 6.
Note: The fax machine uses a lithium
battery to keep automatic dialling
numbers and other programmed data
in memory when the power is turned
off. Battery power is consumed
primarily when the power is off. With
the power kept continuously off, the
life of the battery is about 5 years. If
the battery dies, have your dealer or
retailer replace it. Do not try to
replace it yourself.
Page 92

Sending a Fax by Automatic Dialling
90
2 Press the Rapid Key corresponding
to the desired Speed Dial number.
Rapid Key Dialling
If the number you want to dial has
been stored for Automatic Dialling as
a Speed Dial number from 01 to 38,
you can dial it by pressing the
corresponding Rapid Key.
Example: To dial Speed
Dial number 02, press
Rapid Key 02/21.
READY TO SEND
Example: To dial Speed Dial
number 21, press the SHIFT key
and press Rapid Key 02/21.
RESOLUTION
SHIFT
01
20
022103
22
04
23
052406
25
07
26
SHIFT
01
20
022103
22
04
23
052406
25
07
26
SHIFT
1 Load the document(s).
• Set the resolution and/or contrast if
desired.
• If the Speed Dial number is from 20
to 38, press the SHIFT key and
then press the Rapid key.
• The document will be automatically
transmitted once the connection is
established.
Speed Dialling
Speed Dialling can be used to dial
any number that has been stored for
Automatic Dialling.
1 Load the document(s).
RESOLUTION
•
Set the resolution and/or contrast if
desired.
READY TO SEND
• The name of the receiving party will
appear in the display. If no name
was stored, the fax number will
appear. (If the name or number is
incorrect, press the STOP key.)
Page 93

Sending a Fax by Automatic Dialling
91
2. Sending
Documents
3 Check the display. If the name or
number shown is correct, press the
START key. (If not, press the STOP
key and then repeat Step 2.)
START
• To enter numbers 1 through 9, first
enter 0 and then the number.
Direct Keypad Dialling
You can also enter a full number with
the number keys and then press the
START key to begin dialling. You can
use this method to dial a full number
when you don’t need to speak to the
other party before faxing.
Note: Direct Keypad Dialling cannot
be used to dial a number within the
same PBX as your fax machine. To
send a document to a fax machine in
your PBX, use Normal Dialling.
• Set the resolution and/or contrast if
desired.
2 Enter the number of the receiving
machine by pressing the numeric
keys.
RESOLUTION
2
5
8
GHI
JKL
MNO
TUV
WXYZ
PQRS
ABC
DEF
1
4
7
3
6
9
START
• If a pause is required between any
of the digits to access a special
service or an outside line, press the
REDIAL key (two seconds per
pause). The pause will appear as a
hyphen. Several pauses can be
entered in a row.
3 Check the display. If the number of
the receiving machine shown is
correct, press the START key.
• If it is not correct, press the STOP
key to backspace and clear one
digit at a time, and then re-enter
the correct digit(s).
READY TO SEND
1 Load the document(s).
2 Press the SPEED DIAL key and
then enter the Speed Dial number
by pressing the numeric keys.
(Example)
SPEED
DIAL
0
9
Page 94

Sending a Fax by Automatic Dialling
92
Searching for an auto-dial
number
If you don’t remember the Rapid Key
or Speed Dial number in which you
have programmed a particular fax
number, you can search for the
number by following the steps below.
Once you have found the number, you
can dial and transmit the loaded
document by simply pressing the
START key.
3 Enter the first letter of the stored
name by pressing the appropriate
number key (the key below the
marked letter) one or more times
until the letter appears in the
display. If the name begins with a
special character or number, press
1.
• Set the resolution and/or contrast if
desired.
2 Press the SEARCH/R key and then
the 1 key.
SEARCH
R
1
1 Load the document(s).
RESOLUTION
2
5
8
GHI
JKL
MNO
TUV
WXYZ
PQRS
ABC
DEF
1
4
7
3
6
9
• If you don’t remember the first
letter, go to Step 4 (you will scroll
through the list from the beginning).
• If a name wasn’t stored for the
number, press 0. This will cause
numbers, not names, to appear
when you scroll.
READY TO SEND
Page 95

Sending a Fax by Automatic Dialling
93
2. Sending
Documents
Automatic redialling
If you use automatic dialling
(including Direct Keypad Dialling) and
the line is busy, the fax machine will
automatically redial the number. The
fax machine will make up to two
redialling attempts at an interval of
five minutes.
♦
To stop automatic redialling, press
the STOP key.
4 Press the # key or the * key to
scroll through the names (numbers
if you pressed 0). Stop when the
desired name appears in the
display.
• If no names have been stored that
begin with the entered letter, you
will scroll from the next name, in
alphabetical order, in the list. If no
names/numbers have been stored
at all, NO DATA will appear.
or
5 Press the START key. The
document will be automatically
transmitted once the connection is
established.
START
Recall Interval for automatic
redialling
If desired, you can change the
interval at which the fax machine
makes automatic redialling attempts.
1 Press these keys:
2 Enter a 2-digit number from 01 to
15 for the number of minutes in the
interval.
RECALL INTERVAL
Press
3 times
Example:
3 minutes
3 Press the STOP key to return to the
date and time display.
Page 96

Sending a Fax by Automatic Dialling
94
Error Correction Mode
The fax machine is set to
automatically correct any distortions
in a transmission due to noise on the
telephone line before printing at the
receiving end. This function is called
Error Correction Mode (ECM). ECM is
effective for both transmissions and
receptions, and is only effective when
the other fax machine has ECM as
well.
If desired, you can turn ECM off. This
will increase slightly the amount of
memory available for memory
transmission and reception.
ECM MODE
1 Press these keys:
FUNCTION
4
2 Press 1 to turn on ECM or 2 to turn
it off.
3 Press the STOP key to return to the
date and time display.
STOP
or
YES NO
1 2
3 Press the STOP key to return to the
date and time display.
2 Enter a 2-digit number from 00 to
10 for the maximum number of
redial attempts.
Example:
3 attempts
Recall times for automatic
dialling
If desired, you can change the
maximum number of automatic
redialling attemps made when the
line is busy.
♦Under certain conditions (for
example if a person answers the
call on a telephone), automatic
redialling may stop before the set
number of redialling attempts are
made.
1 Press these keys:
RECALL TIMES
Press
4 times
Page 97

95
3. Receiving
Documents
3. Receiving Documents
Using TEL/FAX Mode
Press the RECEPTION
MODE key until the
arrow in the display
points to TEL/FAX.
When the reception mode is set to TEL/FAX, your fax automatically answers all calls
on 2 rings. After answering, your fax monitors the line for about 5 seconds to see if a
fax tone is being sent.
♦If your fax detects a fax tone (this means that the call is an automatically dialled
fax), it will automatically begin reception of the incoming document.
♦If your fax doesn't detect a fax tone (this means that the call is a voice call or
manually dialled fax), it will make a ringing sound (called pseudo ringing) for 15
seconds to alert you to answer. If you don't answer within this time, your fax will
send a fax tone to the other machine to allow the calling party to send a fax
manually if they desire.
Note: Only the fax will alert you to voice calls or manually dialled faxes by pseudo
ringing. An extension phone connected to the same line will not ring after the
connection has been made.
RECEPTION
MODE
FAX
TEL
A.M.
TEL/FAX
Page 98

Using TEL/FAX Mode
96
Pseudo Ring Duration for Tel/
Fax Mode
If desired, you can change the
duration of pseudo ringing in Tel/Fax
mode.
1 Press these keys:
2 Enter a number as follows for the
desired duration:
3 Press the STOP key to return to the
date and time display.
15 seconds:
30 seconds:
60 seconds:
120 seconds:
FUNCTION
4
Press
8 times
PSEUDO RING DUR.
STOP
3
2
1
4
Page 99

Using FAX Mode
97
3. Receiving
Documents
♦If you pick up the handset before the machine answers, you can talk to the other
party and/or receive a document as explained in
Using TEL mode
on page 99.
2 rings
RECEPTION
MODE
FAX
TEL
TEL/FAX
A.M.
Fax reception
To select FAX mode, press
the RECEPTION MODE
key until the arrow in the
display points to FAX.
Using FAX Mode
When the reception mode is set to FAX, the fax machine will automatically answer
all calls on two rings and receive incoming faxes.
Page 100

Using FAX Mode
98
Changing the number of
rings
If desired, you can change the
number of rings on which the fax
machine answers incoming calls in
FAX mode. Any number from 2 to 5
can be selected.
1 Press these keys:
NUMBER OF RINGS
ENTER (2-5) (2)
FUNCTION
4
Press
2 times
Example: 3 rings
2 Enter the desired number of rings
(any number from 2 to 5).
3 Press the STOP key to return to
the date and time display.
STOP
3
 Loading...