

Page 1

MODEL
FO-1460
FACSIMILE
OPERATION MANUAL
1. Installation
2. Initial Settings
3. Sending Documents
4. Receiving Documents
5. Making Copies
6. Making Telephone Calls
7. Answering Machine Connection
8. Special Functions
9. Optional Settings
10. Printing Reports and Lists
11. Maintenance
12. Troubleshooting
Page 2

MAINS PLUG WIRING INSTRUCTIONS
This equipment is fitted with a moulded type mains plug which incorporates a detachable fuse
cover, under no circumstances should the plug be used without the fuse cover fitted.
In the unlikely event of the so cket outlet in your home not bein g compatible with the plug
supplied, cut of f t he mains plug an d f it an appropriate t yp e o bs er vi ng th e wiring code b el ow .
DANGER:
The fuse from the cut-off plug should be removed and the plug should be disposed
of in a safe ma nner. Un der no cir cumstan ces shoul d the cu t-off pl ug be inserted into a socket
outlet as a seriou s el ec tr ic sho ck ma y oc cu r.
If you are not sure how to do this, get help from a qualified electrician.
IMPORTANT
The wires in this mains lead are coloured in accordance with the following code:
GREEN-AND-YELLOW: Earth
BLUE: Neutral
BROWN: Live
As the colou rs of th e wi re s i n th e mai ns lea d of thi s ap pa ra tu s may not corre sp on d w it h the
coloured markings identifying the terminals in your plug, proceed as follows:
The wire which is co loured
GREEN-AND-YELLOW
must be connected to the terminal in the
plug which is mar ke d b y t he letter E, or by the safety eart h symb ol , or coloure d gr een or
green-and-yellow.
The wire which is coloured
must be connected to the terminal which is marked with
BLUE
the letter N or coloured bl ack.
The wire which is colour ed
BROWN
must be connected to the terminal which is marked with
the letter L or coloured red.
This apparatus must be protected b y a 13A fuse in the mains plug or distribution board.
"WARNING: THIS APPARATUS MUST BE EARTHED"
This equipment complies with the requirements of Directives 89/336/EEC and 73/23/EEC as amended by 93/68/EEC.
Dieses Gerät entspricht den Anforderungen der EG-Richtlinien 89/336/EWG und 73/23/EWG mit Änderung 93/68/EWG.
Ce matériel répond aux exigences contenues dans les directives 89/336/CEE et 73/23/CEE modifiées par la directive
93/68/CEE.
Dit apparaat voldoet aan de eisen van de richtlijnen 89/336/EEG en 73/23/EEG, gewijzigd door 93/68/EEG.
Dette udstyr overholder kravene i direktiv nr. 89/336/EEC og 73/23/EEC med tillæg nr. 93/68/EEC.
Quest’ apparecchio è conforme ai requisiti delle direttive 89/336/EEC e 73/23/EEC, come emendata dalla direttiva
93/68/EEC.
Este equipamento obedece às exigências das directivas 89/336/CEE e 73/23/CEE, na sua versão corrigida pela
directiva 93/68/CEE.
Este aparato satisface las exigencias de las Directivas 89/336/CEE y 73/23/CEE, modificadas por medio de la
93/68/CEE.
Denna utrustning uppfyller kraven enligt riktlinjerna 89/336/EEC och 73/23/EEC så som kompletteras av 93/68/EEC.
Dette produktet oppfyller betingelsene i direktivene 89/336/EEC og 73/23/EEC i endringen 93/68/EEC.
Tämä laite täyttää direktiivien 89/336/EEC ja 73/23/EEC vaatimukset, joita on muutettu direktiivillä 93/68/EEC.
89/336/EEC : EMC directive 73/23/EEC : Low voltade directive 93/68/EEC : CE Mark regulation
This equipment is not designed for making emer gency telephony
calls when the power fails. Alternative arrangements should be
made for access to emergency services.
Page 3
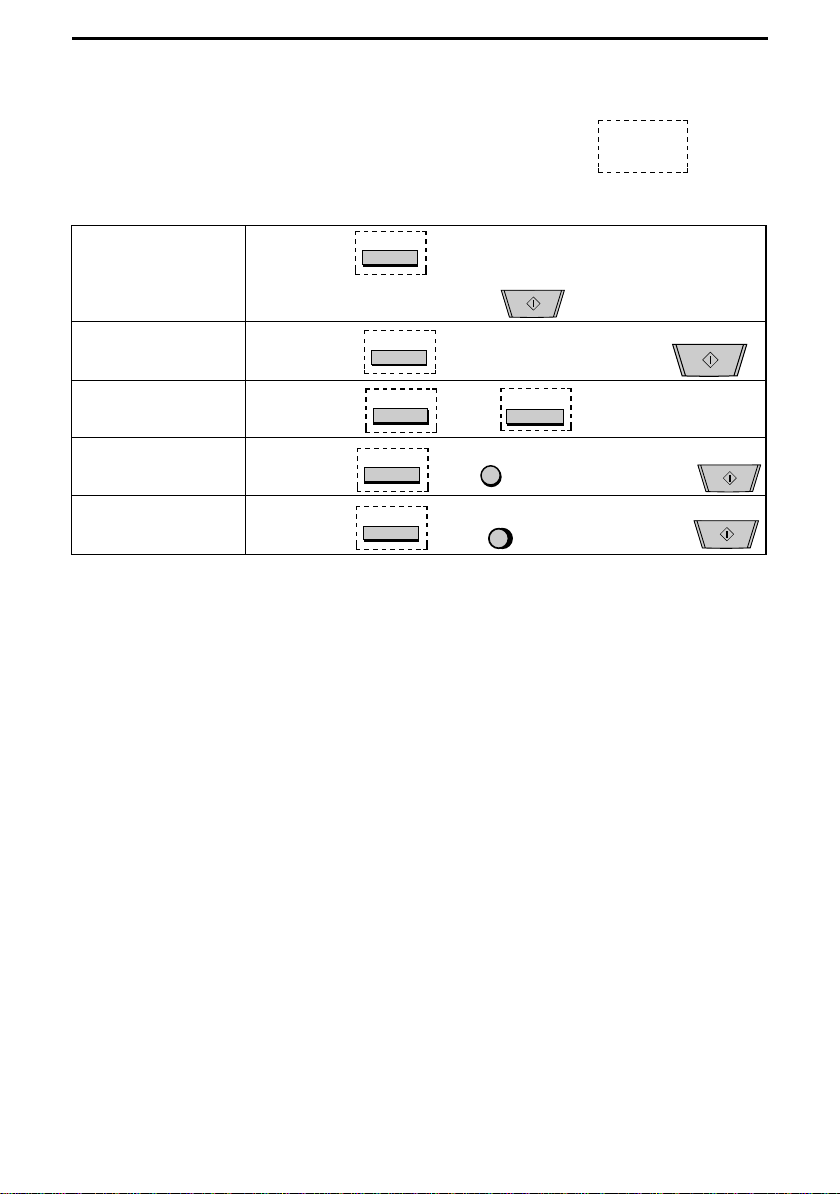
Quick Reference Guide
Note: Steps which are optiona l ar e enclosed in a dotted frame:
Transmitting documents
Normal Dialling
Direct Keypad
Dialling
Rapid Key Dialling
Speed Dialling
Redialling
Load
document
→
Load
document
Load
document
Load
document
Load
document
RESOLUTION
→
Wait for
reception tone
→
→
RESOLUTION
→
RESOLUTION
→
RESOLUTION
RESOLUTION
→
→
→
→
→
→
SPEED DIAL
REDIAL
Lift handset
or
SPEAKER
press
START
Dial (press
numeric keys)
SHIFT
Enter Speed Dial
number (press 2
→
numeric keys)
Wait for
→
reception tone
→
→
→
Hang up
→
Press Rapid
Key
Dial (press
numeric keys)
START
START
→
START
→
Page 4
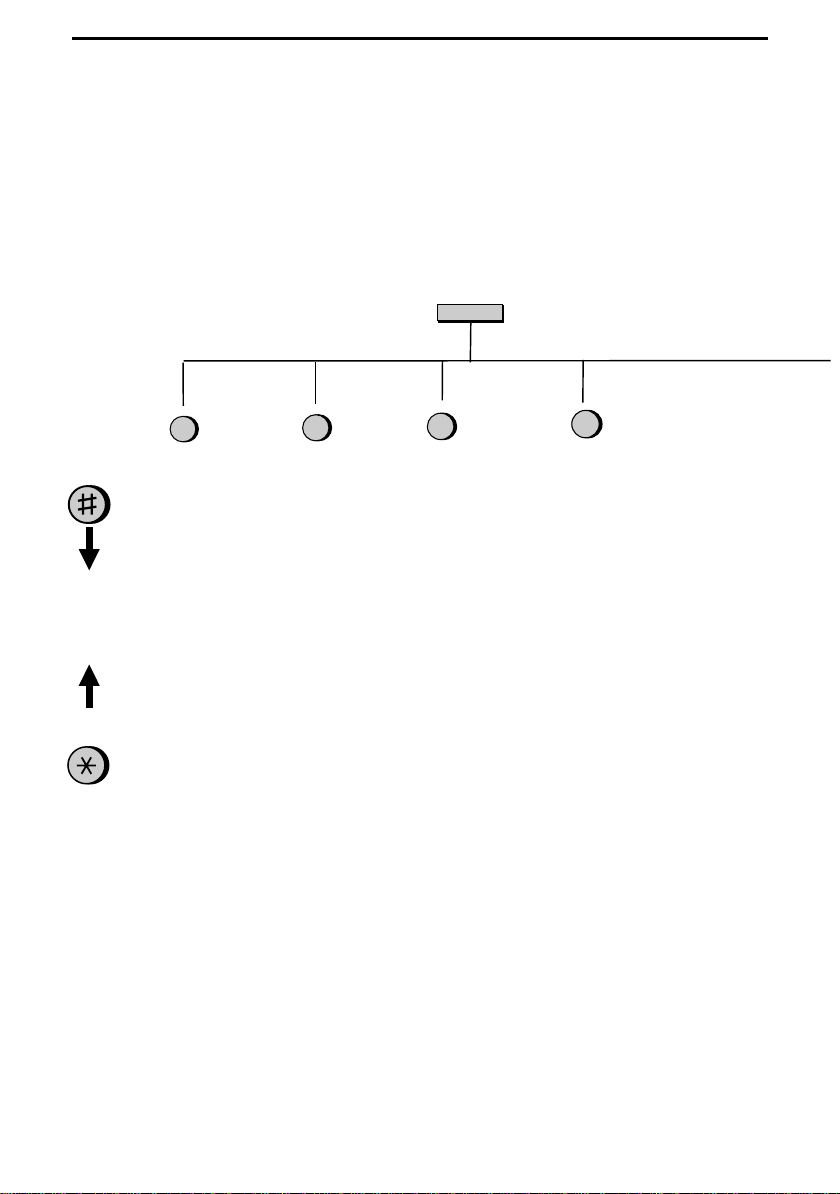
FUNCTION key menu
Quick Reference Guide
The following chart shows the layout of the functions and settings accessed by pressing the
FUNCTION
then "#" or "*" until the desired setting appears.
Instructions for making each setting appear in the display. If you have any difficulty, refer to the de-
tailed instructions on the page shown below the setting.
key. First press the
1
Timer Mode
Send Mode
(61)
Poll Mode
(61)
FUNCTION
2
Listing Mode
Activity Report
(73)
Timer List (75)
Telephone
Number List (76)
Passcode List
(76)
Option Setting List
(76)
Anti Junk Fax
Number List (77)
Program/Group
List (77)
Print Setup List
(78)
key, the appropriate numeric key as shown, and
FUNCTION
3
Entry Mode
Fax/Tel
Numbers for
Auto Dialling
(21)
Own Number
and Name Set
(16)
Polling Security
Select (59)
Passcode
Numbers for
Polling (60)
Date and Time
Set (19)
Store Junk Fax
Number (52)
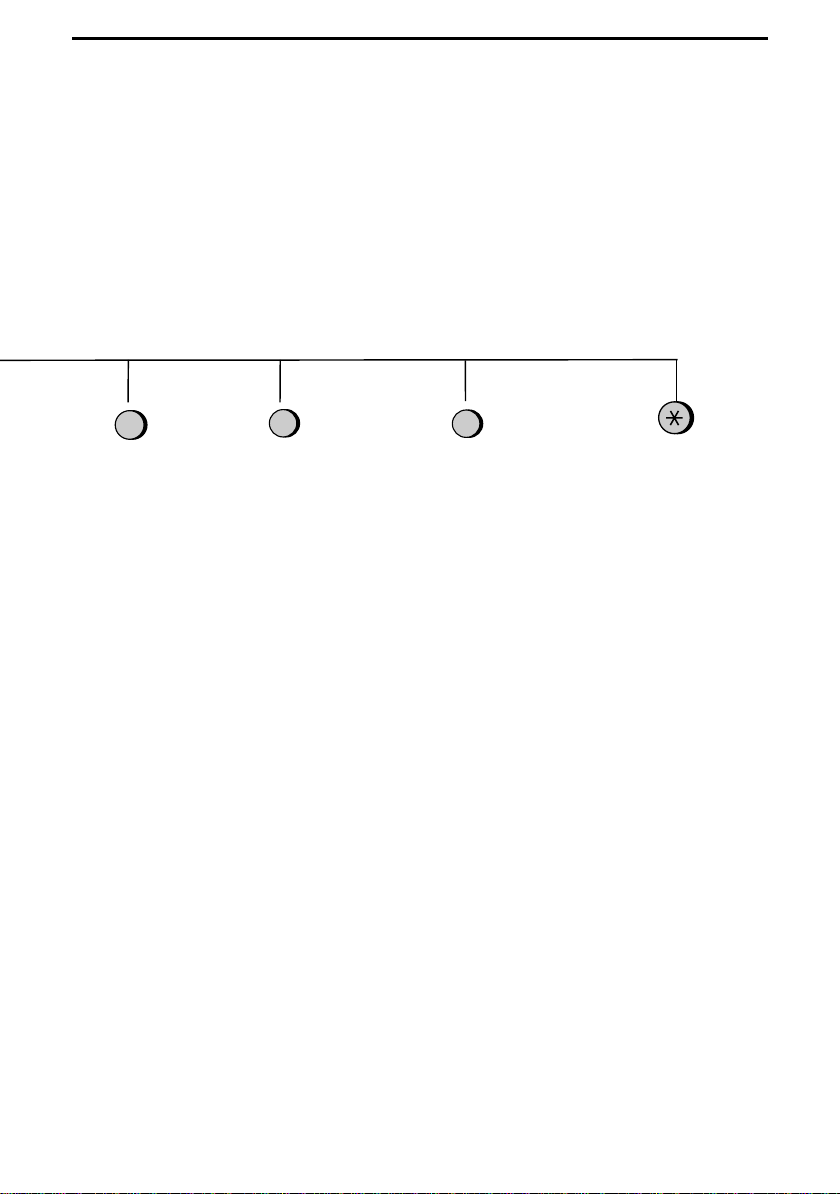
4
Optional Settings
Fine Resolution
Priority (68)
Number of Rings in
FAX Mode (68)
Recall Interval (69)
Recall Times (69)
Telephone/Fax
Remote Number
(69)
Remote Reception
Select (69)
Transaction Report
Print Select (69)
Dial Mode (69)
Pseudo Ringing
Duration (70)
Quiet Detec t Time
(70)
Quiet Detec t Start
Timing (70)
Off-Hook Hold (71)
Select Auto
Receive (71)
PBX Recall (71)
Fax Signal Receive
(71)
Junk Number
Check (71)
Polling (71)
Auto Cover
Sheet (72)
Activity Report
(72)
ECM (72 )
Page 5
Quick Reference Guide
5
Cover Sheet
Cover Sheet
Header (29)
6
Print Set-up
Initialize Film (5)
Reception Ratio
(39)
2 in 1 Print (39)
Paper Type Set
(12)
Copy Cut-off (42)
7
Program/Group
Program Entry
Mode (63)
Group Entry
Mode (24)
Page Count
(30)
Page 6

Introduction
Welcome to the FO-1460 and thank you for choosing Sharp! In addition to providing you with the ease and convenience of plain-pap er printing, the FO-1460
features a variety of special functions designed to increase the range and power
of your communicati on s.
This manual gives you easy-to-follow instructions for installing and using the
FO-1460. The Table of Contents will show you where instructions for using
each feature are located. Whilst you may not need to read every section in detail
at first, we recommend you at least review them briefly.
If you have any questions or problems which cannot be solved by reading this
manual, please contact your Sharp dealer.
♦ Keys, switches, and labels on the machine are indicated in BOLD print.
♦ Messages appearing in the display are indicated in CAPITAL LETTERS.
Important safety information
•
If any of your telephone equipment is not operating properly, you should
immediately remove it from your telephone line, as it may cause harm to the
telephone network.
•
Never install telephone wiring during a lightning storm.
•
Never install telephone jacks in wet locations unless the jack is specifically
designed for wet locations.
•
Never touch uninsulated telephone wires or terminals unless the telephone line
has been disconnected at the network interface.
•
Use caution when installing or modifying telephone lines.
•
Avoid using a telephone (o ther than a cord less ty pe) d uring an electrical s torm.
There may be a remote risk of electric shock from lightning.
•
Do not use a telephone to report a gas leak in the vicinity of the leak.
•
Do not install or use the machine near water, or when you are wet. Take care
not to spill any liquids on the machine.
Page 7

Regulatory information
This facsimile machine is only designed to operate in the country where approved.
Your Sharp FO-1460 Facsimile Transceiver is approved for connection to the Public
Switched Telephone Network (PSTN), it is also approved for connection via a Private
Branch Exchange (PBX), and can be used with either Loop Disconnect (LD) or Dual
Tone Multi-Frequency (DTMF) signalling.
Your facsimile machine is not suitable as an extension to some payphones or for use on
shared service lines.
REN
The Ringer Equivalence Number (REN) of your fax machine is 1.
The total number of instruments that can be connected to an exclusive line is determined
by adding the REN values of each instrument. The total should not exceed 4.0. A
telephone pr ov id e d by BT is ass u m e d to ha ve a RE N of 1 un le s s ot he rwise marked.
Satisfactory ringer operation can not be guaranteed in installations consisting of mixed
apparatus types, even if the REN value does not exceed 4.
Emergency services
Emergency services (999) can be called from this apparatus. Please display on the
telephone the number required to access that service, together with the number of the
telephone, using the labe l provided.
Private branch exchange (PBX) connection
Your facsimile machine is approved for connection to the Public Telephone Network
(PSTN) via compatible PBX systems. Consult your supplier for a list of suitable PBX
systems. It cannot be guaranteed that this facsimile machine will operate correctly under
all possible conditions of connection to compatible PBX systems.
This facsimile machine has been approved for use of the following facilities:
Simple tele ph on e
Tone dialling (DTMF)
Loop discon ne c t (Pulse dia lling)
Memory dialling
Loudspeaking (Call Progress Monitor)
On-hook dia l ling
Page 8

Automatic answering
Automatic dialling
Automatic clearing
Last number redial
Time break or Earth recall
Series connection of extension telephone(s)
Any other usage will invalidate the approval of the facsimile if as a result it then ceases
to comply with the standards against which approval was granted.
Series connection
When connected via series apparatus, difficulties may occasionally be experienced when
making calls to the PSTN and by both parties during telephone conversations. If
difficulties are experienced, contact the supplier or maintainer of the series apparatus in
the first instance.
While operation may be possi b le in itially, change s to or m od e rn is a tion of the network
taking place in the normal course of events may result in the facsimile equipment being
connected to a network service with which it was not designed to be compatible. Failure
of the facsimile / series apparatus to work under these circumstances may not be the
fault of the ne twork operator.
The voltage drop introduced by your facsimile between the PSTN and the associated
apparatus at a current of 40mA d.c. is 2 volts, therefore no additional series equipment
may be connected.
Page 9

Table of Contents
1 Installation 1
Unpacking Checklist. . . . . . . . . . . . . . . . . . . . . . . . . . . . . . . . . . . . . . . . 1
Loading the Imaging Film . . . . . . . . . . . . . . . . . . . . . . . . . . . . . . . . . . . 2
Connections. . . . . . . . . . . . . . . . . . . . . . . . . . . . . . . . . . . . . . . . . . . . . . . 6
Attachments. . . . . . . . . . . . . . . . . . . . . . . . . . . . . . . . . . . . . . . . . . . . . . . 9
Loading Printing Paper . . . . . . . . . . . . . . . . . . . . . . . . . . . . . . . . . . . . . 10
2 Initial Settings 13
Setup Guide. . . . . . . . . . . . . . . . . . . . . . . . . . . . . . . . . . . . . . . . . . . . . . 13
A Look at the Operation Panel . . . . . . . . . . . . . . . . . . . . . . . . . . . . . . . 14
Entering Your Name and Fax Number. . . . . . . . . . . . . . . . . . . . . . . . . 16
Entering Letters for Names. . . . . . . . . . . . . . . . . . . . . . . . . . . . . . . . . . 17
Setting the Date and Time. . . . . . . . . . . . . . . . . . . . . . . . . . . . . . . . . . . 19
Selecting the Reception Mode . . . . . . . . . . . . . . . . . . . . . . . . . . . . . . . 20
Storing Numbers for Automatic Dialling . . . . . . . . . . . . . . . . . . . . . . . 21
Volume Adjustment . . . . . . . . . . . . . . . . . . . . . . . . . . . . . . . . . . . . . . . 25
3 Sending Documents 26
Transmittable Documents. . . . . . . . . . . . . . . . . . . . . . . . . . . . . . . . . . . 26
Loading the Document . . . . . . . . . . . . . . . . . . . . . . . . . . . . . . . . . . . . . 27
Optional Transmission Settings . . . . . . . . . . . . . . . . . . . . . . . . . . . . . . 28
Dialling and Transmission . . . . . . . . . . . . . . . . . . . . . . . . . . . . . . . . . . 31
4 Receiving Documents 36
5 Making Copies 40
6 Making Telephone Calls 43
7 Answering Machine Connection 46
Preparations. . . . . . . . . . . . . . . . . . . . . . . . . . . . . . . . . . . . . . . . . . . . . . 46
Using the Connection . . . . . . . . . . . . . . . . . . . . . . . . . . . . . . . . . . . . . . 47
Optional A.M. Connection Settings . . . . . . . . . . . . . . . . . . . . . . . . . . . 50
Page 10

8 Special Functions 52
Blocking Reception of Unwanted Faxes . . . . . . . . . . . . . . . . . . . . . . . 52
Memory. . . . . . . . . . . . . . . . . . . . . . . . . . . . . . . . . . . . . . . . . . . . . . . . . 54
Broadcasting . . . . . . . . . . . . . . . . . . . . . . . . . . . . . . . . . . . . . . . . . . . . . 56
Polling (Requesting a Fax Transmission). . . . . . . . . . . . . . . . . . . . . . . 58
Timer Operations . . . . . . . . . . . . . . . . . . . . . . . . . . . . . . . . . . . . . . . . . 61
Entering and Using Programs. . . . . . . . . . . . . . . . . . . . . . . . . . . . . . . . 63
9 Optional Settings 68
10 Printing Reports and Lists 73
11 Maintenance 79
12 Troubleshooting 81
Problems and Solutions. . . . . . . . . . . . . . . . . . . . . . . . . . . . . . . . . . . . . 81
Messages and Signals . . . . . . . . . . . . . . . . . . . . . . . . . . . . . . . . . . . . . . 84
Clearing Paper Jams . . . . . . . . . . . . . . . . . . . . . . . . . . . . . . . . . . . . . . . 86
Specifications 88
Index 90
Page 11
1
Chapter
Installation
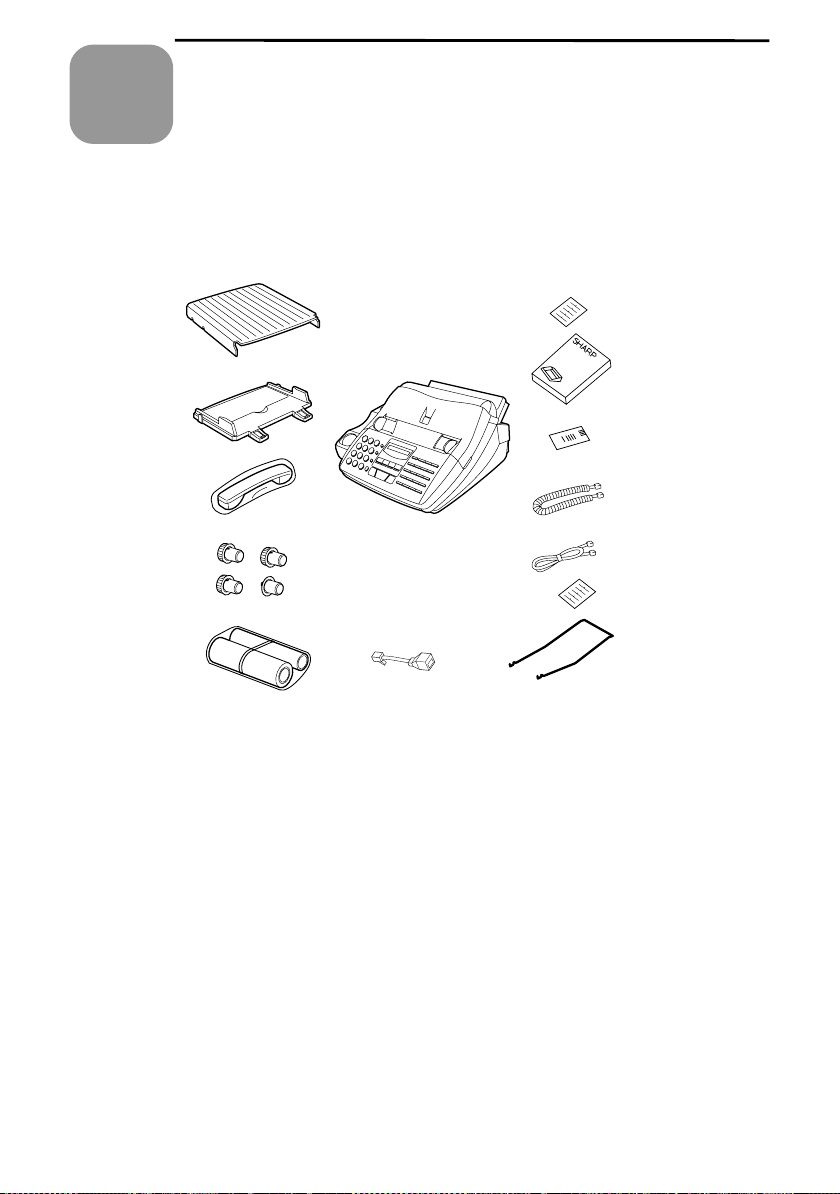
Unpacking Checklist
After unpacking your fax, make sure you have all the items shown below. If any
are missing, contact your dealer.
Paper tray
cover
Paper tray
Handset
3 gears and
1 flange
Sample
imaging film
Extension telephone
socket adapter
Rapid key
labels
Operation
manual
British Teleco m
fax book card
Handset lead
Telephone
line cord
Emergency labels
Original document
support (locat ed
between box and
packing case)
Points to keep in mind when setting up
♦ The fax must be installed on a level surface.
♦ Keep the fax away from air conditioners, heaters, direct sunlight, and dust.
♦ Provide easy access to the front, back, and sides of the fax. In particular, keep
the area in front of the fax clear, or the original document may jam as it
comes out after scanning.
♦ If the machine is moved from a cold to a warm place, it is possible that con-
densation may form on the scanning glass, preventing proper scanning of
documents for transmission. To remove the condensation, turn on the power
and wait approximately two hours before using the machine.
♦ If your area experiences a high incidence of lightning or power surges, we rec-
ommend that you install surge protectors for the power and telephone lines.
Surge protectors can be purchased at most telephone specialty stores.
1
Page 12
Chapter 1 Installation
Loading the Imaging Film
The printer unit in your fax creates printed text and imag es by applyin g heat to
the imaging film, which causes ink to be transferred from the film to the page.
Follow the steps below to install or replace the imaging film.
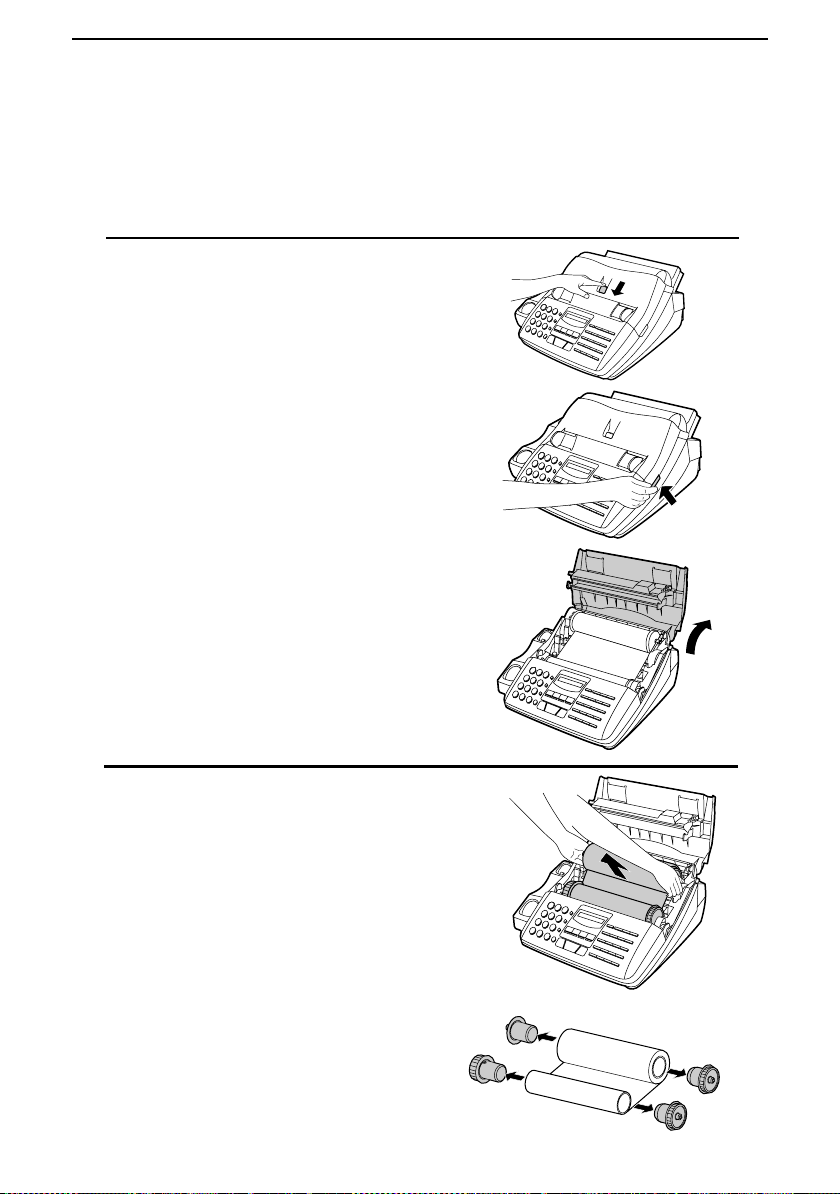
Press the release button marked OPEN
1
and open the print compartment cover.
•••• Caution! The pr inti n g hea d (t he st rip
of metal on the underside of the cover)
applies heat to the imaging film. It
may be hot if a docum ent ha s just bee n
printed.
If you are replacing the imaging film,
2
take the old film out of the printing compartment and remove the three (3) green
gears and the green flange from the ends
of the spools.
DO NOT DISCARD THE GREEN
GEARS AND THE GREEN
FLANGE!
2
Page 13
Take the new film out of its package,
3
and insert two of the gears provided with
the fax into the ends of the spool with
film. Make sure that the two tabs on the
gears fit properly into the slots in the
ends of the spool.
•••• Do not yet remove the band which
holds the spools together.
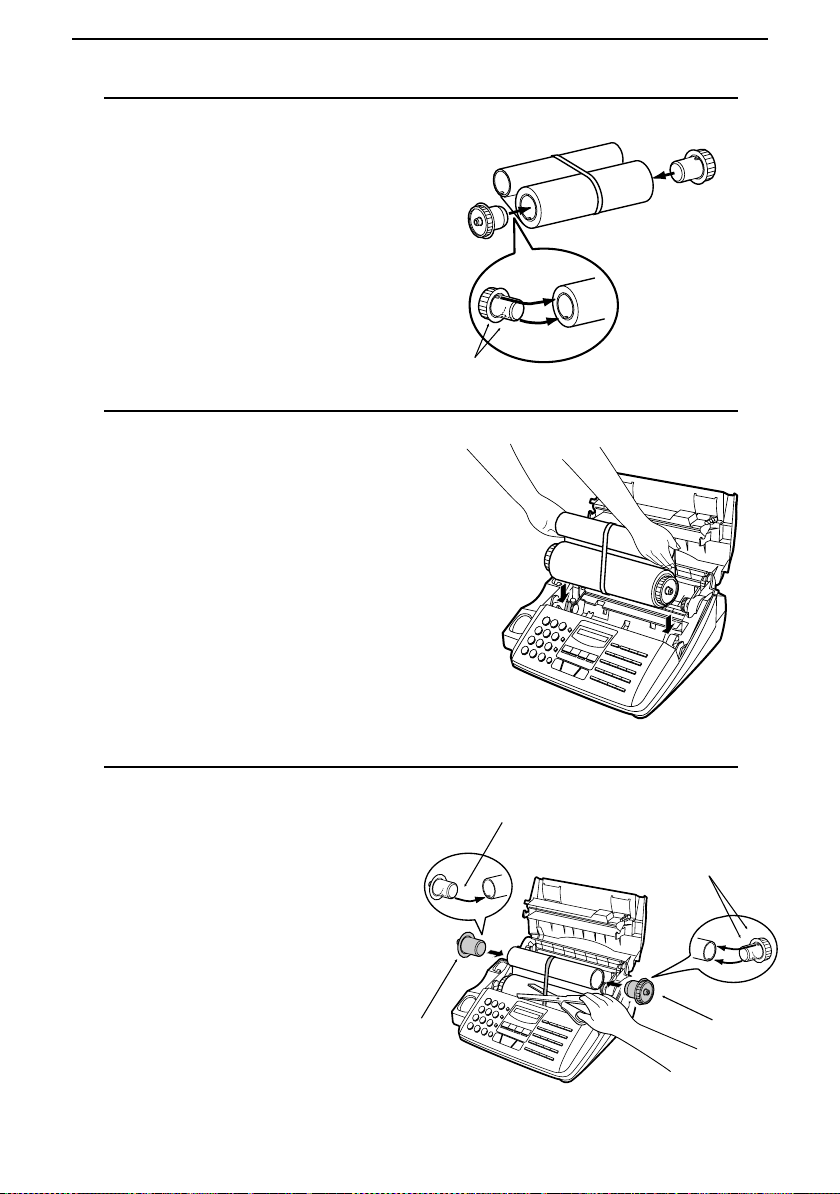
Hold the empty spool so that the end
4
with only one slot is on the left, and
lower the spools into the front of the
printing compartment. The gears in the
ends of the spool with film should fit into
the slots on each side of the printing compartment.
Chapter 1 Installation
2 tabs
Cut the band which holds the spools
5
together with scissors, and remove it.
Insert the remaining gear into the
right end of the empty spool and the
flange into the left end of the empty
spool. Make sure the tabs on the gear
and the flange fit into the slots in the
ends of the spool (the gear has two
tabs and the flange has one tab).
Flange
1 tab
2 tabs
Gear
3
Page 14
Chapter 1 Installation
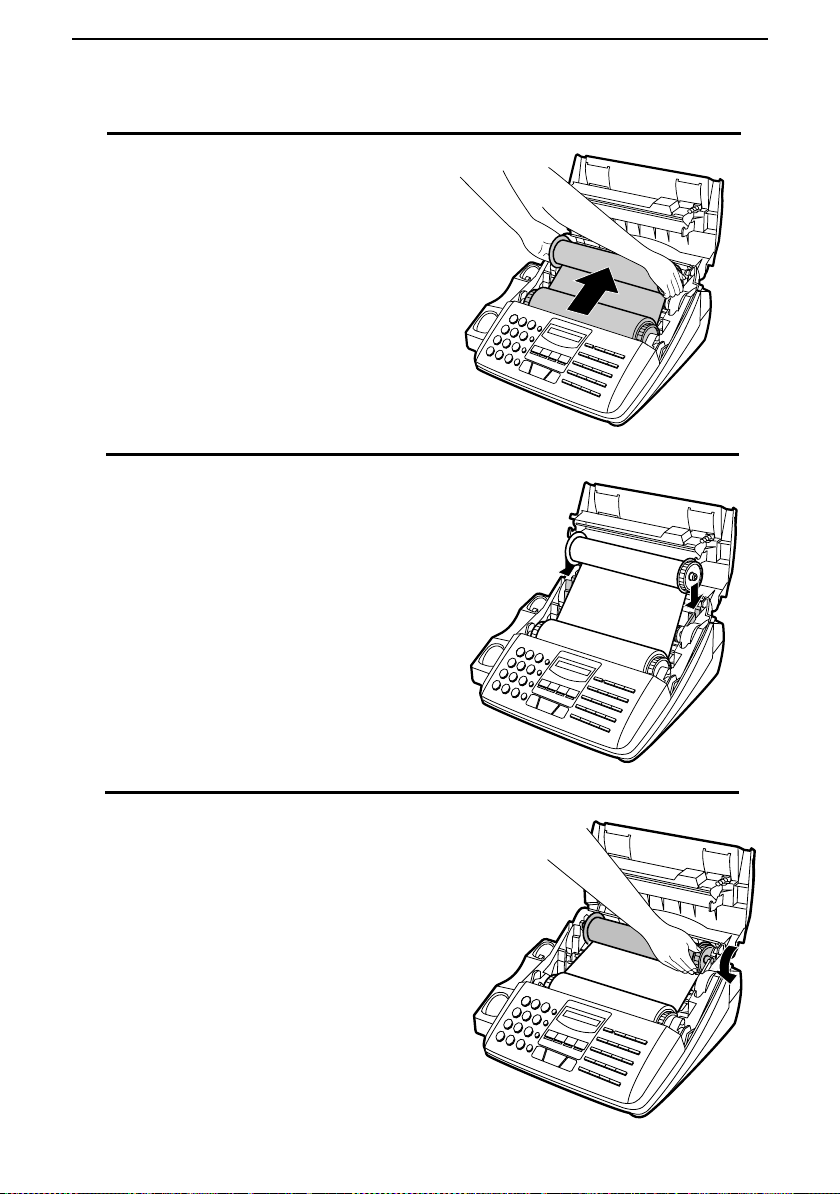
Pull the empty spool toward the back of
6
the compartment, unwinding the film as
you pull.
Insert the empty spool into the back of
7
the compartment so that the gear and the
flange fit into the slots on the sides of the
compartment.
•••• Make sure that the green gear engages
with the white gear below it.
Wind the film slightly (rotate the gear on
8
the right side of the empty spool) so that
there is no slack in the film. Make sure
that both edges of the film wind onto the
spool evenly.
4
Page 15
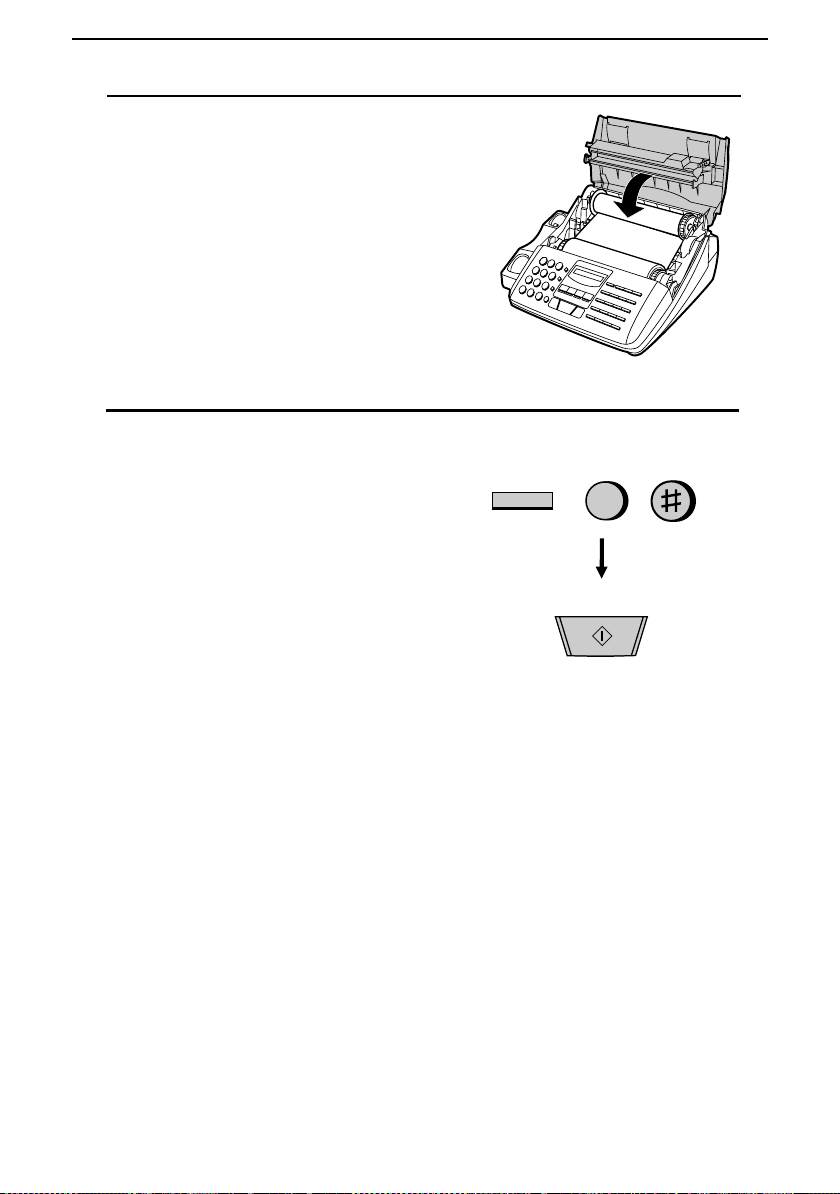
Close the print compartment cover, mak-
9
ing sure it clicks into place.
•••• Caution! Close the cover slowly to
make sure it doesn’t pinch your fingers.
If you replaced the film, initialize the
10
new film by pressing the FUNCTION
key, the "6" key, an d the "#" key on the
operation panel. Make sure that INITIALIZE FILM appears in the display, and
then press the START key. (Do not perform this step if you installed the initial
sample roll of film.)
Chapter 1 Installation
FUNCTION
6
START
When to replace the imaging film
The sample roll of imaging film provided with your fax is capable of printing approximately 60 pages of A4 size paper. When it is used up, FILM END will appear in the display. Replace it with the following imaging film which is
available at your dealer.
FO-15CR Imagin g Fil m
One roll of FO-15CR imaging film is capable of printing approximately 470
pages of A4 size paper when printed continuously.
Caution!
The text of documents printed with the imaging film is visible on the
used film. If confidential information has been printed, dispose of the
film appropriately.
5
Page 16
Chapter 1 Installation
Connections
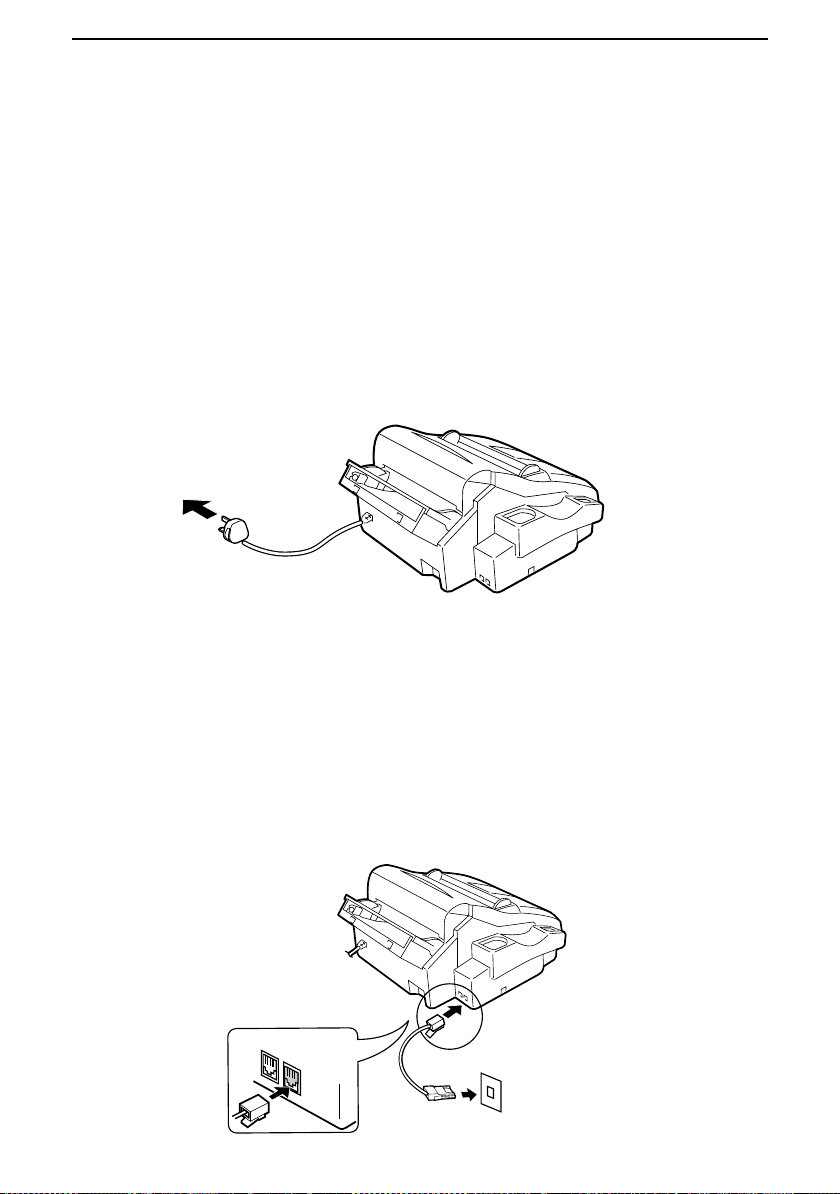
Power lead
Plug the power lead into a 230 V, earthed (3-prong) AC outlet.
♦ The fax does not have a power on/off switch, so the power is turned on and
off by simply plugging or unplugging the power lead.
♦ Important: Whenever you unplug the power lead, disconnect the fax ma-
chine from the telephone network first.
♦ Caution: The mains outlet (socket-outlet) shall be installed near the equip-
ment and shall be easily accessible.
Telephone line cord
Plug one end of the telephone line into the socket on the fax marked "TEL.
LINE". Plug the other end into a new plan telephone wall socket.
♦ If you do not have a new plan telephone socket, contact your local tele-
phone supplier. Con nec tio n t o the t el eph on e ne tw ork mu st not be ha rd
wired.
♦ Eire: Only the supplied cord should be used. If a longer cord is required,
please consult yo ur supp lie r or ser vic in g age n t.
TEL.
SET
TEL.
LINE
6
Page 17

Chapter 1 Installation
Comments:
Your fax is set for tone dialling. If you are on a pulse dial line, you must reset
••••
the fax for pulse dialling. This is done by resetting Option Setting 8 as
described in Chapter 9, "Optional Settings".
If you are connecting the fax to a PBX, you may need to reset the fax to the
••••
appropriate recall mode for the PBX. This is done by setting Option Setting
14 as described in Chapter 9
If you intend to use a computer fax modem on the same phone lin e, you must
••••
reset Option Setting 15 to NO in order to prevent transmission and reception
errors. This procedure is described in Chapter 9, "Optional Settings".
Extension phones can be used to make and receive calls as normal with the
••••
fax connected. For details on receiving faxes fr om an extensio n ph on e, s ee
Chapter 4, "Receiving Documents".
The facsimile machine will not ring in response to incoming calls and
••••
cannot be used to make outgoing calls in the absence of mains power to
the machine. For this reason it is recommended that the fax is not left as
the only telephone instrument on line when in this state.
Your fax cannot be used on a key system without the necessary adap tation of
••••
the system. Please consult the installers of the system if this is required.
Handset
Connect the handset lead to the handset and the fax as shown.
♦ The ends of the handset lead are identical, so they will go into either socket.
Place the handset on the handset rest.
Use the handset to make ordinary
phone calls, or to transmit and
receive docum en ts ma nu al ly .
7
Page 18
Chapter 1 Installation
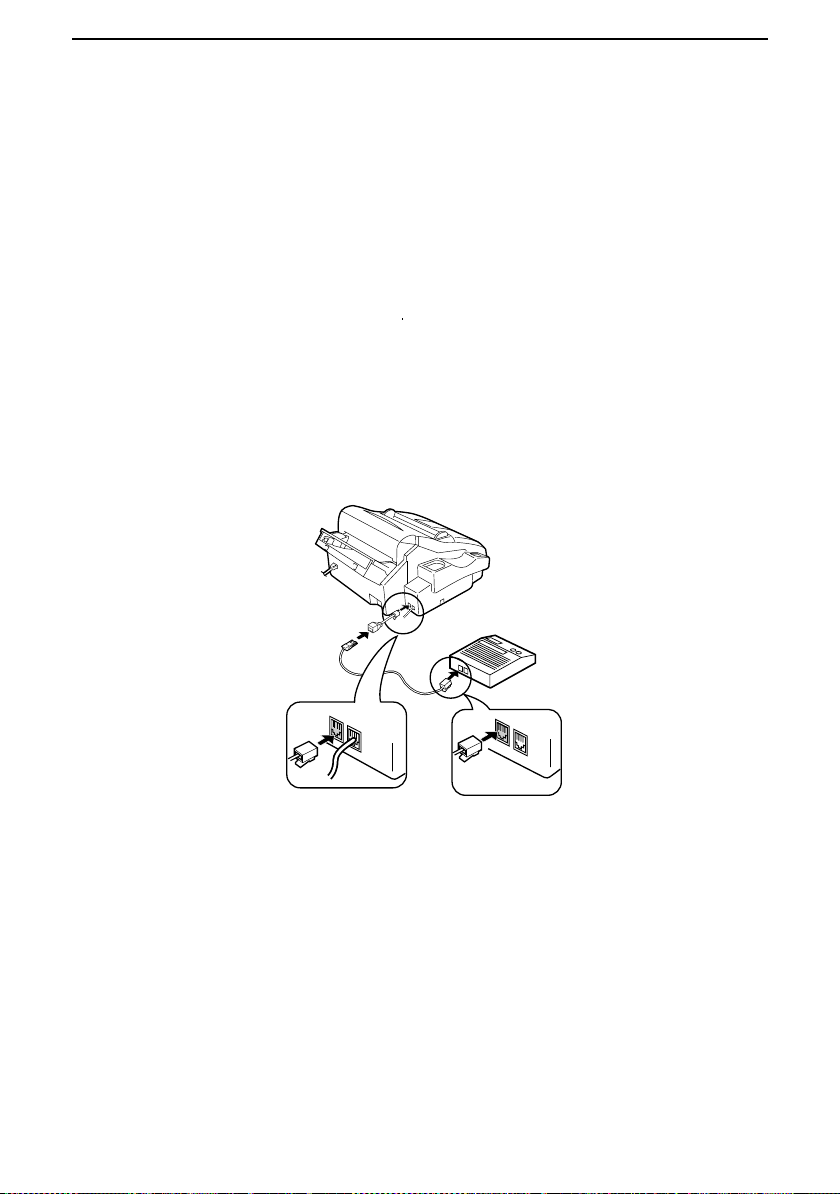
Connecting an answering machine
If desired, you can connect an answering machine to your fax. This will allow
you to receive both voice and fax messages on the same line while you are ou t.
For details on using this feature, see Chapter 7.
To connect an answering machine, remove the seal covering the socket marked
TEL. SET on the fax. Insert the modular plug of the socket adaptor into the
TEL. SET socket, and then insert the plug of the answering machine line into
the U.K. style socket of the adaptor.
♦ Important: If the answering machine is not connected to the extension tele-
phone socket on the fax as shown, the set-up will not operate properly.
♦ Eire: Remove the seal covering the socket marked TEL. SET on th e fax.
Insert the plug of the answering machine line directly into the TEL.SET
socket.
8
TEL.
SET
TEL.
LINE
tel
line
telephone
Important:
When connecting an
answering machine, make sure the
line plug is insert ed into the
answering machine’s telephone
socket, not its te lephone socket.
Comments:
The safety status of this socket is TNV, and is provided for the connection of
••••
approved telephone equipment only. To ensure continued safety compliance,
do not connect any other equipment to this socket.
More than one extension telephone may be connected to the same line as the
••••
fax, provided that the total REN value does not exceed 4. This includes an
answering machine if connected as shown above.
line
Page 19
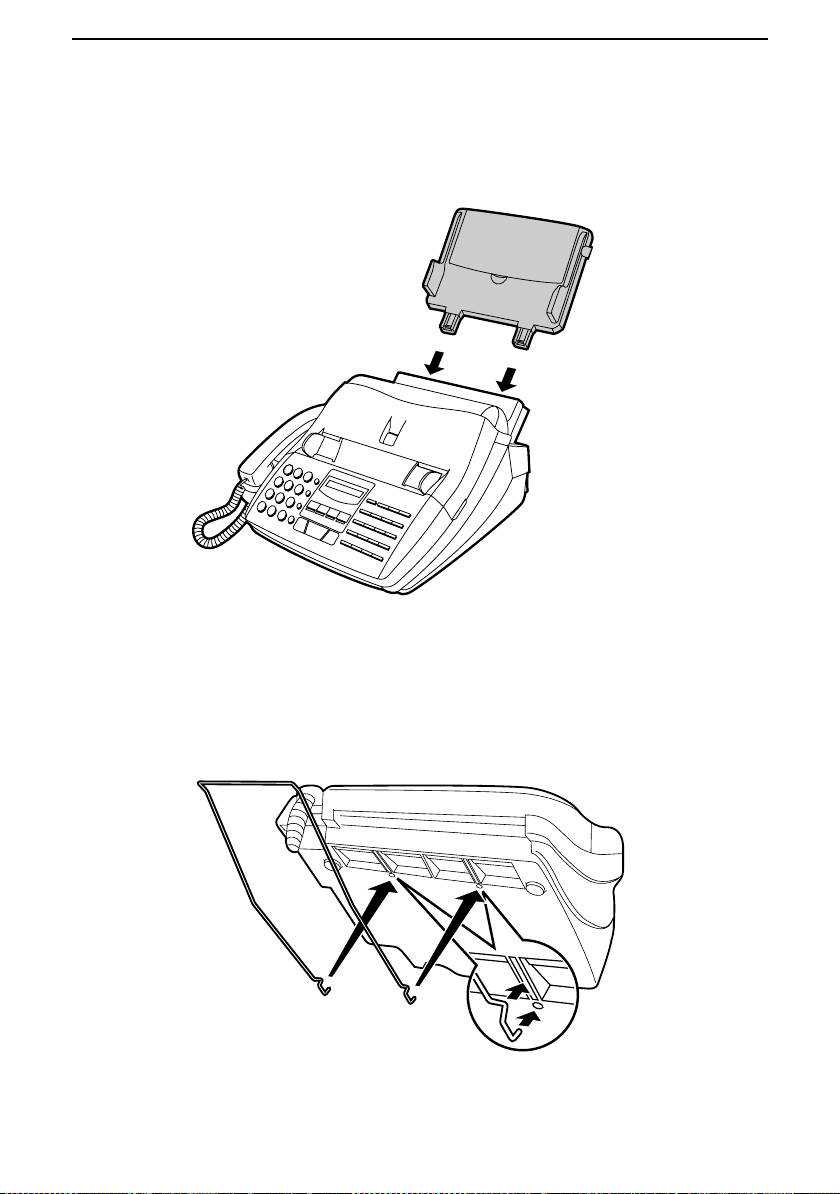
Attachments
Insert the paper tray into the back of the fax as shown.
Chapter 1 Installation
If desired, attach the original document support by inserting the ends into the
holes in the bottom of the fax as shown.
9
Page 20
Chapter 1 Installation
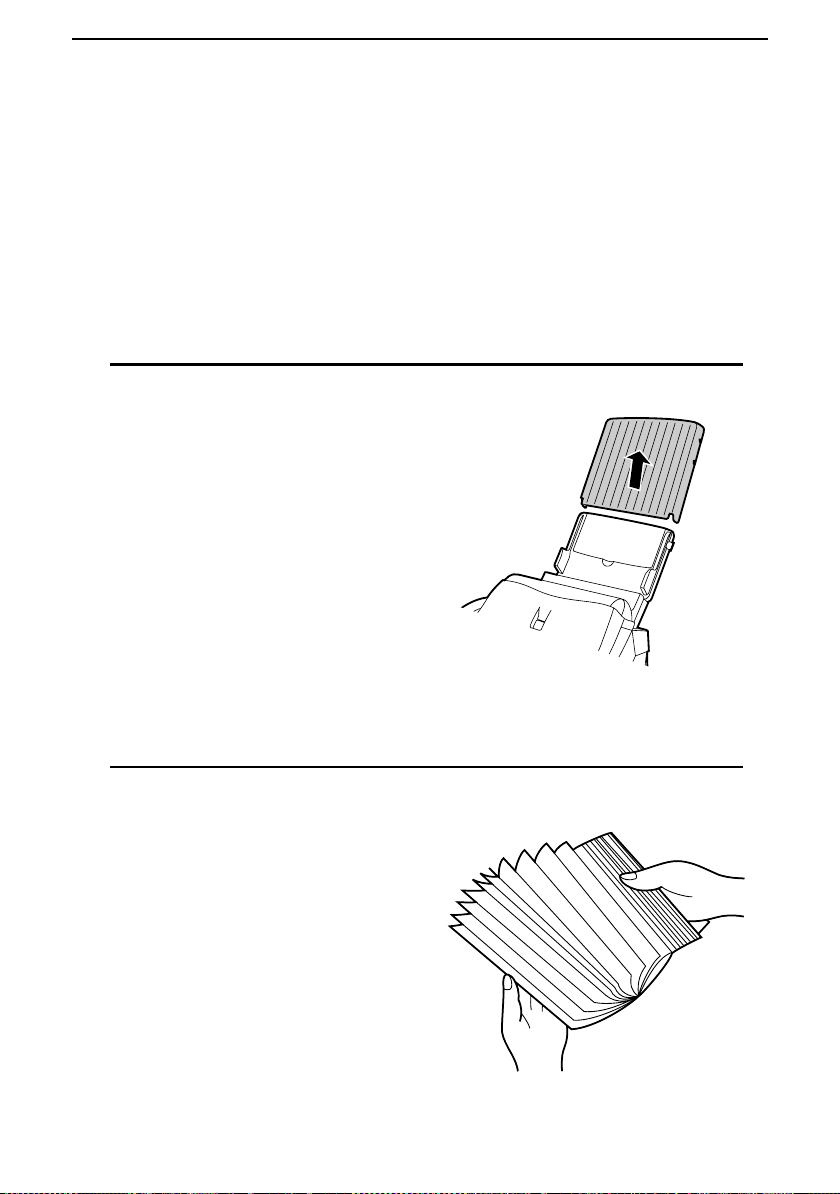
Loading Printing Paper
The paper tray holds the paper on which received documents and copies are
printed. Up to 200 sheets of A4-size paper from 60 to 80 g/m
the tray. Less sheets can be loaded when using heavier paper. The maximum allowed paper weight is 90 g/m
Note: When receiving or copying documents, do not allow more than 100
pages to collect in the received document outlet. Otherwise, the outlet
may become obstructed, causing paper jams.
Remove the paper cover if it is on the pa-
1
per tray.
2
.
2
can be loaded in
Fan the paper, and then tap the edge
2
against a flat surface to even the stack.
10
Page 21
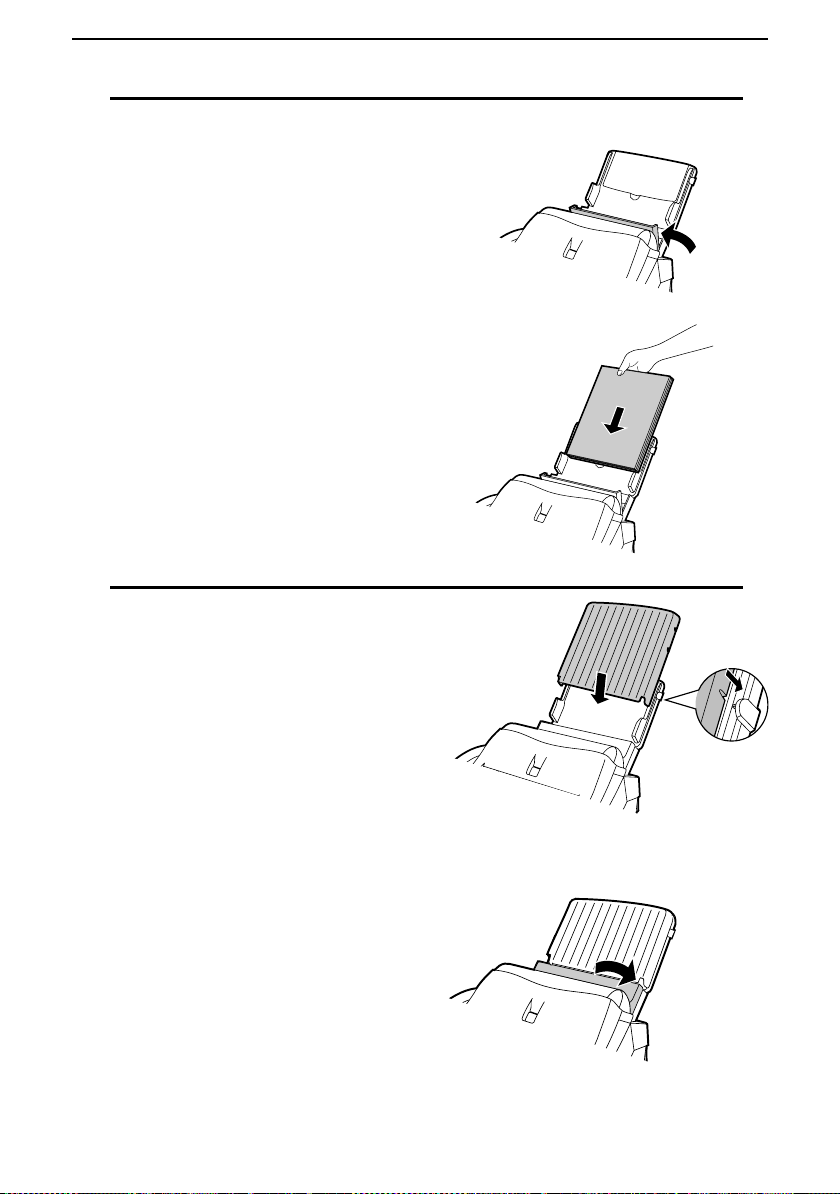
Pull the paper release plate toward you
3
and insert the stack of paper into the
tray, print side down.
•••• If paper remain s in the tray, take it out
and combine it into a single stack with
the new paper before adding the new
paper.
Replace the paper cover on the paper
4
tray and then push the paper release plate
back down.
•••• Import ant : Be sure to replace the pa-
per cover before you push the paper release plate down.
Chapter 1 Installation
11
Page 22
Chapter 1 Installation
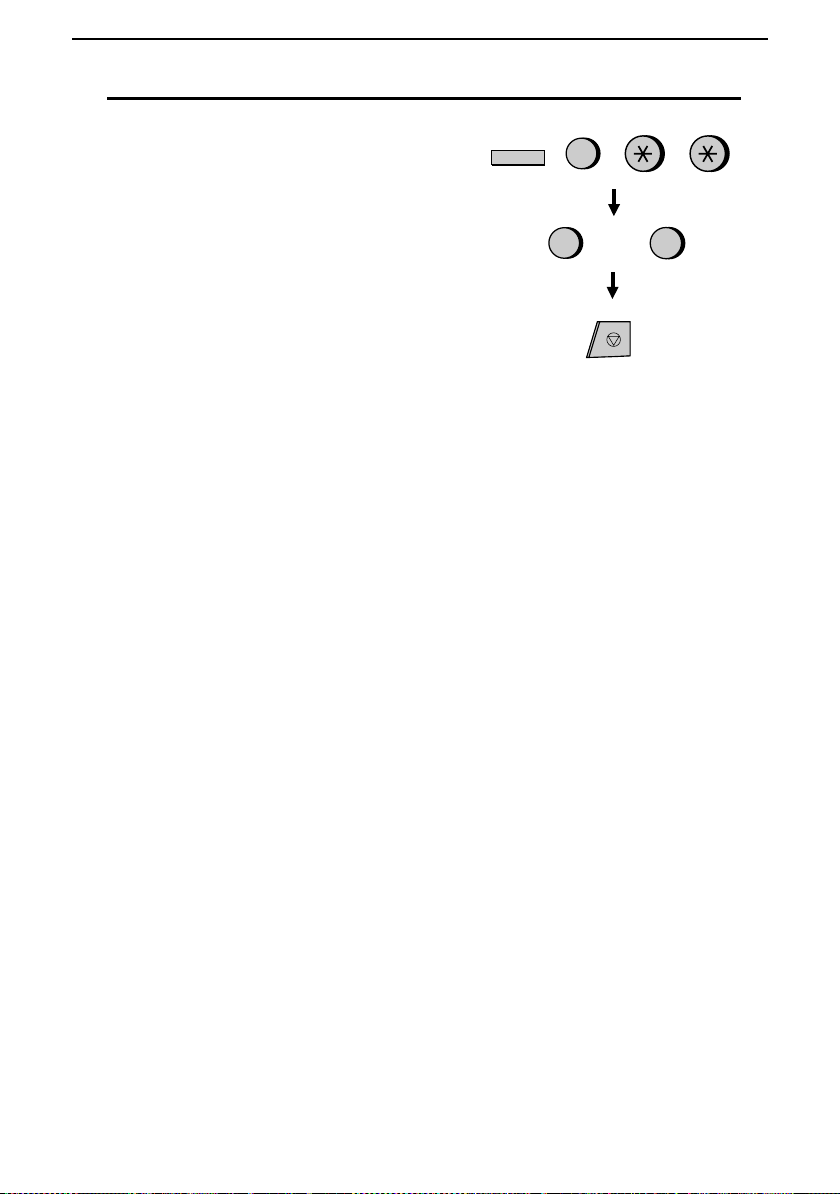
Your fax has been set at the factory to
5
print on regula r pap e r. If yo u ha ve
loaded high quality thermal transfer paper, you must change this setting to
HIGH QUALITY. Press the FUNC-
TION key, the "6" key, the "*" key two
times, and then press "1" to select regular, or "2" to select high quality paper.
When finished, press the STOP key. Be
sure to change this setting again if you
change back to regular paper.
FUNCTION
6
or
1
2
STOP
12
Page 23

2
Initial
Chapter
Setup Guide
Before you can begin using your fax, there are some settings that must be made
with the keys on the operation panel. Some of the settings are required for basic
use of your fax, others may or may not be necessary depending on how you
want to use the fax. The procedures for making the settings are described in this
chapter in the order shown below.
Required settings:
♦ Entering your name and fax/telephone number in the fax
♦ Setting the fax to the current date and time
♦ Selecting the reception mode
Other settings:
♦ Storing numbers for automatic dialling: Automatic dialling allows you to
Settings
dial a full fax or phone number by simply pressing a Rapid Key, or by
pressing the SPEED DIAL key and entering a 2-digit number. To use auto-
matic dialling, you must store the desired fax and phone numbers in the fax.
♦ Volume adjustment: Adjustment of the volume of the speaker and ringer.
13
Page 24
Chapter 2 Initial Settings
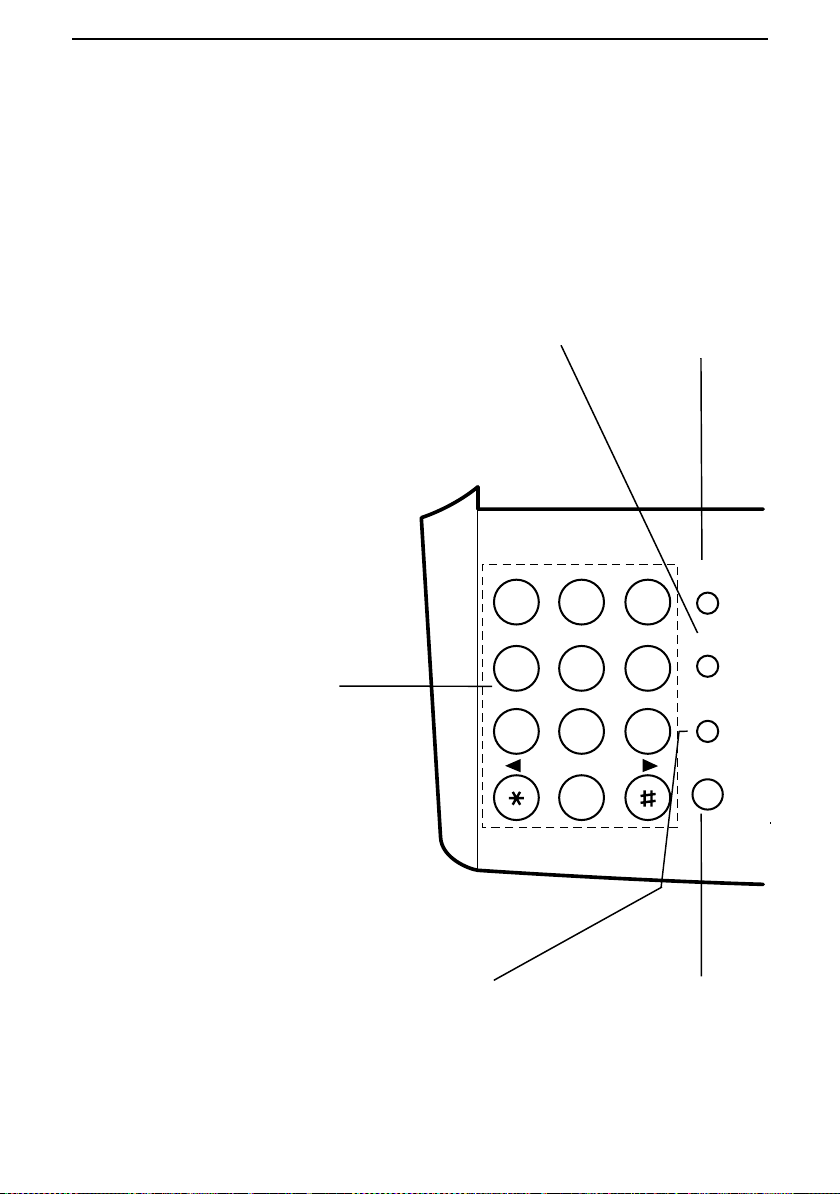
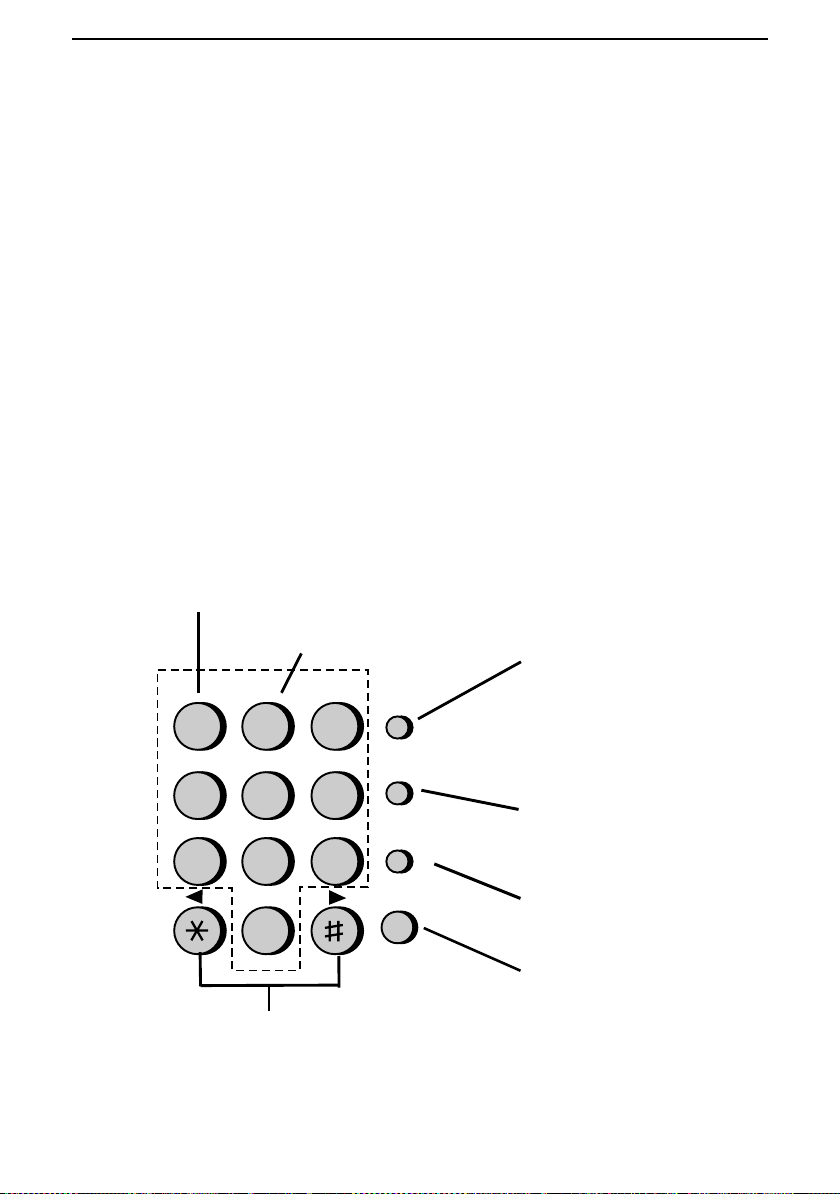
A Look at the Operation Panel
Before you make the settings, take a moment to familiarise yourself with the
operation pan el.
Number keys
Use these keys to di al
numbers, and enter
numbers and le tters
during number/name
storing procedures.
REDIAL key
Press this key to
automatica lly redial
the last number
dialled.
123
GHI JKL MNO
456
789
SPEED DIAL key
Press this key to
dial a 2-digit Speed
Dial number.
ABC DEF
TUV WXYZPQRS
SYMBOLS
0
SPEED
DIAL
REDIAL
SEARCH
SPEAKER
R
14
SEARCH/R key
Press this key to search
for an automatic di alling
number, or, if yo u are on a
P.B.X. extension, pre ss
this key to transfer or put
the other party on hol d.
SPEAKER key
Press this key to
dial a number
without picking up
the handset.
Page 25
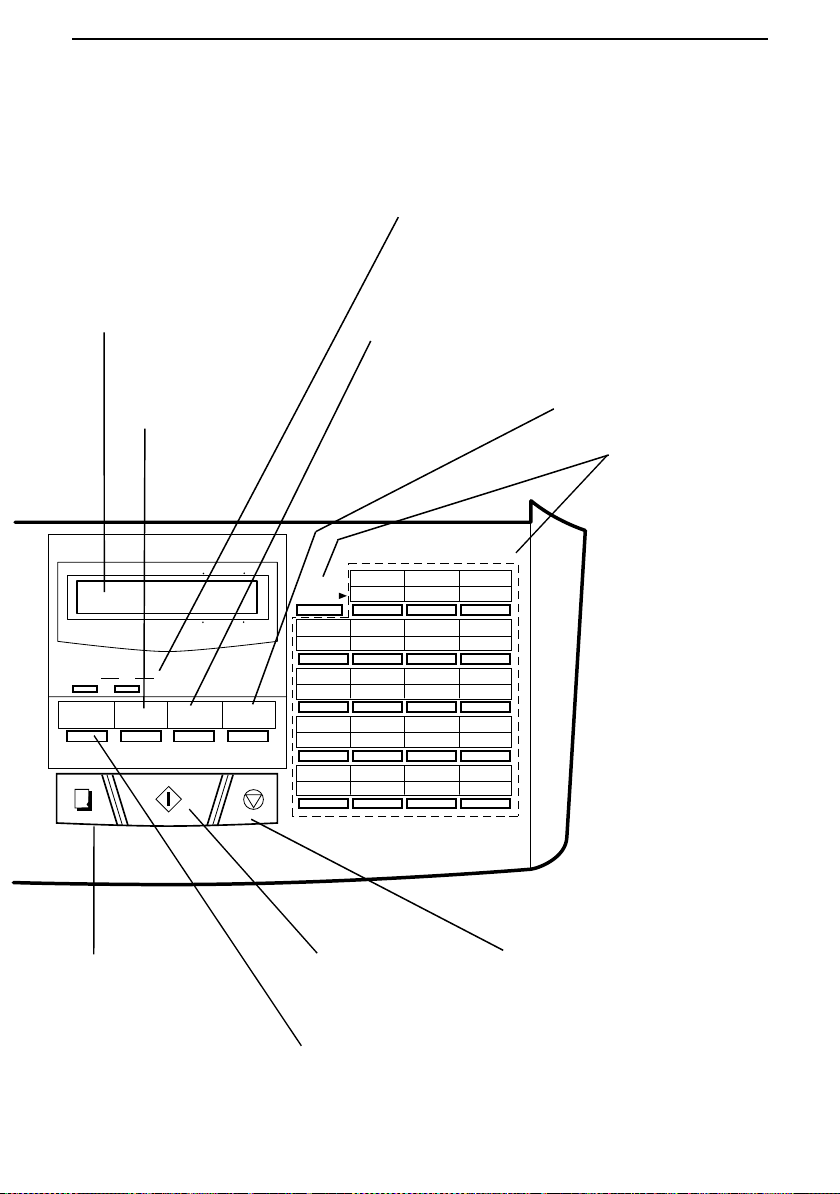
Display
This displays v arious
messages during operation
and programmin g.
FUNCTION key
Press this key to
select various
special functi on s.
FAXTEL
TEL/FAX
A.M.
DOWN
UP VOLUME
RECEPTION
FUNCTION MEMORY
START
RESOLUTION
STOP
MODE
COPY/
HELP
Chapter 2 Initial Settings
VOLUME keys
Press these keys to adjust the volume of
the speaker whe n the
SPEAKER
key
has been presse d, or th e vo lu m e of the
ringer at all other times.
RESOLUTION key
Press this key to
adjust the resolution
and contrast before
sending or copying a
document.
MEMORY key
Press this key to
scan a documen t
into memory before
transmitting it.
01 02 03
20 21 22
SHIFT
0504 06 07
2423 25 26
0908 10 11
2827 29 30
1312 14 15/POLL
3231 33 34
17/P216/P1 18/G1 19/G2
3635 37 38
Rapid Dial Keys
Press one of these
keys to dial a fax or
voice number
automatically. To
dial the bottom
number on a Rapid
Key, press the
key before
SHIFT
pressing the Rapid
Key. (Note that you
must attach the
Rapid Key labels.)
COPY/HELP key
When a document is in
the feeder, pres s th is key
to make a copy. At an y
other time, press this key
to print out the Help List,
a quick reference gu ide
to the operatio n of your
fax.
START key
Press this key to sen d
or receive a docu ment.
RECEPTION MODE key
Press this key to select
the mode of reception.
key
STOP
Press this key to stop
operations before they
are completed.
15
Page 26

Chapter 2 Initial Settings
Entering Your Name and Fax Number
To have your name and fax/telephone number printed at the top of every page
you transmit, program them by pressing the panel keys as shown below.
♦ If you make a mistake, press the SEARCH/R key to move the cursor back
to the mistake, then enter the correct number or letter. (To move the cursor
forward, press the SPEAKER key.)
Press the FUNCTION key and then th e
1
"3" key. ENTRY MODE will appear in
the display.
Press the "#" key two times.
2
OWN NUMBER SET will appear in the
display.
FUNCTION
3
Press the START key.
3
Enter your fax number (max. of 20 dig-
4
its) by pressing the number keys. (To insert a space between digits, press the "#"
key. To insert a "+", press the "*" key.)
Press the START key.
5
Note that there are letters marked above
6
each of the number keys. Enter your
name by pressing the appropriate number key for each letter several times until
the letter appears in the display. (Max. of
24 characters.) For example, to enter "S"
press "7" five times. See the following
page for more details.
Press the START key and then the
7
STOP key.
START
5
5
5
START
(Example: SHARP)
S:
7
4 4 4
H:
2
A:
7 7 7 7
R:
SPEAKER
7 7
P:
START
1
(Example)
7 7 7
2
(Move cursor)
STOP
32
4
7
16
Page 27
Chapter 2 Initial Settings
Entering Letters for Names
Names are programmed by pressing the numeric keys. You will notice that letters are indicated above each of the number keys "2" through "9". To enter a letter (or number), press the appropriate key one or more times until the letter
appears in the display (the number will appear first, followed by the letters in
the order indicated above the key). The keys used for entering letters and editing
are shown below.
Comments:
To enter two letters in succession which require using the same key, press the
••••
SPEAKER key after entering the first letter to move the cursor to the right.
To change a letter, move the cursor to that letter and enter the desired letter.
••••
The new letter will replace the old one.
Letters and numbers
Space
Press this key twice
to enter a space.
123
GHI JKL MNO
4
PQRS
7
To enter a letter or nu m be r, press
the appropriate key repeatedly until
the desired number/letter appears
in the display (t he num b er appears
first, then the letters in the order
shown above the ke y).
ABC DEF
5
TUV WXYZ
8
SYMBOLS
6
9
SPEED
DIAL
REDIAL
SEARCH
SPEAKER
R
0
Delete
Press this key to delete the
letter highlighted by the cursor
(if the cursor is to the right of
the last letter en te re d, it will
backspace and de le te the last
letter).
Shift
Press this key on ce to change
case (press it again to change
back).
Cursor left
Press this key to move the
cursor to the left.
Symbols
Press either key r ep ea te dl y un ti l th e
desired symbol appears (see the
symbol list on the following page).
Cursor right
Press this key to move the
cursor to the right.
17
Page 28
Chapter 2 Initial Settings
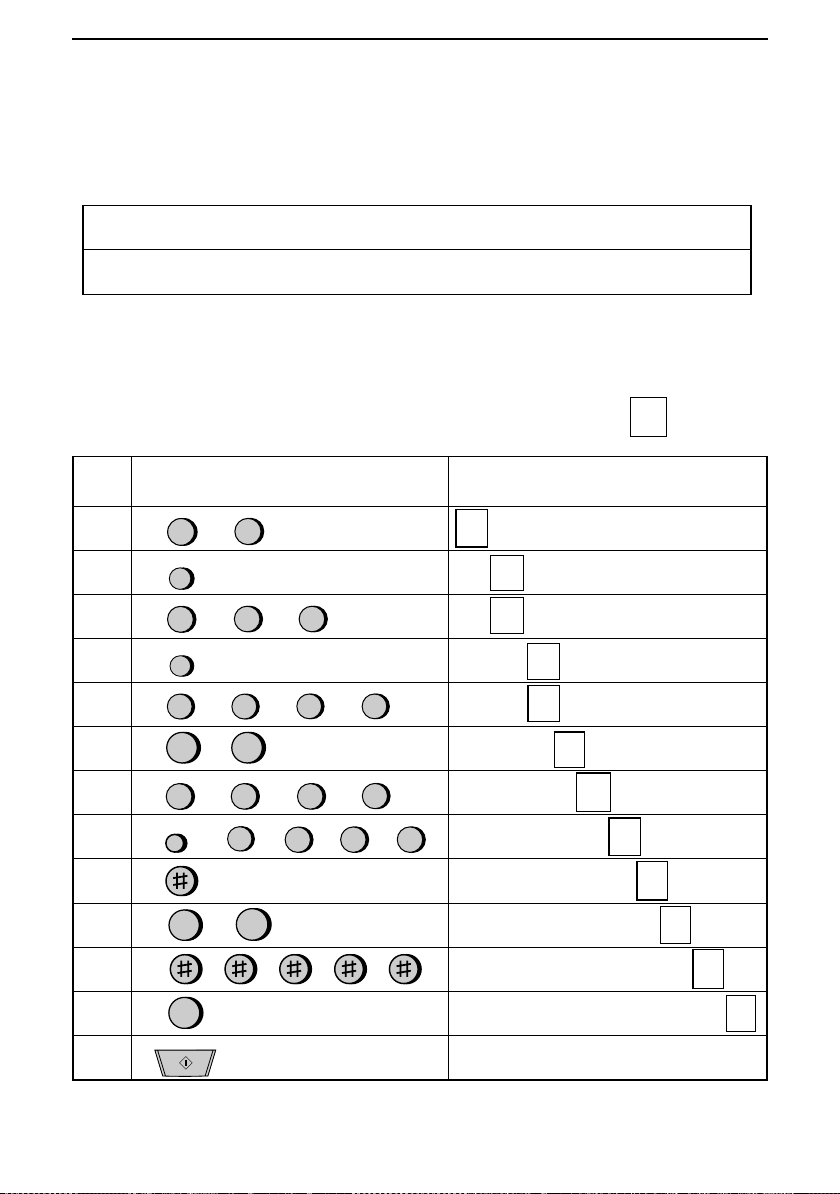
Symbol list
To enter a symbol from the list below, press the "#" key or the "*" key repeatedly until the desired symbol appears.
→ ←
#
. / ! " # $ % & ’ ( ) + + , - : ; < = > ? @ [ ¥ ] ^ _ p { | }
Example
The following is an example of entering the name "ABC Co. #1".
♦
The cursor in the display is indicated below by a rectangle:
Step Press these keys: Display
ABC
1
2
SPEAKER
2
ABC
3
2
SPEAKER
4
ABC
5
2
6
ABC
7
8
2
REDIAL
ABC
2
A
A
ABC
2
ABC
2
11
ABC
2
MNO
6
MNO
6
ABC
2
ABC
2
ABC
2
ABC
2
ABC
2
MNO6MNO
6
B
A
A
B
B
A
A
C
B
C
ABC
ABC
*
→ ←
C
C
o
18
10
11
12
13
B
9
1
1
A
A
A
1
START
ABC Co
C
B
C
B
CCo
o
C
Co
.
.
#
.
#
.
1
Page 29
Chapter 2 Initial Settings
Setting the Date and Time
The date and time appear in the display and reports, and are printed at the top of
every page you transmit. Set the date and time by pressing the keys on the operation panel as shown belo w.
♦ To correct a mistake, press the SPEED DIAL key to move the cursor back
to the mistake, and then enter the correct number.
Press the FUNCTION key and then th e
1
"3" key. ENTRY MODE will appear in
the display.
Press the "*" key two times.
2
DATE & TIME SET will appear in the
display.
FUNCTION
3
Press the START key.
3
Enter a two-digit number for the day
4
("01" to "31").
Enter a two-digit number for the month
5
("01" for January, "02" for February,
"12" for December, etc.).
Enter the last two digits of the year.
6
(Note: In the year 2000, "00" will appear
for the year.)
Enter a two-digit number for the hour
7
("00" to "23") and a two-digit number
for the minute ("00" to "59").
Press the START key and then the
8
STOP key.
START
0
0
9
0
START
5
(Example: the 5th)
1
(Example: Janu ary)
8
(Example: 1998)
2
9
(Example: 9:25)
5
STOP
19
Page 30

Chapter 2 Initial Settings
Selecting the Reception Mode
Your fax has four modes for receiving incoming calls and faxes:
TEL mode: This is the most convenient mode for receiving phone calls. You
can also receive faxes; however, all calls must first be answered by picking up
the fax’s handset or an extension phone connected to the same line.
FAX mode: Select this mode when you only want to receive faxes on your line.
The fax will automatically answer all calls and receive incoming faxes.
TEL/FAX mode: This mode is convenient for receiving both faxes and voice
calls. When a call comes in, the fax will detect whether it is a voice call (including manually dialled fax transmissions), or an automatically dialled fax. If it is a
voice call, the fax will make a special ringing sound to alert you to answer. If it
is an automatically dialled fax transmission, reception will begin automatically.
A.M. mode: Select this mode when an answering machine is connected as described in "Connections" in Chapter 1 and you want the answer ing machin e to
answer all calls. This allows you to receive both voice messages and faxes while
you are out.
Setting the reception mode
RECEPTION
Press the RECEPTION MODE key until the arrow in the display points to the
desired mode.
MODE
For more information on receiving faxes in TEL, TEL/FAX mode and FAX
mode, see Chapter 4, "Receiving Documents". For more inf or matio n on using
A.M. mode, see Chapter 7.
20
Page 31

Chapter 2 Initial Settings
Storing Numbers for Automatic Dialling
Automatic dialling is a quick and convenient way of dialling which is performed
by either pressing a Rapid Key (Rapid Key Dialling), or pressing the SPEED
DIAL key and entering a 2-digit number (Speed Dialling). Automatic dialling
can be used for both fax transmissions and voice calls.
To use automatic dialling, you must first store the full number in your fax and assign a 2-digit Speed Dial number to it. You can also enter a name which appears
in the display when the number is dialled. Up to 99 numbers can be stored.
♦ Speed Dial numbers from "01" to "38" can be used for both Rapid Key Di-
alling and Speed Dialling; Speed Dial numbers from "39" to "99" can only
be used for Speed Dialling.
♦ To allow easy identification of the Rapid Keys, attach each strip of Rapid
Key labels above the appropriate row of Rapid Keys. The arrangement of
the keys is shown in "A Look at the Operation Panel" in th is chapter. Each
time you store a number for Rapid Key Dialling, write the name of the
party above the appropriate key.
Storing numbers
Comments:
You may need to add a pause between certain digits to allow time for
••••
connection. For example, if you are on a PBX telephone system that requires
an access number to be dialled (such as "9") for an outside line, you may
need to enter a pause between the access number and the number of the
receiving fax machine. Pauses are entered by pressing the REDIAL key, and
several can be entered in a row if necessary. The first pause entered gives a
time delay of about 4 seconds, and subsequent pauses give delays of 0.9
seconds each. The total duration of pauses enter ed fo r any one fax or vo ice
number cannot exceed 11 seconds.
To confirm that Automatic Dialling numbers have been stored correctly, print
••••
out the Telephone List. The procedure for doing this is described in Chapter
10, "Printing out Reports and Lists".
To enter letters for names or correct a mistake, see "Entering letters for
••••
names" in this chapter.
21
Page 32

Chapter 2 Initial Settings
Press the keys shown at right.
1
FAX/TEL. # MODE will appear in the
display.
Press "1" to select SET.
2
Enter a two-digit number (from "01" to
3
"99") by pressing the number keys. This
will be the Speed Dial number.
Enter the fax or voice number by press-
4
ing the number keys (max. of 32 digits including pauses).
FUNCTION
1
0
5
5
5
3
1
(Example)
2
1
(Example)
3
4
Press the START key.
5
Enter the name of the location or party
6
by pressing the appropriate number key
for each letter several times until the letter appears in the display (max. of 20
characters). (See "Entering Letters for
Names" in this chapter for more details.)
If you don’t want to enter a name, skip
this step.
Press the START key.
7
Return to Step 3 to store another num-
8
ber, or press STOP to exit. If the number
will be used for Rapid Key Dialling, you
can write the name on the label above
the appropriate Rapid Key.
START
(Example: SHARP)
7 7 7 7
S:
H:
4 4 4
A:
2
2
R:
7 7 7 7
SPEAKER
7
P:
START
Step 3 or
(Move cursor)
7
STOP
7
22
Page 33

Clearing numbers
Chapter 2 Initial Settings
Press the keys shown at right.
1
FAX/TEL. # MODE will appear in the
display.
Press "2" to select CLEAR.
2
Enter the Speed Dial number that you
3
want to clear by pressing the number
keys.
Press the START key.
4
Return to Step 3 to clear another num-
5
ber, or press STOP to exit.
FUNCTION
2
0
START
Step 3 or
3
1
STOP
Making changes
To make changes in a number previously stored, repeat the storing procedure.
Select the Speed Dial number for which you want to make changes in Step 3,
and then change the number and/or name when they appear in the display
(Steps 4 and 6, respectively).
(Example)
Numbers and letters are changed as described in "En terin g letters for names" in
this chapter.
A lithium battery keeps automatic dialling numbers in memory
Your fax uses a lithium battery to keep automatic dialing numbers and other programmed data in memory when the power is turned off. Battery power is consumed primarily when the power is off. With the power kept continuously off,
the life of the battery is about 5 years. If the battery dies, have your dealer or retailer replace it. Do not try to replace it yourself.
23
Page 34

Chapter 2 Initial Settings
Storing numbers in Group Keys
Group Keys allow you to di al a gro up of fax num ber s by si mp l y pr es si ng the appropriate Group Key once. They are convenient fo r the Br oad cas ting function ,
which is used to transmit a document to a group of fax machines.
Rapid Keys 18/G1 and 19/G2 can be programmed as Group Keys. To program
or clear a Group Key, follow the steps below. Note that one key cannot be simultaneously programmed as both a Rapid Key and a Group Key.
♦ Up to 20 fax numbers can be stor e d in on e Grou p K ey.
♦ Only Speed Dial numbers can be stored in a Group Key. Full numbers can-
not be stored.
♦ A Group Key cannot be cleared if it is has been programmed into a Pro-
gram Key. First clear the Program Key as described in "Entering and Using
Programs" in Chapter 8, then clear the Group Key. If you need to check
which Program Key the Group Key is used in, print out the Program and
Group List as descri be d in Ch a pter 10.
Press the keys shown at right.
1
GROUP ENTRY MODE will appear in
the display.
Press "1" to program a Group Key, or
2
"2" to clear a Group Key.
Press a Group Key (Rapid Ke y 18 /G1 or
3
19/G2) to select it. If you are clearing
the key, go to Step 5.
Enter the Speed Dial numbers of the re-
4
ceiving machines.
Press the START key.
5
Return to Step 3 to program or clear an-
6
other Group Key, or press STOP to exit.
24
FUNCTION
1
18/G1
37
0 1 0 2
START
Step 3 or
7
or
2
(Example)
(Example)
STOP
Page 35

Chapter 2 Initial Settings
Volume Adjustment
You can adjust the volume of the speaker and ringer using the UP and DOWN
keys on the operation panel.
Speaker
The speaker has three volume levels: HIGH, MIDDLE, and LOW. To adjus t the
volume of the speaker, press the SPEAKER key and then press the UP or
DOWN key until the desired level appears in the display. Press the SPEAKER
key again to turn the speaker off.
Ringer
The ringer has four volume levels: HIGH, MIDDLE, LOW, and OFF. To adjust
the volume of the ringer, press the UP or DOWN key until the desired level appears in the display (make sure the SPEAKER has not been pres se d and the
handset is not lifted). The fax will ring at the new volume level each time you
change the level. If you select OFF, press the START key to confirm your selection.
When the ringer is off and the reception mode is set to TEL/FAX, faxes will be
received quietly and telephone calls will be indicated with a low level on the
ringer.
25
Page 36

3
Sending
Chapter
Transmittable Documents
Your fax can transmit most standard of fice do cum ents . Specific guidelin es are
as follows:
Size and weight
The size and weight of documents which you can load in the docum ent feed er
depend on whether you load one sheet at a time or several sheets at once.
One sheet at a time:
Documents
52 g/m
52 g/m
2
Several sheets at once:
2
Note: The area of the document which is scanned by the fax is slightly
smaller than the actual document size. The scanning width is 210 mm,
and the scanning length is the length of the document minus 4 mm.
157 g/m
80 g/m
2
2
128 mm
128 mm
148 mm
148 mm
216 mm
216 mm
Other restrictions
♦ Documents written in yellow, greenish yellow, or light blue ink cannot be
transmitted, as the scanner does not recognise these colours.
♦ Ink, glue, and correct in g flu id on doc ume n ts must be dr y bef or e the y pass
through the document feeder.
♦ All clips, staples, and pin s must be re mov e d from doc u men ts be fo re
transmission. If these are not removed, they may damage the fax.
1.0 m
297 mm
♦ Documents which are patched, taped, torn, smaller than the minimum size,
carbon backed, or easily smudged should be photocopied, and the copy
used for transmission.
26
Page 37

Chapter 3 Sending Documents
Loading the Document
Up to 20 pages can be placed in the feeder at one time. The pages will be
automatically fed into the fax starting from the page on the bottom.
♦ If you need to send or copy more than 20 pages, place the additional pages
gently and carefully in the feeder just before the last page is scanned. Do
not try to force them in, as this may cause double-feeding or jamming.
♦ If your document consists of several large or thick pages which must be
loaded one at a time, insert each page into the feeder as the previous page
is being scanned. Insert gently to prevent double-feeding.
Adjust the document guides to the width
1
of your doc ument.
Place the document face down and push
2
it gently into the document feeder. The
top edge of the document should enter the
fax first.
•••• The feeder will draw the leading edge
of the document into the fax. READY
TO SEND will appear in the display.
You can now either make resolution
3
and/or contrast settings as described in
the following section, or dial the other
party as described in the section,
"Dialling and transmission".
Important:
If you need to remove the document from the feeder before transmission or
copying, first open the operation panel by pulling the front edge up (grasp it
at the PANEL RELEASE mark), and then remo ve the do cum e nt. If yo u try
to pull the document out without opening the operation panel, you may
damage the feeder mechanism.
27
Page 38

Chapter 3 Sending Documents
Optional Transmission Settings
If desired, there are several transmission settings which are possible before
dialling and transmitting the document.
Note: To make the settings, the document must first be loaded in the feeder.
Resolution
Your fax has four resolution settings. If you do not make a setting, the fax will
automatically send the document in STANDARD resolution.
STANDARD: Use STANDARD for ordinary documents. This setting
gives you the fastest and most economical transmission.
FINE: Use FINE for improved reproduction, especially with
documents containing small letters or fine drawings.
SUPER FINE: Use SUPER FINE when you need the highest quality of
reproductio n.
HALF TONE: Use HALF TONE for photographs and illustrations. The
original will be reproduced in 64 shades of grey.
Note: In order to transmit in FINE or SUPER FINE resolution, the receiving
fax machine must also have that resolution. If it doesn’t, your fax will
automatically step down to the next best available setting.
Contrast
The contrast is normally set to AUTO, which means that the fax automatically
controls the contrast, but for faint documents you can change the setting to
DARK.
Setting the resolution and contrast
Press the RESOLUTION key one or
more times until the desired resolution
and contrast settings appear in the display.
•••• The first time you m ove through the list
of resolution settings, the contrast
setting AUTO will appear next to each
resolution setting. The second time you
move through the list, the contrast
setting DARK will appear.
28
RESOLUTION
Page 39

Chapter 3 Sending Documents
Cover Sheet
You can have your fax generate a cover sheet and send it as the last page of the
transmission. The cover sheet includes the date and time, the s end er’ s name and
number, and the receiver’s name and number if an automatic dialling number is
used. The total number of pages sent is indicated on the bottom.
♦ Your name and number must be programmed in order for them to appear
on the cover sheet. (See "Entering Your Name and Fax Number" in
Chapter 2.)
To include a cover sheet with each transmission, set Option Setting 18 to YES
as described in Chapter 9, "Optional Settings". Note that once Option Setting 18
is set to YES, cover sheets will be automatically included with every
transmission until you change the setting to NO.
When the cover sheet function is turned on, you can als o select a messag e which
will appear as a header at the top of the cover sheet. To do so, follow the steps
below. Note that the message selection is only effective for one transmission.
Press the keys shown at right. CO VER
1
SHEET HEAD will appear in the display.
Select a message by entering a number
2
from "1" to "4" as shown below:
"1": URGENT
"2": IMPORTANT
"3": CONFIDENTIAL
"4": PLS. DISTRIBUTE
FUNCTION
1
5
Example
29
Page 40

Chapter 3 Sending Documents
Batch Page Numbering (Page Counter)
This setting is used to change the page numbering of the transmitted document
from simple numbering ("P.1", "P.2", etc.) to batch numbering, which means
that a slash and the total number of pages being sent are add ed after each page
number (for example, "P. 1/5", "P.2/5", etc.). This allows the receiver to check
for any missing pages.
♦ If you are sending a cover sheet, do not include the cover sheet in the total
number of pages. Your fax will adjust the number to include the cover
sheet automatically.
♦ If you need to cancel a batch number entry, remove the document from the
feeder or press the STOP key.
♦ If the number of pages actually transmitted does not coincide with the
batch number entered, the alarm will sound and PAGE COUNT ERROR
will appear in the display. "PAGE E." will also appear in the "NOTE"
column of the Transaction Report if it has been set to print out.
Load the document. Press the keys
1
shown at right. PAGE COUNTER SET
will appear in the display.
FUNCTION
Enter the total number of pages ("01" to
2
"99") by pressing the number keys.
30
1
0
(Example)
Page 41

Chapter 3 Sending Documents
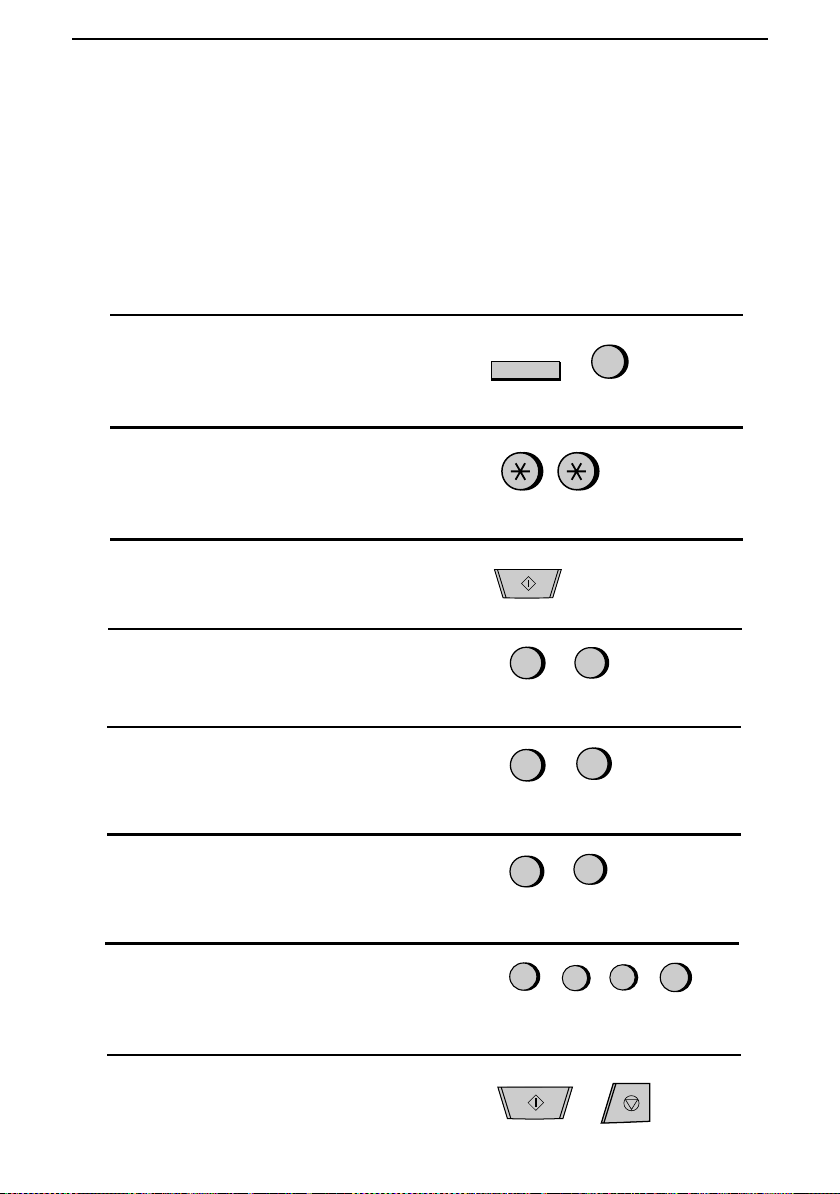
Dialling and Transmission
Once you have loaded the document and made any desired contr as t/res o lutio n
settings, you are ready to dial the number of the receiving fax machine and transmit the document. There are several ways of dialling, and you can select the one
which best suits yo ur needs.
Normal Dialling
With Normal Dialling, you pick up the handset (or press the SPEAKER key)
and dial as you would to make a telephone call. If the receiving machine is set
to receive faxes manually (this means that the receiving party ans wers yo ur call
by picking up the handset and speaking, and then press es their Start key to beg in
fax reception), you can talk with them before sending the fax.
Pick up the handset or press th e
1
SPEAKER key. Listen for the dial tone.
SPEAKER
or
Dial the number of the receiving ma-
2
chine by pressing the numeric keys.
Wait for the connection. Depending on
3
the setting of the receiving machine, you
will either hear a facsimile reception
tone or the other person will answer.
•••• If the other party answers, ask them to
press their Start key (if you pressed
the SPEAKER key, pick up the han dset to speak with them). This causes
the receiving machine to issue a reception tone.
ABC DEF
2
1
GHI JKL MNO
45
TUV WXYZPQRS
78
SYMBOLS
0
Beep
3
6
9
31
Page 42

Chapter 3 Sending Documents
When you hear the reception tone, press
4
COPY/
HELP
START
the START key. Replace the handset if
you used it.
•••• When transmission is completed, the
fax will beep.
Direct Keypad Dialling
If you do not need to talk with the other party before sending the fax, you can
just dial; it isn’t necessary to pick up the handset or press the SPEAKER key.
♦ Direct Keypad Dialling is a form of automatic dialling, so if you need to in-
sert a pause between any digits of the number, press the REDIAL key. (For
more information on pauses, see "Storing Numbers for Automatic Dialling"
in Chapter 2.)
Enter the number of the receiving ma-
1
chine by pressing the numeric keys.
ABC DEF
2
1
GHI JKL MNO
45
TUV WXYZPQRS
78
SYMBOLS
0
3
6
9
STOP
Check the display. If the number of the
2
receiving machine shown is correct,
press the START key.
•••• If it is not correct, press the STOP key
to backspace and clear one digit at a
time, and then re-enter the correct
digit(s).
32
COPY/
HELP
START STOP
Page 43

Chapter 3 Sending Documents
Rapid Key Dialling
If the number you want to dial has been stored for automatic dialling as a Speed
Dial number from 01 to 38 (see "Storing Numbers for Automatic Dialling" in
Chapter 2), you can dial it by pr es s i ng the corr es po nd i ng Rapid Key. (If the
Speed Dial number is from 20 to 38, press the SHIFT key and then press the
Rapid key.)
01 02 03
20 21 22
04 05 06 07
23 24 26
08 09 10 11
27 28 30
12
31 32
16
/P117/P2
35 36
Example:
13
15
/POLL
14
To dial Speed Dial
number "02", pr es s R ap id Key
02/21.
SHIFT
Example:
number "21", pr es s th e
key and then press Rapid Key
02/21.
01 02 03
20 21 22
04 05 06 07
23 24 26
08 09 10 11
27 28 30
13
12
14
31 32
16
/P117/P2
35 36
To dial Speed Dial
SHIFT
♦ The name of the receiving party will appear in the display. If no name was
stored, the fax number will appear. (If the name or number is incorrect,
press the STOP key.)
♦ The document will be automatically transmitted once the connection is
made.
Speed Dialling
Speed Dialling can be used to dial any number which has been stored for automatic dialling (see "Storing Numbers for Automatic Dialling" in Chapter 2).
Press the SPEED DIAL key and then en-
1
ter the two digits of the Speed Dial number by pressing the number keys.
•••• To enter numbers 1 through 9, first en-
ter 0 and then the number.
SPEED
DIAL
/POLL
15
1
GHI JKL MNO
45
78
ABC DEF
2
TUV WXYZPQRS
SYMBOLS
0
3
6
9
Check the displa y. If the nam e or num-
2
ber shown is correct, press the START
key. (If not, press the STOP key and
then repeat Step 1.)
COPY/
HELP
START
STOP
33
Page 44

Chapter 3 Sending Documents
Using the SEARCH/R key
If you don’t reme mber the Rapid Key or Speed Dial numbe r in which you have
stored a particular fax number, you can search for the number by following the
steps below. Once you have found the number, you can dial it and transmit the
loaded document by simply pressing the START key.
Press the SEARCH/R key.
1
Enter the first letter of the stored name
2
by pressing the appropriate number key
(the key which corresponds to the required letter) one or more times until the
letter appears in the display. If the name
begins with a special character or number, press "1".
•••• If you don’t remember the first letter,
go to Step 3 (you will scroll through
the list from the beginning).
•••• If a name wasn’t stored for the num-
ber, press "0". This will cause numbers, not names, to appear when you
scroll.
Press the "#" key or the "*" key to scroll
3
through the names (numbers if you
pressed "0"). Stop when the desired
name appears in the display.
•••• If no names have been stored that be-
gin with the entered letter, you will
scroll from the next name, in alphabetical order, in the list. If no names/numbers have been stored at all, NO
DATA will appear.
SEARCH
R
ABC DEF
1
GHI JKL MNO
45
TUV WXYZPQRS
78
SYMBOLS
or
2
3
6
9
0
Press the START key. The document
4
will be automatically transmitted once
the connection is made.
34
START
Page 45

Chapter 3 Sending Documents
Automatic redialling
If you use automatic dialling (including Direct Keypad Dialling) and the line is
busy, your fax will automatically redial the number. Up to 2 redialling attempts
will be made at intervals of 5 minutes.
♦ To stop automatic redialling, press the STOP key.
♦ If desired, you can change the number of times the fax redials with Option
Setting 4, and the interval at which redialling takes place with Option Setting 3. See Chapter 9, "Optional Settings".
Using the REDIAL key
You can press the REDIAL key to redial the last number dialled. To send a
document, proceed from Step 3 of Normal Dialling. Note that the speaker will
be automatically activated, so you do not need to pick up the handset immediately.
35
Page 46

4
Receiving
Chapter
Using FAX mode
When the reception mode is set to FAX (press the RECEPTION MODE key
until the arrow in the display points to FAX), your fax automatically answers all
calls on 1 ring and receives the incoming documents.
♦ You can change the number of rings after which the fax answers incoming
♦ If you pick up the handse t be fo re yo ur fax a nswe rs, yo u c an t al k to the
Using TEL mode
When the reception mode is set to TEL (press the RECEPTION MODE key
until the arrow points to TEL), you must answer all calls (including fax transmissions) usin g t he fax ’s han dse t or an ext ens io n ph one connected to the same
line.
Documents
calls by changing Option Setting 2 (see "Optional settings" in Chapter 9).
Any number from "1" to "5" can be selected ("1" to "3" rings in Eire).
other party and/or receive a document as described below in "Using TEL
mode". For example, with the fax set to answer on 4 rings, you can receive
both voice calls and fax messages in FAX mode by answering before the
fourth ring, but still have the fax answer calls automatically at times when
you are unable to respond personally.
Receiving documents on your fax mac hine
To receive a document on your fax machine, pick up the handset when it rings.
•••• If you hear a f a x tone, wait until
RECEIVING appears in the display,
and then replace the handset.
•••• If the other party first talks to you and
then wants to send a fax, press the
START key after speaking (press your
START key before the se nde r pre sses
their Start key). Replace the handset.
Note: If you have set Option Setting 15 to OFF and you hear a fax tone when
you pick up the handse t, you must pr e ss the START key to begin reception.
36
Page 47

Chapter 4 Receiving Documents
Receiving documents on an extension phone
If you hear a fax tone when you answer an extension phone, wait until your fax
answers with a pronounced, high-pitch tone, and then hang up. Your fax will
automatically receive the document.
♦ If your fax does not respond within 5 seconds, noise on the line may be pre-
venting it from detecting the fax tone. In this case, manually activate fax reception as described in the following paragraph.
If the other party first talks to you and then wants to send a document, press "5",
"*" and "*" if you are on a tone dial phone. If you are on a pulse dial phone,
set the handset down (do not hang up), walk over to the fax, pick up the handset,
and press the START key.
Your fax will not accept the signal to begin reception ("5", "*", and "*") if a
••••
document is loaded in its feeder.
Comments:
If you have set Option Setting 15 to OFF and hear a fax tone when you
••••
answer the extension phon e, you must press "5", "*", and "*" if you are on
a tone dial phone, or walk over to the fax, pick up the handset, and press the
START key if you are on a pulse dial only phone.
The code used to activate fax reception from a tone dial extensio n ph on e
••••
("5", "*", and "*") can be changed if desired. See Option Setting 5
("Tel/Fax Remote Number") in Chapter 9, "Optional Settings".
If you do not intend to use the code for activating fax reception , yo u can tur n
••••
detection of the code off by resetting Option Setting 6. This will ensure that
the fax never mistakenly attempts to begin reception if it detects a signal
which it perceives to be similar to "5", "*", and "*" while you are talking on
an extension phone.
37
Page 48

Chapter 4 Receiving Documents
Using TEL/FAX mode
When the reception mode is set to TEL/FAX (press the RECEPTION MODE
key until the arrow in the display points to TEL/FAX), your fax automatically
answers all calls on 1 ring. After answering, your fax monitors the line for about
5 seconds to see if a fax tone is being sent.
♦ If your fax detects a fax tone (this means that the call is an automatically di-
alled fax), it will automatically begin reception of the incoming document.
♦ If your fax doesn’t detect a fax tone (this means that the call is a voice call
or manually dialled fax), it will make a ringing sound (called pseudo ringing) for 15 seconds to alert you to answer. If you don’t answer within this
time, your fax will send a fax tone to the other machine to allow the calling
party to send a fax manually if they desire.
Comments:
Only the fax will alert you to voice calls or manually dialled faxes by pseudo
••••
ringing. An extension phone connected to the same line will not ring after the
connection has been made. The hands et of a parallel extension teleph on e can,
however, be picked up to answer the call. To disable the pseu do ring ing once
the handset is lifted, press "#" key on the dial pad of the phone. This can only
be done from a tone dial phone.
38
The number of rings to answer can be adjusted by changing Option Setting 2.
••••
See Chapter 9, "Optional Settings".
The duration of pseudo ringing can be adjusted with Option Setting 9. See
••••
Chapter 9, "Optional Settings".
When this function is enabled, the machine may not be connected to lines
••••
listed in telephone directories issued by public network operators. Publication
of the number of this machine should be accompanied with advice of the
function.
Page 49

Chapter 4 Receiving Documents
2 in 1 Print
To save paper, you can have the size of your incoming faxes reduced by 55%.
This will allow you to receive, for example, a 2-page document on one page
(note that this may not be possible if the document pages are longer than your
printing paper). To turn on this function, follow the steps below.
Press the keys shown at right. 2 IN 1
1
PRINT will appear in the display.
FUNCTION
6
Press "1" to turn on the function, or "2"
2
to turn it off.
Press the STOP key.
3
On Off
or
1
STOP
2
Reception Ratio
Your fax has been set at the factory to automatically reduce the size of received
documents to fit the size of the printing paper. This ensures that data on the
edges of the document are not cut off. If desired, you can tur n t his function off
and have received documents printed at full size.
Note: If a document is too long to fit on the printing paper, the remainder
will be printed on a second page. In this case, the cut-off point may occur in
the middle of a line.
Note: Automatic reduction may not be possible if the received document is
too large, contains too many fine graphics or images, or is sent at high resolution. In this case, the remainder of the document will be printed on a second
page.
Press the keys shown at right. RECEP-
1
TION RATIO will appear in the display.
FUNCTION
6
Press "1" to turn automatic reduction on,
2
or "2" to turn it off.
Press the STOP key.
3
On Off
or
1
STOP
2
39
Page 50

5
Making
Chapter
Your fax can also be used to make copies. Single and multiple copies (up to 99
per original) can be made, enabling your fax to double as an office copier .
♦ The default resolution for copying is SUPER FINE.
♦ If you are making multiple copies of more than one original, you can
Copies
choose whether to have the copies sorted (SORT COPY) or not sorted
(MULTI COPY). The following example shows how the copies are ordered in each case when 3 copies each of 3 originals are made.
Originals
C
B
A
Sorted
(SORT COPY)
C
B
A
A
Load the document(s) face down.
1
C
B
C
B
A
•••• If desired, adjust the resolution and/or
contrast with the RESOLUTION key.
Press the COPY/HELP key.
2
•••• If yo u a re on ly mak ing one cop y of the
original (or of each original) and don’t
want to make a reduction or enlargement setting, press the START key
twice. Copying will begin. If you are
only making one copy and want to
make a reduction or enlargement setting, press the START key once and
go to Step 5.
Not sorted
A
A
B
A
B
COPY/
HELP
(MULTI COPY)
B
C
C
C
START
STOP
40
Page 51

Chapter 5 Making Copies
Press "1" (MULTI CO PY) i f you do n’ t
3
want the copies sorted, or "2" (SORT
COPY) if you want them sorted.
Enter the desire d nu mb er of copi es w it h
4
the numeric keys.
•••• If the desired number of copies is from
1 to 9, enter "0" first.
•••• If you don’t want to make a reduction
or enlargement setting, press the
START key. Copying will begin.
Set the amount of reduction or enlarge-
5
ment by entering a number from "1" to
"5" as shown below. Copying will be gin.
1: AUTO (automatic size adjustment to
match the size of the printing paper)
2: 50%
3: 100% (no reduct io n or enl arg e men t)
4: 125%
5: 135%
Multi
1
1
2
or
2
(Example)
(Example)
Sort
2
Note: If you place a large number of originals in the feeder, the memory may
become full before a ll of them can be sca nned (MEMORY IS FULL will appear in the display). If this happens, press the START key to copy the originals which have been scanned, and then repeat the copy procedure for the
remaining originals, including the original which was being scanned when the
memo ry be c ame fu l l .
41
Page 52

Chapter 5 Making Copies
Copy Cut-off
When making a copy, your fax has been set at the factory to not print the remaining part of a document if the document is longer than the printing paper. If
you want your fax t o always print the remaining part of the document on a second page, follow the steps below.
Press the keys shown at right.
1
COPY CUT-OFF will appear in the display.
Press "1" to turn copy cut-off on (the re-
2
maining part of the document will not be
printed), or "2" to turn it off (the remaining part will be printed on a second page).
FUNCTION
1
or
6
2
Press the STOP key.
3
STOP
42
Page 53

6
Making
Chapter
Your fax can be used like a regular telephone to make and receive voice calls.
♦ To make or receive a phone call, the power must be on.
Pick up the handset or press th e
1
SPEAKER key. Listen for the dial tone.
Telephone Calls
or
SPEAKER
Dial the number using one of the follow-
2
ing methods:
•••• Normal Dialling: Enter the full tele-
phone number with the numeric keys.
•••• Rapid K e y Dialling: Press the appro-
priate Rapid Key.
•••• Speed Dialling: Press the SP EE D
DIAL key, and enter the 2-digit Speed
Dial number with the numeric keys.
Speak with the other party when they an-
3
swer.
•••• If yo u pr esse d the SPEA KER key,
pick up the handset to talk.
ABC DEF
2
1
GHI JKL MNO
45
3
6
TUV WXYZPQRS
78
SYMBOLS
0
9
43
Page 54

Chapter 6 Making Voice Calls
Using the SEARCH/R key
You can use the SEARCH/R key to search for a Rapid Key or Speed Dial number. First search for the number as described in "Using the SEARCH/R key" in
"Dialling and Transmission" in Chapter 3, then pick up the handset or press the
SPEAKER key. The number will be dialled automatically (do not press the
START key).
Redial
The last number called can be redialled by pressin g the REDIAL key (it is not
necessary to pick up the handset or press the SPEAKER key). When the other
party answers, pick up the handset to talk.
Issuing tone signals
If you are on a pulse dial line, you can use the "*" key to temporarily issue tone
signals when you press the numeric keys. This allows you to use certain telephone services which require entering tone signals.
When you need to enter one or more tone signals, press the "*" key and then
press the appropriate numeric keys.
To change back to pulse mode, simply hang up (the dialling mode automatically
changes back to the setting of Option Setting 8 when you hang up).
PBX operations and public network services
If your fax is connected to a PBX, you can use it to perfor m the fo llowin g operations:
♦ Making enquiry calls: During a call, you ca n pu t the othe r party on ho l d,
make a further call to a third party, and then go back to your original caller.
♦ Transferring calls: You can transfer a call to another number on the same
PBX without operator assistance.
Your fax is also fully compatible with British Telecom Network Services and
Telecom Eireann Phone Plus Services and can be used in conjunction with any
facility that requires a recall command.
44
Page 55

Chapter 6 Making Voice Calls
Note: To perform PBX operations, Option Setting 14 must be set to the appropriate recall mode for your PBX (see Chapter 9, "Optional Settings"). Check
your PBX manual or consult your supplier for the correct recall mode. If you
are using British Telecom Network Services or Telecomm Eireann Phone
Plus Services, Option Setting 14 must be set to time-break recall. (This is the
initial factory setting).
Making enquiry calls
During the telephone conversation, press
1
the SEARCH/R key. This puts the other
party on hold.
When you hear the dial tone, dial the
2
number of the third party for the enquiry
call.
When you have finished the enquiry call,
3
you will be automatically returned to the
original caller as soon as the third party
hangs up.
Transferring calls
During the telephone conversation, press
1
the SEARCH/R key. This puts the other
party on hold.
SEARCH
R
1
GHI JKL MNO
45
78
SYMBOLS
SEARCH
ABC DEF
2
TUV WXYZPQRS
0
R
3
6
9
When you hear the dial tone, dial the
2
number to which you want to transfer the
call. When the other party answers, hang
up, and the call will be transferred.
ABC DEF
2
1
GHI JKL MNO
45
TUV WXYZPQRS
78
SYMBOLS
0
3
6
9
45
Page 56

7
Answering
Chapter
Preparations
If you have connected an answering machine to your fax as described in "Connections" in Chapter 1, you can receive both voice messages and fax transmissions on the same line while you are out. To use the connection, first change the
outgoing message of your answering mach ine, and then set the reception mode
of your fax to A.M. when you go out.
Changing the outgoing message
The outgoing message (OGM) of yo ur answerin g mach ine s ho uld be chang ed to
inform callers who want to send a fax to press their Start key. For example, your
message might go as follows:
"Hello. You’ve reached the ABC company. No one is available to take your call
right now. Please leave a message after the beep or press your facsimile Start
key to send a fax. Thank you for calling."
Comments:
••••
Machine Connection
It is advisable to keep the length of the message under 10 seconds. If it is too
long, you may have difficulty receiving faxes sent by automatic dialling.
46
Your callers can even leave a voice message and send a fax message on the
••••
same call. Modify your outgoing mess age to exp lain that they can firs t leave
a voice message, and then press their Start key to send a fax.
Page 57

Chapter 7 Answering Machine Connection
Using the Connection
RECEPTION
Set the reception mode of your fax to
1
A.M. by pressi ng the RECEPTION
MODE key.
Set your answering machine to auto an-
2
swer.
•••• Your answering machine must be set
to answer on a maximum of two rings.
If not, you may not be able to receive
faxes sent by automatic dialling.
•••• If your answering machine has a toll
saver function, make sure that it will
answer by the fourth ring.
Note: If your answering machine has a remote retrieval function, make sure
the code used to activate remote retrieval is different from the code used to activate fax reception with an extension telephone (see Chapter 4, "Receiving
Documents"). If they are the same, entering the code from an outside telephone to retrieve messages will cause the fax machine to be activated.
MODE
47
Page 58

Chapter 7 Answering Machine Connection
How the answering machine mode operates
While you are out, all of your incoming calls will be answered by your answering machine and its outgoing message will play. Voice callers can leave a message. During this time, your fax machine will quietly monitor the line. If your
fax machine detects a fax tone or a duration of silence equal to four seconds
(called "Quiet Detect Time"), it will take over the line and begin reception.
Your fax machine listens for a duration of silence because some transmitting machines do not send a fax tone when the fax is sent manually (this means that the
person faxing uses the handset to dial and then presses their Start key after listening to your outgoing message). Pressing the Start key in this case causes the line
to go silent. The timing for fax reception is shown below.
10 sec.
Quiet Detect Time
(Initial setting: 4 sec.)
Sender presses
start key
(Line goes silent)
14 sec.
Fax reception
begins
Fax machine
rings
0 sec.
Outgoing message
(10 sec. max)
Answering machine
answers
♦ If the connection is not good or there is noise on the line, the answering ma-
chine and/or fax machine may not respond properly.
♦ The call counter on your answering machine may indicate that voice mes-
sages were received, when only fax messages were received.
Note: To prevent the fax from taking over the line and beginning reception if
you call in from an external phone or answer on an extension phone, press any
three keys (other than the code to activate fax reception, "5", "*", and "*")
on the dia l pad of the phone. This can only be performed from a phone capable of tone dialling.
48
Page 59

Chapter 7 Answering Machine Connection
If it doesn’t work
If the connection doesn’t operate properly, first make sure that the answering machine is properly connected to the fax. One end of the answering machine line
should be inserted in the "TEL. SET" socket on the fax (or another wall line
socket), and the other end in the answering machine’s telephone line socket.
If the connections are correct and A.M. mode still doesn’t operate properly, the
timing with which the answering machine and the fax operate are probably not
well synchronized. Some common synchronization problems and their solutions
are described below.
♦ Are callers who want to leave a voice message being interrupted by the fax
before they can do so?
The fax is set to take over the line and begin reception if it detects a specified duration of silence (called "Quiet Det ect Ti me") . If you r ou tgo ing mes s age con t ains
a pause or the caller pauses while leaving a message, and the pause is longer than
the specified duration, the fax will interrupt.
It is best to shorten or eliminate such pauses, but if necessar y yo u can als o try
lengthening the Quiet Detect Time setting. This procedure is described in "Optional Settings" at the end of this chapter.
♦ Are callers who want to se nd a fax manually having trouble doing so after
your answering machine’s outgoing message plays?
If so, the answering machine may be disconnecting the line (hanging up) before
your fax has a chance to take over the line and begin reception. You can make
your fax activate sooner by shortening the Quiet Detect Time setting. This procedure is described in "Optional Settings" at the end of this chapter.
♦ Are you having trouble receiving documents sent by automatic dialling?
Make sure that your answering machine’s outgoing message is less than 10 sec-
onds long, and that your answering mach ine is set to answer on between 2 and 4
rings.
Inserting a short pause (about 4 seconds) at t he beginning of your answering machine’s outgoing message might also help , as this gives yo ur fax a chance to
clearly hear and detect the fax "calling" tone which the transmitting fax sends in
the case of automatic dialing.
49
Page 60

Chapter 7 Answering Machine Connection
Optional A.M. Connection Settings
If necessary, you can use the following settings to improve the response of the
answering machine connection to incoming calls.
Quiet Detect Time
This function causes the fax machine to take over the line and begin reception if
a certain duration of silence is detected after the answering machine answers.
Time selections for the period of silence are 1 to 10 seconds. Quiet Detect Time
has been set to 4 seconds at the factory. This gives the best perform ance with
most answering machines; however, you may need to adjust this setting depending on the disconnect time of your answering machin e.
♦ Some answering machines may have unusually fast disconnect times (equal
to or very slightly less than 4 seconds), which means that the answering machine may disconnect the line before fax reception can begin. In this case,
try a Quiet Detect Time setting of about 3 seconds.
♦ If the fax machine is interrupting callers before they can leave a message,
try a longer Quiet Detect Time setting. If your outgoing message includes a
period of silence, make sure that the setting is longer than that period of silence, or re-record your outgoing message to shorten the silence.
To change the Quiet Detect Time setting, reset Option Setting 10 as described in
Chapter 9, "Optional Settings".
Note: Quiet Detect Time can be turned off by entering "00" for the time.
Note, however, that the fax machine will not be able to receive faxes sent
manually by Normal Dialling.
If it still doesn’t work...
With certain answering machines, it may not be possible to find a Quiet Detect
Time setting which will allow both fax reception and uninterrupted voice message recording. In this case, callers on tone dial lines can still send faxes by
pressing "5", "*", and "*" on their fax. This is the code for activating fax reception which can be changed by resetting Option Setting 5.
To use this method, turn off Quiet Detect Time by resetting Option Setting 10 to
"00", and then change your outgoi ng mes s age to inf or m cal lers on to ne dial li nes
that they can send a fax by pressing "5", "*", "*", and then their Start key.
50
Page 61

Chapter 7 Answering Machine Connection
Select Auto Receive
When this function is turned on, your fax will answer the call after 5 rings if the
answering machine for some reason fails to answer before that time. This ensures that you will receive fax messages even if the answering machine’s tape
fills up or the answering machine is not turned on.
This function has been turned off at the factory. If you wa nt t o tur n i t on, re se t
Option Setting 13 as described in Chapter 9, "Optional Settings".
Note: When this function is turned on, make sure that the answering machine
is set to answer on 4 rings or less. If it isn’t, the fax will alway s an swer first,
preventing callers from leaving voice messages.
Quiet Detect Start Timing
This setting can be used to delay the start of the Quiet Detect Time function. For
example, if you want to insert a pause at the beginn ing of your ans werin g machine’s outgoing message to ensure cle ar detection of fax signals, you can use
this setting to delay the start of silence detection so that the pause will not cause
the fax to take over the line.
Quiet Detect Start Timing has been turned off at the factory. If you want to use
this function, turn it on by resetting Option Setting 11 to the desired delay time
(1 to 15 seconds). This procedure is described in Chapter 9, "Optional Settings".
As a general guide, the delay time should be slightly longer than the pause before the outgoi ng message.
Off Hook Hold
This setting can be used to make the fax automatically take over the line and attempt reception after a set number of seconds.
For normal operation, we recommend that you do not turn this function on; however, if you are having trouble receiving faxes in A.M. mode, you can try various time settings to see if it helps. Turn the function on by resetting Option
Setting 12 to the desired number of seconds (1 to 255 seconds). This procedure
is described in Chapter 9, "Optional Settings".
Hint: This setting is useful in situations where you only want to receive fax
transmissions (no voice messages), but still want to use the answering machine to play an outgoing message. In this case, if your outgoing message
was, for example, 14 seconds, you would set the time to 15 seconds.
51
Page 62

8
Special
Chapter
Blocking Reception of Unwanted Faxes
The Anti Junk Fax function allows you to block reception of faxe s fro m par ties
which you specify. This s aves pap e r by not pr i nt in g ou t unwanted "junk" faxes.
To use this function, first turn it on by setting Option Setting 16 to YES as described in Chapter 9, and then enter the fax numbers from wh ich you do not
want to receive faxes as shown below.
Comments:
••••
••••
Press the keys shown at right.
1
JUNK FAX # MODE will appear in the
display.
Functions
Up to 5 numbers can be entered in the Anti Junk Number List.
To clear a number from the Anti Junk Number List, you need to know the
1-digit number which identifies it. If you have forgotten this number, print
out the Anti Junk Number List as described in Chapter 10.
FUNCTION
3
Press "1" to store a number in the Anti
2
Junk Number List, or "2" to clear a number from the list.
3
Storing: Enter a 1-digit number from
"1" to "5". This number identifies the fax
number you will store in the next step.
Clearing: Enter the number which identifies the fax number you want to clear,
and go to Step 5.
52
1
1
2
or
(Example)
Page 63

Enter the fax number (max. of 20 digits).
4
Chapter 8 Special Functions
5
5
5
1
2
(Example)
3
4
Press the START key.
5
Return to Step 3 to enter (or clear) an-
6
other number, or pr ess STOP to exit.
START
STOP
Step 3 or
53
Page 64

Chapter 8 Special Functions
Memory
Your fax has a memory which can be used to temporarily store both incoming
and outgoing document s .
♦ Approximately 39 pages of average content (based on ITU-T Test Chart #1
at standard resolution) can be held in memory if they are all going to be
transmitted (27 pages if Option Setting 20, Error Correction Mode, is set to
YES), or 30 pages if they are all received (29 pages if Option Setting 20 is
set to YES). Less can be he ld if an y we re sc ann e d usin g fin e or ha lf ton e
resolution.
Sending documents from memory
With this function, the original document is scanned immediately, stored in
memory, and then transmitted once the connection to the receiving machine is
made. This is convenient when transmitting to places where the line is often
busy, as it saves you from waiting to pick up the original document and frees
the feeder for other operations. After transmission, the document will be
cleared from memory.
♦ Only one memory transmission can be set at a time.
♦ The amount of memory currently occupied appears as a percentage in the
display while the document is being scanned.
Load the document(s).
1
•••• Set the re solution and/or contrast if de-
sired.
Press the MEMORY key and then "1".
2
Enter the number of the receiving ma-
3
chine using one of the following methods:
•••• Press a Rapid Key.
•••• Press the SPEED DIAL key an d ent er
a Speed Dial number.
•••• Enter a full telephone number by press-
ing the number ke y s.
54
MEMORY
1
01
20
(Example)
Page 65

Chapter 8 Special Functions
Press the START key if you enter ed a
4
Speed Dial number or a full number.
•••• The document will be scanned and
stored in memory. Your fax will then
dial the receiving machine and transmit the document (redialling will be
done automatically if necessary).
START
If the memory becomes full...
If the memory becomes full while the document is being scanned, MEMORY
IS FULL will appear in the display.
♦ Press the START key if you want to transmi t the pag e s whi ch ha ve bee n
stored up to that point in memory. The remaining pages will be ejected
from the feeder. After transmission, the memory will be cleared and you
can transmit the remaining pages. You will also need to transmit the page
which was being scanned when the memory filled up.
♦ Press the STOP key if you want to cancel the entire transmission.
Substitute reception into memory
This is a back-up function which is automatically activated if your fax runs out
of paper, the printing ribbon needs replacement, or the paper jams.
When you have received a document in memory, FAX RX IN MEMORY will
appear in the display, alternating with OUT OF PAPER, FILM END, or PAPER
JAM. When you add paper, replace the imaging film, or clear the jam, the stored
documents will automatically print out.
♦ If you received documents in memory because the fax ran out of paper, be
sure to add paper which is the same size as the paper previously used. If not,
the document print-out size may not match the size of the printing paper.
Caution!
When documents are stored in memory, do not turn the power off. This will
••••
erase all of the contents.
If documents received in memory are los t du e to a power failure or ot her
••••
interruption of the power supply, a "CLEAR REPORT" will be printed out
when the power is restored. This gives information about the reception s lost,
including the fax numbers of the transmitting machines if they are available.
55
Page 66

Chapter 8 Special Functions
Broadcasting
This function allows you to send the same document to as many as 20 different
locations with just one operation. First store the document in memory, then enter the numbers of the receiving machines. The document will be transmitted to
each location.
♦ You can only use Rapid Keys or Speed Dial numbers to dial the numbers
of the receiving machines.
Load the document(s).
1
Press the MEMORY key and then "2".
2
MEMORY
2
Dial the receiving machines (maximum
3
of 20) using one or both of the following
methods:
•••• Enter one or more Speed Dial numbers
by pressing the numeric keys.
•••• Press on e or mo re Ra p id Ke ys.
Press the START key.
4
•••• Set the re solution and/or contrast if de-
sired.
56
2
01
20
START
2
(Example)
Page 67

Chapter 8 Special Functions
Press the START key. Transmission will
5
begin.
•••• A Transaction Report is au tomatically
printed out after Broadcasting is completed. Check the "Note" column of the
report to see if any of the locations are
marked "Busy" or have a communication error code. If so, send the document to those locations again.
START
Broadcasting using a Group Key
If the fax machines to which you w ant t o br oad cas t have al l been pr og ram med
into one Group Key, you can perform the broadcasting operation using the following simplified procedure:
Load the document(s).
1
•••• Make any desired transm ission set-
tings (resolution, contrast, etc.).
Press the appropriate Group Key. Trans-
2
mission will begin.
18/G1
37
(Example)
57
Page 68

Chapter 8 Special Functions
Polling (Requesting a Fax Transmission)
Polling allows you to request another fax machine to send a document to your
fax machine. In other words, the receiving fax machine, not the transmitting fax
machine, initiates the transmission. You can use your fax to both poll and be
polled by other s .
To use the polling function, you must first reset Rapid Key 15/POLL for use as
a polling key. This is done by resetting Option Setting 17, as described in Chapter 9, "Optional Settings". (Note that when Rapid Key 15/POLL is set as a polling key, it cannot be used for Rapid Key Dialling.)
Requesting transmission
Note: Rapid Dial Keys cannot be used for polling. To dial a Rapid Dial location, press the SPEED DIAL key and then enter the 2-digit number corresponding to the Rapid Key.
Dial the fax mach ine yo u wa nt t o pol l us-
1
ing one of the following methods:
•••• Pick up th e handset (or press the
SPEAKER key) and dial the full number. Wait for the fax answerback tone.
•••• Press the SPEED DIAL key an d ent er
a 2-digit Speed Dial number.
SPEED
DIAL
0
(Example)
1
•••• Enter the full number u sing the nu-
meric keys.
Press Rapid Key 15/POLL .
2
•••• If you used the handset, replace it
when POLLING appears in the display.
Reception will begin.
58
15/POLL
34
Page 69

Chapter 8 Special Functions
Being polled (polling standby)
To let another fax machine poll your fax, simply set the reception mode to
FAX, and load the document(s) to be sent.
Transmission will take place when the other fax machine calls your fax and activates polling. Automatic reception is possible whilst your fax is on polling
standby.
Polling security
Polling Security allows you to prevent unauthorized polling of your fax. When
this function is turned on, polling will only take place when the fax number of
the polling fax machine has been entered in your fax’s list of permitted fax numbers (called "passcode numbers"). The number of the polling fax must also be
correctly programmed into itself for identification.
To use Polling Security, follow the steps below to turn the function on, and then
enter permitted numbers as shown on the following page.
Press the keys shown at right.
1
ENTRY MODE will appear in the display.
FUNCTION
3
Press the "#" key three times.
2
SECURITY SELECT will appear in the
display.
Press "1" to turn polling security on, or
3
"2" to turn it off.
Press the START key and then the
4
STOP key.
1
START
or
2
STOP
59
Page 70

Chapter 8 Special Functions
Storing and clearing fax numbers for polling per m ission
You can store up to 10 fax numbers in your fax’s list of permitted numbers.
Press the keys shown at right.
1
ENTRY MODE will appear in the display.
Press the "#" key four times.
2
PASSCODE # MODE will appear in the
display.
Press "1" to store a number, or "2" to
3
clear a number.
Storing: Enter a 2-digit number from
4
"01" to "10". This number identifies the
fax number you will store in the next
step.
Clearing: Enter the number which identifies the fax number you want to clear,
and go to Step 6.
FUNCTION
1
0
3
or
1
(Example)
2
Enter the fax number (max. of 20 digits).
5
Press the START key.
6
Return to Step 4 to enter (or clear) an-
7
other number, or pr ess STOP to exit.
60
5
5 5 1 2 3 4
(Example)
START
STOP
Step 4 or
Page 71

Chapter 8 Special Functions
Timer Operations
The Timer function allows you to set a transmission and/or polling operation to
be performed automatically at a time you specify. One transmission operation
and one polling operation can be set at the same time, and the times they will be
performed can be specified up to 24 ho urs in advance.
As an example, you can use this function to take advantage of off-peak telephone rates without having to be there when the operation is performed.
Note: Only a Speed Dial number can be used to dial the receiving machine.
••••
Setting a timer operation
Press the keys shown at right.
1
TIMER MODE will appear in the display.
Press "#" to set a transmission operation
2
(SEND MODE), or "*" to set a polling
operation (POLLING MODE).
FUNCTION
1
or
Press "1" to select SET.
3
Enter the time at which you want the op-
4
eration to take place (2 digits for the
hour and 2 digits for the minute).
Press the START key.
5
1
0
START
9 2 5
(Example: 9:25)
61
Page 72

Chapter 8 Special Functions
Enter the Speed Dial number of the re-
6
ceiving fax machine.
••••
If this is a polling operation, go to
Step 9.
0
5
(Example)
Press the START key.
7
Adjust the resolution and/or contrast
8
(skip this step if you do n’t wan t to
change settings).
Press the START key and then the
9
STOP key. If this is a transmission operation, load the document in the feeder
sometime before the specified time of
transmission.
START
RESOLUTION
START
STOP
To cancel an operation
If you need to cancel an operation after it has been set, follow the steps below.
Press the keys shown at right.
1
TIMER MODE will appear in the display.
FUNCTION
1
Press "#" to cancel a transmission opera-
2
tion, or "*" to cancel a polling operation.
Press "2" to select CLEAR.
3
Press the START key and then the
4
STOP key.
62
2
START
or
STOP
Page 73

Chapter 8 Special Functions
Entering and Using Programs
If you frequently perform the same operation involving the same party, you can
program all the steps of the operation into one Program Key. This allows you to
perform the operation by simply pressi ng that key.
♦ Rapid Keys 16/P1 and 17 /P 2 ca n be use d as Progr a m Keys. Ho we ver , a ke y
cannot be used if it is already being used for Rapid Key Dialling.
♦ Only Speed Dial numbers can be used to enter fax numbers of receiving ma-
chines in the Program Keys. Full numbers cannot be entered.
♦ If the program is for a regular transmission or polling operation, a timer set-
ting can be included to have the operation performed automatically at a selected time.
♦ To clear a mistake, press the STOP key.
Initial procedure
To program an operation, first perform the following basic procedure. After you
have completed it, refer to the procedure for the specific op eratio n yo u want to
program.
Press the keys shown at right.
1
PRG. ENTRY MODE will appear in the
display.
Press "1" to select SET.
2
Press a Program Key ("16/P1 " or
3
"17/P2") to select it.
Enter a name fo r the pr og ram (ma x. of
4
20 characters). (See "Entering Letters for
Names" in Chapter 2).
Skip this step if you don’t want to enter
a name.
FUNCTION
1
16/P1
35
ABC
DEF
3
2
7
or
GHI
4
17/P2
36
WXY
…………
9
(Example)
63
Page 74

Chapter 8 Special Functions
Press the START key.
5
Press the "#" key or the "*" until the de-
6
sired operation appears in the display.
The operations will appear in the following order:
•••• Transmission ("SEND")
•••• Polling
•••• Broadcasting
Press the START key and then continue
7
with the specific procedure for your operation (see the following pages).
Transmission
(Continued from "Initial procedure".)
Press "1" if you want the document to be
8
scanned into memory and then transmitted, or "2" if you want the document to
be transmitted directly from the feeder.
(Note: If you select "2", you can include
a timer setting in the program.)
•••• If yo u pr esse d "1", go to Step 11. If
you pressed "2" and don’t want to
make a timer setting, go to Step 10.
START
START
1
or
or
2
Enter the time at which you want the op-
9
eration to take place (2 digits for the
hour and 2 digits for the minute).
Press the START key.
10
64
0 9
START
2
(Example: 9:25)
5
Page 75

Enter the Speed Dial number of the re-
11
ceiving fax machine.
Chapter 8 Special Functions
2
5
(Example)
Press the START key.
12
If desired, set the resolution and/or con-
13
trast by pressing the RESOLUTION
key (otherwise, skip this step).
Press the START key and then the
14
STOP key.
Polling
(Continued from "Initial procedure".)
Enter the time at which you want the op-
8
eration to take place (2 digits for the
hour and 2 digits for the minute).
If you don’t want to make a timer setting, go to Step 9.
START
RESOLUTION
START
0
9 2
STOP
5
(Example: 9:25)
Press the START key.
9
Enter the Speed Dial number of the re-
10
ceiving fax machine.
Press the START key and then the
11
STOP key.
START
2
START
5
(Example)
STOP
65
Page 76

Chapter 8 Special Functions
Broadcasting
(Continued from "Initial procedure".)
Enter the Speed Dial numbers of the re-
8
ceiving machines.
2
5
Press the START key.
9
If desired, set the resolution and/or con-
10
trast by pressing the RESOLUTION key
(otherwise, skip this step).
Press the START key and then the
11
STOP key.
Clearing a Program key
To clear a Program key, follow these steps:
Press the keys shown at right.
1
PRG. ENTRY MODE will appear in the
display.
3
RESOLUTION
FUNCTION
5
START
START
(Example)
STOP
7
Press "2" to select CLEAR.
2
Press the Program Key yo u wa nt to c lea r.
3
Press the START key and then the
4
STOP key.
66
16/P1
35
START
2
(Example)
STOP
Page 77

Chapter 8 Special Functions
Using a Program key
A programmed operation is per fo rmed as follows:
Load the document.
1
Press the appropriate Program Key.
2
Note: A maximum of 2 timer operations can be set at any one time, including
both timer operations set by pressing a Program Key and operations set as described in "Timer Operations" in this chapter.
16/P1
35
(Example)
To cancel a programme d tim er operation
If a Program Key has been pressed for a timer operatio n and you need to cancel
the operation before it is performed, follow these steps:
Press the Program Key.
1
Press the START key.
2
16/P1
35
(Example)
START
67
Page 78

9
Optional
Chapter
A variety of optional settings are available which you can use to fine-tune your
fax to better suit your needs. The settings are made by pressing the panel keys,
and each setting is described in the list below.
Accessing the settings
Press the keys shown at left. OPTION
1
SETTING will appear in the display.
Move through the list of settings by
2
pressing "#" to move forward, or "*" to
move backward. The settings will appear
in the order listed below.
When the desired setting appears in the
3
display, make a selection by pressing the
appropriate number key as described below. Your selection will be automatically stored.
Press the STOP key.
4
Settings
FUNCTION
2
STOP
4
or
(Example)
Settings
Setting 1: FINE RESOLUTION PRIORITY
This sets the default resolution (the resolution used if a setting is not made with
the RESOLUTION key) for transmitting documents. Press "1" (YES) to set it
to FINE, or "2" (NO) to set it to STANDARD.
•
Initial setting: "2"
Setting 2: NUMBER OF RINGS AUTO RECEPTION
This sets the number of rings your fax allows before answering an incoming
call in FAX and TEL/FAX reception mode. Enter any number from "1" to "5"
("1" to "3" in Eire).
•
Initial setting: "1"
68
Page 79

Chapter 9 Optional Settings
Setting 3: RECALL INTERVAL
This sets the amount of time your fax will wait between automatic redials
when the line is busy. Press "01" for 1 minute , "02" for 2 minutes, etc., up to a
maximum of 15 min utes.
•
Initial setting: "05"
Setting 4: RECALL TIMES
This sets the maximum number of times your fax will automatically redial if
the line is busy. Enter any number from "00" to "04". (In Eire, enter any
number from "01" to "03").
•
Initial setting: "02"
Setting 5: TEL/FAX REMOTE NUMBER (TRANSFER CODE)
This sets the 1-digit number for activating fax reception from an extension
phone. Enter any number from "0" to "9".
•
Initial setting: "5"
Setting 6: REMOTE RECEPTION SELECT
This turns detection of the code for activating fax receptio n fr om an extensio n
phone on or off. Press "1" to turn detection on, or "2" to turn detection off.
•
Initial setting: "1"
Setting 7: TRANSACTION REPORT PRINT SELECT
This sets the condition for printing out a Transaction Report. Enter a number
from "1" to "5" as follows:
"1" (ALWAYS PRINT): A report will be printed after each transmission,
reception, or error.
"2" (ERR/TIMER/MEM): A report will be printed after an error, timer
operation, or me mor y op era ti o n.
"3" (SEND ONLY): A report will be printed only after a transmission.
"4" (NEVER PRINT): A report will never be printed.
"5" (ERROR ONLY): A report will be printed only after an error occurs.
•
Initial setting: "3"
Setting 8: DIAL MODE
This sets the mode of dialling. Press "1" if you are on a tone dial line, or "2" if
you are on a pulse dial line.
•
Initial setting: "1"
69
Page 80

Chapter 9 Optional Settings
Note: All telephone lines accept pulse dialling but only modern types of
exchange systems accept tone. To check your line type lift the receiver
as if to make a telephone call and attempt dialling in the tone dial
mode. If after dialling a digit you find that the dial tone has been
removed from the line, you are on a tone dial line. If not, you are on a
pulse dial line. Repeat the above in the pulse dial mode to confirm.
Setting 9: PSEUDO RINGING DURATION
This sets the duration of pseudo ringing when the reception mode is set to
TEL/FAX. Enter a number from "1" to "4" as follows:
"1" (15 SEC.): 15 seconds
"2" (30 SEC.): 30 seconds
"3" (60 SEC.): 60 seconds
"4" (120 SEC.): 120 seconds
Ireland: Settings "3" and "4" are not available.
•
Initial setting: "1"
Setting 10: QUIET DETECT TIME
This sets the duration of silence (in seconds) after which the fax will take over
the line and begin reception when an answering machine is connected. En ter a
number from "01" to "10", or enter "00" to turn off the function. (See Chapter
7 for more details.)
•
Initial setting: "04"
Setting 11: QUIET DETECT START TIMING
This setting can be used to delay the start of the Quiet Detect Time function
used for an answering machine connection . En ter a 2-digit nu mb er equ al to the
desired number of seconds of the delay ("01" to "15"), or enter "00" for no
delay. (See Chapter 7 for more details.)
•
Initial setting: "00"
70
Page 81

Chapter 9 Optional Settings
Setting 12: OFF HOOK HOLD TIME
This setting can be used to make the fax automatically take over the line a set
number of seconds after an answering machine connected to the fax answers.
Set the number of seconds by entering a 3-dig it number (" 001" to "255"), or
enter "000" to turn off the function. (See Chapter 7 for more details.)
•
Initial setting: "000"
Setting 13: SELECT AUTO RECEIVE
Press "1" to have the fax answer a call if an answering machine connected to
the fax does not answer within 5 rings. Press "2" to turn the function off. (See
Chapter 7 for more details.)
•
Initial setting: "2"
Setting 14: PBX RECALL
This sets the recall mode used for transferring calls on a PBX or utilising BT
Network services. Refer to your PBX manual or consult your supplier for the
correct setting if the factory setting is inappropriate. Enter "1" for earth recall,
"2" for time break recall, or "3" for no operat ion.
•
Initial setting: "2"
Setting 15: FAX SIGNAL RECEIVE
Your fax is set to automatically begin reception if you hear a high-pitch ed fax
tone after answering a call. If you use a computer fax mo dem on the same line,
you must turn this setting off in order to prevent your fax from mistakenly
attempting to receive documents sent from the computer fax modem. Press "1"
to turn the setting on, or "2" to turn it off.
•
Initial setting: "1"
Setting 16: JUNK FAX NUMBER CHECK
Press "1" to prevent reception from fax numbers entered in the Anti Junk Fax
List. Press "2" to allow reception from all numbers.
•
Initial setting: "2"
Setting 17: POLLING
Press "1" if you want to use Rapid Key 15/POLL as a polling key. Press "2" if
you want to use it as a regular Rapid Key.
•
Initial setting: "2"
71
Page 82

Chapter 9 Optional Settings
Setting 18: AUTO COVER SHEET
Press "1" (YES) to have the fax automatically generate a cover sheet and send
it as the last page of each transmission. Press "2" (NO) to turn the function off.
•
Initial setting: "2"
Setting 19: ACTIVITY REPORT AUTO PRINT OUT
Press "1" to have your fax automatically print out an Activity Report once
every 30 operations. (The list can still be printed out on demand when desired.)
Press "2" to turn automatic print-out off.
•
Initial setting: "2"
Setting 20: ERROR CORRECTION MODE (ECM)
Press "1" (YES) to have any distortions in a transmission due to noise on the
telephone line be corrected before print-out at the receiving end. This is only
effective when the other machine has ECM as well. Press "2" (NO) to turn the
function off.
•
Initial setting: "1"
72
Page 83

10
Printing
Chapter
You can print out a variety of lists showing settings and information entered in
the fax. You can also have the fax automatically print out a report on transactions after they are made. The lists and the report are described below.
Printing out a list
Reports and Lists
Press the keys shown at left. LISTING
1
MODE will appear in the display.
Press the "#" key or the "*" key until
2
the desired list appears in the display.
Press the START key.
3
Activi ty Report
This report shows information on your most recently performed send and receive operations (a combined maximum of 30 operations can appear). The report is divided into two parts: the TRANSMISSIONS ACTIVITY REPORT,
which shows information on transmissions, and the RECEPTIONS ACTIVITY
REPORT, which shows information on receptions.
♦ If Option Setting 19 is set to "1", a report will be automatically printed out
whenever information on 30 operations has accumulated. (A report can
still be printed on demand at any time.)
♦ All information is erased after a report is printed out. If automatic print-out
is disabled and print-out has not been performed manually for 30 operations, the information on the oldest operation will be overwritten each time
a new operatio n i s perf or med .
FUNCTION
2
or
START
73
Page 84

Chapter 10 Printing Reports and Lists
Explanation of headings
SENDER/
RECEIVER
The fax number of the other machine involved in the transaction. In the case
of a transmission, the number dialled appears. In the case of a reception, the
programmed ID of the sending machine appears. If this machine does not
have an ID function, the commun ication mode will appear (for example,
"G3").
PAGES
NOTE
Number of pages transmitted or received.
OK
P.FAIL
JAM
NO PAPER
CANCEL
pressed, no document was in th e feeder, or the other machine requested
transmission using a function which yo ur fax does not have.
COM.E-0
Explanations of the error numbers are given in the following tables, however,
these are primarily for use by service engineers. In general, you will want to
simply try the transaction again. If necessary, check with the other party to
make sure their machine is functioning properly.
Transmission errors
Able to recognise handshake signal, but it has errors.
E-0
Cannot recognise the handshake signal from the receiver side.
E-1
Line disconnected during transmission.
E-2
Line disconnected after modem speed fall-back.
E-3
Line disconnected during multi-page transmission.
E-4
Cannot recognize the handshake signal for next page at receiver side.
E-6
No response from receiver side or "disconnect signal" is received at transmitter
E-7
side.
Error was not corrected after the predetermined number of retries because of an
E-8
error in a part of a page.
E-11
E-12
E-13
Error occurred after or whilst reception by the remote (receiving) machine was
revealed to be impossible.
Error occurred just after fall-back.
Error occurred after a response to a retransmission end command was received.
- Transmission/reception was normal.
- A power failure occurred.
- A problem with the fax paper or document occurred.
- You ran out of fax paper during reception.
- Transmission was cancelled because the
COM.E-14
to
- A telephone line error prevented the transaction.
STOP
key was
74
Page 85

Reception errors
Able to recognise handshake signal, but it has errors.
E-0
Line disconnected during reception.
E-1
Cannot recognise the handshake signal from the transmitter side.
E-2
Cannot recognise the last handshake signal from the transmitter side.
E-3
Cannot recognise the handshake signal for next page from the transmitter side in
E-4
the case of mode change.
Cannot recognise the handshake signal for next page from transmitter side.
E-5
No response from transmitter or "disconnect signal" is received at receiver side.
E-7
Error occurred upon completion of reception of all pages.
E-8
Error occurred when mode was changed or transmission/reception switching was
E-9
performed.
E-10
E-11
E-12
E-13
E-14
Error occurred during partial page or physical page reception.
Error occurred after or during inquiry from the remote (transmitting) machine as to
whether reception was possible or not.
Error occurred during or just after fallback.
Error occurred after retransmission end command was received.
Error occurred after voice communication command was received.
Chapter 10 Printing Reports and Lists
Timer list
This list shows the timer operations which are currently set.
75
Page 86

Chapter 10 Printing Reports and Lists
Telephone Number List
This list shows the fax and voice numbers which have been stored for automatic
dialling.
Passcode List
This list shows settings made for polling security, your name and fax/telephone
number as entered in the machine, and a sample of the header printed at the top
of every page you transmit (HEADER PRINT).
Option Setting List
This list shows the current status of the optional settings.
76
Page 87

Chapter 10 Printing Reports and Lists
Anti Junk Number List
This list shows the fax numbers from which reception is not allowed.
Program and Group List
The top part of this list shows the programs which have been entered. The bottom part shows the fax numbers which have been s tor ed in each Gro up Key.
77
Page 88

Chapter 10 Printing Reports and Lists
Print Setup List
This list shows the current status of the printing settings made by pressing the
FUNCTION key and the "6" key.
Transaction Report
This report is printed out automatically after an operation is completed to allow
you to check the result. The fax is set at the factory to print out the report after
every transmission, but you can change the setting to have it printed out under a
variety of other conditions. This is done by changing Option Setting 7 as described in Chapter 6.
♦ The same headings appear in the Transaction Report as in the Activity Re-
port. See "Activity Report" in this chapter for an explanation of the headings.
♦ The Transaction report cannot be printed out manually.
Help List
This list is obtained by pressing the COPY/HELP key whilst no documents are
loaded and contains basic information on how to perform certain functions including dialling and changing reception modes. It also provides a complete list
of options available in function mode.
78
Page 89

11
Chapter
Fax print head
Clean the print head frequently to ensure optimum printing performance. To
clean the print head, first unplug the power lead, open the print compartment
cover (press the release marked OPEN), and remove the imaging film.
Wipe the print head, frame and roller with a soft cloth dampened with den atur e d
alcohol.
Maintenance
Print head
Frame
Rollers
Caution!
Do not use benzene or thinner. Avoid touching the print head with hard
••••
objects.
The print head may be hot if your fax machine has just received a large
••••
number of documents. If this is the case, allow the print head to cool prior to
cleaning.
79
Page 90

Chapter 11 Maintenance
Scanning glass and rollers
Clean the scanning glass and rollers frequently to ensure the quality of transmitted images and copies. Open the operation panel by pulling the front edge up
(grasp it at the PANEL RELEASE mark), and wipe the scanning glass, white
backplate, and rollers with a soft cloth.
♦
Make sure that all dirt and stains (such as correcting fluid) are removed, as
dirt and stains will cause vertical lines on transmitted images and copies.
♦
Adhesive cellophane tape is useful for removal of debris from the rollers.
White
backplate
Document
rollers
Scanning glass
Note: The opening of the cover is shown exagerrated. The cover does not
open this wide.
The housing
Wipe the external parts and surface of the machine with a dry cloth.
Caution!
Do not use benzene or thinner. These solvents may damage or discolour the
••••
machine.
80
Page 91

12
Chapter
Troubleshooting
Problems and Solutions
Note: For problems with an answering machine connection, see "If it doesn’t
work" in Chapter 7, "Answering Machine Connection".
Problem Check and remedy
Nothing appears in the display.
The fax does not respond
when you press any of its
keys.
Dialling is not po ss ib le.
The power is on, but no
transmission takes place.
••••
Make sure the po wer cord is properl y pl ug ge d
into a power outlet.
••••
Connect anothe r el ec tr ic al app li an ce to th e
outlet to confirm that it has power.
••••
If a beep sound is no t m ad e when you press the
keys, unplug the power cord and then plug it
back in severa l se co nds later.
••••
Make sure the po wer cord is properl y pl ug ge d
into a power outlet as calls cannot be made or
received when power is removed.
••••
Make sure that the telephone line is properly
connected to bot h th e
wall socket.
••••
Make sure that the fax is set to the correct
dialling mode for your telephone line. See Option
Setting 8 in Chapter 9.
••••
Make sure that the receiving machine has fax
paper.
••••
Make sure that the telephone line cord is
plugged into the "
"
TEL. SET
••••
If the receivin g m ac hi ne is in manual mode with
no attendant, re ce ption will not be possi bl e.
" socket.
TEL. LINE
TEL. LINE
socket and the
" socket, and not th e
••••
If the receivin g m ac hi ne is no t a Sha rp mo de l,
make sure it is G3 compatible.
••••
Check the displa y fo r error messages.
••••
Pick up the handse t an d ch ec k fo r a di al ton e.
Call the receiving machine by normal (manual)
dialling, and co nf irm its response.
81
Page 92

Chapter 12 Troubleshooting
Automatic docu m ent feeding does not work for transmission or copying.
Nothing is printed at the receiving end.
A distorted image is received at the othe r en d.
The power is on, but no reception takes place.
The printing paper does not
come out.
The printing paper comes
out blank when you try to receive a documen t.
••••
Check the size and weight of the document (see
"Transmittable documents" in Chapter 3).
••••
Make sure that the document for tran sm i ss io n is
placed face down in the feeder.
••••
Make sure that the fax paper is properl y lo ad ed
at the receivin g m ac hi ne .
••••
Noise on the teleph one line may cause
distortion. Try sending the document again.
••••
Make a copy of the document on your fax. I f th e
copy is also distorted, your fax may have a
problem. If the problem persists, call for service.
••••
Make sure that the telephone line cor d is
plugged into the "
the "
TEL. SET
••••
The printing paper may be jammed. See
"Clearing Jammed Printing Paper" in this
chapter.
••••
Make sure that the printing paper is pr op er ly
loaded in your machine.
••••
Make sure that th e do cu m en t is loa ded properly
in the feeder of th e tr ansmitting machi ne . Mak e
a copy to confirm the printing ability of your
machine.
TEL. LINE
" socket.
" socket, and
not
The received document is
faint.
Received images are distorted.
82
••••
Ask the other party to send higher contrast
documents. I f th e co ntrast is still to o lo w , yo ur
fax may have a problem. Make a copy to check
it.
••••
Noise on the teleph one line may cause
distortion. Have the other party try sending the
document again.
••••
The print head ma y be dir t y. See "Fa x pr in t
head" in Chapter 11.
••••
Make a copy of anot he r do cu m en t on your fax. If
the copy is also distorted, your fax may have a
problem. If the problem persists, call for service.
Page 93

Reception/copying is interrupted.
Voice calls ta ken on an extension phone ar e in te rrupted by the fax.
Chapter 12 Troubleshooting
••••
If reception or co py in g ha s been done
continuously fo r a lo ng time, the print head ma y
have become over he ated. Turn off the powe r
and let it cool down.
••••
The fax may interrupt during a voice call if
reception mode is set to A.M. To prevent
interruption on a tone dial exte nsion phone,
press any three keys on the extension phone
after answeri n g. (Note: Do not enter the code to
activate fax reception.)
No reception occu rs wh en
polling is attem p te d.
••••
Make sure you have not ru n ou t of pri nting paper.
••••
Make sure the transmitting machine is in
automatic r e ce pt ion mode.
••••
If the transmitting machine has polling security,
make sure that you r fa x nu m be r has been
entered both in your fax and in the transmitting
machine.
83
Page 94

Chapter 12 Troubleshooting
Messages and Signals
Display messages
COVER OPEN The printing compartment cover is open. Close it.
DOCUMENT JAMMED
FAX RX IN MEMORY
FILM END
FUNCTION MODE
LINE ERROR
LINE IS IN USE
MEMORY IS FULL The memory is full. See "Memory" in Chapter 8.
MEMORY PRINTING
ON HOOK DIAL
The original document is jammed. See the
following section, "Clearing Paper Jams".
A fax has been received in memory because the
imaging film needs replacement, you have run
out of printing paper, or the paper is jammed.
The fax will print out automatically when the
problem is fixed.
The imaging film may need replacement. Check
the film and replace it if necessary.
FUNCTION
The
Transmission or reception was not successful.
STOP
Press
again.
An extension phone connected to the fax is being
used. Do not lift the fax’s handset or attempt
transmission at this time, as this will interrupt the
conversation on the extension phone.
The fax is preparing or printing out a document
from memory.
SPEAKER
The
fax is waiting for you to dial.
key has been pressed.
to clear the message, and then try
key has been pressed and the
OUT OF PAPER You are out of printing paper.
OVER HEAT
PAPER JAMMED
The print head has overheated. Operation may
be continued once it cools.
The printing paper is jammed. See the following
section, "Clearing Paper Jams".
84
Page 95

Audible signals
Chapter 12 Troubleshooting
Continuous tone 3 seconds
Intermittent tone
(3 bleeps)
Rapid intermittent tone
5 seconds
(1 second on,
1 second off)
35 seconds
(0.7 seconds on,
0.3 seconds off)
Indicates the end of transmission,
reception, or copying.
Indicates incomplete
transmission, reception, or
copying.
Indicates that the handset is off
hook.
85
Page 96

Chapter 12 Troubleshooting
Clearing Paper Jams
Clearing a jammed document
If a document doesn’t feed properly during transmission or copying, or
DOCUMENT JAMMED appears in the display, first try pressing the START
key. If the document do es n’ t feed ou t, open the operation panel (gra sp t he fr on t
edge at the "PANEL RELEASE" mark and pull up) and pull it out gently.
Clearing jammed fax paper
Press the release marked OPEN and
1
open the print compartment cover.
•••• Caution! The printing head (the strip
of metal on the underside of the frame)
applies heat to the printing film. It
may be hot if a document has just been
printed.
Remove the imaging film from the
2
printing compartment and set it on a
sheet of paper.
86
Page 97

Gently pull the jammed paper out of the
3
printing compartment.
Replace the imaging film, making sure
4
that the flange goes into the rear slot on
the left side of the printing compartment.
Also, make sure that the right, rear gear
engages with the gear below it.
Wind the film slightly (rotate the gear on
5
the right side of the rear spool) so that
there is no slack in the film. Make sure
that both edges of the film wind onto the
spool evenly.
Chapter 12 Troubleshooting
Close the print compartment cover,
6
making sure it clicks into place.
•••• Caution! Close the cover slowly to
make sure it doesn’t pinch your
fingers.
87
Page 98

Specifications
Applicable telephone line: Public switched telephone network/PBX
Compatibility: ITU-T (CCITT) G3 mo de
Configuration: Half-duplex, desktop transceiver
Memory size*: 512 KB (approx. 30 average pages wi th ECM function
off)
1 MB add-on available as option
Compression scheme: MH, MR, MMR
Scanning method: Flat-bed, solid-state CCD
Resolution: Horizontal:
8 lines/mm
Vertical:
Standard 3.85 lines/mm
Fine /Halftone 7.7 lines/mm
Super fine 15.4 lines/mm
Recording system: Thermal transfer recording
Display: 7 x 5 dots, 1 line by 16-digit display
Reception modes: FAX, TEL, TEL/FAX, A.M.
Modem speed: 9600 bps wi th automatic fallba ck to 7200, 4800, or
2400 bps
Transmission time*: Approx. 9 seconds
Effective recording width: 204 mm
Input document size: Automatic feeding:
Width 148 to 216 mm
Length 128 t o 297 mm
Manual feeding:
Width 148 to 216 mm
Length 128 t o 1000 mm
Effective scanning width: 210 mm max.
Automatic document feeder: 20 sheets max.
Halftone (grey scale): 64 levels
* Based on ITU-T Test Chart #1 at standard resolution in Sharp special mode,
excluding time for protocol signals (i.e., ITU-T phase C time only).
88
Page 99

Specifications
Contrast control: Automatic/Dark selectable
Copy function: Single/Multi-copy/Sort-copy (99 copies/page)
Telephone function: Standard (cannot be used if power fails)
Power requirements: 230 V AC, 50 Hz
Operating environment: 5 - 35°C, 20 to 80% RH
Power consumption: Stand-by: 5 W
Maximum: 95 W
Dimensions: Width: 365 mm
Depth: 353 mm
Height: 193 mm
(Without attachments)
Weight: Approx. 4.7 kg
As a part of our policy of continuous improvement, SHARP reserves the right to
make design and specificati o n chan ges fo r pr od uct imp ro vem ent wi tho ut pr i or
notice. The performance specification figu res ind i cated are no min al values of
production un its. There may be some deviations from these values in individual
units.
89
Page 100

Index
A
A.M. reception mode, 20, 47
Activity Report, 73
Automatic printing, 72
Answering machine connection
Connecting, 8
Off Hook Hold, 51, 71
Problems, 49
Quiet Detect Start Timing, 51, 70
Quiet Detect Time, 48, 50, 70
Select Auto Receive, 51, 71
Tone dial fax activation, 50
Anti Junk Fax, 52, 71
Anti Junk Number List, 77
Audible signals, 85
Auto cover sheet, 72
Automatic dialling, 21, 33
B
Batch Page Numbering, 30
Broadcasting, 56
C
Cleaning, 79 - 80
Contrast, 28
Copies, 40
Copy Cut-off setting, 42
Copy/Help key, 15, 40
Cover Sheet, 29, 72
Display, 15
Display messages, 84
Document feeder, 27
Document gui des, 27
Document rest rictions, 26
Document rollers, 80
Document sizes, 26
Document, maximum scanni ng size, 26
Down key, 15
E
Error Correction Mode, 72
Extension teleph one, using, 37
F
FAX reception mode, 20, 36
Fine Resolution Priority, 68
Function key, 15
G
Group Keys
Storing, 24
Using, 57
H
Halftone, 28
Handset, 7
Help List, 78
Housing, cleaning, 80
D
Date, setting, 19
Dial mode, 69
Dialling
Direct Keypad, 32
Normal, 31, 43
Rapid Key, 33, 43
Search, 34, 44
Speed, 33, 43
Direct Keypad Dialling, 32
90
I
Imaging film
Loading, 2
Replacing, 5
Initialise Film setting, 5
J
Jams, clearing, 86
Junk fax number check, 71
 Loading...