

Page 1
Page 2

NOTICE FOR UNITS INSTALLED IN NEW ZEALAND
WARNING:
WARNING:
WARNING:
Should any physicaldamage occur to the equipment which may result in internal
parts becoming exposed, the equipment should immediately.be.disconnected
and the user should arrange for its repair before it is reconnected, or its disposal
if necessary.
(NEW ZEALAND PTC 101)
Should it be necessary to move the equipment, it is necessary to disconnect the
telecom networkconnectionbeforedisconnectingthepowerleadoranyseparate
earth lead. Similarly when reconnecting the equipment it isnecessarytoconnect
the power lead or earth lead before connecting to the telecom network.
(NEW ZEALAND PTC 101)
This equipment rrlay not necessarily provide for the effective hand-over of a call
to or from a telephone connected to the same line.
(NEW ZEALAND PTC211 )
The operation of this equipment on the same lines as telephones or other
equipment with audible warning devices or automatic ring detectors will give rise
to bell tinkle or noise and may cause false tripping of the ring detector. Should
such a problem occur, the user is not to contact Telecom faults service.
(NEW ZEALAND PTC211 )
Use of this device for monitoring telephone conversations is not permissible
under New Zealand law, unless:-
(a) At least one party of the conversation has given consent for its use, or,
WARNING:
(b) Use is authorised for Policeor Security Service applications.
Not all standard telephones and standard telephone answering machines will
respond to incoming ringing when connected to the extension socket of the
equipment.
(NEW ZEALAND PTC211 )
Page 3

.
C your purchaseottheFO-135, andthank youforchoosing
Sharp!
The FO-I 35 facsimile transceiver isG3compatible,the mostcommonly used
type offacsimile machinetoday. Inaddition to the basicoperationsofsending
and receiving documents, it provides a variety of special features designed
to increase the range and power of your communication. These make it an
ideal tool for the office, no matter how big or small the scale of operation.
.
i
Page 4
INTRODUCTION
i
TABLE OF CONTENTS
1. A LOOK AT THE MACHINE
2. INSTALLATION
SITE SELECTION . . . . . . . . . . . . . . . . . . . . . . . . . . . . . . . . . . . 2-1
UNPACKING . . . . . . . . . . . . . . . . . . . . . . . . . . . . . . . . . . . . . . 2-2
ASSEMBLYANDCONNECTIONS . . . . . . . . . . . . . . . . . . . . . . . . . . 2-3
LOADINGTHE RECORDING PAPER . . . . . . . . . . . . . . . . . . . . . . . . . 2-4
3. INITIAL PROGRAMMING
ENTERING YOUR NAME AND FAX NUMBER . . . . . . . . . . . . . . . . . . . . 3-1
ENTERING LETTERS FOR NAMES . . . . . . . . . . . , . . . . . . . . . . . . . 3-2
SETTING THE DATE AND TIME . . . . . . . . . . . . . . . . . . . . . . . . . . . 3-3
STORING NUMBERS FOR AUTOMATIC DIALLING . . . . . . . . , . . . . . . . . 3-4
4. BASIC OPERATIONS
TRANSMISSION . . . . . . . . . . . . . . . . . . . . . . . . . . . . . . . . . . . . 4-1
RECEPTION . , . . . . . . , . . . . . . . . . . . . . . . . . . . . . . . . . . . . . 4-8
COPYING . . . . . . . . . . . . . . . . . . . . . . . . . . . . . . . . . . . . . . . 4-Il
VOICE COMMUNICATIONS , , , . , , , , , . . . . . . . . . . . . , , . , . . . . .4-12
5. USING YOUR FAX WITH OTHER DEVICES 5-1
ANSWERING MACHINE . , . . . . . . . . . . . . . . . , . . . . . . . . . . . . . . 5-1
EXTENSION TELEPHONE . . . . . . . . . . . , . . . . . . . . . . . . . . . . . . 5-7
1-1
2“1
3-1
4-1
ii
6. OPTIONAL SETTINGS
7. PRINTING OUT REPORTS AND LISTS
8. USER MAINTENANCE
RECORDING PAPER . . . . . . . . . . . . . . . . . . . . , . . . . . . . . . . . . 8-1
CLEANING THE MACHINE . . . . . . . . . . . . . . . m. . , . . . , . , . . . . . 8-2
9. TROUBLESHOOTING
PROBLEMS AND SOLUTIONS . . . . , . . . . . . . . . . . . . . . . . , . . . . . 9-1
MESSAGES AND SIGNALS . . . . . . . . . . . . . . . , . . . . , . . . . . . . . . 9-3
CLEARING PAPER JAMS . . . . . . . . . . . . . . . . . . . . . . . . . . . . . . . 9-4
10. SPECIFICATIONS
QUICK REFERENCE GUIDE
INDEX
.
ii
4-1
7-1
8-1
9-1
10-1
Quick-i
Index-i
Page 5
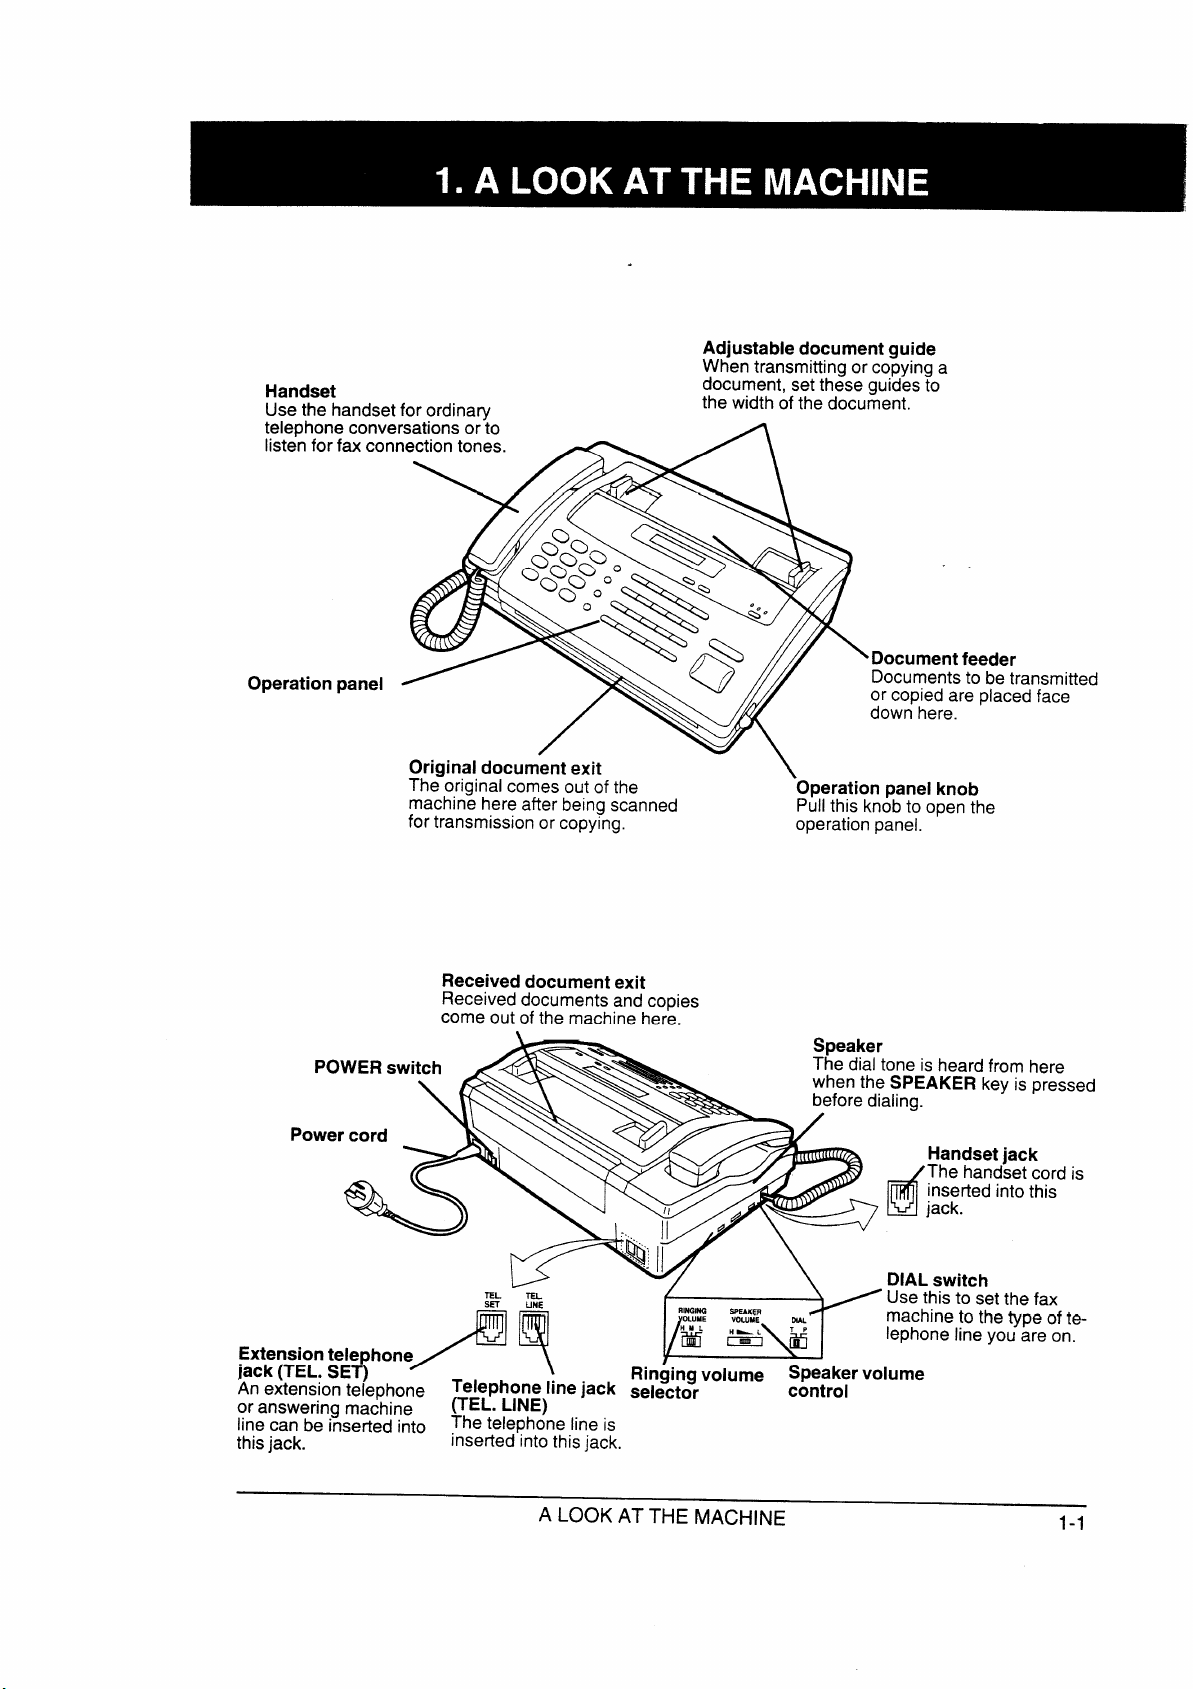
Use handset
t
O
.
A
Whentransmittingorcopyinga
document,settheseguidesto
\
t
E t
e t
a
d
n
/
d
T
i
T
t
A LOOK AT THE MACHINE
1-1
Page 6
A LOOK AT THE MACHINE
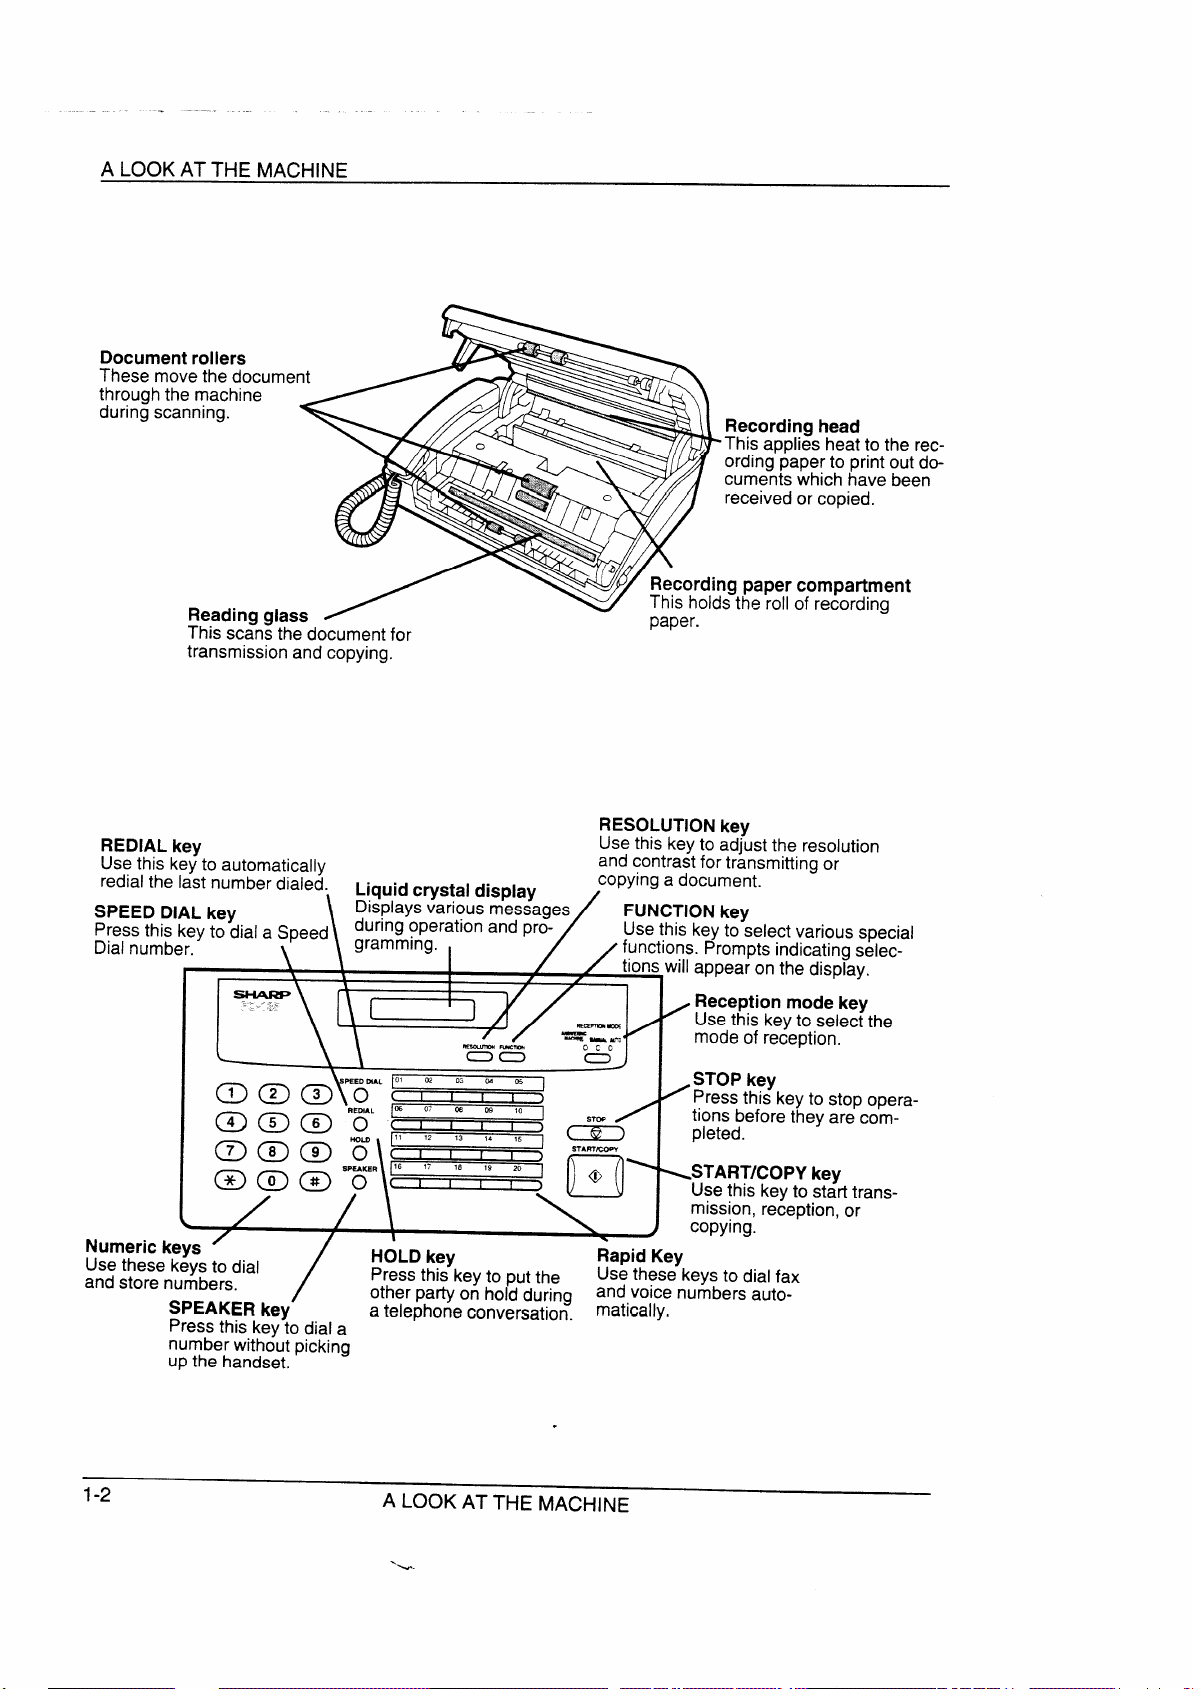
t c
a
a
.
L
m m m
@ m m
/ I t
‘
n
Up h
R
a
o
g
\
\
I
[\ [
5
/
a t c
a
f
J
f
I
0
>
~
m
t
.
A LOOK AT THE MACHINE
Page 7

Take the following points into consideration when selecting a site for your
FO-I 35:
Enviro
●
The machine must be installed on a level surface.
●
Keep the machine away from air conditioners, heaters, direct sunlight, and dust.
●
Provide easy access to the front, back, and sides of the machine. In particular,
keep the area in front of the machine clear, or the original document may jam as
it comes out after scanning.
●
The temperature should be between 5°and 35°C.
●
The humidity should be between 300/0and 85% (without condensation).
Electr
A 230-240 V, 50 Hz, earthed (3-prong) AC outlet is required.
● I e a i o
a p
p t s
Telepja
A standard telephone jack must be located near the machine.
I thmaci mofra cot a w pl
If the machine is moved from a cold to a warm place, it is possible that the
reading glass may mist up due to condensation, preventing proper scanning
of documents for transmission. To remove the mist, turn on the power and
wait approximately 2 hours before using the machine.
INSTALLATION
2-1
Page 8
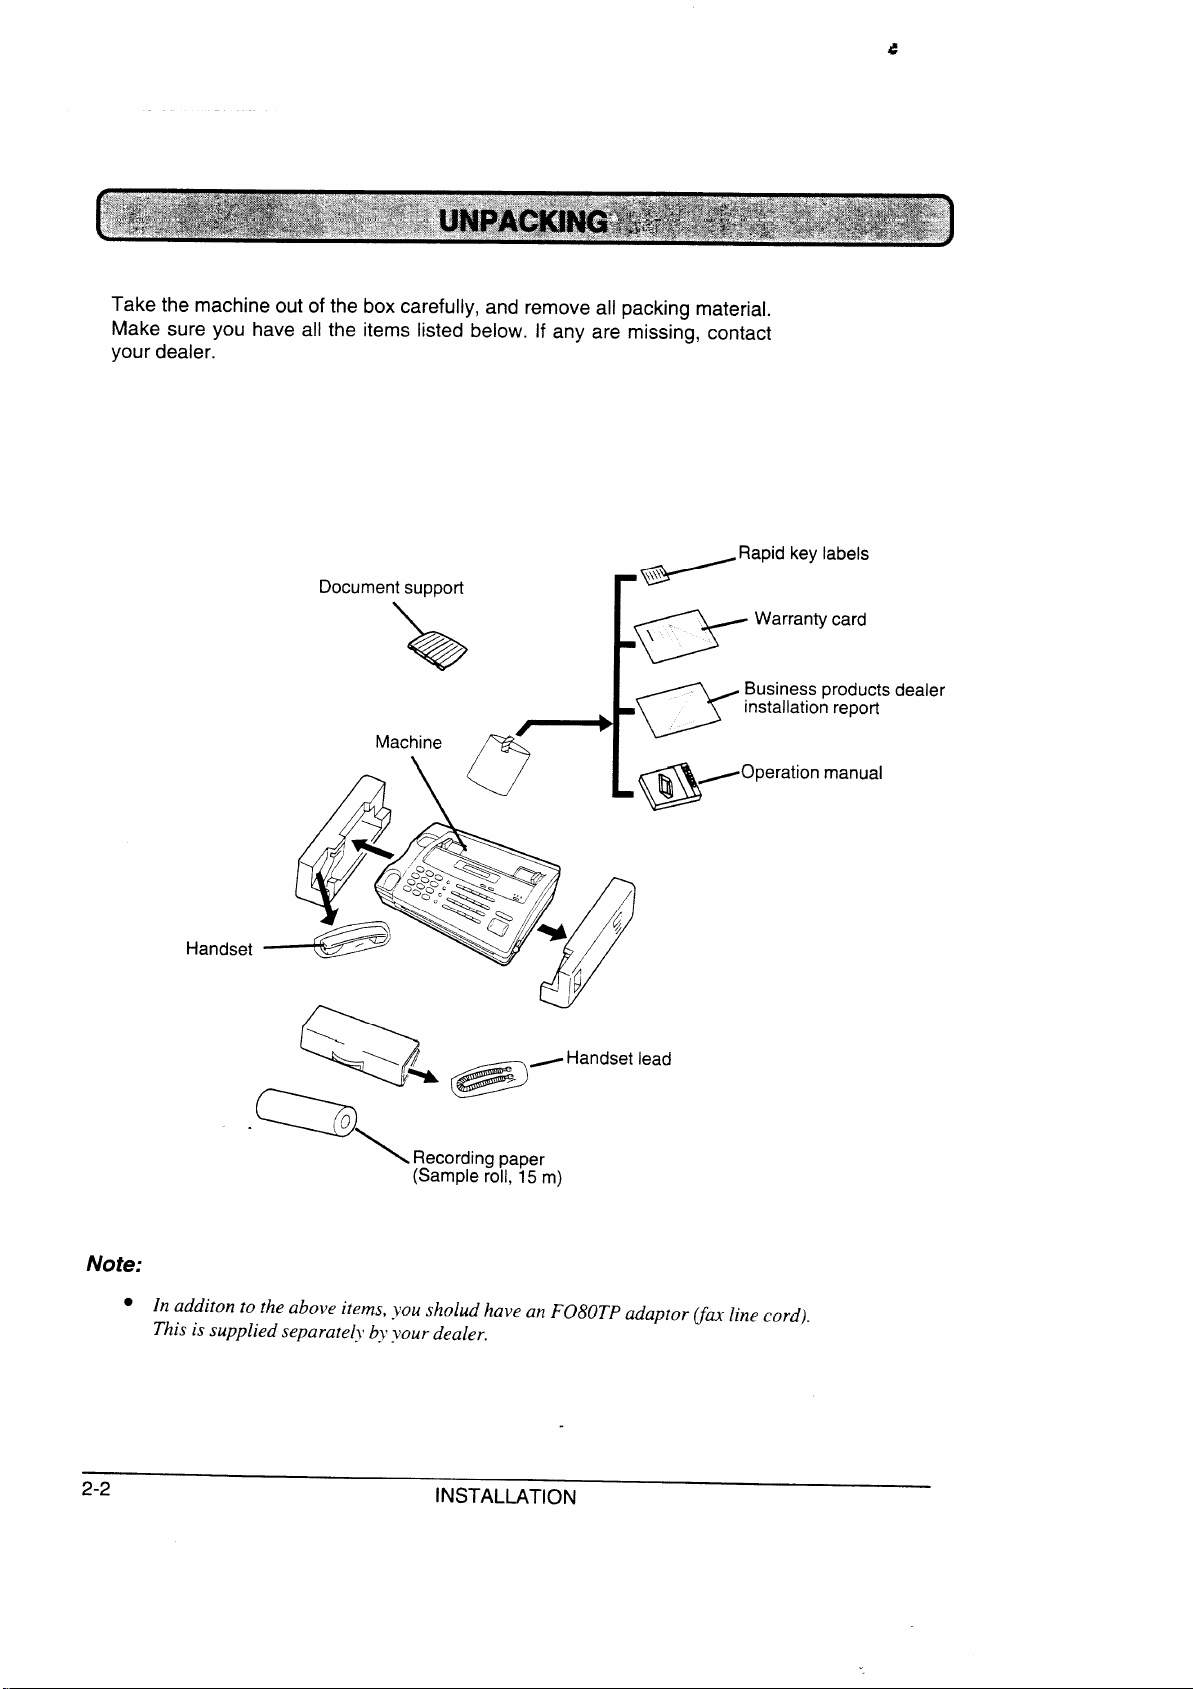
Take the machine out of the box carefully, and remove all packing material.
Make sure you have all the items listed below. If any are missing, contact
your dealer.
i
o
Z
@
a
manual
\\
Q
R
Not
●
s s
. .
INSTALLATION
Page 9

, - >
1
A
w’ ‘ ~
1~, >-
-<, ‘
:
‘<:.
. .
the power cord into a 230-240 V,
grounded (3-prong) AC outlet.
Press the power switch to turn on the
power.
2
3
3
/
.
/
\.u....7~9;
v ,“
-/
‘&
- -
(; :
. —..
. .
.,
3
<~.
“
.e
Connectthehandsetcordtothehandset
and the machine as shown.
s Theendsofthe handsetcordare iden-
tical, so they will go into either jack.
Place the handset on the handset rest.
adaptor into the teiephone jack on the wall. Insert the small
modular plug which terminates the
adaptor line cord into the jack on the
backofthe machine marketedTEL.LINE.
Adjust the volume switches on the left
side of the machine:
c RINGINGVOLUME: Set the switch at
high (H), medium (M), or low (L) as
desired.
● SPEAKER VOLUME:
setting from high (H) to low (L) as
desired.
5
Set the mode of dialing with the DIAL
switch. Select “T”if you are on a touch-
m
~ WARNING NOTICE: For all units installed in NewZealand, only
; the T setting for tone dialling is permitted, The P setting for pulse
~ dialling does not operate properly and must not be used.
INSTALLATION
tone line, or “P”ifyou are on a pulse dial
(rotary) line.
“ Be sureto makethe correct setting, or
you will not be able to make a call.
s Slide the hook-shaped ends of the
support onto the two studs on the rear
cf the machine as shown.
2-3
Page 10
1
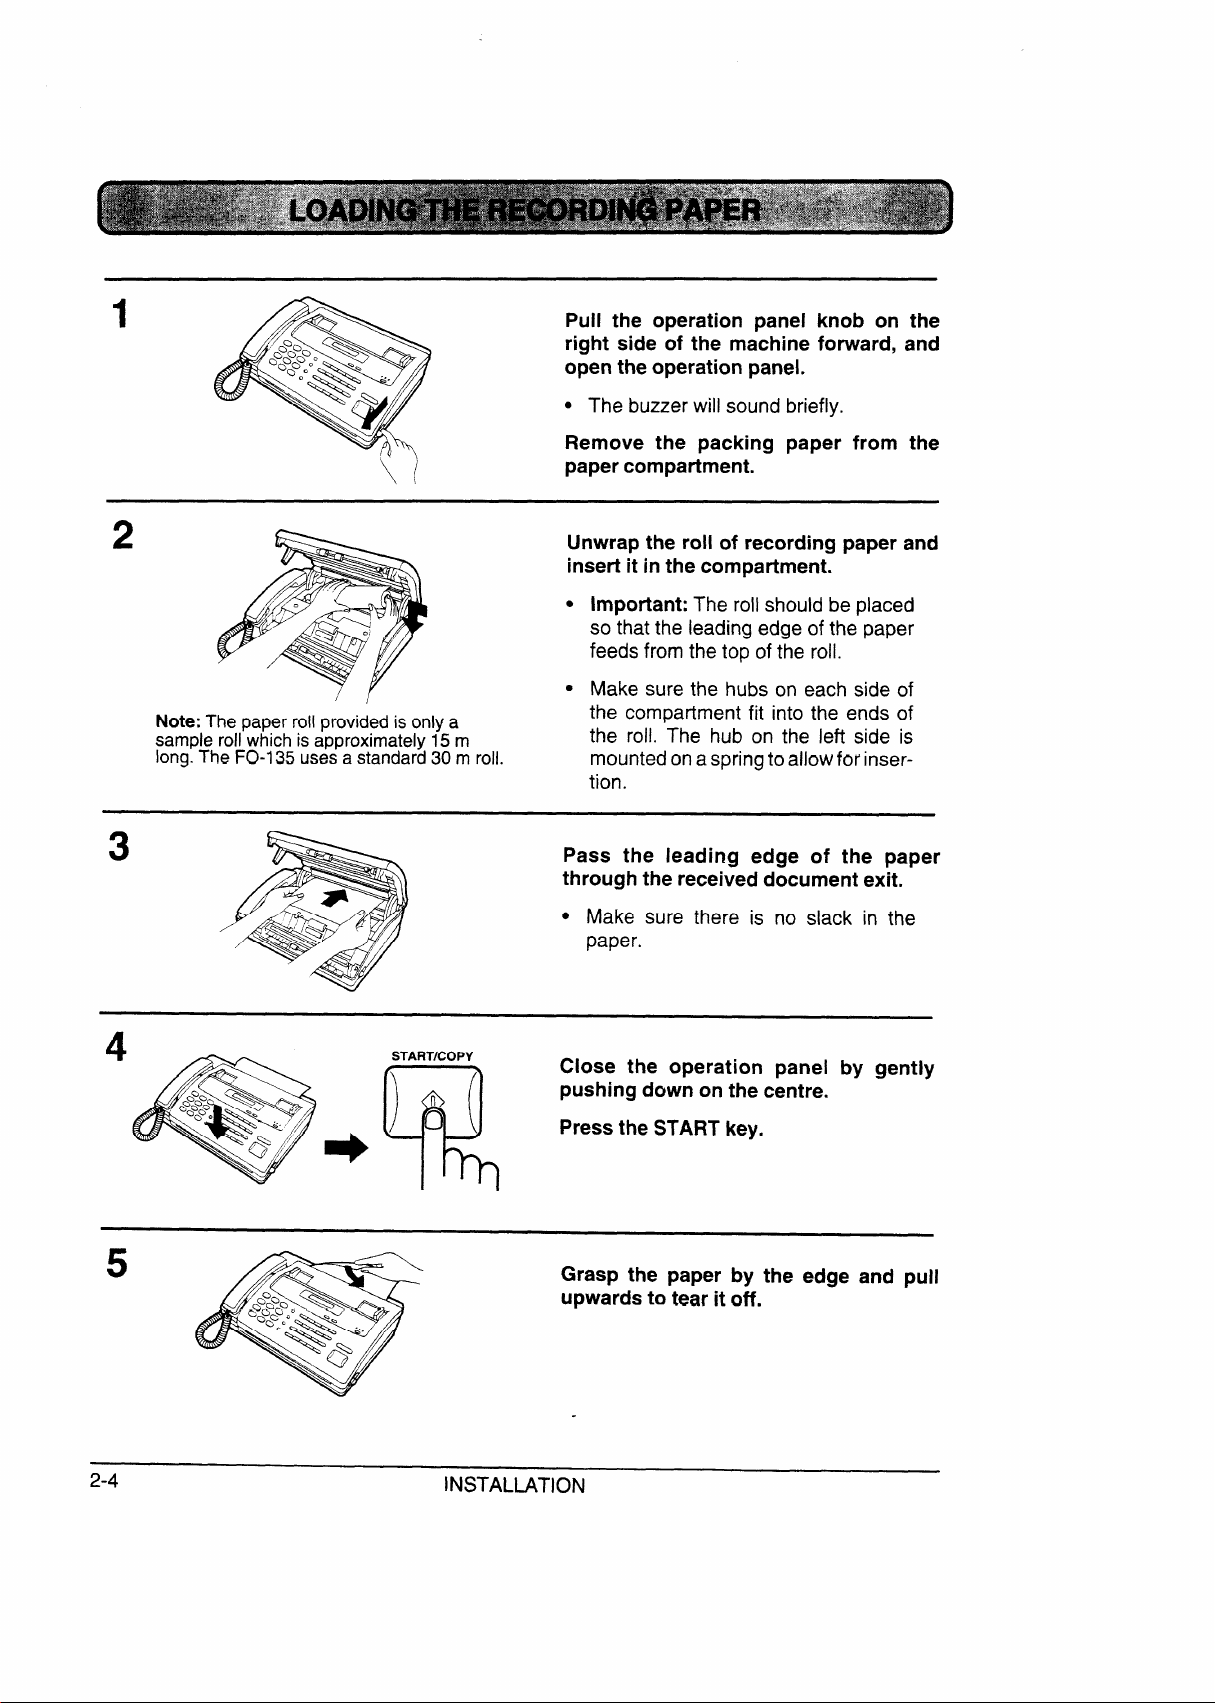
Pull the operation panel knob on the
right side of the machine forward, and
A
open the operation panel.
“ The buzzerwill sound briefly.
2
3
Y
~
/
\
Remove the packing paper from the
paper compartment.
Unwrap the roll of recording paper and
insert it in the compartment.
● Important: The roll should be placed
so that the leading edge of the paper
feeds from the top of the roll.
● Make sure the hubs on each side of
c fit into the ends of
p a
a m
a m
the
the roll. The hub on the left side is
mountedonaspringtoallowfor insertion.
Pass the leading edge of the paper
through the received document exit.
/
c Make sure there is no slack in the
paper.
2-4
4
S
&
Close the operation panel by gently
pushing down on the centre.
Press the START key.
*
R
Grasp the paper by the edge pull
upwards to tear it off.
INSTALLATION
Page 11
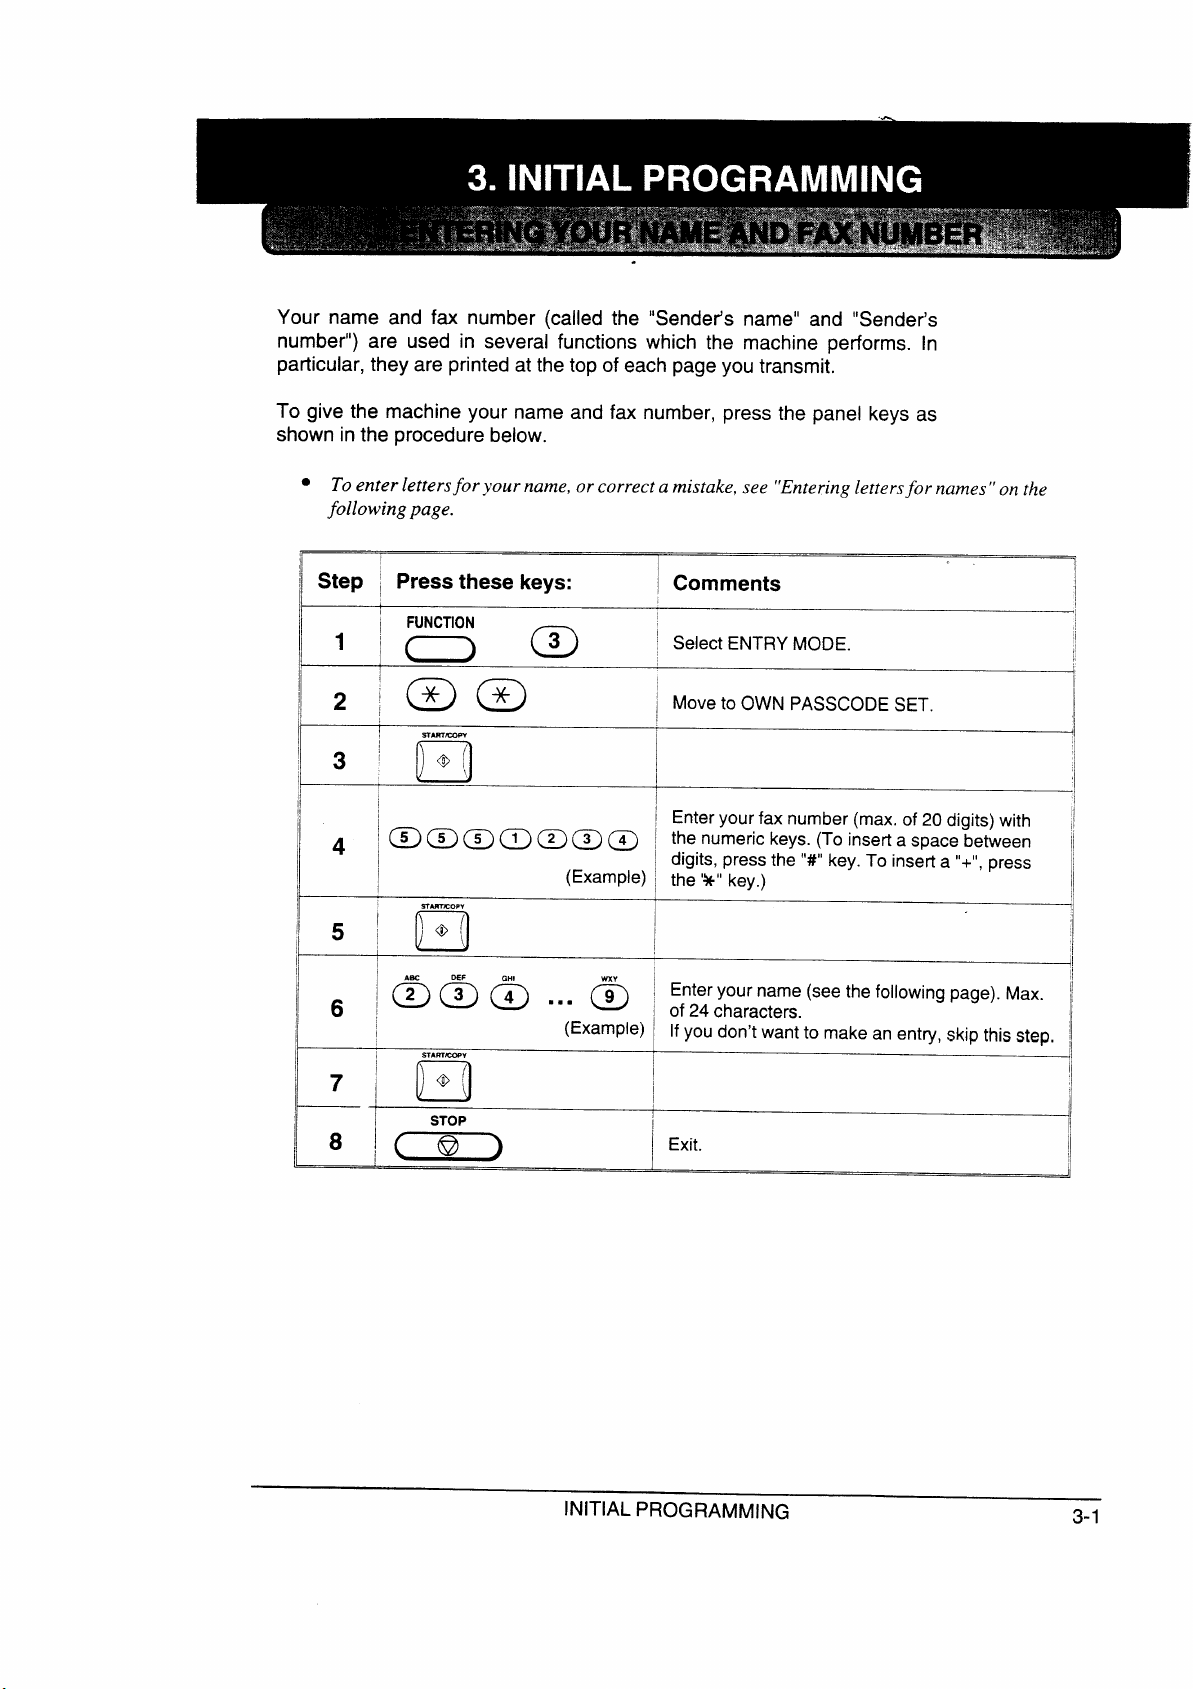
Your name and fax number (called the “Sender’s name” and “Sender’s
ST
number”) are used in several functions which the machine performs. In
particular, they are printed at the top of each page you transmit.
To give the machine your name and fax number, press the panel keys as
shown in the procedure below.
● f o
f
!
Step ~
~
Press these keys:
I Comments
1
;=O;a !
~
i OWNPASSCODESET.
I
!
~
I @ ~ ~ ~ ~ I a
I
~ ~ ~ @ @ @ ~ o
I
I
!
7 I @ (
n
S
(Example)~
(
~
~ a
~ d
I
~
INITIAL PROGRAMMING
3-1
Page 12
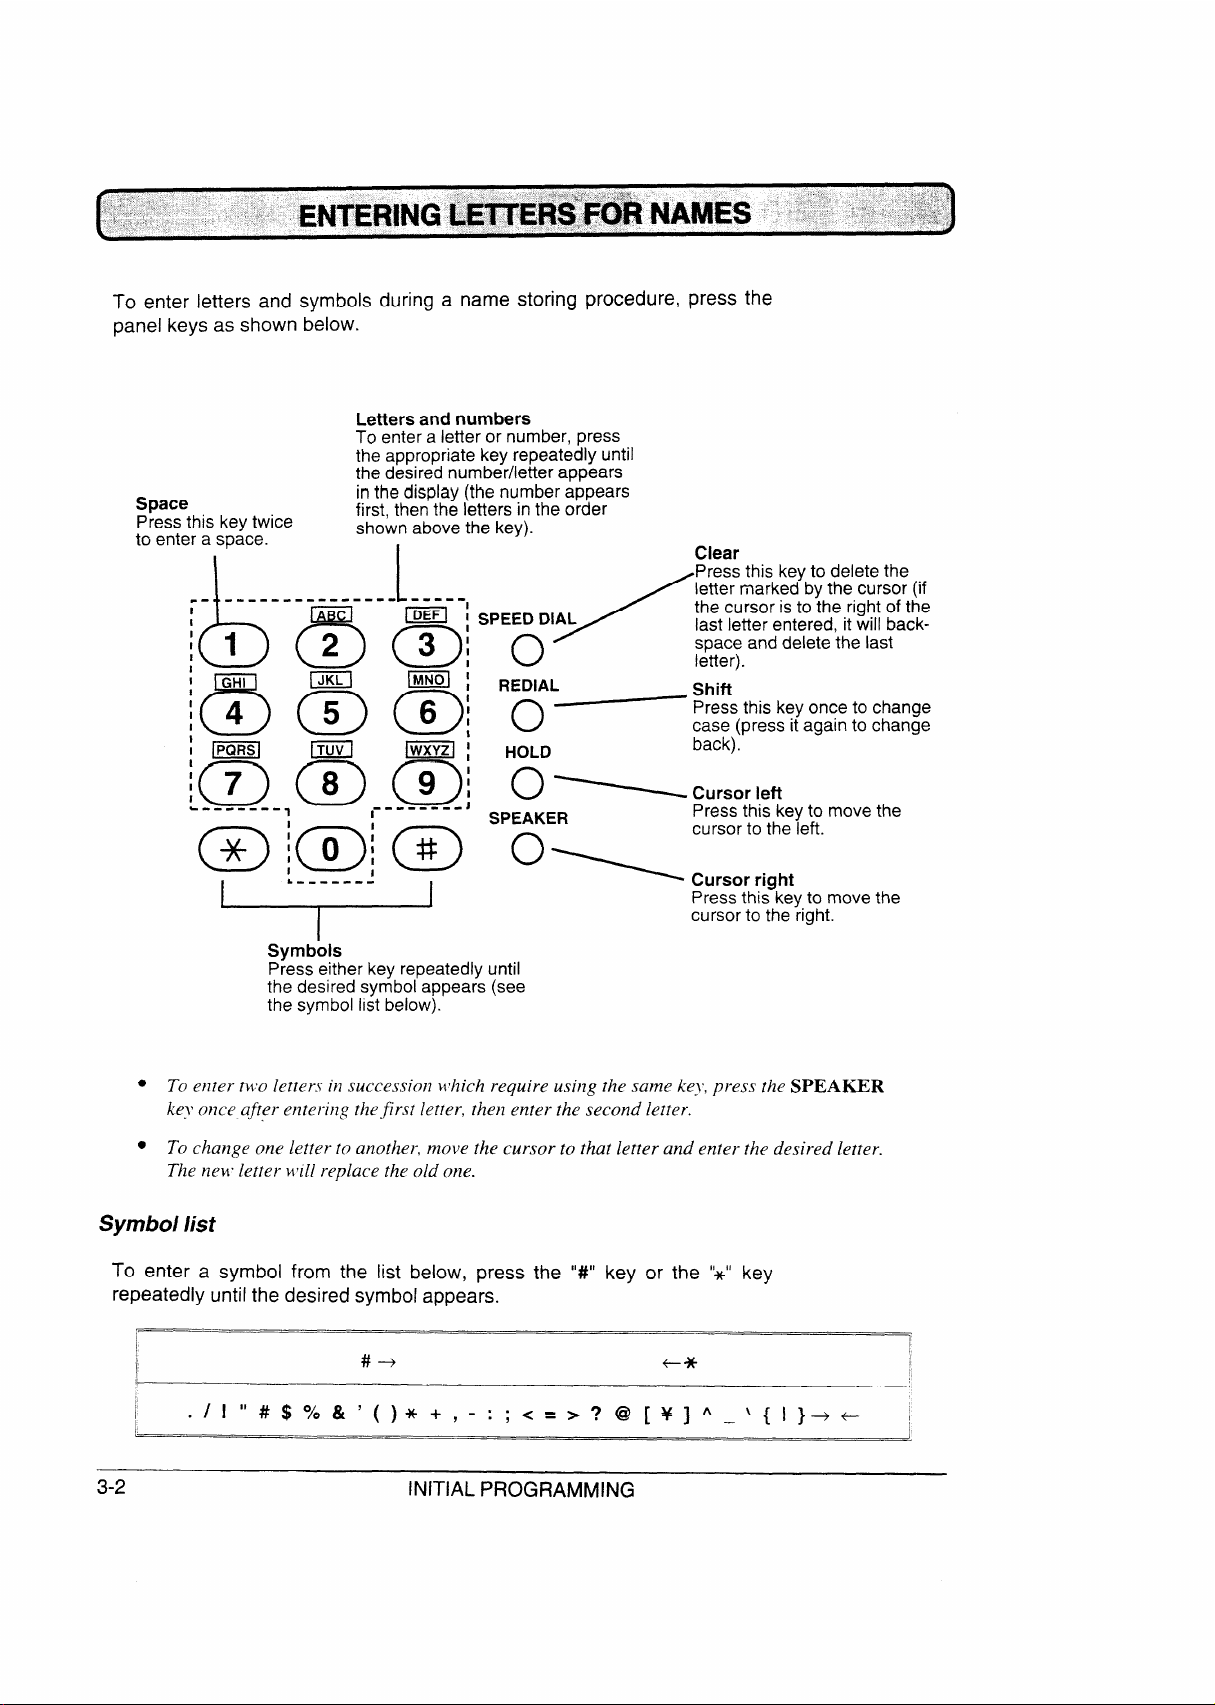
To symbols during a name storing procedure, press the
panel keys as shown
below.
a
a r
n
a
.------
1
1
I
I
I
I
0
I
I
i
I
I
I
.0
● s
--------
1
4
e
I
.,.
~
o
~Cursor left
o
o
r
●
Symbli
To a below, the ‘*” key
r symbol appears.
3-2
#
INITIAL PROGRAMMING
+
1
I
I
Page 13
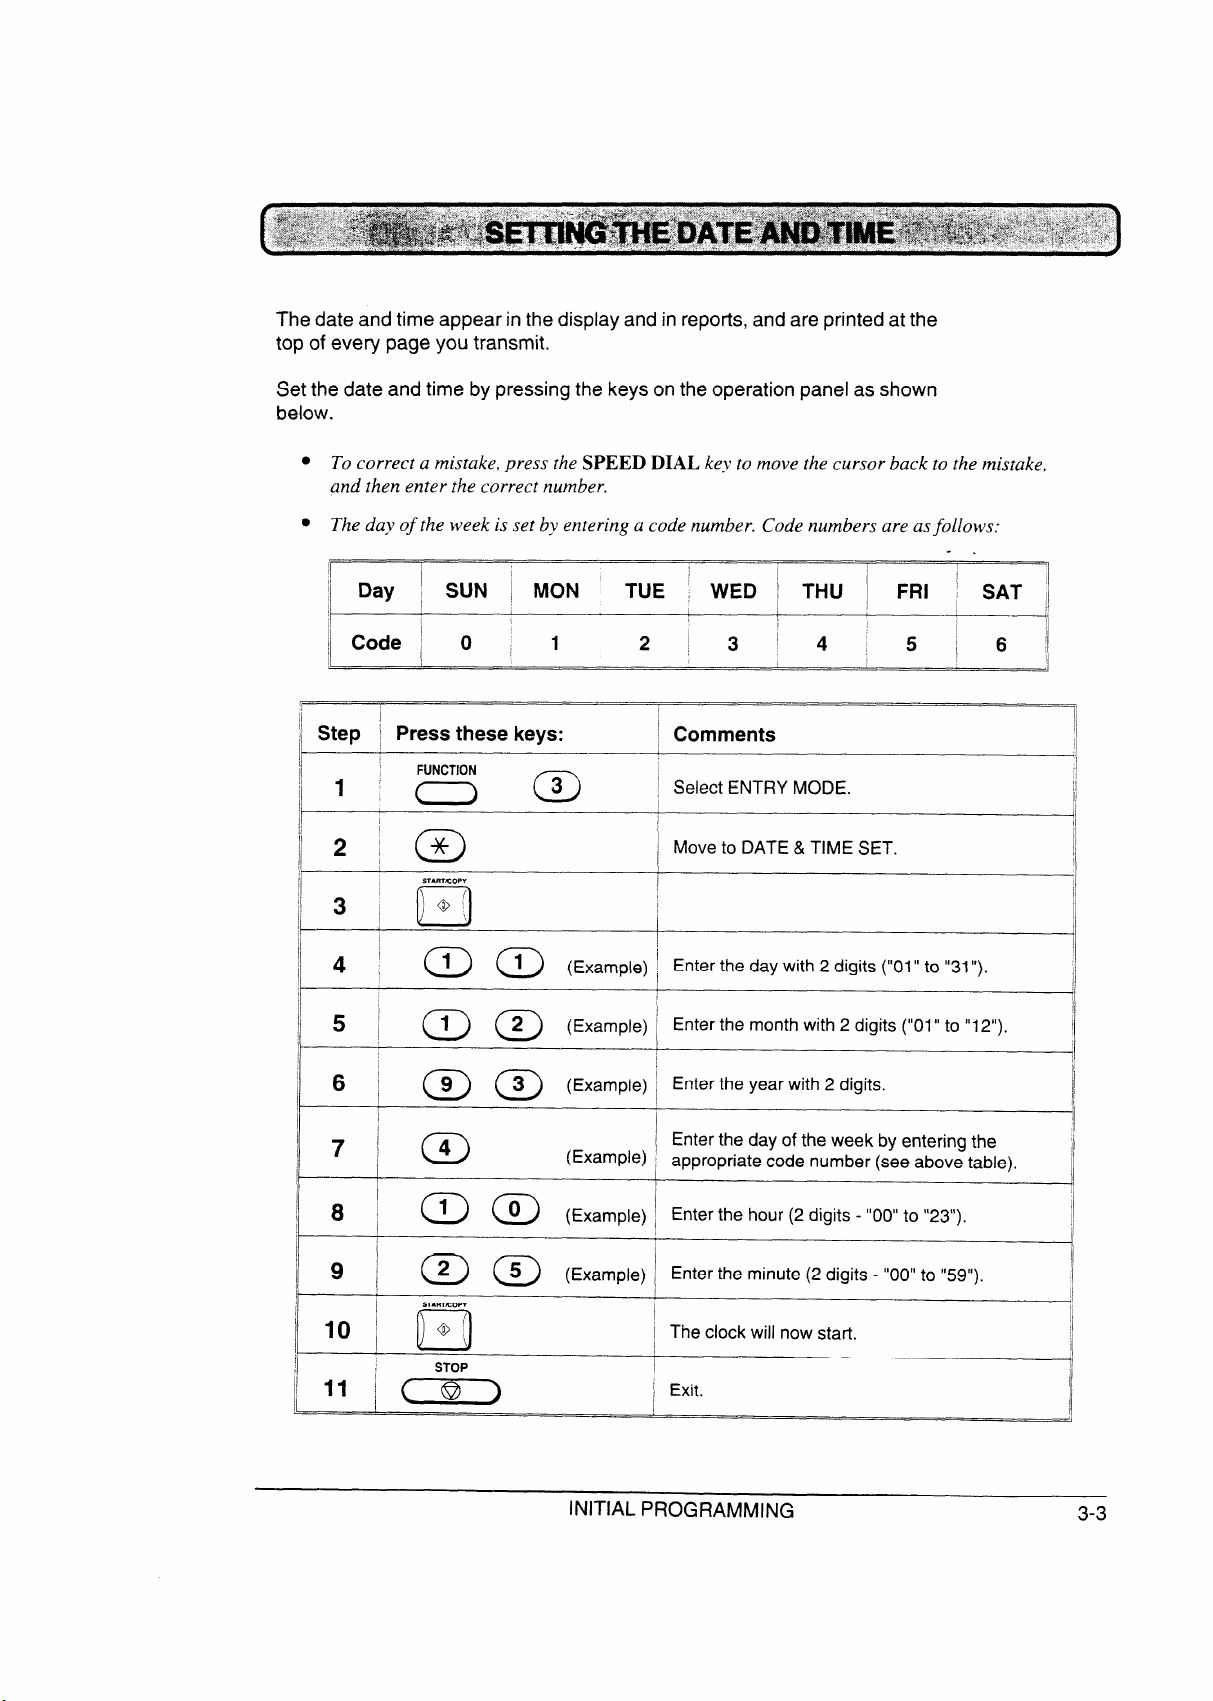
The date and time appear in the display and in reports, and are printed at the
top of every page you transmit.
Set the date and time by pressing the keys on the operation panel as shown
below.
●
a
a
I
1
Day ~ SUN ! MON TUE
I
I
~~Step
1 ’:3- ~
~
I
Press these keys:
I
WED ~ THU I
I
1
I
~ Comments
~ Select
I
I
~
]1
!
~~ 4 ! ~ ~
(Example)~ 2
I
I
5 ~ @ @ (Examp”)~
,
~E•Œ°6À•‘ ~ ~ ~ ~ ,( ~ 2
I
~
I
I
I
~ 8
I
I
~
I-
i
I
I
I
,
7
; am ~
“
@ @ (E.amPl’)~
SI
10 ~ + [
‘D
S
(Example)~ a I
( ~ -
I I
‘hec’ockwi”‘
~
I
I Exit.
I
-.
FRI ‘
2 ~
-
SAT ,,
I
I
,
I
I
I
I
I
1
1
INITIAL PROGRAMMING
3-3
Page 14
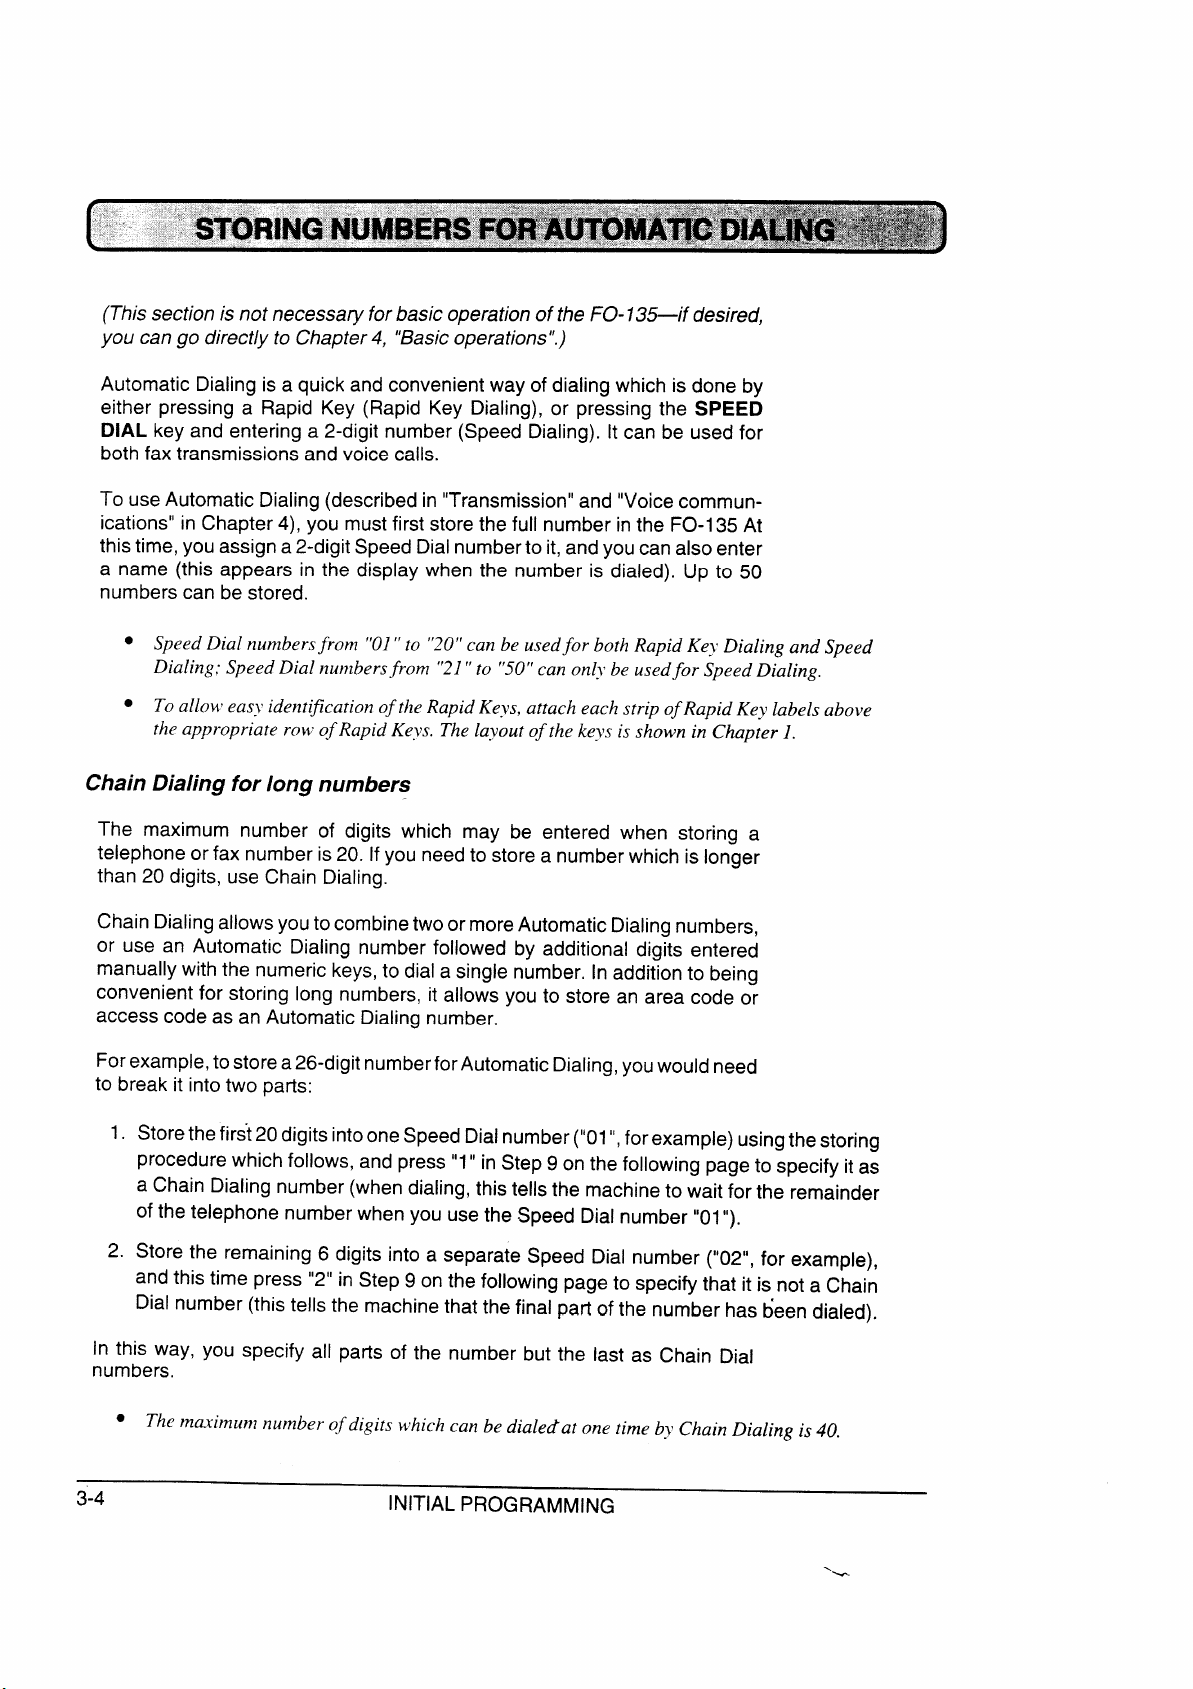
(This section is not necessary for basic operation of the FO-135—if desired,
you can go directly to Chapter4, “Basicoperations”.)
Automatic Dialing is a quick and convenient way of dialing which is done by
either pressing a Rapid Key (Rapid Key Dialing), or pressing the SPEED
DIAL key and entering a 2-digit number (Speed Dialing). It can be used for
both fax transmissions and voice calls.
To use Automatic Dialing (describedin “Transmission” and “Voice commun-
ications” in Chapter 4), you must first store the full number in the FO-I 35 At
this time, youassign a 2-digit Speed Dialnumberto it, andyou can also enter
a name (this appears in the display when the number is dialed). Up to 50
numbers can be stored.
● n
D
● i
a
ChaDialfolonum
The maximum number of digits which may be entered when storing a
telephone or fax number is20. If you need to store a number which is longer
than 20 digits, use Chain Dialing.
Chain Dialing allows youtocombinetwoor moreAutomatic Dialing numbers,
or use an Automatic Dialing number followed by additional digits entered
manually with the numeric keys,to dial a single number. In addition to being
convenient for storing long numbers, it allows you to store an area code or
access code as an Automatic Dialing number.
Forexample,to store a26-digit numberfor Automatic Dialing,youwould need
to break it into two parts:
1.
Storethe first 20digits intooneSpeed Dialnumber(“01”,forexample) usingthestoring
procedure which follows, and press”1” in Step 9 on the following page to specify it as
a Chain Dialing number (when dialing, this tells the machine to wait for the remainder
of the telephone number when you use the Speed Dial number “01“).
2.
Store the remaining 6 digits into a separate Speed Dial number (“02”, for example),
and this time press “2” in Step 9 on the following page to specify that it is not a Chain
Dial number (this tells the machine that the final part of the number has been dialed).
In this way, you specify all parts of the number but the last as Chain Dial
numbers.
●
3-4
INITIAL PROGRAMMING
Page 15
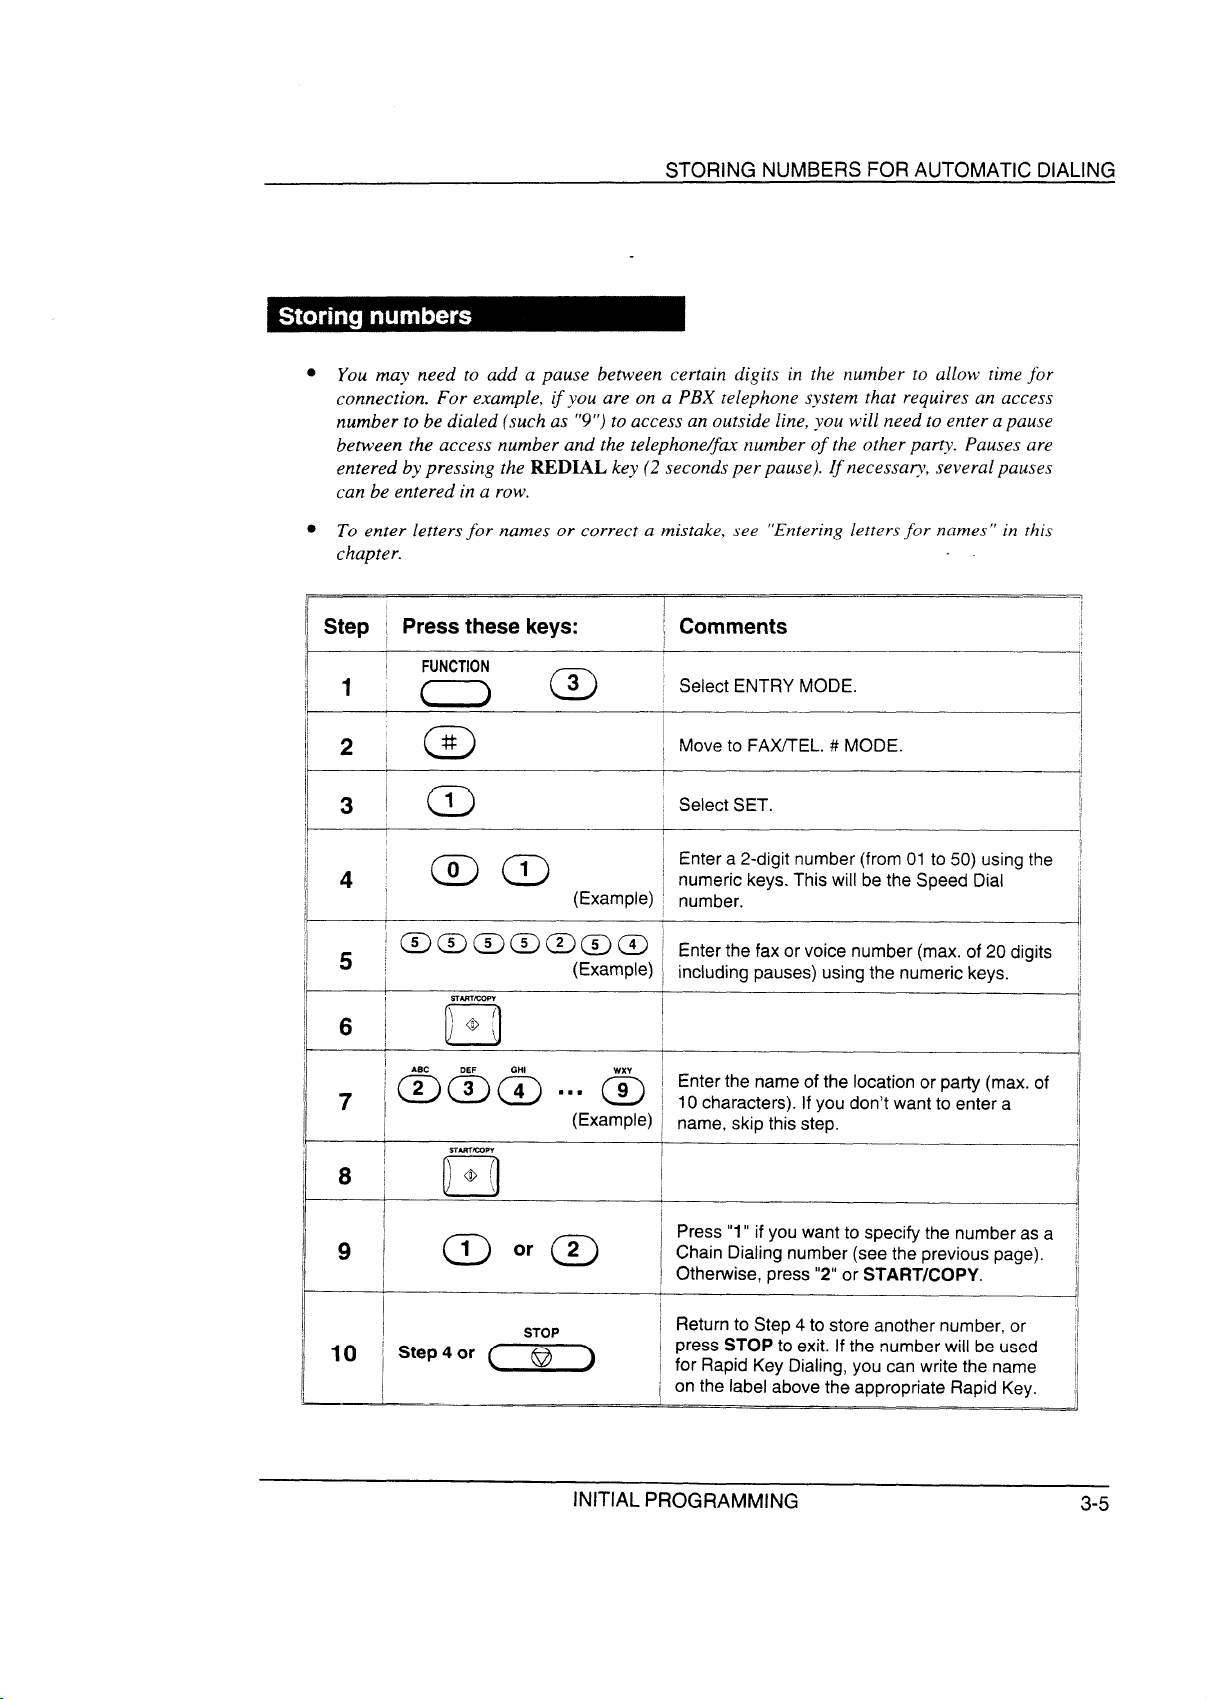
● a
c a
t
a
● a
r
II ~tep ;
,
1’
il
Press these keys:
I
I
03
D
STORING NUMBERS FOR AUTOMATIC DIALING
a
Comments
#
1
1
I
I
1
a
c a
O S
4
a /
!
I
1
I
II
~
I
I
,
I
a
!
~
i
INITIAL PROGRAMMING
3-5
Page 16
STORING NUMBERS FOR AUTOMATIC DIALING
Step
1
2
3
4
5
6
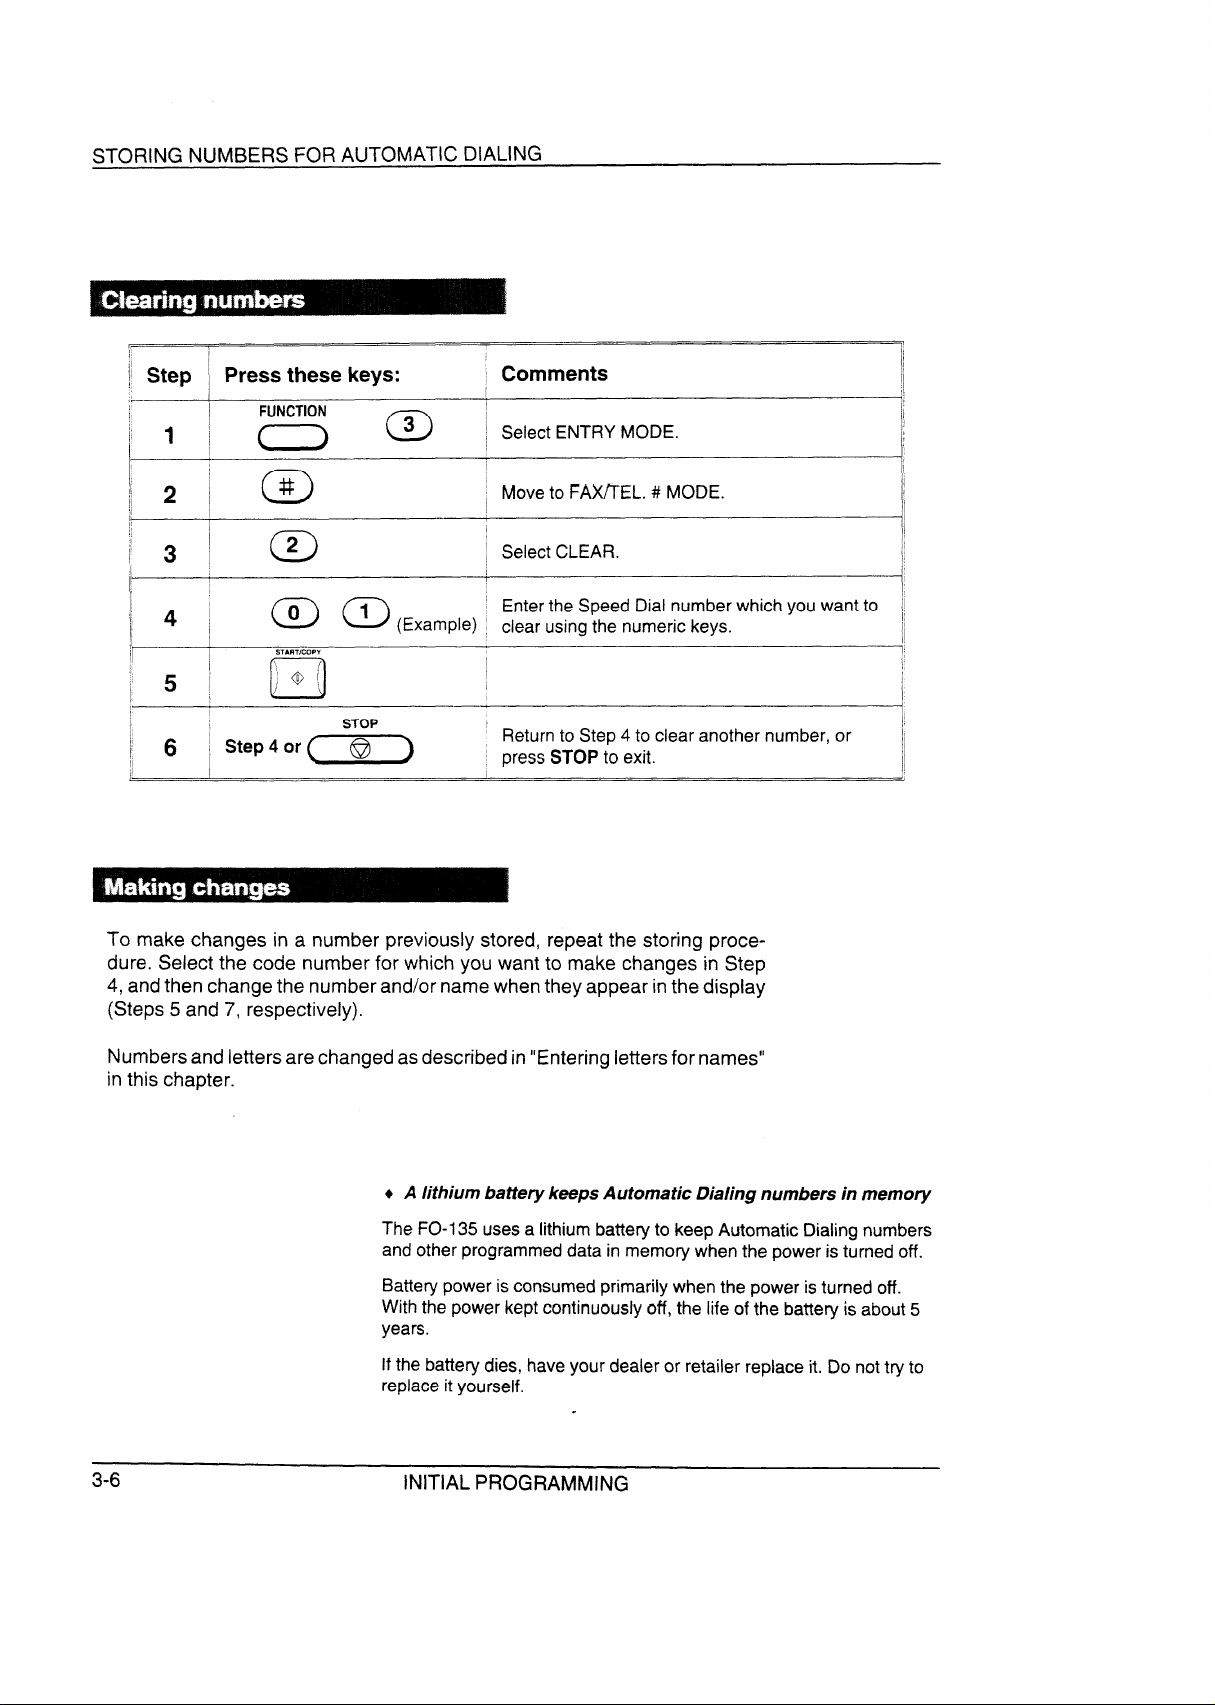
make changes in a number previously stored, repeat the storing proce-
dure. Select the code number for which you want to make changes in Step
andthen change the number and/or name whenthey appear in the display
(Steps 5 and 7, respectively).
Press these keys:
F
03
#
0
2
o
S
“
o
Comments
Select
FAX~EL.# MODE.
Select
the whichyouwantto ~,
clearusingthenumerickeys.
4
press toexit.
I
f,
I
I
I
1’
I
I
I
Numbersand letters are changedasdescribedin“Enteringlettersfor names”
inthis chapter.
+ A
a
p
c 5
y
.
3-6
INITIAL PROGRAMMING
Page 17

d
lines are as follows:
Sia wei
Thesizeandweight of documents whichyoucanload
a
One sheet at a time:
q
1
!
,
I
i
~ ]
x
+
b
I
I
1
x
Several sheets at once:
I
I
-------
x
● t i
x
d t
. .
I
—,
f
1
4
Othrestri
● Documents blue inkcannot betransmit-
ted, as the scanner does not recognisethese colours.
● Ink, glue, and correcting fluid on documents must be dry before they are transmit-
ted.
● All clips, staples, and pins must be removedfrom documents before transmission.
If these are not removed, they may damage the machine.
c Documents whicharepatched,taped, torn, smallerthan the minimum size, carbon
backed, or easily smudged should be photocopied, and the copy used for
transmission,
BASIC OPERATIONS
4-1
Page 18

TRANSMISSION
Upto 10sheets can be placed in the feeder at one time (see “Transmittable
documents” at the beginning of this section for allowed sizes). These will be
automatically fed into the machine starting from the sheet on the bottom.
● a
c
d
● d c a
t
d
2
3
1
~
/
,. ....
Adjustthedocument guides tothe width
of your document.
Placethedocument face down and push
it gently into the document feeder. The
top edge of the document should enter
the machine first.
●
The feeder will draw the leading edge
of the document into the machine.
SEND READY will appear in the
display.
You can now either make resolution
and/or contrast settings as described in
the following section, or
party as described in the section, “DialIing and transmission”.
4-2
.
BASIC OPERATIONS
Page 19

TRANSMISSION
If you want, you can adjust the resolution and contrast before sending a
document.
Resol
The FO-135 has 3 resolution settings:
STANDARD:
Use STANDARD for ordinary documents. This setting gives
you the fastest and most economical transmission.-
FINE:
Use FINE for improved reproduction, especially with documents containing small letters or fine drawings.
HALF TONE:
Use HALF TONE for photographs and illustrations. The
original will be reproduced in 16 shades of grey.
If you do not make a setting, the machine will automatically send the
document in STANDARD. (The default setting can be changed to FINE by
adjusting User Switch l—see Chapter 6, “Optional settings”.)
● r r
r a
Cont
The contrast is normally set to AUTO, which means that the machine
automatically controls the contrast, but for very light documents you can
change the setting to DARK.
Makt sett
Pressthe RESOLUTION key one or more
R
times until the desired resolution and
contrast settings appear in the display.
Thefirsttime you movethrough the list
of resolution settings, the contrast
setting AUTO will appear next to each
resolution setting. The second time
yoI,Imovethrough the list, the contrast
setting DARK will appear.
BASIC OPERATIONS
4-3
Page 20

TRANSMISSION
Once you have loaded the document and made any desired transmission
settings, you are ready to dial the number of the receiving fax machine and
transmitthe document. There areseveralwaysofdialling,andyoucanselect
the one which best suits your needs.
NormDial
With Normal Dialing, you pick upthe handset (or pressthe SPEAKER key)
and dial as you would to make a telephone call. If the receiving machine is
set to receive faxes manually (this means that the receiving party first
answers your call vocally, and then presses their Start key to begin fax
reception), you can talk with them before sending the fax.
Pick up the handset or press the
SPEAKER key. Listen for the dial tone.
‘Wo‘p~
2
3
4
/’( \
4
/’ i%
/
R
@@@
ma
ma
S
Dial the number of the receiving
machine by pressing the numeric keys.
h
Wait for the connection. Depending on
thesettingofthe receiving machine, you
will either hear a facsimile reception
tone or the other person will answer.
●
If the other party answers, ask them
to presstheir Start key (ifyou pressed
the SPEAKER key, pick up the
handset to speak with them). This
causes the receiving machine to
issue a reception tone.
Whenyouhearthe reception tone, press
the START/COPY key. Replace the
‘(
handset if you used it.
● At the end of transmission, the buzzer
will sound briefly and the machinewill
- return to standby mode.
4-4
BASIC OPERATIONS
Page 21

TRANSMISSION
DirKeyDia
If you don’t need to talk with the other party before sending the fax, you can
just dial—it isn’t necessary to pick up the handset or press the SPEAKER
key.
● a a
R i
A
1
2
R
S
)
)
& ii
\
Press the appropriate numeric keys to
enter the number.
Check the display. If the number of the
receiving machine shown is correct,
pressthe START/COPY key.
s If it is not correct, pressthe STOP key
to backspace and clear individual
digits, and then re-enter the correct
digits.
RapK Dia
If the number you want to dial has been stored for Automatic Dialing as a
Speed Dial number from “01” to “20” (see “Storing numbers for Automatic
Dialing” in Chapter 3), you can dial it by pressingthe corresponding Rapid
Key.
Press the Rapid Key corresponding to
the desired Speed Dial number.
02 03 04 05
I
(
‘
~ oa o9 10
I 1
The name of the receiving party will
appear in the display, or the fax
numberifnonamewasstoredforthat
number. (If the name or number is
incorrect, press the STOP key.)
The document will be automatically
transmitted once the connection is
made.
BASIC OPERATIONS
4-5
Page 22

SpeDial
Speed Dialing can be used to dial any number which has been stored for
Automatic Dialing (see “Storing numbers for Automatic Dialing” in Chapter
3).
Press the SPEED DIAL key and then
enter the two digits of the Speed Dial
number by pressing the numeric keys.
Q To enter numbers 1 through 9, first
‘‘PER+=M
enter Oand then the number.
2
S
4
o
n
Check the display. If the name or
number shown is correct, press the
START/COPY key. (if not, press the
STOP key.)
ChaDial
An Automatic Dialing number set for Chain Dialing(see“Storing numbers for
Automatic Dialing” in Chapter 3) can be combined with another Automatic
Dialing number or digits entered manually with the numeric keys to dial one
number up to digits long, The following are some examples of how this
can be done:
● Pressappropriate Rapid Keys in the properorder. For example, press Rapid Key
01, then Rapid Key 02.
c Enter Speed Dial numbers in the proper order. For example, press the SPEED
DIAL key and “22”, then the SPEED DIALkeyand “23”. Press the START/COPY
key after the final number to begin transmission.
● Press a Rapid Key and then manually enter a number by pressing appropriate
numeric keys. Press the START/CC)PYkey after the final numeric key to begin
transmission. (Use this method, for example, when you have stored a long
distance access code into a Rapid Key, and want to dial this in combination with
a number which hasn’t been stored as an Automatic Dialing number.)
4-6
BASIC OPERATIONS
Page 23

Usit REDk
if the line is busy, you can press the REDIAL key to redial the number (the
last number dialled is redialled).
TRANSMISSION
1
2
3
Press the REDIAL key.
s The speaker will be activated.
Wait for the connection. Depending on
thesettingofthe receiving machine, you
will either hear a facsimile reception
tone or the other person will answer.
● If the other person answers, pick up
the handset and ask them to press
their Start key. This causes the other
machine to issue a reception tone.
S
When you hearthe reception tone, press
the START/COPY key. Replace the
handset if you used it.
Automredi
If you use Direct Keypad Dialling or Automatic Dialing and the line is busy,
the FO-135will automatically redialthe number. This will be done 2 times at
intetvals of 5 minutes.
● m r
BASIC OPERATIONS 4-7
Page 24

The FO-I 35 has two basic modes of reception: manual and automatic. With
manual reception, you must first pick up the handset and then press the
START/COPY key.With automatic reception, you don’t needto do anything;
the machine automatically receivesthe incoming document.
“ Manual reception is generally used when you will be receiving both voice calls
and facsimile transmissions on the same line.
● Automatic reception is generally usedfor a dedicated fax line (onlyfaxtransmis-
sions will be coming in).
REM
AN
MAM A
C
o
-J
h
REM
AN
MAM A
C
Q
J
h
Setthe modeof reception with the reception mode key on the panel.
. For manual reception, set the switch
to MANUAL.
● For automatic reception, set the
switch to AUTO.
(TheANSWERING MACHINE setting
is used when you connect an answe-
ring machine to the fax machine. This
is described in Chapter 5.)
When the FO-135 rings, pick up the
handset.
4-8
BASIC OPERATIONS
Page 25

RECEPTION
2
S
(
~
\
q
J
\
\
3
Note:
● a a
t 4 o
p
“ s
You will either hear a fax tone or the
other party will speak to you.
●
If you hear a fax tone, press the
START/COPY key.
●
If the other party first speaks with you
and then wants to send a document,
press the START/COPY key after
speaking.
Hang up when RECEIVING appears in
the display. When reception is
ted, the buzzerwill sound.
Inautomatic reception mode, the FO-135 automatically answersall calls and
receivesthe incoming documents.
●
2 s 1 4
● o
a a
After receiving a document, grasp the paper by the edge and pull upwards to
tear it off.
BASIC OPERATIONS
4-9
Page 26

RECEPTION
Chang
a f you to use one line for both fax and
voice communications without havingto personally answer every call. When
it isturned on, the FO-135 detects whether an incoming call is a voice call or
a fax. If it is a voice call (or a manually dialled fax), the machine will signal
you to answer. If it is an auto-dialled fax, the machine will automatically start
reception.
● A F C
f m a
● A C
a
d
TurnAutomFatiP
o
Automatic Fax/Phone Changeover is turned on by setting User Switch 4 to
“YES”. The procedure for doing this is described in Chapter 6, “Optional
settings”.
● A C
Hothfunctoper
When a call comes in, the machine answers it. The number of rings the
machine waits before answering depends on which reception mode is used
and the User Switch setting made for that mode.
“ if the machine detects a fax tone, it begins reception automatically.
. If the machine doesn’t detect a fax tone, it will make a special ringing sound
(called pseudo ringing) for approximately 15 seconds, signaling you to pick up
the handset.
In the latter case, if you do not pick up the handset within 15 seconds, the
FO-135 issues a fax tone to the other machine. This allows the other party to
send a fax manually if they desire when you are out. The document will be
receivedautomatically.
● o i a
a
t a
t o A D
● d o 7
s P
.
4-1o
s
BASIC OPERATIONS
Page 27

.
FO-135can also be
r
● r
1
2 Ifdesired, adjust the resolution and con-
R
no
needs adjustment.
o
p
t
Load the document face down as you
would for a transmission.
trast with the RESOLUTION key.
h
3
S
+
a
document,
O
Press the START/COPY key.
a
i
Page 28

The FO-I 35 can be used likea regular telephone to make and receive voice
calls.
● t
i
Makitelepcal
S
1
“ ‘* +
>
g;$$%:~+
<.”::\\~;,/
\\< ~
\
or 0
,//
Pick up the handset or press the
SPEAKER key. Listen for the dial tone.
2
@
@@@
@( )@
h
3
Dial the number using one of the foliowing methods:
c Enter the full tele-
phone number with the numeric keys.
● Rapid Key Dialing: Press the appro-
priate Rapid Key.
c Speed Dialing: Press the SPEED
DIAL key, and enter the 2-digit Speed
Dial number with the numeric keys.
Speak with the other party when they
answer.
.
upthe handset.
Redi
The last number called can be redialed by pressingthe REDIAL key (it is not
necessary
a
Ho
You can put the other party on hold during a conversation by pressing the
HOLDkey, this is done,they cannot hearyou,Youcanputthe handset
back
not put the handset back in the cradle, press the HOLD key one more time.
4-12
c
the handset. Ifyou did
BASIC OPERATIONS
Page 29

.
You can connect most answering machines to to receive both
voice messages and fax transmissions on the same line while you are out.
end of the answering machine
line into the jack on the back side of the
F080TPadaptor.
. .
Chant outgmes
The outgoing message (OGM) of
to send afax to presstheir Start key. For
example, your message might go as follows:
a a
c ”
●
d r
●
a a
a
a
●
i a
r t (
a i t a
d
Othconside
● Your answering machine must beset to answer on 1to4 rings (preferably 1or2).
If it is set to ring on more than 4 rings, you may not be able to receive faxes sent
by automatic dialing.
● If your answering machine has a remote retrieval function, make sure the code
used to activate remote retrieval is different from the code used to activate fax
reception with an extension telephone (see “Extension telephone” which follows
inthis chapter). If they are the same, entering the code from an outside telephone
to retrieve messages will cause the fax machine to be activated.
USING YOUR FAX WITH OTHER DEVICES
5-1
Page 30

ANSWERING MACHINE
Whthanswemaci n i u
a c when you
aren’t using it. If it has a handset, it will function as an extension telephone.
● a e t
r
1
2
RECEPTIONMODE
AN
M M A
0
(
Set the reception mode to ANSWERING
MACHINE by pressing the reception
mode key.
Set your answering machine to auto
answer.
● Make sure it is set to answer on 1 to 4
rings.
s If your answering machine has a toll
saver function, make sure that it will
answer by the fourth ring.
Hothhookoper
While you are out, all of your incoming calls will be answered
a
on the line. Callers who want to leave a voice
message can do so without knowing a fax machine is there. If the FO-135
detects a fax transmission (see below), it will disconnect the answering
machine and begin reception.
● c n
p
● a a
r r
FAX WITH OTHER DEVICES
Page 31

How fax transmissions are detected
ANSWERING MACHINE
The fax machine detects fax transmissions in two ways,
depending on
whether the fax is being sent automatically or manually:
A t
a a t
t a a
m a “ t
t a
a
t
1 4
e c t
t
a t
transmittingmachinedoes not
a r
H a t a
f t
d a a
a
a
such
asRapid
suchas NormalDialing,the
a a 6
c a t
t
d a 6
FO-135
Not
● A f d
r d “
t
● d
r a
“ s
“ a
USING FAX WITH OTHER DEVICES
5-3
Page 32

A
If necessary, you can use one or more of the f
r a
QuiDetTi
This function switches a call to the FO-135 if a certain period of silence is
detected after the answering machine answers. To receive faxes sent by
Normal Dialing, the function must be turned on.
Time selections for the period of silence are 1to 10seconds.A setting close
to 6 seconds will generally give the best performance, but you can try other
settings if desired. For example, some answering machines have fast disconnect times (approximately 4 seconds), and in this case you should try a
setting of 3 seconds.
● The factory setting is 6 seconds.
Important:
● A p t
r m
●
r m s a
● caa l s
a m
; Step , Press these keys:
(
I
I
1
1
,
~
p
F
0°
0
#
o
‘ Comments
I
1
(
!
3 ~ a a
~
I
;,
4 ‘ (~>
(Example) ~ t
STOP
~
,!
I
1
,
a
‘
5-4
USING YOUR FAX WITH OTHER DEVICES
‘+.
Page 33

QuiDetStTim
setting can be used to delay the start of Quiet Detect Time if the latter
is turned on.
We recommend that you only use this function if there is a long pause
between the time the answering machine answers a call and the beginning
of the outgoing message (a pause is sometimes added before the message
to allow clear detection of possiblefax tones). Inthis case, delaying the start
of Quiet Detect Time prevents the fax from cutting in before voice callers can
leave a message.
You can set Quiet DetectTime to start at any time from 1to 15secondsafter
the answering machine answers, or enter “00” for no delay.
● The factoty setting is “00” (off).
Hint:
● a
~ Step
~ Press these keys:
Comments
I
I
t
I
I
I
Set a
~
I
4
S
m
I
I
I
AnsweMacFaiMo
When this function is turned on, the fax machine will answer the call after 6
rings if the answering machine for some reasonfails to answer before that
time. This ensures that you will receive fax messages even if the answering
machine’s tape fills up or the answering machine is not turned on,
● The factory setting is “NO” (off).
Impor
● 4
m
p
USING YOUR FAX WITH OTHER DEVICES
5-5
Page 34

ANSWERING MACHINE
I
Step ‘ Press these keys:
Comments
I
1
~m”; m ~ ‘e’ect’””o”
I
I
~
Off-HHoTi
This setting is u a
a
For normal operation, we recommend that you do not turn this function on;
however, if you are having trouble receiving faxes in answering machine
mode you can try various time settings to see if it helps. You can select any
time from 1 to 255 seconds. Entering “000” turns the function off.
● The factory setting is
Important:
● s a g
m
● m a r
a p
I
II Step Press these keys:
F
1 1
0 @ ‘‘e’M
1;
~ 3 /
!,
,,
!
5-6
~~ ~ ~
S
USING YOUR FAX WITH OTHER DEVICES
(Example) ~ seconds)withthenumerickeys.
~ Comments
~
I
I
I se’theholdtime
I
‘
3
Page 35

.
You
e t to the FO-135. if the teiephone is
a touch-tone teiephone, you can use it to activate fax reception by pressing
“5” and “*”.
● A t e t a
r
● e t d
s t
● ~
r
Connea extetele
Plug the end of the extension telephone
line either into the jack on the back side
of the F080TP adaptor, or into the jack
marked TEL. SET on the fax machine
(first remove the seal from the jack).
or
WITH OTHER DEVICES
5-7
Page 36

EXTENSION TELEPHONE
touch
Activafarecepwia
1
2
3
w
*
o
tele
Answertheextension telephone when it
rings. You will either hear a fax tone or
the other party will speak.
. If you hear a fax tone, go to Step 3.
If the other party wants to send a fax
after speaking, ask them to press their
Start key.
Press “5”and “+”on your telephone.
●
If connected to a wall jack, you must press
and ‘~”during the interval 3
9 seconds after picking up the
handset.
●
Receptionwill begin. Hang
Note: -
● a fmr
S
5-8
USING FAX WITH OTHER DEVICES
Page 37

A variety of optional settings are available which you can use to fine-tune the
FO-135 to your needs. The settings are called
I
~ Step ,
Press these keys:
Comments
I
2
~/
m “
“
I
,
3 ~
4 , (~)
~
2
o
S
(Example)‘
Switch1: R
r t
●
a r “1” 5 1
●
Switch
a 4
~
I
‘
I
~
I
I
,
I
OPTIONAL
●
Page 38

OPTIONAL
—
..—- -— —-
“l”
F C
t a r
T
T
c T a
f
d A C
a
“1”
“1“
.
t
s
“1”
t r
a t
●
● “l”
v d r a
v d t
a t
h
h
●
●
OPTIONAL
. .
Page 39

.
A variety of lists showing settings and information entered inthe machine can
be printed out on-demand. A report on transactions made can also be set to
print out automatically under selected conditions. Each list and the report is
described below.
~ Step
1
I
;j
2
‘~
I
Press these keys:
; o @ !
m “ @
TeiepLi
This list shows the fax and voice
numbers which have been stored for
Automatic Dialling.
PassLi
This list shows your name and fax
number as entered in the machine, a
sample of what is printed at the top of
every page you transmit (HEADER
PRINT), and the current status of the
optional settings for answering machine
hook-up.
UsSwiLi
This list shows the current setting of all
User Switches.
i Com
1
I
~
~
~ t e
S x N E
0 Q 1
0S3 S T
0 @ T
0
a N S N
2 R 1 : T S F ~
h
\
T .
F T N F N C
i 4
1
S S 2 -
F : T N S F X MC
S N E N E
T F l I
S , T t
2 5 1
M P
9 I M 1N *
Q E D TI M
O H H
S R R 1V
Q D S TI
F T , S F M [
S N
1 F P T
2 N O R 1N
3
4
s T R 8
6
7
8
9
9 S
1 -
P L
U $ I L1
1T S
4 R N U A S
T F f C
T P I S
P RI I D 1O
P S
T I S
2 O f 1 :
2 5 1
T 1
2 O M 1 :
2 5 1
2 S 1 P
2 O n 1 :
2 5 1
C D L
e E
0
N
O S
N
I I M
N
N
( )
E P [
I S
N
N
1/
,
1,
I
I
I
PRINTING OUT REPORTS AND LISTS
7-1
Page 40

—.....————————
—
PRINTING LISTS
—
This reportis printed out automatically
afteran operation is performed to
allow you to check the result. The
machineisset atthefactoryto printout
the report only when an error occurs,
butyoucanchange the setting to have
it printed out after every transaction
...........................................................*.....***.
.
●
.
.
✎
F ; T , S F a R I
. ●
●
S
●
.
S
D
. ●
.
2 1 : 6
●
. * . . . . * * * * * . . . . * * . . . . . . . . . . . . . . .*. .
T R
R E E P T
2 O M 1 : ●
2 5 i 2
1
N
3 O
●
.
●
.
.
●
●
*
.
(and error), every transmission (and
error), or not at all. Change the setting
by resetting User Switch 6.
● o
Explanao head
R
f c
t r
- Tr
- A o
- A r
- r
- A t t
a t
- T
d t a
f
t
~ E-O
I
‘ E-1
E-2 ~
,
!l E-3 ;
, I t
I
I
~ E-6
j
E-7
!;
, t
I
Transmission errors
r h ,
~ r h ~
r
d t ~
~ d
f
~ d m
‘ r h
~ r
I
~ r r
“
PRINTING OUT REPORTS AND LISTS
1
I
1
)
I
I
!
;
/
I
‘ E-1
~
~
~ d
Reception errors
1
Ii ‘-2 !
~
‘ E-3 ~
I
!: E-7
~
~
I
,
)
I
~ :
‘ E-5 ~
1
I t
“ !
,
t
t
thetransmitterside
t
1
;
1
;
I
I
Page 41

Your FO-135 prints by means of thermal printing. The head applies heat to
special paper which is chemically treated to change coiour when heated to
a certain level, and this creates the printed text or image.
To assure a long life for your machine and obtain the best reproduction
quality, we recommend that
you only use the following Sharp recording
paper:
FO-20PR Recording Paper (30 m roll)
● a n e
Do not unpack the paper until you are ready to use it. It may become
discolored if:
c It is stored in a place with high humidity or high temperature.
G It is exposed to direct sunlight.
“ It comes in contact with glue, thinner, or a freshly copied blueprint.
G It is scratched, causing heat due to friction.
● A rubber eraser or adhesive tape is used on it.
Sharp paper hasablackstripeonthe last 1.5 mofthe roll.When the machine
detects this stripe, it finishes printing the current page and then stops. NO
PAPER will appear in the display, and further reception and copying will not
be possible. To replacethe paper,first take out the old roll,then load the new
roll as described in “Loading the recording paper” in Chapter 2.
USER MAINTENANCE
8-1
Page 42

Cleanthe recordingheadfrequently to ensure optimum printing pedormance.
To clean the head, first turn off the open the operation panel, and
removethe
r
Wipe the recording head and edge ofthe
R
h
head cover with a soft cloth dampened
with ethyl alcohol.
Cauti
●
●
l a
c
Clean the reading glass and rollers frequently to ensure the quality of
transmitted images and Open the operation panel, and clean them
as shown below.
Wipethe reading glass, white backplate,
and rollers with a cotton pad or soft
Doc
roller
cloth.
● Makesurethatall dirtandstains (such
as those of correcting fluid) are
removed, as these will cause vertical
lines on transmitted images and
copies.
e a
Cauti
●
USER MAINTENANCE
.
Page 43

.
Problem
~ s
● Make sure the power switch has been switched to the
Check and remedy
the power cord is properly connected.
correct position.
I
● Connect another electrical appliance to the outlet to
confirm that it is live.
The machine does not respond
to any key operation.
Automatic document feeding
● If a beep sound is not made when the keys are
pressed, turn off the power and then turn it back on
several seconds later.
● Check the size of the document (see “Transmittable
does not work (for transmission documents” in Chapter
copying).
Dialling cannot be performed. ‘ Make sure the power is on for Automatic Dialling.
● Make sure that the line is properly connected to the
!
jack.
● Make sure that the setting of the DIAL switch is
correct (tone “T”or pulse “P”).
Nothing is printed at the
receiving end.
I
● Make sure that the document for transmission is
placed face down in the feeder.
The power is on, but no
transmission takes place.
A distorted image is received at
the other end.
—
● Make sure that the recording paper is properly loaded
\
at the receiving machine.
● Make sure that the receiving machine has recording
I
paper.
● If the receiving machine is in manual mode with no
attendant, reception will not be possible,
● Ifthe receiving machine is not a Sharp model, make
I
sure it is G3 compatible,
I
● for error messages.
I ●
Pick up the handset and check for a dial tone.
●
Noiseon the telephone line may cause distortion. Try 1
sending the document again.
● Make a copy of the document on your machine. If the ~
copy is also distorted, your machine may have a
probiem. If the problem persists, call for service.
TROUBLESHOOTING
I
/
I
i~
9-1
Page 44

PROBLEMS S
Problem
Nothing is printed when you try
to receive a document.
The recording paper does not
come out.
The received image has low
contrast.
Receivedimages are distofied.
Check and remedy
● Make sure that the recording paper is properly loaded ~
in your machine.
● Make sure the power is on.
● Make sure that the document for transmission is I
loadedface down in the feeder of the other machine. ~
c Makesurethe paper is not jammed (see “Clearing ~
jammed recording paper” in this chapter).
● Makesure that the recommended recording paper is
used (see “Recording paper” in Chapter 9).
● Ask the other party to send higher contrast
documents. If the contrast is still too low, your
machine may have a a copy to check ~
it.
●
Noise on the telephone line may cause distortion. ~
Havethe other party try sending the document again. ~
●
The recording head may be dirty (see “Cleaning the
scanning and printing parts” in Chapter 9).
●
Make a copy of another document If ~
the copy is also distorted, your machine may have a ~
problem. If the problem persists, call for service.
I
1!
,,
I
~
i
1
]!
j
I
I
I
I
Copies are distorted.
Reception/copying is interrupted.
Make sure that the recommended recording paper is
used (see “Recording paper” in Chapter 9).
Make sure that the recording paper is properly loaded ~~
in your machine.
The recording head may be dirty (see “Cleaning the
scanning and printing parts” in Chapter 9).
Make a copy of another document on your machine. If II
the copy is also distorted, your machine may have a ~~
problem. If the problem persists, call for service.
“ If reception or copying has been done continuously 1:
for a long time, the recording head maybe
overheated. Turn off the power and let it cool down. ~
TROUBLESHOOTING
,
I
I
‘
1’
I
II
Page 45

I
~ t
I
~
~
D
!
F
~
1
:1ONHOOKD’AL
~~
~
I
I
~
I
~
~ a d
T s
I
1 P
A
t i
~ o
,
1
I
I
,
I
,.,.—. -.
C
I
i
I
3
5
1
TROUBLESHOOTING
t
I
t
or
I
I
—
I
9-3
Page 46

a d feed properly during transmission or copying, or
DOCUMENTJAM appears
d o
out gently.
● Before closing the operation panel,
S
make
extend to the received docu-
ment exit).
pull it
2
3
1
//
/
/
Open the operation panel and remove
the paper roll.
Cut off the wrinkled part of the paper,
Reload the paper.
● Jammed recording paper is often
caused by improper loading. Be sure
to carefully follow the instructions for
paper loading given in “Loading the
recording paper” in Chapter 2.
.
9-4
TROUBLESHOOTING
Page 47

Applicable telephone line:
Compatibility:
Configuration:
Compression scheme:
Scanning method:
Resolution:
Public switched telephone network /
H t
s
H
8
Recording system:
Display:
Reception modes:
Modem speed:
Transmission time* :
Effective recording width:
Input document size:
Effective scanning width:
Automatic document feeder:
Halftone (grey scale):
Contrast control:
Copy function:
Telephone function:
Power requirements:
Operating temperature:
Power consumption:
Dimensions:
Weight:
F —
7 x 5 1
A
—
bps with automatic fallback to 7200, 4800, or 2400
mode)
210
—
—
—
mm
Length— 128to 1000 mm
210
O
A s
be used if power fails)
V AC, 50 Hz
5 to 35°C
Stand-by: 13W
Maximum: 110W
Width: 340 mm
Depth: 255 mm
Height: 115mm
Approx. 3.6 kg
. .
* r
p C
,
a c i
s i p
i p
i
SPECIFICATIONS
10-1
Page 48

I
Usethis guide as a convenient reminder for operating the machine after you
have read the detailed instructions for each procedure in the manual.
Not
● o a \
~.-
, !
!
I
Transmidocum
Normal Dialing
Direct Keypad
Dialing
Rapid Key Dialing
Load
document
Load
document
Load
document
~--------=
+ + ~
Waitfor
+
receptiontone +
*
+:
I
----------
;
RESOLUTION;
:o~
L ------.-d
Lift
STHCWV
‘; @ f +
D
Dial(press
+ numerickevs)
Dial(press
+ numerickeys)
Hangup
.,
T---------7
;
RESOLUmON:
O ; + Key
L --
PressRapid
SpeDial
Redialing
Makivoical
I
,
I
I
Lifthandset
~
press
Lifthandset
~
press
Lifthandset
press~
EnterSpeedDialnumber
(press2 numerickeys) + ~~~~~~~d
Lifthandset
~
press
QUICK REFERENCE GUIDE
Normal Dialing
.
Rapid Key Dialing !
SpeDial
Redialing
Quick-i
Dial(press
+ numerickeys)
PressRapid
+ Key
SPEEDDIAL
+
+
o
REDIAL
o
.
+ youpressed
+
Lifthandsetif
+ ;;:g;
Lifi handsetif
+ ;;::;:;d
Lifthandsetif
Lifthandsetif
Page 49

—.
QUICK REFERENCE GUIDE
Operaust FUNk
The following chart shows how to access FUNCTION key operations. Once
you have accessed the desired operation, follow the instructions which
appear
————.——...
— ..-.
Answe
machine settings
Printing out lists
I
~ ~=t @
I
I
[ ?H”; @
j
+ a “
~ @ o’@
(Pressuntil desireditemappears)
(Pressuntil desir<ditemappears)
Entering yo
naa num
Settt da
anti
Enterin@I
RapK a
SpeDi
~ : m + ~ ~
I
; ?=: @ + m
\
F
~ ( @ + @ + @ @
numb
Setting
User I
Swit
FUNCTION
( @ + @ ‘
I
(pres...tildesireditemaPpears)
QUICK REFERENCE GUIDE
Quick-ii
Page 50

A
Adjustable document guides . . . . . . . . . . 1-1
Alphanumeric keyboard . . . . . . . . . . . . 3-2
A
A . . . .
Connection . . . . . . . . . . . . . . . 5-1
Off-Hook Hold Time . . . . . . . . . . . 5-6
Quiet Detect Start Timing . . . . . . . . 5-5
Quiet Detect Time . . . . . . . . . . . . 5-4
Assembly . . . . . . . , . . . . . . . . . . . . 2-3
Audible signals . . . . . . . . . . . , . . . . . 9-3
A D . . . .
A F C . . . . .
A R
. . . . . . . . . . . . . .
c
D . . . .
Connections . . . .
Contrast . . . . . .
Copying . . . . . . .
C .
D
Normal . . . .
Speed , . . ,
Dial switch . . . . .
Direct Keypad Dialing . . . . . . . . . . . . . 4-5
Displaymessages . . . . . . . . . . . . . . . 9-3
Documentfeeder . . . . . . . . . . . . . . . . 1-1
Documentrestrictions . . . . . . . . . . . . . 4-1
Documentrollers . . . . . . . . . . . . . . . . 1-2
Documentsizes . . . . . . , . . . . . . . . . 4-1
D r . . , . .
Datesetting . . . . . . . . . . . . . . . . . . . 3-3
E
Extensiontelephone . . . . . . . . . . . , . . 5-7
Extensiontelephone jack , , , , , , , , , , , 1-1
Editing Phone Numbers . . . . . . . . . . . . 3-6
F
Functionkey . . . . . . . . . . . . . . . . . . 1-2
Faflel # (Number) Mode . . . . . . . . . . . 3-5
Fine (Resolution) Priority . . . . . . . . . . . . 6-1
H
Handset . . . . . . . . . . . . . . . . . . . . 1-1
Handsetjack . . . . . . . . . . . . . . . .1-1, 2-3
Hold key . . . . . . . . . . . . . . . . . . . . 1-2
Housing,cleaning . . . . . . . . . . . . . . . 8-2
1
installation . . . . . . . . . . . . . . . . 2-1 -2-4
J
Jammeddocuments . . . . . . . . . . . . . . 9-4
L
Liquid crystaldisplay . . . . . . . . . . . . . . 1-2
. . . . . . . . . . . . . .
. . . . . . . . . . . . . .
. . . . . . . . . . . . . .
. . . . . . . . . . . . .
. . . . . . . . . . . . . .
. . . . . . . . . . . . . .
. . . . . . . . . . . . . .
. . . . . . . . . . . . . .
. .
. . . . . . . . . . . . . .
.
. . . . . . . . . . . . . .
( . . . .
Loadingthe document . . . . . . . . . . . . . 4-2
N
Normal Dialing . . . . . . . . . . . . . . . . . 4-4
Number of Rings (to answer) . . . . . . . . . 6-1
Numeric keys . . . . . . . . . . . . . . . . . . 1-2
o p . . . . .
0
Hook Hold . . . . . . . . . . . . . . . . . 5-6
Off
Operation panel knob . . . . . . . . . . . . . 1-1
P
PaperSave . . . . . . . . . . . . . . . . . . . 6-2
Paper used infax machine . . . . . . . . . . . 8-1
PasscodeList . . . . . . . . . . . . . . . . . 7-1
Powerswitch . . . . . . . . . . . . . . . . . . 1-1
Pausein Automatic Dialing . . . . . . . . . . 3-5
( . . . . . . .
Q
Quiet Detect TM (time) . . . . . . . . . . . . . 5-4
Quiet Start Time . . . . . . . . . . . . . . . . 5-5
R
Rapid Key Dialing . . . . . , . . . . . . . . . 4-5
Rapid Keys . . . . . . . . . . . . . . . , . . . 1-2
Readingglass,cleaning . . . . . . . . . . . . 8-2
Reception . . . . . . . . . . . . . . . . . . . 4-8
Automatic . . . . . , . . . . . . . . . . 4-9
Manual . . . . . . . . . . . . . . . . . 4-8
Receptionmode key . . . . . . . . . . . . . . 1-2
Recordinghead,cleaning . . . . . . . . . . . 8-2
Recordingpaper . . . . . . . . . . . . . . . . 8-1
Loading . . . . . . . . . . . . . . . . . 2-4
Redialkey . . . . . . . . . . . . . . . . . . . 1-2
Redialing . . . . . . . . . . . . . . . . . . . . 4-7
Resolution . . . . . . . . . . . . . . . . . . . 4-3
Resolutionkey . . . . . , . . . . . . . . . . . 1-2
Ringingvolume selector . . . . . . . . . . . . 1-1
Rollers,cleaning . . . . . . . . . . . . . . . . 8-2
s
SelectAuto RCV (Receive) . . . . . . . . . . 5-5
Speaker key . . . . . . . . . . . . . . . . . . 1-2
Speakervolume control . . . . . . . . . . . . 1-1
Speed Dial key . . . . . . . . . . . . . . . . . 1-2
Speed Dialling . . . . . . . . . . . . . . . . . 4-6
StatiCopy key . . . . . . . , . . , . . . . . , 1-2
Stop key . . . . . . . . . . . . . . . . . . . . 1-2
T
Telephone Iinejack . . . . . . . . . . . . . . 1-1
Telephone List . . . . . . . . . . . . . . . . . 7-1
Time Save . . . . . . . . . . . . . . . . . . . 6-2
Transaction Report . . . . . . . . . . . . . . . 7-2
Troubleshooting . . . . . . . . . . . . . 9-1 -9-4
Time setting . . . . . . . . . . . . . . . . . . 3-3
n p
u
User Switch List . . . . , . . . . , . . . . . . 7-1
Use! Switches . . . . . . . . . . . . . . . . . 6-1
Page 51

SHARP CORPORATION OF AUSTRALIA PTY.LTD.
A.C.N. 003039405
1 tiuntingwood
DrHuntBlacktown, N.S.W., 2148
SHARP CORPORATION
PRINTED IN THAILAND
(TINSE3360XHZZ)
 Loading...