

. .
.-

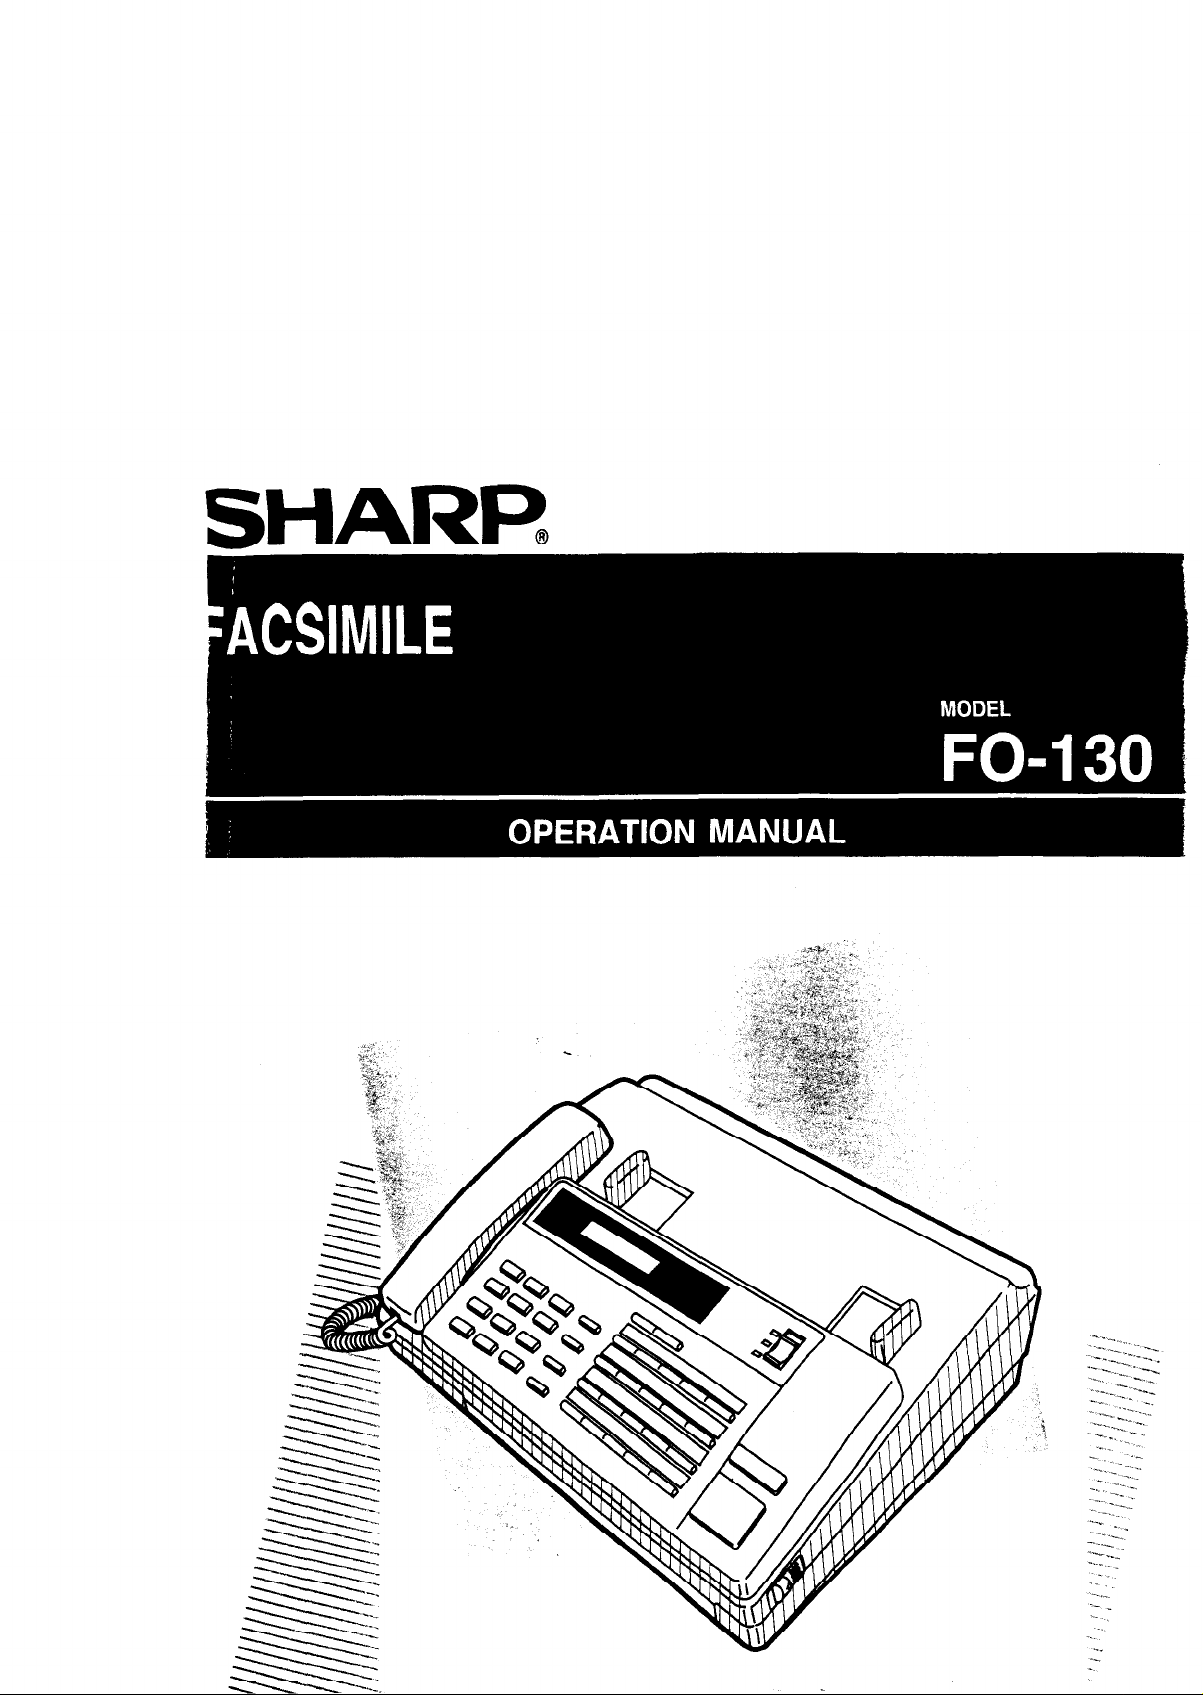
Congratulations on your purchase of the FO-130, and thank you for having chosen Sharp!
The FO-130 facsimile transceiver is G3 compatible, the most commonly used type of facsimile
machine today. In addition to the basic operations of sending and receiving documents, it provides
a variety of special features designed to increase the range and power of your communication.
These make it an ideal tool for the office, no matter how big or small the scale of operation.
i
This manual is intended to help you with the installation and operation of the FO-130. The
information is presented as follows:
The parts of the machine:
The names, brief descriptions, and illustrations of the various parts of the machine are contained
in Chapter 1, “The parts of the machine”.
Unpacking and Setup:
Instructions for getting your fax machine installed are contained in Chapter 2, “Installation”. This
also contains guidelines on selecting a suitable location, electrical conditions, telephone
conditions, etc.
Basic operations:
Basic operations such as sending and receiving documents, copying, and using the machine
as a telephone are explained in Chapter 3, “Basic operations”. This chapter is particularly
important for beginners.
Connecting an answering machine or extension phone to your fax machine:
This is described in Chapter 4, “Using your fax with other devices”.
Optional settings and entry of telephone numbers, etc.:
Optional settings made with the User Switches and entry of telephone numbers for automatic
dialing, etc. are described in Chapter 5, “Optional settings and data entry”.
Reports and lists regarding the activity and settings of your machine:
The procedures for printing these out can be found in Chapter 6, “Printing out reports and lists”.
Maintenance and troubleshooting:
Basic maintenance procedures and troubleshooting are described in Chapters 7 and 8,
respectively.
The following conventions are used in this manual:
l Keys, switches, and labels on the machine are indicated in BOLD print.
l Messages appearing in the display are indicated in CAPITAL LETTERS.
If you have any questions or problems which cannot be solved by reading this manual, please
contact your Sharp dealer.
ii

.
GENERAL CAUTIONS
l Do not open the machine during operation (transmitting, receiving, or copying).
l Do not spill any liquids on the machine. These can damage the internal circuitry.
Your fax machine and the telephone system
The Austel Registration
shown on the label on
Number and Ringer Equivalence Number (REN) for this equipment are
the back of the machine. The telephone company may require these
numbers.
The sum of all Ringer Equivalence Numbers on your telephone line should be three or less in order
to assure proper service from the telephone company.
If any of your equipment is not operating properly, you should immediately remove it from your
telephone line, as it may cause harm to the telephone network. If the telephone company notes a
problem, they may temporarily disconnect service.
. .
III
INTRODUCTION
i
ABOUT THIS MANUAL
BEFORE USING YOUR FAX MACHINE
TABLE OF CONTENTS
1. THE PARTS OF THE MACHINE
MAIN PARTS
....................................
Front .....................................
Rear
......................................
Recording paper compartment
OPERATION PANEL
................................
........................
l-l
l-l
l-1
1-2
1-3
l-4
2. INSTALLATION 2-1
SITE SELECTION
..................................
2-1
,..
Ill
iv
ii
UNPACKING .....................................
SETTING UP
....................................
Assembly and Connections
Loading the recording paper
ENTERING YOUR NAME AND FAX NUMBER
3. BASIC OPERATIONS
PREPARING TO TRANSMIT A DOCUMENT
About the original
...............................
Readable length and width
Using the document carrier
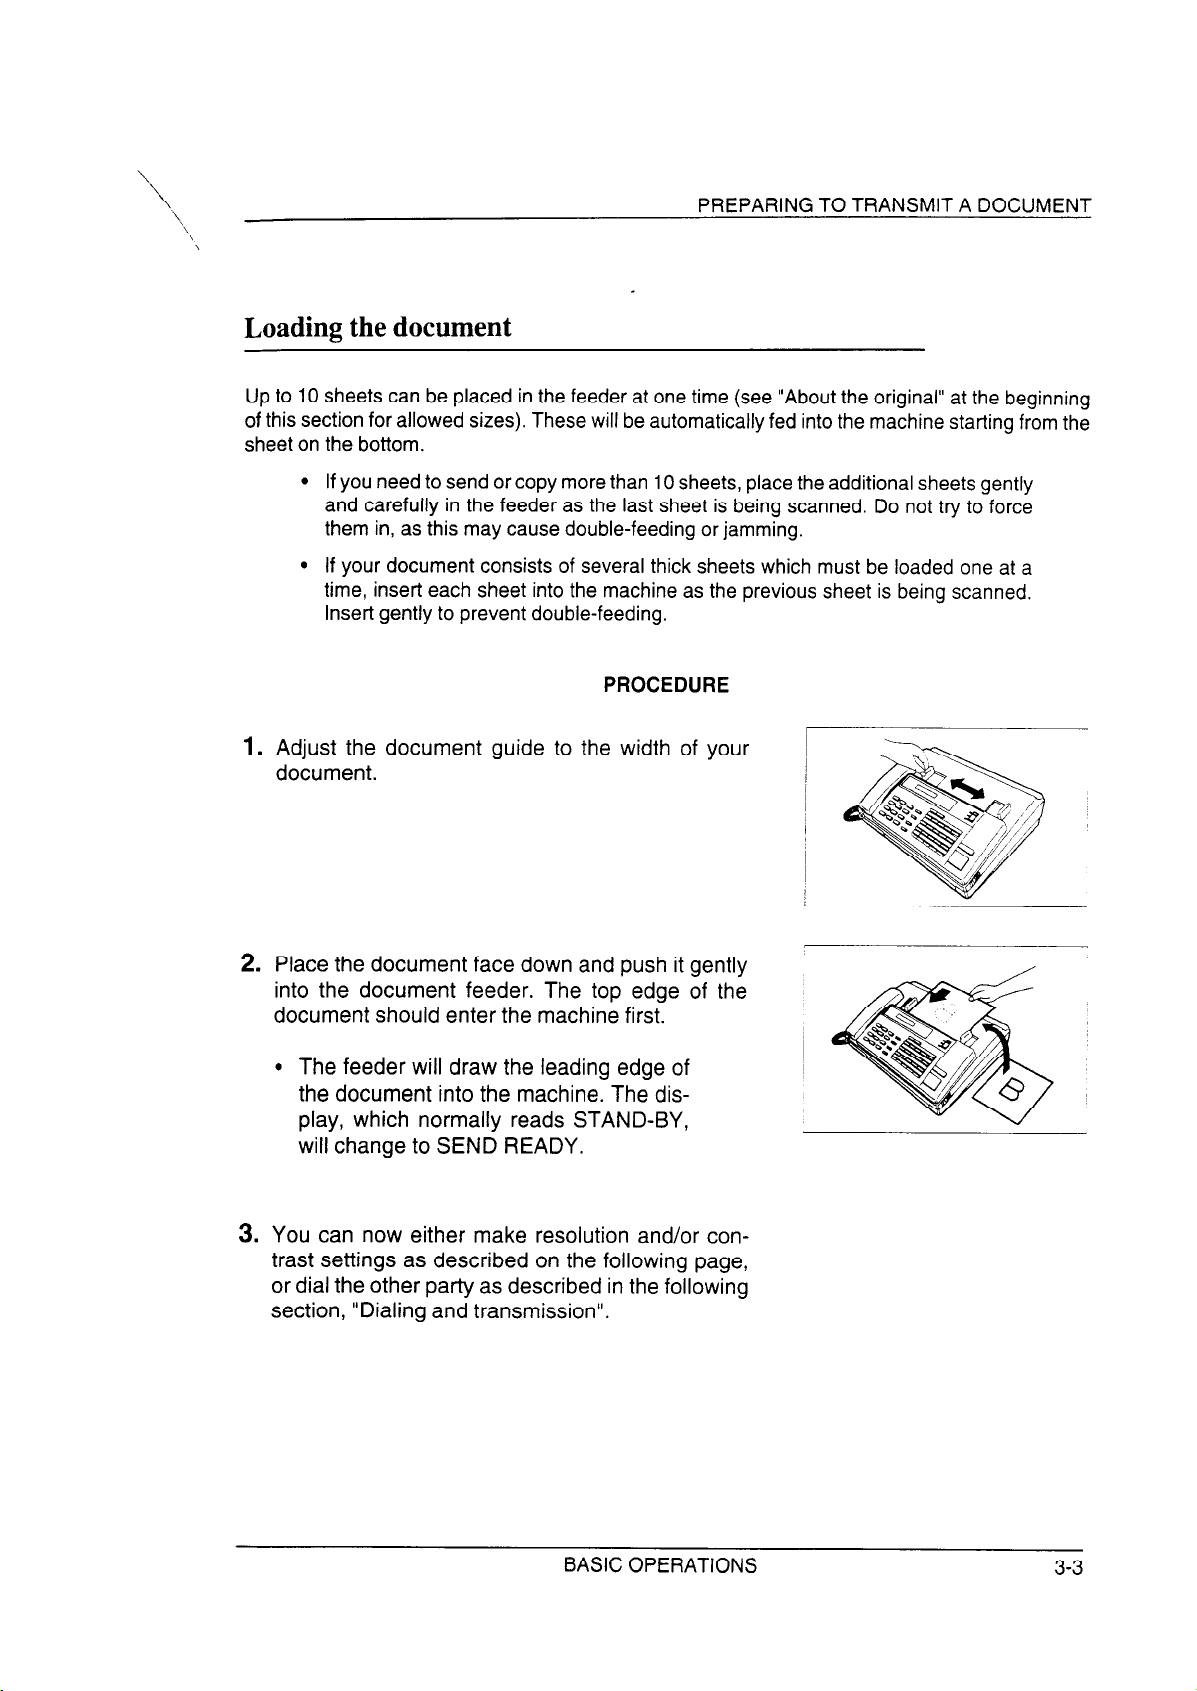
Loading the document
..........................
.........................
..........................
..........................
............................
...................
....................
2-2
2-3
2-3
2-4
2-6
3-l
3-1
3-1
3-2
3-2
3-3
iv
--\
TABLE OF CONTENTS
Resolution and contrast
DIALING AND TRANSMISSION
Normal dialing
Direct Keypad Dialing
.................................
.............................
Using the Autodialer (automatic dialing)
Redialing when the line is busy
RECEIVING A DOCUMENT
Modes of reception
............................
.............................
Manual reception ..............................
Automatic reception
.............................
Automatic Fax/Phone Changeover
Paper cutting
................................
COPYING .....................................
............................
..........................
........................
.....................
...................
3-4
3-6
3-6
3-7
3-7
3-8
.3-10
.3-l 0
.3-l 1
.3-l 1
.3-l 2
.3-l 3
.3-14
VOICE COMMUNICATIONS
...........................
.3-15
4. USING YOUR FAX WITH OTHER DEVICES 4-1
ANSWERING MACHINE
Connection and preparations
..............................
.........................
Using the answering machine hook-up
Optional settings ...............................
EXTENSION TELEPHONE .............................
....................
4-l
4-l
4-2
4-5
4-9
5. OPTIONAL SETTINGS AND DATA ENTRY 5-l
LETTERS AND CHARACTERS FOR NAMES
Entry
Deletions and changes
.............................. : ...... 5-1
............................
...................
5-1
5-2
V
TABLE OF CONTENTS
FAX AND VOICE NUMBERS FOR AUTOMATIC DIALING
USER SWITCHES
6. PRINTING OUT REPORTS AND LISTS
TELEPHONE LIST
PASSCODE LIST
USER SWITCH LIST
TRANSACTION REPORT
7. USER MAINTENANCE
RECORDING PAPER . . . . . . . . . . . . . . . . . . . . . . . . . . . . . . . 7-1
Recommended paper . . . . . . . . . . . . . . . . . . . . . . . . . . . . 7-l
Handling and storing recording paper
Replacing the recording paper
..................................
..................................
..................................
................................
..............................
....................
........................
.............
5-3
5-5
6-1
6-l
6-2
6-4
6-5
7-1
7-1
7-2
CLEANING THE RECORDING HEAD
CLEANING THE READING GLASS AND ROLLERS
CLEANING THE HOUSING
ABOUT THE LITHIUM BAITERY
8. TROUBLESHOOTING
GENERAL CORRECTIVE MEASURES
DISPLAY MESSAGES
ALARMS .......................................
CLEARING A JAMMED DOCUMENT
CLEARING JAMMED RECORDING PAPER
COMMUNICATION ERROR CODES
...............................
.......................
.............................
..........................
.......................
........................
........................
................
....................
7-3
7-4
7-5
7-6
8-1
8-1
8-4
8-5
8-6
8-7
8-8
vi
TABLE OF CONTENTS
9. SPECIFICATIONS 9-1
QUICK REFERENCE GUIDE
INDEX
Quick-i
Index-i
vii
TABLE OF CONTENTS
Notes
VIII
. . .
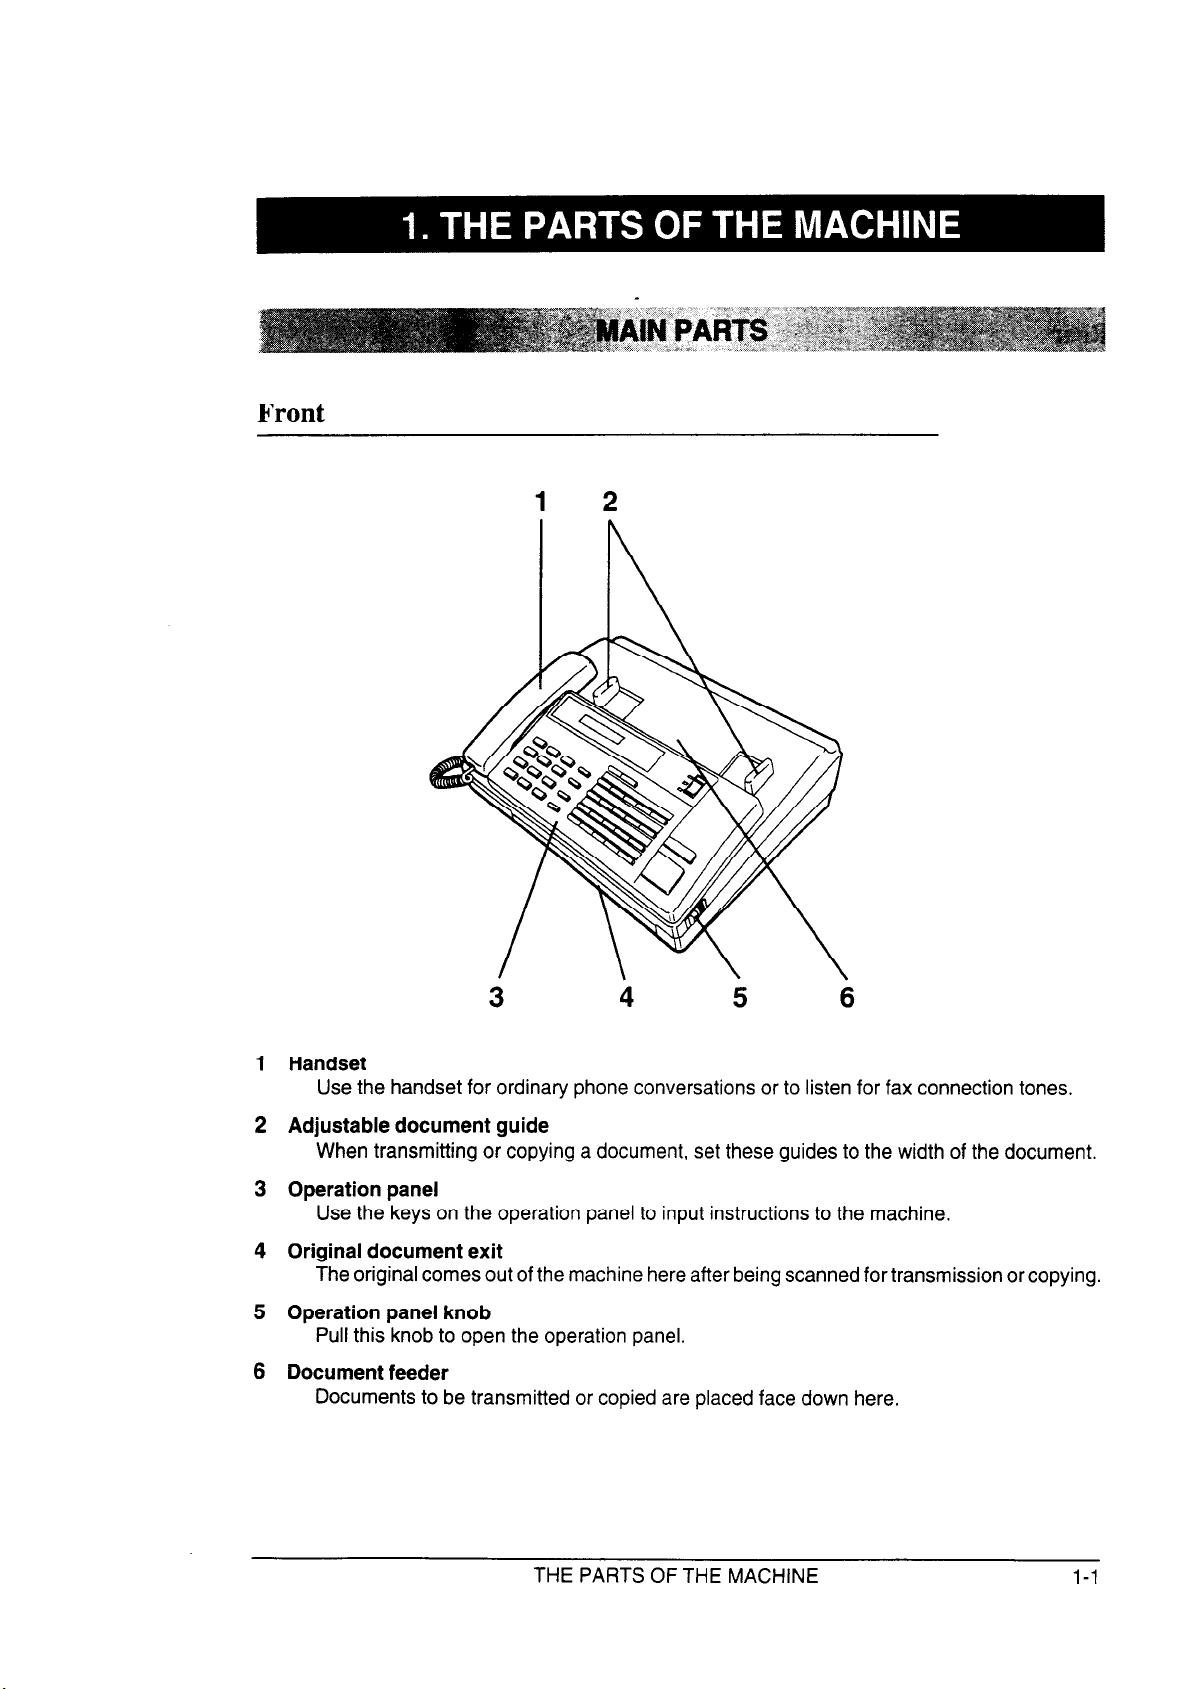
3
Handset
Use the handset for ordinary phone conversations or to listen for fax connection tones.
Adjustable document guide
When transmitting or copying a document, set these guides to the width of the document.
Operation panel
Use the keys on the operation panel to input instructions to the machine.
Original document exit
The original comes out of the machine here after being scanned for transmission or copying.
Operation panel knob
Pull this knob to open the operation panel.
Document feeder
Documents to be transmitted or copied are placed face down here.
4
5 6
THE PARTS OF THE MACHINE
l-l
MAIN PARTS
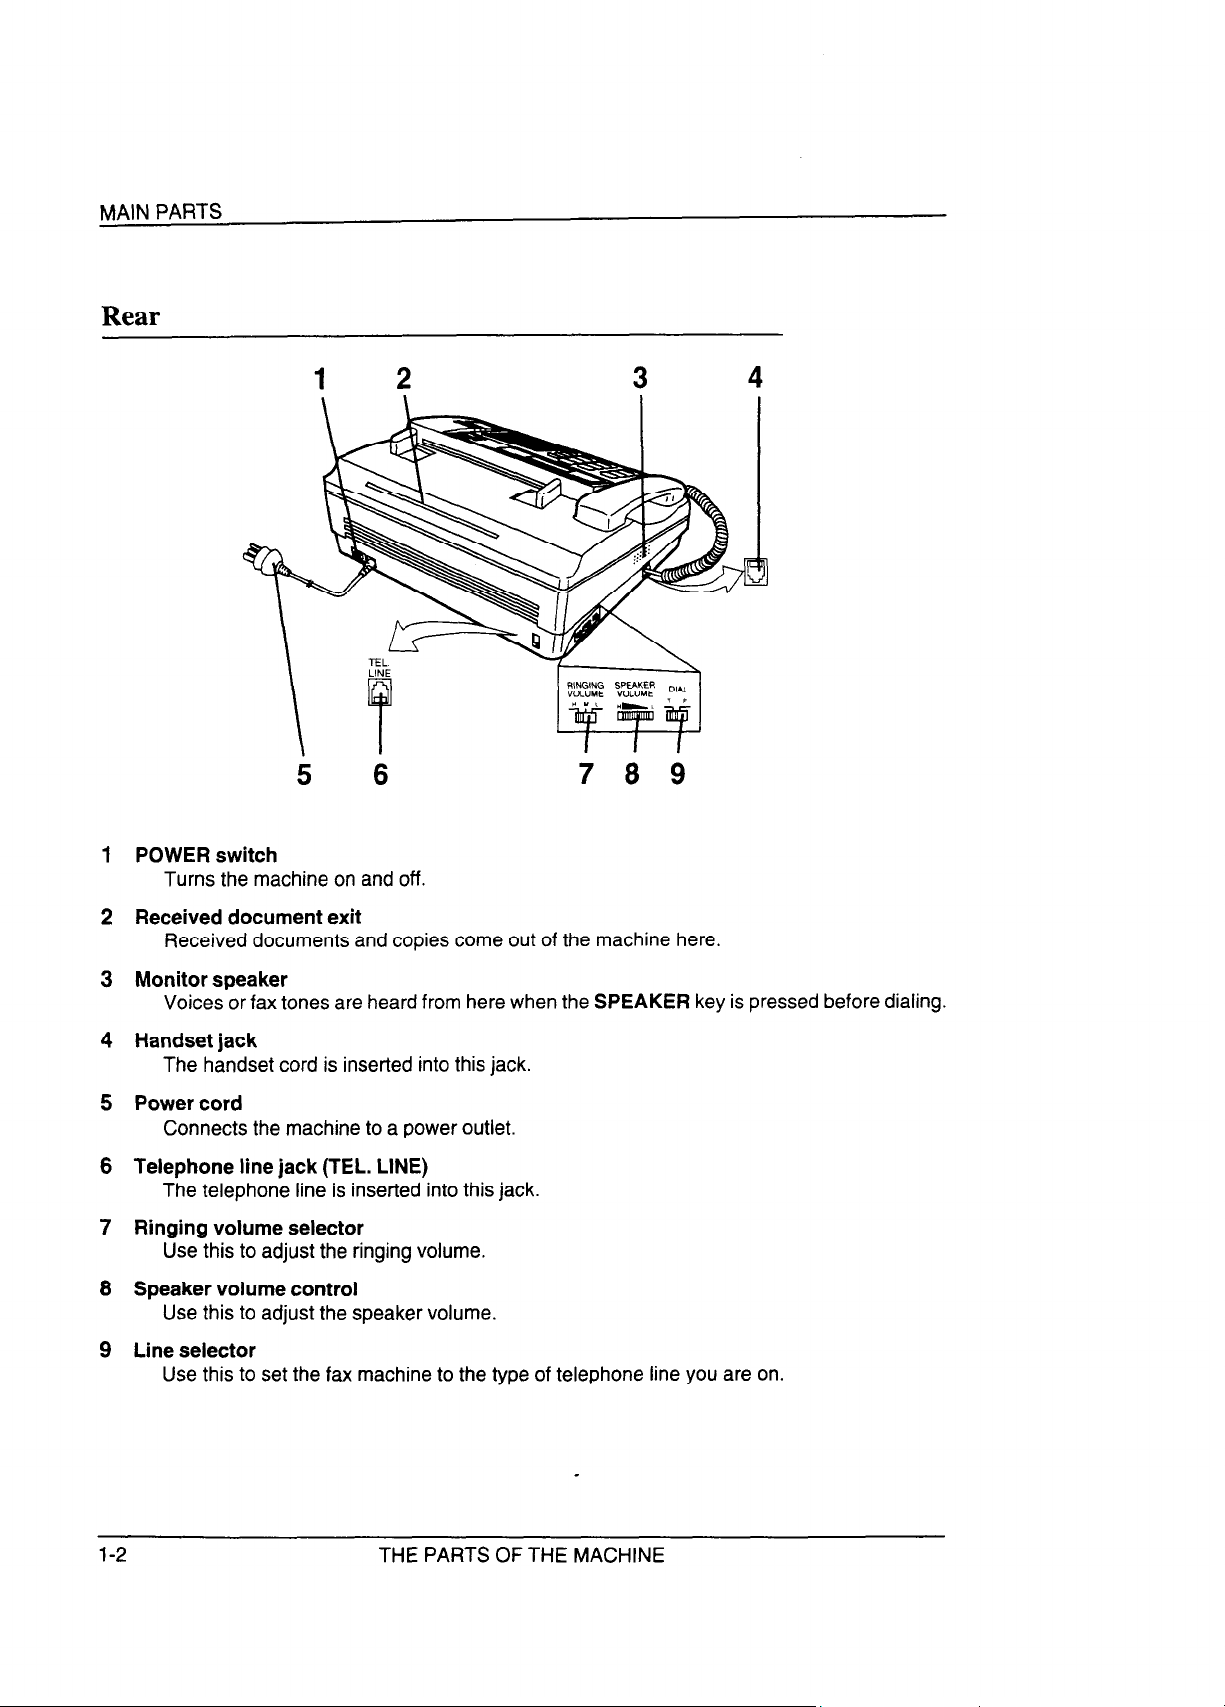
Rear
POWER switch
Turns the machine on and off.
Received document exit
Received documents and copies come out of the machine here
Monitor speaker
Voices or fax tones are heard from here when the SPEAKER key is pressed before dialing.
Handset jack
The handset cord is inserted into this jack.
Power cord
Connects the machine to a power outlet.
Telephone line jack (TEL. LINE)
The telephone line is inserted into this jack.
Ringing volume selector
Use this to adjust the ringing volume.
Speaker volume control
Use this to adjust the speaker volume.
Line selector
Use this to set the fax machine to the type of telephone line you are on.
l-2
THE PARTS OF THE MACHINE
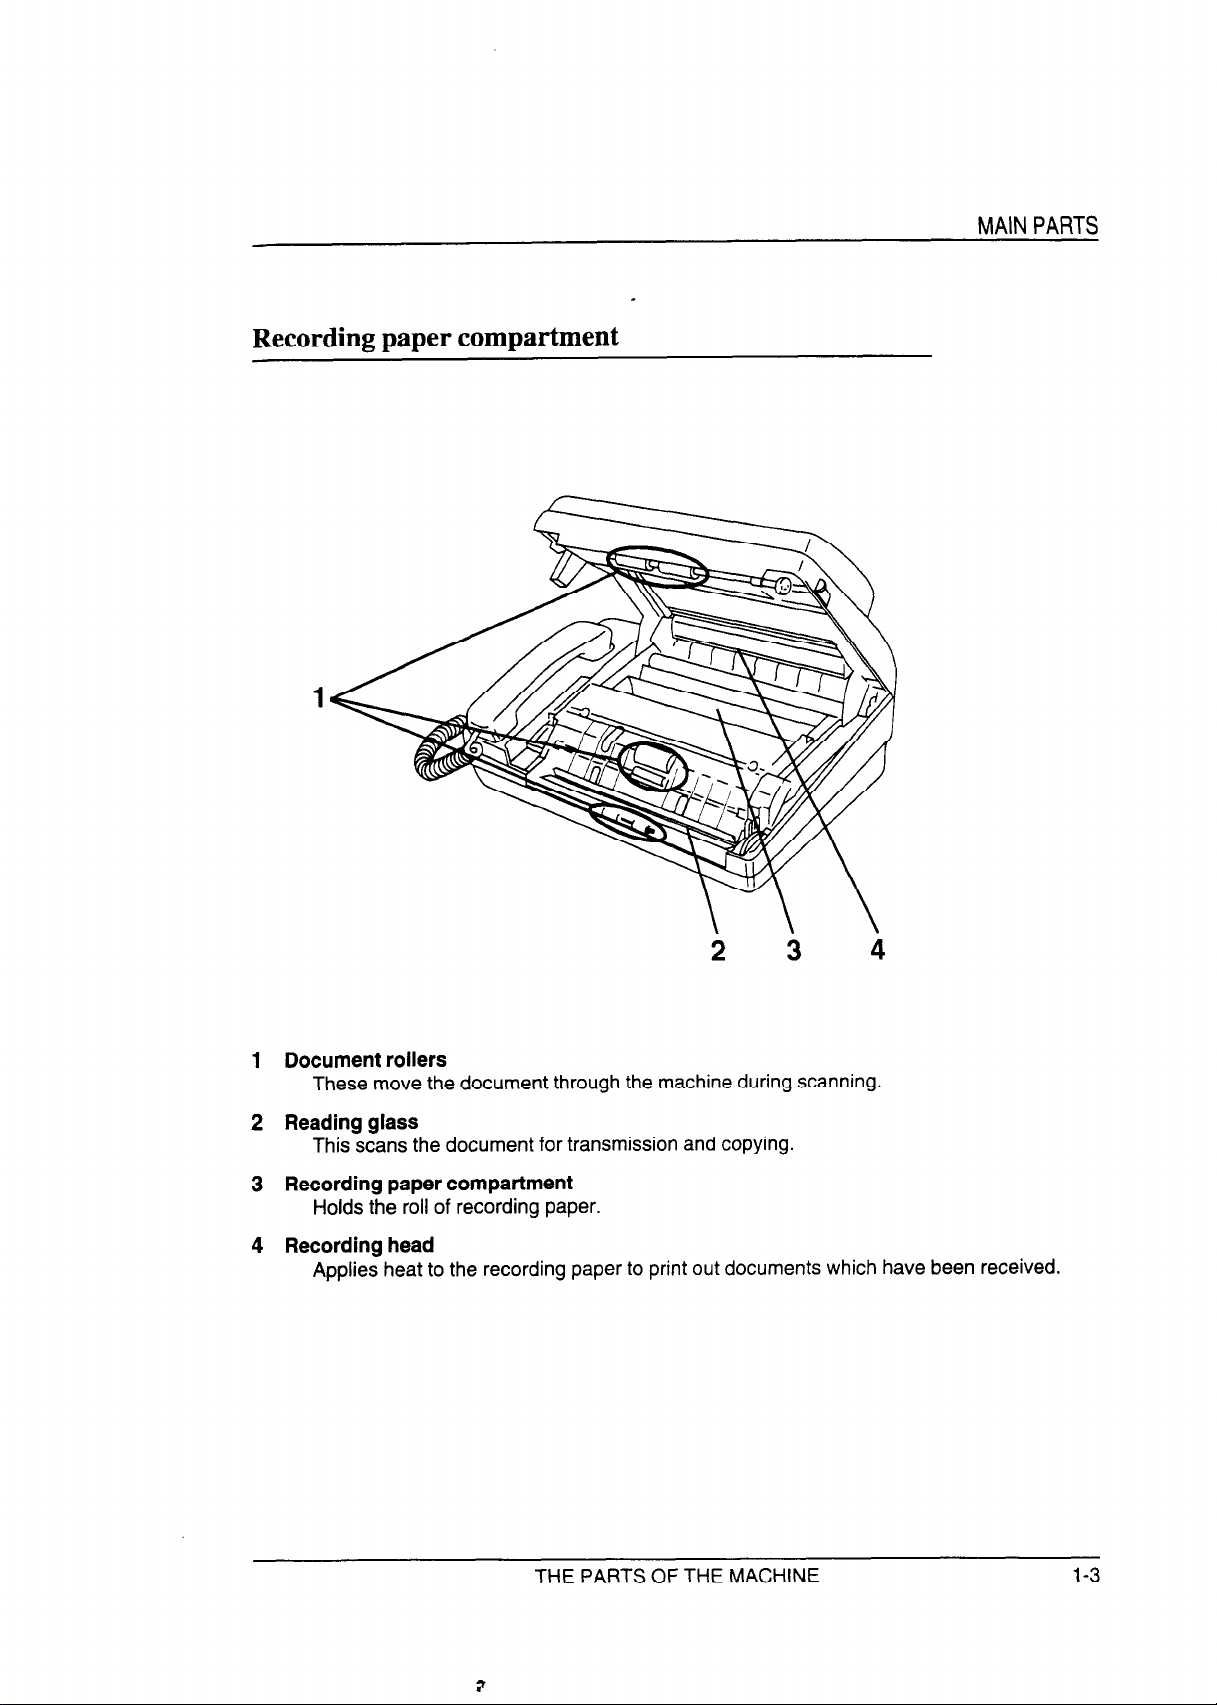
Recording paper compartment
MAIN PARTS
1 Document rollers
These move the document through the machine during scanning.
2 Reading glass
This scans the document for transmission and copying.
3 Recording paper compartment
Holds the roll of recording paper.
4 Recording head
Applies heat to the recording paper to print out documents which have been received.
2 3
4
THE PARTS OF THE MACHINE
1-3

1 Liquid crystal display
Displays various messages during operation and programming.
2 SPEED DIAL key
Press this key to enter a 2-digit Speed Dial number.
3 REDIAL key
Press this key to automatically redial the last number dialed, or to enter a pause during
programming.
4 RESOLUTION key
Use this key to adjust the resolution and contrast for transmitting or copying a document.
5 FUNCTION key
Use this key to select various special functions and enter data. Prompts indicating selections
will appear on the display.
6 Reception mode switch
Use this key to select the mode of reception.
l-4
THE PARTS OF THE MACHINE
OPERATION PANEL
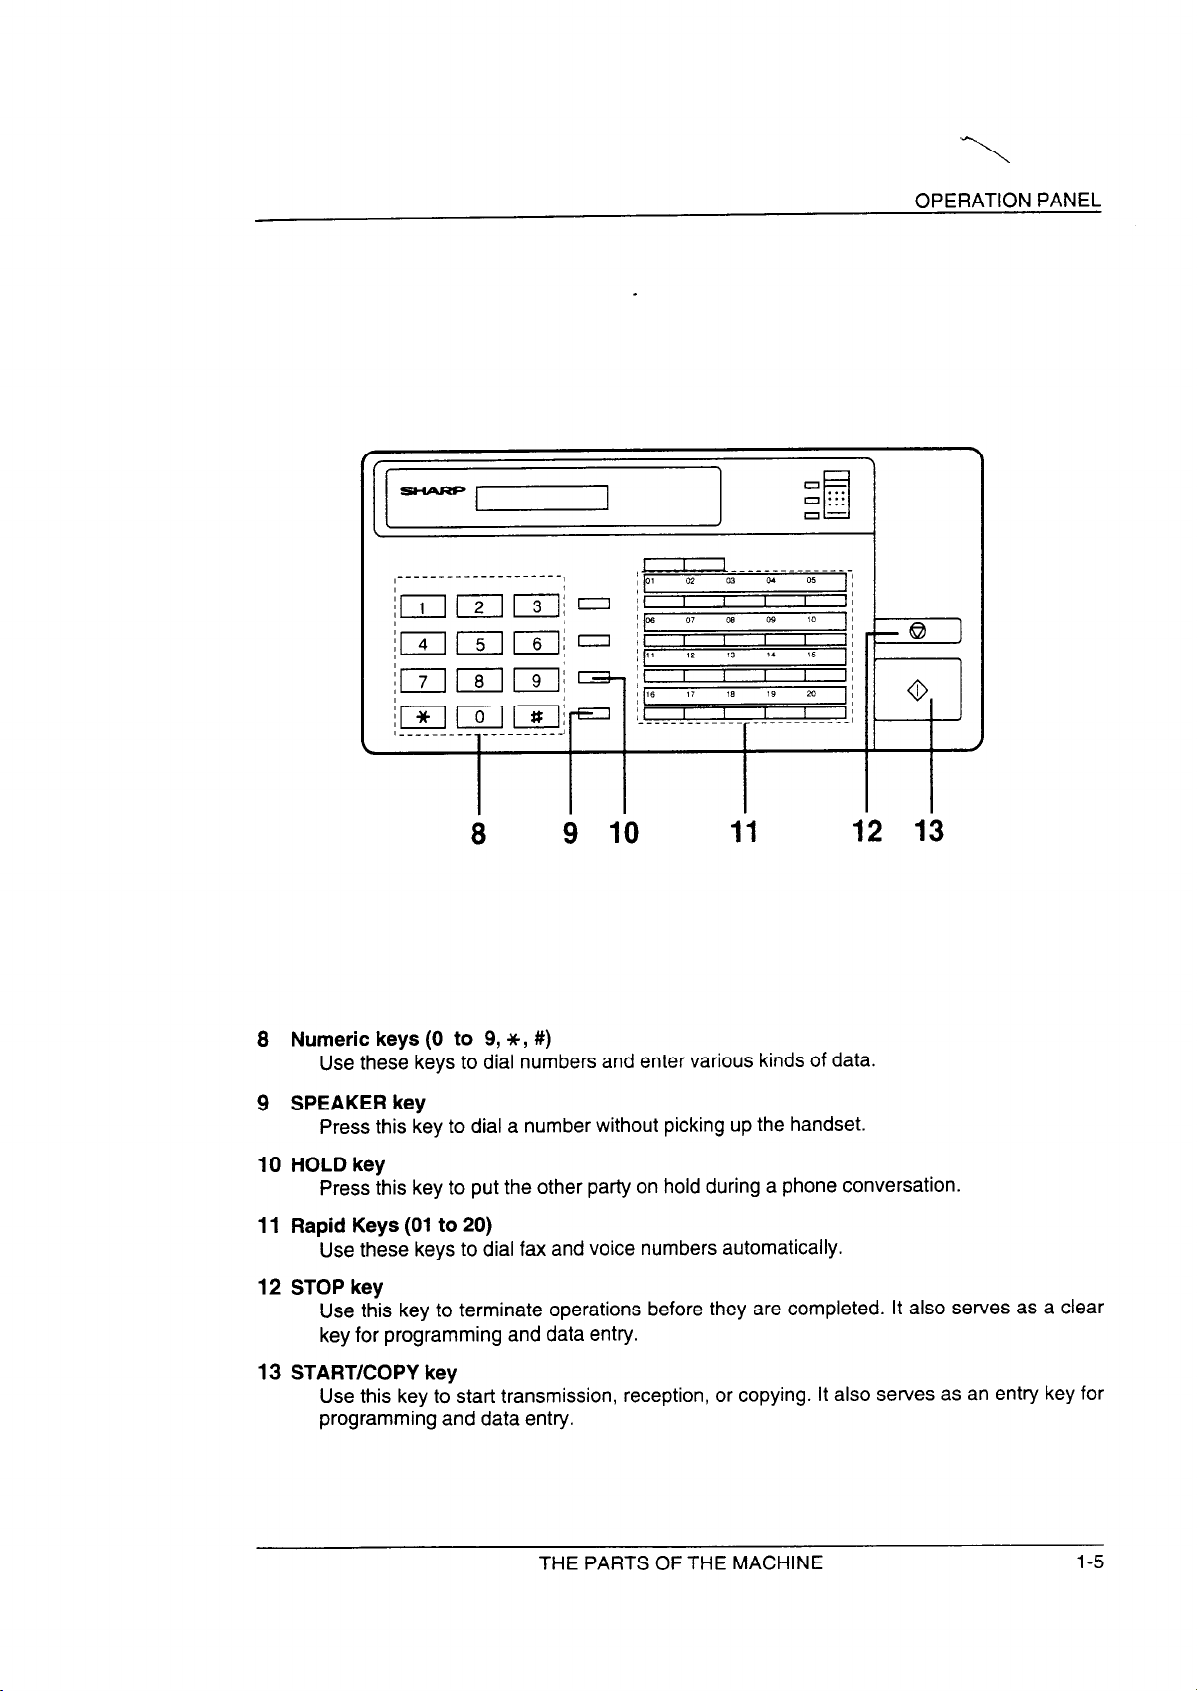
8 Numeric keys (0 to 9, *, #)
Use these keys to dial numbers and enter various kinds of data.
9 SPEAKER key
Press this key to dial a number without picking up the handset.
10 HOLD key
Press this key to put the other party on hold during a phone conversation.
11 Rapid Keys (01 to 20)
Use these keys to dial fax and voice numbers automatically.
12 STOP key
Use this key to terminate operations before they are completed. It also serves as a clear
key for programming and data entry.
13 START/COPY key
Use this key to start transmission, reception, or copying. It also serves as an entry key for
programming and data entry.
9 10
11
THE PARTS OF THE MACHINE
l-5
OPERATION PANEL
Notes
1-6
THE PARTS OF THE MACHINE
Take the following points into consideration when selecting a site for your FO-130:
ENVIRONMENT
The machine must be installed on a level surface.
Keep the machine away from air conditioners, heaters, direct sunlight, and dust.
Provide easy access to the front, back, and sides of the machine. In particular, keep
the area in front of the machine clear, or the original document may jam as it comes
out after scanning.
The temperature should be between 5” and 35°C.
The humidity should be between 30% and 85% (without condensation).
ELECTRICITY
A 240 V, 50 Hz, grounded (3-prong) AC outlet is required.
J# Note:
l If your area experiences a high incidence of lightning or power surges, we recommend that you
install a surge protector for the power and telephone lines. Surge protectors can be purchased at
most telephone specialty stores.
TELEPHONE JACK
A standard telephone wall jack must be located near the machine.
INSTALLATION
2-1
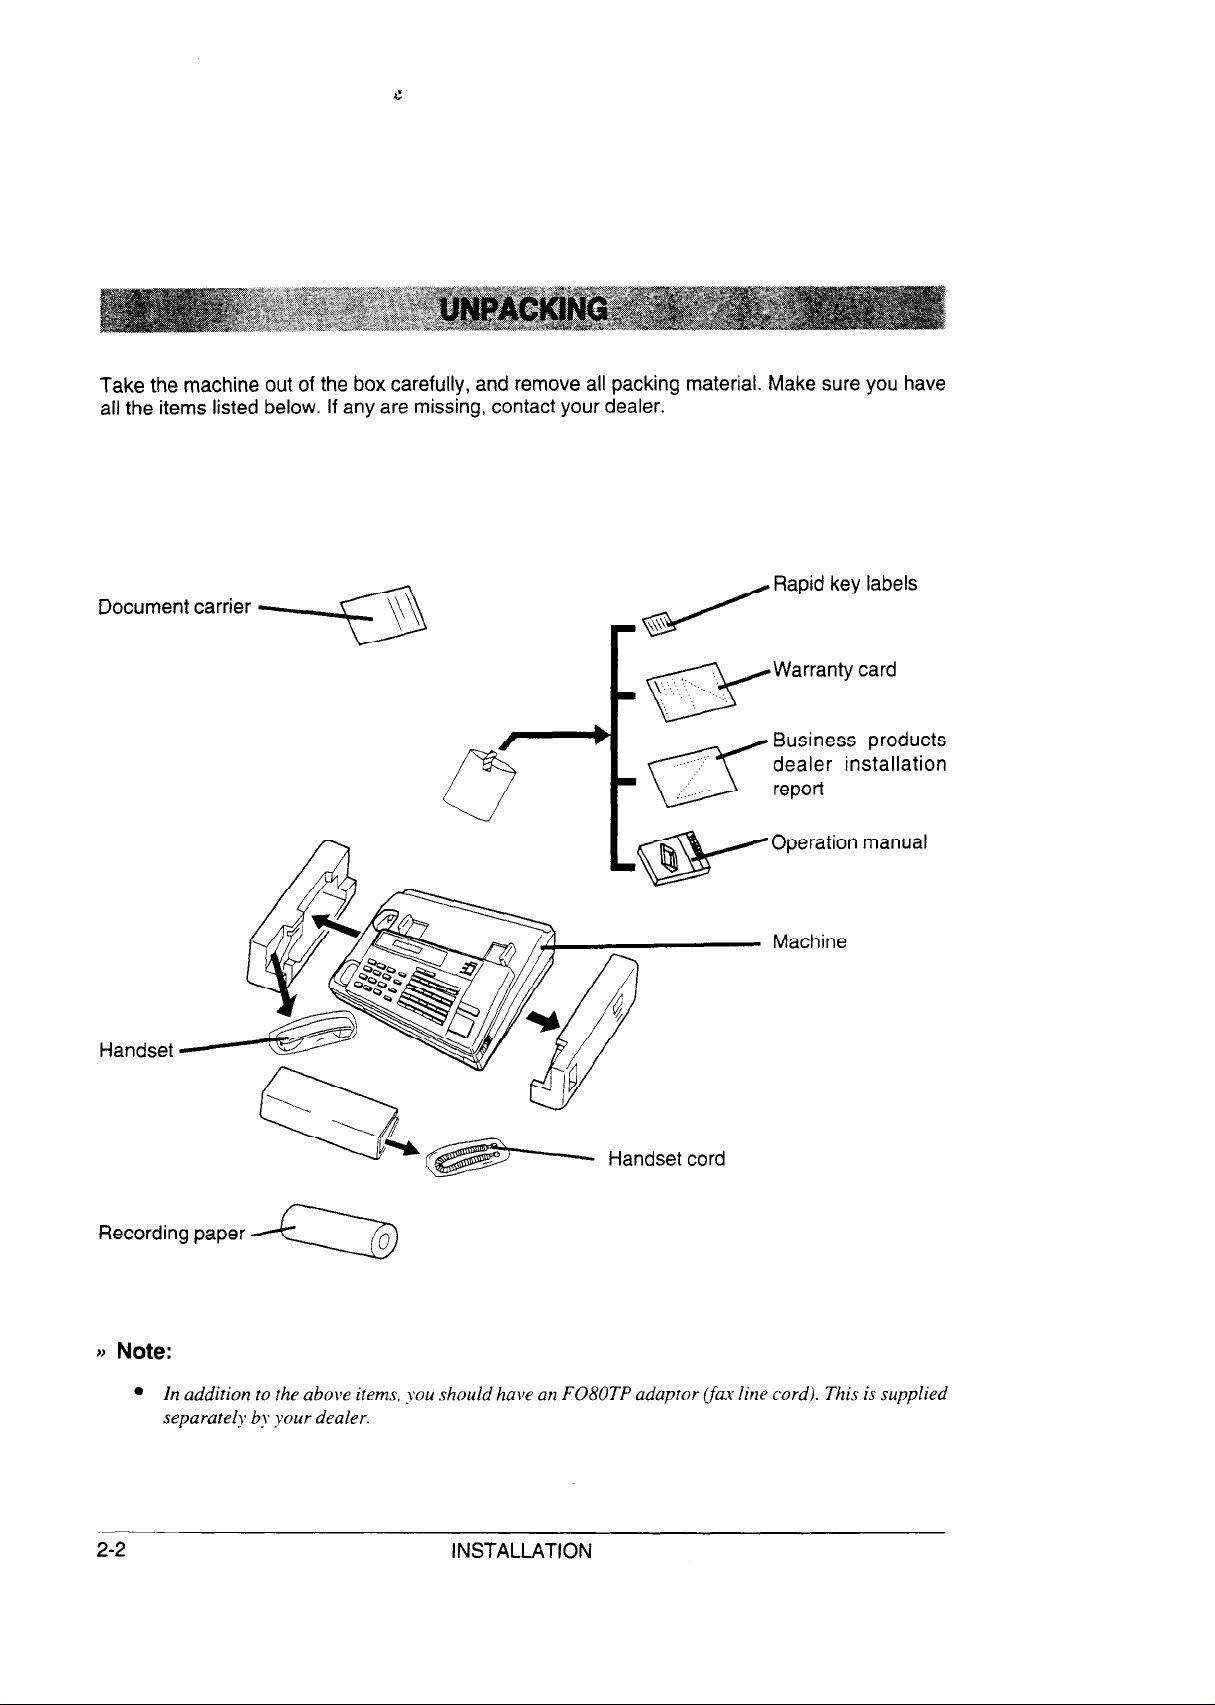
Take the machine out of the box carefully, and remove all packing material. Make sure you have
all the items listed below. If any are missing, contact your dealer.
Document carrier +
Machine
Handset
Handset cord
Recording paper
e
l In addition to the above items, you should have an F080TP adaptor (fin line cord). This is supplied
separately by your dealer.
2-2 INSTALLATION
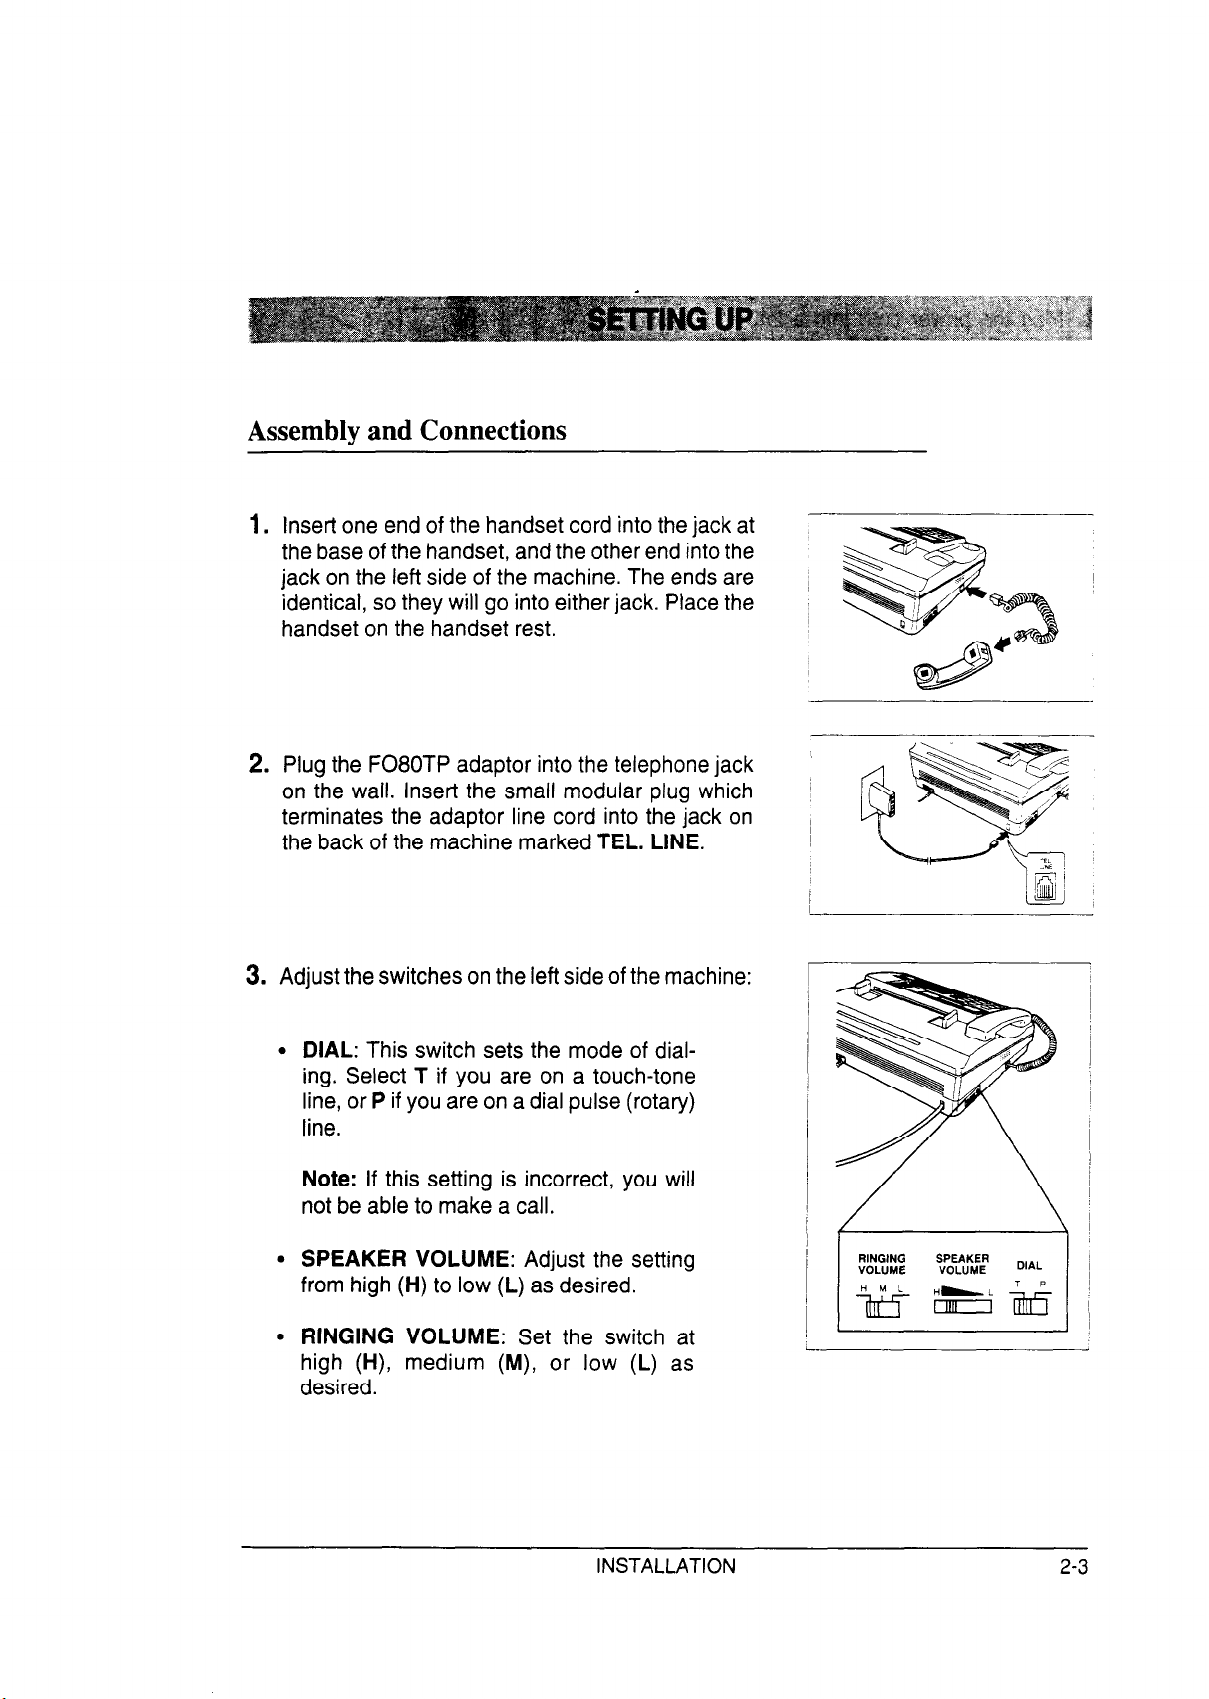
Assembly and Connections
1. Insert one end of the handset cord into the jack at
the base of the handset, and the other end into the
jack on the left side of the machine. The ends are
identical, so they will go into either jack. Place the
handset on the handset rest.
2. Plug the F080TP adaptor into the telephone jack
on the wail. Insert the small modular plug which
terminates the adaptor line cord into the jack on
the back of the machine marked TEL. LINE.
3. Adjust the switches on the left side of the machine:
l DIAL: This switch sets the mode of dial-
ing. Select T if you are on a touch-tone
line, or P if you are on a dial pulse (rotary)
line.
Note: If this setting is incorrect, you will
not be able to make a call.
l SPEAKER VOLUME: Adjust the setting
from high (H) to low (L) as desired.
l RINGING VOLUME: Set the switch at
high (H), medium (M), or low (L) as
desired.
INSTALLATION
RINGING SPEAKER
VOLUME VOLUME
DIAL
2-3
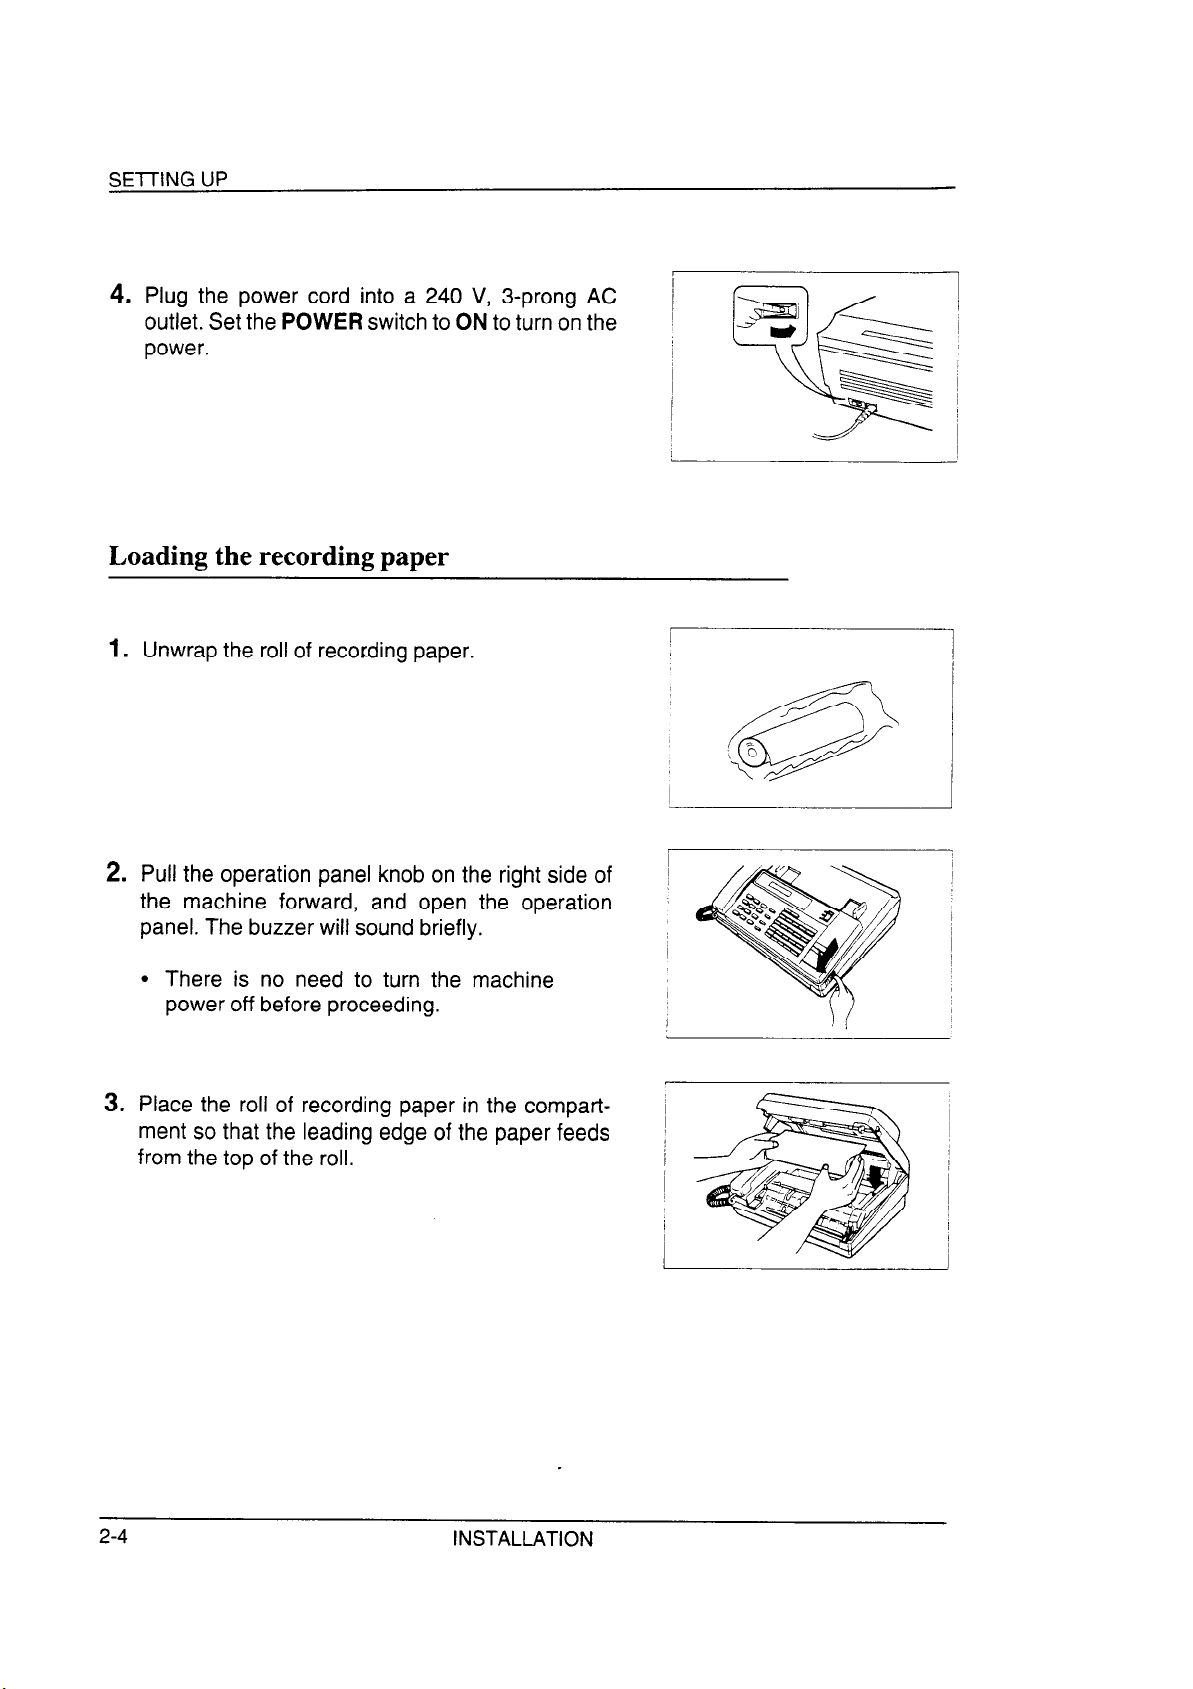
4.
Plug the power cord into a 240 V, 3-prong AC
outlet. Set the POWER switch to ON to turn on the
power.
Loading the recording paper
1.
Unwrap the roll of recording paper.
2.
Pull the operation panel knob on the right side of
the machine forward, and open the operation
panel. The buzzer will sound briefly.
l There is no need to turn the machine
power off before proceeding.
3.
Place the roll of recording paper in the compart-
ment so that the leading edge of the paper feeds
from the top of the roll.
I
~
I
1
I
~
INSTALLATION
I
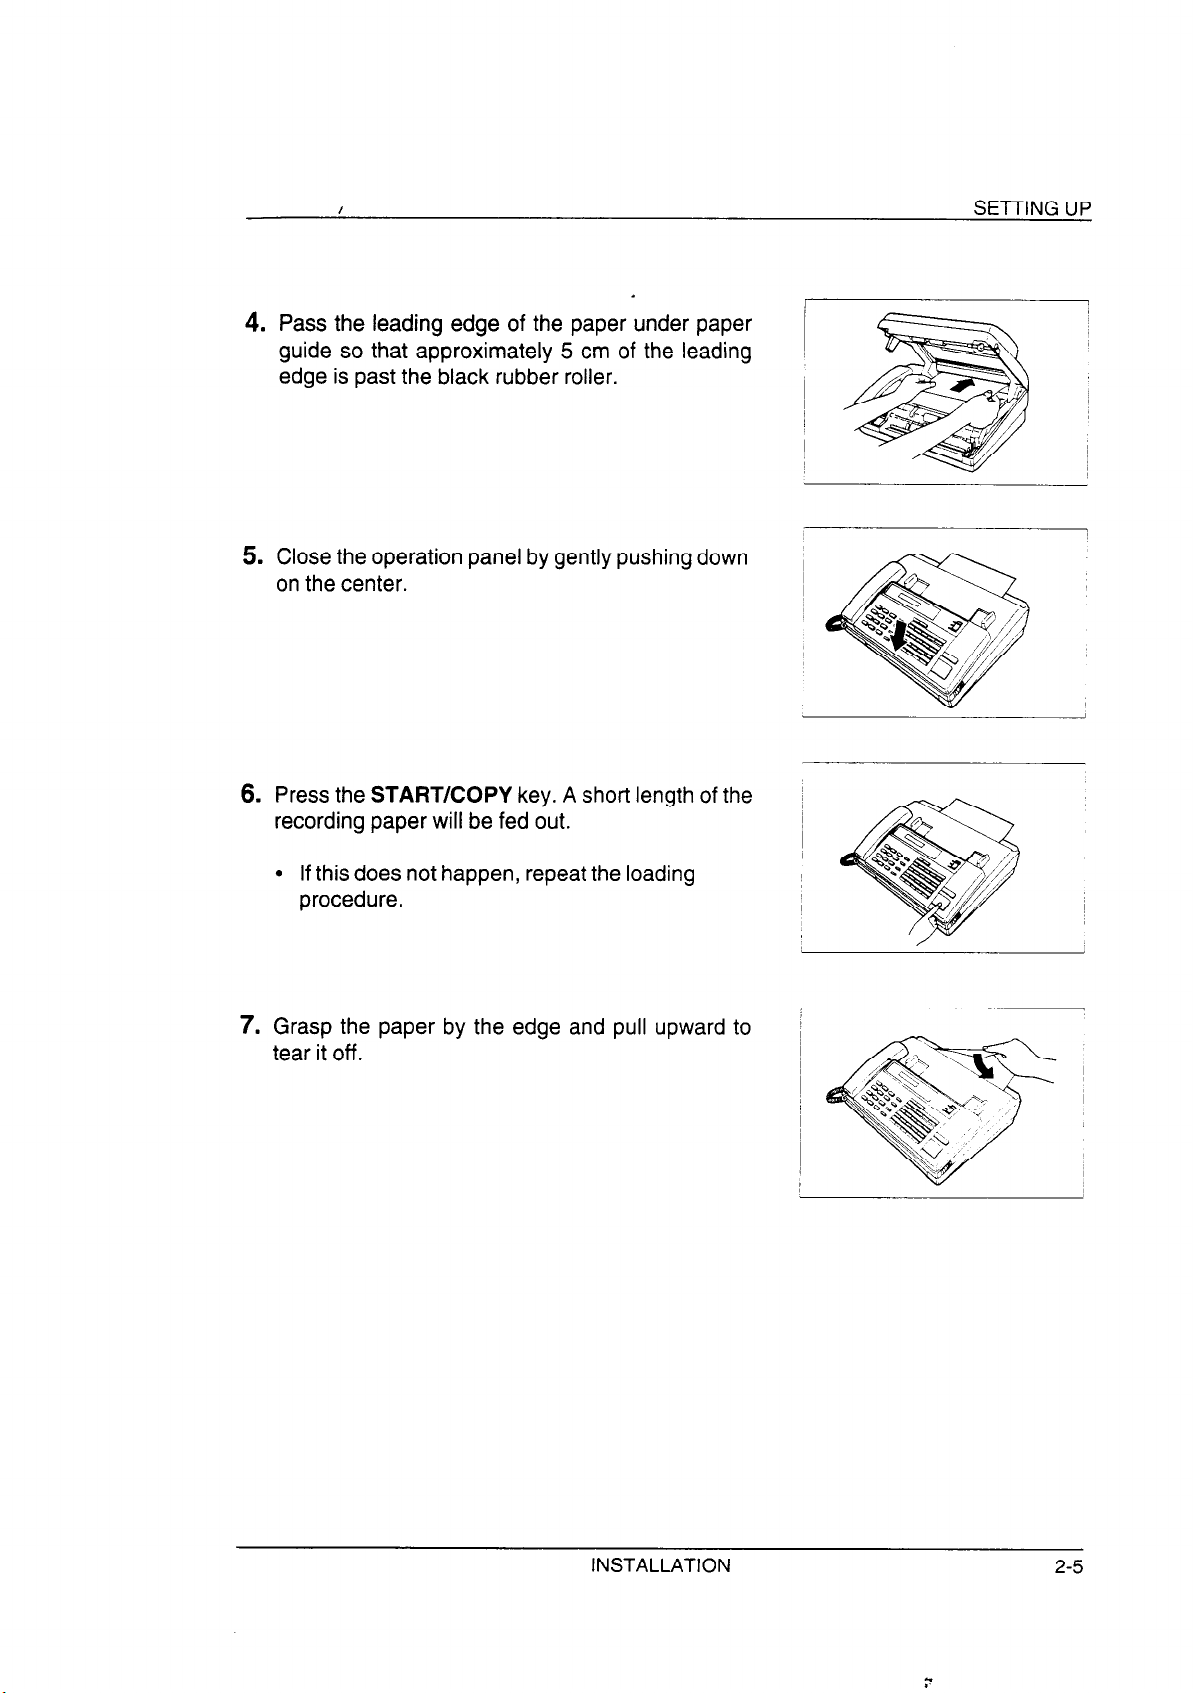
Pass the leading edge of the paper under paper
4.
guide so that approximately 5 cm of the leading
edge is past the black rubber roller.
5.
Close the operation panel by gently pushing down
on the center.
SETTING UP
~
I
6.
Press the START/COPY key. A short length of the
recording paper will be fed out.
l If this does not happen, repeat the loading
procedure.
7.
Grasp the paper by the edge and pull upward to
tear it off.
~
I
/
I
I
INSTALLATION
2-5
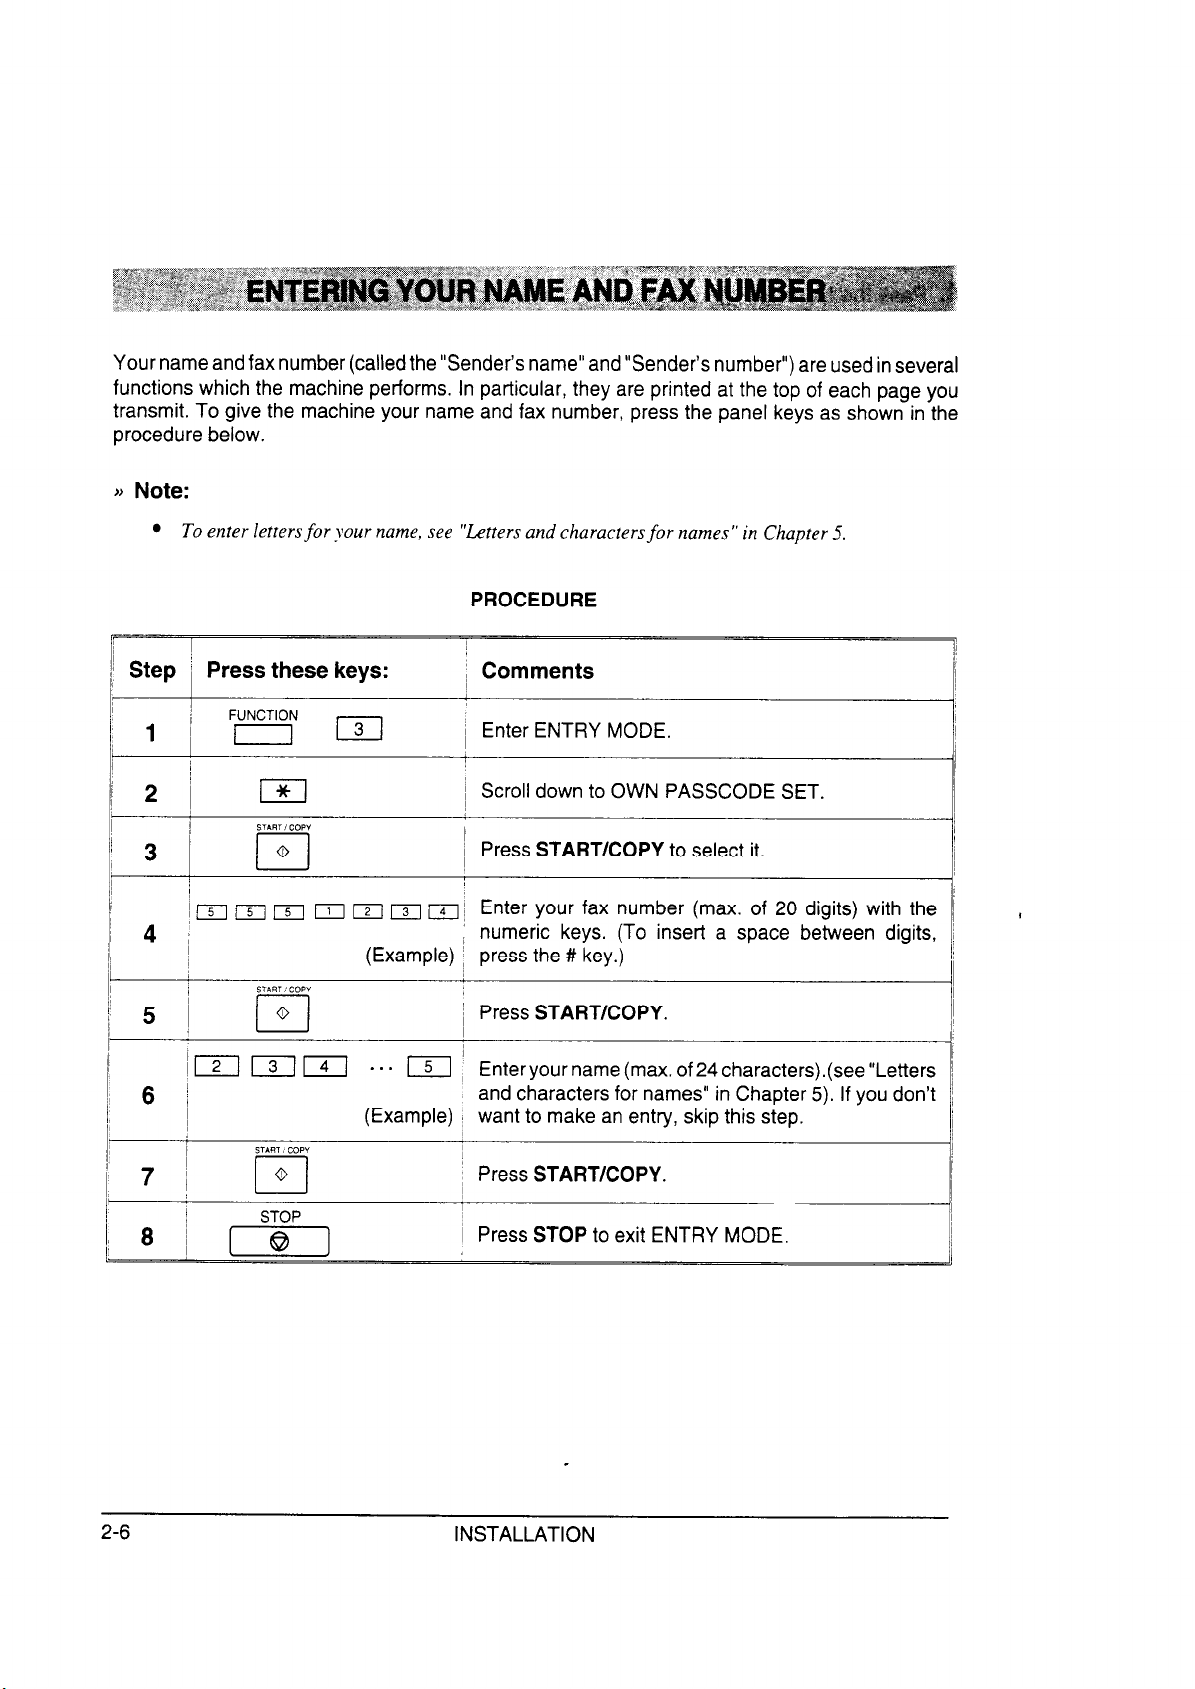
Your name and fax number (called the “Sender’s name” and “Sender’s number”) are used in several
functions which the machine performs. In particular, they are printed at the top of each page you
transmit. To give the machine your name and fax number, press the panel keys as shown in the
procedure below.
j) Note:
l To enter letters for your name, see “Letters and characters for names” in Chapter 5.
PROCEDURE
Step i Press these keys:
FUNCTION
1 ’ [ 131
2~ El
SilRT i COPY
3
~ [q /5/ 151 II ~1 131 /; Enter your fax number (max. of 20 digits) with the
4 I
5 !
/
I121
START : COPY
(Example) I press the # key.)
a-- 151 1 Enteryo
6 /
(Example) I want to make an entry, skip this step.
START COPY
~ Comments
~ Enter ENTRY MODE.
~ Scroll down to OWN PASSCODE SET.
I
~ Press START/COPY to select it.
numeric keys. (To insert a space between digits,
I Press START/COPY.
I
ur name (max. of 24 characters).(see “Letters
and characters for names” in Chapter 5). If you don’t
I
i Press START/COPY.
Press STOP to exit ENTRY MODE.
2-6
INSTALLATION
About the original
Your FO-130 can transmit most standard office documents. Specific guidelines are as follows:
SIZE AND WEIGHT
The size and weight of documents which you can load in the document feeder depends on whether
you load one sheet at a time or several sheets at once.
1) When you load several sheets at once:
Width:
148 to 216 mm
Length: 128 to 197 mm
Thickness:
Weight:
0.06 to 0.12 mm
52 to 104 g/m’
2) When you load one sheet at a time:
Width:
Length:
Thickness:
Weight:
148 to 216 mm
128 to 1000 mm
0.06 to 0.20 mm
52 to 157 g/m’
)j Note:
l To send documents smaller than the minimum size. use the document carrier as described in “Using
the document carrier” which follows in this section.
OTHER RESTRICTIONS
l Documents written in yellow, greenish yellow, or light blue ink cannot be trans-
mitted.
l Ink, glue, and correcting fluid on documents must be dry before they are trans-
mitted.
l All clips, staples, and pins must be removed from documents before transmission.
If these are not removed, they may damage the machine.
l Patched or taped documents should be copied on a copy machine, and the copy
used for transmission.
BASIC OPERATIONS
3-1
PREPARING TO TRANSMIT A DOCUMENT
Readable length and width
The area of the document which is read (scanned) by the machine is slightly smaller than the actual
document size. Any characters or graphics outside this area will not be transmitted.
Readable width: 210mm
Readable length:
The length of the sheet minus 4 mm from both the top and bottom edges.
Using the document carrier
The document carrier must be used for the following types of documents:
Documents which are torn.
Documents smaller than the minimum size (see the preceding page).
Carbon-backed documents (insert a sheet of white paper between the carbon back
of the document and the document carrier).
Documents which are easily smudged.
Use the document carrier according to the instructions on the back.
)) Note:
l If the document carrier is dirty, clean it with a soji cloth moistened M’ith water. Make sure it has
dried completely before using it for transmission.
3-2
BASIC OPERATIONS
\
‘\
PREPARING TO TRANSMIT A DOCUMENT
Loading the document
Up to 10 sheets can be placed in the feeder at one time (see “About the original” at the beginning
of this section for allowed sizes). These will be automatically fed into the machine starting from the
sheet on the bottom.
l If you need to send or copy more than 10 sheets, place the additional sheets gently
and carefully in the feeder as the last sheet is being scanned. Do not try to force
them in, as this may cause double-feeding or jamming.
l If your document consists of several thick sheets which must be loaded one at a
time, insert each sheet into the machine as the previous sheet is being scanned.
Insert gently to prevent double-feeding.
PROCEDURE
1.
Adjust the document guide to the width of your
document.
2.
Place the document face down and push it gently
into the document feeder. The top edge of the
document should enter the machine first.
l The feeder will draw the leading edge of
the document into the machine. The dis-
play, which normally reads STAND-BY,
will change to SEND READY.
3.
You can now either make resolution and/or contrast settings as described on the following page,
or dial the other party as described in the following
section, “Dialing and transmission”.
BASIC OPERATIONS
3-3
PREPARING TO TRANSMIT A DOCUMENT
Resolution and contrast
If you want, you can adjust the resolution and contrast before sending a document.
RESOLUTION
The FO-130 has 3 resolution settings:
STANDARD:
FINE:
HALF TONE: Use HALF TONE for photographs and illustrations. The original will be
If you do not make a setting, the machine will automatically send the document in STANDARD (the
default setting can be changed to FINE by adjusting User Switch 1 - see “User switches” in Chapter
5).
)) Note:
l In order to transmit with FINE resolution, the receiving far machine must also have that resolution.
Use STANDARD for ordinary documents. This setting gives you the fastest
and most economical transmission.
Use FINE for improved reproduction, especially with documents containing
small letters or fine drawings.
reproduced in 16 shades of gray.
If it doesn’t, your machine will automatically step down to STANDARD.
CONTRAST
The contrast is normally set to AUTO, which means that the machine automatically controls the
contrast, but for very light documents you can change the setting to DARK.
3-4
BASIC OPERATIONS
PREPARING TO TRANSMIT A DOCUMENT
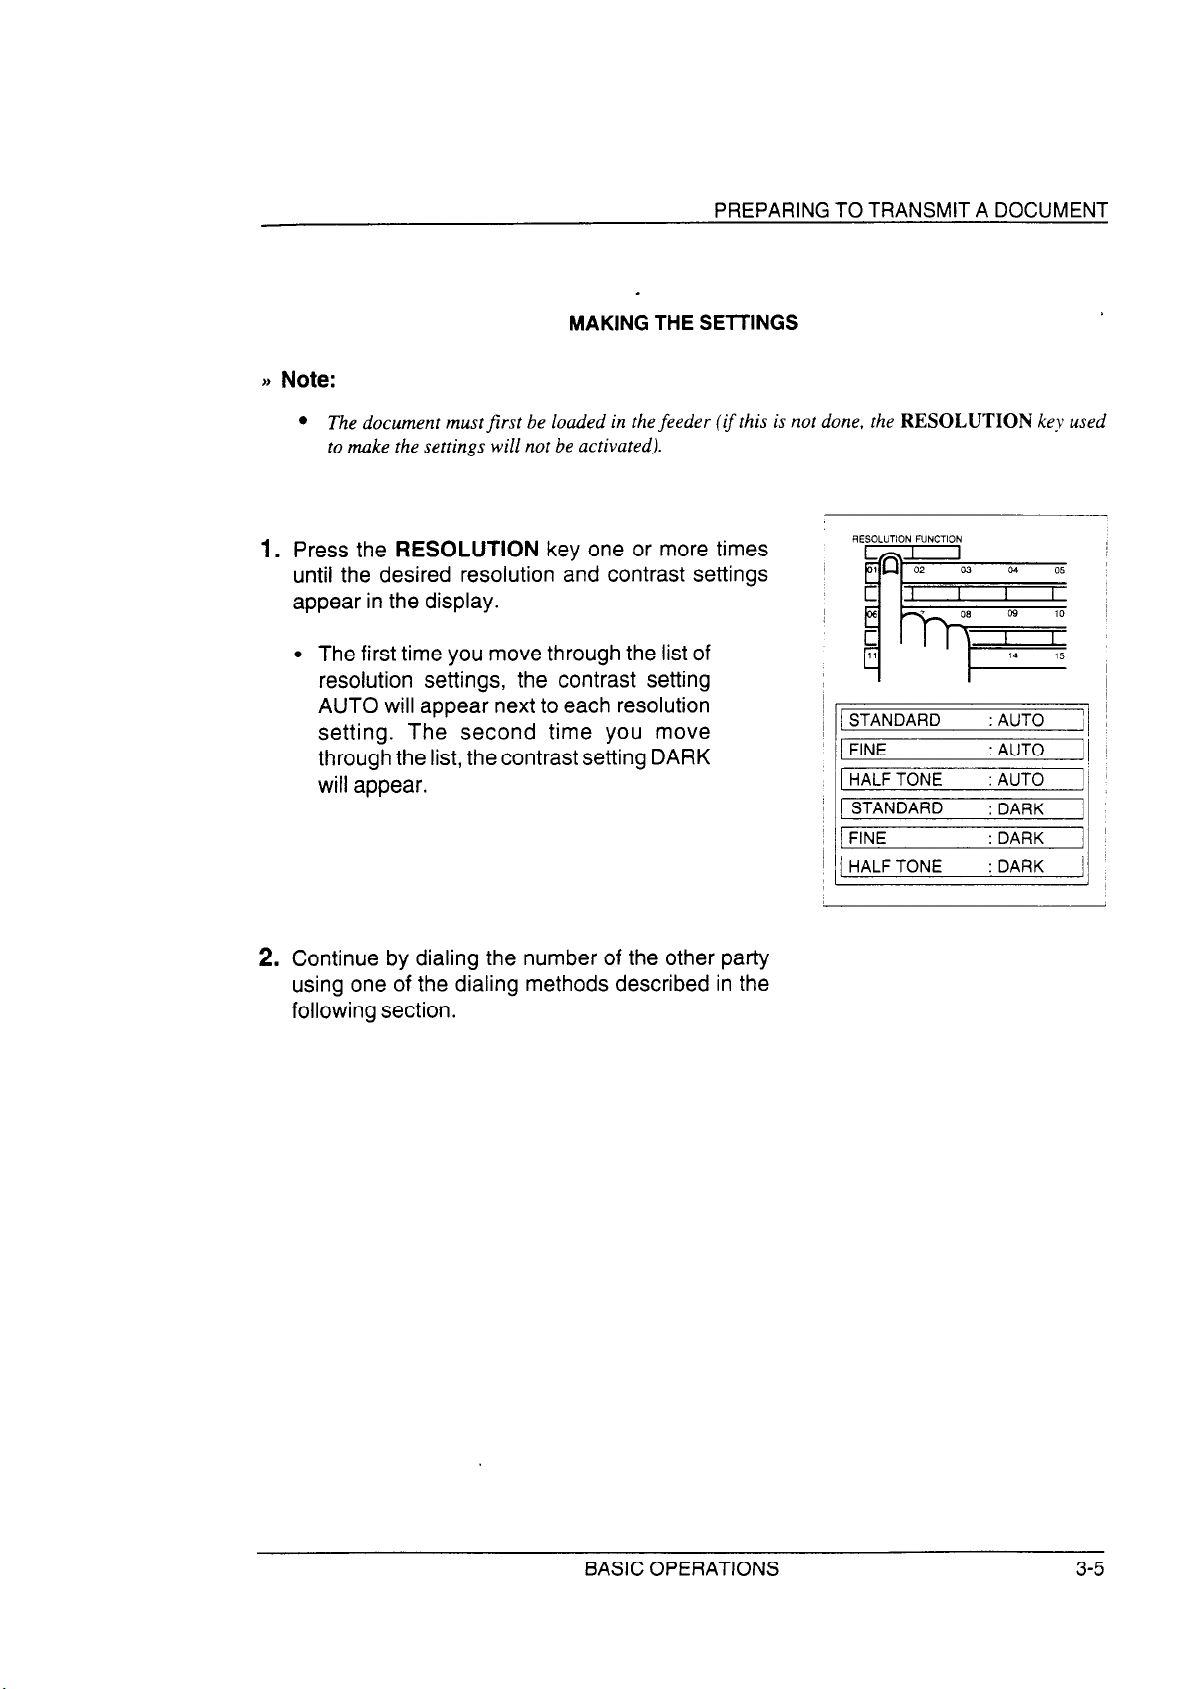
MAKING THE SETTINGS
l The document mustjirst be loaded in the feeder (ifthis is not done, the RESOLUTION key used
to make the settings will not be activated).
Press the RESOLUTION key one or more times
1.
until the desired resolution and contrast settings
appear in the display.
. The first time you move through the list of
resolution settings, the contrast setting
AUTO will appear next to each resolution
setting. The second time you move
through the list, the contrast setting DARK
will appear.
STANDARD
FINE
HALF TONE
STANDARD
FINE
HALF TONE
:AUTO ii
: AUTO
: AUTO
: DARK
: DARK
: DARK ,
I!
2. Continue by dialing the number of the other party
using one of the dialing methods described in the
following section.
BASIC OPERATIONS
3-5
Once you have loaded the document and made resolution and/or contrast settings as described
in the previous section, you are ready to dial the number of the receiving fax machine and transmit
the document. There are several ways of dialing, and you may select the one which best suits your
needs.
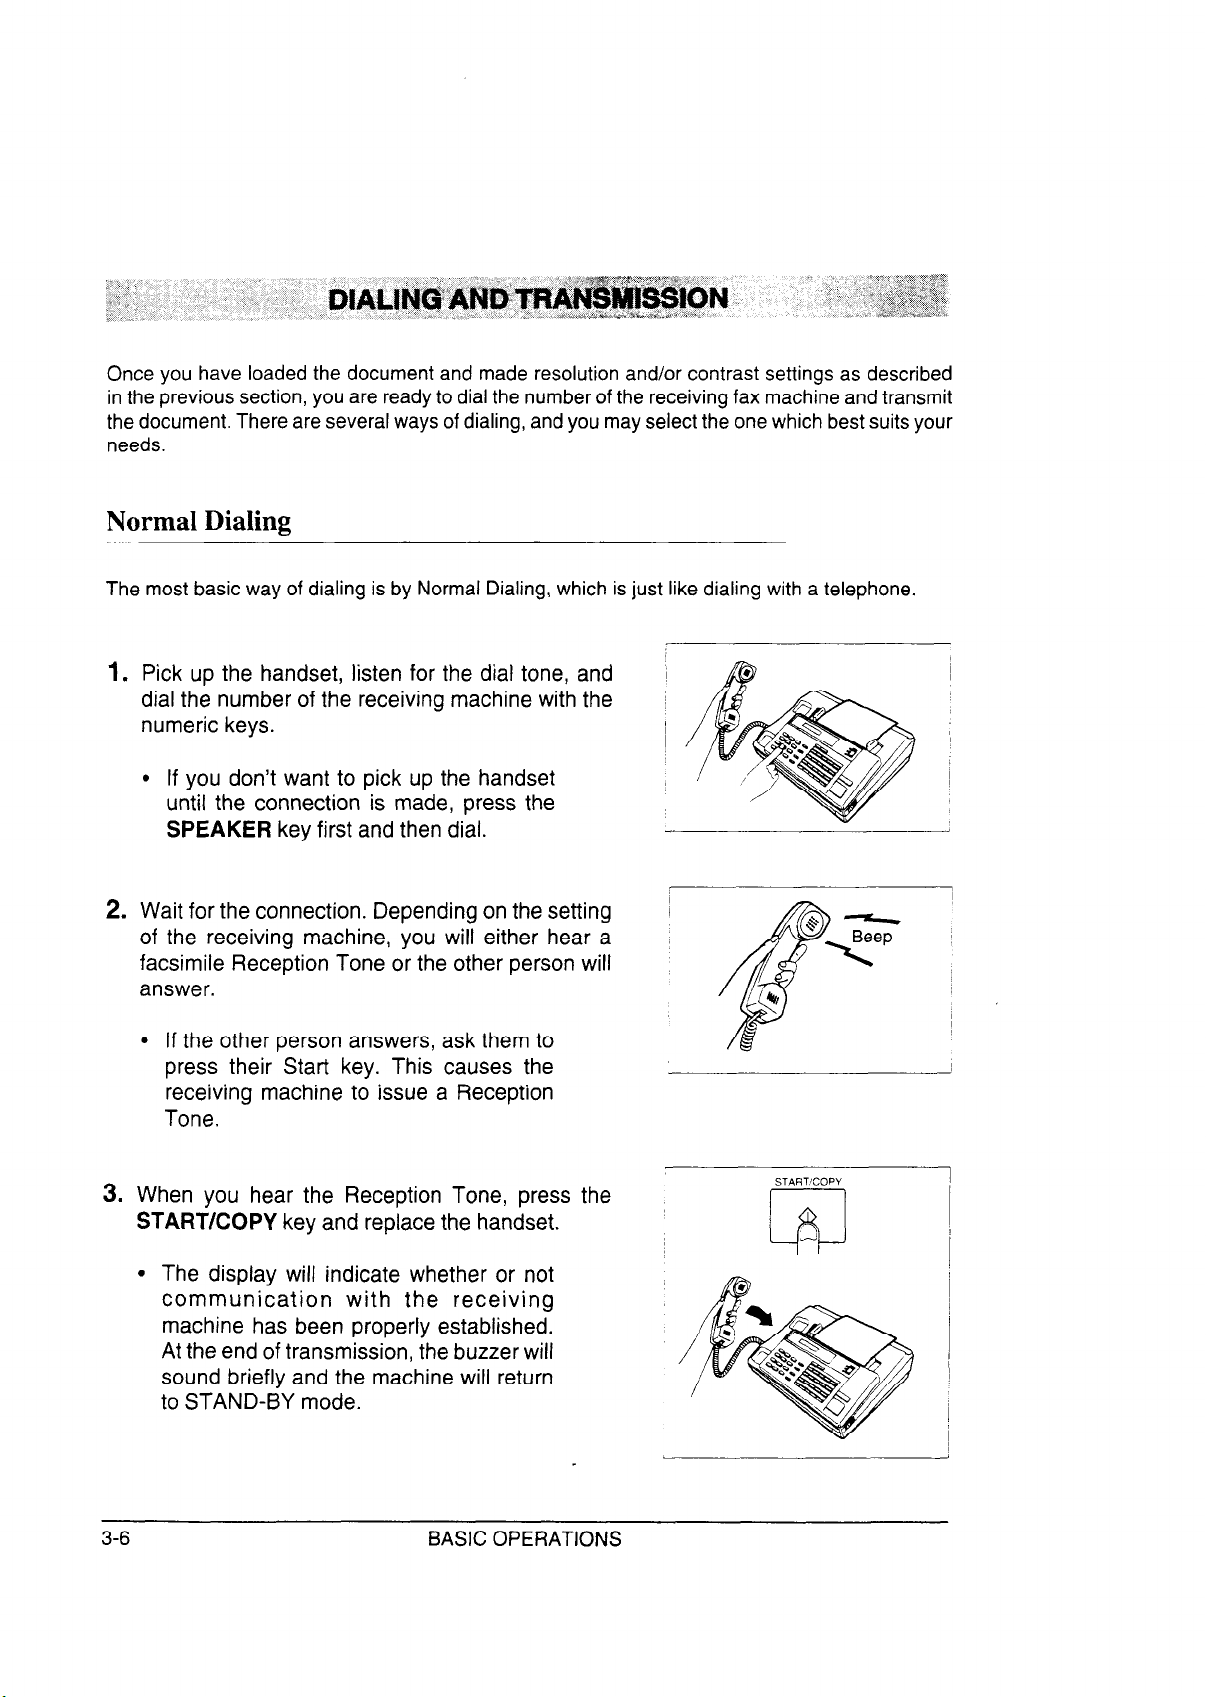
Normal Dialing
The most basic way of dialing is by Normal Dialing, which is just like dialing with a telephone.
1. Pick up the handset, listen for the dial tone, and
dial the number of the receiving machine with the ~
numeric keys.
l If you don’t want to pick up the handset
until the connection is made, press the
SPEAKER key first and then dial.
2. Wait for the connection. Depending on the setting
of the receiving machine, you will either hear a
facsimile Reception Tone or the other person will
answer.
l If the other person answers, ask them to
press their Start key. This causes the
receiving machine to issue a Reception
Tone.
3. When you hear the Reception Tone, press the
START/COPY key and replace the handset.
I
/
I
STARTCOPY
l The display will indicate whether or not
communication with the receiving
machine has been properly established.
At the end of transmission, the buzzer will
sound briefly and the machine will return
to STAND-BY mode.
3-6
BASIC OPERATIONS

DIALING AND TRANSMISSION
Direct Keypad Dialing
If the receiving machine is set to automatic reception (see the following section, “Receiving a
document”), you can dial the number without first picking up the handset or pressing the SPEAKER
key. Simply press the appropriate numeric keys.
l After dialing, check the display. If the number of the receiving machine shown is
correct, press the START/COPY key. If it is not correct, press the STOP key to
backspace one digit at a time, then enter the correct number(s).
Using the Autodialer (automatic dialing)
The Autodialer allows you to dial by simply entering a two-digit code number. Each code number
corresponds to a full fax or voice number (to dial a voice number, see “Voice Communications” in
this chapter), and up to 50 such numbers can be stored in the Autodialer’s memory. Code numbers
which may be used are any number from 01 to 50.
j) Important:
l To use the Autodialer, the receiving machine must be set to automatic reception.
There are two ways of dialing with the Autodialer:
RAPID KEY DIALING (one-touch)
Rapid Key Dialing is done using the Rapid Keys on the right side of the panel. Each key is numbered
from 01 to 20, and these numbers correspond to code numbers 01 to 20. (Note that only these 20
numbers can be dialed with Rapid Key Dialing; the other code numbers must be dialed by Speed
Dialing as described on the following page.)
To dial, simply press the Rapid Key corresponding to the desired code number. Do
1.
not lift the handset or press the SPEAKER key.
The name of the receiving party will appear in the display, or the fax number if no
2.
name was recorded for that number. If the name or number is incorrect, press the
STOP key.
The document will be automatically transmitted once the connection is made. You do
3.
not need to press the START/COPY key.
BASIC OPERATIONS
3-7

DIALING AND TRANSMISSION
SPEED DIALING
Speed Dialing is done using the SPEED DIAL key and the numeric keys on the lefl side of the
panel. Any of code numbers 01 through 50 may be dialed. (Note that numbers 01 through 20 may
be dialed both by Speed Dialing and by Rapid Key Dialing.)
1. To dial, press the SPEED DIAL key and then enter the two digits of the code number
using the numeric keys. To enter numbers 1 through 9, first enter 0 and then the
number. Do not pick up the handset or press the SPEAKER key.
2. Check the display. If the name or number shown is correct, press the START/COPY
key and the document will be transmitted. If it is incorrect, press the STOP key.
ABOUT NUMBER ENTRY
See “Fax and voice numbers for automatic dialing” in Chapter 5 for the procedure for entering
numbers into the Autodialer of the FO-130. For each code number, you may enter a fax or voice
number and a name (this appears in the display when the number is called).
Redialing when the line is busy
REDIAL KEY
If the line is busy, you can press the REDIAL key to redial the number. This can be used with any
of the methods of dialing described above.
The REDIAL key works the same way as Normal Dialing using the SPEAKER key:
1. Press the REDIAL key.
2. Wait for the connection. Depending on the setting of the receiving machine, you will
either hear a facsimile Reception Tone or the other person will answer.
l If the other person answers, pick up the handset and ask them to press their Start
key. This causes the other machine to issue a Reception Tone.
3. When you hear the Reception Tone, press the START/COPY key. Replace the
handset if you used it.
a) Note:
w If you do any programming operations after attempting to dial, you will not be able to use the
REDIAL key (programming erases the numberfrom memov).
3-8
BASIC OPERATIONS

DIALING AND TRANSMISSION
.
AUTOMATIC REDIALING
If you use Direct Keypad Dialing or automatic dialing and the line is busy, the FO-130 will
automatically redial the number. This will be done 2 times at intervals of 5 minutes.
BASIC OPERATIONS
3-9

Modes of reception
The FO-130 has two basic modes of reception: manual and automatic. With manual reception, you
must first pick up the handset and then press the START/COPY key. With automatic reception,
you don’t need to do anything; the machine automatically receives the incoming document.
Manual reception is generally used when you will be receiving both voice calls and
facsimile transmissions on the same line.
Automatic reception is generally used for a dedicated fax line (only fax transmissions will be coming in).
SETTING THE MODE
Set the mode of reception with the Reception mode switch in the upper right-hand corner of the
operation panel.
l For manual reception, set the switch to
MANUAL.
. For automatic reception, set the switch to
AUTO.
(The ANSWERING MACHINE setting is used when you connect an answering machine to the fax
machine. This is described in Chapter 4.)
ANSWERING
MACHINE
MANUAL
AUTO
ANSWERING
. . .
. . .
J
. . .
a
t
3-l 0
BASIC OPERATIONS

RECEIVING A DOCUMENT
Manual reception
The procedure for receiving documents manually is as follows:
1. When the telephone rings, pick up the handset on the fax machine.
2. You will either hear a fax tone or the other party will speak to you.
. If you hear a fax tone, press the START/COPY key.
l If the other party first speaks with you and then wants to send a document, press
the START/COPY key after speaking.
3. Hang up when FAX CONNECTING appears in the display. When reception is
completed, the buzzer will sound.
VARIATIONS
As a back-up feature of manual reception mode, you can set the FO-130 to automatically receive
fax transmissions after 4 rings. This is useful if you are occasionally unable to respond to an
incoming call personally. The setting is made with User Switch 3. See “User Switches” in Chapter
5.
Automatic reception
In automatic reception mode, the FO-130 automatically answers all calls and receives the incoming
documents.
VARIATIONS
l You can change the number of rings after which the machine answers incoming
calls with User Switch 2 (see “User Switches” in Chapter 5). 1 or 4 rings may be
selected.
l You can speak with the other party by picking up the handset before the machine
answers. To receive a document afterwards, press the START/COPY key and
hang up.
BASIC OPERATIONS
3-11

RECEIVING A DOCUMENT
Automatic Fax/Phone Changeover
This is a special function which allows you to use one line for both fax and voice communications
without having to personally answer every call. When it is enabled, the FO-130 detects whether an
incoming call is a voice call or a fax transmission. If it is a voice call, the machine will signal you to
answer. If it is a fax transmission, the machine will automatically start reception.
ENABLING AUTOMATIC FAX/PHONE CHANGEOVER
Automatic Fax/Phone Changeover is enabled by setting User Switch 4 to “YES”. The procedure
for doing this is described in “User Switches” in Chapter 5.
l Automatic Fax/Phone Changeover is normally used in automatic reception mode.
However, it can also be used in manual reception mode if User Switch 3 is set to
YES.
Important:
l Do not enable Automatic F&Phone Changeover when using an extension telephone or an
answering machine with the fm machine (voice calls cannot be signaled through these devices).
HOW THE FUNCTION OPERATES
1.
When a call comes in, the machine will answer within 10 seconds.
2.
If the machine detects a fax tone, it begins reception automatically.
If the machine doesn’t detect a fax tone, its pseudo ringer will ring for approximately
15 seconds, signaling you to pick up the handset. (Note that only the pseudo ringer,
which makes a sound slightly different from that of normal ringing, will ring; an
extension telephone connected to the machine will not ring.)
3.
In the latter case, if you do not pick up the handset within 15 seconds, the FO-130
issues a fax tone to the other machine. This enables the other party to send a fax
manually if they desire. The document will be received automatically.
3-12
BASIC OPERATIONS

RECEIVING A DOCUMENT
)J Comments:
l lfthe otherparty calls with the intention of sending a document manually, the FO-130 will treat the
call as a voice call. This is because normal dialing is usedfor manual transmission, and no far tone
is issued. The FO-130 will only be able to recognize a far transmission if the other party uses
automatic dialing.
l The duration ofpseudo ringing can be adjusted with User Switch 7 (see “User Switches” in Chapter
5). Possible settings are 15, 30, 60. or I20 seconds (the factory setting is 15 seconds).
Paper cutting
After receiving a document, grasp the paper by the edge and
pull upward to tear it off.
BASIC OPERATIONS
3-13

The FO-130 can also be used to make copies. In particular, this function can be used to make
sample copies of documents to be transmitted to see if the resolution or contrast needs adjustment.
t) Note:
l The default resolution for copying is FINE.
1.
Load the document face down as you would for a
regular transmission.
2.
If desired, adjust the resolution and contrast with
the RESOLUTION key.
3. Press the START/COPY key.
START/COPY
INCOMING CALLS DURING COPYING
The FO-130 goes into manual reception mode during copying, so if a call comes in at this time,
pick up the handset to answer.
l To receive a document, press the START/COPY key after copying is finished. If
you want to begin reception immediately, press the STOP key to stop copying, and
then press the START/COPY key.
3-14
BASIC OPERATIONS

The FO-130 can be used like a regular telephone to make and receive voice calls.
)a Note:
l When the power is oj$ you cannot dial to make telephone calls. However, you can receive incoming
calls.
MAKING TELEPHONE CALLS
1. Pick up the handset or press the SPEAKER key.
2. Dial the number using one of the following methods:
l Normal Dialing: Enter the full telephone number with the numeric keys.
l Rapid Key Dialing: Press the appropriate Rapid Key.
l Speed Dialing:tPress the SPEED DIAL key, and then enter the 2-digit code number
with the numeric keys.
3. Speak with the other party when they answer. If you pressed the SPEAKER key, pick
up the handset.
REDIAL
The last number called can be redialed by pressing the REDIAL key. (It is not necessary to pick
up the handset or press the SPEAKER key.)
When the other party answers, pick up the handset.
HOLD
You can put the other party on hold during a conversation by pressing the HOLD key. When this
is done, they cannot hear you. You can put the handset back in the cradle without breaking the
connection.
When you are ready to speak with them again, pick up the handset. If you did not put the handset
back in the cradle, press the HOLD key one more time.
BASIC OPERATIONS
3-15

VOICE COMMUNICATIONS
Notes
3-16
BASIC OPERATIONS

You can connect an answering machine to your FO-130 to receive both voice messages and fax
transmissions on the same line while you are out.
Connection and preparations
CONNECTING THE ANSWERING MACHINE
Plug the end of the answering machine line into the
jack on the back side of the F080TP adaptor.
l Important: To operate properly, the
answering machine line must be plugged
into the jack on the back of the F080TP
adaptor. Do not connect it to any other
jacks.
CHANGING THE OUTGOING MESSAGE
The outgoing message (OGM) of your answering machine should be changed to inform callers who
want to send a fax manually to press their Start key. For example, your message might go as follows:
“Hello. You’ve reached the ABC company. No one is available to take your call right
now. Please leave a message after the beep or press your facsimile Start key to send
a fax. Thank you for calling.”
In addition, try to keep the length of the message under 10 seconds. If it is too long, you may have
difficulty receiving faxes sent by automatic dialing.
j) Hint:
l You mayfind that inserting a shortpause before the outgoing message will help improve the reception
offax transmissions sent b_y automatic dialing (when automatic dialing is used, a far tone is sent
immediately by the transmitting machine. and inserting a pause before the message ensures clear
detection of such tones).
USING YOUR FAX WITH OTHER DEVICES
4-l

ANSWERING MACHINE
OTHER CONSIDERATIONS
l Your answering machine must be set to answer on 2 to 4 rings (preferably 2). If
not, you may not be able to receive faxes sent by automatic dialing.
l If your answering machine has a remote retrieval function, make sure the code
used to activate remote retrieval is different from the code used to activate fax
reception with an extension telephone (see “Extension telephone” which follows in
this chapter). If they are the same, entering the code from an outside telephone to
retrieve messages will cause the fax machine to be activated.
WHEN THE ANSWERING MACHINE IS NOT IN USE
The answering machine can be left connected to the fax machine when you aren’t using it. If it has
a handset, it will function as an extension telephone, as described in “Extension telephone” which
follows in this chapter.
)j Important:
l When using an answering machine as an extension telephone. make sure that it is turned 08 and
the Reception mode switch on the.fax machine is set to AUTO or MANUAL.
l Do not enable Automatic Fax/Phone Changeotaerwhen using an answering machine as an extension
telephone. (When Automatic F&Phone Changeover is enabled. the answering machine is discon-
nected when the machine answers incoming calls.)
Using the answering machine hook-up
ACTIVATING THE HOOK-UP
1. Set the Reception mode switch in the upper right-
hand corner of the operation panel to ANSWER-
ING MACHINE.
2. Set your answering machine to auto answer. Make
sure it is set to answer on 2 to 4 rings.
ANSWERING
4-2
USING YOUR FAX WITH OTHER DEVICES

-\
ANSWERING MACHINE
HOW THE HOOK-UP OPERATES
While you are out, all of your incoming calls will be answered by your answering machine, since it
has been set to answer on 2 to 4 rings. While the outgoing message is being played, your fax
machine will listen quietly on the line. Callers who want to leave a voice message can do so without
knowing a fax machine is there.
If your fax machine detects a fax transmission (see below), it will disconnect the answering machine
and begin reception.
)P Comments:
l If the connection is not good or there is noise in the line. the unsuering muchine antiorfax machine
may not respond properly.
l The call counter on xour anslc,ering machine may indicate that a lsoice message ~t’as received. \t,hen
only fax messages were receir,ed.
How fax transmissions are detected:
The fax machine detects fax transmissions in two ways, depending on whether the fax is being
sent automatically or manually:
Automatic transmission:
If the fax is sent using a form of automatic transmission, such as Rapid Key or Speed
Dialing, the transmitting machine will send an intermittent “Calling Tone” for a period
of about 30 to 40 seconds after dialing. When your machine detects this tone, it will
disconnect the answering machine, send a “Reception Tone” in response, and begin
receiving the transmission.
If the transmitting machine does not receive a Reception Tone from your machine
within 30 to 40 seconds after dialing, it will usually hang up and automatically redial
several minutes later.
Since your fax machine may not be able to detect the transmitting machine’s Calling
Tone until after the outgoing message ends, it is important that the answering machine
answer the call within 2 to 4 rings and the outgoing message does not last too long.
Otherwise, your machine may not be able to establish communication with the
transmitting machine before the latter hangs up.
USING YOUR FAX WITH OTHER DEVICES 4-3

ANSWERING MACHINE
Manual transmission:
If the fax is being sent using a form of manual transmission, such as Normal Dialing,
the transmitting machine does not send a Calling Tone; rather, the operator normally
waits for a Reception Tone and then presses their Start key. In the case of an
answering machine hook-up, they will hear your outgoing message instead of a
Reception Tone, and then press their Start key.
However, this alone does not signal a fax transmission to your machine. Instead, it
uses a function called “Quiet Detect Time” to detect the transmission. This function
causes your machine to disconnect the answering machine and begin reception if it
detects a certain period of silence.
Your fax machine is set to automatically begin reception if it detects a period of silence
of 6 seconds. Since this is a fax transmission and no one will speak after the outgoing
message, your machine will disconnect the answering machine 6 seconds after the
message ends and begin reception.
j) Comments:
l The period of silence afrer $t,hich the fax- machine disconnects the answering machine and begins
reception can be adjusted. See “Quiet Detect Time” in the follolzing section, “Optional settings”.
l Additional methods of making the fax machine disconnect the answering machine and begin
reception are described in ‘Answering Machine Failure Mode” and “Off-Hook Hold Time” in the
following section, “Optional settings”. These are functions n,hich can be used if needed to improve
the response of the fax machine to incoming calls.
GETTING MORE OUT OF YOUR HOOK-UP
Your callers can even leave a voice message and send a fax message on the same call. Modify
your outgoing message to explain that they can first leave a voice message, and then press their
Start key to send a fax. Keep in mind that this will only work if the caller is listening to the outgoing
message through the handset of their fax machine; it will not work with automatic transmissions.
4-4
USING YOUR FAX WITH OTHER DEVICES

ANSWERING MACHINE
Optional settings
If necessary, you can use one or more of the following settings to improve the response of the fax
machine to incoming calls.
QUIET DETECT TIME
This function switches a call to the fax machine if a certain period of silence is detected after the
answering machine answers. To receive faxes sent by normal dialing, the function must be enabled.
Time selections for the period of silence are 1 to 10 seconds. A setting close to 6 seconds will
generally give the best performance, but you can try other settings if desired.
l The factory setting is 6 seconds.
j) Caution!
l Although it is possible to disable thefttnction by entering “00”jor the time selection, this wYllpre~~ent
you from receiving faxes sent by normal dialiny.
jj Important:
l The Quiet Detect Time setting should be longer than any period of silence included in your recorded
message, or the call will be switched to the fax machine before the caller has a chance to speak.
l If your answering machine has a VOX mode and you hate enabled it (this causes the answering
machine to break the connection if a certain period of silence is detected), make sure that the time
setting for that mode is longer than the Quiet Detect Time setting.
l If a caller pauses for a period of time longer than the Quiet Detect Time setting while leaiing a
message, the far machine will cut in. Make sure the Quiet Detect Titne setting is longer than an?
possible pauses.
Make the setting by pressing the panel keys as follows:
I Step /
/ 1
I
Press these keys:
FUNCTION
I El
(Example) “00” to disable the function.
~ Comments
~ Enter A.M.MODE.
Scroll to QUIET DETECT TM.
Set the time by entering a two-digit number equal to )
the number of seconds (“01” to “10” seconds), or enter
i
!
Press STOP to return to STAND-BY.
USING YOUR FAX WITH OTHER DEVICES
4-5

c
ANSWERING MACHINE
QUIET DETECT START TIMING
This setting can be used to delay the start of Quiet Detect Time if the latter is enabled.
We recommend that you only use this function if there is a long pause between the time the
answering machine answers a call and the beginning of the outgoing message (a pause is
sometimes added before the message to allow clear detection of possible fax tones). In this case,
delaying the start of Quiet Detect Time prevents the fax from cutting in before voice callers can
leave a message.
You can set Quiet Detect Time to start at any time from 1 to 15 seconds after the answering machine
answers, or enter “00” for no delay.
l The factory setting is “00” (off).
)) Hint:
l As a general guide, the start timing setting should be slight& longer than the pause before the
outgoing message.
Make the setting by pressing the panel keys as follows:
I,
1 Step ~ Press these keys:
1~
i ;,,C,,,; ~
j! 1
!
,2’El
j 3
I
ii 4
ji
IO
(Example) enter “00” for no delay.
STOP
mcl
~
i Comments
Enter A.M. MODE.
Scroll to QUIET START TIME.
Set the start timing by entering a two-digit number
equal to the number of seconds (“01” to “15” sets), or
Press STOP to return to STAND-BY.
I
USING YOUR FAX WITH OTHER DEVICES

ANSWERING MACHINE
ANSWERING MACHINE FAILURE MODE
When this function is enabled, the fax machine will answer the call after 6 rings if the answering
machine for some reason fails to answer before that time. This ensures that you will receive fax
messages even if the answering machine’s tape fills up or the answering machine is not turned on.
l
The factory setting is “NO” (off).
jj Important:
l
When thisfunction is enabled, make sure that the answering machine is set to answer on 4 rings or
less. If it isn’t, the fax machine will always answer first, preventing callers from leaving voice
messages.
Make the setting by pressing the panel keys as follows:
Step
1
2
Press these keys:
FUNCTION
0 101
Comments
Enter A.M. MODE.
EIEI Scroll to SELECT AUTO RCV.
m Yes (answer after 6
rings)
121 No (do not answer
if the answering
machine fails to
answer)
STOP
lel
Press one of the numeric keys at left to make the
setting.
Press STOP to return to STAND-BY.
USING YOUR FAX WITH OTHER DEVICES
4-7

ANSWERING MACHINE
OFF-HOOK HOLD TIME
This setting is used to switch calls unconditionally to the fax machine at a set time after the
answering machine answers.
For normal operation, we recommend that you do not enable this function; however, if you are
having trouble receiving faxes in answering machine mode you can try various time settings to see
if it helps. You can select any time from 1 to 255 seconds. Entering “000” disables the function.
l The factory setting is “000” (off).
jj Important:
l When selecting a time, you will generally want to make it long enough for your recorded message
to be played andfor callers to leave messages.
l Ifyou are going to play back your messagesfrom a remote location (remote retrieval), you will want
to select a time longer than the playback time.
Make the setting by pressing the panel keys as follows:
I
1 Step
I-----
1
L
I 2
I
3
1
/
I
/ 4
Press these keys:
FUNCTION
I I
lo 131 =(Example)
STOP
mcl
Comments
Enter A.M.MODE.
Scroll to OFF HOOK HOLD.
Set the hold time by entering 3 digits (from “000” to
“255” seconds) with the numeric keys.
Press STOP to return to STAND-BY.
4-8
USING YOUR FAX WITH OTHER DEVICES

Important:
l When using an extension telephone, do not enable Automatic Fax/Phone Changeover. (When
Automatic Fax/Phone Changeover is enabled, the extension telephone is disconnected when the
machine answers incoming calls.)
l Although rotary dial telephones can be connected to the fa machine to receive voice calls, they
cannot be used to activate fax receptions.
CONNECTING THE EXTENSION TELEPHONE
Plug the end of the extension telephone line into
the jack on the back side of the F080TP adaptor.
l Important: To operate properly, the ex-
tension telephone line must be plugged
into the jack on the back of the F080TP
adaptor. Do not connect it to any other
jacks.
ACTIVATING FAX RECEPTION WITH A TOUCH-TONE TELEPHONE
1.
The telephone rings. Answer it. You will either hear a fax tone or the other party will
speak. If you hear a fax tone, go to Step 3.
If the other party wants to send a fax after speaking, have them press their Start key.
2.
3.
Press “5” and ‘k” on your telephone.
4.
Reception begins. Hang up.
Note:
l The code used to activate far reception ( ‘5” and “#‘) can be changed by resetting User Switch 5.
See “User Switches” in Chapter 5.
USING YOUR FAX WITH OTHER DEVICES
4-9

EXTENSION TELEPHONE
Notes
4-10
USING YOUR FAX WITH OTHER DEVICES

Entry
To enter names when doing various types of data entry, use the numeric keys. The characters
which may be entered with each key are as follows:
/ Space ~
Press the appropriate numeric key one or more times until the desired number or letter
1.
appears in the display. The number will appear first, and then the letters in the order
they are marked.
~ Alphabet (A-Z) ~
PROCEDURE
When the desired letter appears, press the SPEAKER key to enter it (this moves the
2.
cursor one space to the right). If the subsequent letter you want to enter is marked
over a different key, pressing that key will also enter the letter (it is not necessary to
press the SPEAKER key).
TO CHANGE CASE
The letters initially appear as upper case letters. To enter a lower case letter, press the REDIAL
key. To change back to upper case, press the REDIAL key again.
OPTIONAL SETTINGS AND DATA ENTRY
5-l

LETTERS AND CHARACTERS FOR NAMES
SPECIAL SYMBOLS
Special symbols can be selected by pressing the “#” and ‘k” keys. The “#” key moves
1.
you forward through the list, and the I’*” key moves you backward.
To enter the symbol, press the SPEAKER key.
2.
The list of characters is as follows:
. I ! l”
#+
#$%&‘()*+,‘:;<=>?@[Y]A_‘{l}+t
t*
SPACE
Press the “1” key twice to enter a space between two words.
Deletions and changes
MOVING THE CURSOR
To make deletions and/or changes, you may have to move the cursor. Press the SPEAKER key
to move it to the right, and press the HOLD key to move it to the left.
DELETIONS
Deletions are made by pressing the SPEED DIAL key. This occurs in two ways:
l When the cursor is to the right of the last character entered, it will move one space
backward, deleting the last character as it goes.
I
l When the cursor is over a character, the character will be deleted.
CHANGES
To change one character to another, move the cursor over the character, and press the appropriate
key for the new character. The new character will replace the old character.
5-2
OPTIONAL SETTINGS AND DATA ENTRY

You can store up to 50 fax and/or voice numbers in the Autodialer of the FO-130. These numbers
can be dialed by entering 2-digit code numbers (see “Using the Autodialer” in Chapter 3).
For each code number, you can enter a fax or voice number, and a name.
STORING NUMBERS
ja Comments:
l You may need to add a pause between certain digits to allow time for connection. For example, if
you are on a PBX telephone system that requires an access number to be dialed (such as “9”) to
access an outside line. you will need to enter a pause between the access number and the number
of the receiving fax machine.
l Pauses are entered by pressing the REDIAL key. Each pause gives a time delay of about 2 seconds.
If necessary, several pauses can be entered in a row.
l To correct an entr), see “Deletions and changes” in “‘Letters and characters for names” in this
chapter.
Step / Press these keys:
!I
FUNCTION
0 131
,2 I
1 !
iol
/
( 6 1 m ~ Press START/COPY.
/
I
fX m 15/ Jlj 121 / a 1 Enter the fax or voice number (max. of 32 digits) using
[21 l7-J 141 * * *
(Example) , numeric keys. This will be the code number.
(Example) j the numeric keys.
7
(Example) I
j Comments
i Enter ENTRY MODE.
~ Move to FAX/TEL.# MODE.
/ Press “1” to select SET.
Enter a 2-digit number (from 01 to 50) using the j
I ! !
13] ’ Enter the name of the location or party (max. of 20
’ characters). (See the first section of this chapter).
If you don’t want to enter a name, skip this step. ~
I
Ii
,
11
I/
1
,
OPTIONAL SETTINGS AND DATA ENTRY
5-3

FAX AND VOICE NUMBERS FOR AUTOMATIC DIALING
I
8
I Press START/COPY.
You can now make entries for a new number (go back
to Step 4), or press STOP to exit ENTRY MODE.
For easy identification, affix the Rapid Key labels above the appropriate Rapid Keys, and fill in the
names of the parties programmed for each key.
CLEARING NUMBERS
Press these keys:
FUNCTION
~ 3 / 121
I
j Comments
/
Enter ENTRY MODE.
Move to FAX/TEL.# MODE.
i Press “2” to select CLEAR.
I
~ Enter the code number which you want to clear using
(Example) ~ the numeric keys.
I
~ Press START/COPY to clear the number.
/
1
I
/
/
I
Return to Step 4 to clear another number, or press ~
: STOP to exit ENTRY MODE.
CHANGING NUMBERS
To change Rapid Key or Speed Dial number entries previously made, repeat the storing procedure.
Select the Rapid Key or Speed Dial number for which you want to make changes in Step 4, and
then change the number and/or name when they appear in the display (Steps 5 and 7, respectively).
Numbers and characters are changed as described in “Deletions and changes” in “Letters and
characters for names” in this chapter.
5-4
OPTIONAL SETTINGS AND DATA ENTRY
I
I

User switches are electronic switches located in the micro-circuitry of the FO-130. These switches
control various aspects of the functioning of the machine. Each switch is set at the factory; however,
you may want to change one or more of these settings to better suit your needs. The switches are
described in the list below, along with their corresponding settings.
ACCESSING THE SWITCHES
1.
Press the FUNCTION key and “4” to enter USER SWITCH MODE (this will appear in
the display).
Scroll through the list of switches by pressing “#” to move forward, or ‘W’ to move
2.
backward. The switches will appear in the order shown below.
When the desired switch appears in the display, make the setting.
3.
4.
After the setting is made, the display will show the next item in the list. You can either
make a setting for that item, or press STOP to exit USER SWITCH MODE.
SWITCH SElTINGS
Switch 1: FINE RESOLUTION PRIORITY
This switch is used to change the default resolution for document transmission from STANDARD
to FINE. Press “1” (YES) to change it to FINE, or “2” (NO) to change it back to STANDARD.
l Factory setting: “2”
Switch 2: NUMBER OF RINGS TO ANSWER
This sets the number of rings the fax machine waits before answering an incoming call in automatic
reception mode. Press “1” to select 4 rings, or “2” to select 1 ring.
l Factory setting: “2”
Switch 3: 4 RINGS MANUAL ANSWER
Press “1” (YES) to have the machine answer a call after 4 rings when it is in manual reception
mode. Press “2” (NO) to disable the function.
l Factory setting: “2”
OPTIONAL SETTINGS AND DATA ENTRY
5-5

USER SWITCHES
Switch 4: AUTO FAX/PHONE CHANGEOVER
Press “1 I’
(YES) to have the machine detect whether incoming calls are voice calls or fax
transmissions in automatic reception mode. Press “2” (NO) to disable the function.
l Factory setting: “2”
Switch 5: TELEPHONE/FAX REMOTE NUMBER
This sets the 1 -digit code number for transferring an incoming fax from an extension telephone to
the FO-130. Enter any number from “0” to “9”.
l Factory setting: “5”
Switch 6: TRANSACTION PRINT CONDITION LIST
This sets the condition for printing out Transaction Reports. Enter a number from “1” to “4” as
follows:
“1” (ALWAYS PRINTS): Prints out a report after each transmission and reception.
“2” (ERROR PRINT):
“3” (SEND ONLY):
Prints out a report only when an error occurs.
Prints out a report only after each transmission.
“4” (NEVER PRINTS):
l Factory setting: “2”
Does not print out any reports.
Switch 7: PSEUDO RINGING DURATION
This sets the duration of pseudo ringing when Automatic Fax/Phone Changeover is enabled. Enter
a number from “1” to “4” as follows:
“1” : 15 seconds
“2” :
30 seconds
“3” : 60 seconds
“4” :
l Factory setting: "1"
120 seconds
5-6
OPTIONAL SETTINGS AND DATA ENTRY

To see what fax and voice numbers have been entered for automatic dialing, you can print out the
Telephone List.
PRINTING OUT
Print out the list by pressing the panel keys as follows:
/
Press these keys:
1 Comments
FUNCTION
I 121
FOR :
SPEED NO.
01 JQNE SMITH
02 fiBC TOOL CO.
03 N.Y.
04 JACK WILLIAMS
John Doe Corp.
NAME
SALES OFFICE
1 Enter LISTING MODE.
Scroll down to TEL. # LIST.
Print it out.
SAMPLE LIST
TELEPHONE LIST
201 555 1234
TELEPHONE NO.
123-456-7890
987-654-3212
147-258-3695
963-852-7417
PRINTING OUT REPORTS AND LISTS

This list shows the following items:
SENDER’S NAME
SENDER’S TELEPHONE
NUMBER
HEADER PRINT
QUIET DETECT TIME
OFF HOOK HOLD
SELECT AUTO RECEIVE
QUIET DETECT START
TIMING
Your name as entered in the machine.
Your fax number as entered in the machine.
Sample of what is printed at the top of each transmitted page.
Quiet Detect Time setting for answering machine hook-up.
Off Hook Hold Time setting for answering machine hook-up.
Answering Machine Failure Mode setting for answering
machine hook-up.
Quiet Detect Start Timing setting for answering machine hookup.
PRINTING OUT
Print out the list by pressing the panel keys as follows:
Press these keys:
6-2 PRINTING OUT REPORTS AND LISTS
/
1 Comments
~ Enter LISTING MODE.
I
/ Scroll down to PASSCODE LIST.
i Print it out.
/

SAMPLE LIST
PbSSCODE LIST
FOR :
SENDER’S N&ME
SENDER’S TELEPHONE NUMBER
HEADER PRINT
ANSWERING MACHINE NODE
John Doe Corp. 201 555 1234
John Doe Corp.
201
555 1234
John
QUIET DETECT TINE
OFF HOOK HOLD
SELECT ClUTO RECEIVE
QUIET DETECT STQRT TIMING
Doe Corp. 201 555 1234
P.O1
06s
000s
NO
00s
PRINTING OUT REPORTS AND LISTS
6-3

This list shows the current setting of all User Switches
PRINTING OUT
Print out the list by pressing the panel keys as follows:
!’
/ Step 1 Press these keys:
, Comments
j FUNCTION
1 I 121
2
IXIEI
FOR :
SW NO. ITEM
John Doe Corp.
1
2
3
4
5
6
7
I
1 Enter LISTING MODE.
I Scroll down to USER SWITCH LIST.
SAMPLE LIST
USER SWITCH LIST
201 555 1234
FINE PRIORITY
NUMBER OF RINGS
4 RINGS MANUAL ANSWER
TEL/FAX AUTO CHFlNGE
TEL/FAX REMOTE NO.
TRANSACTION PRINT SELECT
PSEUDO RINGING DURATION
ii
II
SETTING
NO
IRING
NO
NO
(5 >*
ERROR PRINT
15s
6-4
PRINTING OUT REPORTS AND LISTS
\_

-\
This report shows the type of transaction which took place, the name or number of the other machine
involved, the number of pages, and the result.
The Transaction Report is normally printed out only when a problem occurs. However, you can
change the setting to have it printed out after every transmission, every transmission and reception,
or not at all. The setting is made with User Switch 6 (See “User Switches” in Chapter 5). It cannot
be printed out manually.
EXPLANATION OF HEADINGS
SENDER/RECEIVER
PAGES
NOTE
The fax number of the other machine involved in the transaction.
If this machine does not have an ID function, the communication
mode will appear (for example, “G3”).
Number of pages transmitted.
Conditions of communication.
ja Notes which may appear are as follows:
OK
P.FAIL
JAM
NO PAPER No recording paper.
Transmission was normal.
Power failure occurred.
A problem with the recording paper or document occurred.
COM.E-0 to COM.E-7 A line error prevented transmission (see “Communication error
codes” in Chapter 8).
CANCEL Transmission was canceled because the STOP key was
pressed, no document was in the feeder, or the other machine
requested transmission using a function which the FO-130 does
not have.
PRINTING OUT REPORTS AND LISTS
6-5

TRANSACTION REPORT
SAMPLE REPORT
*********************************************************************
*
*
*
*
* *
*
* *
*
FOR : John Doe Corp. 201 555 1234
RECEIVE
SENDER PeGES NOTE
. . .
*
*
*********************************************************************
914-555-9876 1 OK
TRQNSACTION REPORT
-7
*
*
*
*
*
*
*
*
6-6
PRINTING OUT REPORTS AND LISTS

Your FO-130 prints by means of thermal printing. The head applies heat to special paper which is
chemically treated to turn color when heated to a certain level, and this creates the printed text or
image.
Recommended paper
To assure a long life for your machine and obtain the best reproduction quality, we recommend
that you use the following Sharp recording paper:
FO-20PR
Recording Paper 216 mm x 30 m roll
This paper is available from your authorized Sharp facsimile dealer.
l Using a non-sharp brand ofpaper may result in poor copy quality and excessive build-up of residue
on the head.
Sharp paper has a black stripe on the last 1.5 m of the roll which activates the paper-out sensor in
the machine. When it detects this stripe, the machine finishes printing the current page, and then
stops. This ensures that the printer head does not come in direct contact with the paper feed roller
when the end of the roll is reached
l Using paper without the proper end mark may cause the paper feed roller to rub directly on the
printer head, eventually damaging both the roller and the head.
Handling and storing recording paper
The paper may become discolored if:
l It is stored in a place with high humidity or high temperature.
l It is exposed to direct sunlight.
l It comes in contact with glue, thinner, or a freshly copied blueprint.
l It is scratched, causing heat due to friction.
l A rubber eraser or adhesive tape is used on it.
Do not unpack the paper until you are ready to use it.
USER MAINTENANCE
7-l

RECORDING PAPER
Replacing the recording paper
.
When the paper runs out, NO PAPER will appear in the display. Reception and copying will no
longer be possible.
To replace the paper, first take out the old roll:
1. Pull the operation panel knob forward and open the
operation panel. The buzzer will sound briefly.
2. Remove the remainder of the old roll of paper.
I
Insert the new roll as you did when first installing
3.
your fax machine (see “Setting up” in Chapter 2).
7-2
USER MAINTENANCE

A clean recording head helps your fax machine deliver optimum printing performance. Clean the
head frequently as follows:
1. Turn off the power of the fax machine. Pull the
operation panel knob forward and open the operation panel.
2. Wipe the recording head and edge of the head
cover with a soft cloth dampened with ethyl alcohol.
3. Close the operation panel by gently pushing down
on the center. Turn the power back on.
~
I
jj Caution!
l Do not use benzene or thinner. Avoid touching the head with hard objects.
l The head may be hot if yourfar machine has just received a large number of documents.vthis is the
case, allow the head to cool prior to cleaning.
USER MAINTENANCE
7-3

A dirty reading glass or rollers will affect the quality of transmitted images. Clean these frequently
as
1. Turn off the power of the fax machine. Pull the
operation panel knob forward and open the operation panel.
2. Take out the roll of recording paper.
Wipe the reading glass and rollers with a cotton
3.
pad or soft cloth.
1
/
4. Replace the recording paper (see “Setting up” in
Chapter 2), and close the operation panel.
7-4
USER MAINTENANCE

Wipe the external surface of the machine,document feeder,etc.With a dry cloth.
)j Caution!
l Do not use benzene or thinner. These solvents may damage or discolor the machine.
._
USER MAINTENANCE
7-5

The FO-130 uses a lithium battery to keep programmed data in memory when the power is turned
Off.
Battery power is consumed primarily when the power is turned off. With the power kept continuously
off, the life of the battery is about 5 years.
If the battery dies, have your dealer or retailer replace it. Replacement cannot be done by the user.
7-6
USER MAINTENANCE
\

Problem
I
Check and remedy
Nothing appears on the display.
The machine does not respond to
any key operation.
Automatic document feeding
does not work (for transmission or
copying).
Dialing cannot be done.
I l Make sure the power cord is properly connected.
,
l Make sure the power switch has been switched to the
I correct position.
i l Connect another electrical appliance to the outlet to
see if it is live.
. If a beep sound (input or error signal) is not made
!
when the keys are pressed, turn off the power and
then turn it back on several seconds later.
l Check the size of the document (see “About the
original” in Chapter 3).
I
l Make sure the power is on.
I
l Make sure that the line is properly connected to the
jack.
~ l Make sure that the setting of the line selector is cor-
rect (touch-tone or dial pulse).
Nothing is printed on the receiv- j .
ing end.
I
I l Make sure that the recording paper is properly loaded
The power is on, but no transmis-
) l Make sure that the receiving machine has recording
~
sion takes place.
TROUBLESHOOTING
Make sure that the document for transmission is
placed face down in the feeder.
in the receiving machine.
paper.
(continued)
8-l

GENERAL CORRECTIVE MEASURES
Problem
(continued)
A distorted image is received at
the other end.
Nothing is printed when you try to
receive a document.
Check and remedy
I
/ l If the receiving machine is in manual mode with no at-
tendant, reception will not be possible.
i l If the receiving machine is not a Sharp model, make
sure it is G3 compatible.
~ l Check the display for error messages.
l Noise in the telephone line may cause distortion. Try
sending the document again.
I* Mk
a e a copy of the document on your machine. If the
copy is also distorted, your machine may have a prob-
1
tern.
I
l Make sure that the recording paper is properly loaded
in your unit.
/ l Make sure the power is on.
~
1 l Make sure that the document for transmission is
loaded face down in the feeder of the other machine.
The recording paper does not 1 l
come out.
The received image has low contrast.
Received images are distorted.
8-2
Make sure the paper is not jammed (see “Clearing
jammed recording paper” in this chapter).
i l Make sure that the specified recording paper is used
(see “Recommended paper” in Chapter 7).
I
l Ask the other party to send higher contrast docu-
ments. If the contrast is still too low, your machine
may have a problem. Make a copy to check it.
l Noise in the telephone line may cause distortion.
_~-
Have the other party try sending the document again.
1 (continued)
TROUBLESHOOTING

GENERAL CORRECTIVE MEASURES
Problem
(continued)
Copies are distorted.
,
1
1
Reception/copying is interrupted.
Check and remedy
i l The recording head may be dirty (see “Cleaning the
recording head” in Chapter 7).
Make a copy of another document on your machine. If
l
the copy is also distorted, your machine may have a
problem.
i .
Make sure that the specified recording paper is used
(see “Recommended paper” in Chapter 7).
~
.
Make sure that the recording paper is properly loaded
in your machine.
.
The recording head may be dirty (see “Cleaning the
recording head” in Chapter 7).
.
Make a copy of another document on your machine. If
the copy is also distorted, your machine may have a
problem.
If reception or copying has been done continuously for
~ l
a long time, the recording head may be overheated.
Turn off the power and let it cool down.
;
‘i
I
!
TROUBLESHOOTING
8-3

The following is a list of messages which may appear on the display, their meanings, and any
needed corrective measures.
i ** STAND-BY >tc*
I TOTAL PAGE(S) 01
I
~ NO PAPER
-I
j COVER OPEN
1
I DOCUMENT JAM
~ LINE ERROR
r--
FUNCTION MODE The machine is in function mode.
/, STORED
/I
! ON HOOK DIAL The handset is on hook.
/
SEND READY
j
j Ready for transmission or reception.
i Number of pages transmitted or received.
I You have run out of recording paper.
I
/ The operation panel is open. Close it.
~ The document is jammed. See the following section, ~
] “Clearing a jammed document”.
I
~ Transmission or reception was not successful. Try again. ~
Programming has been completed.
/ A document has been loaded and the machine is waiting
for transmission instructions.
1
I
I
I
I
/
/
I
TROUBLESHOOTING

Continuous tone
3 seconds
Indicates the end of transmission, reception,
1 or copying.
Intermittent tone
5 seconds
(1 second on,
1 second off)
35 seconds
(0.7 seconds on,
0.3 seconds off)
Indicates incomplete transmission, recep-
tion, or copying.
Indicates that the handset is off hook.
TROUBLESHOOTING

If the document doesn’t feed properly during transmission or copying, or DOCUMENT JAM appears
in the display, first try pressing the START/COPY key. If the document is not fed out, you will have
to remove it manually as follows:
1. Pull the operation panel knob on the right side of
the machine forward, and open the operation
panel. The buzzer will sound briefly.
2. Gently pull out the jammed document.
3. Close the operation panel by pushing down on the
center.
8-6
TROUBLESHOOTING

Pull the operation panel knob on the right side of
1.
the machine forward, and open the operation
panel. The buzzer will sound briefly.
2. Remove the paper roll.
3. Cut off the wrinkled part of the paper.
i oo .&
! 0
,o
Reload the paper and close the operation panel.
4.
>>
Vote:
l Jammed recording paper is often caused by improper
loading. Be sure to carefully follow the instructions for
paper loading given in “Setting up” in Chapter 2.
TROUBLESHOOTING
,
8-7

The following codes may appear in the NOTE column of transaction reports. Check the appropriate
list based on whether you were transmitting or receiving.
TRANSMISSION
Code /
Error Condition
/
1 COM. ~-0 1 Able to recognize the handshake signal, but it has errors.
Cannot recognize the handshake signal from the receiver side.
1
Line disconnected during transmission.
2
/ Line disconnected after modem speed fall-back.
3
Line disconnected during multi-page transmission.
4
Cannot recognize the handshake signal for next page at receiver side.
6
~ 7 No response from receiver side or “disconnect signal” is received at transmitter
~ side.
!
~
~
~
~
~
I
TROUBLESHOOTING

.
RECEPTION
COMMUNICATION ERROR CODES
I
Code /
Error Condition
I
1 COM. ~-0 1 Able to recognize handshake signal, but the handshake signal has errors.
,I.
/ Lrne drsconnected during reception.
2 , Cannot recognize the handshake signal from the transmitter side.
I
~ Cannot recognize the last handshake signal from the transmitter side.
3
j
Cannot recognize the handshake signal for next page from the transmitter side
4 ~
in the case of mode change.
~ Cannot recognize the handshake signal for next page from transmitter side. ‘/
5
7 ; No response from transmitter or “disconnect signal” is received at receiver side,
--7/
I
:I
I
I
1;
I!
TROUBLESHOOTING 8-9

COMMUNICATION ERROR CODES
Notes
8-10
TROUBLESHOOTING

\
Applicable telephone line:
Compatibility:
Configuration:
Compression scheme:
Scanning method:
Resolution:
Recording system:
Display:
Reception modes:
Modem speed:
Transmission time* :
Effective recording width:
Input document size:
Public switched telephone network
CCITT G3 mode
Half-duplex, desktop transceiver
Modified Huffman and Sharp special mode
Flat-bed, solid-state CCD
Horizontal:
8 lines/mm
Vertical:
Standard - 3.85 lines/mm
Fine/Halftone - 7.7 lines/mm
Thermal recording
7 x 5 dots, 1 line by 16-digit display
Auto/Manual/Answering machine
9600 bps with automatic fallback to 7200, 4800, or 2400 bps
Approx. 15 seconds (Sharp special mode)
210 mm max.
Automatic feeding:
Width - 148 to 216 mm
Length - 128 to 297 mm
Manual feeding:
Width - 148 to 216 mm
Length - 128 to 1000 mm
Effective scanning width:
Automatic document
210 mm max.
Standard (10 sheets max.)
feeder:
Halftone (gray scale):
Contrast control:
Copy function:
l Based on CCllT Test Chart #1 at standard resolution in Sharp special mode, excluding time for
Standard (16 levels)
Automatic/Dark selectable
Standard
protocol signals (i.e., CCllT phase C time only).
SPECIFICATIONS
9-1

SPECIFICATIONS
Telephone function:
Power requirements:
Operating temperature:
Power consumption:
Dimensions:
Weight:
As a part of our policy of continuous improvement, SHARP reserves the right to make
design and specification changes for product improvement without prior notice. The
performance specifications figures indicated are nominal values of production units. There ;
may be some deviation from these values in individual units.
Standard (cannot be used if power fails)
230 - 240 V AC, 50 Hz
5 to 35°C
Stand-by: 15 W
Maximum: 120 W
Width: 365 mm
Depth: 283 mm
Height: 111 mm
Approx. 4.7 kg
9-2
SPECIFICATIONS

This guide should only be used after you have read the detailed instructions for each procedure in
the manual.
u Note:
l Steps which are optional are enclosed in a dottedframe: j
SENDING DOCUMENTS
c---------7
; RESOLUTION I
+ : 0
L____-__-_A
Wait for
reception tone
Normal Dialing
I
j Load
/ document
Dial (press
numeric keys) +
r---------7
Direct Keypad
Dialing
Rapid Key Dialing / Load
Speed Dialing
Redialing
Load
document
I
/ document
Load
document
Load
document
Enter Speed Dial number
(press 2 numeric keys) +
Wait for
reception tone
I RESOLUTION :
+
I 0 : 4
L_________J
r---------7
: RESOLUTION I
+ I I
L__________l
r---------7
: RESOLUTION :
+
InI+ I +
L_________J
r---------7
: RESOLUTION :
+
ICI:+ I --)
L_________J
+
: +
: +
START! COPY
cl
ST*RT I copr
0
r---------7
L_________J
Lift handset
press SO~EAKER
+ @
Dial (press
numeric keys)
Press Rapid
Key
SPEED DIAL
0
REDIAL
0
START COPI
I
+
+ Hang
START
+
c
<
QUICK REFERENCE GUIDE
Quick-i

QUICK REFERENCE GUIDE
MAKING VOICE CALLS
1 Normal Dialing
Rapid Key Dialing
r-----
i Speed Dialing
Redialing
Quiet Detect Time
Quiet Detect Start
Timing
~ Lift handset
~ press S06EAKER
Lift handset
press E-EAKER
/ Lift handset SPEED DIAL
press SOLEAKER
Enter Speed Dial number
(press 2 numeric keys) -+ ~~E~~~~d
REDIAL
+ Lift handset
Dial (press
+
numeric keys)
Press Rapid
j Key
+ 0
+ you pressed
+
Lift handset if
I
ANSWERING MACHINE SETTINGS
FUNCTION
FUNCTION
n /xl + m 4 (“00” to “15”)
Enter 2-dtgit
Lift handset if
+ you pressed
SPEAKER
Lift handset if
SPEAKER
number
I
I
/
I
I
I
Answering
Machine Failure
Mode
Off-Hook Hold
Time
Enter “1” (yes)
or
“2” (no)
FUNCTION
[]/Op-l~-+
Enter 3-digit number
(“000” to “255”)
QUICK REFERENCE GUIDE
STOP
+!xzl
STOP
-+I

/ Entering
QUICK REFERENCE GUIDE
YOUR NAME AND FAX NUMBER
r
j Entering
Clearing
+ (press numeric keys)
Enter your name
(press numeric keys)
Enter your fax number
STARi t COPY
+
+
-+I
FAX AND VOICE NUMBERS FOR AUTOMATIC DIALING
‘m [31 ~ I#/ + ( + ;;:,:y;k$!)number 11
+ Enter fax or voice number
(press numeric keys)
Enter name (press
numeric keys)
Enter Z-digit number
(“01” to “50”)
+
+
+
START COP”
0
cl
STlRTl COPY
START ,COP”
STOP
+Gxl
START I con
STOP
+
STOP
‘I
+
!/
II
I
/
1
,~
,!
I j
Fine resolution 1
priority
(Setting the default
resolution to FINE)
Number of rings
to answer
(Number of rings
the machine waits
before answering in
automatic reception
mode)
USER SWITCHES
FUNCTION
11 141 + I#I +
FUNCTION
nl+41=+
Enter “1” (4 rings)
or
“2” (1 ring)
QUJCK REFERENCE GUIDE
Enter “1” (yes)
or
“2’ (no)
STOP
-+lol
STOP
+ [y--B-) ~
Quick-iii
‘I
‘I

QUICK REFERENCE GUIDE
4 rings manual
answer
(Setting the
machine to answer
after 4 rings in
manual reception
mode)
Auto Fax/Phone
Changeover
(Detection of fax
and voice calls in
automatic reception
mode)
Tel/Fax remote #
(Number for trans-
ferring faxes from
extension
telephone)
Enter “1’ (yes)
or
“2’ [no)
Enter “1’ (yes)
or
‘2’ (no)
Enter number
from ‘0’ to ‘9’
STOP
-+DCl
STOP
+[el
STOP
-+Dxl
Transaction list
(Print out setting for
Transaction Report)
Pseudo ringing
duration
(Duration of pseudo
ringing for Auto
Fax/Phone Change-
over)
Enter number from ‘l’to ‘4’:
“1” = after trans., rec.. or error
“2” = if error occurs
“3” = after trans.
“4” = no print out
Enter number from ‘1’ to ‘4’:
“1” = 15 sec.
“2” = 30 sec.
“3” = 60 sec.
“4” = 120 sec.
STOP
+lol
STOP
-+DCl
Quick-iv
QUICK REFERENCE GUIDE

PRlNTlNd OUT LISTS
QUICK REFERENCE GUIDE
Passcode List
User Switch List
/ Space ~ ~
i FUNCTION
ENTERING LETTERS AND CHARACTERS
Alphabet (A-Z)
ifi m p,i HO
L___________________--_-_----,
START I CWY
0
cl
QUICK REFERENCE GUIDE
Quick-v

QUICK REFERENCE GUIDE
r
Notes
Quick-vi
QUICK REFERENCE GUIDE

A
H
4djustable document guide ....... l-1
4larms ................ .8-5
Answering machine
Answering Machine Failure Mode 4-7
Connection ........... .4-l
Off-hook Hold Time ....... .4-8
Quiet Detect Start Timing .... .4-6
Quiet Detect Time ....... .4-5
Settings ............. .4-l
Assembly ............... .2-3
Automatic dialing ........... .3-7
Automatic Fax/Phone Changeover . . 3-12
C
Connections ............. .2-3
Contrast ................ .3-4
Copying ................ 3-14
D
Dialing
Direct Keypad .......... .3-7
Normal ............. .3-6
Rapid key ............ .3-7
Speed .............. .3-8
Direct Keypad Dialing ......... .3-7
Display messages .......... .8-4
Document carrier ........... .3-2
Document feeder ............ l-1
Document restrictions ......... .3-l
Document rollers ............ l-3
Document sizes ............ .3-l
Document, readable length and width .3-2
E
Electricity ............... .2-l
Error codes .............. .8-8
Extension telephone ......... .4-9
F
Function key .............. l-4
Handset . . .
Handset jack
Hold key . . . .
Housing, cleaning
.
. .
...... l-l
...... 1-2
......
......
I
Installation .
. . .
L
Line selector . . . . .
Liquid crystal display
Loading the document .
......
...... l-4
......
N
Normal dialing
Numeric keys .
. . . . . .
. , . . . .
0
Operation panel knob . . . . . . . l-l
P
. .
. .
. .
.
. .
. .
. .
.
. .
. .
. .
. 3-13
. . 6-2
. .
. .
3-7
. .
7-4
: 3-10
3-11
. 3-11
. . l-4
l-3
.
7-3
.
2-4
. . 7-2
. . l-4
Paper cutting . . .
Passcode List . .
Power switch . . .
R
Rapid Key Dialing . . . . .
Rapid Keys . . . . . .
Reading glass . . . .
Reading glass, cleaning .
Reception . . . . . . . .
Automatic . . . .
Manual . . . . . . .
Reception mode switch . .
Recording head . . . . .
Recording head, cleaning .
Recording paper
Loading . . . . . . .
Replacing . . . . . .
Redial key . . . .
l-5
7-5
2-l
l-2
3-3
3-6
l-5
l-2
l-5
l-3
Index-i

Redialing . . . . . . . .
Resolution . . . . . . .
Resolution key . . . .
Ringing volume selector
Roller, cleaning . . . . .
S
. . . . . . .
. . . . . . .
. . . * . . 1-4
. . . . . * .
. . . . .
3-8
3-4
1-2
7-4
Speaker key . . .
Speaker volume control .
Speed Dial key . . . . .
Speed Dialing . . . . . .
Star-t/copy key . . . . . .
Stop key . . . . . . . .
Telephone line jack . . . . . . . . . . . l-2
Telephone List . . . . . . . . . .6-l
Transaction Report . . . . . . . . . . .6-5
Troubleshooting
Jammed document . . . . . . . .8-6
Jammed recording paper . . . . .8-7
. . . . .
. . . * .
. . . . .
. . . . .
. . . . .
. . . . .
1-5
1-2
l-4
3-8
1-5
1-5
U
User Switch List . . . . .
User Switches . . . . .
. . . . .
. . .
6-4
5-5
Index-ii

-
NOTICE FOR UNITS INSTALLED IN NEW ZEALAND
Should any physical damage occur to the equipment which may result in internal
parts becoming exposed, the equipment should immediately be disconnected
and the user should arrange for its repair before it is reconnected, or its disposal
if necessary.
(NEW ZEALAND PTC 101)
-.
Should it be necessary to move the equipment, it is necessary to disconnect the
J.
telecom networkconnection before disconnecting the power lead or any separate
earth lead. Similarly when reconnecting the equipment it is necessary to connect
the power lead or earth lead before connecting to the telecom network.
(NEW ZEALAND PTC 101)
This equipment may not necessarily provide for the effective hand-over of a call
to or from a telephone connected to the same line.
(NEW ZEALAND PTC 211)
The operation of this equipment on the same lines as telephones or other
equipment with audible warning devices of automatic ring detectors will give rise
to bell tinkle or noise and may cause false flipping of the ring detector. Should
such a problem occur, the user is not to contact Telecom faults service.
(NEW ZEALAND PTC 211)

SHARR
SHARP CORPORATION OF AUSTRALIA PTY.LTD.
A.C.N. 003 039 405
1 Huntingwood Drive, Huntingwood, Blacktown, N&W.,21 48
SHARP CORPORATION
PRINTED IN THAILAND
(TINSE312OXHZ.4)
 Loading...