

ELECTRONIC CASH REGISTER
ELEKTRONISCHE REGISTRIERKASSE
CAISSE ENREGISTREUSE ELECTRONIQUE
CAJA REGISTRADORA ELECTRONICA
INSTRUCTION MANUAL
BEDIENUNGSANLEITUNG
ER
-A220
MODEL
MODELL
MODELE
MODELO
MANUEL D’INSTRUCTIONS
MANUAL DE INSTRUCCIONES
ER-A220

CAUTION:
The cash register and the remote drawer should be securely fitted to the supporting
platforms to avoid instability when the drawers are open.
CAUTION:
The socket-outlet shall be installed near the equipment and shall be easily accessible.
VORSICHT:
Die Netzsteckdose muß nahe dem Gerät angebracht und leicht zugänglich sein.
ATTENTION:
La prise de courant murale devra être installée a proximité de l’équipement et devra être
facilement accessible.
AVISO:
El tomacorriente debe estar instalado cerca del equipo y debe quedar bien accesible.
VARNING:
Det matande vägguttaget skall placeras nära apparaten och vara lätt atkomligt.
CAUTION:
For a complete electrical disconnection pull out the mains plug.
VORSICHT:
Zur vollständigen elektrischen Trennung vom Netz den Netzstecker ziehen.
ATTENTION:
Pour obtenir une mise hors-circuit totale, débrancher la prise de courant secteur.
AVISO:
Para una desconexión eléctrica completa, desenchufar el enchufe de tomacorriente.
VARNING:
För att helt koppla fran strömmen, dra ut stickproppen.

INTRODUCTION
Thank you very much for your purchase of the SHARP Electronic Cash Register, Model ER-A220.
Please read this Manual carefully before operating your machine in order to gain full understanding of
functions and features.
Please keep this manual for future reference, it will help you, if you encounter any operational problems.
IMPORTANT
• Install your register in a location that is not subject to direct radiation, unusual temperature changes,
high humidity or exposed to water sources.
Installation in such locations could cause damage to the cabinet and the electronic components.
• The register should not be operated by an individual with wet hands.
The water could seep into the interior of the register and cause component failure.
• When cleaning your register, use a dry, soft cloth. Never use solvents, such as benzine and/or
thinner.
The use of such chemicals will lead to discoloration or deterioration of the cabinet.
• The register plugs into any standard wall outlet (Official (nominal) voltage).
Other electrical devices on the same electrical circuit could cause the register to malfunction.
• If the register malfunctions, call your local dealer for service - do not try to repair the register
yourself.
• For a complete electrical disconnection, pull out the mains plug.
English
English
English
PRECAUTION
This Electronic Cash Register has a built-in memory protection circuit which is operated by rechargeable
batteries.
As you know, all batteries will, in time, dissipate their charge even if not used. Therefore to insure an
adequate initial charge in the protection circuit, and to prevent any possible loss of memory upon installation, it
is recommended that each unit be allowed to recharge for a period of 24 to 48 hours prior to use by the
customer.
In order to charge the batteries, the machine must be plugged in. This recharging precaution can prevent
unnecessary initial service calls.
English
1

CONTENTS
INTRODUCTION............................................................................................................................................1
IMPORTANT..................................................................................................................................................1
PRECAUTION................................................................................................................................................1
CONTENTS....................................................................................................................................................2
EXTERNAL VIEW..........................................................................................................................................4
PRINTER........................................................................................................................................................4
KEYBOARD...................................................................................................................................................5
KEYS AND SWITCHES.................................................................................................................................6
1 Mode switch and mode keys.................................................................................................................6
2 Drawer lock key.....................................................................................................................................6
DISPLAYS......................................................................................................................................................7
FOR THE MANAGER
PROGRAMMING ...........................................................................................................................................8
1 Setting the date and time ......................................................................................................................8
2 Setting the register number and consecutive number...........................................................................9
3 Programming the tax rate......................................................................................................................9
4 Programming for departments.............................................................................................................10
5 Price Lookup (PLU) programming.......................................................................................................12
6 Programming for miscellaneous keys .................................................................................................13
Programming the rate(
Programming the discount key amount (
Programming the percent rate limitation (
Programming function parameters for
Programming function parameters for
Programming function parameters for
7 Text programming ...............................................................................................................................16
How to program alphanumeric characters....................................................................................16
Programming the department text................................................................................................18
Programming the PLU text (item label) ........................................................................................18
Programming the function text......................................................................................................18
Programming the cashier names..................................................................................................20
Programming logo messages.......................................................................................................20
Programming foreign currency symbol.........................................................................................21
Programming domestic currency symbol .....................................................................................21
8 Programming various functions...........................................................................................................22
Programming optional feature selection.......................................................................................22
Programming print format.............................................................................................................22
Programming receipt print format.................................................................................................23
Programming EURO system settings...........................................................................................24
Programming power saving mode................................................................................................24
Programming logo message print format .....................................................................................25
Programming RS-232C interface .................................................................................................25
Programming thermal printer density ...........................................................................................26
Language selection ......................................................................................................................27
Programming the AUTO key ........................................................................................................27
9 Reading stored program......................................................................................................................28
TRAINING MODE ........................................................................................................................................29
READING (X) AND RESETTING (Z) OF SALES TOTALS ........................................................................30
1 Summery of reading (X) and resetting (Z) reports...............................................................................30
2 Daily sales totals .................................................................................................................................31
3 Periodic consolidation .........................................................................................................................33
CCD -Compulsory Cash/cheque Declaration...........................................................................................34
%, e
2
)....................................................................................................13
) ...............................................................................14
-
)..............................................................................14
%
and %keys..............................................................14
-
key.............................................................................15
e
;, ', î, r
and pkeys........................................16

ELECTRONIC JOURNAL............................................................................................................................35
PROGRAMMING FOR EURO .....................................................................................................................36
OVERRIDE ENTRIES..................................................................................................................................39
CORRECTION AFTER FINALIZING A TRANSACTION (AFTER GENERATING A RECEIPT)................39
FOR THE OPERATOR
PRIOR TO ENTRIES....................................................................................................................................40
1 Preparations for entries.......................................................................................................................40
2 Power saving mode.............................................................................................................................40
3 Error warning.......................................................................................................................................41
ENTRIES......................................................................................................................................................42
1 Item entries..........................................................................................................................................42
Single item entries........................................................................................................................42
Repeat entries ..............................................................................................................................42
Multiplication entries.....................................................................................................................43
Single item cash sale (SICS) entry...............................................................................................43
2 Displaying subtotal ..............................................................................................................................44
3 Finalization of transaction....................................................................................................................44
Cash or cheque tendering ............................................................................................................44
Cash or cheque sale that does not need any tender entry...........................................................45
Credit sale ....................................................................................................................................45
Mixed-tender sale.........................................................................................................................45
4 Computation of VAT (Value Add Tax)/tax ...........................................................................................45
5 Auxiliary entries...................................................................................................................................47
Percent calculations (premium or discount) .................................................................................47
Deduction entries..........................................................................................................................47
Refund entries ..............................................................................................................................48
Printing of non-add code numbers ...............................................................................................48
6 Payment treatment..............................................................................................................................49
Currency exchange ......................................................................................................................49
Received on account entries ........................................................................................................50
Paid out entries.............................................................................................................................50
No sale (exchange) ......................................................................................................................50
7 Automatic sequence key (
8 Receipt issuance after finalization/Copy receipt..................................................................................51
CORRECTION .............................................................................................................................................52
1 Correction of the last entry (direct void) ..............................................................................................52
2 Correction of the next-to-last or earlier entry (indirect void) ................................................................52
3 Subtotal void........................................................................................................................................53
4 Correction of incorrect entries not handled by the direct or indirect void function...............................53
OVERLAPPED CASHIER ENTRY ..............................................................................................................53
OPERATOR MAINTENANCE......................................................................................................................54
1 In case of power failure .......................................................................................................................54
2 In case of printer error.........................................................................................................................54
3 Cautions in handling the printer and recording paper .........................................................................54
4 Installing and removing the paper roll .................................................................................................55
5 Removing a paper jam ........................................................................................................................57
6 Cleaning the print head .......................................................................................................................57
7 Removing the till and the drawer.........................................................................................................57
8 Opening the drawing by hand .............................................................................................................58
9 Installing the fixing angle bracket ........................................................................................................58
10 Before calling for service.....................................................................................................................59
LIST OF OPTIONS.......................................................................................................................................60
SPECIFICATIONS .......................................................................................................................................60
key) entries..........................................................................................50
`
3
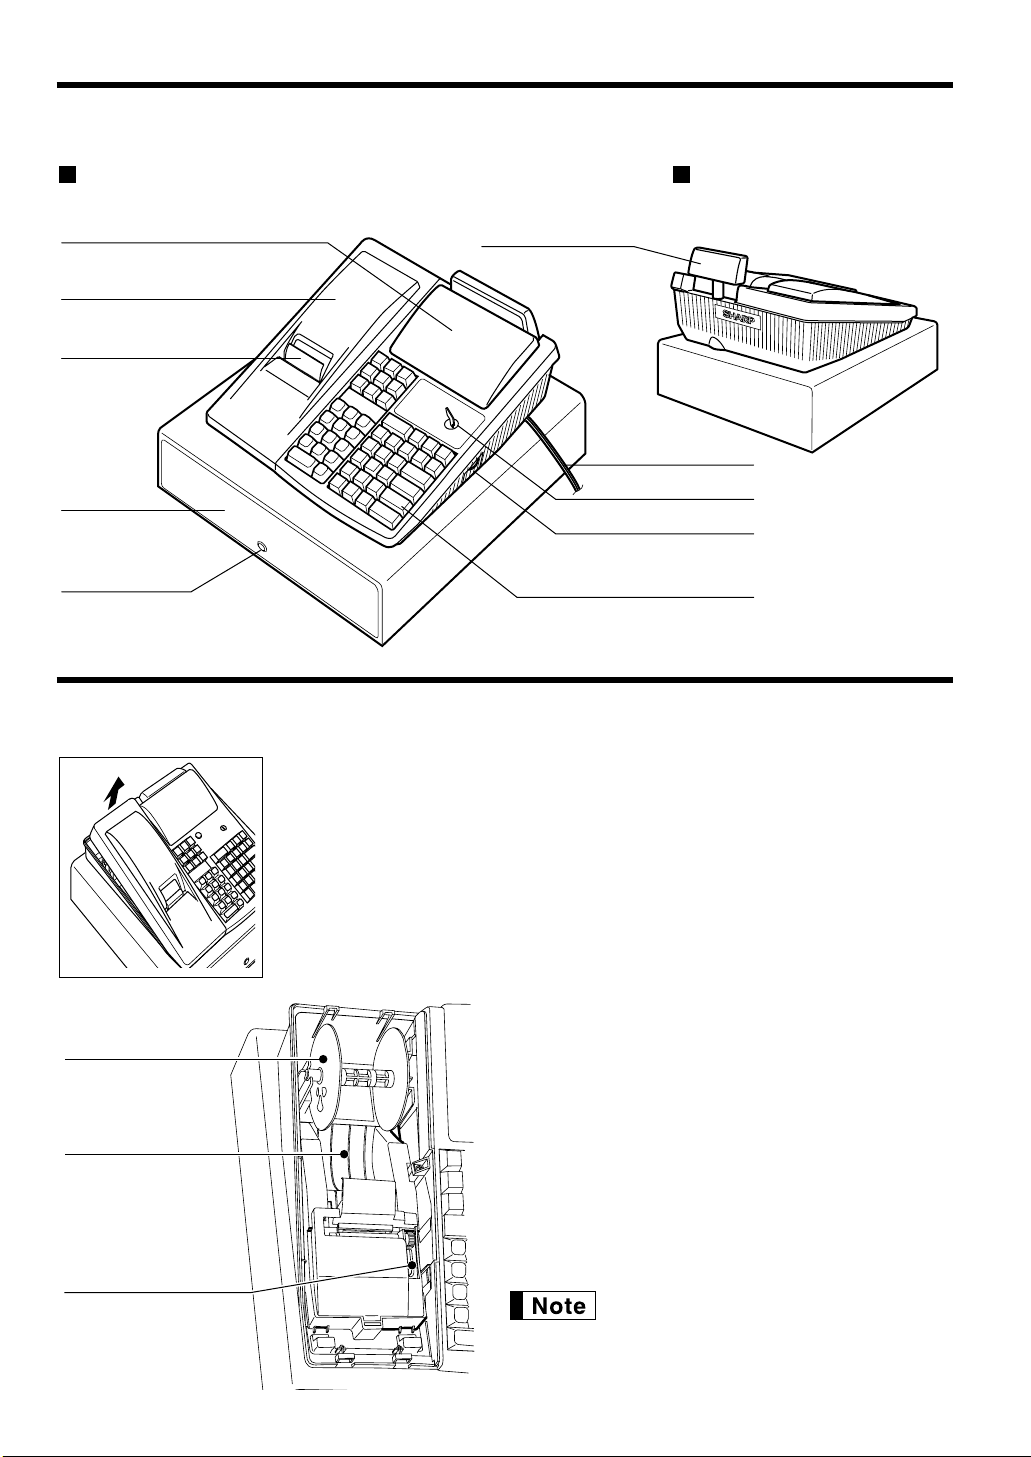
Print head release lever
Paper bed
Take-up spool
EXTERNAL VIEW
ER-A220
Operator display
Receipt paper
Drawer lock
Drawer
Printer cover
Customer display
(Pop-up type)
Mode switch
RS-232C connector cover
Power cord
Keyboard
Front view Rear view
PRINTER
4
The printer is one station type thermal printer, and therefore it does not require any
type of ink ribbon or cartridge. The average life of the printer is approximately 4
million lines.
When removing the printer cover, lift up its rear. When installing the printer cover,
hook it on the pawls on the cabinet and shut it.
Caution: Be very careful with the cutter which is mounted on the cover, so as
not to cut yourself.
Print head release lever
The print head can be lifted off the roller by the print
head release lever (gray lever on the right side of the
printer). Pulling the lever toward you move the print
head away from the roller. If the paper becomes
jammed, you will need to use this lever to release the
print head from the paper so you can remove the
jammed paper.
Your register is shipped with the print head release
lever positioned at the lifted up position. Be sure to
push down the lever toward the paper bed side (printing
position) before you use the register.
Do not attempt to remove the paper roll
with the head in the down position. This
may result in damage to the printer and
print head.
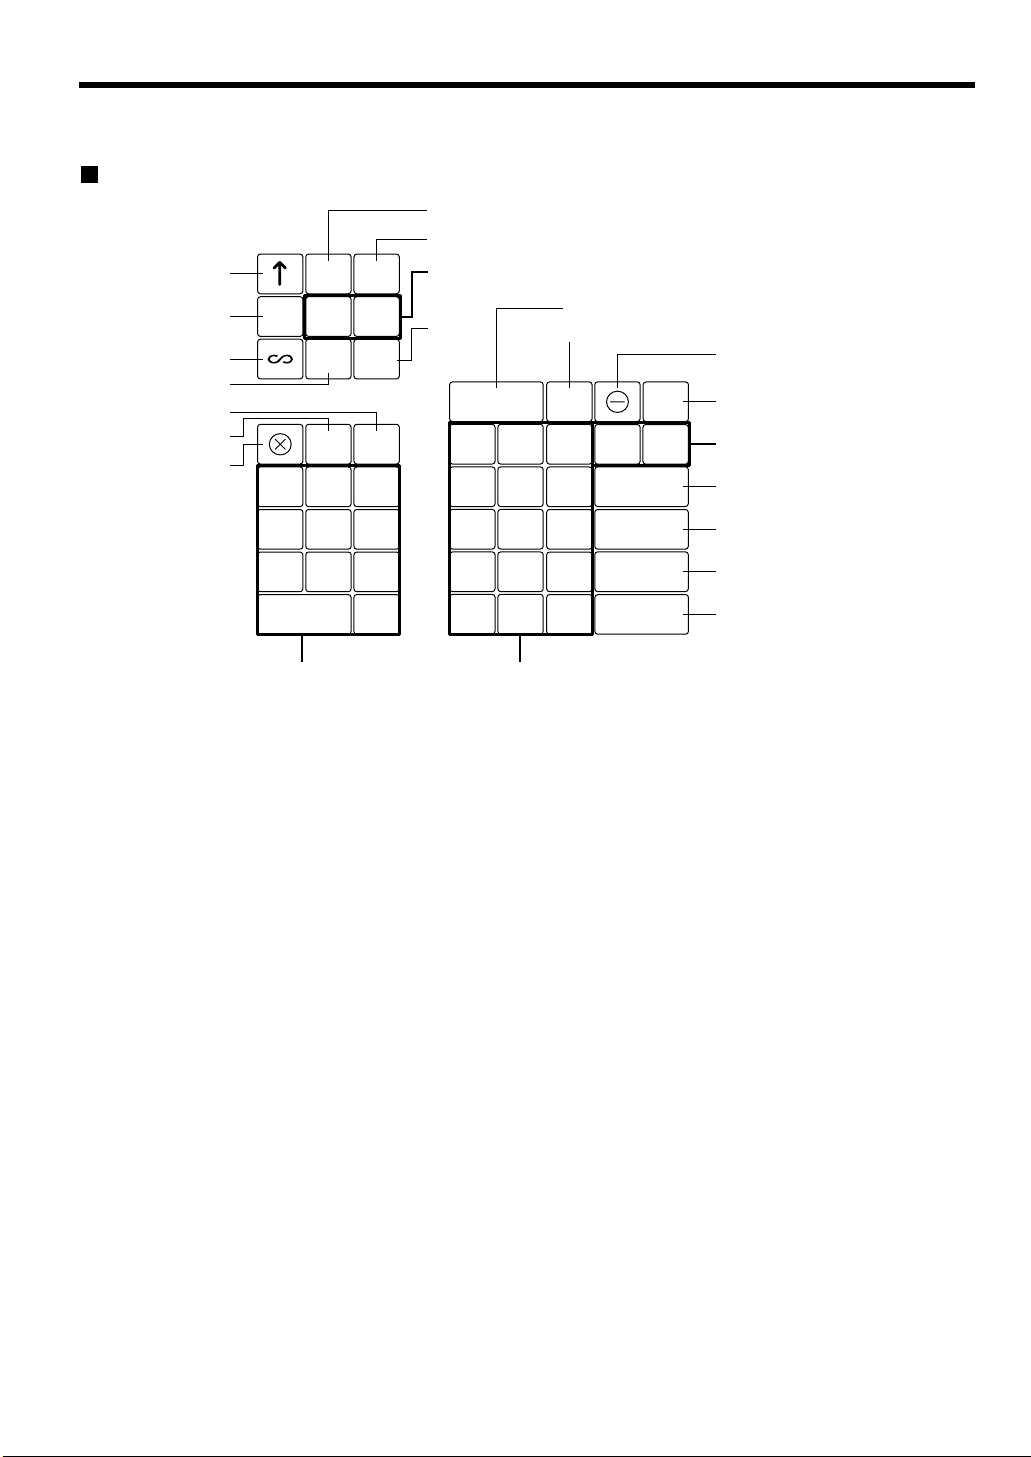
KEYBOARD
1
4
3
2
5
11
12
13
14
15
123
456
789
6
7
8
9
10
AMT
TL/NS
#/TM/ST
CH
CR
EX
%1
%2
PLU
CL
•
00
0
RA
RF
ESC
AUTO
1
RCPT
/PO
AUTO
2
Received-on account key
Cashier code entry key
Auto 1 and 2 keys
Paper feed key
Receipt print/
Paid-out key
Void key
Refund key
Clear key
Decimal point key
Multiplication key
Escape
key
PLU/Subdepartment key
Amount key
Department keys
Numeric keys
Option keys
◊ Value added tax key
Ó Department shift key
ö~õ Department keys
(To operate dept. 16 key though dept. 30 keys, press
the department shift key and the corresponding dept. key.)
Discount key
Foreign currency
exchange key
Percent 1 and 2 keys
Credit key
Cheque key
Non-add code/Time display/
Subtotal key
Total/No sale key
CASH
#
Standard keyboard layout
5
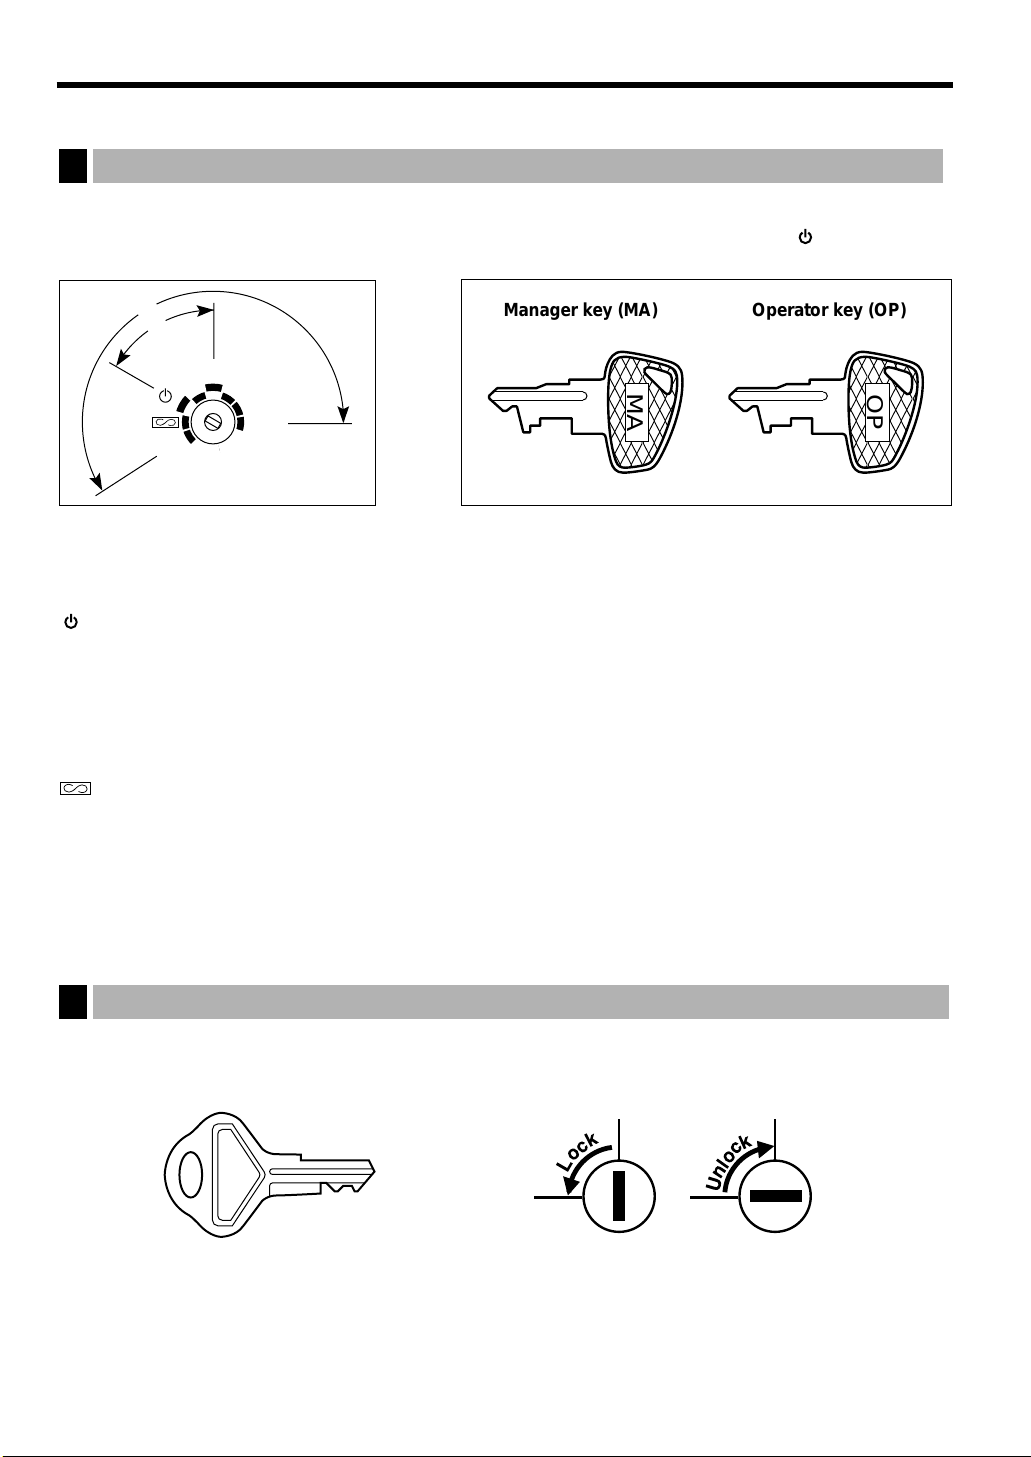
KEYS AND SWITCHES
SK1-1
PGM
OP
X/Z
REG
MGR
X1/Z1
X2/Z2
OP
MA
MA
OP
Mode switch and mode keys
1
The mode switch can be operated by inserting one of the two supplied mode keys - manager (MA) and operator
(OP) keys. These keys can be inserted or removed only when the switch is in the “REG” or “ ” position.
Manager key (MA) Operator key (OP)
The mode switch has these settings:
: This mode locks all register operations. (AC power becomes off.)
No change occurs to register data.
OP X/Z: This setting allows cashiers to take individual cashier X or Z reports, to take flash reports, and to take
electronic journal reports. And it can be used to toggle receipt state “ON” and “OFF” by pressing the
key.
REG: For entering sales.
PGM: To program various items.
MGR: For manager's entries. The manager can use this mode for an override entry.
X1/Z1: To take the X/Z report for various daily totals, and take electronic journal reports
X2/Z2: To take the X/Z report for various periodic (weekly or monthly) consolidation
Ü
: Enters into the void mode. This mode allows correction after finalizing a transaction.
Drawer lock key
2
This key locks and unlocks the drawer. To lock it, turn 90 degrees counterclockwise. To unlock it, turn 90
degrees clockwise.
6
DISPLAYS
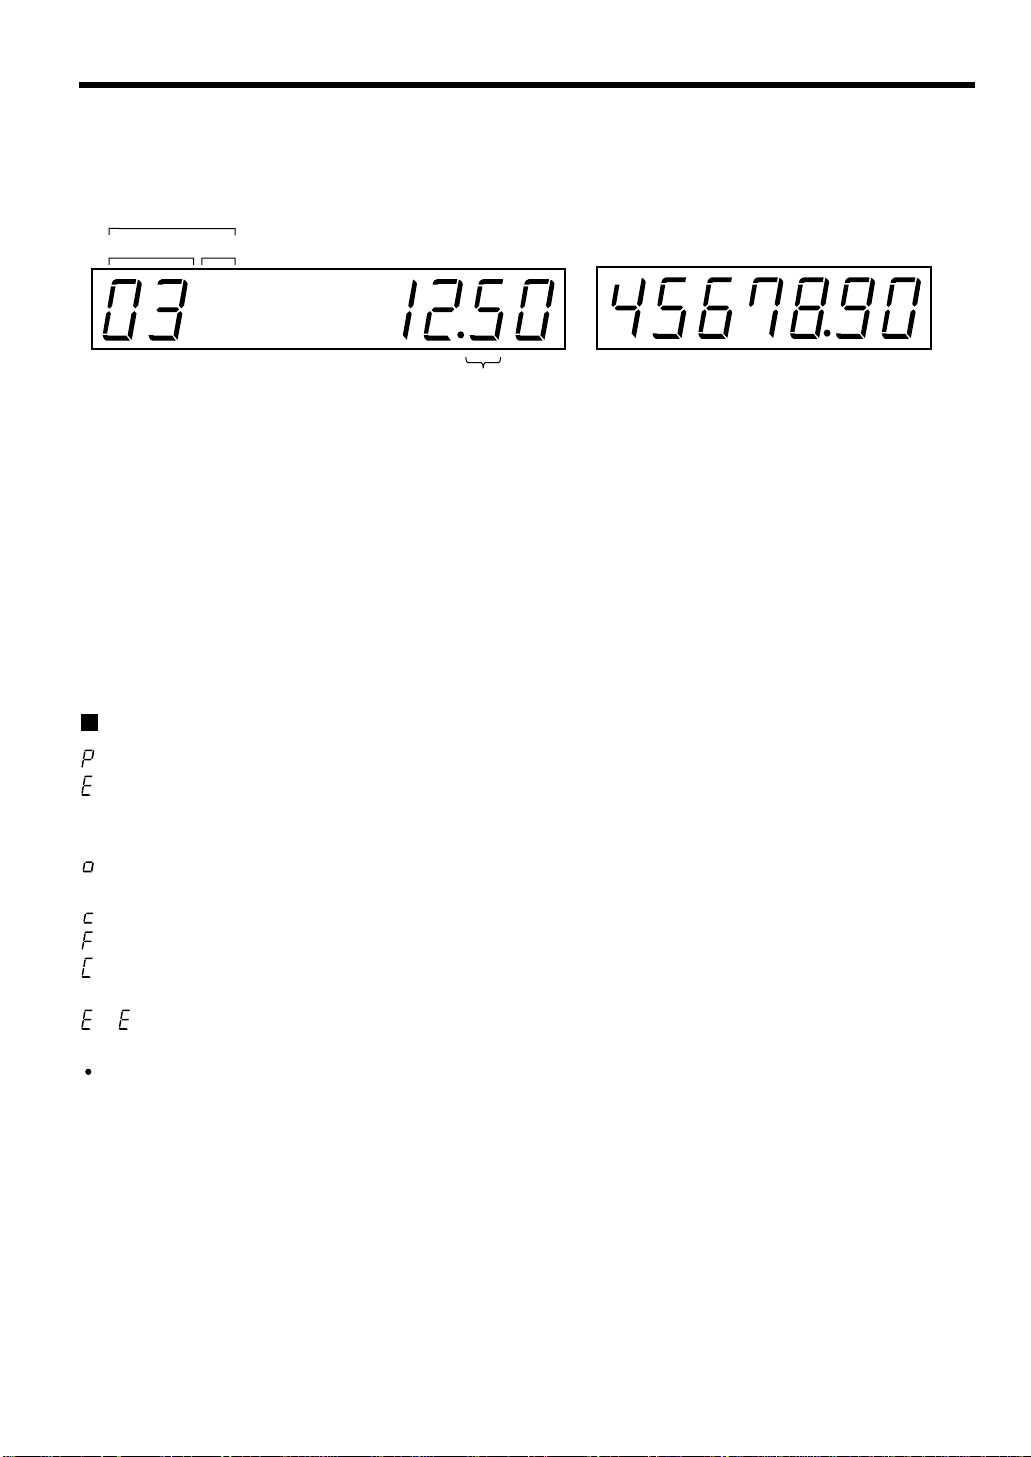
Operator display Customer display (Pop-up type)
PLU/SUB
DEPT REPEAT
RCPT
OFF
Amount: Appears in the far-right eight (max.) positions.
Cashier code: Appears in the second position (one digit).
Number of repeats for repetitive registrations:
The number of repeats is displayed, starting at “2” and incremented with each repeat.
When you have registered ten times, the display will show “0.”
Example: (2 → 3 → 4
Receipt function status:
The indicator “_” appears in the ninth position when the receipt function is put in the OFF
status.
Time: Appears in the second to sixth positions (using 24-hour format) in the OP X/Z, REG, or
MGR mode. In the REG, or MGR mode, press the
cashier code
.....
9 → 0 → 1 → 2
...
)
key to display the time.
Ñ
Machine state symbols
: Appears in the tenth place during programming.
: Appears in the tenth place when an error is detected.
– (Floating): Appears when a minus department or PLU/subdepartment entry is made or when a discount,
refund, or void entry is made.
: Appears in the tenth place when the subtotal is displayed or when the amount tendered is smaller
than the sale amount.
: Appears in the tenth place when the
: Appears in the tenth place when a transaction is finalized by pressing the
: Appears in the tenth place when the change due amount is displayed or when the cash/cheque
declaration is compulsory.
– : May appear in the far-left three positions at the timing of key entry when the electronic journal
memory is full. (Depending on programming.)
: May appear right below the eighth and ninth places at the timing of finalization of a transaction
when the electronic journal memory is nearly full. (Depending on programming.)
Also appears right below the tenth place when power saving mode is effective.
key is pressed to calculate a subtotal in foreign currency.
e
, 'or îkey.
É
7
Time
4Ñ
≈
Ñ É
Time (max. four digits)
3Ñ
≈
Ñ É
Date (seven or eight digits)
FOR THE MANAGER
PROGRAMMING
This chapter illustrates how to program your cash register. Program every item necessary for your store by
following the appropriate procedure.
• You can select the language of texts printed on receipts or journals from English, German, French
or Spanish. For the language selection, please refer to "Language Selection" described later in
this section.
Preparations for Programming
1. Plug your machine into a standard wall outlet.
2. Put the manager key in the mode switch and turn it to the PGM position.
3. Check to see whether paper roll is present in the machine. If it is missing, install a paper roll correctly
referring to the procedure in “4. Installing and removing the paper roll” under “OPERATOR MAINTENANCE”.
4. Program necessary items into your machine.
• On the key operation example shown in the programming details, numeric such as 26082000
indicates the parameter which must be entered using the corresponding numeric keys.
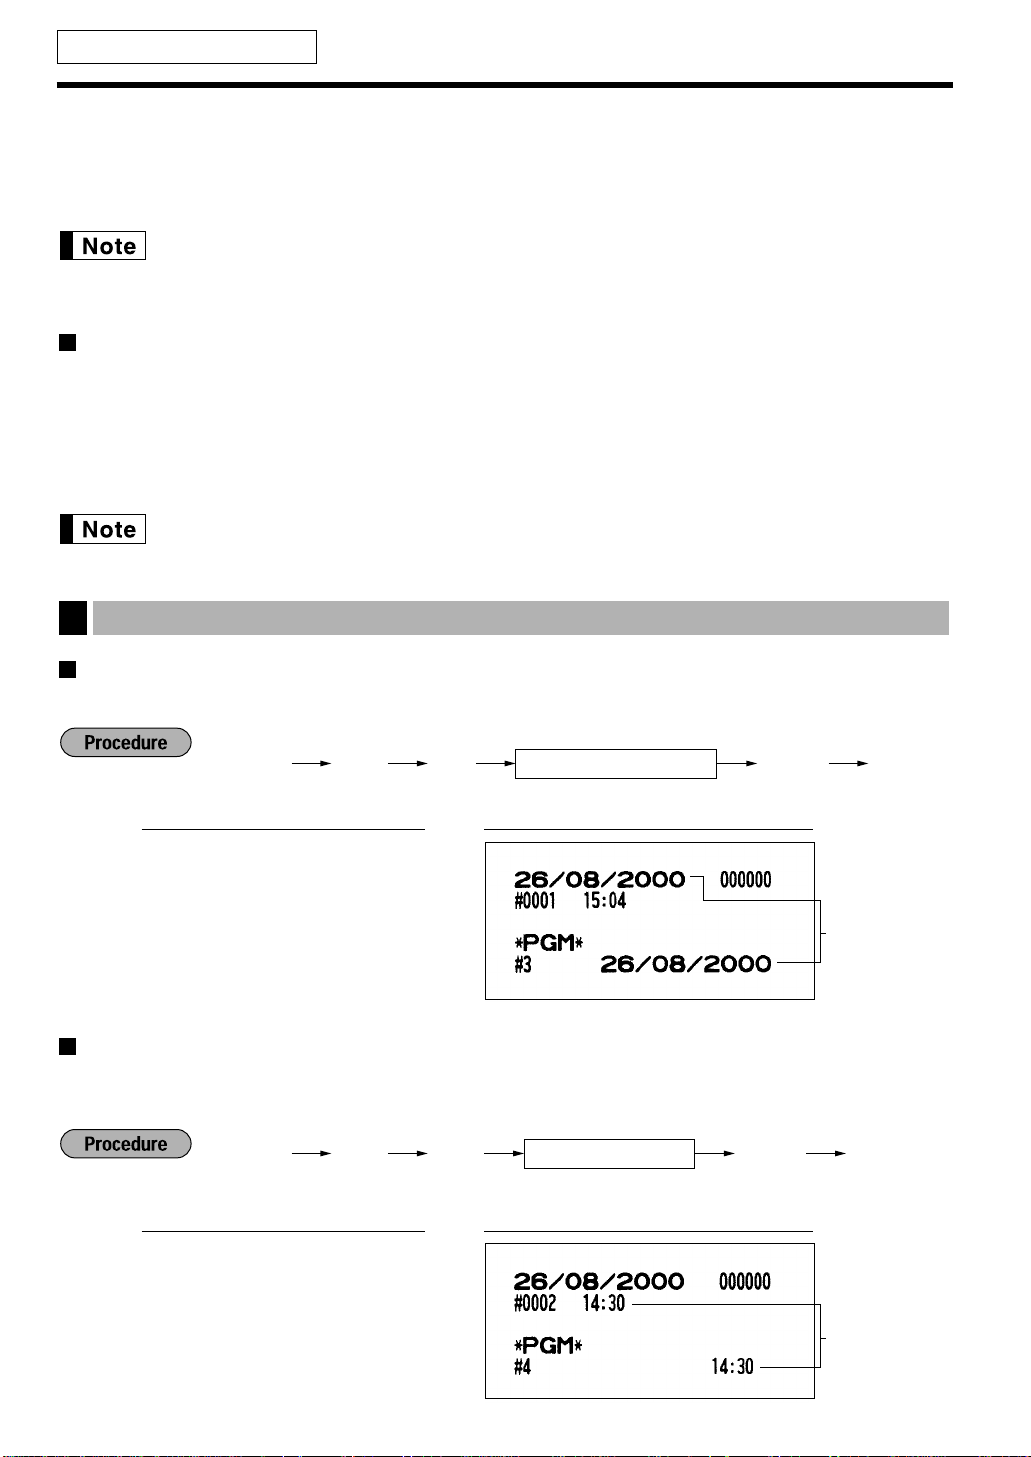
Setting the date and time
1
Setting the date
Enter day (one or two digits), month (two digits), and year (four digits : 1999 to 2098) in this sequence.
PrintKey operation example
Ñ3 ≈
26082000
Setting the time
Set the time using the 24-hour format. For example, when the time is set to 2:30 AM, enter 230; and when it is
set to 2:30 PM, enter 1430.
ÑÉ
Date
PrintKey operation example
Ñ4 ≈
1430
ÑÉ
8
Consecutive
number
Setting the register and consecutive number
2Ñ
≈
Ñ É
A number (one to four digits) that is one
less than the desired starting number
To begin the count from 0001
1Ñ
≈
Ñ É
Register number (one to six digits)
To set the register number “0”
ń
*
1
A
≈ ≈
?
1-4
*2Sign and
tax rate
*3Lowest taxable
amount
Ñ É
To program "0"
To innibit this tax rate
To program "0"
9
2
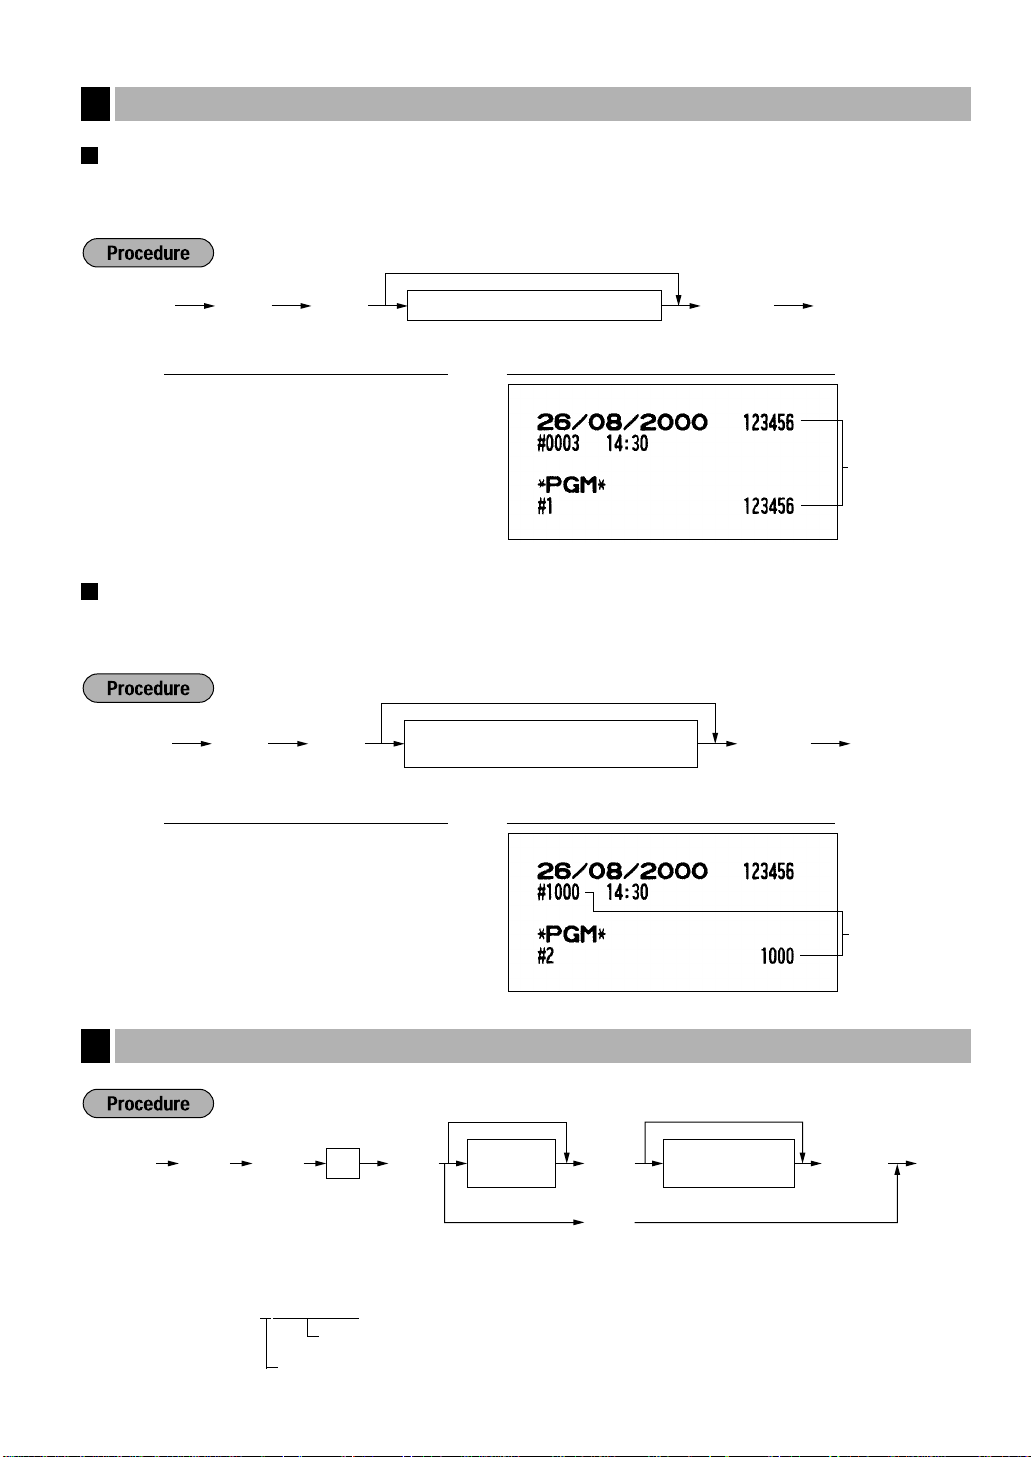
Setting the register number
When your store has two or more registers, it is practical to set separate register numbers for their identification.
You may set them in a maximum of six digits.
PrintKey operation example
Ñ1 ≈
123456
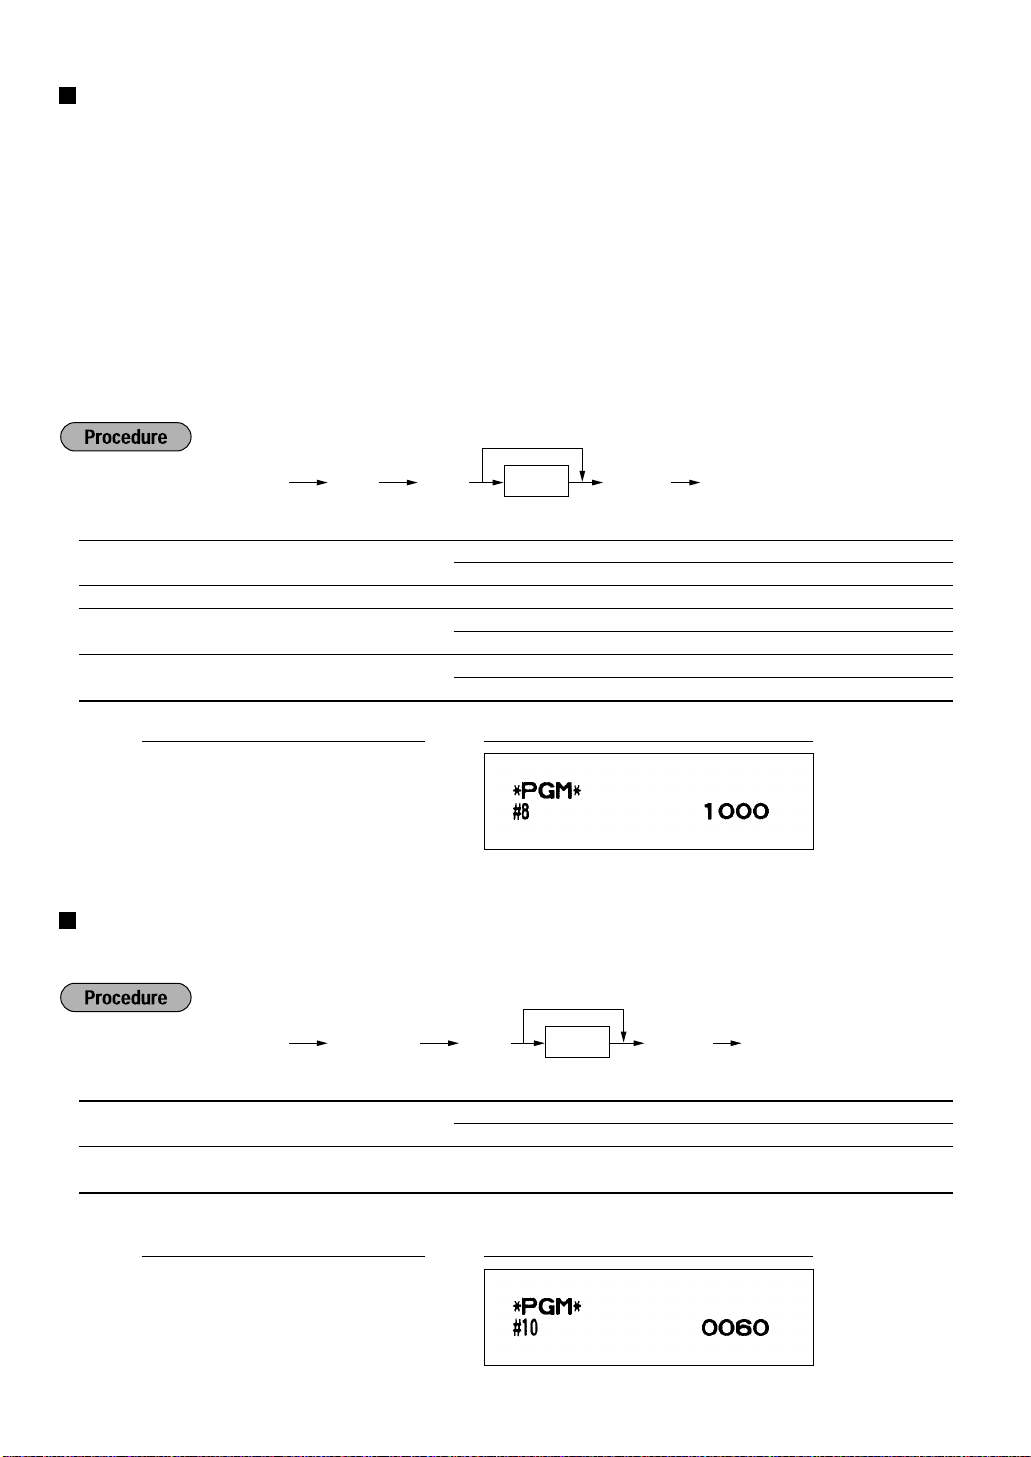
Setting the consecutive number
The consecutive number is increased by one each time a receipt is issued.
Enter a number (one to four digits) that is one less than the desired starting number.
ÑÉ
Register number
PrintKey operation example
Ñ2 ≈
1000
ÑÉ
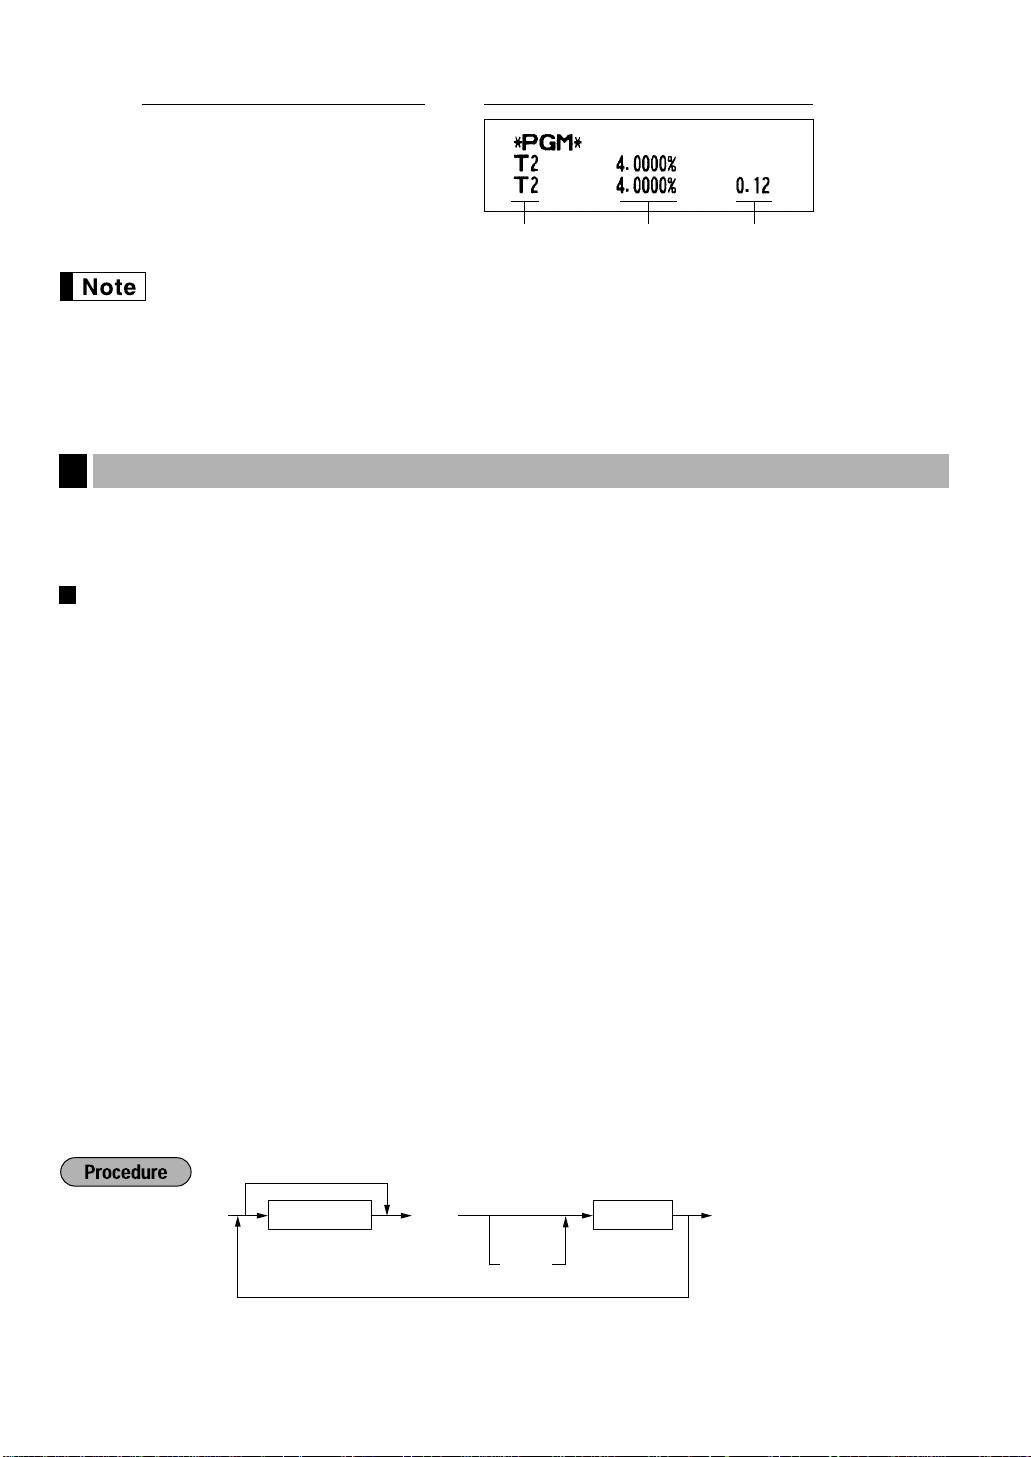
Programming the tax rate
3
*1: Enter a corresponding tax rate number. For example, when you program a tax rate as tax rate 1, enter 1.
*2: Sign and tax rate: XYYY.YYYY
Sign -/+ = 1/0
*3: Max. five digits: 0.00 to 999.99
Tax rate= 0.0001 to 100.0000
9
To set all zeros
≈
Dept. keyABCDEFGHI
É
To program another dept.
Ó
*
Tax rate 2 Tax rate: 4% Lowest
taxable amount
PrintKey operation example
Ñ9 ≈
2
≈
4
≈
12
ÑÉ
• The lowest taxable amount is valid only when you select add on tax system. If you select VAT
(Value added system), it is ignored.
• If you make an incorrect entry before pressing the third
it with the
key. Then program again from the beginning correctly.
Ñ
• If you select VAT system, the sign which you program is ignored.
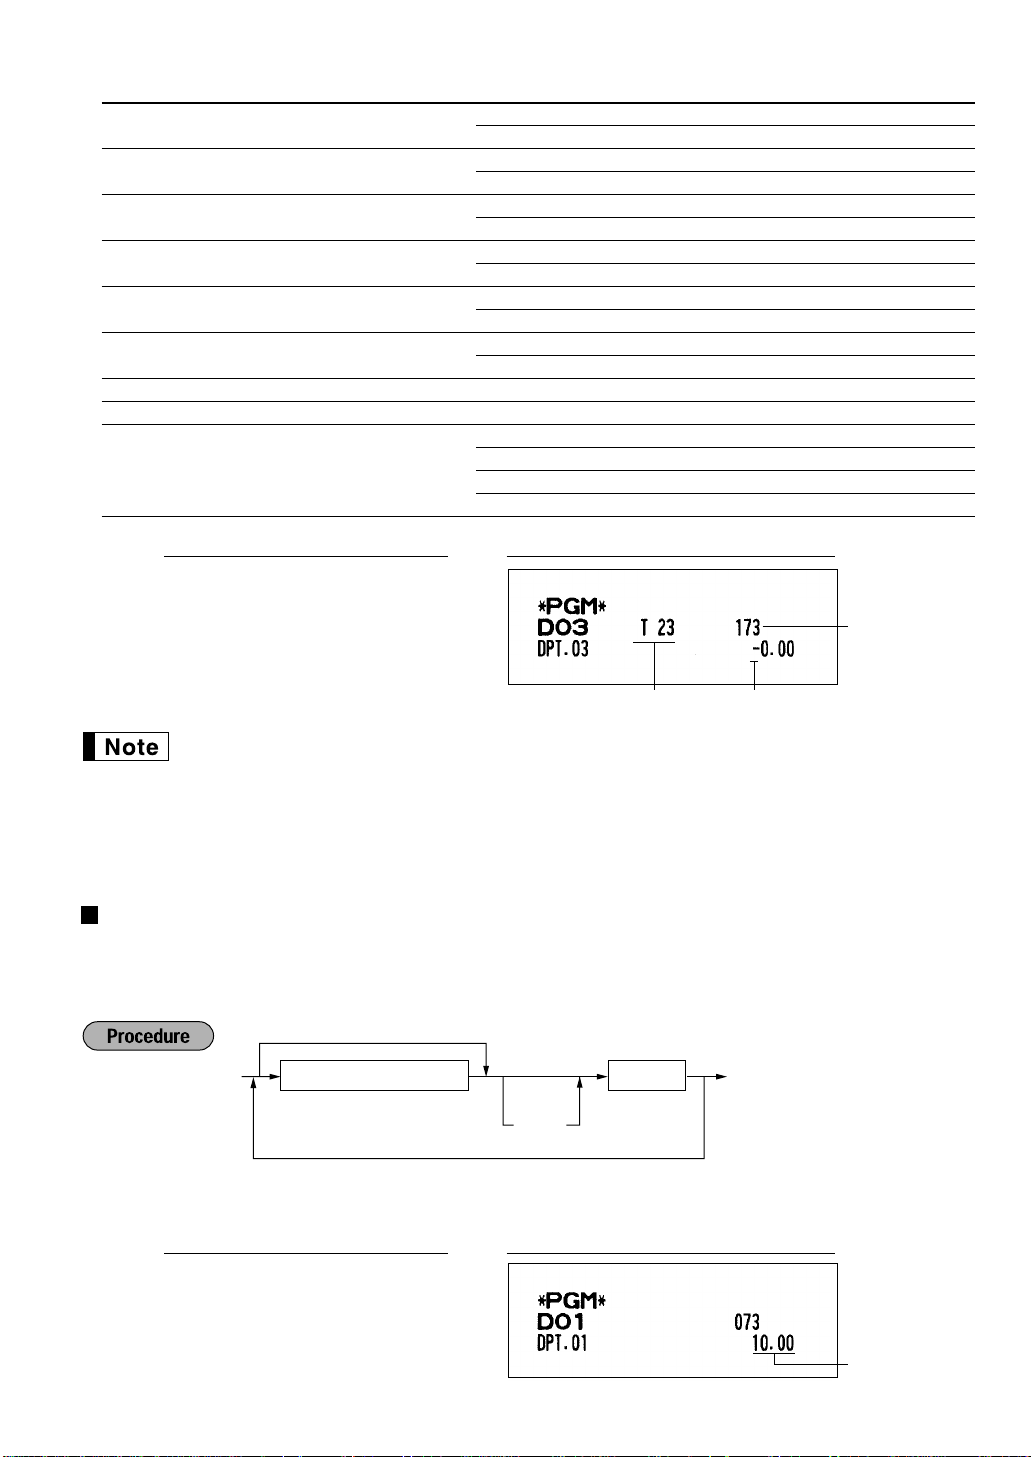
Programming for departments
4
Your machine is equipped with 15 standard departments and 15 optional departments (departments 16 through
30).
key; and if you make an error after pressing the third ≈key, finalize it with the
c
Functional programming
Tax status
Assign a tax status to each department. When entries are made into taxable departments in a
transaction, tax is automatically computed according to the associated tax rate as soon as the
transaction is completed.
key in programming a tax rate, cancel
≈
SICS (Single Item Cash Sale)
If the first registration is to a department set for SICS, the sale is finalized as soon as the department
key is pressed. If the sale is preceded by registrations to departments not set for SICS, a sale to a
department set for SICS does not finalize and can be repeated until the
Sign
You may assign each department to plus department for normal sales, or minus department for minus
transaction.
HALO(High Amount Lockout)
Set the number of allowable digits for the maximum entry amount for each department. The limit is
effective for operations in the REG mode and can be overridden in the MGR mode.
Type of unit price entry
You may select one of the following four types of unit price entry for each department.
• Open and preset / Preset only / Open only / Inhibit department key
key is pressed.
É
*To program departments 16 through 30, press the department shift key at this point.
10
* Item: Selection: Entry:
Unit price
To set zero
To program another dept.
Dept. keyUnit price(max. six digits)
É
Ó
*
A VAT4 or TAX4 Yes 1
No 0
B VAT3 or TAX3 Yes 1
No 0
C VAT2 or TAX2 Yes 1
No 0
D VAT1 or TAX1 Yes 1
No 0
E SICS / Normal SICS 1
Normal 0
F Sign Minus department 1
Plus department 0
G Always enter 0. 0
H HALO 0-7
I Type of unit price entry Open and preset 3
Preset only 2
Open only 1
Inhibit department key 0
PrintKey operation example
011011073
≈
úÉ
From left, EHI
Tax status
• The tax system of your machine has been factory–set to automatic VAT1–4. If you desire to
select any of automatic tax 1–4, manual VAT1–4, manual VAT1, manual tax 1–4, and the
combination of the automatic VAT 1 and the automatic tax 2–4, consult your dealer.
• When the combination of the automatic VAT1 and automatic tax 2–4 system is selected, one of
the VAT1(D) can be selected in combination with tax 2–4.
Example: ABCD = 1001, 1010, 1100
Unit price
You can program unit prices up to a maximum of six digits (9999.99). Even if a department is not programmed
to allow the entry of preset unit prices in functional programming, the department is automatically changed to
allow the entry of preset unit prices by this programming entry.
Sign(F)
*To program departments 16 through 30, press the department shift key at this point.
1000
¯
É
PrintKey operation example
11
PLU code
Unit price
Associated dept.
PLU code*
1
Dept. key
Unit price
(max. six digits)
Ö
?
To program zero
To inhibit
To program the following PLU
To program another PLU
É
Ó
*
2
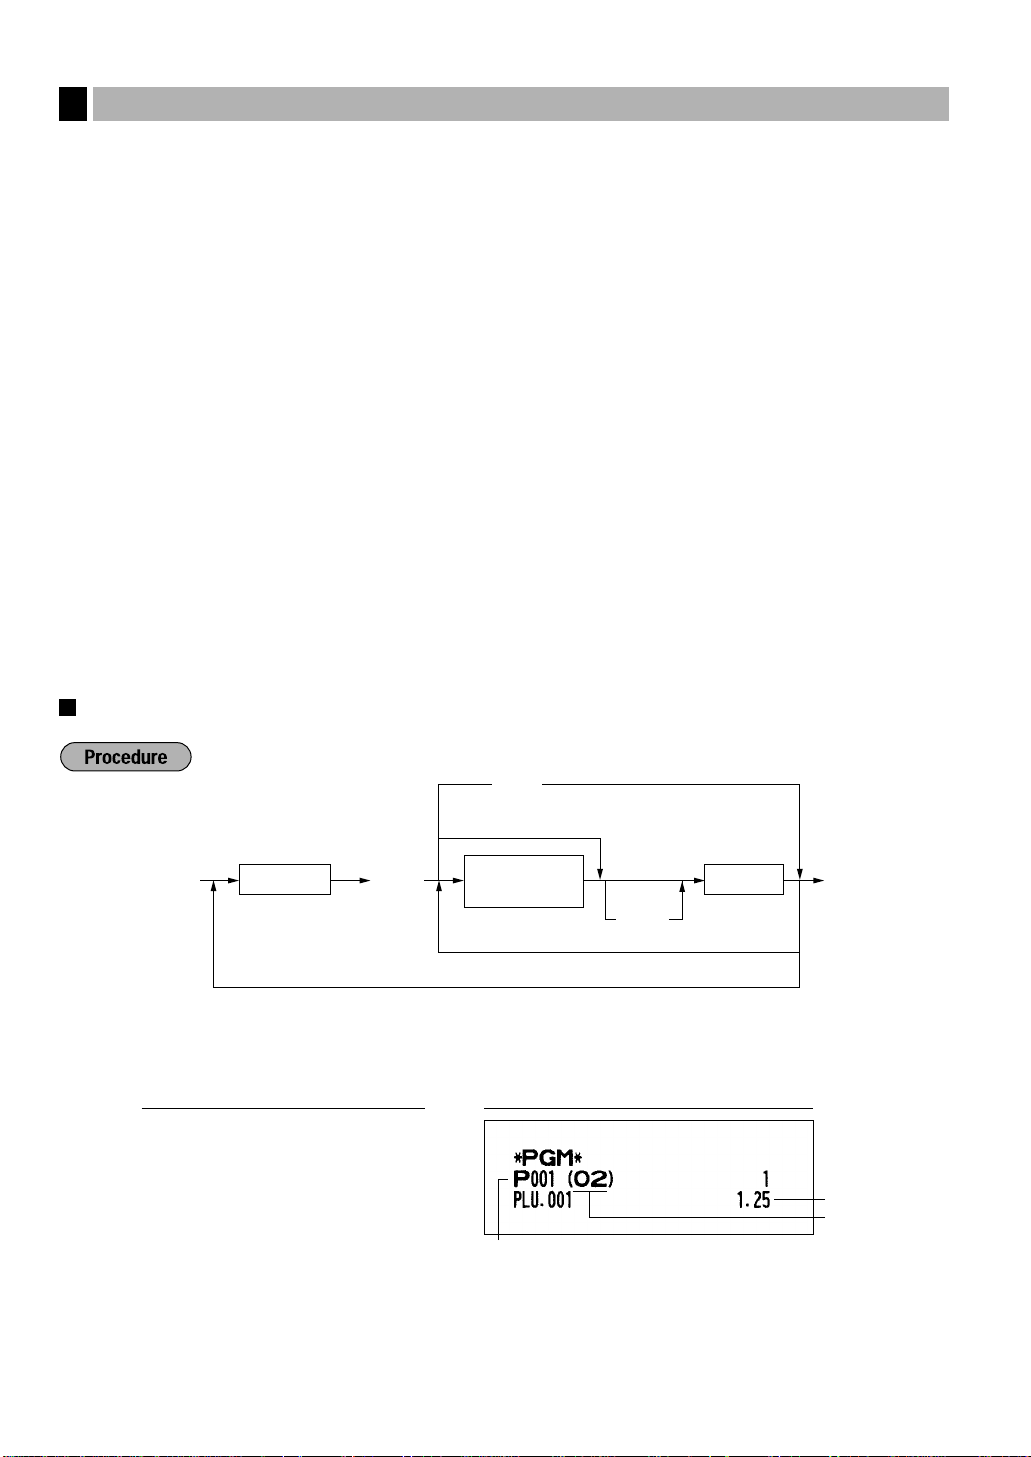
Price lookup (PLU) programming
5
Each PLU requires you to program the following:
PLU code (three digits: 1 to 500)
Associated department
When a PLU is associated with a department, the following functions of the PLU depend on the
programming for the corresponding department.
• Tax status
• HALO (only for the subdepartment)
• Single item cash sale
• Sign
Unit price (max. six digits)
You will usually have unit prices programmed for individual PLUs as PLU preset unit prices. If you program
unit price “0” for a PLU, you can enter only the selling quantity of the PLU, i.e. the PLU can be used only
as a counter.
PLU or subdepartment mode
• If the PLU mode (i.e. automatic preset unit price entry) is selected, individual PLU entries can be made by
entering the assigned code and depressing the
• If the subdepartment mode is selected, the following key operations must be performed: Enter the price,
press the
key, enter the PLU code, and press the Ökey.
å
Ö
key.
Unit price and associated department assignment
*1: 1 through 500
*2: To assign departments 16 through 30, press the department shift key at this point.
PrintKey operation example
1
Ö
125
˘
É
12
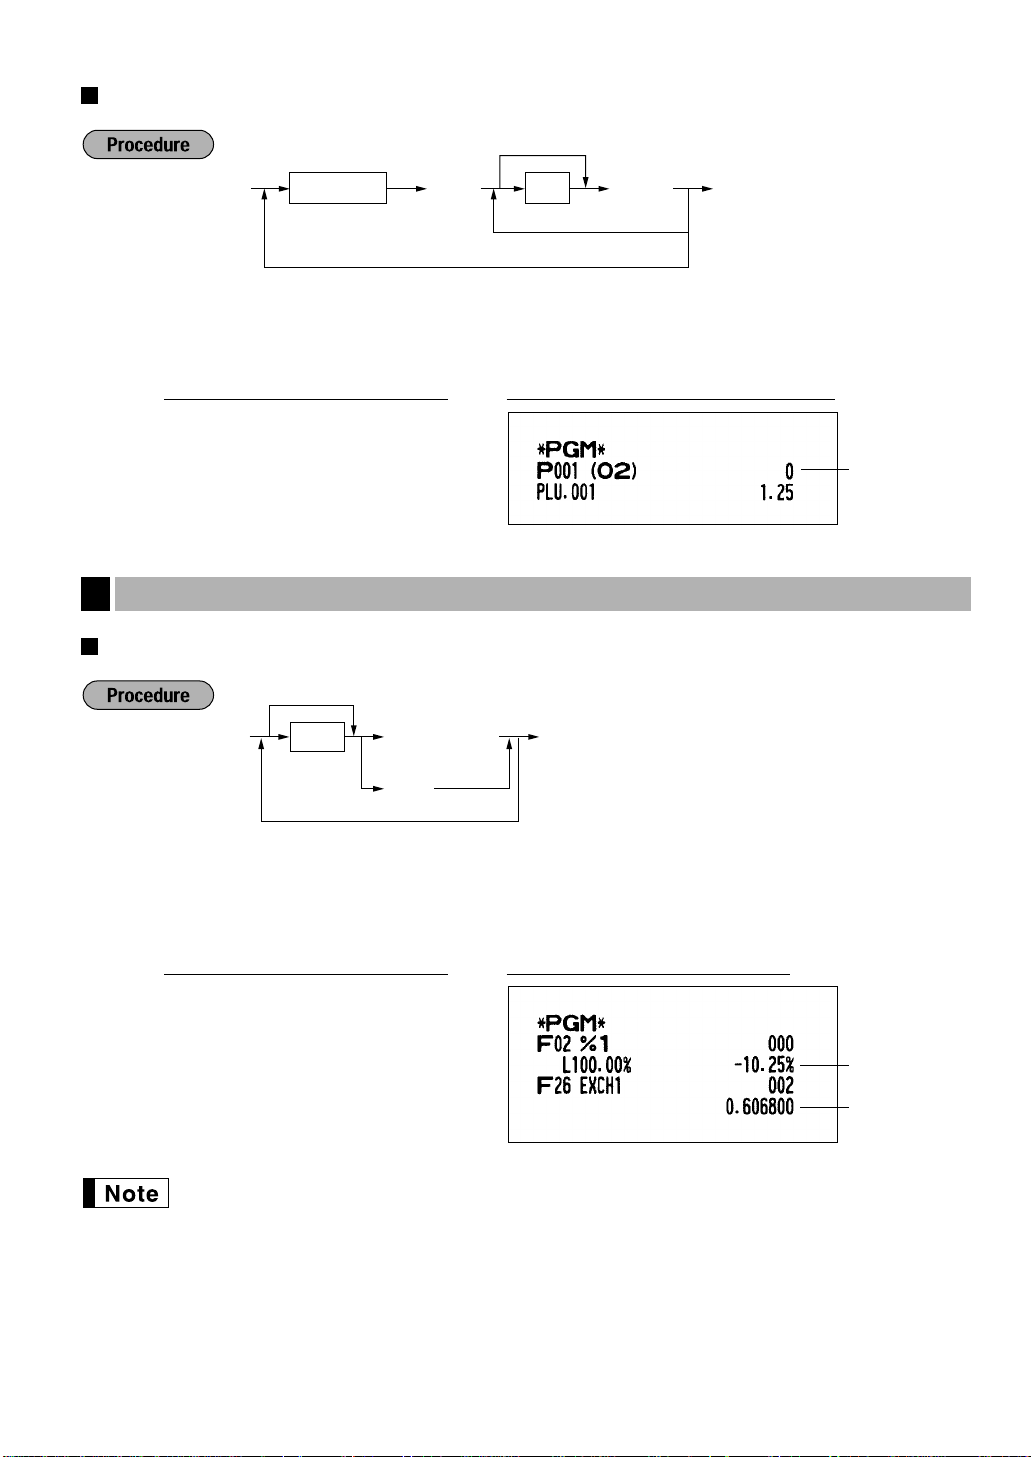
PLU/subdepartment mode
Percent rate
Currency
exchange rate
*Rate or
∞
e
ɧ
To program another rate
To program zero
PLU/subdept.
mode
*1PLU code
Ö
To program "0"
To program the following PLU
To program another PLU
ÉÑ
*2A
*1: 1 through 500
*2: 0 for subdepartment mode or 1 for PLU mode
1
Ö
0
ÑÉ
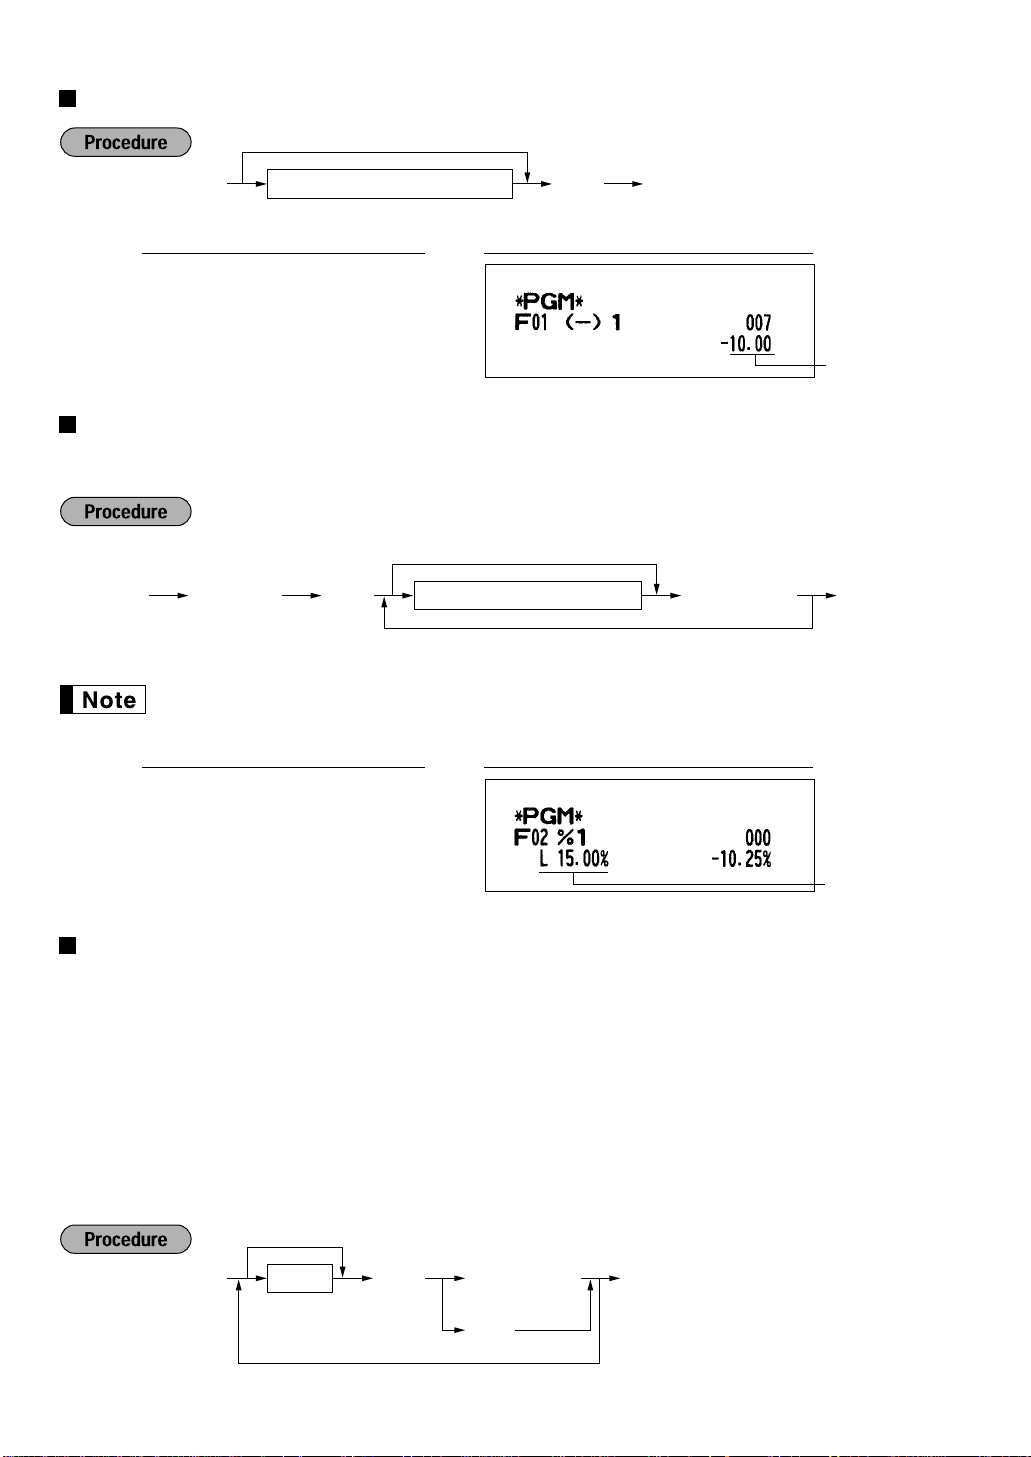
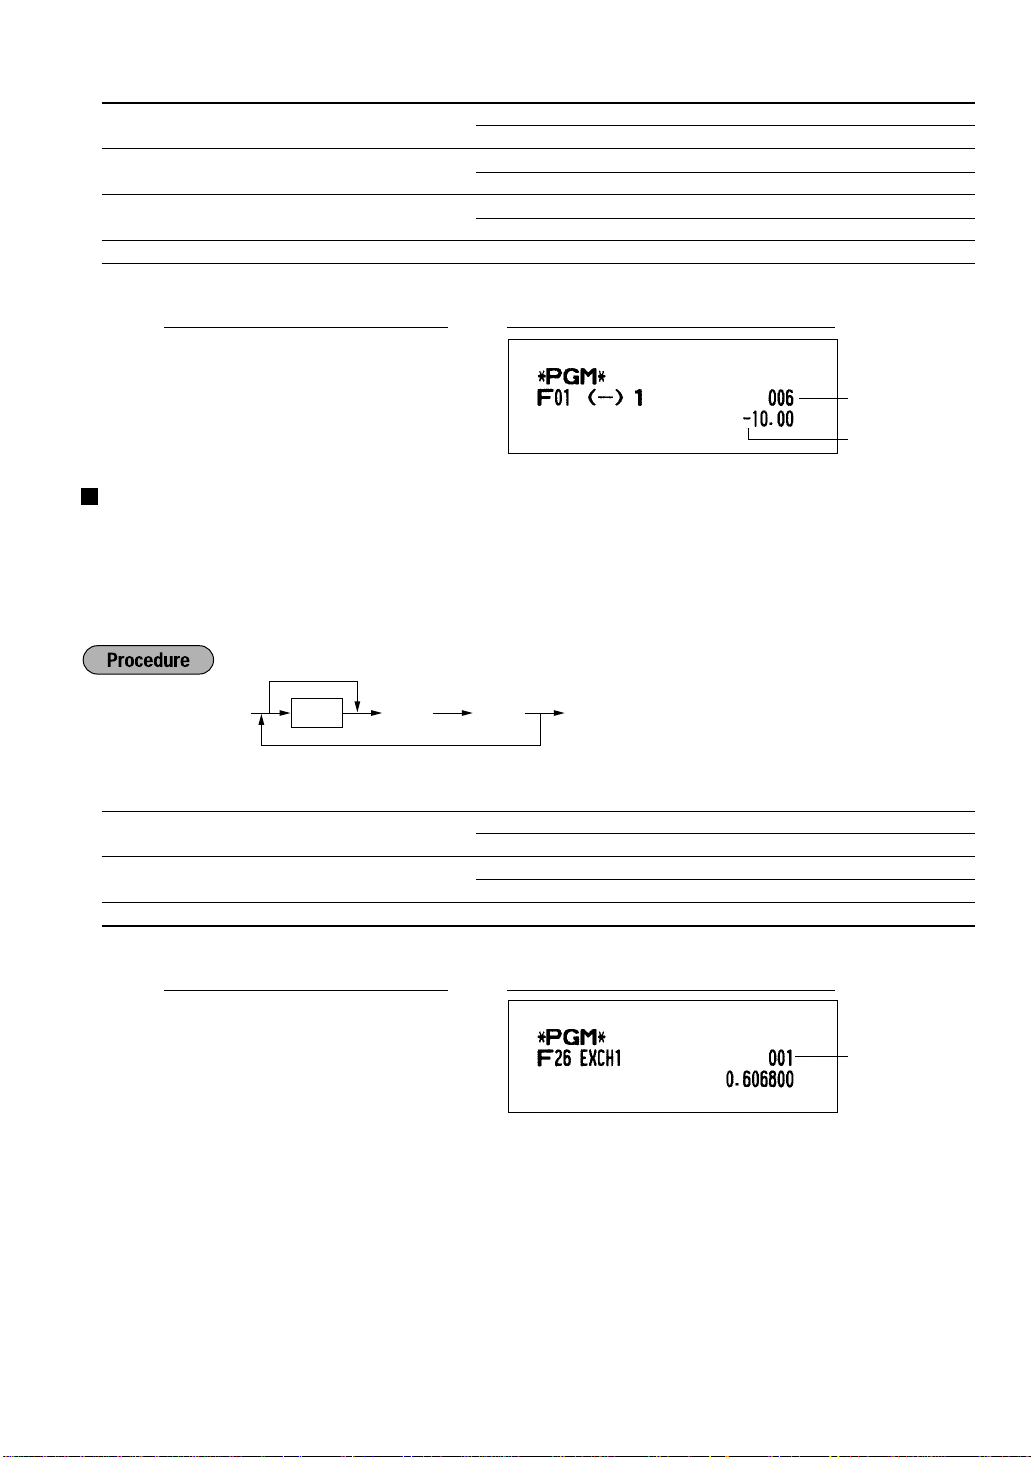
Programming for miscellaneous keys
6
Programming the rate (%, e)
PrintKey operation example
*: Rate
0.00 — 100.00 (% rate)
0.000000 — 999.999999 (Currency exchange rate)
PrintKey operation example
10 .25
0 .6068
∞
e
É
You must use a decimal point when setting rates that are fractional.
13
Programming the discount key amount (-)
*ABCD or
∞≈
-
ɧ
To program for another key
To program “0” for all items
Ñ ≈29
Percentage limit (0.00 -100.00)
É
To program zero
To program for another percent key
or
∞§
Discount amount (max. six digits)
É-
To program zero
1000
-
É
PrintKey operation example
Discount amount
Programming the percent rate limitation (
You can program the upper limit of percent rates for percent entries.
(Percent entries that exceed the upper limit may be overridden in the MGR mode.)
10.00% can be entered as
fractional entry.
10
or
10.00
%
)
. The .key is needed only for
PrintKey operation example
Ñ29≈
15
.00∞
É
Programming function parameters for -and %keys
+/- sign
Programming of the +/- sign assigns the premium or discount function for each key.
Item % / Item
Subtotal % / Subtotal
Limit amount (HALO) (For discount key only)
â
Percent/discount calculation for the individual department and PLU
â
Percent/discount calculation for the subtotals
The HALO limit is in effect for the REG-mode operations but can be overridden in the MGR mode. The
HALO limit is represented by the number of allowable digit for the maximum entry amount for discount
key.
Percentage limit
14
*: Item: Selection: Entry:
From left, ABC
*ABC
É
To program “0” for all items
To change settings
≈e
A +/- sign + (premium) sign 0
- (discount) sign 1
B Item % / Item
C Subtotal % / Subtotal
D Limit amount* for discount key 0-7
* When programming for percent keys, always enter 0.
â
â
1006
≈
Enable 0
Disable 1
Enable 0
Disable 1
PrintKey operation example
-É
From left, BCD
Sign(A)
Programming function parameters for ekey
Currency exchange rate entry selection
You can enable or disable preset and manual entry of currency exchange rate.
Number of digits after decimal point
Set the number of digits after decimal point which is printed on the receipts for currency exchange amount.
*: Item: Selection: Entry:
A Manual rate entry Enable 0
Disable 1
B Preset rate entry Enable 0
Disable 1
C Number of digits after decimal point 0-3
PrintKey operation example
001
≈
eÉ
15
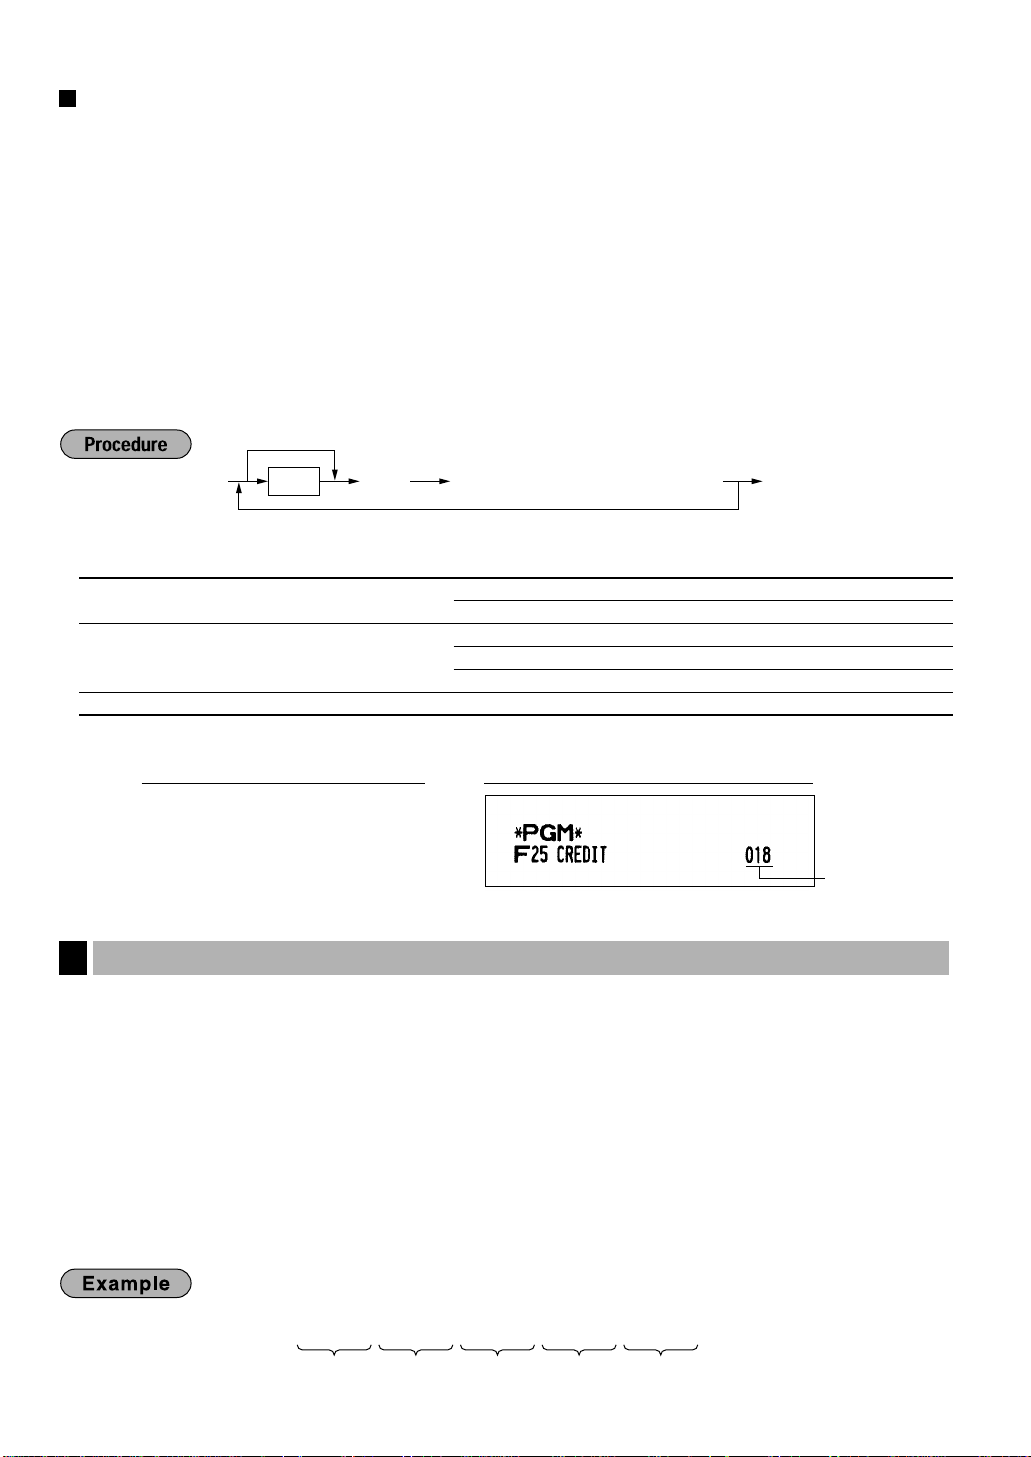
Programming function parameters for ;, ', î, rand pkeys
253
º
083
º
072
º
065
º
082
º
080
º
S H A R P
From left, ABC
*1ABC or
É
To program “0” for all items
To program for another key
*
2
:Press Ñ key for ; key setting.
≈Ñ,',î,rp
*
2
Footer printing
This programming decides whether or not your machine should print a message at the foot of a receipt
when a specified media key is used.
Amount tendered compulsory
You may select amount tendered compulsory or optional for the
You may select amount tendered compulsory or inhibited for the
Limit amount (HALO)
For the
;
HALO limit is in effect for REG-mode operation but can be overridden in the MGR mode. The HALO
limit is represented by the number of allowable digits for the maximum entry or total amount. When “0”
is set, the operation of the corresponding key is prohibited.
*1:Item: Selection: Entry:
A Footer print* Yes 1
B Amount tendered entry* Compulsory 1
C Limit amount 0-8
* When programming for ror pkey, always enter 0.
', î
key, program upper limit entry for total cash amount which can be handled on your register. The
, rand pkeys, program upper limit entry amount for the tendered amount. For the
No 0
Non-compulsory for the ;or 'keys 0
Inhibit for the îkey 0
and 'keys.
;
key.
î
PrintKey operation example
018
≈
îÉ
Text programming
7
How to program alphanumeric characters
Your register allows you to program the text for departments, PLUs, function and so on in the character entry
mode. If you enter a programming job that entails alphanumeric character input, the register automatically goes
into the character entry mode.
In the character entry mode, perform alphanumeric character input by referring to the alphanumeric character
code table and entering the character codes with the numeric keys.
Entering character codes
• Numerals, letters and symbols are programmable by entering character codes and the
alphanumeric character code table on the next page.
• Double-size characters can be made by entering the character code 253.
• All three digits of the character code MUST be entered (even if it starts with zeros).
To program the word “SHARP” with the letter “S” being double size
16
key. See the
º
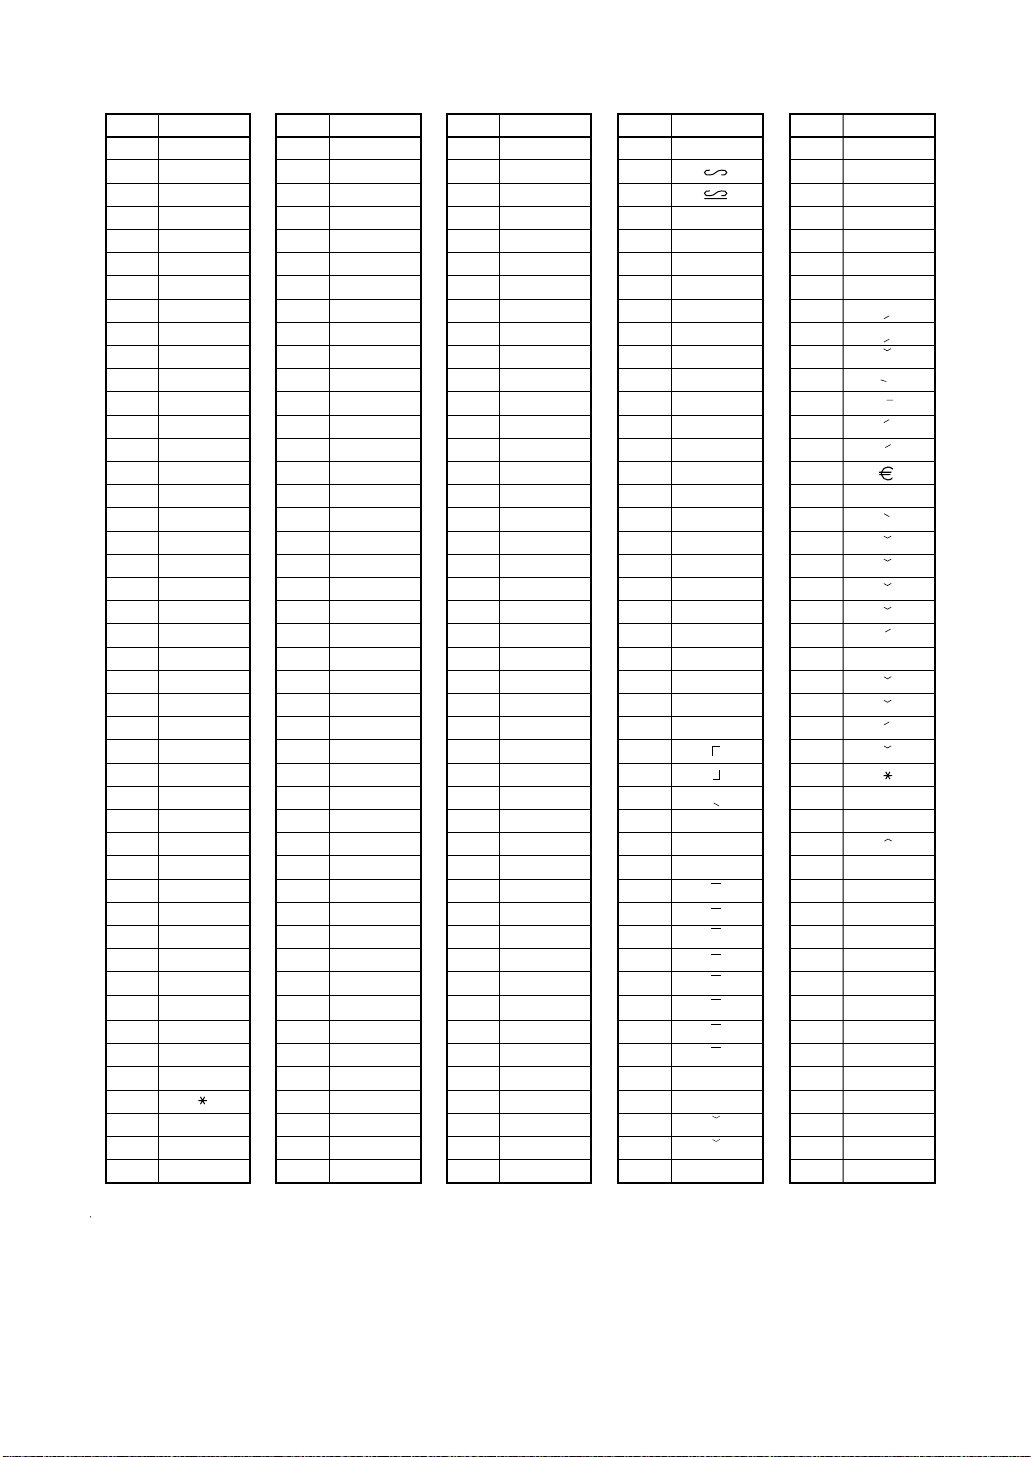
Alphanumeric character code table
✱
✱
Code
001
002
003
004
005
006
007
008
009
010
011
012
013
014
015
016
017
018
019
020
021
022
023
024
025
026
027
028
029
030
031
032
033
034
035
036
037
038
039
040
041
042
043
044
045
Character
á
â
ê
î
ì
í
ô
ó
û
ú
œ
u
ú
o
ó
¨
U
Ú
O
Ó
(space)
!
”
#
$
%
&
’
(
)
+
,
-
Code
046
047
048
049
050
051
052
053
054
055
056
057
058
059
060
061
062
063
064
065
066
067
068
069
070
071
072
073
074
075
076
077
078
079
080
081
082
083
084
085
086
087
088
089
090
Character
.
/
0
1
2
3
4
5
6
7
8
9
:
;
<
=
>
?
@
A
B
C
D
E
F
G
H
I
J
K
L
M
N
O
P
Q
R
S
T
U
V
W
X
Y
Z
Code
091
092
093
094
095
096
097
098
099
100
101
102
103
104
105
106
107
108
109
110
111
112
113
114
115
116
117
118
119
120
121
122
123
124
125
126
127
128
129
130
131
132
133
134
135
Character
Ä
Ö
Ü
^
_
a
b
c
d
e
f
g
h
i
j
k
l
m
n
o
p
q
r
s
t
u
v
w
x
y
z
{
|
}
ß
¢
!!
1
2
3
4
1/2
F
T
←
Code
136
137
138
139
140
141
142
143
144
145
146
147
148
149
150
151
152
153
154
155
156
157
158
159
160
161
162
163
164
165
177
178
180
181
182
183
184
185
186
187
188
189
190
191
192
Character
→
F
T
↓
ç
°
¿
Ù
à
Æ
ø
Å
¤
é
è
Pt
i
Ñ
ò
£
¥
°
Á
Í
A
a
E
e
I
i
U
u
N
n
C
S
C
▲
▲
´´
´´
´´
´´
193
194
195
196
197
198
199
200
201
202
203
204
205
206
207
208
209
210
211
212
213
214
215
216
217
218
219
224
225
226
227
228
229
230
231
232
233
234
235
236
237
238
253
I
G
S
G
g
K
k
L
l
Z
D
d
C
c
P
e
s
c
z
y
u
n
r
§
Ø
↑
]
[
ä
ö
ü
æ
å
É
ñ
*(DC)
’
.
.
.
.
.
.
.
.
.
.
.
.
”
Code
Character
(DC): Double-size character code
17
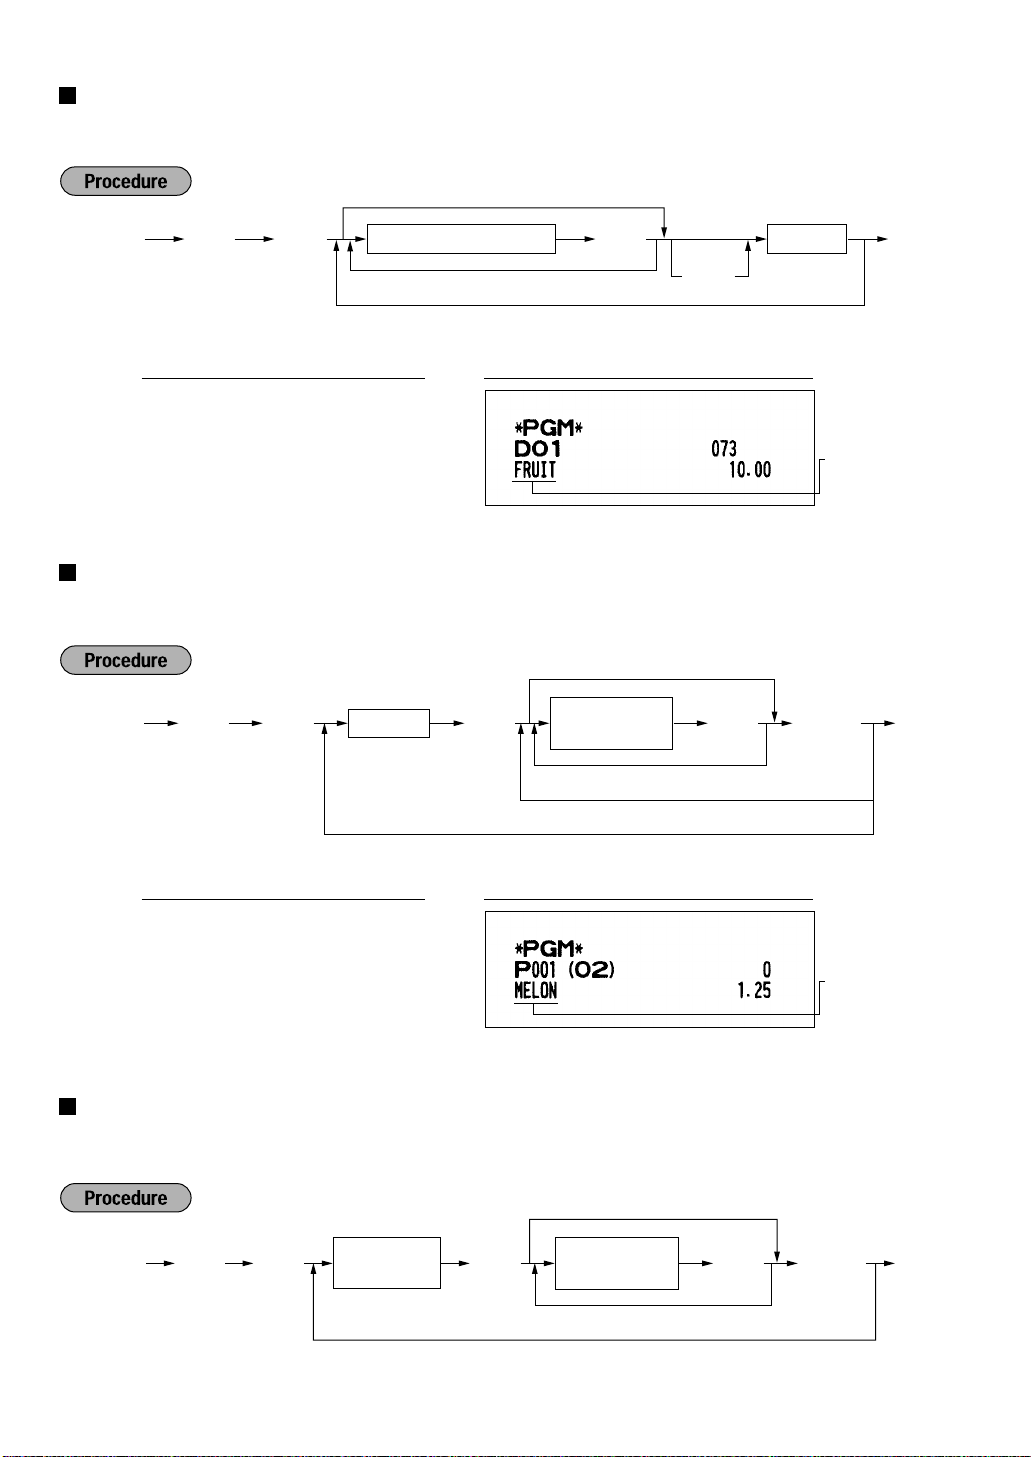
Programming the department text
You can program a maximum of 16 characters of text for each department. Program the text by entering the
character codes.
To keep the current setting
Ñ .1
*To program departments 16 through 30, press the department shift key at this point.
Character code (3 digits) Dept. key
Up to 16 characters
To program another department
º
*
Ó
PrintKey operation example
É
Ñ1 .
070 º082 º085
073 º084
Programming the PLU text (item label)
You can program a maximum of 16 characters of text (item label) for each PLU or subdepartment. Program the
text by entering the character codes.
Ñ .2 Ö
º
º
¯É
PLU code
To keep the current setting
Character code
(3 digits)
Up to 16 characters
To program the next PLU
º
Text
programmed for
dept. 1
ÉÑ
To program another PLU
PrintKey operation example
Ñ2 .
1
Ö
077 º069 º076
079 º078
Programming the function text
You can program a maximum of 12 characters of text for each function key and other functions using the table
on the following pages. Program the text by entering the character codes.
Ñ .3 ≈
18
* Function no.: See “List of function texts” shown on the following page.
º
º
ÑÉ
*Function no.
(max. 2 digits)
To keep the current setting
Character code
(3 digits)
Up to 12 characters
To program another function text
º
Text
programmed for
PLU code 1
ÉÑ

Function
no.
Key or function
Default
setting
Function
no.
Key or function
Default
setting
1
â
(–)1
2%1 %1
3%2 %2
4 Differ DIFFER
5 Taxable 1 subtotal TAX1 ST
6 Taxable 2 subtotal TAX2 ST
7 Taxable 3 subtotal TAX3 ST
8 Taxable 4 subtotal TAX4 ST
9 VAT/tax 1 VAT 1
10 VAT/tax 2 VAT 2
11 VAT/tax 3 VAT 3
12 VAT/tax 4 VAT 4
13 Net 1
NET1
14 Net 2 NET2
15 Refund REFUND
16 Void
17 Void mode total MODE
18 MGR void MGR
19 Subtotal void SBTL
20 No sale NO SALE
21 RA RA
22 PO PO
23 Cash
CASH
24 Cheque CHECK
25 Credit CREDIT
26 Exchange (Preset rate) EXCH1
27 Exchange (Open rate) EXCH2
28 Exchange is EXCH1 IS
29 Exchange cheque EX1 CHK
30 Exchange credit EX1 CR
31 Cash in drawer CID
32 Cash/cheque is CA/CH IS
33 Cash/cheque in drawer CA/CH ID
34 Change for cheque CHK/CG
35 Customer GUEST
36 Paid total PAID TL
37 Domestic currency 1 DOM.CUR1
38 Domestic currency 2 DOM.CUR2
39 Dom. currency for EX cheque DOM.CUR1
40 Dom. currency for EX credit DOM.CUR1
41 Cheque in drawer CH ID
42 (+) Dept total DEPT TL
43 (-) Dept total DEPT (-)
44 Net 1 (Taxable 1 - VAT/tax 1) NET 1
45 Net 2 (Taxable 2 - VAT/tax 2) NET 2
46 Net 3 (Taxable 3 - VAT/tax 3) NET 3
47 Net 4 (Taxable 4 - VAT/tax 4) NET 4
48 Subtotal SUBTOTAL
49 Merchandise subtotal MDSE ST
50 Total TOTAL
51 Change CHANGE
52 Sales q'ty ITEMS
53 Average AVE.
54 CCD
CCD
55 CCD differ CCD DIF.
56 CCD differ total DIF. TL
57 Total tax TTL TAX
58 Net without tax
NET
59 Department report title DEPT
60 PLU report title PLU
61 Transaction report title TRANS.
62 Cashier report title CASHIER
63 Hourly report title
HOURLY
64 Daily net report title DAILY
65 Non add symbol (8 chara.) #
66 Copy receipt title
COPY
67 EJ report title EJ
68 EJ report end title EJ END
Ñ3 .
067 º065 º082
List of function texts
25
≈
º
068
º
ÑÉ
PrintKey operation example
19
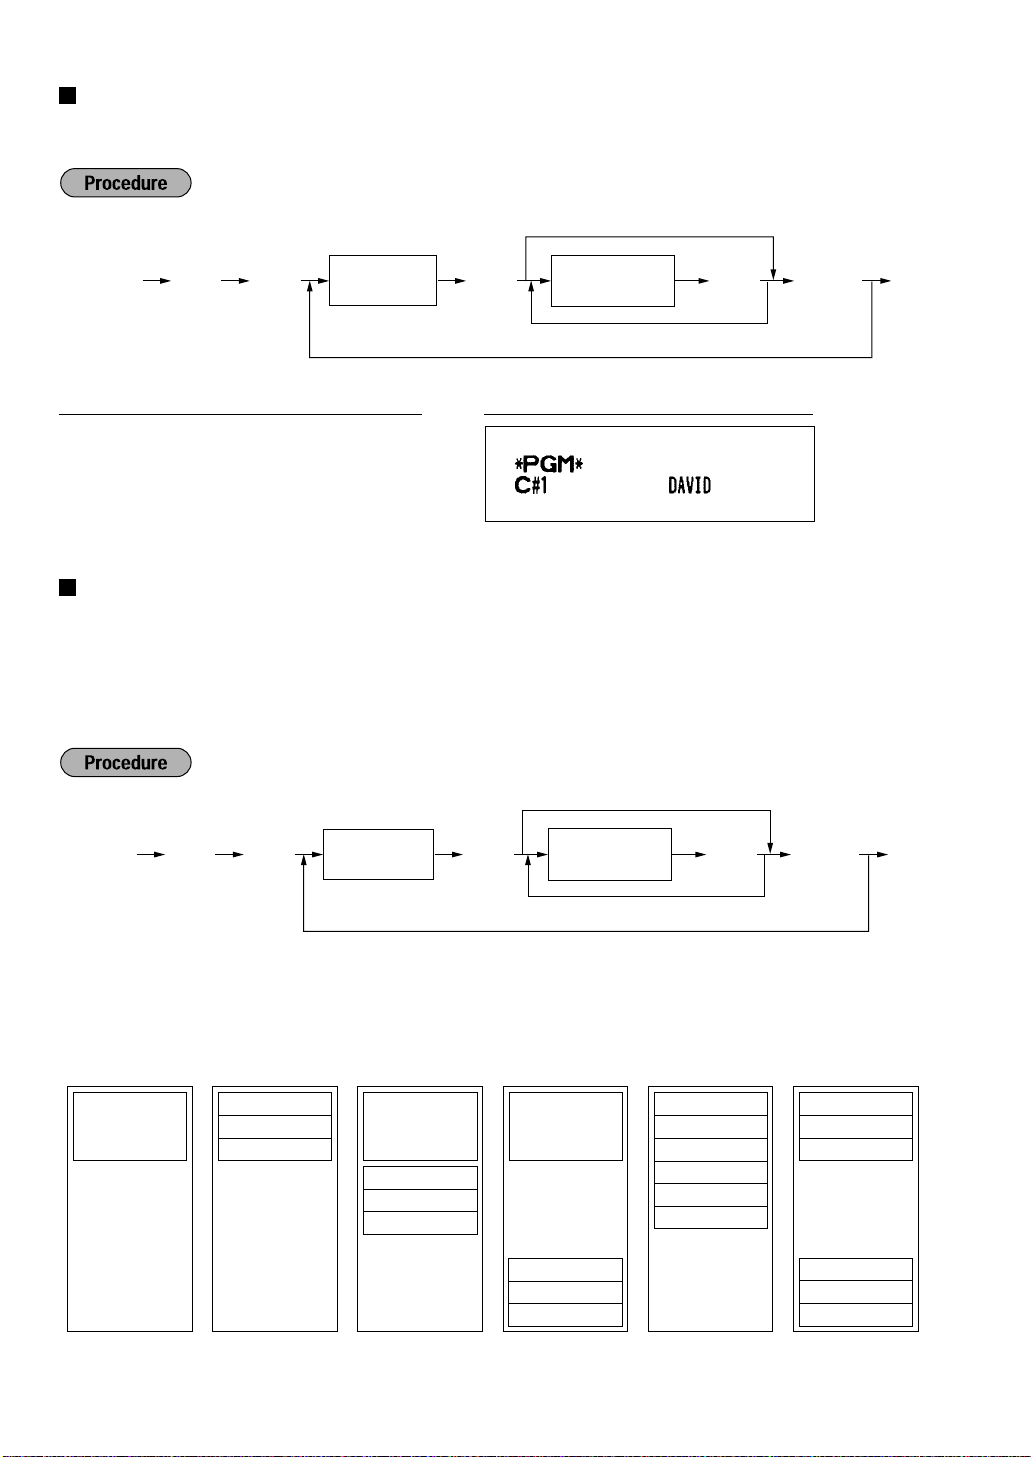
Programming the cashier names
Graphic logo
Default setting
Text 2nd line
Graphic logoGraphic logo
Text 3rd line
Text 1st line
Header 3-line
message and
footer 3-line
messages
Header 3-line message Footer 3-line
message
Header 6-line
message
Text 2nd line
Text 3rd line
Text 1st line
Text 2nd line
Text 3rd line
Text 1st line
Text 2nd line
Text 3rd line
Text 1st line
Text 5th line
Text 6th line
Text 4th line
Text 5th line
Text 6th line
Text 4th line
Text 5th line
Text 6th line
Text 4th line
Ñ .4 ≈
*Line number
(1-6)
Up to 30 characters
Character code
(3 digits)
ÉÑ
To keep the current setting
º
To program another line
Ñ .5 ≈
Cashier code
(1-6)
Up to 12 characters
Character code
(3 digits)
ÉÑ
To keep the current setting
º
To program another cashier name
You can program a maximum of 12 characters of cashier name for each cashier. Program the text by entering
the character codes.
PrintKey operation example
Ñ5 .
1
≈
068 º065 º086 º073 º068
º
ÑÉ
Programming logo messages
Your register can print programmed messages for customers on every receipt. On the standard model, only
graphic logo is printed on the receipt (If you want a graphic logo customized for your store, please consult with
your dealer.). If you want to print logo message, please change the logo print format. (See page 25 for the
programming details.) You have five options described below.
Program the text by entering the character codes.
* “Header 3-line message” type: 1 to 3
“Footer 3-line message” type : 4 to 6
“Header 6-line message” type: 1 to 6
“Header 3-line and footer 3-line message” type: 1 to 6 (1 to 3 as header, 4 to 6 as footer)
20
To program “THANK YOU” with double size and being centered on the third line as the logo message:
Domestic
currency symbol
Ñ85.
Up to 4 characters
Character code
(3 digits)
ÉÑ
To keep the current setting
º
✱
Ñ6.
Up to 4 characters
Character code
(3 digits)
ÉÑ
To keep the current setting
º
PrintKey operation example
Ñ4 .
3
≈
032 º032 º032 º032 º032 º032
253 º084 º253 º072 º253 º065
253 º078 º253 º075 º032 º032
253 º089 º253 º079 º253 º085
º
º
º
º
ÑÉ
6-line logo message is preprogrammed when shipped. So, please start entering from the first line
when you first program a logo message.
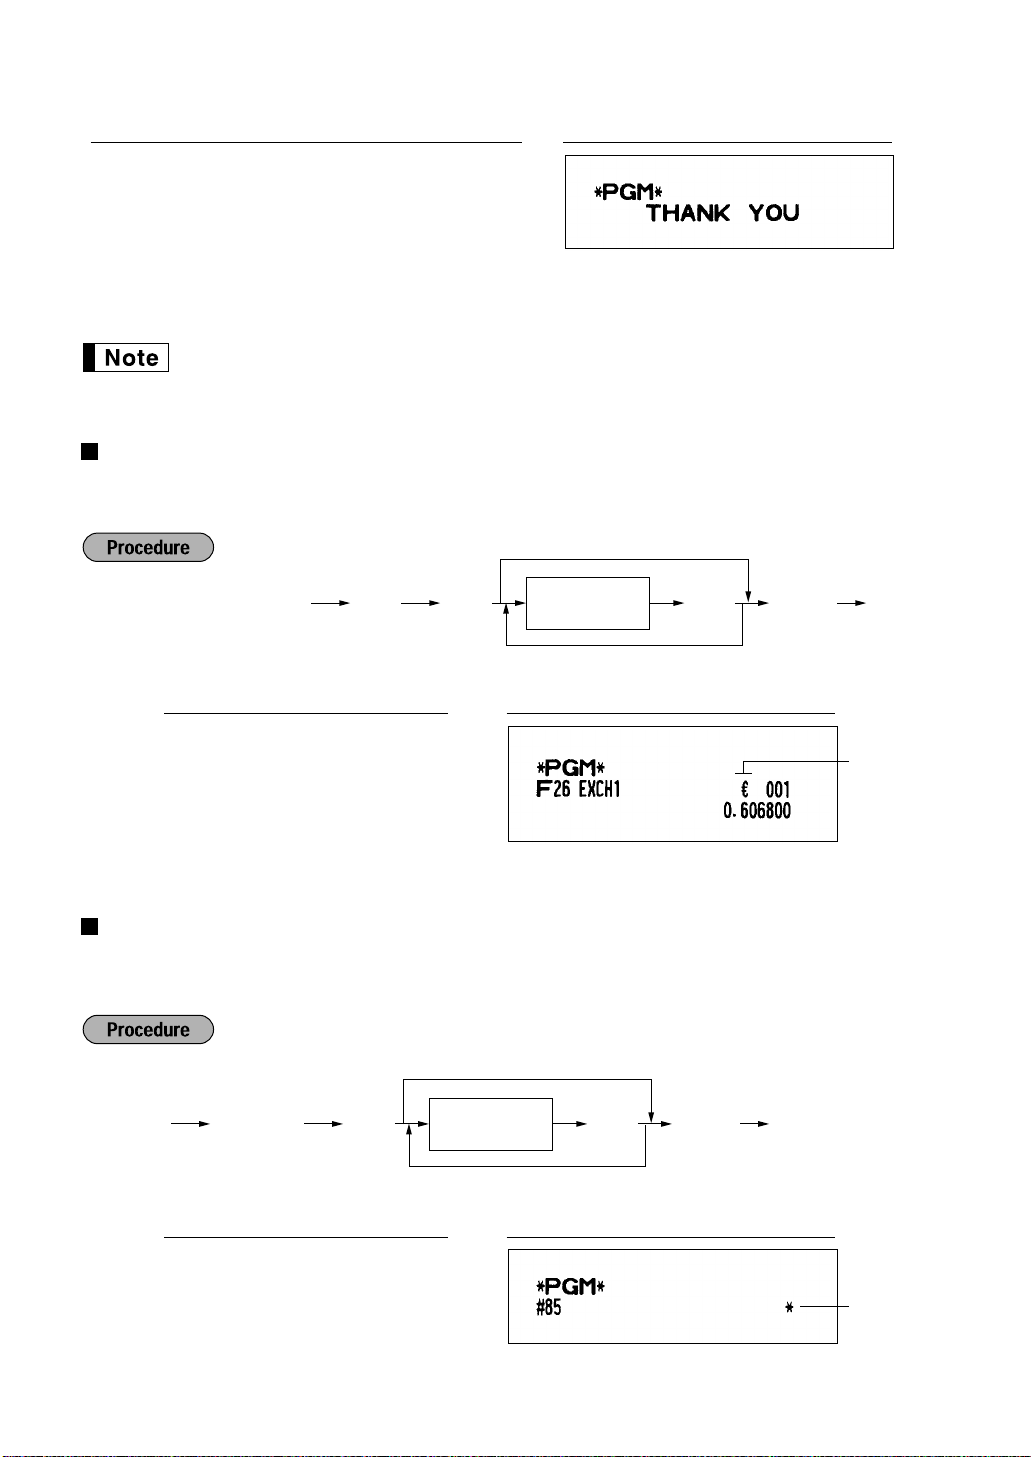
Programming foreign currency symbol
Foreign currency symbol for ekey is printed on a foreign currency exchange amount which rate is preset by
programming. Program the text by entering the character codes.
PrintKey operation example
Ñ6 .
032 º032 º032
207
º
º
Foreign currency
symbol
ÑÉ
Programming domestic currency symbol
“ ” is set as a default setting. When you want to change the domestic currency symbol, program the symbol
(max. 4 characters) by entering the character codes.
PrintKey operation example
85
Ñ
032 º032 º032
.
º
042
º
ÑÉ
21
Ñ6≈
*ABCDEFGH
ÉÑ
To set “0” for all items
Ñ5≈
*ABCDEFGH
ÉÑ
To set “0” for all items
Programming various functions
8
You can continue programming until Ékey is pressed for the programming described in this
section. To continue programming, repeat from the first numeric key entry.
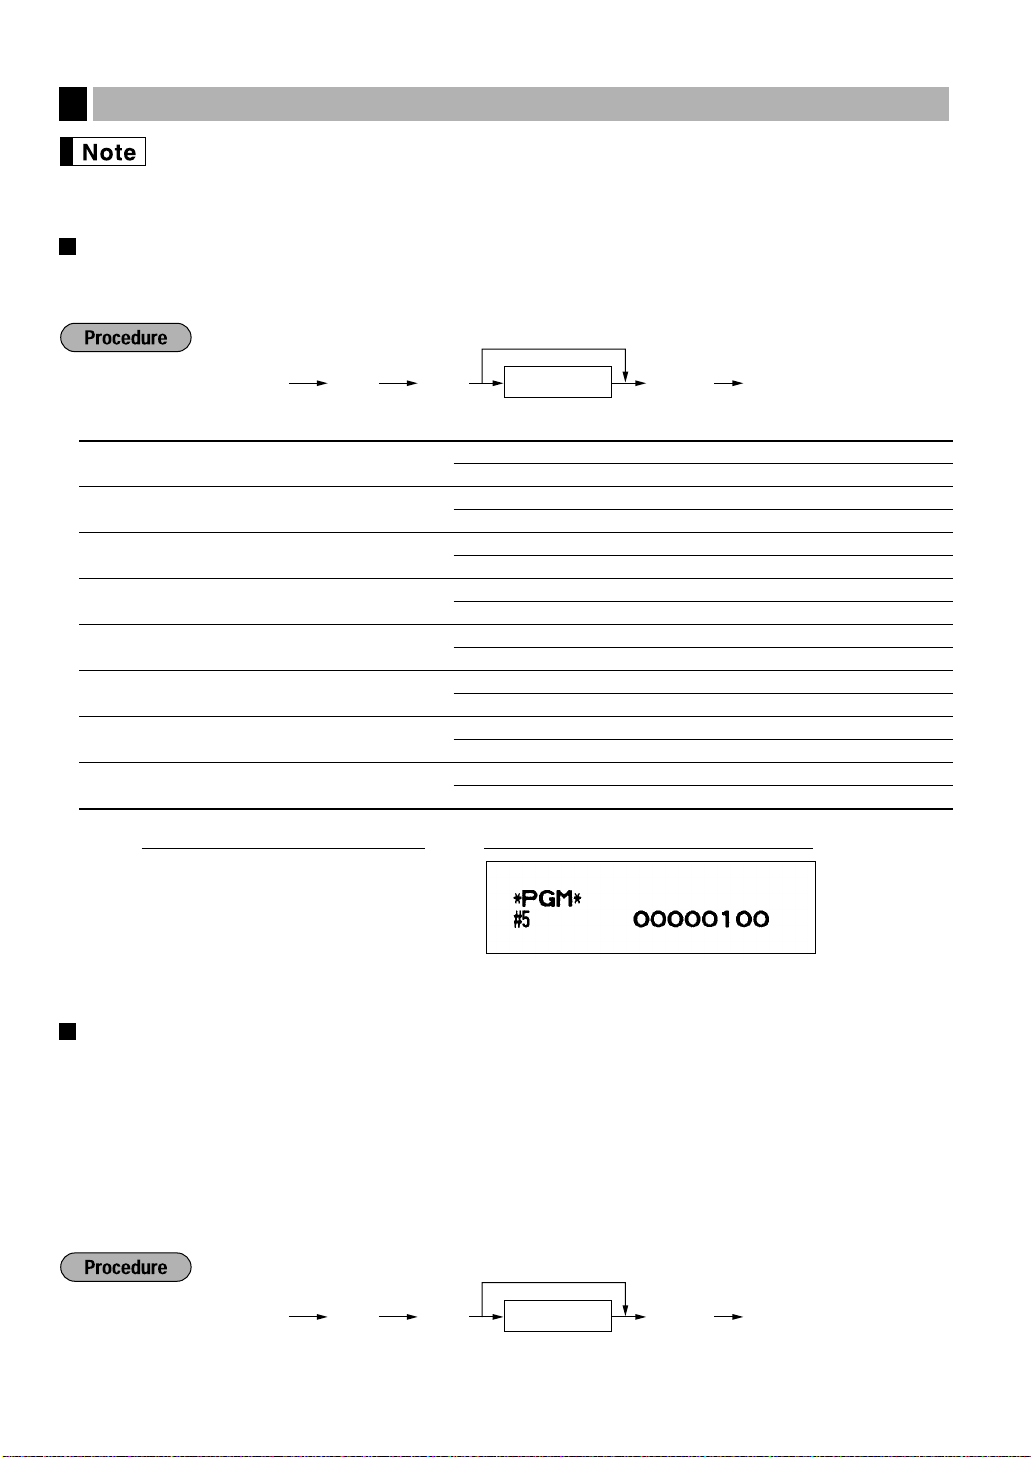
Programming optional feature selection
You can enable or disable the operation of Paid out, Received-on account, Refund, No-sale, Void in the
REG-mode, and also select if you enable fractional quantity entry or not.
* Item: Selection: Entry:
A Paid-out in the REG-mode Enable 0
Disable 1
B Received on account in the REG-mode Enable 0
Disable 1
C Subtotal void in the REG-mode Enable 0
Disable 1
D Indirect void in the REG-mode Enable 0
Disable 1
E Direct void in the REG-mode Enable 0
Disable 1
F Refund entry in the REG-mode Enable 0
Disable 1
G No sale in the REG-mode Enable 0
Disable 1
H Fractional quantity entry Enable 0
Disable 1
Ñ5 ≈
00000100
Ñ
É
Programming print format
You can program;
Printer type - Use printer as journal printer or for issuance of receipt
Receipt print form - Detailed receipt print or summary receipt print
On the summary receipt print, the details of each item are not printed.
Date print selection for receipts
Consecutive number print selection
Separator line in the reports
Zero skip for reports
22
PrintKey operation example
* Item: Selection: Entry:
Ñ7≈
*ABCDEFGH
ÉÑ
To set “0” for all items
A Printer type Journal printer 0
Receipt printer 1
B Receipt print form Total 0
Detailed 1
C Always enter 0. 0
D Date print on receipts Yes 0
No 1
E Consecutive no. print Yes 0
No 1
F Separator line in reports Separator line 1
One line space 0
G Zero skip in PLU report Yes 1
No 0
H Zero skip in general/cashier/hourly/ Yes 1
daily report No 0
PrintKey operation example
Ñ6 ≈
10000111
Ñ
É
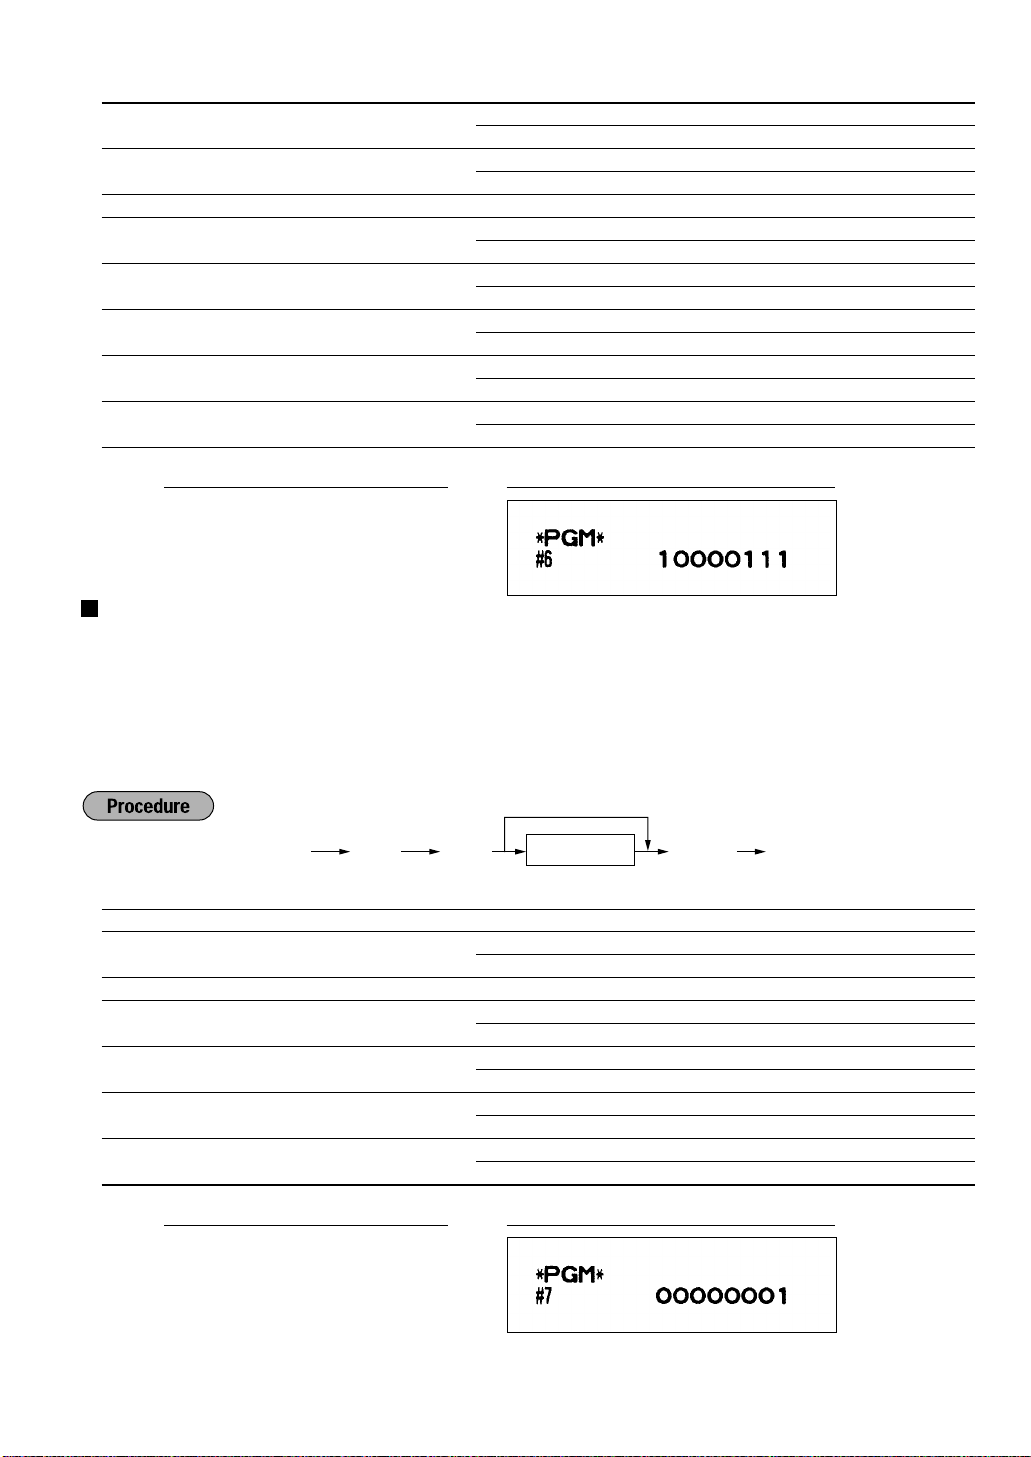
Programming receipt print format
You can make selection of;
Subtotal print when
VAT/tax amount print
Taxable amount print
NET amount print
Purchase number printing
key is pressed
Ñ
* Item: Selection: Entry:
A - B Always enter 0. 0
C Subtotal print with a press of subtotal key Yes 1
No 0
D Always enter 0. 0
E VAT/tax amount print Yes 0
No 1
F Taxable amount print Yes 0
No 1
G Net amount print Yes 0
No 1
H Purchase no. print Yes 0
No 1
PrintKey operation example
Ñ7 ≈
00000001
Ñ
É
23
Programming EURO system settings
Ñ10≈
*ABCD
ÉÑ
To set “0” for all items
Ñ8≈
*ABCD
ÉÑ
To set “0” for all items
For details of EURO system settings, please refer to “PROGRAMMING FOR EURO”.
Printing exchange total amount and change amount on receipt or journal
Total and change amounts in exchange currency are printed respectively below each of the total and exchange
amounts in domestic currency.
Cheque and credit operation when tendering in foreign currency
Exchange calculation method
“Division” or “Multiplication” can be selected for the conversion method from domestic currency to exchange
currency, and the calculation is performed as follows:
In case that “Division” is selected:
Domestic currency amount Exchange rate = Exchange amount
In case that “Multiplication” is selected
Domestic currency amount Exchange rate = Exchange amount
* Item: Selection: Entry:
A Printing exchange total amount and Yes 1
change amount on receipt or journal No 0
B Always enter 0. 0
C Cheque and credit operation when Yes 1
tendering in foreign currency No 0
D Exchange calculation method Division 1
Multiplication 0
PrintKey operation example
Ñ8 ≈
1000
Ñ
É
Programming power saving mode
For the details of power saving mode, please refer to “Power saving mode” of “PRIOR TO ENTRIES”.
* Item: Selection: Entry:
A Entering power saving mode Yes 0
when time is displayed No 1
B-D Time(min.) to entering power saving mode 001-254 or 999*
since no operation is made
* 999: inhibit entering power saving mode
PrintKey operation example
10
Ñ
0060
≈
Ñ
É
24
Programming logo message print format
Ñ32≈
*AB
ÉÑ
To set “00”
Ñ31≈
*AB
ÉÑ
To set “00”
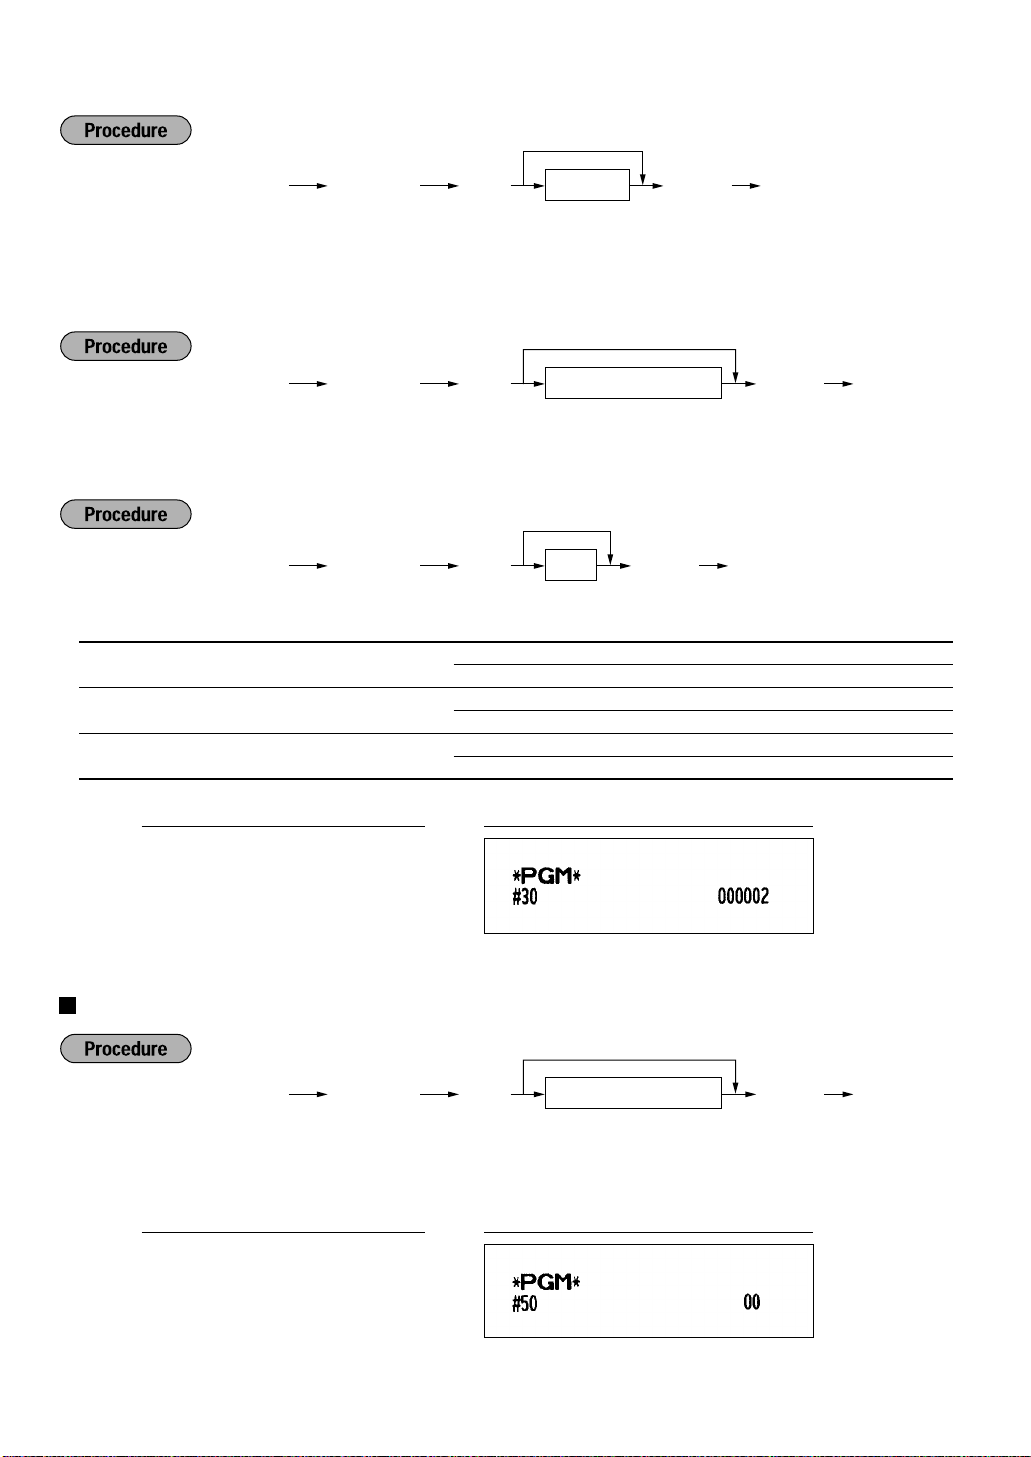
Ñ30≈
Terminal number (max. 6 digits)
ÉÑ
To set “0”
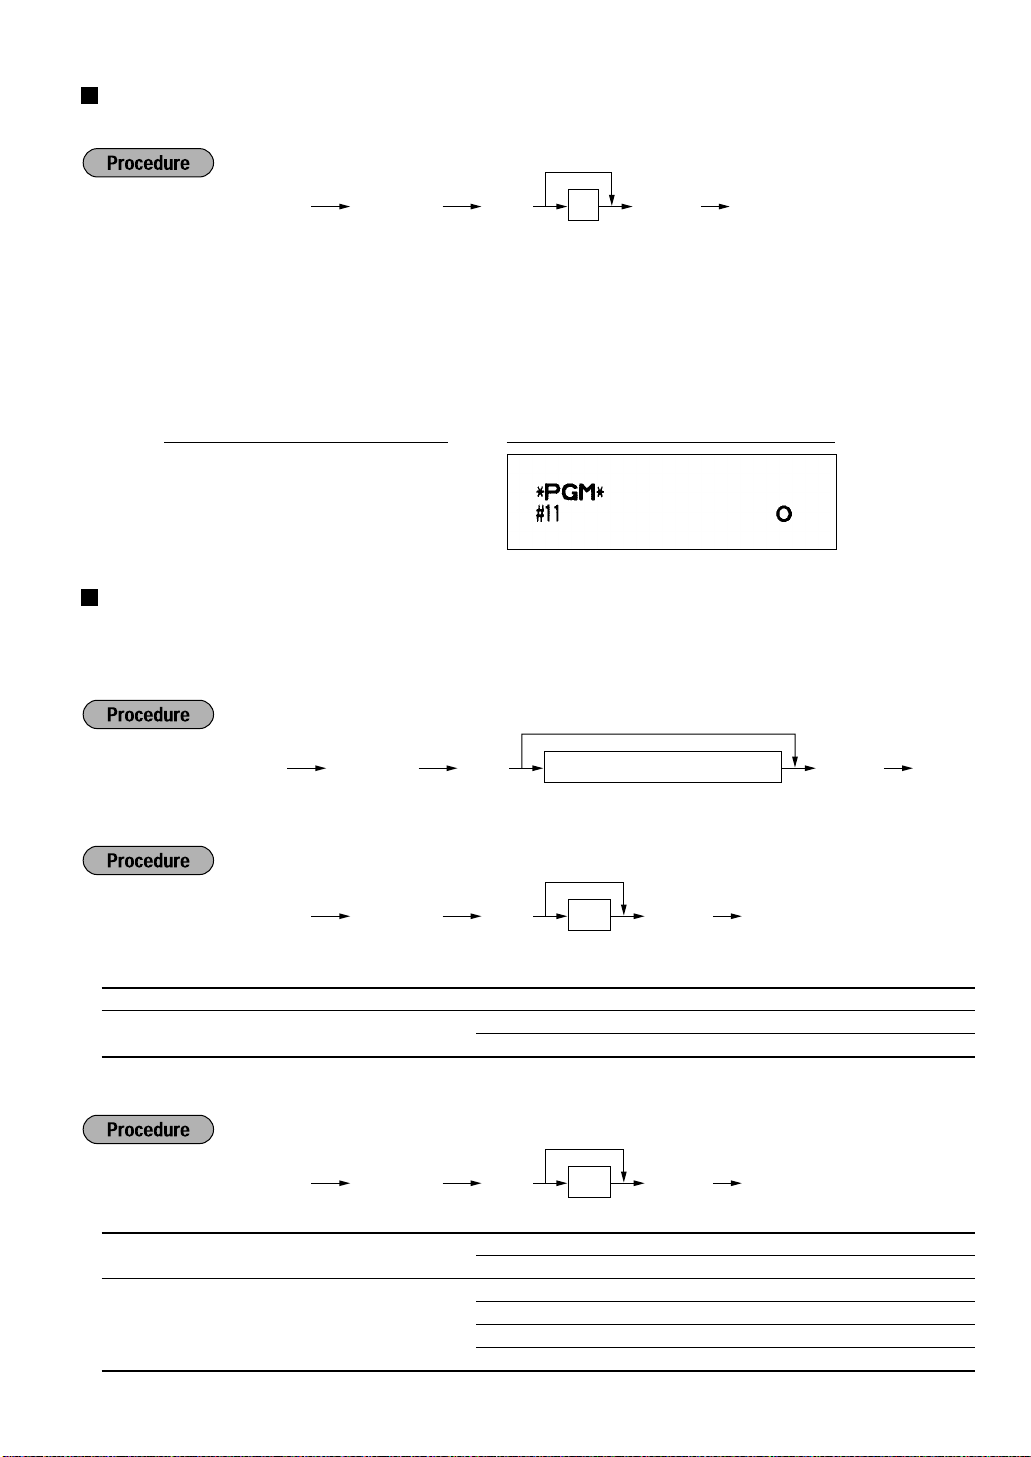
Ñ11≈
*A
ÉÑ
To set “0”
You can select the number of lines of logo message, and the position to print it on receipt or journal.
*A: Loge message type
0: Header 3-line message without graphic logo
1: Graphic logo only
2: Footer 3-line message with graphic logo
3: Header 6-line message
4: Header 3-line message with graphic logo
5: Header 3-line message and footer 3-line message
PrintKey operation example
11
Ñ
0
≈
Ñ
É
Programming RS-232C interface
To realize the on-line communication, please consult with your dealer.
(1) RS-232C terminal number
(2) RS-232C transmission form
* Item: Selection: Entry:
A Always enter 0. 0
B Transmission line form Half duplex system 1
Full duplex system 0
(3) RS-232C transmission type and baud rate
* Item: Selection: Entry:
A Transmission type Send print data 1
Download/upload RAM data 0
B Baud rate (bps) 2400 3
4800 4
9600 5
19200 6
25
(4) RS-232C start code and end code
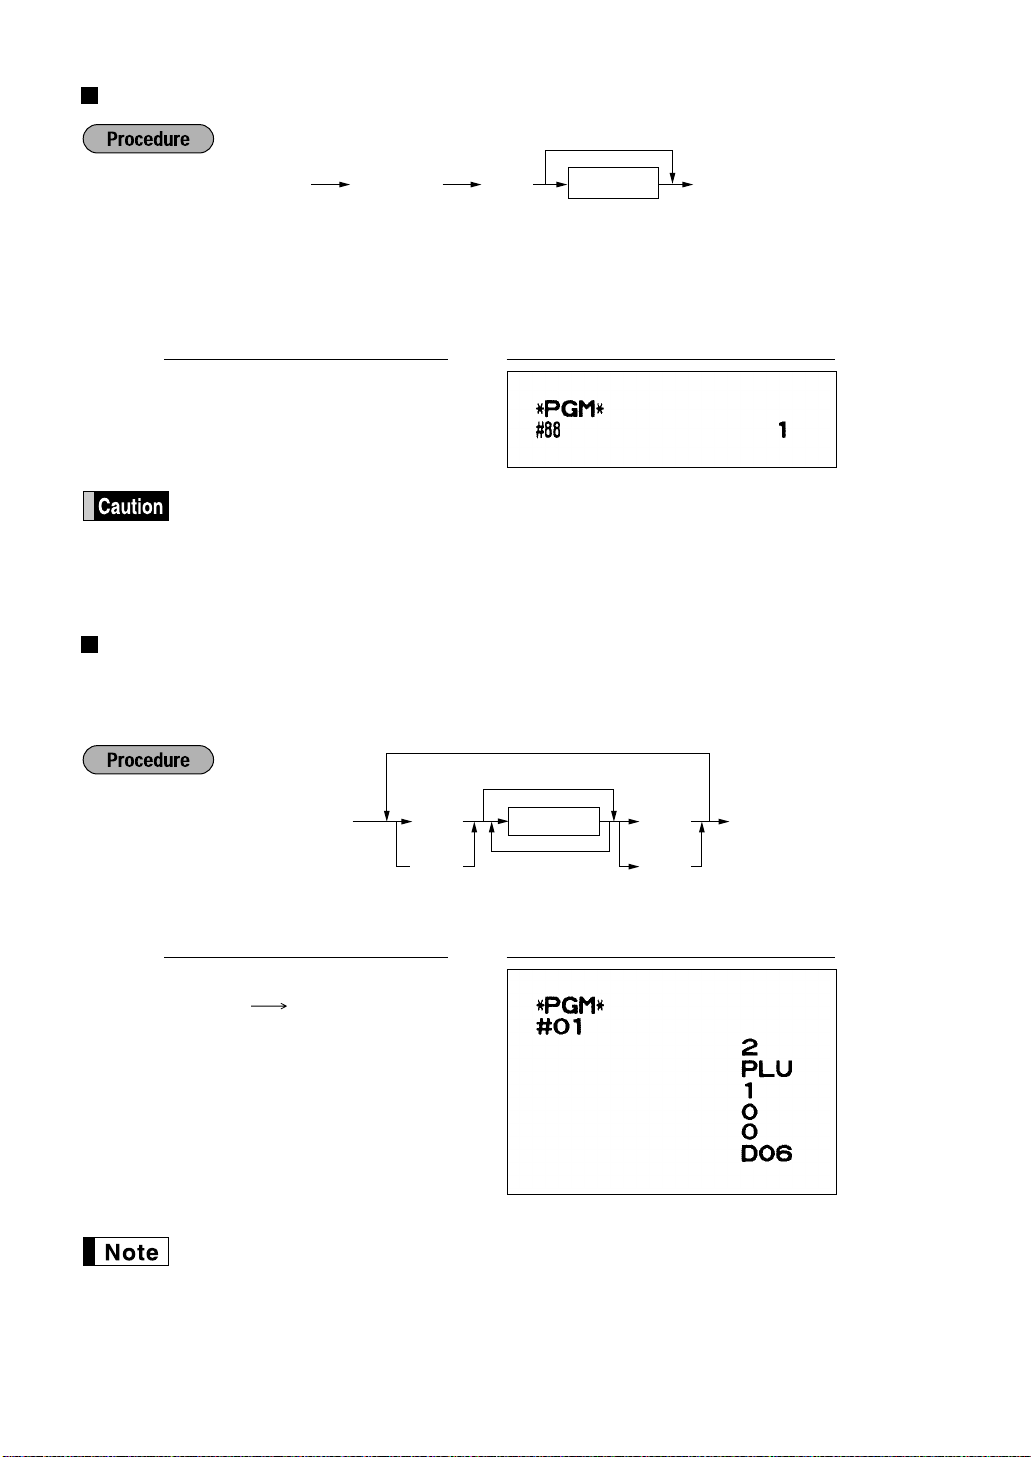
Ñ50≈
*Printer density (00-99)
ÉÑ
To set “0”
Ñ36≈
*ABC
ÉÑ
To set “0” for all items
Ñ35≈
Time out (1 to 255 sec.)
ÉÑ
To set “0”
Ñ33≈
*ABCDEF
ÉÑ
To set “000000”
*A-C: Start code 000-127
D-F: End code 000-127
(5) RS-232C time out setting
(6) RS-232C print data
* Item: Selection: Entry:
A Sensing DR signal Yes 0
No 1
B Sensing CS signal Yes 0
No 1
C Sending all print data Yes 1
No 0
Programming thermal printer density
*“00” = 70% for standard density
“50” = 100% for standard density
“99” = 130% for standard density
26
30
Ñ
2
≈
Ñ
É
50
Ñ
00
≈
Ñ
É
PrintKey operation example
PrintKey operation example
Language selection
~
2 Ö 100
ü
~
É
AUTO1
setting
~
¡
É
Transaction
Delete
max. 25 times
~
¡
Ñ88≈
*Language
É
To set “0”
*Language: 0: English
1: German
2: French
3: Spanish
PrintKey operation example
88
Ñ
When you change the language by executing this procedure, the texts such as department/PLU
texts, logo message and function texts, which you programmed, will be reset to the default settings.
Programming the AUTO key — Automatic sequencing key —
If you program frequently performed transactions or report sequences for the AUTO keys, you can call those
transactions and/or reports simply by pressing the corresponding AUTO keys in key operations.
1
≈
É
Programming for
~
When the AUTO key has been programmed to execute a report job function etc., the mode switch
must be in the appropriate position (X1/Z1 or X2/Z2).
; entering a PLU 2 item (programmed unit price: 1.50) and a dept. 6 item (unit price: 1.00)
PrintKey operation example
27
Mode
Dept. code
Dept. text
Function no.& its text
Dept. unit price w/sign
Dept. function
Discount amt. w/sign
Minus department
Foreign currency symbol/
Function parameters
Rate
HALO
Function parameters
Function parametrs (A-C)
Percent limit
Tax status
Lowest taxable amount
Cashier name
Cashier code
Tax rate
Logo Message
Optional feature selection (A-H)
Print format (A-H)
Receipt print format(A-H)
EURO system setting(A-D)
Power saving mode(A-D)
Logo messeage print format
RS-232C terminal no.
RS-232C transmission form (AB)
RS-232C transmission type/baud rate(AB)
RS-232C Start-End code
RS-232C timeout
RS-232C print data
Thermal printer density
Percent rate with sign
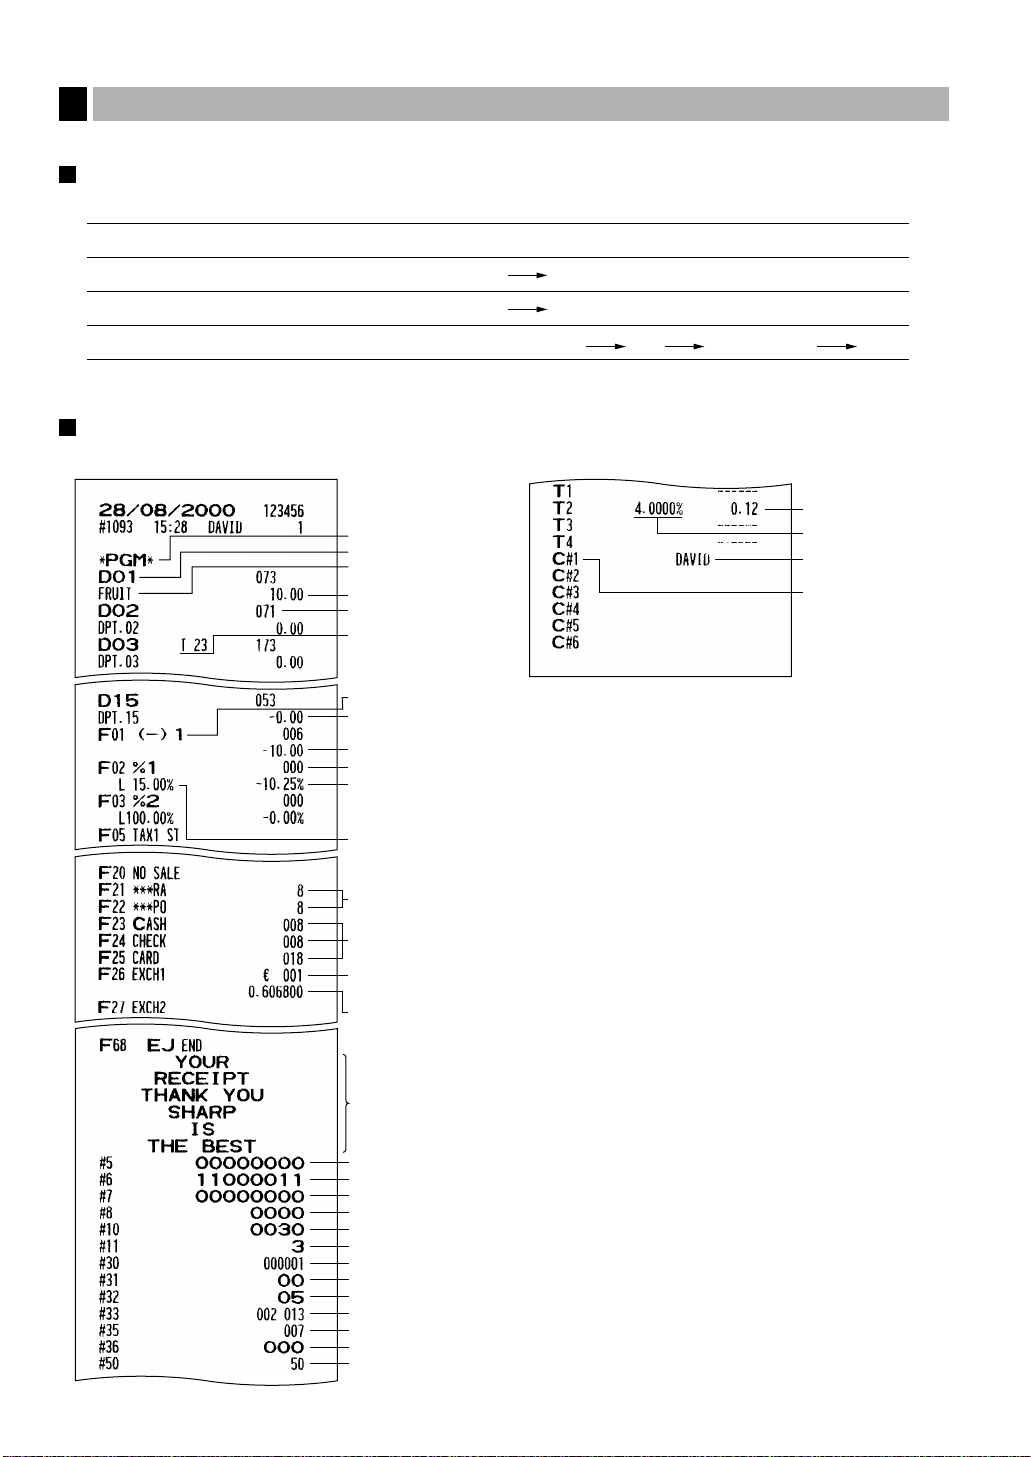
Reading stored programs
9
Your machine allows you to read every program stored in the PGM mode.
Key sequence for reading stored program
Report name Key sequence
Programming report
É
Auto key programming report 1 É
Printer density programming report 3 É
PLU programming report Start PLU code ≈ End PLU code Ö
Sample printouts
1 Programming report
28

2 Auto key programming report 3 Printer density programming report
PLU code
PLU text
Range
Mode parameter
Unit price
Associated
dept. code
Entered Value
Printer density
Printing density
example
4 PLU programming report
TRAINING MODE
The training mode is used when the operator or the manager practices register operations.
When a cashier set in training is selected, the machine automatically enters the training mode. When a cashier
not set in training is selected, the machine automatically enters the ordinary REG mode. (For programming,
consult your dealer.)
The training operations is valid only in REG, MGR and mode.
The corresponding cashier memory is updated in the training mode. Other memories are not updated.
PrintKey operation example
1000
¯
3
≈
ú
É
29

READING (X) AND RESETTING (Z)
Item
Mode switch
position
Key operation
.
Ó
É
Reading
Resetting
.
‹
X1/Z1 X2/Z2
.
‹
<OP X/Z> X
X1, Z1 X2, Z2
X1, Z1
--
X1, Z1
--
X1, Z1
--
X1, Z1
--
<OP X/Z>X, Z
É
key: Sales total
≈
key: Amount of cash in drawer
Dept. key ( ¯ to ì ) : Department total amount
For optional dept. keys: Dept. key (
ö
to õ )
Reading
Resetting
Reading
Resetting
Full cashier reading and
resetting
(Full cashier report)
Reading and resetting of
sales information for a
range of PLUs/
subdepartments
(PLU sales report)
Reading and resetting of
hourly sales information
(Hourly report)
Reading and resetting of
the daily net totals
(Daily net total report)
.
r
Reading
Resetting
X2, Z2
--
Cashier code
.
All PLUs
End
PLU code
Start
PLU code
Ö≈
Reading
Resetting
.
Ñ
Reading
Resetting
.
Ñ
Reading
Resetting
Flash report:
(Only display)
To clear the display,
press the
c
key or
turn the mode switch to
another position.
Full reading and
resetting
(Full sales report)
Individual cashier
reading and resetting
(Individual cashier
report)
OF SALES TOTALS
• Use the reading function (X) when you need to take a reading of sales information entered since the last
resetting. You can take this reading any number of times. It does not affect the register’s memory.
• Use the resetting function (Z) when you need to clear the register’s memory. Resetting prints all sales
information and clears the entire memory except for the GT1 through GT3 and Training GT reset count, and
consecutive number.
Summary of reading (X) and resetting (Z) reports
1
X1 and Z1 reports: Daily sales reports
X2 and Z2 reports: Periodic (monthly) consolidation reports
30
• In the reports, when both of sales quantity and sales amount are zero, their printing is skipped. If
you do not want to skip, change the programming. (Refer to “Programming print format”.)
• “X” represents read symbol and “Z” represents reset symbol in the reports.

Next sales total
Taxable 1 total
VAT 1 total
Tax total
Net total without tax
Mode title*1
Reset counter
Net grand total(GT2-GT3)
Grand total of plus
registration
Grand total of
minus registration
Grand total of training
mode registration
Dept. code
Sales q'ty
Sales amount
“+” dept. counter
and total
“-” dept. counter
and total
Subtotal counter
and total
Subtotal percent 1
counter and total
No-sales counter
Customer counter
Paid total
Paid total average per
customer
Cash in drawer
Cheque in drawer
Cash + cheque in drawer
Change total for cheque
tendering
Item counter and total
Item percent 1
counter and total
Refund counter and total
REG-mode void counter
and total
Void-mode transaction
counter and total
Manager item void counter
and total
Subtotal void counter
and total
Received on account
counter and total
Paid out counter and total
Cash counter and total
Cheque sales counter and
total
Credit sale and tendering
counter and total
Exchange counter and
total (in preset rate entry)
Domestic currency
Exchange manual rate
entry counter and total
Exchange check (in preset
rate entry)
Exchange credit (in preset
rate entry)
*2
Daily sales totals
2
Full sales report
• Sample report
*1: When you take X1 report, “X1” is printed.
*2: Printed in the Z1 report only.
31

Cashier reports
PLU code
Item label
Mode title*
Report title
Range
Range sum
Sales q'ty and total
Mode title*
Report title
Customer counter
Sales total
Individual cashier report
• Sample report
Mode title*
Report title
Cashier code
Cashier name
Customer counter
Paid total
Average
*: When you take Z1 report, “Z1” is printed.
When you take the reports in OP X/Z mode, “OPX” or “OPZ” is printed.
Full cashier report
The printout occurs in the same format as in the sample report of individual cashier, but all cashier’s sales data
are printed in the order of cashier code number (from #1 to #6).
Hourly report PLU sales report
• Sample report • Sample report
*: When you take Z1 report, “Z1” is printed.
32
*: When you take Z1 report, “Z1” is printed.

Mode title*
Report title
Periodic consolidation
3
Full sales report
• Sample report
Mode title*1
Reset counter of daily total
Reset counter of periodic
consolidation
Grand total
*2
The subsequent printouts are the same in format as in the X1/Z1 full sales report.
*1: When you take X2 report, “X2” is printed.
*2: Printed in the Z2 report only
Daily net total report
• Sample report
*: When you take Z2 report, “Z2” is printed.
33

CCD -Compulsory Cash/cheque Declaration-
CCD entry amount
Currency exchange 1
in drawer to be obtained
Total of entered (declared)
exchange 1 in drawer
Difference
Cash in drawer
to be obtained
Check in drawer
Cash/cheque
in drawer to be obtained
Total of entered (declared)
cash/cheque in drawer
Difference
Total of difference
Cashier
code
.
‹≈Ñe
Ñ
OP X/Z mode
X1/Z1 mode
• Full cashier report
• Individual cashier report
.
‹
.
r
?É
The drawer opens and the cashier is prompted to
enter the cash and cheque amounts. (“ ” is displayed.)
Input the cheque or
currency denomination
Input the total amount of
cash or cheques
To display cash/cheque subtotal
Cancel
previous
entry
Q'ty
Amount
Xor
Ñe
or
X1/Z1 mode
If you want to make mandatory the declaration of the cash and cheque amount in the drawer before
outputting cashier Z reports, consult your dealer and have your register programmed for compulsory
cash/cheque declaration.
If your register is programmed for compulsory cash/cheque declaration (CCD), a cashier must first count and
declare the cash and cheque amounts (of domestic and foreign currency) in the drawer, before he or she can
output a cashier report. The procedure for outputting a CCD report is shown below.
Types of compulsory cash/cheque declaration
• Compulsory declaration prior to individual cashier resetting
• Compulsory declaration prior to full cashier resetting
• When cash/cheque declaration is compulsory, flash reports are not available.
: When inputting the cash and/or cheque amount in the drawer
Ñ
: When inputting the amount of a foreign currency in the drawer
e
34

ELECTRONIC JOURNAL
Header
information
print
700 .
Reading
To read/reset all of the data:
Resetting
É≈
710
To read the last 10 records:
É≈
This function is intended to record the journal data in the electronic journal (EJ) memory instead of journal paper.
For details, consult your dealer.
Recording journal data
Your register records the journal data in REG, PGM, , X1/Z1 and X2/Z2 modes into the EJ memory. In the
X1/Z1 and X2/Z2 modes, the header information (please refer to EJ report sample shown below.) is stored in the
memory.
Printing journal data on the way of a transaction
You can print journal data of a current transaction recorded in EJ memory by pressing the
transaction.
• This function is valid when the printer type is set to receipt type on the programming, and also the
receipt ON/OFF function is set to OFF.
• Sample receipt
EJ report title
EJ report end title
key during the
Ü
Reading and resetting the electronic journal data (Issuing EJ report)
You can read the journal data stored in the EJ memory in the journal format by executing following procedure in
the X1/Z1 or OP X/Z mode.
• On the EJ memory, a maximum of 2500 lines of data can be
stored. When executing all data reading, all of the data stored
in the EJ memory will be printed. So, make sure that there are
enough paper on a paper roll. To save paper, compression
print is available. Please consult with your dealer for details.
• To stop reading or resetting the data, turn the mode switch to
“MGR” position. However, when you are resetting the data, it
will not be cleared.
• You can set a warning system to let you know the time when
the memory is almost full, and/or to lock the data entry except
issuing the EJ report when the memory is full. Please consult
with your dealer for details.
• Sample EJ report
35

PROGRAMMING FOR EURO
Sales total amount in EURO (as domestic currency)
Sales total amount in national currency*
Tendered amount in EURO
Change in EURO
Change in national currency*
*: They are printed for infomation purposes only.
Sales total amount in national currency (as domestic currency)
Sales total amount in EURO*
Tendered amount in national currency
Change in national currency
Change in EURO*
*: They are printed for infomation purposes only.
Your register can be modified to correspond with each period set for the introduction of EURO, and in your
register each currency is treated as shown on the table below depending on which period you are in.
Basically your register can be automatically modified to correspond to the introduction of EURO by executing the
modification operation in the X2/Z2 mode. However, there are several options you must set depending on your
needs.
How currencies are treated in your register
EURO
Currency
National currency
(DM, F, etc.)
Foreign currency
Receipt samples
Period 1
Period 1
After the introduction of
EURO, and before EURO
banknotes and coins begin to
circulate
Exchange key
(Preset rate entry)
Domestic currency
Exchange key
(Manual rate entry)
Period 2
After EURO banknotes and
coins begin to circulate, and
before national currency is
withdrawn from circulation.
(Co-existence of EURO and
national currency)
Domestic currency
Exchange key
(Preset rate entry)
Exchange key
(Manual rate entry)
Period 3
After the national currency is
withdrawn from circulation
Domestic currency
Exchange key
36
Period 2
Period 3

Automatic Modification of Register System for Introduction of EURO
800 . É≈
*A
To make your register correspond to the introduction of EURO, your register system can be automatically
modified when the procedure shown below is executed in the X2/Z2 mode. According to the steps of the
introduction, you can make your register correspond to EURO. Set the manager key (MA) to X2/Z2 position,
and use the following sequence.
*A=1: Applicable for period 1
*A=2: Applicable for period 2
*A=3: Applicable for period 3
• You can perform each operation only once with the substitution of “A=1”, “A=2” and “A=3”. If you
perform the operation with the substitution of “A=2” first, you cannot perform the operation with
the substitution of “A=1”. If you perform the operation with the substitution of “A=3” first, you
cannot perform the operation with the substitution of “A=1” and “A=2”.
The details of the automatic register system modification are as follows:
(As for PGM functions described below, please refer to “Programming EURO system settings” for “Printing
exchange total amount and change amount on receipt or journal” and “Exchange calculation method”,
“Programming function parameters for
“Programming exchange currency symbol" for exchange currency symbol, and “Programming domestic currency
symbol” for domestic currency symbol.)
When “1” is substituted to “A”:
1. Issuing a general Z1 report
2. Issuing a general Z2 report
3. Setting “printing” for a PGM function “Printing exchange total amount and change amount on receipt or
journal”
4. Setting “division” for a PGM function “Exchange calculation method”
5. Setting the EURO symbol ( ) for the currency symbol of exchange key, and setting “2” for the number of
digits after decimal point of exchange amount
6. Setting the round-off function for currency exchange
key” for the number of digits after decimal point of exchange amount,
e
After the execution of the procedure with the substitution of “1”, treat EURO as foreign currency using the
exchange key (
When “2” is substituted to “A”:
) with the preset rate entry.
e
1. Issuing a general Z1 report
2. Issuing a general Z2 report
3. Resetting GT1, GT2, GT3 and Training GT
4. Setting “printing” for a PGM function “Printing exchange total amount and change amount on receipt or
journal”
5. Setting “multiplication” for a PGM function “Exchange calculation method”
6. Changing the domestic currency symbol to the EURO symbol ( ) and setting the number of digits after
decimal point of the domestic currency amount to 2
7. For the setting of the currency symbol and the number of digits after decimal point of exchange amount, the
ones that had been set to the domestic currency are set.
8. Setting the round-off function for currency exchange
After the execution of the procedure with the substitution of “2”, treat EURO as domestic currency, and national
currency as foreign currency using the exchange key (
Since EURO becomes domestic currency in your register after execution of the procedure with the substitution
of “2”, you must change unit prices in each department and PLU to make prices correspond to EURO before
actually you start operating your register again. As for the miscellaneous keys, also please change the rates or
amounts so that they are based on amounts in EURO.
) with the preset rate entry.
e
37

When “3” is substituted to “A”:
1. Issuing a general Z1 report
2. Issuing a general Z2 report
3. Resetting GT1, GT2, GT3 and Training GT
4. Setting “not printing” for a PGM function “Printing exchange total amount and change amount on receipt or
journal”
5. Setting “multiplication” for a PGM function “Exchange calculation method”
6. Changing the domestic currency symbol to the EURO symbol ( ) and setting the number of digits after
decimal of the domestic currency amount to 2
7. Setting the round-off function for currency exchange
After the execution of the procedure with the substitution of “3”, treat EURO as domestic currency.
When the operation with the substitution of “2” has been performed already, “3. Resetting GT1, GT2, GT3 and
Training GT” is not executed.
When the operation with the substitution of “1” or “2” has been performed already, the currency symbol of
exchange key is overwritten with a space.
• If you want to check the current status you are in, set the manager key (MA) to X2/Z2 position,
and use the following sequence.
800 É≈
Optional Programming for the Introduction of EURO
Some programming relating with the function of exchange key (e) cannot be changed automatically with the
execution of modification operation described in the previous section. After the execution on each period,
conduct the following programming depending on your needs.
Programming for Exchange Key (e)
Currency exchange rate
For period 1 and period 2, set the EURO conversion rate.
For programming details, refer to “Programming the rate”.
Exchange rate entry selection
When you treat EURO currency in the exchange key, you must apply preset rate entry. So, make enable for
preset rate entry for period 1 and period 2. For programming details, refer to “Programming function parameters
for
key”.
e
Cheque/credit operation
For period 1 and period 2, enable cheque/credit operation when tendering in foreign currency so that you can
treat cheque and credit for EURO currency and national currency. For programming details, refer to
“Programming EURO system setting”.
38

OVERRIDE ENTRIES
Programmed limit for functions (such as for maximum amounts) can be overridden by making an entry in the
MGR mode.
1. Turn the mode switch to the MGR position.
2. Make an override entry.
On this example, the register has been programmed not to allow deduction entries over
1.00.
PrintKey operation example
REG-mode 1500
entries 250 -...Error
˘
c
Turn the mode switch
to the MGR position.
250
-
Return the mode switch
to the REG position.
É
CORRECTION AFTER FINALIZING A
TRANSACTION (AFTER GENERATING A RECEIPT)
When you need to void incorrect entries that cashiers cannot correct (incorrect entries that are found after
finalizing a transaction or cannot be corrected by direct or indirect void), follow this procedure.
1. Turn the mode switch to the position using the manager key (MA).
2. Repeat the entries that are recorded on an incorrect receipt. (All data for the incorrect receipt are removed
from register memory; the voided amounts are added to the void-mode transaction totalizer.)
Cancellation receiptIncorrect receipt
39

‹
Cashier code
To display the signed-on cashier code
‹‹
■ Sign-on ■ Sign-off
Cashier code
Cashier name
FOR THE OPERATOR
PRIOR TO ENTRIES
Preparations for entries
1
Before registrations, insert the operator key into the mode switch and turn it to the REG position and check the
following items:
Paper roll
If the paper roll is not set in the machine or there is low roll, install new one according to section “4. Installing
and removing the paper roll” under “OPERATOR MAINTENANCE.”
Bill separator
A bill separator is set in a drawer. When necessary, use the separator so that you can treat two kinds of bills in
a bill case.
Receipt ON/OFF function
When you use the printer to issue receipts, you can disable receipt printing in the REG mode to save paper
using the receipt function. To disable receipt printing, press the
the receipt printing status ON and OFF.
To check the receipt printing status, turn the mode switch to the OP X/Z position or press the
mode. When the function is in the OFF status, the receipt off indicator “_” illuminates. Your register will print
reports regardless of the receipt state, so the paper roll must be installed even when the receipt state is “OFF”.
Cashier assignment
Prior to any item entries, cashiers must enter their cashier codes into the register. However, the code entry may
not be necessary when the same cashier handles the next transaction.
key in the OP X/Z position. This key toggles
Ü
key in the REG
c
Power saving mode
2
When the time which is programmed has passed under the condition that no entry nor operation is performed,
your register will enter the power saving mode.
When your register goes to the power saving mode, it will light off all the display except the decimal point at the
leftmost position. Your register will return to the normal operation mode when any key is pressed or a mode is
changed with the mode key. However, please note that when your register is recovered by a key entry, its key
entry is invalid. So, after the recovery, start the key entry from the beginning.
40

c
Transaction
To clear the error state
Ã
Ã
Error warning
3
In the following examples, your register will go into an error state accompanied with a warning beep and the
error symbol “ ” on the display. Clear the error state by pressing the
Please refer to the error code table on page 59.
• When you enter an over 32-digit number (entry limit overflow): Cancel the entry and re-enter a correct number.
• When you make an error in key operation: Clear the error and continue operation.
• When you make an entry beyond a programmed amount entry limit: Check to see if the entered amount is
correct. If it is correct, it can be rung up in the MGR mode. Contact your manager.
• When an including-tax subtotal exceeds eight digits: Delete the subtotal by pressing the
É, '
Error escape function
When you want to quit a transaction because of an error or something uncontrollable, use the error escape
function as shown below:
The transaction is voided (treated as a subtotal void) and the receipt is issued by this function. If you have
already entered tendered amount, the operation is finalized as a cash sale.
or îkey to finalize the transaction.
key and take proper action.
c
c
key and press the
41

ENTRIES
200 ô
ô
10 Ö
Ö
500 å
60 Ö
Ö
É
Repeated
subdepartment
entry
Repeated PLU
entry
Repeated
department entry
Unit price
(max. 7 digits)
å
PLU code
Ö
*
PLU code
Ö
Department keyUnit price *
1
(max. 7 digits)
When using a programmed unit price
Ó
*
2
Item entries
1
Single item entries
Department entries
Enter a unit price and press a department key. If you use a programmed unit price, press a department key only.
*1Less than the programmed upper limit amounts
2
*
For the optional departments 16 through 30, press
the department shift key at this point.
PLU entries
Enter a PLU code and press the
Subdepartment (open PLU) entries
When those departments and PLUs for which the unit price has been programmed as zero (0) are
entered, only the sales quantity is added.
Ö
key.
* Less than the programmed upper
limit amounts
1200
ú
û
2
Ö
1200 å11
Ö
É
Repeat entries
You can use this function for entering a sale of two or more same items.
42
PrintKey operation example
PrintKey operation example

Multiplication entries
≈
Ö
Unit price
PLU code
å
Unit price
Ö
PLU code
Q'ty Dept. key
When you use a programmed
unit price
Dept. entry
PLU entry
Subdept. entry
Use this feature entry method when you need to enter two or more same items.
This feature helps when you sell a large quantity of items or need to enter quantities that contain decimals.
• Q'ty: Up to four digits integer + three digits decimal
(When fractional quantity is entered, the quantity is counted as one.)
• Unit price: Less than a programmed upper limit
• Q'ty x unit price: Up to seven digits
PrintKey operation example
Department entry
PLU entry
Subdepartment
entry
7 . 5 ≈
165 ô
15 ≈
13 Ö
3 ≈
100 å
60 Ö
É
Single item cash sale (SICS) entry
• This function is useful when a sale is for only one item and is for cash; such as a pack of cigarettes. This
function is applicable only to those departments that have been set for SICS or to their associated PLUs or
subdepartments.
• The transaction is finalized and the drawer opens as soon as you press the department key or
PrintKey operation example
250
For finishing
the transaction
ã
Ö
key.
If an entry to a department or PLU/subdepartment set for SICS follows the ones to departments or
PLUs/subdepartments not set for SICS, it does not finalize and results in a normal sale.
43

Displaying subtotals
2
The subtotal is displayed by pressing the
been made is displayed and the symbol “ ” will light up in the display.
100 ã
100
˘
700
ú
key. When you press it, the subtotal of all entries which have
Ñ
Ñ
É
Subtotal will not be printed on a receipt on the current factory setting. If you want to print it, change
the setting by programming. Refer to “Programming receipt print format”.
Finalization of transaction
3
PrintKey operation example
Cash or cheque tendering
Press the
a cash tender or press the
amount of the sale, your register will show the change due amount and the symbol “ ” will light up. Otherwise
your register will show a deficit and the symbol “ ” will light up. Make a correct tender entry.
Cash tendering
key to get a subtotal, enter the amount tendered by your customer, then press the Ékey if it is
Ñ
key if it is a cheque tender. When the amount tendered is greater than the
'
PrintKey operation example
Ñ
1000
É
Cheque tendering
PrintKey operation example
Ñ
1000
'
44

Cash or cheque sale that does not need any tender entry
Enter items and press the Ékey if it is a cash sale or press the 'if it is a cheque sale. Your register will
display the total sale amount.
PrintKey operation example
300
ü
10
Ö
É
In the case of cheque sale
Credit sale
Enter items and press the credit key (î).
PrintKey operation example
2500
ü
3250
ä
î
Mixed-tender sale
You can perform mixed-tendering of cheque and cash, cash and credit, and cheque and credit.
PrintKey operation example
Ñ
950
É
î
Computation of VAT (Value Added Tax)/tax
4
VAT/ tax system
The machine may be programmed for the following six tax systems by your dealer.
Automatic VAT 1-4 system (Automatic operation method using programmed percentages)
This system, at settlement, calculates VAT for taxable 1 through 4 subtotals by using the corresponding
programmed percentages.
Automatic tax 1-4 system (Automatic operation method using programmed percentages)
This system, at settlement, calculates taxes for taxable 1 through 4 subtotals by using the corresponding
programmed percentages, and also adds the the calculated taxes to those subtotals, respectively.
45

Manual VAT 1-4 system (Manual entry method using programmed percentages)
Ñ ◊
Ñ ◊
VAT rate
To use a programmed rate
Ñ ◊
This system provides the VAT calculation for taxable 1 through 4 subtotals. This calculation is performed using
the corresponding programmed percentages when the
Manual VAT 1 system (Manual entry method for subtotals that uses VAT 1 preset percentages)
This system enables the VAT calculation for the then subtotal. This calculation is performed using the VAT 1
preset percentages when the ◊key is pressed just after the
can be used.
Manual tax 1-4 system (Manual entry method using preset percentages)
This system provides the tax calculation for taxable 1 through 4 subtotals. This calculation is performed using
the corresponding programmed percentages when the
After this calculation, you must finalize the transaction.
key is pressed just after the
◊
key. For this system, the keyed-in tax rate
Ñ
key is pressed just after the
◊
Ñ
Ñ
key.
key.
Automatic VAT 1 and automatic tax 2-4 system
This system enables the calculation in the combination with automatic VAT 1 and automatic tax 2 through 4. The
combination can be any of VAT1 corresponding to taxable 1 and any of tax 2 through 4 corresponding to taxable
2 through taxable 4 for each item. The tax amount is calculated automatically with the percentages previously
programmed for these taxes.
• A PLU not programmed for any of the tax statuses is registered depending on the tax status of
the department which the PLU belongs to.
• VAT/tax assignment symbol can be printed at the fixed right position near the amount on the
receipt as follows:
VAT1/tax1 A
VAT2/tax2 B
VAT3/tax3 C
VAT4/tax4 D
When the multiple VAT/tax is assigned to a department or a PLU, a symbol of the lowest number
assigned to VAT/tax rate will be printed. For details, contact your authorized SHARP dealer.
PrintKey operation example
550
ù
Ñ
◊
É
(When the manual VAT 1-4
system is selected)
46

Auxiliary entries
5
Percent calculations (premium or discount)
• Your register provides the percent calculation for the subtotal and/or each item entry depending on the
programming.
• Percentage: 0.01 to 100.00% (Application of preset rate (if programmed) and manual rate entry are available.)
Percent calculation for the subtotal
PrintKey operation example
4
≈
140
û
570
ä
Ñ
∞
É
(When a discount and 10% is
programmed for the ∞key)
Percent calculation for item entries
PrintKey operation example
800
ü
§
15
Ö
7 .5
§
É
(When premium and 15% are
programmed for the §key)
Deduction entries
Your register allows you to deduct a preset amount or a certain amount manually entered, which are less than a
programmed upper limit. These calculations can be after the entry of an item and/or the computation of subtotal
depending on the programming.
Deduction for the subtotal
PrintKey operation example
575
ü
10
Ö
Ñ
100
-
É
47

Deduction for item entries
Function text
PrintKey operation example
675
ä
-
É
(When a deduction amount of
75 is programmed.)
Refund entries
If a refund item is the one entered into a department, enter the amount of the refund, then press the ©key and
the corresponding department key in this order; and if an item entered into a PLU is returned, enter the
corresponding PLU code, then press the
250
©ü
7
13
©Ö
©
≈
and Ökeys.
PrintKey operation example
É
Printing of non-add code numbers
Enter a non-add code number such as a customer’s code number and credit card number within a maximum of
16 digits and press the
key at any point during the entry of a sale. Your register will print it at once.
Ñ
PrintKey operation example
1230
Ñ
1500
ü
î
48

Domestic currency
Exchange rate
Domestic currency
Foreign currency
Foreign currency symbol
e
c
É
'
î
Reentry
Amount
tendered
(max. 8 digits)
*Exchange rate
For direct finalizationPreset exchange rate
After an entry
is completed
or
After the amount
tendered is found
smaller than the
sales amount in
a sales entry
Next registration
or
payment in
domestic currency
For an additional payment in foreign currency
Payment treatment
6
Currency exchange
Your register allows payment entries of foreign currency. Pressing the ekey creates a subtotal in foreign
currency.
*Exchange rate: 0.000000 to 999.999999
• When the amount tendered is short, the deficit is shown in domestic currency.
• Availability of credit and cheque tendering is depending on programming (only for preset
exchange rate).
• If programmed, a foreign currency symbol is printed when you apply preset rate.
Applying preset exchange rate
Currency
exchange
Amount
tendered in
foreign currency
Applying manual exchange rate
15000
2300
4650
1 .0190
10000
2300
4650
ü
ä
e
É
ü
ä
e
É
PrintKey operation example
PrintKey operation example
49

Received on account entries
Amount
(max. 8 digits)
Ü
(Available cash tendering only)
*
Amount
(max. 8 digits)
r
(Available cash tendering only)
*
*Less than the programmed upper limit
PrintKey operation example
12345
Ñ
4800
r
Paid out entries
*Less than the programmed upper limit
PrintKey operation example
6789
Ñ
3000
Ü
No sale (exchange)
Simply press the Ékey without any entry. The drawer will open and the printer will print “NO SALE” on the
journal or the receipt. If you let your machine print a non-add code number before pressing the
sale entry is achieved with a non-add code number printed.
É
key, a no
Automatic sequencing key (`key) entries
7
You can achieve a programmed transaction simply by pressing a corresponding automatic sequencing key.
PrintKey operation example
¡
50
(¡= 500
äÉ
)

When the receipt function is in the “ON” status,
the “ COPY ” symbol will be printed on the receipt.
Receipt issuance after finalization/Copy receipt
8
If your customer wants a receipt after you have finalized a transaction with the receipt function being in the
“OFF” status (no receipting), press the
receipt when the receipt function is in the “ON” status. If you want to make a copy, please consult your dealer.
key. This will produce a receipt. Your register can also print a copy
Ü
• Pressing the
• When more than 30 items are entered, the receipt will be issued in the format of summary receipt
print.
Printing a receipt after making the entries shown below with the receipt function being in the
“OFF” status
key in the OP X/Z mode before registration toggles the status “ON” and “OFF”.
Ü
850
˘
3
≈
150
¯
É
For receipting→
When the receipt function is in the “ON” status and you press the
Ü
PrintKey operation example
key to make a copy
Ü
51

CORRECTION
Correction
of a PLU entry
Correction of
a refund entry
Correction
of a
department
entry
1310 ü
1755 ä
10 Ö
12 Ö
250 © ü
825 ä
1310 ? ü
12 ? Ö
250 © ? ü
É
Correction of the last entry (direct void)
1
If you make an incorrect entry relating to a department, PLU/subdepartment, percentage (∞and §),
deduction (
) or refund, you can void this entry by pressing the ?key immediately after the incorrect entry.
-
PrintKey operation example
1250
ü
?
2
Ö
?
600
ô
§
?
328
ã
28
?
250
©
ü
?
É
Correction of the next-to-last or earlier entry (indirect void)
2
With the
made during a transaction if you find it before finalizing the transaction (e.g. pressing the
function is applicable to department, PLU/subdepartment and refund entries only.
52
key, you can void any incorrect department entry, PLU/subdepartment entry or item refund entry
?
PrintKey operation example
É
key). This

Subtotal void
1310 ˘
˘
1755 ü
10 Ö
35 Ö
Ñ
?
Ñ
Subtotal void
3
You can void an entire transaction. Once subtotal void is executed, the transaction is aborted and the register
issues a receipt. This function does not work when more than 30 items have been entered.
PrintKey operation example
Correction of incorrect entries not handled by the direct or indirect void
4
function
Any errors found after the entry of a transaction has been completed or during an amount tendered entry cannot
be voided. These errors must be corrected by the manager.
The following steps should be taken:
1. If you are making the amount tendered entry, finalize the transaction.
2. Make correct entries from the beginning.
3. Hand the incorrect receipt to your manager for its cancellation.
OVERLAPPED CASHIER ENTRY
This function allows you to switch from one cashier to another and to interrupt the first cashier’s entry. So the
second cashier can do his or her entry in this mode. For actual use of this function, consult your dealer.
• The overlapped cashier entry is not effective while the tendering sale is going on.
• If any cashier is still making an entry (or has not finalized the transaction yet), the machine does
not run in any mode other than REG and MGR and can print no X/Z reports. The symbol “ ” and
the corresponding cashier code(s) are displayed at this time.
CommentsKey operation example
The entry by cashier 1 is started.
The entry by cashier 2 is started.
(The entry by cashier 1 is interrupted.)
The transaction by cashier 2 is finalized.
The entry by cashier 1 is restarted.
The transaction by cashier 1 is finalized.
1. Cashier 1 is assigned.
2. Cashier 2 is assigned.
3. Cashier 1 is assigned.
(1‹)
100
360
2
3
150
100
360
¯
ú
ú
‹
≈
˘
;
1
‹
¯
ú
É
53

OPERATOR MAINTENANCE
In case of power failure
1
When power is lost, the machine retains its memory contents and all information on sales entries.
• When power failure is encountered in register idle state or during
an entry, the machine returned to the normal state of operation
after power recovery.
• When power failure is encountered during a printing cycle, the
register prints “========” and then carries out the correct
printing procedure after power recovery. (See the sample print.)
In case of printer error
2
If the printer runs out of paper, the printer will stall, “PPPPPPPPPP” will appear on the display. Key entries will
not be accepted. Referring to
the proper position, then press the
If the print head comes up, the printer stalls, “H” will appear on the very left of the display. Key entries will not be
accepted. Bring back the print head to the correct position, then press the ckey. The printer will print the
power failure symbol and resume printing.
“
4. Installing and removing the paper roll” in this chapter, install a new roll paper in
key. The printer will print the power failure symbol and resume printing.
c
Cautions in handling the printer and recording paper
3
Cautions in handling the printer
• If you are not going to use the register for an extended period of time, pull the
print head release lever toward you so that the print head is set apart from
the plate. (head-up position)
• Avoid the environments of dusty and humid place, direct sunlight and iron
powder(a permanent magnet and electromagnet are use in this machine.)
• Use the print head release lever only when necessary.
• Never pull the paper when it is in contact with the print head. First release the
head with the print head release lever, and then remove the paper.
• Never touch the surface of the print head.
• Never touch around the print head and the motor during printing or before they have had sufficient time to cool.
Cautions in handling the recording paper (thermal paper)
• Use only the paper specified by SHARP.
• Do not unpack the thermal paper until you are ready to use it.
• Avoid heat. The paper will color at around 70°C.
• Avoid dusty and humid places for storage. Avoid direct sunlight.
• The printed text on the paper can discolor under the conditions of exposure of high humidity and temperature,
exposure to the direct sunlight, contact with glue, thinner or a freshly copied blueprint, and heat caused by
friction from scratching or other such means.
• Be very careful when handling the thermal paper. If you want to keep a permanent record, copy the printed text
with a photocopier.
54

Installing and removing the paper roll
4
Be sure to use paper rolls specified by SHARP.
The use of any other paper rolls than specified could cause paper jamming, resulting in register malfunction.
Paper specification
Paper width: 57.5 ± 0.5 mm Max. outside diameter: 70 mm Quality: Thermal paper
• Be sure to set paper roll(s) prior to using your machine, otherwise it may cause a malfunction.
Install the paper roll in the printer. Be careful then to set the roll and cut the paper end correctly.
If the top end of the paper roll is fixed with paste or tape, the paper may lose its color development ability in the
pasted or taped area due to the deterioration of the heat-sensitive color development component of the paper
surface. This may result in nothing appearing at this location when printing is performed. Therefore, when setting
a new paper roll in the machine, be sure to cut off approximately one revolution (approx. 25 cm long).
(How to set the paper roll) (How to cut the paper end)
Correct
To the printer
Correct Incorrect
To the printer
Incorrect
Installing the paper roll
Precaution: Be very careful for the manual cutter mounted on the printer cover when removing and
replacing the cover, so as not to hurt yourself.
When you install a paper roll for the first time, the printer is in printer error status because no paper
roll has not installed yet. So, after installing a paper roll correctly, clear the error status by pressing
key.
c
1. Turn the mode switch to the “REG” position with the AC cord connected.
2. Remove the printer cover.
3. Check that the print head release lever is in its printing position.
4. Set the paper correctly as illustrated above in the paper bed.
5. Insert the end of the paper into the printer, while pressing the
is caught by the printer auto-feed and comes out of the printer at the top.
key, until it
á
6. When not using the take-up spool (using as receipt paper) :
• Cut off the excess paper that comes out of the printer using the edge of the
inner cover, and replace the printer cover.
When using the take-up spool (using as journal paper):
• Insert the end of the paper into the slit in the spool. (Press the
feed more paper if required.)
• Wind the paper two or three turns around the spool shaft.
• Set the spool on the bearing, and press the
in the paper.
• Replace the printer cover.
key to take up excess slack
á
á
key to
You can wind the roll paper in OP X/Z, X1/X2, and X2/Z2 modes
even if you programmed so that the printer is used for issuance of
receipts. This may be convenient to wind reports. In this case,
set the roll paper to the take-up spool.
55

When you want to manually install a new roll of paper while your machine is turned off, follow the
steps shown below:
1. Pull the print head release lever toward you (to the head-up position). (Refer to the drawing on page 54.)
2. Correctly place the new paper roll into the paper bed.
3. Insert the paper end into the printer until it comes out of the printer.
4. Return the print head release lever to its original position.
Removing the paper roll
When a red dye appears on the paper roll, it is time to replace the existing paper roll. Replace the paper roll
with new one. If you plan not to use your register for an extended period of time, remove the paper roll, and
store it in the appropriate place.
Precaution: Be very careful for the manual cutter mounted on the printer cover when removing and
replacing the cover, so as not to hurt yourself.
When the take-up spool is not used:
1. Remove the printer cover.
2. Cut the paper behind the printer and near the paper roll.
3. Press the
completely.
key until the paper remaining in the printer comes out
á
4. Remove the paper roll from the paper bed.
Do not pull the paper through the printer.
When the take-up spool is used:
1. Remove the printer cover.
2. Press the
the way.
key to advance the journal paper until its printed part is out of
á
3. Cut the paper and remove the take-up spool.
4. Cut the paper behind the printer and near the paper roll.
5. Press the
completely.
key until the paper remaining in the printer comes out
á
6. Remove the paper roll from the paper bed.
Do not pull the paper through the printer.
7. Remove the outer side of the take-up spool as shown
on the left.
8. Remove the printed journal roll from the take-up spool.
56

2
1
Removing a paper jam
5
Precaution: Be very careful for the manual cutter mounted on the printer cover when removing and
replacing the cover, so as not to hurt yourself. Never touch the print head immediately
after printing, because the head may still be hot.
1. Remove the printer cover.
2. Pull the print head release lever toward you (to the head-up position). (Refer to the drawing on page 54.)
3. Remove the paper jam. Check for and remove any shreds of paper that may remain in the printer.
4. Return the print head release lever to its original position.
5. Reset the paper roll correctly by following the steps in “Installing the paper roll”.
Cleaning the print head
6
When the printed text is getting dark or faint, paper dust may be stuck to the print head. Clean the print head as
follows:
Precautions:
• Never touch the print head with a tool or anything hard as it may damage
the head.
• Be very careful for the manual cutter mounted on the printer cover when
removing and replacing the cover, so as not to hurt yourself.
1. Turn the mode switch to the “ ” position.
2. Remove the printer cover.
3. Remove the inner cover that protects the printer (Press the lever, and lift it
up.)
4. Pull the print head release lever toward you (to the head-up position). (Refer
to the drawing on page 54.)
Roller
Thermal
head
5. Clean the print head with a cotton swab or soft rag moistened with ethyl
alcohol or isopropyl alcohol.
6. Return the print head release lever to its original position immediately after
cleaning.
7. Replace the inner cover. (Insert the side tabs of the cover into their slots and
press the cover in the printer until it is properly seated.)
8. Reset the paper roll correctly by following the steps in “Installing the paper
roll”.
Removing the till and the drawer
7
The till in the register is detachable. After closing your business for the day, remove the till from the drawer and
keep the drawer open. The 5-denomination coin case is also detachable from the till. To detach the drawer, pull
it forward fully with the till removed, and remove it by lifting it up.
Coin case
Bill case
Bill
separator
Till
Drawer
5-denomination coin case
(detatchable)
Coin case
57

Lever
Opening the drawer by hand
8
The drawer automatically opens in the usual way. However, when power
failure is encountered or the machine becomes out of order, slide the lever
located on the machine bottom in the direction of the arrow. (See the figure at
the left.)
The drawer will not open, if it is locked with a drawer lock key.
Installing the fixing angle bracket
9
To prevent the register from moving when the drawer opens, the fixing angle bracket is supplied with the
register. By attaching the bracket to the table where the register is installed, you can hook the register on this
bracket and secure the register to its position.
How to install the fixing angle bracket
1. Thoroughly clean the location where the fixing angle
bracket (B) is to be placed.
2. Peel off the adhesive tape on the fixing angle bracket.
3. Hook the angle bracket onto the hook (A) that is located
at the bottom rear of the register.
4. Firmly stick the fixing angle bracket to the table surface
that your cleaned above.
A
B
How to remove the register from the fixing angle bracket
58
1. Lift up the front of the register and pull the register
towards you.

Before calling for service
10
The malfunctions shown in the left-hand column below, labelled “Fault,” do not necessarily indicate functional
faults of the machine. It is therefore advisable to refer to the “Checking” shown in the right-hand column before
calling for service.
Fault Checking
The display won't be illuminated even when
(1)
the mode switch is turned to any other
position than “ ”.
The display is illuminated, but the whole machine
(2)
refuses registrations.
No receipt is issued. • Is the paper roll properly installed?
(3)
No journal paper is taken up. • Is the take-up spool installed on the bearing properly?
(4)
Printing is unusual. • Is the print head release lever at the printing position?
(5)
• Is power supplied to the electrical outlet?
• Is the power cord plug out or loosely connected to the
electrical outlet?
• Is a cashier code assigned to the register?
• Is the mode switch set properly at the “REG” position?
• Is there a paper jam?
• Is the receipt function in the “OFF” status?
• Is the print head release lever at the printing position?
• Is there a paper jam?
• Is the paper roll properly installed?
Error code table
When the following error codes are displayed, press the ckey and take a proper action according to the table
below.
Error
code
Error status Action
E01 Registration error Make a correct key entry.
E02 Misoperation error Make a correct key entry.
E03 Undefined code is entered. Enter a correct code, or declare it by the programming.
E07 Memory is full (in the `key programming). Program the `key within 25 steps.
E11 Compulsory depression of the
key for direct Press the Ñkey and continue the operation.
Ñ
finalization
E12 Compulsory tendering Make a tendering operation.
E22 Overlapped cashier error
E23 Cashier resetting over error
E32 No entry of a cashier code Make a cashier code entry.
E34 Overflow limitation error Make a registration within a limit of entry.
E35 The open price entry is inhibited. Make a preset price entry.
E36 The preset price entry is inhibited. Make an open price entry.
E37 The direct finalization is inhibited. Make a tendering operation.
E67 Subtotal void is not allowed. Finalize the transaction, and correct the wrong entries in the
void mode.
59

LIST OF OPTIONS
For your register, the following options are available.
For details, contact your dealer.
•Remote drawer model ER-05DW and ER-06DW
•Till model ER-58CC for ER-05DW
•Coin case model ER-58CV for ER-05DW
•Key kit models
By using the following key kits, you can change the keyboard layout of your register.
• ER-11KT7: 30 regular size key kits • ER-12KT7: 30 1 x 2 size key kits
• ER-22KT7: 10 2 x 2 size key kits • ER-11DK7G: 30 regular size dummy key kits
• ER-51DK7G: 10 5 x 1 size dummy key kits
SPECIFICATIONS
Model: ER-A220
Dimensions: 330 (W) x 363 (D) x 238 (H) mm
Weight: 8.9 kg
Power source: Official (nominal) voltage and frequency
Power consumption: Stand-by 20W
Operating 45W (max.)
Working temperature: 0 °C to 40 °C
Electronics: LSI (CPU) etc.
Built-in battery: Rechargeable battery, memory holding time about 1 month
(with fully charged built-in battery, at room temperature)
Display:
Operator display: 7-segment display (10 positions)
Customer display: 7-segment display (7 positions)
Printer:
Type: One-station thermal printer
Printing speed: Approx. 13.3 lines/second
Printing capacity: 30 digits each for receipt and journal paper
Other functions: • Graphic logo printing function
• Logo message function
• Receipt (ON-OFF) function, compression printing function
Paper roll: Width: 57.5 ± 0.5 mm
Max. diam.: 70 mm
Quality: High quality (0.06 to 0.08 mm thickness)
Cash drawer: 3 slots for bill and 7 for coin denominations
Accessories: Manager key 2
Operator key 2
Drawer lock key 2
Paper roll 1
Take-up spool 1
Bill separator 1 (Set in the drawer)
Fixing angle bracket 1
Instruction manual 1 copy
* Specifications and appearance subject to change without notice for improvement.
60

EINLEITUNG
Wir danken Ihnen, daß Sie sich für den Erwerb des elektronischen Kassensystems, Modell ER-A220,
entschieden haben.
Lesen Sie bitte diese Bedienungsanleitung vor Inbetriebnahme der Registrierkasse sorgfältig durch, um in der
Lage zu sein, das hochwertige System mit allen seinen Funktionen richtig und problemlos bedienen zu
können.
Diese Bedienungsanleitung sollte sorgfältig aufbewahrt werden, damit sie im Fall von Bedienungsproblemen
jederzeit griffbereit ist.
WICHTIG
• Als Aufstellplatz Ihrer Registrierkasse sollte eine Stelle gewählt werden, die keiner direkten
Sonneneinstrahlung, ungewöhnlichen Temperaturveränderungen, hoher Luftfeuchtigkeit oder
Wasserbeeinflussung ausgesetzt ist.
Das Aufstellen der Registrierkasse an solchen Plätzen könnte zu Beschädigungen des Gehäuses oder der
elektronischen Bauteile führen.
• Die Registrierkasse sollte nicht von Personen mit nassen Händen bedient werden.
Es könnte Wasser in das Innere der Registrierkasse eindringen und zur Beschädigung der elektronischen
Bauteile führen.
• Die Registrierkasse darf nur mit einem trockenen und weichen Tuch gereinigt werden. Ätzende
Flüssigkeiten wie Benzin oder Farbverdünner dürfen niemals zur Reinigung verwendet werden.
Die Verwendung von solchen Chemikalien führt zu Verfärbungen oder Beschädigungen des Gehäuses.
• Das Kassensystem kann an jede normale Steckdose (offizielle Netzspannung) angeschlossen
werden.
Beim Anschluß von anderen Elektrogeräten an den gleichen Stromkreis kann es zu Störungen in der
Registrierkasse kommen.
• Setzen Sie sich bei einer Störung der Registrierkasse bitte mit Ihrem Fachhändler in Verbindung und
versuchen Sie niemals, die Registrierkasse selbst zu reparieren.
• Zur vollständigen elektrischen Trennung vom Netz den Netzstecker ziehen.
VORSICHT
Dieses Kassensystem ist mit einer Speichersicherung ausgestattet, um bei einem eventuellen Stromausfall
die gespeicherten Informationen zu erhalten.
Wie im allgemeinen bekannt ist, werden die dafür verwendeten Batterien auch bei Nichtbenutzung über eine
längere Zeitspanne entladen. Um daher eine ausreichende Erstaufladung der Batterien zu gewährleisten und
um einem möglichen Verlust des Speicherinhalts nach der Aufstellung der Registrierkasse vorzubeugen, wird
empfohlen, das jede einzelne Kasseneinheit vor der Inbetriebnahme 24 bis 48 Stunden aufgeladen wird.
Zum Aufladen der Batterien muß die Registrierkasse an das Netz angeschlossen werden. Durch diese
vorbeugende Batterieaufladung kann eine eventuelle Anforderung des Kundendiensttechnikers vermieden
werden.
Deutsch
1

INHALT
EINLEITUNG..................................................................................................................................................1
WICHTIG .......................................................................................................................................................1
VORSICHT.....................................................................................................................................................1
INHALT ........................................................................................................................................................2
AUSSENANSICHT.........................................................................................................................................4
DRUCKER......................................................................................................................................................4
TASTATUR....................................................................................................................................................5
SCHLÜSSEL UND SCHALTER ....................................................................................................................6
1 Funktionsschloß und Funktionsschlüssel..............................................................................................6
2 Schubladenschlüssel.............................................................................................................................6
ANZEIGEN.....................................................................................................................................................7
PROGRAMMIERUNG....................................................................................................................................8
1 Einstellung von Datum und Uhrzeit.......................................................................................................8
2 Einstellung der Maschinennummer sowie der laufenden Nummer.......................................................9
3 Programmierung des Steuersatzes.......................................................................................................9
4 Programmierung für Warengruppen....................................................................................................10
5 Programmierung für PLUs (Einzelartikel)............................................................................................12
6 Programmierung verschiedener Tasten..............................................................................................13
Programmierung von Prozentsatz und Fremdwährungs-Umrechnungskurs (
%, e
)................13
Programmierung des Rabattbetrags (
-
)....................................................................................14
Programmierung der Prozentsatzbegrenzung (
%
).....................................................................14
Programmierung der Funktionsparameter für die Tasten
-
und %........................................14
Programmierung der Funktionsparameter für die
e
Taste ........................................................15
Programmierung der Funktionsparameter für die Tasten
;, ', î, r
und p..................16
7 Textprogrammierung...........................................................................................................................16
Programmierung des Warengruppentexts....................................................................................18
Programmierung des PLU-Texts (Artikelbezeichnung) ................................................................18
Programmierung des Funktionstexts............................................................................................18
Programmierung der Kassierernamen .........................................................................................20
Programmierung der Kopf- und Fußzeilen für den Bonausdruck.................................................20
Programmierung des Fremdwährungssymbols............................................................................21
Programmierung des Inlandswährungssymbols...........................................................................21
8 Programmierung verschiedener Funktionen .......................................................................................22
Programmierung der Wahl für zusätzliche Funktionen.................................................................22
Programmierung des Druckformats .............................................................................................22
Programmierung für Kassenbonausdruck....................................................................................23
Programmierung für das EURO-System .....................................................................................24
Programmierung des Stromsparmodus........................................................................................24
Programmierung des Klischeedruckformats.................................................................................25
Programmierung der RS-232C-Schnittstelle ................................................................................25
Programmierung der Thermodrucker-Druckdichte.......................................................................26
Sprachauswahl ............................................................................................................................27
Programmierung der AUTO-Tasten .............................................................................................27
9 Abruf gespeicherter Programminhalte.................................................................................................28
SCHULUNGSBETRIEBSART.....................................................................................................................29
ABRUF (X) UND NULLSTELLUNG (Z) VON UMSÄTZEN ........................................................................30
1 Kurzbeschreibung für den Abruf (X) und die Nullstellung (Z) von Umsatzberichten...........................30
2 Tagesumsatzberichte..........................................................................................................................31
3 Periodische Berichte ...........................................................................................................................33
ZWANGSWEISE KASSEN-IST-EINGABE (CCD) ......................................................................................34
FÜR DEN GESCHÄFTSFÜHRER
2

ELEKTRONISCHES JOURNAL (EJ)..........................................................................................................35
EURO-PROGRAMMIERUNG......................................................................................................................36
ÜBERSCHREIBUNG VON BETRAGSEINGABE-BEGRENZUNGEN........................................................39
KORREKTUR NACH ABSCHLUSS EINER TRANSAKTION (NACH ERFOLGTER BONAUSGABE).....39
VOR DER REGISTRIERUNG......................................................................................................................40
1 Vorbereitung für Registrierungen ........................................................................................................40
2 Stromsparmodus.................................................................................................................................40
3 Fehlermeldung ....................................................................................................................................41
REGISTRIERUNGEN...................................................................................................................................42
1 Postenregistrierungen .........................................................................................................................42
Einzelpostenregistrierungen.........................................................................................................42
Wiederholungsregistrierungen......................................................................................................42
Multiplikationsregistrierungen.......................................................................................................43
Einzelposten-Barverkauf (SICS)-Registrierungen........................................................................43
2 Anzeige der Zwischensummen ...........................................................................................................44
3 Abschluß einer Transaktion.................................................................................................................44
Bar- oder Scheckeingabe.............................................................................................................44
Bar- oder Scheckverkauf, der keine Zahlgeldregistrierung erforderlich macht.............................45
Kreditverkauf ................................................................................................................................45
Gemischte Zahlung .....................................................................................................................45
4 Berechnung der Mehrwertsteuer (MWSt)............................................................................................45
5 Unterschiedliche Registrierungen .......................................................................................................47
Prozentberechnungen (Aufschlag oder Abschlag).......................................................................47
Abzugs(Rabatt)-Registrierungen..................................................................................................47
Retourenregistrierungen...............................................................................................................48
Ausdrucken von nichtaddierenden Nummern ..............................................................................48
6 Zahlungshandhabung..........................................................................................................................49
Fremdwährungsumrechnung........................................................................................................49
Registrierungen für bezahlte Rechnungen...................................................................................50
Ausgabenregistrierungen .............................................................................................................50
Kein Verkauf (Geldwechsel).........................................................................................................50
7 Registrierungen mit der Automatik-Eingabetaste (
`
Taste).............................................................50
8 Kassenbonausstellung nach Abschluß/Bonkopie ...............................................................................51
KORREKTUREN..........................................................................................................................................52
1 Korrektur der letzten Registrierung (Sofortstorno) ..............................................................................52
2 Korrektur der vorletzten bzw. früheren Registrierung (indirekter Storno)............................................52
3 Zwischensummenstorno .....................................................................................................................53
4 Korrektur von falschen Registrierungen, die nicht durch die direkte oder indirekte Stornofunktion
verarbeitet werden können..................................................................................................................53
ÜBERLAPPENDE KASSIERERREGISTRIERUNG....................................................................................53
WARTUNG DURCH DEN BEDIENER.........................................................................................................54
1 Verhalten bei Stromausfall ..................................................................................................................54
2 Bei Auftritt einer Druckerstörung .........................................................................................................54
3 Handhabung des Druckers und des Thermopapiers...........................................................................54
4 Einsetzen und Herausnehmen der Papierrolle....................................................................................55
5 Behebung eines Papierstaus ..............................................................................................................57
6 Reinigung des Thermodruckkopfes.....................................................................................................57
7 Entfernen des Schubladeneinsatzes und der Schublade....................................................................57
8 Öffnen der Schublade von Hand.........................................................................................................58
9 Befestigen des Haltewinkels ...............................................................................................................58
10 Bevor Sie den Kundendiensttechniker anfordern................................................................................59
SONDERZUBEHÖR ....................................................................................................................................60
TECHNISCHE DATEN.................................................................................................................................60
FÜR DEN BEDIENER
3

DRUCKER
Als Drucker wird ein Thermodrucker für Kassenbon und Journalstreifen (1
Stationsdrucker) verwendet, so daß keine Farbbänder oder Tintenpatronen
erforderlich sind. Die durchschnittliche Lebensdauer des Druckers beträgt ca. 4
Millionen Zeilen.
Beim Entfernen der Druckwerkabdeckung muß die Abdeckung an der Rückseite
angehoben werden. Beim Aufsetzen der Druckwerkabdeckung ist diese in die
Sperrklinken am Gehäuse einzurasten und danach zu schließen.
Vorsicht: Da die Bonabrißvorrichtung an der Abdeckung befestigt ist,
vorsichtig verfahren, damit Sie keine Schnittverletzungen erleiden.
Thermodruckkopf-Freigabehebel
Der Thermodruckkopf kann mit dem grauen Hebel an
der rechten Seite des Druckers von der Druckwalze
abgehoben werden. Den Hebel nach vorne ziehen, um
den Thermodruckkopf abzuheben. Wenn es zu einem
Papierstau kommt, muß dieser Hebel benutzt werden,
damit das Papier entfernt werden kann.
Ihre Registrierkasse wird mit angehobenem
Thermodruckkopf ausgeliefert. Vor der Benutzung der
Registrierkasse muß der Hebel deshalb in Richtung
Papieraufnahme (Druckposition) hinuntergedrückt werden.
Niemals das Entfernen der Papierrolle
versuchen, wenn der Thermodruckkopf
abgesenkt ist. Dies kann zur
Beschädigung des Druckers und des
Thermodruckkopfes führen.
AUSSENANSICHT
Vorderansicht Rückansicht
ER-A220
4
Bedieneranzeige
Druckwerkabdeckung
Kassenbon
Schublade
Schubladenschloß
Kundenanzeige
(Ausklapptyp)
Netzkabel
Funktionsschloß
RS-232C-Anschluß-
steckerabdeckung
Tastatur
Aufwickelspule
ThermodruckkopfFreigabehebel
Papieraufnahme

5
TASTATUR
Standardtastaturanordnung
1
4
3
2
5
11
12
13
14
15
123
456
789
6
7
8
9
10
AMT
TL/NS
#/TM/ST
CH
CR
EX
%1
%2
PLU
CL
•
00
0
RA
RF
ESC
AUTO
1
RCPT
/PO
AUTO
2
Taste für bezahlte Rechnungen
Kassierercode-Eingabetaste
Automatik-Eingabetasten 1 und 2
Papiervorschubtaste
Kassenbonausdruck-/
Ausgabentaste
Stornotaste
Retourentaste
Löschtaste
Dezimalpunkttaste
Multiplikationstaste
Aufhebungstaste
PLU/Sub-Warengruppentaste
Betragseingabetaste
Warengruppentasten
Zehnertastatur
Optionale Tasten
◊
MWSt-Taste
Ó
Warengruppen-Umschalttaste
ö~õ
Warengruppentasten
(Um die Warengruppentasten 16 bis 30 zu aktivieren, sind die
Warengruppen-Umschalttaste und jeweils die entsprechende
Warengruppentaste zu drücken.)
Rabattaste
FremdwährungsUmrechnungstaste
Prozenttasten 1 und 2
Kredittaste
Schecktaste
Nichtaddierende Nummerntaste/
Uhrzeitanzeigetaste/
Zwischensummentaste
Total-/Kein-Verkauf-Taste
CASH
#

6
SCHLÜSSEL UND SCHALTER
Das Funktionsschloß kann durch Einstecken mit einem von zwei mitgelieferten Funktionsschlüsseln gedreht
werden. Diese Schlüssel bestehen aus dem Managerschlüssel (MA) sowie dem Bedienerschlüssel (OP). Diese
Schlüssel können nur in der REG- bzw. -Position eingesteckt oder abgezogen werden.
Funktionsschloß-Einstellpositionen:
: In dieser Betriebsart werden sämtliche Registrierkassenfunktionen gesperrt. (Die Netzspannung wird
unterbrochen.)
Die registrierten Daten werden aber nicht verändert.
OP X/Z: Ermöglicht das Erstellen von Einzelkassierer-X- oder -Z-Berichten und Flash-Berichten, sowie das
Erstellen von elektronischen Journalberichten. Ermöglicht das Ein-/Ausschalten der
Kassenbonausgabe durch Betätigen der
Ü
Taste.
REG: Für unterschiedliche Registrierungen.
PGM: Zur Programmierung unterschiedlicher Positionen.
: Um die Registrierkasse in den Stornomodus zu bringen. In diesem Modus lassen sich nach einer
Transaktion Korrekturen vornehmen.
MGR: Ausschließlich für Eingaben durch den Geschäftsführer. Der Geschäftsführer kann diese Betriebsart
verwenden, um eine Transaktions-Überschreibung vorzunehmen.
X1/Z1: Ermöglicht das Abrufen und die Nullstellung verschiedener Tagesumsätze und die Erstellung
elektronischer Journalberichte.
X2/Z2: Ermöglicht das Abrufen und die Nullstellung der Wochen- und Monatsumsätze.
Mit diesem Schlüssel kann die Schublade verschlossen oder aufgeschlossen werden. Zum Verschließen um 90
Grad nach links drehen. Zum Aufschließen um 90 Grad nach rechts drehen.
SK1-1
Schubladenschlüssel
2
PGM
OP
X/Z
REG
MGR
X
1/Z1
X2/Z2
OP
MA
Funktionsschloß und Funktionsschlüssel
1
MA
OP
Managerschlüssel (MA) Bedienerschlüssel (OP)

7
ANZEIGEN
Bedieneranzeige Kundenanzeige (Ausklapptyp)
Betrag: Erscheint an den äußersten rechten acht (max.) Positionen.
Kassierercode: Erscheint an der zweiten Position (eine Stelle).
Anzahl von Wiederholungen für Wiederholregistrierungen:
Die Anzahl der Wiederholungen wird von “2” aufwärts angezeigt und mit jeder
Wiederholung weitergezählt. Nach zehn Eingaben zeigt die Anzeige “0” an.
Beispiel: (2 → 3 → 4
.....
9 → 0 → 1 → 2
...
)
Kassenbon-Ausgabefunktionsstatus:
Die Anzeige “_” erscheint an der neunten Position, wenn die Kassenbon-Ausgabefunktion
in den OFF-Status gebracht wurde.
Uhrzeit: Erscheint an den zweiten bis sechsten Positionen im 24-Stunden-Format in den
Betriebsarten OP X/Z, REG oder MGR. In den Betriebsarten REG oder MGR ist die
Ñ
Taste zu betätigen, um die Uhrzeit anzuzeigen.
Registrierkassen-Statussymbole:
: Erscheint während der Programmierung an der zehnten Position.
: Erscheint bei einem Fehlerauftritt an der zehnten Position.
– (fließend): Dieses Symbol erscheint, wenn eine Eingabe in eine Minus-Warengruppe bzw. -PLU/Sub-
Warengruppe vorgenommen wird, sowie bei Eingabe eines Rabattbetrages, einer Rückerstattung
oder einer Stornierung.
: Erscheint an der zehnten Position, wenn die Zwischensumme angezeigt wird, oder wenn das
Zahlgeld unter dem Verkaufsbetrag liegt.
: Erscheint an der zehnten Position, wenn die
e
Taste gedrückt wird, um die Zwischensumme in
Fremdwährung zu berechnen.
: Erscheint an der zehnten Position, wenn eine Transaktion durch eine der folgenden Tasten
abgeschlossen wird:
É
, 'und î.
: Erscheint an der zehnten Position, wenn der Wechselgeldbetrag angezeigt wird, oder wenn eine
zwangsweise Kassen-Ist-Eingabe erforderlich ist.
– : Kann in den äußersten linken drei Positionen zum Zeitpunkt einer Eingabe auftreten, wenn der
elektronische Journalspeicher voll ist (von der Programmierung abhängig).
: Kann unmittelbar unter den achten und neunten Positionen zum Zeitpunkt des
Transaktionsabschlusses auftreten, wenn der elektronische Journalspeicher nahezu voll ist (von
der Programmierung abhängig).
Erscheint ebenfalls unmittelbar unter der zehnten Position, wenn der Stromsparmodus aktiviert ist.
Kassierercode
PLU/SUB
DEPT REPEAT
RCPT
OFF

8
PROGRAMMIERUNG
Dieses Kapitel beschreibt, wie Sie Ihre Registrierkasse programmieren müssen.
Programmieren Sie Ihre Registrierkasse mit allen für Ihr Geschäft erforderlichen Positionen/Artikel und folgen
Sie dazu bitte den nachfolgenden Anweisungen.
• Die Sprachauswahl der gewünschten Texte auf dem Kassenbon oder Journalstreifen lassen sich
zwischen Englisch, Deutsch, Französisch und Spanisch wählen. Für die Wahl der Sprache
beziehen Sie sich bitte auf den später behandelten Abschnitt “Sprachauswahl”.
Vorbereitungen zur Programmierung
1.
Schließen Sie Ihre Registrierkasse an eine Steckdose an.
2.
Stecken Sie den Managerschlüssel in das Funktionsschloß und drehen Sie das Schloß in die PGM-Position.
3.
Überprüfen Sie, ob sich die Papierrolle in der Registrierkasse befindet. Wenn nicht, eine Papierrolle korrekt
einsetzen und dabei sich auf den Abschnitt “4. Einsetzen und Herausnehmen der Papierrolle” unter
“WARTUNG DURCH DEN BEDIENER” beziehen.
4.
Programmieren Sie die erforderlichen Artikel/Positionen in Ihrer Registrierkasse.
• In den nachstehenden Tastenbedienungsbeispielen weist eine Zahl wie 26082000 den Parameter
an, der mit den entsprechenden Zifferntasten eingegeben werden muß.
Einstellung des Datums
Den Tag (ein oder zwei Stellen), Monat (zwei Stellen) und das Jahr (vier Stellen: 1999 bis 2098) in dieser
Reihenfolge eingeben.
Einstellung der Uhrzeit
Die Uhrzeit nach dem 24-Stundensystem einstellen. Zum Beispiel, wenn die Uhrzeit auf 2:30 (morgens)
eingestellt werden soll, 230 eingeben. Bei einer Uhrzeit von 14:30 (nachmittags) ist 1430 einzugeben.
Ñ4 ≈
1430
ÑÉ
DruckTastenbedienung
4Ñ
≈
Ñ É
Uhrzeit (max. vier Stellen)
Ñ3 ≈
26082000
ÑÉ
DruckTastenbedienung
3Ñ
≈
Ñ É
Datum (sieben oder acht Stellen)
Einstellung von Datum und Uhrzeit
1
FÜR DEN GESCHÄFTSFÜHRER
Datum
Uhrzeit

9
Einstellung der Maschinennummer
Wenn Ihr Geschäft zwei oder mehrere Registrierkassen besitzt, ist es vorteilhaft, unterschiedliche
Maschinennummern zu schaffen, um die Unterscheidung der Registrierkassen zu ermöglichen. Sie können bis
zu sechs Stellen dafür aufwenden.
Einstellung der laufenden Nummer
Die laufende Nummer wird mit jedem Ausdrucken eines Kassenbons um eins erhöht. Eine Nummer (ein bis vier
Stellen) eingeben, die um eins niedriger ist als der gewünschte Startwert.
*1: Die zugehörige Steuersatznummer eingeben. Beispiel: Bei Programmierung des Steuersatzes 1, eine “1”
eingeben.
*2: Vorzeichen und Steuersatz: XYYY.YYYY
*3: Max. fünf Stellen: 0.00 bis 999.99
Programmierung des Steuersatzes
3
Ñ2 ≈
1000
ÑÉ
DruckTastenbedienung
Ñ1 ≈
123456
ÑÉ
DruckTastenbedienung
Einstellung der Maschinennummer sowie der laufenden Nummer
2
Maschinennummer
1Ñ
≈
Ñ É
Maschinennummer (ein bis sechs Stellen)
Um die Maschinennummer auf “0” einzustellen.
2Ñ
≈
Ñ É
Eine Nummer (ein bis vier Stellen), die um eins
niedriger ist als der gewünschte Startwert.
Um mit der Zählung bei “0001” zu beginnen.
Laufende
Nummer
ń
*
1
A
≈ ≈
?
1-4
*2Vorzeichen
und
Steuersatz
*3Niedrigster
steuerpflichtiger
Betrag
ÑÉ
Um “0” zu programmieren.
Um diesen Steuersatz unzulässig zu machen.
Um “0” zu programmieren.
9
Steuersatz = 0.0001 bis 100.0000
Vorzeichen -/+ = 1/0

10
• Bei der Wahl des MWSt-Aufschlags-Systems kann der niedrigste steuerpflichtige Betrag gewählt
werden. Bei der Wahl des MWSt-Systems ist dies nicht möglich.
• Wenn beim Programmieren eines Steuersatzes vor dem Drücken der dritten
≈
Taste eine
falsche Eingabe gemacht wird, kann der Fehler mit der Löschtaste
c
aufgehoben werden.
Wenn der Fehler nach Drücken der
≈
Taste gemacht wird, ist der Abschluß mit der ÑTaste
auszuführen. Danach die Programmierung erneut und richtig vom Anfang an beginnen.
• Wenn das MWSt-System gewählt wird, wird das programmierte Vorzeichen ignoriert.
Ihre Registrierkasse ist mit 15 Standard-Warengruppen ausgestattet. Darüberhinaus kann über die
Warengruppen-Umschalttaste ein Zugriff auf weitere 15 Warengruppen (Warengruppen 16 bis 30) erfolgen.
Funktionsprogrammierung
Steuerstatus
Jeder Warengruppe einen Steuerstatus zuordnen. Wenn bei einer Transaktion Eingaben in
steuerpflichtige Warengruppen vorgenommen werden, wird die Steuer gemäß des zugeordneten
Steuersatzes unmittelbar nach Abschluß der Transaktion berechnet.
SICS (Einzelposten-Barverkauf)
Wenn es sich um die erste Registrierung für eine Warengruppe handelt, die für SICS programmiert
wurde, wird der Verkauf unmittelbar nach der Betätigung der Warengruppentaste abgeschlossen.
Wenn der Verkauf durch eine Registrierung für Warengruppen beginnt, die nicht für SICS programmiert
wurden, wird ein Verkauf zu einer auf SICS programmierten Warengruppe nicht abgeschlossen und
kann solange wiederholt werden, bis die
É
Taste gedrückt wird.
Vorzeichen
Sie können jede Warengruppe für normale Verkäufe Plus-Warengruppen zuordnen, oder MinusWarengruppen für Minus-Transaktionen.
HALO (Obere Eingabe-Betragsgrenze)
Die Anzahl der zulässigen Stellen für den maximalen Eingabebetrag für jede einzelnen Warengruppe
programmieren. Die obere Eingabe-Betragsgrenze ist bei Operationen in der REG-Betriebsart effektiv
und kann in der MGR-Betriebsart außer Kraft gesetzt werden.
Typen von Einzelpreisregistrierungen
Sie können einen der folgenden vier Typen von Einzelpreisregistrierungen für jede Warengruppe
wählen.
• Offener und vorprogrammierter Preis/Nur vorprogrammierter Preis/Nur offener Preis/Warengruppentaste sperren
* Die Warengruppen-Umschalttaste an dieser Stelle betätigen, um die Warengruppen 16 bis
30 zu programmieren.
Um alle Nullen zu programmieren.
≈
WarengruppentasteABCDEFGHI
É
Um eine andere Warengruppe zu programmieren.
Ó
*
Programmierung für Warengruppen
4
Ñ9 ≈
2
≈
4
≈
12
ÑÉ
DruckTastenbedienung
Steuersatz 2 Steuersatz: 4% Niedrigster
steuerpflichtiger Betrag

11
* Positionen: Auswahl: Eingabe:
A Herausrechnende MWSt 4 oder Ja 1
aufschlagende MWSt 4
Nein 0
B Herausrechnende MWSt 3 oder Ja 1
aufschlagende MWSt 3
Nein 0
C Herausrechnende MWSt 2 oder Ja 1
aufschlagende MWSt 2
Nein 0
D Herausrechnende MWSt 1 oder Ja 1
aufschlagende MWSt 1
Nein 0
E SICS / Normal Einzelposten-Barverkauf (SICS) 1
Normal 0
F Vorzeichen Minus-Warengruppe 1
Plus-Warengruppe 0
G Immer 0 eingeben. 0
H Obere Eingabe-Betragsgrenze 0-7
I Typ der Einzelpreisregistrierung Offener und vorprogrammierter Preis 3
Nur vorprogrammierter Preis 2
Nur offener Preis 1
Warengruppentaste sperren 0
•
Das Steuersystem Ihrer Registrierkasse wurde werkseitig auf automatisch herausrechnende MWSt-Berechnung 1 - 4
eingestellt. Wenn Sie den Wunsch haben, die automatisch aufschlagende MWSt-Berechnung 1 - 4, die manuell
herausrechnende MWSt-Berechnung 1 - 4, die manuell herausrechnende MWSt-Berechnung 1, die manuell
aufschlagende MWSt-Berechnung 1 - 4 sowie die Kombination von automatisch herausrechnender MWSt-Berechnung 1
und automatisch aufschlagender MWSt-Berechnung 2 - 4 zu benutzen, sprechen Sie bitte mit Ihrem Fachhändler.
•
Wenn die Kombination der automatisch herausrechnenden MWSt-Berechnung 1 und der automatisch aufschlagenden
MWSt-Berechnung 2 - 4 gewählt wird, kann eine der Mehrwertsteuern 1 (D) zusammen mit den aufschlagenden
Mehrwertsteuern 2 - 4 verwendet werden.
Beispiel: ABCD = 1001, 1010, 1100
Einzelpreis
Sie können die Einzelpreise mit bis zu sechs Stellen (9999.99) programmieren. Auch wenn die Warengruppe
nicht für die Eingabe von vorprogrammierten Einzelpreisen im Funktionsprogramm programmiert ist, wird die
Warengruppe automatisch geändert, um die Eingabe der programmierten Einzelpreise durch dieses Programm
zu gestatten.
* Die Warengruppen-Umschalttaste an dieser Stelle betätigen, um die Warengruppen 16 bis
30 zu programmieren.
1000
¯
É
DruckTastenbedienung
Um einen Nullpreis zu programmieren.
Um eine andere Warengruppe zu programmieren.
WarengruppentasteEinzelpreis (max. sechs Stellen)
É
Ó
*
011011073
≈
úÉ
DruckTastenbedienung
Von links, EHI
Steuerstatus
Vorzeichen (F)
Einzelpreis

12
Jedes PLU erfordert folgende Programmierung:
PLU-Code (drei Stellen: 1-500)
Zugeordnete Warengruppe
Wenn ein PLU einer Warengruppe zugeordnet ist, hängen die folgenden Funktionen des PLUs von der
Programmierung für die entsprechende Warengruppe ab.
• Steuerstatus
• Obere Eingabe-Betragsgrenze (nur für Sub-Warengruppen)
• Einzelposten-Barverkauf
• Vorzeichen
Einzelpreis (max. sechs Stellen)
Normalerweise werden Sie Einzelpreise für individuelle PLUs als PLU-Einzelpreise programmieren. Falls
Sie den Einzelpreis “0” für ein PLU programmieren, können Sie nur die Verkaufsmenge in den PLU
eingeben, d.h. das PLU kann nur als Zähler verwendet werden.
PLU- oder Sub-Warengruppenmodus
• Wenn der PLU-Modus gewählt wird (z.B. automatische Festpreisregistrierung), können Einzel-PLUEingaben durch Eintippen der zugeordneten Codes und anschließendes Drücken der
Ö
Taste
vorgenommen werden.
• Wenn der Sub-Warengruppenmodus gewählt wird, müssen die folgenden Tastenbedienungen ausgeführt
werden: Den Preis eingeben, die
å
Taste drücken, den PLU-Code eingeben und die ÖTaste drücken.
Zuordnung des Einzelpreises und der assoziierten Warengruppen
1
Ö
125
˘
É
DruckTastenbedienung
PLU-Code*
1
Warengruppentaste
Einzelpreis
(max. sechs Stellen)
Ö
?
Um einen Nullpreis zu programmieren.
Zum Sperren.
Um das folgende PLU zu programmieren.
Um ein anderes PLU zu programmieren.
É
*1: 1 bis 500
*2: Die Warengruppen-Umschalttaste an dieser Stelle betätigen, um die Warengruppen 16 bis 30 zu zuordnen.
Ó
*
2
Programmierung für PLUs (Einzelartikel)
5
Einzelpreis
PLU-Code
Zugeordnete
Warengruppe

13
PLU-/Sub-Warengruppen-Modus
*1: 1 bis 500
*2: 0 für Sub-Warengruppenmodus oder 1 für PLU-Modus
Programmierung von Prozentsatz und Fremdwährungs-Umrechnungskurs
(
%, e
)
*: Satz/Kurs
0.00 - 100.00 (Prozentsatz)
0.000000 - 999.999999 (Fremdwährungs-Umrechnungskurs)
Der Dezimalpunkt muß verwendet werden, wenn es sich um Nachkommastellen handelt.
10 .25
∞
0 .6068
e
É
DruckTastenbedienung
*Satz/Kurs
oder
∞
e
ɧ
Um einen anderen Satz/Kurs zu programmieren.
Um Null zu programmieren.
Programmierung verschiedener Tasten
6
1
Ö
0
ÑÉ
DruckTastenbedienung
*1PLU-Code
Ö
Um Null zu programmieren.
Um das folgende PLU zu programmieren.
Um ein anderes PLU zu programmieren.
ÉÑ
*2A
PLU-/SubWarengruppenModus
Prozentsatz
FremdwährungsUmrechnungskurs

14
Programmierung des Rabattbetrags (-)
Programmierung der Prozentsatzbegrenzung (
%
)
Sie können die obere Prozentsatzgrenze bei Prozentsatzeingaben programmieren.
(Prozenteingaben, die den oberen Grenzwert überschreiten, können im MGR-Modus überschrieben werden.)
10% können als
10
oder
10.00
eingegeben werden. Die Taste .ist
ausschließlich für Bruchwerte erforderlich.
Programmierung der Funktionsparameter für die Tasten -und
%
+/- Vorzeichen
Durch die Programmierung des Vorzeichens +/- werden die Aufschlags- oder Abschlagsfunktion für
jede Taste zugeordnet.
Posten % / Posten
â
Prozent-/Rabattberechnung für Einzelwarengruppe und -PLU
Zwischensummen % / Zwischensumme
â
Prozent-/Rabattberechnung für die Zwischensummen
Obere Eingabe-Betragsgrenze (nur für Rabattaste)
Die obere Eingabe-Betragsgrenze ist für REG-Modus-Operationen aktiviert, kann aber im MGR-Modus
überschrieben werden. Die obere Eingabe-Betragsgrenze wird durch die Anzahl der zulässigen Stellen
für den max. Eingabebetrag mit der Rabattaste bestimmt.
*ABCD oder
∞≈
-
ɧ
Um für eine andere Taste zu programmieren.
Um Null für alle Positionen
zu programmieren.
Ñ29≈
15
.00∞
É
DruckTastenbedienung
Ñ ≈29
Prozentgrenzwert (0.00 - 100.00)
É
Um Null zu programmieren.
Um eine andere Prozenttaste zu programmieren.
oder
∞§
1000
-
É
DruckTastenbedienung
Rabattbetrag (max. sechs Stellen)
É-
Um Null zu programmieren.
Rabattbetrag
Prozentsatzgrenze

15
*: Positionen: Auswahl: Eingabe:
A Vorzeichen +/- + Vorzeichen (Aufschlag) 0
- Vorzeichen (Abschlag) 1
B Posten % / Posten
â
Ermöglichen 0
Sperren 1
C Zwischensummen % / Zwischensummen âErmöglichen 0
Sperren 1
D Begrenzungsbetrag* für Rabattaste 0-7
* Beim Programmieren von Prozenttasten ist immer 0 einzugeben.
Programmierung der Funktionsparameter für die eTaste
Eingabewahl für Fremdwährungs-Umrechnungskurs
Die Voreinstellung und manuelle Eingabe des Fremdwährungs-Umrechnungskurses kann ermöglicht oder
gesperrt werden.
Anzahl der Nachkommastellen
Die Anzahl der Nachkommastellen, die auf den Kassenbons für den Fremdwährungsbetrag ausgedruckt werden
sollen, kann programmiert werden.
*: Positionen: Auswahl: Eingabe:
A Manuelle Kurseingabe Ermöglichen 0
Sperren 1
B Festkurseingabe Ermöglichen 0
Sperren 1
C Anzahl der Nachkommastellen 0-3
001
≈
eÉ
DruckTastenbedienung
*ABC
É
Um Null für alle Positionen
zu programmieren.
Um die Einstellungen zu verändern.
≈ e
1006
≈
-É
DruckTastenbedienung
Von links, BCD
Vorzeichen (A)
Von links, ABC

16
Programmierung der Funktionsparameter für die Tasten;, ', î, rund
p
Ausdruck der Fußzeile
Diese Programmierung bestimmt, ob bei einer spezifizierten Zahlungsmitteltaste ein Text am Ende des
Kassenbons ausgedruckt werden soll.
Zwangsweise Zahlgeldeingabe
Sie können zwangsweise Zahlgeldeingabe für die Tasten
;
und 'wählen.
Sie können zwangsweise Zahlgeldeingabe für die
î
Taste wählen oder sperren.
Obere Eingabe-Betragsgrenze (HALO)
Für die Tasten
', î
, rund pist eine obere Eingabe-Betragsgrenze für den Zahlgeldbetrag zu
programmieren. Für die
;
Taste muß eine obere Eingabe-Betragsgrenze für den Gesamt-Barbetrag
programmiert werden, der auf Ihrer Registrierkasse verarbeitet werden kann. Die obere EingabeBetragsgrenze ist im REG-Modus aktiviert, kann jedoch im MGR-Modus überschrieben werden. Die
Betragsgrenze wird durch die Anzahl der zulässigen Stellen für den max. Eingabebetrag oder
Gesamtbetrag bestimmt. Wenn “0” eingestellt ist, wird die Funktion der entsprechenden Taste gesperrt.
*1:Positionen: Auswahl: Eingabe:
A Ausdruck der Fußzeile* Ja 1
Nein 0
B Zahlgeldeingabe* Zwangsweise 1
Zwanglos für die ;oder 'Taste 0
Für die îTaste sperren. 0
C Betragsgrenze 0-8
* Wenn für die Taste roder pprogrammiert wird, immer 0 eingeben.
Programmierung alphanumerischer Zeichen
Ihre Registrierkasse gestattet die Programmierung für Warengruppen, PLUs, Funktionen usw. im
Zeicheneingabemodus. Wenn ein Programmierjob ausgeführt wird, der alphanumerische Zeichen aufweist,
schaltet die Registrierkasse automatisch in den Zeicheneingabemodus um.
Bei der Eingabe von alphanumerischen Zeichen ist auf die Zeichencodetabelle Bezug zu nehmen und die
Zeichen auf dem Zehnertastaturfeld einzugeben.
Eingabe der Zeichencodes
• Nummern, Buchstaben und Symbole können durch Eingabe der Zeichencodes und der
º
Taste
programmiert werden. Siehe hierfür die alphanumerische Zeichencodetabelle auf der nächsten Seite.
• Zeichen doppelter Größe können durch Eingabe des Zeichencodes 253 erzielt werden.
• Es MÜSSEN alle drei Stellen des Zeichencodes eingegeben werden (auch wenn dieser mit Nullen beginnt).
Um das Wort “SHARP” zu programmieren, wobei das “S” in doppelter Größe erscheinen soll,
muß die folgende Eingabefolge durchgeführt werden:
253
º
083
º
072
º
065
º
082
º
080
º
S H A R P
Textprogrammierung
7
018
≈
îÉ
DruckTastenbedienung
*1ABC oder
É
Um Null für alle Positionen
zu programmieren.
Um für eine andere Taste zu programmieren.
*
2
: Die Ñ Taste für die Einstellung der ; Taste drücken.
≈ Ñ,',î,rp
*
2
Von links, ABC

17
Alphanumerische Zeichencodetabelle
*(DC): Code für Zeichen in doppelter Größe
Code
001
002
003
004
005
006
007
008
009
010
011
012
013
014
015
016
017
018
019
020
021
022
023
024
025
026
027
028
029
030
031
032
033
034
035
036
037
038
039
040
041
042
043
044
045
Zeichen
á
â
ê
î
ì
í
ô
ó
û
ú
œ
u
ú
o
ó
L
C
G
¨
V
D
U
J
P
S
Y
F
U
Ú
O
Ó
(Leerstelle)
!
”
#
$
%
&
’
(
)
+
,
-
Code
046
047
048
049
050
051
052
053
054
055
056
057
058
059
060
061
062
063
064
065
066
067
068
069
070
071
072
073
074
075
076
077
078
079
080
081
082
083
084
085
086
087
088
089
090
Zeichen
.
/
0
1
2
3
4
5
6
7
8
9
:
;
<
=
>
?
@
A
B
C
D
E
F
G
H
I
J
K
L
M
N
O
P
Q
R
S
T
U
V
W
X
Y
Z
Code
091
092
093
094
095
096
097
098
099
100
101
102
103
104
105
106
107
108
109
110
111
112
113
114
115
116
117
118
119
120
121
122
123
124
125
126
127
128
129
130
131
132
133
134
135
Zeichen
Ä
Ö
Ü
^
_
a
b
c
d
e
f
g
h
i
j
k
l
m
n
o
p
q
r
s
t
u
v
w
x
y
z
{
|
}
ß
¢
!!
1
2
3
4
1/2
F
T
←
Code
136
137
138
139
140
141
142
143
144
145
146
147
148
149
150
151
152
153
154
155
156
157
158
159
160
161
162
163
164
165
177
178
180
181
182
183
184
185
186
187
188
189
190
191
192
Zeichen
→
F
T
↓
ç
°
¿
Ù
à
Æ
ø
Å
¤
é
è
Pt
i
Ñ
ò
£
¥
°
Á
Í
A
a
E
e
I
i
U
u
N
n
C
S
C
▲
▲
´´
´´
´´
´´
193
194
195
196
197
198
199
200
201
202
203
204
205
206
207
208
209
210
211
212
213
214
215
216
217
218
219
224
225
226
227
228
229
230
231
232
233
234
235
236
237
238
253
I
G
S
G
g
K
k
L
l
Z
D
d
C
c
P
e
s
c
z
y
u
n
r
§
Ø
↑
]
[
ä
ö
ü
æ
å
É
ñ
*(DC)
’
.
.
.
.
.
.
.
.
.
.
.
.
”
Code
Zeichen

18
Programmierung des Warengruppentexts
Es lassen sich bis zu 16 Zeichen für jede einzelne Warengruppe programmieren. Der Text wird durch Eingabe
der Zeichencodes programmiert.
* Die Warengruppen-Umschalttaste an dieser Stelle betätigen, um die Warengruppen 16 bis
30 zu programmieren.
Programmierung des PLU-Texts (Artikelbezeichnung)
Es lassen sich bis zu 16 Zeichen (Artikelbezeichnung) für jedes einzelne PLU programmieren. Der Text wird
durch Eingabe der Zeichencodes programmiert.
Programmierung des Funktionstexts
Es lassen sich bis zu 12 Zeichen für jede einzelne Funktionstaste sowie andere Funktionen programmieren.
Hierfür die Tabelle auf der folgenden Seite benutzen. Der Text wird durch Eingabe der Zeichencodes
programmiert.
* Funktions-Nr.: Siehe “Funktionstextliste” auf der folgenden Seite.
Ñ2 .
1
Ö
077 º069 º076
º
079 º078
º
ÑÉ
DruckTastenbedienung
Ñ1 .
070 º082 º085
º
073 º084
º
¯É
DruckTastenbedienung
Programmierter
Text für
Warengruppe 1
Programmierter
Text für PLUCode 1
Ñ .1
Zeichencode (3 Stellen)
Warengruppentaste
É
Um die gegenwärtige Einstellung beizubehalten.
Um eine andere Warengruppe zu programmieren.
Bis zu 16 Zeichen
º
Ó
*
Ñ .2 Ö
PLU-Code
Um das nachfolgende PLU zu programmieren.
Bis zu 16 Zeichen
Zeichencode
(3 Stellen)
ÉÑ
Um die gegenwärtige Einstellung beizubehalten.
º
Um ein anderes PLU zu programmieren.
Ñ .3 ≈
*
Funktions-Nr.
(max. 2 Stellen)
Um einen anderen Funktionstext zu programmieren.
Um die gegenwärtige Einstellung beizubehalten.
Zeichencode
(3 Stellen)
Bis zu 12 Zeichen
º
ÉÑ

19
Funktionstextliste
Ñ3 .
25
≈
067 º065 º082
º
068
º
ÑÉ
DruckTastenbedienung
1
â
(–) 1
2%1 %1
3%2 %2
4 Differenz DIFFERENZ
5 Mehrwertsteuerpflichtige
MWSTUMSATZ 1
Zwischensumme 1
6 Mehrwertsteuerpflichtige
MWSTUMSATZ 2
Zwischensumme 2
7 Mehrwertsteuerpflichtige
MWSTUMSATZ 3
Zwischensumme 3
8 Mehrwertsteuerpflichtige
MWSTUMSATZ 4
Zwischensumme 4
9 Herausrechnende MWST 1
MWSt/aufschlagende MWSt 1
10 Herausrechnende MWST 2
MWSt/aufschlagende MWSt 2
11 Herausrechnende MWST 3
MWSt/aufschlagende MWSt 3
12 Herausrechnende MWST 4
MWSt/aufschlagende MWSt 4
13 Netto 1 NETTO 1
14 Netto 2 NETTO 2
15 Retouren RETOUREN
16 Storno
EINZELSTORNO
17 Storno-Betriebsart
STORNOMODUS
18 Geschäftsführer-Storno
MGR-STORNO
19 Zwischensummen-Storno
ZWS-STORNO
20 Kein Verkauf
KEIN VERKAUF
21 Bezahlte Rechnung
BEZ.ECHNUNG
22 Ausgaben AUSGABEN
23 Bargeld BAR
24 Scheck SCHECK
25 Kredit KREDIT
26 Fremdwährung (programmierter
FR.WÄHRUNG1
Umrechnungskurs)
27 Fremdwährung (offener
FR.WÄHRUNG2
Umrechnungskurs)
28 Fremdwährung-Kassen-Ist
FR.WÄHR1 IST
29 Fremdwährung/Scheck
WÄHR1 SCHECK
30 Fremdwährung/Kredit
WÄHR1 KREDIT
31 Bargeld in der Schublade BAR/LADE
32 Bargeld/Scheck-Ist BAR/CHK IST
33 Bargeld/Scheck in der Schublade
BAR/CHK LADE
34 Rückgeld für Scheckzahlung
SCHECKWECHGD
Funktions-
Nr.
Funktion
Standardtext
35 Kunde KUNDEN
36 Gesamtzahlung BEZAHLT
37 Inlandswährung 1
IN.WÄHRUNG1
38 Inlandswährung 2
IN.WÄHRUNG2
39 Inlandswährung für
IN.WÄHR1 CHK
Fremdwährung/Scheck
40 Inlandswährung für
IN.WÄHR1 KRE
Fremdwährung/Kredit
41 Scheck in der Schublade
SCHECK/LADE
42 Gesamt (+)-Warengruppe
+WGR.GESAMT
43 Gesamt (-)-Warengruppe
-WGR.GESAMT
44 Nettoumsatz 1
NETTO1 GES.
(Steuerpflichtig 1 - MWSt 1)
45 Nettoumsatz 2
NETTO2 GES.
(Steuerpflichtig 2 - MWSt 2)
46 Nettoumsatz 3
NETTO3 GES.
(Steuerpflichtig 3 - MWSt 3)
47 Nettoumsatz 4
NETTO4 GES.
(Steuerpflichtig 4 - MWSt 4)
48 Zwischensumme ZW-SUMME
49 Nettozwischensumme ZWS-NETTO
50 Gesamt GESAMT
51 Rückgeld RÜCKGELD
52 Anzahl gekaufter Posten POSTEN
53 Durchschnitt
DURCHSCHNITT
54
Zwangsweise Kassen-Ist-Eingabe
CCD
55 Kassen-Soll-Ist-Differenz CCD-DIFFER.
56 Kassen-Soll-Ist-Gesamtdifferenz
DIFFERENZ TL
57 Gesamtmehrwertsteuer-Betrag
MWST-GESAMT
58 Gesamtnettoumsatz ohne MWSt
NETTO GESAMT
59 Warengruppenbericht-Kopfzeile
WARENGRUPPEN
60 PLU(Artikel)-Bericht-Kopfzeile ARTIKEL
61 Transaktionsbericht-Kopfzeile FINANZBER.
62 Kassiererbericht-Kopfzeile KASSIERER
63 Stundenumsatzbericht-Kopfzeile
STUNDENUMS.
64 Tagesnettobericht-Kopfzeile TÄGLICH
65 Nicht addierendes Symbol #
(8 Zeichen)
66 Bonkopie-Kopfzeile BONKOPIE
67 E-Journal-Bericht-Kopfzeile E-JOURNAL
68 E-Journal-Bericht-Abschlußzeile
JOURNAL ENDE
Funktions-
Nr.
Funktion
Standardtext

20
Programmierung der Kassierernamen
Für jeden Kassierernamen können bis 12 Zeichen programmiert werden. Die Programmierung läßt sich durch
Eingabe der Zeichencodes ausführen.
Programmierung der Kopf- und Fußzeilen für den Bonausdruck
Ihre Registrierkasse kann auf jedem Kassenbon Textinformationen für Kunden ausdrucken. Das
Standardmodell druckt nur das grafische Logo auf dem Kassenbon aus. Möchten Sie das grafische Logo
ändern, wenden Sie sich bitte an Ihren Fachhändler. Wenn Sie einen anderen Klischeeausdruck wünschen,
ändern Sie bitte das Klischee-Druckformat (siehe Seite 25 für die Programmiereinzelheiten). Sie haben die
nachfolgenden fünf Optionen.
Programmieren Sie den Text durch Eingabe der Zeichencodes.
* “3 Kopfzeilen”: 1 bis 3
“3 Fußzeilen”: 4 bis 6
“6 Kopfzeilen”: 1 bis 6
“3 Kopfzeilen und 3 Fußzeilen”: 1 bis 6 (1 bis 3 als Kopfzeile, 4 bis 6 als Fußzeile)
Grafisches
Logo
Vorgabe
Grafisches
Logo
Grafisches
Logo
Text 1. Kopfzeile
3 Kopfzeilen und
3 Fußzeilen
3 Kopfzeilen
3 Fußzeilen
6 Kopfzeilen
Text 2. Kopfzeile
Text 3. Kopfzeile
Text 1. Kopfzeile
Text 2. Kopfzeile
Text 3. Kopfzeile
Text 1. Kopfzeile
Text 2. Kopfzeile
Text 3. Kopfzeile
Text 1. Kopfzeile
Text 2. Kopfzeile
Text 3. Kopfzeile
Text 4. Fußzeile
Text 5. Fußzeile
Text 6. Fußzeile
Text 4. Kopfzeile
Text 5. Kopfzeile
Text 6. Kopfzeile
Text 4. Fußzeile
Text 5. Fußzeile
Text 6. Fußzeile
Ñ .4 ≈
*
Zeilennummer
(1-6)
Bis zu 30 Zeichen
Zeichencode
(
3 Stellen
)
ÉÑ
Um die gegenwärtige Einstellung beizubehalten.
º
Um eine andere Zeile zu programmieren.
Ñ5 .
1
≈
068 º065 º086 º073 º068
º
ÑÉ
DruckTastenbedienung
Um die gegenwärtige Einstellung beizubehalten.
Kassierercode
Ñ .5 ≈
(1-6)
Um einen anderen Kassierernamen zu programmieren.
Zeichencode
(3 Stellen)
Bis zu 12 Zeichen
º
ÉÑ

21
Programmierung von “THANK YOU” in doppelter Größe und mittig ausgerichtet auf der dritten Zeile des
Klischeeausdrucks.
Vor der Auslieferung wurde ein 6zeiliger Klischeetext programmiert. Beim Programmieren eines
Klischeetexts muß deshalb mit der ersten Zeile begonnen werden.
Programmierung des Fremdwährungssymbols
Das Fremdwährungssymbol für die eTaste wird bei Bezahlung mit Fremdwährung ausgedruckt, deren
Umrechnungskurs durch Programmierung bestimmt wurde. Der Text ist durch Eingabe der Zeichencodes zu
programmieren.
Programmierung des Inlandswährungssymbols
“ ” gilt als Vorgabeeinstellung. Wenn Sie das Inlandswährungssymbol verändern möchten, muß das Symbol
(max. 4 Zeichen) durch Eingabe der Zeichencodes programmiert werden.
Ñ
85
.
032 º032 º032
º
042
º
ÑÉ
DruckTastenbedienung
Ñ85 .
Bis zu 4 Zeichen
Zeichencode
(
3 Stellen
)
ÉÑ
Um die gegenwärtige Einstellung beizubehalten.
º
✱
Ñ6 .
032 º032 º032
º
207
º
ÑÉ
DruckTastenbedienung
Ñ6 .
Bis zu 4 Zeichen
Zeichencode
(
3 Stellen
)
ÉÑ
Um die gegenwärtige Einstellung beizubehalten.
º
Ñ4 .
3
≈
032 º032 º032 º032 º032 º032
º
253 º084 º253 º072 º253 º065
º
253 º078 º253 º075 º032 º032
º
253 º089 º253 º079 º253 º085
º
ÑÉ
DruckTastenbedienung
Fremdwährungssymbol
Inlandswährungssymbol

22
Sie können die Programmierung für die in diesem Abschnitt beschriebenen Programmierung
fortsetzen, bis die
É
Taste gedrückt wird. Um mit der Programmierung fortzufahren, ist von der
ersten numerischen Tasteneingabe aus zu wiederholen.
Programmierung der Wahl für zusätzliche Funktionen
Sie können die Vorgänge wie Ausgaben, Bezahlte Rechnung, Retouren, Kein Verkauf oder Storno im REGModus ermöglichen oder sperren. Ferner läßt sich festlegen, ob Mengenbruchwerte eingegeben werden können
oder nicht.
* Positionen: Auswahl: Eingabe:
A Ausgaben im REG-Modus Ermöglichen 0
Sperren 1
B Bezahlte Rechnung im REG-Modus Ermöglichen 0
Sperren 1
C Zwischensummen-Storno im REG-Modus Ermöglichen 0
Sperren 1
D Indirekter Storno im REG-Modus Ermöglichen 0
Sperren 1
E Direktstorno im REG-Modus Ermöglichen 0
Sperren 1
F Retouren-Eingabe im REG-Modus Ermöglichen 0
Sperren 1
G Kein Verkauf im REG-Modus Ermöglichen 0
Sperren 1
H Eingabe von Mengenbruchwerten Ermöglichen 0
Sperren 1
Programmierung des Druckformats
Sie können folgende Programmierungen vornehmen:
Druckertyp - Verwendung des Druckers als Journaldrucker oder Kassenbondrucker
Kassenbonausdruck - Detaillierter Bonausdruck oder Gesamtbonausdruck
Auf dem Gesamtbonausdruck werden die einzelnen Positionen nicht ausgedruckt.
Datumsausdruck auf Kassenbons
Ausdruck der laufenden Nummern
Trennlinie in den Berichten
Nullunterdrückung in den Berichten
Ñ6 ≈
*ABCDEFGH
ÉÑ
Um Null für alle Positionen zu programmieren.
Ñ5 ≈
00000100
Ñ
É
DruckTastenbedienung
Ñ5 ≈
*ABCDEFGH
ÉÑ
Um Null für alle Positionen zu programmieren.
Programmierung verschiedener Funktionen
8

23
* Positionen: Auswahl: Eingabe:
A Druckertyp Journaldrucker 0
Kassenbondrucker 1
B Kassenbonausdruck Gesamt 0
Detailliert 1
C Immer 0 eingeben. 0
D Datumsausdruck auf Kassenbons Ja 0
Nein 1
E Ausdruck der laufenden Nummern Ja 0
Nein 1
F Trennlinie in den Berichten Trennlinie 1
Eine Leerzeile 0
G Nullunterdrückung im PLU-Bericht Ja 1
Nein 0
H Nullunterdrückung im Allgemeinen/ Ja 1
Kassierer-/Stunden-/Tagesbericht Nein 0
Programmierung für Kassenbonausdruck
Sie können folgende Programmierungen vornehmen:
Zwischensummenausdruck durch Drücken der
Ñ
Taste
Betragsausdruck für MWSt/Steuer
Ausdruck des steuerpflichtigen Betrags
Ausdruck des Nettobetrags
Ausdruck der Anzahl gekaufter Posten
* Positionen: Auswahl: Eingabe:
A - B Immer 0 eingeben. 0
C Zwischensummenausdruck durch Drücken Ja 1
der Zwischensummentaste
Nein 0
D Immer 0 eingeben. 0
E Betragsausdruck für MWSt/Steuer Ja 0
Nein 1
F Ausdruck des steuerpflichtigen Betrags Ja 0
Nein 1
G Ausdruck des Nettobetrags Ja 0
Nein 1
H Ausdruck der Anzahl gekaufter Posten Ja 0
Nein 1
Ñ7 ≈
00000001
Ñ
É
DruckTastenbedienung
Ñ7 ≈
*ABCDEFGH
ÉÑ
Um Null für alle Positionen zu programmieren.
Ñ6 ≈
10000111
Ñ
É
DruckTastenbedienung

24
Programmierung für das EURO-System
Für Einzelheiten bezüglich des EURO-Systems beziehen Sie sich bitte auf den Abschnitt “EUROPROGRAMMIERUNG”.
Ausdruck der Gesamtsummen und Wechselgeldbeträge in Fremdwährung auf dem Kassenbon oder
Journalstreifen
Die Gesamtsummen und Wechselgeldbeträge in Fremdwährung werden unter den Gesamtsummen und
Wechselgeldbeträgen in Inlandswährung ausgedruckt.
Scheck- und Kredittransaktionen bei Zahlung mit Fremdwährung
Fremdwährungs-Berechnungsmethode
Für die Umrechnungsmethode der Inlandswährung in Fremdwährung kann “Division” oder “Multiplikation”
gewählt werden. Die Berechnung ist wie folgt auszuführen:
Wenn “Division” gewählt wird:
Inlandswährungsbetrag 4 Umrechnungskurs = Fremdwährungsbetrag
Wenn “Multiplikation” gewählt wird:
Inlandswährungsbetrag 3 Umrechnungskurs = Fremdwährungsbetrag
* Positionen: Auswahl: Eingabe:
A
Ausdruck der Gesamtsummen und Wechselgeldbeträge
Ja 1
in Fremdwährung auf Kassenbon oder Journalstreifen
Nein 0
B Immer 0 eingeben. 0
C Scheck- und Kredittransaktion bei Ja 1
Zahlung mit Fremdwährung
Nein 0
D Fremdwährungs-Berechnungsmethode Division 1
Multiplikation 0
Programmierung des Stromsparmodus
Nähere Einzelheiten hinsichtlich des Stromsparmodus entnehmen Sie bitte dem Abschnitt “Stromsparmodus” im
Kapitel “VOR DER REGISTRIERUNG”.
* Positionen: Auswahl: Eingabe:
A Aktivierung des Stromsparmodus, wenn Ja 0
die Uhrzeit angezeigt wird.
Nein 1
B-D
Zeitspanne (min) zur Aktivierung des Stromspar-
001-254 oder 999*
modus, ab der keine Bedienung erfolgt ist.
* 999: Sperrt die Aktivierung des Stromsparmodus.
Ñ
10
≈
0060
Ñ
É
DruckTastenbedienung
Ñ10 ≈
*ABCD
ÉÑ
Um Null für alle Positionen zu programmieren.
Ñ8 ≈
1000
Ñ
É
DruckTastenbedienung
Ñ8 ≈
*ABCD
ÉÑ
Um Null für alle Positionen zu programmieren.

25
Programmierung des Klischeedruckformats
Sie können die Anzahl der Zeilen für den Klischeedruck und die auf dem Kassenbon oder Journalstreifen zu
druckenden Textzeilen bestimmen.
*A: Klischeedrucktyp
0: 3 Kopfzeilen ohne grafisches Logo
1: Nur grafisches Logo
2: Grafisches Logo mit 3 Fußzeilen
3: 6 Kopfzeilen
4: Grafisches Logo mit 3 Kopfzeilen
5: 3 Kopfzeilen und 3 Fußzeilen
Programmierung der RS-232C-Schnittstelle
Um die Online-Kommunikationsfunktion zu aktivieren, sprechen Sie bitte mit Ihrem Fachhändler.
(1) RS-232C-Terminalnummer
(2) RS-232C-Übertragungsformat
* Positionen: Auswahl: Eingabe:
A Immer “0” eingeben. 0
B Übertragungsformat Halb-Duplex 1
Voll-Duplex 0
(3) RS-232C-Übertragungstyp und Baudrate
* Positionen: Auswahl: Eingabe:
A Übertragungstyp Senden von Druckdaten 1
Herunter-/Hinaufladen von RAM-Daten 0
B Baudrate (bps) 2400 3
4800 4
9600 5
19200 6
Ñ32 ≈
*AB
ÉÑ
Um auf “00” einzustellen.
Ñ31 ≈
*AB
ÉÑ
Um auf “00” einzustellen.
Ñ30 ≈
Terminalnummer (max. 6 Stellen)
ÉÑ
Um auf “0” einzustellen.
Ñ
11
≈
0
Ñ
É
DruckTastenbedienung
Ñ11 ≈
*A
ÉÑ
Um auf “0” einzustellen.

26
(4) RS-232C-Startcode und -Endcode
*A-C: Startcode 000-127
D-F: Endcode 000-127
(5) RS-232C-Zeitüberschreitungseinstellung
(6) RS-232C-Druckdaten
* Positionen: Auswahl: Eingabe:
A Erfassen des DR-Signals Ja 0
Nein 1
B Erfassen des CS-Signals Ja 0
Nein 1
C Senden aller Druckdaten Ja 1
Nein 0
Programmierung der Thermodrucker-Druckdichte
*“00” = 70% der Standard-Druckdichte
“50” = 100% der Standard-Druckdichte
“99” = 130% der Standard-Druckdichte
Ñ
50
≈
00
Ñ
É
DruckTastenbedienung
Ñ50 ≈
*Druckdichte (00-99)
ÉÑ
Um auf “0” einzustellen.
Ñ
30
≈
2
Ñ
É
DruckTastenbedienung
Ñ36 ≈
*ABC
ÉÑ
Um alle Positionen auf “0” einzustellen.
Ñ35 ≈
Zeitüberschreitung (1 bis 255 sec)
ÉÑ
Um auf “0” einzustellen.
Ñ33 ≈
*ABCDEF
ÉÑ
Um auf “000000” einzustellen.

27
Sprachauswahl
*Sprache: 0: Englisch
1: Deutsch
2: Französisch
3: Spanisch
Wenn Sie die Sprache durch Ausführung dieses Verfahrens verändern möchten, werden die
vorprogrammierten Texte wie z.B. Warengruppen-/PLU-Texte sowie Klischeetexte und
Funktionstexte auf ihren Vorgabe-werte zurückgestellt.
Programmierung der AUTO-Tasten
Wenn Sie häufig durchgeführte Transaktionen oder Berichtserstellungen für die AUTO-Tasten programmieren,
können diese Transaktionen und/oder Berichte abgerufen werden, indem Sie die entsprechenden AUTO-Tasten
betätigen.
Programmierung für
~
: Eingabe des PLU-Codes 2 (Festpreis: 1.50) sowie der Warengruppe 6 (Einzelpreis:
1.00).
Wenn die AUTO-Taste für die Ausführung von Berichtsfunktionen usw. programmiert wurde, muß
sich das Funktionsschloß in der geeigneten Position (X1/Z1 oder X2/Z2) befinden.
~
2 Ö 100
ü
~
É
DruckTastenbedienung
~
¡
É
Transaktion
Löschen
max. 25
Tasteneingaben
~
¡
Ñ
88
≈
1
É
DruckTastenbedienung
Ñ88 ≈
*Sprache
É
Um auf “0” einzustellen.
AUTO1Einstellung

28
Ihre Registrierkasse ermöglicht den Abruf aller Programminhalte im PGM-Modus.
Tasteneingabefolge für den Abruf gespeicherter Programminhalte
Druckbeispiele
1 Genereller Programmierbericht
Abruf gespeicherter Programminhalte
9
Niedrigster
steuerpflichtiger Betrag
Steuersatz
Kassierername
Kassierer-Code
Modus
Warengruppencode
Warengruppentext
Warengruppen-Einzelpreis
mit Vorzeichen
Warengruppenfunktion
Steuerstatus
Klischeedruck
Zusätzliche Funktionswahl (A-H)
Druckformat (A-H)
Kassenbon-Druckformat (A-H)
EURO-Systemeinstellung (A-D)
Stromsparmodus (A-D)
Klischee-Druckformat
RS-232C-Terminalnummer
RS-232C-Übertragungsformat (AB)
RS-232C-Übertragungstyp und Baudrate (AB)
RS-232C-Startcode und -Endcode
RS-232C-Zeitüberschreitungseinstellung
RS-232C-Druckdaten
Thermodrucker-Druckdichte
Funktionsnummer und zugehöriger Text
Minus-Warengruppe
Rabattbetrag mit Vorzeichen
Funktionsparameter (A-C)
Prozentsatz mit Vorzeichen
Prozentsatzgrenze
Betragsgrenze
Funktionsparameter
Fremdwährungssymbol/Funktionsparameter
Umrechnungskurs
Berichtsbezeichnung Tasteneingabefolge
Genereller Programmierbericht É
Auto-Tasten-Programmierbericht 1 É
Druckdichte-Programmierbericht 3 É
PLU-Programmierbericht Start-PLU-Code ≈ End-PLU-Code Ö

29
2 Auto-Tasten-Programmierbericht 3 Druckdichte-Programmierbericht
4 PLU-Programmierbericht
SCHULUNGSBETRIEBSART
Die Schulungsbetriebsart dient dem Bediener oder Geschäftsführer zum Üben von Registrierungen.
Wenn die Schulungsbetriebsart für einen Kassierer gewählt wurde, schaltet sich die Registrierkasse
automatisch in diese Betriebsart um. Kassierer, die nicht auf Schulungsbetriebsart eingestellt sind, arbeiten in
der normalen REG-Betriebsart. (Für die Programmierung für Kassierer sprechen Sie bitte mit Ihrem
Fachhändler.)
Die Schulungsfunktion ist nur in den Betriebsarten REG, MGR und zulässig.
In der Schulungsbetriebsart wird der entsprechende Kassiererspeicher aktualisiert. Andere Speicher werden
jedoch nicht berührt.
1000
¯
3
≈
ú
É
DruckTastenbedienung
Bereich
Modus-Parameter
Einzelpreis
Zugeordneter Warengruppencode
Eingegebener Wert
Druckdichte
Druckdichte
(Beispiel)
PLU-Code
PLU-Text

30
ABRUF (X) UND NULLSTELLUNG (Z)
VON UMSÄTZEN
• Wenn Sie die Umsätze vom Zeitpunkt der letzten Nullstellung an abrufen möchten, die Abruffunktion (X)
benutzen. Dieser Abruf kann beliebig oft vorgenommen werden. Der Speicher der Registrierkasse wird
dadurch nicht beeinflußt.
• Um den Speicher zu löschen, muß die Nullstellungsfunktion (Z) angewendet werden. Durch die Nullstellung
werden sämtliche Umsätze ausgedruckt und der gesamte Speicher gelöscht (außer für GT1 bis GT3,
Schulung-GT, Nullstellungszähler und die laufende Nummer).
X1/Z1-Umsatzberichte: Tagesumsatzberichte
X2/Z2-Umsatzberichte: Periodische (monatliche) Konsolidierungsberichte
• In den Berichten werden Nullumsätze nicht ausgedruckt; der Ausdruck wurde auf Unterdrücken
programmiert. (Beziehen Sie sich hierfür auf die “Programmierung des Druckformats”.)
• “X” bedeutet “Abruf” und “Z” bedeutet “Nullstellung” in den Berichten.
Bezeichnung
Funktionsschloß-
position
Tastenbedienung
.
Ó
É
Abruf
Nullstellung
.
‹
X1/Z1 X2/Z2
.
‹
<OP X/Z> X
X1, Z1 X2, Z2
X1, Z1
--
X1, Z1
--
X1, Z1
--
X1, Z1
--
<OP X/Z>X, Z
É
Taste: Gesamtumsatz
≈
Taste: Kassensoll
Warengruppentaste ( ¯ bis ì ) : Warengruppen-Gesamtsumme
Für zusätzliche Warengruppentasten:
(
ö
bis õ )
Abruf
Nullstellung
Abruf
Nullstellung
Gesamtkassierer-Abruf
und -Nullstellung
(Gesamtkassiererbericht)
PLU-Bericht (von - bis)
(PLU-Umsatzbericht)
Stundenumsätze-Abruf
und -Nullstellung
(Stunden-Umsatzbericht)
Tagesnettoumsatz-Abruf
und -Nullstellung
(Tages-Nettoumsatzbericht)
.
r
Abruf
Nullstellung
X2, Z2
--
Kassierercode
.
Alle PLUs
EndPLU-Code
StartPLU-Code
Ö≈
Abruf
Nullstellung
.
Ñ
Abruf
Nullstellung
.
Ñ
Abruf
Nullstellung
Flash-Berichte: (Nur
Anzeige)
Um die Anzeige zu
Allgemeiner
Tagesgesamtumsatzbericht
Einzelkassierer-Abruf
und -Nullstellung
(Einzelkassiererbericht)
drücken oder in eine
andere Funktionsschloßposition wechseln.
löschen, die c Taste
Warengruppentaste
Kurzbeschreibung für den Abruf (X) und die Nullstellung (Z) von Umsatzberichten
1

31
Gesamtumsatzbericht
• Berichtsbeispiel
*1: Wenn ein X1-Bericht erstellt wird, wird “X1” ausgedruckt.
*2: Ausdruck nur im Z1-Bericht.
*2
Tagesumsatzberichte
2
Modustitel*1
Nullstellungszähler
Nettoendsumme
(GT2 - GT3)
Endsumme der PlusRegistrierungen
Endsumme der MinusRegistrierungen
Endsumme der Registrierungen
in der Schulungsbetriebsart
Warengruppencode
Umsatzmenge
Umsatzbetrag
Umsatzmenge und
Gesamtsumme für “+”Warengruppe
Umsatzmenge und
Gesamtsumme für “–”Warengruppe
Zwischensummenâ-
Zähler
und Gesamtsumme
Zwischensummen %1Zähler und
Gesamtsumme
Nettogesamtumsatz
Steuerpflichtiger Umsatz 1
Mehrwertsteuerpflichtiger
Umsatz 1
Gesamtmehrwertsteuer-Betrag
Gesamtnettoumsatz
ohne MWSt
Posten
â
-Zähler und
Gesamtsumme
Posten %1-Zähler und
Gesamtsumme
Retourenzähler und
Gesamtsumme
REG-Modus-Stornierungszähler
und Gesamtsumme
Stornomodus-Zähler und
Gesamtsumme
Geschäftsführer-Stornierungszähler
und Gesamtsumme
Zwischensummen-Stornierungszähler
und Gesamtsumme
Kein-Verkauf-Zähler
Zähler für bezahlte Rechnung
und Gesamtsumme
Ausgabenzähler und
Gesamtsumme
Kundenzähler
Gesamtzahlung
Durchschnittliche
Gesamtzahlung pro Kunde
Barverkaufszähler und
Gesamtsumme
Scheckverkaufszähler und
Gesamtsumme
Kreditverkaufszähler und
Gesamtsumme
Fremdwährungszähler und Gesamtsumme
(programmierter Umrechnungskurs)
Inlandswährung
Manueller FremdwährungsEingabezähler und
Gesamtsumme
Scheck in Fremdwährung
(programmierter
Umrechnungskurs)
Kredit in Fremdwährung
(programmierter
Umrechnungskurs)
Kassensoll (Bar)
Kassensoll (Scheck)
Kassensoll (Bar und Scheck)
Rückgeld-Gesamtsumme
für Scheck

32
Kassiererberichte
Einzelkassiererbericht
• Berichtsbeispiel
*: Wenn ein Z1-Bericht erstellt wird, wird “Z1” ausgedruckt.
Wenn die Berichte im OP X/Z-Modus erstellt werden, wird “OPX” oder “OPZ” ausgedruckt.
Gesamtkassiererbericht
Der Ausdruck hat das gleiche Format wie die Berichtsbeispiele für die einzelnen Kassierer. Die Umsatzdaten
der Kassierer werden in der Reihenfolge der Kassierercodenummern ausgedruckt (von #1 bis #6).
Stunden-Umsatzbericht PLU-Umsatzbericht
• Berichtsbeispiel • Berichtsbeispiel
*: Wenn ein Z1-Bericht erstellt wird, wird “Z1”
ausgedruckt.
*: Wenn ein Z1-Bericht erstellt wird, wird “Z1”
ausgedruckt.
Modustitel*
Berichtstitel
Kassierercode
Kassierername
Kundenzähler
Gesamtzahlung
Durchschnitt
Modustitel*
Berichtstitel
Kundenzähler
Gesamtumsatz
Modustitel*
Berichtstitel
Bereich
Umsatzmenge
und
Gesamtsumme
Bereichsgesamtsumme und
Gesamtmenge
PLU-Code
Artikel-
bezeichnung

33
Gesamtumsatzbericht
• Berichtsbeispiel
Die nachfolgenden Ausdrucke weisen das gleiche Format wie die X1/Z1-Gesamtumsatzberichte auf.
*1: Wenn ein X2-Bericht erstellt wird, wird “X2” ausgedruckt.
*2: Ausdruck nur im Z2-Bericht.
Tages-Nettoumsatzbericht
• Berichtsbeispiel
*: Wenn ein Z2-Bericht erstellt wird, wird “Z2” ausgedruckt.
Modustitel*
Berichtstitel
Periodische Berichte
3
Modustitel*1
Täglicher Nullstellungszähler
Periodischer Nullstellungszähler
Endsummen
*2

34
ZWANGSWEISE KASSEN-IST-EINGABE (CCD)
Wenn der Bar-/Scheckbestand in der Schublade vor der Ausgabe eines Kassierer-Nullstellungsberichtes
zwangsweise eingegeben werden soll, wenden Sie sich bitte an Ihren Fachhändler, damit dieser Ihre
Registrierkasse auf Kassen-Ist-Eingabe programmiert.
Wenn Ihre Registrierkasse auf zwangsweise Kassen-Ist-Eingabe (CCD) programmiert wurde, muß der
Kassierer zuerst den Bar- und Scheckbestand (in Landes- und ggf. Fremdwährung) zählen und eingeben, bevor
ein Kassiererbericht ausgegeben werden kann. Nachfolgend ist das Verfahren für die Ausgabe eines CCDBerichts aufgeführt.
Arten von zwangsweisen Kassen-Ist-Eingaben
• Zwangsweise, wenn Einzelkassierer-Nullstellungen durchgeführt werden.
• Zwangsweise, wenn Gesamtkassierer-Nullstellungen durchgeführt werden.
• Wenn Kassen-Ist-Eingabe zwangsweise ist, kann kein Flash-Bericht erstellt werden.
Ñ
: Wenn der Barbetrag und/oder der Scheckbetrag für die Schublade eingegeben wird.
e
: Wenn der Fremdwährungsbetrag für die Schublade eingegeben wird.
Kassierercode
.
‹ ≈ Ñe
Ñ
OP X/Z-Modus
X1/Z1-Modus
• Gesamtkassierer-
Nullstellungsbericht
• Einzelkassierer-Nullstellungsbericht
.
‹
.
r
?É
Die Schublade öffnet sich und der Kassierer wird aufgefordert,
die Bar- und Scheckbeträge einzugeben (“ ” wird angezeigt).
Die Scheck- oder
Währungseinheit eingeben.
Den gesamten Bar- und
Scheckbetrag eingeben.
Zur Anzeige der Bar-/Scheck-Zwischensumme
Vorhergehende
Eingabe
annulieren.
Menge
Betrag
X
oder
Ñe
oder
X1/Z1-Modus
Fremdwährung 1
Fremdwährung 1-Ist
Differenz
Kassensoll (Bar)
Kassensoll (Scheck)
Kassensoll (Bar/Scheck)
Bar/Scheck-Ist
Differenz
Gesamtdifferenz
Kassen-IstEingabebeträge

35
ELEKTRONISCHES JOURNAL (EJ)
Diese Funktion dient zum Abspeichern der Journaldaten im elektronischen Journaldatenspeicher. Nähere
Auskünfte erteilt Ihnen Ihr Fachhändler.
Aufzeichnen der Journaldaten
Ihre Registrierkasse speichert die Journaldaten in den Betriebsarten REG, PGM, , X1/Z1 sowie X2/Z2 im
EJ-Speicher ab. In den Betriebsarten X1/Z1 und X2/Z2 wird die Kopfzeileninformation im Speicher abgelegt.
(Beziehen Sie sich bitte hierfür auf den nachfolgenden EJ-Berichtsbeispiel.)
Ausdrucken der Journaldaten während einer Transaktion
Die im EJ-Speicher festgehaltenen Journaldaten einer laufenden Transaktion lassen sich ausdrucken, indem
während der Transaktion die
Ü
Taste gedrückt wird.
• Diese Funktion ist zulässig, wenn der Drucker auf Kassenbondruck programmiert und die
Kassenbon-ON/OFF-Funktion auf OFF eingestellt ist.
• Bonbeispiel
Abruf und Nullstellung der elektronischen Journaldaten (Ausstellung eines EJ-Berichts)
Sie können die im EJ-Speicher abgelegten Daten im Journalformat abrufen, indem das folgende Verfahren im
X1/Z1- oder OP X/Z-Modus ausgeführt wird.
Zum Abrufen/Nullstellen aller Daten: • EJ-Berichtsbeispiel
Zum Abrufen der letzten 10 Datensätze:
•
Im EJ-Speicher lassen sich bis zu 2500 Zeilen speichern.
Wenn alle Daten abgerufen werden, werden sämtliche im
Speicher befindlichen Daten gedruckt. Stellen Sie daher
sicher, daß sich ausreichend Papier auf der Papierrolle
befindet. Um Papier zu sparen, kann ein komprimierter
Ausdruck verwendet werden. Fragen Sie bitte Ihren
Fachhändler hinsichtlich näherer Einzelheiten.
• Drehen Sie das Funktionsschloß in die MGR-Position, um
den Abruf oder die Nullstellung der Daten zu
unterbrechen. Beim Nullstellen der Daten jedoch werden
sie nicht gelöscht.
• Sie können ein Warnsystem einstellen, das Sie wissen
läßt, wann der Speicher nahezu voll ist und/oder Eingaben
sperrt, außer beim Ausstellen eines EJ-Berichts, wenn der
Speicher voll ist. Nähere Einzelheiten erfahren Sie bei
Ihrem Fachhändler.
710 É≈
700 .
Abruf
Nullstellung
É≈
EJ-Berichtstitel
EJ-Bericht-Endtitel
KopfzeilenInformationsdruck

36
EURO-PROGRAMMIERUNG
Ihre Registrierkasse kann für jeden einzelnen Zeitraum bei der Einführung des EURO modifiziert werden. Je
nach dem Zeitpunkt der EURO-Einführung werden in der nachfolgenden Tabelle drei Zeiträume festgelegt.
Grundsätzlich läßt sich Ihre Registrierkasse für die EURO-Einführung durch Ausführung der Modifikation im
X2/Z2-Modus automatisch modifizieren. Je nach den Erfordernissen sind jedoch zuvor einige Optionen
einzustellen.
Verarbeitung der einzelnen Währungen in Ihrer Registrierkasse
Druckbeispiele
Zeitraum 1
Zeitraum 2
Zeitraum 3
Zeitraum 1
Nach der Einführung des
EURO und vor der Zirkulation
von EURO-Banknoten und
-Münzen.
Fremdwährungstaste
(programmierter Umrechnungskurs)
Inlandswährung
Fremdwährungstaste
(manuelle Umrechnungskurseingabe)
Zeitraum 2
Nach der Zirkulation von EUROBanknoten und -Münzen und
bevor die nationale Währung
aus dem Verkehr gezogen wird.
(Koexistenz von EURO und
nationaler Währung)
Inlandswährung
Fremdwährungstaste
(programmierter Umrechnungskurs)
Fremdwährungstaste
(manuelle Umrechnungskurseingabe)
Zeitraum 3
Nachdem die nationale
Währung aus dem Verkehr
gezogen ist.
Inlandswährung
Fremdwährungstaste
EURO
Nationale Währung
(DM, F usw.)
Fremdwährung
Währung
Gesamtumsatz in nationaler Währung (als Inlandswährung)
Gesamtumsatz in EURO*
Zahlung in nationaler Währung
Rückgeld in nationaler Währung
Rückgeld in EURO*
*: Der Ausdruck dient ausschließlich zu Informationszwecken.
Gesamtumsatz in EURO (als Inlandswährung)
Gesamtumsatz in nationaler Währung*
Zahlung in EURO
Rückgeld in EURO
Rückgeld in nationaler Währung*
*: Der Ausdruck dient ausschließlich zu Informationszwecken.

37
Automatische Modifikation des Registrierkassen-Systems für die
Einführung des EURO
Um Ihre Registrierkasse für die Einführung des EURO vorzubereiten, kann diese Modifikation gemäß der
nachfolgenden Tasteneingabefolge im X2/Z2-Modus automatisch ausgeführt werden. Entsprechend den
Einführungsschritten läßt sich Ihre Registrierkasse auf den EURO abstimmen. Den Managerschlüssel (MA) in
die X2/Z2-Position drehen und die folgende Tasteneingabefolge benutzen.
*A=1: Für Zeitraum 1 anwendbar
*A=2: Für Zeitraum 2 anwendbar
*A=3: Für Zeitraum 3 anwendbar
• Jeder einzelne Vorgang läßt sich nur einmal durch den Ersatz von “A=1”, “A=2” und “A=3”
durchführen. Wenn der Vorgang mit dem Ersatz von “A=2” zuerst durchgeführt wurde, läßt sich
der Vorgang mit dem Ersatz von “A=1” nicht mehr erzielen. Wenn der Vorgang mit dem Ersatz
von “A=3” zuerst durchgeführt wurde, läßt sich der Vorgang mit dem Ersatz von “A=1” und “A=2”
nicht mehr erzielen.
Die näheren Einzelheiten für die automatisch erfolgende Modifikation des Registrierkassensystems sind wie
folgt:
(Für die nachfolgend aufgeführten PGM-Funktionen ist auf die folgenden Abschnitte in dieser Anleitung Bezug
zu nehmen: “Programmierung für das EURO-System”, “Programmierung der Funktionsparameter für die
e
Taste”, “Programmierung des Fremdwährungssymbols” und “Programmierung des Inlandswährungssymbols”.)
Wenn für “A” “1” gesetzt wird:
1.
Ausstellung eines allgemeinen Z1-Berichts
2.
Ausstellung eines allgemeinen Z2-Berichts
3.
Programmierung von “Ausdruck” für die PGM-Funktion “Ausdruck der Gesamtsummen und
Wechselgeldbeträge in Fremdwährung auf dem Kassenbon oder Journalstreifen”
4.
Programmierung von “Division” für die PGM-Funktion “Berechnungsmethode für Fremdwährung”
5.
Programmierung des EURO-Symbols ( ) für das Währungssymbol der Fremdwährungstaste sowie die
Programmierung von “2” für die Anzahl der Nachkommastellen beim Fremdwährungsbetrag
6.
Programmierung für das Aktivieren der Rundungsfunktion für den Fremdwährungsbetrag
Nach der Ausführung des Verfahrens mit dem Ersatz von “1” ist der EURO als Fremdwährung zu betrachten.
Hierfür die Fremdwährungstaste (
e
) benutzen.
Wenn für “A” “2” gesetzt wird:
1.
Ausstellung eines allgemeinen Z1-Berichts
2.
Ausstellung eines allgemeinen Z2-Berichts
3.
Nullstellung von GT1, GT2, GT3 und Schulung-GT
4.
Programmierung von “Ausdruck” für die PGM-Funktion “Ausdruck der Gesamtsummen und
Wechselgeldbeträge in Fremdwährung auf dem Kassenbon oder Journalstreifen”
5.
Programmierung von “Multiplikation” für die PGM-Funktion “Berechnungsmethode für Fremdwährung”
6.
Programmierung des EURO-Symbols ( ) für das Inlandswährungssymbol sowie die Programmierung von
“2” für die Anzahl der Nachkommastellen beim Inlandswährungsbetrag
7.
Für die Programmierung des Währungssymbols und die Anzahl der Nachkommastellen beim
Fremdwährungsbetrag werden die gleichen Parameter wie für die Inlandswährung verwendet
8.
Programmierung für das Aktivieren der Rundungsfunktion für den Fremdwährungsbetrag
Nach der Ausführung des Verfahrens mit dem Ersatz von “2” ist der EURO als Inlandswährung zu betrachten.
Für die bisherige Inlandswährung die Fremdwährungstaste (
e
) benutzen.
800 . É≈
*A

38
Da der EURO nach der Ausführung des Verfahrens mit dem Ersatz von “2” zu Ihrer Inlandswährung wird,
müssen die Festpreise für jede Warengruppe und PLU verändert werden, um diese den EURO-Preisen vor der
erneuten Bedienung der Registrierkasse anzugleichen. Eine Reihe anderer Tasten müssen ebenfalls
umprogrammiert werden, damit Prozentwerte und Summen auf dem EURO basieren.
Wenn für “A” “3” gesetzt wird:
1.
Ausstellung eines allgemeinen Z1-Berichts
2.
Ausstellung eines allgemeinen Z2-Berichts
3.
Nullstellung von GT1, GT2, GT3 und Schulung-GT
4.
Programmierung von “Kein Ausdruck” für die PGM-Funktion “Ausdruck der Gesamtsummen und
Wechselgeldbeträge in Fremdwährung auf dem Kassenbon oder Journalstreifen”
5.
Programmierung von “Multiplikation” für die PGM-Funktion “Berechnungsmethode für Fremdwährung”
6.
Programmierung des EURO-Symbols ( ) für das Inlandswährungssymbol sowie die Programmierung von
“2” für die Anzahl der Nachkommastellen Inlandswährungsbetrag
7.
Programmierung für das Aktivieren der Rundungsfunktion für den Fremdwährungsbetrag
Nach der Ausführung des Verfahrens mit dem Ersatz von “3” ist der EURO als Inlandswährung zu betrachten.
Wenn der Vorgang mit dem Ersatz von “2” bereits ausgeführt wurde, so wird “3. Nullstellung von GT1, GT2, GT3
und Schulung-GT” nicht ausgeführt.
Wenn der Vorgang mit dem Ersatz von “1” oder “2” bereits ausgeführt wurde, so wird das Währungssymbol der
Fremdwährung mit einem Leerzeichen überschrieben.
• Wenn Sie den augenblicklichen Zustand der Registrierkasse überprüfen möchten, ist der
Managerschlüssel (MA) in die X2/Z2-Position zu bringen und die folgende Tastenbedienung
auszuführen.
Zusätzliche Programmierung für die Einführung des EURO
Der Inhalt der Programmierung für die Fremdwährungstaste (e) läßt sich mit der Ausführung der Modifikation
(im vorherigen Abschnitt beschrieben) nicht verändern. Nach der Ausführung für jeden einzelnen Zeitraum ist
die folgende Programmierung je nach Ihrem Wunsch auszuführen.
Programmierung für die Fremdwährungstaste (e)
Fremdwährungs-Umrechnungskurs
Für die Zeiträume 1 und 2 ist der EURO-Umrechnungskurs einzugeben.
Für nähere Einzelheiten der Programmierung beziehen Sie sich bitte auf den Abschnitt “Programmierung von
Prozentsatz und Fremdwährungs-Umrechnungskurs”
Wahl der Umrechnungskurseingabe
Wenn EURO der Fremdwährungstaste zugeordnet ist, muß die Eingabe des programmierten
Umrechnungskurses erfolgen. Dabei ist die Umrechnungskurseingabe für die Zeitäume 1 und 2 zu ermöglichen.
Nähere Einzelheiten für die Programmierung sind dem Abschnitt “Programmierung der Funktionsparameter für
die
e
Taste” zu entnehmen.
Scheck-/Kreditzahlung
Für die Zeiträume 1 und 2 ist die Scheck-/Kreditzahlung für die Zahlung in Fremdwährung so zu aktivieren, daß
Scheck- und Kreditzahlung für den EURO sowie für die nationale Währung verwendet werden können. Nähere
Einzelheiten für die Programmierung sind dem Abschnitt “Programmierung für das EURO-System” zu
entnehmen.
800 É≈
 Loading...