

Page 1

1
1 Electric shock could occur if used outdoors or on wet surfaces.
2 Do not leave the unit from unattended when the unit is plugged in. Unplug the unit from the outlet when not in
use and when user servicing.
3 Close attention is necessary when used by or near children. Do not allow to be used as a toy.
4 Use only for intended use as described in this manual. Use only the manufacture's recommended attachments.
5 Never operate this vacuum cleaner if it has a damaged cord or plug, if it is not working properly, if it has been
dropped, damaged, exposed to weather or dropped into water.
Return the vacuum cleaner to a Sharp Authorized Servicer for examination and repair.
6 Do not pull or carry this vacuum cleaner by the power cord. Do not use the power cord as a handle, close a door
on the cord, or pull the cord around sharp edges or corners.
Keep cord away from heated surfaces.
7 Never disconnect the plug by pulling on the cord. To disconnect from an outlet, grasp the plug, not the cord.
8 Never operate this vacuum cleaner with any air opening blocked.
Keep the air openings free of dust, lint, hair and any other similar material. When the motor pre-filter becomes
dirty, rinse in warm water . Filter should be completely dry before reusing.
9 Never drop or insert any object into any opening.
10 Keep hair, face, fingers and loose clothing away from any opening, such as all moving parts.
11 Do not pick up lit cigarettes, hot ashes, matches or similar materials, razor blades, needles, pins or other sharp
objects. Do not suck water or any other liquid.
1
2 Do not use the vacuum cleaner without the high efficiency air filter installed. Doing so can cause damage to the unit.
1
3 Before removing the plug from the outlet, push switch to "Stop".
1
4 Use extra caution when cleaning on stairs.
1
5 Never handle the plug, cord or vacuum cleaner with wet hands.
16 Do not use in presence of flammable or combustible liquids or fumes.
1
7 Do not place heavy objects on the vacuum cleaner.
1
8 Do not step on the hose or pull the hose forcibly.
1
9 Do not pick up large objects such as waste paper or cloth which may clog the hose.
20 Do not expose this vacuum cleaner to high temperatures while operating or during storage.
21 Store this vacuum cleaner in a dry place.
22 Use the carrying handle of the body to carry this vacuum cleaner.
23 Rewind the cord by holding the plug to prevent any injury.
24 Children should be supervised to ensure that they do not play with the appliance.
25 This appliance is not intended for use by persons (including children) with reduced physical, sensory or mental
capabilities, or lack of experience and knowledge, unless they have been given supervision or instruction concern
-
ing use of the appliance by a person responsible for their safety.
Caution : If the cord of this appliance is damaged, it must only be replaced by an Authorized Service Center appointed
by SHARP in order to avoid hazard.
SAVE THESE INSTRUCTIONS
This vacuum cleaner is intended for household use only.
WARNING
Operate vacuum cleaner only at the voltage
specified on nameplate.
EC-S2142
EC-S2141
VACUUM CLEANER
OPERATION MANUAL
Thank you very much for buying SHARP.
Before using your SHARP vacuum cleaner, please read this operation
manual carefully to obtain the best use from your vacuum cleaner.
WARNING /
To reduce the risk of fire, electric shock or injury:
MODEL
EC-S2142,S2141.indd 1 12.5.8 2:58:02 PM
Page 2

2
Metal telescopic tube
Extension/contraction button
Adjust the length while
sliding the button.
Fitting the brush to the metal
telescopic tube.
Page
4
ASSEMBLING THE VACUUM CLEANER
Name of each section and how to assemble
Accessories
Page
Page
4
Page
7
11
Dust cup
Operating handle
Click
Click
Pages within a frame show the ones where major points are explained.
The hose can turn 360
degrees to prevent
excessive distortion.
Hand control switch
Press to start, change mode and
turn off the operation.
Attach/ejector button
Remove the metal telescopic tube
while pressing the button.
Dusting brush
Crevice nozzle
Suction head
(Floor head)
Hook (rear side)
Alarm lamp /Dust disposaltime indication
Exhaust outlet
The exhaust outlet incorporates
an allergy defense f ilt e r
and the product main body
incorporates an exhaust -air
ultra high efficiency air filter.
(Maintenance is unnecessary.
They are not detachable.)
care is needed. They are not
Attach/ejector button
Remove the hose while
pressing the button.
Rotate the cup handle to open
the bottom lid.
Hose (1 piece) Metal telescopic tube (1 piece)
Air Turbine head
(1 piece)
Floor head
(1 piece)
Dusting brush (1 piece)
(Initially installed in
the operating handle)
Crevice nozzle (1 piece)
Multi head (1 piece)
Cleaning brush (1 piece)
(Installed in the product)
Joint pipe
(1 piece)
(EC-S2142 only)
Joint pipe
(EC-S2142 only)
EC-S2142,S2141.indd 2 12.5.8 2:58:05 PM
Page 3

3
Page
9
Page
7
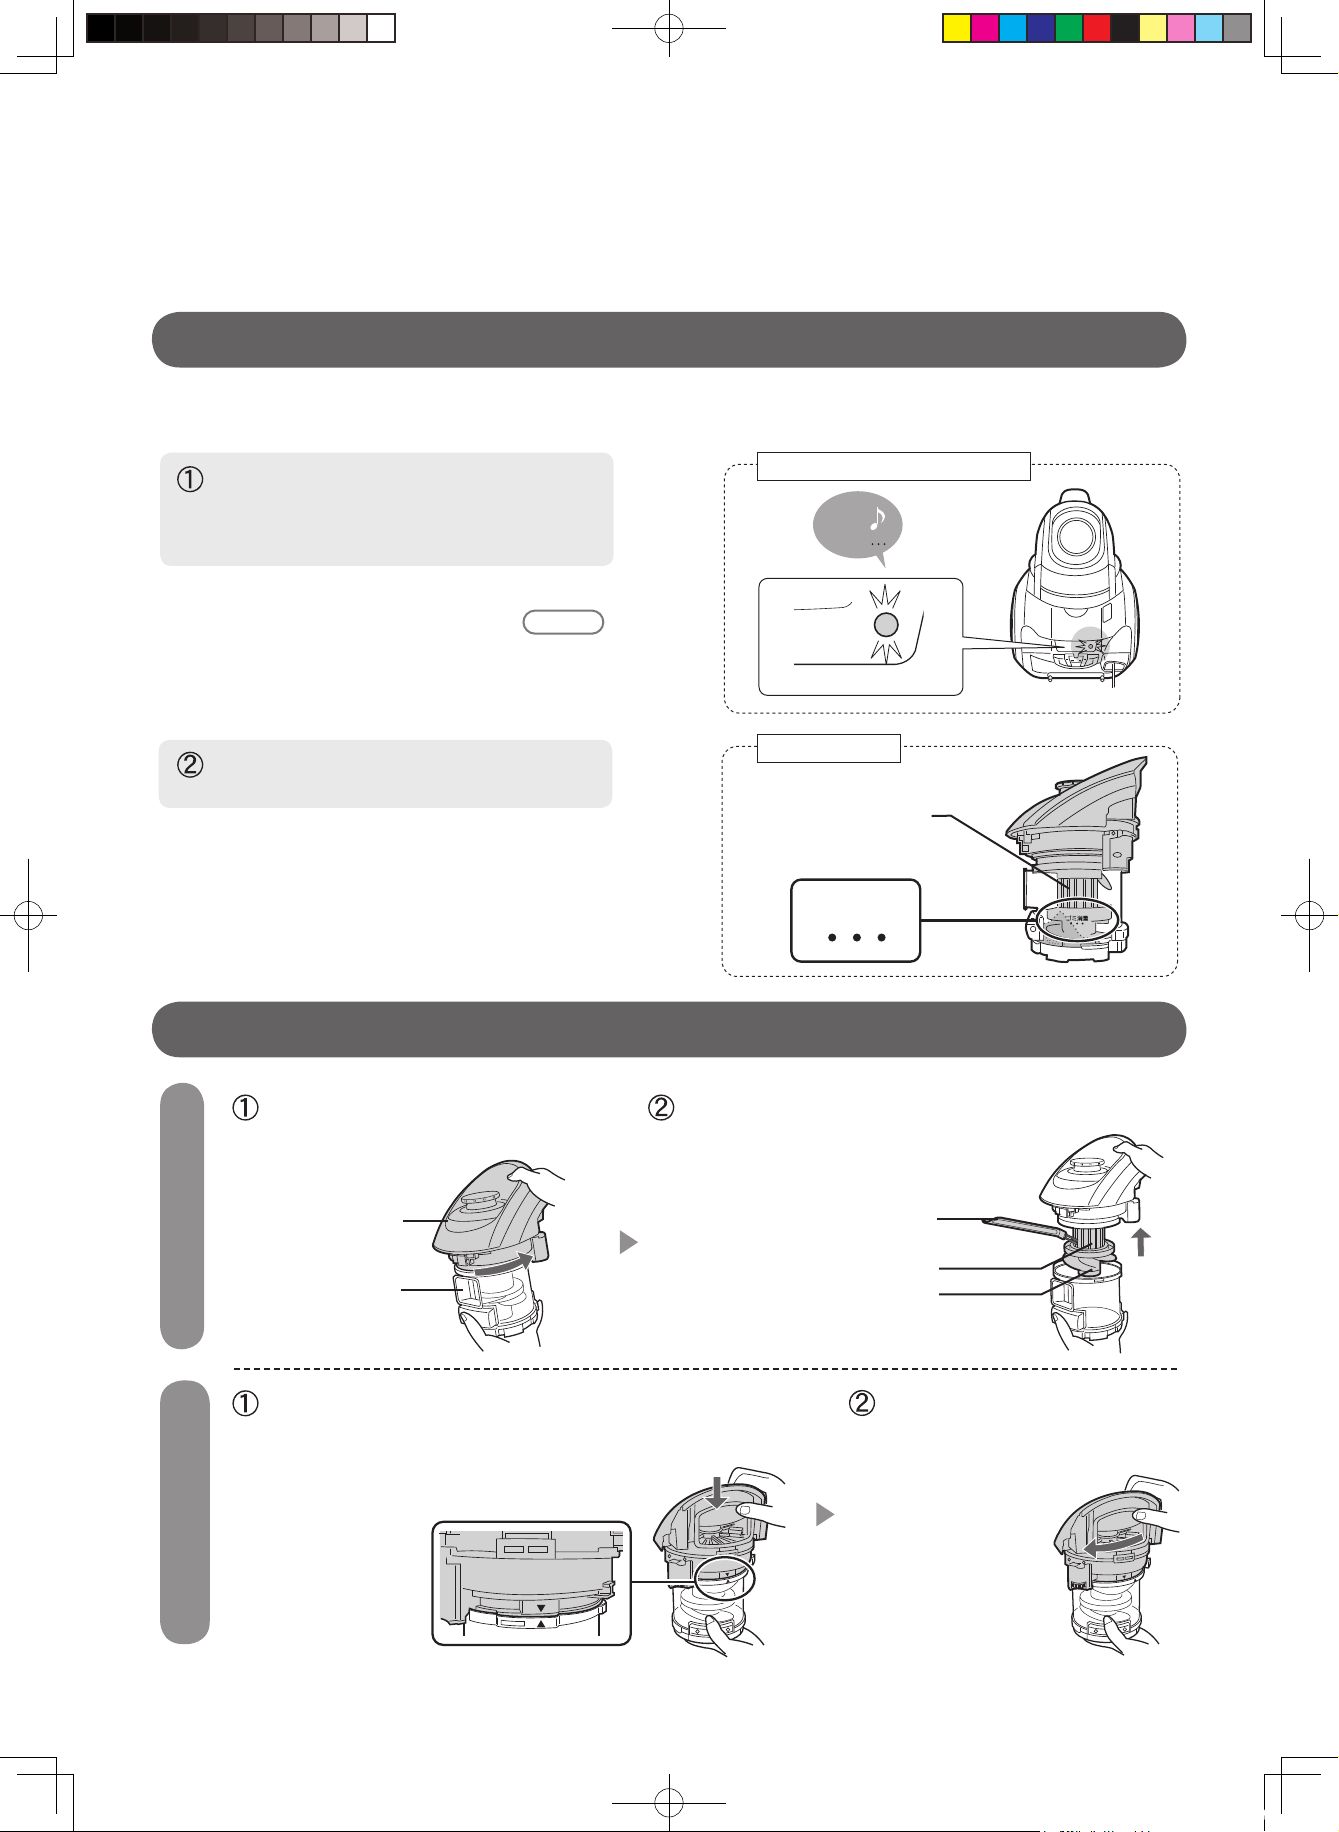
Dust disposal warning lamp
Lamp & sound
Indications
Clean the filters.
Red
Fast blinking.
Empty the dust cup.
(Dust disposal
warning indication)
Red
Blinking.
After product operation has finished.
Peeep
Peeep
Peeep
peep, peep
Indication lamp
Lamp & sound
High mode.
Low mode.
Slow-speed blinking.
Blue
Continuous lighting.
The clean
mechanism
is in operation.
Continuous
lighting/Blinking.
Blue
After product operation has finished
Page
4
Page
6
Indications
Power supply
Power consumption
Collection capacity
Weight
Dimensions (mm)
Cord length
220-240V 50/60Hz
1400W
0.4L
7.5kg
(Floor head,metal telescopic
tube and hose attached,
joint pipe)
Product size
Width 276×Depth 456×Height 261
4.8m
Indication lamp/sound
SPECIFICATIONS
Alarm lamp(Blue)
Dust disposal warning lamp
(Red)
Page
7
Page
10
For assembly, insert each component securely
until it clicks.
Cup ejector button
Cord winding button
Holder
Power plug
(Power cord)
Cleaning brush
Page
4
(Installed in the main body)
After use,
store it in the main body
in such a direction as
shown in the drawing.
High efficiency
air filter
incorporated
Cup handle
Cylindrical filter
Bottom lid
(A g+ (silver)
ion plated)
Supplied printed matters
Operation manual (1 copy)
The lamp and sound will let you know of the
operating conditions.
Standing
EC-S2142,S2141.indd 3 12.5.8 2:58:06 PM
Page 4

4
Cautions
Basics of use
Hand control switch
Stop
High
Low
Starting the vacuuming
Metal telescopic tube
Regarding the power cord
Finishing the vacuuming operation
High
Low
Stop
Stop
High mode: When you want to vacuum at the maximum suction
power press the High button.
(Blue: Lighting)
Low mode: When you want to reduce noise, or when you want to
release the head from smaller mats, press the Low button.
(Blue: Slow-speed blinking)
Vacuuming operation stops.
The automatic cleaning mechanism activates to compress
the rubbish and auto cleans the high efficiency air filter.
When you want to stop the operation of the cleaning
mechanism, press the “Stop ” button again.
• Do not draw out the power cord beyonding the red
mark limit.(There is a risk of cable disconnection.)
• When you cannot roll up the cord completely, draw it
out again for a length of 1 to 2 m and attempt to roll it
up again.
• When rolling up the cord, press the cord winding button
firmly.
• Do not slide the extension/contraction button while vacuuming.
(There is a risk that fingers might get caught in the metal telescopic tube.)
• Do not do vacuuming without attaching the suction head or other supplementary suction tools.
(There is a risk of property damage or malfunction.)
Adjust the length while
sliding the button.
Cord winding button
Red mark
Indication lamp
Indication lamp
Blue
Blue
Indication lamp
USING THE VACUUM CLEANER
EC-S2142,S2141.indd 4 12.5.8 2:58:09 PM
Page 5

5
Turn the head forward and
hook it on the tab.
For loose hair from pet, etc.
Rubber blade
(Gray)
Supplementary suction tools
Dusting brush
Multi head
Removing the brush
Attaching the brush
Using the brush
Crevice nozzle
Using the head
Attaching the head
Storing the head
“Click”
“Click”
To use it
Turn it in the
direction of
the arrow.
To fold it up
for storage.
Using the nozzle
To operating
handle.
Turn the head backward and
hook it on the tab.
Lint brush
(Red)
Useful for clothes, fabric sofas,
Mattresses, car seats, etc
When vacuum cleaning with supplementary suction tools,
• Do not use them for the piano etc. which are likely to be damaged.
• Do not use them in the High mode.
Remove it by sliding it forward.
Insert it.
In the direction of " ".
While gently laying it on
the inside edge of the
pipe.
Head
Pull
Turn
Multi head
Forward
Backward
Head
While pulling
the head.
Insert it into the pipe
for connection.
EC-S2142,S2141.indd 5 12.5.8 2:58:13 PM
(EC-S2142 only)
Page 6

6
USING THE VACUUM CLEANER
Various ways to use the cleaning mechanism
When you do not want have automatic operation of the cleaning mechanism
Method 1
Method 2
1
How to set for method 2
When you want to operate the cleaning mechanism manually
Stop
Low
peep, peep
peep
Every time you press
the“Stop”button,
the automatic operation
starts.
In case the product is used just
for a short time, the automatic
operation does not start.
(Blue:Fast-speed blinking)
( Blue:Continuous lighting)
Indication lamp/sound
In automatic operation
Stop
2
Stop
3
Stop
peep, peep, peep
peeep
When you press the Stop bottun, the auto cleaning procesure will start to compress the dust to the bottom of the dust cup.
Stop the automatic operation.Press the Stop button again.
Set the product to “manual cleaning” in case the product is used just for a short time
(1 minute or less).
• After vacuuming, be sure to operate the cleaning procedure manually before you put the vacuum cleaner
away. (See the following.)
Pull the power plug and insert it into the outlet again. Do not press high/low
button.
(Press and hold for 3 seconds or more)
Press “Low” button.
Every time you press it, the mode is
changed from one to the other.
The setting is complete.
• The setting remains stored even if the power
plug is removed from the outlet.
It is most effective to do this job before emptying the dust cup or taking care of the product.
(Press for 3 seconds or more.)
After finishing vacuum cleaner
operation.
Cleaning mechanism operation.
(For about 15 seconds)
Finish
(Continued)
EC-S2142,S2141.indd 6 12.5.8 2:58:15 PM
Page 7

7
EMPTYING THE DUST CUP
Remove the dust cup from the vacuum cleaner to empty the dust cup
1
2
3
4
“Click”
Page
10
Empty the dust cup over a newspaper, trash box, etc. since the dust is likely to spill out.
Remove the power plug from the outlet and take the
dust cup out of the unit.
Press the cup ejector button. Lift up the dust cup.
Emptying the dust cup.
Rotate the dust cup handle in the direction of the arrow to open the
bottom lid.
(The screw fin rotates and pushes out the dust.)
Close the bottom lid
securely.
Install the dust cup in the product.
Push it firmly until it clicks.
• Be careful in handling the
removed dust cup set to
prevent your hands and
fingers from getting injured
by the gear wheels.
• Do not rotate the cup handle
when the dust cup is popped up
from the product or is being
carried.
• Depending on the kind or
amount of dust, it may
be hard to operate the cup
handle.
• If you find it hard to open the
bottom lid, do the cleaning of
the inside of the screw fin.
• If the dust cup set is not
installed in the product
securely, the suction power
may be reduced or the dust
may enter into the motor
cauing malfunctions.
To install it securely
• Remove the dust and foreign
substances from the bottom of
the dust-cup in the vacuum
cleaner
• After installation, lift the dust
cup slightly to check that it
is locked in.
Cup handle
Bottom lid
Screw fin
Bottom lid
Gear wheel
EC-S2142,S2141.indd 7 12.5.8 2:58:16 PM
“Click”
Page 8
8
FULL
(Red: Blinking)
Dust
disposal
Peep
Peep
Peep
When to empty the dust cup
EMPTYING THE DUST CUP
If any foreign objects are tangled in the dust cup
1
2
Empty the dust cup in the following cases. If you continue to use the product without emptying the dust cup, the
dust is likely to accumulate on the cylindrical filter and cause the suction power to be reduced.
When the dust-disposal warning
lamp (Red) is blinking.
(Dust disposal-time indication)
Indicating the time to empty the dust cup after the
cleaning mechanism operation is finished.
When the dust is accumulated close
to the maximum limit line.
Depending on the kind of dust or use conditions, the
dust may be accumulated close to the “Dust limit line”
indicated on the dust cup before the dust disposal-
time indication appears.
In this case, empty the dust cup.
Turn the cover assembly in
the direction of the arrow.
Remove the cover assembly to take
away those tangled
foreign objects
.
To reassemble the dust cup set, align t h e
position of ▼ of the cover assembly and ▲ of
the dust cup so that they correspond
with each other.
Turn the cover assembly in
the direction of the arrow
to install it securely.
Dust disposal-time indication
Dust cup set
Cover assembly
Dust cup
Cylindrical filter
Cleaning brush
Screw fin
Cylindrical filter
Dust limit line
Page
3
(Continued)
EC-S2142,S2141.indd 8 12.5.8 2:58:18 PM
Page 9

9
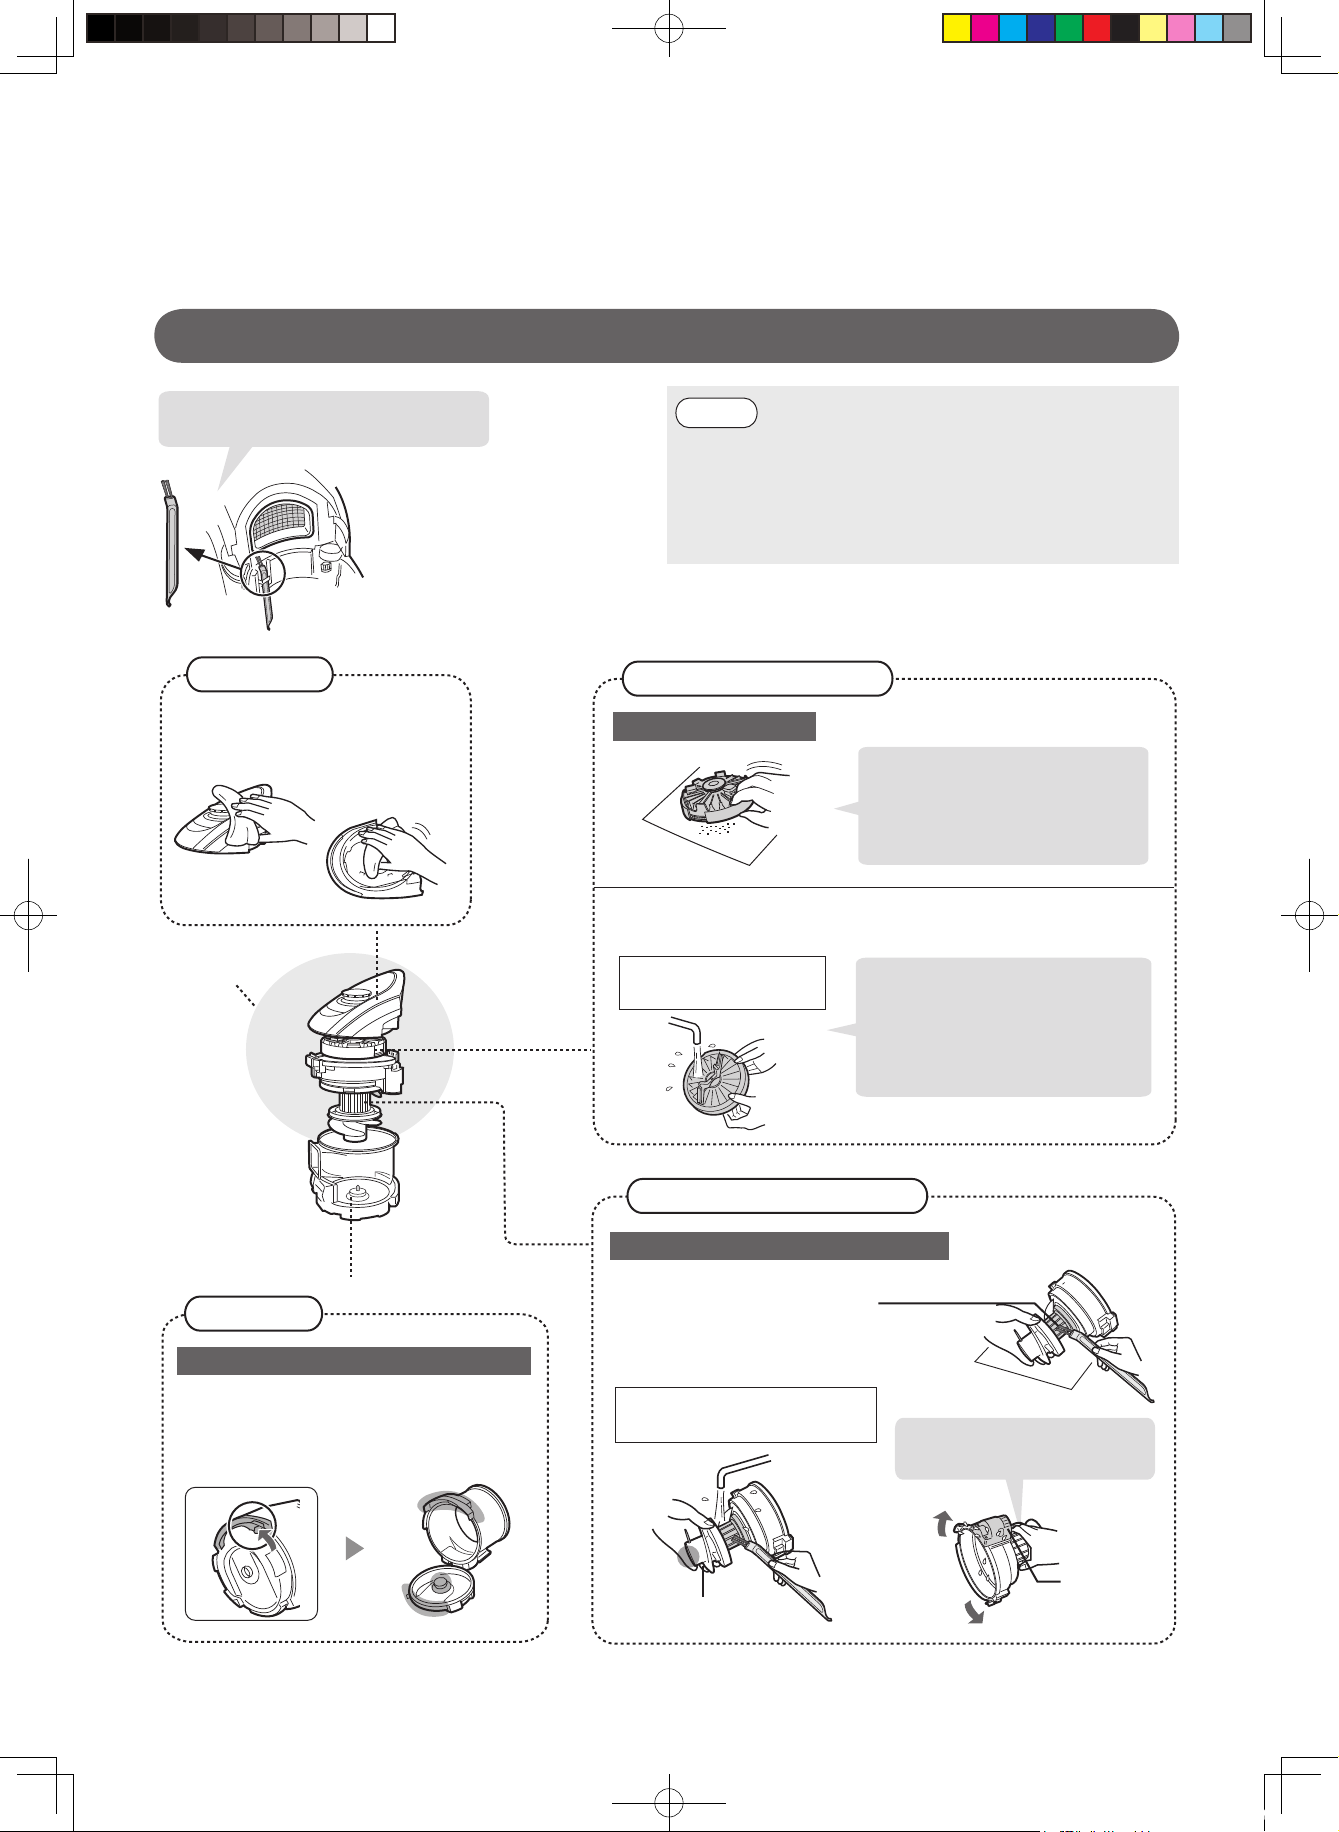
TAKING CARE OF THE PRODUCT
When the dust-disposal warning lamp(Red) and sound indicate
Dust cup (Removing each component)
1
2
Clean of the dust cup set also in the following cases
(Red: Blinking)
peep, peep
Dust
disposal
(Red : Blinking)
Take the following measures
Page
9
11
The filter is blocked up and the suction power has been reduced.
Stop operation and disconnect the power plug.
Empty the dust cup, clean of the cylindrical
filter and the high efficiency air filter.
If you continue to use the product without cleaning, it will come
to a stop automatically.
• Wait at least 2 minutes before restarting your cleaning operation.
(If you restart the cleaning operation within 2 minutes, the warning sound may beep.)
• The suction power gets reduced.
• Operation noises are changed or increased.
• The unit's body gets hot.
• Foreign objects are tangled in the cylindrical filter.
• You are worryed about the dirtiness of the dust cup.
• The bottom lid of the dust cup is hard to open.
• The product has suctioned fine powder.
Removing the filter cover.
Turn the cup cover in the
direction of arrow,
Remove the cup
cover.
Shift the lock in the
direction of release.
Removing the high efficiency air filter.
• Do not try to grasp the
grid element to remove
the filter. (There is a risk
of injuries.)
Removing the cup cover.
Remove it.
EC-S2142,S2141.indd 9 12.5.8 2:58:20 PM
Page 10
10
NOTE
TAKING CARE OF THE PRODUCT
Dust cup (Taking care of each component.)
Clean of it over a newspaper etc.
Filter cover
Cup cover (Cylndrical filter)
Dust cup
High efficiency air filter
Clean it with the supplied cleaning
brush.
(Mounted on the product)
After use, store it in the
direction shown in the
drawing.
• Do not use chemicals, warm water, etc.
• After cleaning, leave it in the breezy shade until it
becomes completely dry. Do not use a drier etc. at all.
(Using the dust cup before it becomes completely
dry may create a smell or cause malfunctions.)
Wipe with cloth soaked in water
or diluted neutral detergent.
Washing with water
• Remove the dust by tapping
the filter on the floor with
newspapers etc. spread out,
and then wash with water.
Dry completely in the shade.
Measure of drying
time: For a day.
• If it is not possible to remove
odor even after such efforts,
soak it in a solution of 10 mL
of bleach diluted with a liter
of water for about 3 hours,
and rinse.
Water or diluted neutral detergent
Cylindrical filter (Clean gently.)
Measure of drying time:
For a day.
Shake it sufficiently to
drain off the excess water.
Water or diluted neutral detergent
Dry it sufficiently after washing.
Turn it upside down and press the lever
located on the bottom surface to open the
bottom lid.
If it is hard to open the bottom lid, clean the section marked with • thoroughly to remove foreign objects.
Screw fin
Gear wheel
(Continued)
Cover assembly
Dry completely in the shade.
EC-S2142,S2141.indd 10 12.5.8 2:58:23 PM
Page 11
11
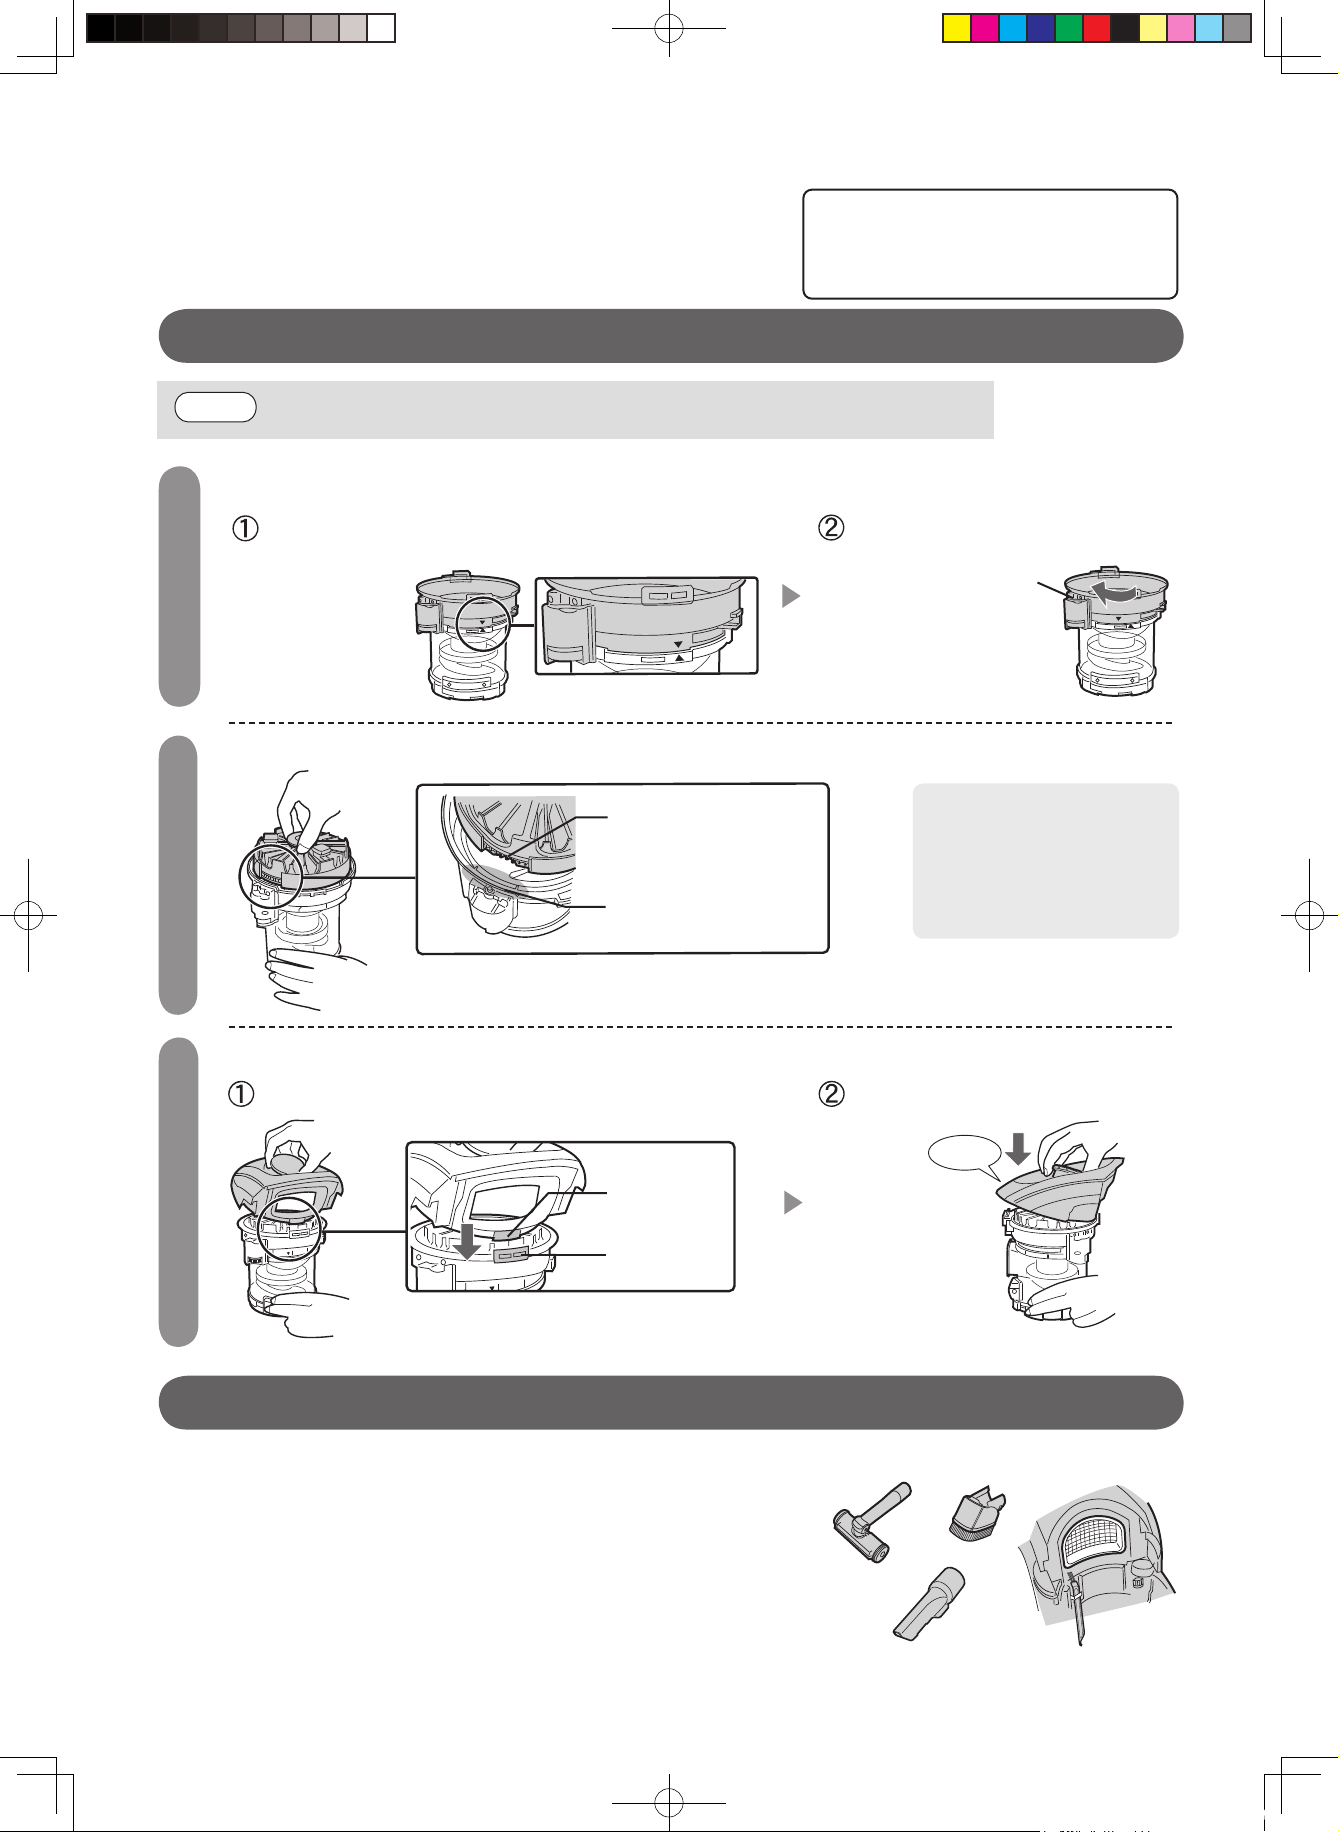
NOTE
Dust cup (Installing each component.)
1
2
3
Product body and supplementary suction tools
Tab of the
filter cover
Hole of the
cup cover
“Click”
Set it so that the high
efficiency air filter ’snotch
and the gear section align
with each other.
Gear wheel area
• Install each component securely. Otherwise you cannot finish assembling the set.
Be sure to disconnecy off the power plug
before care and cleaning.
(electric shock and/or injuries.)
Warning
Putting together the dust cup and the cup cover.
Align them so that the cup cover indicator marked with ▲
and the dust cup indicator marked with ▼align with each
other.
Turn the cup cover in
the direction of arrow
and install it securely.
Installing the high efficiency air filter.
• Make sure that there is
no dust or foreign object
within the cup cover before
installation.
(There is a risk of generating
unusual noises.)
Installing the filter cover.
Engage the filter cover tab in the cup cover hole.
Press it until it clicks.
If it becomes noticeably dirty:
• When it becomes noticeably dirty, wipe it with a cloth soaked in water
or diluted neutral detergent.
Do not use any items such as thinner, benzene, etc.
(There is a risk of discoloration or deform.)
• As for the supplementary suction tools, rinse and dry them sufficiently.
Drain off the excess water completely and dry them in the breezy shade
sufficiently.
EC-S2142,S2141.indd 11 12.5.8 2:58:25 PM
Page 12
12
Problem Check points Action
TROUBLESHOOTING
Before asking for repairs or making any inquiries, please check the following points.
Motor/Operation
Stops operating.
Motor does not turn on
when the power switch
is turned on.
SHARP CORPORATION
Osaka, Japan
• Is the cylinder type filter clogged?
• Is the dust cup full of dirt?
• Is the filter clogged?
• Are the main body, metal telescopic
tube, suction head clogged?
• Check that the power cord and plug is properly plugged into an electrical outlet.
• Maintenance.(Page7-11)
• Remove dust.(Page 7)
Suction power/sound
Suction power is weak.
Operation sound becomes
loud/changes.
• Is the cylinder type filter clogged?
• Is the dust cup full of dust?
• Is the filter clogged?
• Are the main body, metal telescopic tube,
suction head clogged?
• Maintenance.(Page7-11)
• Remove dust.(Page 7)
Smell
The main body/exhaust
smells.
• Is the dust cup full of dust?
(Some kinds of dirt may cause smell.)
• Is the cylinder type filter or filter dried
enough?
• Discard dirt.(Page 7, 8)
• Wash them again and fully dry.
(Page9-11)
Dust cup
Difficult to set the dust
cup to the main body.
• Check for any dust blocking the bottom
of the attach part of the main system.
• Is the dust cup properly set up?
• Is the filter case or filter properly set up?
• Remove dust or other object. (Page 7)
• Set the filter case and filter properly.
(Page 7, 11)
Auto cleaning
Press the Off button and
the operation starts again.
The operation noise of
the cleaning mechanism
is unusual.
• Is the cleaning mechanism is in automatic operation.(Page 6)
• Did you allow the product to suck in any
large solid items?
• Remove dust.(Page 7)
Cord
The plug or power cord
is extremely hot.
• Is the power cord loosely plugged into
the outlet?
• Are you using an extension cord?
(Under normal situation, the power cord
and its plug may reach up to 40°C.)
• Be sure to insert the power plug
completely.
• Do not use an extension cord.
2
CN
TINSJA427VBRZ 2EK
Printed in China
EC-S2142,S2141.indd 12 12.5.8 2:58:26 PM
 Loading...