

Page 1
Recording
Formatting a disc
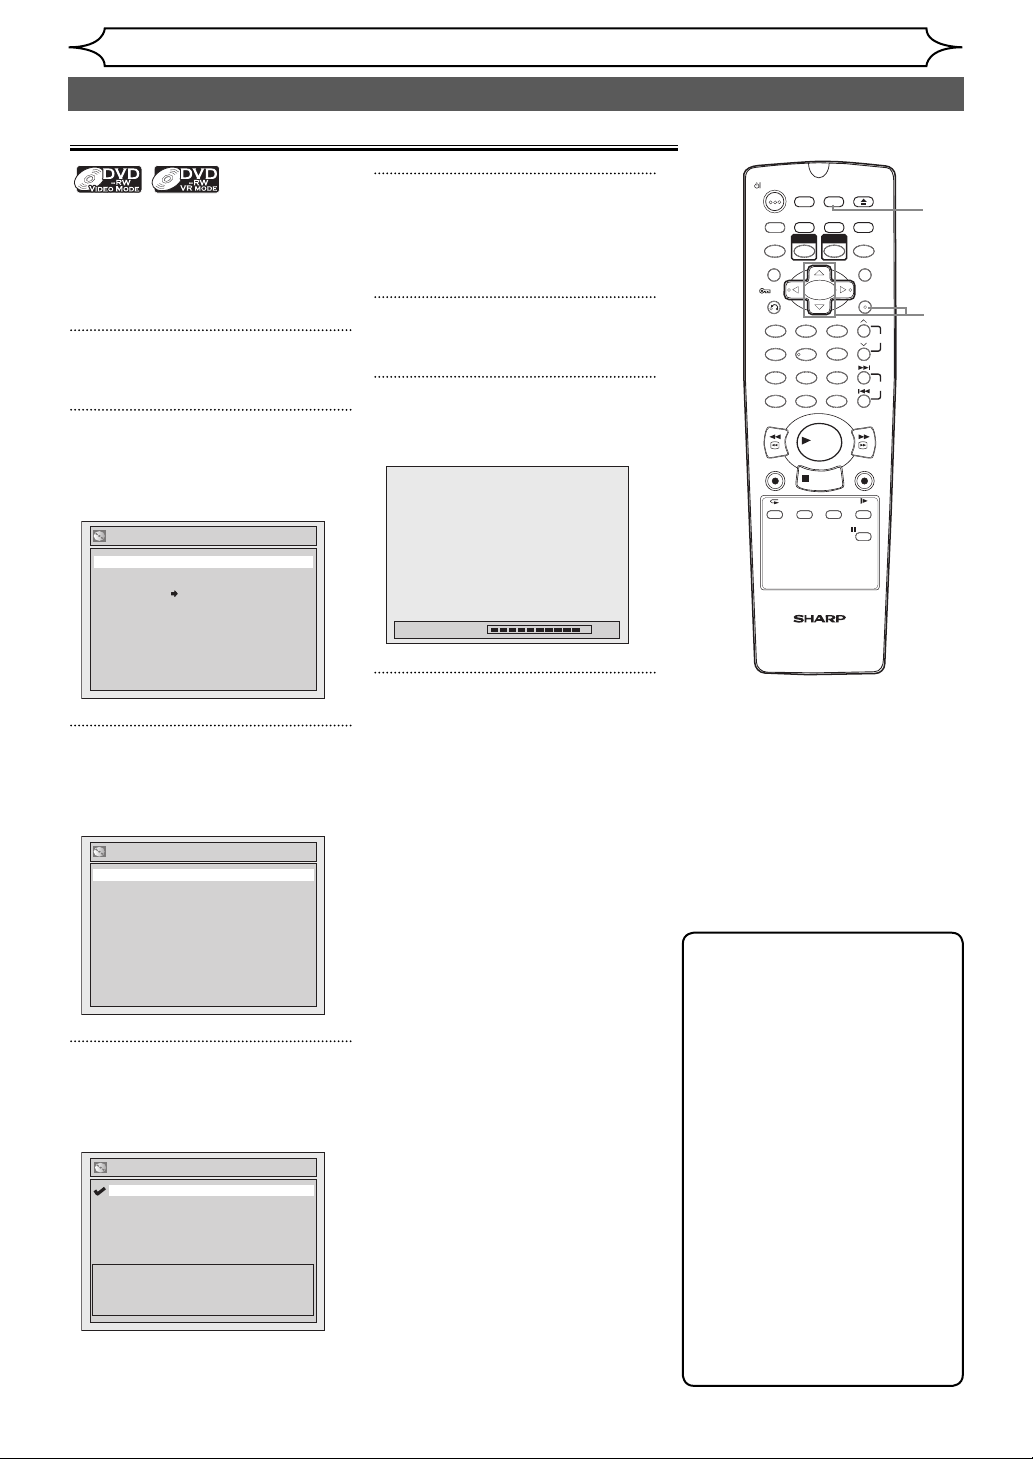
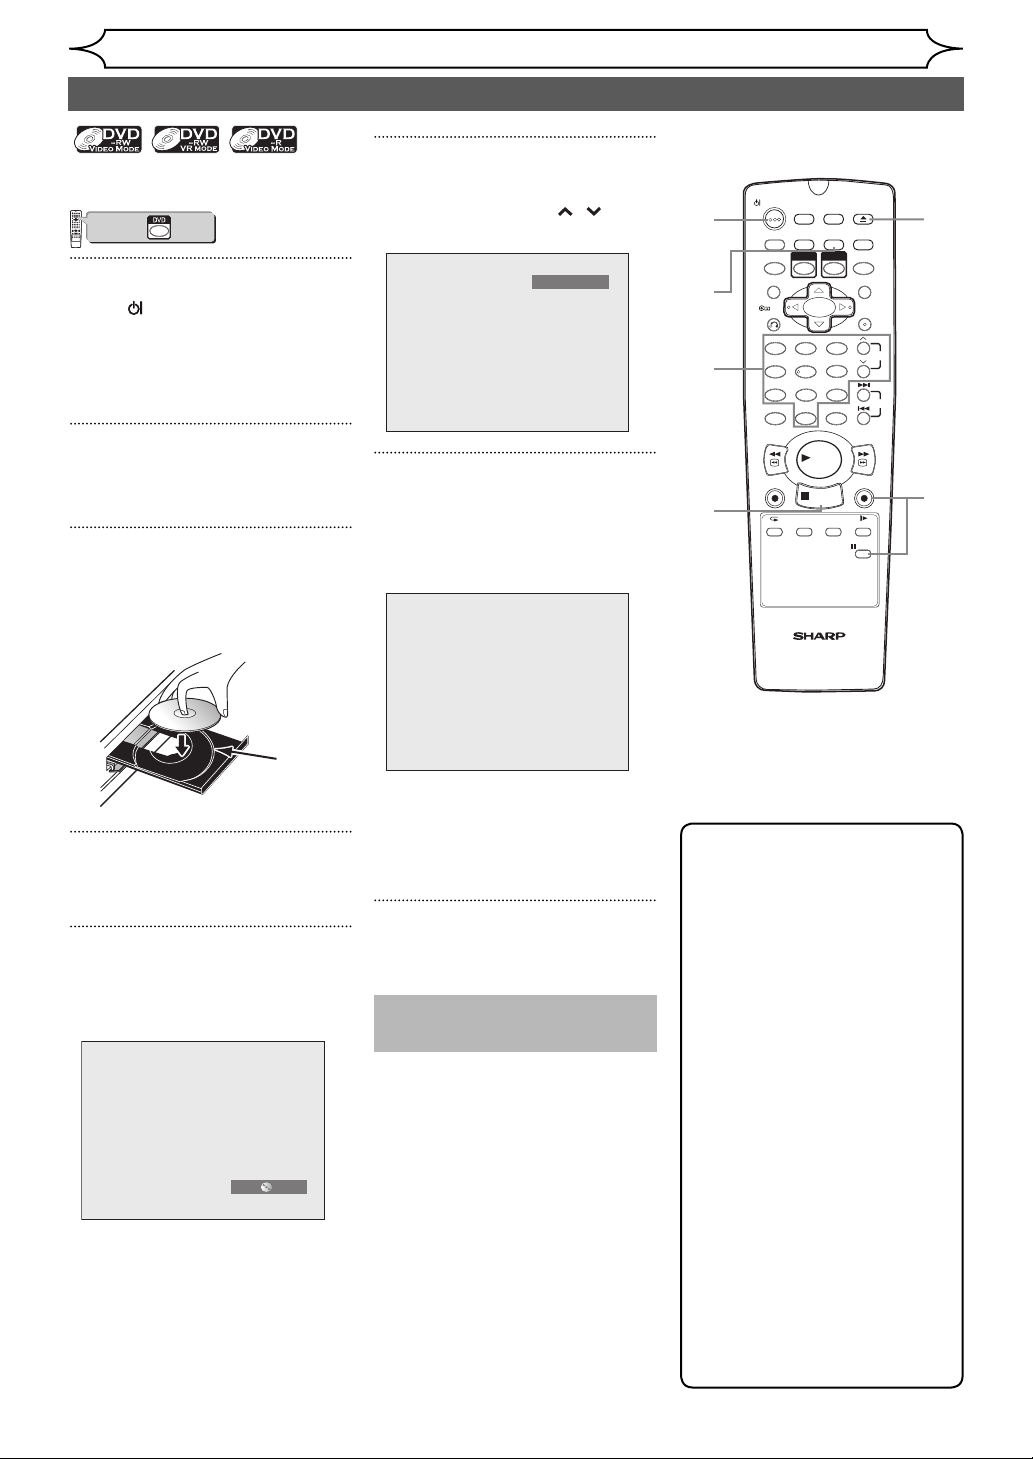
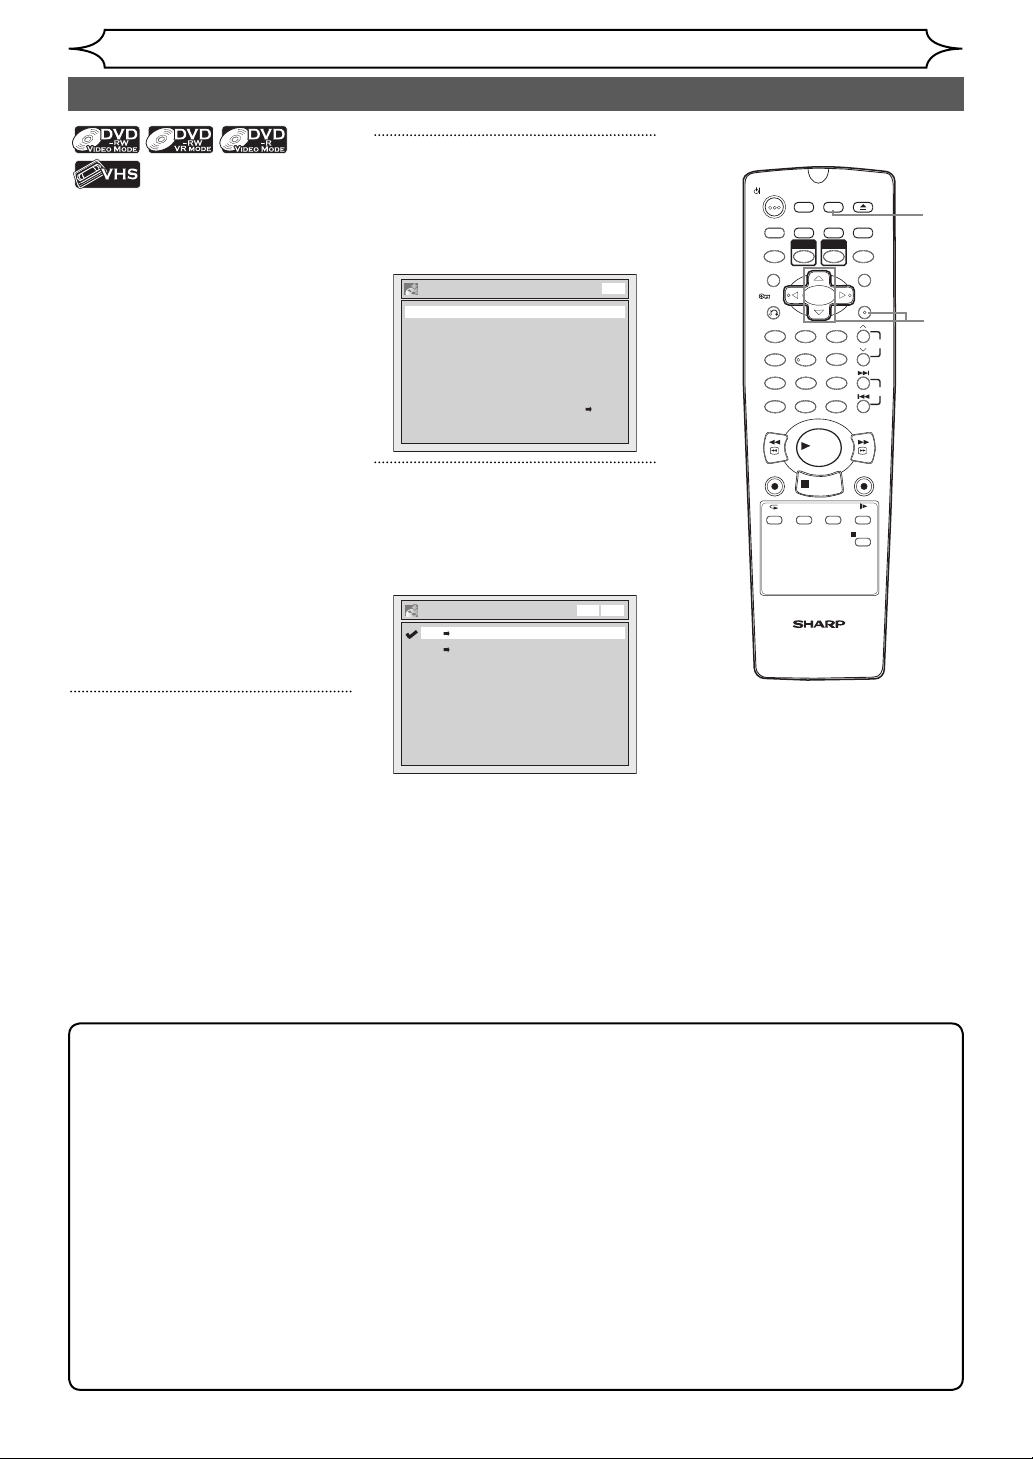
Choosing the recording format of a brand-new DVD-RW disc
When inserting a brand-new disc,
the unit automatically starts to
initialise the disc. You can also
manually format a DVD-RW disc
once it has been used.
1
In stop mode, press [SETUP].
2
Select “Disc” using [Cursor
K / L], then press [ENTER].
Disc menu will appear.
Disc
Format
Finalise
Disc Protect OFF ON
3
Select “Format” using [Cursor
K / L], then press [ENTER].
Format menu will appear.
Format
Start
Format Mode Video mode
5
Select “Video mode” or “VR
mode” using [Cursor K / L],
then press [ENTER].
6
Press [SETUP] to exit.
7
Insert a brand-new disc.
Formatting will start.
Formatting 90%
8
Formatting is completed.
“100%” is indicated.
OPERATE
DUBBING
T-SET
TIMER PROG.
VCR
ZOOM
RETURN
.@/: ABC DEF
1 2 3
GHI JKL MNO
54
PQRS TUV WXYZ
708 9
CLEAR/C-RESET
SPACE DISPLAY
REV
VCR
REC/OTR
AUDIOREPEAT
VCR/DVD RECORDER
COMBINATION
NB203ED
REC MODE
PLAY
STOP
SEARCH
SETUP
OPEN/CLOSE
EJECT
RAPID PLAY
DVD
CM SKIP
MENU LISTTOP MENU
ENTER
PROG.
6
SKIP
FWD
DVD
REC/OTR
SLOW
PAUS E
1
6
2
3
4
5
4
Select “Format Mode” using
[Cursor K / L], then press
[ENTER].
Format - Format Mode
Video mode
VR mode
Video mode
DVD Player Compatibility mode.
VR mode
Editing possibility mode.
26 EN
Note
• The recording format setting
is effective only for DVD-RW
discs. You cannot change the
recording format for a DVD-R
disc. DVD-R discs are always
in Video mode.
• You cannot mix two formats
on one DVD-RW disc. If
you insert a disc that has
been recorded before, the
recording format cannot be
changed even if you change
it in the Setup menu.
• The unit is not compatible
with DVD+RW/+R discs. If
a brand-new DVD+RW or
DVD+R disc is inserted, the
error message (“Disc Error”)
will appear.
Page 2
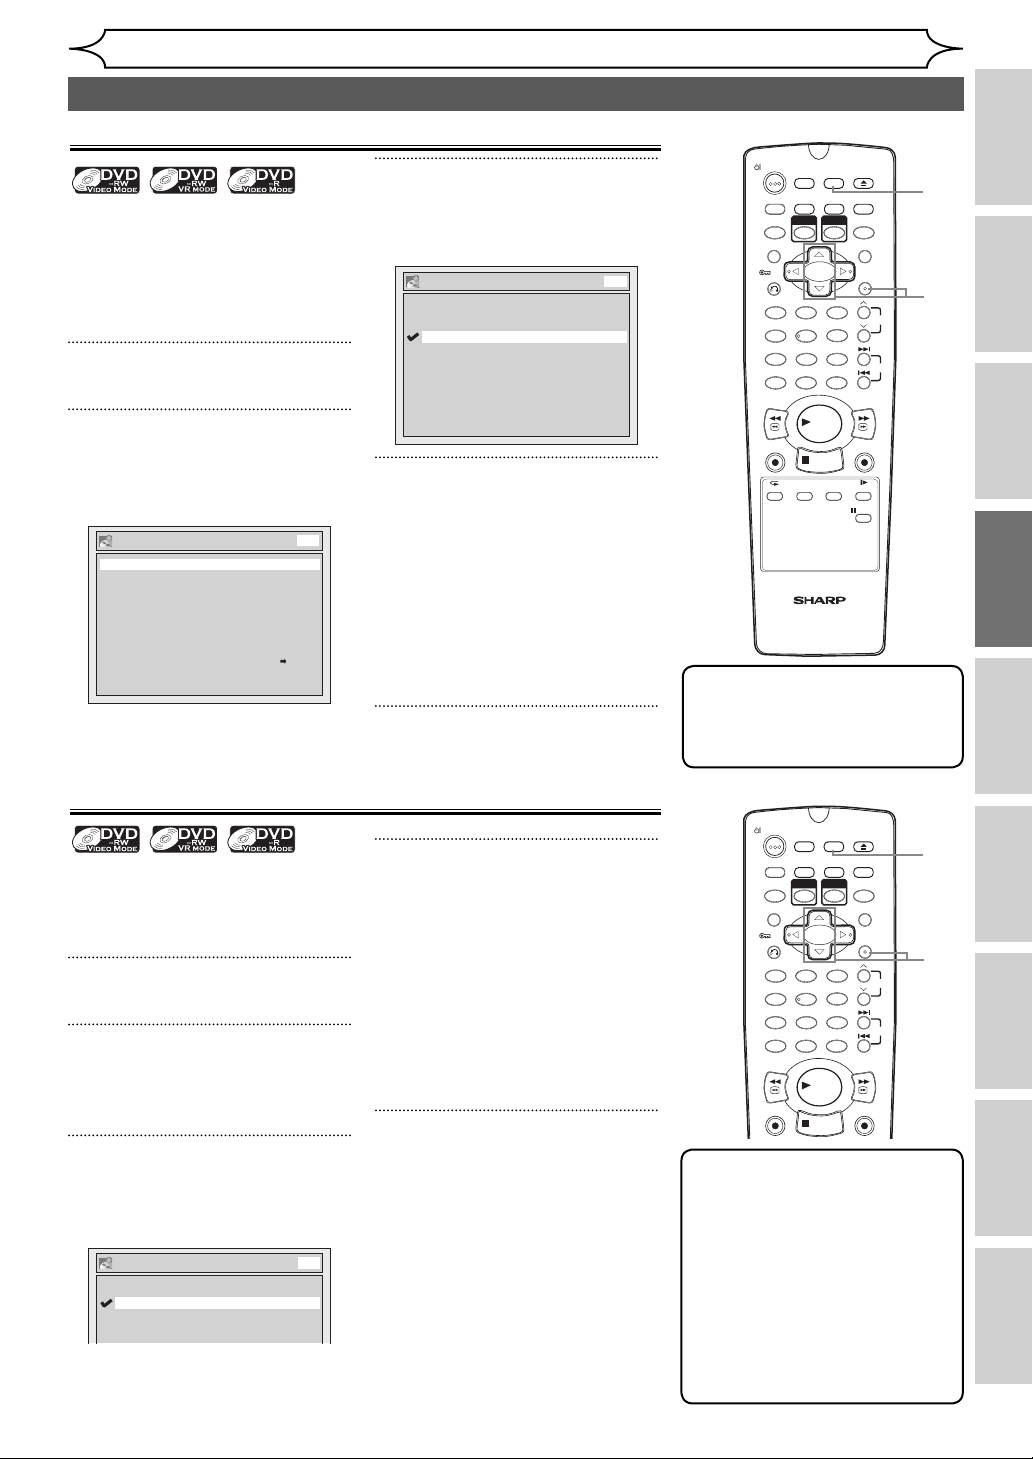
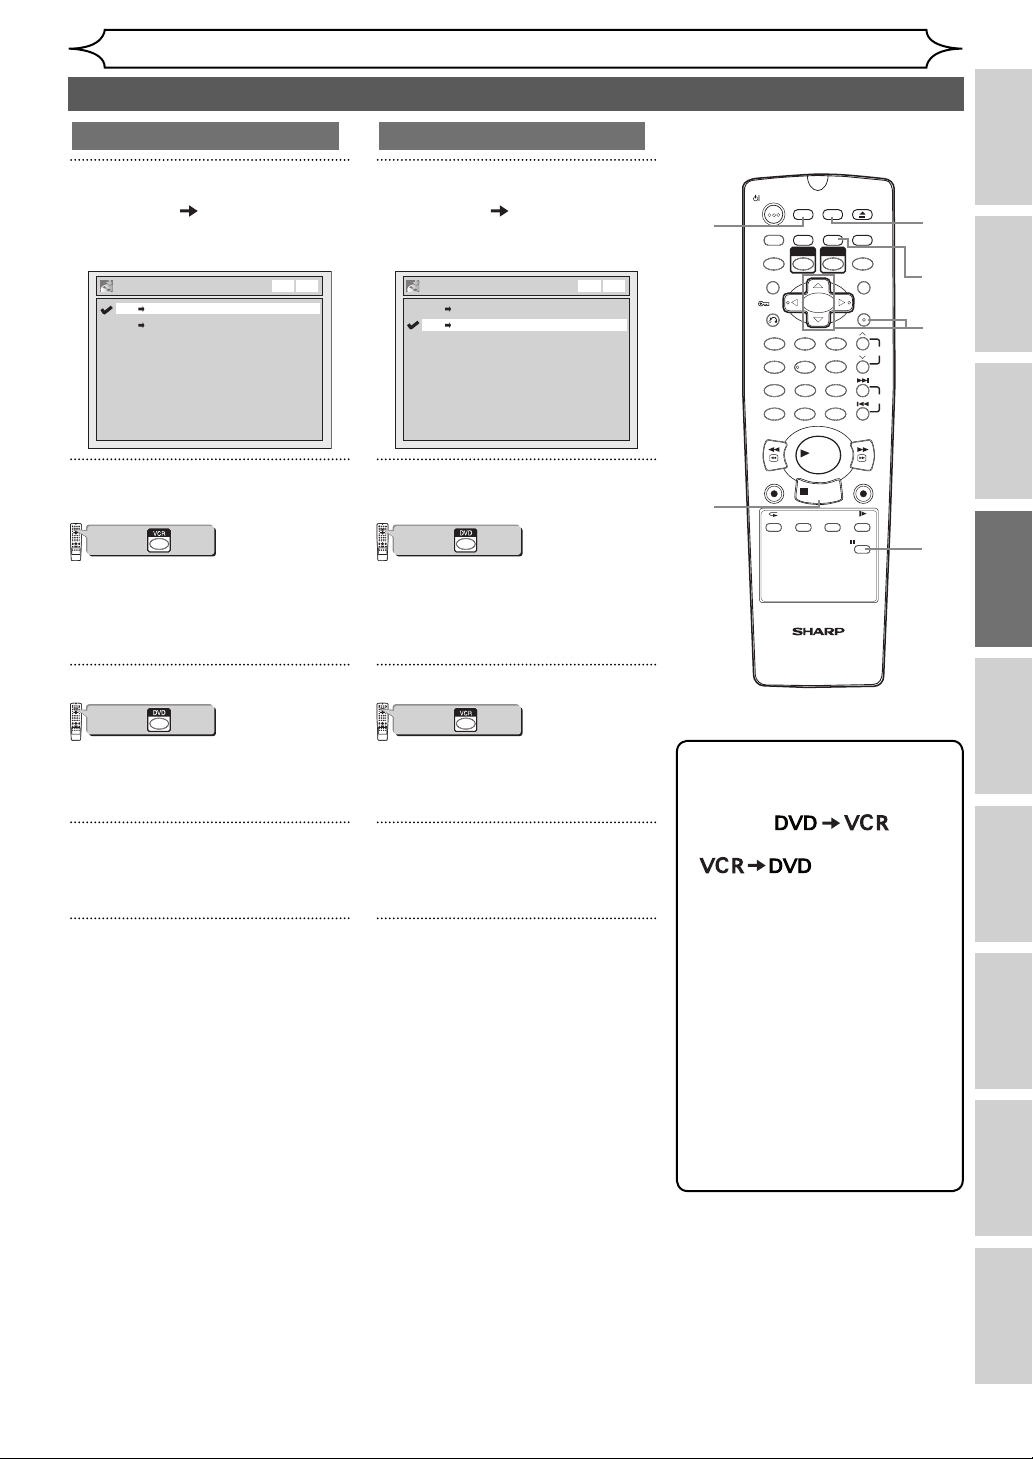
Setting Auto Chapter
The unit inserts a chapter mark
periodically (every 10 minutes by
default) during recording. Using
the Auto Chapter menu, you can
set this function off or change the
time period.
1
In stop mode, press [SETUP].
2
Select “Recording” using
[Cursor K / L], then press
[ENTER].
Recording
Auto Chapter
Recording Audio Select (XP)
Auto Finalise
Satellite Link
Bilingual Recording Audio
External Input Audio
Dubbing Mode
DVD
10 minutes
Dolby Digital
OFF
Main
Stereo
VCR DVD
Recording
Formatting a disc (cont’d)
3
Select “Auto Chapter” using
[Cursor K / L], then press
[ENTER].
Auto Chapter
OFF
5 minutes
10 minutes
15 minutes
30 minutes
60 minutes
DVD
4
If you wish to set “Auto
Chapter” off, select “OFF”
using [Cursor K / L], then press
[ENTER].
If you wish to change the time
period for Auto Chapter, select
the required time period using
[Cursor K / L], then press
[ENTER].
5
Press [SETUP] to exit.
OPERATE
T-SET
ZOOM
RETURN
.@/: ABC DEF
1 2 3
GHI JKL MNO
PQRS TUV WXYZ
708 9
CLEAR/C-RESET
REV
VCR
REC/OTR
SETUP
DUBBING
TIMER PROG.
REC MODE
VCR
DVD
6
54
SPACE DISPLAY
PLAY
STOP
AUDIOREPEAT
SEARCH
VCR/DVD RECORDER
COMBINATION
NB203ED
OPEN/CLOSE
EJECT
RAPID PLAY
CM SKIP
MENU LISTTOP MENU
ENTER
FWD
DVD
REC/OTR
SLOW
PAUS E
PROG.
SKIP
Note
• You cannot set or clear
chapter marks on DVD-R discs
manually.
1
5
2
3
4
Recording Disc Playback EditingBefore you start Connections Getting started
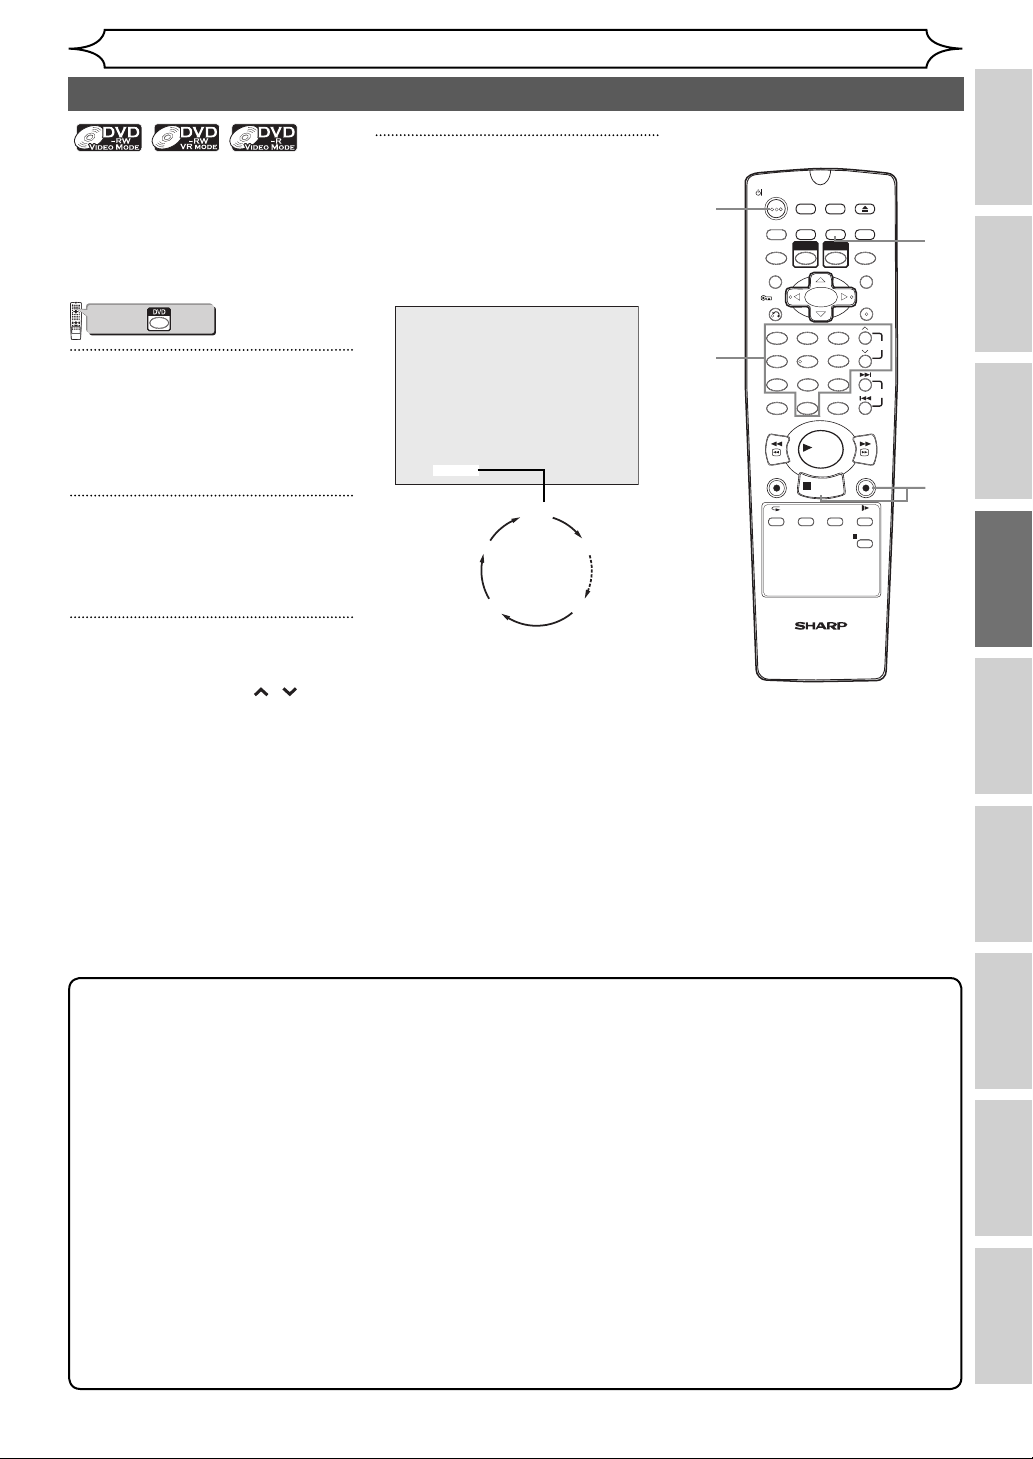
Recording Audio Select (XP)
You can enjoy high quality sound
recording. This function works
only when the recording mode is
set at XP.
1
In stop mode, press [SETUP].
2
Select “Recording” using
[Cursor K / L], then press
[ENTER].
3
Select “Recording Audio Select
(XP)” using [Cursor K / L], then
press [ENTER].
Recording Audio Select (XP)
PCM
Dolby Digital
The default is “Dolby Digital”.
DVD
4
Select “PCM” or “Dolby Digital”
using [Cursor K / L], then press
[ENTER].
PCM:
Records PCM audio for the best
quality sound.
Dolby Digital:
Records Dolby Digital audio for
good quality sound.
5
Press [SETUP] to exit.
DUBBING
TIMER PROG.
VCR
54
SPACE DISPLAY
REC MODE
PLAY
STOP
SETUP
OPEN/CLOSE
EJECT
RAPID PLAY
DVD
CM SKIP
MENU LISTTOP MENU
ENTER
PROG.
6
SKIP
FWD
DVD
REC/OTR
OPERATE
T-SET
ZOOM
RETURN
.@/: ABC DEF
1 2 3
GHI JKL MNO
PQRS TUV WXYZ
708 9
CLEAR/C-RESET
REV
VCR
REC/OTR
Note
• “PCM” stands for Pulse Code
Modulation. It changes
analogue sound to digital
sound without compressing
audio data.
• When the recording mode is
set at other than XP, the unit
records “Dolby Digital” audio
automatically even if you
selected “PCM”.
1
5
Setup menu
2
3
4
OthersVCR functions
Changing the
27EN
Page 3
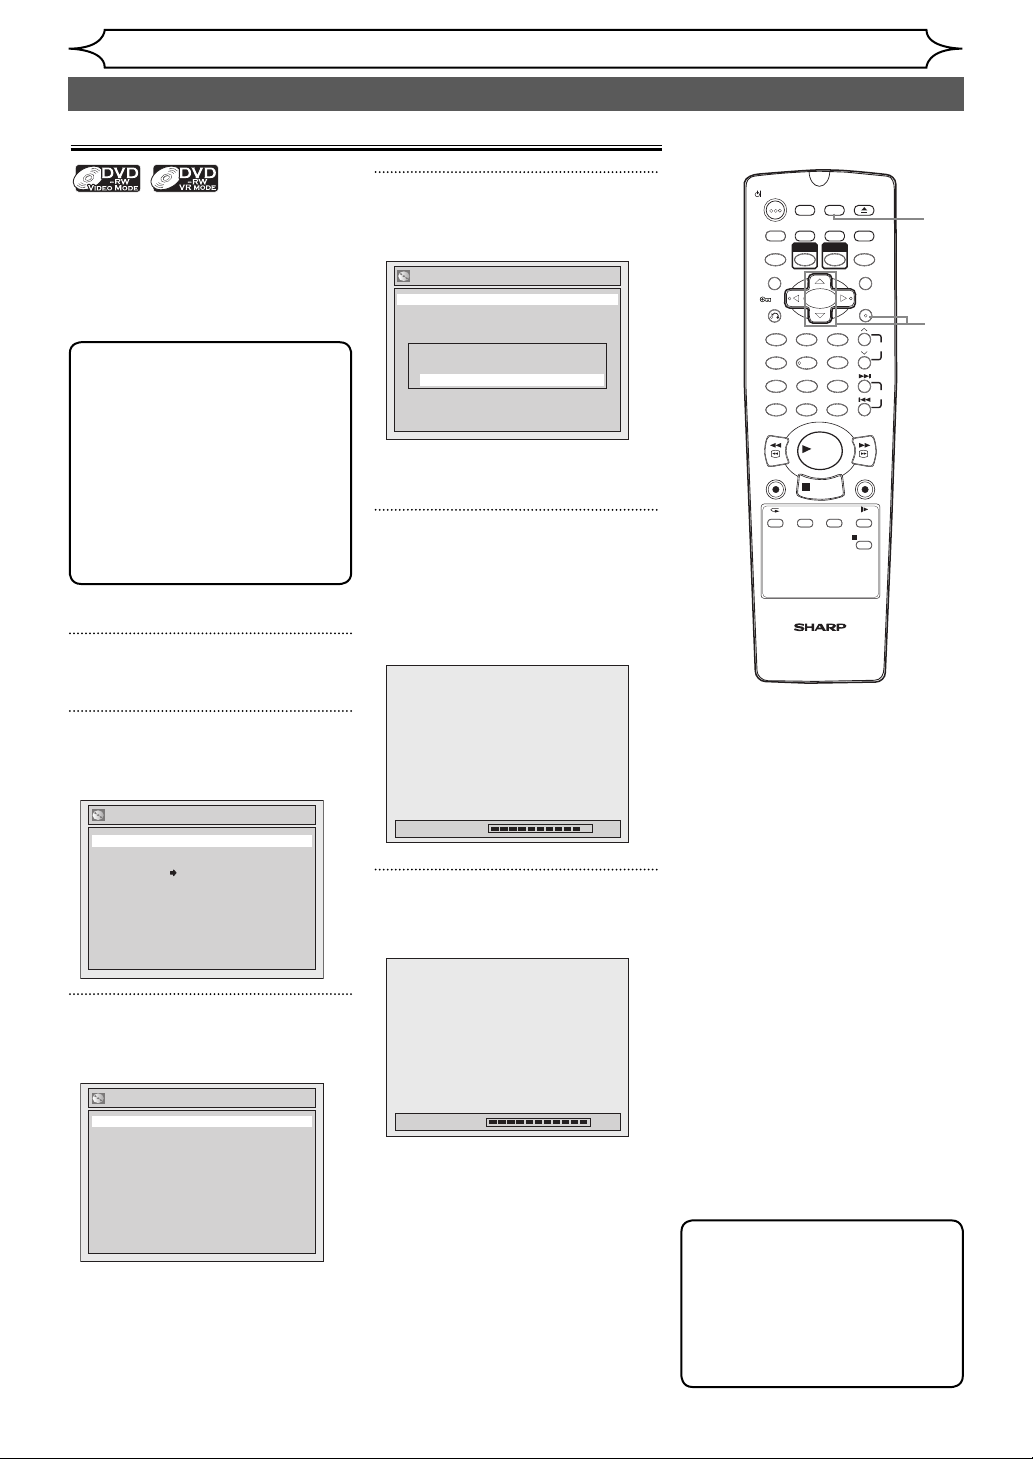
Formatting a disc (cont’d)
Reformatting a disc manually
Recording
If you are using a DVD-RW disc,
you can format the disc by
performing “Format”. By default
it will be in Video mode. You can
change this to VR mode using the
Setup menu.
Note
• When you reformat the disc,
the contents of the disc are
erased.
• Make sure that the recording
format is set to the desired
mode. (See steps 1 to 6 in
“Choosing the recording
format of a brand-new DVDRW disc” on page 26.)
Insert a recordable disc.
1
In stop mode, press [SETUP].
2
Select “Disc” using [Cursor
K / L], then press [ENTER].
Disc
Format
Finalise
Disc Protect OFF ON
4
Select “Start” using [Cursor
K / L], then press [ENTER].
Format
Start
Format mode Video mode
Are you sure?
Yes
No
A popup window will appear and
prompt you to confirm.
5
Select “Yes” using [Cursor
K / L], then press [ENTER].
Formatting will start.
If you want to cancel formatting,
select “No”.
Formatting 90%
6
Formatting is completed.
“100%” is indicated.
OPERATE
DUBBING
T-SET
TIMER PROG.
VCR
ZOOM
RETURN
.@/: ABC DEF
1 2 3
GHI JKL MNO
54
PQRS TUV WXYZ
708 9
SPACE DISPLAY
CLEAR/C-RESET
REV
VCR
REC/OTR
AUDIOREPEAT
VCR/DVD RECORDER
COMBINATION
NB203ED
REC MODE
PLAY
STOP
SEARCH
SETUP
OPEN/CLOSE
EJECT
RAPID PLAY
DVD
CM SKIP
MENU LISTTOP MENU
ENTER
PROG.
6
SKIP
FWD
1
2
3
4
5
DVD
REC/OTR
SLOW
PAUS E
3
Select “Format” using [Cursor
K / L], then press [ENTER].
Format
Start
Format Mode Video mode
28 EN
Formatting 100%
Note
• It is not possible to use a disc
formatted with this unit on
other DVD recorder. When
you use a disc with another
DVD recorder, format a disc
using that DVD recorder.
Page 4
Selecting the Sound mode
This unit can receive bilingual broadcasts.
You can switch between modes by pressing
[AUDIO] on the remote control. Each mode is
indicated on the TV screen as follows.
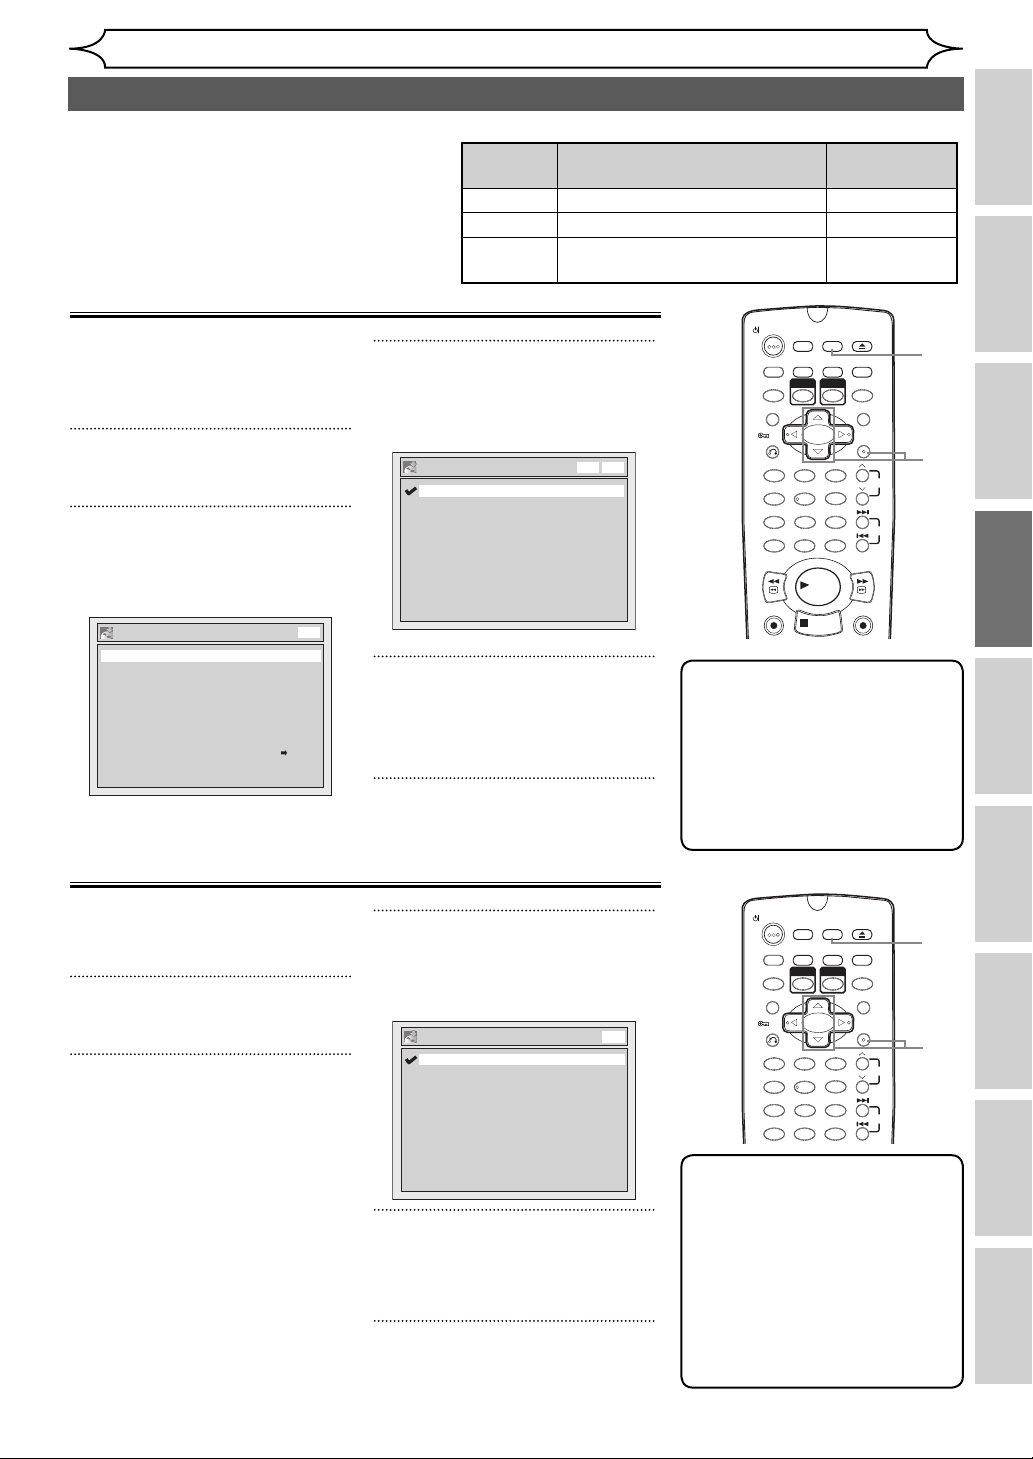
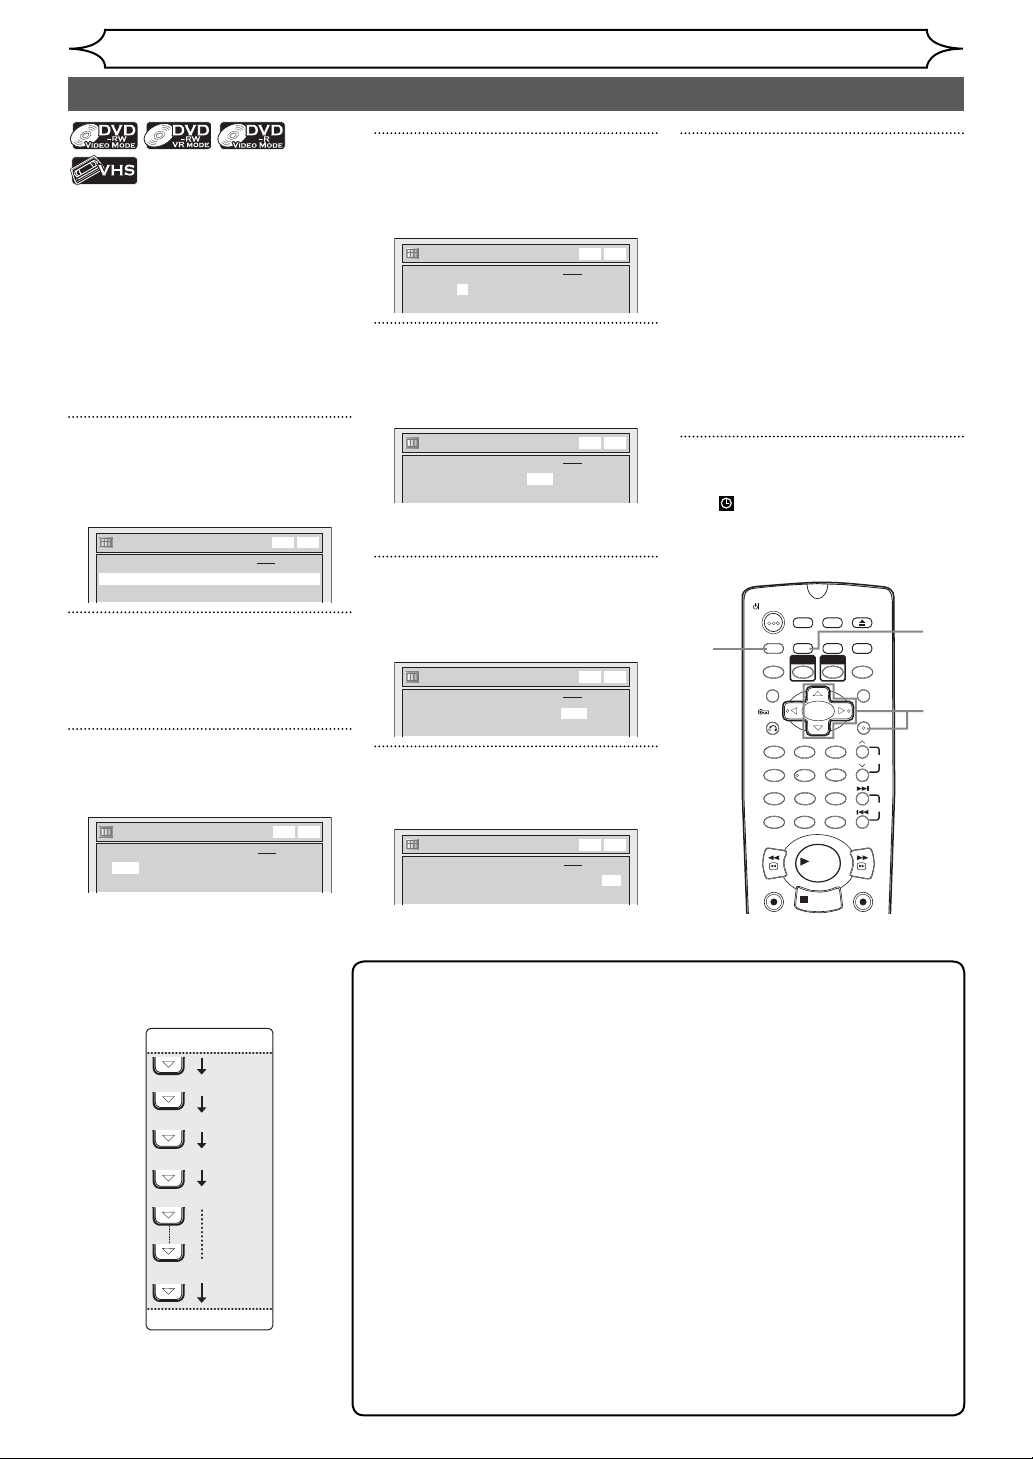
Setting External Input Audio
When the external input audio
is a bilingual broadcast, you can
choose “Stereo” or “Bilingual” to
record on a DVD.
1
In stop mode, press [SETUP].
3
Select “External Input Audio”
using [Cursor K / L], then press
[ENTER].
External Input Audio
Stereo
Bilingual
2
Select “Recording” using
[Cursor K / L], then press
[ENTER].
Recording
Auto Chapter
Recording Audio Select (XP)
Auto Finalise
Satellite Link
Bilingual Recording Audio
External Input Audio
Dubbing Mode
DVD
10 minutes
Dolby Digital
OFF
Main
Stereo
VCR DVD
4
Select “Stereo” or “Bilingual”
using [Cursor K / L], then press
[ENTER].
5
Press [SETUP] to exit.
Recording
• During reception of bilingual broadcasts
Mode Audio output
Main Main audio from both speakers Main
Sub Sub audio from both speakers Sub
Main / Sub
• Main audio from the left speaker
• Sub audio from the right speaker
OPERATE
DUBBING
T-SET
TIMER PROG.
ZOOM
RETURN
DVDVCR
.@/: ABC DEF
1 2 3
GHI JKL MNO
PQRS TUV WXYZ
708 9
CLEAR/C-RESET
REV
VCR
REC/OTR
Note
• If you select “Stereo”:
The audio will be recorded as
“stereo audio”.
• If you select “Bilingual”:
The audio will be recorded
as “bilingual audio” (see next
section for more detail).
Display on the
TV screen
Main / Sub
OPEN/CLOSE
EJECT
SETUP
REC MODE
RAPID PLAY
VCR
DVD
CM SKIP
MENU LISTTOP MENU
ENTER
6
54
SPACE DISPLAY
FWD
PLAY
DVD
REC/OTR
STOP
PROG.
1
5
2
3
SKIP
Recording Disc Playback EditingBefore you start Connections Getting started
4
Setting Bilingual Recording Audio
You can select either “Main” or
“Sub” audio to record a bilingual
broadcast in Video mode.
3
Select “Bilingual Recording
Audio” using [Cursor K / L],
1
then press [ENTER].
In stop mode, press [SETUP].
2
Select “Recording” using
[Cursor K / L], then press
[ENTER].
4
Select “Main” or “Sub” using
[Cursor K / L], then press
[ENTER].
5
Press [SETUP] to exit.
Bilingual Recording Audio
Main
Sub
DVD
DUBBING
TIMER PROG.
VCR
54
SPACE DISPLAY
SETUP
REC MODE
DVD
6
OPEN/CLOSE
EJECT
RAPID PLAY
CM SKIP
MENU LISTTOP MENU
ENTER
PROG.
SKIP
OPERATE
T-SET
ZOOM
RETURN
.@/: ABC DEF
1 2 3
GHI JKL MNO
PQRS TUV WXYZ
708 9
CLEAR/C-RESET
Note
• If you are recording onto a
VR mode disc, both “Main”
and “Sub” will be recorded
regardless of your setting
here. And when you play
back, you can choose
either audio format or a
combination of both as your
playback audio.
1
Setup menu
5
2
3
4
OthersVCR functions
29EN
Changing the
Page 5
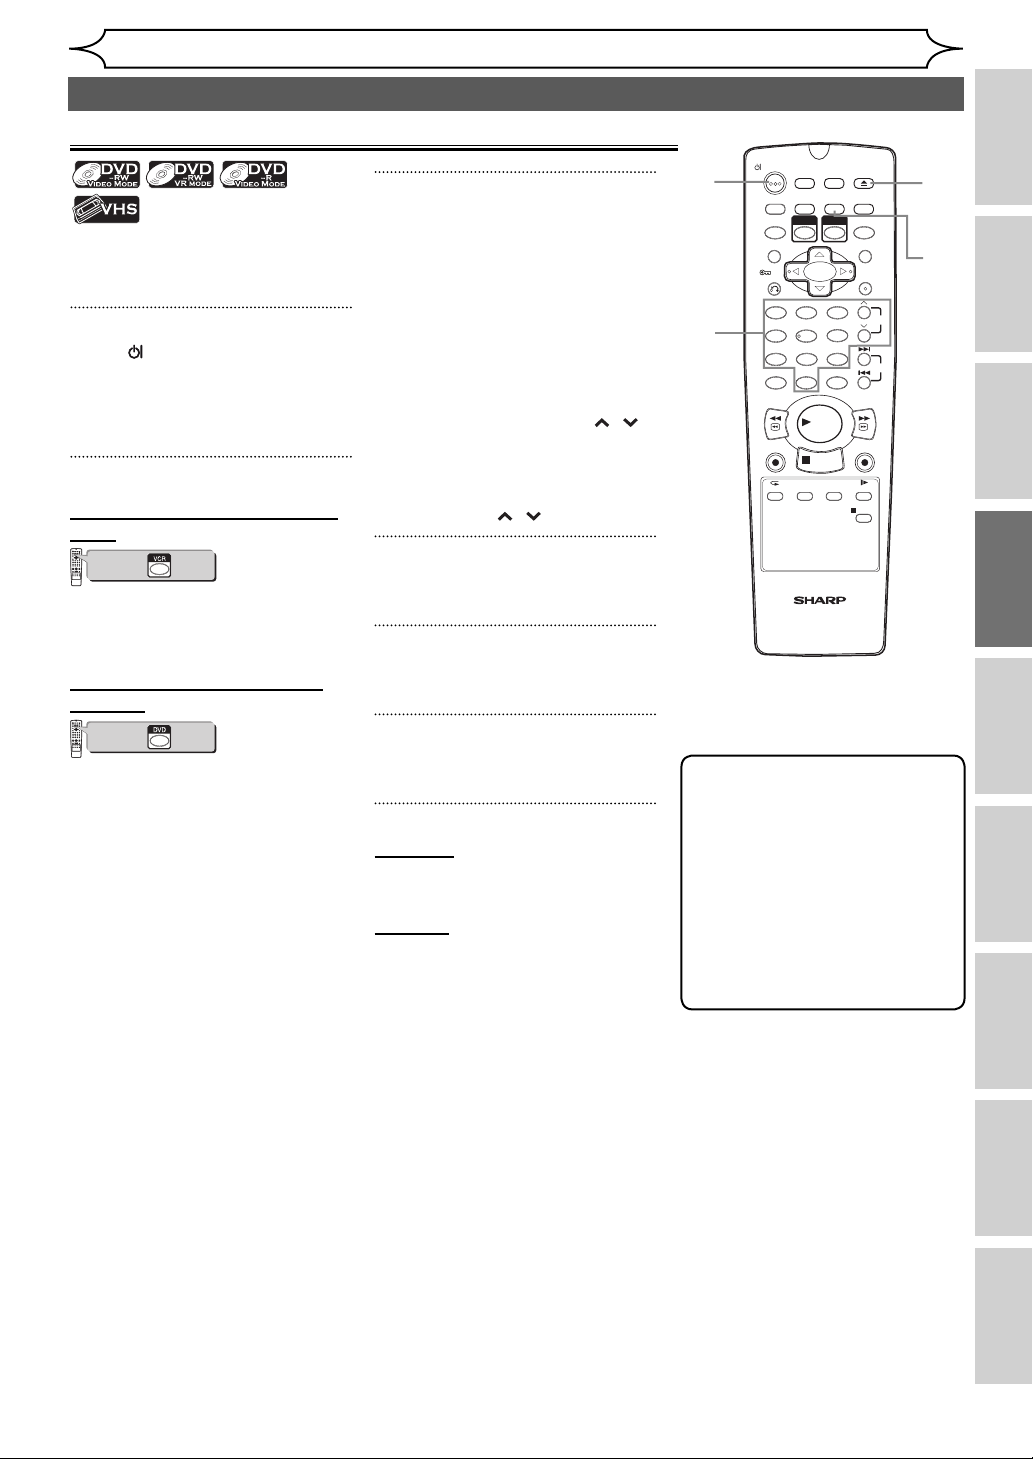
Recording
Basic recording
Follow the steps below to record
a TV programme.
VCR
DVD
123
6
54
89
7
+10
0
PLAY
STOP
Press first.
VCR/DVD COMBINATION
NA527AD
1
Press [ OPERATE] to turn on
the unit.
Turn on the TV and be sure to
select the input to which the unit
is connected.
2
Press [OPEN/CLOSE EJECT A]
to open the disc tray.
3
Place the disc on the disc tray
with its label facing up. Be sure
to align the disc with the disc
tray guide.
6
Select the desired channel to
record using [PROG.
/ ] or
[the Number buttons].
P08
7
Press [DVD REC/OTR I] to start
recording.
The “I” mark will be displayed
for 5 seconds.
1
5
6
8
OPERATE
DUBBING
T-SET
TIMER PROG.
VCR
ZOOM
RETURN
.@/: ABC DEF
1 2 3
GHI JKL MNO
54
PQRS TUV WXYZ
708 9
SPACE DISPLAY
CLEAR/C-RESET
REV
VCR
REC/OTR
AUDIOREPEAT
VCR/DVD RECORDER
COMBINATION
PLAY
STOP
NB203ED
SETUP
REC MODE
DVD
6
SEARCH
OPEN/CLOSE
EJECT
RAPID PLAY
CM SKIP
MENU LISTTOP MENU
ENTER
FWD
DVD
REC/OTR
SLOW
PAUS E
2
4
PROG.
SKIP
7
Disc
tray
guide
4
Press [OPEN/CLOSE EJECT A] to
close the disc tray.
5
Select the recording mode
using [REC MODE].
(See page 24.)
SP 0:58
I
To pause the recording, press
[PAUSE F]. Press [PAUSE F]
or [DVD REC/OTR I] again to
restart the recording.
8
Press [STOP C] to stop the
recording.
This operation may take a
few moments to complete.
Note
• You can change the channel
while in the REC pause mode.
• Recording starts immediately
and continues until the disc is
full or you stop recording.
• If the clock is not set, the
date and time space next to
title names in the Original or
Playlist will be blank.
• You cannot change the
recording mode while in the
REC or REC pause mode.
• Even if the broadcasting
you are recording is in the
SECAM system, this unit
automatically converts it
to the PAL system when
recording.
• If you want to monitor the
programme that you are
recording, make sure the
device such as STB is turned
off when it is connected to
AV2.
30 EN
Page 6
Recording
One-touch Timer Recording (OTR)
This is a simple way to set the
recording time in blocks of 30
minutes. Check that the disc you
are recording onto has enough
space remaining for the time you
set.
VCR
DVD
123
6
54
89
7
+10
0
PLAY
STOP
Press first.
VCR/DVD COMBINATION
NA527AD
1
Turn on the unit and insert a
recordable disc.
Make sure that the TV input is set
on the unit.
2
Select the recording mode
using [REC MODE].
(See page 24.)
3
Select the desired channel to
record using [PROG. / ] or
[the Number buttons].
4
Press [DVD REC/OTR I] repeatedly until the desired recording
time (30 minutes to 8 hours)
appears on the TV screen.
One-touch Timer Recording will
start.
I
0:30
0:30
(Normal Recording)
8:00 7:30
• When the unit reaches the
specified time, it will be turned
off automatically.
• To change the recording
length during one-touch timer
recording, press
[DVD REC/OTR I] repeatedly
until the desired length
appears.
• To cancel One-touch Timer
Recording within the specified
time, press [STOP C].
1:00
1
3
OPERATE
DUBBING
T-SET
TIMER PROG.
VCR
ZOOM
RETURN
.@/: ABC DEF
1 2 3
GHI JKL MNO
54
PQRS TUV WXYZ
708 9
SPACE DISPLAY
CLEAR/C-RESET
REV
VCR
REC/OTR
AUDIOREPEAT
VCR/DVD RECORDER
COMBINATION
PLAY
NB203ED
REC MODE
STOP
SEARCH
SETUP
OPEN/CLOSE
EJECT
RAPID PLAY
DVD
CM SKIP
MENU LISTTOP MENU
ENTER
PROG.
6
SKIP
FWD
DVD
REC/OTR
2
4
SLOW
PAUS E
Recording Disc Playback EditingBefore you start Connections Getting started
Note
• The remaining recording time will be displayed on the front panel display during One-touch Timer
Recording. Press [DISPLAY] to see it on the TV screen.
• Unlike the timer recording, you can perform the following operations during one-touch timer
recording.
- Turn off the power.
- Use [DVD REC/OTR I] or [STOP C].
• You cannot use the pause function during one-touch timer recording.
• The unit will be turned off automatically under the following conditions.
- No space remains on the disc.
- If a power failure occurs.
• If DVD One-touch Timer Recording is completed during VCR playback or recording, the DVD will be in
stop mode and the VCR keeps the current mode.
• When One-touch Timer Recording is finished and the power is turned off, the unit will switch to the
timer-standby mode automatically if a timer recording has been programmed. Press [T-SET] to cancel
the timer-standby mode to use the unit continuously.
• If you want to monitor the programme that you are recording, make sure the device such as STB is
turned off when it is connected to AV2.
Setup menu
OthersVCR functions
31EN
Changing the
Page 7
Recording
Timer Recording
You can set the unit to record up
to 8 programmes, up to a month
in advance. Daily or weekly
programme recordings are also
available.
• Be sure to set the clock before
entering a timer programming.
Insert a recordable disc or a
tape with a record tab.
1
In stop mode, press
[TIMER PROG.].
Timer Programming list will appear.
Timer Programming
Date Start End CH Mode
1. - - -
2. - - -
DVD
VCR
DVDVCR
2
Select a programme that is not
set using [Cursor K / L], then
press [ENTER].
3
Enter the date using [Cursor
K / L], then press [Cursor B].
Timer Programming
Date Start End CH Mode
1. 01/01 --:-- --:-- P01
2. - - -
Each time you press [Cursor L]
at the current date, the timer
recording date will change as
follows.
e.g., 1st January
01/01
Daily
M-F
(Mon.-Fri.)
W-SAT
W-FRI
W-SUN
31/01
32 EN
DVD
VCR
DVDVCR
4
Enter the time to start and to
end using [Cursor K / L], then
press [Cursor B].
Timer Programming
Date Start End CH Mode
1. 01/01 12:00 --:-- P01
2. - - -
DVD
VCR
DVDVCR
5
Select the channel number to
record using [Cursor K / L],
then press [Cursor B].
Timer Programming
Date Start End CH Mode
1. 01/01 12:00 13:00 P01
2. - - -
DVD
VCR
DVDVCR
To record from the external input,
select “AV1”, “AV2”, or “AV3”.
6
Select the recording media
(“DVD” or “VCR”) using [Cursor
K / L], then press [Cursor B].
Timer Programming
Date Start End CH Mode
1. 01/01 12:00 13:00 P01 DVD
2. - - -
DVD
VCR
DVDVCR
7
Select the recording mode using
[Cursor K / L]. (See page 24.)
Timer Programming
Date Start End CH Mode
1. 01/01 12:00 13:00 P01 DVD XP
2. - - -
DVD
VCR
DVDVCR
8
Press [ENTER] when all information required is entered.
Your programme setting is
stored.
• To set another programme,
repeat steps 2 to 8.
• To exit, press [TIMER PROG.].
• If the recording times of two
or more programmes overlap,
“Overlap” and overlapped
programme numbers are
displayed. (See pages 33-34.)
9
Press [T-SET].
The icon will appear on the
front panel display and the unit
enters to the timer-standby
mode.
DUBBING
TIMER PROG.
VCR
54
SPACE DISPLAY
REC MODE
PLAY
STOP
SETUP
OPEN/CLOSE
EJECT
RAPID PLAY
DVD
CM SKIP
MENU LISTTOP MENU
ENTER
PROG.
6
SKIP
1
8
2
3
4
5
FWD
6
DVD
REC/OTR
7
9
OPERATE
T-SET
ZOOM
RETURN
.@/: ABC DEF
1 2 3
GHI JKL MNO
PQRS TUV WXYZ
708 9
CLEAR/C-RESET
REV
VCR
REC/OTR
8
Note
• If you have not set the clock, the clock setting window will appear
instead of the Timer Programming list. Continue from step 4 in “Clock
Setting” on page 22 before programming the timer.
• Press [Cursor { / B] to move the cursor in the Timer Programming list.
• If a basic recording or One-touch Timer Recording is in progress on
one component (e.g. VCR) and the timer recording set for the other
component (e.g. DVD) is about to begin, the unit automatically
switches to the programmed channel for timer recording 2 minutes
before the programmed starting time, and the recording in progress
(for VCR) will be cancelled UNLESS their recording channels are the
same. If their recording channels are the same, the timer recording
will start without cancelling the recording currently in progress. In this
case, the recording of the same channel will be made on both DVD
and VCR.
• Cancel the timer-standby mode by pressing [T-SET] before operation
for either DVD or VCR. When finished operating, press [T-SET] to
resume the timer-standby mode.
• In the timer-standby mode, you can turn on the power and use the
component (VCR or DVD) which is not currently timer-programmed.
Page 8

Recording
Timer Recording (cont’d)
Checking, cancelling, or correcting the timer
programming information
In the following example, No.
5 timer programming overlaps
on No. 1 and No. 6 timer
programmes. In such a case, you
should correct the programme
time to clear the overlap.
Timer Programming
Date Start End CH Mode
1. 01/01 12:00 13:00 P01 DVD XP
2. - - -
3. - - -
4. - - -
5. 01/01 12:30 14:00 P02 DVD SP
6. 01/01 13:45 21:00 P12 DVD SEP
7. - - -
8. - - -
No.1 6
Overlap
DVD
VCR
DVDVCR
1
Press [T-SET] so that the
icon disappears from the front
panel display.
2
Press [TIMER PROG.].
Timer Programming list will
appear.
Timer Programming
Date Start End CH Mode
1. 01/01 12:00 13:00 P01 DVD XP
2. - - -
3. - - -
4. - - -
5. - - -
6. - - -
7. - - -
8. - - -
DVD
VCR
DVDVCR
3
Check the information on the
list you will need.
4
To clear the timer programming, select the desired programme using [Cursor K / L],
then press [CLEAR/C-RESET].
To correct the timer programming
1) Select the desired programme
using [Cursor K / L], then
press [ENTER].
2) Correct the timer programming
using [Cursor K / L / { / B].
3) Press [ENTER] again.
5
Press [TIMER PROG.] to exit.
6
Press [T-SET] to return to the
timer-standby mode.
To check the timer programming in process
Press [TIMER PROG.].
DUBBING
TIMER PROG.
VCR
54
SPACE DISPLAY
REC MODE
PLAY
STOP
SETUP
OPEN/CLOSE
EJECT
RAPID PLAY
DVD
CM SKIP
MENU LISTTOP MENU
ENTER
PROG.
6
SKIP
FWD
DVD
REC/OTR
1
6
OPERATE
T-SET
ZOOM
RETURN
.@/: ABC DEF
1 2 3
GHI JKL MNO
PQRS TUV WXYZ
708 9
CLEAR/C-RESET
REV
VCR
REC/OTR
Note
• If a timer recording is
proceeding, that programme
is highlighted in red. In such
a case, you cannot select any
other programmes.
• When you check the timer
programming in progress
by pressing [TIMER PROG.]
during operations of the
component (VCR or DVD)
which is not currently used
for the timer recording,
the programme will not be
highlighted. In this case,
you cannot select other
programmings.
2
5
6
4
Recording Disc Playback EditingBefore you start Connections Getting started
To stop the timer recording in progress
Press [STOP C] to stop the disc recording or [STOP C/EJECT A] to
stop the tape recording on the front panel of the unit.
If the timer programming did not complete correctly
The error number appears on the
Timer Programming list.
Timer Programming
Date Start End CH Mode
01/01 12:00 13:00 P01 DVD E1
*
2. - - -
3. - - -
DVD
VCR
DVDVCR
The error programme will be
displayed in grey with an asterisk
and have an error number.
The error programme will be
deleted once you check the error
in the programme list, or once
you cancel the timer-standby
mode and re-enter it.
Press [CLEAR/C-RESET] to erase
the selected programme.
The error numbers indicate:
E1-22
E37-39
E23-24 Unrecordable disc
E25 • Copy prohibited programme
E26-28 Copy prohibited programme
E29 Disc protected
E30 Disc full
E31 Already recorded 99 titles (Video
E32 Already recorded 99 titles (VR
E33
Recording error
• Cannot record because of the
NTSC / PAL-60 signal is received.
mode)
mode)
Already recorded 999 chapters
Note
• [STOP C] on the remote
control is not effective.
E34 No space for Control information
E35 PCA (Power Calibration Area) full
E36
E40 • There are some unrecorded
E41 Power failure
E42 No disc
Already finalised Video format disc
parts due the overlapped timer
programmes.
• Recording did not start at the
start time.
• There is no tape in the cassette
compartment.
• Tape recording reaches to
the tape end during timer
recording.
Setup menu
OthersVCR functions
33EN
Changing the
Page 9

Recording
Timer Recording (cont’d)
Hints for Timer Recording
• If there is a power failure or the unit is unplugged for
more than 1 hour, the clock setting and all timer settings
will be lost.
• If there is no disc or an unrecordable disc in the tray, the
icon will flash and the timer recording will not occur.
Insert a recordable disc.
• If there is no tape or a tape with a record tab is not in
the cassette compartment, the VCR indicator on the
front panel flashes and the timer recording cannot be
performed. Please insert a recordable tape.
• When all timer recordings are complete, the
icon
flashes. To play back or eject the recorded disc, press
[T-SET], and then press [PLAY B] or [OPEN/CLOSE
EJECT A].
• The timer recording cannot be performed in DVD and
VCR at the same time. If you set two programmings with
the same channel and time both in DVD and VCR, the
programming that has priority will be recorded.
Priority of overlapped settings
The unit records programmes according to prior ity if the timer programmes overlap.
If the starting time is same:
• The timer programming set first (PROG. 1) has
priority.
PROG. 1
PROG. 2
Actual
recording
Additional 30 seconds (at the most) are cut o.
PROG. 1
PROG. 2
PROG. 2 recording will start after PROG. 1 recording
is completed.
If programming has been made at the end of
the programming (PROG. 1) currently being
recorded:
• The timer programming set first (PROG. 2) has
priority. PROG. 3 will not be recorded.
PROG. 1
PROG. 2
PROG. 3
Actual
recording
Additional 30 seconds (at the most) are cut o.
PROG. 1 PROG. 2
PROG. 2 recording will start after PROG. 1 recording
is completed.
Note for DVD recording
• If the recording time of two programmes overlap, or the End time of a programme and the Start time of
another is same, the first 30 seconds (at the most) of the subsequent programme are cut off.
If the End time of the programme currently being
recorded and the Start time of the subsequent programme are same:
• If PROG. 1 is a DVD recorded programme, the
beginning of PROG. 2 may be cut off.
* If the cut off time exceeds 1 minute, the error number
“E40” will appear in the Timer Programming list.
• You cannot make any DVD operation during DVD timer
recording.
• You cannot make any VCR operation during VCR timer
recording.
• If the Start and End times are same, the length of the
recording will be set for 24 hours. If the disc or tape
becomes full during recording, the unit will turn itself
off. To continue recording, press [T-SET] to cancel the
timer-standby mode, insert a recordable disc or tape and
press [T-SET] again.
• If two or more programmes overlap, “Overlap” and the
overlapped programme number will appear on the
display.
• If the Start time is earlier and the End time is later than
the current time, the recording will start immediately
after you press [T-SET].
• If a videotape ends during the timer recording, the unit
will automatically stop, eject the videotape, and turn
itself off. To continue recording, insert a recordable tape.
If the recording time is partially overlapped:
• The timer programming with the earlier start
time (PROG. 2) has priority. PROG. 1 will start after
PROG. 2 recording is completed.
PROG. 1
PROG. 2
Actual
recording
Additional 30 seconds (at the most) are cut o.
PROG. 2 PROG. 1
If the recording time entirely overlaps:
• The shorter timer programming (PROG. 1) is not
recorded.
PROG. 1
PROG. 2
Actual
recording
PROG. 1
PROG. 2
Actual
recording
The rst 30 seconds (at the most) are cut o.*
PROG. 2
PROG. 2PROG. 1
34 EN
Page 10

You can set the unit to start
recording whenever it detects
the video signal from the external
tuner.
Preparing for the Satellite Link
Timer Recording:
Preparation on the tuner
• The external tuner should be
equipped with some kind of
timer function. Using timer
function of the tuner, set it to
be turned on when it comes
to the time you want to start
recording, and off when it
comes to the time you want to
finish recording. (Refer to the
tuner’s manual on how to set
the timer.)
• Make sure to turn the power off
when you finish setting.
Preparation on this unit
• Make sure to select the desired
Recording mode beforehand.
External tuner
(commercially available)
Scart cable (commercially available)
DVD/VCR DVD ANTENNA
S-VIDEO
AUDIO
DIGITAL
AV2 (DECODER)
COMPONENT
VIDEO OUT
OUT
OUT
AUDIO OUT
Y
IN
P
B
L
/C
B
COAXIAL
AV1 (TV)
P
R
R
/C
R
OUT
1
In stop mode, press [SETUP].
2
Select “Recording” using
[Cursor K / L], then press
[ENTER].
Recording
Auto Chapter
Recording Audio Select (XP)
Auto Finalise
Satellite Link
Bilingual Recording Audio
External Input Audio
Dubbing Mode
DVD
10 minutes
Dolby Digital
OFF
Main
Stereo
VCR DVD
Recording
Satellite Link
3
Select “Satellite Link” using
[Cursor K / L], then press
[ENTER].
Setting menu will appear.
Satellite Link
DVD
Start Mode
VCR
17:30 DVD SP
To Standby Mode
DVDVCR
4
Select the time, media and
recording mode using [Cursor
K / L], then press [ENTER].
5
Set the desired start time
using [Cursor K / L], then press
[Cursor B].
• The hour can be selected
among 0-23.
• Repeat procedures in step 5 to
set the desired minutes.
• If you wish to go back to the
left, press [Cursor {].
6
Select the recording media
using [Cursor K / L], then press
[Cursor B].
7
Select the recording mode
using [Cursor K / L].
See page 24 for details.
8
Press [ENTER].
“To Standby Mode” is highlighted.
Satellite Link
DVD
Start Mode
VCR
17:30 DVD SP
To Standby Mode
DVDVCR
9
Press [ENTER] again.
In a second, the unit will be
turned off automatically as
it goes into the Satellite Link
standby mode.
• Until the time you set in “Start”,
the clock will appear on the
front panel.
• “Sat” will appear on the front
panel display at the start time.
To cancel the Satellite Link
function while in the Satellite
Link standby mode:
Press [T-SET] to turn on the unit.
To cancel the Satellite Link
function while the Satellite Link
Recording is in progress:
Press [STOP C] on the front panel
of the unit.
DUBBING
TIMER PROG.
VCR
54
SPACE DISPLAY
AUDIOREPEAT
REC MODE
PLAY
STOP
SEARCH
SETUP
OPEN/CLOSE
EJECT
RAPID PLAY
DVD
CM SKIP
MENU LISTTOP MENU
ENTER
1
2
PROG.
6
SKIP
FWD
DVD
REC/OTR
SLOW
PAUS E
3
4
5
6
7
8
9
OPERATE
T-SET
ZOOM
RETURN
.@/: ABC DEF
1 2 3
GHI JKL MNO
PQRS TUV WXYZ
708 9
CLEAR/C-RESET
REV
VCR
REC/OTR
9
Recording Disc Playback EditingBefore you start Connections Getting started
Changing the
Setup menu
VCR/DVD RECORDER
COMBINATION
NB203ED
OthersVCR functions
35EN
Page 11

Recording
Satellite Link (cont’d)
Note
• If you have not set the clock, the clock setting window will appear at step 3. Follow to step 4 in “Clock
Setting” on page 22.
• You cannot set the End time for the Satellite Link Timer Recording on this unit.
• Recording picture will be distorted if the copy protection signal is being detected during Satellite Link
Timer Recording.
• When a regular Timer Recording and the Satellite Link Timer Recording are overlapped, those
recordings are recorded as illustrated below.
Example 1
Timer
Recording
Satellite Link
Actual
Recording
Timer
Recording
Satellite Link
Actual
Recording
Settings for external equipment
Connection to external equipment
Connect the external equipment
using either the input terminals,
AV1, AV2, (Rear) or AV3 (Front).
However, for AV3 jacks, you
have to select S-INPUT or VIDEO
input jacks depending on the
connected devices.
Use a commercially available
Scart, S-Video or Video cable
and an Audio cable for this
connection.
3
Select “Select Video” using
[Cursor K / L], then press
[ENTER].
1
In stop mode, press [SETUP].
2
Select “Required Setting”
using [Cursor K / L], then press
[ENTER].
Required Setting
Select Video
TV Aspect
DVDVCR
Video In
4:3 Letter Box
4
Select the input jack type to be
used using [Cursor K / L], then
press [ENTER].
• If you want to use VIDEO input
jack (Composite), select “Video
In”.
• If you want to use S-INPUT jack,
select “S-Video In”.
Example 2
Select Video - AV3 (Front
Video In
S-Video In
Example 3
Timer
Recording
Satellite Link
Actual
Recording
OPERATE
T-SET
ZOOM
)
DVDVCR
RETURN
.@/: ABC DEF
1 2 3
GHI JKL MNO
PQRS TUV WXYZ
708 9
CLEAR/C-RESET
REV
VCR
REC/OTR
SETUP
DUBBING
TIMER PROG.
REC MODE
VCR
DVD
6
54
SPACE DISPLAY
PLAY
STOP
AUDIOREPEAT
SEARCH
VCR/DVD RECORDER
COMBINATION
NB203ED
OPEN/CLOSE
EJECT
RAPID PLAY
CM SKIP
MENU LISTTOP MENU
ENTER
FWD
DVD
REC/OTR
SLOW
PAUS E
PROG.
SKIP
1
5
2
3
4
36 EN
5
Press [SETUP] to exit.
Page 12
Settings for external equipment (cont’d)
Recording from external equipment
3
Select the external input mode
Before recording from external
equipment, see page 15 for
connection instructions.
1
Press [ OPERATE] to turn on
the unit.
Turn on the TV and be sure to
select the input to which the unit
is connected.
2
When you want to record to a
tape:
VCR
DVD
123
6
54
89
7
+10
0
PLAY
STOP
Press first.
VCR/DVD COMBINATION
NA527AD
Insert the tape with a record
tab into the cassette compartment.
When you want to record to
the disc:
VCR
DVD
123
6
54
89
7
+10
0
PLAY
STOP
Press first.
VCR/DVD COMBINATION
NA527AD
Press [OPEN/CLOSE EJECT A] to
open the disc tray, then place
the disc to record on.
Press [OPEN/CLOSE EJECT A]
again to close the disc tray.
to which the external equipment is connected. (AV1, AV2,
or AV3)
To use the Scart terminal or
input jacks on the rear of this
unit;
To select the “AV1”, or “AV2”,
press [0], [0], [1] or [0], [0], [2]
accordingly or use [PROG. / ].
To use the input jacks on the
front of this unit;
To select “AV3”, press [0], [0], [3]
or use [PROG. / ].
4
Select a recording mode using
[REC MODE]. (See page 24.)
5
Press [REC/OTR] (VCR or DVD)
on the unit to start recording.
6
Press the PLAY button on the
external recording component.
7
For tape:
Press [STOP C/EJECT A] on the
unit to stop recording.
For disc:
Press [STOP C] on the unit to
stop recording.
Recording
1
3
OPERATE
T-SET
ZOOM
RETURN
.@/: ABC DEF
1 2 3
GHI JKL MNO
PQRS TUV WXYZ
708 9
CLEAR/C-RESET
REV
VCR
REC/OTR
SETUP
DUBBING
TIMER PROG.
REC MODE
VCR
DVD
6
54
SPACE DISPLAY
PLAY
STOP
AUDIOREPEAT
SEARCH
VCR/DVD RECORDER
COMBINATION
NB203ED
OPEN/CLOSE
EJECT
RAPID PLAY
CM SKIP
MENU LISTTOP MENU
ENTER
FWD
DVD
REC/OTR
SLOW
PAUSE
PROG.
SKIP
Note
• During recording, if a signal
other than PAL is detected
(such as NTSC), recording is
paused.
• If you want to monitor the
programme that you are
recording, make sure the
device such as Satellite
Box is turned off when it is
connected to AV2.
2
4
Recording Disc Playback EditingBefore you start Connections Getting started
Setup menu
Changing the
OthersVCR functions
37EN
Page 13
You can copy a DVD disc to a
videotape or copy a videotape to
a DVD disc. This function will be
available only if the DVD disc or
the tape is not copy protected.
Before starting this function,
prepare for the recording on the
DVD-RW/-R disc or the videotape.
See pages 24-25, 87.
Note for recording to a tape:
• The tape's record tab is intact.
• The videotape is long enough
to record the DVD disc.
Note for recording to a disc:
• The DVD disc is satisfied with
the recording status.
See pages 24-25.
Insert a disc and a tape with a
record tab.
Recording
Dubbing Mode
2
Select “Recording” using
[Cursor K / L], then press
[ENTER].
Recording menu will appear.
Recording
Auto Chapter
Recording Audio Select (XP)
Auto Finalise
Satellite Link
Bilingual Recording Audio
External Input Audio
Dubbing Mode
DVD
10 minutes
Dolby Digital
OFF
Main
Stereo
VCR DVD
3
Select “Dubbing Mode” using
[Cursor K / L], then press
[ENTER].
Option window will appear.
Dubbing Mode
VCR DVD
DVD VCR
VCR DVD
OPERATE
DUBBING
T-SET
TIMER PROG.
VCR
ZOOM
RETURN
.@/: ABC DEF
1 2 3
GHI JKL MNO
54
PQRS TUV WXYZ
708 9
SPACE DISPLAY
CLEAR/C-RESET
REV
VCR
REC/OTR
AUDIOREPEAT
VCR/DVD RECORDER
COMBINATION
NB203ED
REC MODE
PLAY
STOP
SETUP
DVD
SEARCH
6
OPEN/CLOSE
EJECT
RAPID PLAY
CM SKIP
MENU LISTTOP MENU
ENTER
FWD
DVD
REC/OTR
SLOW
PAUS E
PROG.
1
2
3
SKIP
1
In stop mode, press [SETUP].
Note for VCR to DVD duplication:
• After starting VCR to DVD duplication, the picture may be distorted because of the auto tracking
function. This is not a malfunction. Be advised to play back the tape until the picture is stabilized, then
set the starting point which you wish to start recording, and start VCR to DVD duplication.
• This unit will automatically stop the duplication if playback with no image detected for more than 3
minutes during VCR to DVD duplication.
• If the playback sound mode of VCR is set to “STEREO”, “LEFT” or “RIGHT”, the sound mode upon dubbing
is automatically switched to “STEREO”. If the playback sound mode is set to “MONO”, the sound mode
upon dubbing is also “MONO”.
• If you set “External Input Audio” to “Stereo”, the sound is recorded in “Stereo” (both Video mode and VR
mode).
• While in video mode, if you set “External Input Audio” to “Bilingual”, the audio set in “Bilingual
Recording Audio” mode is recorded. While in VR mode, if you set “External Input Audio” to “Bilingual”,
bilingual audio is recorded.
• The main and sub audio will be simultaneously recorded (VR mode). You can select audio modes during
playback.
38 EN
Page 14
Recording
Dubbing Mode (cont’d)
VCR to DVD
4
Select “VCR DVD” using
[Cursor K / L], then press
[ENTER].
Dubbing Mode
VCR DVD
DVD VCR
VCR DVD
5
Press [SETUP] to exit.
VCR
DVD
123
6
54
89
7
+10
0
PLAY
STOP
Press first.
VCR/DVD COMBINATION
NA527AD
Press [PLAY B](VCR) on the
unit, and then press [PAUSE F]
at the point you wish to start
recording.
6
VCR
DVD
123
6
54
89
7
+10
0
PLAY
STOP
Press first.
VCR/DVD COMBINATION
NA527AD
Make sure to select a recording
mode using [REC MODE]. (See
page 24.)
7
Press [DUBBING].
VCR to DVD duplication will start.
8
Press [STOP C] to stop the
recording.
DVD to VCR
4
Select “DVD VCR” using
[Cursor K / L], then press
[ENTER].
Dubbing Mode
VCR DVD
DVD VCR
VCR DVD
5
Press [SETUP] to exit.
VCR
DVD
123
6
54
89
7
+10
0
PLAY
STOP
Press first.
VCR/DVD COMBINATION
NA527AD
Press [PLAY B](DVD) on the
unit, and then press [PAUSE F]
at the point you wish to start
recording.
6
VCR
DVD
123
6
54
89
7
+10
0
PLAY
STOP
Press first.
VCR/DVD COMBINATION
NA527AD
Make sure to select a recording
mode using [REC MODE]. (See
page 87.)
7
Press [DUBBING].
DVD to VCR duplication will start.
8
Press [STOP C] to stop the
recording.
DUBBING
TIMER PROG.
VCR
54
SPACE DISPLAY
AUDIOREPEAT
REC MODE
PLAY
STOP
SETUP
DVD
SEARCH
6
OPEN/CLOSE
EJECT
RAPID PLAY
CM SKIP
MENU LISTTOP MENU
ENTER
FWD
DVD
REC/OTR
SLOW
PAUS E
PROG.
5
6
4
SKIP
7
8
OPERATE
T-SET
ZOOM
RETURN
.@/: ABC DEF
1 2 3
GHI JKL MNO
PQRS TUV WXYZ
708 9
CLEAR/C-RESET
REV
VCR
REC/OTR
5
VCR/DVD RECORDER
COMBINATION
NB203ED
Note
• When you turn off the unit
after setting the Dubbing
Mode to ,
the setting will be set to
automatically.
• Dubbing Mode is available
only if the tape or disc is not
copy protected.
• You cannot change the output
mode during VCR to DVD or
DVD to VCR duplication.
• If you want to watch the
duplicated material, after the
VCR to DVD duplication, press
[DVD] first then press [PLAY B].
• If you want to watch the
duplicated material, after the
DVD to VCR duplication, press
[VCR] first then press [PLAY B].
Recording Disc Playback EditingBefore you start Connections Getting started
Changing the
Setup menu
OthersVCR functions
39EN
Page 15

Recording
Setting a disc to protect
To prevent accidental overrecording, editing or erasing of
recordings, you can protect them
using the Setup menu.
Insert a recordable disc.
1
In stop mode, press [SETUP].
2
Select “Disc” using [Cursor
K / L], then press [ENTER].
Disc
Format
Finalise
Disc Protect OFF ON
3
Select “Disc Protect OFF ➔ ON”
using [Cursor K / L], then press
[ENTER].
Disc Protect OFF ON
Yes
No
4
Select “Yes” using [Cursor
K / L], then press [ENTER].
The disc is protected.
5
Press [SETUP] to exit.
DUBBING
TIMER PROG.
VCR
SETUP
REC MODE
DVD
OPEN/CLOSE
EJECT
RAPID PLAY
CM SKIP
MENU LISTTOP MENU
ENTER
1
5
OPERATE
T-SET
ZOOM
RETURN
Note
• The Disc Protect setting is
available only when a disc
recorded in VR mode is inserted.
• You can select only “Disc
Protect ON ➔ OFF” when a
protected disc is inserted.
To cancel the disc protect:
• Select “Disc Protect ON ➔ OFF”
at step 3, then select “Yes”.
• If you insert a disc protected
with this unit, “Disc Protect
ON ➔ OFF” will appear instead
of “OFF ➔ ON”.
Disc Protect ON OFF
Yes
No
2
3
4
You will need to finalise discs to
play them back in other players.
Finalising may take from several
minutes up to an hour. (A disc
recorded in Video mode can take
up to 15 minutes. A disc recorded
in VR mode can take up to 60
minutes.)
A shorter recording period on
the disc will require a longer time
period for finalisation. Do not
unplug the mains cable during
finalisation.
Insert a recordable disc before
finalising.
1
In stop mode, press [SETUP].
2
Select “Disc” using [Cursor
K / L], then press [ENTER].
Disc
Format
Finalise
Disc Protect OFF ON
Finalising discs
3
Select “Finalise” using [Cursor
K / L], then press [ENTER].
Finalise
Yes
No
4
Select “Yes” using [Cursor
K / L], then press [ENTER].
Finalising will start.
Finalising 90%
5
Finalising is completed.
Finalising 100%
OPERATE
DUBBING
T-SET
TIMER PROG.
VCR
ZOOM
RETURN
.@/: ABC DEF
1 2 3
GHI JKL MNO
54
PQRS TUV WXYZ
708 9
SPACE DISPLAY
CLEAR/C-RESET
REV
VCR
REC/OTR
AUDIOREPEAT
VCR/DVD RECORDER
COMBINATION
PLAY
NB203ED
REC MODE
STOP
SEARCH
SETUP
OPEN/CLOSE
EJECT
RAPID PLAY
DVD
CM SKIP
MENU LISTTOP MENU
ENTER
1
2
PROG.
6
SKIP
FWD
DVD
REC/OTR
SLOW
PAUS E
3
4
40 EN
Page 16

Recording
Finalising discs (cont’d)
XXXX (cont’d)
To cancel finalising... (DVD-RW only)
Press [STOP C] during the finalising is in progress. Select “Yes” using
[Cursor { / B] then press [ENTER]. Finalising is cancelled and the unit
switches to stop mode.
appears when [STOP C] is pressed, you cannot cancel finalising
If
Do you want to cancel ?
Yes No
because the finalising has already reached at a critical point in its process.
If “No” is selected and [ENTER] or [RETURN ] is pressed, finalising is
continued.
You cannot cancel finalising a DVD-R disc once it has started.
Finalising 5%
Note
• Finalising a disc in Video mode automatically creates a Title menu.
• You can use the unit to record or edit a disc recorded in VR mode even after it is finalised. After you
finalise a disc recorded in Video mode, you cannot edit or record anything else on that disc.
• To release the finalisation of the DVD-RW disc, select “Undo Finalise” at step 3.
• If you insert a DVD-RW disc finalised with this unit, “Undo Finalise” will
appear instead of “Finalise”.
• DO NOT power off during finalising. This may result in a malfunction.
Disc
Format
Undo Finalise
Disc Protect OFF ON
Auto finalise
SETUP
DUBBING
TIMER PROG.
REC MODE
VCR
DVD
6
54
SPACE DISPLAY
PLAY
STOP
AUDIOREPEAT
SEARCH
VCR/DVD RECORDER
COMBINATION
NB203ED
OPEN/CLOSE
EJECT
RAPID PLAY
CM SKIP
MENU LISTTOP MENU
ENTER
FWD
DVD
REC/OTR
SLOW
PAUS E
PROG.
SKIP
You can finalise discs
automatically when the disc
space runs out if you set this in
the Setup menu.
1
In stop mode, press [SETUP].
2
Select “Recording” using
[Cursor K / L], then press
[ENTER].
Recording
Auto Chapter
Recording Audio Select (XP)
Auto Finalise
Satellite Link
Bilingual Recording Audio
External Input Audio
Dubbing Mode
DVD
10 minutes
Dolby Digital
OFF
Main
Stereo
VCR DVD
3
Select “Auto Finalise” using
[Cursor K / L], then press
[ENTER].
Auto Finalise - Disc Full
ON
OFF
DVD
4
Select “ON” using [Cursor
K / L], then press [ENTER].
5
Press [SETUP] to exit.
OPERATE
T-SET
ZOOM
RETURN
.@/: ABC DEF
1 2 3
GHI JKL MNO
PQRS TUV WXYZ
708 9
CLEAR/C-RESET
REV
VCR
REC/OTR
Recording Disc Playback EditingBefore you start Connections Getting started
1
5
2
3
4
Setup menu
Changing the
Note
• Auto finalise function is not
available for discs formatted
in VR mode.
OthersVCR functions
41EN
Page 17

Disc Playback
Information on playing back DVDs
Read the following information before you play
back a DVD.
Playable discs
You can play back all the discs listed on the right.
Before attempting to play back a DVD, make sure
it meets the requirements for Region Codes and
Colour Systems as described in this section. Discs
that bear any of the logos shown below will be
played back correctly in this unit. Other disc types
are not guaranteed to be played back.
Colour systems
Disc Logo
DVD-Video
DVD-RW
(VIDEO / VR mode,
DivX® les)
DVD-R
(VIDEO mode,
DivX® les)
DVDs are recorded using different colour systems
throughout the world. The most common colour
system, used primarily in the U.K. and other EU
countries, is PAL. This unit uses the PAL system.
However, it is also possible to play back DVDs
using other colour systems, such as NTSC.
Region codes
This unit has been designed to play back DVDs
for Region Two (2). It is only possible to play back
DVDs in this unit that are labelled for Region 2 or
for ALL regions. You cannot play back DVDs that
are labelled for other regions. Look for DVDs that
bear either of the symbols shown below. If these
region symbols do not appear on your DVD, you
cannot play back the DVD in this unit.
2
The number inside the globe refers to region of the
world.
A DVD labelled for a specific region can only be
played back in the unit with the same region code.
ALL
Playing back on DivX® file
The unit performs Official DivX® Certified product;
Plays all versions of DivX® video (including DivX®6 )
with standard playback of DivX® media files.
Discs containing the DivX® files with the DivX®
GMC (Global Motion Compensation) playback
feature, which is DivX® supplemental function,
cannot be played back on this unit.
DVD+RW*
DVD+R*
DVD-RAM
(Only the disc with
removable cartridge
can be used.)
CD-DA (AUDIO CD)
VCD (VIDEO CD) /
SVCD
CD-RW
(CD-DA FORMAT,
MP3, JPEG,
DivX® les)
CD-R
(CD-DA FORMAT,
MP3, JPEG,
DivX® les)
Kodak Picture CD
* There may be a disc which cannot be used or
played back.
DIGITAL VIDEO
42 EN
Page 18

Disc Playback
Basic playback
Hint for DVD playback
The contents of a DVD are
generally divided into titles.
Titles are sometimes further
subdivided into chapters.
Playing back a DVD-RW / DVD-R / DVD+RW / DVD+R
disc
Start Rec. Stop/Start Stop Rec.
Title 1 Title 2
Chapter 1 Chapter 1Chapter 2 Chapter 3 Chapter 2
VCR
DVD
123
6
54
7
89
+10
0
PLAY
STOP
Press first.
VCR/DVD COMBINATION
NA527AD
1
Press [ OPERATE] to turn on
the unit.
Turn on the TV and be sure to
select the input to which the unit
is connected.
2
Press [OPEN/CLOSE EJECT A] to
open the disc tray.
3
Place the disc on the disc tray
with its label facing up. Be sure
to align the disc with the disc
tray guide.
Disc
tray
guide
4
Press [OPEN/CLOSE EJECT A] to
close the disc tray.
5
Press [TOP MENU] to display
the Title menu.
You can switch between the
“Original” and “Playlist” in the VR
mode using [MENU LIST].
<e.g. DVD-RW VR mode Playlist>
Playlist
1 2 3
15/04/06 19:00 P12 XP
4 5 6
6
Select the desired title using
[Cursor K / L / { / B], then
press [ENTER].
Pop-up window will appear.
Playlist
Play
Edit
15/04/06 19:00 P12 XP
4 5 6
2 3
7
Select “Play” using [Cursor
K / L], then press [ENTER].
Playback will start.
8
Press [STOP C] to stop playback.
To eject the disc, press
[OPEN/CLOSE EJECT A] to open
the disc tray, then remove the disc.
Press [OPEN/CLOSE EJECT A] to
close the disc tray before turning
off the unit.
SETUP
DUBBING
TIMER PROG.
REC MODE
VCR
DVD
6
54
SPACE DISPLAY
PLAY
STOP
AUDIOREPEAT
SEARCH
VCR/DVD RECORDER
COMBINATION
NB203ED
OPEN/CLOSE
EJECT
RAPID PLAY
CM SKIP
MENU LISTTOP MENU
ENTER
FWD
DVD
REC/OTR
SLOW
PAUS E
PROG.
SKIP
1
5
OPERATE
T-SET
ZOOM
RETURN
.@/: ABC DEF
1 2 3
GHI JKL MNO
PQRS TUV WXYZ
708 9
CLEAR/C-RESET
REV
VCR
REC/OTR
Note
• For DVD-RW (Video mode)
and DVD-R (Video mode) discs
that are already finalised,
a title list will be displayed
instead of thumbnails.
• If you insert a DVD-RW
recorded in VR mode and it
has a Playlist, the Playlist is
displayed.
• You can resume playback
from where you stopped
playing back the disc (Resume
playback). See page 49 for
details.
• You can also start playback by
pressing [PLAY B] instead of
[ENTER] at step 6.
• Some discs may start playback
automatically.
2
4
8
Recording Disc Playback EditingBefore you start Connections Getting started
6
7
8
Setup menu
OthersVCR functions
Changing the
43EN
Page 19

Disc Playback
Basic playback (cont’d)
Playing back a DVD-Video / CD / Video CD
If you are playing back a DVD-
VCR
DVD
123
6
54
89
7
+10
0
PLAY
STOP
Press first.
VCR/DVD COMBINATION
NA527AD
Video or a Video CD, a menu may
appear.
See pages 47-48 for details.
1
Follow the steps 1 to 4 in
“Playing back a DVD-RW / DVDR / DVD+RW / DVD+R disc” on
page 43.
3
Press [STOP C] to stop playback.
2
Press [PLAY B] to start playback.
Playback will start.
Playing back an MP3 / JPEG
.@/: ABC DEF
1 2 3
GHI JKL MNO
54
PQRS TUV WXYZ
708 9
CLEAR/C-RESET
SPACE DISPLAY
REV
VCR
REC/OTR
AUDIOREPEAT
PLAY
STOP
SEARCH
PROG.
6
SKIP
FWD
REC/OTR
SLOW
PAUS E
DVD
2
3
VCR
DVD
123
6
54
89
7
+10
0
PLAY
STOP
Press first.
VCR/DVD COMBINATION
NA527AD
1
Follow the steps 1 to 4 in
“Playing back a DVD-RW / DVDR / DVD+RW / DVD+R disc” on
page 43.
The File List will appear.
• If you are in stop mode, press [TOP
MENU] to display the File List.
File List
disc name
folder name 1
folder name 2
folder name 3
folder name 4
3
1 file name 1
3
2 file name 2
3 file name 1
4 file name 2
1/2
To exit the File List , press
[TOP MENU] again or press
[STOP C].
2
Press [Cursor K / L] to select
the desired folder (group) or
file (track), then press [ENTER].
If a file is selected:
Playback will start.
If a folder is selected:
The files in the folder will appear.
Press [Cursor K / L] to select the
track or folder you want, then
press [ENTER].
• Press [PLAY B], [ENTER] or
[Cursor B] to move to any
lower folders.
• Press [Cursor s] or
[RETURN ] to move back to
the folder above.
44 EN
Hints for MP3 / JPEG files:
• Folders are known as Groups,
files are known as Tracks.
• Folders are shown with the
icon.
• MP3 files are shown with the 3
icon.
Playback will start from the
selected track and continue
with each one after.
• JPEG files are shown with the
icon.
• The unit can recognise up to
255 groups (or folders) and up
to 999 tracks.
• The name of each folder and file
can be displayed using up to 29
characters.
Unrecognisable characters are
replaced with asterisks.
• Unplayable groups and tracks
may be displayed depending on
the recording conditions.
• For MP3 file recorded in Variable
Bit Rate (VBR), the unit may not
display the actual elapsed time.
• If there are no files in the folder,
“No Files” is displayed.
• High resolution or large-size
JPEG files take a few moments
to be displayed.
• It is not possible to play back
progressive JPEGs (JPEG files
saved in progressive format) on
this unit.
• It is not possible to play back
JPEG files of 12MB or more.
It is recommended that files to
be played back in this unit are
recorded under the following
specifications:
[MP3]
• Sampling frequency: 44.1kHz or
48kHz
• Constant Bit Rate: 112kbps to
320kbps
[JPEG] Size of picture
• Upper limit: 6300 x 5100dots
• Lower limit: 32 x 32dots
• Capacity limit: less than 12MB
VCR
DVD
54
SPACE DISPLAY
PLAY
STOP
CM SKIP
MENU LISTTOP MENU
ENTER
PROG.
6
SKIP
FWD
DVD
REC/OTR
2
1
ZOOM
RETURN
.@/: ABC DEF
1 2 3
GHI JKL MNO
PQRS TUV WXYZ
708 9
CLEAR/C-RESET
REV
VCR
REC/OTR
Note
• MP3 files cannot be recorded
as digital sound using an MD
or DAT deck.
• Files with extensions other
than “.mp3 (MP3)” or “.jpg /
.jpeg (JPEG)” will not be listed
in the File List.
• Some folders or tracks
listed in the File List may
be unplayable due to their
recording status.
• The File List displays only up
to 8 folder and file names.
Page 20

Disc Playback
Basic playback (cont’d)
Kodak Picture CD
The Picture CD is a service to
convert photographs taken by
a conventional film camera into
digital data and write the data
on a CD. You can enjoy picture
images on the TV set by playing
back the Picture CDs.
For details of Kodak Picture CD,
contact a shop that provides
developing service of Kodak Inc.
VCR
DVD
123
6
54
7
89
+10
0
PLAY
STOP
Press first.
VCR/DVD COMBINATION
NA527AD
1 Press [TOP MENU].
Picture CD
1 2 3
4 5 6
• To exit the Picture CD
thumbnail List, press
[TOP MENU] again or press
[STOP C].
Arrow icons mean the title list
includes a next or previous
page. Press [Cursor
{/B] in
the direction of the icon you
wish to follow. You can also
2 Press [Cursor K / L / { / B]
to select a desired track to be
played back, then press
[PLAY B] or [ENTER].
An image will be played back
from the selected track and go
to the next one in turn.
3 Press [STOP C] to stop
playback.
quick review the six thumbnails
at once between the first and
last pages by pressing
[SKIP H / G].
Notes on JPEG and Kodak Picture CD:
After track is displayed for 5 seconds or 10 seconds (set in the “Slide
Show”) the display moves to the next track.
During JPEG or Kodak Picture CD playback, press [Cursor B]
or [Cursor {] to rotate a picture 90 degrees clockwise or
counterclockwise respectively.
(Not available when the display menu appears.)
Recording Disc Playback EditingBefore you start Connections Getting started
Playing back a DivX®
VCR
DVD
123
6
54
89
7
+10
0
PLAY
STOP
Press first.
VCR/DVD COMBINATION
NA527AD
1
Follow the steps 1 to 4 in
“Playing back a DVD-RW / DVDR / DVD+RW / DVD+R disc” on
page 43.
The File List will appear.
File List
disc name
folder name 1
folder name 2
folder name 3
folder name 4
1 file name 1
2 file name 2
3 file name 3
4 file name 4
5 file name 5
To exit the File List, press
[TOP MENU] again or press
[STOP C].
1/2
2
Press [Cursor K / L] to select
the desired folder (group) or
file (track), then press [ENTER].
If a file is selected:
Playback will start.
If a folder is selected:
The files in the folder will appear.
Press [Cursor K / L] to select the
track or folder you want, then
press [ENTER].
• Press [PLAY B], [ENTER] or
[Cursor B] to move to any
lower folders.
• Press [Cursor {] or
[RETURN ] to move back to
the folder above.
1
OPERATE
DUBBING
T-SET
TIMER PROG.
VCR
ZOOM
RETURN
.@/: ABC DEF
1 2 3
GHI JKL MNO
54
PQRS TUV WXYZ
708 9
SPACE DISPLAY
CLEAR/C-RESET
REV
VCR
REC/OTR
AUDIOREPEAT
VCR/DVD RECORDER
COMBINATION
NB203ED
REC MODE
PLAY
STOP
SETUP
DVD
SEARCH
6
OPEN/CLOSE
EJECT
RAPID PLAY
CM SKIP
MENU LISTTOP MENU
ENTER
FWD
DVD
REC/OTR
SLOW
PAUS E
PROG.
2
Changing the
Setup menu
SKIP
OthersVCR functions
45EN
Page 21

Disc Playback
Basic playback (cont’d)
It is recommended that files to be played back in
this unit are recorded under the following specifications:
[DivX®]
• Official DivX® Certified product
• Plays all versions of DivX® video (including DivX®6 )
with standard playback of DivX® media files
• Maximum size of image : 720 x 480 @30fps
720 x 576 @25fps
• Sampling frequency of audio: 8kHz-48kHz
• Audio type : MPEG1 audio layer 3 (MP3),
MPEG1 audio layer 2,
Dolby Digital
Hint for the purchased or rental Official DivX®
Certified product
• When you purchased or rental a DivX® file
through the DivX® Video-On-Demand (VOD)
services, a registration code is required every time
you get the new file from the DivX® VOD services.
Refer to “DivX® VOD” on page 59.
• Some DivX® VOD files are restricted with the
limited playable times (you cannot play them
back beyond the limit). If your DivX® VOD file has
such limit, the playback confirmation screen will
appear.
Use [Cursor { / B] to select “YES” if you want
to play back the file, or to select “NO” if you do
not wish to play it back. Then, press [ENTER] to
confirm the selection.
DivX® VOD RENTAL
This rental has O views left.
Do you want to use one
of your O views now?
YES NO
• You cannot play back the DivX® VOD files, of
which rental period has been expired. In such
case, press [TOP MENU] and select other files
that can be played back.
RENTAL EXPIRED
This rental is expired.
Please push ‘TOP MENU’.
Hint
• DivX® is a codec (compression/decompression)
that can compress images to a very small amount
of data. The software can compress video data
from almost any sources to the size that can be
sent on the Internet without compromising visual
quality of the images.
• A file with an extension of “.avi” and “.divx”
is called an DivX® file. All files with the “.avi”
extension are recognised as MPEG4.
• Files whose extension other than “.avi” and “.divx”
will not be listed on the DivX® menu. However,
unplayable groups or tracks may be displayed,
depending on the recording conditions.
• Even if the file has an extension of either “.avi”
and “.divx”, this unit cannot play it back if it is
recorded in the format other than DivX®.
• Folders are known as Groups; files are known as tracks.
• A symbol of is shown on the top of the file name.
• A maximum of 255 folders or 999 files may be
recognised in one disc.
• Up to 8 hierarchies can be recognised in one
folder. Files in the 9th or deeper hierarchies
cannot be played back.
• If the track extends beyond the scope of screen, a
down arrow “L” appears, indicating that the user
can view another part on the previous page. The
current page number and the number of total pages
are shown on the right of the down arrow “L”.
• The name of group and track can be displayed up
to 29 characters. Unrecognisable characters will
be replaced with asterisks.
• You can play back the disc recorded in multisession.
• Playback will be paused if the File List is displayed
during the playback.
• It may take a while for audio and images to be
output after you inserted a disc and pressed
[PLAY B].
• When playing back the files recorded in high bit
rates, the images can be interrupted in some
occasions.
• Although DivX® logo has been obtained for this
unit, it may not be able to play back some data,
depending on the characteristics, bit rates, or
audio format settings, etc.
• Use the software recognised by the DivX, Inc.
when you make DivX® files.
• A DivX® file whose file size exceeds 2GB cannot
be played back.
• When using tools or utilities to make up DivX®
files, read their instruction manual beforehand.
• Never use the MPEG4 tools when you make
DivX® files. Otherwise, noise or disturbance of the
picture and sound may be generated.
• If a large-sized DivX® file is selected, it may take
a while to start the playback (over 20 seconds
sometimes).
46 EN
Page 22

Disc Playback
Basic playback (cont’d)
Hint
• If DivX® files written on CD discs cannot be played
back, rewrite them on a DVD disc and try to play
back.
• For more information for DivX®, please visit
http://www.divx.com.
• If you insert a CD-RW/-R with DivX® files that are
mixed with MP3 and JPEG files, the Playback
Media Selection screen will be displayed. Please
select “Video” and proceed to next step.
Please select the media
to play back.
Video
Audio & Picture
Playing back discs using the Disc menu
• Press [MENU LIST] to call up the Playback Media
Selection screen in stop mode.
• If you select “Audio & Picture”, instead of “Video”
on the Playback Media Selection screen, this unit
can play back MP3 / JPEG files.
• You cannot play back the DivX® VOD files
obtained with different registration codes on this
unit. Press [TOP MENU] and select other files that
can be played back.
AUTHORIZATION ERROR
This player is not authorized to
play this video.
Please push ‘TOP MENU’.
Recording Disc Playback EditingBefore you start Connections Getting started
A DVD contains a disc menu,
which lists the contents and
enables you to customize
playback. The menu may offer
choices for subtitle languages,
special features, and chapter
selection. Usually this information
appears automatically when you
start playback, but sometimes
you need to press [MENU LIST]
to display the menu.
VCR
DVD
123
6
54
89
7
+10
0
PLAY
STOP
Press first.
VCR/DVD COMBINATION
NA527AD
1
Press [MENU LIST].
If the feature is not available,
may appear on the TV screen.
2
Select an item using [Cursor
K / L / { / B], then press
[ENTER].
Repeat this step until all the
features you want are set up or
to start playing back the disc
from the menu. The following
operations are available.
[MENU LIST] button:
Displays the DVD menu, which
will vary among discs, and may
be same with the Title menu.
[Cursor K / L / { / B] buttons:
Move the cursor from item to
item on the screen.
[ENTER] button:
Selects the currently highlighted
menu option.
[the Number buttons]:
Selects a numbered menu option
(available on certain discs).
3
Press [MENU LIST] to exit the
disc menu.
SETUP
DUBBING
TIMER PROG.
REC MODE
VCR
DVD
6
54
SPACE DISPLAY
PLAY
STOP
AUDIOREPEAT
SEARCH
VCR/DVD RECORDER
COMBINATION
NB203ED
OPEN/CLOSE
EJECT
RAPID PLAY
CM SKIP
MENU LISTTOP MENU
ENTER
FWD
DVD
REC/OTR
SLOW
PAUS E
PROG.
SKIP
2
OPERATE
T-SET
ZOOM
RETURN
.@/: ABC DEF
1 2 3
GHI JKL MNO
PQRS TUV WXYZ
708 9
CLEAR/C-RESET
REV
VCR
REC/OTR
Note
• Menus vary among discs.
Refer to the information
accompanying the disc for
details.
1
2
3
2
Setup menu
OthersVCR functions
Changing the
47EN
Page 23

Disc Playback
Basic playback (cont’d)
Playing back a disc using the Title menu
The disc will start playing
Some DVDs have a Title menu,
which lists the titles available on
the DVD. You can start playing
back such discs at a specific title.
VCR
DVD
123
6
54
89
7
+10
0
PLAY
STOP
Press first.
VCR/DVD COMBINATION
NA527AD
1
Press [TOP MENU].
The Title menu will appear.
If the feature is not available,
may appear on the TV screen.
2
Select a desired item using
[Cursor K / L / { / B], then
press [ENTER].
back at the title you selected.
The following operations are
available.
[TOP MENU] button:
Displays the DVD “Title Menu”
which will vary between discs.
[Cursor K / L / { / B] buttons:
Move the cursor from item to
item on the screen.
[ENTER] button:
Selects the currently highlighted
menu option.
[the Number buttons]:
Selects a numbered menu option
(available on certain discs).
3
Press [TOP MENU] to exit.
PBC function for Video CDs
DUBBING
TIMER PROG.
VCR
54
SPACE DISPLAY
SETUP
REC MODE
DVD
6
OPEN/CLOSE
EJECT
RAPID PLAY
CM SKIP
MENU LISTTOP MENU
ENTER
PROG.
SKIP
1
2
3
OPERATE
T-SET
ZOOM
RETURN
.@/: ABC DEF
1 2 3
GHI JKL MNO
PQRS TUV WXYZ
708 9
CLEAR/C-RESET
Note
• [TOP MENU] will not be
available for some DVDs.
• Menus vary among discs.
Refer to the information
accompanying the disc for
details.
2
This unit conforms to ver.1.1 and
ver.2.0 of the Video CD standard
playback control (PBC) function.
This enables you to play back
interactive software using menu
screens. Refer to the information
accompanying the Video CD.
Ver.1.1 (without PBC function):
You can still enjoy playback of
pictures and music from the CD.
Ver.2.0 (with PBC function):
“PBC ON” will appear on the
Note
• When playing back Video CDs with the PBC function, “Pbc” is
displayed instead of the playing back time and current track
indications on the front panel display.
• Some operations cannot be performed unless the function is
cancelled either automatically or intentionally by you.
• Operations that are not available when the PBC function is set to
“ON” are indicated by the following symbol in this manual:
screen and display when playing
back a Video CD with the PBC
(PBC OFF)
function.
Playing back a Video CD using the Title menu
VCR
DVD
123
6
54
7
89
+10
0
PLAY
STOP
Press first.
VCR/DVD COMBINATION
NA527AD
3
Press [RETURN ] to go back
to the Title menu.
1
When playing back a Video CD
with the PBC function, the Title
menu will appear automatically.
3
OPERATE
DUBBING
T-SET
TIMER PROG.
VCR
ZOOM
RETURN
.@/: ABC DEF
1 2 3
GHI JKL MNO
54
PQRS TUV WXYZ
708 9
SPACE DISPLAY
CLEAR/C-RESET
SETUP
REC MODE
DVD
6
OPEN/CLOSE
EJECT
RAPID PLAY
CM SKIP
MENU LISTTOP MENU
ENTER
PROG.
SKIP
2
2
Press [the Number buttons] to
select the desired title.
Playback will start at the selected
title.
48 EN
Note
• While the On-Screen Display
appears, you cannot perform
steps 2 and 3.
Page 24

Disc Playback
PBC function for Video CDs (cont’d)
Cancelling and Recalling the PBC function
VCR
DVD
123
6
54
7
89
+10
0
PLAY
STOP
Press first.
VCR/DVD COMBINATION
NA527AD
(PBC OFF)
Insert a Video CD.
1
In stop mode, press [SETUP].
2
Select “CD Playback Mode”
using [Cursor K / L], then press
[ENTER].
CD Playback Mode
Random Play
Program Play
PBC (Video CD only) ON
Slide Show 5 sec.
Resume playback
3
Select “PBC (Video CD only)”
using [Cursor K / L], then press
[ENTER].
4
Select “OFF” using [Cursor
K / L], then press [ENTER].
5
Press [SETUP] to exit.
To recall the PBC function, select
“ON” in step 4 above.
Special playback
DUBBING
TIMER PROG.
VCR
54
SPACE DISPLAY
SETUP
REC MODE
DVD
6
OPEN/CLOSE
EJECT
RAPID PLAY
CM SKIP
MENU LISTTOP MENU
ENTER
PROG.
SKIP
OPERATE
T-SET
ZOOM
RETURN
.@/: ABC DEF
1 2 3
GHI JKL MNO
PQRS TUV WXYZ
708 9
CLEAR/C-RESET
Note
• The default setting of “PBC
(Video CD only)” is “ON”.
1
5
2
3
4
Recording Disc Playback EditingBefore you start Connections Getting started
(PBC OFF)
You can resume playback from
the point where you stopped it
before.
VCR
DVD
123
6
54
89
7
+10
0
PLAY
STOP
Press first.
VCR/DVD COMBINATION
NA527AD
1
During playback, press
[STOP C].
The resume message will appear.
2
Press [PLAY B].
In a few seconds, playback will
resume from the point at which
you stopped it before. Even if you
turn off the unit, you can resume
playback at the same point after
turning back on the unit.
To cancel the resume playback
and start playing back the disc
from the beginning:
Press [STOP C] while playback is
stopped.
PQRS TUV WXYZ
708 9
CLEAR/C-RESET
REV
VCR
REC/OTR
SPACE DISPLAY
AUDIOREPEAT
PLAY
STOP
SEARCH
FWD
REC/OTR
SLOW
PAUS E
SKIP
2
DVD
1
2
Note
• For Video CDs, if you turn PBC
on using the Setup menu, the
resume function is cancelled.
• For MP3 and JPEG files,
playback will resume from
the beginning of the track at
which playback was stopped.
Changing the
Setup menu
OthersVCR functions
49EN
Page 25

Fast forward / Fast reverse
VCR
DVD
123
6
54
7
89
+10
0
PLAY
STOP
Press first.
VCR/DVD COMBINATION
NA527AD
1
During playback, press
[FWD D / q] or [REV E / r].
Each time you press
[FWD D / q] or [REV E / r],
the approximate speed will
change as follows.
Fast forward or fast reverse
playback across titles (for DVDs)
or tracks (for MP3) is not possible.
Normal
x20
speed
playback
Disc Playback
Special playback (cont’d)
• For Audio CDs and MP3 files,
approximate speed is fixed at
x8 with sound.
• For Video CDs, approximate
forward speeds are x2, x8 and
x16, and approximate reverse
speeds are x2, x8 and x16.
• For DivX® files, approximate
forward speeds are x2, x20 and
x40, and approximate reverse
speeds are x5, x20 and x40.
• To return to playback at normal
speed, press [PLAY B].
• Picture quality of DivX® files in
fast reverse is lower than that
in fast forward.
• For some DivX® files, Fast
forward/Fast reverse may not
function.
x2 x20x5 x40x40
.@/: ABC DEF
1 2 3
GHI JKL MNO
54
PQRS TUV WXYZ
708 9
SPACE DISPLAY
CLEAR/C-RESET
REV
VCR
REC/OTR
AUDIOREPEAT
PLAY
STOP
SEARCH
PROG.
6
SKIP
FWD
DVD
REC/OTR
SLOW
PAUS E
Note
• Forward/reverse speeds
are indicated with icons as
follows.
Forward (Approx. Speed):
x2:
x20:
x40:
Reverse (Approx. Speed):
x5:
x20:
x40:
1
Skipping TV commercials during playback
e.g. Press [CM SKIP] once.
To enjoy recorded programmes
without any interruptions, press
[CM SKIP].
VCR
DVD
123
6
54
89
7
+10
0
PLAY
STOP
Press first.
VCR/DVD COMBINATION
NA527AD
CM Skip
1
During playback, press
[CM SKIP].
Normal playback will start 30second advanced point from the
point at which you press
[CM SKIP].
Each time you press [CM SKIP],
the start point will move another
30 seconds forward and playback
resume automatically.
You can press [CM SKIP] up to 6
times (180 seconds).
Playback will restart automatically.
30 sec.
(forwarding 30 seconds.)
B
OPERATE
DUBBING
T-SET
TIMER PROG.
VCR
ZOOM
RETURN
.@/: ABC DEF
1 2 3
GHI JKL MNO
54
PQRS TUV WXYZ
708 9
SPACE DISPLAY
CLEAR/C-RESET
REV
VCR
REC/OTR
AUDIOREPEAT
VCR/DVD RECORDER
COMBINATION
PLAY
NB203ED
REC MODE
STOP
SEARCH
SETUP
OPEN/CLOSE
EJECT
RAPID PLAY
DVD
CM SKIP
MENU LISTTOP MENU
ENTER
PROG.
6
SKIP
FWD
DVD
REC/OTR
SLOW
PAUS E
1
50 EN
 Loading...