

Page 1
Quick Start Guide for DV-RW260H
Accessories
TV/VIDEO
Remote control unit
Tw o R-03 (“AAA” size,
UM/SUM-4, HP-16 or
similar) batteries for
the remote control unit
21 pin scart cable
75 ohm coaxial cable
How to install the batteries
Use micro batteries type R-03 (“AAA” size, UM/SUM-4, HP-16 or similar).
Open the battery
compartment
cover in the
direction of the
arrow.
Install two
batteries (supplied), paying
attention to the
polarity diagram in
the battery
compartment.
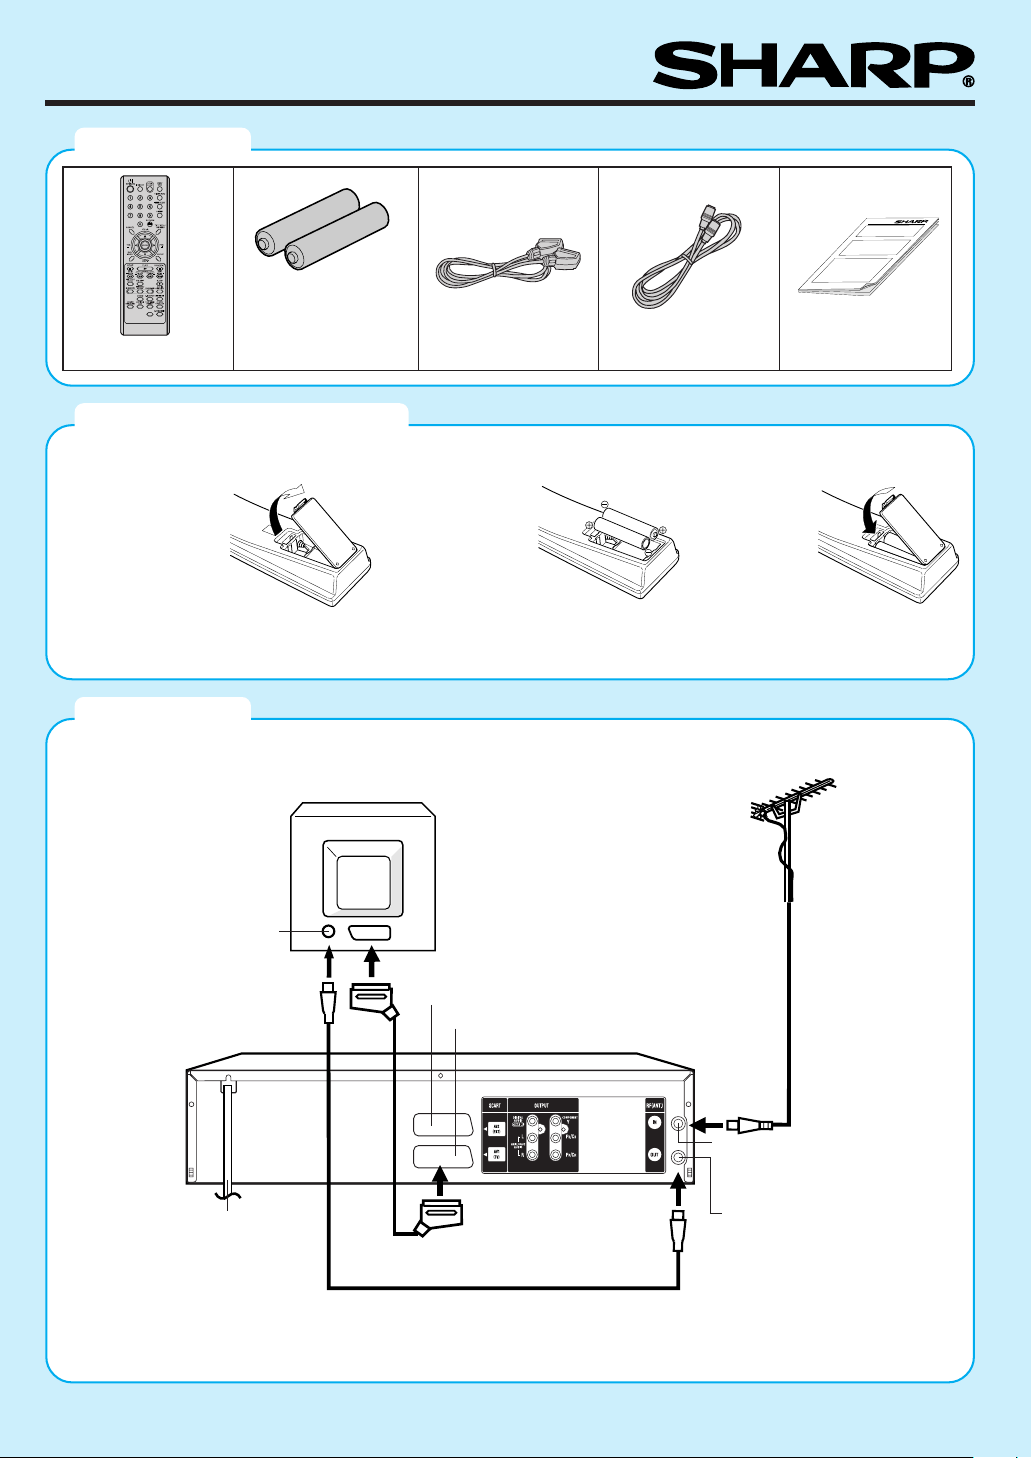
Connection
Disconnect all antenna wires from the rear of your TV and connect as follows.
TV
Quick start guide
Replace the
compartment
cover.
Antenna
Antenna-Input
To Scart socket
EXTERNAL Scart Socket (AV2)
TV Scart socket (AV1)
VCR/DVD
RF-Input (from house antenna)
AC power cord 240V/50 Hz
Supplied Scart cable
Supplied Coaxial cable
RF-Output (to TV)
When you connect your equipment as shown in the diagram above, switch the TV to it's AV channel (this may
be labelled EXT / AUX etc.)
1
Page 2

Automatic TV tuning and clock setting
Plug your unit into the mains supply and it will automatically start to tune itself in and set the correct date and time. When auto
tuning is complete, you must switch the TV to it’s AV channel.
AUTOMATIC SETUP IS ONLY AVAILABLE WHEN YOU PLUG THE UNIT IN FOR THE FIRST TIME.
Preparation
• Make sure your unit is connected properly to the TV. (See the diagram of Connection on page 1.)
• If a satellite receiver is connected with the coaxial lead, make sure it’s switched ON and set to SKY ONE.
• Turn on the TV and select the channel you wish to allocate for video use.
• Especially ensure an external aerial is connected.
1. Plug in your unit's plug into the
mains supply. “Auto” will start to
flash in the unit display. And
also “AUTO TUNING” will be
displayed on the TV screen.
Your unit will automatically tune
itself in and set the correct time
and date (This may take
approx. 4 minutes).
AUTO TUNING
2. Press the OPERATE button to turn OFF the unit. Now
the TV is tuned to your unit.
Notes:
•
The unit automatically corrects the clock setting every hour
and automatically adjusts the clock setting for Daylight
Saving Time.
• Your unit will tune the TV stations as follows.
CH 1 BBC 1 CH 5 Channel 5
CH 2 BBC 2 CH 6 Satellite
CH 3 ITV CH 7 etc.
CH 4 Channel 4
SETUP MENU
The SETUP MENU consists of several menus where you can make various settings concerning language, clock, audio functions,
images and so on.
The following setting is a basic process. There are various procedures over the setting items. Please set the menu up according
to the key-guide of each SETUP MENU indicated below.
Preparation:
• Turn ON the TV and switch the TV to it’s AV channel (this may be labelled EXT/AUX etc.)
• The video tape and DVD should be stopped.
1. Press SETUP. The SETUP
MENU screen will appear.
2. Press C or D to select the
required menu and press
ENTER. The submenu
screen of the selected
menu will appear.
3. Press C or D to select the
required submenu and
press ENTER. The screen
for the selected submenu
will appear.
SETUP MENU
TIMER REC SET
SYSTEM SETUP
AV SETUP
REC SETUP
CHANNEL SETUP
OTHER
SETUP MENU
TIMER REC SET
SYSTEM SETUP
AV SETUP
REC SETUP
CHANNEL SETUP
OTHER
SETUP MENU
TIMER REC SET
SYSTEM SETUP
OSD LANGUAGE
AV SETUP
DVD MENU
AUDIO
REC SETUP
SUBTITLE
CHANNEL SETUP
OTHER
LANGUAGE
PARENTAL
CLOCK
DISC SETUP
OTHER
LANGUAGE
LANGUAGE
PARENTAL
CLOCK
DISC SETUP
OTHER
ENGLISH
ENGLISH
ENGLISH
AUTOMATIC
4. Press C or D to select the
required item you want,
and press ENTER.
Selectable items will be
listed.
5. Press C or D to select the required item and press
ENTER. This completes the setting procedure.
To return to the previous screen, press RETURN. To
close the SETUP MENU, press SETUP.
• Some items cannot be selected, depending on the oper
ating status (For details, refer to page 20 of the operation
manual).
SETUP MENU
TIMER REC SET
SYSTEM SETUP
OSD LANGUAGE
AV SETUP
DVD MENU
AUDIO
REC SETUP
SUBTITLE
CHANNEL SETUP
OTHER
LANGUAGE
LANGUAGE
PARENTAL
CLOCK
DISC SETUP
OTHER
ENGLISH
ENGLISH
ENGLISH
AUTOMATIC
ENGLISH
FRANCAIS
ESPANOL
DEUTSCH
ITALIANO
OTHER
AUTOMATIC
OFF
2
Page 3

Read this before recording onto a disc
You can use DVD-RW and DVD-R discs to record video. This unit has two modes for formatting discs for recording: VR
mode and Video mode.
VR mode
• This mode can only be used for recording onto DVD-RW
discs.
•You can edit the recorded contents of a disc.
•You can record on a disc repeatedly, by deleting items that
you have recorded previously.
• The disc recorded in this mode can be played back with
other DVD-RW-compatible players.
Video mode
•You cannot edit the recorded contents of a disc.
• Additional recording is possible, but deleting of recorded
contents is not possible (Deleting is only possible in VR
mode).
•
When you finalise a disc in Video mode, the recordings can
be viewed on compatible DVD Players. To confirm compatibility, refer to your DVD Players operation manual.
Once you have finalised a DVD-R disc, you cannot make
any additional recordings.
• This mode can be used for the recording on DVD-R and
DVD-RW (DVD-RW Ver.1.1, Ver.1.1 CPRM support and
Ver .1.2 CPRM support).
Recording onto video tapes or DVDs
Preparation:
•Turn ON the TV and switch the TV to it's AV channel (this may be labelled EXT / AUX etc.)
• Press DVD/VCR to select the appropriate mode.
• Load a recordable video tape or DVD into the unit.
Note:
If you use a unused DVD-RW disc, you must format the disc
at first. (see “Starting with an unused disc”(automatic
formatting) on P.4 in this Quick start guide)
Recording a TV program
1. Press REC MODE/SPEED to select the recording mode.
2. Press numeric keys or CH / to select the channel
you want to recorded.
3. Press
Setting the end time of the recording
Press
Each time you press
from 30 minutes up to 6 hours.
To cancel the recording
Press STOP.
22
2REC/OTR.
22
22
2REC/OTR repeatedly to set the recording end time.
22
22
2REC/OTR, you can set the end time
22
FINALISING A DISC
If you want to play back your recordings on other DVD players, it is recommended to use DVD-R discs that have been recorded in Video
mode. You must finalise the disc to ensure that other players can read it correctly.
Please note that once a DVD-R disc is finalised, it is not possible to make any additional recordings.
DVD-RW discs, although not generally compatible with other DVD players, can be un-finalised after the finalisation process has taken place.
Preparation:
• Turn ON the TV and switch the TV to it's AV channel (this may
be labelled EXT / AUX etc.)
• The video tape and DVD should be stopped.
1. Press SETUP. The SETUP MENU screen will appear.
2. Select “SYSTEM SETUP”
and press ENTER. Then
select “DISC SETUP” and
press ENTER.
SETUP MENU
TIMER REC SET
SYSTEM SETUP
AV SETUP
REC SETUP
CHANNEL SETUP
OTHER
DISC SETUP
REFORMAT AS DVD VIDEO
REFORMAT AS DVD VR
NEW DISC FORMAT
FINALISE
PROTECT DISC (VR ONLY)
UNDO FINALISE
PROCEED
PROCEED
VR
PROCEED
OFF
PROCEED
3. Select “FINALISE” and
press ENTER. Then select “
FINALISE
START” and press ENTER.
The finalisation will start.
START CANCEL
4. When finalisation is complete, “FINALISING COMPLETED PRESS ENTER” will appear. Press ENTER, the
normal TV screen will appear.
•To cancel the finalisation, select “UNDO FINALISE” at
step 3 and press ENTER.
• The finalisation process may require a few minutes to about
1 hour according to disc type or the amount of free space
on the disc.
DISC FORMAT
Selecting automatic format mode
If you use a DVD-RW disc (DVD-RW Ver.1.1, Ver.1.1 CPRM support and Ver.1.2 CPRM support), you can select the mode
you would like to use for automatic formatting (VR mode is the factory default setting).
Preparation:
•Turn ON the TV and switch the TV to it's AV channel (this
may be labelled EXT / AUX etc.)
• The video tape and DVD should be stopped.
1. Press SETUP. Select
“SYSTEM SETUP” and
press ENTER. Then select
“DISC SETUP” and press
ENTER.
SETUP MENU
TIMER REC SET
SYSTEM SETUP
AV SETUP
REC SETUP
CHANNEL SETUP
OTHER
REFORMAT AS DVD VIDEO
REFORMAT AS DVD VR
NEW DISC FORMAT
FINALISE
PROTECT DISC (VR ONLY)
UNDO FINALISE
DISC SETUP
PROCEED
PROCEED
VR
PROCEED
OFF
PROCEED
2. Select “NEW DISC FORMAT” and press ENTER.
3. Select “VR”(VR mode) or
“VIDEO”(Video mode) and
press ENTER. Then press
SETUP to return to normal
screen.
3
SETUP MENU
TIMER REC SET
SYSTEM SETUP
AV SETUP
REC SETUP
CHANNEL SETUP
OTHER
REFORMAT AS DVD VIDEO
REFORMAT AS DVD VR
NEW DISC FORMAT
FINALISE
PROTECT DISC (VR ONLY)
UNDO FINALISE
DISC SETUP
VR
VIDEO
PROCEED
PROCEED
VR
PROCEED
OFF
PROCEED
Page 4

Starting with an unused disc (automatic formatting)
Only DVD-RW discs need to be formatted.
1. When you insert an unused
disc, the following mes-
NEW DISC FORMAT
sage screen will appear.
(Only DVD-RW discs need
START CANCEL
to be formatted.)
VIDEO MODE
3. When formatting is complete, “FORMATTING COMPLETED
PRESS ENTER” will appear. Press ENTER to finish
formatting process.
• On DVD-RW discs (DVD-RW Ver.1.1, Ver.1.1 CPRM support
and Ver.1.2 CPRM support) there are two recording formats
available: the VR mode and the Video mode. You can select
either of them at “Selecting automatic format mode” as shown
2. Select START and press
ENTER. Formatting will
start.
INITIALIZING DISC
VIDEO MODE
on the previous DISC FORMAT column (VR mode is the
factory default setting).
• On DVD-RW discs (Ver.1.0) there is only recording format of
VR mode available.
Format a recorded disc
You can format a recorded DVD-RW disc. Check the contents of the disc before formatting. When you format a disc, any
previously recorded contents of the disc will be erased.
Preparation:
•Turn ON the TV and switch the TV to it's AV channel
(this may be labelled EXT / AUX etc.)
• The video tape and DVD should be stopped.
1. Press SETUP.
2. Select “SYSTEM SETUP” and press ENTER. Then select
“DISC SETUP” and press ENTER.
3. To format a DVD in Video
mode, select “REFORMAT
AS DVD VIDEO”, and to
format it in the VR mode,
select “REFORMAT AS
SETUP MENU
TIMER REC SET
SYSTEM SETUP
AV SETUP
REC SETUP
CHANNEL SETUP
OTHER
DISC SETUP
REFORMAT AS DVD VIDEO
REFORMAT AS DVD VR
NEW DISC FORMAT
FINALISE
PROTECT DISC (VR ONLY)
UNDO FINALISE
PROCEED
PROCEED
VR
PROCEED
OFF
PROCEED
DVD VR”, then press
ENTER.
ENTER
SELECT
RETURN SETUPENTER BACK END
4. Select “START” and press
ENTER. The formatting will
REFORMAT
start.
START CANCEL
5. When formatting is complete, “REFORMATTING
COMPLETED PRESS ENTER” will appear. Press
ENTER, to finish formatting process.
Dubbing a tape onto a disc
Preparation:
•Turn ON the TV and switch the TV to it's AV channel (this may be labelled EXT / AUX etc.)
• Load a source video tape and a disc for recording.
• Confirm that there is enough disc space remaining before you start the recording.
1. Press DVD/VCR and select DVD mode.
4. Press DUBBING. The
screen below will appear.
2. Press REC MODE/SPEED and select the recording mode.
5. Select “YES” and press
3. Press DVD/VCR and select VCR mode.
ENTER. Dubbing starts.
Dubbing a disc onto a tape
Preparation:
•Turn ON the TV and switch the TV to it's AV channel (this may be labelled EXT / AUX etc.)
• Load a source DVD and a video tape for recording.
• Confirm that there is enough tape space remaining before you start the recording.
1. Press DVD/VCR and select VCR mode.
2. Press REC MODE/SPEED and select the recording mode.
3. Press DVD/VCR and select DVD mode.
4. Press DUBBING. The
screen below will appear.
5. Select “YES” and press
ENTER. Dubbing starts.
CONFIRM DUBBING FROM VCR TO DVD
YES NO
CONFIRM DUBBING FROM DVD TO VCR
YES NO
J2H00707A SH
Printed in Malaysia
X
4
 Loading...