

Page 1
VCR/DVD COMBINATION
®
COMBINATION VCR/DVD
BRUKSANVISNING
OPERATION MANUAL
DV-NC65S
NTSC/PAL
2
Denna DVD-spelare har regionkod 2.
The region number for this Unit is 2.
DV-NC65S
BRUKSANVISNING / OPERATION MANUAL
comes from
in making this paper
sustainable forests
100% of the pulp used
TINS-A403WJZZ
i detta papper kommer
från skogar som brukas
100% av pappersmassen
med hållbart skogsbruk
Osaka, Japan
Sonninstraße 3, 20097 Hamburg, Germany
SHARP CORPORATION
SHARP ELECTRONICS (EUROPE) GmbH
Trykket i Storbritannia
Printed in Great Britain
DVNC65SEHyo1_4.pm6 8/10/02, 11:55 am1
Page 2

DVNC65SE003_008.pm6 7/10/02, 4:04 pm3
ENGLISH
GB-3
Page 3
About This Manual
• All mentions of “the Unit” refer to the DV-NC65S VCR/DVD COMBINATION.
• All mentions of “the Remote” refer to the remote control unit.
• The following table describes the icons used in this Operation Manual.
Icon Meaning
Tips and Hints for easier operation
DVD
DVD
C D
C D
Functions for DVD
Functions for Audio CD
Quick Start Guide (the separate sheet)
General Information
Connection and Initial Setting
VCR, DVD Setup
Watching the VCR, DVD
Other Information
Important!
Be sure to read this Operation Manual carefully before using the Unit for the first time, and keep it on hand for
future reference when you experience operational problems.
GB-4
DVNC65SE003_008.pm6 7/10/02, 4:04 pm4
Page 4
Note:
CLASS 1
LASER PRODUCT
This unit can be used only where the power
supply is AC 230V-240V, 50Hz. It cannot be used
elsewhere.
CAUTION:
USE OF CONTROLS OR ADJUSTMENTS OR
PERFORMANCE OF PROCEDURES OTHER
THAN THOSE SPECIFIED HEREIN MAY RESULT
IN HAZARDOUS RADIATION EXPOSURE.
AS THE LASER BEAM USED IN THIS UNIT IS
HARMFUL TO THE EYES, DO NOT ATTEMPT TO
DISASSEMBLE THE CABINET. REFER SERVICING TO QUALIFIED PERSONNEL ONLY.
WARNING:
TO REDUCE THE RISK OF FIRE OR ELECTRIC
SHOCK, DO NOT EXPOSE THIS EQUIPMENT TO
RAIN OR MOISTURE.
SAFETY INFORMATION
INFORMATION
GENERAL
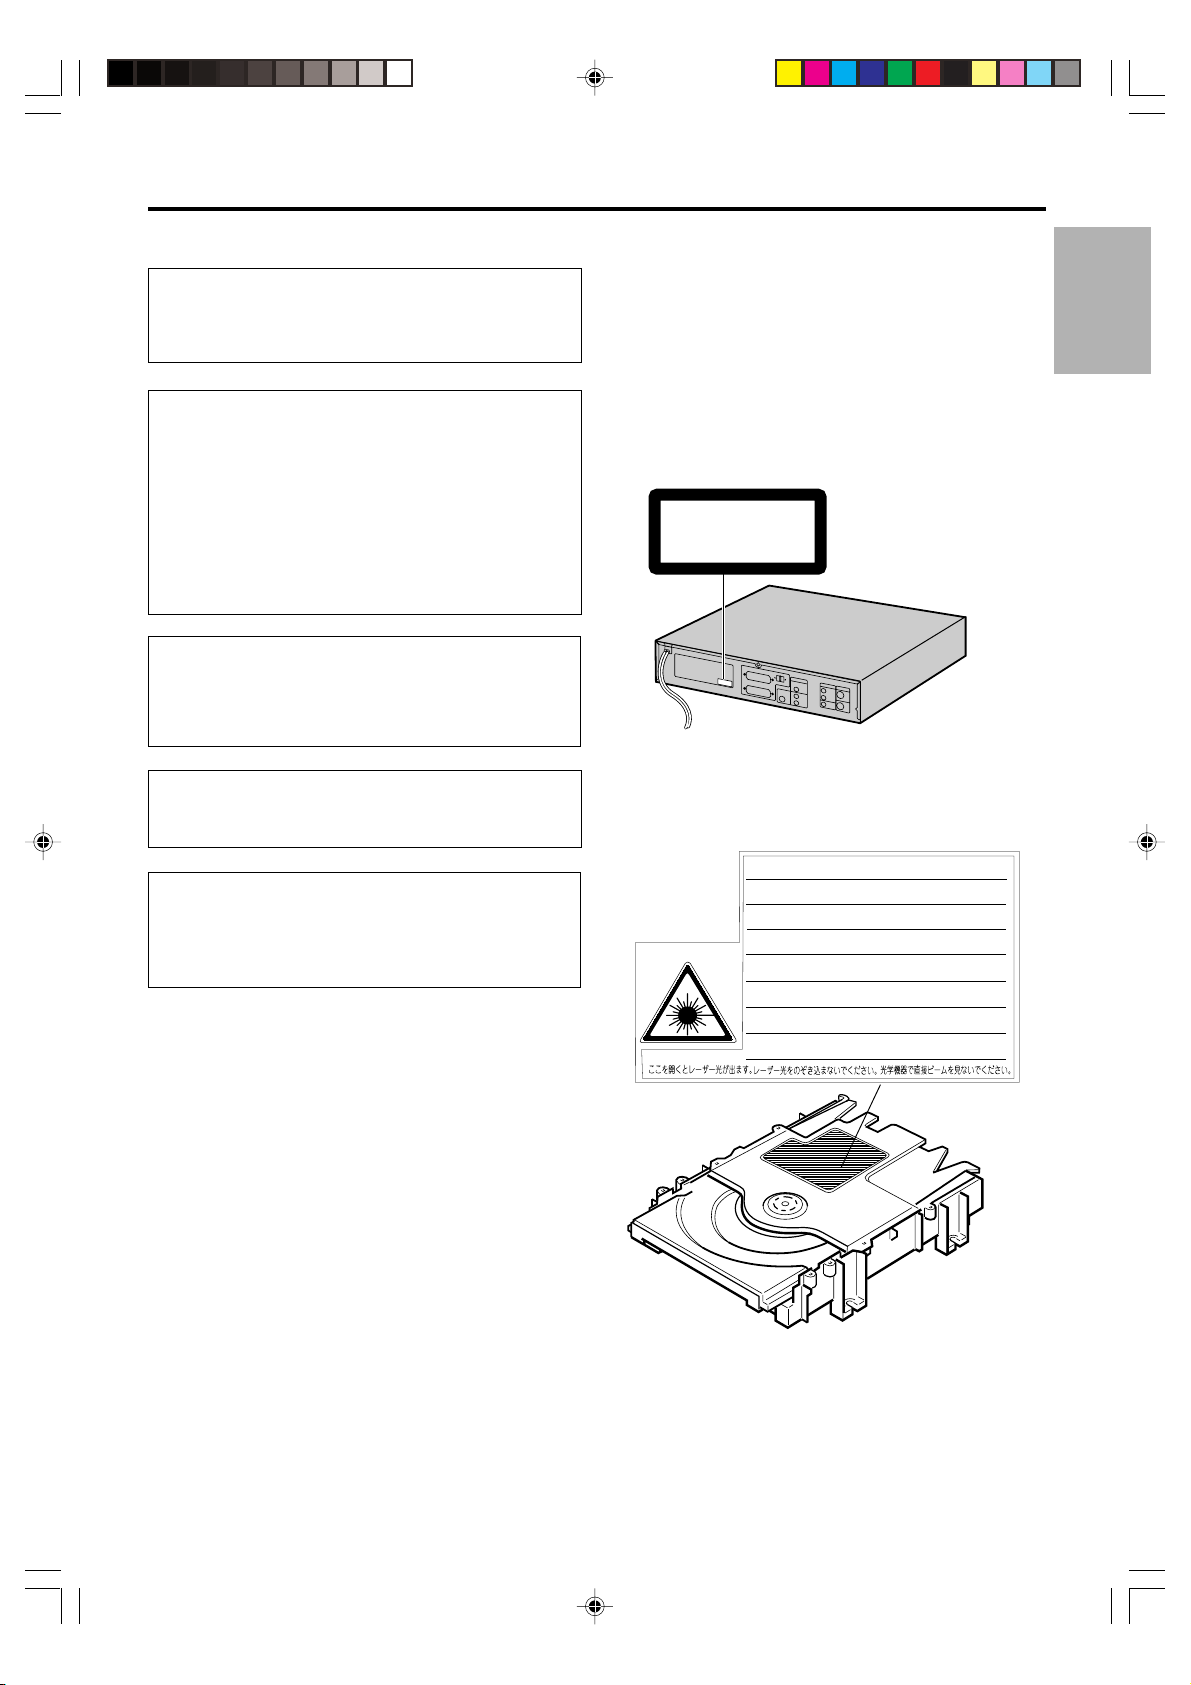
• This Unit is classified as a CLASS 1 LASER
product.
• The CLASS 1 LASER PRODUCT label is located
on the rear cover.
• This product contains a low power laser device.
To ensure continued safety do not remove any
cover or attempt to gain access to the inside of
the product. Refer all servicing to qualified
personnel.
(Rear of product)
TO REDUCE THE RISK OF FIRE OR ELECTRIC
SHOCK, AND ANNOYING INTERFERENCE, USE
THE RECOMMENDED ACCESSORIES ONLY.
Laser Diode Properties
Material: AlGaInP
Wave length: 650 nm
Emission Duration: Continuous
Laser output: Max. 0.7 mW
Power Lead Protection
To avoid any malfunctions of the unit, and to protect
against electric shock, fire or personal injury, please
observe the following.
• Hold the plug firmly when connecting or
disconnecting the AC power lead.
• Keep the AC power lead away from heating
appliances.
• Never put any heavy object on the AC power lead.
• Do not attempt to repair or reconstruct the AC
power lead in any way.
SA005WJ
CAUTION-LASER RADIATION WHEN OPEN. DO NOT STARE INTO BEAM
OR VIEW DIRECTLY WITH OPTICAL INSTRUMENTS.
VORSICHT-LASERSTRAHLUNG, WENN GEFFNET. BLICKEN SIE NICHT IN DEN STRAHL
UND BETRACHTEN SIE DIESEN NICHT DIREKT MIT OPTISCHEN INSTRUMENTEN.
ATTENTION-RADIATION LASER EN CAS D'OUVERTURE. NE PAS FIXER LE
FAISCEAU NI REGARDER DIRECTEMENT DES INSTRUMENTS OPTIQUES.
VARNING-LASERSTRÅLNING NÄR DENNA DEL ÄR ÖPPNAD. STIRRA EJ IN
I STRÅLEN OCH BETRAKTA EJ STRÅLEN MED OPTISKA INSTRUMENT.
VARO! AVATTAESSA OLET ALTTIINA LASERSÄTEILYLLE. ÄLÄ TUIJOTA
SÄTEESEEN ÄLÄKÄ KATSO SITÄ OPTISEN LAITTEEN LÄPI.
VARNING-LASERSTRÅLNING NÄR DENNA DEL ÄR ÖPPNAD. STIRRA EJ IN I
STRÅLEN OCH BETRAKTA EJ STRÅLEN GENOM OPTISKT INSTRUMENT.
ADVARSEL-LASERSTRÅLING NÅR DEKSEL ÅPNES. STIRR IKKE INN I
STRÅLEN ELLER SE DIREKTE MED OPTISKE INSTRUMENTER.
ADVARSEL-LASERSTRÅLING VED ÅBNING. SE IKKE IND I STRÅLENHELLER IKKE MED OPTISKE INSTRUMENTER.
DVNC65SE003_008.pm6 7/10/02, 4:04 pm5
GB-5
Page 5

SAFETY INFORMATION
Location and Handling
• Do not place your Unit in enclosed spaces or do
not cover it to prevent excessive temperatures
inside the unit.
• Do not place the Unit in direct sunlight, or near heat
sources.
• Keep the Unit away from strong magnetic fields, i.e.
loudspeakers etc.
• Do not place any object containing water or other
liquids on the Unit. In the event that liquid should
enter the cabinet, unplug the Unit immediately and
contact the retailer or service centre approved by
SHARP immediately.
• Do not remove the Unit cabinet. Touching parts
inside the cabinet could result in electric shock and/
or damage to the Unit. For service and adjustment
inside the cabinet, call a qualified dealer or service
centre approved by SHARP.
Periods of no use
When the unit is not being used, switch the unit to the
Standby mode.
When left unused for a long period of time, the unit
should be unplugged from the household AC socket.
No Fingers or Other Objects Inside
Do not put any foreign object on the disc tray.
Stacking
Place the unit in a horizontal position, and do not
place anything heavy on it.
Condensation
Moisture may form on the pickup lens in the following
conditions:
• immediately after a heater has been turned on.
• in a steamy or very humid room.
• when the unit is suddenly moved from a cold
environment to a warm one.
If moisture forms inside this unit, it may not operate
properly.
In this case, turn on the power and wait about one
hour for the moisture to evaporate.
Cleaning
Unplug your Unit before cleaning. Use a damp cloth
for cleaning. Do not use cleaning fluids or aerosols
which could enter the unit and cause damage, fire, or
electrical shock. These substances may also deteriorate the finish of your Unit.
If there is Noise Interference on the
TV While a Broadcast is being
Received
Depending on the reception condition of the TV,
interference may appear on the TV monitor while you
watch a TV broadcast and the unit is left on. This is
not a malfunction of the unit or the TV. To watch a TV
broadcast, turn off the unit.
Service
Do not attempt to service this Unit yourself. Please
refer any service to the nearest service centre
approved by SHARP.
Copyright
Recording and playback of any material may require
consent.
Please refer particularly to the provisions of the
Copyright Act 1956, the Dramatic and Musical
Performers Protection Act 1958, the Performers
Protection Acts 1963 and 1972 and to any subsequent statutory enactments and orders.
HOWVIEW is registered trademarks of Gemstar
• S
Development Corporation.
• The S
HOWVIEW system is manufactured under
license from Gemstar Development Corporation.
Copy Protection
This Unit supports Macrovision copy protection.
On DVDs that include a copy protection code, if the
contents of the DVD are copied using a VCR, the
copy protection code prevents the videotape copy
from playing normally.
Apparatus Claims of U.S.Patent Nos. 4,631,603,
4,577,216, 4,819,098 and 4,907,093 licensed for
limited viewing uses only.
This product incorporates copyright protection
technology that is protected by method claims of
certain U.S. patents and other intellectual property
rights owned by Macrovision Corporation and
other rights owners. Use of this copyright
protection technology must be authorized by
Macrovision Corporation, and is intended for home
and other limited viewing uses only unless
otherwise authorized by Macrovision Corporation.
Reverse engineering or disassembly is prohibited.
Recommended Measures for
Optimum Picture Excellence
The unit is a precision device that is constructed
using extremely accurate technology.
Soiling or friction affecting the pickup lens or disc
drive can impair the image quality.
neither video or audio will be played back. To obtain
optimum picture quality, the Unit should be checked
(cleaning and replacement of some parts) every
1,000 hours. Note that this period varies depending
on the environment (temperature, humidity, dust, etc.)
in which the Unit is used. Contact your authorized
Sharp supplier for details.
Do not attempt to clean the pickup lens yourself.
In the worst case,
GB-6
DVNC65SE003_008.pm6 7/10/02, 4:04 pm6
Page 6

GENERAL INFORMATION
Contents
INFORMATION
GENERAL
DVD SETUP
SAFETY INFORMATION ................................ 5
Contents ......................................................... 7
Types of Discs that Can Be Played on
This Unit ..................................................... 9
Disc Handling and Maintenance ................ 11
Features ....................................................... 12
Accessories ................................................. 13
Major Components...................................... 14
CONNECTION AND INITIAL SETTINGS
Basic Connection ........................................ 19
Connecting to ANTENNA IN/ANTENNA OUT .. 19
Connecting a TV with LINE 1 (TV) Output
and LINE 2 Input SCARTS .......................... 20
Connecting a TV Equipped with VIDEO/
AUDIO Input Jacks ....................................... 21
DVD Audio Connections............................. 22
Connecting a TV Equipped with S-VIDEO
Input Jacks ................................................... 22
Connecting to Audio Equipment .......................22
Playing 2 channel audio ................................ 22
Playing Dolby Digital (5.1 channel), DTS or
MPEG audio ............................................... 23
Preparations Before Using The Product ... 24
VCR SETUP
VCR Auto Installation ................................. 26
VCR Setup.................................................... 28
Menu Screen ....................................................28
Mode Selection ................................................. 29
Manually Tuning Channel Setting ..................... 30
Channel Sort .................................................... 32
Deleting Channels ............................................33
Re-naming Channels ........................................ 34
Clock Setting .................................................... 35
Manual Clock Setting ....................................35
Changing the on-screen display language .......36
Decoder Switching Operation ........................... 37
Selecting the Output from the VCR ..................37
VCR Display Information ............................ 38
VCR Reset ....................................................... 38
DVD Setup.................................................... 40
About the SET UP Screen ................................ 40
TV MODE Setting ............................................. 41
PARENTAL LEVEL Setting ........................... 43
AUDIO Setting ..................................................45
Setting the COMPRESSION
(Dolby Digital output level) ..........................45
Setting the DOLBY DIGITAL .........................46
Setting the MPEG ......................................... 47
Setting the CINEMA VOICE ..........................48
DISC LANGUAGE Setting ................................ 49
Setting SUBTITLE, AUDIO and MENU
languages ................................................... 49
Selecting languages from OTHER ................50
DVD Display Information ............................ 51
Operation Mode Indicators ...............................51
Language Code List for Disc Language ... 51
WATCHING THE VCR
Playback....................................................... 54
Playback ...........................................................54
Picture Disturbance During Playback ...............54
Pausing and Slow Motion ................................. 55
Fast Forwarding/Rewinding a Video Tape ........ 55
Forward/Reverse Visual Search ....................... 55
Automatic Head Cleaning System .................... 55
Playing Back an S-VHS Cassette.....................56
Playing Back an NTSC Cassette ...................... 56
Blue Mute ......................................................... 57
Colour ............................................................... 57
16:9 Playback and Recording...........................58
Audio Output Mode ..................................... 59
Hi-Fi Stereo Sound ...........................................59
NICAM/IGR Hi-Fi Stereo Sound .......................59
Sharp Super Picture .................................... 60
Auto Repeat/Auto Zero Back ...................... 61
Auto Repeat......................................................61
Auto Zero Back ................................................. 61
DPSS (Digital Program Search System) /
Skip Search.............................................. 62
DPSS ................................................................ 62
Skip Search ......................................................62
CONNECTION AND
INITIAL SETTINGS
VCR SETUP
DVD SETUP
WATCHING
THE VCR
WATCHING
THE DVD
INFORMATION
OTHER
DVNC65SE003_008.pm6 9/10/02, 10:02 am7
GB-7
Page 7

Contents
TV Program Recording ............................... 63
Selection of a Channel .................................. 63
Tape Speed Selection ...................................63
Immediate Recording ....................................63
Simple Timed Recording .................................. 63
Timer Recording.......................................... 64
How to Use the SHOWVIEW® system to Make a
Recording.....................................................64
How to Set a Delayed Recording ..................... 66
Setting a Recording ...................................... 66
How to Check, Change, and Cancel a Delayed
Recording.....................................................68
Checking a Recording ................................... 68
Changing a Recording .................................. 69
Cancelling a Recording ................................. 69
Recording from Other Equipment ............. 70
Tape Remaining ........................................... 71
Recording a DVD Disc onto a Video
Cassette ................................................... 72
Recording a DVD disc onto a video cassette
(Tape Editing mode) .....................................72
WATCHING THE DVD
Preparing to Use the DVD .......................... 74
When connecting a TV with the DVD
output jacks .................................................. 74
When connecting a TV with the DVD/VCR
shared output jacks ...................................... 74
Playback....................................................... 75
Basic Play ......................................................... 75
Fast Forward/Fast Reverse...............................76
Slow-Motion Play .............................................. 76
Still/Pause.........................................................77
Frame Advance ................................................ 77
Skip (Forward/Reverse) .................................... 77
Angle Selection ........................................... 78
Playing MP3 Discs ...................................... 79
Regarding MP3 discs ....................................... 79
Playing MP3 discs ............................................79
To play MP3 discs............................................. 80
To play another file (music title)
while playing ................................................ 80
To skip the file while playing .............................80
About the Function Control Screen .......... 81
Direct skip (title/chapter/time) ...........................82
Sub Title language setting ................................ 83
Angle setting ..................................................... 84
Audio setting ..................................................... 85
Advanced Surround setting ..............................86
Digital Gamma setting ......................................87
Direct Selection of Scenes ......................... 88
Selecting Scenes by Title Number ................... 88
Selecting Scenes from the Menu Screen .........88
Programmed Playback................................ 89
Chapter Programmed Playback ....................... 89
Track Programmed Playback ............................ 90
MP3 Files Programmed Playback ....................91
Repeat Playback.......................................... 93
Repeat playback ............................................... 92
A-B Repeat .......................................................93
Resume Function ........................................ 94
OTHER INFORMATION
Troubleshooting .......................................... 96
Definition of Terms ...................................... 98
Specifications ............................................ 101
GB-8
DVNC65SE003_008.pm6 7/10/02, 4:04 pm8
Page 8
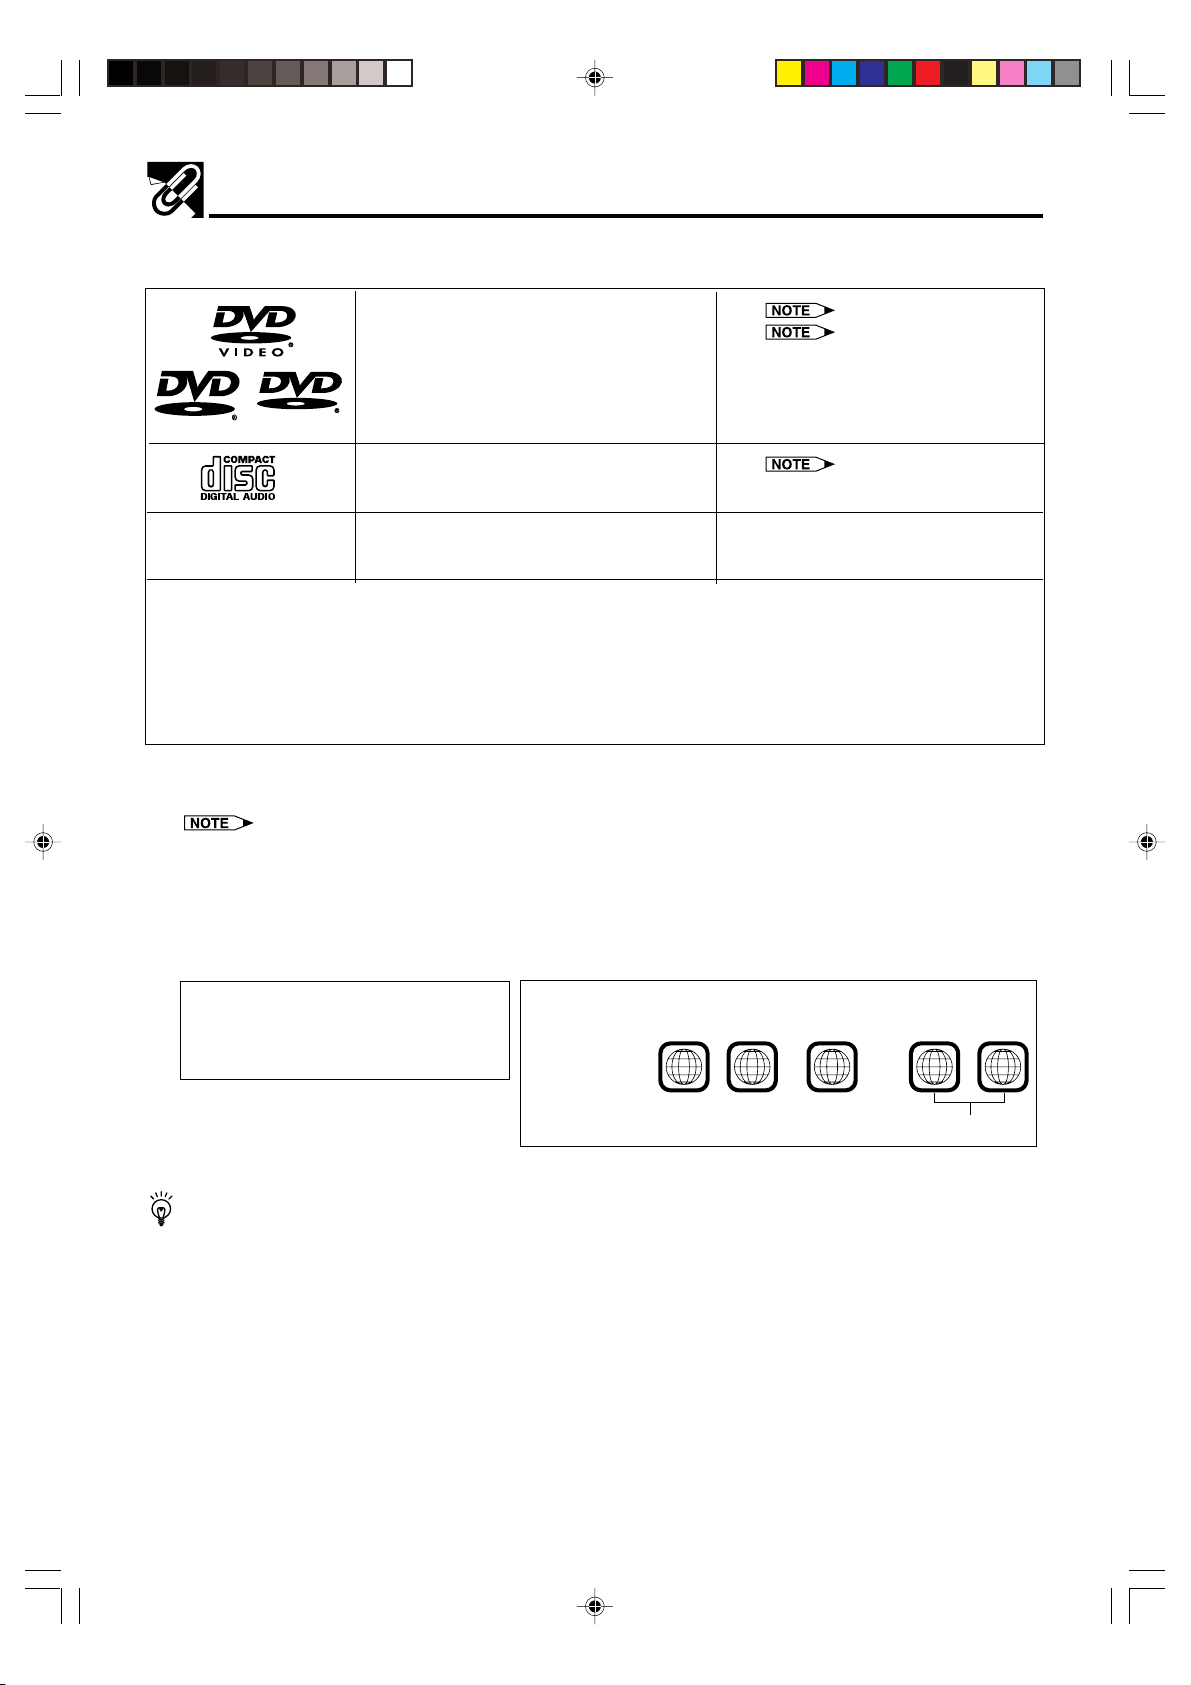
Types of Discs that Can Be Played on This Unit
This Unit can play back discs bearing any of the following marks:
DVD See 1
DVD-R / DVD-RW See
[8cm(3") disc/12cm(5") disc]
2 on the next page
R 4.7
Other CDs
1) On CD-G and CD-EXTRA discs, only the sound can be played (no images).
2) Video CD, Photo CD, DVD-ROM, DVD-RW (Video recording format), DVD-Audio, SACD and CD-ROM
discs cannot be used.
3) Discs with unusual shapes (heart-shaped or hexagonal discs) cannot be used. The use of such discs
will cause a fault.
• This Unit will reject an incompatible disc, therefore the disc type should be checked.
This unit will output NTSC signals when playing “NTSC discs”.
NTSC signals cannot be converted to modifed PAL signals.
An NTSC TV or NTSC-compatable Multi-system TV must be used when playing NTSC discs.
• DVD video players and discs are designed with region numbers which dictate the regions in which a disc can be
played. If the region number on the disc you want to play does not match the region number in this Unit, you will not
be able to play the disc.
• DVD R/DVD-RW discs recorded in video mode can only be played back.
• Non-finalised DVD-RW discs can not be played back.
The region number for
this Unit is
R W
Audio CDs See
[8cm(3") disc/12cm(5") disc]
CD-R/CD-RW
[8cm(3") disc/12cm(5") disc]
1
Samples of region number marks compatible
with this Player:
2
.
• Discs recorded in MP3 file format or
Audio format.
2
21
3 on the next page
1
.... ........
2
6
213
546
ALL
As for the list of the region number 2 countries and the world map for all region numbers, refer to
pages 99 and 100.
DVNC65SE009_013.pm6 9/10/02, 10:05 am9
Disc playable in all regions
GB-9
Page 9
Types of Discs that Can Be Played on This Unit
Disc Function or Operation that is Not Available
In the cases listed below, the indicator may appear on the TV screen, which indicates that the
function or operation is not available.
• When you intend to perform the function or operation on which the manufacturer restriction is imposed:
The specific functions on some DVDs are determined by the disc manufacturer. As this Unit plays disc
data in accordance with the guidelines of the disc manufacturer, some functions may not be available on
some discs. Be sure to read the documentation provided with the disc.
• When you intend to perform the functions or operations prohibited for the current disc:
The types of functions and operations that can be used for a particular disc vary depending on the
features of that disc. Some disc functions and operations may differ from the descriptions given in this
Operation Manual. In this event, follow the instructions given on the screen.
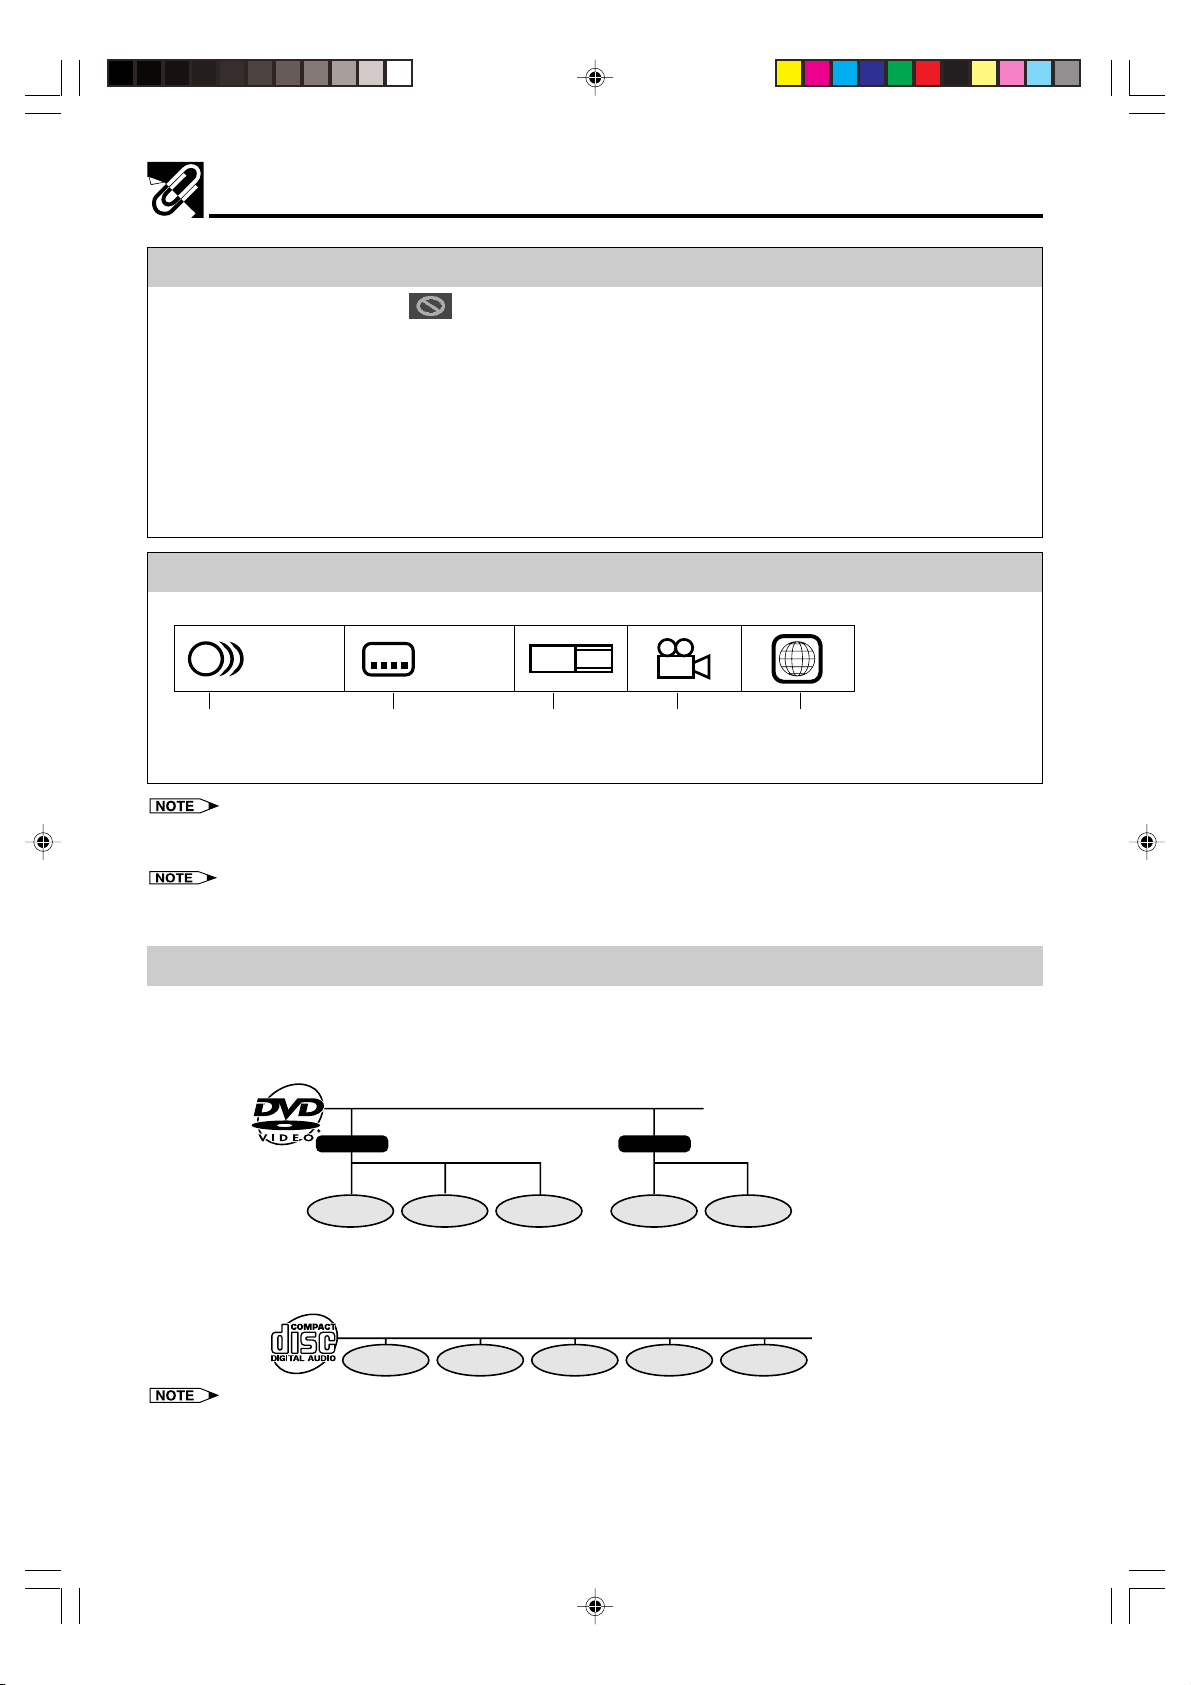
Icons Used on DVDs
Sample Icons
1. English
2
2. Chinese
Number of audio
tracks
2
• This Unit supports 2-channel (L/R) audio and 5.1ch (Multi-channel) MPEG Audio 1/2 (only when the DIGITAL OUT coaxial
jack is used for connection). It does not support 7.1 channel MPEG Audio Version 2.0.
3
• When playing back a CD-G (Graphics) or CD EXTRA disc, the audio portion will be played, but the graphic images will not
be shown.
Type of subtitles
recorded
2
1. English
2. Chinese
LB
16:9
Screen aspect
ratio recorded
2
multiple
camera angles
2
Region code indicatorDisc with
Title, Chapter and Tracks
• DVDs are divided into “titles” and “chapters”. If the disc has more than one movie on it, each movie would be
a separate “title”. “Chapters”, on the other hand, are sections of titles.
Example: DVD
Title 1
Chapter 1 Chapter 2 Chapter 3 Chapter 1 Chapter 2
Title 2
• Audio CDs are divided into “tracks”. You can think of a “track” as one tune on an Audio CD.
Example: Audio CD
Track 1 Track 2 Track 3 Track 4 Track 5
• Numbers identify each title, chapter, and track on a disc. Most discs have these numbers recorded on them, but some do
not.
GB-10
DVNC65SE009_013.pm6 7/10/02, 4:05 pm10
Page 10
Handling Precautions
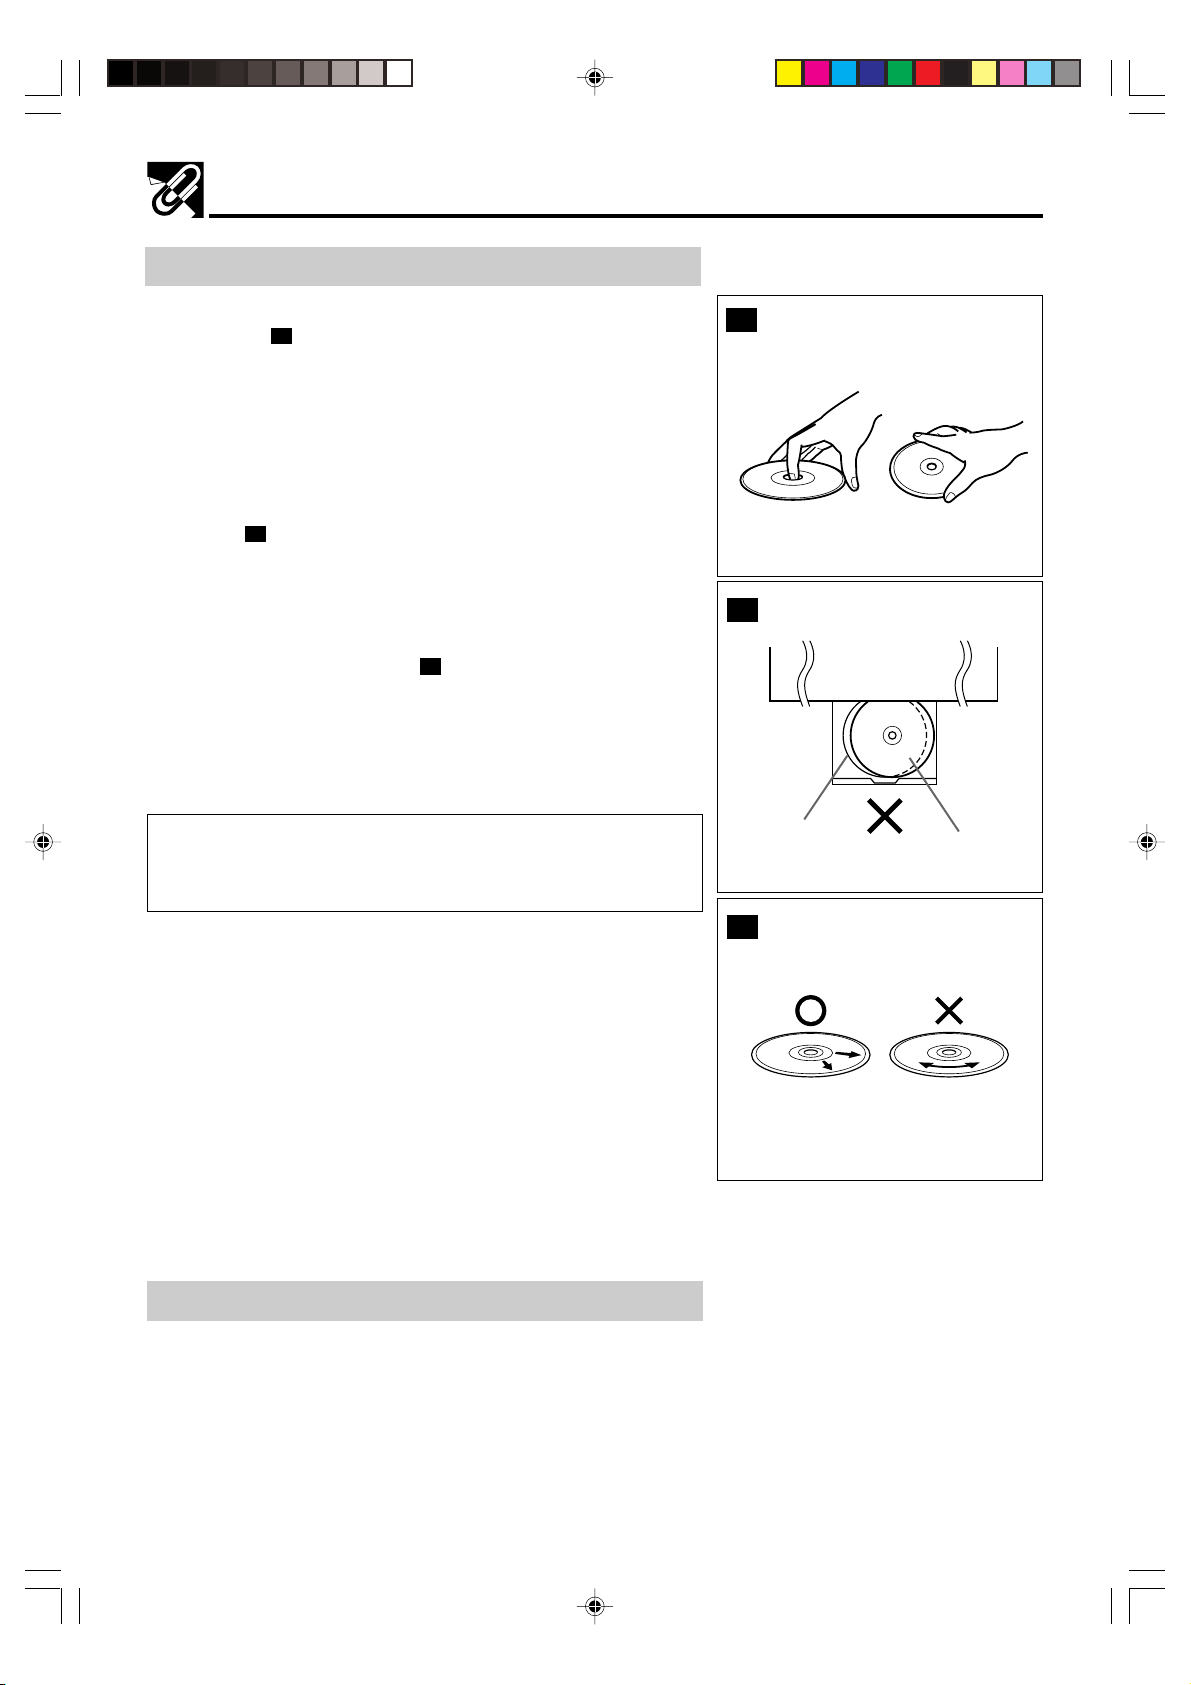
Disc Handling and Maintenance
• Hold the disc by the edges so the surface will not be soiled with
(
fingerprints.
Fingerprints, dirt and scratches can cause skipping and distortion.
• Do not write on the label side with a ball-point pen or other writing
utensils.
• Do not use record cleaning sprays, benzine, thinner, static electricity
prevention liquids or any other solvent.
• Be careful not to drop or bend the disc.
• Do not install more than 1 disc on the disc tray.
• Do not try to close the disc tray when the disc is not installed
properly.
• Be sure to store the disc in its exclusive case when not in use.
Then store upright.
• Do not stick paper or adhesive labels to the disc.
)
A
(
)
B
If the Surface is Soiled (C)
Wipe gently with a soft, damp (water only) cloth.
When wiping discs, always move the cloth from the center hole
toward the outer edge.
(If you wipe the discs using a circular motion, circular scratches are
likely to occur, which will cause noise.)
If the playing surface of a disc is soiled or scratched, the Unit may
decide that the disc is incompatible and eject the disc tray, or it
may fail to play the disc correctly. Wipe any soiling off the playing
surface with a soft cloth.
A
B
Disc tray
C
Disc
If the Disc is Brought from a Cold to a Warm
Environment, Dew May Form on the Disc
Wipe the dew off with a soft, dry, lint-free cloth before using the disc.
Improper Disc Storage
You can damage discs if you store them in the following places:
• Areas exposed to direct sunlight
• Humid or dusty areas
• Areas directly exposed to a heat outlet or heating appliance
Maintenance
• Be sure to turn the Unit off and disconnect the AC power cord
before maintaining the Unit.
• Wipe this Unit with a dry soft cloth.
If the surfaces are extremely dirty, wipe clean with a cloth which
has been dipped in a weak soap-and-water solution and wrung
out thoroughly and then wipe again with a dry cloth.
• Never use alcohol, benzine, thinner, cleaning fluid or other
chemicals. And do not use compressed air to remove dust.
GB-11
DVNC65SE009_013.pm6 7/10/02, 4:05 pm11
Page 11
Features
■ Common Features
• A DVD, AUDIO CD player and VCR all in one.
• Simultaneous VCR recording and DVD playback.
■ VCR
• Hi-Fi Stereo Sound/Double-Azimuth 4-Heads
• 1 minute Rewind (E-180)
• S-VHS Simple Playback
• HQ (High Quality) Circuitry
• Simple Recording Timer
• Sharp Super Picture
■ DVD
• Plays DVD and Audio CD discs as well as CD-R/CD-RW discs recorded in MP3 file format
• Advanced Surround provides high-quality surround sound
• Digital Gamma correction and Digital Super Picture functions
• Dolby Digital*
• High-quality digital images
• High-quality digital sound
*1 Manufactured under license from Dolby Laboratories. “Dolby”, “Pro Logic” and the double-D symbol are
trademarks of Dolby Laboratories.
*2 “DTS” and “DTS Digital Surround” are trademarks of Digital Theater Systems, Inc.
1
, DTS*2, MPEG Audio digital out capability
Disc Features and this Operation Manual
• The types of functions and operations that can be used for a particular disc vary depending on the
features of that disc. In some cases, these functions and operations may differ from the descriptions given
in this Operation Manual. In this event, follow the instructions given on the screen. This Operation Manual
only covers basic disc operations.
• For some operations, the or indicator may appear on the TV screen. This indicates that
the operation described in this Operation Manual is not permitted for the current disc.
GB-12
DVNC65SE009_013.pm6 7/10/02, 4:05 pm12
Page 12
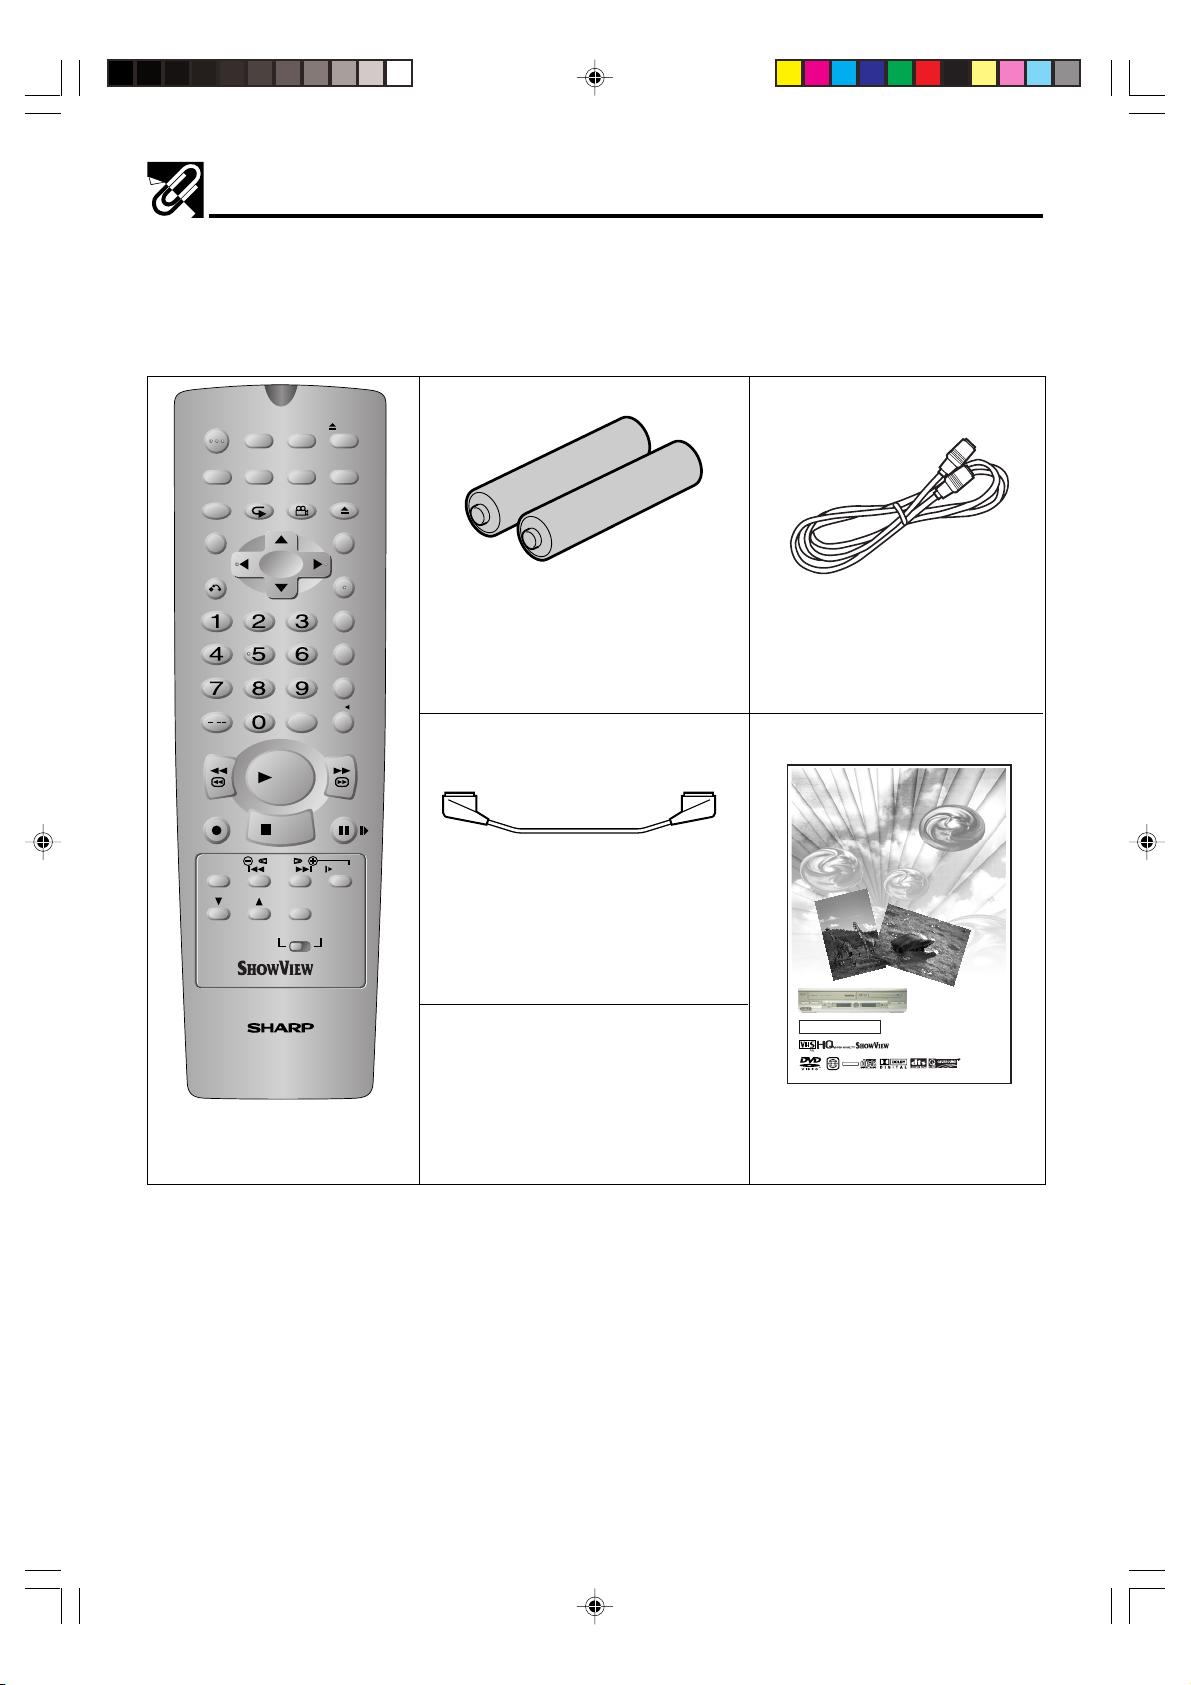
Accessories
CHECK THAT ALL THESE ACCESSORIES ARE SUPPLIED WITH YOUR VCR.
CONTACT YOUR DEALER IF ANY ARE MISSING.
TIMER
OPERATE
ON/OFF
SHOWVIEW
EJECT
VCR/ DVD
DISPLAY
FUNCTION
CONTROL
TITLE
ON
SCREEN
PROG/
REPEAT
SELECTOR
ANGLE
VCR MENU
DVD SETUP
OPEN/
CLOSE
DVD MENU
CLEAR
RETURN
/
REV FWD
INPUT SELECT
SET
ENTER
ZERO BACK
SKIP SEARCH
TV/VCR
VCR DVDAM/PM
PLAY
REC
TAPE
SPEED
CH
VCR/DVD COMBINATION
RRMCGA055WJSA
STOP
DPSS
SKIP
AUDIO
OUTPUT
VCR DVD
PAUSE/STILL
SLOW
Remote control unit
Two batteries
(R6 UM/SUM-3 or AA)
for the Remote
SCART lead
(FULL Type)
Quick Start Guide
Round coaxial cable
(75 Ohm)
SHARP
VCR/DVD COMBINATION
COMBINATION VCR/DVD
DV-NC65S
Denna DVD-spelare har regionkod 2.
The region number for this Unit is 2.
NTSC/PAL
2
®
BRUKSANVISNING
OPERATION MANUAL
®
Operation Manual
Remote Control
• The remote control must be pointed towards the Uunit to operate.
• Do not expose to liquid or shock.
• May not function if the Unit is in direct sunlight or any other strong light.
• Replace both alkaline batteries (type AA/R6/UM3) if the remote control fails.
• Remove the batteries and keep in a safe place if you do not plan to use the Unit for several months.
• Remove and dispose of flat batteries safely and promptly.
• Incorrect use of batteries may cause them to leak or burst.
DVNC65SE009_013.pm6 9/10/02, 10:07 am13
GB-13
Page 13
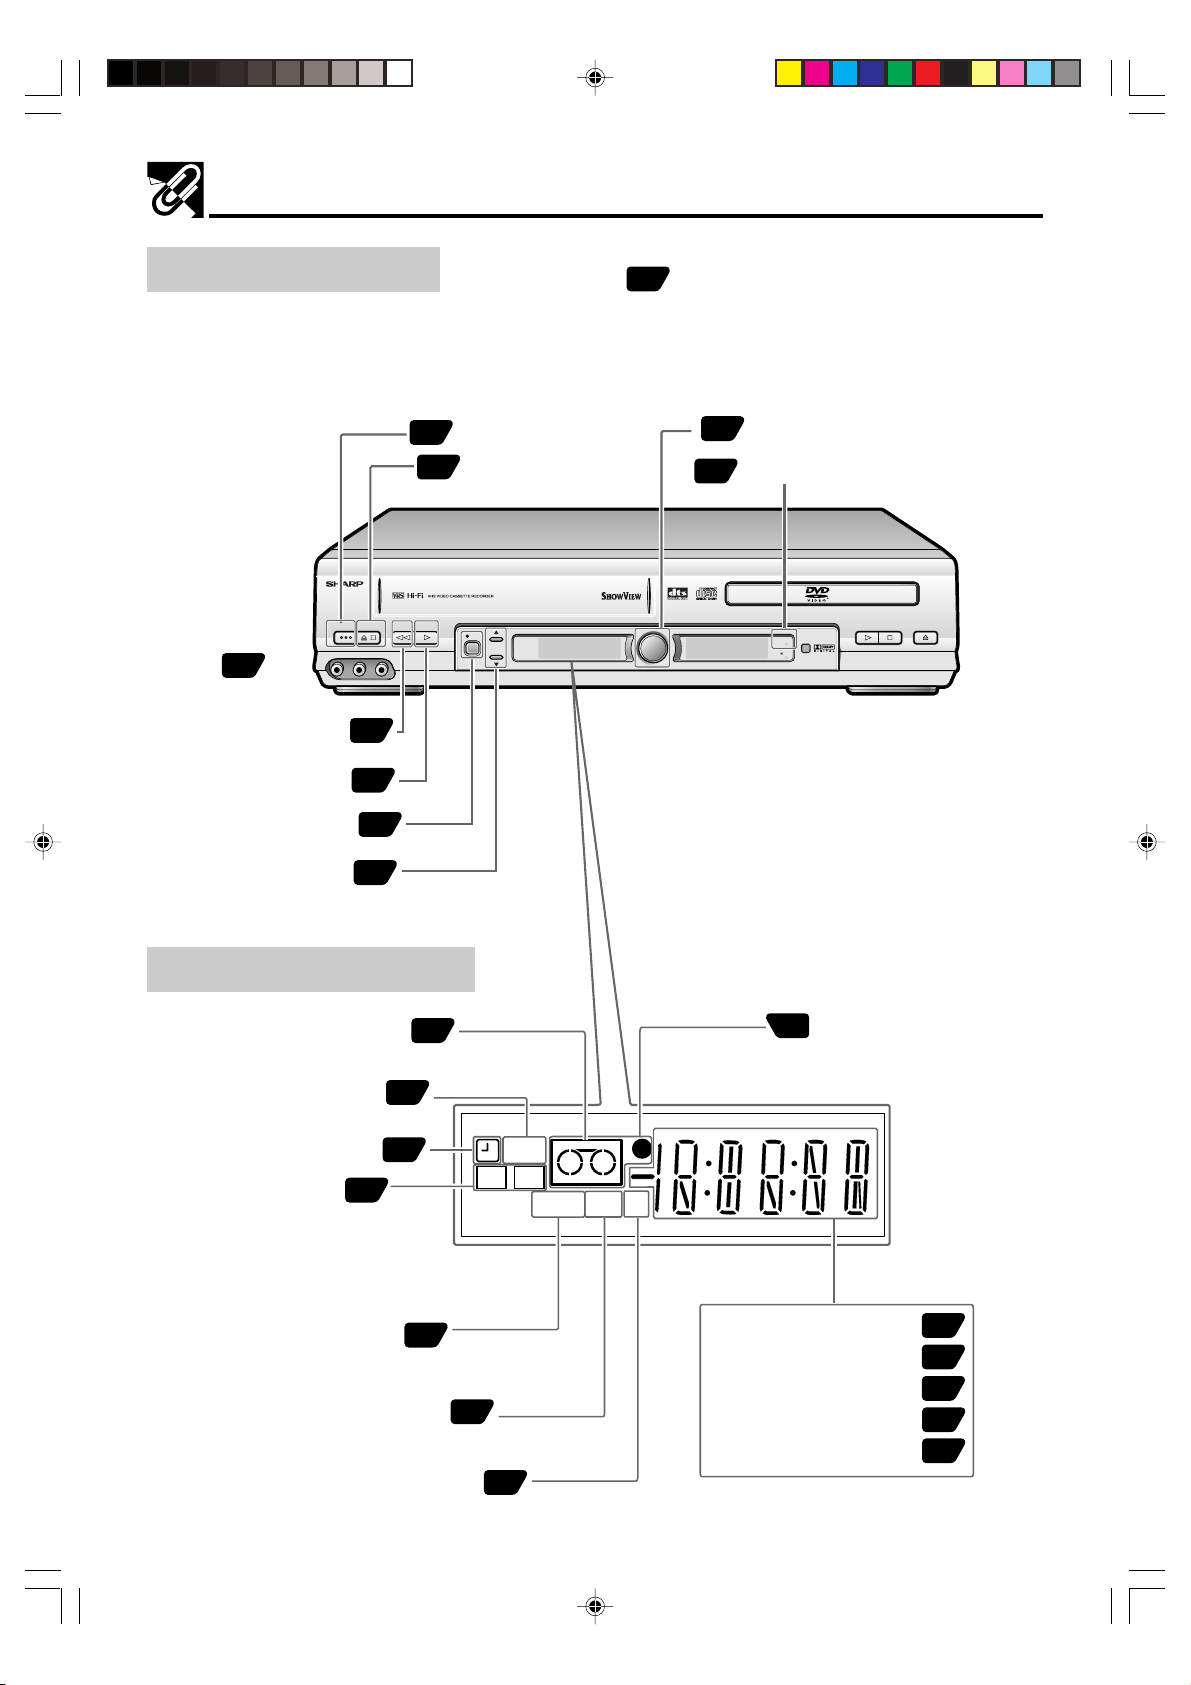
Major Components
VCR Main Unit (Front)
Front AUDIO/
VIDEO input
70
jack
PLAY/X2
DV-NC65
OPERATE
LINE IN 3 VIDEO L - AUDIO - R
REW
REC
EJECT/STOP
55
54
63
PAL
REW
/
OPERATE
24
EJECT/STOP
54
PLAY/X2
REC
Numbers in refer to the main pages in this
Operation Manual where the topic is explained.
VCR/DVD SELECTOR
24
TIMER indicator
63
DVD / CD PLAYER
CH
VCR/DVD
SELECTOR
VCR DVD
TIMER
STOP
OPEN/CLOSE
PLAY
CH K/L
54
VCR Front Panel Display
Cassette-in Indicator
VCR Mode
Indicator
Timer Recording
Indicator
Audio Output
Indicator
59
Tape Speeds
Indicator
Video Programming System/
Programme Delivery Control
Decoder Indicator
54
37
63
63
Indicator
65
VCR
L R
SEPVP D
37
Recording Indicator
63
Clock Indicator
Channel Indicator
Tape Counter Indicator
Tape Status Indicator
Tape Remain Indicator
38
63
38
38
38
GB-14
DVNC65SE014_018.pm6 7/10/02, 4:16 pm14
Page 14
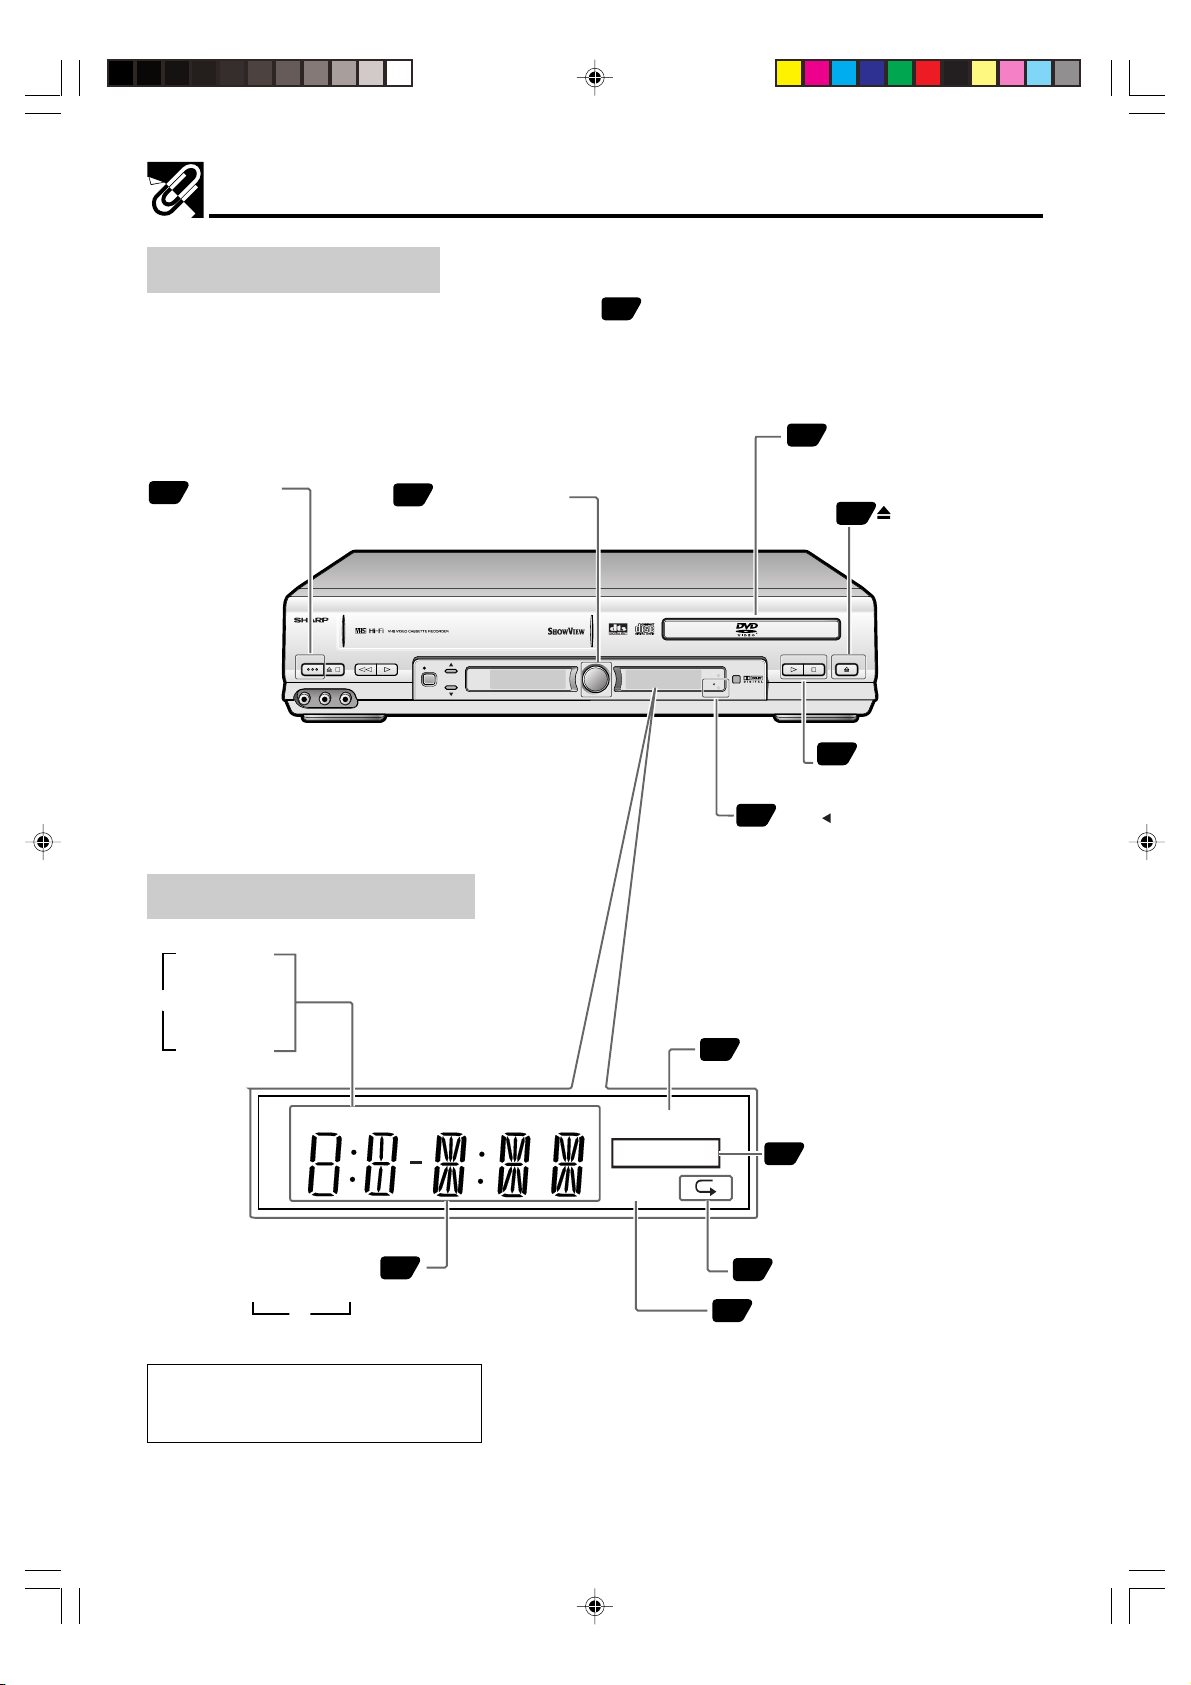
DVD Main Unit (Front)
OPERATE
24
24
Numbers in refer to the main pages in this
Operation Manual where the topic is explained.
VCR/DVD
Selector/Indicator
75
Major Components
Disc tray
OPEN/CLOSE
75
DV-NC65
OPERATE
LINE IN 3 VIDEO L - AUDIO - R
EJECT/STOP
PAL
PLAY/X2
REW
/
REC
DVD Front Panel Display
TITLE
indicator
1
TRACK
indicator
CHAPTER
indicator
TITLE
TRACK
CHAPTER
DVD / CD PLAYER
CH
VCR/DVD
SELECTOR
VCR DVD
TIMER
STOP
OPEN/CLOSE
PLAY
Disc operation buttons
75
(PLAY, STOP)
72
VCR DVD indicator
PROGRAM indicator
91
TOTAL
PROGRAM
VIRTUAL
ANGLE
A B
VIRTUAL surround
86
indicator
Operation status/
Time indicator
2
You can toggle between 1 and 2 by
pressing the remote control unit’s
DISPLAY button (page 51).
DVNC65SE014_018.pm6 7/10/02, 4:16 pm15
51
REPEAT indicator
93
ANGLE indicator
84
GB-15
Page 15
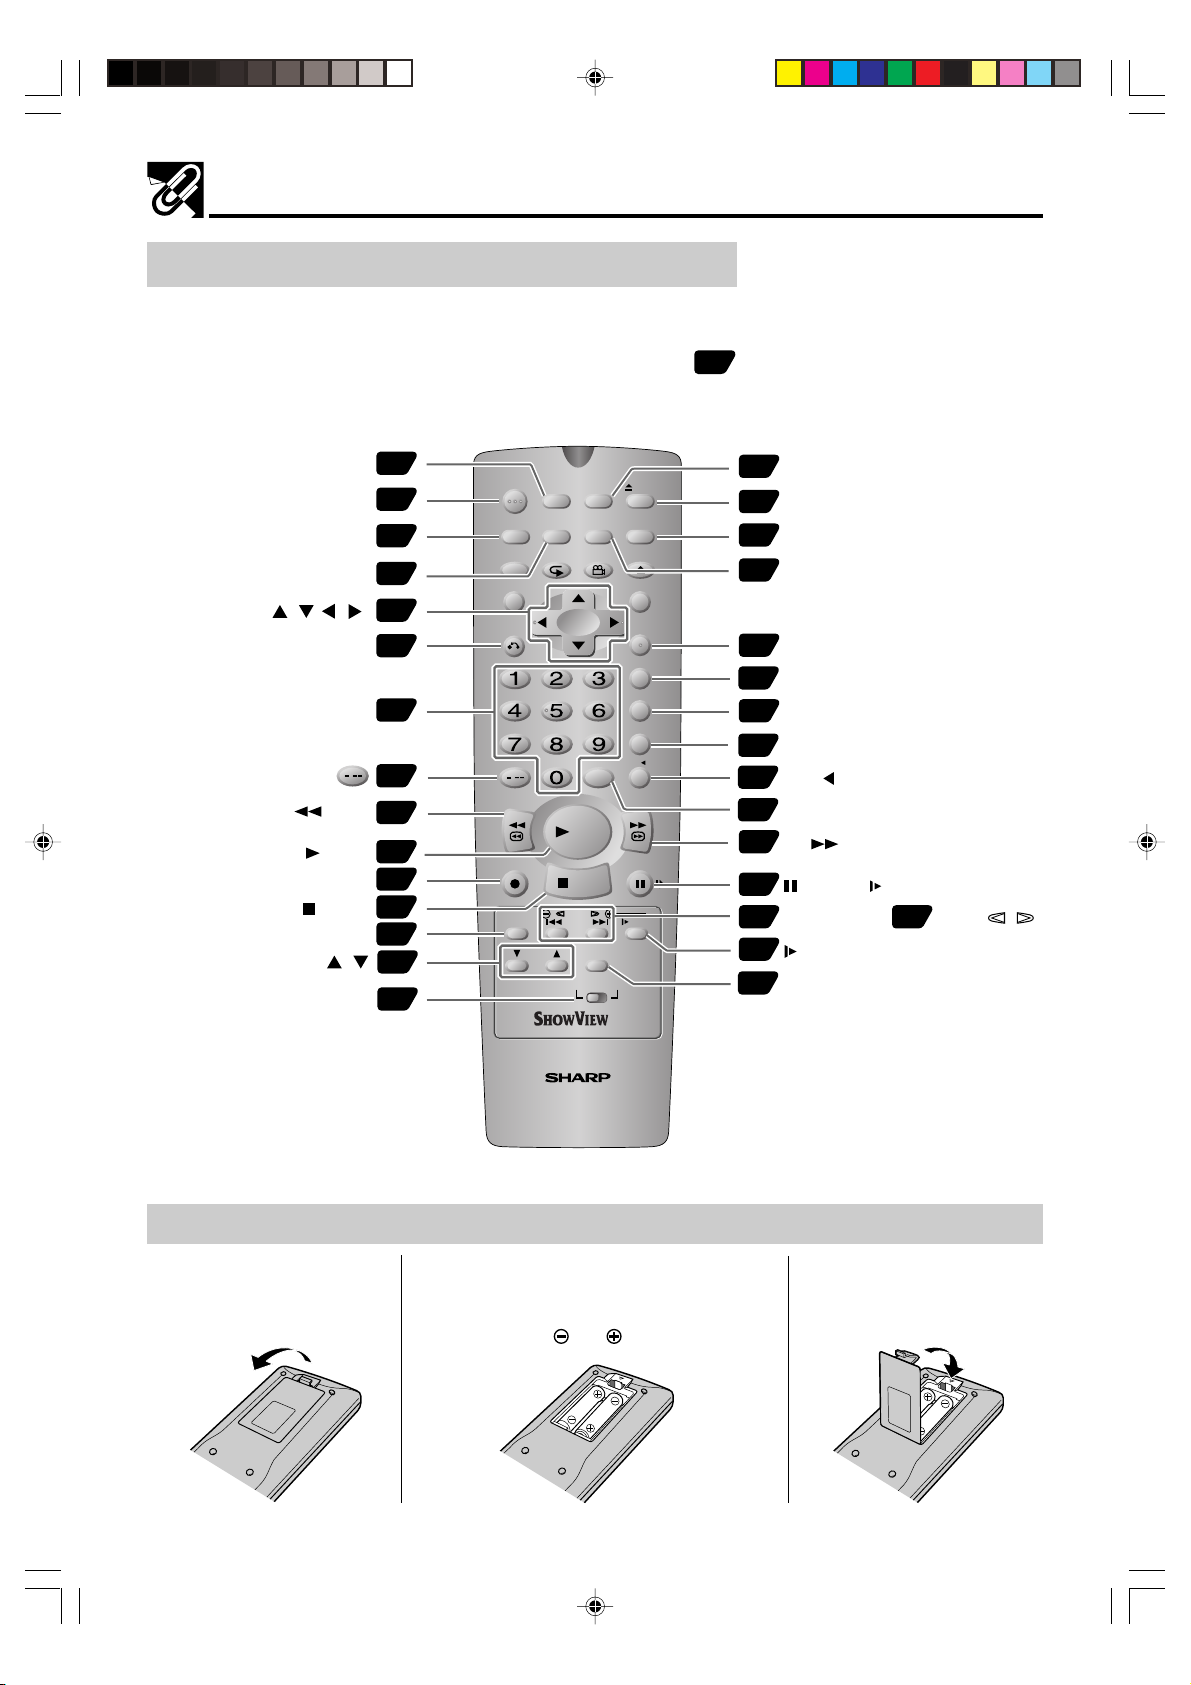
Major Components
Remote (VCR Operation Buttons)
• The explanations on this page use the VCR/DVD CHANGE Switch in the VCR position.
Numbers in refer to the main pages in this
Operation Manual where the topic is explained.
TIMER ON/OFF
OPERATE
DISPLAY
ON SCREEN
CURSOR ( / / / )
CLEAR
Number buttons
AM/PM or
/
REW
PLAY
REC
Æ
STOP
TAPE SPEED
CH /
VCR/DVD CHANGE Switch
63
24
51
38
27
32
63
35
55
54
63
54
63
63
24
TIMER
OPERATE
ON/OFF
SHOWVIEW
ON
CH
SCREEN
PROG/
REPEAT
VCR/ DVD
SELECTOR
ANGLE
INPUT SELECT
PLAY
STOP
DPSS
SKIP
AUDIO
OUTPUT
VCR DVD
DISPLAY
FUNCTION
CONTROL
TITLE
CLEAR
RETURN
/
REV FWD
REC
TAPE
SPEED
EJECT
VCR MENU
DVD SETUP
OPEN/
CLOSE
DVD MENU
SET
ENTER
ZERO BACK
SKIP SEARCH
TV/VCR
VCR DVDAM/PM
PAUSE/STILL
SLOW
64
S
HOWVIEW
54
EJECT
27
VCR MENU
24
VCR/DVD SELECTOR
26
SET
61
ZERO BACK
62
SKIP SEARCH
37
TV/VCR
72
VCR DVD
70
INPUT SELECT
55
FF
55
PAUSE/ STILL
55
SLOW —/±, DPSS /
54
SLOW
59
AUDIO OUTPUT
62
Loading the Batteries
1 Open the battery cover
by pulling the lid in the
direction of the arrow.
GB-16
DVNC65SE014_018.pm6 9/10/02, 10:10 am16
VCR/DVD COMBINATION
RRMCGA055WJSA
2 Load the batteries.
Load the two batteries (R6 UM/SUM-3 or
AA) supplied with the Remote so that the
battery poles and are positioned as
indicated.
3 Close the battery cover
by lowering the lid in the
direction of the arrow.
Page 16
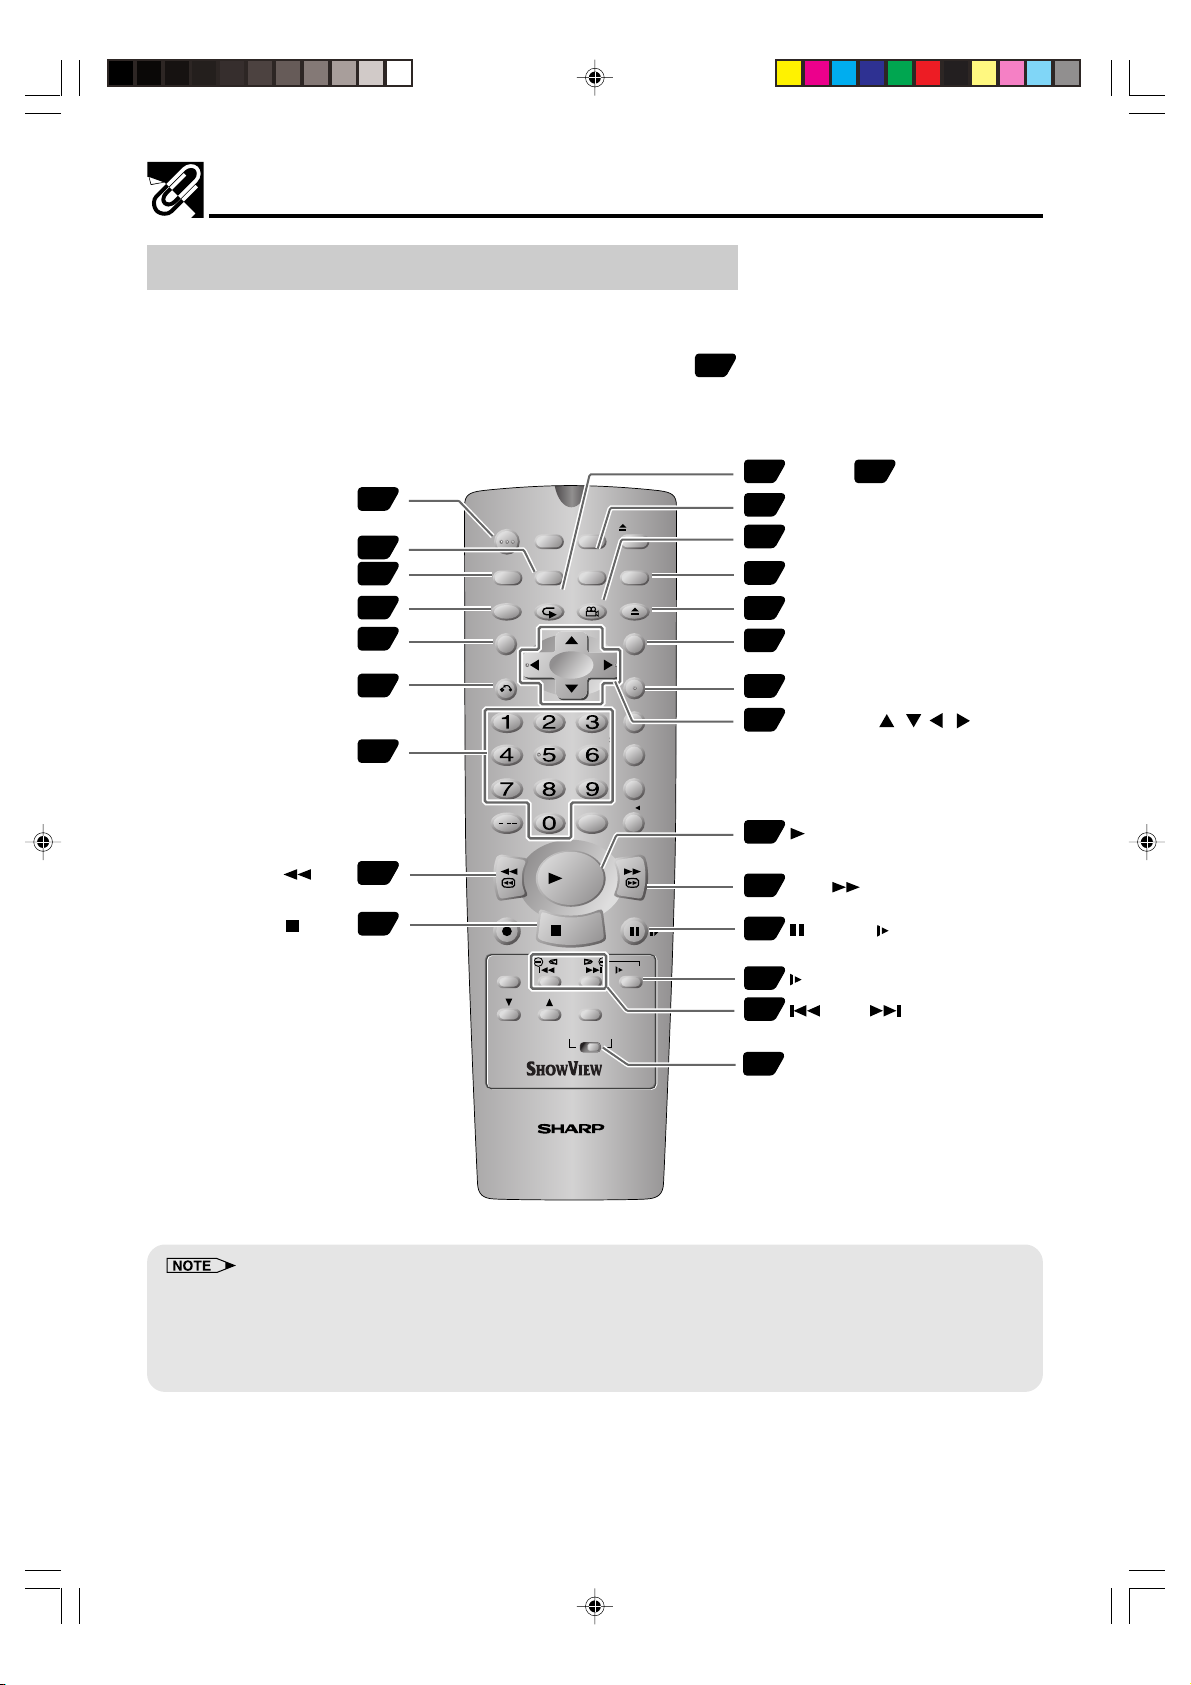
Remote (DVD Operation Buttons)
• The explanations on this page use the VCR/DVD CHANGE Switch in the DVD position.
Numbers in refer to the main pages in this
Operation Manual where the topic is explained.
89 92
PROG, REPEAT
REV
24
51
51
81
88
42
43
76
75
TIMER
OPERATE
ON/OFF
SHOWVIEW
VCR/ DVD
ON
DISPLAY
FUNCTION
CONTROL
TITLE
CLEAR
RETURN
/
REV FWD
REC
TAPE
SPEED
CH
SCREEN
PROG/
REPEAT
SELECTOR
ANGLE
INPUT SELECT
PLAY
STOP
DPSS
SKIP
AUDIO
OUTPUT
VCR DVD
EJECT
VCR MENU
DVD SETUP
OPEN/
CLOSE
DVD MENU
SET
ENTER
ZERO BACK
SKIP SEARCH
TV/VCR
VCR DVDAM/PM
PAUSE/STILL
SLOW
74
VCR/DVD SELECTOR
78
ANGLE
41
DVD SETUP
75
OPEN/CLOSE
88
DVD MENU
39
ENTER
CURSOR ( / / / )
41
75
PLAY
76
FWD
77
PAUSE/ STILL
76
SLOW
77
24
SKIP
VCR/DVD CHANGE Switch
OPERATE
ON SCREEN
DISPLAY
FUNCTION CONTROL
TITLE
RETURN
Number buttons
STOP
Major Components
VCR/DVD COMBINATION
RRMCGA055WJSA
• Do not subject the Remote to shock, water or excessive humidity.
• The Remote may not function if the Unit sensor is in direct sunlight or any other strong light.
• Incorrect use of batteries may cause them to leak or burst. Read the battery warnings and use the batteries properly.
• Do not mix old and new batteries, or mix brands in use.
• Remove the batteries if you do not use the Remote for an extended period of time.
DVNC65SE014_018.pm6 7/10/02, 4:16 pm17
GB-17
Page 17
Major Components
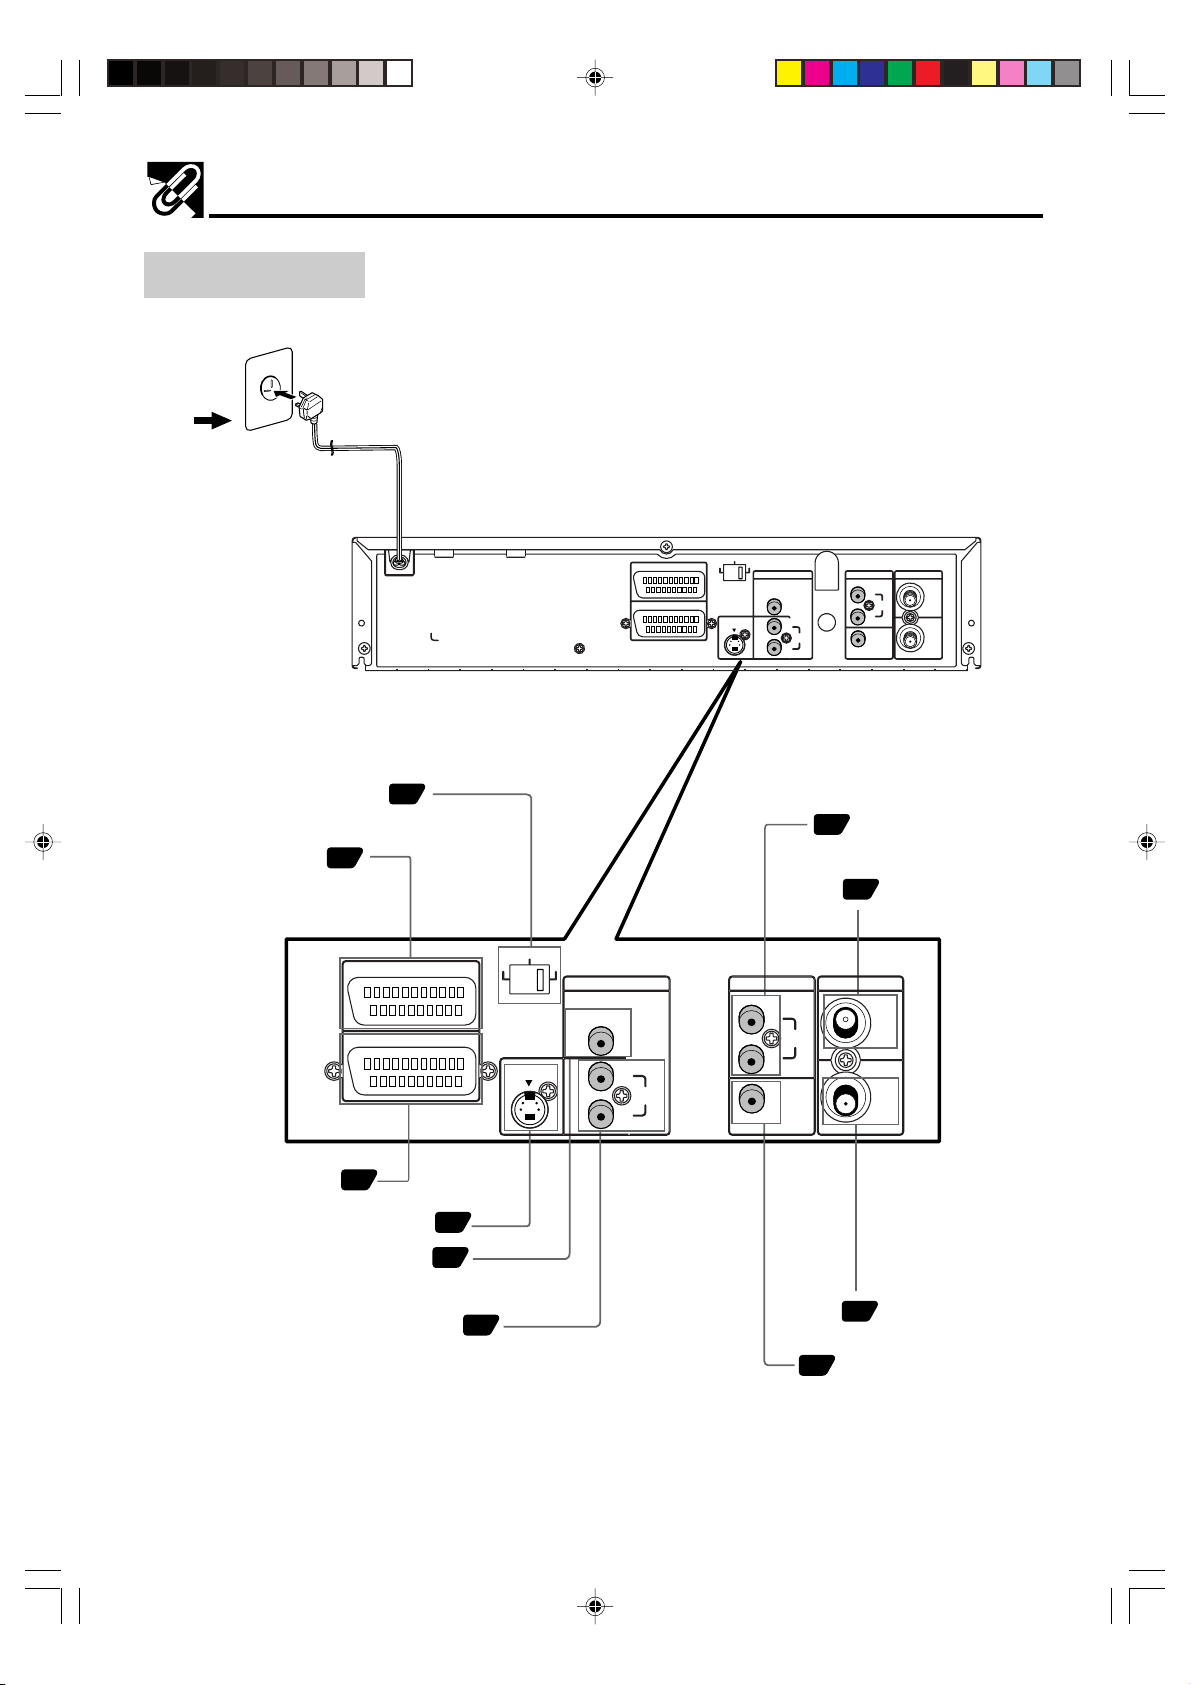
Main Unit (Rear)
To an AC outlet
LINE 2
LINE 1 (TV)
RGB
S-VIDEO
OUTPUT
SELECTOR
S-VIDEO
VIDEO
AUDIO
DVD OUT
ANTENNA
VCR/DVD OUT
R
R
AUDIO
L
L
VIDEO
IN
AUDIO
OUT
OUTPUT SELECTOR
SCART LINE 2 socket
SCART LINE 1 (TV) socket
20
20
DVD S-VIDEO output jack
DVD DIGITAL AUDIO output jack
DVD AUDIO output jacks
20
LINE 2
LINE 1 (TV)
22
23
22
RGB
S-VIDEO
OUTPUT
SELECTOR
S-VIDEO
VIDEO
DVD OUT
AUDIO
VCR/DVD shared
21
AUDIO output jacks
ANTENNA IN (antena
19
or cable input)
VCR/DVD OUT
R
R
AUDIO
L
L
VIDEO
ANTENNA
AUDIO
21
IN
OUT
ANTENNA OUT
19
VCR/DVD shared VIDEO
output jack
GB-18
DVNC65SE014_018.pm6 9/10/02, 10:17 am18
Page 18
Basic Connection
Caution:
• Be sure to turn off the Unit and equipment to be connected before connecting.
• Read through the operation manual for the equipment to be connected.
•
Be sure that the colours of the jacks and plugs match up when using a VIDEO/AUDIO lead (commerially available)
• Be sure to keep the Unit connection leads separate from the TV aerial lead when you install the Unit,
because it may cause electrical interference when you are watching television programmes.
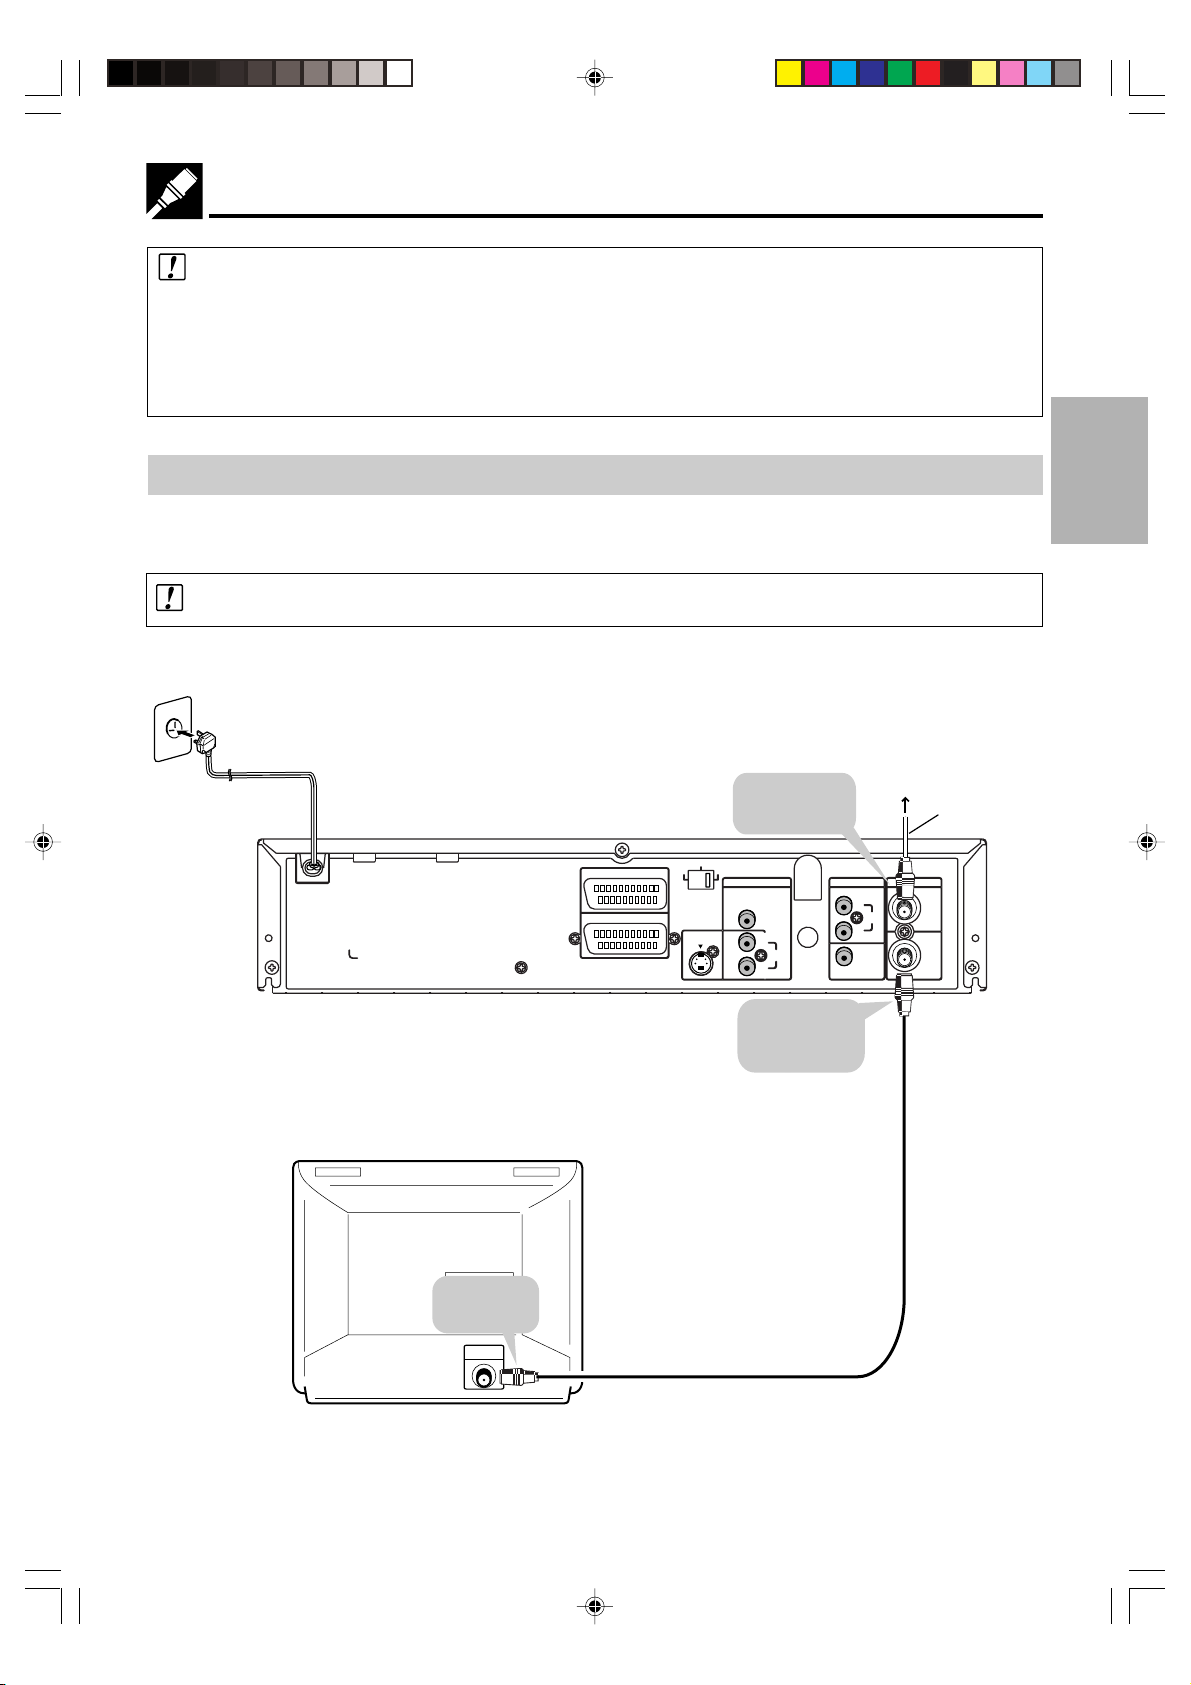
Connecting to ANTENNA IN/ANTENNA OUT
The connection method differs depending on the type of TV.
The signal from ANTENNA OUT will only be the Television Signal. A scart lead MUST be used to view the units’
playback signal.
.
CONNECTION AND
INITIAL SETTINGS
To antenna
input jack
TV
S-VIDEO
LINE 2
LINE 1 (TV)
RGB
OUTPUT
SELECTOR
S-VIDEO
Round coaxial cable
(RF connection cable)
(supplied)
To ANTENNA
IN jack
VIDEO
DVD OUT
AUDIO
R
AUDIO
L
To ANTENNA
OUT jack
VCR/DVD OUT
R
L
VIDEO
Antenna
ANTENNA
AUDIO
Aerial cable
IN
OUT
DVNC65SE019_024.pm6 7/10/02, 4:35 pm19
GB-19
Page 19
Basic Connection
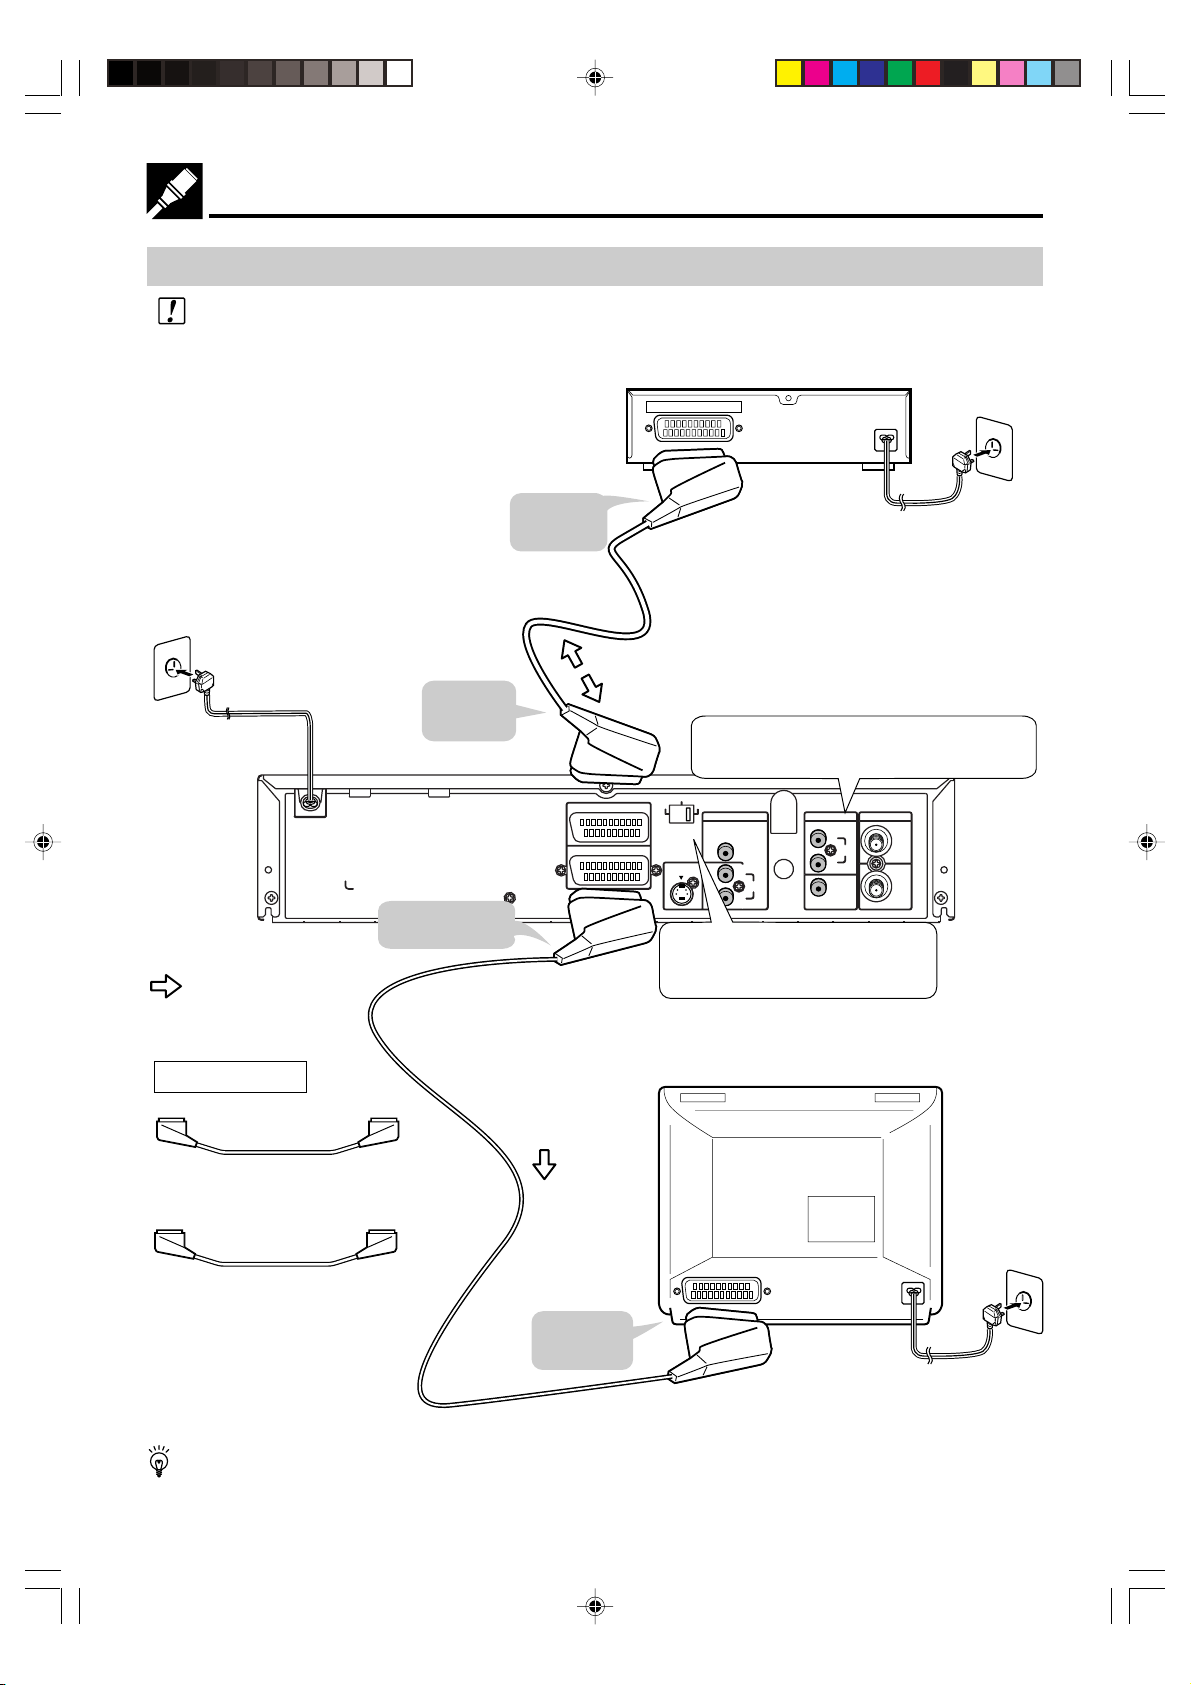
Connecting a TV with LINE 1 (TV) Output and LINE 2 Input SCARTS
Use the SCART leads (one SCART lead: supplied) to connect the Unit to your TV and VCR or
DECORDER.
VCR or DECODER
SCART OUTPUT
To SCART
output
To LINE 2
SCART
VCR/DVD OUT jacks can be used instead of
LINE 1(TV), depending on your TV.
: Signal flow
Required leads
SCART lead (one SCART lead:
supplied)
SCART lead (the other SCART
lead: commercially available)
To LINE 1 (TV)
SCART
LINE 2
LINE 1 (TV)
To SCART
input
S-VIDEO
VIDEO
RGB
OUTPUT
SELECTOR
S-VIDEO
DVD OUT
AUDIO
VCR/DVD OUT
R
AUDIO
R
AUDIO
L
L
VIDEO
Change the position according to
the signal type (VIDEO/S-VIDEO/
RGB) that is output to TV during
DVD playback.
ANTENNA
IN
OUT
TV
The factory default setting for the OUTPUT SELECTOR is “VIDEO”. If your TV supports the higher quality
modes S-VIDEO or RGB via the SCART, then please set the selector for your preference.
GB-20
DVNC65SE019_024.pm6 7/10/02, 4:35 pm20
Page 20
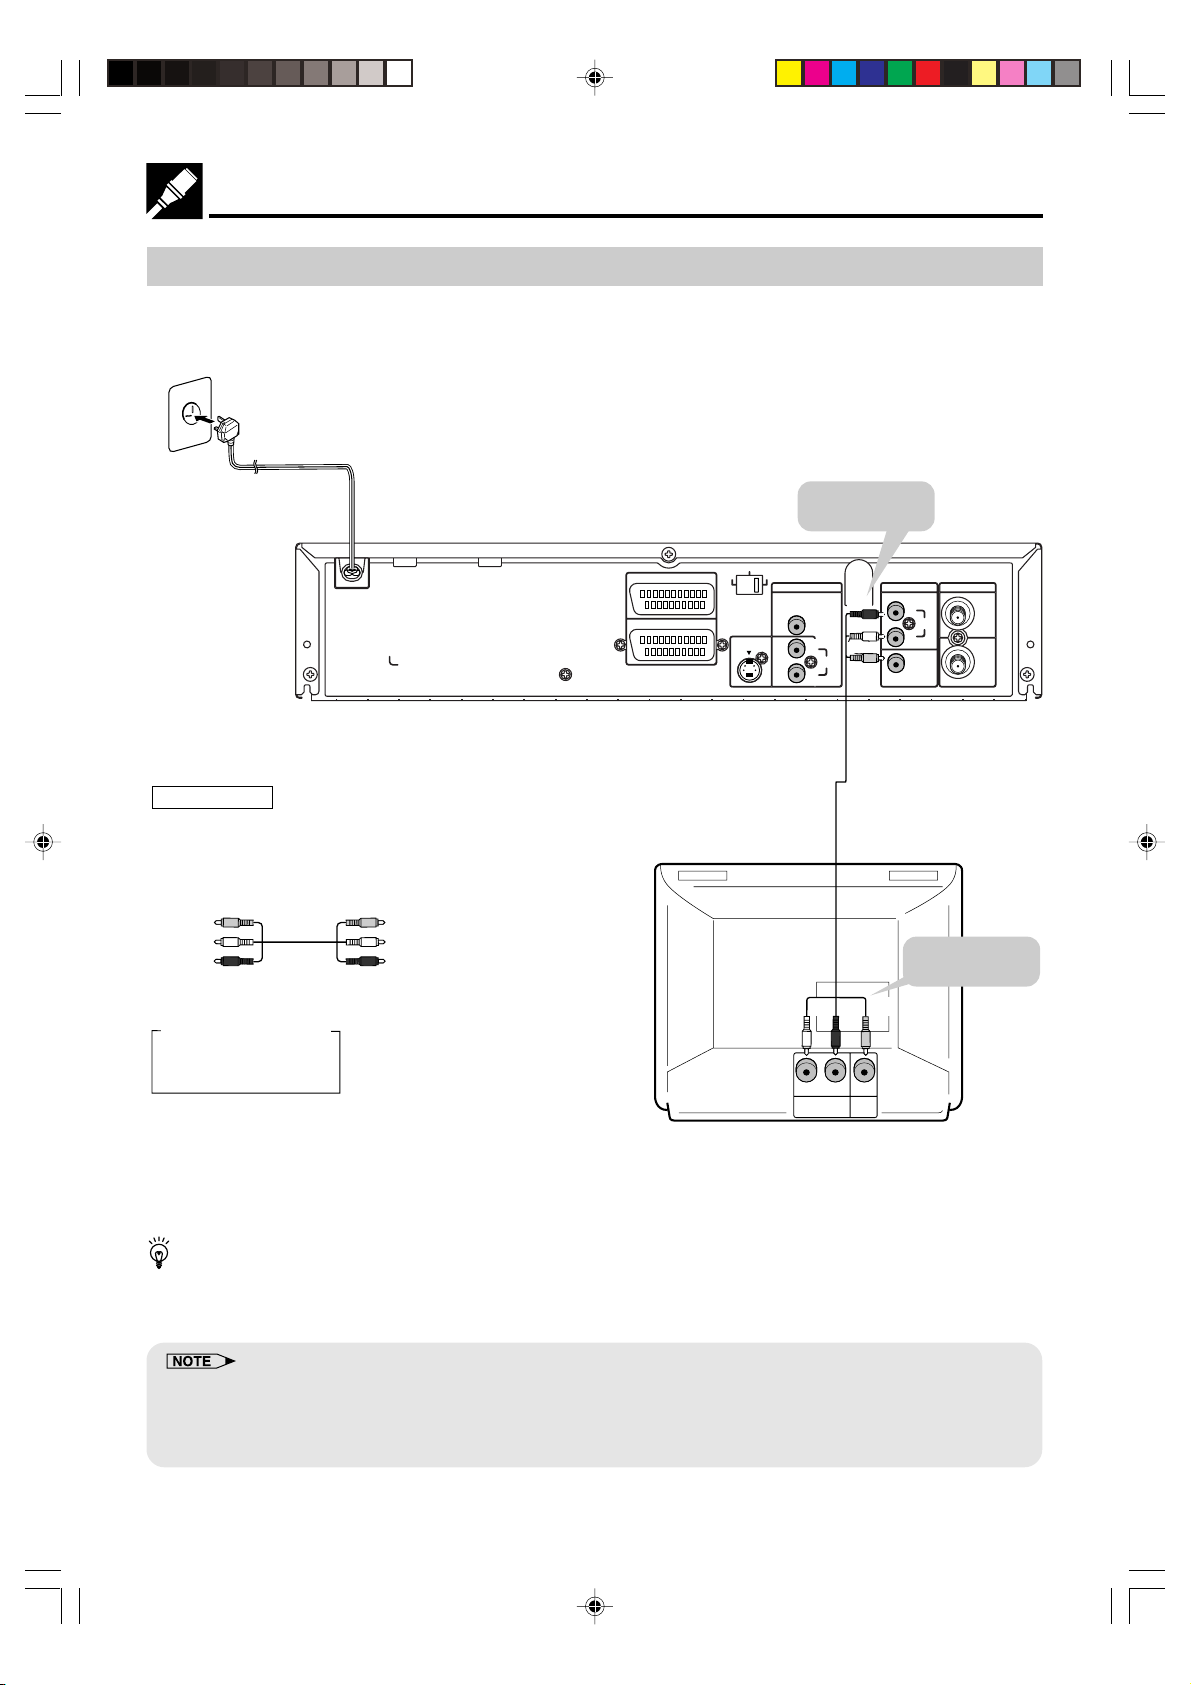
Connecting a TV Equipped with VIDEO/AUDIO Input Jacks
To VIDEO/AUDIO
OUT jacks
S-VIDEO
VIDEO
LINE 2
LINE 1 (TV)
RGB
OUTPUT
SELECTOR
S-VIDEO
DVD OUT
AUDIO
R
AUDIO
L
Basic Connection
VCR/DVD OUT
(Red)
R
(White)
(Yellow)
AUDIO
L
VIDEO
ANTENNA
IN
OUT
Required leads
VIDEO/AUDIO lead
(commercially available)
Yellow
White (L)
Red (R)
Jack and Plug Colours
Video : Yellow
Audio Left : White
Audio Right
: Red
Yellow
White (L)
Red (R)
VIDEO/AUDIO lead
(commercially available)
(White)
(Red) (Yellow)
LR
VIDEO
AUDIO
IN
IN
To VIDEO/AUDIO
input jacks
TV (with external input jacks)
• You will not be able to hear all of the sound being output by the Unit if you use the VIDEO/AUDIO lead
shown above to a monaural TV that has only one AUDIO input jack.
• Be sure that the colours of the jacks and plugs match up when connecting the lead.
• Connect the Unit directly to the TV. If you attempt to view video on a TV connected via a VCR, the copy protection
function will scramble the picture.
• If you want to listen to the audio through audio equipment, connect only VIDEO lead to the TV.
DVNC65SE019_024.pm6 7/10/02, 4:35 pm21
GB-21
Page 21
DVD Audio Connections
Connecting a TV Equipped with S-VIDEO Input Jacks
When you want to achieve a better video image by connecting a TV equipped with an S-VIDEO input connector
to the Unit, you should use an S-VIDEO lead (commercially available) to connect the TV to the Unit.
Please note, if the Output Selector Switch is set to RGB, no signal will be output from the S-VIDEO socket.
Connecting to Audio Equipment
Connecting the Unit to audio equipment provides normal stereo sound plus powerful stereo sound enhanced
by Dolby Digital (5.1 channel), DTS, and MPEG Audio.
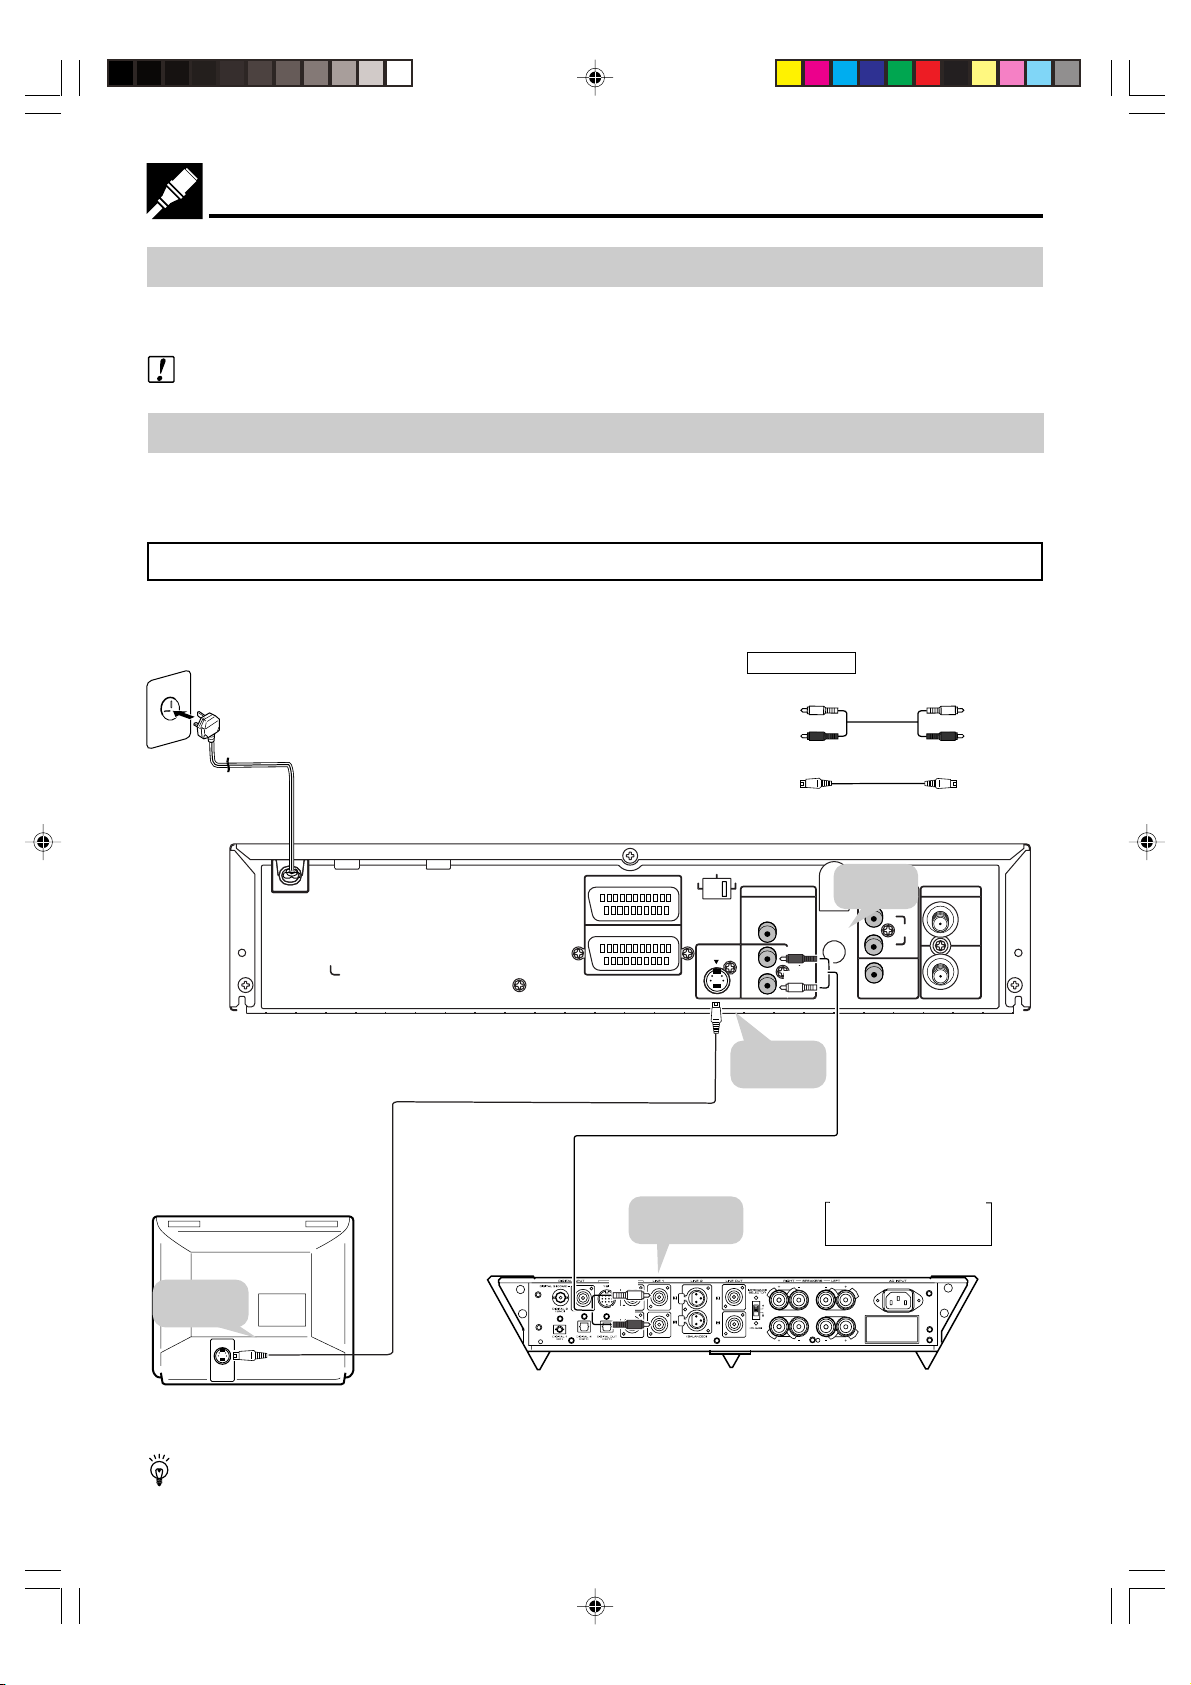
Playing 2 channel audio
■ Analogue Connection
Required lead
VIDEO/AUDIO lead (commercially available)
White (L)
Red (R)
S-VIDEO lead (commercially available)
White (L)
Red (R)
To S-VIDEO
input jack
S-VIDEO
INPUT
TV (with external input jacks)
LINE 2
LINE 1 (TV)
S-VIDEO lead
(commercially available)
To amplifier
audio input jacks
(White)
(Red)
S-VIDEO
VIDEO
RGB
SELECTOR
DVD OUT
OUTPUT
AUDIO
S-VIDEO
VIDEO/AUDIO lead
(commercially available)
(Red)
R
AUDIO
(White)
L
To S-VIDEO
OUT jack
Amplifier of stereo system, etc.
To AUDIO
VCR/DVD OUT
OUT jacks
Jack and Plug Colours
Audio Left: White
Audio Right: Red
R
L
VIDEO
AUDIO
ANTENNA
IN
OUT
If the Unit is set to OPERATE ON, the DVD signals will be output from the DVD OUT jacks at all times.
(The DVD signals will be output from the DVD OUT jacks also when using the VCR.)
GB-22
DVNC65SE019_024.pm6 7/10/02, 4:35 pm22
Page 22
DVD Audio Connections
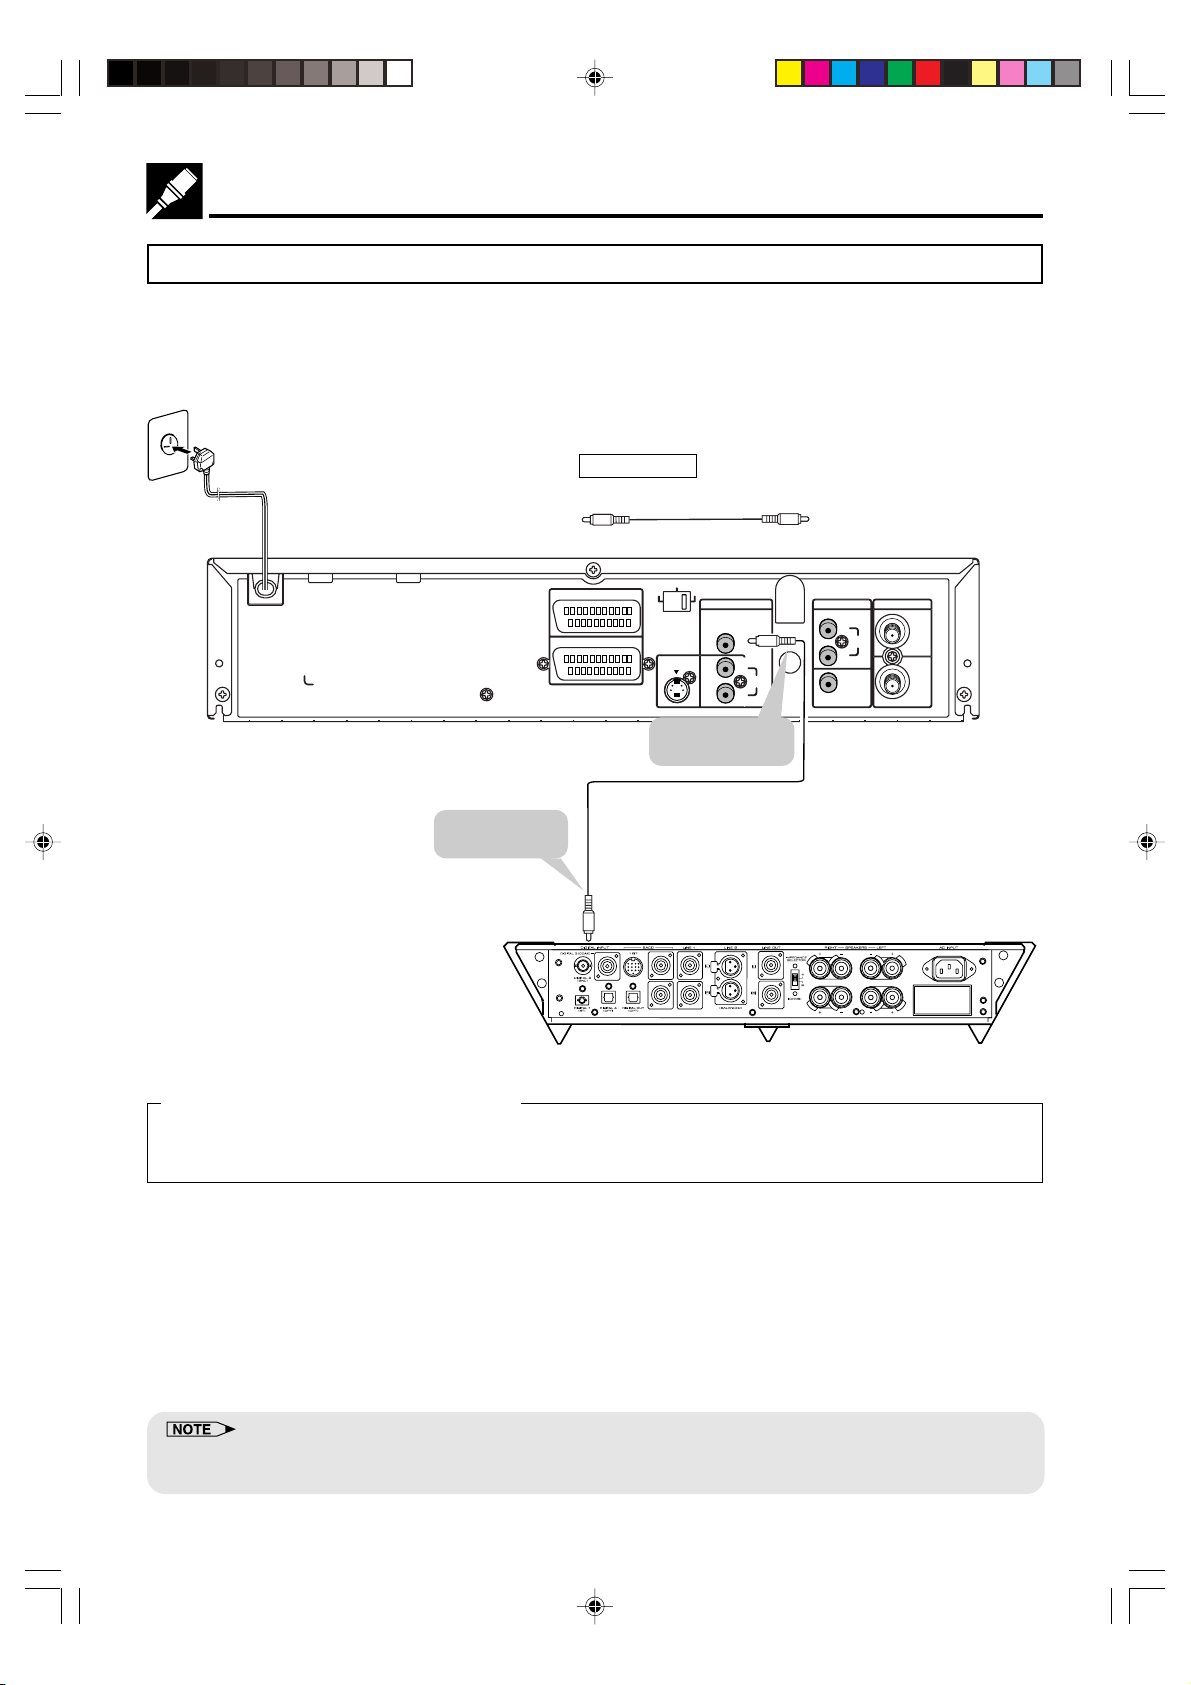
Playing Dolby Digital (5.1 channel), DTS or MPEG audio
Connecting an amplifier with a Dolby Digital/DTS/MPEG Audio digital surround processor or a Dolby Digital/
DTS/MPEG Audio surround processor to your Unit’s coaxial digital jack provides richer and more powerful
audio play.
■ Connection to a processor or amplifier with a coaxial digital input jack
Required lead
Coaxial digital lead (commercially available)
S-VIDEO
VIDEO
LINE 2
LINE 1 (TV)
RGB
SELECTOR
OUTPUT
S-VIDEO
DVD OUT
AUDIO
R
L
To coaxial
DIGITAL OUT jack
AUDIO
VCR/DVD OUT
R
AUDIO
L
VIDEO
ANTENNA
IN
OUT
Coaxial digital lead
To coaxial
(commercially available)
digital input jack
Audio equipment
Digital Connection to an MD to Record a CD
Some Audio CDs have a short silent section between musical tracks. When sound from discs such as these is
digitally recorded by connecting the Unit directly to a digital recorder (such as an MD player), the music may be
recorded continuously and track numbers may be lost.
■ Digital Connection to Audio Equipment or MD Player without a Dolby Digital Decoder
• Audio CD
Play the disc as you normally would, with the audio mode set to “L+R” (see page 85). With a digital
connection, audio of a disc recorded with DTS sounds abnormal in this case.
• DVD
With a digital connection, audio cannot be produced from a DVD recorded with Dolby Digital (5.1 channel),
Dolby Surround (Pro Logic), DTS or MPEG Audio, so you should use an analogue connection to play such
discs. Discs with linear PCM audio should play normally.
• This connection is not possible if the processor or amplifier to which you want to connect does not have a coaxial
digital input jack.
DVNC65SE019_024.pm6 7/10/02, 4:35 pm23
GB-23
Page 23
Preparations Before Using the Product
/
OPEN/
CLOSE
OPERATE
VCR/DVD
SELECTOR
VCR MENU
DVD SETUP
TAPE
SPEED
ON
SCREEN
TIMER
ON/OFF
TITLE
DVD MENU
DISPLAY
SHOWVIEW
EJECT
FUNCTION
CONTROL
PROG/
REPEAT
ANGLE
CLEAR
RETURN
REV FWD
SET
ENTER
ZERO BACK
SKIP SEARCH
TV/VCR
VCR DVDAM/PM
INPUT SELECT
PAUSE/STILL
REC
PLAY
STOP
SLOW
CH
VCR DVD
SKIP
DPSS
AUDIO
OUTPUT
VCR/DVD COMBINATION
RRMCGA071WJSA
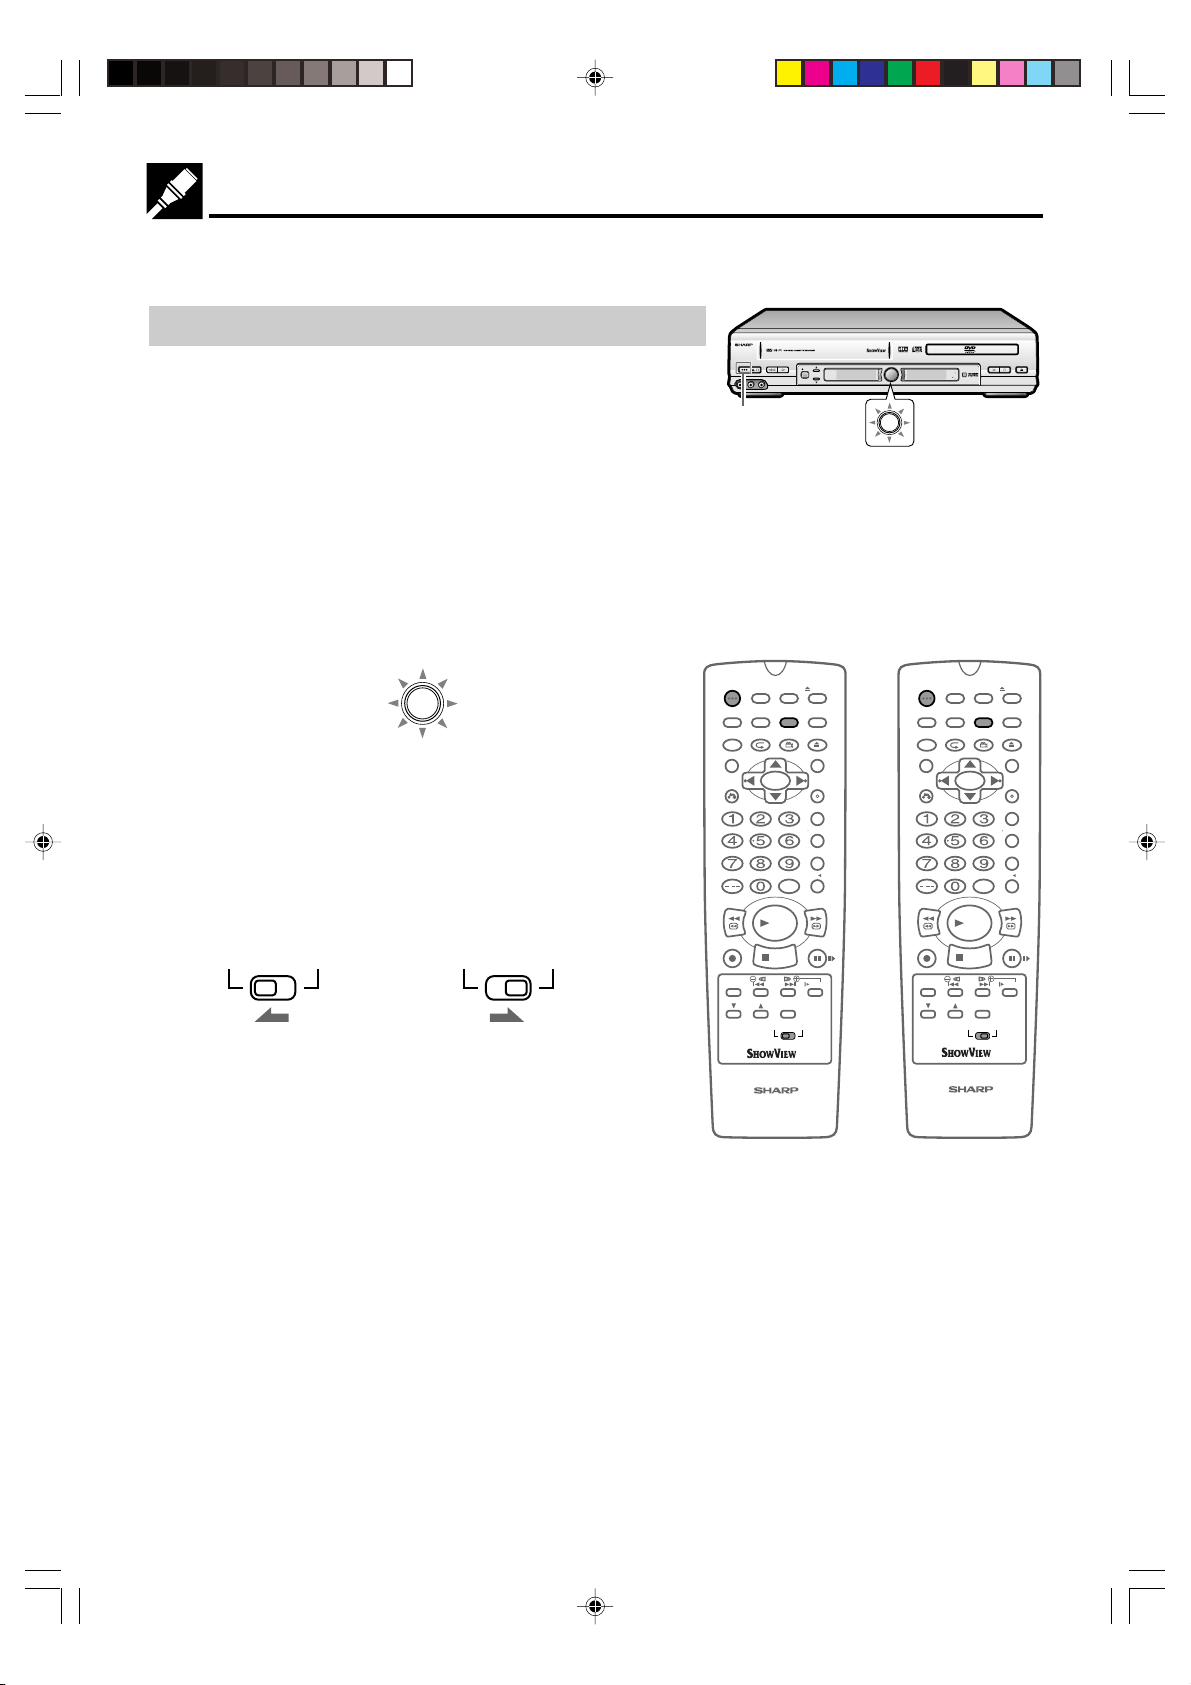
Preparing to Watch a VCR or a DVD
1 Turn on the TV and switch the TV channel to the external
“VIDEO” or “AV” channel connected to the DVD/VCR shared
output jacks.
2 Press OPERATE.
• The product is turned on.
3 Press VCR/DVD SELECTOR on the remote control to switch to
the “VCR” mode or “DVD” mode.
• The VCR/DVD SELECTOR on the product lights up in orange
for “VCR” or green for “DVD”.
VCR/DVD
SELECTOR
• Each time VCR/DVD SELECTOR is pressed, the mode
changes between “VCR” mode and “DVD” mode.
• The mode can be switched by pressing the VCR/DVD
SELECTOR on the product.
4 Move the VCR/DVD change switch on the remote control to
either “VCR” or “DVD”.
VCR DVD
The VCR functions on The DVD functions on
the remote will now the remote will now
take priority. take priority.
VCR DVD
DV-NC65
EJECT/STOP
OPERATE
/
LINE IN 3 VIDEO L - AUDIO - R
OPERATE
PAL
PLAY/X2
REW
REC
CH
VCR/DVD
SELECTOR
VCR/DVD
SELECTOR
DVD / CD PLAYER
TIMER
VCR DVD
VCR/DVD
SELECTOR
TIMER
OPERATE
SHOWVIEW
ON/OFF
ON
VCR/DVD
DISPLAY
SCREEN
SELECTOR
PROG/
FUNCTION
CONTROL
CLEAR
RETURN
ANGLE
REPEAT
TITLE
INPUT SELECT
/
REV FWD
PLAY
REC
STOP
DPSS
TAPE
SKIP
SPEED
AUDIO
CH
OUTPUT
VCR DVD
VCR/DVD COMBINATION
RRMCGA071WJSA
STOP
PLAY
EJECT
VCR MENU
DVD SETUP
OPEN/
CLOSE
DVD MENU
ENTER
ZERO BACK
SKIP SEARCH
TV/VCR
VCR DVDAM/PM
PAUSE/STILL
SLOW
OPEN/CLOSE
SET
GB-24
DVNC65SE019_024.pm6 7/10/02, 4:36 pm24
Page 24
VCR Setup
VCR Auto Installation .................................................................. 26
VCR Setup .................................................................................... 28
Menu Screen............................................................................... 28
Mode Selection ........................................................................... 29
Manually Tuning Channel Setting ................................................ 30
Channel Sort ............................................................................... 32
Deleting Channels ....................................................................... 33
Re-naming Channels .................................................................. 34
Clock Setting ............................................................................... 35
Manual Clock Setting ............................................................... 35
Changing the on-screen display language.................................. 36
Decoder Switching Operation ..................................................... 37
Selecting the Output from the VCR............................................. 37
VCR Display Information ............................................................. 38
VCR Reset .................................................................................. 38
VCR SETUP
DVNC65SE025 Tobira.pm6 9/10/02, 10:20 am25
25Web-site:www.sharp.co.uk/support Help line:08705 274277 (office hours)
GB-25
Page 25

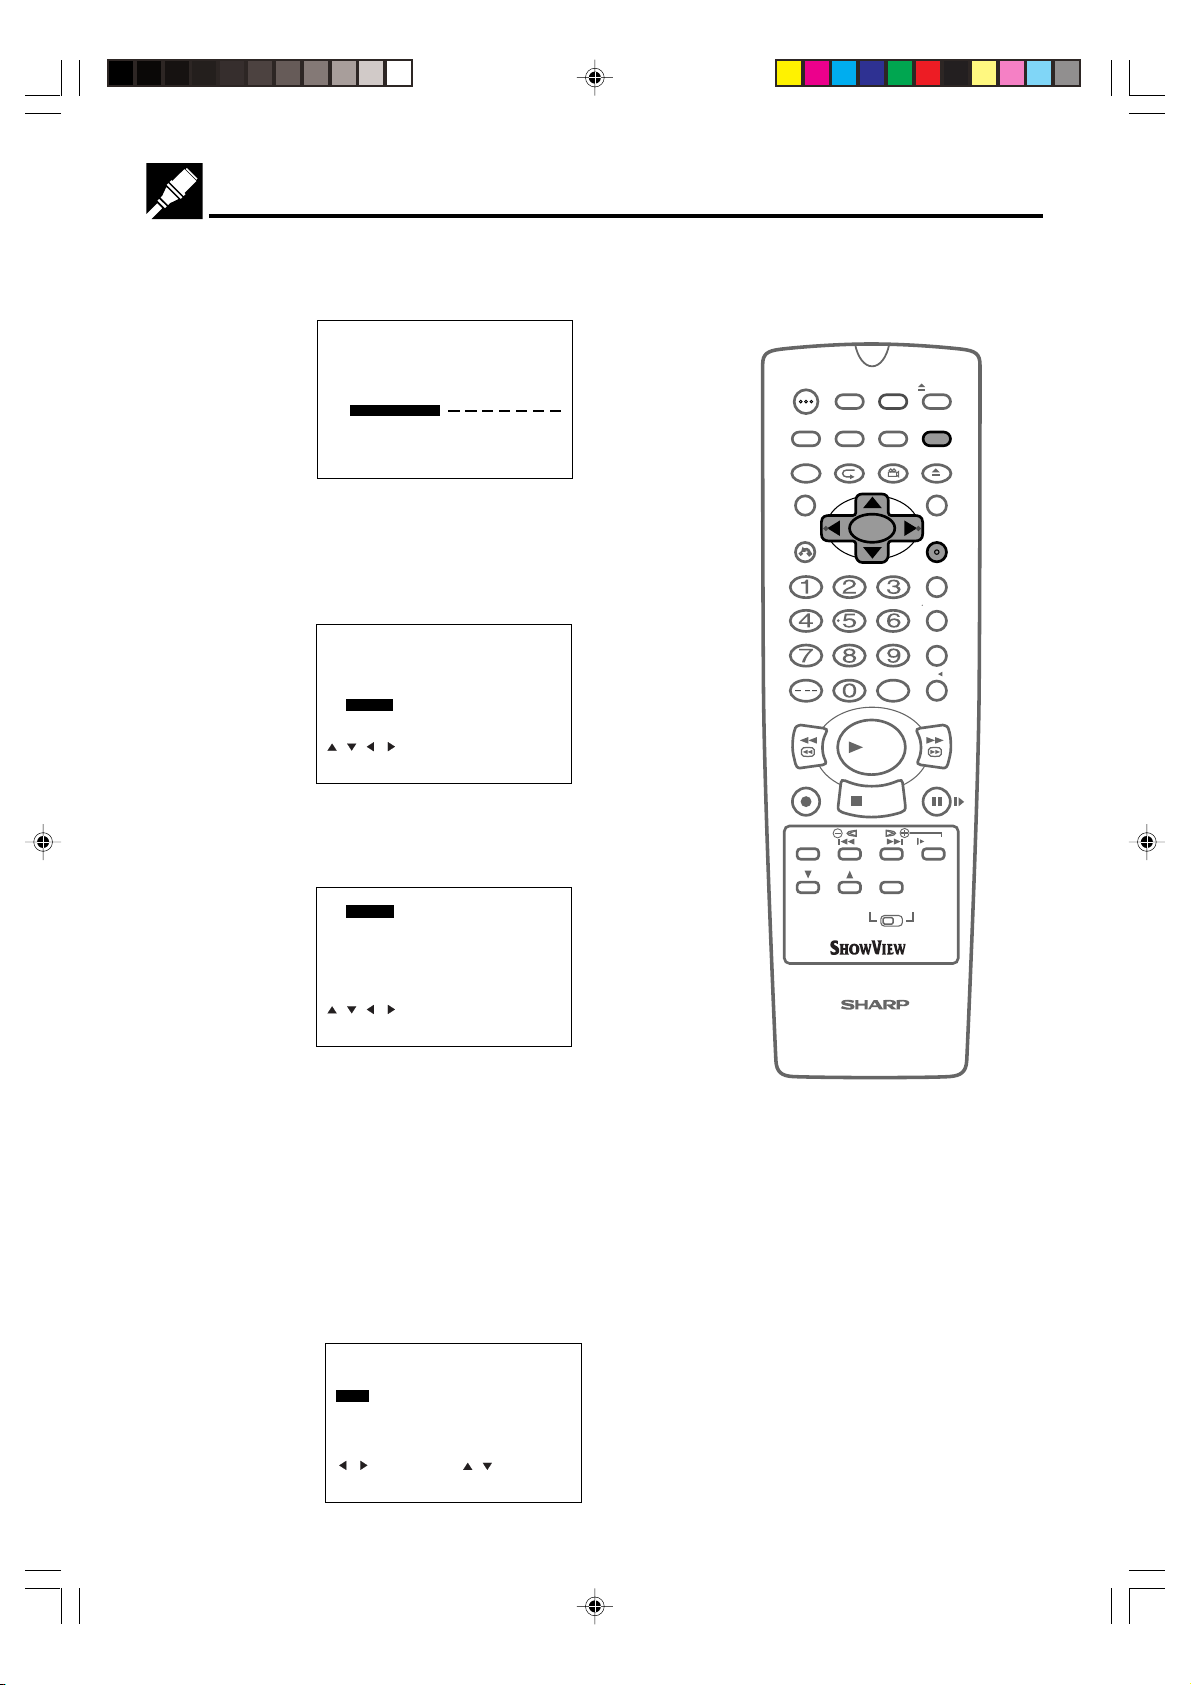
VCR Auto Installation
This Unit automatically tunes the TV channels for your area, then
using Teletext information sorts the TV channels into a standard
order and sets the clock. If the Unit has not previously been tuned-in,
instructions will be given on screen to guide you through this procedure.
1 Press OPERATE.
2 The screen below should now be displayed on your TV screen.
AUTO INSTALLATION
PRESS SET KEY TO START.
AUTOMATISCHE EINSTELLUNG.
ZUM BEGINN,DIE SET-TASTE
DRÜCKEN.
SET :EINGABE MENU:ENDE
• If the AUTO INSTALLATION screen does not appear when you switch on
your VCR or you wish to reset your Unit and start the installation again,
refer to VCR RESET on page 38.
3 Press SET to continue with the installation.
\\
4 Press ' / " /
confirm.
||
\ /
| to select your language. Then press SET to
\\
||
LANGUAGE
ENGLISH ESPAÑOL
DEUTSCH SVENSKA
FRANÇAIS NEDERLANDS
ITALIANO
TIMER
OPERATE
DISPLAY
FUNCTION
CONTROL
TITLE
CLEAR
RETURN
ON/OFF
ON
SCREEN
PROG/
REPEAT
SHOWVIEW
VCR/ DVD
SELECTOR
ANGLE
INPUT SELECT
/
REV FWD
PLAY
REC
STOP
CH
DPSS
SKIP
AUDIO
OUTPUT
VCR DVD
TAPE
SPEED
EJECT
VCR MENU
DVD SETUP
OPEN/
CLOSE
DVD MENU
SET
ENTER
ZERO BACK
SKIP SEARCH
TV/VCR
VCR DVDAM/PM
PAUSE/STILL
SLOW
KL H J:SELECT
SET :ENTER MENU:EXIT
\\
5 Press ' / " /
||
\ /
| to select your country. Then press SET to
\\
||
confirm.
COUNTRY
A I
B N
DK P
FIN E
D S
NL CH
OTHERS
KL H J:SELECT
SET :ENTER MENU:EXIT
6 Ensure your Aerial/Scart cables are connected to your Unit and
then press SET to confirm.
PLEASE BE SURE THE
AERIAL/SCART CABLE IS
CONNECTED TO YOUR VCR.
PRESS SET TO CONTINUE
SET :ENTER MENU:EXIT
GB-26
VCR/DVD COMBINATION
RRMCGA071WJSA
DVNC65SE026_027.pm6 7/10/02, 5:36 pm26
Page 26
7 All available terrestrial channels will be automatically installed.
/
OPEN/
CLOSE
OPERATE
VCR/ DVD
SELECTOR
VCR MENU
DVD SETUP
TAPE
SPEED
ON
SCREEN
TIMER
ON/OFF
TITLE
DVD MENU
DISPLAY
SHOWVIEW
EJECT
FUNCTION
CONTROL
PROG/
REPEAT
ANGLE
CLEAR
RETURN
REV FWD
SET
ENTER
ZERO BACK
SKIP SEARCH
TV/VCR
VCR DVDAM/PM
INPUT SELECT
PAUSE/STILL
REC
PLAY
STOP
SLOW
CH
VCR DVD
SKIP
DPSS
AUDIO
OUTPUT
VCR/DVD COMBINATION
RRMCGA071WJSA
(Auto install may take a few minutes.)
1 CH22
AUTOMATIC TUNING.
PLEASE WAIT.
SET :ENTER MENU:EXIT
8 Once Auto Installation is complete, the MOVE menu screen will
appear showing all the channels the Unit was able to tune in.
\\
9 If you wish to move any channels, press ' / " /
highlight the channel to be moved. Then press SET to confirm.
MOVE 1/5
1ARD1 7 13
2ZDF 8 14
3RTL1 9 15
4RTL2 10 16
5NDR3 11 17
6 12 18
CLEAR:CHANNEL SORT
:SELECT
SET :ENTER MENU:EXIT
\ /
\\
||
| to
||
VCR Auto Installation
\\
10 Press ' / " /
||
\ /
| to highlight the new position for the channel.
\\
||
Then press SET to confirm.
MOVE 1/5
1NDR3 7 13
2ARD1 8 14
3ZDF 9 15
4RTL1 10 16
5RTL2 11 17
6 12 18
11 If any more channels are to be moved, repeat this procedure
from step 7.
12 Press VCR MENU to exit if you are satisfied with the channel
order.
• The correct time and date should now be displayed on your TV
screen for approximately 2 seconds. If the clock is not automatically set, the “CLOCK” screen will appear. Refer to
CLEAR:CHANNEL SORT
:SELECT
SET :ENTER MENU:EXIT
Manual Clock Setting on page 35.
CLOCK
MODE TIME DATE YEAR
24H 01:00 1/01 02 *
MODE:24H/12H
:SELECT :CHANGE
SET :ENTER MENU:EXIT
GB-27
DVNC65SE026_027.pm6 7/10/02, 5:36 pm27
Page 27
VCR Setup
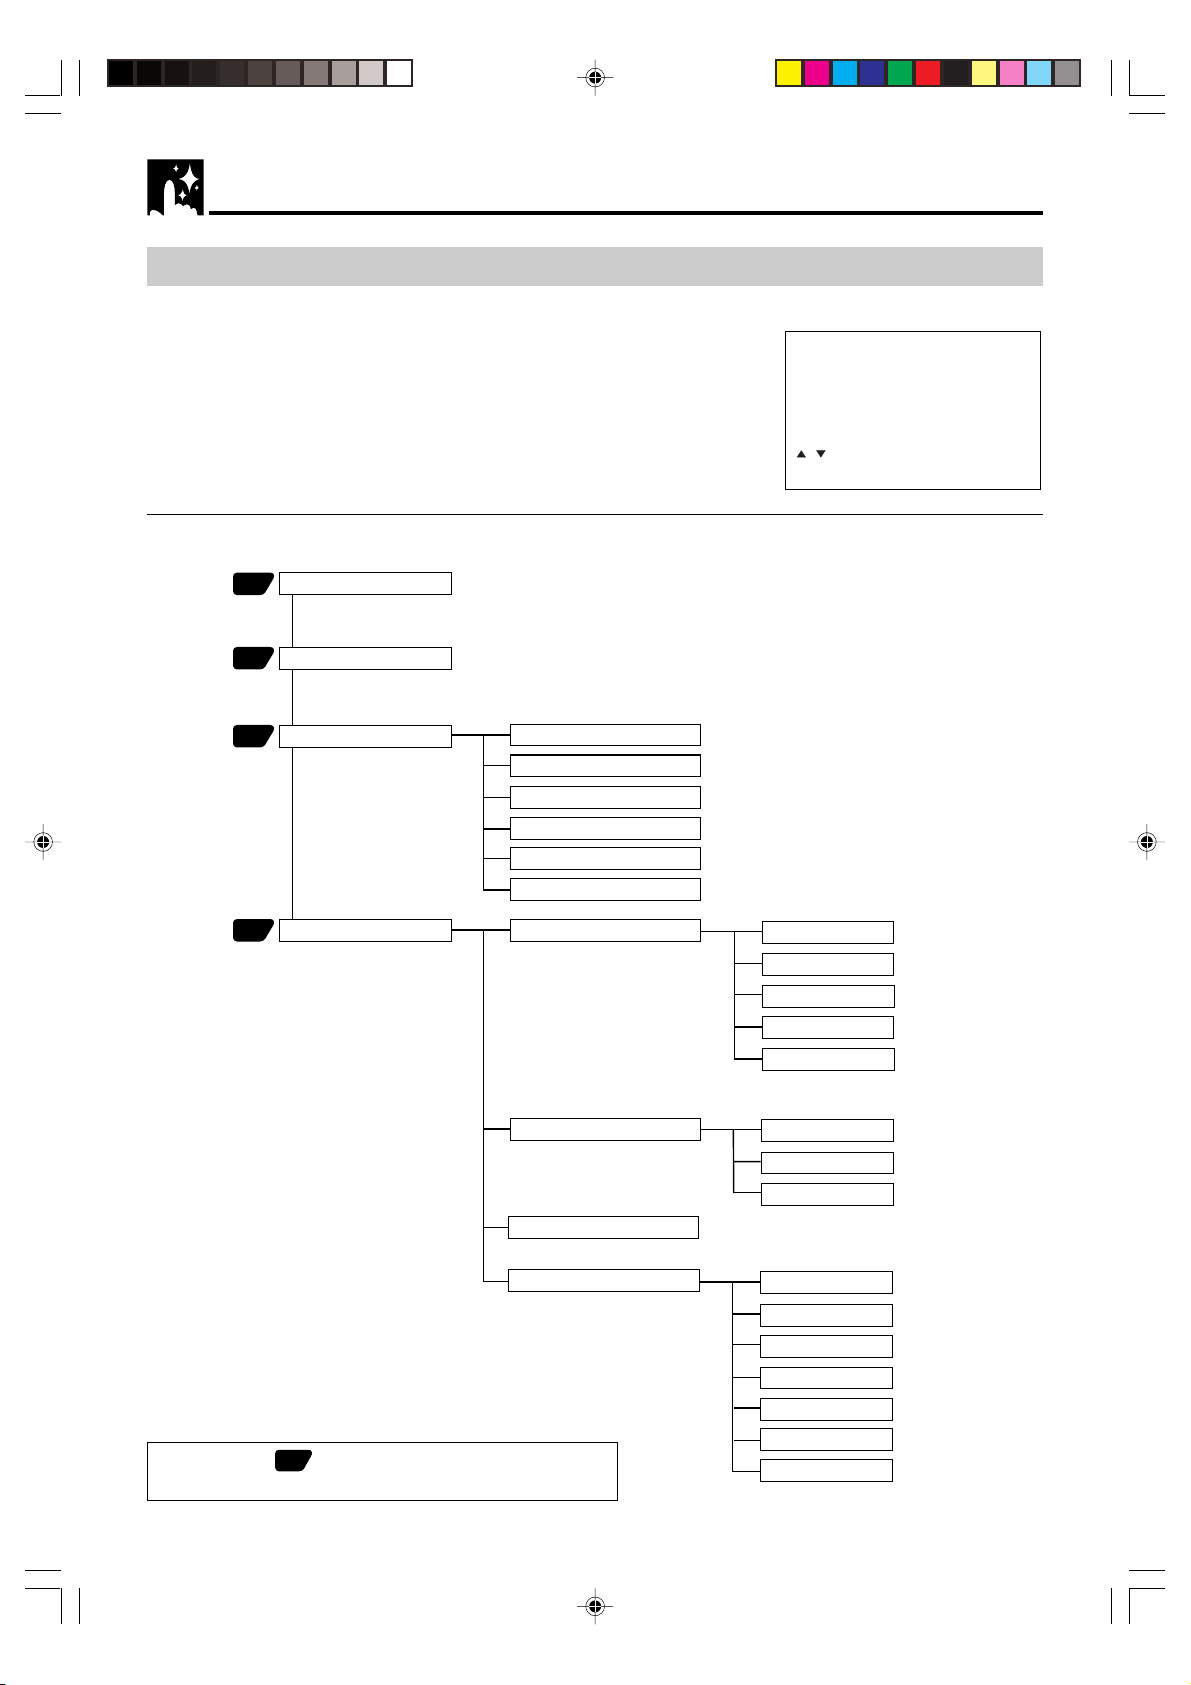
Menu Screen
The MENU screen is a home screen used to select various screen
functions. A sub-menu will appear once you select an item for the
menu. See the following pages for details on each menu procedure.
MENU item list
Main Menu
S
HOWVIEW
64
TIMER
66
NICAM [
29
MODE
AUTO/OFF
COLOUR [
BLUE MUTE [
REPEAT [
16:9 [
AUTO/OFF
SUPER.P [
]
AUTO/PAL/MESECAM
AUTO/OFF
ON/OFF
ON/OFF
]
]
]
]
Menu Screen
MENU
SHOWVIEW
TIMER
MODE
SET UP
:SELECT
SET :ENTER MENU:EXIT
]
26
SETUP
CHANNEL PRESET
CHANNEL SORT
CLOCK
LANGUAGE
• Numbers in refer to the pages where the setting
procedures are described.
PRESET
CHANNEL
FINE TUNING
DECODER
SKIP
MOVE
CANCEL
NAME
ENGLISH
DEUTSCH
FRANÇAIS
ITALIANO
ESPAÑOL
SVENSKA
NEDERLANDS
GB-28
DVNC65SE028_038.pm6 7/10/02, 5:49 pm28
Page 28
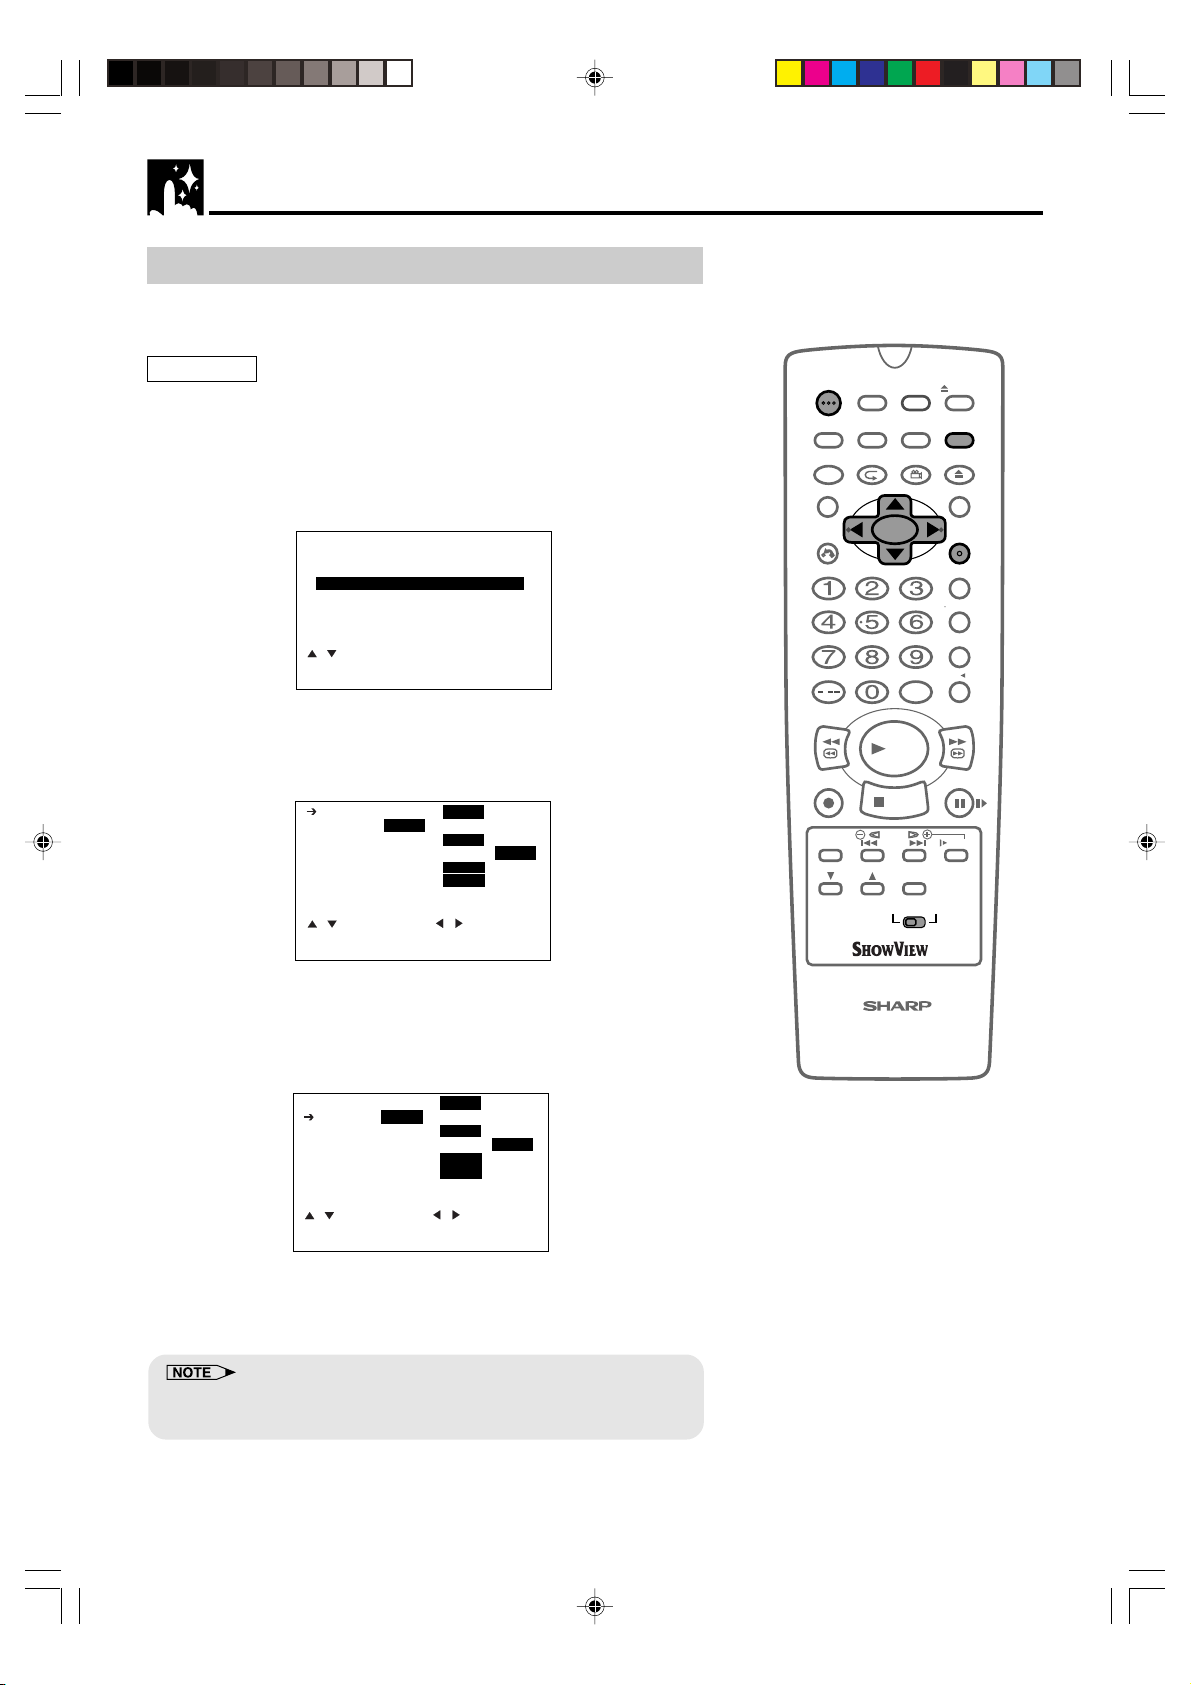
Mode Selection
You can use the Mode selection screen to select the mode for basic
features.
VCR Setup
Preparation
• Press OPERATE. Then move the VCR/DVD CHANGE Switch to
VCR.
1 Press VCR MENU to display the menu screen.
2 Select “MODE” with ' / " and then press SET.
MENU
SHOWVIEW
TIMER
MODE
SET UP
:SELECT
SET :ENTER MENU:EXIT
3 Example: When you change the NICAM settings.
\\
Set “NICAM” mode to “AUTO” or “OFF” with
".
(See NICAM Hi-Fi STEREO SOUND on page 59.)
NICAM AUTO OFF
COLOUR AUTO PAL MESECAM
BLUE MUTE AUTO OFF
REPEAT ON OFF
16:9 AUTO OFF
SUPER.P ON OFF
:SELECT :CHANGE
SET :ENTER MENU:EXIT
||
\ /
|. Then press
\\
||
TIMER
OPERATE
DISPLAY
FUNCTION
CONTROL
TITLE
CLEAR
RETURN
ON/OFF
ON
SCREEN
PROG/
REPEAT
SHOWVIEW
VCR/ DVD
SELECTOR
ANGLE
INPUT SELECT
/
REV FWD
PLAY
REC
STOP
CH
DPSS
SKIP
AUDIO
OUTPUT
VCR DVD
TAPE
SPEED
EJECT
VCR MENU
DVD SETUP
OPEN/
CLOSE
DVD MENU
SET
ENTER
ZERO BACK
SKIP SEARCH
TV/VCR
VCR DVDAM/PM
PAUSE/STILL
SLOW
4 Set “COLOUR” mode to “AUTO”, “PAL” or “MESECAM” with
\\
||
\ /
|. Then press ".
\\
||
(See COLOUR on page 57.)
• You can change the BLUE MUTE, 16:9, SUPER.P and
REPEAT settings the same way (See on pages 57, 58, 60 and
61).
NICAM AUTO OFF
COLOUR AUTO PAL MESECAM
BLUE MUTE AUTO OFF
REPEAT ON OFF
16:9 AUTO OFF
SUPER.P ON OFF
:SELECT :CHANGE
SET :ENTER MENU:EXIT
5 Press SET to enter.
• The screen returns to MENU screen, and press MENU
to return to normal.
• If you press VCR MENU to exit the mode selection screen in Step 5,
the data will not be stored. Be sure to press SET to store the data.
VCR/DVD COMBINATION
RRMCGA071WJSA
GB-29
DVNC65SE028_038.pm6 7/10/02, 5:49 pm29
Page 29

VCR Setup
Manually Tuning Channel Setting
It should not be necessary to tune in a broadcast channel manually
except in unusual circumstances such as poor signal.
To manually tune in a channel, follow the procedure below.
Preparation
• Press OPERATE. Then move the VCR/DVD CHANGE Switch to
VCR.
• Ensure the Video channel is selected on the TV.
1 Press VCR MENU. Press ' / " to select SET UP. Press SET to
confirm.
OPERATE
DISPLAY
FUNCTION
CONTROL
TITLE
CLEAR
RETURN
TIMER
ON/OFF
ON
SCREEN
PROG/
REPEAT
SHOWVIEW
VCR/ DVD
SELECTOR
ANGLE
EJECT
VCR MENU
DVD SETUP
OPEN/
CLOSE
DVD MENU
SET
ENTER
2 “CHANNEL PRESET” will be highlighted. Press SET to confirm.
SET UP
CHANNEL PRESET
CHANNEL SORT
CLOCK
LANGUAGE
:SELECT
SET :ENTER MENU:EXIT
\\
3 “PRESET” will be selected. Press
||
\ /
| to choose the required
\\
||
VCR preset channel.
PRESET 1
CHANNEL CH21
FINE TUNING
DECODER ON OFF
SKIP ON OFF
:SELECT :CHANGE
SET :ENTER MENU:EXIT
4 Press ' / " to select “CHANNEL”.
\\
5 Press
when a channel is received. If it is not the desired channel, press
\\
\ /
\\
||
\ /
| to start tuning in either direction. Tuning will stop
\\
||
||
| to continue tuning.
||
ZERO BACK
SKIP SEARCH
TV/VCR
INPUT SELECT
VCR DVDAM/PM
/
REV FWD
PLAY
REC
TAPE
SPEED
CH
VCR/DVD COMBINATION
RRMCGA071WJSA
STOP
DPSS
SKIP
AUDIO
OUTPUT
VCR DVD
PAUSE/STILL
SLOW
6 Press ' / " to select “FINE TUNING”. Press and hold
until the sharpest colour picture is obtained.
IMPORTANT NOTE:
7 Press ' / " to select “DECODER”. This is preset to OFF. If
you connect a decoder, as shown previously, you must use
\ \
\ /
\ \
GB-30
DVNC65SE028_038.pm6 7/10/02, 5:49 pm30
||
| to turn the decoder function ON. Refer to DECODER
||
SWITCHING OPERATION on page 37.
\\
\ /
\\
||
|
||
Page 30
/
OPEN/
CLOSE
OPERATE
VCR/ DVD
SELECTOR
VCR MENU
DVD SETUP
TAPE
SPEED
ON
SCREEN
TIMER
ON/OFF
TITLE
DVD MENU
DISPLAY
SHOWVIEW
EJECT
FUNCTION
CONTROL
PROG/
REPEAT
ANGLE
CLEAR
RETURN
REV FWD
SET
ENTER
ZERO BACK
SKIP SEARCH
TV/VCR
VCR DVDAM/PM
INPUT SELECT
PAUSE/STILL
REC
PLAY
STOP
SLOW
CH
VCR DVD
SKIP
DPSS
AUDIO
OUTPUT
VCR/DVD COMBINATION
RRMCGA071WJSA
\\
8 Press ' / " to select “SKIP” then
||
\ /
| to select “ON” or “OFF”.
\\
||
• The SKIP function determines whether the channel can be
selected when using the CH ' / " instead of the number
buttons.
9 Press SET to store this channel. The Unit will increment to the
next channel up.
• If any more channels are to be tuned in, repeat this procedure.
• Once all the channels have been tuned in. Press VCR MENU
to return to the normal screen.
VCR Setup
GB-31
DVNC65SE028_038.pm6 7/10/02, 5:49 pm31
Page 31

VCR Setup
Channel Sort
When your Unit tunes in broadcast channels automatically, it sorts
them into a standard order using teletext information. You can
change the order of the channel with the following procedure.
1 Press VCR MENU.
2 Press ' / " to select “SET UP”. Press SET to confirm.
MENU
SHOWVIEW
TIMER
MODE
SET UP
:SELECT
SET :ENTER MENU:EXIT
3 Press ' / " to select “CHANNEL SORT”. Press SET to confirm.
CHANNEL SORT
MOVE
CANCEL
NAME
SET UP
:SELECT
SET :ENTER MENU:EXIT
4 The MOVE position will be highlighted. Press SET to confirm.
\\
5 Press ' / " /
SET to confirm.
||
\ /
| to highlight the channel to be moved. Press
\\
||
MOVE 1/5
1ARD1 7 13
2ZDF 8 14
3RTL1 9 15
4RTL2 10 16
5NDR3 11 17
6 12 18
CLEAR:CHANNEL SORT
:SELECT
SET :ENTER MENU:EXIT
TIMER
OPERATE
DISPLAY
FUNCTION
CONTROL
TITLE
CLEAR
RETURN
ON/OFF
ON
SCREEN
PROG/
REPEAT
SHOWVIEW
VCR/ DVD
SELECTOR
ANGLE
INPUT SELECT
/
REV FWD
PLAY
REC
STOP
TAPE
SPEED
DPSS
SKIP
AUDIO
CH
OUTPUT
VCR DVD
VCR/DVD COMBINATION
RRMCGA071WJSA
EJECT
VCR MENU
DVD SETUP
OPEN/
CLOSE
DVD MENU
SET
ENTER
ZERO BACK
SKIP SEARCH
TV/VCR
VCR DVDAM/PM
PAUSE/STILL
SLOW
\\
6 Press ' / " /
||
\ /
| to highlight the new position for the channel.
\\
||
Press SET to confirm.
MOVE 1/5
1NDR3 7 13
2ARD1 8 14
3ZDF 9 15
4RTL1 10 16
5RTL2 11 17
6 12 18
SELECTED: CH5
:SELECT
SET :ENTER MENU:EXIT
7 If any more channels are to be moved, repeat the procedure
from step 5.
8 When all the channels are in your preferred order, either press
CLEAR to return to the CHANNEL SORT menu or press VCR
MENU to return to the normal screen.
• If when moving channels the picture becomes unclear and the on-screen display is unreadable, ON SCREEN can
be used to toggle between a blue background and the normal picture.
• The blue background will be shown until either another channel is selected or ON SCREEN is pressed again.
GB-32
DVNC65SE028_038.pm6 7/10/02, 5:49 pm32
Page 32

Deleting Channels
If there is a channel you wish to delete from the VCR memory, you
can follow the procedure below.
VCR Setup
1 Press VCR MENU.
2 Press the ' / " to select “SET UP”. Press SET to confirm.
MENU
SHOWVIEW
TIMER
MODE
SET UP
:SELECT
SET :ENTER MENU:EXIT
3 Press ' / " to select “CHANNEL SORT”. Press SET to confirm.
4 Press ' / " to select “CANCEL”. Press SET to confirm.
\\
5 Press ' / " /
||
\ /
| to highlight the channel to be cancelled.
\\
||
CANCEL 1/5
1NDR3 7 13
2ARD1 8 14
3ZDF 9 15
4RTL1 10 16
5RTL2 11 17
6CH5 12 18
CLEAR: CHANNEL SORT
:SELECT
SET :ENTER MENU:EXIT
TIMER
OPERATE
DISPLAY
FUNCTION
CONTROL
TITLE
CLEAR
RETURN
ON/OFF
ON
SCREEN
PROG/
REPEAT
SHOWVIEW
VCR/ DVD
SELECTOR
ANGLE
INPUT SELECT
/
REV FWD
PLAY
REC
STOP
CH
DPSS
SKIP
AUDIO
OUTPUT
VCR DVD
TAPE
SPEED
EJECT
VCR MENU
DVD SETUP
OPEN/
CLOSE
DVD MENU
SET
ENTER
ZERO BACK
SKIP SEARCH
TV/VCR
VCR DVDAM/PM
PAUSE/STILL
SLOW
6 Press SET twice to cancel the channel.
CANCEL 1/5
1ARD1 7 13
2ZDF 8 14
3RTL1 9 15
4RTL2 10 16
5CH5 11 17
6 12 18
CLEAR: CHANNEL SORT
:SELECT
SET :ENTER MENU:EXIT
7 When all the channels you wish have been cancelled, either
press CLEAR to return to the CHANNEL SORT menu or press
VCR MENU to return to the normal screen.
• If when deleting channels the picture becomes unclear and the onscreen display is unreadable, ON SCREEN can be used to toggle
between a blue background and the normal picture.
• The blue background will be shown until either another channel is
selected or ON SCREEN is pressed again.
VCR/DVD COMBINATION
RRMCGA071WJSA
GB-33
DVNC65SE028_038.pm6 7/10/02, 5:49 pm33
Page 33

VCR Setup
Re-naming Channels
When your Unit tunes in broadcast channels automatically, it names
them using teletext information. You can change the name of a
channel with the following procedure.
1 Press VCR MENU.
2 Press ' / " to select “SET UP”. Press SET to confirm.
MENU
SHOWVIEW
TIMER
MODE
SET UP
:SELECT
SET :ENTER MENU:EXIT
3 Press ' / " to select “CHANNEL SORT”. Press SET to confirm.
4 Press ' / " to select “NAME”. Press SET to confirm.
\\
5 Press ' / " /
||
\ /
| to highlight the channel to be re-named.
\\
||
Press SET to confirm.
NAME 1/5
1ARD1 7 13
2ZDF 8 14
3RTL1 9 15
4CH4 10 16
5CH5 11 17
6CH6 12 18
CLEAR: CHANNEL SORT
:SELECT
SET :ENTER MENU:EXIT
6 To enter a new channel name use ' / " to scroll through the
\\
characters and
confirm.
||
\ /
| to move to the next position. Press SET to
\\
||
TIMER
OPERATE
DISPLAY
FUNCTION
CONTROL
TITLE
CLEAR
RETURN
ON/OFF
ON
SCREEN
PROG/
REPEAT
SHOWVIEW
VCR/ DVD
SELECTOR
ANGLE
INPUT SELECT
/
REV FWD
PLAY
REC
STOP
CH
DPSS
SKIP
AUDIO
OUTPUT
VCR DVD
TAPE
SPEED
EJECT
VCR MENU
DVD SETUP
OPEN/
CLOSE
DVD MENU
SET
ENTER
ZERO BACK
SKIP SEARCH
TV/VCR
VCR DVDAM/PM
PAUSE/STILL
SLOW
NAME 1/5
1ARD1 7 13
2ZDF 8 14
3RTL1 9 15
4RTL2 10 16
5CH5 11 17
6CH6 12 18
CLEAR: CHANNEL SORT
:SELECT
SET :ENTER MENU:EXIT
7 If any more channels are to be re-named, repeat the procedure
from step 5.
8 When all the channels are named correctly, either press CLEAR
to return to the CHANNEL SORT menu or press VCR MENU to
return to the normal screen.
• If when re-naming channels the picture becomes unclear and the onscreen display is unreadable, ON SCREEN can be used to toggle
between a blue background and the normal picture.
• The blue background will be shown until either another channel is
selected or ON SCREEN is pressed again.
GB-34
VCR/DVD COMBINATION
RRMCGA071WJSA
DVNC65SE028_038.pm6 7/10/02, 5:49 pm34
Page 34

Clock Setting
Manual Clock Setting
The clock will normally be set using teletext information when your
Unit automatically tunes in the broadcast channels. If for any reason
teletext signals are not present, your Unit will not be able to set the
clock. This procedure will allow you to set the clock manually.
Preparation
• Press OPERATE. Then move the VCR/DVD CHANGE
Switch to VCR.
1 Press VCR MENU.
2 Press ' / " to select “SET UP”. Press SET to confirm.
3 Press ' / " to select “CLOCK.” Press SET to confirm.
SET UP
CHANNEL PRESET
CHANNEL SORT
CLOCK
LANGUAGE
:SELECT
SET :ENTER MENU:EXIT
4 Press ' / " to select either 12 or 24 hour clock.
CLOCK
MODE TIME DATE YEAR
12H 12:00AM 1/04 02 *
TIMER
OPERATE
DISPLAY
FUNCTION
CONTROL
TITLE
CLEAR
RETURN
/
REV FWD
REC
TAPE
SPEED
CH
ON/OFF
ON
SCREEN
PROG/
REPEAT
SHOWVIEW
VCR/ DVD
SELECTOR
ANGLE
INPUT SELECT
PLAY
STOP
DPSS
SKIP
AUDIO
OUTPUT
VCR DVD
VCR Setup
EJECT
VCR MENU
DVD SETUP
OPEN/
CLOSE
DVD MENU
SET
ENTER
ZERO BACK
SKIP SEARCH
TV/VCR
VCR DVDAM/PM
PAUSE/STILL
SLOW
MODE:24H/12H
:SELECT :CHANGE
SET :ENTER MENU:EXIT
\\
5 Press
||
\ /
| to select “TIME”. Enter the time using the number
\\
||
buttons or ' / ". If the minutes or hours are less than 10, enter
leading 0. If using the 12 hour clock enter AM or PM by pressing
AM/PM on the Remote.
\\
6 Press
||
\ /
| to select “DATE”. Enter the date using the number
\\
||
buttons or ' / ". For example, for 1st April enter 01 04.
\\
7 Press
||
\ /
| to select “YEAR”. Enter the last two digits of the
\\
||
year using the number buttons or ' / ". For example, for 2002
enter 02. For the year 2003 enter 03.
8 Auto Clock Setting
\\
Press
CLOCK on/off (
confirm.
||
\ /
| to select *. Press ' / " to change between AUTO
\\
||
is “ON”, – is “OFF”). Then press SET to
*
VCR/DVD COMBINATION
RRMCGA071WJSA
• If AUTO CLOCK is set to OFF (– is
OFF) then you will need to update the
clock for daylight saving.
GB-35
DVNC65SE028_038.pm6 7/10/02, 5:49 pm35
Page 35

VCR Setup
Changing the on-screen display language
Changing the language used by the on-screen display will not
change the operation of the VCR or make it suitable for any other
broadcast standard.
1 Press VCR MENU.
2 Press ' / " to select “SET UP”. If the display is not in a
language you can understand, this is the fourth option from the
top. Press SET to confirm.
3 Press ' / " to select “LANGUAGE” (the last option).
4 Press SET.
\\
5 Press ' / " /
confirm. Press VCR MENU to return to a normal screen.
||
\ /
| to select your language. Press SET to
\\
||
LANGUAGE
ENGLISH ESPAÑOL
DEUTSCH SVENSKA
FRANÇAIS NEDERLANDS
ITALIANO
KL H J:SELECT
SET :ENTER MENU:EXIT
TIMER
OPERATE
DISPLAY
FUNCTION
CONTROL
TITLE
CLEAR
RETURN
ON/OFF
ON
SCREEN
PROG/
REPEAT
SHOWVIEW
VCR/ DVD
SELECTOR
ANGLE
INPUT SELECT
/
REV FWD
PLAY
REC
STOP
CH
DPSS
SKIP
AUDIO
OUTPUT
VCR DVD
TAPE
SPEED
EJECT
VCR MENU
DVD SETUP
OPEN/
CLOSE
DVD MENU
SET
ENTER
ZERO BACK
SKIP SEARCH
TV/VCR
VCR DVDAM/PM
PAUSE/STILL
SLOW
GB-36
DVNC65SE028_038.pm6 9/10/02, 10:21 am36
VCR/DVD COMBINATION
RRMCGA071WJSA
Page 36

Decoder Switching Operation
If you have a separate decoder connected to the Unit’s L2 input as
previously shown in the “Basic Connection” section, you will need to
set the decoder function to ON in order to record the unscrambled
signal and/or watch it on your TV. Now, when the Unit receives a
scrambled signal it is output via LINE 2 terminal to the decoder. The
decoder then outputs the unscrambled signal back to LINE 2
terminal and the signal can be recorded. The Unit outputs the
descrambled signal to your TV through the LINE 1 terminal and you
can watch the unscrambled picture.
When making recording using a separate decoder connected as
shown, remember to leave the decoder function ON.
If you connect a decoder unit to this Unit, the decoder unit provides
a switching signal which will automatically allow your TV to display
the unscrambled signal routed through the Unit. To use this feature
make sure that the Unit is connected to both TV and decoder unit by
the SCART leads. Then:
• Press OPERATE to place the Unit in STAND-BY mode.
OR
• Press TV/VCR to place the Unit in “VCR mode”. The “VCR”
indicator appears on the VCR Front Panel display.
Selecting the Output From the VCR
If your VCR is connected to your TV with a scart lead, when you start
to play a video tape the VCR will automatically switch its output so
that the playback picture is shown on the TV. In this case, “VCR” will
appear on the VCR display.
You can manually override this by pressing TV/VCR on the remote
control. Now the TV broadcast channel will be seen on the TV screen
and “VCR” will disappear from the VCR display.
• Pressing TV/VCR again will return the TV picture to the playback
picture.
• While in DVD mode, the unit will override this function.
DV-NC65
PAL
EJECT/STOP
PLAY/X2
REW
OPERATE
LINE IN 3 VIDEO L - AUDIO - R
REC
/
EJECT /
OPERATE
OPERATE
DISPLAY
FUNCTION
CONTROL
CLEAR
RETURN
CH
VCR/DVD
SELECTOR
STOP
TIMER
SHOWVIEW
ON/OFF
ON
SCREEN
PROG/
REPEAT
TITLE
/
REV FWD
PLAY
REC
STOP
CH
DPSS
SKIP
VCR DVD
TAPE
SPEED
VCR/ DVD
SELECTOR
ANGLE
SKIP SEARCH
INPUT SELECT
AUDIO
OUTPUT
EJECT
VCR MENU
DVD SETUP
OPEN/
CLOSE
DVD MENU
SET
ENTER
ZERO BACK
TV/VCR
VCR DVDAM/PM
PAUSE/STILL
SLOW
VCR Setup
DVD / CD PLAYER
STOP
OPEN/CLOSE
PLAY
TIMER
VCR DVD
DVNC65SE028_038.pm6 7/10/02, 5:49 pm37
VCR/DVD COMBINATION
RRMCGA071WJSA
GB-37
Page 37

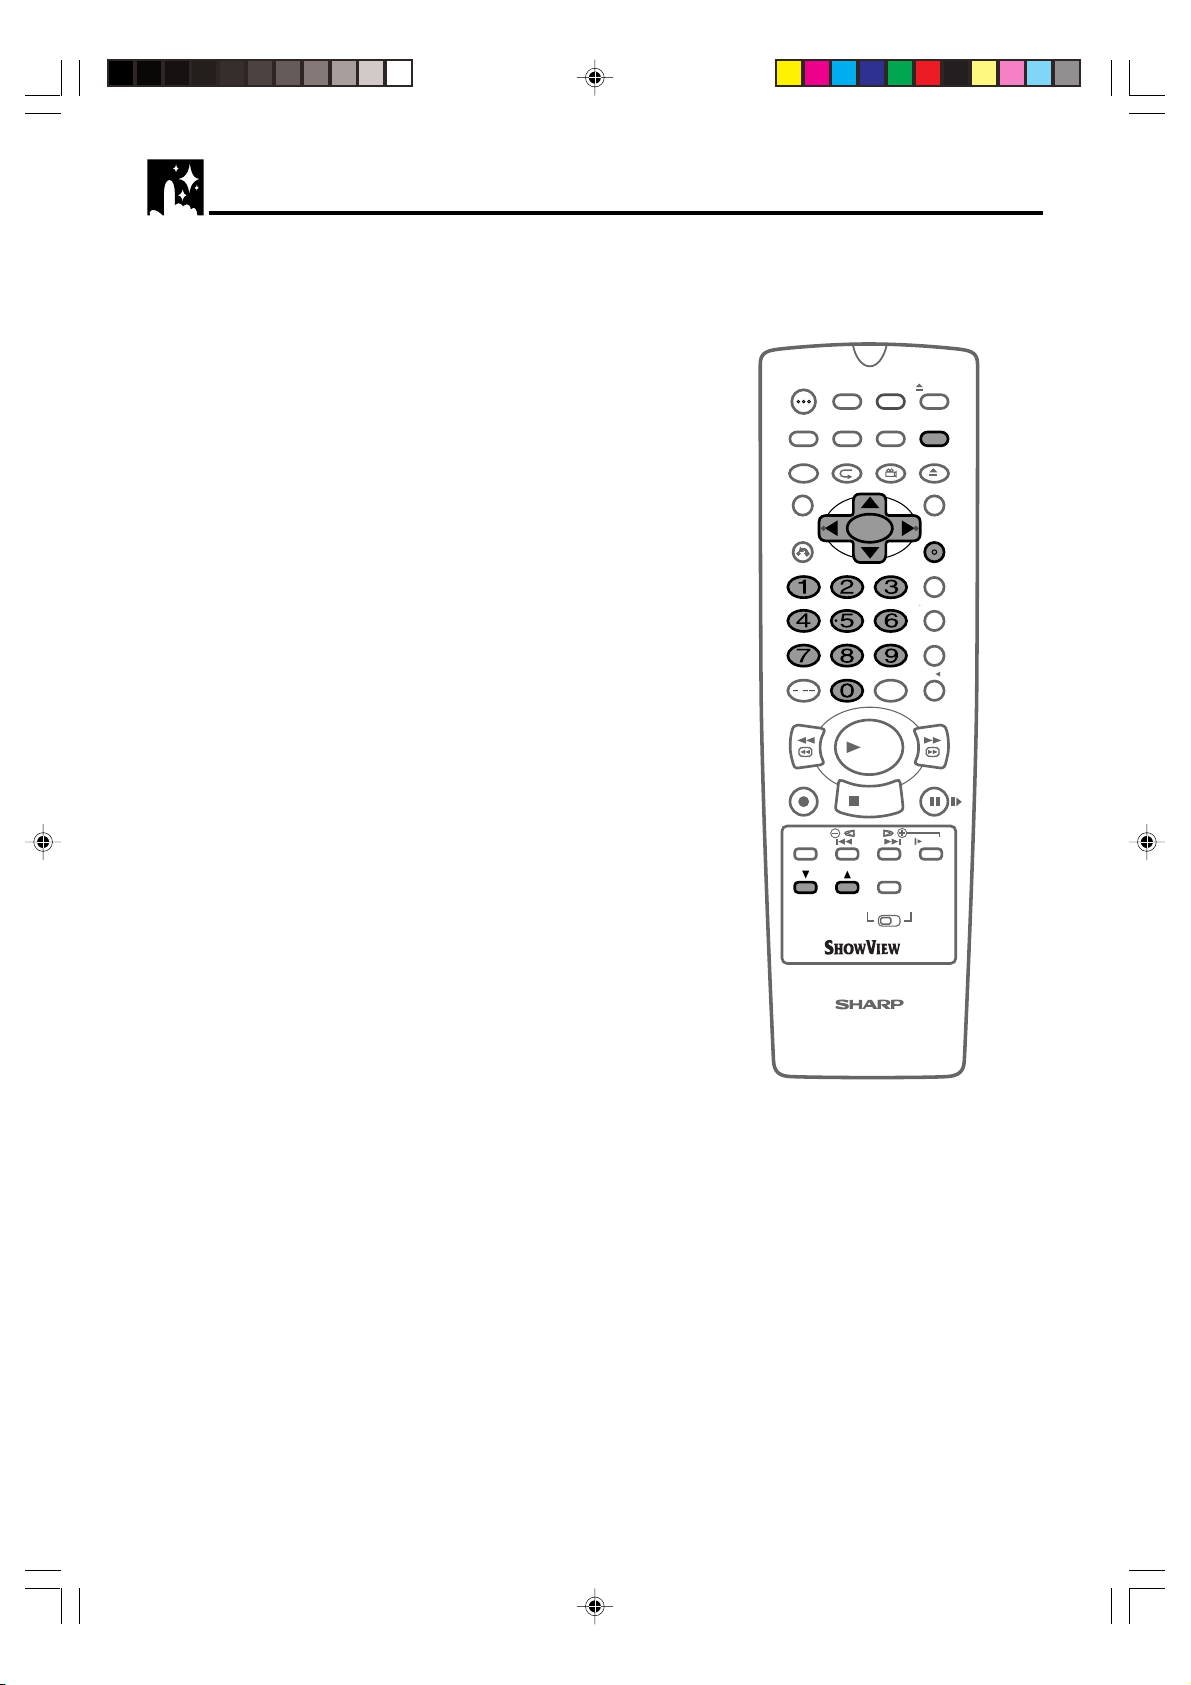
VCR Display Information
All the information you need on the VCR status will be summarised on the on-screen display. If you are recording, playing back a tape or watching a broadcast on the video channel, you can call up three standard onscreen displays. The display can be selected by pressing ON SCREEN on the Remote, 1, 2, 3 or 4 times.
Programme number and channel
Tape Status
NICAM signal
Audio output mode
Tape speed
Tape remaining
Time
Date
Tape counter
• If the clock is not set, the time and date will not be displayed.
• When tape playback mode,”channel”is not displayed
1 CH59
SUPER P. ON NICAM
STEREO
SP L R
10:00AM REM 1:05
9/07 02 0:00.00
1CH59
Each time ON SCREEN on the Remote is pressed, the display on the TV screen changes the mode in the
following sequence:
AUTO mode → FULL mode → Counter mode → OFF mode
• AUTO mode.................... The current mode and channel number will be displayed for 3 seconds when
an operation or number button is pressed.
• FULL mode .................... All the active features will also be shown on screen.
• Counter mode ................ This display will show the tape counter and amount of tape remaining.
• OFF mode ...................... This will remove the display from the screen.
Each time DISPLAY on the Remote is pressed, the VCR Front Panel Display changes the mode in the following
sequence:
Clock mode → Channel position mode*1 → Tape counter mode → Tape remain mode
• Clock mode..................... The current time will be displayed.
• Channel position mode..The channel position will be displayed.
*1
*1 When in tape playback
mode, “channel” is not
displayed
• Tape counter mode.........The current tape position will be displayed.
• Tape remain mode..........The amount of video tape remaining will be displayed.
• The default time and date will not be displayed if the clock has not been set.
• The VCR will return to Tape counter mode each time it is switched on.
• If you are recording from this VCR to another, make sure you remove the display from the screen otherwise it will be
recorded.
• When power ON, channel position is displayed.
• Usually use the “channel position”.
VCR Reset
1 Select VCR/DVD CHANGE Switch to VCR.
2 Press OPERATE.
3 Press and hold VCR MENU and CH " together on the the Remote Control for 10 seconds.
• VCR reset is now complete.
GB-38
DVNC65SE028_038.pm6 7/10/02, 5:50 pm38
Page 38

DVD Setup
DVD Setup........................................................................................ 40
About the SET UP Screen ............................................................. 40
TV MODE Setting .......................................................................... 41
PARENTAL LEVEL Setting ............................................................ 43
AUDIO Setting................................................................................ 45
Setting the COMPRESSION
(Dolby Digital output level) ........................................................ 45
Setting the DOLBY DIGITAL ....................................................... 46
Setting the MPEG ....................................................................... 47
Setting the CINEMA VOICE ........................................................ 48
DISC LANGUAGE Setting ............................................................. 49
Setting SUB TITLE, AUDIO and MENU
languages from 8 languages .................................................... 49
Selecting languages from OTHER .............................................. 50
DVD Display Information ................................................................ 51
Operation Mode Indicators............................................................. 51
Language Code List for Disc Language ....................................... 52
DVD SETUP
DVNC65SE039 Tobira.pm6 7/10/02, 5:50 pm39
39Web-site:www.sharp.co.uk/support Help line:08705 274277 (office hours) GB-39
Page 39

DVD Setup
About the SETUP Screen
This section describes how to specify various basic settings using the
SETUP screen. The list below shows all the items you can set and
adjust. See the following pages for details on each setup procedure.
• The setting procedures described on the following pages are
available only in STOP mode.
• The OSD (On Screen Display) screens used in this Operation
Manual are purely for the purposes of explanation. The actual
displays may differ slightly from what is shown here.
Setup item list
Main Menu
41
43
45
TV MODE
• Specifies the setting for the type of TV connected
and the playback format for wide-screen video
material.
PARENTAL [1 to 8 (ON)/OFF]/Country Code
• Sets or changes the parental level (1 to 8).
• Sets the password used to prevent the parental
level from being changed too easily.
• Information for Country Code
AUDIO
•
Use this setting for increasing the average volume
of Dolby Digital audio when playing a DVD.
• Use this setting for specifying either “BITSTREAM”
or “D-PCM”/“PCM” as the digital type output.
TV MODE
COMPRESSION [ON/OFF]
MPEG
CINEMA VOICE [ON/OFF]
DIGITAL
(Example) DVD MODE
TV MODE
PARENTAL LEVEL 8
AUDIO
DISC LANGUAGE
PS
4 : 3
4 : 3
LB
16 : 9
BITSTREAM
D-PCM
BITSTREAM
PCM
49
DISC LANGUAGE
• Use this setting for selecting languages of
subtitle, audio track and disc menu recorded on
a disc.
• Numbers in refer to the pages where the setting
procedures are described.
GB-40
DVNC65SE040_042.pm6 9/10/02, 10:23 am40
AUDIO
SUB TITLE
MENU
ENGLISH
SPANISH
FRENCH
ITALIAN
GERMAN
CHINESE
SWEDISH
DUTCH
OTHER
Languages you
can select are
same as above.
Languages you
can select are
same as above.
Page 40

TV MODE Setting
Preparation
• Press OPERATE. Then move the VCR/DVD CHANGE Switch to
DVD.
1 While this Unit is stopped, press DVD SETUP to display the
SETUP screen.
2 Use ' or " to select the “ TV MODE SETUP”.
TV MODE
PARENTAL OFF
AUDIO
DISC LANGUAGE
3 Press ENTER and then use ' or " to select “TV MODE”.
4 Press ENTER to display the items you can select.
4:3
5 Use ' or " to select
(Example) Selecting
4:3
LB
4:3
PS
PS
,
or
16:9
.
.
TIMER
OPERATE
DISPLAY
FUNCTION
CONTROL
TITLE
CLEAR
RETURN
ON/OFF
ON
SCREEN
PROG/
REPEAT
SHOWVIEW
VCR/ DVD
SELECTOR
ANGLE
INPUT SELECT
/
REV FWD
PLAY
REC
STOP
CH
DPSS
SKIP
AUDIO
OUTPUT
VCR DVD
TAPE
SPEED
DVD Setup
EJECT
VCR MENU
DVD SETUP
OPEN/
CLOSE
DVD MENU
SET
ENTER
ZERO BACK
SKIP SEARCH
TV/VCR
VCR DVDAM/PM
PAUSE/STILL
SLOW
TV MODE:
Continue on next page ➔
DVNC65SE040_042.pm6 7/10/02, 5:54 pm41
VCR/DVD COMBINATION
RRMCGA071WJSA
GB-41
Page 41

DVD Setup
4:3
PS
•
— (Pan & Scan mode): When wide-screen video
material is played, this mode clips the right and left sides of
the image so that it can be viewed on a conventional TV
screen.
• Some wide-screen DVDs that do not permit Pan & Scan mode
playback are automatically played in letterbox mode (black bands
top and bottom).
4:3
LB
•
— (Letterbox mode): When wide-screen video material
is played in this mode on a conventional TV screen, black
bands appear at the top and bottom of the screen.
16:9
— (Wide-screen TV): This is the correct mode for playing
•
wide-screen videos on a wide-screen TV.
• You must also set the screen mode on your wide-screen TV to
“FULL”.
6 Press ENTER to confirm the “TV MODE” setting.
• When you have completed the setting above, press RETURN
to exit the SETUP screen.
Cut off when a wide-screen video
image is played.
The actual appearance of the image
depends on the screen mode setting
of your wide-screen TV.
GB-42
DVNC65SE040_042.pm6 7/10/02, 5:54 pm42
Page 42

Parental Level Setting
Certain discs come preset with country codes and parental level
settings defined for particular countries. Discs equipped with the
parental lock function are rated according to their content. The rated
content allowed by a parental lock level and the way a DVD can be
controlled vary from disc to disc. Some discs, for example, may let you
edit out scenes and replace them with scenes suitable for children. You
can also use the parental lock to completely disable playback of the
DVD.
Preparation
• See Preparing to Watch a DVD on page 24.
1 Press DVD SETUP to display the SETUP screen.
2 Use ' or " to select the “ PARENTAL SETUP” and then press
ENTER.
• The password specification and verification screen appears.
PARENTAL
PASSWORD
PASSWORD --- LEVEL 8
CODE UK
• If you have already set your password, - - - - (password
verification display) appears.
3 Use the number buttons (0 to 9) to enter a 4-digit password.
PASSWORD : 1 2 3 4
Displayed when “1234”
is being entered as the
password
TIMER
OPERATE
DISPLAY
FUNCTION
CONTROL
TITLE
CLEAR
RETURN
ON/OFF
ON
SCREEN
PROG/
REPEAT
SHOWVIEW
VCR/ DVD
SELECTOR
ANGLE
INPUT SELECT
/
REV FWD
PLAY
REC
STOP
TAPE
SPEED
DPSS
SKIP
AUDIO
CH
OUTPUT
VCR DVD
VCR/DVD COMBINATION
RRMCGA071WJSA
DVD Setup
EJECT
VCR MENU
DVD SETUP
OPEN/
CLOSE
DVD MENU
SET
ENTER
ZERO BACK
SKIP SEARCH
TV/VCR
VCR DVDAM/PM
PAUSE/STILL
SLOW
• Enter the numbers slowly as each number is stored separately.
• If you enter the wrong number three times in succession, the normal screen
reappears.
If you forget your password, you can erase your current password by
press rSTOP four times.
4 The cursor is moved to “LEVEL” and then press ENTER.
PARENTAL
LEVEL 1 LEVEL 5
LEVEL 2 LEVEL 6
LEVEL 3 LEVEL 7
LEVEL 4 LEVEL 8
OFF
DVNC65SE043_048.pm6 7/10/02, 6:04 pm43
GB-43
Page 43

DVD Setup
5 Press ',", \ or | to select the desired parental level and then
press ENTER.
PARENTAL
PASSWORD
LEVEL 8
CODE UK
• Level 1: for most restrictive viewing → Level 8: for adult viewing
(The smaller the number, the greater the level of restriction.)
• When the parental level is set to “OFF”, DVDs can be played
back regardless of the parental level.
The parental level for the UK is as follows:
Level 8: Adult
Level 1: Child
As for the set up of an appropriate level, please check the level
when you purchase your DVD disc equipped with the parental
feature.
6 Press " to select “CODE” and then press ENTER.
PARENTAL
CODE
USA FRANCE
CANADA UK
JAPAN ITALY
GERMANY SPAIN
TIMER
OPERATE
DISPLAY
FUNCTION
CONTROL
TITLE
CLEAR
RETURN
ON/OFF
ON
SCREEN
PROG/
REPEAT
SHOWVIEW
VCR/ DVD
SELECTOR
ANGLE
INPUT SELECT
/
REV FWD
PLAY
REC
STOP
CH
DPSS
SKIP
AUDIO
OUTPUT
VCR DVD
TAPE
SPEED
EJECT
VCR MENU
DVD SETUP
OPEN/
CLOSE
DVD MENU
SET
ENTER
ZERO BACK
SKIP SEARCH
TV/VCR
VCR DVDAM/PM
PAUSE/STILL
SLOW
7 Press ',", \ or | to select the desired country code and then
press ENTER.
• If you want to go to the next page, select the country code
displayed at the bottom, then press ".
PARENTAL
PASSWORD
LEVEL 8
CODE UK
Country Code List
USA FINLAND
CANADA BELGIUM
JAPAN HONG KONG
GERMANY SINGAPORE
FRANCE THAILAND
8 Press RETURN to return to the SETUP screen.
• If you want to go on and specify other settings, use ' or " to
display other SETUP screens. However, press RETURN if you
want to exit the SETUP screen.
Important!
• Be sure to try playing back the disc to confirm that the parental level
setting is working correctly. If it is not working correctly, try changing the
country code.
• You can use the parental lock function only with DVD discs that are equipped with the parental lock feature.
• On some DVD discs, the parental level setting is fixed and cannot be modified.
• The parental level depends on countries. If you do not set the country code correctly, it fails to work correctly.
• Some DVD discs allow the viewer to temporarily change the parental level setting to view the original scenes. When this prompt
appears, input the password to view the original scenes.
UK MALAYSIA
ITALY INDONESIA
SPAIN TAIWAN
SWISS PHILIPPINE
SWEDEN AUSTRALIA
HOLLAND RUSSIA
NORWAY CHINA
DENMARK
GB-44
VCR/DVD COMBINATION
RRMCGA071WJSA
DVNC65SE043_048.pm6 7/10/02, 6:04 pm44
Page 44

AUDIO Setting
COMPRESSION ............ Use this setting for increasing the average
volume of Dolby Digital audio when playing a
DVD.
DIGITAL/MPEG ....... Use these settings for specifying the type of
digital output when playing a disc recorded
using Dolby Digital/MPEG AUDIO.
CINEMA VOICE............. Use the setting for raising the sound of the
centre speaker to make the voices in a
movie easier to hear.
Setting the COMPRESSION
(Dolby Digital output level)
When Dolby Digital is used to record the audio on a DVD disc, the
average overall volume level of the audio is relatively lower than that
produced by an Audio CD. This is to provide the widest possible
dynamic range. To counteract this, this Unit automatically raises the
overall average volume level of a disc recorded using Dolby Digital to a
level that is similar to that of an Audio CD.
COMPRESSION:
ON
• Audio level the same
as audio CD, etc.
DVD
Dolby Digital Audio
COMPRESSION:
OFF
• Low audio level
TIMER
OPERATE
DISPLAY
FUNCTION
CONTROL
TITLE
CLEAR
RETURN
ON/OFF
ON
SCREEN
PROG/
REPEAT
SHOWVIEW
VCR/ DVD
SELECTOR
ANGLE
INPUT SELECT
/
REV FWD
PLAY
REC
STOP
CH
DPSS
SKIP
AUDIO
OUTPUT
VCR DVD
TAPE
SPEED
DVD Setup
EJECT
VCR MENU
DVD SETUP
OPEN/
CLOSE
DVD MENU
SET
ENTER
ZERO BACK
SKIP SEARCH
TV/VCR
VCR DVDAM/PM
PAUSE/STILL
SLOW
Audio CD's
• OFF.............. Audio level recorded on disc is played back without
modification.
• ON ............... Dolby Digital average audio level is increased so it
sounds similar to that of Audio CD.
• Use of the “OFF” setting is recommended when the Unit is connected
to audio equipment or, depending on the disc, the sound is abnormal.
• Advanced Surround is disabled when “COMPRESSION” is set to
“ON”.
Preparation
• Press OPERATE. Then move the VCR/DVD CHANGE Switch to
DVD.
1 Press DVD SETUP to display the SETUP screen.
DVNC65SE043_048.pm6 7/10/02, 6:04 pm45
VCR/DVD COMBINATION
RRMCGA071WJSA
GB-45
Page 45

DVD Setup
2 Use ' or " to select the “ AUDIO SETUP”.
3 Press ENTER and then use ' or " to select “COMPRESSION”.
AUDIO
COMPRESSION ON
DIGITAL BITSTREAM
MPEG BITSTREAM
CINEMA VOICE OFF
4 Press ENTER to display the settings you can select.
AUDIO
COMPRESSION
ON
OFF
5 Use ' or " to select “ON” or “OFF”.
• Use of the “OFF” setting is recommended when the Unit is
connected to audio equipment.
6 Press ENTER to confirm the setting.
• When you have completed the above setting, press RETURN
to exit the SETUP screen. However, if you want to specify the
“ DIGITAL” setting in succession, proceed to step 1 below.
TIMER
OPERATE
DISPLAY
FUNCTION
CONTROL
TITLE
CLEAR
RETURN
ON/OFF
ON
SCREEN
PROG/
REPEAT
SHOWVIEW
VCR/ DVD
SELECTOR
ANGLE
INPUT SELECT
/
REV FWD
PLAY
REC
STOP
CH
DPSS
SKIP
AUDIO
OUTPUT
VCR DVD
TAPE
SPEED
EJECT
VCR MENU
DVD SETUP
OPEN/
CLOSE
DVD MENU
SET
ENTER
ZERO BACK
SKIP SEARCH
TV/VCR
VCR DVDAM/PM
PAUSE/STILL
SLOW
• Whenever the “COMPRESSION” setting is “ON”, Advanced Surround
setting is automatically changed to “OFF”.
Setting the DOLBY DIGITAL
When playing a disc recorded using Dolby Digital (5.1ch), you can
specify either “BITSTREAM” or “D-PCM” as the digital type output.
• Before setting the “ DIGITAL” , perform the step 1 to 2 on pages
45 and 46.
1 Press ENTER and then use ' or " to select “ DIGITAL”.
2 Press ENTER to display the settings you can select.
AUDIO
DIGITAL
BITSTREAM
D-PCM
GB-46
VCR/DVD COMBINATION
RRMCGA071WJSA
DVNC65SE043_048.pm6 7/10/02, 6:04 pm46
Page 46

3 Use ' or " to select “BITSTREAM” or “D-PCM”.
BITSTREAM: Use this setting for a digital connection of a receiver
(amplifier) equipped with a Dolby Digital decoder.
D-PCM: Use this setting for a digital connection to the
(Down Mix PCM) PCM digital input jack of a DAT or MD, or for a digital
connection to a receiver (amplifier) that does not have
a Dolby Digital decoder.
4 Press ENTER to confirm the setting.
5 Press RETURN to exit the SETUP screen and return to normal
screen.
• When you have completed the above setting, press RETURN to exit
the SETUP screen. However, if you want to specify the “MPEG”
setting in succession, proceed to step 1 below.
Setting the MPEG
Selected the same as “COMPRESSION” on page 45 for MPEG signals.
1 Press ENTER and then use ' or " to select “MPEG”.
2 Press ENTER to display the settings you can select.
AUDIO
MPEG
BITSTREAM
PCM
TIMER
OPERATE
DISPLAY
FUNCTION
CONTROL
TITLE
CLEAR
RETURN
ON/OFF
ON
SCREEN
PROG/
REPEAT
SHOWVIEW
VCR/ DVD
SELECTOR
ANGLE
INPUT SELECT
/
REV FWD
PLAY
REC
STOP
CH
DPSS
SKIP
AUDIO
OUTPUT
VCR DVD
TAPE
SPEED
DVD Setup
EJECT
VCR MENU
DVD SETUP
OPEN/
CLOSE
DVD MENU
SET
ENTER
ZERO BACK
SKIP SEARCH
TV/VCR
VCR DVDAM/PM
PAUSE/STILL
SLOW
3 Use ' or " to select “BITSTREAM” or “PCM”.
BITSTREAM: Use this setting for a digital connection of a receiver
(amplifier) equipped with an MPEG Audio decoder.
PCM: Use this setting for a digital connection to the PCM
VCR/DVD COMBINATION
RRMCGA071WJSA
digital input jack of a DAT or MD, or for a digital
connection to a receiver (amplifier) that does not have
an MPEG Audio decoder.
4 Press ENTER to confirm the setting.
5 Press RETURN to exit the SETUP screen and return to normal
screen.
• If you want to go on and specify other settings, use ' or " to
display the other SETUP screen without pressing RETURN.
When playing a disc recorded using DTS, the bitstream type signal is
output regardless of the setting of “ Digital” and “MPEG”.
• When audio CD’s that support MPEG are played back, BITSTREAM signals will be output, even if
“MPEG” has been set to “PCM”.
• Make sure to set “DIGITAL” or “MPEG” to “PCM” when making a digital connection to 2 channel audio equipment or
MD. Leaving on “BITSTREAM” may cause static noise and damage the speakers as well as incorrect recording on
MD’s.
DVNC65SE043_048.pm6 7/10/02, 6:04 pm47
GB-47
Page 47

DVD Setup
Setting the CINEMA VOICE
This function raises the sound of the centre speaker to make the
voices in a movie easier to hear.
• Before setting the “CINEMA VOICE”, perform steps 1 and 2 from
pages 45 to 46.
1 Press ENTER and then use ' or " to select “CINEMA VOICE”.
2 Press ENTER to display the settings you can select.
AUDIO
CINEMA VOICE
ON
OFF
3 Use ' or " to select “ON” or “OFF”.
ON: Set to “ON” when you want to raise the sound of
the voice.
OFF: Set to “OFF” when you do want to use this
function.
4 Press ENTER to confirm the setting.
5 When you have completed the setting above, press RETURN to
return to the SETUP screen. However, if you want to go on and
specify other settings, use ' or " to display other setting
screens.
TIMER
OPERATE
DISPLAY
FUNCTION
CONTROL
TITLE
CLEAR
RETURN
ON/OFF
ON
SCREEN
PROG/
REPEAT
SHOWVIEW
VCR/ DVD
SELECTOR
ANGLE
INPUT SELECT
/
REV FWD
PLAY
REC
STOP
CH
DPSS
SKIP
AUDIO
OUTPUT
VCR DVD
TAPE
SPEED
EJECT
VCR MENU
DVD SETUP
OPEN/
CLOSE
DVD MENU
SET
ENTER
ZERO BACK
SKIP SEARCH
TV/VCR
VCR DVDAM/PM
PAUSE/STILL
SLOW
• The CINEMA VOICE setting raises the sound of the centre
channel. It does not affect the voices in other channels.
• Even if this function is set to “ON”, the results may or may not
be effective, depending on the disc.
GB-48
DVNC65SE043_048.pm6 7/10/02, 6:04 pm48
VCR/DVD COMBINATION
RRMCGA071WJSA
Page 48

DISC LANGUAGE Setting
Use this setting for selecting the language for subtitles, audio tracks
and disc menu.
• Note that the language you select is not displayed or does
not sound if it is not recorded on the disc you are playing.
•
With some discs, it is intentionally disabled by the disc manufacturer
to change the language of the subtitle, audio track and disc menu
through this SETUP screen. When playing such discs, try using
FUNCTION CONTROL (pages 81 and 83) or, if applicable, use the
menu that appears on the DVD.
OPERATE
DISPLAY
FUNCTION
CONTROL
TITLE
TIMER
ON/OFF
ON
SCREEN
PROG/
REPEAT
SHOWVIEW
VCR/ DVD
SELECTOR
ANGLE
DVD Setup
EJECT
VCR MENU
DVD SETUP
OPEN/
CLOSE
DVD MENU
Setting SUB TITLE, AUDIO and MENU
languages.
Preparation
•
Press OPERATE. Then move the VCR/DVD CHANGE Switch to DVD.
1 Press DVD SETUP to display the SETUP screen.
2 Use ' or " to select the “ DISC LANGUAGE”.
TV MODE
PARENTAL LEVEL 8
AUDIO
DISC LANGUAGE
3 Press ENTER and then use ' or " to select “AUDIO”,
“SUB TITLE” or “MENU”.
• You can set “AUDIO”, “SUB TITLE” or “MENU” individually.
(Example) Selecting “AUDIO”
DISC LANGUAGE
AUDIO ENGLISH
SUB TITLE ENGLISH
MENU ENGLISH
CLEAR
RETURN
ZERO BACK
SKIP SEARCH
INPUT SELECT
/
REV FWD
PLAY
REC
STOP
TAPE
SPEED
DPSS
SKIP
AUDIO
CH
OUTPUT
VCR DVD
VCR/DVD COMBINATION
RRMCGA071WJSA
SET
ENTER
TV/VCR
VCR DVDAM/PM
PAUSE/STILL
SLOW
4 After selecting the item, press ENTER.
5 Select the language you want to use with ', ", \ and |.
(Example) Selecting “ENGLISH”
AUDIO
ENGLISH CHINESE
SPANISH SWEDISH
FRENCH DUTCH
ITALIAN OTHER
GERMAN
• If you want to use any languages which are not on the
OSD, proceed to step 1 under “Selecting languages from
OTHER” on next page.
DVNC65SE049_050.pm6 7/10/02, 6:06 pm49
GB-49
Page 49

DVD Setup
6 Press ENTER to confirm the setting.
7 Repeat steps 4 to 7 above to go on with other “DISC
LANGUAGE” settings in succession.
8 If you want to exit the SETUP screen and return to the normal
screen, press RETURN.
• If you want to go on and specify other settings, press ' or "
to display other SETUP screen without pressing RETURN.
OPERATE
DISPLAY
FUNCTION
CONTROL
TITLE
TIMER
ON/OFF
ON
SCREEN
PROG/
REPEAT
SHOWVIEW
VCR/ DVD
SELECTOR
ANGLE
EJECT
VCR MENU
DVD SETUP
OPEN/
CLOSE
DVD MENU
Selecting languages from OTHER
Select “OTHER” with ', ", \ and |, then press ENTER to set
1
the “OTHER” input item (two letters).
• See Language Code List for Disc Language on page 52
when selecting the code.
(Example) Selecting “OTHER” in “AUDIO”
OTHER
AUDIO 1 E
AUDIO 2 N
• The “SUB TITLE” and “MENU” screens are displayed
respectively when being set.
2 Press \ or | to select the alphabet as the first letter on
“AUDIO 1” (upper side).
3 Press " to move the cursor to “AUDIO 2” (lower side).
OTHER
AUDIO 1 A
AUDIO 2 F
CLEAR
RETURN
ZERO BACK
SKIP SEARCH
INPUT SELECT
/
REV FWD
PLAY
REC
STOP
TAPE
SPEED
DPSS
SKIP
AUDIO
CH
OUTPUT
VCR DVD
VCR/DVD COMBINATION
RRMCGA071WJSA
SET
ENTER
TV/VCR
VCR DVDAM/PM
PAUSE/STILL
SLOW
4 Press \ or | to select the alphabet as the second letter.
5 Press ENTER to confirm the setting.
• Press RETURN to return to the previous screen.
GB-50
DVNC65SE049_050.pm6 7/10/02, 6:07 pm50
Page 50

DVD Setup
Operation Mode Indicators
Each time ON SCREEN on the Remote is pressed, the display on the TV screen changes the mode in the
following sequence:
AUTO mode → ON mode → OFF mode
• AUTO mode.....Displays indicators for 3 seconds when operation begins.
• ON mode ......... Displays indicators continually until the operation mode is changed.
• OFF mode ....... Does not display indicators.
Each time DISPLAY on the Remote is pressed, the DVD Front Panel Display changes the mode in the following
sequence:
Time mode → Operation Status mode → Title mode
• Time mode ........................... Displays the playing time*.
• Operation Status mode ...... Displays the operation you perform such as “PLAY”, “REV”.
• Title mode ........................... Displays the total number of titles, chapters, or tracks.
* When the disc you attempt to play has no information on time, the operation status is displayed.
This Unit displays the information shown below on the TV screen and on the DVD Front Panel Display
depending on the operation status.
Display Examples
TV Screen DVD Front Panel Display Remarks
If no disc is loaded or "
-----
" appears when the tray
an unplayable disc is is closed and:
loaded when this Unit 1) There is no disc in the tray.
is switched on. 2) The disc type is not DVD or
Audio CD.
3) The disc is not loaded
correctly (upside-down, etc.)
Tray open
Tray closed
Loading
Stopped Ë The indicator changes to show
other indicators (total time, etc.)
Playing û
Still/Paused â When a DVD is played back.
When an Audio CD is played back.
Fast Forward è
Fast Reverse È
Slow Does not function for Audio CD's.
Region (Local) Number Error Indicator
If the region (local) number of the disc that you attempt to play differs from the region number of this Unit (see
page 99), “ REGION CODE ERROR” appears on the TV screen and the disc tray slides out. (The disc
cannot be played.)
DVNC65SE051.pm6 7/10/02, 6:08 pm51
GB-51
Page 51

Language Code List for Disc Language
Code Language Name
AA Afar
AB Abkhazian
AF Afrikaans
AM Ameharic
AR Arabic
AS Assamese
AY Aymara
AZ Azerbaijani
BA Bashkir
BE Byelorussian
BG Bulgarian
BH Bihari
BI Bislama
BN Bengali;
Bangla
BO Tibetan
BR Breton
CA Catalan
CO Corsican
CS Czech
CY Welsh
DA Danish
DE German
DZ Bhutani
EL Greek
EN English
EO Esperanto
ES Spanish
ET Estonian
EU Basque
FA Persian
FI Finnish
FJ Fiji
FO Faroese
FR French
Code Language Name
FY Frisian
GA Irish
GD Scots Gaelic
GL Galician
GN Guarani
GU Gujarati
HA Hausa
HI Hindi
HR Croatian
HU Hungarian
HY Armenian
IA Interlingua
IE Interlingue
IK Inupiak
IN Indonesian
IS Icelandic
IT Italian
IW Hebrew
JA Japanese
JI Yiddish
JW Javanese
KA Georgian
KK Kazakh
KL Greenlandic
KM Cambodian
KN Kannada
KO Korean
KS Kashmiri
KU Kurdish
KY Kirghiz
LA Latin
LN Lingala
LO Laothian
LT Lithuanian
LV Latvian, Lettish
Code Language Name
MG Malagasy
MI Maori
MK Macedonian
ML Malayalam
MN Mongolian
MO Moldavian
MR Marathi
MS Malay
MT Maltese
MY Burmese
NA Nauru
NE Nepali
NL Dutch
NO Norwegian
OC Occitan
OM (Afan) Oromo
OR Oriya
PA Panjabi
PL Polish
PS Pashto, Pushto
PT Portuguese
QU Quechua
RM Rhaeto-
Romance
RN Kirundi
RO Romanian
RU Russian
RW Kinyarwanda
SA Sanskrit
SD Sindhi
SG Sangho
SH Serbo-
Croatian
SI Singhalese
SK Slovak
Code Language Name
SL Slovenian
SM Samoan
SN Shona
SO Somali
SQ Albanian
SR Serbian
SS Siswat
ST Sesotho
SU Sundanese
SV Swedish
SW Swahili
TA Tamil
TE Telugu
TG Tajik
TH Thai
TI Tigrinya
TK Turkmen
TL Tagalog
TN Setswana
TO Tonga
TR Turkish
TS Tsonga
TT Tatar
TW Twi
UK Ukrainian
UR Urdu
UZ Uzbek
VI Vietnamese
VO Volapük
WO Wolof
XH Xhosa
YO Yoruba
ZH Chinese
ZU Zulu
GB-52
DVNC65SE052.pm6 7/10/02, 6:10 pm52
Page 52

Watching the VCR
Playback........................................................................................... 54
Playback......................................................................................... 54
Picture Disturbance During Playback ............................................ 54
Pausing and Slow Motion............................................................... 55
Fast Forwarding/Rewinding a Video Tape ...................................... 55
Forward/Reverse Visual Search ..................................................... 55
Automatic Head Cleaning System ................................................. 55
Playing Back an S-VHS Cassette .................................................. 56
Playing Back an NTSC Cassette ................................................... 56
Blue Mute ....................................................................................... 57
Colour ............................................................................................ 57
16:9 Playback and Recording ........................................................ 58
Audio Output Mode ......................................................................... 59
Hi-Fi Stereo Sound ........................................................................ 59
NICAM/IGR Hi-Fi Stereo Sound .................................................... 59
Sharp Super Picture ....................................................................... 60
Auto Repeat/Auto Zero Back .......................................................... 61
Auto Repeat ................................................................................... 61
Auto Zero Back .............................................................................. 61
DPSS (Digital Program Search System) / Skip Search ................ 62
DPSS ............................................................................................. 62
Skip Search.................................................................................... 62
TV Program Recording ................................................................... 63
Selection of a Channel ................................................................ 63
Tape Speed Selection ................................................................. 63
Immediate Recording .................................................................. 63
Simple Timed Recording ................................................................ 63
Timer Recording.............................................................................. 64
How to Use the SHOWVIEW® System to Make a Recording ............. 64
How to Set a Delayed Recording ................................................... 66
Setting a Recording .................................................................... 66
How to Check, Change, and Cancel a Delayed Recording............ 68
Checking a Recording................................................................. 68
Changing a Recording ................................................................ 69
Cancelling a Recording ............................................................... 69
Recording From Other Equipment ................................................ 70
Tape Remaining ............................................................................... 71
Recording a DVD Disc onto a Video Cassette .............................. 72
Recording a DVD disc onto a video cassette
(Tape Editing mode) ................................................................... 72
WATCHING
THE VCR
Web-site:www.sharp.co.uk/support Help line:08705 274277 (office hours)
DVNC65SE053 Tobira.pm6 9/10/02, 10:25 am53
53
GB-53
Page 53

Playback
Caution:
BEFORE YOU PLAYBACK A VIDEO TAPE:
Condensation forms in the Unit when it is moved out of or into a warm
If you try to playback or record, the video tape and Unit may be damaged.
Turn the Unit on and wait for about two hours until the Unit reaches room
temperature before operating.
Playback
1 Switch on your TV and select the video channel.
2 Carefully push a pre-recorded video tape into the tape
compartment. This will switch the Unit on.
• If the record-protection tab has been removed, the VCR will
start playback as soon as the video tape has been loaded.
3 Press ûPLAY to start playback.
• For double speed playback (without sound), press ûPLAY
again.
• To revert to normal playback, press ûPLAY again.
• To stop the video tape, press ËSTOP.
• To eject the tape, press EJECT.
SHARP SUPER PICTURE should enhance the picture quality during
playback. It is normally set to “ON”. (See page 60.)
Picture Disturbance During Playback
This Unit has an automatic tracking system which reduces picture
disturbance when you start to playback a video tape. When autotracking is in operation
picture still has disturbance you may need to manually track the
video tape:
During PLAYBACK of a video tape.
• Press CH ' / " to position picture interference off the TV screen.
• Press CH ' / " together to start Auto Tracking.
flashes on the on-screen display. If the
place.
DV-NC65
OPERATE
LINE IN 3 VIDEO L - AUDIO - R
EJECT/STOP
PLAY/X2
REW
REC
/
CH
PLAY
CH /
OPERATE
DISPLAY
FUNCTION
CONTROL
TITLE
CLEAR
RETURN
STOP
EJECT /
/
REV FWD
REC
TAPE
SPEED
CH
TIMER
ON/OFF
ON
SCREEN
PROG/
REPEAT
VCR/DVD
SELECTOR
SHOWVIEW
VCR/ DVD
SELECTOR
ANGLE
INPUT SELECT
PLAY
STOP
DPSS
SKIP
AUDIO
OUTPUT
VCR DVD
DVD / CD PLAYER
TIMER
VCR DVD
EJECT
VCR MENU
DVD SETUP
OPEN/
CLOSE
DVD MENU
SET
ENTER
ZERO BACK
SKIP SEARCH
TV/VCR
VCR DVDAM/PM
PAUSE/STILL
SLOW
STOP
OPEN/CLOSE
PLAY
GB-54
DVNC65SE054_062.pm6 8/10/02, 8:42 am54
VCR/DVD COMBINATION
RRMCGA071WJSA
Page 54

Pausing and Slow Motion
/
OPEN/
CLOSE
OPERATE
VCR/ DVD
SELECTOR
VCR MENU
DVD SETUP
TAPE
SPEED
ON
SCREEN
TIMER
ON/OFF
TITLE
DVD MENU
DISPLAY
SHOWVIEW
EJECT
FUNCTION
CONTROL
PROG/
REPEAT
ANGLE
CLEAR
RETURN
REV FWD
SET
ENTER
ZERO BACK
SKIP SEARCH
TV/VCR
VCR DVDAM/PM
INPUT SELECT
PAUSE/STILL
REC
PLAY
STOP
SLOW
CH
VCR DVD
SKIP
DPSS
AUDIO
OUTPUT
VCR/DVD COMBINATION
RRMCGA071WJSA
Playback
1 Press ûPLAY to start the video tape playback.
2 Press âPAUSE/STILL to pause the video tape.
• Press CH ' / " to minimise jitter whilst in pause mode.
• Press ûPLAY to resume playback.
3 Press ?SLOW to playback in slow motion (without sound).
Slow motion speed can be adjusted using SLOW next to
?SLOW. Picture disturbance can be improved by pressing
CH ' / " during slow motion playback.
• Press ûPLAY to resume playback.
• When using SLOW MOTION function some mechanical noise may be
heard.
• There will be picture interference and possibly a change to black and
white picture using the Pause and Slow functions.
• PAUSE mode, Slow Motion will automatically disengage after about 5
minutes.
Fast Forwarding/Rewinding a Video Tape
/
1 Press ËSTOP to stop the video tape.
2 Press FF
è
or È REW.
DV-NC65
OPERATE
LINE IN 3 VIDEO L - AUDIO - R
REW
EJECT/STOP
/
PLAY/X2
REW
PLAY
REC
CH
CH /
DVD / CD PLAYER
STOP
OPEN/CLOSE
PLAY
VCR/DVD
SELECTOR
TIMER
VCR DVD
3 Press ËSTOP to stop fast forward/rewind.
• If you use other than E-90/E-180 cassettes, fast forward and rewind
may take somwhat longer
Forward/Reverse Visual Search
1 Press FF
mode.
2 Press ûPLAY to resume playback.
OR
3 Press FF
search mode. There are 2 search speeds in each direction. The
unit switches between them each time the button is pressed.
4 Press ûPLAY.
• There will be picture interference and possibly a change to black and
white picture using Visual Fast Forward/Rewind functions.
Automatic Head Cleaning System
When the tape is inserted, or ejected, this system automatically
cleans the drum and heads with a special roller before recording or
playback begins, protecting the heads and drum from dirt and
preserving beautiful sound and picture quality.
è
or È REW during playback to select search
è
or È REW to decrease the speed during visual
GB-55
DVNC65SE054_062.pm6 8/10/02, 8:42 am55
Page 55

Playback
Playing Back an S-VHS Cassette
S-VHS (super -VHS) pre-recorded cassettes give you a better quality playback picture with increased detail
and depth.
Your Unit will automatically recognise which type of cassette is being used, VHS or S-VHS and playback the
appropriate standard accordingly.
• All of the VCR’s playback functions can be used during S-VHS playback, SLOW, PLAY/X2, VISUAL SEARCH, etc.
• Your Unit is S-VHS playback only, it will not record S-VHS.
• Some picture noise may be observed on the screen in trick playback (Slow Motion, Frame Advance playback).
Playing Back an NTSC Cassette
NTSC (National Television Standards Committee) is a different TV standard to PAL and is used in some NonEuropean Countries. Your Unit can playback pre-recorded NTSC cassette onto a PAL system TV, but cannot
record an NTSC signal onto a video cassette.
• You cannot record NTSC signals or dub NTSC cassettes onto other VCR’s from this Unit.
• You cannot use Slow speed, Still frame, Double Speed, Frame Advance or Tape Remaining with a pre-recorded NTSC
cassette.
• Some picture noise may be observed on the screen in Long Play (LP) mode trick playback (Slow Motion, Frame
Advance playback).
• On some TVs, the picture may appear in black and white or there may be no picture. This does not indicate a fault
with your VCR.
• On some TVs, the picture may shrink vertically causing black bands to appear at the top and bottom of your screen.
• On some TVs, the played-back picture may roll vertically. This does not indicate a fault with your VCR.
GB-56
DVNC65SE054_062.pm6 8/10/02, 8:42 am56
Page 56

BLUE MUTE
The TV screen will be blue if a TV channel with no signal is selected,
an unrecorded section of tape is played or the quality of the recording on the tape is poor. Select OFF in the mode menu to disable this
feature.
1 Press VCR MENU to display the main menu on the screen.
2 Press ' / " to select “MODE”.
3 Press SET.
4 Press ' / " to select “BLUE MUTE”.
NICAM AUTO OFF
COLOUR AUTO PAL MESECAM
BLUE MUTE AUTO OFF
REPEAT ON OFF
16:9 AUTO OFF
SUPER.P ON OFF
:SELECT :CHANGE
SET :ENTER MENU:EXIT
\\
5 Press
||
\ /
| to select “AUTO” or “OFF”.
\\
||
6 Press SET to confirm and then VCR MENU to return to the
normal screen
COLOUR
If the VCR is playing poor quality recording, the picture may turn
black and white. Selecting PAL or MESECAM may improve this
(depending on the recording), although coloured speckles may
appear on black and white recordings.
TIMER
OPERATE
DISPLAY
FUNCTION
CONTROL
TITLE
CLEAR
RETURN
ON/OFF
ON
SCREEN
PROG/
REPEAT
SHOWVIEW
VCR/ DVD
SELECTOR
ANGLE
INPUT SELECT
/
REV FWD
PLAY
REC
STOP
CH
DPSS
SKIP
AUDIO
OUTPUT
VCR DVD
TAPE
SPEED
EJECT
VCR MENU
DVD SETUP
OPEN/
CLOSE
DVD MENU
SET
ENTER
ZERO BACK
SKIP SEARCH
TV/VCR
VCR DVDAM/PM
PAUSE/STILL
SLOW
Playback
1 Follow steps 1 to 3 from BLUE MUTE above.
2 Press ' / " to select “COLOUR”.
NICAM AUTO OFF
COLOUR AUTO PAL MESECAM
BLUE MUTE AUTO OFF
REPEAT ON OFF
16:9 AUTO OFF
SUPER.P ON OFF
:SELECT :CHANGE
SET :ENTER MENU:EXIT
\\
3 Press
||
\ /
| to select “AUTO”, “PAL” or “MESECAM”.
\\
||
4 Press SET to confirm and then VCR MENU to return to the
normal screen.
DVNC65SE054_062.pm6 9/10/02, 10:27 am57
VCR/DVD COMBINATION
RRMCGA071WJSA
GB-57
Page 57

Playback
16:9 Playback and Recording
This feature allows the playback and recording of wide screen format
signals (16.9), which should automatically change the picture size
setting on a wide screen TV. To allow the operation of this feature,
ensure 16:9 modes is set to AUTO in the MODE menu. A scart
connection must be used between the VCR (SOCKET L1) and the
TV.
During Playback of a 16:9 encoded tape the TV should switch to
(Widescreen) 16:9 mode.
1 Follow steps 1 to 3 from BLUE MUTE on page 57.
2 Press ' / " to select “16:9”.
NICAM AUTO OFF
COLOUR AUTO PAL MESECAM
BLUE MUTE AUTO OFF
REPEAT ON OFF
16:9 AUTO OFF
SUPER.P ON OFF
:SELECT :CHANGE
SET :ENTER MENU:EXIT
\\
3 Press
||
\ /
| to select “AUTO” or “OFF”.
\\
||
4 Press SET to confirm and then VCR MENU to return to the
normal screen.
TIMER
OPERATE
DISPLAY
FUNCTION
CONTROL
TITLE
CLEAR
RETURN
ON/OFF
ON
SCREEN
PROG/
REPEAT
SHOWVIEW
VCR/ DVD
SELECTOR
ANGLE
INPUT SELECT
/
REV FWD
PLAY
REC
STOP
CH
DPSS
SKIP
AUDIO
OUTPUT
VCR DVD
TAPE
SPEED
EJECT
VCR MENU
DVD SETUP
OPEN/
CLOSE
DVD MENU
SET
ENTER
ZERO BACK
SKIP SEARCH
TV/VCR
VCR DVDAM/PM
PAUSE/STILL
SLOW
GB-58
DVNC65SE054_062.pm6 8/10/02, 8:42 am58
VCR/DVD COMBINATION
RRMCGA071WJSA
Page 58

Hi-Fi STEREO SOUND
Stereo sound is possible from this Unit if you have a stereo TV
connected to the Unit with a scart lead, or audio equipment connected with audio phono leads. The Unit is normally set so that
stereo sound is possible. The sound output from the Unit is
controlled by AUDIO OUTPUT. If you wish to change the sound
output you can use AUDIO OUTPUT as follows:
• Press AUDIO OUTPUT once. The LEFT audio channel will be sent
to BOTH speakers. q will appear on the VCR Front Panel display.
• Press AUDIO OUTPUT again. The RIGHT audio channel will be
sent to BOTH speakers. w will appear on the VCR Front Panel
display.
• Press AUDIO OUTPUT a third time and the MONO track will be
sent to BOTH speakers. q and w will not appear on the VCR
Front Panel display.
• Pressing AUDIO OUTPUT a fourth time, normal Hi-Fi stereo sound
will be heard. q and w will appear on the VCR Front Panel
display.
NICAM/IGR Hi-Fi STEREO SOUND
Your Unit can receive and record NICAM/IGR sound. The Unit is
normally set so that NICAM/IGR sound is possible if it is present on
the receiving signal, otherwise the Unit will automatically switch to
receive the mono signal. NICAM/IGR sound can be turned off. If you
wish to do this follow the procedure below:
1 Press VCR MENU to display the menu screen.
2 Press ' / " to select “MODE” then press SET to confirm.
• The MODE menu will be displayed with NICAM selected.
Audio Output Mode
TIMER
OPERATE
DISPLAY
FUNCTION
CONTROL
TITLE
CLEAR
RETURN
/
REV FWD
REC
TAPE
SPEED
CH
ON/OFF
ON
SCREEN
PROG/
REPEAT
SHOWVIEW
VCR/ DVD
SELECTOR
ANGLE
INPUT SELECT
PLAY
STOP
DPSS
SKIP
AUDIO
OUTPUT
VCR DVD
EJECT
VCR MENU
DVD SETUP
OPEN/
CLOSE
DVD MENU
SET
ENTER
ZERO BACK
SKIP SEARCH
TV/VCR
VCR DVDAM/PM
PAUSE/STILL
SLOW
NICAM AUTO OFF
COLOUR AUTO PAL MESECAM
BLUE MUTE AUTO OFF
REPEAT ON OFF
16:9 AUTO OFF
SUPER.P ON OFF
:SELECT :CHANGE
SET :ENTER MENU:EXIT
\\
3 Press
||
\ /
| to select “OFF”.
\\
||
4 Press SET to confirm and return to the menu screen.
5 Press VCR MENU to exit to normal screen.
• If the tape being played back does not carry sound recorded on Hi-Fi
tracks, L and R will not appear on the display.
• lf the sound contains ‘crackling’ or ‘popping’ noises the sound quality
may be improved by adjusting the tracking using CH ' / ".
• If the poor quality is for a long period the Unit will automatically select
the mono track and the sound will be in mono.
• NICAM sound may not be stereo.
VCR/DVD COMBINATION
RRMCGA071WJSA
GB-59
DVNC65SE054_062.pm6 8/10/02, 8:42 am59
Page 59

Sharp Super Picture
This function creates clearer picture quality only during playback.
1 Press VCR MENU to display the menu screen.
2 Select “MODE” with ' / " and then press SET.
MENU
SHOWVIEW
TIMER
MODE
SET UP
:SELECT
SET :ENTER MENU:EXIT
OPERATE
DISPLAY
FUNCTION
CONTROL
TITLE
TIMER
ON/OFF
ON
SCREEN
PROG/
REPEAT
SHOWVIEW
VCR/ DVD
SELECTOR
ANGLE
EJECT
VCR MENU
DVD SETUP
OPEN/
CLOSE
DVD MENU
3 Select “SUPER. P” with ' / ". Then set it to “ON” or “OFF” with
\\
||
\ /
|.
\\
||
NICAM AUTO OFF
COLOUR AUTO PAL MESECAM
BLUE MUTE AUTO OFF
REPEAT ON OFF
16:9 AUTO OFF
SUPER.P ON OFF
:SELECT :CHANGE
SET :ENTER MENU:EXIT
ON:
Normally leave the mode set to ON. This high picture quality
function will create a clearer image during playback.
OFF:
Set to OFF when playing back a tape on the VCR while editing
or when strong noise appears on the screen.
4 Press SET to confirm and return to the menu screen.
5 Press VCR MENU to exit to normal screen.
• This function only operates during playback. It will not operate when
recording or watching a TV program with the VCR tuner.
• When playing S-VHS tape
1. Sharp Super Picture is set to off automatically. When finished play-
back, the setting will return to the previous setting.
2. You cannot change ON/OFF setting manually.
• The ON/OFF status of the Sharp Super Picture can be checked when
ON SCREEN is pressed to display OSD.
• When the Unit power is turned off, the Sharp Super Picture setting is
retained in memory.
• If power is interrupted for more than 60 seconds (power failure, etc.),
the setting will return to ON.
CLEAR
RETURN
ZERO BACK
SKIP SEARCH
INPUT SELECT
/
REV FWD
PLAY
REC
STOP
TAPE
SPEED
DPSS
SKIP
AUDIO
CH
OUTPUT
VCR DVD
VCR/DVD COMBINATION
RRMCGA071WJSA
SET
ENTER
TV/VCR
VCR DVDAM/PM
PAUSE/STILL
SLOW
GB-60
DVNC65SE054_062.pm6 8/10/02, 8:43 am60
Page 60

Auto Repeat/Auto Zero Back
/
OPEN/
CLOSE
OPERATE
VCR/ DVD
SELECTOR
VCR MENU
DVD SETUP
TAPE
SPEED
ON
SCREEN
TIMER
ON/OFF
TITLE
DVD MENU
DISPLAY
SHOWVIEW
EJECT
FUNCTION
CONTROL
PROG/
REPEAT
ANGLE
CLEAR
RETURN
REV FWD
SET
ENTER
ZERO BACK
SKIP SEARCH
TV/VCR
VCR DVDAM/PM
INPUT SELECT
PAUSE/STILL
REC
PLAY
STOP
SLOW
CH
VCR DVD
SKIP
DPSS
AUDIO
OUTPUT
VCR/DVD COMBINATION
RRMCGA071WJSA
Auto Repeat
This function replays the specified part.
1 Press VCR MENU to display the menu screen.
2 Select “MODE” with ' / " and then press SET.
MENU
SHOWVIEW
TIMER
MODE
SET UP
:SELECT
SET :ENTER MENU:EXIT
3 Select “REPEAT” mode with ' / ". Then set the mode to “ON”
\\
or “OFF” with
NICAM AUTO OFF
COLOUR AUTO PAL MESECAM
BLUE MUTE AUTO OFF
REPEAT ON OFF
16:9 AUTO OFF
SUPER.P ON OFF
:SELECT :CHANGE
SET :ENTER MENU:EXIT
\ /
\\
||
|.
||
4 Press SET to confirm and return to the menu screen.
5 Press VCR MENU to return to normal screen.
Auto Zero Back
ZERO BACK uses the tape counter to determine a specific point on
a cassette you may wish to return to.
1 Press DISPLAY until tape counter appears.
2 Press CLEAR to identify the current position on a video cassette
and the tape counter will appear.
3 Press ZERO BACK when you wish to return to this position on
the video cassette. The cassette will rewind/advance to this
point.
• The tape counter will only operate on recorded sections of cassette.
GB-61
DVNC65SE054_062.pm6 8/10/02, 8:43 am61
Page 61

DPSS (Digital Program Search System) / Skip Search
DPSS
Your Unit records a marker signal on the tape at the start of each
recording. These signals can be used later to locate the starting
point of a recording.
Press DPSS to locate a previous programme or the next
programme.
1 Load the video cassette into the Unit.
2 Press DPSS
screen display, and the Unit will fast forward to locate the third
recording after the current one.
3 Press DPSS once. DPSS -1 will appear on the on-screen
display and the Unit will rewind to locate the beginning of the
current recording.
DPSS
Number
4 To cancel the search before it has finished, press ■ STOP or
ûPLAY.
/
three times. DPSS 3 will appear on the on-
DPSS Signals
Current tape position
Fast ForwardRewind
TIMER
OPERATE
DISPLAY
FUNCTION
CONTROL
TITLE
CLEAR
RETURN
ON/OFF
ON
SCREEN
PROG/
REPEAT
SHOWVIEW
VCR/ DVD
SELECTOR
ANGLE
INPUT SELECT
/
REV FWD
PLAY
REC
STOP
CH
DPSS
SKIP
AUDIO
OUTPUT
VCR DVD
TAPE
SPEED
EJECT
VCR MENU
DVD SETUP
OPEN/
CLOSE
DVD MENU
SET
ENTER
ZERO BACK
SKIP SEARCH
TV/VCR
VCR DVDAM/PM
PAUSE/STILL
SLOW
• Recordings must be longer than 3 minutes.
• The starting point of playback may vary.
• This feature will only work with video tapes recorded on a VCR with the
DPSS feature.
Skip Search
With this feature, you can set a forward video search time to approx.
30, 60, 90 or 120 seconds of recorded material. After searching,
normal playback will resume automatically.
1 Press ûPLAY to start playback.
2 Press SKIP SEARCH.
The number of times you press SKIP SEARCH determines the
forward search time.
Number of 1 Time 2 Times 3 Times 4 Times
Times Pressed
Video Search Time Approx. 30 sec. Approx. 60 sec. Approx. 90 sec. Approx. 120 sec.
GB-62
VCR/DVD COMBINATION
RRMCGA071WJSA
DVNC65SE054_062.pm6 8/10/02, 8:43 am62
Page 62

TV Program Recording
Immediate Recording
Selection of a Channel
Select the channel you wish to record by using the number buttons,
or select the next/previous channel by pressing CH ' / ".
To change between single digit and 2-digit channel numbers, press
- / --. For example, for channel 24, press - / -- then press 2 and 4.
Tape Speed Selection
Your Unit has three tape speeds: SP (Standard Play), LP (Long Play)
and EP (Extended Play). Press TAPE SPEED to select the desired
setting.
It is recommended that EP recordings are only played back on the
Unit on which they were originally recorded.
You can record the channel you are watching or a different channel.
MODE
CASSETTE
E-240
SP
Standard Play
240 min.
LP
Long Play
480 min.
EP
Extended Play
720 min.
Immediate Recording
1 Insert a video tape into your Unit.
2 Select the channel you wish to record on the Unit as above.
3 Press
ÆÆ
ÆREC to start recording.
ÆÆ
TIMER
OPERATE
DISPLAY
FUNCTION
CONTROL
TITLE
CLEAR
RETURN
/
REV FWD
REC
TAPE
SPEED
CH
ON/OFF
ON
SCREEN
PROG/
REPEAT
SHOWVIEW
VCR/ DVD
SELECTOR
ANGLE
INPUT SELECT
PLAY
STOP
DPSS
SKIP
AUDIO
OUTPUT
VCR DVD
EJECT
VCR MENU
DVD SETUP
OPEN/
CLOSE
DVD MENU
SET
ENTER
ZERO BACK
SKIP SEARCH
TV/VCR
VCR DVDAM/PM
PAUSE/STILL
SLOW
4 Press âPAUSE/STILL to pause during recording.
5 Press
ÆÆ
ÆREC to continue recording.
ÆÆ
6 Press ËSTOP once to stop recording.
Simple Timed Recording
1 Press
ÆÆ
ÆREC.
ÆÆ
2 To specify a stop time, each additional press of
the stop time by 10 minutes.
3 Press ËSTOP once to stop recording at any time.
G STOP 15:30
ÆÆ
ÆREC will delay
ÆÆ
VCR/DVD COMBINATION
RRMCGA071WJSA
• If the tape ends before the recording is
complete the Unit will stop recording,
rewind, eject the tape and place the
Unit into STANDBY mode.
• If the Unit ejects the video tape when
you press
ÆÆ
ÆREC the tape is record
ÆÆ
protected. i.e. record protection tab has
been removed.
DVNC65SE063_070.pm6 8/10/02, 9:10 am63
GB-63
Page 63

Timer Recording
How to Use the S
HOWVIEW
®
System to Make a
Recording
The SHOWVIEW system allows you to program the Unit to record up to
eight programmes using the S
HOWVIEW numbers published in TV
listings (refer to your daily newspaper or TV magazine).
Preparations
• Check that the clock is displaying the correct time.
• If the Timer Standby symbol
the TIMER ON/OFF to remove the
GG
G appears on the VCR display, press
GG
GG
G symbol.
GG
1 Press the SHOWVIEW button.
2 Enter the SHOWVIEW number from the TV listing using the number
buttons.
MENU
SHOWVIEW NO.
ONCE WEEKLY DAILY
:SELECT 0~9 :DATA
SET :ENTER MENU:EXIT
• An ERROR message will appear if you have entered a number that is
not a current SHOWVIEW number. If this happens press CLEAR to delete
the numbers as required and enter the correct SHOWVIEW number.
3 Press ' / " to select ONCE, WEEKLY, DAILY.
• If you want to make additional recordings at the same time
each day or week, then use
DAILY option as appropriate.
\\
||
\ /
| to select the WEEKLY, or
\\
||
4 Press SET to confirm.
TIMER
OPERATE
DISPLAY
FUNCTION
CONTROL
TITLE
CLEAR
RETURN
ON/OFF
ON
SCREEN
PROG/
REPEAT
SHOWVIEW
VCR/ DVD
SELECTOR
ANGLE
INPUT SELECT
/
REV FWD
PLAY
REC
STOP
TAPE
SPEED
DPSS
SKIP
AUDIO
CH
OUTPUT
VCR DVD
VCR/DVD COMBINATION
RRMCGA071WJSA
EJECT
VCR MENU
DVD SETUP
OPEN/
CLOSE
DVD MENU
SET
ENTER
ZERO BACK
SKIP SEARCH
TV/VCR
VCR DVDAM/PM
PAUSE/STILL
SLOW
• Check that the menu list agrees with the times shown in the TV listing.
If it does not, press CLEAR to return to the SHOWVIEW system menu,
and re-enter the correct SHOWVIEW number.
The first time that you use the SHOWVIEW system to make a recording
on each channel Preset, (PR) may be highlighted on the On-Screen
Display.
5 Enter the channel number you wish to record using the number
buttons.
(Example) Channel 2
1/2
DATE PR START STOP
21/06 02 12:00
/ : :
/ : :
/ : :
PR :PRESET
:SELECT
SET :ENTER MENU:EXIT
GB-64
DVNC65SE063_070.pm6 8/10/02, 9:10 am64
13:00
SP
:CHANGE
Page 64

\\
6 If you wish to change the recording speed, use
||
\ /
| to highlight
\\
||
SP. Press ' / " to select standard play (SP), long play (LP) or
extended play (EP) as required.
1/2
DATE PR START STOP
21/06 02 12:00
/ : :
/ : :
/ : :
SP/LP/EP:TAPE SPEED
:SELECT
SET :ENTER MENU:EXIT
7 For VPS/PDC setting use
13:00
\\
||
\ /
| to highlight the final column (See
\\
||
SP
:CHANGE
NOTE below). Using ' / " will select VPS/PDC “ON” or “OFF”.
(✽ = ON – = OFF).
1/2
DATE PR START STOP
21/06 02 12:00
/ : :
/ : :
/ : :
VPS/PDC *:ON -:OFF
:SELECT
SET :ENTER MENU:EXIT
13:00
:CHANGE
SP
8 Press SET to confirm the programme. The SHOWVIEW system
menu will reappear. If you wish to enter further S
recordings repeat this procedure.
MENU
SHOWVIEW NO.
ONCE WEEKLY DAILY
HOWVIEW system
Timer Recording
TIMER
OPERATE
DISPLAY
FUNCTION
CONTROL
TITLE
CLEAR
RETURN
/
REV FWD
REC
TAPE
SPEED
CH
ON/OFF
ON
SCREEN
PROG/
REPEAT
SHOWVIEW
VCR/ DVD
SELECTOR
ANGLE
INPUT SELECT
PLAY
STOP
DPSS
SKIP
AUDIO
OUTPUT
VCR DVD
EJECT
VCR MENU
DVD SETUP
OPEN/
CLOSE
DVD MENU
SET
ENTER
ZERO BACK
SKIP SEARCH
TV/VCR
VCR DVDAM/PM
PAUSE/STILL
SLOW
:SELECT 0~9 :DATA
SET :ENTER MENU:EXIT
VCR/DVD COMBINATION
9 When you have completed entering the timer settings, press
RRMCGA071WJSA
VCR MENU to remove the menu from the TV screen.
10 Ensure that the tape on which you wish to record is inserted into
the Unit, then press TIMER ON/OFF once to place the Unit in
TIMER STANDBY mode.
Panel Display and the timer standby indicator will be illuminated.
• You may also access the SHOWVIEW system menu by the following procedure:
1 Press VCR MENU.
2 The SHOWVIEW system option will be highlighted. Press SET to confirm.
Continue from step 2 of this procedure.
• VPS/PDC is a signal broadcast by some TV stations which adjusts the start and stop time of your Unit recording. This
ensures that if there is a change in broadcast time for your programme the Unit will still record the whole programme.
It is essential that the start time as it appears in the TV listing is used to program the Unit, as this information is used to
identify the VPS/PDC signal corresponding to your programme.
GG
• If the
G symbol flashes a video tape has not been inserted into the Unit.
GG
• If the video cassette is ejected when the Unit tries to record the record protection tab has been removed.
• During recording, press ■STOP to cancel the recording. If there are further recordings to be made, the Unit will return
to Timer Standby.
GG
G will be shown on the VCR Front
GG
GB-65
DVNC65SE063_070.pm6 8/10/02, 9:11 am65
Page 65

Timer Recording
How to Set a Delayed Recording
You can make a maximum of eight delayed recordings up to a year
in advance. The example shown is for 24-hour clock operation. To
change to12-hour clock operation refer to the Manual Clock Setting
section of this manual. 12-hour clock am/pm can be selected using
AM/PM.
Preparations
• If the Timer Standby symbol
Display, press the TIMER ON/OFF to remove the
GG
G appears on the VCR Front Panel
GG
GG
G symbol.
GG
• Check that the VCR clock is displaying the correct time.
Setting a Recording
For example: Recording a programme on channel 3 from 21:05 to
22:30 on July 9th.
OPERATE
DISPLAY
FUNCTION
CONTROL
TITLE
CLEAR
RETURN
TIMER
ON/OFF
ON
SCREEN
PROG/
REPEAT
SHOWVIEW
VCR/ DVD
SELECTOR
ANGLE
ZERO BACK
SKIP SEARCH
EJECT
VCR MENU
DVD SETUP
OPEN/
CLOSE
DVD MENU
SET
ENTER
1 Press ËSTOP to ensure that the Unit is switched on.
2 Press VCR MENU.
3 Press ' / " to select “TIMER”. Then press SET to confirm.
MENU
SHOWVIEW
TIMER
MODE
SET UP
:SELECT
SET :ENTER MENU:EXIT
4 Press SET again, the on-screen display will now show today’s
date. If you wish to change the date use ' / " or number
buttons. If you use the number buttons, enter two digits for the
day, then two for the month. For example for July 9th, press 0 9
(9th), then 0 7 (July). When the correct date for your recording is
shown, press
||
| to move to the next setting.
||
1/2
DATE PR START STOP
21/06 02 12:00
9/07 : :
/ : :
/ : :
DATE:DAY/MONTH
:SELECT
SET :ENTER MENU:EXIT
13:00 SP*
:CHANGE
TV/VCR
INPUT SELECT
VCR DVDAM/PM
/
REV FWD
PLAY
REC
TAPE
SPEED
CH
VCR/DVD COMBINATION
RRMCGA071WJSA
STOP
DPSS
SKIP
AUDIO
OUTPUT
VCR DVD
PAUSE/STILL
SLOW
GB-66
DVNC65SE063_070.pm6 8/10/02, 9:11 am66
Page 66

5 If you want to make additional recordings at the same time each
day or week, use ' / " to select D (daily) or W (weekly). Then
||
press
| to move to the next setting.
||
1/2
DATE PR START STOP
— -:— -:— —-
21/06 02 12:00
9/07D : :
/ : :
/ : :
:ONCE
W:WEEKLY D:DAILY
:SELECT
SET :ENTER MENU:EXIT
13:00 SP*
:CHANGE
6 Enter the channel number using ' / " or the number buttons.
For example to record a programme on channel 3, press 0 3.
Then press
||
| to move to the next setting.
||
7 Enter the start time using ' / " or the number buttons, hours
first then minutes (when entering less than 10 hours or minutes
add a ‘0’ before the number), for example for 21:05 start, press 2
1 0 5. Then press
||
| to move to the next setting.
||
1/2
DATE PR START STOP
21/06 02 12:00
9/07D03 21:05
/ : :
/ : :
:SELECT
SET :ENTER MENU:EXIT
13:00 SP*
:
:CHANGE
8 Enter the stop time, for example for 22:30 stop, press 2 2 3 0.
Timer Recording
TIMER
OPERATE
DISPLAY
FUNCTION
CONTROL
TITLE
CLEAR
RETURN
/
REV FWD
REC
TAPE
SPEED
CH
ON/OFF
ON
SCREEN
PROG/
REPEAT
SHOWVIEW
VCR/ DVD
SELECTOR
ANGLE
INPUT SELECT
PLAY
STOP
DPSS
SKIP
AUDIO
OUTPUT
VCR DVD
EJECT
VCR MENU
DVD SETUP
OPEN/
CLOSE
DVD MENU
SET
ENTER
ZERO BACK
SKIP SEARCH
TV/VCR
VCR DVDAM/PM
PAUSE/STILL
SLOW
9 If you wish to change the “RECORDING SPEED”, use
highlight SP. Press ' / " to select standard play (SP), long
play (LP) or extended play (EP) as required.
1/2
DATE PR START STOP
21/06 02 12:00
9/07D03 21:05
/ : :
/ : :
SP/LP/EP:TAPE SPEED
:SELECT
SET :ENTER MENU:EXIT
10 For VPS/PDC setting use
(See note on next page). Using ' / " will select VPS/PDC “ON”
or “OFF” ( ✽ = ON – = OFF).
1/2
DATE PR START STOP
21/06 02 12:00
9/07D03 21:05
/ : :
/ : :
1 /2
DATE PR START STOP
VPS/PDC :ON :OFF
:SELECT
SET :ENTER MENU:EXIT
*
13:00 SP*
22:30 SP
:CHANGE
\\
||
\ /
| to highlight the final column
\\
||
13:00 SP*
22:30 SP
:CHANGE
\\
\ /
\\
||
| to
||
VCR/DVD COMBINATION
RRMCGA071WJSA
DVNC65SE063_070.pm6 8/10/02, 9:11 am67
GB-67
Page 67

Timer Recording
11 Press SET to confirm.
• The MENU now shows all the timer settings you have entered.
If you wish to make additional timer recordings, repeat this
procedure.
12 When you have completed entering timer settings, press VCR
MENU to remove the menu from the TV screen.
13 Ensure that the tape on which you wish to record is inserted into
the Unit, then press TIMER ON/OFF once to place the Unit in
TIMER STANDBY mode.
Panel display and the timer standby indicator will be illuminated.
GG
G will be shown on the VCR Front
GG
OPERATE
DISPLAY
FUNCTION
CONTROL
TITLE
TIMER
ON/OFF
ON
SCREEN
PROG/
REPEAT
SHOWVIEW
VCR/ DVD
SELECTOR
ANGLE
EJECT
VCR MENU
DVD SETUP
OPEN/
CLOSE
DVD MENU
• VPS/PDC is a signal broadcast by some TV stations which adjusts the
start and stop time of your VCR recording. This ensures that if there is
a change in broadcast time for your programme the Unit will still
record the whole programme. It is essential that the start time as it
appears in the TV listing is used to program the Unit, as this information is used to identify the VPS/PDC signal corresponding to your
programme.
GG
• If the
G symbol flashes a video tape has not been inserted into the
GG
Unit.
• If the video tape is ejected when the Unit tries to record the record
protection tab has been removed.
• During recording, press ËSTOP to cancel the recording. If there are
further recordings to be made, the Unit will return to Timer Standby.
How to Check, Change, and Cancel a Delayed Recording
Checking a Recording
You can see on the Timer setting screen a list of all timer
programmes that are already set.
Preparations
• If the Timer Standby symbol
Display, press the TIMER ON/OFF to remove the
GG
G appears on the VCR Front Panel
GG
GG
G symbol.
GG
CLEAR
RETURN
SKIP SEARCH
INPUT SELECT
/
REV FWD
PLAY
REC
STOP
TAPE
SPEED
DPSS
SKIP
AUDIO
CH
OUTPUT
VCR DVD
VCR/DVD COMBINATION
RRMCGA071WJSA
SET
ENTER
ZERO BACK
TV/VCR
VCR DVDAM/PM
PAUSE/STILL
SLOW
1 Press ËSTOP to switch on the VCR.
2 Press VCR MENU.
3 Press ' / " to select “TIMER”. Press SET to confirm.
• All the delayed recordings in the VCR’s memory will be shown.
MENU
SHOWVIEW
TIMER
MODE
SET UP
:SELECT
SET :ENTER MENU:EXIT
4 If the settings are correct press VCR MENU to exit.
GB-68
DVNC65SE063_070.pm6 8/10/02, 9:11 am68
Page 68

Changing a Recording
1 Follow steps 1 to 3 of Checking a Recording on page 68.
2 To change a delayed recording, press ' / " to highlight the
recording, then press SET to select.
\\
3 Press
||
\ /
| to highlight the setting to be changed and correct it
\\
||
by using ' / " or the number buttons.
1/2
DATE PR START STOP
21/06 02 12:00
/ : :
/ : :
/ : :
2/2
CLEAR:CANCEL
:SELECT
SET :ENTER MENU:EXIT
13:00 SP*
4 When all corrections are complete press SET to confirm, then
press VCR MENU to exit.
Cancelling a Recording
1 Follow steps 1 to 3 of Checking a Recording on page 68.
2 To cancel a delayed recording, press ' / " to highlight the
recording to be cancelled, then press CLEAR.
1/2
DATE PR START STOP
21/06 02 12:00
/ : :
/ : :
/ : :
2/2
CLEAR:CANCEL
:SELECT
SET :ENTER MENU:EXIT
13:00 SP*
3 Press VCR MENU to exit.
Timer Recording
TIMER
OPERATE
DISPLAY
FUNCTION
CONTROL
TITLE
CLEAR
RETURN
/
REV FWD
REC
TAPE
SPEED
SHOWVIEW
ON/OFF
VCR/ DVD
ON
SELECTOR
SCREEN
PROG/
ANGLE
REPEAT
INPUT SELECT
PLAY
STOP
DPSS
SKIP
AUDIO
CH
OUTPUT
VCR DVD
VCR/DVD COMBINATION
RRMCGA071WJSA
EJECT
VCR MENU
DVD SETUP
OPEN/
CLOSE
DVD MENU
SET
ENTER
ZERO BACK
SKIP SEARCH
TV/VCR
VCR DVDAM/PM
PAUSE/STILL
SLOW
• If there are some programmes to be recorded, do not forget to press
TIMER ON/OFF to return the Unit to Timer Standby mode.
DVNC65SE063_070.pm6 8/10/02, 9:11 am69
GB-69
Page 69

Recording From Other Equipment
LINE 1 (TV)
Recording from Other Equipment
You can record video and audio signals from various external
sources, such as a camcorder, onto a video tape using this Unit.
For example, recording from a camcorder connected to LINE 2 IN/
DECODER on the Unit:
LINE 2
LINE 1 (TV)
L
R
DVD/VCR Unit back panel
1 Connect your signal source (e.g.
Camcorder, Digital Camera etc.) to the
desired scart socket on the back of the
Unit using the manufacturers’
recommended cable (not supplied).
2 Ensure that the tape on which you wish to
record is inserted into the Unit.
RGB
SELECTOR
S-VIDEO
OUTPUT
S-VIDEO
VIDEO
DISPLAY
FUNCTION
CONTROL
TITLE
CLEAR
RETURN
TIMER
ON/OFF
ON
SCREEN
PROG/
REPEAT
SHOWVIEW
VCR/ DVD
SELECTOR
ANGLE
INPUT SELECT
OPERATE
/
REV FWD
PLAY
REC
STOP
CH
DPSS
SKIP
AUDIO
OUTPUT
VCR DVD
TAPE
SPEED
EJECT
VCR MENU
DVD SETUP
OPEN/
CLOSE
DVD MENU
SET
ENTER
ZERO BACK
SKIP SEARCH
TV/VCR
VCR DVDAM/PM
PAUSE/STILL
SLOW
3 Press the INPUT SELECT button on the
remote control until the VCR display
shows L2.
4 Press the RECORD button on the remote
to start recording.
OTHER POSSIBLE CONNECTIONS
• If you wish to record from a source connected to
LINE 1 IN/OUT, select L1. Press the
on the remote to start recording.
• If you wish to record from a source connected with
audio phone leads to the sockets on the front of the
Unit, select L3. Press the
ÆÆ
ÆREC button on the
ÆÆ
remote to start recording.
• There are many different ways of connecting external equipment to the Unit. Please refer to your equipment operation
manuals for further information.
ÆÆ
ÆREC button
ÆÆ
LINE IN 3 VIDEO L - AUDIO - R
VCR/DVD COMBINATION
RRMCGA055WJSA
GB-70
DVNC65SE063_070.pm6 8/10/02, 9:11 am70
Page 70

Tape Remaining
When you load a video cassette into the Unit, the Unit can calculate
approximately the amount of video tape remaining in hours and
minutes. This is useful in determining whether or not there is sufficient tape left to make a recording.
When a video tape is playing, the amount of tape remaining is
calculated automatically. To display the amount of video tape
remaining:
1 Load the video cassette into the Unit.
2 Press DISPLAY as many times as necessary until “R” appears
on the VCR Front Panel display. The tape will wind forward for a
few seconds and then return to its original position. The tape
remaining will be shown on the VCR Front Panel display in hours
and minutes. By pressing TAPE SPEED on the Remote the
remaining time will change between standard play, long play and
extended play.
OPERATE
DISPLAY
FUNCTION
CONTROL
TITLE
CLEAR
RETURN
TIMER
ON/OFF
ON
SCREEN
PROG/
REPEAT
SHOWVIEW
VCR/ DVD
SELECTOR
ANGLE
SKIP SEARCH
EJECT
VCR MENU
DVD SETUP
OPEN/
CLOSE
DVD MENU
SET
ENTER
ZERO BACK
• If the TAPE REMAINING function is interrupted, the remaining time will
not be displayed.
• If less than 5 minutes of tape remains the display will flash.
• When you start recording or playback, the VCR will begin the
computation. However, this may take some time. When the
computation is completed, the tape remaining will be shown on the
OSD and VCR display for 5 seconds.
• If the “REM” mode is selected with MODE OSD or DISPLAY and the
VCR is in Stop mode, the tape will automatically fast forward or rewind
for a few seconds and then the VCR will begin computing the amount
of tape remaining.
• During computation, REC will not function and pressing STOP,
PLAY/X2 or other buttons will interrupt the computation.
• Setting the DPSS or ZERO BACK function during computation may
cancel it.
• The indicated length of tape remaining is only an approximate guide.
• This function may not work properly for video tapes other than E-60,
E-90, E-180 and E-240.
• The length of tape remaining during fast forward or rewind may be
indicated as greater than it actually is.
• When and S tapes are used with a cassette adapter, the
C
C
indication may not be correct.
TV/VCR
INPUT SELECT
VCR DVDAM/PM
/
REV FWD
PLAY
REC
TAPE
SPEED
CH
VCR/DVD COMBINATION
RRMCGA071WJSA
STOP
DPSS
SKIP
AUDIO
OUTPUT
VCR DVD
PAUSE/STILL
SLOW
DVNC65SE071_072.pm6 8/10/02, 9:23 am71
GB-71
Page 71

Recording a DVD Disc onto a Video Cassette
Use the following procedure to record the images and sounds on a
DVD disc onto a video cassette.
Recording a DVD disc onto a video cassette
(Tape Editing mode)
Preparation
TV
• Turn on the TV and switch to the external “VIDEO” or “AV” channel.
This Unit
• Press OPERATE.
• Move the VCR/DVD CHANGE Switch on the Remote to DVD.
1 Insert both the DVD disc and the video cassette for recording.
2 Press VCR
• The VCR
• The channel has changed to DVD playback picture and the
product enters the REC PAUSE mode.
3 Press ON SCREEN to turn off the DVD on screen display (see
page 38).
• If the DVD on screen display is “ON” while recording, the
display will also be recorded.
4 Press ûPLAY.
• The disc starts playback
5 Press æREC.
• The images on the DVD disc are recorded onto the VCR
cassette.
\\
\ DVD.
\\
\\
\ DVD indicator on the product lights up.
\\
DV-NC65
EJECT/STOP
REW
OPERATE
/
AV 2 IN VDEO
LINE IN 3 VIDEO L - AUDIO - R
OPERATE
PAL
PLAY/X2
REC
CH
TIMER
OPERATE
ON/OFF
ON
DISPLAY
SCREEN
PROG/
FUNCTION
REPEAT
CONTROL
TITLE
CLEAR
RETURN
/
REV FWD
REC
TAPE
SPEED
CH
DVD / CD PLAYER
STOP
OPEN/CLOSE
PLAY
TIMER
VCR/DVD
SELECTOR
VCR DVD
PLAY
VCR DVD indicator
SHOWVIEW
EJECT
VCR/ DVD
VCR MENU
SELECTOR
DVD SETUP
OPEN/
ANGLE
CLOSE
DVD MENU
SET
ENTER
ZERO BACK
SKIP SEARCH
TV/VCR
VCR DVDAM/PM
INPUT SELECT
PLAY
PAUSE/STILL
STOP
DPSS
SLOW
SKIP
AUDIO
OUTPUT
VCR DVD
6 To stop the Tape Editing mode, first move the VCR/DVD
CHANGE Switch to VCR and press the ËSTOP button to stop
the VCR. Then move the selector switch to DVD and press
ËSTOP to stop the DVD.
• The following are not signs of trouble:
1 The brightness of images from regular DVD disc playback and from discs played in Tape Editing mode might vary.
2 The discs playing time and the Real time counter vary slightly when recording.
• While in Tape Editing mode it is not possible to adjust timer settings to use Exact Rec function.
• The DVD/VCR output jacks become VCR fixed.
• The following operations cancel the Tape Editing mode:
1 When stopped or performing other tape operations except for recording or pause.
2 When changing channels.
3 When pressing VCR \ DVD once more or turning the power on or off, after setting the Tape Editing mode.
• Copy protected DVD discs cannot be recorded (the image will be distorted when æREC is pressed).
• Discs that can be recorded onto tape are DVD discs that are not copy protected, and Audio CD-R and CD-RW (CD-R
or CD-RW are limited to those recorded in Audio CD format).
The recordings which you make from TV/radio broadcasts or audio sources (such as records) are for your
own private use and cannot be used without prior permission or consent of the author.
GB-72
DVNC65SE071_072.pm6 8/10/02, 9:24 am72
VCR/DVD COMBINATION
RRMCGA071WJSA
Page 72

Watching the DVD
Preparing to Use The DVD.............................................................. 74
When connecting a TV with the DVD output jacks ......................... 74
When connecting a TV with the DVD/VCR
shared output jacks .................................................................... 74
Playback........................................................................................... 75
Basic Play ...................................................................................... 75
Fast Forward/Fast Reverse ............................................................ 76
Slow-Motion Play ........................................................................... 76
Still/Pause ...................................................................................... 77
Frame Advance .............................................................................. 77
Skip (Forward/Reverse) ................................................................. 77
Angle Selection ............................................................................... 78
Playing MP3 Discs .......................................................................... 79
Regarding MP3 discs ..................................................................... 79
Playing MP3 discs.......................................................................... 79
To play MP3 discs .......................................................................... 80
To play another file (music title) while playing ................................ 80
To skip the file while playing ........................................................... 80
About the Function Control Screen .............................................. 81
Direct skip (title/chapter/time) ........................................................ 82
Subtitle language setting................................................................ 83
Angle setting .................................................................................. 84
Audio setting .................................................................................. 85
Advanced Surround setting............................................................ 86
Digital Gamma setting.................................................................... 87
Direct Selection of Scenes ............................................................. 88
Selecting Scenes by Title Number ................................................. 88
Selecting Scenes from the Menu Screen....................................... 88
Programmed Playback ................................................................... 89
Chapter Programmed playback ..................................................... 89
Track Programmed playback .......................................................... 90
MP3 Files Programmed playback .................................................. 91
Repeat Playback.............................................................................. 93
Repeat playback ............................................................................ 92
A-B Repeat .................................................................................... 93
Resume Function ............................................................................ 94
WATCHING
THE DVD
DVNC65SE073 Tobira.pm6 8/10/02, 9:25 am73
GB-73
Page 73

Preparing to Use The DVD
The following steps are necessary to display the DVD screen on the
TV.
When connecting a TV with the DVD output
jacks
DV-NC65
OPERATE
AV 2 IN VDEO
LINE IN 3 VIDEO L - AUDIO - R
PAL
EJECT/STOP
PLAY/X2
REW
REC
/
CH
VCR/DVD
SELECTOR
DVD / CD PLAYER
STOP
OPEN/CLOSE
PLAY
TIMER
VCR DVD
1 Turn on the TV and switch the TV channel to the external input
“VIDEO” or “AV” channel connected to the DVD output jack.
2 Press OPERATE.
The start up screen is displayed on the TV screen.
•
3 Move the VCR/DVD CHANGE Switch on the remote control to
DVD.
VCR DVD
• When the TV is connected to the DVD output jack, the image will be
displayed regardless of the VCR/DVD mode selected. Therefore, it is
not necessary to adjust the mode selected.
When connecting a TV with the DVD/VCR
shared output jacks
1 Turn on the TV and switch the TV channel to the external input
“VIDEO” or “AV” channel connected to the DVD/VCR shared
output jack.
OPERATE
OPERATE
RETURN
VCR / DVD Selector
TIMER
SHOWVIEW
ON/OFF
VCR/ DVD
SELECTOR
ANGLE
INPUT SELECT
PLAY
STOP
DPSS
SKIP
AUDIO
OUTPUT
VCR DVD
VCR MENU
DVD SETUP
DVD MENU
ZERO BACK
SKIP SEARCH
PAUSE/STILL
ON
DISPLAY
SCREEN
PROG/
FUNCTION
REPEAT
CONTROL
TITLE
CLEAR
/
REV FWD
REC
TAPE
SPEED
CH
EJECT
OPEN/
CLOSE
SET
ENTER
TV/VCR
VCR DVDAM/PM
SLOW
2 Press OPERATE.
3 Move VCR/DVD CHANGE Switch on the remote control to DVD.
VCR DVD
4 Press VCR/DVD SELECTOR to enter the DVD mode.
• The VCR/DVD SELECTOR on the product lights up in green.
VCR/DVD
SELECTOR
Lights up in green
Each time VCR/DVD SELECTOR is pressed, the mode
•
changes between “VCR” mode and “DVD” mode.
GB-74
DVNC65SE074_080.pm6 8/10/02, 9:43 am74
VCR/DVD COMBINATION
RRMCGA071WJSA
Page 74

Preparation
• See Preparing to Use DVD on page 24.
Playback
DVD
DVD
OPERATE
C D
C D
CD-R/RW
CD-R/RW
OPEN/CLOSE
DVD
DVD
C D
C D
CD-R/RW
CD-R/RW
• The icons below are used in this Operation Manual:
DVD
DVD
........ Indicates the functions that can be performed
for DVDs.
........ Indicates the functions that can be performed
C D
C D
for AUDIO CDs.
CD-R/RW
... Indicates the functions that can be performed
CD-R/RW
for CD-R/RW.
P
O
T
S
/
T
C
E
J
E
R
E
W
O
P
-R
IO
D
U
)-A
O
N
O
(M
L
O
E
D
V
N
I
2
V
A
Basic Play
1 Press OPERATE.
2 Press îOPEN/CLOSE to open the disc tray.
3 Place a disc onto the tray.
• Hold the disc without touching either of its surfaces, position it
with the printed title side facing up, align it with the guides,
and place it in its proper position.
1 8 cm (3") disc 2 12 cm (5") disc
• Do not stack discs in the tray. This can damage the player
and the discs.
4 Press î OPEN/CLOSE to close the disc tray.
5 Press ûPLAY.
• Playback image appears on the screen. (The “Start Up
screen” will be shown for audio CDs.)
• Some discs are played back automatically without pressing
û PLAY.
• Some discs prompt you to select a title. In this case, select a
title you want to view.
6 Press ËSTOP to stop playback.
• If the disc is loaded upside down or is damaged, “– – – – –” appears
on the DVD Front Panel display and the disc tray slides out.
• If you attempt to play a DVD disc with the wrong region code, “
REGION CODE ERROR” appears on the TV screen and the disc tray
slides out.
DV-NC65
OPERATE
AV 2 IN VDEO
LINE IN 3 VIDEO L - AUDIO - R
PAL
EJECT/STOP
PLAY/X2
REW
REC
/
CH
VCR/DVD
SELECTOR
DVD / CD PLAYER
STOP
OPEN/CLOSE
PLAY
TIMER
VCR DVD
STOP
Disc
IMER
Y
A
L
P
W
E
R
Y
B
D
N
A
T
S
T
D
V
D
R
C
V
1
TIMER
OPERATE
ON/OFF
DISPLAY
SCREEN
PROG/
FUNCTION
REPEAT
CONTROL
TITLE
CLEAR
RETURN
/
REV FWD
REC
TAPE
SPEED
CH
2
ON
PLAY
STOP
DPSS
SKIP
VCR DVD
SHOWVIEW
VCR/ DVD
SELECTOR
ANGLE
ZERO BACK
SKIP SEARCH
INPUT SELECT
AUDIO
OUTPUT
EJECT
VCR MENU
DVD SETUP
OPEN/
CLOSE
DVD MENU
ENTER
TV/VCR
VCR DVDAM/PM
PAUSE/STILL
SLOW
PLAY
SET
DVNC65SE074_080.pm6 8/10/02, 9:43 am75
VCR/DVD COMBINATION
RRMCGA071WJSA
GB-75
Page 75

Playback
DVD
DVD
C D
C D
CD-R/RW
CD-R/RW
Fast Forward/Fast Reverse
1 Press FWD
• The disc begins fast scan at ×2 speed (1).
• Three speeds are available for DVD and for Audio CDs. Each
time FWDè or ÈREV is pressed, the speed of fast scan
changes in the following sequence:
Number of Presses
1 (approx. x2) → 2 (approx. x8) → 3 (approx. x32)
è
or ÈREV during playback.
1
DVD
Fast scan image appears here.
(No image is shown for Audio CDs.)
The speed of fast scan
2 Press ûPLAY when you reach the desired point.
• On some discs, the fast scan function is disabled.
• On DVD discs, audio and subtitles are not played back during the fast
scan playback. Audio is played back only when the search speed of
the fast forward is 1 (about x2).
• With a DVD disc, you cannot search past a title. Playback starts from
the beginning of the title.
• Depending on the audio equipment, the sound may not come out
when the fast forward is 1 (about x2).
DVD
DVD
Slow-Motion Play
1 Press ?SLOW in the play mode or still mode.
• Three speeds are available.
the speed of slow-motion playback changes in the following
sequence:
(DVD)
Number of Presses
1 (approx. x1/2) → 2 (approx. x1/8) → 3 (approx. x1/16)
Each time ?SLOW is pressed,
DV-NC65
OPERATE
AV 2 IN VDEO
LINE IN 3 VIDEO L - AUDIO - R
PAL
EJECT/STOP
PLAY/X2
REW
REC
/
CH
VCR/DVD
SELECTOR
DVD / CD PLAYER
STOP
OPEN/CLOSE
PLAY
TIMER
VCR DVD
PLAY
TIMER
OPERATE
DISPLAY
FUNCTION
CONTROL
TITLE
CLEAR
RETURN
/
REV FWD
REC
TAPE
SPEED
SHOWVIEW
ON/OFF
VCR/ DVD
ON
SELECTOR
SCREEN
PROG/
ANGLE
REPEAT
SKIP SEARCH
INPUT SELECT
PLAY
STOP
DPSS
SKIP
AUDIO
CH
OUTPUT
VCR DVD
VCR/DVD COMBINATION
RRMCGA071WJSA
EJECT
VCR MENU
DVD SETUP
OPEN/
CLOSE
DVD MENU
SET
ENTER
ZERO BACK
TV/VCR
VCR DVDAM/PM
PAUSE/STILL
SLOW
2 Press ûPLAY to return to the normal playback or press
âPAUSE/STILL to return to the still picture mode.
• On some discs, the slow-motion playback functions are disabled.
• Slow-motion playback is disabled on Audio CDs and MP3 discs.
GB-76
DVNC65SE074_080.pm6 8/10/02, 9:43 am76
Page 76

Playback
/
OPEN/
CLOSE
OPERATE
VCR/ DVD
SELECTOR
VCR MENU
DVD SETUP
TAPE
SPEED
ON
SCREEN
TIMER
ON/OFF
TITLE
DVD MENU
DISPLAY
SHOWVIEW
EJECT
FUNCTION
CONTROL
PROG/
REPEAT
ANGLE
CLEAR
RETURN
REV FWD
SET
ENTER
ZERO BACK
SKIP SEARCH
TV/VCR
VCR DVDAM/PM
INPUT SELECT
PAUSE/STILL
REC
PLAY
STOP
SLOW
CH
VCR DVD
SKIP
DPSS
AUDIO
OUTPUT
VCR/DVD COMBINATION
RRMCGA071WJSA
DVD
DVD
C D
C D
CD-R/RW
CD-R/RW
Still/Pause
1
Press âPAUSE/STILL during playback.
2 If you press ûPLAY while paused (STILL/PAUSE), normal
playback resumes.
DVD
DVD
Frame Advance
1
Press âPAUSE/STILL during playback.
• The playback is paused (STILL/PAUSE).
• The disc goes forward by one frame each time
âPAUSE/STILL is pressed.
2 Press ûPLAY to return to the normal playback.
DVD
DVD
C D
C D
CD-R/RW
CD-R/RW
DV-NC65
OPERATE
AV 2 IN VDEO
LINE IN 3 VIDEO L - AUDIO - R
PAL
EJECT/STOP
PLAY/X2
REW
REC
/
CH
VCR/DVD
SELECTOR
DVD / CD PLAYER
STOP
OPEN/CLOSE
PLAY
TIMER
VCR DVD
PLAY
Skip (Forward/Reverse)
While you are playing a disc, this function jumps to the beginning of
the next chapter/track (Forward) or the current chapter/track (Reverse)
and automatically starts playing that chapter/track.
1 While a disc is playing, press SKIPà or
• Playback skips forwards one chapter/track for each time
SKIPà is pressed.
• If you press ÀSKIP and playback begins, and you then
press ÀSKIP again within 3 seconds, playback returns to
the beginning of the previous chapter/track.
• The frame advance playback functions are disabled for Audio CDs and
CD-R/RW.
• On some discs, the skip functions are disabled.
• The playback image is not displayed during the skip. It resumes
during playback following the skip.
À
SKIP.
GB-77
DVNC65SE074_080.pm6 8/10/02, 9:44 am77
Page 77

Playback
DVD
DVD
Angle Selection
Some DVD discs contain scenes which have been shot simultaneously
from a number of difference angles. For these discs, the same scene
can be viewed from each of these different angles. (The recorded
angles differ depending on the disc used.)
1 While you are playing a DVD disc with different angles recorded,
press ANGLE to view the number of the current angle.
1
Number changes to show the
number of the current angle. (The
maximum number stipulated by the
manufacturers is 9.)
Lights when different angles are recorded
for the title currently playing.
2 Use ' or " (or ANGLE) to change the scene to the next angle
in those recorded.
• About two seconds later, playback continues from the new
angle you selected.
• If no button is pressed within 10 seconds, playback continues
without changing the current angle.
Sequence of angle shots
(Example)
TIMER
OPERATE
DISPLAY
FUNCTION
CONTROL
TITLE
CLEAR
RETURN
ON/OFF
ON
SCREEN
PROG/
REPEAT
SHOWVIEW
VCR/ DVD
SELECTOR
ANGLE
INPUT SELECT
/
REV FWD
PLAY
REC
STOP
CH
DPSS
SKIP
AUDIO
OUTPUT
VCR DVD
TAPE
SPEED
EJECT
VCR MENU
DVD SETUP
OPEN/
CLOSE
DVD MENU
SET
ENTER
ZERO BACK
SKIP SEARCH
TV/VCR
VCR DVDAM/PM
PAUSE/STILL
SLOW
1
98
98
2
2
98
• This function can only be used for discs on which scenes shot from
multiple angles have been recorded.
• If no angles are recorded, is displayed.
XX
GB-78
DVNC65SE074_080.pm6 8/10/02, 9:44 am78
3
3
98
VCR/DVD COMBINATION
RRMCGA071WJSA
Page 78

Playing MP3 Discs
This Unit is able to play CD-R or CD-RW discs recorded in MP3 format.
Regarding MP3 discs
• MP3 files are audio data compressed in MPEG1 Audio layer 3 file format. “MP3 files” have “.mp3” as extensions.
• Some files that have “.mp3” extensions or files that have not been recorded in MP3 format will produce noise
or cannot be played.
• Some discs cannot be played depending on the actual CD-R/CD-RW disc condition, the recording equipment and the disc’s recording.
• Data on the CD-R or CD-RW disc, which has not been recorded in MP3 format, audio tracks or has been
recorded in other file formats except MP3, cannot be played.
Playing MP3 discs
• Discs that have more than 1000 folders and files in total cannot be played.
• Some MP3 files are not played in the order they were recorded.
• The number of layers, which can be recognized, including files and folders, is maximum 8.
• Only the first session of a multi-session disc can be played.
• When both audio tracks and MP3 files are recorded on a disc, audio tracks will be played.
• Depending on the folder tree, reading MP3 files can take time.
(The more files there are, the longer the reading time. Therefore it is recommended to lower the number of
folders before recording.)
• Folder or track (file) names are limited to 8 characters. The folder / file names are displayed in half-size,
capital letters or half-size numbers. Folder or track (file) names that go over 8 characters will be abbreviated.
• Certain letters or symbols in folder names or file names may not be displayed. In this case, “?” will be
displayed.
• The playing time may not be correctly displayed during MP3 file playback.
• It is recommended to record data at a lower speed as data recorded at fast speed can produce noise and
may not be able to be played.
CAUTION
• It is impossible to make a digital copy by using a digital audio recording device which outputs sound from discs in MP3
format through the coaxial digital output jack of this Unit.
GB-79
DVNC65SE074_080.pm6 8/10/02, 9:44 am79
Page 79

Playing MP3 Discs
CD-R/RW
CD-R/RW
To play MP3 discs
1
Load the MP3 recorded CD-R or the CD-RW.
• The folder selection screen will be displayed after the date
is read.
: 1/ 4
FOLDER1 FOLDER2
FOLDER3 FOLDER4
MP3
2 Select the folder you want to play by using ', ", \ or | and
then press ENTER.
• The file (music title) in the folder is displayed on the file
selection screen.
FOLDER1
1 TITLE01 2 TITLE02
3 TITLE03 4 TITLE04
MP3
• Press RETURN to return to the folder selection screen.
• When pressing ûPLAY after selecting the folder, the
playback screen is displayed and the files in that folder
can be played from the beginning.
3 Select the file (music title) you want to play by using ', ", \
or | and then press ENTER.
• The chosen file (music title) will be played in sequence.
FOLDER1
1 TITLE01 2 TITLE02
3 TITLE03 4 TITLE04
5 TITLE05 6 TITLE06
7 TITLE07 8 TITLE08
FOLDER1 7 TITLE07
|
MP3
4 Press ËSTOP to stop playback.
TIMER
OPERATE
DISPLAY
FUNCTION
CONTROL
TITLE
CLEAR
RETURN
ON/OFF
ON
SCREEN
PROG/
REPEAT
SHOWVIEW
VCR/ DVD
SELECTOR
ANGLE
INPUT SELECT
/
REV FWD
PLAY
REC
STOP
TAPE
SPEED
DPSS
SKIP
AUDIO
CH
OUTPUT
VCR DVD
VCR/DVD COMBINATION
RRMCGA071WJSA
EJECT
VCR MENU
DVD SETUP
OPEN/
CLOSE
DVD MENU
SET
ENTER
ZERO BACK
SKIP SEARCH
TV/VCR
VCR DVDAM/PM
PAUSE/STILL
SLOW
To play another file (music title) while playing
1 Press ', ", \ or | to select the file (music title) you want to
play and then press ENTER.
• The chosen file (music title) will be played.
• The file where the cursor is on, will be played when the cursor is
moved to a different file from the file being played and no opertion is
taken within 10 seconds.
• Press RETURN to return to the folder selection screen.
To skip the file while playing
1
Press SKIPà or ÀSKIP during playback.
• SKIPà
•
When playing files (tracks) from other folders, press RETURN and
will skip forward, and
then select the files from the folder selection screen.
While the MP3 disc is playing
• Time Search is disabled.
• It is possible to repeat one track or the entire folder.
GB-80
DVNC65SE074_080.pm6 8/10/02, 9:44 am80
À
SKIP will rewind.
Page 80

|||
|||
About the Function Control Screen
DVD
DVD
C D
Using Function control, you can check at a glance and change the current settings of the following items:
SUBTITLE, ANGLE, AUDIO, ADVANCED SURROUND and DIGITAL GAMMA.
Function control also allows you three ways of direct skips (title [track],chapter and time).
• While the disc is playing, press FUNCTION CONTROL to display the screen shown below.
• Pressing ' or " changes the currently selected item.
• Numbers in
refer to the pages where the setting procedures are described.
C D
1 Direct title skip
Direct chapter skip
2
3
Direct time skip
4
Subtitle
Angle
5
Currently selected item
2/5
8/30
01:30:08
2 ENGLISH
1
1
6
Audio
7
Advanced Surround
8
Digital Gamma
11
1 Direct title skip
11
• The number of the title currently played back is
displayed.
• You can skip directly to the desired title.
22
2 Direct chapter skip
22
• The number of the chapter currently played back is
displayed.
• You can skip directly to the desired chapter.
33
3 Direct time skip
33
•
Elapsed time from the beginning of the disc is displayed.
• You can skip directly to the point from which you want
to start playback.
44
4 Subtitle setting
44
• The subtitle number and language currently selected
are displayed. (When a disc with only one subtitle is
played back, xx is displayed.)
• You can select the desired subtitle language.
55
5 Angle setting
55
• The current angle is displayed. (When a disc with
only one angle is played back, xx is displayed.)
• You can select the desired angle.
82
82
82
83
84
ON
ON
|
DVD
BIT RATE indicates the
5.1ch
66
6 Audio setting
66
•
The type of audio currently selected is displayed.
• You can select the desired type of audio.
77
7 Advanced Surround setting
77
• This function provides rich surround sound by
downmixing Dolby Digital 5.1 channel and Dolby
Surround (Pro Logic) to 2-channel audio or TV.
• You can toggle the setting between “ON” and “OFF”,
and change the level.
• When “COMPRESSION” is “ON”, this function is
disabled, which is indicated by xx. To use the
Advanced Surround function, set the
“COMPRESSION” to “OFF” (see page 45).
88
8 Digital Gamma setting
88
• You can make the entire image easier to see by
brightening the darker and obscure portions.
• You can toggle the setting between “ON” and “OFF”,
and change the level.
85
amount of data that is
being transferred to the
Unit per second.
However, note that
picture quality is not
always in proportion to
the bit rate.
86
87
• In Function Control mode, you can return to the previous setting screen by pressing RETURN or
FUNCTION CONTROL.
• You can cancel the Function Control mode by pressing ËSTOP, DVD MENU, or TITLE.
• The setting screen is cleared automatically whenever you display a DVD screen that prompts you to change the
scene by pressing ', ", \, or |.
• When playing back Audio CDs only the Track Number and Time is displayed.
DVNC65SE081_087.pm6 8/10/02, 10:12 am81
GB-81
Page 81

About the Function Control Screen
DVD
DVD
C D
C D
Direct skip (title/chapter/time)
Use the following procedure to perform Direct title skip, Direct
chapter skip, or Direct time skip.
1 Press FUNCTION CONTROL during playback.
• The Function control screen appears.
2/5
8/3‰
‰1:3‰:‰8
ENGLISH
2
1
5 1ch
1
.
ON
ON
DVD
2 Use ' or " to select and then press ENTER.
(Example) Direct title skip
-/5
DVD
3 Use number buttons (0 to 9) to input the title number to which
you want to skip.
• You can also use ' or " to input the title number.
• When you specify the time for the direct time skip, use \ or |
to move the highlighting to the next or previous digit .
(Example) Entering title 5
5/5
DVD
TIMER
OPERATE
DISPLAY
FUNCTION
CONTROL
TITLE
CLEAR
RETURN
ON/OFF
ON
SCREEN
PROG/
REPEAT
SHOWVIEW
VCR/ DVD
SELECTOR
ANGLE
INPUT SELECT
/
REV FWD
PLAY
REC
STOP
TAPE
SPEED
DPSS
SKIP
AUDIO
CH
OUTPUT
VCR DVD
VCR/DVD COMBINATION
RRMCGA071WJSA
EJECT
VCR MENU
DVD SETUP
OPEN/
CLOSE
DVD MENU
SET
ENTER
ZERO BACK
SKIP SEARCH
TV/VCR
VCR DVDAM/PM
PAUSE/STILL
SLOW
4 Press ENTER.
• The played back image changes to the beginning of the
specified title.
• You can exit the Function control screen by pressing
RETURN or FUNCTION CONTROL.
• The number of titles, chapters or times you can input depends on that
of the titles, chapters or times recorded on a disc you play.
GB-82
DVNC65SE081_087.pm6 8/10/02, 10:12 am82
Page 82

/
OPEN/
CLOSE
OPERATE
VCR/ DVD
SELECTOR
VCR MENU
DVD SETUP
TAPE
SPEED
ON
SCREEN
TIMER
ON/OFF
TITLE
DVD MENU
DISPLAY
SHOWVIEW
EJECT
FUNCTION
CONTROL
PROG/
REPEAT
ANGLE
CLEAR
RETURN
REV FWD
SET
ENTER
ZERO BACK
SKIP SEARCH
TV/VCR
VCR DVDAM/PM
INPUT SELECT
PAUSE/STILL
REC
PLAY
STOP
SLOW
CH
VCR DVD
SKIP
DPSS
AUDIO
OUTPUT
VCR/DVD COMBINATION
RRMCGA071WJSA
DVD
DVD
Subtitle language setting
Use the following procedure to perform the Subtitle language setting.
1 Press FUNCTION CONTROL during playback.
• The Function control screen appears.
2/5
8/3‰
‰1:3‰:‰8
ENGLISH
2
1
5 1ch
1
.
ON
ON
DVD
2 Use ' or " to select and then press ENTER.
About the Function Control Screen
2 ENGLISH
DVD
3 Press ' or " to select the subtitle language you want to use.
• You can set the subtitle setting to “OFF”.
• You can also toggle the setting between “ON” and “OFF” by
pressing \ or |.
(Example) Selecting “3 SPANISH”
4 Press ENTER to confirm the setting.
• You can exit the Function control screen by pressing
RETURN or FUNCTION CONTROL.
• This function can only be used for discs on which subtitles have been
recorded in multiple languages.
3 SPANISH
• Some DVD discs are marked “Forced Display”, indicating that the
subtitling cannot be suppressed. With such discs, the subtitles will be
displayed even when you select “ OFF” display. This does not
indicate a fault with this Unit.
• If no subtitles are recorded on the disc, xx is displayed.
DVD
GB-83
DVNC65SE081_087.pm6 8/10/02, 10:12 am83
Page 83

About the Function Control Screen
DVD
DVD
Angle setting
You can change the angle of view when playing a DVD video disc
that contains scenes recorded from multiple angles.
Use the following procedure to perform the Angle setting.
1 Press FUNCTION CONTROL during playback.
• The Function control screen appears.
2/5
8/3‰
‰1:3‰:‰8
ENGLISH
2
1
5 1ch
1
.
ON
ON
DVD
2 Use ' or " to select and then press ENTER.
1
DVD
3 Press ' or " to select the angle number you want.
• The number of recorded angles differs depending on the disc used.
DVD
TIMER
OPERATE
DISPLAY
FUNCTION
CONTROL
TITLE
CLEAR
RETURN
ON/OFF
ON
SCREEN
PROG/
REPEAT
SHOWVIEW
VCR/ DVD
SELECTOR
ANGLE
INPUT SELECT
/
REV FWD
PLAY
REC
STOP
CH
DPSS
SKIP
AUDIO
OUTPUT
VCR DVD
TAPE
SPEED
EJECT
VCR MENU
DVD SETUP
OPEN/
CLOSE
DVD MENU
SET
ENTER
ZERO BACK
SKIP SEARCH
TV/VCR
VCR DVDAM/PM
PAUSE/STILL
SLOW
2
4 Press ENTER to confirm the setting.
• You can exit the Function control screen by pressing RETURN or
FUNCTION CONTROL.
• This function can only be used for discs on which scenes shot from
multiple angles have been recorded.
• If no angles are recorded on the disc, xx is displayed.
VCR/DVD COMBINATION
RRMCGA071WJSA
GB-84
DVNC65SE081_087.pm6 8/10/02, 10:12 am84
Page 84

DVD
DVD
Audio setting
A number of different methods are used to record audio onto a DVD
video disc, including multi-channels (used for voiceovers in other
languages), Dolby Digital (5.1ch), DTS, and Linear PCM. This Unit
provides a number of different audio modes from which you can
choose to suit the type of disc you are playing.
Use the following procedure to perform the Audio setting.
1 Press FUNCTION CONTROL during playback.
• The Function control screen appears.
2/5
8/3‰
‰1:3‰:‰8
ENGLISH
2
1
5 1ch
1
.
ON
ON
DVD
2 Use ' or " to select and then press ENTER.
1
5.1ch
DVD
3 Press ' or " to select the audio format you want to use.
• See page 45 for details about the types of audio format.
About the Function Control Screen
TIMER
OPERATE
DISPLAY
FUNCTION
CONTROL
TITLE
CLEAR
RETURN
/
REV FWD
REC
TAPE
SPEED
CH
ON/OFF
ON
SCREEN
PROG/
REPEAT
SHOWVIEW
VCR/ DVD
SELECTOR
ANGLE
INPUT SELECT
PLAY
STOP
DPSS
SKIP
AUDIO
OUTPUT
VCR DVD
EJECT
VCR MENU
DVD SETUP
OPEN/
CLOSE
DVD MENU
SET
ENTER
ZERO BACK
SKIP SEARCH
TV/VCR
VCR DVDAM/PM
PAUSE/STILL
SLOW
2LPCM
DVD
4 Press ENTER to confirm the setting.
• You can exit the Function control screen by pressing RETURN or
FUNCTION CONTROL.
• This function can only be used for discs on which the sound has been
recorded in multiple formats.
• With certain types of discs, you can change the audio using the disc
menu.
• A DTS digital surround decoder is required to listen to DTS audio.
VCR/DVD COMBINATION
RRMCGA071WJSA
GB-85
DVNC65SE081_087.pm6 8/10/02, 10:12 am85
Page 85

About the Function Control Screen
|
DVD
DVD
Advanced Surround setting
This function allows you to enjoy a “surround sound” effect when you
are using an analog connection (using LINE 1 OUT on this Unit) to 2channel audio equipment (TV, etc.).
Preparation
To use the Advanced Surround function
• Set the “COMPRESSION” setting in “AUDIO” to “OFF” (see page
45).
Refer to the table below about the types of audio format with which
Advanced Surround works.
Système sonore enregistré sur le disque
Dolby
Digital
Dolby
Pro Logic
Dolby Digital
2can./
Linéaire PCM
✕✕
MPEG Audio
Version 2.0/
DTS
1 Press FUNCTION CONTROL during playback.
• The Function control screen appears.
2/5
8/3‰
‰1:3‰:‰8
ENGLISH
2
1
5 1ch
1
.
ON
ON
DVD
TIMER
OPERATE
DISPLAY
FUNCTION
CONTROL
TITLE
CLEAR
RETURN
ON/OFF
ON
SCREEN
PROG/
REPEAT
SHOWVIEW
VCR/ DVD
SELECTOR
ANGLE
INPUT SELECT
/
REV FWD
PLAY
REC
STOP
CH
DPSS
SKIP
AUDIO
OUTPUT
VCR DVD
TAPE
SPEED
EJECT
VCR MENU
DVD SETUP
OPEN/
CLOSE
DVD MENU
SET
ENTER
ZERO BACK
SKIP SEARCH
TV/VCR
VCR DVDAM/PM
PAUSE/STILL
SLOW
2 Use ' or " to select and then press ENTER.
ON
||
DVD
3 Press ' or " to toggle Advanced Surround between “ON” and
“OFF”.
4 While “ON” is selected, use \ or | to change the level setting.
ON
|||
DVD
5 Press ENTER to confirm the setting.
• You can exit the Function control screen by pressing
RETURN or FUNCTION CONTROL.
VCR/DVD COMBINATION
RRMCGA071WJSA
• Advanced Surround does not operate
on Audio CDs.
• Advanced Surround does not operate
when you set the “COMPRESSION”
setting in “AUDIO SETUP” to “ON”.
• Advanced Surround does not operate
when you are using a Digital
connection.
• Advanced Surround does not operate
when you play back a disc recorded
using Linear PCM or DTS format.
GB-86
DVNC65SE081_087.pm6 8/10/02, 10:12 am86
Page 86

|
/
OPEN/
CLOSE
OPERATE
VCR/ DVD
SELECTOR
VCR MENU
DVD SETUP
TAPE
SPEED
ON
SCREEN
TIMER
ON/OFF
TITLE
DVD MENU
DISPLAY
SHOWVIEW
EJECT
FUNCTION
CONTROL
PROG/
REPEAT
ANGLE
CLEAR
RETURN
REV FWD
SET
ENTER
ZERO BACK
SKIP SEARCH
TV/VCR
VCR DVDAM/PM
INPUT SELECT
PAUSE/STILL
REC
PLAY
STOP
SLOW
CH
VCR DVD
SKIP
DPSS
AUDIO
OUTPUT
VCR/DVD COMBINATION
RRMCGA071WJSA
DVD
DVD
Digital Gamma setting
DIGITAL GAMMA is a digital image quality enhancement function
that gives a richer image by brightening the darker and more
obscure portions of the image without altering the brightness of the
brighter portions, thereby making the entire image easier to see.
Three digital gamma settings are available to allow for differences in
the images played and in brightness of the room.
1 Press FUNCTION CONTROL during playback.
• The Function control screen appears.
2/5
8/3‰
‰1:3‰:‰8
ENGLISH
2
1
5 1ch
1
.
ON
ON
DVD
2 Use ' or " to select and then press ENTER.
About the Function Control Screen
ON
||
DVD
3 Press ' or " to toggle DIGITAL GAMMA between “ON” and
“OFF”.
4 While “
5 Use \ or | to change the level.
ON” is displayed, press \ or |.
• The level selection indicator that shows the current level
appears.
• If no button is pressed within 10 seconds, the level selection
indicator goes off.
ON
|||
DVD
6 Press ENTER to confirm the setting.
• If no change is made for 10 seconds after the level is set, the level
indicator goes off.
• You can exit the Function control screen by pressing RETURN or
FUNCTION CONTROL.
GB-87
DVNC65SE081_087.pm6 8/10/02, 10:13 am87
Page 87

Direct Selection of Scenes
DVD
DVD
Selecting Scenes by Title Number
1
Press TITLE to show the title screen.
(Example)
DISCOVERY EUROPE
1
DISCOVERY AFRICA
2
OPERATE
DISPLAY
FUNCTION
CONTROL
TITLE
TIMER
ON/OFF
ON
SCREEN
PROG/
REPEAT
SHOWVIEW
VCR/ DVD
SELECTOR
DVD SETUP
ANGLE
DVD MENU
EJECT
VCR MENU
OPEN/
CLOSE
2 Use the number buttons (0 to 9) to enter the desired title, or ',
", | or \ to highlight the desired title.
3 When you press ENTER or û PLAY, the title specified in step 2
starts playing.
Selecting Scenes from the Menu Screen
Press DVD MENU to show the menu screen.
1
(Example)
T I T L E
12
C
3
D
gos
MENU
tas
sihes
F
4
i
B
d
r
s
2 Use the number buttons (0 to 9) or ', ", | or \ to highlight the
desired title.
(Example) Title 2 selected.
T I T L E
1 2
C
MENU
tas
sihes
F
CLEAR
RETURN
SKIP SEARCH
INPUT SELECT
/
REV FWD
PLAY
REC
STOP
TAPE
SPEED
DPSS
SKIP
AUDIO
CH
OUTPUT
VCR DVD
VCR/DVD COMBINATION
RRMCGA071WJSA
SET
ENTER
ZERO BACK
TV/VCR
VCR DVDAM/PM
PAUSE/STILL
SLOW
3
D
4
i
B
d
r
gos
s
3 When you press ENTER or û PLAY, title 2 starts playing.
• These functions only operate on DVD discs that have a title or menu
screen.
• Languages not provided on the disc are not displayed.
GB-88
DVNC65SE088_090.pm6 8/10/02, 10:21 am88
Page 88

Programmed Playback
The two types of programmed playback provided by this Unit are
chapter programmed playback (DVD discs) and track programmed
playback (audio CD MP3 recorded on CD-R/RW).
DVD
DVD
Chapter Programmed Playback
1
Press PROG/ once while the disc is stopped.
• The “DVD-VIDEO PROGRAM” screen appears.
• Press PROG/ to return to the normal screen.
DVD-VIDEO PROGRAM
TITLE
1
2
3
ENTER
SELECT
2 Press ' or " to select the desired title and then press ENTER.
• The chapter selection screen appears.
DVD-VIDEO PROGRAM
: 2 : 2
1 1:
2 2:
3 3:
4:
5:
6:
SELECT
3 Press ' or " to select the desired chapter and press ENTER.
• The chapter is programmed in the playlist.
DVD-VIDEO PROGRAM
: 2 : 2
1 1: 3
2 2: 1
3 3:
4:
5:
6:
SELECT
• Repeat the above step for each of the chapters that you want
to play as part of the program.
• To delete the chapter programmed in the playlist, follow the
steps below:
1 Press | to move the cursor to the playlist.
2 Press ' or " to select the program (chapter) you
want to delete and then press RETURN.
• To delete all programmed chapters, move the cursor to the
playlist and then press RETURN for more than two seconds.
4 Press ûPLAY to begin playing the programmed chapters.
• The chapters will be played in the order they were entered.
• The PROGRAM indicator lights up on the DVD Front Panel
display.
5 Press
ËË
ËSTOP to stop programmed playback.
ËË
• To start programmed playback again, follow the steps below:
1 Press
2 Press PROG/.
3 Select the title you programmed and press ENTER. (If
ËË
ËSTOP to stop programmed playback.
ËË
other titles are selected, the previously entered program
will be cleared.)
4 Press ûPLAY.
SET
START
START
RETURN
RETURN
TIMER
OPERATE
DISPLAY
FUNCTION
CONTROL
TITLE
CLEAR
RETURN
ON/OFF
ON
SCREEN
PROG/
REPEAT
SHOWVIEW
VCR/ DVD
SELECTOR
ANGLE
SKIP SEARCH
INPUT SELECT
EJECT
VCR MENU
DVD SETUP
OPEN/
CLOSE
DVD MENU
SET
ENTER
ZERO BACK
TV/VCR
VCR DVDAM/PM
/
REV FWD
PLAY
REC
TAPE
SPEED
CH
VCR/DVD COMBINATION
RRMCGA071WJSA
STOP
DPSS
SKIP
AUDIO
OUTPUT
VCR DVD
PAUSE/STILL
SLOW
• Up to 24 chapters can be programmed.
• Press RETURN to return to the previous
screen.
• The program cannot be set during the
normal playback.
• This function can only be used for DVD
discs on which the chapter has been
recorded.
• On some discs in which programmed
playback is prohibited, this function is
disabled.
GB-89
DVNC65SE088_090.pm6 8/10/02, 10:21 am89
Page 89

C D
C D
Track Programmed Playback
1
Press PROG/ while the disc is stopped.
• The “CD PROGRAM” screen appears.
• Press PROG/ to return to the normal screen.
CD PROGRAM
1 1:
2 2:
3 3:
4 4:
5 5:
6 6:
SELECT
START
2 Press ' or " to select the desired track and then press
ENTER.
• The track is programmed in the playlist.
CD PROGRAM
1 1: 3
2 2: 2
3 3:
4 4:
5 5:
6 6:
SELECT
START
3 Repeat step 2 for each of the tracks that you want to play as part
of the program.
4 Press ûPLAY to begin playing the programmed tracks.
• The tracks will be played in the order they were entered.
Programmed Playback
TIMER
OPERATE
DISPLAY
FUNCTION
CONTROL
TITLE
CLEAR
RETURN
/
REV FWD
REC
TAPE
SPEED
CH
ON/OFF
ON
SCREEN
PROG/
REPEAT
SHOWVIEW
VCR/ DVD
SELECTOR
ANGLE
INPUT SELECT
PLAY
STOP
DPSS
SKIP
AUDIO
OUTPUT
VCR DVD
EJECT
VCR MENU
DVD SETUP
OPEN/
CLOSE
DVD MENU
SET
ENTER
ZERO BACK
SKIP SEARCH
TV/VCR
VCR DVDAM/PM
PAUSE/STILL
SLOW
5 Press
ËË
ËSTOP to stop programmed playback.
ËË
• Up to 24 tracks can be programmed.
• The programe cannot be set during the normal playback.
• On some discs in which programmed playback is prohibited, this
function is disabled.
GB-90
VCR/DVD COMBINATION
RRMCGA071WJSA
DVNC65SE088_090.pm6 8/10/02, 10:21 am90
Page 90

CD-R/RW
CD-R/RW
MP3 Files Programmed Playback
1 Press PROG/ while the disc is stopped.
• The “MP3 PROGRAM” screen appears.
• Press PROG/ to return to the normal screen.
MP3 PROGRAM
: 1/4
FOLDER1 1:
FOLDER2 2:
FOLDER3 3:
FOLDER4 4:
5:
6:
ENTER
SELECT
SET
2 Press ' or " to select the desired folder and then press
ENTER.
MP3 PROGRAM
FOLDER1
TITLE01 1:
TITLE02 2:
TITLE03 3:
TITLE04 4:
TITLE05 5:
TITLE06 6:
SELECT
START
RETURN
3 Press ' or " to select the desired folder and then press
ENTER.
• The file is programmed in the playlist.
• Press RETURN to return to step 2 and then select the files of
the other folder.
MP3 PROGRAM
FOLDER1
TITLE01 1:TITLE03
TITLE02 2:TITLE04
TITLE03 3:TITLE01
TITLE04 4:
TITLE05 5:
TITLE06 6:
SELECT
• Repeat the above step for each of the files that you want to
play as part of the program.
• To delete the files programmed in the playlist, follow the steps
below:
1 Press | to move the cursor to the playlist.
2 Press ' or " to select the program (track/file) you want
to delete and then press RETURN.
• To delete all programmed chapter numbers, move the cursor
to the playlist and then press RETURN for more than two
seconds.
4 Press
ûû
ûPLAY to begin playing the MP3 files.
ûû
• The file will be played in the order they were entered.
5 Press
ËË
ËSTOP to stop the programmed playback.
ËË
• To start programmed playback again, follow the steps below:
1 Press
ËË
ËSTOP to stop programmed playback.
ËË
2 Press PROG/.
3 Select the file you programmed and press ENTER.
4 Press
ûû
ûPLAY.
ûû
START
RETURN
Programmed Playback
TIMER
OPERATE
DISPLAY
FUNCTION
CONTROL
TITLE
CLEAR
RETURN
/
REV FWD
REC
TAPE
SPEED
• Repeat playback is disabled on
some discs.
SHOWVIEW
ON/OFF
VCR/ DVD
ON
SELECTOR
SCREEN
PROG/
ANGLE
REPEAT
INPUT SELECT
PLAY
STOP
DPSS
SKIP
AUDIO
CH
OUTPUT
VCR DVD
VCR/DVD COMBINATION
RRMCGA071WJSA
EJECT
VCR MENU
DVD SETUP
OPEN/
CLOSE
DVD MENU
SET
ENTER
ZERO BACK
SKIP SEARCH
TV/VCR
VCR DVDAM/PM
PAUSE/STILL
SLOW
DVNC65SE091_094.pm6 8/10/02, 10:27 am91
GB-91
Page 91

Repeat Playback
DVD
DVD
Repeat playback
1 Press
RR
RREPEAT while a disc is playing.
RR
• The “
• Each time
RR
R” indicator appears on the DVD Front Panel.
RR
RR
RREPEAT is pressed, the repeat function
RR
changes as follows.
• Depending on the disc type, the repeat function will vary.
DVD
DVD
Chapter Repeat
Title Repeat
C
A
T
A
B
B
B
B
DVD
DVD
A-B Repeat
(See the next page for details)
OFF
C D
C D
Track Repeat
Repeat all files in the disc
T
B
A
A
B
B
DVD
TIMER
OPERATE
DISPLAY
FUNCTION
CONTROL
TITLE
CLEAR
RETURN
ON/OFF
ON
SCREEN
PROG/
REPEAT
SHOWVIEW
VCR/ DVD
SELECTOR
ANGLE
INPUT SELECT
/
REV FWD
PLAY
REC
STOP
CH
DPSS
SKIP
AUDIO
OUTPUT
VCR DVD
TAPE
SPEED
EJECT
VCR MENU
DVD SETUP
OPEN/
CLOSE
DVD MENU
SET
ENTER
ZERO BACK
SKIP SEARCH
TV/VCR
VCR DVDAM/PM
PAUSE/STILL
SLOW
A-B Repeat
(See the next page for details)
OFF
CD-R/RW
CD-R/RW
Repeat one file
(Only MP3 File Format)
T
B
A
B
Repeat all files in the folder
B
A
B
OFF
2 Press ENTER to start repeat playback.
RR
• Press
• Repeat playback is disabled on some discs.
• Repeat playback cannot be used during programmed playback.
GB-92
RREPEAT and select OFF when returning to regular
RR
playback.
DVD
DVD
VCR/DVD COMBINATION
RRMCGA071WJSA
DVNC65SE091_094.pm6 8/10/02, 10:27 am92
Page 92

Repeat Playback
DVD
DVD
C D
C D
A-B Repeat
A-B repeat allows you to repeat a specified section on the disc.
1 Press
RR
RREPEAT three times while a disc is playing.
RR
2 While you are playing a disc, press ENTER when you reach the
start of the section to be repeated.
3 While the disc is playing the same title (same chapter/track),
press ENTER again when you reach the end of the section to
be repeated.
B
A
B
B
A
• The A-B repeat begins from the point where you specified in
• Press
• To cancel A-B repeat, press
• A-B repeat can only be used within the same title/track.
(On some DVD discs, A-B repeat is restricted to the same chapter.)
If the title/track finishes before specifying the ending location (B), the
location where the title/track finishes will be set as the ending location
(B).
• The A-B repeat function cannot be used during programmed
playback.
• If the DVD Front Panel display does not show the elapsed playback time
while a disc is playing, A-B repeat playback cannot be used for that disc.
• The A-B repeat function does not operate in scenes where different
camera angles are recorded.
DVD
step 1.
RR
RREPEAT to turn off the “
RR
to regular playback.
RR
R” indicator when returning
RR
ËË
Ë STOP, TITLE or DVD MENU.
ËË
TIMER
OPERATE
DISPLAY
FUNCTION
CONTROL
TITLE
CLEAR
RETURN
ON/OFF
ON
SCREEN
PROG/
REPEAT
SHOWVIEW
VCR/ DVD
SELECTOR
ANGLE
INPUT SELECT
/
REV FWD
PLAY
REC
STOP
CH
DPSS
SKIP
AUDIO
OUTPUT
VCR DVD
TAPE
SPEED
EJECT
VCR MENU
DVD SETUP
OPEN/
CLOSE
DVD MENU
SET
ENTER
ZERO BACK
SKIP SEARCH
TV/VCR
VCR DVDAM/PM
PAUSE/STILL
SLOW
DVNC65SE091_094.pm6 8/10/02, 10:28 am93
VCR/DVD COMBINATION
RRMCGA071WJSA
GB-93
Page 93

Resume Function
DVD
DVD
C D
C D
This function enables you to resume the playback from the location
you specify.
1 Press ËSTOP at the desired point during playback.
• “RESUME” appears followed by “RESUME” on the screen.
• This Unit stores the location where you stopped.
r
DVD
TO CANCEL RESUME PLAY
PRESS STOP
RESUME
OPERATE
DISPLAY
FUNCTION
CONTROL
TITLE
TIMER
ON/OFF
ON
SCREEN
PROG/
REPEAT
SHOWVIEW
VCR/ DVD
SELECTOR
DVD SETUP
ANGLE
DVD MENU
EJECT
VCR MENU
OPEN/
CLOSE
2 Press ûPLAY to restart play.
• Play resumes from a point slightly before the point where it
was stopped.
• Press ûPLAY to resume disc play, if auto-playback starts
from the beginning of the disc when you reload the same disc
after removing it.
• Resume information will not be cancelled if the power is turned off.
• The continued playback described here may not be possible on some
discs (such as discs that automatically start playing when the disc tray
closes).
This resume operation does not work in the following cases.
• If you press ËSTOP twice.
• If you press ËSTOP during auto-playback.
• When you open the disc tray.
• After enabling the Resume function.
CLEAR
RETURN
SKIP SEARCH
INPUT SELECT
/
REV FWD
PLAY
REC
STOP
TAPE
SPEED
DPSS
SKIP
AUDIO
CH
OUTPUT
VCR DVD
VCR/DVD COMBINATION
RRMCGA071WJSA
SET
ENTER
ZERO BACK
TV/VCR
VCR DVDAM/PM
PAUSE/STILL
SLOW
GB-94
DVNC65SE091_094.pm6 8/10/02, 10:28 am94
Page 94

Other Information
Troubleshooting .............................................................................. 96
Definition of Terms .......................................................................... 98
Specifications ................................................................................ 101
WATCHING
THE DVD
Web-site:www.sharp.co.uk/support Help line:08705 274277 (office hours)
DVNC65SE095 Tobira.pm6 8/10/02, 10:29 am95
95
GB-95
Page 95

Troubleshooting
The following problems do not always denote a broken this unit. Perform the checks listed below before calling
service.
■ VCR/DVD
Problem
• No power
• The Remote does not work.
• No picture
• Dew
■ VCR
Problem
• TV will not tune in to the VCR.
• Auto Installation screen does not
appear when the VCR is switched
or Auto Installation is not complete.
• Display is not working.
• No picture appears.
• Playback picture is snowy.
• Playback/Recording does not play
back in Stereo.
Suggested Solution
• Is the power cord connected properly?
• Is the power cord firmly plugged into the power outlet?
• One of the safety mechanisms may be operating. In this event,
unplug the Unit from the power outlet briefly and then plug it in
again.
• Are the batteries loaded correctly?
• Are the batteries flat?
• Is the signal emitter on the Remote pointing at the Unit?
• Is the Remote too far from the Unit, or is there any obstacle between
the Remote and the Unit?
• Did the VCR/DVD CHANGE Switch change correctly?
• Did the VCR/DVD SELECTOR change correctly?
• See page 6 for information.
Possible Cause/Solutions
• Check all the cables are correctly connected.
• Check your TV manual for correct tuning of your TV.
• Reset the VCR and complete AUTO INSTALLATION again. (Refer
on
to VCR Reset on page 38.)
• Make sure the power cord is plugged in.
• Make sure the wall socket has power .
• Make sure the TV is set to the video channel.
• Check all connecting cables.
• Adjust the tracking using CH '/".
• Try another tape.
• The video heads may have been contaminated - refer to a SHARP
Service Facility.
• Ensure the VCR is connected to a stereo TV with a SCART lead.
• Programme may not carry stereo.
• Tape is automatically ejected when
pressing
ÆÆ
ÆREC or TIMER ON/OFF.
ÆÆ
GB-96
DVNC65SE096_101.pm6 9/10/02, 10:31 am96
• The record-protection tab has been removed from the cassette.
Page 96

Troubleshooting
Problem
• The SHOWVIEW system does not
record desired programme.
• Tape can not be loaded.
• Rewind is not possible.
• Desired channel position can not be
selected.
• No colour or poor TV picture on
normal viewing.
• Desired channel has interference.
■ DVD
Possible Cause/Solutions
• Broadcast does not carry VPS/PDC signal which alters recording
time.
• Check VPS/PDC mode is switched ON.
• Ensure date and time are correctly set on the Unit.
• Make sure there is no other tape in the VCR.
• Make sure you are loading the tape correctly.
• Make sure the tape is not at the start.
• The channel position has been set to be skipped. Cancel the SKIP
mode for that channel.
• Make sure all the cables are connected properly.
• Make sure the VCR power cord is properly plugged in.
• Possible weak signal strength, the same channel with a better
signal strength may have been tuned in on another VCR preset
channel. Example; VCR preset 1 = ZDF and VCR preset 14 = ZDF
(Refer to Manually Sorting Channels section to move the channel
to your desired position.)
• TV aerial may need adjusting.
Problem
• The DVD player is switched on but
does not operate.
• The playback image does not
appear.
• No sound is produced.
• The sound is not Dolby Digital (5ch
or 5.1ch).
• The image and sound are garbled.
• The sound is not stable during
playback.
This unit is equipped with a microprocessor. Its performance could be adversely affected by external electrical
noise or interference. If this should happen, unplug the Unit and plug it in again after a few minutes.
• Have you loaded a disc?
• Is the disc unplayable? (See pages 9 – 11.)
• Is there dew in the DVD player? (See page 11.)
• Are the video and audio cables connected correctly? (See pages
18 – 23.)
• Is the disc scratched? (See page 11.)
• Is the disc dirty? (See page 11.)
• Is the disc loaded upside down?
• Is the input selector on the TV set to “VIDEO” or “AV”?
• Is the audio equipment switched on and are all the components
connected properly? (Refer to the operation manuals for your
audio equipment.)
• Is the disc you are playing recorded in Dolby Digital (5ch or
5.1ch)?
• Have you set the “ DIGITAL” in “AUDIO SETUP” to
“BITSTREAM”? (See page 45.)
• Is the disc scratched? (See page 11.)
• Are vibrations from the speakers affecting the DVD player?
• Set the “COMPRESSION” in “AUDIO SETUP” to “OFF” (See page
45.)
Suggested Solution
INFORMATION
OTHER
DVNC65SE096_101.pm6 9/10/02, 10:31 am97
GB-97
Page 97

Definition of Terms
■ VCR
Full Automatic
Playback
Sharp Super
Picture
S-VHS Simple
Playback
Tracking
Control
■ DVD
Angle
This function automatically turns the power on and starts to playback when a tape with
the erasure protection tabs removed is inserted.
Enhanced picture quality during playback.
This function facilitates S-VHS software playback. The original high picture quality of SVHS (horizontal resolution of 400 lines) cannot be played.
When noise appears on an image during tape playback, you can adjust the image
quality to a suitable level so as to reduce the noise.
Recorded onto some DVD discs are scenes which have been simultaneously shot from
a number of different angles (the same scene is shot from the front, from the left side,
from the right side, etc,). With such discs, you can select the angle on Function Control
Screen to view the scene from different angles.
Chapter
Number
Compression
(Dolby Digital
output level)
Digital Gamma
Dolby Digital
(5.1 channel)
Advanced
Surround
These numbers are recorded on DVD discs. A title is subdivided into many sections,
each of which is numbered, and specific parts of video presentations can be searched
quickly using these numbers.
Setting that increases the average volume of Dolby Digital audio when playing a DVD.
Corrects for gradations in dark areas of images to make images clearer.
A sound system developed by Dolby Laboratories Inc. that gives movie theater ambience to audio output when the DVD video player is connected to a Dolby Digital 5.1
channel processor or amplifier.
Provides rich surround sound by downmixing Dolby Digital 5.1 channel and Dolby
Surround (Pro Logic) to 2-channel audio.
GB-98
DVNC65SE096_101.pm6 8/10/02, 10:35 am98
Page 98

Definition of Terms
DVD
Letter Box
4:3
LB
Linear PCM
Sound
Pan Scan
4:3
PS
Pickup
Region
Number
This refers to a high-density optical disc on which high-quality pictures and sound have
been recorded by means of digital signals. Incorporating a new video compression
technology (MPEG II) and high-density recording technology, DVD enables esthetically
pleasing full-motion video to be recorded over long periods of time (for instance, a
whole movie can be recorded).
DVD has a structure consisting of two 0.6 mm thin discs which are adhered to each
other. Since the thinner the disc, the higher the density at which the information can be
recorded, a DVD disc has a greater capacity than a single 1.2 mm thick disc. Since the
two thin discs are adhered to each other, there is the potential to achieve double-sided
play sometime in the future for even longer duration play.
Screen size that cuts off the top and bottom of the image to allow playing of Wide (16:9)
software on a connected 4:3 TV.
Linear PCM is a signal recording format used for audio CDs.
The sound on audio CDs is recorded at 44.1 kHz with 16 bits. (On DVD discs, sound is
recorded at between 48 kHz with 16 bits and 96 kHz with 24 bits.)
Screen size that cuts off the sides of the image to allow playing of Wide (16:9) software
on a connected 4:3 TV.
Laser device that reads the data from a disc for playback.
Number identifying a geographic region of compatibility for a DVD.
The list of the region number 2 countries
Common Names Names of Nations and Areas
Albania Republic of Albania
Andorra Principality of Andorra
Austria Republic of Austria
Bahrain State of Bahrain
Belgium Kingdom of Belgium
Bosnia and Bosnia and Herzegovina
Herzegovina
Bulgaria Republic of Bulgaria
Croatia Republic of Croatia
Cyprus Republic of Cyprus
Czech The Czech Republic
Denmark Kingdom of Denmark
Egypt Arab Republic of Egypt
Finland Republic of Finland
France French Republic
Germany Federal Republic of Germany
Greece Hellenic Republic
Hungary Republic of Hungary
Iceland Republic of Iceland
Iran Islamic Republic of Iran
Iraq Republic of Iraq
Ireland Ireland
Israel State of Israel
Italy Republic of Italy
Japan Japan
Jordan Hashemite Kingdom of Jordan
Kuwait State of Kuwait
Lebanon Republic of Lebanon
Lesotho Kingdom of Lesotho
Liechtenstein Principality of Liechtenstein
Luxembourg Grand Duchy of Luxembourg
Macedonia The Former Yugoslav Republic
of Macedonia
Common Names Names of Nations and Areas
Malta Republic of Malta
Monaco Principality of Monaco
Netherlands Kingdom of the Netherlands
Norway Kingdom of Norway
Oman Sultanate of Oman
Poland Republic of Poland
Portugal Portuguese Republic
Qatar State of Qatar
Romania Romania
San Marino Republic of San Marino
Saudi Arabia Kingdom of Saudi Arabia
Slovakia The Slovak Republic
Slovenia Republic of Slovenia
South Africa Republic of South Africa
Spain Spain
Swaziland Kingdom of Swaziland
Sweden Kingdom of Sweden
Switzerland Swiss Confederation
Syrian Arab Republic Syrian Arab Republic
Turkey Republic of Turkey
United Arab Emirates United Arab Emirates
United Kingdom United Kingdom of Great Britain and
Vatican City State State of the City of Vatican
Yemen Republic of Yemen
Yugoslavia Federal Republic of Yugoslavia
Channel Islands* Channel Islands
Faeroe Islands* Faeroe Islands
Gibraltar* Gibraltar
Greenland* Greenland
Isle of Man* Isle of Man
Svalbard and Jan Svalbard and Jan Mayen Islands
Mayen Islands*
Northern Ireland
*Represents area name
DVNC65SE096_101.pm6 8/10/02, 10:35 am99
GB-99
Page 99

The world map for all region numbers
Definition of Terms
1
Subtitles
Time Number
5
2
1
6
1
2
3
5
1
4
2
These are the printed lines appearing at the bottom of the screen which translate or
transcribe the dialog. They are recorded on DVD discs.
This indicates the play time which has elapsed from the start of a disc or a title. It can
be used to find a specific scene quickly. (It may not work with some discs.)
4
Title Menu
Title Number
Track Number
This is a menu displayed by some DVDs for selection of chapters and subtitle set. The
title menu is also called a “top menu”.
These numbers are recorded on DVD discs. When a disc contains two or more movies,
these movies are numbered as title 1, title 2, etc.
These numbers are assigned to the tracks which are recorded on audio CDs. They
enable specific tracks to be located quickly.
GB-100
DVNC65SE096_101.pm6 8/10/02, 10:35 am100
Page 100

Specifications
DVD/VCR shared output jacks VIDEO jack: RCA Pin-jack
JACKS
INPUT/OUTPUT
Video Recording System Rotary Two-Head Helical Scanning
Number of Video Heads 4
Audio Recording System 1 Stationary Head for Linear Audio
VCR
Audio signal frequency characteristics For DVD linear PCM playback:
DVD
Recording/Playback Time (SP) 240 min (With E-240 Cassette)
DVD/VCR shared Video output Output level: 1 Vp-p (75Ω)
Video signal horizontal resolution 500 lines (450 lines min.)
Total harmonic distortion ratio CD: 0.006% (JEITA)
Signal System PAL/MESECAM
DVD output jacks VIDEO jack: S-Video jack
VIDEO input jacks VIDEO jack: SCART
Video Signal Standard PAL/MESECAM Colour System
Tape Width 12.7 mm
Tape Speed (PAL) (SP) 23.39 mm/sec
(NTSC) (SP) 33.35 mm/sec
Channel Coverage VHF E2-E12 + S1-S41; UHF E21-E69
Antenna Input 75Ω
Video Input Input level: 0.5 to 2.0 Vp-p (75Ω)
Video Output Output level: 1.0 Vp-p (75Ω)
Audio Input Input level: –3.8 dBs (47kΩ)
(0 dBs = 0.775 Vrms)
Audio Output Output level: –3.8 dBs (1kΩ)
(0 dBs = 0.775 Vrms)
Hi-Fi Audio Dynamic Range: ~ 90 dB
Memory Backup 10 minutes
S video output Y output level: 1 Vp-p (75Ω)
Audio output Output level: 2 Vrms (1 kHz, 0 dB)
S/N ratio 60 dB (50 dB min.)
S/N ratio CD: 96 dB, 1 kHz (JEITA)
Dynamic range DVD linear PCM: 96 dB (JEITA)
Pickup Wave length: 650 nm (DVD) / 780nm (CD)
Operating temperature 5°C to 35°C (41°F to 95°F)
Storage temperature –20°C to 55°C (–4°F to 131°F)
Power supply 230V-240V AC, 50 Hz
Power consumption 20 W
Dimensions 430 mm × 93.5 mm × 350 mm (W × H × D)
Weight 5.3 kg
AUDIO jack: RCA Pin-jack
AUDIO jack: RCA Pin-jack
DIGITAL AUDIO IF: Coaxial digital
AUDIO output jack: RCA Pin-jack
AUDIO jack: SCART
VIDEO jack : RCA pin-jack
AUDIO jack : RCA pin-jack
2 Rotary Heads for Hi-Fi stereo
(LP) 11.70 mm/sec
(EP) 7.80 mm/sec
(LP) 16.67 mm/sec (Playback only)
(EP) 11.12 mm/sec
(LP) 480 min (With E-240 Cassette)
(EP) 720 min (With E-240 Cassette)
Frequency Response: 20 Hz-20 kHz
C output level: 0.300 Vp-p (75Ω)
4 Hz to 22 kHz (48 kHz sampling)
CD playback: 4 Hz to 20 kHz (JEITA)
CD: 96 dB (JEITA)
Laser output: Max. 0.7 mW
}
Specifications are subject to change without notice.
Weight and dimensions are approximate.
DVNC65SE096_101.pm6 8/10/02, 10:35 am101
GB-101
 Loading...