

Page 1
DV-L70S
DV-L70BL
ENGLISH .............GB1–GB95
ESPAÑOL ...............E 1 – E 95
SVENSKA ...............S 1 – S 95
Portable DVD Video Player
Reproductor de Video DVD Portátil
Bärbar DVD-spelare
OPERATION MANUAL
MANUAL DE MANEJO
BRUKSANVISNING
NTSC/PAL
Page 2

This equipment complies with the requirements of Directives 89/336/EEC
and 73/23/EEC as amended by 93/68/EEC.
Dieses Gerät entspricht den Anforderungen der EG-Richtlinien 89/336/
EWG und 73/23/EWG mit Änderung 93/68/EWG.
Ce matériel répond aux exigences contenues dans les directives 89/336/
CEE et 73/23/CEE modifiées par la directive 93/68/CEE.
Dit apparaat voldoet aan de eisen van de richtlijnen 89/336/EEG en 73/
23/EEG, gewijzigd door 93/68/EEG.
Dette udstyr overholder kravene i direktiv nr. 89/336/EEC og 73/23/EEC
med tillæg nr. 93/68/EEC.
Quest’ apparecchio è conforme ai requisiti delle direttive 89/336/EEC e
73/23/EEC, come emendata dalla direttiva 93/68/EEC.
Η εγκατάσταση αυτή ανταποκρίνεται στις απαιτήσεις των οδηγιών
της Ευρωπαϊκής Ενωσης 89/336/ΕΟΚ και 73/23/ΕΟΚ, #πως οι
κανονισµοί αυτοί συµπληρώθηκαν απ# την οδηγία 93/68/ΕΟΚ.
Este equipamento obedece às exigências das directivas 89/336/CEE e
73/23/CEE, na sua versão corrigida pela directiva 93/68/CEE.
Este aparato satisface las exigencias de las Directivas 89/336/CEE y 73/
23/CEE, modificadas por medio de la 93/68/CEE.
Denna utrustning uppfyller kraven enligt riktlinjerna 89/336/EEC och 73/
23/EEC så som kompletteras av 93/68/EEC.
Dette produktet oppfyller betingelsene i direktivene 89/336/EEC og 73/
23/EEC i endringen 93/68/EEC.
Tämä laite täyttää direktiivien 89/336/EEC ja 73/23/EEC vaatimukset,
joita on muutettu direktiivillä 93/68/EEC.
Page 3

SPECIAL NOTE FOR USERS IN THE U.K.
The mains lead of this product is fitted with a non-rewireable (moulded) plug
incorporating a 3A fuse.
Should the fuse need to be replaced, a BSI or ASTA approved BS 1362 fuse
marked or and of the same rating as above, which is also indicated on the
pin face of the plug, must be used.
Always refit the fuse cover after replacing the fuse. Never use the plug without
the fuse cover fitted.
In the unlikely event of the socket outlet in your home not being compatible with
the plug supplied, cut-off the mains plug and fit an appropriate type.
DANGER: The fuse from the cut-off plug should be removed and the cut-off
To fit an appropriate plug to the mains lead, follow the instructions below:
IMPORTANT: The wires in the mains lead are coloured in accordance with the
As the colours of the wires in the mains lead of this product may not correspond
with the coloured markings identifying the terminals in your plug, proceed as
follows:
—The wire which is coloured blue must be connected to the plug terminal which
is marked N or coloured black.
—The wire which is coloured brown must be connected to the plug terminal
which is marked L or coloured red.
Ensure that neither the brown nor the blue wire is connected to the earth
terminal in your three-pin plug.
Before replacing the plug cover make sure that:
—If the new fitted plug contains a fuse, its value is the same as that removed
from the cut-off plug.
—The cord grip is clamped over the sheath of the mains lead and not simply
over the lead wires.
IF YOU HAVE ANY DOUBT, CONSULT A QUALIFIED ELECTRICIAN.
plug destroyed immediately and disposed of in a safe manner.
Under no circumstances should the cut-off plug be inserted
elsewhere into a 13A socket outlet, as a serious electric shock may
occur.
following code:
Blue: Neutral
Brown: Live
Page 4

ENGLISH
OPERATION MANUAL
INFORMATION
GENERAL
CONNECTION and
INITIAL SETTING
OPERATIONS
BASIC
FUNCTIONS
SPECIAL
OTHERS
Page 5
IMPORTANT SAFEGUARDS AND PRECAUTIONS
CAUTION
BEFORE OPERATING YOUR NEW DVD PLAYER, PLEASE CAREFULLY
READ THIS OPERATION MANUAL AND THEN SAVE IT FOR FUTURE
REFERENCE.
Note:
This unit can be used only where the power supply is AC 110V-240V,
50/60Hz. It cannot be used elsewhere.
CAUTION:
USE OF CONTROLS OR ADJUSTMENTS OR PERFORMANCE OF
PROCEDURES OTHER THAN THOSE SPECIFIED HEREIN MAY
RESULT IN HAZARDOUS RADIATION EXPOSURE.
AS THE LASER BEAM USED IN THIS DVD PLAYER IS HARMFUL
TO THE EYES, DO NOT ATTEMPT TO DISASSEMBLE THE
CABINET. REFER SERVICING TO QUALIFIED PERSONNEL ONLY.
WARNING:
TO REDUCE THE RISK OF FIRE OR ELECTRIC SHOCK, DO NOT
EXPOSE THIS EQUIPMENT TO RAIN OR MOISTURE.
TO REDUCE THE RISK OF FIRE OR ELECTRIC SHOCK, AND
ANNOYING INTERFERENCE, USE THE RECOMMENDED
ACCESSORIES ONLY.
Laser Diode Properties
for DVD disc Play for CD, Video CD disc Play
Material: AlGaInP Material: AlGaAs
Wave length: 650 nm Wave length: 780 nm
Emission duration: Continuous Emission duration: Continuous
Laser output: Max. 0.7 mW Laser output: Max. 0.7 mW
GB
2
Page 6
IMPORTANT SAFEGUARDS AND PRECAUTIONS
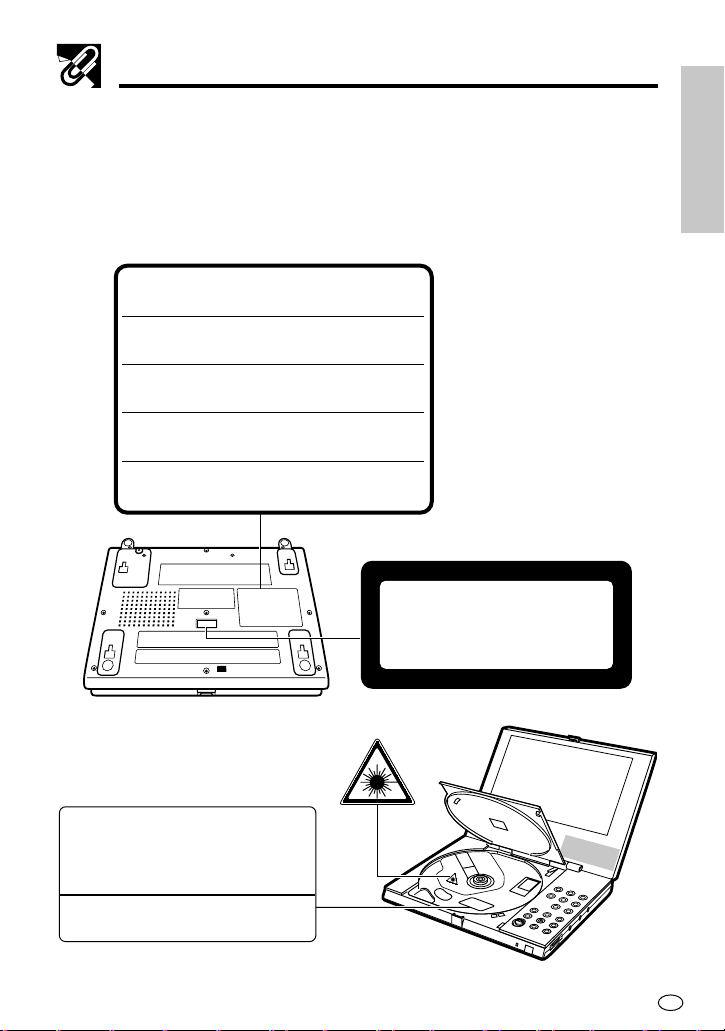
• This DVD player is classified as a CLASS 1 LASER product.
• “CLASS 1 LASER PRODUCT” is printed at the bottom of the player.
• The laser caution label is located at the bottom of the player.
• This product contains a low power laser device.
To ensure continued safety do not remove any cover or attempt to gain
access to the inside of the product. Refer all servicing to qualified
personnel.
CAUTION : VISIBLE AND INVISIBLE LASER RADIATION WHEN OPEN
AND INTERLOCKS DEFEATED. DO NOT STARE INTO BEAM OR VIEW
DIRECTLY WITH OPTICAL INSTRUMENT.
VARNING : SYNLIG OCH OSYNLIG LASERSTRÅLNING NÄR DENNA DEL
ÄR ÖPPNAD OCH SPÄRRAR ÄR URKOPPLADE. STIRRA EJ IN I
STRÅLEN OCH BETRAKTA EJ STRÅLEN GENOM OPTISKA INSTRUMENT.
VARO : AVATTAESSA JA SUOJALUKITUS OHITETTAESSA OLET ALTTIINA
NÄKYVÄÄ JA NÄKYMÄTÖN LASERSÄTEILYLLE. ÄLÄ TUIJOTA SÄTEESEEN
ÄLÄKÄ KATSO SITÄ OPTISEN LAITTEEN LÄPI.
ADVARSEL : SYNLIG OG USYNLIG LASERSTRÅLNING NÅR DEKSEL ÅPNES
OG SIKKERHEDSLÅS BRYTES.STIRR IKKE INN I STRÅLEN ELLER SE
DIREKTE MED OPTISKE INSTRUMENTER.
ADVARSEL : SYNLIG OG USYNLIG LASERSTRÅLNING VED ÅBNING, NÅR
SIKKERHEDSAFBRYDERE ER UDE AF FUNKTION. SE IKKE IND I
STRÅLENHELLER IKKE MED OPTISKE INSTRUMENTER.
CLASS 1
LASER PRODUCT
INFORMATION
GENERAL
VISIBLE AND INVISIBLE LASER RADIATION
CAUTION
WHEN OPEN AND INTERLOCKS DEFEATED.
DO NOT STARE INTO BEAM OR VIEW
DIRECTLY WITH OPTICAL INSTRUMENT.
WARNING
DO NOT DEFEAT THESE INTERLOCKS.
GB
3
Page 7

IMPORTANT SAFEGUARDS AND PRECAUTIONS
Power Cord Protection
To avoid any malfunctions of the unit, and to protect against electric shock,
fire or personal injury, please observe the following.
• Hold the plug firmly when connecting or disconnecting the AC power cord.
• Keep the AC power cord away from heating appliances.
• Never put any heavy object on the AC power cord.
• Do not attempt to repair or reconstruct the AC power cord in any way.
Location and Handling
• Air vents are provided in the DVD player cabinet to prevent excessive
temperatures inside the unit. Do not place your DVD player in closed
spaces, cover it, or otherwise block the vents.
• Do not place the DVD player in direct sunlight, or near heat sources.
• Keep the DVD player away from strong magnetic objects.
• Do not insert or drop anything into the DVD player through the air vents
as this could cause serious damage, possibly resulting in fire.
• Do not place any object containing water or other liquids on the DVD
player. In the event that liquid should enter the cabinet, unplug the DVD
player immediately and contact the retailer or service centre approved
by SHARP immediately.
• Do not remove the DVD player cabinet. Touching parts inside the
cabinet could result in electric shock and/or damage to the DVD player.
For service and adjustment inside the cabinet, call a qualified dealer or
service centre approved by SHARP.
Nonuse Periods
When the unit is not being used, turn the unit off.
When left unused for a long period of time, the unit should be unplugged
from the household AC outlet.
No Fingers or Other Objects Inside
Do not place any foreign object in the disc compartment.
Stacking
Place the unit in a horizontal position, and do not place anything heavy on it.
GB
4
Page 8

IMPORTANT SAFEGUARDS AND PRECAUTIONS
Condensation
Moisture may form on the pickup lens in the following conditions:
• immediately after a heater has been turned on.
• in a steamy or very humid room.
• when the unit is suddenly moved from a cold environment to a warm one.
If moisture forms inside this unit, it may not operate properly.
In this case, turn on the power and wait about one hour for the moisture to
evaporate.
If There is Noise Interference on the TV While a
Broadcast is being Received
Depending on the reception condition of the TV, interference may appear
on the TV monitor while you watch a TV broadcast and the unit is left on.
This is not a malfunction of the unit or the TV. To watch a TV broadcast,
turn off the unit.
Service
Do not attempt to service this DVD player yourself. Please refer any
service to the nearest service centre approved by SHARP.
Copyright
Audio-visual material may consist of copyrighted works which must not be
recorded without the authority of the owner of the copyright. Please refer to
relevant laws in your country.
Copy Protection
For the European Continent except the U.K.
This DVD player supports Macrovision copy protection.
On DVD discs that include a copy protection code, if the contents of the
DVD disc are copied using a VCR, the copy protection code prevents the
videotape copy from playing normally.
For the U.K.
Recording and playback of any material may require consent.
Please refer particularly to the provisions of the Copyright Act 1956, the
Dramatic and Musical Performers Protection Act 1958, the Performers
Protection Acts 1963 and 1972 and to any subsequent statutery
enactments and orders.
GB
5
Page 9
IMPORTANT SAFEGUARDS AND PRECAUTIONS
Apparatus Claims of U.S.Patent Nos. 4,631,603, 4,577,216, 4,819,098
and 4,907,093 licensed for limited viewing uses only.
This product incorporates copyright protection technology that is
protected by method claims of certain U.S. patents and other intellectual
property rights owned by Macrovision Corporation and other rights
owners. Use of this copyright protection technology must be authorized
by Macrovision Corporation, and is intended for home and other limited
viewing uses only unless otherwise authorized by Macrovision
Corporation. Reverse engineering or disassembly is prohibited.
Recommended Measures for Optimum Picture Excellence
The unit is a precision device that is constructed using extremely accurate
technology.
Soiling or friction affecting the pickup lens or disc drive can impair the
image quality.
obtain optimum picture quality, the player should be checked (cleaning and
replacement of some parts) every 1,000 hours. Note that this period varies
depending on the environment (temperature, humidity, dust, etc.) in which
the player is used. Contact your authorized Sharp supplier for details.
Do not attempt to clean the pickup lens yourself.
At the worst, neither video nor audio will be played back. To
GB
6
Page 10
Disc Handling and Maintenance
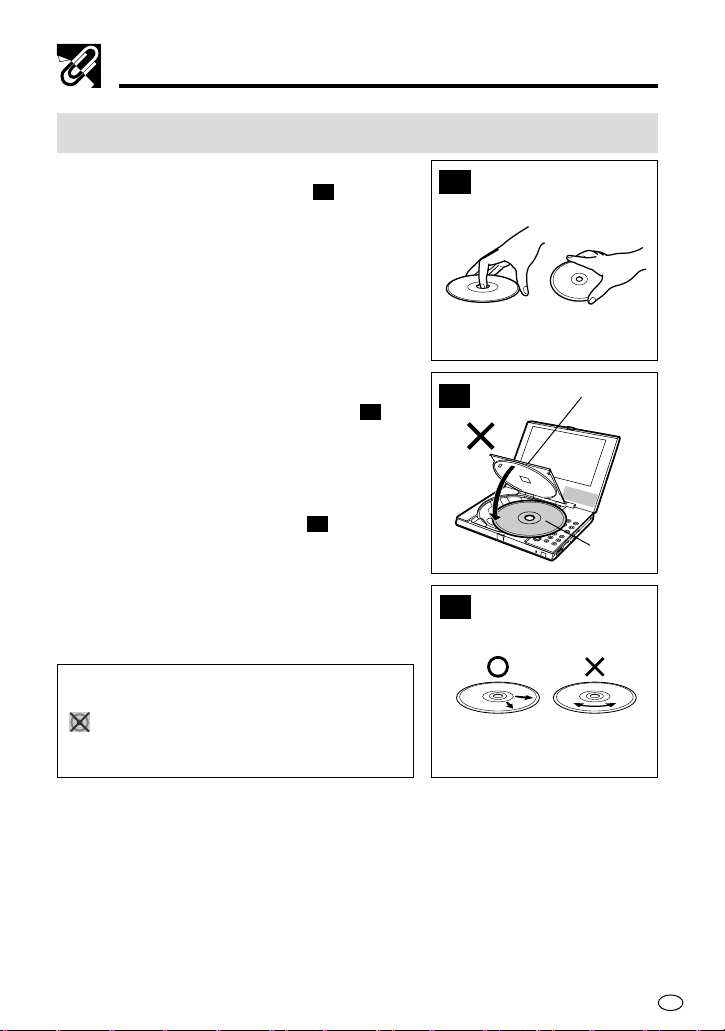
Handling precautions
• Hold the disc by the edges so the surface will
not be soiled with fingerprints.
Fingerprints, dirt and scratches can cause
skipping and distortion.
• Do not write on the label side with a ball-point
pen or other writing utensils.
• Do not use record cleaning sprays, benzine,
thinner, static electricity prevention liquids or
any other solvent.
• Be careful not to drop or bend the disc.
• Do not install more than 1 disc.
Do not try to close the disc compartment cover
•
when the disc is not installed properly.
• Be sure to store the disc in its exclusive case
when not in use. Then store upright.
• Do not stick paper or adhesive labels to the
disc.
(
)
A
(B)
If the Surface is Soiled (C)
Wipe gently with a soft, damp (water only) cloth.
When wiping discs, always move the cloth from
the centre hole toward the outer edge.
(If you wipe the discs using a circular motion,
circular scratches are likely to occur, which will
cause noise.)
If the playing surface of a disc is soiled or
scratched, the player may display indicator
on the screen and fail to play the disc
correctly. Wipe any soiling off the playing
surface with a soft cloth.
A
Disc compartment cover
B
C
Disc
If the Disc is Brought from a Cold to a Warm Environment,
Dew may form on the Disc
Wipe this dew off with a soft, dry, lint-free cloth before using the disc.
Improper Disc Storage
You can damage discs if you store them in the following places:
• Areas exposed to direct sunlight
• Humid or dusty areas
• Areas directly exposed to a heat outlet or heating appliance
GB
7
Page 11

Contents
GENERAL INFORMATION
IMPORTANT SAFEGUARDS AND PRECAUTIONS .................................................................... 2
Disc Handling and Maintenance ................................................................................................. 7
Handling precautions .............................................................................................................. 7
Features ...................................................................................................................................... 10
Accessories ................................................................................................................................ 11
Types of Disc that can be played on Your DVD Player............................................................ 12
Discs recorded by PAL system, Discs recorded by NTSC system and Type of TV connection ..........
NTSC disc playback on a PAL TV......................................................................................... 16
Quick Start Guide....................................................................................................................... 17
General Guide .................................................................................................................. .......... 24
Using Headphones .................................................................................................................... 28
To use the supplied earphones............................................................................................. 28
CONNECTION and INITIAL SETTING
Connecting to External Equipment for Input .......................................................................... 29
To connect external equipment ............................................................................................. 29
Connecting a TV with External Terminals ................................................................................ 30
Connecting to Audio Equipment .............................................................................................. 31
Playing 2 channel audio........................................................................................................ 31
Playing Dolby Digital (5.1 channel), DTS and MPEG Version 2.0 audio............................... 32
Using the AC Adapter ................................................................................................................ 33
Using a Battery Pack (Sold Separately) ................................................................................... 34
To charge the battery pack ................................................................................................... 34
To attach a battery pack to the DVD player .......................................................................... 35
Battery Capacity Indicator ........................................................................................................ 37
Turning Power On and Off ......................................................................................................... 38
To turn main power on and off .............................................................................................. 38
Using the Remote Control Unit................................................................................................. 40
To load batteries ................................................................................................................... 40
Remote control unit operating range .................................................................................... 40
Operation Modes........................................................................................................................ 41
To select an operation mode................................................................................................. 41
Setup ........................................................................................................................................... 42
Setting the language............................................................................................................. 42
TV MODE SET setting.......................................................................................................... 43
PARENTAL setting ................................................................................................................45
COMPRESSION (Dolby Digital Output Level) setting .......................................................... 47
DISC MENU LANGUAGE setting ......................................................................................... 49
MPEG OUT setting ............................................................................................................... 50
Screen Size Setting.................................................................................................................... 52
To set the screen size ........................................................................................................... 52
Changing the Display Mode ...................................................................................................... 54
To change the display mode ................................................................................................. 54
DVD mode operation indicators ............................................................................................ 56
GB
8
16
Page 12

Contents
BASIC OPERATIONS
Playing a Disc............................................................................................................................. 57
To play a disc ........................................................................................................................ 57
To adjust the volume level..................................................................................................... 58
To stop disc play ................................................................................................................... 58
Other Disc Play Features .......................................................................................................... 59
To resume disc play after stopping ....................................................................................... 59
To use fast forward and fast reverse ..................................................................................... 60
To use slow motion (DVD only)............................................................................................. 60
To use still picture and frame advance ................................................................................. 61
Chapter/track skip................................................................................................................. 62
Title/track direct skip ............................................................................................................. 63
Chapter direct skip (DVD only) ............................................................................................. 63
SPECIAL FUNCTIONS
Repeat Playback ........................................................................................................................ 64
Programmed Playback .............................................................................................................. 66
Making Display Settings............................................................................................................ 70
To make digital gamma settings (DVD, Video CD only) ........................................................ 70
To make digital super picture settings (DVD, Video CD only) ............................................... 71
Audio Selection (DVD, Video CD only) ..................................................................................... 72
Angle Selection (DVD only)....................................................................................................... 74
Subtitle Selection (DVD only).................................................................................................... 75
Using Dolby Virtual (DVD only) ................................................................................................. 76
Selecting Titles from the Title Menu of a DVD (DVD only) ...................................................... 77
Setting Play Parameters Using the Disc Menu (DVD only) .................................................... 78
Settings from the DVD Player Control Panel (GUI) ................................................................. 79
Adjusting Display....................................................................................................................... 81
To adjust display colours .......................................................................................................81
To adjust overall screen brightness ...................................................................................... 82
Viewing Images from an External Device ................................................................................ 83
OTHERS
References.................................................................................................................................. 84
Precautions........................................................................................................................... 84
AC Adapter ........................................................................................................................... 86
Care ...................................................................................................................................... 86
Battery Pack (Sold Separately)............................................................................................. 86
Troubleshooting ......................................................................................................................... 88
Error Indicators and Warnings .................................................................................................. 91
Specifications............................................................................................................................. 92
Glossary...................................................................................................................................... 94
9
GB
Page 13

Features
7" LCD Screen and Stereo Speakers
• A big 7" LCD screen and built-in stereo speakers provide exciting DVD
viewing, even without connecting to a TV.
• Dolby Virtual provides high-quality surround sound.
2-Way Power Supply (Battery pack is sold separately.)
• A 2-way power supply allows operation using the supplied AC adapter for
indoor play, or the battery pack sold separately for outdoor play.
Compact, Lightweight Design
• About the size of a movie DVD case, your DVD player is designed to go
along just about anywhere.
High-Resolution Images, High-Quality Sound
• A high-resolution 336,960-pixel LCD screen produces images of outstanding
quality.
• Digital gamma correction and digital super picture provide more realistic
image detail.
• Dolby Virtual ensures richer sound from two built-in speakers.
AV input/output, optical digital output jack equipped as
standard
• An optical digital output jack (which doubles as the audio input/output jack)
can be used to output a stream of *
digital audio and Audio MPEG. Connecting a Dolby Digital/DTS/Audio MPEG
digital surround processor or amplifier to this jack creates an environment of
amazingly powerful surround sound.
• The AV input/output jack can be used to connect a video deck or camcorder
to your DVD player. Or you can use these jacks to connect to a TV for bigscreen viewing. (Output only is supported for S-video. An S-video signal
cannot be input to your DVD player.)
1
Dolby Digital 5.1 channel audio, *2DTS
1
Manufactured under license from Dolby Laboratories. “Dolby”, “Pro Logic”
*
and the double-D symbol are trademarks of Dolby Laboratories. Confidential
Unpublished Works. ©1992-1997 Dolby Laboratories, Inc. All rights
reserved.
2
“DTS” and “DTS Digital Surround” are trademarks of Digital Theater Systems,
*
Inc.
GB
10
Page 14
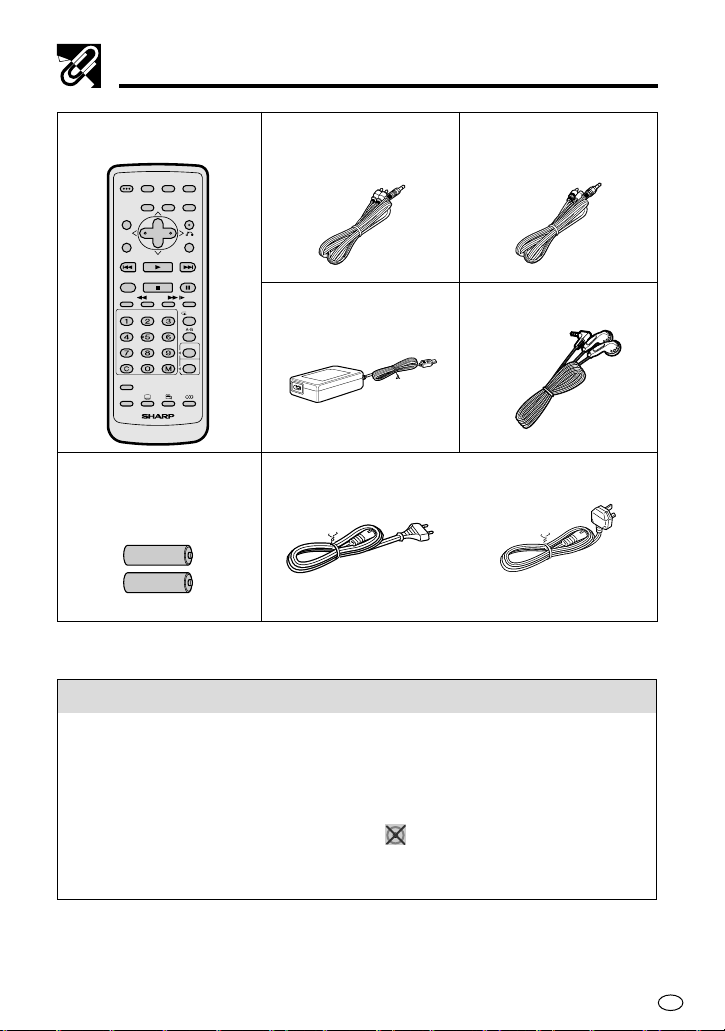
Accessories
Remote Control Unit
BACKLIGHT
VIEW
HI/LOW/OFF
MODE
DIGITAL
VIRTUAL
GAMMA
STILL/PAUSE
SUBTITLE ANGLE AUDIO
VIDEO
ADJUST
DIGITAL
S.PICTURE
RETURN
SKIP
SKIP
PROGRAM
DIRECT
SLOWFWDREVDISPLAY
REPEAT
OPERATE
TITLE ENTER
MENU
SKIP PLAY
RESUME STOP
CLEAR MEMORY
SETUP
SETUP
SUBTITLE
ON/OFF
Two (R6 UM/SUM-3 or
AA) Batteries for the
Remote Control Unit
Audio Cord S-video/Video Cord
AC Adapter
Earphones
AC Cord
For the European Continent
For the U.K. and Eire
except the U.K. and Eire
(Supplied with DV-L70S/
DV-L70BL)
(Supplied with
DV-L70S only)
Disc Features and this Operation Manual
• The types of functions and operations that can be used for a particular
disc vary depending on the features of that disc. In some cases, these
functions and operations may differ from the descriptions given in this
Operation Manual. In this event, follow the instructions given on the
screen. This Operation Manual only covers basic disc operations.
• For some operations, the
the screen. This indicates that the operation described in
this Operation Manual is not permitted for the current disc.
øø
ø or indicator may appear on
øø
11
GB
Page 15
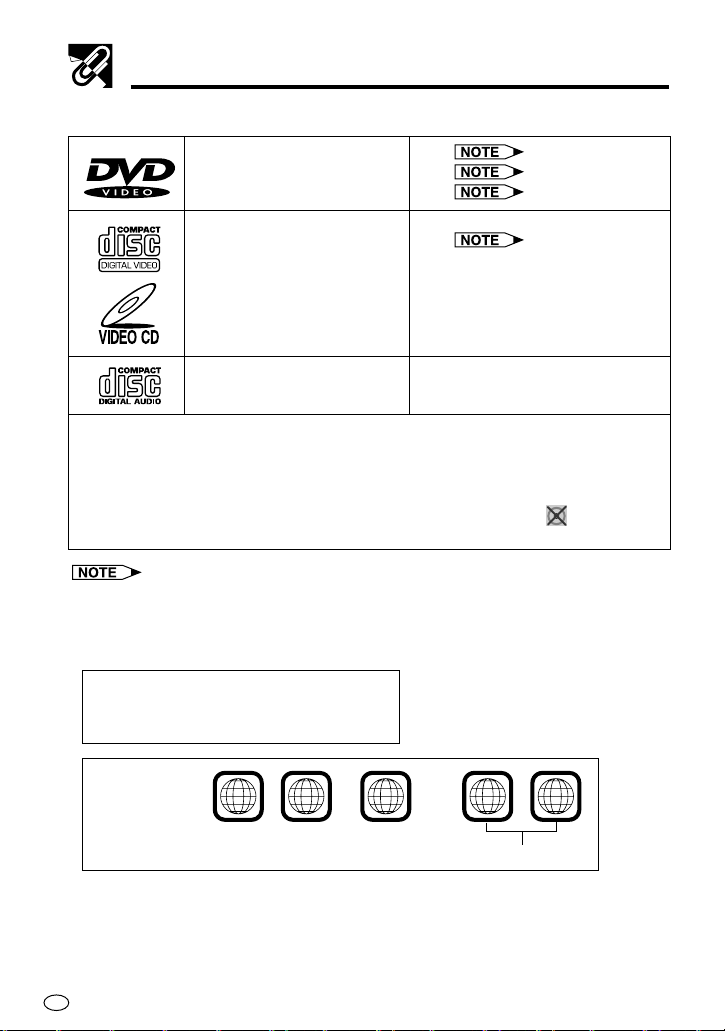
T ypes of Disc that can be played on Y our DVD Player
The unit can play back discs bearing any of the following marks:
DVD See 1
[8cm disc/12cm disc] See 2 on the next page
Video CDs
[8cm disc/12cm disc] • Supports version until version 2.0.
Audio CDs
[8cm disc/12cm disc]
Other CDs
1) On CD-G and CD-EXTRA discs, only the sound can be played (no images).
2) Photo CD, DVD-ROM and CD-ROM discs cannot be used.
3) Discs with unusual shapes (heart-shaped or hexagonal discs) cannot be used. The
use of such discs will cause a fault.
• When the player detects an incompatible disc, it displays indicator . When this
happens, check the disk type.
See 3 on the next page
See 2 on the next page
• DVD players and discs are designed with region numbers which dictate the regions in
1
which a disc can be played. If the region number on the disc you want to play does not
match the region number in your DVD player, you will not be able to play the disc.
The region number for
this DVD player is
Sample disc
display:
GB
12
2
2
.
1
.... ........
21
2
Disc playable in all regions
213
ALL
6
546
Page 16

Types of Disc that can be played on Your DVD Player
The list below shows the countries covered by region number 2.
Common Names Names of Nations and Areas
Albania Republic of Albania
Andorra Principality of Andorra
Austria Republic of Austria
Bahrain State of Bahrain
Belgium Kingdom of Belgium
Bosnia and Bosnia and Herzegovina
Herzegovina
Bulgaria Republic of Bulgaria
Croatia Republic of Croatia
Cyprus Republic of Cyprus
Czech The Czech Republic
Denmark Kingdom of Denmark
Egypt Arab Republic of Egypt
Finland Republic of Finland
France French Republic
Germany Federal Republic of Germany
Greece Hellenic Republic
Hungary Republic of Hungary
Iceland Republic of Iceland
Iran Islamic Republic of Iran
Iraq Republic of Iraq
Ireland Ireland
Israel State of Israel
Italy Republic of Italy
Japan Japan
Jordan Hashemite Kingdom of Jordan
Kuwait State of Kuwait
Lebanon Republic of Lebanon
Lesotho Kingdom of Lesotho
Liechtenstein Principality of Liechtenstein
Luxembourg Grand Duchy of Luxembourg
Macedonia The Former Yugoslav Republic
Malta Republic of Malta
of Macedonia
Common Names Names of Nations and Areas
Monaco Principality of Monaco
Netherlands Kingdom of the Netherlands
Norway Kingdom of Norway
Oman Sultanate of Oman
Poland Republic of Poland
Portugal Portuguese Republic
Qatar State of Qatar
Romania Romania
San Marino Republic of San Marino
Saudi Arabia Kingdom of Saudi Arabia
Slovakia The Slovak Republic
Slovenia Republic of Slovenia
South Africa Republic of South Africa
Spain Spain
Swaziland Kingdom of Swaziland
Sweden Kingdom of Sweden
Switzerland Swiss Confederation
Syrian Arab Syrian Arab Republic
Republic
Turkey Republic of Turkey
United Arab United Arab Emirates
Emirates
United Kingdom United Kingdom of Great Britain
Vatican City State State of the City of Vatican
Yemen Republic of Yemen
Yugoslavia Federal Republic of Yugoslavia
Channel Islands* Channel Islands
Faeroe Islands* Faeroe Islands
Gibraltar* Gibraltar
Greenland* Greenland
Isle of Man* Isle of Man
Svalbard and Jan
Mayen Islands*
and Northern Ireland
Svalbard and Jan Mayen Islands
*represents Area Name
2
• The specific playback functionality for some DVD and video CD discs is determined by
the disc manufacturer. Because this DVD player plays disc data in accordance with
the disc manufacturer’s guidelines, some functions may not be available on some
discs. Be sure to read the instructions provided with the disc.
The “Prohibited” indicator
øø
ø displayed during DVD player operation indicates
øø
that such manufacturer-imposed restrictions apply.
3
• This DVD player supports the 2-channel(L/R) audio in Audio MPEG Version 2.0.
However , it does not support 7.1-channel in Audio MPEG Version 2.0.
13
GB
Page 17
Types of Disc that can be played on Your DVD Player
Discs that Cannot be Played
1.You cannot play illegally produced discs.
• You cannot play discs of other region number than No. 2 (refer to the list
of region number 2 on page 13), such as discs for the use in U.S.A.
(region No. 1) and China (region No. 6).
2.You cannot play scratched discs.
3.You cannot play discs that are dusty, soiled or marked with fingerprints.
• If the playing surface of a disc is soiled or scratched, the player may
display indicator
on the screen and fail to play the disc correctly.
(Refer to the instructions on page 7 and clean discs before attempting to
play them.)
While a disc is playing, soiling or scratches on the disc may disrupt the
image (appearing as blocks on the screen). When the image is disrupted,
the player automatically restores the correct image after 2 or 3 seconds. If
the normal screen does not reappear, press the RESUME button on the
remote control. This will bring up the normal screen again.
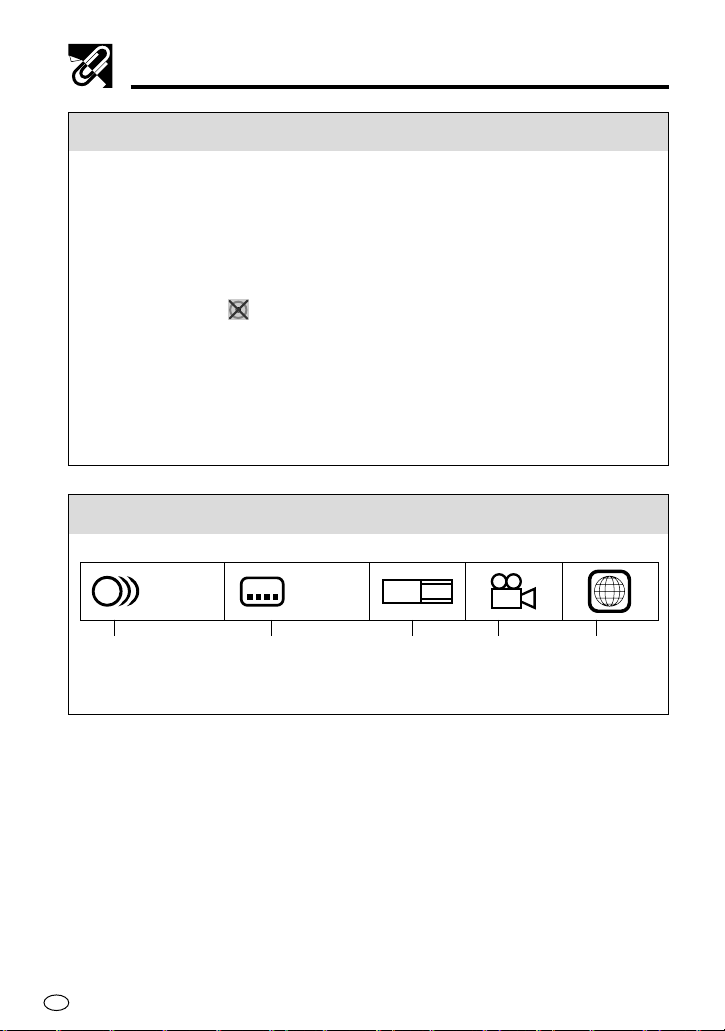
Icons Used on DVD Discs
Sample Icons
2
1. English
2. Chinese
2
1. English
2. Chinese
16:9
LB
213
2
546
Number of recorded
audio tracks
GB
14
Type of subtitles
recorded
Screen
aspect ratio
recorded
Disc with
multiple
camera
angles
Region code
indicator
(see page 12)
Page 18

Types of Disc that can be played on Your DVD Player
Title, chapter and tracks
• DVDs are divided into “titles” and “chapters”. If the disc has more than one
movie on it, each movie would be a separate “title”. “chapters”, on the other
hand, are subdivisions of titles.
Example: DVD
Title 1 Title 2
Chapter 1 Chapter 2 Chapter 3 Chapter 1 Chapter 2
• Video CDs and audio CDs are divided into “tracks”. You can think of a
“track” as one tune on an audio CD.
Example: Video CD or Audio CD
Track 1
• Numbers identify each title, chapter, and track on a disc. Most discs have these
numbers recorded on them, but some do not.
Track 2 Track 3 Track 4 Track 5
15
GB
Page 19
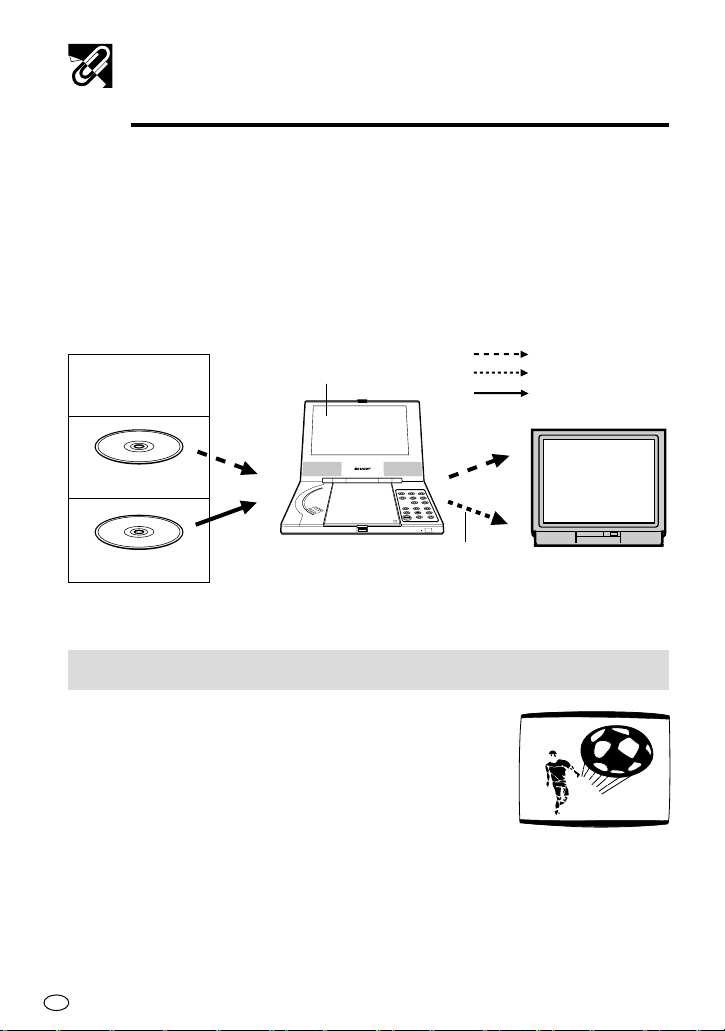
Discs recorded by PAL system, Discs recorded
PAL signal
Modified PAL signal
NTSC signal
(
)
by NTSC system and Type of TV connection
• The DVD player can play back discs recorded by NTSC using the modified
PAL system, such as Video CD, DVD-region 2, but cannot play back discs
for the use in U.S.A. (region No. 1).
• Region numbers cannot be changed in this system.
• This DVD player also has a built-in system converter which makes it possible
to view discs (Video CD, DVD-region 2) recorded by the NTSC system using
a PAL TV. (See “NTSC disc playback on a PAL TV” below.)
DVD Disc (region 2)
or
PAL/modified PAL image is
displayed on the LCD screen.
Video CD Disc
PAL
P
U
S
H
T
O
C
LO
S
E
O
N
/
S
T
A
N
D
B
Y
Signal is converted from NTSC system
NTSC
type to modified PAL system type.
Multi System TV
NTSC disc playback on a PAL TV
When playing an NTSC disc using a PAL TV, please note
the following:
• The picture will shrink vertically to some degree, as
shown in the diagram, but this does not indicate a
malfunction in your TV or DVD player.
• If your TV does not have a V-HOLD control, the picture
may roll and be unwatchable. However, if you use a TV
with V-HOLD control, you can stop the rolling by adjusting the V-HOLD
control and watch the picture.
PAL TV
GB
16
Page 20
Quick Start Guide
This Quick Start Guide provides only the most basic information for operating
your DVD player. See the other sections of this Operation Manual for full details
about operational procedures, precautions, and other information.
• Connections and initial settings ... on pages 29 to 50
• To play a disc ............................... on pages 57 to 82
• To view images from a video deck or other external equipment
..................................................... on page 83
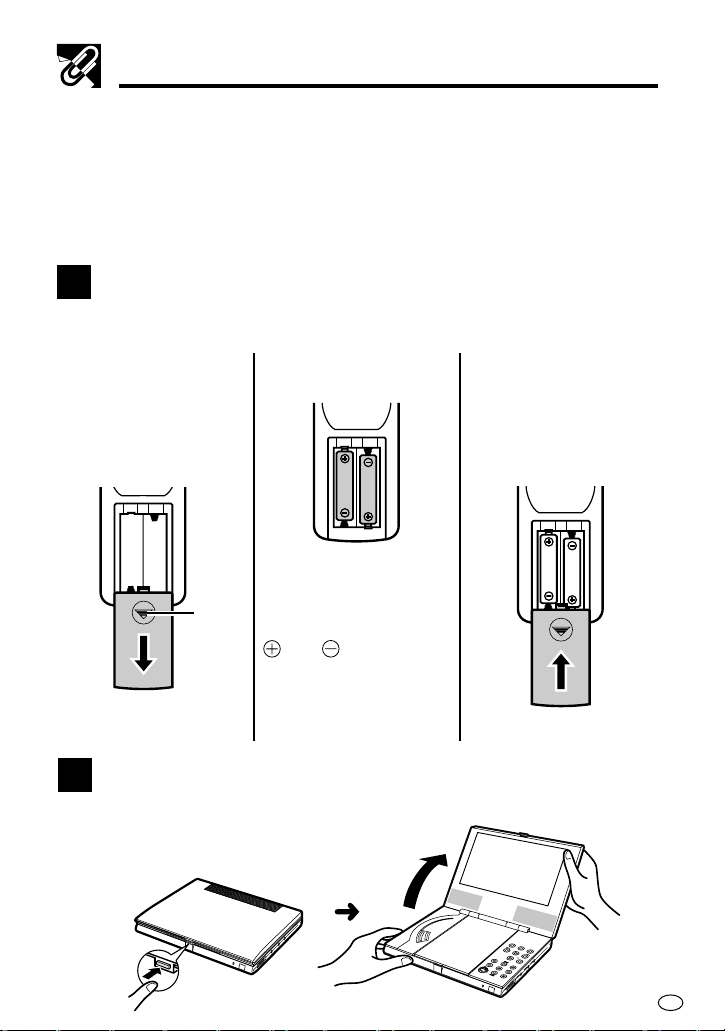
1 Load batteries into the remote control unit.
Correctly load two batteries into the remote control unit that comes with the
DVD player.
1 While pressing down
at the point indicated
by the " mark, slide
the battery cover
from the remote
control unit.
Press
here.
2 Load the batteries.
Load the two (R6 UM/
SUM-3 or AA) batteries
that come with the DVD
player, making sure their
and ends are
facing as indicated by
the markings inside the
battery compartment.
3 Slide the battery
cover back into
place.
2 Open the display panel.
1 Press the display panel release. 2 Open the display panel.
17
GB
Page 21
Quick Start Guide
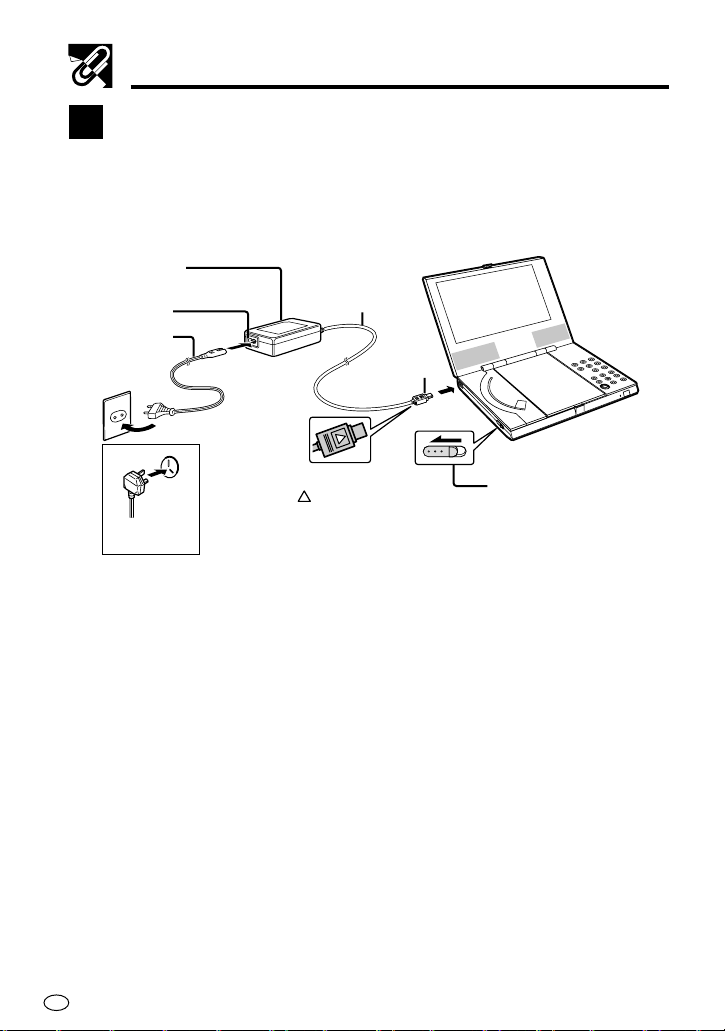
3 Turn on the DVD player.
1 Plug the AC cord into the power socket of the AC adapter (1).
Plug the DC output plug into the DC input jack of the DVD player
2
3 Plug the other end of the AC cord into a household power outlet (3).
4 Slide the main power switch to the “ON” position (4).
AC Adapter
(supplied)
Power socket
AC cord
(supplied)
3
1
To power
socket
DC cord
DC output
plug
2
(2).
GB
18
3
For the U.K.
and Eire
To household
power outlet
The side of the plug
should be
with
facing up
(so you can see it).
4
Main power switch
Page 22
Quick Start Guide
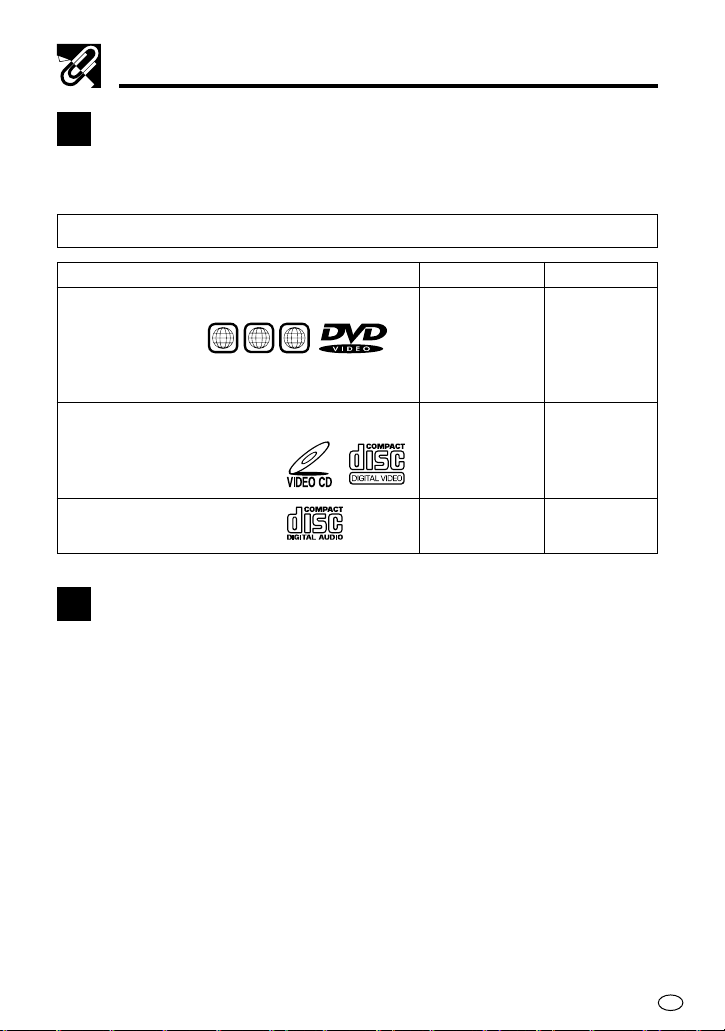
4 Prepare the disc you want to play.
Before loading a disc, check to make sure that it is one that is supported by
the DVD player.
Supported disc types
Disc Type
Disc Contents
Disc Size
DVD Video Disc
Region Numbers:
NTSC/PAL system
DVD discs that conform to the region numbers
noted above (see page 12)
213
546
ALL
2
Audio and
video (movies)
12cm / 8cm
Video CD
NTSC/PAL system video CDs
Audio CD
Audio and
video (movies)
Audio
12cm / 8cm
12cm /
8cm (single)
5 Load the disc and start play.
After confirming that the disc is compatible, you can load it into the DVD player
and play it.
19
GB
Page 23
Quick Start Guide
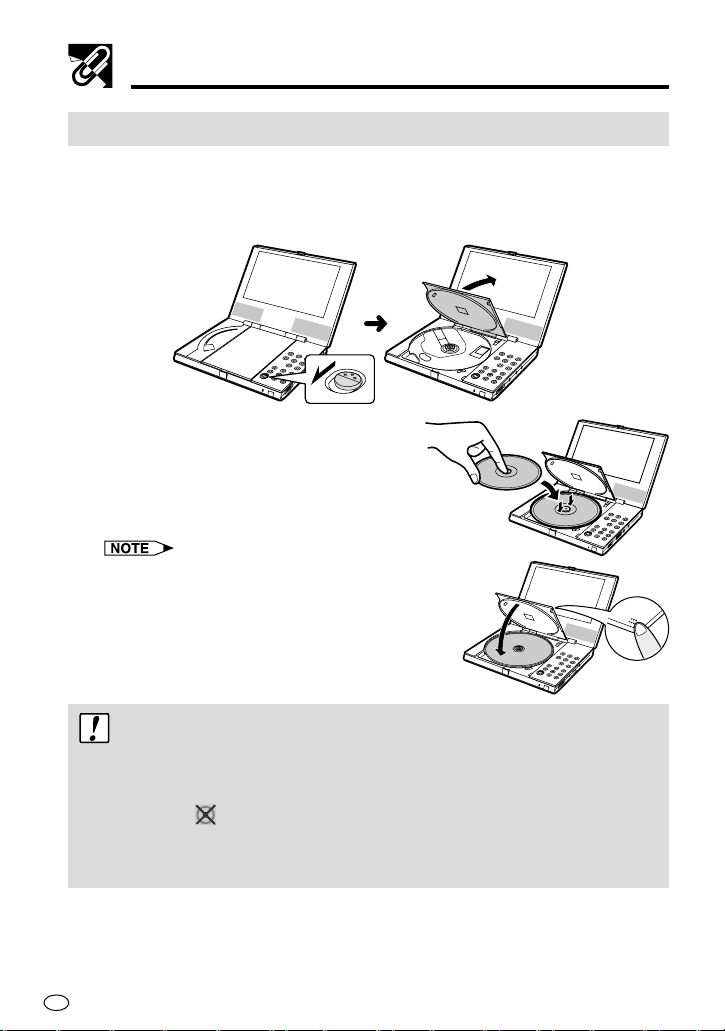
To load a disc into the disc player
1 Slide the disc compartment cover release button in the direction indicated
by the arrow and open the cover.
• Pressing the button causes the cover to open only partially. Lift the
cover by hand to open it the rest of the way.
2 Gently press down on the disc in the
vicinity of the centre hole so it seats
properly into place.
• You should be able to hear and feel the
disc seat securely into place when you
press down on it.
• Make sure the label of the disc is facing
up when you load it into the player.
3 Close the disc compartment cover and
press down at the corner marked “PUSH
TO CLOSE” so it locks securely into place.
P
U
S
H
T
O
C
L
O
S
E
Important!
• Make sure the disc seats securely when you load it into the player. An
improperly seated disc can result in damage to the disc and malfunction of
the player.
•
The indicator appears on the display if the disc you are using is damaged,
if you load the disc upside-down, or if the region number of the disc you are
using is one that is not supported by this disc player. If the above indicator
appears, remove the disc from the player and take the proper corrective action.
GB
20
Page 24
BACKLIGHT
1 C 001
1:23:40
T 0
VIEW
HI/LOW/OFF
VIRTUAL
MODE
DIGITAL
GAMMA
VIDEO
ADJUST
DIGITAL
S.PICTURE
OPERATE
TITLE ENTER
MENU
SKIP SKIP
RESUME STOP
RETURN
PLAY
STILL/PAUSE
PLAY
SLOWFWDREVDISPLAY
REPEAT
PROGRAM
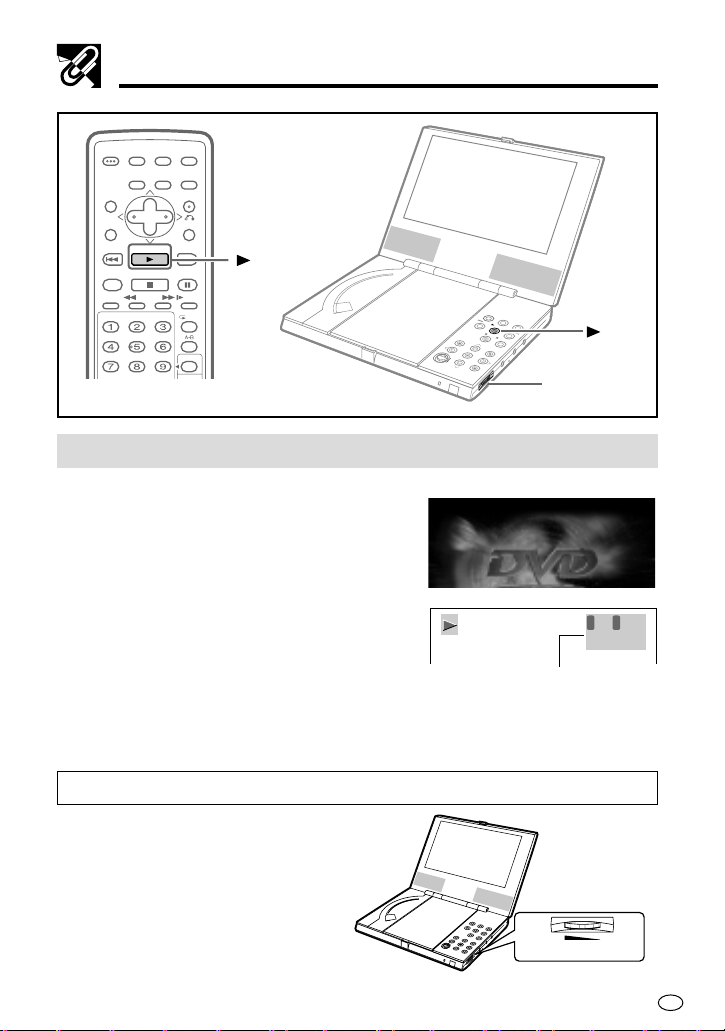
To play a disc
1 The startup screen appears after a few
moments.
• For information about how to turn on
power and load a disc, see page 18
and 20 respectively.
2 After the startup screen appears, press
ûPLAY.
• This starts play of the disc.
Images appear on the display only when the
display mode is “ON”. See “Changing the
Display Mode” on page 54 for more information.
I
N
D
V
S
K
I
P
S
T
O
P
T
I
T
L
E
M
E
E
N
T
O
E
P
R
E
N
R
E
T
U
R
O
N
/S
N
T
A
N
D
I
M
B
Y
E
M
U
L
X
O
A
V
M
Startup screen
Quick Start Guide
P
U
T
/
D
B
A
C
K
H
L
I
I
G
/
L
H
O
T
W
/
O
F
V
F
I
E
W
M
O
D
E
P
L
A
Y
/
G
U
I
S
K
I
P
S
T
IL
L
/P
A
U
S
S
E
E
N
O
H
P
N
U
G
O
L
O
I
A
D
N
U
A
A
L
A
C
I
T
P
O
O
E
D
I
V
N
PLAY
Volume dial
To adjust the volume level
Rotate the volume dial on the right side of
the DVD player to adjust the volume level of
the audio within a range of 0 to 10.
VOLUME
Higher
MAX
2
6
4
MIN
Lower
GB
21
Page 25
1 C 002
1:13:45
T 0
Quick Start Guide
V
O
L
U
M
E
V
I
D
E
O
A
U
D
I
O
O
P
T
I
C
A
L
A
N
A
L
O
G
P
H
O
N
E
S
M
A
X
M
I
N
O
N
/S
T
A
N
D
B
Y
INPUT/
DVD
BACKLIGHT
HI/LOW/OFF
VIEW
MODE
SKIP
PLAY/GUI
SKIP
STOP
TITLE
MENU
ENTER
RETURN
OPEN
STILL/P
AUS
E
SKIP
PLAY
STOP
SKIP
Disc compartment
cover release button
BACKLIGHT
VIEW
HI/LOW/OFF
VIRTUAL
DIGITAL
GAMMA
MODE
VIDEO
ADJUST
DIGITAL
S.PICTURE
RETURN
SKIP
STILL/PAUSE
SLOWFWDREVDISPLAY
REPEAT
PROGRAM
DIRECT
SKIP
PLAY
SKIP
STOP
FWD
REV
OPERATE
TITLE ENTER
MENU
SKIP PLAY
RESUME STOP
CLEAR MEMORY
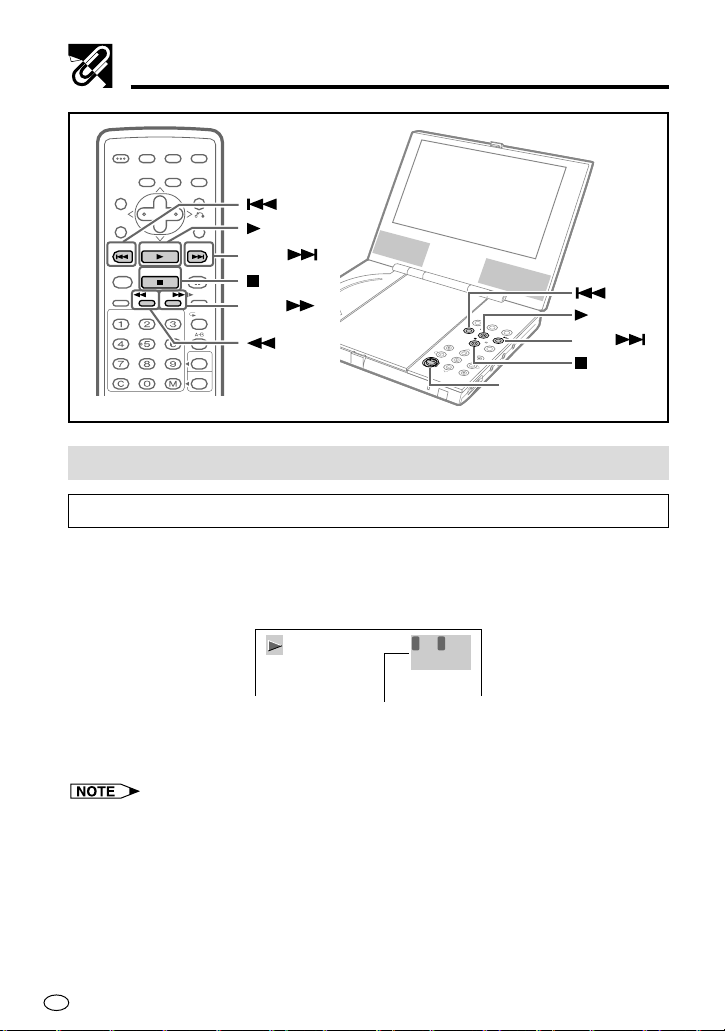
Disc play operations
To use chapter (track) skip
While a disc is playing, press SKIP à or À SKIP.
• SKIP à skips to the next chapter (track).
À
•
SKIP skips to the beginning of the current chapter (track). Press
À
SKIP again to skip to the previous chapter (track).
Images appear on the display only when the display
mode is “ON”. See “Changing the Display Mode” on
page 54 for more information.
• You may not be able to use chapter (track) skip with some discs.
• You may not be able to use chapter information display with some discs.
GB
22
Page 26
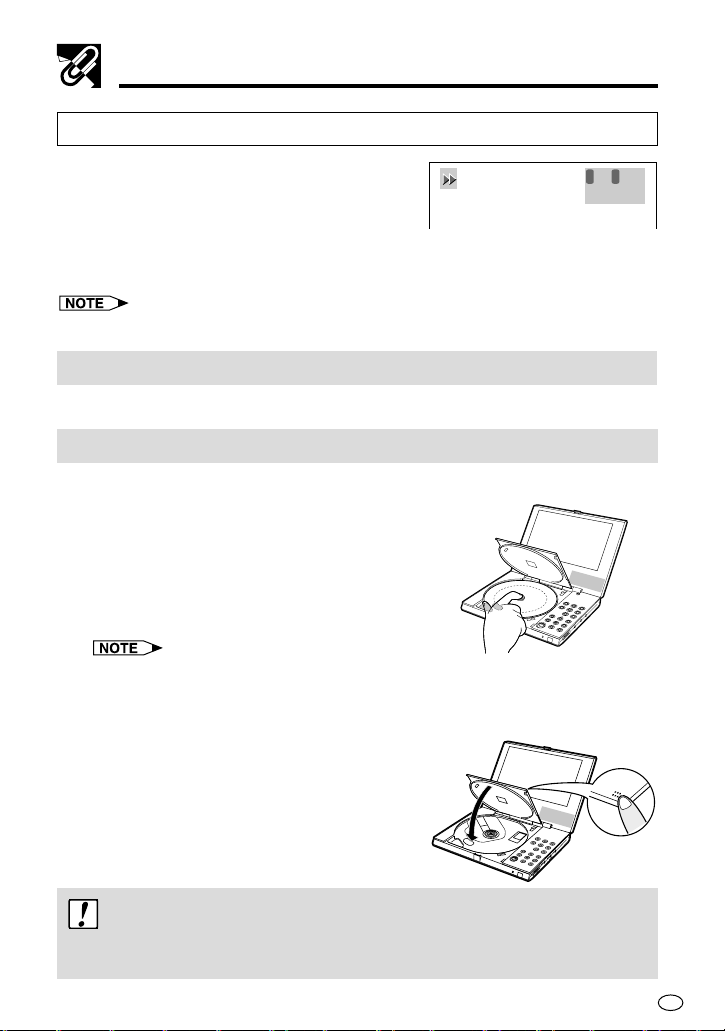
To fast forward and fast reverse
1 C 001
1:02:36
T 0
Quick Start Guide
1 While a disc is playing, press FWD
è
or ÈREV.
• FWDè starts fast forward.
• ÈREV starts fast reverse.
2 To stop a fast forward or fast reverse operation, press ûPLAY.
• This returns to normal play.
• You may not be able to use fast forward and fast reverse with some discs.
To stop disc play
1 Press ËSTOP.
To remove the disc from the player
1 Slide the disc compartment cover release button in the direction indicated
by the arrow and open the cover.
2 Carefully remove the disc from the player.
• Take care so you do not touch the disc surface with your fingers. As shown
in the illustration, place your index finger into the centre hole of the disc and
lift up the edge of the disc with your thumb.
3 Close the disc compartment cover and press
down at the corner marked “PUSH TO
CLOSE” so it locks securely into place.
P
U
S
H
T
O
C
LO
S
E
Important!
• Keep the disc compartment cover closed except when loading or removing a
disc. Otherwise, dust getting into the DVD player can lead to malfunction.
23
GB
Page 27
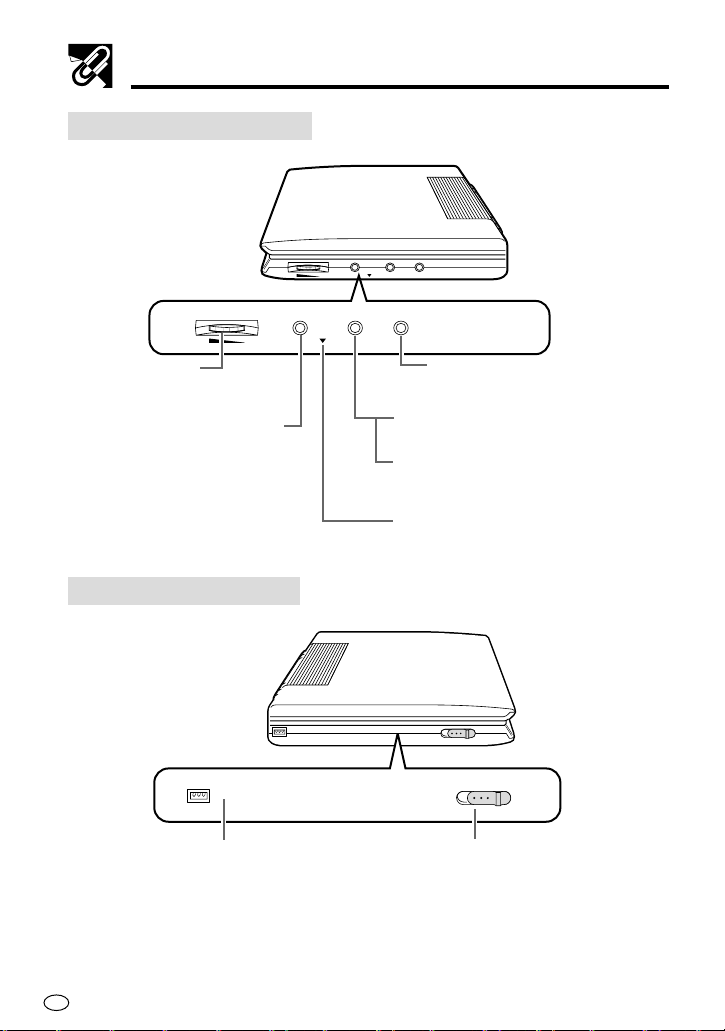
General Guide
DVD Player - Right side
VOLUME
MAX MIN
VOLUME
MAX
VIDEO
2
6
4
MIN
Volume dial
(see page 58)
Video input/output jack (yellow)
S-video output jack (yellow)
(see page 29)
DVD Player - Left side
DC IN 9V
DC IN 9V
VIDEO
2
6
4
AUDIO
DIGITAL OUT (OPTICAL)
PHONES
AUDIO
DIGITAL OUT (OPTICAL)
PHONES
Headphones jack (green)
(see page 28)
Audio input/output jack (white)
(see page 29)
Optical digital output jack (white)
(see page 32)
Battery guide (see page 35)
OFF
POWER ON
POWER ON
OFF
GB
24
DC IN jack
(see page 33)
Main power switch
(see page 38)
Page 28
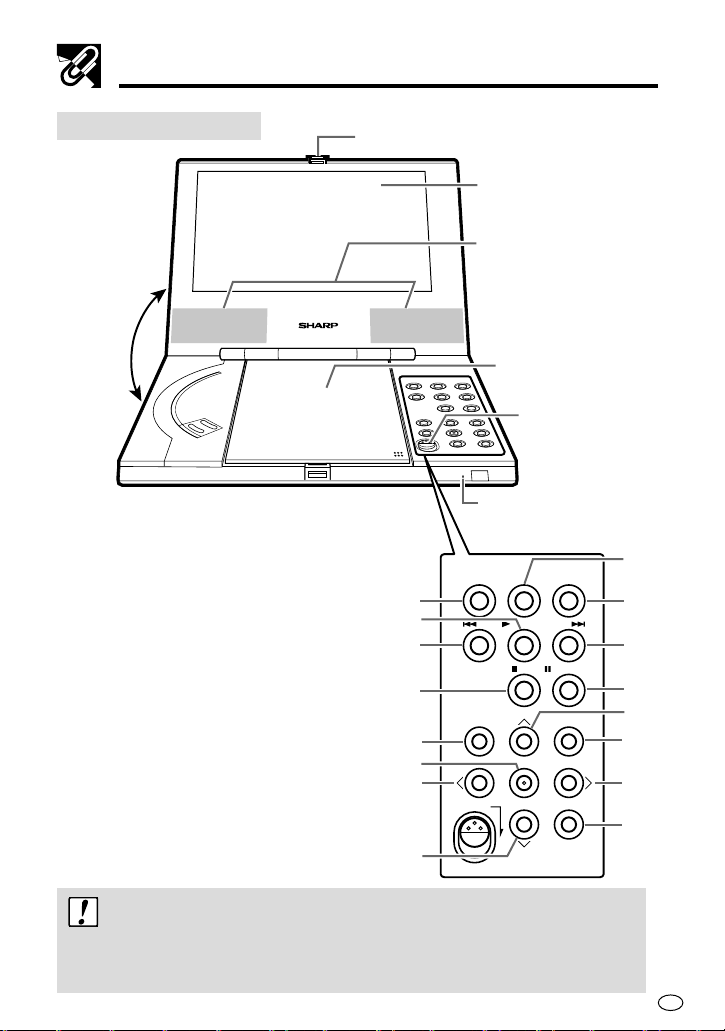
General Guide
DVD Player - Front
Display panel
movement range
180°
0°
1 INPUT/DVD (see page 41)
2 PLAY (û)/GUI button (see page 57/79)
3 SKIP (À) button (see page 62)
4 STOP (Ë) button (see page 58)
5 TITLE button (see page 77)
6 ENTER button (see page 42)
7\ (see page 42)
8" (see page 42)
9 BACKLIGHT HI/LOW/OFF button
(see page 82)
0 VIEW MODE button (see page 53)
q SKIP (à) button (see page 62)
w STILL/PAUSE (â) button (see page 61)
e' (see page 42)
r MENU (see page 78)
t| (see page 42)
y RETURN button* (see page 66)
* When in the Standby mode, pressing
this button restores full power.
Display panel release (see page 17)
LCD screen
(see page 17)
Speakers
Disc compartment cover
(see page 20)
Disc compartment
PUSH TO
CLOSE
ON/STANDBY
cover release button
(see page 20)
Power/Standby lamp
(see page 38)
INPUT/
BACKLIGHT
HI/LOW/OFF
VIEW
MODE
DVD
1
2
SKIP
PLAY/GUI
SKIP
3
STILL/PAUSE
STOP
4
TITLE MENU
5
OPEN
ENTER
RETURN
6
7
8
9
0
q
w
e
r
t
y
Important!
• The range of movement for the display panel is 0° to 180°. Never try to force
the display panel open past 180°. Doing so can seriously damage the display
panel and DVD player.
25
GB
Page 29
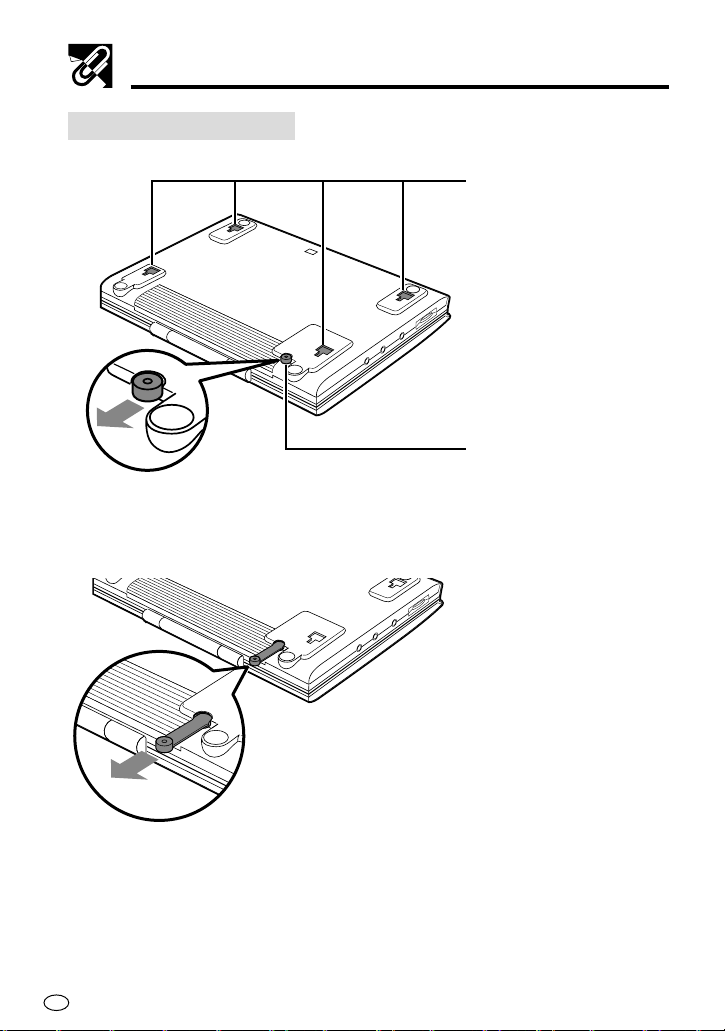
General Guide
DVD Player - Bottom
Battery connectors
Anti-tip stand
GB
Extending the anti-tip stand protects
against the DVD player tipping
backwards while the display panel is open.
26
Page 30

Remote Control Unit
General Guide
5
6
7
8
9
0
q
w
e
r
t
y
u
1234
BACKLIGHT
VIEW
OPERATE
HI/LOW/OFF
VIRTUAL
TITLE ENTER
MENU
SKIP PLAY
RESUME STOP
CLEAR MEMORY
SETUP
SUBTITLE
ON/OFF
SUBTITLE ANGLE AUDIO
MODE
DIGITAL
GAMMA
VIDEO
ADJUST
DIGITAL
S.PICTURE
RETURN
SKIP
STILL/PAUSE
PROGRAM
DIRECT
SLOWFWDREVDISPLAY
REPEAT
i
o
p
a
s
d
f
g
h
j
k
l
;
1 OPERATE button (see page 39)
2 BACKLIGHT HI/LOW/OFF button
(see page 82)
3 VIEW MODE button (see page 53)
4 VIDEO ADJUST button
(see page 81)
5 VIRTUAL button (see page 76)
6 TITLE button (see page 77)
7 Cursor buttons ('"\|)
(see page 42)
8 MENU button (see page 78)
9 SKIP (À) button (see page 62)
0 RESUME button (see page 59)
q DISPLAY button (see page 54)
w REV (È) button (see page 60)
e Number buttons (see page 63)
r C (CLEAR) button (see page 63)
t SETUP button (see page 42)
y SUBTITLE ON/OFF button
(see page 75)
u SUBTITLE button (see page 75)
i DIGITAL GAMMA button
(see page 70)
o DIGITAL S.PICTURE button
(see page 71)
p ENTER button (see page 42)
a RETURN button (see page 66)
s PLAY (û) button (see page 57)
d SKIP (à) button (see page 62)
f STOP (Ë) button (see page 58)
g STILL/PAUSE (â) button
(see page 61)
h SLOW (
j FWD (è) button (see page 60)
k REPEAT button (see page 64)
l A-B button (see page 65)
; PROGRAM button (see page 66)
DIRECT button (see page 63)
M (MEMORY) button (see page 67)
ANGLE button (see page 74)
AUDIO button (see page 72)
) button (see page 60)
27
GB
Page 31

Using Headphones
You can connect the earphones that come with the DVD player or
commercially available headphones with a stereo mini plug to the headphones
jack and listen to the audio output.
To use the supplied earphones
1 Connect the earphones that come with the DVD player to the headphones
jack.
• The headphones jack is a stereo mini jack.
PHONES
VOLUME
VIDEO
PHONES
2
MAX MIN
Important!
• Lower the volume level to minimum before you plug the supplied earphones or
commercially available headphones.
AUDIO
6
4
DIGITAL OUT (OPTICAL)
• Connecting the supplied earphones or commercially available headphones
disables the DVD player’s speakers.
2 Use the volume dial to adjust the volume level.
2
6
4
MIN
Lower
GB
MAX
Higher
28
Page 32

Connecting to External Equipment for Input
Selecting “INPUT” as the INPUT mode of the DVD player automatically
switches the function of its video and audio input/output jacks to input. Then
you can view images from a connected VCR or camcorder on the screen of
your DVD player.
External Equipment
VCR (PAL system only)
To connect external equipment
VIDEO AUDIO
VOLUME
VIDEO
PHONES
2
MAX MIN
AUDIO
6
4
DIGITAL OUT (OPTICAL)
Audio cord
(supplied)
To video
output jack
Camcorder
(PAL system only)
To audio
output jack
(White)
(Red)
Jack and
Plug Colors
Video: Yellow
Audio Left: White
Audio Right: Red
CONNECTION and
INITIAL SETTING
S-video/
(Yellow)
video cord
(supplied)
VCR or other device
with external output jack
Important!
• When inputting a modified PAL or NTSC signal, images will not appear on the
screen. This does not indicate malfunction.
• Be sure to turn both the DVD player and the other equipment off before
connecting them. Doing so protects against damage.
• Use only the audio and video cables supplied with the DVD player to connect
to the video input/output and audio input/output jacks. Using other cables can
cause malfunction.
• Refer to the operation manual for the other equipment for details about its
operation, connecting procedures, etc.
• Do not use the S-video cord for connecting to another device for input.
The S-video cord is for output only.
29
GB
Page 33

Connecting a TV with External Terminals
You can use the S-video plug of the S-video/video cord to connect your DVD
player to a television equipped with an S-video input jack and enjoy viewing
high-quality images on the TV screen.
• Be sure to turn both the DVD player and the TV equipment off before
connecting them.
Jack and Plug Colors
Video: Yellow
Audio Left: White
VIDEO AUDIO
VOLUME
VIDEO
2
MAX MIN
AUDIO
6
4
DIGITAL OUT (OPTICAL)
PHONES
To audio
input jack
Audio Right: Red
Audio cord
(supplied)
To video
input jack
S-video/video cord
(White)
(Red)
(Yellow)
or
To TV with
external
terminals
(supplied)
To S-video
input jack
• If you want to listen to the audio through audio equipment, connect only the
S-video/video cord to the TV.
• Play is possible while the display panel of the DVD player is closed. In this case,
no audio is output from the DVD player speakers.
• Use the remote control unit to control the DVD player while the display panel is closed.
To watch DVD player images on the TV
1 Turn on the TV.
2 Set the TV to channel where the DVD player is connected (“AV”,
“VIDEO”, etc.).
3 Turn on the DVD player and start play.
• See page 57 for details on how to play a disc.
GB
30
Page 34

Connecting to Audio Equipment
Connecting the DVD player to audio equipment provides normal stereo sound
plus powerful stereo sound enhanced by Dolby Digital (5.1 channel) and DTS.
Playing 2 channel audio
The audio input/output jack of the DVD player also doubles as an optical digital
output jack.
■ Analogue Connection ■ Digital Connection
DIGITAL OUT (OPTICAL)
VOLUME
2
4
MAX MIN
VIDEO
6
PHONES
AUDIO
DIGITAL OUT (OPTICAL)
VOLUME
2
4
MAX MIN
AUDIO
VIDEO
PHONES
AUDIO
6
DIGITAL OUT (OPTICAL)
To optical
digital output
jack
Audio cord
(supplied)
To optical
digital input
jack
Optical digital
cable
(commercially
available)
To amplifier
audio input jack
(White)
(Red)
Jack and Plug Colors
Audio Left: White
Audio equipment with
optical digital input jack
Audio Right: Red
Audio equipment, etc.
■ Digital Connection to Audio Equipment or MD Player without a Dolby
Digital Decoder
• Only discs that have a linear PCM audio track (44.1kHz,48kHz sampling
frequency) will play back correctly via the digital optical link.
• Discs that have multi channel sound i.e. Dolby Digital (5.1 channel), Dolby
Surround (Pro Logic), DTS or Audio MPEG Version 2.0 will only work with
units equipped with the appropriate decoder. To play these discs please use
the analogue connection.
• Compatibility with Audio MPEG Version 2.0 (Multi) only supports the L and R
components.
31
GB
Page 35

Connecting to Audio Equipment
Helpful Hints
• When connecting to audio equipment, we recommend that you set the
“COMPRESSION (Dolby Digital Output Level)” to “OFF” (see page 47).
Digital Connection to an MD to Record a CD
When you are using a digital connection to record the contents of a CD to
an MD, the track numbers of the CD may not match the track numbers
recorded to the MD.
Playing Dolby Digital (5.1 channel), DTS and MPEG
Version 2.0 audio
• Connecting an amplifier with a Dolby Digital/DTS/Audio MPEG Version 2.0
digital surround processor or a Dolby Digital/DTS/Audio MPEG Version 2.0
digital surround decoder to your DVD player’s optical digital jack provides richer,
more powerful audio play.
• To use DTS digital surr ound, use the Disc Menu (page 78) or press AUDIO
(page 72) to select DTS audio.
DIGITAL OUT (OPTICAL)
VOLUME
• You need to purchase a
commercially available optical
digital cable to make the
connection described here.
• This connection is not possible
if the processor or amplifier to
which you want to connect
does not have an optical
digital input jack.
• Refer to the operation manual
for the processor or amplifier
for information about
connecting to it.
GB
32
2
6
4
MAX MIN
VIDEO
PHONES
AUDIO
DIGITAL OUT (OPTICAL)
To optical
digital output
jack
Optical digital
cable
(commercially
available)
To optical
digital
input jack
Dolby Digital (5.1ch)/DTS/
Audio MPEG Version 2.0
processor or amplifier
Page 36

Using the AC Adapter
AC Adapter
(supplied)
Power socket
AC cord
(supplied)
To power
socket
To household
power outlet
For the U.K.
and Eire
Important!
• Make sure the main power switch of the DVD player is in the “OFF” position
before attaching or detaching the AC adapter.
• Use only the AC adapter specified for the DVD player. Use of another type of
AC adapter can cause damage to and malfunction of the player.
• The AC adapter may become warm after long-term use. This is normal and
does not indicate malfunction.
• When not in use, be sure to unplug the AC adapter from the power outlet.
• Do not leave the AC adapter in areas subject to high humidity or dust. Such
conditions create the danger of fire and electric shock.
DC cord
DC output
plug
To DC
input jack
• The AC adapter that comes with the DVD player is designed for use with any
power source in the range of 110V to 240V, so you can even take it with you when
travelling abroad. In some countries, however, you may need to purchase an AC
plug adapter (often available at airports) to match the plug of the AC adapter to
local power outlets.
CAUTION
Never use any commercially available electronic transformer.
• Connecting the AC adapter to an electronic voltage transformer of the type
widely available at tourist shops can result in fire, electrical shock or other
hazards.
33
GB
Page 37

Using a Battery Pack (Sold Separately)
The following describes how to charge the battery pack sold separately (BTL100 (S)/BT-L100 (BL)) and use it to power the DVD player.
To charge the battery pack
Use the AC adapter that comes with the DVD player to charge the battery pack.
1 Plug the AC cord into the power socket
of the AC adapter (1).
• Push the cord into the AC adapter as far
as it can go.
2 Plug the other end of the AC cord into a
household power outlet (2).
3 Plug the DC cable into the battery pack (3).
Charge Lamp
The charge lamp is red while charging
is in progress, and turns green when
the battery pack is fully charged.
Important!
• Make sure the main power switch of the DVD video player is in the “OFF”
position before attaching or detaching the AC adapter.
• A battery pack that is attached to the DVD player does not charge while the
player is turned on. Turn power off in order to charge the battery pack.
• Before storing a battery pack, first fully discharge it by using it to power DVD
player operation. At least every six months, charge a stored battery pack and
use it to power the DVD player.
2
1
2
For
the U.K.
and Eire
3
• The battery pack becomes warm when charging. This is normal and does not
indicate abnormality.
• If the charge lamp flashes red or does not light when charging, it could mean the
battery pack is faulty. See “Troubleshooting” on page 88.
Charge time
Charge time: Approximately five hours
• The charge time noted here is the time required to bring a fully depleted
battery pack to full charge.
• Cold conditions and the condition of the battery pack may cause the
required charge time to be longer.
GB
34
Page 38

Using a Battery Pack (Sold Separately)
Be sure to charge a battery pack before using it.
To attach a battery pack to the DVD player
Make sure the DVD player’s main power switch is in the “OFF” position.
1 Align the battery guide " with the '
mark (1) on the battery pack.
2 Slide the DVD player in the
direction indicated by the arrow (2).
2
1
3 Plug the battery pack’s DC cable into the
DC input jack of the DVD player.
Important!
• To prevent mis-operation while attaching or removing the battery pack, make
sure the main power switch of the DVD player is in the “OFF” position.
• Make sure that the battery pack is positioned correctly when you attach it to
the DVD player. Positioning it wrong can cause malfunction.
• Remove the battery pack from the DVD player when you are through using it.
Battery
guide
• The battery pack becomes warm during use. This is normal and does not
indicate malfunction.
Helpful Hints
Using the AC Adapter with the Battery Pack
• A safety feature automatically turns off DVD player power if you set the volume
level too high while playing certain types of discs. If this happens, lower the
volume level and restart play.
• You can charge the battery pack while it is attached to the DVD player by
connecting the AC adapter to the DVD player and turning off DVD player power.
• The DVD player is powered by the AC adapter if you turn it on under the
above conditions. The battery pack is not charged while DVD player power
is turned on.
35
GB
Page 39

Using a Battery Pack (Sold Separately)
DVD continuous play time
DVD continuous play time
(Using speakers)
• The DVD continuous play time is a reference value indicating maximum play
time with low display brightness at 20°C.
• Play time may be shorter due to disc type, temperature, battery condition,
and speaker volume.
Approximately 3 hours
To remove the battery pack from the DVD player
Make sure the DVD player’s main power switch is in the “OFF” position.
1 Unplug the DC cable. While holding down the battery release button, slide
the DVD player in the direction indicated by the arrow.
Battery release button
2 Lift the DVD player in the direction indicated by the arrow.
Important!
• Never remove the battery pack while a playback operation is in progress.
GB
36
Page 40

Battery Capacity Indicator
• The battery capacity indicator appears only while the display mode is “AUTO”
or “ON”. With “AUTO”, the indicator appears for a short while and then
disappears.
• Battery condition, temperature, and operational conditions affect the
remaining capacity of a battery. Because of this the battery capacity
indicator is intended to be for reference purposes only.
• Regardless of the display mode, the low battery warning appears on the
display whenever the battery is about to go dead.
• The low battery warning does not appear when the display panel is closed.
When the power/standby lamp goes out, replace the battery pack with a
charged one or switch to AC adapter power.
Low battery warning
➜➜
Full charge Flashing
• After the low battery warning appears, the DVD player shuts down. When this
happens, replace the battery pack with a charged one or switch to AC adapter
power.
Low
CAUTION:
When battery power is low, power may suddenly turn off when you change
to another operation mode (DVD, INPUT, etc.). When this happens, replace
the battery pack with a charged one or switch to AC adapter power.
37
GB
Page 41

Turning Power On and Off
To turn main power on and off
Y
B
D
N
A
T
S
/
N
O
Power/standby lamp
Main power switch on Main power switch off
For the U.K.
and Eire
• Slide the main power switch left to the “ON” position to turn power on.
• Slide the main power switch right to the “OFF” position to turn power
off.
• In the following cases, the power/standby lamp on the front of the DVD
player lights green to let you know that power is on. This helps to ensure you
do not forget and leave power on.
1 When the display panel is closed with main power turned on
2 When the backlight setting is “OFF” (see page 82)
POWER ON
OFF
POWER ON
OFF
• When not in use, unplug the AC adapter from the power outlet.
GB
38
Page 42

Turning Power On and Off
To turn power on and off with the remote control unit
When the main power switch is in the “ON” position, you can turn power off
and on by pressing OPERATE.
BACKLIGHT
VIEW
HI/LOW/OFF
VIRTUAL
MODE
DIGITAL
GAMMA
VIDEO
ADJUST
DIGITAL
S.PICTURE
OPERATE
OPERATE
TITLE ENTER
MENU
RETURN
SKIP PLAY SKIP
RESUME STOP
CLEAR MEMORY
STILL/PAUSE
SLOWFWDREVDISPLAY
REPEAT
PROGRAM
DIRECT
INPUT/
DVD
BACKLIGHT
HI/LOW/OFF
VIEW
SKIP
MODE
PLAY/GUI
SKIP
STOP
STILL/P
TITLE
AU
SE
S
E
N
O
H
P
MENU
ENTER
OPEN
O
N
/S
T
A
N
D
B
Y
G
O
L
O
I
A
D
N
U
A
A
L
A
C
I
T
P
O
RETURN
O
E
D
I
V
RETURN
IN
M
E
M
U
L
X
O
A
V
M
Power/standby lamp
1 Press OPERATE.
• Each press of OPERATE toggles power on and off.
• Pressing OPERATE does not turn on power if the main power switch is
in the “OFF” position.
• After DVD player power is turned off using OPERATE, the power/
standby lamp is red to indicate the DVD player is in the Standby mode.
Standby mode
In the Standby mode, the power/standby lamp is red, regardless of whether
the display panel is open or closed. The DVD player goes into the Standby
mode when either of the following happens.
• When you press OPERATE
• When disc play is stopped for about five minutes in the DVD mode
To restore full power from the Standby mode, press RETURN on the player,
slide the main power switch to the “OFF” position and then back to “ON” again,
or press OPERATE.
39
GB
Page 43

Using the Remote Control Unit
To load batteries
For information about how to load the batteries, see page 17.
Remote control unit operating range
Important!
• Do not subject the remote control
unit to strong impact.
• Do not allow the remote control unit
to become wet and keep it out of
areas subject to high humidity.
Remote sensor
• The remote control unit may fail to work
properly after you replace its batteries. When
this happens, remove the batteries and leave
them out for at least five minutes. Next, reload
the batteries and try again.
• The remote control unit may not work properly
if the remote sensor of the DVD player is in
direct sunlight or other strong light. Change
Signal emitter
15°
5m
BACKLIGHT
OPERATE
HI/LOW/OFF
VIRTUAL
TITLE ENTER
MENU RETURN
the orientation of the light or the DVD player
and try again.
Improperly using batteries can cause them to leak. Note the following
precautions when using batteries.
CAUTION
• Make sure the positive and negative ends of the batteries are
facing correctly.
• Never mix batteries of different types.
• Never mix new batteries with old ones. Doing so reduces the life of the
new batteries and can cause the old batteries to leak.
• Do not leave dead batteries in the remote control unit. Touching fluid
leaking from batteries can cause skin irritation. Clean out any leaked fluid
with a cloth, taking care not to get any on your fingers.
• The batteries that come with the DVD player discharge slightly during shipping
and storage. You should be able to get about six months to one year of operation
from the supplied batteries.
• If you do not plan to use the remote control unit for a long time, remove its batteries.
GB
40
15°
MODE
DIGITAL
GAMMA
VIEW
VIDEO
ADJUST
DIGITAL
S.PICTURE
Page 44

INPUT
Operation Modes
Your DVD player has two operation modes. Select the one that suits the
operation you want to perform.
• DVD mode for disc playback
• INPUT mode for input from external equipment
POWER ON
OFF
INPUT/
DVD
BACKLIGHT
HI/LOW
/OFF
VIEW
SKIP
MODE
PLAY/G
UI
SKIP
STO
P
STILL/PAUSE
TITLE
OPEN
O
N
/S
T
A
N
D
B
Y
S
E
N
O
H
P
MENU
ENTER
G
O
L
O
I
A
D
N
U
A
A
L
A
C
I
T
P
O
R
ETU
O
RN
E
D
I
V
IN
M
E
M
U
L
X
O
A
V
M
INPUT/
DVD
To select an operation mode
1 Slide the main power switch towards “ON” to turn on power.
2 Press INPUT/DVD.
• Each press of INPUT/DVD toggles between the DVD mode and the
INPUT mode.
DVD Mode
INPUT Mode
GB
41
Page 45

Setup
T V MO D E S E T
DV UPD SET
19
6
:
CO PRESS
I
OFF
PARENTAL
NOON
EN
EN
DISC MENU LANGUAGE
OSD LANGUAGE SETUP
M
ENGL I SH ESPAÑOL
FRANÇA I S SVENSKA
O
SD L A SE T UP
DEUTSCH NEDERLANDS
I
TALI
NOA
NGUGE
A
ENGL I SH ESPAÑOL
SELEC . I PANTALLADIOA
M
SEL .M O D O TV
S
DV UPD SET
BLOQ.NIÑO
DES
COMPRES I Ó
NACT
EN
ES
19
6
:
IDIOMA MENÚ DISCO
SELEC. IDIOMA P ANT.
TITLE ENTER
MENU
SKIP PLAY SKIP
RESUME STOP
CLEAR MEMORY
SETUP
STILL/PAUSE
RETURN
PROGRAM
DIRECT
ENTER
SLOWFWDREVDISPLAY
REPEAT
SETUP
O
N
/
S
T
A
N
INPUT/
DVD
BACKLIGHT
HI/LOW/OFF
VIEW
SKIP
MODE
PLAY/GUI
SKIP
STOP
S
TITLE
TILL/PA
U
SE
S
E
N
O
H
P
MENU
ENTER
OPEN
D
B
Y
G
O
L
IO
A
D
N
U
A
A
L
A
IC
T
P
O
RETURN
O
E
ID
V
IN
M
E
M
U
L
X
O
A
V
M
ENTER
Setting the language
1 Press INPUT/DVD a number of times until you enter the DVD mode.
2 Press SETUP. DVD SET UP screen appears.
CAUTION:
When you use the DVD player
press SETUP. OSD LANGUAGE SET UP
screen in the Step 3 appears. You should set
the language to be used for the “OSD
LANGUAGE SET UP”. (7 languages)
for the first time,
3 Use ' or " to move the cursor (_) to
“OSD LANGUAGE SET UP” and use \ or
| to display OSD LANGUAGE SET UP
screen.
INPUT/
DVD
4 Select the language with ', ", \, |.
Example: ESP AÑOL
5 Press ENTER to register the setting. The
Spanish DVD SET UP screen appears.
6 If you want to complete the settings here,
press ENTER to exit the setup procedure.
GB
42
Page 46

TV MODE SET setting
The following describes how to select the DVD playback display format.
Viewing on the DVD Player Screen or a Wide Screen TV
Using a 16:9 Wide Image
Select
Viewing on a 4:3 Size TV
16 : 9
for wide DVD video output.
• A wide image size is output when playing a
• When playing a 4:3 image disk, you can
wide image disc.
select the image size you want for the DVD
player screen or connected TV (see page
52).
Using Pan Scan
43:
Select
P S
for wide DVD video output.
When playing a wide image disc, the left and
right sides of the image are cut (pan scan) to
output a natural-looking 4:3 size image.
A wide image disc without pan scan
played back in letter box.
A 4:3 disk is played as-is in 4:3.
Setup
P S
is
Using Letter Box
43:
Select
LB for wide DVD video output.
When playing a wide image disc, black
bands are inserted at the top and bottom and
a 4:3 size image is output.
A 4:3 disk is played as-is in 4:3.
43
GB
Page 47

Setup
DVD SE T UP
TV MODE SET
PARENTA L OF F
16 : 9
DVD SE T UP
TV MODE SET
PARENTA L OF F
4 3:
P S
BACKLIGHT
VIEW
HI/LOW/OFF
VIRTUAL
MODE
DIGITAL
GAMMA
VIDEO
ADJUST
DIGITAL
S.PICTURE
RETURN
STILL/PAUSE
ENTER
RETURN
OPERATE
TITLE ENTER
MENU
SKIP PLAY SKIP
RESUME STOP
SLOWFWDREVDISPLAY
REPEAT
PROGRAM
CLEAR MEMORY
SETUP
SUBTITLE
ON/OFF
DIRECT
SETUP
To make TV MODE SET setting
1 Press SETUP.
• This displays the DVD SET UP screen.
2 Use " and ' to select “TV MODE SET”.
3 Use \ and | to select the screen type (see
page 43).
I
N
P
U
T
/
D
V
D
B
A
C
K
H
L
I
I
G
/
L
H
O
T
W
/
O
F
V
F
I
E
S
W
K
M
I
P
O
D
E
P
L
A
Y
/
G
U
I
S
K
I
P
S
T
O
P
S
T
T
I
I
T
L
L
L
E
/P
A
U
S
S
E
E
N
O
H
P
M
E
E
N
N
U
G
T
O
P
E
N
O
N
/S
T
A
N
D
B
Y
O
E
L
R
O
I
A
D
N
U
A
A
L
A
C
I
T
P
O
R
E
T
U
O
R
E
N
D
I
V
N
I
M
E
M
U
L
X
O
A
V
M
ENTER
RETURN
4 Press ENTER to register the setting.
• This returns to the startup screen.
• Never open the DVD SET UP screen while a playback operation is in progress. If
a disc is playing, stop playback first.
• If you select 16:9 while a 4:3 TV is connected, playing a 16:9 disc displays a
vertical image screen. (Black bands appear at the top and bottom of the screen.)
Helpful Hints
• To exit the DVD SET UP screen and return to the startup screen, press RETURN.
GB
44
Page 48

Setup
PARENTAL setting
Parental level
DVD discs equipped with the parental lock function are rated according to
their content. The rated content allowed by a parental lock level and the way a
DVD disc can be controlled may vary from disc to disc. For example, if the
disc allowed you to edit out violent scenes unsuitable for children and replace
them with more viewable scenes, or lock out play of the DVD disc altogether.
• You can use the parental lock function only with DVD discs that are equipped with
the parental lock feature.
DVD player parental level settings
Level 1: for general viewing (highly restricted level that can be viewed by
anyone. Sensational scenes are cut or replaced with other scenes.) → Level 8:
for adults only (a level to be viewed by adults only. Unrestricted view of any
scene)
(The smaller the number, the greater the level of restriction.)
• When “PARENTAL” is set to “OFF”, DVD discs can be played back
regardless of the parental level. The factory default setting is “OFF”.
Passwords
The parental level setting of the DVD player can be protected by a password
against unauthorized changes. Once you set a password, it must be input to
perform the following operations.
• To change the parental level
• To temporarily change the parental level during playback
45
GB
Page 49

Setup
DVD SET UP
TV MODE SET
PARENTA L OF F
PASS
W
ORD
=
----
16 : 9
PASSWORD
=
1234
PARENTAL LEVEL:4
( LEVEL . 8 FOR ADULTS
)
SELECT LEVEL
To make PARENTAL setting
1 Press SETUP.
• This displays the DVD SET UP screen.
2 Use " and ' to select “PARENTAL”.
Press |.
• If there is no password registered yet, the password input field appears
? ? ? instead of .
as
?
3 Use the number buttons to input the
password.
4 Use \ and | to select the parental level
and then press ENTER.
• This returns to the startup screen.
Repeat steps 1 through 4 above whenever you want to change the parental
level.
• The first time you input a new password, the DVD player will prompt you to input it
a second time for confirmation. The password you input is registered
automatically, and you will have to input it each time you change the parental
level in the future.
• You must input the correct password to make any changes in the parental level.
Be sure to keep a separate record of your password somewhere for later
reference.
• Some DVDs allow the viewer to temporarily change the parental level setting to
view the original scenes. When this prompt appears, input the password to view
the original scenes.
Helpful Hints
• The illustration on page 44 shows the buttons used in this procedure.
If you forget your password, press ËSTOP four times instead of inputting
numbers in step 3 of the procedure. This clears the currently set password.
GB
46
Page 50

Setup
COMPRESSION (Dolby Digital Output Level) setting
When Dolby Digital is used to record the audio on a DVD disc, the average
overall volume level of the audio is relatively lower than that produced by an
audio CD. This is to provide the widest possible dynamic range. To counteract
this, your DVD player automatically raises the overall average volume level of a
disc recorded using Dolby Digital to a level that is similar to that of an audio
CD.
COMPRESSION:
OFF
COMPRESSION:
ON
DVD
Dolby Digital audio
Audio CDs
• OFF ................ Audio level recorded on disc is played back without
modification.
• ON .................Dolby Digital average audio level is increased so it sounds
similar to that of an audio CD.
Helpful Hints
• Use of the “OFF” setting is recommended when the DVD player is connected to
audio equipment.
• The factory default setting is “ON”.
• Low audio level
• Audio level the same as
audio CD
47
GB
Page 51

Setup
DVD SET UP
TV MODE SET
PARENTA L OFF
COMPRESS ION ON
16 : 9
DVD SET UP
TV MODE SET
PARENTA L OFF
COMPRESS ION OFF
16 : 9
OPERATE
TITLE ENTER
MENU
RESUME STOP
STILL/PAUSE
SKIP PLAY SKIP
RETURN
VIRTUAL
BACKLIGHT
HI/LOW/OFF
VIEW
MODE
DIGITAL
GAMMA
DIGITAL
S.PICTURE
VIDEO
ADJUST
ENTER
RETURN
SETUP
PROGRAM
DIRECT
CLEAR MEMORY
SUBTITLE
ON/OFF
SUBTITLE ANGLE AUDIO
SETUP
I
N
P
U
T
/
D
V
D
B
A
C
K
H
L
I
I
G
/
L
H
O
T
W
/
O
F
V
F
I
E
S
W
K
M
I
P
O
D
E
P
L
A
Y
/
G
U
I
S
K
I
P
S
T
O
P
S
T
T
I
I
T
L
L
L
E
/
P
A
U
S
S
E
E
N
O
H
P
M
E
E
N
N
U
G
T
O
P
E
N
O
N
/
S
T
A
N
D
B
Y
O
E
L
R
IO
A
D
N
U
A
A
L
A
IC
T
P
O
R
E
T
U
O
R
E
N
ID
V
IN
M
E
M
U
L
X
O
A
V
M
T o set the COMPRESSION (Dolby Digital Output Level)
1 Press SETUP.
• This displays the DVD SET UP screen.
2 Use " and ' to select
“COMPRESSION”.
ENTER
RETURN
3 Use \ and | to select the setting you
want.
• Each press of \ or | toggles between
“OFF” and “ON”.
4 Press ENTER.
Helpful Hints
• To exit the DVD SET UP screen and return to the startup screen, press RETURN.
GB
48
Page 52

T V MO D E S E T
DV UPDSET
19
6
:
COMPRESS
I
OFF
PARENTAL
NO ON
ENGL I SH ESPAÑOL
FRANÇA I S SVENSKA
DISC
M
NGUAGEE NULA
DIGITAL
T V MO D E SET
DV UPDSET
19
6
:
COMPRESS
I
OFF
PARENTAL
NO ON
ES
EN
DISC MENU LANGUAGE
OSD LANGUAGE SETUP
T V MO D E SET
DV UPDSET
19
6
:
COMPRESS
I
OFF
PARENTAL
NO ON
EN
EN
DISC MENU LANGUAGE
OSD LANGUAGE SETUP
DIGITAL
VIRTUAL
GAMMA
TITLE ENTER
MENU
S.PICTURE
ENTER
RETURN
SKIP PLAY SKIP
RESUME STOP
STILL/PAUSE
SLOWFWDREVDISPLAY
REPEAT
I
N
P
U
T
/
D
V
D
B
A
C
K
H
L
I
I
G
/
CLEAR MEMORY
SETUP
SUBTITLE
ON/OFF
SUBTITLE ANGLE AUDIO
PROGRAM
DIRECT
SETUP
O
N
/
S
T
A
N
D
B
Y
L
H
O
T
W
/O
F
V
F
I
E
S
W
K
M
I
P
O
D
E
P
L
A
Y
/
G
U
I
S
K
IP
S
T
O
P
S
T
T
I
IL
T
L
L
E
/P
A
U
S
S
E
E
N
O
H
P
M
E
E
N
N
U
G
T
O
P
E
N
O
E
L
R
O
I
A
D
N
U
A
A
L
A
C
I
T
P
O
R
E
T
U
O
R
E
N
D
I
V
N
I
M
E
M
U
L
X
O
A
V
M
Use this setting for selecting disc menu languages recorded on a disc.
DISC MENU LANGUAGE setting
Selecting 7 languages from DISC MENU LANGUAGE
1 Press SETUP to display the DVD SET UP
screen.
Setup
ENTER
2 Use ' or " to move the cursor (_) to
“DISC MENU LANGUAGE”.
3 Use \ or | to display the DISC MENU
LANGUAGE screen.
4 Select the language you want to use with
', ", \, | and press ENTER.
Example: ESP AÑOL
49
GB
Page 53

Setup
FRANÇA I S SVENSKA
A A
DEUTSCH NEDER LANDS
I
TALI
NOA OTHER
FRANÇA I S SVENSKA
A F
DEUTSCH NEDER LANDS
I
TALI
NOA OTHER
––
DEUTSCH NEDER LANDS
I
TALI
NOA OTHER
D
ISC
M
NGUAGEE NULA
T V MO D E SET
DV UPDSET
19
6
:
EN
EN
DISC MENU LANGUAGE
OSD LANGUAGE SETUP
MPE G OUT T V
Selecting languages from OTHER
1 Use ', ", \, | to select “OTHER”, then
press ENTER to set the “OTHER” input
item (two letters).
2 For example, to select “AF” (Afrikaans), use ' or " to select “A” as the
first letter, use \ or | to move to the second place, then use ' or " to
select “F”.
• When “A” is selected for the first letter, only letters to the right of codes
beginning with “A” can be selected as the second letter. Refer to the codes
beginning with “A” on the language code list on menu screen (see next page).
Example: First letter – A
Second letter – A, B, F, M, R, S, Y or Z
3 Press ENTER to return to the DVD SET UP screen.
• Some discs allow disc menu language setting from the disc menu. See page 78
for more information.
• Some discs will not allow the menu language to be changed.
MPEG OUT setting
Simultaneous output of an analogue and digital audio signal is not possible for the
AUDIO/DIGIT AL OUT (OPTICAL) when playing MPEG 5.1 channel softwar e. As a
result, 2-channel analogue output will not be possible at the time of digital 5.1
channel output. To this end, it will be necessary to set either a digital output of the
MPEG audio or an analogue output using MPEG OUT on the DVD SET UP screen.
1 Use ' and " to select “MPEG OUT”.
2 Use \ and | to select the setting you
want, and then press ENTER.
TV setting: Set this when using the analogue output of the MPEG
AMP setting: Set this when using MPEG multiplex audio with a digital
3 Press ENTER to exit the setup procedure. The startup screen then appears.
GB
50
audio (e.g., TV 2-channel stereo).
connection to the amplifier. (The 2-channel analogue
output is not possible at this time)
Page 54

Language code list on menu screen
Setup
Code Language Name
AA Afar
AB Abkhazian
AF Afrikaans
AM Ameharic
AR Arabic
AS Assamese
AY Aymara
AZ Azerbaijani
BA Bashkir
BE Byelorussian
BG Bulgarian
BH Bihari
BI Bislama
BN Bengali;
Bangla
BO Tibetan
BR Breton
CA Catalan
CO Corsican
CS Czech
CY Welsh
DA Danish
DE German
DZ Bhutani
EL Greek
EN English
EO Esperanto
ES Spanish
ET Estonian
EU Basque
FA Persian
FI Finnish
FJ Fiji
FO Faroese
FR French
Code Language Name
FY Frisian
GA Irish
GB Scots Gaelic
GL Galician
GN Guarani
GU Gujarati
HA Hausa
HI Hindi
HR Croatian
HU Hungarian
HY Armenian
IA Interlingua
IE Interlingue
IK Inupiak
IN Indonesian
IS Icelandic
IT Italian
IW Hebrew
JA Japanese
JI Yiddish
JW Javanese
KA Georgian
KK Kazakh
KL Greenlandic
KM Cambodian
KN Kannada
KO Korean
KS Kashmiri
KU Kurdish
KY Kirghiz
LA Latin
LN Lingala
LO Laothian
LT Lithuanian
LV Latvian, Lettish
Code Language Name
MG Malagasy
MI Maori
MK Macedonian
ML Malayalam
MN Mongolian
MO Moldavian
MR Marathi
MS Malay
MT Maltese
MY Burmese
NA Nauru
NE Nepali
NL Dutch
NO Norwegian
OC Occitan
OM (Afan) Oromo
OR Oriya
P A Panjabi
PL Polish
PS Pashto, Pushto
PT Portuguese
QU Quechua
RM Rhaeto-
Romance
RN Kirundi
RO Romanian
RU Russian
RW Kinyarwanda
SA Sanskrit
SD Sindhi
SG Sangho
SH Serbo-
Croatian
SI Singhalese
SK Slovak
Code Language Name
SL Slovenian
SM Samoan
SN Shona
SO Somali
SQ Albanian
SR Serbian
SS Siswat
ST Sesotho
SU Sundanese
SV Swedish
SW Swahili
TA Tamil
TE Telugu
TG Tajik
TH Thai
TI Tigrinya
TK Turkmen
TL Tagalog
TN Setswana
TO Tonga
TR Turkish
TS Tsonga
TT Tatar
TW Twi
UK Ukrainian
UR Urdu
UZ Uzbek
VI Vietnamese
VO Volapük
WO Wolof
XH Xhosa
YO Yoruba
ZH Chinese
ZU Zulu
51
GB
Page 55

Screen Size Setting
When viewing a DVD on your DVD player screen, you select the screen size
that best suits the image you are viewing.
To set the screen size
Software
Mode
SMART
STRETCH
Type
Wide 4:3 4:3 Letter Box
Full Screen
Image is stretched
by its four corners.
Image is stretched by its
four corners. Top and
bottom remain black.
STRETCH
ZOOM
SIDE BAR
• Using different screen size mode combinations from those shown above will
produce images that are stretched horizontally or cut off at the top and bottom.
Helpful Hints
• The screen size mode automatically changes to STRETCH when you play a 16:9
wide image DVD with the “TV MODE SET” item of the DVD SET UP set to 16:9.
GB
52
Full Screen
Top and Bottom Cut
Screen stretched vertically to fit.
Left and right remain black.
Above screen stretched
horizontally to fit.
Above screen resided to fit,
with top and bottom cut.
Left and right remain
black
Screen stretched horizontally to
fit. Top and bottom remain black.
Full Screen
Screen stretched vertically to fit.
Letter Box
Page 56

Screen Size Setting
BACKLIGHT
VIEW
HI/LOW/OFF
VIRTUAL
DIGITAL
GAMMA
VIDEO
MODE
ADJUST
VIEW
MODE
DIGITAL
S.PICTURE
VIEW
M
SM
ART STRETCH
O
DE
RETURN
OPERATE
TITLE ENTER
MENU
SKIP PLAY SKIP
RESUME STOP
CLEAR MEMORY
STILL/PAUSE
SLOWFWDREVDISPLAY
REPEAT
PROGRAM
DIRECT
I
N
P
U
T
/
D
V
D
B
A
C
K
H
L
I
I
G
/
L
H
O
T
W
/
O
F
V
F
I
E
S
W
K
M
I
P
O
D
E
P
L
A
Y
/
G
U
I
S
K
I
P
S
T
O
P
S
T
T
I
I
T
L
L
L
E
/
P
A
U
S
S
E
E
N
O
H
P
M
E
E
N
N
U
G
T
O
P
E
N
O
N
/S
T
A
N
D
B
Y
O
E
L
R
IO
A
D
N
U
A
A
L
A
IC
T
P
O
R
E
T
U
O
R
E
N
ID
V
IN
M
E
M
U
L
X
O
A
V
M
1 Press VIEW MODE.
DE
MO
EW
ARVITR
ETCH
STMS
• Each press of VIEW MODE cycles through the screen size settings in
the sequence: STRETCH → ZOOM → SIDE BAR → SMART STRETCH
→ STRETCH
Screen size screen
VIEW
MODE
• The ZOOM mode uses a special process to stretch the image vertically.
Compared with the original image, you may be able to notice some jagged lines
or horizontal inside the stretched image. This does not indicate malfunction.
53
GB
Page 57

Changing the Display Mode
OPERATE
TITLE ENTER
MENU
RESUME STOP
STILL/PAUSE
REPEAT
PROGRAM
DIRECT
CLEAR MEMORY
SKIP PLAY SKIP
SLOWFWDREVDISPLAY
RETURN
VIRTUAL
BACKLIGHT
HI/LOW/OFF
VIEW
MODE
DIGITAL
GAMMA
DIGITAL
S.PICTURE
VIDEO
ADJUST
DISPLAY
To change the display mode
1 Press DISPLAY.
• Each press of DISPLAY cycles thr ough the
display mode settings in the following
sequence: ON → OFF → AUTO → ON.
AUTO ...... Display indicators appear for about
ON .......... Display indicators remain displayed.
OFF ......... Display indicators are not displayed.
• With some discs, chapter numbers and elapsed play time may not appear.
You can select “AUTO”, “ON”, or “OFF” as the display mode. The following
shows what appears on the display when “AUTO” or “ON” is selected.
■ DVD Mode
DVD
three seconds and then disappear.
1 C 001
T 0
1:23:24
Operation indicator
Operation indicator
Operation indicator
GB
54
Video CD
Audio CD
Elapsed play time
Title number / Chapter number
T 01
3:24
Elapsed play time
Track number
T 02
5:00
Elapsed play time
Track number
Page 58

Changing the Display Mode
INPUT
1/3 1C 001
:
NOEN
1/4 1/2T 0
■ Audio Switching
DVD
1 C 001
1/4 0:00:24
DIGITAL
T 0
Audio indicator (for Dolby Digital
5.1 channel)
Linear PCM 2ch
1 C 001
2/4 0:00:24
LPCM
T 0
Audio indicator (for linear PCM 2ch)
Audio MPEG Version 2.0
1 C 001
3/4 0:00:24
MPEG
T 0
Audio indicator (for Audio MPEG
Version 2.0)
Video CD, Audio CD
1 C 001
L+R 0 :00 :24
T 0
■ INPUT Mode
■ DVD Player GUI (DVD Mode)
55
GB
Page 59

Changing the Display Mode
DVD mode operation indicators
The following are examples of display indicators that appear during DVD
playback.
DVD Player Status Display Indicators
Play attempted without a disc
Play attempted with a non-compatible
disc
Loading (data being read from disc)
Stop
Play
Pause
Slow
Fast Forward
Fast Reverse
GB
56
1 C 001
T 0
1:23:24
Appears when display mode is “ON”.
1 C 001
T 0
1:23:24
Appears when display mode is “ON”.
1 C 001
T 0
1:23:24
Appears when display mode is “ON”.
1 C 001
T 0
1:23:24
Appears when display mode is “ON”.
1 C 001
T 0
1:23:24
Appears when display mode is “ON”.
Page 60

Playing a Disc
This DVD player can play a DVD, video CD, or audio CD using the procedure
described below.
BACKLIGHT
VIEW
HI/LOW/OFF
VIRTUAL
DIGITAL
GAMMA
VIDEO
MODE
ADJUST
DIGITAL
S.PICTURE
RETURN
STILL/PAUSE
SLOWFWDREVDISPLAY
REPEAT
PROGRAM
DIRECT
PLAY
STOP
RESUME
POWER ON
OFF
INPUT/
V
I
E
W
O
D
E
S
E
N
O
DVD
PLAY
STOP
Volume dial
I
N
P
U
T
/
D
V
D
B
A
C
K
H
L
I
I
G
/
L
H
O
T
W
/
O
F
F
S
K
M
I
P
P
L
A
Y
/
G
U
I
S
K
I
P
S
T
O
P
S
T
T
I
I
T
L
L
L
E
/
P
A
U
S
E
H
P
M
E
E
N
N
U
G
T
O
P
E
N
O
N
/
S
T
A
N
D
B
Y
O
E
L
R
IO
A
D
N
U
A
L A
A
IC
T
P
O
R
E
T
U
R
EO
N
ID
V
IN
M
E
M
U
L
X
O
A
V
M
OPERATE
TITLE ENTER
MENU
SKIP PLAY SKIP
RESUME STOP
CLEAR MEMORY
To play a disc
1 Slide the main power switch towards “ON” to turn on power.
2 Press INPUT/DVD a number of times until
you enter the DVD mode.
OPERATIONS
BASIC
3 Load the disc you want to play into the DVD player.
• See page 20 for information about loading discs.
4 Press ûPLAY.
• This starts disc play.
• Wait to press ûPLAY until the startup screen appears (see page 21).
Helpful Hints
• If the disc you are using supports auto start, it starts to play automatically (even if
you do not press ûPLAY), as soon as you close the disc compartment cover.
1 C 001
T 0
0:00:01
57
GB
Page 61

Playing a Disc
1T0
2
4
6
MAX
MIN
Lower
Higher
CAUTION
• Never try to open the disc compartment cover and look inside the disc
compartment at the laser while a disc is playing. Doing so creates the
danger of serious eye damage.
Important!
• Do not press down on the disc compartment cover while a disc is playing.
• Keep the disc compartment cover closed except when loading or
removing a disc. Otherwise, dust getting into the DVD player can lead to
malfunction.
• The indicator
appears on the display if the disc you are using is damaged,
if you load the disc upside-down, or if the region number of the disc you are
using is one that is not supported by this disc player . If the above indicator
appears, remove the disc from the player and take the proper corr ective action.
Helpful Hints
• Disc scratches, noise, or other factors can cause temporary problems with the
video image from a DVD or video CD. If this happens, press RESUME to jump
ahead to where play returns to normal.
To adjust the volume level
Rotate the volume dial on the right side of the
DVD player to adjust the volume level of the
audio within a range of 0 to 10.
• A safety feature automatically turns off DVD player power if you set the volume
level too high while playing certain types of discs. If this happens, lower the
volume level and restart play.
To stop disc play
1 Press Ë
• If you do not perform any operation for about five minutes after stopping disc
play, indicator disappears from the screen and the DVD player goes into its
Standby mode.
• All buttons except OPERATE are disabled in the Standby mode.
• To restore full power from the Standby mode, slide the main power switch to the
“OFF” position and then back to “ON” again, or press OPERATE.
• You can also restore full power from the Standby mode by pressing RETURN on
the DVD player’s control panel.
GB
58
STOP
.
Page 62

Other Disc Play Features
This section explains how to use skip, slow motion, and other play features.
BACKLIGHT
VIEW
HI/LOW/OFF
VIRTUAL
MODE
DIGITAL
GAMMA
VIDEO
ADJUST
DIGITAL
S.PICTURE
RETURN
STILL/PAUSE
SLOWFWDREVDISPLAY
REPEAT
PROGRAM
DIRECT
RESUME
PLAY
STOP
SLOW
FWD
REV
T
/
D
V
D
B
A
C
K
H
L
I
I
G
/
L
H
O
T
W
/
O
F
V
F
I
E
S
W
K
M
I
P
O
D
E
P
L
A
Y
/
G
U
I
S
K
I
P
S
T
O
P
S
T
T
I
I
T
L
L
L
E
/
P
A
U
S
S
E
E
N
O
H
P
M
E
E
N
N
U
G
T
O
P
E
N
D
B
Y
O
E
L
R
IO
A
D
N
U
A
A
L
A
IC
T
P
O
R
E
T
U
O
R
E
N
ID
V
IN
M
E
M
U
L
X
O
A
V
M
DVD
PLAY
STOP
I
INPUT/
N
P
U
OPERATE
TITLE ENTER
MENU
SKIP PLAY SKIP
RESUME STOP
CLEAR MEMORY
To resume disc play after stopping
1
While the disc is playing, press Ë STOP at the location where you want to stop.
• Leave the disc in the DVD player. The DVD player remembers the
location where you stopped.
2 To restart play, press RESUME.
• Play resumes from a point slightly before the point where it was stopped.
• This resume operation does not work with PBC (playback control) play of a video
CD with PBC.
• This resume operation may not work with certain types of discs.
This resume operation does not work in the following cases.
• If the main power switch is turned off after disc play is stopped.
• If the DVD player enters the Standby mode after disc play is stopped.
• If you change to the INPUT mode.
• If you remove the disc from the DVD player after disc play is stopped.
• If you display the DVD SET UP screen or disc menu screen after disc play is
stopped.
59
GB
Page 63

1 C 001
0:00:24
T 0
1 C 001
0:00:25
T 0
1 C 001
0:00:24
T 0
Other Disc Play Features
To use fast forward and fast reverse
èè
è
èè
is pressed
è
to start fast forward or ÈREV for
1 While a disc is playing, press FWD
fast reverse.
• Initially, the fast forward or fast reverse operation is performed at a
relatively slow speed. With a DVD (but not an audio CD or video CD),
you can press FWDè or ÈREV again to increase the speed.
Example: Display after FWD
2 Press ûPLAY to resume normal play.
• You may not be able to use these operations with some discs.
• With a DVD, you cannot fast forward or fast reverse from one title to another.
Normal play resumes when the beginning of a title is reached.
• Audio and subtitles are not played while fast forwarding or fast reversing with a
DVD or video CD.
T o use slow motion (DVD only)
1 While a disc is playing, press SLOW.
2 To cancel slow motion and return to normal play, press ûPLAY.
• You may not be able to use slow motion with some discs.
• Slow motion cannot be used with video CDs or audio CDs.
GB
60
Page 64

1 C 001
0:00:24
T 0
BACKLIGHT
A
N
D
B
Y
IN
P
U
T
/
D
V
D
B
A
C
K
L
IG
H
T
H
I/L
O
W
/O
F
F
V
IE
W
M
O
D
E
S
K
IP
P
L
A
Y
/G
U
I
S
K
IP
S
T
O
P
T
IT
L
E
M
E
N
U
E
N
T
E
R
R
E
T
U
R
N
O
P
E
N
STILL/PAUSE
V
O
LU
M
E
V
ID
E
O
A
U
D
IO
O
P
T
IC
A
L A
N
A
LO
G
P
H
O
N
E
S
M
A
X
M
IN
PLAY
STILL/
PAUSE
VIEW
OPERATE
HI/LOW/OFF
MODE
DIGITAL
VIRTUAL
GAMMA
TITLE ENTER
MENU
SKIP PLAY SKIP
RESUME STOP
STILL/PAUSE
VIDEO
ADJUST
DIGITAL
S.PICTURE
RETURN
SLOWFWDREVDISPLAY
REPEAT
Other Disc Play Features
PLAY
STILL/PAUSE
CLEAR MEMORY
DIRECT
To use still picture and frame advance
1 While a disc is playing, press â STILL/
PROGRAM
PAUSE.
• This freezes the image on the screen.
• Each press of â STILL/PAUSE
advances the frame.
2 To cancel still picture and return to normal
play, press ûPLAY.
• You may not be able to use still picture and frame advance with some discs.
• Frame advance cannot be used with video CDs.
Helpful Hints
• This operation performs the audio CD PAUSE function.
1 C 001
T 0
0:00:25
61
GB
Page 65

1 C 002
0:13:45
T 0
03: 24
Other Disc Play Features
T
TITLE ENTER
MENU
SKIP PLAY SKIP
RESUME STOP
CLEAR MEMORY
SETUP
SUBTITLE
ON/OFF
RETURN
STILL/PAUSE
PROGRAM
SUBTITLE ANGLE AUDIO
SLOWFWDREVDISPLAY
REPEAT
DIRECT
RETURN
SKIP
PLAY
SKIP
Number
buttons
DIRECT
(C) CLEAR
I
N
P
U
T
/
D
V
D
B
A
C
K
H
L
I
I
G
/
L
H
O
T
W
/
O
F
V
F
IE
S
K
M
I
P
O
D
E
P
L
A
Y
/
G
U
I
S
K
I
P
S
T
O
P
S
T
T
I
IL
T
L
L
E
/P
A
U
S
S
E
E
N
O
H
P
M
E
E
N
N
U
G
T
O
P
E
N
A
N
D
B
Y
O
E
L
R
O
I
A
D
N
U
A
A
L
A
C
I
T
P
O
R
E
T
U
O
R
E
N
D
I
V
N
I
M
E
M
U
L
X
O
A
V
M
GUI
W
SKIP
RETURN
See page 79 for information about how to skip to a specific chapter (track) using the
DVD player’s GUI.
Chapter/track skip
1 While a disc is playing, press SKIP
À
SKIP.
When using video CD PBC (playback
control) play
• SKIP à is the same as a NEXT button.
À
•
SKIP is the same as a PREVIOUS
button.
• Pressing RETURN displays the previous menu screen.
à
or
SKIP
• Operation depends on the video CD type.
• You may not be able to use chapter (track) skip with certain discs.
Helpful Hints
• SKIP à skips to the next chapter (track).
• À SKIP skips to the beginning of the current chapter (track). Press
À SKIP again to skip to the beginning of the previous chapter (track).
GB
62
Page 66

Other Disc Play Features
Title/track direct skip
You can use direct skip only with a disc that is playing or that was playing
but it now stopped.
In the case of a video CD or audio CD, start from step 2.
1 While the disc is playing or stopped, press DIRECT.
2 Use the number buttons to input the number of the title (track) to which you
want to skip.
Example: Press 3.
-
3 C 003
T
1:39:54
3 Press ûPLAY.
• You must press ûPLAY within about 10 seconds after inputting a number.
• You may not be able to use direct skip with certain discs.
• Direct skip does not work immediately after you load a disc into the DVD player or
when the DVD player is in the Standby mode. It can be used only after the disc
has been played, even if only partially.
Helpful Hints
• If you are playing a video CD or audio CD, input a track number.
• If you make a mistake while inputting a number, press C (CLEAR) and try again.
Chapter direct skip (DVD only)
1 While the disc is playing, press DIRECT twice.
2 Use the number buttons to input the number of the chapter to which you
want to skip.
Example: Press 3.
1 C--3
T 0
1:23:25
3 Press ûPLAY.
• You must press ûPLAY within about 10 seconds after inputting a number.
• You cannot skip to a chapter with a video CD or audio CD.
• With certain DVDs, the chapter number may not appear on the display.
• Some DVDs may partially disable the direct skip function.
Helpful Hints
• If you make a mistake while inputting a number, press C (CLEAR) and try again.
63
GB
Page 67

Repeat Playback
1 C 001
0:00:22
T 0
C
1 C 001
0:00:22
T 0
T
OPERATE
TITLE ENTER
MENU
RESUME STOP
STILL/PAUSE
REPEAT
PROGRAM
DIRECT
CLEAR MEMORY
SKIP PLAY SKIP
SLOWFWDREVDISPLAY
RETURN
VIRTUAL
BACKLIGHT
HI/LOW/OFF
VIEW
MODE
DIGITAL
GAMMA
DIGITAL
S.PICTURE
VIDEO
ADJUST
REPEAT
A-B
Chapter repeat (DVD only)
Example: To repeat play the chapter you are currently viewing
1 Play the chapter you want to repeat.
2 Press REPEAT to start repeat play of the chapter.
• To cancel repeat play, press REPEAT
again. This clears the “
from the display.
” indicator
C
• You may not be able to use repeat play with certain discs.
Title repeat (DVD only)
Example: To repeat play the title you are currently viewing
1 Play the title you want to repeat.
2 Press REPEAT twice to start repeat play of the title.
• To cancel repeat play, press REPEAT
again. This clears the “
from the display.
• You may not be able to use repeat play with certain discs.
GB
64
” indicator
T
Page 68

Repeat Playback
1 C 001
0:01:00
T 0A1 C 001
0:02:00
T 0
A B
Disc repeat (video CD, audio CD only)
Example: To repeat play a disc
1 While the disc is playing, press REPEAT
to start repeat play.
• To cancel repeat play, press REPEAT
again. This clears the “
” indicator
from the display.
• You cannot use repeat play with PBC (playback control) play of a PBC video CD.
• You may not be able to use repeat play with certain discs.
• You cannot use repeat play in combination with programmed play.
A-B repeat (DVD only)
Example: T o repeat the scene from 0:01:00 to 0:02:00 in Chapter 1 of Title 1
1 When play reaches the start point of the
scene, press A-B.
• This registers the location at the start
point (A).
2 When play reaches the end point of the
scene, press A-B again.
• This starts A-B repeat from the start
point (A) and the end point (B).
• To cancel A-B repeat, press A-B again. This clears the “
from the display.
A B
” indicator
FUNCTIONS
SPECIAL
• The start point and end point must be inside the same chapter.
• A-B repeat cannot be used with a video CD or audio CD.
• A-B repeat cannot be used with some multi-angle functions (see page 74).
Helpful Hints
• A-B repeat is cancelled whenever you press ËSTOP, TITLE, or MENU.
65
GB
Page 69

Programmed Playback
TITLE
T
=
TTTTT
TTT
TITLE PROGRAM
–– ––––––––––
––––
T
=
TTTTT
TTT
TRACK P ROGRAM
–– ––––––––––
––––
TRACK
O
N
/
S
T
A
N
D
B
Y
I
N
P
U
T
/
D
V
D
B
A
C
K
L
I
G
H
T
H
I
/
L
O
W
/
O
F
F
V
I
E
W
M
O
D
E
S
K
I
P
P
L
A
Y
/
G
U
I
S
K
I
P
S
T
O
P
T
I
T
L
E
M
E
N
U
E
N
T
E
R
R
E
T
U
R
N
O
P
E
N
S
T
I
L
L
/
P
A
U
S
E
V
O
L
U
M
E
V
ID
E
O
A
U
D
IO
O
P
T
IC
A
L
A
N
A
L
O
G
P
H
O
N
E
S
M
A
X
M
IN
PLAY
Setting on the screen
STOP
RETURN
You can program your DVD player to play titles, tracks, or chapters in the
sequence you want.
TITLE ENTER
MENU
SKIP PLAY SKIP
RESUME STOP
CLEAR MEMORY
SETUP
SUBTITLE
ON/OFF
Title/Track programmed playback
This function can be used only with a disc that has been played once,
even partially.
1 Turn on the DVD player, start play of the disc, and then stop play. Next,
press PROGRAM.
DVD
• Pressing PROGRAM displays the title
RETURN
RETURN
STILL/PAUSE
SLOWFWDREVDISPLAY
REPEAT
PROGRAM
DIRECT
PLAY
STOP
Number
buttons
PROGRAM
(M) MEMORY
(C) CLEAR
SUBTITLE ANGLE AUDIO
programming screen.
Video CD, Audio CD
• Pressing PROGRAM displays the track
programming screen.
• Press RETURN if you want to exit the above screens.
• You cannot program the play sequence while a disc is playing.
• Play sequence programming does not work with a disc that does not include
title (track) information.
• Play sequence programming does not work with a disc that disables
programming. Such discs marked with the indicator ø.
• Play sequence programming does not work immediately after you load a disc
GB
66
into the DVD player or when the DVD player is in the Standby mode. It can be
used only after the disc has been played, even if only partially .
Page 70

Programmed Playback
0 C 001
1:23:24
T 1
PROGRAM
2 Use the number buttons to input the title number or track number you want,
and then press M (MEMORY).
Example: To input Title (Track) 10, press 1, 0 and then M (MEMORY).
DVD
TITLE PROGRAM
––
10
T
T
––
––
T
T
––
––
T
T
––
––
T
T
––
––
T
T
=
T
TITLE
––
––
T
T
––
––
T
T
––
––
T
T
––
––
T
T
––
- –
T
T
Video CD, Audio CD
TRACK P ROGRAM
–– ––––––––––
TTTTT
T
TTT
=
TRACK
––10
• Repeat step 2 for up to 20 titles (tracks) in the sequence that you want
them to play.
3 Press ûPLAY to start play in the sequence
you specified.
• Titles (tracks) are played in the
sequence you specified.
T o stop programmed play
1 Press Ë STOP.
Helpful Hints
• The number you input is not stored in memory if there is no corresponding title
(track) number on the disc. Make sure you input title (track) numbers correctly.
• If you input the wrong number, press C (CLEAR) and then re-input.
• Holding down C (CLEAR) for about two seconds clears all the program data in
memory.
• To exit the programming procedure part way through, press RETURN.
• You can also input one-digit numbers in step 2. To input 2, for example, press 2
and then M (MEMORY).
67
GB
Page 71

Programmed Playback
CM
T
:
10
––––
––––
C
=
CCCCC
CCC
HAPTER PROGRA
–– ––––––––––
––––
TITLE
CERHAPT
=
O
N
/S
T
A
N
D
B
Y
I
N
P
U
T
/
D
V
D
B
A
C
K
L
I
G
H
T
H
I
/
L
O
W
/
O
F
F
V
I
E
W
M
O
D
E
S
K
I
P
P
L
A
Y
/
G
U
I
S
K
I
P
S
T
O
P
T
I
T
L
E
M
E
N
U
E
N
T
E
R
R
E
T
U
R
N
O
P
E
N
S
T
IL
L
/P
A
U
S
E
VOLUME
VIDEO
AUDIO
OPTICAL ANALOG
PHONES
MAX
MIN
PLAY
STOP
RETURN
Setting on the screen
TITLE ENTER
MENU
SKIP PLAY SKIP
RESUME STOP
RETURN
STILL/PAUSE
SLOWFWDREVDISPLAY
REPEAT
RETURN
PLAY
STOP
Number
buttons
PROGRAM
CLEAR MEMORY
SETUP
SUBTITLE
ON/OFF
DIRECT
PROGRAM
(M) MEMORY
(C) CLEAR
If you have a DVD that includes chapter data, you can program your DVD
player to play chapters in the sequence you want.
Chapter programmed playback (DVD only)
This function can be used only with a disc that has been played once,
even partially .
1 Turn on the DVD player, start play of the disc, and then stop play. Next,
press PROGRAM twice.
• This displays the chapter programming screen.
• Press RETURN if you want to exit the above screen.
2 Use the number buttons to input the title number you want, and then press
M (MEMORY).
Example: To input Title 10, press 1, 0 and
then M (MEMORY).
• You cannot program the play sequence while a disc is playing.
• Play sequence programming does not work with a disc that does not include
chapter information.
• Play sequence programming does not work with a disc that disables
programming. Such discs marked with the indicator ø.
• Play sequence programming does not work immediately after you load a
disc into the DVD player or when the DVD player is in the Standby mode. It
can be used only after the disc has been played, even if only partially.
GB
68
Page 72

CM
T
:
10
3 –––
––––
C
=
CCCCC
CCC
HAPTER PROGRA
–– ––––––––––
––02
TITLE C ERHAPT
=
0 C 023
1:05:46
T 1
PROGRAM
Programmed Playback
3 Use the number buttons to input the chapter number you want, and then
press M (MEMORY).
Example: To input Chapter 23, press 2, 3
and then M (MEMORY).
• Repeat step 3 for up to 20 chapters in
the sequence that you want them to
play.
4 Press û PLAY to start play in the
sequence you specified.
To stop programmed play
1 Press Ë STOP.
Helpful Hints
• The number you input is not stored in memory if there is no corresponding title
number on the disc. Make sure you input title numbers correctly.
• If you input the wrong number, press C (CLEAR) and then re-input.
• Holding down C (CLEAR) for about two seconds clears all the program data in
memory.
• To exit the programming procedure part way through, press RETURN.
• You can also input one-digit numbers in steps 2 and 3. To input 2, for example,
press 2 and then M (MEMORY).
69
GB
Page 73

Making Display Settings
ON
GAMMA
VOLUME
VIDEO
AUDIO
OPTICAL ANALOG
PHONES
MAX
MIN
O
N
/
S
T
A
N
D
B
Y
I
N
P
U
T
/
D
V
D
B
A
C
K
L
IG
H
T
H
I
/L
O
W
/
O
F
F
V
I
E
W
M
O
D
E
S
K
I
P
P
L
A
Y
/
G
U
I
S
K
I
P
S
T
O
P
T
IT
L
E
M
E
N
U
E
N
T
E
R
R
E
T
U
R
N
O
P
E
N
ST
IL
L
/P
A
U
S
E
GUI
Digital gamma is a function that brings out the best that DVD has to offer by
making darker areas of the image brighter while leaving its bright areas
unchanged.
Digital super picture enhances the fine detail of the image and outlines of the
objects it contains. It also minimizes noise, making the image clearer.
BACKLIGHT
VIEW
VIDEO
OPERATE
HI/LOW/OFF
MODE
DIGITAL
VIRTUAL
GAMMA
TITLE ENTER
MENU
SKIP PLAY SKIP
RESUME STOP
STILL/PAUSE
See page 79 for information about how to make these settings using the DVD player’s GUI.
To make digital gamma settings (DVD, Video CD only)
1 Press DIGITAL GAMMA.
• Each press of DIGITAL GAMMA cycles through the digital gamma
settings in the following sequence: AUTO → ON → OFF.
• The current setting is shown on the
display.
ADJUST
DIGITAL
S.PICTURE
RETURN
PROGRAM
SLOWFWDREVDISPLAY
DIGITAL
GAMMA
DIGITAL
S.PICTURE
REPEAT
Current setting
When you are playing the DVD image on an external monitor screen, the effect
that digital gamma has on the image depends on whether the DVD player’s
display panel is open or closed.
Helpful Hints
• Digital gamma helps to add depth to movie and concert images that contain a lot
of dark scenes, and when viewing images under bright light.
GB
70
Page 74

Making Display Settings
S.PICTURE
ON
S.PICTURE
2 While “ON” is selected, use \ and | to set the digital gamma level.
• The current level is shown on the
display.
Bright ↔ Brighter
\|
GAMMA
Level display
• The level display remains on the screen for about 10 seconds.
Helpful Hints
• If the level setting disappears from the screen, you can change the level setting
by pressing DIGITAL GAMMA to display it again. Next, use \ and | to change
the level.
T o make digital super picture settings (DVD, V ideo
CD only)
1 Press DIGITAL S.PICTURE.
• Each press of DIGITAL S.PICTURE toggles the digital super picture
setting between “ON” and “OFF”.
• The current setting is shown on the
display.
Current setting
2 While “ON” is selected, use \ and | to set
the digital super picture level.
Level display
• The level display remains on the screen for about 10 seconds.
When you are playing the DVD image on an external monitor screen, the effect
that digital super picture has on the image depends on whether the DVD
player’s display panel is open or closed.
Helpful Hints
• For greater image detail and sharper images, adjust the digital super picture
setting so the indicator is more towards .
• To reduce the digital noise in older images and other images that contain noise,
adjust the digital super picture setting so the indicator is more towards .
• Adjusting the digital super picture towards for DVD play and for video CD
play is recommended for best image quality.
• If the level setting disappears from the screen, you can change the level setting
by pressing DIGITAL S.PICTURE to display it again. Next, use \ and | to
change the level.
71
GB
Page 75

Audio Selection (DVD, Video CD only)
1/3
DIGITAL
V
O
L
U
M
E
V
I
D
E
O
A
U
D
I
O
O
P
T
I
C
A
L
A
N
A
L
O
G
P
H
O
N
E
S
M
A
X
M
I
N
O
N
/S
T
A
N
D
B
Y
I
N
P
U
T
/
D
V
D
B
A
C
K
L
I
G
H
T
H
I
/
L
O
W
/
O
F
F
V
I
E
W
M
O
D
E
S
K
I
P
P
L
A
Y
/
G
U
I
S
K
I
P
S
T
O
P
T
I
T
L
E
M
E
N
U
E
N
T
E
R
R
E
T
U
R
N
O
P
E
N
S
T
IL
L
/P
A
U
S
E
GUI
'
"
OPERATE
TITLE ENTER
MENU
RESUME STOP
STILL/PAUSE
SKIP PLAY SKIP
RETURN
VIRTUAL
BACKLIGHT
HI/LOW/OFF
VIEW
MODE
DIGITAL
GAMMA
DIGITAL
S.PICTURE
VIDEO
ADJUST
SETUP
SUBTITLE
ON/OFF
SUBTITLE ANGLE AUDIO
AUDIO
A number of different methods are used to record audio onto a DVD, including
multi-channels (used for voiceovers in other languages), Dolby Digital (5.1ch),
DTS, linear PCM and Audio MPEG Version 2.0. Your DVD player provides a
number of different audio modes from which you can choose to suit the type of
disc you are playing.
See page 79 for information about how to make these settings using the DVD player’s GUI.
To select the audio channel for playback
1 While the disc is playing, press AUDIO.
Example: DVD with three audio channels
• The display shows which of the channels is currently selected.
Video CD
L+R
• Some discs allow audio channel switching from the disc menu. See page 78 for
more information.
GB
72
Page 76

Audio Selection (DVD, Video CD only)
L
R
2 Press AUDIO to cycle through the available
channels and select the one you want.
• In the case of a video CD or audio CD,
each press of AUDIO cycles through
the channels in the following sequence:
L+R → L → R.
Helpful Hints
• With a DVD player, use ' and " to scroll through the channel numbers.
• The channel number selection display remains on the screen for about 10
seconds.
To play DTS/MPEG audio using a DTS/Audio MPEG digital surround
decoder
3/3
LPCM
1 Connect the DVD player to the DTS/Audio MPEG digital surround decoder
(see page 32).
2 Press AUDIO to select the DTS/MPEG mode.
• You must use a DTS digital surround decoder (see page 32) in order to play DTS
audio. Playing back a DTS audio disc on the DVD player alone will not produce
correct audio output, even if you select the DTS mode.
73
GB
Page 77

Angle Selection (DVD only)
V
O
L
U
M
E
V
I
D
E
O
A
U
D
I
O
O
P
T
I
C
A
L
A
N
A
L
O
G
P
H
O
N
E
S
M
A
X
M
I
N
O
N
/S
T
A
N
D
B
Y
I
N
P
U
T
/
D
V
D
B
A
C
K
L
I
G
H
T
H
I
/
L
O
W
/
O
F
F
V
I
E
W
M
O
D
E
S
K
I
P
P
L
A
Y
/
G
U
I
S
K
I
P
S
T
O
P
T
I
T
L
E
M
E
N
U
E
N
T
E
R
R
E
T
U
R
N
O
P
E
N
S
T
I
L
L
/
P
A
U
S
E
GUI
'
"
OPERATE
TITLE ENTER
MENU
SKIP PLAY SKIP
RETURN
VIRTUAL
BACKLIGHT
HI/LOW/OFF
VIEW
MODE
DIGITAL
GAMMA
DIGITAL
S.PICTURE
VIDEO
ADJUST
SETUP
PROGRAM
DIRECT
CLEAR MEMORY
SUBTITLE
ON/OFF
SUBTITLE ANGLE AUDIO
ANGLE
SUBTITLE
SUBTITLE
ON/OFF
You can change the angle of view when playing a DVD that contains scenes
recorded from multiple angles.
See page 79 for information about how to make this setting using the DVD player’s GUI.
To change the view angle
1 While the disc is playing, press ANGLE.
• This displays the currently selected view angle number.
Example: When there are five view angles
1/5
2 While the view angle numbers are on the
screen, use ANGLE to select the one you
want.
• The number of the view angle you
select is shown on the screen.
• The angle number does not appear if the disc you are using has only one angle
of view.
• The actual procedure for changing the view angle depends on the disc you are
using. See the disc jacket for details.
• The view angle number remains on the display for about 10 seconds.
GB
74
3/5
Page 78

Subtitle Selection (DVD only)
1/3:ON
XX
1/3:OFF
You can use the following procedure to select the set of subtitles you want to
use when the DVD you are playing includes subtitle sets for multiple
languages.
To change the subtitle set
1 While the disc is playing, press SUBTITLE.
• This displays the currently selected subtitle set number.
Example: When there are three subtitle
sets
• If the disc does not have any subtitle
XX
data,
set number.
appears in place of the subtitle
2 Select the number of the subtitle set you want.
• The number of the subtitle set you select is shown on the screen.
• The subtitle set number does not appear if the disc you are using has only one
set of subtitle.
• While the subtitle set numbers are on the display, use ' and " to select the one
you want.
To turn subtitling on and off
1 While the disc is playing, press SUBTITLE
ON/OFF to toggle subtitling on and off.
• The subtitle set numbers remain on the
screen for about 10 seconds.
75
GB
Page 79

Using Dolby Virtual (DVD only)
VIRTUAL
ON
V
O
L
U
M
E
V
I
D
E
O
A
U
D
I
O
O
P
T
I
C
A
L
A
N
A
L
O
G
P
H
O
N
E
S
M
A
X
M
I
N
O
N
/S
T
A
N
D
B
Y
I
N
P
U
T
/
D
V
D
B
A
C
K
L
I
G
H
T
H
I
/
L
O
W
/
O
F
F
V
I
E
W
M
O
D
E
S
K
I
P
P
L
A
Y
/
G
U
I
S
K
I
P
S
T
O
P
T
I
T
L
E
M
E
N
U
E
N
T
E
R
R
E
T
U
R
N
O
P
E
N
S
T
I
L
L
/
P
A
U
S
E
GUI
• Your DVD player has built-in virtual surround circuitry that provides rich
audio output when playing through a stereo (2-channel) television or through
audio equipment.
• Dolby Virtual lets you play audio from DVDs recorded using Dolby Digital
(5.1 channel) and Dolby Surround (Pro Logic).
• See the disc jacket for information about how its audio was recorded.
Dolby Virtual
The following table shows the types of audio recordings for which Dolby Virtual
is enabled.
Dolby Digital
(5.1 channel)
Dolby Surround
(Pro Logic)
YesYes
• Dolby Virtual is disabled when the DVD player is connected to external
equipment over an optical digital connection.
BACKLIGHT
VIEW
HI/LOW/OFF
VIRTUAL
DIGITAL
GAMMA
MODE
VIDEO
ADJUST
DIGITAL
S.PICTURE
RETURN
STILL/PAUSE
SLOWFWDREVDISPLAY
REPEAT
VIRTUAL
OPERATE
TITLE ENTER
MENU
SKIP PLAY SKIP
RESUME STOP
Linear PCM Audio/
DTS Audio
No
MPEG Audio
Ver.2.0
No
PROGRAM
See page 79 for information about how to make this setting using the DVD player’s GUI.
To turn Dolby Virtual on and off
1 While the DVD is playing, press VIRTUAL.
• Each press of VIRTUAL toggles Dolby
Virtual on and off.
• Dolby Virtual cannot be used with a video CD or audio CD.
• Dolby Virtual is disabled during playback of a DVD recorded with DTS audio,
linear PCM audio and Audio MPEG Version 2.0.
• The QSound mark used by Dolby Virtual is a trademark of QSound Labs, Inc.
GB
76
Page 80

Selecting Titles from the T itle Menu of a DVD (DVD only)
V
O
L
U
M
E
V
ID
E
O
A
U
D
IO
O
P
T
IC
A
L
A
N
A
L
O
G
P
H
O
N
E
S
M
A
X
M
IN
O
N
/S
T
A
N
D
B
Y
I
N
P
U
T
/
D
V
D
B
A
C
K
L
I
G
H
T
H
I
/
L
O
W
/
O
F
F
V
I
E
W
M
O
D
E
S
K
I
P
P
L
A
Y
/
G
U
I
S
K
I
P
S
T
O
P
T
I
T
L
E
M
E
N
U
E
N
T
E
R
R
E
T
U
R
N
O
P
E
N
S
T
I
L
L
/
P
A
U
S
E
TITLE
PLAY
ENTER
Some DVDs have a title menu that you use to select the title you want to play.
VIDEO
BACKLIGHT
VIEW
OPERATE
TITLE ENTER
MENU
SKIP PLAY SKIP
RESUME STOP
To select a title from the title menu of a DVD
This function can be used only with a disk that has been played once,
even partially .
1 While the disc is playing or stopped, press TITLE to display its title menu.
2 Use ' and " to select the title you want.
3 Press ENTER or ûPLAY to start play of the selected title.
HI/LOW/OFF
VIRTUAL
MODE
DIGITAL
GAMMA
ADJUST
DIGITAL
S.PICTURE
RETURN
STILL/PAUSE
SLOWFWDREVDISPLAY
REPEAT
PROGRAM
TITLE
ENTER
PLAY
Number
buttons
• Some DVDs use the term “top menu” instead of “title menu”.
• Nothing appears on the screen when you press TITLE if the disc you are using
does not have a title menu.
• The procedure shown here provides only general steps. The actual procedure for
using the title menu depends on the disc you are using. See the disc jacket for
details.
• The title menu does not appear immediately after you load a disc into the DVD
player or when the DVD player is in the Standby mode. It appears only after the
disc has been played, even if only partially.
Helpful Hints
• You can also specify a title by inputting a title number with the number buttons.
77
GB
Page 81

Setting Play Parameters Using the Disc Menu (DVD only)
V
O
L
U
M
E
V
I
D
E
O
A
U
D
I
O
O
P
T
I
C
A
L
A
N
A
L
O
G
P
H
O
N
E
S
M
A
X
M
I
N
O
N
/
S
T
A
N
D
B
Y
I
N
P
U
T
/
D
V
D
B
A
C
K
L
I
G
H
T
H
I
/
L
O
W
/
O
F
F
V
I
E
W
M
O
D
E
S
K
I
P
P
L
A
Y
/
G
U
I
S
K
I
P
S
T
O
P
T
I
T
L
E
M
E
N
U
E
N
T
E
R
R
E
T
U
R
N
O
P
E
N
S
T
IL
L
/P
A
U
S
E
MENU
ENTER
Some DVDs include a disc menu that you can use to select subtitle set, audio
channel, and Dolby Digital (5.1 channel) or DTS audio. You can also turn disc
menu on and off.
BACKLIGHT
VIEW
HI/LOW/OFF
VIRTUAL
MODE
DIGITAL
GAMMA
VIDEO
ADJUST
DIGITAL
S.PICTURE
RETURN
STILL/PAUSE
SLOWFWDREVDISPLAY
REPEAT
PROGRAM
ENTER
MENU
Number
buttons
OPERATE
TITLE ENTER
MENU
SKIP PLAY SKIP
RESUME STOP
To use the disc menu to turn on subtitling
This function can be used only with a disk that has been played once,
even partially.
1 While the disc is playing or stopped, press MENU to display the disc menu.
2 Use ' and " to select the subtitle item on the disc menu.
3 Press ENTER to display the subtitle set number selection screen.
4 Use ' and " to select the subtitle set you want to use.
5 Press ENTER to register your selection and display the subtitles.
Repeat the above procedure to make other disc menu settings.
• The procedure shown here provides only general steps. The actual procedure for
using the disc menu depends on the disc you are using. See the disc jacket for
details.
• The disc menu does not appear immediately after you load a disc into the DVD
player or when the DVD player is in the Standby mode. It appears only after the
disc has been played, even if only partially.
Helpful Hints
• You can also select items by using the number buttons.
GB
78
Page 82

Settings from the DVD Player Control Panel (GUI)
Certain DVD settings must be made using the DVD player’s control panel, and
cannot be made using the remote control unit. Other settings can be made
using either the remote control unit or the control panel.
I
N
P
U
T
/
D
V
D
B
A
C
K
H
L
I
I
G
/
L
H
O
T
W
/
O
F
V
F
I
E
S
W
K
M
I
P
O
D
E
P
L
A
Y
/
G
U
I
S
K
I
P
S
T
O
P
S
T
T
I
I
T
L
L
L
E
/
P
A
U
S
E
PHONES
M
E
E
N
N
U
T
O
E
P
R
E
N
O
N
/
S
T
A
N
D
B
Y
DIO
AU
OPTICAL ANALOG
R
E
T
U
R
N
VIDEO
MIN
VOLUME
MAX
GUI
ENTER
To make settings from the DVD player control panel
1 While the disc is playing, press GUI.
• Each press of GUI cycles through the setting screens in the sequence
shown below.
"
Screen 1
1
1/3 1C 001
:
ON
Screen 2
"
23 54
1/4 1/2T 0
EN
"
678
GAMMA
S.PICTURE
AU ONTO ON
1 C 001
T 0
1:06:45
VIRTUAL
1 Subtitling
2 View angle
3 Audio mode
4 Title selection
5 Chapter selection
6 Digital gamma
7 Digital super picture
8 Dolby Virtual
• The setting screen disappears from the display if you do not perform any
operation for about 10 seconds.
• You can manually clear the setting screen by pressing MENU or TITLE.
79
GB
Page 83

Settings from the DVD Player Control Panel (GUI)
AU OFFTO ON
S.PICTURE
VIRTUAL
GAMMA
AU ONTO ON
S.PICTURE
VIRTUAL
GAMMA
OF ONFON
GAMMA
S.PICTURE
VIRTUAL
ON ONON
GAMMA
S.PICTURE
VIRTUAL
ON ONOFF
GAMMA
S.PICTURE
VIRTUAL
ON ONON
GAMMA
S.PICTURE
VIRTUAL
1 C 001
1:06:45
T 0
2 While “Screen 1” or “Screen 2” is on the display, use \ and | to select the
setting you want to change.
Example: View angle Example: Dolby Virtual
1/3 1C 0011/4 1/2T 0
The icon of any function that is not supported by the disc you are using is
XX
replaced by
.
3 Use " and ' to change the selected setting.
1/3 1C 0012/4 1/2T0
■ Digital Gamma Correction
4 Press ENTER to cycle through the
available settings: AUTO → ON →
OFF.
5 While the “ON” setting is displayed,
use " and ' to change the level
setting.
■ Digital Super Picture
4 Use ENTER to toggle digital super
picture on and off.
5 While the “ON” setting is displayed,
use " and ' to change the level
setting.
6 After you are finished, press GUI to clear
the setting screen from the display.
• Press GUI as many times as necessary
to return to the normal operation screen.
• The setting screen is cleared automatically whenever you display a DVD screen
that enables you to change the scene by pressing ', ", \ or |.
• The setting screen is cleared whenever you press ËSTOP, TITLE, or MENU.
GB
80
Page 84

Adjusting Display
BR IGHT
CO RL OU
CO RL
OU
Use the procedures described here to adjust the brightness and contrast of the
colours that appear on the display, and the overall brightness of the display.
VIDEO
BACKLIGHT
OPERATE
To adjust display colours
1 Press VIDEO ADJUST.
2 Use " and ' to select the item whose setting you want to change.
• The colour of the selected item changes to indicate it is selected.
3 Use \ and | to change the setting of the
selected item.
Example: When selecting “COLOUR”
VIEW
HI/LOW/OFF
MODE
DIGITAL
VIRTUAL
GAMMA
TITLE ENTER
MENU
SKIP PLAY SKIP
RESUME STOP
STILL/PAUSE
ADJUST
DIGITAL
S.PICTURE
RETURN
SLOWFWDREVDISPLAY
REPEAT
VIDEO
ADJUST
I
N
P
U
T
/
D
V
D
B
A
C
K
H
L
I
I
G
/
L
H
O
T
W
/
O
F
V
F
I
E
S
W
K
M
I
P
O
D
E
P
L
A
Y
/
G
U
I
S
K
I
P
S
T
O
P
S
T
T
I
IL
T
L
L
E
/P
A
U
S
E
PHONES
M
E
E
N
N
U
T
O
E
P
R
E
N
N
/S
T
A
N
D
B
Y
AUDIO
OPTICAL ANALOG
R
E
T
U
R
N
VIDEO
MIN
VOLUME
MAX
Helpful Hints
• BRIGHT .... Controls image colour brightness
• COLOUR .. Controls image colour contrast
4 After you are finished, press VIDEO ADJUST.
• The setting screen disappears from the display if you do not perform any
operation for about five seconds.
• The settings you make here are retained even when you turn off the DVD player.
81
GB
Page 85

Adjusting Display
S
BACKLIGHT
HI/LOW/OFF
BACKLIGHT
VIEW
HI/LOW/OFF
VIRTUAL
MODE
DIGITAL
GAMMA
VIDEO
ADJUST
DIGITAL
S.PICTURE
RETURN
STILL/PAUSE
SLOWFWDREVDISPLAY
REPEAT
/STANDBY
I
N
P
U
T
/
D
V
D
B
A
C
K
H
L
IG
I
/L
H
O
T
W
/
O
F
V
F
I
E
S
W
K
M
I
P
O
D
E
P
L
A
Y
/
G
U
I
S
K
I
P
S
T
O
P
S
T
T
I
IL
T
L
L
E
/P
A
U
S
S
E
E
N
O
H
P
M
E
E
N
N
U
G
T
O
P
E
N
O
E
L
R
O
I
A
D
N
U
A
A
L
A
C
I
T
P
O
R
E
T
U
O
R
E
N
D
I
V
N
I
M
E
M
U
L
X
O
A
V
M
BACKLIGHT
HI/LOW/OFF
OPERATE
TITLE ENTER
MENU
SKIP PLAY SKIP
RESUME STOP
To adjust overall screen brightness
Use the following procedure to adjust the overall screen brightness level and to
turn screen illumination on and off.
1 Press BACKLIGHT HI/LOW/OFF.
• Each press of BACKLIGHT HI/LOW/OFF cycles through the backlight
settings in the following sequence:
HI → LOW → OFF → HI.
T
TILL/PAUSE
I
T
L
E
S
E
N
O
H
P
M
E
E
N
N
U
G
T
ON/STANDBY
O
P
E
N
O
E
L
R
O
I
A
D
N
U
A
A
L
A
C
I
T
P
O
R
E
T
U
O
R
E
N
D
I
V
N
I
M
E
M
U
L
X
O
A
V
M
• The power/standby lamp of the DVD player lights green whenever the
backlight is turned off.
• The setting you make here is retained even when you turn off the DVD player.
GB
82
Page 86

Viewing Images from an External Device
INPUT
Use the following procedure to set up the DVD player for use as a monitor for
viewing images from a VCR or camcorder.
I
N
P
U
T
/
D
V
D
B
A
C
K
H
L
I
I
G
/
L
H
O
T
W
/
O
F
V
F
I
E
S
W
K
M
I
P
O
D
E
P
L
A
Y
/
G
U
I
S
K
I
P
S
T
O
P
S
T
T
I
I
T
L
L
L
E
/
P
A
U
S
S
E
E
N
O
H
P
M
E
E
N
N
U
G
T
O
P
E
N
O
N
/S
T
A
N
D
B
Y
O
E
L
R
IO
A
D
N
U
A
A
L
A
IC
T
P
O
R
E
T
U
O
R
E
N
ID
V
IN
M
E
M
U
L
X
O
A
V
M
To view images from an external device
1 Connect the external device using the procedure on page 29.
2 Turn on the external device.
3 Turn on the DVD player.
4 Press INPUT/DVD to enter the INPUT
mode.
INPUT/
DVD
5 Press the play button of the external device.
• Power is not supplied from the DVD player to a connected camcorder.
• When not using the DVD player with external equipment, be sure to disconnect
all cords from the video input/output and audio input/output terminals.
83
GB
Page 87

References
Precautions
Use & Care
•Avoid magnetic sources.
Using the DVD player near strong fluorescent lights, motors,
televisions, or other magnetic sources may adversely affect
recorded images.
•Remember to remove the disc, turn off the power when
the DVD player is not in use.
•Using the DVD player near a broadcasting station or other powerful
transmission source may cause buzzing or picture deterioration.
•Avoid shocks and dropping.
Do not drop or otherwise subject the DVD player to hard shocks
or strong vibrations.
•Avoid placing the DVD player in close proximity to
lighting equipment.
The heat from incandescent lights may deform the DVD player, or
cause it to malfunction.
•Always respect prohibitions or restrictions on the use of
electronic equipment on commercial flights or in other
sensitive areas.
•Be aware of the temperature and humidity.
Y ou can use your DVD player at 0°C to +40°C and at 30% to
80% relative humidity. Do not store the unit in an unventilated car
in the summer , in direct sunlight, or near strong heat sources; this
can result in severe damage to the unit’s casing and circuitry or
in burning yourself.
•Avoid situations where water, sand, dust or other
foreign matter could get on or inside the DVD player, and do not use or
leave your DVD player in areas with excessive smoke,
steam or moisture.
Such environments can cause malfunctions or cause mildew to
form on the lenses. Be sure to keep the unit in a well-ventilated
location.
•
When using your DVD player in a cold environment, the
colour LCD screen often appears less bright immediately after the power is
turned on.
This is not a malfunction. To prevent the DVD player from becoming too cold, wrap
it in a thick cloth (a blanket, etc.).
•Never touch the pickup lens when installing or cleaning discs.
This will cause the DVD player to malfunction.
GB
84
Page 88

References
•Do not leave the DVD player on your lap for a long time during use.
Heat generated by the DVD player can cause low-temperature burning of the skin
over time.
Moving and shipment
•Remove the disc before packing the DVD player for moving or shipment.
It is also a good idea to remove the disc and turn off power whenever you are not
using the DVD player.
Saving power
•Help save power by turning off the DVD player when you are not using it. If
you do not plan to use the DVD player for a long time (such as when leaving
on a trip), unplug the power cord from the power outlet.
Care of the LCD
•To clean off the screen, turn off power and wipe the display with a soft cloth.
About the LCD Panel
•The LCD panel is a product of the latest LCD manufacturing technology that
provides a pixel yield of 99.99%. This means that less than 0.01% of the total
number of pixels are defective (they do not turn on or always remain turned on).
•The fluorescent tube that provides backlighting of the screen requires periodic
replacement. As a general rule, the life of the fluorescent tube is about 10,000
hours of continuous use under normal temperatures. If the display appears dark, if
it flickers, or if it fails to light, contact your original retailer or your nearest Sharp
service centre for replacement.
Copyright Information
•Unauthorized copying, broadcast, public display, transmission, public
performance and rental (regardless of whether or not such activities are for profit)
of disc contents are prohibited by law.
•This device is equipped with copy protection technology that causes substantial
degradation of images when the contents of a disc are copied to video tape.
•This device is protected by U.S. patents and other intellectual property rights, the
copyright for which belongs to Macrovision Corporation. The use of Macrovision’s
copy protection technology in the device is authorized by Macrovision and is
intended for home use only, unless otherwise authorized in writing by Macrovision.
Reverse engineering or disassembly is prohibited.
•This device was manufactured under license from Dolby Laboratories Licensing
Corporation.
•Dolby, Dolby Digital, Dolby Pro Logic, and the double-D symbol ( ) are
trademarks of Dolby Laboratories Licensing Corporation.
•DTS is a trademark of Digital Theater Systems.
85
OTHERS
GB
Page 89

References
AC Adapter
•The supplied AC adapter is compatible with 50Hz and 60Hz electrical
systems in the range of 110 V to 240 V AC.
•The AC adapter may interfere with reception if used near a radio.
•Prevent flammables, liquids, and metal objects from entering the adapter.
•The adapter is sealed unit. Do not attempt to open and modify it.
•Do not damage, drop, or subject the adapter to vibration.
•Do not leave the adapter in direct sunlight.
•Avoid using the adapter in humid or extremely hot places.
Care
Cleaning and Maintenance
•Many plastic parts are used in the DVD player casing. Do not use thinners,
benzenes or other strong chemical cleaners. These may cause discolouration
and damage to the casing.
•Clean the casing with a soft, dry cloth. If the casing is particularly dirty, wipe
the casing with a tightly wrung cloth dampened with a diluted, neutral
detergent. Then wipe it again with a soft, dry cloth.
•Use a soft, dry cloth to wipe finger marks and other soiling off the LCD screen.
Battery Pack (Sold Separately)
Danger!
Be sure to observe the following precautions whenever handling the battery pack. Failure
to do so can result in battery pack leakage, overheating, smoke emission, fire, or rupture.
1. Never try to take the battery pack apart or modify it in any way. Never apply solder
directly to battery pack terminals.
2. When the battery pack is removed from the unit, do not allow its terminals to contact
each other through needles, necklaces, or other metal objects.
3. Never leave the battery pack in direct sunlight, on the dashboard of a vehicle, or in
any other area where it is exposed to high temperature (greater than 60°C).
4. Never place the battery pack into water, salt water or fire, and do not expose it to heat.
5. Use only the specified AC adapter to charge the battery pack.
6. This battery pack is designed to power specific portable DVD video players only.
Never use it with any other device.
GB
86
Page 90

References
Warning!
1. Never drop the battery pack or otherwise subject it to strong impact.
2. Use and store the battery pack in areas that is out of the reach of small children.
3. Never place the battery pack inside a microwave oven or a washing machine.
4. Fluid from inside the battery pack getting into the eyes can cause loss of eyesight.
Wash out the eyes thoroughly with plain water and then contact a doctor
immediately. Battery pack fluid on clothing or skin can cause skin irritation. Wash off
fluid immediately with plain water.
Caution!
1. Charge the battery pack in an area where the temperature is within the range of
10°C to 30°C. Charging outside this temperature range creates the danger of battery
pack leakage, overheating, smoke emission, fire, or rupture.
2. When not in use, remove the battery pack and store it in a cool place.
3. Before transporting the DVD video player to another location, remove the battery pack.
Failure to do so creates the danger of personal injury due to the battery pack falling out.
4. Avoid prolonged contact with the AC adapter or battery pack while charging.Prolonged
contact while charging creates the danger of low-temperature burns.
5. Do not allow the ventilation hole on the back of the battery pack to become blocked.
A blocked ventilation hole prevents internal heat from escaping, creating the danger
of battery pack leakage, overheating, smoke emission, fire, or rupture.
6. Keep the battery pack out of areas subject to large amounts of oil smoke, steam,
moisture, dust, etc.
• Never leave the battery pack in food preparation areas, near heaters, or in any
other location where it can be exposed to oil smoke or steam. Doing so creates the
danger of fire and electric shock.
• Do not use or store the battery pack where it is exposed to direct sunlight, sources
of heat, or any other location subject to high temperatures. Doing so creates the
danger of battery pack leakage, overheating, smoke emission, fire, or rupture.
Battery Pack Charging Precautions
•Charge the battery pack in an area where the temperature is in the range of
10°C to 30°C.
Low temperature can inhibit charging and cause deterioration of the battery
pack. The battery pack also cannot charge fully under high temperatures.
•Charging of a battery pack may become disabled (and the charge lamp may
fail to light) whenever heat from the DVD player caused the internal
temperature of an attached battery pack to rise above certain level. When this
happens, remove the battery pack from the DVD player. Charging will start
automatically when battery pack internal temperature drops to a safe level.
Storage Precautions
•Before storing a battery pack, first fully discharge it by using it to power DVD
player operation. Store the battery pack in a cool place.
Storing a battery while it is charged or in a hot location promotes deterioration.
87
GB
Page 91

Troubleshooting
Whenever you are having problems with your DVD player, check the following
points before requesting service.
Problem
Power does not
turn on or suddenly turns off.
Power does not
turn on or
suddenly turns
off under
battery power.
The remote control
unit does not work.
No image appears
or no audio is
produced.
Recommended Action
• Make sure the power plug of the AC adapter is
plugged into a power outlet.
• Try turning power off and then back on again.
• Check if the battery pack is charged. If not,
charge it.
• Make sure that batteries are loaded correctly.
• Check for dead batteries.
• Make sure the signal emitter of the remote
control unit is pointed at the remote sensor of
the DVD player.
• Make sure the remote control unit is not too far
from the DVD player.
• Make sure nothing is blocking the signal path
between the remote control unit and DVD
player.
• Make sure video and audio cords are connected
correctly.
• Make sure the disc you are trying to play is a
DVD (Region 2 or ALL), video CD, or audio CD.
• Use a disc that is free of dirt and scratches.
• Make sure the disc is not upside-down.
• The DVD player’s pickup lens may be dirty. Take
the DVD player to your nearest service centre
for cleaning.
• If you want to display images on a connected TV,
make sure the TV channel is set to VIDEO or AV.
Page
33
38
34
40
29-32
12-14
7
20
6
30
The micro-controller built into the DVD player can be affected by
external electrical noise and interference. If you suspect this is the
problem, try turning the DVD player off and then back on again.
GB
88
Page 92

Troubleshooting
Problem
Nothing appears
on the screen.
No audio is output.
Nothing appears
on the screen and
no audio is output.
Image and sound
are distorted
No image from
a connected
device appears
on the screen
of the DVD
player.
INPUT mode
No image from
the DVD player
appears on the
screen of a
connected
device.
The volume of
DVD mode
Dolby Digital
audio from a
DVD is too low.
Recommended Action
• Check the DVD player’s overall screen
brightness setting to make sure it is not “OFF”.
• Make sure the display panel is open. Audio is
not output through the DVD player speakers
while the display panel is closed.
• Check the volume dial setting. If it is at zero,
rotate the dial to turn up the volume.
• Make sure headphones are not connected to
the headphones jack. Connecting headphones
disables the DVD player’s speakers.
• Make sure the DVD player is in the DVD mode
and not the INPUT mode.
• Use a disc that is free of scratches.
• Make sure that the DVD player’s built-in
speakers are not receiving interference from
external speakers.
• Make sure video and audio cords are connected
correctly.
• Make sure you are not trying to use the S-video
cord for input. The S-video cord is for output
only.
• Make sure the DVD player is in the INPUT
mode and not the DVD mode.
• Make sure the channel of the connected TV is
set to VIDEO or AV.
• Make sure video and audio cords are connected
correctly.
• Change the “COMPRESSION” setting to “ON”.
This setting compensates for the relatively low
average volume level of Dolby Digital, which is
used to provide the widest possible dynamic
range.
Page
82
30
21, 58
28
41
7, 58
–
29
83
30
47
89
GB
Page 93

Troubleshooting
Problem Recommended Action
The battery
pack does not
charge.
• Make sure the main power switch is in the
“OFF” position. The battery pack does not
charge when it is connected to the DVD player
while DVD player power is turned on.
• A warm battery takes longer than normal to
charge. Wait until the battery cools to normal
temperature before trying to charge it.
Power does
not turn on.
The battery
charge lamp
does not light
(the battery
pack does not
charge).
• Replace the battery pack with a charged one or
switch to AC adapter power.
• Charging of a battery pack may become
disabled (and the charge lamp may fail to light)
whenever heat from the DVD player causes the
internal temperature of an attached battery pack
to rise above certain level. When this happens,
remove the battery pack from the DVD player.
Charging will start automatically when battery
pack internal temperature drops to a safe level.
• Make sure the temperature of the battery pack
is within the allowable temperature range of
10°C to 30°C for charging.
Battery Pack Operation
The battery
charge lamp is
flashing.
• Check to make sure that the AC adapter DC
cable is connected correctly.
Try disconnecting the AC adapter DC cable from
•
the battery pack and then reconnecting it. If the
battery pack is attached to the DVD player, first
disconnect the battery pack DC cable from the
DVD player before performing the above step.
• Try charging another battery pack. The same
symptom occurring with another battery pack
may indicate a problem with the AC adapter. If
the other battery pack charges normally, it can
indicate a problem with the first battery pack or
that the first battery pack has reached the end
of its normal service life.
Cannot record to
an MD.
When recording from
a CD to an MD over
an optical digital
connection, the CD
track numbers and
MD track numbers
do not match.
• Make sure the connected audio equipment is
turned on.
Check if linear PCM is selected as the audio mode.
•
•
When the space between tracks of some disks is
very short, two tracks can be recorded as a single
track, which causes a mismatch of track numbers.
• CD and MD track numbers may not match when
recording from a CD using programmed play or
direct skip.
Page
34, 35
–
33-36
–
86
33
–
–
72
–
GB
90
Page 94

Error Indicators and Warnings
The error indicators and warnings described below appear on the display
whenever there is a disk play problem, operational problem, etc.
Display Meaning
• The region number of the DVD
you are attempting to play is not 2
or ALL.
• The disc you are attempting to
play is not compatible with this
DVD player.
• You are attempting a play
operation while there is no disc in
the disc compartment.
• The disc you are using does not
Low battery warning
support the operation you are
trying to perform.
• You are trying to perform a wrong
operation.
• Battery power is low. DVD player
power turns off automatically.
Replace the battery pack with a
charged one or switch to AC
adapter power.
■ Power/Standby Lamp
Lamp Status
Lit red
Lit green
Meaning
• Standby
Press OPERATE or use the DVD
player’s main power switch to
restore full power.
• Display brightness is “OFF” or the
display panel is shut while DVD
main power is turned on.
91
GB
Page 95

Specifications
Product Portable DVD Player
Supported Disc Types DVD (Region Number 2, ALL), Video CD, Audio CD
Signal System NTSC/PAL
Video Input/Output Input/Output Jack:Mini jack × 1 (accepts
S-Video Output Y Output Level: 1Vp-p (75Ω)
Audio Input/Output Input/Output Jack: Mini jack × 1 (accepts
Digital Audio Interface Optical digital output: Mini jack (shared with
Headphones Output Output Jack: Mini jack (stereo)
Power Requirements AC Adapter: 9V DC
Power Consumption Main Power On: 11W average (15.5W maximum)
Model DV-L70S/DV-L70BL
Input/Output Levels: 1Vp-p (75Ω)
C Output Level: 0.286Vp-p (75Ω)
Output Jack:
Input/Output Levels: 2Vrms (1kHz, 0dB)
Audio Output 0.8W + 0.8W
Display Screen Size: 7 inches (87.8 (H) × 155.5 (W) mm)
Type: Transmissive TN liquid crystal panel
Drive: TFT (thin transistor) active matrix
Pixels: 336,960 (234 (H) × 480 (W) × 3),
Effective Pixel Rate: 99.99% minimum
Speakers Two 28mm round speakers
Light Source Internal (fluorescent)
Video Signal Horizontal Resolution: 480 lines (DVD)
S/N Ratio: 60dB minimum
Audio Signals Frequency Characteristics:
Linear PCM DVD: 4Hz to 22kHz (48kHz sampling)/
CD: 4Hz to 20kHz (EIAJ)
(Audio MPEG Version 2.0)
S/N Ratio: CD: 95dB 1kHz (EIAJ)
Dynamic Range: Linear PCM DVD: 94dB (EIAJ)
Total Harmonic Distortion Ratio: 0.006% maximum
(AC Adapter) Standby: 0.5W (Power/standby lamp lit red)
Main Power Off: 0W
Dimensions 188 (W) × 141 (D) × 25.4 (H) mm
(except for projections)
supplied S-video/video cord)
Mini jack (shared with Video In/Out) × 1
(accepts supplied S-video/video cord)
supplied audio cord)
audio In/Out)
4Hz to 44kHz (96kHz sampling)
CD: 94dB (EIAJ)
(EIAJ)
GB
92
Page 96

Specifications
Weight 620g
Operating Temperature 5°C to 35°C
Operating Humidity 80% RH maximum
Storage Temperature –20°C to 40°C
AC Adapter Specifications
Power Requirements 110 to 240V AC, 50/60Hz
Rated Input Capacity DVD Operation: 30VA
Charging (110V): 30VA
Rated Output DVD Operation: 9V DC
Charging: 9V DC
Dimensions 58 (W) × 104 (D) × 275 (H) mm
Weight 170g
Specifications are subject to change without notice.
Weight and dimensions are approximate.
Digital Output (Linear PCM)
• The digital output format used in this DVD player is linear PCM audio
sampled at 44.1kHz or 48kHz. Linear PCM sound for DVD video discs
sampled at 96kHz cannot be output digitally. Check the disc jacket for
information on the audio sampling used.
93
GB
Page 97

Glossary
Backlight
Chapter
Compression
(Dolby Digital
output level)
Digital gamma
Digital super
picture
Display colour
settings
Dolby Digital
(5.1 channel)
Dolby Virtual
Surround
DTS
Built-in fluorescent light that supplies screen illumination.
A section inside a title.
Setting that increases the average volume of Dolby Digital
audio when playing a DVD.
Corrects for gradations in dark areas of images to make
images clearer.
Enhances the fine detail of the image and outlines of the
objects it contains.
Settings for controlling the brightness, and contrast of
image colours.
A sound system developed by Dolby Laboratories Inc. that
gives movie theater ambience to audio output when the
DVD player is connected to a Dolby Digital 5.1 channel
processor or amplifier.
Provides rich surround sound by downmixing Dolby Digital
5.1 channel and Dolby Surround (Pro Logic) to 2-channel
audio.
Theater audio system by Digital Theater Systems Inc. Six
audio channels are used to create accurate sound field
positioning and realistic sound.
DVD mode
GUI
INPUT mode
Letter box
43:
GB
94
LB
DVD player mode for playing DVDs.
Graphical User Interface. The GUI uses symbols and
marks to create an easy-to-understand interface for
performing such operations as: switching the angle of the
DVD, controlling digital gamma correction, making disc
playback settings, etc.
DVD player mode for playing the audio and video from a
connected device.
Screen size that cuts off the top and bottom of the image
to allow playing of Wide (16:9) software on a connected
4:3 TV.
Page 98

Glossary
Linear PCM audio
Pan scan
P S
43:
Parental level
Pickup
Playback control
(PBC)
Region number
Screen size
Title
Title menu
Audio signal recording system used for audio CDs.
Screen size that cuts off the sides of the image to allow
playing of Wide (16:9) software on a connected 4:3 TV.
Setting that makes it possible to control the types of
scenes that can be played by the DVD player. This setting
helps to keep children from viewing adult material.
Laser device that reads the data from a disc for playback.
This video CD system allows selection of scenes or
information from an on-screen menu.
Number identifying a geographic region of compatibility
for a DVD.
This setting makes it possible to fit an image onto the
screen by cutting off the top and bottom, cutting off the
sides, or by stretching the image. You can set the screen
size by selecting SIDE BAR, STRETCH, ZOOM or SMART
STRETCH.
When a DVD contains multiple movies, each movie is
called a “title”.
This is a menu displayed by some DVDs for selection of
chapters and subtitle set. The title menu is also called a
“top menu”.
Track
View angle
One tune on an audio CD.
Some DVDs have recordings from multiple angles, so you
can select a view angle when playing the disc.
95
GB
Page 99

SHARP CORPORATION
Osaka, Japan
Printed in Japan
Impreso en Japón
Tryckt i Japan
TINS-3709GEZZ
T2315-A
 Loading...