

Page 1
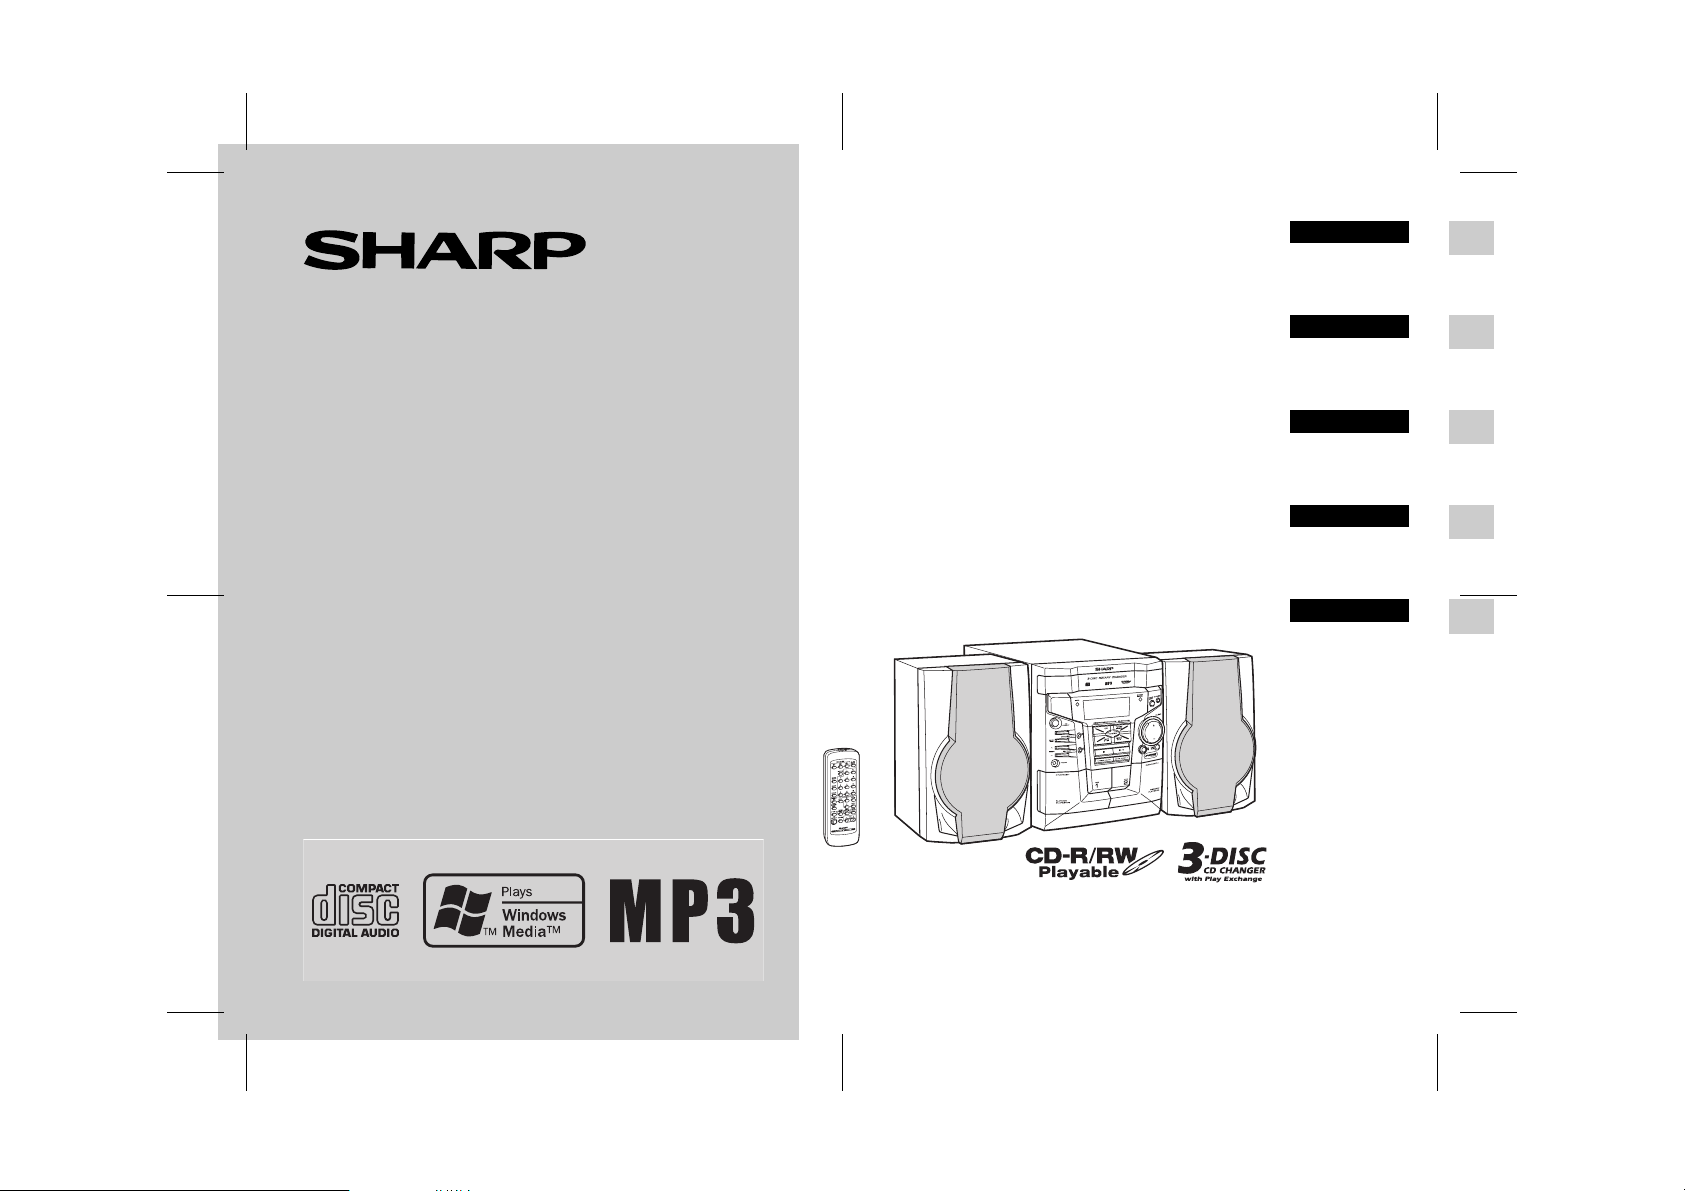
MINIWIEŻA
MIKRO KOMPONENS RENDSZER
MINIKOMPONENTNÍ SYSTÉM
KOMPONENTOVÝ MIKROSYSTÉM
MINI COMPONENT SYSTEM
MODEL
MODEL
MODEL
MODEL
MODEL
CD-MPX100H
INSTRUKCJA OBSŁUGI
KEZELÉSI ÚTMUTATÓ
NÁVOD K POUŽITÍ
NÁVOD NA POUŽÍVANIE
OPERATION MANUAL
W skład miniwieży CD-MPX100H wchodzi urządzenie główne
(CD-MPX100H) oraz komplet kolumn (CP-MPX100H).
CD-MPX100H mikro komponens rendszer. A következő
elemeket tartalmazza: CD-MPX100H (központi egység) és
CP-MPX100H (hangszórórendszer).
Minikomponentní systém CD-MPX100H se skládá z hlavní
jednotky CD-MPX100H a systému reproduktorů CP-MPX100H.
Komponentový mikrosystém CD-MPX100H pozostávajúci z
jednotky CD-MPX100H (hlavná jednotka) a CP-MPX100H
(reproduktorový systém).
CD-MPX100H Mini Component System consisting of
CD-MPX100H (main unit) and CP-MPX100H (speaker system).
Y
A
L
P
S
I
D
POLSKI
Patrz strony od
i do x oraz od
PL-1 do PL-32.
MAGYAR
Tekintse át az
oldalakat i-t
ig és az M-1-től
M-32-ig.
Viz strany i až x
a Č-1 až
Č-32.
SLOVENSKY
Pozrite si,
prosím, strany i
až x a S-1 až
S-32.
Please refer to
pages i to x and
E-1 to E-32.
ČESKY
ENGLISH
ő
l x-
1
2
3
4
5
04/10/6 CD-MPX100H(3)_FRONT.fm
TINSZA162AWZZ
Page 2
CD-MPX100H
i
04/10/6 CD-MPX100H(3)_common.fm
TINSZA162AWZZ
Page 3

CD-MPX100H
SPECIAL NOTES
This equipment complies with the requirements of Directives
89/336/EEC and 73/23/EEC as amended by 93/68/EEC.
When the ON/ STAND-BY button is set at STAND-BY position,
mains voltage is still present inside the unit.
When the ON/ STAND-BY button is set at STAND- BY position,
the unit may be brought into operation by the timer mode or
remote control.
Warning:
This unit contains no user serviceable parts. Never remove
covers unless qualified to do so. This unit contains dangerous
voltages, always remove mains plug from the socket before any
service operation and when not in use for a long period.
Audio-visual material may consist of copyrighted works which
must not be recorded without the authority of the owner of the
copyright. Please refer to relevant law in your country.
Warning:
To prevent fire or shock hazard, do not expose this appliance
to dripping or splashing. No objects filled with liquids, such
as vases, should be placed on the apparatus.
This product is classified as a CLASS 1 LASER PRODUCT.
CAUTION
This product contains a low power laser device. To ensure
continued safety do not remove any cover or attempt to gain
access to the inside of the product. Refer all servicing to
quali-fied personnel.
NOTE
Supply of this product does not convey a license nor imply any right
to distribute content created with this product in revenue-generating
broadcast systems (terrestrial, satellite, cable and/or other distribution channels), revenue-generating streaming applications (via Internet, intranets and/or other networks), other revenue-generating
content distribution systems (pay-audio or audio-on-demand applications and the like) or on revenue-generating physical media (compact discs, digital versatile discs, semiconductor chips, hard drives,
memory cards and the like). An independent license for such use is
required. For details, please visit http://mp3licensing.com
MPEG Layer-3 audio coding technology licensed from Fraunhofer
IIS and Thomson.
.
v
04/10/6 CD-MPX100H(3)_common.fm
TINSZA162AWZZ
Page 4

Attention: Your product is
marked with this symbol.
It means that used
electrical and electronic
products should not be
mixed with general
household waste. There is
a separate collection
system for these products.
CD-MPX100H
A. Information on Disposal for Users (private households)
1. In the European Union
Attention: If you want to dispose of this equipment, please do not use the ordinary dust bin!
Used electrical and electronic equipment must be treated separately and in accordance with legislation
that requires proper treatment, recovery and recycling of used electrical and electronic equipment.
Following the implementation by member states, private households within the EU states may return
their used electrical and electronic equipment to designated collection facilities free of charge*. In some
countries* your local retailer may also take back your old product free of charge if you purchase a similar
new one.
*) Please contact your local authority for further details.
If your used electrical or electronic equipment has batteries or accumulators, please dispose of these
separately beforehand according to local requirements.
By disposing of this product correctly you will help ensure that the waste undergoes the necessary
treatment, recovery and recycling and thus prevent potential negative effects on the environment and
human health which could otherwise arise due to inappropriate waste handling.
2. In other Countries outside the EU
If you wish to discard this product, please contact your local authorities and ask for the correct method of
disposal.
For Switzerland: Used electrical or electronic equipment can be returned free of charge to the dealer,
even if you don't purchase a new product. Further collection facilities are listed on the homepage of
www.swico.ch or www.sens.ch.
B. Information on Disposal for Business Users
1. In the European Union
If the product is used for business purposes and you want to discard it:
Please contact your SHARP dealer who will inform you about the take-back of the product. You might be
charged for the costs arising from take-back and recycling. Small products (and small amounts) might be
taken back by your local collection facilities.
For Spain: Please contact the established collection system or your local authority for take-back of your
used products.
2. In other Countries outside the EU
If you wish to discard of this product, please contact your local authorities and ask for the correct method
of disposal.
04/10/6 CD-MPX100H(3)_common.fm
x
TINSZA162AWZZ
Page 5
CD-MPX100H
ENGLISH
Introduction
ENGLISH
Contents
Thank you for purchasing this SHARP product. To obtain the best
performance from this product, please read this manual carefully. It
will guide you in operating your SHARP product.
Accessories
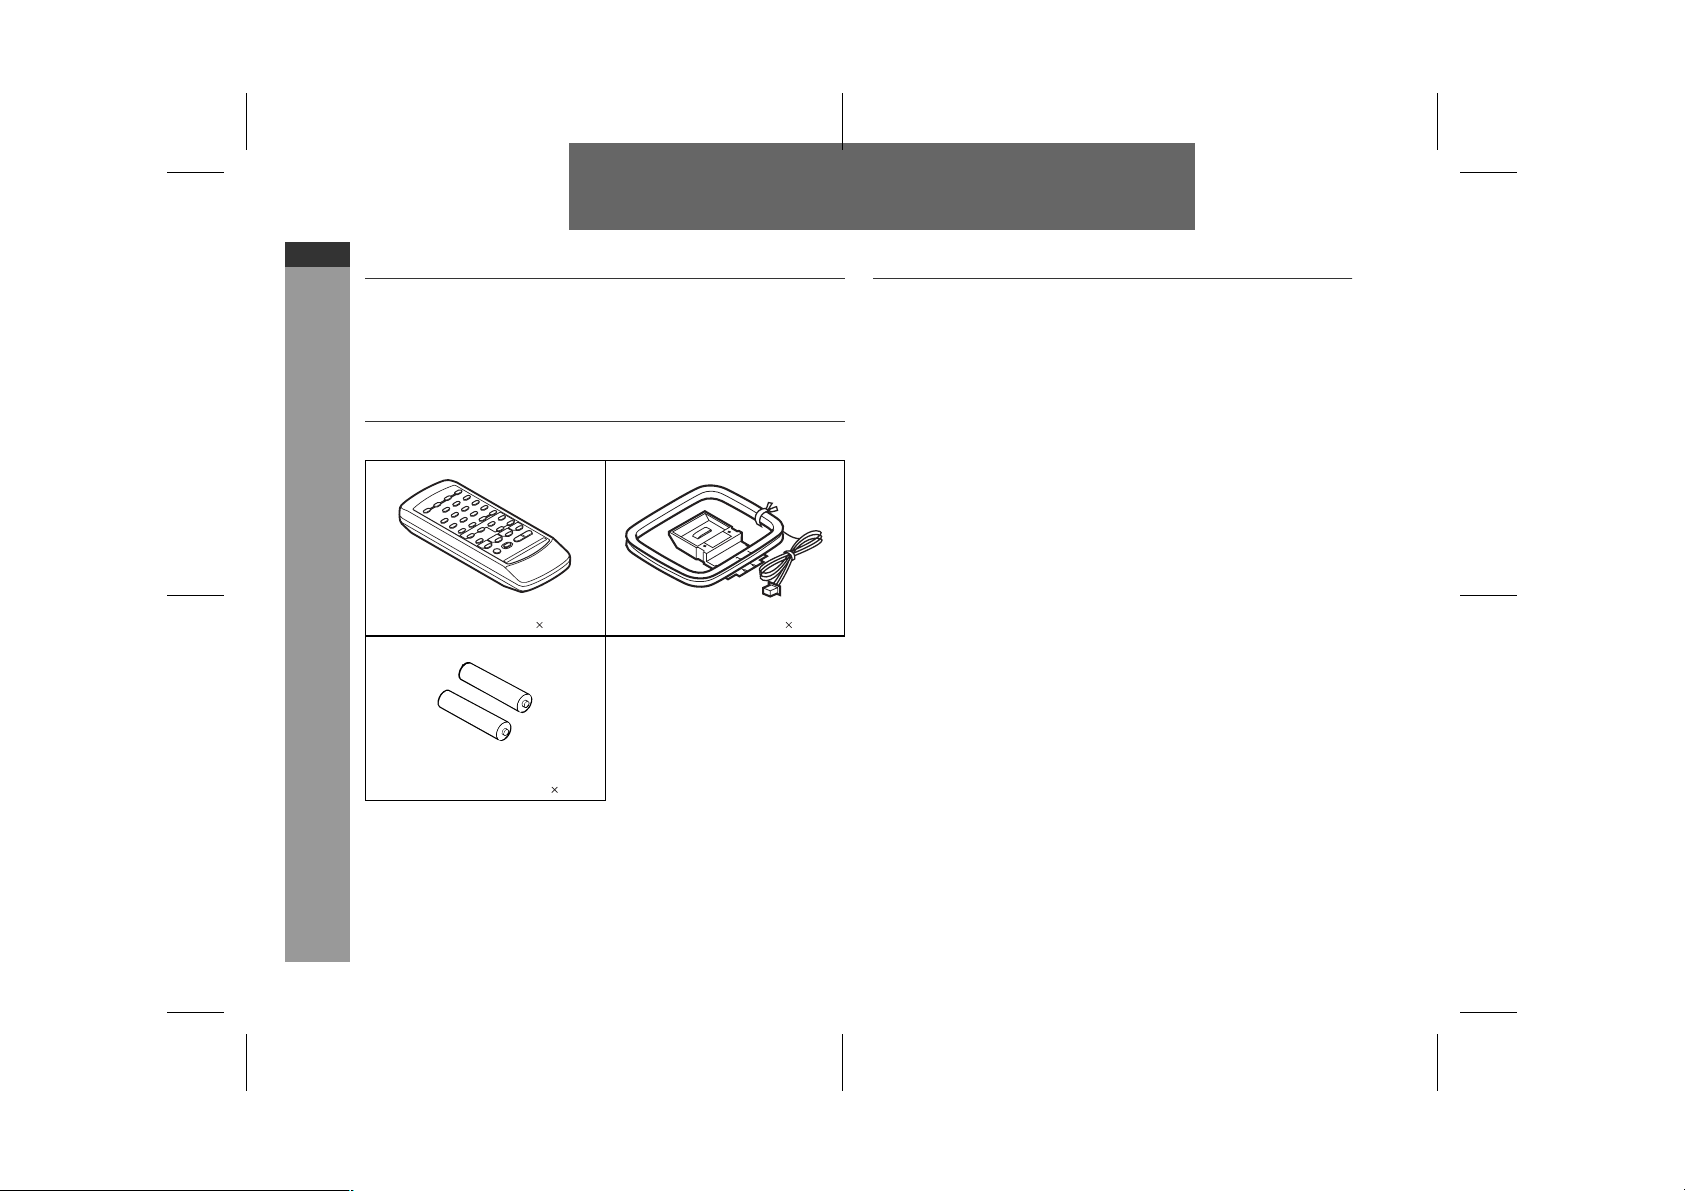
Please confirm that the following accessories are included.
Remote control 1 FM/AM loop aerial 1
General Information
"AA" size battery (UM/SUM-3,
R6, HP-7 or similar) 2
Note:
Only the above accessories are included.
Page
■
General Information
Precautions . . . . . . . . . . . . . . . . . . . . . . . . . . . . . . . . . . . . . . . . . . 2
Controls and indicators . . . . . . . . . . . . . . . . . . . . . . . . . . . . . 3 - 5
■
Preparation for Use
System connections . . . . . . . . . . . . . . . . . . . . . . . . . . . . . . . 6 - 8
Remote control . . . . . . . . . . . . . . . . . . . . . . . . . . . . . . . . . . . . . . . 9
■
Basic Operation
General control . . . . . . . . . . . . . . . . . . . . . . . . . . . . . . . . . . . . . . 10
Setting the clock . . . . . . . . . . . . . . . . . . . . . . . . . . . . . . . . . . . . 11
■
CD or MP3/WMA disc Playback
Listening to a CD or MP3/WMA disc . . . . . . . . . . . . . . . . 12 - 14
Advanced CD or MP3/WMA disc playback . . . . . . . . . . . 15 - 17
■
Radio
Listening to the radio . . . . . . . . . . . . . . . . . . . . . . . . . . . . . 18 - 19
■
Tape Playback
Listening to a cassette tape (TAPE 1 or TAPE 2) . . . . . . 20 - 21
■
Tape Recording
Recording to a cassette tape . . . . . . . . . . . . . . . . . . . . . . 21 - 23
■
Advanced Features
Timer and sleep operation . . . . . . . . . . . . . . . . . . . . . . . . 24 - 27
Enhancing your system . . . . . . . . . . . . . . . . . . . . . . . . . . . . . . . 28
■
References
Troubleshooting chart . . . . . . . . . . . . . . . . . . . . . . . . . . . . 29 - 31
Maintenance . . . . . . . . . . . . . . . . . . . . . . . . . . . . . . . . . . . . . . . . 31
Specifications . . . . . . . . . . . . . . . . . . . . . . . . . . . . . . . . . . . . . . . 32
E-1
9/3/05 CD-MPX100H_1.fm
TINSZA162AWZZ
Page 6
Precautions
■
General
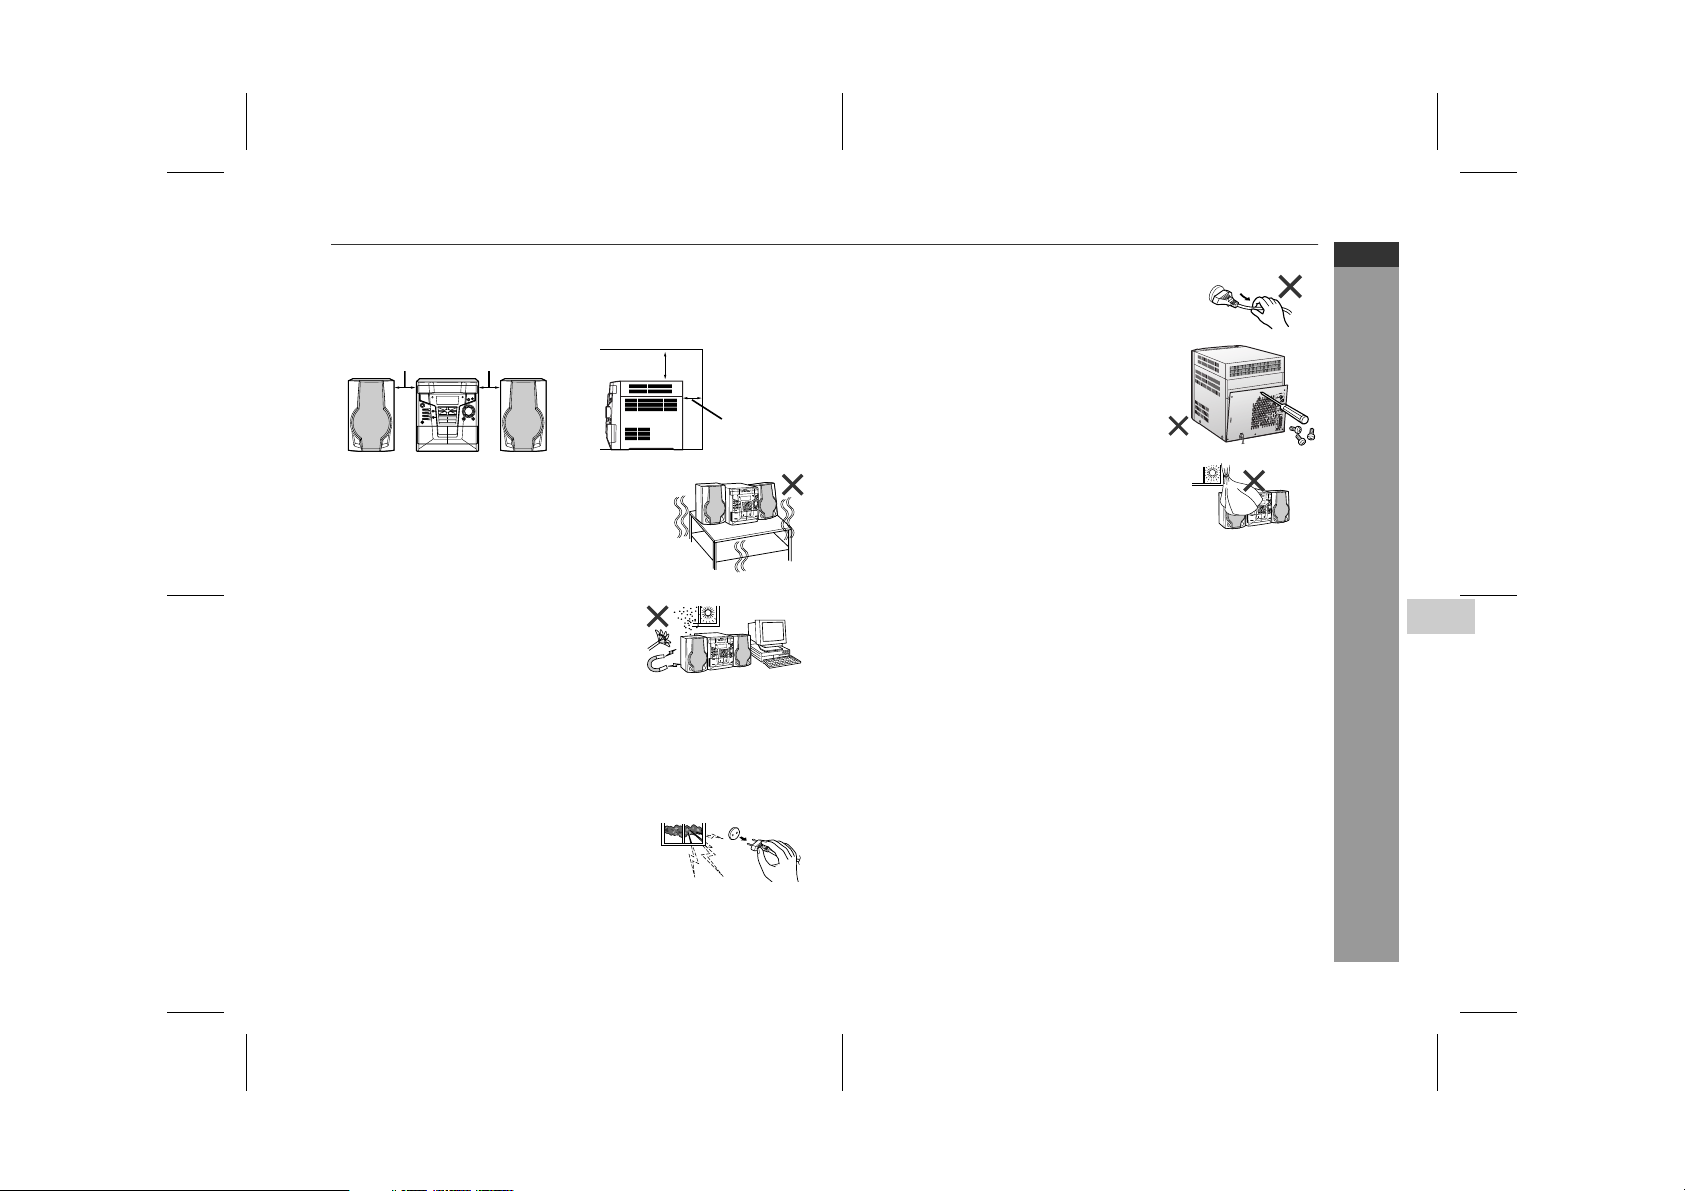
Please ensure that the equipment is positioned in a well ventilated
●
area and ensure that there is at least 10 cm (4") of free space
along the sides, top and back of the equipment.
10 cm (4")10 cm (4")
Use the unit on a firm, level surface free from
●
vibration.
Keep the unit away from direct sunlight,
●
strong magnetic fields, excessive dust,
humidity and electronic/electrical equipment (home computers, facsimiles, etc.)
which generate electrical noise.
Do not place anything on top of the unit.
●
Do not expose the unit to moisture, to temperatures higher than
●
60°C (140°F) or to extremely low temperatures.
If your system does not work properly, disconnect the AC power
●
lead from the wall socket. Plug the AC power lead back in, and
then turn on your system.
In case of an electrical storm, unplug the
●
unit for safety.
10 cm (4")
10 cm (4")
Hold the AC power plug by the head when
●
removing it from the wall socket, as pulling
the lead can damage internal wires.
●
Do not remove the outer cover, as this
may result in electric shock. Refer internal service to your local SHARP service
facility.
The ventilation should not be impeded by
●
covering the ventilation openings with
items, such as newspapers, tablecloths,
curtains, etc.
No naked flame sources, such as lighted candles, should be
●
placed on the apparatus.
Attention should be drawn to the environmental aspects of battery
●
disposal.
The apparatus is designed for use in moderate climate.
●
This unit should only be used within the range of 5°C - 35°C (41°F-
●
95°F).
Warning:
The voltage used must be the same as that specified on this unit. Using this product with a higher voltage other than that which is specified is dangerous and may result in a fire or other type of accident
causing damage. SHARP will not be held responsible for any damage resulting from use of this unit with a voltage other than that which
is specified.
■
Volume control
The sound level at a given volume setting depends on speaker efficiency, location, and various other factors. It is advisable to avoid exposure to high volume levels. Do not turn the volume on to full at
switch on and listen to music at moderate levels.
CD-MPX100H
ENGLISH
5
1
2
General Information
3
4
5
6
7
9/3/05 CD-MPX100H_1.fm
E-2
TINSZA162AWZZ
Page 7
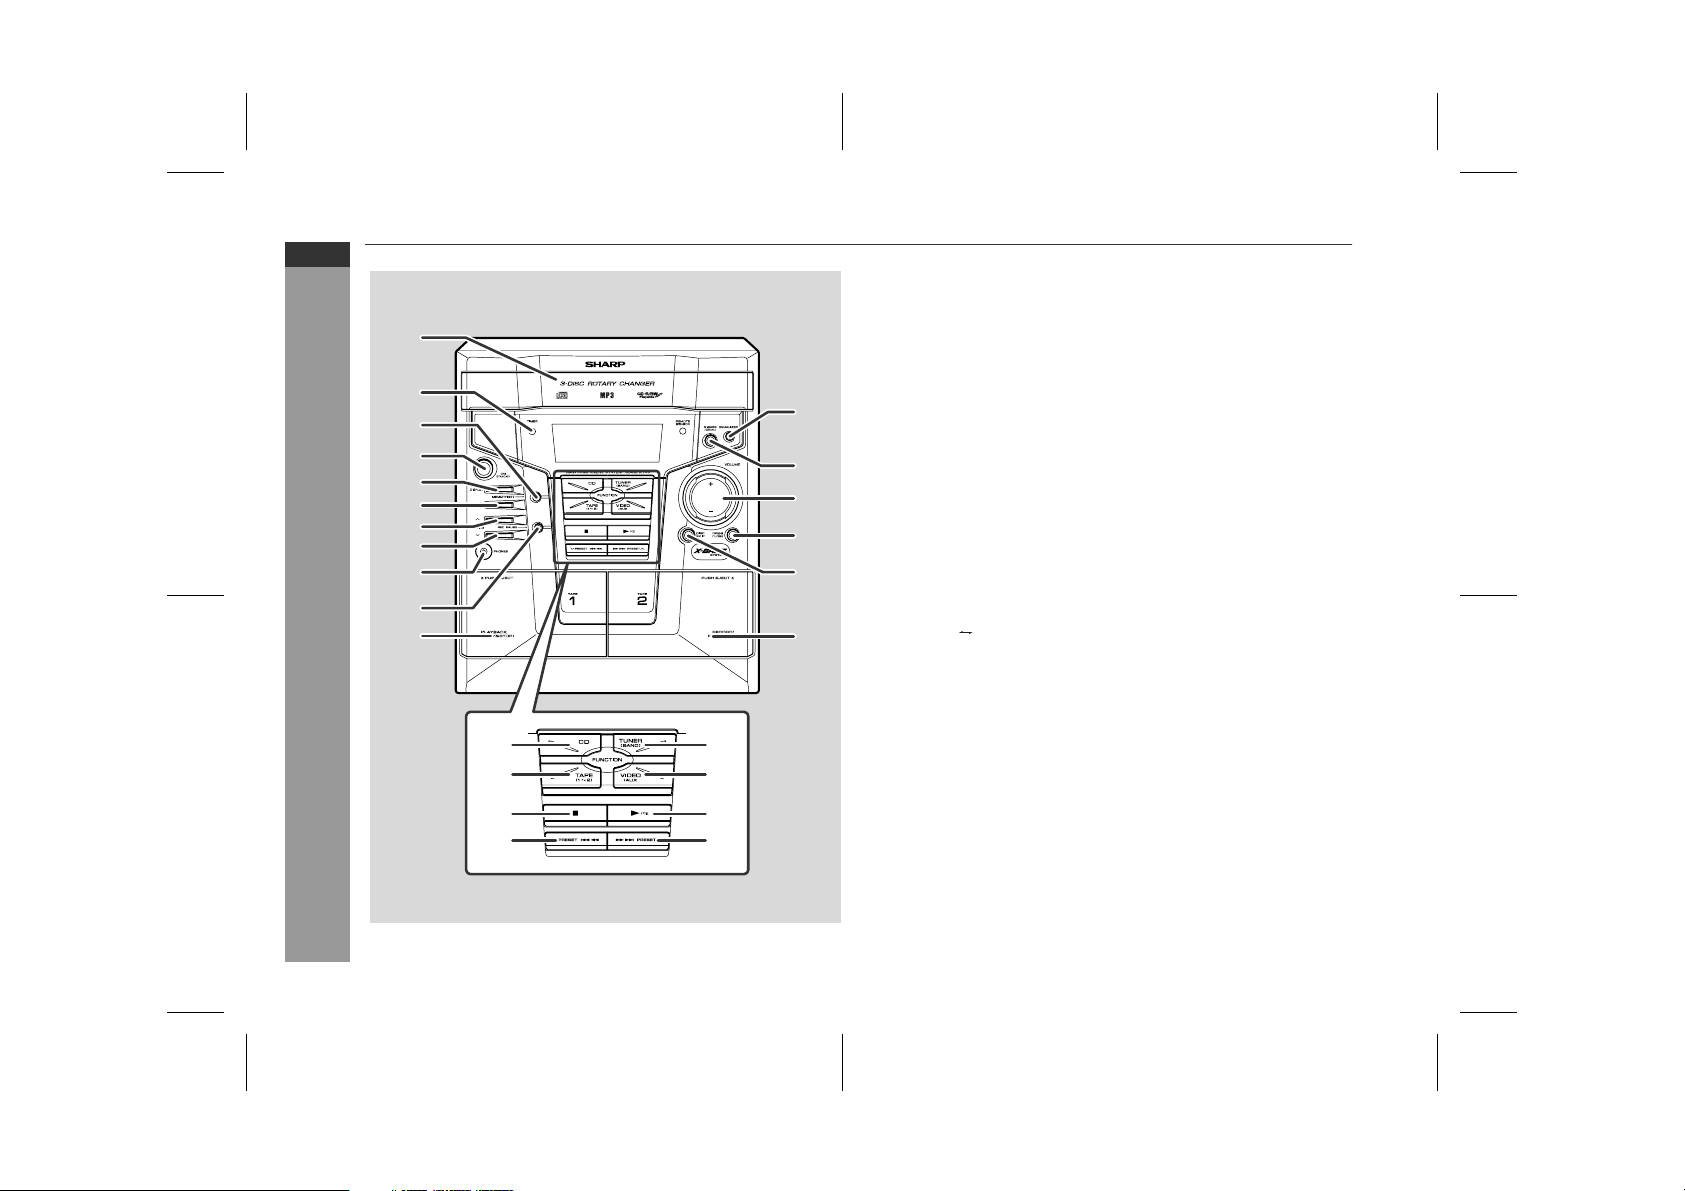
CD-MPX100H
ENGLISH
Controls and indicators
1
2
3
4
5
6
7
8
9
10
11
General Information
18
19
22
23
12
13
14
16
15
17
■
Front panel
1. Disc Tray . . . . . . . . . . . . . . . . . . . . . . . . . . . . . . . . . . . . . . . . 13
2. Timer Set Indicator . . . . . . . . . . . . . . . . . . . . . . . . . . . . . . . . 25
3. Memory/Set Button . . . . . . . . . . . . . . . . . . . 11, 17, 19, 24, 27
4. On/Stand-by Button . . . . . . . . . . . . . . . . . . . . . . . . . . . . . . . . 8
5. Display Button . . . . . . . . . . . . . . . . . . . . . . . . . . . . . . . . . . . 15
6. Clock/Timer Button . . . . . . . . . . . . . . . . . . . . . . . . . 11, 24, 27
7. Tuning Up Button . . . . . . . . . . . . . . . . . . . . . . . . . . . . . . . . . 18
8. Tuning Down Button . . . . . . . . . . . . . . . . . . . . . . . . . . . . . . 18
9. Headphone Socket . . . . . . . . . . . . . . . . . . . . . . . . . . . . . . . . 28
10. Tape 2 Record Pause Button . . . . . . . . . . . . . . . . . . . . 22, 23
11. Tape 1 Cassette Compartment . . . . . . . . . . . . . . . . . . . . . . 20
12. Equalizer Mode Select Button . . . . . . . . . . . . . . . . . . . . . . . 10
13. Extra Bass/Demo Mode Button . . . . . . . . . . . . . . . . . . . . 8, 10
14. Volume Up and Down Buttons . . . . . . . . . . . . . . . . . . . 10, 24
15. Disc Skip Button . . . . . . . . . . . . . . . . . . . . . . . . . . . . . . . . . . 12
16. Disc Tray Open/Close Button . . . . . . . . . . . . . . . . . . . . . . . 12
17. Tape 2 Cassette Compartment . . . . . . . . . . . . . . . . . . . . . . 20
18. CD Button . . . . . . . . . . . . . . . . . . . . . . . . . . . . . . . . . . . . . . . 12
19. Tape (1 2) Button . . . . . . . . . . . . . . . . . . . . . . . . . . . . . . . 20
20. Disc or Tape Stop Button . . . . . . . . . . . . . . . . . . . . . . . 12, 20
21. Disc Track Down or Fast Reverse, Tape 2 Rewind,
Tuner Preset Down, Time Down Button . . . . . . 11, 14, 19, 21
22. Tuner (Band) Button . . . . . . . . . . . . . . . . . . . . . . . . . . . . . . 18
23. Video/Auxiliary Button . . . . . . . . . . . . . . . . . . . . . . . . . . . . . 28
24. Disc Play or Repeat, Tape Play Button . . . . . . . . . 12, 16, 20
25. Disc Track Up or Fast Forward, Tape 2 Fast Forward,
Tuner Preset Up, Time Up Button . . . . . . . . . . . 11, 14, 19, 21
Reference page
E-3
20
21
24
25
9/3/05 CD-MPX100H_1.fm
TINSZA162AWZZ
Page 8
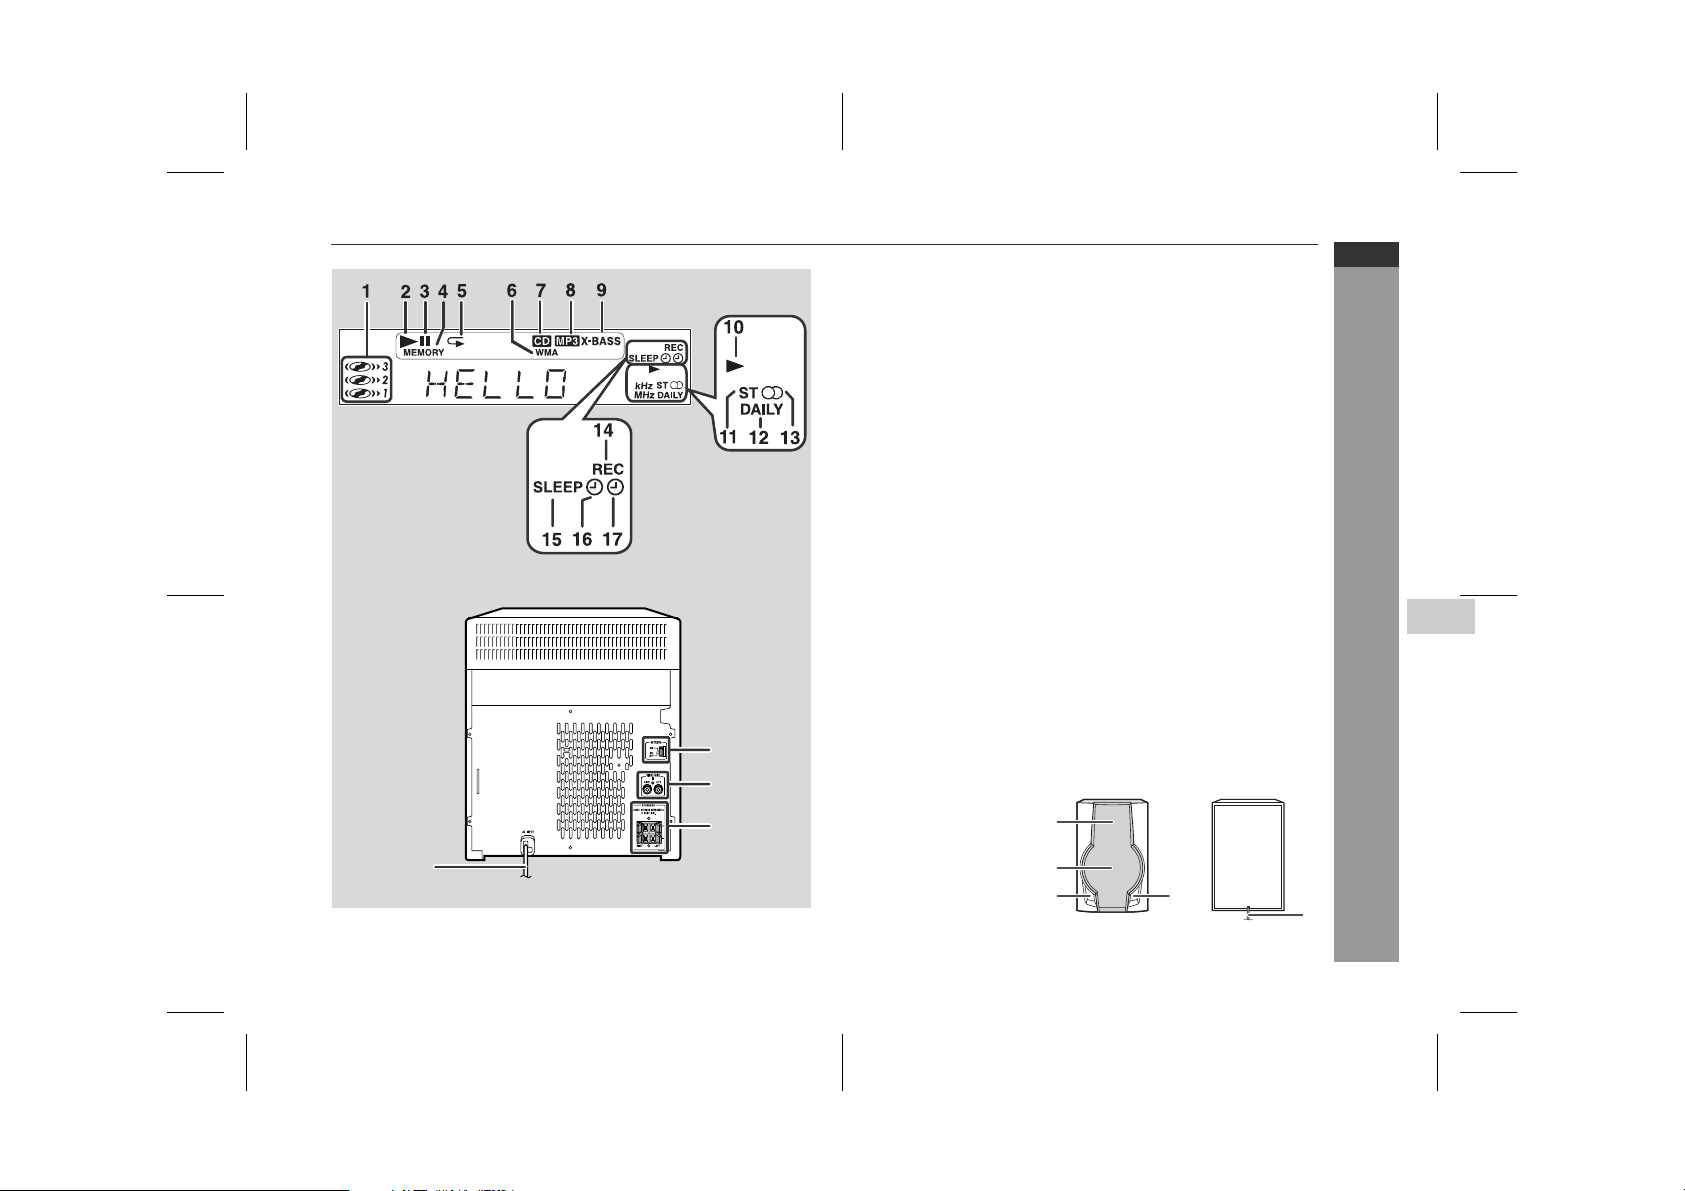
Controls and indicators (continued)
2
3
4
1
■
Display
1. Disc Number Indicators . . . . . . . . . . . . . . . . . . . . . . . . . . . . 17
2. CD Play Indicator . . . . . . . . . . . . . . . . . . . . . . . . . . . . . . . . . 14
3. CD Pause Indicator . . . . . . . . . . . . . . . . . . . . . . . . . . . . . . . 14
4. Memory Indicator . . . . . . . . . . . . . . . . . . . . . . . . . . . . . . . . . 19
5. CD Repeat Play Indicator . . . . . . . . . . . . . . . . . . . . . . . . . . 16
6. WMA Indicator . . . . . . . . . . . . . . . . . . . . . . . . . . . . . . . . . . . 13
7. CD Indicator . . . . . . . . . . . . . . . . . . . . . . . . . . . . . . . . . . . . . 13
8. MP3 Indicator . . . . . . . . . . . . . . . . . . . . . . . . . . . . . . . . . . . . 13
9. Extra Bass Indicator . . . . . . . . . . . . . . . . . . . . . . . . . . . . . . 10
10. Tape Play Indicator . . . . . . . . . . . . . . . . . . . . . . . . . . . . . . . 20
11. FM Stereo Mode Indicator . . . . . . . . . . . . . . . . . . . . . . . . . . 18
12. Daily Timer Indicator . . . . . . . . . . . . . . . . . . . . . . . . . . . . . . 25
13. FM Stereo Receiving Indicator . . . . . . . . . . . . . . . . . . . . . . 18
14. Tape 2 Record Indicator . . . . . . . . . . . . . . . . . . . . . . . . . . . 23
15. Sleep Indicator . . . . . . . . . . . . . . . . . . . . . . . . . . . . . . . . . . . 27
16. Timer Play Indicator . . . . . . . . . . . . . . . . . . . . . . . . . . . . . . . 25
17. Timer Recording Indicator . . . . . . . . . . . . . . . . . . . . . . . . . 25
■
Rear panel
1. AC Power Lead . . . . . . . . . . . . . . . . . . . . . . . . . . . . . . . . . . 6, 8
2. FM/AM Loop Aerial Socket . . . . . . . . . . . . . . . . . . . . . . . . 6, 7
3. Video/Auxiliary (Audio Signal) Input Sockets . . . . . . . . . . 28
4. Speaker Terminals . . . . . . . . . . . . . . . . . . . . . . . . . . . . . . . 6, 7
■
Speaker system
1. Tweeter
2. Woofer
3. Bass Reflex Duct
4. Speaker Wire
1
2
3
Reference page
Reference page
3
4
CD-MPX100H
ENGLISH
5
1
2
General Information
3
4
5
6
7
9/3/05 CD-MPX100H_1.fm
E-4
TINSZA162AWZZ
Page 9
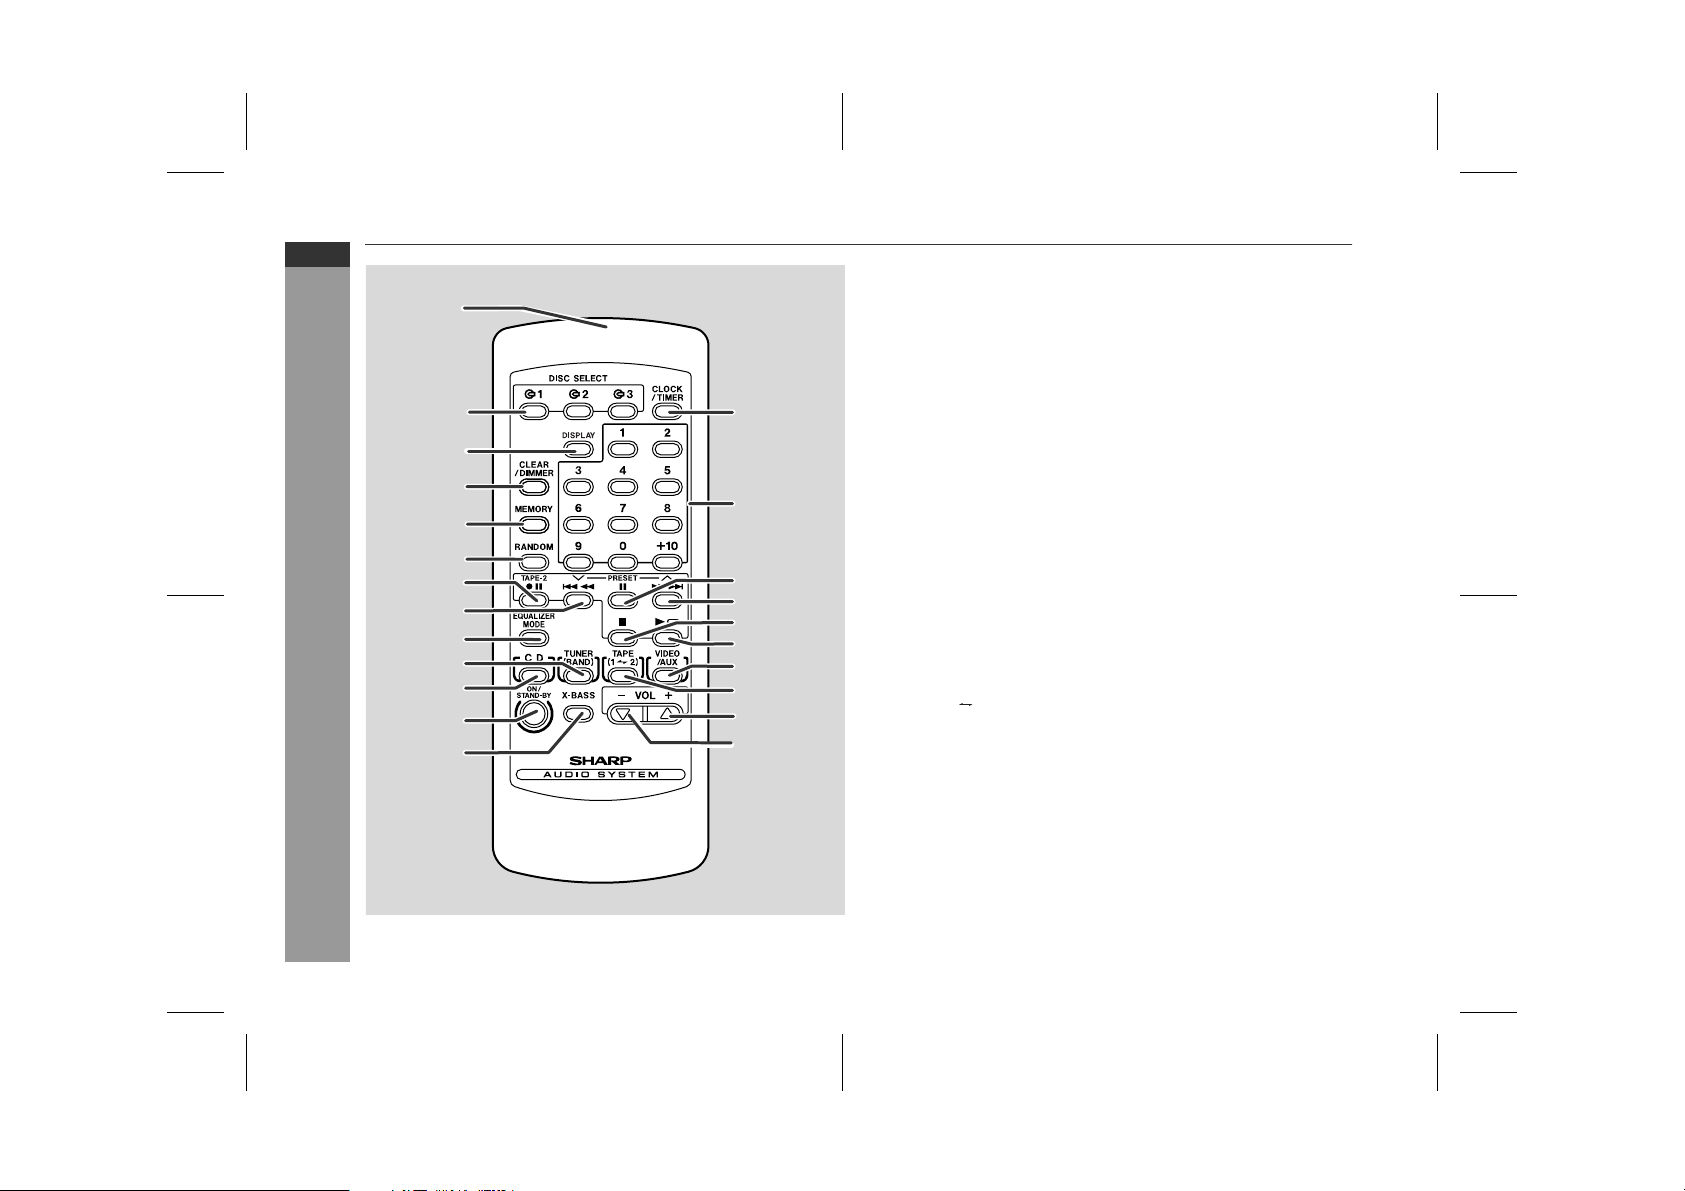
CD-MPX100H
ENGLISH
1
2
3
4
5
6
7
8
9
10
11
General Information
12
13
14
15
16
17
18
19
20
21
22
23
■
Remote control
1. Remote Control Transmitter . . . . . . . . . . . . . . . . . . . . . . . . . 9
2. Disc Number Select Buttons . . . . . . . . . . . . . . . . . . . . . 12, 22
3. MP3/WMA Display Button . . . . . . . . . . . . . . . . . . . . . . . . . . 15
4. Disc Clear/Dimmer Button . . . . . . . . . . . . . . . . . . . . . . . 10, 17
5. Memory Button . . . . . . . . . . . . . . . . . . . . . . 11, 17, 19, 24, 27
6. Disc Random Button. . . . . . . . . . . . . . . . . . . . . . . . . . . . . . . 16
7. Tape 2 Record Pause Button . . . . . . . . . . . . . . . . . . . . 22, 23
8. Disc Track Down or Fast Reverse, Tape 2 Rewind,
Tuner Preset Down, Time Down Button . . . . . . 11, 14, 19, 21
9. Equalizer Mode Select Button . . . . . . . . . . . . . . . . . . . . . . . 10
10. Tuner (Band) Button . . . . . . . . . . . . . . . . . . . . . . . . . . . . . . 18
11. CD Button . . . . . . . . . . . . . . . . . . . . . . . . . . . . . . . . . . . . . . . 12
12. On/Stand-by Button . . . . . . . . . . . . . . . . . . . . . . . . . . . . . . . . 9
13. Extra Bass Button . . . . . . . . . . . . . . . . . . . . . . . . . . . . . . . . 10
14. Clock/Timer Button . . . . . . . . . . . . . . . . . . . . . . . . . 11, 24, 27
15. Disc Direct Search Buttons . . . . . . . . . . . . . . . . . . . . . . . . . 16
16. Disc Pause Button. . . . . . . . . . . . . . . . . . . . . . . . . . . . . . . . . 14
17. Disc Track Up or Fast Forward, Tape 2 Fast Forward,
Tuner Preset Up, Time Up Button . . . . . . . . . . . 11, 14, 19, 21
18. Disc/Tape Stop Button . . . . . . . . . . . . . . . . . . . . . . . . . . 12, 21
19. Disc Play or Repeat/Tape Play Button . . . . . . . . . . 12, 16, 20
20. Video/Auxiliary Button . . . . . . . . . . . . . . . . . . . . . . . . . . . . . 28
21. Tape (1 2) Button. . . . . . . . . . . . . . . . . . . . . . . . . . . . . . . . 20
22. Volume Up Button . . . . . . . . . . . . . . . . . . . . . . . . . . . . . . . . 10
23. Volume Down Button . . . . . . . . . . . . . . . . . . . . . . . . . . . . . . 10
Reference page
E-5
9/3/05 CD-MPX100H_1.fm
TINSZA162AWZZ
Page 10
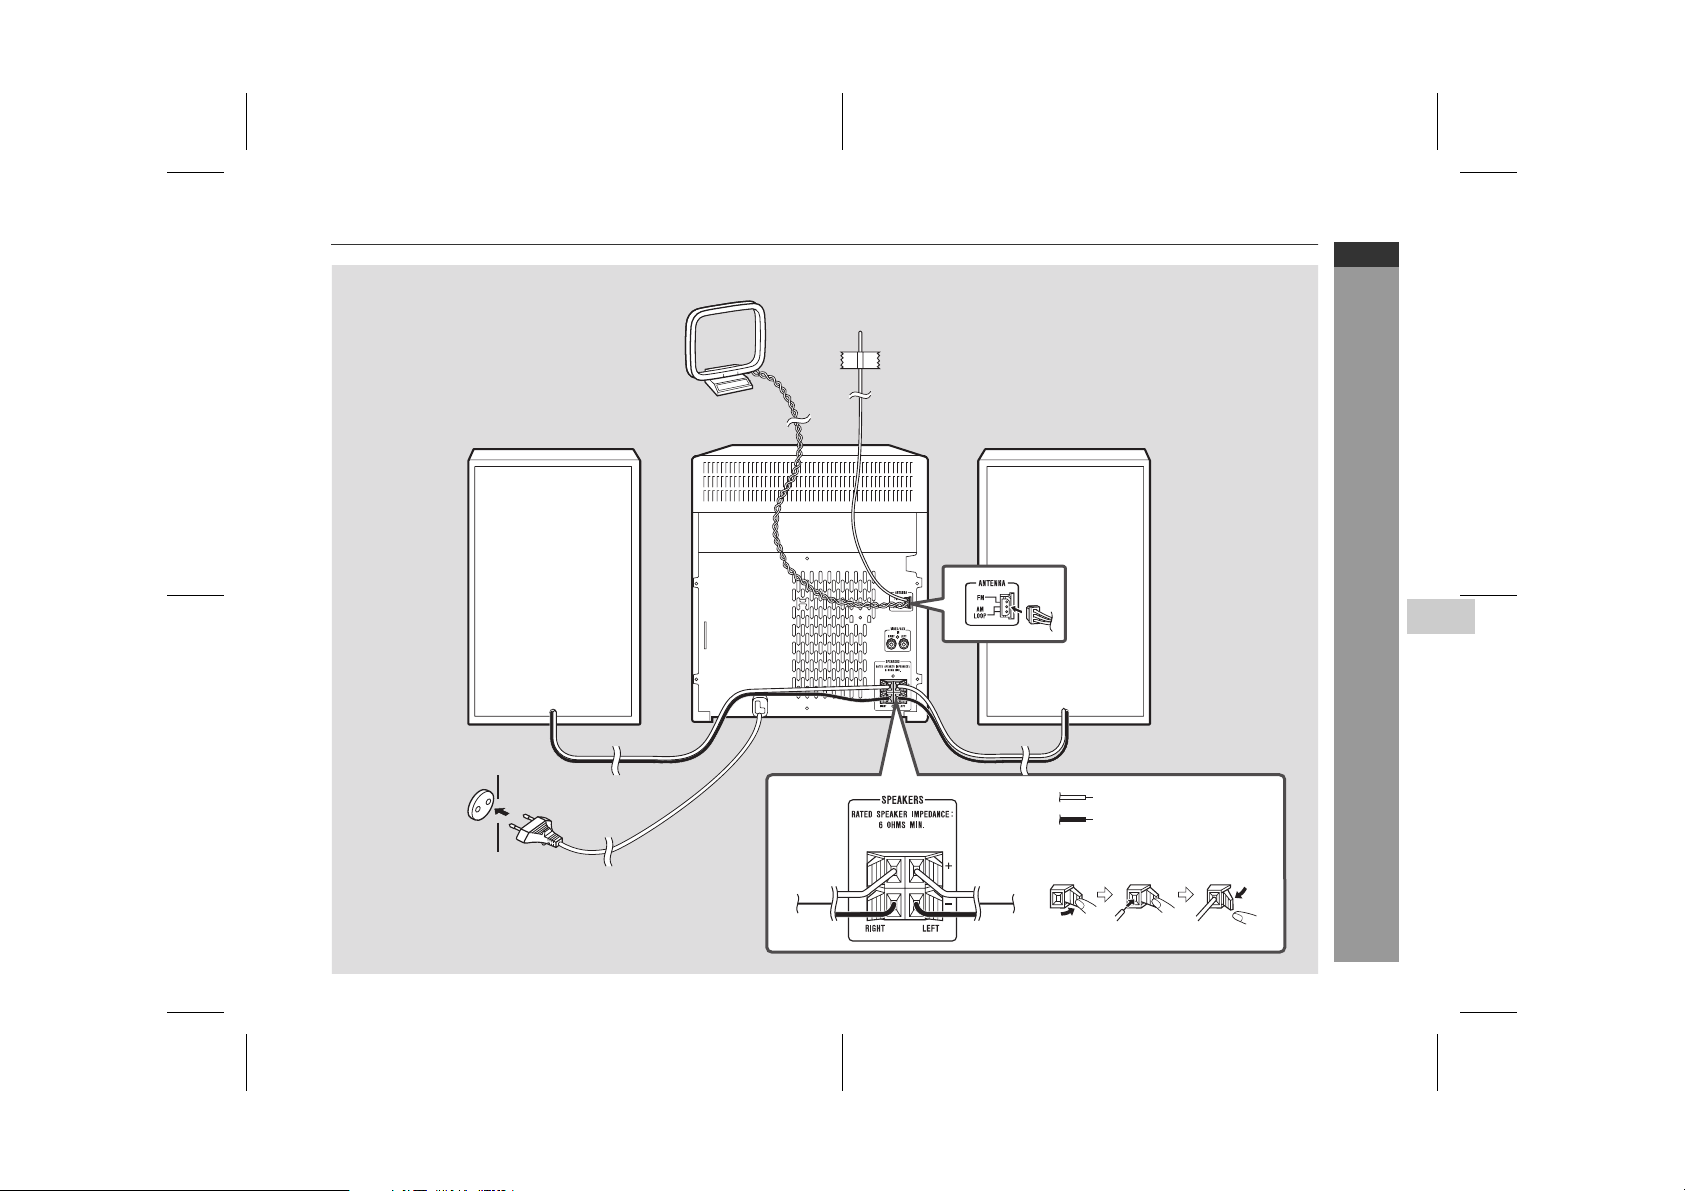
System connections
AM loop aerial
AM loop aerial
FM aerial
FM aerial
CD-MPX100H
ENGLISH
Left speakerRight speaker
Left speakerRight speaker
5
1
Wall socket
Wall socket
(AC 230 V, 50 Hz)
(AC 230 V, 50 Hz)
Red
Black
9/3/05 CD-MPX100H_1.fm
Preparation for Use
E-6
TINSZA162AWZZ
2
3
4
5
6
7
Page 11
CD-MPX100H
ENGLISH
■
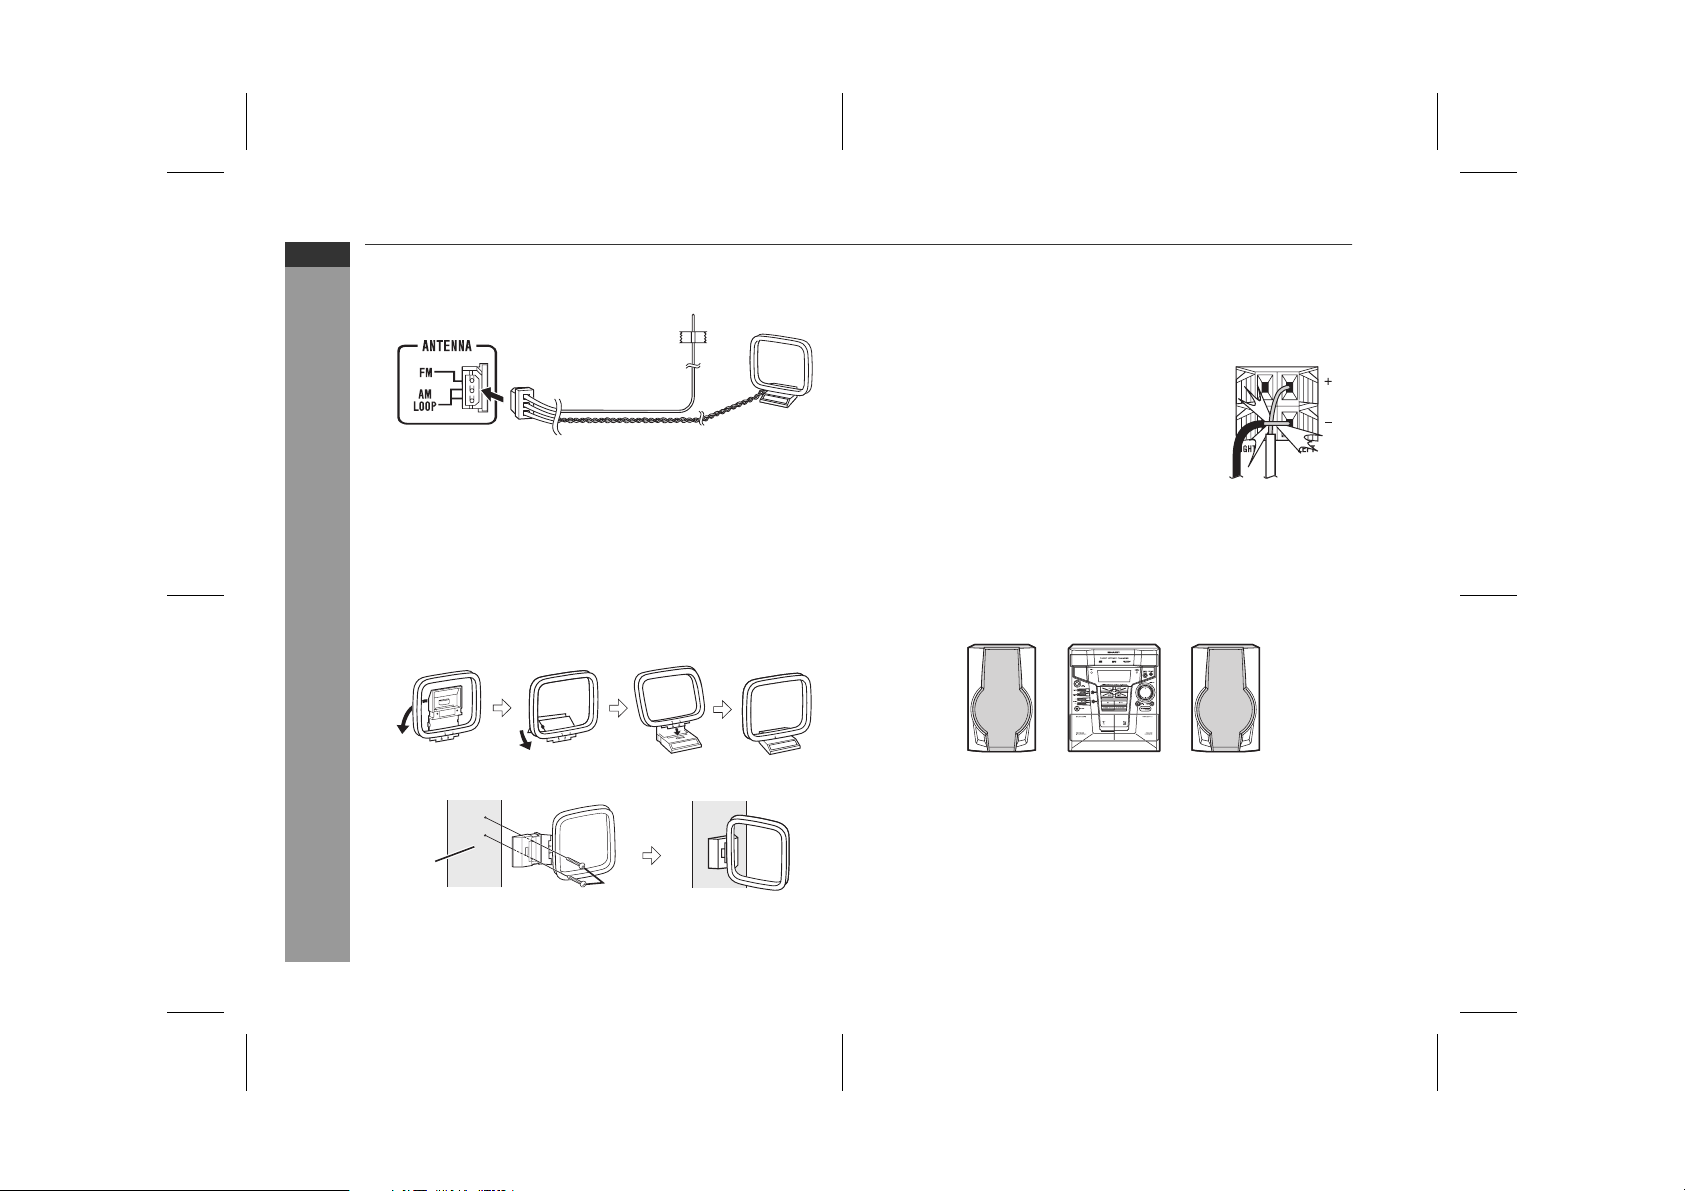
FM/AM loop aerial connection
Connect the FM/AM loop aerial to the ANTENNA socket.
Position the FM aerial wire and rotate the AM loop aerial for optimum
reception. Place the AM loop aerial on a shelf, or attach it to a stand
or a wall.
Notes:
Placing the aerial on the unit or near the AC power lead may
●
cause noise pickup. Place the aerial away from the unit for better
reception.
Do not connect the attached FM aerial to an external FM aerial.
●
Otherwise trouble may occur.
Installing the AM loop aerial:
<Assembling>
Preparation for Use
■
Speaker connection
Connect the black wire to the minus (-) terminal, and the red wire to
the plus (+) terminal.
Caution:
Use speakers with an impedance of 6 ohms
●
or more, as lower impedance speakers can
damage the unit.
Do not mistake the right and the left chan-
●
nels. The right speaker is the one on the right
side when you face the unit.
●
Do not let the bare speaker wires touch
each other.
Do not allow any objects to fall into or to be
●
placed in the reflex ducts.
Do not stand or sit on the speakers. You may be injured.
●
■
Placing the speaker system
There is no distinction between the right and the left speakers.
Left speaker Right speaker
Incorrect
E-7
<Attaching to the wall>
Wall
Screws
(not supplied)
Note:
The speaker grilles are not removable.
9/3/05 CD-MPX100H_1.fm
TINSZA162AWZZ
Page 12
System connections (continued)
■
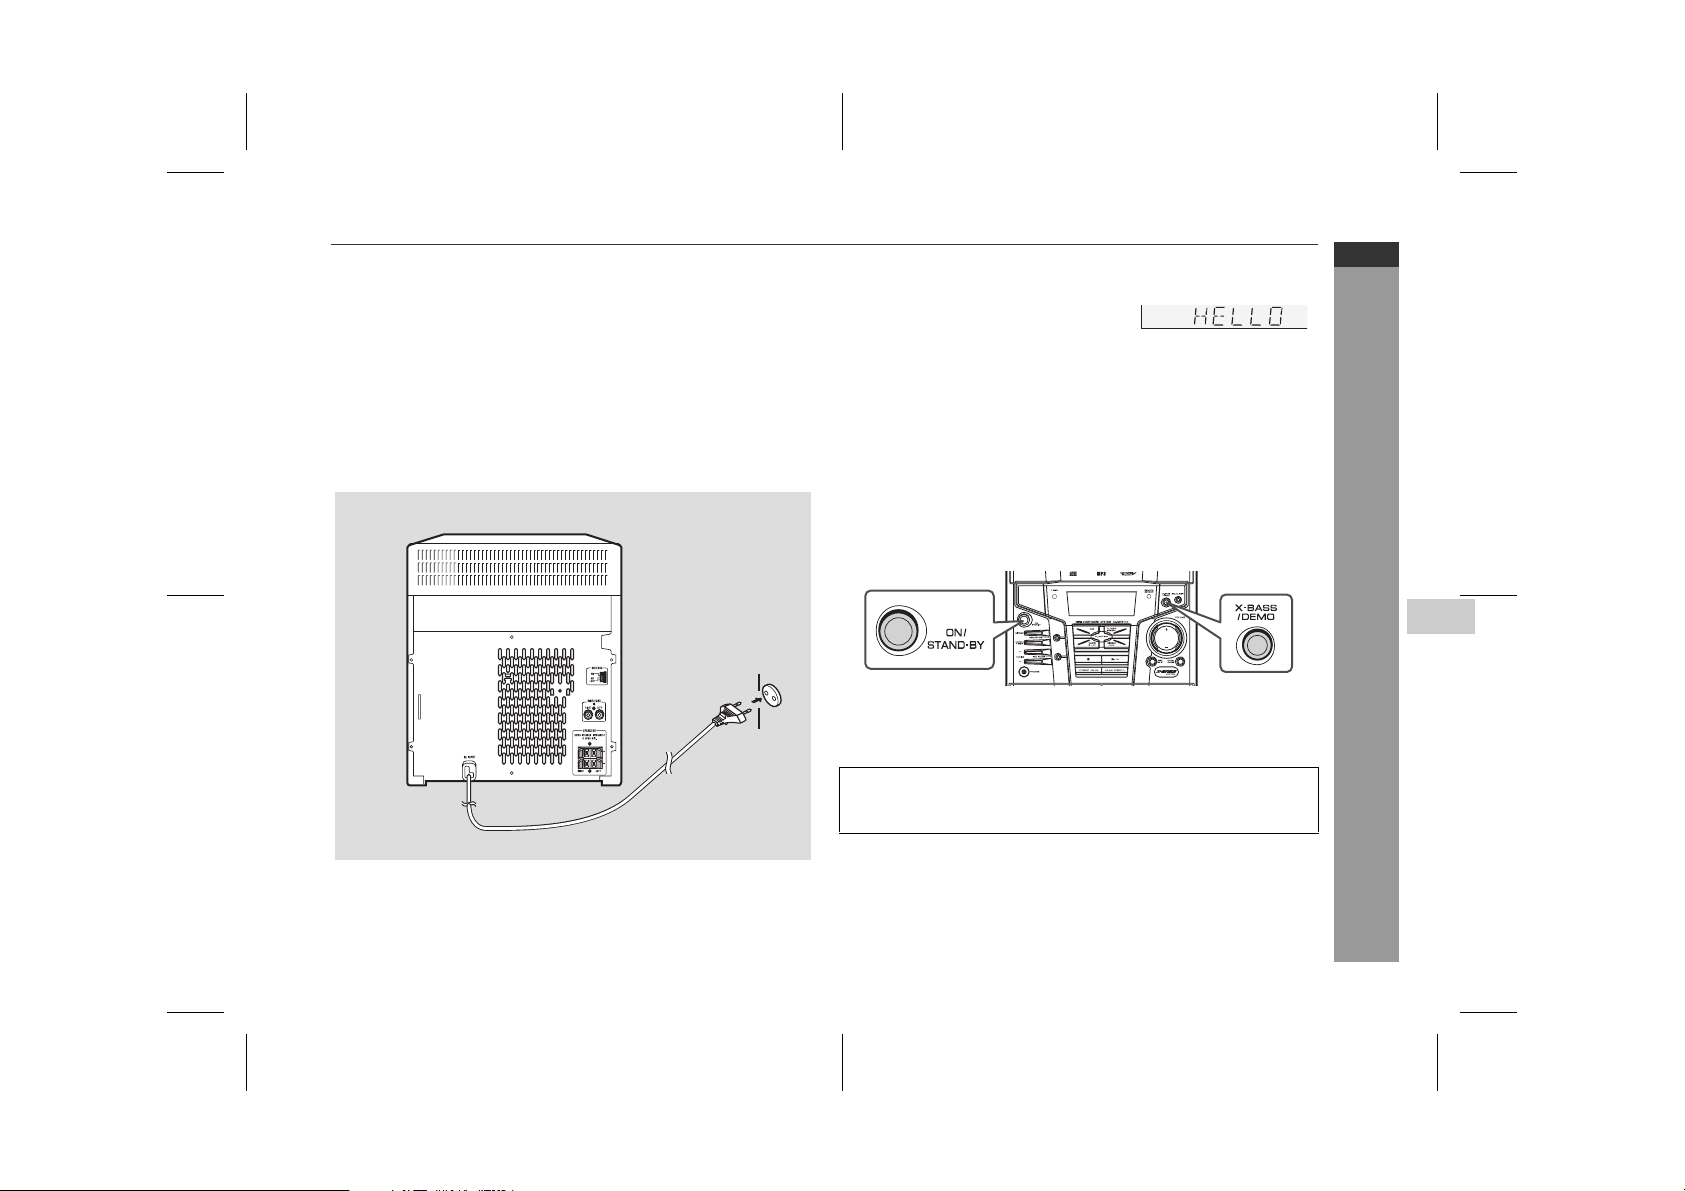
AC power connection
After checking all the connections have been made correctly, plug
the AC power lead of this unit into the wall socket. If you plug in the
unit first, the unit will enter the demonstration mode.
Notes:
The unit will start the tape initialisation when plugged in to the AC
●
socket. During this process, initialising sound will be heard and the
unit cannot be turned on. Wait until the process is finished.
Unplug the AC power lead from the wall socket if the unit will not
●
be in use for a prolonged period of time.
■
Demonstration mode
The first time the unit is plugged in, the
unit will enter the demonstration mode.
You will see words scroll.
To cancel the demonstration mode:
When the unit is in the power stand-by mode (demonstration mode),
press the X-BASS/DEMO button. The demonstration mode will be
cancelled and the display will disappear.
To return to the demonstration mode:
When the unit is in the power stand-by mode, press the X-BASS/
DEMO button again.
Note:
When the power is on, the X-BASS/DEMO button can be used to
select the extra bass mode.
CD-MPX100H
ENGLISH
5
1
Wall socket
(AC 230 V, 50 Hz)
■
To turn the power on
Press the ON/STAND-BY button to turn the power on.
After use:
Press the ON/STAND-BY button to enter the power stand-by
mode.
9/3/05 CD-MPX100H_1.fm
TINSZA162AWZZ
Preparation for Use
2
3
4
5
6
7
E-8
Page 13
CD-MPX100H
Remote sensor
0.2 m - 6 m
(8" - 20')
ENGLISH
Remote control
■
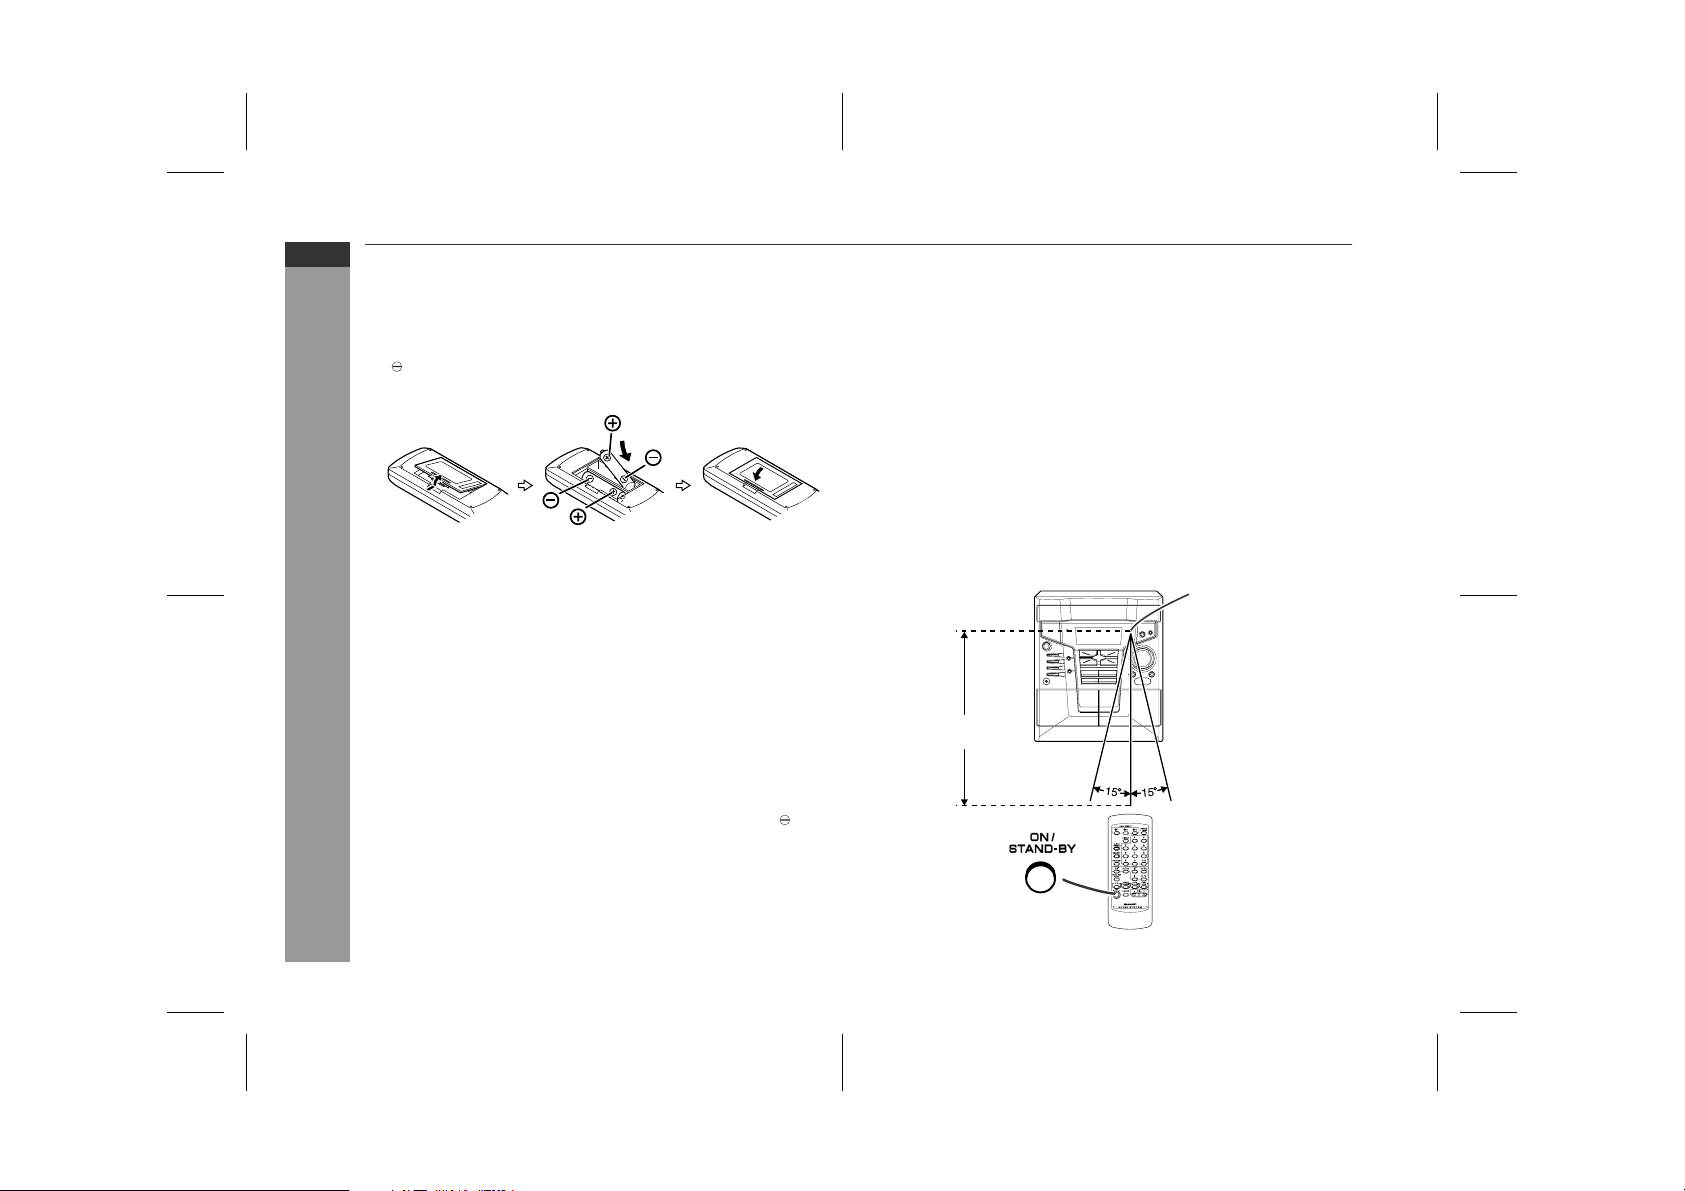
Battery installation
1 Open the battery cover.
2 Insert the supplied batteries according to the direction indi-
cated in the battery compartment.
When inserting or removing the batteries, push them towards the
battery terminals.
3 Close the cover.
Precautions for battery use:
Replace all old batteries with new ones at the same time.
●
Do not mix old and new batteries.
●
Remove the batteries if the unit is not to be used for long periods
●
of time. This will prevent potential damage due to battery leakage.
Caution:
Preparation for Use
Do not use rechargeable batteries (nickel-cadmium battery, etc.).
●
Installing the batteries incorrectly may cause the unit to malfunc-
●
tion.
Battery removal:
Remove the battery cover. Push each battery toward the battery
terminal and take them out.
Notes concerning use:
Replace the batteries if the operating distance is reduced or if the
●
operation becomes erratic. Purchase 2 "AA" size batteries (UM/
SUM-3, R6, HP-7 or similar).
Periodically clean the transmitter on the remote control and the
●
sensor on the unit with a soft cloth.
Exposing the sensor on the unit to strong light may interfere with
●
operation. Change the lighting or the direction of the unit.
Keep the remote control away from moisture, heat, shock, and
●
vibrations.
■
Test of the remote control
Check the remote control after checking all the connections (see pages 6 - 8).
Point the remote control directly at the remote sensor on the unit.
The remote control can be used within the range shown below:
Press the ON/STAND-BY button. Does the power turn on? Now, you
can enjoy music.
E-9
9/3/05 CD-MPX100H_1.fm
TINSZA162AWZZ
Page 14
General control
■
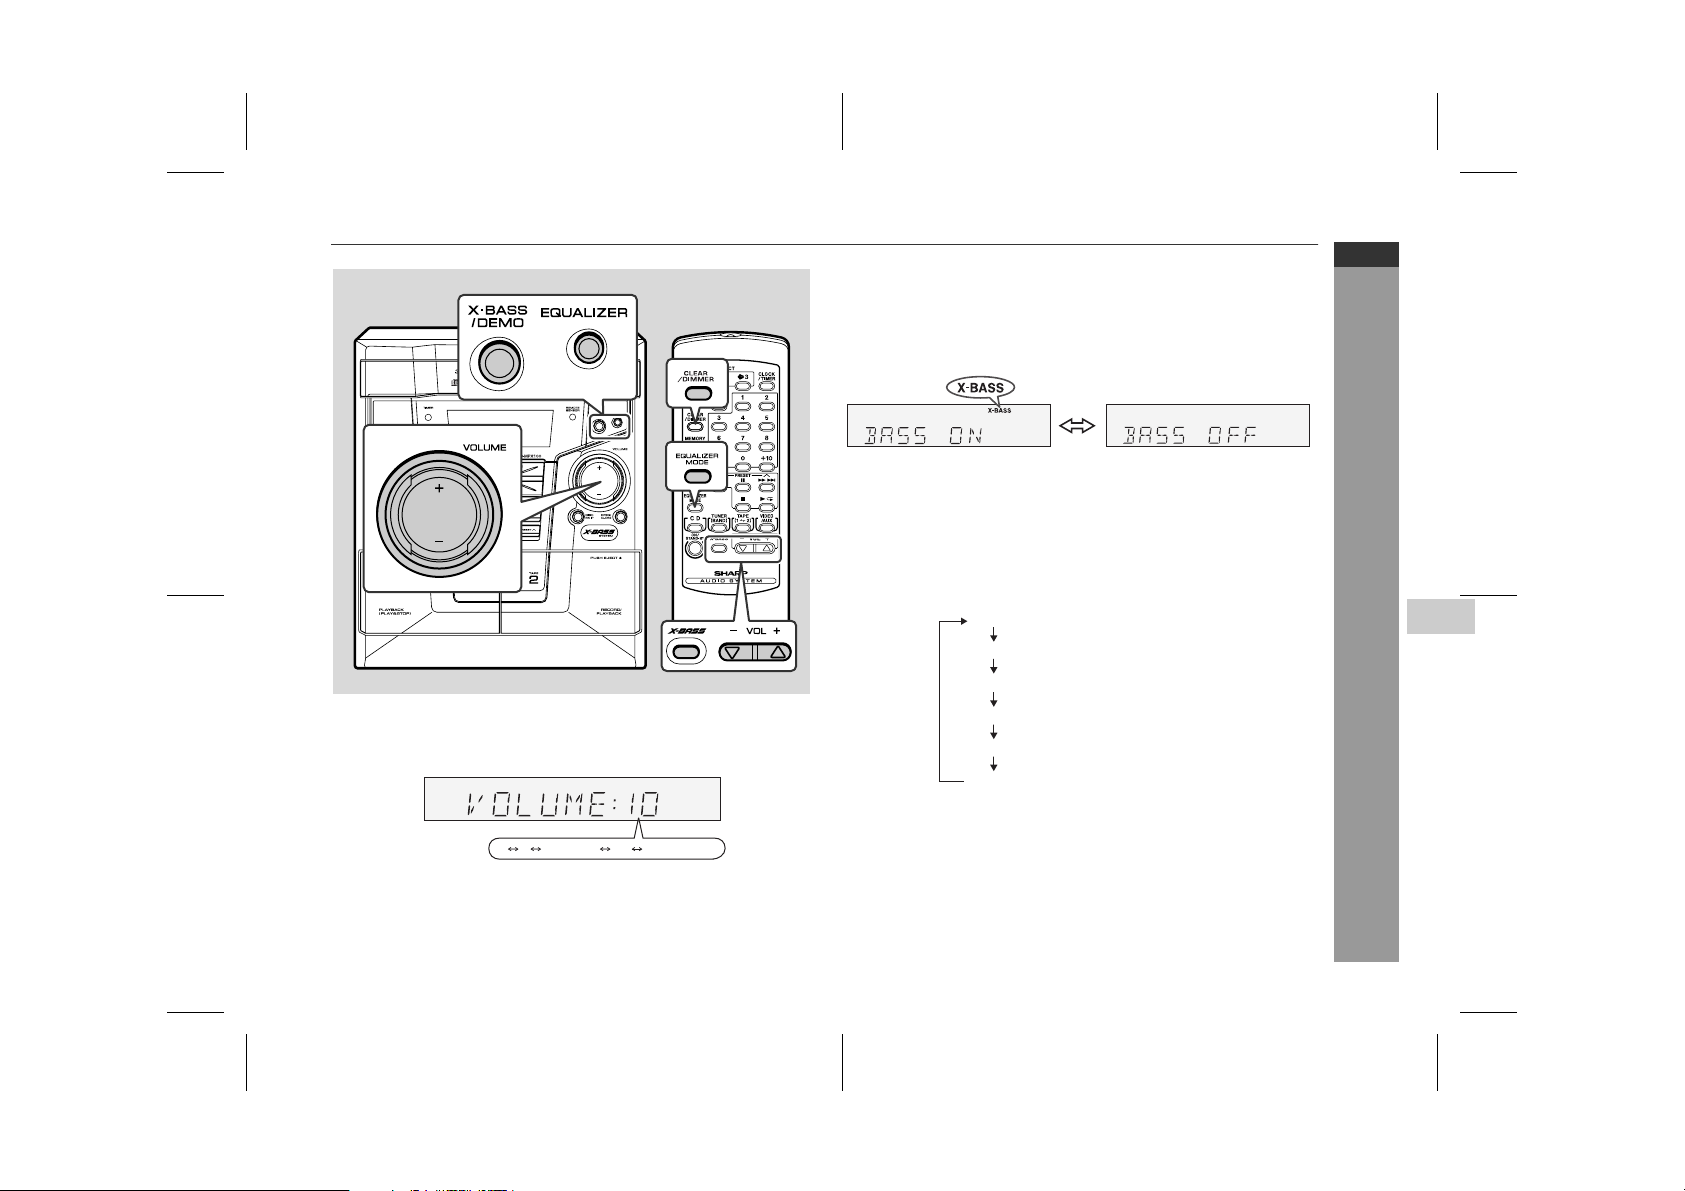
Bass control
When the power is first turned on, the unit will enter the extra bass
mode which emphasises the bass frequencies, and "X-BASS" will
appear. To cancel the extra bass mode, press the X-BASS/DEMO
(X-BASS) button.
■
Equalizer
When the EQUALIZER (EQUALIZER MODE) button is pressed, the
current mode setting will be displayed. To change to a different
mode, press the EQUALIZER (EQUALIZER MODE) button repeatedly until the desired sound mode appears.
CD-MPX100H
ENGLISH
■
Volume control
Press the VOLUME (+ or -) button to increase or decrease the
volume.
.....
12 29 30 MAXIMUM0
Volume Auto Fade-in
If you turn off and on the main unit with the volume set to 27 or higher,
the volume starts at 16 and fades in to the last set level.
FLAT
ROCK
CLASSIC
POPS
VOCAL
JAZZ
■
Display brightness control
When the unit is in power on mode, you can change the display
brightness by holding down the CLEAR/DIMMER button on the remote control for 2 seconds or more.
9/3/05 CD-MPX100H_1.fm
No equalization.
For rock music.
For classical music.
For pop music.
Vocals are enhanced.
For jazz.
TINSZA162AWZZ
5
1
Basic Operation
2
3
4
5
6
7
E-10
Page 15
CD-MPX100H
ENGLISH
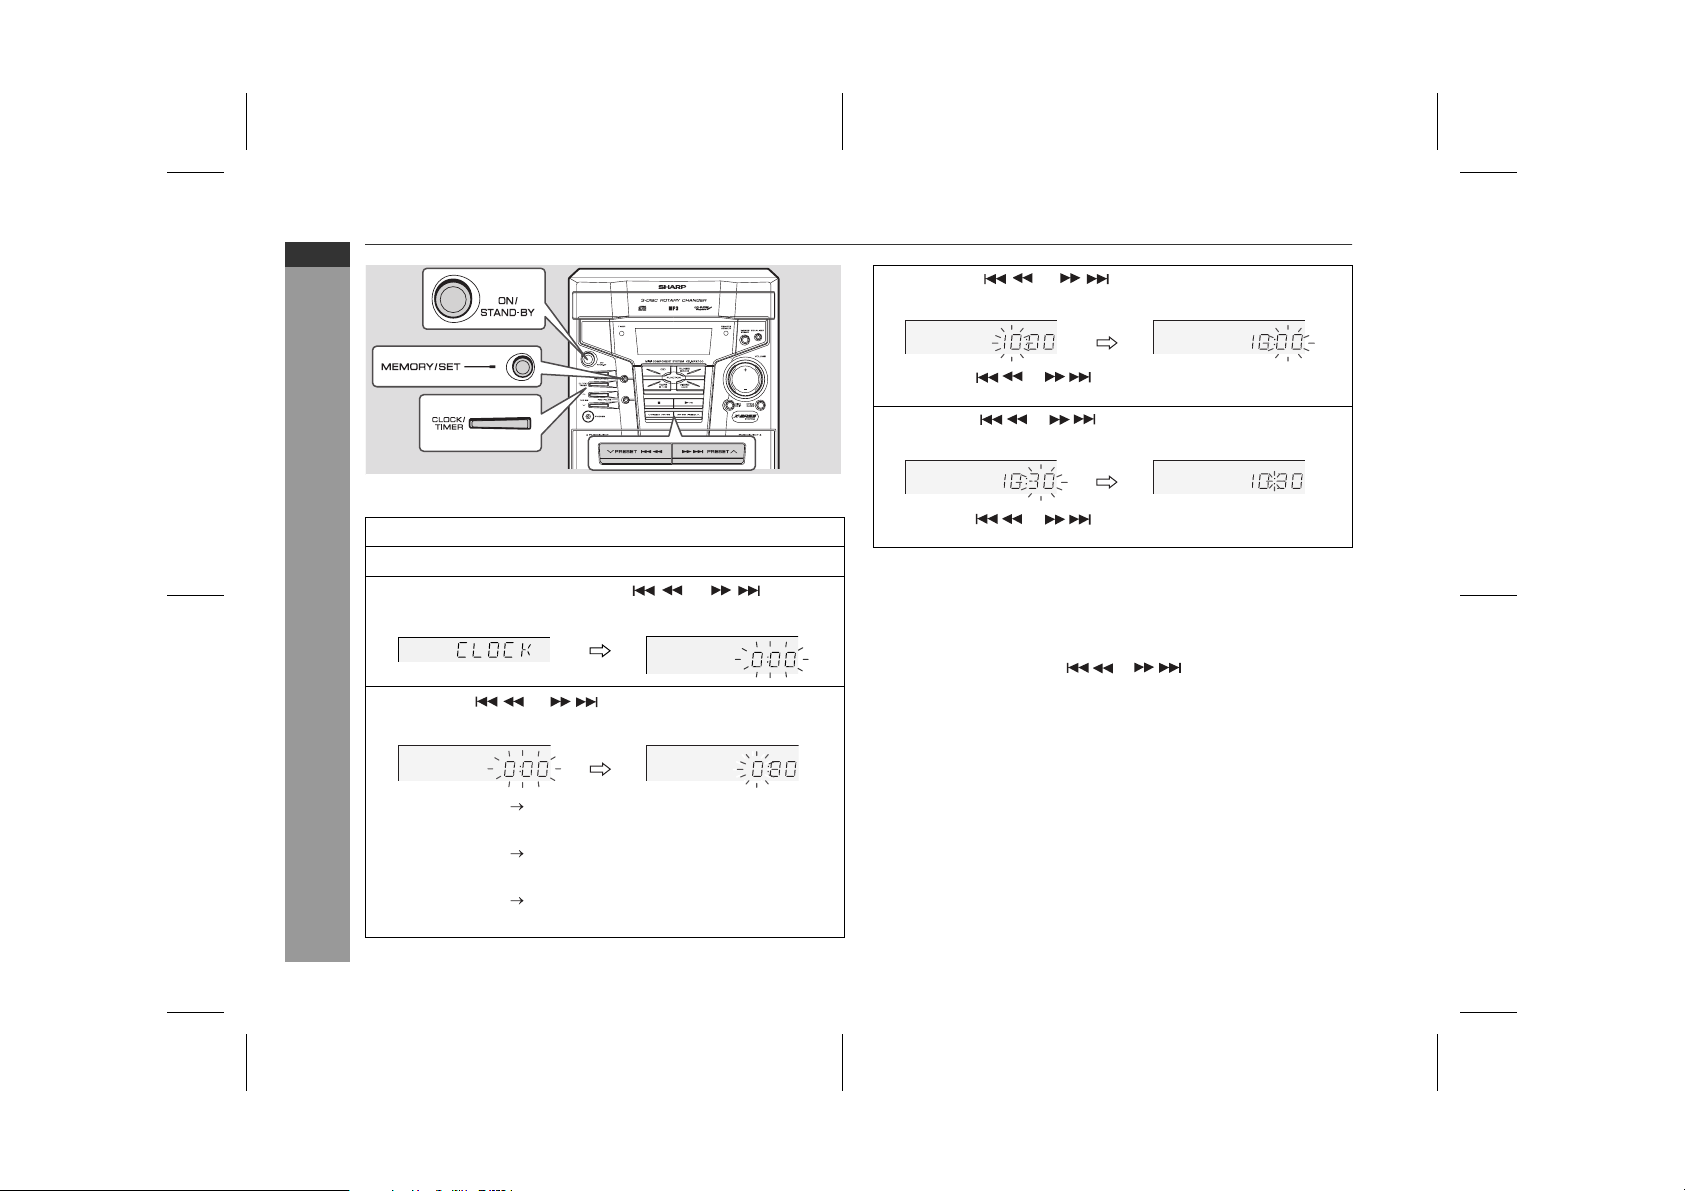
Setting the clock
Press the or button to adjust the hour and
5
then press the MEMORY/SET button.
In this example, the clock is set for the 24-hour (0:00) display.
Press the ON/STAND-BY button to turn the power on.
1
Press the CLOCK/TIMER button.
2
Within 10 seconds, press the or button to
3
select "CLOCK", and press the MEMORY/SET button.
Press the or button to select 24-hour or 12-
4
Basic Operation
hour display and then press the MEMORY/SET button.
"0:00" The 24-hour display will appear.
(0:00 - 23:59)
"AM 12:00" The 12-hour display will appear.
(AM 12:00 - PM 11:59)
"AM 0:00" The 12-hour display will appear.
(AM 0:00 - PM 11:59)
E-11
Press the
1 hour. Hold it down to advance continuously.
Press the or button to adjust the minutes and
6
then press the MEMORY/SET button.
Press the
1 minute. Hold it down to change the time in 5-minute intervals.
To confirm the time display:
[When the unit is in the stand-by mode]
Press the CLOCK/TIMER button.
The time display will appear for about 10 seconds.
[When the power is on]
Press the CLOCK/TIMER button.
Within 10 seconds, press the
The time display will appear for about 10 seconds.
Note:
The "CLOCK" will appear or time will flash to confirm the time
display when the AC power supply is restored after a power failure
or unplugging the unit. If incorrect, readjust the clock as follows.
To readjust the clock:
Perform "Setting the clock" from step 1. If the "CLOCK" does not
appear in step 3, step 4 (for selecting the 24-hour or 12-hour
display) will be skipped.
To change the 24-hour or 12-hour display:
1 Clear all the programmed contents. [Refer to "Clearing all the
memory (reset)" on page 30 for details.]
2 Perform "Setting the clock" from step 1.
Note:
The clock can also be set with the remote control.
or
or
button once to advance the time by
button once to advance the time by
or
button to display the time.
9/3/05 CD-MPX100H_2.fm
TINSZA162AWZZ
Page 16
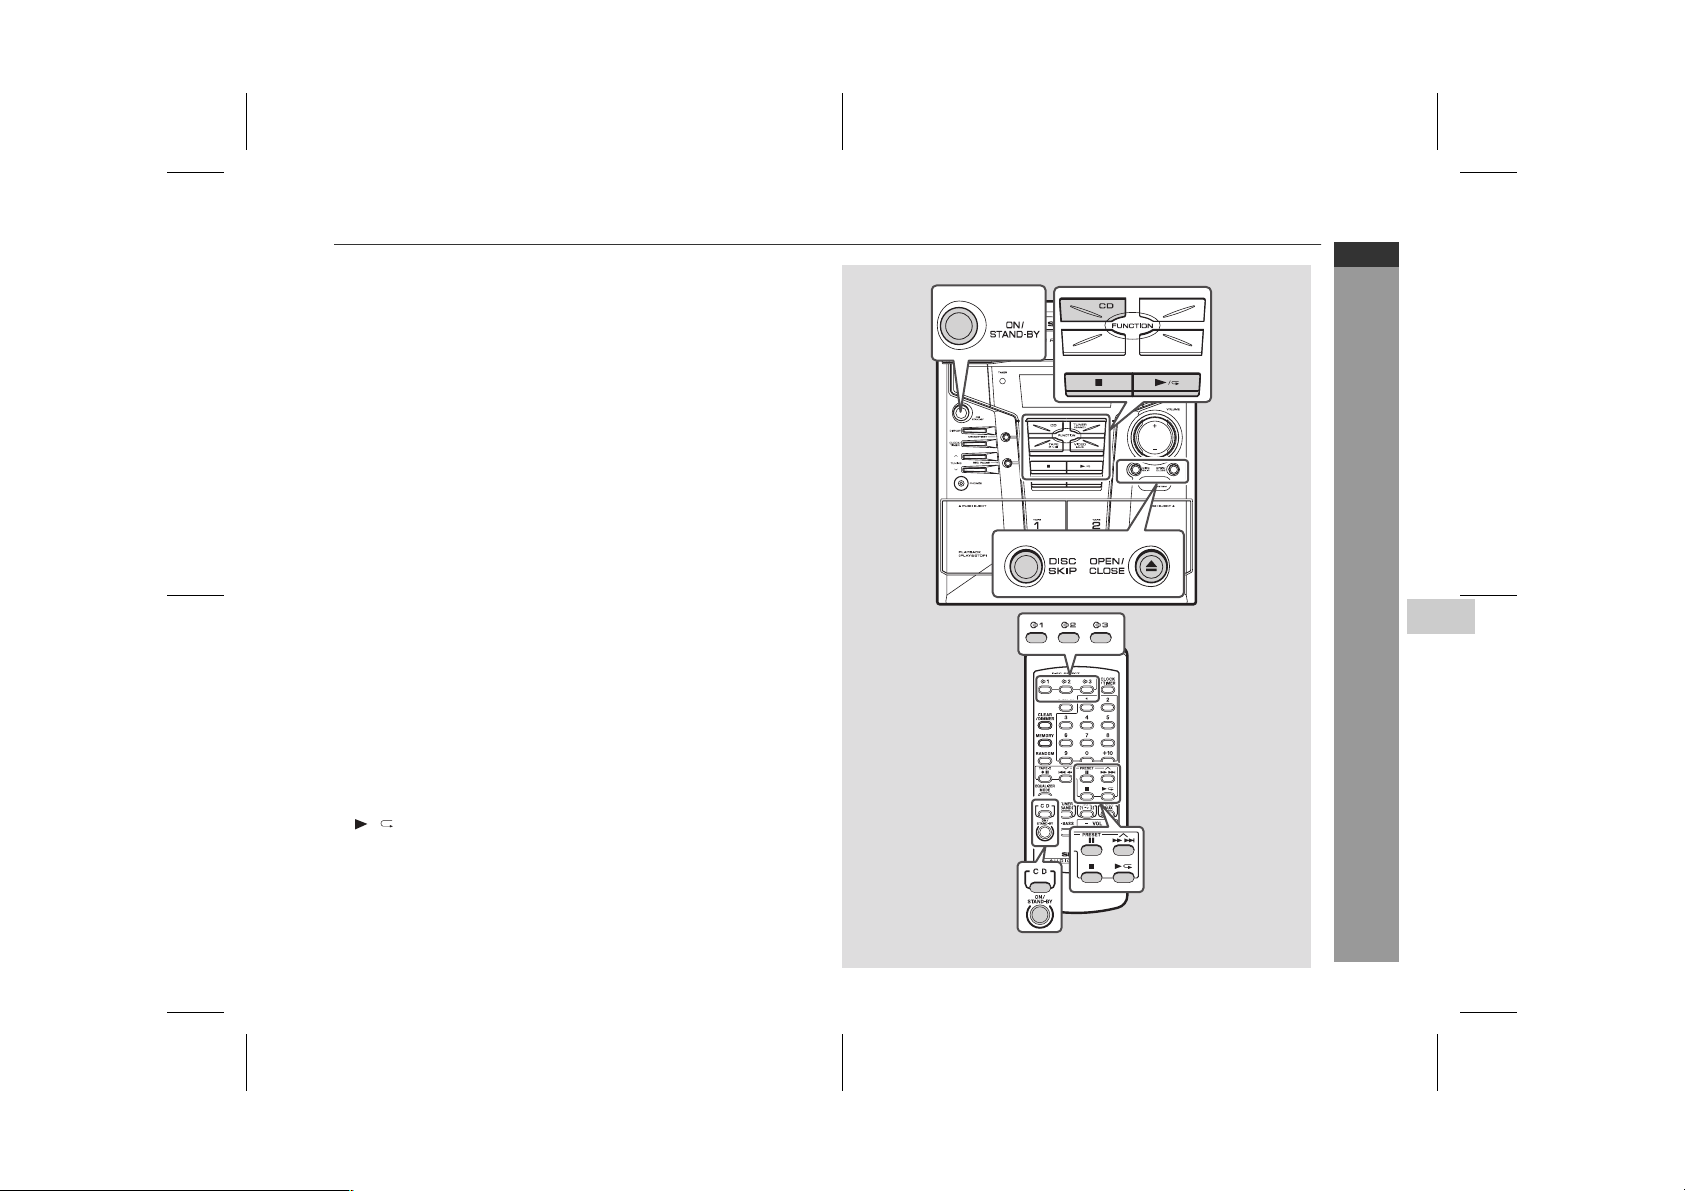
Listening to a CD or MP3/WMA disc
This system can play back a standard CD, CD-R/RW in the CD format and CD-R/RW with MP3 or WMA files, but cannot record on
them.
Some audio CD-R and CD-RW discs may not be playable due to the
state of disc or the device that was used for recording.
MP3:
MP3 is a form of compression. It is an acronym which stands
for MPEG Audio Layer 3.
MP3 is a type of audio code which is processed by significant
compression from the original audio source with very little loss
in sound quality.
This system supports MPEG 1 Layer 3, MPEG 2 Layer 3, and
●
VBR files.
During VBR file playback, time counter in the display may differ
●
from its actual playback time.
WMA:
WMA files are Advanced System Format files that include audio
files which are compressed with Windows Media Audio codec.
WMA is developed by Microsoft as an audio format file for Windows Media Player.
Notes:
"MP3" or "WMA" indicator will light up after the unit reads infor-
●
mation on an MP3 or WMA disc.
Auto power on function:
When you press any of the following buttons, the unit turns on.
CD button (main unit and remote control): The unit turns on and
●
the "CD" function is activated.
/ button (main unit and remote control): The unit turns on and
●
playback of the last function starts (CD, TAPE, TUNER, VIDEO/
AUX).
Auto power off function:
In the stop mode of CD, MP3 or WMA operation, the main unit enters
the stand-by mode after 15 minutes of inactivity.
CD-MPX100H
ENGLISH
5
2
3
CD or MP3/WMA disc Playback
4
5
6
7
8
E-12
9/3/05 CD-MPX100H_2.fm
TINSZA162AWZZ
Page 17
CD-MPX100H
ENGLISH
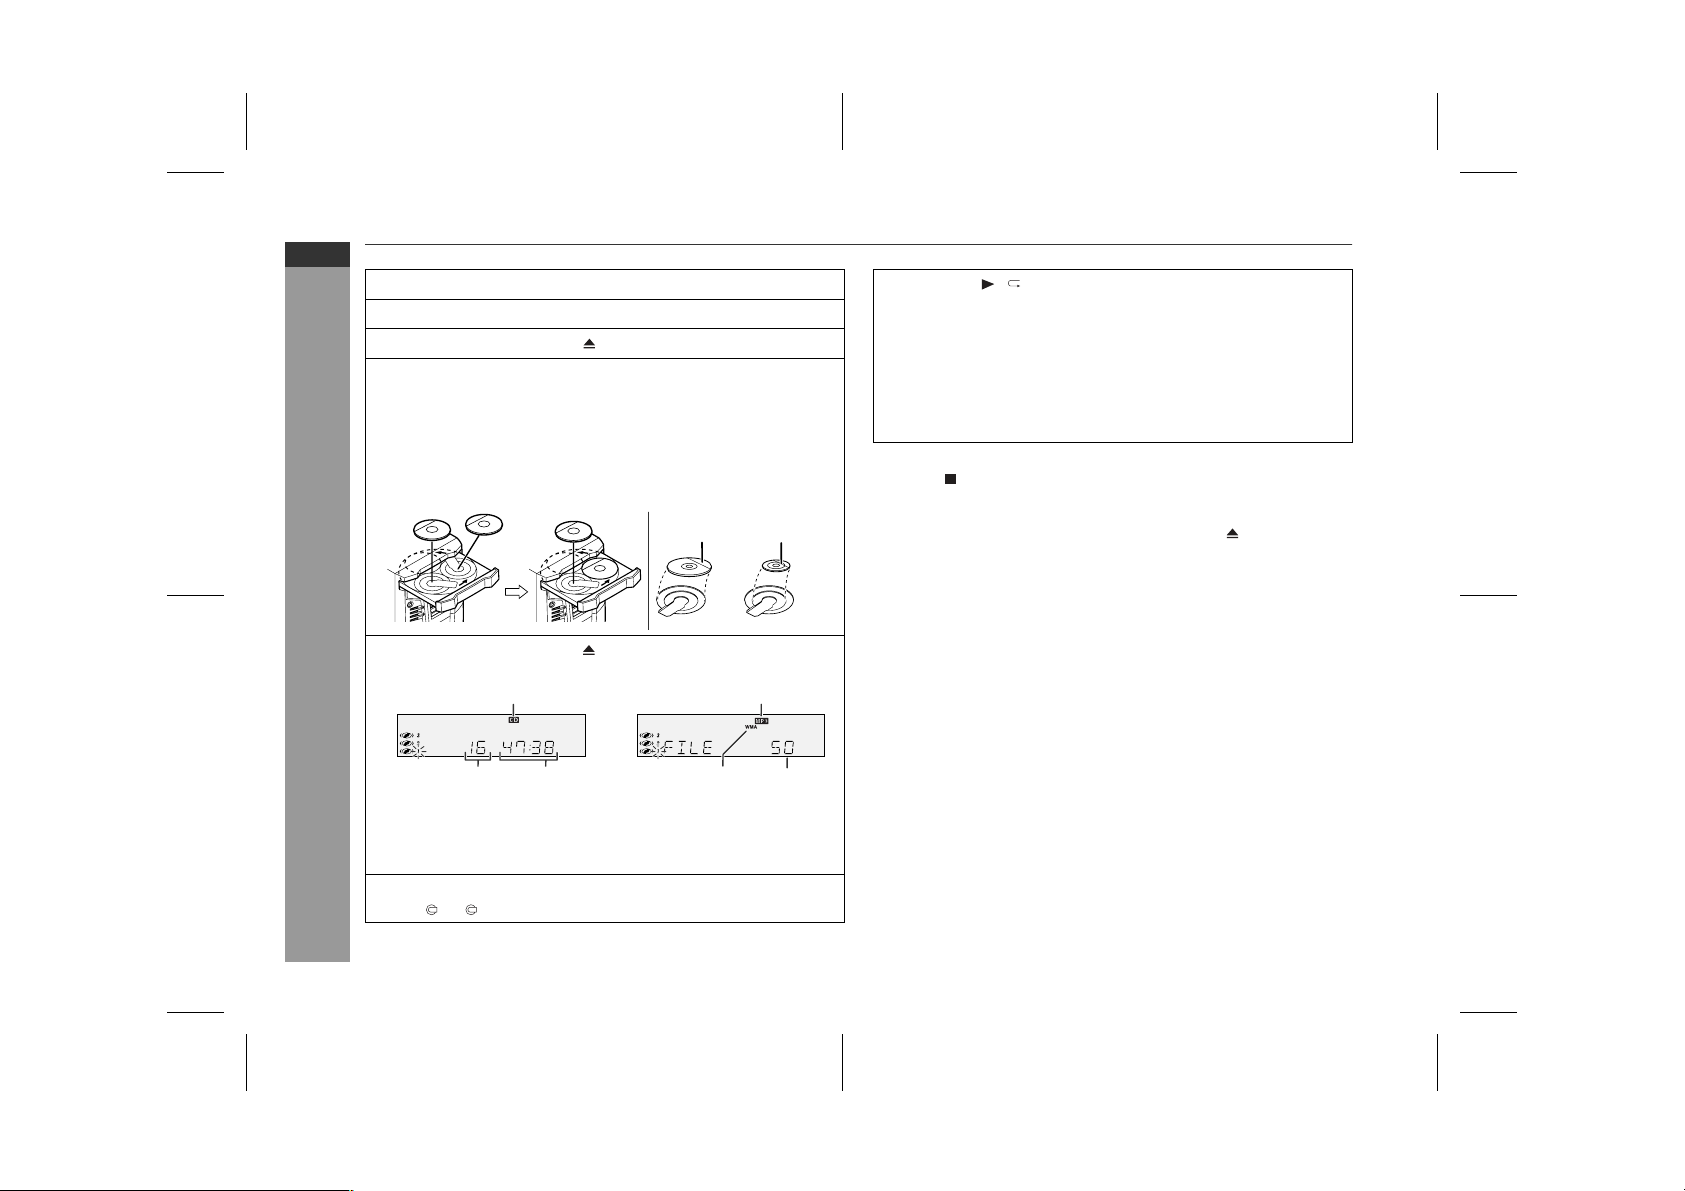
Press the ON/STAND-BY button to turn the power on.
1
Press the CD button.
2
Press the OPEN/CLOSE button to open the disc tray.
3
Place the disc on the disc tray, label side up.
4
When loading a third disc, press the DISC SKIP button to
turn the disc tray, then place the disc in the open position.
Disc can be placed on any open position on the disc tray.
●
Be sure to place 8 cm (3") disc in the middle of the disc
●
positions.
Press the OPEN/CLOSE button to close the disc tray.
5
[CD] [MP3/WMA]
Total number of
tracks on the disc
CD or MP3/WMA disc Playback
●
To select the disc you want to listen to first, press one of
6
the 1 - 3 buttons on the remote control.
CD Indicator MP3 Indicator
Total playing
time of the disc
Due to the structure of the disc information, it takes longer to
read an MP3/WMA disc than a normal CD (approximately 20
to 90 seconds).
12 cm (5") 8 cm (3")
WMA indicator Total number
of track
Press the / button to start playback.
7
Playback will begin from track 1 on the disc you have select-
●
ed to play. After that disc finishes playing, the next disc will
automatically start playback.
When the last track on the third disc has finished playing, the
●
CD player will automatically stop.
When there is no disc in one of the disc 1 - 3 positions, that
●
position will be skipped and the next disc will be played.
To stop playback:
Press the button.
To remove the disc:
Whilst in the stop mode, press the OPEN/CLOSE button.
The disc tray will open. Remove the two discs. Then, press the DISC
SKIP button to rotate the disc tray and remove the remaining disc.
Caution:
Do not place two disc in one disc tray.
●
Do not play discs of special shapes (heart, octagon, etc.). It may
●
cause malfunctions.
Do not push the disc tray whilst it is moving.
●
Do not turn the disc tray by hand. This may cause malfunctions.
●
If the power fails whilst the tray is open, wait until the power is re-
●
stored.
If the disc tray is stopped forcibly, "ER-CD20" will appear on the
●
display for 3 seconds and the unit will not function. If this occurs,
press the ON/STAND-BY button to enter the power stand-by
mode and then turn the power on again.
If TV or radio interference occurs during CD operation, move the
●
unit away from the TV or radio.
If a disc is damaged, dirty, or loaded upside down, the disc will
●
skip or not play back.
E-13
9/3/05 CD-MPX100H_2.fm
TINSZA162AWZZ
Page 18
Listening to a CD or MP3/WMA disc (continued)
■
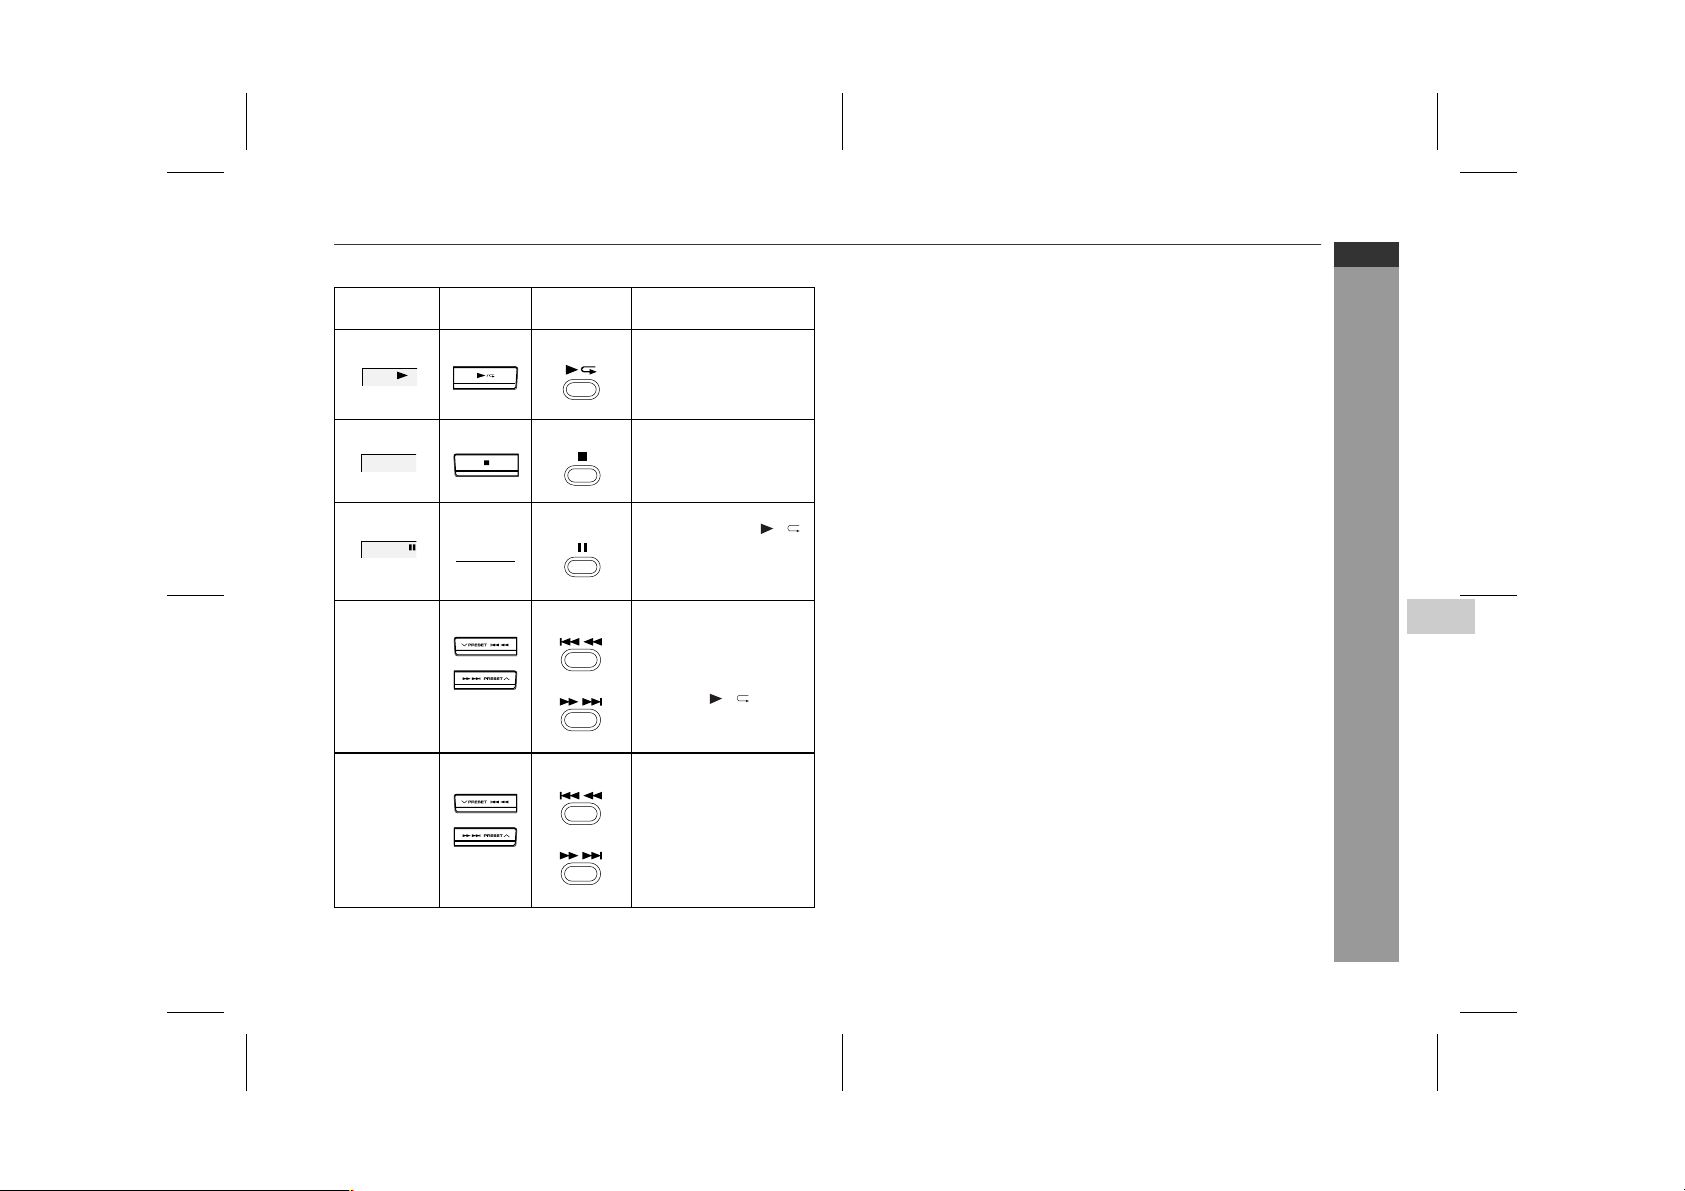
Various disc functions
Function Main Unit Remote
Play
Stop
Pause
Track up/
Track down
Fast forward/Fast
reverse
Control
Operation
Press in the stop mode.
Press in the playback
mode.
Press in the playback
mode. Press the /
button to resume playback from the paused
point.
Press in the playback or
stop mode.
If you press the button
in the stop mode,
press the / button
to start the desired
track.
Press and hold down in
the playback mode.
Release the button to
resume playback.
Notes for CD:
Track up/track down is possible only within individual discs.
●
Fast forward/fast reverse is possible only within individual discs.
●
When the end of the last track is reached during fast forward,
●
"END" will appear on the display and CD operation will be paused.
When the beginning of the first track is reached during fast
reverse, the unit will enter the playback mode.
Notes for MP3/WMA discs:
Track up/track down is possible only within individual discs.
●
The sound is heard during fast forward/fast reverse with a CD, but
●
not with an MP3/WMA disc. For fast forward or fast reverse of an
MP3/WMA disc, refer to playback time on the display.
Fast forward/fast reverse is possible only within individual tracks.
●
When the end of the track is reached during fast forward, the next
●
track will be played. Playback of the track will begin when its beginning is reached during fast reverse.
CD-MPX100H
ENGLISH
5
2
3
CD or MP3/WMA disc Playback
4
5
6
9/3/05 CD-MPX100H_2.fm
7
8
E-14
TINSZA162AWZZ
Page 19
CD-MPX100H
ENGLISH
Advanced CD or MP3/WMA disc playback
■
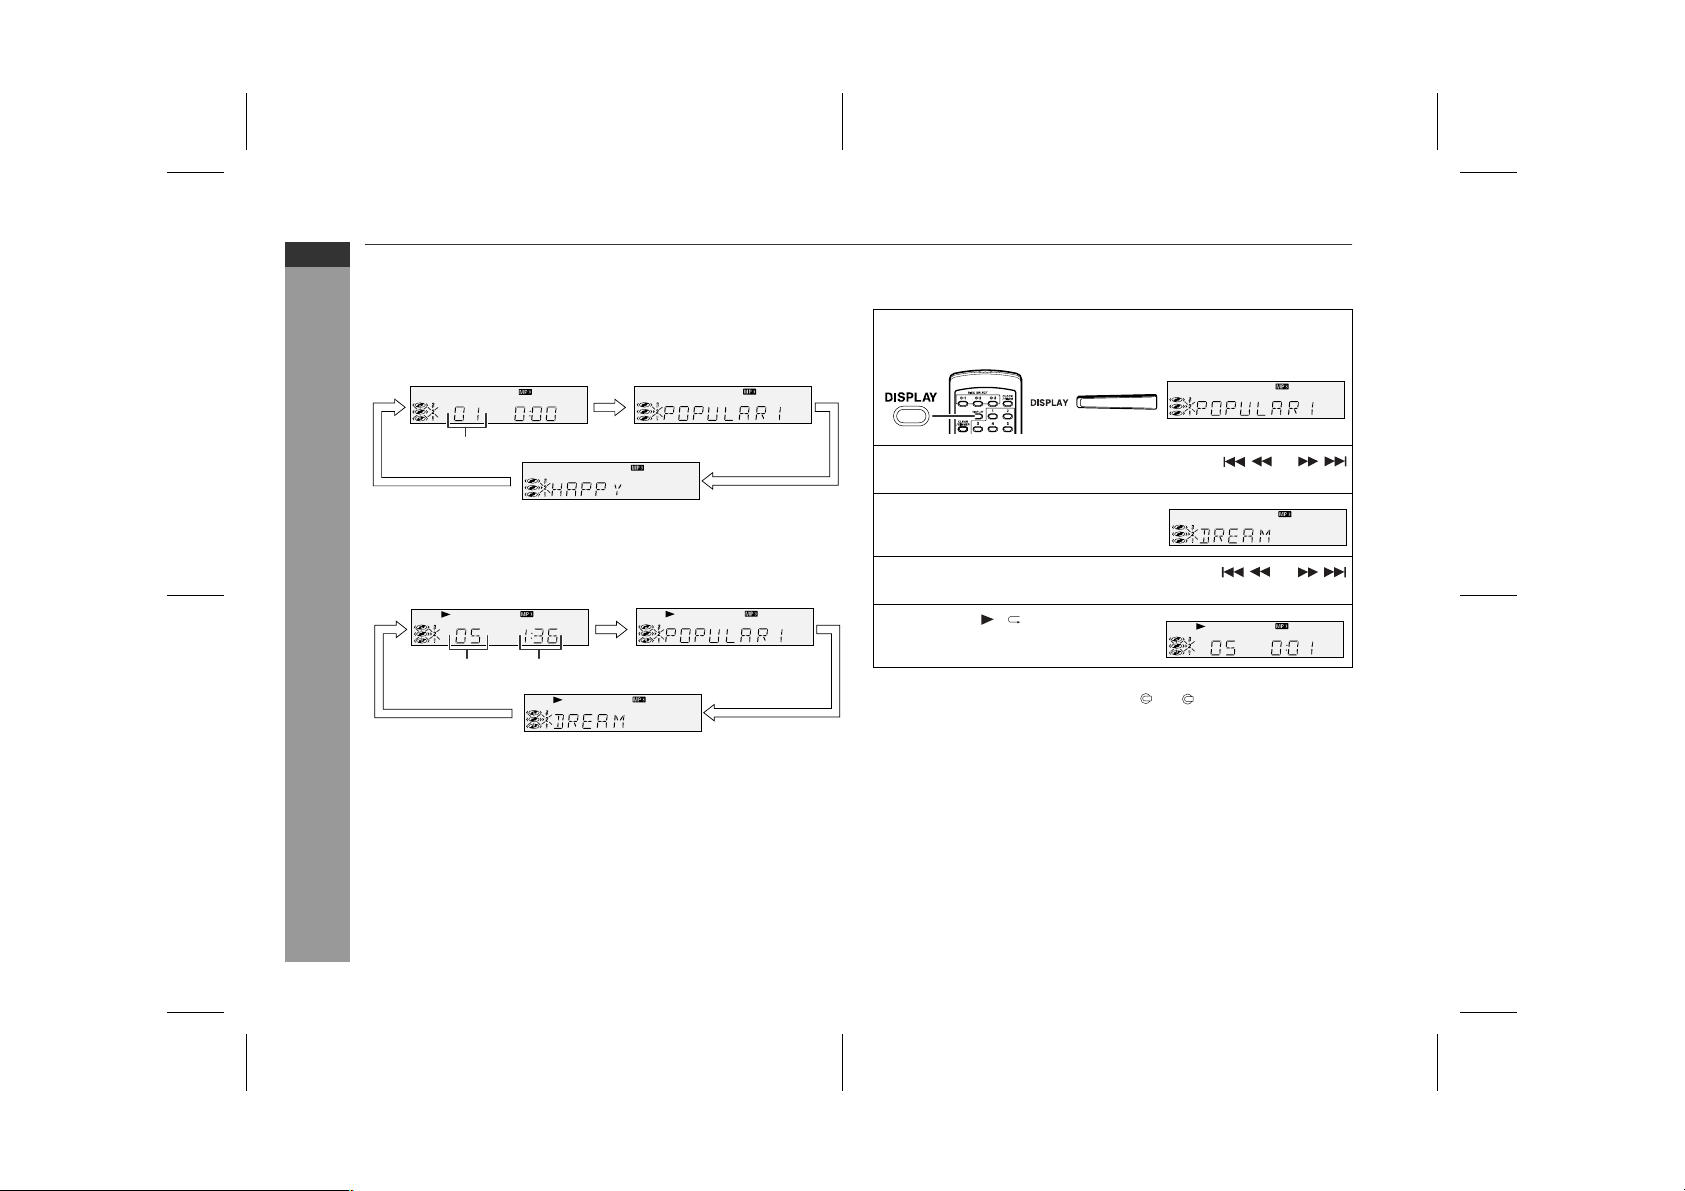
To change the display (MP3/WMA discs only)
Whilst in the stop mode or playback mode, press the DISPLAY
button.
Each time the button is pressed, the display will change as follows.
[When in the stop mode]
■
To select the desired folder or track by name
(MP3/WMA discs only)
Whilst in the stop mode, press the DISPLAY button to dis-
1
play the folder name.
Track number
Track name
[When in the playback mode]
Elapsed playback
time
Track name
CD or MP3/WMA disc Playback
E-15
Folder name
Folder nameTrack number
Select the desired folder by pressing the or
2
button.
Press the DISPLAY button to
3
display the track name.
Select the desired track by pressing the or
4
button.
Press the / button to begin
5
playback.
Note:
After selecting a disc with one of the 1 - 3 buttons, the display
will not change even if the DISPLAY button is pressed, and neither
the folder nor track name is displayed.
9/3/05 CD-MPX100H_2.fm
TINSZA162AWZZ
Page 20
Advanced CD or MP3/WMA disc playback (continued)
■
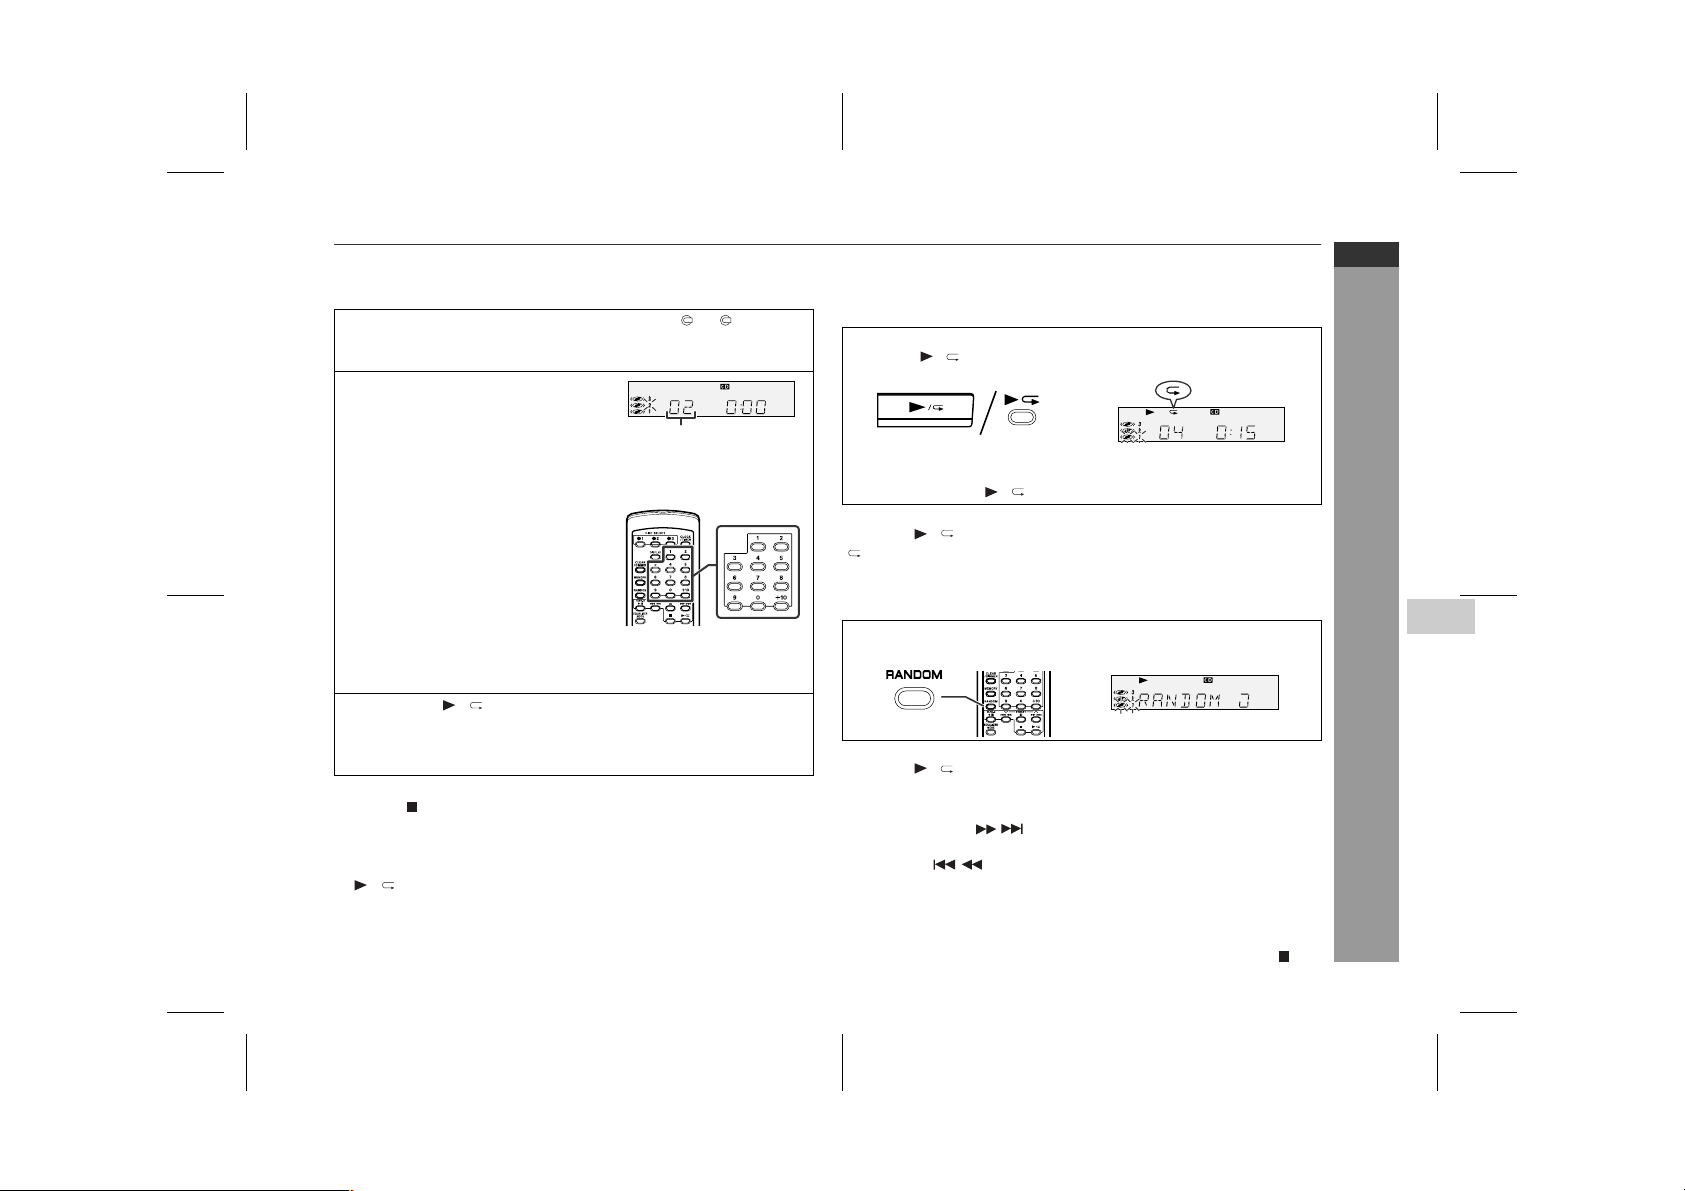
Direct search of the track
By using the direct search buttons, the desired tracks can be played.
Whilst in the stop mode, press one of the 1 - 3 buttons
1
on the remote control or DISC SKIP button to select the desired disc.
Use the direct search buttons
2
on the remote control to select
the desired track.
The direct search buttons allow you to select up to number 9.
●
When selecting number 10 or more, use the "+10" button.
●
A. For example, to choose 13
1 Press the "+10" button once.
2 Press the "3" button.
B. For example, to choose 30
1 Press the "+10" button three times.
2 Press the "0" button.
Press the / button to start playback.
3
Playback of the selected track is started. When the end of last
track of the disc selected is reached, the next disc will be automatically started.
To stop playback:
Press the button.
Notes:
The selected track can be started simply by pressing the direct
●
search buttons during playback. (It is not necessary to press the
/ button.)
A track number higher than the number of tracks on the disc can-
●
not be selected.
During random play, direct search is not possible.
●
Selected track number
■
Repeat play
All tracks on up to 3 discs, or a programmed sequence can be continuously repeated.
To repeat all tracks on up to 3 discs:
Press the / button twice.
To repeat a desired track:
Perform steps 1 - 4 in the "Programmed play" section on page 17
and then press the / button twice.
To cancel repeat play:
Press the / button again.
" " will go out.
■
Random play
The tracks on the disc(s) can be played in random order automatically.
Press the RANDOM button on the remote control to begin random play.
To cancel random play:
Press the / button.
"NORMAL" will appear for 2 seconds.
Notes:
If you press the button during random play, you can move
●
to the track selected next by the random operation. On the other
hand, the button does not allow you to move to the previous track. The beginning of the track being played will be located.
In random play, the unit will select and play tracks automatically.
●
(You cannot select the order of the tracks.)
Caution:
After performing repeat or random play, be sure to press the button. Otherwise, the disc(s) will play continuously.
CD-MPX100H
ENGLISH
5
2
3
CD or MP3/WMA disc Playback
4
5
6
7
8
E-16
9/3/05 CD-MPX100H_2.fm
TINSZA162AWZZ
Page 21
CD-MPX100H
ENGLISH
■
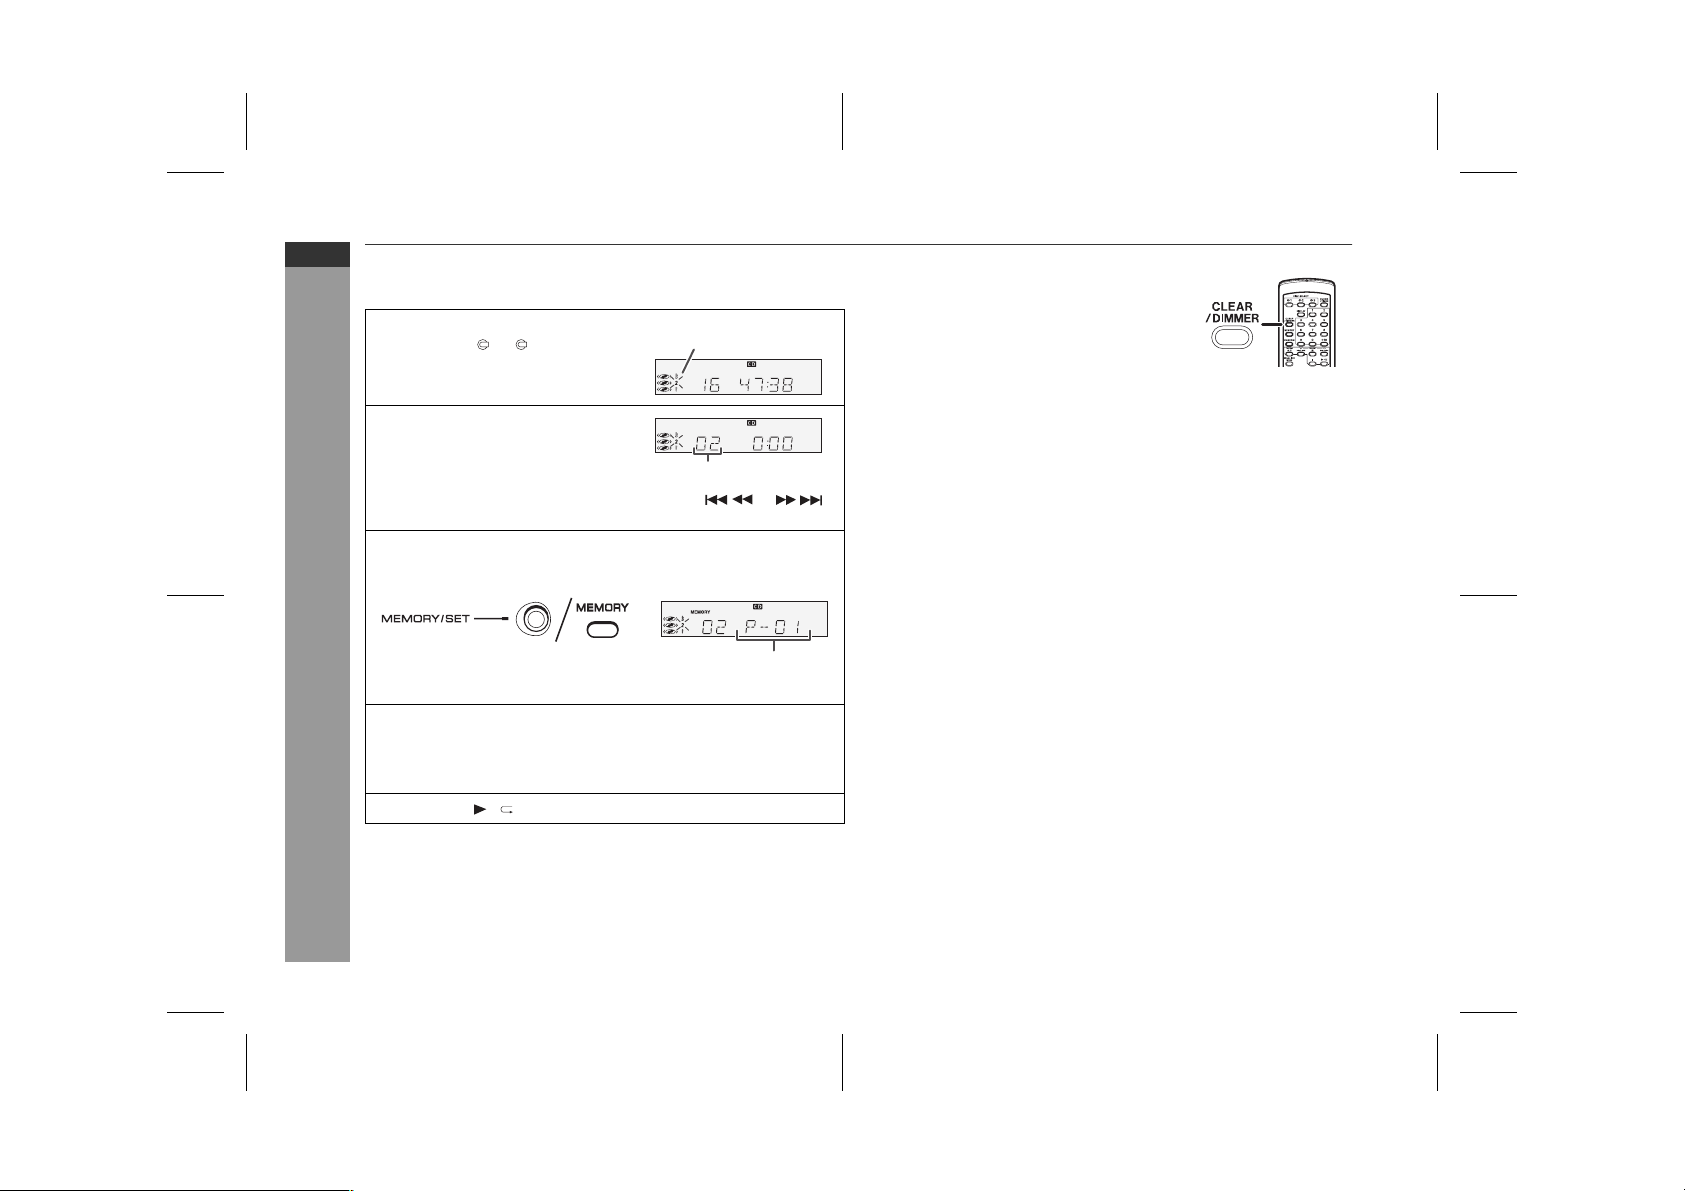
Programmed play
You can choose up to 32 selections for playback in the order you like.
Whilst in the stop mode, press
1
one of the 1 - 3 buttons on
the remote control to select
the desired disc.
Press the direct search but-
2
tons on the remote control to
select the desired track.
You can also select a track by pressing the or
button.
Press the MEMORY/SET (MEMORY) button to save the
3
track number.
When the track is memorised, "MEMORY" will appear.
Repeat steps 1 - 3 for other tracks. Up to 32 tracks can be
4
programmed.
If you make a mistake, the programmed tracks can be cleared
CD or MP3/WMA disc Playback
by pressing the CLEAR/DIMMER button.
Press the / button to start playback.
5
Selected disc number
Selected track number
Playback order
To clear the programmed selections:
Whilst the "MEMORY" indicator is lit, set the
stop mode and then press the CLEAR/DIMMER button.
Each time the button is pressed, one track will
be cleared, beginning with the last track programmed. When all the tracks are cleared,
"MEMORY" indicator will disappear.
Adding tracks to the programme:
If a programme has been previously stored, the "MEMORY" indicator will be displayed. Then follow steps 1 - 3 to add tracks. The new
tracks will be stored after the last track of the original programme.
Notes:
Opening the disc tray automatically cancels the programmed
●
sequence.
Even if you press the ON/STAND-BY button to enter the stand-
●
by mode or change the function from CD (MP3/WMA) to another,
the programmed selections will not be cleared.
During programme operation, random play is not possible.
●
E-17
9/3/05 CD-MPX100H_2.fm
TINSZA162AWZZ
Page 22
Listening to the radio
■
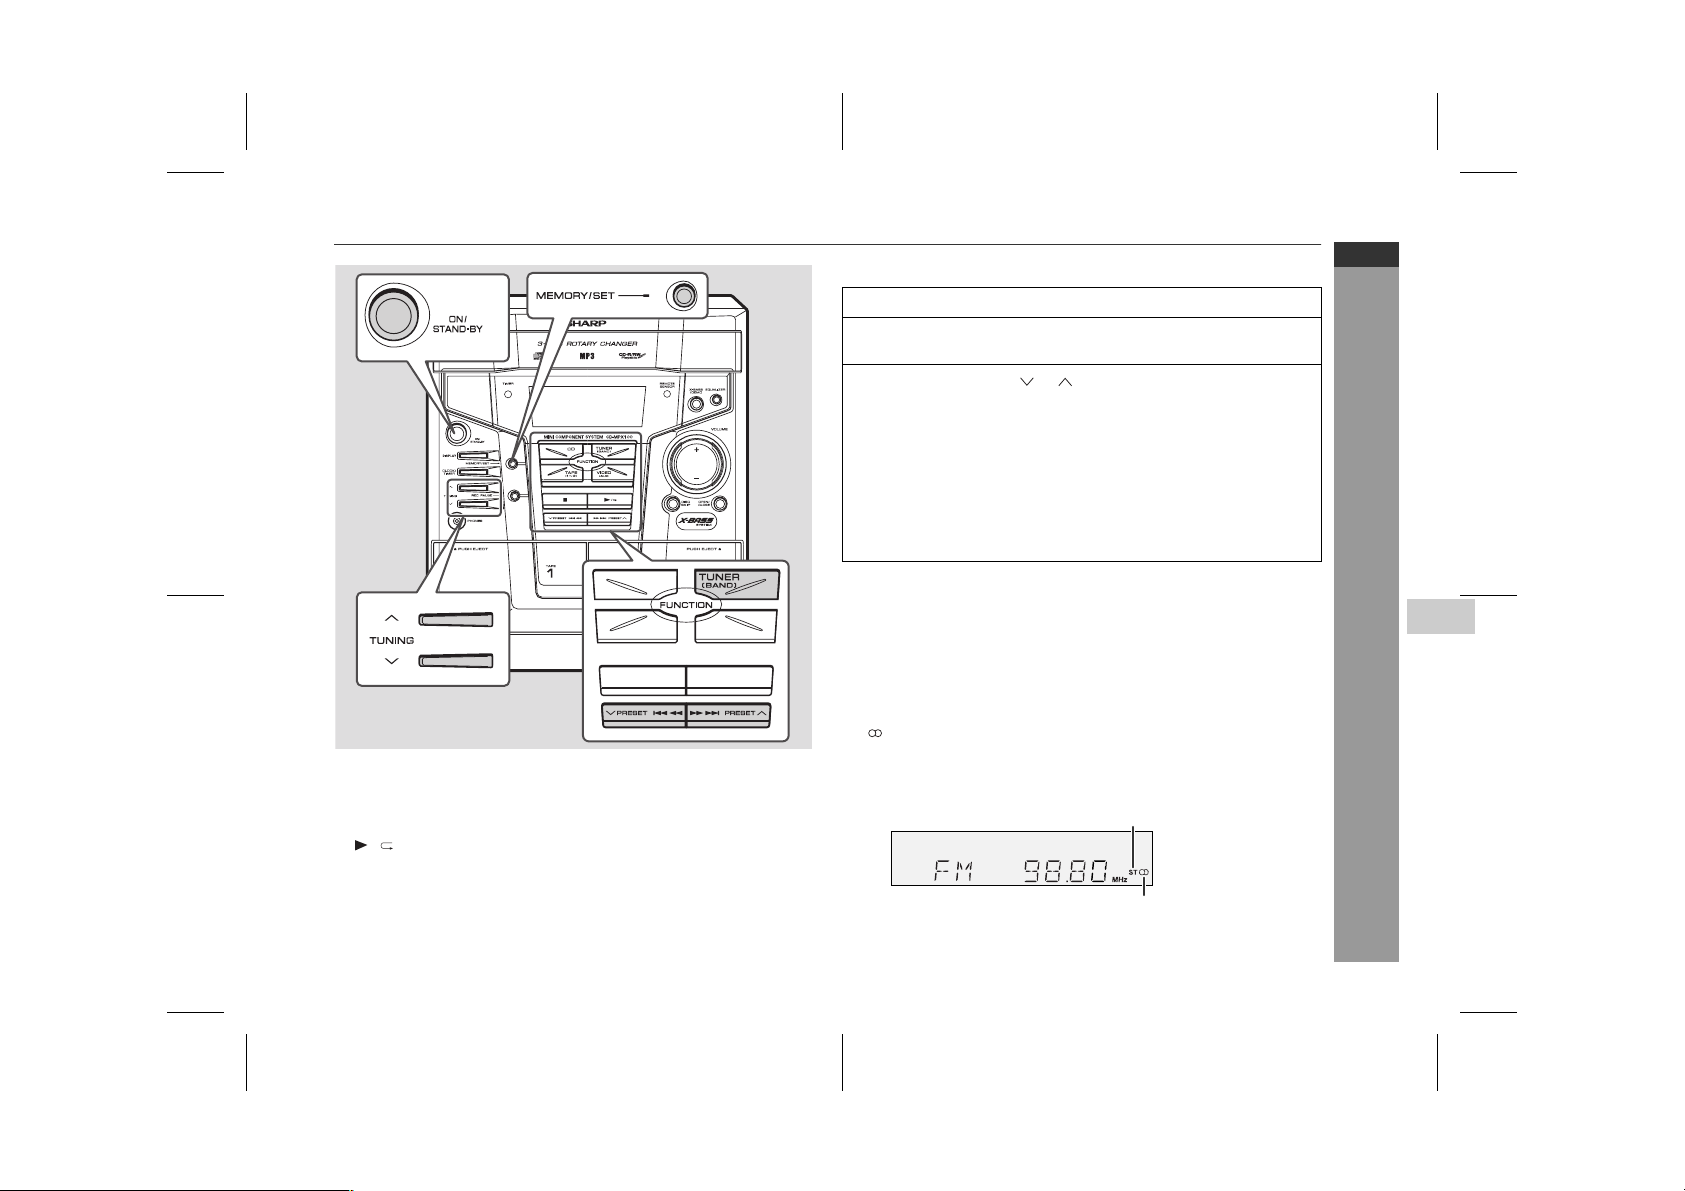
Tuning
Press the ON/STAND-BY button to turn the power on.
1
Press the TUNER (BAND) button repeatedly to select the
2
desired frequency band (FM or AM).
Press the TUNING ( or ) button to tune in to the desired
3
station.
Manual tuning:
Press the TUNING button as many times as required to tune in
to the desired station.
Auto tuning:
When the TUNING button is pressed for more than 0.5 seconds, scanning will start automatically and the tuner will stop at
the first receivable broadcast station.
Notes:
When radio interference occurs, auto scan tuning may stop auto-
●
matically at that point.
Auto scan tuning will skip weak signal stations.
●
To stop the auto tuning, press the TUNING button again.
●
CD-MPX100H
ENGLISH
5
Radio
Auto power on function:
When you press any of the following buttons, the unit turns on.
TUNER (BAND) button (main unit and remote control): The unit
●
turns on and the "TUNER" function is activated.
/ button (main unit and remote control): The unit turns on and
●
playback of the last function starts (CD, TAPE, TUNER, VIDEO/
AUX).
To receive an FM stereo transmission:
Press the TUNER (BAND) button to display the "ST" indicator.
" " will appear when an FM broadcast is in stereo.
●
If the FM reception is weak, press the TUNER (BAND) button to
●
extinguish the "ST" indicator. The reception changes to monaural,
and the sound becomes clearer.
FM stereo mode indicator
FM stereo receiving indicator
9/3/05 CD-MPX100H_2.fm
TINSZA162AWZZ
2
3
4
5
6
7
8
E-18
Page 23
CD-MPX100H
ENGLISH
Radio
■
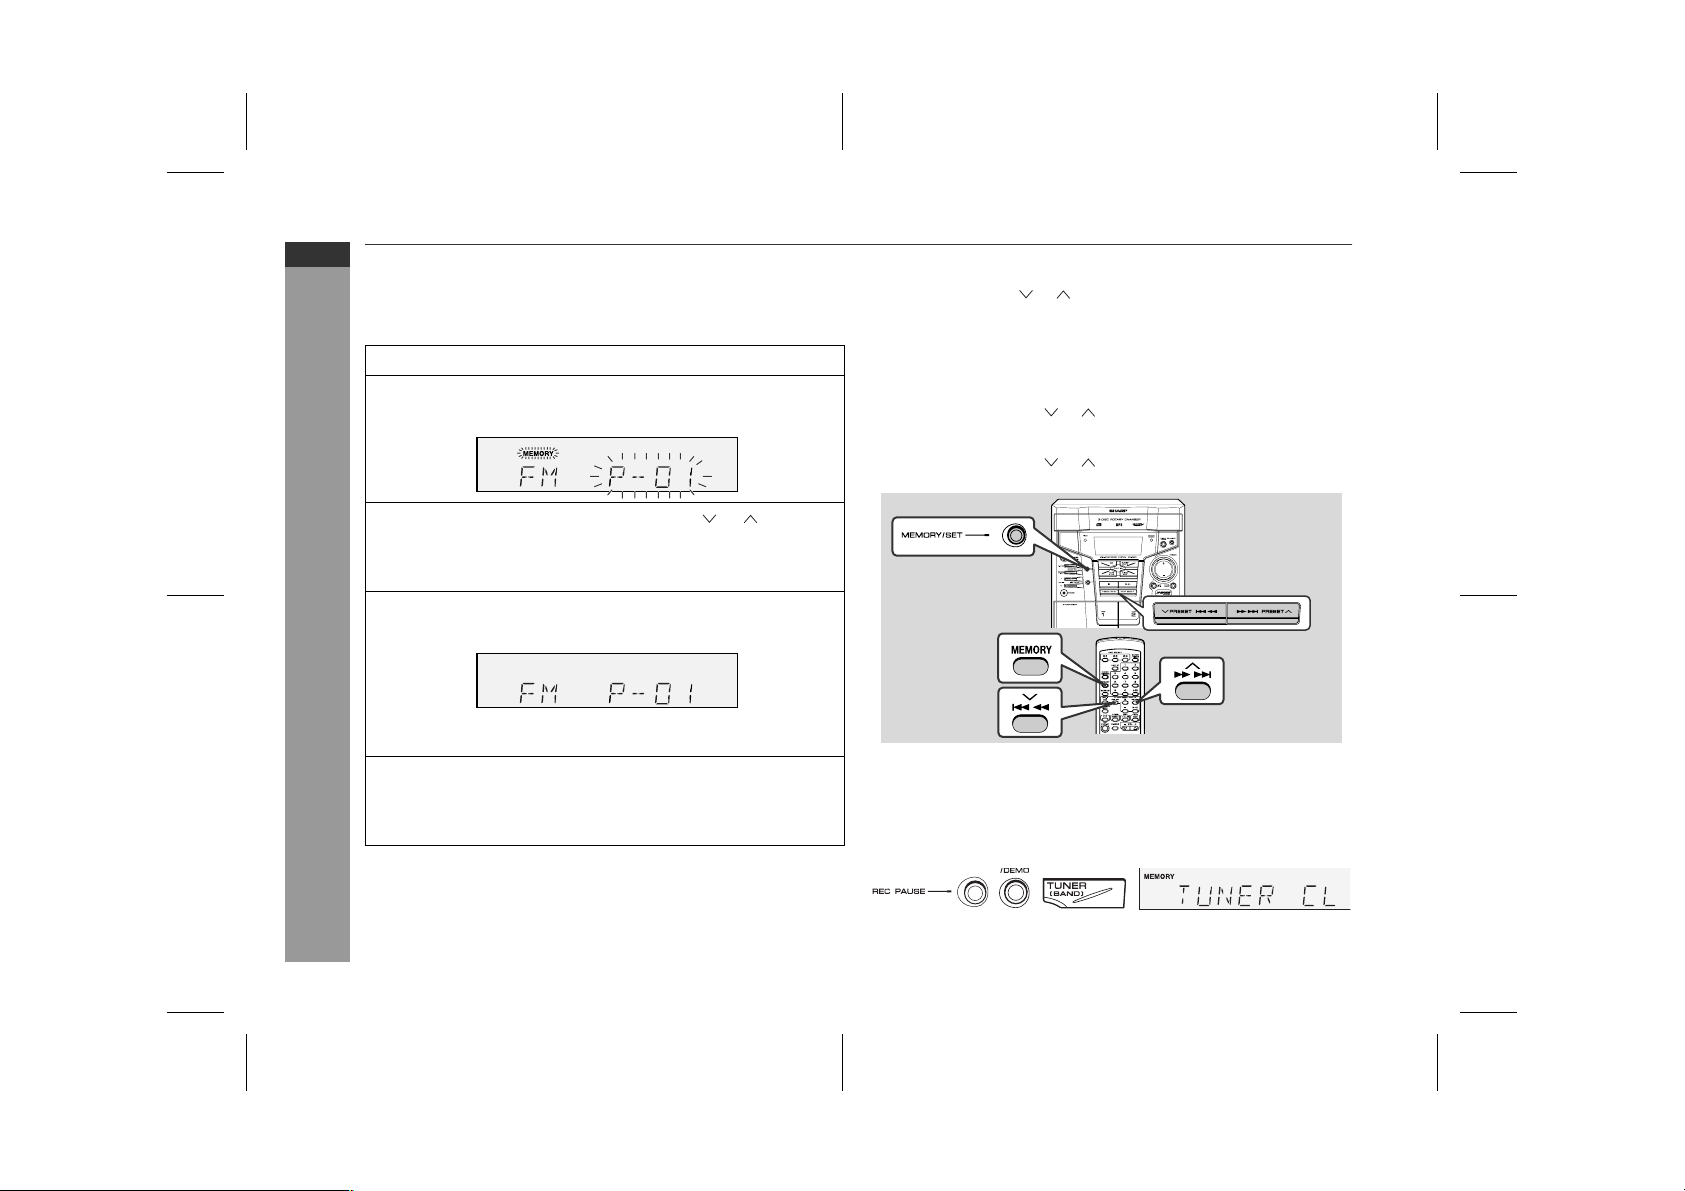
Memorising a station
You can store 40 AM and FM stations in memory and recall them at
the push of a button. (Preset tuning)
Perform steps 1 - 3 in "Tuning" on page 18.
1
Press the MEMORY/SET (MEMORY) button to enter the
2
preset tuning saving mode.
Within 30 seconds, press the PRESET ( or ) button to
3
select the preset channel number.
Store the stations in memory, in order, starting with preset
channel 1.
Within 30 seconds, press the MEMORY/SET (MEMORY)
4
button to store that station in memory.
If the "MEMORY" and preset number indicators go out before
the station is memorised, repeat the operation from step 2.
Repeat steps 1 - 4 to set other stations, or to change a pre-
5
set station.
When a new station is stored in memory, the station previously
memorised for that preset channel number will be erased.
Note:
The backup function protects the memorised stations for a few hours
should there be a power failure or the AC power lead become disconnected.
■
To recall a memorised station
Press the PRESET ( or ) button for less than 0.5 seconds to select the desired station.
■
To scan the preset stations
The stations saved in memory can be scanned automatically. (Preset
memory scan)
1 Press the PRESET ( or ) button for more than 0.5 seconds.
The preset number will flash and the programmed stations will be
tuned in sequentially, for 5 seconds each.
2 Press the PRESET ( or ) button again when the desired sta-
tion is located.
■
To erase entire preset memory
1 Press the ON/STAND-BY button to enter the stand-by mode.
2 Whilst pressing down the REC PAUSE button and the X-BASS/
DEMO button, press the TUNER button until "TUNER CL" appears.
E-19
9/3/05 CD-MPX100H_2.fm
TINSZA162AWZZ
Page 24
Listening to a cassette tape (TAPE 1 or TAPE 2)
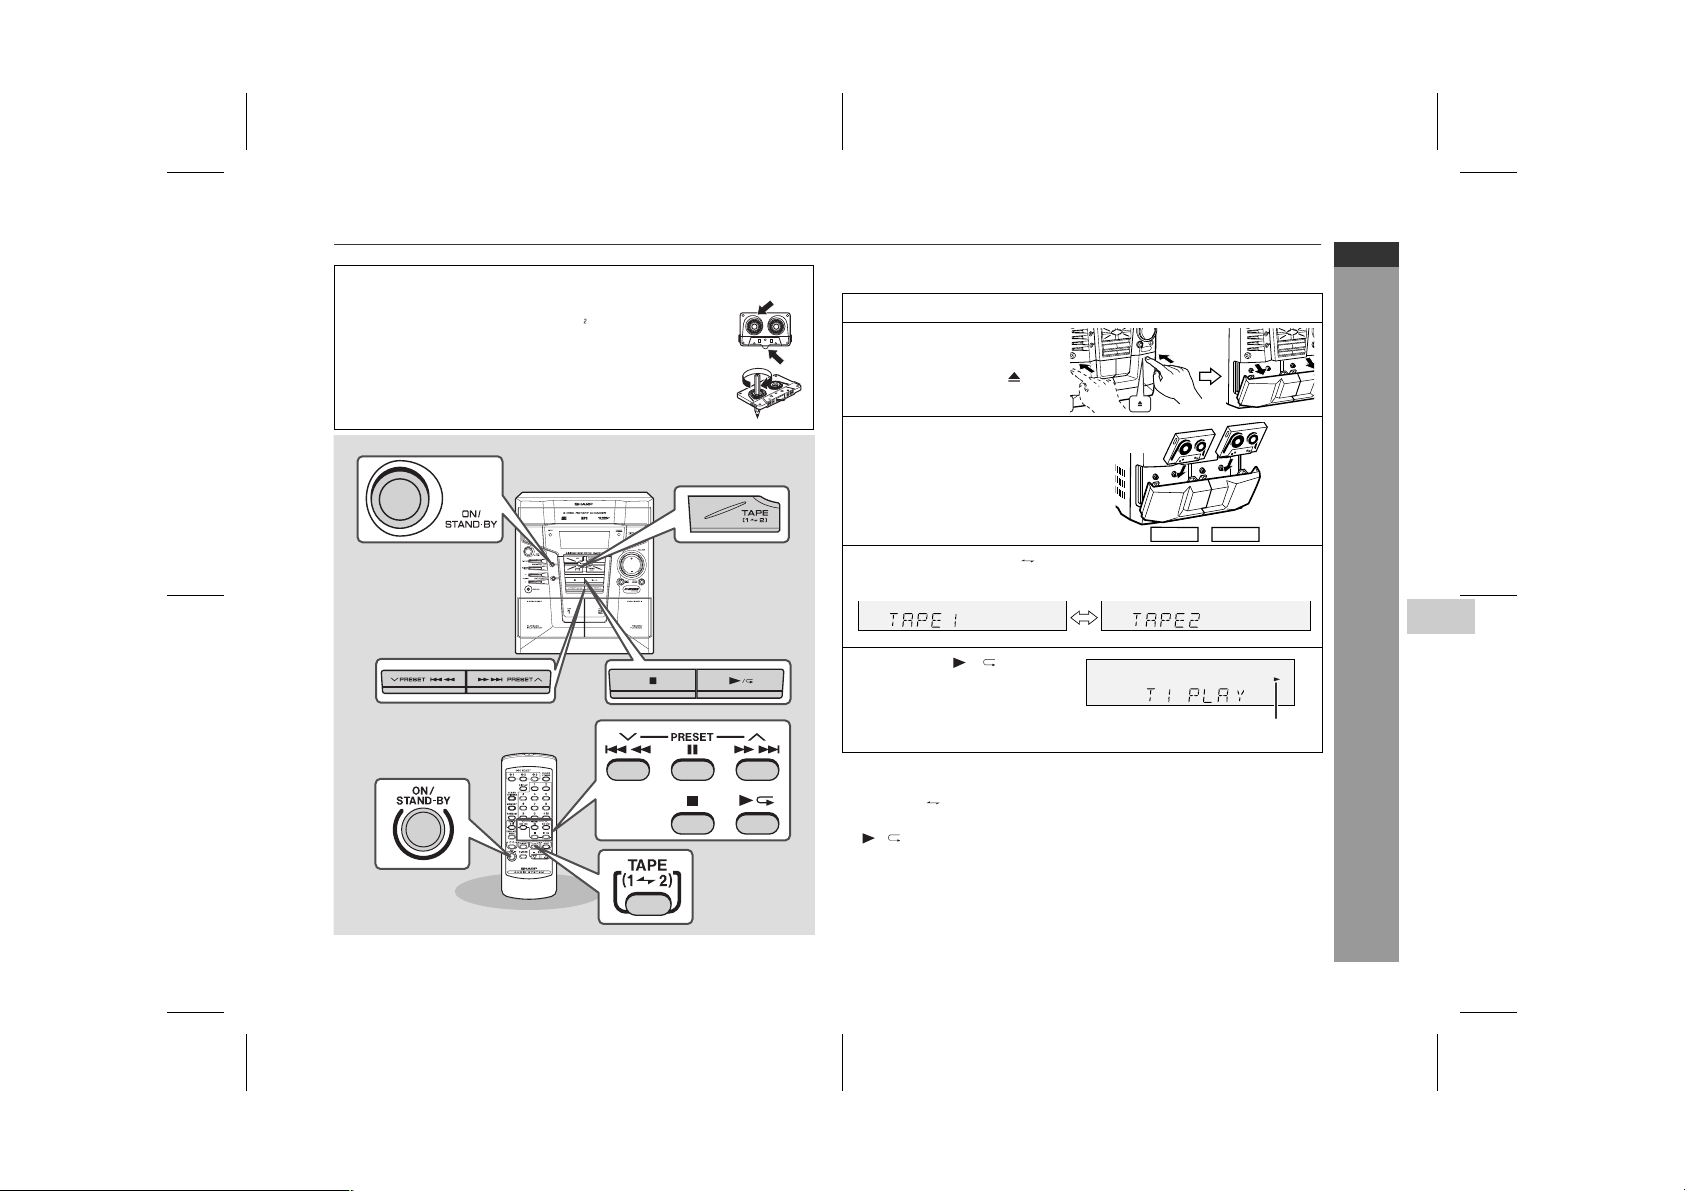
Before playback:
●
For playback, use normal or low-noise tapes for
the best sound. (Metal or CrO tapes are not
recommended.)
Do not use C-120 tapes or poor-quality tapes, as
●
they may cause malfunctions.
Before loading a tape into the cassette compart-
●
ment, tighten the slack with a pen or a pencil.
■
Tape 1 playback
Press the ON/STAND-BY button to turn the power on.
1
Open the cassette com-
2
partment by pushing
the area marked " ".
Load a cassette into the
3
TAPE 1 compartment or
TAPE 2 compartment
with the side to be
played facing towards
you.
Press the TAPE (1 2) button to select the cassette you
4
want to listen to.
Press the / to start
5
playback.
Auto power on function:
When you press any of the following buttons, the unit turns on.
TAPE (1 2) button (main unit and remote control): The unit turns
●
on and the "TAPE" function is activated.
/ button (main unit and remote control): The unit turns on and
●
playback of the last function starts (CD, TAPE, TUNER, VIDEO/
AUX).
Auto power off function:
In the stop mode of tape operation, the main unit enters the stand-by
mode after 15 minutes of inactivity.
TAPE 1
TAPE 2
Tape play indicator
CD-MPX100H
ENGLISH
5
Tape Playback
2
3
4
5
6
7
8
E-20
9/3/05 CD-MPX100H_2.fm
TINSZA162AWZZ
Page 25
CD-MPX100H
ENGLISH
■
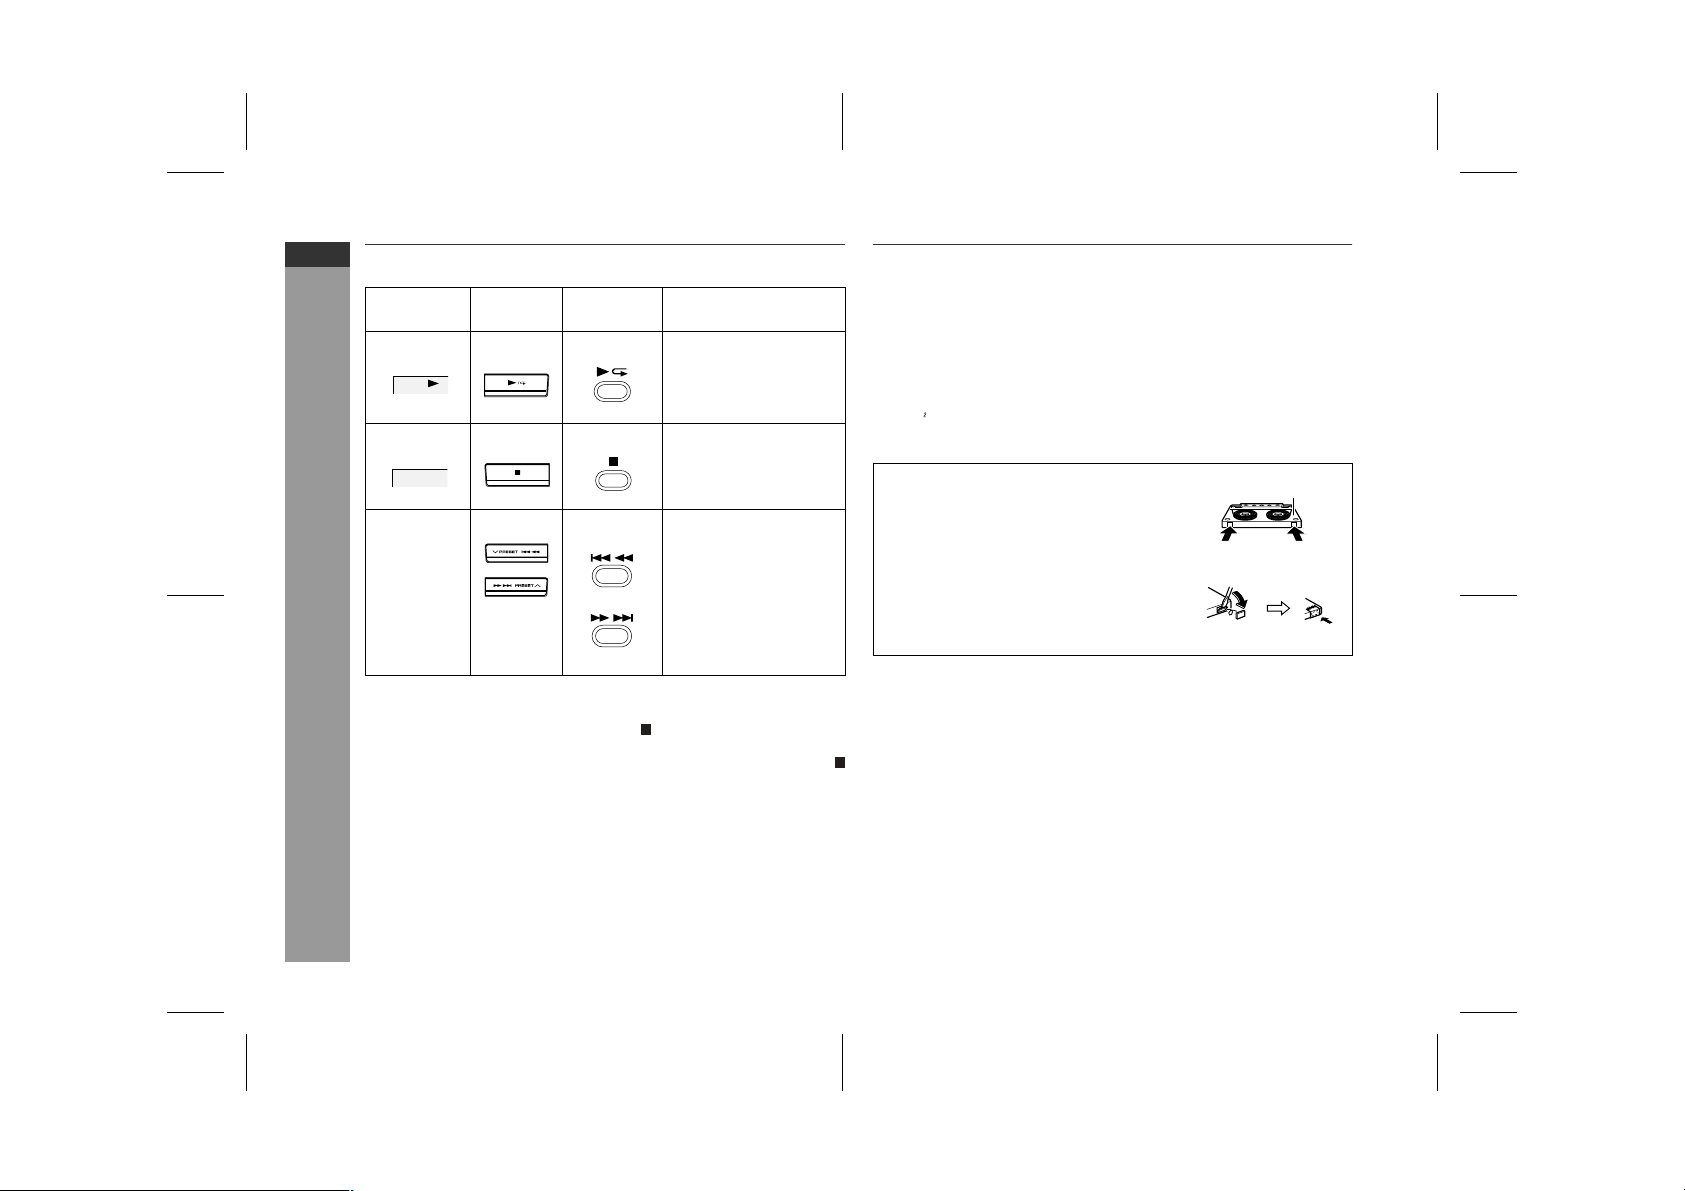
Various tape functions
Function Main Unit Remote
Playback Press in the stop mode.
Stop Press in the playback
Fast
forward/
Rewind
(TAPE 2
only)
Tape Recording
Caution:
To remove the cassette, press the button, and then open the
●
compartment.
Before changing from one tape operation to another, press the
●
button.
If a power failure occurs during tape operation, the tape head will
●
remain engaged with the tape and the cassette door will not open.
In this case, wait until the power is restored.
Control
Operation
mode.
Press in the playback or
stop mode.
Recording to a cassette tape
Before recording:
When recording important selections, make a preliminary test to
●
ensure that the desired material is properly recorded.
SHARP is not liable for damage or loss of your recording arising
●
from malfunction of this unit.
The volume and sound controls can be adjusted with no effect on
●
the recorded signal (Variable Sound Monitor).
●
For recording, use only normal tapes. Do not use metal or
CrO tapes.
Recording can be operated in the TAPE 2 compartment only. The
●
TAPE 1 compartment is for playback only.
Erase-prevention tab of cassette tapes:
When recording on a cassette tape,
●
make sure that the erase-prevention
tabs are not removed. Cassettes have
removable tabs that prevent accidental
recording or erasing.
To protect the recorded sound, remove
●
the tab after recording. Cover the tab
hole with adhesive tape to record on the
tape without the tab.
Tab for
side B
Side A
Tab for
side A
E-21
9/3/05 CD-MPX100H_3.fm
TINSZA162AWZZ
Page 26
Recording to a cassette tape (continued)
■
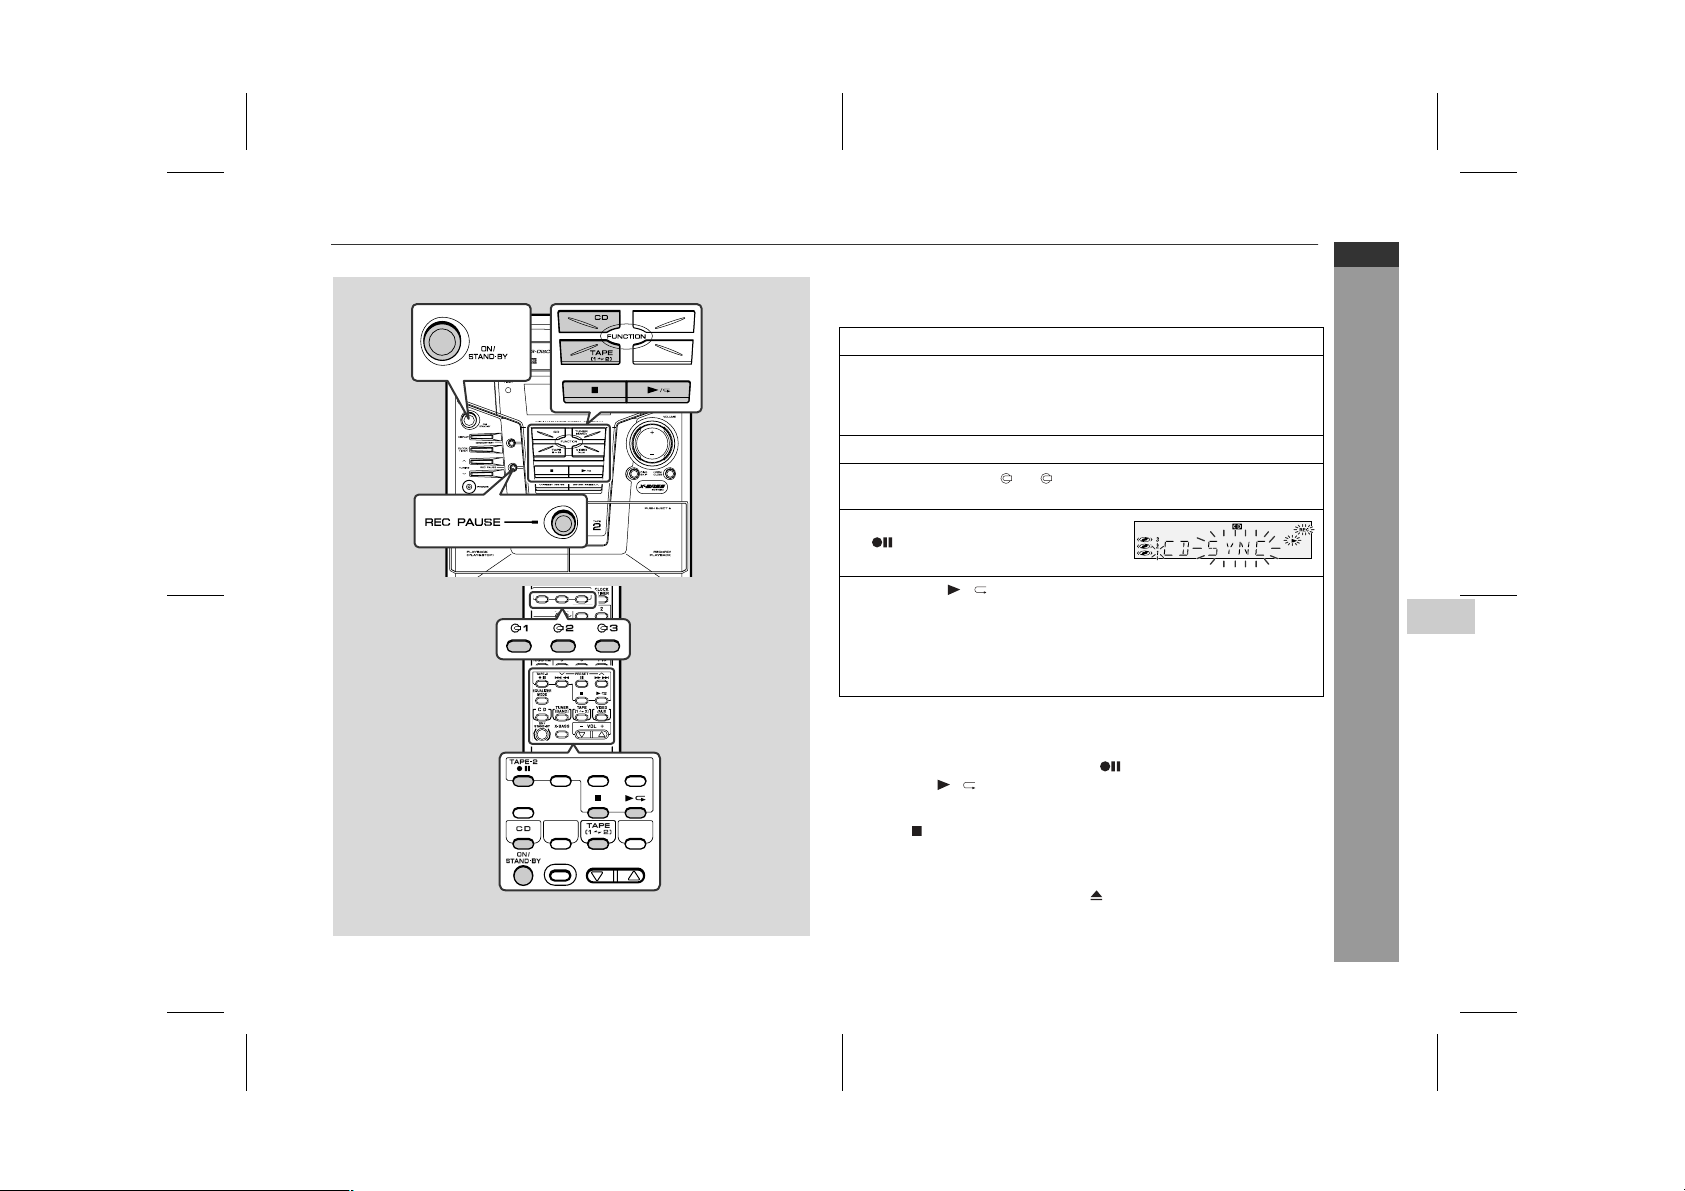
Recording from a CD or MP3/WMA disc
You can record 3 discs continuously.
Press the ON/STAND-BY button to turn the power on.
1
Load a cassette into the TAPE 2 cassette compartment with
2
the side to be recorded on facing you.
Wind past the leader of the tape, on which recording cannot be
performed.
Press the CD button and load the desired disc.
3
Press one of the 1 - 3 buttons on the remote control to
4
select the disc to be recorded first.
Press the REC PAUSE (TAPE-2
5
) button.
Recording will be paused.
Press the
6
Disc playback will start approximately 7 seconds after the
●
tape starts.
Recording is started from the selected disc. When the play-
●
back of the last disc is finished or the end of the tape is
reached, the disc and the cassette will stop automatically.
To perform programmed recording:
1 Programme discs and tracks. (See page 17.)
2 Press the REC PAUSE (TAPE-2 ) button.
3 Press the / button.
To stop recording:
Press the button.
The disc and tape will stop.
Note:
Whilst recording, OPEN/CLOSE button is deactivated. It is rec-
●
ommended to perform disc recording after closing the disc tray.
/
button to start recording.
CD-MPX100H
ENGLISH
5
Tape Recording
9/3/05 CD-MPX100H_3.fm
E-22
TINSZA162AWZZ
Page 27
CD-MPX100H
ENGLISH
■
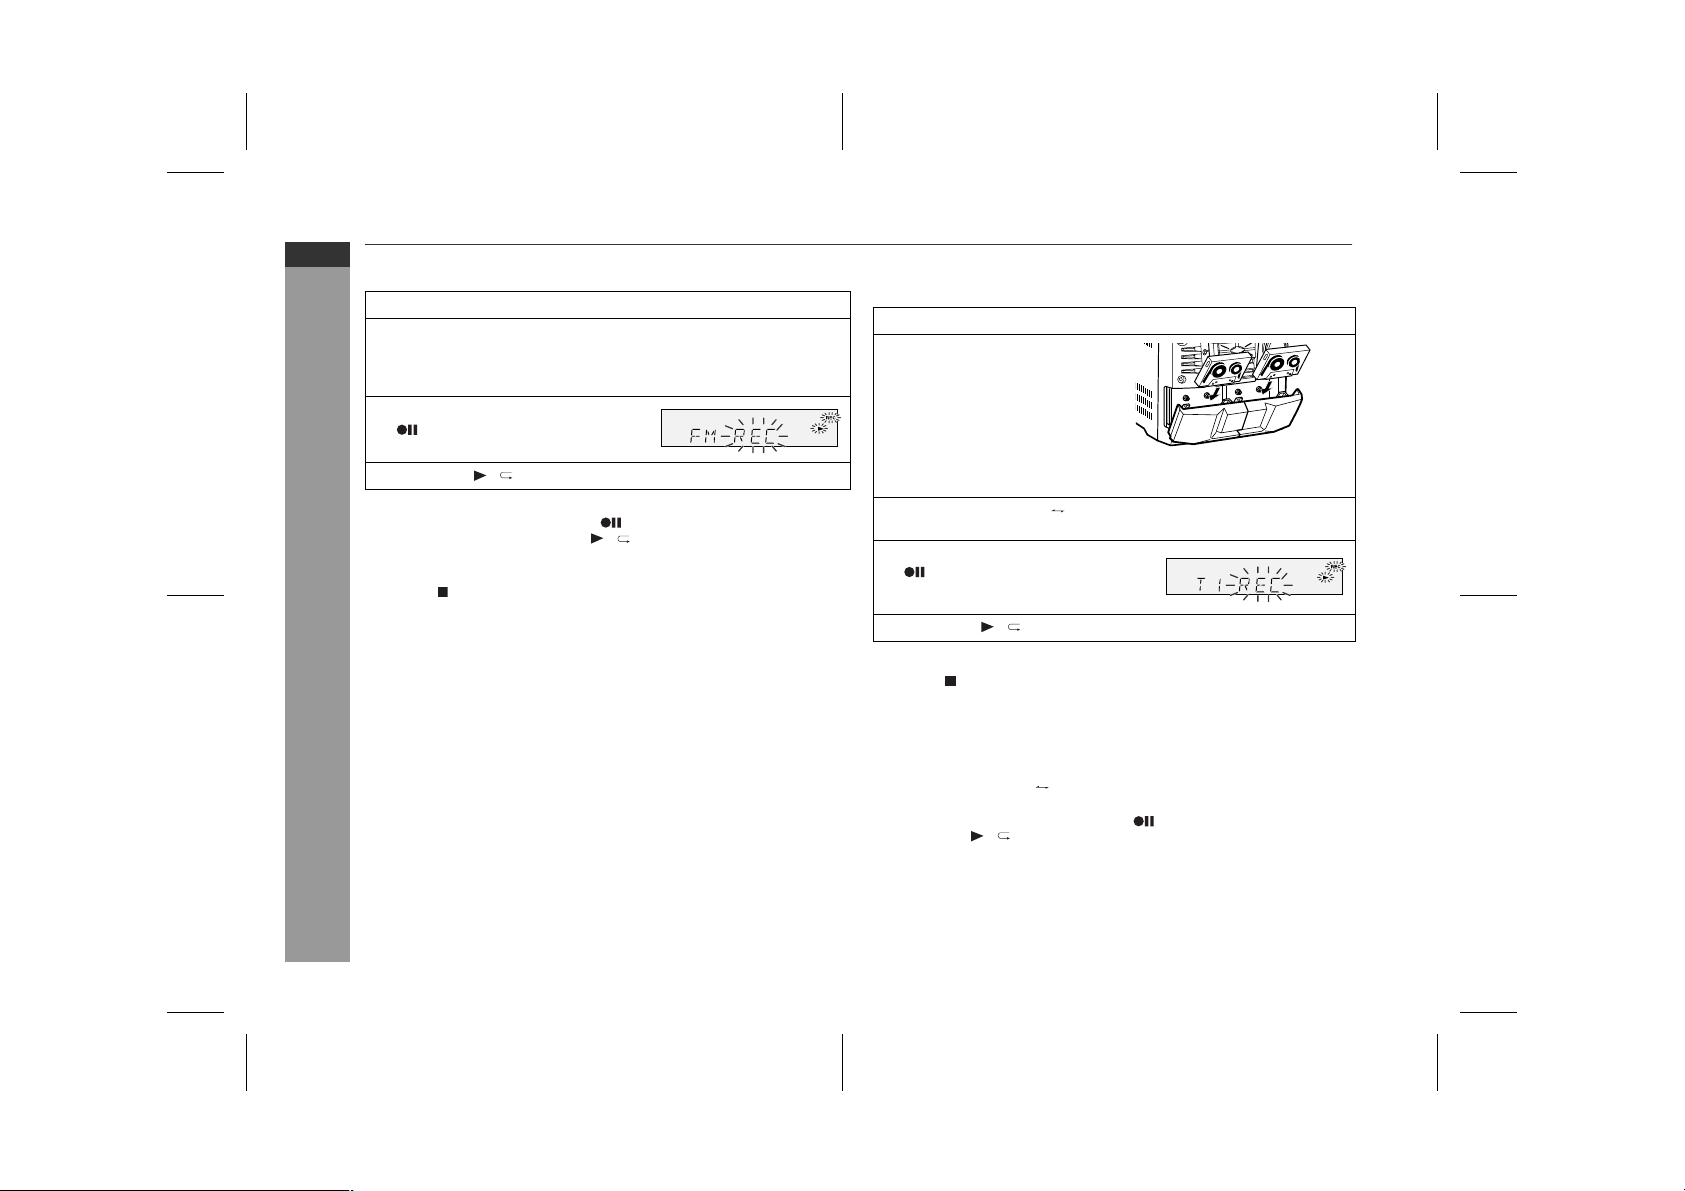
Recording from the radio
Tune in to the desired station. (See page 18.)
1
Load a cassette into the TAPE 2 cassette compartment with
2
the side to be recorded on facing you.
Wind past the leader of the tape, on which recording cannot be
performed.
Press the REC PAUSE (TAPE-2
3
) button.
Recording will be paused.
Press the / button to start recording.
4
To interrupt recording:
Press the REC PAUSE (TAPE-2 ) button.
To resume recording, press the / button.
To stop recording:
Press the button.
Note:
If you hear a whistling noise whilst recording an AM station, move
the AM loop aerial.
Tape Recording
■
Dubbing from tape to tape
You can record from TAPE 1 to TAPE 2.
Press the ON/STAND-BY button to turn the power on.
1
Load a prerecorded cassette
2
into the TAPE 1 cassette com-
partment. Insert a blank tape into
the TAPE 2 cassette compart-
ment.
It is recommended that the recording tape is the same length as
the master tape.
Press the TAPE (1 2) button until "TAPE 1" appears on
3
the display.
Press the REC PAUSE (TAPE-2
4
) button.
Recording will be paused.
Press the / button to start dubbing.
5
To stop dubbing:
Press the button.
TAPE 1 and TAPE 2 will simultaneously stop.
■
Erasing recorded tapes
1 Load the tape to be erased into the TAPE 2 cassette compart-
ment with the side to be erased facing towards you.
2 Press the TAPE (1 2) button until "TAPE 2" appears on the
display.
3
Press the REC PAUSE (TAPE-2 ) button.
4 Press the / button to start erasing.
Note:
Make sure that the TAPE 1 is not in use.
E-23
9/3/05 CD-MPX100H_3.fm
TINSZA162AWZZ
Page 28
Timer and sleep operation
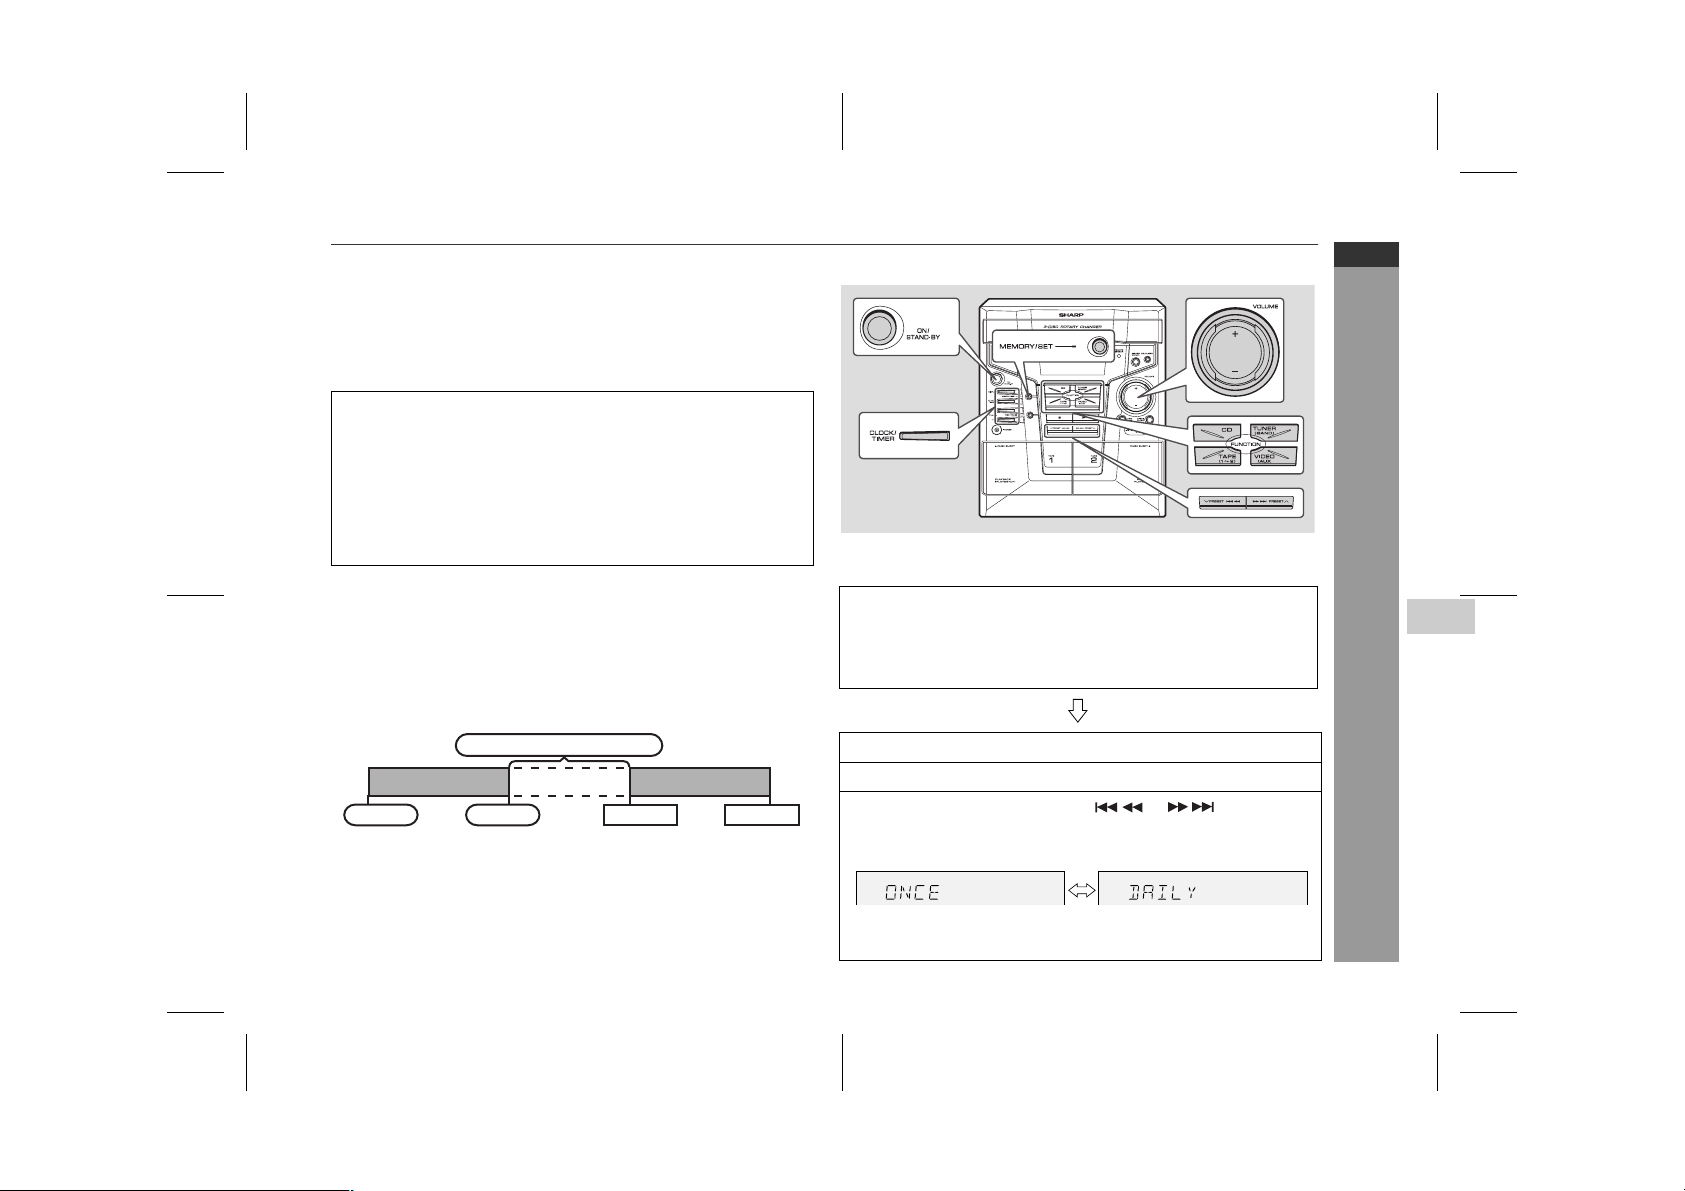
Timer playback:
The unit turns on and plays the desired source (CD, TUNER, TAPE)
at the preset time.
Timer recording:
The unit turns on and starts recording from the tuner at the preset
time.
This unit has 2 types of timer: ONCE TIMER and DAILY TIMER.
Once timer:
For example, if you are away but want to record a programme on a
radio station.
Daily timer:
For example, set the timer as a wake up call every morning.
Using the once timer and daily timer in combination:
For example, use the once timer to record a radio programme, and
use the daily timer as an alarm clock.
1 Set the daily timer (pages 24 - 26).
2 Set the once timer (pages 24 - 26).
Start
Note:
When the setting times for the daily timer and once timer overlap, the
once timer takes priority. Allow an interval of at least 1 minute between operations.
Once timer play and once timer recording works for
one time only at a preset time.
Daily timer play and daily timer recording works at
the same preset time everyday.
1 minute or more
Daily timer
Stop Start Stop
Once timer
■
Timer playback or timer recording
Before setting timer:
1 Check that the clock is set to the correct time (refer to page 11).
If it is not set, you cannot use the timer function.
2 For timer playback: Load a cassette or discs to be played.
For timer recording: Load a cassette for recording in the
Press the ON/STAND-BY button to turn the power on.
1
Press the CLOCK/TIMER button.
2
Within 10 seconds, press the or button to
3
select "ONCE" or "DAILY", and press the MEMORY/
SET button.
Set the unit to the correct time if "ONCE" and "DAILY" does not
appear.
cassette compartment.
Continued to the next page
CD-MPX100H
ENGLISH
5
Advanced Features
E-24
9/3/05 CD-MPX100H_3.fm
TINSZA162AWZZ
Page 29
CD-MPX100H
ENGLISH
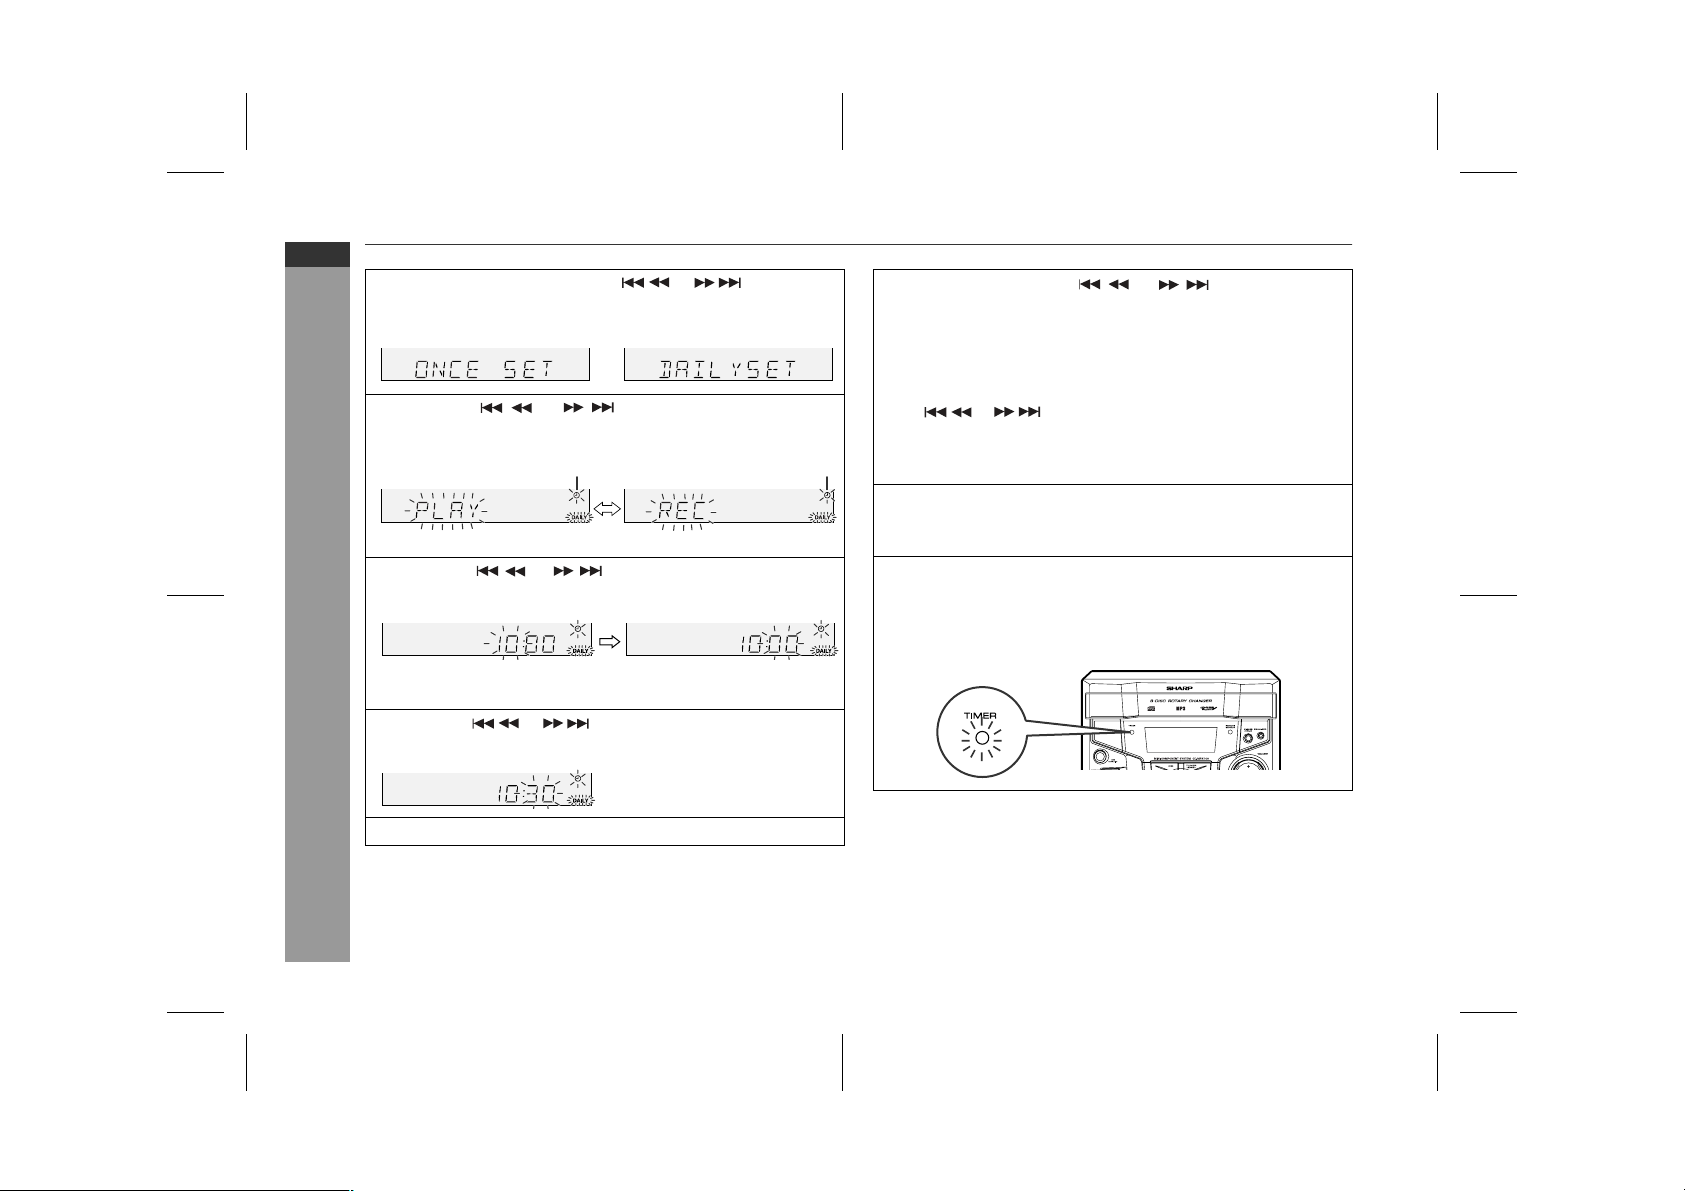
Within 10 seconds, press the or button to
4
select "ONCE SET" or "DAILY SET", and press the
MEMORY/SET button.
Press the or button to select "PLAY" or
5
"REC", and press the MEMORY/SET button.
The illustrations show the daily timer setting.
Press the or button to adjust the hour and
6
then press the MEMORY/SET button.
The illustrations show the timer playback setting in the daily
timer mode.
Advanced Features
Press the or button to adjust the minutes and
7
then press the MEMORY/SET button.
White Red
Switch input with the or button, and then
9
press the MEMORY/SET button.
To select the timer playback source: CD, TUNER, TAPE 1 or
TAPE 2.
To select the timer recording source: TUNER.
When you select the tuner, select a station by pressing the
●
or
button.
If a station has not been programmed, "NO P.SET" will be
●
displayed and timer setting will be cancelled.
Adjust the volume using the VOLUME control, and then
10
press the MEMORY/SET button.
Do not turn the volume up too high.
Press the ON/STAND-BY button to enter the power stand-
11
by mode.
The "TIMER" indicator lights up and the unit is ready for timer
playback or timer recording.
button, and then press the MEMORY/SET
E-25
Set the time to finish as in step 6 and 7 above.
8
Continued to the next page
9/3/05 CD-MPX100H_3.fm
TINSZA162AWZZ
Page 30
Timer and sleep operation (continued)
When the preset time is reached, playback or recording will
12
start.
The volume will increase gradually until it reaches the preset
volume.
When the timer end time is reached, the system will enter
13
the power stand-by mode automatically.
Once timer:
The timer will be cancelled.
Daily timer:
The timer will operate at the same time every day. It will continue until the daily timer setting is cancelled. Cancel the daily
timer when it is not used.
Note:
When performing timer playback or recording using another unit connected to the VIDEO/AUX INPUT socket, select "VIDEO" in step 9.
This unit will turn on or enter the power stand-by mode automatically,
however, the connected unit will not turn on or off.
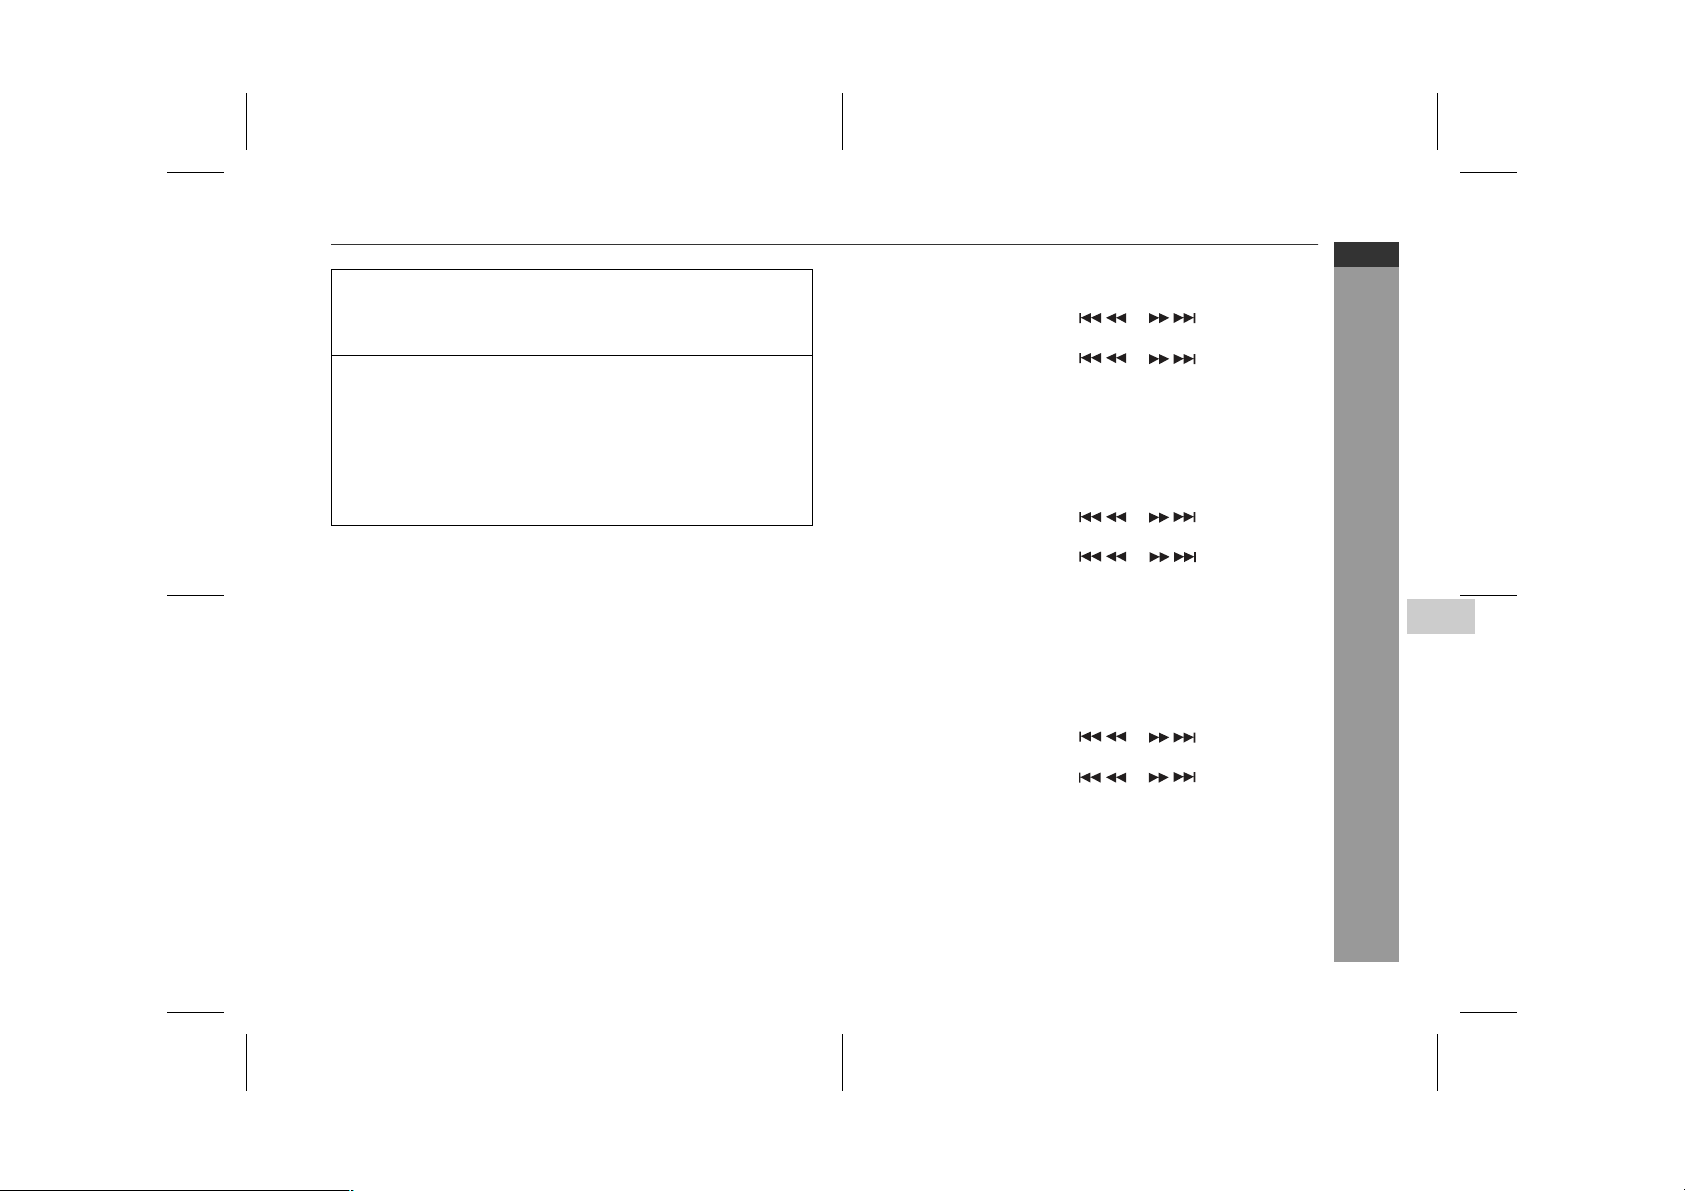
Checking the timer setting in the timer stand-by mode:
1 Press the CLOCK/TIMER button.
2 Within 10 seconds, press the or button to select
"ONCE" or "DAILY", and press the MEMORY/SET button.
3 Within 10 seconds, press the or button to select
"ONCE CAL" or "DAILY CAL", and press the MEMORY/SET
button.
The unit returns to the timer stand-by mode after displaying the
setting in order.
Cancelling the timer setting in the timer stand-by mode:
1 Press the CLOCK/TIMER button.
2 Within 10 seconds, press the or button to select
"ONCE" or "DAILY", and press the MEMORY/SET button.
3 Within 10 seconds, press the or button to select
"ONCE OFF" or "DAILY OFF", and press the MEMORY/SET
button.
Timer will be cancelled (the setting will not be cancelled).
Reusing the memorised timer setting:
The timer setting will be memorised once it is entered. To reuse the
same setting, perform the following operations.
1 Turn the power on and press the CLOCK/TIMER button.
2 Within 10 seconds, press the or button to select
"ONCE" or "DAILY", and press the MEMORY/SET button.
3 Within 10 seconds, press the or button to select
"ONCE ON" or "DAILY ON", and press the MEMORY/SET
button.
4 Press the ON/STAND-BY button to enter the power stand-by
mode.
CD-MPX100H
ENGLISH
5
Advanced Features
Note:
The timer can also be set with the remote control.
9/3/05 CD-MPX100H_3.fm
E-26
TINSZA162AWZZ
Page 31
CD-MPX100H
Sleep timer setting
Timer playback or
recording setting
Sleep operation will
automatically stop.
Timer playback or recording
start time
End time
1 minute - 3 hours Desired time
ENGLISH
■
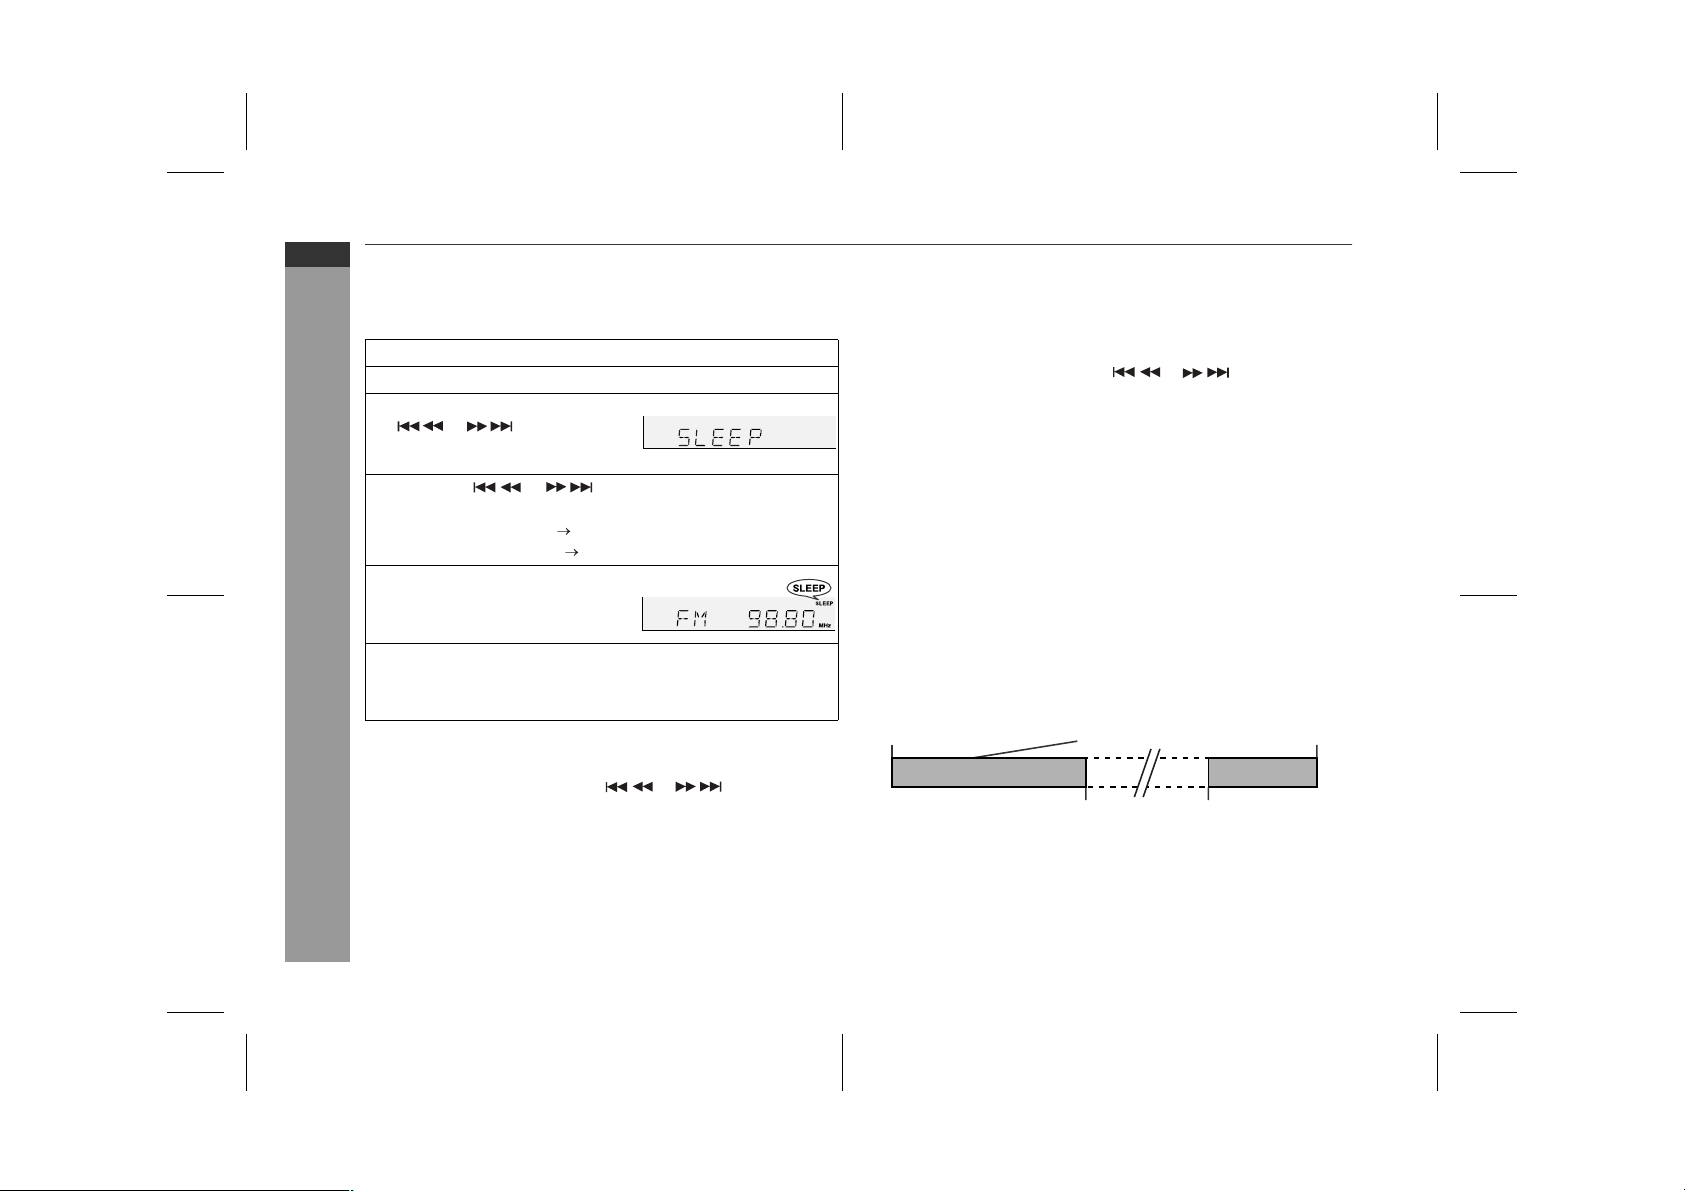
Sleep operation
The radio, compact disc and cassette tape can all be turned off automatically.
Play back the desired sound source.
1
Press the CLOCK/TIMER button.
2
Within 10 seconds, press the
3
or button to select
"SLEEP", and press the MEMORY/SET button.
Press the or button to select time.
4
(Maximum: 3 hours - Minimum: 1 minute)
3 hours - 5 minutes 5 - minute intervals
●
5 minutes - 1 minute 1 - minute intervals
●
Press the MEMORY/SET but-
5
ton.
"SLEEP" will appear.
The unit will enter the power stand-by mode automatically
6
after the preset time has elapsed.
The volume will be turned down 1 minute before the sleep
Advanced Features
operation finishes.
To confirm the remaining sleep time:
1 Whilst "SLEEP" is indicated, press the CLOCK/TIMER button.
2 Within 10 seconds, press the or button to select
"SLEEP X : XX".
"X : XX" is sleep remaining time.
The remaining sleep time is displayed for about 10 seconds.
●
You can change the remaining sleep time whilst it is displayed
●
by pressing the MEMORY/SET button (steps 4 - 5).
To cancel the sleep operation:
Press the ON/STAND-BY button whilst "SLEEP" is indicated.
To cancel the sleep operation without setting the unit to the stand-by
mode, proceed as follows.
1 Whilst "SLEEP" is indicated, press the CLOCK/TIMER button.
2 Within 10 seconds, press the or button to select
"SLEEP OFF", and press the MEMORY/SET button.
■
To use timer and sleep operation together
Sleep and timer playback:
For example, you can fall asleep listening to the radio and wake up
to CD in the next morning.
Sleep and timer recording:
For example, you can fall asleep listening to the CD and record radio
programmes whilst sleeping.
1 Set the sleep time (see left, steps 1 - 5).
2 Whilst the sleep timer is set, set the timer playback or recording
(steps 2 - 10, pages 24 - 25).
Caution:
When using the cassette deck, be sure the tape length is long
enough to perform both functions. If you want to sleep and wake up
listening to a tape, and the length of the tape is shorter than the
sleep timer setting, timer playback or recording will not be possible.
E-27
9/3/05 CD-MPX100H_3.fm
TINSZA162AWZZ
Page 32
Enhancing your system
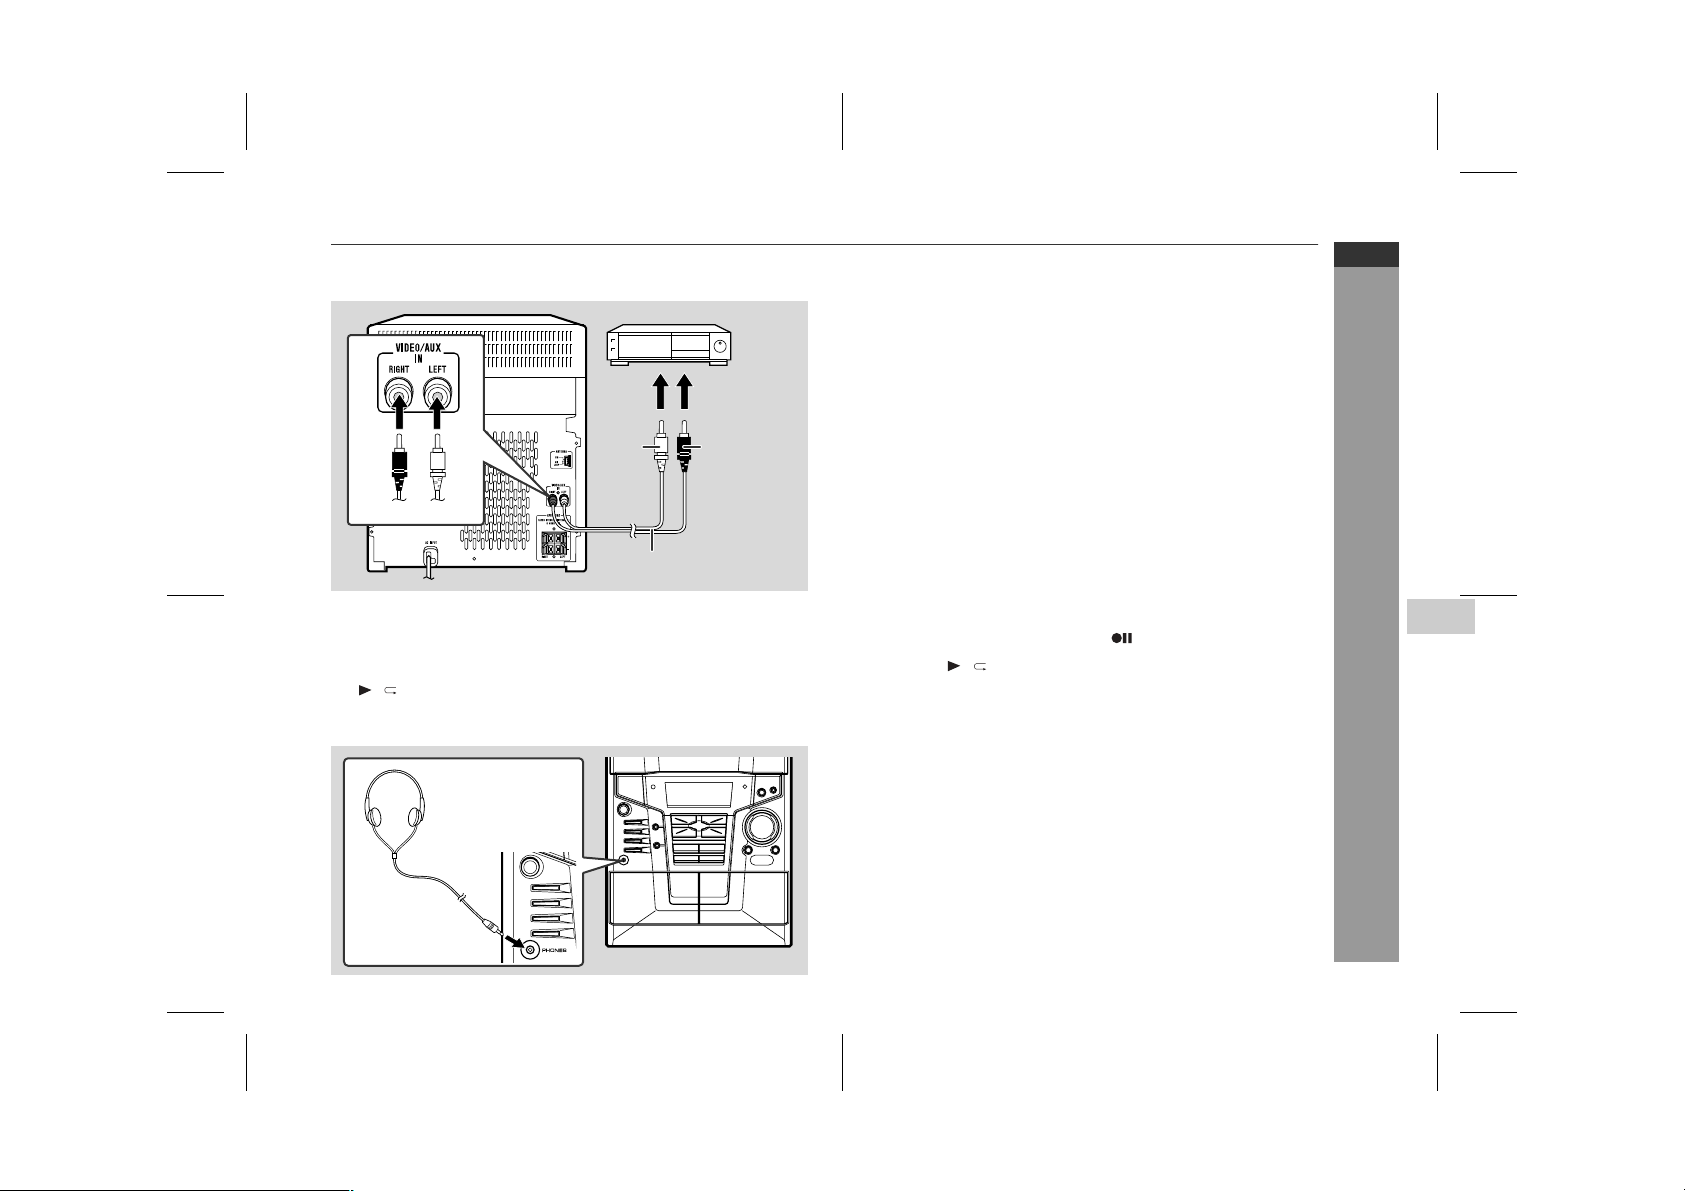
The connection lead is not included. Purchase a commercially available lead as shown below.
VCR, DVD, etc.
To the line
output sockets
White Red
WhiteRed
RCA lead (not supplied)
Auto power on function:
When you press any of the following buttons, the unit turns on.
VIDEO/AUX button (main unit and remote control): The unit turns
●
on and the "VIDEO" function is activated.
/ button (main unit and remote control): The unit turns on and
●
playback of the last function starts (CD, TAPE, TUNER, VIDEO/
AUX).
■
Listening to the playback sounds from VCR,
DVD, etc.
Use a connection lead to connect the VCR, DVD, etc. to the
1
VIDEO/AUX IN sockets.
When using video equipment, connect the audio output to this
unit and the video output to a television.
Press the ON/STAND-BY button to turn the power on.
2
Press the VIDEO/AUX button.
3
Play the connected equipment.
4
Note:
To prevent noise interference, place this unit away from a television.
■
To record on a tape
Insert a cassette in the TAPE 2 cassette compartment.
1
Press the VIDEO/AUX button.
2
Press the REC PAUSE (TAPE-2 ) button.
3
Press the / button.
4
Play the VCR, DVD, etc.
5
■
Headphones
Before plugging in or unplugging the headphones, reduce the
●
volume.
Be sure your headphones have a 3.5 mm (1/8") diameter plug and
●
are between 16 ohms and 50 ohms impedance. The recommended impedance is 32 ohms.
Plugging in the headphones disconnects the speakers automati-
●
cally. Adjust the volume using the VOLUME buttons.
CD-MPX100H
ENGLISH
5
Advanced Features
9/3/05 CD-MPX100H_3.fm
E-28
TINSZA162AWZZ
Page 33
CD-MPX100H
ENGLISH
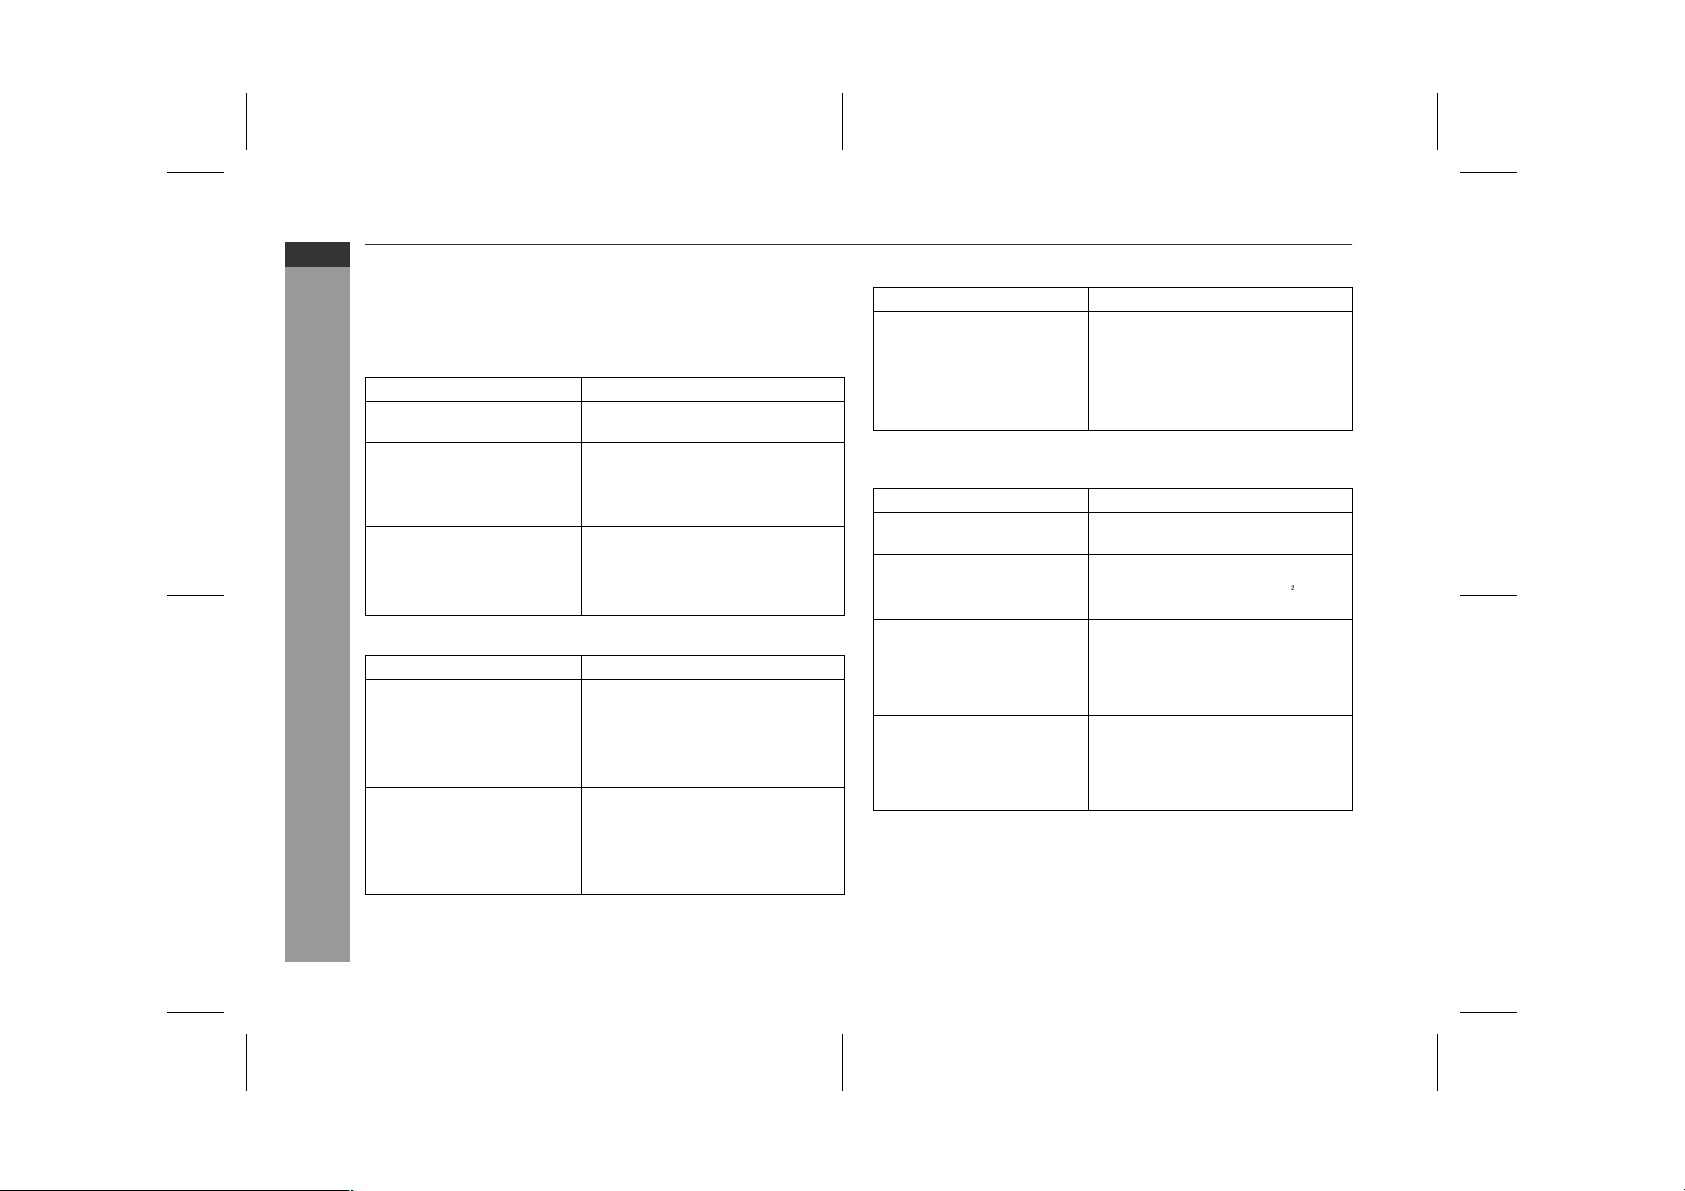
Troubleshooting chart
Many potential problems can be resolved by the owner without calling a service technician.
If something is wrong with this product, check the following before
calling your authorised SHARP dealer or service centre.
■
■
References
General
Symptom Possible cause
The clock is not set to the
●
correct time.
When a button is pressed,
●
the unit does not respond.
No sound is heard.
●
CD player
Symptom Possible cause
Playback does not start.
●
Playback stops in the
●
middle or is not performed
properly.
Playback sounds are
●
skipped, or stopped in the
middle of a track.
Did a power failure occur? Reset
●
the clock. (Refer to page 11.)
Set this unit to the power stand-
●
by mode and then turn it back on.
If the unit still malfunctions, reset
●
it. (Refer to page 30.)
Is the volume level set to "0"?
●
Are the headphones connected?
●
Are the speaker wires discon-
●
nected?
Is the disc loaded upside down?
●
Does the disc satisfy the stan-
●
dards?
Is the disc distorted or
●
scratched?
Is the unit located near excessive
●
vibrations?
Is the disc very dirty?
●
Has condensation formed inside
●
the unit?
■
Tuner
Symptom Possible cause
The radio makes unusual
●
noises continuously.
■
Cassette deck
Symptom Possible cause
Cannot record.
●
Cannot record tracks with
●
proper sound quality.
Cannot erase completely.
●
Sound skipping.
●
Cannot hear treble.
●
Sound fluctuation.
●
Cannot remove the tape.●If a power failure occurs during
●
Is the unit placed near the TV or
●
computer?
Is the FM aerial or AM loop aerial
●
placed properly? Move the aerial
away from the AC power lead if
it's located nearby.
Is the erase-prevention tab
●
removed?
Is it a normal tape? (You cannot
●
record on a metal or CrO tape.)
Is there slack in the tape?
●
Is the tape stretched?
●
Are the capstans, pinch rollers,
●
or heads dirty?
playback, the heads remain
engaged with the tape. Do not
open the compartment with
great force.
E-29
9/3/05 CD-MPX100H_3.fm
TINSZA162AWZZ
Page 34
Troubleshooting chart (continued)
■
Remote control
Symptom Possible cause
The remote control does
●
not operate.
■
Condensation
Sudden temperature changes, storage or operation in an extremely
humid environment may cause condensation inside the cabinet (CD
pickup, tape heads, etc.) or on the transmitter on the remote control.
Condensation can cause the unit to malfunction. If this happens,
leave the power on with no disc (or cassette) in the unit until normal
playback is possible (about 1 hour). Wipe off any condensation on
the transmitter with a soft cloth before operating the unit.
■
Before transporting the unit
1 Press the ON/STAND-BY button to turn the power on.
2 Press the CD button.
3 Press the OPEN/CLOSE button to open the disc tray.
Remove all disc inserted in the unit.
4 Press the OPEN/CLOSE button to close the disc tray.
Make sure that "NO DISC" is displayed.
5 Press the ON/STAND-BY button to enter the stand-by mode,
and then unplug the AC power lead from the wall socket.
Is the AC power lead of the unit
●
plugged in?
Is the battery polarity correct?
●
Are the batteries dead?
●
Is the distance or angle incor-
●
rect?
Does the remote control sensor
●
receive strong light?
■
If trouble occurs
When this product is subjected to strong external interference
(mechanical shock, excessive static electricity, abnormal supply
voltage due to lightning, etc.) or if it is operated incorrectly, it may
malfunction.
If such a problem occurs, do the following:
1 Set the unit to the stand-by mode and turn the power on again.
2 If the unit is not restored in the previous operation, unplug and
plug in the unit, and then turn the power on.
Note:
If neither operation above restores the unit, clear all the memory by
resetting it.
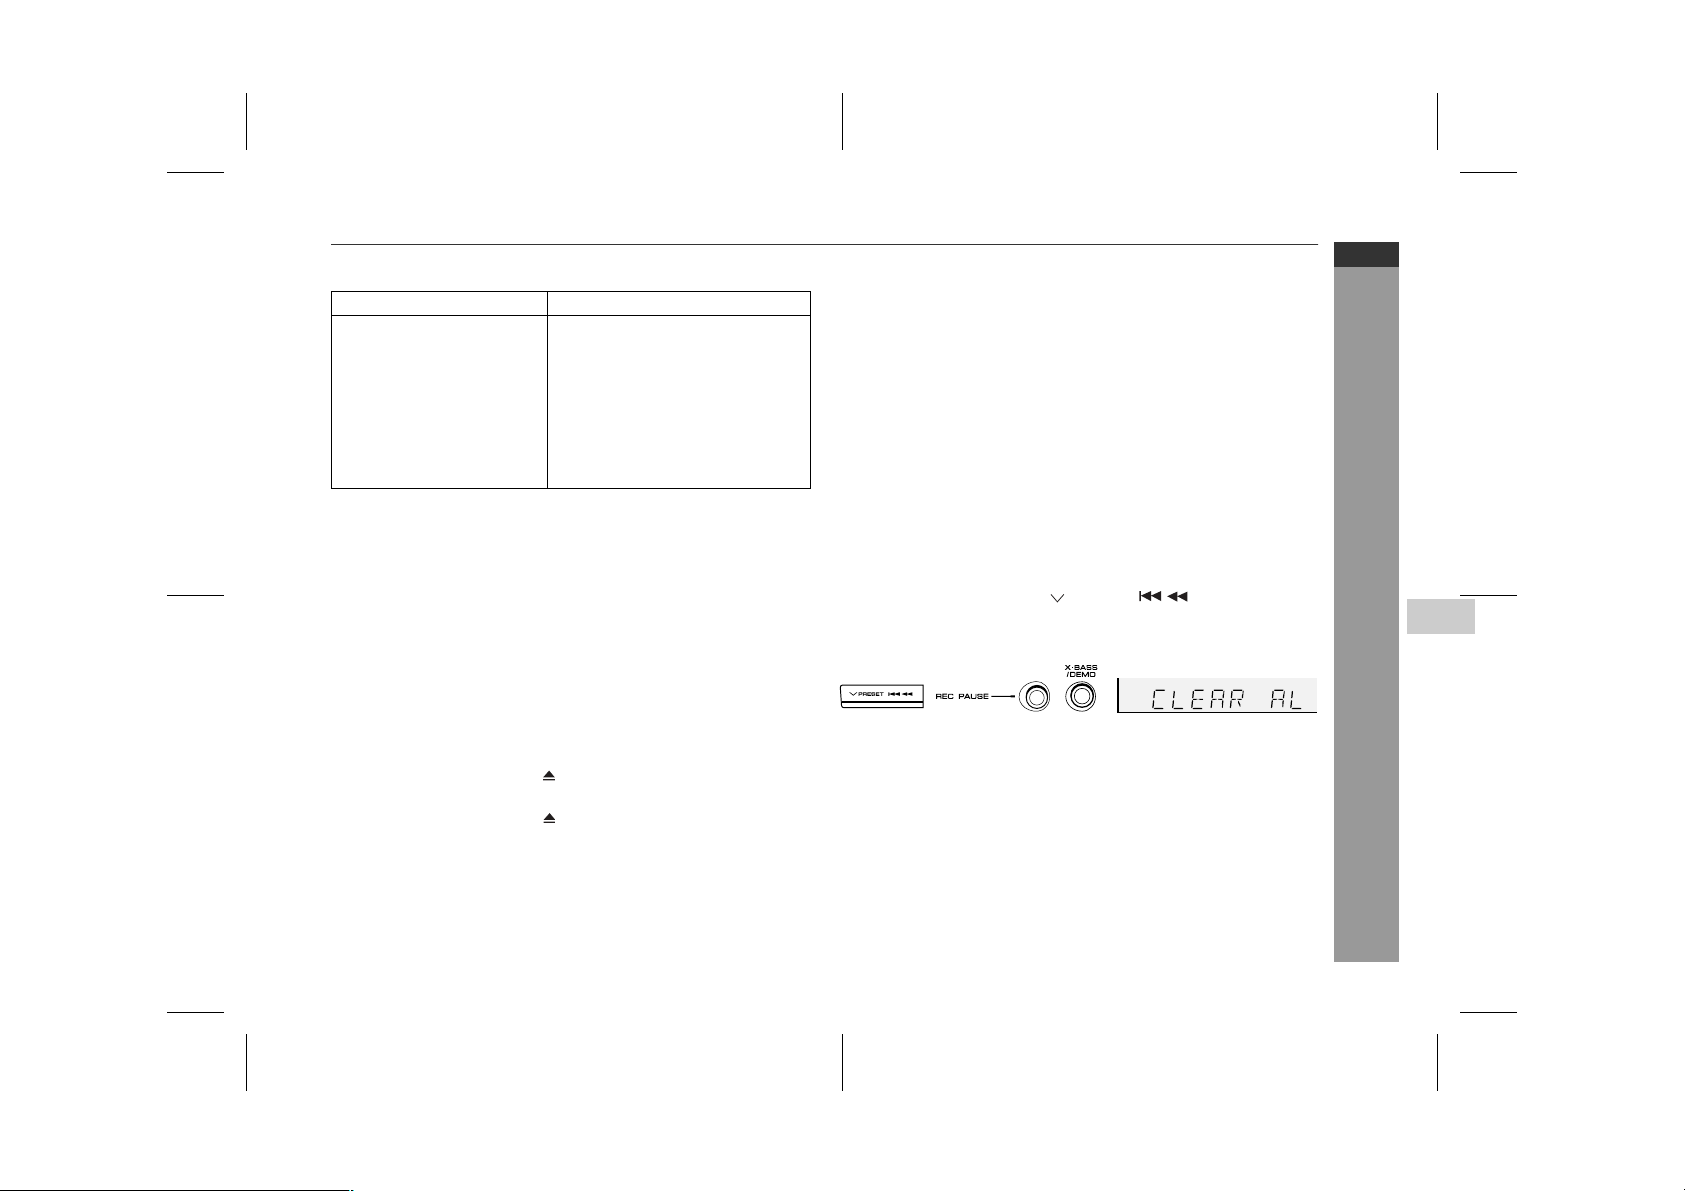
■
Clearing all the memory (reset)
1 Press the ON/STAND-BY button to enter the power stand-by
mode.
2 Whilst pressing down the PRESET button and the X-
BASS/DEMO button, press the REC PAUSE button until "CLEAR
AL" appears.
Caution:
This operation will erase all data stored in memory including clock,
timer settings, tuner preset, and CD programme.
CD-MPX100H
ENGLISH
5
References
9/3/05 CD-MPX100H_3.fm
E-30
TINSZA162AWZZ
Page 35
CD-MPX100H
TAPE 1
TAPE 2
A
C
B
C
D
E
B
ENGLISH
■
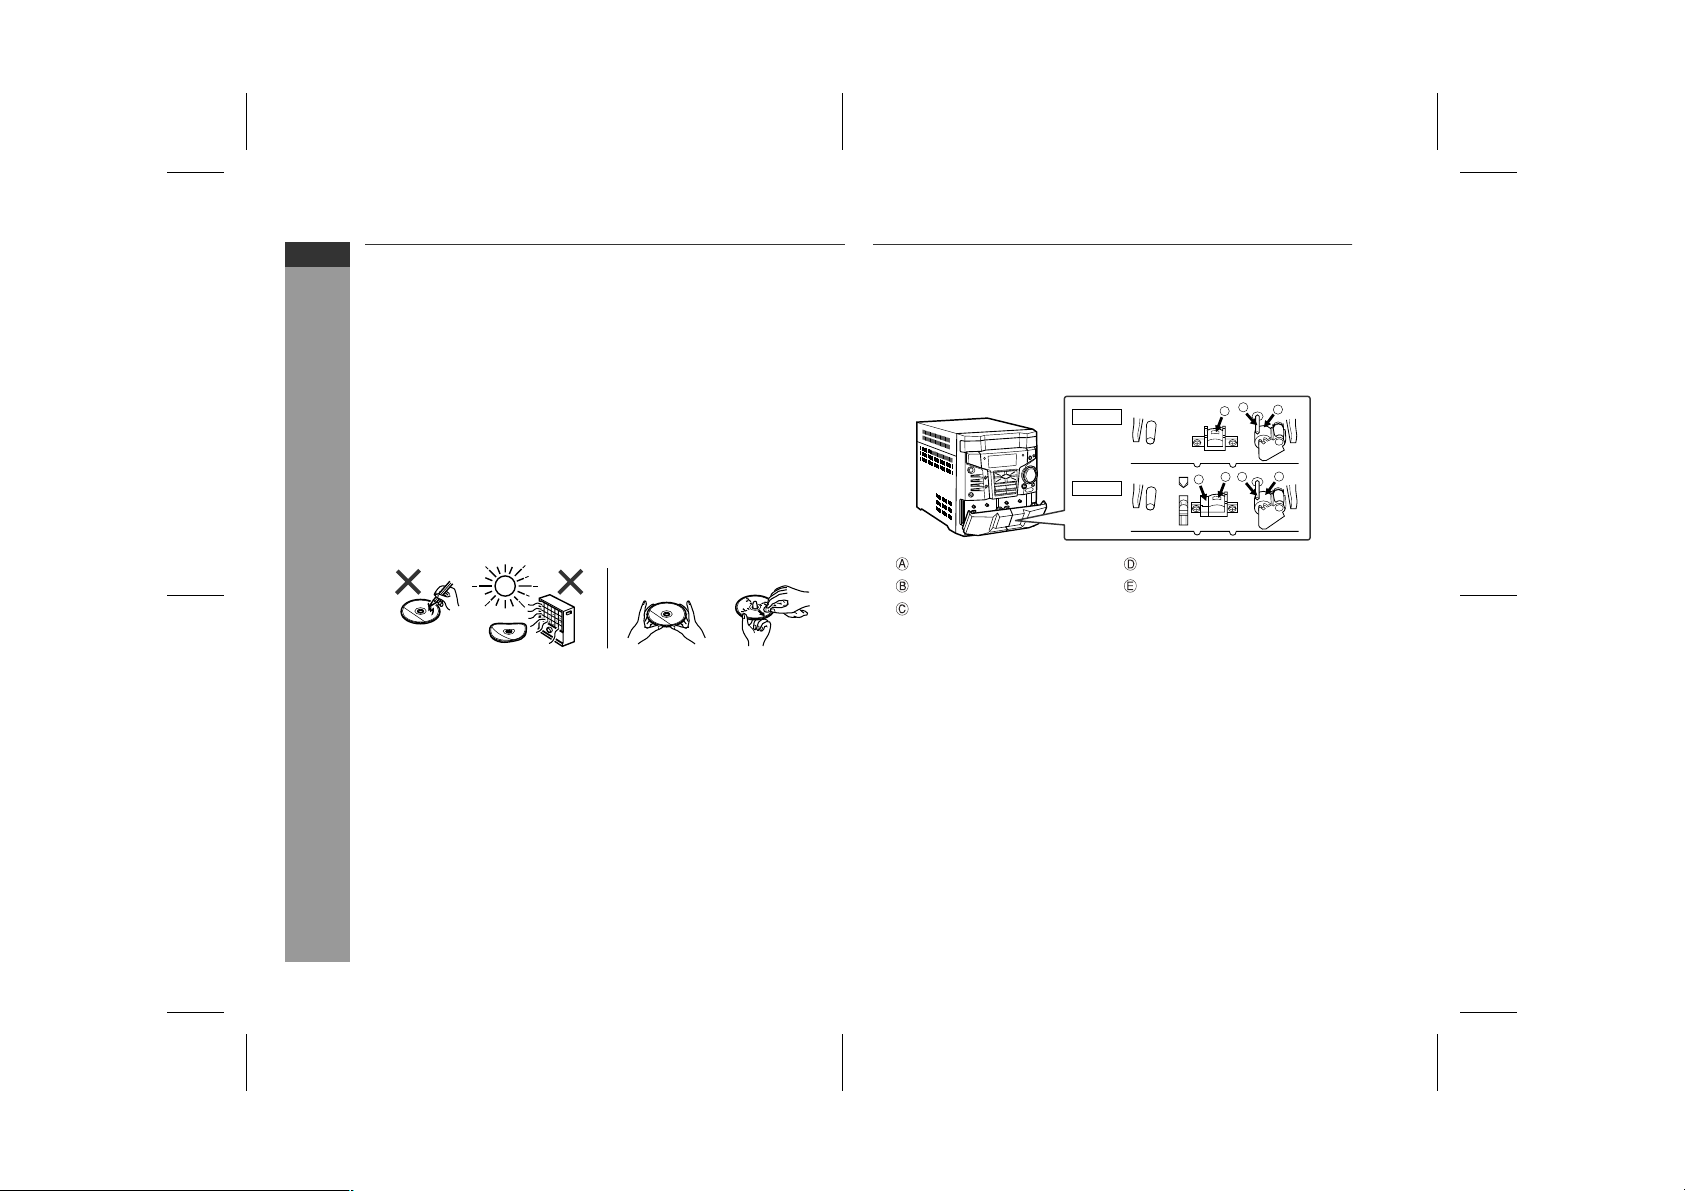
Care of compact discs
Compact discs are fairly resistant to damage, however mistracking
can occur due to an accumulation of dirt on the disc surface. Follow
the guidelines below for maximum enjoyment from your CD collection and player.
Do not write on either side of the disc, particularly the non-label
●
side from which signals are read. Do not mark this surface.
Keep your discs away from direct sunlight, heat, and excessive
●
moisture.
Always hold the CDs by the edges. Fingerprints, dirt, or water on
●
the CDs can cause noise or mistracking. If a CD is dirty or does
not play properly, clean it with a soft, dry cloth, wiping straight out
from the centre, along the radius.
Maintenance
■
Cleaning the tape-handling parts
Dirty heads, capstans or pinch rollers can cause poor sound and
●
tape jams. Clean these parts with a cotton swab moistened with
commercial head/pinch roller cleaner or isopropyl alcohol.
When cleaning the heads, pinch rollers, etc., unplug the unit
●
which contains high voltages.
References
E-31
NO YES
Correct
Playback head Erase head
Capstan Recording/Playback head
Pinch roller
After long use, the deck's heads and capstans may become mag-
●
netised, causing poor sound. Demagnetise these parts once every 30 hours of playing/recording time by using a commercial tape
head demagnetiser. Read the demagnetiser's instructions carefully before use.
■
Cleaning the cabinet
Periodically wipe the cabinet with a soft cloth and a diluted soap
solution, then with a dry cloth.
Caution:
Do not use chemicals for cleaning (petrol, paint thinner, etc.).
●
It may damage the cabinet finish.
Do not apply oil to the inside of the unit. It may cause
●
malfunctions.
9/3/05 CD-MPX100H_3.fm
TINSZA162AWZZ
Page 36
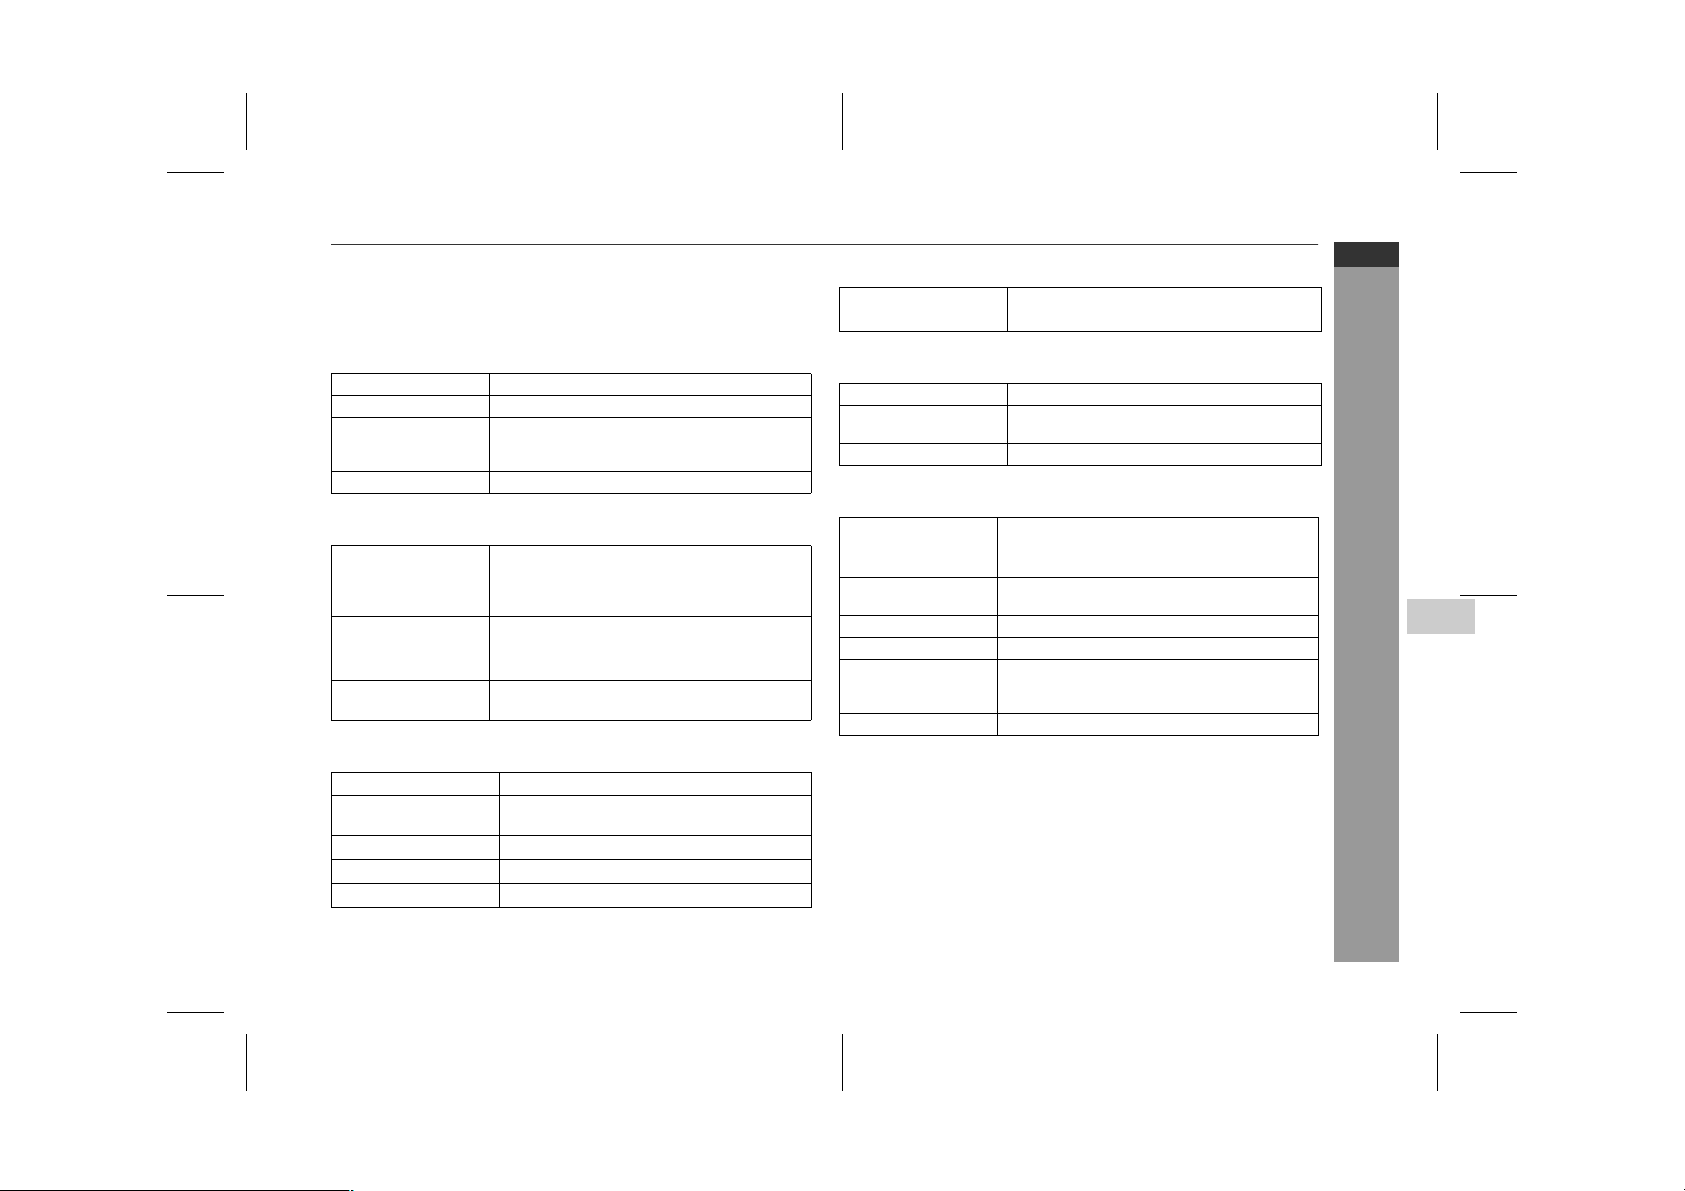
Specifications
As part of our policy of continuous improvement, SHARP reserves
the right to make design and specification changes for product improvement without prior notice. The performance specification figures indicated are nominal values of production units. There may be
some deviations from these values in individual units.
■
General
Power source
Power consumption
Dimensions
Weight
■
Amplifier
Output power
Output terminals
Input terminals
■
CD player
Type
Signal readout
D/A converter
Frequency response
Dynamic range
AC 230 V, 50 Hz
50 W
Width: 270 mm (10-5/8")
Height: 305 mm (12")
Depth: 342 mm (13-1/2")
6.1 kg (13.42 lbs.)
MPO: 78 W (39 W + 39 W) (DIN 45 234)
RMS: 40 W (20 W + 20 W) (DIN 45 234)
RMS: 34 W (17 W + 17 W) (DIN 45 500)
Speaker: 6 ohms
Headphones: 16 - 50 ohms
(recommended: 32 ohms)
Video/Auxiliary (audio signal):
500 mV/47 k ohms
3-disc multi-play compact disc player
Non-contact, 3-beam semiconductor laser
pickup
1-bit D/A converter
20 - 20,000 Hz
90 dB (1 kHz)
■
Tuner
Frequency range
■
Cassette deck
Frequency response
Signal/noise ratio
Wow and flutter
■
Speaker
Type
Maximum input
power
Rated input power
Impedance
Dimensions
Weight
FM: 87.5 - 108.0 MHz
AM: 522 - 1,620 kHz
50 - 14,000 Hz (normal tape)
55 dB (TAPE 1, playback)
50 dB (TAPE 2, recording/playback)
0.35 % (DIN 45 511)
2-way type speaker system
12 cm (4-3/4") Woofer
Tweeter
40 W
20 W
6 ohms
Width: 200 mm (7-7/8")
Height: 305 mm (12")
Depth: 185 mm (7-1/4")
2.4 kg (5.3 lbs.)/each
CD-MPX100H
ENGLISH
5
References
9/3/05 CD-MPX100H_3.fm
E-32
TINSZA162AWZZ
Page 37
TINSZA162AWZZ
05C R YT 1
SHARP CORPORATION
0401_A5
04/10/6 CD-MPX100H(3)_BACK.fm
TINSZA162AWZZ
 Loading...