

Page 1
CD-BK280V Video CD Mini System consisting of CD-BK280V (main unit), CP-BK280 (front
speakers) and GBOXS0070AWM1 (surround speakers).
Mini-chaîne CD vidéo CD-BK280V composée de CD-BK280V (appareil principal), CPBK280 (enceintes avant) et de GBOXS0070AWM1 (enceintes surround).
VIDEO CD MINI SYSTEM
MINI-CHAÎNE CD VIDÉO
SISTEMA MINI VÍDEO CD
MODEL
MODÈLE
MODELO
CD-BK280V
OPERATION MANUAL
MODE D’EMPLOI
MANUAL DE MANEJO
Sistema mini vídeo CD CD-BK280V que consta de CD-BK280V (aparato principal) , CPBK280 (altavoces delanteros), y GBOXS0070AWM1 (altavoces de sonido perimétrico).
CD-BK280V CD-BK280V
GBOXS0070AWM1
CP-BK280
NTSC/PAL
ENGLISH
FRANÇAIS
ESPAÑOL
Please refer to pages E-1 to E-46.
Se reporter aux pages F-1 à F-46.
Consulte las páginas S-1 a S-46.
SHARP CORPORATION
Page 2

ENGLISH
Introduction
Thank you for purchasing this SHARP product. To obtain the best performance from
this product, please read this manual carefully. It will guide you in operating your
SHARP product.
Contents
Importa n t Ins truction
„
Accessories . . . . . . . . . . . . . . . . . . . . . . . . . . . . . . . . . . . . . . . . . . . . . . . . . . . . . . . 2
Special Notes . . . . . . . . . . . . . . . . . . . . . . . . . . . . . . . . . . . . . . . . . . . . . . . . . . . . . . 2
General Information
„
Precautions . . . . . . . . . . . . . . . . . . . . . . . . . . . . . . . . . . . . . . . . . . . . . . . . . . . . . . . 3
Controls and Indicators . . . . . . . . . . . . . . . . . . . . . . . . . . . . . . . . . . . . . . . . . . 4 - 7
Preparation for Use
„
Remote Control . . . . . . . . . . . . . . . . . . . . . . . . . . . . . . . . . . . . . . . . . . . . . . . . . . . . 8
System Connections . . . . . . . . . . . . . . . . . . . . . . . . . . . . . . . . . . . . . . . . . . . . 9 - 13
Basic Operation
„
General Control . . . . . . . . . . . . . . . . . . . . . . . . . . . . . . . . . . . . . . . . . . . . . . . . . . . 14
Sound Control . . . . . . . . . . . . . . . . . . . . . . . . . . . . . . . . . . . . . . . . . . . . . . . . . . . . 15
Setting the Clock . . . . . . . . . . . . . . . . . . . . . . . . . . . . . . . . . . . . . . . . . . . . . . . . . .16
- Introduction / Contents -
Important Instruction
Video CD Playback
„
Video CD . . . . . . . . . . . . . . . . . . . . . . . . . . . . . . . . . . . . . . . . . . . . . . . . . . . . . . . . 17
Preparation for Video CD Playback . . . . . . . . . . . . . . . . . . . . . . . . . . . . . . . . . . .18
Playback of a Video CD (CDs) with P. B. C. (Version 2.0) . . . . . . . . . . . . . . 19, 20
Playback of a Video CD (CDs) without P. B. C. (Version 1.1) . . . . . . . . . . . . 21, 22
Advanced Video CD (Version 1.1) Playback
„
Direct Search System . . . . . . . . . . . . . . . . . . . . . . . . . . . . . . . . . . . . . . . . . . . . . . 23
Repeat or Random Play . . . . . . . . . . . . . . . . . . . . . . . . . . . . . . . . . . . . . . . . . . . .23
Programmed Play . . . . . . . . . . . . . . . . . . . . . . . . . . . . . . . . . . . . . . . . . . . . . . . . .24
Digest Selection of Discs and Tracks . . . . . . . . . . . . . . . . . . . . . . . . . . . . . .25, 26
Time Search Selection . . . . . . . . . . . . . . . . . . . . . . . . . . . . . . . . . . . . . . . . . . . . . 26
Bookmark Function . . . . . . . . . . . . . . . . . . . . . . . . . . . . . . . . . . . . . . . . . . . . . . . 27
Resume Play . . . . . . . . . . . . . . . . . . . . . . . . . . . . . . . . . . . . . . . . . . . . . . . . . . . . .28
To Play Back the Video CD Manually . . . . . . . . . . . . . . . . . . . . . . . . . . . . . . . . . . 28
Changing the TV Screen Display . . . . . . . . . . . . . . . . . . . . . . . . . . . . . . . . . . . . .28
Page
Page
CD Playback
„
Listening to a CD (CDs) . . . . . . . . . . . . . . . . . . . . . . . . . . . . . . . . . . . . . . . . . 29, 30
Playbac k of MP3 Encoded CD
„
Listening to MP3 Disc . . . . . . . . . . . . . . . . . . . . . . . . . . . . . . . . . . . . . . . . . . . . . . 31
Radio
„
Listening to the Radio . . . . . . . . . . . . . . . . . . . . . . . . . . . . . . . . . . . . . . . . . . . . . 32
Listening to the Memorised Station . . . . . . . . . . . . . . . . . . . . . . . . . . . . . . . . . . 33
Tape Playback
„
Listening to a Cassette Tape (T APE 1) . . . . . . . . . . . . . . . . . . . . . . . . . . . . . . . . 34
Listening to a Cassette Tape (T APE 2) . . . . . . . . . . . . . . . . . . . . . . . . . . . . . . . . 35
Karaoke
„
Playing Karaoke . . . . . . . . . . . . . . . . . . . . . . . . . . . . . . . . . . . . . . . . . . . . . . . 36, 37
Tape Recording
„
Recording from the Radio . . . . . . . . . . . . . . . . . . . . . . . . . . . . . . . . . . . . . . . . . . 38
Recording from a CD (CDs) . . . . . . . . . . . . . . . . . . . . . . . . . . . . . . . . . . . . . . . . . 39
Dubbing from Tape to Tape . . . . . . . . . . . . . . . . . . . . . . . . . . . . . . . . . . . . . . . . . 40
Advanced Features
„
Timer and Sleep Operation . . . . . . . . . . . . . . . . . . . . . . . . . . . . . . . . . . . . . . 41, 42
Enhancing Your System . . . . . . . . . . . . . . . . . . . . . . . . . . . . . . . . . . . . . . . . . . . . 43
References
„
Troubleshooting Chart . . . . . . . . . . . . . . . . . . . . . . . . . . . . . . . . . . . . . . . . . . 44, 45
Maintenance . . . . . . . . . . . . . . . . . . . . . . . . . . . . . . . . . . . . . . . . . . . . . . . . . . . . . 45
Specifications . . . . . . . . . . . . . . . . . . . . . . . . . . . . . . . . . . . . . . . . . . . . . . . . . . . . 46
E-1
ENGLISH
01/5/28 CD-BK280V(X)E1.fm
Page 3
Accessories
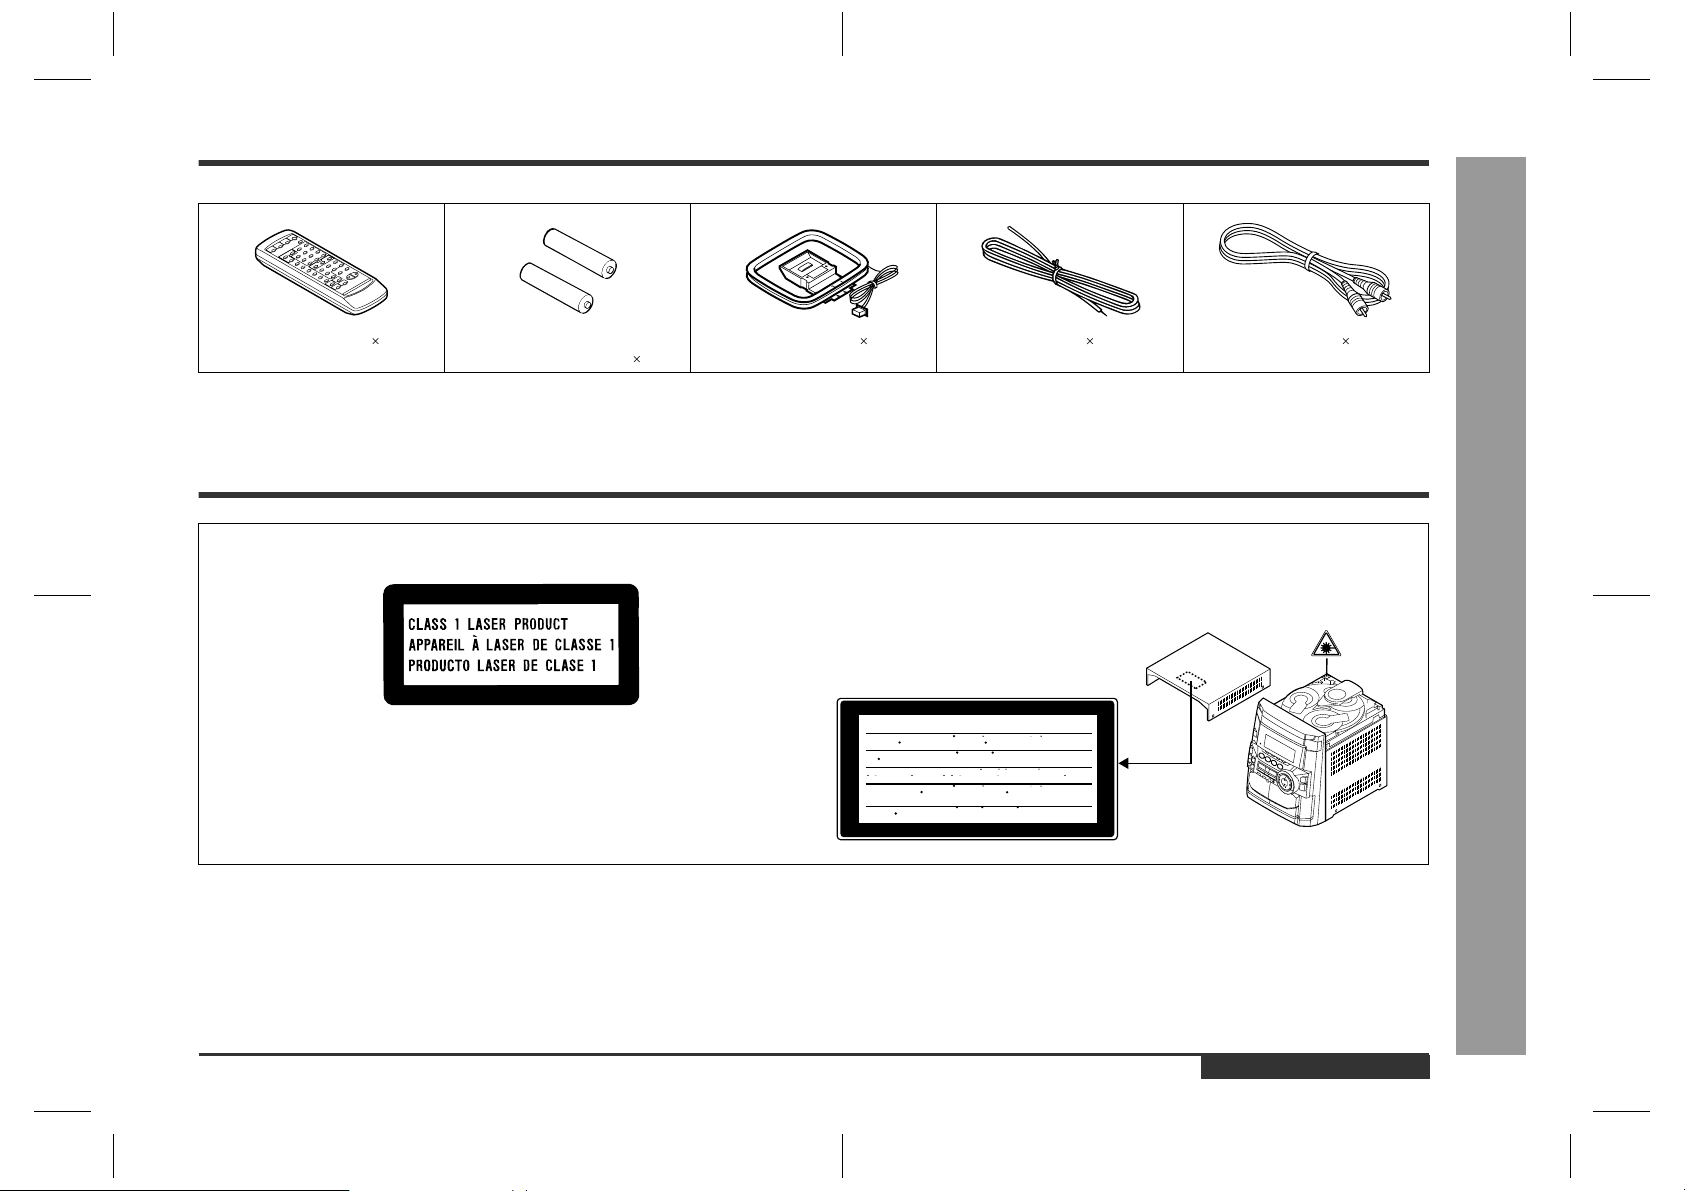
Please confirm that the following accessories are included.
CD-BK280V
Remote control 1 "AA" size battery (UM/SUM-3,
AM loop aerial 1 FM aerial 1 Video cable 1
R6, HP-7 or similar) 2
Note:
Only the above accessories are included.
Special Notes
CAUTION
Material: GaAIAs
z
This Video CD Mini System is classified as a CLASS 1 LASER product.
z
The CLASS 1 LASER PRODUCT label is located on the rear cover.
z
Use of controls, adjustments or performance of procedures other than those
specified herein may result in hazardous radiation exposure.
As the laser beam used in this compact disc player is harmful to the eyes, do not
attempt to disassemble the cabinet. Refer servicing to qualified personnel only.
z
When the ON/STAND-BY button is set at STAND-BY position, mains voltage is still
present inside the unit. When the ON/STAND-BY button is set at STAND-BY position, the unit may be brought into operation by the timer mode or remote control.
z
Audio-visual material may consist of copyrighted works which must not be
recorded without the authority of the owner of the copyright. Please refer to the relevant laws in y our country.
Laser Diode Properties
Wavelength: 780 nm
Emission Duration: continuous
Laser Output: max. 0.6 mW
CAUTION-INVISIBLE LASER RADIATION WHEN OPEN. DO NOT STARE INTO
BEAM OR VIEW DIRECTLY WITH OPTICAL INSTRUMENTS.
VARNING-OSYNLIG LASERSTRALNING NAR DENNA DEL AR OPPNAD. STIRRA
EJ IN I STRALEN OCH BETRAKTA EJ STRALEN MED OPTISKA INSTRUMENT.
ADVERSEL-USYNLIG LASERSTRALING VED ABNING. SE IKKE IND I
STRALEN-HELLER IKKE MED OPTISKE INSTRUMENTER.
VARO! AVATTAESSA OLET ALTTIINA NAKYMATON LASERSATEILYLLE.
ALA TUIJOTA SATEESEEN ALAKA KATSO SITA OPTISEN LAITTEEN LAPI.
VARNING-OSYNLIG LASERSTRALNING NAR DENNA DEL AR OPPNAD.
STIRRA EJ IN I STRALEN OCH BETRAKTA EJ STRALEN GENOM OPTISKT
INSTRUMENT.
ADVERSEL-USYNLIG LASERSTRALING NAR DEKSEL APNES. STIRR IKKE
INN I STRALEN ELLER SE DIREKTE MED OPTISKE INSTRUMENTER.
Warning:
This unit contains no user serviceable parts. Never remove covers unless qualified to
do so. This unit contains dangerous voltages, always remove mains plug from the
socket before any service operation and when not in use for a long period.
Warning:
To prevent fire or shock hazard, do not expose this appliance to dripping or splashing.
No objects filled with liquids, such as vases, shall be placed on the apparatus.
- Accessories / Special Notes -
Important Instruction
ENGLISH
E-2
CD-BK280V(X)E1.fm01/5/28
Page 4
Precautions
General Information
General
„
z
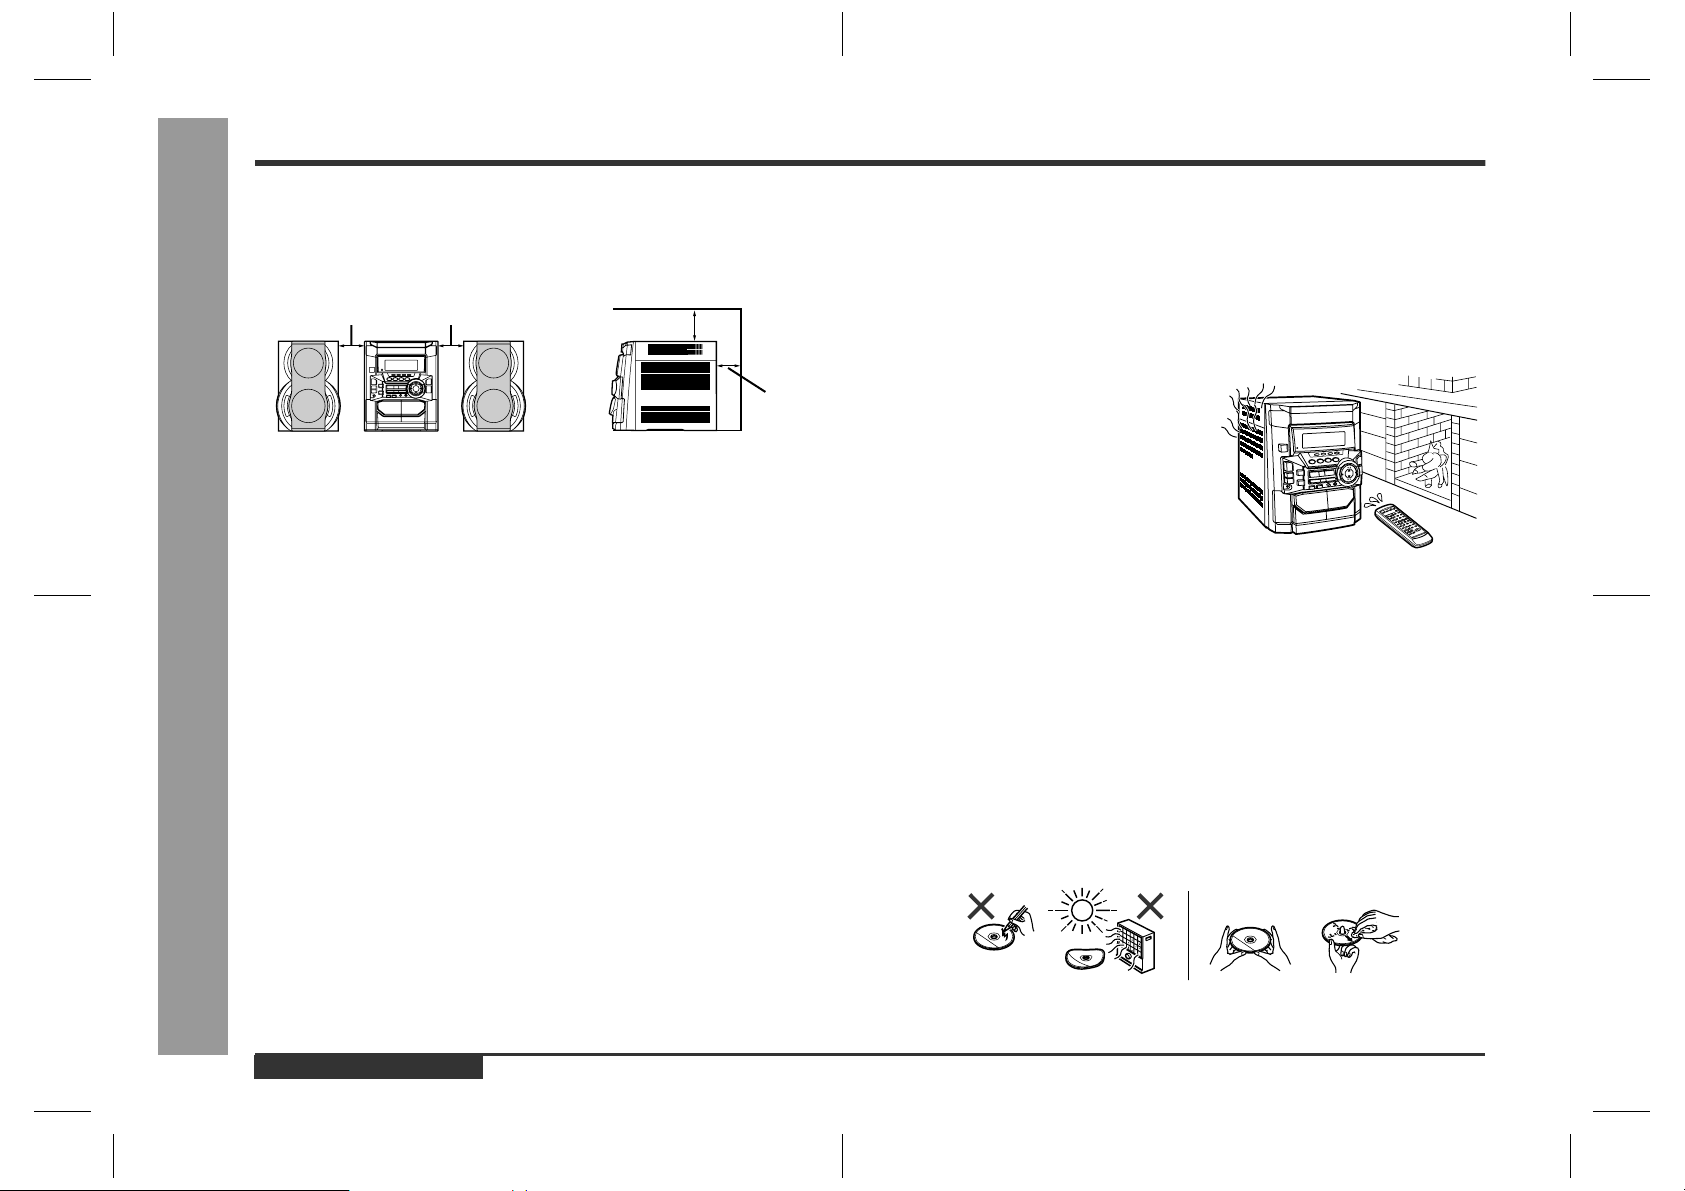
Please ensure that the equipment is positioned in a well ventilated area and
ensure that there is at least 10 cm (4") of free space along the sides, top and back
of the equipment.
10 cm (4") 10 cm (4")
z
Use the unit on a firm, level surface free from vibration.
z
Keep the unit away from direct sunlight, strong magnetic fields, excessive dust,
humidity and electronic/electrical equipment (home computers, facsimiles, etc.)
which generates electrical noise.
z
Do not place anything on top of the unit.
z
Do not expose the unit to moisture, to temperatures higher than 60°C (140°F) or to
extremely low temperatures.
z
If your system does not work properly, disconnect the AC power lead from the wall
socket. Plug the AC power lead back in, and then turn on your system.
z
In case of an electrical storm, unplug the unit for safety.
z
Hold the AC power plug by the head when removing it from the wall socket, as
pulling the lead can damage internal wires.
z
Do not remove the outer cover, as this may result in electric shock. Refer
- Precautions -
internal service to your local SHARP service facility .
z
The ventilation should not be impeded by covering the ventilation openings with
items, such as newspapers, tablecloths, curtains, etc.
z
No naked flame sources, such as lighted candles, should be placed on the apparatus.
z
Attention should be drawn to the environmental aspects of battery disposal.
z
This unit should only be used within the range of 5°C - 35°C (41°F - 95°F).
10 cm (4")
10 cm (4")
Volume control
„
The sound level at a given volume setting depends on speaker efficiency, location,
and various other factors. It is advisable to avoid exposure to high volume levels,
which occurs whilst turning the unit on with the volume control setting up high, or
whilst continually listening at high volumes.
Condensation
„
Sudden temperature changes, storage or operation in an extremely humid environment
may cause condensation inside the cabinet
(CD pickup, tape heads, etc.) or on the transmitter on the remote control.
Condensation can cause the unit to malfunction. If this happens, leave the power on with
no disc (or cassette) in the unit until normal
playback is possible (about 1 hour). Wipe off
any condensation on the transmitter with a soft
cloth before operating the unit.
Care of compact discs
„
Compact discs are fairly resistant to damage, however mistracking can occur due to
an accumulation of dirt on the disc surface. Follow the guidelines below for maximum
enjoyment from your CD collection and player.
z
Do not write on either side of the disc, par ticularly the non-label side from which
signals are read. Do not mark this surface.
z
Keep your discs away from direct sunlight, heat, and excessive moisture.
z
Always hold the CDs by the edges. Fingerprints, dirt, or water on the CDs can
cause noise or mistracking. If a CD is dirty or does not play properly , clean it with a
soft, dry cloth, wiping straight out from the centre, along the radius.
E-3
Warning:
The voltage used must be the same as that specified on this unit. Using this product
with a higher voltage other than that which is specified is dangerous and ma y result in
a fire or other type of accident causing damage. SHARP will not be held responsible
for any damage resulting from use of this unit with a voltage other than that which is
specified.
ENGLISH
NO YES
Correct
CD-BK280V(X)E1.fm01/5/28
Page 5
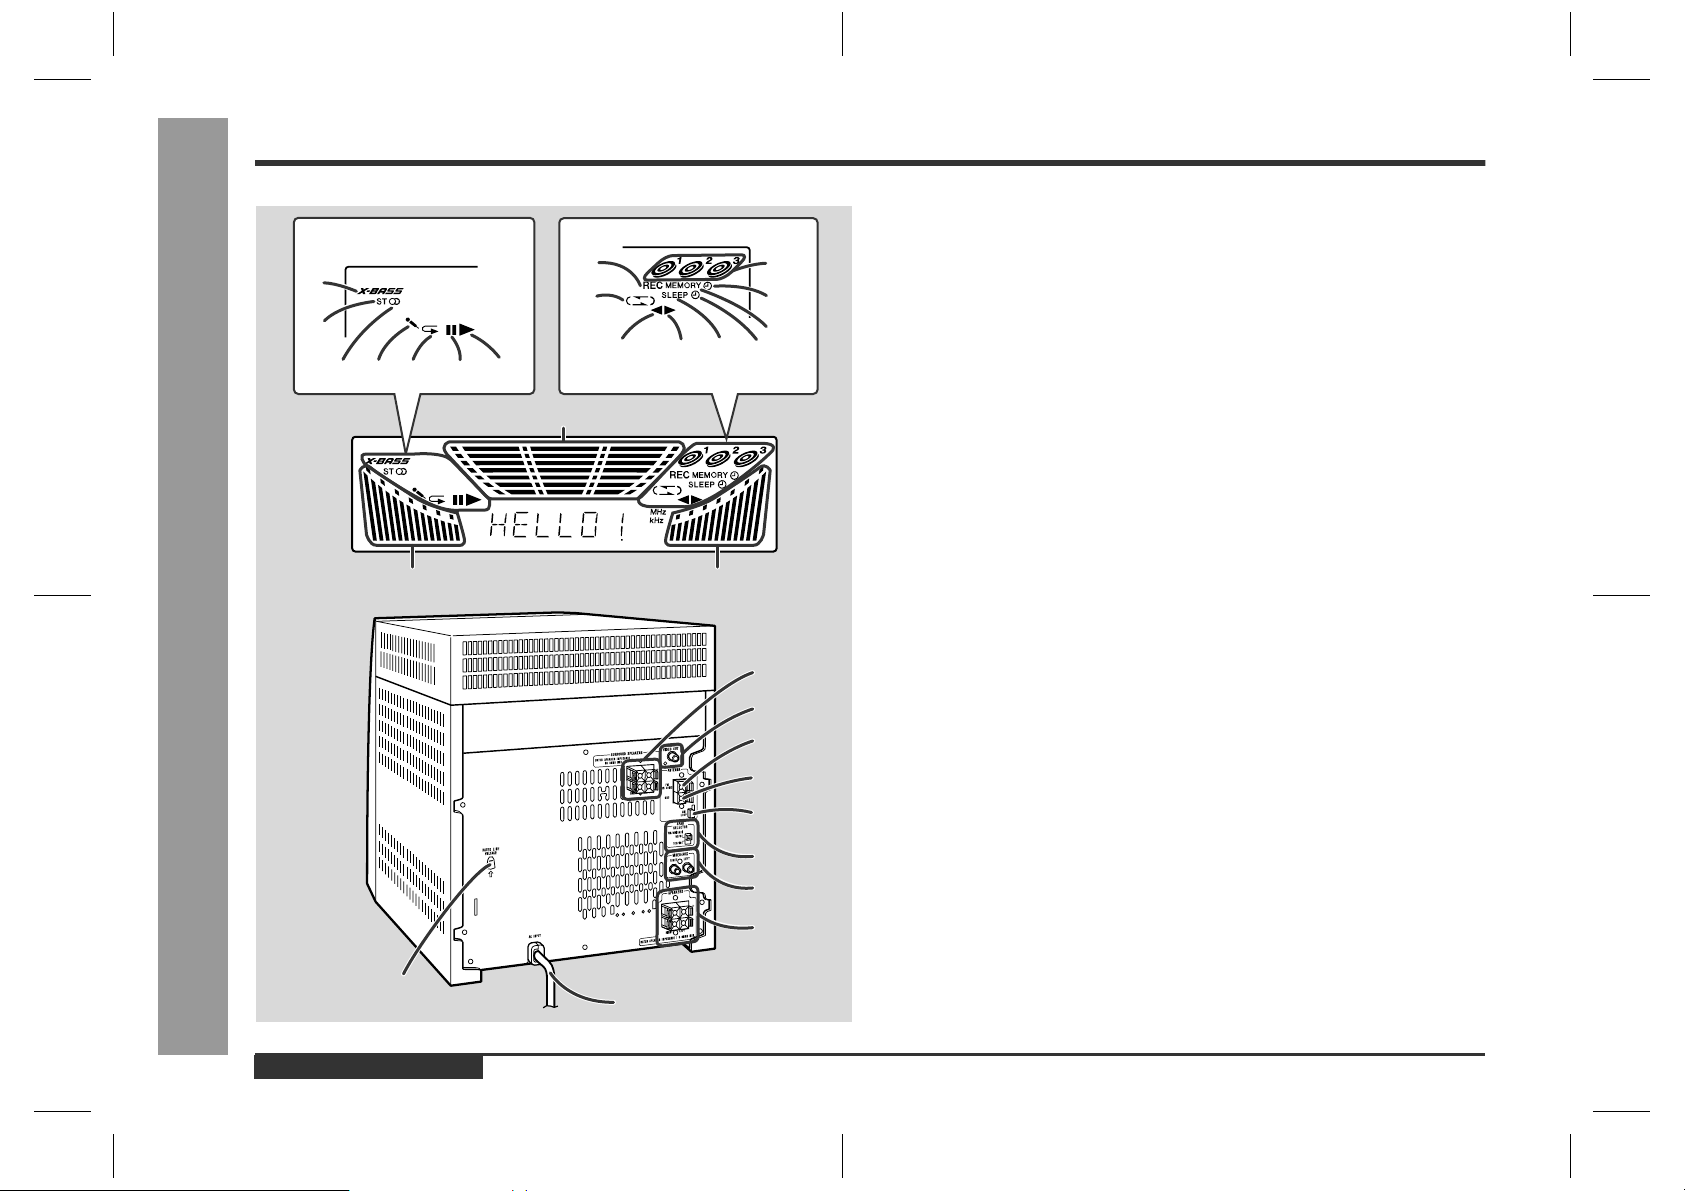
Controls and Indicator s
67
1
2
3
1412 1311
18
19
20
21
22
29 30 31 33 3432
8
1615 17
23
24
25
26
27
28
9
10
CD-BK280V
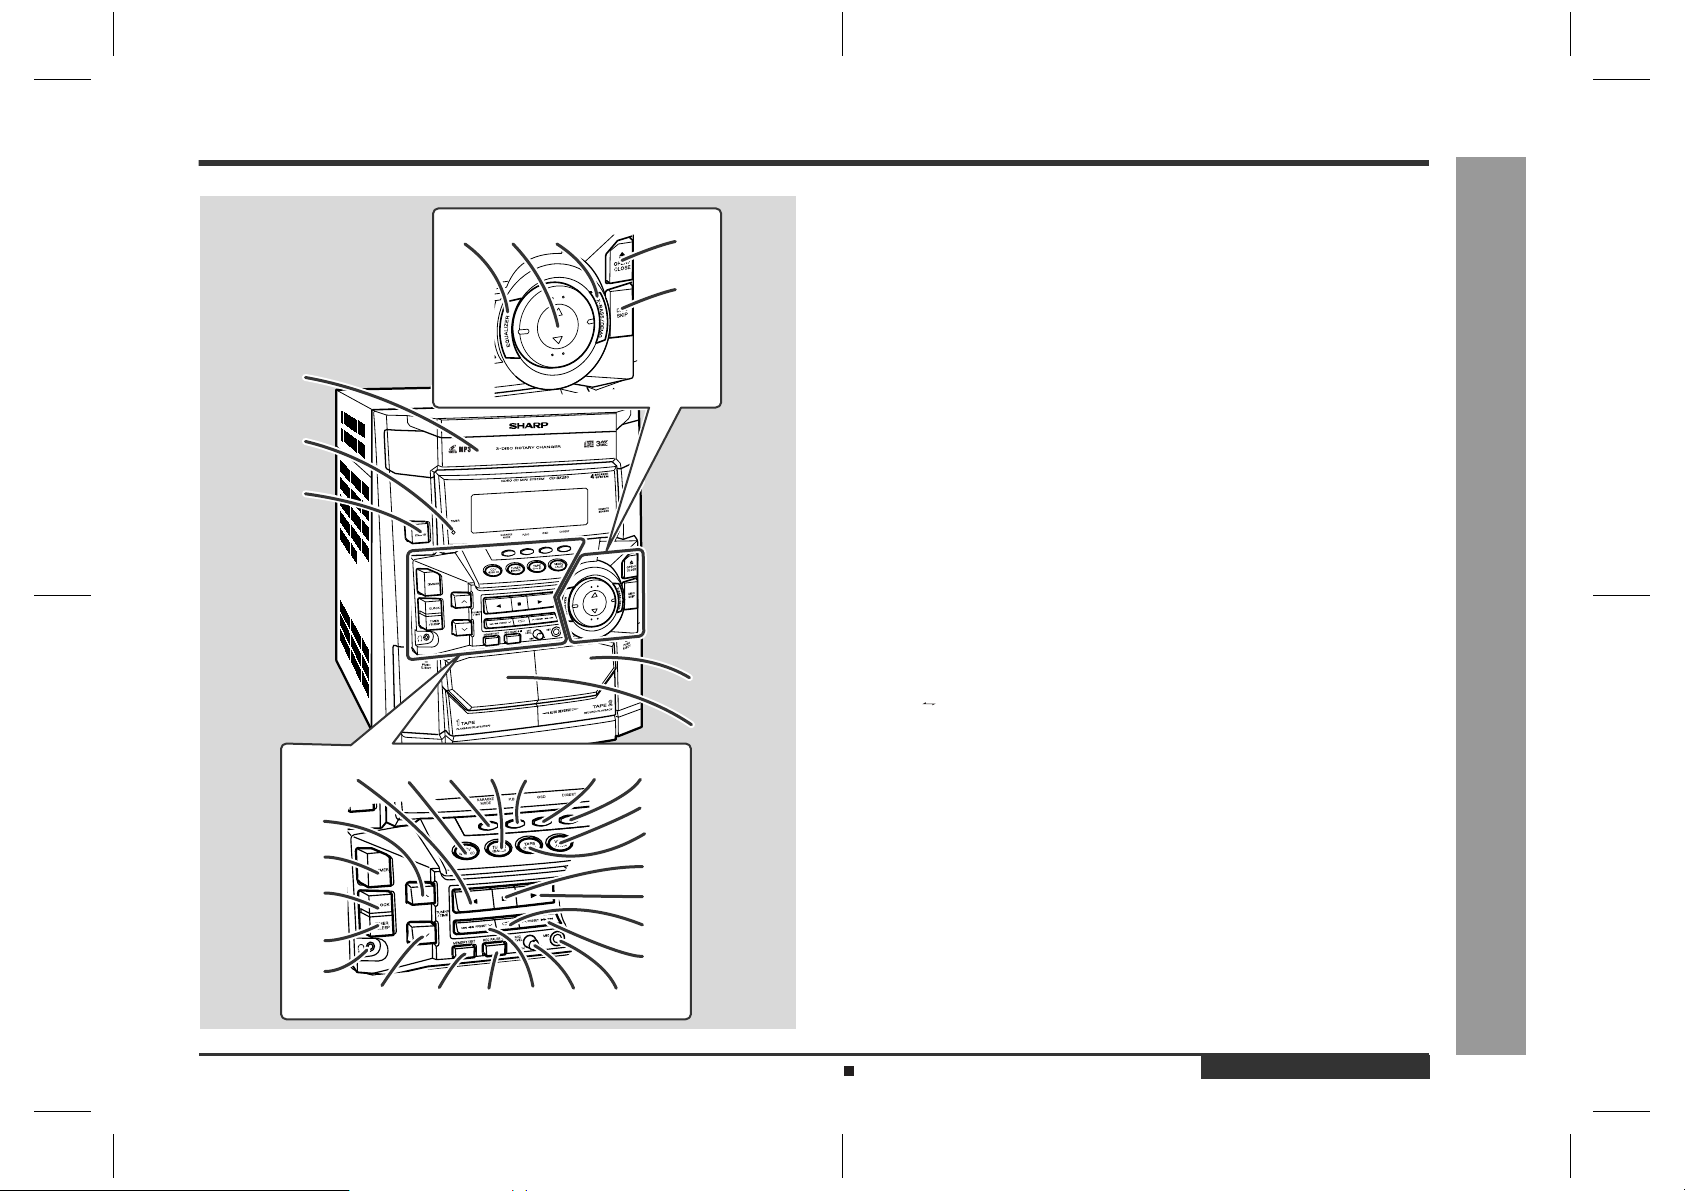
Front panel
„
1.Disc Tray . . . . . . . . . . . . . . . . . . . . . . . . . . . . . . . . . . . . . . . . . . . . . . 19
2.Timer Set Indicator . . . . . . . . . . . . . . . . . . . . . . . . . . . . . . . . . . . . . . 42
3.On/Stand-by Button . . . . . . . . . . . . . . . . . . . . . . . . . . . . . . . . . . . . .14
4.Tape 2 Cassette Compartment . . . . . . . . . . . . . . . . . . . . . . . . . . 35, 40
5.Tape 1 Cassette Compartment . . . . . . . . . . . . . . . . . . . . . . . . . . 34, 40
6.Equalizer Mode Select Button . . . . . . . . . . . . . . . . . . . . . . . . . . . . .15
7.Volume Up and Down Buttons . . . . . . . . . . . . . . . . . . . . . . . . . . . . . 15
8.Extra Bass/Demo Mode Button . . . . . . . . . . . . . . . . . . . . . . . . . 14, 15
9.Disc Tray Open/Close Button . . . . . . . . . . . . . . . . . . . . . . . .19, 21, 29
10.Disc Skip Button . . . . . . . . . . . . . . . . . . . . . . . . . . . . . . . . . . 19, 21, 29
11.Tape 2 Reverse Play Button . . . . . . . . . . . . . . . . . . . . . . . . . . . . . . . 35
12.Video CD/CD/MP3 Disc Button . . . . . . . . . . . . . . . . . . . 19, 21, 29, 39
13.Karaoke Mode Button . . . . . . . . . . . . . . . . . . . . . . . . . . . . . . . . . . . . 37
14.Tuner (Band) Button . . . . . . . . . . . . . . . . . . . . . . . . . . . . . . . . . . . . . 32
15.Video CD Playback Control Button . . . . . . . . . . . . . . . . . . . . . . . . .20
16.Video CD On Screen Display On/Off Button . . . . . . . . . . . . . . . . . . 28
17.Video CD Digest/Time Search Button . . . . . . . . . . . . . . . . . . . .25, 26
18.Tuning and Time Up Button . . . . . . . . . . . . . . . . . . . . . . . . . . . .16, 32
19.Dimmer Button . . . . . . . . . . . . . . . . . . . . . . . . . . . . . . . . . . . . . . . . . 14
20.Clock Button . . . . . . . . . . . . . . . . . . . . . . . . . . . . . . . . . . . . . . . . 16, 41
21.Timer/Sleep Button . . . . . . . . . . . . . . . . . . . . . . . . . . . . . . . . . . . 41, 42
22.Headphone Socket . . . . . . . . . . . . . . . . . . . . . . . . . . . . . . . . . . . . . . 43
4
5
23.Video/Auxiliary Button . . . . . . . . . . . . . . . . . . . . . . . . . . . . . . . . 41, 43
24.Tape (1 2) Button . . . . . . . . . . . . . . . . . . . . . . . . . . . . . . . . 34, 35, 40
25.Video CD Stop or Return,
CD/MP3 Disc/Tape Stop Button . . . . . . . . . . . . . . . . 20, 22, 30, 34, 35
26.Video CD Play or Repeat or Select or Resume,
CD/MP3 Disc Play or Repeat, Tape 1 Play,
Tape 2 Forward Play Button . . . . . . . . . . . . . 19, 21, 23, 28, 29, 34, 35
27.Tape 2 Reverse Mode Select Button . . . . . . . . . . . . . . . . . . . . . . . . 35
28.Video CD Skip or Next, CD/MP3 Disc Track Up or Fast Forward,
Tape 2 Fast Wind, Tuner Preset Up Button . . . . . . . 20, 22, 30, 33, 35
29.Tuning and Time Down Button . . . . . . . . . . . . . . . . . . . . . . . . . 16, 32
30.Memory/Set Button . . . . . . . . . . . . . . . . . . . . . . . . . . . . . . . . 16, 24, 33
31.Tape 2 Record Pause Button . . . . . . . . . . . . . . . . . . . . . . . . . . 38 - 40
32.Video CD Skip or Previous,
CD/MP3 Disc Track Down or Fast Reverse,
Tape 2 Fast Wind, Tuner Preset Down Button . . . . 20, 22, 30, 33, 35
33.Microphone Level Control . . . . . . . . . . . . . . . . . . . . . . . . . . . . . . . . 36
34.Microphone Socket . . . . . . . . . . . . . . . . . . . . . . . . . . . . . . . . . . . . . . 36
Reference page
- Controls and Indicators -
General Information
Description of remote control (See page 7.)
CD-BK280V(X)E1.fm01/5/28
ENGLISH
E-4
Page 6
General Information
Controls and Indicators (continued)
1
2
34 5 6
7
17 17
- Controls and Indicators -
8
9
13 14 15 16
17
1
2
3
4
5
6
7
10
11
12
Display
„
1.Extra Bass Indicator
2.FM Stereo Mode Indicator
3.FM Stereo Receiving Indicator
4.Karaoke Mode Indicator
5.Disc Repeat Play Indicator
6.Disc Pause Indicator
7.Disc Play Indicator
8.Tape 2 Record Indicator
9.Tape Reverse Mode Indicator
10.Disc Number Indicators
11.Timer Play Indicator
12.Memory Indicator
13.Tape 2 Reverse Play Indicator
14.Tape 1 Play or Tape 2 Forward Play Indicator
15.Sleep Indicator
16.Timer Recording Indicator
17.Spectrum Analyser/Volume Level Indicator
Rear panel
„
1.Surround Speaker Terminals. . . . . . . . . . . . . . . . . . . . . . . . . . . . 9 - 12
2.Video Output Socket . . . . . . . . . . . . . . . . . . . . . . . . . . . . . . . . . . . . .12
3.FM 75 Ohms Aerial Terminal . . . . . . . . . . . . . . . . . . . . . . . . . . . . .9, 10
4.FM Aerial Earth Terminal . . . . . . . . . . . . . . . . . . . . . . . . . . . . . . . .9 , 10
5.AM Loop Aerial Socket . . . . . . . . . . . . . . . . . . . . . . . . . . . . . . . . .9, 10
6.Span Selector Switch . . . . . . . . . . . . . . . . . . . . . . . . . . . . . . . . . . . .13
7.Video/Auxiliary (Audio Signal) Input Sockets . . . . . . . . . . . . . . . . .43
8.Front Speaker Terminals . . . . . . . . . . . . . . . . . . . . . . . . . . . . . . . 9 - 11
9.AC Power Lead . . . . . . . . . . . . . . . . . . . . . . . . . . . . . . . . . . . . . . . . . .13
10.AC Voltage Selector . . . . . . . . . . . . . . . . . . . . . . . . . . . . . . . . . . . . . .13
Reference page
E-5
10
ENGLISH
8
9
CD-BK280V(X)E1.fm01/5/28
Page 7
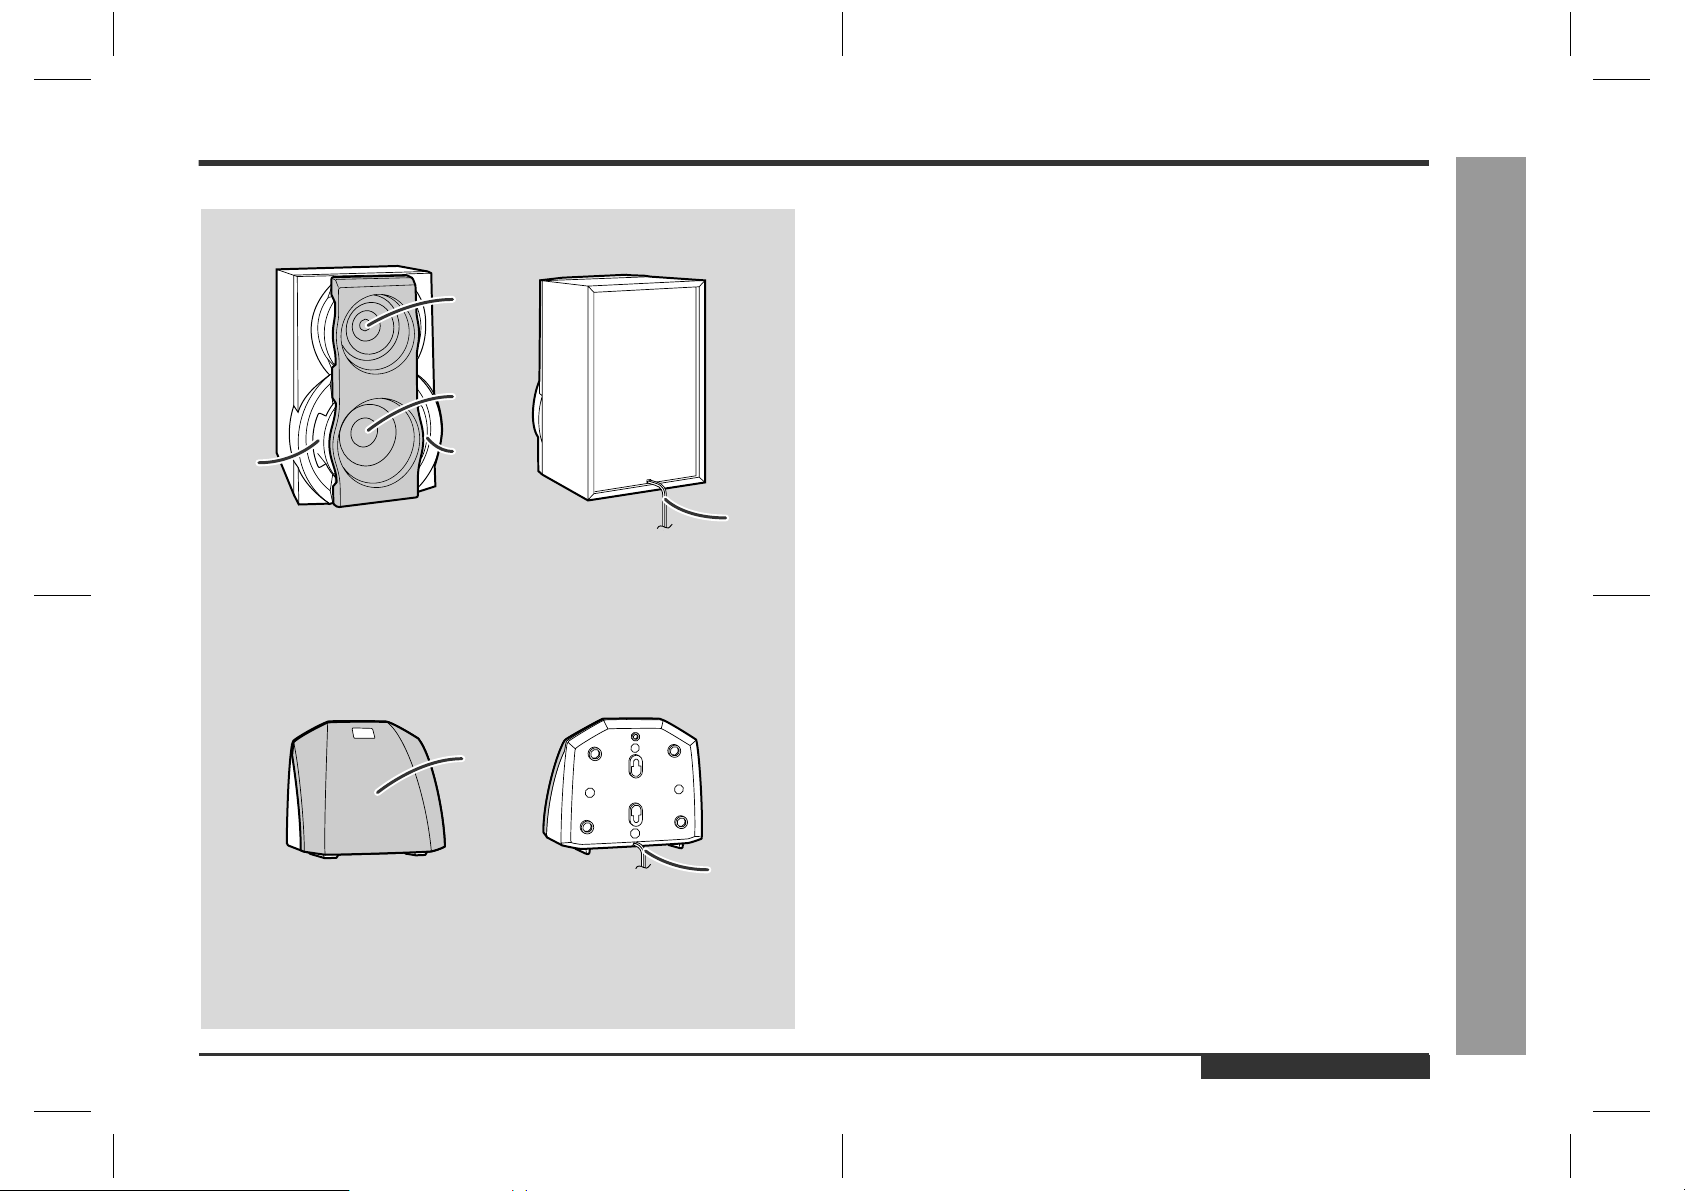
Front speaker
„
1.Tweeter
2.Woofer
3.Bass Reflex Duct
1
2
3
3
4
1
4.Speaker Wire
Surround speaker
„
1.Full-Range Speaker
2.Speaker Wire
CD-BK280V
- Controls and Indicators -
General Information
2
ENGLISH
CD-BK280V(X)E1.fm01/5/28
E-6
Page 8
General Information
Controls and Indicators (continued)
1
2
3
4
5
6
7
8
9
- Controls and Indicators -
10
11
12
13
14
15
16
17
18
19
20
21
22
23
24
25
26
27
28
29
30
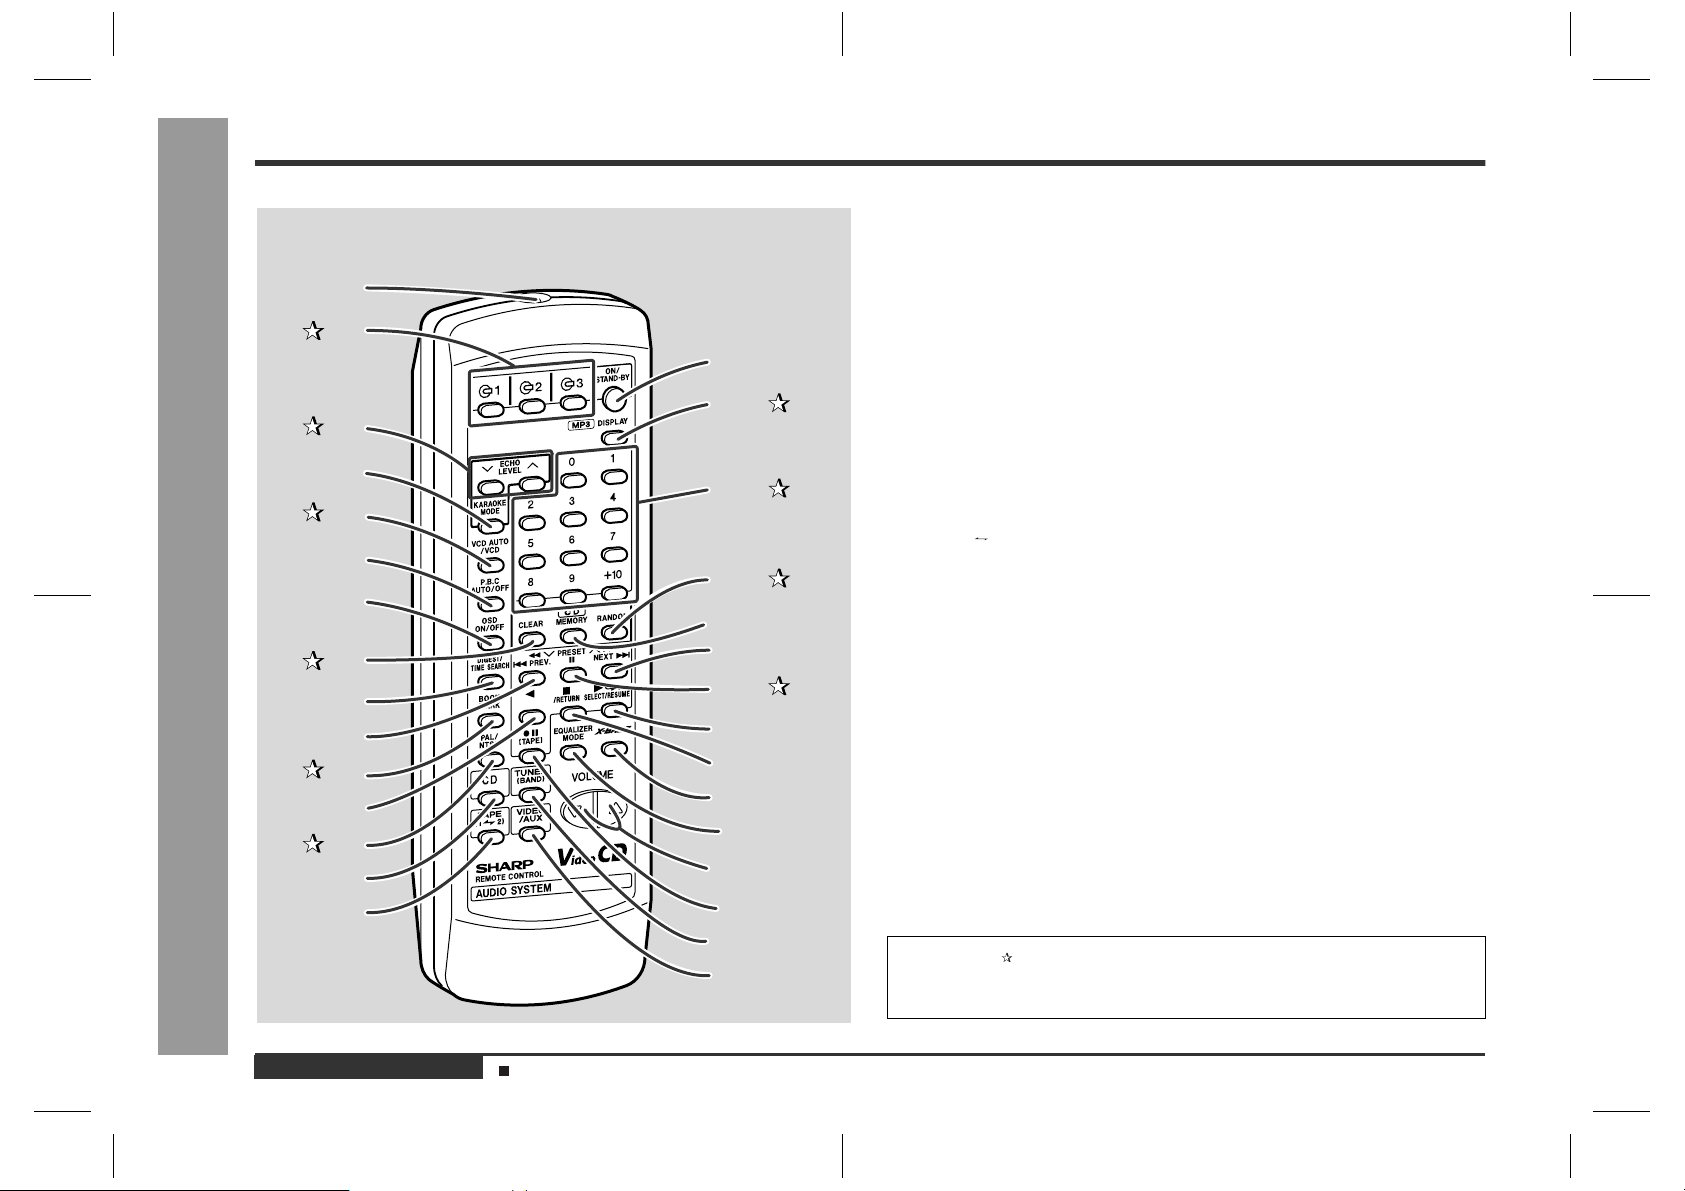
Remote control
„
Remote Control Transmitter . . . . . . . . . . . . . . . . . . . . . . . . . . . . . . . . . . .8
1.
2.Disc Number Select Buttons . . . . . . . . . . . . . . . . . . . . . . . . . . . . . . . .24
3.Echo Level Up and Down Buttons . . . . . . . . . . . . . . . . . . . . . . . . . . .36
Karaoke Mode Button . . . . . . . . . . . . . . . . . . . . . . . . . . . . . . . . . . . . . . .37
4.
5.Video CD Auto/On Button . . . . . . . . . . . . . . . . . . . . . . . . . . . . . . . . . .28
Video CD Playback Control Auto/Off Button . . . . . . . . . . . . . . . . . . . . . .20
6.
Video CD On Screen Display On/Off Button . . . . . . . . . . . . . . . . . . . . . .28
7.
8.Disc Clear Button . . . . . . . . . . . . . . . . . . . . . . . . . . . . . . . . . . . . . . . . .24
Video CD Digest/Time Search Button . . . . . . . . . . . . . . . . . . . . . . . .25, 26
9.
Video CD Skip or Prev ious, CD/MP3 Disc Track Down o r Fast Rev erse,
10.
Tape 2 Fast Wind, Tuner Preset Down Button . . . . . . .20, 22, 30, 33, 35
11.Video CD Bookmark Button . . . . . . . . . . . . . . . . . . . . . . . . . . . . . . . .27
Tape 2 Reverse Play Button . . . . . . . . . . . . . . . . . . . . . . . . . . . . . . . . .35
12.
13.PAL/NTSC Select Button . . . . . . . . . . . . . . . . . . . . . . . . . . . . . . . . . .18
Video CD/CD/MP3 Disc Button . . . . . . . . . . . . . . . . . . . . . . 1 9, 21, 29, 39
14.
Tape (1 2) Button . . . . . . . . . . . . . . . . . . . . . . . . . . . . . . . . . .34, 35, 40
15.
On/Stand-by Button . . . . . . . . . . . . . . . . . . . . . . . . . . . . . . . . . . . . . . . .8
16.
17.MP3 Disc Display Button . . . . . . . . . . . . . . . . . . . . . . . . . . . . . . . . . .31
18.Disc Direct Search Buttons . . . . . . . . . . . . . . . . . . . . . . . . . . . . .19, 23
19.Disc Random Button . . . . . . . . . . . . . . . . . . . . . . . . . . . . . . . . . . . . .23
Disc Memory Button . . . . . . . . . . . . . . . . . . . . . . . . . . . . . . . . . . . . . . .24
20.
Video CD Skip or Ne xt , CD/MP3 Disc Track Up or Fast Forward,
21.
Tape 2 Fast Wind, Tuner Preset Up Button . . . . . . . . .20, 22, 30, 33, 35
22.Disc Pause Button . . . . . . . . . . . . . . . . . . . . . . . . . . . . . . . . .20, 22, 30
Video CD Play or Repe at or Select or Resume ,
23.
CD/MP3 Disc Play or Repeat, Tape 1 Play,
Tape 2 Forward Play Button . . . . . . . . . . . . . . .19, 21, 23, 28, 29, 34, 35
Video CD Stop or Return,
24.
CD/MP3 Disc/Tape Stop Button . . . . . . . . . . . . . . . . . .20, 22, 30, 34, 35
Extra Bass Button . . . . . . . . . . . . . . . . . . . . . . . . . . . . . . . . . . . . . . . . .15
25.
Equalizer Mode Select Button . . . . . . . . . . . . . . . . . . . . . . . . . . . . . . . .15
26.
Volume Up and Down Buttons . . . . . . . . . . . . . . . . . . . . . . . . . . . . . . .15
27.
Tape 2 Record Pause Button . . . . . . . . . . . . . . . . . . . . . . . . . . . . 38 - 40
28.
Tuner (Band) Button . . . . . . . . . . . . . . . . . . . . . . . . . . . . . . . . . . . . . . .32
29.
Video/Auxiliary Button . . . . . . . . . . . . . . . . . . . . . . . . . . . . . . . . . . . . . .43
30.
Buttons with " " mark in the illustration can be operated on the remote control
only.
Other buttons can be operated both on the main unit and the remote control.
Reference page
E-7
ENGLISH
Battery installation for remote control (See page 8.)
CD-BK280V(X)E1.fm01/5/28
Page 9
Remote Control
CD-BK280V
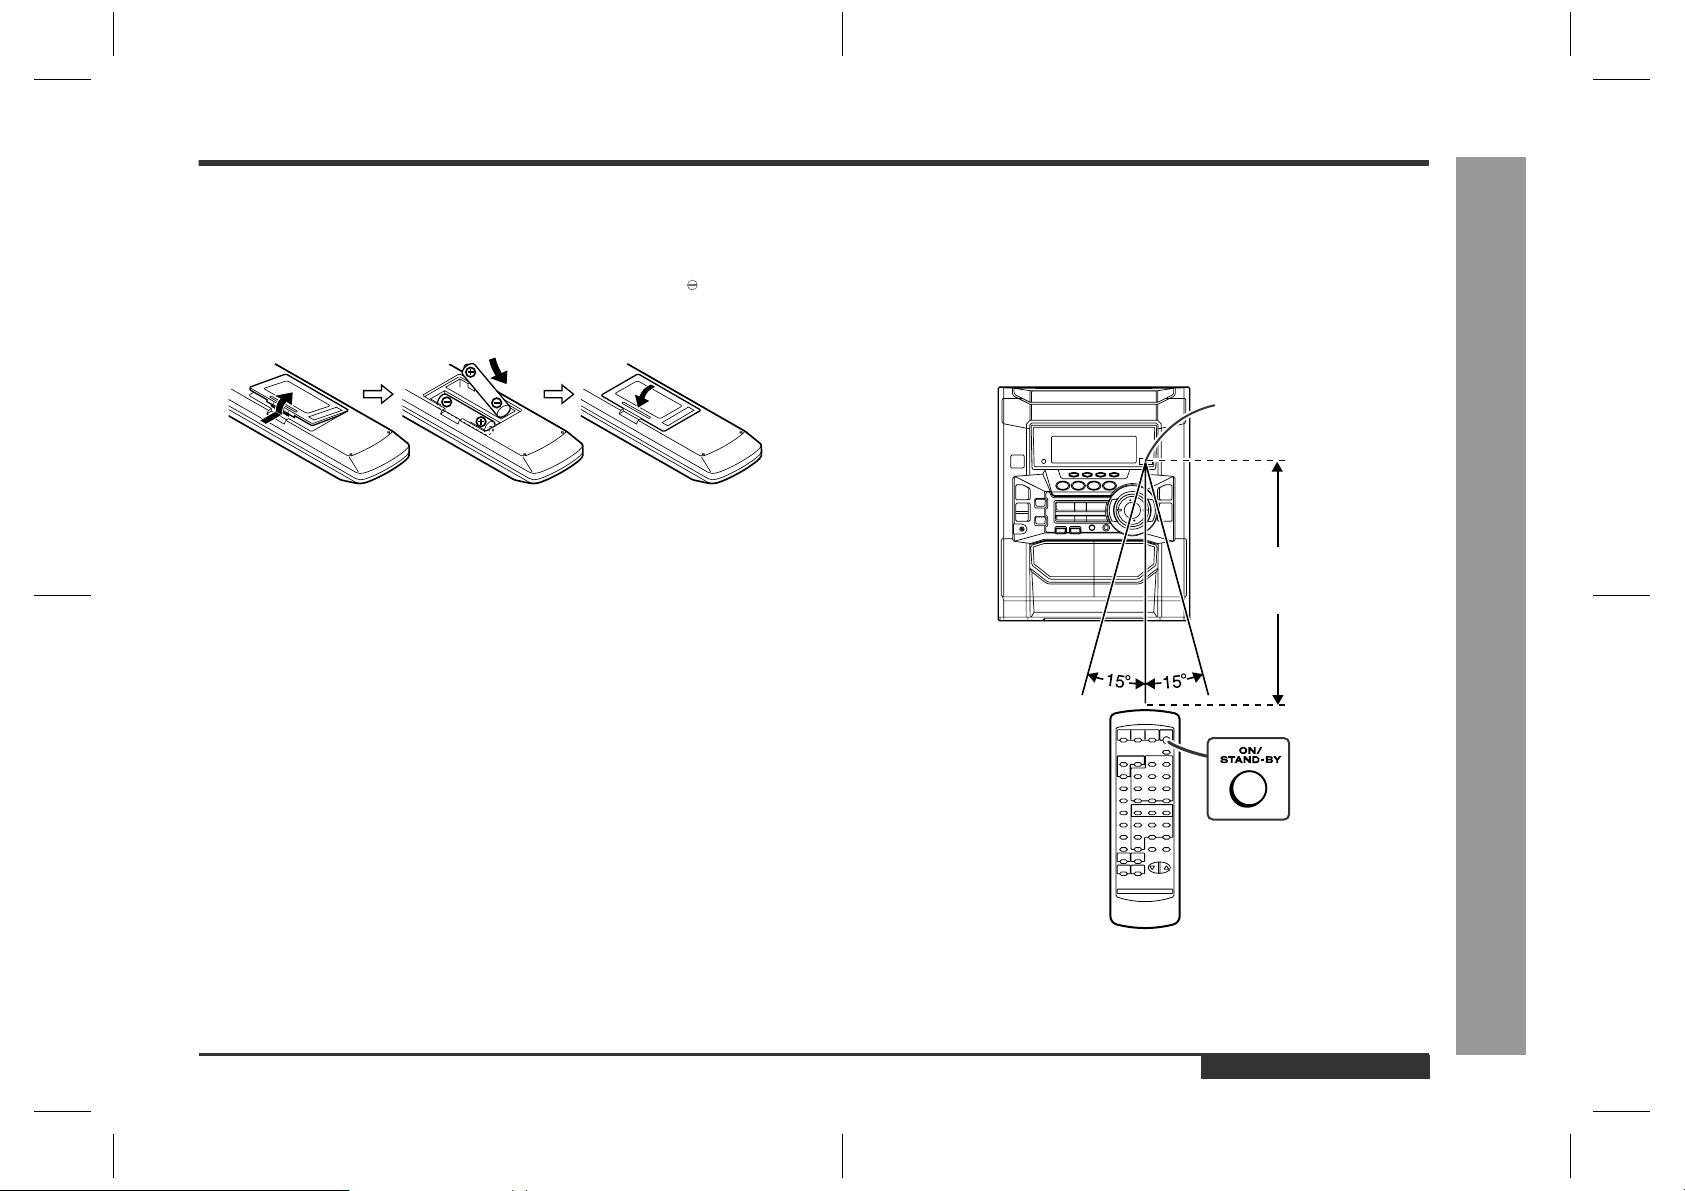
Battery installation
„
1 Remove the battery cover.
2 Insert the batteries according to the direction indicated in the bat-
tery compartment.
When inserting or removing the batteries, push them towards the battery termi-
nals.
3 Replace the cover.
Precautions for battery use:
z
Replace all old batteries with new ones at the same time.
z
Do not mix old and new batteries.
z
Remove the batteries if the unit will not be used for long periods of time. This will
prevent potential damage due to battery leakage.
Caution:
z
Do not use rechargeable batteries (nickel-cadmium battery, etc.).
z
Installing the batteries incorrectly may cause the unit to malfunction.
Notes concerning use:
z
Replace the batteries if the operating distance is reduced or if the operation
becomes erratic. Purchase 2 "AA" size batteries (UM/SUM-3, R6, HP-7 or similar).
z
Periodically clean the transmitter on the remote control and the sensor on the unit
with a soft cloth.
z
Exposing the sensor on the unit to strong light may interfere with operation.
Change the lighting or the direction of the unit.
z
Keep the remote control away from moisture, heat, shock, and vibrations.
Test of the remote control
„
Check the remote control after checking all connections have been made correctly.
(See pages 9 - 13.)
Face the remote control directly to the remote sensor on the unit.
The remote control can be used within the range shown below:
Press the ON/STAND-BY button. Does the power turn on? Now, you can enjoy the
music.
Remote sensor
0.2 m - 6 m
(8" - 20')
- Remote Control -
Preparation for Use
ENGLISH
E-8
CD-BK280V(X)E1.fm01/5/28
Page 10
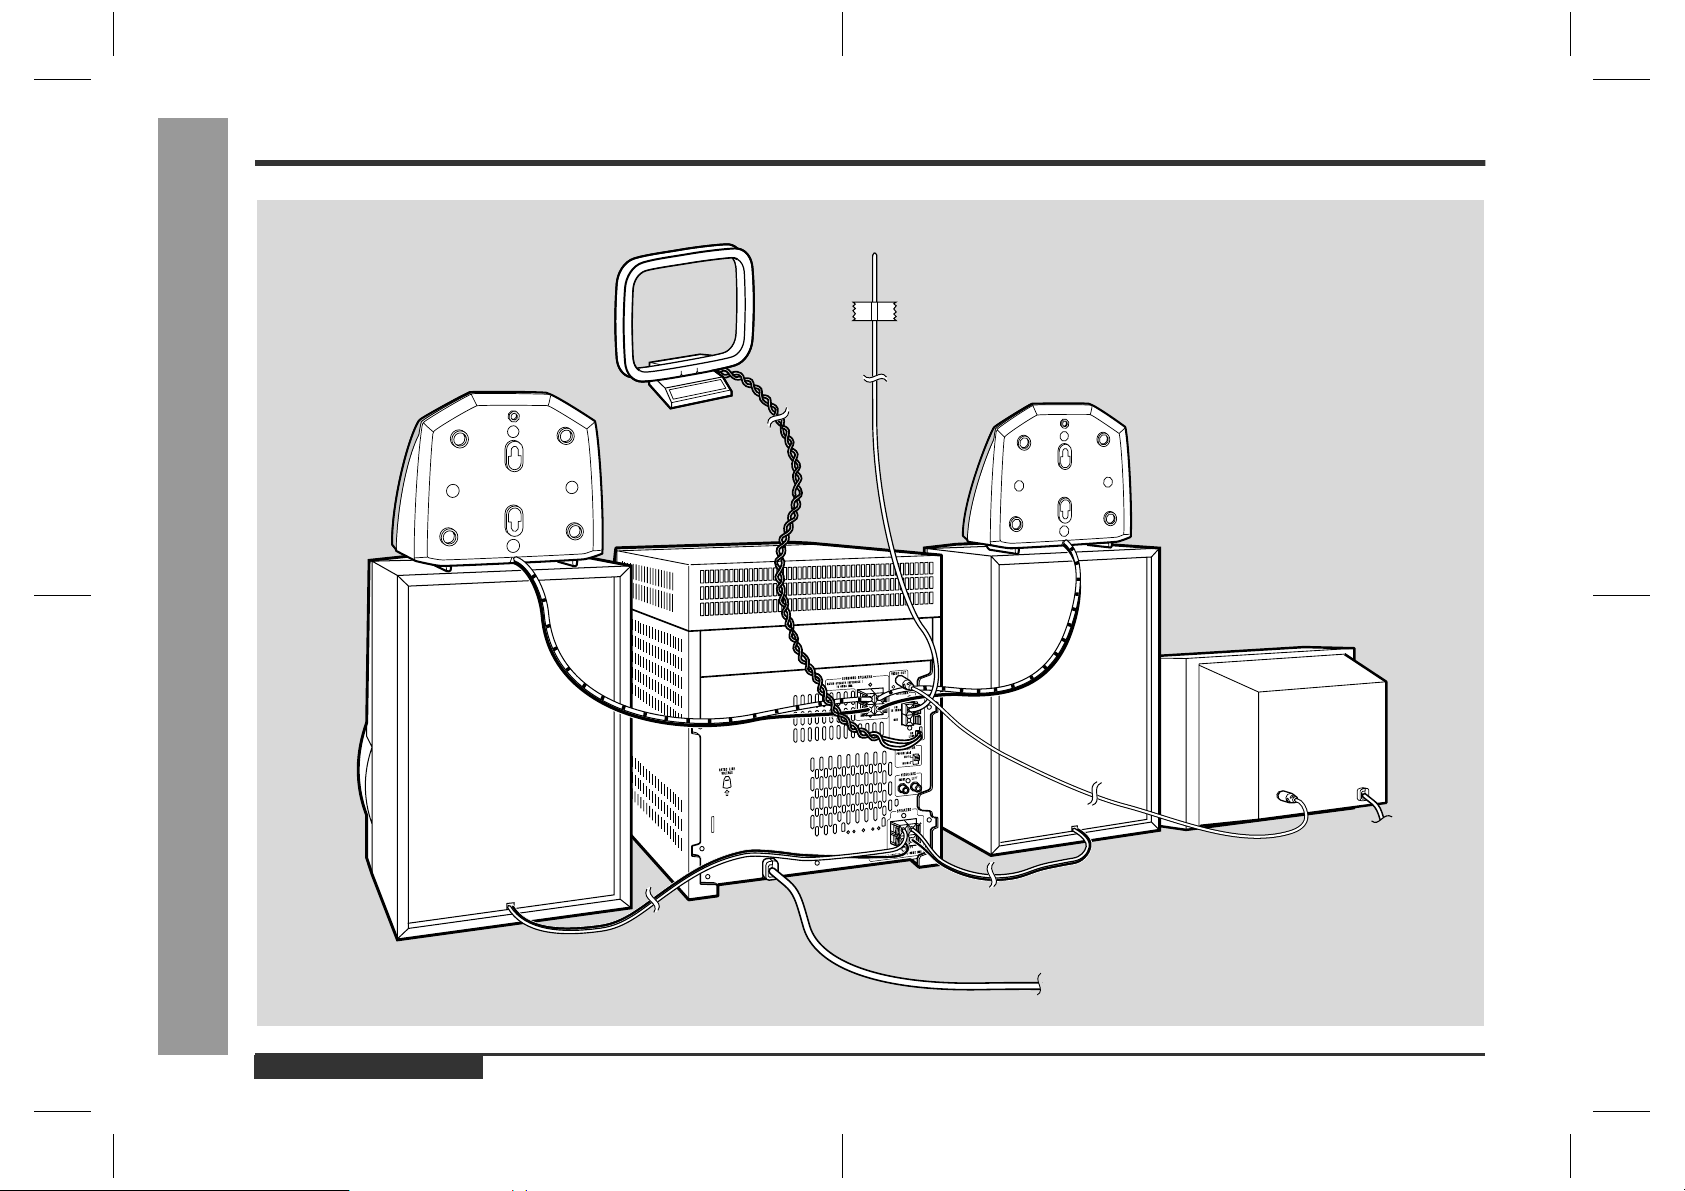
System Connections
Preparation for Use
AM loop aerial
Surround speaker (Right)
- System Connections -
FM aerial
Surround speaker (Left)
TV
E-9
ENGLISH
Front speaker (Right)
Front speaker (Left)
To a wall socket
(See page 13.)
CD-BK280V(X)E1.fm01/5/28
Page 11
CD-BK280V
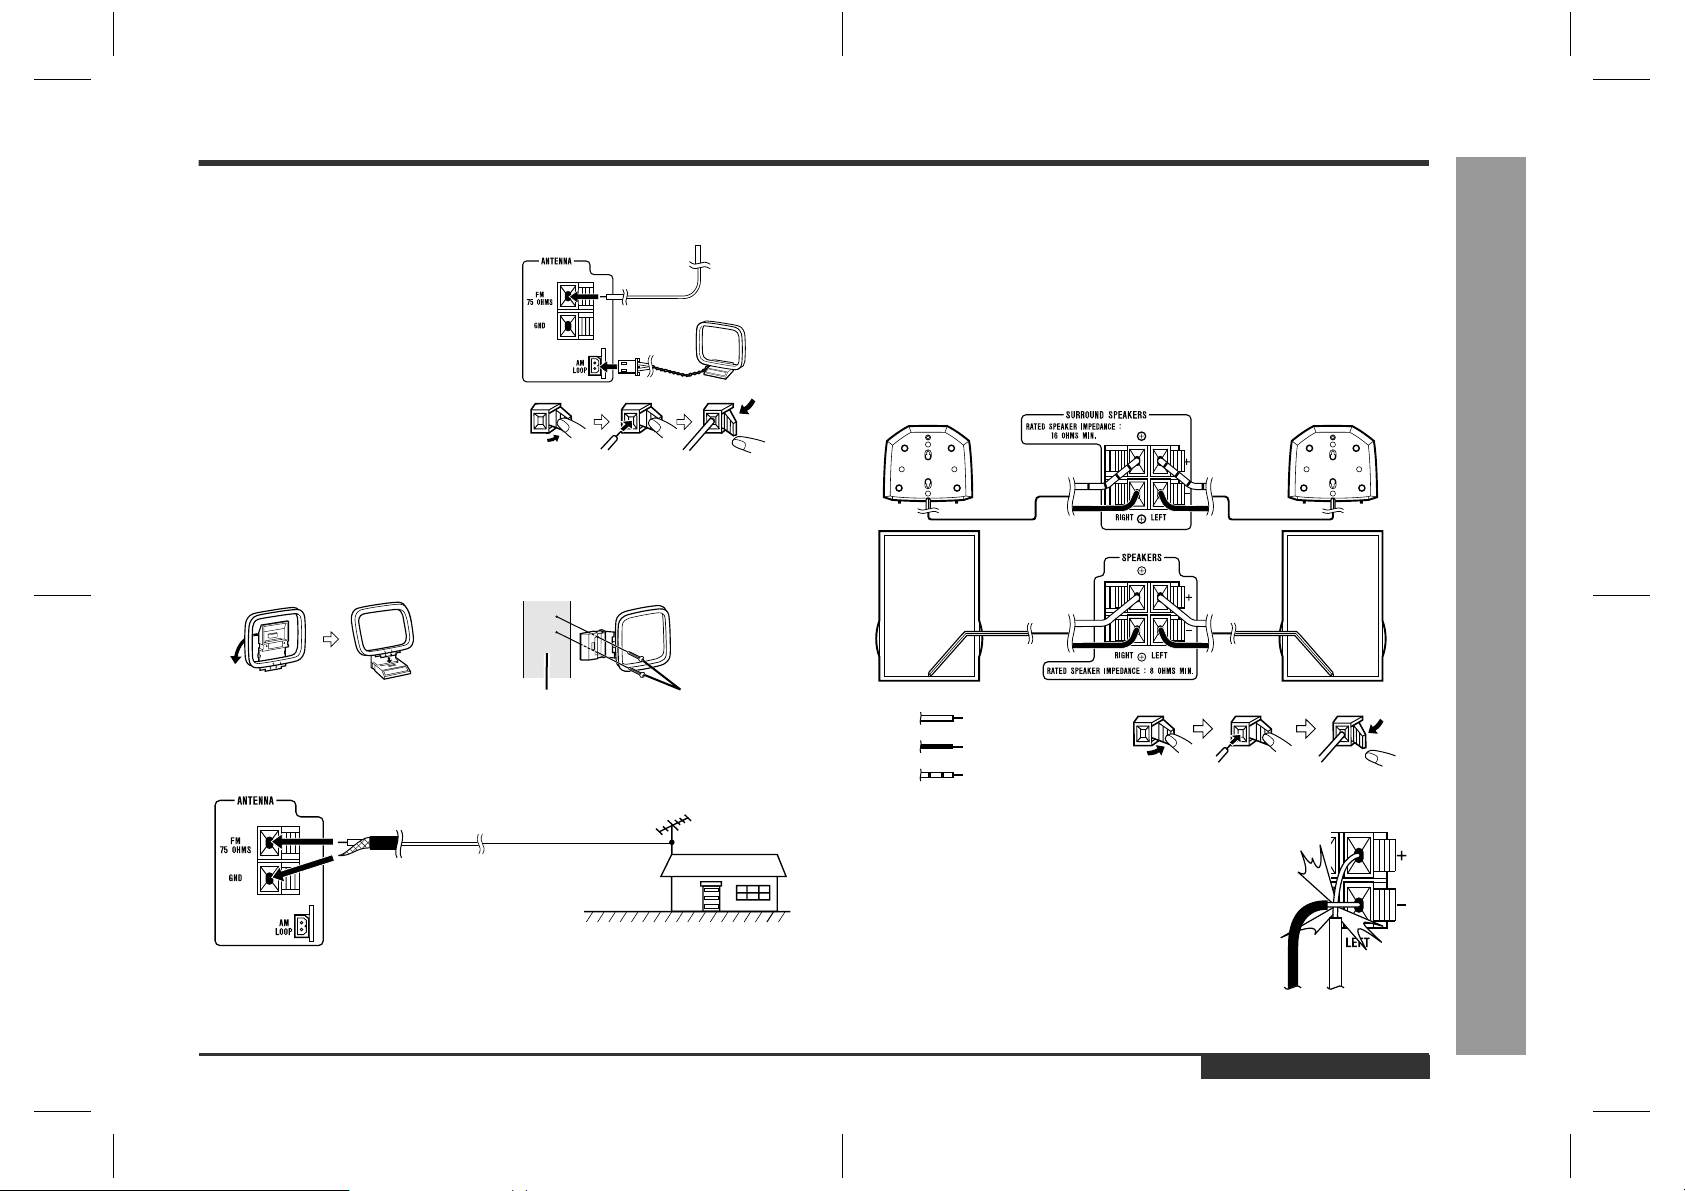
Aerial connection
„
Supplied FM aerial:
Connect the FM aerial wire to the FM 75
OHMS terminal and position the FM aerial
wire in the direction where the strongest
signal can be received.
Supplied AM loop aerial:
Connect the AM loop aerial wire to the AM
LOOP socket. Position the AM loop aerial
for optimum reception. Place the AM loop
aerial on a shelf, etc., or attach it to a stand
or a wall with screws (not supplied).
Note:
Placing the aerial on the unit or near the AC power lead may cause noise pickup.
Place the aerial away from the unit for better reception.
Installing the AM loop aerial:
< Assembling > < Attaching to the wall >
Wall Screws (not supplied)
External FM aerial:
Use an external FM aerial if you require better reception. Consult your dealer.
External
FM aerial
75 ohm
coaxial
cable
Note:
When an external FM aerial is used, disconnect the supplied FM aerial wire.
Speaker connection
„
Front speakers
Connect the black wire to the SPEAKERS (-) terminal, and the red wire to the
SPEAKERS (+) terminal.
Surround speakers
Connect the black wire to the SURROUND SPEAKERS (-) terminal, and the green
wire to the SURROUND SPEAKERS (+) terminal.
Surround speaker (Right) Surround speaker (Left)
Front speaker (Right)
Red
Black
Green
Front speaker (Left)
Caution:
z
If you use other speakers with impedance lower than that
specified, the unit may be damaged. Front speakers: 8
ohms Surround speakers: 16 ohms
z
Do not mistake the right and the left channels. The right
speaker is the one on the right side when you face the unit.
z
Do not let the bare speaker wires touch each other.
z
Do not allow any objects to fall into or to be placed in the
bass reflex ducts.
z
Do not stand or sit on the speakers. You may be injured.
Incorrect
- System Connections -
Preparation for Use
ENGLISH
E-10
CD-BK280V(X)E1.fm01/5/28
Page 12
System Connections (continued)
Preparation for Use
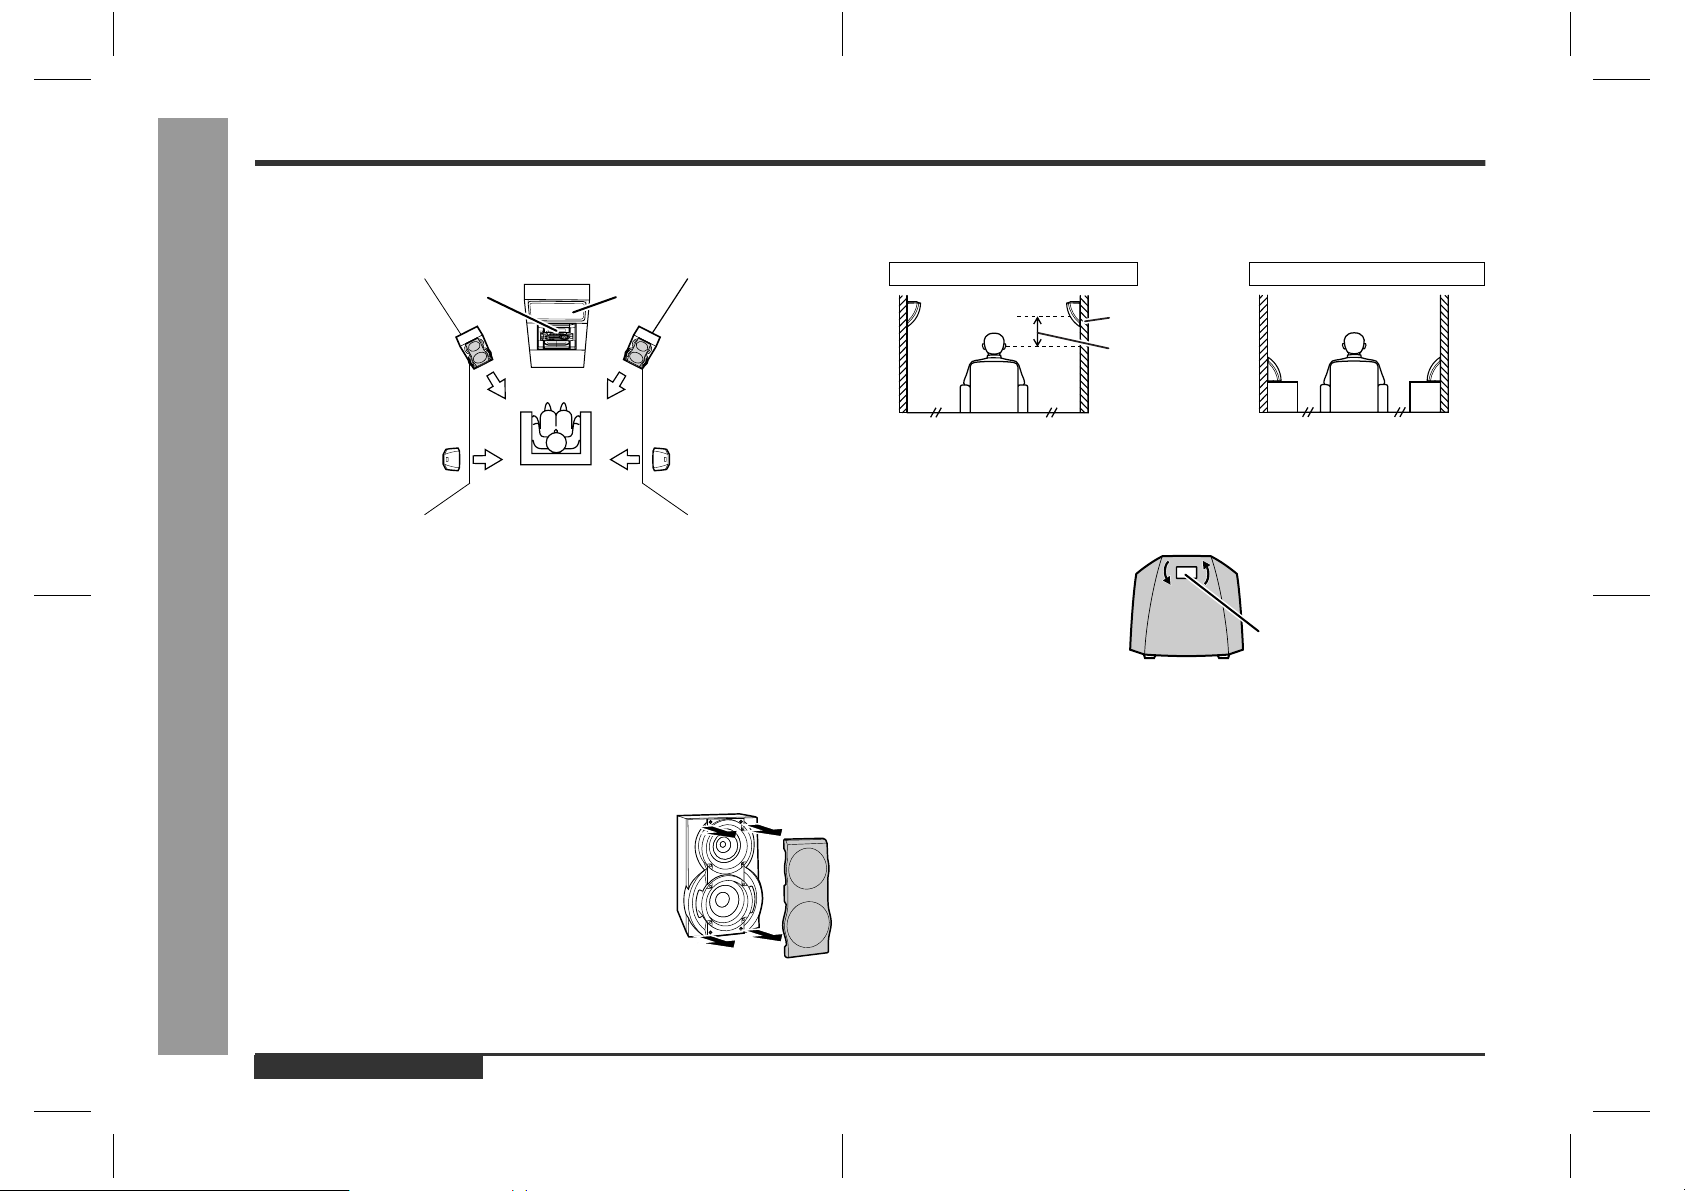
Placing the speaker system
„
To enjoy the surround effect, we recommend that you place each speaker as shown
to the below.
Main unit
Front speaker
(Left)
Surround speaker
(Left)
TV
Front speaker
(Right)
Surround speaker
(Right)
Notes:
z
The front speakers are magnetically shielded.
Therefore, they do not affect the display even you use them near the TV. However,
some colour variation may occur, depending on the type of TV used.
If colour variation occurs...
Turn off the TV (from the power switch).
After 15 - 30 minutes, turn the TV on again.
If the colour variation is still present...
- System Connections -
Move the front speakers further away from the TV.
z
If any kind of magnet or an electromagnet is placed too close to the TV and the system, irregular colours may appear on the TV screen.
Installation of the surround speakers:
If possible, mount the surround speakers on the wall. Install them 60 cm - 90 cm (23"
- 35") above the height of your ears when you are seated.
Example: when installed on the wall Example: when installed vertically
Wall
60 - 90 cm
(23" - 35")
Note:
When the surround speakers are not installed on the wall, the speaker badge will be
upside down. In this case, you can adjust the badge to face the proper direction by
turning it by hand.
Badge
E-11
Front speaker grilles are removable:
Make sure nothing comes into contact with the speaker
diaphragms when you remove the speaker grilles.
Note:
The speaker grilles on the surround speakers are not removable.
ENGLISH
CD-BK280V(X)E2.fm01/5/28
Page 13

CD-BK280V
To mount the surround speakers on the
„
wall
The design of the surround speakers allows them to be hung on the wall. Be sure to
use the type and size of screw that is shown to the below.
5 mm (3/16")
Min. 22 mm (7/8")
1
Drive one screw through the wall for each speaker.
5 mm (3/16")
Wall mounting screw
Wall surface
z
Make sure that both the screw and the wall can support a load of 20 kg (45
lbs.).
z
Drive the screws, so there is about a 5 mm (3/16") space between the wall
and the head of the screw.
2
Mount the surround speaker on the wall so that the screw head is
inserted into the slot on the surround speaker.
Min. 17 mm (11/16")
3.2 mm (1/8")
9 mm (3/8")
TV/monitor connection
„
If the TV/monitor has a video input, connect it to VIDEO OUT socket on the rear of
the unit.
TV
To video
input socket
Video cable
Note:
If the TV/monitor does not have a video input, the VIDEO OUT socket on the unit
should be connected to a VCR with a video input, which in turn should be connected
to the TV/monitor through the TV ANTENNA/CABLE input. (Be sure to turn on the
VCR, and set the VCR's input mode to "auxiliary".)
- System Connections -
Preparation for Use
Wall surface
ENGLISH
E-12
CD-BK280V(X)E2.fm01/5/28
Page 14

System Connections (continued)
Preparation for Use
Setting the AC voltage selector
„
Check the setting of the AC voltage selector located on the rear panel before plugging the unit into a wall socket. If necessary, adjust the se lector to corr espond to the
AC power voltage used in your area.
Turn the selector with a screwdriv er unti l the a ppropriate voltage nu mber appears in the window (110 V, 127 V, 220 V or 230 V - 240 V AC).
Connecting the AC power lead
„
After making all connections, plug the unit. If you plug the unit first,
the unit will enter the demonstration mode.
Note:
Unplug the AC power lead from the wall socket if the unit will not be in use for a prolonged period of time.
AC Plug Adaptor
In areas (or countries) where a wall socket as shown in illustration is used, connect
the unit using the AC plug adaptor supplied with the unit, as illustrated. The AC plug
adaptor is not included in areas where the wall socket and AC power plug can be
directly connected (see illustration ).
- System Connections -
Setting the FM/AM span selector
„
1
The International Telecommunication Union (ITU) has established that member countries should maintain either a 100 kHz or a 50 kHz interval between broadcasting frequencies of FM stations and 10 kHz or 9 kHz for AM station. The illustration shows
the 50/9 kHz zones (regions 1 and 3), and the 100/10 kHz zone (region 2).
Before using the unit, set the SPAN SELECTOR switch (on the rear panel) to the
interval (span) of your area.
E-13
ENGLISH
To change the tuning zone:
1 Press the ON/STAND-BY button to enter the stand-by mode.
2 Set the SPAN SELECTOR switch (on the rear panel) as follows.
z
For 50 kHz FM interval (9 kHz in AM) 50/9
z
2
For 100 kHz FM interval (10 kHz in AM) 100/10
3 Whilst pressing down the button and the X-BASS/DEMO button, press the ON/
STAND-BY button until "CLEAR AL" appears.
Caution:
This operation will erase all data stored in memory including clock, timer settings,
tuner preset, and CD programme.
CD-BK280V(X)E2.fm01/5/28
Page 15
General Control
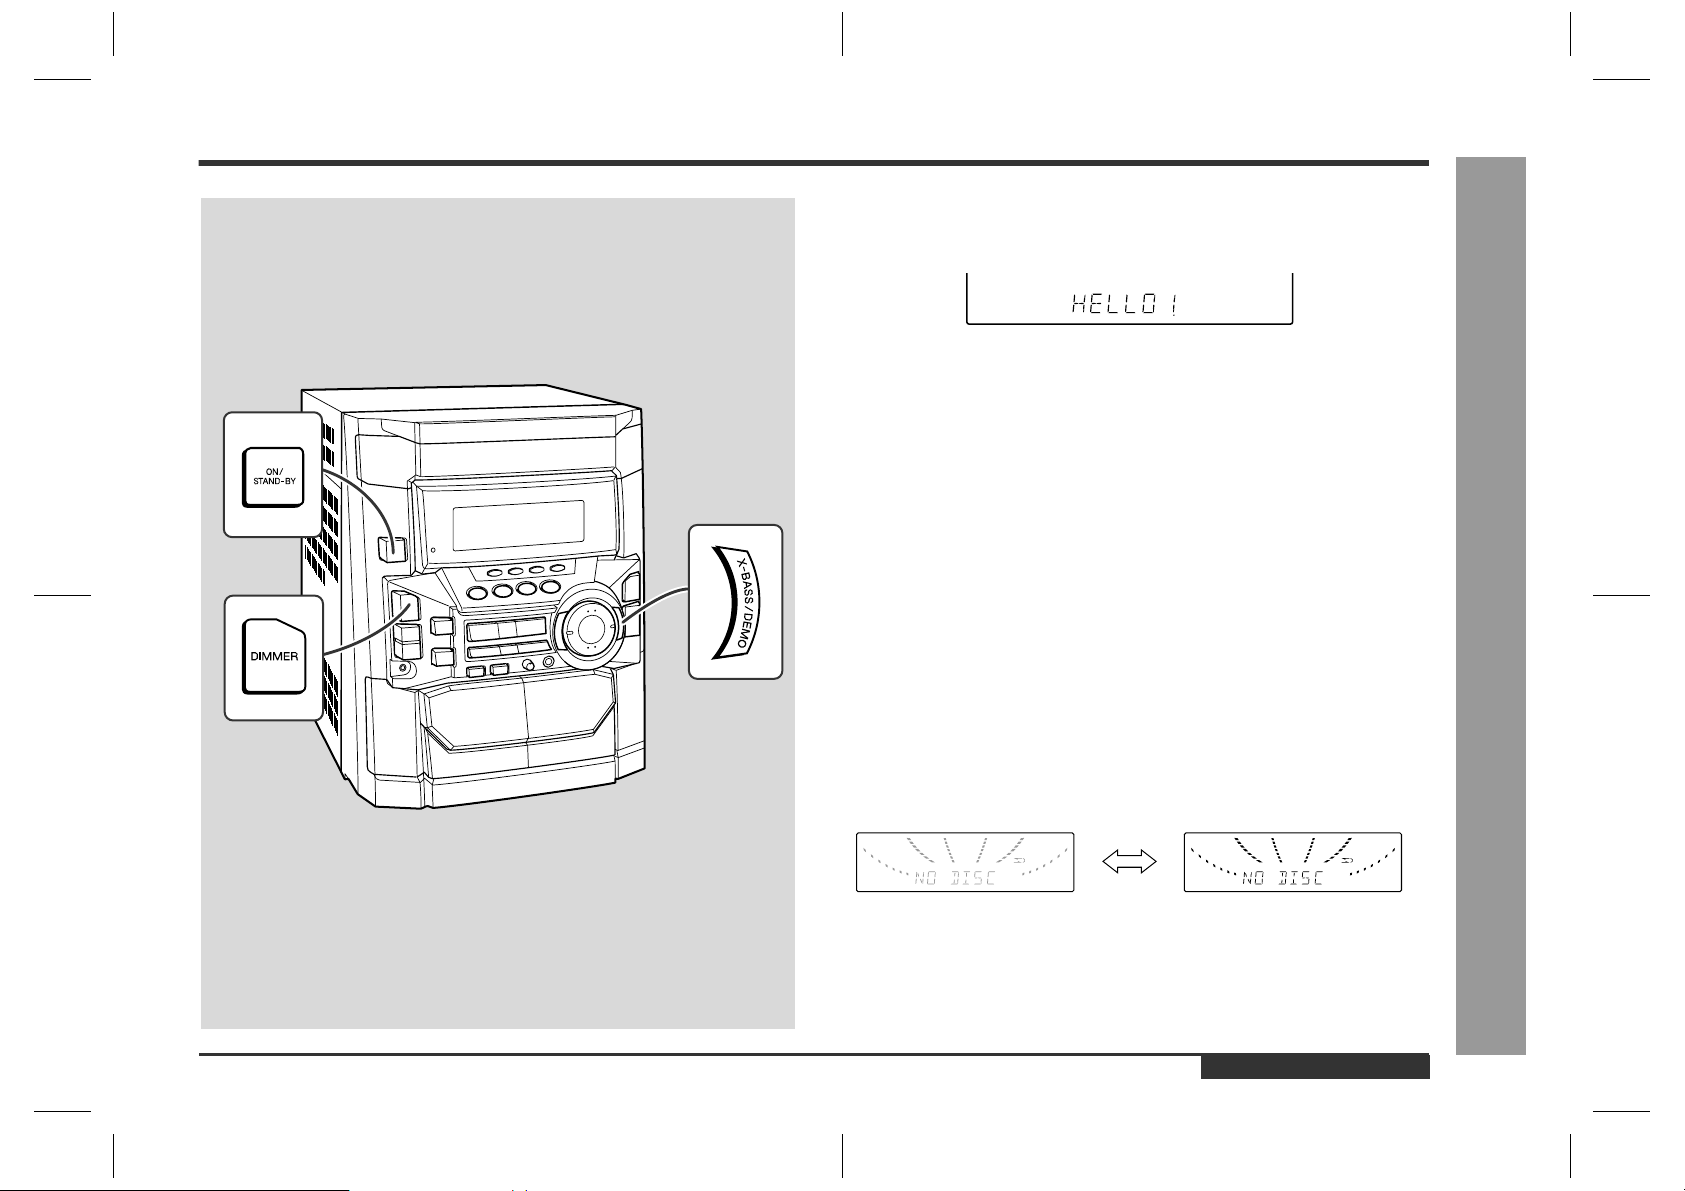
Demonstration mode
„
The first time the unit is plugged in, the unit will enter the demonstration mode. You
will see words scroll.
To cancel the demonstration mode:
When the unit is in the power stand-by mode (demonstration mode), press the
X-BASS/DEMO button. The demonstration mode will be cancelled and the display
will disappear.
To return to the demonstration mode:
When the unit is in the power stand-by mode, press the X-BASS/DEMO button again.
Note:
When the power is on, the X-BASS/DEMO button can be used to select the extra
bass mode.
To turn the power on
„
Press the ON/STAND-BY button to turn the power on.
CD-BK280V
To set the unit to stand-by mode:
Press the ON/STAND-BY button again.
To change the display brightness (2 levels)
„
You can switch the display brightness by pressing the DIMMER button.
Dimmed Brightened
ENGLISH
CD-BK280V(X)E2.fm01/5/28
- General Control -
Basic Operation
E-14
Page 16
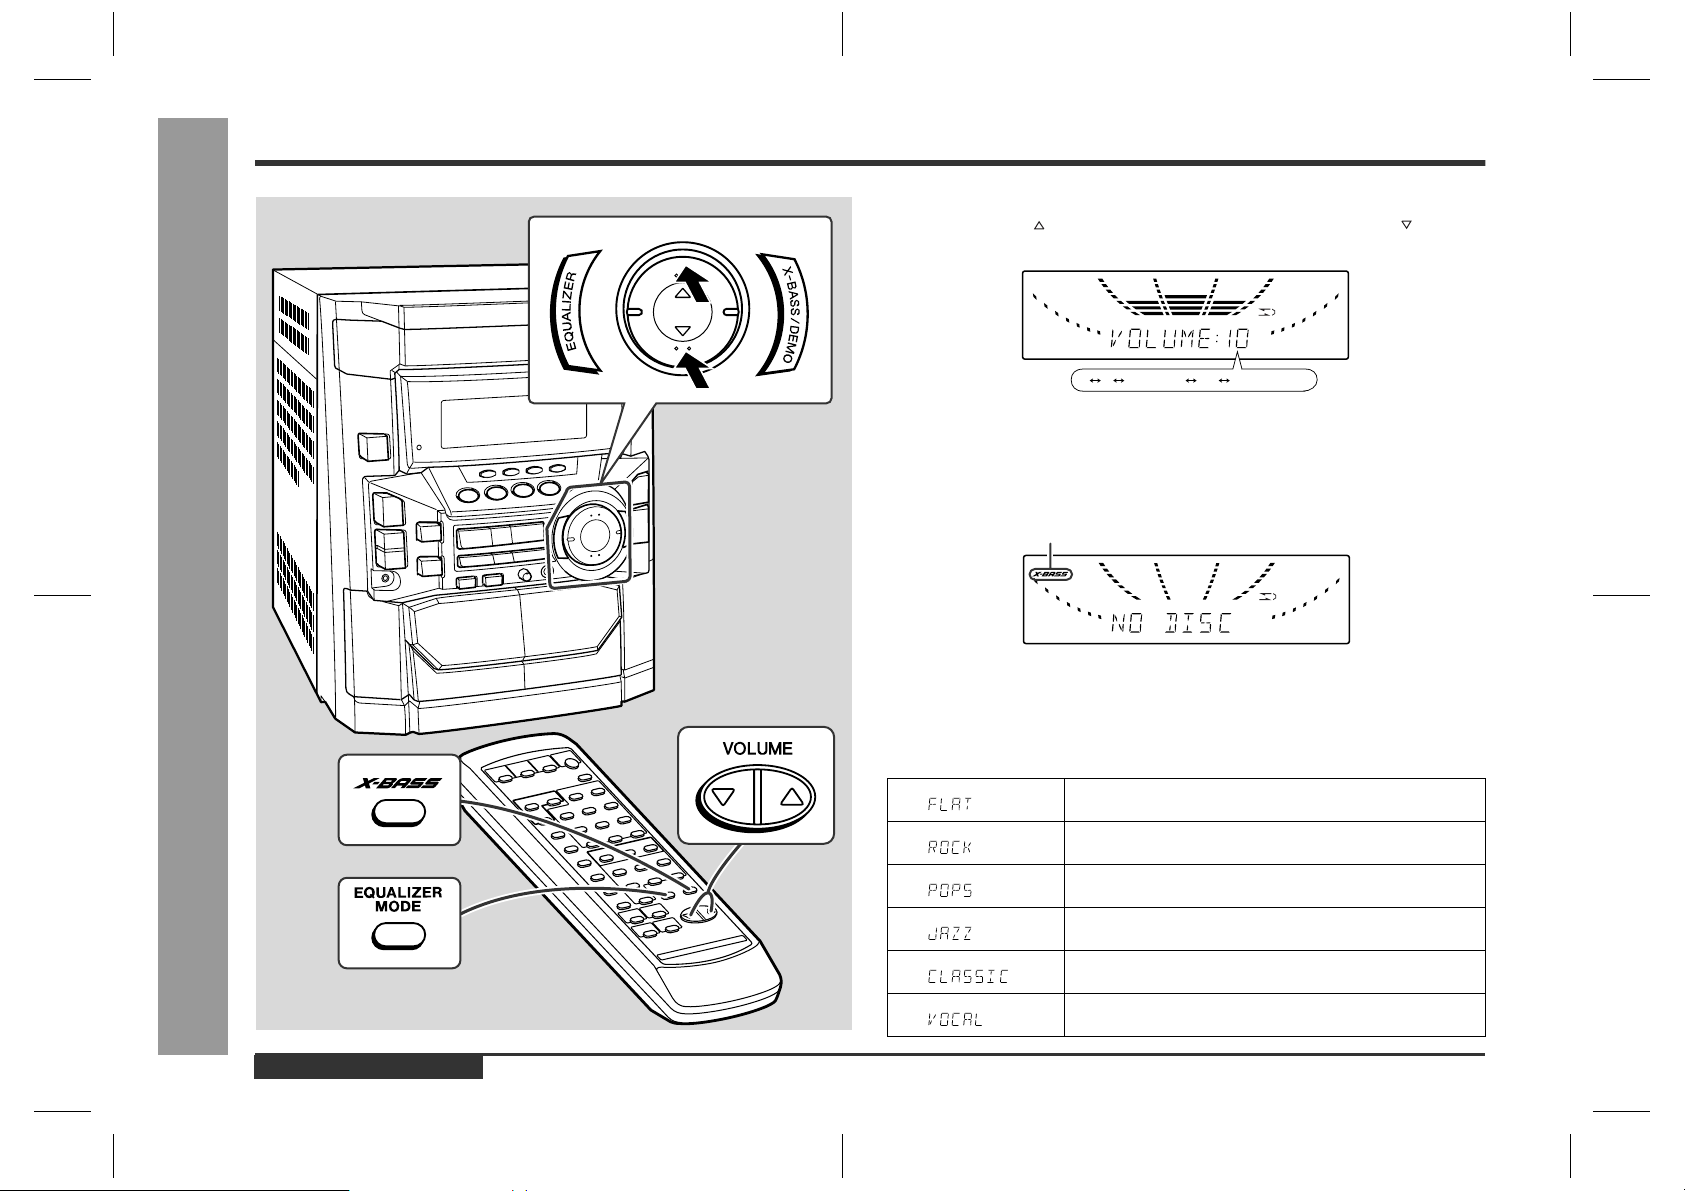
Sound Control
Volume control
„
Press the VOLUME button to increase the volume and the VOLUME button for
decreasing.
- Sound Control -
Basic Operation
012 29 30 MAXIMUM
Bass control
„
When the power is first turned on, the unit will enter the extra bass mode which
emphasises the bass frequencies, and "X-BASS" will appear. To cancel the extra
bass mode, press the X-BASS/DEMO (X-BAS S) button.
X-BASS indicator
Equalizer
„
When the EQUALIZER (EQUALIZER MODE) button is pressed, the current mode
setting will be displayed. To change to a different mode, press the EQUALIZER
(EQUALIZER MODE) button repeatedly until the desired sound mode appears.
The sound is not modified.
Bass and treble are emphasised.
Bass and treble are slightly emphasised.
Treble is cut a little.
.....
E-15
Treble is reduced a lot.
Vocals (midrange tones) are emphasised.
ENGLISH
CD-BK280V(X)E2.fm01/5/28
Page 17
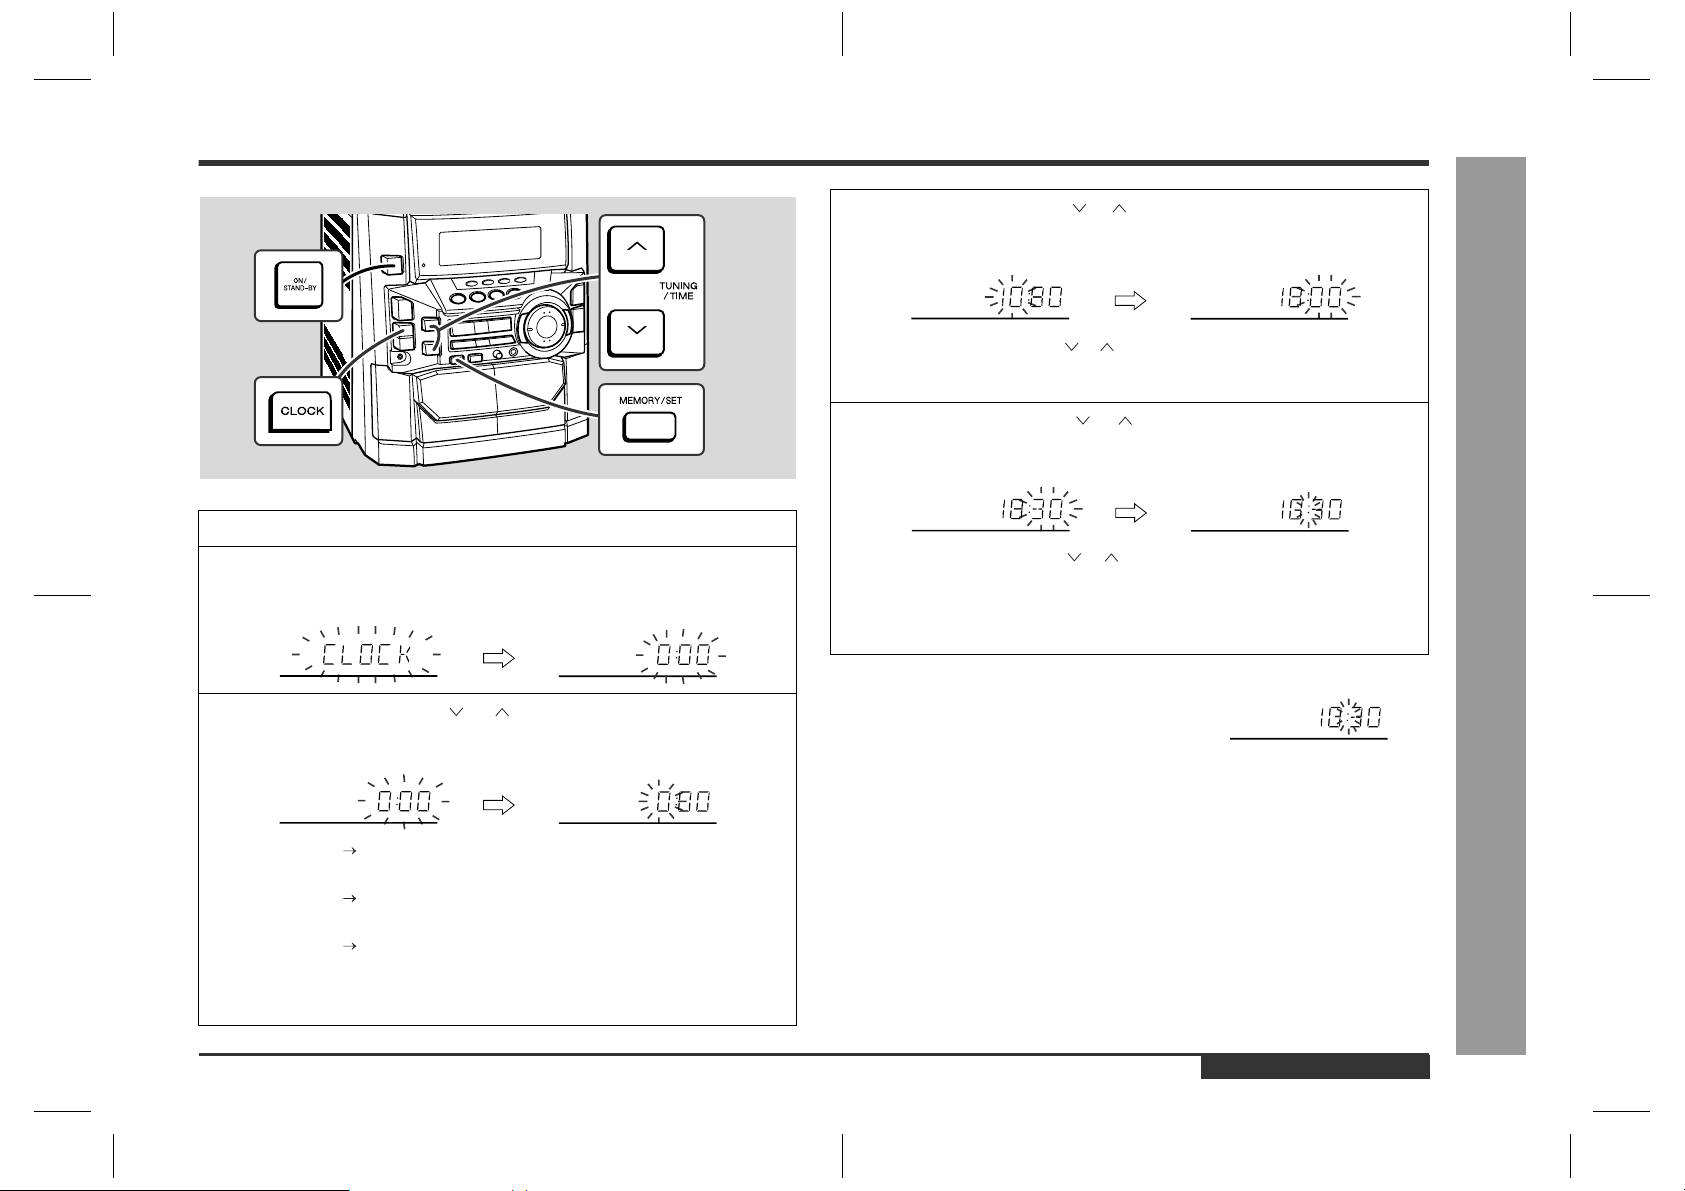
Setting the Clock
In this example, the clock is set for the 24-hour (0:00) display.
1
Press the ON/STAND-BY button to turn the power on.
2
Press the CLOCK button and within 5 seconds, press the MEMORY/SET button.
4
Press the TUNING/TIME ( or ) button to adjust the hour and then
press the MEMORY/SET button.
z
Press the TUNING/TIME ( or ) button once to advance the time by 1 hour.
Hold it down to advance continuously.
z
When the 12-hour display is selected, "AM" will change automatically t o "PM".
5
Press the TUNING/TIME ( or ) button to adjust the minutes and
then press the MEMORY/SET button.
z
Press the TUNING/TIME ( or ) button once to advance the time by 1
minute. Hold it down to change the time in 5-minute intervals.
z
The hour will not advance even if minutes advance from "59" to "00".
z
The clock begins counting from "0" seconds. (Seconds are not displayed.)
The time display will disappear after a few seconds.
CD-BK280V
3
Press the TUNING/TIME ( or ) button to select 24-hour or 12hour display and then press the MEMORY/SET button.
"0:00" The 24-hour display will appear.
(0:00 - 23:59)
"AM 12:00" The 12-hour display will appear.
(AM 12:00 - PM 11:59)
"AM 0:00" The 12-hour display will appear.
(AM 0:00 - PM 11:59)
Note that this can only be set when the unit is first installed or it has been reset.
[Refer to "Clearing all the memory (reset)" on page 45 for details.]
To confirm the time display:
Press the CLOCK button.
The time display will appear for about 5 seconds.
Note:
The "CLOCK" or time will flash at the push of the CLOCK button when the AC power
supply is restored after a power failure or unplugging the unit.
Readjust the clock as follows.
To readjust the clock:
Perform "Setting the Clock" from the beginning. If the time display is flashing, step 3
(for selecting the 24-hour or 12-hour display) will be skipped.
To change the 24-hour or 12-hour display:
1 Clear all the programmed contents. [Refer to "Clearing all the memory (reset)" on
page 45 for details.]
2 Perform "Setting the Clock" from the beginning.
ENGLISH
CD-BK280V(X)E2.fm01/5/28
- Setting the Clock -
Basic Operation
E-16
Page 18
Video CD
Video CD Playback
Any CD that contains motion pictures can be played.
You can enjoy motion pictures with the sound quality of MDs and the picture quality of
VHS tapes.
Digital compression technology allows the continuous playback of up to 74 minutes
from a 12 cm disc.
With video CDs, you can select the items you want to watch from the on-screen
menu. Discs which support "Playback control" can display still pictures. (See pages
19 - 20.)
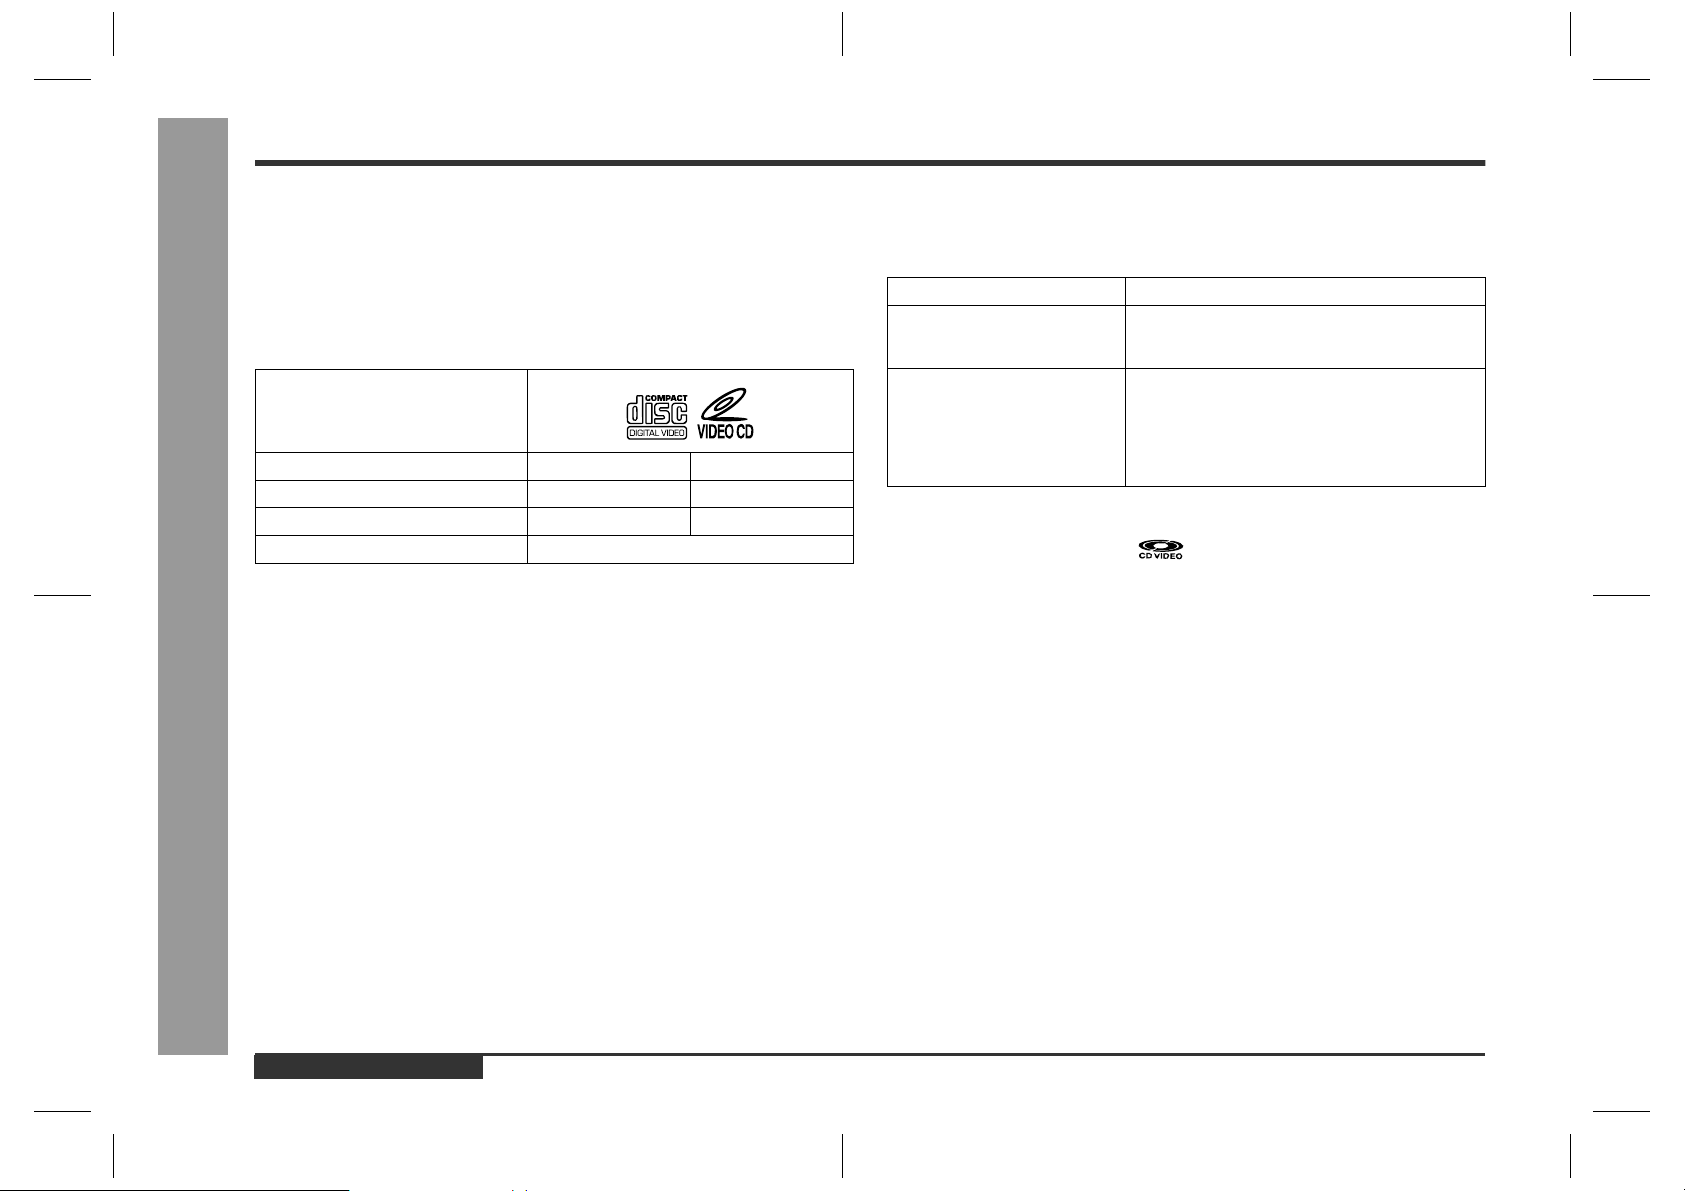
The disc symbols are found on the disc labels or jackets.
Symbol
Size
Label sides
Audio recording format
Video recording format
8 cm (3") 12 cm (5")
1 side 1 side
Digital (max. 20 min) Digital (max. 74 min)
MPEG 1
- Video CD -
Types of discs
„
This unit handles video CDs that suppor t P BC (version 2.0). (PBC is an abbreviation
of "Playback Control".)
You can enjoy the following two types of playback, depending on the disc.
Disc type Features
Video CDs without PBC
(version 1.1)
Video CDs with PBC
(version 2.0)
Sound and motion pictures can be played using
the same control operations as applied to music
CDs.
In addition to the features shown above (for discs
without PBC), PBC CDs have a menu that is displayed on the TV screen. You can play interactive
games and make use of other software with the
retrieval function (menu playback). You can also
display high resolution or normal still pictures.
Notes:
z
Video CDs are recorded in PAL or NTSC format.
z
Analogue system CDVs (12 cm) cannot be played.
z
Photo CDs and CD-ROMs cannot be played.
E-17
ENGLISH
CD-BK280V(X)E2.fm01/5/28
Page 19
Preparation for Video CD Playback
CD-BK280V
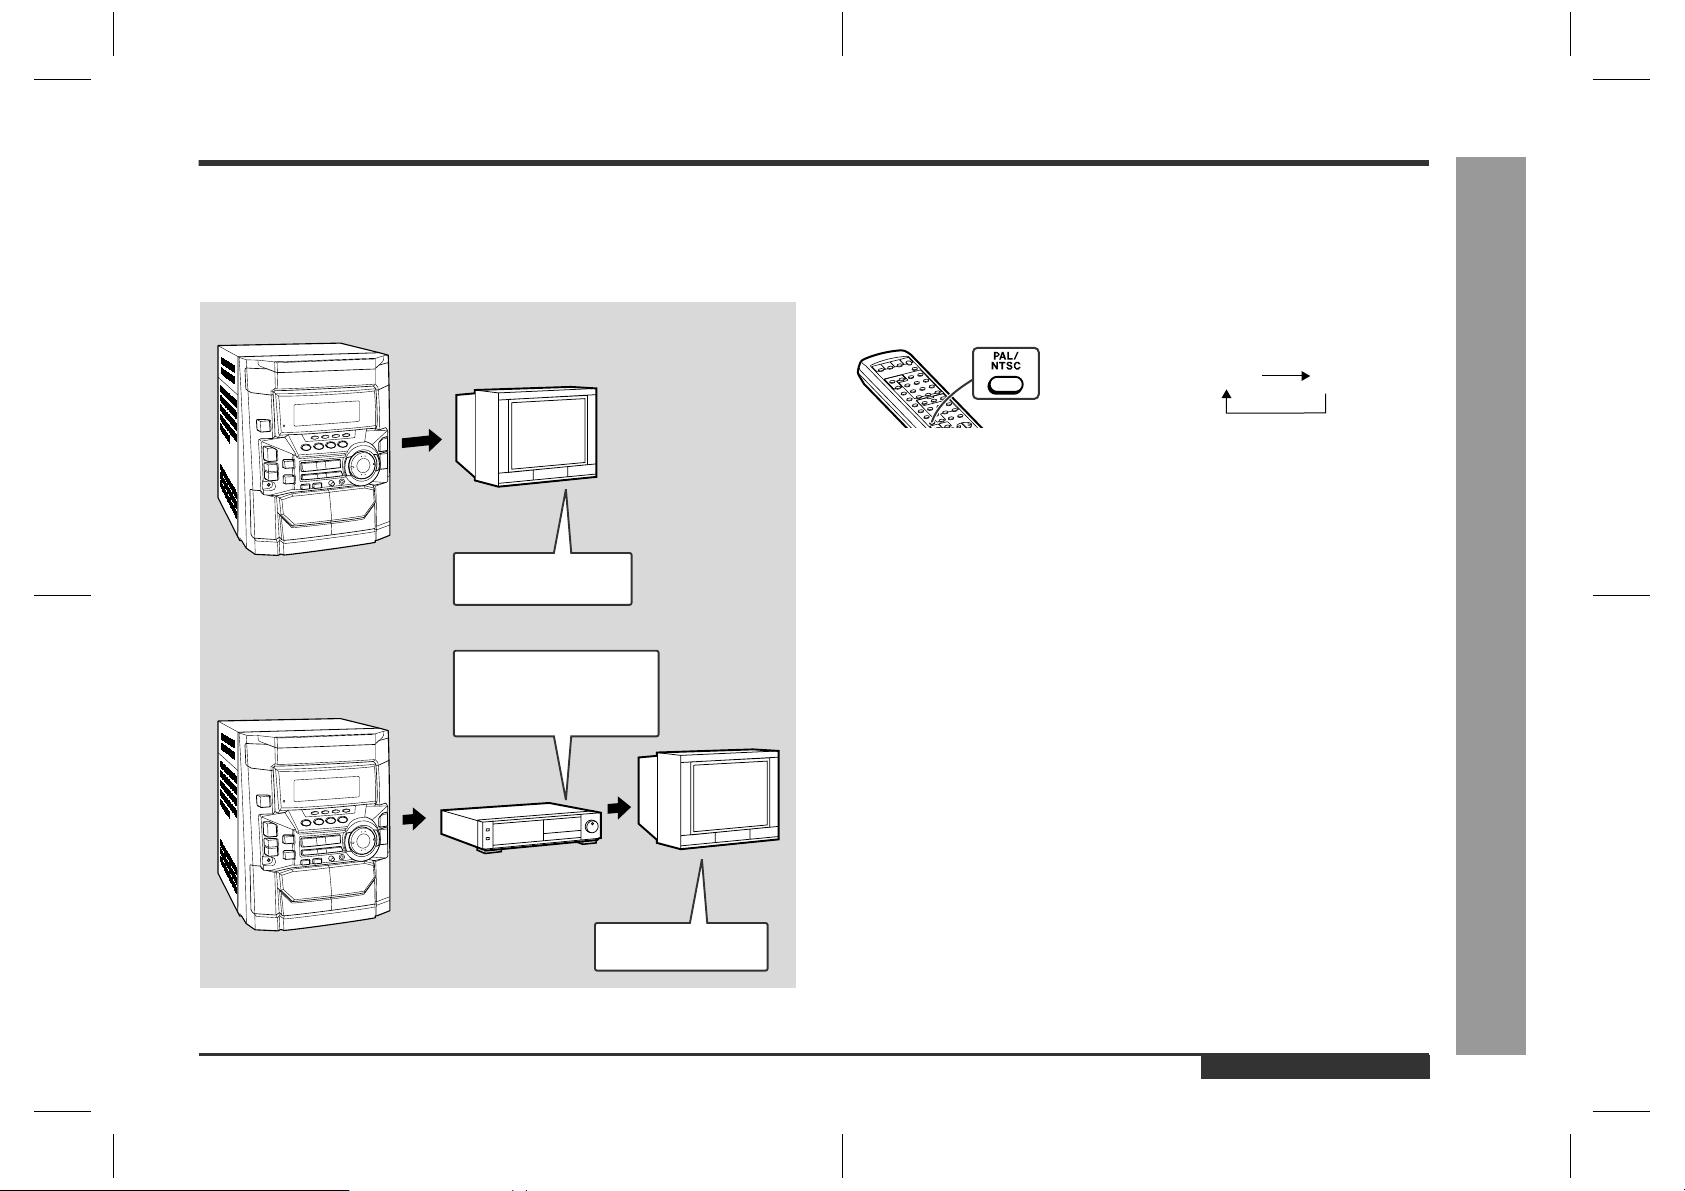
Adjusting the TV and VCR
!
The TV and VCR input varies according to connection method. Be sure to make the
settings correctly. (Then, follow the playback procedure on pages 19 - 20 to check the
settings.)
<For TV sets with a video input socket>
TV
Set the input selector
to VCR.
<For TV sets without a video input socket>
Set the input selector
to AUX.
Set the TV/VCR selector
to VCR.
TV
VCR
Selecting the video output format
!
Video CD is recorded in PAL or NTSC format.
Select the video output format (NTSC or PAL) according to your TV or VCR.
To select the video output format:
Whilst in the stop mode, press the PAL/NTSC button.
Each time this button is pressed, the format will change in the following order:
NTSC PAL
Notes:
"
Video CDs are recorded in PAL or NTSC format. When you watch a PAL disc in
the NTSC mode or an NTSC disc in the PAL mode, the vertical size of the picture
will not be modified.
"
If a multi-mode TV is equipped with an input selector switch, set the switch to
"MULTI MODE". For the details, refer to the TV operation manual.
"
Do not change the video output format during playback. If you do, the picture signal may not be output properly.
"
Picture may be distorted when the setting is switched. This is not the malfunction
of the unit.
"
A few hours after the unit is unplugged, the setting will change back to the state at
the factory shipment (default setting). The setting details vary depending on areas.
Video CD Playback
- Preparation for Video CD Playback -
Set the input selector
to VCR.
ENGLISH
E-18
CD-BK280V(X)E2.fm01/10/12
Page 20
Playback of a Video CD (CDs) with P. B. C. (Version 2.0)
Video CD Playback
Playback control:
Video CDs that support "Playback control" can display still pictures. This function can
be used with video CD software (video CDs with playback control) that have a playback method recorded on them. You can select items you want to watch from the
menu displayed on the TV screen, or you can show still pictures.
1
Turn on the TV and set the input selector to "VCR".
2
Press the ON/STAND-BY button to turn the power on.
3
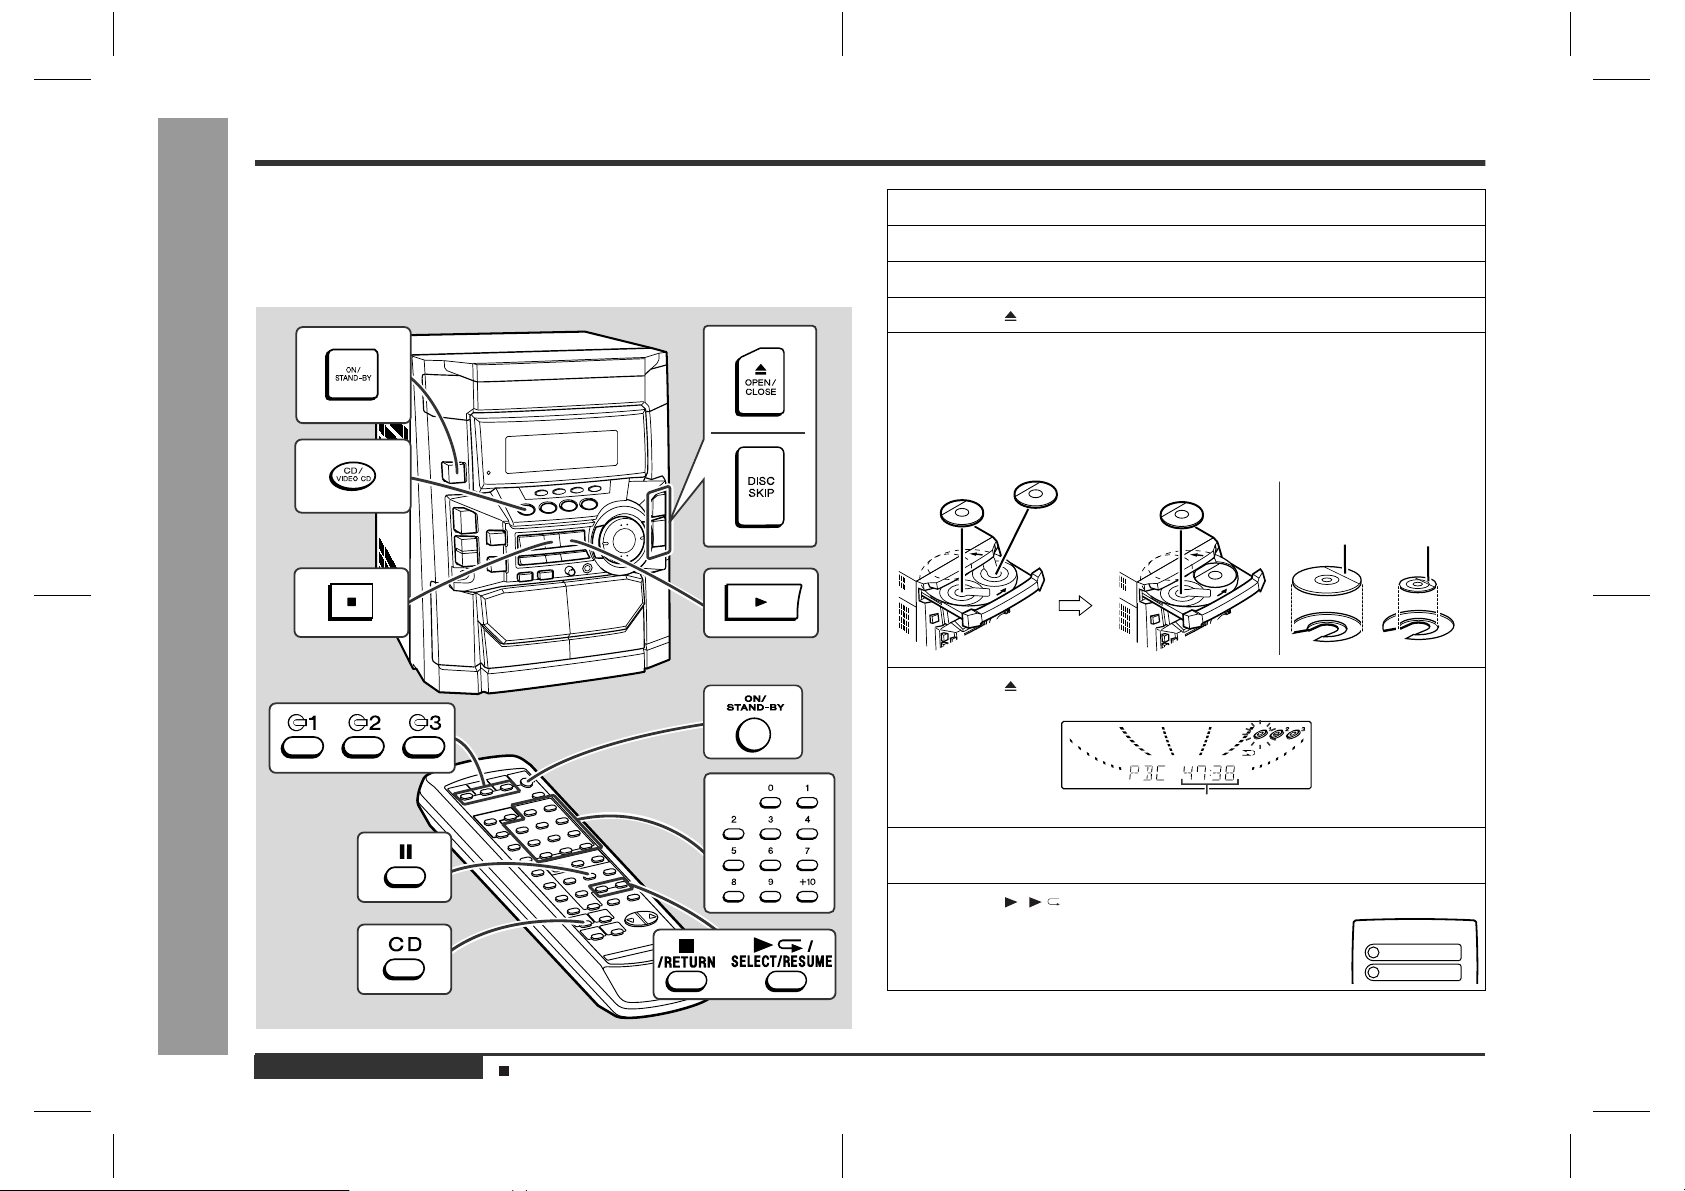
Press the CD/VIDEO CD (CD) button.
4
Press the OPEN/CLOSE button to open the disc tray.
5
Place the video CD(s) with P.B.C. on the disc tray, label side up.
When loading a third disc, press the DISC SKIP button to turn the
disc tray, then place the video CD in the open position.
z
Video CDs can be placed in any open position in the disc tray.
z
Be sure to place 8 cm (3") Video CD(s) in the middle of the disc positions.
12 cm (5")
6
Press the OPEN/CLOSE button to close the disc tray.
8 cm (3")
E-19
- Playback of a Video CD (CDs) with P. B. C. (Version 2.0) -
ENGLISH
Sound Control (See page 15.)
Total playing time of the video CD whose number is flashing
7
To select the video CD you want to listen to first, press the DISC
SKIP button.
8
Press the ( /SELECT/RESUME) button.
A menu will appear on the TV and playback will be paused.
CD-BK280V(X)E2.fm01/5/28
<TV screen>
1
2
Page 21
9
Select the desired menu number using the direct search buttons
on the remote control.
z
Playback will begin.
z
After playback has finished, the menu will reappear. Select the menu number
you want to play.
To interrupt playback:
Press the button on the remote control.
To resume playback from the same point, press the /SELECT/RESUME button.
To stop the current operation and return to the menu:
Press the ( /RETURN) button for less than 0.5 seconds.
To completely stop the video CD:
Hold down the ( /RETURN) button for more than 1 second.
To remove the video CDs:
Whilst in the stop mode, press the OPEN/CLOSE button.
The disc tray will open. Remove the two discs. Then, press the DISC SKIP button to
rotate the disc tray and remove the remaining disc.
z
If the DISC SKIP button does not allow to rotate the disc tray (you cannot remove
the disc), close and open again the tray.
After use:
Press the ON/STAND-BY button to enter the power stand-by mode.
Notes:
z
During playback, you can select another disc by pressing either of the DISC SKIP
button or one of the 1 - 3 buttons on the remote control.
z
Whilst the disc is being read ("TOC READ" is displayed), another disc cannot be
selected even if y ou press the DISC SKIP button or one of the 1 - 3 buttons on
the remote control.
z
Playback control allows a video CD to be played back according to instructions
recorded on the disc. The "previous", "next", "return" and "select" operations may
function differently, depending on the PBC CDs.
z
Some video CDs with playback control may have an "auto pause" recorded on
them. When such a disc is played, the screen will stop automatically at the point
where an "auto pause signal" has been inserted.
z
If the picture looks dirty when a video CD is played back, there may be a scratch
on the video CD. Replace it with another video CD in good condition.
The P.B.C. function will not work in the following conditions.
z
When repeat, random, programme, bookmark, resume, disc digest, track digest or
time search play has been selected and playback begins.
z
When track numbers are selected using the direct search, the PRESET
(NEXT ) or PRESET ( PREV.) button, and playback begins.
To move the menu screen (menu screen
„
with more than 1 page)
To move to the next menu screen:
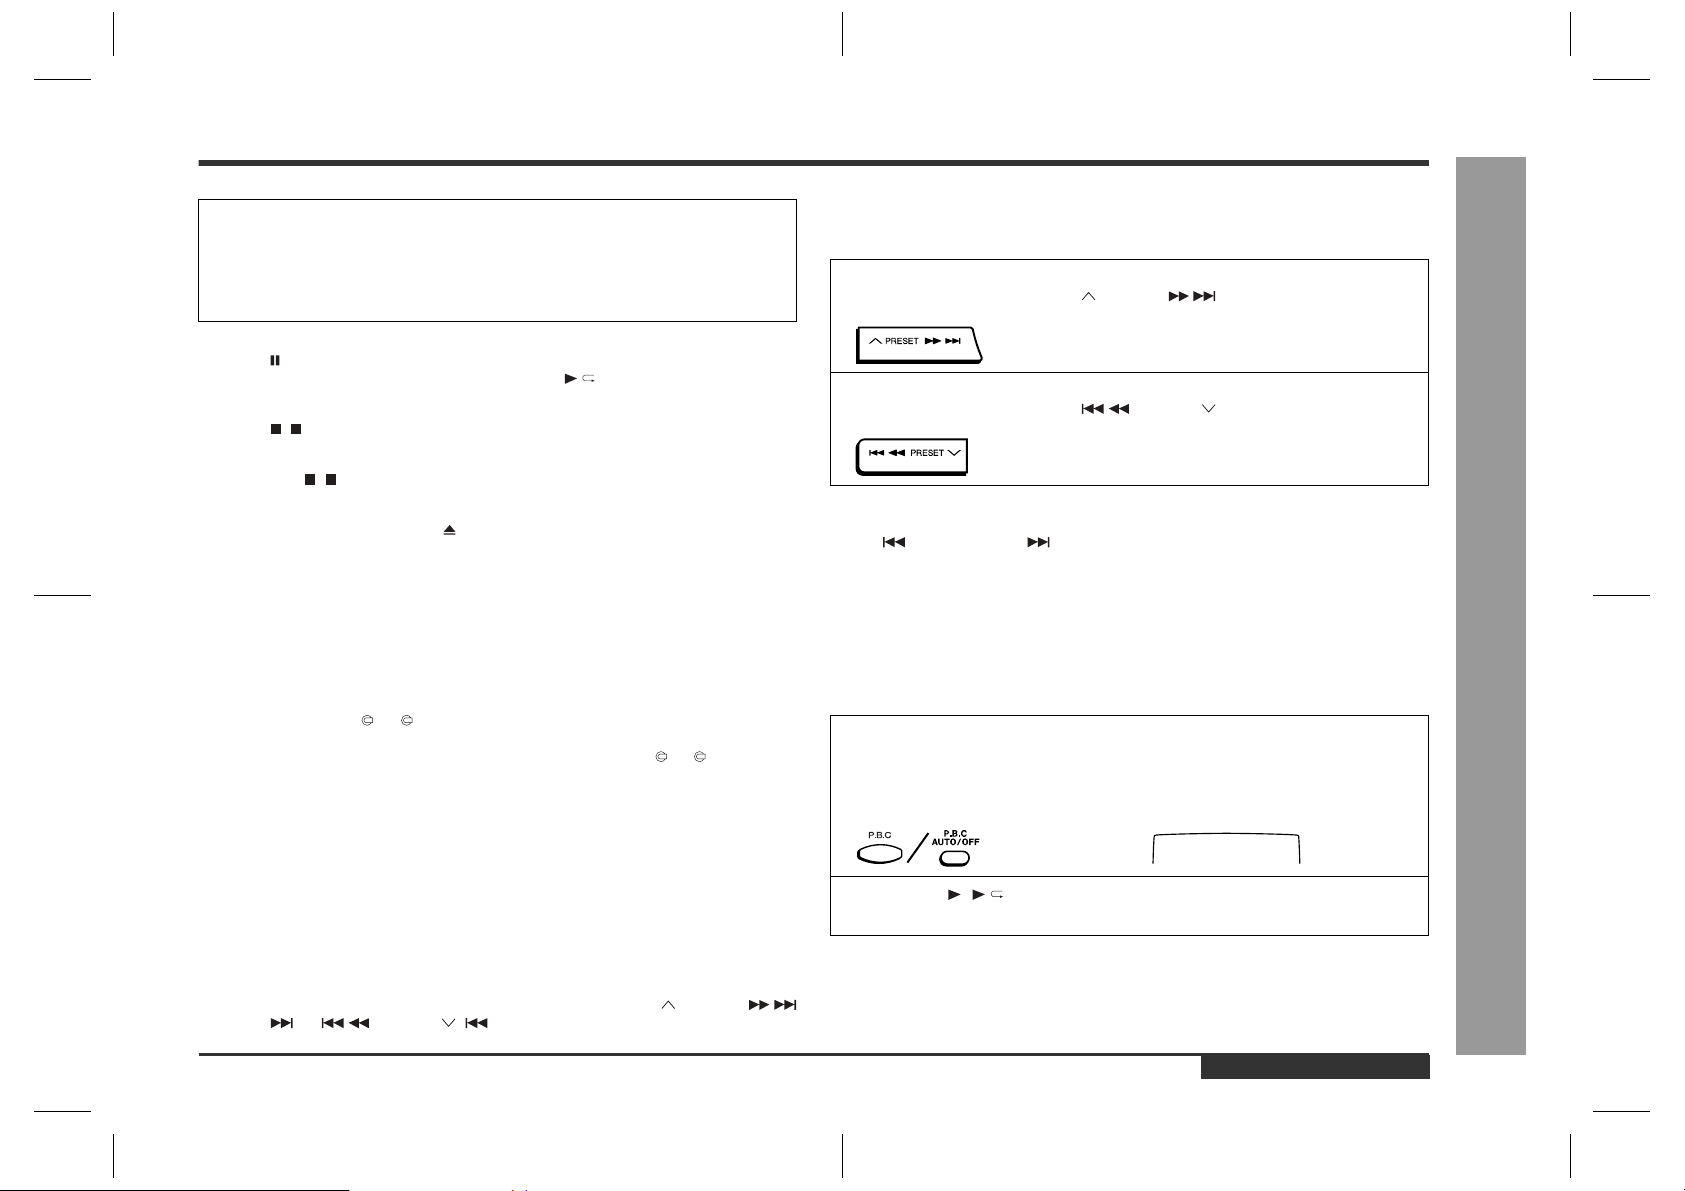
Whilst in the stop mode, press the PRESET button.
To return to the previous menu screen:
Whilst in the stop mode, press the PRESET button.
Notes:
z
This function may not work, depending on the disc.
z
The PREV. or NEXT button on the remote control allows you to locate the
desired portion.
To play without activating the playbac k
„
control function
You can play a video CD with P.B.C. without activating the playback control function.
In this case, the menu screen will not appear, and the disc will be played in the same
way as a video CD without P.B.C.
1
Whilst in the stop mode, press the P.B.C. (P.B.C. AUTO/OFF) button to cancel the P.B.C. mode.
The P.B.C. function cannot be cancelled whilst the menu screen is displayed.
<TV screen>
PBC OFF
2
Press the ( /SELECT/RESUME) button.
Playback will begin.
Notes:
z
The P.B.C. function can also be cancelled whilst in the playback mode.
z
Some video CDs with P.B.C. cannot be played back when the P.B.C. mode is off.
z
See pages 21 - 28 to perform various playback functions without activating the
P.B.C. function.
CD-BK280V
Video CD Playback
- Playback of a Video CD (CDs) with P. B. C. (Version 2.0) -
ENGLISH
E-20
CD-BK280V(X)E2.fm01/5/28
Page 22
Playback of a Video CD (CDs) without P. B. C. (Version 1.1)
4
Press the OPEN/CLOSE button to open the disc tray.
5
Place the video CD(s) on the disc tray, label side up.
When loading a third disc, press the DISC SKIP button to turn the
disc tray, then place the video CD in the open position.
z
Video CDs can be placed in any open position in the disc tray.
z
Be sure to place 8 cm (3") Video CD(s) in the middle of the disc positions.
6
Press the OPEN/CLOSE button to close the disc tray.
Video CD Playback
E-21
- Playback of a Video CD (CDs) without P. B. C. (Version 1.1) -
1
Turn on the TV and set the input selector to "VCR".
2
Press the ON/STAND-BY button to turn the power on.
3
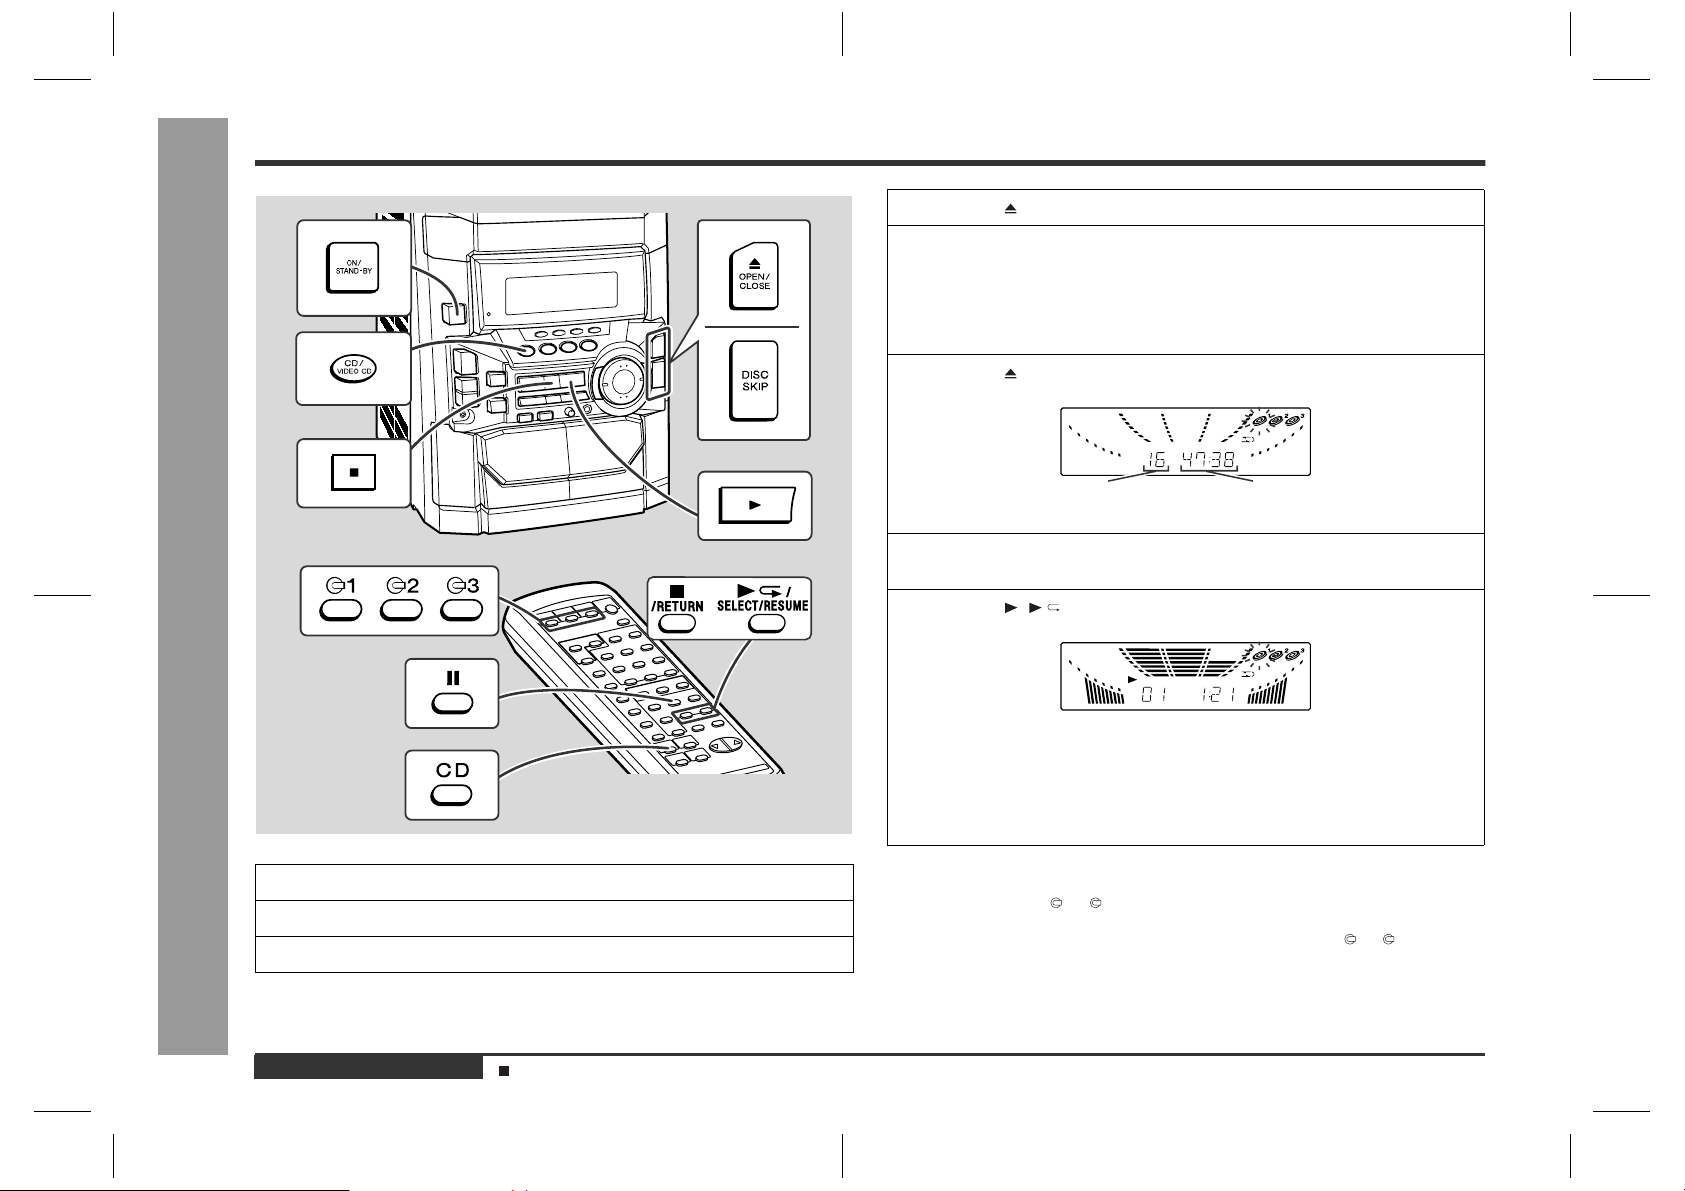
Press the CD/VIDEO CD (CD) button.
ENGLISH
Sound Control (See page 15.)
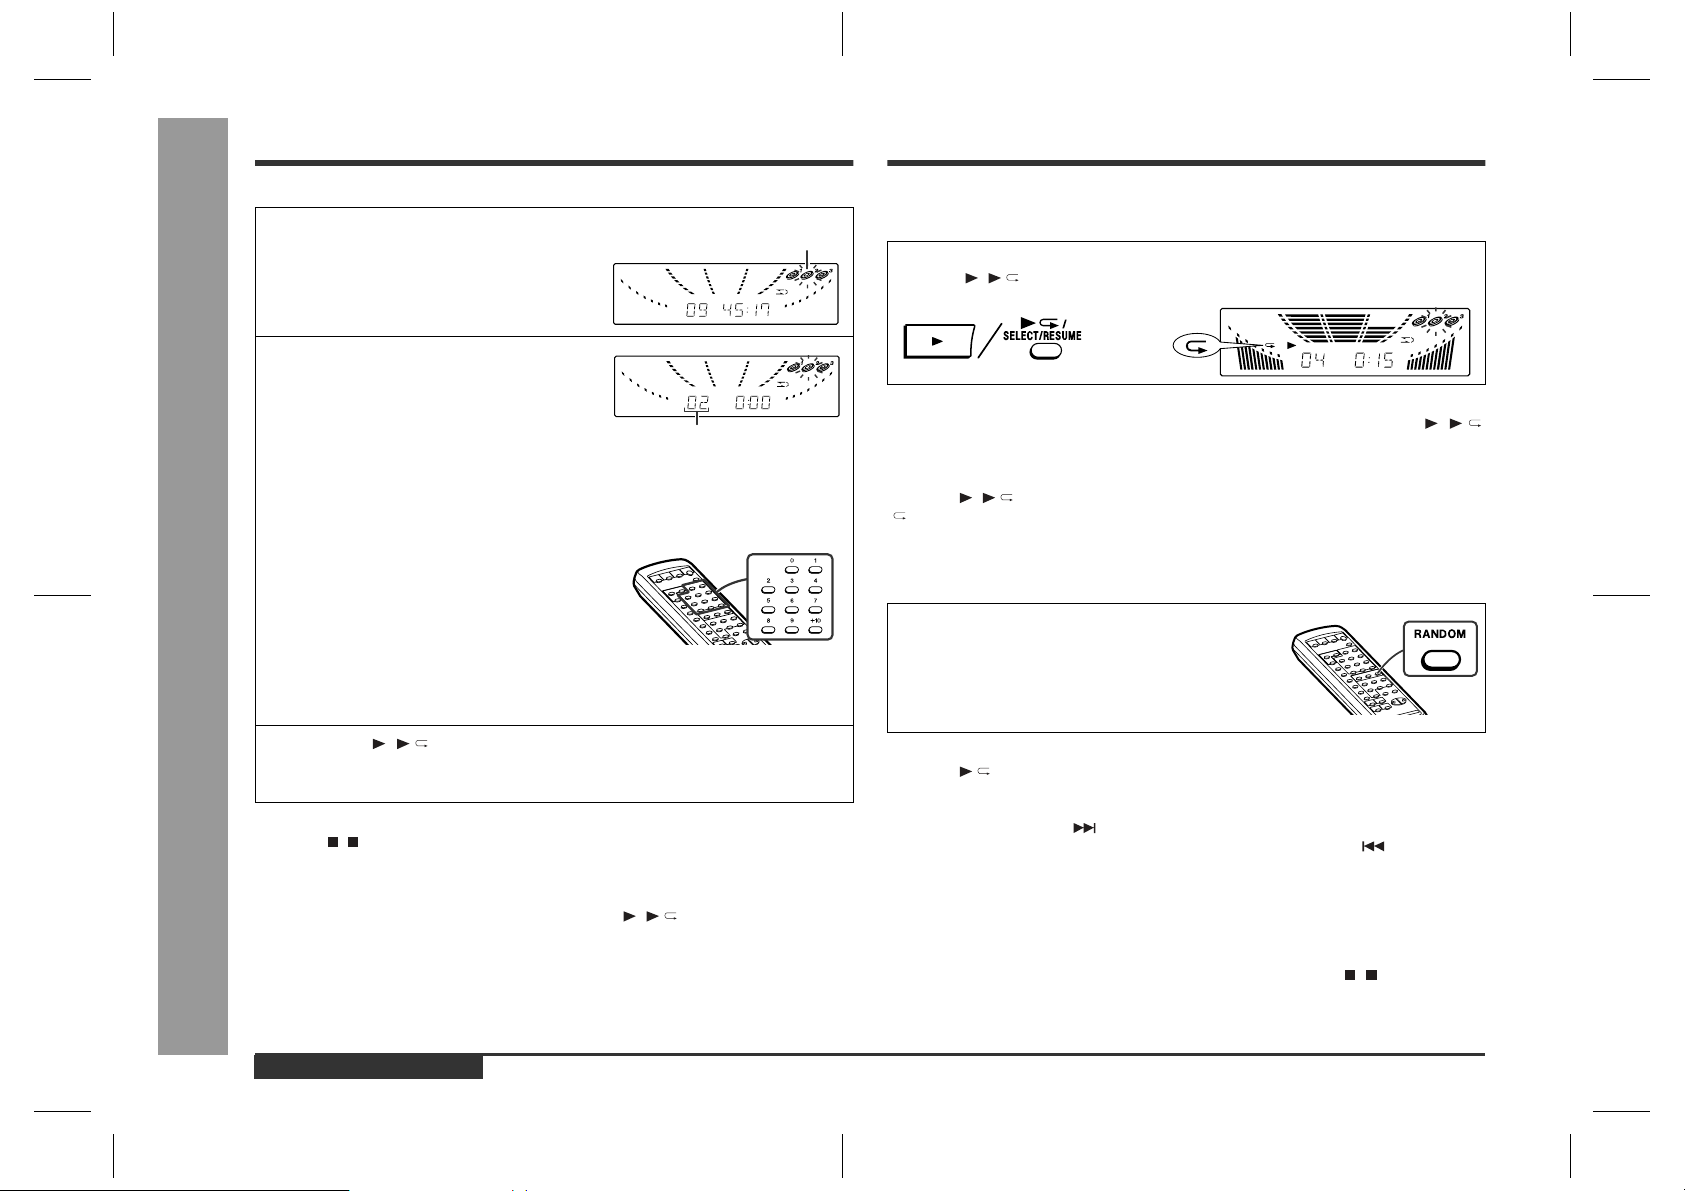
Total number of tracks on the
video CD whose number is flashing
7
To select the video CD you want to listen to first, press the DISC
SKIP button.
8
Press the ( /SELECT/RESUME) button to start playback.
z
Playback will begin from track 1 on the disc you have selected to play. After
that disc finishes playing, the next disc will automatically start playback.
z
When the last track on the third disc has finished playing, the unit will stop automatically.
z
When there is no video CD in one of the disc 1 - 3 positions, the next video
CD will be played.
Notes:
z
During playback, you can select another disc by pressing either of the DISC SKIP
button or one of the 1 - 3 buttons on the remote control.
z
Whilst the disc is being read ("TOC READ" is displayed), another disc cannot be
selected even if you press the DISC SKIP button or one of the 1 - 3 buttons on
the remote control.
Total playing time of the video CD
whose number is flashing
CD-BK280V(X)E3.fm01/5/28
Page 23
CD-BK280V
To interrupt playback:
Press the button on the remote control.
To resume playback from the same point, press the /SELECT/RESUME button.
To stop playback:
Press the ( /RETURN) button.
To remove the video CDs:
Whilst in the stop mode, press the OPEN/CLOSE button.
The disc tray will open. Remove the two discs. Then, press the DISC SKIP button to
rotate the disc tray and remove the remaining disc.
z
If the DISC SKIP button does not allow to rotate the disc tray (you cannot remove
the disc), close and open again the tray.
After use:
Press the ON/STAND-BY button to enter the power stand-by mode.
To skip to the beginning of a track (skip
„
search)
To move to the beginning of the next track:
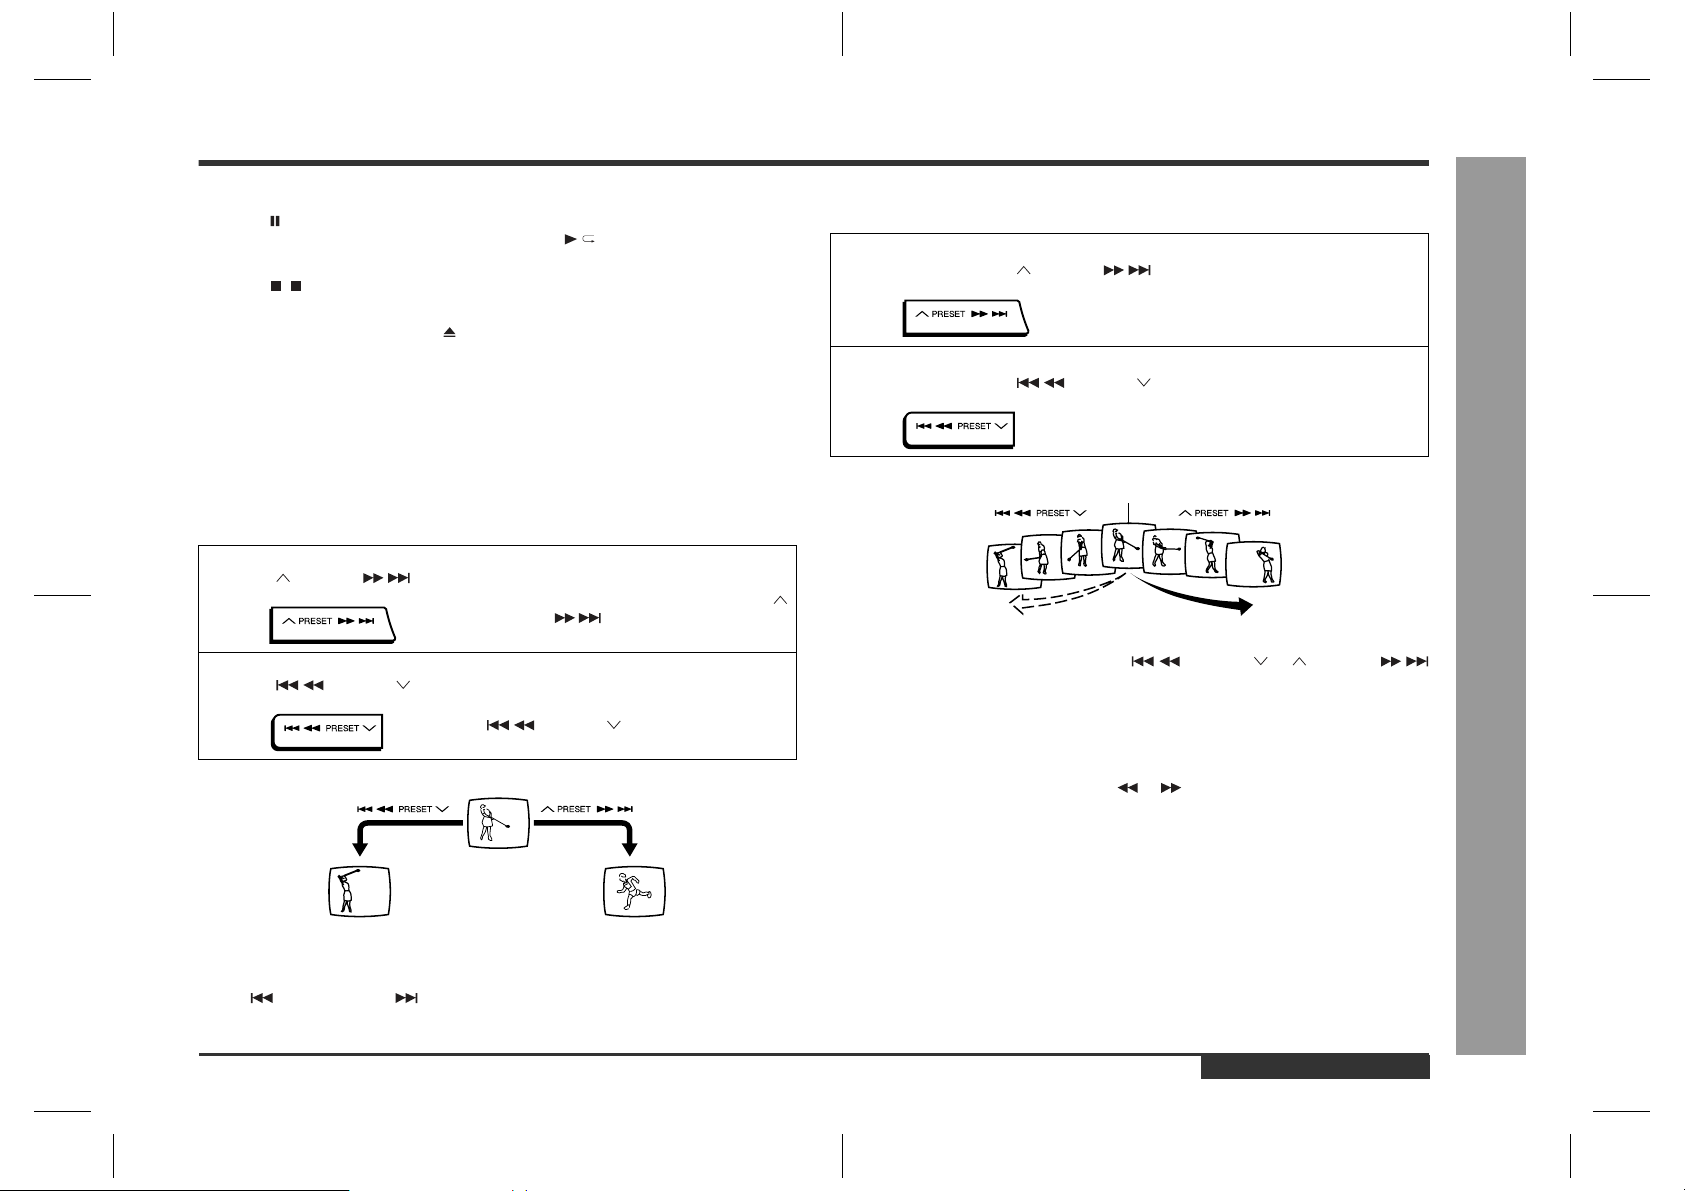
Press the PRESET button for less than 0.5 seconds during playback.
z
You can skip to any track by pressing the
PRESET button repeatedly until the
desired track number appears.
To restart the track being played:
Press the PRESET button for less than 0.5 seconds during playback.
z
You can skip to any track by pressing the
PRESET button repeatedly until
the desired track number appears.
[Example] When the current track is 9
Scan play
„
For fast forward:
Press and hold down the PRESET button during playback.
For fast reverse:
Press and hold down the PRE SE T button during playback.
Current scene
Notes:
z
Normal playback will resume when the PRESET or PRESET
button is released.
z
You can locate the desired portion on a single disc only.
z
During scan play, colours may fade, pictures may be distorted, or noise bars may
be seen.
z
Pictures are shown intermittently and no sound is heard during fast forward or fast
reverse on video CDs.
z
This can be operated by pressing the or button on the remote control.
Video CD Playback
Beginning of track 9 Beginning of track 10
Notes:
z
You can skip to the beginning of a track on a single disc only.
z
The PRE V. or NEXT button on the remote control allows you to locate the
beginning of a track.
- Playback of a Video CD (CDs) without P. B. C. (Version 1.1) -
ENGLISH
E-22
CD-BK280V(X)E3.fm01/5/28
Page 24
Direct Search System
Repeat or Random Play
Advanced Video CD (Version 1.1) Playback
By using the direct search buttons, the desired tracks can be played.
1
Whilst in the stop mode, press the
DISC SKIP button to select the de-
sired disc.
2
Use the direct search b uttons on the
remote control to select the desired
track.
Selected track number
z
The direct search buttons allow you to select up to number 10.
z
When selecting number 11 or more, use the "+10" button.
A. For example, to choose 13
1 Press the "+10" button once.
2 Press the "3" button.
B. For example, to choose 30
1 Press the "+10" button three times.
2 Press the "0" button.
3
Press the ( /SELECT/RESUME) button to start playback.
Playback of the selected track is started. When the end of last track of the disc
selected is reached, the next disc will be automatically started.
To stop playback:
- Direct Search System / Repeat or Random Play -
Press the ( /RETURN) button.
Notes:
z
The selected track can be started simply by pressing the direct search buttons
during playback. [It is not necessary to press the ( /SELECT/RESUME) button.]
z
A track number higher than the number of tracks on the disc cannot be selected.
z
During random play, direct search system is not possible.
Selected disc number
Repeat Play
„
All tracks on up to 3 discs, or a programmed sequence can be continuously repeated.
To repeat all tracks on up to 3 discs:
Press the ( /SELECT/RESUME) button twice.
To repeat a desired track:
Perform steps 1 - 5 in the "Programmed Play" section and then press the ( /
SELECT/RESUME) button twice.
To cancel repeat play:
Press the ( /SELECT/RESUME) button again.
" " will go out.
Random Play
„
The tracks on the disc(s) can be played in random order automatically.
Press the RANDOM button on the remote
control to begin random play.
To cancel random play:
Press the /SE L ECT /R ESUME button.
Notes:
z
If you press the NEXT button during random play, you can move to the track
selected next by the random operation. On the other hand, the PREV. button
does not allow you to move to the previous track. The beginning of the track being
played will be located.
z
In random play, the unit will select and play tracks automatically. (Y ou cannot select
the order of the tracks.)
Caution:
z
After performing repeat or random play, be sure to press the ( /RETURN) button. Otherwise, the disc(s) will play continuously.
z
During P.B.C. play, repeat or random play is not possible.
E-23
ENGLISH
CD-BK280V(X)E3.fm01/5/28
Page 25
Programmed Play
CD-BK280V
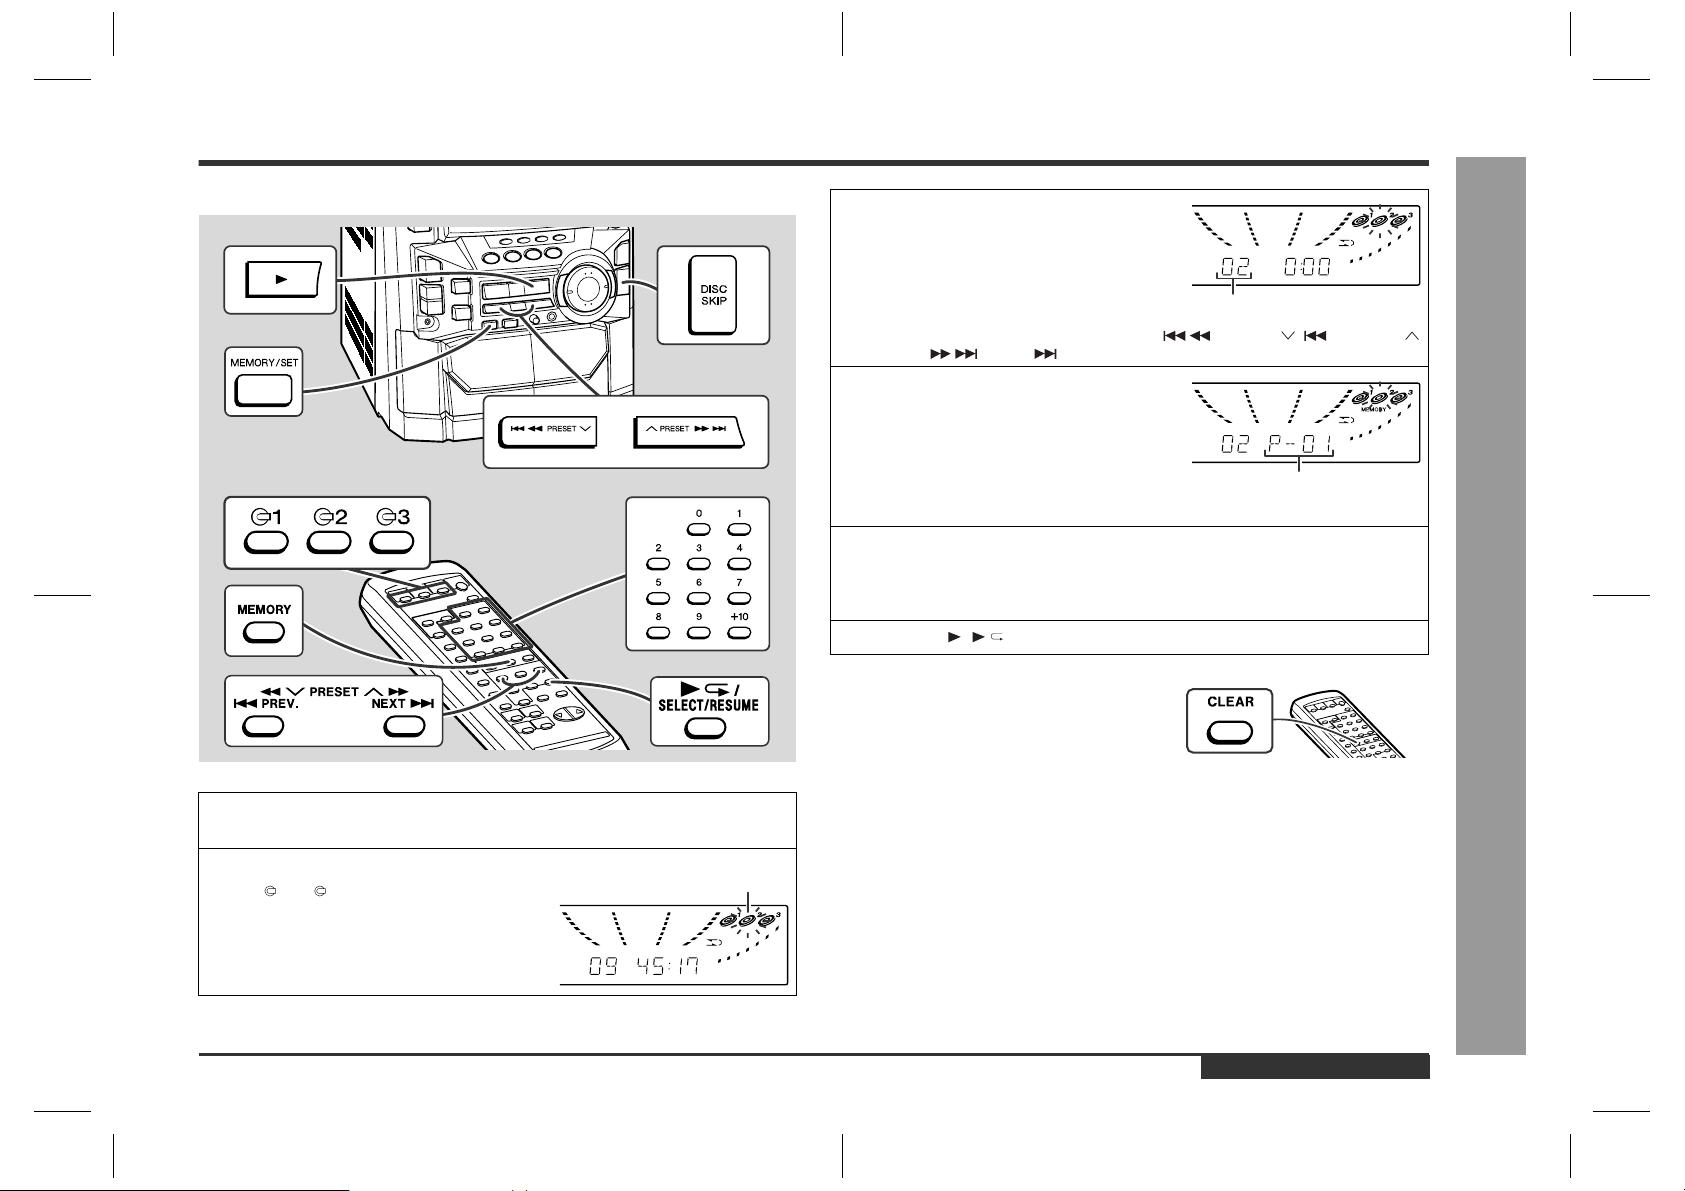
You can choose up to 32 selections for playback in the order you like.
1
Press the DISC SKIP button 3 times for the unit to read the information of each disc to programme them.
2
Whilst in the stop mode, press one of
the 1 - 3 buttons on the remote
control to select the desired disc.
Selected disc number
3
Press the direct search buttons on
the remote control to select the de-
sired track.
Selected track number
You can also select a track by pressing the PRESET ( PREV.) or
PRESET (NEXT ) button.
4
Press the MEMORY/SET (MEMORY)
button to save the track number.
Playback order
When the track is memorised, "MEMORY" will appear.
5
Repeat steps 2 - 4 for other tracks. Up to 32 tracks can be programmed.
If you make a mistake, the programmed tracks can be cleared by pressing the
CLEAR button.
6
Press the ( /SELECT/RESUME) button to start playback.
To clear the programmed selections:
Press the CLEAR button on the remote control
whilst the "MEMORY" indicator is lit.
Each time the button is pressed, one track will
be cleared, beginning with the last track programmed. When all the tracks are cleared,
"MEMORY" will disappear.
Adding tracks to the programme:
If a programme has been previously stored, the "MEMORY" indicator will be displayed. Then follow steps 2 - 4 to add tracks. The new tracks will be stored after the
last track of the original programme.
Notes:
z
Opening the disc tray automatically cancels the programmed sequence.
z
Even if you press the ON/STAND-BY button to enter the stand-by mode or the
function is changed from CD/VIDEO CD (CD) to another, the programmed selections will not be cleared.
z
During programme operation, random play is not possible.
z
The programme function will not work in the P.B.C. mode. Whilst the programme
function is active, the P.B.C. function will be cancelled automatically.
- Programmed Play -
Advanced Video CD (Version 1.1) Playback
ENGLISH
E-24
CD-BK280V(X)E3.fm01/5/28
Page 26
Digest Selection of Discs and Tracks
1
8
7
2
9
6
3
4
5
1015111412
13
<TV screen>
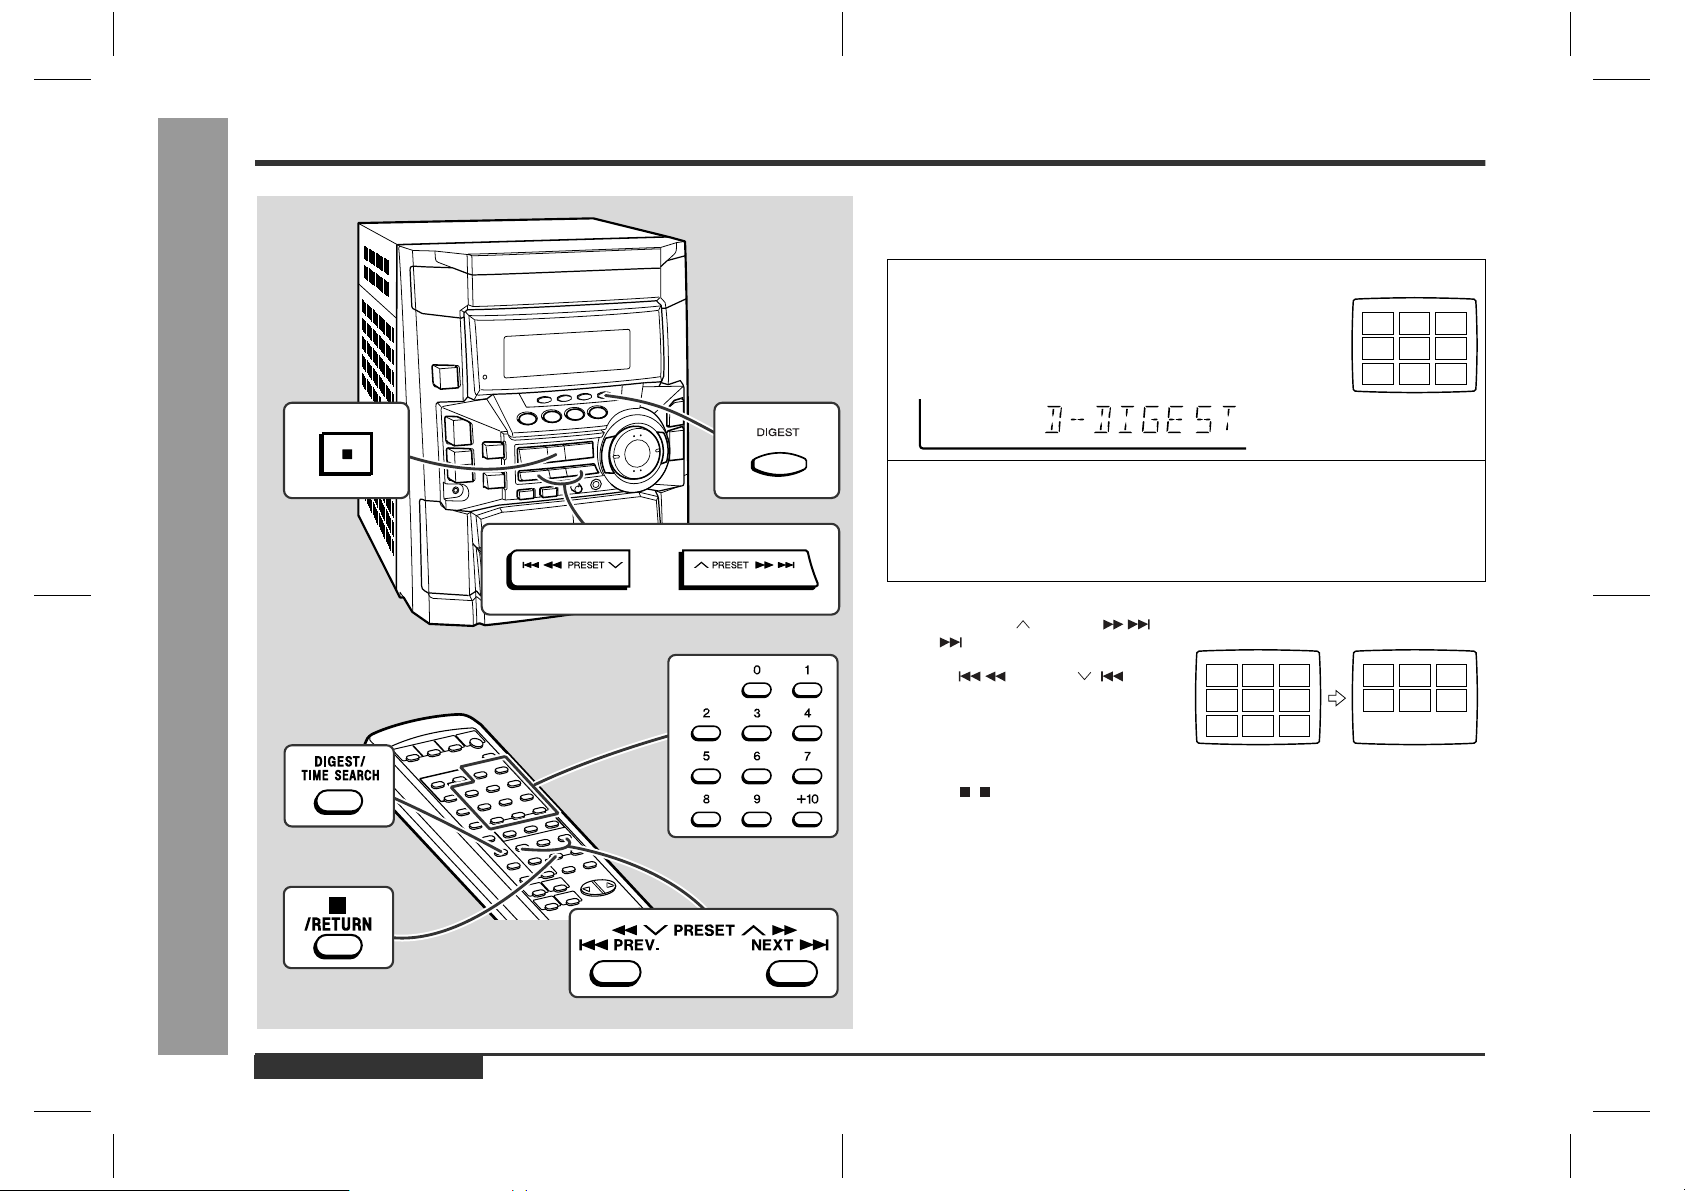
Disc digest selection
„
You can play back a desired track by selecting one from the 9 displayed tracks on the
screen.
1
Whilst in the stop mode, press the DIGEST (DIGEST/TIME SEARCH) button.
z
Up to 9 tracks will be displayed on the screen.
z
Each time a track is displayed, you can hear the first several seconds of the track.
2
Press the direct search buttons on the remote control to s elect the
desired track.
z
Playback will be started from the selected track.
z
When the last track on the third disc has finished playing, the unit will stop automatically.
When there are more than 9 tracks on the video CD:
Each press of the PRESET
(NEXT ) button will display the next 9
tracks.
Press the PRESET ( PREV.)
button to return to the previous display.
<TV screen>
1
2
8
9
7
6
3
4
5
- Digest Selection of Discs and Tracks -
To cancel the disc digest:
Press the ( /RETURN) button.
Notes:
z
The disc digest function is available only in the stop mode.
z
This function is not available with an audio CD.
Advanced Video CD (Version 1.1) Playback
E-25
ENGLISH
CD-BK280V(X)E3.fm01/5/28
Page 27
Time Search Selection
CD-BK280V
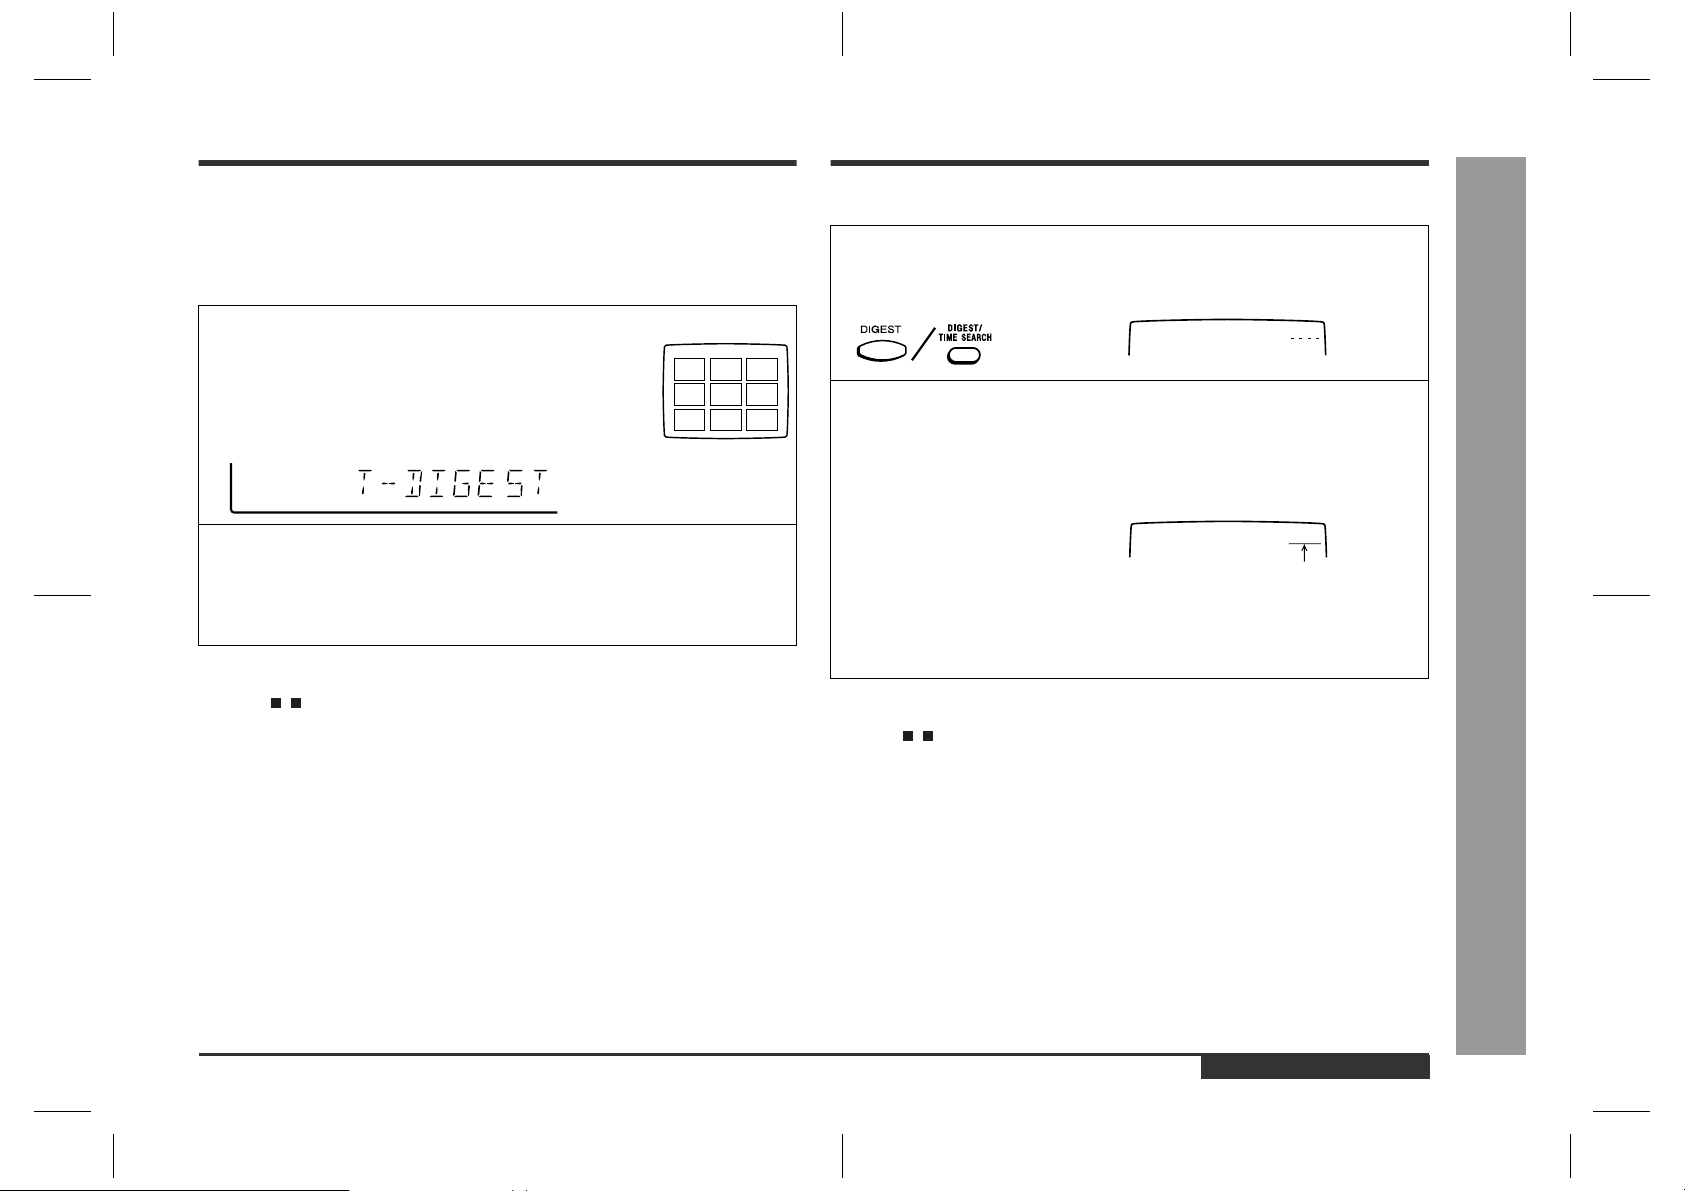
Track digest selection
„
Each track is divided into 9 sections.
You can look at the sections and select the scene you want to start watching from.
This function is convenient when you want to start from the middle of an undivided
track, for example, a movie.
1
During playback, press the DIGEST (DIGEST/
TIME SEARCH) button.
z
The track being played back will be divided into 9 sections and playback will be paused.
z
Each time a divided section is displayed, you can hear
the first several seconds of the section.
2
Press the direct search buttons on the remote control to s elect the
<TV screen>
1
2
8
9
7
6
3
4
5
scene you want to watch.
z
Playback will be started from the selected scene.
z
When the last track on the third disc has finished playing, the unit will stop automatically.
To cancel the track digest operation:
Press the ( /RETURN) button.
Notes:
z
The track digest function works only during playback.
z
This operation is not accepted by a short time track (less than one minute), still
pictures (menu display, photo, etc.) and audio CDs.
z
One track is divided into nine frames of equal playing time.
Caution:
Digest function of discs and tracks will not work during P.B.C. and programme play.
Cancel the P.B.C. mode before using this function on a video CD with P.B.C.
You can play back from the desired scene by specifying the time.
1
Whilst in the playback mod e, hold down the DIGEST (DIGEST/TIM E
SEARCH) button to enter the time search mode.
<TV screen>
GO TO
2
Use the direct search buttons on th e r em ote c ontrol to sp eci fy the
:
time.
[For example, to select 2 minutes and 30 seconds.]
Press "0", "2", "3", "0" successively.
<TV screen>
GO TO
z
The point of specified time will be located on the track being played and playback will resume from that point.
z
When the last track on the third disc has finished playing, the unit will stop automatically.
02:30
Selected time
To cancel the time search operation:
Press the ( /RETURN) button.
Notes:
z
Time search mode will be cancelled automatically if the desired time is not entered
within 10 seconds.
z
The time search function will not work during P.B.C. and programme play. Cancel
the P.B.C. mode before using this function on a video CD with P.B.C.
z
This operation is not accepted by still pictures (menu display, photo, etc.).
- Digest Selection of Discs and Tracks / Time Search Selection -
Advanced Video CD (Version 1.1) Playback
ENGLISH
CD-BK280V(X)E3.fm01/5/28
E-26
Page 28
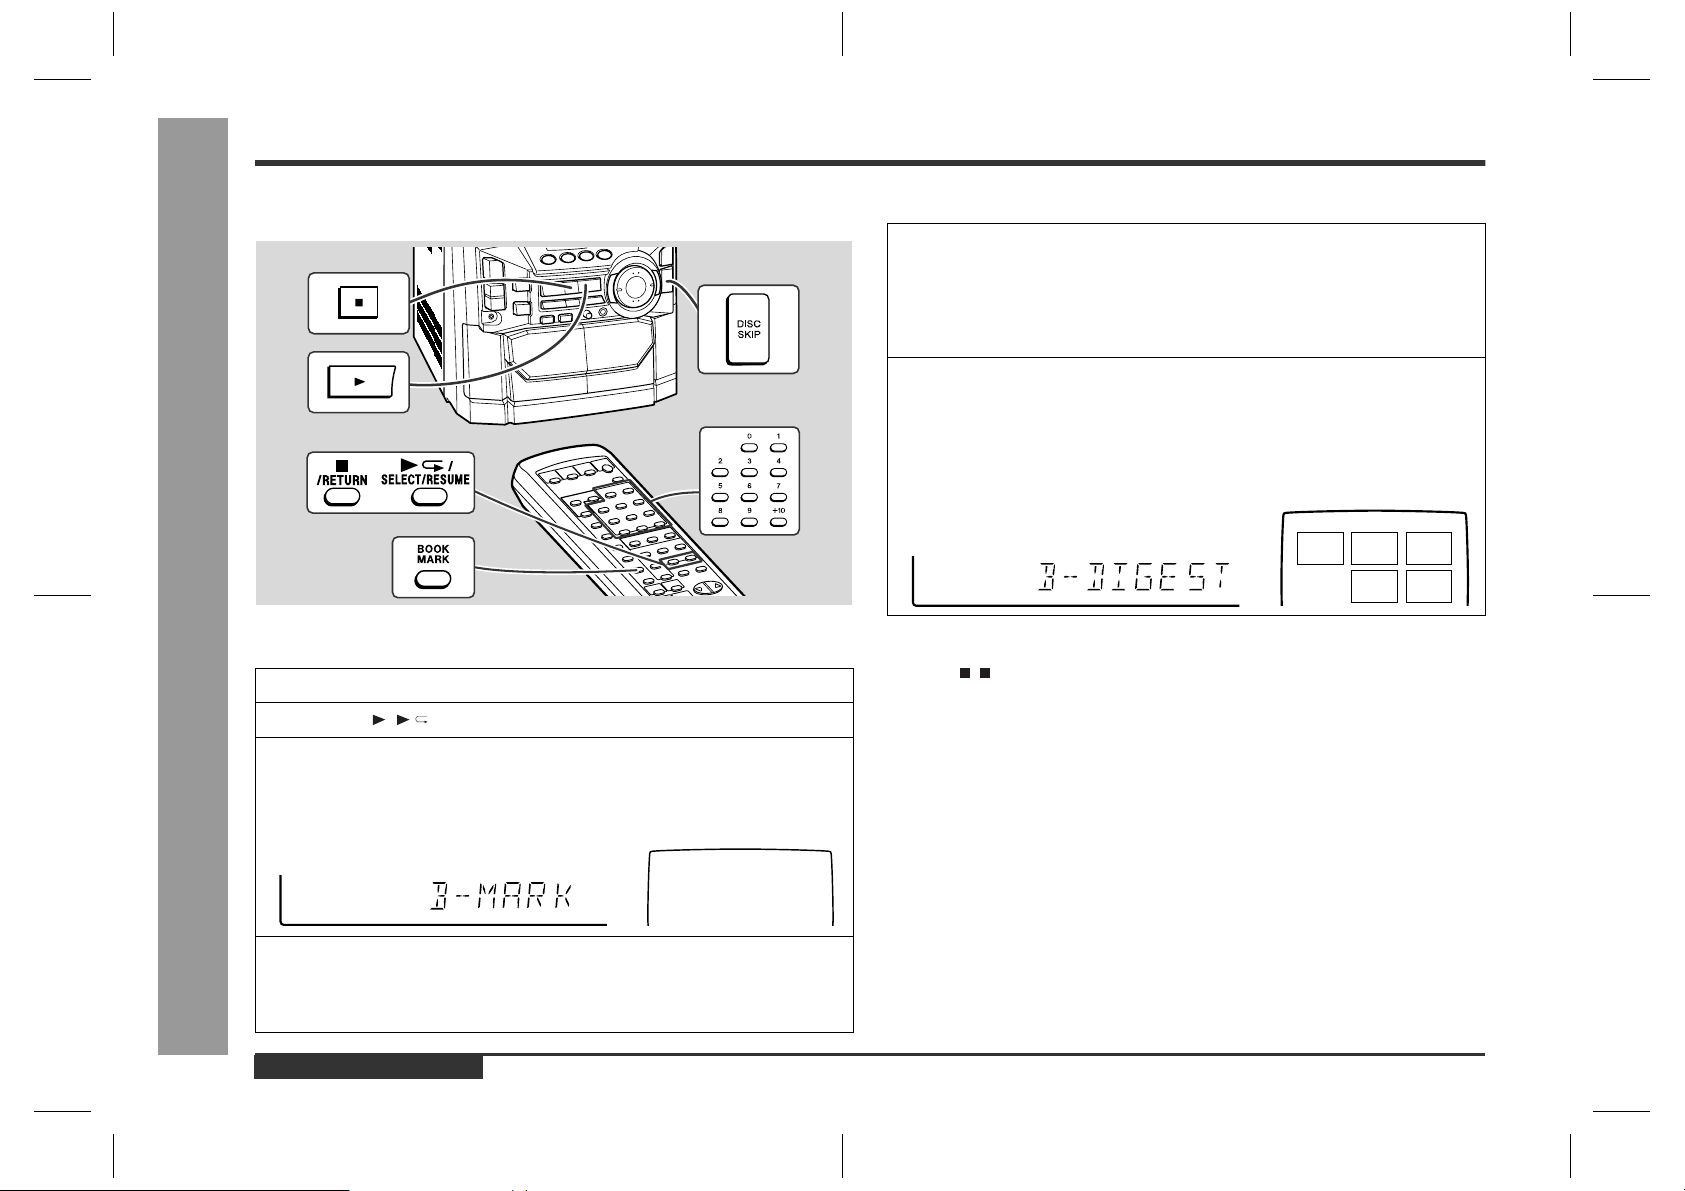
Bookmark Function
This function marks the desired scene on the video CD to play it back easily. (Up to 9
scenes per disc can be marked.)
To create a bookmark
„
1
Press the DISC SKIP button to select the desired disc.
- Bookmark Function -
2
Press the ( /SELECT/RESUME) button.
3
Press the BOOKMARK button on the remote control when the desired scene is displayed.
"B-M" will appear on the TV screen for a few seconds.
<TV screen>
B-M
To recall a bookmarked scene
„
1
Whilst in the stop or playback mode, hold down the BOOKMARK
button on the remote control for more than 1 second.
"BOOKMARK DIGEST" will appear before the marked scenes and numbers are
displayed on the TV screen. Each time a bookmarked scene is displayed, you
can hear the first several seconds of the scene. After displaying every scene, this
unit will enter the pause mode automatically.
2
Press the direct search buttons on the remote control to s elect the
scene you want to play back.
z
Playback will begin from the selected scene.
z
When the third disc has finished, the unit will stop automatically.
<TV screen>
1 2
To cancel the bookmark function:
Press the ( /RETURN) button.
Notes:
z
This function works only with video CDs.
z
Even if the unit is set to the stand-by mode or the function is changed from CD/
VIDEO CD (CD) to some other function, the marks will not be erased.
z
Opening the disc tray automatically erases the marks.
z
Marks created on one of the discs 1 - 3 will be erased when creating marks on
other discs.
z
The bookmark function will not work during P.B.C. and programme play. Cancel
the P.B.C. mode before using this function on a video CD with P.B.C.
z
This function is invalid with still pictures (menu display, photo, etc.) and audio CD.
z
Every marked scene will be erased automatically when the programme is mem orised.
3
5
4
Advanced Video CD (Version 1.1) Playback
E-27
4
Repeat step 3.
z
Up to 9 scenes can be marked.
z
If more than 9 bookmarks are created, bookmarks will be erased in the order
they were created.
ENGLISH
CD-BK280V(X)E3.fm01/5/28
Page 29
Resume Play
Changing the TV Screen Dis-
CD-BK280V
This function is to restart playback from the point where it has stopped.
During the stop mode, hold down the ( /SELECT/RESUME) button for more than 1 second.
Playback will begin at the point where playback has stopped.
Notes:
z
Resume play cannot be activated when the function is changed from CD/VIDEO
CD (CD) to another or the unit is set to the power stand-by mode.
z
Resume play cannot be performed in the P.B.C. mode.
z
Resume play cannot be performed whilst opening the disc tray or after changing
the disc.
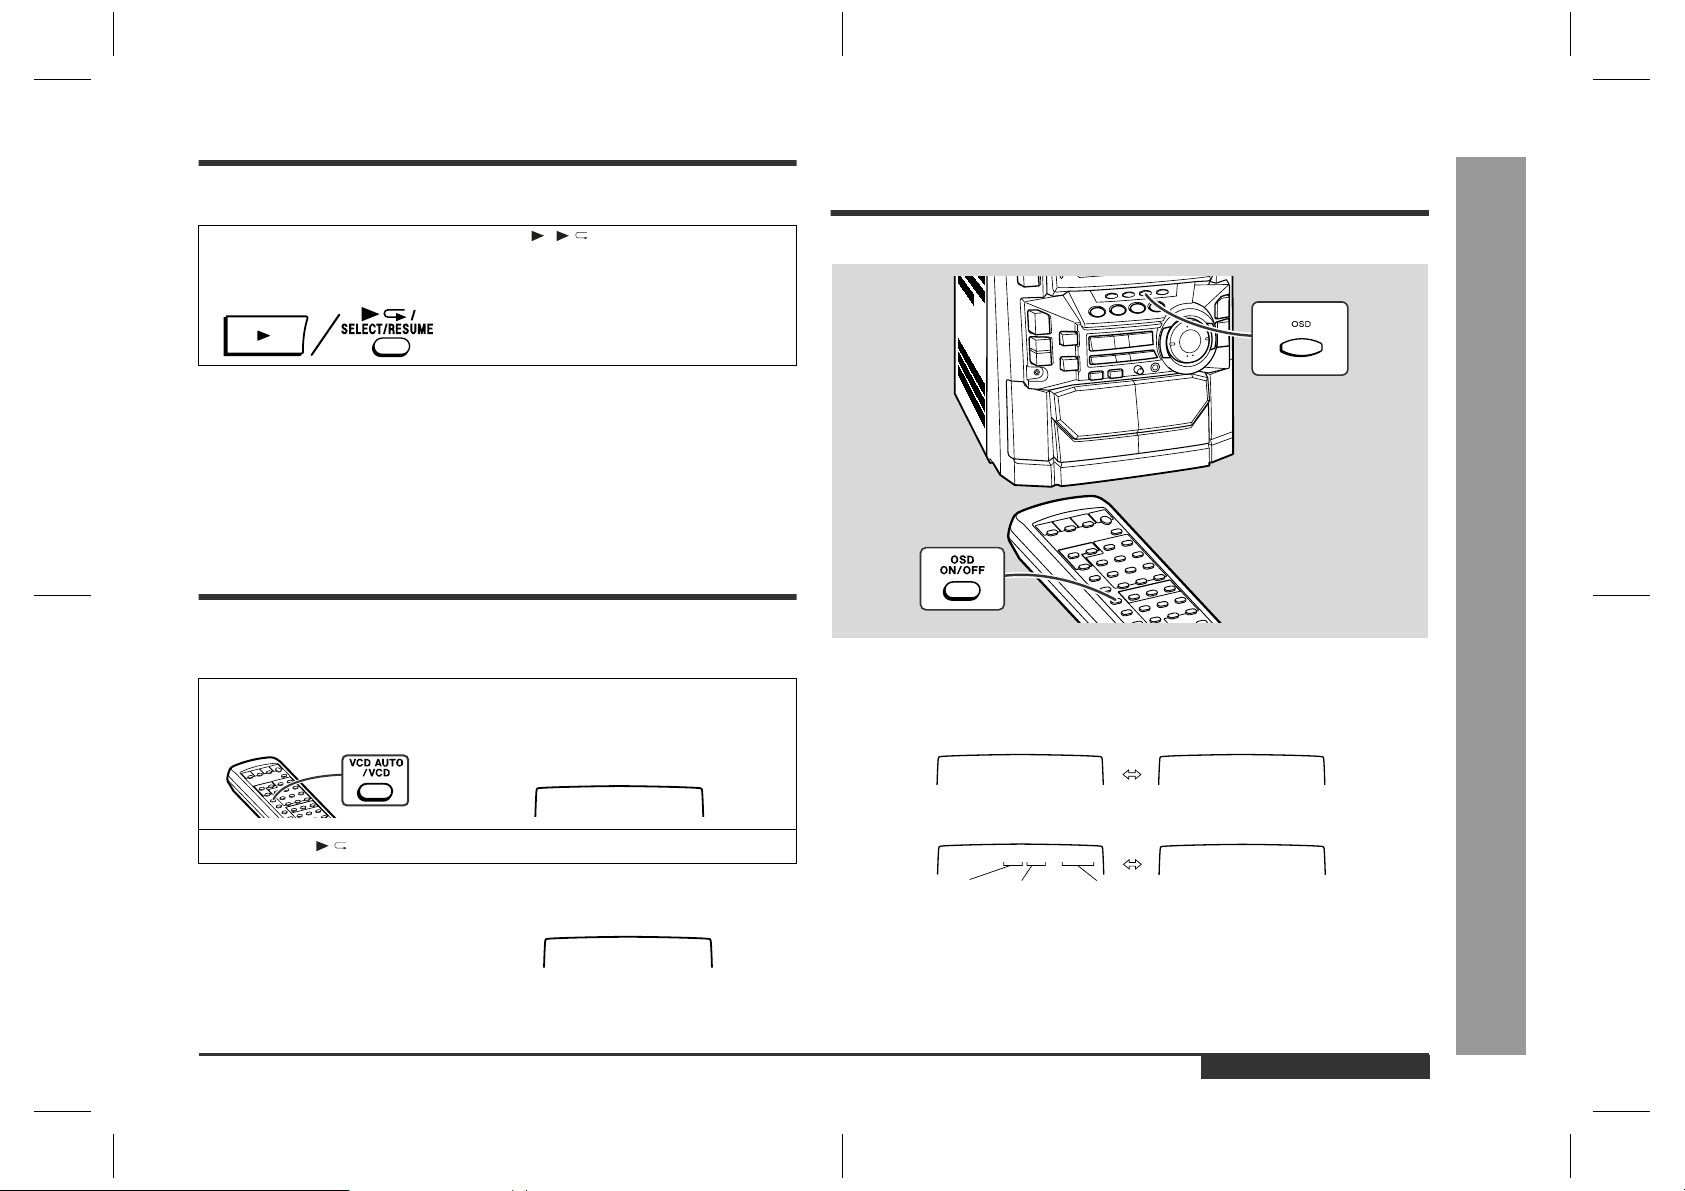
To Play Back the Video CD
Manually
Usually this unit detects the video CD and plays back pictures and sounds. In case
this unit fails to judge it correctly, you can play back the video CD manually.
1
Press the VCD AUTO/VCD button until "VCD ON" appears on the
TV screen.
<TV screen>
VCD ON
2
Press the /SELECT/RESUME button.
To return to the mode detecting the video CD automatically:
Press the VCD AUTO/VCD button until "VCD
AUTO" appears on the TV screen.
Notes:
z
This setting will be cancelled when you change the discs.
z
Whilst in the "VCD ON" state, you cannot play back audio CDs.
<TV screen>
VCD AUTO
play
You can check the operation of the main unit by the on-screen display.
Each time the OSD (OSD ON/OFF) button is pressed during playback
or in the stop mode, the display will change as follows:
[During stop mode]
00:00
[During playback]
01:26
002/010
Track
Total
number
number of
tracks
Note:
The displays may differ depending on the discs.
Elapsed time
No display
No display
Advanced Video CD (Version 1.1) Playback
- Resume Play / To Play Back the Video CD Manually / Changing the TV Screen Display -
ENGLISH
E-28
CD-BK280V(X)E3.fm01/5/28
Page 30
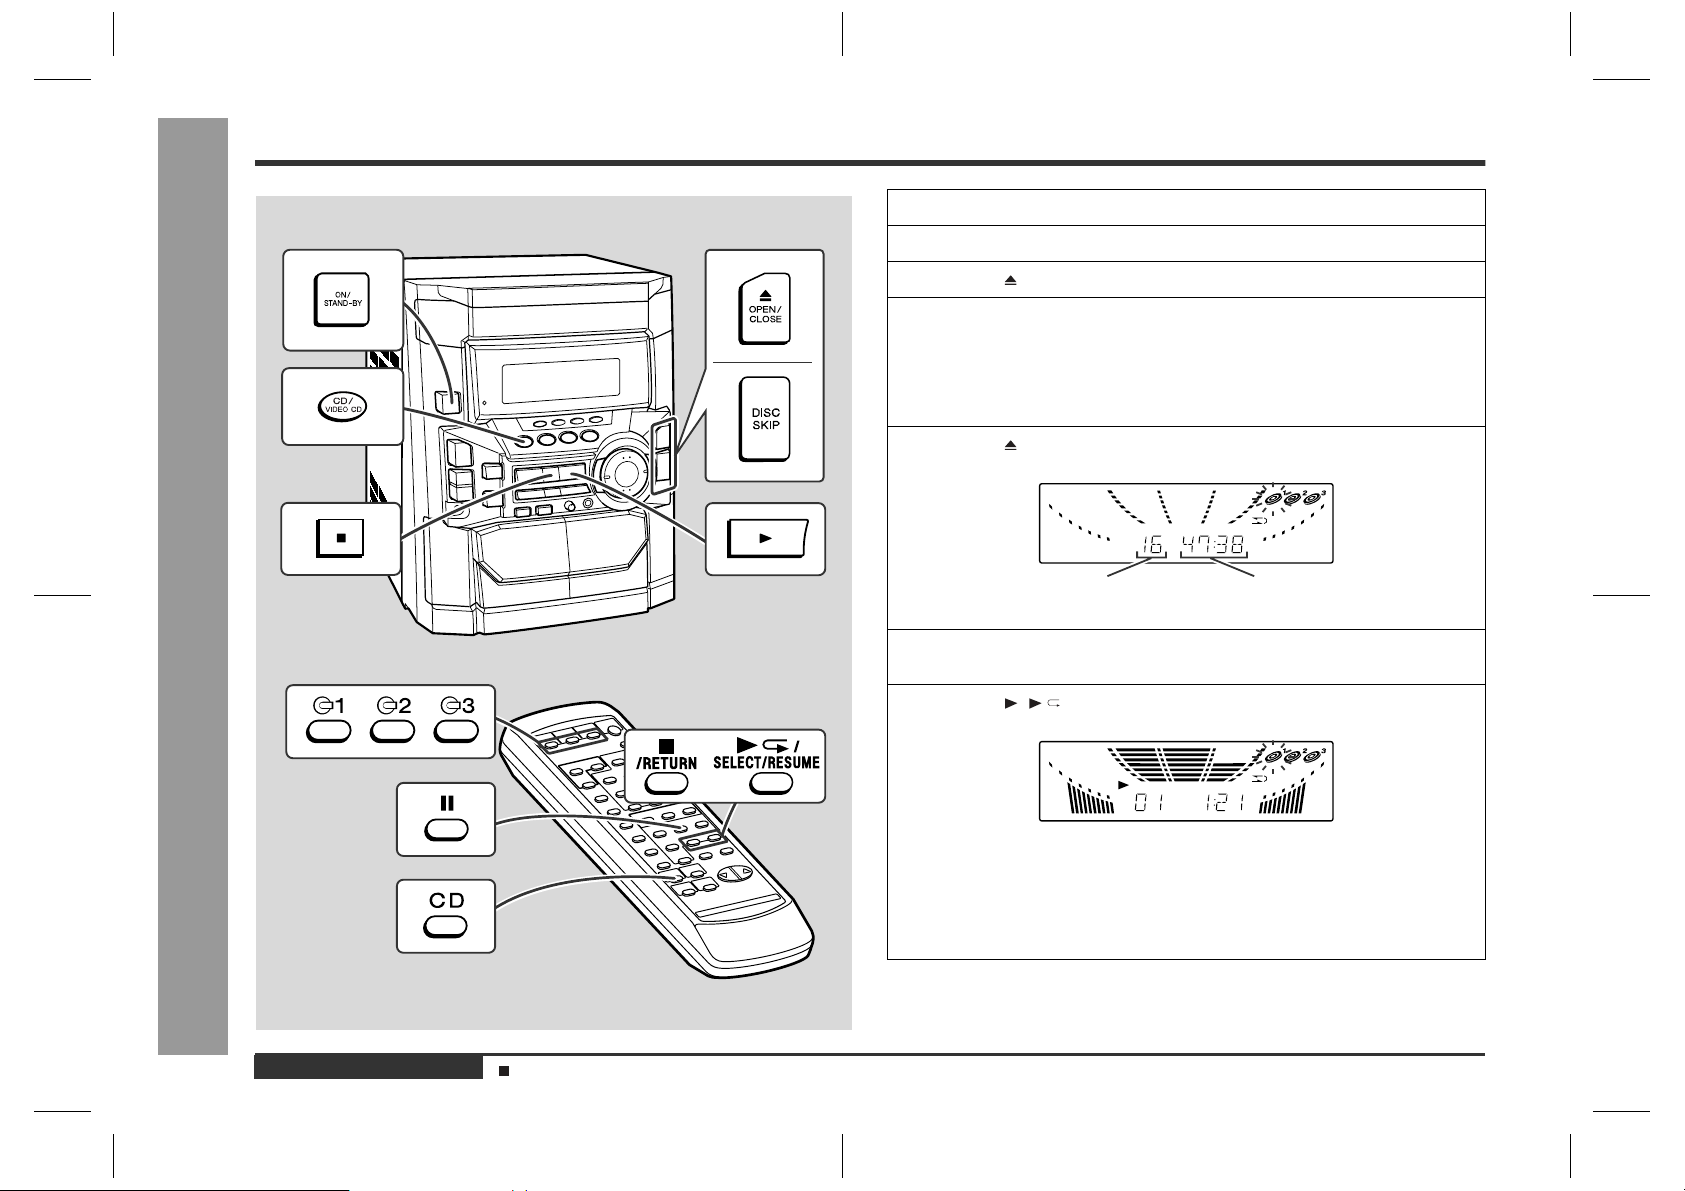
Listening to a CD (CDs)
1
Press the ON/STAND-BY button to turn the power on.
2
Press the CD/VIDEO CD (CD) button.
3
Press the OPEN/CLOSE button to open the disc tray.
4
Place the CD(s) on the disc tray, label side up.
When loading a third disc, press the DISC SKIP button to turn the
disc tray, then place the CD in the open position.
z
CDs can be placed on any open position on the disc tray.
z
Be sure to place 8 cm (3") CD(s) in the middle of the disc positions.
5
Press the OPEN/CLOSE button to close the disc tray.
CD Playback
E-29
Total number of tracks on the
CD whose number is flashing
6
To select the CD you want to listen to first, press the DISC SKIP
button.
7
Press the ( /SELECT/RESUME) button to start playback.
Total playing time of the CD whose
number is flashing
- Listening to a CD (CDs) -
z
Playback will begin from track 1 on the disc you have selected to play. After
that disc finishes playing, the next disc will automatically start playback.
z
When the last track on the third disc has finished playing, the CD player will
stop automatically.
z
When there is no CD in one of the disc 1 - 3 positions, that position will be
skipped and the next CD will be played.
ENGLISH
Sound Control (See page 15.)
CD-BK280V(X)E3.fm01/5/28
Page 31

CD-BK280V
To interrupt playback:
Press the button on the remote control.
To resume playback from the same point, press the /SELECT/RESUME button.
To stop playback:
Press the ( /RETURN) button.
To remove the CDs:
Whilst in the stop mode, press the OPEN/CLOSE button.
The disc tray will open. Remove the two discs. Then, press the DISC SKIP button to
rotate the disc tray and remove the remaining disc.
z
If the DISC SKIP button does not allow to rotate the disc tray (you cannot remove
the disc), close and open again the tray.
After use:
Press the ON/STAND-BY button to enter the power stand-by mode.
The following playback functions are the same as video CD operations.
Direct Search System . . . . . . . . . . . . . . . . . . . . . . . . . . . . . . . . . . . . . . . . . . . . . .23
Repeat or Random Play . . . . . . . . . . . . . . . . . . . . . . . . . . . . . . . . . . . . . . . . . . . . .23
Programmed Play . . . . . . . . . . . . . . . . . . . . . . . . . . . . . . . . . . . . . . . . . . . . . . . . .24
Page
Notes:
z
Whilst in the "VCD ON" state, you cannot play back audio CDs.
z
During playback, you can select another disc by pressing either of the DISC SKIP
button or one of the 1 - 3 buttons on the remote control.
z
Whilst the disc is being read ("TOC READ" is displayed), another disc cannot be
selected even if y ou press the DISC SKIP button or one of the 1 - 3 buttons on
the remote control.
To locate the beginning of a track
„
To move to the beginning of the next track:
Press the PRESET button for less than 0.5 seconds during playback.
z
You can skip to any track by pressing the
PRESET button repeatedly until the
desired track number appears.
To restart the track being played:
Press the PRESET button for less than 0.5 seconds during playback.
z
You can skip to any track by pressing the
PRESET button repeatedly until
the desired track number appears.
Notes:
z
You can locate the beginning of a track on a single disc only.
z
The PREV. or NEXT button on the remote control allows you to locate the
beginning of a track.
To locate the desired portion
„
For fast forward:
Press and hold down the PRESET button during playback.
For fast reverse:
Press and hold down the PRE SE T button during playback.
CD Playback
- Listening to a CD (CDs) -
Caution:
z
Do not place two CDs in one disc tray.
z
Do not push the disc tray whilst it is moving.
z
Do not turn the disc tray by hand. This may cause malfunctions.
z
If the power fails whilst the tray is open, wait until the power is restored.
z
If the disc tray is stopped forcib l y, "ER-CD10" will appear in the display and the unit
will not function. If this occurs, press the ON/STAND-BY button to enter the power
stand-by mode and then turn the power on again.
z
If TV or radio interference occurs during CD operation, move the unit away from
the TV or radio.
z
If a disc is damaged, dirty, or loaded upside down, the disc will be skipped.
Notes:
z
Normal playback will resume when the PRESET or PRESET
button is released.
z
The or button on the remote control allows you to locate the desired portion.
ENGLISH
CD-BK280V(X)E3.fm01/5/28
E-30
Page 32

Listening to MP3 Disc
- Listening to MP3 Disc -
Playback of MP3 Encoded CD
MP3 is a form of compression. It is an acronym which stands for Mpeg 1 Audio Layer
3. MPEG layer 3 is a type of audio code which is processed by significant compression (up to 12 : 1) from the original audio source with very little loss in sound quality.
Normal play
„
Refer to "Listening to a CD (CDs)" (29 - 30 pages).
To change the display
„
Whilst in the stop mode or playback mode, press the MP3 DISPLAY button.
Each time the button is pressed, the display will change as follows.
[When in the stop mode]
Total number of tracks Folder name
Track name
[When in the playback mode]
Track
number
Elapsed playback time
Track name
Folder name
Selecting and listening to the desired track
„
1
Whilst in the stop mode, press the DISC
SKIP button on the main unit to select
the desired disc.
2
Press the MP3 DISPLAY button to display the folder name.
3
Select the desired folder by pressing the PREV. or NEXT button.
4
Press the MP3 DISPLAY button to display the track name.
5
Select the desired track by pressing the PREV. or NEXT button.
The direct search buttons also allow you to select the track.
6
Press the /SELECT/RESUME button
to begin playback.
To stop playback:
Press the /RETURN button.
The following playback functions are the same as video CD or CD
operations.
To locate the beginning of a track . . . . . . . . . . . . . . . . . . . . . . . . . . . . . . . . . . . . 30
To locate the desired portion . . . . . . . . . . . . . . . . . . . . . . . . . . . . . . . . . . . . . . . . 30
Repeat or Random Play . . . . . . . . . . . . . . . . . . . . . . . . . . . . . . . . . . . . . . . . . . . . 23
Programmed Play . . . . . . . . . . . . . . . . . . . . . . . . . . . . . . . . . . . . . . . . . . . . . . . . . 24
Caution:
If you change the folder or track name display whilst programming, another disc cannot be selected.
Note:
Due to the structure of its disc information, it takes longer to read an MP3 disc than a
normal CD (approximately 20 to 90 seconds).
Selected disc number
Page
E-31
ENGLISH
Sound Control (See page 15.)
CD-BK280V(X)E4.fm01/5/28
Page 33

Listening to the Radio
1
Press the ON/STAND-BY button to turn the power on.
2
Press the TUNER (BAND) button repeatedly to select the desired
frequency band (FM or AM).
3
Press the TUNING/TIME ( or ) button to tune in to the desired
station.
Manual tuning:
Press the TUNING/TIME button as many times as required to tune in to the desired station.
Auto tuning:
When the TUNING/TIME button is pressed for more than 0.5 seconds, scanning
will start automatically and the tuner will stop at the first receivable broadcast station.
Notes:
z
When radio interference occurs, auto scan tuning may stop automatically at
that point.
z
Auto scan tuning will skip weak signal stations.
z
To stop the auto tuning, press the TUNING/TIME button again.
To receive an FM stereo transmission:
Press the TUNER (BAND) button to display the "ST" indicator.
z
" " will appear when an FM broadcast is in stereo.
FM stereo mode indicator
CD-BK280V
Radio
- Listening to the Radio -
FM stereo receiving indicator
z
If the FM reception is weak, press the TUNER (BAND) button to extinguish the
"ST" indicator. The reception changes to monaural, and the sound becomes
clearer.
After use:
Press the ON/STAND-BY button to enter the power stand-by mode.
Sound Control (See page 15.)
ENGLISH
CD-BK280V(X)E4.fm01/5/28
E-32
Page 34

Listening to the Memorised Station
Radio
- Listening to the Memorised Station -
Memorising a station
„
You can store 40 AM and FM stations in memory and recall them at the push of a button. (Preset tuning)
1
Perform the steps 1 - 3 in "Listening to the Radio" on page 32.
2
Press the MEMORY/SET button to enter the preset tuning saving
mode.
3
Within 30 seconds, press the PRESET or PRESET
button to select the preset channel number.
Store the stations in memory, in order, starting with preset channel 1.
4
Within 30 seconds, press the MEMORY/SET button to store that
station in memory.
If the "MEMORY" and preset number indicators go out before the station is
memorised, repeat the operation from step 2.
5
Repeat steps 1 - 4 to set other stations, or to change a preset station.
When a new station is stored in memory, the station previously memorised will
be erased.
Note:
The backup function protects the memorised stations for a few hours should there be
a power failure or the AC power lead disconnection.
To recall a memorised station
„
Press the PRESET or PRESET button for less than
0.5 seconds to select the desired station.
Preset channel Frequency and frequency band
This can be operated by pressing the PRESET ( or ) button on the remote
control.
To scan the preset stations
„
The stations saved in memory can be scanned automatically. (Preset memory scan)
1
Press the PRESET or PRESET button for more
than 0.5 seconds.
z
The preset number will flash and the programmed stations will be tuned in sequentially, for 5 seconds each.
z
This can be operated by pressing the PRESET ( or ) button on the remote
control.
2
Press the PRESET or PRESET button again when
the desired station is located.
To erase entire preset memory
„
1 Press the ON/STAND-BY button to enter the stand-by mode.
2 Whilst pressing down the TUNER (BAND) button and the X-BASS/DEMO button,
press the ON/STAND-BY button until "TUNER CL" appears.
E-33
ENGLISH
Listening to the Radio (See page 32.)
CD-BK280V(X)E4.fm01/5/28
Page 35

Listening to a Cassette Tape (TAPE 1)
CD-BK280V
Before playback:
z
For playback, use normal or low-noise tapes for the best sound.
(Metal or CrO tapes are not recommended.)
z
Do not use C-120 tapes or poor-quality tapes, as they may cause malfunctions.
z
Before loading a tape into the cassette compartment, tighten the slack
with a pen or a pencil.
1
Press the ON/STAND-BY button to turn the power on.
2
Press the TAPE (1 2) button to select TAPE 1.
3
Open the cassette door by pushing the area marked " PUSH
EJECT".
4
Load a cassette into the TAPE 1 cassette compartment with the
side to be played facing toward you.
5
Press the ( /SELECT/RESUME) button to start playback.
To stop playback:
Press the ( /RETURN) button.
Note:
You cannot fast-forward or rewind the cassette in the TAPE 1 compartment.
Tape Playback
- Listening to a Cassette Tape (TAPE 1) -
Sound Control (See page 15.)
CD-BK280V(X)E4.fm01/5/28
ENGLISH
E-34
Page 36

Tape Playback
Listening to a Cassette Tape (TAPE 2)
3
Open the cassette door by pushing
the area marked " PUSH EJECT".
4
Load a cassette into the TAPE 2 cassette compartment with side A facing
you.
5
Press the button to choose one
side or both sides.
... To listen to both sides.
... For endless repeat play of both sides.
... To listen to one side.
6
Press the ( /SELECT/RESUME) button to listen to side A, or
the button for side B.
To play both sides ( ), start from side A. When playback starts from side B, side
A will not be played.
To stop playback:
Press the ( /RETURN) button.
E-35
Fast forward/rewind on side A:
To advance the tape, press the PRESET ( ) button. To rewind it, press the
- Listening to a Cassette Tape (TAPE 2) -
1
Press the ON/STAND-BY button to turn the power on.
2
Press the TAPE (1 2) button to select TAPE 2.
ENGLISH
Sound Control (See page 15.)
PRESET ( ) button.
Fast forward/rewind on side B:
To advance the tape, press the PRESET ( ) button. To rewind it, press the
PRESET ( ) button.
Caution:
z
To rem ove the cassette, press the ( /RETURN) button, and then open the compartment.
z
Before changing from one tape operation to another, press the ( /RETURN) button.
z
If a power failure occurs during tape operation, the tape head will remain engaged
with the tape and the cassette door will not open. Wait until the power is restored.
CD-BK280V(X)E4.fm01/5/28
Page 37

Playing Karaoke
CD-BK280V
You can enjoy karaoke to video CDs, CDs, MP3 Discs, radio, cassettes, and other
external devices by connecting a separately available microphone to this unit.
1
Set the MIC LEVEL control to MIN to protect the speakers from
shock noise and to avoid disturbing noises.
2
Connect the microphone to the MIC socket.
z
Use a microphone with a 6.3 mm (1/4") plug, an impedance of 600 ohms.
z
Use a standard plug adaptor when using a microphone with a 3.5 mm (1/8")
diameter plug.
3
Press the ON/STAND-BY button to turn the power on.
4
Press one of the CD/VIDEO CD (CD), TUNER (BAND), TAPE (1 2),
VIDEO/AUX buttons to select the audio source and play it.
If you wish to record, start recording in the TAPE 2 compartment. (Refer to pages
38 - 40 for details.)
5
Adjust the volume of the audio source using the VO LUME buttons.
6
Turn the MIC LEVEL control towards MAX to increase the microphone volume and towards MIN to decrease it.
7
Press the ECHO LEVEL button on the remote control to increase
the microphone echo, and the ECHO LEVEL button to decrease
it.
Notes:
z
When you sing too loud through the microphone, your voice may be distorted
depending on the devices connected. If this happens, lower the microphone volume.
z
If an extremely sensitive microphone is used, howling may be generated.
z
Unidirectional microphone is more appropriate for vocal use.
Karaoke
- Playing Karaoke -
If squealing occurs:
z
Reduce the microphone volume.
z
Change the direction of the microphone.
z
Reduce the volume of the main unit.
z
Move the microphone away from the speakers.
Caution:
z
When not using the microphone, remove it from the MIC socket.
z
When connecting or disconnecting the microphone, set the MIC LEVEL control to
MIN.
ENGLISH
CD-BK280V(X)E4.fm01/5/28
E-36
Page 38

Playing Karaoke (continued)
Notes:
z
The initial audio mode setting is "STEREO".
z
In any mode other than the STEREO mode, " " will appear.
z
The setting will remain unchanged when you change the disc, you set the unit to
the stand-by mode or the function is changed from the CD/VIDEO CD (CD) to
another function.
z
When playing a sound multiplexed disc on which a vocal and music have been
separately recorded, select the audio mode as desired.
To change general stereo source to
„
karaoke source
Even ordinary discs and tapes not recorded specifically for karaoke can be used for
karaoke just by toning down the main vocal.
Press the KARAOKE MODE button until "V-CANCEL" appears in the
display.
" " will appear.
Karaoke
E-37
To change the audio mode
„
Sound of the playback source can be switched among the STEREO, L-CH, R-CH,
and V- CANCEL (VOCAL CANCEL) modes.
The audio mode function is used when the left and right channels ha ve individual sig-
- Playing Karaoke -
nals from each other.
Press the KARAOKE MODE b utton until the desired audio mode is displayed.
Each time the KARAOKE MODE button is pressed, the mode will change as follows:
STEREO
L-CH
R-CH
V-CANCEL
STEREO L-CH
Sounds on the left and right channels are played.
Sounds on the left channel only are played.
Sounds on the right channel only are played.
The main vocal is lowered.
ENGLISH
R-CH
V-CANCEL
Notes:
z
Use discs recorded in stereo. The function will not work with mono sources.
z
With some discs and tapes the original vocals may still be heard.
Notes on sound multiplex ed karao ke disc s:
Sound multiplexed karaoke discs are discs on which the main vocal and the BGM
(Background music) have been recorded on one of the two channels and only the
BGM on the other.
z
The function will not work properly with discs which do not belong to this group.
z
Discs on which vocal has been recorded on the left channel and music on the right
may not play properly.
CD-BK280V(X)E4.fm01/5/28
Page 39

Recording from the Radio
CD-BK280V
Before recording:
z
When recording important selections, make a preliminary test to ensure that the
desired material is properly recorded.
z
SHARP is not liable for damage or loss of your recording arising from malfunction
of this unit.
z
The volume and sound controls can be adjusted with no effect on the recorded
signal (Variable Sound Monitor).
z
For recording, use only normal tapes. Do not use metal or CrO tapes.
1
Tune in to the desired station. (See page 32.)
2
Load a cassette into the TAPE 2 cass ette compartment with s ide A
facing you.
Wind past the leader of the tape, on which recording cannot be performed.
3
Press the button to choose one
side or both sides.
... To record on both sides.
... To record on only one side.
4
Press the REC PAUSE [ (TAPE)]
button.
Recording will be paused.
5
Press the ( /SELECT/RESUME) button to record on side A, or
the button for side B.
To record on both sides, begin on side A. (If recording is started from side B, the
tape will not switch over to side A.)
To interrupt recording:
Press the REC PAUSE [ (TAPE)] button.
To resume recording, press the same recording button you pressed in step 5. Other
buttons do not allow resuming.
To stop recording:
Press the ( /RETURN) button.
Note:
If you hear a whistling noise whilst recording an AM station, move the AM loop aerial.
Erase-prevention tab of cassette tapes:
z
When recording on a cassette tape, make
sure that the erase-prevention tabs are not removed. Cassettes have removable tabs that
prevent accidental recording or erasing.
z
To protect the recorded sound, remove the tab
after recording. Cover the tab hole with adhesive tape to record on the tape without the tab.
Tab of side B Tab of side A
Side A
Tape Recording
- Recording from the Radio -
Listening to the Radio (See page 32.)
CD-BK280V(X)E4.fm01/5/28
ENGLISH
E-38
Page 40

Tape Recording
- Recording from a CD (CDs) -
Recording from a CD (CDs)
You can record 3 CDs continuously.
1
Press the ON/STAND-BY button to turn the power on.
2
Load a cassette into the TAPE 2 casse tte compartme nt with side A
facing you.
Wind past the leader of the tape, on which recording cannot be performed.
3
Press the CD/VIDEO CD (CD) button and load the desired disc.
4
Press the button to choose one
side or both sides.
... To record on both sides.
... To record on only one side.
5
Press the DISC SKIP button to select the disc to be recorded first.
6
Press the REC PAUSE [ (TAPE)]
button.
Recording will be paused.
7
Press the ( /SELECT/RESUME) button to record on side A, or
the button for side B.
z
To record on both sides, begin on side A. (If recording is started from side B,
the tape will not switch over to side A.)
z
Recording is started from the selected CD. When the playback of the last disc
is finished or the end of the tape is reached, the CD and the cassette will stop
automatically.
z
CD playback will start approximately 5 seconds after the tape starts.
To perform programmed recording:
1 Programme discs and tracks. (See page 24.)
2 Press the REC PAUSE [ (TAPE)] button.
3 Press the ( /SELECT/RESUME) button to record on side A, or the button
for side B.
To stop recording:
Press the ( /RETURN) button.
The CD and tape will stop.
E-39
ENGLISH
Auto restart function:
If the recording side is switched from side A to B during recording, the system will
record the interrupted track on side B from its beginning. The recording will be made
without cutting the beginning of the track on side B.
Programmed Play (See page 24.)
CD-BK280V(X)E4.fm01/5/28
Page 41

Dubbing from Tape to Tape
You can record from TAPE 1 to TA PE 2.
1
Press the ON/STAND-BY button to turn the power on.
2
Load a prerecorded cassette into the TAPE 1 cassette compartment. Insert a blank tape into the TAPE 2 cassette compartment.
It is recommended that the recording tape is the same length as the master tape.
3
Press the TAPE (1 2) button until
"TAPE 1" appears on the display.
The reverse mode will be set to " ".
4
Press the REC PAUSE [ (TAPE)]
button.
Recording will be paused.
5
Press the ( /SELECT/RESUME) button.
To stop dubbing:
Press the ( /RETURN) button.
TAPE 1 and TAPE 2 will simultaneously stop.
Erasing recorded tapes
„
1 Load the tape to be erased into the TAPE 2 cassette compartment with the side to
be erased facing toward you.
2 Press the TAPE (1 2) button until "TAPE 2" appears on the display.
3 Set the button to " " to erase only one side and to " " to erase both sides.
4 Press the REC PAUSE [ (TAPE)] button.
5 Press the ( /SELECT/RESUME) button to erase side A, or the button to
erase side B.
To erase both sides, begin from side A. (If erasing is started from side B, the tape
will not switch over to side A.)
Note:
Make sure that the TAPE 1 is not in use.
CD-BK280V
Tape Recording
- Dubbing from Tape to Tape -
ENGLISH
CD-BK280V(X)E4.fm01/5/28
E-40
Page 42

Timer and Sleep Operation
Timer playback:
The unit turns on and plays the desired source (video CD, CD, MP3 disc, tuner, tape)
at the preset time.
Timer recording:
The unit turns on and starts recording from the tuner at the preset time.
Sleep operation:
The radio, video CD, CD, MP3 disc and cassette tape can all be turned off automatically.
- Timer and Sleep Operation -
Advanced Features
Timer playback or Timer recording
„
Before setting timer:
1 Press the CLOCK button to check that the clock is on time.
2 For timer playback: Load a cassette or discs to be played.
For timer recording: Load a cassette for recording in the TAPE 2 cas-
1
Press the ON/STAND-BY button to turn the power on.
2
Press the CD/VIDEO CD, TUNER (BAND) or TAPE (1 2) button to
select the desired function.
To select the timer playback source: CD/VIDEO CD, TUNER (BAND) or TAPE
(1 2).
To select the timer recording source: TUNER (BAND).
When you selected the TUNER (BAND), tune in to the desired station.
3
Adjust the volume using the VOLUME buttons.
Do not turn the volume up too high.
4
Press the TIMER/SLEEP button repeatedly to s elect timer playback
or timer recording.
Display the white " " for timer playback and the red " " for timer
recording.
sette compartment.
E-41
ENGLISH
Setting the Clock (See page 16.)
White
5
Press the TUNING/TIME ( or ) button to specify the hour to start,
then press the MEMORY/SET button.
The illustrations show the timer playback setting.
Red
CD-BK280V(X)E5.fm01/5/28
Page 43

6
Press the TUNING/TIME ( or ) button to specify the minutes,
then press the MEMORY/SET button.
7
The unit will enter the timer stand-by mode automatically.
To cancel the timer playback/timer recording:
Press the ON/STAND-BY button to turn the power on.
8
When the preset time is reached, playback or recording will start.
The volume will increase gradually until it reaches the volume you were listening
at before your system enters the timer stand-by mode.
9
In timer playback:
If you select CD/VIDEO CD or TAPE, the unit will enter the stand-by mode after
the playback. If you select TUNER, it will enter the stand-by mode one hour after
the timer playback starts.
In timer recording:
When the recording tape reaches its end, the timer recording will end, and the
unit will enter the stand-by mode.
To reset or change the timer setting:
Perform "Timer playback or Timer recording" from the beginning.
Notes:
z
Once the time is set, the setting will be retained until a new time is entered.
z
When performing timer playback or recording using another unit connected to the
VIDEO/AUX sockets, select "VIDEO/AUX" in step 2.
At this time, only this unit will be t urned on or enter the power stand-by mode automatically. It will enter the power stand-by mode when the end of the recording tape
is reached in timer recording or 1 hour after the playback starts in timer playback.
However, another unit will not be turned on or off.
Sleep operation
„
1
Play back the desired sound source.
2
Press the TIMER/SLEEP button repeatedly until "SLEEP" is displayed.
To change the sleep time:
Whilst the sleep time is displayed, press the TUNING/TIME ( or ) button.
(Maximum: 3 hours - Minimum: 1 minute)
z
3 hours - 5 minutes 5-minute intervals
z
5 minutes - 1 minute 1-minute intervals
3
Press the MEMORY/SET button.
4
Your system will enter the power stand-by mode automatically after the preset time has elapsed.
The volume will be turned down 1 minute before the sleep operation finishes.
To cancel the sleep operation:
Press the ON/STAND-BY button whilst the sleep timer is set.
To confirm the remaining sleep time:
Press the TIMER/SLEEP button whilst the sleep timer is set.
The remaining sleep time is displayed for about 5 seconds.
Note:
Once the sleep time is set, it will remain unchanged until a new time is entered.
CD-BK280V
- Timer and Sleep Operation -
Advanced Features
Listening to the Radio (See page 32.)
CD-BK280V(X)E5.fm01/5/28
ENGLISH
E-42
Page 44

Enhancing Your System
The connection lead is not included. Purchase a commercially available lead as
shown below.
- Enhancing Your System -
Advanced Features
Red
White
VCR, DVD, etc.
White
RCA lead
(not supplied)
To the
line output
sockets
Red
Listening to the playback sounds from
„
VCR, DVD, etc.
1
Use a connection lead to c onnect the VCR, DVD, etc. to the VIDEO/
AUX sockets.
When using video equipment, connect the audio output to this unit and the video
output to a television.
2
Press the ON/STAND-BY button to turn the power on.
3
Press the VIDEO/AUX button.
4
Play the connected equipment.
Note:
To prevent hum interference, place this unit away from a television.
To record on a tape
„
1
Insert a cassette in the TAPE 2 cassette compartment.
2
Press the VIDEO/AUX button.
3
Press the REC PAUSE [ (TAPE)] button.
4
Press the ( /SELECT/RESUME) or button.
5
Play the VCR, DVD, etc.
Headphones
„
z
Before plugging in or unplugging the headphones, reduce the volume.
z
Be sure your headphones have a 3.5 mm (1/8") diameter plug and are between 16
ohms and 50 ohms impedance. The recommended impedance is 32 ohms.
z
Plugging in the headphones disconnects the speakers automatically. Adjust the
volume using the VOLUME buttons.
E-43
ENGLISH
CD-BK280V(X)E5.fm01/5/28
Page 45

Troubleshooting Chart
CD-BK280V
Many potential problems can be resolved b y the owner without calling a service technician.
If something is wrong with this product, check the following before calling your authorised SHARP dealer or service centre.
General
„
Symptom Possible cause
z
The clock is not on time.
z
When a button is pressed, the unit
does not respond.
z
No sound is heard.
Video CD
„
Symptom Possible cause
z
The picture is not displayed during
playback.
z
The picture quality is poor, or it is
distorted.
CD player
„
Symptom Possible cause
z
Playback does not start.
z
Playback stops in the middle or is
not performed properly.
z
Playback sounds are skipped, or
stopped in the middle of a track.
z
Did a power failure occur? Reset the
clock. (Refer to page 16.)
z
Set this unit to the power stand-by mode
and then turn it back on.
z
If the unit still malfunctions, reset it. (Refer
to page 45.)
z
Is the volume level set to "0"?
z
Are the headphones connected?
z
Are the speaker wires disconnected?
z
Is the karaoke mode set to "L-CH", "R-CH"
or "V-CANCEL"?
z
Is the TV unplugged?
z
Is the unit connected improperly?
z
Is the input selector on the TV set to other
than "VCR"?
z
Is the unit being played without selecting
video CD?
z
Is the disc very dirty?
z
Is the disc loaded upside down?
z
Does the disc satisfy the standards?
z
Is the disc distorted or scratched?
z
Is the unit located near excessive vibrations?
z
Is the disc very dirty?
z
Has condensation formed inside the unit?
Tuner
„
Symptom Possible cause
z
Radio makes unusual noise consecutively.
Cassette deck
„
Symptom Possible cause
z
Cannot record.
z
Cannot record tracks with proper
sound quality.
z
Cannot erase completely.
z
Sound skipping.
z
Cannot hear treble.
z
Sound fluctuation.
z
Cannot remove the tape.
Karaoke
„
Symptom Possible cause
z
The vocal part of a multiplexed
disc is not heard.
Remote control
„
Symptom Possible cause
z
The remote control does not operate.
z
Is the unit placed near the TV or computer?
z
Is the FM aerial or AM loop aerial placed
properly? Move the AC power lead away
from the aerial if located near.
z
Is the erase-prevention tab removed?
z
Is it a normal tape? (You cannot record on
a metal or CrO tape.)
z
Is there any slack?
z
Is the tape stretched?
z
Are the capstans, pinch rollers, or heads
dirty?
z
If a power failure occurs during playback,
the heads remain engaged with the tape.
Do not open the compartment forcibly.
Wait until electricity resumes.
z
Is the karaoke mode set to "L-CH", "R-CH"
or "V-CANCEL"?
z
Is the AC power lead of the unit plugged
in?
z
Is the battery polarity respected?
z
Are the batteries dead?
z
Is the distance or angle incorrect?
z
Does the remote control sensor receive
strong light?
References
- Troubleshooting Chart -
ENGLISH
E-44
CD-BK280V(X)E5.fm01/5/28
Page 46

Troubleshooting Chart (continued)
„
When this product is subjected to strong external interference (mechanical shock,
excessive static electricity, abnormal supply voltage due to lightning, etc.) or if it is
operated incorrectly, it may malfunction.
If such a problem occurs, do the following:
1 Set the unit to the stand-by mode and turn the power on again.
2 If the unit is not restored in the previous operation, unplug and plug in the unit,
Note:
If neither operation above restores the unit, clear all the memory by resetting it.
„
1 Press the ON/STAND-BY button to enter the power stand-by mode.
2 Whilst pressing down the button and the X-BASS/DEMO button, press the ON/
References
Caution:
This operation will erase all data stored in memory including clock, timer settings,
tuner preset, and CD programme.
- Troubleshooting Chart / Maintenance -
„
1 Press the ON/STAND-BY button to turn the power on.
2 Press the CD/VIDEO CD button.
3 Press the OPEN/CLOSE button to open the disc tray.
4 Press the OPEN/CLOSE button to close the disc tray.
5 Press the ON/STAND-BY button to enter the stand-by mode, and then unplug
If trouble occurs
and then turn the power on.
Clearing all the memory (reset)
STAND-BY button until "CLEAR AL" appears.
Before transporting the unit
Remove all discs from the unit.
Make sure that "NO DISC" is displayed.
the AC power lead from the wall socket.
Maintenance
Cleaning the tape-handling parts
„
z
Dirty heads, capstans or pinch rollers can cause poor sound and tape jams. Clean
these parts with a cotton swab moistened with commercial head/pinch roller
cleaner or isopropyl alcohol.
z
When cleaning the heads, pinch rollers, etc., unplug the unit which contains high
voltages.
B
TAPE 1
TAPE 2
Playback head Erase head
z
After long use, the deck's heads and capstans may become magnetised, causing
poor sound. Demagnetise these parts once every 30 hours of playing/recording
time by using a commercial tape head demagnetiser. Read the demagnetiser's
instructions carefully before use.
Cleaning the cabinet
„
Periodically wipe the cabinet with a soft cloth and a diluted
soap solution, then with a dry cloth.
Capstan Recording/Playback head
Pinch roller
A
E
D
Caution:
z
Do not use chemicals for cleaning (petrol, paint thinner,
etc.). It may damage the cabinet finish.
z
Do not apply oil to the inside of the unit. It may cause
malfunctions.
C
CC
BB
E-45
ENGLISH
CD-BK280V(X)E5.fm01/5/28
Page 47

Specifications
CD-BK280V
As part of our policy of continuous improvement, SHARP reserves the right to make
design and specification changes for product improvement without prior notice. The
performance specification figures indicated are nominal values of production units.
There may be some deviations from these values in individual units.
General
„
Power source
Power consumption
Dimensions
Weight
Amplifier
„
Output power
Output terminals
Input terminals
Video CD
„
Video output format
CD player
„
Type
Signal readout
D/A converter
Frequency response
Dynamic range
AC 110/127/220/230 - 240 V, 50/60 Hz
130 W
Width: 270 mm (10-11/16")
Height: 330 mm (13")
Depth: 340 mm (13-3/8")
7.4 kg (16.1 lbs.)
Front speakers:
MPO: 160 W (80 W + 80 W) (10 % T.H.D.)
RMS: 100 W (50 W + 50 W) (10 % T.H.D.)
RMS: 70 W (35 W + 35 W) (0.9 % T.H.D.)
Surround speakers:
MPO: 80 W (40 W + 40 W) (10 % T.H.D.)
RMS: 50 W (25 W + 25 W) (10 % T.H.D.)
RMS: 34 W (17 W + 17 W) (0.9 % T.H.D.)
Front speakers: 8 ohms
Surround speakers: 16 ohms
Headphones: 16 - 50 ohms (recommended: 32 ohms)
Video out: 1 Vp-p (75 ohms)
Video/Auxiliary (audio signal): 500 mV/47 kohms
Microphone: 1 mV/600 ohms
PAL/NTSC
3-disc multi-play compact disc player
Non-contact, 3-beam semiconductor laser pickup
1-bit D/A converter
20 - 20,000 Hz
90 dB (1 kHz)
Tuner
„
Frequency range
Cassette deck
„
Frequency response
Signal/noise ratio
Wow and flutter
Front speaker
„
Type
Maximum input power
Rated input power
Impedance
Dimensions
Weight
Surround speaker
„
Type
Maximum input power
Rated input power
Impedance
Dimensions
Weight
FM: 88 - 108 MHz
AM: 531 - 1,602 kHz
50 - 14,000 Hz (Normal tape)
55 dB (TAPE 1, playback)
50 dB (TAPE 2, recording/playback)
0.3 % (WRMS)
2-way type speaker system
5 cm (2") Tweeter
13 cm (5-1/4") Woofer
100 W
50 W
8 ohms
Width: 220 mm (8-11/16")
Height: 330 mm (13")
Depth: 217 mm (8-9/16")
3.3 kg (7.3 lbs.)/each
10 cm (4") full-range speaker
50 W
25 W
16 ohms
Width: 200 mm (7-7/8")
Height: 93 mm (3-11/16")
Depth: 170 mm (6-3/4")
0.5 kg (1.1 lbs.)/each
- Specifications -
References
ENGLISH
E-46
CD-BK280V(X)E5.fm01/5/28
Page 48

FRANÇAIS
Introduction
Nous vous remercions d'avoir porté votre choix sur ce produit SHARP. Pour en tirer le
meilleur parti, veuillez lire ce mode d'emploi très attentivement.
Table des matières
Instructions importantes
Instructions importantes
„
Accessoires . . . . . . . . . . . . . . . . . . . . . . . . . . . . . . . . . . . . . . . . . . . . . . . . . . . . . . . 2
Remarques spéciales . . . . . . . . . . . . . . . . . . . . . . . . . . . . . . . . . . . . . . . . . . . . . . . 2
Informations générales
„
Précautions . . . . . . . . . . . . . . . . . . . . . . . . . . . . . . . . . . . . . . . . . . . . . . . . . . . . . . . 3
Commandes et voyants . . . . . . . . . . . . . . . . . . . . . . . . . . . . . . . . . . . . . . . . . . 4 - 7
Avant l'utilisation
„
Télécommande . . . . . . . . . . . . . . . . . . . . . . . . . . . . . . . . . . . . . . . . . . . . . . . . . . . . 8
Raccordement du système . . . . . . . . . . . . . . . . . . . . . . . . . . . . . . . . . . . . . . 9 - 13
Fonctionnement de base
„
Commande générale . . . . . . . . . . . . . . . . . . . . . . . . . . . . . . . . . . . . . . . . . . . . . . . 14
Réglage du son . . . . . . . . . . . . . . . . . . . . . . . . . . . . . . . . . . . . . . . . . . . . . . . . . . . 15
Réglage de l'horloge . . . . . . . . . . . . . . . . . . . . . . . . . . . . . . . . . . . . . . . . . . . . . . . 16
Lecture de CD vidéo
„
CD vidéo . . . . . . . . . . . . . . . . . . . . . . . . . . . . . . . . . . . . . . . . . . . . . . . . . . . . . . . . . 17
- Introduction / Table des matières -
Préparation pour la lecture de CD vidéo . . . . . . . . . . . . . . . . . . . . . . . . . . . . . . . 18
Lecture de CD vidéo avec P.B.C. (version 2.0) . . . . . . . . . . . . . . . . . . . . . . . 19, 20
Lecture de CD vidéo sans P.B.C. (version 1.1) . . . . . . . . . . . . . . . . . . . . . . . 21, 22
Lecture avancée de CD vidéo (version 1.1)
„
Système de recherche directe . . . . . . . . . . . . . . . . . . . . . . . . . . . . . . . . . . . . . . .23
Répétition et lecture au hasard . . . . . . . . . . . . . . . . . . . . . . . . . . . . . . . . . . . . . . 23
Lecture des morceaux programmés . . . . . . . . . . . . . . . . . . . . . . . . . . . . . . . . . . 24
Sélection de digest sur disques et morceaux . . . . . . . . . . . . . . . . . . . . . . . 25, 26
Sélection de r e ch e rche pa r te m p s . . . . . . . . . . . . . . . . . . . . . . . . . . . . . . . . . . . . 2 6
Fonction de signet . . . . . . . . . . . . . . . . . . . . . . . . . . . . . . . . . . . . . . . . . . . . . . . . 27
Lecture par reprise . . . . . . . . . . . . . . . . . . . . . . . . . . . . . . . . . . . . . . . . . . . . . . . . 28
Pour reproduire le CD vidéo manuellement . . . . . . . . . . . . . . . . . . . . . . . . . . . . 28
Changement de l'affichage sur TV . . . . . . . . . . . . . . . . . . . . . . . . . . . . . . . . . . . 28
Page
Page
Lecture CD
„
Écoute de CD . . . . . . . . . . . . . . . . . . . . . . . . . . . . . . . . . . . . . . . . . . . . . . . . . . 29, 30
Lecture du CD encodé en MP3
„
Écoute du disque MP3 . . . . . . . . . . . . . . . . . . . . . . . . . . . . . . . . . . . . . . . . . . . . . 31
Radio
„
Écoute de la radio . . . . . . . . . . . . . . . . . . . . . . . . . . . . . . . . . . . . . . . . . . . . . . . . . 32
Écoute d'une station mise en mémoire . . . . . . . . . . . . . . . . . . . . . . . . . . . . . . . 33
Lecture de la cassette
„
Écoute d'une cassette (TAPE 1) . . . . . . . . . . . . . . . . . . . . . . . . . . . . . . . . . . . . . 34
Écoute d'une cassette (TAPE 2) . . . . . . . . . . . . . . . . . . . . . . . . . . . . . . . . . . . . . 35
Karaoké
„
Faire du karaoké . . . . . . . . . . . . . . . . . . . . . . . . . . . . . . . . . . . . . . . . . . . . . . . 36, 37
Enregistrement sur la cassette
„
Enregistrement à partir de la radio . . . . . . . . . . . . . . . . . . . . . . . . . . . . . . . . . . . 38
Enregistrement de CD . . . . . . . . . . . . . . . . . . . . . . . . . . . . . . . . . . . . . . . . . . . . . 39
Copie entre cassettes . . . . . . . . . . . . . . . . . . . . . . . . . . . . . . . . . . . . . . . . . . . . . . 40
Fonctions avancées
„
Opérations programmées et mise en arrêt différée . . . . . . . . . . . . . . . . . . . 41, 42
Enrichissement du système . . . . . . . . . . . . . . . . . . . . . . . . . . . . . . . . . . . . . . . . 43
Références
„
Dépannage . . . . . . . . . . . . . . . . . . . . . . . . . . . . . . . . . . . . . . . . . . . . . . . . . . . . 44, 45
Entretien . . . . . . . . . . . . . . . . . . . . . . . . . . . . . . . . . . . . . . . . . . . . . . . . . . . . . . . . 45
Fiche technique . . . . . . . . . . . . . . . . . . . . . . . . . . . . . . . . . . . . . . . . . . . . . . . . . . . 46
F-1
FRANÇAIS
01/5/28 CD-BK280V(X)F1.fm
Page 49

Accessoires
Vérifier que les accessoires ci-dessous sont présents dans l'emballage.
CD-BK280V
Télécommande 1 Pile "AA" (UM/SUM-3, R6, HP-7
Cadre-antenne PO 1 Antenne FM 1 Câble vidéo 1
ou équivalent) 2
Note:
L'appareil est livré seulement avec les accessoires ci-dessus.
Remarques spéciales
ATTENTION
Matière: GaAIAs
z
Cette mini-chaîne CD vidéo est classée comme un produit CLASS 1 LASER.
z
L'étiquette CLASS 1 LASER PRODUCT se trouve au couvercle arrière.
z
Respecter les indications données relatives à la manipulation, au réglage et au
fonctionnement. En cas de non-respect, on s'exposera à une radiation dangereuse.
Éviter absolument de démonter l'appareil, qui utilise un rayon laser nuisible aux
yeux. Pour toute réparation, s'adresser à une personne qualifiée.
z
Lorsque la touche ON/STAND-BY est mise en STAND-BY, l'appareil est toujours
sous tension. Lorsque la touche ON/STAND-BY se trouve sur la position STAND BY, l'appareil est prêt à fonctionner par la minuterie ou la télécommande.
z
Le matériel audio-visuel peut comporter des oeuvres faisant l'objet de droits
d'auteur qui ne peuvent être enregistrées sans l'autorisation du possesseur du
droit d'auteur, v euillez vous référer aux réglementations nationales en vigueur.
Caractéristiques de la diode laser
Longueur d'onde: 780 nm
Durée d'émission: ininterrompue
Puissance de sortie laser maximale: 0,6 mW
CAUTION-INVISIBLE LASER RADIATION WHEN OPEN. DO NOT STARE INTO
BEAM OR VIEW DIRECTLY WITH OPTICAL INSTRUMENTS.
VARNING-OSYNLIG LASERSTRALNING NAR DENNA DEL AR OPPNAD. STIRRA
EJ IN I STRALEN OCH BETRAKTA EJ STRALEN MED OPTISKA INSTRUMENT.
ADVERSEL-USYNLIG LASERSTRALING VED ABNING. SE IKKE IND I
STRALEN-HELLER IKKE MED OPTISKE INSTRUMENTER.
VARO! AVATTAESSA OLET ALTTIINA NAKYMATON LASERSATEILYLLE.
ALA TUIJOTA SATEESEEN ALAKA KATSO SITA OPTISEN LAITTEEN LAPI.
VARNING-OSYNLIG LASERSTRALNING NAR DENNA DEL AR OPPNAD.
STIRRA EJ IN I STRALEN OCH BETRAKTA EJ STRALEN GENOM OPTISKT
INSTRUMENT.
ADVERSEL-USYNLIG LASERSTRALING NAR DEKSEL APNES. STIRR IKKE
INN I STRALEN ELLER SE DIREKTE MED OPTISKE INSTRUMENTER.
Avertissement:
Cet appareil contient des pièces non réparables par l'utilisateur. Personne non qualifiée n'enlèvera jamais les couvercles. L'appareil contenant des organes portés à
haute tension, débrancher l'appareil avant toute réparation ou en période de non-utilisation.
Avertissement:
Pour éviter un incendie ou une se cousse électrique, mettre l'appareil à l'abri d'eau
(éclaboussure, goutte). Ne pas poser sur l'appareil un récipient contenant du liquide.
- Accessoires / Remarques spéciales -
Instructions importantes
FRANÇAIS
F-2
CD-BK280V(X)F1.fm01/5/28
Page 50

Précautions
Général
„
z
Vérifier que l'appareil est installé dans un lieu bien aéré et qu'il est dégagé de tous
côtés (pas d'obstacle à moins de 10 cm de l'appareil).
10 cm 10 cm
z
Installer l'appareil sur un socle stable, horizontal et exempt de vibrations.
z
Mettre l'appareil à l'abri du soleil, du champ magnétique, de la poussière excessive ou de l'humidité. On l'écartera aussi d'un appareil électronique (ordinateur
domestique, télécopieur, etc.) qui provoquerait des parasites.
z
Ne rien placer sur l'appareil.
z
Mettre l'appareil à l'abri de l'humidité, de la chaleur excessive (supérieure à 60°C)
ou du froid excessif.
z
Si le système ne fonctionne pas correctement, débrancher et rebrancher le système. Puis on le rallumera.
z
En cas d'orage, débrancher l'appareil.
z
Débrancher le cordon d'alimentation en le tenant par la fiche pour ne pas abîmer
les fils internes.
z
Ne pas ôter l'enveloppe, on s'exposera à la secousse électrique. Pour toute
réparation interne, s'adresser au revendeur SHARP.
- Précautions -
z
Veiller à ne pas couvrir les ouvertures de ventilation de journaux, de nappes, de
rideaux, etc.
z
Éviter de placer sur l'appareil une bougie qui brûle.
z
Il faut traiter une pile usée selon la réglementation environnementale.
z
Utiliser ce produit dans une plage de température comprise entre 5 et 35°C.
Information s générales
Avertissement:
Respecter la tension indiquée sur l'appareil. Le fonctionnement sur une tension plus
élevée est dangereux et risque de provoquer un incendie ou tout autre type d'accident. SHARP ne sera pas tenu pour responsable des dommages causés par le nonrespect de la tension spécifiée.
10 cm
10 cm
Commande de volume
„
Le niveau sonore réel dans un réglage donné dépend de divers éléments: rendement
des enceintes, lieu d'écoute, etc. Éviter une augmentation brusque du volume. Elle
se produit, par exemple, lors de la mise sous tension avec un réglage du volume
élevé. Éviter aussi une longue écoute à niveau élevé.
Condensation
„
Le changement brusque de la température et
la conservation ou l'utilisation dans un lieu très
humide peuvent occasionner une formation de
condensation à l'intérieur de l'appareil (cellules
porte-laser pour CD, têtes magnétiques, etc.)
ou sur l'émetteur de la télécommande.
La condensation peut entraîner un mauvais
fonctionnement de l'appareil. Si le cas se présente, laisser l'appareil sous tension, sans disque (ou cassette) dans le compartiment, pour
1 heure environ afin d'assurer une lecture normale. Essuyer l'émetteur de la télécommande
avec un chiffon doux.
Entretien des compact discs
„
Le compact disc résiste bien aux dommages, mais il peut se produire un mauvais alignement dû à l'encrassement de la surface du disque. Afin de profiter au maximum
des disques et de ce lecteur, suivre les conseils ci-dessous.
z
Éviter d'écrire sur le disque, notamment sur la face non munie d'une étiquette. La
lecture se fait sur la face non munie d'une étiquette.
z
Éviter d'exposer les disques directement au soleil, à la chaleur et à l'humidité.
z
Tenir le com pact disc par les bords. Les traces de doigts, la saleté et l'eau sur le
compact disc sont à l'origine de bruit ou d'un alignement erroné. Si le compact
disc est encrassé ou ne fonctionne pas correctement, nettoyer le disque avec un
chiffon doux et sec. Essuyer du centre vers la périphérie, en ligne droite.
NON OUI
Correct
F-3
FRANÇAIS
CD-BK280V(X)F1.fm01/5/28
Page 51

Commandes et voyants
67
1
2
3
1412 1311
18
19
20
21
22
29 30 31 33 3432
8
1615 17
23
24
25
26
27
28
9
10
CD-BK280V
Façade
„
1.Tiroir de disque . . . . . . . . . . . . . . . . . . . . . . . . . . . . . . . . . . . . . . . . .19
2.Voyant de réglage de la minuterie . . . . . . . . . . . . . . . . . . . . . . . . . . 42
3.Touche marche/attente . . . . . . . . . . . . . . . . . . . . . . . . . . . . . . . . . . . 14
4.Compartiment de la cassette 2 . . . . . . . . . . . . . . . . . . . . . . . . . 35, 40
5.Compartiment de la cassette 1 . . . . . . . . . . . . . . . . . . . . . . . . . 34, 40
6.Sélecteur de mode d'égaliseur . . . . . . . . . . . . . . . . . . . . . . . . . . . . 15
7.Touches de volume haut et bas . . . . . . . . . . . . . . . . . . . . . . . . . . . . 15
8.Touche d'extra-graves/mode de démonstration . . . . . . . . . . . . 14, 15
9.Touche d'ouverture/fermeture de tiroir de disque . . . . . . . 19, 21, 29
10.Touche de saut de disque . . . . . . . . . . . . . . . . . . . . . . . . . . 19, 21, 29
11.Touche de lecture arrière de la cassette 2 . . . . . . . . . . . . . . . . . . . 35
12.Touche de CD vidéo/CD/disque MP3 . . . . . . . . . . . . . . . 19, 21, 29, 39
13.Touche de mode de karaoké . . . . . . . . . . . . . . . . . . . . . . . . . . . . . .37
14.Touche de tuner (gamme d'ondes) . . . . . . . . . . . . . . . . . . . . . . . . .32
15.Touche de contrôle de lecture CD vidéo . . . . . . . . . . . . . . . . . . . . . 20
16.Touche marche/arrêt d'affichage sur écran CD vidéo . . . . . . . . . . 28
17.Touche de recherche de temps/digest de CD vidéo . . . . . . . . 25, 26
18.Touche d'accord et de temps haut . . . . . . . . . . . . . . . . . . . . . .16, 32
19.Touche de gradateur . . . . . . . . . . . . . . . . . . . . . . . . . . . . . . . . . . . . . 14
20.Touche d'horloge . . . . . . . . . . . . . . . . . . . . . . . . . . . . . . . . . . . . 16, 41
21.Touche de minuterie/mise en arrêt différée . . . . . . . . . . . . . . .41, 42
22.Prise de casque . . . . . . . . . . . . . . . . . . . . . . . . . . . . . . . . . . . . . . . . . 43
23.Touche vidéo/auxiliaire . . . . . . . . . . . . . . . . . . . . . . . . . . . . . . . . 41, 43
4
5
24.Touche de cassette (1 2) . . . . . . . . . . . . . . . . . . . . . . . . . . 34, 35, 40
25.Touche d'arrêt ou retour de CD vidéo,
d'arrêt de CD/disque MP3/cassette . . . . . . . . . . . . . 20, 22, 30, 34, 35
26.Touche de lecture, répétition, sélection ou reprise de CD vidéo,
de lecture ou répétition de CD/disque MP3, de lecture
de la cassette 1, de lecture avant
de la cassette 2 . . . . . . . . . . . . . . . . . . . . . . . 19, 21, 23, 28, 29, 34, 35
27.Touche de sélection de mode d'inversion de la cassette 2 . . . . . . 35
28.Touche de saut ou suivant de CD vidéo, de plage haut ou avance
rapide de CD/disque MP3, de bobinage rapide de la cassette 2,
de présélection haut de tuner . . . . . . . . . . . . . . . . . 20, 22, 30, 33, 35
29.Touche d'accord et de temps bas . . . . . . . . . . . . . . . . . . . . . . . 16, 32
30.Touche de mémoire/réglage . . . . . . . . . . . . . . . . . . . . . . . . . 16, 24, 33
31.Touche de pause d'enregistrement de la cassette 2 . . . . . . . 38 - 40
32.Touche de saut ou précédent de CD vidéo, de plage bas ou
inversion de CD/disque MP3, de bobinage rapide de la cassette 2,
de présélection bas de tuner . . . . . . . . . . . . . . . . . . 20, 22, 30, 33, 35
33.Commande de niveau de microphone . . . . . . . . . . . . . . . . . . . . . . 36
34.Prise de microphone . . . . . . . . . . . . . . . . . . . . . . . . . . . . . . . . . . . . .36
Page de référence
- Commandes et voyants -
Information s générales
Descriptions de la télécommande (Voir page 7.)
CD-BK280V(X)F1.fm01/5/28
FRANÇAIS
F-4
Page 52

Commandes et voyants (suite)
1
2
34 5 6
- Commandes et voyants -
Information s générales
8
9
13 14 15 16
7
17
17 17
1
2
3
4
5
6
7
8
10
11
12
Affichage
„
1.Voyant extra-graves
2.Voyant de mode FM stéréo
3.Voyant de réception en FM stéréo
4.Voyant de mode karaoké
5.Voyant de répétition de disque
6.Voyant de pause de disque
7.Voyant de lecture de disque
8.Voyant d'enregistrement de la cassette 2
9.Voyant de mode d'inversion cassette
10.Voyants de numéro de disque
11.Voyant de lecture programmée
12.Voyant de mémoire
13.Voyant de lecture arrière de la cassette 2
14.V o y ant de lectur e de la cassette 1 ou de lect ure av ant de la cassette
2
15.Voyant de mise en arrêt différée
16.Voyant d'enregistrement programmé
17.Analyseur spectral/voyant de niveau de volume
Panneau arrière
„
1.Bornes d'enceinte surround . . . . . . . . . . . . . . . . . . . . . . . . . . . . 9 - 12
2.Prise de sortie vidéo . . . . . . . . . . . . . . . . . . . . . . . . . . . . . . . . . . . . .12
3.Borne d'antenne FM de 75 ohms . . . . . . . . . . . . . . . . . . . . . . . . .9, 10
4.Borne de terre pour antenne FM . . . . . . . . . . . . . . . . . . . . . . . . .9, 10
5.Prise de cadre-antenne PO . . . . . . . . . . . . . . . . . . . . . . . . . . . . . .9, 10
6.Sélecteur d'intervalle . . . . . . . . . . . . . . . . . . . . . . . . . . . . . . . . . . . . .13
7.Prises d'entrée vidéo/auxiliaire (signal audio) . . . . . . . . . . . . . . . .43
8.Bornes d'enceinte avant. . . . . . . . . . . . . . . . . . . . . . . . . . . . . . . . 9 - 11
9.Cordon d'alimentation . . . . . . . . . . . . . . . . . . . . . . . . . . . . . . . . . . . .13
10.Sélecteur de tension . . . . . . . . . . . . . . . . . . . . . . . . . . . . . . . . . . . . .13
Page de référence
F-5
10
FRANÇAIS
9
CD-BK280V(X)F1.fm01/5/28
Page 53

Enceinte avant
„
1.Tweeter
2.Woofer
3.Évent de baffle réflex
1
2
3
3
4
1
4.Fil d'enceinte
Enceinte surround
„
1.Haut-parleur de large bande
2.Fil d'enceinte
CD-BK280V
- Commandes et voyants -
Information s générales
2
FRANÇAIS
CD-BK280V(X)F1.fm01/5/28
F-6
Page 54

Commandes et voyants (suite)
1
2
3
4
5
6
7
8
9
- Commandes et voyants -
10
11
Information s générales
12
13
14
15
16
17
18
19
20
21
22
23
24
25
26
27
28
29
30
Télécommande
„
1.Émetteur de télécommande . . . . . . . . . . . . . . . . . . . . . . . . . . . . . . . . . . . . 8
2.Touches de sélection de numéro de disque . . . . . . . . . . . . . . . . . . . . . 24
3.Touches de niveau d'écho haut/bas . . . . . . . . . . . . . . . . . . . . . . . . . . . 3 6
4.Touche de mode de karaoké . . . . . . . . . . . . . . . . . . . . . . . . . . . . . . . . . . . 37
5.Touche auto/marche de CD vidéo . . . . . . . . . . . . . . . . . . . . . . . . . . . . . 28
6.Touche auto/arrêt de contrôle de lecture de CD vidéo . . . . . . . . . . . . . . . 20
7.Touche marche/arrêt d'affichage sur écran CD vidéo . . . . . . . . . . . . . . . . 28
8.Touche d'annulation de disque . . . . . . . . . . . . . . . . . . . . . . . . . . . . . . . 2 4
9.Touche de recherche de temps/digest de CD vidéo . . . . . . . . . . . . . . 25, 26
10.Touche de saut ou précédent de CD vidéo, de plage bas ou inversion de CD/
disque MP3, de bobinag e rapi de de la cassette 2, de présé le cti on bas
de tuner . . . . . . . . . . . . . . . . . . . . . . . . . . . . . . . . . . . . . . . 20, 22, 30, 33, 35
11.Touche de signet de CD vidéo . . . . . . . . . . . . . . . . . . . . . . . . . . . . . . . . 27
12.Touche de lecture arrière de la cassette 2 . . . . . . . . . . . . . . . . . . . . . . . . 35
13.Sélecteur PA L/NTSC . . . . . . . . . . . . . . . . . . . . . . . . . . . . . . . . . . . . . . . . 1 8
14.Touche de CD vidéo/CD/disque MP3 . . . . . . . . . . . . . . . . . . . 19, 21, 29, 39
15.Touche de cassette (1 2) . . . . . . . . . . . . . . . . . . . . . . . . . . . . . . 34, 35, 40
16.Touche marche/attente . . . . . . . . . . . . . . . . . . . . . . . . . . . . . . . . . . . . . . . . 8
17.Touche d'affichage de disque MP3 . . . . . . . . . . . . . . . . . . . . . . . . . . . . 31
18.Touches de recherche directe de disque . . . . . . . . . . . . . . . . . . . . 19, 23
19.Touche de lecture au hasard de disque . . . . . . . . . . . . . . . . . . . . . . . . 23
20.Touche de mémoire de disque . . . . . . . . . . . . . . . . . . . . . . . . . . . . . . . . . 24
21.Touche de saut ou sui vant de CD vi déo, de plage haut ou avance rapide de
CD/disque MP3, de bo bi nage rapide de la cassette 2, de pré sélection haut
de tuner . . . . . . . . . . . . . . . . . . . . . . . . . . . . . . . . . . . . . . . 20, 22, 30, 33, 35
22.Touche de pause de disque . . . . . . . . . . . . . . . . . . . . . . . . . . . . 20, 22, 30
23.T ouche de lecture, répétition, sélection ou reprise de CD vidéo, de lecture ou
répétition de CD/disqu e M P 3, de lec tu re de l a ca ssette 1, de lecture avant
de la cassette 2 . . . . . . . . . . . . . . . . . . . . . . . . . . . 19, 21, 23, 28, 29, 34, 35
24.Touche d'arrêt ou retour de CD vidéo,
d'arrêt de CD/disque MP3/cassette . . . . . . . . . . . . . . . . . . 20, 22, 30, 34, 35
25.Touche d'extra-graves . . . . . . . . . . . . . . . . . . . . . . . . . . . . . . . . . . . . . . . . 15
26.Sélecteur de mode d'égaliseur . . . . . . . . . . . . . . . . . . . . . . . . . . . . . . . . . 1 5
27.Touches de volume haut et bas . . . . . . . . . . . . . . . . . . . . . . . . . . . . . . . . . 15
28.Touche de pause d'enregistrement de la cassette 2 . . . . . . . . . . . . . .38 - 40
29.Touche de tuner (gamme d'ondes) . . . . . . . . . . . . . . . . . . . . . . . . . . . . . . 32
30.Touche vidéo/auxiliaire . . . . . . . . . . . . . . . . . . . . . . . . . . . . . . . . . . . . . . . 43
Les touches portant la marque " " dans l'illustration ne peuvent être comman-
dées que par la télécommande.
Les autres touches peuvent être commandées par l'appareil principal ou la télé-
commande.
Page de référence
F-7
FRANÇAIS
Mise en place des piles pour la télécommande (Voir page 8.)
CD-BK280V(X)F1.fm01/5/28
Page 55

Télécommande
CD-BK280V
Mise en place des piles
„
1 Retirer le couvercle.
2 Installer les piles en respe ctant les polarités indiqué es dans le loge-
ment de piles.
Pour introduire ou retirer les piles, on les poussera vers les bornes .
3 Remettre le couvercle en place.
Précautions à prendre:
z
Remplacer en même temps toutes les piles par des neuves.
z
Ne pas utiliser en même temps des piles neuves et anciennes.
z
Pour éviter un endommagement éventuel dû à la fuite, on retirera les piles en
période de non-emploi prolongée.
Attention:
z
Éviter d'utiliser des piles rechargeables (pile nickel-cadmium, etc.).
z
La mauvaise installation des piles peut entraîner un mauvais fonctionnement de
l'appareil.
Notes:
z
Remplacer les piles si la distance télécommandable est réduite ou si le fonctionnement est irrégulier. Se procurer 2 piles au format "AA" (UM/SUM-3, R6, HP-7 ou
équivalent).
z
Avec un chiffon doux, nettoyer régulièrement l'émetteur de la télécommande et le
capteur de l'appareil.
z
Une forte lumière frappant le capteur gênera le fonctionnement. Modifier l'éclairage ou changer l'orientation de l'appareil.
z
Mettre la télécommande à l'abri de l'humidité, la chaleur, le choc et les vibrations.
Essai de la télécommande
„
Vérifier la télécommande après avoir effectué tous les raccordements (voir pages 9 -
13).
Diriger la télécommande vers le capteur placé sur l'appareil.
La télécommande peut être utilisée dans le rayon illustré ci-dessous:
Appuyer sur la touche ON/STAND-BY. Le système s'est allumé ? On peut maintenant
écouter de la musique.
Capteur de télécommande
0,2 m - 6 m
- Télécommande -
Avant l'utilisatio n
FRANÇAIS
F-8
CD-BK280V(X)F1.fm01/5/28
Page 56

Raccordement du système
Avant l'utilisatio n
Cadre-antenne PO
Enceinte surround (droite)
- Raccordement du système -
Antenne FM
Enceinte surround (gauche)
Téléviseur
F-9
FRANÇAIS
Enceinte avant (droite)
Enceinte avant (gauche)
Vers une prise murale
(Voir page 13.)
CD-BK280V(X)F1.fm01/5/28
Page 57

CD-BK280V
Raccordement des antennes
„
Antenne FM fournie:
Brancher l'antenne FM à la borne FM 75
OHMS et diriger l'antenne FM vers la direction qui assure la meilleure réception.
Cadre-antenne PO fourni:
Raccorder le cadre-antenne PO à la prise
AM LOOP. Positionner le cadre-antenne
de façon à assurer la meilleure réception.
Placer le cadre-antenne PO sur un meuble ou une étagère ou le visser sur une
lampe ou au mur (vis non fournies).
Note:
Éloigner l'antenne de l'appareil ou du cordon d'alimentation pour assurer une
meilleure réception.
Mise en place du cadre PO:
< Montage > < Fixation au mur >
Mur Vis (non fournies)
Antenne extérieure FM:
Pour obtenir une meilleure réception, utiliser une antenne extérieure FM. S'adresser
au revendeur.
Antenne
extérieure FM
Câble coaxial
de 75 ohms
Note:
Pour utiliser une antenne extérieure FM, débrancher l'antenne FM fournie.
Raccordement des ence intes
„
Enceintes avant
Raccorder le fil noir à la borne SPEA KERS (-) et le fil rouge à la bor ne SPE AKERS
(+).
Enceintes surround
Raccorder le fil noir à la borne SUR ROUND SPEAKERS (-) et le fil vert à la borne
SURROUND SPEAKERS (+).
Enceinte surround (droite)
Enceinte avant (droite)
Rouge
Noir
Vert
Enceinte surround (gauche)
Enceinte avant (gauche)
Attention:
z
Si on utilise d'autres enceintes ayant une impédance inférieure à celle spécifiée, l'appareil risque de s'endommager.
Enceintes avant: 8 ohms Enceintes surround: 16 ohms
z
Ne pas prendre le canal droit pour le canal gauche. L'enceinte de droite est celle située à droite quand on se place
devant le système.
z
Ne pas laisser se toucher les fils dénudés des enceintes.
z
Ne rien placer ou laisser pénétrer dans l'évent de baffle réflex.
z
Éviter de monter (ou s'asseoir) sur les enceintes. On risque
de se blesser en tombant.
Incorrect
Avant l'utilisatio n
- Raccordement du système -
FRANÇAIS
F-10
CD-BK280V(X)F1.fm01/5/28
Page 58

Raccordement du système (suite)
Avant l'utilisatio n
Positionnement des enceintes
„
Pour profiter de l'effet surround, il est conseillé de placer les enceintes comme le
montre l'illustration ci-dessous.
Appareil
principal
Enceinte avant
(gauche)
Enceinte surround
(gauche)
Téléviseur
Enceinte avant
(droite)
Enceinte surround
(droite)
Notes:
z
Les enceintes avant sont magnétiquement blindées.
On peut donc les placer à proximité d'un téléviseur sans affecter ce dernier. Tou-
tefois, il peut se produire une variation des couleurs selon le type du téléviseur.
S'il se produit une altération des couleurs ...
Éteindre le téléviseur (avec le commutateur marche/arrêt).
15 - 30 minutes après, rallumer le téléviseur.
Si les couleurs restent toujours altérées ...
Éloigner les enceintes avant du téléviseur.
- Raccordement du système -
z
S'il se trouve un aimant ou un électro-aimant à proximité du téléviseur ou du système, les couleurs peuvent être altérées sur l'écran du téléviseur.
Emplacement des evceintes surround:
Fixer les enceintes surround au mur si c'est possible. On les placera à 60 cm - 90 cm
au-dessus d'un auditeur assis.
Exemple: fixation au mur Exemple: installation verticale
Mur
60 - 90 cm
Note:
Lorsque les enceintes surround ne sont pas installées au mur, leur emblème est mis
à l'envers. On retournera alors l'emblème à la main.
Emblème
F-11
Les façades des enceintes avant sont amovibles:
Veiller à ce que rien ne se heurte contre le diaphragme
lorsqu'on retire la façade.
Note:
Les façades des enceintes surround ne sont pas amovibles.
FRANÇAIS
CD-BK280V(X)F2.fm01/5/28
Page 59

CD-BK280V
P our fixer les enceintes surround au mur
„
Les enceintes surround ont été conçues pour être raccrochées a u mur. Vérifier le
type et la taille des vis (voir ci-dessous).
5 mm
22 mm mini
1
Fixer chaque enceinte au mur au moyen d'une vis.
5 mm
Vis de fixation
Mur
z
Vérifier que les vis et le mur peuvent supporter une charge de 20 kg.
z
Serrer les vis de façon à ce que leur tête se trouve à 5 mm du mur.
2
Fixer les enceintes surround en les rac croc hant aux vi s (e mpl ace ments prévus à cet effet sur les enceintes).
17 mm mini
3,2 mm
9 mm
Raccordement d'un moniteur/téléviseur
„
Si le moniteur/télé est doté d'une entrée vidéo, on le raccordera à la prise VIDEO
OUT à l'arrière de l'appareil.
Téléviseur
Vers une prise
d'entrée vidéo
Câble vidéo
Note:
Si le moniteur/télé en est démuni, la prise VIDEO OUT sur l'appareil devra être connectée à un magnétoscope doté d'une entrée vidéo. On raccordera ensuite le
magnétoscope au moniteur/télé par l'intermédiaire d'une entrée TV ANTENNA/
CABLE. (Allumer et régler le magnétoscope sur l'entrée "auxiliaire".)
Avant l'utilisatio n
- Raccordement du système -
Mur
FRANÇAIS
F-12
CD-BK280V(X)F2.fm01/5/28
Page 60

Raccordement du système (suite)
Avant l'utilisatio n
Réglage du sélecteur de tension CA
„
Avant de brancher l'appareil, vérifier le réglage du sélecteur de tension situé au dos.
Régler, s'il y a lieu, le sélecteur sur la tension de la région.
Avec u n to urnevis, tourner le sélecteur j usqu 'à ce que la valeur de tension appropriée appa rais se dans la fen être (110 V, 127 V, 220 V ou 230
V - 240 V CA).
Branchement du cordon d'alimentation
„
Brancher le système après avoir terminé toutes les connexions. Si on
branche le système avant le raccordement, il entre en mode de
démonstration.
Note:
Débrancher l'appareil en période de non-utilisation prolongée.
Adaptateur de fiche CA
Dans les régions (ou pays) où la prise murale est similaire à celle montrée dans
l'illustration , brancher l'appareil avec l'adaptateur de fiche (voir illustration). Cet
adaptateur n'accompagne pas les appareils destinés aux régions où le branchement
peut se faire directement (voir illustration ).
- Raccordement du système -
Réglage du sélecteur d'intervalle FM/PO
„
1
L'Union Internationale des Télécommunications (UIT) a imposé à ses pays membres
de maintenir un intervalle de 100 kHz ou 50 kHz entre les fréquences de radiodiffusion des stations FM et un intervalle de 10 kHz ou 9 kHz pour les stations PO. L'illustration indique les zones de 50/9 kHz (régions 1 et 3) et la zone de 100/10 kHz
(région 2).
Avant d'ut iliser l'appareil, agir sur le commutateur SPAN SELECTOR (situé à l'arrière)
pour le régler sur l'intervalle (portée) de la région.
F-13
FRANÇAIS
Pour modifier la zone d'accord:
1 Appuyer sur la touche ON/STAND-BY pour mettre l'appareil en mode d'attente.
2 Régler le commutateur SPAN SELECTOR (situé à l'arrière) comme suit.
z
2
Pour l'intervalle de 50 kHz en FM (9 kHz en PO) 50/9
z
Pour l'intervalle de 100 kHz en FM (10 kHz en PO) 100/10
3 Tout en maintenant les touches et X-BASS/DEMO enfoncées, appuyer sur la
touche ON/STAND-BY pour afficher "CLEAR AL".
Attention:
Cette opération efface toutes les données en mémoire: réglages pour horloge, minuterie, présélection de tuner et programmes CD.
CD-BK280V(X)F2.fm01/5/28
Page 61

Commande générale
Mode de démonstration
„
La première fois qu'on branche l'appareil, ce dernier entre en mode de démonstration. Des mots se déplacent sur l'afficheur.
Pour annuler le mode de démonstration:
Lorsque l'appareil se trouve en attente (mode de démonstration), appuyer sur la touche X-BASS/DEMO. Le mode de démonstration s'annule et l'affichage disparaît.
Pour repasse r au mode de démonstra tion:
Lorsque l'appareil est en veille, réappuyer sur la touche X-BASS/DEMO.
Note:
Lorsque l'appareil est allumé, la touche X-BASS/DEMO peut être utilisée pour passer
en mode d'extra-graves.
P our allumer l'appareil
„
Appuyer sur la touche ON/STAND-BY pour allumer l'appareil.
Pour mettre l'appareil en attente:
Réappuyer sur la touche ON/STAND-BY.
Pour modifier la luminosité de l'affichage
„
(2 niveaux)
On peut éclaircir ou assombrir l'afficheur en agissant sur la touche DIMMER.
CD-BK280V
- Commande générale -
Fonctionnement de base
Assombri Éclairci
FRANÇAIS
CD-BK280V(X)F2.fm01/5/28
F-14
Page 62

Réglage du son
Commande de volume
„
Appuyer sur la touche VOLUME pour augmenter le volume et la touche VOLUME
pour l'effet contraire.
- Réglage du son -
Fonctionnement de base
012 29 30 MAXIMUM
Commande de graves
„
Branché, l'appareil entre automatiquement en mode d'extra-graves, qui suramplifie
les basses fréquences, et affiche "X-BASS". Pour annuler ce mode, il suffit d'appuyer
sur la touche X-BASS/DEMO (X-BASS).
Voyant X-BASS
Égaliseur
„
La pression sur la touche EQUALIZER (EQUALIZER MODE) perm et de visualiser le
mode d'égaliseur en cours. Pour passer à un autre mode, on le sélectionnera en
agissant à plusieurs reprises sur la touche EQUALIZER (EQUALIZER MODE).
Le son n'est pas modifié.
Les graves et les aigus sont amplifiés.
Les graves et les aigus sont légèrement amplifiés.
Les aigus sont un peu supprimés.
.....
F-15
Les aigus sont réduits.
Les voix (plage moyenne) sont amplifiées.
FRANÇAIS
CD-BK280V(X)F2.fm01/5/28
Page 63

Réglage de l'horloge
Dans cet exemple, l'horloge est réglée sur l'affichage 24 heures (0:00).
1
Appuyer sur la touche ON/STAND-BY pour allumer l'appareil.
2
Appuyer sur la touche CLOCK et, avant 5 secondes, appuyer sur
la touche MEMORY/SET.
3
Appuyer sur la touche TUNING/TIME ( ou ) pour sélectionner
l'affichage 24 ou 12 heures et puis presser la touche MEMORY/
SET.
4
Appuyer sur la touche TUNING/TIME ( ou ) pour régler les heures et puis presser la touche MEMORY/SET.
z
Appuyer une fois sur la touche TUNING/TIME ( ou ) pour avancer l'heure
de 1 heure. On la maintiendra enfoncée pour avancer l'heure continuellement.
z
S'il s'agit de l'affichage 12 heures, "AM" passe automatiquement à "PM".
5
Appuyer sur la touche TUNING/TIME ( ou ) pour régler les minutes et puis presser la touche MEMORY/SET.
z
Appuyer une fois sur la touche TUNING/TIME ( ou ) pour avancer l'heure
de 1 minute. Si on la maintient enfoncée, le temps change à un intervalle de
5 minutes.
z
L'heure n'avance pas même si les minutes passent de "59" à "00".
z
L'horloge se met à compter à partir de "0" seconde (les secondes ne s'affichent pas d'ailleurs). L'heure affichée disparaît au bout de quelques secondes.
Pour vérifier l'heure:
Appuyer sur la touche CLOCK.
L'afficheur indiquera l'heure pour 5 secondes environ.
CD-BK280V
- Réglage de l'horloge -
"0:00" L'affichage sur 24 heures apparaît.
(0:00 - 23:59)
"AM 12:00" L'affichage sur 12 heures apparaît.
(AM 12:00 - PM 11:59)
"AM 0:00" L'affichage sur 12 heures apparaît.
(AM 0:00 - PM 11:59)
Il faut rappeler que cette opération se fait lors de la première utilisation ou après
la réinitialisation. [Pour plus de détails, se reporter à "Effacement de toute la mémoire (réinitialisation) à la page 45.]
Note:
"CLOCK" ou l'heure clignote à la pression de la touche CLOCK lorsque le courant est
rétabli à la suite d'une panne de courant ou d'un débranchement de l'appareil.
Remettre l'horloge comme suit.
Pour remettre l'horloge à l'heure:
Suivre "Réglage de l'horloge" depuis le début. Si l'heure affichée clignote, on peut
sauter l'étape 3 (choix de l'affichage 24 ou 12 heures).
Pour passer à l'affichage 24 heures ou 12 heures:
1 Effacer tous les contenus programmés. [Pour plus de détails, se reporter à "Effa-
cement de toute la mémoire (réinitialisation) à la page 45.]
2 Renouveler "Réglage de l'horloge".
FRANÇAIS
CD-BK280V(X)F2.fm01/5/28
Fonctionnement de base
F-16
Page 64

CD vidéo
- CD vidéo -
Lecture de CD vidéo
Tout CD contenant des images animées (film) est lisible.
Vous pouvez apprécier les films avec une qualité sonore de MD et une qualité
d'image de cassette VHS.
La technologie de compression numérique permet la lecture en continu d'un maximum de 74 minutes sur un disque de 12 cm.
Avec les CD vidéo, il est possible de sélectionner les éléments à v isualiser au menu
sur écran. Les disques qui supportent le "Contrôle de la lecture" peuvent afficher des
images fixes. (Voir pages 19 - 20.)
Les symboles de disque se trouvent sur l'étiquette ou la pochette du disque.
Symbole
Taille 8 cm 12 cm
Côté étiquette 1 face 1 face
Format d'enregistrement audio Numérique
(20 mn maxi)
Format d'enregistrement vidéo MPEG 1
Numérique
(74 mn maxi)
Types de disques
„
Cet appareil accepte les CD vidéo supportant PBC (Version 2.0)(PBC est l'abréviation de "Contrôle de la lecture").
On peut choisir l'un des deux types de lecture en fonction du disque.
Type de disque Caractéristiques
CD vidéo sans PBC
(version 1.1)
CD vidéo avec PBC
(version 2.0)
Le son et les images animées peuvent être reproduits en suivant les mêmes opérations que celles
décrites pour CD audio.
Outre la caractéristique ci-dessus (pour les disques sans PBC), les CD à PBC ont un menu s'affichant sur l'écran du téléviseur. Il est possible de
jouer des jeux interactifs et d'utiliser d'autres logiciels à fonction de recherche (lecture du menu). Il
est aussi possible d'afficher des images haute résolution ou des images fixes normales.
Notes:
z
Les CD vidéo sont enregistrés sous un format PAL ou NTSC.
z
Les CDV (12 cm) en système analogique sont illisibles.
z
Les CD photo et CD-ROM sont illisibles.
F-17
FRANÇAIS
CD-BK280V(X)F2.fm01/5/28
Page 65

Préparation pour la lecture de CD vidéo
CD-BK280V
Réglage du téléviseur et du magnétoscope
!
L'entrée du téléviseur ou du magnétoscope peut varier selon la méthode de raccordement. Bien effectuer le réglage. (Pour vérifier le réglage, suivre le procédé de la
lecture aux pages 19 - 20.)
<Pour téléviseurs dotés d'une prise d'entrée vidéo>
Téléviseur
Mettre le sélecteur
d'entrée en VCR.
<Pour téléviseurs sans prise d'entrée vidéo>
Mettre le sélecteur
d'entrée en AUX.
Mettre le sélecteur
en VCR.
Téléviseur
Magnétoscope
Sélection du format de sortie vidéo
!
Le CD vidéo est enregistré en format PAL ou NTSC.
Sélectionner un format de sortie vidéo (NTSC ou PAL) selon le téléviseur ou le
magnétoscope.
Pour sélectionner le format de sortie vidéo:
En mode d'arrêt, appuyer sur la touche PAL/NTSC.
Chaque pression de la touche commute le format dans l'ordre suivant:
NTSC PAL
Notes:
"
Les CD vidéo ont été enregistrés sous un format PAL ou NTSC. Si on reproduit un
disque PAL en mode NTSC ou inversement, la taille de l'image se modifie verticalement.
"
Sur un téléviseur multimode avec sélecteur d'entrée, régler le sélecteur à "MULTI
MODE". Pour les détails, voir le mode d'emploi du téléviseur.
"
Ne pas changer de format de sortie vidéo pendant la lecture. Sinon, le signal
d'image pourrait ne pas être envoyé correctement.
"
Les images peuvent être distordues lorsque le réglage est changé. Il ne s'agit pas
d'un mauvais fonctionnement.
"
Quelques heures après le débranchement, l'appareil repasse au réglage par
défaut qui varie selon la région.
Lecture de CD vidéo
- Préparation pour la lecture de CD vidéo -
Mettre le sélecteur
d'entrée en VCR.
FRANÇAIS
F-18
CD-BK280V(X)F2.fm01/10/12
Page 66

Lecture de CD vidéo avec P.B.C. (version 2.0)
Lecture de CD vidéo
Contrôle de la lecture:
Les CD vidéo supportant le "Contrôle de la lecture" peuvent afficher une image fixe.
Cette fonction est utilisable avec des CD vidéo (CD vidéo avec contrôle de la lecture)
à méthode de lecture enregistrée. Il est possible de sélectionner les éléments à
visionner au menu affiché sur l'écran du téléviseur, ou d'afficher des images fixes.
1
Allumer le téléviseur et régler son sélecteur d'entrée sur "VCR"
(magnétoscope).
2
Appuyer sur la touche ON/STAND-BY pour allumer l'appareil.
3
Appuyer sur la touche CD/VIDEO CD (CD).
4
Appuyer sur la touche OPEN/CLOSE pour ouvrir le tiroir.
5
Placer un ou des CD vidéo avec P.B.C. dans le tiroir, l'étiquette
vers le haut.
Pour mettre le troisième CD vidéo en pl ace, on press era sur la touche DISC SKIP pour tourner le tiroir et le posera sur une place vide.
z
On peut mettre des CD vidéo dans une position souhaitée sur le tiroir.
z
Mettre le CD vidéo de 8 cm au centre d'une position.
12 cm
6
Refermer le tiroir en appuyant sur la touche OPEN/CLOSE.
8 cm
F-19
- Lecture de CD vidéo avec P.B.C. (version 2.0) -
Temps de lecture total du CD vidéo dont le numéro est en clignotement
7
Pour sélectionner le premier CD vidéo à écouter, appuyer sur la
touche DISC SKIP.
8
FRANÇAIS
Appuyer sur la touche ( /SELECT/RESUME).
Un menu apparaîtra sur le téléviseur et l'appareil passera
en pause de lecture.
Réglage du son (Voir page 15.)
<Écran du téléviseur>
1
2
CD-BK280V(X)F2.fm01/5/28
Page 67

9
Sélectionner le numéro de menu souhaité avec les touches de recherche directe de la télécommande.
z
La lecture commencera.
z
La lecture terminée, le menu apparaîtra sur l'écran. Sélectionner le numéro
pour la reproduction.
Interruption de la lecture:
Appuyer sur la touche de la télécommande.
Pour reprendre la lecture à partir du même point, appuyer sur la touche /
SELECT/RESUME.
Pour arrêter l'opération en cours et revenir au menu:
Appuyer sur la touche ( /RETURN) moins de 0,5 seconde.
Pour arrêter complètement le CD vidéo:
Maintenir la touche ( /RETURN) pressée plus d'une seconde.
Pour retirer des CD vidéo:
En mode d'arrêt, appuyer sur la touche OPEN/CLOSE.
Le tiroir de disque s'ouvre. Enlever les deux disques, puis appuyer sur la touche
DISC SKIP pour tourner le tiroir. Retirer le disque qui reste.
z
Si la touche DISC SKIP ne permet de tourner le tiroir (on ne peut pas alors retirer
le disque), fermer et rouvrir le tiroir.
Après utilisation:
Appuyer sur la touche ON/STAND-BY pour passer en veille.
Notes:
z
Pendant la lecture, on peut sélectionner un autre disque en pressant sur la touche
DISC SKIP ou l'une des touches 1 - 3 de la télécommande.
z
Pendant que l'appareil lit le disque ("TOC READ" reste affiché), on ne peut pas
sélectionner un autre disque même si on appuie sur la touche DISC SKIP ou l'une
des touches 1 - 3 de la télécommande.
z
Le contrôle de la lecture permet de lire un CD vidéo en fonction des instructions
enregistrées sur le disque. Les opérations "précédent", "suivant", "retour" et
"sélection" peuvent différer selon les CD PBC.
z
Certains CD vidéo avec contrôle de la lecture peuvent avoir une pause automatique enregistrée. Sur de tels disques, l'écran sera automatiquement arrêté au point
où un signal de pause automatique a été inséré.
z
Si l'image reproduite est parasitée, le CD vidéo peut être rayé. On le remplacera
par un autre.
La fonction P.B.C. ne fonctionnera pas dans les conditions suivantes.
z
Quand la lecture commence avec une lecture à répétition, au hasard ou programmée, une reprise de lecture, un condensé de disque, un condensé de plage ou la
recherche temporelle sélectionnée.
z
Quand la lecture commence avec les numéros de plage sélectionnés en recherche directe, avec la touche PRESET (NEXT ) ou PRESET
( PREV.).
P our se déplacer sur un men u dépassant 1
„
page
Pour passer au menu suivant:
En mode d'arrêt, appuyer sur la touche PRESET .
Pour repasser au menu précédent:
En mode d'arrêt, appuyer sur la touche PRESET .
Notes:
z
Cette fonction peut ne pas fonctionner selon le disque lu.
z
La touche PREV. ou NEXT de la télécommande permet de localiser un
passage souhaité.
Lecture sans activation de la fonction de
„
contrôle de la lecture
Il est possible de reproduire un CD vidéo avec P.B.C. sans activer la fonction de contrôle de la lecture.
Le menu n'apparaîtra pas dans ce cas et le disque sera reproduit comme s'il s'agissait d'un CD vidéo sans P.B.C.
1
En mode d'arrêt, appuyer sur la touche P.B.C. (P.B.C. AUTO/OFF)
pour annuler le mode P.B.C.
La fonction P.B.C. ne peut pas être annulée quand l'écran de menu est affiché.
<Écran du téléviseur>
PBC OFF
2
Appuyer sur la touche ( /SELECT/RESUME).
La lecture commencera.
Notes:
z
La fonction P.B.C. peut aussi être annulée en mode de lecture.
z
Certains CD vidéo avec P.B.C. ne peuvent pas être lus quand le mode P.B.C. est
désactivé.
z
Voir les pages 21 - 28 pour l'exécution des différentes fonctions sans activation de
la fonction P.B.C.
CD-BK280V
Lecture de CD vidéo
- Lecture de CD vidéo avec P.B.C. (version 2.0) -
FRANÇAIS
F-20
CD-BK280V(X)F2.fm01/5/28
Page 68

Lecture de CD vidéo sans P.B.C. (version 1.1)
4
Appuyer sur la touche OPEN/CLOSE pour ouvrir le tiroir.
5
Placer un ou des CD vid éo dan s le ti ro ir de di sque , l 'étiq uette ve rs
le haut.
Pour mettre le troisième CD vidéo en pl ace, on press era sur la touche DISC SKIP pour tourner le tiroir et le posera sur une place vide.
z
On peut mettre des CD vidéo dans une position souhaitée sur le tiroir.
z
Mettre le CD vidéo de 8 cm au centre d'une position.
6
Refermer le tiroir en appuyant sur la touche OPEN/CLOSE.
Lecture de CD vidéo
F-21
Nombre de morceaux total du CD
vidéo dont le numéro est en
clignotement
7
Pour sélectionner le premier CD vidéo à écouter, appuyer sur la
touche DISC SKIP.
8
Pour déclencher la lecture, appuyer sur la touche ( /SELECT/
RESUME).
z
La lecture commence par le morceau 1 sur le disque sélectionné. Ce disque
terminé, l'appareil passe automatiquement au suivant.
- Lecture de CD vidéo sans P.B.C. (version 1.1) -
1
Allumer le téléviseur et régler son sélecteur d'entrée sur "VCR"
(magnétoscope).
2
Appuyer sur la touche ON/STAND-BY pour allumer l'appareil.
3
Appuyer sur la touche CD/VIDEO CD (CD).
FRANÇAIS
Réglage du son (Voir page 15.)
z
Lorsque l'appareil termine le dernier morceau du troisième disque, il s'arrête
automatiquement.
z
Lorsque l'un des trois emplacements 1 - 3 est vide, l'appareil le sautera pour
passer au suivant.
Notes:
z
Pendant la lecture, on peut sélectionner un autre disque en pressant sur la touche
DISC SKIP ou l'une des touches 1 - 3 de la télécommande.
z
Pendant que l'appareil lit le disque ("TOC READ" reste affiché), on ne pe ut pas
sélectionner un autre disque même si on appuie sur la touche DISC SKIP ou l'une
des touches 1 - 3 de la télécommande.
Temps de lecture total du CD vidéo
dont le numéro est en clignotement
CD-BK280V(X)F3.fm01/5/28
Page 69

CD-BK280V
Interruption de la lecture:
Appuyer sur la touche de la télécommande.
Pour reprendre la lecture à partir du même point, appuyer sur la touche /
SELECT/RESUME.
Arrêt de la lecture:
Appuyer sur la touche ( /RETURN).
Pour retirer des CD vidéo:
En mode d'arrêt, appuyer sur la touche OPEN/CLOSE.
Le tiroir de disque s'ouvre. Enlever les deux disques, puis appuyer sur la touche
DISC SKIP pour tourner le tiroir. Retirer le disque qui reste.
z
Si la touche DISC SKIP ne permet de tourner le tiroir (on ne peut pas alors retirer
le disque), fermer et rouvrir le tiroir.
Après utilisation:
Appuyer sur la touche ON/STAND-BY pour passer en veille.
P our repasser au début du morceau en
„
cours (recherche de saut)
Pour passer au morceau suivant:
Appuyer, en cours de lect ure, sur l a touche PRESET (moins de 0, 5 seconde).
z
On peut passer directement à un morceau
souhaité. Afficher son numéro en agissant
à plusieurs reprises sur la touche PRESET .
Pour repasser le morceau en cours:
Appuyer, en cours de lect ure, sur l a touche PRESET (moins de 0,5 seconde).
z
On peut passer directement à un morceau
souhaité. Afficher son numéro en agissant
à plusieurs reprises sur la touche
PRESET .
[Exemple] Lorsque le morceau 9 est en cours
Lecture de balayage
„
Pour avancer rapidement:
En cours de lecture, presser la touche PRESET .
Pour reculer rapidement:
En cours de lecture, presser la touche PRESET .
Scène en cours
Notes:
z
La lecture normale se déclenche dès qu'on relâche la touche PRESET
ou PRESET .
z
La recherche d'un passage souhaité se fait sur un seul disque.
z
Pendant la lecture en balayage, les couleurs peuvent s'altérer et les images peuvent être distordues ou parasitées.
z
Pendant l'a v ance rapide ou l 'in v ersion sur CD vidéo, les images sont intermittentes
et aucun son n'est entendu.
z
Cette opération se fait au moyen de la touche ou de la télécommande.
Lecture de CD vidéo
- Lecture de CD vidéo sans P.B.C. (version 1.1) -
Notes:
Début du morceau 9 Début du morceau 10
z
On peut passer au début d'une plage sur un seul disque.
z
La touche PREV. ou NE XT sur la télécommande per met aussi de rechercher des morceaux.
FRANÇAIS
F-22
CD-BK280V(X)F3.fm01/5/28
Page 70

Système de recherche directe
Répétition et lecture au hasard
L'emploi des touches de recherche directe permet de lire les plages souhaitées.
1
En mode d'arrêt, appuyer sur la touche DISC SKIP pour sélectionner un
disque souhaité.
2
Utiliser les touches de rec herche directe de la télécommande pour sé-
lectionner un morceau souhaité.
z
Les touches de recherche directe permettent de sélectionner jusqu'au numéro 10.
z
Pour le numéro 11 ou plus, utiliser la touche "+10".
A. Par exemple, pour choisir 13
1 Appuyer une fois sur la touche "+10".
2 Appuyer sur la touche "3".
B. Par exemple, pour choisir 30
1 Appuyer trois fois sur la touche "+10".
2 Appuyer sur la touche "0".
3
Pour déclencher la lecture, appuyer sur la touche ( /SELECT/
RESUME).
La lecture du morceau souhaité démarre. Lorsque le dernier morceau sur le disque contenant le morceau souhaité est terminé, le disque suivant se déclenche
automatiquement.
Arrêt de la lecture:
Appuyer sur la touche ( /RETURN).
Notes:
- Système de recherche directe / Répétition et lecture au hasard -
z
Pour déclencher la lecture du morceau choisi, il suffit simplement d'agir en cours
Lecture avancée de CD vidéo (version 1.1)
de lecture sur les touches de recherche directe. [On n'a pas besoin de presser sur
la touche ( /SELECT/RESUME).]
z
Un numéro de plage supérieur au nombre de plages sur le disque ne peut pas
être sélectionné.
z
En lecture au hasard, la recherche directe est impossible.
Numéro du disque choisi
Numéro de la plage choisie
Répétition
„
On peut répéter la totalité des disques (3 maxi) ou une programmation.
Répétition de la totalité des disques (3 maxi):
Appuyer deux fois sur la touche ( /SELECT/RESUME).
Pour répéter un morceau:
Suivre les étapes 1 - 5 dans le chapitre "Lecture des morceaux programmés" et puis
appuyer deux fois sur la touche ( /SELECT/RESUME).
Pour arrêter la répétition:
Réappuyer sur la touche ( /SEL ECT/RESUM E) .
" " s'éteint.
Lecture au hasard
„
On peut écouter des morceaux dans un ordre laissé au hasard.
Appuyer sur la touche RANDOM de la télécommande pour déclencher la lecture au hasard.
Annulation de la lecture au hasard:
Appuyer sur la touche /SELECT/RESUME.
Notes:
z
Si on appuie sur la touche NEXT pendant la lecture au hasard, on peut passer
à un morceau suivant sélectionné par l'opération au hasard. Mais la touche
PREV. ne permet pas de repasser au morceau précédent. L'appareil repasse
alors au début du morceau en cours.
z
Lors de la lecture au hasard, l'appareil reproduit des morceaux dans un ordre
aléatoire. (Il est impossible de spécifier un ordre.)
Attention:
z
Après la répétition ou la lecture au hasard, penser à appuyer sur la touche ( /
RETURN). Dans le cas contraire, l'appareil lira le ou les disques indéfiniment.
z
Pendant la lecture P.B.C., la répétition ou la lecture au hasard n'est pas autorisée.
F-23
FRANÇAIS
CD-BK280V(X)F3.fm01/5/28
Page 71

Lecture des morceaux programmés
CD-BK280V
On peut sélectionner 32 morceaux (maxi) pour la lecture dans un ordre souhaité.
1
Appuyer 3 fois sur la touche DISC SKIP afin de lire les informa tions
des disques et de les programmer.
2
En mode d'arrêt, appuyer sur l'une
des touches 1 - 3 de la télécom-
mande pour sélectionner un disque
souhaité.
Numéro du disque choisi
3
Appuyer sur les touches de recherche directe de la télécommande pour
sélectionner la plage souhaitée.
Numéro de la plage choisie
On peut sélectionner une piste en pressant sur la touche PRESET (
PREV.) ou PRESET (NEXT ).
4
Appuyer sur la touche MEMORY/SET
(MEMORY) pour stocker le numéro
de morceau.
Ordre de lecture
Lorsque le morceau est mis en mémoire, l'appareil affiche "MEMORY".
5
Renouveler les étapes 2 - 4 pour d'autres morceaux. 32 morceaux
au total sont programmables.
En cas d'erreur, on peut effacer des morceaux programmés en pressant sur la
touche CLEAR.
6
Pour déclencher la lecture, appu yer su r la touc he ( /SELECT/
RESUME).
Effacement des morceaux programmés:
Appuyer sur la touche CLEAR de la télécommande pendant que le voyant "MEMORY" reste
allumé.
Chaque fois que la touche est pressée, un morceau s'efface à partir du dernier morceau programmé. Tous les morceaux effacés,
"MEMORY" disparaîtra.
Ajout de morceaux au programme:
Si un programme a été stocké préalablement, l'appareil affiche "MEMORY". Suivre
les étapes 2 - 4 pour ajouter des morceaux. Ces derniers seront stockés à la suite du
programme d'origine.
Notes:
z
L'ouverture du tiroir de disque annule automatiquement la séquence programmée.
z
Les morceaux programmés ne s'effacent pas même si on appuie sur la touche
ON/STAND-BY pour entrer en attente ou passe de la fonction CD/VIDEO CD (CD)
à une autre.
z
La lecture au hasard n' est pa s ut ili sable pour la lecture des mor ce aux pr ogrammés.
z
La fonction de programmation ne marche pas dans le mode P.B.C. qui s'annule
automatiquement si on active la programmation.
- Lecture des morceaux programmés -
Lecture avancée de CD vidéo (version 1.1)
FRANÇAIS
F-24
CD-BK280V(X)F3.fm01/5/28
Page 72

Sélection de digest sur disques et morceaux
1
8
7
2
9
6
3
4
5
1015111412
13
<Écran du téléviseur>
Sélection de digest sur disques
„
Il est possible de lire la plage souhaitée en sélectionnant une des 9 plages affichées
sur l'écran.
1
En mode d'arrêt, appuyer sur la touche DIGEST
(DIGEST/TIME SEARCH).
z
9 plages maximum seront affichées sur l'écran.
z
Chaque fois qu'un morceau s'affiche, l'appareil en reproduit les premières secondes.
2
Appuyer sur les touches de rech erche directe de la télécomma nde
pour sélectionner la plage souhaitée.
z
La lecture commencera à la plage souhaitée.
z
Lorsque l'appareil termine le dernier morceau du troisième disque, il s'arrête
automatiquement.
Quand le CD vidéo contient plus de 9 plages:
Chaque pression de la touche PRESET
(NEXT ) permet d'afficher les 9
plages suivantes.
Appuyer sur la touche PRESET
( PREV.) pour repasser à l'affichage
précédent.
<Écran du téléviseur>
1
2
3
8
9
4
7
6
5
- Sélection de digest sur disques et morceaux -
Lecture avancée de CD vidéo (version 1.1)
F-25
FRANÇAIS
Pour annuler le digest de disque:
Appuyer sur la touche ( /RETURN).
Notes:
z
La fonction de digest sur disque n'est utilisable qu'en mode d'arrêt.
z
Cette fonction n'est pas disponible pour un CD audio.
CD-BK280V(X)F3.fm01/5/28
Page 73

Sélection de recherche par
CD-BK280V
Digest de plage
„
Chaque plage est divisée en 9 sections.
On peut sélectionner une scène par laquelle commence la reproduction. Cette fonction est pratique surtout s'il s'agit d'un film non-divisé par exemple.
1
Pendant la lecture, appuyer sur la touc he DIGEST
(DIGEST/TIME SEARCH).
z
La plage lue sera divisée en 9 parties et l'appareil passera en pause de lecture.
z
Chaque fois qu'une partie divisée s'affiche, l'appareil en
reproduit les premières secondes.
2
Appuyer sur les touche s de recher che directe de la téléco mmande
<Écran du téléviseur>
1
2
3
8
9
4
7
6
5
pour sélectionner la scène à visionner.
z
La lecture commencera à partir de la scène sélectionnée.
z
Lorsque l'appareil termine le dernier morceau du troisième disque, il s'arrête
automatiquement.
Pour annuler la fonction de digest de plage:
Appuyer sur la touche ( /RETURN).
Notes:
z
La fonction de digest sur plage n'est utilisable qu'en cours de lecture.
z
Cette opération n'est pas autorisée sur une plage de cour te durée (moins d'une
minute), une image fixe (menu, photo, etc.) et un CD audio.
z
Une plage est divisée en neuf parties ayant une durée égale.
Attention:
La fonction de digest sur disques et morceaux ne marche pas pendant la lectu re
P.B.C. et la lecture des morceaux programmés. Annuler le mode P.B.C. préalablement.
temps
On peut commencer la lecture par une scène souhaitée en indiquant le temps.
1
En cours de lecture, maintenir la touche DIGEST (DIGEST/TIME
SEARCH) enfoncée pour activer le mode de recherche par temps.
<Écran du téléviseur>
GO TO
2
Agir sur les touches de recherche directe de la télécommande
pour spécifier le temps.
[Pour spécifier 2 minutes et 30 secondes par exemple]
Appuyer successivement sur "0", "2", "3", "0".
<Écran du téléviseur>
GO TO
z
Le point du temps spécifié sera détecté et la lecture reprendra.
z
Lorsque l'appareil termine le dernier morceau du troisième disque, il s'arrête
automatiquement.
Pour annuler la fonction de recherche par temps:
Appuyer sur la touche ( /RETURN).
Notes:
z
Le mode recherche par temps sera automatiquement annulé si le temps souhaité
n'est pas déclaré dans les 10 secondes.
z
La recherche par temps ne fonctionnera pas pendant la lecture P.B.C. et la lecture
des morceaux programmés. Annuler le mode P.B.C. préalablement.
z
Cette fonction n'est pas autorisée sur les images fixes (menu, photo, etc.).
:
02:30
Temps spécifié
Lecture avancée de CD vidéo (version 1.1)
- Sélection de digest sur disques et morceaux / Sélection de recherche par temps -
FRANÇAIS
CD-BK280V(X)F3.fm01/5/28
F-26
Page 74

Fonction de signet
Cette fonction permet de repérer une scène souhaitée sur le CD vidéo pour faciliter
la lecture. (On peut repérer jusqu'à 9 scènes sur un disque.)
Pour créer un signet
„
1
Appuyer sur la touche DISC SKIP pour sélectionner un disque sou-
- Fonction de signet -
Lecture avancée de CD vidéo (version 1.1)
haité.
2
Appuyer sur la touche ( /SELECT/RESUME).
3
Appuyer sur la touche BOOKMARK d e la télécommande l orsque la
scène souhaitée est affichée.
"B-M" apparaît quelques secondes sur l'écran du téléviseur.
4
Répéter l'étape 3.
z
Jusqu'à 9 scènes peuvent être marquées.
z
Si on crée plus de 9 signets, les signets s'effacent un à un à partir du plus ancien.
<Écran du téléviseur>
B-M
P our rappeler une scène repérée par
„
signet
1
En mode d'arrêt ou de lecture, presser plus de 1 seconde sur la
touche BOOKMARK de la télécommande.
"BOOKMARK DIGEST" apparaît avant que les scènes repérées et les numéros
s'affichent sur l'écran. Chaque fois qu'une scène repérée s'affiche, l'appareil en
reproduit les premières secondes et se met en pause après avoir visualisé toutes
les scènes.
2
Agir sur les touches de recherche directe de la télécommande
pour sélectionner une scène à reproduire.
z
La lecture commencera à partir de la scène sélectionnée.
z
Le troisième disque terminé, l'appareil se mettra en arrêt automatiquement.
<Écran du téléviseur>
1 2
Pour annuler la fonction de signet:
Appuyer sur la touche ( /RETURN).
Notes:
z
Cette fonction est opérante seulement avec les CD vidéo.
z
Les signets ne s'effaceront pas même si on met l'appareil en attente ou passe de
la fonction CD/VIDEO CD (CD) à une autre.
z
L'ouverture du tiroir de disque efface automatiquement les signets.
z
Les signets créés sur l'un des disques 1 - 3 s'effacent lorsque l'on en crée sur
d'autres disques.
z
La fonction de signet ne marche pas pendant la lecture P.B.C. et la lecture des
morceaux programmés. Annuler le mode P.B.C. préalablement.
z
Cette fonction est invalidée pour les images fixes (affichage de menu, photos etc.)
et les CD audio.
z
Chaque scène marquée sera automatiquement effacée à la sauvegarde du pro-
gramme.
3
5
4
F-27
FRANÇAIS
CD-BK280V(X)F3.fm01/5/28
Page 75

Lecture par reprise
Changement de l'affichage
CD-BK280V
Cette fonction permet de reprendre la lecture à partir du point où elle a été interrompue.
En mode d'arrêt, maintenir la touche ( /SELECT/RESUME) enfoncée plus de 1 seconde.
La lecture recommencera au point où elle a été arrêtée.
Notes:
z
La lecture par reprise n'est pas autorisée si on passe de la fonction CD/VIDEO CD
(CD) à une autre ou met l'appareil en attente.
z
La reprise de la lecture est impossible en mode P.B.C.
z
La reprise de la lecture est impossible quand le tiroir de disque est ouvert ou
après le changement de disque.
Pour reproduire le CD vidéo
manuellement
Normalement, cet appareil détecte la présence de CD vidéo et le reproduit. Si ce
n'est pas le cas, il faut manoeuvrer manuellement.
1
Appuyer sur la touche VCD AUTO/VCD jusqu'à ce que "VCD ON"
apparaisse sur l'écran du téléviseur.
<Écran du téléviseur>
VCD ON
sur TV
L'état de fonctionnement de l'appareil principal peut être contrôlé sur l'affichage sur
écran.
Chaque fois que la touche OSD (OSD ON/OFF) est pressée en cours
de lecture ou d'arrêt, l'affichage se modifie comme suit:
[En mode d'arrêt]
00:00
Ancun affichage
2
Appuyer sur la touche /SELECT/RESUME.
Pour re v enir au mode de détection autom atiq ue des CD vidéo:
Appuyer sur la touche VCD AUTO/VCD jusqu'à
ce que "VCD AUTO" apparaisse sur l'écran du
téléviseur.
Notes:
z
Ce réglage s'annule lorsque l'on change de disques.
z
En état de "VCD ON", la lecture de CD audio est impossible.
<Écran du téléviseur>
VCD AUTO
[En lecture]
01:26
002/010
Numéro de
morceau
Note:
Les affichages peuvent varier selon les disques.
Nombre
total de
morceaux
Temps écoulé
CD-BK280V(X)F3.fm01/5/28
Ancun affichage
FRANÇAIS
Lecture avancée de CD vidéo (version 1.1)
- Lecture par reprise / P our reproduire le CD vidéo manuellement / Changement de l'affichage sur TV -
F-28
Page 76

Écoute de CD
1
Appuyer sur la touche ON/STAND-BY pour allumer l'appareil.
2
Appuyer sur la touche CD/VIDEO CD (CD).
3
Appuyer sur la touche OPEN/CLOSE pour ouvrir le tiroir.
4
Placer des CD, face étiquetée en haut, dans le tiroir de disque.
Pour mettre un troisième disque en place, tourner le tiroir de dis-
que en appuyant sur la touche DISC SKIP.
z
On peut mettre des CD n'importe quelle position sur le tiroir.
z
Bien placer des CD de 8 cm au milieu de la position.
5
Refermer le tiroir en appuyant sur la touche OPEN/CLOSE.
Lecture CD
F-29
Nombre total de morceaux sur
le CD dont le numéro clignote
6
Pour sélectionner le premier CD à écouter, appuyer sur la touche
- Écoute de CD -
FRANÇAIS
Réglage du son (Voir page 15.)
DISC SKIP.
7
Pour déclencher la lecture, appuyer s ur la touche ( /SELECT/
RESUME).
z
La lecture commence par le morceau 1 sur le disque sélectionné. Ce disque
terminé, l'appareil passe automatiquement au suivant.
z
Lorsque le dernier morceau sur le troisième disque est terminé, le lecteur CD
se met en arrêt automatiquement.
z
S'il y a une place vide (positions 1 - 3), l'appareil la sautera et lira un disque
suivant.
CD-BK280V(X)F3.fm01/5/28
Temps de lecture total sur le CD
dont le numéro clignote
Page 77

CD-BK280V
Interruption de la lecture:
Appuyer sur la touche de la télécommande.
Pour reprendre la lecture à partir du même point, appuyer sur la touche /
SELECT/RESUME.
Arrêt de la lecture:
Appuyer sur la touche ( /RETURN).
Pour retirer des CD:
En mode d'arrêt, appuyer sur la touche OPEN/CLOSE.
Le tiroir de disque s'ouvre. Enlever les deux disques, puis appuyer sur la touche
DISC SKIP pour tourner le tiroir. Retirer le disque qui reste.
z
Si la touche DISC SKIP ne permet de tourner le tiroir (on ne peut pas alors retirer
le disque), fermer et rouvrir le tiroir.
Après utilisation:
Appuyer sur la touche ON/STAND-BY pour passer en veille.
Les fonctions d e lecture suiv antes son t les mêmes que celles pour CD
vidéo.
Système de recherche directe . . . . . . . . . . . . . . . . . . . . . . . . . . . . . . . . . . . . . . .23
Répétition et lecture au hasard . . . . . . . . . . . . . . . . . . . . . . . . . . . . . . . . . . . . . .23
Lecture des morceaux programmés . . . . . . . . . . . . . . . . . . . . . . . . . . . . . . . . . .24
Page
Notes:
z
En état de "VCD ON", la lecture de CD audio est impossible.
z
Pendant la lecture, on peut sélectionner un autre disque en pressant sur la touche
DISC SKIP ou l'une des touches 1 - 3 de la télécommande.
z
Pendant que l'appareil lit le disque ("TOC READ" reste affiché), on ne peut pas
sélectionner un autre disque même si on appuie sur la touche DISC SKIP ou l'une
des touches 1 - 3 de la télécommande.
Pour localiser un morceau
„
Pour passer au morceau suivant:
Appuyer, en cours de lecture, sur la touche PRESET (moins de 0,5 seconde).
z
On peut passer directement à un morceau
souhaité. Afficher son numéro en agissant
à plusieurs reprises sur la touche PRESET .
Pour repasser le morceau en cours:
Appuyer, en cours de lecture, sur la touche PRESET (moins de 0,5 seconde).
z
On peut passer directement à un morceau
souhaité. Afficher son numéro en agissant
à plusieurs reprises sur la touche
PRESET .
Notes:
z
On peut localiser un morceau sur un seul disque.
z
La touche PREV. ou NE XT sur la télécommande per met aussi de recher cher des morceaux.
Pour localiser un passage souhaité
„
Pour avancer rapidement:
En cours de lecture, presser la touche PRESET .
- Écoute de CD -
Lecture CD
Attention:
z
Placer un seul CD sur le tiroir.
z
Ne pas pousser le tiroir en cours de mouvement.
z
Ne pas tourner le tiroir de disque à la main. Cela entraînera un mauvais fonctionnement.
z
S'il se produit une panne de courant alors que le tiroir est ouvert, attendre le rétablissement du courant.
z
Si on arrête le tiroir avec force, l'appareil affiche "ER-CD10" et ne fonctionne plus.
Si le cas se présente, appuyer sur la touche ON/STAND-B Y pour passer en veille
et réappuyer dessus pour rallumer l'appareil.
z
En cas de parasites sur télévision ou radio au cours de l'utilisation de disques,
éloigner l'appareil du téléviseur ou du poste de radio.
z
S'il s'agit d'un disque endommagé, encrassé ou mis à l'envers, l'appareil le sautera.
Pour reculer rapidement:
En cours de lecture, presser la touche PRESET .
Notes:
z
La lecture normale se déclenche dès qu'on relâche la touche PRESET
ou PRESET .
z
La touche ou de la télécommande per met de localiser un passage souhaité.
FRANÇAIS
CD-BK280V(X)F3.fm01/5/28
F-30
Page 78

Écoute du disque MP3
MP3, c'est une forme de compression et se développe en Mpeg 1 Audio Layer 3.
"Mpeg layer 3" est un type de code audio qui permet de compresser considérablement des données audio avec la moindre perte de qualité sonore, surtout s'il s'agit
d'une compression à 1/12.
„
Se reporter à "Écoute de CD" (pages 29 - 30).
„
En mode d'arrêt ou de lecture, appuyer sur la touche MP3 DISPLAY.
Chaque fois que la touche est pressée, l'affichage se modifie comme suit.
[En mode d'arrêt]
- Écoute du disque MP3 -
Lecture du CD encodé en MP3
[En mode de lecture]
Lecture ordinaire
Pour modifier l'affichage
Nombre total de morceaux
Titre de morceau
Numéro de
morceau
Temps de lecture écoulé
Titre de morceau
Nom de dossier
Nom de dossier
Écoute du morceau souhaité en le sélec-
„
tionnant
1
En mode d'arrêt, appuyer sur la touche
DISC SKIP de l'appareil principal pour
sélectionner un disque souhaité.
2
Appuyer sur la touche MP3 DISPLAY pour afficher le nom du dossier.
3
Sélctionner le dossier souhaité en agissant sur la tou che PREV.
ou NEXT .
4
Appuyer sur la touche MP3 DISPLAY pour afficher le morceau.
5
Sélectionner le morceau souhaité en agissant sur la touche
PREV. ou NEXT .
Les touches de recherche directe permettent aussi de sélectionner des morceaux.
6
Appuyer sur la touche /SELECT/RESUME pour déclencher la lecture.
Arrêt de la lecture:
Appuyer sur la touche /RETURN.
Les fonctions de lecture ci-dessous sont les mêmes que celles de CD
vidéo ou CD audio.
Pour localiser un morceau . . . . . . . . . . . . . . . . . . . . . . . . . . . . . . . . . . . . . . . . . . 30
Pour localiser un pa ssage souhaité . . . . . . . . . . . . . . . . . . . . . . . . . . . . . . . . . . 30
Répétition et lecture au hasard . . . . . . . . . . . . . . . . . . . . . . . . . . . . . . . . . . . . . . 23
Lecture des morceaux programmés . . . . . . . . . . . . . . . . . . . . . . . . . . . . . . . . . . 24
Attention:
Si on change l'affichage de dossiers ou de morceaux au cours de la programmation,
il n'est pas possible de choisir un autre disque.
Note:
L'appareil prend plus de temps (environ 20 à 90 secondes) pour lire un disque MP3
qu'un CD ordinaire à cause de la structure de ses informations.
Numéro du disque choisi
Page
F-31
FRANÇAIS
Réglage du son (Voir page 15.)
CD-BK280V(X)F4.fm01/5/28
Page 79

Écoute de la radio
1
Appuyer sur la touche ON/STAND-BY pour allumer l'appareil.
2
Appuyer à plusieurs reprises sur la touche TUNER (BAND) pour
sélectionner une gamme d'ondes souhaitée (FM ou AM).
3
Appuyer sur la touche TUNING/TIME ( ou ) pour faire l'accord
sur la station souhaitée.
Accord manuel:
Appuyer sur la touche TUNING/TIME autant de fois qu'il est nécessaire pour régler le tuner sur la station.
Accord automatique:
Si on presse la touche TUNING/TIME plus de 0,5 seconde, le tuner part en recherche et se cale sur la première station qu'il capte.
Notes:
z
La recherche automatique s'arrêtera dès qu'il se produira des parasites.
z
Le balayage automatique sautera des stations à faible puissance.
z
Pour arrêter la recherche, réappuyer sur la touche TUNING/TIME.
Pour recevoir une émission FM stéréo:
Appuyer sur la touche TUNER (BAND) pour allumer le voyant "ST".
z
" " apparaît lorsque l'émission FM captée est en stéréo.
CD-BK280V
Radio
Voyant de mode FM stéréo
Voyant de réception en FM stéréo
z
Si la réception en FM n'est pas bonne, appuyer sur la touche TUNER (BAND)
pour éteindre "ST". La réception passe en mono, mais le son devient plus clair.
Après utilisation:
Appuyer sur la touche ON/STAND-BY pour passer en veille.
Réglage du son (Voir page 15.)
FRANÇAIS
CD-BK280V(X)F4.fm01/5/28
- Écoute de la radio -
F-32
Page 80

Écoute d'une station mise en mémoire
Radio
- Écoute d'une station mise en mémoire -
Mise en mémoire d'une station
„
Il est possible de stocker 40 stations en PO et en FM et de les rappeler par une simple pression d'une touche (accord de présélection).
1
Suivre les étapes 1 - 3 dans "Écoute de la radio", page 32.
2
Appuyer sur la touche MEMORY/SET p our passer en mode de sauvegarde de présélection.
3
Avant 30 secondes, appuyer sur la touche PRESET ou
PRESET pour sélectionner un numéro de présélection.
Stocker des stations en mémoire dans l'ordre à partir du canal de présélection 1.
4
Avant 30 secondes, appuyer sur la touche MEMORY/SET pour
mettre la station en mémoire.
Si le voyant "MEMORY" et le voyant de numéro de présélection s'éteignent
avant la mise en mémoire de la station, renouveler l'opération depuis l'étape 2.
5
Renouveler les étapes 1 - 4 pour mémoriser d'autres stations ou
remplacer une station mise en mémoire.
Une nouvelle station remplace celle déjà mise en mémoire.
Note:
La fonction de protection conserve les stations en mémoire pendant plusieurs heures
même s'il se produit une panne de courant ou un débranchement de l'appareil.
Rappel d'une station mémorisée
„
Appuyer moins de 0,5 seconde sur la touche PRESET ou
PRESET pour sélectionner une station souhaitée.
Canal de présélection Fréquence et gamme d'ondes
Cette opération se fait en appuyant sur la touche PRESET ( ou ) de la télécommande.
P o ur balayer les stations préréglées
„
On peut balayer les stations mises en mémoire automatiquement. (balayage dans la
mémoire de présélection)
1
Appuyer plus de 0,5 seconde sur la touche PRESET ou
PRESET .
z
Les numéros de présélection se mettent à clignoter et l'appareil se cale sur
chaque station pendant 5 secondes.
z
Cette opération se fait en appuyant sur la touche PRESET ( ou ) de la télécommande.
2
Réappuyer sur la touche PRESET ou PRESET dès
la localisation de la station.
P o ur effacer toute la mémoire
„
1 Appuyer sur la touche ON/STAND-BY pour mettre l'appareil en mode d'attente.
2 Tout en maintenant les touches TUNER (BAND) et X-BASS/DEMO enfoncées,
appuyer sur la touche ON/STAND-BY pour afficher "TUNER CL".
F-33
FRANÇAIS
Écoute de la radio (Voir page 32.)
CD-BK280V(X)F4.fm01/5/28
Page 81

Écoute d'une cassette (TAPE 1)
CD-BK280V
Avant la lecture:
z
Pour assurer la meilleure qualité sonore, utiliser des cassettes
normales ou à faible bruit. (Les cassettes métal ou CrO sont déconseillées.)
z
Éviter d'utiliser les cassettes C-120 ou les cassettes de mauvaise
qualité. L'appareil risque de mal fonctionner.
z
Avant de mettre une cassette dans le compartiment, tendre la bande
magnétique avec un crayon ou un stylo à bille.
1
Appuyer sur la touche ON/STAND-BY pour allumer l'appareil.
2
Sélectionner TAPE 1 en appuyant sur la touche TAPE (1 2).
3
Ouvrir le compartiment de cassette en pressant sur la zone marquée " PUSH EJECT".
4
Mettre une cassette dans le compartiment TAPE 1 en tournant la
face à reproduire vers soi.
5
Pour déclencher la lecture, appuyer sur la t ouch e ( /SELECT/
RESUME).
Arrêt de la lecture:
Appuyer sur la touche ( /RETURN).
Note:
Il n'est pas possible d'avancer rapidement ou de rembobiner la cassette dans le compartiment TAPE 1.
- Écoute d'une cassette (TAPE 1) -
Lecture de la cassette
Réglage du son (Voir page 15.)
CD-BK280V(X)F4.fm01/5/28
FRANÇAIS
F-34
Page 82

Écoute d'une cassette (TAPE 2)
3
Ouvrir le compartiment d e cassette en
pressant sur la zone marquée "
PUSH EJECT".
4
Mettre une cassette dans le compartiment TAPE 2 en tournant la face A
vers soi.
5
Appuyer sur la touche pour sélectionner une face ou deux faces.
... Pour écouter les deux faces.
... Pour répéter les deux faces.
... Pour écouter une seule face.
6
Appuyer sur la touche ( /SELECT/RESUME) pour écouter la
face A ou la touche pour la face B.
Pour reproduire les deux faces ( ), commencer par la face A. Si on commence
par la face B, la face A ne sera pas lue.
Arrêt de la lecture:
Appuyer sur la touche ( /RETURN).
- Écoute d'une cassette (TAPE 2) -
Lecture de la cassette
1
Appuyer sur la touche ON/STAND-BY pour allumer l'appareil.
2
Sélectionner TAPE 2 en appuyant sur la touche TAPE (1 2).
F-35
FRANÇAIS
Réglage du son (Voir page 15.)
Avance rapide/rebobinage sur la face A:
Pour faire défiler la bande, appuyer sur la touche PRESET ( ). Pour le
rembobinage, appuyer sur la touche PRESET ( ).
Avance rapide/rebobinage sur la face B:
Pour faire défiler la bande, appuyer sur la touche PRESET ( ). Pour le
rembobinage, appuyer sur la touche PRESET ( ).
Attention:
z
Pour retirer la cassette, appuyer sur la touche ( /RETURN) et puis ouvr ir le
compartiment.
z
Pour changer de mode, appuyer sur la touche ( /RETURN).
z
S'il se produit une panne de courant en cours d'opération cassette, la tête magné-
tique reste engagée avec la bande et le compartiment refuse de s'ouvrir. On atten-
dra alors le rétablissement de courant.
CD-BK280V(X)F4.fm01/5/28
Page 83

Faire du karaoké
CD-BK280V
On peut faire du karaoké avec CD vidéo, CD, disque MP3, tuner, cassettes ou
d'autres éléments audio en branchant un microphone en option.
1
Régler la commande MIC LEVEL sur MIN pour éviter du bruit ou un
bruit de choc des enceintes.
2
Raccorder le microphone à la prise MIC.
z
Utiliser un microphone doté d'une fiche de 6,3 mm et ayant une impédance
de 600 ohms.
z
Utiliser un adaptateur de fiche standard pour raccorder un microphone ayant
une fiche de 3,5 mm de diamètre.
3
Appuyer sur la touche ON/STAND-BY pour allumer l'appareil.
4
Appuyer sur l'une des touches CD/VIDEO CD (CD), TUNER
(BAND), TAPE (1 2), VIDEO/AUX pour sélectionner une source
audio et déclencher la lecture de cette dernière.
Pour effectuer l'enregistrement, déclencher l'opération sur le compartiment
TAPE 2. (Pour plus de détails, se reporter aux pages 38 - 40.)
5
Régler le volume de la source audio en agissant sur les touches
VOLUME.
6
Tourner la commande MIC LEVEL vers MAX pour augme nter le volume du micro et vers MIN pour l'effet contraire.
7
Appuyer sur la touche ECHO LEVEL de la télécommande pour
amplifier l'écho et la touche ECHO LEVEL pour l'effet contraire.
Notes:
z
Si on chante trop haut au microphone, la voix peut être distordue sui vant l'élément
connecté. Si le cas se présente, baisser le volume du microphone.
z
S'il s'agit d'un microphone très sensible, il peut se produire un hurlement.
z
Préférer un microphone unidirectionnel qui est plus adapté pour la voix.
Karaoké
- Faire du karaoké -
En cas d'interférences:
z
Baisser le volume du microphone.
z
Modifier la direction du microphone.
z
Réduire le volume sur l'appareil principal.
z
Éloigner le microphone des enceintes.
Attention:
z
En période de non-emploi, débrancher le microphone de la prise MIC.
z
Pour brancher ou débrancher le microphone, régler la commande MIC LEVEL sur
MIN.
FRANÇAIS
CD-BK280V(X)F4.fm01/5/28
F-36
Page 84

Karaoké
Faire du karaoké (suite)
Pour changer le mode audio
„
On peut commuter le son d'une source de lecture parmi les modes STEREO, L-CH,
R-CH et V-CANCEL (VOCAL CANCEL).
Le mode audio s'utilise lorsque les deux canaux émettent des signaux différents.
- Faire du karaoké -
Appuyer sur la touche KARA O KE MODE autant de f o is qu'il est nécessaire pour afficher un mode audio souhaité.
Chaque fois que la touche KARAOKE MODE est pressée, le mode change comme
suit:
Notes:
z
Le mode audio est réglé par défaut sur "STEREO".
z
Dans les autres modes que STEREO, " " apparaît.
z
Le réglage reste inchangé même si on change de disque, met l'appareil en attente
ou passe de la fonction CD/VIDEO CD (CD) à une autre.
z
Pour reproduire un disque à son multiplexe sur lequel la voix et la musique sont
enregistrés séparément, sélectionner le mode audio à volonté.
Pour utiliser une source stéréo ordinaire
„
comme karaoké
On peut utiliser des disques et des cassettes ordinaires pour le karaoké. Il suffit de
baisser le volume de la voix principale.
Agir sur la touche KARAOK E MODE jusqu'à ce que l'appareil affiche
"V-CANCEL".
" " apparaît.
Notes:
z
Utiliser des disques enregistrés en stéréo. Cette fonction ne marche pas avec une
source monophonique.
z
Selon les disques ou les cassettes, les voix originales restent toujours audibles.
Notes sur les disques karaoké multiplex:
Les disques karaoké à son multiplexe sont des disques sur lesquels la voix principale
et la musique de fond sont enregistrés sur l'un des deux canaux et l'autre ne porte
que la musique.
z
Cette fonction ne marche pas bien sur des disques qui n'appartiennent pas à ce
groupe.
z
L'appareil ne reproduit pas correctement des disques dont le canal gauche porte
seulement la voix et dont le canal droit porte seulement la musique.
F-37
STEREO L-CH
STEREO L'appareil reproduit le son des deux canaux.
L-CH L'appareil reproduit le son du canal gauche.
R-CH L'appareil reproduit le son du canal droit.
V-CANCEL La voix principale est réduite.
FRANÇAIS
R-CH
V-CANCEL
CD-BK280V(X)F4.fm01/5/28
Page 85

Enregistrement à partir de la radio
CD-BK280V
Avant l'enregistrement:
z
Avant tout enregistrement important, faire un essai pour s'assurer que l'enregistrement se fait correctement.
z
SHARP n'est pas tenu responsable de tout dommage (ou per te d'enregistrement)
qui pourrait résulter d'un mauvais fonctionnement de l'appareil.
z
On peut agir sur les commandes de volume ou de son sans affecter le niveau
d'enregistrement (contrôle sonore variable).
z
Pour l'enregistrement, utiliser seulement des cassettes normales et non
cassettes métal ou CrO .
1
Faire l'accord sur une station souhaitée (voir page 32).
2
Mettre une cassette dans le compartiment TAPE 2 en tournant la
face A vers soi.
Enrouler l'amorce où l'enregistrement ne se fait pas.
3
Appuyer sur la touche pour sélectionner une face ou deux faces.
... Pour enregistrer sur les deux faces.
... Pour enregistrer sur une seule face.
4
Appuyer sur la touche REC PAUSE
[ (TAPE)].
L'enregistrement est mis en pause.
5
Appuyer sur la touche ( /SELECT/RESUME) pour enregistrer
sur la face A ou la touche pour la face B.
Pour enregistrer sur les deux faces, commencer par la face A. (Si on commence
par la face B, l'appareil ne passera pas à la face A.)
Pour interrompre l'enregistrement:
Appuyer sur la touche REC PAUSE [ (TAPE)].
Pour reprendre l'enregistrement, appuyer sur la touche qu'on a pressée à l'étape 5.
Les autres ne permettront pas la reprise.
Arrêt de l'enregistrement:
Appuyer sur la touche ( /RETURN).
Note:
S'il se produit un sifflement au cours de l'enregistrement d'une émission PO, éloigner
le cadre-antenne PO.
Languette contre l'effacement:
z
Avant de faire un enregistrement, vérifier la
présence de la languette qui, une fois retirée,
interdira un enregistrement ou un effacement
accidentels.
z
Pour protéger l'enregistrement, retirer la languette. Pour effectuer un nouvel enregistrement, couvrir le trou d'un morceau de bande
adhésive.
Languette pour
la face B
Face A
Languette pour
la face A
- Enregistrement à partir de la radio -
Enregistrement sur la cassette
Écoute de la radio (Voir page 32.)
CD-BK280V(X)F4.fm01/5/28
FRANÇAIS
F-38
Page 86

- Enregistrement de CD -
Enregistrement sur la cassette
Enregistrement de CD
On peut enregistrer successivement 3 CD.
1
Appuyer sur la touche ON/STAND-BY pour allumer l'appareil.
2
Mettre une cassette dans le compartiment TAPE 2 en tournant la
face A vers soi.
Enrouler l'amorce où l'enregistrement ne se fait pas.
3
Appuyer sur la touche CD/VIDEO CD (CD) et mettre le disque souhaité en place.
4
Appuyer sur la touche pour sélectionner une face ou deux faces.
... Pour enregistrer sur les deux faces.
... Pour enregistrer sur une seule face.
5
Appuyer sur la touche DISC SKIP po ur sélectionne r le premier di sque à enregistrer.
6
Appuyer sur la touche REC PAUSE
[ (TAPE)].
L'enregistrement est mis en pause.
7
Appuyer sur la touche ( /SELECT/RESUME) pour enregistrer
sur la face A ou la touche pour la face B.
z
Pour enregistrer sur les deux faces, commencer par la face A. (Si on commence par la face B, l'appareil ne passera pas à la face A.)
z
L'enregistrement commence par le CD choisi. Le CD et la cassette se mettent
en arrêt lorsque le dernier disque est terminé ou que la cassette arrive à la fin.
z
La lecture CD se déclenche automatiquement 5 secondes après le départ de
la cassette.
Pour enregistrer des morceaux en les programmant:
1 Programmer des disques et des morceaux (voir page 24).
2 Appuyer sur la touche REC PAUSE [ (TAPE)].
3 Appuyer sur la touche ( /SELECT/RESUME) pour enregistrer sur la face A
ou la touche pour la face B.
Arrêt de l'enregistrement:
Appuyer sur la touche ( /RETURN).
Le CD s'arrête ainsi que la cassette.
F-39
FRANÇAIS
Redémarrage automatique:
Si la face A termine au cours de l'enregistrement d'un morceau, ce dernier sera enregistré sur la face B depuis son début. On n'aura donc aucune partie perdue.
Lecture des morceaux programmés (Voir page 24.)
CD-BK280V(X)F4.fm01/5/28
Page 87

Copie entre cassettes
On peut copier la cassette 1 vers la cassette 2.
1
Appuyer sur la touche ON/STAND-BY pour allumer l'appareil.
2
Mettre une cassette enregistrée dans le compartiment TAPE 1 et
une cassette vierge dans le compartiment TAPE 2.
Il est conseillé d'utiliser deux cassettes de la même durée d'enregistrement.
3
Agir sur la touche TAPE (1 2) pour
afficher "TAPE 1".
Le mode d'inversion sera réglé sur " ".
4
Appuyer sur la touche REC PAUSE
[ (TAPE)].
L'enregistrement est mis en pause.
5
Appuyer sur la touche ( /SELECT/RESUME).
Arrêt de la copie:
Appuyer sur la touche ( /RETURN).
Les cassettes TAPE 1 et TAPE 2 s'arrêtent en même temps.
Effacement de cassettes enregistrées
„
1 Mettre une cassette à effacer dans le compartiment TAPE 2 en tournant la face à
effacer vers soi.
2 Agir sur la touche TAPE (1 2) pour afficher "TAPE 2".
3 Mettre la touche en " " pour effacer une seule face et en " " pour effacer les
deux faces.
4 Appuyer sur la touche REC PAUSE [ (TAPE)].
5 Appuyer sur la touche ( /SELECT/RESUME) pour effacer la face A ou la tou-
che pour la face B.
Pour effacer les deux faces, commencer par la face A. (Si on commence par la
face B, l'appareil ne passera pas à la face A.)
Note:
Vérifier que la platine TAPE 1 n'est pas en cours d'utilisation.
CD-BK280V
- Copie entre cassettes -
Enregistrement sur la cassette
FRANÇAIS
F-40
CD-BK280V(X)F4.fm01/5/28
Page 88

Opérations programmées et mise en arrêt différée
Fonctions avancées
Lecture programmée:
L'appareil s'allume et reproduit la source souhaitée (CD vidéo, CD, disque MP3,
tuner, cassette) à l'heure programmée.
Enregistrement programmé:
L'appareil s'allume et déclenche l'enregistrement à partir du tuner à l'heure préréglée.
Mise en arrêt différée:
On peut éteindre automatiquement le tuner, le CD vidéo, le CD, le disque MP3 et la
cassette.
Opérations programmées (lecture ou enre-
„
gistrement)
Avant de régler la minuterie:
1 Appuyer sur la touche CLOCK pour vérifier que l'horloge est à l'heure.
2 Pour la lecture programmée: Mettre en place une cassette ou des disques à re-
Pour l'enregistrement programmé:
1
Appuyer sur la touche ON/STAND-BY pour allumer l'appareil.
2
Appuyer sur la touche CD/VIDEO CD, TUNER (BAND) ou TAPE (1
2) pour sélectionner une fonction souhaitée.
Pour sélectionner une source pour la lecture programmée: CD/VIDEO CD, TUNER (BAND) ou TAPE (1 2).
Pour sélectionner la source pour l'enregistrement programmé: TUNER (BAND).
Si on choisit TUNER (BAND), faire l'accord sur une station souhaitée.
3
Régler le volume en pressant sur les touches VOLUME.
Éviter de trop élever le volume.
4
Agir à plusieurs reprises sur la touche TIMER/SLEEP pour sélectionner la lecture ou l'enregistrement.
Afficher le " " blanc pour la lecture ou le " " rouge pour l'enregis-
trement.
produire.
Mettre une cassette pour enregistrement dans le
compartiment TAPE 2.
F-41
- Opérations programmées et mise en arrêt différée -
FRANÇAIS
Réglage de l'horloge (Voir page 16.)
Blanc
5
Appuyer sur la touche TUNING/TIME ( ou ) pour déclarer l'heure
de début et puis presser la touche MEMORY/SET.
Les illustrations indiquent le réglage de la lecture programmée.
Rouge
CD-BK280V(X)F5.fm01/5/28
Page 89

6
Appuyer sur la touche TUNING/TIME ( ou ) pour déclarer les minutes et puis presser sur la touche MEMORY/SET.
7
L'appareil entre automatiquement en veille.
Pour annuler l'opération programmée:
Appuyer sur la touche ON/STAND-BY pour allumer l'appareil.
8
À l'heure programmée, la lecture ou l'enregistrement se déclenche.
Le niveau sonore augmente petit à petit jusqu'au niveau réglé lors de la programmation.
9
En lecture programmée:
Si on sélectionne CD/VIDEO CD ou TAPE, l'appareil entre en attente après la
lecture. S'il s'agit de TUNER, il entre en attente une heure après le départ de la
lecture programmée.
En enregistrement programmé:
Lorsque la cassette pour enregistrement atteint la fin, l'enregistrement programmé se termine et l'appareil passe en attente.
Pour réinitialiser ou changer le réglage de la minuterie:
Suivre "Opérations programmées (lecture ou enregistrement)".
Notes:
z
L'heure d'opération une fois programmée, l'appareil la conservera à moins qu'on
ne la modifie.
z
Pour effectuer une opération programmée (lecture ou enregistrement) avec un élément raccordé aux prises VIDEO/AUX, sélectionner "VIDEO/AUX" à l'étape 2.
Seul cet appareil peut alors s'allumer ou passer en attente automatiquement. Il
passe en attente lorsque la cassette pour enregistrement atteint la fin (en cours
d'enregistrement programmé) ou 1 heure après le déclenchement de la lecture programmée. Toutefois, l'autre appareil ne s'allume pas et ne s'éteint pas automatiquement.
Mise en arrêt différée
„
1
Allumer la source souhaitée.
2
Agir à plusieurs reprises sur l a touche TIMER/SLEEP pour afficher
"SLEEP".
Changement de la durée d'écoute:
Pendant la lecture déclenchée par la mise en arrêt différée, appuyer sur la touche TUNING/TIME ( ou ).
(Maximum: 3 heures - Minimum: 1 minute)
z
3 heures - 5 minutes intervalle de 5 minutes
z
5 minutes - 1 minute intervalle de 1 minute
3
Appuyer sur la touche MEMORY/SET.
4
La durée programmée é coulée, le système entre automa tiquement
en veille.
Le niveau sonore baisse dans la dernière minute de la lecture programmée.
Annulation de la mise en arrêt différée:
Au cours de la lecture pour la mise en arrêt différée, appuyer sur la touche ON/
STAND-B Y.
Pour vérifier la durée pour la mise en arrêt différée:
Au cours de la lecture pour la mise en arrêt différée, appuyer sur la touche TIMER/
SLEEP.
L'appareil affiche pour 5 secondes le temps restant pour la mise en arrêt différée.
Note:
Une fois la durée programmée, elle restera inchangée jusqu'à une nouvelle programmation.
CD-BK280V
Fonctions avancées
- Opérations programmées et mise en arrêt différée -
Écoute de la radio (Voir page 32.)
CD-BK280V(X)F5.fm01/5/28
FRANÇAIS
F-42
Page 90

Enrichissement du système
- Enrichissement du système -
Fonctions avancées
Le câble de raccordement n'est pas fourni. Se procurer un câble vendu dans le commerce.
Magnétoscope,
lecteur de DVD, etc.
Vers les prises
de sortie
de ligne
Rouge
Blanc
Blanc
Cordon RCA
(non fourni)
Rouge
Écoute du son en provenance d'un magné-
„
toscope, un lecteur DVD, etc.
1
Utiliser un câble de racco rdement pour racc order un magnéto scope, un lecteur de DVD, etc. aux prises VIDEO/AUX.
Lorsqu'il s'agit d'un élément vidéo, relier la sortie audio à ce système et la sortie
vidéo à un téléviseur.
2
Appuyer sur la touche ON/STAND-BY pour allumer l'appareil.
3
Appuyer sur la touche VIDEO/AUX.
4
Déclencher la lecture sur l'élément raccordé.
Note:
Pour supprimer un bourdonnement, mettre l'appareil à l'écar t du téléviseur.
Enregistrement sur une cassette
„
1
Mettre une cassette dans le compartiment TAPE 2.
2
Appuyer sur la touche VIDEO/AUX.
3
Appuyer sur la touche REC PAUSE [ (TAPE)].
4
Appuyer sur la touche ( /SELECT/RESUME) ou .
5
Déclencher le magnétoscope, le lecteur de DVD, etc.
Casque
„
z
Avant de brancher ou de débrancher le casque, réduire le niveau sonore.
z
Utiliser un casque muni d'une fiche de 3,5 mm de diamètre et ayant une impédance de 16 à 50 ohms. L'impédance préconisée est de 32 ohms.
z
Lorsque le casque est branché, les enceintes sont automatiquement déconnectées. Régler le volume en pressant les touches VOLUME.
F-43
FRANÇAIS
CD-BK280V(X)F5.fm01/5/28
Page 91

Dépannage
CD-BK280V
L'utilisateur peut résoudre pas mal de problèmes sans faire appel à un dépanneur.
Si le cas se présente, se reporter au tableau ci-dessous avant de prendre contact
avec un revendeur ou un centre de réparation agréés par SHARP.
Général
„
Problème Cause
z
L'horloge n'est pas à l'heure.
z
L'appareil ne répond pas à la pression d'une touche.
z
Aucun son n'est entendu.
CD vidéo
„
Problème Cause
z
L'image ne s'affiche pas pendant
la lecture.
z
L'image est distordue ou sa qualité est mauvaise.
Lecteur CD
„
Problème Cause
z
La lecture ne démarre pas.
z
La lecture s'arrête au milieu ou ne
se fait pas correctement.
z
La lecture est intermittente ou s'arrête.
z
Y a-t-il eu une panne de courant? Remettre l'horloge à l'heure (voir page 16).
z
Mettre l'appareil en veille et le rallumer.
z
S'il fonctionne toujours mal, réinitialiser
(voir page 45).
z
Le volume est-il réglé sur "0"?
z
Le casque est-il branché?
z
Les fils des enceintes sont-ils débranchés?
z
Le mode de karaoké est-il réglé sur "LCH", "R-CH" ou "V-CANCEL"?
z
Le téléviseur est-il débranché?
z
L'appareil est-il raccordé incorrectement?
z
Le sélecteur d'entrée sur la télé n'est réglé
sur "VCR"?
z
On n'a pas sélectionné "CD vidéo" avant
la lecture?
z
Le disque est-il encrassé?
z
Le disque est-il mis à l'envers?
z
Le disque satisfait-il à la norme?
z
Le disque est-il distordu ou rayé?
z
L'appareil subit-il des vibrations?
z
Le disque est-il encrassé?
z
Une condensation est-elle formée dans
l'appareil?
Tuner
„
Problème Cause
z
L'émission radiodiffusée est para-
sitée consécutivement.
Platine à cassette
„
Problème Cause
z
Enregistrement impossible.
z
La qualité sonore n'est pas assu-
rée à l'enregistrement.
z
Effacement incomplet.
z
Le son saute.
z
Les aigus sont faibles.
z
Fluctuation de son.
z
La cassette refuse de sortir.
Karaoké
„
Problème Cause
z
On n'entendra pas la voix d'un dis-
que multiplexe.
Télécommande
„
Problème Cause
z
La télécommande ne fonctionne
pas.
z
L'appareil se trouve-t-il à proximité d'un
téléviseur ou d'un PC?
z
L'antenne FM ou le cadre-antenne PO
est-il placé correctement? Éloigner le cordon d'alimentation de l'antenne.
z
La languette de protection est-elle enlevée?
z
S'agit-il d'une cassette normale? (La cassette métal ou CrO n'est pas utilisable.)
z
La bande est-elle détendue?
z
La bande est-elle étirée?
z
Les cabestans, les galets ou les têtes
sont-ils encrassés?
z
S'il se produit une panne de courant en
cours d'opération cassette, la tête magnétique reste engagée avec la bande et le
compartiment refuse de s'ouvrir. On attendra alors le rétablissement de courant.
z
Le mode de karaoké est-il réglé sur "LCH", "R-CH" ou "V-CANCEL"?
z
L'appareil est-il branché sur secteur?
z
Les polarités des piles sont-elles respectées?
z
Les piles sont mortes?
z
La distance et l'angle sont-ils corrects?
z
Le capteur de télécommande reçoit-il une
forte lumière?
- Dépannage -
Références
FRANÇAIS
F-44
CD-BK280V(X)F5.fm01/5/28
Page 92

Références
Dépannage (suite)
En cas de dérangement
„
Si l'appareil a subi une force extérieure (chocs, électricité statique, surtension due à
un foudre, etc.) ou une mauvaise manipulation, il peut mal fonctionner.
Procéder alors comme suit:
1 On mettra l'appareil en attente et le rallumera.
2 Si l'appareil n'est pas remis en état dans l'opération précédente, il faut le débran-
cher et rebrancher. Et enfin rallumer l'appareil.
Note:
Si l'appareil n'est toujours pas remis en état, il faut le réinitialiser pour effacer toute la
mémoire.
Effacement de toute la mémoire (réinitiali-
„
sation)
1 Appuyer sur la touche ON/STAND-BY pour passer en veille.
2 Tout en maintenant les touches et X-BASS/DEM O enfoncées, appuyer sur la
touche ON/STAND-BY pour afficher "CLEAR AL".
- Dépannage / Entretien -
Attention:
Cette opération efface toutes les données en mémoire: réglages pour horloge, minuterie, présélection de tuner et programmes CD.
Avant de transporter l'appareil
„
1 Appuyer sur la touche ON/STAND-BY pour allumer l'appareil.
2 Appuyer sur la touche CD/VIDEO CD.
3 Appuyer sur la touche OPEN/CLOSE pour ouvrir le tiroir.
Retirer tous les disques de l'appareil.
4 Refermer le tiroir en appuyant sur la touche OPEN/CLOSE.
Vérifier que l'appareil affiche "NO DISC".
5 Passer en attente en appuyant sur la touche ON/STAND-BY et débrancher
l'appareil.
Entretien
Nettoyage des pièces relatives à la bande
„
z
L'encrassement des têtes, cabestans ou galets est à l'origine de la mauvaise qualité sonore et de l'emmêlement de la bande. Nettoyer ces pièces à l'aide d'un
coton-tige imbibé d'un produit spécial en vente dans le commerce.
z
Avant le nettoyage, débrancher l'appareil qui renferme des organes portés à haute
tension.
B
TAPE 1
TAPE 2
Tête de lecture Tête d'effacement
z
Après une période d'utilisation prolongée, les têtes et les cabestans se magnétisent, causant un son médiocre. Démagnétiser ces pièces toutes les 30 heures de
lecture/enregistrement à l'aide d'un démagnétiseur de tête en vente dans le commerce. Avant utilisation, lire attentivement la notice du démagnétiseur.
Nettoyage du coffret
„
Essuyer régulièrement le coffret à l'aide d'un chiffon doux
et d'une solution d'eau savonneuse, puis essuyer à l'aide
d'un chiffon sec.
Cabestan Tête d'enregistrement/lecture
Galet
A
E
D
Attention:
z
Éviter d'utiliser des produits chimiques (essence, diluant, etc.) pour le nettoyage. On risque d'abîmer la finition de l'enveloppe.
z
Ne pas lubrifier l'appareil. Ce dernier peut mal fonctionner.
C
CC
BB
F-45
FRANÇAIS
CD-BK280V(X)F5.fm01/5/28
Page 93

Fiche technique
CD-BK280V
SHARP se réserve le droit d'apporter des modifications à la présentation et aux
caractéristiques des appareils à fin d'amélioration. Les valeurs indiquées dans ce
document sont les valeurs nominales des appareils de série mais de légères différences peuvent être constatées d'un appareil à l'autre.
Général
„
Alimentation
Consommation
Dimensions
Poids
Amplificateur
„
Puissance de sortie
Bornes de sortie
Bornes d'entrée
CD vidéo
„
Format de sortie vidéo
Lecteur CD
„
Type
Procédé de lecture
Convertisseur N/A
Réponse en fréquence
Gamme dynamique
110/127/220/230 - 240 V CA, 50/60 Hz
130 W
Largeur: 270 mm
Hauteur: 330 mm
Profondeur: 340 mm
7,4 kg
Enceintes avant:
MPO: 160 W (80 W + 80 W) (10 % de D.H.T.)
RMS: 100 W (50 W + 50 W) (10 % de D.H.T.)
RMS: 70 W (35 W + 35 W) (0,9 % de D.H.T.)
Enceintes surround:
MPO: 80 W (40 W + 40 W) (10 % de D.H.T.)
RMS: 50 W (25 W + 25 W) (10 % de D.H.T.)
RMS: 34 W (17 W + 17 W) (0,9 % de D.H.T.)
Enceintes avant: 8 ohms
Enceintes surround: 16 ohms
Casque: 16 - 50 ohms (recommandé: 32 ohms)
Sortie vidéo: 1 Vc-c (75 ohms)
Vidéo/auxiliaire (signal audio): 500 mV/47 kilohms
Microphone: 1 mV/600 ohms
PAL/NTSC
Lecteur de 3 disques compacts
Sans contact, par laser à semi-conducteur à 3 faisceaux
1 bit
20 - 20.000 Hz
90 dB (1 kHz)
Tuner
„
Gamme de fréquences
Platine à cassette
„
Réponse en fréquence
Rapport signal/bruit
Pleurage et scintillement
Enceinte avant
„
Type
Puissance d'entrée
maximale
Puissance d'entrée
nominale
Impédance
Dimensions
Poids
Enceinte surround
„
Type
Puissance d'entrée
maximale
Puissance d'entrée
nominale
Impédance
Dimensions
Poids
FM: 88 - 108 MHz
PO: 531 - 1.602 kHz
50 - 14.000 Hz (Bande normale)
55 dB (TAPE 1, lecture)
50 dB (TAPE 2, enregistrement/lecture)
0,3 % (WRMS)
Enceinte à 2 voies
Tweeter de 5 cm
Woofer de 13 cm
100 W
50 W
8 ohms
Largeur: 220 mm
Hauteur: 330 mm
Profondeur: 217 mm
3,3 kg/chacune
Large bande de 10 cm
50 W
25 W
16 ohms
Largeur: 200 mm
Hauteur: 93 mm
Profondeur: 170 mm
0,5 kg/chacune
Références
- Fiche technique -
FRANÇAIS
F-46
CD-BK280V(X)F5.fm01/5/28
Page 94

ESPAÑOL
Introducción
Muchas gracias por haber adquirido este producto SHARP. Lea atentamente este
manual para conseguir el mejor rendimiento del aparato. Le servirá también como
guía operativa de este producto SHARP.
Índice
„
Accesorios . . . . . . . . . . . . . . . . . . . . . . . . . . . . . . . . . . . . . . . . . . . . . . . . . . . . . . . . 2
Notas especiales . . . . . . . . . . . . . . . . . . . . . . . . . . . . . . . . . . . . . . . . . . . . . . . . . . . 2
„
Precauciones . . . . . . . . . . . . . . . . . . . . . . . . . . . . . . . . . . . . . . . . . . . . . . . . . . . . . .3
Controles e indicadores . . . . . . . . . . . . . . . . . . . . . . . . . . . . . . . . . . . . . . . . . . 4 - 7
„
Controlador remoto . . . . . . . . . . . . . . . . . . . . . . . . . . . . . . . . . . . . . . . . . . . . . . . . 8
Conexiones del sistema . . . . . . . . . . . . . . . . . . . . . . . . . . . . . . . . . . . . . . . . . 9 - 13
„
Control general . . . . . . . . . . . . . . . . . . . . . . . . . . . . . . . . . . . . . . . . . . . . . . . . . . . 14
Control del sonido . . . . . . . . . . . . . . . . . . . . . . . . . . . . . . . . . . . . . . . . . . . . . . . .15
Ajuste del reloj . . . . . . . . . . . . . . . . . . . . . . . . . . . . . . . . . . . . . . . . . . . . . . . . . . . 16
„
- Introducción / Índice -
CD vídeo . . . . . . . . . . . . . . . . . . . . . . . . . . . . . . . . . . . . . . . . . . . . . . . . . . . . . . . . . 17
Preparación para la reproducción de discos CD vídeo . . . . . . . . . . . . . . . . . . . 18
Reproducción de un disco CD (discos CD) vídeo con P.B.C.
(Versión 2.0) . . . . . . . . . . . . . . . . . . . . . . . . . . . . . . . . . . . . . . . . . . . . . . . . . . . 19 , 2 0
Reproducción de un disco CD (discos CD) vídeo sin P.B.C.
Instrucciones importantes
(Versión 1.1) . . . . . . . . . . . . . . . . . . . . . . . . . . . . . . . . . . . . . . . . . . . . . . . . . . . 21 , 2 2
„
Sistema de búsqueda directa . . . . . . . . . . . . . . . . . . . . . . . . . . . . . . . . . . . . . . . 23
Repetición de la reproducción o reproducción aleatoria . . . . . . . . . . . . . . . . . 23
Reproducción programada . . . . . . . . . . . . . . . . . . . . . . . . . . . . . . . . . . . . . . . . . 24
Selección de resumen de discos y pistas . . . . . . . . . . . . . . . . . . . . . . . . . .25, 26
Selección de búsqueda por el tiempo . . . . . . . . . . . . . . . . . . . . . . . . . . . . . . . . . 26
Función de marcador . . . . . . . . . . . . . . . . . . . . . . . . . . . . . . . . . . . . . . . . . . . . . .27
Reproducción reanudada . . . . . . . . . . . . . . . . . . . . . . . . . . . . . . . . . . . . . . . . . . . 28
Para reproduci r manualmente el disco CD vídeo . . . . . . . . . . . . . . . . . . . . . . . 28
Cambio de la visualización de la pantalla del televisor . . . . . . . . . . . . . . . . . . . 28
Instrucciones importantes
Información general
Preparación para su utilización
Operación básica
Reproducción de CD vídeo
Reproducción avanzada de discos CD
vídeo (Versión 1.1)
Página
Página
Reproducción de CD
„
Audición de un disco CD (discos CD) . . . . . . . . . . . . . . . . . . . . . . . . . . . . . 29, 30
Reproducción de discos CD codificados
„
por MP3
Audición de un disco MP3 . . . . . . . . . . . . . . . . . . . . . . . . . . . . . . . . . . . . . . . . . . 31
Radio
„
Audición de la radio . . . . . . . . . . . . . . . . . . . . . . . . . . . . . . . . . . . . . . . . . . . . . . . 32
Audición de la emisora memorizada . . . . . . . . . . . . . . . . . . . . . . . . . . . . . . . . . . 33
Reproducción de cintas
„
Audición de una cinta de cassette (TAPE 1) . . . . . . . . . . . . . . . . . . . . . . . . . . . 34
Audición de una cinta de cassette (TAPE 2) . . . . . . . . . . . . . . . . . . . . . . . . . . . 35
Karaoke
„
Reproducción de Karaoke . . . . . . . . . . . . . . . . . . . . . . . . . . . . . . . . . . . . . . . 36, 37
Grabación de cintas
„
Grabación desde la radio . . . . . . . . . . . . . . . . . . . . . . . . . . . . . . . . . . . . . . . . . . . 38
Grabación desde un CD (discos CD) . . . . . . . . . . . . . . . . . . . . . . . . . . . . . . . . . 39
Doblaje de cinta a cinta . . . . . . . . . . . . . . . . . . . . . . . . . . . . . . . . . . . . . . . . . . . . 40
Características avanzadas
„
Operación del temporizador y de desconexión automática . . . . . . . . . . . . 41, 42
Mejoramiento de su sistema . . . . . . . . . . . . . . . . . . . . . . . . . . . . . . . . . . . . . . . . 43
Referencias
„
Cuadro para localización de averías . . . . . . . . . . . . . . . . . . . . . . . . . . . . . . . 44, 45
Mantenimiento . . . . . . . . . . . . . . . . . . . . . . . . . . . . . . . . . . . . . . . . . . . . . . . . . . . . 45
Especificaciones técnicas . . . . . . . . . . . . . . . . . . . . . . . . . . . . . . . . . . . . . . . . . . 46
S-1
ESPAÑOL
01/5/28 CD-BK280V(X)S1.fm
Page 95

Accesorios
Verifique que estén incluidos los accesorios siguientes.
CD-BK280V
Controlador remoto 1
Pila del tamaño "AA" (UM/SUM-
3, R6, HP-7 o equivalentes) 2
Antena de cuadro de AM 1 Antena de FM 1 Cable de vídeo 1
Nota:
Sólo se incluyen los accesorios de arriba.
Notas especiales
PRECAUCIÓN Características del diodo láser
Material: GaAIAs
z
Este sistema mini vídeo CD est á clasifica do como un product o CLASS 1 LASER.
z
La etiqueta CLASS 1 LASER PRODUCT está situada en la tapa posterior.
z
El uso de los controles, ajustes o ejecución de procedimientos distintos de los
especificados podría causar la exposición a radiación peligrosa.
No intente desmontar la caja ya que el haz de láser usado en este reproductor
de discos compactos es perjudicial para los ojos. Para el servicio de reparación,
consulte a una persona cualificada.
z
Cuando el botón ON/STA ND-BY está puesto en la posición STAND-BY, todavía
hay tensión dentro del aparato. Cuando el botón ON/STAND-BY está puesto en la
posición STAND-BY, el aparato puede ponerse en funcionamiento utilizando el
modo del temporizador o el controlador remoto.
z
El material audiovisual puede consistir en trabajos que tengan derechos de autor
y que no deben grabarse sin la autorización del poseedor de dichos dere chos de
autor. Sírvase consultar las leyes aplicables en su país.
Longitud de onda: 780 nm
Duración de emisión : continua
Salida de láser: máx. 0,6 mW
CAUTION-INVISIBLE LASER RADIATION WHEN OPEN. DO NOT STARE INTO
BEAM OR VIEW DIRECTLY WITH OPTICAL INSTRUMENTS.
VARNING-OSYNLIG LASERSTRALNING NAR DENNA DEL AR OPPNAD. STIRRA
EJ IN I STRALEN OCH BETRAKTA EJ STRALEN MED OPTISKA INSTRUMENT.
ADVERSEL-USYNLIG LASERSTRALING VED ABNING. SE IKKE IND I
STRALEN-HELLER IKKE MED OPTISKE INSTRUMENTER.
VARO! AVATTAESSA OLET ALTTIINA NAKYMATON LASERSATEILYLLE.
ALA TUIJOTA SATEESEEN ALAKA KATSO SITA OPTISEN LAITTEEN LAPI.
VARNING-OSYNLIG LASERSTRALNING NAR DENNA DEL AR OPPNAD.
STIRRA EJ IN I STRALEN OCH BETRAKTA EJ STRALEN GENOM OPTISKT
INSTRUMENT.
ADVERSEL-USYNLIG LASERSTRALING NAR DEKSEL APNES. STIRR IKKE
INN I STRALEN ELLER SE DIREKTE MED OPTISKE INSTRUMENTER.
Advertencia:
Tenga en cuenta que dentro de este aparato no hay piezas que pueda reparar. No
quite nunca las tapas a menos que se esté cualificado para hacerlo. Este aparato
tiene en su interior tensiones peligrosas. Desenchufe siempre la clavija de la red del
tomacorriente antes de realizar cualquier servicio de mantenimiento y c uando no se
use el aparato durante un largo período de tiempo.
Advertencia:
Para evitar incendios y descargas eléctricas, no exponga el aparato a goteo o salpicadura de líquidos. No deberán ponerse encima del aparato objetos que estén llenos
de líquido, como por ejemplo un florero.
- Accesorios / Notas especiales -
Instrucciones importantes
ESPAÑOL
S-2
CD-BK280V(X)S1.fm01/5/28
Page 96

Precauciones
- Precauciones -
Información general
General
„
z
Asegúrese de que el equipo esté colocado en un área bien ventilada y asegúrese
de que haya por lo menos 10 cm de espacio libre a lo largo de los lados, par te
superior y parte posterior del equipo.
10 cm 10 cm
z
Use el aparato sobre una superficie nivelada y firme, en un lugar que no esté
expuesto a vibraciones.
z
Mantenga el aparato apartado de la luz directa del sol, fuer tes campos magnéticos, polvo excesivo, humedad y de equipos electrónicos/eléctricos (computadoras
del hogar, facsímiles, etc.) que generan ruido eléctrico.
z
No ponga nada encima del aparato.
z
No exponga el aparato a la humedad, a temperaturas superiores a 60°C ni a temperaturas muy bajas.
z
Si su sistema no funciona correctamente, desconecte el cable de alimentación de
CA de la toma de CA. Enchufe otra vez el cable de alimentación de CA, y luego
conecte la alimentación del sistema.
z
Si se produce una tormenta con rayos, desenchufe el aparato por razones de
seguridad.
z
Sujete la clavija de alimentación de corriente alterna al quitar esta clavija del
tomacorriente. Si la quita tirando del cable puede romper o estropear los hilos y
conexiones internas.
z
No quite la tapa exterior dado que pueden producirse descargas eléctricas.
Solicite el servicio técnico a un centro de servicio local SHARP.
z
La ventilación no debe impedirse al cubrir las aberturas de ventilación con cosas
como periódicos, tapetes, cortinas, etc.
z
Las fuentes de llamas abiertas, tales como velas encendidas no deben colocarse
encima del aparato.
z
Deberá prestarse atención a los aspectos del medio am biente al deshacerse de
las pilas.
z
Este aparato sólo debe ser utilizado dentro de un margen de temperaturas de 5°C
- 35°C.
Advertencia:
Se debe usar la misma tensión que la especificada en el aparato. Si usa este aparato
con una tensión más alta que la especificada, es peligroso y puede provocar incendios o accidentes que causen daños. SHARP no asumirá responsabilidad alguna por
cualquier daño de este aparato que resulte del uso de una tensión distinta a la especificada.
10 cm
10 cm
Control de volumen
„
El nivel de sonido en una posición de volumen fijado depende de una combinación
de rendimiento y posición de los altavoces y varios otros factores. Es aconsejable
evitar altos niveles de volumen. Esto se produce, por ejemplo, al conectar el aparato
con el volumen puesto en una posición alta. Evite continuar la audición prolongada a
altos niveles de volumen.
Condensación
„
Los cambios súbitos de la temperatura, y el almacenaje u operación en lugares muy húmedos pueden causar condensación de
humedad dentro de la caja (fonocaptor de CD,
cabezas de la cinta, etc.) o en el transmisor del
controlador remoto.
La condensación puede causar mal funcionamiento en el aparato. Si así sucede, deje la alimentación conectada sin ningún disco (ni
cassette) en el aparato hasta que sea posible
la reproducción normal (aproximadamente 1
hora). Frote la humedad condensada en el
transmisor con un paño suave antes de poner
el aparato en funcionamiento.
Cuidados de los discos compactos
„
Los discos compactos son bastante resistentes a posibles daños, sin embargo se
puede producir un mal seguimiento de la pista debido a una acumulación de polvo
en la superficie de los discos. Tenga presente las instrucciones siguientes para
poder disfrutar lo máximo posible de su colección de discos compactos y de este
reproductor.
z
No escriba en ninguna cara del disco, particularmente en la cara que no tiene etiqueta donde se leen las señales musicales. No estropee esta superficie.
z
Mantenga los discos alejados de los rayos directos del sol, de focos de calor y de
humedad excesiva.
z
Sujete siempre los discos por sus bordes. Huellas digitales, polvo o agua en los
discos compactos pueden causar ruidos o un mal seguimiento de la pista. Si un
disco compacto está sucio o no se reproduce adecuadamente, límpielo con un
paño seco y suave, pasándolo en dirección del centro hacia afuera a lo largo del
radio.
NO
SÍ
Correcto
S-3
ESPAÑOL
CD-BK280V(X)S1.fm01/5/28
Page 97

Controles e indicadores
67
1
2
3
1412 1311
18
19
20
21
22
29 30 31 33 3432
8
1615 17
23
24
25
26
27
28
9
10
CD-BK280V
Panel frontal
„
1.Bandeja de discos . . . . . . . . . . . . . . . . . . . . . . . . . . . . . . . . . . . . . . . 19
2.Indicador de ajuste del temporizador . . . . . . . . . . . . . . . . . . . . . . .42
3.Botón de conexión/reserva . . . . . . . . . . . . . . . . . . . . . . . . . . . . . . . 14
4.Compartimiento del cassette de cinta 2 . . . . . . . . . . . . . . . . . . 35, 40
5.Compartimiento del cassette de cinta 1 . . . . . . . . . . . . . . . . . . 34, 40
6.Botón de selección del modo del ecualizador . . . . . . . . . . . . . . . . 15
7.Botones de aumento y reducción del volumen . . . . . . . . . . . . . . . 15
8.Botón de graves extra/modo de demostración . . . . . . . . . . . . 14, 15
9.Botón de abertura/cierre de la bandeja de discos . . . . . . . 19, 21, 29
10.Botón de salto de disco . . . . . . . . . . . . . . . . . . . . . . . . . . . . 19, 21, 29
11.Botón de reproducción inversa de cinta 2 . . . . . . . . . . . . . . . . . . . 35
12.Botón de discos CD vídeo/CD/MP3 . . . . . . . . . . . . . . . .19, 21, 29, 39
13.Botón del modo de Karaoke . . . . . . . . . . . . . . . . . . . . . . . . . . . . . .37
14.Botón del sintonizador (banda) . . . . . . . . . . . . . . . . . . . . . . . . . . . .32
15.Botón de control de reproducción de CD vídeo . . . . . . . . . . . . . . . 20
16.Botón de activación/desactivación de visualización
en la pantalla de CD vídeo . . . . . . . . . . . . . . . . . . . . . . . . . . . . . . . . 28
17.Botón de resumen de CD vídeo/búsqueda por el tiempo . . . . 25, 26
18.Botón de incremento del tiempo y de sintonización . . . . . . . . 16, 32
19.Botón de intensidad de iluminación . . . . . . . . . . . . . . . . . . . . . . . . 14
20.Botón del reloj . . . . . . . . . . . . . . . . . . . . . . . . . . . . . . . . . . . . . . . 16, 41
21.Botón del temporizador/desconexión automática . . . . . . . . . . 41, 42
22.Toma de auriculares . . . . . . . . . . . . . . . . . . . . . . . . . . . . . . . . . . . . . 43
4
5
23.Botón de vídeo/auxiliar . . . . . . . . . . . . . . . . . . . . . . . . . . . . . . . . 41, 43
24.Botón de cinta (1 2) . . . . . . . . . . . . . . . . . . . . . . . . . . . . . . 34, 35, 40
25.Botón de parada o retorno de CD vídeo,
de parada de discos CD/MP3/cinta . . . . . . . . . . . . . 20, 22, 30, 34, 35
26.Botón de reproducción, repetición, selección o reanudación
de CD vídeo, de reproducción o repetición
de discos CD/MP3, de reproducción de cinta 1,
de reproducción hacia delante de cinta 2 . . 19, 21, 23, 28, 29, 34, 35
27.Botón selector del modo de inversión de cinta 2 . . . . . . . . . . . . .35
28.Botón de salto o siguiente de CD vídeo, de avance de pista o
avance rápido de discos CD/MP3, de bobinado rápido de cinta 2,
de sintonización preajustada ascendente . . . . . . . 20, 22, 30, 33, 35
29.Botón de reducción del tiempo y de sintonización . . . . . . . . . 16, 32
30.Botón de memoria/ajuste . . . . . . . . . . . . . . . . . . . . . . . . . . . 16, 24, 33
31.Botón de pausa de grabación de cinta 2 . . . . . . . . . . . . . . . . 38 - 40
32.Botón de salto o anterior de CD vídeo, de retroceso de pista o
inver si ón rápida de disco s CD/MP3, de bob inad o rápido de cin t a 2,
de sintonización preajustada descendente . . . . . . 20, 22, 30, 33, 35
33.Control de nivel del micrófono . . . . . . . . . . . . . . . . . . . . . . . . . . . . 36
34.Toma de micrófono . . . . . . . . . . . . . . . . . . . . . . . . . . . . . . . . . . . . . .36
Página de referencia
- Controles e indicadores -
Información general
Descripción del controlador remoto (Vea la página 7.)
CD-BK280V(X)S1.fm01/5/28
ESPAÑOL
S-4
Page 98

- Controles e indicadores -
Información general
Controles e indicadores (continuación)
1
2
34 5 6
17 17
8
9
13 14 15 16
7
17
10
11
12
1
2
3
4
5
6
7
Visualizador
„
1.Indicador de graves extra
2.Indicador del modo de FM en estéreo
3.Indicador de recepción de FM en estéreo
4.Indicador del modo de Karaoke
5.Indicador de la repetición de la reproducción de discos
6.Indicador de pausa de discos
7.Indicador de reproducción de discos
8.Indicador de grabación de cinta 2
9.Indicador del modo de inversión de cintas
10.Indicadores del número de disco
11.Indicador de reproducción con temporizador
12.Indicador de memoria
13.Indicador de reproducción inversa de cinta 2
14.Indicador de reproducción de cinta 1 o de reproducción hacia
delante de cinta 2
15.Indicador de desconexión automática
16.Indicador de grabación con temporizador
17.Indicador del analizador de espectro/nivel de volumen
Panel posterior
„
1.Terminales de los altavoces de sonido perimétrico . . . . . . . . . 9 - 12
2.Toma de salida de vídeo . . . . . . . . . . . . . . . . . . . . . . . . . . . . . . . . . .12
3.Terminal de la antena de FM de 75 ohmios . . . . . . . . . . . . . . . . .9, 10
4.Terminal de tierra de la antena de FM . . . . . . . . . . . . . . . . . . . . .9, 10
5.Toma de la antena de cuadro de AM . . . . . . . . . . . . . . . . . . . . . .9, 10
6.Selector de margen de frecuencias . . . . . . . . . . . . . . . . . . . . . . . . .13
7.Tomas de entrada de vídeo/auxiliar (señal de audio) . . . . . . . . . . .43
8.Terminales de los altavoces delanteros . . . . . . . . . . . . . . . . . . . 9 - 11
9.Cable de alimentación de CA . . . . . . . . . . . . . . . . . . . . . . . . . . . . . .13
10.Selector de tensión de CA . . . . . . . . . . . . . . . . . . . . . . . . . . . . . . . .13
Página de referencia
S-5
10
ESPAÑOL
8
9
CD-BK280V(X)S1.fm01/5/28
Page 99

Altavoz delantero
„
1.Altavoz de agudos
2.Altavoz de graves
3.Conducto de reflexión de graves
1
2
3
3
4
1
4.Cable del altavoz
Altavoz de sonido perimétrico
„
1.Altavoz de gama completa
2.Cable del altavoz
CD-BK280V
- Controles e indicadores -
Información general
2
ESPAÑOL
CD-BK280V(X)S1.fm01/5/28
S-6
Page 100

- Controles e indicadores -
Información general
Controles e indicadores (continuación)
1
2
16
17
3
4
5
6
7
8
9
10
11
12
13
14
15
18
19
20
21
22
23
24
25
26
27
28
29
30
Controlador remoto
„
1.Transmisor de control remoto . . . . . . . . . . . . . . . . . . . . . . . . . . . . . . . . . . . 8
2.Botones selectores del número de disco . . . . . . . . . . . . . . . . . . . . . . . 24
3.Botones de aumento y reducción del nivel de eco . . . . . . . . . . . . . . . 36
4.Botón del modo de Karaoke . . . . . . . . . . . . . . . . . . . . . . . . . . . . . . . . . . . 37
5.Botón de operación automática/activación de CD vídeo . . . . . . . . . . 28
6.Bo tó n de operación automática /d esa ct i vación de control
de reproducción de CD vídeo . . . . . . . . . . . . . . . . . . . . . . . . . . . . . . . . . . 20
7.Bo tó n de activación/desactivación de visualiza ci ón
en la pantalla de CD vídeo . . . . . . . . . . . . . . . . . . . . . . . . . . . . . . . . . . . . 28
8.Botón de borrado de discos . . . . . . . . . . . . . . . . . . . . . . . . . . . . . . . . . . 24
9.Botón de resumen de CD vídeo/búsqueda por el tiempo . . . . . . . . . . 25, 26
10.Botón de salto o ant erior de CD vídeo, de retroceso de pis ta o inversión
rápida de discos CD/MP3, de bobinado rápido de ci nt a 2, de sintonización
preajustada descendente . . . . . . . . . . . . . . . . . . . . . . . . . 20, 22, 30, 33, 35
11.Botón de marcador de CD vídeo . . . . . . . . . . . . . . . . . . . . . . . . . . . . . . 27
12.Botón de reproducción inversa de cinta 2 . . . . . . . . . . . . . . . . . . . . . . . . . 35
13.Botón selector de PAL/NTSC . . . . . . . . . . . . . . . . . . . . . . . . . . . . . . . . . 18
14.Botón de discos CD vídeo/CD/MP3 . . . . . . . . . . . . . . . . . . . . 19, 21, 29, 39
15.Botón de cinta (1 2) . . . . . . . . . . . . . . . . . . . . . . . . . . . . . . . . . . 34, 35, 40
16.Botón de conexión/reserva . . . . . . . . . . . . . . . . . . . . . . . . . . . . . . . . . . . . . 8
17.Botón de visualización de discos MP3 . . . . . . . . . . . . . . . . . . . . . . . . . 3 1
18.Botones de búsqueda directa de discos . . . . . . . . . . . . . . . . . . . . 19, 23
19.Botón de reproducción aleatoria de discos . . . . . . . . . . . . . . . . . . . . . 23
20.Botón de memoria de discos . . . . . . . . . . . . . . . . . . . . . . . . . . . . . . . . . . . 24
21.Botón de salto o siguiente de CD vídeo, de avance de pista o avance rápido
de discos CD/MP3, de bobinado rápido de cinta 2,
de sintonización preajustada ascendente . . . . . . . . . . . . . 20, 22, 30, 33, 35
22.Botón de memoria de discos . . . . . . . . . . . . . . . . . . . . . . . . . . . 20, 22, 30
23.Botón de reproducción, repetición, selección o reanudación de CD vídeo,
de reproducción o repetición de discos CD/MP3, de reproducción de cinta 1,
de reproducción hacia del an te de ci nta 2 . . . . . . . 19, 21, 23, 28, 29, 34 , 35
24.Botón de parada o retorno de CD vídeo,
de parada de discos CD/MP3/cinta . . . . . . . . . . . . . . . . . . 20, 22, 30, 34, 35
25.Botón de graves extra . . . . . . . . . . . . . . . . . . . . . . . . . . . . . . . . . . . . . . . . 15
26.Botón de selección del modo del ecualizador . . . . . . . . . . . . . . . . . . . . . . 15
27.Botones de aumento y reducción del volumen . . . . . . . . . . . . . . . . . . . . . 15
28.Botón de pausa de grabación de cinta 2 . . . . . . . . . . . . . . . . . . . . . . .38 - 40
29.Botón del sintonizador (banda) . . . . . . . . . . . . . . . . . . . . . . . . . . . . . . . . . 32
30.Botón de vídeo/auxiliar . . . . . . . . . . . . . . . . . . . . . . . . . . . . . . . . . . . . . . . 43
Los botones con la marca " " en la ilustración pueden operarse sólo con el con-
trolador remoto.
Los otros botones se pueden operar con el aparato principal y el controlador re-
moto.
Página de referencia
S-7
ESPAÑOL
Instalación de las pilas en el controlador remoto (Vea la página 8.)
CD-BK280V(X)S1.fm01/5/28
 Loading...