

Page 1
MINI COMPONENT SYSTEM
MINI-CHAÎNE STÉRÉO
CD-BA250 Mini Component System consisting of CD-BA250 (main
unit) and CP-BA250 (speaker system).
Mini-chaîne stéréo CD-BA250 composée de CD-BA250 (appareil principal) et de CP-BA250 (enceintes acoustiques).
MODEL
MODÈLE
CD-BA250
CD-BA2600
OPERATION MANUAL
MODE D’EMPLOI
CD-BA2600 Mini Component System consisting of CD-BA2600 (main
unit) and CP-BA2600 (speaker system).
Mini-chaîne stéréo CD-BA2600 composée de CD-BA2600 (appareil
principal) et de CP-BA2600 (enceintes acoustiques).
ENGLISH
FRANÇAIS
Please refer to pages E-1 to E-28.
Se reporter aux pages F-1 à F-28.
Page 2
E-1
ENGLISH
General Information
- Introduction / Special Note / Accessories / Contents -
Audio-visual material may consist of copyrighted works which must not be recorded
without the authority of the owner of the copyright. Please refer to the rele vant laws in
Note:
Only the above accessories are included.
Accessories
Please confirm that the following accessories are included.
Remote control 1 FM/AM loop aerial 1
your country.
Special Note
Introduction
Thank you for purchasing this SHARP product. To obtain the best performance from
this product, please read this manual carefully. It will guide you in operating your
SHARP product.
ENGLISH
Precautions . . . . . . . . . . . . . . . . . . . . . . . . . . . . . . . . . . . . . . . . . . . . . . . . . . . . . . . 2
Controls and Indicators . . . . . . . . . . . . . . . . . . . . . . . . . . . . . . . . . . . . . . . . . . 3 - 6
System Connections . . . . . . . . . . . . . . . . . . . . . . . . . . . . . . . . . . . . . . . . . . . . . 7, 8
Remote Control . . . . . . . . . . . . . . . . . . . . . . . . . . . . . . . . . . . . . . . . . . . . . . . . . . . . 9
General Control . . . . . . . . . . . . . . . . . . . . . . . . . . . . . . . . . . . . . . . . . . . . . . . . . . . 10
Sound Control . . . . . . . . . . . . . . . . . . . . . . . . . . . . . . . . . . . . . . . . . . . . . . . . . . . . 11
Setting the Clock . . . . . . . . . . . . . . . . . . . . . . . . . . . . . . . . . . . . . . . . . . . . . . . . . . 12
Listening to a CD (CDs) . . . . . . . . . . . . . . . . . . . . . . . . . . . . . . . . . . . . . . . . . 13, 14
Starting playbac k with a desired track . . . . . . . . . . . . . . . . . . . . . . . . . . . . . . . . 15
Repeat or Random Play . . . . . . . . . . . . . . . . . . . . . . . . . . . . . . . . . . . . . . . . . . . . 15
Programmed Play . . . . . . . . . . . . . . . . . . . . . . . . . . . . . . . . . . . . . . . . . . . . . . . . . 16
Listening to the Radio . . . . . . . . . . . . . . . . . . . . . . . . . . . . . . . . . . . . . . . . . . . . . 17
Listening to the memorised station . . . . . . . . . . . . . . . . . . . . . . . . . . . . . . . . . . 18
Listening to a Cassette Tape (TAPE 1 or TAPE 2) . . . . . . . . . . . . . . . . . . . . . . . 19
Recording from the Radio . . . . . . . . . . . . . . . . . . . . . . . . . . . . . . . . . . . . . . . . . . 20
Recording from a CD (CDs) . . . . . . . . . . . . . . . . . . . . . . . . . . . . . . . . . . . . . . . . . 21
Dubbing from Tape to Tape . . . . . . . . . . . . . . . . . . . . . . . . . . . . . . . . . . . . . . . . . 22
Timer and Sleep Operation . . . . . . . . . . . . . . . . . . . . . . . . . . . . . . . . . . . . . . 23, 24
Enhancing Your System . . . . . . . . . . . . . . . . . . . . . . . . . . . . . . . . . . . . . . . . . . . . 25
Troubleshooting Chart . . . . . . . . . . . . . . . . . . . . . . . . . . . . . . . . . . . . . . . . . . 26, 27
Maintenance . . . . . . . . . . . . . . . . . . . . . . . . . . . . . . . . . . . . . . . . . . . . . . . . . . . . . 27
Specifications . . . . . . . . . . . . . . . . . . . . . . . . . . . . . . . . . . . . . . . . . . . . . . . . . . . . 28
LIMITED WARRANTY . . . . . . . . . . . . . . . . . . . . . . . . . . . . . . . . . . . . . . Back cover
References
Advanced Features
Tape Recording
Tape Playback
Radio
Advanced CD Playback
CD Playback
Basic Operation
Preparation for Use
General Information
Contents
Page
Page 3
tion.
z
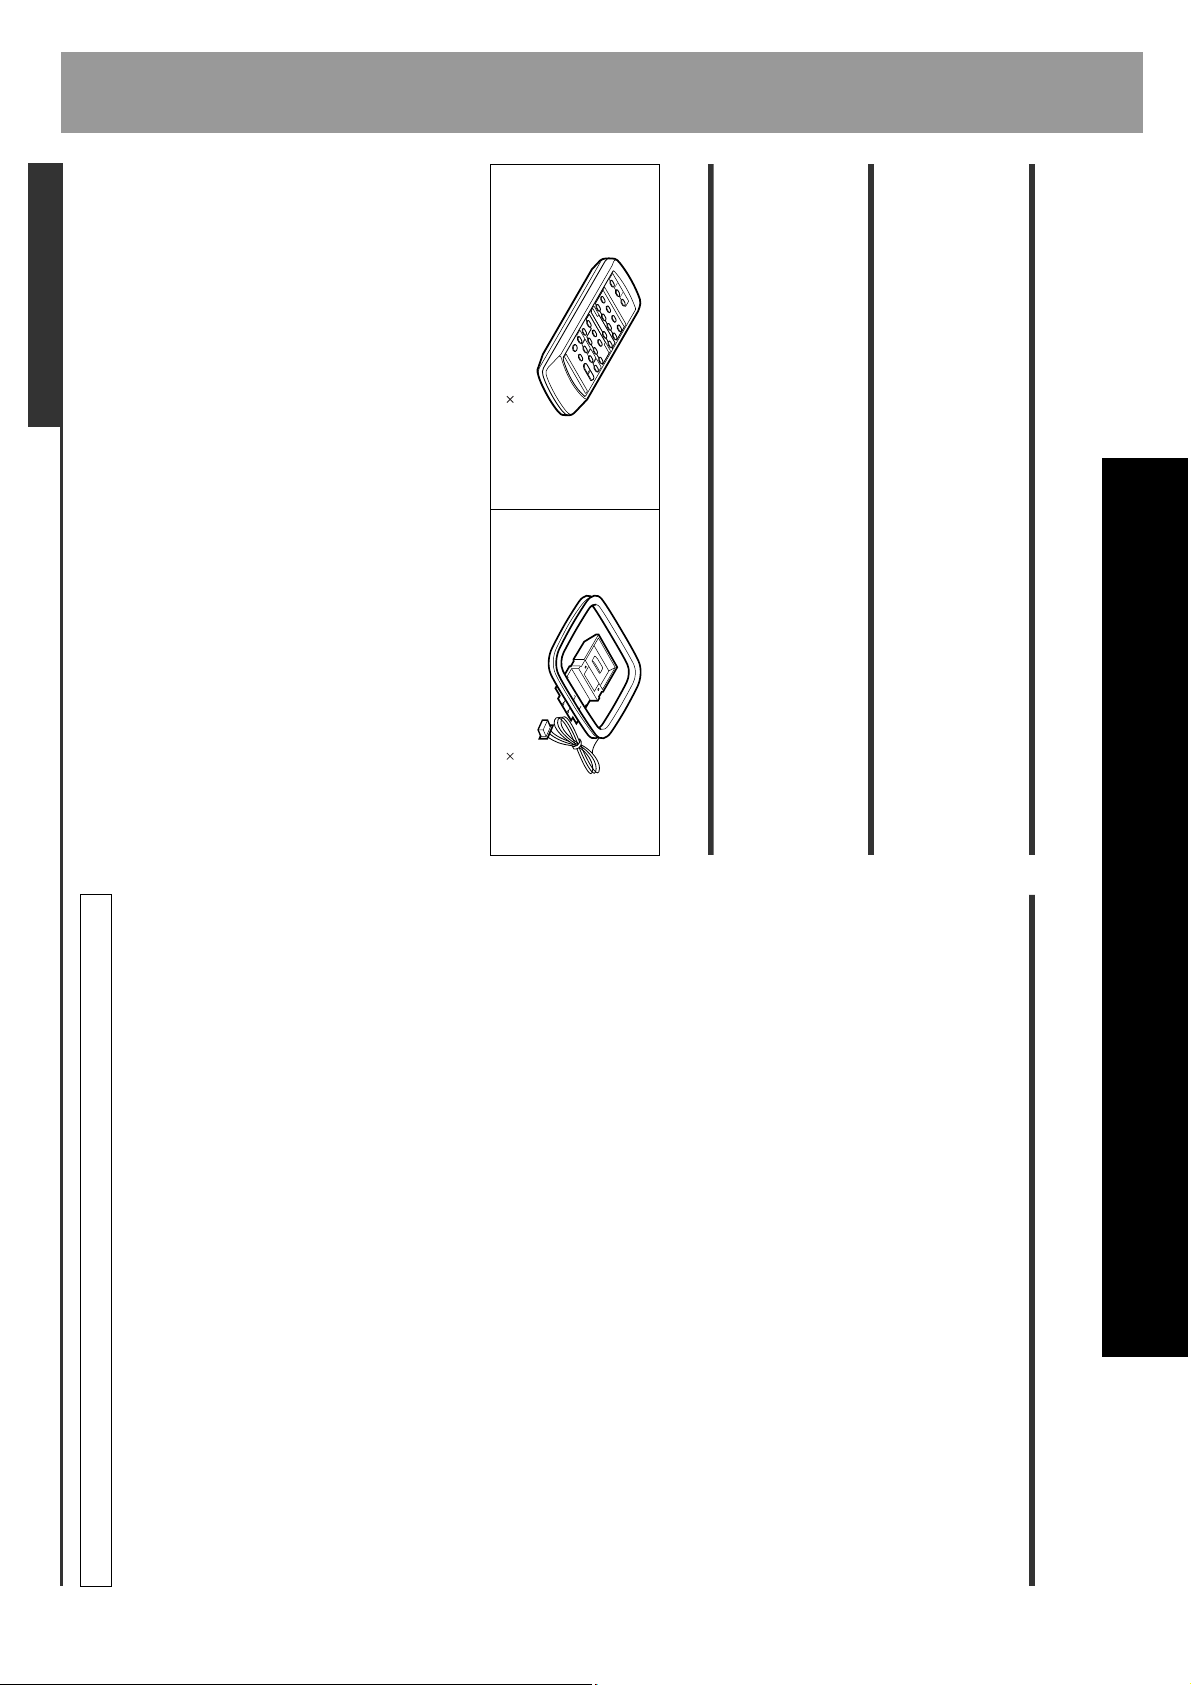
Use the unit on a firm , level surface free from vibra-
10 cm (4") 10 cm (4" )
10 cm (4")
back of the unit.
z
Please ensure that the equ ipment is po sitioned in a well-ventilated area and
ensure that there is at least 10 cm (4") of free spa ce alo ng the sides, top and
General
Precautions
z
Hold the AC power p lug by the head when remo ving
it from the wal l sock et , as pul lin g th e le ad ca n da m-
age internal wires.
z
In case of an electrical st or m , un plug the unit for
safety.
wall socket. Plug the AC power lead back in, and then turn on your syste m .
z
ers, facsimiles, etc.) which generates electrical
noise.
Do not place anything on top of the unit.zDo not expose the unit to moisture, to temperatures higher than 60°C (140°F)
or to extremely low temperatures.zIf your system does not work properly, disconnect the AC power lead from the
z
Keep the unit away from direct sunlight, strong
magnetic fields, ex ce ssi ve dust, humidity and
electronic/electrical equipment (home comput -
NO
10 cm (4")
z
Warning:
The voltage used must be the same as that specifi ed on this unit. Using this
product with a higher voltage other than that which is specified is dangerous and
may result in a fire or other type of accident causing damage. SHARP will not be
held responsible for any damage result ing from use of this unit with a voltage
other than that which is specified.
The sound level at a given volume setting depends on speaker efficiency, loca-
tion, and various other factors. It is advi sable to avoid exposure to high volume
levels, which occur whilst turning the un it on with the volume contro l setting up
high, or whilst continually list e ni ng at hi gh volumes.
Compact discs are fairly resistant to damage, however mistracking can occur
due to an accumulation of dir t on the disc surface. Follow the guidelines below
for maximum enjoyment from your CD collection and player.
z
Do not write on ei ther side of the disc, par ticularly the non-label side from
cause noise or mi stracking. If a CD i s dir ty or does not play properly, clean it
with a soft, dry cloth, wiping straight out from the centre, along the radius.
which signals are read. Do not mark this surface.zKeep your discs away from direct sunlight, heat, and excessive moisture.zAlways hold the CDs by the edges. Fingerprints, dirt, or water on the CDs can
Care of compact discs
Volume control
This unit should only be us ed within the range of 5°C - 35° C (41°F - 95°F).
z Do not remove the outer co ver, as this may re-
sult in electric shock. Refer internal service to
your local SHARP service facility.
ENGLISH
E-2
YES
correct
General Information
- Precautions -
Page 4
E-3
General Information
- Controls and Indicators -
Controls and Indicators
ENGLISH
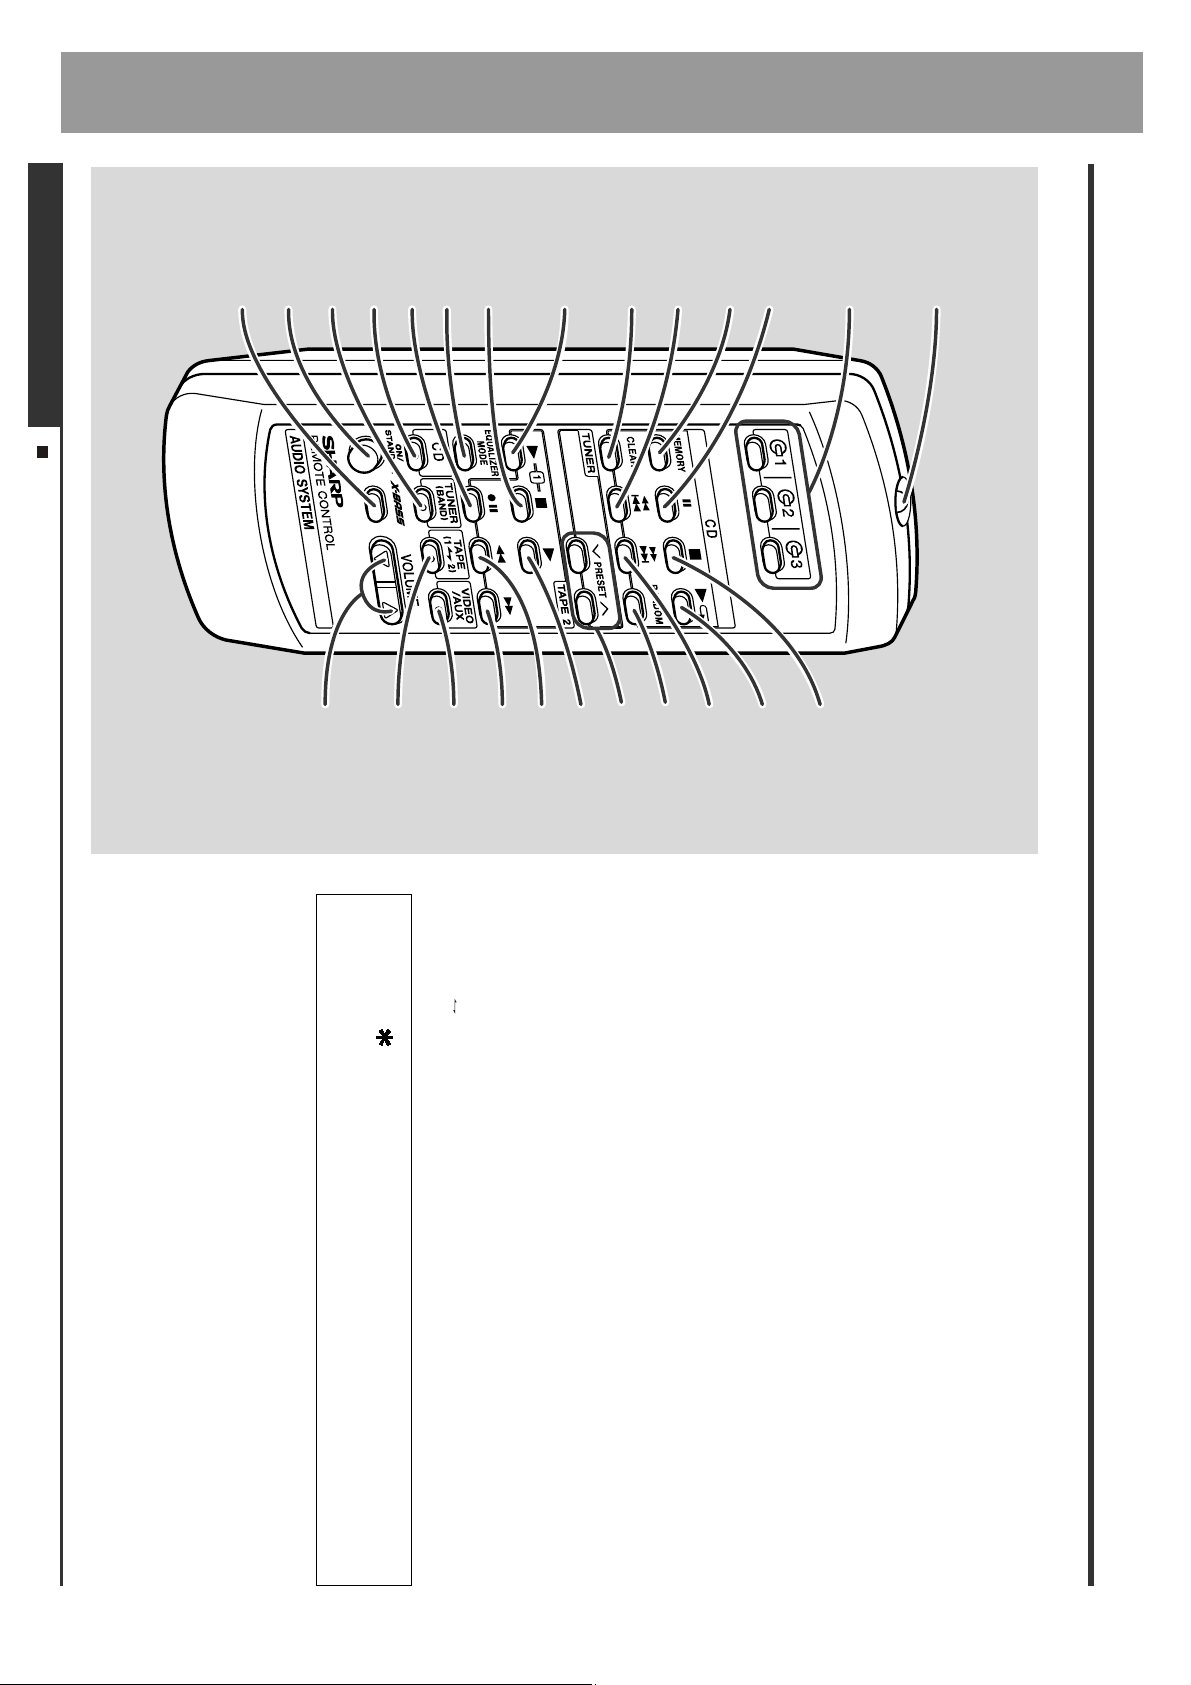
Description of remote control (See page 5.)
23 24 25 26
20
19
18
22
21
17
161514131211
5
4
3
2
1
10
67
8
9
26.CD Track Down or Fast Reverse, Tape 2 Rewind,
Tuner Preset Down Button . . . . . . . . . . . . . . . . . . . . . . . . . .14, 18, 19
Tuner Preset Up Button . . . . . . . . . . . . . . . . . . . . . . . . . . . . .14, 18, 19
8.Extra Bass/Demo Mode Button . . . . . . . . . . . . . . . . . . . . . . . . .10, 11
9.Disc Tray Open/Close Button . . . . . . . . . . . . . . . . . . . . . . . . . . . . . .13
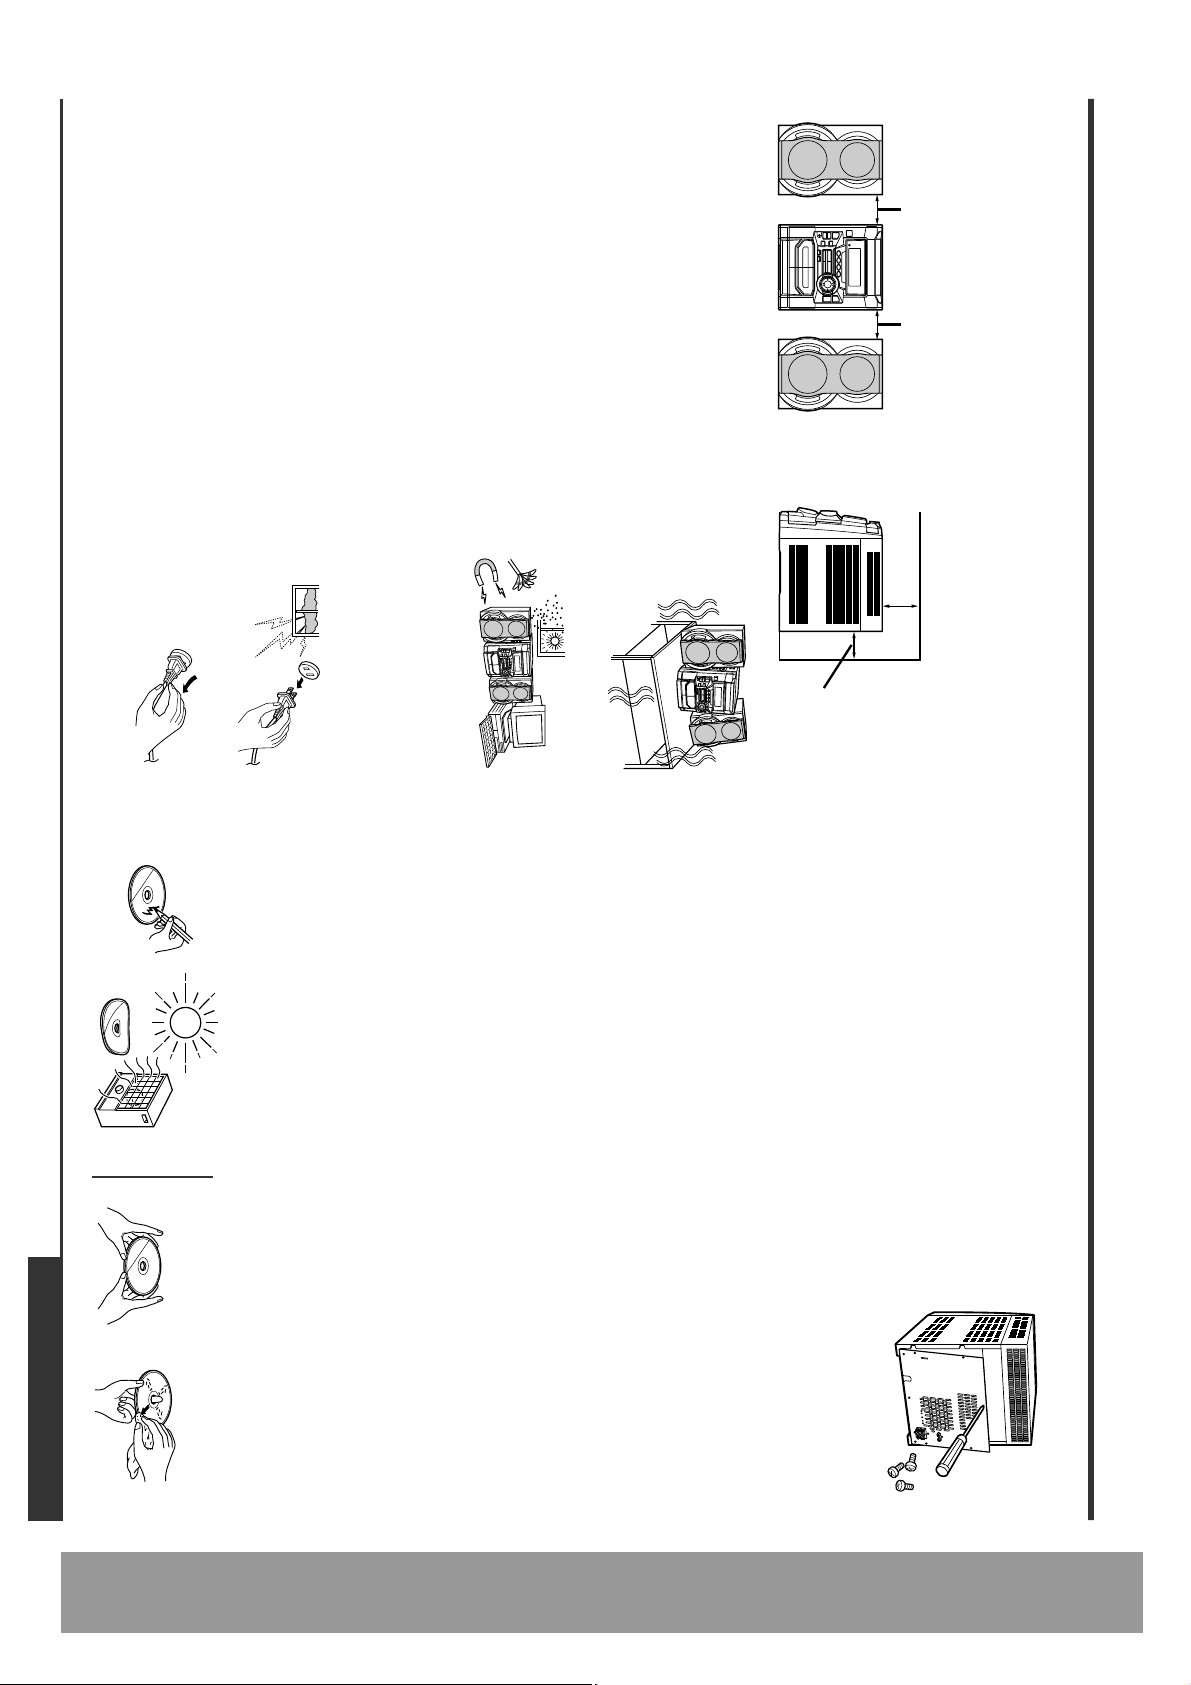
5.Tape 1 Cassette Compartment . . . . . . . . . . . . . . . . . . . . . . . . . .19, 22
6.Equalizer Mode Select Button . . . . . . . . . . . . . . . . . . . . . . . . . . . . .11
7.Volume Up or Down Buttons . . . . . . . . . . . . . . . . . . . . . . . . . . . . . . .11
4.Tape 2 Cassette Compartment . . . . . . . . . . . . . . . . . . . . . . . . . .19, 22
2.Timer Set Indicator . . . . . . . . . . . . . . . . . . . . . . . . . . . . . . . . . . . . . .24
3.Power On/Stand-by Button . . . . . . . . . . . . . . . . . . . . . . . . . . 12, 23, 27
1.Disc Tray . . . . . . . . . . . . . . . . . . . . . . . . . . . . . . . . . . . . . . . . . . . . . . .13
Front panel
Reference page
10.Disc Skip Button . . . . . . . . . . . . . . . . . . . . . . . . . . . . . . . . . . . . .13, 15
11.Tuning and Time Up Button . . . . . . . . . . . . . . . . . . . . . . . . . . . .12, 17
12.CD or Tape Stop Button . . . . . . . . . . . . . . . . . . . . . . . . . . . . . . .14, 19
13.CD Button . . . . . . . . . . . . . . . . . . . . . . . . . . . . . . . . . . . . . . . . . . .13, 21
14.Tuner (Band) Button . . . . . . . . . . . . . . . . . . . . . . . . . . . . . . . . . . . . .17
15.Tape (1 2) Button . . . . . . . . . . . . . . . . . . . . . . . . . . . . . . . . . . .19, 22
16.Video/Auxiliary Button . . . . . . . . . . . . . . . . . . . . . . . . . . . . . . . .23, 25
17.Dimmer Button . . . . . . . . . . . . . . . . . . . . . . . . . . . . . . . . . . . . . . . . . .10
18.Clock Button . . . . . . . . . . . . . . . . . . . . . . . . . . . . . . . . . . . . . . . . .12, 23
19.Timer/Sleep Button . . . . . . . . . . . . . . . . . . . . . . . . . . . . . . . . . . .23, 24
20.Headphone Socket . . . . . . . . . . . . . . . . . . . . . . . . . . . . . . . . . . . . . . .25
21.CD Play or Repeat, Tape Play Button . . . . . . . . . . . . . . . . . .14, 15, 19
22.CD Track Up or Fast Forward, Tape 2 Fast Forward,
23.Tuning and Time Down Button . . . . . . . . . . . . . . . . . . . . . . . . . .12, 17
24.Memory/Set Button . . . . . . . . . . . . . . . . . . . . . . . . . . . . . . . .12, 16, 18
25.Tape 2 Record Pause Button . . . . . . . . . . . . . . . . . . . . . . . .20, 21, 22
Page 5
2
1
4
3
2
1
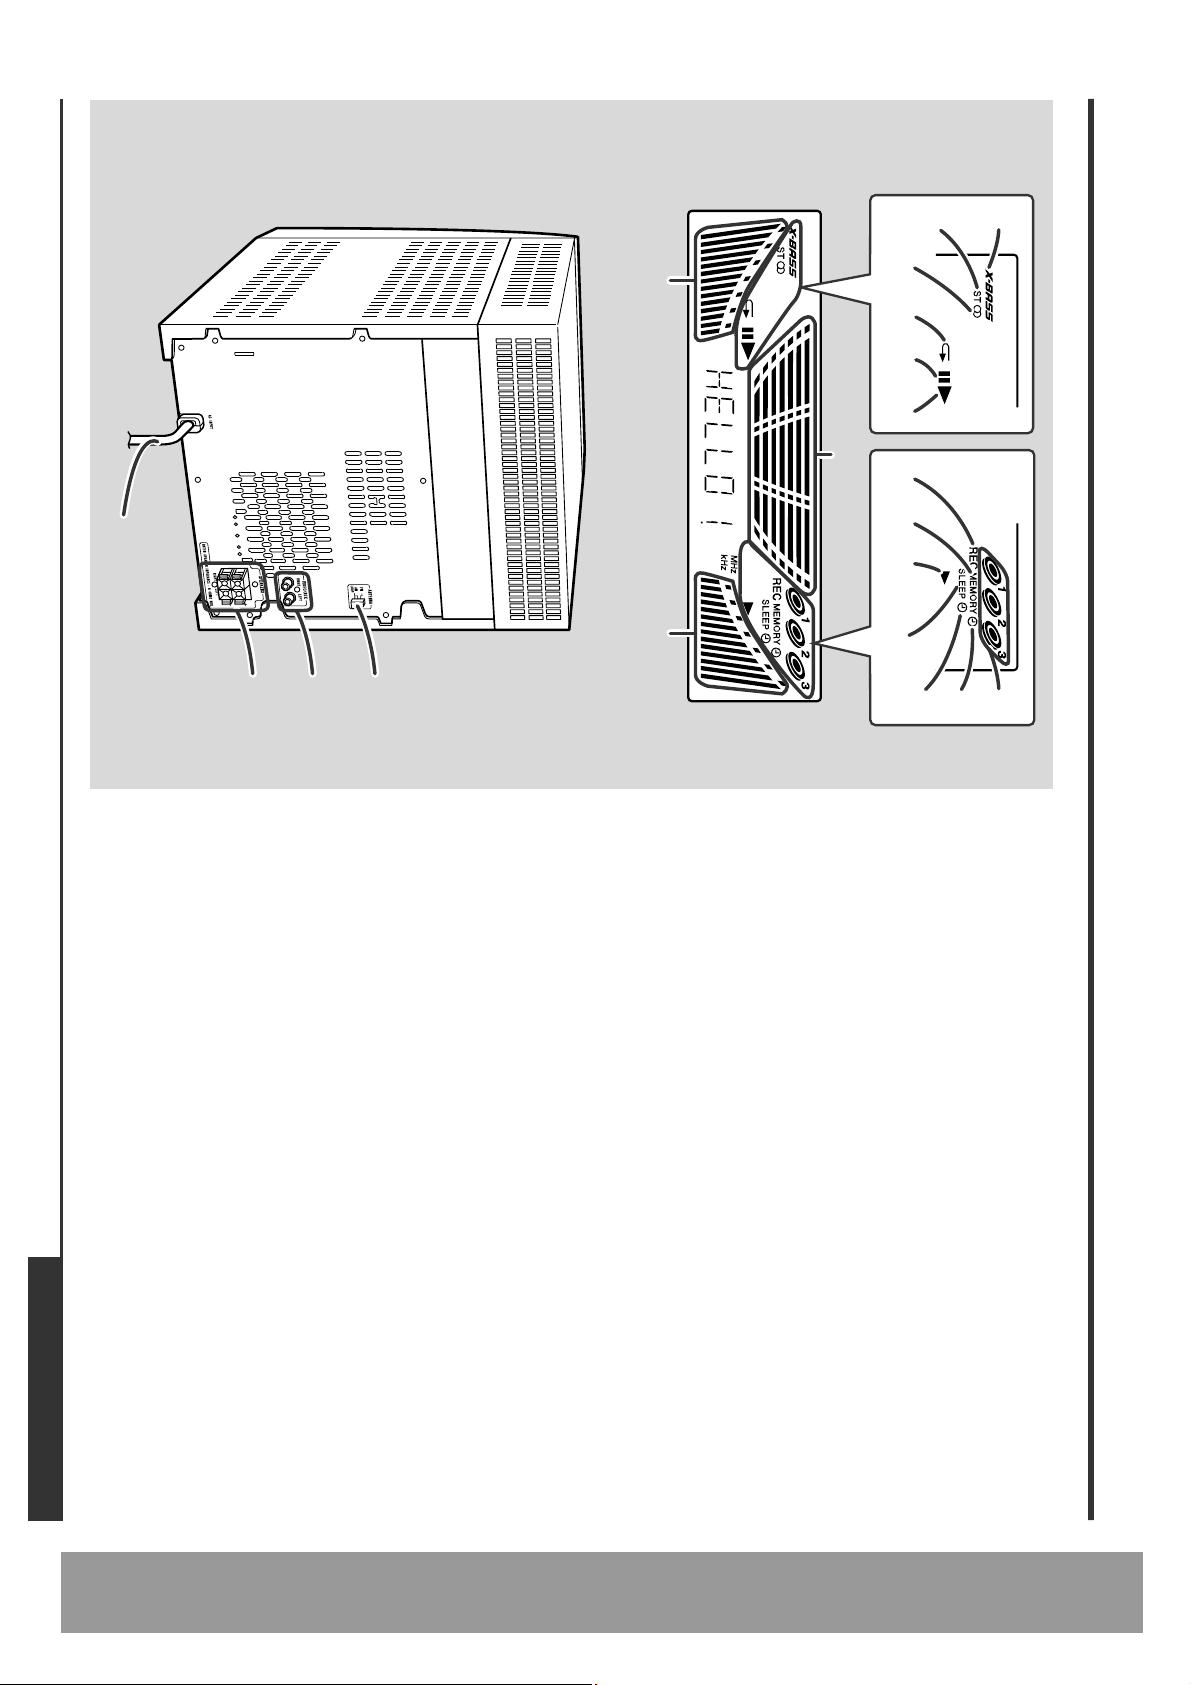
4.AC Power Lead . . . . . . . . . . . . . . . . . . . . . . . . . . . . . . . . . . . . . . . .7, 8
3.Speaker Terminals . . . . . . . . . . . . . . . . . . . . . . . . . . . . . . . . . . . . . 7, 8
14 14
345 10
14
1112 136
7
8
9
10.Tape 2 Record Indicator
11.Memory Indicator
12.Tape Play Indicator
13.Sleep Indicator
1.FM/AM Loop Aerial Socket . . . . . . . . . . . . . . . . . . . . . . . . . . . . . . . 7, 8
2.Video/Auxiliary (Audio Signal) Input Sockets . . . . . . . . . . . . . . . . . 25
14.Spectrum Analyzer/Volume Level Indicator
9.Timer Recording Indicator
8.Timer Play Indicator
3.FM Stereo Receiving Indicator
4.CD Repeat Play Indicator
5.CD Pause Indicator
6.CD Play Indicator
7.Disc Number Indicators
Rear panel
2.FM Stereo Mode Indicator
1.Extra Bass Indicator
Display
ENGLISH
E-4
Reference page
General Information
- Controls and Indicators -
Page 6
E-5
General Information
- Controls and Indicators -
Controls and Indicators (continued)
ENGLISH
Battery installation for remote control (See page 9.)
14
13
12
25
11
10
24
9
23
8
22
21
7
20
✱
6
19
5
18
✱
17
4
✱
3
16
15
2
1
Other buttons can be operated both on the main unit and the remote control.
Buttons with " " mark in the illustration can be operated on the remote control
only.
25.
Tape 2 Record Pause Button . . . . . . . . . . . . . . . . . . . . . . . . . .20, 21, 22
CD Button . . . . . . . . . . . . . . . . . . . . . . . . . . . . . . . . . . . . . . . . . . .13, 21
Tuner (Band) Button . . . . . . . . . . . . . . . . . . . . . . . . . . . . . . . . . . . . . . .17
Power On/Stand-by Button . . . . . . . . . . . . . . . . . . . . . . . . . . . .9, 23, 27
Extra Bass Button . . . . . . . . . . . . . . . . . . . . . . . . . . . . . . . . . . . . . . . .11
CD Stop Button . . . . . . . . . . . . . . . . . . . . . . . . . . . . . . . . . . . . . . .14, 21
CD Play or Repeat Button . . . . . . . . . . . . . . . . . . . . . . . . . . . . . . .14, 15
CD Track Up or Fast Forward Button . . . . . . . . . . . . . . . . . . . . . . . . . .14
Tuner Preset Up/Down Buttons . . . . . . . . . . . . . . . . . . . . . . . . . . . . . .18
Tape 2 Play Button . . . . . . . . . . . . . . . . . . . . . . . . . . . . . . . . . . . . . . . .19
Tape 2 Rewind Button . . . . . . . . . . . . . . . . . . . . . . . . . . . . . . . . . . . . .19
Tape 2 Fast Forward Button . . . . . . . . . . . . . . . . . . . . . . . . . . . . . . . . .19
Video/Auxiliary Button . . . . . . . . . . . . . . . . . . . . . . . . . . . . . . . . . . . . .25
Tape (1 2) Button . . . . . . . . . . . . . . . . . . . . . . . . . . . . . . . . . . . .19, 22
Volume Up or Down Buttons . . . . . . . . . . . . . . . . . . . . . . . . . . . . . . . .11
7.
Tape 1 Play Button . . . . . . . . . . . . . . . . . . . . . . . . . . . . . . . . . . . . . . . .198.Tape 1/Tape 2 Stop Button . . . . . . . . . . . . . . . . . . . . . . . . . . . .19, 20, 229.Equalizer Mode Select Button . . . . . . . . . . . . . . . . . . . . . . . . . . . . . . .11
6.CD Clear Button . . . . . . . . . . . . . . . . . . . . . . . . . . . . . . . . . . . . . . . . .16
4.
CD Memory Button . . . . . . . . . . . . . . . . . . . . . . . . . . . . . . . . . . . . . . .165.CD Track Down or Fast Reverse Button . . . . . . . . . . . . . . . . . . . . . . . .14
3.CD Pause Button . . . . . . . . . . . . . . . . . . . . . . . . . . . . . . . . . . . . . . . .14
10.
11.
12.
13.
14.
15.
16.
17.
18.CD Random Button . . . . . . . . . . . . . . . . . . . . . . . . . . . . . . . . . . . . . .15
19.
20.
21.
22.
23.
24.
1.
Remote Control Transmitter . . . . . . . . . . . . . . . . . . . . . . . . . . . . . . . . . .92.Disc Number Select Buttons . . . . . . . . . . . . . . . . . . . . . . . . . .13, 16, 21
Remote control
Reference page
Page 7
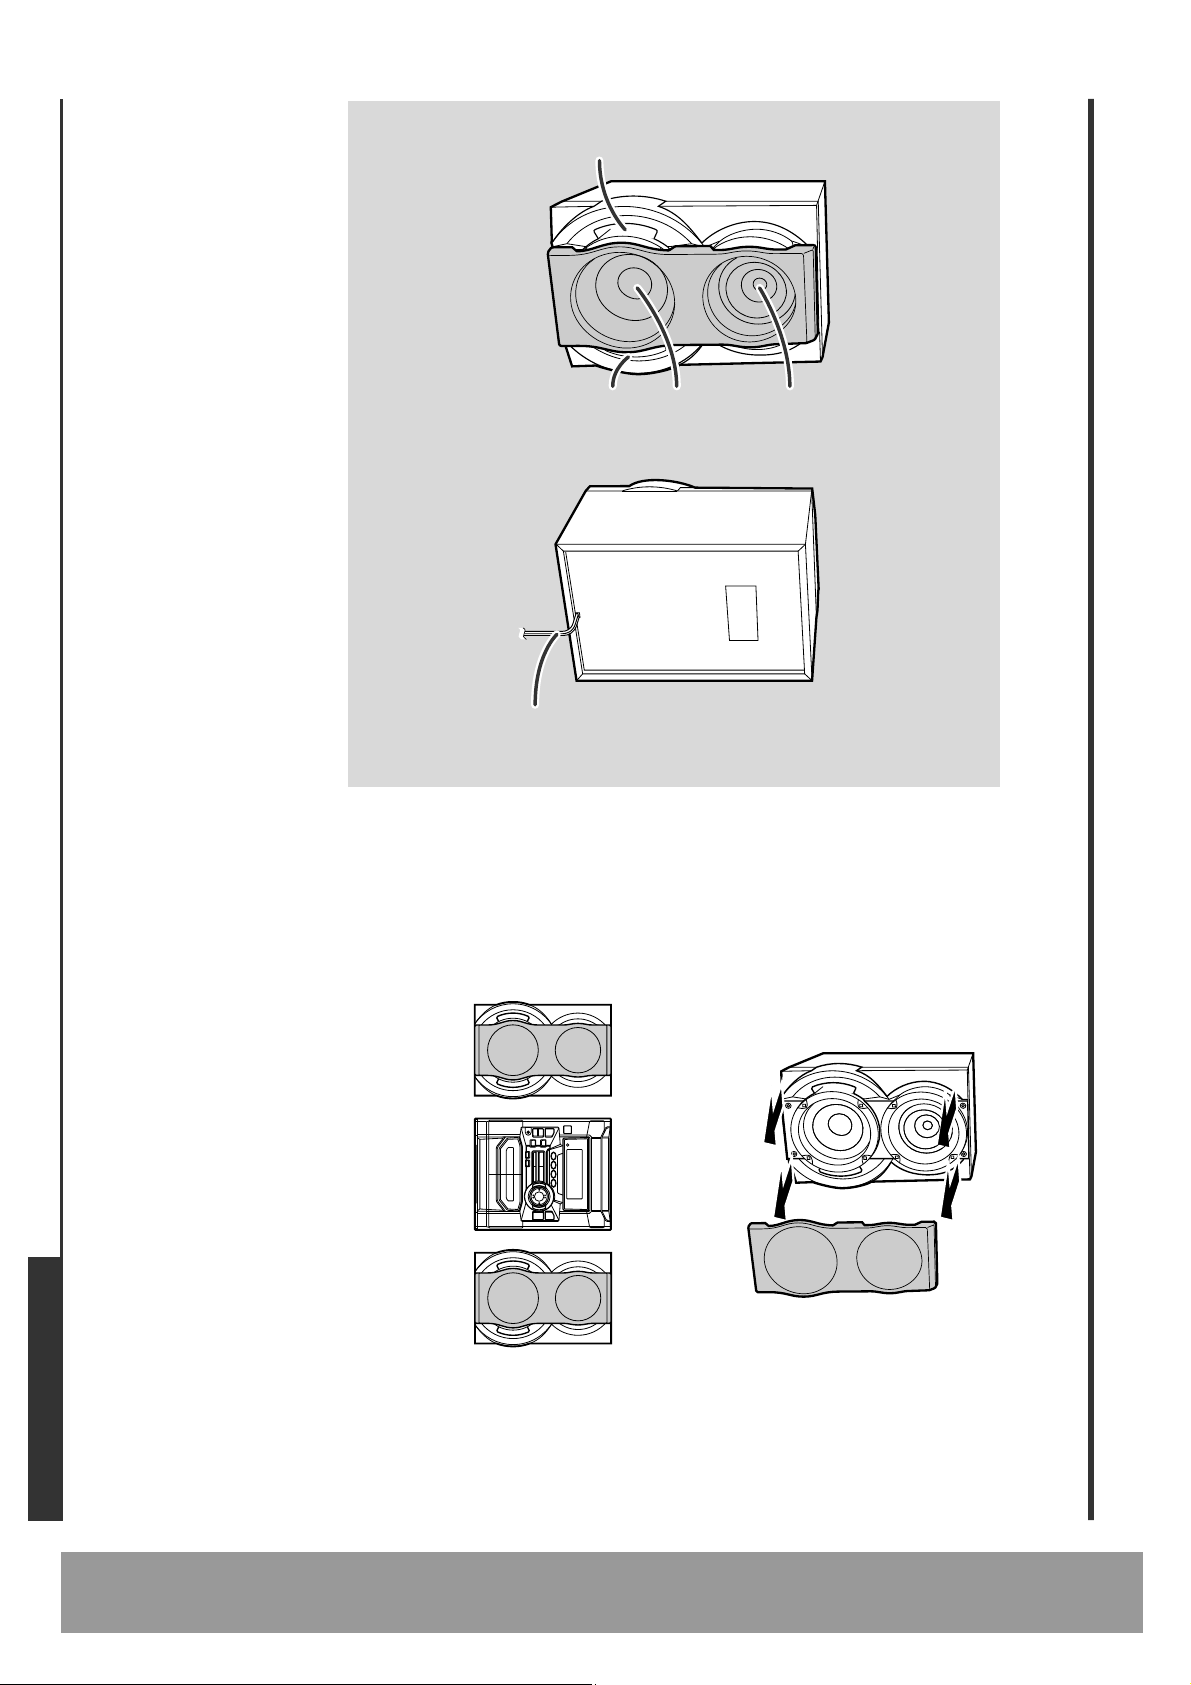
3.Bass Reflex Duct
4.Speaker Wire
2.Woofer
1.Tweeter
3
Speaker system
4
3
2
Placing the speaker system:
There is no distinction between the right and the left speakers.
1
Speaker grilles are removable:
Make sure nothing comes into contact with the speaker diaphragms when you
remove the speaker grilles.
ENGLISH
E-6
Left speaker Right speaker
General Information
- Controls and Indicators -
Page 8
E-7
ENGLISH
Preparation for Use
- System Connections -
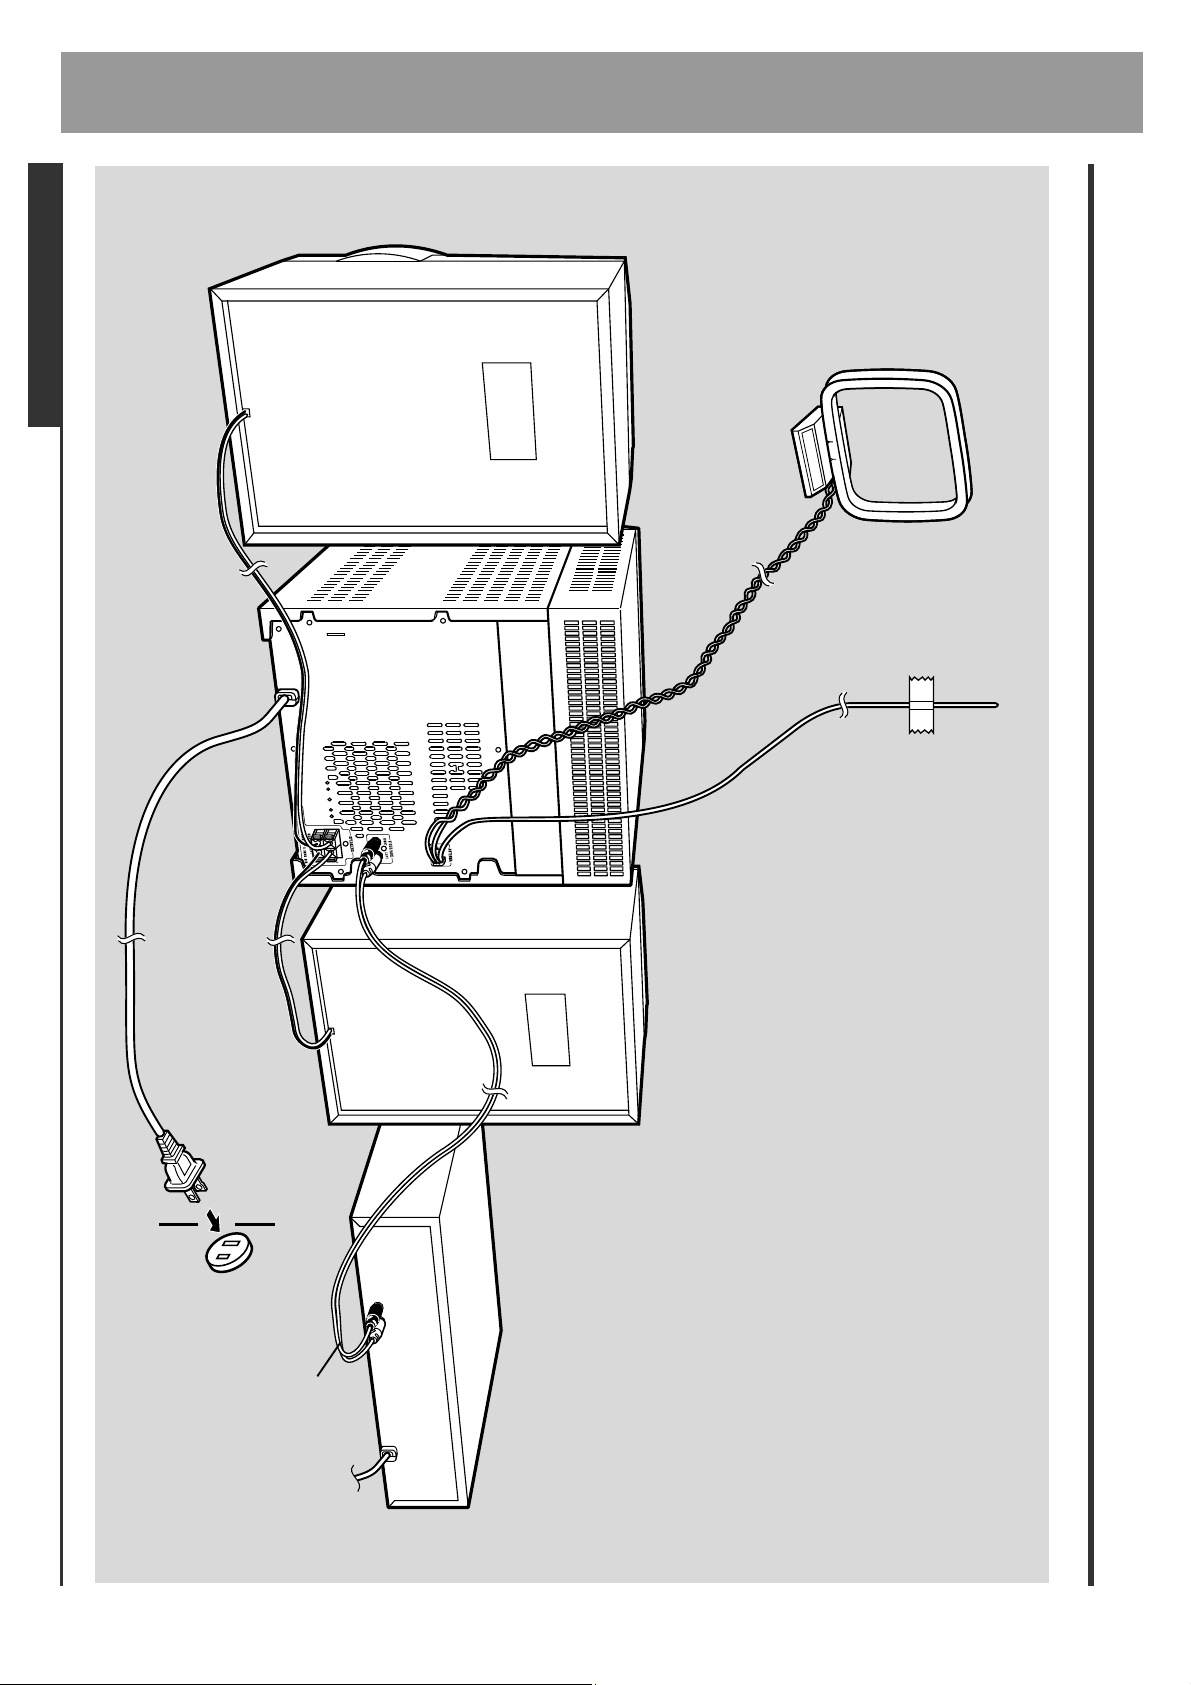
System Connections
Right speaker
AM loop aerial
Wall socket
(AC 120 V, 60 Hz)
FM aerial
Left speaker
VCR, DVD, etc.
not supplied
Page 9
Incorrect
z
Do not stand or sit on the speakers. You may be in-
jured.
z
Do not allow any objects to fall into or to be placed in
the bass reflex ducts.
z
right speaker is the one on the right side when you face
the unit.
Do not let the bare speaker wires touch each other.
z
Caution:
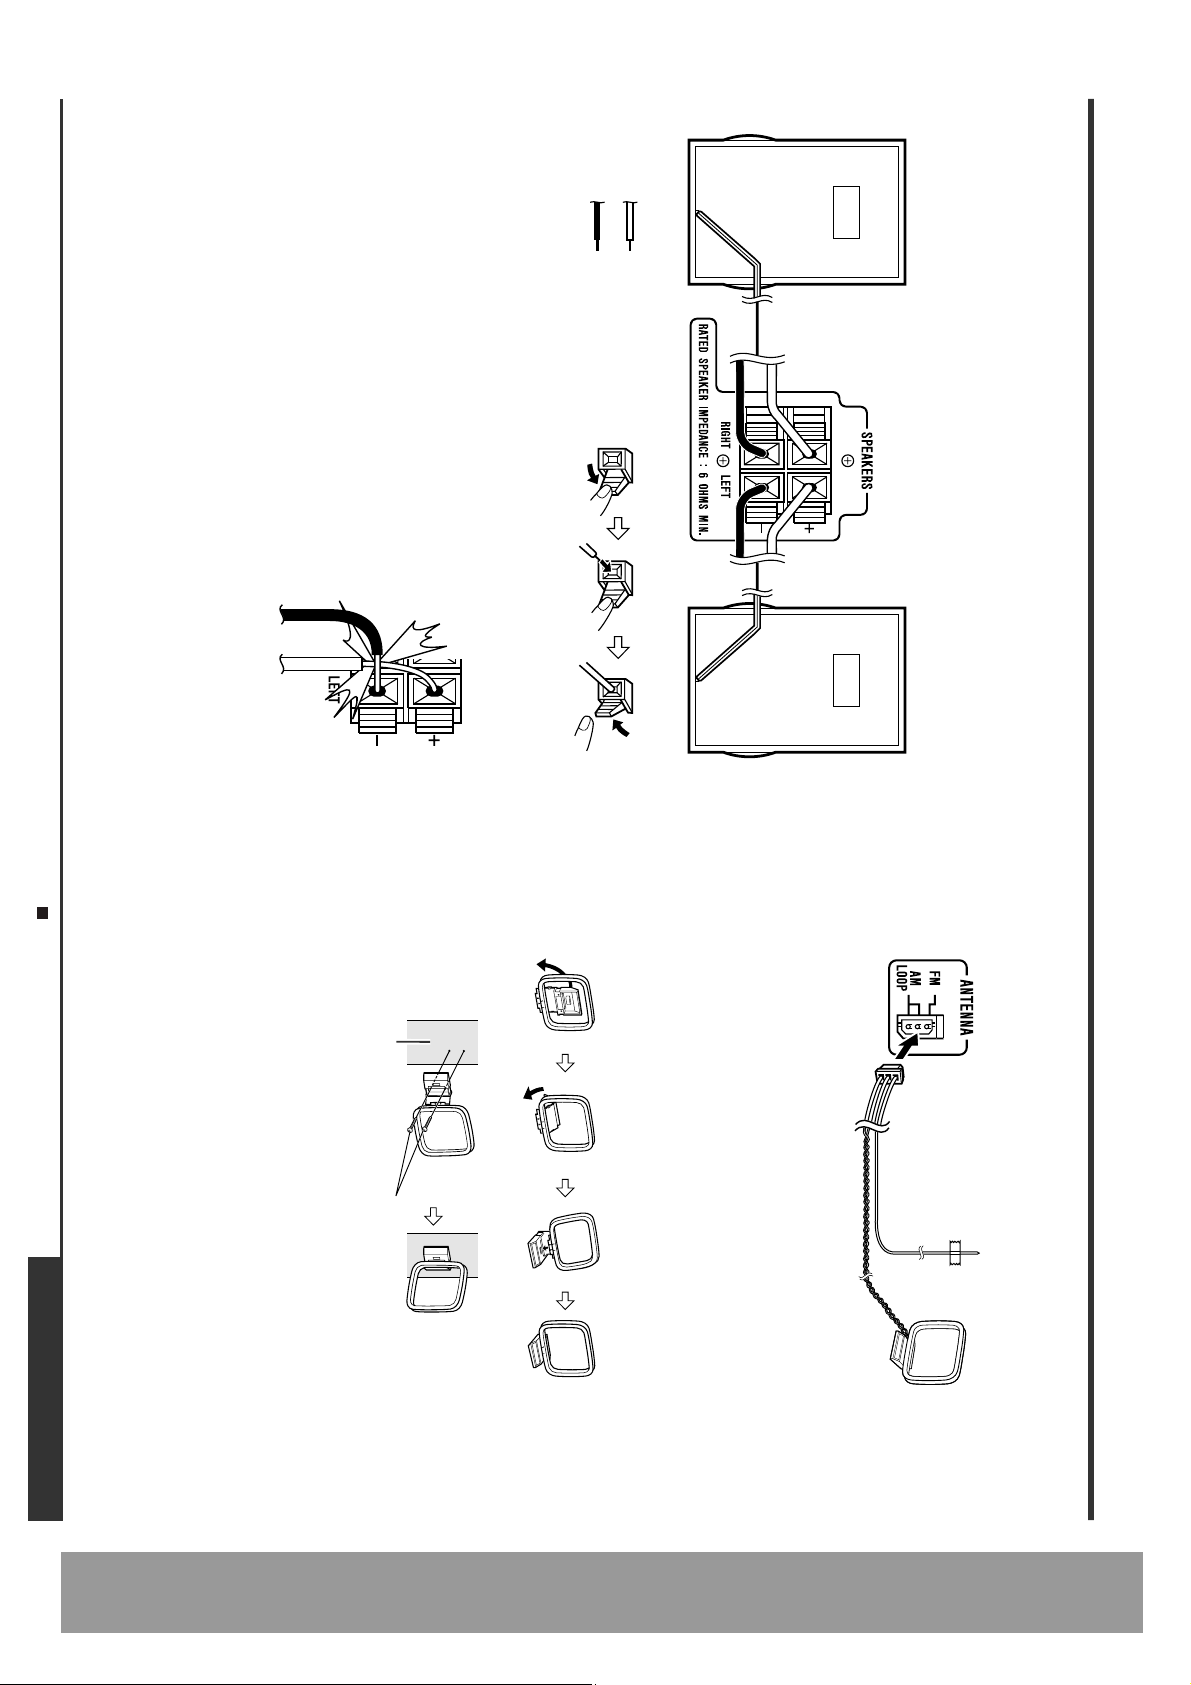
Use speakers with an impedance of 6 ohms or more, as lower impedance speakers
can damage the unit.zDo not mistake the right and the left channels. The
Black
Red
(+) terminal.
Right speaker Left speaker
Connect the black wire to the minus (-) terminal, and the red wire to the plus
Speaker connection
Demonstration mode (See page 10.)
ENGLISH
WIDE SLOT, FULLY INSERT.
CAUTION:
TO PREVENT ELECTRIC SHOCK, MATCH WIDE BLADE OF PLUG TO
After checkin g all the conn ections have been made correctly, plu g the AC
power lead of this unit into the wall socket. If you plug the unit first, the unit
will enter the demonstration mode (see page 10).
Note:
Unplug the unit if it will not be used for a prolonged period of time.
< Attaching to the wall >
Connecting the AC power lead
Wall Screws (not supplied)
< Assembling >
Placing the aerial on the unit or near the AC power lead may cause noise pickup.
Place the aerial away from the unit for better reception.
Do not connect the attached FM aerial to an external FM aerial. Otherwise, trouble
may occur.
Position the FM aerial wire and rotate the AM loop aerial for optimum reception.
Place the AM loop aerial on a shelf, or attach it to a stand or a wall.
Notes:
z
z
Installing the AM loop aerial:
Connect the FM/AM loop aerial to the ANTENNA socket.
FM/AM loop aerial connection
E-8
Preparation for Use
- System Connections -
Page 10
E-9
Preparation for Use
- Remote Control -
ENGLISH
Precautions for battery use:
Caution:
Notes concerning use:
z
with a soft cloth.
Exposing the sensor on the unit to strong light may interfere with operation.
Change the lighting or the direction of the unit.zKeep the remote control away from moisture, heat, shock, and vibrations.
z
Replace the batteries if the operating distance is reduced or if the operation
becomes erratic.zPeriodically clean the transmitter on the remote control and the sensor on the unit
z
Do not use rechargeable batteries (nickel-cadmium battery, etc.).zInstalling the batteries incorrectly may cause the unit to malfunction.
prevent potential damage due to battery leakage.
z
Replace all old batteries with new ones at the same time.zDo not mix old and new batteries.zRemove the batteries if the unit will not be used for long periods of time. This will
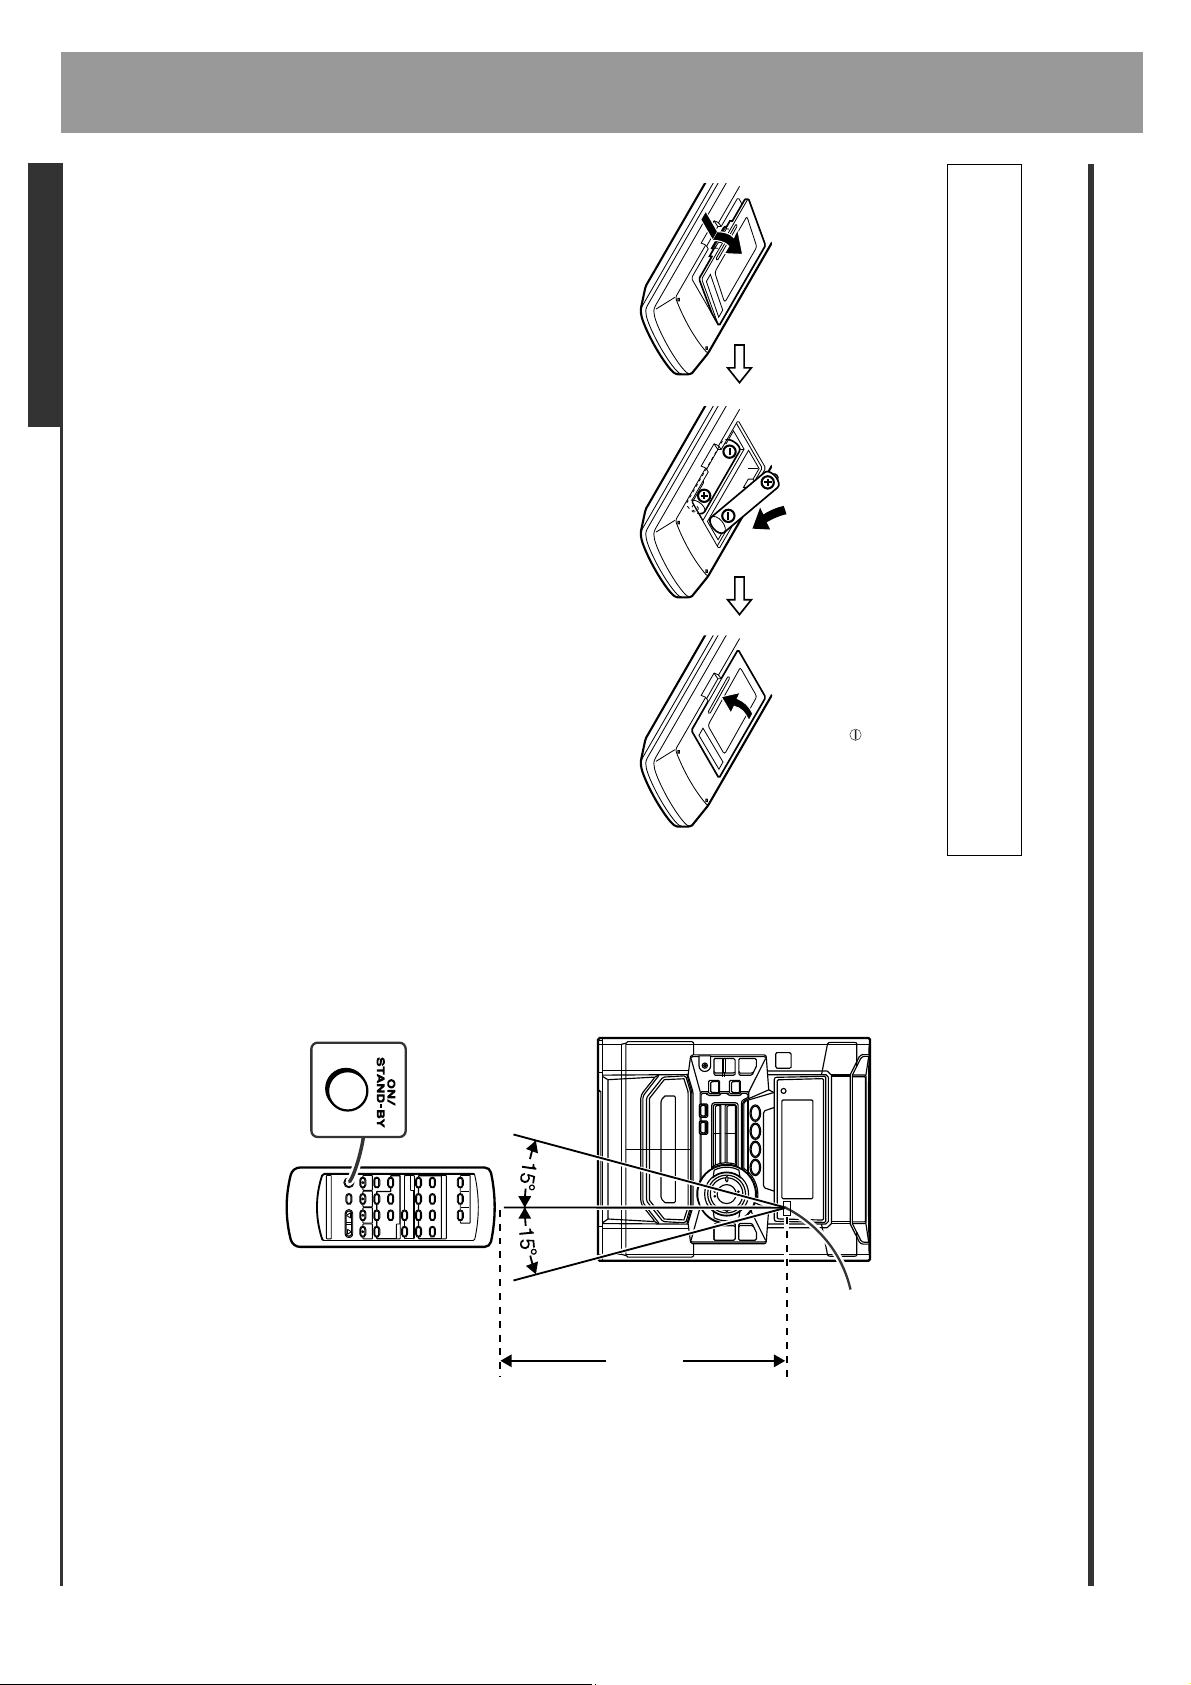
3 Replace the cover.
When inserting or removing the batteries, push them towards the battery termi-
nals.
2 Insert the batteries according to the direction indicated in the bat-
tery compartment.
1 Remove the battery cover.
Batteries are not included.
Use 2 "AA" size batteries (UM/SUM-3, R6, HP-7 or similar).
Battery installation
Remote Control
0.2 m - 6 m
(8" - 20')
Press the ON/STAND- BY button. Does the power turn on? Now, you can enjoy the
music.
Remote sensor
Face the remote control directly to the remote sensor on the unit.
The remote control can be used within the range shown below:
Test of the remote control
Page 11
General Control
ENGLISH
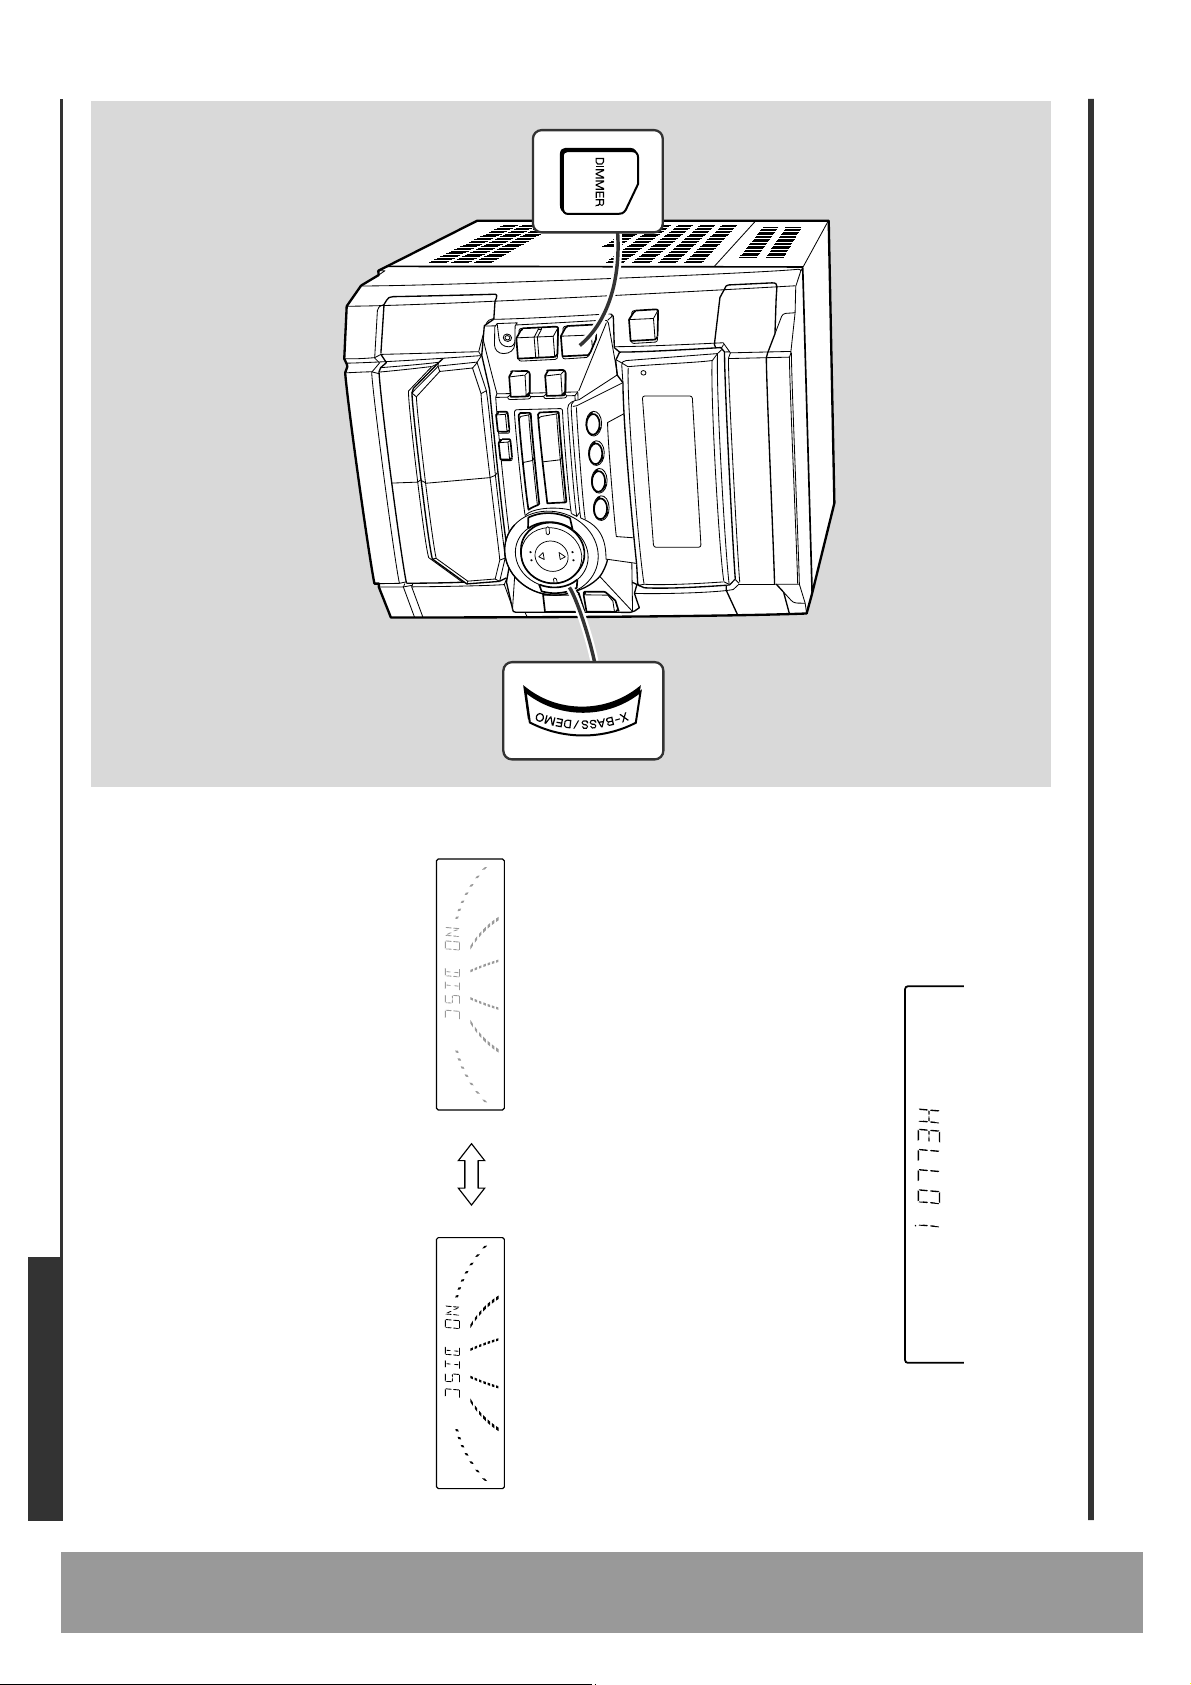
The first time the unit is plugged, the unit will enter the demonstration mode. You will
You can switch the display brightness by pressing the DIMMER button.
bass mode.
To cancel the demonstration mode:
When the unit is in the power stand-by mode (demonstration mode), press the X-
BASS/DEMO button. The demonstration mode will be canceled and the display will
disappear.
To return to the demonstration mode:
When the unit is in the power stand-by mode, press the X-BASS/DEMO button again.
Note:
When the power is on, the X-BASS/DEMO button can be used to select the extra
Display brightness (2 levels)
Dimmed Brightened
see words scroll.
Demonstration mode
E-10
Basic Operation
- General Control -
Page 12
E-11
ENGLISH
Basic Operation
- Sound Control -
Sound Control
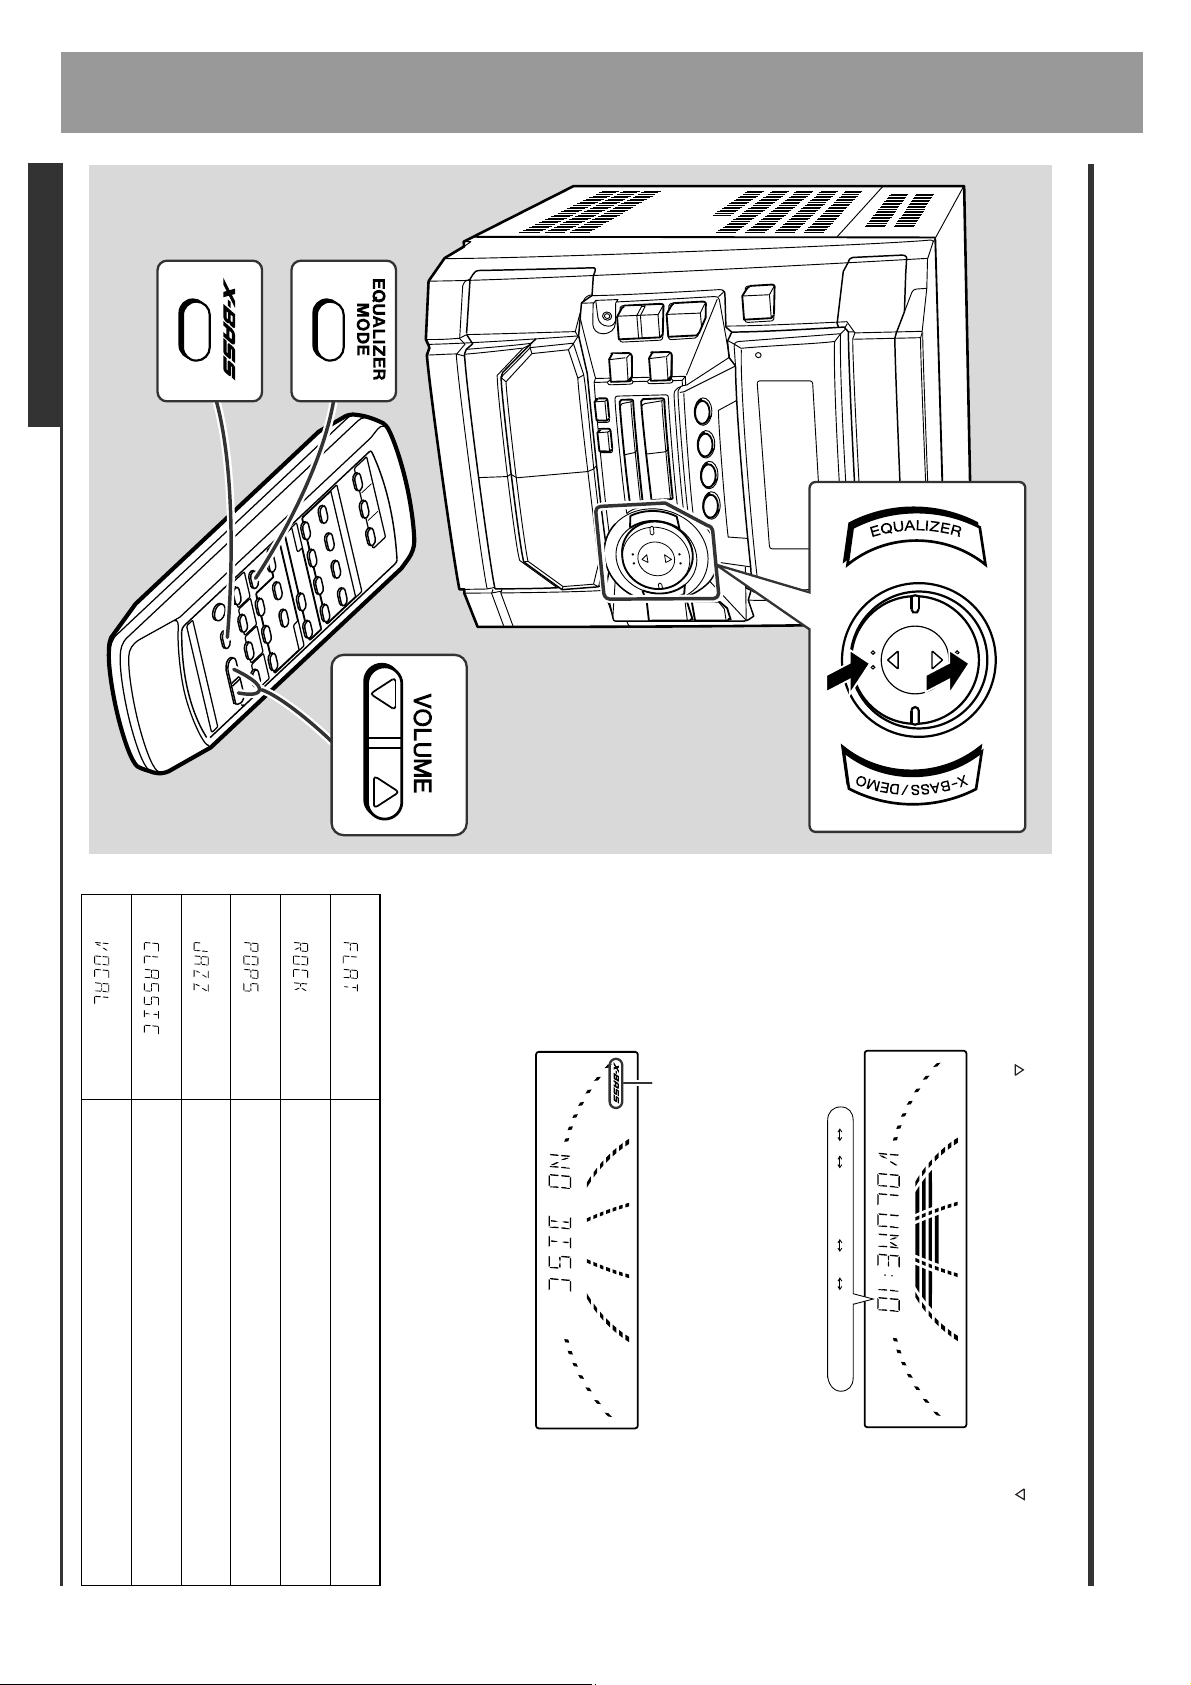
Vocals (midrange tones) are emphasised.
Treble is reduced a lot.
Treble is cut a little.
Bass and treble are slightly emphasised.
Bass and treble are emphasised.
The sound is not modified.
Press the VOLUME button to increase the volume and the VOLUME button for
When the EQUALIZER (EQUALIZER MODE) button is pressed, the current mode
setting will be displayed. To change to a different mode, press the EQUALIZER
(EQUALIZER MODE) button repeatedly until the desired sound mode appears.
Equalizer
bass mode, press the X-BASS/DEMO (X-B AS S) button.
Bass control
X-BASS indicator
012 29 30 MAXIMUM
.....
When the power is first turned on, the unit will enter the extra bass mode which
emphasises the bass frequencies, and "X-BASS" will appear. To cancel the extra
decreasing.
Volume control
Page 13
3
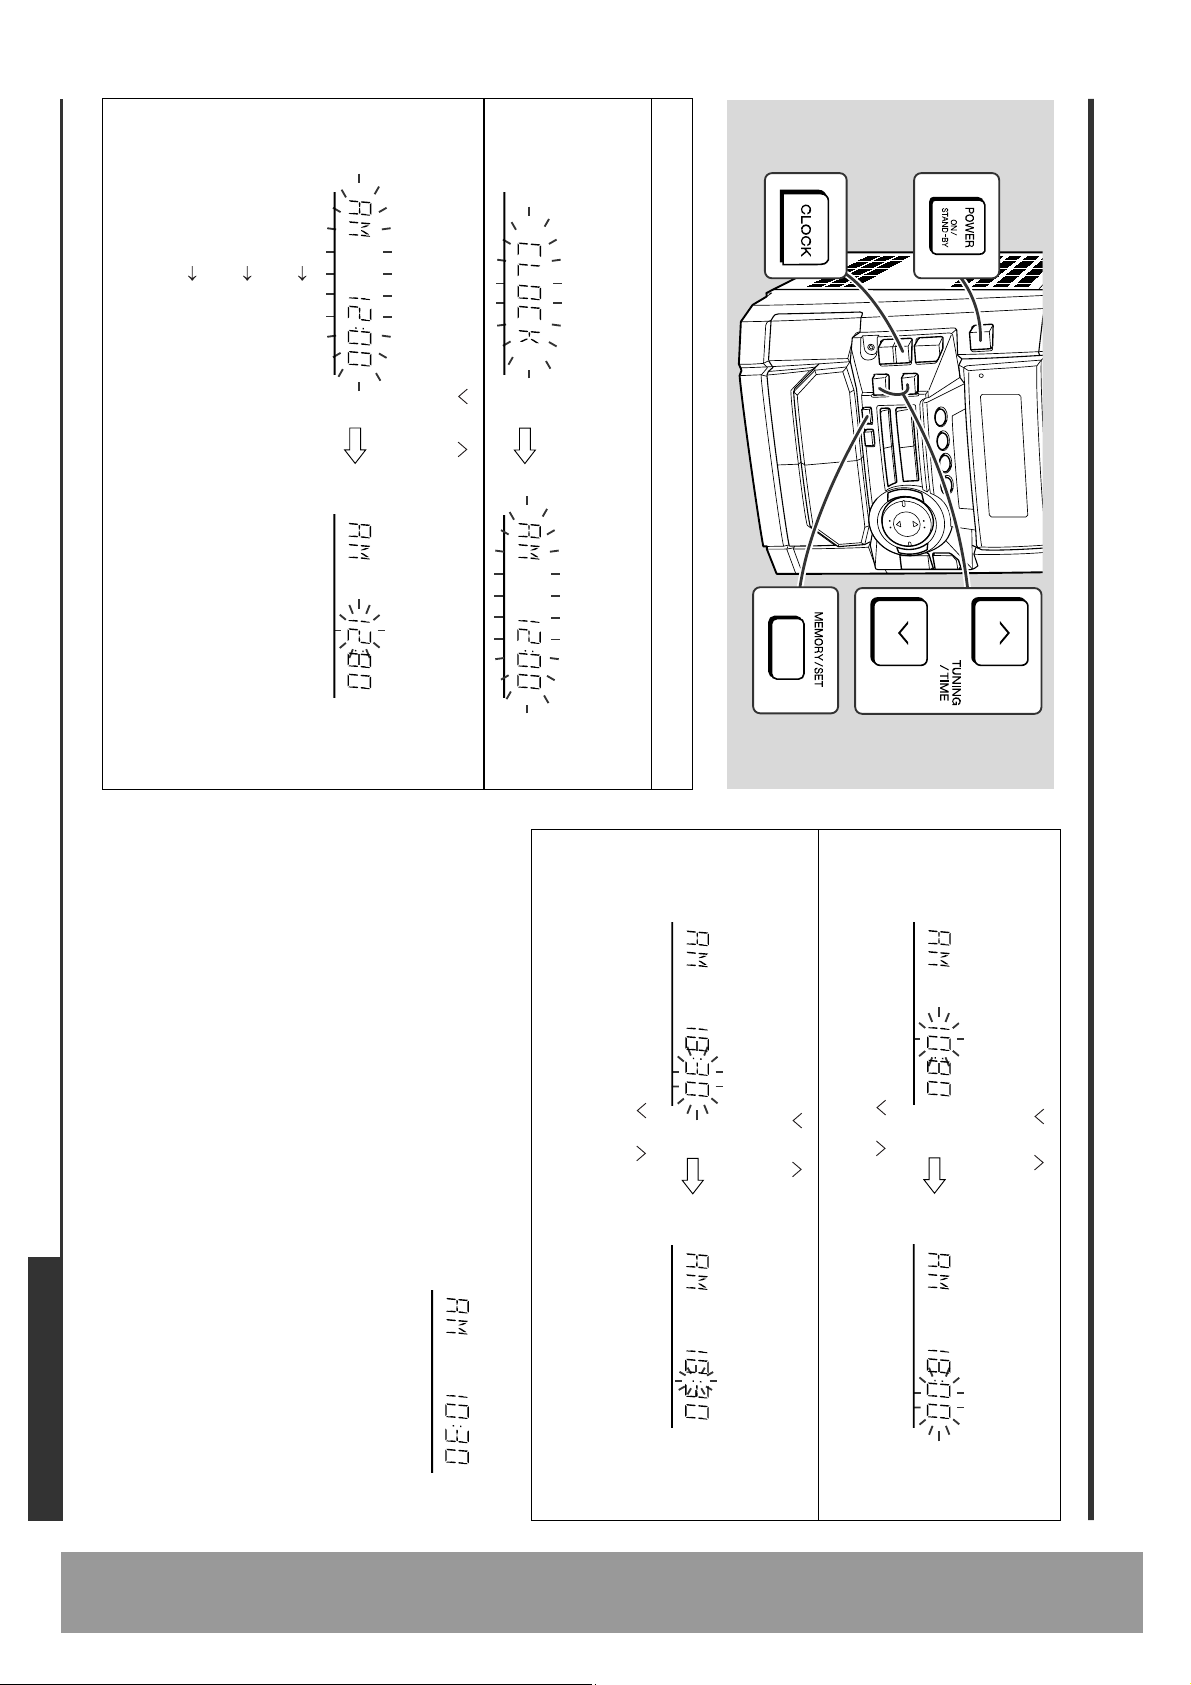
Press the TUNING/TIME ( or ) button to select 12-hour or 24-
"AM 12:00" The 12-hour display will appear.
(AM 12:00 - PM 11:59)
"AM 0:00" The 12-hour display will appear.
(AM 0:00 - PM 11:59)
"0:00" The 24-hour display will appear.
(0:00 - 23:59)
Note that this can only be set when the unit is first installed or it has been reset.
(Refer to step 3 under "If trouble occurs" on page 27.)
hour display and then press the MEMORY/SET button.
2
Press the ON/STAND-BY button to turn the power on.
Press the CLOCK button and within 5 seconds, press the MEMO-
RY/SET button.
In this example, the clock is set for the 12-hour (AM 12:00) display.
1
Setting the Clock
ENGLISH
To change the 12-hour or 24-hour display:
1 Clear all the programmed contents. [Perform to step 3 under "If trouble occurs" on
2 Perform "Setting the Clock" from the beginning.
page 27 for details.]
To confirm the time display:
Press the CLOCK button.
The time display will appear for about 5 seconds.
z
The clock begins counting from "0" seconds. (Seconds are not displayed.)
The time display will disappear after a few seconds.
z
Press the TUNING/TIME ( or ) button once to advance the time by 1
minute. Hold it down to change the time in 5-minute intervals.zThe hour will not advance even if minutes advance from "59" to "00".
then press the MEMORY/SET button.
Press the TUNING/TIME ( or ) button to adjust the minutes and
5
4
Press the TUNING/TIME ( or ) button to adjust the hour and then
z
Press the TUNING/TIME ( or ) button once to advance the time by 1 hour.
Hold it down to advance continuously.zWhen the 12-hour display is selected, "AM" will change automatically to "PM".
press the MEMORY/SET button.
Note:
The "CLOCK" or time will flash at the push of the CLOCK button when the AC power
supply is restored after a power failure or unplugging the unit.
Readjust the clock as follows.
To readjust the clock:
Perform "Setting the Clock" from the beginning. If the time display is flashing, step 3
(for selecting the 12-hour or 24-hour display) will be skipped.
E-12
Basic Operation
- Setting the Clock -
Page 14

E-13
ENGLISH
Sound Control (See page 11.)
CD P layback
- Listening to a CD (CDs) -
This system can play audio CD-R and CD-RW discs just as CD discs, but cannot per-
form recording.
Listening to a CD (CDs)
1
2
3
disc tray, then place the CD in the open position.
When loading a third disc, press the DISC SKIP button to turn the
4
Place the CD(s) on the disc tray, label side up.
Press the OPEN/CLOSE button to open the disc tray.
Press the CD button.
Press the ON/STAND-BY button to turn the power on.
6
To select the CD you want to listen to first, press one of 1 - 3
buttons on the remote control.
Total number of tracks
on the CD whose
number is flashing
Total playing time of the CD whose
number is flashing
5
Press the OPEN/CLOSE button to close the disc tray.
12 cm (5") 8 cm (3")
z
Be sure to place 8 cm (3") CD(s) in the middle of the disc positions.
z
CDs can be placed on any open position on the disc tray.
Page 15
the TV or radio.zIf a disc is damaged, dirty, or loaded upside down, the disc will be skipped.
z
If TV or radio interference occurs during CD operation, move the unit away from
z
If the disc tray is stopped f orcibl y, "ER-CD10" will appear in the display and the unit
will not function. If this occurs, press the ON/STA ND-B Y button to enter the power
stand-by mode and then turn the power on again.
Caution:
z
z
Do not place two CDs in one disc tray.zDo not push the disc tray whilst it is moving.
Do not turn the disc tray by hand. This may cause malfunctions.zIf the power fails whilst the tray is open, wait until the power is restored.
Press the ON/STAND-BY button to enter the power stand-by mode.
that disc finishes playing, the next disc will automatically start playback.zWhen the last track on the third disc has finished playing, the CD player will
z
Playback will begin from track 1 on the disc you have selected to play. After
z
stop automatically.
When there is no CD in one of the disc 1 - 3 positions, that position will be
skipped and the next CD will be played.
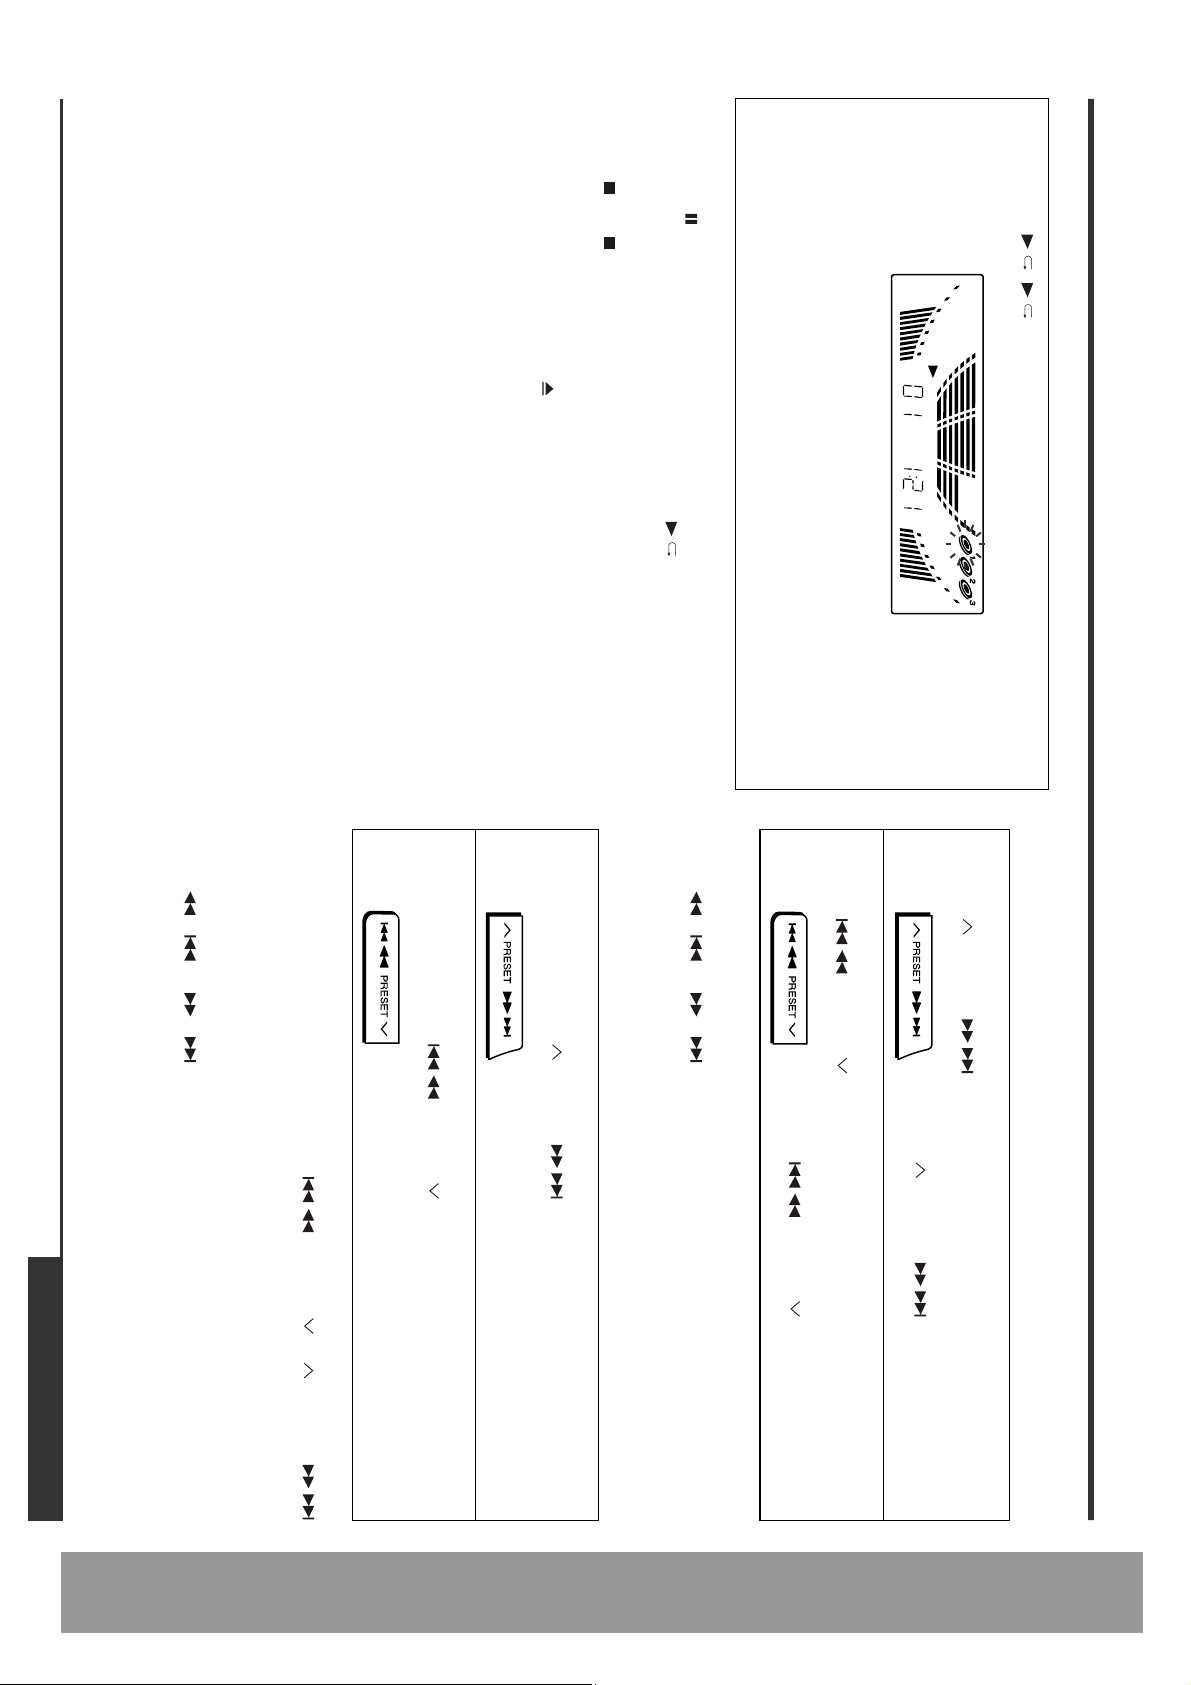
7
Press the / ( ) button to start playback.
To interrupt playback:
Press the CD button on the remote control.
To resume playback from the same point, press the button.
To stop playback:
Press the (CD ) button.
To remove the CDs:
Whilst in the stop mode, press the OPEN/CLOSE button.
The disc tray will open. Remove the two discs. Then, press the DISC SKIP button to
rotate the disc tray and remove the remaining disc.
After use:
ENGLISH
desired portion.
the display and CD operation will be paused. When the beginning of the first track
is reached during fast reverse, the disc will start playback automatically.zThe / or / button on the remote control allows you to locate the
Notes:
Notes:
z
Normal playback will resume when the PRESET or PRESET
button is released.zYou can locate the desired portion on a single disc only.zWhen the end of the last track is reached during fast forward, "END" will appear on
For audible fast reverse:
Press and hold down the PRESET button during playback.
Press and hold down the PRESET button during playback.
For audible fast forward:
To locate the desired portion
beginning of a track.
z
You can locate the beginning of a track on a single disc only.zThe / or / button on the remote control allows you to locate the
To restart the track being played:
Press the PRESET button for less than 0.5 seconds during playback.
z
You can skip to any track by pressing the
the desired track number appears.
PRESET button repeatedly until
the desired track number appears.
Press the PRESET button for less than 0.5 seconds during playback.
z
You can skip to any track by pressing the
PRESET button repeatedly until
To move to the beginning of the next track:
To locate the beginning of a track
E-14
CD P layback
- Listening to a CD (CDs) -
Page 16
E-15
ENGLISH
Advanced CD Playback
- Starting playback with a desired track / Repeat or Random Play -
To stop playback:
Press the (CD ) button.
Notes:
z
When the DISC SKIP button is pressed during playback, the next disc will begin
automatically.zWhen one of the 1 - 3 buttons on the remote control is pressed during play-
back, the selected disc will begin automatically.
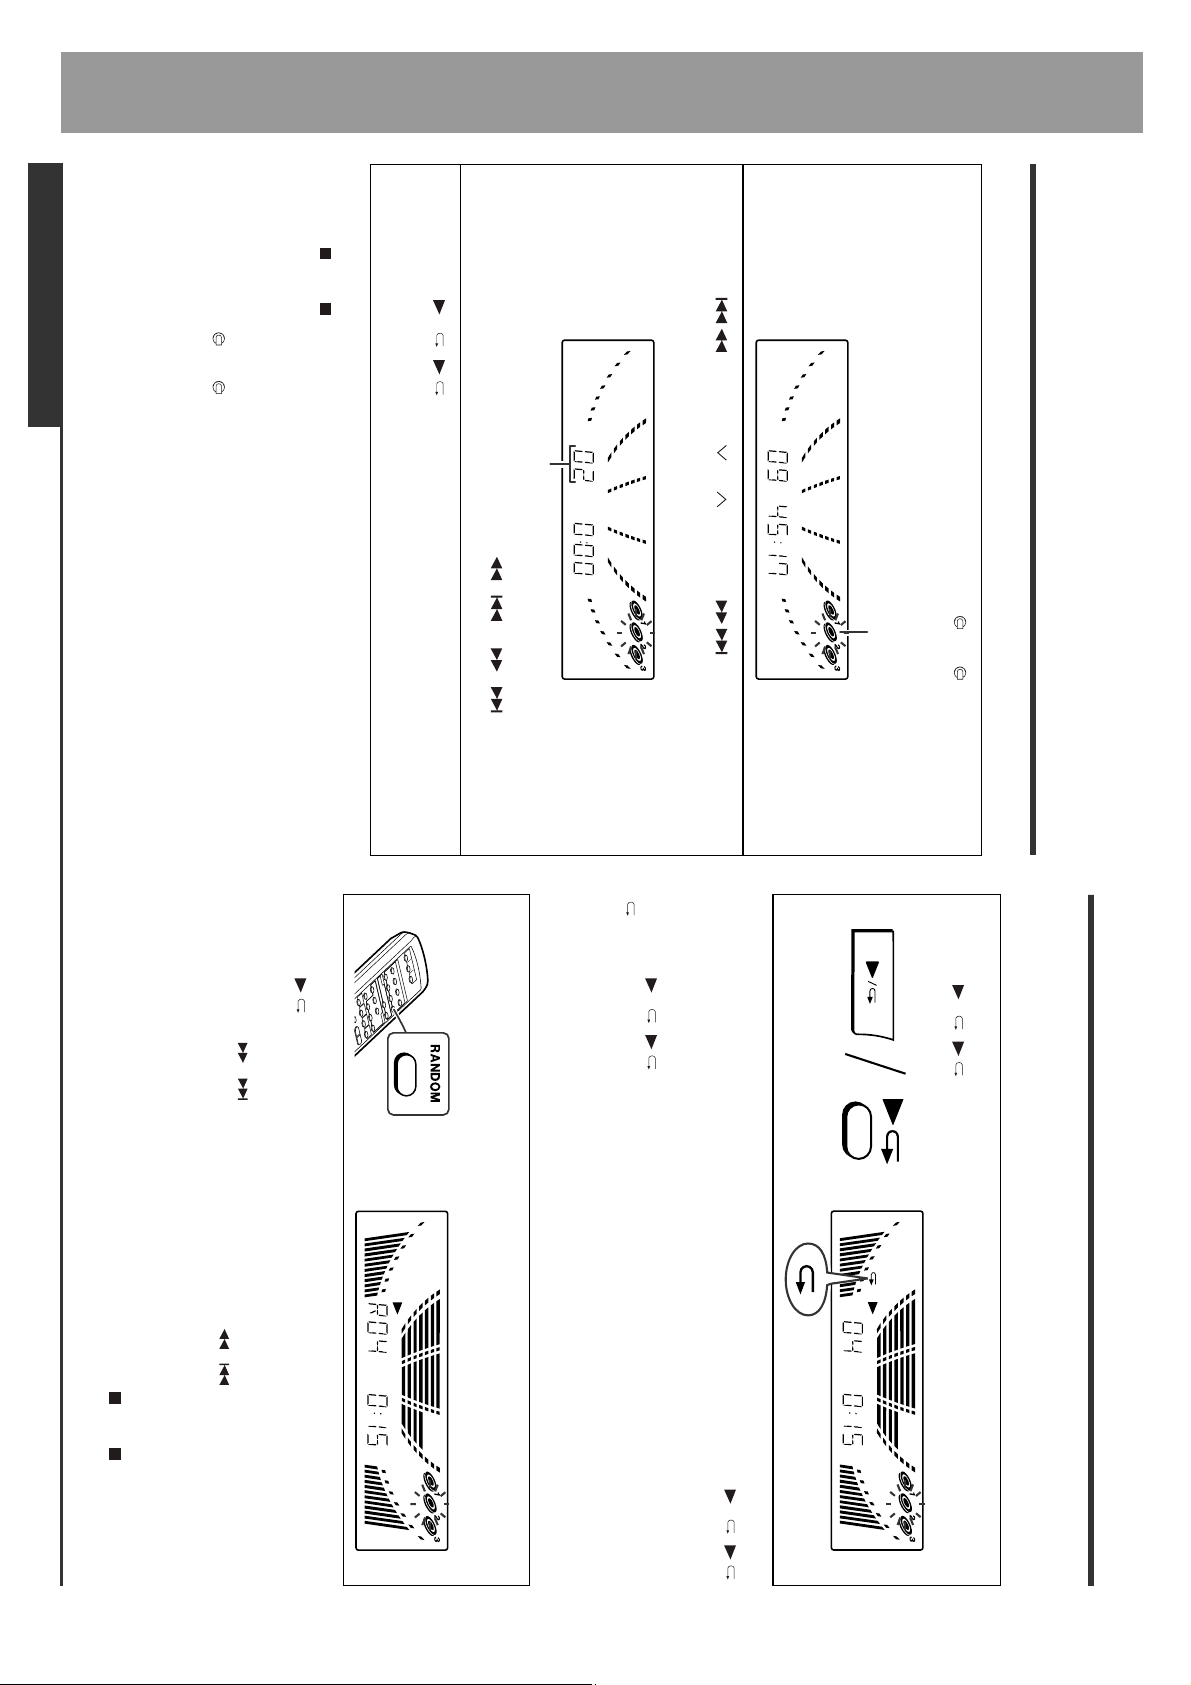
3
You can also select a track by pressing the / or / button on the
remote control.
Press the / ( ) button to start playback.
Playback of the selected track is started. When the end of last track of the disc
with the selected track is reached, the next disc will be automatically started.
Selected track number
desired track.
2
Press the PRESET or PRESET button to select the
You can play a disc starting with the desired track.
1
Whilst in the stop mode, press one of the 1 - 3 buttons on the
remote control or DISC SKIP button to select the desired disc.
Selected disc number
desired track
Starting playback with a
Caution:
After performing repeat or random play, be sure to press the (CD ) button. Other-
wise, the disc(s) will play continuously.
select the order of the tracks.)
z
If you press the / button during random play, you can move to the track selected
next by the random operation. On the other hand, the / button does not allow you
to move to the previous track. The beginning of the track being played will be located.zIn random play, the CD player will select and play tracks automatically. (You cannot
To cancel random play:
Press the button.
Notes:
play.
Press the RANDOM button on the remote control to begin random
The tracks on the disc(s) can be played in random order automatically.
Press the / ( ) button twice.
Random Play
To repeat a desired track:
Perform steps 1 - 4 in the "Programmed Play" section and then press the / ( )
button twice.
To cancel repeat play:
Press the / ( ) button again.
" " will go out.
To repeat all tracks on up to 3 discs:
All tracks on up to 3 discs, or a programmed sequence can be continuously repeated.
Repeat Play
Repeat or Random Play
Page 17
the remote control to select the
desired disc.
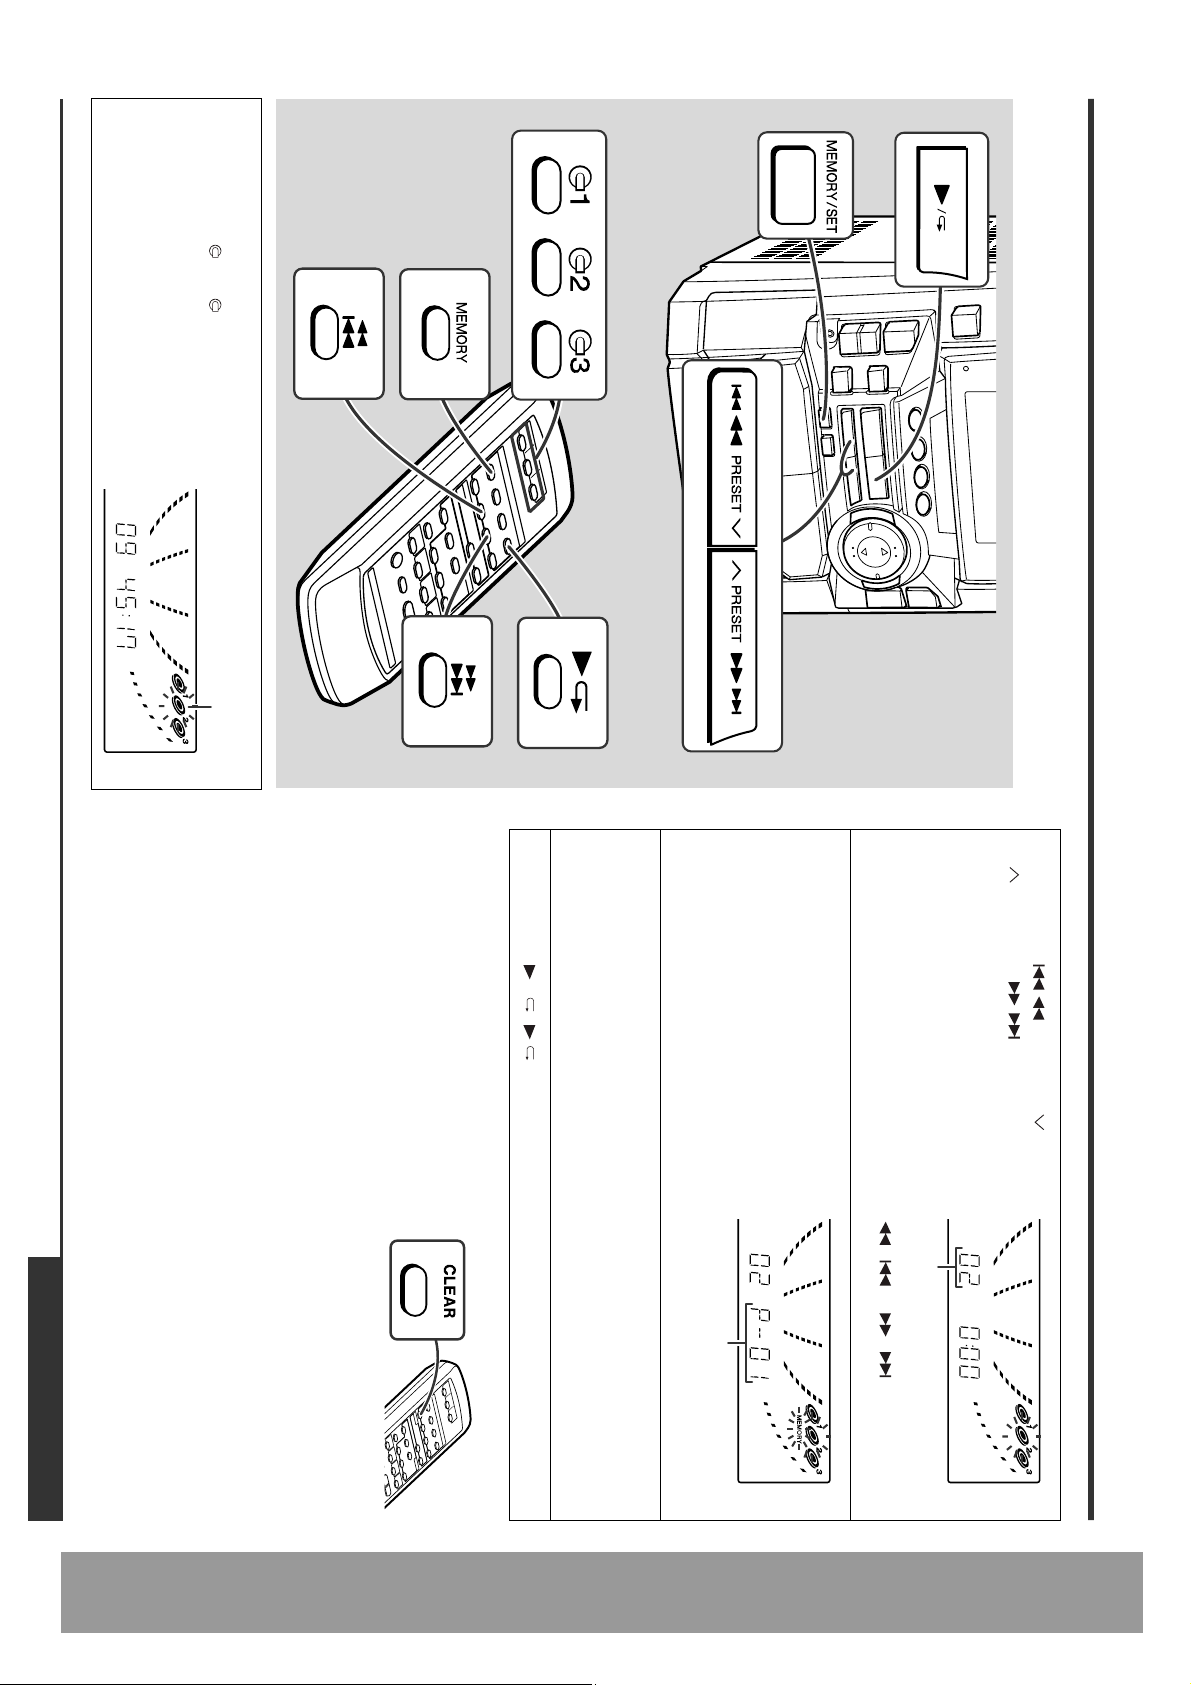
1
Whilst in the stop mode, press
one of the 1 - 3 buttons on
Selected disc number
Programmed Play
By specifying discs from 1 to 3 and tracks from 1 to 99, you can choose up to 32
selections for playbac k in the order you like.
ENGLISH
z
Opening the disc tray automatically cancels the programmed sequence.zEven if you press the ON/STAND-BY button to enter the stand-by mode or change
the function from CD to another, the programmed selections will not be cleared.
During programme operation, random play is not possible.
grammed. When all the tracks are cleared,
"MEMORY" will disappear.
be cleared, beginning with the last track pro-
Whilst in the stop mode, press the CLEAR but-
ton on the remote control.
Each time the button is pressed, one track will
To clear the programmed selections:
5
Press the / ( ) button to start playback.
If you make a mistake, the programmed tracks can be cleared by pressing the
CLEAR button.
grammed.
4
Repeat steps 1 - 3 for other tracks. Up to 32 tracks can be pro-
When the track is memorised, "MEMORY" will appear.
Playback order
ORY) button to save the track
number.
3
Press the MEMORY/SET (MEM-
You can also select a track by pressing the / or / button on the
remote control.
Selected track number
2
Press the PRESET or
lect the desired track.
PRESET button to se-
Adding tracks to the programme:
If a programme has been previously stored, the "MEMORY" indicator will be dis-
played. Then follow steps 1 - 3 to add additional tracks. The new tracks will be stored
after the last track of the original programme.
Notes:
z
E-16
Advanced CD Playback
- Programmed Play -
Page 18
E-17
ENGLISH
Sound Control (See page 11.)
Radio
- Listening to the Radio -
Listening to the Radio
To receive an FM stereo transmission:
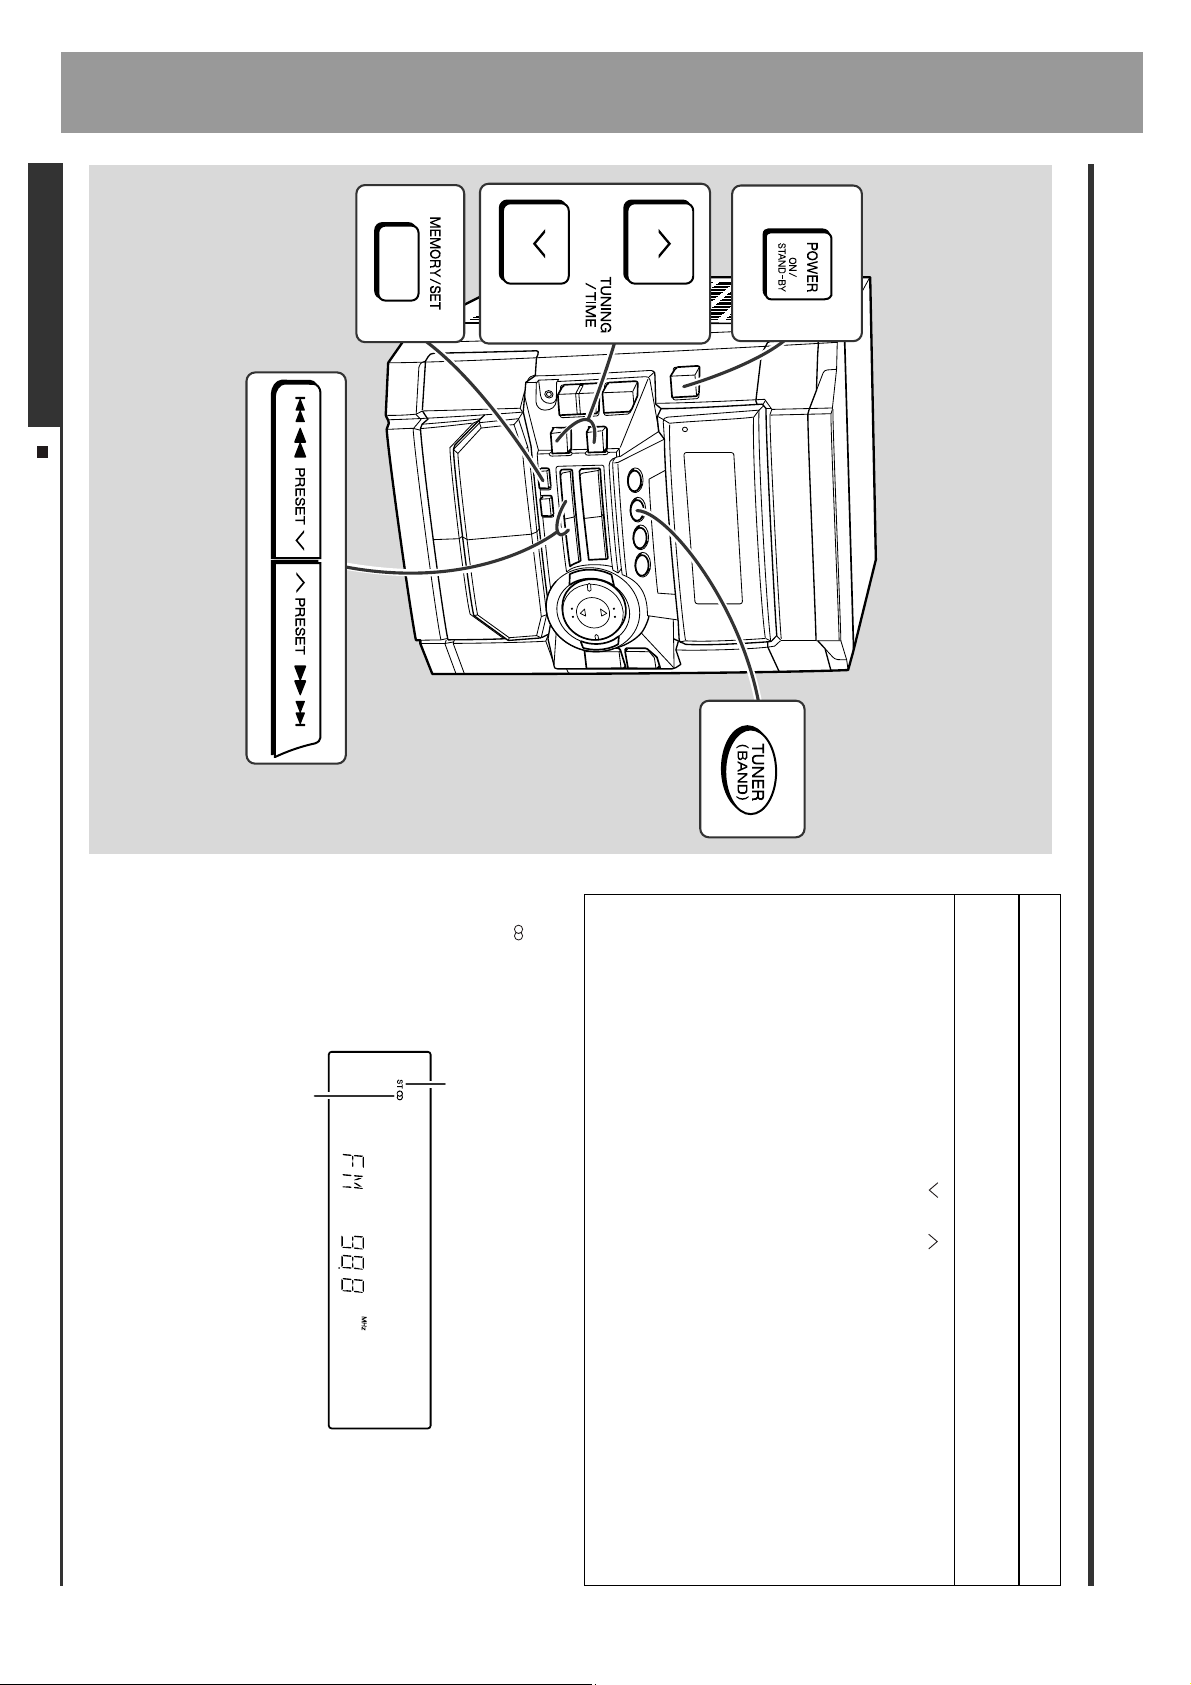
Press the TUNER (BAND) button to display the "ST" indicator.
z
" " will appear when an FM broadcast is in stereo.
FM stereo mode indicator
z
To stop the auto tuning, press the TUNING/TIME button again.
1
3
Press the TUNING/TIME ( or ) button to tune in to the desired
station.
Manual tuning:
Press the TUNING/TIME button as many times as required to tune in to the de-
sired station.
Auto tuning:
When the TUNING/TIME button is pressed for more than 0.5 seconds, scanning
will start automatically and the tuner will stop at the first receivable broadcast sta-
tion.
Notes:
z
When radio interference occurs, auto scan tuning may stop automatically at
that point.zAuto scan tuning will skip weak signal stations.
2
Press the TUNER (BAND) button repeatedly to select the desired
frequency band (FM or AM).
Press the ON/STAND-BY button to turn the power on.
If the FM reception is weak, press the TUNER (BAND) button to extinguish the
"ST" indicator. The reception changes to monaural, and the sound becomes
clearer.
z
FM stereo receiving indicator
After use:
Press the ON/STAND-BY button to enter the power stand-by mode.
Page 19

The backup function protects the memorised stations for a few hours should there be
a power failure or the AC power lead disconnection.
Note:
tion.
When a new station is stored in memory, the station previously memorised will
be erased.
5
Repeat steps 1 - 4 to set other stations, or to change a preset sta-
You can store 40 AM and FM stations in memory and recall them at the push of a but-
ton. (Preset tuning)
Memorising a station
button to select the preset channel number.
3
Within 30 seconds, press the PRESET or PRESET
4
Store the stations in memory, in order, starting with preset channel 1.
Within 30 seconds, press the MEMORY/SET button to store that
If the "MEMORY" and preset number indicators go out before the station is
memorised, repeat the operation from step 2.
station in memory.
mode.
2
Press the MEMORY/SET button to enter the preset tuning saving
1
Perform the steps 1 - 3 in "Listening to the Radio" on page 17.
Listening to the memorised station
Listening to the Radio (See page 17.)
ENGLISH
1 Press the ON/STAND-BY button to enter the stand-by mode.
2 Press the ON/STAND-BY button whilst holding down the TUNER (BAND) button
and X-BASS/DEMO button until "TUNER CL" appears.
To erase entire preset memory
the desired station is located.
2
Press the PRESET or PRESET button again when
control.
z
This can be operated by pressing the PRESET ( or ) button on the remote
quentially, for 5 seconds each.
1
Press the PRESET or PRESET button for more
than 0.5 seconds.
z
The preset number will flash and the programmed stations will be tuned in se-
The stations saved in memory can be scanned automatically. (Preset memory scan)
To scan the preset stations
This can be operated by pressing the PRESET ( or ) button on the remote
control.
0.5 seconds to select the desired station.
Preset channel Frequency and frequency band
Press the PRESET or PRESET button for less than
To recall a memorised station
E-18
Radio
- Listening to the memorised station -
Page 20

E-19
ENGLISH
Sound Control (See page 11.)
Tape Playback
- Listening to a Cassette Tape (TAPE 1 or TAPE 2) -
z
functions.
Before loading a tape into the cassette compartment, tighten the slack
with a pen or a pencil.
z
Do not use C-120 tapes or poor-quality tapes, as they may cause mal-
(Metal or CrO tapes are not recommended.)
Listening to a Cassette Tape (TAPE 1 or TAPE 2)
Before playback:
z
For playback, use normal or low-noise tapes for the best sound.
1 Press the (TAPE ) button, then press the TAPE (1 2) button to select TAPE
2 To advance the tape, press the PRESET (TAPE 2 ) button. To rewind
Caution:
z
z
To remove the cassette , press the (TAPE ) button, and then open the compartment.zBefore changing from one tape operation to another, press the (TAPE ) button.
If a power failure occurs during tape operation, the tape head will remain engaged with
the tape and the cassette door will not open. In this case, wait until the power is
restored.
it, press the PRESET (TAPE 2 ) button.
Fast forward/rewind: (TAPE 2 only)
2.
Press the (TAPE ) button.
To stop playback:
TAPE 2 button.
5
Press the / button to start playback.
When playback is performed using the remote control, press the TAPE 1 or
4
Press the TAPE (1 2) button to select the cassette you want to
listen to.
TAPE 1 TAPE 2
played facing toward you.
3
Load a cassette into th e TAPE 1 o r TAPE 2
cassette compartment with the side to be
2
Open the cassette door by pushing the area marked " PUSH
EJECT".
1
Press the ON/STAND-BY button to turn the power on.
Playback is possible in TAPE 1 compartment as well as in TAPE 2.
Page 21

signal (Variable Sound Monitor).zFor recording, use only normal tapes. Do not use metal or CrO tapes.
of this unit.zThe volume and sound controls can be adjusted with no effect on the recorded
z
z
When recording important selections, make a preliminar y test to ensure that the
desired material is properly recorded.
SHARP is not liable for damage or loss of your recording arising from malfunction
Recording from the Radio
Before recording:
Listening to the Radio (See page 17.)
ENGLISH
after recording. Cover the tab hole with adhe-
sive tape to record on the tape without the tab.
Erase-prevention tab of cassette tapes:
moved. Cassettes have removable tabs that
z
When recording on a cassette tape, make
sure that the erase-prevention tabs are not re-
Side A
z
prevent accidental recording or erasing.
To protect the recorded sound, remove the tab
Tab for side B
Tab for side A
If you hear a whistling noise whilst recording an AM station, move the AM loop aerial.
Note:
Press the (TAPE ) button.
4
Recording will be paused.
Press the / button on the main unit or the TAPE 2 button on
the remote control to start recording.
3
Press the REC PAUSE ( ) button.
Wind past the leader of the tape, on which recording cannot be performed.
side to be recorded on facing you.
2
Load a cassette into the TAPE 2 cassette compartment with the
To interrupt recording:
Press the REC PAUSE ( ) button.
To resume recording, press the / (TAPE 2 ) button.
To stop recording:
1
Tune in to the desired station. (See page 17.)
only.
Recording can be operated in the TAPE 2 compartment. The TAPE 1 is for playback
E-20
Tape Recording
- Recording from the Radio -
Page 22

E-21
ENGLISH
Programmed Play (See page 16.)
Tape Recording
- Recording from a CD (CDs) -
Recording from a CD (CDs)
memory by programming, recording will restart from the first track stored in memory.)
PAUSE ( ) button and then the / (T APE 2 ) button. (If tracks have been stored in
When the end of the tape is reached while recording, the CD player will display the track
number which was being played at that time, and stop automatically. If you want to restart
recording from the beginning of the interrupted track, turn over the tape, press the REC
Note:
3 Press the / (TAPE 2 ) button.
To stop recording:
Press the (CD ) button.
The CD and tape will stop.
1 Programme discs and tracks. (See page 16.)
2 Press the REC PAUSE ( ) button.
To perform programmed recording:
is finished or the end of the tape is reached, the CD and the cassette will stop
automatically.
z
CD playback will start approximately 5 seconds after the tape starts.zRecording is started from the selected CD. When the playback of the last disc
Wind past the leader of the tape, on which recording cannot be performed.
side to be recorded on facing you.
2
Load a cassette into the TAPE 2 cassette compartment with the
3
4
Press one of the 1 - 3 buttons on the remote control to select
the disc to be recorded first.
Press the CD button and load the desired disc.
button.
5
Press the REC PAUSE ( )
6
Recording will be paused.
Press the / (TAPE 2 ) button
to start recording.
1
Press the ON/STAND-BY button to turn the power on.
You can record 3 CDs continuously.
Page 23

Dubbing from Tape to Tape
ENGLISH
You can record from TAPE 1 to TAPE 2.
To stop dubbing:
Press the (TAPE ) button.
TAPE 1 and TAPE 2 will simultaneously stop.
be erased facing toward you.
1 Load the tape to be erased into the TAPE 2 cassette compartment with the side to
Erasing recorded tapes
play.
3
Press the TAPE (1 2) button until "TAPE 1" appears on the dis-
5
Recording will be paused.
Press the / button on the main unit or the TAPE 2 button on
the remote control to start dubbing.
4
Press the REC PAUSE ( ) button.
ment. Insert a blank tape into the TAPE 2 cassette compartment.
It is recommended that the recording tape is the same length as the master tape.
2
Load a prerecorded cassette into the TAPE 1 cassette compart-
Note:
Make sure that the TAPE 1 is not in use.
2 Press the TAPE (1 2) button until "TAPE 2" appears on the display.
3 Press the REC PAUSE ( ) button.
4 Press the / button on the main unit or the TAPE 2 button on the remote con-
trol to start erasing.
1
Press the ON/STAND-BY button to turn the power on.
For recording, use only normal tapes. Do not use metal or CrO tapes.
E-22
Tape Recording
- Dubbing from Tape to Tape -
Page 24

E-23
ENGLISH
Setting the Clock (See page 12.)
Advanced Features
- Timer and Sleep Operation -
Timer and Sleep Operation
Timer playback:
The unit turns on and plays the desired source (CD, tuner, tape) at the preset time.
Timer recording:
The unit turns on and starts recording from the tuner at the preset time.
Sleep operation:
The radio, compact disc and cassette tape can all be turned off automatically.
The illustrations show the timer playback setting.
5
Press the TUNING/TIME ( or ) button to specify the hour to start,
then press the MEMORY/SET button.
white
Display the white " " for timer playback and the red " " for timer
recording.
Before setting timer:
1
To select the timer playback source: CD, TUNER (BAND) or TAPE (1 2).
desired function.
2
Press the CD, TUNER (BAND) or TAPE (1 2) button to select the
Press the ON/STAND-BY button to turn the power on.
4
Press the TIMER/SLEEP button repeatedly to select timer playback
or timer recording.
3
tion.
Adjust the volume using the VOLUME buttons.
Do not turn the volume up too high.
To select the timer recording source: TUNER (BAND).
When you selected the TUNER (BAND), tune in to the desired sta-
2 For timer playback: Load a cassette or discs to be played.
For timer recording: Load a cass ette for recording in the TAPE 2 cassette compart-
ment.
1 Press the CLOCK button to check that the clock is on time.
Timer playback or Timer recording
red
Page 25

However, another unit will not be turned on or off.
matically. It will enter the power stand-by mode when the end of the recording tape
is reached in timer recording or 1 hour after the playback starts in timer playback.
VIDEO/AUX sockets, select "VIDEO/AUX" in step 2.
At this time, only this unit will be turned on or enter the power stand-by mode auto-
z
z
Once the time is set, the setting will be retained until a new time is entered.
When performing timer playback or recording using another unit connected to the
Notes:
To reset or change the timer setting:
Perform "Timer playback or Timer recording" from the beginning.
unit will enter the stand-by mode.
When the recording tape reaches its end, the timer recording will end, and the
In timer recording:
back. If you select TUNER, it will enter the stand-by mode one hour after the tim-
er playback starts.
press the MEMORY/SET button.
6
Press the TUNING/TIME ( or ) button to specify the min ute, then
9
In timer playback:
If you select CD or TAPE, the unit will enter the stand-by mode after the play-
8
When the preset time is reached, playback or recording will start.
The volume will increase gradually until it reaches the volume you were listening
to before your system enters the timer stand-by mode.
Press the ON/STAND-BY button to turn the power on.
To cancel the timer playback/timer recording:
7
The unit will enter the timer stand-by mode automatically.
Listening to the Radio (See page 17.)
ENGLISH
Note:
Once the sleep time is set, it will remain unchanged until the setting is changed.
To confirm the remaining sleep time:
Press the TIMER/SLEEP button whilst the sleep timer is set.
The remaining sleep time is displayed for about 5 seconds.
To cancel the sleep operation:
Press the ON/STAND-BY button whilst the sleep timer is set.
ter the preset time has elapsed.
The volume will be turned down 1 minute before the sleep operation finishes.
4
Your system will enter the power stand-by mode automatically af-
3
z
z
Press the MEMORY/SET button.
3 hours - 5 minutes 5-minute intervals
5 minutes - 1 minute 1-minute intervals
While the sleep time is displayed, press the TUNING/TIME ( or ) button.
(Maximum: 3 hours - Minimum: 1 minute)
To change the sleep time:
2
Press the TIMER/SLEEP button repeatedly until "SLEEP" is dis-
played.
1
Play back the desired sound source.
Sleep operation
E-24
Advanced Features
- Timer and Sleep Operation -
Page 26

E-25
ENGLISH
Advanced Features
- Enhancing Your System -
Red
White
White
RCA lead
(not supplied)
VCR, DVD, etc.
The connection lead is not included. Purchase a commercially available lead as
shown below.
Enhancing Your System
volume using the VOLUME buttons.
z
ohms and 50 ohms impedance. The recommended impedance is 32 ohms.
Plugging in the headphones disconnects the speakers automatically. Adjust the
z
Before plugging in or unplugging the headphones, reduce the volume.zBe sure your headphones have a 3.5 mm (1/8") diameter plug and are between 16
Headphones
Play the VCR, DVD, etc.
5
4
Press the / (TAPE 2 ) button.
3
Press the REC PAUSE ( ) button.
2
Press the VIDEO/AUX button.
1
Insert a cassette in the TAPE 2 cassette compartment.
Note:
To prevent hum interference, place this unit away from a television.
To record on a tape
4
Play the connected equipment.
Red
3
Press the VIDEO/AUX button.
To the line
output socket
2
Press the ON/STAND-BY button to turn the power on.
output to a television.
1
Use a connection lead to c onnect the VCR, DVD, e tc. to the VIDEO/
AUX socket.
When using video equipment, connect the audio output to this unit and the video
VCR, DVD, etc.
Listening to the playback sounds from
Page 27

z
Radio makes unusual noise con -
secutively.
Tuner
z
Playback sounds are skipped, or
stopped in the middle of a track .
z
z
Playback does not sta r t.
Playback stops in t he middle or is not
performed properly.
CD player
z
does not respond.
z
The clock is not on time.
When a button is pressed , the unit
z
No sound is heard.
General
Troubleshooting Chart
Many potential "problems" can be resolved by the owner without calling a service
technician.
If something is wrong with this product, check the following before calling your autho-
rised SHARP dealer or service centre.
Symptom Possible cause
z
z
z
z
z
z
Is the unit placed near the TV or computer?
Is the FM/AM loop aerial placed properly?
Move the AC power lead away from the aer-
ial if located near.
z
Does the disc sati sfy the standards?
Is the disc distorted or scratched?
Is the unit located near excessive vibrations?
Is the disc very dirty?
Has condensation formed inside the unit?
Symptom Possible cause
z
Is the disc loaded ups i de-down?
z
z
z
step 3 under "If trouble occurs" on page 27.)
Is the volume level set to "0"?
Are the headphones connected?
Are the speaker wires disco nnected?
z
Set this unit to the power s tand-by mode and
then turn it back on.zIf the unit still malfunctions, reset it. (Ref er to
Symptom Possible cause
z
Did a power failure occur? Reset the clock.
(Refer to page 12.)
ENGLISH
Symptom Possible cause
Remote control
z
z
z
Cannot hear treble.
Sound fluctuation.
Cannot remove the tape.
z
z
If a power failure oc curs durin g playback, the
heads remain engaged with the ta pe. Do no t
open the compartment for cibly. Wait until
electricity resumes.
z
Is the tape stre tched?
Are the capstans, pinch rollers, or heads
dirty?
z
Cannot record.
Cannot record tracks wit h proper
sound quality.
Cannot erase completely.zSound skipping.
z
z
Is there any slack?
z
Is the erase-protection tab removed?
Is it a normal tape? (You cannot record on a
metal or CrO tape.)
z
z
Cassette deck
Symptom Possible cause
transmitter with a sof t cloth befo re operating the u nit.
Condensation
z
z
Is the distance or ang le incorrect?
Does the remote control sensor receive
strong light?
z
The remote control does not oper-
ate.
z
z
Is the AC power lead of the unit plugged in?
Is the battery polarity respected?zAre the batteries dead?
Sudden tempera ture changes, storage or operation
in an extremely humid environment may cause con-
densation inside the cabinet (CD pickup, tape
heads, etc.) or on th e tran smitt er o n the remo te con-
trol.
Condensation can cause the unit to malfunction. If
this happens, leave the power on with no disc (or
cassette) in the unit until normal playback is possibl e
(about 1 hour). Wipe off any condensation on the
E-26
References
- Troubleshooting Chart -
Page 28

E-27
References
- Troubleshooting Chart / Maintenance -
ENGLISH
Caution:
This operation will erase all data stored in memory including c lock, timer settings,
1 Press the ON/STAND-BY button to turn the power on.
2 Press the CD button.
3 Press the OPEN/CLOSE button to open the disc tray.
4 Press the OPEN/CLOSE button to close the disc tray.
5 Press the ON/STAND-BY button to enter the stand-by mode, and then unplug
Remove all CDs inserted in the unit.
Make sure that "NO DISC" is displayed.
the AC power lead from the AC socket.
Before transporting the unit
tuner preset, and CD programme.
Press the ON/STAND-BY button to enter the power stand-by mode.
Whilst pressing down the / button and the X-BASS/DEMO button, press
the ON/STAND-BY button until "CLEAR AL" appears.
3 If neither step 1 nor 2 restores the unit, do the following:
the power on.
If such a problem occurs, do the following:
1 Set the unit to the stand-by mode and turn the power on again.
2 If the unit is not restored in step 1, unp lug and plug in the unit , and then turn
If trouble occurs
When this product is subjected to strong external interference (mechanical shock,
excessive static electricity, abnormal supply voltage due to lightning, etc.) or if it is
operated incorrectly, it may malfunction.
Troubleshooting Chart (continued)
cides on the unit.
Caution:
Do not use oil, solvents, petrol, paint thinners or insecti-
soap solution, then with a dry cloth.
Periodically wipe the cabinet with a soft cloth and a diluted
Cleaning the cabinet
z
Dirty heads, capstans or pinch rollers can cause poor sound and tape jams. Clean
these parts with a cotton swab moistened with commercial head/pinch roller
cleaner or isopropyl alcohol.
Cleaning the tape-handling parts
time by using a commercial tape head demagnetiser. Read the demagnetiser's
z
After long use, the deck's heads and capstans may become magnetised, causing
poor sound. Demagnetise these par ts once every 30 hours of playing/recording
Playback head Erase head
Capstan Record ing/Playback head
Pinch roller
TAPE 2
D
E
B
C
TAPE 1
A
B
C
In order to ensure proper operation of the CD player, preventative maintenance
(cleaning of the laser pickup lens) should be performed periodically. Lens cleaners
are commercially available. Contact your local CD software dealer for options.
instructions carefully before use.
Cleaning the CD pickup lens
voltages.
z
When cleaning the heads, pinch rollers, etc., unplug the unit which contains high
Maintenance
Page 29

Frequency response
Dynamic range
20 - 20,000 Hz
90 dB (1 kHz)
Type
Signal readout
D/A converter
3-disc multi-play compact disc player
Non-contact, 3-beam semiconductor laser pickup
1-bit D/A converter
CD player
Input terminals
Headphones: 16 - 50 ohms (recommended: 32 ohms)
Video/Auxiliary (audio signal): 500 mV/47 kohms
Output terminals
Speakers: 6 ohms
Output power
RMS: 150 W (75 W + 75 W) (10 % T.H.D.)
Amplifier
Weight
Depth: 340 mm (13-7/16")
6.3 kg (13.8 lbs.)
Specifications
As part of our policy of continuous improvement, SHARP reserves the right to make
design and specification changes for product improvement without prior notice. The
performance specification figures indicated are nominal values of production units.
There may be some deviations from these values in individual units.
Power source
Power consumption
Dimensions
General
AC 120 V, 60 Hz
128 W
Width: 270 mm (10-5/8")
Height: 330 mm (13")
ENGLISH
Weight
3.0 kg (6.6 lbs.)/each
Dimensions
Rated input power
Impedance
Maximum input power
Type
Signal/noise ratio
Wow and flutter
Speaker
55 dB (TAPE 1, playback)
50 dB (TAPE 2, recording/playback)
2-way type speaker system
5 cm (2") Tweeter
10 cm (3-15/16") Woofer
150 W
75 W
6 ohms
Width: 220 mm (8-11/16")
Height: 330 mm (13")
Depth: 217 mm (8-9/16")
0.3 % (WRMS)
Frequency response
Cassette deck
50 - 14,000 Hz (Normal tape)
AM: 530 - 1,720 kHz
Frequency range
Tuner
FM: 87.5 - 108 MHz
E-28
References
- Specifications -
Page 30

F-1
FRANÇAIS
Informations générales
- Introduction / Remarque spéciale / Accessoires / Table des matières -
Remarque spéciale
Le matériel audio-visuel peut comporter des oeuvres faisant l'objet de droits d'auteur
qui ne peuvent être enregistrées sans l'autorisation du possesseur du droit d'auteur,
Accessoires
Note:
L'appareil est livré seulement avec les accessoires ci-dessus.
Télécommande 1 Cadre-antenne AM/FM 1
Vérifier que les accessoires ci-dessous sont présents dans l'emballage.
veuillez vous référer aux réglementations nationales en vigueur.
meilleur parti, veuillez lire ce mode d'emploi très attentivement.
Introduction
Nous vous remercions d'avoir porté votre choix sur ce produit SHARP. Pour en tirer le
FRANÇAIS
Précautions . . . . . . . . . . . . . . . . . . . . . . . . . . . . . . . . . . . . . . . . . . . . . . . . . . . . . . . 2
Commandes et voyants . . . . . . . . . . . . . . . . . . . . . . . . . . . . . . . . . . . . . . . . . . 3 - 6
Raccordement du système . . . . . . . . . . . . . . . . . . . . . . . . . . . . . . . . . . . . . . . . 7, 8
Télécommande . . . . . . . . . . . . . . . . . . . . . . . . . . . . . . . . . . . . . . . . . . . . . . . . . . . . 9
Commande générale . . . . . . . . . . . . . . . . . . . . . . . . . . . . . . . . . . . . . . . . . . . . . . . 10
Réglage du son . . . . . . . . . . . . . . . . . . . . . . . . . . . . . . . . . . . . . . . . . . . . . . . . . . . 11
Réglage de l'horloge . . . . . . . . . . . . . . . . . . . . . . . . . . . . . . . . . . . . . . . . . . . . . . . 12
Écoute de CD . . . . . . . . . . . . . . . . . . . . . . . . . . . . . . . . . . . . . . . . . . . . . . . . . . 13, 14
Déclenchement de la lecture depuis un morceau souhaité . . . . . . . . . . . . . . . 15
Répétition et lecture au hasard . . . . . . . . . . . . . . . . . . . . . . . . . . . . . . . . . . . . . . 15
Lecture des morceaux programmés . . . . . . . . . . . . . . . . . . . . . . . . . . . . . . . . . . 16
Écoute de la radio . . . . . . . . . . . . . . . . . . . . . . . . . . . . . . . . . . . . . . . . . . . . . . . . . 17
Écoute d'une station mise en mémoire . . . . . . . . . . . . . . . . . . . . . . . . . . . . . . . 18
Écoute de la cassette (TAPE 1 ou TAPE 2) . . . . . . . . . . . . . . . . . . . . . . . . . . . . . 19
Enregistrement à partir de la radio . . . . . . . . . . . . . . . . . . . . . . . . . . . . . . . . . . . 20
Enregistrement à partir de CD . . . . . . . . . . . . . . . . . . . . . . . . . . . . . . . . . . . . . . . 21
Copie entre cassettes . . . . . . . . . . . . . . . . . . . . . . . . . . . . . . . . . . . . . . . . . . . . . . 22
Opérations programmées et mise en arrêt différée . . . . . . . . . . . . . . . . . . . 23, 24
Enrichissement du système . . . . . . . . . . . . . . . . . . . . . . . . . . . . . . . . . . . . . . . . 25
Dépannage . . . . . . . . . . . . . . . . . . . . . . . . . . . . . . . . . . . . . . . . . . . . . . . . . . . . 26, 27
Entretien . . . . . . . . . . . . . . . . . . . . . . . . . . . . . . . . . . . . . . . . . . . . . . . . . . . . . . . . 27
Fiche technique . . . . . . . . . . . . . . . . . . . . . . . . . . . . . . . . . . . . . . . . . . . . . . . . . . . 28
GARANTIE LIMITÉE . . . . . . . . . . . . . . . . . . . . . . . . . . . . . . . .Couverture arrière
Références
Fonctions avancées
Enregistrement sur la cassette
Lecture de la cassette
Radio
Lecture avancée de CD
Lecture CD
Fonctionnement de base
Avant l'utilisation
Informations générales
Table des matières
Page
Page 31

z
Débrancher le cordon d'alimentation en le tenant
par la fiche pour ne pas abîmer les fils internes.
z
En cas d'orage, dé br ancher l'appare il.
système. Puis on le rallumera.
z
électronique (ordinateur domestique, téléco-
pieur, etc.) qui provoquerait des parasites.
Ne rien placer sur l'appareil.zMettre l'appare il à l'abri de l'hum idité, de la chaleur excessive (supérieur e à
60°C) ou du froid excessif.zSi le système ne fonctionne pas co rrectement, débranch er et rebrancher le
z
Mettre l'apparei l à l'abri du soleil, du champ ma-
gnétique, de la poussière excess iv e ou de l'hu-
midité. On l'écar te ra aussi d'un apparei l
z
Installer l'appareil sur un socle stable, horizontal et
exempt de vibrati ons .
10 cm 10 cm
10 cm
tous côtés (pas d'obstacle à moins de 10 cm de l'appareil).
z
Vérifier que l'appareil est installé dans un lieu bien aéré et qu'il est dégagé de
Général
Précautions
NON
10 cm
z
Avertissement:
Respecter la t ensi on i ndiqu ée su r l'appar eil . Le fonctionnem ent sur une t en sion
plus élevée est dangereux et risque de provoquer un incendie ou tout autre type
d'accident. SHARP ne sera pas tenu po ur respons able des dommag es causés
par le non-respect de la tension spécifiée.
Le niveau sonore réel dans un réglage don né dépend de di vers éléments: ren-
dement des enceint es, lieu d'écoute, etc. Éviter une augm entation bru sque du
volume. Elle se produit, par exemple, lors de la mise sous tension avec un
réglage du volume élevé. Éviter aussi une longu e écoute à niveau élevé.
Le compact disc r ésiste bien au x domma ges, mais il peut se produire u n mau-
vais alignement dû à l'enc rass em ent de la surface du disque. Afin de profiter au
maximum des disques et de ce lecteur, suivre les conseil s ci -dessous.
z
Utiliser ce produit dans une plage de température comprise entre 5°C et
Éviter d'écrire sur le disque, notamment sur la face non munie d'une éti-
le compact disc sont à l'origine de bruit ou d'un alignement erroné. Si le com-
pact disc est encrassé ou ne fonctionn e pas correc tem ent, ne ttoyer le disque
avec un chiffon doux et sec. Essuyer d u centre vers la périphér ie, en ligne
droite.
quette. La lecture se fait sur la face non munie d'une étiq uet t e.zÉviter d'exposer les disques directement au soleil, à la chaleur et à l'humidité.zTenir le compact disc par les bords. Les traces de doigts, la saleté et l'eau sur
Entretien des compact discs
Commande de volume
35°C.
ne, s'adresser au revendeur SHARP.
z Ne pas ôter l'e nveloppe, on s'exposera à la se -
cousse électrique. Pour toute réparation inter-
FRANÇAIS
F-2
OUI
correct
Informations générales
- Précautions -
Page 32

F-3
FRANÇAIS
23 24 25 26
20
19
18
17
Informations générales
- Commandes et voyants -
3
2
Commandes et v oyants
1
Description de la télécommande (Voir page 5.)
8
161514131211
22
21
4
67
5
10.Touche de saut de disque . . . . . . . . . . . . . . . . . . . . . . . . . . . . . .13, 15
11.Touche d'accord et d'heure haut . . . . . . . . . . . . . . . . . . . . . . . .12, 17
12.Touche d'arrêt de CD ou cassette . . . . . . . . . . . . . . . . . . . . . . .14, 19
13.Touche CD . . . . . . . . . . . . . . . . . . . . . . . . . . . . . . . . . . . . . . . . . . 13, 21
14.Touche de tuner (gamme d'ondes) . . . . . . . . . . . . . . . . . . . . . . . . . .17
15.Touche de cassette (1 2) . . . . . . . . . . . . . . . . . . . . . . . . . . . . .19, 22
16.Touche vidéo/auxiliaire . . . . . . . . . . . . . . . . . . . . . . . . . . . . . . . .23, 25
17.Touche de gradateur . . . . . . . . . . . . . . . . . . . . . . . . . . . . . . . . . . . . .10
18.Touche d'horloge . . . . . . . . . . . . . . . . . . . . . . . . . . . . . . . . . . . . .12, 23
19.Touche de minuterie/mise en arrêt différée . . . . . . . . . . . . . . . .23, 24
20.Jack de casque . . . . . . . . . . . . . . . . . . . . . . . . . . . . . . . . . . . . . . . . .25
21.Touche de lecture ou répétition CD, de lecture cassette . .14, 15, 19
22.Touche d'avance rapide ou plage haut CD,
23.Touche d'accord et d'heure bas . . . . . . . . . . . . . . . . . . . . . . . . .12, 17
24.Touche de mémoire/réglage . . . . . . . . . . . . . . . . . . . . . . . . .12, 16, 18
25.Touche de pause d'enregistrement de cassette 2 . . . . . . .20, 21, 22
26.Touche d'inversion ou plage bas CD,
de rebobinage de cassette 2, de présélection bas . . . . . . .14, 18, 19
d'avance rapide de cassette 2, de présélection haut . . . . .14, 18, 19
7.Touches de volume . . . . . . . . . . . . . . . . . . . . . . . . . . . . . . . . . . . . . .11
8.Touche d'extra-graves/mode de démonstration . . . . . . . . . . . .10, 11
9.Touche d'ouverture/fermeture de tiroir . . . . . . . . . . . . . . . . . . . . . .13
4.Compartiment de cassette 2 . . . . . . . . . . . . . . . . . . . . . . . . . . . .19, 22
5.Compartiment de cassette 1 . . . . . . . . . . . . . . . . . . . . . . . . . . . .19, 22
6.Sélecteur de mode d'égaliseur . . . . . . . . . . . . . . . . . . . . . . . . . . . . .11
10
3.Touche de marche/attente . . . . . . . . . . . . . . . . . . . . . . . . . . .12, 23, 27
9
1.Tiroir de disque . . . . . . . . . . . . . . . . . . . . . . . . . . . . . . . . . . . . . . . . .13
2.Voyant de réglage de la minuterie . . . . . . . . . . . . . . . . . . . . . . . . . .24
Façade
Page de référence
Page 33

SHARP CORPORATION
N˚ DE SÉRIE
SHARP CORPORATION
(CD-BA2600)
MINI-CHAÎNE STÉRÉO
120 V CA 60 Hz 128 W
GAMME DE FRÉQUENCES: FM 87,5 - 108 MHz
AM 530 - 1720 kHz
N˚ DE SÉRIE
(CD-BA250)
MINI-CHAÎNE STÉRÉO
120 V CA 60 Hz 128 W
GAMME DE FRÉQUENCES: FM 87,5 - 108 MHz
AM 530 - 1720 kHz
2
1
MODÈLE N˚ CD-BA2600
4
3
2
MODÈLE N˚ CD-BA250
1
4.Cordon d'alimentation . . . . . . . . . . . . . . . . . . . . . . . . . . . . . . . . . . 7, 8
3.Bornes d'enceinte . . . . . . . . . . . . . . . . . . . . . . . . . . . . . . . . . . . . . .7, 8
14 14
345 10
14
1112 136
7
8
9
10.Voyant d'enregistrement de cassette 2
11.Voyant de mémoire
12.Voyant de lecture de cassette
13.Voyant de mise en arrêt différée
1.Jack de cadre-antenne AM/FM . . . . . . . . . . . . . . . . . . . . . . . . . . . . 7, 8
2.Jacks d'entrée vidéo/auxiliaire (signal audio) . . . . . . . . . . . . . . . . 25
14.Analyseur spectral/voyant de niveau de volume
9.Voyant d'enregistrement programmé
7.Voy a nts de nu méro de disque
8.Voyant de lecture programmée
3.Voyant de réception en FM stéréo
4.Voyant de répétition CD
5.Voyant de pause CD
6.Voyant de lecture CD
Panneau arrière
1.Voyant extra-graves
2.Voyant de mode FM stéréo
Affichage
FRANÇAIS
F-4
Page de référence
Informations générales
- Commandes et voyants -
Page 34

F-5
FRANÇAIS
Mise en place des piles pour la télécommande (Voir page 9.)
14
13
Informations générales
- Commandes et voyants -
12
11
10
9
8
7
✱
6
5
4
✱
3
2
Commandes et voyants (suite)
1
25
lécommande.
24
Les touches portant la marque " " (voir illustration) ne peuvent être commandés
Les autres touches peuvent être commandées depuis l'appareil principal et la té-
que sur la télécommande.
25.
Touches de volume . . . . . . . . . . . . . . . . . . . . . . . . . . . . . . . . . . . . . . .11
23
24.
Touche de cassette (1 2) . . . . . . . . . . . . . . . . . . . . . . . . . . . . . .19, 22
22
21
20.
21.
22.
23.
Touche de lecture de cassette 2 . . . . . . . . . . . . . . . . . . . . . . . . . . . . .19
Touche de rebobinage de cassette 2 . . . . . . . . . . . . . . . . . . . . . . . . . .19
Touche d'avance rapide de cassette 2 . . . . . . . . . . . . . . . . . . . . . . . . .19
Touche vidéo/auxiliaire . . . . . . . . . . . . . . . . . . . . . . . . . . . . . . . . . . . . .25
20
19.
Touches de présélection haut/bas de tuner . . . . . . . . . . . . . . . . . . . . .18
15
16
17
18
19
✱
18.Touche de lecture au hasard CD . . . . . . . . . . . . . . . . . . . . . . . . . . .15
Touche de pause d'enregistrement de cassette 2 . . . . . . . . . .20, 21, 22
Touche CD . . . . . . . . . . . . . . . . . . . . . . . . . . . . . . . . . . . . . . . . . . .13, 21
Touche de tuner (gamme d'ondes) . . . . . . . . . . . . . . . . . . . . . . . . . . .17
Touche de marche/attente . . . . . . . . . . . . . . . . . . . . . . . . . . . . .9, 23, 27
Touche d'extra-graves . . . . . . . . . . . . . . . . . . . . . . . . . . . . . . . . . . . . .11
Touche d'arrêt CD . . . . . . . . . . . . . . . . . . . . . . . . . . . . . . . . . . . . .14, 21
Touches de lecture ou répétition CD . . . . . . . . . . . . . . . . . . . . . . .14, 15
Touche d'avance rapide ou plage haut CD . . . . . . . . . . . . . . . . . . . . .14
7.
Touche de lecture de cassette 1 . . . . . . . . . . . . . . . . . . . . . . . . . . . . .198.Touche d'arrêt de cassette 1/2 . . . . . . . . . . . . . . . . . . . . . . . . .19, 20, 229.Sélecteur de mode d'égaliseur . . . . . . . . . . . . . . . . . . . . . . . . . . . . . .11
6.Touche d'effacement CD . . . . . . . . . . . . . . . . . . . . . . . . . . . . . . . . . .16
4.
Touche de mémoire CD . . . . . . . . . . . . . . . . . . . . . . . . . . . . . . . . . . . .165.Touche d'inversion ou plage bas CD . . . . . . . . . . . . . . . . . . . . . . . . . .14
3.Touche de pause CD . . . . . . . . . . . . . . . . . . . . . . . . . . . . . . . . . . . . .14
10.
11.
12.
13.
14.
15.
16.
17.
1.
Émetteur de télécommande . . . . . . . . . . . . . . . . . . . . . . . . . . . . . . . . . .92.Sélecteurs de numéro de disque . . . . . . . . . . . . . . . . . . . . . . .13, 16, 21
Télécommande
Page de référence
Page 35

4.Fil d'enceinte
1.Tweeter
2.Woofer
3.Évent de baffle réflex
3
Enceinte acoustique
SHARP CORPORATION
MODÈLE N˚ CP-BA2600
IMPÉDANCE 6 OHMS
PUISSANCE NOMINALE 75 W
PUISSANCE NOMINALE MAXIMALE 150 W
SHARP CORPORATION
(CD-BA2600)
ENCEINTES ACOUSTIQUES
HAUT-PARLEURS: WOOFER 13 cm
TWEETER 5 cm
IMPÉDANCE 6 OHMS
PUISSANCE NOMINALE 75 W
PUISSANCE NOMINALE MAXIMALE 150 W
(CD-BA250)
ENCEINTES ACOUSTIQUES
HAUT-PARLEURS: WOOFER 13 cm
TWEETER 5 cm
MODÈLE N˚ CP-BA250
3
2
4
Mise en place des enceintes:
Il n'y a pas de différence entre les deux enceintes.
1
Les façades des enceintes sont amovibles:
Veiller à ce que rien ne se heurte contre le diaphragme lorsqu'on retire la façade.
FRANÇAIS
Enceinte gauche Enceinte droite
F-6
Informations générales
- Commandes et voyants -
Page 36

F-7
FRANÇAIS
Avant l'utilisation
- Raccordement du système -
Raccordement du système
Enceinte de droite
Cadre-antenne AM
Antenne FM
Prise murale
(120 V CA, 60 Hz)
Enceinte de gauche
Magnétoscope, DVD, etc.
Non fourni
Page 37

Incorrect
risque de se blesser en tombant.
z
z
Ne rien placer ou laisser pénétrer dans l'évent de baf-
fle réflex.
Éviter de monter (ou s'asseoir) sur les enceintes. On
se place devant le système.zNe pas laisser se toucher les fils dénudés des en-
ceintes.
L'enceinte de droite est celle située à droite quand on
Brancher le fil noir sur la borne négative (-) et le fil rouge sur la borne posi-
Précautions:
z
Utiliser des enceintes ayant une impédance d'au moins 6 ohms. Des enceintes à
faible impédance risquent d'endommager l'appareil.zNe pas prendre le canal droit pour le canal gauche.
Rouge
Noir
tive (+).
Raccordement des enceintes
Enceinte droite Enceinte gauche
LA PRISE ET POUSSER JUSQU'AU FOND.
Mode de démonstration (Voir page 10.)
FRANÇAIS
Débrancher l'appareil en période de non-utilisation prolongée.
ATTENTION:
POUR ÉVITER LES CHOCS ÉLECTRIQUES, INTRODUIRE LA LAME LA
PLUS LARGE DE LA FICHE DANS LA BORNE CORRESPOND ANTE DE
Note:
page 10).
Mur Vis (non fournies)
Après avoir vérifié tous les raccordements, brancher l'appareil sur secteur.
Si on branche l'appareil avant cela, il entre en mode de démonstration (voir
< Fixation au mur >
Branchement du cordon d'alimentation
< Montage >
Éloigner l'antenne de l'appareil ou du cordon d'alimentation pour assurer une
meilleure réception.
Ne pas relier l'antenne FM fournie et une antenne FM extérieure. Un problème se
produira.
Positionner l'antenne (le fil) FM et diriger le cadre AM pour obtenir la meilleure récep-
tion. Placer le cadre AM sur une étagère ou le visser sur une lampe ou au mur.
Notes:
z
z
Mise en place du cadre AM:
Raccorder l'antenne FM/AM au jack ANTENNA.
Raccordement de l'antenne FM/AM
F-8
Avant l'utilisation
- Raccordement du système -
Page 38

F-9
Avant l'utilisation
- Télécommande -
FRANÇAIS
Précautions à prendre:
Précautions:
Notes:
z
Lorsque la distance de commande diminue ou que le fonctionnement est irrégu-
lier, remplacer les piles.zAvec un chiffon doux, on essuiera régulièrement l'émetteur de la télécommande et
le capteur de l'appareil principal.zUne forte lumière frappant le capteur peut déranger le fonctionnement. Modifier
l'éclairage ou l'orientation de l'appareil.zMettre la télécommande à l'abri de l'humidité, la chaleur, le choc et les vibrations.
z
Éviter d'utiliser des piles rechargeables (pile nickel-cadmium, etc.).zLa mauvaise installation des piles peut entraîner un mauvais fonctionnement de
l'appareil.
période de non-emploi prolongée.
z
Remplacer en même temps toutes les piles par des neuves.zNe pas utiliser en même temps des piles neuves et anciennes.zPour éviter un endommagement éventuel dû à la fuite, on retirera les piles en
3 Remettre le couvercle en place.
Pour introduire ou retirer les piles, on les poussera vers les bornes .
ment de piles.
Aucune pile n'est livrée avec l'appareil.
1 Retirer le couvercle.
2 Installer les piles e n respectan t les polari tés indiquée s dans le loge-
Utiliser 2 piles "AA" (UM/SUM-3, R6, HP-7 ou équivalent).
Mise en place des piles
Télécommande
0,2 m - 6 m
Capteur
écouter de la musique.
La télécommande peut être utilisée dans le rayon illustré ci-dessous:
Appuyer sur la touche ON/STAND-BY. Le système s'est allumé ? On peut maintenant
Diriger la télécommande vers le capteur placé sur l'appareil.
Essai de la télécommande
Page 39

Commande générale
FRANÇAIS
Assombri Éclairci
La première fois qu'on branche l'appareil, ce dernier entre en mode de démonstra-
On peut éclaircir ou assombrir l'afficheur en agissant sur la touche DIMMER.
mode d'extra-graves.
Pour annuler le mode de démonstration:
Lorsque l'appareil est en attente (mode de démonstration), appuyer sur la touche X-
BASS/DEMO. Le mode de démonstration est annulé et son affichage disparaît.
Pou r repasse r au mode de démonstra tion:
Lorsque l'appareil est en veille, réappuyer sur la touche X-BASS/DEMO.
Note:
Dès la mise sous tension, la touche X-BASS/DEMO peut être utilisée pour passer au
Luminosité de l'afficheur (2 niveaux)
tion. Des mots se déplacent sur l'afficheur.
Mode de démonstration
F-10
Fonctionnement de base
- Commande générale -
Page 40

F-11
FRANÇAIS
Fonctionnement de base
- Réglage du son -
Réglage du son
Les voix (plage moyenne) sont amplifiées.
La pression sur la touche EQUALIZER (EQUALIZER MODE) perm et de visualiser le
mode d'égaliseur en cours. Pour passer à un autre mode, on le sélectionnera en
agissant à plusieurs reprises sur la touche EQUALIZER (EQUALIZER MODE).
Égaliseur
Le son n'est pas modifié.
Les graves et les aigus sont amplifiés.
Les graves et les aigus sont légèrement amplifiés.
Les aigus sont un peu supprimés.
Les aigus sont réduits.
sur la touche X-BASS/DEMO (X-BASS ).
Commande de graves
Voyant X-BASS
012 29 30 MAXIMUM
.....
Branché, l'appareil entre automatiquement en mode d'extra-graves, qui suramplifie
les basses fréquences, et affiche "X-BASS". P our annuler ce mode, il suffit d'appuyer
Appuyer sur la touche VOLUME pour augmenter le volume et la touche VOLUME
pour l'effet contraire.
Commande de volume
Page 41

3
Appuyer sur la touche TUNING/TIME ( ou ) pour sélectionner
l'affichage 12 ou 24 heures et puis appuyer sur la touche MEMO-
"AM 12:00" L'affichage sur 12 heures apparaît.
(AM 12:00 - PM 11:59)
"AM 0:00" L'affichage sur 12 heures apparaît.
(AM 0:00 - PM 11:59)
"0:00" L'affichage sur 24 heures apparaît.
(0:00 - 23:59)
Il faut rappeler que ce réglage se fait lors de la première utilisation ou après la
réinitialisation. (Se reporter à l'étape 3 dans "En cas de dérangement", page 27.)
RY/SET.
2
Appuyer sur la touche CLOCK et, avant 5 second es, presser sur la
touche MEMORY/SET.
Appuyer sur la touche ON/STAND-BY pour allumer l'appareil.
Dans cet exemple, l'horloge est réglée sur l'affichage 12 heures (AM 12:00).
1
Réglage de l'horloge
2 Renouveler "Réglage de l'horloge".
FRANÇAIS
Pour passer à l'affichage 12 heures ou 24 heures:
1 Effacer tout le contenu du programme. [Pour plus de détails, se reporter à l'étape
3 dans "En cas de dérangement", page 27.]
ron.
L'afficheur indiquera l'heure pour 5 secondes envi-
Pour vérifier l'heure:
Appuyer sur la touche CLOCK.
z
L'heure n'avance pas même si les minutes passent de "59" à "00".zL'horloge départ à partir de "0" seconde (les secondes ne s'affichent pas
d'ailleurs). L'heure affichée disparaît au bout de quelques secondes.
z
Appuyer une fois sur la touche TUNING/TIME ( ou ) pour avancer l'heure
de 1 minute. On la maintiendra pressée pour modifier l'heure à un intervalle
de 5 minutes.
5
de 1 heure. On la maintiendra enfoncée pour avancer l'heure continuelle-
ment.
z
Appuyer une fois sur la touche TUNING/TIME ( ou ) pour avancer l'heure
z
Appuyer sur la touche TUNING/TIME ( ou ) pour régler les mi-
nutes et puis appuyer sur la touche MEMORY/SET.
S'il s'agit de l'affichage 12 heures, "AM" passe automatiquement à "PM".
4
Appuyer sur la touche TUNING/TIME ( ou ) pour régler les heu-
res et puis appuyer sur la touche MEMORY/SET.
Note:
"CLOCK" ou l'heure clignote sur l'afficheur à la pression de la touche CLOCK lorsque
le courant est rétabli à la suite d'une panne de courant ou d'un débranchement de
l'appareil.
Remettre l'horloge à l'heure comme suit.
Pour remettre l'horloge à l'heure:
Suivre "Réglage de l'horloge" depuis le début. Si l'heure affichée clignote, sauter
l'étape 3 (choix de l'affichage 12 ou 24 heures).
F-12
Fonctionnement de base
- Réglage de l'horloge -
Page 42

F-13
FRANÇAIS
Réglage du son (Voir page 11.)
Lecture CD
- Écoute de CD -
Écoute de CD
Cet appareil permet de reproduire des disques CD-R et CD-RW audio ainsi que CD
conventionnels et non d'enregistrer dessus.
1
2
3
Pour mettre un troisième disque en place, tourner le tiroir de dis-
que en appuyant sur la touche DISC SKIP et ouvrir le tiroir.
4
Mettre des CD dans le tiroir, face étiquetée en haut.
Appuyer sur la touche ON/STAND-BY pour allumer l'appareil.
Appuyer sur la touche CD.
Appuyer sur la touche OPEN/CLOSE pour ouvrir le tiroir.
6
Pour sélectionner un CD qu'on souhaite écouter premièrement,
appuyer sur l'une des touches 1 - 3 sur la télécommande.
Nombre de morceaux
sur le CD dont le nu-
méro clignote
Temps de lecture sur le CD dont le
numéro clignote
5
Refermer le tiroir CD en appuyant sur la touche OPEN/CLOSE.
12 cm 8 cm
z
z
On peut mettre des CD n'importe où sur le tiroir.
Bien placer des CD de 8 cm au milieu de l'emplacement.
Page 43

z
Placer un seul CD sur le tiroir.zNe pas pousser le tiroir en cours de mouvement.
Ne pas tourner le tiroir à la main. Cela entraînera un mauvais fonctionnement.
S'il se produit une panne de courant alors que le tiroir est ouvert, attendre le réta-
blissement du courant.
Si on arrête le tiroir avec force, l'appareil affiche "ER-CD10" et ne fonctionne plus.
Si le cas se présente, appuyer sur la touche ON/STAND-BY pour passe r en veille
et réappuyer dessus pour rallumer l'appareil.
En cas de parasites sur télévision ou radio au cours de l'utilisation de disques,
éloigner l'appareil du téléviseur ou du poste de radio.zS'il s'agit d'un disque endommagé, encrassé ou mis à l'envers, l'appareil le sau-
tera.
se met en arrêt automatiquement.zSi l'une des positions 1 - 3 ne contient pas de disque, l'appareil sautera auto-
matiquement cette position et lira le disque suivant.
z
z
La lecture se déclenche à partir du morceau 1 sur le disque qu'on a choisi. Ce
disque terminé, l'appareil passe au disque suivant.
Lorsque le dernier morceau sur le troisième disque est terminé, le lecteur CD
7
Déclencher la lecture en appuyant sur la touche / ( ).
Interruption de la lecture:
Appuyer sur la touche CD de la télécommande.
Pour reprendre la lecture à par tir du même point, appuyer sur la touche .
Arrêt de la lecture:
Appuyer sur la touche (CD ).
Pour retirer des CD:
En mode d'arrêt, appuyer sur la touche OPEN/CLOSE.
Le tiroir de disque s'ouvre. Enlever les deux disques, puis appuyer sur la touche
DISC SKIP pour tourner le tiroir. Retirer le disque qui reste.
Après utilisation:
Appuyer sur la touche ON/STAND-BY pour passer en veille.
Précautions:
z
z
z
z
sage souhaité.
FRANÇAIS
Notes:
Notes:
z
La lecture normale se d éclenche dès qu'on relâche la touche PRESET
ou PRESET .zLa recherche d'un passage souhaité se fait sur un seul disque.zLorsque l'avance rapide atteint la fin du dernier mo rceau, l'appareil affiche "END"
et entre en pause. Lorsque l'opération d'inversion atteint le début du premier mor-
ceau, l'appareil passe en mode de lecture.zLa touche / ou / sur la télécommande permet de loca liser un pas-
Pour l'inversion audible:
En cours de lecture, presser la touche PRESET .
En cours de lecture, presser la touche PRESET .
Pour l'avance rapide audible:
Pour localiser un passage souhaité
z
On peut localiser un morceau sur un seul disque.zLa touche / ou / sur la télécommande per met aussi de rechercher
des morceaux.
z
On peut passer à un morceau souhaité en
agissant à plusieurs reprises sur la touche
de morceau affiché.
PRESET en observant le numéro
de).
Appuyer, en cours de lecture, sur la touche PRESET (moins de 0,5 secon-
Pour repasser le morceau en cours:
de morceau affiché.
agissant à plusieurs reprises sur la touche
PRESET en observant le numéro
z
On peut passer à un morceau souhaité en
de).
Appuyer, en cours de lecture, sur la touche PRESET (moins de 0,5 secon-
Pour passer au morceau suivant:
Pour localiser un morceau
F-14
Lecture CD
- Écoute de CD -
Page 44

F-15
FRANÇAIS
Lecture avancée de CD
- Déclenchement de la lecture depuis un morceau souhaité / Répétition ou lecture au hasard -
depuis un morceau souhaité
On peut reproduire un disque depuis un morceau souhaité.
1
En mode d'arrêt, appuyer sur l'une des touches 1 - 3 sur la té-
mande, l'appareil lira le disque choisi.
disque suivant.zSi, en cours de lecture, on appuie sur l'une des touches 1 - 3 de la télécom-
Notes:
z
Si, en cours de lecture, on appuie sur la touche DISC SKIP, la lecture passe au
Appuyer sur la touche (CD ).
Arrêt de la lecture:
vant.
ceau du disque portant le morceau choisi est terminé, l'appareil passe au sui-
sélectionner une plage.
Appuyer sur la touche PRESET ou PRESET pour
2
que.
Numéro du disque choisi
lécommande ou sur la touche DISC SKIP pour sélectionner le dis-
3
On peut aussi sélectionner un morceau en pressant la touche / ou /
Déclencher la lecture en appuyant sur la touche / ( ).
L'appareil commence la lecture du morceau désigné. Lorsque le dernier mor-
de la télécommande.
Numéro de plage sélectionné
Déclenchement de la lecture
Attention:
Après la répétition ou la lecture au hasard, penser à appuyer sur la touche (CD ).
Dans le cas contraire, l'appareil lira le ou les disques indéfiniment.
n'est donc pas possible de désigner l'ordre de la lecture .)
z
Si, en lecture au hasard , on appuie sur la touche / , on peut passer à un morceau
suivant chois i par l'opération au hasard. Par contre, la touche / ne permet pas de
passer au précédent. L'appareil passe simplement au déb ut du morceau en cours.zLa lecture au hasard consiste à reproduire les morceaux dans un ordre aléatoire. (Il
Annulation de la lecture au hasard:
Appuyer sur la touche .
Notes:
On peut écouter des morceaux dans un ordre laissé au hasard.
Appuyer sur la touche RANDOM de la télécommande pour d éclencher
la lecture au hasard.
Appuyer deux fois sur la touche / ( ).
Lecture au hasard
Pour repasser un morceau souhaité:
Suivre les étapes 1 - 4 dans le paragraphe "Lecture des morceaux programmés" et
appuyer deux fois sur la touche / ( ).
Pour arrêter la répétition:
Réappuyer sur la touche / ( ).
" " s'éteint.
Répétition de la totalité des disques (3 maxi):
On peut répéter la totalité des disques (3 maxi) ou une programmation.
Répétition
Répétition et lecture au hasard
Page 45

ner un morceau souhaité.
1
En mode d'arrêt, appuyer sur
l'une des touches 1 - 3 de la
télécommande pour sélection-
Numéro du disque choisi
En spécifiant les disques 1 - 3 et les morceaux 1 - 99, on peut programmer jusqu'à 32
morceaux pour la lecture dans un ordre souhaité.
Lecture des morceaux programmés
més.
FRANÇAIS
autre.zLa lecture au hasard n'est pas utilisable pour la lecture des morceaux program-
z
L'ouverture du tiroir de disque annule automatiquement la séquence programmée.zLes morceaux programmés ne s'effacent pas même si on appuie sur la touche
ON/STAND-BY pour passer en attente ou si on passe de la fonction CD à une
Notes:
Ajout de morceaux au programme:
Si un programme a été stocké préalablement, l'appareil affiche "MEMORY". Suivre
les étapes 1 - 3 pour ajouter des morceaux. Ces derniers seront stockés à la suite du
programme d'origine.
grammé. Si tous les morceaux sont effacés,
"MEMORY" disparaît.
ceau s'efface à partir du dernier morceau pro-
de la télécommande.
Chaque fois que la touche est pressée, un mor-
En mode d'arrêt, appuyer sur la touche CLEAR
Effacement de morceaux programmés:
5
Déclencher la lecture en appuyant sur la touche / ( ).
touche CLEAR.
au total sont programmables.
En cas d'erreur, on peut effacer des morceaux programmés en pressant sur la
4
Renouveler les étapes 1 - 3 pour d'autres morceaux. 32 morceaux
Lorsque le morceau est mis en mémoire, l'appareil affiche "MEMORY".
Ordre de lecture
ker le numéro de morceau.
RY/SET (MEMORY) pour stoc-
3
Appuyer sur la touche MEMO-
On peut aussi sélectionner un morceau en pressant la touche / ou /
de la télécommande.
Numéro de plage sélectionné
pour sélectionner une plage.
PRESET ou PRESET
2
Appuyer sur la touche
F-16
Lecture avancée de CD
- Lecture des morceaux programmés -
Page 46

F-17
FRANÇAIS
Réglage du son (Voir page 11.)
Radio
- Écoute de la radio -
Écoute de la radio
Appuyer sur la touche ON/STAND-BY pour passer en veille.
Après utilisation:
pour éteindre le voyant "ST". La réception passe en mono et le son devient clair.
z
Si la réception en FM n'est pas bonne, appuyer sur la touche TUNER (BAND)
Voyant de réception en FM stéréo
Voyant de mode de FM stéréo
z
" " apparaît lorsque l'émission FM captée est en stéréo.
Pour recevoir une émission en FM stéréo:
Appuyer sur la touche TUNER (BAND) pour allumer le voyant "ST".
1
3
Appuyer sur la touche TUNING/TIME ( ou ) pour faire l'accord
sur la station souhaitée.
Accord manuel:
Appuyer sur la touche TUNING/TIME autant de fois qu'il est nécessaire pour ré-
gler le tuner sur la station.
Accord automatique:
Si on presse la touche TUNING/TIME plus de 0,5 seconde, le tuner part en re-
cherche et se cale sur la première station qu'il capte.
Notes:
z
z
z
La recherche automatique s'arrêtera dès qu'il se produira des parasites.
Le balayage automatique sautera des stations à faible puissance.
Pour arrêter la recherche, réappuyer sur la touche TUNING/TIME.
2
Appuyer sur la touche ON/STAND-BY pour allumer l'appareil.
Appuyer à plusieurs reprises sur la touche TUNER (BAND) pour
sélectionner une gamme d'ondes souhaitée (FM ou AM).
Page 47

Note:
La fonction de protection conserve les stations en mémoire pendant plusieurs heures
même s'il se produit une panne de courant ou un débranchement de l'appareil.
Il est possible de stocker 40 stations en AM et en FM dans la mémoire et de les rap-
2
Appuyer sur la touche MEMO RY/SET pour passer en mode de sau-
vegarde de présélection.
1
Suivre les étapes 1 - 3 dans "Écoute de la radio", page 17.
PRESET pour sélectionner le numéro de présélection.
3
Avant 30 secondes, appuyer sur la touche PRESET ou
5
Si le voyant "MEMORY" et le voyant de numéro de présélection s'éteignent
avant la mise en mémoire de la station, renouveler l'opération depuis l'étape 2.
Renouveler les étapes 1 - 4 pour mémoriser d'autres stations ou
remplacer une station mise en mémoire.
Une nouvelle station remplace celle déjà mise en mémoire.
4
Avant 30 secondes, appuyer sur la touche MEMORY/SET pour
mettre la station en mémoire.
Stocker des stations en mémoire dans l'ordre à partir du canal de présélection 1.
peler par une simple pression d'une touche.
Mise en mémoire d'une station
Écoute d'une station mise en mémoire
Écoute de la radio (Voir page 17.)
FRANÇAIS
(BAND) enfoncée afin de faire apparaître "TUNER CL".
2 Appuyer sur la touche ON/STAND-BY tout en maintenant la touche TUNER
1 Appuyer sur la touche ON/STAND-BY pour mettre l'appareil en mode d'attente.
tion
Pour effacer toute la mémoire de présélec-
On peut balayer les stations mises en mémoire automatiquement. (balayage dans la
mémoire de présélection)
z
Les numéros de présélection se mettent à clignoter et l'appareil se cale sur
1
Appuyer moins de 0,5 seconde sur la touche PRESET ou
PRESET .
Pour balayer les stations présélectionnées
Cette opération se fait en pressant sur la touche PRESET ( ou ) de la télé-
commande.
Canal de présélection Fréquence et gamme d'ondes
2
Réappuyer sur la touche PRESET ou PRESET
lorsque la station souhaitée est détectée.
chaque station pendant 5 secondes.zCette opération se fait en pressant sur la touche PRESET ( ou ) de la té-
lécommande.
PRESET pour sélectionner une station souhaitée.
Appuyer moins de 0,5 seconde sur la touche PRESET ou
Rappel d'une station mémorisée
F-18
Radio
- Écoute d'une station mise en mémoire -
Page 48

F-19
FRANÇAIS
Réglage du son (Voir page 11.)
Lecture de la cassette
- Écoute de la cassette (TAPE 1 ou TAPE 2) -
magnétique avec un crayon ou un stylo à bille.
z
qualité. L'appareil risque de mal fonctionner.
Avant de mettre une cassette dans le compartiment, tendre la bande
normale ou à faible bruit. (Les cassettes métal ou CrO sont dé-
conseillées.)zÉviter d'utiliser les cassettes C-120 ou les cassettes de mauvaise
Avant la lecture:
z
Pour obtenir la meilleure qualité sonore, utiliser une cassette
Écoute de la cassette (TAPE 1 ou TAPE 2)
ne s'ouvrira pas . Il faut attendre le rétablissement du courant.
1 Appuyer sur la touche (TAPE ), puis sur la touche TAPE (1 2) pour sélec-
z
S'il se produit une panne de courant pendant le fonctionnement de la cassette, la tête
de lecture restera engagée avec la bande magnétique et le compartiment de cassette
z
Pour retirer la cassette, appuyer sur la touche (TAPE ) et puis ouvrir le comparti-
ment.zPour changer de mode en cours d'opération cassette, appuyer sur la touche (TAPE
).
tionner TAPE 2.
Pour le rembobinage, appuyer sur la touche PRESET (TAPE 2 ).
2 Pour faire défiler la bande, appuyer sur la touche PRESET (TAPE 2 ).
Précautions:
Avance rapide/rebobinage: (TAPE 2 uniquement)
Arrêt de la lecture:
Appuyer sur la touche (TAPE ).
3
Mettre une cassette dans le compa rtimen t
TAPE 1 ou TAPE 2 en tournant la face à
lire vers soi.
qu'on souhaite écouter.
4
Appuyer sur la touche TAPE (1 2) pour sélectionner la cassette
TAPE 1 TAPE 2
5
Déclencher la lecture en appuyant sur la touche / .
Pour télécommander la lecture, appuyer sur la touche TAPE 1 ou TAPE 2 .
2
Ouvrir le compartiment de cassette en pressant sur la zone mar-
quée " PUSH EJECT".
temps.
1
Allumer l'appareil en appuyant sur la touche ON/STAND-BY.
La lecture est possible sur les compartiments TAPE 1 et TA PE 2, mais pas en mêm e
Page 49

cassettes métal ou CrO .
z
d'enregistrement (contrôle sonore variable).
Pour l'enregistrement, utiliser seulement une cassette normale. Éviter des
z
z
SHARP n'est pas tenu responsable de tout dommage (ou perte d'enregistrement)
qui pourrait résulter d'un mauvais fonctionnement de l'appareil.
On peut agir sur les commandes de volume ou de son sans affecter le niveau
Av ant l'enregistrement:
z
Avant tout enregistrement important, faire un essai pour s'assurer que l'enregistre-
ment se fait correctement.
Enregistrement à partir de la radio
nouvel enregistrement.
Écoute de la radio (Voir page 17.)
FRANÇAIS
d'un morceau de bande adhésive pour faire un
effacement (ou enregistrement) accidentel.zPour protéger un enregistrement qu'on vient
d'effectuer, retirer la languette. Couvrir le trou
Languette pour
la face B
Languette pour
la face A
de protection qui protège la cassette contre un
cassette, vérifier la présence de la languette
Languette de protection contre l'effacement:
z
Avant d'effectuer l'enregistrement sur une
Face A
le cadre-antenne AM.
TAPE 2 de la télécommande pour déclencher l'enregistrement.
4
Appuyer sur la touche / de l'appareil principal ou sur la touche
L'enregistrement est mis en pause.
3
Appuyer sur la touche REC PAUSE ( ).
Enrouler l'amorce où l'enregistrement ne se fait pas.
2
Mettre une cassette dans le com partiment TAPE 2 en tournant ve rs
soi la face sur laquelle on enregistre.
Pou r interrompre l'enregistrement:
Appuyer sur la touche REC PAUSE ( ).
Pour relancer l'enregistrement, réappuyer sur la touche / (TAPE 2 ).
Arrêt de l'enregistrement:
Appuyer sur la touche (TAPE ).
Note:
S'il se produit un sifflement au cours de l'enregistrement d'une émission AM, éloi gner
1
Faire l'accord sur la station voulue. (Voir page 17.)
seulement.
L'enregistrement se fait dans le compartiment TAPE 2. Le TAPE 1 est pour la lecture
F-20
Enregistrement sur la cassette
- Enregistrement à partir de la radio -
Page 50

F-21
FRANÇAIS
Lecture des morceaux programmés (Voir page 16.)
Enregistrement sur la cassette
- Enregistrement à partir de CD -
Enregistrement à partir de CD
grammés, l'enregistrement reprendra à partir du premier morceau en mémoire.)
3 Appuyer sur la touche / (TAPE 2 ).
Arrêt de l'enregistrement:
Appuyer sur la touche (CD ).
Le CD s'arrête ainsi que la cassette.
Note:
Lorsque l'enregist rement arrive à la fin de la cassette, le lecteur CD se met en arrêt en affi-
chant le numéro du morceau en cours d'enregistrement. Pour reprendre l'enregistrement
de ce morceau interrompu, retourner la cassette et appuyer sur la touche REC PAUSE
( ) puis sur la touche / (TAPE 2 ). (S'il s'agit de l'enregistrement des morceaux pro-
Pour enregistrer des morceaux en les programmant:
1 Programmer des disques et des morceaux (voir page 16).
2 Appuyer sur la touche REC PAUSE ( ).
la cassette.zL'enregistrement commence par le CD choisi. Le CD et la cassette se mettent
en arrêt lorsque le dernier disque est terminé ou que la cassette atteint la fin.
z
La lecture CD se déclenche automatiquement 5 secondes après le départ de
registrement.
(TAPE 2 ) pour déclencher l'en-
6
Appuyer sur la touche /
L'enregistrement est mis en pause.
5
Appuyer sur la touche REC
PAUSE ( ).
4
Appuyer sur l'une des touches 1 - 3 de la télécommande pour
sélectionner le premier disque à enregistrer.
3
Appuyer sur la touche CD et mettre le disque souhaité en place.
Enrouler l'amorce où l'enregistrement ne se fait pas.
2
Mettre une cassette dans le compartiment TAPE 2 en tournan t vers
soi la face sur laquelle on enregistre.
1
Appuyer sur la touche ON/STAND-BY pour allumer l'appareil.
On peut enregistrer 3 CD de suite.
Page 51

Copie entre cassettes
Vérifier que le compartiment TAPE 1 n'est pas en cours d'utilisation.
FRANÇAIS
Note:
3 Appuyer sur la touche REC PAUSE ( ).
4 Appuyer sur la touche / de l'appareil principal ou sur la touche TAPE 2 de
la télécommande pour déclencher l'effacement.
On peut duplicater des morceaux de TAPE 1 à TAPE 2.
2 Agir sur la touche TAPE (1 2) pour afficher "TAPE 2".
effacer vers soi.
Effacement de cassettes enregistrées
TAPE 2 de la télécommande pour déclencher la copie.
5
Appuyer sur la touche / de l'appareil principal ou sur la touche
L'enregistrement est mis en pause.
4
Appuyer sur la touche REC PAUSE ( ).
3
Agir sur la touche TAPE (1 2) pour afficher "TAPE 1".
2
Mettre une cassette enregistrée dans le compartiment TAPE 1 et
une cassette vierge dans le compartiment TAPE 2.
Il est conseillé d'utiliser deux cassettes ayant la même durée d'enregistrement.
Arrêt de la copie:
Appuyer sur la touche (TAPE ).
Les cassettes TAPE 1 et TAPE 2 s'arrêtent en même temps.
1 Mettre la cassette à effacer dans le compartiment TAPE 2 en tournant la face à
1
Appuyer sur la touche ON/STAND-BY pour allumer l'appareil.
Pour enregistrer, utiliser seulement une cassette normale et non métal ou CrO .
F-22
Enregistrement sur la cassette
- Copie entre cassettes -
Page 52

F-23
FRANÇAIS
Réglage de l'horloge (Voir page 12.)
Fonctions avancées
- Opérations programmées et mise en arrêt différée -
Le tuner, le CD ou la cassette peut être éteint automatiquement.
Enregistrement programmé:
L'appareil s'allume et commence l'enregistrement d'une émission radio à l'heure pré-
réglée.
Mise en arrêt différée:
heure préréglée.
Lecture programmée:
L'appareil s'allume et reproduit une source spécifiée (CD, tuner, cassette) à une
Opérations programmées et mise en arrêt différée
Les illustrations indiquent le réglage de la lecture programmée.
heures de départ et puis appuyer sur la touche MEMORY/SET.
5
Appuyer sur la touche TUNING/TIME ( ou ) pour déclarer les
blanc
pour l'enregistrement programmé.
Afficher le " " blanc pour la lecture programmée et le " " rouge
lectionner la lecture progra mmée ou l'e nregistrem ent pro grammé.
4
Appuyer à plusieurs repri ses su r la touch e TIMER/SL EEP pour sé-
Avant de régler la minuterie:
1
Pour sélectionner une source pour la lecture programmée: CD, TUNER (BAND)
sélectionner une fonction souhaitée.
2
Appuyer sur la touche CD, TUNER (BAND) ou TAPE (1 2) pour
Appuyer sur la touche ON/STAND-BY pour allumer l'appareil.
3
ou TAPE (1 2).
Pour sélectionner la source pour l'enregistrement programmé: TUNER (BAND).
Si on choisit "TUNER (BAND)", faire l'accord sur une station sou-
haitée.
Régler le volume en pressant sur les touches VOLUME.
Éviter de trop élever le volume.
2 Pour la lecture programmée: Mettre une casset te ou des d is que s à re prod uire.
Pour l'enregistrement programmé: Mettre une cassette pour enreg istrement dans le
compartiment TAPE 2.
1 Appuyer sur la touche CLOCK pour vérifier que l' horloge est à l'heure.
Lecture ou enregistrement programmés
rouge
Page 53

modifie.zPour programmer la lecture ou l'enregistrement avec un élément raccordé aux
jacks VIDEO/AUX, sélectionner "VIDEO/AUX" à l'étape 2.
Seul cet appareil s'allume alors et entre en veille automatiquement. En enregistre-
ment programmé, l'appareil passe en veille dès la fin de la cassette et, en lecture
programmée, 1 heure après le départ de la lecture. La mise sous/hors tension de
l'élément raccordé ne se fait pas automatiquement.
z
L'heure d'opération une fois programmée, l'appareil la gardera à moins qu'on ne la
Notes:
Suivre "Lecture ou enregistrement programmés" depuis le début.
Pour réinitialiser ou modifier le réglage de la minuterie:
pareil repasse en veille.
Lorsque la cassette atteint la fin, l'enregistrement programmé se termine et l'ap-
Si on sélectionne CD ou TAPE, l'appareil entre en attente après la lecture. S'il
s'agit de TUNER, il entre en attente une heure après le départ de la lecture pro-
grammée.
Dans l'enregistrement programmé:
9
Dans la lecture programmée:
Le niveau sonore augmente petit à petit jusqu'au niveau réglé lors de la program-
mation.
che.
8
À l'heure programmée, la lecture ou l'enregistrement se déclen-
Pour annuler l'opération programmée:
Appuyer sur la touche ON/STAND-BY pour allumer l'appareil.
7
L'appareil entre automatiquement en veille.
6
Appuyer sur la touche TUNING/TIME ( ou ) pour déclarer les mi-
nutes et puis appuyer sur la touche MEMORY/SET.
Écoute de la radio (Voir page 17.)
FRANÇAIS
mation.
Une fois la durée programmée, elle restera inchangée jusqu'à une nouvelle program-
en veille.
Le niveau sonore baisse dans la dernière minute de la lecture programmée.
4
La durée programmé e écoulée, le systèm e entre au tomatiquemen t
3
Appuyer sur la touche MEMORY/SET.
z
z
3 heures - 5 minutes intervalle de 5 minutes
5 minutes - 1 minute intervalle de 1 minute
Changement de la durée pour la mise en arrêt différée:
Lorsque la durée est affichée, appuyer sur la touche TUNING/TIME ( ou ).
(Maximum: 3 heures - Minimum: 1 minute)
2
Agir à plusieurs reprises sur la touche TIM ER/SLEEP pour affich er
"SLEEP".
Annulation de la mise en arrêt différée:
Au cours de la lecture pour la mise en arrêt différée, appuyer sur la touche ON/
STAND-B Y.
Pour vérifier le temps restant pour la mise en arrêt différée:
Au cours de la lecture pour la mise en arrêt différée, appuyer sur la touche TIMER/
SLEEP.
L'appareil affiche pour 5 secondes le temps restant de la lecture pour la mise en arrêt
différée.
Note:
1
Reproduire la source souhaitée.
Mise en arrêt différée
F-24
Fonctions avancées
- Opérations programmées et mise en arrêt différée -
Page 54

F-25
Fonctions avancées
- Enrichissement du système -
Enrichissement du système
Le câble de raccordement n'est pas fourni. Se procurer un câble vendu dans le com-
merce.
FRANÇAIS
Cordon RCA
(non fourni)
Rouge
Blanc
Blanc
Rouge
Vers le jack
de sortie
de ligne
Magnétoscope, DVD, etc.
tées. Régler le volume en pressant les touches VOLUME.
z
Avant de brancher ou de débrancher le casque, réduire le niveau sonore.zUtiliser un casque muni d'une fiche de 3,5 mm de diamètre et ayant une impé-
dance de 16 à 50 ohms. L'impédance préconisée est de 32 ohms.zLorsque le casque est branché, les enceintes sont automatiquement déconnec-
Casque
Déclencher le magnétoscope, le lecteur de DVD, etc.
5
4
Appuyer sur la touche / (TAPE 2 ).
3
Appuyer sur la touche REC PAUSE ( ).
2
Appuyer sur la touche VIDEO/AUX.
1
Mettre une cassette en place dans le compartiment TAPE 2.
Pour enregistrer sur une cassette
4
Déclencher la lecture sur l'élément raccordé.
3
Appuyer sur la touche VIDEO/AUX.
2
Appuyer sur la touche ON/STAND-BY pour allumer l'appareil.
Lorsqu'il s'agit d'un élément vidéo, relier la sortie audio à ce système et l a sortie
vidéo à un téléviseur.
1
Utiliser un cordon de raccordement pour connecter un magnéto-
scope, un lecteur de DVD, etc. au jack VIDEO/AUX.
Note:
Pour supprimer un bourdonnement, mettre l'appareil à l'écar t du téléviseur.
Écoute du son en provenance d'un magné-
toscope, un lecteur DVD, etc.
Page 55

z
L'émission radiodiffusée est parasi-
tée consécutivement.
Tuner
z
La lecture est int ermittent e ou s'a rrê-
te.
fait pas c orrectement.
z
La lecture s'arrête au milieu ou ne se
z
La lecture ne démarre pas.
Lecteur CD
z
sion d'une touche.
z
L'horloge n'est pas à l'heure.
L'appareil ne répond pas à la pres -
z
Aucun so n n' e s t entendu .
Général
Dépannage
L'utilisateur peut résoudre pas mal de problèmes sans faire appel à un dépanneur.
Si le cas se présente, se reporter au tableau ci-dessous avant de prendre contact
avec un revendeur ou un centre de réparation agréés par SHARP.
Problème Cause
z
z
z
pareil?
z
Le disque satisfait-il à la norme?
Le disque est-il distordu ou rayé?
L'appareil subit-il des vibrations ?
Le disque est-il encrassé?zUne condensation est-elle formée dans l'ap-
z
z
L'appareil est-il placé à proximité d'un télévi-
seur ou d'un PC?
L'antenne FM/AM est-elle placée correcte-
ment? On l'éloignera du cordon d'alimenta-
tion.
Problème Cause
z
z
Le disque est-il mis à l'envers?
z
Le volume est-il réglé sur "0"?
Le casque est-il branché?
Les fils des enceintes sont-ils débranchés?
z
z
z
Mettre l'appareil en veille et le rallumer.
Si l'appareil fonctionne toujou rs mal, il faut le
réinitialiser. (Se re porter à l'étap e 3 dans "En
cas de dérangement", page 27.)
Problème Cause
z
Y a-t-il eu une panne de courant ? Remettre
l'horloge à l'heure (voir page 12).
l'émetteur de la téléc ommande avec un chif fon doux.
FRANÇAIS
ron afin d'assurer une lect ure normale. Essuyer
Condensation
z
z
z
Les piles sont-elles épuisées?
La distance ou l'angle est correc t?
Le capteur de télécommand e reçoit-il une
forte lumière?
z
La télécommande ne fonct i onne
pas.
z
L'appareil est-il branché ?zLes polarités sont-elles respectées?
Un changement brusque de la température et la
condensation ou l'ut ilisation dans un lieu très humide
peuvent occa sionner une formation de co ndensation
à l'intérieur de l'appareil (cellul e porte-laser, tête ma-
gnétique, etc.) ou l'émetteur de la télécommande.
La condensation pe ut entraîner un mauvais fonc-
tionnement de l'appareil. Si le cas se présente, lais-
ser l'appareil sou s t ension, sans disque (ou
cassette) dans le comp artiment, pour 1 heure envi-
Télécommande
Problème Cause
blissement de courant.
z
La cassette refuse de sortir.
z
S'il se produit une panne de courant en cours
d'opération cassette, la tête magnétique res-
te engagée avec la bande et le compartiment
refuse de s'ouvrir. On attendra alors le réta-
z
Fluctuation de son.
z
Les aigus sont faibles.
z
z
La bande est-elle étirée?
Les cabestans, les ga lets ou les têtes sont-ils
propres?
z
z
Le son saute.
La bande est-elle déte ndue?
z
Effacement incomplet.
z
z
Enregistrement impossib le.
La qualité sonore n'est pas assurée
à l'enregistrement.
z
z
La languette de protection est-elle enlevée?
S'agit-il d'une cassette normale? (La casset-
te métal ou CrO n'est pas utilisable.)
Platine à cassette
Problème Cause
F-26
Références
- Guide de dépannage -
Page 56

F-27
Références
- Guide de dépannage / Entretien -
FRANÇAIS
4 Refermer le tiroir CD en appuyant sur la touche OPEN/CLOSE.
5 Appuyer sur la touche ON/STAND-BY pour mettre l'appareil en mode d'attente
Vérifier que l'appareil affiche "NO DISC".
et débrancher l'appareil.
1 Appuyer sur la touche ON/STAND-BY pour allumer l'appareil.
2 Appuyer sur la touche CD.
3 Appuyer sur la touche OPEN/CLOSE pour ouvrir le tiroir.
Retirer tous les CD mis dans l'appareil.
Attention:
Cette opération efface toutes les données mises en mémoire: horloge, minuterie,
présélections de tuner et programmes CD.
Avant de transporter l'appareil
Appuyer sur la touche ON/STAND-BY pour passer en veille.
Tout en pressant les touches / ou X-BASS/DEMO, presser la touche ON/
STAND-BY jusqu'à l'apparition de "CLEAR AL".
Si l'appareil a subi une force extérieure (chocs, électricité statique, surtension due à
un foudre, etc.) ou une mauvaise manipulation, il peut mal fonctionner.
Procéder alors comme suit:
1 On mettra l'appareil en attente et le rallumera ensuite.
2 Si l'appareil n'est pas remis en état malgré l'étape 1, débrancher et rebran-
3 Si l'étape 1 ou 2 ne permet pas de remettre l'appareil en état, procéder com-
cher l'appareil. Et rallumer ce dernier.
me suit:
En cas de dérangement
Dépannage (suite)
Éviter de mettre l'appareil en contact avec de l'huile, du sol-
vant, de l'essence, du diluant ou de l'insecticide.
Attention:
d'un chiffon sec.
Essuyer régulièrement le coffret à l'aide d'un chiffon doux
et d'une solution d'eau savonneuse, puis essuyer à l'aide
toyage de la cellule porte-laser ) devra être effectué régulièrement. Il existe des kits
de nettoyage dans le commerce. Se renseigner auprès du revendeur de CD local.
Nettoyage du coffret
Pour bien assurer le bon fonctionnement du lecteur CD, un entretien préventif (net-
Nettoyage de la cellule porte-laser CD
lité sonore et de l'emmêlement de la bande. Nettoyer ces pièces à l'aide d'un
coton-tige imbibé d'un produit spécial en vente dans le commerce.zAvant le nett o y age , débrancher l'appareil qui renf erme des organes portés à haute
z
L'encrassement des têtes, cabestans et galets est à l'origine de la mauvaise qua-
Nettoyage des pièces relatives à la bande
z
Après une période d'utilisation prolongée, les têtes et les cabestan s se magnéti-
sent, causant un son médiocre. Démagnétiser ces pièces toutes les 30 heures de
lecture/enregistrement à l'aide d'un démagnétiseur de tête en vente dans le com-
merce. Av ant utilisation, lire attentivement la notice du démagnétiseur.
Tête de lecture Tête d'effacement
Cabestan
Galet
TAPE 2
D
Tête d'enregistrement/lecture
E
B
C
tension.
TAPE 1
A
B
C
Entretien
Page 57

Réponse en fréquence
Gamme dynamique
20 - 20.000 Hz
90 dB (1 kHz)
Type
Procédé de lecture
Convertisseur N/A
Lecteur de 3 disques compacts
Sans contact, par laser à semi-conducteur à 3 fais-
ceaux
1 bit
Bornes d'entrée
Lecteur CD
Vidéo/auxiliaire (signal audio): 500 mV/47 kilohms
Bornes de sortie
Puissance de sortie
Poids
Consommation
Dimensions
Amplificateur
128 W
Largeur: 270 mm
Hauteur: 330 mm
Profondeur: 340 mm
RMS: 150 W (75 W + 75 W) (10 % de D.H.T.)
Enceintes: 6 ohms
Casque: 16 - 50 ohms (recommandé: 32 ohms)
6,3 kg
Alimentation
Général
120 V CA, 60 Hz
Fiche technique
SHARP se réserve le droit d'apporter des modifications à la présentation et aux
caractéristiques des appareils à fin d'amélioration. Les valeurs indiquées dans ce
document sont les valeurs nominales des appareils de série mais de légères diffé-
rences peuvent être constatées d'un appareil à l'autre.
FRANÇAIS
Profondeur: 217 mm
Dimensions
Largeur: 220 mm
Hauteur: 330 mm
Poids
3,0 kg/chacune
Puissance d'entrée no-
minale
Impédance
75 W
6 ohms
Puissance d'entrée
maximale
150 W
Woofer de 10 cm
Tweeter de 5 cm
Type
Enceintes
Enceintes à 2 voies
Pleurage et scintillement
50 dB (TAPE 2, enregistrement/lecture)
0,3 % (WRMS)
Réponse en fréquence
Rapport signal/bruit
50 - 14.000 Hz (Bande normale)
55 dB (TAPE 1, lecture)
Platine à cassette
Gamme de fréquences
Tuner
FM: 87,5 - 108 MHz
AM: 530 - 1.720 kHz
F-28
Références
- Fiche technique -
Page 58

MEMO/MÉMORANDUM
Page 59

MEMO/MÉMORANDUM
Page 60

TINSK0111AWZZ
SHARP ELECTRONICS OF CANADA LTD
335 Britannia Road East
Mississauga, Ontario
L4Z 1W9
(905) 568-7140 or 1-(877) SHARP-CC
Web site: www.sharp.ca
SHARP ELECTRONICS OF CANADA LTD.
335 Britannia Road East, Mississauga,Ontario L4Z 1W9
SHARP CORPORATION
(2000.11)
Vacuum Cleaner 1 year
DVD Player 1 year
To obtain the name and address of the nearest Authorized Sharp Service Centre or Dealer, please contact:
SHARP ELECTRONICS OF CANADA LTD.
Oven.
This warranty constitutes the entire express warranty granted by Sharp and no other dealer, service centre or their agent
or employee is authorized to extend, enlarge or transfer this warranty on behalf of Sharp. To the extent the law permits,
Sharp disclaims any and all liability for direct or indirect damages or losses or for any incidental, special or consequential
damages or loss of profits resulting from a defect in material or workmanship relating to the product, including damages
for the loss of time or use of this Sharp product or the loss of information. The purchaser will be responsible for any
removal, reinstallation, transportation and insurance costs incurred. Correction of defects, in the manner and period of
time described herein, constitute complete fulfillment of all obligations and responsibilities of Sharp to the purchaser with
respect to the product and shall constitute full satisfaction of all claims, whether based on contract, negligence, strict
liability or otherwise.
Colour Television 1 year (picture tube 1 additional year)
LCD Projector 1 year (bulb 90 days)
LCD TV 1 year
Video Cassette Recorder 1 year
Camcorder 1 year
TV/VCR Combo 1 year (picture tube 1 additional year)
Audio Products 1 year
Microwave Oven 2 years (magnetron 3 additional years for part only)
WARRANTY PERIODS
Sharp Electronics of Canada Ltd. (hereinafter called “Sharp”) gives the following express warranty to the first consumer
purchaser for this Sharp brand product, when shipped in its original container and sold or distributed in Canada by Sharp
or by an Authorized Sharp Dealer:
Sharp warrants that this product is free, under normal use and maintenance, from any defects in material and workman-
ship. If any such defects should be found in this product within the applicable warranty period, Sharp shall, at its option,
repair or replace the product as specified herein.
This warranty shall not apply to:
(a) Any defects caused or repairs required as a result of abusive operation, negligence, accident, improper installation
(b) Any Sharp product tampered with, modified, adjusted or repaired by any party other than Sharp, Sharp’s Authorized
(c) Damage caused or repairs required as a result of the use with items not specified or approved by Sharp, including
(d) Any replacement of accessories, glassware, consumable or peripheral items required through normal use of the
(e) Any cosmetic damage to the surface or exterior that has been defaced or caused by normal wear and tear.
(f) Any damage caused by external or environmental conditions, including but not limited to transmission line/power
(g) Any product received without appropriate model, serial number and CSA/cUL markings.
(h) Any products used for rental or commercial purposes.
(i) Any installation, setup and/or programming charges.
Should this Sharp product fail to operate during the warranty period, warranty service may be obtained upon delivery of
the Sharp product together with proof of purchase and a copy of this LIMITED WARRANTY statement to an Authorized
Sharp Service Centre or an Authorized Sharp Servicing Dealer. In home warranty service may be provided at Sharp’s
discretion on any Sharp television with the screen size of 27” or larger and on any Sharp Over The Range Microwave
or inappropriate use as outlined in the owner’s manual.
Service Centres or Sharp’s Authorized Servicing Dealers.
but not limited to head cleaning tapes and chemical cleaning agents.
product including but not limited to earphones, remote controls, AC adapters, batteries, temperature probe, stylus,
trays, filters, belts, ribbons, cables and paper.
line voltage or liquid spillage.
Congratulations on your purchase!
VALID IN CANADA ONLY
Consumer Electronics Products
LIMITED WARRANTY
9906
PRINTED IN MALA YSIA
IMPRIMÉ EN MALAISIE
A0012.HK
SHARP ÉLECTRONIQUE DU CANADA LTÉE
335 Britannia Road East
Mississauga, Ontario
L4Z 1W9
(905) 568-7140 ou 1-(877) SHARP-CC
Site Web: www.sharp.ca
(2000.11)
(c) Au dommage causé ou réparation requise à la suite de l’utilisation avec des articles non désignés ou approuvés
(d) Au remplacement des accessoires, des pièces en verre, des articles consommables ou périphériques, devenu
(e) Aux défauts cosmétiques à la surface ou à l’extérieur de l’appareil, et qui sont causés par une usure normale;
(f) Aux dommages causés par des conditions extérieures et relatives à l’environnement, y compris mais non limité à
(g) Aux produits dont le numéro de série et de modèle ou le marquage CSA/cUL, ou les deux, ont été enlevés ou
(h) Aux produits de consommation ou utilisés à des fins de location.
(i) Aux coûts d’installation, configuration et/ou programmation.
Si un défaut de fabrication est décelé dans ce produit Sharp au cours de la période de la garantie. La réparation sous
garantie est offerte à la condition que le produit Sharp soit livré accompagné de la preuve d’achat et une copie de cette
GARANTIE LIMITÉE à un centre agréé de service Sharp ou à un Détaillant autorisé au service Sharp. La garantie de
service à domicile peut être offerte, à la discrétion de Sharp, sur tous les téléviseurs Sharp dont l’écran est de 27
pouces ou plus et sur les fours micro-onde Sharp au-dessus de la cuisinière.
La garantie ci-dessus constitue la seule garantie expresse accordée par Sharp. Aucun autre détaillant, aucun centre de
service, leurs représentants ou employés, ne sont autorisés à prolonger la durée de la garantie, à fournir des garanties
autres ou à transférer cette garantie au nom de Sharp. Dans la mesure où la loi en vigueur le permet, Sharp décline
toute responsabilité pour les pertes ou les dommages directs ou indirects, pour les pertes ou les dommages imprévus
et pour les pertes de profits indirectes résultant d’un défaut de fabrication du produit, y compris les dommages reliés à
la perte de temps ou d’utilisation de ce produit Sharp. L’acheteur doit assumer les coûts de démontage, de réinstallation,
de transport et d’assurance de l’appareil. La réparation des défectuosités, selon la manière et durant la période de
temps ci-haut décrites, constitue l’exécution complète de toutes les obligations et les responsabilités de Sharp vis-à-vis
de l’acheteur en ce qui a trait au produit et constituera un acquittement complet pour toute réclamation, qu’elle soit
basée sur le contrat, la négligence, la responsabilité stricte ou autre.
Téléviseur couleur 1 an (tube cathodique 1 an additionel)
Projecteur LCD 1 an (ampoule 90 jours)
Télévisour LCD 1 an
Magnétoscope 1 an
Caméscope 1 an
Téléviseur/magnétoscope 1 an (tube cathodique 1 an additionel)
Produits audio 1 an
Four micro-ondes 2 ans (magnétron 3 ans de garantie supplémentaire-pièces seulement)
Aspirateurs 1 an
Lecteur DVD 1 an
Pour obtenir le nom et l’adresse du Centre de service ou du Détaillant autorisé au service Sharp le plus près, veuillez
écrire ou téléphoner à:
service Sharp ou à un Détaillant autorisé au service Sharp;
par Sharp, y compris, mais non limité aux rubans pour nettoyage de tête et les nettoyants chimiques;
nécessaire à la suite d’une utilisation normale du produit, y compris, mais sans en être limité, aux écouteurs, les
télécommandes, les adaptateurs c.a., les piles, la sonde de température, les pointes de lecture, les plateaux, les
filtres, les courroies, rubans, papier ou autre;
du liquide répandu, une tension de la ligne électrique ou de transmission trop élevée ou autre;
effacés;
SHARP ÉLECTRONIQUE DU CANADA LTÉE.
PÉRIODES DE GARANTIE
Sharp Électronique du Canada Ltée (ci-après nommée “Sharp”) donne la garantie expresse suivante à l’acheteur initial
du produit ci-dessous mentionné de Sharp, si celui-ci est emballé dans son contenant original et s’il est vendu et
distribué au Canada par Sharp ou par un Détaillant autorisé Sharp:
Sharp garantit que ledit produit est, s’il est utilisé et entretenu normalement,exempt de défaut de fabrication. Si un
défaut de fabrication est décelé durant la période de garantie stipulée, Sharp s’engage à réparer ou remplacer, selon
son choix, le produit spécifié ci-dessous.
La garantie offerte par Sharp ne s’applique pas:
(a) Aux appareils qui ont été l’objet d’un emploi abusif, de négligence, d’un accident, d’une installation inadéquate ou
(b) Aux produits Sharp altérés, modifiés, réglés ou réparés ailleurs qu’aux bureaux de Sharp, à un centre agréé de
d’une utilisation non appropriée, tel qu’il est mentionné dans le manuel du propriétaire;
POUR CANADA SEULEMENT
Bravo! Vous Venez de faire un excellent achat!
Produits Électronique grand public
GARANTIE LIMITÉE
 Loading...