

Page 1
SPLIT TYPE
ROOM AIR CONDITIONER
OPERATION MANUAL
CONDIZIONATORE D'ARIA
DA CAMERA TIPO SPLIT
MANUALE DI ISTRUZIONI
ΑΙΡΚΟΝΤΙΣΙΟΝ ΔΩΜΑΤΙΟΥ
ΤΥΠΟΥ SPLIT
ΕΓΧΕΙΡΙΔΙΟ ΛΕΙΤΟΥΡΓΙΑΣ
ENGLISH ITALIANO EΛΛΗΝΙΚΑ TÜRKÇE DEUTSCH
Plasmacluster is a trademark
of Sharp Corporation.
INDOOR UNIT
AR CONDICIONADO DE SALA
DE DUAS UNIDADES
MANUAL DE OPERAÇÃO
ACONDICIONADOR DE AIRE
DE DOBLE SERVICIO
MANUAL DE INSTRUCCIONES
SPLİT KLİMA
KULLANMA KILAVUZU
APARAT DE AER CONDIŢIONAT
DE TIP SPLIT
MANUAL DE UTILIZARE
ТИП - СПЛИТ СИСТЕМА
СТАЕН КЛИМАТИК
ИНСТРУКЦИЯ ЗА УПОТРЕБА
ZWEITEILIGES
KLIMAGERÄT
BEDIENUNGSANLEITUNG
PORTUGUÊS
ESPA
Ñ
OL
ROMÂNĂ
БЪЛГАРСКИ
AY-XPC18LR
AY-XP24LR
POKOJOWY KLIMATYZATOR
TYPU SPLIT
POLSKI
INSTRUKCJA OBSŁUGI
AY-XPC18LR_cover.indd 1AY-XPC18LR_cover.indd 1 2010-03-18 16:42:142010-03-18 16:42:14
Page 2
Pb
AY-XPC18LR_OM_ENG.indd 1AY-XPC18LR_OM_ENG.indd 1 2010-03-18 16:45:072010-03-18 16:45:07
Page 3
ENGLISH
Please read this manual carefully before using the product. This manual
should be kept in a safe place for handy reference.
CONTENTS
• SAFETY PRECAUTIONS..................................GB-1
• PART NAMES ...................................................GB-2
• USING THE REMOTE CONTROL ....................GB-4
• SETTING AIR PURIFYING FILTER ..................GB-5
• TIPS ON SAVING ENERGY ..............................GB-5
• BASIC OPERATION ..........................................GB-6
ADJUSTING THE AIR FLOW DIRECTION
•
• PLASMACLUSTER OPERATION .....................GB-7
• COANDA AIRFLOW ..........................................GB-8
• SPOT AIR ..........................................................GB-8
• FULL POWER OPERATION .............................GB-9
• ENERGY SAVING OPERATION .......................GB-9
• 1.2.3.5-h OFF TIMER ........................................GB-10
• TIMER OPERATION .........................................GB-10
• SELF CLEAN OPERATION...............................GB-12
• DISPLAY BUTTON ............................................GB-12
• AUXILIARY MODE ............................................GB-12
• MAINTENANCE ................................................GB-13
• NOTE ON OPERATION ....................................GB-14
• BEFORE CALLING FOR SERVICE ..................GB-15
..............GB-7
SAFETY PRECAUTIONS
WARNING
• Do not pull or deform the power supply cord.
Pulling and misuse of the power supply cord
can result in damage to the unit and cause
electrical shock.
• Be careful not to expose your body directly to
the outlet air for a long time. It may affect your
physical conditions.
• When using the air conditioner for infants,
children, elderly, bedridden, or disabled people
make sure the room temperature is suitable for
those in the room.
• Never insert objects into the unit. Inserting
objects can result in injury due to the high
speed rotation of internal fans.
• Ground the air conditioner without fail. Do not
connect the grounding wire to gas pipe, water
pipe, lightning rod or telephone grounding
wire. Incomplete grounding may cause electric
shock.
• If anything is abnormal with the air conditioner
(ex. a burning smell), stop the operation
immediately and turn the circuit breaker OFF.
• The appliance shall be installed in accordance
with national wiring regulations.
connection can cause the power supply cord,
plug and the electrical outlet to overheat and
cause fi re.
• If the supply cord is damaged, it must be
replaced by the manufacturer or its service
agent or a similarly qualifi ed person in order
to avoid a hazard. Use only the manufacturespecifi ed power cord for replacement.
Improper cable
ENGLISH
• Do not splash or pour water directly on the unit.
Water can cause electrical shock or equipment
damage.
• Do not attempt to install/remove/repair the unit
by yourself. Incorrect work will cause electric
shock, water leak, fi re etc. Consult your dealer
or other qualified service personnel for the
installation/removal/repair of the unit.
CAUTION
• Open a window or door periodically to
ventilate the room, especially when using gas
appliances. Insuffi cient ventilation may cause
oxygen shortage.
• Do not operate the buttons with wet hand. It
may cause electric shock.
• For safety, turn the circuit breaker off when not
using the unit for an extended period of time.
• Check the outdoor unit mounting rack
periodically for wear and to make sure it is
fi rmly in place.
• Do not put anything on the outdoor unit nor step
on it. The object or the person may fall down or
drop, causing injury.
• This unit is designed for residential use. Do not
use for other applications such as in a kennel
or greenhouse to raise animals or grow plants.
• Do not place a vessel with water on the unit.
If water penetrates into the unit, electrical
insulations may deteriorate and cause electric
shock.
• Do not block the air inlets nor outlets of the
unit. It may cause insuffi cient performance or
troubles.
• Be sure to stop the operation and turn the
circuit breaker off before performing any
maintenance or cleaning. A fan is rotating inside
the unit and you may get injured.
• This appliance is not intended for use by young
children or infi rm persons without supervision.
Young children should be supervised to ensure
that they do not play with the appliance.
• Make sure to connect the air conditioner to
power supply of the rated voltage and frequency. Use of a power supply with improper
voltage and frequency can result in equipment
damage and possible fi re.
• Do not install the unit in a place where infl am-
mable gas may leak. It may cause fi re.
Install the unit in a place with minimal dust,
fumes and moisture in the air.
• Arrange the drain hose to ensure smooth drainage. Insuffi cient drainage may cause wetting of
the room, furniture etc.
• Make sure a leak breaker or a circuit breaker is
installed, depending on the installation location,
to avoid electrical shock.
GB-1
AY-XPC18LR_OM_ENG.indd 1AY-XPC18LR_OM_ENG.indd 1 2010-03-18 16:45:422010-03-18 16:45:42
Page 4
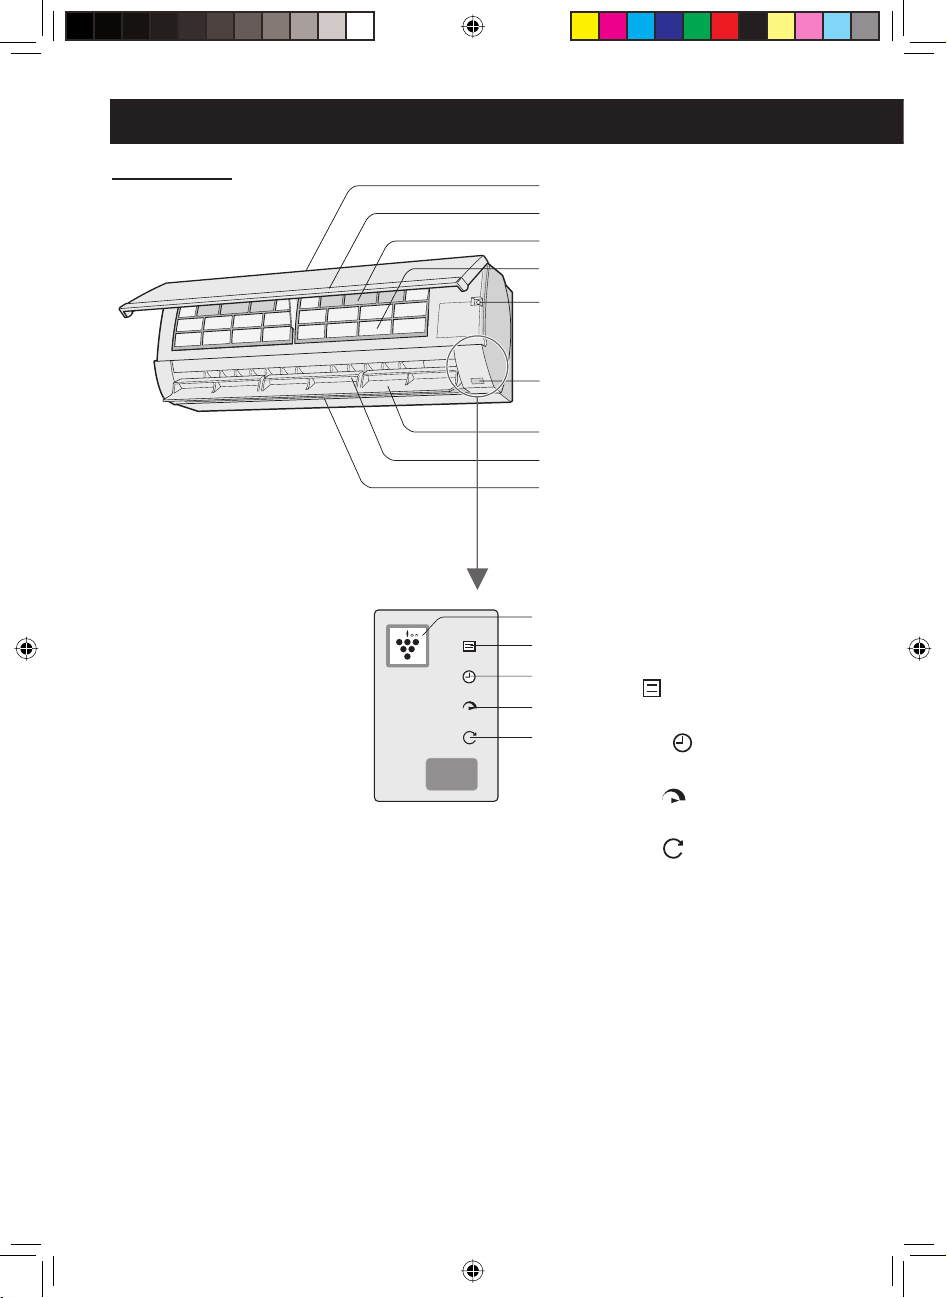
PART NAMES
INDOOR UNIT
1 Inlet (Air)
1
2
2 Open Panel
3
3 Air purifying fi lter
4
4 Air Filter
5
5 AUX Button
6 Receiver Window
7 Vertical Airfl ow Louvre
6
8 Horizontal Airfl ow Louvre
7
9 Outlet (Air)
8
9
10 PLASMACLUSTER Lamp
10
11
12
13
14
(blue)
11 OPERATION Lamp
(red
12 TIMER Lamp
(orange
)
)
13 FULL POWER Lamp
(green
14 SELF CLEAN Lamp
(green
NOTE:
Actual units might vary slightly
from those shown above.
)
)
GB-2
AY-XPC18LR_OM_ENG.indd 2AY-XPC18LR_OM_ENG.indd 2 2010-03-18 16:45:422010-03-18 16:45:42
Page 5
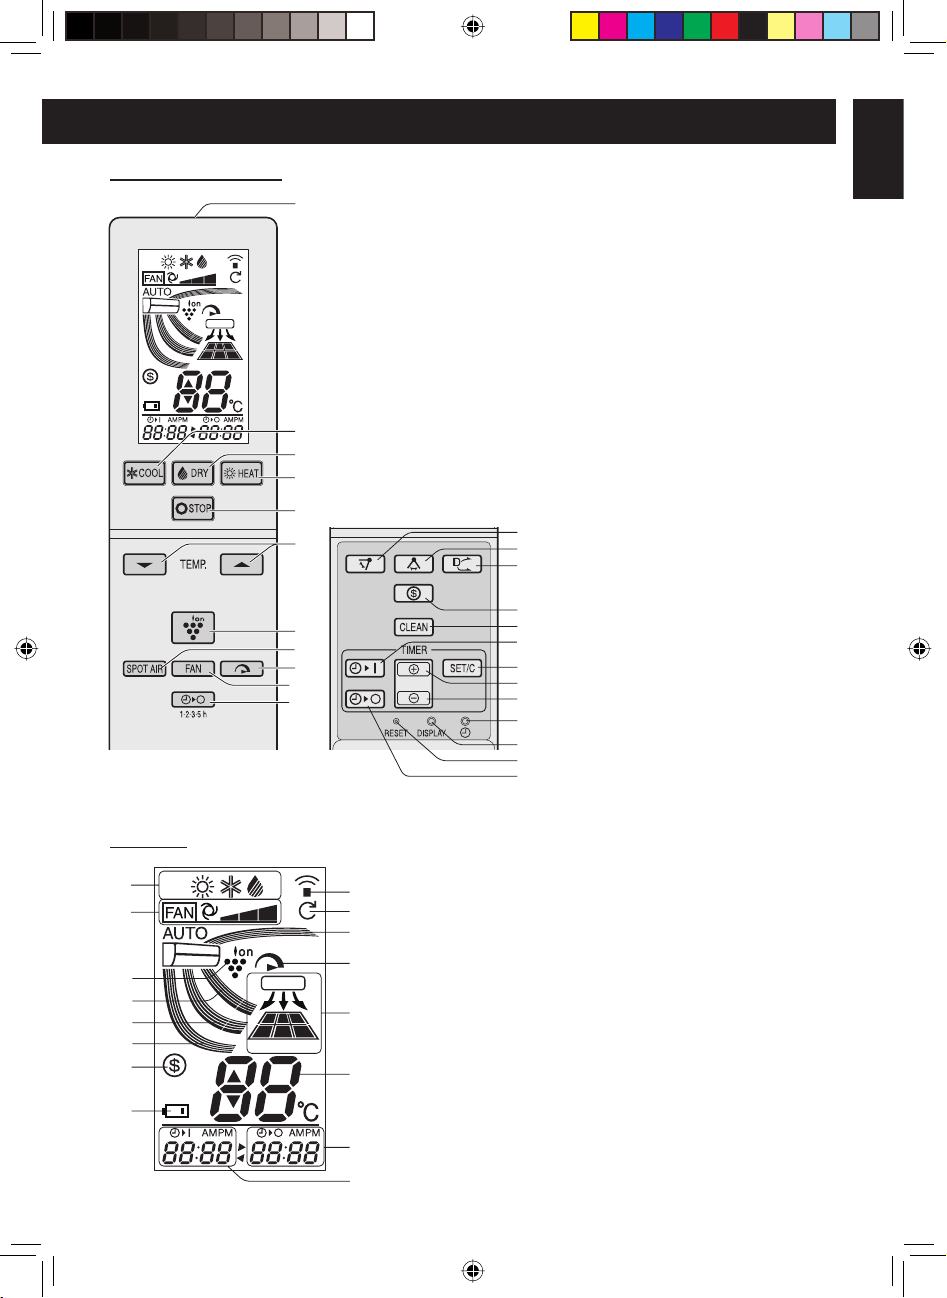
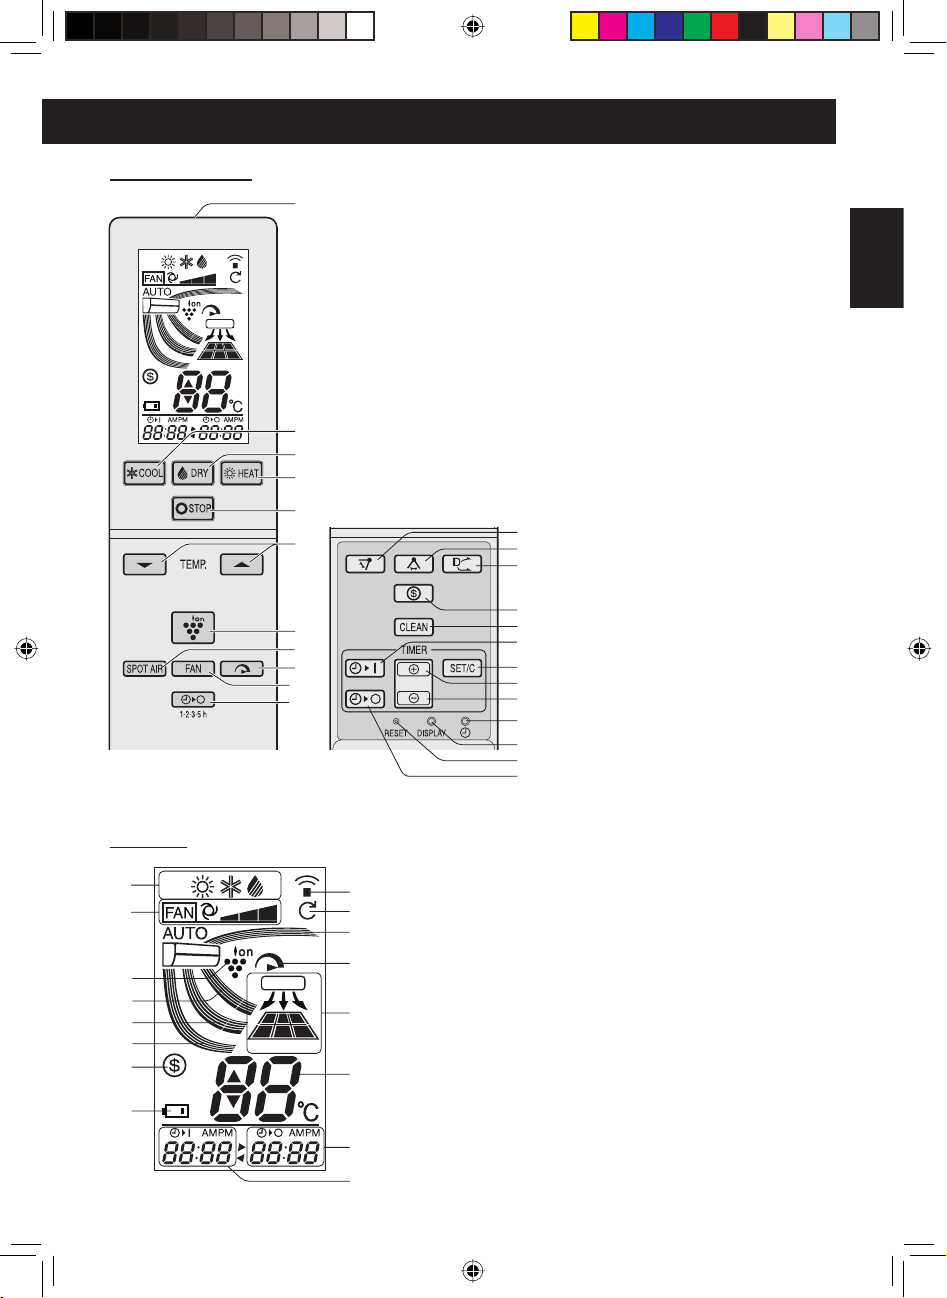
REMOTE CONTROL
1
2
3
4
5
6
7
8
9
10
11
1 TRANSMITTER
2 COOL Button
3 DRY Button
4 HEAT Button
5 STOP Button
6 THERMOSTAT Button
7 PLASMACLUSTER Button
8 SPOT AIR Button
9 FULL POWER Button
10 FAN Button
11 1.2.3.5h OFF TIMER Button
12 SWING Button
(vertical direction)
13 SWING Button
(horizontal direction)
12
14 COANDA AIRFLOW Button
13
14
15 ENERGY SAVE Button
16 SELF CLEAN Button
15
17 TIMER ON Button
16
18 TIMER SET/CANCEL Button
17
19 TIME ADVANCE Button
18
19
20 TIME REVERSE Button
20
21 CLOCK Button
21
22 DISPLAY Button
22
23 RESET Button
23
24 TIMER OFF Button
24
ENGLISH
DISPLAY
1
2
3
4
5
6
7
9
10
11
12
13
14
1 MODE Symbols
2 FAN SPEED Symbols
3 PLASMACLUSTER Symbol
4 AIR FLOW Symbol (COOL/DRY)
5 AIRFLOW Symbol (HEAT)
6 COANDA AIRFLOW Symbol (HEAT)
7 ENERGY SAVE Symbol
8 BATTERY Symbol
9 TRANSMITTING Symbol
10 SELF CLEAN Symbol
11 COANDA AIRFLOW Symbol (COOL/DRY)
12 FULL POWER Symbol
8
15
16
13 SPOT AIR Symbol
14 TEMPERATURE Indicator
15 TIMER OFF Indicator
16 TIMER ON Indicator / CLOCK
GB-3
AY-XPC18LR_OM_ENG.indd 3AY-XPC18LR_OM_ENG.indd 3 2010-03-18 16:45:442010-03-18 16:45:44
Page 6
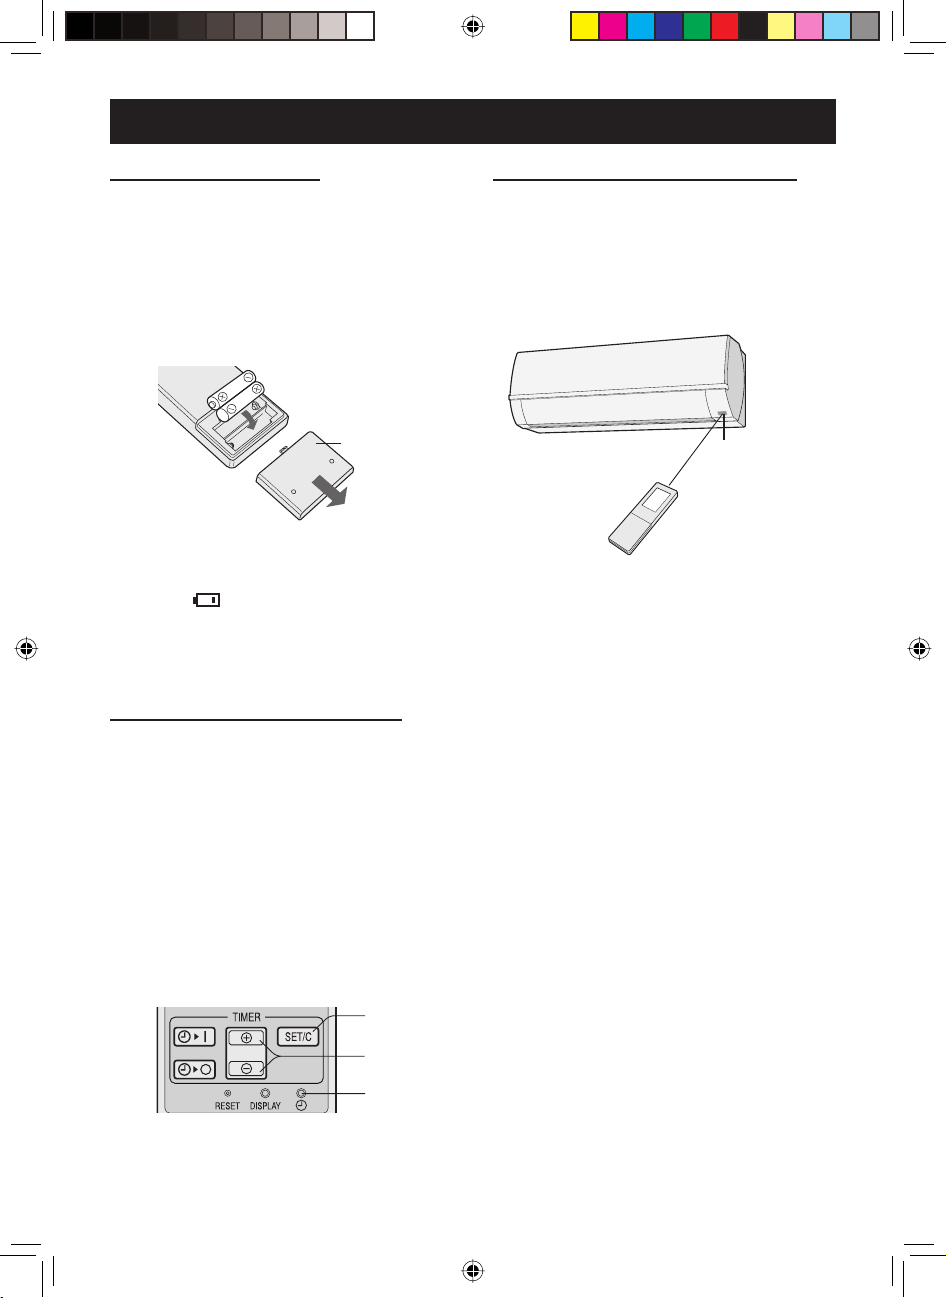
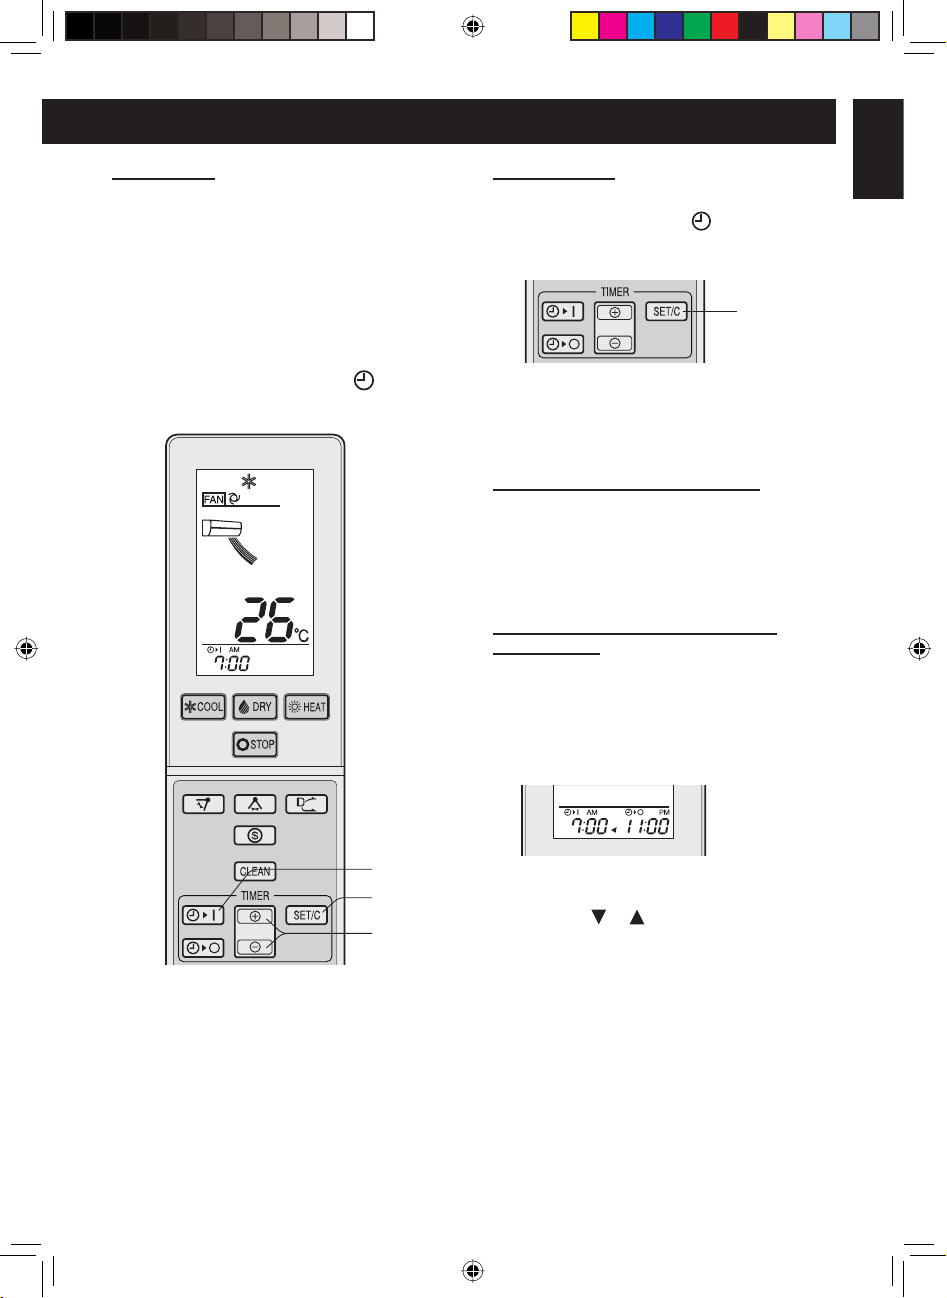
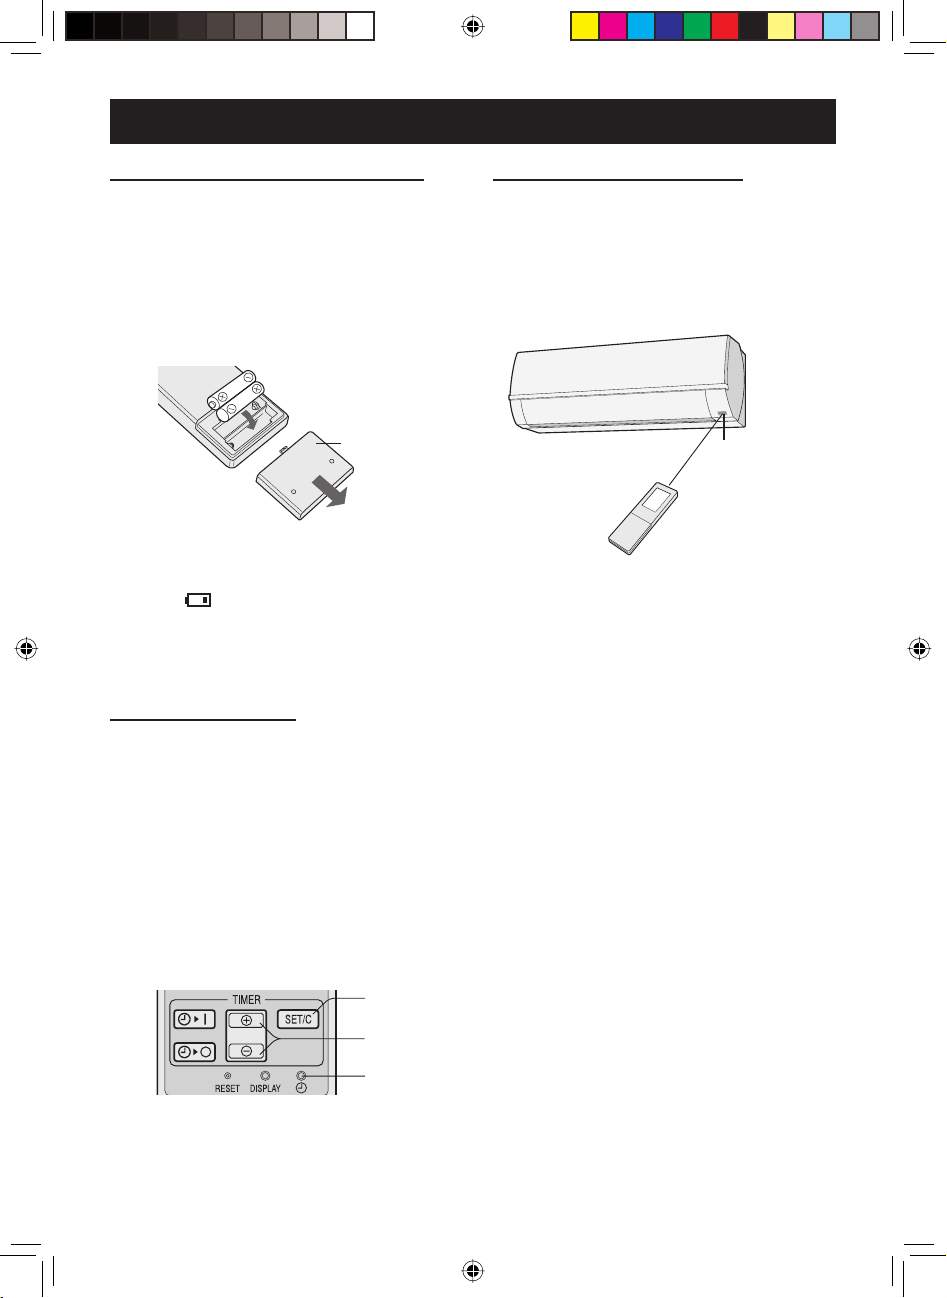
USING THE REMOTE CONTROL
LOADING BATTERIES
Remove the battery cover.
1
Insert two batteries. (AAA(R03))
• Make sure the (+) and (-) polarities are
2
correctly aligned.
Reinstall the battery cover.
3
Press the RESET Button
• The display indicates “AM 6:00”.
4
Battery cover
NOTE:
• The battery life is approximately 1 year in normal use.
• Replace the batteries when the remote control
displays "
• When replacing the batteries, always change
both and use the same type.
• If you will not be using the unit for a long time,
remove the batteries from the remote control.
SETTING THE CURRENT TIME
There are two clock modes: 12-hour mode
and 24-hour mode.
To set the 12-hour mode, press the
1
CLOCK button once.
To set the 24-hour mode, press the
CLOCK button twice.
Press the TIME ADVANCE or RE-
2
VERSE button to set the current
time.
• Hold down the button to advance or reverse the time quickly.
Press the SET/C button.
• The colon (:) blinks.
3
".
3
USING THE REMOTE CONTROL
Point the remote control towards the receiver window and press the desired button. The unit generates a beep when it
receives the signal.
• Make sure nothing, such as curtains, block the
signal receiver window.
• The signal effective distance is 7 m.
7 m
CAUTION:
• Do not expose the receiver window to direct
sunlight. This may adversely affect its operation.
• Use of certain fl uorescent lamp in the same
room may interfere with transmission of the
signal.
• Do not leave the remote control in direct sunlight or near a heater. Protect the remote control from moisture and shock.
Receiver window
2
1
NOTE:
• The current time cannot be set when the timer
is set.
GB-4
AY-XPC18LR_OM_ENG.indd 4AY-XPC18LR_OM_ENG.indd 4 2010-03-18 16:45:442010-03-18 16:45:44
Page 7
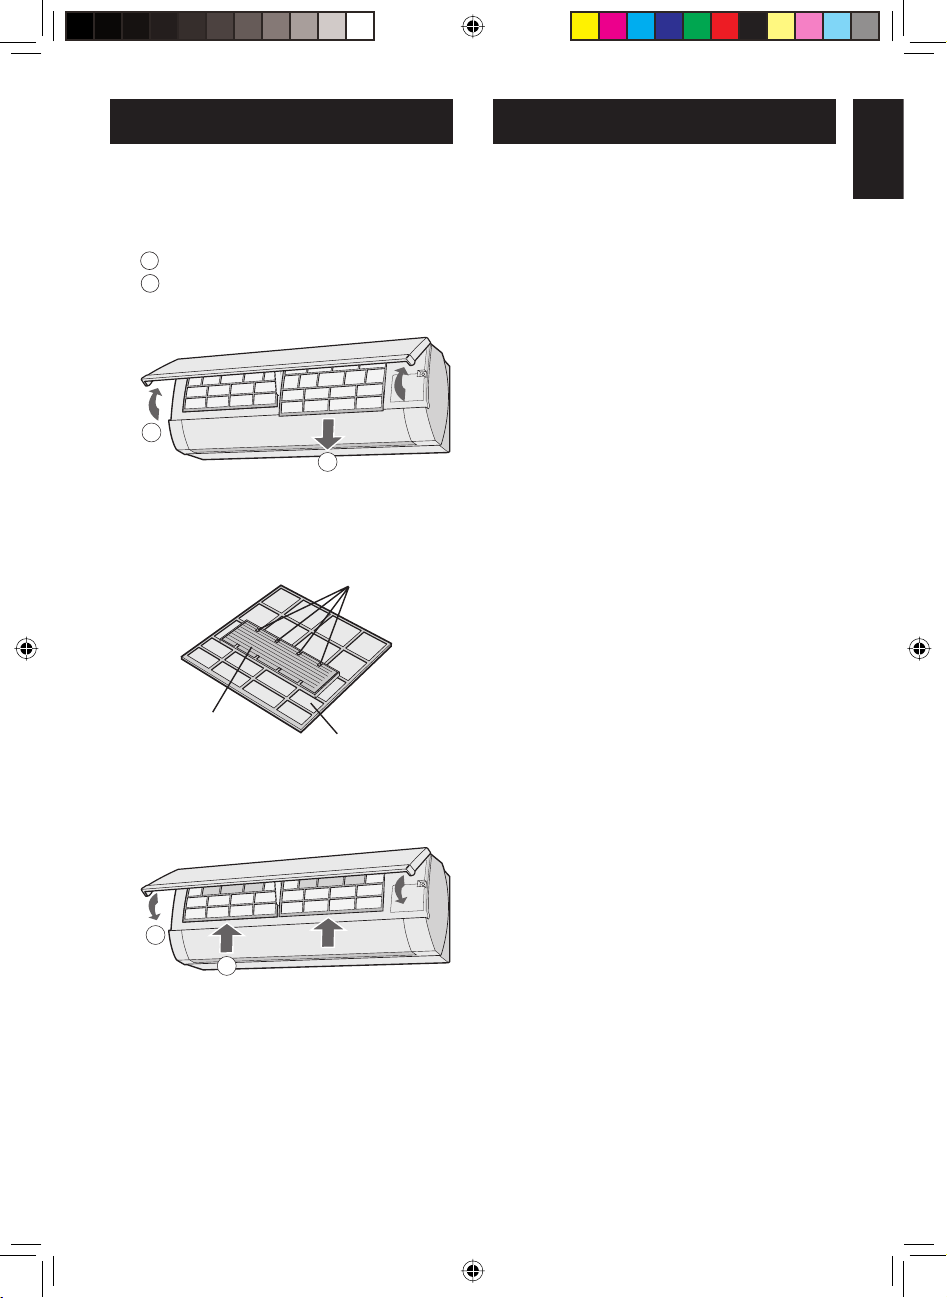
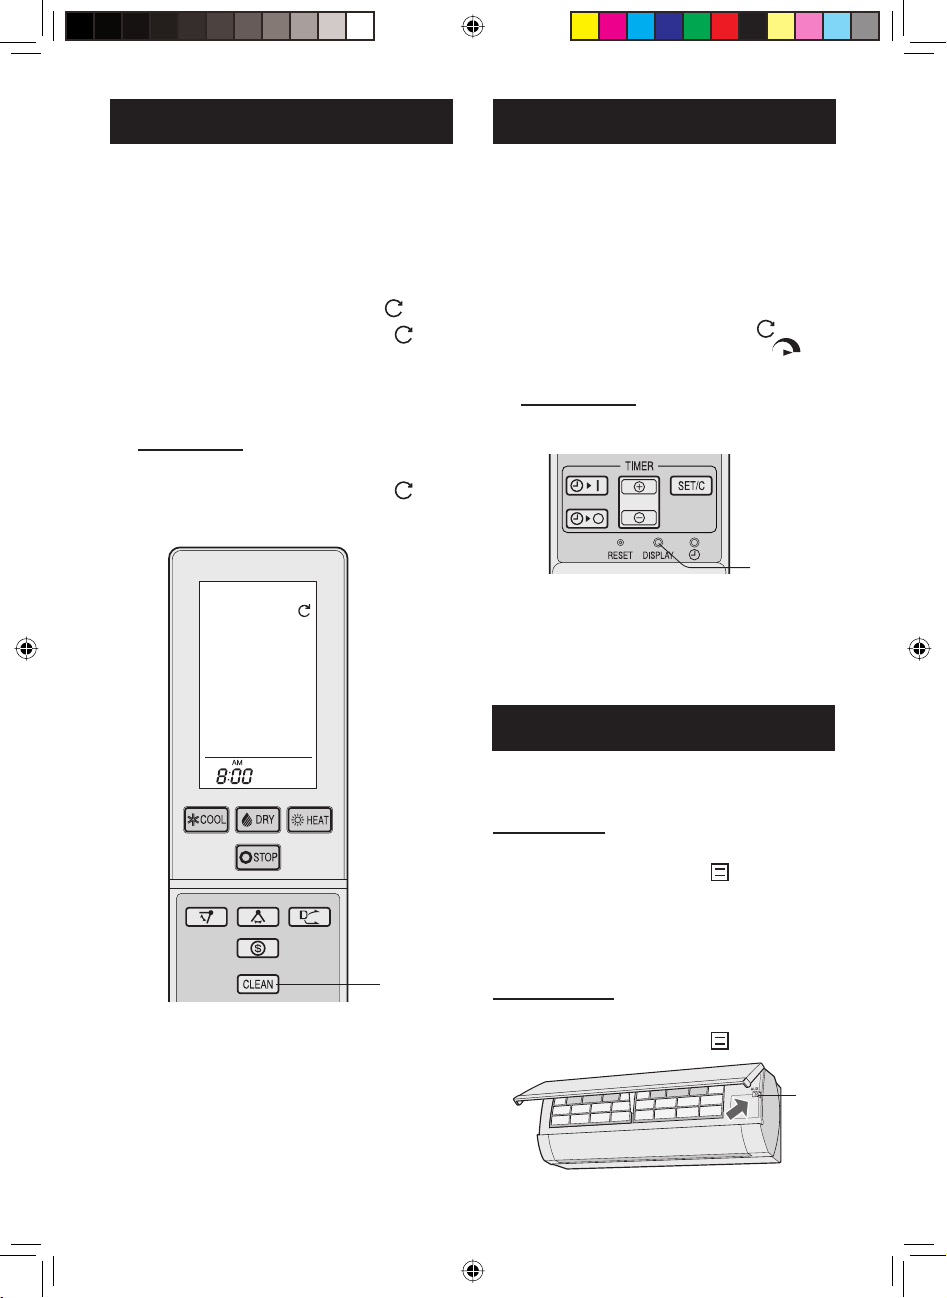
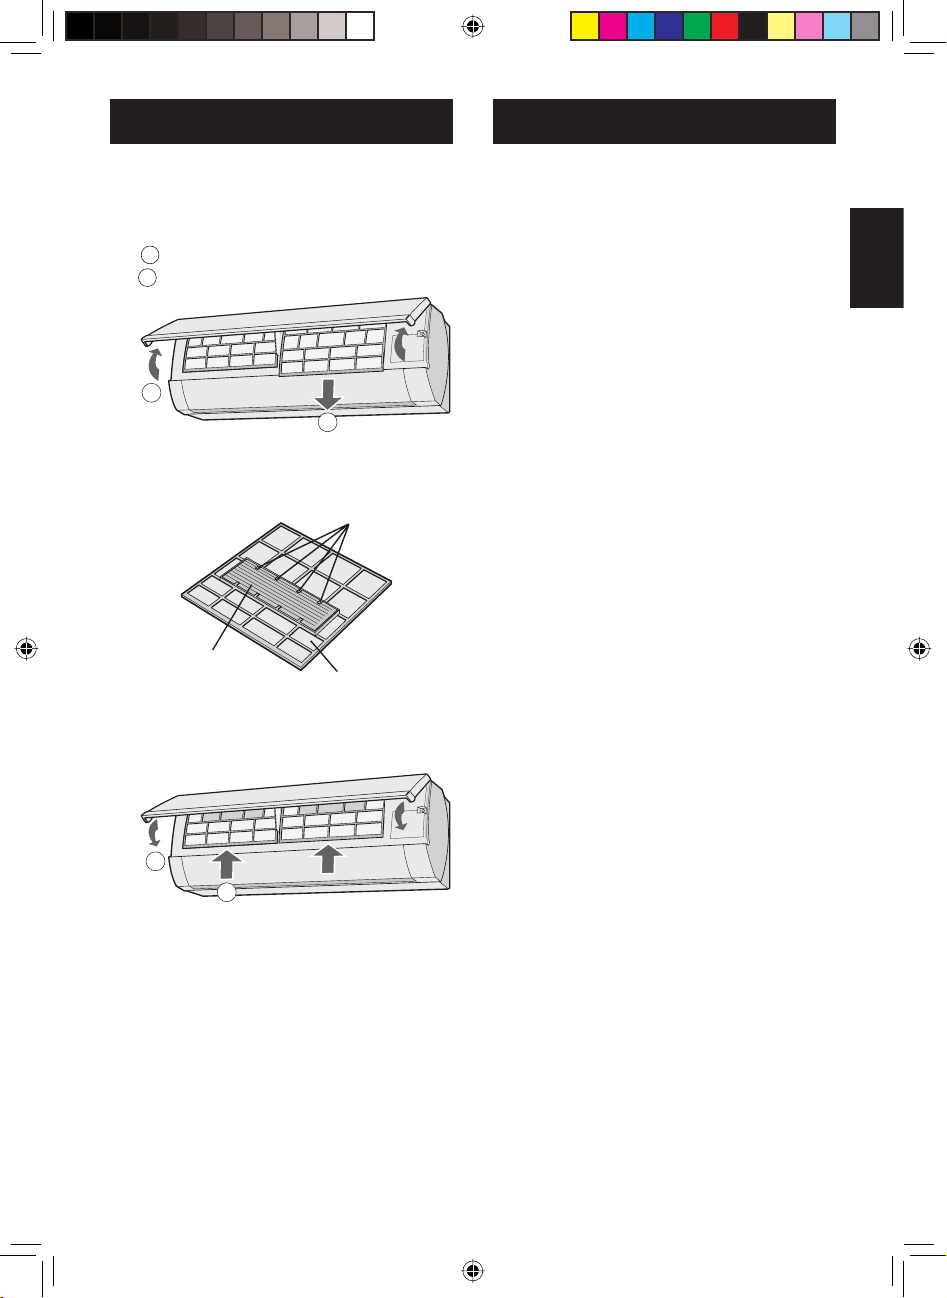
SETTING AIR PURIFYING FILTER
TIPS ON SAVING ENERGY
ENGLISH
The air purifying fi lters remove dust from
the air and discharge clean air.
Take out the air fi lters.
1
1
Open the open panel.
2
Pull the air fi lters down to remove
them.
1
2
Set the air purifying fi lter under
2
the fi lter stoppers on the air
fi lter.
Filter stopper
Air purifying fi lter
Air fi lter
Below are some simple ways to save energy when you use your air conditioner.
Set the proper temperature
• Setting to higher or lower then necessary temperature point will result in increased power
consumption.
Block direct sunlight and prevent drafts
• Blocking direct sunlight during cooling operation will reduce power consumption.
• Close the windows and doors during cooling
and heating operations.
Keep fi lter clean to ensure the most ef-
fi cient operation
Turn off the circuit breaker when the
unit is not used for an extended period
of time
• The indoor unit still consumes a small amount
of power when it is not operating.
Reinstall the air fi lters and close
3
the open panel.
2
1
NOTE:
• Do not open the plastic bag until using the
filters. (Otherwise the filters life may get
shorter.)
• Do not expose the fi lters to direct sunlight.
(Otherwise they may deteriorate.)
GB-5
AY-XPC18LR_OM_ENG.indd 5AY-XPC18LR_OM_ENG.indd 5 2010-03-18 16:45:452010-03-18 16:45:45
Page 8
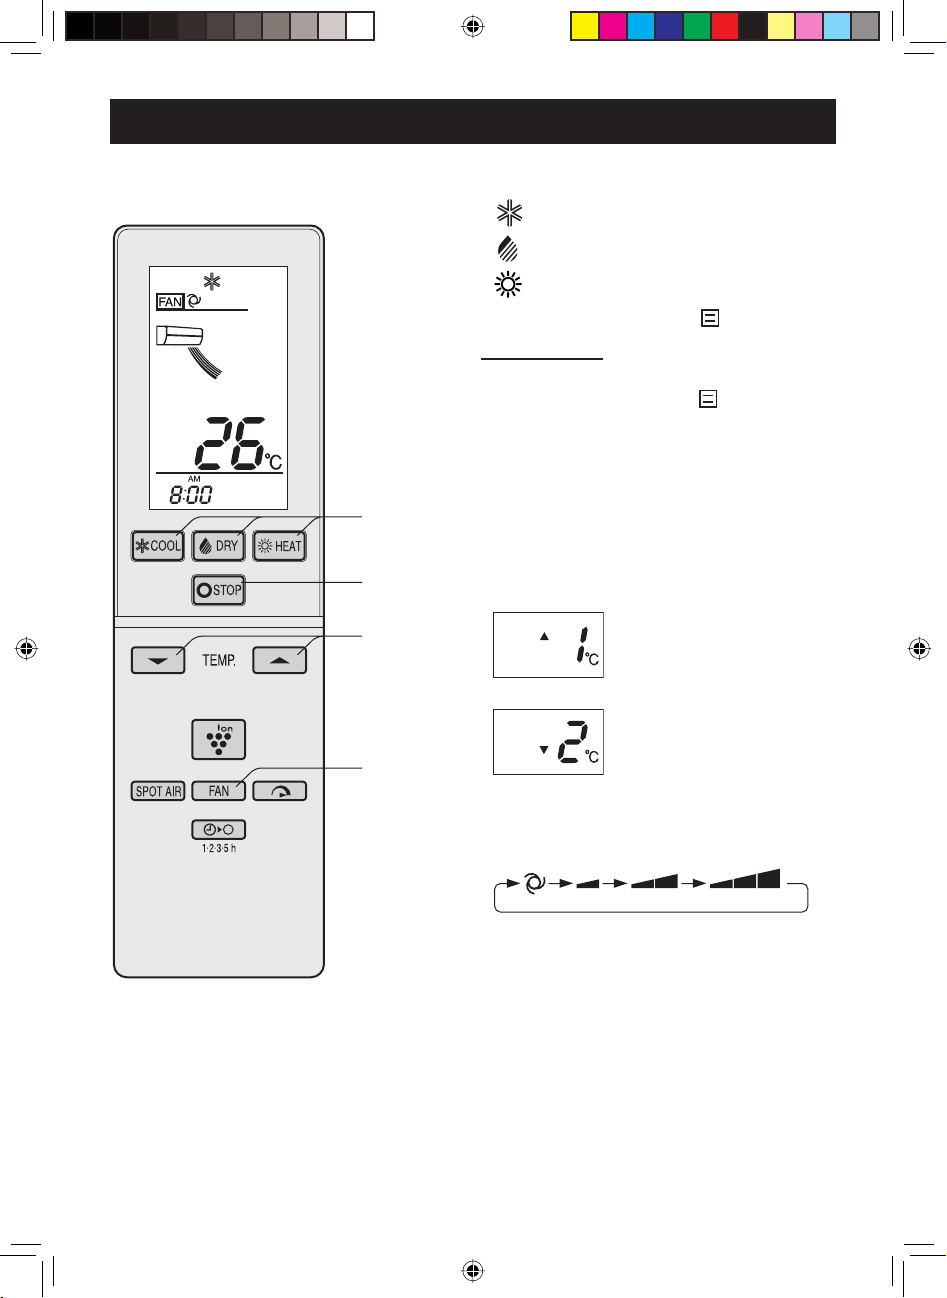
BASIC OPERATION
1
TURN OFF
2
Press the COOL, DRY or HEAT button .
1
: COOL
: DRY
: HEAT
• The red OPERATION lamp ( ) will light up.
TO TURN OFF
Press the STOP button.
• The red OPERATION lamp ( ) will turn off.
Press the THERMOSTAT button to set
2
the desired temperature.
(COOL/HEAT mode)
The temperature setting range:18-32 °C.
(DRY mode)
The temperature can be changed up to ±2 °C the
automatically set of temperature.
(Example: 1 °C higher)
(Example: 2 °C lower)
3
Press the FAN button to set the desired
3
fan speed.
AUTO SOFT LOW HIGH
• In the DRY mode, the fan speed is preset to
AUTO and cannot be changed.
GB-6
AY-XPC18LR_OM_ENG.indd 6AY-XPC18LR_OM_ENG.indd 6 2010-03-18 16:45:452010-03-18 16:45:45
Page 9
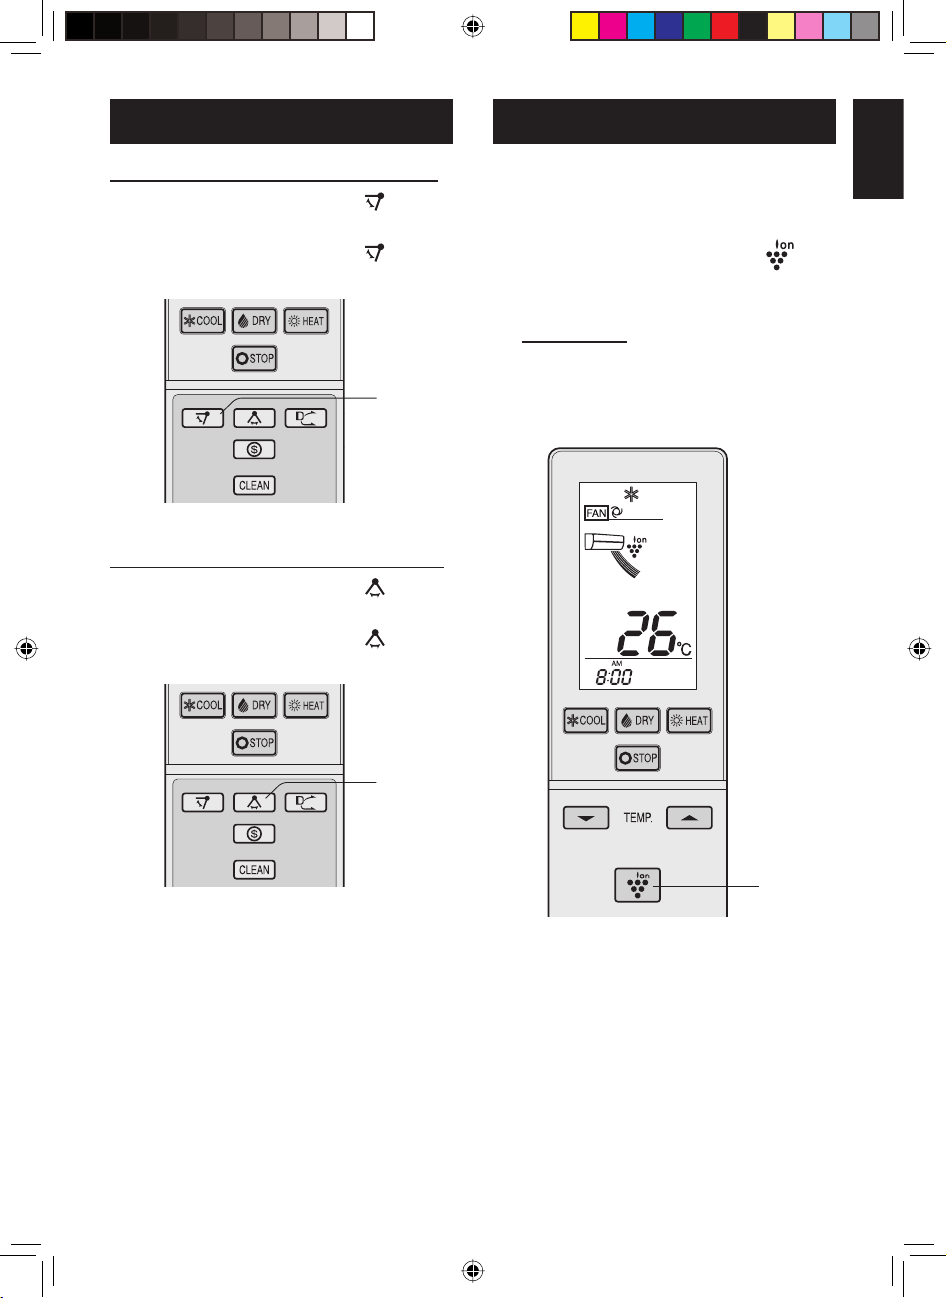
ADJUSTING THE AIR FLOW
DIRECTION
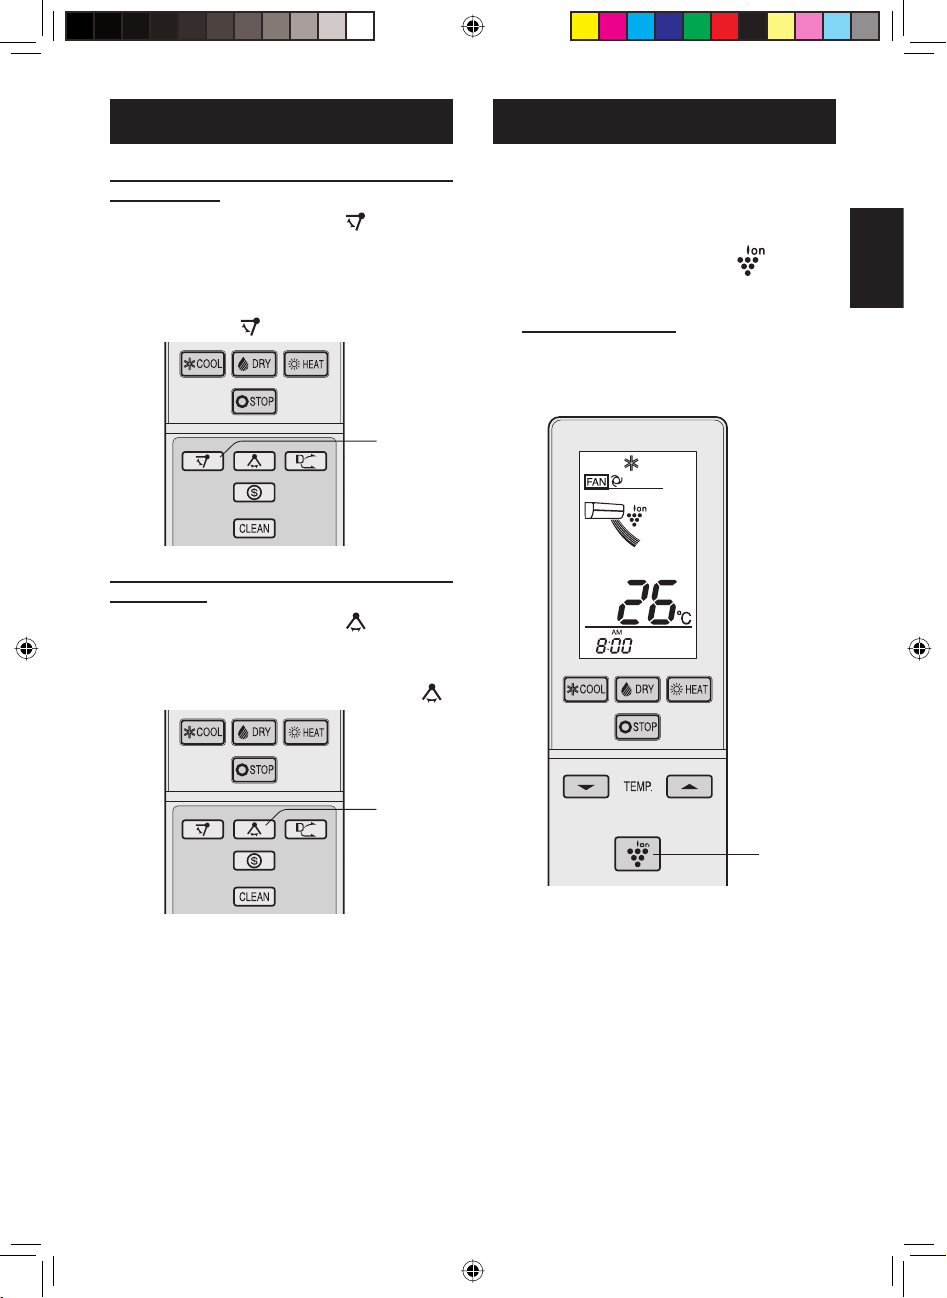
PLASMACLUSTER OPERATION
ENGLISH
VERTICAL AIR FLOW DIRECTION
Press the SWING button ( ).
1
• The vertical airfl ow louvre will swing.
Press the SWING button ( ) again
2
to stop the desired position.
1
2
HORIZONTAL AIR FLOW DIRECTION
Press the SWING button ( ).
1
• The horizontal airfl ow louvre will swing.
Press the SWING button ( ) again
2
to stop the desired position.
Plasmacluster ions released into the room
will reduce some airborne mold.
During operation, press the PLAS-
1
MACLUSTER button.
• The remote control will display “ ”.
• The blue PLASMACLUSTER lamp will
light up.
TO CANCEL
Press the PLASMACLUSTER button
again.
• The blue PLASMACLUSTER lamp will
turn off.
1
2
1
CAUTION:
Never attempt to adjust the louvres manually.
• Manual adjustment of the louvres can cause
the unit to malfunction.
• When the vertical adjustment louvre is positioned at the lowest position in the COOL or
DRY mode for an extended period of time,
condensation may result.
NOTE:
• The adjustment range is narrower the SWING
range in order to prevent condensation from
dripping.
AY-XPC18LR_OM_ENG.indd 7AY-XPC18LR_OM_ENG.indd 7 2010-03-18 16:45:462010-03-18 16:45:46
NOTE:
• Use of the PLASMACLUSTER operation will
be memorized, and it will be activated the next
time you turn on the unit.
• To perform Plasmacluster operation in FAN
only mode, press the PLASMACLUSTER button when the unit is not operating.
The mode symbol of the remote control will go
off and the fan speed cannot be set to AUTO.
GB-7
Page 10
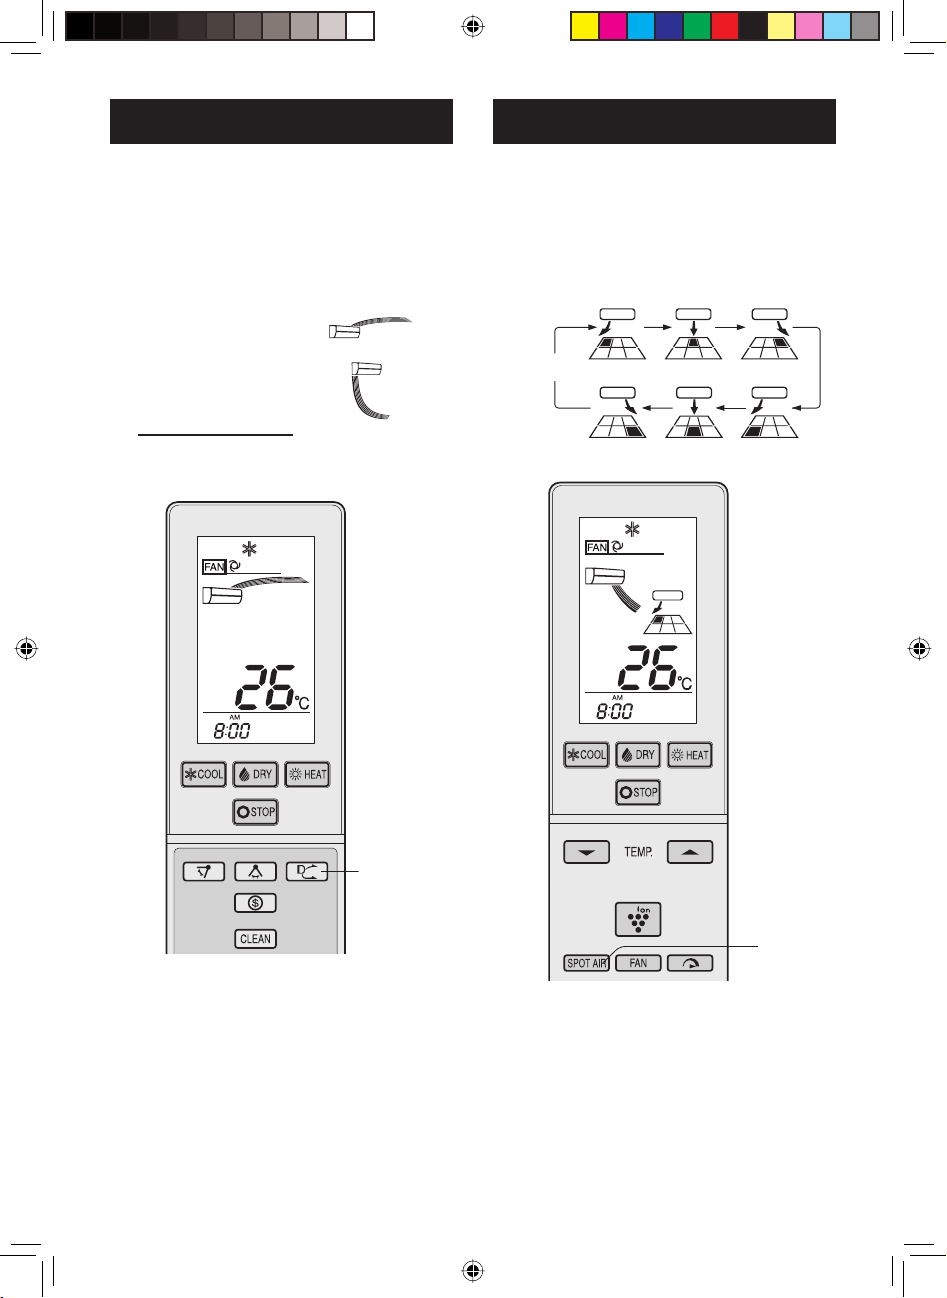
COANDA AIRFLOW
SPOT AIR
In cool or dry mode, vertical airfl ow louvre
is set obliquely upward to deliver cool air
to the ceiling in order to avoid direct airfl ow. In heat mode, vertical airfl ow louvre
is set downward to deliver the warm air
down to the fl oor.
During operation, press the COAN-
1
DA AIFLOW button.
(COOL / DRY mode)
• The remote control will display “ ”.
(HEAT mode)
• The remote control will display “
TO CANCEL
Press the COANDA AIFLOW button
again.
”.
The louvres are adjusted so that air fl ow is
delivered to the desired area.
Press the SPOT AIR button to select
1
the desired air fl ow direction.
CANCEL
1
1
NOTE:
• If you want COANDA AIRFLOW operation in
FULL POWER mode, press COANDA AIRFLOW button during FULL POWER operation.
• The COANDA AIRFLOW setting and the
SPOT AIR setting can not be used together.
AY-XPC18LR_OM_ENG.indd 8AY-XPC18LR_OM_ENG.indd 8 2010-03-18 16:45:462010-03-18 16:45:46
NOTE:
• If you want the SPOT AIR setting in the FULL
POWER mode, press the SPOT AIR button
during the FULL POWER operation.
• The COANDA AIRFLOW setting and the
SPOT AIR setting can not be used together.
GB-8
Page 11
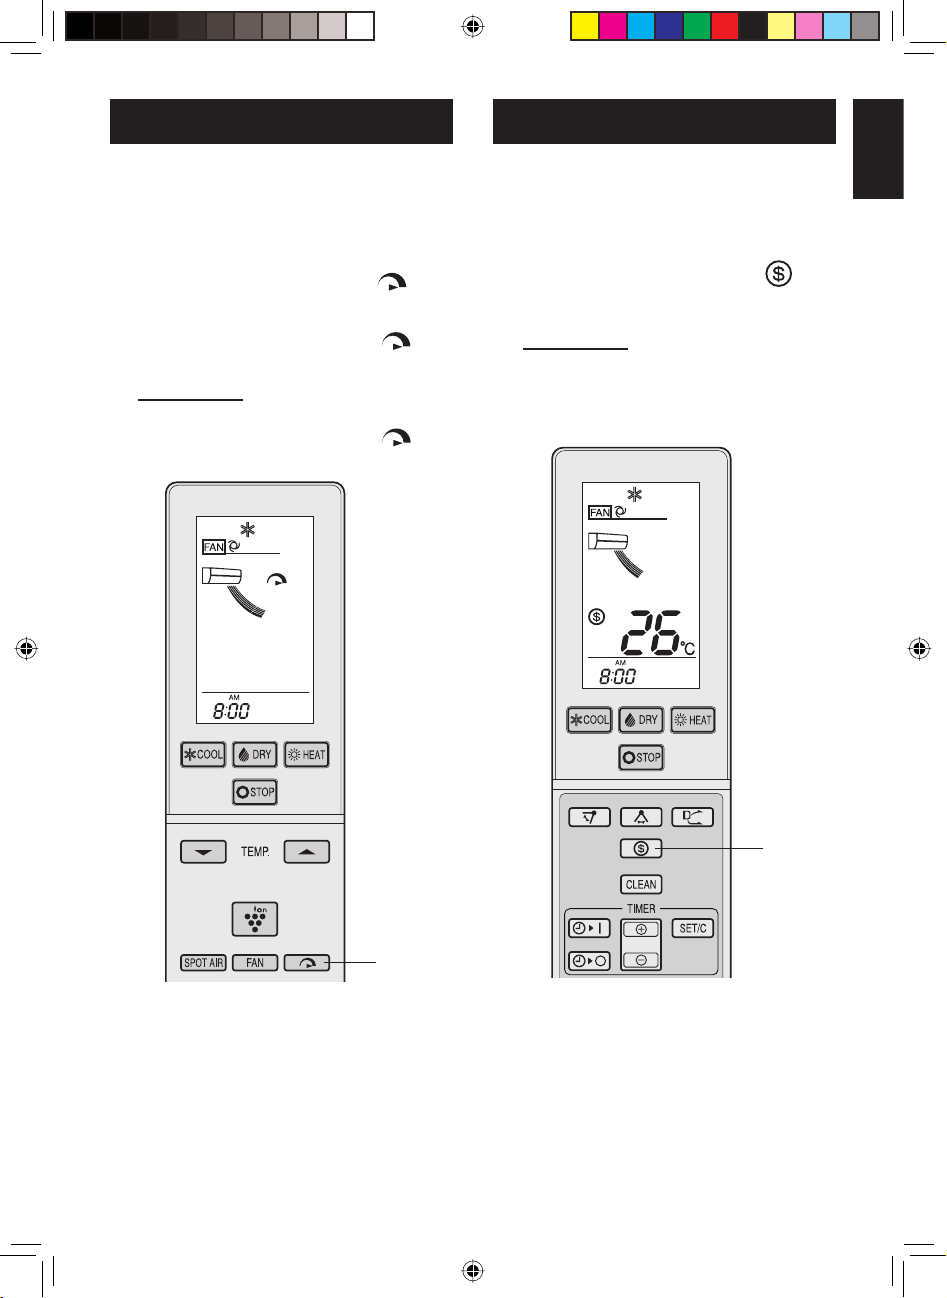
FULL POWER OPERATION
ENERGY SAVING OPERATION
ENGLISH
The air conditioner works at the maximum
power to makes the room cool or warm
rapidly.
During operation, press the FULL
1
POWER button.
• The remote control will display “ ” and
AIR FLOW symbol will get longer.
• The temperature display will go off.
• The green FULL POWER lamp (
light up.
TO CANCEL
Press the FULL POWER button again.
• The green FULL POWER lamp ( ) will
turn off.
) will
The temperature set point is automatically
controlled to save energy.
During operation, press the ENER-
GY SAVE button.
1
• The remote control will display “ ”.
• The fan speed will be set to AUTO.
TO CANCEL
Press the ENERGY SAVE button
again.
1
1
NOTE:
NOTE:
• The air conditioner will operate at “Extra
HIGH” fan speed for 5 minutes, and then shift
to “HIGH” fan speed.
• You can not set the temperature or fan speed
during the FULL POWER operation.
• The ENERGY SAVING operation and the
FULL POWER operation can not be used together.
AY-XPC18LR_OM_ENG.indd 9AY-XPC18LR_OM_ENG.indd 9 2010-03-18 16:45:472010-03-18 16:45:47
• In HEAT mode, the temperature set point will
be automatically fl uctuated between 0 - 2 °C
lower than the original temperature setting.
In COOL or DRY mode, the temperature set
point will be automatically fl uctuated between
0 - 1 °C higher than the original temperature
setting.
• The ENERGY SAVING operation and the
FULL POWER operation can not be used together.
GB-9
Page 12
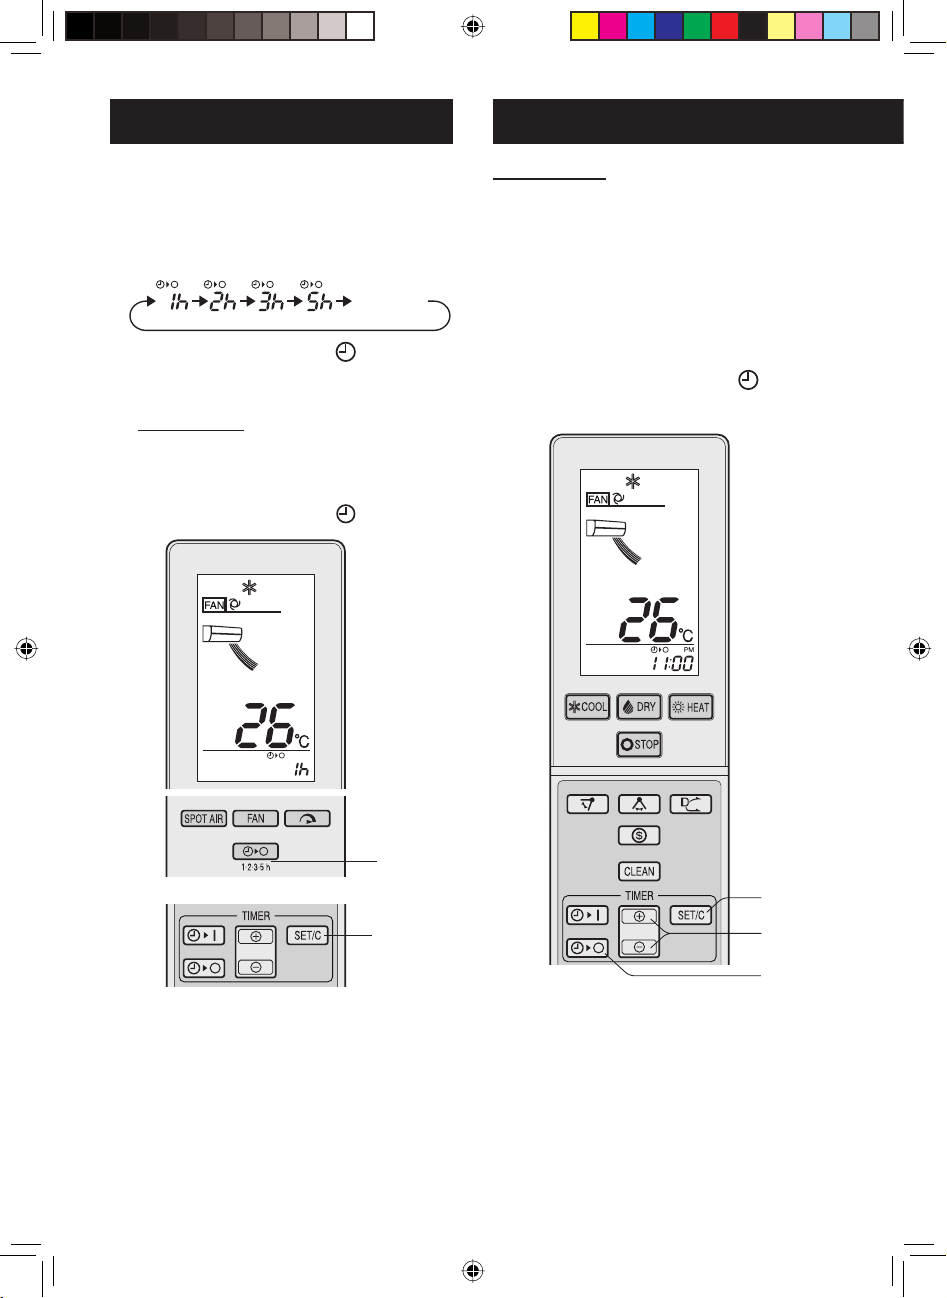
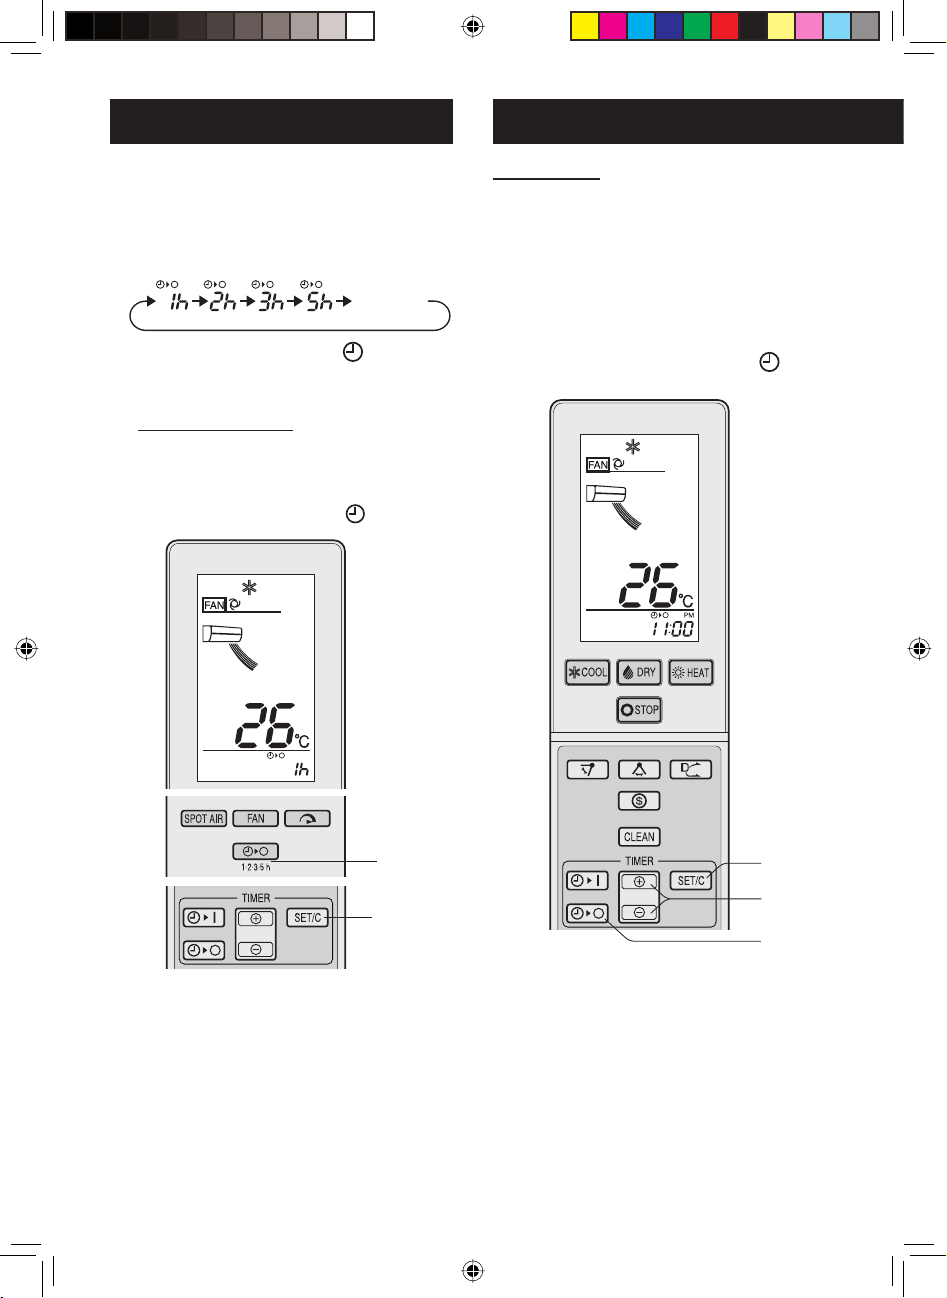
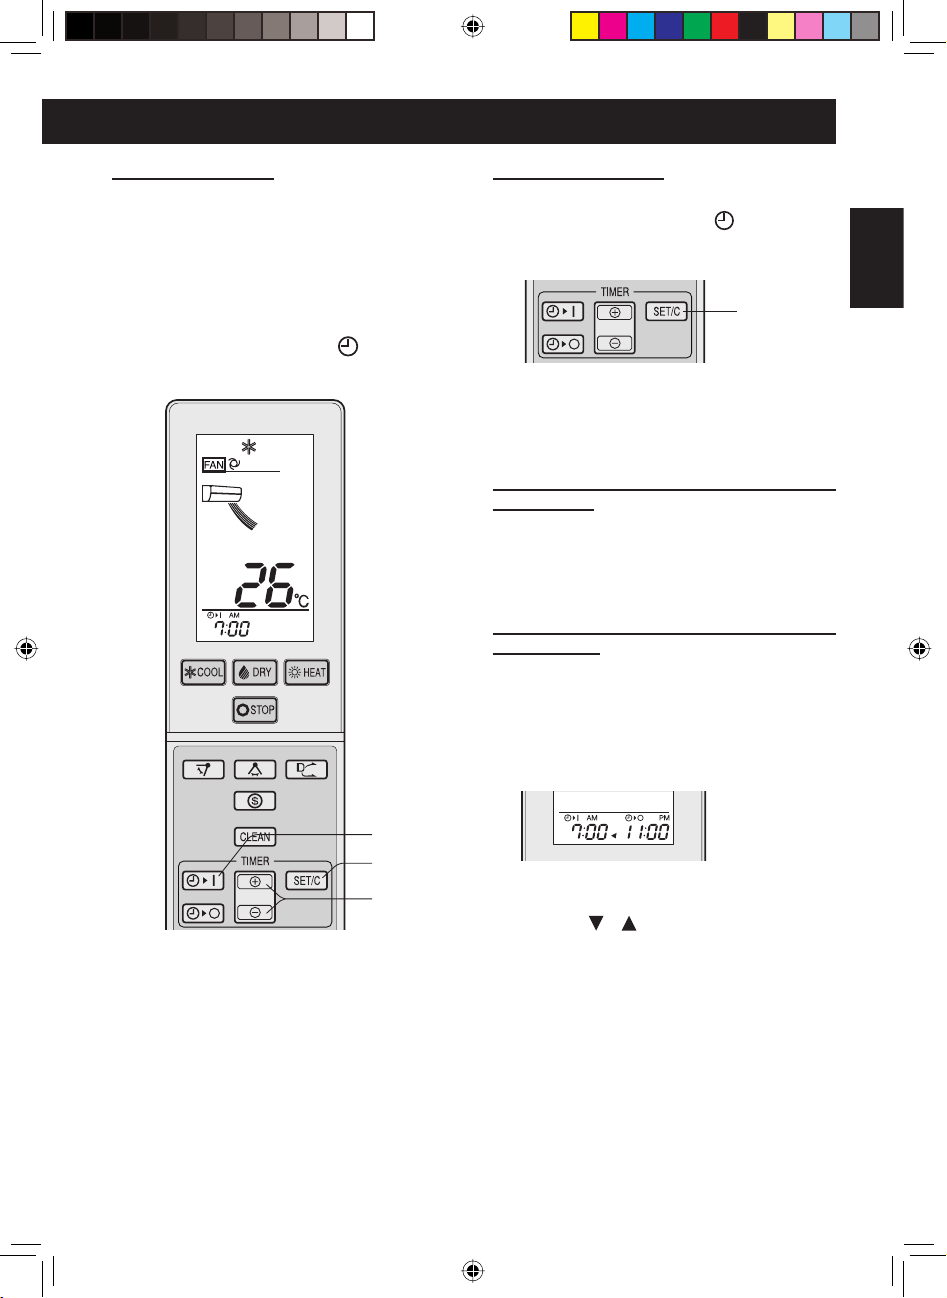
1.2.3.5h OFF TIMER
TIMER OPERATION
When the 1.2.3.5h OFF TIMER is set, the
unit will automatically turn off after the setting hours.
Press the 1.2.3.5h OFF TIMER but-
1
ton to set the desired time.
CANCEL
• The orange TIMER lamp ( ) will light up.
• The remaining time will be indicated on
the remote control in 1-hour increments.
TO CANCEL
Press the SET/C button.
Alternatively, press the 1.2.3.5h OFF
TIMER button.
• The orange TIMER lamp ( ) will turn off.
TIMER OFF
Press the TIMER OFF button.
1
• The TIMER OFF indicator will blink.
Press the TIME ADVANCE or RE-
2
VERSE button to set the desired
time.
• The time can be set in 10-minute increments.
Press the SET/C button.
3
• The orange TIMER lamp ( ) will light
up.
1
3
CANCEL
2
1
NOTE:
• The 1.2.3.5h OFF TIMER has priority over
TIMER ON and TIMER OFF.
• If the 1.2.3.5h OFF TIMER is set while the unit
is not operating, the unit will operate at the
formerly set condition.
• If TIMER ON and/or TIMER OFF are set,
TIMER CANCEL button cancels every setting.
AY-XPC18LR_OM_ENG.indd 10AY-XPC18LR_OM_ENG.indd 10 2010-03-18 16:45:472010-03-18 16:45:47
NOTE:
• When the TIMER OFF is set, the temperature
setting is automatically adjusted to prevent
the room from be coming excessively cold
or warm, for example while you sleep. (Auto
Sleep function)
COOL mode: One hour after the timer is set,
the temperature setting rises by 1 °C.
HEAT mode: One hour after the timer is set,
the temperature setting drops by 3 °C.
GB-10
Page 13
ENGLISH
TIMER ON
Press the TIMER ON button.
1
• The TIMER ON indicator will blink.
Press the TIME ADVANCE or RE-
2
VERSE button to set the desired
time.
• The time can be set in 10-minute increments.
Press the SET/C button.
3
• The orange TIMER lamp ( ) will light
up.
TO CANCEL
Press the SET/C button.
• The orange TIMER lamp ( ) will turn off.
•
The current time will be displayed on the re-
mote control.
CANCEL
TO CHANGE TIME SETTING
Cancel the TIMER setting, then set it
again
TO COMBINE TIMER ON AND
TIMER OFF
Set the TIMER OFF and TIMER ON.
Example
Current time: 9:00 p.m.)
(
OFF TIMER at 11:00 p.m.
ON TIMER at 7:00 a.m.
1
3
2
NOTE:
• The unit will turn on prior to the set time to
allow the room to reach the desired temperature. (Awaking function)
AY-XPC18LR_OM_ENG.indd 11AY-XPC18LR_OM_ENG.indd 11 2010-03-18 16:45:472010-03-18 16:45:47
• The arrow ( or ) between the TIMER ON
indicator and the TIMER OFF indicator shows
which timer will activate fi rst.
NOTE:
• You cannot program the ON-TIMER and OFFTIMER to operate the unit at different temperatures or other settings.
• Either timer can be programmed to activate
prior the other.
GB-11
Page 14
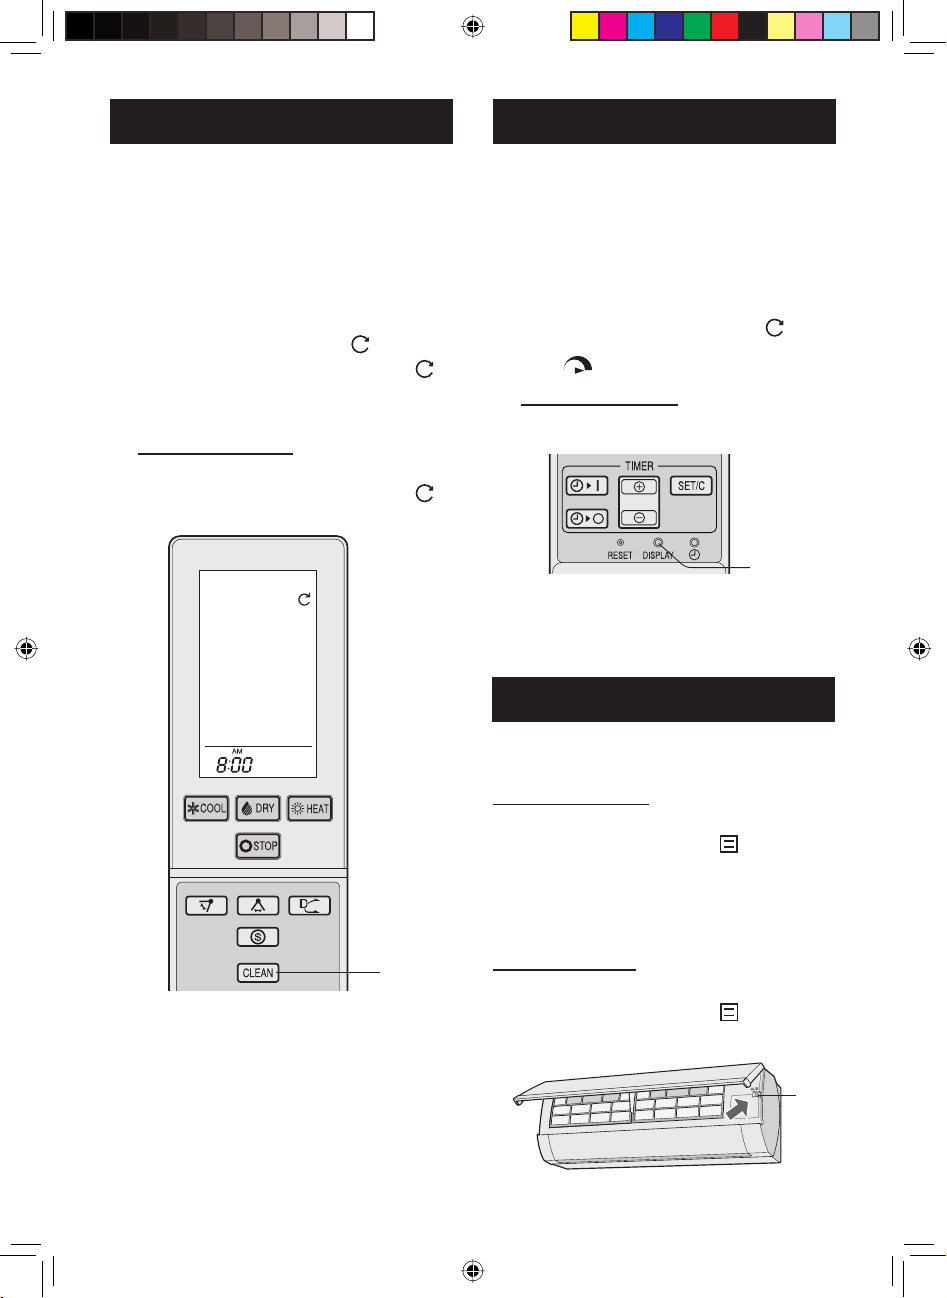
SELF CLEAN OPERATION
DISPLAY BUTTON
SELF CLEAN operation will reduce the
growth mold fungus with Plasmacluster
ions and dry inside of the unit. Utilize the
operation at seasonal change over terms
Press the SELF CLEAN button when
1
the unit is not operating.
• The remote control will display “ ”.
• The green SELF CLEAN LAMP (
the blue PLASMACLUSTER lamp will light
up.
• The unit will stop operation after 40 minutes.
TO CANCEL
Press the SELF CLEAN button.
• The green SELF CLEAN LAMP ( ) and
the blue PLASMACLUSTER lamp will turn
off.
.
) and
Press the DISPLAY button when the lamps
on the unit are too bright. (The red OPERATION lamp and the orange TIMER lamp
cannot be turned off.)
During operation, press the DIS-
1
PLAY button.
• The blue PLASMACLUSTER lamp, the
green SELF CLEAN LAMP ( ) and/or
the green FULL POWER lamp ( ) will
turn off.
TO LIGHT UP
Press the DISPLAY button again.
1
AUXILIARY MODE
Use this mode when the remote control is
not available.
TO TURN ON
Press the AUX button.
• The red OPERATION lamp ( ) will light.
• The mode and the temperature setting are
automatically selected according to the room
temperature and the outdoor temperature
when the unit is turned on. The fan speed is
set to AUTO.
1
TO TURN OFF
Press the AUX button again.
NOTE:
• You cannot set the temperature, fan speed, air
fl ow direction or timer setting during the SELF
CLEAN operation.
• Mold fungus already grown can not be
eliminated by this operation.
• The red OPERATION lamp ( ) will turn off.
AUX
GB-12
AY-XPC18LR_OM_ENG.indd 12AY-XPC18LR_OM_ENG.indd 12 2010-03-18 16:45:472010-03-18 16:45:47
Page 15
MAINTENANCE
ENGLISH
Be sure to stop the operation and turn off
the circuit breaker before performing any
maintenance.
CLEANING THE AIR FILTERS
The fi lters should be cleaned every two weeks.
Turn off the unit.
1
Remove the fi lters.
2
1
Lift the open panel.
2
Pull the air fi lters down to remove them.
1
2
Take off the air purifying fi lters
3
from the air fi lters.
Clean the fi lters.
4
Use a vacuum cleaner to remove dust. If
the fi lters are dirty, wash them with warm
water and a mild detergent. Dry fi lters in
the shade before reinstalling.
Reinstall the air purifying fi lters.
5
Reinstall the fi lters and close the
6
open panel.
MAINTENANCE AFTER AIR CONDITIONER SEASON
Operate the unit in the SELF CLEAN
1
operation to thoroughly dry inside
the unit.
Stop the operation and turn off the
2
circuit breaker.
Clean the fi lters, then reinstall them.
3
MAINTENANCE BEFORE AIR CONDITIONER SEASON
Make sure that the air fi lters are not
1
dirty.
Make sure that nothing obstructs
2
the air inlet or outlet.
REPLACING THE AIR PURIFYING
FILTER
The fi lters should be changed every 3 - 6
months
Take off the old air purifying fi lters
1
from the air fi lters.
Set the new air purifying filters,
2
under the fi lter stoppers on the air
fi lters.
Filter stopper
2
1
CLEANING THE UNIT AND THE REMOTE CONTROL
• Wipe them with a soft cloth.
• Do not directly splash or pour water on them.
It can cause electrical shock or equipment
damage.
• Do not use hot water, thinner, abrasive pow-
ders or strong solvents.
Air purifying fi lter
NOTE:
• The air purifying fi lters are not washable for
reuse. The new fi lters are available at your
nearest dealer.
Disposal of Filters
Please dispose of replaced fi lters according to
the local disposal laws and regulations.
AIR PURIFYING fi lter materials
Filter:Polypropylene
Frame:Polyester
Air fi lter
GB-13
AY-XPC18LR_OM_ENG.indd 13AY-XPC18LR_OM_ENG.indd 13 2010-03-18 16:45:482010-03-18 16:45:48
Page 16

NOTE ON OPERATION
OPERATING CONDITION
Cooling (
Indoor temperature Outdoor temperature
Upper limit 32 ˚C
Lower limit 21 ˚C
Indoor temperature Outdoor temperature
Upper limit 32 ˚C 46 ˚C
Lower limit 21 ˚C -10 ˚C
Heating (
Indoor temperature Outdoor temperature
Upper limit 27˚C 24 ˚C
Lower limit - -15 ˚C
• The built-in protective device may prevent the
unit from operating when used at higher temperature than this range.
• Condensation may form on the air outlet if the
unit operates continuously in the COOL or
DRY mode when humidity is over 80 %.
AY-XPC18LR)
46 ˚C (Single use)
43 ˚C (Multi use)
-10 ˚C (Single use)
21 ˚C
Cooling (
AY-XP24LR)
AY-XPC18LR, AY-XP24LR)
(Multi use)
WHEN POWER FAILURE OCCURS
• This air conditioner has a memory function to
store settings when a power failure occurs.
After power recovery, the unit will automati-
cally re-start in the same settings which were
active before the power failure, except for
timer settings.
• If a power failure occurs while the timer is set,
the timer setting will be cancelled and will not
be retrieved even after the power is restored.
NOTE ON HEATING OPERATION
DEFROSTING FUNCTION
• When frost forms on the outdoor unit during
heating operation, the unit operate automatic
defrosting for about 5 to 10 minutes to remove
the frost. During defrosting, the inside and outside fans stop operating.
HEATING EFFICIENCY
• The unit employs a heat pump that draws
heat from the outside air and releases it into
the room. The outside temperature therefore
greatly affects the heating effi ciency.
• If the heating efficiency is reduced due to
low outside temperatures, use an additional
heater.
• It takes time to warm up and heat the entire
room because of the forced air circulation sys-
tem.
NOTE IN USING AY-XPC18LR AS A
MULTI-SYSTEM AIR CONDITIONER
With a multi system air conditioner, multiple indoor units can connect to one outdoor unit.
With a multi system air conditioner, you cannot
operate different indoor units in different mode.
• If one unit is operating in COOL (or DRY)
mode, the other units are to be operated in
the same mode. The mode of the indoor unit
which operates fi rst is given priority. The in-
door unit turned on later in different mode can
not start operation. It starts to beep and the
OPERATION lamp and TIMER lamp starts to
blink. In this case, set all the indoor units to
the same operation mode.
• COOL mode and DRY mode can be set at the
same time.
GB-14
AY-XPC18LR_OM_ENG.indd 14AY-XPC18LR_OM_ENG.indd 14 2010-03-18 16:45:492010-03-18 16:45:49
Page 17
BEFORE CALLING FOR SERVICE
ENGLISH
The following conditions do not denote
equipment malfunctions.
Unit does not operate
• The unit will not operate if it is turned on immediately after it is turned off. The unit will
not operate immediately after the mode is
changed. This is to protect the unit. Wait 3
minutes before operating the unit.
Unit does not send out warm air
• In heating operation, the indoor fan may not
start for 2 to 5 minutes after the unit is turned
on to prevent cold air from blowing out of the
unit.
• The unit is defrosting. Wait for 5 to 10 minutes.
Odors
•
Carpet and furniture odors that entered into the
unit may be sent out from the unit.
Cracking noise
• This sound is generated by the friction of the
unit expanding or connecting due to a temperature change.
A low buzzing noise
• This is a sound of the unit generating Plasmacluster ions.
Swishing noise
• The soft, swishing noise is the sound of the
refrigerant fl owing inside the unit.
Mist seen at indoor air outlet
• In cooling operation, this is caused by the
difference between the room air temperature
and the air discharged.
Water vapour
• In heating operation, water vapour may fl ow
out of the outdoor unit during defrosting.
The outdoor unit does not stop
• After stopping the operation, the outdoor unit
will rotate its fan for about a minute to cool
down the unit.
Odor emitted from the plasmacluster air outlet
• This is the smell of ozone generated from the
Plasmacluster Ion generator. The ozone concentration is very small, posing no adverse
effect on your health. The ozone discharged
into the air rapidly decomposes, and its density in the room will not increase.
When using AY-XPC18LR as a multisystem air conditioner
An indoor unit which is not in operation is getting warm.
Warm air is coming out from an indoor
unit in PLASMACLUSTER only mode.
• The refrigerant is fl owing through the indoor
unit when the other unit is operating in HEAT
mode.
No air fl ow comes out of an indoor unit
when the unit is in PLASMACLUSTER
only mode or SELF CLEAN operation.
• The outdoor unit is defrosting.
An indoor unit starts to beep, and the
OPERATION lamp and TIMER lamp
start to blink at the same time
• Check if all the indoor units are set to the
same mode. If not, set all the indoor units to
the same operation mode.
Check the following points before calling
for service.
The unit does not operate
• Check if the circuit breaker has tripped or the
fuse has blown.
The unit does not cool(or heat) the
room effectively
• Check the fi lters. If dirty, clean them.
• Check the outdoor unit to make sure nothing
is blocking the air inlet or outlet.
• Check the thermostat is proper setting.
• Make sure windows and doors are closed
tightly.
The unit does not receive the remote
control signal
• Check whether the remote control batteries
have become old and weak.
• Try to send the signal again with the remote
control pointed properly towards the unit’s signal receiver window.
• Check whether the remote control batteries
are installed properly.
Please call for service when OPERATION
lamp, TIMER lamp and/or PLASMACLUSTER lamp on the unit blink.
GB-15
AY-XPC18LR_OM_ENG.indd 15AY-XPC18LR_OM_ENG.indd 15 2010-03-18 16:45:492010-03-18 16:45:49
Page 18

Attenzione: Il dispositivo è contrassegnato da questo simbolo,
che segnala di non smaltire le
apparecchiature elettriche ed
elettroniche insieme ai normali
rifi uti domestici. Per tali prodotti
è previsto un sistema di raccolta a parte.
A. Informazioni sullo smaltimento per gli utenti (privati)
1. Nell'Unione europea
Attenzione: Per smaltire il presente dispositivo, non utilizzare il normale
bidone della spazzatura!
Le apparecchiature elettriche ed elettroniche usate devono essere gestite a
parte e in conformità alla legislazione che richiede il trattamento, il recupero
e il riciclaggio adeguato dei suddetti prodotti.
In seguito alle disposizioni attuate dagli Stati membri, i privati residenti
nella UE possono conferire gratuitamente le apparecchiature elettriche ed
elettroniche usate a centri di raccolta designati*. In alcuni paesi*, anche il
rivenditore locale può ritirare gratuitamente il vecchio prodotto se l'utente
acquista un altro nuovo di tipologia simile. *)
Per maggiori informazioni si prega di contattare l'autorità locale competente.
Se le apparecchiature elettriche o elettroniche usate hanno batterie o accumulatori, l'utente dovrà smaltirli a parte preventivamente in conformità alle
disposizioni locali.
Lo smaltimento corretto del presente prodotto contribuirà a garantire che i
rifi uti siano sottoposti al trattamento, al recupero e al riciclaggio necessari
prevenendone il potenziale impatto negativo sull'ambiente e sulla salute
umana, che potrebbe derivare da un'inadeguata gestione dei rifi uti.
2. In paesi che non fanno parte dell'UE
Se si desidera eliminare il presente prodotto, contattare le autorità locali e
informarsi sul metodo di smaltimento corretto.
Per la Svizzera: Le apparecchiature elettriche o elettroniche usate possono essere restituite gratuitamente al rivenditore, anche se non si acquista
un prodotto nuovo. Altri centri di raccolta sono elencati sulle homepage di
www.swico.ch o di www.sens.ch.
B. Informazioni sullo smaltimento per gli utenti commerciali
1. Nell'Unione europea
Se il prodotto è impiegato a scopi commerciali, procedere come segue per
eliminarlo.
Contattare il proprio rivenditore SHARP che fornirà informazioni circa il ritiro
del prodotto. Potrebbero essere addebitate le spese di ritiro e riciclaggio.
Prodotti piccoli (e quantitativi ridotti) potranno essere ritirati anche dai centri
di raccolta locali.
Per la Spagna: Contattare il sistema di raccolta uffi ciale o l'ente locale
preposto al ritiro dei prodotti usati.
2. In paesi che non fanno parte dell'UE
Se si desidera eliminare il presente prodotto, contattare le autorità locali e
informarsi sul metodo di smaltimento corretto.
La batteria fornita con questo prodotto contiene tracce di piombo.
Per EU: Il cassonetto barrato indica che le batterie usate non devono esse-
re gettate assieme ai rifi uti domestici! Vi è un sistema di raccolta differen-
ziata per le batterie usate, che consente il loro corretto trattamento e riciclo
secondo quanto previsto dalle leggi vigenti. Vi prego di contattare le locali
autorità per i dettagli del sistema di raccolta e riciclaggio.
Pb
AY-XPC18LR_OM_IT.indd 1AY-XPC18LR_OM_IT.indd 1 2010-03-18 16:51:162010-03-18 16:51:16
Per la Svizzera: Le batterie usate devono essere restituite al punto vendita
Per altri Stati non-EU: Vi prego di contattare le autorità locali per conoscere
il metodo corretto di conferimento delle batterie usate.
Contiene gas fl uorurati ad effetto serra disciplinati dal protocollo di Kyoto
R410A (Potenziale di riscaldamento globale 1980)
IT
Page 19

ITALIANO
Vi preghiamo di leggere attentamente questo manuale prima di utilizzare
il climatizzatore. Si consiglia di tenere questo manuale in un posto sicuro, in caso di consultazioni future.
INDICE
• PRECAUZIONI DI SICUREZZA ........................IT-1
• NOMI DEI COMPONENTI .................................IT-2
• USO DEL TELECOMANDO ..............................IT-4
SISTEMARE I FILTRI DI PURIFICAZIONE DELL'ARIA
•
•
SUGGERIMENTI PER RISPARMIARE ENERGIA
• FUNZIONI DI BASE ..........................................IT-6
REGOLAZIONE DELLA DIREZIONE DEL FLUSSO D'ARIA
•
• FUNZIONAMENTO DEL PLASMACLUSTER ...IT-7
• FLUSSO D'ARIA EFFETTO COANDA ..............IT-8
• MODO SPOT AIR ..............................................IT-8
•
FUNZIONAMENTO FULL POWER (MASSIMA POTENZA)
FUNZIONAMENTO PER RISPARMIARE ENERGIA
•
• TIMER SPENTO 1.2.3.5 ORE ...........................IT-10
• FUNZIONAMENTO DEL TIMER .......................IT-10
• FUNZIONAMENTO AUTOPULENTE ................IT-12
• Tasto DISPLAY ..................................................IT-12
• MODALITA' AUSILIARIA ...................................IT-12
• MANUTENZIONE ..............................................IT-13
• INFORMAZIONI SUL FUNZIONAMENTO ........IT-14
• PRIMA DI RICHIEDERE ASSISTENZA ............IT-15
..IT-5
..IT-5
..IT-7
..IT-9
..IT-9
PRECAUZIONI DI SICUREZZA
ATTENZIONE
•
Non tirate o deformate il cavo di alimentazione. Se
si tira o si usa scorrettamente il cavo, l’unità si può
danneggiare e provocare scosse elettriche.
•
Fate attenzione a non esporvi direttamente all’uscita
dell’aria per un lungo periodo di tempo. Potrebbe
danneggiare la vostra salute.
•
Nel caso si usi il condizionatore d’aria in presenza di
neonati, bambini, persone anziane, persone costrette a stare a letto o persone con handicap fi sici, assi-
curatevi prima che la temperatura sia loro gradita.
•
Non iserite mai oggetti nell’unità. Ciò potrebbe portare a lesioni a causa dell’alta velocità di rotazione dei
ventilatori interni.
•
Collegate correttamente il condizonatore d’aria a
terra. Non collegate il cavo a terra al tubo del gas, al
tubo dell’acqua, al parafulmini o al cavo a terra del
telefono. Un collegamento a terra incompleto potrebbe causare una scossa elettrica.
•
In caso di anomalie del condizionatore d’aria (per
esempio odore di bruciato), interrompete subito l’uso
e SPEGNETE l’interruttore di circuito.
•
L’apparecchio deve essere installato in conformità
con i regolamenti di connessione elettrica nazionali.
Un collegamento scorretto del cavo può provocare
il surriscaldamento del cavo di alimentazione, della
spina e della presa elettrica e causare un incendio.
•
Se è danneggiato il cavo di alimentazione, bisogna
farlo sostituire dal fabbricante, da un centro di assistenza o da una persona qualifi cata per evitare
eventuali rischi. Sostituire il cavo di alimentazione
solo con un altro specifi cato dal produttore.
•
Non spruzzate o gettate acqua direttamente sull’
unità. L’acqua potrebbe causare una scossa elettrica
o danni all’apparecchio.
•
Non cercate di installare/rimuovere/riparare l’unità senza assistenza. Un uso errato causerà scosse elettriche,
ITALIANO
perdite d’acqua, incendi e così via. Consultate il vostro
rivenditore o altro personale di servizio qualifi cato per l’
installazione/rimozione/riparazione dell’unità.
PRECAUZIONI
•
Aprite periodicamente una fi nestra o una porta per
ventilare la stanza, specialmente quando si usano
apparecchi a gas. Una ventilazione insufficiente
potrebbe causare mancanza di ossigeno.
•
Non toccate i tasti con le mani bagnate. Ciò potrebbe
provocare una scossa elettrica.
• Per sicurezza, spegnete l’interruttore del circuito quando
non usate l’unità per un lungo periodo di tempo.
• Controllate periodicamente la cremagliera di montaggio
dell’unità esterna ed assicuratevi che sia ben collocato
al suo posto.
•
Non urtate l’unità esterna e non collocate alcun
oggetto sopra di essa, poiché potrebbe cadere
causando lesioni.
•
Questa unità è stata progettata per l’uso in aree
residenziali. Non usatela in luoghi differenti, come
canili o serre.
•
Non collocate contenitori d’acqua sull’unità. Se l’
acqua penetra nell’unità, l’isolamento elettrico si
potrebbe rovinare causando una scossa elettrica.
• Non bloccate gli sbocchi d’uscita ed entrata dell’aria
dell’unità. Ciò potrebbe compromettere il funzionamento
o provocare guasti.
•
Assicuratevi di spegnere l’apparecchio e l’interruttore
di circuito prima di eseguire lavori di manutenzione
o pulitura. Il ventilatore che gira all’interno dell’unità
potrebbe provocare lesioni.
•
Questo apparecchio non è stato progettato per
essere utilizzato da bambini o persone inferme senza
supervisione. I bambini devono essere controllati per
assicurarsi che non giochino con l’apparecchio.
•
Assicuratevi di collegare il condizionatore a una
presa di corrente del voltaggio e della frequenza
indicati. L’utilizzo di una presa con voltaggio e frequenza sbagliati può causare danni all’apparecchio
e provocare anche un incendio.
• Non installare l’unità in un luogo dove ci potrebbero essere
perdite di gas infi ammabile. Ciò potrebbe provocare incendi.
Non collocate l’unità in luoghi nei quali l’aria conten-
ga polvere, fumi oppure umidità in misura eccessiva.
•
Sistemate il tubo di drenaggio in modo tale da assicurare un drenaggio corretto. Un drenaggio insuffi -
ciente potrebbe far fuoriuscire acqua dalla stanza,
bagnare i mobili e così via.
•
Assicuratevi di installare un interruttore differenziale
o magnetometrico a seconda del luogo d’installazione, per evitare scosse elettriche.
IT-1
AY-XPC18LR_OM_02_IT.indd 1AY-XPC18LR_OM_02_IT.indd 1 2010-03-19 08:49:592010-03-19 08:49:59
Page 20

NOMI DEI COMPONENTI
UNITA’ INTERNA
1 Entrata (dell’aria)
1
2
2 Pannello aperto
3
3
Filtro di purifi cazione dell’aria
4
4 Filtri dell’aria
5
5 Tasto AUX
6 Finestra di ricezione
7 Deflettore di regolazione
6
7
8
9
10
11
12
13
14
verticale del fl usso d’aria
8
Defl ettore di regolazione oriz-
zontale del fl usso d’aria
9 Uscita (d’aria)
10 Spia PLASMACLUSTER
(blu)
11 Spia OPERATION
(rosso
12 Spia TIMER
(arancione
)
)
13 Spia FULL POWER
(MASSIMA POTENZA)
(verde
14 Spia SELF CLEAN
(AUTOPULIZIA) (verde
NOTE:
Le unità effettive potrebbero differire leggermente da quelle illustrate sopra.
)
)
IT-2
AY-XPC18LR_OM_IT.indd 2AY-XPC18LR_OM_IT.indd 2 2010-03-18 16:51:222010-03-18 16:51:22
Page 21
TELECOMANDO
1
2
3
4
5
6
7
8
9
10
11
1
TRASMETTITORE
2 Tasto COOL (freddo)
3 Tasto DRY (secco)
4 Tasto HEAT (caldo)
5 Tasto STOP
6 Tasto TEMP.
7 Tasto PLASMACLUSTER
8 Tasto SPOT AIR
9 Tasto FULL POWER
(Massima potenza)
10 Tasto FAN (Ventilatore)
Tasto TIMER SPENTO 1.2.3.5 ORE
11
12 Tasto SWING
(direzione verticale)
13 Tasto SWING
(direzione orizzonatale)
12
14 Tasto FLUSSO D’ARIA
EFFETTO COANDA
13
14
15 Tasto ENERGY SAVE
(Risparmio di energia)
15
16
16
17
18
19
20
21
22
23
24
Tasto SELF CLEAN (Autopulizia)
17 Tasto TIMER ON
18 Tasto TIMER SET/CANCEL
Tasto TIME ADVANCE (avanti)
19
20
Tasto TIME REVERSE (indietro)
21 Tasto CLOCK
22 Tasto DISPLAY
23 Tasto RESET
24 Tasto TIMER OFF
ITALIANO
DISPLAY
1
2
3
4
5
6
7
8
9
10
11
12
13
14
15
16
1 Simboli di MODALITA’
Simboli di FAN SPEED (Velocita’ del ventilatore)
2
3 Simbolo PLASMACLUSTER
Simbolo del FLUSSO D’ARIA (COOL/DRY) (freddo/secco)
4
5 Simbolo del FLUSSO D'ARIA (HEAT) (caldo)
Simbolo FLUSSO D'ARIA EFFETTO COANDA (HEAT) (caldo)
6
7
Simbolo ENERGY SAVE (Risparmio di energia)
8 Simbolo BATTERY (Batteria)
9 Simbolo TRASMISSIONE
10 Simbolo SELF CLEAN (Autopulizia)
11 Simbolo FLUSSO D’ARIA EFFETTO COANDA
(COOL/DRY) (freddo/secco)
12
Simbolo FULL POWER (Massima potenza)
13 Simbolo SPOT AIR
14 Indicatore di TEMPERATURA
15 Indicatore TIMER OFF
16 Indicatore TIMER ON/CLOCK
IT-3
AY-XPC18LR_OM_IT.indd 3AY-XPC18LR_OM_IT.indd 3 2010-03-18 16:51:222010-03-18 16:51:22
Page 22
USO DEL TELECOMANDO
INSERIMENTO DELLE BATTERIE
Togliete il coperchio delle batterie.
1
Inserite due batterie. (AAA (R03))
• Assicuratevi che le polarità (+) e (-) siano
2
disposte correttamente.
Reinserite il coperchio delle batterie.
3
Pemere il tasto RESET.
• Il display indica “AM 6:00”.
4
Coperchio
delle batterie
NOTE:
• In condizioni di uso normali, le batterie durano
circa un anno.
• Sostituite le batterie quando sul telecomando
appare “
• Quando sostituite le batterie, cambiatele sempre entrambe e usatene dello stesso tipo.
•
Se non intendete usare l’unità per un lungo periodo di tempo, togliete le batterie dal telecomando.
IMPOSTARE L’ORA
Ci sono due modalità per l’orologio: modalità a 12 e a 24 ore.
Per impostare la modalità 12 ore
1
premete il tasto CLOCK una volta.
Per impostare la modalità 24 ore
premete il tasto CLOCK due volte.
Premete il tasto TIME ADVANCE o
2
REVERSE per impostare l’ora.
• Tenete il tasto premuto per far andare
avanti o indietro l’ora velocemente.
Pemere il tasto SET/C.
• I due punti (:) lampeggiano.
3
”.
USO DEL TELECOMANDO
Puntate il telecomando verso la fi nestra di
ricezione del segnale dell’unità e premete il
tasto desiderato. L’unità emette un segnale
acustico quando riceve il segnale.
•
Assicuratevi che niente, come per esempio una
tenda, blocchi la fi nestra di ricezione del segnale.
• La distanza effettiva del segnale è di 7 metri.
7 m
PRECAUZIONI:
• Non espontete la fi nestra di ricezione alla luce
diretta del sole. Questo potrebbe danneggiare
irrimediabilmente il suo funzionamento.
• L’uso di lampade fluorescenti nella stessa
stanza potrebbe interferire con la trasmissione
del segnale.
• Non lasciate il telecomando alla luce diretta
del sole o vicino ad un termosifone. Proteggete il telecomando dall’umidità e da colpi.
Finestra di
ricezione
3
2
1
NOTE:
• L’ora non può essere impostata quando è impostato il timer.
IT-4
AY-XPC18LR_OM_IT.indd 4AY-XPC18LR_OM_IT.indd 4 2010-03-18 16:51:222010-03-18 16:51:22
Page 23
SISTEMARE I FILTRI DI PURIFICAZIONE DELL’ARIA
SUGGERIMENTI PER RISPARMIARE ENERGIA
I fi ltri di purifi cazione dell’aria tolgono la
polvere dall’aria e rilasciano aria pulita.
Estraete i fi ltri dell’aria.
1
Aprite il pannello frontale.
1
2
Spingete i fi ltri verso il basso per estrarli.
1
2
Posizionate il fi ltro di purifi cazione
dell’aria sotto i tappini del fi ltro.
2
Tappini del fi ltro
Filtro di purifi cazione
dell’aria
Reinstallate i filtri dell’aria e chiudete il pannello aperto.
3
Filtri dell’aria
Qui di sotto sono presentati alcuni semplici metodi per risparmiare energia durante l’
uso del condizionatore d’aria.
Impostare la temperatura adatta
• Impostare una temperatura più alta o più bassa comporta un aumento di consumo energetico.
Evitate la luce solare diretta e le correnti d’aria
• Evitando la luce solare diretta durante il raffreddamento si risparmierà energia.
• Chiudete le fi nestre e le porte durante le ope-
razioni di raffreddamento e riscaldamento.
Tenete i fi ltri puliti per garantire un fun-
zionamento più effi cace
Spegnete l’interruttore quando non usate l’unità per un lungo periodo di tempo
• L’unità interna continua a consumare una
piccola quantità di energia quando non è in
funzione.
ITALIANO
2
1
NOTE:
•
Non aprite la busta di plastica finché non
dovete usare i fi ltri. (Altrimenti i fi ltri potrebbero
durare di meno.)
• Non esponete i filtri alla luce solare diretta. (Altrimenti si potrebbero deteriorare.)
IT-5
AY-XPC18LR_OM_IT.indd 5AY-XPC18LR_OM_IT.indd 5 2010-03-18 16:51:232010-03-18 16:51:23
Page 24
FUNZIONI DI BASE
1
SPEGNERE
2
Premete il tasto COOL (freddo), DRY
1
(secco) o HEAT (caldo).
: RAFFREDDAMENTO
: DEUMIDIFICAZIONE
:
RISCALDAMENTO
•
La spia rossa di OPERATION ( ) si illuminerà.
PER SPEGNERE
Pemere il tasto STOP.
• La spia rossa di OPERATION ( ) si spegnerà.
Premete il tasto TEMP. per impostare la
2
temperatura desiderata.
(Modalità RAFFREDDAMENTO/RISCALDAMENTO)
Intervallo di impostazione della temperatura: 18-32 °C.
(Modalita’ DEUMIDIFICAZIONE)
La temperatura può essere modifi cata fi no a ±2 °C ri-
spetto all’impostazione automatica della temperatura.
(Esempio: 1 °C in più)
(Esempio: 2 °C in meno)
3
Premete il tasto FAN (Ventilatore) per
3
impostare la velocità del ventilatore desiderata.
AUTOMATICO MODERATO BASSO ALTO
• Nella modalità DEUMIDIFICAZIONE, la velocità
del ventilatore è preselezionata su AUTOMATICO e non può essere cambiata.
IT-6
AY-XPC18LR_OM_IT.indd 6AY-XPC18LR_OM_IT.indd 6 2010-03-18 16:51:232010-03-18 16:51:23
Page 25
REGOLAZIONE DELLA
DIREZIONE DEL FLUSSO D’ARIA
FUNZIONAMENTO DEL PLASMACLUSTER
DIREZIONE VERTICALE DEL FLUSSO D’ARIA
Pemere il tasto SWING ( ).
1
• Il defl ettore verticale del fl usso d’aria si
muoverà.
Premere ancora il tasto SWING per
2
fermare il defl ettore nella posizione
desiderata (
).
1
2
DIREZIONE ORIZZONTALE DEL FLUSSO D’ARIA
Pemere il tasto SWING ( ).
1
•
Il defl ettore orizzontale del fl usso d’aria si muoverà.
Premere ancora il tasto SWING per fermare
2
il defl ettore nella posizione desiderata (
).
Gli ioni rilasciati nella stanza ridurranno
delle muffe trasportate dall’aria.
Premete il tasto PLASMACLUSTER
1
durante il funzionamento.
• Sul telecomando apparirà “ ”.
•
La spia blu PLASMACLUSTER si illuminerà.
PER ANNULLARE
Pemere nuovamente il tasto PLASMACLUSTER.
•
La spia blu PLASMACLUSTER si spegnerà.
ITALIANO
1
2
1
PRECAUZIONI
Non provate mai a regolare i defl ettori manualmente.
•
La regolazione manuale dei defl ettori di regolazione
verticale può causare un malfunzionamento dell’unità quando si usa il telecomando per la regolazione.
•
Quando il defl ettore di regolazione verticale è posi-
zionato nella parte bassa nella modalità RAFFREDDAMENTO o DEUMIDIFICAZIONE per un lungo periodo di tempo, si potrebbe formare della condensa.
NOTE:
• L’intervallo di regolamente è più limitato rispetto all’intervallo SWING per evitare che la
condensa goccioli.
AY-XPC18LR_OM_IT.indd 7AY-XPC18LR_OM_IT.indd 7 2010-03-18 16:51:242010-03-18 16:51:24
NOTE:
• L’utilizzo della funzione PLASMACLUSTER
verrà memorizzato e sarà attivato la volta
successiva che si accende il condizionatore d’
aria.
• Per utilizzare l’operazione Plasmacluster solo
in modalità FAN (Ventilatore), premete il tasto
PLASMACLUSTER quando l’unità non è in
funzione.
Il simbolo MODALITA del telecomando si
spegnerà e la velocità del ventilatore non può
essere impostata su AUTOMATICO.
IT-7
Page 26
FLUSSO D’ARIA EFFETTO COANDA
MODO SPOT AIR
In modalità raffreddamento o deumidifi cazione
il defl ettore di regolazione verticale è inclinato
verso l’alto per indirizzare l’aria fredda verso il
soffi tto per evitare il fl usso d’aria diretto.
Premete il tasto FLUSSO D’ARIA EFFET-
1
TO COANDA durante il funzionamento.
(modalità COOL/DRY) (freddo/secco)
• Sul telecomando apparirà “ ”.
(modalità HEAT) (caldo)
• Sul telecomando apparirà “
PER ANNULLARE
Pemere nuovamente il tasto FLUSSO
D’ARIA EFFETTO COANDA.
”.
I deflettori sono regolati in modo che il
fl usso d’aria venga indirizzato nella zona
desiderata.
Premete il tasto SPOT AIR per sele-
1
zionare la direzione del fl usso d’aria
desiderato.
ANNULLA
1
1
NOTE:
• Se disederate il FLUSSO D’ARIA EFFETTO
COANDA in modalità FULL POWER (Massima
potenza), premete il tasto FLUSSO D’ARIA
EFFETTO COANDA durante la funzione in
modalità FULL POWER (Massima potenza).
• L’inpostazione FLUSSO D’ARIA EFFETTO
COANDA e SPOT AIR non possono essere
usati insieme.
AY-XPC18LR_OM_IT.indd 8AY-XPC18LR_OM_IT.indd 8 2010-03-18 16:51:242010-03-18 16:51:24
NOTE:
• Se desiderate l’impostazione STOP AIR e la
modalità FULL POWER (Massima potenza),
premete il tasto STOP AIR durante la funzione
FULL POWER (Massima potenza).
• L’inpostazione FLUSSO D’ARIA EFFETTO
COANDA e SPOT AIR non possono essere
usati insieme.
IT-8
Page 27
FUNZIONAMENTO FULL POWER (MASSIMA POTENZA)
FUNZIONAMENTO PER RISPARMIARE ENERGIA
Il condizionatore funziona alla massima
potenza per rendere la stanza calda o fresca rapidamente.
Premete il tasto FULL POWER (Massi-
1
ma potenza) durante il funzionamento.
•
Sul telecomando apparirà “ ” e il simbolo
FLUSSO D’ARIA dureranno più a lungo.
•
Dal display scomparirà l’indicazione della temperatura.
•
La spia verde FULL POWER (Massima potenza) ( ) si illuminerà.
PER ANNULLARE
Pemere nuovamente il tasto FULL
POWER (Massima potenza).
• La spia verde FULL POWER (Massima
potenza) (
) si spegnera.
La temperatura impostata è controllata
automaticamente per risparmiare energia.
Premete il tasto ENERGY SAVE (Ri-
sparmio di energia) durante il fun-
1
zionamento.
• Sul telecomando apparirà “ ”.
• La velocità del ventilatore verrà impostata
su AUTOMATICO.
PER ANNULLARE
Pemere nuovamente il tasto ENERGY
SAVE (Risparmio di energia).
ITALIANO
1
1
NOTE:
•
Il condizionatore funzionerà alla velocità del ventilatore “Extra HIGH” per 5 minuti, mettetela poi su “HIGH”.
•
Non potete impostare la temperatura o la velocità
del ventilatore durante il funzionamento FULL
POWER (Massima potenza).
•
L’operazione ENERGY SAVE (Risparmio di energia) e FULL POWER (Massima potenza) non possono essere usati insieme.
AY-XPC18LR_OM_IT.indd 9AY-XPC18LR_OM_IT.indd 9 2010-03-18 16:51:252010-03-18 16:51:25
NOTE:
• In modalità HEAT (caldo), la temperatura fl ut-
tuerà automaticamente tra 0 - 2 °C in meno
rispetto alla temperatura impostata all’inizio.
In modalità COOL (freddo), la temperatura
fl uttuerà automaticamente tra 0 - 1 °C in più
rispetto alla temperatura impostata all’inizio.
• L’operazione ENERGY SAVE (Risparmio di
energia) e FULL POWER (Massima potenza)
non possono essere usati insieme.
IT-9
Page 28
TIMER SPENTO 1.2.3.5 ORE
FUNZIONAMENTO DEL TIMER
Quando il TIMER OFF 1.2.3.5 ore è impostato, l’unità si spegnerà automaticamente
dopo le ore impostate.
Premete il tasto TIMER OFF 1.2.3.5
1
ore per impostare l’ora desiderata.
ANNULLA
•
La spia arancione del TIMER ( ) si illuminerà.
•
Il tempo rimanente verrà indicato sul telecomando a scatti di un’ora.
PER ANNULLARE
Pemere il tasto SET/C.
In alternativa premete il tasto TIMER
OFF 1.2.3.5 ore
•
La spia arancione del TIMER ( ) si spegnerà.
TIMER OFF
Pemere il tasto TIMER OFF.
1
• L’indicatore TIMER OFF lampeggerà.
Premete il tasto TIME ADVANCE o
2
REVERSE per impostare l’ora.
• L’ora può essere impostata con scatti di
10 minuti.
Pemere il tasto SET/C.
3
• La spia arancione del TIMER ( ) si illuminerà.
1
ANNULLA
3
2
1
NOTE:
• L’operazione TIMER OFF 1.2.3.5 ore ha la
priorità sulle impostazioni TIMER ON e TIMER OFF.
• Se il TIMER OFF 1.2.3.5 ore viene impostato
mentre l’unità non è in funzione, l’unità funzionerà in base alle condizioni impostate precedentemente.
• Se il TIMER ON e/o il TIMER OFF sono impostati, il tasto TIMER CANCEL annulla ogni
impostazione.
AY-XPC18LR_OM_IT.indd 10AY-XPC18LR_OM_IT.indd 10 2010-03-18 16:51:252010-03-18 16:51:25
NOTE:
•
Quando viene impostato il TIMER OFF, l’impostazione della temperatura viene regolata automaticamente per evitare che la stanza diventi eccessivamente fredda o calda, per esempio
quando dormite. (Funzione Auto Sleep)
Modalità COOL (freddo): un’ora dopo l’impo-
stazione del timer, l’impostazione della temperatura aumenta di 1 °C.
Modalità HEAT (caldo): un’ora dopo l’imposta-
zione del timer, l’impostazione della temperatura diminuisce di 3 °C.
IT-10
Page 29
TIMER ATTIVATO
Pemere il tasto TIMER.
1
• L’indicatore TIMER ON lampeggerà.
Premete il tasto TIME ADVANCE o
2
REVERSE per impostare l’ora.
•
L’ora può essere impostata con scatti di 10 minuti.
Pemere il tasto SET/C.
3
•
La spia arancione del TIMER ( ) si illuminerà.
PER ANNULLARE
Pemere il tasto SET/C.
•
La spia arancione del TIMER ( ) si spegnerà.
•
L’ora attuale apparirà sul telecomando.
ANNULLA
PER CAMBIARE LE IMPOSTAZIONI
DELL’ORA
Annullate le impostazioni del TIMER e
poi impostatele di nuovo.
PER ASSOCIARE IL TIMER ON E IL
TIMER OFF
Impostate il TIMER OFF e il TIMER ON.
Esempio
Ora attuale: 9:00 p.m.)
(
TIMER OFF alle 11:00 p.m.
TIMER ON alle 7:00 a.m.
ITALIANO
1
3
2
• La freccia ( o ) tra l’indicatore TIMER ON
e l’indicatore TIMER OFF mostra quale timer
si attiverà per primo.
NOTE:
NOTE:
• L’unità si accenderà prima dell’ora impostata
per permettere che la stanza raggiunga la
temperatura desiderata all’ora del programma.
(Funzione risveglio)
AY-XPC18LR_OM_IT.indd 11AY-XPC18LR_OM_IT.indd 11 2010-03-18 16:51:252010-03-18 16:51:25
• Non si può programmare il TIMER ON e il
TIMER OFF per mettere in funzione l’unità a
diverse temperature o secondo altre impostazioni.
• Un timer può essere programmato per attivarsi prima dell’altro.
IT-11
Page 30
FUNZIONAMENTO AUTOPULENTE
Tasto DISPLAY
La funzione SELF CLEAN (Autopulizia)
riduce lo sviluppo di funghi e muffe con ioni
Plasmacluster e asciuga l’interno dell’untià.
Utilizzate questo funzionamento al cambio
di stagione
Schiacciate il pulsante SELF CLEAN
1
.
(Autopulizia) quando l’unità non è in
funzione.
• Sul telecomando apparirà “ ”.
La spia verde SELF CLEAN (Autopulizia) ( ) e
•
la spia blu PLASMACLUSTER si illumineranno.
•
L’unità smetterà di funzionare dopo 40 minuti.
PER ANNULLARE
Pemere il tasto SELF CLEAN (Autopulizia).
•
La spia verde SELF CLEAN (Autopulizia) ( ) e
la spia blu PLASMACLUSTER si illumineranno.
Premete il tasto DISPLAY quando le spie
sull’unità sono troppo luminose. (La spia
rossa OPERATION e quella arancione TIMER non possono essere spente.)
Premete il tasto DISPLAY durante il
1
funzionamento.
• La spia blu PLASMACLUSTER, la spia verde SELF CLEAN (Autopulizia) ( ) e/o la
spia verde FULL POWER (Massima potenza) ( ) si spegneranno.
PER ACCENDERE
Pemere nuovamente il tasto DISPLAY.
1
MODALITA’ AUSILIARIA
Usate questa modalità quando il telecomando non è disponibile.
PER ACCENDERE
Pemere il tasto AUX.
•
La spia rossa di OPERATION ( ) si illuminerà.
• L’impostazione della modalità e della temperatura sono selezionate automaticamente
secondo la temperatura della stanza e quella
esterna quando l’unità è accesa. La velocità
del ventilatore è impostata su AUTOMATICO.
1
NOTE:
• Non si può impostare la temperatura, la velocità del ventilatore, la direzione del fl usso d’
aria o le impostazioni del timer durante la funzione SELF CLEAN (Autopulizia).
Muffe e funghi già presenti non possono essere
•
eliminati con questa operazione.
PER SPEGNERE
Pemere nuovamente il tasto AUX.
•
La spia rossa di OPERATION ( ) si spegnerà.
AUX
IT-12
AY-XPC18LR_OM_IT.indd 12AY-XPC18LR_OM_IT.indd 12 2010-03-18 16:51:262010-03-18 16:51:26
Page 31

MANUTENZIONE
Assicuratevi di interrompere il funzionamento dell’apparecchio e spegnete l’interruttore del circuito prima di accingervi alla
manutenzione.
PULIZIA DEI FILTRI DELL’ARIA
I fi ltri dovrebbero essere puliti ogni due settimane.
Spegnete l’unità.
1
Togliete i fi ltri.
2
1
Sollevate il pannello aperto.
2
Spingete i fi ltri verso il basso per estrarli.
1
2
Togliete i fi ltri di purifi cazione dell’
3
aria dai fi ltri dell’aria.
Pulite i fi ltri.
4
Usate un’aspirapolvere per togliere la polvere. Se i fi ltri sono sporchi, lavateli con ac-
qua tiepida e un detergente delicato. Asciugate i fi ltri all’ombra prima di reinstallarli.
Reinstallate i fi ltri di purifi cazione
5
dell’aria.
MANUTENZIONE UNA VOLTA TERMINATA LA STAGIONE DEL CONDIZIONATORE D’ARIA
Utilizzate l’unità in modalità SELF
CLEAN (Autopulizia) per asciugare a
1
fondo l’interno dell’unità.
Interrompete il funizionamento e spe-
2
gnete l’interruttore.
Pulite i fi ltri e poi reinstallateli.
3
MANUTENZIONE PRIMA DELLA STAGIONE DEL CONDIZIONATORE D’ARIA
Assicuratevi che i fi ltri dell’aria non
1
siano sporchi.
Assicuratevi che l’entrata e l’uscita
2
dell’aria non siano ostruite.
RIPOSIZIONARE I FILTRI DI PURIFICAZIONE DELL’ARIA
I fi ltri dovrebbero essere cambiati ogni 3-6 mesi.
Togliete i fi ltri di purifi cazione dell’
1
aria dai fi ltri dell’aria.
Inserite i nuovi filtri di purificazione
2
dell’aria sotto i tappini dei fi ltri del’aria.
Tappini del fi ltro
ITALIANO
Reinstallate i fi ltri e chiudete il pan-
6
nello aperto.
2
1
PULIZIA DELL’UNITA’ E DEL TELECOMANDO
• Strofi nateli con un panno morbido.
• Non schizzate o versate acqua sui componen-
ti, poiché possono verifi carsi scosse elettriche
o danni all’apparecchiatura.
• Non usate acqua calda, diluenti, polvere abra-
siva o solventi forti.
Filtro di purifi cazione
dell’aria
NOTE:
• I fi ltri di purifi cazione dell’aria non sono lavabili
per un riutilizzo. I nuovi fi ltri sono disponibili
presso il vostro fornitore.
Eliminazione dei fi ltri
Per favore eliminate i fi ltri sostituiti secondo le
leggi e le regolamentazioni locali di smaltimento.
Materiali del fi ltro di FURIFICAZIONE DELL’ARIA
Filtro: Polipropilene
Cornice: Poliester
Filtri dell’aria
IT-13
AY-XPC18LR_OM_IT.indd 13AY-XPC18LR_OM_IT.indd 13 2010-03-18 16:51:262010-03-18 16:51:26
Page 32

INFORMAZIONI SUL FUNZIONAMENTO
CONDIZIONI DI FUNZIONAMENTO
Raffreddamente (
Temperatura interna Temperatura esterna
Limite
superiore
Limite
inferiore
Limite
superiore
Limite
inferiore
Riscaldamento (
Limite
superiore
Limite
inferiore
• Il sistema di protezione incorporato potrebbe
interrompere il funzionamento dell’unità quando la si utilizza ad una temperatura più elevata
rispetto a questo intervallo.
• Si potrebbe formare della condensa all’uscita
dell’aria se l’unità funziona continuamente in
modalità RAFFREDDAMENTO o DEUMIDIFICAZIONE quando l’umidità è al di sopra dell’
80%.
32 ˚C
21 ˚C
Raffreddamente (
Temperatura interna Temperatura esterna
32 ˚C 46 ˚C
21 ˚C -10 ˚C
Temperatura interna Temperatura esterna
27˚C 24 ˚C
AY-XPC18LR)
46 ˚C (Uso singolo)
43 ˚C (Uso multiplo)
-10 ˚C (Uso singolo)
21 ˚C
(Uso multiplo)
AY-XP24LR)
AY-XPC18LR, AY-XP24LR)
- -15 ˚C
SE SI VERIFICA UN GUASTO ALL’
ALIMENTAZIONE
• Se si verifi ca un guasto all’alimentazione, il
condizionatore d’aria è dotato di una funzione
di memoria che memorizza le impostazioni.
Dopo il ripristino dell’alimentazione, l’unità
riprenderà il funzionamento con le stesse
impostazioni di prima, fatta eccezione delle
impostazioni del timer.
• Se si verifica un guasto all’alimentazione
mentre il timer è impostato, le impostazioni
del timer verranno cancellate e non saranno
ripristinate, neanche dopo la ripresa dell’alimentazione.
NOTE SULLE OPERAZIONI DI RISCALDAMENTO
FUNZIONE DI SCONGELAMENTO
• Quando si forma del ghiaccio nell’unità esterna durante le operazioni di riscaldamento, l’
unità inizierà a scongelarsi automaticamente
per circa 5-10 minuti per sciogliere il ghiaccio.
Durante lo scongelamento i ventilatori interno
ed esterno smettono di funzionare.
EFFICIENZA DEL RISCALDAMENTO
• L’unità usa una pompa di calore che raccoglie calore dall’aria esterna e lo diffonde nella
stanza. Di conseguenza, la temperatura dell’
aria esterna infl uisce notevolmente sull’effi ca-
cia del riscaldamento.
• Se la capacità di riscaldamento è ridotta a
causa di una bassa temperatura esterna, utilizzate una stufa aggiuntiva.
• Per riscaldare tutto l’ambiente occorrerà del
tempo, in quanto l’unità adotta un sistema a
circolazione forzata.
SE SI USA AY-XPC18LR COME CONDIZIONATORE D’ARIA MULTI-SYSTEM
Con un condizionatore d’aria multi-system, più
unità interne possono essere collegate ad una
unità esterna.
Con un condizionatore d’aria multi-system, non
potete far funizonare diverse unità interne in
diverse modalità.
• Se un’unità è in funzione con la modalità
COOL (freddo) (o DRY) (Secco), le altre unità
devono funzionare nella stessa modalità. La
modalità dell’unitò interna che funziona per
prima ha la priorità. L’unità interna che viene accesa in seguito in na modalità diversa
non può mettersi in funzione. Inizia a fare un
suono (bip) e le spie OPERATION e TIMER
iniziano a lampeggiare. In questo caso, impostate tutte le unità interne sulla stessa modalità di operazione.
• La modalità COOL (freddo) e DRY (secco)
possono essere impostati contemporaneamente.
IT-14
AY-XPC18LR_OM_IT.indd 14AY-XPC18LR_OM_IT.indd 14 2010-03-18 16:51:272010-03-18 16:51:27
Page 33

PRIMA DI RICHIEDERE ASSISTENZA
Le seguenti condizioni non signifi cano mal-
funzionamento
L’unità non funziona
• L’unità non funziona se viene accesa subito
dopo averla spenta. L’unità non funziona immediatamente dopo aver cambiato la modalità. Ciò al fi ne di porteggere il meccanismo
interno. Attendere 3 minuti prima che l’unità
funzioni.
L’unità non emette aria calda
• Nella modalità di RISCALDAMENTO, il ventilatore interno potrebbe non funzionare per
2-5 minuti dopo l’accensione dell’unità per
evitare che esca aria fredda.
• L’unità si sta scongelando. Aspettate 5 o 10
minuti.
Odori
•
Odori di tappeti e della mobilia che sono entrati
nell’unità possono essere espulsi dall’unità.
Scricchiolio
• Questo rumore viene generato dall’unità che
si decomprime e assesta a causa del cambiamento di temperatura.
Viene emesso un leggero ronzio
•
Questo rumore proviene dall’unità mentre
produce ioni Plasmacluster.
Sibilo
• Il suono delicato, tipo sibilo, è prodotto dal
refrigerante che scorre all’interno dell’unità.
C’è condensa all’uscita d’aria interna
•
Durante il raffreddamento è causato dalla
differenza tra la temperatura dell’aria nella stanza
e l’aria scaricata.
Vapore acqueo
• Durante il riscaldamento potrebbe fuoriuscire
del vapore acqueo dall’unità esterna durante
lo scongelamento.
L’unità esterna non smette di funzionare
• Dopo aver interrotto il funzionamento, l’unità
esterna continuerà a far girare il ventilatore
per circa un minuto per raffreddare l’unità.
Odori emessi dalla presa plasmacluster
• Si tratta dell’odore dell’ozono prodotto dal
generatore di ioni Plasmacluster. La concentrazione di ozono è minima, quindi non è pericolosa per
la salute. La scarica di ozono nell’aria svanisce rapidamente e la sua densità all’interno della stanza
non aumenta.
Se si usa AY-XPC18LR come condizionatore d’aria multi-system
Un’unità interna non in funzione sta diventando calda.
Dell’aria calda esce da un’unità interna
nella modalità PLASMACLUSTER.
• Il liquido refrigerante fuoriesce dall’unità interna quando l’altra unità è in funizone nella
modalità HEAT (caldo).
Non c’è fusso d’aria dall’unitò interna
quando questa è in modalità PLASMACLUSTER o SELF CLEAN (Autopulizia).
• L’unità esterna si sta scongelando.
Un’unità interna inizia a fare un suono
(bip) e la spia OPERATION e TIMER iniziano a lampeggiare contemporaneamente.
• Controllate che tutte le unità interne sono
impostate sulla stessa modalità. Altrimenti
impostate tutte le unità interne sulla stessa
modalità di operazione.
Controllate le seguenti opzioni prima di
chiamare l’assistenza.
L’unità non funziona
• Controllate che l’interruttore del circuito non
sia saltato o che non sia bruciato un fusibile.
L’unità non raffredda (o scalda) effettivamente la stanza
• Controllate i fi ltri. Puliteli se sono sporchi.
• Controllate l’unità esterna e assicuratevi che l’
uscita o l’entrata dell’aria non siano ostruite.
• Controllate che il termostato sia impostato
correttamente.
• Assicuratevi che porte e fi nestre siano ben
chiuse.
L’unità non riceve il segnale del telecomando
• Controllate che le batterie del telecomando
non siano vecchie o scariche.
• Provate a inviare nuovamente il segnale puntando il telecomando correttamente verso la
fi nestra di ricezione del segnale dell’unità.
• Controllate che le batterie del telecomando
siano inserite correttamente.
Si prega di chiedere assistenza quando la
spia di OPERATION e la spia TIMER e/o
la spia PLASMACLUSTER sull’unità lampeggiano.
ITALIANO
IT-15
AY-XPC18LR_OM_IT.indd 15AY-XPC18LR_OM_IT.indd 15 2010-03-18 16:51:272010-03-18 16:51:27
Page 34

Προσοχή: Το προϊόν σας έχει
σήμανση με αυτό το σύμβολο.
Αυτό σημαίνει ότι τα χρησιμοποιημένα ηλεκτρικά και
ηλεκτρονικά προϊόντα δεν θα
πρέπει να αναμιγνύονται με
γενικά οικιακά απορρίμματα.
Υπάρχει ξεχωριστό σύστημα
περισυλλογής για τα συγκεκριμένα προϊόντα.
A. Πληροφορίες σχετικά με την απόρριψη εξοπλισμού
1. Στην Ευρωπαϊκή Ένωση
Προσοχή: Αν επιθυμείτε να απορρίψετε τον εξοπλισμό αυτό, μην χρησιμοποιείτε τον συνηθισμένο κάδο απορριμμάτων!
Η επεξεργασία του χρησιμοποιημένου ηλεκτρικού και ηλεκτρονικού εξοπλισμού πρέπει να γίνεται ξεχωριστά και σε συμφωνία με τη νομοθεσία που
απαιτεί την κατάλληλη επεξεργασία, αποκατάσταση και ανακύκλωση του
χρησιμοποιημένου ηλεκτρικού και ηλεκτρονικού εξοπλισμού
Έπειτα από σχετική εφαρμογή σε χώρες-μέλη, ο χρησιμοποιημένος
ηλεκτρικός και ηλεκτρονικός εξοπλισμός του κάθε σπιτιού εντός της ΕΕ
μπορεί να επιστραφεί χωρίς χρέωση* σε προκαθορισμένες εγκαταστάσεις
περισυλλογής. Σε ορισμένες χώρες* είναι δυνατόν να επιστρέψετε το παλιό
σας προϊόν στον τοπικό σας προμηθευτή χωρίς χρέωση, αν αγοράσετε ένα
παρόμοιο καινούργιο
*) Για περισσότερες πληροφορίες, επικοινωνήστε με το φορέα της περιοχής
σας.
Αν ο χρησιμοποιημένος ηλεκτρικός ή ηλεκτρονικός σας εξοπλισμός έχει
μπαταρίες ή συσσωρευτές, απορρίψτε αυτά πρώτα ξεχωριστά, σύμφωνα
με τις τοπικές απαιτήσεις.
Η σωστή απόρριψη του προϊόντος αυτού θα σας βοηθήσει να βεβαιωθείτε
ότι τα απορρίμματα υφίστανται την απαραίτητη επεξεργασία,
ση και ανακύκλωση, αποτρέποντας έτσι πιθανές αρνητικές συνέπειες για το
περιβάλλον και την ανθρώπινη υγεία, οι οποίες διαφορετικά θα μπορούσαν
να προκύψουν λόγω της ακατάλληλης επεξεργασίας απορριμμάτων.
2. Σε άλλες χώρες εκτός της ΕΕ
Αν επιθυμείτε να απορρίψετε το συγκεκριμένο προϊόν, επικοινωνήστε με
τους τοπικούς σας φορείς και ζητήστε πληροφορίες
απόρριψης.
B. Πληροφορίες σχετικά με την απόρριψη εξοπλισμού για χρήστες σε
επιχειρήσεις.
1. Στην Ευρωπαϊκή Ένωση
Αν το προϊόν χρησιμοποιείται σε επιχειρήσεις και επιθυμείτε να το απορρίψετε:
Επικοινωνήστε με τον προμηθευτή SHARP, ο οποίος θα σας πληροφορήσει σχετικά με την επιστροφή του προϊόντος. Ενδέχεται να χρεωθείτε για
κόστος της επιστροφής και της ανακύκλωσης. Προϊόντα μικρού μεγέθους
(και σε μικρές ποσότητες) ενδέχεται να μπορούν να επιστραφούν από τις
τοπικές σας υπηρεσίες περισυλλογής.
2. Σε άλλες χώρες εκτός της ΕΕ
Αν επιθυμείτε να απορρίψετε το συγκεκριμένο προϊόν, επικοινωνήστε με
τους τοπικούς σας φορείς και ζητήστε πληροφορίες για τη σωστή
απόρριψης.
προϊόν.
(οικιακή χρήση)
.
αποκατάστα-
για τη σωστή μέθοδο
το
μέθοδο
Η μπαταρία που διατίθεται με αυτό το προϊόν περιλαμβάνει ίχνη από μόλυβδο.
Για τις χώρες της Ευρωπαϊκής Ένωσης
απαγορεύεται, υποδεικνύει πως οι χρησιμοποιημένες μπαταρίες δεν πρέπει να τοποθετούνται με τα υπόλοιπα σκουπίδια του νοικοκυριού. Υπάρχει
ειδικό σύστημα περισυλλογής των χρησιμοποιημένων μπαταριών, που
επιτρέπει τη σωστή διαχείρηση και ανακύκλωση σύμφωνα με τη νομοθεσία.
Παρακαλείστε να επικοινωνήσετε με τις τοπικές αρχές για λεπτομέρειες
Pb
AY-XPC18LR_OM_GR.indd 1AY-XPC18LR_OM_GR.indd 1 2010-03-18 16:37:392010-03-18 16:37:39
ως προς τα σημεία αποκομιδής και ανακύκλωσης.
Για την Ελβετία: Οι χρησιμοποιημένες μπαταρίες να επιστρέφονται στο
σημείο πώλησης τους.
Για τις χώρες εκτός της Ευρ. Ένωσης: Παρακαλούμε επικοινωνήστε με
τις τοπικές αρχές, για τη σωστή μέθοδο απομάκρυνσης των χρησιμοποιημένων μπαταριών.
Περιέχει φθοριούχα αέρια θερμοκηπίου καλυπτόμενα από το πρωτόκολλο του Κιότο
R410A (Δυναμικό θέρμανσης του πλανήτη 1980)
: Ο κάδος απορριμμάτων με την ένδειξη
GR
Page 35

ΕΛΛΗΝΙΚΑ
Παρακαλούμε διαβάστε αυτό το εγχειρίδιο χρήσης προσεκτικά προτού
χρησιμοποιήσετε το προϊόν. Αυτό το εγχειρίδιο θα πρέπει να φυλάσσεται
σε ασφαλές μέρος για γρήγορη αναφορά.
ΠΕΡΙΕΧΟΜΕΝΑ
• ΠΡΟΦΥΛΑΞΕΙΣ ΑΣΦΑΛΕΙΑΣ ............................GR-1
• ΟΝΟΜΑΣΙΕΣ ΕΞΑΡΤΗΜΑΤΩΝ ......................... GR-2
• ΧΡΗΣΗ ΤΟΥ ΤΗΛΕΧΕΙΡΙΣΤΗΡΙΟΥ ................... GR-4
ΕΓΚΑΤΑΣΤΑΣΗ ΦΙΛΤΡΟΥ ΚΑΘΑΡΙΣΜΟΥ ΑΕΡΑ
•
•
ΥΠΟΔΕΙΞΕΙΣ ΓΙΑ ΕΞΟΙΚΟΝΟΜΗΣΗ ΕΝΕΡΓΕΙΑΣ
• ΒΑΣΙΚΗ ΛΕΙΤΟΥΡΓΙΑ ........................................GR-6
ΡΥΘΜΙΣΗ ΤΗΣ ΚΑΤΕΥΘΥΝΣΗΣ ΤΗΣ ΡΟΗΣ ΑΕΡΑ
•
• ΛΕΙΤΟΥΡΓΙΑ PLASMACLUSTER .....................GR-7
• ΠΛΗΚΤΡΟ COANDA AIRFLOW ........................GR-8
• SPOT AIR ..........................................................GR-8
• ΛΕΙΤΟΥΡΓΙΑ ΠΛΗΡΟΥΣ ΙΣΧΥΟΣ ...................... GR-9
ΛΕΙΤΟΥΡΓΙΑ ΕΞΟΙΚΟΝΟΜΗΣΗΣ ΕΝΕΡΓΕΙΑΣ ..
•
•
ΧΡΟΝΟΔΙΑΚΟΠΤΗΣ ΑΠΕΝΕΡΓΟΠΟΙΗΣΗΣ 1.2.3.5-ΩΡΩΝ
• ΛΕΙΤΟΥΡΓΙΑ ΧΡΟΝΟΔΙΑΚΟΠΤΗ ......................GR-10
• ΛΕΙΤΟΥΡΓΙΑ ΑΥ ΤΟ-ΚΑΘΑΡΙΣΜΟΥ ...................GR-12
• ΠΛΗΚΤΡΟ ΑΠΕΙΚΟΝΙΣΗΣ (DISPLAY) .............GR-12
• ΒΟΗΘΗΤΙΚΗ ΛΕΙΤΟΥΡΓΙΑ ................................GR-12
• ΣΥΝΤΗΡΗΣΗ .....................................................GR-13
• ΣΗΜΕΙΩΣΗ ΓΙΑ ΛΕΙΤΟΥΡΓΙΑ ............................GR-14
• ΠΡΙΝ ΚΑΛΕΣΕΤΕ ΤΟ ΣΕΡΒΙΣ...........................GR-15
..GR-5
..GR-5
..GR-7
GR-9
..GR-10
ΠΡΟΦΥΛΑΞΕΙΣ ΑΣΦΑΛΕΙΑΣ
ΠΡΟΕΙΔΟΠΟΙΗΣΗ
•
Μην τραβάτε ή παραμορφώνετε το καλώδιο τροφοδοσίας.
Το τράβηγμα και η κακή χρήση του καλωδίου τροφοδοσίας
μπορεί να προκαλέσουν βλάβη της μονάδας και ηλεκτροπληξία.
•
Προσέξτε ώστε να μην εκθέσετε το σώμα σας απευθείας στον
αέρα εξόδου για μεγάλο χρονικό διάστημα. Αυτό μπορεί να
επηρεάσει τη φυσική σας κατάσταση.
•
Όταν χρησιμοποιείτε τη συσκευή κλιματισμού για βρέφη,
παιδιά, ηλικιωμένους, κλινήρεις ή ανθρώπους με κινητικά
προβλήματα βεβαιωθείτε ότι η θερμοκρασία δωματίου είναι η
κατάλληλη για τα άτομα που βρίσκονται στο χώρο.
•
Μην εισάγετε ποτέ αντικείμενα μέσα στη μονάδα. Η εισαγωγή
αντικειμένων μπορεί να προκαλέσει τραυματισμούς, λόγω
της υψηλής ταχύτητας περιστροφής των εσωτερικών
ανεμιστήρων.
•
Γειώστε σωστά τη συσκευή κλιματισμου. Μη συνδέετε
το καλώδιο γείωσης με σωλήνα αερίου, σωλήνα νερού,
αλεξικέραυνο ή καλώδιο γείωσης τηλεφώνου. Αν η γείωση
είναι ατελής μπορεί να προκληθεί ηλεκτροπληξία.
•
Εάν εμφανιστεί οποιουδήποτε είδους ανωμαλία στη συσκευή
κλιματισμού (π.χ. μυρωδιά καμμένου), σταματήστε αμέσως
τη λειτουργία και θέστε ΕΚΤΟΣ ΛΕΙΤΟΥΡΓΙΑΣ τον διακόπτη
του κυκλώματος.
•
Η συσκευή θα πρέπει να εγκατασταθεί ανάλογα με τον
εθνικό κανονισμό καλωδίωσης. Λανθασμένη σύνδεση του
καλωδίου μπορεί να προκαλέσει υπερθέρμανση στο καλώδιο
τροφοδοσίας, το φις και την πρίζα, με αποτέλεσμα να υπάρχει
κίνδυνος πυρκαγιας.
•
Εάν το καλώδιο τροφοδοσίας είναι κατεστραμμένο, πρέπει
να αντικατασταθεί από τον κατασκευαστή ή από τον
εξουσιοδοτημένο αντιπρόσωπο σέρβις ή από ένα αντίστοιχα
καταρτισμένο άτομο προς αποφυγή βλαβών. Σε περίπτωση
αντικατάστασης, να χρησιμοποιείτε μόνο το καλώδιο
τροφοδοσίας που ορίζει ο κατασκευαστής.
•
Μην καταβρέχετε ή ρίχνετε νερό απευθείας επάνω στη μονάδα.
Το νερό μπορεί να προκαλέσει ηλεκτροπληξία ή βλάβη του
εξοπλισμού.
•
Μην επιχειρήσετε να εγκαταστήσετε/αφαιρέσετε/επισκευάσετε
μόνοι σας τη μονάδα. Η εσφαλμένη εργασία μπορεί να
περοκαλέσει ηλεκτροπληξία, διαρροή νερού, πυρκαγιά
κλπ. Συμβουλευθείτε τον αντιπρόσωπο ή άλλο ειδικευμένο
προσωπικό συντήρησης σχετικά με την εγκατάσταση/αφαίρεση/
επισκευή της μονάδας.
ΠΡΟΣΟΧΗ
•
Να ανοίγετε περιοδικά ένα παράθυρο ή μια πόρτα για να
αερίζεται το δωμάτιο, ειδικά όταν χρησιμοποιείτε συσκευές
αερίου. Αν ο αερισμός είναι ανεπαρκής μπορεί να προκληθεί
έλλειψη οξυγόνου.
•
Μη χειρίζεστε τα πλήκτρα με υγρά χέρια. Υπάρχει κίνδυνος
ηλεκτροπληξίας.
•
Για λόγους ασφαλείας, θέστε το διακόπτη εκτός λειτουργίας
όταν δεν πρόκειται να χρησιμοποιήσετε τη μονάδα για μεγάλο
χρονικό διάστημα.
•
Να ελέγχετε περιοδικά το πλαίσιο στήριξης της εξωτερικής
μονάδας για τυχόν φθορές και να βεβαιώνεστε ότι είναι σωστά
στερεωμένο στη θέση του.
•
Μην τοποθετείτε οτιδήποτε επάνω στην εξωτερική μονάδα και
μην πατάτε επάνω της. Τα αντικείμενα ή τα άτομα μπορεί να
πέσουν και να προκληθεί τραυματισμός.
•
Η μονάδα αυτή είναι σχεδιασμένη για οικιακή χρήση. Μην τη
χρησιμοποιείτε για άλλες εφαρμογές όπως σε σπίτια σκύλων ή
θερμοκήπια για την ανάπτυξη ζώων ή φυτών.
•
Μην τοποθετείτε δοχεία με νερό επάνω στη μονάδα. Εάν
διεισδύσει νερό στη μονάδα, υπάρχει κίνδυνος φθοράς των
ηλεκτρικών μονώσεων και πρόκλησης ηλεκτροπληξίας.
•
Μη φράσσετε τις εισόδους και εξόδους αέρα της μονάδας.
Μπορεί να προκληθεί ανεπαρκής απόδοση ή βλάβες.
•
Φροντίστε να διακόψετε τη λειτουργία και να θέσετε εκτός
λειτουργίας το διακόπτη πριν πραγματοποιήσετε συντήρηση
ή καθαρισμό. Στο εσωτερικό της μονάδας υπάρχει ένας
περιστρεφόμενος ανεμιστήρας και μπορεί να τραυματιστείτε.
•
Αυτή η συσκευή δεν προορίζεται για χρήση από μικρά παιδιά
ή από άτομα κλονισμένης υγείας χωρίς επίβλεψη. Τα μικρά
παιδιά πρέπει να επιβλέπονται ώστε να διασφαλιστεί ότι δεν
παίζουν με την συσκευή.
•
Βεβαιωθείτε ότι έχετε συνδέσει τη συσκευή κλιματισμού σε παροχή ρεύματος καθορισμένης τάσης και συχνότητας. Η χρήση
ακατάλληλης τάσης και συχνότητας μπορεί να οδηγήσει σε
βλάβη του εξοπλισμού και πιθανή πυρκαγιά.
•
Μην εγκαταστήσετε τη μονάδα σε σημείο όπου υπάρχει
κίνδυνος διαρροής ευφλέκτων αερίων. Μπορεί να προκληθεί
πυρκαγιά.
Εγκαταστήστε τη μονάδα σε σημείο με τη λιγότερη δυνατή σκό-
νη, καπνούς και υγρασία στον αέρα.
•
Τοποθετείστε το σωλήνα αποστράγγισης έτσι ώστε να εξασφαλίζεται ομαλή αποστράγγιση. Εάν η αποστράγγιση είναι
ανεπαρκής μπορεί να δημιουργηθεί υγρασία στο δωμάτιο, στα
έπιπλα κ.λ.π.
•
Βεβαιωθείτε ότι έχει τοποθετηθεί ένας διακόπτης διαρροών ή
ένας διακόπτης κυκλώματος, ανάλογα με τη θέση της εγκατάστασης, ώστε να αποφύγετε την ηλεκτροπληξία.
EΛΛΗΝΙΚΑ
GR-1
AY-XPC18LR_OM_GR.indd 1AY-XPC18LR_OM_GR.indd 1 2010-03-18 16:37:442010-03-18 16:37:44
Page 36

ΟΝΟΜΑΣΙΕΣ ΕΞΑΡΤΗΜΑΤΩΝ
ΕΣΩΤΕΡΙΚΗ ΜΟΝΑΔΑ
1 Είσοδος (αέρα)
1
2
2 Ανοικτός Πίνακας
3
3 Φίλτρο καθαρισμού αέρα
4
4 Φίλτρο αέρα
5
5 Πλήκτρο AUX
6 Πλαίσιο δέκτη
7 Κάθετη γρίλλια ροής αέρα
6
8 Οριζόντια γρίλλια ροής αέρα
7
9 Έξοδος αέρα
8
9
10 Λυχνία PLASMACLUSTER
10
11
12
13
14
(μπλε)
11 Λυχνία ΛΕΙΤΟΥΡΓΙΑΣ
(κόκκινο
12 Λυχνία ΧΡΟΝΟΔΙΑΚΟΠΤΗ
(πορτοκαλί
Λυχνία ΠΛΗΡΟΥΣ ΛΕΙΤΟΥΡΓΙΑΣ
13
(πράσινο )
)
)
14 Λυχνία ΑΥΤΟΚΑΘΑΡΙΣΜΟΥ
(πράσινο
ΣΗΜΕΙΩΣΗ:
Οι πραγματικές μονάδες μπορεί
να διαφέρουν ελαφρά από αυτές
που εμφανίζονται παραπάνω.
)
GR-2
AY-XPC18LR_OM_GR.indd 2AY-XPC18LR_OM_GR.indd 2 2010-03-18 16:37:442010-03-18 16:37:44
Page 37

ΤΗΛΕΧΕΙΡΙΣΤΗΡΙΟ
ΟΘΟΝΗ ΕΝΔΕΙΞΕΩΝ
1
2
3
4
5
6
7
8
1
2
3
4
5
6
7
8
9
10
11
10
11
12
13
14
15
16
12
13
14
15
16
17
18
19
20
21
22
23
24
1 Σύμβολα ΛΕΙΤΟΥΡΓΙΩΝ
2 Σύμβολα ΤΑΧΥΤΗΤΑΣ ΑΝΕΜΙΣΤΗΡΑ
9
3 Σύμβολο PLASMACLUSTER
4
Σύμβολο ΚΑΤΕΥΘΥΝΣΗΣ ΑΕΡΑ (ΨΥΞΗ/ΑΦΥΓΡΑΝΣΗ)
5 Σύμβολο AIRFLOW (ΘΕΡΜΑΝΣΗ)
6 Σύμβολο COANDA AIRFLOW (ΘΕΡΜΑΝΣΗ)
7 Σύμβολο ΕΞΟΙΚΟΝΟΜΗΣΗΣ ΕΝΕΡΓΕΙΑΣ
8 Σύμβολο ΜΠΑΤΑΡΙΑΣ
9 Σύμβολο ΕΚΠΟΜΠΗΣ
10 Σύμβολο ΑΥΤΟΚΑΘΑΡΙΣΜΟΥ
11
Σύμβολο COANDA AIRFLOW (ΨΥΞΗ/ΑΦΥΓΡΑΝΣΗ)
12 Σύμβολο ΠΛΗΡΟΥΣ ΙΣΧΥΟΣ
13 Σύμβολο SPOT AIR
14 Ένδειξη ΘΕΡΜΟΚΡΑΣΙΑΣ
15
Ένδειξη ΧΡΟΝΟΔΙΑΚΟΠΤΗΣ ΑΠΕΝΕΡΓΟΠΟΙΗΣΗΣ
16
Ένδειξη ΧΡΟΝΟΔΙΑΚΟΠΤΗ ΕΝΕΡΓΟΠΟΙΗΣΗΣ / ΡΟΛΟΪ
1 ΠΟΜΠΟΣ
2 Πλήκτρο ΨΥΞΗ
3 Πλήκτρο ΑΦΥΓΡΑΝΣΗ
4 Πλήκτρο ΘΕΡΜΑΝΣΗ
5 Πλήκτρο STOP
6 Πλήκτρο THERMOSTAT
7 Πλήκτρο PLASMACLUSTER
8 Πλήκτρο SPOT AIR
9 Πλήκτρο FULL POWER
10 Πλήκτρο FAN
11
Πλήκτρο ΧΡΟΝΟΔΙΑΚΟΠΤΗ ΑΠΕΝΕΡΓΟΠΟΙΗΣΗΣ 1.2.3.5 ΩΡΩΝ
12 Πλήκτρο SWING
(κάθετη κατεύθυνση)
13 Πλήκτρο SWING
(οριζόντια κατεύθυνση)
14
Πλήκτρο COANDA AIRFLOW
15 Πλήκτρο ΕΞΟΙΚΟΝΟΜΗΣΗ
ΕΝΕΡΓΕΙΑΣ
Πλήκτρο ΑΥΤΟ-ΚΑΘΑΡΙΣΜΟΥ
16
17 Πλήκτρο ΧΡΟΝΟΔΙΑΚΟΠΤΗ
ΕΝΕΡΓΟΠΟΙΗΣΗΣ
18
Πλήκτρο ΡΥΘΜΙΣΗΣ/ΑΚΥΡΩΣΗΣ
ΧΡΟΝΟΔΙΑΚΟΠΤΗ (SET/C)
19 Πλήκτρο TIME ADVANCE
20 Πλήκτρο TIME REVERSE
21 Πλήκτρο ΡΟΛΟΪ
22 Πλήκτρο DISPLAY
23 Πλήκτρο RESET
24 Πλήκτρο ΧΡΟΝΟΔΙΑΚΟΠΤΗ
ΑΠΕΝΕΡΓΟΠΟΙΗΣΗΣ
EΛΛΗΝΙΚΑ
GR-3
AY-XPC18LR_OM_GR.indd 3AY-XPC18LR_OM_GR.indd 3 2010-03-18 16:37:452010-03-18 16:37:45
Page 38

ΧΡΗΣΗ ΤΟΥ ΤΗΛΕΧΕΙΡΙΣΤΗΡΙΟΥ
ΕΙΣΑΓΩΓΗ ΜΠΑΤΑΡΙΩΝ
Αφαιρέστε το κάλυμμα των μπαταρι-
1
ών.
Εισάγετε δύο μπαταρίες. (AAA (R03))
• Βεβαιωθείτε ότι οι (+) και (-) πολικότητες
2
είναι όρθα ευθυγραμμισμένες.
Επανατοποθετήστε το κάλυμμα των
3
μπαταριών.
Πιέστε το πλήκτρο RESET.
• Η οθόνη δείχνει “AM 6:00”.
4
Κάλυμμα
μπαταριών
ΣΗΜΕΙΩΣΗ:
•
Οι μπαταρίες έχουν διάρκεια ζωής ένα περίπου έτος
με κανονική χρήση.
•
Αντικαταστήστε τις μπαταρίες όταν το τηλεχειριστήριο δείξει “ ”.
•
Όταν αντικαθιστάτε τις μπαταρίες, πάντα να αλλάζετε και
τις δύο και να χρησιμοποιείτε τον ίδιο τύπο μπαταρίας.
•
Εάν δεν πρόκειται να χρησιμοποιήσετε τη μονάδα για μεγάλο χρο-
νικό διάστημα, αφαιρέστε τις μπαταρίες από το τηλεχειριστήριο.
ΡΥΘΜΙΣΗ ΤΗΣ ΩΡΑΣ
Υπάρχουν δύο λειτουργίες ώρας: Η 12ωρη
λειτουργία και η 24ωρη λειτουργία.
Για να ορίσετε την 12ωρη λειτουργία,
1
πιέστε το κουμπί ΡΟΛΟΪ μία φορά.
Για να ορίσετε την 24ωρη λειτουργία,
πιέστε το κουμπί ΡΟΛΟΪ δύο φορές.
Πιέστε το κουμπί TIME ADVANCE ή το κουμπί
2
REVERSE για ορίσετε την τρέχουσα ώρα.
• Κρατήστε πατημένο το κουμπί για να προχωρήσετε ή να γυρίσετε την ώρα γρήγορα.
Πιέστε το πλήκτρο SET/C.
• Η άνω-κάτω τελεία (:) αναβοσβήνει.
3
ΧΡΗΣΗ ΤΟΥ ΤΗΛΕΧΕΙΡΙΣΤΗΡΙΟΥ
Στρέψτε το τηλεχειριστήριο προς το πλαίσιο του δέκτη σήματος της μονάδας και πιέστε το πλήκτρο που επιθυμείτε. Η μονάδα
εκπέμπει ένα μπιπ μόλις λάβει το σήμα.
• Βεβαιωθείτε ότι τίποτα, όπως κουρτίνες, δεν
μπλοκάρει το πλαίσιο του δέκτη σήματος.
• Το σήμα μεταδίδεται αποτελεσματικά μέχρι τα
7 μ.
7 μ
ΠΡΟΣΟΧΗ:
• Μην εκθέτετε το πλαίσιο του δέκτη σε άμεσο
ηλιακό φως. Μπορεί να επηρεάσει δυσμενώς
τη λειτουργία του.
• Χρήση συγκεκριμένου λαμπτήρα φθορισμού
στον ίδιο χώρο, μπορεί να παρεμποδίσει την
μετάδοση του σήματος.
• Μην αφήνετε το τηλεχειριστήριο σε άμεσο ηλιακό φως ή δίπλα σε καλοριφέρ. Προστατέψτε
το τηλεχειριστήριο από υγρασία
σμούς.
Πλαίσιο δέκτη
και κραδα-
3
2
1
ΣΗΜΕΙΩΣΗ:
• Η τρέχουσα ώρα δεν μπορεί να οριστεί όταν
είναι ρυθμισμένος ο χρονοδιακόπτης.
GR-4
AY-XPC18LR_OM_GR.indd 4AY-XPC18LR_OM_GR.indd 4 2010-03-18 16:37:452010-03-18 16:37:45
Page 39

ΕΓΚΑΤΑΣΤΑΣΗ ΦΙΛΤΡΟΥ ΚΑΘΑΡΙΣΜΟΥ ΑΕΡΑ
ΥΠΟΔΕΙΞΕΙΣ ΓΙΑ ΕΞΟΙΚΟΝΟΜΗΣΗ ΕΝΕΡΓΕΙΑΣ
Τα φίλτρα καθαρισμού αέρα απομακρύνουν την σκόνη από τον αέρα και απελευθερώνουν καθαρό αέρα.
Αφαιρέστε τα φίλτρα αέρα.
1
1
Ανοίξτε το κάλυμμα.
2
Τραβήξτε τα φίλτρα αέρα προς τα
κάτω για να τα αφαιρέσετε.
1
2
Εγκαταστήστε το φίλτρο καθαρι-
2
σμού αέρα κάτω από τα στόπερ
των φίλτρων πάνω στο φίλτρο
αέρα.
Στόπερ φίλτρου
Φίλτρο
καθαρισμού αέρα
Φίλτρο αέρα
Παρακάτω ακολουθούν ορισμένοι απλοί
τρόποι για εξοικονόμιση ενέργειας όταν
χρησιμοποιείτε τη συσκευή κλιματισμού.
Ορίστε την κατάλληλη θερμοκρασία
• Υψηλότερη ή χαμηλότερη από την απαραίτητη
ρύθμιση θερμοκρασίας θα έχει ως αποτέλεσμα αυξημένη κατανάλωση ενέργειας.
Προφυλάξτε τη συσκευή από άμεση
ηλιακή ακτινοβολία και ρεύματα αέρα
• Η προφύλαξη της συσκευής από την άμεση
ηλιακή ακτινοβολία κατα τη διαρκεια της λειτουργίας ψύξης θα μειώσει την κατανάλωση
ενέργειας.
• Κλείνετε τα παράθυρα και τις πόρτες κατά τις
λειτουργίες ψύξης και θέρμανσης.
Διατηρήστε καθαρό το φίλτρο ώστε να
εξασφαλίσετε την πιο αποδοτική λειτουργία
Κλείστε τον διακόπτη όταν δεν θα χρησιμοποιήσετε τη μονάδα για μεγάλο
χρονικό διάστημα
• Η εσωτερική μονάδα καταναλώνει μια μικρή
ποσότητα ενέργειας ακόμη και όταν δε λειτουργεί.
EΛΛΗΝΙΚΑ
Επανεγκαταστήστε τα φίλτρα
3
αέρα και κλείστε το κάλυμμα.
2
1
ΣΗΜΕΙΩΣΗ:
•
Μην ανοίξετε την πλαστική σακούλα μέχρι τα χρησιμοποιήσετε να φίλτρα. (Ειδάλλως τα
φίλτρα μπορεί να κοντύνουν.)
•
Μην εκθέτετε τα φίλτρα σε άμεσο ηλιακό
φως. (Ειδάλλως μπορεί να αλλοιωθούν.)
GR-5
AY-XPC18LR_OM_GR.indd 5AY-XPC18LR_OM_GR.indd 5 2010-03-18 16:37:452010-03-18 16:37:45
Page 40

ΒΑΣΙΚΗ ΛΕΙΤΟΥΡΓΙΑ
1
ΑΠΕΝΕΡΓΟΠΟΙΗΣΗ
2
Πιέστε το κουμπί ΨΥΞΗ, ΑΦΥΓΡΑΝΣΗ ή
1
ΘΕΡΜΑΝΣΗ.
: ΨΥΞΗ
: ΑΦΥΓΡΑΝΣΗ
: ΘΕΡΜΑΝΣΗ
• Η κόκκινη λυχνία ΛΕΙΤΟΥΡΓΙΑΣ ( ) θα ανά-
ψει.
ΓΙΑ ΝΑ ΘΕΣΕΤΕ ΕΚΤΟΣ ΛΕΙΤΟΥΡΓΙΑΣ
Πιέστε το πλήκτρο STOP.
• Η κόκκινη λυχνία ΛΕΙΤΟΥΡΓΙΑΣ ( ) θα σβή-
σει.
Πιέστε το πλήκτρο THERMOSTAT για να
2
εισάγετε την επιθυμητή θερμοκρασία.
(Λειτουργια ΨΥΞΗΣ/ΘΕΡΜΑΝΣΗΣ)
Το εύρος ρύθμισης της θερμοκρασίας: 18-32 °C.
(Λειτουργια ΑΦΥΓΡΑΝΣΗΣ)
Η θερμοκρασία μπορεί να αλλάξει κατά ±2 °C σε
σχέση με την αυτόματα καθορισμένη θερμοκρασία.
(Παράδειγμα: 1 °C υψηλότερα)
3
(Παράδειγμα: 2 °C χαμηλότερα)
Πιέστε το πλήκτρο FAN για να ρυθμίσετε
3
την επιθυμητή ταχύτητα ανεμιστήρα.
ΑΥΤΟΜΑΤΗ ΑΠΑΛΗ ΧΑΜΗΛΗ ΥΨΗΛΗ
• Στη λειτουργία ΑΦΥΓΡΑΝΣΗΣ, η ταχύτητα ανε-
μιστήρα είναι προρυθμισμένη στην ΑΥΤΟΜΑΤΗ
και δεν μπορεί να αλλάξει.
GR-6
AY-XPC18LR_OM_GR.indd 6AY-XPC18LR_OM_GR.indd 6 2010-03-18 16:37:462010-03-18 16:37:46
Page 41

ΡΥΘΜΙΣΗ ΤΗΣ ΚΑΤΕΥΘΥΝΣΗΣ
ΤΗΣ ΡΟΗΣ ΑΕΡΑ
ΛΕΙΤΟΥΡΓΙΑ PLASMACLUSTER
ΚΑΘΕΤΗ ΚΑΤΕΥΘΥΝΣΗ ΡΟΗΣ ΑΕΡΑ
Πιέστε το πλήκτρο SWING ( ).
1
• Η κάθετη γρίλλια ροής αέρα θα αρχίσει να
ταλαντεύεται.
Πατήστε ξανά το κουμπί SWING ( ) για
2
να σταματήσετε στην επιθυμητή θέση.
1
2
ΟΡΙΖΟΝΤΙΑ ΚΑΤΕΥΘΥΝΣΗ ΡΟΗΣ ΑΕΡΑ
Πιέστε το πλήκτρο SWING ( ).
1
• Η οριζόντια γρίλλια ροής αέρα θα αρχίσει
να ταλαντεύεται.
Πατήστε ξανά το κουμπί SWING ( ) για
2
να σταματήσετε στην επιθυμητή θέση.
Τα ιόντα Plasmacluster που απελευθερώθηκαν
στο δωμάτιο θα μειώσουν κάπως την μούχλα
που βρίσκεται στον αέρα.
Κατά τη διάρκεια της λειτουργίας πα-
1
τήστε το κουμπί PLASMACLUSTER.
• Το τηλεχειριστήριο θα εμφανίσει “ ”.
• Η μπλε λυχνία PLASMACLUSTER θα
ανάψει.
ΑΚΥΡΩΣΗ
Πιέστε ξανά το πλήκτρο PLASMA-
CLUSTER.
• Η μπλε λυχνία PLASMACLUSTER θα
σβήσει.
EΛΛΗΝΙΚΑ
1
2
ΠΡΟΣΟΧΗ:
Ποτέ μην προσπαθήσετε να ρυθμίσετε τις γρίλλιες χειροκίνητα.
• Η χειροκίνητη ρύθμιση της γρίλιας κάθετης
ρύθμισης μπορεί να προκαλέσει βλάβη στη
μονάδα.
• Όταν η γρίλια κάθετης ρύθμισης βρίσκεται
στην κατώτατη θέση στη λειτουργία ΨΥΞΗΣ ή
ΑΦΥΓΡΑΝΣΗΣ για παρατεταμένο χρονικό διάστημα, μπορεί να σχηματισθούν υδρατμοί.
ΣΗΜΕΙΩΣΗ:
• Το εύρος ρύθμισης είναι μικρότερο από το εύρος λειτουργίας SWING ώστε να αποφευχθεί
συμπύκνωση υδρατμών από το να στάξουν.
ΣΗΜΕΙΩΣΗ:
• Η χρήση της λειτουργίας PLASMACLUSTER
θα καταχωρηθεί στη μνήμη και θα ενεργοποιηθεί την επόμενη φορά που θα θέσετε σε
λειτουργία τη συσκευή κλιματισμού.
• Για να εκτελέσετε την λειτουργία Plasmacluster
μόνο σε λειτουργία ΑΝΕΜΙΣΤΗΡΑ, πιέστε το
κουμπί PLASMACLUSTER όταν η μονάδα δεν
λειτουργεί.
Το σύμβολο λειτουργίας του τηλεχειριστηρίου
θα σβήσει και η
μπορεί να οριστεί στο ΑΥΤΟΜΑΤΟ.
ταχύτητα του ανεμιστήρα δεν
GR-7
AY-XPC18LR_OM_GR.indd 7AY-XPC18LR_OM_GR.indd 7 2010-03-18 16:37:472010-03-18 16:37:47
1
Page 42

ΠΛΗΚΤΡΟ COANDA AIRFLOW
SPOT AIR
Σε λειτουργία ψύξης ή αφύγρανσης, ή
κάθετη γρίλλια ροής αέρα ρυθμίζεται λοξά
προς τα πάνω ώστε να κατευθύνει τον
κρύο αέρα στο ταβάνι και να αποφεύγεται
η απευθείας έκθεση στη ροή του αέρα. Σε
λειτουργία θέρμανσης, η κάθετη γρίλλια
ροής αέρα ρυθμίζεται προς τα κάτω για να
κατευθύνει τον θερμό αέρα
μα.
Κατά τη διάρκεια της λειτουργίας
1
πατήστε το κουμπί COANDA AIRFLOW.
(Λειτουργία ΨΥΞΗΣ / ΑΦΥΓΡΑΝΣΗΣ)
• Το τηλεχειριστήριο θα εμφανίσει “
(Λειτουργία ΘΕΡΜΑΝΣΗΣ)
• Το τηλεχειριστήριο θα εμφανίσει “
ΑΚΥΡΩΣΗ
Πιέστε ξανά το πλήκτρο COANDA AIRFLOW.
προς το πάτω-
”.
Οι γρίλλιες ρυθμίζονται ώστε η ροή του
αέρα να μεταφέρεται στην επιθυμητή
περιοχή.
Πιέστε το κουμπί SPOT AIR για να
1
επιλέξετε την επιθυμητή κατεύθυνση
ροής αέρα.
ΑΚΥΡΩΣΗ
”.
1
ΣΗΜΕΙΩΣΗ:
•
Εάν επιθυμείτε την λειτουργία COANDA AIRFLOW
σε λειτουργία ΠΛΗΡΟΥΣ ΙΣΧΥΟΣ, πιέστε το κουμπί
COANDA AIRFLOW κατά τη διάρκεια της λειτουργίας ΠΛΗΡΟΥΣ ΙΣΧΥΟΣ.
•
Η ρύθμιση COANDA AIRFLOW και η ρύθμιση
SPOT AIR δεν μπορούν να χρησιμοποιηθούν μαζί.
ΣΗΜΕΙΩΣΗ:
• Εάν θέλετε ρύμιση SPOT AIR σε λειτουργία
ΠΛΗΡΟΥΣ ΙΣΧΥΟΣ, πιέστε το κουμπί SPOT
AIR κατά τη διάρκεια της λειτουργίας ΠΛΗΡΟΥΣ ΙΣΧΥΟΣ.
• Η ρύθμιση COANDA AIRFLOW και η ρύθμιση
SPOT AIR δεν μπορούν να χρησιμοποιηθούν
μαζί.
1
GR-8
AY-XPC18LR_OM_GR.indd 8AY-XPC18LR_OM_GR.indd 8 2010-03-18 16:37:472010-03-18 16:37:47
Page 43

ΛΕΙΤΟΥΡΓΙΑ ΠΛΗΡΟΥΣ ΙΣΧΥΟΣ
ΛΕΙΤΟΥΡΓΙΑ ΕΞΟΙΚΟΝΟΜΗΣΗΣ ΕΝΕΡΓΕΙΑΣ
Η μονάδα κλιματισμού λειτουργεί στη μέγιστη ισχύ για να ψύξει ή για να θερμάνει το
χώρο γρήγορα.
Κατά τη διάρκεια της λειτουργίας πα-
1
τήστε το κουμπί ΠΛΗΡΟΥΣ ΙΣΧΥΟΣ.
• Τηλεχειριστήριο θα δείξει “ ” και το
σύμβολο AIR FLOW θα γίνει μακρύτερο.
• Η προβολή θερμοκρασίας θα σβήσει.
Η πράσινη λυχνία ΠΛΗΡΟΥΣ ΙΣΧΥΟΣ ( )
•
θα ανάψει.
ΑΚΥΡΩΣΗ
Πιέστε το πλήκτρο ΠΛΗΡΟΥΣ ΙΣΧΥΟΣ ξανά.
•
Η πράσινη λυχνία ΠΛΗΡΟΥΣ ΙΣΧΥΟΣ ( ) θα σβήσει.
Η ρύθμιση της θερμοκρασίας ελέγχεται
αυτόματα ώστε να εξοικονομηθεί ενέργεια.
Κατά τη διάρκεια της λειτουργίας
πατήστε το κουμπί ΕΞΟΙΚΟΝΟΜΗ-
1
ΣΗ ΕΝΕΡΓΕΙΑΣ.
• Το τηλεχειριστήριο θα εμφανίσει “ ”.
• Η ταχύτητα του ανεμιστήρα θα ρυθμιστεί
στο ΑΥΤΟΜΑΤΟ.
ΑΚΥΡΩΣΗ
Πιέστε ξανά το πλήκτρο ΕΞΟΙΚΟΝΟΜΗΣΗ ΕΝΕΡΓΕΙΑΣ.
EΛΛΗΝΙΚΑ
1
1
ΣΗΜΕΙΩΣΗ:
• Η μονάδα κλιματισμού θα λειτουργεί στην “Έξτρα ΥΨΗΛΗ” ταχύτητα ανεμιστήρα για 5 λεπτά
και έπειτα θα γυρίσει σε “ΥΨΗΛΗ” ταχύτητα
ανεμιστήρα.
• Δεν μπορείτε να ρυθμίσετε τη θερμοκρασία ή
την ταχύτητα του ανεμιστήρα κατά τη λειτουργία ΠΛΗΡΟΥΣ ΙΣΧΥΟΣ.
• Η λειτουργία ΕΞΟΙΚΟΝΟΜΗΣΗΣ ΕΝΕΡΓΕΙΑΣ
και η λειτουργία ΠΛΗΡΟΥΣ ΙΣΧΥΟΣ δεν μπορούν να χρησιμοποιηθούν μαζί.
AY-XPC18LR_OM_GR.indd 9AY-XPC18LR_OM_GR.indd 9 2010-03-18 16:37:472010-03-18 16:37:47
ΣΗΜΕΙΩΣΗ:
• Σε λειτουργία ΘΕΡΜΑΝΣΗΣ, η ορισμένη θερμοκρασία αυτόματα θα διακυμαίνεται μεταξύ
0 - 2 °C χαμηλότερα από την αρχική ρύθμιση
της θερμοκρασίας.
Σε λειτουργία ΨΥΞΗΣ ή ΑΦΥΓΡΑΝΣΗΣ, η ορι-
σμένη θερμοκρασία αυτόματα θα διακυμαίνεται μεταξύ 0 - 1 °C υψηλότερα από την αρχική
ρύθμιση της θερμοκρασίας.
• Η λειτουργία ΕΞΟΙΚΟΝΟΜΗΣΗΣ ΕΝΕΡΓΕΙΑΣ
και η λειτουργία ΠΛΗΡΟΥΣ ΙΣΧΥΟΣ δεν μπορούν να χρησιμοποιηθούν μαζί.
GR-9
Page 44

ΧΡΟΝΟΔΙΑΚΟΠΤΗΣ ΑΠΕΝΕΡΓΟΠΟΙΗΣΗΣ 1.2.3.5-ΩΡΩΝ
ΛΕΙΤΟΥΡΓΙΑ ΧΡΟΝΟΔΙΑΚΟΠΤΗ
Όταν ο ΧΡΟΝΟΔΙΑΚΟΠΤΗΣ ΑΠΕΝΕΡΓΟΠΟΙΗΣΗΣ 1.2.3.5 ΩΡΩΝ είναι ρυθμισμένος, η μονάδα αυτόματα θα απενεργοποιηθεί μετά τις ορισμένες ώρες.
Πιέστε το κουμπί ΧΡΟΝΟΔΙΑΚΟΠΤΗ
1
ΑΠΕΝΕΡΓΟΠΟΙΗΣΗΣ 1.2.3.5 ΩΡΩΝ
για να ορίσετε τον επιθυμητό χρόνο.
ΑΚΥΡΩΣΗ
•
Η πορτοκαλί λυχνία ΧΡΟΝΟΔΙΑΚΟΠΤΗ ( ) θα ανάψει.
•
Ο χρόνος που απομένει θα φαίνεται στο τηλεχειριστήριο
σε διαστήματα της 1 ώρας.
ΑΚΥΡΩΣΗ
Πιέστε το πλήκτρο SET/C.
Εναλλακτικά πιέστε το κουμπί ΧΡΟ-
ΝΟΔΙΑΚΟΠΤΗ ΑΠΕΝΕΡΓΟΠΟΙΗΣΗΣ
1.2.3.5 ΩΡΩΝ.
•
Η πορτοκαλί λυχνία ΧΡΟΝΟΔΙΑΚΟΠΤΗ ( ) θα σβήσει.
ΧΡΟΝΟΔΙΑΚΟΠΤΗΣ ΑΠΕΝΕΡΓΟΠΟΙΗΣΗΣ
Πιέστε το πλήκτρο ΧΡΟΝΟΔΙΑΚΟ-
1
ΠΤΗΣ ΑΠΕΝΕΡΓΟΠΟΙΗΣΗΣ.
• Η ένδειξη ΧΡΟΝΟΔΙΑΚΟΠΤΗ ΑΠΕΝΕΡΓΟΠΟΙΗΣΗΣ θα ανασβοσβήνει.
Πιέστε το κουμπί TIME ADVANCE ή
2
το κουμπί REVERSE για ορίσετε τον
επιθυμητό χρόνο.
• Ο χρόνος μπορεί να οριστεί σε διαστήματα των 10 λεπτών.
Πιέστε το πλήκτρο SET/C.
3
• Η πορτοκαλί λυχνία ΧΡΟΝΟΔΙΑΚΟΠΤΗ
( ) θα ανάψει.
1
3
ΑΚΥΡΩΣΗ
2
1
ΣΗΜΕΙΩΣΗ:
•
Ο ΧΡΟΝΟΔΙΑΚΟΠΤΗΣ ΑΠΕΝΕΡΓΟΠΟΙΗΣΗΣ 1.2.3.5 ΩΡΩΝ
έχει προτεραιότητα σε σχέση με τον ΧΡΟΝΟΔΙΑΚΟΠΤΗ ΕΝΕΡΓΟΠΟΙΗΣΗΣ και τον ΧΡΟΝΟΔΙΑΚΟΠΤΗ ΑΠΕΝΕΡΓΟΠΟΙΗΣΗΣ.
•
Εάν οριστεί ο ΧΡΟΝΟΔΙΑΚΟΠΤΗΣ ΑΠΕΝΕΡΓΟΠΟΙΗΣΗΣ
1.2.3.5 ΩΡΩΝ ενώ η μονάδα δεν λειτουργεί, η μονάδα θα
λειτουργήσει στην προηγούμενη κατάσταση που είχε οριστεί.
•
Εαν ο ΧΡΟΝΟΔΙΑΚΟΠΤΗΣ ΕΝΕΡΓΟΠΟΙΗΣΗΣ και/ή ο ΧΡΟΝΟΔΙΑΚΟΠΤΗΣ ΑΠΕΝΕΡΓΟΠΟΙΗΣΗΣ είναι ρυθμισμένοι, το
κουμπί ΑΚΥΡΩΣΗ ΧΡΟΝΟΔΙΑΚΟΠΤΗ ακυρώνει κάθε ρύθμιση.
AY-XPC18LR_OM_GR.indd 10AY-XPC18LR_OM_GR.indd 10 2010-03-18 16:37:482010-03-18 16:37:48
ΣΗΜΕΙΩΣΗ:
•
Όταν έχει ρυθμιστεί ο ΧΡΟΝΟΔΙΑΚΟΠΤΗΣ ΑΠΕΝΕΡΓΟΠΟΙΗΣΗΣ, η θερμοκρασία ρυθμίζεται αυτόματα για την αποφυγή
της υπερβολικής αύξησης ή μείωσης της θερμοκρασίας εντός
του δωματίου, για παράδειγμα όταν κοιμάστε. (Αυτόματη Λειτουργία Ύπνου)
Λειτουργία ΨΥΞΗΣ: Μία ώρα αφού έχει ρυθμιστεί ο χρονοδια-
κόπτης, η θερμοκρασία αυξάνεται κατά 1 °C.
Λειτουργία ΘΕΡΜΑΝΣΗΣ: Μία ώρα αφού έχει ρυθμιστεί ο
χρονοδιακόπτης, η θερμοκρασία μειώνεται κατά 3 °C.
GR-10
Page 45

ΧΡΟΝΟΔΙΑΚΟΠΤΗΣ ΕΝΕΡΓΟΠΟΙΗΣΗΣ
Πιέστε το πλήκτρο ΧΡΟΝΟΔΙΑΚΟ-
1
ΠΤΗ ΕΝΕΡΓΟΠΟΙΗΣΗΣ.
• Η ένδειξη ΧΡΟΝΟΔΙΑΚΟΠΤΗ ΕΝΕΡΓΟΠΟΙΗΣΗΣ θα ανασβοσβήνει.
Πιέστε το κουμπί TIME ADVANCE
2
ή το κουμπί REVERSE για ορίσετε
τον επιθυμητό χρόνο.
• Ο χρόνος μπορεί να οριστεί σε διαστήματα των 10 λεπτών.
Πιέστε το πλήκτρο SET/C.
3
• Η πορτοκαλί λυχνία ΧΡΟΝΟΔΙΑΚΟΠΤΗ
( ) θα ανάψει.
ΑΚΥΡΩΣΗ
Πιέστε το πλήκτρο SET/C.
• Η πορτοκαλί λυχνία ΧΡΟΝΟΔΙΑΚΟΠΤΗ ( )
θα σβήσει.
•
Η τρέχουσα ώρα θα φανεί στο τηλεχειριστήριο.
ΑΚΥΡΩΣΗ
ΑΛΛΑΓΗ ΡΥΘΜΙΣΗΣ ΧΡΟΝΟΥ
Ακυρώστε τη ρύθμιση του ΧΡΟΝΟΔΙΑΚΟΠΤΗ, έπειτα ξαναρυθμίστε τον
ΓΙΑ ΝΑ ΣΥΝΔΥΑΣΕΤΕ ΤΟΝ ΧΡΟΝΟΔΙΑΚΟΠΤΗ
ΕΝΕΡΓΟΠΟΙΗΣΗΣ ΚΑΙ ΑΠΕΝΕΡΓΟΠΟΙΗΣΗΣ
Ορίστε τον ΧΡΟΝΟΔΙΑΚΟΠΤΗ ΑΠΕΝΕΡΓΟΠΟΙΗΣΗΣ και τον ΧΡΟΝΟΔΙΑΚΟΠΤΗ
ΕΝΕΡΓΟΠΟΙΗΣΗΣ.
Παράδειγμα
Τρέχουσα ώρα: 9:00 p.m.)
(
ΧΡΟΝΟΔΙΑΚΟΠΤΗΣ ΑΠΕΝΕΡΓΟΠΟΙΗΣΗΣ σε 11:00 p.m.
ΧΡΟΝΟΔΙΑΚΟΠΤΗΣ ΕΝΕΡΓΟΠΟΙΗΣΗΣ
σε 7:00 a.m.
EΛΛΗΝΙΚΑ
1
3
2
ΣΗΜΕΙΩΣΗ:
• Η μονάδα θα ενεργοποιηθεί πριν από το
ρυθμισμένο χρόνο ώστε η θερμοκρασία του
δωματίου να φτάσει στην επιθυμητή τιμή μέσα
στον προγραμματισμένο χρόνο. (Λειτουργία
αφύπνισης)
AY-XPC18LR_OM_GR.indd 11AY-XPC18LR_OM_GR.indd 11 2010-03-18 16:37:482010-03-18 16:37:48
• Το βέλος ( ή ) μετάξυ της ένδειξης του
ΧΡΟΝΟΔΙΑΚΟΠΤΗ ΕΝΕΡΓΟΠΟΙΗΣΗΣ και
του ΧΡΟΝΟΔΙΑΚΟΠΤΗ ΑΠΕΝΕΡΓΟΠΟΙΗΣΗΣ
δείχνει ποιος χρονοδιακόπτης θα ενεργοποιηθεί πρώτος.
ΣΗΜΕΙΩΣΗ:
• Δεν μπορείτε να προγραμματίσετε τον ΧΡΟΝΟΔΙΑΚΟΠΤΗ ΕΝΕΡΓΟΠΟΙΗΣΗΣ και τον
ΧΡΟΝΟΔΙΑΚΟΠΤΗ ΑΠΕΝΕΡΓΟΠΟΙΗΣΗΣ
για να λειτουργήσει η μονάδα σε διαφορετικές
θερμοκρασίες ή άλλες ρυθμίσεις.
• Και οι δυο χρονοδιακόπτες μπορούν να προγραμματιστούν ώστε να ενεργοποιηθούν ο
ένας πριν τον άλλον.
GR-11
Page 46

ΛΕΙΤΟΥΡΓΙΑ ΑΥΤΟ-ΚΑΘΑΡΙΣΜΟΥ
ΠΛΗΚΤΡΟ ΑΠΕΙΚΟΝΙΣΗΣ (DISPLAY)
Η λειτουργία ΑΥΤΟ -ΚΑΘΑΡΙΣΜΟΥ θα
μειώση την ανάπτυξη μούχλας με ιόντα
Plasmacluster και θα αφυγράνει το
εσωτερικό της μονάδας. Χρησιμοποιήστε
την λειτουργία κατά τις αλλαγές των
εποχών
1
.
Πιέστε το κουμπί ΑΥΤΟ-ΚΑΘΑΡΙ-
ΣΜΟΥ όταν η μονάδα είναι εκτός
λειτουργίας.
• Το τηλεχειριστήριο θα εμφανίσει “ ”.
• Η πράσινη λυχνια ΑΥΤΟ-ΚΑΘΑΡΙΣΜΟΥ
(
) και η μπλε λυχνία PLASMACLUSTER
θα ανάψουν.
• Η μονάδα θα σταματήσει να λειτουργεί
μετά από 40 λεπτά.
ΑΚΥΡΩΣΗ
Πιέστε το πλήκτρο ΑΥΤΟ-ΚΑΘΑΡΙΣΜΟΥ.
• Η πράσινη λυχνια ΑΥΤΟ-ΚΑΘΑΡΙΣΜΟΥ
( ) και η μπλε λυχνία PLASMACLUSTER
θα σβήσουν.
Πιέστε το κουμπί DISPLAY όταν οι λυχνίες
της μονάδας είναι υπερβολικά φωτεινές.
(Η κόκκινη λυχνία ΛΕΙΤΟΥΡΓΙΑΣ και η
πορτοκαλί λυχνία ΧΡΟΝΟΔΙΑΚΟΠΤΗ δεν
μπορούν να απενεργοποιηθούν)
Κατά τη διάρκεια της λειτουργίας
1
πατήστε το κουμπί DISPLAY.
• Η μπλε λυχνία PLASMACLUSTER, η πρά-
σινη λυχνια ΑΥΤΟ -ΚΑΘΑΡΙΣΜΟΥ ( )
και/ή πράσινη λυχνία ΠΛΗΡΟΥΣ ΙΣΧΥΟΣ
( ) θα σβήσουν.
ΑΥΞΗΣΗ ΦΩΤΕΙΝΟΤΗΤΑΣ
Πιέστε ξανά το πλήκτρο DISPLAY.
1
ΒΟΗΘΗΤΙΚΗ ΛΕΙΤΟΥΡΓΙΑ
Χρησιμοποιήστε αυτόν τον τρόπο λειτουργίας
όταν το τηλεχειριστήριο δεν είναι διαθέσιμο.
ΓΙΑ ΝΑ ΘΕΣΕΤΕ ΣΕ ΛΕΙΤΟΥΡΓΙΑ
Πιέστε το πλήκτρο AUX.
•
Η κόκκινη λυχνία ΛΕΙΤΟΥΡΓΙΑΣ ( ) θα ανάψει.
• Η λειτουργία και η ρύθμιση θερμοκρασίας επι-
λέγονται αυτόματα σύμφωνα με τη θερμοκρασία δωματίου και την εξωτερική θερμοκρασία
όταν η μονάδα είναι ενεργοποιημένη. Η ταχύτητα ανεμιστήρα ρυθμίζεται στο ΑΥΤΟΜΑΤΗ.
ΓΙΑ ΝΑ ΘΕΣΕΤΕ ΕΚΤΟΣ ΛΕΙΤΟΥΡΓΙΑΣ
Πιέστε ξανά το πλήκτρο AUX.
1
ΣΗΜΕΙΩΣΗ:
• Δεν μπορείτε να ορίσετε την θερμοκρασία, την
ταχύτητα του ανεμιστήρα, την κατεύθυνση του
αέρα ή τη ρύθμιση του χρονοδιακόπτη κατά τη
διάρκεια της λειτουργίας ΑΥΤΟ -ΚΑΘΑΡΙΣΜΟΥ.
• Μούχλα που ήδη έχει αναπτυχθεί δεν μπορεί
να εξαλειφθεί μέσω αυτής της λειτουργίας.
•
Η κόκκινη λυχνία ΛΕΙΤΟΥΡΓΙΑΣ ( ) θα σβήσει.
AUX
GR-12
AY-XPC18LR_OM_GR.indd 12AY-XPC18LR_OM_GR.indd 12 2010-03-18 16:37:492010-03-18 16:37:49
Page 47

ΣΥΝΤΗΡΗΣΗ
Βεβαιωθείτε ότι έχετε σταματήσει την λειτουργία και έχετε κλείσει τον διακόπτη του
κυκλώματος προτού εκτελέσετε οποιαδήποτε εργασία συντήρησης.
ΚΑΘΑΡΙΣΜΟΣ ΦΙΛΤΡΩΝ ΑΕΡΑ
Τα φίλτρα πρέπει να καθαρίζονται κάθε δύο
εβδομάδες.
Θέστε εκτός λειτουργίας τη μονά-
1
δα.
Αφαιρέστε τα φίλτρα.
2
1
Ανασηκώστε τον ανοικτό πίνακα.
2
Τραβήξτε τα φίλτρα αέρα προς τα κάτω
για να τα αφαιρέσετε.
1
2
Αφαιρέστε τα φίλτρα καθαρισμού
3
αέρα από τα φίλτρα αέρα.
Καθαρίστε τα φίλτρα.
4
Χρησιμοποιήστε μια ηλεκτρική σκούπα για
να απομακρύνετε τη σκόνη. Εάν τα φίλτρα
είναι βρώμικα, πλύνετε τα με χλιαρό νερό
και ένα ήπιο απορρυπαντικό. Αφήστε τα
φίλτρα να στεγνώσουν στη σκιά πριν τα
επανατοποθετήσετε.
Επανεγκαταστήστε τα φίλτρα κα-
5
θαρισμού αέρα.
ΣΥΝΤΗΡΗΣΗ ΕΠΕΙΤΑ ΑΠΟ ΤΗΝ ΠΕΡΙΟΔΟ
ΧΡΗΣΗΣ ΤΗΣ ΣΥΣΚΕΥΗΣ ΚΛΙΜΑΤΙΣΜΟΥ
Θέστε τη μονάδα σε λειτουργία ΑΥΤΟ-
1
ΚΑΘΑΡΙΣΜΟΥ ώστε να αφυγράνετε
εντελώς το εσωτερικό της μονάδας.
Σταματήστε την λειτουργία και κλεί-
2
στε τον διακόπτη.
Καθαρίστε τα φίλτρα, έπειτα επανα-
3
τοποθετήστε τα.
ΣΥΝΤΗΡΗΣΗ ΠΡΙΝ ΑΠΟ ΤΗΝ ΠΕΡΙΟΔΟ
ΧΡΗΣΗΣ ΤΗΣ ΣΥΣΚΕΥΗΣ ΚΛΙΜΑΤΙΣΜΟΥ
Βεβαιωθείτε ότι τα φίλτρα αέρα δεν
1
είναι βρώμικα.
Βεβαιωθείτε ότι δεν παρεμποδίζεται
2
η είσοδος ή η έξοδος του αέρα.
ΑΝΤΙΚΑΤΑΣΤΑΣΗ ΤΩΝ ΦΙΛΤΡΩΝ
ΚΑΘΑΡΙΣΜΟΥ ΑΕΡΑ
Τα φίλτρα πρέπει να αλλάζουν κάθε 3-6
μήνες
Αφαιρέστε τα παλιά φίλτρα καθαρι-
1
σμού αέρα από τα φίλτρα αέρα.
Εγκαταστήστε τα νέα φίλτρα καθα-
2
ρισμού αέρα, κάτω από τα στόπερ
των φίλτρων πάνω στα φίλτρα
αέρα.
Στόπερ φίλτρου
EΛΛΗΝΙΚΑ
Επανεγκαταστήστε τα φίλτρα αέρα
6
και κλείστε το κάλυμμα.
2
1
ΚΑΘΑΡΙΣΜΟΣ ΤΗΣ ΜΟΝΑΔΑΣ ΚΑΙ
ΤΟΥ ΤΗΛΕΧΕΙΡΙΣΤΗΡΙΟΥ
• Σκουπίστε τα με ένα μαλακό ύφασμα.
• Μη ρίξετε νερό επάνω τους γιατί αυτό μπορεί
να προκαλέσει ηλεκτροπληξία ή βλάβη του
εξοπλισμού.
• Μη χρησιμοποιείτε ζεστό νερό, διαλύτες, λειαντικές σκόνες ή ισχυρούς διαλύτες.
Φίλτρο καθαρισμού
αέρα
ΣΗΜΕΙΩΣΗ:
• Το φίλτρα καθαρισμού αέρα δεν μπορούν να
πλυθούν για να επαναχρησιμοποιηθούν. Τα
νέα φίλτρα είναι διαθέσιμα στον κοντινότερό
σας αντιπρόσωπο.
Απόρριψη των Φίλτρων
Παρακαλούμε απορρίψτε τα φίλτρα που έχουν
αντικατασταθεί σύμφωνα με τους τοπικούς νόμους και κανονισμούς απόρριψης.
Υλικά των φίλτρων ΚΑΘΑΡΙΣΜΟΥ ΑΕΡΑ
Φίλτρο: Πολυπροπυλένιο
Πλαίσιο: Πολυεστέρας
Φίλτρο αέρα
GR-13
AY-XPC18LR_OM_GR.indd 13AY-XPC18LR_OM_GR.indd 13 2010-03-18 16:37:492010-03-18 16:37:49
Page 48

ΣΗΜΕΙΩΣΗ ΓΙΑ ΛΕΙΤΟΥΡΓΙΑ
ΚΑΤΑΣΤΑΣΗ ΛΕΙΤΟΥΡΓΙΑΣ
Ψύξη (
AY-XPC18LR)
Εσωτερική
θερμοκρασία
Ανώτατο
όριο
Κατώτατο
όριο
Ανώτατο
όριο
Κατώτατο
όριο
Θέρμανση (
Ανώτατο
όριο
Κατώτατο
όριο
• Η εσώκλειστη συσκευή προστασίας μπορεί να
αποτρέψει τη λειτουργία της μονάδας σε υψηλότερη θερμοκρασία πέραν των ορίων αυτού
του φάσματος.
• Μπορεί να προκληθέι υγροποίηση στην έξοδο
του αέρα αν η μονάδα λειτουργεί συνεχόμενα
στις λειτουργίες ΨΥΞΗΣ ή ΑΦΥΓΡΑΝΣΗΣ όταν
η υγρασία είναι πάνω από 80%.
32 ˚C
21 ˚C
Ψύξη (
Εσωτερική
θερμοκρασία
32 ˚C 46 ˚C
21 ˚C -10 ˚C
AY-XPC18LR, AY-XP24LR)
Εσωτερική
θερμοκρασία
27˚C 24 ˚C
- -15 ˚C
Εξωτερική θερμοκρασία
46 ˚C (Μονή χρήση)
43 ˚C
10 ˚C (Μονή χρήση)
21 ˚C
AY-XP24LR)
Εξωτερική θερμοκρασία
Εξωτερική θερμοκρασία
(Πολλαπλή χρήση)
(Πολλαπλή χρήση)
ΣΕ ΠΕΡΙΠΤΩΣΗ ΔΙΑΚΟΠΗΣ ΤΟΥ
ΡΕΥΜΑΤΟΣ
• Αυτή η συσκευή κλιματισμού διαθέτει λειτουργία μνήμης για να αποθηκεύει τις ρυθμίσεις
ακόμη και αν συμβεί διακοπή ρεύματος.
Μόλις αποκατασταθεί η ηλεκτρική τροφοδο-
σία, η μονάδα θα ξεκινήσει αυτόματα με τις ίδιες ρυθμίσεις οι οποίες ήταν ενεργοποιημένες
πριν από τη διακοπή, εκτός από τις ρυθμίσεις
του χρονοδιακόπτη.
Εάν συμβεί διακοπή ρεύματος ενώ ο χρο-
•
νοδιακόπτης είναι ρυθμισμένος, η ρύθμιση
του χρονοδιακόπτει θα ακυρωθεί και δεν θα
ανακτηθεί ακόμα και όταν αποκατασταθεί η
ηλεκτρική τροφοδοσία.
ΣΗΜΕΙΩΣΗ ΓΙΑ ΤΗΝ ΛΕΙΤΟΥΡΓΙΑ
ΘΕΡΜΑΝΣΗΣ
ΛΕΙΤΟΥΡΓΙΑ ΑΠΟΨΥΞΗΣ
• Όταν σχηματίζεται πάγος στην εξωτερική
μονάδα κατά τη διάρκεια της λειτουργίας
θέρμανσης, η μονάδα θέτει σε λειτουργία την
αυτόματη απόψηξη για 5 με 10 λεπτά ώστε
να αφαιρέσει τον πάγο. Κατά τη διάρκεια της
απόψυξης, οι εσωτερικοί και εξωτερικοί ανεμιστήρες δεν λειτουργούν.
ΑΠΟΔΟΣΗ ΘΕΡΜΑΝΣΗΣ
• Η μονάδα διαθέτει μια αντλία θερμότητας, η
οποία απορροφά θερμότητα από τον εξωτερικό αέρα και την απελευθερώνει μέσα στο
δωμάτιο. Συνεπώς η θερμοκρασία του εξωτερικού αέρα επηρεάζει σημαντικά την απόδοση
της θέρμανσης.
• Εάν η απόδοση της θέρμανσης μειώνεται
λόγω χαμηλής εξωτερικής θερμοκρασίας, χρησιμοποιήστε ένα πρόσθετο θερμαντικό σώμα
• Για την προθέρμανση και τη θέρμανση ολόκληρου του δωματίου απαιτείται κάποιος χρόνος,
λόγω του συστήματος εξαναγκασμένης κυκλο-
φορίας αέρα.
ΣΗΜΕΙΩΣΗ ΓΙΑ ΟΤΑΝ ΧΡΗΣΙΜΟΠΟΙΕΙΤΕ ΤΟ AY-XPC18LR ΣΑΝ ΣΥΣΤΗΜΑ
ΚΛΙΜΑΤΙΣΜΟΥ ΠΟΛΛΑΠΛΩΝ ΧΡΗΣΕΩΝ
Με ένα σύστημα κλιματισμού πολλαπλών χρήσεων, πολλαπλές εσωτερικές μονάδες μπορούν
να συνδεθούν στην εξωτερική μονάδα.
Με ένα σύστημα κλιματισμού πολλαπλών χρήσεων, δεν μπορείτε να λειτουργείτε τις εσωτερικές μονάδες σε διαφορετικές λειτουργίες.
• Εάν μια μονάδα λειτουργεί σε λειτουργία
ΨΥΞΗΣ (ή ΑΦΥΓΡΑΝΣΗΣ), οι άλλες μονάδες
πρέπει να λειτουργούν στην ίδια λειτουργία. Η
λειτουργία της εσωτερικής μονάδας που λειτουργεί πρώτη έχει προτεραιότητα. Η εσωτερική μονάδα που ενεργοποιείται αργότερα σε
διαφορετικη λειτουργία δεν μπορεί να ξεκινήσει να λειτουργεί. Αρχίζει να βγάζει ένα βόμβο
(μπιπ) και η λυχνία ΛΕΙΤΟΥΡΓΙΑΣ και η λυχνία
ΧΡΟΝΟΔΙΑΚΟΠΤΗ αρχίζουν να αναβοσβήνουν. Σε αυτή την περίπτωση ρυθμίστε όλες
τις εσωτερικές μονάδες στην ίδια λειτουργία.
• Η λειτουργία ΨΥΞΗΣΗ και η λειτουργία ΑΦΥΓΡΑΝΣΗΣ μπορούν να οριστούν ταυτόχρονα.
.
GR-14
AY-XPC18LR_OM_GR.indd 14AY-XPC18LR_OM_GR.indd 14 2010-03-18 16:37:502010-03-18 16:37:50
Page 49

ΠΡΙΝ ΚΑΛΕΣΕΤΕ ΤΟ ΣΕΡΒΙΣ
Τα παρακάτω δεν υποδηλώνουν βλάβη
του εξοπλισμού
Η μονάδα δεν λειτουργεί
•
Η μονάδα δε λειτουργεί εάν τεθεί σε λειτουργία
αμέσως έπειτα από την απενεργοποίηση της.
Η μονάδα δε λειτουργεί αμέσως έπειτα από
την αλλαγή του τρόπου λειτουργίας. Αυτό γίνεται για την προστασία της μονάδας. Περιμένετε για 3 λεπτά πριν λειτουργήσετε τη μονάδα.
Η μονάδα δεν εκπέμπει θερμό αέρα
•
Κατά τη λειτουργία ΘΕΡΜΑΝΣΗΣ, ο ανεμιστήρας της εσωτερικής μονάδας μπορεί να μην
εκκινήσει για 2 έως 5 λεπτά ύστερα από την ενεργοποίηση της μονάδας, προκειμένου να αποφευχθεί η
έξοδος κρύου αέρα από τη μονάδα.
• Η μονάδα αποψύχεται. Περιμένετε για 5 έως
10 λεπτά.
Οσμές
•
Η μονάδα μπορεί να αναδίδει τις οσμές
που εισήλθαν σε αυτή, από τα χαλιά και τα έπιπλα.
Έντονος θόρυβος
• Η ήχος παράγεται από την τριβή της μονάδας
η οποία διαστέλλεται ή σχετίζεται με αλλαγή
θερμοκρασίας.
Ακούγεται ασθενής ήχος βομβητή
• Είναι ήχος της μονάδας που παράγει τα ιόντα
Plasmacluster.
Χαμηλός θόρυβος
•
Ο απαλός, χαμηλός θόρυβος είναι ο ήχος του
ψυκτικού που ρέει στο εσωτερικό της μονάδας.
Εμφάνιση αχνού στην εσωτερική έξοδο αέρα
• Σε λειτουργία ψύξης, αυτό συμβαίνει λόγω της
διαφοράς μεταξύ της θερμοκρασίας του αέρα
του δωματίου και της θερμοκρασίας του αέρα
που εκπέμπεται.
Υδρατμοί
• Σε λειτουργία θέρμανσης, υδρατμοί μπορεί να
εξέλθουν από την εξωτερική μονάδα κατά τη
διάρκεια της απόψυξης.
Η εξωτερική μονάδα δεν σταματάει
•
Μετά την διακοπή της λειτουργίας, η εξωτερική μονάδα θα περιστρέφει τον ανεμιστήρα της
περίπου ένα λεπτό ώστε να ψύξει την μονάδα.
Εκπεμπόμενες οσμές από την έξοδο
αέρα Plasmacluster
• Αυτή είναι η οσμή του όζοντος που παράγεται
από τη γεννήτρια ιόντων Plasmacluster. Η συγκέντρωση όζοντος είναι πολύ μικρή και δεν
έχει άσχημες επιπτώσεις στην υγεία σας.Το
όζον που απελευθερώνεται στην ατμόσφαιρα
αποσυντίθεται γρήγορα, και η πυκνότητα του
στο δωμάτιο δε θα αυξηθεί.
Όταν χρησιμοποιείτε το AY-XPC18LR σαν
σύστημα κλιματισμού πολλαπλών χρήσεων
Εσωτερική μονάδα που δεν βρίσκεται
σε λειτουργία ζεσταίνεται.
Θερμός αέρας εξέρχεται από την εσωτερική
μονάδα σε λειτουργία PLASMACLUSTER
μόνο.
•
Το ψυκτικό ρέει μέσα από την εσωτερική μονάδα
όταν η άλλη μονάδα λειτουργεί στη ΘΕΡΜΑΝΣΗ.
Δεν εξέρχεται αέρας από την εσωτερική μονάδα όταν η μονάδα είναι μόνο
σε λειτουργία PLASMACLUSTER ή σε
λειτουργία ΑΥΤΟ-ΚΑΘΑΡΙΣΜΟΥ.
• Η εξωτερική μονάδα αποψύχεται.
Μια εσωτερική μονάδα αρχίζει να κάνει
βόμβο (μπιπ) και η λυχνία ΛΕΙΤΟΥΡΓΙΑΣ και η λυχνία ΧΡΟΝΟΔΙΑΚΟΠΤΗ αρχίζουν να αναβοσβήνουν ταυτόχρονα.
•
Ελέγξτε εάν όλες οι εσωτερικές μονάδες είναι ρυθ-
μισμένες στην ίδια λειτουργία. Εάν όχι, ρυθμίστε
όλες τις εσωτερικές μονάδες στην ίδια λειτουργία.
Ελέγξτε τα ακόλουθα σημεία προτού καλέσετε το σέρβις.
Η μονάδα δεν λειτουργεί
•
Ελέγξτε για να δείτε εάν ο διακόπτης του κυκλώματος έχει ενεργοποιηθεί ή εάν έχει καεί η ασφάλεια.
Η μονάδα δεν ψύχει (ή θερμαίνει) το
χώρο επαρκώς
•
Ελέγξτε τα φίλτρα. Εάν είναι βρώμικα, καθαρίστε τα.
•
Ελέγξτε την εξωτερική μονάδα για να βεβαιωθείτε ότι
δεν παρεμποδίζεται η είσοδος ή η έξοδος του αέρα.
•
Ελέγξτε αν η ρύθμιση του θερμοστάτη είναι σωστή.
•
Βεβαιωθείτε ότι τα παράθυρα και οι πόρτες είναι
καλά κλεισμένα.
Η μονάδα δεν λαμβάνει σήμα από το
τηλεχειριστήριο
•
Ελέγξτε εάν οι μπαταρίες του τηλεχειριστηρίου
έχουν εξασθενήσει.
•
Προσπαθείστε να μεταδώσετε πάλι το σήμα με το
τηλεχειριστήριο σωστά στραμμένο προς το παράθυρο του δέκτη σήματος της μονάδας.
•
Ελέγξτε εάν οι μπαταρίες του τηλεχειριστηρίου είναι
σωστά τοποθετημένες.
Καλέστε το σέρβις όταν οι λυχνίες ΛΕΙΤΟΥΡΓΙΑΣ, ΧΡΟΝΟΔΙΑΚΟΠΤΗ και/ή
PLASMACLUSTER στον πίνακα ενδείξεων αναβοσβήνουν.
EΛΛΗΝΙΚΑ
GR-15
AY-XPC18LR_OM_GR.indd 15AY-XPC18LR_OM_GR.indd 15 2010-03-18 16:37:502010-03-18 16:37:50
Page 50

Atenção: O seu produto está
identifi cado com este símbo-
lo. Signifi ca que os produtos
eléctricos e electrónicos não
devem ser misturados com o
lixo doméstico comum. Existe
um sistema de recolhas específi co para estes produtos.
A. Informações sobre a Eliminação de Produtos para os Utilizadores
(particulares)
1. Na União Europeia
Atenção: Se quiser eliminar este equipamento, não o deve fazer juntamente com o lixo doméstico comum!
O equipamento eléctrico e electrónico deve ser tratado separadamente e
ao abrigo da legislação aplicável que obriga a um tratamento, recuperação e reciclagem adequados de equipamentos eléctricos e electrónicos
usados.
Após a implementação desta legislação por parte dos Estados-membros,
todos os cidadãos residentes na União Europeia poderão entregar o seu
equipamento eléctrico e electrónico usado em estações de recolha específi cas a título gratuito*. Em alguns países* o seu revendedor local também
pode recolher o seu equipamento usado a título gratuito na compra de um
novo equipamento.
*) Contacte as entidades locais para mais informações.
Se o seu equipamento eléctrico e electrónico usado funcionar a pilhas ou
baterias, deverá eliminá-las em separado, conforme a legislação local, e
antes de entregar o seu equipamento.
Ao eliminar este produto correctamente estará a contribuir para que o lixo
seja submetido aos processos de tratamento, recuperação e reciclagem
adequados. Desta forma é possível evitar os efeitos nocivos que o tratamento inadequado do lixo poderia provocar no ambiente e na saúde.
2. Em outros Países fora da UE
Se quiser eliminar este produto, contacte as entidades locais e informe-se
sobre o método correcto para proceder à sua eliminação.
Na Suíça: O equipamento eléctrico e electrónico é aceite, a título gratuito,
em qualquer revendedor, mesmo que não tenha adquirido um novo produto. Poderá encontrar uma lista das estações de recolha destes equipamentos na página da Web www.swisco.ch ou www.sens.ch.
B. Informações sobre a Eliminação de Produtos para UtilizadoresEmpresas
1. Na União Europeia
Se o produto for usado para fi ns comerciais e quiser eliminá-lo:
Contacte o seu revendedor SHARP que irá informá-lo sobre a melhor
forma de eliminar o produto. Poderá ter de pagar as despesas resultantes
da recolha e reciclagem do produto. Alguns produtos mais pequenos (e em
pequenas quantidades) poderão ser recolhidos pelas estações locais.
Na Espanha: Contacte o sistema de recolhas público ou as entidades
locais para mais informações sobre a recolha de produtos usados.
2. Em outros Países fora da UE
Se quiser eliminar este produto, contacte as entidades locais e informe-se
sobre o método correcto para proceder à sua eliminação.
A bateria fornecida com este produto contém traços de chumbo.
Para a União Europeia: O contentor de rodas traçado signifi ca que as bate-
rias usadas não deverão ser colocadas junto com o lixo doméstico! Existe
um sistema de separação próprio para baterias usadas, para permitir um
tratamento e reciclagem própria de acordo com a legislação em vigor. Por
favor contacte as autoridades locais para mais detalhes nos esquemas de
recolha e reciclagem.
Pb
AY-XPC18LR_OM_PT.indd 1AY-XPC18LR_OM_PT.indd 1 2010-03-18 16:41:042010-03-18 16:41:04
Para a Suíça:
Para os outros países fora da União Europeia: por favor contacte a sua au-
toridade local para o método correcto de disposição das baterias usadas.
Contém gases fl uorados com efeito de estufa abrangidos pelo Protocolo de Quioto
R410A (Potencial de aquecimento global 1980)
As baterias usadas deverão ser devolvidas ao ponto de venda.
PT
Page 51

PORTUGUÊS
CONTEÚDOS
• MEDIDAS DE SEGURANÇA ............................PT-1
• NOMES DAS PEÇAS ........................................PT-2
• USO DO TELECOMANDO................................PT-4
COLOCAR O FILTRO PURIFICADOR DO AR
•
• SUGESTÕES PARA POUPAR ENERGIA .........PT-5
• FUNÇÕES BÁSICAS ........................................PT-6
DIRECCIONAR O FLUXO DE AR
•
• FUNÇÃO PLASMACLUSTER ...........................PT-7
• FLUXO DE AR COANDA ..................................PT-8
• MODO AR DIRECCIONADO ............................PT-8
• FUNÇÃO POTÊNCIA MÁXIMA .........................PT-9
• OPERAÇÃO POUPAR ENERGIA .....................PT-9
• 1.2.3.5h TEMPORIZADOR DESLIGADO..........PT-10
• OPERAÇÃO TEMPORIZADOR ........................PT-10
• OPERAÇÃO LIMPEZA AUTOMÁTICA ..............PT-12
• TECLA DISPLAY ...............................................PT-12
• MODO DE AUXÍLIO ..........................................PT-12
• MANUTENÇÃO .................................................PT-13
• NOTAS SOBRE O FUNCIONAMENTO ............PT-14
• ANTES DE SOLICITAR ASSISTÊNCIA ............PT-15
Leia atentamente este manual de instruções antes de usar o produto.
Guarde o manual num lugar seguro para rápida consulta futura.
•
Não espalhar ou verter água directamente sobre a unidade. A
água poderá causar choque eléctrico ou danos no equipamento.
•
Não tente instalar/remover/reparar a unidade você mesmo(a).
Um trabalho incorrecto poderá causar choques eléctricos,
fugas de água, incêndios, etc. Consulte o seu revendedor ou
outro pessoal especializado de assistência qualifi cado para a
..PT-5
instalação/remoção/reparação do aparelho.
ATENÇÃO:
•
..........................PT-7
Abra periodicamente uma janela ou uma porta para ventilar o
compartimento, especialmente quando utilizar aparelhos a gás.
A ventilação insufi ciente poderá causar redução de oxigénio.
•
Não utilize os botões com as mãos molhadas. Poderá causar
choques eléctricos.
•
Para sua segurança, desligue o disjuntor quando não utilizar a
unidade por um período longo de tempo.
•
Verifi que periodicamente o desgaste do chassis de montagem
da unidade exterior e certifi que-se que se encontra fi rmemente
na posição adequada.
•
Não coloque nada sobre a unidade exterior e não suba
para cima da unidade. O objecto ou a pessoa poderão cair
causando ferimentos.
•
Esta unidade foi concebida para utilização residencial. Não
utilize para outras aplicações, tais como num canil ou numa
MEDIDAS DE SEGURANÇA
AVISO
•
Não puxe ou deforme o cabo de fornecimento de energia.
Puxar o cabo de fornecimento de energia e a sua má utilização
poderão resultar em danos para a unidade e causar choque
eléctrico.
•
Evite expor o seu corpo directamente à saída de ar durante um
período prolongado. Poderá afectar a sua condição física.
•
Quando utilizar o ar condicionado para bebés, crianças,
idosos, acamados ou pessoas defi cientes, assegure-se de
que a temperatura é adequada para os que se encontram no
compartimento.
•
Nunca introduza objectos na unidade. A introdução de objectos
poderá resultar em ferimentos provocados pela elevada
velocidade de rotação das ventoinhas internas.
•
Não se esqueça de ligar o aparelho de ar condicionado à terra.
Não ligue o fi o de terra à tubagem de gás, canalização de
água, pára-raios ou cabos telefónicos de terra. A ligação de
terra incompleta poderá causar choque eléctrico.
•
Se algo estiver anormal com o aparelho de ar condicionado (por
ex., cheiro a queimado), páre imediatamente o funcionamento
e DESLIGUE o disjuntor.
•
O aparelho deverá ser instalado respeitando os regulamentos
nacionais de instalações eléctricas. A ligação inadequada
do cabo poderá causar o sobreaquecimento do cabo de
fornecimento de energia, da fi cha e da tomada eléctrica de
estufa para criação de animais ou plantas.
•
Não coloque recipientes com água na unidade. Se a água
penetrar na unidade, os isolamentos eléctricos poder-se-ão
deteriorar e causar choques eléctricos.
•
Não bloquear as entradas nem as saídas de ar da unidade.
Poderá causar um desempenho insufi ciente ou problemas.
Assegure-se de que o aparelho não está em funcionamento e
•
desligue o disjuntor antes de executar qualquer manutenção ou
limpeza. Existe uma ventoinha a rodar no interior da unidade e
você poderá fi car ferido.
•
Este aparelho não é destinado ao uso por crianças ou pessoas
doentes sem supervisão. As crianças devem ser vigiadas para
garantir que não brincam com o aparelho.
•
Certifi que-se de ligar o ar condicionado à fonte de alimentação
com a voltagem e frequência adequadas. O uso de uma fonte
de alimentação com voltagem e frequência impróprias pode
resultar em estragos no equipamento e num possível incêndio.
•
Não instale a unidade num local onde possam existir fugas de
gás infl amável. Poderá provocar um incêndio.
Instale a unidade num local com o mínimo de poeira, vapores e
humidade no ar.
•
Disponha o tubo de drenagem de forma a assegurar uma boa
drenagem. Uma drenagem insufi ciente poderá fazer fazer com
que o compartimento, mobiliário, etc. fi quem molhados.
•
Assegure-se de que se encontra instalado um disjuntor diferencial ou um corta-circuitos, dependendo do local de instalação,
para evitar o choque eléctrico.
parede e provocar um incêndio.
•
Se o cabo de alimentação estiver danificado, deverá ser
substituído pelo fabricante ou pelo seu agente de serviço ou
pessoa identicamente qualifi cada, a fi m de evitar uma situação
de perigo. Para substituição, utilize apenas o cabo de energia
especifi cado pelo fabricante.
PORTGUÉS
PT-1
AY-XPC18LR_OM_PT.indd 1AY-XPC18LR_OM_PT.indd 1 2010-03-18 16:41:092010-03-18 16:41:09
Page 52

NOMES DAS PEÇAS
UNIDADE INTERIOR
1 Entrada (Ar)
1
2
2 Painel aberto
3
3 Filtro purifi cador do ar
4
4 Filtro de ar
5
5 Tecla AUX
6 Janela receptora
7 Palhetas verticais
6
8 Palhetas horizontais
7
9 Saída (Ar)
8
9
10
10
Lâmpada de PLASMACLUSTER
11
12
13
14
(azul)
Lâmpada de FUNCIONAMENTO
11
(vermelha )
Lâmpada do TEMPORIZADOR
12
(laranja )
13 Lâmpara
(verde )
14 Lâmpara
(verde )
NOTA:
As unidades reais podem divergir ligeiramente daquelas acima
ilustradas.
POTÊNCIA MÁXIMA
LIMPEZA AUTOMÁTICA
PT-2
AY-XPC18LR_OM_PT.indd 2AY-XPC18LR_OM_PT.indd 2 2010-03-18 16:41:092010-03-18 16:41:09
Page 53

TELECOMANDO
MOSTRADOR
1
2
3
4
5
6
7
8
1
2
3
4
5
6
7
8
9
10
11
10
11
12
13
14
15
16
1 TRANSMISSOR
2 Tecla FRIO (COOL)
3 Tecla SECAR (DRY)
4 Tecla CALOR (HEAT)
5 Tecla STOP
6 Tecla TERMÓSTATO
7 Tecla PLASMACLUSTER
8 Tecla AR DIRECCIONADO
(SPOT AIR)
9 Tecla POTÊNCIA MÁXIMA
10 Tecla VENTOINHA (FAN)
11 Tecla 1.2.3.5h TEMPORIZA-
DOR DESLIGADO
12 Tecla GIRAR
(sentido vertical)
13 Tecla GIRAR
(sentido horizontal)
12
14 Tecla FLUXO DE AR COANDA
13
15 Tecla POUPAR ENERGIA
14
16 Tecla LIMPEZA AUTOMÁTICA
(CLEAN)
15
17 Tecla TEMPORIZADOR
16
17
18
19
20
21
22
23
24
LIGADO
18 Tecla TIMER SET/CANCEL
19 Tecla ADIANTAR
20 Tecla ATRASAR
21 Tecla RELÓGIO
22 Tecla DISPLAY
23 Tecla RESET
24 Tecla TEMPORIZADOR
DESLIGADO
1 Símbolos de MODO
9
2 Símbolos VELOCIDADE DA VENTOINHA
3 Símbolo PLASMACLUSTER
4 Símbolo AIR FLOW (FRIO/SECO)
5 Símbolo AIRFLOW (CALOR)
6 Símbolo COANDA AIRFLOW (CALOR)
7 Símbolo POUPAR ENERGIA
8 Símbolo BATERIA
9 Símbolo TRANSMISSÃO
10 Símbolo LIMPEZA AUTOMÁTICA
11 Símbolo COANDA AIRFLOW (FRIO/SECO)
12 Símbolo POTÊNCIA MÁXIMA
13 Símbolo AR DIRECCIONADO
14
Indicador de TEMPERATURA
15
Indicador de TEMPORIZADOR DESLIGADO
16
Indicador de TEMPORIZADOR LIGADO / RELÓGIO
PT-3
PORTGUÉS
AY-XPC18LR_OM_PT.indd 3AY-XPC18LR_OM_PT.indd 3 2010-03-18 16:41:092010-03-18 16:41:09
Page 54

USO DO TELECOMANDO
INSTALAR AS PILHAS
Retire a tampa das pilhas.
1
Insira duas pilhas. (AAA (R03))
• Verifi que se as polaridades (+) e (-) estão
2
correctamente alinhadas.
Reinstale a tampa das pilhas.
3
Prima a tecla RESET
• O mostrador indica “AM 6:00”.
4
Tampa do
telecomando
NOTA:
•
A duração de vida das pilhas é de aproximadamente um ano sob condições normais de utilização.
•
Substitua as pilhas quando o telecomando mostrar
“ ”.
•
Quando substituir as pilhas, substitua sempre as
duas ao mesmo tempo e use pilhas do mesmo tipo.
•
Se não pretender utilizar a unidade por um período
mais prolongado, retire as pilhas do telecomando.
ACERTAR A HORA
Existem dois modos do relógio: modo 12
horas e modo 24 horas.
Para estabelecer o modo 12 horas,
1
prima a tecla RELÓGIO uma vez.
Para estabelecer o modo 24 horas,
prima a tecla RELÓGIO duas vez.
Prima a tecla ADIANTAR ou ATRA-
2
SAR para defi nir a hora actual.
• Prima continuamente a tecla para adiantar ou atrasar o tempo com rapidez.
Prima a tecla SET/C.
• Os dois pontos (:) irão piscar.
3
USO DO TELECOMANDO
Aponte o telecomando na direcção do
receptor da unidade e prima a tecla que
pretende accionar. Ouvir-se-á um som
quando a unidade receber o sinal.
• Verifi que que não há nada (cortinas, etc.) a
bloquear a janela receptora do sinal.
• A distância efectiva do sinal é de 7 m.
7 m
ATENÇÃO:
• Não exponha a janela receptora directamente
à luz solar. Isto pode afectar negativamente a
operação.
• O uso de certo tipo de lâmpadas fl uorescen-
tes no quarto pode interferir com a transmissão do sinal.
• Não deixe o telecomando à luz solar directa
ou perto de uma fonte de calor. Proteja o telecomando de humidade e choques.
Janela receptora
3
2
1
NOTA:
• A hora não pode ser acertada enquanto o
temporizador estiver a funcionar.
PT-4
AY-XPC18LR_OM_PT.indd 4AY-XPC18LR_OM_PT.indd 4 2010-03-18 16:41:102010-03-18 16:41:10
Page 55

COLOCAR O FILTRO PURIFICADOR DO AR
SUGESTÕES PARA POUPAR ENERGIA
Os fi ltros purifi cadores do ar eliminam o
pó do ar e libertam ar limpo.
Retire os fi ltros de ar.
1
1
Abra o painel de comandos.
2
Puxe os fi ltros de ar para baixo a
fi m de os poder tirar.
1
2
Coloque o fi ltro purifi cador do
2
ar debaixo das patilhas dos fi l-
tros no fi ltro de ar.
Patilhas
Filtro purifi cador
do ar
Filtro de ar
Aqui poderá encontrar algumas formas de
poupar energia enquanto utiliza o seu ar
condicionado.
Seleccione a temperatura adequada
• Ao seleccionar uma temperatura mais alta ou
mais baixa do que o necessário estará a aumentar o consumo de energia.
Evitar exposições directas à luz solar e
correntes de ar
• Ao evitar que a luz solar entre directamente na divisão durante o arrefecimento pode
reduzir-se o consumo de energia.
• Feche portas e janelas durante as operações
de arrefecimento e aquecimento.
Mantenha o fi ltro limpo para assegurar
um funcionamento perfeito
Desligue o disjuntor quando a unidade
não for utilizada durante um longo período de tempo
• A unidade interior continua a consumir uma
pequena quantidade de energia, mesmo não
estando a funcionar.
PORTGUÉS
Instale novamente os filtros e
3
feche o painel aberto.
2
1
NOTA:
•
Não abra o saco de plástico antes de usar
os fi ltros. (Caso contrário poderão estragar-se mais
depressa do que o normal.)
•
Não exponha os filtros a luz solar directa,
pois podem deteriorar-se.
PT-5
AY-XPC18LR_OM_PT.indd 5AY-XPC18LR_OM_PT.indd 5 2010-03-18 16:41:102010-03-18 16:41:10
Page 56

FUNÇÕES BÁSICAS
1
DESLIGAR
2
Prima a tecla FRIO, SECO ou CALOR.
1
: FRIO
: SECO
: CALOR
• A luz vermelha de FUNCIONAMENTO ( )
acender-se-á.
PARA DESACTIVAR
Prima a tecla STOP.
• A luz vermelha de FUNCIONAMENTO ( )
apagar-se-á.
Prima a tecla TERMOSTATO para regular
2
a temperatura desejada.
(Modo FRIO/CALOR)
Alcançe de temperatura defi nido: 18-32 °C.
(Modo SECO)
A temperatura pode ser alterada até ±2 °C da
defi nição automática de temperatura.
(Exemplo: 1 °C mais)
(Exemplo: 2 °C menos)
3
Prima a tecla VENTOINHA para determi-
3
nar a velocidade desejada da ventoinha.
AUTO SUAVE LENTO RÁPIDO
• No modo SECO, a velocidade da ventoinha en-
contra-se ajustada no modo AUTO e não pode
ser alterada.
PT-6
AY-XPC18LR_OM_PT.indd 6AY-XPC18LR_OM_PT.indd 6 2010-03-18 16:41:112010-03-18 16:41:11
Page 57

DIRECCIONAR O FLUXO DE AR
FUNÇÃO PLASMACLUSTER
DIRECÇÃO DO FLUXO VERTICAL DE AR
Prima a tecla GIRAR ( ).
1
• As palhetas verticais irão girar.
Prima novamente a tecla GIRAR
2
) para parar na posição desejada.
(
1
2
DIRECÇÃO DO FLUXO HORIZONTAL DE AR
Prima a tecla GIRAR ( ).
1
• As palhetas verticais irão girar.
Prima novamente a tecla GIRAR
2
) para parar na posição desejada.
(
Iões Plasmacluster positivos e negativos
serão libertados reduzindo os fungos
existentes no ar.
Durante a operação, prima a tecla
1
PLASMACLUSTER.
• O telecomando irá exibir o símbolo “ ”.
• A lâmpada azul PLASMACLUSTER acender-se-á.
PARA DESACTIVAR
Prima novamente a tecla PLASMACLUSTER.
• A lâmpada azul PLASMACLUSTER apagar-se-á.
PORTGUÉS
1
2
ATENÇÃO:
Nunca tente ajustar as palhetas manualmente.
• O ajuste manual destas palhetas pode provocar o mau funcionamento da unidade.
• Quando os modos FRIO e SECO são utilizados por um período prolongado com as palhetas de regulação verticais ajustadas numa
posição muito virada para baixo, pode formarse água de condensação.
NOTA:
• O alcance da direcção é mais estreita do que
no modo GIRAR de forma a evitar a condensação de gotejar.
NOTA:
• A utilização da operação PLASMACLUSTER
será memorizada e activada na próxima vez
que utilizar o equipamento.
• Para realizar a operação Plasmacluster no
modo VENTOINHA, prima a tecla PLASMACLUSTER com a unidade desligada.
O símbolo do modo no telecomando será
desligado e a velocidade da ventoinha não
poderá ser colocada em AUTO.
PT-7
AY-XPC18LR_OM_PT.indd 7AY-XPC18LR_OM_PT.indd 7 2010-03-18 16:41:112010-03-18 16:41:11
1
Page 58

FLUXO DE AR COANDA
AR DIRECCIONADO
Nos modos frio e seco, as palhetas verticais posicionam-se em diagonal para cima
direccionando o ar fresco para o tecto,
evitando assim fl uxos de ar directos. No
modo calor, as palhetas verticais viramse para baixo para enviar o ar quente em
direcção ao chão.
Durante o funcionamento, prima a
1
tecla FLUXO DE AR COANDA.
(Modo FRIO / SECO)
O telecomando irá exibir o símbolo “ ”.
(Modo CALOR)
•
O telecomando irá exibir o símbolo “ ”.
PARA DESACTIVAR
Prima novamente a tecla FLUXO DE
AR COANDA.
As palhetas estão ajustadas de modo a
direccionar o ar para a área desejada.
Prima a tecla MODO AR DIRECCIO-
1
NADO para escolher o a direcção
desejada do fl uxo de ar.
DESACTIVAR
1
1
NOTA:
• Se desejar a função FLUXO DE AR COANDA
no modo POTÊNCIA MÁXIMA, prima a tecla
FLUXO DE AR COANDA durante a função
POTÊNCIA MÁXIMA.
• As defi nições de FLUXO DE AR COANDA e
de SPOT AIR não podem ser usadas em simultâneo.
AY-XPC18LR_OM_PT.indd 8AY-XPC18LR_OM_PT.indd 8 2010-03-18 16:41:122010-03-18 16:41:12
NOTA:
• Se desejar as defi nições de AR DIRECCIO-
NADO durante o modo POTÊNCIA MÁXIMA,
prima a tecla AR DIRECCIONADO durante a
função POTÊNCIA MÁXIMA.
• As defi nições de FLUXO DE AR COANDA e
de AR DIRECCIONADO não podem ser usadas em simultâneo.
PT-8
Page 59

FUNÇÃO POTÊNCIA MÁXIMA
OPERAÇÃO POUPAR ENERGIA
O ar condicionado trabalha na potência
máxima para tornar o quarto frio ou quente o mais rapidamente possível.
Durante o funcionamento, prima a
1
tecla POTÊNCIA MÁXIMA.
• O telecomando mostrará “ ” e o símbolo FLUXO DE AR aumentará.
O mostrador da temperatura desligar-se-á.
•
•
A lâmpada verde POTÊNCIA MÁXIMA ( )
acender-se-á.
PARA DESACTIVAR
Prima novamente a tecla POTÊNCIA MÁXIMA.
•
A lâmpada verde POTÊNCIA MÁXIMA ( )
apagar-se-á.
A temperatura inicial é automaticamente
regulada para poupar energia.
Durante o funcionamento, prima a
tecla POUPAR ENERGIA.
1
• O telecomando irá exibir o símbolo “ ”.
• A velocidade da ventoinha será defi nida
automaticamente.
PARA DESACTIVAR
Prima novamente a tecla POUPAR
ENERGIA.
PORTGUÉS
1
1
NOTA:
•
O ar condicionado funcionará com velocidade
da ventoinha “Muito RÁPIDA” durante 5 minutos
e depois mudará para velocidade “RÁPIDA”.
• Não se pode defi nir a temperatura nem a ve-
locidade da ventoinha durante a função POTÊNCIA MÁXIMA.
•
As operações POUPAR ENERGIA e POTÊNCIA
MÁXIMA não podem ser usadas em simultâneo.
AY-XPC18LR_OM_PT.indd 9AY-XPC18LR_OM_PT.indd 9 2010-03-18 16:41:122010-03-18 16:41:12
NOTA:
• No modo CALOR, a temperatura inicial fl utu-
ará automaticamente entre 0 - 2 °C menos do
que as defi nições originais de temperatura.
No modo FRIO ou SECO, a temperatura inicial
fl utuará automaticamente entre 0 - 1 °C mais
do que as defi nições originais de temperatura.
•
As operações POUPAR ENERGIA e POTÊNCIA
MÁXIMA não podem ser usadas em simultâneo.
PT-9
Page 60

1.2.3.5h TEMPORIZADOR DESLIGADO
OPERAÇÃO TEMPORIZADOR
Quando o 1.2.3.5h TEMPORIZADOR DESLIGADO é activado, a unidade desligar-se-á
automaticamente ao fi m do tempo defi nido.
Prima a tecla 1.2.3.5h TEMPORI-
ZADOR DESLIGADO para defi nir o
1
tempo desejado.
DESACTIVAR
•
A lâmpada laranja TEMPORIZADOR ( ) acender-se-á.
•
O tempo restante será indicado no telecomando em
intervalos de 1 hora.
PARA DESACTIVAR
Prima a tecla SET/C.
Em alternativa, prima a tecla 1.2.3.5h
TEMPORIZADOR DESLIGADO.
•
A lâmpada laranja TEMPORIZADOR ( ) apagar-se-á.
TEMPORIZADOR DESLIGADO
Prima a tecla TEMPORIZADOR DES-
1
LIGADO.
• O indicador de TEMPORIZADOR DESLIGADO irá piscar.
Prima a tecla ADIANTAR ou ATRA-
2
SAR para defi nir o tempo desejado.
• O tempo pode ser defi nido em intervalos
de 10 minutos.
Prima a tecla SET/C.
3
•
A lâmpada laranja TEMPORIZADOR ( )
acender-se-á.
1
DESACTIVAR
3
2
1
NOTA:
•
O funcionamento do 1.2.3.5h TEMPORIZADOR DESLIGADO tem prioridade sobre o funcionamento do TEMPORIZADOR LIGADO e TEMPORIZADOR DESLIGADO.
•
Se o 1.2.3.5h TEMPORIZADOR DESLIGADO for regulado enquanto a unidade não estiver a funcionar, a unidade
funcionará durante nas condições previamente reguladas.
•
Quando o TEMPORIZADOR LIGADO e o TEMPORIZADOR DESLIGADO estão activados, a tecla CANCELAR
O TEMPORIZADOR cancela todas as defi nições.
AY-XPC18LR_OM_PT.indd 10AY-XPC18LR_OM_PT.indd 10 2010-03-18 16:41:122010-03-18 16:41:12
NOTA:
•
Quando o modo de funcionamento TEMPORIZADOR
DESLIGADO está activo, a temperatura do quarto é
regulada automaticamente para evitar que o quarto fi que
demasiado frio ou quente enquanto você, por exemplo,
dorme (função automática nocturna).
Modo FRIO: Uma hora depois de se ligar o temporizador,
a regulação da temperatura sobe 1 °C.
Modo CALOR: Uma hora depois de se ligar o temporizador, a regulação da temperatura cai 3 °C.
PT-10
Page 61

TEMPORIZADOR LIGADO
Prima a tecla TEMPORIZADOR LIGADO.
1
• O indicador de TEMPORIZADOR LIGADO irá piscar.
Prima a tecla ADIANTAR ou ATRA-
2
SAR para defi nir o tempo desejado.
• O tempo pode ser defi nido em intervalos
de 10 minutos.
Prima a tecla SET/C.
3
•
A lâmpada laranja TEMPORIZADOR ( )
acender-se-á.
PARA DESACTIVAR
Prima a tecla SET/C.
• A lâmpada laranja TEMPORIZADOR ( )
apagar-se-á.
•
A hora actual será indicada no mostrador do
telecomando.
DESACTIVAR
ALTERAR AS DEFINIÇÕES DE TEMPO
Desactive as defi nições do TEMPORI-
ZADOR e defi na-as outra vez.
COMBINAR O TEMPORIZADOR
LIGADO E DESLIGADO
Defi nir o TEMPORIZADOR DESLIGADO
e o TEMPORIZADOR LIGADO.
Exemplo
Hora actual: 9:00)
(
TEMPORIZADOR DESLIGADO às 11:00
TEMPORIZADOR LIGADO às 7:00
PORTGUÉS
1
3
2
NOTA:
• A unidade ligar-se-á antes da hora pré-defi ni-
da para assim possibilitar que a temperatura
desejada na divisão seja realmente alcançada
na hora programada. (Função de Acordar)
AY-XPC18LR_OM_PT.indd 11AY-XPC18LR_OM_PT.indd 11 2010-03-18 16:41:132010-03-18 16:41:13
• A seta ( ou ) entre o indicador de TEMPORIZADOR LIGADO e TEMPORIZADOR
DESLIGADO mostra qual dos dois se iniciará
em primeiro lugar.
NOTA:
• Não se pode programar o TEMPORIZADOR
LIGADO e o TEMPORIZADOR DESLIGADO
para a unidade funcionar com temperaturas
diferentes ou outras defi nições.
• Cada temporizador pode ser programado
para se activar antes do outro.
PT-11
Page 62

OPERAÇÃO LIMPEZA AUTOMÁTICA
TECLA DISPLAY
A operação LIMPEZA AUTOMÁTICA reduzirá o
crescimento de bolor com os iões Plasmacluster
e secará o interior da unidade. Utilize a operação
em períodos de mudança de estação.
Prima a tecla LIMPEZA AUTOMÁTI-
1
CA com a unidade desligada.
• O telecomando irá exibir o símbolo “ ”.
A lâmpada verde LIMPEZA AUTOMÁTICA (
•
) e a lâmpada azul PLASMACLUSTER
acender-se-ão.
• A unidade terminará a operação ao fi m de
40 minutos.
PARA DESACTIVAR
Prima a tecla LIMPEZA AUTOMÁTICA.
•
A lâmpada verde LIMPEZA AUTOMÁTICA (
) e a lâmpada azul PLASMACLUSTER
apagar-se-ão.
Prima a tecla DISPLAY quando as lâmpadas da unidade estiverem demasiado
brilhantes. (A lâmpada vermelha FUNCIONAMENTO e a lâmpada laranja TEMPORIZADOR não podem ser desligadas.)
Durante o funcionamento, prima a
1
tecla DISPLAY.
• A lâmpada azul PLASMACLUSTER, a lâmpada
verde LIMPEZA AUTOMÁTICA ( ) e/ou
a lâmpada verde POTÊNCIA MÁXIMA ( )
apagar-se-ão.
PARA ACENDER
Prima novamente a tecla DISPLAY.
1
MODO DE AUXÍLIO
Use este modo quando o telecomando
não estiver disponível.
PARA ACTIVAR
Prima a tecla AUX.
• A luz vermelha de FUNCIONAMENTO ( )
acender-se-á.
• Ao ligar a unidade, a defi nição do modo e da
temperatura são automaticamente seleccionadas de acordo com a temperatura da divisão e a temperatura exterior. A velocidade da
ventoinha é estabelecida automaticamente.
1
NOTA:
• Não é possível alterar as defi nições da tem-
peratura, da velocidade da ventoinha, da
direcção do fl uxo de ar ou do temporizador
durante a operação LIMPEZA AUTOMÁTICA.
O bolor já desenvolvido não pode ser eliminado
•
através desta operação.
PARA DESACTIVAR
Prima novamente a tecla AUX.
• A luz vermelha de FUNCIONAMENTO ( )
apagar-se-á.
AUX
PT-12
AY-XPC18LR_OM_PT.indd 12AY-XPC18LR_OM_PT.indd 12 2010-03-18 16:41:132010-03-18 16:41:13
Page 63

MANUTENÇÃO
Certifi que-se que termina a operação e
desliga o disjuntor antes de realizar qualquer tipo de manutenção.
LIMPEZA DOS FILTROS DE AR
Os fi ltros devem ser limpos de duas em duas
semanas.
Desligue a unidade.
1
Retire os fi ltros.
2
1
Levante o painel.
2
Puxe os fi ltros de ar para baixo a fi m de
os poder tirar.
1
2
Retire os filtros purificadores do
3
ar dos fi ltros de ar.
Limpe os fi ltros.
4
Use um aspirador para retirar o pó. Se os
fi ltros estiverem sujos, lave-os com água
morna e um detergente suave. Seque os
fi ltros à sombra antes de os voltar a instalar.
Instalar novamente os filtros pu-
5
rifi cadores do ar.
MANUTENÇÃO APÓS A ÉPOCA DE
AR CONDICIONADO
Utilize a unidade na função LIMPEZA
1
AUTOMÁTICA para secar cuidadosamente o interior da unidade.
Termine a função e desligue o disjun-
2
tor.
Limpe os fi ltros e, em seguida, volte
3
a instalá-los.
MANUTENÇÃO ANTES DA ÉPOCA
DE AR CONDICIONADO
Certifi que-se de que os fi ltros de ar
1
não estão sujos.
Certifi que-se de que não há nada a
2
obstruir a entrada e a saída de ar do
aparelho.
SUBSTITUIR O FILTRO PURIFICADOR DO AR
Os fi ltros devem ser substituidos cada 3-6
meses
Retire os fi ltros purifi cadores do ar
1
velhos dos fi ltros de ar.
Coloque os novos fi ltros purifi cado-
2
res do ar por baixo das patilhas nos
fi ltros de ar.
Patilhas
PORTGUÉS
Instale novamente os filtros e fe-
6
che o painel aberto.
2
1
LIMPEZA DA UNIDADE E DO TELECOMANDO
• Limpe-os com um pano macio.
• Não borrife nem deite água por cima destes,
pois tal poderá causar choque eléctrico ou
danos no equipamento.
• Não use água quente, diluente, pós abrasivos
ou dissolventes fortes.
Filtro purifi cador
do ar
NOTA:
• Os fi ltros purifi cadores do ar não podem ser
lavados para reutilização. Filtros novos podem ser encontrados no seu revendedor mais
próximo.
Eliminação dos Filtros
Elimine os fi ltros de acordo com as leis e regu-
lamentos locais.
Materiais do fi ltro PURIFICADOR DO AR
Filtro: Polipropileno
Armação: Poliéster
Filtro de ar
PT-13
AY-XPC18LR_OM_PT.indd 13AY-XPC18LR_OM_PT.indd 13 2010-03-18 16:41:142010-03-18 16:41:14
Page 64

NOTAS SOBRE O FUNCIONAMENTO
ESTADO DO FUNCIONAMENTO
Refrigerador (
Temperatura interior Temperatura exterior
Limite
superior
Limite
inferior
Refrigerador (
Temperatura interior Temperatura exterior
Limite
superior
Limite
inferior
Aquecedor (
Temperatura interior Temperatura exterior
Limite
superior
Limite
inferior
• O dispositivo de proteção instalado pode impedir o funcionamento da unidade ao ser usada com temperaturas superiores a estas.
• Se o ar registar uma humidade superior a 80%
poderá formar-se condensação na saída de ar,
caso a unidade seja constantemente utilizada
nos modos FRIO e SECO.
AY-XPC18LR)
32 ˚C
21 ˚C
32 ˚C 46 ˚C
21 ˚C 10 ˚C
AY-XPC18LR, AY-XP24LR)
27˚C 24 ˚C
- 15 ˚C
46 ˚C (Uso simples)
43 ˚C (Uso múltiplo)
-10 ˚C (Uso simples)
21 ˚C
(Uso múltiplo)
AY-XP24LR)
EM CASO DE FALHA DE CORRENTE
• Este ar condicionado tem uma função de
memória para o caso de haver uma falha de
corrente.
Depois da corrente ter sido restabelecida, a
unidade é automaticamente reiniciada com
as mesmas regulações que estavam activas
antes da falta de corrente, excepto as regulações do temporizador.
• Se ocorrer uma falha de corrente quando o
temporizador estiver activo, as defi nições do
temporizador serão apagadas e não serão
recuperadas, mesmo depois da corrente ser
restabelecida.
NOTA SOBRE A FUNÇÃO DE
AQUECIMENTO
FUNÇÃO DE DESCONGELAR
• Quando se formar gelo na unidade exterior
durante a função de aquecimento, a unidade
começará automaticamente a descongelar
durante 5 a 10 minutos para remover o gelo.
Durante o processo de descongelar, as ventoinhas interior e exterior não trabalham.
EFICÁCIA DO AQUECIMENTO
• A unidade dispõe duma bomba de calor que
puxa o calor do ar exterior e liberta-o no interior. Por consequência, a efi cácia do aqueci-
mento depende em grande parte da temperatura do ar exterior.
• Se a efi cácia do aquecimento diminuir devido
a temperaturas exteriores muito baixas, aconselha-se o uso de um aquecimento adicional.
• O aparelho demora algum tempo até aquecer
e, por sua vez, a aquecer a divisão, dado que
esta unidade funciona com um sistema de cir-
culação de ar forçado.
NOTAS SOBRE A UTILIZAÇÃO DO
AY-XPC18LR COMO AR CONDICIONADO MULTI-SISTEMA
Com um multi-sistema de ar condicionado, podem-se ligar várias unidades interiores a uma
unidade exterior.
Com um multi-sistema de ar condicionado, as
diferentes unidades interiores não podem funcionar em modos diferentes.
• Se uma unidade está a funcionar em modo
FRIO (ou SECO), as outras unidades devem
ser ligadas no mesmo modo. O modo da
unidade interior que começou a funcionar em
primeiro lugar tem prioridade. A unidade interior ligada mais tarde num modo diferente não
conseguirá funcionar. Irá apitar e as lâmpadas
de FUNCIONAMENTO e TEMPORIZADOR
começarão a piscar. Neste caso, programe
todas as unidades interiores para o mesmo
modo de funcionamento.
• Os modos FRIO e SECO podem ser defi nidos
ao mesmo tempo.
PT-14
AY-XPC18LR_OM_PT.indd 14AY-XPC18LR_OM_PT.indd 14 2010-03-18 16:41:152010-03-18 16:41:15
Page 65

ANTES DE SOLICITAR ASSISTÊNCIA
As seguintes condições de funcionamento
não denunciam avarias do equipamento.
A unidade não funciona
•
A unidade não funcionará se for ligada imediatamente após ter sido desligada. A unidade não
funcionará imediatamente após uma mudança
de funções. Esta característica visa a protecção do mecanismo interno. Espere 3 minutos
até colocar a unidade em funcionamento.
Não sai ar quente da unidade
• No modo de funcionamento CALOR, a ventoinha interior pode não se iniciar entre 2 a 5
minutos depois da unidade ter sido ligada a
fi m de evitar a circulação de ar frio.
• A unidade está a descongelar. Espere entre 5
a 10 minutos.
Cheiros
•
Cheiros de carpetes ou móveis que tenham
penetrado na unidade poderão ser emitidos
pela unidade.
Estalidos
• Este som é gerado pela fricção da unidade a
expandir-se ou a ligar-se, devido a uma alteração da temperatura.
Zumbido baixo
• Este som é produzido pela unidade ao gerar
iões Plasmacluster.
Ruído sibilante
•
O ruído grave e sibilante que se ouve é o ruído do
agente de refrigeração a correr dentro da unidade.
Névoa na saída de ar interior
• Durante a operação de arrefecimento, isto
acontece devido à diferença entre a temperatura ambiente do quarto e o ar descarregado.
Vapor de água
• Durante a operação de aquecimento, pode
sair vapor de água da unidade exterior se
esta estiver a descongelar.
A unidade exterior não pára
• Depois de cancelar a operação, a unidade
exterior girará a ventoinha durante cerca de
um minuto para arrefecer a unidade.
Odor emitido pela saída de ar do Plasmacluster
• Trata-se do cheiro a ozono criado pelo gerador de iões Plasmacluster. A concentração
de ozono é muito baixa, não tendo qualquer
efeito adverso sobre a sua saúde. O ozono
libertado para o ar decompõe-se rapidamente
e a sua densidade na divisão não aumenta.
Ao usar o AY-XPC18LR como ar condicionado multi-sistema
Uma unidade interior que não está em
funcionamento está a aquecer-se.
Sai ar quente de uma unidade interior
no modo PLASMACLUSTER.
• Sai refrigerador da unidade interior quando as
outras unidades estão a funcionar no modo
CALOR.
Não sai fl uxo de ar de uma unidade interior
quando a unidade está no modo PLASMACLUSTER ou na função LIMPEZA AUTOMÁTICA.
• A unidade exterior está a descongelar-se.
PORTGUÉS
Uma unidade interior emite um apito e as
lâmpadas de FUNCIONAMENTO e TEMPORIZADOR começam a piscar em simultâneo.
•
Verifi que se todas as unidades interiores estão
programadas para o mesmo modo. Se não
estiverem, programe todas as unidades interiores com o mesmo modo de funcionamento.
Verifique os seguintes pontos antes de
contactar a assistência técnica.
A unidade não funciona
• Verifi que se o disjuntor disparou ou se o fusí-
vel se fundiu.
A unidade não arrefece (ou aquece) devidamente o quarto
•
Controle os fi ltros. Se estiverem sujos, limpe-os.
•
Controle a unidade exterior para verifi car se
existe algo a obstruir a entrada ou saída de ar.
• Verifi que se o termostato está devidamente
regulado.
• Assegure-se de que as portas e janelas estão
devidamente fechadas.
A unidade não recebe o sinal do telecomando
• Verifi que se as pilhas do telecomando estão
fracas ou gastas.
• Tente emitir novamente o sinal com o telecomando a apontar devidamente para a janela
receptora do aparelho.
• Verifi que se as pilhas do telecomando estão
devidamente colocadas.
Contacte o Serviço de Assistência Técnica
se a lâmpada de FUNCIONAMENTO, a lâmpada do TEMPORIZADOR e/ou a lâmpada
do PLASMACLUSTER fi carem intermitentes.
PT-15
AY-XPC18LR_OM_PT.indd 15AY-XPC18LR_OM_PT.indd 15 2010-03-18 16:41:152010-03-18 16:41:15
Page 66

Atención: Su producto está
marcado con este símbolo.
Signifi ca que los productos
eléctricos y electrónicos usados
no deberían mezclarse con los
residuos domésticos generales.
Existe un sistema de recogida independiente para estos
productos.
A. Información sobre eliminación para usuarios particulares
1. En la Unión Europea
Atención: Si quiere desechar este equipo, ¡por favor no utilice el cubo de la
basura habitual!
Los equipos eléctricos y electrónicos usados deberían tratarse por separado de acuerdo con la legislación que requiere un tratamiento, una recuperación y un reciclaje adecuados de los equipos eléctricos y electrónicos
usados.
Tras la puesta en práctica por parte de los estados miembros, los hogares
de particulares dentro de los estados de la Unión Europea pueden devolver
sus equipos eléctricos y electrónicos a los centros de recogida designados
sin coste alguno*. En algunos países* es posible que también su vendedor
local se lleve su viejo producto sin coste alguno si Ud. compra uno nuevo
similar.
*) Por favor, póngase en contacto con su autoridad local para obtener más
detalles.
Si sus equipos eléctricos o electrónicos usados tienen pilas o acumuladores, por favor deséchelos por separado con antelación según los requisitos
locales.
Al desechar este producto correctamente, ayudará a asegurar que los
residuos reciban el tratamiento, la recuperación y el reciclaje necesarios,
previniendo de esta forma posibles efectos negativos en el medio ambiente y la salud humana que de otra forma podrían producirse debido a una
manipulación de residuos inapropiada.
2. En otros países fuera de la Unión Europea
Si desea desechar este producto, por favor póngase en contacto con las
autoridades locales y pregunte por el método de eliminación correcto.
Para Suiza: Los equipos eléctricos o electrónicos pueden devolverse al
vendedor sin coste alguno, incluso si no compra ningún nuevo producto.
Se puede encontrar una lista de otros centros de recogida en la página
principal de www.swico.ch o www.sens.ch.
B. Información sobre Eliminación para empresas usuarias
1. En la Unión Europea
Si el producto se utiliza en una empresa y quiere desecharlo:
Por favor póngase en contacto con su distribuidor SHARP, quien le infor-
mará sobre la recogida del producto. Puede ser que le cobren los costes
de recogida y reciclaje. Puede ser que los productos de tamaño pequeño
(y las cantidades pequeñas) sean recogidos por sus centros de recogida
locales.
Para España: Por favor, póngase en contacto con el sistema de recogida
establecido o con las autoridades locales para la recogida de los productos
usados.
2. En otros países fuera de la Unión Europea
Si desea desechar este producto, por favor póngase en contacto con sus
autoridades locales y pregunte por el método de eliminación correcto.
Las baterías suministradas con este producto contienen pequeñas cantidades de Plomo.
Para EU: El contenedor de basura con ruedas tachado indica que las
baterías usadas no deberían mezclarse con los residuos domésticos generales. Existe un sistema de recogida independiente de baterías usadas,
para permitir un correcto tratamiento y reciclado de acuerdo con la legislación vigente. Por favor póngase en contacto con el sistema de recogida
establecido o con las autoridades locales para la recogida selectiva de las
Pb
AY-XPC18LR_OM_ES.indd 1AY-XPC18LR_OM_ES.indd 1 2010-03-18 16:39:002010-03-18 16:39:00
baterías usadas.
Para Suiza: Las baterías usadas deben ser retornadas al punto de venta.
Para otros países fuera de la Unión Europea: Por favor póngase en contac-
to con las autoridades locales para un correcto procedimiento de eliminación de las baterías usadas.
Contiene gases fl uorados de efecto invernadero regulados por el Protocolo de Kioto
R410A (Potencial de calentamiento atmosférico 1980)
ES
Page 67

ESPAÑOL
ÍNDICE
• PRECAUCIONES DE SEGURIDAD .................ES-1
• DESIGNACIÓN DE LAS PIEZAS ......................ES-2
• USO DEL MANDO A DISTANCIA ......................ES-4
CONFIGURACIÓN DEL FILTRO PURIFICADORDE AIRE
•
•
ALGUNOS CONSEJOS PARA AHORRAR ENERGÍA ...
• FUNCIONAMIENTO BÁSICO ...........................ES-6
AJUSTE DE LA DIRECCIÓN DE LA CORRIENTE DE AIRE ..
•
•
FUNCIONAMIENTO DEL PLASMACLUSTER
• CORRIENTE DE AIRE PROGRESIVA ..............ES-8
• AIRE DIRIGIDO .................................................ES-8
• FUNCIONAMIENTO A CAPACIDAD MÁXIMA ..ES-9
FUNCIONAMIENTO EN MODO AHORRO DE ENERGÍA
•
•
TEMPORIZADOR DE DESCONEXIÓN de 1.2.3.5h
•
FUNCIONAMIENTO CON EL TEMPORIZADOR
• FUNCIÓN AUTO LIMPIEZA ..............................ES-12
• TECLA VISUALIZACIÓN ...................................ES-12
• MODO AUXILIAR ..............................................ES-12
• MANTENIMIENTO ............................................ES-13
OBSERVACIÓN SOBRE EL FUNCIONAMIENTO
•
•
ANTES DE LLAMAR AL DEPARTAMENTO TÉCNICO ...
Antes de usar la unidad lea detenidamente el manual. Guárdelo en un
lugar seguro para consultarlo con facilidad.
•
No rocíe o derrame agua directamente sobre la
unidad. El agua puede causar descargas eléctricas
o daños al equipo.
• No trate de instalar/desmontar/reparar la unidad
por su cuenta. Los trabajos mal realizados pueden
ocasionar descargas eléctricas, fugas de agua,
..ES-5
ES-5
ES-7
..ES-7
incendios, etc. Consulte a su distribuidor o a
personal cualifi cado para instalar/desmontar/reparar
la unidad.
PRECAUCIÓN
• Abra periódicamente una ventana o una puerta para
ventilar la habitación, sobre todo si se usan aparatos
que funcionan con gas. Una ventilación insuficiente
..ES-9
..ES-10
..ES-10
puede causar escasez de oxígeno.
• No pulse las teclas con las manos mojadas para evitar
descargas eléctricas.
• Por seguridad, desconecte el diferencial cuando no vaya
a utilizar la unidad por un período de tiempo prolongado.
• Examine periódicamente la rejilla de montaje de la
unidad exterior para determinar si existe desgaste y
..ES-14
ES-15
asegurarse de que está convenientemente sujeta.
• No coloque nada en la unidad exterior ni se suba
encima. El objeto o la persona pueden caerse, con
PRECAUCIONES DE SEGURIDAD
ADVERTENCIA
•
No deforme ni tire del cable de alimentación. Estirar
y utilizar incorrectamente el cable de alimentación
puede ocasionar daños o descargas eléctricas.
Tenga cuidado de no exponer su cuerpo directamente
•
a la salida de aire durante un largo período de
tiempo, ya que podría afectar a su salud.
• Al usar el acondicionador de aire para recién
nacidos, niños, ancianos, personas postradas en
cama o inválidas, asegúrese de que la temperatura
de la habitación sea la adecuada.
• No inserte objetos dentro de la unidad. Insertar
objetos puede causar heridas debido a la rotación a
alta velocidad de los ventiladores internos.
• Asegúrese de conectar a tierra el acondicionador
de aire. No conecte la toma de tierra a tuberías de
gas, tuberías de agua, pararrayos o tomas de tierra
de teléfono. Si la conexión a tierra es incompleta,
pueden producirse descargas eléctricas.
Si sucede algo anormal con el acondicionador de aire (p.
•
ej., se detecta un olor a quemado), detenga inmediatamente
su funcionamiento y desactive el cortacircuito.
• El aparato se debe instalar de conformidad a las
normas nacionales sobre cableado. Una conexión
inadecuada puede ocasionar el sobrecalentamiento
del cable de alimentación, del enchufe y del
tomacorriente, y causar un incendio.
• Si el cable de alimentación está dañado, deberá ser
reemplazado por el fabricante, por un técnico de
servicio autorizado o por una persona similarmente
cualificada, para evitar situaciones peligrosas.
riesgo de lesiones.
• Esta unidad está diseñada para uso doméstico. No la
utilice para otros fi nes, tales como habitáculos para criar
animales o invernaderos.
• No coloque vasijas con agua sobre la unidad. Si el agua
penetra en la unidad, los aislantes eléctricos pueden
deteriorarse y pueden producirse descargas eléctricas.
• No bloquee las entradas ni las salidas de aire de
la unidad para evitar problemas o un rendimiento
insufi ciente.
• Asegúrese de detener el funcionamiento de la unidad
y desconectar el cortacircuito antes de llevar a cabo
cualquier mantenimiento o limpieza. La unidad integra
un ventilador en movimiento y podría causar heridas.
Este aparato no está diseñado para su uso sin supervisión
•
por parte de niños o personas enfermas. Los niños deben
ser vigilados para asegurarse de que no jueguen con el
aparato.
• Asegúrese de conectar el acondicionador de aire a la
fuente de alimentación del voltaje y frecuencia correctos. La utilización de una fuente de alimentación con
un voltaje y frecuencia inadecuados puede ocasionar
daños en el equipo e incluso causar un incendio.
• No instale el aparato en lugares con peligro de fuga de
gases para evitar incendios.
Instale el aparato en un lugar con poco polvo, vapores y
humedad.
• Coloque la manguera de drenaje de tal forma que se
asegure un drenaje fl uido. Un drenaje insufi ciente puede
causar humedad en la habitación, muebles, etc.
• Asegúrese de instalar un interruptor automático de pérdidas o un diferencial, dependiendo de la ubicación de
la instalación, para evitar descargas eléctricas.
Para su sustitución, utilice únicamente el cable de
alimentación especifi cado por el fabricante.
ESPAÑOL
ESPA
Ñ
OL
ES-1
AY-XPC18LR_OM_ES.indd 1AY-XPC18LR_OM_ES.indd 1 2010-03-18 16:39:062010-03-18 16:39:06
Page 68

DESIGNACIÓN DE LAS PIEZAS
UNIDAD INTERIOR
1 Entrada de aire
1
2
2 Panel de apertura
3
3 Filtro purifi cador de aire
4
4 Filtro de aire
5
5 Tecla AUX
6 Célula receptora
7 Defl ectores de corriente
6
7
8
9
10
11
12
13
14
de aire vertical
8 Defl ectores de corriente
de aire horizontal
9 Salida de aire
10
Lámpara de PLASMACLUSTER
(azul)
Lámpara de FUNCIONAMIENTO
11
(roja )
Lámpara de TEMPORIZADOR
12
(naranja )
Lámpara de CAPACIDAD
13
MÁXIMA
(verde )
14 Tecla AUTO LIMPIEZA
(verde
NOTA:
Los aparatos pueden diferir ligeramente de los indicados en las
ilustraciones.
)
ES-2
AY-XPC18LR_OM_ES.indd 2AY-XPC18LR_OM_ES.indd 2 2010-03-18 16:39:062010-03-18 16:39:06
Page 69

ESPAÑOL
MANDO A DISTANCIA
Visualizador
1
2
3
4
5
6
7
8
1
2
3
4
5
6
7
8
9
10
11
10
11
12
13
14
15
16
1 TRANSMISOR
2 Tecla COOL
3 Tecla DRY
4 Tecla HEAT
5 Tecla STOP
6 Tecla TERMOSTATO
7 Tecla PLASMACLUSTER
8 Tecla AIRE DIRIGIDO
9 Tecla CAPACIDAD MÁXIMA
10 Tecla FAN
11 Botón TEMPORIZADOR DE
12 Tecla OSCILACIÓN
(vertical)
13 Tecla OSCILACIÓN
(horizontal)
14 Tecla CORRIENTE DE AIRE
12
13
15
14
16 Tecla AUTO LIMPIEZA
17 Tecla TEMPORIZADOR DE
15
CONEXIÓN
16
18
17
TEMPORIZADOR (SET/C)
18
19 Tecla AVANCE DE HORAS
19
20
20
21
21 Tecla RELOJ
22
22 Tecla VISUALIZACIÓN
23
23 Tecla RESTABLECER
24
24 Tecla TEMPORIZADOR DE
DESCONEXIÓN
1 Símbolos de MODO
2 Símbolos de VELOCIDAD DEL VENTILADOR
9
3 Símbolo de PLASMACLUSTER
4
Símbolo de CORRIENTE DE AIRE (ENFRIAR/DESHUMECTAR)
5 Símbolo de CORRIENTE DE AIRE (CALOR)
6
Símbolo de CORRIENTE DE AIRE PROGRESIVA (CALOR)
7 Símbolo de AHORRO DE ENERGÍA
8 Símbolo de PILA
9 Símbolo de TRANSMISIÓN
10 Símbolo de AUTO LIMPIEZA
11
Símbolo de CORRIENTE DE AIRE (ENFRIAR/DESHUMECTAR)
12 Símbolo de CAPACIDAD MÁXIMA
13 Símbolo de AIRE DIRIGIDO
14
Indicador de TEMPERATURA
15
Indicador de TEMPORIZADOR DE DESCONEXIÓN
16
Indicador de TEMPORIZADOR DE CONEXIÓN/RELOJ
DESCONEXIÓN de 1.2.3.5h
PROGRESIVA
Tecla AHORRO DE ENERGÍA
Tecla ESTABLECER/CANCELAR
Tecla RETROCESO DE HORAS
ESPA
Ñ
OL
ES-3
AY-XPC18LR_OM_ES.indd 3AY-XPC18LR_OM_ES.indd 3 2010-03-18 16:39:062010-03-18 16:39:06
Page 70

USO DEL MANDO A DISTANCIA
FORMA DE COLOCAR LAS PILAS
Retire la tapa del compartimento de
1
pilas.
Inserte dos pilas. (AAA (R03))
• Asegúrese de que las polaridades (+) y (-)
2
están correctamente alineadas.
Coloque de nuevo la tapa del com-
3
partimento de pilas.
Pulse la tecla RESTABLECER
• El visualizador indica “AM 6:00”.
4
Tapa del
compartimiento
de las pilas
NOTA:
• Las pilas duran un año aproximadamente.
• Sustituya las pilas cuando el mando a distancia muestre “
• Al sustituir las pilas, cambie siempre las dos y
asegúrese de que son del mismo tipo.
• Cuando no vaya a usar la unidad durante un
período largo de tiempo, extraiga las pilas del
mando a distancia.
AJUSTAR LA HORA ACTUAL
Existen dos modos de ajustar la hora: ciclo de 12 horas y ciclo de 24 horas.
Para ajustar el modo de 12 horas,
1
pulse la tecla RELOJ una vez.
Para ajustar el modo de 24 horas,
pulse la tecla RELOJ dos veces.
Pulse las teclas AVANCE o RETRO-
2
CESO DE HORAS para ajustar la
hora actual.
• Mantenga la tecla pulsada para avanzar
o retroceder rápidamente.
Pulse la tecla SET/C.
• Parpadearán los dos puntos (:).
3
”.
3
USO DEL MANDO A DISTANCIA
Apunte el mando a distancia hacia la célula receptora de señal de la unidad y pulse
la tecla deseada. Cuando la unidad reciba
la señal, producirá un sonido audible.
• Asegúrese de que no haya cortinas u otros
objetos entre la célula receptora de señal y la
unidad.
• La señal es efi caz hasta a 7 metros de distan-
cia.
7 m
PRECAUCIÓN:
• No permita que la célula receptora de señal
reciba la luz directa del sol, ya que su funcionamiento podría deteriorarse.
• El uso de determinadas lámparas fl uorescen-
tes en la misma habitación que la unidad puede interferir en la transmisión de la señal.
• No deje el mando a distancia expuesto directamente a los rayos del sol ni cerca de calentador. Proteja la unidad y el mando a distancia
contra la humedad y los golpes.
Célula receptora
2
1
NOTA:
• Mientras el aparato este funcionando en el
modo temporizador, no es posible ajustar la
hora actual.
ES-4
AY-XPC18LR_OM_ES.indd 4AY-XPC18LR_OM_ES.indd 4 2010-03-18 16:39:072010-03-18 16:39:07
Page 71

CONFIGURACIÓN DEL FILTRO PURIFICADOR DE AIRE
ALGUNOS CONSEJOS PARA AHORRAR ENERGÍA
ESPAÑOL
Los fi ltros purifi cadores de aire eliminan
el polvo del aire y emiten aire puro.
Retire los fi ltros.
1
1
Abra el panel de apertura.
2
Para extraerlos tire de los fi ltros
hacia abajo.
1
2
Coloque el fi ltro purifi cador de
2
aire debajo de los topes del fi l-
tro localizados sobre el fi ltro de
aire.
Filtro purifi cador de aire
Topes del fi ltro
Filtro de aire
A continuación se indican algunos consejos sencillos para ahorrar energía al usar
el acondicionador de aire.
Ajuste la temperatura correcta
• La selección de una temperatura más alta o
más baja de lo necesario aumentará el consumo de energía.
Bloquee los rayos solares directos y
evite corrientes de aire
• Si bloquea la exposición del aparato a los rayos solares directos cuando utilice la unidad
para enfriar se reducirá el consumo de energía.
• Cierre las ventanas y puertas durante al enfriar y calentar.
Para garantizar un funcionamiento efi -
ciente del aparato, mantenga el fi ltro
siempre limpio
Apague el cortacircuito cuando no esté
utilizando el aparato por un período de
tiempo prolongado
• La unidad interior consume una pequeña cantidad de energía incluso si no está en funcionamiento.
ESPA
Ñ
OL
Vuelva a colocar los fi ltros de
3
aire y cierre el panel de apertura.
2
1
NOTA:
•
No abra la bolsa de plástico hasta que
vaya a utilizar los fi ltros. (De lo contrario, la
vida de los fi ltros podría verse reducida.)
•
No exponga los filtros directamente a la
luz solar. (De lo contrario, se podrían deteriorar.)
ES-5
AY-XPC18LR_OM_ES.indd 5AY-XPC18LR_OM_ES.indd 5 2010-03-18 16:39:072010-03-18 16:39:07
Page 72

FUNCIONAMIENTO BÁSICO
1
APAGAR
2
Pulse las teclas COOL, DRY o HEAT.
1
: COOL (ENFRIAR)
: DRY (DESHUMECTAR)
: HEAT (CALENTAR)
• La lámpara roja de FUNCIONAMIENTO ( )
se iluminará.
DESACTIVACIÓN
Pulse la tecla STOP.
• La lámpara roja de FUNCIONAMIENTO ( )
se apagará.
Pulse la tecla TERMOSTATO para ajustar
2
la temperatura.
(Modo ENFRIAR/CALENTAR)
La temperatura puede ajustarse dentro del mar-
gen de 18 a 32 °C.
(Modo DESHUMECTAR)
La temperatura puede cambiarse en incrementos
de hasta ±2 °C con respecto al ajuste automático
de temperatura.
(Ejemplo: 1 °C más)
3
(Ejemplo: 2 °C menos)
Pulse la tecla FAN para ajustar la veloci-
3
dad del ventilador.
AUTOMÁTICO SUAVE
• Cuando la unidad funciona en el modo DESHU-
MECTAR, la velocidad del ventilador se ajusta
a AUTOMÁTICO y no se puede modifi car.
BAJA
ALTA
ES-6
AY-XPC18LR_OM_ES.indd 6AY-XPC18LR_OM_ES.indd 6 2010-03-18 16:39:082010-03-18 16:39:08
Page 73

AJUSTE DE LA DIRECCIÓN DE
LA CORRIENTE DE AIRE
FUNCIONAMIENTO DEL PLASMACLUSTER
ESPAÑOL
DIRECCIÓN DE LA CORRIENTE DE
AIRE VERTICAL
Pulse la tecla OSCILACIÓN ( ).
1
•
El defl ector de fl ujo de aire vertical oscilará.
Pulse la tecla OSCILACIÓN ( ) de
2
nuevo para detener el defl ector en
la posición deseada.
1
2
DIRECCIÓN DE LA CORRIENTE DE
AIRE HORIZONTAL
Pulse la tecla OSCILACIÓN ( ).
1
•
El defl ector de fl ujo de aire horizontal oscilará.
Pulse la tecla OSCILACIÓN ( ) de
2
nuevo para detener el defl ector en
la posición deseada.
Los iones de Plasmacluster liberados en la
habitación reducirán el moho transportado
por el aire.
Con la unidad en funcionamiento,
1
pulse la tecla PLASMACLUSTER.
• En el mando a distancia se visualiza la
indicación “ ”.
• La lámpara azul de PLASMACLUSTER
se encenderá.
CANCELAR
Pulse nuevamente la tecla PLASMACLUSTER.
• La lámpara azul de PLASMACLUSTER
se apagará.
ESPA
Ñ
OL
1
2
PRECAUCIÓN:
No trate nunca de graduar manualmente los
defl ectores.
El ajuste manual de los defl ectores puede cau-
•
sar el funcionamiento incorrecto de la unidad.
•
Si el defl ector de ajuste vertical se ha regulado en la posi-
ción más baja en el modo ENFRIAR o DESHUMECTAR por
un período largo de tiempo, puede formarse condensación.
NOTA:
• El margen de ajuste es más estrecho que el
margen de OSCILACIÓN con el fi n de impedir
que se forme condensación de agua.
NOTA:
• El uso del PLASMACLUSTER se memorizará
y se activará cuando la unidad se vuelva a
encender.
• Para activar el Plasmacluster en el modo
VENTILACIÓN, pulse la tecla PLASMACLUSTER sin la unidad en funcionamiento.
El símbolo de modo del control remoto se
apagará y la velocidad del ventilador no se
podrá ajustar a AUTOMÁTICO.
ES-7
AY-XPC18LR_OM_ES.indd 7AY-XPC18LR_OM_ES.indd 7 2010-03-18 16:39:082010-03-18 16:39:08
1
Page 74

CORRIENTE DE AIRE PROGRESIVA
AIRE DIRIGIDO
En el modo enfriar o deshumectar, el defl ector de fl ujo de aire vertical se coloca
de forma oblicua hacia arriba para enviar
el aire frío hacia el techo y así evitar la corriente de aire directa. En modo calentar,
se coloca hacia abajo para enviar el aire
caliente hacia abajo en dirección al suelo.
Con la unidad en funcionamiento,
1
pulse la tecla CORRIENTE DE AIRE
PROGRESIVA.
(modo ENFRIAR/DESHUMECTAR)
• En el mando a distancia se visualiza la indicación “ ”.
(Modo CALENTAR)
•
En el mando a distancia se visualiza la
indicación “ ”.
CANCELAR
Pulse de nuevo la tecla CORRIENTE
DE AIRE PROGRESIVA.
Los defl ectores se ajustan para que el aire
se envíe al área deseada.
Pulse la tecla AIRE DIRIGIDO para
1
seleccionar la dirección deseada del
fl ujo de aire.
CANCELAR
1
1
NOTA:
• Si desea utilizar el ajuste AIRE DIRIGIDO en
NOTA:
•
Si desea utilizar la función CORRIENTE DE AIRE
PROGRESIVA en modo CAPACIDAD MÁXIMA, pulse
la tecla CORRIENTE DE AIRE PROGRESIVA en
modo CAPACIDAD MÁXIMA.
•
Los modos CORRIENTE DE AIRE PROGRESIVA y
AIRE DIRIGIDO no se pueden utilizar conjuntamente.
AY-XPC18LR_OM_ES.indd 8AY-XPC18LR_OM_ES.indd 8 2010-03-18 16:39:092010-03-18 16:39:09
modo CAPACIDAD MÁXIMA, pulse la tecla
AIRE DIRIGIDO durante el funcionamiento en
modo CAPACIDAD MÁXIMA.
• Los modos CORRIENTE DE AIRE PROGRESIVA y AIRE DIRIGIDO no se pueden utilizar
conjuntamente.
ES-8
Page 75

FUNCIONAMIENTO A CAPACIDAD MÁXIMA
FUNCIONAMIENTO EN MODO AHORRO DE ENERGÍA
ESPAÑOL
El acondicionador de aire trabaja a capacidad máxima para enfriar la habitación o
calentarla rápidamente.
Con la unidad en funcionamiento,
1
pulse la tecla CAPACIDAD MÁXIMA.
• En el mando a distancia se visualiza la indicación “
TE DE ÁIRE se alargará.
• Desaparece la indicación de temperatura.
• La lámpara verde de CAPACIDAD MÁXIMA (
CANCELAR
Pulse de nuevo la tecla CAPACIDAD
MÁXIMA.
• La lámpara verde de CAPACIDAD MÁXI-
MA (
” y el símbolo de CORRIEN-
) se iluminará.
) se apagará.
La temperatura es controlada automáticamente
para ahorrar energía.
Con la unidad en funcionamiento,
pulse la tecla AHORRAR ENERGÍA.
1
• En el mando a distancia se visualiza la
indicación “ ”.
• La velocidad del ventilador se ajustará al
modo AUTOMÁTICO.
CANCELAR
Pulse nuevamente la tecla AHORRAR ENERGÍA.
ESPA
Ñ
OL
1
1
NOTA:
•
El acondicionador de aire operará en la velocidad
del ventilador “Extra ALTA” durante cinco minutos
y después cambiará a “ALTA”.
•
No es posible ajustar la temperatura o la velocidad
del ventilador en el modo CAPACIDAD MÁXIMA.
•
Los modos AHORRO DE ENERGÍA y CAPACIDAD
MÁXIMA no se pueden utilizar conjuntamente.
AY-XPC18LR_OM_ES.indd 9AY-XPC18LR_OM_ES.indd 9 2010-03-18 16:39:092010-03-18 16:39:09
NOTA:
•
En modo CALENTAR, la temperatura fluctuará
automáticamente entre 0 y 2 °C por debajo de la
temperatura ajustada originalmente.
En modo ENFRIAR o DESHUMECTAR, la tempe-
ratura fl uctuará automáticamente entre 0 y 1 °C por
encima de la temperatura ajustada originalmente.
•
Los modos AHORRO DE ENERGÍA y CAPACIDAD
MÁXIMA no se pueden utilizar conjuntamente.
ES-9
Page 76

TEMPORIZADOR DE DESCONEXIÓN de 1
.2.3.
5h
FUNCIONAMIENTO CON EL TEMPORIZADOR
Cuando se ajusta el TEMPORIZADOR DE DESCONEXIÓN de 1.2.3.5h, la unidad se apagará automáticamente en función de las horas ajustadas.
Pulse TEMPORIZADOR DE DESCONEXIÓN
1
de 1.2.3.5h para ajustar las horas deseadas.
CANCELAR
• La lámpara anaranjada de TEMPORIZADOR ( ) se iluminará.
El tiempo restante se indicará en el mando
•
a distancia en incrementos de una hora.
CANCELAR
Pulse la tecla SET/C.
Alternativamente, pulse el TEMPORIZA-
DOR DE DESCONEXIÓN de 1.2.3.5h.
• La lámpara anaranjada del TEMPORIZADOR ( ) se apagará.
TEMPORIZADOR DE DESCONEXIÓN
1
2
3
Pulse la tecla TEMPORIZADOR DE
DESCONEXIÓN.
• El indicador TEMPORIZADOR DE DESCONEXIÓN parpadeará.
Pulse las teclas de AVANCE o RE-
TROCESO DE HORAS para ajustar
la hora actual.
• El tiempo puede regularse en incrementos
de 10 minutos.
Pulse la tecla SET/C.
• La lámpara anaranjada de TEMPORIZADOR ( ) se iluminará.
1
CANCELAR
3
2
NOTA:
•
El TEMPORIZADOR DE DESCONEXIÓN de 1.2.3.5h tiene
prioridad sobre el TEMPORIZADOR DE CONEXIÓN y sobre el
TEMPORIZADOR DE DESCONEXIÓN.
•
Si el TEMPORIZADOR DE DESCONEXIÓN de 1.2.3.5h se
ajusta sin la unidad en marcha, la unidad funcionará en el modo
ajustado anteriormente.
•
Si está activado el TEMPORIZADOR DE CONEXIÓN o el TEMPORIZADOR DE DESCONEXIÓN, ambos ajustes se cancelan
con la tecla CANCELACIÓN DEL TEMPORIZADOR (SET/C).
NOTA:
•
En el modo TEMPORIZADOR DE DESCONEXIÓN, la temperatura se ajusta automáticamente para evitar que suba o
baje excesivamente, por ejemplo, mientras duerme. (Función
de desconexión automática nocturna)
Modo ENFRIAR: transcurrida una hora tras establecer el
temporizador, el ajuste de temperatura sube 1 °C.
Modo CALENTAR: transcurrida una hora tras establecer el
temporizador, el ajuste de temperatura sube 3 °C.
ES-10
AY-XPC18LR_OM_ES.indd 10AY-XPC18LR_OM_ES.indd 10 2010-03-18 16:39:102010-03-18 16:39:10
1
Page 77

ESPAÑOL
TEMPORIZADOR DE CONEXIÓN
Pulse la tecla TEMPORIZADOR
1
DE CONEXIÓN.
• El indicador TEMPORIZADOR DE
CONEXIÓN parpadeará.
Pulse las teclas de AVANCE o
2
RETROCESO DE HORAS para ajustar la hora actual.
• El tiempo puede regularse en incrementos de 10 minutos.
Pulse la tecla SET/C.
3
• La lámpara anaranjada de TEMPORIZADOR ( ) se iluminará.
1
3
2
NOTA:
• La unidad se encenderá antes del tiempo
ajustado para alcanzar la temperatura deseada en la habitación. (Función de reloj despertador)
CANCELAR
Pulse la tecla SET/C.
• La lámpara anaranjada de TEMPORIZADOR
( ) se apagará.
•
En el mando a distancia se visualizará la hora actual.
CANCELAR
PARA MODIFICAR EL AJUSTE DE LA HORA
Cancelar primero la función TEMPORIZADOR y ajustarla de nuevo.
COMBINAR EL TEMPORIZADOR DE
CONEXIÓN Y EL TEMPORIZADOR
DE DESCONEXIÓN
Ajuste el TEMPORIZADOR DE CONEXIÓN y el TEMPORIZADOR DE DESCONEXIÓN.
Ejemplo
hora actual: 9:00 p.m.)
(
TEMPORIZADOR DE DESCONEXIÓN a
las 11:00 p.m.
TEMPORIZADOR DE CONEXIÓN a las
7:00 a.m.
• La fl echa ( o ) entre los indicadores del
TEMPORIZADOR DE CONEXIÓN y del TEMPORIZADOR DE DESCONEXIÓN señala qué
TEMPORIZAOR se activará en primer lugar.
NOTA:
• No es posible programar el TEMPORIZADOR
DE CONEXIÓN y el TEMPORIZADOR DE
DESCONEXIÓN para utilizar la unidad a temperaturas diferentes o con otros ajustes.
Es posible programar cualquiera de los tempo-
•
rizadores para que se active antes que el otro.
ESPA
Ñ
OL
ES-11
AY-XPC18LR_OM_ES.indd 11AY-XPC18LR_OM_ES.indd 11 2010-03-18 16:39:102010-03-18 16:39:10
Page 78

FUNCIÓN AUTO LIMPIEZA
TECLA VISUALIZACIÓN
La función AUTO LIMPIEZA reducirá el
crecimiento de hongos de moho mediante
iones de Plasmacluster y secará por
dentro la unidad. Utilice esta función en
todos los cambios estacionales.
Pulse la tecla AUTO LIMPIEZA cuando
1
la unidad no está en funcionamiento.
• En el mando a distancia se visualiza la
indicación “ ”.
La lámpara verde de AUTO LIMPIEZA ( ) y
•
la azul de PLASMACLUSTER se iluminarán.
• La unidad dejará de funcionar después de
cuarenta minutos.
CANCELAR
Pulse la tecla AUTO LIMPIEZA.
•
La lámpara verde de AUTO LIMPIEZA ( ) y
la azul de PLASMACLUSTER se apagarán.
Pulse la tecla VISUALIZACIÓN cuando las
lámparas de la unidad brillen demasiado.
(La lámpara roja de FUNCIONAMIENTO
y la lámpara anaranjada de TEMPORIZADOR no se pueden apagar.)
Con la unidad en funcionamiento,
1
pulse la tecla VISUALIZACIÓN.
• La lámpara azul de PLASMACLUSTER,
la verde de AUTO LIMPIEZA ( ) y/o la
verde de CAPACIDAD MÁXIMA ( ) se
apagarán.
ILUMINAR
Pulse nuevamente la tecla VISUALIZACIÓN.
1
MODO AUXILIAR
Use este modo si no dispone de mando a
distancia.
ENCENDER
Pulse la tecla AUX.
• La lámpara roja de FUNCIONAMIENTO ( )
se iluminará.
• El modo y la temperatura se seleccionan
automáticamente al encender la unidad en
función de la temperatura ambiente y de la
temperatura exterior. La velocidad del ventilador está ajustada a AUTOMÁTICO.
APAGAR
1
NOTA:
•
Durante el proceso de AUTO LIMPIEZA no se
puede ajustar la temperatura ni la velocidad del
ventilador ni la dirección de la corriente de aire.
Tampoco se puede ajustar el temporizador.
•
Los hongos de moho ya formados no se pueden
eliminar con esta función.
Pulse de nuevo la tecla AUX.
•
La lámpara roja de FUNCIONAMIENTO ( ) se apagará.
AUX
ES-12
AY-XPC18LR_OM_ES.indd 12AY-XPC18LR_OM_ES.indd 12 2010-03-18 16:39:102010-03-18 16:39:10
Page 79

MANTENIMIENTO
ESPAÑOL
Asegúrese de detener el funcionamiento
y apagar el diferencial antes de realizar
cualquier mantenimiento.
LIMPIEZA DE LOS FILTROS DE AIRE
Los fi ltros deben limpiarse cada dos semanas.
Desconecte la unidad.
1
Retire los fi ltros.
2
1
Levante el panel de apertura.
2
Para retirarlos, tire de los fi ltros hacia
abajo.
1
2
Retire los fi ltros purifi cadores de
3
aire de los fi ltros de aire.
Limpie los fi ltros.
4
Use un aspirador para retirar el polvo. Si
los fi ltros están sucios, lávelos con agua
tibia y un detergente suave. Seque los
fi ltros a la sombra antes de volverlos a instalar.
Vuelva a colocar los fi ltros purifi ca-
5
dores de aire.
MANTENIMIENTO DESPUÉS DE UTILIZAR
EL ACONDICIONADOR DE AIRE
Utilice la unidad en modo AUTO LIM-
1
PIEZA para secar la unidad completamente por dentro.
Detenga el funcionamiento de la
2
unidad y apague el diferencial.
Limpie los fi ltros y colóquelos de
3
nuevo.
MANTENIMIENTO ANTES DE UN PERÍODO DE USO DEL ACONDICIONADOR DE AIRE
Asegúrese de que los fi ltros de aire
1
no estén sucios.
Asegúrese de que nada obstruye
2
las entradas o salidas de aire.
CAMBIAR EL FILTRO PURIFICADOR
DE AIRE
Los fi ltros deben cambiarse cada 3 a 6
meses.
Retire los fi ltros de aire los fi ltros
1
purifi cadores de aire viejos.
Coloque los fi ltros purifi cadores de
2
aire nuevos debajo de los topes de
filtro localizados en los filtros de
aire.
Topes del fi ltro
ESPA
Ñ
OL
Vuelva a colocar los fi ltros y cierre
6
el panel de apertura.
2
1
LIMPIEZA DE LA UNIDAD Y DEL
MANDO A DISTANCIA
• Límpielos con un paño suave.
• No rocíe o derrame agua directamente sobre
ellos para evitar descargas eléctricas o daños
al equipo.
• No utilice agua caliente, diluyentes, polvos
abrasivos o disolventes fuertes.
Filtro purifi cador
de aire
NOTA:
• Los fi ltros purifi cadores de aire no se pueden
lavar para ser reutilizados. Puede solicitar fi l-
tros nuevos a su distribuidor más cercano.
Desecho de los fi ltros
Deseche los fi ltros cambiados de acuerdo a las
leyes y regulaciones locales.
Materiales del FILTRO PURIFICADOR DE AIRE
Filtro: Polipropileno
Marco: Poliéster
Filtro de aire
ES-13
AY-XPC18LR_OM_ES.indd 13AY-XPC18LR_OM_ES.indd 13 2010-03-18 16:39:112010-03-18 16:39:11
Page 80

OBSERVACIÓN SOBRE EL FUNCIONAMIENTO
ESTADO DE FUNCIONAMIENTO
Enfriar (
AY-XPC18LR)
Temperatura interna Temperatura externa
Límite
superior
Límite
inferior
Límite
superior
Límite
inferior
Calentar (
Límite
superior
Límite
inferior
• El dispositivo protector que incorpora el aparato puede impedir que siga funcionando cuando
se use a una temperatura superior a este margen.
• Si el aparato funciona continuamente en el
modo ENFRIAR o DESHUMECTAR, puede
formarse condensación en la salida de aire
cuando la humedad ambiental es superior a
un 80%.
32 ˚C
21 ˚C
Enfriar (
Temperatura interna Temperatura externa
32 ˚C 46 ˚C
21 ˚C -10 ˚C
AY-XPC18LR, AY-XP24LR)
Temperatura interna Temperatura externa
27°C 24 ˚C
- -15 ˚C
46 ˚C (una unidad)
43 ˚C
10 ˚C (una unidad)
21 ˚C
AY-XP24LR)
(varias unidades)
(varias unidades)
FALLO DE CORRIENTE
• Este acondicionador de aire incorpora una
función de memoria automática para almacenar la confi guración si ocurre un fallo de
corriente.
Recuperado el suministro eléctrico, el aparato
se reiniciará automáticamente con los ajustes
activos antes del fallo de la corriente, a excepción de la confi guración del reloj.
• Si se produce un fallo de corriente con el
temporizador en funcionamiento, el ajuste del
temporizador se cancelará y no se recuperará
tras la vuelta del suministro eléctrico.
OBERVACIÓN SOBRE EL MODO
DE CALENTAMIENTO
FUNCIÓN DESHIELO
• Si se forma hielo en la unidad externa durante
la operación de calentamiento, la unidad funcionará en modo de deshielo automático durante unos cinco a diez minutos para retirar el
hielo. Durante esta fase, el ventilador interior y
el ventilador exterior dejan de funcionar.
EFICIENCIA DEL CALENTAMIENTO
• El aparato utiliza una bomba de calor que
extrae el calor del aire exterior y lo libera en
la habitación. Por esta razón, la temperatura
del aire exterior infl uye en gran medida en la
efi ciencia de calentamiento.
• Si la efi ciencia del calentamiento se reduce
debido a temperaturas bajas exteriores, utilice
un calentador adicional.
• El proceso de calentamiento de toda la habitación puede llevar cierto tiempo dado que la
unidad emplea un circuito de circulación forza-
da de aire.
NOTA PARA EL USO DE AY-XPC18LR
COMO ACONDICIONADOR DE AIRE
MULTISISTEMA
En los acondicionadores de aire multisistema,
se pueden conectar varias unidades interiores
a una unidad exterior.
El acondicionador de aire multisistema no permite utilizar varias unidades interiores en modo
diferente.
• Si se utiliza una unidad en modo ENFRIAR (o
DESHUMECTAR), el resto de unidades deben
funcionar en el mismo modo. Tiene prioridad
el modo de la unidad interior que primero se
pone en funcionamiento. Si se intenta activar
una unidad posteriormente en un modo diferente, no se pondrán en marcha. Empezará a
emitir señales sonoras y la lámpara de FUNCIONAMIENTO y la de TEMPORIZADOR
empezarán a parpadear. En este caso, ajuste
todas las unidades interiores al mismo modo
de funcionamiento.
• El modo ENFRIAR y el modo DESHUMECTAR se pueden ajustar simultáneamente.
ES-14
AY-XPC18LR_OM_ES.indd 14AY-XPC18LR_OM_ES.indd 14 2010-03-18 16:39:122010-03-18 16:39:12
Page 81

ANTES DE LLAMAR AL DEPARTAMENTO TÉCNICO
ESPAÑOL
Los siguientes estados no implican un
funcionamiento incorrecto del equipo.
La unidad no se pone en marcha
•
La unidad no funcionará inmediatamente después de apagarla. La unidad no funcionará inmediatamente después de variar el modo
de servicio. La intención es proteger la unidad.
Espere tres minutos antes de poner en funcionamiento la unidad.
No sale aire caliente
• En el modo CALENTAR, puede suceder que
el ventilador interior tarde de dos a cinco
minutos en comenzar a funcionar después
de encender la unidad. La intención es evitar
que la unidad despida aire frío.
• La unidad se está deshelando. Espere de
cinco a diez minutos.
Olores
•
La unidad podría despedir olores de muebles y
alfombras absorbidos.
Crujidos
• Estos sonidos se producen por la fricción de
la unidad al expandirse o contraerse debido a
cambios de temperatura.
Zumbidos
• Sonidos emitidos por la unidad al generar iones de plasmacluster.
Silbidos
• Se producen silbidos suaves cuando el refrigerante fl uye por el interior de la unidad.
Niebla en la salida de aire interior
• En el modo enfriar, se desprende niebla por
la diferencia entre la temperatura del aire en
la habitación y el aire despedido por la unidad.
Vapor de agua
• En el modo calentar, la unidad exterior puede
despedir vapor de agua durante el deshielo.
La unidad exterior no se detiene
• Después de detener el funcionamiento, el
ventilador de la unidad exterior girará durante
aproximadamente un minuto para enfriar la
unidad.
Olor despedido en la salida de aire del
plasmacluster
• Se trata de olor a ozono que genera el generador iónico Plasmacluster. La concentración
de ozono es muy baja y no tiene efectos perjudiciales para la salud. El ozono descargado
en el aire se descompone rápidamente y su
densidad en la habitación no aumenta.
Cuando se utiliza AY-XPC18LR como
acondicionador de aire multisistema
Se calienta una unidad interior que no
está en funcionamiento.
Una unidad interior expulsa aire caliente
en el modo PLASMACLUSTER únicamente.
•
El refrigerante fl uye a través de la unidad interior cuan-
do la otra unidad se encuentra en modo CALENTAR.
No sale aire de una unidad interior cuando
la unidad se encuentra en modo PLASMACLUSTER únicamente o en modo AUTO
LIMPIEZA.
• La unidad externa se está deshelando.
Una unidad interior empieza a emitir señales sonoras y la lámpara de FUNCIONAMIENTO y la de TEMPORIZADOR empiezan a parpadear simultáneamente.
•
Compruebe que todas las unidades tienen ajustado
el mismo modo. De lo contrario, ajuste todas las unidades interiores al mismo modo de funcionamiento.
ESPA
Ñ
OL
Antes de llamar al departamento técnico,
compruebe los siguientes puntos.
La unidad no funciona
• Verifi que si el diferencial se ha pisado o si el
fusible se ha fundido.
La unidad no enfría (o calienta) la habitación efi cazmente
• Examine los fi ltros. Si están sucios, límpielos.
• Examine la unidad exterior para asegurarse
de que la salida y entrada de aire no están
obstruidas.
• Examine el termostato para determinar si está
bien ajustado.
• Asegúrese de que las ventanas y puertas estén bien cerradas.
La unidad no recibe la señal del control remoto
• Examine las pilas del mando a distancia para
comprobar si están viejas o descargadas.
• Trate de enviar la señal de nuevo apuntando
el mando a distancia hacia la célula receptora
de la unidad.
• Examine las pilas del mando a distancia para
comprobar si están correctamente instaladas.
Llame al servicio de mantenimiento cuando parpadeen la lámpara de FUNCIONAMIENTO, la lámpara de TEMPORIZADOR
y/o la lámpara de PLASMACLUSTER de
la unidad.
ES-15
AY-XPC18LR_OM_ES.indd 15AY-XPC18LR_OM_ES.indd 15 2010-03-18 16:39:122010-03-18 16:39:12
Page 82

AY-XPC18LR_OM_TR.indd 1AY-XPC18LR_OM_TR.indd 1 2010-03-18 16:34:002010-03-18 16:34:00
Page 83

TÜRKÇE
Ürünü kullanmadan önce lütfen bu kılavuzu dikkatle okuyun. İstenildiğinde başvurulabilmesi için bu kılavuz güvenli bir yerde saklanmalıdır.
İÇİNDEKİLER
• EMNİYET TEDBİRLERİ ....................................TR-1
• PARÇALARIN İSİMLERİ ...................................TR-2
• UZAKTAN KUMANDANIN KULLANIMI .............TR-4
HAVA TEMİZLEME FİLTRESİNİN AYARLANMASI
•
• ENERJİ TASARRUFUYLA İLGİLİ BİLGİLER ....TR-5
• TEMEL İŞLETİM ................................................TR-6
HAVA AKIŞ YÖNÜNÜN AYARLANMASI
•
• PLASMACLUSTER’İN İŞLETİMİ .......................TR-7
• COANDA HAVA AKIŞI .......................................TR-8
• SPOT HAVA .......................................................TR-8
• TAM GÜÇLE İŞLETİM .......................................TR-9
• ENERJİ TASARRUFLU İŞLETİM ......................TR-9
• 1.2.3.5saat KAPANMA ZAMANLAYICISI ..........TR-10
• ZAMANLAYICI AYARI ........................................TR-10
• KENDİNİ TEMİZLEME İŞLEMİ..........................TR-12
• GÖSTERGE (DISPLAY) DÜĞMESİ .................. TR-12
• YARDIMCI (AUXILIARY) MOD ..........................TR-12
• BAKIM ...............................................................TR-13
• İŞLETİMLE İLGİLİ NOT .....................................TR-14
• SERVİS ÇAĞIRMADAN ÖNCE.........................TR-15
..................TR-7
..TR-5
EMNİYET TEDBİRLERİ
UYARI
• Elektrik kablosunu çekmeyin veya deforme
etmeyin. Elektrik kablosunun çekilmesi veya
hatalı kullanılması üniteye hasar verebilir ve
elektrik çarpmasına sebep olabilir.
• Doğrudan hava çıkışı önünde uzun süre durmamaya dikkat edin. Fiziki durumunuzu etkileyebilir.
• Klimayı bebekler, çocuklar veya yaşlı, yatalak
ya da özürlü insanlar için kullanırken oda sıcaklığının onlar için uygun olmasına dikkat edin.
• Ünite içine hiçbir cisim sokmayın. Cisim sokulması, dahili fanların yüksek devri nedeniyle
yaralanmaya sebep olabilir.
• Klimayı kesinlikle topraklayın. Topraklama telini
gaz borusuna, su borusuna, paratonere veya
telefon topraklama teline bağlamayın. Tam top-
raklama yapılmaması elektrik çarpmasına yol
açabilir.
• Klimada herhangi bir anormallik görürseniz (örneğin yanık kokusu) hemen durdurun ve devre
kesiciyi KAPALI konuma alın.
• Uygulama, ulusal kablolama düzenlemelerine
uygun bir şekilde kurulmalıdır.
bağlantısı elektrik kablosunun, fi şin ve elektrik
prizinin aşırı ısınmasına ve yangına sebep olabilir.
• Besleme kablosu arızalıysa, tehlikenin önlenmesi için üretici veya servis temsilcisi veya
benzeri yetkili bir kişi tarafından değiştirilmelidir.
Sadece imalatçı tarafından belirtilen bir kabloyla değiştirin.
Yanlış kablo
• Doğrudan klima üzerine su sıçratmayın veya
dökmeyin. Su, elektrik çarpmasına veya ekipman hasarına yol açabilir.
• Klimayı kendi kendinize monte etmeye, sökmeye ve onarmaya çalışmayın. Yanlış bir işlem
elektrik çarpmasına, su kaçağına, yangına,
vs. sebep olur. Klimanın montajı, sökülmesi ve
onarımı için satıcınıza veya başka uzman servis personeline başvurun.
UYARI
• Özellikle gazlı cihazlar kullanırken odayı havalandırmak için periyodik olarak bir pencere veya
kapı açın. Yetersiz havalandırma oksijen eksikliğine sebep olabilir.
•
Düğmelere ıslak elle dokunmayın. Elektrik çarp-
masına sebep olabilir.
• Emniyet amacıyla, klima uzun süre kullanılma-
yacağı zaman devre kesiciyi kapatın.
• Dış ünite montaj zemininde periyodik olarak
aşınma kontrolü yapın ve ünitenin yerinde sağlam durduğundan emin olun.
• Dış ünite üzerine herhangi bir cisim koymayın
veya üzerine basmayın. Cisim düşebilir veya
siz düşerek yaralanabilirsiniz.
• Bu ünite evlerde kullanım için tasarlanmıştır.
Hayvan veya bitki yetiştirmek için kulübe veya
sera gibi yerlerde kullanmayın.
• Klima üzerine içi su dolu bir kap koymayın. Klimaya su girerse elektrik izolasyonu bozulabilir
ve elektrik çarpmasına sebep olabilir.
• Klimanın hava girişlerini ve çıkışlarını engellemeyin. Yetersiz performansa veya arızaya
sebep olabilir.
• Herhangi bir bakı m veya temizlik yapmadan
önce klimayı durdurmaya ve devre kesiciyi kapatmaya dikkat edin. Klimanın içinde dönen bir
fan vardır ve yaralanabilirsiniz.
• Bu cihaz, küçük çocuklar veya özürlüler tarafından başlarında birisi bulunmadan kullanım
için tasarlanmam
oynamamaları için kontrol altında olmalıdır.
Klimayı, anma voltajı ve frekansındaki bir güç
•
kaynağına bağlamaya dikkat edin. Uygun olmayan voltaj ve frekansa sahip bir güç kaynağının
kullanılması ekipman hasarına ve yangına sebep olabilir.
• Klimayı, yanıcı gaz kaçağı olabilecek bir yere
monte etmeyin. Yangına sebep olabilir.
Klimayı, havada minimum toz, duman ve nem
bulunan bir yere monte edin.
• Drenaj hortumunu, problemsiz görev yapacak
şekilde döşeyin. Yetersiz drenaj odada, mobilyalarda, vs. neme yol açabilir.
• Elektrik çarpmasını önlemek için, tesisatın yerine bağlı olarak bir kaçak önleyici veya bir devre
kesici takılmasına dikkat edin.
ıştır. Küçük çocuklar, cihazla
TÜRKÇE
TR-1
AY-XPC18LR_OM_TR.indd 1AY-XPC18LR_OM_TR.indd 1 2010-03-18 16:34:062010-03-18 16:34:06
Page 84

PARÇALARIN İSİMLERİ
İÇ ÜNİTE
1 Hava Girişi
1
2
2 Açılır Panel
3
3 Hava temizleme fi ltresi
4
4 Hava Filtresi
5
5 YARDIMCI MOD Düğmesi
(AUX)
6 Alıcı Gözü
6
7 Dikey Hava Akış Kanatçığı
8 Yatay Hava Akış Kanatçığı
7
9 Hava Çıkışı
8
9
10
10 PLASMACLUSTER Lambası
11
12
13
14
(mavi)
11 İŞLETİM Lambası
(kırmızı )
12 ZAMANLAYICI Lambası
(turuncu
)
13 TAM GÜÇ Lambası
(yeşil
KENDİNİ TEMİZLEME Lambası
14
(yeşil )
NOT:
Satın aldığınız ünite yukarıda gösterilenden biraz farklı olabilir.
)
TR-2
AY-XPC18LR_OM_TR.indd 2AY-XPC18LR_OM_TR.indd 2 2010-03-18 16:34:062010-03-18 16:34:06
Page 85

UZAKTAN KUMANDA
1
2
3
4
5
6
7
8
9
10
11
1 VERİCİ
2 SOĞUTMA düğmesi
3 NEM ALMA düğmesi
4 ISITMA düğmesi
5 DURDURMA düğmesi
6 SICAKLIK düğmesi
7
PLASMACLUSTER düğmesi
8 SPOT HAVA düğmesi
9 TAM GÜÇ düğmesi
10 FAN düğmesi
11 1.2.3.5saat KAPANMA
ZAMANLAYICISI düğmesi
12 SALINIM düğmesi
(dikey yönde)
13 SALINIM düğmesi
12
(yatay yönde)
13
14
15
16
17
18
19
20
21
22
23
24
COANDA HAVA AKIŞI düğmesi
14
15
ENERJİ TASARRUFU düğmesi
16
KENDİNİ TEMİZLEME düğmesi
17
ZAMANLAYICI AÇIK düğmesi
18
ZAMANLAYICI AYAR/İPTAL düğmesi
19
ZAMAN İLERLETME düğmesi
20
ZAMAN GERİLETME düğmesi
21 SAAT düğmesi
22 GÖSTERGE düğmesi
23 SIFIRLAMA düğmesi
24
ZAMANLAYICI KAPALI düğmesi
TÜRKÇE
GÖSTERGE
1
2
3
4
5
6
7
9
10
11
12
13
14
1 MOD sembolleri
2 FAN HIZI sembolleri
3 PLASMACLUSTER sembolü
4 HAVA AKIŞI sembolü (SOĞUTMA/NEM ALMA)
5 HAVA AKIŞI sembolü (ISITMA)
6 COANDA HAVA AKIŞI sembolü (ISITMA)
7 ENERJİ TASARRUFU sembolül
8 PİL sembolü
9 AKTARMA sembolü
10 KENDİNİ TEMİZLEME sembolül
11
COANDA HAVA AKIŞI Sembolü (SOĞUTMA/NEM ALMA)
12 TAM GÜÇ sembolü
8
15
16
13 SPOT HAVA sembolü
14 SICAKLIK göstergesi
15 ZAMANLAYICI KAPALI göstergesi
16 ZAMANLAYICI AÇIK göstergesi / SAAT
TR-3
AY-XPC18LR_OM_TR.indd 3AY-XPC18LR_OM_TR.indd 3 2010-03-18 16:34:062010-03-18 16:34:06
Page 86

UZAKTAN KUMANDANIN KULLANIMI
PİLLERİN TAKILMASI
Pil yuvası kapağını çıkarın.
1
İki pil takın.
• (+) ve (-) kutuplarının doğru şekilde denk
2
getirildiğinden emin olun.
Pil yuvası kapağını tekrar yerine takın.
(AAA (R03))
3
SIFIRLAMA (RESET) düğmesine basın.
• Ekranda “AM 6:00” yazısı görünür.
4
Pil yuvası
kapağı
NOT:
• Pilin ömrü, normal kullanımda yaklaşık 1 yıldır.
• Uzaktan kumanda ekranında “
lendiğimde pilleri değiştirin.
• Pilleri değiştireceğinizde her zaman ikisini birden değiştirin ve aynı türden piller kullanın.
• Üniteyi uzun süre kullanmayacaksanız pilleri
uzaktan kumandadan çıkarın.
SAATİN AYARLANMASI
İki saat modu bulunmaktadır: 12-saatlik mod
ve 24-saatlik mod.
12 saatlik modu ayarlamak için SAAT
1
düğmesine bir kez basın.
24 saatlik modu ayarlamak için SAAT
düğmesine iki kez basın.
Saati ayarlamak için ZAMAN İLER-
2
LETME veya ZAMAN GERİLETME
düğmesine basın.
• Saati hızlı ilerletmek veya geriletmek için
düğmeye basılı tutun.
AYAR/C (SET/C) düğmesine basın.
• İki nokta üst üste (:) yanıp söner.
3
” görüntü-
3
UZAKTAN KUMANDANIN KULLANIMI
Uzaktan kumandayı alıcı gözüne doğru tutun ve
istediğiniz düğmeye basın.
ğında bir bip sinyali verir.
• Alıcı gözünü hiçbir şeyin, örneğin perdelerin,
kapatmadığından emin olun.
• Sinyalin etki etme mesafesi 7 metredir.
UYARI:
• Alıcı gözüne doğrudan güneş ışığı gelmesine
izin vermeyin. Bu çalışmasını olumsuz etkileyebilir.
• Aynı odada belirli fl oresan lambaların kullanı-
mı sinyalin iletilmesine etki edebilir.
• Uzaktan kumandayı doğrudan güneş ışığının
altında veya bir ısıtıcının yanında bırakmayın.
Uzaktan kumandayı nemden ve darbelerden
koruyun.
Ünite sinyali aldı-
7 m
Alıcı gözü
2
1
NOT:
• Zamanlayıcı ayarlıyken saat ayarı yapılamaz.
TR-4
AY-XPC18LR_OM_TR.indd 4AY-XPC18LR_OM_TR.indd 4 2010-03-18 16:34:072010-03-18 16:34:07
Page 87

HAVA TEMİZLEME FİLTRESİNİN AYARLANMASI
ENERJİ TASARRUFUYLA İLGİLİ BİLGİLER
Hava temizleme fi ltreleri havadaki tozu alır
ve dışarı temiz hava verir.
Hava fi ltrelerini çıkarın.
1
1
Açılır paneli açın.
2
Hava fi ltrelerini aşağı çekerek çıkarın.
1
2
Hava temizleme fi ltrelerini hava
2
filtresindeki filtre durdurucuların altına yerleştirin.
Filtre
durdurucu
Hava temizleme
fi ltresi
Hava fi ltresi
Hava fi ltrelerini yerine takın ve
3
açılır paneli kapatın.
Aşağıda, klimanızı kullanırken enerji tasarrufu sağlamanın bazı basit yolları verilmiştir.
Doğru sıcaklığa ayarlayın
• Gerekli olandan yüksek veya düşük sıcaklığa
ayarlamak güç tüketiminin artmasına neden
olur.
Doğrudan güneş ışığını ve hava akı mlarını önleyin
• Soğutma sırasında direkt güneş ışığının önlenmesi enerji tüketimini azaltır.
• Soğutma ve ısıtma işlemleri sırasında pencere
ve kapıları kapatın.
En verimli işletimi sağlamak için fi ltre-
leri temiz tutun
Ünite uzun süre kullanılmadığında devre kesiciyi kapalı durumda bırakın
•
İç ünite çalışmadığı zaman da az miktarda güç
harcar.
TÜRKÇE
2
1
NOT:
•
Filtreleri kullanana kadar plastik torbayı
açmayın. (Aksi takdirde fi ltrelerin ömrü kısalabilir.)
•
Filtreleri doğrudan güneş ı şı ğı na maruz
bırakmayın. (Aksi takdirde bozulabilirler.)
TR-5
AY-XPC18LR_OM_TR.indd 5AY-XPC18LR_OM_TR.indd 5 2010-03-18 16:34:072010-03-18 16:34:07
Page 88

TEMEL İŞLETİM
1
KAPATMA
2
SOĞUTMA, NEM ALMA veya ISITMA düğ-
1
mesine basın.
: SOĞUTMA
:
NEM ALMA
:
ISITMA
• Kırmızı İŞLETİM lambası ( ) yanar.
KAPATMAK İÇİN
DURDURMA düğmesine basın.
• Kırmızı İŞLETİM lambası ( ) söner.
İstenen sıcaklığı ayarlamak için SICAK-
2
LIK düğmesine basın.
(SOĞUTMA/ISITMA modu)
Sıcaklık ayar aralığı: 18-32 °C.
(NEM ALMA modu)
Sıcaklık, otomatik olarak ayarlanmış olan sıcak-
lıktan ±2 °C oynatılabilir.
(Örnek: 1 °C daha yüksek)
(Örnek: 2 °C daha düşük)
3
İstenen fan hızını ayarlamak için FAN
3
düğmesine basın.
OTOMATİK
• NEM ALMA modunda fan hızı OTOMATİK’e
ayarlıdır ve değiştirilemez.
TR-6
AY-XPC18LR_OM_TR.indd 6AY-XPC18LR_OM_TR.indd 6 2010-03-18 16:34:082010-03-18 16:34:08
HAFİF DÜŞÜK YÜKSEK
Page 89

HAVA AKIŞ YÖNÜNÜN
AYARLANMASI
PLASMACLUSTER’İN İŞLETİMİ
DİKEY HAVA AKIŞ YÖNÜ
SALINIM düğmesine basın ( ).
1
• Dikey hava akış kanatçığı hareket etmeye
başlar.
İstenilen konumda durdurmak için
2
SALINIM düğmesine ( ) yeniden
basın.
1
2
YATAY HAVA AKIŞ YÖNÜ
SALINIM düğmesine ( ) basın.
1
•
Dikey hava akış kanatçığı hareket etmeye başlar.
İstenilen konumda durdurmak için SA-
2
LINIM düğmesine (
) yeniden basın.
Havaya bırakılan plazma kümesi iyonları
havadaki küfü biraz azaltır.
Cihaz çalışırken PLASMACLUSTER
1
düğmesine basın.
• Uzaktan kumandada “ ” görülür.
• Mavi PLASMACLUSTER lambası yanar.
İPTAL ETMEK İÇİN
PLASMACLUSTER düğmesine tekrar
basın.
• Mavi PLASMACLUSTER lambası söner.
TÜRKÇE
1
2
1
UYARI:
Kanatçıkları asla el ile ayarlamaya çalışmayın.
• Dikey hava akış kanatçığının elle ayarlanması, ünitenin arıza yapmasına sebep olabilir.
• Dikey hava akış kanatçığı, SOĞUTMA veya
NEM ALMA modunda uzun süre en alçak konumda tutulursa su yoğuşması olabilir.
NOT:
•
Yoğuşma sonucu su damlamasını önlemek
için ayar aralığı SALINIM aralığından daha dar
olmalıdır.
AY-XPC18LR_OM_TR.indd 7AY-XPC18LR_OM_TR.indd 7 2010-03-18 16:34:082010-03-18 16:34:08
NOT:
• PLASMACLUSTER işleminin kullanımı cihaz
tarafından hatırlanır ve üniteyi bir sonraki açı-
şınızda aktif hale gelir.
• Plasmacluster’ı yalnızca FAN işletim modunda
kullanmak istiyorsanız, PLASMACLUSTER
düğmesine ünite çalışır durumda değilken basın.
Uzaktan kumandanın mod sembolü kapanır
ve fan hızı OTOMATİK’e ayarlanamaz.
TR-7
Page 90

COANDA HAVA AKIŞI
SPOT HAVA
Soğutma veya nem alma modunda dikey
hava akış kanatçığı, doğrudan hava akışı
vermemek için soğuk havayı tavana vermek maksadıyla yukarı eğimli durur. Isıtma
modunda kanatçık sıcak havayı zemine
vermek için aşağı dönük durur.
Çalışma sırasında, COANDA HAVA
1
AKIŞI düğmesine basın.
(SOĞUTMA/NEM ALMA modu)
Uzaktan kumandada “ ”
(ISITMA modu)
• Uzaktan kumandada “ ” görülür.
İPTAL ETMEK İÇİN
COANDA HAVA AKIŞI düğmesine tekrar basın.
görülür.
Kanatçıklar hava akışının istenen alana
gönderileceği şekilde ayarlanır.
İstenilen hava akışı yönünü seçmek
1
için SPOT HAVA düğmesine basın.
İPTAL
1
1
NOT:
• COANDA HAVA AKIŞINI TAM GÜÇ modunda
kullanmak istiyorsanız, TAM GÜÇLE işletim
esnasında COANDA HAVA AKIŞI düğmesine
basın.
• COANDA HAVA AKIŞI ayarı ve SPOT HAVA
ayarı birlikte kullanılamaz.
AY-XPC18LR_OM_TR.indd 8AY-XPC18LR_OM_TR.indd 8 2010-03-18 16:34:092010-03-18 16:34:09
NOT:
• TAM GÜÇ modunda SPOT HAVA ayarını
kullanmak istiyorsanız, TAM GÜÇLE işletim
esnasında SPOT HAVA düğmesine basın.
• COANDA HAVA AKIŞI ayarı ve SPOT HAVA
ayarı birlikte kullanılamaz.
TR-8
Page 91

TAM GÜÇLE İŞLETİM
ENERJİ TASARRUFLU İŞLETİM
Klima, odayı hızlı bir şekilde soğutmak veya
ısıtmak için maksimum güçte çalışır.
Çalışma sırasında, TAM GÜÇ düğme-
1
sine basın.
•
Uzaktan kumandada “ ” görüntülenir ve
HAVA AK IŞI sembolü daha uzun hale gelir.
• Sıcaklık göstergesi söner.
• Yeşil TAM GÜÇ lambası (
İPTAL ETMEK İÇİN
TAM GÜÇ
• Yeşil TAM GÜÇ lambası ( ) söner.
düğmesine tekrar basın.
) yanar.
Enerji tasarrufu yapılması için sıcaklık ayar
noktası otomatik olarak kontrol edilir.
Çalışma sırasında, ENERJİ TASAR-
RUFU düğmesine basın.
1
• Uzaktan kumandada “ ” görülür.
• Fan hızı OTOMATİK olarak ayarlanır.
İPTAL ETMEK İÇİN
ENERJİ TASARRUFU düğmesine tekrar basın.
TÜRKÇE
1
1
NOT:
• Klima 5 dakika boyunca “Ekstra YÜKSEK” fan
hızında çalışır ve daha sonra “YÜKSEK” fan
hızına geçer.
• TAM GÜÇLE işletim sırasında sıcaklığı veya
fan hızını ayarlayamazsınız.
•
ENERJİ TASARRUFLU işletim ve TAM GÜÇLE
işletim birlikte kullanılamaz
AY-XPC18LR_OM_TR.indd 9AY-XPC18LR_OM_TR.indd 9 2010-03-18 16:34:092010-03-18 16:34:09
.
NOT:
• ISITMA modunda sıcaklı k ayar noktası otomatik olarak orijinal sıcaklık ayarının 0 - 2 °C
altına iner.
SOĞUTMA veya NEM ALMA modunda sıcak-
lık ayar noktası otomatik olarak orijinal sıcaklık ayarının 0 - 1 °C üstüne çıkar.
• ENERJİ TASARRUFLU işletim ve TAM GÜÇLE işletim birlikte kullanılamaz.
TR-9
Page 92

1.2.3.5saat KAPANMA ZAMANLAYICISI
ZAMANLAYICI AYARI
1.2.3.5saat KAPANMA ZAMANLAYICISI ayarlandığında, ünite ayarlanan zaman gelince
otomatik olarak kapanır.
İstenilen zamanı ayarlamak için
1
1.2.3.5saat KAPANMA ZAMANLAYICISI düğmesine basın.
İPTAL
• Turuncu ZAMANLAYICI lambası ( ) yanar.
• Kalan zaman uzaktan kumandada 1 saatlik aralıklarla gösterilir.
İPTAL ETMEK İÇİN
AYAR/C (SET/C) düğmesine basın.
Alternatif olarak, 1.2.3.5saat KAPANMA
ZAMANLAYICISI düğmesine basın
•
Turuncu ZAMANLAYICI lambası ( ) söner.
.
ZAMANLAYICI KAPALI
ZAMANLAYICI KAPALI düğmesine
1
basın.
• ZAMANLAYICI KAPALI göstergesi yanıp
söner.
İstenen zamanı ayarlamak için ZA-
2
MAN İLERLETME veya ZAMAN GERİLETME düğmesine basın.
• Bu ayar 10 dakikalık artışlarla yapılabilir.
AYAR/C (SET/C) düğmesine basın.
3
•
Turuncu ZAMANLAYICI lambası ( ) yanar.
1
İPTAL
3
2
1
NOT:
• 1.2.3.5saat KAPANMA ZAMANLAYICISI, ZAMANLAYICI AÇIK ve ZAMANLAYICI KAPALI
fonksiyonlarına göre önceliğe sahiptir.
• Ünite kapalıyken 1.2.3.5saat KAPANMA ZAMANLAYICISI ayarlanırsa, ünite, daha önce
ayarlanmış koşulda çalışır.
• ZAMANLAYICI AÇIK ve/veya ZAMANLAYICI
KAPALI ayarlıysa, ZAMANLAYICI İPTAL düğ-
mesi tüm ayarları iptal eder.
AY-XPC18LR_OM_TR.indd 10AY-XPC18LR_OM_TR.indd 10 2010-03-18 16:34:092010-03-18 16:34:09
NOT:
• ZAMANLAYICI KAPALI modu ayarlandığında
siz uyurken odanın aşırı soğuk veya sıcak
olmasını önlemek için sıcaklık ayarı otomatik
olarak ayarlanır. (Otomatik Uyku fonksiyonu)
SOĞUTMA modu: Zamanlayıcı ayarlandıktan
bir saat sonra sıcaklık ayarı 1 °C yükselir.
ISITMA modu: Zamanlayıcı ayarlandıktan bir
saat sonra sıcaklık ayarı 3 °C düşer.
TR-10
Page 93

ZAMANLAYICI AÇIK
ZAMANLAYICI AÇIK düğmesine basın.
1
• ZAMANLAYICI AÇIK göstergesi yanıp söner.
İstenen zamanı ayarlamak için ZA-
2
MAN İLERLETME veya ZAMAN GERİ-
LETME düğmesine basın.
• Bu ayar 10 dakikalık artışlarla yapılabilir.
AYAR/C düğmesine basın.
3
•
Turuncu ZAMANLAYICI lambası ( ) yanar.
İPTAL ETMEK İÇİN
AYAR/C (SET/C) düğmesine basın.
• Turuncu ZAMANLAYICI lambası ( ) söner.
•
Saat uzaktan kumandada görüntülenir.
İPTAL
ZAMAN AYARINI DEĞİŞTİRMEK İÇİN
ZAMANLAYICI ayarını iptal edin ve daha
sonra yeniden ayarlayın.
ZAMANLAYICI AÇIK VE ZAMANLAYICI
KAPALIYI BİRLEŞTİRMEK İÇİN
ZAMANLAYICI KAPALI ve ZAMANLAYICI AÇIK ayarlarını yapın.
Örnek
Şimdiki zaman: 9:00 p.m.)
(
KAPANMA SAATİ 11:00 p.m.
AÇILMA SAATİ 7:00 a.m.
TÜRKÇE
1
3
2
•
ZAMANLAYICI AÇIK ve ZAMANLAYICI KAPALI göstergesi arasındaki ok ( veya ) hangi
zamanlayıcının daha önce devreye gireceğini
gösterir.
NOT:
• Ünite, odanın istenen sıcaklığa ulaşması na
olanak sağlamak için ayarlanan zamandan
önce devreye girer. (Uyanma fonksiyonu)
AY-XPC18LR_OM_TR.indd 11AY-XPC18LR_OM_TR.indd 11 2010-03-18 16:34:102010-03-18 16:34:10
NOT:
•
AÇILMA ZAMANLAYICISI ve KAPANMA ZAMANLAYICINI üniteyi değişik sıcaklıklarda veya ayarlarda çalıştıracak şekilde programlayamazsınız.
• Programlardan herhangi biri diğerinden önce
devreye girecek şekilde programlanabilir.
TR-11
Page 94

KENDİNİ TEMİZLEME İŞLEMİ
GÖSTERGE (DISPLAY) DÜĞMESİ
KENDİNİ TEMİZLEME işlemi, Plasmacluster iyonları ile mavi küf büyümesini azaltır
ve ünitenin içini kuru tutar. Mevsimsel olarak şartlar değiştiğinde bu işlemden fayda-
.
lanın
Ünite çalışmıyor durumdayken KEN-
1
DİNİ TEMIZLEME düğmesine basın.
• Uzaktan kumandada “ ” görülür.
Yeşil KENDİNİ TEMİZLEME lambası ( )
•
ve mavi PLASMACLUSTER lambası yanar.
• Ünite 40 dakika sonra işlemi durdurur.
İPTAL ETMEK İÇİN
KENDİNİ TEMİZLE düğmesine basın.
•
Yeşil KENDİNİ TEMİZLEME lambası ( )
ve mavi PLASMACLUSTER lambası söner.
Unite üzerindeki lambalar çok parlak yandığında GÖSTERGE düğmesine basın.
(Kırmızı İŞLETİM lambası ve turuncu ZAMANLAYICI lambası kapatılamaz.)
Cihaz çalışırken GÖSTERGE düğme-
1
sine basın.
• Mavi PLASMACLUSTER lambası, yeşil
KENDİNİ TEMİZLEME lambası ( ) ve/
veya yeşil TAM GÜÇ lambası ( ) söner.
IŞIKLARI AÇMAK İÇİN
GÖSTERGE düğmesine tekrar basın.
1
YARDIMCI (AUXILIARY) MOD
Uzaktan kumanda bulunmadığı zaman bu
modu kullanın.
AÇMAK İÇİN
AUX düğmesine basın.
• Kırmızı İŞLETİM lambası ( ) yanar.
Mod ve sıcaklık ayarları ünite açıldığında oda-
•
nın sıcaklığı ve dışarının sıcaklığına göre otomatik olarak seçilir. Fan hızı OTOMATİK olarak
ayarlanır.
1
KAPATMAK İÇİN
AUX düğmesine tekrar basın.
NOT:
• KENDİNİ TEMİZLEME işlemi esnasında sı-
caklığı, fan hızını, hava akış yönünü veya zamanlayıcı ayarını değiştiremezsiniz.
• Zaten oluşmuş olan mavi küfl er bu işlem ile
temizlenemez.
• Kırmızı İŞLETİM lambası ( ) söner.
AUX
TR-12
AY-XPC18LR_OM_TR.indd 12AY-XPC18LR_OM_TR.indd 12 2010-03-18 16:34:102010-03-18 16:34:10
Page 95

BAKIM
Herhangi bir bakım işi yapmadan önce
cihazın çalışmasını durdurduğunuzdan ve
devre kesiciyi kapattığınızdan emin olun.
HAVA FİLTRELERİNİN TEMİZLENMESİ
Filtreler iki haftada bir temizlenmelidir.
Üniteyi kapatın.
1
Filtreleri çıkarın.
2
1
Açılır paneli yukarı kaldırın.
Hava fi ltrelerini aşağı çekerek çıkarın.
2
1
2
Hava temizleme fi ltrelerini hava fi ltre-
3
lerinden çıkarın.
Filtreleri temizleyin.
4
Elektrikli süpürgeyle tozunu alın. Filtreler
kirliyse ılık su ve yumuşak bir deterjanla
yıkayın. Yerine takmadan önce filtreleri
gölgede kurutun.
Hava temizleme fi ltrelerini geri takın.
5
Hava fi ltrelerini yerine takın ve açı-
6
lır paneli kapatın.
KLİMA İŞLETİM MEVSİMİNDEN SONRA BAKIM
Ünitenin içini tamamen kurutmak için
1
üniteyi KENDİNİ TEMİZLEME modunda çalıştırın.
Cihazı durdurun ve devre kesiciyi
2
kapalı konuma getirin.
Filtreleri temizleyin ve tekrar yerine
3
takın.
KLİMA İŞLETİM MEVSİMİNDEN ÖNCE
BAKIM
Hava filtrelerinin kirli olmamasına
1
dikkat edin.
Hava girişinde ve çıkışında engel
2
bulunmamasına dikkat edin.
HAVA TEMİZLEME FİLTRELERİNİN
DEĞİŞTİRİLMESİ
Filtreler her 3-6 ayda bir değiştirilmelidir
Hava temizleme fi ltrelerini hava fi l-
1
trelerinden çıkarın.
Yeni hava temizleme filtrelerini hava
2
fi ltreleri üzerindeki durdurucuların üze-
rine yerleştirin.
Filtre
durdurucu
TÜRKÇE
2
1
ÜNİTENİN VE UZAKTAN KUMANDANIN TEMİZLENMESİ
• Yumuşak bir bezle silin.
• Bunlara doğrudan su sıçratmayın veya dök-
meyin. Elektrik çarpmasına veya ekipman
arızasına neden olabilirsiniz.
• Sıcak su, tiner, aşındırıcı tozlar veya güçlü çö-
zücüler kullanmayın.
Hava temizleme
fi ltresi
NOT:
• Hava temizleme fi ltreleri yeniden kullanılmak
üzere yıkanamazlar. Size en yakın bayiden
yeni fi ltreler alabilirsiniz.
Filtrelerin Atılması
Değiştirdiğiniz fi ltreleri lütfen yerel atık yasaları
ve düzenlemelerine uygun olarak atın.
HAVA TEMİZLEME fi ltresi malzemeleri
Filtre: Polipropilen
Çerçeve: Polyester
Hava fi ltresi
TR-13
AY-XPC18LR_OM_TR.indd 13AY-XPC18LR_OM_TR.indd 13 2010-03-18 16:34:112010-03-18 16:34:11
Page 96

İŞLETİMLE İLGİLİ NOT
ÇALIŞMA KOŞULU
Soğutma (
İçerinin Sıcaklığı Dışarının Sıcaklığı
Üst limit 32 ˚C
Alt limit 21 ˚C
Soğutma (
İçerinin Sıcaklığı Dışarının Sıcaklığı
Üst limit 32 ˚C 46 ˚C
Alt limit 21 ˚C -10 ˚C
Isıtma (
İçerinin Sıcaklığı Dışarının Sıcaklığı
Üst limit 27˚C 24 ˚C
Alt limit - -15 ˚C
• Entegre koruma tertibatı bu aralığın üstündeki
sıcaklıklarda kullanıldığında ünitenin çalışmasını önler.
• Nem %80’in üzerindeyken ünite SOĞUTMA
veya NEM ALMA modunda sürekli çalışırsa
hava çıkışında yoğuşma olabilir.
AY-XPC18LR)
46 ˚C (Tek kullanım)
43 ˚C
(Çoklu kullanım)
-10 ˚C (Tek kullanım)
(
21 ˚C
Çoklu kullanım)
AY-XP24LR)
AY-XPC18LR, AY-XP24LR)
BİR ELEKTRİK KESİNTİSİ OLDU-
ĞUNDA
• Bu ünite, bir elektrik kesintisi olduğunda ayarları hafızasında tutar.
Elektrikler tekrar geldiğinde, ünite, zamanlayı-
cı ayarları hariç olmak üzere elektrik kesintisinden önceki ayarlarla otomatik olarak tekrar
çalışır.
• Zamanlayıcı ayarlanmışken bir elektrik kesintisi olursa, zamanlayıcı ayarı iptal edilir ve elektrikler geri geldiğinde de kaldığı yerden devam
etmez.
ISITMA İŞLETİMİ HAKKINDA NOT
BUZ ÇÖZME FONKSİYONU
• Isıtma işletimi esnasında dış ünitede buzlanma olduğunda, ünite buzu çözmek için 5 ila
10 dakika otomatik olarak buz çözme işlemi
yapar. Buz çözme esnasında iç ve dış fanlar
çalışmaz.
ISITMA VERİMİ
• Ünite, dışarıdaki havadan ısı elde etmek ve
bu ısıyı odaya vermek için bir ısı pompası
kullanır. Bu nedenle, dışarıdaki sıcaklık ısıtma
verimini büyük ölçüde etkiler.
• Düşük dış sıcaklıklar nedeniyle ısıtma verimi
düşerse ilave bir ısıtıcı kullanın.
• Basınçlı hava sirkülasyonu nedeniyle cihazın
ısınması ve tüm odayı ısıtması zaman alır.
AY-XPC18LR ÇOKLU SİSTEM KLİ-
ME ŞEKLİNDE KULLANIM İÇİN NOT
Çoklu sistem klimalarda birden çok iç ünite tek
bir dış üniteye bağlanabilir.
Çoklu sistem klimalarda değişik iç üniteleri değişik modlarda çalıştıramazsınız.
• Ünitelerden biri SOĞUTMA (veya NEM ALMA)
modunda çalışıyorsa diğer üniteler de aynı
modda çalıştırılmalıdı r. İlk önce çalıştırılmış
iç ünitenin moduna öncelik verilir. Daha sonra
değişik modda açılan iç ünite çalışmaya baş-
layamaz. Bip sesi çıkarmaya başlar ve İŞLE-
TİM lambası ile ZAMANLAYICI lambası yanıp
söner. Bu durumda tüm iç üniteleri aynı işletim
moduna ayarlayın.
• SOĞUTMA MODU ve NEM ALMA modu aynı
anda ayarlanabilir.
TR-14
AY-XPC18LR_OM_TR.indd 14AY-XPC18LR_OM_TR.indd 14 2010-03-18 16:34:112010-03-18 16:34:11
Page 97

SERVİS ÇAĞIRMADAN ÖNCE
Aşağıdaki koşullar ekipmanın arızalı oldu-
ğunu göstermez.
Ünitenin çalışmaması
• Ünite kapatıldı ktan hemen sonra açı lı rsa
çalışmaz. Ünite mod değiştirildikten hemen
sonra çalışmaz. Bu, üniteyi korumak içindir.
Üniteyi çalıştırmak için 3 dakika bekleyin.
Ünitenin sıcak hava üfl ememesi
• Isıtma işletiminde, ünite açıldıktan sonra üniteden soğuk hava üfl enmesini önlemek için
dahili fan 2 ilâ 5 dakika çalışmayabilir.
• Ünite buzlarını çözüyordur. 5 ila 10 dakika
bekleyin.
Kokular
•
Üniteden, üniteye giren halı veya mobilya kokuları gelebilir.
Çıtırtı sesi
• Bu ses, bır sıcaklık değişiminden ötürü ünitenin genişlemesi veya parçalarının birleşmesinden kaynaklanan sürtünme sebebiyledir.
Alçak bir vızıltı duyulması
• Bu, ünitenin Plasmacluster iyonları oluşturmasından kaynaklanan sestir.
Hışırtı sesi
• Yumuşak hışırtı sesi, ünitenin içinde akan so-
ğutma gazının sesidir.
İç ünite hava çıkışında buğulanma
•
Soğutma işletiminde, buğulanma görülmesinin sebebi oda sıcaklığı ile dışarı üfl enen havanın
sıcaklığı arasında fark olmasıdır.
Su buharı
• Isıtma işletiminde, buzların çözülmesi esnasında dış üniteden su buharı çıkabilir.
Dış ünitenin durmaması
• İşletimin durdurulmasından sonra dış ünite
üniteyi soğutmak için fanını bir dakika kadar
döndürür.
Plasmacluster hava çıkışından koku yayılması
•
Bu, Plasmacluster iyon oluşturucusunun ürettiği ozon kokusudur. Ozonun yoğunluğu çok
azdır, sağlığınız üzerinde etkisi yoktur. Havaya yayılan ozon kısa sürede ayrışır ve odadaki yoğunluğu artmaz.
AY-XPC18LR çoklu sistem klima şeklinde
kullanılırken
Çalışmayan bir iç ünite ısınıyor.
Yalnızca PLASMACLUSTER modun-
dayken iç üniteden ılık hava geliyor.
• Diğer ünite ISITMA modunda çalışırken iç üniteden soğutma gazı geçiyor.
Yalnızca PLASMACLUSTER modundayken veya KENDİNİ TEMİZLEME işlemi
yaparken iç üniteden hava gelmiyor.
• Dış ünite buz çözüyor.
İç ünite bip sesi çıkarmaya başlıyor ve
aynı anda İŞLETİM lambası ve ZAMANLAYICI lambası yanıp sönmeye başlıyor.
• Tüm iç ünitelerin aynı modda ayarlı olup olmadıklarını kontrol edin. Eğer değillerse, tüm
iç üniteleri aynı işletim moduna getirin.
Servis çağırmadan önce aşağıdaki noktaları kontrol edin.
Ünite çalışmıyor
• Devre kesicinin ya da sigortanın atmış olup
olmadığını kontrol edin.
Ünite odayı etkin bir şekilde soğutmuyor (veya ısıtmıyor)
• Filtreleri kontrol edin. Kirliyse temizleyin.
• Dış üniteyi kontrol ederek hava girişinin veya
çıkışının tıkalı olmadığından emin olun.
• Sıcaklığın uygun ayarlı olup olmadığını kontrol
edin.
• Pencerelerin ve kapıların sıkıca kapalı olması-
na dikkat edin.
Unite uzaktan kumanda sinyalini almıyor
• Uzaktan kumandanın pillerinin eski veya zayıf
olup olmadığını kontrol edin.
•
Uzaktan kumandayı ünitenin sinyal alıcısına
doğru tutarak tekrar sinyal göndermeyi deneyin.
• Uzaktan kumandanın pillerinin doğru takılıp
takılmadıklarını kontrol edin.
TÜRKÇE
Ünitedeki İŞLETİM Lambası, ZAMANLAYICI Lambası ve/veya PLASMACLUSTER
lambası yanıp söndüğünde lütfen servis
çağırın.
TR-15
AY-XPC18LR_OM_TR.indd 15AY-XPC18LR_OM_TR.indd 15 2010-03-18 16:34:112010-03-18 16:34:11
Page 98

Atenţie: Produsul
dumneavoastră este marcat
cu acest simbol care indică
că produsele electrice şi
electronice uzate nu trebuie
aruncate împreună cu
deşeurile casnice. Pentru
aceste produse există un
sistem separat de colectare.
A. Informaţii pentru utilizatorii casnici
1. În Uniunea Europeană
Atenţie: Dacă doriţi să aruncaţi acest echipament, vă rugăm să nu folosiţi
recipientul de gunoi uzual!
Echipamentele electrice şi electronice uzate trebuie eliminate separat, în
conformitate cu legislaţia în vigoare care impune tratarea, valorifi carea şi
reciclarea corespunzătoare a acestora.
În urma implementării legislaţiei de către statele membre UE, utilizatorii
casnici din acestea pot preda gratuit* echipamentele electronice şi electrice
uzate la centrele de colectare autorizate. În anumite ţări* magazinele locale
preiau gratuit produsul uzat la achiziţionarea unui alt produs similar.
*) Pentru informaţii suplimentare vă rugăm contactaţi autoritatea locală.
Dacă echipamentele dumneavoastră electrice şi electronice uzate au ba-
terii sau acumulatori, acestea/aceştia trebuie eliminate/eliminaţi separat în
conformitate cu reglementările locale.
Eliminând acest produs în mod corect contribuiţi la tratarea, valorifi carea şi
reciclarea corespunzătoare a deşeurilor, prevenind astfel efectele negative
asupra sănătăţii umane şi a mediului care pot ap
tului necorespunzător al deşeurilor.
2. În alte ţări din afara Uniunii Europene
Dacă doriţi să aruncaţi acest produs, vă rugăm contactaţi autoritatea locală
pentru a afl a care este metoda corectă de eliminare.
B. Informaţii pentru utilizatorii profesionali
1. În Uniunea Europeană
Dacă produsul este de uz profesional şi doriţi să îl aruncaţi:
Vă rugăm contactaţi distribuitorul SHARP care vă va furniza informaţii
privind preluarea produsului. Este posibil să vi se ceară să acoperiţi cheltuielile ocazionate de preluare şi reciclare. Produsele de mici dimensiuni (şi
cantităţile mici) pot fi preluate de centrele de colectare locale.
2. În alte ţări din afara Uniunii Europene
Dacă doriţi să aruncaţi acest produs, vă rugăm contactaţi autoritatea locală
pentru a afl a care este metoda corect
ă de eliminare.
ărea în urma managemen-
Bateria furnizată împreună cu acest produs conţine urme de plumb.
Pentru UE: Coşul pe roţi tăiat cu x indică faptul că bateriile consumate nu
trebuie aruncate împreună cu gunoiul menajer! Există un sistem de colectare separat pentru bateriile consumate, pentru a permite tratamentul corect
şi reciclarea în concordanţă cu legislaţia. Contactaţi autoritatea locală
pentru detalii despre metodele de colectare şi reciclare.
Pb
AY-XPC18LR_OM_RO.indd 1AY-XPC18LR_OM_RO.indd 1 2010-03-18 16:35:292010-03-18 16:35:29
Pentru Elveţia: Bateriile consumate trebuie returnate punctului de vânzare.
Pentru alte state non-UE: Contactaţi autoritatea locală pentru metoda
corectă de aruncare a bateriilor cosumate.
Conţine gaze fl uorurate cu efect de seră reglementate de protocolul de la Kyoto
R410A (Poten
ţ
ial de încălzire globală 1980)
RO
Page 99

ROMÂNĂ
Vă rugăm să citiţi cu atenţie acest manual înainte de utilizarea produsului. Păstraţi acest manual la îndemână pentru a putea fi consultat pe
parcursul utilizării produsului.
CUPRINS
• MĂSURI DE SIGURANŢĂ ............................... RO-1
• DENUMIRILE COMPONENTELOR ................. RO-2
• UTILIZAREA TELECOMENZII ......................... RO-4
SETAREA FILTRULUI DE PURIFICARE A AERULUI ..
•
•
INDICAŢII PENTRU ECONOMISIREA ENERGIEI ..
• UTILIZAREA DE BAZĂ .................................... RO-6
AJUSTAREA DIRECŢIEI CURENTULUI DE AER
•
• SETAREA PLASMACLUSTER ......................... RO-7
• JET DE AER COANDĂ..................................... RO-8
• AER PRIN FANTE ............................................ RO-8
• OPERARE LA PUTERE MAXIMĂ .................... RO-9
• SETAREA ECONOMISIRE ENERGIE ............. RO-9
• TEMPORIZATOR DE OPRIRE 1.2.3.5 ore .... RO-10
• SETAREA CRONOMETRULUI ...................... RO-10
• OPERAŢIUNEA DE AUTOCURĂŢARE ......... RO-12
• BUTONUL DE AFIŞARE ................................ RO-12
• MOD AUXILIAR DE UTILIZARE .................... RO-12
• ÎNTREŢINERE ............................................... RO-13
• OBSERVAŢII DESPRE OPERARE ................ RO-14
• ÎNAINTE DE A SUNA LA SERVIS .................. RO-15
RO-5
RO-5
... RO-7
MĂSURI DE SIGURANŢĂ
ATENŢIE
•
Nu trageţi şi nu deformaţi cablul de alimentare cu
curent electric. Tragerea şi utilizarea incorectă a
cablului poate avea drept efect avarierea unităţii şi
electrocutarea utilizatorului.
•
A nu se expune nicio parte a corpului la orifi ciul de
evacuare a aerului pentru mult timp. Expunerea poate afecta starea fi zică a utilizatorului.
•
Utilizând aparatul de aer condiţionat pentru nou-năs-
cuţi, copii, persoane în vârstă, persoane imobilizate
la pat sau cu dizabilităţi, asiguraţi-vă că temperatura
din cameră este adecvată pentru aceste persoane.
•
Nu introduceţi niciun fel de obiecte în unitate. Introducerea de obiecte poate rezulta în vătămări corporale
cauzate de viteza de rotaţie a ventilatoarelor interne.
•
Împământarea trebuie făcută cu mare atenţie. Nu conectaţi cablul la ţevile de gaz, de apă, la paratrăsnet sau la
cablul de împământare al telefonului. O împământare
incorectă poate cauza electrocutarea utilizatorului.
•
În cazul apariţiei oricăror anormalităţi în funcţionarea
aparatului de aer condiţionat (de ex. miros de ars), opriţi
aparatul imediat şi deconectaţi-l de la reţeaua electrică.
•
Dispozitivul trebuie instalat în concordanţă cu legile
naţionale de electrifi care. Conectarea incorectă a
cablurilor poate provoca incendii şi supraîncălzirea
cablului de alimentare, a prizei şi a ştecherului.
•
Cablurile de alimentare avariate necesită înlocuirea
lor de către producător sau de către agentul lui de
servis sau de către o persoană cu o califi care similară
pentru a evita orice fel de pagube. Pentru înlocuire
utilizaţi numai tipul de cablu specifi cat de producător.
•
Nu stropiţi, nici nu vărsaţi apă direct pe unitate. Apa
poate cauza şocuri electrice şi avarierea unităţii.
•
Aparatul nu poate fi instalat/ mutat/ reparat de către
utilizator. Utilizarea incorectă a aparatului poate
provoca electrocutări, scurgeri de apă, incendii etc.
Înainte de instalarea/ mutarea/ repararea unităţii
consultaţi dealerul sau o altă persoană califi cată să
asigure servisul.
ATENŢIE
•
Deschideţi periodic o fereastră sau o uşă pentru
aerisirea încăperii, mai ales când utilizaţi dispozitive
cu gaz. O aerisire insufi cientă poate cauza lipsă de
oxigen.
•
Nu operaţi butoanele cu mâini ude. Pericol de elec-
trocutare.
•
Pentru siguranţa Dumneavoastră, întrerupeţi alimen-
tarea cu curent electric, când dispozitivul nu este
folosit pentru o perioadă mai lungă de timp.
•
Verifi caţi periodic stabilitatea platformei exterioare de
susţinere.
•
Nu puneţi nimic şi nu călcaţi pe platforma exterioară
de susţinere. Persoana sau obiectul pot cădea sau
aluneca, provocând vătămări.
•
Această unitate este destinată utilizării în apartamen-
te şi birouri. Nu utilizaţi în alte locuri, cum ar fi serele
sau spaţiile pentru animale.
•
Nu puneţi vase cu apă pe unitate. Apa care pătrunde
în unitate, poate deteriora izolaţiile electrice şi poate
provoca şocuri electrice.
•
Nu blocaţi orifi ciile de admisie şi de evacuare ale ae-
rului. Blocarea poate cauza performanţe mai reduse
şi probleme de funcţionare.
•
Opriţi unitatea şi întrerupeţi alimentarea cu curent
electric înainte de orice activităţi de întreţinere sau
curăţare. În interiorul unităţii se roteşte un ventilator,
care poate provoca vătămări.
•
Acest aparat nu poate fi utilizat de copiii mici sau de
persoanele infi rme fără supraveghere. Copiii mici
trebuie supravegheaţi pentru a nu se juca la aparat.
•
Asiguraţi-vă că aparatul a fost conectat la o sursă
de energie cu un voltaj şi o frecvenţă adecvată. Utilizarea unei surse de energie cu voltaj sau frecvenţă
inadecvată poate duce la avarierea echipamentului
sau la apariţia unui incendiu.
•
Nu instalaţi unitatea în locuri unde pot apărea scur-
geri de gaze infl amabile. Pericol de incendiu.
Instalaţi unitatea într-un loc cât mai ferit de praf, fum
şi umezeală.
•
Aranjaţi cât mai bine tubul de drenaj. Aranjarea
incorectă a tubului de drenaj poate provoca udarea
camerei, mobilei etc.
•
Asiguraţi-vă că aveţi instalat un întrerupător al cu-
rentului adecvat instalaţiei de electricitate posedate
pentru a evita electrocutarea.
ROMÂNĂ
RO-1
AY-XPC18LR_OM_RO.indd 1AY-XPC18LR_OM_RO.indd 1 2010-03-18 16:35:342010-03-18 16:35:34
Page 100

DENUMIRILE COMPONENTELOR
UNITATEA DE INTERIOR
1 Orifi ciu de admisie a aerului
1
2
2 Panou de deschidere
3
3
Filtru de purifi care a aerului
4
4 Filtru de aer
5
5 Buton AUX
6 Fereastră de admisie
7 Fantă jet de aer vertical
6
8 Fantă jet de aer orizontal
7
9 Orifi ciu de evacuare a aerului
8
9
10
10 Indicator PLASMACLUSTER
11
12
13
14
(albastru)
11 Indicator OPERATION
(roşu
12 Indicator TIMER
(portocaliu
)
)
13 Indicator FULL POWER
(verde
14 Indicator SELF CLEAN
(verde
OBSERVAŢIE:
Unităţile actuale se pot deosebi
uşor de cele prezentate alături.
)
)
RO-2
AY-XPC18LR_OM_RO.indd 2AY-XPC18LR_OM_RO.indd 2 2010-03-18 16:35:342010-03-18 16:35:34
 Loading...