

Page 1

LASER PRINTER
Operation Manual (for network scanner)
Be sure to become thoroughly familiar with this manual to gain
the maximum benefit from the product.
Before installing this product, be sure to read the installation
requirements and cautions sections of the "Operation manual
for printer operation and general information".
Be sure to keep all operation manuals handy for reference
including this manual, the "Operation manual for printer
operation and general information" and operation manuals for
any optional equipment which has been installed.
Page 2

Page 3

INTRODUCTION
The optional Network Scanner Expansion Kit (AR-NS2) enables the machine to be used as a network scanner . P age
2 of the manual that accompanies the Network Scanner Expansion Kit (AR-NS2) contains an overview of the network
scanner functions, general considerations, and an explanation of image sending methods. Please read the manual
that accompanies the AR-NS2 before you read this man ual. Both manuals explain only the netw ork scanner functions
of the product. For information on loading paper , replacing toner cartridges, clearing paper misfeeds, handling peripheral
units, and other printer-related information, please refer to y our "Operation manual (f or printer operation and general
information)".
Additional manuals hav e been provided for copy and facsimile features. Please ref er to these as necessary.
To enable the network scanner function of this machine, a product key (password) must be entered using a key
operator program. This is only required once. Use the "Product Ke y Entry for Network Scanner Expansion Kit" program
to enter the product key. If you do not know your product key, please ask your dealer. (For information on using key
operator programs, ref er to "Operation man ual (for printer operation and gener al inf ormation)".)
NOTES
• Before using the network scanner feature, several settings must be established from the Web page. These settings are
explained from page 2 on. The settings must be established by the network administrator . Such settings must be effected by
the system administrator who has the special network related backgrounds.
• This manual assumes that several options have been installed.
• In this manual, American spellings are used.
TABLE OF CONTENTS
Page
INTRODUCTION...................................................... 1
SETTINGS AND PROGRAMMING REQUIRED
FOR THE NETW ORK SCANNER FEATURE ........... 2
●ABOUT THE WEB P A GE.................................... 2
●SETTING PASSWORDS .................................... 2
BASIC SETTINGS FOR NETWORK SCANNING
●
●SETTING UP DESTINATION INFORMATION.... 4
●STORING SENDER INFORMATION.................. 5
●STORING A CUSTOM DIRECTORY.................. 5
CONDITION SETTING SCREEN
OF SCANNER MODE .............................................. 6
SENDING AN IMAGE............................................... 8
●BASIC TRANSMISSION METHOD .................... 8
●TRANSMISSION METHODS
FOR SCAN TO E-MAIL (MANUAL
ENTRY, BROADCAST TRANSMISSION)......... 1 0
●SCANNING AND TRANSMITTING
A TWO-SIDED ORIGINAL................................ 11
●STAMPING SCANNED ORIGINALS
(VERIFICATION STAMP FUNCTION) .............. 12
SCANNING SETTINGS
(ORIGINAL SIZE, RESOLUTION, AND EXPOSURE)
●
MANUALLY SETTING THE SCANNING SIZE
●SELECTING THE RESOLUTION ..................... 14
●SELECTING THE EXPOSURE ........................ 15
..... 3
.... 13
.... 13
Page
PRIORITY TRANSMISSION OF A ST ORED JOB
CANCELING AN E-MAIL/FTP TRANSMISSION .... 16
STORING, EDITING, AND CLEARING
FROM THE TOUCH P ANEL ................................... 17
●STORING ONE-TOUCH KEYS
(only addresses for Scan to E-mail
and Internet-Fax).............................................. 17
●
EDITING AND DELETING ONE-TOUCH KEYS
●PROGRAMMING A GROUP KEY.................... 20
●EDITING AND DELETING GROUP KEYS....... 21
●STORING SENDER INFORMATION................ 2 2
●EDITING AND DELETING
SENDER INFORMATION................................. 2 2
●STORING A GR OUP INDEX............................ 23
●PRINTING PROGRAMMED INFORMATION ... 23
TROUBLESHOO TING............................................ 24
●IF YOUR E-MAIL IS RETURNED ..................... 2 4
●IF A TRANSMISSION ERR OR OCCURS ........ 24
KEY OPERATOR PROGRAMS .............................. 25
●KEY OPERATOR PROGRAM LIST.................. 25
●USING THE KEY OPERATOR PROGRAMS.... 25
●SETTING PROGRAMS.................................... 26
●PRINTING OUT SETTINGS............................. 27
SPECIFICATIONS .................................................. 28
..... 16
..... 19
1
Page 4
SETTINGS AND PROGRAMMING REQ UIRED
FOR THE NETWORK SCANNER FEATURE
T o use the Network Scanner feature , settings for the E-mail server , DNS server , and destination addresses must be established.
To establish the settings, use a computer that is connected to the same network as the machine to access the
machine's Web page. The Web page can be displayed with your Web browser (Internet Explorer 4.0 or later, or
Netscape Navigator 4.0 or later). To access the Web page , refer to page 2-6 of "Operation manual (f or printer operation
and general information)".
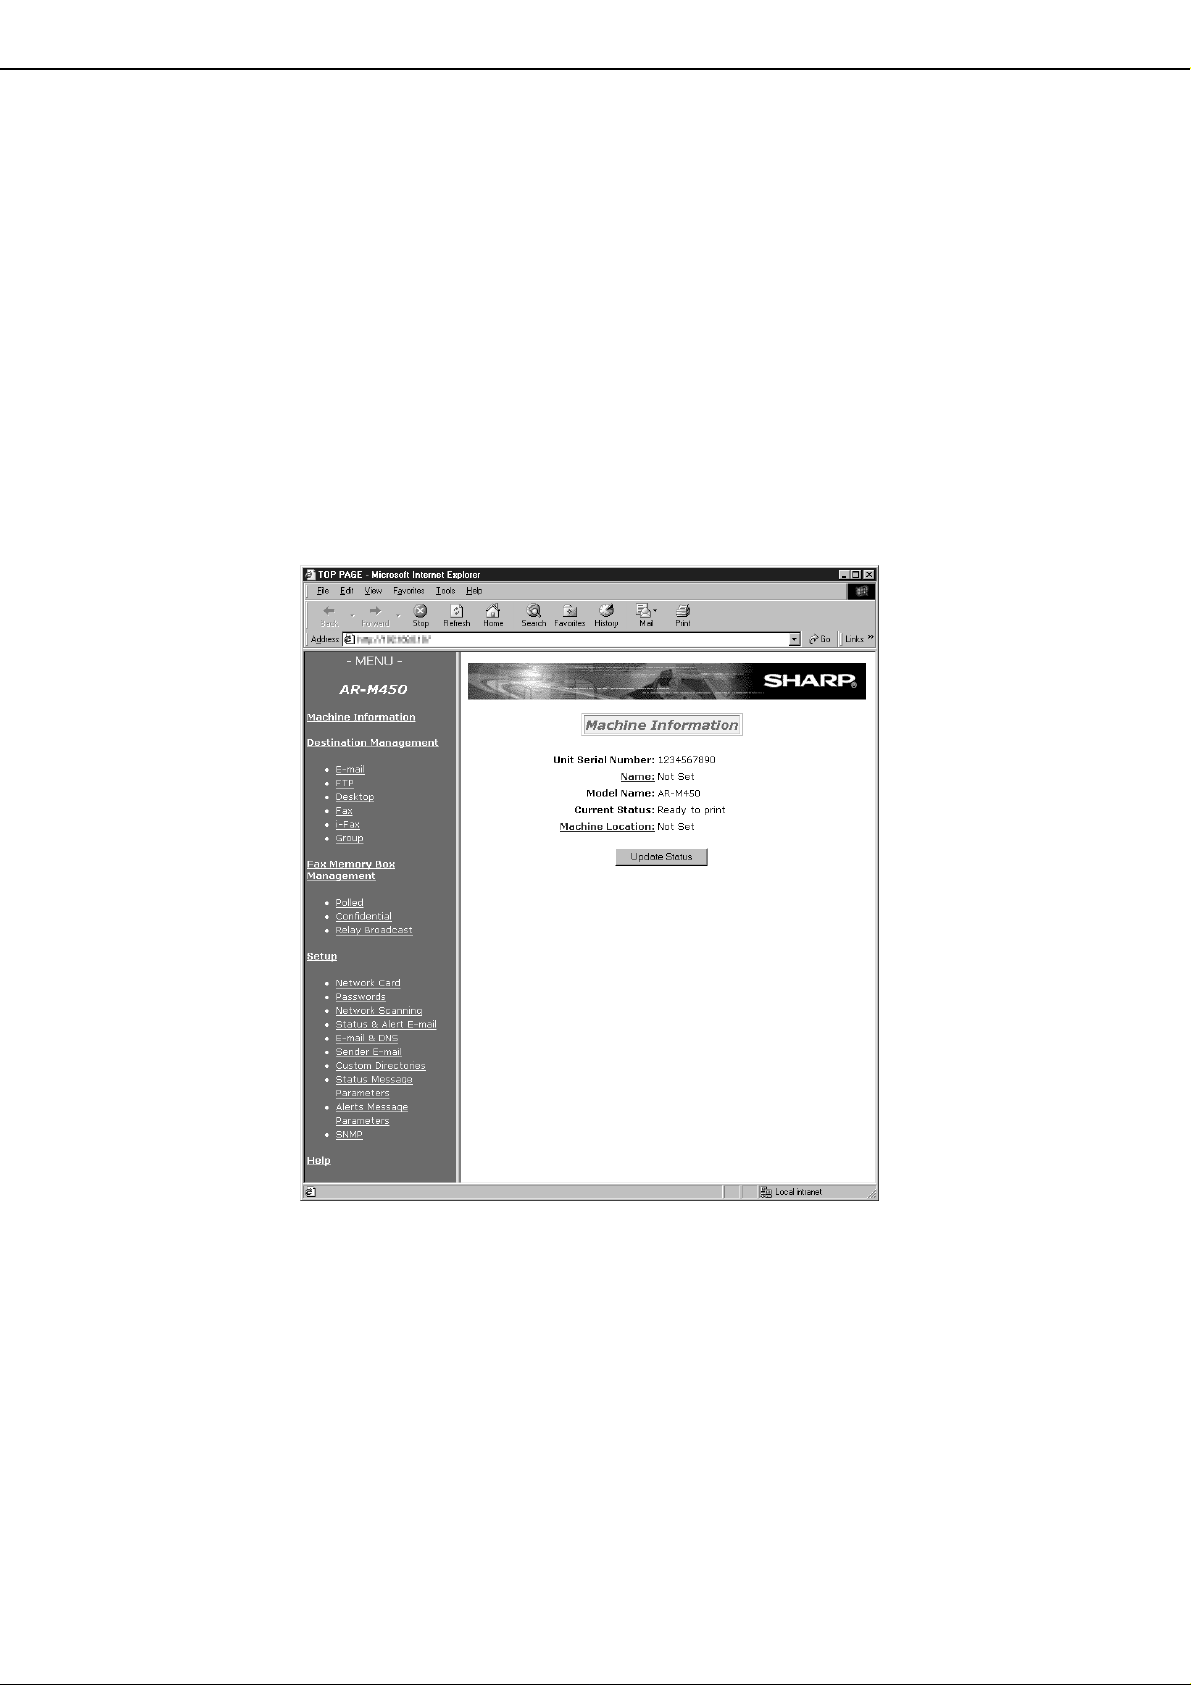
ABOUT THE WEB P AGE
When you access the Web page in the machine, the f ollowing page will appear in y our bro wser.
A menu frame appears on the left side of the page. When y ou click an item in the menu, a screen appears in the right
frame that allows you to establish settings for that item.
For overviews of each of the menu items, refer to pages 2-7 to 2-8 of "Operation manual (for printer operation and
general information)".
For detailed explanations of the procedures for establishing settings, click "Help" in the menu frame.
SETTING PASSWORDS
Pass w ords can be set to restrict Web page access and protect settings.
Note that it is not necessary to set passwords; the netw ork scanner functionality can also be used without passwords.
A password can be set for the administrator and passwords can be set for each user. If you use a user password to
access the W eb page, you will be able to estab lish, edit, and delete destinations in the Scanner Destination Management
menu; ho w e ver, y ou will not be ab le to estab lish settings in the Setup men u.
The passwords f or "User" and "admin" are both initially set to "Sharp". If you wish to change the pass words when first
establishing the settings, enter "Sharp" in "Old Admin Pass word" bef ore y ou estab lish the settings. A password must
consist of alphanumeric characters and be no more than seven char acters long. Passwords are case sensitiv e.After
entering a password, click "Submit" to set it. After setting the password, turn the machine power off and then back on.
When a password is set, you will be prompted for the password when you attempt to access a Web page with
protected settings. For the "User name", enter "user" if you are accessing the page as a user, or "admin" if you are
accessing the page as an administrator . For detailed information on setting passwords, ref er to "Help".
2
Web P age
Page 5
SETTINGS AND PROGRAMMING REQUIRED FOR THE NETWORK SCANNER FEATURE
BASIC SETTINGS FOR NETWORK SCANNING
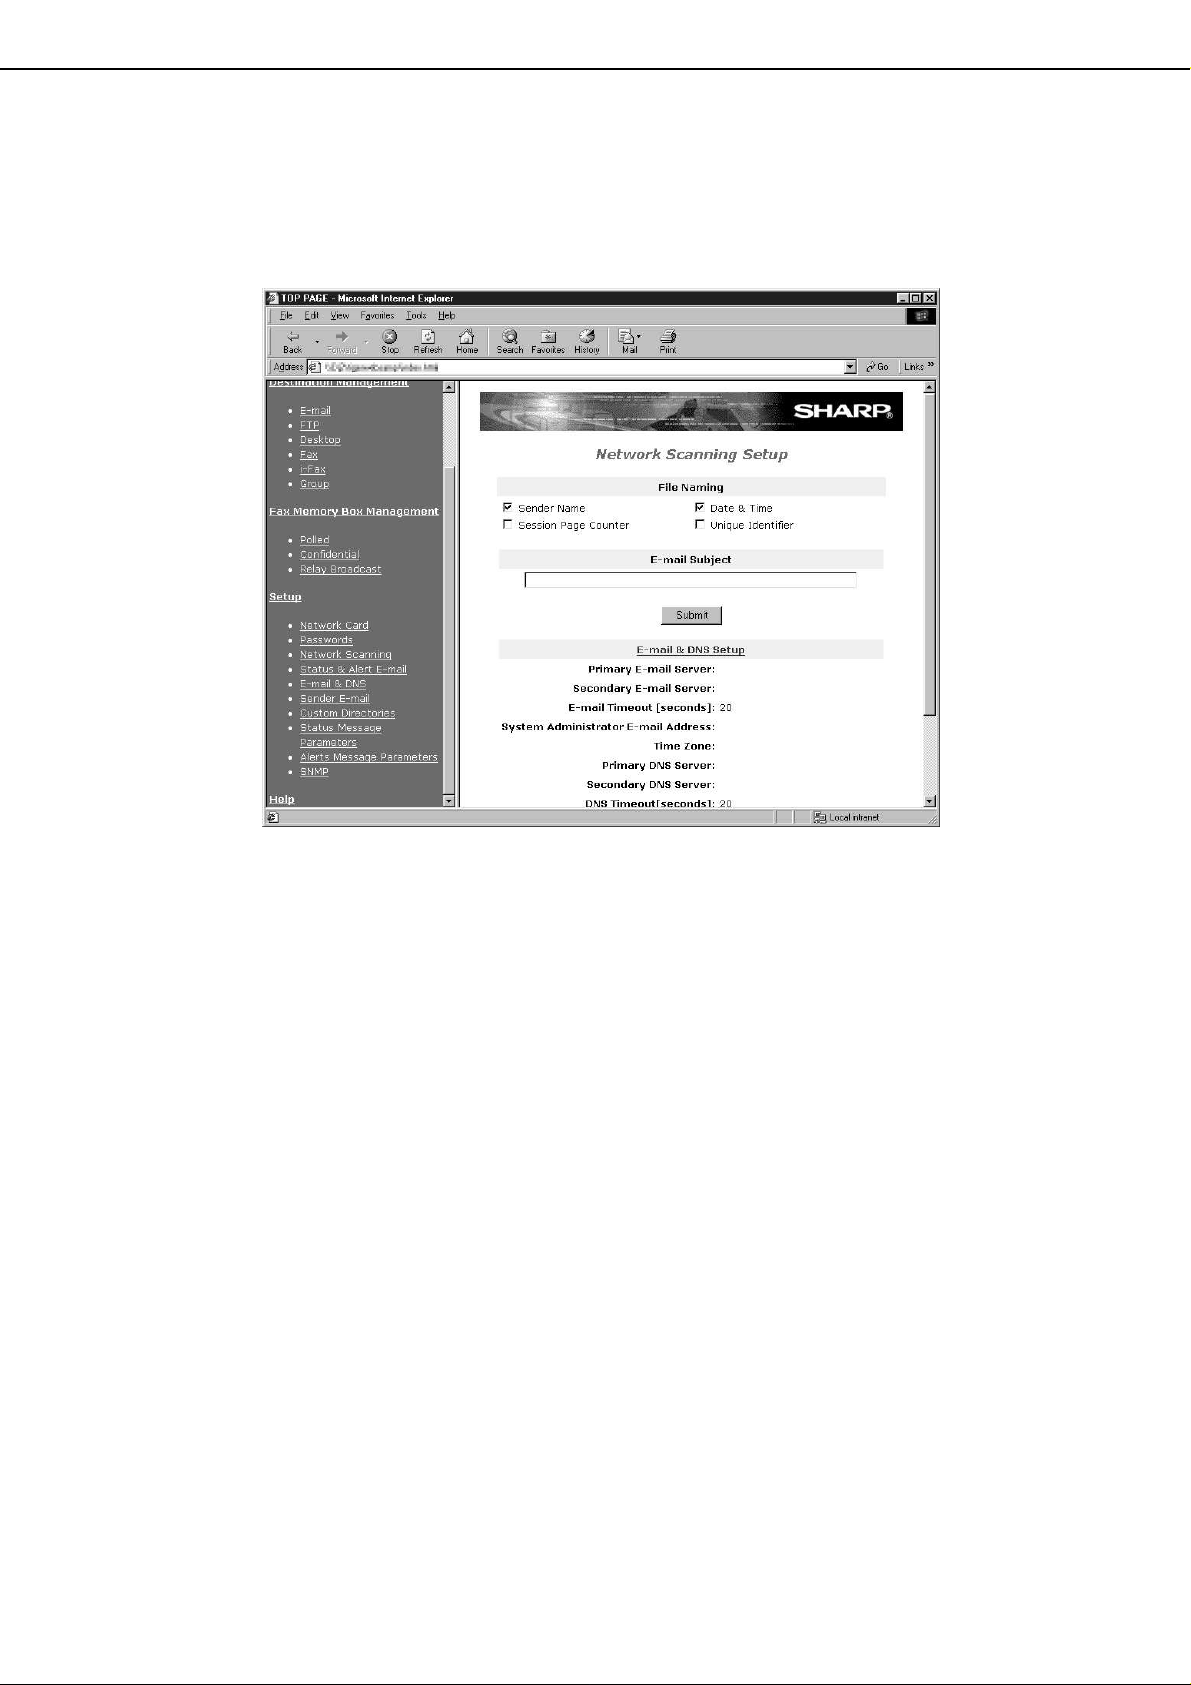
Click "Network Scanning" in the menu frame, and then estab lish the required settings. These settings should only be
established by the network administrator. After entering the settings, be sure to click "Submit" to store them. For
detailed information on setting procedures, refer to "Help".
Network Scanning Setting screen
■■
■ Select the method for assigning a file name to a scanned image
■■
Select the method for assigning a file name to a scanned image. In "File Naming", clic k the items that y ou wish to
use in the file name. "Sender Name" and "Date & Time" are initially selected. If you are going to send images to the
same recipient more than once, we recommend that you also select "Session P age Counter" or "Unique Identifier"
to prevent sending multiple files with the same name, which would result in each successive file overwriting the
previous file.
■■
■ Selecting an e-mail subject (only used for Scan to E-mail)
■■
Enter a subject when using Scan to E-mail. Only one subject can be entered. If nothing is entered, “Scanned
image from <Device Name>” will appear.
*The name that appears in <Device Name> is the name stored in "Name" in the screen that appears when you clic k "Status
& Alert E-mail" in the menu frame. If a name has not been stored, the product name will appear.
■■
■ E-mail Server and DNS Server Settings
■■
E-mail sent by Scan to E-mail or Scan to FTP (Hyperlink) uses SMTP. To use either of these transmission methods,
you must first click "E-mail & DNS Setup" in the Network Scanning page and then enter the required inf ormation in the
settings under "E-mail Setup". (This page can also be display ed b y clicking "E-mail & DNS" in the Web page menu.)
If you entered a host name in "Primary E-mail Server" or "Secondary E-mail Server" under "E-mail Setup", you will
need to enter the settings for the DNS server under "DNS Setup".
If you entered a host name in "Hostname or IP Address" when storing a destination for Scan to FTP (Scan to FTP
(Hyperlink)) or Scan to Desktop, you will also need to enter the settings f or the DNS server under "DNS Setup".
3
Page 6

SETTINGS AND PROGRAMMING REQUIRED FOR THE NETWORK SCANNER FEATURE
SETTING UP DESTINATION INFORMATION
To store the name and address of a destination in an auto dial key, click "Destination Management" or one of the
transmission methods in the Web page menu frame. "Destination Management" can also be used to edit or clear
stored destinations.
A total of 500 destinations can be stored, including E-mail, FTP, Desktop, Internet-Fax, and Group destinations.
Among these, a combined total of 100 Scan to FTP and Desktop destinations can be stored.
The stored destinations appear as one-touch keys in the touch panel of the machine when you send an image,
allowing you to select the destination.
For detailed inf ormation on setting up, editing, and deleting destinations, ref er to "Help".
■■
■ Storing destinations for Scan to E-mail and Internet-Fax
■■
Scan to E-mail and Internet-Fax destinations can also be stored, edited, and cleared from the touch panel of the
machine. (Pages 17 - 19)
To perform Scan to E-mail, the e-mail server settings must first be established. (Refer to page 3.)
■■
■ Storing destinations for Scan to FTP
■■
If you select the "Enable Hyperlink to FTP server to be e-mailed" checkbox, you can send an e-mail message to
a "Sender" selected from "E-mail Destination" (stored in "Sender E-mail" in the Web page menu (page 5)), to
notify that person of the location of the scanned image data and its file format. (Scan to FTP (Hyperlink))
The e-mail includes a link to the location of the scanned image data, and if the FTP server does not require a user
name or password (anonymous server), the recipient can display the image by simply clicking on the address .
If you entered a host name in "Hostname or IP Address", you will need to enter the DNS server settings. Clic k "Email & DNS" and enter the settings under "DNS Setup". To perform Scan to FTP (Hyperlink), you must also enter
the settings under "E-mail Setup" for the e-mail server. (Ref er to page 3.)
■■
■ Storing destinations for Scan to Desktop
■■
Scan to Desktop can only be used if Network Scanner Tool is installed in your computer (Network Scanner Tool is
included on the CD-ROM that accompanies the AR-NS2 Network Scanner Expansion Kit).
You can store a Scan to Desktop destination in the Web page, or in Network Scanner Tool. We recommend that
you normally use Network Scanner Tool, which automatically establishes settings . The Web page is primarily used
when the same settings are to be established in multiple laser printers, or when the network administrator perf orms
maintenance. If the information set here differs from the information set in the host computer, transmission and
reception will not take place normally. For details, refer to "User's Guide"* for Network Scanner Tool in the CDROM that accompanies the Network Scanner Expansion Kit (AR-NS2).
If you entered a host name in “Hostname or IP Address”, y ou will need to enter the DNS server settings. (Ref er to
page 3.)
*To view "User's Guide", Adobe Acrobat Reader 4.05 or later is necessary. If this is not installed on your computer, you can
install it from the CD-ROM that accompanies the Network Scanner Expansion Kit (AR-NS2). For details, ref er to the operation
manual for the Network Scanner Expansion Kit (AR-NS2).
■■
■ Storing Groups
■■
If you are using Scan to E-mail or Internet-Fax, a scanned image can be sent to multiple destinations in a single
operation. To use this function, you must first store the destinations in a group. Click "Group" and then select the
Scan to E-mail or Internet Fax destinations that you wish to store in the group. Up to 300 destinations can be
stored in one group. Only destinations for E-mail or Internet-Fax can be stored in a group. Note that multiple
destinations cannot be entered manually when sending an image.
4
Page 7

SETTINGS AND PROGRAMMING REQUIRED FOR THE NETWORK SCANNER FEATURE
■■
■ Items common to all transmission methods when storing destinations
■■
• Full Name, Display Name
Only alphabetical characters and symbols can be used to enter names in "Full Name" and "Display Name". For
the maximum number of characters that can be entered, click "Help" in the menu frame. "Display Name" is the
one-touch key name that is displa yed in the touch panel of the machine. If a displa y name is not stored, the first 18
characters of the name stored in "Full Name" are automatically used as the display name.
• Initial, Custom Directory
Stored destinations are arranged on "indexes" when displayed in the touch panel of the machine. There are two
types of indexes: the ABC index and group indexes. The ABC index arranges destinations based on the letter
entered in "Initial", which is normally the first letter of the name entered in "Full Name". If a destination is frequently
used, it is convenient to select the "Frequently Used" checkbox to include the destination in the alphabetical
"FREQUENT USE" index. Group indexes ("Custom Directories") allow you to create and name inde x es (see the
following page) of destinations f or specific purposes.
• File Format
When you store a destination, you can also select the compression mode and the f ormat of the image file that is
created when you scan an original for transmission. You can select TIFF-F, TIFF, or PDF for the file type , and MH
(G3), MMR (G4), or "Uncompressed" for the compression mode. An initial setting has been made f or the file type
and compression mode, so you only need to make a selection if the initial settings are not satisfactory. For an
explanation of the initial settings of each of the transmission methods, clic k "Help" in the menu fr ame .
NOTE
Internet-Fax only has one file format, TIFF-F, and thus there is no selection. MH (G3) or MMR (G4) can be selected for the
compression mode.
STORING SENDER INFORMATION
To store the sender information (Sender Name, E-mail Address) that is display ed when the recipient receives your email, click "Sender E-mail" in the menu frame and then clic k "Add". Information for up to 20 different senders can be
stored. Select a sender from the stored senders using the touch panel of the machine when you send an image (page
8). The selected sender appears in the sender column of the recipient's e-mail software program.
NOTE
If you do not select a sender when sending an image, the default sender information stored with the key operator program is
automatically sent. (Page 27)
STORING A CUSTOM DIRECTORY
Auto dial k eys (one-touch ke ys and group k eys) are normally stored in the ABC index. However , y ou can also use the
group indexes (custom directory) to group destinations for more convenient use. Six indexes are available, and a
name up to 6 characters long can be assigned to each index.
Click "Custom Directory" in the menu frame of the Web page, and then enter the desired name in the screen that
appears. "User-*" is initially entered for the name of each index. Clear this and then enter the new name.
The procedure for storing auto dial numbers in a group index is e xplained on page 4, and the procedure f or s witching
between the ABC index and the group indexes is e xplained on page 7.
NOTE
You can also store indexes in the Custom Directory from the touch panel of the machine.
5
Page 8
CONDITION SETTING SCREEN OF SCANNER MODE
ADDRESS
DIRECTORY
AUTO
READY TO SEND.
ORIGINAL
STANDARD
RESOLUTION
AUTO
EXPOSURE
ADDRESS REVIEW
SENDER LISTE-MAIL ADDRESS
The condition setting screen of scanner mode is displayed by pressing the IMAGE SEND key (refer to page 4 of
"Operation manual (for copier)") while the print mode, cop y mode, or job status screen appears in the touch panel. In
the explanations that follo w, it is assumed that the initial screen that appears after pressing the IMAGE SEND key is
the condition setting screen (shown below). If you ha v e set the display to show the address directory (follo wing page)
when the IMAGE SEND ke y is pressed, touch the CONDITION SETTINGS key in the address directory to display the
condition setting screen.
The key operator progr am can be used to set the display to show either the condition setting screen (sho wn below) or
the address directory screen (following page) when the IMAGE SEND key is pressed (refer to page 26).
NOTE
For information on the parts of the unit and the operation panel that are used for network scanning, refer to pages 3-4 of
"Operation manual (for copier)". F or parts that are used for both network scanning and printing, ref er to chapter 1 of "Operation
manual (for printer operation and general information)".
■■
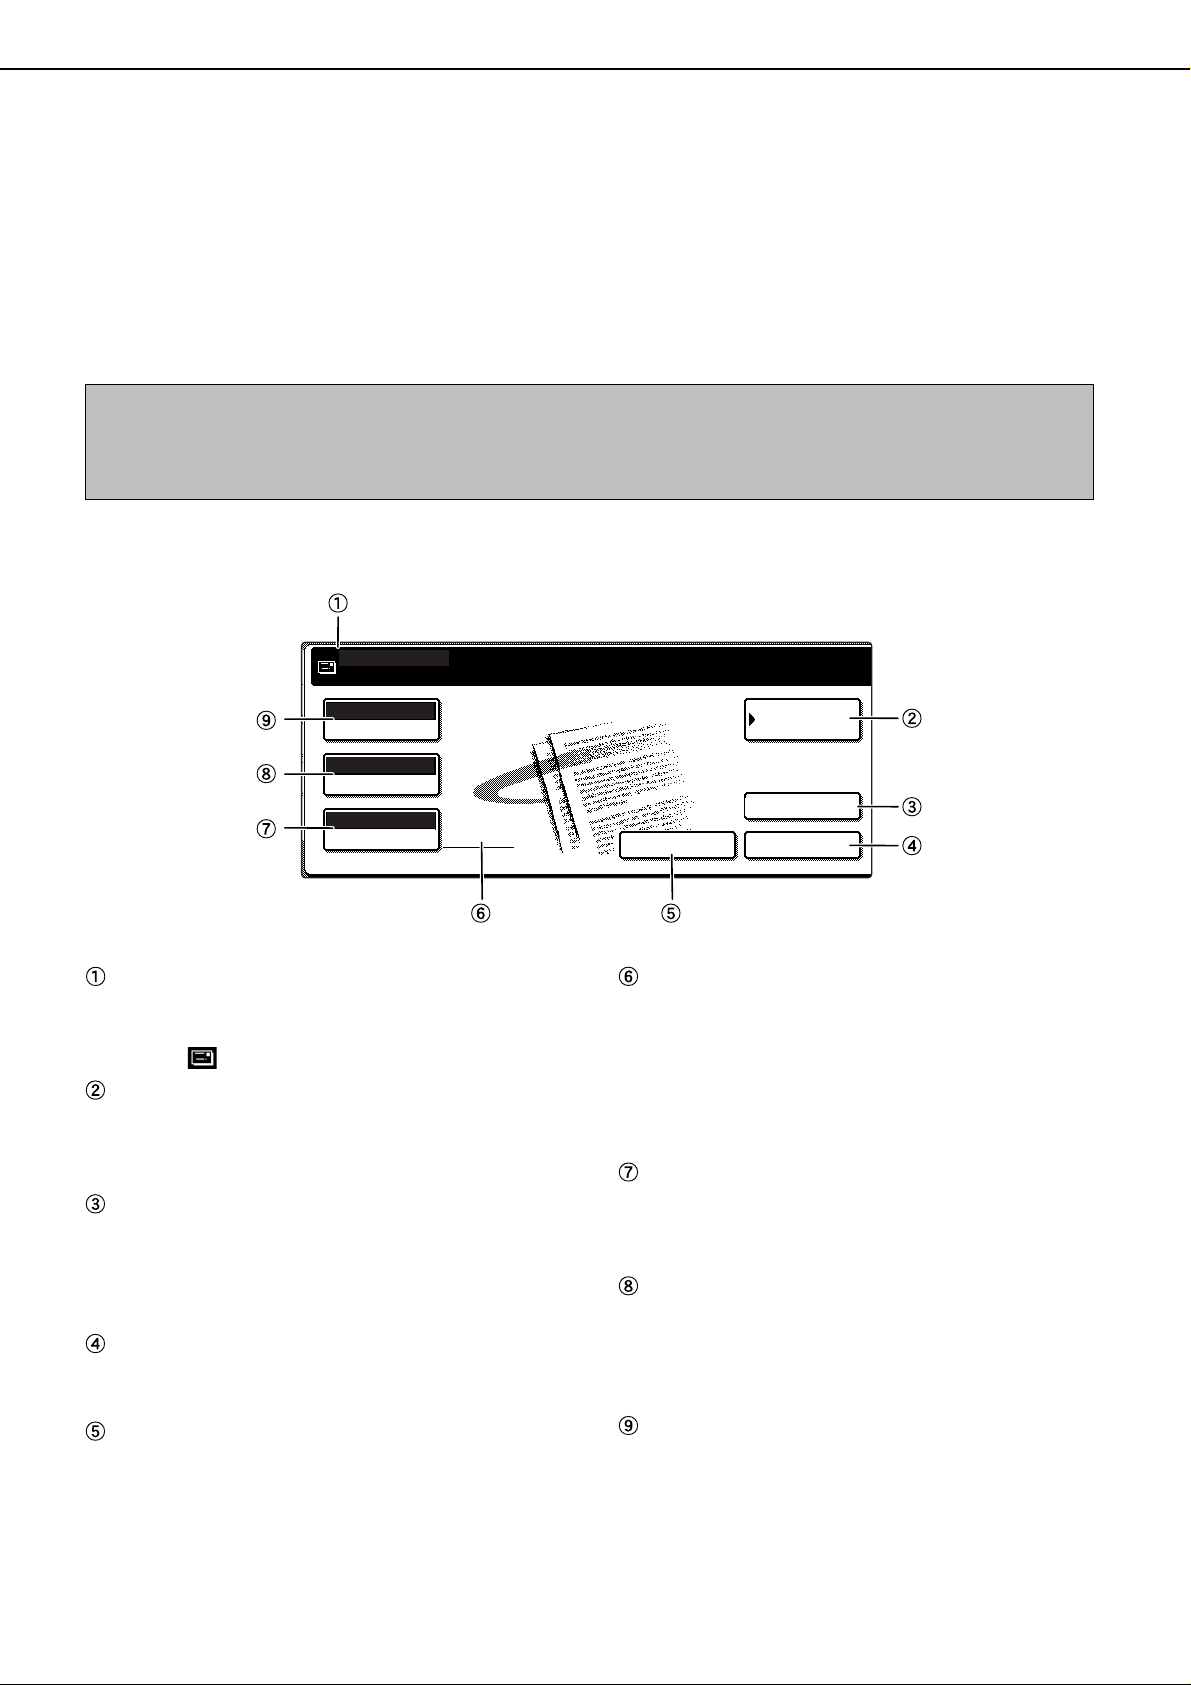
■ Condition setting screen
■■
The display is initially set (factory setting) to show the f ollowing condition setting screen as the initial screen.
Message display
Messages appear here to indicate the current status
of the machine. When the machine is ready to send,
an icon appears to the left.
ADDRESS DIRECTORY key (page 9)
This displays the Address Directory screen (next
page). Touch this ke y when you want to use an autodial number (one-touch dialing or group dialing).
ADDRESS REVIEW key (page 10)
When performing Scan to E-mail or Internet-Fax
broadcast transmission, touch this key to chec k your
selected destinations. Your selected destinations will
appear as a list, and the list can be edited.
SENDER LIST key (page 8)
Touch this key to select the sender when sending
an image.
E-MAIL ADDRESS key (page 10)
When performing Scan to E-mail or Internet-Fax
transmission, touch this key if y ou wish to enter the
e-mail address of the recipient manually instead of
6
using an auto dial key.
T wo-sided scanning and verification stamp icon
display (pages 11-12)
Icons appear here when you touch the ORIGINAL
key and select two-sided scanning and/or the
verification stamp function (when the optional
verification stamp unit is installed). The icons can
be touched to open function selection screens.
ORIGINAL key (pages 11-13)
Touch this key when you wish to manually set the
size of the original to be scanned, scan both sides
of the original, or use the verification stamp option.
RESOLUTION key (page 14)
Touch this key to change the resolution setting for
the original to be scanned. The selected resolution
setting will be highlighted above the key. The initial
factory setting is STANDARD .
EXPOSURE key* (page 15)
Touch this key to change the exposure setting for
the original to be scanned. The selected exposure
setting will be highlighted above the key. The initial
factory setting is AUTO.
*If the Fax Expansion Kit (AR-FX5) is installed, "SPECIAL
MODES" appears instead of "EXPOSURE".
Page 9
CONDITION SETTING SCREEN OF SCANNER MODE
GROUP6GROUP5GROUP4GROUP3GROUP2GROUP1
ABC GROUP
SHARP CORPORATION
FREQUENT USE ABCD EFGHI JKLMN OPQRST UVWXYZ
ABC GROUP
TPS
SHARP GROUP D DESKTOP
E F
G H DESKTOP
CONDITION
SETTINGS
READY TO SEND.
ADDRESS REVIEW
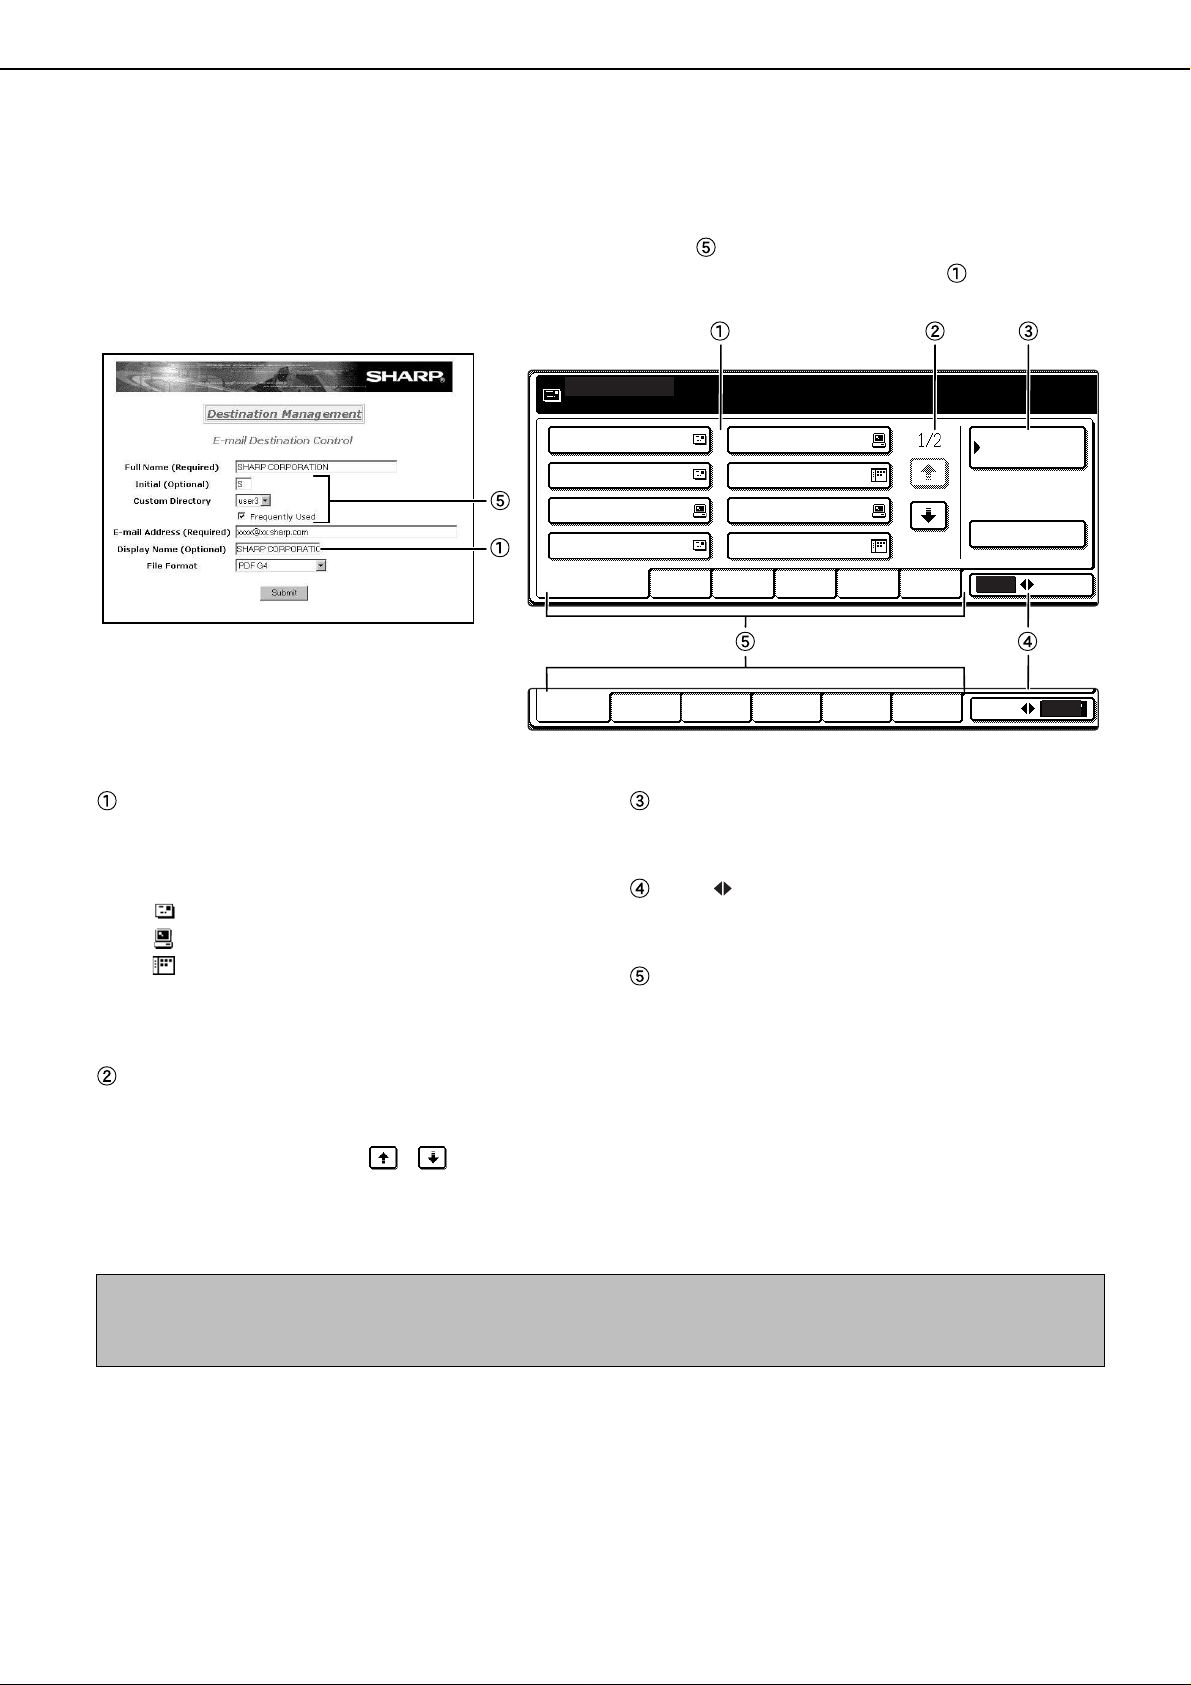
■ Address directory screen (alphabetically ordered)
If you hav e set the initial screen to the address directory screen using the key operator progr am, the initial screen
will appear as follows .
Destinations stored using the W eb page are grouped in inde x es (
each destination, and the name entered in "Display Name" is displa y ed in the one-touch k e y (
) according to the letter entered in "Initial" for
).
E-mail Destination Management page
One-touch key display
This shows the one-touch keys that have been
stored on the selected "index card". The key type is
indicated by the icon at the right.
:Scan to E-mail, Internet-Fax
: Scan to FTP
: Scan to Desktop
The display is initially set to show 8 keys. This can
be changed to 6 or 12 using the key operator
program. (Refer to page 26.)
Display switching key s
In cases where the one-touch keys cannot all be
displayed on one screen, this shows how many
screens are left. Touch the "
" " " keys to move
through the screens.
CONDITION SETTINGS key
This displays the condition setting screen (pre vious
page), which is used to set various conditions.
ABC GROUP key
Touch this key to switch between the alphabetical
index and the group inde x.
Index keys
One-touch key destinations are stored on each of
these index cards (alphabetical index or group
index). Touch an index key to display the card.
Group index es make it possible to store one-touch
keys by group with an assigned name for easy
reference. This is done with the custom settings (refer
to page 5). Frequently used one-touch key
destinations can be stored on the FREQUENT USE
card for conv enient access .
NOTE
The screen showed above is the alphabetical address directory. If desired, the initial screen can be set to the group address
directory (refer to page 26).
7
Page 10
SENDING AN IMAGE
AUTO A4
ORIGINAL
STANDARD
RESOLUTION
AUTO A4
ORIGINAL
STANDARD
RESOLUTION
AUTO
EXPOSURE
ADDRESS REVIEW
DIRECTORY
2 GROUP
SHARP PPD
1 GROUP
1 GROUP
BASIC TRANSMISSION METHOD
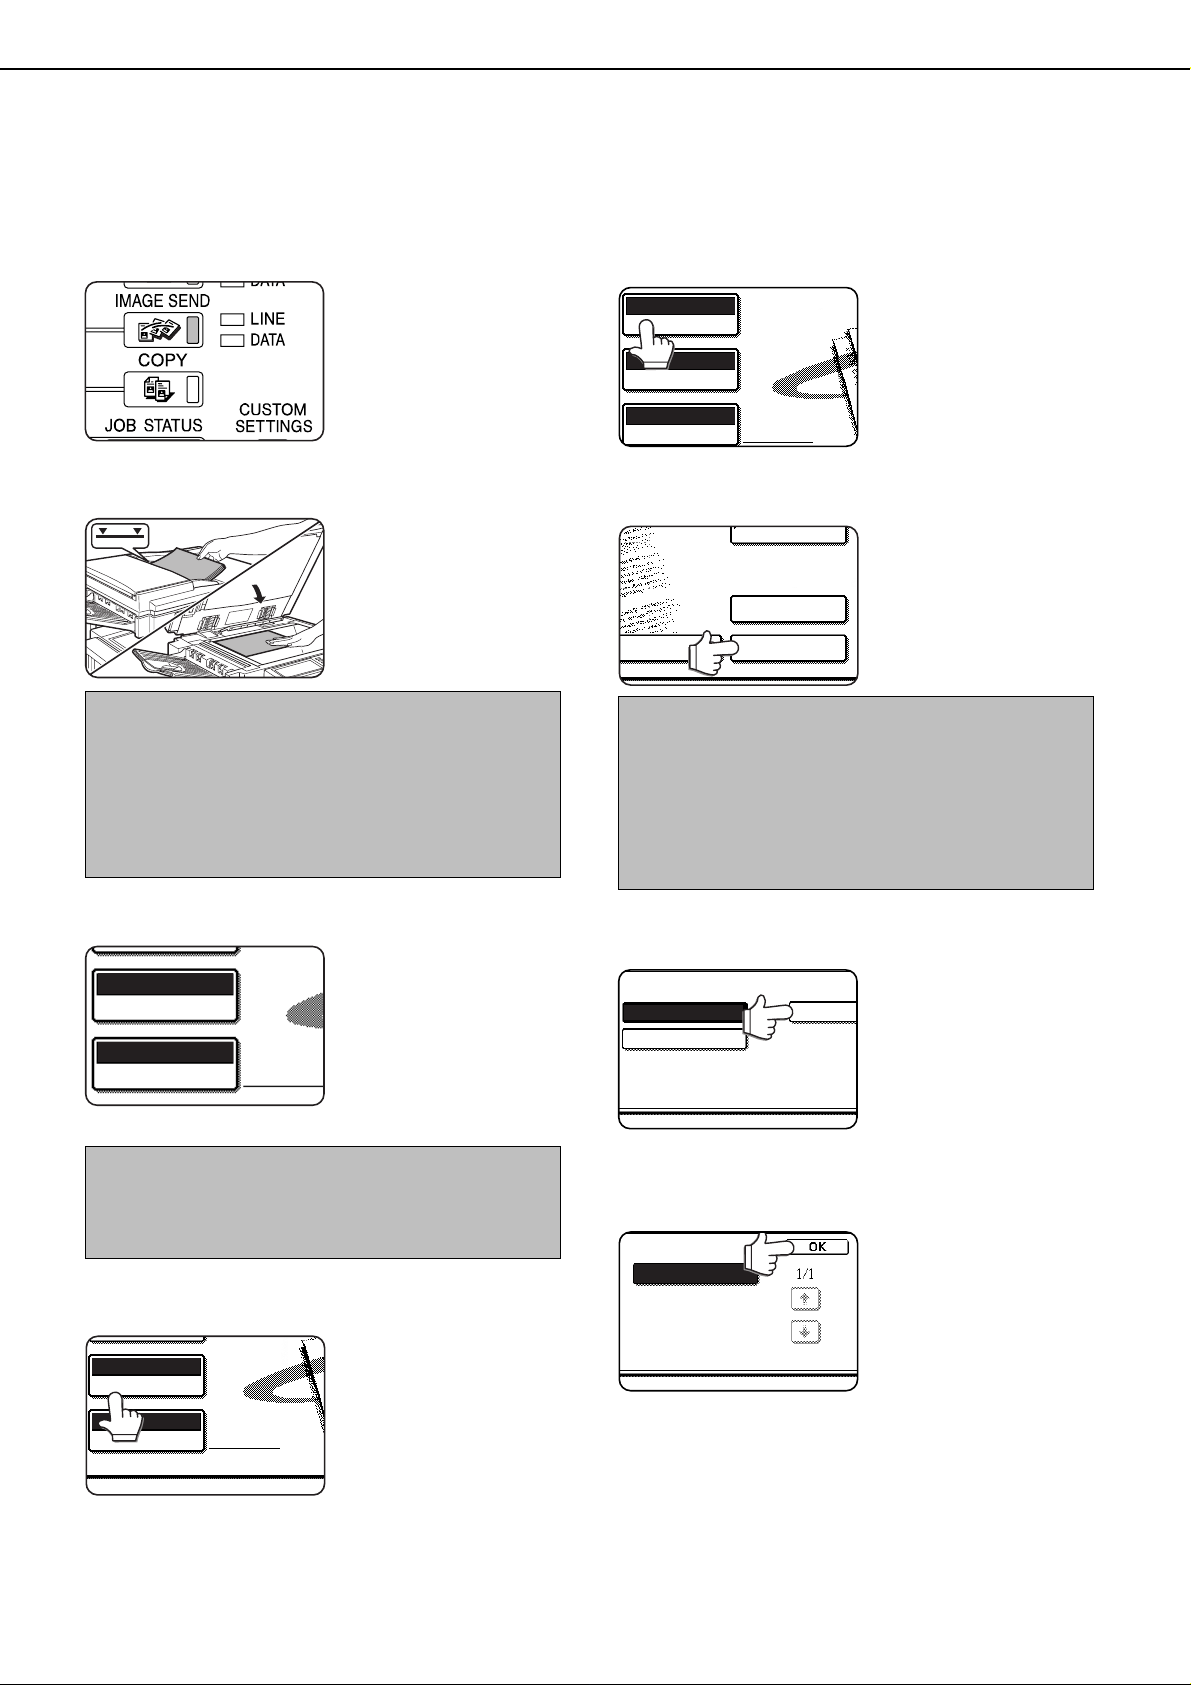
Make sure the machine is in scanner mode.
1
When the IMAGE SEND
key light is on, the machine
is in scanner mode. If the
light is not on, press the
IMAGE SEND key.
Load the original.
2
For detailed information on
loading an original, refer to
pages 7 and 8 of "Operation
manual (for copier)".
NOTE
You cannot load documents in both the auto document
feeder and on the document glass and send them in a
single transmission. If documents are loaded in both the
auto document feeder and on the document glass, only
the document in the auto document feeder will be scanned
and transmitted.
If needed, adjust the e xposure setting.
5
(Refer to page 15.)
The initial factory setting is
AUTO.
Touch the SENDER LIST key.
6
This step is not necessary
for Scan to FTP or Scan to
Desktop. Go directly to step
9 (next page).
NOTES
• You can omit selection of a sender (go directly to step
11). In this case, the default sender information stored
with the key operator program is automatically
transmitted. (Page 27)
• Up to 20 senders can be stored using the Web page.
(Page 5)
Check the original size.
3
The original size is
automatically detected.
If you loaded a non-standard
size document or wish to
change the scanning size,
touch the ORIGINAL key
and set the document size.
(Refer to page 13.)
NOTE
To scan a two-sided original or use the verification stamp
function (if the optional verification stamp unit is installed),
refer to pages 11 and 12.
If needed, adjust the resolution setting.
4
(Refer to page 14.)
The initial factory setting is
STANDARD
RESOLUTION
AUTO A4
ORIGINAL
STANDARD.
Touch a key to select a sender.
7
Touch the OK key.
8
The touched key is
highlighted. If you made a
mistake, touch the correct
key. The highlighting will
move to the new key.
The selected sender will be
the sender of the e-mail.
8
Page 11

SENDING AN IMAGE
ADDRESS
DIRECTORY
FREQUENT USE ABCD EFGHI JKLMN OPQRS
T.P.S.
SHARP GROUP
SHARP CORPORATION
READY TO SEND.
READ-END
Touch the ADDRESS DIRECT ORY key.
9
The address directory
screen appears.
Touch the one-touch key for the desired
10
destination.
Refer to page 7 for
information on using the
address directory screen.
The key you touched is
highlighted. If you touch the
wrong key , touch the k ey again
to cancel the selection. The key
display will return to normal.
NOTES
• Refer to pages 4 and 5 for information on programming
one-touch key destinations.
•
When pressing a one-touch key, corresponding information from
the email destination screen is shown in the message display. Up
to 28 characters can be displayed in the message screen,
regardless of the number of characters that have been entered.
• You can also manually enter the address of a Scan to Email destination, or select multiple destinations for a
broadcast transmission. (Next page)
Using the auto document feeder
Press the START key .
11
Using the document glass
Press the START key .
11
The original is scanned
and the READ-END key
appears.
If you have another page to scan, change pages
12
and then press the ST AR T key.
Repeat this sequence until all pages have been scanned.
You can change the resolution and exposure settings
as needed for each page (refer to pages 14 and 15).
If no action is taken for one minute, scanning
automatically ends and the transmission job is stored.
After the final page is scanned, touc h the READ-
13
END key.
The machine makes a beep
sound to inform you that the
transmission job is stored
and JOB STORED appears
in the message display. (The
destination is automatically
called and the document
transmitted after previously
stored jobs are completed.)
Open the document glass cover and remove the
document.
Scanning begins and the
transmission job is stored.
(The job is transmitted
after previously stored
transmission jobs have
been completed.)
If scanning is completed normally, the machine makes a
beep sound to inform you that the transmission job is stored
and JOB STORED appears in the message display.
NOTES
• Canceling transmission
To cancel transmission while SCANNING ORIGINAL... appears in the display or before the READ-END key is pressed, press the C key or
the CA key. To cancel a transmission job that is already stored, press the JOB STATUS key and cancel the job as e xplained on page 16.
• Important points when using Scan to E-mail
Be very careful not to send image data files that are too large. Y our mail server's system administrator ma y hav e placed a limi t
on the amount of data that can be sent in one e-mail transmission. If this limit is e xceeded, the e-mail will not be delivered to
the recipient. Even if there is no limit and your e-mail is successfully delivered, a large data file may take a long time to be
received and place a heavy burden on the recipient's network, depending on the recipient's network (Internet) connection
environment. If large image data files are repeatedly sent, the resulting burden on the network may slow down the speed of
other, unrelated data transmissions and in some cases, may even cause the mail server or network to go down.
In cases where you need to send multiple documents, try such measures as lowering the resolution or image quality mode.
•
If the power is turned off or a power failure occurs while a document is being scanned in the auto document feeder , the machine will stop and
a document misfeed will occur . After power is restored, remove the document as explained on page 29 of "Operation manual (f or c opier)".
9
Page 12

SENDING AN IMAGE
E-MAIL ADDRESS SENDER
ADDRESS
DIRECT
CANCEL OK
OK
ADDRESS REVIEW
DIRECTORY
CONDITION
SETTINGS
NEXT ADDRESS
TRANSMISSION METHODS FOR SCAN TO E-MAIL
(MANUAL ENTRY, BROADCAST TRANSMISSION)
It is possible to manually enter the address of a Scan to E-mail destination, or select multiple destinations for a
broadcast transmission. (These procedures are not possible when performing an Internet-Fax transmission.) First
use the procedure in "Basic transmission method" on pages 8 to 9.
Perform steps 1 through 8 of "Basic
1
transmission method" (pages 8 to 9).
Touch the E-MAIL ADDRESS key.
2
Enter the e-mail address.
3
If you make a mistake, press the key to move the cursor
(■) back to the mistake and then enter the correct
character.
Touch the FILE FORMAT ke y.
4
NOTE
The initial file format setting can be changed with the key
operator program. (Page 27)
Select the file type and the compression mode.
5
E-MAIL ADDRESS
FILE FORMAT
PDF
TIFF-F
The file format is initially set
to "File type: PDF,
Compression mode: MMR
(G4)". If you do not need to
change the file format, go
directly to step 6.
CANCEL OK
FILE TYPE COMPRESSION MODE
TIFF
NONE
MMR (G4)
MH (G3)
Touch the outer OK key.
6
You will return to the initial
screen.
If you are not performing a
broadcast transmission, go
directly to step 9.
If you wish to enter another e-mail address,
7
repeat steps 2 through 6.
NOTES
•If the key operator
program has been set
so that the NEXT
ADDRESS key must
always be pressed
(page 26) and you wish
to enter another
address, press the
NEXT ADDRESS key and then repeat steps 2 through 6.
• If you frequently use broadcasting to send documents to
the same group of destinations, it is convenient to prog ram
those destinations into a group key. (Page 4)
T ouch the ADDRESS REVIEW key and chec k the
8
destinations.
When the ADDRESS
REVIEW key is pressed,
only the entered
destinations are displayed.
If you need to clear a
destination, press its key.
Press the OK key to return
to the initial screen.
Continue from step 11 of "Basic transmission
9
method" (pages 8 to 9).
NOTES
• To cancel a broadcast transmission when selecting
OK
destinations, press the CA key.
• When you perform a broadcast transmission, the
compression mode set with the key operator program is
used as the file compression mode for all destinations.
This is initially set to "MH (G3)". If desired, y ou can change
the setting to "MMR (G4)". (Page 27)
10
Page 13

Booklet Tablet
SENDING AN IMAGE
AUTO MANUAL
2-SIDED
BOOKLET
2-SIDED
TABLET
ORIGINAL SIZE
OK
AUTO A4
ORIGINAL
STANDARD
RESOLUTION
SCANNING AND TRANSMITTING A TWO-SIDED ORIGINAL
A two-sided original can be automatically scanned and transmitted using the auto document feeder . Follow the steps
below .
Make sure the machine is in scanner mode and
1
then load the document in the auto document
feeder.
Touch the ORIGINAL key .
2
When you touch the
STANDARD
RESOLUTION
AUTO A4
ORIGINAL
Touch the 2-SIDED BOOKLET key or the 2-
3
SIDED TABLET key as appropriate for the
original you loaded.
ORIGINAL key, check the
original size displayed in the
key .
If necessary, touch the
MANUAL key and set the
original size. (Page 13)
Touch the OK key.
4
You will return to the initial
screen.
A two-sided original icon appears next to the ORIGINAL key.
(Example: The icon that appears when the 2-SIDED
BOOKLET key is touched.)
Continue from step 4 of "Basic transmission
5
method" (pages 8 to 9).
NOTES
• Booklets and tablets
Two-sided originals that are bound at the side are booklets, and two-sided originals
that are bound at the top are tablets.
• Two-sided scanning turns off after the document is stored in memor y. Pressing the
CA key will also cancel two-sided scanning.
11
Page 14

OK
STAMP
L
T
OK
STAMP
L
T
AUTO A4
ORIGINAL
STANDARD
RESOLUTION
SENDING AN IMAGE
STAMPING SCANNED ORIGINALS (VERIFICA TION STAMP FUNCTION)
If the optional verification stamp unit has been installed on the scanner unit, you can
have a pink fluorescent "
using the auto document feeder .
This feature does not operate f or originals scanned on the document glass.
NOTE
When both sides of an original are scanned, only the front side of the original is stamped.
In scanner mode, load the original and set an y
1
needed scanning conditions such as the
original size, resolution, and e xposure.
Stamping position
Touch the ORIGINAL key.
2
STANDARD
RESOLUTION
AUTO A4
ORIGINAL
" mark stamped on the edge of each original that is scanned
Touch the OK key.
4
Make sure that the verification stamp icon
5
appears to the right of the ORIGINAL key.
Paper f eed direction
A pink fluorescent " " mark is
stamped on scanned originals.
You will return to the initial
screen.
When this icon appears, the
edge of each original will be
stamped as it is scanned.
If you have selected twosided scanning, the
verification stamp icon will
appear to the right of the
two-sided scanning icon.
Touch the STAMP key .
3
The STAMP key is only
displayed if the verification
stamp unit has been
installed.
When touched, the key is
highlighted.
NOTES
• If an error occurs during scanning, scanning is canceled and the original is ejected. In this case, the original may be stampe d
without having been scanned.
• You can use the key operator program to permanently turn on the verification stamp function. (Refer to page 26.)
■■
■ Replacing the verification stamp cartridge
■■
The optional verification stamp unit contains a consumable
verification stamp cartridge (ink cartridge). This cartr idge (ARSV1) must be replaced when the mark stamped on each original
becomes faint. Follow the steps belo w to replace the cartridge.
Remove the stamp cover, and then grasp the finger hold
1
on the ink cartridge and pull the cartridge out of the unit.
2
12
Insert the new cartridge into the unit. Replace the stamp cover .
Begin scanning.
6
The verification stamp function automatically turns off
when all originals have been scanned.
Note that the function will also automatically turn off if you
take no action for one minute after turning on the function.
Finger hold
Page 15

SCANNING SETTINGS
ROTATE THE IMAGE 90 DEGREE
MANUAL
STA
2-SIDED
TABLET
OK
OK
B4
A3
B5R
A4
A5
A5R
INCH
AB
A4RB5
ORIGINAL SIZE
MANUALAUTO
OK
OK
INCH
AB
ORIGINAL SIZE
MANUALAUTO
5 X8
1
/
2
1
/
2
5 X8 R
1
/
2
1
/
2
8 X11
1
/
2
8 X11R
1
/
2
8 X14
1
/
2
11X17
OK
OK
8 X11
1
/
2
ORIGINAL
STANDARD
RESOLUTION
8 X11
1
/
2
(ORIGINAL SIZE, RESOLUTION, AND EXPOSURE)
When sending an image, you can adjust the original size, resolution, and exposure settings as needed.
MANUALLY SETTING THE SCANNING SIZE
If you load an original that is not a standard size, or if you wish to change the scanning siz e, touch the ORIGINAL ke y
and set the original size manually. P erf orm the following steps after loading the document in the automatic document
feeder or on the document glass.
NOTE
Standard sizes that can be detected are as follows:
5-1/2"x8-1/2", 8-1/2"x11", 8-1/2"x11"R, 8-1/2"x14", 11"x17" (A3, B4, A4, A4R, B5, B5R, A5). If a non-standard size original is
loaded (including special sizes), the closest standard size may be displayed, or the original size may not appear at all.
Touch the ORIGINAL key .
1
STANDARD
RESOLUTION
AUTO A4
ORIGINAL
Touch the MANU AL ke y.
2
ORIGINAL SIZE
The sizes that can be
selected are displayed.
NOTE
If you wish to rotate the original 90° when creating an image
file, click the "Load the original so that the image is oriented
horizontally" checkbox (a chec kmark should appear in the
box).
If you wish to select an inch size, touch the
INCH key and then touch the desired
AB
original size key.
INCH is highlighted and
inch size keys are
displayed. To retur n to the
AB palette, touch the
INCH key once again.
AB
Touch the outer OK key.
4
You will return to the initial
screen. (Pressing the inner
OK key in the step above
returns you to step 2.)
The selected size appears in the top half of the
5
ORIGINAL key .
Touch the desired original size key.
3
AUTO is no longer
highlighted. MANUAL and
the original size key you
touched are highlighted.
NOTE
You can return to automatic detection by pressing the CA key.
13
Page 16

SCANNING SETTINGS (ORIGINAL SIZE, RESOLUTION, AND EXPOSURE)
STANDARD
FINE
SUPER FINE HALF TONE
ULTRA FINE
FINE
HALF TONE
OK
FINE
SELECTING THE RESOLUTION
After loading the original, you can adjust the resolution as needed for the type of original and the size of the letters on
it. After loading the original in scanner mode, adjust the settings as explained below. The initial resolution setting is
STANDARD.
■ Change the resolution.
Touch the RESOLUTION key.
1
STANDARD
RESOLUTION
AUTO A4
ORIGINAL
Touch the desired resolution key.
2
The selected key is
highlighted. If you selected
FINE, SUPER FINE, or
ULTRA FINE, you can also
touch the HALF TONE key
to select halftone.
Touch the OK key.
3
You will return to the initial
screen.
■ Resolution settings
Touch this key if your original consists of
Standard
Fine
Super fine
Ultra fine
Half tone
normal-sized characters (like those in
this manual).
Touch this key if your original has small
characters or diagrams. The original will
be scanned at twice the resolution of the
Standard setting.
Touch this key if your original has intricate pictures or diagrams. A higher-quality image will be produced than with the
Fine setting.
Touch this key if your original has intricate pictures or diagrams. This setting
gives the best image quality. However,
transmission will take longer than with
the other settings.
Touch this key if your original is a photograph or has gradations of color (such as
a color original). This setting will produce
a clearer image than Fine, Super fine, or
Ultra fine used alone. Half tone cannot be
selected if Standard has been selected.
NOTES
• The initial factory resolution setting is Standard. If desired,
you can change the initial setting to a different setting
using the key operator program. (Refer to page 26.)
• When using the automatic document feeder, the
resolution setting cannot be changed once scanning has
begun.
14
Page 17

AUTO A4
ORIGINAL
STANDARD
RESOLUTION
AUTO
EXPOSURE
AUTO
DARK
LIGHT
ORIGINAL
OK
LIGHT
SCANNING SETTINGS (ORIGINAL SIZE, RESOLUTION, AND EXPOSURE)
SELECTING THE EXPOSURE
After loading the original, you can adjust the contrast as needed for the darkness and type of the original. After loading
the original in scanner mode, adjust the settings as explained below. The initial e xposure setting is AUTO.
■ Change the exposure.
Touch the EXPOSURE key.
1
If the Fax Expansion Kit
(AR-FX5) has been
installed, the SPECIAL
MODES key will appear in
place of the EXPOSURE
key. In this case, press the
SPECIAL MODES key and
then press the EXPOSURE
key .
Touch the desired exposure key.
2
The selected key is
highlighted.
Touch the OK key.
3
You will return to the initial
screen.
■ Exposure settings
Dark Select this setting if your original consists
Original mostly of dark characters.
This setting automatically adjusts the ex-
Auto
Light Select this setting if your original consists
Original mostly of faint characters.
posure for light and dark parts of the original.
NOTE
When using the document glass to scan pages an original,
the exposure setting can be changed each time you change
pages. When using the automatic document feeder, the
exposure setting cannot be changed once scanning has
begun.
15
Page 18

E-MAIL/FTP
WAITING
WAITING
WAITING
PRIORITY
STOP/DELETE
PRIORITY TRANSMISSION OF A STORED JOB
E-MAIL/FTP
WAITING
WAITING
WAITING
PRIORITY
STOP/DELETE
If you hav e an urgent transmission job and multiple transmission jobs ha ve already been stored, y ou can give priority
to the urgent job so that it will be transmitted immediately after the job currently being ex ecuted. This is done from the
job status screen. For details on using the job status screen, refer to page 1-14 of "Operation manual (for printer
operation and general information)".
Press the JOB STATUS key.
1
Touch the E-MAIL/FTP key.
2
Touch the job key of the transmission job to
3
which you wish to give priority.
The touched key is highlighted.
Touch the PRIORITY key.
4
The selected job moves up
to the next position after the
job currently being
executed.
When the current job is completed, execution begins of
the job selected in step 3.
NOTE
If the job currently being executed is a broadcast
transmission, the priority job will be executed after the call
to the current destination is completed. When the priority
job is completed, the remaining broadcast destinations are
called. However, if the priority job is also a broadcast
transmission, the job is begun after the current broadcast
job is completed.
CANCELING AN E-MAIL/FTP TRANSMISSION
You can cancel a transmission job that is in progress or that has been stored. Cancellation is done from the e-mail/
FTP job status screen.
Press the JOB STATUS key.
1
Touch the E-MAIL/FTP key.
2
Touch the job key of the transmission job you
3
wish to cancel.
The touched key is highlighted.
Touch the ST OP/DELETE ke y.
4
A message appears to
confirm the cancellation.
T ouch the YES key to delete
the selected job key and
cancel the transmission.
NOTE
If you do not wish to cancel the transmission, touch the
NO key.
16
Page 19

KEY OPERATOR PRO
ADDRESS
CONTROL
DIRECT ADDRESS
CUSTOM INDEX
INDIVIDUAL GROUP
STORE
E-MAIL INTERNET-FAX
NAME
INDEX ADDRESS
DIRECT ADDRESS / INDIVIDUAL
NAME
INDEX FAX
E-MAIL INTERN
INITIAL
FILE FORMAT
STORING, EDITING, AND CLEARING FROM
THE TOUCH P ANEL
One-touch and group ke ys for Scan to E-mail and Internet-F ax, group index es, and senders can also be stored, edited
and cleared from the touch panel of the machine.
ST ORING ONE-TOUCH KEYS
The touch panel of the machine can also be used to store destinations for Scan to E-mail and Internet-F ax. (Scan to
FTP destinations must be stored using the Web page, and Scan to Desktop destinations must be stored using
Network Scanner Tool (page 4).)
Press the CUSTOM SETTINGS ke y.
1
Touch the ADDRESS CONTROL ke y.
2
(only addresses f or Scan to E-mail and Internet-Fax)
Touch the NAME key.
6
The "No." that automatically
appears is the lowest number
from 001 to 500 that has not
yet been programmed. When
NAME is touched, the letterentry screen appears. Enter up
to 36 characters for the name.
NOTE
If you are going to use the Web page to edit or delete the
stored name at a later time, do not use the characters ", <,
or >. These characters cannot be displa yed in the W eb page.
Touch the INITIAL key.
7
Touch the DIRECT ADDRESS key.
3
Touch the INDIVIDU AL ke y.
4
Click the checkbo x of the transmission method
5
to be used so that a checkmark appears.
(Example: Scan to E-mail)
Touch a letter key.
8
The first letter (initial) of the
name entered in step 6 is
initially selected and is
highlighted. If you wish to
change the letter, touch a
different letter key.
NOTE
The initial you enter here determines the position of the
one-touch key in the ABC index. For information on the
ABC index, refer to page 7.
Touch the OK key.
9
17
Page 20

STORING, EDITING, AND CLEARING FROM THE TOUCH PANEL
NAME SHARP CORPORATION
INDEX ADDRE
KEY NAME
INTERNET
ADDRESS
FILE FORMAT
NAME SHARP CORPORATION
E-MAIL INTERNET-
REGISTRATION IS COMPLETED.
INDEX USER 3 ADDRES
KEY NAME SHARP CORPORATION
ppd1@sharp.co.jpDDRESS
PDF / MMR (G4)FILE FORMAT
ppd2@sharp.co.jpDDRESS
SINITIAL
NEXT EXIT
ppd1@sharp.co.jp
Touch the INDEX key.
10
E-MAIL
Touch an index key.
11
DIRECT ADDRESS / INDIVIDUAL
INDEX
SELECT THE CUSTOM INDEX WHERE YOU REGISTER THIS ADDRESS.
USER 1 USER 2
DO YOU REGISTER THIS ADDRESS AT THE [FREQUENT USE], TOO?
Select one of the upper row of keys (USER 1 through USER
6) to determine the location of the one-touch key when the
GROUP index is displayed instead of the ABC index (refer
to page 7). The lower keys are for selecting whether to
include the one-touch key in the FREQUENT USE index.
If you touch the wrong ke y, simply touch the correct key.
Touch the OK key.
12
Touch the ADDRESS key.
13
Enter the e-mail address of the destination.
14
USER 3 USER 4 USER 5 USER 6
YES NO
NEXT EXIT
OK
The E-mail address entry
screen appears.
Check the key name.
16
The characters appearing next to the NAME key will be
displayed in the key. Only the first 18 characters of the
name entered in step 6 will be displayed.
If you need to change the name that will be display ed in
the key, touch the KEY NAME key.
If you do not wish to change
the name, this step is not
necessary.
Check the file format and the compression
17
mode.
For a Scan to E-mail destination
Initial settings are File type: PDF, Compression mode:
MMR (G4). If you need to change these settings, touch
the FILE FORMA T k ey . File type selections are PDF, TIFF,
and TIFF-F; and compression mode selections are
NONE, MH (G3), MMR (G4).
If you do not need to change
the settings, this step is not
necessary .
When you have completed
the settings, press the OK
key.
For an Internet-Fax destination
The initial setting is Compression mode: MH (G3). If you
need to change the setting, press the COMPRESSION
key. Selections are MH (G3) and MMR (G4).
If you do not need to change
the settings, this step is not
necessary .
When you have completed
the settings, press the OK
key.
Up to 64 characters can be entered.
If you make a mistake, touch the key to move the
cursor (n) back one space and then enter the correct
character.
Touch the OK key.
15
You will return to the one-touch key programming screen.
REGISTRATION IS COMPLETED will appear
highlighted to the right of "No.".
NOTE
The "ADDRESS" line only shows 32 digits, regardless of
how many were digits were actually programmed.
18
NOTE
The file format for Internet-Fax is automatically set to TIFF-F.
When you have finished pr ogramming the one-
18
touch key, touch the EXIT key
If you wish to program another one-touch key,
touch the NEXT key.
Pressing the EXIT key
returns you to the screen of
step 4 on the previous page.
Page 21

STORING, EDITING, AND CLEARING FROM THE TOUCH PANEL
AMEND/DELETE
SINITIAL
DELETE EXIT
SINITIAL
DELETE EXIT
DELETE THE ADDRESS?
SHARP CORPORATION
NO YES
EDITING AND DELETING ONE-TOUCH KEYS
If you wish to delete a one-touch ke y or change the E-mail address, name, or other inf ormation programmed in a onetouch key, perform the following procedure.
Press the CUSTOM SETTINGS key, touch the
1
ADDRESS CONTROL key, and then touch the
DIRECT ADDRESS key (refer to steps 1 to 3 on
page 17).
Touch the AMEND/DELETE key.
2
Touch the one-touch key you wish to edit or
3
delete.
DIRECT ADDRESS / AMEND/DELETE
SELECT ADDRESS TO AMEND/DELETE.
SHARP CORPORATION TPS
SHARP GROUP
FREQUENT USE
ABCD EFGHI JKLMN OPQRST UVWXYZ
EXIT
ABC GROUP
T ouch the key corresponding to the inf ormation
4
you wish to change (change the information in
the same way as you stored the inf ormation on
pages 17 to 18).
DIRECT ADDRESS / AMEND/DELETE
E-MAIL
NAME SHARP CORPORATION
INDEX USER 3 ppd1@sharp.co.jpADDRESS
KEY NAME SHRAP CORPORATION PDF / MMR (G4)FILE FORMAT
Make sure that your changes are correct, and
5
then touch the EXIT key.
.
Touch the DELETE key.
6
INTERNET-FAX
DELETE EXIT
If you wish to change
another one-touch key,
repeat steps 3 through 5
SINITIAL
● To edit a one-touch key , follo w steps 4 and 5.
●
T o delete a one-touch key , follow steps 6 and 7.
● When you have finished editing or deleting,
touch the EXIT key.
NOTES
• If you cannot edit or delete a one-touch key
If you attempt to edit or delete a one-touch ke y in the follo wing situations, a warning message will appear and editing/deletion
will not be possible.
●The one-touch key you wish to edit or delete is currently being used for transmission or is used in a currently stored
transmission job.
●The one-touch key is included in a group key.
If the key is being used for a current transmission or currently stored transmission, cancel the transmission or wait until it is
completed and then change or delete the key. If the ke y is included in one of the abo ve g roups, delete the k e y from the group
and then change or delete the key.
• Destinations for Scan to FTP and Scan to Desktop that are stored in one-touch keys cannot be edited or cleared from the
touch panel of the machine. Use the Web page to edit or clear these destinations. (Page 2)
Touch the YES key.
7
If you wish to delete another
one-touch key, repeat steps
3, 6, and 7.
19
Page 22

INDIVIDUAL GROUP
STORE
ME
STORING, EDITING, AND CLEARING FROM THE TOUCH PANEL
ABC GROUP
ADDRESS REVIEW
PROGRAMMING A GROUP KEY
Scan to E-mail and Internet-Fax destinations that hav e been stored in one-touch ke ys can be stored in group keys. Up
to 300 destinations can be stored in a group key.
To program a group key from the Web page, refer to page 4.
NOTE
Only one-touch key destinations can be stored in a group key. If you wish to store a destination that is not programmed in a
one-touch key, first program the destination in a one-touch key and then store it in the group key.
Press the CUSTOM SETTINGS key, touch the
1
ADDRESS CONTROL key, and then touch the
DIRECT ADDRESS key (refer to steps 1 to 3 on
page 17).
Touch the GROUP ke y.
2
Follow steps 6 through 12 of "Storing one-touch
3
keys" (pages 17 to 18) to enter a GROUP NAME,
INITIAL, and INDEX.
Touch the ADDRESS key.
4
Touch index keys and the
5
needed, and then touch one-touch keys of the
destinations that you wish to store in the group.
DIRECT ADDRESS / GROUP
SELECT ADDRESS.
A B
C GROUP SHARP CORPORATION
TPS
FREQUENT USE ABCD EFGHI JKLMN OPQRST UVWXYZ
keys as
ADDRESS REVIEW
ABC GROUP
T o chec k the destinations that y ou have stored
6
in the group, touch the ADDRESS REVIEW key.
A list of your selected
destinations is displayed.
You can delete a displayed
destination by touching it.
When a message appears
asking if you want to delete
the destination, touch the
YES key.
Touch the outer OK key.
7
DIRECT ADDRESS / GROUP
SELECT ADDRESS TO DELETE.
GROUP NAME : SHARP GROUP
SHARP CORPORATION TPS
The number of destinations in the group appears to the
right of the ADDRESS key.
Check the name of the key (refer to step 16 on
8
page 18).
The characters appearing next to the KEY NAME key
will be displayed in the group key. To change these
characters, touch the KEY NAME key. This step is not
necessary if you do not wish to change the characters.
Touch the EXIT key when you have finished
9
programming the group ke y.
If you wish to pr ogram another group key , touch
the NEXT key.
When you touch the EXIT key, you will return to the
screen of step 2.
OK
OK
One-touch keys that ha ve been touched are highlighted.
If you touch the wrong key, simply touch it again to cancel
the highlighting and remove the destination from the
group.
NOTE
One group key cannot be stored in another group key.
Group keys appear grayed out and cannot be touched.
20
Page 23

STORING, EDITING, AND CLEARING FROM THE TOUCH PANEL
AMEND/DELETE
SINITIAL
DELETE EXIT
SINITIAL
DELETE EXIT
DELETE THE ADDRESS?
SHARP GROUP
NO YES
EDITING AND DELETING GROUP KEYS
If you need to delete group ke y or change its name or one of its stored destinations, perf orm the following procedure.
Press the CUSTOM SETTINGS key, touch the
1
ADDRESS CONTROL key, and then touch the
DIRECT ADDRESS key (refer to steps 1 to 3 on
page 17).
Touch the AMEND/DELETE key.
2
T ouch the gr oup key y ou wish to edit or delete.
3
DIRECT ADDRESS / AMEND/DELETE
SELECT ADDRESS TO AMEND/DELETE.
SHARP CORPORATION TPS
SHARP GROUP
FREQUENT USE
ABCD EFGHI JKLMN OPQRST UVWXYZ
EXIT
ABC GROUP
To edit a destination stored in a group key, touch the
ADDRESS key. The following screen appears.
DIRECT ADDRESS / AMEND/DELETE
SELECT ADDRESS.
A B
C GROUP SHARP CORPORATION
TPS
FREQUENT USE
The one-touch keys stored in the group are highlighted.
To add another one-touch key to the group, touch the
key to highlight it.
To delete a one-touch key from the group, touch the k ey
so that it is no longer highlighted.
Make sure the edited information is correct, and
5
then touch the EXIT key.
ABCD EFGHI JKLMN OPQRST UVWXYZ
If you wish to change
another group key, repeat
steps 3 through 5.
ADDRESS REVIEW
ABC GROUP
● To edit a group key, follow steps 4 and 5.
●
T o delete
a group key
, f ollow steps 6 and 7.
● When you have finished editing or deleting,
touch the EXIT key.
Touch the key of the item you wish to change
4
(to edit the item, follow the same steps as for
one-touch keys on page 17).
DIRECT ADDRESS / AMEND/DELETE
NOTE
If you cannot edit or delete a group key
If you attempt to edit or delete a group key in the f ollo wing situations, a warning message will appear and editing/deletion will not be possible .
●The one-touch key you wish to change or delete is currently being used for transmission or is used in a currently stored
If the key is being used for a current transmission or currently stored transmission, cancel the transmission or wait until it is
completed and then edit or delete the key.
002
GROUP NAME SHRAP GROUP
INDEX USER 2 2 ADDRESSESADDRESS
KEY NAME SHARP GROUP
transmission job.
DELETE EXIT
Touch the DELETE key.
6
Touch the YES key.
SINITIAL
7
If you wish to delete another
group key, repeat steps 3,
6, and 7.
21
Page 24

E-MAIL SENDER
STORE
RE.ADDRESS
SENDER NAME
RE.ADDRESS
SENDER NAME 1 GROUP
AMEND/DELETE
IST
1 GROUP
2 GROUP
STORING, EDITING, AND CLEARING FROM THE TOUCH PANEL
STORING SENDER INFORMATION
Use this procedure to store the sender information (sender name and e-mail address) that is displayed when the
recipient receives your e-mail. Information for up to 20 different senders can be stored. Select a sender from the
stored senders using the touch panel of the digital copying machine when you send an image (page 8). The selected
sender appears in the sender column of the recipient's e-mail software program. If you prefer to store sender inf ormation
from the W eb page , ref er to page 5.
Press the CUSTOM SETTINGS key, and then
1
touch the ADDRESS CONTROL key (refer to
steps 1 and 2 on page 17).
Touch the E-MAIL SENDER key.
2
Touch the ST ORE key.
3
Touch the SENDER NAME key.
4
The "No." that automatically
appears is the lowest number
from 01 to 20 that has not yet
been programmed. When
SENDER NAME is touched,
the letter-entry screen
appears. Enter up to 20
characters for the name.
Touch the RE.ADDRESS key.
5
The display changes to the
address entry screen when
you touch the RE.ADDRESS
key. Up to 64 characters can
be entered for the sender's
e-mail address. When
finished, press the OK key to
return to the original screen.
If you have finished storing sender s, touch the
6
EXIT key. If you wish to store another sender,
touch the NEXT key.
EDITING AND DELETING SENDER INFORMATION
Use this procedure when you need to edit sender information or clear a sender .
Perform steps 1 and 2 of "STORING SENDER
1
INFORMATION".
Touch the AMEND/DELETE key.
2
The stored senders appear.
T ouch the one-touch ke y of the sender that you
3
wish to edit or clear.
The edit/clear screen of the
touched sender appears.
22
Edit or clear the sender.
4
E-MAIL SENDER
SENDER NAME
RE.ADDRESS
1 GROUP
ppd1@sharp.co.jp
Edit sender information in the same way that y ou stored
it. When finished, touch the EXIT key to return to the
screen of step 3.
To clear the sender, touch the DELETE key. A message
appears asking you to confirm your selection. Touch the
YES key to clear the sender and return to the screen of
step 3.
EXITDELETE
Page 25

S
L
LIST PRINT
SENDING ADDRESS LIST
PRINTER TEST PAGE
ALL CUSTOM SETTING LIST
INDIVIDUAL
LIST
GROUP LIST
DIRECT ADDRESS
CUSTOM INDEX
STORING, EDITING, AND CLEARING FROM THE TOUCH PANEL
STORING A GROUP INDEX
You can assign any name up to 6 characters long to each of the USER index es (USER 1 to USER 6).
To perform this procedure from the W eb page, ref er to page 5.
Press the CUSTOM SETTINGS key, and then
1
touch the ADDRESS CONTROL key (refer to
steps 1 and 2 on page 17).
Touch the CUST OM INDEX key.
2
Touch an index key (USER 1 to USER 6).
3
You can enter a name for the selected index.
CUSTOM SETTINGS
CUSTOM INDEX
SELECT THE KEY TO BE CUSTOM NAMED.
USER 1 USER 2 USER 3 USER 4 USER 5 USER 6
When touched, the letter entry screen appears.
OK
Enter a maximum of 6 characters for the index
4
name.
Use the key to clear the displayed name and then
enter the desired name.
When finished, touch the OK key. The new name appears
in the screen of step 3.
If you wish to program another index name,
5
repeat steps 3 and 4.
When finished, touch the OK ke y.
To change a user index name, re-enter the name as
explained in step 4.
PRINTING PROGRAMMED INFORMATION
You can print out lists of the one-touch keys and group k e ys that have been stored in the machine.
Press the CUSTOM SETTINGS ke y.
1
Touch the LIST PRINT key.
2
Touch the SENDING ADDRESS LIST key.
3
Touch the key of the list you wish to print.
4
PROCESSING PRINT
DATA appears in the
message display and
printing begins.
T o cancel printing, touch the
CANCEL key.
NOTES
• The list is printed before other print jobs waiting to be printed.
• If you attempt to print a list when no data exists, a warning message will appear.
23
Page 26

TROUBLESHOOTING
IF YOUR E-MAIL IS RETURNED
If a Scan to E-mail or Internet-Fax is not successfully transmitted, an e-mail informing you of this fact is sent to the
sender selected at the time of transmission. If this happens, read the e-mail and determine the cause of the error, and
then repeat the transmission.
IF A TRANSMISSION ERROR OCCURS
If a transmission error occurs when you send a scanned image, a message informing you of the error and an error
code will appear in the touch panel on the machine.
■■
■ Error Code Table
■■
Error Code Description of the Error
CE-01 The optional network interface card (Print Server Card) is not installed or is out of order .
CE-02 Cannot find the specified mail server or FTP server.
CE-03 The server was down during the scanning of the original.
CE-04 An invalid account name or password for the FTP server has been entered.
CE-05 An invalid directory of the FTP server has been entered.
CE-00 An error other than the above has occurred.
24
Page 27

KEY OPERATOR PROGRAMS
This section explains the key operator programs that are related to the network scanner feature of the machine. For
key operator prog rams that are related to the printer and copy functions of the machine, refer to "Operation manual
(for printer operation and general inf ormation)" and "Operation manual (for copier)".
NOTE
You may not be able to use all of the programs in the k ey oper ator program list. Programs that you can use will depend on what
peripheral devices are installed on the machine.
KEY OPERATOR PROGRAM LIST
Program name Pa ge
Image send settings
Operation settings
Default displa y setting 26
The number of direct address keys displayed setting
Must input next address k ey at broadcast setting
Initial resolution setting 26
Default v erification stamp 26
Scan to E-mail initial status settings
Default sender set 2 7
Initial file format setting 2 7
Compression mode at broadcasting 27
26
26
USING THE KEY OPERATOR PROGRAMS
To use a key operator program, follow the procedure on page 7-6 of "Operation manual (for printer operation and
general information)". (Please carefully read "Supplementary explanation of key oper ation for ke y operator programs"
on the same page.) For explanations of each setting, refer to the f ollowing pages .
25
Page 28

KEY OPERATOR PROGRAMS
SETTING PROGRAMS
The setting programs for the network scanner feature
of the machine are explained here. Explanations of the
setting programs used for the copy feature, setting
programs used for the facsimile feature, and setting
programs that are related to the printer feature can be
found in the copy, facsimile, and printer manuals.
Operation settings
The following operation settings are a vailab le:
●Default displa y setting
●The number of direct address keys displa yed setting
●Must input next address key at broadcast setting
●Initial resolution setting
●Default verification stamp
Default display setting
You can select the initial display that appears when
you press the IMAGE SEND k ey to change to scanner
mode or when you press the CA ke y in scanner mode.
Normally the initial display is set to the condition setting
screen (page 6).
The following three selections are av ailable:
• Condition setting screen
• Address directory (ABC)
• Address directory (Group)
When an address directory (ABC or Group) is
selected, the selected index of that address directory
(page 7) is set as the initial screen.
The number of direct address keys
displayed setting
The number of one-touch keys displayed in each
address directory screen can be changed from 8
(the normal setting) to 6 or 12.
Touch 6, 8, or 12 to select the desired number.
NOTE
For the key name that appears in each one-touch key, a
maximum of 18 characters can appear when the number
of one-touch keys displa yed is set to 6 or 8. A maximum of
10 characters can appear when the number of one-touch
keys displayed is set to 12.
Must input next address key at
broadcast setting
You can select whether the NEXT ADDRESS key
must be pressed before entering the ne xt destination
when performing a broadcast transmission (only for
Scan to E-mail). Usually this is set so that the NEXT
ADDRESS key can be omitted.
Example: Normal setting (factory setting)
XXXX NEXT ADDRESS One-touch NEXT ADDRESS One-touch
Manual
Can be omitted Can be omitted
XXXX NEXT ADDRESS XXXX
Manual Manual
Cannot be omitted.
If the box is chec ked, it will no longer be possib le to
omit the NEXT ADDRESS key as shown in the
above example. Even if the next destination to be
entered is a one-touch key, the NEXT ADDRESS
key must be touched bef ore the one-touch key can
be entered.
If you attempt to enter a subsequent destination
without touching the NEXT ADDRESS key, the
destination will not be entered.
Initial resolution setting
This setting is used to change the default resolution
setting for scanner mode from STANDARD to FINE,
SUPER FINE, or ULTRA FINE. HALF TONE can
also be selected for the latter three resolution
settings. STANDARD is normally selected for the
initial resolution setting. If you wish to select HALF
TONE f or the selected resolution setting, touch the
HALF TONE key to highlight it.
NOTES
• HALF TONE cannot be selected for STANDARD
resolution.
• For more information on each of the resolution settings,
refer to page 14.
Default verification stamp
(Can only be selected if the optional verification
stamp unit is installed.)
Select this setting if you wish to always have a
verification mark stamped on originals that are
scanned using the scanner unit. Normally this setting
is not selected.
To select this setting, check the box.
26
Page 29

DISPLAY
CONTRAST
LIST PRIN
KEY OPERATOR PROGRAMS
ADDRESS
CONTROL
ON
DEVICE CONTROL
LIST PRINT
SENDER LIST
ALL KEY OPERATOR PROGRAMS LIST
KEY OPERATOR PROGRAMS
Scan to E-mail initial status settings
The Scan to E-mail initial status settings let you adjust
certain default settings for Scan to E-mail.
The Scan to E-mail initial status settings are as follows:
●Default sender set
●Initial file format setting
●Compression mode at broadcasting
Default sender set
If you do not select a sender when performing a
Scan to E-mail operation, the sender information
stored with this setting is automatically used. You
can check the stored sender information by printing
the SENDER list.
Touch the SENDER NAME key and then enter
1
the sender name.
The sender name entry screen appears.
Up to 20 characters can be entered.
Touch the OK key.
2
PRINTING OUT SETTINGS
Settings established with the ke y operator programs can
be verified by printing them out.
Press the CUSTOM SETTINGS ke y.
1
Touch the KEY OPERATOR PROGRAMS key.
2
T ouch the RE.ADDRESS key and then enter the
3
return address.
Up to 64 characters can be entered.
Touch the OK key.
4
The entered return address appears. Chec k the address
to make sure it is correct
Initial file format setting
You can change the default file format (file type and
compression mode) used when the e-mail address
is entered manually for a Scan to E-mail
transmission.
Normally the file type is set to PDF and the
compression mode is set to MMR (G4).
Compression mode at broadcasting
This setting selects the compression mode for
broadcasting using Scan to E-mail. The compression
mode set here is used for all destinations regardless
of their individual compression mode settings.
The usual setting is MH (G3).
Touch the LIST PRINT key.
3
Touch the ALL KEY OPERATOR PROGRAMS
4
LIST key.
PROCESSING PRINT DAT A
appears in the message
screen and printing begins.
T o cancel printing, touch the
CANCEL key.
NOTES
• The list is printed before other jobs waiting to be printed.
• In the screen of Step 4, you can touch the SENDER LIST
key to print the Sender List. This list lets you check the
stored senders.
27
Page 30

SPECIFICATIONS
For information on power requirements, power consumption, dimensions, weight, and other specifications that are
common to all features of the machine, refer to page 6-2 of "Operation manual (for printer operation and general
information)".
Maximum original size 11"x17" (A3)
Two-sided originals Possibl e
Optical resolution 600dpi
Output modes 1bit/pixel
Halftone processing Error dispersion (200/300/400/600dpi)
File format*
Scan destinations Scan to FTP
Management system Uses built-in Web server
Web browser Internet Explorer 4.0 or later, Netscape Navigator 4.0 or later
Network protocol TCP/IP, UDP/IP
LAN connectivity 10Base-T/100Base-TX
Supported mail system Mail servers supporting SMTP
Number of destinations 500 maximum*
Number of senders 20 maximum
Output resolution
Resolution
STANDARD 200x200dpi 200x100dpi 203.2x97.8dpi
FINE 300x300dpi 200x200dpi 203.2x195.6dpi
SUPER FINE 400x400dpi 200x400dpi 203.2x391dpi
ULTRA FINE 600x600dpi 400x400dpi 406.4x391dpi
1
Destination type
File type: PDF/TIFF/TIFF-F
Compression mode: NONE/MH (G3)/MMR (G4)
Scan to Desktop
Scan to E-mail, Internet-Fax
2
E-mail/FTP Broadcast transmission Broadcast transmission
(E-mail/Internet-Fax) (Fax/E-mail/Internet-Fax)
(8x3.85line/mm)
(8x7.7line/mm)
(8x15.4line/mm)
(16x15.4line/mm)
*1The file format for Internet-Fax is automatically set to TIFF-F. Compression mode selections are MH (G3) and
MMR (G4).
*2A total of 500 destinations can be stored, including E-mail, FTP, Desktop, Internet-Fax, and Group destinations.
Among these, a combined total of 100 Scan to FTP and Desktop destinations can be stored.
Some discrepancies may exist in the illustrations and content due to impr ovements to the machine.
28
Page 31

Page 32

Operation manual for network scanner
SHARP CORPORATION
PRINTED IN CHINA
2001E KS1
TINSE2120FCZZ
P350,P450,3500,
3501,3551,4500,4501,4551
Page 33

documentation manual, user maintenance, brochure, user reference, pdf manual
This file has been downloaded from:
User Manual and User Guide for many equipments like mobile phones, photo cameras, monther board, monitors, software, tv, dvd, and othes..
Manual users, user manuals, user guide manual, owners manual, instruction manual, manual owner, manual owner's, manual guide,
manual operation, operating manual, user's manual, operating instructions, manual operators, manual operator, manual product,
 Loading...