

Page 1
AR-PB8
[3] SET UP
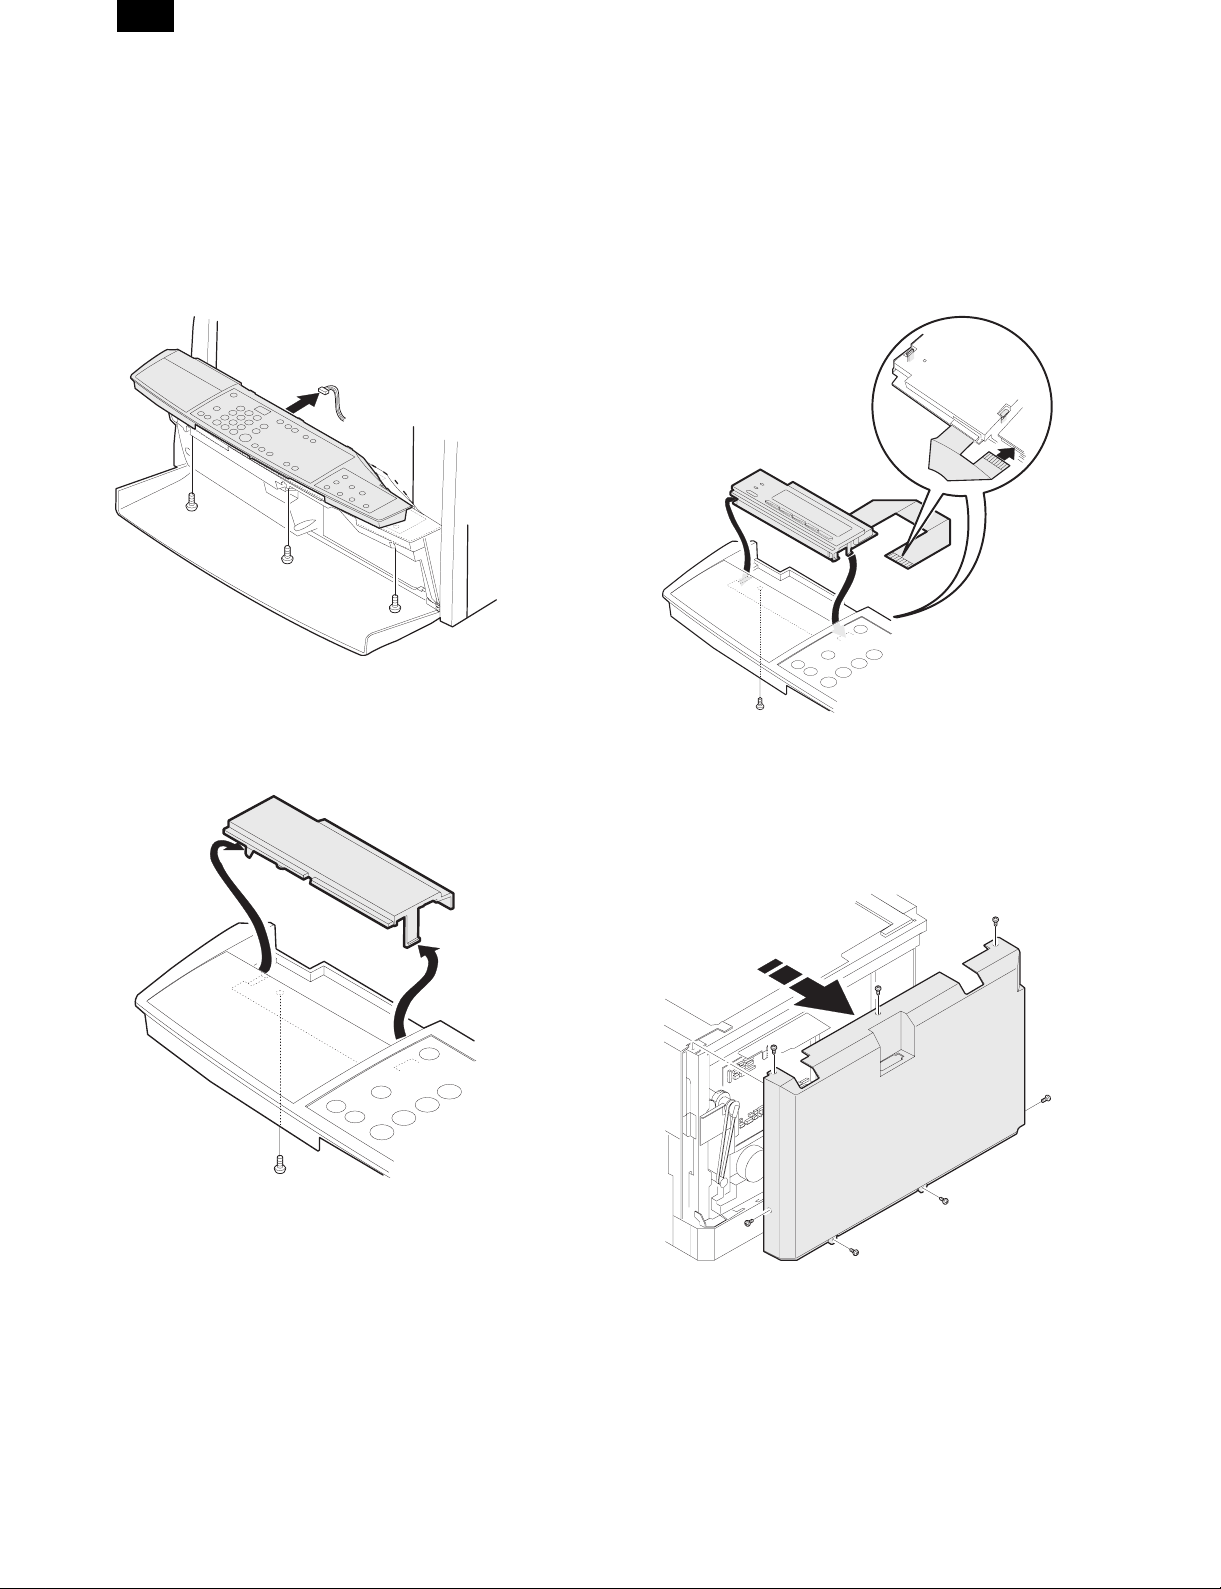
1. Procedures on the copier (operation panel)
∗ When installing the LCD panel kit simultaneonsly.
A. Copier operation panel disassembly
• Remove screws and connector, and remove the operation
panel.
B. Cover disassembly
• Remove screw and disengage pawls, and remove the cover.
C. Printer operation panel installation
• Engage pawls and fix the printer operation panel with screw.
Then connect the flat cable to the connector.
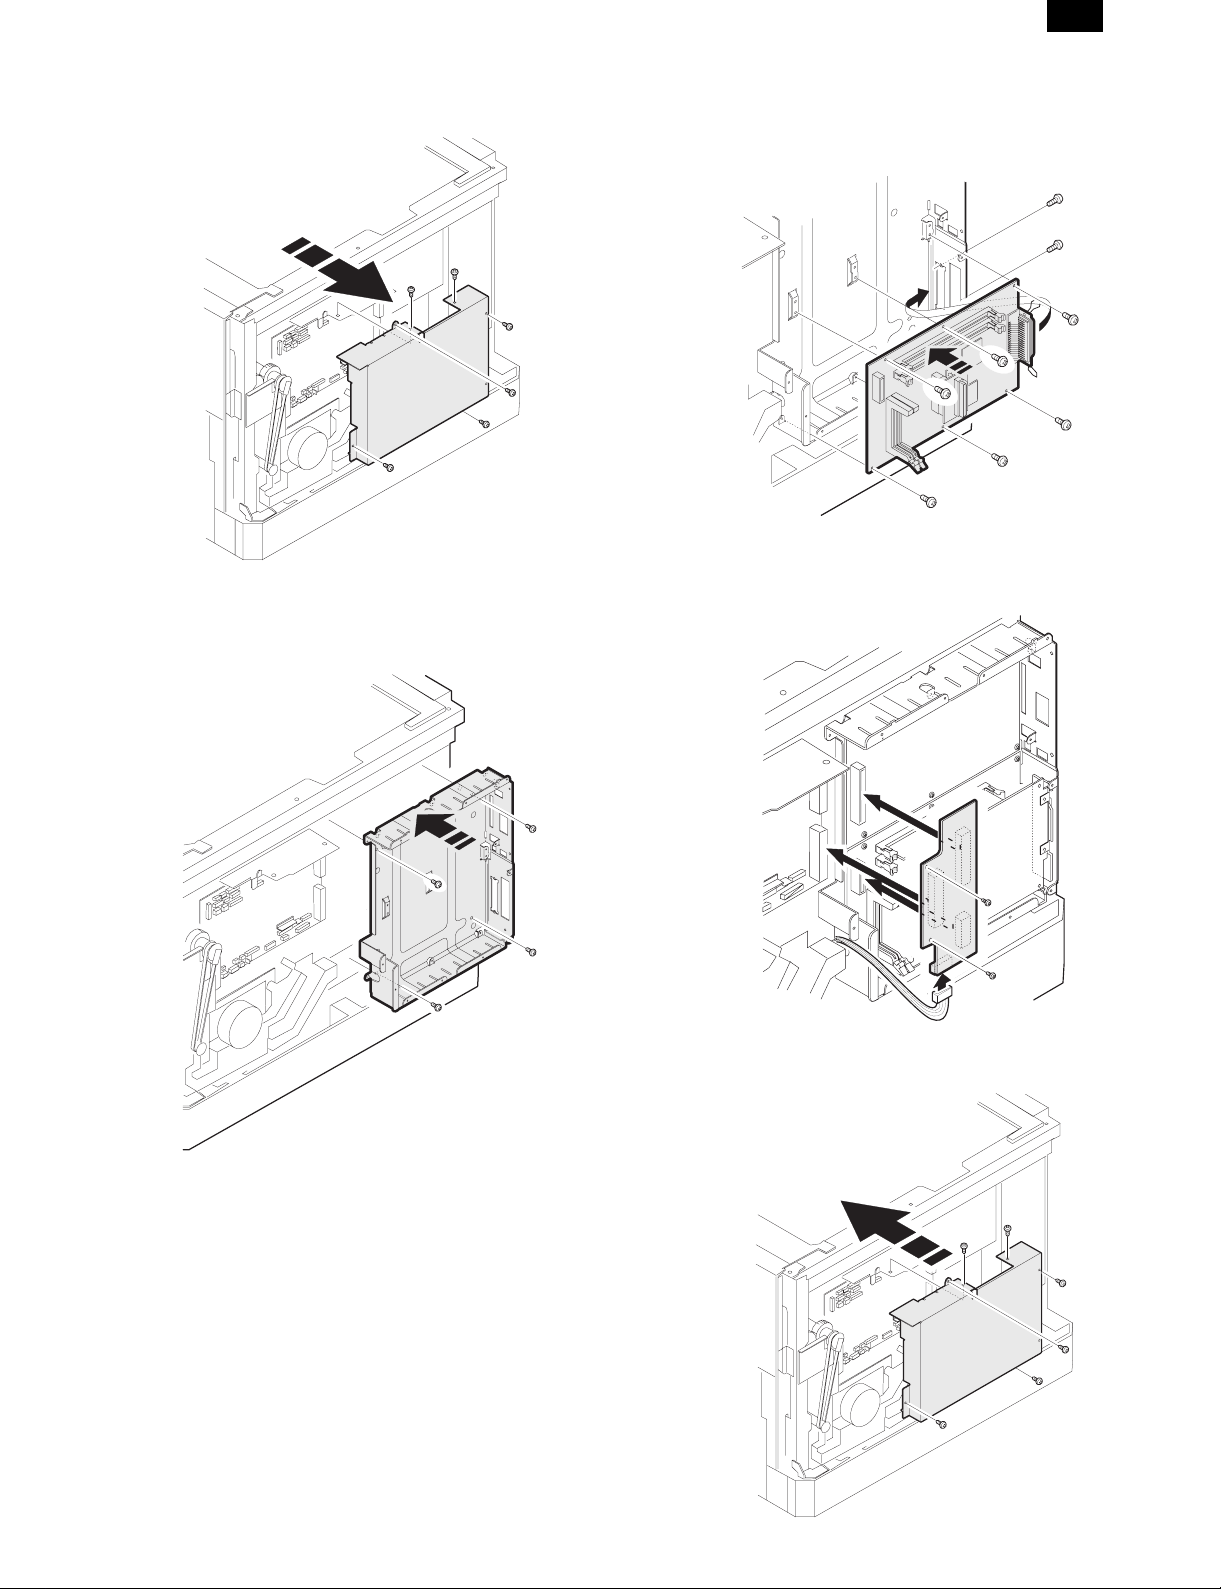
2. Procedures on the copier (rear side)
A. Copier rear cabinet disassembly
• Remove screws and remove the rear cabinet.
3 – 1
Page 2
AR-PB8
B. Copier shield plate disassembly
• Remove screws, and remove the shield plate.
C. PWB fixing plate installation
• Fix the plate with screws.
D. Printer PWB installation
• Fix the printer PWB with screws.
• Before introduction of the Expansion memory, the PS PWB, or
the network PWB, this procedure must be performed.
E. Mother board installation (Packed together with
the LCD kit.)
• Insert the connectors and fix them, then connect the connec-
tors of the copier to them.
F. Shield plate installation
• Fix the shield plate with screws.
3 – 2
Page 3
AR-PB8
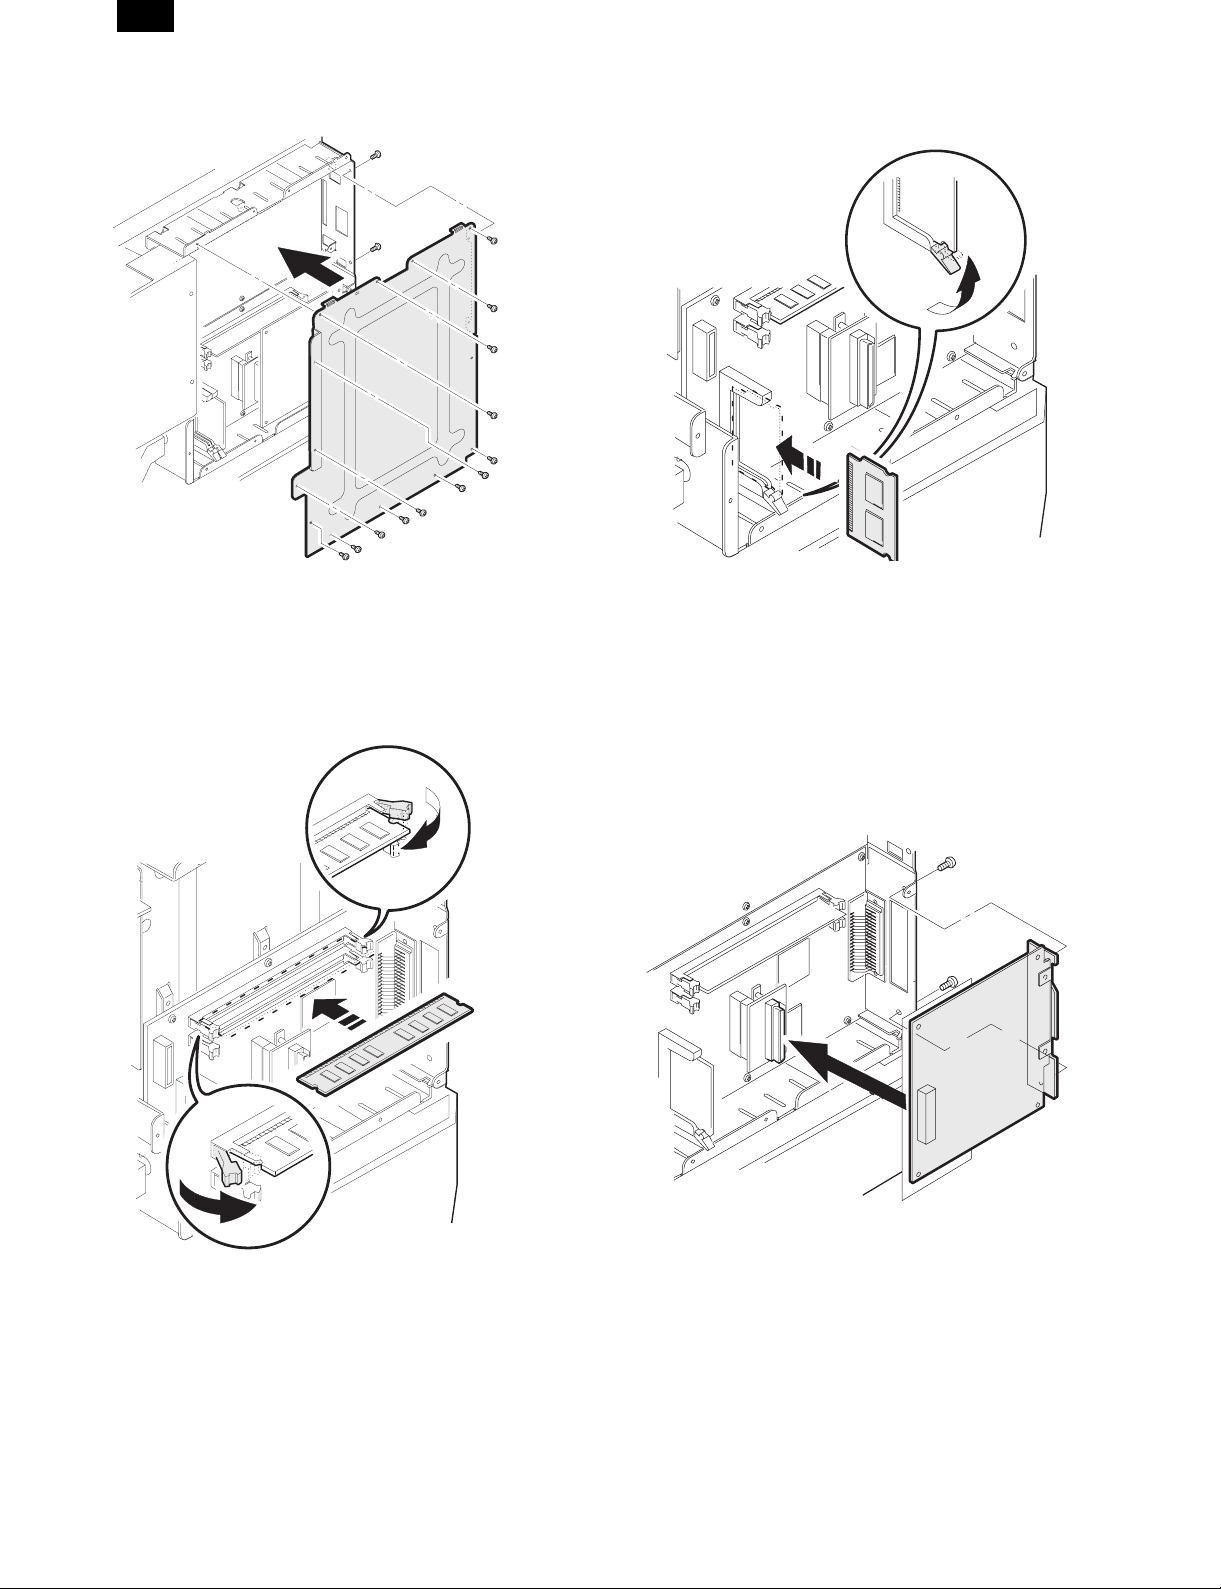
G. PWB cover installation
• Install the PWB cover with screws.
4. PS kit (AR-PS1) installation
• Fix the PS PWB with pawl.
∗Note: The DIMM connector and the PS-PWB are provided with
the reverse insertion protection key(notch). A strong push,
however, allows reverse insertion. Use great care of the
inserting direction.
3. Expansion memory installation
• Fix the memory PWB with pawls.
5. Network Interface Control PWB
installation
• Insert the network PWB into the printer PWB connector and fix
it with screws.
3 – 3
Page 4

AR-PB8
6. INSTALLING THE PRINTER DRIVER
To use this printer with your computer, you must install the printer
driver.
Install the printer driver using the supplied SHARP Software CDROM. This kit is supplied with the following printer drivers:
• PCL6 for Windows 95/98
• PCL6 for Windows NT 4.0
• PCL5e for Windows 95/98
• PCL5e for Windows NT 4.0
Note: • It is recommended that you install the PCL6 printer
driver. If you have a problem printing from older
software using the PCL6 driver, remove it and install the
PCL5e driver.
• The printer driver data in the CD-ROM can be copied to
floppy disks.
1. Double-click “My Computer”, “Ar160_200” and
“Makedisk”.
2. Double-click “Makedisk.exe”.
3. Follow the on-screen instructions.
Before installation, make sure that:
• You read the README.TXT file which is contained on the
SHARP Software CD-ROM. This file contains the information
and restrictions for using the printer.
• The printer is connected properly with the computer or network.
• The printer is loaded with paper.
• The printer is turned on and on-line (the ON LINE light is lit).
• You quit all application software that is running on your com-
puter.
• Your computer meets the following hardware and software re-
quirements:
Computer Type IBM PC/AT or compatible computer
equipped with a bi-directional parallel
interface and CD-ROM drive
Operating System Windows 95, Windows 98, Windows NT 4.0
CPU Windows 95: 486SX or better
Windows 98: 486DX/66MHz or better
(Pentium or better is
recommended.)
Windows NT 4.0: 486/25MHz or better
RAM Windows 95: 8MB or more (12MB or
more is recommended.)
Windows 98: 16MB or more (32MB or
more is recommended.)
Windows NT 4.0: 16MB or more
This procedure uses the following drive name in examples:
Drive R: CD-ROM drive (holds the CD-ROM containing the
printer drivers)
Change the drive name as required according to your environment.
A. Installing onto Windows 95
This printer is compatible with plug & play. If your computer is incompatible with plug & play or if you want to use this printer as a network
printer, refer to “Installing onto Windows 95/98 without Using the Plug
& Play Function”.
1) Turn the computer on and start Windows 95.
Note: Depending on which version of Windows you are using,
the display examples in this step may differ from those on
your system.
• Either the “Update Device Driver Wizard” window or the “New
Hardware Found” window may appear automatically.
Note: If neither the “Update Device Driver Wizard” window nor
the “New Hardware Found” window appear, refer to “Installing Windows 95/98 without Using the Plug & Play
Function”.
• If the “Update Device Driver Wizard” window appears, click the
[Next] button and proceed to step 2).
• If the “New Hardware Found” window appears, perform the
following steps:
<1> Choose “Driver from disk provided by hardware manufac-
turer” and click the [OK] button.
<2> When the “Install From Disk” window appears, insert the
SHARP Software CD-ROM into the CD-ROM drive, type
R:\English\WinXX and click the [OK] button.
<3> Choose the appropriate printer driver from those listed below
and click the [OK] button.
• PCL6 Printer Driver: SHARP AR-160/200 Series PCL6
• PCL5e Printer Driver: SHARP AR-160/200 Series PCL5e
Note: It is recommended that you install the PCL6 printer driver.
If you have a problem printing from older software using
the PCL6 driver,remove it and install the PCL5e driver.
<4> Proceed to step 5).
2) Search for the printer driver by clicking [Other Locations...] button.
3) Insert the SHARP Software CD-ROM into the CD-ROM drive, type
R:\English\WinXX and click the [OK] button.
4) After Windows finds the printer driver, click the [Finish] button to
continue the installation.
Note: In this step the PCL6 printer driver is installed automat-
ically. If you want to install the PCL5e printer driver, refer to
“Installing onto Windows 95/98 without Using the Plug &
Play Function”.
5) Set the printer name.
<1> If you want to change the printer name, enter a new name in
the space provided.
<2> If the program displays, “Do you want your Windows-based
programs to use this printer as the default printer?”, check
“Yes”.
<3> Click the [Next] button.
3 – 4
Page 5

AR-PB8
6) Print a test page by clicking the [Finish] button.
Note: If you check “No” and click the [Finish] button, the printer
does not print a test page after the installation.
• The printer driver installation begins.
• If the “Insert Disk” window appears, perform the following
steps:
<1> Click the [OK] button.
<2> When the “Copying Files” window appears, type
R:\English\WinXX and click the [OK] button.
7) When the test page is printed properly, click the [Yes] button.
• The printer is ready for printing.
B. Installing onto Windows 98
This printer is compatible with plug & play. If your computer is incompatible with plug & play or if you want to use this printer as a network
printer, refer to “Installing onto Windows 95/98 without Using the Plug
& Play Function”.
1) Turn the computer on and start Windows 98.
• The “Add New Hardware Wizard” window appears automat-
ically, click the [Next] button.
Note: If the “Add New Hardware Wizard” window does not ap-
pear in this step, refer to “Installing onto Windows 95/98
without Using the Plug& Play Function”.
3) Click the [Have Disk...] button.
4) Insert the SHARP Software CD-ROM into the CD-ROM drive, type
R:\English\WinXX, and click the [OK] button.
5) Choose the appropriate printer driver from those listed below and
click the [Next] button.
• PCL6 Printer Driver: SHARP AR-160/200 Series PCL6
• PCL5e Printer Driver: SHARP AR-160/200 Series PCL5e
Note: It is recommended that you install the PCL6 printer driver.
If you have a problem printing from older software using
the PCL6 driver,remove it and install the PCL5e driver.
2) Display a list of all the printer drivers by checking “Display a list of
all the drivers in a specific location, ...” and clicking the [Next]
button.
6) After Windows finds the printer driver, click the [Next] button to
continue the installation.
7) Print a test page by clicking the [Finish] button.
Note: If you check “No” and click the [Finish] button, the printer
does not print a test page after the installation.
• The printer driver installation begins.
8) When the test page is printed properly, click the [Yes] button.
• The printer is ready for printing.
3 – 5
Page 6

C. Installing onto Windows 95/98 without Using
the Plug & Play Function
Computers using Windows 95 or Windows 98 that are compatible
with plug & play can install the printer driver automatically. However,
if your computer is incompatible with plug & play, or if you want to use
this printer as a network printer, follow the procedure in this section.
The following steps use Windows 98 in display examples.
1) Turn the computer on and start Windows 95/98.
2) Click the Start menu, point to “Settings”, and choose “Printers”.
3) When the “Printers” window appears, double-click the “Add
Printer” icon.
4) Click the [Next] button.
5) If the screen for choosing the connection method appears, choose
the connection method and click the [Next] button.
Note: This screen appears only when the computer is connected
to a network.
• When the printer is directly connected to the computer, choose
“Local printer”.
Otherwise, choose “Network printer”.
If you choose “Network printer” you must specify a network
path or queue name.
Contact your network administrator for details.
The following steps use the example of a local printer.
AR-PB8
9) Choose the port and click the [Next] button.
Note: This screen appears only if you selected “Network printer”
in step 5).
6) Click the [Have Disk...] button.
7) Insert the SHARP Software CD-ROM into the CD-ROM drive, type
R:\English\WinXX, and click the [OK] button.
10)Set the printer name.
<1> If you want to change the printer name, enter a new name in
the space provided.
<2> If the program displays, “Do you want your Windows-based
programs to use this printer as the default printer?”, check
“Yes”.
<3> Click the [Next] button.
11)Print a test page by clicking the [Finish] button.
Note: If you check “No” and click the [Finish] button, the printer
does not print a test page after the installation.
• The printer driver installation begins.
8) Choose the appropriate printer driver from those listed below and
click the [Next] button.
• PCL6 Printer Driver: SHARP AR-160/200 Series PCL6
• PCL5e Printer Driver: SHARP AR-160/200 Series PCL5e
Note: It is recommended that you install the PCL6 printer driver.
If you have a problem printing from older software using
the PCL6 driver,remove it and install the PCL5e driver.
12)When the test page is printed properly, click the [Yes] button.
• The printer is ready for printing.
3 – 6
Page 7

AR-PB8
D. Installing onto Windows NT 4.0
1) Turn the computer on and start Windows NT.
2) Click the Start menu, point to “Settings”, and choose “Printers”.
3) When the “Printers” window appears, double-click the “Add
Printer” icon.
4) Choose “My Computer” or “Network printer server” and click the
[Next] button.
• The following steps use “My Computer” as an example.
For more information about using this printer as a network
printer, refer to the Windows NT 4.0 networking documentation.
5) Check the checkbox for the port you are using and click the [Next]
button.
9) Set the printer name.
<1> If you want to change the printer name, enter a new name in
the space provided.
<2> If the program displays, “Do you want your Windows-based
programs to use this printer as the default printer?”, check
“Yes”.
<3> Click the [Next] button.
6) Click the [Have Disk...] button.
7) Insert the SHARP Software CD-ROM into the CD-ROM drive, type
R:\English\WinNT and click the [OK] button.
10)Make the appropriate settings for your environment.
• When using print sharing, choose “Shared” and enter a share
name. If necessary for your environment, select Windows 95
from the list of operating systems.
• If you are not using shared printing, choose “Not shared”.
After making the settings on this screen, click the [Next] button.
11)Print a test page by clicking the [Finish] button.
Note: If you check “No” and click the [Finish] button, the printer
does not print a test page after the installation.
• The printer driver installation begins.
8) Choose the appropriate printer driver from those listed below and
click the [Next] button.
• PCL6 Printer Driver:SHARP AR-160/200 Series PCL6
• PCL5e Printer Driver:SHARP AR-160/200 Series PCL5e
Note: It is recommended that you install the PCL6 printer driver.
If you have a problem printing from older software using
the PCL6 driver,remove it and install the PCL5e driver.
12)When the test page is printed properly, click the [Yes] button.
• The printer is ready for printing.
E. Changing Printer Configuration Settings
After installing the printer driver use the procedure in this section to
change the printer configuration settings. Also refer to the print driver
help for more information.
1. Click the Start menu, point to “Settings”, and choose “Printers”.
2. Right-click the appropriate printer and choose “Properties”
fromthe menu.
3. Click the Configuration tab and change the printer settings.
3 – 7
 Loading...