

Page 1

MODEL
MODEL
AR-BD14
AR-PB2 A
DIGITAL COPIER
PRINTER EXPANSION KIT
OPERATION MANUAL
• GETTING STARTED
• PRINTING FROM A COMPUTER
IN THE Windows
ENVIRONMENT
• PRINTER DRIVER FOR
Macintosh
• USING THE OPERATION
PANEL
• KEY OPERATOR’S GUIDE
• PRINTER
TROUBLESHOOTING
• SPECIFICATIONS
• APPENDIX
..................................... 23
.......................................... 29
.................................... 64
....................... 1
.............................. 5
.................. 57
......................... 63
Page
.......... 40
Page 2

List of the Applicable Models for the AR-PB2A Printer Expansion Kit
(as of December, 2000)
The details of the specifications, features, and options of the printer may vary with the printer
models. Some features described in this manual may not be available depending on the printer
drivers. See page 66.
Model Name
Hard disk drive
Capacity
Reverse order
printing
Photo
enhancement
Toner save/
smoothing
Confidential
print
Tandem
print
Status/alert
by E-mail
Account
control
Network
scanner
AR-280 AR-285 AR-335 AR-250 AR-281 AR-286 AR-336 AR-405 AR-505 AR-287 AR-337 AR-407 AR-507
Yes Yes Yes Yes Yes Yes Yes Yes Yes Yes Yes Yes Yes
*1
2GB
2GB*12GB*12GB 2GB 2GB 2GB 2GB 2GB 10GB 10GB 10GB 10GB
Yes Yes Yes No Yes No
No No No Yes Yes Yes
No Yes Yes Yes Yes Yes
No No No No Yes Yes
No No No No No Yes Yes
No No No No Yes Yes
No No No No Yes Yes
*2
No No No No Yes Yes
*1 Some units of the models may come with a 1 GB hard disk drive.
*2 Optional AR-NS1 is needed.
CINSE1992FC51
Page 3

Warranty
While every effort has been made to make this document as accurate and helpful as possible,
SHARP Corporation makes no warranty of any kind with regard to its content. All information
included herein is subject to change without notice. SHARP is not responsible for any loss or
damages, direct or indirect, arising from or related to the use of this operation manual.
© Copyright SHARP Corporation 2000. All rights reserved. Reproduction, adaptation or translation
without prior written permission is prohibited, except as allowed under copyright laws.
Trademark Acknowledgments
Microsoft Windows, MS-DOS, and Windows NT are trademarks of Microsoft Corporation in the
U.S.A. and other countries.
Macintosh, Power Macintosh, Mac OS, LaserWriter, and AppleTalk are registered trademarks of
Apple Computer, Inc.
IBM, PC/AT, and PowerPC are trademarks of International Business Machines Corporation.
Pentium is a registered trademark of Intel Corporation.
PCL is a trademark of the Hewlett-Packard Company.
PostScript® is a registered trademark of Adobe Systems Incorporated.
NetWare is a registered trademark of Novell, Inc.
All other trademarks and copyrights are the property of their respective owners.
Conventions
The following conventions are used throughout this operation manual.
CAUTION
This indicates cautions that must be observed for the printer to work properly. If these are not observed,
the printer will not be damaged, but it will not operate or will operate in a way that is unexpected.
NOTE
This indicates points which are not absolutely necessary for printer operation, but which are mentioned in order to show alternative ways of doing something, or for giving further information on
certain topics.
i
Page 4

PRINTER EXPANSION KIT AR-PB2A
SOFTWARE LICENSE
PLEASE READ THIS LICENSE CAREFULLY BEFORE USING THE SOFTWARE. BY USING THE
SOFTWARE, YOU ARE AGREEING TO BE BOUND BY THE TERMS OF THIS LICENSE.
1. License.
read only memory, or on any other media (the "Software") and related documentation are licensed to you by SHARP.
You own the disk on which the Software is recorded but SHARP and/or SHARP’S Licensors retain title to the Software
and related documentation. This License allows you to use the Software on one or more computers connected to a single
printer and make one copy of the Software in machine-readable form for backup purposes only. You must reproduce on
such copy the SHARP copyright notice, the copyright notice of SHARP’S Licensors and any other proprietary legends of
SHARP and/or its Licensors that were on the original copy of the Software. You may also transfer all your license rights
in the software, the backup copy of the Software, the related documentation and a copy of this License to another party,
provided the other party reads and agrees to the terms and conditions of this License.
2. Restrictions.
by SHARP and/or its Licensors and in order to protect them you may not decompile, reverse engineer, disassemble or
otherwise reduce the Software to a human-perceivable form. You may not modify, network, rent, lease, loan, distribute or
create derivative works based upon the Software in whole or in part. You may not electronically transmit the Software
from one computer to another or over a network.
3. Termination.
Software and related documentation and all copies thereof. This License will terminate immediately without notice from
SHARP and/or SHARP’S Licensors if you fail to comply with any provision of this License. Upon termination you must
destroy the Software and related documentation and all copies thereof.
4. Export Law Assurances.
SHARP, nor the direct product thereof, will be exported outside the United States except as authorized and as permitted
by the laws and regulations of the United States. If the Software has been rightfully obtained by you outside of the United
States, you agree that you will not re-export the Software nor any other technical data received from SHARP, nor the
direct product thereof, except as permitted by the laws and regulations of the United states and the laws and the regulation
of the jurisdiction in which you obtained the Software.
5. Government End Users.
Government, the following provisions apply. The Government agrees:
(i) if the Software is supplied to the Department of Defense (DoD), the Software is classified as "Commercial Computer
(ii) if the Software is supplied to any unit or agency of the United States Government other than DoD, the Government’s
6. Limited Warranty on Media.
materials and workmanship under normal use for a period of ninety (90) days from the date of purchase as evidenced by a
copy of the receipt. The entire liability of SHARP and/or its Licensors and your exclusive remedy will be replacement of
the disk which fails to meet the limited warranty provided by this Clause 6. A disk will be replaced when it is returned to
SHARP or a SHARP authorized representative with a copy of the receipt. SHARP will have no responsibility to replace a
disk damaged by accident, abuse or misapplication.
The application, demonstration, system and other software accompanying this License, whether on disk, in
The Software contains copyrighted material, trade secrets and other proprietary material which is owned
This license is effective until terminated. You may terminate this License at any time by destroying the
You agree and certify that neither the Software nor any other technical data received from
If you are acquiring the Software on behalf of any unit or agency of the United States
Software" and the Government is acquiring only "restricted rights" in the Software and its documentation as that term
is defined in Clause 252.227-7013 (c)(1) of the DFARS; and
rights in the Software and its documentation will be as defined in Clause 52.227-19 (c)(2) of the FAR or, in the case of
NASA, in Clause 18-52.227-86 (d) of the NASA Supplement to the FAR.
SHARP warrants the disks on which the Software is recorded to be free from defects in
ANY IMPLIED WARRANTIES ON THE DISKS, INCLUDING THE IMPLIED WARRANTIES OF
MERCHANTABILITY AND FITNESS FOR A PARTICULAR PURPOSE, ARE LIMITED IN DURATION TO
NINETY (90) DAYS FROM THE DATE OF DELIVERY. THIS WARRANTY GIVES YOU SPECIFIC LEGAL
RIGHTS, AND YOU MAY ALSO HAVE OTHER RIGHTS WHICH VARY FROM JURISDICTION TO
JURISDICTION.
ii
Page 5

7. Disclaimer of Warranty on Software.
risk. The software and related documentation are provided "AS IS" and without warranty of any kind and SHARP and
SHARP’S Licensor(s) (for the purpose of provisions 7 and 8, SHARP and SHARP’S Licensor(s) shall be collectively
referred to as "SHARP") EXPRESSLY DISCLAIM ALL WARRANTIES, EXPRESS OR IMPLIED, INCLUDING, BUT
NOT LIMITED TO, THE IMPLIED WARRANTIES OF MERCHANTABILITY AND FITNESS FOR A PARTICULAR
PURPOSE. SHARP DOES NOT WARRANT THAT THE FUNCTIONS CONTAINED IN THE SOFTWARE WILL
MEET YOUR REQUIREMENTS, OR THAT THE OPERATION OF THE SOFTWARE WILL BE UNINTERRUPTED
OR ERROR-FREE, OR THAT DEFECTS IN THE SOFTWARE WILL BE CORRECTED. FURTHERMORE, SHARP
DOES NOT WARRANT OR MAKE ANY REPRESENTATIONS REGARDING THE USE OR THE RESULTS OF
THE USE OF THE SOFTWARE OR RELATED DOCUMENTATION IN TERMS OF THEIR CORRECTNESS,
ACCURACY, RELIABILITY, OR OTHERWISE. NO ORAL OR WRITTEN INFORMATION OR ADVICE GIVEN
BY SHARP OR A SHARP AUTHORIZED REPRESENTATIVE SHALL CREATE A WARRANTY OR IN ANY WAY
INCREASE THE SCOPE OF THIS WARRANTY. SHOULD THE SOFTWARE PROVE DEFECTIVE, YOU (AND
NOT SHARP OR A SHARP AUTHORIZED REPRESENTATIVE) ASSUME THE ENTIRE COST OF ALL
NECESSARY SERVICING, REPAIR OR CORRECTION, SOME JURISDICTIONS DO NOT ALLOW THE
EXCLUSION OF IMPLIED WARRANTIES, SO THE ABOVE EXCLUSION MAY NOT APPLY TO YOU.
8. Limitation of Liability.
LIABLE FOR ANY INCIDENTAL, SPECIAL OR CONSEQUENTIAL DAMAGES THAT RESULT FROM THE USE
OR INABILITY TO USE THE SOFTWARE OR RELATED DOCUMENTATION, EVEN IF SHARP OR A SHARP
AUTHORIZED REPRESENTATIVE HAS BEEN ADVISED OF THE POSSIBILITY OF SUCH DAMAGES. SOME
JURISDICTIONS DO NOT ALLOW THE LIMITATION OR EXCLUSION OF LIABILITY FOR INCIDENTAL OR
CONSEQUENTIAL DAMAGES SO THE ABOVE LIMITATION OR EXCLUSION MAY NOT APPLY TO YOU.
In no event shall SHARP’S total liability to you for all damages, losses, and causes of action (whether in contract, tort
(including negligence) or otherwise) exceed the amount paid by you for the Software.
9. Controlling Law and Severability.
Windows, this license shall be governed by and construed in accordance with the laws of the state of California and
Washington, respectively. If for any reason a court of competent jurisdiction finds any provision of this License, or
portion thereof, to be unenforceable, that provision of the License shall be enforced to the maximum extent permissible so
as to effect the intent of the parties, and the remainder of this License shall continue in full force and effect.
10. Complete Agreement.
the Software and related documentation, and supersedes all prior or contemporaneous understandings or agreements,
written or oral, regarding such subject matter. No amendment to or modification of this License will be binding unless in
writing and signed by a duly authorized representative of SHARP.
UNDER NO CIRCUMSTANCES INCLUDING NEGLIGENCE, SHALL SHARP BE
This License constitutes the entire agreement between the parties with respect to the use of
You expressly acknowledge and agree that use of the Software is at your sole
For a portion of the Software related with Apple Macintosh and Microsoft
iii
Page 6

Table of Contents
CHAPTER 1 GETTING STARTED
INTRODUCTION............................................................................................................................ 1
USING THIS MANUAL................................................................................................................... 2
For General Users ................................................................................................................... 2
For Key Operators ................................................................................................................... 3
CONNECTING TO THE PRINTER ................................................................................................ 3
PARALLEL PRINTER INTERFACE............................................................................................... 3
Connection............................................................................................................................... 4
NETWORK INTERFACE ...............................................................................................................4
CHAPTER 2 PRINTING FROM A COMPUTER IN THE Windows ENVIRONMENT
INTRODUCTION............................................................................................................................ 5
AR-PB2A PRINTER DRIVERS AND UTILITIES............................................................................ 5
SELECTING THE BEST PRINTER DRIVER................................................................................. 5
Checking the Hardware and Software Requirements ............................................................. 6
INSTALLING PRINTER DRIVERS ................................................................................................ 6
Using the Installer in the CD-ROM (Windows 95/ Windows 98/ Windows NT 4.0) ................. 7
Windows 95 with Plug & Play (parallel connections only) ....................................................... 8
Windows 98 with Plug & Play (parallel connections only) ....................................................... 9
Windows 95/ Windows 98 without Plug & Play...................................................................... 10
Windows 3.1x ........................................................................................................................ 11
Windows NT 4.0 .................................................................................................................... 11
Making Floppy Disks from CD-ROM ..................................................................................... 11
Uninstalling Printer Drivers and Printer Utilities ..................................................................... 12
Deleting Printer Drivers.......................................................................................................... 12
INSTALLING DISPLAY FONT ..................................................................................................... 13
INSTALLING RESIDENT FONT INFORMATION
(PPD for Windows 95/Windows 98 only) ..................................................................................... 13
PRINTING A TEST PAGE FROM YOUR COMPUTER............................................................... 14
Windows 95, Windows 98 or Windows NT 4.0 ...................................................................... 14
Windows 3.1x ........................................................................................................................ 14
PRINTING DOCUMENTS FROM THE COMPUTER .................................................................. 14
Using the Auditing Mode........................................................................................................ 15
FONTS ......................................................................................................................................... 15
CONTROLLING PRINTER FEATURES FROM THE PRINTER DRIVER................................... 16
Windows 95/ Windows 98/ Windows NT 4.0 ......................................................................... 16
Windows 3.1x ........................................................................................................................ 16
PRINTER STATUS MONITOR .................................................................................................... 17
Checking the Hardware and Software Requirements ........................................................... 17
How to Install the Printer Status Monitor ............................................................................... 17
How to Set up the Printer Status Monitor .............................................................................. 18
How to Use the Printer Status Monitor .................................................................................. 19
iv
Page 7

TABLE OF CONTENTS
PRINTER ADMINISTRATION UTILITY ....................................................................................... 20
Checking the Hardware and Software Requirements ........................................................... 20
How to Install the Printer Administration Utility ...................................................................... 21
How to Use the Printer Administration Utility ......................................................................... 21
NW SETUP ..................................................................................................................................22
Outline of the NW Setup ........................................................................................................ 22
Checking the Hardware and Software Requirements ........................................................... 22
How to Install the NW Setup.................................................................................................. 22
How to Use the NW Setup..................................................................................................... 22
CHAPTER 3 PRINTER DRIVER FOR Macintosh
INSTALLING THE PPD FILE ....................................................................................................... 23
Checking the Hardware and Software Requirements ........................................................... 23
How to Install the PPD File .................................................................................................... 23
Selecting the Printer .............................................................................................................. 24
Controlling Printer Features from the Printer Driver .............................................................. 26
AR-PB2A PPD UTILITY ............................................................................................................... 27
CHAPTER 4 USING THE OPERATION PANEL
INTRODUCTION.......................................................................................................................... 29
USES OF THE OPERATION PANEL ..........................................................................................29
CONFIGURATION FROM THE OPERATION PANEL ................................................................ 30
Accessing the Printer Configuration Menu ............................................................................ 30
Using the Printer Configuration Menu.................................................................................... 30
Example Configuration Task.................................................................................................. 31
Printer Configuration Menus .................................................................................................. 31
Printer Settings ...................................................................................................................... 33
Interface Settings................................................................................................................... 34
Network Settings.................................................................................................................... 34
Print Test Page ...................................................................................................................... 35
Initialize and/or Store Settings ............................................................................................... 35
COPIER MODE AND PRINTER MODE ...................................................................................... 36
Selecting the Online Mode..................................................................................................... 36
TRAY SELECT AND JOB CANCEL ............................................................................................ 37
Tray Selection........................................................................................................................ 37
Interrupting and Canceling Print Jobs.................................................................................... 37
CONFIDENTIAL PRINT ............................................................................................................... 38
TANDEM PRINT .......................................................................................................................... 39
v
Page 8

TABLE OF CONTENTS
CHAPTER 5 KEY OPERATOR’S GUIDE
INTRODUCTION.......................................................................................................................... 40
KEY OPERATOR PROGRAMS................................................................................................... 40
Printer Exposure Level ..........................................................................................................42
Memory Reserved for Printer ................................................................................................ 42
Output Method When Memory is Full .................................................................................... 43
Set the Number of Confidential Print Jobs to Be Stored........................................................ 43
Enable Bypass-Tray Size Detection ...................................................................................... 44
Give Priority to Print Speed in Staple Mode .......................................................................... 44
Prohibit Notice Page Printing................................................................................................. 44
Prohibit Rotated Output .........................................................................................................45
Prohibit Bypass-Tray Selection ............................................................................................. 45
Prohibit Auto Tray Switching.................................................................................................. 45
Prohibit Test Page Printing .................................................................................................... 45
Prohibit Changes to Printer Settings...................................................................................... 45
Prohibit Changes to Interface Settings .................................................................................. 46
Prohibit Changes to Network Settings ................................................................................... 46
Record Copy and Print Per Account...................................................................................... 46
WEB PAGE FEATURE ................................................................................................................47
Password Setting................................................................................................................... 47
E-mail Setup and Network Scanning Setup........................................................................... 49
STATUS/ALERT BY E-MAIL........................................................................................................ 52
Before Using the “Status/Alert by E-mail” function ................................................................ 52
Setting the “Status/Alert by E-mail” function .......................................................................... 52
Status/Alert Messages...........................................................................................................56
CHAPTER 6 PRINTER TROUBLESHOOTING
INTRODUCTION.......................................................................................................................... 57
NOTES ON PRINTING LENGTHY DOCUMENTS ...................................................................... 57
NOTICE PAGE PRINTING .......................................................................................................... 58
Disabling Notice Page and Separator Sheet Printing ............................................................ 58
TROUBLESHOOTING .................................................................................................................58
CHAPTER 7 SPECIFICATIONS
SPECIFICATIONS ....................................................................................................................... 63
CHAPTER 8 APPENDIX
PRINT AREA................................................................................................................................ 64
FONT LIST................................................................................................................................... 65
PRINTER DRIVER FEATURES................................................................................................... 66
SUPPLEMENT............................................................................................................................. 68
vi
Page 9

Chapter 1 Getting Started
Introduction
The AR-PB2A Printer Expansion Kit adds high-speed, laser set-printing capability to the powerful
features of the AR-287/AR-337/AR-407/AR-507 copiers and other copiers of the same series to
provide a convenient, high-productivity document printing system easily controlled from a desktop or
networked computer. Note that throughout this operation manual, we will refer to AR-287,
AR-337, AR-407, AR-507 or any other digital copying machine of the same series in which the
AR-PB2A Printer Expansion Kit has been installed simply as the ‘printer’.
The many useful features and functions of the printer include:
• printing multiple sets of documents
• stapling documents (with an optional finisher)
• automatic booklet printing*
• automatic 2-sided (duplex) printing*
• printing multiple document pages on a single sheet (N-up printing)
• printing cover sheets (different first pages)
* For booklet printing and 2-sided printing, an optional duplex module is required in some models.
This operation manual assumes that the AR-PB2A Printer Expansion Kit has already been installed
in your copier and is ready to use with your computer. This chapter shows you how to check the
printer cable connections linking the printer with your computer. These tasks should be completed by
an authorized dealer service technician before the appropriate AR-PB2A printer drivers are installed
in your computer.
NOTES
This operation manual describes only printer features. For a description of copier features, see the copier
operation manual. Refer to the copier operation manual for copier operation, supplies, maintenance, and
specifications for print media usage.
When connecting this printer through a network to computers, an optional network interface card (Print Server
Card) is needed. However, in some countries and regions, the network interface card is not available. In this case,
connect the printer to a computer through a parallel interface. If additional information is required concerning the
network interface card, consult your authorized Sharp Dealer.
1
Page 10

GETTING STARTED
Using This Manual
This operation manual, together with the on-line help files supplied with the printer drivers, provides
complete information on using this printer. The operation manual and on-line help files are intended
as operation guides for general users and key operators.
on:
• connecting the printer to a computer
• selecting and installing printer drivers
• using the operation panel to control printer functions
• troubleshooting printer problems
• printer specifications
The on-line help files include specific information on:
• configuring printer drivers
• adjusting printer driver settings
• using advanced printer features under specific printer drivers
The on-line help file for a given printer driver is automatically installed along with that printer driver,
and can be accessed by clicking the ‘Help’ button available in the printer driver dialog box (Windows
system).
The operation manual includes information
NOTE
The method of accessing the on-line help depends on the particular printer driver. With the PCL5e, PCL6, and
PostScript® drivers, the on-line help can be accessed by clicking the ‘Help’ button. With the Sharp-specific
PostScript® PPD driver, the on-line help can be accessed by clicking the help icon and then clicking the item for
which information is needed.
For General Users
General users should read the Getting Started, Printing from a Computer in the Windows
Environment, Printer Driver for Macintosh, and Using the Operation Panel sections of this operation
manual to become familiar with the available features and functions of this printer.
The on-line help files supplied with the printer drivers should then be consulted for specific
information on using particular printer features.
2
Page 11

GETTING STARTED
For Key Operators
In addition to the information recommended for general users, key operators should read the Key
Operator’s Guide section of this operation manual to become familiar with the key operator programs
and the web page feature.
The Printer Troubleshooting and Specifications sections can also be consulted for information that
will aid in operating the printer/copier smoothly and efficiently.
Connecting to the Printer
The computer communicates with the printer through a local parallel printer or optional network
interface that has been installed as part of the AR-PB2A Printer Expansion Kit by your authorized
Sharp dealer. The following section shows the location of the printer interface connection and
provides step-by-step procedures on how to connect the appropriate cable.
NOTE
If you plan on moving the printer, contact your authorized Sharp dealer.
Parallel Printer Interface
The printer supports an IEEE 1284-compliant parallel printer interface. This interface requires an
IEEE 1284-compliant cable that connects to the rear of the printer to the computer (see Figure 1-1).
CAUTION
Connector
36-pin DDK 57LE-40360-730B (D29) female connector or
equivalent connector
Cable
Shielded type bi-directional parallel interface
For best results, use a printer interface cable that is
IEEE1284 compliant.
Do not attempt to connect the printer interface cable to the printer and/or computer with the power turned on.
Connecting the printer interface cable while power is applied can cause equipment damage.
18
36 19
1
3
Page 12

GETTING STARTED
Connection
1. Make sure both the printer and the computer are turned off.
2. Plug one end of the printer cable into the printer and the other end into the computer’s parallel
connector.
Figure 1-1. Connecting the Printer Interface Cable
NOTES
In order to have best performance, make sure to use shielded parallel cable.
For specifications of the parallel interface of your computer, see its operation manual.
The printer sends and receives data bi-directionally and at high speed. Some switch boxes cannot support high-speed
bi-directional data transfer and using them might cause printing errors.
For further details on the specifications of the printer’s parallel interface, consult an authorized Sharp dealer.
Network Interface
The printer can also be connected to a network using an optional network interface card (Print
Server Card) supplied by authorized Sharp dealers. For details on network interface, see the
operation manual of the network interface card.
4
Page 13

Chapter 2 Printing From a Computer in the
Windows Environment
Introduction
A printer driver must be installed before the printer can be used to print documents created or stored
on a desktop or networked computer. This chapter describes the printer drivers and utilities supplied
with the printer for the Windows system. Information provided includes:
• Full descriptions of all supplied printer drivers
• Detailed information on selecting and installing printer drivers
• Detailed information on installing and using printer utilities
AR-PB2A Printer Drivers and Utilities
The following printer drivers and utilities are included in the CD-ROM supplied with the printer. Refer
to Table 2-1 to determine which driver or drivers are compatible with your operating system.
1. Windows PostScript® printer driver
2. Sharp-specific PostScript® PPD
3. Windows PCL5e printer driver
4. Windows PCL6 printer driver
5. Printer Status Monitor
6. Printer Administration Utility
7. NW Setup
8. Display font
Selecting the Best Printer Driver
Refer to Table 2-1 to select the printer driver that best fits your needs. Table 2-1 shows which printer
drivers are compatible with specific operating system software, i.e., WIN 3.1 or WIN 95/ WIN 98. The
features that can be used in this printer varies with the printer drivers and printer models. (See page
66.) Some features cannot be used depending on the printer drivers, printer models or operating
systems even if these are described in this manual.
5
Page 14

PRINTING FROM A COMPUTER IN THE WINDOWS ENVIRONMENT
Table 2-1. Printer Driver Compatibility
WIN 95/
WIN 98
NOTE
NO. PRINTER DRIVER WIN 3.1
1 Windows PS X X X
2 Windows PPD X X
3 Windows PCL5e X X X
4 Windows PCL6 X X
Users of Windows will obtain maximum functionality and better output quality by installing the Windows PostScript®
Printer driver. Alternatively, the Windows PCL5e driver will provide the best print speed.
Checking the Hardware and Software Requirements
You will need the following hardware and software in order to install the printer driver.
Computer
Type
Operating
System
CPU
RAM
• IBM PC/AT or compatible computer equipped with a bi-directional parallel interface
• Windows 3.1x, Windows 95, Windows 98, Windows NT 4.0
• Windows 3.1/Windows 95: 486SX or better
• Windows 98: 486DX/ 66 MHz or better (Pentium or better is recommended.)
• Windows NT4.0: 486/ 25MHz or better
• Windows 3.1/Windows 95: 8 MB or more (12 MB or more is recommended.)
• Windows 98: 16 MB or more (32 MB or more is recommended.)
• Windows NT 4.0: 16 MB or more
WIN NT
Installing Printer Drivers
A compatible printer driver must be loaded to enable a computer’s operating system to communicate with the printer.
The following procedures describe how to install each of the supplied printer drivers. To install multiple
Windows printer drivers, the installation procedure must be performed for each driver.
Printer utilities such as the Printer Status Monitor, Printer Administration Utility, and NW Setup are
also included in the CD-ROM. If you install these utilities, see their respective sections before
installing them (pages 17 to 22).
NOTE
Before installing a printer driver, be sure to read the “Readme” file for the latest information.
6
Page 15

PRINTING FROM A COMPUTER IN THE WINDOWS ENVIRONMENT
Using the Installer in the CD-ROM (Windows 95/Windows 98/Windows NT 4.0)
NOTE
The PPD printer driver must be installed using the plug & play feature or from the Add Printer Wizard. See the
following sections.
1. Start Windows.
2. Insert the supplied PRINTER UTILITIES CD-ROM into a CD-ROM drive.
• If your computer is configured for auto start on the CD-ROM, proceed to step 5.
3. On the ‘Start’ menu, click ‘Run’.
4. Enter the CD-ROM drive and setup command. Then click the ‘OK’ button.
Example: If the CD-ROM drive is designated as drive Q, type “Q:\Setup.exe” and click ‘OK’.
5. The license agreement will be displayed. Read it and click ‘Next’ if you accept the agreement.
6. Select English as a language for software to be installed and click ‘Next’.
• The printer drivers and utilities that can be installed from the CD-ROM will be displayed.
7
Page 16

PRINTING FROM A COMPUTER IN THE WINDOWS ENVIRONMENT
7. Select the desired printer drivers and utilities to be installed by clicking the check boxes.
• If a printer driver or a printer utility (except NW Setup and Display Font) is highlighted by clicking the
icon or the name part, you can select the ‘README display’ button to display the information on the
highlighted driver or utility.
• Printer Administration Utility, Printer Status Monitor, and NW Setup can be used only if the printer is
used as a network printer. See the installation requirements on pages 17, 20, and 22 before
installing them.
8. Click the ‘Next’ button.
• The list of the printer drivers and utilities to be installed will appear.
9. Click the ‘Start’ button.
10. Follow the instructions on your screen to install the selected printer drivers and utilities.
11. When installation is complete, the message “Setup has finished installing your selected
package(s).” will appear. Click the ‘Close’ button.
12. If restart of the computer is requested, click ‘Yes’.
• Restart of the computer may be needed depending on the program to be installed and the system
configuration.
Windows 95 with Plug & Play (parallel connections only)
When using Windows 95 with plug & play*, follow the procedure below.
* The plug & play feature is effective if both the computer and peripheral equipment are equipped
with IEEE 1284 compliant parallel interface.
1. Ensure that the printer cable is connected between your computer and the printer and then turn on
the printer.
2. Start Windows on your computer.
NOTE
Before installing the printer driver, be sure to close all other open applications.
• If you use Windows 95 on a personal computer with the plug & play feature, the ‘Update
Device Driver Wizard’ window will appear. If the ‘New Hardware Found’ window appears,
follow the procedure below:
(1) Click the ‘Driver from Disk Provided by Hardware Manufacturer’ button and then click ‘OK’.
(2) When the ‘Install From Disk’ window appears, insert the PRINTER UTILITIES CD-ROM into
a CD-ROM drive. Specify the path shown in Table 2-2 and click the ‘OK’ button.
• If your computer is configured for auto start, the license agreement will be displayed.
Click the ‘Cancel’ button.
(3) Proceed to step 4.
8
Page 17

PRINTING FROM A COMPUTER IN THE WINDOWS ENVIRONMENT
Table 2-2. Printer Driver Path
Example: The CD-ROM drive is designated as drive Q.
Printer driver Operating system Path
PCL5e Windows 95/Windows 98
Windows NT 4.0
Windows 3.1x
PCL6 Windows 95/Windows 98
Windows NT 4.0
PostScript Windows 95/Windows 98
Windows NT 4.0
Windows 3.1x
PPD Windows 95/Windows 98
Windows NT 4.0
Q:\Option\English\9x_pcl5e
Q:\Option\English\Nt_pcl5e
Q:\Option\English\3x_pcl5e
Q:\Option\English\9x_pcl6
Q:\Option\English\Nt_pcl6
Q:\Option\English\9x_ps2
Q:\Option\English\Nt_ps2
Q:\Option\English\3x_ps2
Q:\Option\English\9x_psppd
Q:\Option\English\Nt_psppd
• If either the ‘Update Device Driver Wizard’ window or the ‘New Hardware Found’ window
does not appear, follow the procedure of Windows 95/Windows 98 without Plug & Play.
3. Insert the PRINTER UTILITIES CD-ROM into a CD-ROM drive, specify the path shown in Table
2-2, and click the ‘Next’ button.
• If your computer is configured for auto start, the license agreement will be displayed. Click the
‘Cancel’ button.
4. Highlight the desired printer driver and click ‘Next’ to continue.
5. Ensure that ‘Yes’ is checked to use the printer as the default printer. Click the ‘Next’ button.
6. Follow the instructions on your screen to install the supplied printer driver.
Windows 98 with Plug & Play (parallel connections only)
When using Windows 98 with plug & play*, follow the procedure below.
* The plug & play feature is effective if both the computer and peripheral equipment are equipped
with IEEE 1284 compliant parallel interface.
1. Ensure that the printer cable is connected between your computer and the printer and then turn on
the printer.
2. Start Windows on your computer.
NOTE
Before installing the printer driver, be sure to close all other open applications.
9
Page 18

PRINTING FROM A COMPUTER IN THE WINDOWS ENVIRONMENT
• If you use Windows 98 on a personal computer with plug & play feature, the ‘Add New
Hardware Wizard’ window will appear. If the ‘Add New Hardware Wizard’ window does not
appear, follow the procedure of Windows 95/Windows 98 without Plug & Play.
3. Click the ‘Next’ button.
4. Ensure that ‘Search for the best driver for your device’ is selected and click the ‘Next’ button.
5. Insert the PRINTER UTILITIES CD-ROM into a CD-ROM drive, specify the path shown in Table 22, and click the ‘Next’ button.
• If your computer is configured for auto start, the license agreement will be displayed. Click the
‘Cancel’ button.
6. Highlight the desired printer driver and click ‘Next’ to continue.
7. Ensure that ‘Yes’ is checked to use the printer as the default printer. Click the ‘Next’ button.
8. Follow the instructions on your screen to install the supplied printer driver.
Windows 95/Windows 98 without Plug & Play
1. Ensure that the printer cable is connected between your computer and the printer and then turn on
your computer.
2. On the Windows 95/Windows 98 Start menu, highlight ‘Settings’, then highlight and click on
‘Printers’.
3. From the Printers window, select ‘Add Printer’ to run the Add Printer Wizard. Then click ‘Next’.
4. If Windows 95/Windows 98 has been configured for network operation, it might be necessary to
select ‘Local Printer’ or ‘Network Printer’. Select the appropriate option, and click ‘Next’ to continue.
5. If ‘Network Printer’ was selected, specify the appropriate Network Path or Queue Name and click
‘Next’.
6. The installation window will display a list of printer models and manufacturers. Click the ‘Have Disk’
button.
7. Insert the PRINTER UTILITIES CD-ROM into a CD-ROM drive. Specify the path shown in Table
2-2 and click the ‘OK’ button. Highlight the desired printer driver, and click ‘Next’ to continue.
• If your computer is configured for auto start, the license agreement will be displayed. Click
the ‘Cancel’ button.
8. If ‘Local Printer’ was selected in step 4 above, the installation window will display a list of possible
port assignments. Select the correct port, usually LPT1 for local printers and click ‘Next’.
9. Ensure that ‘Yes’ is checked to use the printer as the default printer. Click the ‘Next’ button.
• At this time, ensure that the printer has been turned on and has been connected to your
computer.
10. Follow the instructions on your screen to install the supplied printer driver.
10
Page 19

PRINTING FROM A COMPUTER IN THE WINDOWS ENVIRONMENT
Windows 3.1x
1. Ensure that the printer cable is connected between your computer and the printer and then turn on
your computer.
2. From the Program Manager, double click on ‘Control Panel’ located in the ‘Main’ menu.
3. From the Control Panel, double click on ‘Printers.’
4. Click on ‘Add’ and then ‘Install Unlisted or Updated Printer.’
5. Click on ‘Install.’
6. Insert the PRINTER UTILITIES CD-ROM into a CD-ROM drive, specify the path shown in Table 22, and click the ‘OK’ button. Then select the desired printer driver.
7. Follow the instructions on your screen to install the supplied printer driver.
NOTE
The PPD and PCL6 printer drivers cannot be installed on Windows 3.1x.
Windows NT 4.0
1. Ensure that the printer cable is connected between your computer and the printer and then turn on
your computer.
2. On the Start menu, highlight ‘Settings’, then highlight and click on ‘Printers’.
3. From the Printers window, select ‘Add Printer’ to run the Add Printer Wizard.
4. Select ‘My computer’ or ‘Network Printer Server’ and then click on ‘Next’.
5. Follow the instructions on your screen to install the supplied printer driver. See Table 2-2 for the
printer driver path.
Making Floppy Disks from CD-ROM
The printer drivers and printer utilities in the CD-ROM can be copied to floppy disks. To install a
printer driver on a computer without a CD-ROM drive, the printer driver must be copied to a floppy
disk. The copying procedure on a Windows 95, Windows 98 or Windows NT 4.0 computer is shown
as follows.
1. On the ‘Start’ menu, click ‘Run’.
2. Enter the CD-ROM drive, the desired folder, and “Mkdisk.bat”.
11
Page 20

PRINTING FROM A COMPUTER IN THE WINDOWS ENVIRONMENT
Example: The CD-ROM drive is designated as drive Q.
Windows NT PCL5e: Q:\Option\English\Nt_pcl5e\Mkdisk.bat
Windows 95/98 PCL5e: Q:\Option\English\9x_pcl5e\Mkdisk.bat
Windows 3.1 PCL5e: Q:\Option\English\3x_pcl5e\Mkdisk.bat
Windows NT PCL6: Q:\Option\English\Nt_pcl6\Mkdisk.bat
Windows 95/98 PCL6: Q:\Option\English\9x_pcl6\Mkdisk.bat
Windows NT PS: Q:\Option\English\Nt_ps2\Mkdisk.bat
Windows 95/98 PS: Q:\Option\English\9x_ps2\Mkdisk.bat
Windows 3.1 PS: Q:\Option\English\3x_ps2\Mkdisk.bat
Windows NT PPD: Q:\Option\English\Nt_psppd\Mkdisk.bat
Windows 95/98 PPD: Q:\Option\English\9x_psppd\Mkdisk.bat
Printer Status Monitor: Q:\Packages\English\Smon\Mkdisk.bat
Printer Administration Utility: Q:\Packages\English\Sadmin\Mkdisk.bat
NW Setup: Q:\Packages\English\Nwsetup\Mkdisk.bat
Display Font: Q:\Option\Font\Mkdisk.bat
3. Click ‘OK’.
4. Follow the on-screen instructions.
For installation from a floppy disk, use the same procedure as the installation from the CD-ROM but
insert the floppy disk and specify the floppy disk drive.
After installing the PPD driver on the Windows 95 or Windows 98 system, resident font information
must be installed. See page 13.
Uninstalling Printer Drivers and Printer Utilities
To uninstall a printer driver or a printer utility that has been installed using the installer, follow the
procedure shown below.
To delete a printer driver that has been installed using the plug & play feature or from the Add Printer
wizard, see the next section.
1. On the ‘Start’ menu, highlight ‘Settings’, then highlight and click on ‘Control Panel’.
2. Double-click ‘Add/Remove Programs’.
3. Select the utility to be deleted and click ‘Add/Remove’.
4. Click ‘Yes’.
Deleting Printer Drivers
To delete a printer driver that has been installed using the plug & play feature or from the Add Printer
wizard, follow the procedure shown below.
1. On the ‘Start’ menu, highlight ‘Settings’, then highlight and click on ‘Printers’.
2. Right-click the printer to be deleted.
3. Click ‘Delete’ and then follow the instructions on your screen.
12
Page 21

PRINTING FROM A COMPUTER IN THE WINDOWS ENVIRONMENT
Installing Display Font
The AR-PB2A PRINTER UTILITIES CD-ROM contains display fonts for displaying on the computer
screen. If the display fonts have been installed, the print image can be checked properly on the
screen.
To install these display fonts, use the installer in the CD-ROM described on page 7 and select
Display Font when selecting the drivers and utilities to be installed. Then, follow the instructions on
your screen.
NOTES
To use the display fonts for the PPD driver, install the resident font information for the PPD. See the next section.
The fonts listed in Table 8-1 (page 65) are provided as display fonts.
Installing Resident Font Information
(PPD for Windows 95/Windows 98 only)
If you have installed the PPD printer driver for Windows 95/Windows 98, install the resident font
information following the procedure below.
NOTES
1. Start Windows.
2. Insert the supplied PRINTER UTILITIES CD-ROM into a CD-ROM drive.
• If your computer is configured for auto start, the license agreement will be displayed. Click the
3. On the ‘Start’ menu, click ‘Run’.
4. Enter the CD-ROM drive and “Option\English\9x_psppd\Pfmsetup.exe”. Then click the ‘OK’ button.
Before installing the resident font information, be sure to install the printer driver.
When installing the resident font information, be sure to close all other open applications.
If you have changed the port for the printer from Properties of the printer driver when the printer is used as a
network printer, reinstall the resident font information.
If printer resident fonts cannot be specified from application software, the resident font information has not been
installed or the information is not proper. In this case, reinstall the resident font information.
‘Cancel’ button.
Example: If the CD-ROM drive is designated as drive Q, type “Q:\Option\English\9x_psppd\
Pfmsetup.exe” and click ‘OK’.
5. Click the ‘OK’ button.
• If the printer driver has not been installed, installation of the resident fonts will not be performed.
6. Click the ‘OK’ button.
7. After the resident fonts have been installed, restart Windows.
13
Page 22

PRINTING FROM A COMPUTER IN THE WINDOWS ENVIRONMENT
Printing a Test Page from Your Computer
This section describes how to print a test page from your computer. Printing a test page verifies that
the printer and your computer are connected correctly.
Windows 95, Windows 98 or Windows NT 4.0
NOTE
1. If necessary, install the appropriate printer driver(s). Refer to ‘Installing Printer Drivers’ for specific
2. From the Windows desktop, click on ‘Start.’
3. Highlight ‘Settings’ and then click on ‘Printers.’
4. Right click on the Sharp printer icon and then click on ‘Properties.’
5. Click on ‘Print Test Page.’
6. Follow the instructions on the screen to finish printing the test page.
Users of Windows 95, Windows 98 or Windows NT 4.0 will be prompted to print a test page when installing their
selected printer driver(s). Otherwise, follow the procedures given below.
instructions.
Windows 3.1x
1. If necessary, install the appropriate printer driver(s). Refer to ‘Installing Printer Drivers’ for specific
instructions. (page 11)
2. Print a test page or test document using one of your installed word processing programs such as
Notepad.
NOTE
Refer to Chapter 4 on Operation Panel to make sure the printer is ready and on-line to print the document.
Printing Documents from the Computer
In most cases, it is not necessary to use the operation panel when printing documents from the
computer. When a document is sent to the printer from the computer, the printer will automatically
print the document. However, following the procedure specified below can help ensure that
documents are printed accurately. The procedure assumes that the printer has been properly
connected to a computer as described in Chapter 1, and that a printer driver has been installed as
described in this chapter. For more information regarding the printer operation panel, refer to
Chapter 4.
14
Page 23

PRINTING FROM A COMPUTER IN THE WINDOWS ENVIRONMENT
1. Check the operation panel to confirm that the ON LINE indicator is lit. If the ON LINE indicator is not
lit, press the PRINT key to select the printer mode and then press the “ONLINE” key on the touch
panel to set the printer to the on-line condition.
2. Check the paper tray(s) to ensure that the desired paper is loaded.
3. Using the computer and any appropriate application software, load the document to be printed, set
any desired features using the installed printer driver, and give the command to print the document.
If necessary, refer to the documentation for the computer and/or the application software for help
on issuing the necessary commands.
4. The printer will print the document.
Using the Auditing Mode
The printer can be programmed to use the auditing mode using a key operator program (page 46). If
the printer has been programmed in the auditing mode, an assigned 5-digit account number can be
specified on the setting screen of the printer driver when printing. The account numbers used for
printing are common to those for copying.
NOTES
When using the PPD printer driver, the auditing mode cannot be used.
To enter an account number each time printing is executed, set ‘Query Job Control’ on the Advanced tab of the
printer driver.
If an unassigned number is entered or no number is entered, the print job will be executed and the number of
printed pages will be accumulated against the account number 99999 if the number 99999 has been registered. (If
not, print pages are not accumulated.) The number 99999 can be registered using a copier key operator program.
Fonts
Refer to Table 8-1 for a complete list of fonts resident in the printer for use by the supplied printer
drivers.
The resident fonts are always available to the printer and need not be downloaded with each print
job. Using the resident fonts enables the printer to operate at maximum performance, and reduces
the amount of data which must be transferred from the computer to the printer with each print job.
15
Page 24

PRINTING FROM A COMPUTER IN THE WINDOWS ENVIRONMENT
Controlling Printer Features from the Printer Driver
The method to access the features of the printer driver is described below for each supported
operating system.
Before setting the printer driver, check the following items.
• The SHARP AR-PB2A printer driver has been installed in the computer to be used. If not, see
INSTALLING PRINTER DRIVERS on page 6.
• The above printer driver has been selected.
NOTE
For information on what features are supported by a specific printer driver, consult the help file of each printer
driver.
Windows 95/Windows 98/Windows NT 4.0
1. Within the application, select File/Print.
2. Click the ‘Properties’ button.
3. The properties of the SHARP AR-PB2A printer driver will be displayed.
4. Select desired settings on each tab.
5. Press the ‘OK’ button to store the settings and terminate the properties.
NOTE
In some applications, the method above cannot be used. In this case, (1) click the ‘Start’ button of the computer and
then select ‘Printers’ from Settings. (2) If you use Windows 95/Windows 98, right-click the installed printer driver
icon in the ‘Printers’ folder and select ‘Properties’ in the menu. If you use Windows NT 4.0, right-click the installed
printer driver icon in the ‘Printers’ folder and select “Document default values” in the menu. Then proceed to step 3
above.
Windows 3.1x
1. Double-click the ‘Print Manager’ icon in the Main window of program manager.
2. Select ‘Options’ in the Print Manager and then select ‘Printer Setup’.
3. Select the SHARP AR-PB2A printer driver in the Installed Printers: and click the ‘Setup’ icon.
4. The properties of the SHARP AR-PB2A printer driver will be displayed.
5. Select desired settings on each tab.
6. Press the ‘OK’ button to store the settings and terminate the properties.
16
Page 25

PRINTING FROM A COMPUTER IN THE WINDOWS ENVIRONMENT
Printer Status Monitor
If the Printer Status Monitor is installed, you can monitor the status of a SHARP printer that is
connected to the network. Be sure to check the system environment described below before
installing the Printer Status Monitor.
NOTE
To use the Printer Status Monitor, the printer must be equipped with the AR-PB2A Printer Expansion Kit and Print
Server Card (AR-NC1D or AR-NC3D).
Checking the Hardware and Software Requirements
To use the Printer Status Monitor, the following hardware and software are needed. For upgrade of
installed software, use the supplied CD-ROM and the Microsoft Web Site.
Computer: IBM PC/AT or compatible computer
Operating system: Windows 95, Windows 98, Windows NT 4.0 with Service Pack 3 or later
Required software component: TCP/IP is definitely required.
CPU: Intel 486DX/ 66 MHz or better
RAM: 16 MB or more for Windows 95 and Windows 98 (24 MB or more is recommended)
32 MB or more for Windows NT 4.0
Hard disk: 16 MB or more available space
How to Install the Printer Status Monitor
To install the Printer Status Monitor, use the installer supplied with the CD-ROM. Follow the
procedure described in “Using the Installer in the CD-ROM” on page 7. Select the Printer Status
Monitor in step 7 of this procedure.
NOTES
To install or uninstall the Printer Status Monitor on the Windows NT system, use the ‘Administrator’ privileges. If
another user installs or uninstalls it, the settings may not be correct.
If a PCMCIA network card is removed or inserted while the Printer Status Monitor is operating, a malfunction may
occur. Be careful not to remove or insert a PCMCIA card in any case while the Printer Status Monitor is operating.
17
Page 26
PRINTING FROM A COMPUTER IN THE WINDOWS ENVIRONMENT
How to Set up the Printer Status Monitor
To monitor a SHARP printer with the Printer Status Monitor, prepare the setting as below.
1. Check that your computer meets the hardware and software requirements described above.
2. If printing is not performed through a server, set the printer so that the IP peer-to-peer printing
software (P2P-IP) supplied with the Print Server Card (AR-NC1D or AR-NC3D) is used for printing.
In this case, the name of the ‘port to print to’ must be indicated with an IP address. The setting
method of the IP peer-to-peer printing software is shown as follows.
(1) Install the IP peer-to-peer printing software referring to the “Print Server Card Quick Configuration
Guide” supplied with the Print Server Card.
(2) Change the name of the ‘port to print to’ to an IP address. To change it, start P2P-IP from the ‘Start’
menu to open the setting screen of the IP peer-to-peer printing software and change ‘Printer
Names’ to ‘based on IP Address’. The computer must be restarted after the change above is made.
(3) Install the printer driver to be monitored referring to “Installing printer drivers” on page 6. At this
time, set the port added with the IP peer-to-peer printing software (P2P-IP) as ‘Print to the following
port’. If the driver has been already installed, change the ‘Print to the following port’ setting in the
‘Details’ tab to the port that has been added with the IP peer-to-peer printing software (P2P-IP).
Setting is complete. Start the Printer Status Monitor and check that the printer can be monitored.
The Printer Status Monitor, however, can be used without the above P2P-IP installed in the following
case.
• On the Windows NT 4.0 system, the printer can be monitored even if ‘TCP/IP Printing’ mounted to
Windows NT 4.0 is used.
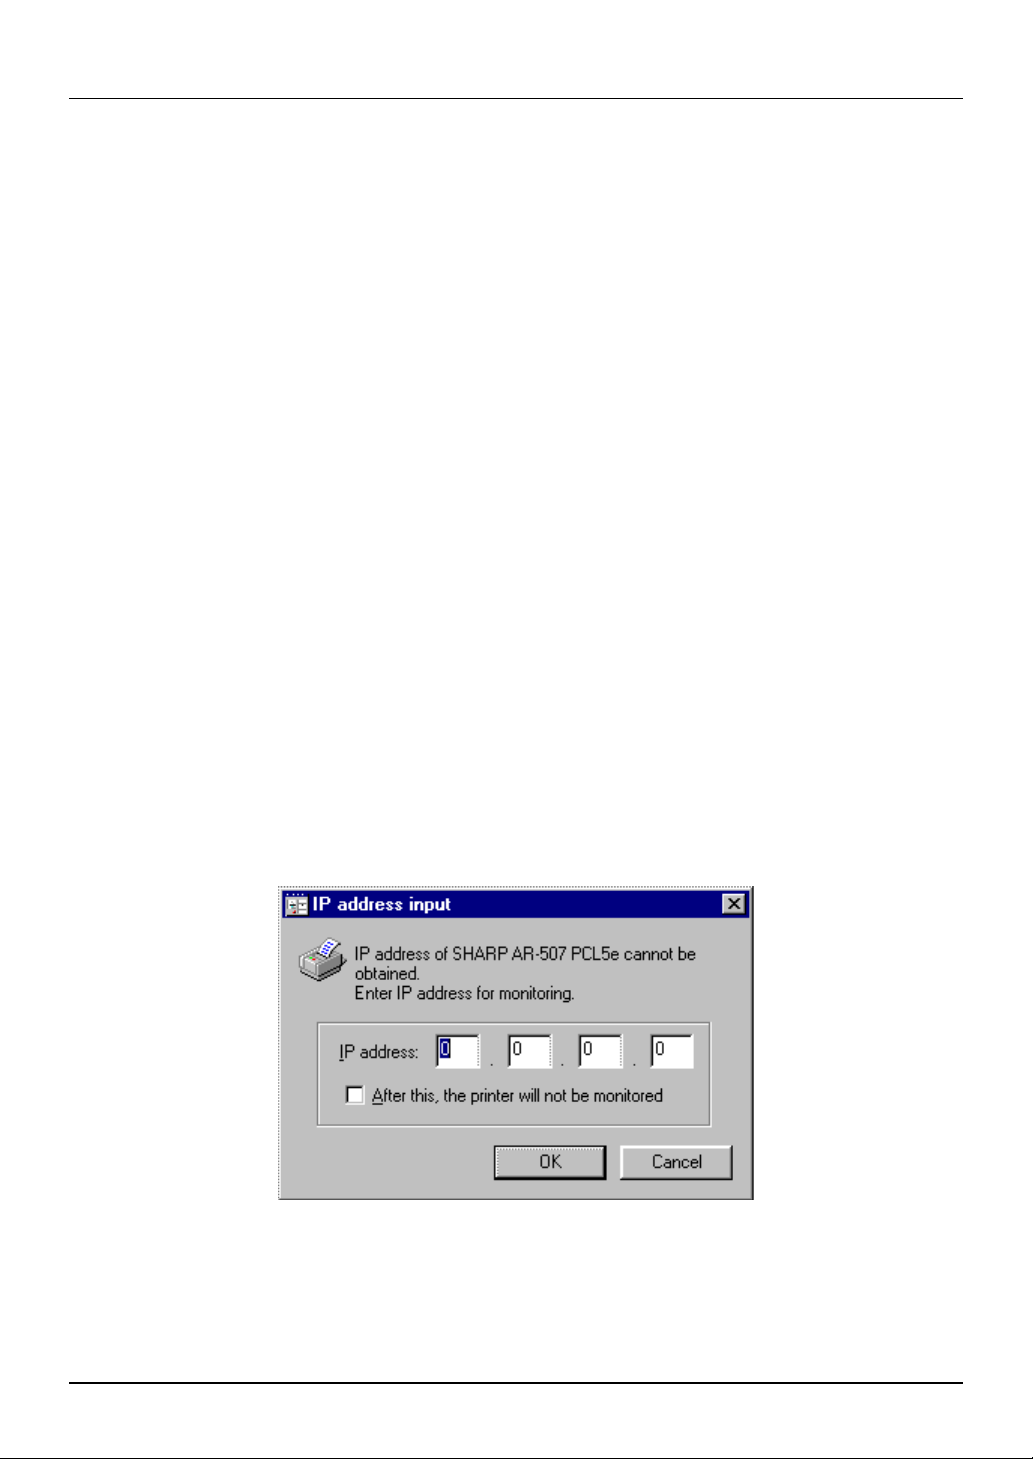
3. When the Printer Status Monitor is started, the following dialog will appear for a printer of which the
IP address information cannot be acquired from the printer driver. Input the IP address.
• If monitoring of this printer is not needed after this, check the box of ‘After this, the printer will not be
monitored.’. This dialog for this printer will not appear after the next start-up.
• To cancel monitoring only this time, click ‘Cancel’. The dialog will appear after the next start-up.
18
Page 27

PRINTING FROM A COMPUTER IN THE WINDOWS ENVIRONMENT
How to Use the Printer Status Monitor
The Printer Status Monitor is used to monitor, display, and report the status of the printer that is
connected to a network. It can display the information such as:
• Whether the printer is ready for printing
• Which options are installed
Whether the printer contains sufficient paper and toner
•
• Print completion notification
Also a change of the printer status can be reported when it occurs.
For starting the Printer Status Monitor, select ‘SHARP Printer Status Monitor’ and ‘Printer Status
Monitor’ from ‘Programs’ of the ‘Start’ menu.
For details of use of the Printer Status Monitor, see the help file. Select ‘SHARP Printer Status
Monitor’ and ‘Help’ from ‘Programs’ of the ‘Start’ menu.
NOTES
Since the Printer Status Monitor acquires and displays the information that is held in the printer without any
processing, information types may differ and some types of information may not be displayed depending on the
printer model.
If the PPD driver is used, the print completion notification function does not operate.
19
Page 28

PRINTING FROM A COMPUTER IN THE WINDOWS ENVIRONMENT
Printer Administration Utility
If the Printer Administration Utility is installed, you can set and monitor a SHARP printer that is
connected to the network. Be sure to check the system environment described below before
installing the Printer Administration Utility.
NOTE
When the AR-PB2A is installed in AR-505/507/407/337/287, the Printer Administration Utility is fully functional;
however, if the AR-PB2A is installed in other models, its functionality is limited as follows:
AR-505/507/407/337/287 All functionality is supported.
AR-405/336/286/281/250 Printing Settings tab and Resources tab are not displayed.
AR-335/285/280 Printing Settings tab and Resources tab are not displayed. Some information display
may be limited.
Checking the Hardware and Software Requirements
The hardware and software requirements for the Printer Administration Utility are those for the
Printer Status Monitor described on page 17, Winsock 2 or later, and COMCTL32.DLL version 4.72
or later (included with Internet Explorer 4.0 or later).
NOTE
NOTE
If you use the Windows 95 operating system, Winsock2 (Windows Socket2 update) must be installed on your
computer. Download the Winsock2 setup file (filename: W95ws2setup.exe) from the Microsoft Web Site and install
Winsock2 on your computer.
When downloading of Winsock2 setup file W95ws2setup.exe is complete, install Winsock2 in the following
procedure.
1. Copy W95ws2setup.exe to a folder of your selection and execute it by double-clicking the icon.
2. A dialog will appear indicating completion of installation. Click ‘OK’ to restart the computer.
If Internet Explorer 4.0 or later is not installed on Windows 95 or Windows NT 4.0, use the supplied CD-ROM to
update the file COMCTL32.DLL. Follow the steps below. (If you use the Windows 98 operating system, this
operation is not needed.)
1. Copy Comupd.exe in the Comctlud folder to a folder of your choice and execute it by double-clicking the icon.
2. Specify a proper folder for decompression of the compressed file and click ‘OK’.
3. 401comupd.exe will be restored in the folder you have chosen. Double-click the icon to execute the file.
4. A dialog asking about execution of installation will appear. Click ‘Yes’.
5. The License Agreement will be displayed. Please read accept it (click ‘Yes’).
6. A dialog will appear indicating completion of file copying. Click ‘OK’.
7. A dialog requesting restarting of the computer will appear. Click ‘Yes’ to restart the computer.
Update of COMCTL32.DLL is now complete.
20
Page 29
PRINTING FROM A COMPUTER IN THE WINDOWS ENVIRONMENT
How to Install the Printer Administration Utility
To install the Printer Administration Utility, use the installer supplied with the CD-ROM. Follow the
procedure described in “Using the installer in the CD-ROM” on page 7. Select the Printer
Administration Utility in step 7 of this procedure.
NOTES
To install or uninstall the Printer Administration Utility on the Windows NT system, use the ‘Administrator’
privileges. If another user installs or uninstalls it, the settings may not be correct.
If a PCMCIA network card is removed or inserted while the Printer Administration Utility is operating, a malfunction
may occur. Be careful not to remove or insert a PCMCIA card in any case while the Printer Administration Utility is
operating.
How to Use the Printer Administration Utility
The Printer Administration Utility is used to set and monitor the printer*1 that is connected to a
network through the standard network management protocol SNMP (Simple Network Management
Protocol). The Printer Administration Utility can be used on Windows 95, Windows 98 and Windows
NT 4.0.
*1 The Printer Administration Utility can be used with printers that are compatible with SNMP and
Printer MIB.
For starting the Printer Administration Utility, select ‘SHARP Printer Administration Utility’ and ‘Printer
Administration Utility’ from ‘Programs’ of the ‘Start’ menu.
When the Printer Administration Utility is started, the TCP/IP setting dialog will appear. Enter the IP
address of the network and the network printer to be monitored.
For details of use of the Printer Administration Utility, see the help file. Select ‘SHARP Printer
Administration Utility’ and ‘Help’ from ‘Programs’ of the ‘Start’ menu.
21
Page 30

PRINTING FROM A COMPUTER IN THE WINDOWS ENVIRONMENT
NW Setup
If the printer is used in NetWare environment, the NW Setup allows easy connection setup.
Outline of the NW Setup
The NW Setup is a setup tool for using a SHARP printer with a network card installed in a Novell
NetWare environment. Registration of printers to a NetWare server and parameter settings for a
network card can be performed by using a procedure with wizards.
For using the NW Setup, a Novell Client supplied by Novell must have been installed. Also before
starting the NW Setup, you must log in the NetWare server with the ‘Administrator’ privileges.
Checking the Hardware and Software Requirements
To use the NW Setup, the following hardware and software are needed.
NetWare server: IntranetWare (NetWare 4.x)
NetWare client: Novell Client 4.5 for Windows NT
Novell Client v3.0 for Windows 95/98
Client PC operating system: Windows 95, Windows 98, Windows NT 4.0
Printer: SHARP printer with a Print Server Card (AR-NC1D or AR-NC3D) installed
How to Install the NW Setup
To install the NW Setup, use the installer supplied with the CD-ROM. Follow the procedure described
in “Using the Installer in the CD-ROM” on page 7. Select the NW Setup in step 7 of this procedure.
How to Use the NW Setup
For information on how to use the NW Setup, see the PDF file (\doc\English\NWSetup.pdf) supplied
with the CD-ROM.
22
Page 31

Chapter 3 Printer Driver for Macintosh
Installing the PPD File
Checking the Hardware and Software Requirements
To use a SHARP printer with the AR-PB2A Printer Expansion Kit installed from a Macintosh
computer, the PPD file for Macintosh must be installed to the computer. You will need the following
hardware and software in order to install the PPD file for Macintosh.
Operating system: Mac OS 7.6 to 9.0
CPU: MC 68040 or PowerPC microprocessor
RAM: 16 MB or more for PowerPC microprocessor machine
12 MB or more for MC 68040 machine
Printer driver: LaserWriter 8 version 8.4.1 or later
To use the printer with a Macintosh computer, an optional network interface card (Print Server Card)
is needed. Also the Macintosh computer must be equipped with an Ethernet port. If your computer is
not equipped with an Ethernet port, install an Ethernet interface.
Before installing the PPD file, check the hardware and software requirements above. If LaserWriter 8
is not installed in your computer, install it from the system CD-ROM supplied with your Macintosh
computer.
How to Install the PPD File
1. Turn on your computer and start the operating system.
2. Insert the supplied PRINTER UTILITIES CD-ROM into a CD-ROM drive.
3. Double-click the AR-PB2A icon on the desktop.
4. Double-click the AR-PB2A Installer icon.
• The following display will appear.
23
Page 32

PRINTER DRIVER FOR MACINTOSH
5. Select the desired language (Step 1).
6. Click the ‘Reference’ buttons of ‘Step 2’ and ‘Step 3’ to read the text.
After reading the text, close the file.
7. Click the ‘Install’ button to the right of ‘Step 4’.
8. Select the desired installation type and click the ‘Install’ button.
‘Easy Install’ is recommended. If you select ‘Custom Install’, follow the instructions on your screen.
When uninstalling the PPD file, select ‘Custom Remove’, select the features to be removed, and
click the ‘Remove’ button.
9. After the installation is complete, click the ‘Quit’ button and remove the CD-ROM.
Selecting the Printer
To select this printer, follow the steps below.
1. Ensure that the printer is connected to the network to which your computer is connected.
2. Select ‘Chooser’ from the Apple Menu.
3. Click the ‘LaserWriter 8’ icon.
• The names of connected printers are displayed in the right box.
NOTE
If multiple AppleTalk zones are displayed, select the zone which includes the desired printer.
24
Page 33

PRINTER DRIVER FOR MACINTOSH
4. Select the desired printer (Sharp Corporation Printer).
5. Click the ‘Setup’ or ‘Create’ button.
• If the ‘Setup’ button is clicked, the message indicating current printer description file is selected will
appear. Click the ‘Auto Setup’ button.
• The PPD file selection screen will appear.
6. Select the printer model name to be used and click the ‘Select’ button.
7. Click the ‘OK’ button.
8. Click the close box to close ‘Chooser’.
25
Page 34

PRINTER DRIVER FOR MACINTOSH
Controlling Printer Features from the Printer Driver
The setting method and print condition item names may vary with the operating system versions,
printer driver versions, and application software. To change the settings, use the file menu of
application software.
Paper setting:
1. Select ‘Page Setup’ from the ‘File’ menu of Finder.
• The following display will appear.
2. Adjust each setting.
• Paper size, reduction/enlargement, and orientation can be set.
3. Click the ‘OK’ button.
Print conditions:
1. Select ‘Print’ from the ‘File’ menu of application software.
(The display varies with the operating system versions, printer driver versions, and application
software.)
2. Adjust each setting.
• Number of copies, page range, and the like can be set.
• If the printer has been programmed in the auditing mode, an assigned 5-digit account number must
be specified. The account numbers used for printing are common to those for copying.
• To execute confidential print, specify a 5-digit password.
26
Page 35

PRINTER DRIVER FOR MACINTOSH
• To specify an account number or a password for confidential print or to specify tandem print, click
to the right of ‘General’ and select ‘Job Control’ (or ‘Printer Specific Options’). The default
settings for these functions are off.
3. Click the ‘Print’ button.
AR-PB2A PPD Utility
The AR-PB2A PPD Utility is provided for using the confidential print feature and the auditing mode of
the AR-PB2A printer driver. Use this utility to register 5-digit passwords for confidential print and 5digit account numbers to the PPD file. Also use this utility to change the registered passwords and
account numbers.
If the printer has been programmed in the auditing mode, an assigned 5-digit account number must
be sent to the printer when printing. To register 5-digit account numbers to a Macintosh computer,
use this utility. This utility allows up to 20 account numbers to be registered for the computer. The
numbers are common to those for copying and must be registered using a copier key operator
program. When printing in the auditing mode, one of registered numbers must be specified on the
setting screen of the print conditions. To enable the auditing mode for printing, use a key operator
program. See page 46.
When using the confidential print feature, a password must be specified when printing. This utility
allows up to 20 passwords to be registered. One of registered passwords must be specified on the
setting screen of the print conditions when printing with the confidential print feature. For details on
this feature, see page 38.
To start this utility, select the SHARP AR-PB2A Extras folder and then double click the AR-PB2A
PPD Utility icon.
When this utility is started, the following display will appear.
27
Page 36

PRINTER DRIVER FOR MACINTOSH
1. To register a security password for the confidential print feature, click the ‘Add’ button for
Confidential Print Password. The Confidential Print Password screen will appear. Enter a 5-digit
number in the box and click the ‘OK’ button.
To delete a registered security password, select the password in the box and click the ‘Delete’
button.
2. To register an account number for the computer, click the ‘Add’ button for Account Number. The
Account Number screen will appear. Enter a 5-digit account number and click the ‘OK’ button.
Account number 99999 is used for a special use. See key operator program “Record Copy and
Print per Account” on page 46.
To delete a registered account number, select the account number in the box and click the
‘Delete’ button.
3. To save the registered passwords and account numbers and to exit the utility, click the ‘Save &
Quit’ button.
4. If the PPD file is changed using this utility, be sure to select the printer again through the Chooser.
Use the procedure described in “Selecting the Printer” on pages 24 and 25.
28
Page 37

Chapter 4 Using the Operation Panel
Introduction
This chapter describes procedures for using the operation panel to set and/or adjust a variety of the
printer’s options and features. Information is provided on:
1. Accessing and using the printer configuration menus available from the operation panel
2. Switching from copier mode to printer mode
3. Two special features: confidential print and tandem print
Figure 4-1 shows the available printer keys located on the operation panel with the touch panel basic
screen in the printer mode.
Uses of the Operation Panel
The operation panel provides access to many of the printer’s features and functions. Available options
include the ability to:
1. Print configuration, demonstration, and test pages. These test pages provide information useful for
enhancing the printer’s performance or diagnosing printing problems.
2. Change the printer configuration parameters to work more efficiently with specific software
applications. Figure 4-2 provides a complete flow chart of the touch panel’s display menus.
3. Set up the network IP address and network port operation. (If no network interface card has been
installed, these settings do not appear.)
4. Use key operator programs to adjust printer settings, such as the exposure setting to control
contrast on printed documents. Refer to Key Operator Programs in the next chapter.
READY TO PRINT.
PRINT
COPY
ONLINE
OFFLINE
1
8/ 11R
2
1
1.
8/ 11
2
2.
11 17
1
3.
8/ 14
2
4.
5/ 8/
212
PAPER SELECT MENU
1
5.
8/ 11
1
2
1
4 5
7
AUDIT CLEAR
2 3
8
PROGRAM
0
6
9
P
INTERRUPT
CLEAR
C
CLEAR ALL
CA
START
The indications of the operation panel and touch panel depend on the countries and regions.
Figure 4-1. Operation Panel Key Locations
29
Page 38

USING THE OPERATION PANEL
Print data status
The DATA indicator is on, off or blinking depending on the print data status.
On: Print data* is stored in the printer but printing is not being performed.
Off: Print data* is neither received nor stored.
Blinking: Print data* is stored in the printer and print processing (including other processing
than data reception or printing) is being performed.
* Confidential print data (see page 38) is also included.
Configuration from the Operation Panel
Accessing the Printer Configuration Menu
To access the printer configuration menu, follow the steps below.
1. Press the PRINT key to select the printer mode. Make sure the PRINT indicator lights up and the
basic screen is displayed on the touch panel (see Figure 4-1).
2. Press the “ONLINE” key on the touch panel to select the OFFLINE mode and press the “MENU”
key.
The printer configuration menu screen will appear on the touch panel. The main menu items are:
PRINTER SETTINGS, INTERFACE SETTINGS, NETWORK SETTINGS, PRINT TEST PAGE, and
,
INITIALIZE AND/OR STORE SETTINGS. Use the UP/DOWN arrow (
screen.
) keys to scroll the
NOTES
If any printing data remains in the memory, the printer configuration menu will not appear. In this case, access the
printer configuration menu after printing is complete or press the CLEAR (
continue to access the menu.
If conflicting settings are made with the printer driver and the configuration menu, the printer driver will have
priority.
) key to cancel printing and then
C
Using the Printer Configuration Menu
Use steps 1 and 2 above to access the printer configuration menu.
3. Select the desired main menu item on the touch panel.
4. If a sub-menu appears, select the desired function. To scroll the touch panel screen, use the
UP/DOWN arrow (
5. Turn the setting of a function on or off by pressing its corresponding check box in front of the
function name. For functions without a check box, adjust the settings on each function setting
screen.
6. To exit the configuration menu, return to the main menu by pressing the “OK” key and then
press the “ONLINE/OFFLINE” key to return to the online mode.
If a test print has been selected, once complete, the printer will automatically return to the online
mode.
) keys.
,
30
Page 39

USING THE OPERATION PANEL
Example Configuration Task
The following procedure for changing the page orientation from ‘Portrait’ to ‘Landscape’ provides an
example of operating the operation panel.
Use steps 1 and 2 above to access the printer configuration menu.
Steps 3 through 6 demonstrate how to change the setting from ‘Portrait’ to ‘Landscape’.
3. Press the “PRINTER SETTINGS” key on the main menu screen.
4. Press the “ORIENTATION” key.
5. Press the “LANDSCAPE” key to highlight it and then press the “OK” key.
6. Press the “OK” key to return to the main menu. Press the “ONLINE/OFFLINE” key to return to
the online mode.
Printer Configuration Menus
A flow chart of the printer configuration menu is shown in Figure 4-2. The menu structure changes
depending on whether a network interface card is present in the copier/printer or not. The menus
inside the gray area are for a copier/printer with a network interface card (Print Server Card)
installed.
NOTE
Depending on the particular printer, some functions of the printer configuration menu cannot be set, for example,
smoothing and toner save mode.
31
Page 40

USING THE OPERATION PANEL
Main Menu
PRINTER SETTINGS
INTERFACE SETTINGS
NETWORK SETTINGS
PRINT TEST PAGE
INITIALIZE AND/OR STORE
SETTINGS
PRINTER SETTINGS
SMOOTHING
TONER SAVE MODE
COPIES
ORIENTATION
STANDARD INPUT PAPER
SIZE
STANDARD OUTPUT TRAY
PRINT PS ERRORS
PCL SYMBOL SET SETTING
INTERFACE SETTINGS
HEXADECIMAL DUMP MODE
PARALLEL PORT
EMULATION SWITCHING
NETWORK PORT
EMULATION SWITCHING
I/O TIMEOUT
PORT SWITCHING METHOD
NETWORK SETTINGS
ENABLE TCP/IP
IP ADDRESS SETTING
ENABLE NetWare
ENABLE EtherTalk
(TokenTalk)
PRINT NIC PAGE AT
POWER ON
PRINT TEST PAGE
PRINT CONFIGURATION
PAG E
PRINT RESIDENT FONT
LIST
PRINT DEMO PAGE
PRINT NIC PAGE
PRINT PCL SYMBOL
SET LIST
INITIALIZE AND/OR STORE
SETTINGS
RESTORE FACTORY
DEFAULT
STORE CURRENT
CONFIGURATION
RESTORE CONFIGURATION
RESET THE NIC
COPIES (1* to 999)
ORIENTATION
PORTRAIT*
LANDSCAPE
STANDARD INPUT PAPER SIZE
A3 B4 A4* B5 A5 A6
11 x 17 8-1/2 x 14 8-1/2 x 13
8-1/2 x 11*
5-1/2 x 8-1/2 7-1/2 x 10-1/2
STANDARD OUTPUT TRAY
TOP TRAY
SECOND TRAY*
PARALLEL PORT EMULATION
SWITCHING
AUTOMATIC*
PostScript
PCL
NETWORK PORT EMULATION
SWITCHING
AUTOMATIC*
PostScript
PCL
I/O TIMEOUT (1 to 999, 20*)
PORT SWITCHING METHOD
SWITCH AT END OF JOB*
SWITCH AFTER I/O TIMEOUT
DISABLE PARALLEL PORT
DISABLE NETWORK PORT
IP ADDRESS SETTING
IP ADDRESS (192 168 0 1)
IP SUBNET MASK (255 255 255 0)
IP GATEWAY (192 168 0 1)
NOTES
Figure 4-2. Printer Menu Flow Chart
The menus inside the gray area (Figure 4-2) are for a printer with the network interface card option installed.
Denotes the default setting.
*
The default setting of STANDARD INPUT PAPER SIZE depends on the countries or regions.
•
The default setting of STANDARD OUTPUT TRAY depends on installation of optional finisher.
•
The values indicated with IP ADDRESS are examples.
•
32
Page 41
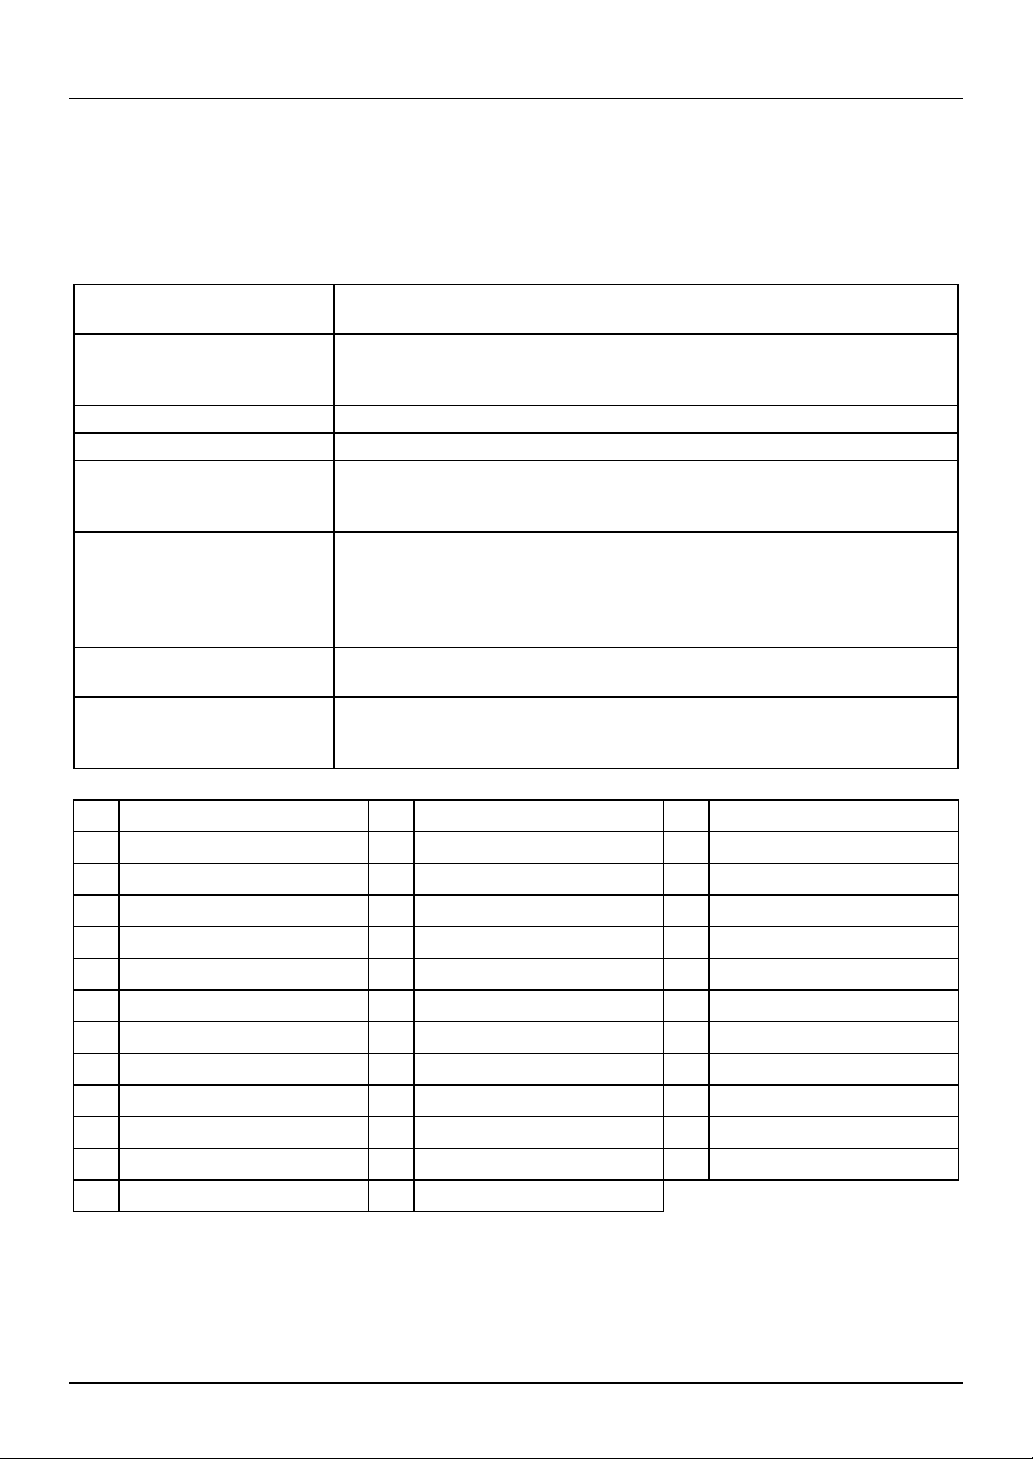
USING THE OPERATION PANEL
Printer Settings
Use the printer settings when printing without the proper printer driver installed (for example, printing
from an MS-DOS application, printing from a computer without the printer driver installed, etc.). This
menu allows detailed print conditions to be set.
SMOOTHING Enables or disables the smoothing function. This setting is enabled in the
default setting.
TONER SAVE MODE Sets or cancels the toner save mode. The toner save mode reduces toner
consumption. Printed images will be lighter but still adequate for general
use. This setting is disabled in the default setting.
COPIES Number of copies to print can be set. 1 to 999 can be entered.
ORIENTATION Selects the default page orientation: portrait or landscape.
STANDARD INPUT PAPER
SIZE
STANDARD OUTPUT TRAY Specifies a default output tray. Top tray, second tray or offset tray can be
PRINT PS ERRORS Determines whether or not PostScript error information will be printed. This
PCL SYMBOL SET SETTING Specifies a PCL symbol set. (The symbol set is used to assign a part of
Specifies a default input paper size. One of the following sizes can be selected:
A3, B4, A4, B5, A5, A6, 11 x 17, 8-1/2 x 14, 8-1/2 x 13, 8-1/2 x 11, 5-1/2 x 8-1/2,
7-1/4 x 10-1/2
selected. The offset tray cannot be selected when no optional finisher
is installed. The second tray cannot be selected when an optional 2-tray finisher
is installed. Face up or face down can also be selected for certain trays in
this menu.
setting is disabled in the default setting.
character codes to characters of a country.) See the table below. The
factory default setting is 1 (Roman-8).
No. Symbol set No. Symbol set No. Symbol set
1 Roman-8 13 ISO 4 United Kingdom 25 PC-852
2 ISO 8859-1 Latin 1 14 ISO 11 Swedish: names 26 PC-775
3 PC-8 15 PC-1004 (OS/2) 27 PC-Turkish
4 PC-8 Danish/Norwegian 16 DeskTop 28 MC Text
5 PC-850 17 PS Text 29 Windows 3.1 Latin 1
6 ISO 6 ASCII 18 Microsoft Publishing 30 Windows 3.1 Latin 2
7 Legal 19 Math-8 31 Windows 3.1 Latin 5
8 ISO 21 German 20 PS Math 32 Windows Baltic (not 3.1)
9 ISO 17 Spanish 21 Pi Font 33 Windows 3.0 Latin 1
10 ISO 69 French 22 ISO 8859-2 Latin 2 34 Symbol
11 ISO 15 Italian 23 ISO 8859-9 Latin 5 35 Wingdings
12 ISO 60 Norwegian v1 24 ISO 8859-10 Latin 6
33
Page 42
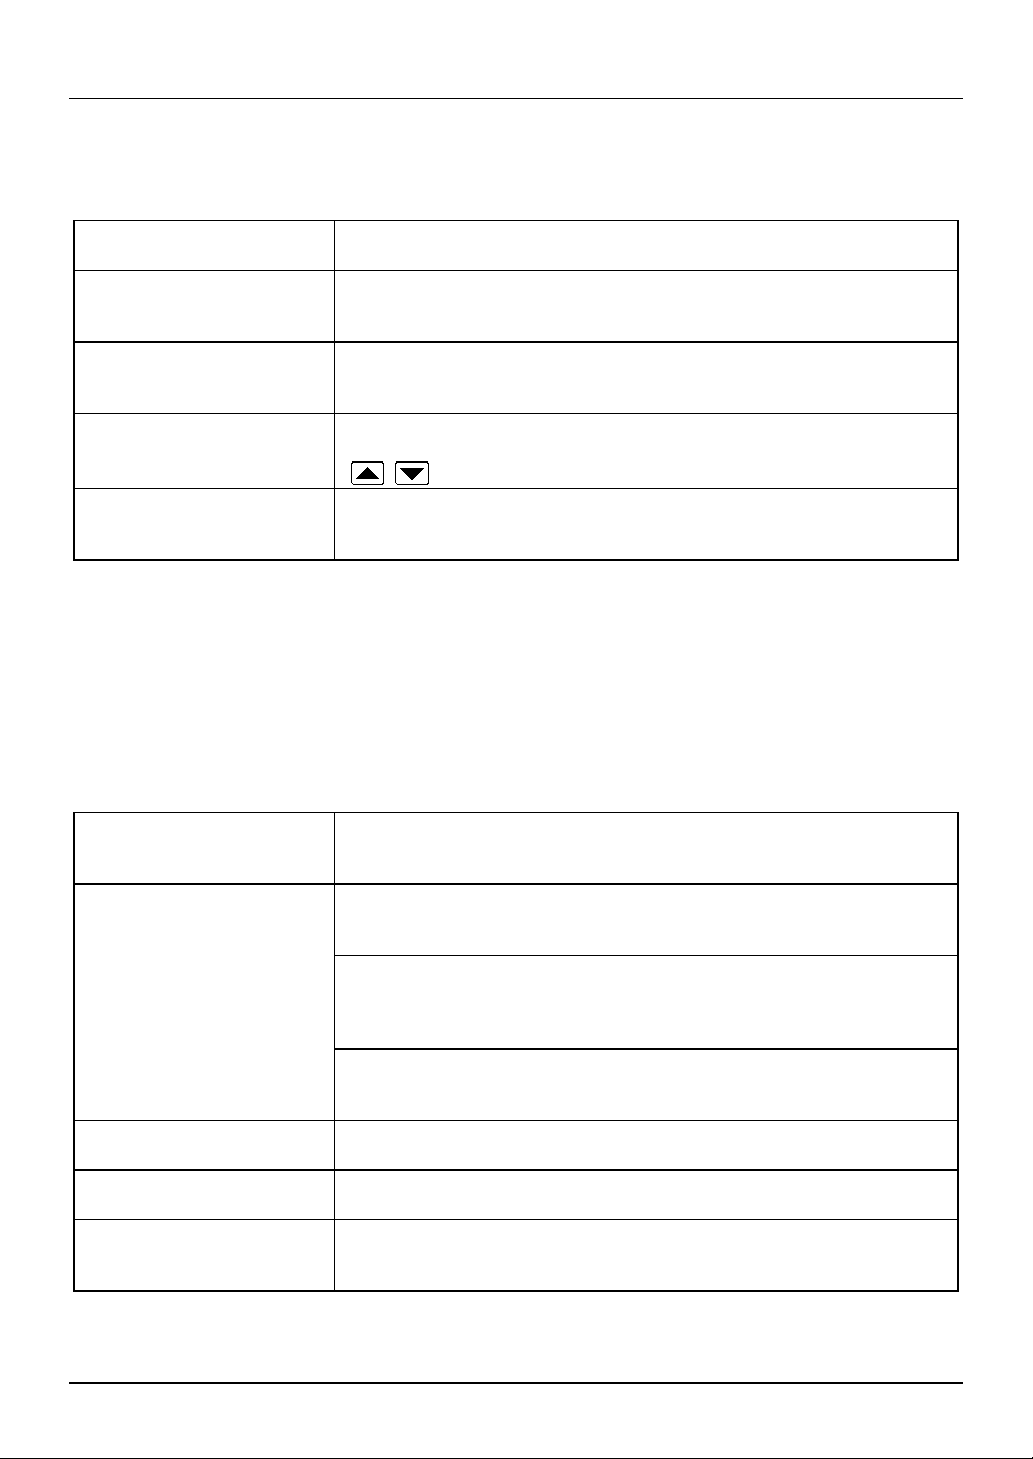
USING THE OPERATION PANEL
Interface Settings
Use the interface settings to configure the printer’s parallel and network interfaces.
HEXADECIMAL DUMP MODE If this function is set, the print job will be output in the hex dump format. This
setting is disabled in the default setting.
PARALLEL PORT
EMULATION SWITCHING
NETWORK PORT
EMULATION SWITCHING
I/O TIMEOUT Use this function to set the amount of time to wait after end of data stream
PORT SWITCHING METHOD Determines which switching method to use for the interface port. “SWITCH AT
* If “AUTO” is set, the printer language will switch automatically in accordance with the data from
the computer. It is recommended to set “AUTO” unless an error due to this setting occurs
frequently.
Specifies a printer language to emulate for printing when the printer is
connected to the computer through a parallel port. “AUTO”*, “PostScript” or
“PCL” can be set.
Specifies a printer language to emulate for printing when the printer is
connected to the computer through network. “AUTO”*, “PostScript” or
“PCL” can be set.
before ending print job. This time can be entered using the
( , ) keys. The allowable range of the time is 1 to 999 seconds.
END OF JOB”, “SWITCH AFTER I/O TIMEOUT”, “DISABLE PARALLEL
PORT” or “DISABLE NETWORK PORT” can be selected.
UP/DOWN
arrow
Network Settings
Use the network settings when using this printer as a network printer. If an optional network interface
card (Print Server Card) is not installed, these settings will not appear on the touch panel.
ENABLE TCP/IP Enables or disables the TCP/IP protocol. This setting is enabled in the default
setting. To use the printer with the TCP/IP protocol, set the IP address in
the next function.
IP ADDRESS SETTING IP ADDRESS: Manually set the printer’s IP address. Note that no number can
exceed 254. First digit of the number cannot be 0. Each item can be selected
directly with the touch key. The value can be input using the 10-key pad.
IP SUBNET MASK: Manually set the printer’s IP subnet mask. Note that no
number can exceed 255. First digit of the number cannot be 0. Each item can
be selected directly with the touch key. The value can be input using the 10-key
pad.
IP GATEWAY: Manually set the printer’s IP gateway. Note that no number can
exceed 254. First digit of the number cannot be 0. Each item can be selected
directly with the touch key. The value can be input using the 10-key pad.
ENABLE NetWare Enables or disables the NetWare protocol. This setting is enabled in the default
setting.
ENABLE EtherTalk
(TokenTalk)
PRINT NIC PAGE AT
POWER ON
Enables or disables the EtherTalk (TokenTalk if TokenRing network is
connected) protocol. This setting is enabled in the default setting.
If this function is set, the printer will print the NIC (Network Interface Card)
configuration page when power is turned on. This setting is enabled in the
default setting.
34
Page 43
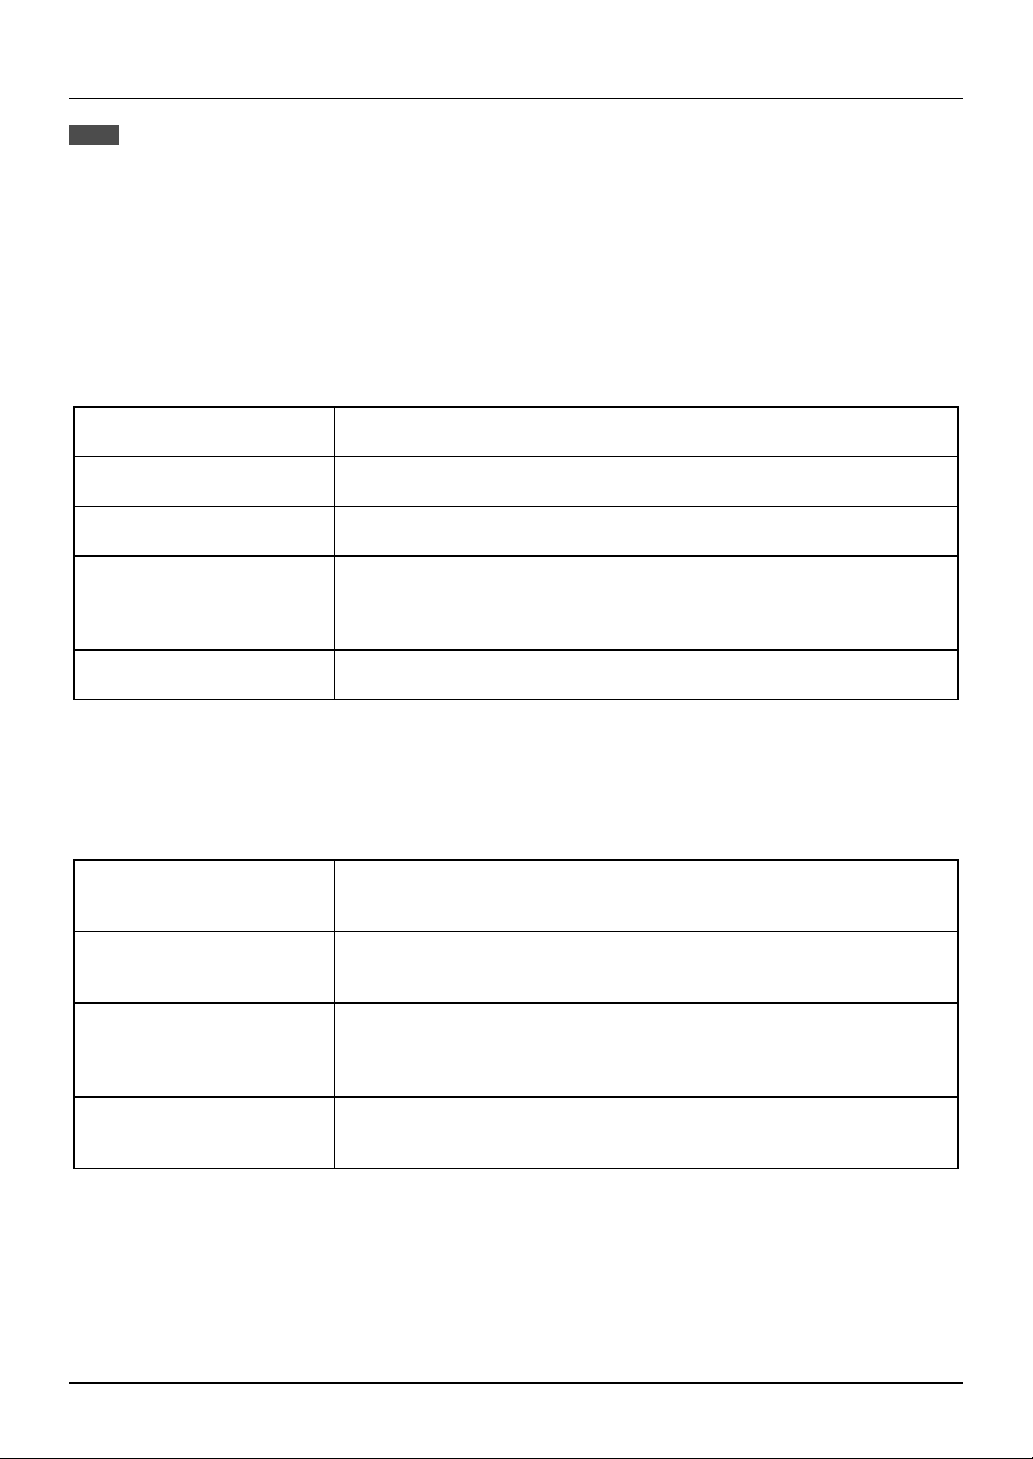
USING THE OPERATION PANEL
NOTE
When the enable or disable setting of protocols (ENABLE TCP/IP, ENABLE NetWare, and ENABLE EtherTalk) is
changed, the new setting will be effective after resetting the printer. For resetting, follow the message by pressing
“OK”, turning the printer off and then back on after waiting a few seconds.
Print Test Page
Printing a test page verifies that the printer operates properly. Also you can check the configuration
settings, built-in fonts etc. When printing is complete, the printer will exit the printer configuration
menu and return to online mode.
PRINT CONFIGURATION
PAGE
PRINT RESIDENT FONT LIST If this key is pressed, the printer will return to the online mode and print the
PRINT DEMO PAGE If this key is pressed, the printer will return to the online mode and print a
PRINT NIC PAGE If this key is pressed, the printer will return to the online mode and print the NIC
PRINT PCL SYMBOL SET
LIST
If this key is pressed, the printer will return to the online mode and print the
configuration list.
resident font list.
demonstration page.
(Network Interface Card) configuration page. If an optional network interface
card (Print Server Card) is not installed, this function will not appear on the
touch panel.
If this key is pressed, the printer will return to the online mode and print the
PCL symbol set list.
Initialize and/or Store Settings
Use these functions to initialize or store printer settings.
RESTORE FACTORY
DEFAULTS
STORE CURRENT
CONFIGURATION
RESTORE CONFIGURATION When this key is pressed, a confirmation window will appear. If the “
RESET THE NIC When this key is pressed, a confirmation window will appear. If the “
When this key is pressed, a confirmation window will appear. If the “
pressed, all the printer configuration settings will return to the factory default
settings.
When this key is pressed, a confirmation window will appear. If the “
pressed, the current printer configuration settings will be stored in the printer’s
nonvolatile memory.
pressed, the printer configuration settings that have been stored in the printer’s
nonvolatile memory with the “STORE CURRENT CONFIGURATION” function
will be recalled.
key is pressed, the settings of the optional network interface card will
return to the factory default settings.
YES
YES
YES
” key is
” key is
” key is
YES
”
35
Page 44

USING THE OPERATION PANEL
NOTES
If configuration settings are protected using key operator programs (Prohibit Changes to Printer Settings and
Prohibit Changes to Interface Settings), the settings cannot return to the factory default setting and stored settings
cannot be recalled.
Use the key operator programs to cancel protection mode.
If the setting of functions of enabling protocols (ENABLE TCP/IP, ENABLE NetWare, and ENABLE EtherTalk) is
changed by using the function “RESTORE FACTORY DEFAULTS” or “RESTORE CONFIGURATION”, the new
setting will be effective after resetting the printer. To reset the printer, turn off the printer and then turn it on after a
few seconds.
The “Restore Factory Defaults” setting does not restore network settings. To return the network settings to the
factory default settings, use the “RESET THE NIC” function.
Copier Mode and Printer Mode
The COPY and PRINT keys can be used to set whether the copier/printer is in the copier mode or
printer mode. The PRINT indicator (see Figure 4-1) lights up when the copier/printer is in the printer
mode; the COPY indicator (see Figure 4-1) lights up when the copier mode is in effect. The default
status is the mode that was selected at the time power was last turned off.
When the copier mode is in effect, pressing the PRINT key will change the setting to the printer
mode. If a document is sent to the printer from a computer when the copier mode is in effect and a
copying operation is not being performed, printing will be performed but the copier mode remains in
effect.
When the printer mode is in effect and no document is being printed, pressing the COPY key will
change the setting to the copier mode.
When the printer mode is in effect and a document is being printed, pressing the COPY key will
change the setting to the copier mode but will not interrupt the current print job until the START key
is pressed. When the copying job is complete, the print job will resume automatically but the copier
mode will remain in effect.
NOTE
If copying is performed, the print job will resume when no copier operation is performed for a programmed period of
time. To resume printing immediately after copying is complete, press the
PRINT
key.
Selecting the Online Mode
If the printer is in the offline mode, printing cannot be performed. To select the online mode, use the
procedure below.
1. If the printer is in the copier mode, press the PRINT key to select the printer mode.
The basic screen of the printer mode will appear.
2. Press the “ONLINE/OFFLINE” key on the touch panel to switch the printer to the online mode.
3. Press the COPY key to select the copier mode.
36
Page 45

USING THE OPERATION PANEL
Tray Select and Job Cancel
Tray Selection
The “PAPER SELECT” key on the touch panel can be used to change paper trays when printing has
stopped for one of the following reasons.
• In ‘Auto Select’ paper source selection mode, all trays on the printer configured for the
requested paper size are out of paper or no trays on the printer are configured for the requested
paper size.
• If a paper source has been specified, the requested tray on the printer has run out of paper.
• If there are no paper trays in the printer configured with the paper size requested, the printer will
request that paper be loaded on the bypass tray.
In most cases it will be best to load or re-load the printer with the appropriate paper size and
continue printing. If it is preferable to continue printing from a different tray (possibly containing a
different size paper than requested by the computer), follow the procedure below.
Tray Change Procedure:
1. Press the “ONLINE/OFFLINE” key on the touch panel (Figure 4-1) to set the printer to an offline
state.
2. Press the “PAPER SELECT” key to select the desired paper tray.
3. Press the “ONLINE/OFFLINE” key to return the printer to an online state. The printer will begin
printing from the selected tray.
NOTES
Selecting a tray containing a different size or orientation of paper than that specified by the computer may result in
the pages being clipped to fit the physical paper size.
Note that using the “
using the printer driver configuration menus.
PAPER SELECT
” key to select a new paper tray overrides any selection previously made
Interrupting and Canceling Print Jobs
To interrupt a print job while the printer is printing, press the “ONLINE/OFFLINE” key on the touch
panel (Figure 4-1). The printer will go off line and stop printing. A message will appear on the touch
panel. To resume printing, press the “ONLINE/OFFLINE” key again to return the printer to the online
status. The printer will go online and resume printing.
While the printer is in the offline mode, the print job can be canceled by pressing the CLEAR key.
Lastly, press the “ONLINE/OFFLINE” key to return the printer to online status. Now the printer is
ready for the next print job.
37
Page 46

USING THE OPERATION PANEL
Confidential Print
The confidential print feature allows printing to be started only after entering the specified password
on the operation panel. This feature is useful for printing secret document data on the printer located
away from the user.
To execute confidential print, specify use of this feature and enter a password on the setting screen
of the printer driver (Advanced tab in the Windows system, print conditions setting in the Macintosh
system (page 27)). The operation procedure on the operation panel for starting confidential print is
described below. The maximum number of confidential print jobs that can be stored in the printer can
be specified using a key operator program. See page 43.
1. Press the PRINT key to select the printer mode.
2. Press the confidential print icon on the touch panel.
• If no confidential print data is stored in the printer or a confidential print job is being stored, this icon
is not displayed.
• If another print job is being received or printing is being performed, press the “ONLINE/OFFLINE”
to select the offline mode and then press the confidential print icon.
3. When confidential print file names and user names are displayed, press the key corresponding to
your job.
4. Enter the password.
• Enter the correct password that has been specified on the computer. If the entered password is not
correct, an alarm will be issued.
5. Press the “OUTPUT” key.
• The print data can be deleted without printing by pressing the “DELETE” key.
6. If the “ONLINE/OFFLINE” key has been pressed in step 2, press the “ONLINE/OFFLINE” key
again to select the online mode.
NOTES
Different first page, transparency inserts, and booklet print are not available with this feature.
Paper tray selection in the printer driver must be ‘Auto Select’.
A confidential print data is deleted when printing is completed or the
If the printer power switch is turned off or the printer is turned off by the auto power shut-off function, all
confidential print data that has been stored in the printer will be deleted. The auto power shut-off time can be
adjusted using a copier key operator program. If confidential print is often used, it is recommended to set a long
auto power shut-off time.
In the following cases, the printer will cancel confidential print and output a notice page. The received print data will
be cleared.
1. The maximum number of print jobs or the maximum number of pages specified with a key operator program is
exceeded. See page 43.
2. ‘Custom paper size’ is specified.
(C) key is pressed during printing.
CLEAR
38
Page 47

USING THE OPERATION PANEL
Tandem Print
If the printer model has the tandem copy/print feature and is connected with another copier of the
same model through the tandem-connection cable so that the tandem copy feature can be used, the
tandem print feature can be used. For printing multiple sets, two printers can be used
simultaneously, allowing printing to be twice as fast as printing on one printer.
To execute tandem print, select this feature on the printer driver setting screen (Advanced tab in the
Windows system, print conditions setting in the Macintosh system (page 27)).
• If the printers are equipped with optional equipment, the two printers must be equipped with the
same optional equipment. A dedicated tandem-connection cable AR-CA1 is required for tandem
print.
• Paper tray selection in the printer driver must be ‘Auto Select’.
• Different first page, transparency inserts, and confidential print are not available.
NOTES
If the printers are connected to the network, print data must be sent to the main printer for tandem print. If the data
is sent to the sub printer, the data will be output without using the tandem print feature.
For tandem printing, the operation settings of the two copier/printers must be the same. For details on these
settings, see the section of Tandem Copy in the copier operation manual.
To cancel tandem printing after starting, press the “
on the main printer.
OFFLINE
” key on the main printer. Then press the
CLEAR
key
Key operator program settings in tandem print
The key operator programs (page 40) can be set on the main printer and on the sub printer
respectively. Depending on the key operator programs, however, the settings on the main printer
may have priority or the settings may function only on the main printer.
1. Key operator programs of which settings on the main printer are given priority (the settings on the
sub printer are ignored):
Printer Exposure Level, Output Method When Memory is Full, and Prohibit Auto Tray Switching
2. Key operator programs that function only on the main printer:
Prohibit Notice Page Printing (Even if notice page printing is enabled, notice pages will be not
output on the sub printer.)
Prohibit Rotated Output (Even if rotated output is enabled, rotated output will not be performed on
the sub printer.)
In case of the other key operator programs than mentioned above, different settings on the main and
sub printers respectively do not matter even when the tandem printing is activated.
39
Page 48

Chapter 5 Key Operator’s Guide
Introduction
This chapter contains information on operation by the key operator or printer administrator.
Information is provided on:
1. Key operator programs
2. Web page features
3. “Status/alert by E-mail” system
Key Operator Programs
A variety of key operator programs are available which allow a key operator to adjust certain printer
features, functions, or operating conditions. These programs are listed in this section. (Refer to Table
5-1.)
Key operator programs governing printer features and functions can be called in the same manner
as the key operator programs governing copier features.
For general information on accessing key operator
programs, including registration of a key operator
code number, refer to the Key Operator’s Guide in
the copier manual.
If the printer expansion kit has been installed, the
“PRINTER” key will be displayed on the touch panel
after the key operator code number is entered. Press
the “PRINTER” key to access the key operator
programs for the printer features.
KEY OPERATOR PROGRAMS
COPIER PRINTER
TOTAL COUNT.
PROGRAM LIST
PRINTOUT.
EXIT
40
Page 49

KEY OPERATOR’S GUIDE
Table 5-1. Key Operator Program Functions
PROGRAM NAME FUNCTION PAGE NO.
Printer Exposure Level Lightens or darkens printouts.
Memory Reserved for Printer Specifies percentage of document memory
allocated to storage of printer jobs.
Output Method When Memory Is Full Specifies whether one set or multiple sets
will be printed when the printer memory
becomes full.
Set the Number of Confidential Print
Jobs to Be Stored
Enable Bypass-Tray Size Detection Enables or disables paper size detection
Give Priority to Print Speed in Staple
Mode
Prohibit Notice Page Printing Specifies whether a notice page will be
Prohibit Rotated Output Enables/disables rotation of print image for
Prohibit Bypass-Tray Selection Enables/disables bypass tray selection in
Prohibit Auto Tray Switching Enables/disables automatic switching
Prohibit Test Page Printing Enables/disables test page printing from
Prohibit Changes to Printer Settings Prohibits modification of basic printer
Prohibit Changes to Interface Settings Prohibits modification of interface settings
Prohibit Changes to Network Settings Prohibits modification of network settings
Record Copy and Print per Account Enables or disables the printer auditing
Specifies the maximum number of
confidential print jobs that can be stored in
the printer and the maximum number of
pages in a job.
for the bypass tray.
Specifies an image processing method for
printing with stapling.
printed when the printer memory becomes
full and divided printing is performed.
printing onto A4R or 8-1/2" x 11"R paper.
the ‘Auto Tray Switching’ mode.
between paper trays during printing when
paper runs out.
the printer configuration menu.
settings in the printer configuration menu.
in the printer configuration menu.
in the printer configuration menu.
mode, which controls access to printer.
42
42
43
43
44
44
44
45
45
45
45
45
46
46
46
41
Page 50

KEY OPERATOR’S GUIDE
Printer Exposure Level
This program is used to adjust the lightness or darkness of documents in the printer mode. The
factory default is level ‘3’.
When the “PRINTER EXPOSURE LEVEL” key is pressed, the following display will appear.
KEY OPERATOR PROGRAMS
PRINTER EXPOSURE LEVEL
OK
1. Set the desired density level using the “ ”
and “
” keys.
2. Press the “OK” key.
Memory Reserved for Printer
This program is used to specify the percentage of document memory allocated to storage of printer
jobs. In the default setting, the memory capacity for printer jobs is 30% (60 pages for A4 or 8-1/2" x
11"). To print documents that exceed this limit, increase the percentage using this program.
When the “MEMORY RESERVED FOR PRINTER” key is pressed, the following display will appear.
NOTE
This program can be used only for models with a 1 GB hard disk drive. For models with a 2 GB or more hard disk
drive or no hard disk drive, this program cannot be used.
KEY OPERATOR PROGRAMS
1. Select the desired percentage.
MEMORY RESERVED FOR PRINTER
30%
45%
35%
50%
60%
NOTES
If ‘30%’ is specified, the maximum number of pages in a block is 60 for A4, letter or smaller sizes. If ‘60%’ is
specified, the maximum number is 120 for A4, letter or smaller sizes.
Since the memory in this printer is used for both copier and printer features, the setting of this program will affect
copying performance. Assign an appropriate value.
40%
55%
OK
2. Press the “OK” key.
42
Page 51

KEY OPERATOR’S GUIDE
Output Method When Memory Is Full
When multiple sets of a document have been requested and the document memory cannot hold the
entire document, this program gives the option to print one set or multiple sets.
When the “OUTPUT METHOD WHEN MEMORY IS FULL” key is pressed, the following display will
appear.
KEY OPERATOR PROGRAMS
OUTPUT METHOD WHEN MEMORY IS
FULL
OK
1. Select “1 SET” or “MULTI-SET”.
2. Press the “OK” key.
1 SET
MULTI-SET
NOTES
When the document memory becomes full of print job pages, the printer will start printing the data which have
been stored in the memory. If multiple sets of the document have been requested and “MULTI-SET” is specified
with this program, the sets will be printed in blocks. Each set of printed sheets will be stacked offset from the
previous set. Finally, the printer will output a notice page unless it is prohibited with a key operator program.
This program applies only to face down delivery. See page 57 “Notes on Printing Lengthy Documents”.
Set the Number of Confidential Print Jobs to Be Stored
This program is used to specify a set of the maximum number of confidential print jobs that can be
stored in the printer and the maximum number of pages in a job. In the default setting, up to 16 jobs
including up to 80 pages of A4 or 8-1/2" x 11" paper can be stored in the printer.
NOTE
1. Select the desired set of the number of jobs and
the number of pages.
• The number of pages indicates the maximum
number for A4 or 8-1/2" x 11" paper.
2. Press the “OK” key.
When the printer has any confidential print jobs, this change cannot be done. Wait until all confidential print jobs are
complete.
43
Page 52

KEY OPERATOR’S GUIDE
Enable Bypass-Tray Size Detection
This program is used to enable or disable paper size detection of the bypass tray in the printer mode.
This setting does not affect the paper size detection in the copier mode.
To enable paper size detection of the bypass tray in the printer mode, press the “ENABLE BYPASS-
TRAY SIZE DETECTION” box to display a check mark.
To disable paper size detection, press the checked box again to clear the check mark.
NOTE
If size detection of the bypass tray is disabled, paper in the bypass tray will always be treated as the largest
allowable size paper (either 11" x 17" or A3). If an image larger than the paper in the bypass tray is printed, a
malfunction may occur. Be careful when disabling the size detection.
Give Priority to Print Speed in Staple Mode
This program is used to select one of the two image processing methods for printing with stapling. If
this program is set, the printer will start printing while storing image data. The printing speed will be
higher. If improper paper size for stapling is found or the number of sheets exceeds the limit for
stapling, however, printing will stop. If this program is not set, the printer will start printing after
storing all image data. The printing speed will be lower. If an error data such as improper paper size
is received, however, the printer will continue printing without stapling. This program is set in the
factory default setting.
To give priority to printing speed, press the “GIVE PRIORITY TO PRINT SPEED IN STAPLE
MODE” box to display a check mark.
To cancel priority to printing speed, press the checked box again to clear the check mark.
NOTE
This program can be applied to the AR-505 and AR-507.
Prohibit Notice Page Printing
This program is used to specify whether a notice page and separator sheets will be printed when the
printer memory becomes full and divided printing must be performed. If notice page printing has
been enabled, a notice page will be printed at the end of a print job and separator sheets will be
printed between each block letting the user know that the job has been divided into blocks and the
user must re-stack the document.
To prohibit notice page printing, press the “PROHIBIT NOTICE PAGE PRINTING” box to display a
check mark.
To restore notice page printing, press the checked box again to clear the check mark.
44
Page 53

KEY OPERATOR’S GUIDE
Prohibit Rotated Output
If this program is not set, the print image will be rotated when the orientation of the print image does
not match that of the available copy paper. If this program is set, a print image specified to be printed
on A4 or 8-1/2
specified paper is not loaded in any tray.
To prohibit rotated output, press the “PROHIBIT ROTATED OUTPUT” box to display a check mark.
To restore rotated output, press the checked box again to clear the check mark.
"
x 11" paper will not be rotated and printed on A4R or 8-1/2" x 11"R paper even if the
Prohibit Bypass-Tray Selection
If this program is set, the bypass tray will not be selected for a print job that specifies auto paper
selection or during auto tray switching.
To prohibit bypass tray selection, press the “PROHIBIT BYPASS-TRAY SELECTION” box to display
a check mark.
To restore bypass tray selection, press the checked box again to clear the check mark.
Prohibit Auto Tray Switching
This program prevents automatic switching between paper trays in print jobs. This program does not
affect the auto tray switching function in the copier mode.
To prohibit automatic tray switching, press the “PROHIBIT AUTO TRAY SWITCHING” box to display
a check mark.
To restore automatic tray switching, press the checked box again to clear the check mark.
Prohibit Test Page Printing
This program prevents printing test pages from the printer configuration menu. If this program is set,
the test page print functions will not appear in the printer configuration menu.
To prohibit test page printing, press the “PROHIBIT TEST PAGE PRINTING” box to display a check
mark.
To restore test page printing, press the checked box again to clear the check mark.
Prohibit Changes to Printer Settings
This program prevents modification of basic printer settings in the printer configuration menu. If this
program is set, the printer settings functions will not appear in the printer configuration menu.
To prohibit modification of printer settings, press the “PROHIBIT CHANGES TO PRINTER
SETTINGS” box to display a check mark.
To enable modification of printer settings, press the checked box again to clear the check mark.
45
Page 54

KEY OPERATOR’S GUIDE
Prohibit Changes to Interface Settings
This program prevents modification of interface settings in the printer configuration menu. If this
program is set, the interface settings functions will not appear in the printer configuration menu.
To prohibit modification of interface settings, press the “PROHIBIT CHANGES TO INTERFACE
SETTINGS” box to display a check mark.
To enable modification of interface settings, press the checked box again to clear the check mark.
Prohibit Changes to Network Settings
This program prevents modification of network settings in the printer configuration menu. If this
program is set, the network settings functions will not appear in the printer configuration menu.
To prohibit modification of network settings, press the “PROHIBIT CHANGES TO NETWORK
SETTINGS” box to display a check mark.
To enable modification of network settings, press the checked box again to clear the check mark.
Record Copy and Print per Account
This program is used to enable or disable the printer auditing mode. If this program is set, the
internal auditor functions for the copier feature can also be applied to the printer feature.
If the printer auditing mode is enabled, a 5-digit account number that has been registered using a
copier key operator program must be specified on the setting screen of the printer driver when
printing is executed. If an improper number is entered or no number is entered, the print job will be
executed and the number of printed sheets will be accumulated against the account number 99999.
Number 99999 must be registered as an account number using a copier key operator program.
NOTES
To enable the printer auditing mode, press the “RECORD COPY AND PRINT PER ACCOUNT” box
to display a check mark.
To disable the printer auditing mode, press the checked box again to clear the check mark.
If this program is set, the account number 99999 cannot be used as a normal account number and the copier key
operator program “Account Limit Setting” will be ignored.
If the number 99999 has not been registered, the job without proper number will not be counted.
Test pages will not be counted against any account number.
However, only the NIC page will be counted against the number 99999 any time.
When this program is set, the message indicating that the account limit setting of the copier feature
will be ignored will be displayed. Press the “OK” key.
46
Page 55

KEY OPERATOR’S GUIDE
Web Page Feature
This copier/printer is equipped with web page features that allow some network-related functions
such as the network scanner function and the Status & Alert by E-mail function to be set and used
with a web browser. (An optional Network Scanner Expansion Kit AR-NS1 is required to use the
network scanner function.)
The web page feature includes the following three types.
1. Password Setting
Setting up the administrator’s and user’s passwords.
The administrator of this software can set the passwords (for administrator and user) to authorize
the access to the E-mail Setup Web page for the security of the settings on the page. If such a
security measure is not required, the Password Setting procedure can be skipped. This will leave
Web access settings open to all users.
2. E-mail Setup and Network Scanning Setup
Configuration of the network scanning system and status/alert by E-mail.
3. Scanning Destination Setup
Setting the default scanning parameters on the device to send the scanned image or data as
Destinations. (An optional Network Scanner Expansion Kit AR-NS1 is required for this setup.)
First, assign an IP address to the copier/printer. See Configuration from the Operation Panel,
Network Settings on page 34.
NOTE
The following characters cannot be input in the Web pages. The input is case-sensitive.
•
Characters that cannot be input: < > & “
•
Examples of improper input: <abc> <abc “abc” “abc abc”
< >
Password Setting
The administrator should exclusively do the setting of the password of two levels: User and Admin
when setting up network scanning system security. A User password is required to create, change,
and delete destinations. An Admin Password lets you access to the same functions as the User
password but is also required to set system configuration settings such as:
• Password Setup page
• Setup Status & Alerts by E-mail pages
• E-mail/Network Scanning Setup page
When you first install your network scanning system, both password functions are disabled. To set a
User and/or Admin password, the administrator needs to follow the steps below:
47
Page 56

KEY OPERATOR’S GUIDE
1. Open the web browser such as Netscape Navigator 4.0 and upper or Internet Explorer 4.0 and
upper.
2. Input the IP Address previously specified to the ADDRESS field of the browser.
• Input the IP address previously specified. When the connection is completed, the Machine
Information Page shown below will be displayed.
3. From the Sharp HTTP Machine Information page, click the ‘Setup’ button.
4. Click on ‘Password Setup’ button. This brings up the Password Setup web page.
48
Page 57

KEY OPERATOR’S GUIDE
5. This page lets the system administrator select passwords for the entire web site (refer to the
following table). Enter a user password in the User Access to Destination List field and/or
administrator password in the Admin Control for E-mail/Scanning field.
One password for each User and Admin respectively can be registered. After entering the
passwords in both the entry and confirm locations for User and Admin, check the box of Enable
Password Protection of This Web Site and click the ‘Submit’ button to register the passwords.
If you enable the password protection with entering neither User nor Admin password, the password
“Sharp” will automatically be entered.
NOTE
The passwords must be confirmed by entering in both fields of “User Access to Destination List” and “Confirm
Password” for the user password and “Admin Control for E-mail/Scanning” and “Confirm Password” for the
administrator password, and then select the ‘Submit’ button to register the passwords.
Once the passwords have been registered, you will be prompted for user name and password every
time you try to enter the web pages of the network scanning system. The user names will always be
“user” for user level and “admin” for administrator level.
Name Definition
Enable Password Protection of This Web
Site
To enable password protection, check the box and
click the ‘Submit’ button. To disable it, clear the
check mark in the box and click the ‘Submit’ button.
User Access in Destination List Enter a User password within 10 characters.
Confirm Password Enter the User password again to confirm it.
Admin Control for E-mail/
Scanning
Enter an Admin password within 10 characters.
Confirm Password Enter the Admin password again to confirm it.
E-mail Setup and Network Scanning Setup
In the “Status/Alert by E-mail” function, SMTP (Simple Mail Transport Protocol) protocol is used to
send the e-mails. This section describes how to set up the basic status of the e-mail sending
including the definition of the file names for the image data to be attached and so on. Such settings
must be effected by the system administrator who has the special network related backgrounds.
49
Page 58
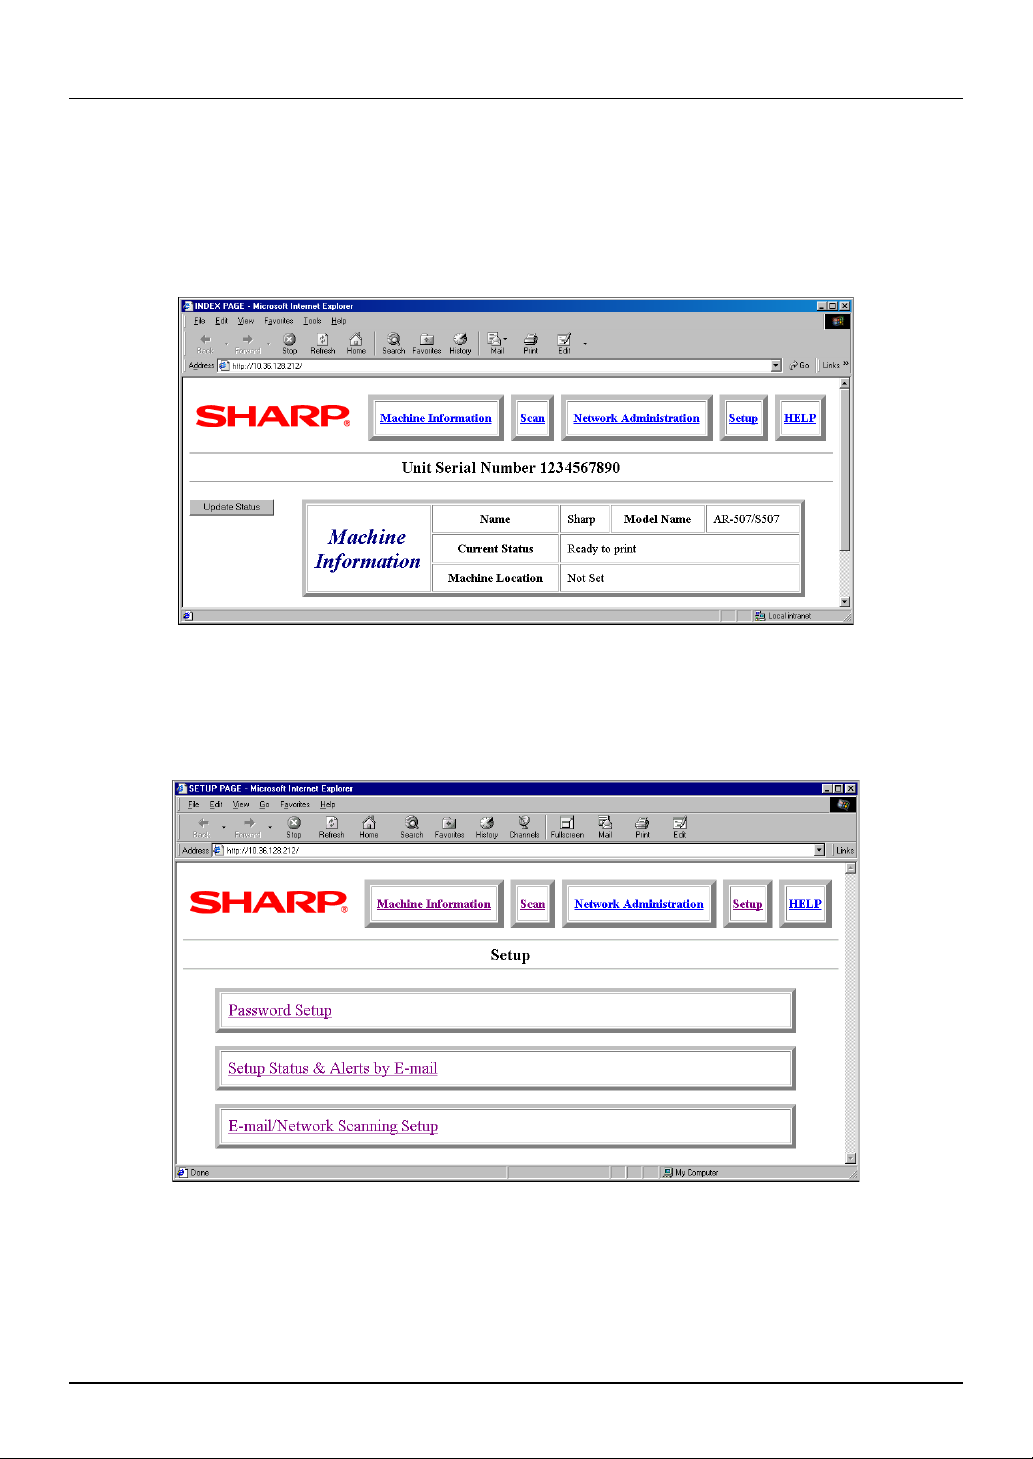
KEY OPERATOR’S GUIDE
1. Open the web browser such as Netscape Navigator 4.0 and upper or Internet Explorer 4.0 and
upper.
2. Input the IP Address previously specified to the ADDRESS field of the browser.
• When the connection is completed, the Machine Information Page shown below will be displayed.
This page displays a navigation bar for accessing other internal web pages that allows to get overall
device status information .
3. Click on the ‘Setup’ button.
• This brings up the Network Scanning Management web page. This page functions as main page
for adding, deleting and modifying scanning destinations.
4. Click on the ‘E-mail/Network Scanning Setup’ button.
• This brings up the E-mail/Network Scanning Setup web page.
50
Page 59
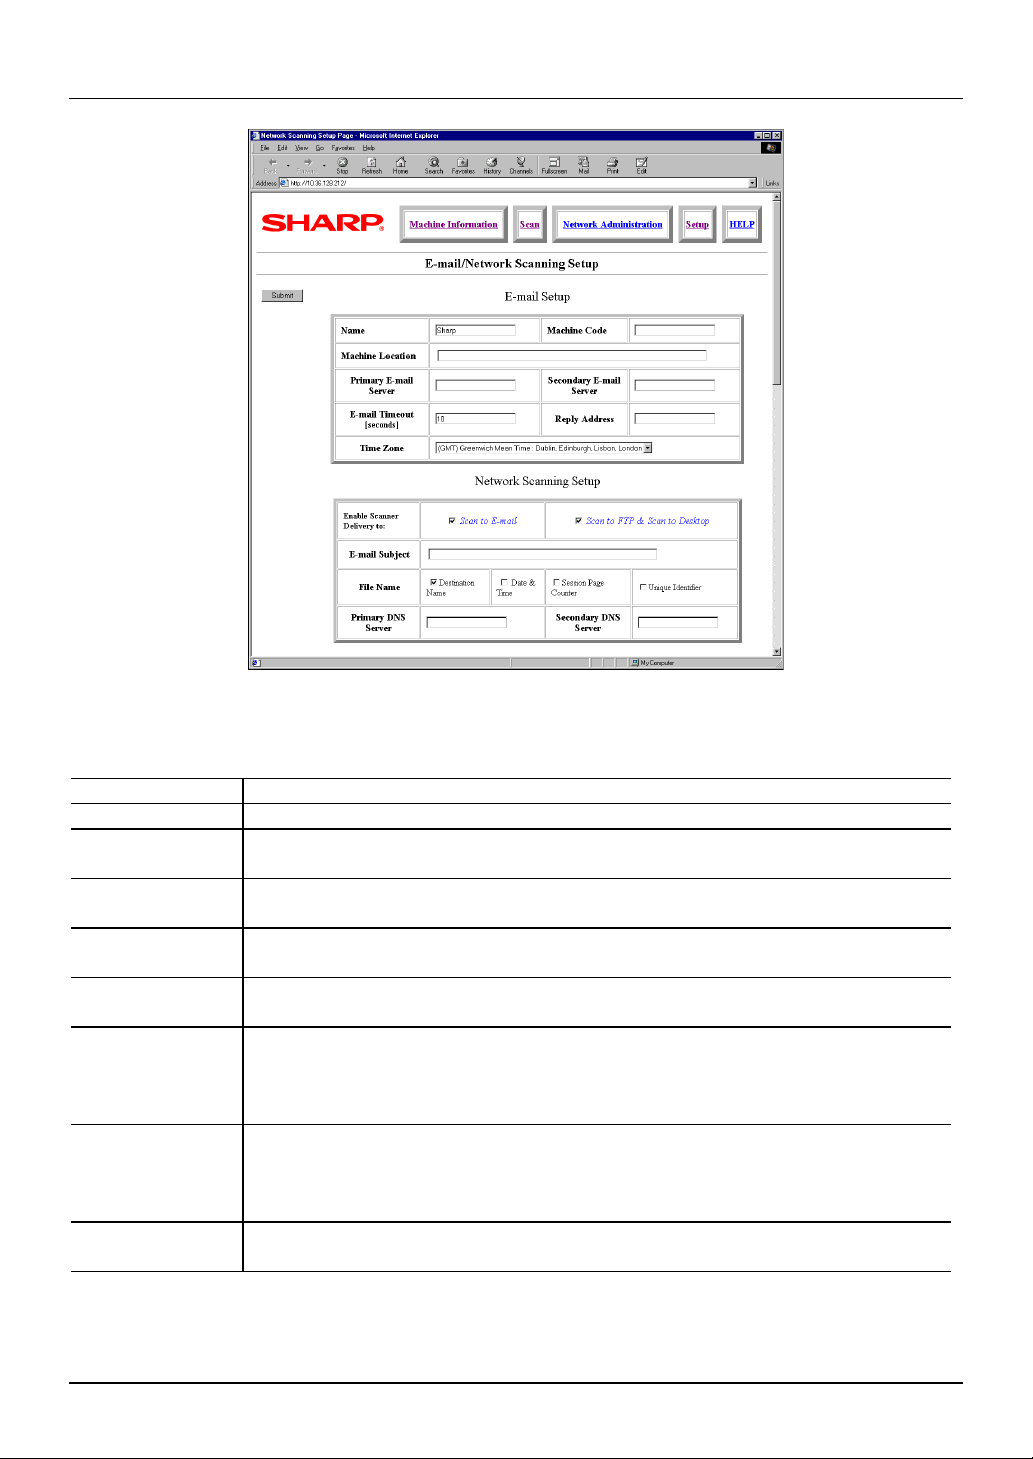
KEY OPERATOR’S GUIDE
5. From this page you can make changes to the items as listed in the following table:
E-mail Setup
Item Description
Name Enter a unique name for the machine within 50 characters.
Machine Code
Machine
Location
Primary E-mail
Server
Secondary
E-mail Server
E-mail Time Out
Reply Address
Time Zone
This is not used. This field can be used to input some machine related
information. Some dealers may use this field to identify the machine.
Enter a unique entry for the machine location within 100 characters.
Enter an IP address for the primary e-mail server or a host name.
Enter an IP address for the secondary e-mail server or a host name. No need
to enter if secondary e-mail server is not set up.
Enter a time out period, from 0 to 60 seconds, that the system will wait for as
it attempts to connect to the primary server. The default is 20 seconds. If no
connection is made, the system will then look for the secondary server if it has
been set up. If not, the system will stop attempting to connect.
Enter an e-mail address to which the machine returns an unsuccessful
delivery message when the distribution has failed. Only 1 e-mail address can
be entered. The entered e-mail address is also used as sender e-mail
address.
Select the time zone of the place to use this Network Scanning System. A
specific time zone is set after the selection.
• To perform network scanner setting, enter the data for the network scanning setup items. (See
the network scanner operation manual.) If a host name for the e-mail server has been entered,
enter its IP address on this screen.
51
Page 60

KEY OPERATOR’S GUIDE
Status/Alert by E-Mail
This function is a notification system that sends information on the status and trouble of the
copier/printer, the status of supplies such as copy paper and toner, etc. to administrators of the
copier/printer and a dealer through E-mail. This system can be used to facilitate the communication
between an operator and administrators or a dealer.
Before Using the “Status/Alert by E-Mail” function
This copier/printer is equipped with a web page feature that allows some network-related functions
such as the network scanner function to be set and used with a web browser. The “Status/Alert by EMail” function is one of the functions that use the web page feature. For the outline of the web page
feature and use of the password function, see page 47.
To use this function, the following hardware and software are needed.
Print Server Card (AR-NC3D)
Browser (Microsoft Internet Explorer 4.0 or later or equivalent)
E-mail software (compatible to SMTP (Simple Mail Transfer Protocol))
Other hardware and software that enable Internet connection and use of E-mail
Setting the “Status/Alert by E-Mail” function
This function allows three kinds of E-mail addresses to be set: two addresses for copier/printer
administrators and one address for a dealer. The status of use of the copier/printer can be
transmitted through E-mail by setting the transmission schedule (status message). Error information
of the copier/printer can also be transmitted (alert message).
The setting method of the “Status/Alert by E-Mail” function is described as follows. If the password
protection has been set, you must enter your password when accessing this function.
Setting the status message parameters
1. Start a browser.
2. Enter in the address box of the browser the IP address that has been specified for this product.
Then access this address.
• See IP address setting of the network settings on page 34.
• The machine information page will appear.
3. Click ‘Setup’.
4. Click ‘Setup Status & Alerts by E-mail’.
5. Click ‘Status Message Parameters Setup’.
6. Enter Status E-mail addresses and time schedules.
52
Page 61
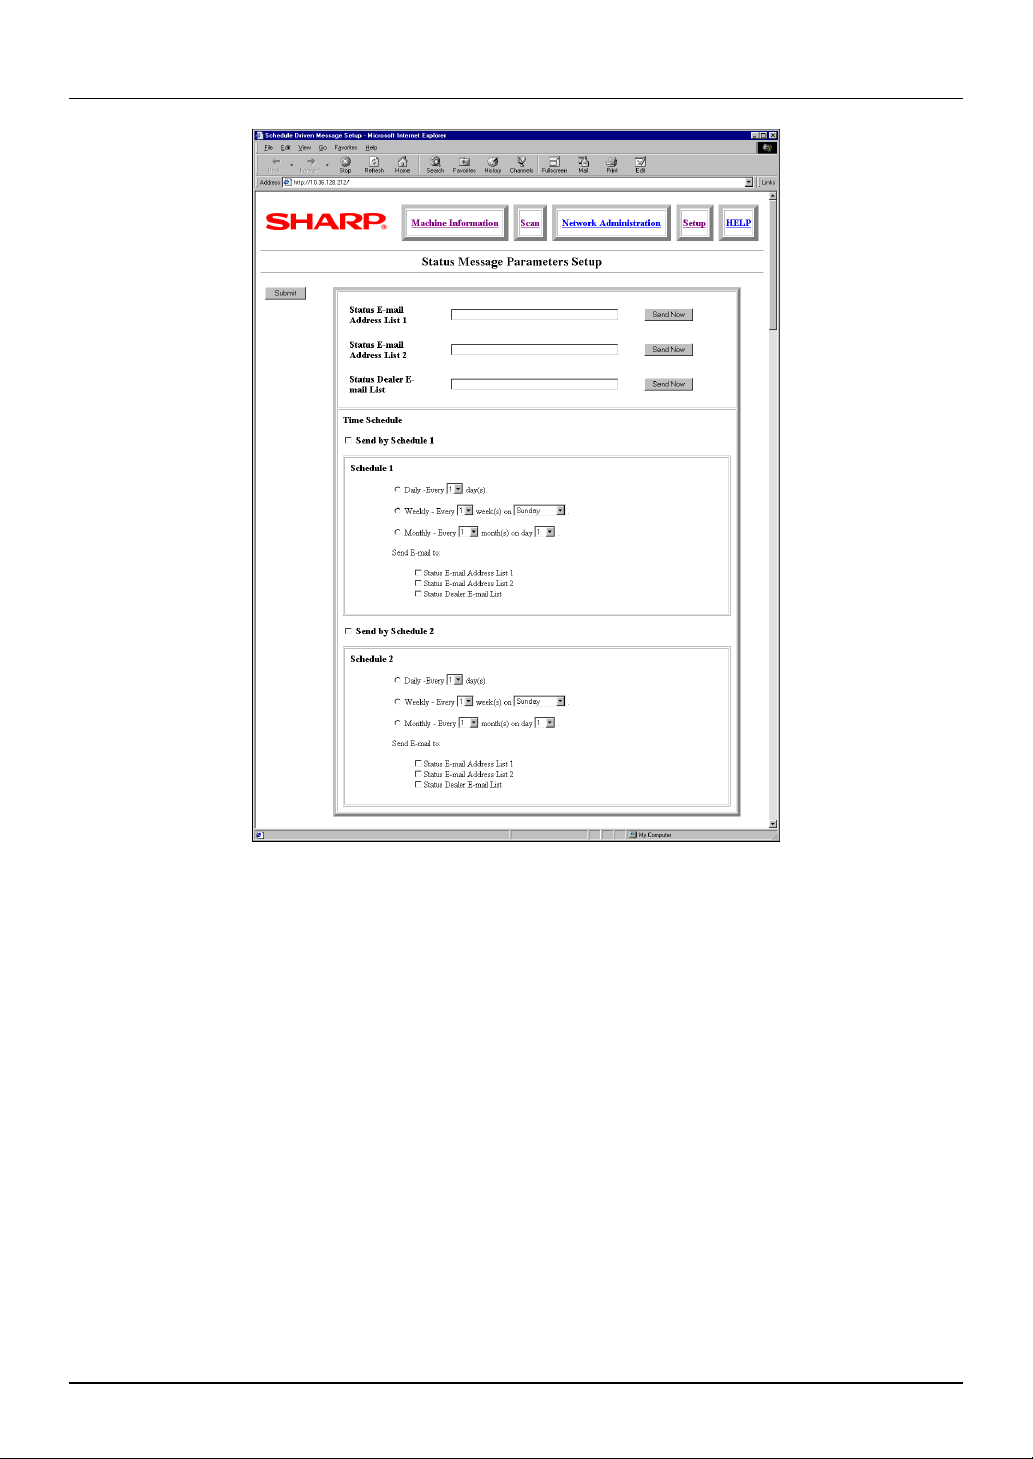
KEY OPERATOR’S GUIDE
• Status E-mail addresses
Enter the E-mail addresses of administrators in the boxes of ‘Status E-mail Address List 1’ and
‘Status E-mail Address List 2’. Enter the address of a dealer in the box of ‘Status Dealer E-mail
List’. Up to 200 characters can be entered for each address. Multiple addresses can be entered in a
box by using a comma “,” or a semi-colon “;” as a delimiter.
Example)
aaa@aaa.com,bbb@bbb.com,......zzz@zzz.com
• Time schedule
Two patterns of time schedules can be set. Select one or two schedule patterns and set each
schedule. The status of the copier/printer will be transmitted to specified addresses periodically
in accordance with the specified time schedule.
53
Page 62

KEY OPERATOR’S GUIDE
Examples)
• If ‘Daily - Every 1 day(s)’ is set, information will be transmitted every day.
• If ‘Weekly
• If ‘Monthly
-
Every 1 week(s) on Sunday’ is set, information will be transmitted every Sunday.
-
Every 1 month(s) on day 1’ is set, information will be transmitted on the first of every
month.
• Information will be transmitted to the checked addresses (Status E-mail Address List 1, Status E-
mail Address List 2 or Status Dealer E-mail List).
7. When all settings are entered, click the ‘Submit’ button.
• Settings will be stored.
NOTES
To cancel the settings, terminate the browser before clicking the ‘Submit’ button.
If a ‘Send Now’ button is clicked, information on the copier/printer will be immediately transmitted to the specified
address.
When the copier/printer operates normally if Status E-mail Address List 1 or Status E-mail Address List 2 has been
set, the total output count, the number of copies in the copier mode, and the number of printed pages in the printer
mode will be transmitted through E-mail. If Status Dealer E-mail List has been set, an attached file created by the
copier/printer will be transmitted.
Setting the alerts message parameters
1. Follow steps 1 to 4 in the procedure for “Setting the status message parameters” on the previous
pages.
2. Click ‘Alerts Message Parameters Setup’.
3. Enter E-mail addresses and specify event information.
54
Page 63
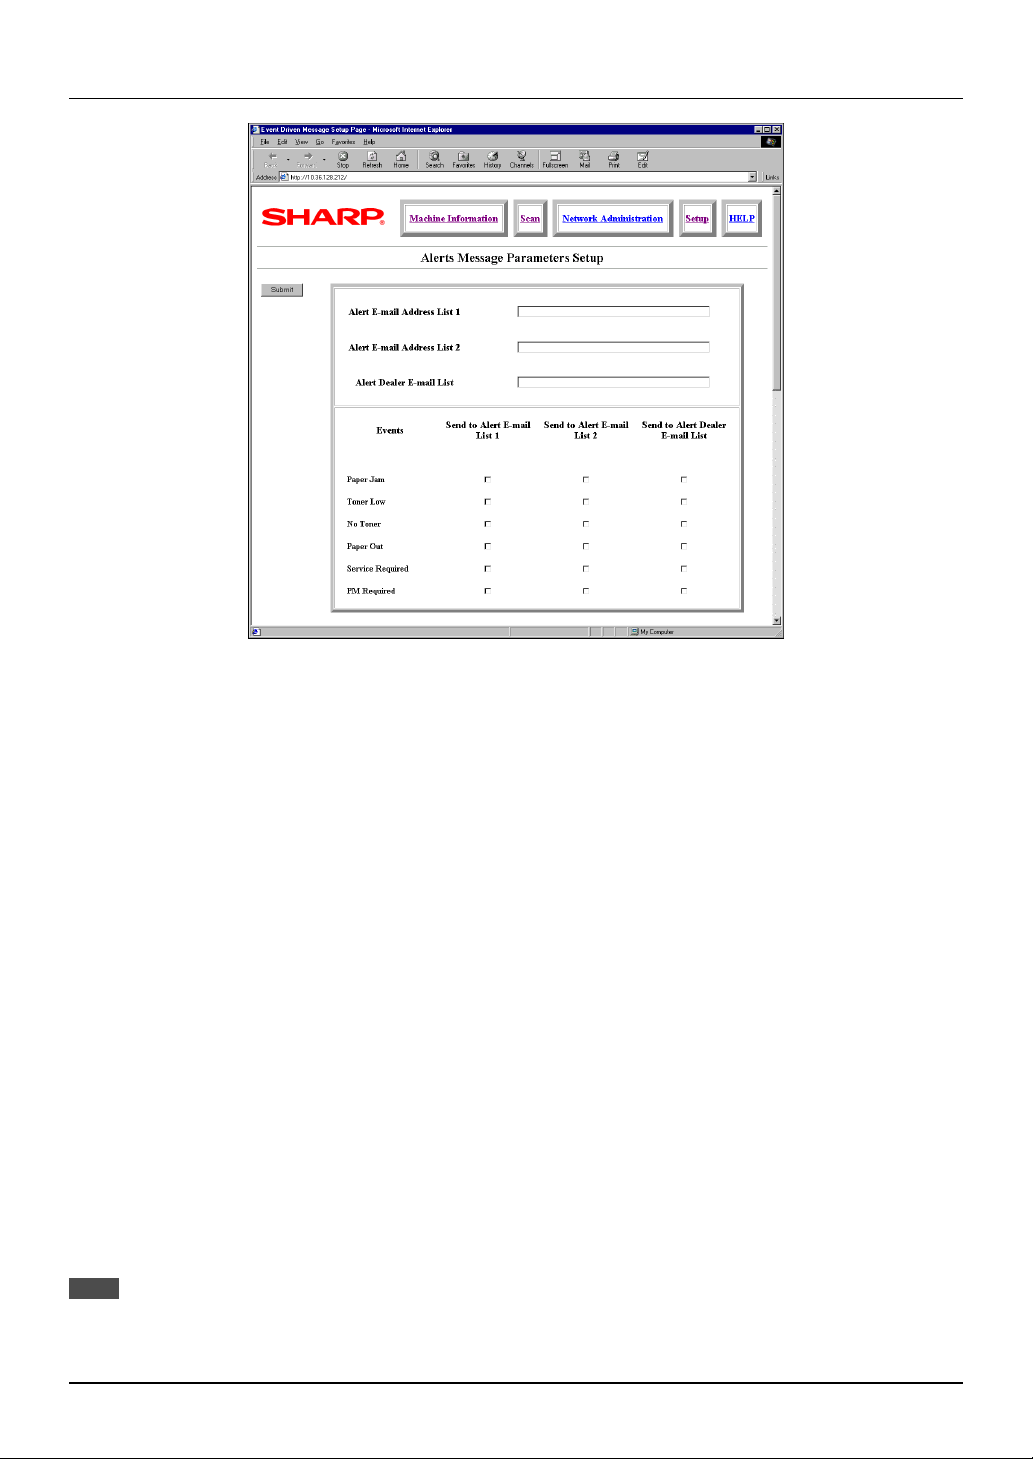
KEY OPERATOR’S GUIDE
• Alert E-mail addresses
Enter the E-mail addresses of administrators in the boxes of ‘Alert E-mail Address List 1’ and ‘Alert
E-mail Address List 2’. Enter the address of a dealer in the box of ‘Alert Dealer E-mail List’. The
entry method is the same as the method in the procedure for the status message.
• Event information
Specify event items on which information is to be transmitted. When an event occurs, the event
information will be transmitted to specified addresses for the event.
The meaning of each event item is shown below.
Paper Jam: A paper misfeed occurs.
Toner Low: Toner is low.
No Toner: Toner must be added.
Paper Out: Paper must be loaded.
Service Required: The self-diagnostic function has found a problem.
PM Required: Maintenance is required.
Specify E-mail addresses to which each event information is to be transmitted when the event
occurs.
4. When all settings are entered, click the ‘Submit’ button.
• Settings will be stored.
NOTE
To cancel the settings, terminate the browser before clicking the ‘Submit’ button.
55
Page 64

KEY OPERATOR’S GUIDE
Status/Alert Messages
Status message
Status messages are transmitted in the following format.
DEVICE NAME: <Device Name>
DEVICE MODEL: <Device Model >
SERIAL NUMBER: <Device Name >
MACHINE CODE: <Code String from Set-up Web Page>
Current device counter information:
Copy Count = <Copy Count >
Print Count = <Print Count>
Total Count = <Total Count>
The meaning of each item is shown below.
Copy Count: Total number of copies in the copier mode
Print Count: Total number of printed sheets in the printer mode
Total Count: Total number of printed sheets including copy count and print count
Alert message
Alert messages are transmitted in the following format.
DEVICE NAME: <Device Name>
DEVICE MODEL: <Device Model >
SERIAL NUMBER: <Serial Number >
MACHINE CODE: <Code String from Set-up Web Page >
Device has detected:
!!!! <Error Message> !!!!
Event (error) information is displayed.
56
Page 65

Chapter 6 Printer Troubleshooting
Introduction
Always check for error messages on your computer’s monitor screen and the printer operation panel
anytime you are unable to complete a print job. These messages can give you easy-to-follow
directions. If the messages do not give specific instructions, check the troubleshooting list on page
58.
NOTE
For problems related to paper misfeed, toner empty, toner container full, and other related copier problems, see the
copier operation manual.
Notes on Printing Lengthy Documents
When printing a lengthy document, the document memory in the printer may become full of print
data. Also a lengthy document may exceed the limit of the output tray. The printer will operate as
follows depending on the conditions.
1. If face down output is specified:
A. If printing one copy of a lengthy document is specified:
Printing will stop when the number of printed sheets reaches the limit of the output tray (if the
tray can detect the limit). When the printed paper is removed from the output tray, printing
will resume.
B. If printing multiple copies of a lengthy document is specified and the key operator program
“Output Method When Memory Is Full” (page 43) is set to “1 SET”:
The printer will print only one set followed by a notice page at the end of the job.
C. If printing multiple copies of a lengthy
document is specified and the key
operator program “Output Method When
Memory Is Full” (page 43) is set to
“MULTI-SET”:
Printed sheets will be divided into blocks*
as shown in the illustration. A separator
sheet will be inserted between each block.
Finally, a notice page will be output. The
number of pages in a block can be
changed using the key operator program
“Memory Reserved for Printer”. See page
43.
Separator sheet
Separator sheet
Separator sheet
1 block
Example:
Two sets of 120-page document are printed
in 60-page blocks.
Notice page
Page 120
Page 61
Page 120
Page 61
Page 60
Page 1
Page 60
Page 1
57
Page 66

PRINTER TROUBLESHOOTING
* The number of pages in a block varies with the paper size, setting of the key operator
program “Memory Reserved for Printer” and printer models.
NOTE
2. If face up output is specified:
For the models without hard disk drive and the models with a 2 GB or more hard disk drive, the key operator
program “Memory Reserved for Printer” is not available. In case of those without hard disk drive, the number of
pages in a block is variable according to the memory use and those with a 2 GB or more drive allow 320 pages in a
block.
Printing will be canceled and a notice page will be output.
Notice Page Printing
If you find that a notice page has been printed at the end of a print job, the print data received from
the computer has not been printed as specified. Read the notice page and retry printing or arrange
the output following the remedies written on the notice page.
Disabling Notice Page and Separator Sheet Printing
Notice page and separator sheet printing can be disabled using a key operator program. See page
44, “Prohibit Notice Page Printing”.
Troubleshooting
Problem: Printer does not operate.
Check: Is the printer plugged in?
Solution: Plug the printer into a grounded outlet.
Check: Is the power switch on?
Solution: Turn the power switch on.
58
Page 67

PRINTER TROUBLESHOOTING
Problem: Printer is on but data is not received. (Data indicator does not blink.)
Check: Is the printer set to the ONLINE mode?
Solution: Use the “ONLINE/OFFLINE” key on the touch panel to select the “ONLINE” mode. (page
36)
Check: Is the correct printer cable properly connected between the printer and your computer?
Solution: Check both ends of the printer cable and make sure you have a solid connection. Try a
known good cable.
Check: Is the correct printer driver installed?
Solution: Install the appropriate printer driver. (page 5)
Check: Is the printer not selected properly or not registered with the network?
Solution: Ensure that this printer is selected on the application software or the printer is registered
on the network.
Problem: Printer is on, data is received but is not printed. (Data indicator blinks.)
Check: Has an error occurred?
Solution: Check to see if an error message is displayed on the touch panel of the printer.
Check: Is the specified size paper loaded in the printer?
Solution: Load paper, select another paper size or cancel printing.
Check: Is printer memory set correctly? (Windows 95/98)
Solution: Set the printer memory which is actually installed in the configuration setting of the printer
driver.
Check: Sufficient memory installed?
Solution: If the PostScript error page indicates user memory error, the memory is not sufficient.
Add memory.
Problem: Printer cannot be selected from computer.
Check: Is the printer driver installed correctly?
Solution: Install the printer driver correctly. (page 5)
Problem: Cannot print test page from operation panel.
Check: Paper tray empty?
Solution: Fill the paper tray.
Check: Paper jam?
Solution: Clear the jam.
Check: Is there sufficient toner in the printer?
Solution: Add toner as specified in the copier manual.
59
Page 68

PRINTER TROUBLESHOOTING
Problem: Printed documents are too light or too dark.
Check: Is the exposure control set properly?
Solution: Use key operator program “Printer Exposure Level” to adjust the exposure.
Problem: Print quality is unsatisfactory.
Check: Was the wrong printer driver installed?
Solution: Uninstall the wrong printer driver, and install Sharp AR-PB2A printer driver. Refer to
Chapter 2.
Problem: Incorrect orientation
Check: Is the orientation setting in the printer driver correct?
Solution: Correct the orientation in the printer driver.
Problem: Paper image is clipped or off the edge of paper.
Check: Zoom printing?
Solution: Use the proper magnification ratio for printing.
Check: Different paper size used?
Solution: From the AR-PB2A printer driver, select the paper size to be the same as the original
document, and make sure that the printer has the correct paper in the tray selected.
Check: Different orientation used?
Solution: From the AR-PB2A printer driver, select the orientation to be the same as the original
document, and make sure that the printer has the correct paper orientation in the tray
selected.
Problem: Black pages
Check: Is color image data printed?
Solution: Color image may be printed in black.
Check: Are the black and white areas reversed?
Solution: Cancel the negative image printing feature in the printer driver.
Problem: Image loss along edges
Check: Is the image loss outside the print area?
Solution: Check the print area information. (page 64)
60
Page 69

PRINTER TROUBLESHOOTING
Problem: Printer prints out blank pages.
Check: Is the print face down?
Solution: Face down or face up can be selected.
Problem: Printer prints in reverse order.
Check: Is reverse order selected in the printer driver?
Solution: Set reverse order with face up delivery.
Problem: Printing stops in the middle of the print job.
Check: Too much paper in the output tray?
Solution: Remove the paper from the output tray.
Check: Has the paper run out?
Solution: Load paper.
Problem: Paper specified from application is not used.
Check: Is paper selection of driver “Auto”?
Solution: Ensure that the desired paper is set in a paper tray of the printer and select “Auto” in the
paper selection of the printer driver.
Problem: Stapling cannot be performed.
Check: Is face down selected?
Solution: Select face up for stapling. (except AR-505 and AR-507)
Check: Different sized papers used?
Solution: Stapling cannot be performed on different sized papers.
Check: Is the paper size acceptable for stapling?
Solution: Check the acceptable paper sizes for stapling referring to the copier operation manual.
Problem: Stapling cannot be performed on the desired location.
Check: Is the desired location acceptable?
Solution: Stapling positions are limited. Check the locations.
Problem: Misfeed or loading paper message appears.
Check: Did a paper misfeed occur, or did the paper in the selected tray run out?
Solution: Clear the error referring to the copier operation manual.
61
Page 70

PRINTER TROUBLESHOOTING
Problem: Misfeed during cover sheet printing
Check: 2-sided printing for covers using heavy paper?
Solution: Use appropriate paper. See the copier operation manual for paper specifications.
Problem: Printer write error occurs when using the printer as a local printer.
Check: Is the timeout time short?
Solution: Set a longer time in the timeout settings under the Details tab. (Windows)
NOTE
Even if a longer time is set, printer write error may occur when copying is being performed.
Problem: Printed sheets will be output to the top tray when another tray is specified.
Check: Is the selected paper size proper for the specified output tray?
Solution: Check the acceptable paper sizes to the specified output tray referring to the copier
operation manual.
Problem: Tandem printing does not start.
Check: Does the “CHECK THE SUB MACHINE.” message appear on the touch panel of the sub
printer?
Solution: Follow the message on the sub printer to solve the problem.
Problem: Tandem printing cannot be performed.
Check: Does the “THE SYSTEM IS NOT CONFIGURED TO PERFORM TANDEM JOB.”
message appear on the touch panel?
Solution: Tandem printing is not performed unless the same options are installed to both the main
and sub printers.
NOTES
If there is insufficient toner in the printer, the ‘Add Toner’ message will normally be displayed.
If you cannot resolve a printing problem using the information in this chapter, contact your authorized Sharp
service center.
62
Page 71

Chapter 7 Specifications
Specifications
Table 7-1. AR-PB2A Specifications
Model AR-PB2A
Printing speed (up to)
Resolution 600 dpi
Operating conditions Temperature: 15°C to 30°C (59°F to 86°F)
Printer option board power source Supplied from copier
Output color Black
Memory 16MB RAM standard
Optional memory Max. 2 pieces of 32 MB RAM
Page description languages PCL5e emulation; PCL6 emulation; PostScript®
Resident font Outline font: 80
Platform IBM PC/AT (Windows); Macintosh
General network card slot Available (In some countries and regions, network
Interface
Plug and Play Available under Windows 95 and Windows 98
Same as copying speed
Humidity: 20% to 85%
Level 2 emulation
Stroke font: 1
interface card is not available.)
IEEE 1284-compatible (parallel port), optional
network interface card (Print Server Card)
Specifications are subject to change without notice. Changes to the specifications will normally
reflect improvements or upgrades to AR-PB2A features and performance.
NOTE
Consult your authorized Sharp dealer for information on an optional memory card and network interface card.
63
Page 72

Chapter 8 Appendix
Print Area
2.7mm (7/64")
2.7mm (7/64")
Printable area
2.7mm (7/64")
Y
X
2.7mm (7/64")
Paper size X Y
A3 6912 9824
B4 5952 8480
A4 6912 4864
B5 5952 4192
A5 4864 3392
A6 2368 3392
Ledger 6464 10080
Letter 6464 4992
Legal 4992 8288
Invoice 4992 3168
Executive 4224 6176
Foolscap 4992 7680
Japanese
Postcard
2240 3392
(dots in 600 dpi)
64
Page 73

APPENDIX
Font List
Table 8-1. Resident Font List
DutchTM 801 SWC Dutch 801TM SWA
Dutch 801 Italic SWC Dutch 801 Italic SWA
Dutch 801 Bold SWC Dutch 801 Bold SWA
Dutch 801 Bold Italic SWC Dutch 801 Bold Italic SWA
SwissTM 742 SWC SwissTM 721 SWA
Swiss 742 Italic SWC Swiss 721 Oblique SWA
Swiss 742 Bold SWC Swiss 721 Bold SWA
Swiss 742 Bold Italic SWC Swiss 721 Bold Oblique SWA
Swiss 742 Condensed SWC Fixed Pitch 810 Courier® SWA
Swiss 742 Condensed Italic SWC Fixed Pitch 810 Courier Italic SWA
Swiss 742 Condensed Bold SWC Fixed Pitch 810 Courier Bold SWA
Swiss 742 Condensed Bold Italic SWC Fixed Pitch 810 Courier Bold Italic SWA
Incised 901 SWC Symbol SWA (PS)
Incised 901 Italic SWC Zapf Calligraphic 801 SWA
Incised 901 Bold SWC Zapf Calligraphic 801 Italic SWA
Zapf Humanist 601 SWC Zapf Calligraphic 801 Bold SWA
Zapf Humanist 601 Italic SWC Zapf Calligraphic 801 Bold Italic SWA
Zapf Humanist 601 Bold SWC Revival 711 ITC Bookman® Light SWA
Zapf Humanist 601 Bold Italic SWC Revival 711 ITC Bookman Italic SWA
Aldine 430 Original Garamond SWC Revival 711 ITC Bookman Demi SWA
Aldine 430 Original Garamond Italic SWC Revival 711 ITC Bookman Demi Italic SWA
Aldine 430 Original Garamond Bold SWC Swiss 721 Narrow SWA
Aldine 430 Original Garamond Bold Italic SWC Swiss 721 Narrow Oblique SWA
Fixed Pitch 810 Courier Roman SWC Swiss 721 Narrow Bold SWA
Fixed Pitch 810 Courier Italic SWC Swiss 721 Narrow Bold Oblique SWA
Fixed Pitch 810 Courier Bold SWC Century 702 Century Schoolbook SWA
Fixed Pitch 810 Courier Bold Italic SWC Century 702 Century Schoolbook Italic SWA
Fixed Pitch 850 Letter Gothic 12 pitch/text SWC Century 702 Century Schoolbook Bold SWA
Fixed Pitch 850 Letter Gothic Bold 12 pitch/text SWC Century 702 Century Schoolbook Bold Italic SWA
Fixed Pitch 850 Letter Gothic Bold Italic 12 pitch/text SWC Geometric 711 ITC Avant Garde Gothic® Book SWA
Flareserif 821 SWC Geometric 711 ITC Avant Garde Gothic Book Oblique SWA
Flareserif 821 Extra Bold SWC Geometric 711 ITC Avant Garde Gothic Demi SWA
Clarendon 701 Clarendon Condensed SWC Geometric 711 ITC Avant Garde Gothic Demi Oblique SWA
Ribbon 131 SWC Chancery 801 ITC Zapf Chancery® Medium Italic SWA
Audrey Two SWC ITC Zapf Dingbats® SWA
Swiss 721 SWM
Swiss 721 Oblique SWM
Swiss 721 Bold SWM
Swiss 721 Bold Oblique SWM
Dutch 801 SWM
Dutch 801 Italic SWM
Dutch 801 Bold SWM
Dutch 801 Bold Italic SWM
Symbol SWA
Wingbats SWM
Line Printer
*1
*1
*1
*1
*1
*1
*1
*1
*2
All above resident fonts in the column are licensed from Bitstream Inc. Dutch and Swiss are
trademarks of Bitstream Inc. All other trademarks and copyrights are the property of their respective
owners.
The font examples can be printed from the printer configuration menu. See page 30.
*1 These fonts cannot be used with the PS driver.
*2 For Line Printer in the above table, display font is not supplied.
65
Page 74
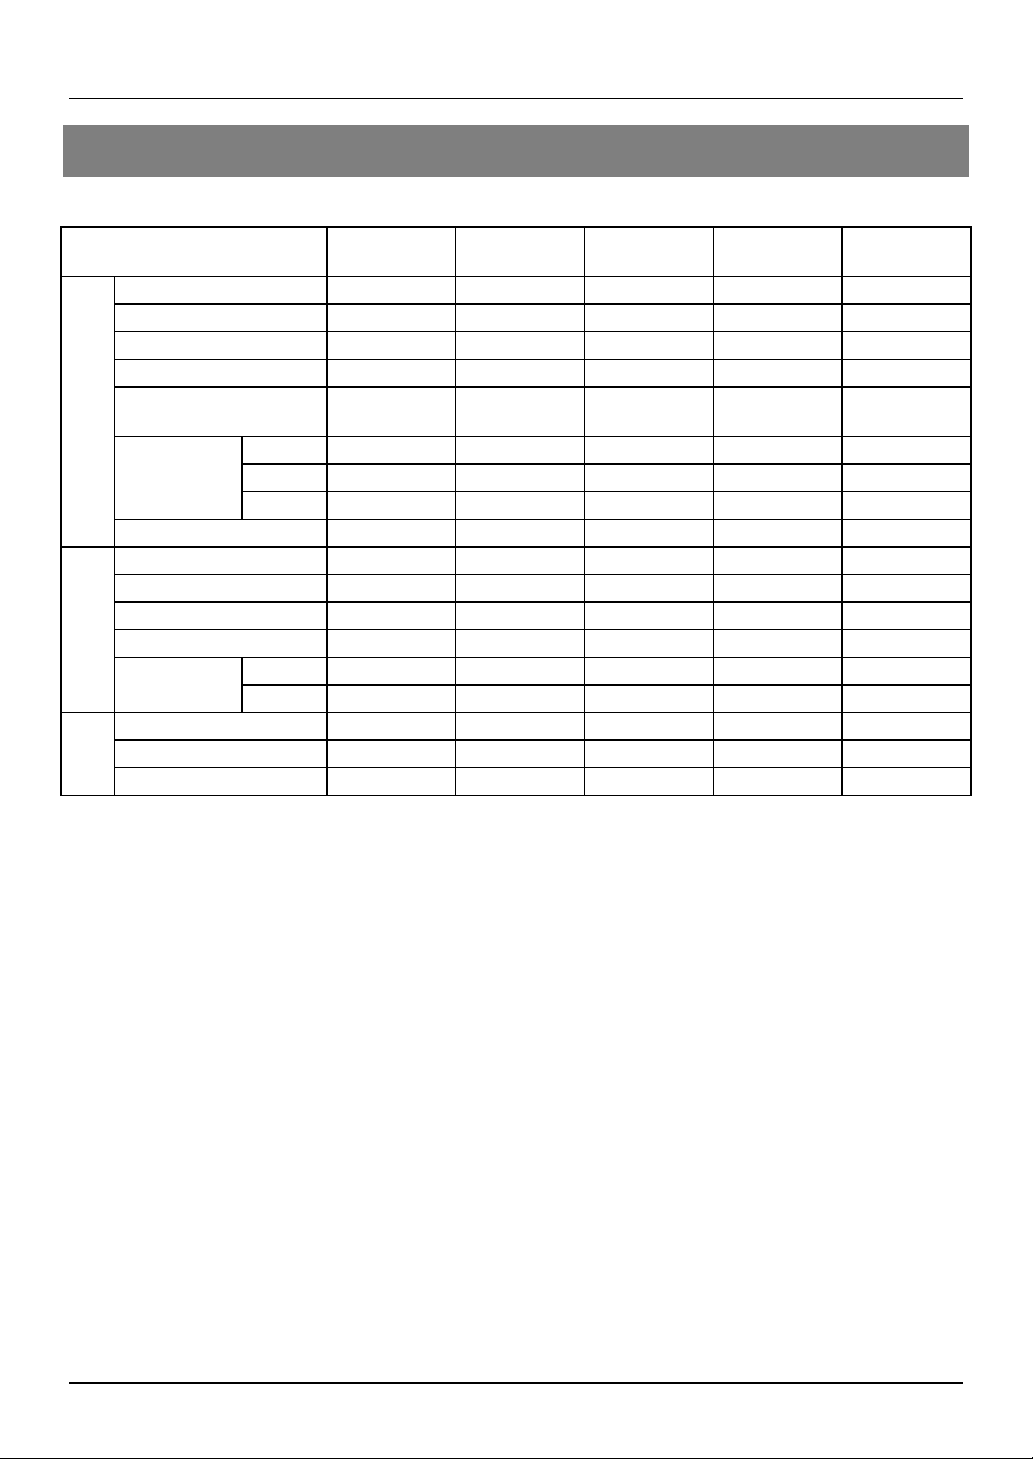
APPENDIX
Printer Driver Features
Features PCL5e PCL6 PS
Copies Yes Yes Yes Yes Yes
Orientation Yes Yes Yes Yes Yes
Reverse Order Yes Yes Yes Yes Yes
General
Duplex Yes Yes Yes Yes Yes
Binding Edge
Number N/A 2/4/6/8/9/16 2/4/6/8/9/16 2/4
Order N/A Fixed Fixed Fixed 2 typesN-up
Border N/A Yes / No Yes / No Yes Yes / No
Pamphlet Style Yes Yes Yes N/A N/A
Paper Size Yes Yes Yes Yes Yes
Paper Input
Custom Paper Size 1 size 1 size 1 size 3 sizes
Source Selection Yes Yes Yes Yes Yes
Different 1st Page Yes Yes Yes N/A Yes
Transparency
Inserts
Output
Paper
Output Tray Selection Yes Yes Yes Yes Yes
Face Up/Down Yes Yes Yes Yes Yes
Staple Yes Yes Yes Yes Yes
Blank Yes Yes Yes Yes Yes
Printed Yes Yes Yes Yes Yes
Left / Top /
Right
Left / Top /
Right
Left / Top /
Right
Windows
PPD
Long / Short Long / Short
*1
*2
Mac PPD
2/4/6/9/16
N/A
*1 Under Windows NT 4.0, the N-up feature is not available with the PPD.
*2 Under Windows NT 4.0, the Custom Paper Size feature is not available.
66
Page 75

Printer Driver Features (continued)
APPENDIX
Features PCL5e PCL6 PS
Windows
PPD
Resolution Setting 600 600 600 600 600
Halftone Setting N/A Yes Yes Yes N/A
Graphics Mode Yes Yes N/A N/A N/A
Smoothing
Graphic
Toner Save
Photo Enhancement
*3
*3
*4
Yes Yes Yes Yes Yes
Yes Yes Yes Yes Yes
N/A N/A Yes N/A N/A
Negative Image N/A N/A Yes Yes Yes
Mirror Image N/A N/A
Horizontal/
vertical
Horizontal
Zoom N/A N/A N/A Yes Yes
Fit to Page Yes Yes Yes N/A N/A
Resident Font 80 fonts 80 fonts 80 fonts 80 fonts 35 fonts
Font
Download Font
Bitmap
TrueType
Graphic
Bitmap
TrueType
Graphic
Bitmap
Type1
TrueType
Bitmap
Type1
TrueType
Configuration Setting Yes Yes Yes Yes Yes
Watermark Yes Yes Yes N/A N/A
Others
Form Overlay Yes Yes N/A N/A N/A
Confidential Print Yes Yes Yes N/A Yes
Account Control Yes Yes Yes N/A Yes
Tandem Print Yes Yes Yes Yes Yes
Job End Notification Yes Yes Yes N/A N/A
Mac PPD
Horizontal/
vertical
N/A
*3 The smoothing and toner save features are not available with the AR-280/AR-285/AR-335
printers.
*4 The photo enhancement feature is only available on AR-505/AR-287/AR-337/AR-407/AR-507.
67
Page 76

APPENDIX
Supplement
• This printer is not equipped with a hard disk drive for additional fonts. Any downloaded fonts cannot
be stored permanently.
• If you try to start printing through the parallel interface before the printer is turned on or while the
message “INITIALIZING. PLEASE WAIT.” is displayed on the touch panel immediately after the
printer is turned on, printing may not be performed properly. Be sure to start printing through the
parallel interface after ensuring that the printer becomes online.
• Depending on printing data, “VM error” or “Memory Full” error message may be printed on a page
or improper printing (some images or characters are missing) may occur. This error occurs
because of insufficient memory when printing a lot of data or complicated data. This error may be
avoided by adding an additional memory to the printer kit. If this error occurs frequently, contact
your dealer.
• With the PPD driver for Windows NT 4.0, the printer resident fonts cannot be specified. Font
downloading, therefore, is always performed when printing is executed. To use the printer resident
fonts under Windows NT 4.0, install the PS, PCL5e or PCL6 driver.
• When printing multiple copies, this printer prints each set sequentially. (This printer does not print all
copies of each page at a time.)
• If the setting “collate” exists in the print dialog box or application’s print settings, do not select this
setting. This setting is not necessary because this printer always performs collated printing. If this
setting is selected, two-sided printing or stapling with multiple copies may not be performed
properly.
• Take care to see the message on the touch panel when adding A4, B5 or 8-1/2" x 11" (letter) paper
in the bypass tray in a print job. If ‘R’ is added to the paper size, for example, “LOAD A4R PAPER.”,
set the paper narrow side into the feed slot. If ‘R’ is not added to the paper size, set the paper wide
side into the feed slot.
• To print onto A4R, B5R or 8-1/2" x 11"R paper, specify the tray in which the desired paper has
been loaded. If the auto paper select function selects these sizes against your intention, consult
with your key operator about setting the key operator program “PROHIBIT ROTATED OUTPUT”.
• If paper must be added when paper has run out in the middle of a print job, be sure to set the paper
in the same orientation. If the orientation is changed in the middle of a print job, part of images may
not be printed. Image rotation will not occur in the middle of a print job.
• When setting A5 or 5-1/2" x 8-1/2" (invoice) size paper in a paper tray or in the bypass tray, be sure
to set the paper wide side into the feed slot. If not, part of images may not be printed.
• When setting A6, Japanese postcard, 10-1/2" x 7-1/4" (executive) or custom size paper in a paper
tray or in the bypass tray, be sure to set the paper narrow side into the feed slot. If not, part of
images may not be printed.
• If any tray is open when a print job is sent to the printer, part of images may not be printed. Be sure
to start printing after ensuring that all the trays are closed.
68
2001A
DSC2
CINSE1992FC51
Page 77

Warning:
This is a Class A product. In a domestic environment this product may cause radio
interference in which case the user may be required to take adequate measures.
The CE mark logo label is affixed on an equipment in case that the directives described in the above sentence are
applicable to the product. (This sentence is not applicable in any country where the above directives are not
required.)
Page 78

AR-PB2 A
SHARP CORPORATION
PRINTED IN JAPAN
2001A DSC2
CINSE1992FC51
 Loading...