

Page 1
AR-PB2
[4] SETTING AND ADJUSTMENT
1. Configuration setting
(Accessing the Printer Configuration Menu)
To access the printer configuration menu, follow the
steps below.
1. Press the PRINT key to select the printer mode. Make sure the
PRINT indicator lights up and the basic screen is displayed on the
touch panel.
2. Press the "ONLINE" key on the touch panel to select the OFFLINE mode and press the "MENU" key.
The printer configuration menu screen will appear on the touch panel.
The main menu items are: PRINTER SETTINGS, INTERFACE SETTINGS, NETWORK SETTINGS, PRINT TEST PAGE, and INITIALIZE
AND/OR STORE SETTINGS. Use the UP/DOWN arrow (▲, ▼) keys
to scroll the screen.
NOTES: If any printing data remains in the memory, the printer con-
figuration menu will not appear. In this case, access the
printer configuration menu after printing is complete or
press the CLEAR () key to cancel printing and then continue to access the menu.
If conflicting settings are made with the printer driver and
the configuration menu, the printer driver will have priority.
PRINT SETTINGS
SMOOTHING
TONER SAVE MODE
COPIES
ORIENTATION
STANDARD INPUT PAPER
SIZE
STANDARD OUTPUT TRAY
PRINT PS ERRORS
INTERFACE SETTINGS
HEXADECIMAL DUMP MODE
PARALLEL PORT
EMULATION SWITCHING
NETWORK PORT
EMULATION SWITCHING
I/O TIMEOUT
PORT SWITCHING METHOD
(Using the Printer Configuration Menu)
Use steps 1 and 2 above to access the printer
configuration menu.
3. Select the desired main menu item on the touch panel.
4. If a sub-menu appears, select the desired function. To scroll the
touch panel screen, use the UP/DOWN arrow (▲, ▼) keys.
5. Turn the setting of a function on or off by pressing its corresponding check box in front of the function name. For functions without
a check box, adjust the settings on each function setting screen.
6. To exit the configuration menu, return to the main menu by pressing the "OK" key and then press the "ONLINE/OFFLINE" key to
return to the online mode.
If a test print has been selected, once complete, the printer will
automatically return to the online mode.
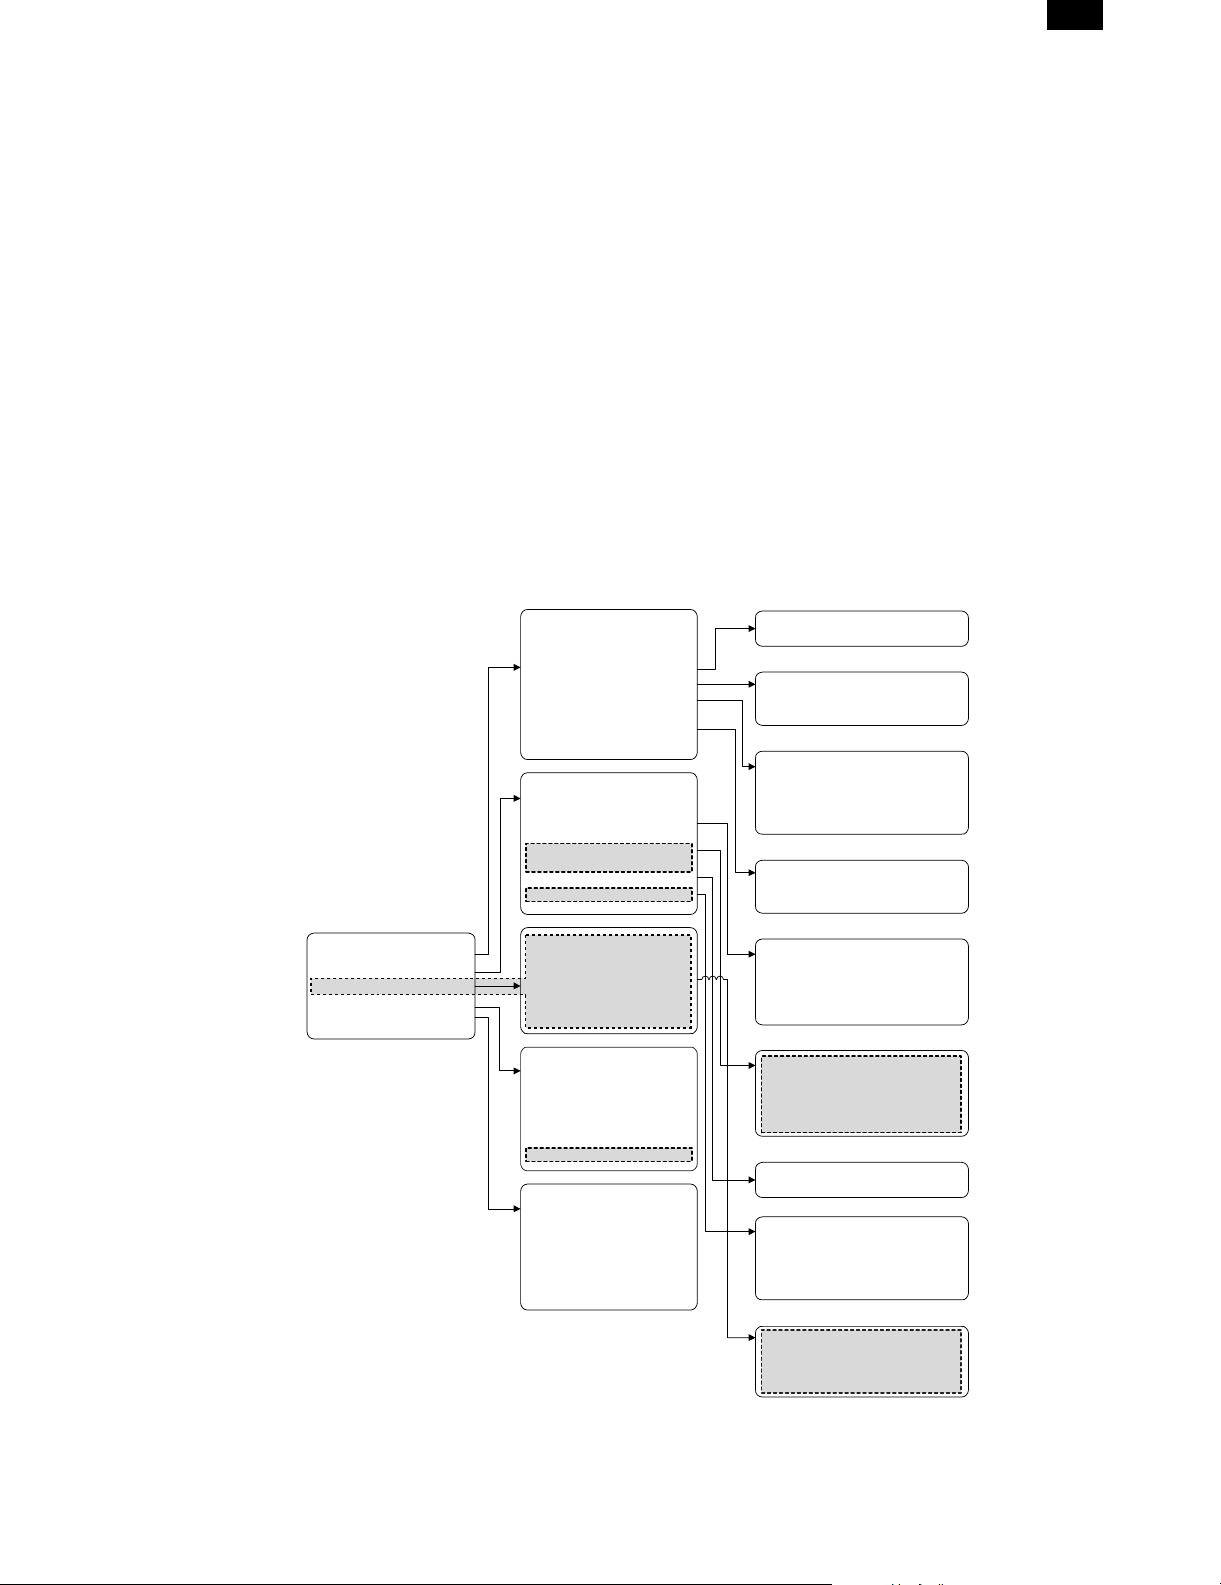
Printer Configuration Menus
A flow chart of the printer configuration menu is shown. The menu
structure changes depending on whether a network interface card is
present in the copier/printer or not. The menus inside the gray area
are for a copier/printer with a network interface card (Print Server
Card) installed.
NOTE: Depending on the particular printer, some functions of the
printer configuration menu cannot be set, for example,
smoothing and toner save mode.
COPIES (1* to 999)
ORIENTATION
PORTRAIT*
LANDSCAPE
STANDARD INPUT PAPER SIZE
A3 B4 A4* B5 A5 A6
11 x 17 8-1/2 x 14 8-1/2 x 13
8-1/2 x 11*
5-1/2 x 8-1/2 7-1/2 x 10-1/2
STANDARD OUTPUT TRAY
TOP TRAY
SECOND TRAY*
Main Menu
PRINTER SETTINGS
INTERFACE SETTINGS
NETWORK SETTINGS
PRINT TEST PAGE
INITIALIZE AND/OR STORE
SETTINGS
NETWORK SETTINGS
ENABLE TCP/IP
IP ADDRESS SETTING
ENABLE NetWare
ENABLE EtherTalk
(TokenTalk)
PRINT TEST PAGE
PRINT CONFIGURATION
PAGE
PRINT PostScript FONT LIST
PRINT PCL FONT LIST
PRINT DEMO PAGE
PRINT NIC PAGE
INITIALIZE AND/OR STORE
SETTINGS
RESTORE FACTORY
DEFAULT
STORE CURRENT
CONFIGURATION
RESTORE CONFIGURATION
NOTES: The menus inside the gray area are for a printer with the
network interface card option installed.
* Denotes the default setting.
PARALLEL PORT EMULATION
SWITCHING
AUTOMATIC*
PostScript
PCL
NETWORK PORT EMULATION
SWITCHING
AUTOMATIC*
PostScript
PCL
I/O TIMEOUT (1 to 999, 20*)
PORT SWITCHING METHOD
SWITCH AT END OF JOB*
SWITCH AFTER I/O TIMEOUT
DISABLE PARALLEL PORT
DISABLE NETWORK PORT
IP ADDRESS SETTING
IP ADDRESS (192 168 0 1)
IP NETWORK (255 255 255 0)
IP GATEWAY (192 168 0 1)
• The default setting of STANDARD INPUT SIZE depends on the
countries or regions.
• The default setting of STANDARD OUTPUT TRAY depends on
installation of optional finisher.
• The values indicated with IP ADDRESS are examples.
4 – 1
Page 2
AR-PB2
A. Printer Settings
Use the printer settings when printing without the proper printer driver
installed (for example, printing from an MS-DOS application, printing
from a computer without the printer driver installed, etc.). This menu
allows detailed print conditions to be set.
SMOOTHING Enables or disables the smoothing function.
This is enabled in the default setting. (This
function is not available with the
AR-280/AR-285/AR-335.)
TONER SAVE
MODE
COPIES Number of copies to print can be set. 1 to 999
ORIENTATION Selects the default page orientation: portrait or
STANDARD
INPUT PAPER
SIZE
STANDARD
OUTPUT TRAY
PRINT PS
ERRORS
Sets or cancels the toner save mode. The
toner save mode reduces toner consumption.
Printed images will be lighter but still adequate
for general use. This is disabled in the default
setting. (This function is not available with the
AR-280/AR-285/AR-335.)
can be entered.
landscape.
Specifies a default input paper size. One of the
following sizes can be selected: A3, B4, A4,
B5, A5, A6, 11 × 17, 8-1/2 × 14, 8-1/2 × 13,
8-1/2 × 11, 5-1/2 × 8-1/2, 7-1/4 × 10-1/2
Specifies a default output tray. Top tray,
second tray or offset tray can be selected. The
offset tray cannot be selected when no optional
finisher (AR-FN1 or AR-FN2) is installed. The
second tray cannot be selected when an
optional 2-tray finisher (AR-FN2) is installed.
Face up or face down can also be selected for
certain trays in this menu.
Determines whether or not PostScript® error
information will be printed. This is disabled in
the default setting.
B. Interface Settings
Use the interface settings to configure the printer’s parallel and network interfaces.
HEXADECIMAL
DUMP MODE
PARALLEL
PORT
EMULATION
SWITCHING
NETWORK
PORT
EMULATION
SWITCHING
I/O TIMEOUT Use this function to set the amount of time to
PORT
SWITCHING
METHOD
* If "AUTO" is set, the printer language will switch automatically in
accordance with the data from the computer. It is recommended to
set "AUTO" unless an error due to this setting occurs frequently.
If this function is set, the print job will be output
in the hex dump format. This is disabled in the
default setting.
Specifies a printer language to emulate for
printing when the printer is connected to the
computer through a parallel port. "AUTO"*,
"PostScript" or "PCL" can be set.
Specifies a printer language to emulate for
printing when the printer is connected to the
computer through network. "AUTO"*,
"PostScript" or "PCL" can be set.
wait after end of data stream before ending
print job. This time can be entered using the
UP/DOWN arrow (▲, ▼) keys. The allowable
range of the time is 1 to 999 seconds.
Determines which switching method to use for
the interface port. "SWITCH AT END OF JOB",
"SWITCH AFTER I/O TIMEOUT", "DISABLE
PARALLEL PORT" or "DISABLE NETWORK
PORT" can be selected.
C. Network Settings
Use the network settings when using this printer as a network printer.
If an optional network interface card (Print Server Card) is not installed, these settings will not appear on the touch panel.
ENABLE
TCP/IP
IP ADDRESS
SETTING
ENABLE
NetWare
ENABLE
EtherTalk
(TokenTalk)
NOTE: When the enable or disable setting of protocols (ENABLE
TCP/IP, ENABLE NetWare, and ENABLE EtherTalk) is
changed, the new setting will be effective after resetting the
printer. For resetting, follow the message by pressing "OK",
turning the printer off and then back on after waiting a few
seconds.
Enables or disables the TCP/IP protocol. This
setting is enabled in the default setting. To use
the printer with the TCP/IP protocol, set the IP
address in the next function.
IP ADDRESS: Manually set the printer’s IP
address. Note that no number can exceed 254.
First digit of the number cannot be 0. Each
item can be selected directly with the touch
key. The value can be input using the 10-key
pad.
IP NETWORK: Manually set the printer’s IP
network. Note that no number can exceed 255.
First digit of the number cannot be 0. Each
item can be selected directly with the touch
key. The value can be input using the 10-key
pad.
IP GATEWAY: Manually set the printer’s IP
gateway. Note that no number can exceed
254. First digit of the number cannot be 0.
Each item can be selected directly with the
touch key. The value can be input using the
10-key pad.
Enables or disables the NetWare protocol. This
setting is enabled in the default setting.
Enables or disables the EtherTalk (TokenTalk
if TokenRing network is connected) protocol.
This is enabled in the default setting.
D. Print Test Page
Printing a test page verifies that the printer operates properly. Also
you can check the configuration settings, built-in fonts etc. When
printing is complete, the printer will exit the printer configuration menu
and return to online mode.
PRINT
CONFIGURATION
PAGE
PRINT PostScript
FONT LIST
PRINT PCL FONT
LIST
PRINT DEMO
PAGE
PRINT NIC PAGE If this key is pressed, the printer will return
If this key is pressed, the printer will return
to the online mode and print the
configuration list.
If this key is pressed, the printer will return
to the online mode and print the PostScript
font list.
If this key is pressed, the printer will return
to the online mode and print the PCL font
list.
If this key is pressed, the printer will return
to the online mode and print a
demonstration page.
to the online mode and print the NIC
(Network Interface Card) configuration
page. If an optional network interface card
(Print Server Card) is not installed, this
function will not appear on the touch panel.
4 – 2
Page 3

AR-PB2
E. Initialize and/or Store Settings
Use these functions to initialize or store printer settings.
RESTORE
FACTORY
DEFAULTS
STORE CURRENT
CONFIGURATION
RESTORE
CONFIGURATION
NOTES: If configuration settings are protected using key operator
programs (Secure Printer Settings and Secure Interface
Settings), the settings cannot return to the factory default
setting and stored settings cannot be recalled.
Use the key operator programs to cancel protection mode.
If the setting of functions of enabling protocols (ENABLE
TCP/IP, ENABLE NetWare, and ENABLE EtherTalk) is
changed by using the function "RESTORE FACTORY
DEFAULTS" or "RESTORE CONFIGURATION", the new
setting will be effective after resetting the printer. To reset
the printer, turn off the printer and then turn it on after a few
seconds.
When this key is pressed, a confirmation
window will appear. If the "YES" key is
pressed, all the printer configuration
settings will return to the factory default
settings.
When this key is pressed, a confirmation
window will appear. If the "YES" key is
pressed, the current printer configuration
settings will be stored in the printer’s
nonvolatile memory.
When this key is pressed, a confirmation
window will appear. If the "YES" key is
pressed, the printer configuration settings
that have been stored in the printer’s
nonvolatile memory with the "STORE
CURRENT CONFIGURATION" function
will be recalled.
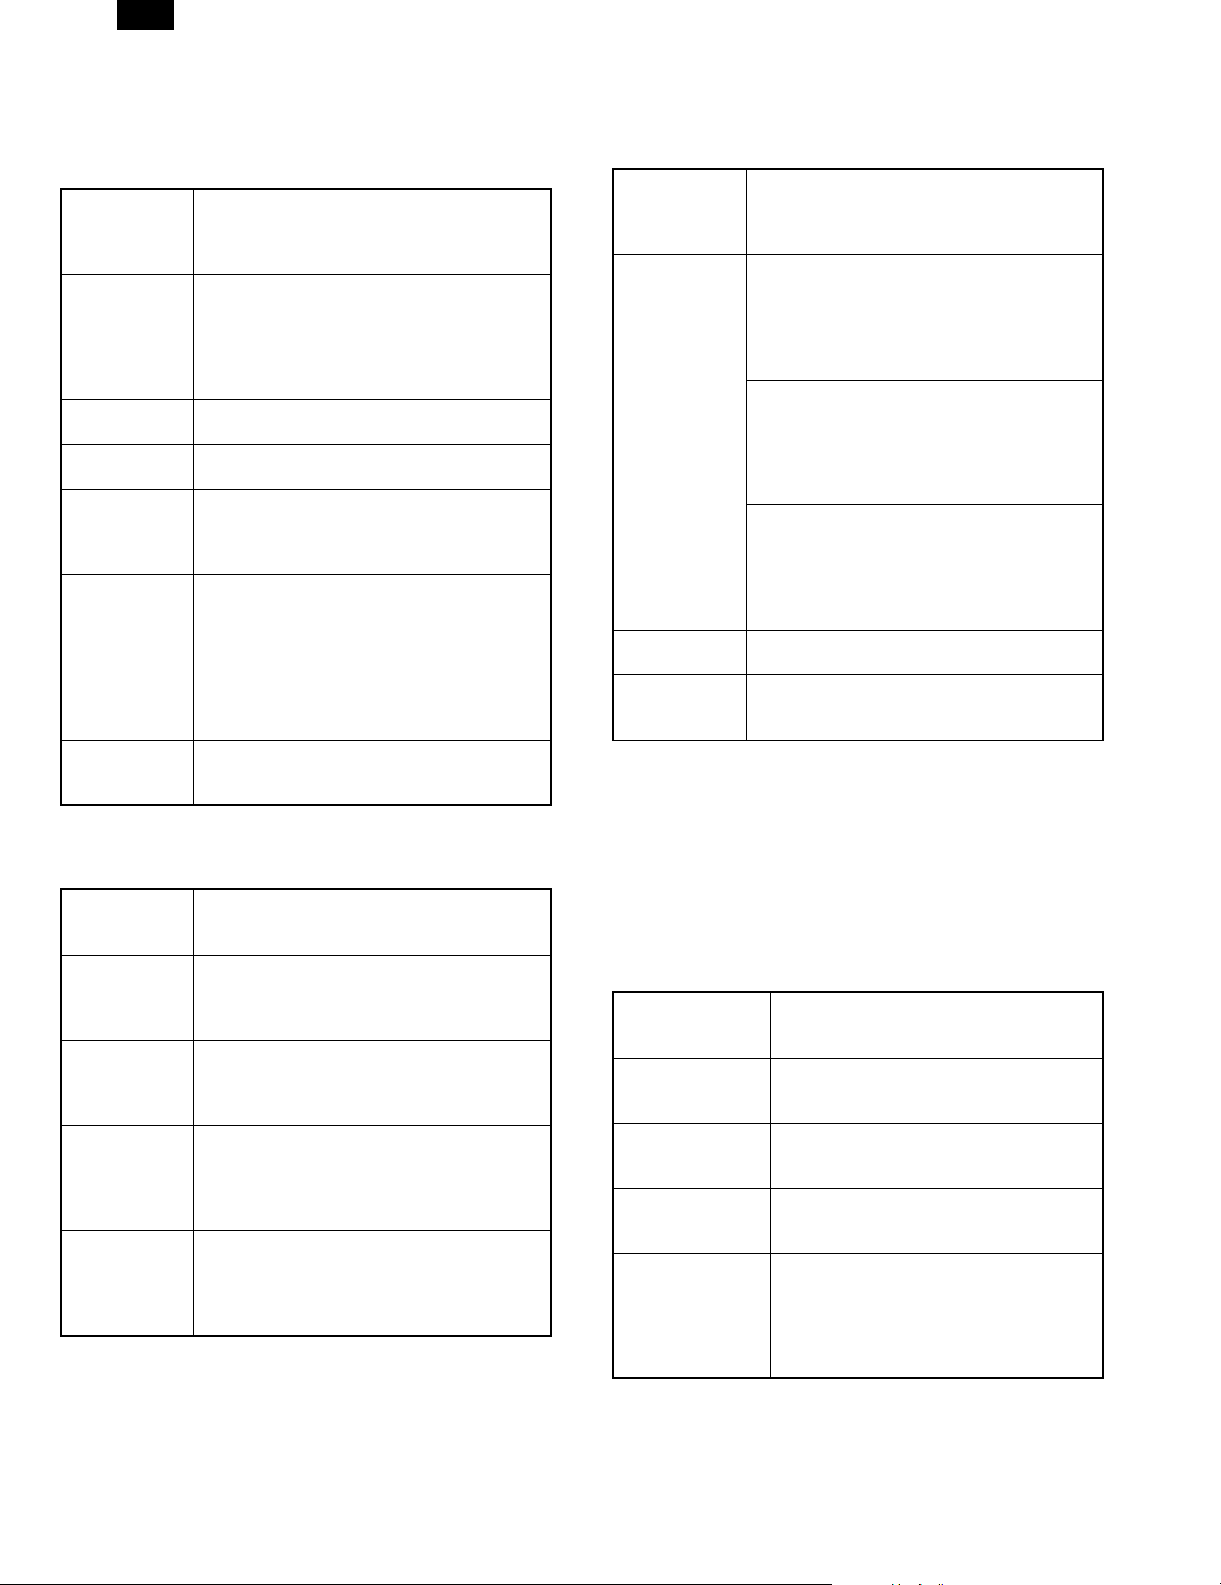
2. Key operator programs
(2) Details (Printer Exposure Level)
This program is used to adjust the lightness or darkness of documents in the printer mode. The factory default is level ‘3’.
When the "PRINTER EXPOSURE LEVEL" key is pressed, the following display will appear.
1. Set the desired density level using the " " and " " keys.
2. Press the "OK" key.
KEY OPERATOR PROGRAMS
PRINTER EXPOSURE LEVEL
(Memory Reserved for Printer)
This program is used to specify the percentage of document memory
allocated to storage of printer jobs. In the default setting, the memory
capacity for printer jobs is 30% (60 pages for A4 or 8-1/2" × 11"). To
print documents that exceed this limit, increase the percentage using
this program.
When the "MEMORY RESERVED FOR PRINTER" key is pressed,
the following display will appear. Depending on the hard disk
capacities, this program cannot be used or some values may not be
displayed.
1. Select the desired percentage.
2. Press the "OK" key.
OK
(1) List
PROGRAM NAME FUNCTION
Printer Exposure
Level
Memory Reserved
for Printer
Output Method
When Memory Is Full
Enable Bypass-Tray
Size Detection
Prohibit Notice Page
Printing
Prohibit Rotated
Output
Prohibit Bypass-Tray
Selection
Prohibit Auto Tray
Switching
Prohibit Test Page
Printing
Prohibit Changes to
Printer Settings
Prohibit Changes to
Interface Settings
Prohibit Changes to
Network Settings
Lightens or darkens printouts.
Specifies percentage of document
memory allocated to storage of printer
jobs.
Specifies whether one set or multiple sets
will be printed when the printer memory
becomes full.
Enables or disables paper size detection
for the bypass tray.
Specifies whether a notice page will be
printed when the printer memory becomes
full and divided printing is performed.
Enables/disables rotation of print image
for printing onto A4R or 8-1/2" × 11"R
paper.
Enables/disables bypass tray selection in
the ‘Auto Tray Switching’ mode.
Enables/disables automatic switching
between paper trays during printing when
paper runs out.
Enables/disables test page printing from
the printer configuration menu.
Prohibits modification of basic printer
settings in the printer configuration menu.
Prohibits modification of interface settings
in the printer configuration menu.
Prohibits modification of network settings
in the printer configuration menu.
KEY OPERATOR PROGRAMS
MEMORY RESERVED FOR PRINTER
30%
45%
35%
50%
OK
40%
55%
60%
NOTES: If ‘30%’ is specified, the maximum number of pages in a
block is 60 for A4, letter or smaller sizes. If ‘60%’ is
specified, the maximum number is 120 for A4, letter or
smaller sizes.
Since the memory in this printer is used for both copier and
printer features, the setting of this program will affect copying performance. Assign an appropriate value.
(Output Method When Memory Is Full)
When multiple sets of a document have been requested and the
document memory cannot hold the entire document, this program
gives the option to print one set or multiple sets as illustrated on page
4-4.
When the "OUTPUT METHOD WHEN MEMORY IS FULL" key is
pressed, the following display will appear.
1. Select "1 SET" or "MULTI-SET".
2. Press the "OK" key.
4 – 3
Page 4

AR-PB2
KEY OPERATOR PROGRAMS
OUTPUT METHOD WHEN MEMORY IS
FULL
OK
1 SET
MULTI-SET
NOTE: When the document memory becomes full of print job pages,
the printer will start printing the data which has been stored
in the memory. If multiple sets of the document have been
requested and "MULTI-SET" is specified with this program,
the sets will be printed as shown below. Each set of printed
sheets will be stacked offset from the previous set. Finally,
the printer will output a notice page unless it is prohibited
with a key operator program.
Notice page
Separator
sheet
1 block
Example: One set of 120-page document is printed in 60-page
blocks.
Separator
sheet
Separator
sheet
Separator
sheet
1 block
Example: Two sets of 120-page document are printed in 60-page
blocks.
(Enable Bypass-Tray Size Detection)
This program is used to enable or disable paper size detection of the
bypass tray in the printer mode. This setting does not affect the paper
size detection in the copier mode.
To enable paper size detection of the bypass tray in the printer mode,
press the "ENABLE BYPASS-TRAY SIZE DETECTION" box to display a check mark.
To disable paper size detection, press the checked box again to clear
the check mark.
NOTE: If size detection of the bypass tray is disabled, paper in the
bypass tray will always be treated as the largest allowable
size paper (either 11" × 17" or A3). If an image larger than
the paper in the bypass tray is printed, a malfunction may
occur. Be careful when disabling the size detection.
Page 61
Page 120
Page 1
Page 60
Notice page
Page 61
Page 120
Page 61
Page 120
Page 1
Page 60
Page 1
Page 60
(Prohibit Notice Page Printing)
This program is used to specify whether a notice page and separator
sheets will be printed when the printer memory becomes full and
divided printing must be performed. If notice page printing has been
enabled, a notice page will be printed at the end of a print job and
separator sheets will be printed between each block letting the user
know that the job has been divided into blocks and the user must
re-stack the document.
To prohibit notice page printing, press the "PROHIBIT NOTICE PAGE
PRINTING" box to display a check mark.
To restore notice page printing, press the checked box again to clear
the check mark.
(Prohibit Rotated Output)
If this program is not set, the print image will be rotated when the
orientation of the print image does not match that of the available
copy paper. If this program is set, a print image specified to be
printed on A4 or 8-1/2" × 11" paper will not be rotated and printed on
A4R or 8-1/2" × 11"R paper even if the specified paper is not loaded
in any tray.
To prohibit rotated output, press the "PROHIBIT ROTATED OUTPUT" box to display a check mark.
To restore rotated output, press the checked box again to clear the
check mark.
(Prohibit Bypass-Tray Selection)
If this program is set, the bypass tray will not be selected for a print
job that specifies auto paper selection or during auto tray switching.
To prohibit bypass tray selection, press the "PROHIBIT BYPASSTRAY SELECTION" box to display a check mark.
To restore bypass tray selection, press the checked box again to
clear the check mark.
(Prohibit Auto Tray Switching)
This program prevents automatic switching between paper trays in
print jobs. This program does not affect the auto tray switching function in the copier mode.
To prohibit automatic tray switching, press the "PROHIBIT AUTO
TRAY SWITCHING" box to display a check mark.
To restore automatic tray switching, press the checked box again to
clear the check mark.
(Prohibit Test Page Printing)
This program prevents printing test pages from the printer configuration menu. If this program is set, the test page print functions will not
appear in the printer configuration menu.
To prohibit test page printing, press the "PROHIBIT TEST PAGE
PRINTING" box to display a check mark.
To restore test page printing, press the checked box again to clear
the check mark.
(Prohibit Changes to Printer Settings)
This program prevents modification of basic printer settings in the
printer configuration menu. If this program is set, the printer settings
functions will not appear in the printer configuration menu.
To prohibit modification of printer settings, press the "PROHIBIT
CHANGES TO PRINTER SETTINGS" box to display a check mark.
To enable modification of printer settings, press the checked box
again to clear the check mark.
(Prohibit Changes to Interface Settings)
This program prevents modification of interface settings in the printer
configuration menu. If this program is set, the interface settings functions will not appear in the printer configuration menu.
To prohibit modification of interface settings, press the "PROHIBIT
CHANGES TO INTERFACE SETTINGS" box to display a check
mark.
To enable modification of interface settings, press the checked box
again to clear the check mark.
4 – 4
Page 5

AR-PB2
(Prohibit Changes to Network Settings)
This program prevents modification of network settings in the printer
configuration menu. If this program is set, the network settings functions will not appear in the printer configuration menu.
To prohibit modification of network settings, press the "PROHIBIT
CHANGES TO NETWORK SETTINGS" box to display a check mark.
To enable modification of network settings, press the checked box
again to clear the check mark.
(3) Notes on Printing Lengthy Documents
When printing a lengthy document, the document memory in the
printer may b ecome ful l of print data . Also, a l engthy doc ument ma y
exceed the limit of the output tray. The printer will operate as follows
depending on the conditions.
NOTE: For units with a 2GB disk drive the block size is 320 pages.
(If face down output is specified:)
a. If printing one copy of a lengthy document is specified:
Printing will stop when the number of printed sheets reaches the
limit of the output tray (if the tray can detect the limit). When the
printed paper is removed from the output tray, printing will
resume.
b. If printing multiple copies of a lengthy document is specified and
the key operator program "Output Method When Memory Is Full"
is set to "1 SET":
The printer will print only one set followed by a notice page at the
end of the job.
c. If printing multiple copies of a lengthy document is specified and
the key operator program "Output Method When Memory Is Full"
is set to "MULTI-SET":
Printed sheets will be divided into blocks* as shown in the illustration. A separator sheet will be inserted between each block. Finally, a notice page will be output. The number of pages in a block
can be changed using the key operator program "Memory
Reserved for Printer".
Notice page
Separator sheet
Separator sheet
Separator sheet
1 block
Example: Two sets of 120-page document are printed in 60-page
blocks.
(If face up output is specified:)
a. If printing one copy of a lengthy document is specified:
Printed sheets will be divided into blocks* as shown in the illustration. A separator sheet will be inserted between each block. Finally, a notice page will be output.
Separator
sheet
1 block
61
120
1
Page 120
Page 61
Page 120
Page 61
Page 60
Page 1
Page 60
Page 1
Notice page
Page 61
Page 120
Page 1
b. If printing multiple copies of a lengthy document is specified and
the key operator program "Output Method When Memory Is Full"
is set to "1 SET":
The printer will print only one set in blocks* as in 2-A and output a
notice page at the end of the job.
Notice page
Separator
sheet
1 block
Page 61
Page 120
Page 1
Page 60
c. If printing multiple copies of a lengthy document is specified and
the key operator program "Output Method When Memory Is Full"
is set to "MULTI-SET":
Printed sheets will be divided into blocks* as shown in the illustration. A separator sheet will be inserted between each block. Finally, a notice page will be output. The number of pages in a block
can be changed using the key operator program "Memory
Reserved for Printer".
Notice page
Separator
sheet
Separator
sheet
Separator
sheet
1 block
Page 61
Page 120
Page 61
Page 120
Page 1
Page 60
Page 1
Page 60
Example: Two sets of 120-page document are printed in 60-page
blocks.
* The number of pages in a block varies with the paper size, setting
of the key operator program "Memory Reserved for Printer" and
printer models.
(Notice Page Printing)
If you find that a notice page has been printed at the end of a print
job, the length of the document exceeded the printer memory
capacity as described above. The print data received from the computer has not been printed as specified. Check the print order and
arrange the order if needed. If the specified number of copies have
not been output, you have remedies: 1) Print again sending the job to
the printer multiple times. 2) Change the key operator program "Output Method When Memory Is Full" to "MULTI-SET".
(Disabling Notice Page and Separator Sheet Printing)
Notice page and separator sheet printing can be disabled using a key
operator program.
60
Page 60
4 – 5
Page 6

AR-PB2
3. Hardware setup and adjustments
A. Flash Memory write protect setting
Flash memory write protect setup (JP109)
Used to setup write protect YES/NO of flash memory.
JP109 JP109
1133
Write protect condition
(Default)
When making version up of the flash memory or when rewriting the
flash memory, short pins 2-3. In normal cases, short pins 1-2 (write
protect).
When shipping, the DIP switch is set to the following value.
JP109 1-2 Flash memory write protect
Write condition
B. Laser power setup
Enter SIM 61-4 and set the setup value to 16 (default).
If set to another value, normal print density may not be obtained.
C. Centro interface adjustment
(1) Centro interface timing adjustment
Enter SIM 67-3 and set the ACK signal width.
If communication between PC and the copier is not normally performed with the set value st to 10 (default), check the environment of
PC and change the set value.
Adjustment range: 0 ~ 255
(2) SELECT IN signal setup
Enter SIM 67-11 and set SELECT IN signal YES/NO.
The relationship between the set value (0 or 1) and SELECT IN
signal is as follows:
Set value SELECT IN signal
0 YES
1NO
If communication between PC and the copier is nor performed normally, check the environment of PC and change the set value.
D. NVRAM clear
Use SIM 67-17.
This is used to clear various setup data relating to the printer opera-
tions stored in NVRAM on the printer control PWB.
Execute this procedure to set all the setup data to default.
E. Network card check
After installing the network card, execute SIM 67-16, and the operation of the network card is displayed as NG or OK.
4 – 6
 Loading...