


MODEL
MODEL
AR-BD14
AR-PB2
DIGITAL COPIER
PRINTER EXPANSION KIT
OPERATION MANUAL
• GETTING STARTED
• PRINTING FROM A COMPUTER
• ADVANCED PRINTING
TECHNIQUES
• USING THE OPERATION
PANEL
• PRINTER
TROUBLESHOOTING
• SPECIFICATIONS
• APPENDIX
...........................................27
................................14
.....................................48
........................1
...................41
.........................47
Page
....5

Before Reading This Manual
This operation manual was written for the AR-PB2 Printer Expansion Kit with floppy disks for
installation of printer drivers.
With the latest version of the AR-PB2 Printer Expansion Kit, the printer drivers ar e supplied with a
CD-ROM and therefore the installation method is different from this manual. A separate
supplement manual is provided to describe the new installation method. Also some additional
features are provided with the latest ver sion. These features are also described in t he supplement
manual.
The separate supplement manual describes the following items.
• Installing printer drivers from the CD-ROM
• PCL6 printer driver
• Printer driver for Macintosh
• Printer Status Monitor
• Printer Administration Utility
• NW Setup
• Additional printer configuration menu and key operator program
List of the Applicable Models for the AR-PB2 Printer Expansion Kit
(as of October, 1999)
Model Name
AR-250
AR-280* Yes 2 GB
AR-281 Yes 2 GB
AR-285* Yes 2 GB
AR-286 Yes 2 GB
AR-335* Yes 2 GB
AR-336 Yes 2 GB
AR-405 Yes 2 GB
AR-505 Yes 2 GB
Some units of the models marked with (*) m ay com e with a 1G B har d disk dr ive.
The specifications, features, and options of the printer described in this operation manual were
written based on the models AR-280, AR-285, and AR-335 with the printer drivers supplied in
floppy disks. The details of these may vary with the printer m odels.
Yes / No Capacity
No / Option (1 GB)
Hard Disk Drive
CINSE1779FC51

Warranty
While every effort has been made to make this document as accurate and helpful as possible,
SHARP Corporation makes no warranty of any kind with regard to its content. All information
included herein is subject to change without notice. SHARP is not responsible for any loss or
damages, direct or indirect, arising fr om or r elated to the use of this operation manual.
© Copyright SHARP Corporation 1999. All rights reserved. Reproduction, adaptation or translation
without prior written permission is prohibited, except as allowed under copyright laws.
Trademark Acknowledgments
Microsoft Windows, MS-DOS, and Windows NT are trademarks of Microsoft Corporation in the
U.S.A. and other countr ies.
IBM and PC/AT are trademarks of International Business Machines Corporation.
Pentium is a registered trademark of Intel Corporation.
Hewlett-Packard, HP, LaserJet and PCL are trademarks of the Hewlett-Packard Company.
PostScript® is a registered trademar k of Adobe Systems Incorporated.
NetWare is a registered trademark of Novell, Inc.
All other trademarks and copyrights are t he pr oper ty of their respective owners.
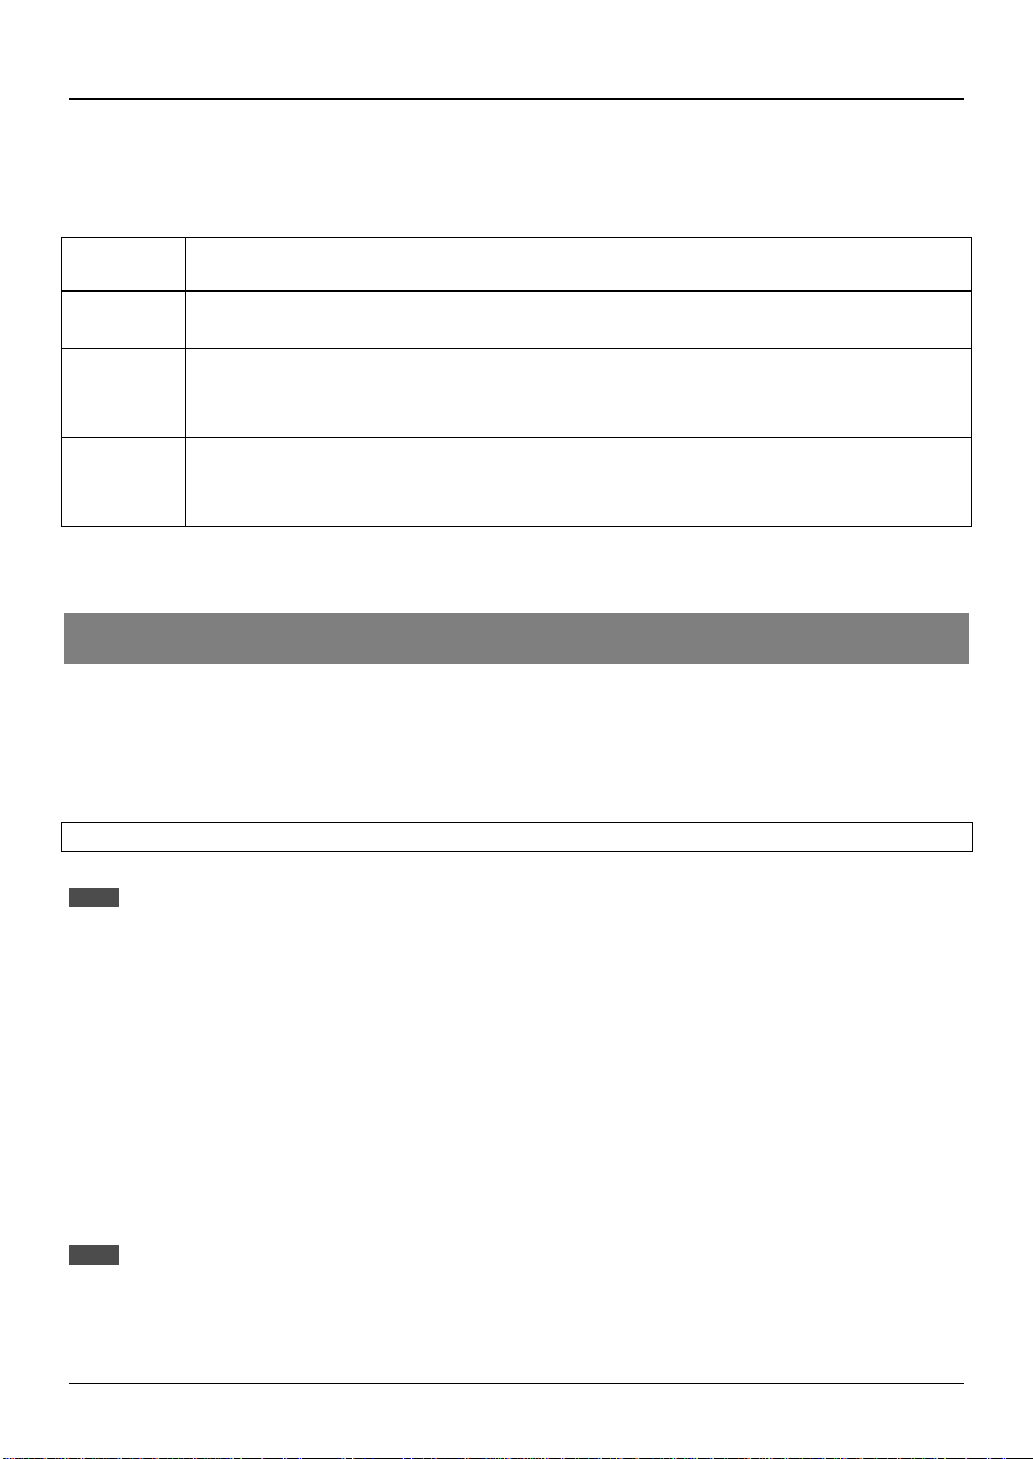
Conventions
The following conventions are used throughout this operation manual.
CAUTION
This indicates cautions that must be observed for the printer to work properly. If these are not observed,
the printer will not be damaged, but it will not operate or will operate in a way that is unexpected.
NOTE
This indicates points which are not absolutely necessary for printer operat ion, but which are mentioned in order to show alternative ways of doing something, or for giving further information on
certain topics.
i

Table of Contents
CHAPTER 1 GETTING STARTED
INTRODUCTION.......................................................................................................................1
USING THIS MANUAL..............................................................................................................2
For General Users...............................................................................................................2
For Key Operators ..............................................................................................................3
CONNECTING TO THE PRINTER............................................................................................3
PARALLEL PRINTER INTERFACE...........................................................................................3
Connection..........................................................................................................................4
NETWORK INTERFACE...........................................................................................................4
CHAPTER 2 PRINTING FROM A COMPUTER
INTRODUCTION.......................................................................................................................5
AR-PB2 PRINTER DRIVERS....................................................................................................5
SELECTING THE BEST PRINTER DRIVER .............................................................................5
Checking the Hardware and Software Requirements..........................................................8
INSTALLING PRINTER DRIVERS.............................................................................................8
Windows 95 with Plug & Play..............................................................................................8
Windows 98 with Plug & Play..............................................................................................9
Windows 95/ Windows 98 without Plug & Play..................................................................10
Windows 3.1x....................................................................................................................11
Windows NT 4.0................................................................................................................11
INSTALLING RESIDENT FONT INFORMATION
(PPD for Windows 95/Windows 98 only)..................................................................................11
PRINTING A TEST PAGE FROM YOUR COMPUTER............................................................12
Windows 95, Windows 98 or Windows NT 4.0...................................................................12
Windows 3.1x....................................................................................................................12
PRINTING DOCUMENTS FROM THE COMPUTER...............................................................13
FONTS....................................................................................................................................13
CHAPTER 3 ADVANCED PRINTING TECHNIQUES
INTRODUCTION.....................................................................................................................14
CONTROLLING PRINTER FEATURES FROM THE PRINTER DRIVER.................................14
Windows 95/ Windows 98/ Windows NT 4.0......................................................................14
Windows 3.1x....................................................................................................................15
PRINTER FEATURES.............................................................................................................15
DETAILS OF SPECIAL FEATURES........................................................................................18
Orientation........................................................................................................................ 18
Reverse Order ..................................................................................................................18
Document Style.................................................................................................................19
“N-up” Printing...................................................................................................................20
Custom Paper Size...........................................................................................................20
Paper Source....................................................................................................................20
Different Paper (Cover Sheet Printing)..............................................................................22
ii

TABLE OF CONTENTS
Transparency Inserts (Interleaves)....................................................................................22
Output...............................................................................................................................22
Face Up/Down.................................................................................................................. 23
Stapling.............................................................................................................................23
Right Edge Binding............................................................................................................25
Image Quality.................................................................................................................... 25
Font..................................................................................................................................25
Watermark........................................................................................................................25
Configuration.....................................................................................................................25
Overlays............................................................................................................................ 26
CHAPTER 4 USING THE OPERATION PANEL
INTRODUCTION.....................................................................................................................27
USES OF THE OPERATION PANEL ......................................................................................27
CONFIGURATION FROM THE OPERATION PANEL.............................................................28
Accessing the Printer Configuration Menu.........................................................................28
Using the Printer Configuration Menu................................................................................28
Example Configuration Task .............................................................................................29
Printer Configuration Menus.............................................................................................. 29
Printer Settings.................................................................................................................31
Interface Settings..............................................................................................................31
Network Settings...............................................................................................................32
Print Test Page.................................................................................................................32
Initialize and/or Store Settings...........................................................................................33
COPIER MODE AND PRINTER MODE...................................................................................33
Selecting the Online Mode................................................................................................ 34
TRAY SELECT AND JOB CANCEL.........................................................................................34
Tray Selection...................................................................................................................34
Interrupting and Canceling Print Jobs................................................................................35
KEY OPERATOR PROGRAMS...............................................................................................35
Printer Exposure Level......................................................................................................36
Memory Reserved for Printer............................................................................................37
Output Method When Memory is Full................................................................................37
Enable Bypass-Tray Size Detection..................................................................................38
Prohibit Notice Page Printing.............................................................................................38
Prohibit Rotated Output.....................................................................................................39
Prohibit Bypass-Tray Selection..........................................................................................39
Prohibit Auto Tray Switching .............................................................................................39
Prohibit Test Page Printing................................................................................................39
Prohibit Changes to Printer Settings..................................................................................40
Prohibit Changes to Interface Settings..............................................................................40
Prohibit Changes to Network Settings...............................................................................40
iii

TABLE OF CONTENTS
CHAPTER 5 PRINTER TROUBLESHOOT I NG
INTRODUCTION.....................................................................................................................41
NOTES ON PRINTING LENGTHY DOCUMENTS...................................................................41
NOTICE PAGE PRINTING......................................................................................................43
Disabling Notice Page and Separator Sheet Printing.........................................................43
TROUBLESHOOTING ............................................................................................................43
CHAPTER 6 SPECIFICATIONS
SPECIFICATIONS................................................................................................................... 47
CHAPTER 7 APPENDIX
PRINT AREA...........................................................................................................................48
FONT LIST..............................................................................................................................49
SUPPLEMENT........................................................................................................................51
INDEX ...........................................................................................................................................52
iv

Chapter 1 Getting Started
Introduction
The AR-PB2 Printer Expansion Kit adds high-speed, laser set-printing capability to the powerful
features of the AR-280/AR-285/AR-335 copiers and other copiers of the same series to provide a
convenient, high-productivity document printing system easily controlled from a desktop or
networked computer. Note that throughout this operation manual, we will refer to the AR-280,
AR-285, AR-335 or any other digital copying machine of the same series in which the AR-PB2
Printer Expansion Kit has been installed simply as the ‘printer’.
The many useful features and functions of the printer include:
• print speeds of up to 28 (AR-280/AR-285) or 33 (AR-335) pages per minute (for the same page)
• printing multiple sets of documents
• stapling documents (with an optional finisher)
• automatic booklet printing*
• automatic 2-sided (duplex) printing*
• printing multiple document pages on a single sheet (N-up printing)
• printing cover sheets (different first pages)
* For booklet printing and 2-sided printing, an optional duplex module is required in some models.
This operation manual assumes that the AR-PB2 Printer Expansion Kit has already been installed
in your copier and is ready to use with your computer. This chapter shows you how to check t he
printer cable connections linking the printer with your computer. These tasks should be completed
by an authorized dealer service technician before the appropriate AR-PB2 printer drivers are
installed in your computer.
NOTES
This operation m anual descr ibes only printer f eatures. For a descri ption of copi er featur es, s ee the c opier oper ation
manual. Refer t o the c opi er oper ati on m anual f or copi er operation, supplies, maintenance, and speci fi c ati ons for print
media usage.
When connecting thi s pri nter thr ough a netw ork to c omputer s, an opti onal netw ork i nterf ace car d ( Pri nt Ser ver C ard)
is needed. However, in some c ountri es and regi ons, the net work inter face car d is not avail able. In t his c ase, connec t
the printer to a com puter through a parallel int erface. If additional inform ation is required conc erning the network
interface card, consult your authorized Sharp Dealer.
1

GETTING STARTED
Using This Manual
This operation manual, together with the on-line help files supplied with the printer dr ivers, provides
complete information on using this printer. The operation manual and on-line help files are intended
as operation guides for general users and key operators. The operation manual includes
information on:
• connecting the printer to a computer
• selecting and installing printer drivers
• advanced printer features and capabilities
• using the operation panel to control printer functions
• troubleshooting printer problems
• printer specifications
The on-line help files include specific information on:
• configuring printer drivers
• adjusting printer driver settings
• using advanced printer features under specific printer drivers
The on-line help file for a given printer driver is automat ically installed along with that printer dri ver,
and can be accessed by clicking the ‘Help’ button available in the printer driver dialog box.
NOTE
The method of access ing the on-line help depends on t he particular pr inter driver. With the PCL5e and PostScr ipt®
drivers, t he on- l i ne hel p can be ac c ess ed by cl i c ki ng t he ‘ H elp’ but ton. With the Sharp-specifi c Post Script® PPD driver ,
the on-line help can be accessed by clicking the help icon and then clicking the item for which information is needed.
For General Users
General users should read the
Techniques
sections of this operation manual to become familiar with the available features and
functions of this printer.
The on-line help files supplied with the printer drivers should then be consulted for specific
information on using particular printer feat ur es.
NOTE
Some features are not supported by some printer drivers; consult the table in the
section of the manual for more information (page 6).
Getting Started, Printing from a Computer, and Advanced Printing
Selecting the Best Printer Driver
2

For Key Operators
GETTING STARTED
In addition to the information recom mended for general users, key oper ators should read the
the Operation Panel
section of this operation manual to become familiar with the features and
Using
functions of the operation panel.
The
Key Operator Programs, Printer Troubleshooting
, and
Specifications
sections can also be
consulted for informat ion t hat will aid in operating the printer/copier smoot hly and ef ficiently.
Connecting to the Printer
The computer communicates with the printer through a local parallel printer or optional network
interface that has been installed as part of the AR-PB2 Printer Expansion Kit by your authorized
Sharp dealer. The following section shows the location of the printer interface connection and
provides step-by-step procedures on how to connect t he appr opr iat e cable.
NOTE
If you plan on moving the printer, contact your authorized Sharp dealer.
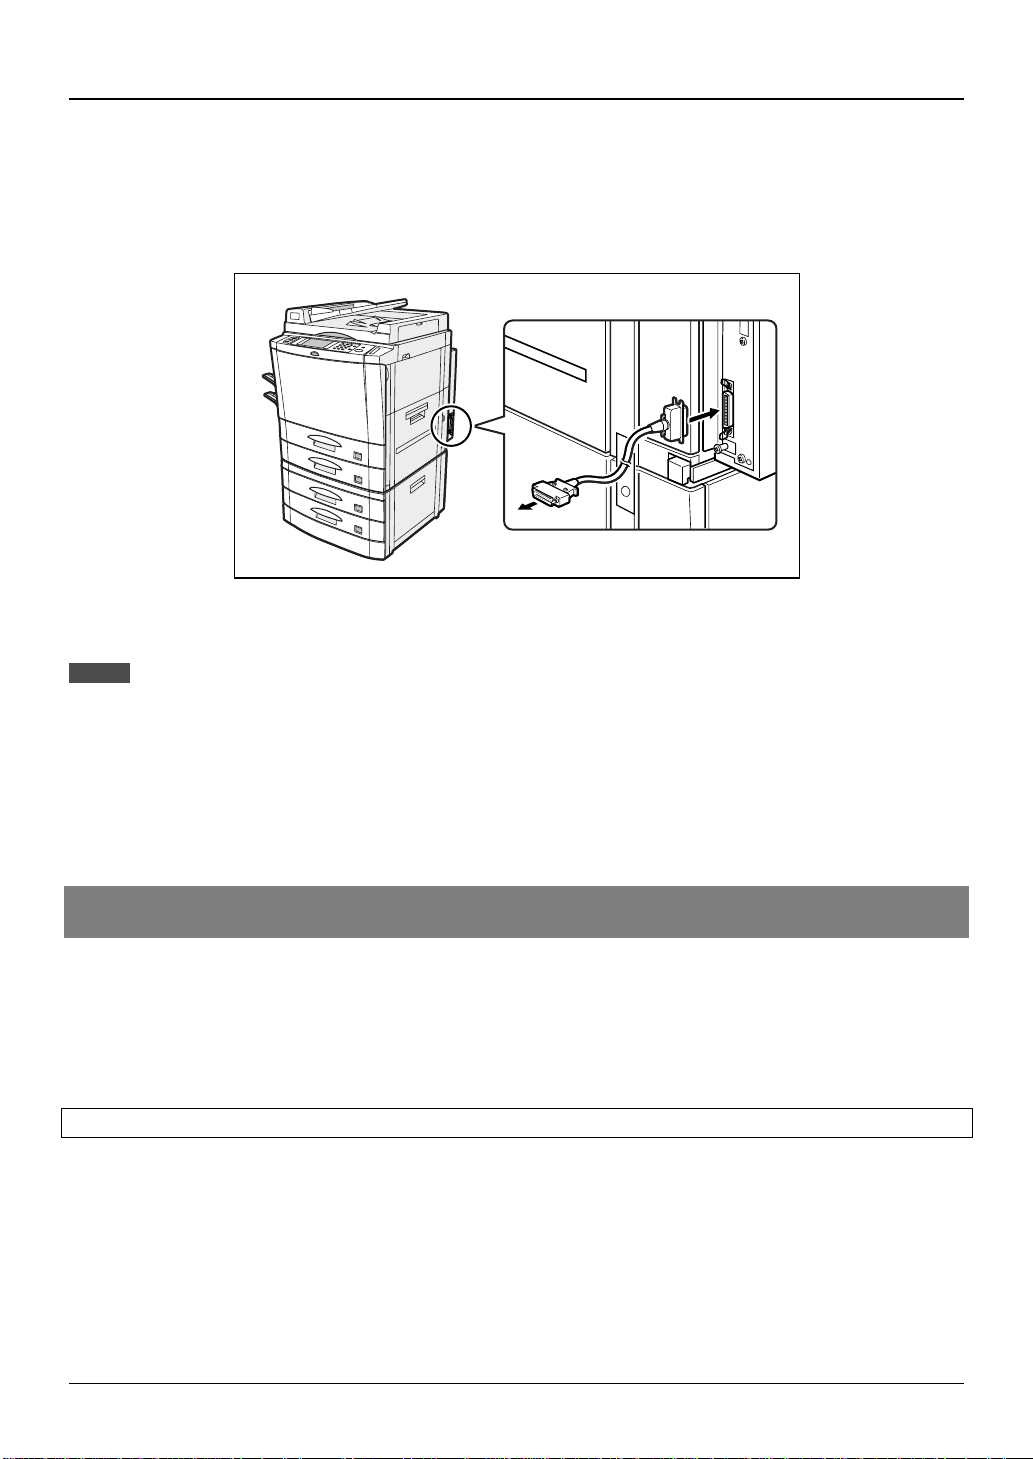
Parallel Printer Interface
The printer supports an IEEE 1284-compliant par allel printer interface. This interface requires an
IEEE 1284-compliant cable that connect s t o the rear of the printer to the com puter (see Figure 1-1).
CAUTION
Connector
36-pin DDK 57LE-40360-730B (D29) female connector or
equivalent connector
Cable
Shielded type bi-directional parallel interface
For best results, use a printer inter f ace cable t hat is
IEEE1284 compliant.
Do not attempt to connec t the printer interface cabl e to the printer and/or com puter with the pow er turned on.
Connecting the printer interface cable while power is applied can cause equipment damage.
18
36 19
1
3
GETTING STARTED
Connection
1. Make sure both the printer and the com puter are turned off.
2. Plug one end of the printer cable into the printer and t he ot her end int o t he com put er ’s par allel
connector.
Figure 1-1. Connecting the Pr i nt er I nt e rface Cable
NOTES
In order to have best performance, make sure to use shielded parallel cable.
For specifications of the parallel interface of your computer, see its operation manual.
The printer sends and r eceiv es data bi- direc tionall y and at high s peed. Som e sw itch boxes cannot support high- speed bi-
directional data transfer and using them might cause printing errors.
For further details on the specifications of the printer’s parallel interface, consult an authorized Sharp dealer.
Network Interface
The printer can also be connected to a network using an optional network interface card (Print
Server Card) supplied by authorized Sharp dealers. For details on network interface, see the
operation manual of the network interf ace car d.
For additional network utilities, see t he separ at e supplem ental manual.
4

Chapter 2 Printing From A Computer
Introduction
A printer driver must be installed before the printer can be used to print documents created or
stored on a desktop or networked computer. This chapter describes the printer drivers supplied
with the printer. Inform ation provided includes:
• Full descriptions of all supplied printer drivers, including a table showing the features supported by
each printer driver
• Detailed information on selecting and installing printer drivers
AR-PB2 Printer Drivers
The following diskettes are supplied with the printer. Refer to Table 2-1 to determine which dr iver or
drivers are compatible with your operating system.
1. Windows PostScript® printer driver (SHARP AR-PB2 PS) for Windows 3.1/Windows 95/
Windows 98 and Sharp-specific PostScript® PPD (SHARP AR-PB2 PS PPD) for Windows
95/Windows 98 (No. 1 in Table 2-1)
2. Windows PostScript® printer driver (SHARP AR-PB2 PS) and Sharp-specific Post Script® PPD
(SHARP AR-PB2 PS PPD) for Windows NT 4.0 (No. 2 in Table 2-1)
3. Windows PCL5e printer driver for Windows 3.1/Windows 95/Windows 98 (SHARP AR-PB2
PCL5e) (No. 3 in Table 2-1)
4. Windows PCL5e printer driver for Windows NT 4.0 (SHARP AR-PB2 PCL5e)
(No. 4 in Table 2-1)
Selecting the Best Printer Driver
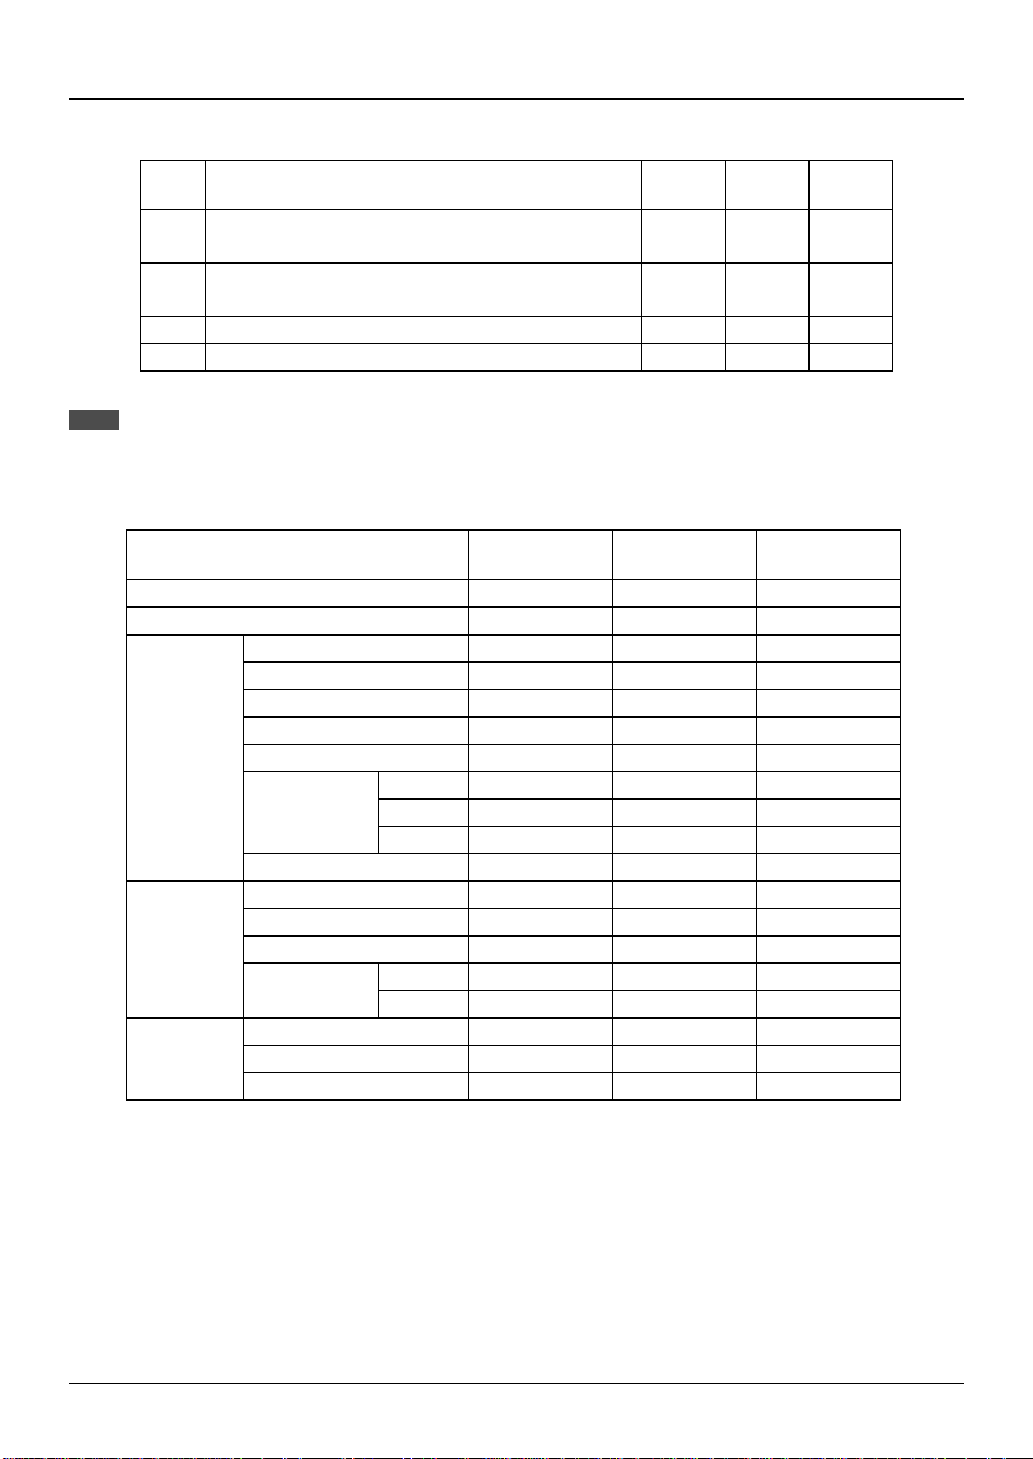
Refer to Table 2-1 and Table 2-2 to select the printer driver that best fits your needs. Table 2-1
shows which printer drivers are compatible with specific operating system software, i.e., WIN 3.1 or
WIN 95/ WIN 98. Table 2-2 provides a full list of printer features and shows which features are
supported by each supplied printer driver.
5
PRINTING FROM A COMPUTER
Table 2-1. Printer Driver Compatibility
NOTE
NO. PRINTER DRIVER WIN 3.1
Windows 3.1/95/98 PS
1
Windows 95/98 PPD
Windows NT PS
2
Windows NT PPD
3 Windows 3.1/95/98 PCL5e X X
4 Windows NT PCL5e X
Users of Wi ndows will obtain maximum functionality and better output quality by installing t he Windows PostScri pt®
Printer driver. Alternatively, the Windows PCL5e driver will provide the best print speed.
WIN 95/
WIN 98
XX
WIN NT
X
X
X
Table 2-2. Printer Dr i ver Feat ur es
Features PCL5e
Output Quality Good Best Best
Print Speed Best Good Good
General
Paper Input
Paper
Output
Copies Yes Yes Yes
Orientation Yes Yes Yes
Reverse Order Yes Yes Yes
Duplex Yes Yes Yes
Binding Edge Left / Top / Right Left / Top / Right Long / Short
N-up
Booklet Yes Yes N/A
Paper Size Yes Yes Yes
Custom Paper Size Yes (1 size) Yes (7 sizes)** Yes (3 sizes)**
Source Selection Yes Yes Yes
Transparency
inserts
Output Tray Selection Yes Yes Yes
Face Up/Down Yes Yes Yes
Staple Yes Yes Yes
Number N/A 2/4/6/8/9/16 2/4*
Order N/A Fixed Fixed
Border N/A Yes Yes
Blank Yes Yes N/A
Printed Yes Yes N/A
Windows
PostScript®
PPD
* Under Windows NT 4.0, the N-up feature is not available with the PPD.
** Under Windows NT 4.0, the Custom Paper Size feature is not available.
6

PRINTING FROM A COMPUTER
Table 2-2. Printer Dr i ver Feat ur es ( cont inued)
Graphic
Font
Watermark
Features PCL5e
Resolution Setting 600/300 600/300 600/300
Halftone Setting N/A Yes Yes
Graphics Mode Yes N/A N/A
Smoothing* Yes Yes Yes
Toner save* Yes Yes Yes
Negative Image N/A Yes Yes
Mirror Image N/A
Zoom N/A N/A Yes
Fit to Page Yes Yes N/A
Font Setting Yes Yes Yes
Resident Font Yes Yes Yes
Download Font
Print Yes Yes N/A
Edit Watermark Yes Yes N/A
1st Page Yes Yes N/A
Background Yes Yes N/A
Outline N/A Yes N/A
Configuration Setting Yes Yes YesOthers
Form Overlay Yes N/A N/A
Bitmap
TrueType
Windows
PostScript®
Horizontal/
vertical
Bitmap
Type1
TrueType
PPD
Horizontal
Bitmap
Type1
TrueType
* The smoothing and toner save features are not available with the AR-280/
AR-285/AR-335 printers.
7
PRINTING FROM A COMPUTER
Checking the Hardware and Software Requirements
You will need the following hardware and softwar e in or der t o inst all t he pr inter driver.
Computer
Type
Operating
System
CPU
RAM
• IBM PC/AT or compatible computer equipped with a bi-directional parallel interface
• Windows 3.1x, Windows 95, Windows 98, Windows NT 4.0
• Windows 3.1/Windows 95: 486SX or better
• Windows 98: 486DX/ 66 MHz or better (Pentium or bett er is r ecom m ended. )
• Windows NT4.0: 486/ 25MHz or better
• Windows 3.1/Windows 95: 8 MB or more (12 MB or more is recommended.)
• Windows 98: 16 MB or more (32 MB or more is r ecom m ended. )
• Windows NT 4.0: 16 MB or more
Installing Printer Drivers
A compatible printer driver must be loaded to enable a computer’s operating system to communicate with the printer.
The following procedures describe how to install each of the supplied printer drivers. To install multiple
Windows printer drivers, the installation procedure must be performed for each driver.
For installation from the PRINTER UTILITIES CD-ROM, see t he separ at e supplem ent al manual.
NOTE
Before installing a printer driver, be sure to read the “Readme” file for the latest information.
Windows 95 with Plug & Play (parallel connections only)
When using Windows 95 with plug & play*, follow the procedure below.
* The plug & play feature is effective if both the computer and per ipheral equipment are equipped
with IEEE 1284 compliant parallel int er face.
1. Ensure that the printer cable is connected between your computer and the printer and then turn on
the printer.
2. Start Windows on your computer.
NOTE
Before installing the printer driver, be sure to close all other open applications.
8

PRINTING FROM A COMPUTER
• If you use Windows 95 on a personal computer with the plug & play feature, t he ‘Update
Device Driver Wizard’ window will appear. I f the ‘New Hardware Found’ window appears,
follow the procedure below:
➀ Click the ‘Driver from Disk Provided by Hardware Manufacturer’ but t on and t hen click ‘OK’.
When the ‘Inst all From Disk’ window appears, insert t he desired diskette into the floppy disk
➁
drive. Type A:\ (if the f loppy disk drive is designated as drive A) and click the ‘OK’ but t on.
Proceed to st ep 4.
➂
• If either t he ‘Update Device Driver Wizard’ window or the ‘New Hardware Found’ window
does not appear, follow the procedure of Wi ndow s 95/Windows 98 without Plug & Pl ay.
3. Insert the desired diskette into the floppy disk drive and click the ‘Next’ button.
4. Highlight the desired printer driver and click ‘Next’ to continue.
5. Ensure that ‘Yes’ is checked to use the printer as the default printer. Click the ‘Next’ button.
6. Follow the instructions on your screen to install the supplied printer driver.
NOTE
In step 4 above, selecting ‘SHARP AR-PB2 PS’ (the PostScript® driver) will generally provide the highest-quality
output and support the widest range of printer features. Alternatively, select either the SHARP AR-PB2 PS PPD (Sharpspecific PostScript® PPD) or the SHARP AR-PB2 PCL5e driver.
Windows 98 with Plug & Play (parallel connections only)
When using Windows 98 with plug & play*, follow the procedure below.
* The plug & play feature is effective if both the computer and per ipheral equipment are equipped
with IEEE 1284 compliant parallel int er face.
1. Ensure that the printer cable is connected between your computer and the printer and then turn on
the printer.
2. Start Windows on your computer.
NOTE
Before installing the printer driver, be sure to close all other open applications.
• If you use Windows 98 on a personal computer with plug & play feature, the ‘Add New
Hardware Wizard’ window will appear. I f the ‘Add New Hardware Wizar d’ window does not
appear, follow the procedure of Window s 95/ W indows 98 without Plug & Play.
9

PRINTING FROM A COMPUTER
3. Click the ‘Next’ button.
4. Ensure that ‘Search for the best driver for your device’ is selected and click the ‘Next’ button.
5. Insert the desired diskette into the floppy disk drive and click the ‘Next’ button.
6. Highlight the desired printer driver and click ‘Next’ to continue.
7. Ensure that ‘Yes’ is checked to use the printer as the default printer. Click the ‘Next’ button.
8. Follow the instructions on your screen to install the supplied printer driver.
NOTE
In step 6 above, selecting ‘SHARP AR-PB2 PS’ (the PostScript® driver) will generally provide the highest-quality
output and support the widest range of printer features. Alternatively, select either the SHARP AR-PB2 PS PPD (Sharpspecific PostScript® PPD) or the SHARP AR-PB2 PCL5e driver.
Windows 95/Windows 98 without Plug & Play
1. Ensure that the printer cable is connected between your computer and the printer and then turn on
your computer.
2. On the Windows 95/Windows 98 Start menu, highlight ‘Settings’, then highlight and click on
‘Printers’.
3. From the Printers window, select ‘Add Printer’ to run the Add Printer Wizard. Then click ‘Next’.
4. If Windows 95/Windows 98 has been configured for network operation, it m ight be necessary to
select ‘Local Printer’ or ‘Network Printer’. Select the appropriate option, and click ‘Next’ to continue.
5. If ‘Network Printer’ was selected, specify the appropriate Network Pat h or Queue Name and click
‘Next’.
6. The installation window will display a list of printer models and manuf actur ers. Click the ‘Have Disk’
button.
7. Insert the desired diskette into the floppy disk drive. Select the floppy disk drive and click the ‘OK’
button. Highlight the desired printer driver, and click ‘Next’ to continue.
8. If ‘Local Printer’ was selected in step 4 above, the installation window will display a list of possible
port assignments. Select the correct port, usually LPT1 for local printers and click ‘Next’.
9. Ensure that ‘Yes’ is checked to use the printer as the default printer. Click the ‘Next’ button.
• At this time, ensure that t he printer has been turned on and has been connected to your
computer.
10. Follow the instructions on your screen to install the supplied printer driver .
NOTE
In step 7 above, sel ecting ‘SHARP AR-PB2 PS’ (t he PostScript® driver) will general ly provide the highest-quality
output and support the widest range of printer features. Alternatively, select either the SHARP AR-PB2 PS PPD
(Sharp-specific PostScript® PPD) or the SHARP AR-PB2 PCL5e driver.
10

PRINTING FROM A COMPUTER
Windows 3.1x
1. Ensure that the printer cable is connected between your computer and the printer and then turn on
your computer.
2. From the Program Manager, double click on ‘Control Panel’ located in the ‘Main’ menu.
3. From the Control Panel, double click on ‘Printers.’
4. Click on ‘Add’ and then ‘Install Unlisted or Updated Printer.’
5. Click on ‘Install.’
6. Insert the desired diskette into the drive, select the floppy disk drive and click the ‘OK’ button. Then
select the desired printer driver.
7. Follow the instructions on your screen to install the supplied printer driver.
NOTE
In step 6 above, selecting ‘SHARP AR-PB2 PS’ (the PostScript® driver) will generally provide the highest-quality
output and support the wides t range of printer featur es. Alternatively , select the SHAR P AR-PB2 PCL5e driver. T he
SHARP AR-PB2 PS PPD (SHARP-specific PostScript® PPD) cannot be installed on Windows 3.1x.
Windows NT 4.0
1. Ensure that the printer cable is connected between your computer and the printer and then turn on
your computer.
2. On the Start menu, highlight ‘Settings’, then highlight and click on ‘Printers’.
3. From the Printers window, select ‘Add Printer’ to run the Add Printer Wizard.
4. Select ‘My computer’ or ‘Network Printer Server’ and then click on ‘Next’.
5. Follow the instructions on your screen to install the supplied printer driver.
NOTE
In step 5 above, selecting ‘SHARP AR-PB2 PS’ (the PostScript® driver) will generally provide the highest-quality
output and support the widest range of printer features. Alternatively, select either the SHARP AR-PB2 PS PPD
(Sharp-specific PostScript® PPD) or the SHARP AR-PB2 PCL5e driver.
Installing Resi dent Font Information
(PPD for Windows 95/Windows 98 only)
If you have installed the PPD printer driver for Windows 95/Windows 98, install the resident font
information following the procedure below.
NOTES
Before installing the resident font information, be sure to install the printer driver.
When installing the resident font information, be sure to close all other open applications.
If you have changed the port for t he pr i nter f r om Pr oper t ies of t he pr i nter dr i v er w hen the printer is used as a net w or k
printer, reinstall the resident font information.
If printer resi dent fonts cannot be specified from appli cation software, the resident font information has not been
installed or the information is not proper. In this case, reinstall the resident font information.
11

PRINTING FROM A COMPUTER
1. Ensure that the printer cable is connected between your computer and the printer and then turn on
your computer.
2. Insert the printer driver diskette for t he PPD driver for Windows 95/Windows 98 into the floppy disk
drive.
3. On the Windows 95/Windows 98 Start menu, select ‘Run’.
4. Type A:\PFMSETUP (if the floppy disk drive is designated as drive A) and click the ‘OK’ button.
5. Follow the instructions on your screen to install the resident font information.
6. When the installation is complete, restart Windows.
Printing a Test Page from Your Computer
This section describes how to print a test page from your computer. Printing a test page verifies
that the printer and your computer are connected correctly.
Windows 95, Windows 98 or Windows NT 4.0
NOTE
Users of Wi ndows 95, Windows 98 or Wi ndows NT 4.0 will be prompted to print a test page when installing thei r
selected printer driver(s). Otherwise, follow the procedures given below.
1. If necessary, install the appr opriate printer dr iver(s). Ref er to ‘Installing Pr inter Driver s’ for specific
instructions.
2. From the Windows desktop, click on ‘Start.’
3. Highlight ‘Settings’ and then click on ‘Printers.’
4. Right click on the Sharp printer icon and then click on ‘Properties.’
5. Click on ‘Print Test Page.’
6. Follow the instructions on the screen to finish printing the test page.
Windows 3.1x
1. If necessary, install the appr opriate printer dr iver(s). Ref er to ‘Installing Pr inter Driver s’ for specific
instructions.
2. Print a test page or test document using one of your installed word processing program s such as
Notepad.
NOTE
Refer to Chapter 4 on Operation Panel to make sure the printer is ready and on-line to print the document.
12

PRINTING FROM A COMPUTER
Printing Documents from the Computer
In most cases, it is not necessary t o use the operation panel when printing documents from the
computer. When a document is sent to the printer from the computer , the printer will aut omatically
print the document. However, following the procedure specified below can help ensure that
documents are printed accurately. The procedure assumes that the printer has been properly
connected to a computer as described in Chapter 1, and that a printer driver has been installed as
described in this chapter. For more information regarding the printer operation panel, refer to
Chapter 4.
1. Check the operation panel to confirm that the ON LINE indicator is lit. I f the ON LINE indicator is
not lit, press the PRINT key to select t he printer mode and then press the “ONLINE” key on the
touch panel to set the printer to the on-line condition.
2. Check the paper tray(s) to ensure that the desired paper is loaded.
3. Using the computer and any appropriate application software, load the document to be printed, set
any desired features using the installed printer driver, and give the command to print the document.
If necessary, refer to the documentation for the computer and/or the application soft ware for help
on issuing the necessary commands.
4. The printer will print the document.
Fonts
Refer to Table 7-1 and Table 7-2 for a complete list of fonts resident in the pr inter for use by the
supplied printer drivers.
The resident fonts are always available to the printer and need not be downloaded with each print
job. Using the resident fonts enables the printer t o operate at maximum perfor mance, and reduces
the amount of data which must be tr ansferred from the computer to t he pr inter with each pr int job.
13

Chapter 3 Advanced Printing Techniques
Introduction
This chapter describes the full range of advanced printing features and capabilit ies available from
the printer.
The following sections describe the capabilities and limits of each feature or group of features.
Using these features requires making adjustments to printer driver settings. For information on
using printer features with a specific printer dr iver, consult the on-line help files supplied with the
printer drivers.
NOTE
For inform ation on what feat ures are suppor ted by a speci fic pri nter dr iver , consul t Tabl e 2-2 in the section
the Best P rinter Driver
.
Selecting
Controlling Printer Features from the Printer Driver
The method to access the features of the printer driver is described below for each supported
operating system.
Before setting the printer dr iver, check the following items.
• The SHARP AR-PB2 printer driver (SHARP AR-PB2 PS, SHARP AR-PB2 PS PPD or SHARP AR-
PB2 PCL5e) has been installed in the computer to be used. If not, see INSTALLING PRINTER
DRIVERS on page 8.
• The above printer driver has been selected.
Windows 95/Windows 98/Windows NT 4.0
1. Within the application, select File/Print.
2. Click the ‘Properties’ button.
3. The properties of the SHARP AR-PB2 printer driver will be displayed.
4. Select desired settings on each tab.
5. Press the ‘OK’ button to store the settings and terminate the properties.
NOTE
In some applicat ions, the method above c annot be used. In this cas e, ➀ click the ‘ Start’ button of the comput er and
then select ‘Pr i nter s ’ fr om Set ti ngs . ➁ If you use Window s 95/ W i ndow s 98, r i ght- c l i ck the i ns tal l ed printer dri ver icon in
the ‘Printer s’ folder and select ‘P roperties’ in the menu. If you use Windows N T 4.0, right- click the i nstalled printer
driver icon in the ‘Printers’ folder and select “Document default values” in the menu. Then proceed to step 3 above.
14

ADVANCED PRINTING TECHNIQ UES
Windows 3.1x
1. Double-click the ‘Print Manager’ icon in the Main window of program manager.
2. Select ‘Options’ in the Print Manager and then select ‘Printer Setup’.
3. Select the SHARP AR-PB2 printer driver in the Installed Printers: and click the ‘Setup’ icon.
4. The properties of the SHARP AR-PB2 printer driver will be displayed.
5. Select desired settings on each tab.
6. Press the ‘OK’ button to store the settings and terminate the properties.
Printer Features
The print conditions that can be set with the printer dr ivers ar e descr ibed below. The item s t o be set
and details vary with the printer drivers and operat ing system s. See table 2-2 on page 6 and on-line
help. For ‘General’, ‘Details’, and ‘Shared’ tabs on the Windows Properties window, see the
Windows on-line help. Depending on application software, some items cannot be set. Also some
items require installation of optional equipment.
The details of special features among the following features are descr ibed on pages 18 t o 26.
Main
Copies:
Specify the number of copies.
Orientation:
Specify orientation of the application pages – portrait or landscape.
Duplex:
Control single-sided or two–sided printing.
N-up:
More than one page can be printed on a single sheet of paper.
Booklet:
Printing order is arranged so that the pr int ed sheet can be f olded into booklet form.
15

ADVANCED PRINTING TECHNIQ UES
Paper input
Paper size:
Select a paper size for printing.
Fit to page:
Automatic reduction or enlargement is performed in accordance with the paper size and original
document size. Paper size must be selected after select ing ‘Fit to Page’ if t he size is not t he def ault
because the default paper size will be selected when ‘Fit t o Page’ is select ed.
Custom paper size:
User-defined paper size is set.
Source paper selection:
Specify a paper input tray on the printer.
Transparency inserts:
An extra sheet is inserted between each page of a printed docum ent .
Paper output
Output tray selection:
Select an output tray.
Face up/down:
Specify the stack output in the selected output t r ay as face up or face down.
Staple:
Printed pages are stapled.
Graphic
Resolution setting:
Select 600 dpi or 300 dpi.
Halftone setting:
Select a halftone pattern.
Graphics mode:
Select raster graphics or HPGL/2.
Negative image:
Black and white areas are reversed.
Mirror image:
Printed image is reversed in the horizontal or vertical direct ion.
Zoom (scaling):
Printed image is reduced or enlarged.
16

Font
Font setting:
Specify use of resident fonts and font download for m at s .
Watermark
Watermark:
A specified word or phrase is printed onto all pages in a job.
Others
Configuration setting:
Specify configuration of optional equipment.
Form overlays:
A specified form is overlaid on all printed pages.
ADVANCED PRINTING TECHNIQ UES
17

ADVANCED PRINTING TECHNIQ UES
Details of Speci al Features
Orientation
Specify how you want to orient the application page.
Portrait.......... Page is readable with the long edge of the paper held vertically.
Landscape .... Page is readable with the long edge of the paper held horizontally.
The default setting is Portrait.
Reverse Order
If this option is selected when f ace up printing has been selected, printing will start from t he page
that is received last. The print ed pages will be ar r anged in the correct order.
To print a document stacked in the correct order in a face-up output tray, t he printer m ust print the
last page first and place it on the bottom of the stack. It continues printing pages from back t o fr ont
finally printing the first page of the document last and placing it on the top of the st ack. To do this,
the pages in the document must be re-ordered from last to first. Normally, the printer does this
automatically, but doing so requires that all pages of a document be received befor e printing any
pages can start. This may cause a short delay in printing or can lead to the document being printed
in blocks if it is too large to fit entirely into the printer’s memory.
Some applications (such as MS Word) are also able to reverse order document s for printing. For
applications that can do this, print performance will be improved by having the application perform
the reverse ordering function. If the application is set to do this, you must also turn off Reverse
Order Printing in the printer driver so that the pr inter knows that it does not need to perform this
function.
Printed last
Printed first
NOTE
Received
first
This feature cannot be used with the face down printing feature.
If face down printing has been selected, printing will always be performe d from the page that is received first.
Received
last
18

ADVANCED PRINTING TECHNIQ UES
Document Style (duplex printing, booklet)
The printer can print documents on both sides of the paper. (An
optional duplex module (AR-DU1) must be installed for the AR-280
printer.) To use the duplex printing feature, you must select the
duplex module in the configuration tab. See page 25.
With the PCL5e or PS drivers, the orientat ion of the ‘front’ and ‘back’
sides of two-sided document pages depends on whether ‘2-sided
(Book)’ or ‘2-sided (Tablet)’ setting is chosen. If ‘2-sided (Book)’ is
selected, documents will be printed like pages of a book, wit h t he t op
of the ‘front’ page and the top of the ‘back’ page printed along the
same edge of the sheet of paper. If ‘2-sided (Tablet)’ is selected,
documents will be printed like pages of a tablet , with the top of the
‘front’ page and the bottom of the ‘back’ page printed along the sam e
edge of the sheet of paper. These choices apply both to portr ait and
landscape pages.
With the PS PPD drivers, the binding position is designated with ‘Flip
on long edge’ or ‘Flip on short edge’. If ‘Flip on long edge’ is selected,
printing is made so that a long edge can be used as a binding edge
regardless of portrait or landscape orientat ion. If ‘Flip on short edge’
is selected, printing is made so that a short edge can be used as a
binding edge regardless of portrait or landscape orientation.
A
B
2-sided (Tablet)
A B
2-sided (Book)
NOTES
The printer can re-arrange the pages of a document so that
the printed sheets can be folded into booklet form (booklet
printing). This feature combines 2-Up printing and two-sided
(duplex) printing, so that two document pages are printed on
each side of each sheet of paper. The booklet printing
feature also re-orders the pages of the document, so that
they will appear in the correct reading order when the
booklet is folded and bound. When the booklet feature is
selected, a list box will appear f or the paper size select ion.
For same-size printing, the paper size must be twice as
large as the original document. But the paper size can be
the same size as the original document by reducing the print image.
NOTES
When printing an odd num ber of origi nals in 2-si ded mode, the total page count may be incr emented by one more
than the number of pages in the document because the back side of the last paper is printed as a blank page.
Ensure “Collate” is not selected in the application print di alogue when setting a multiple num ber of copies on the
application software to ensure correct order printing.
Do not use special papers such as labels and transparency film for duplex printing.
If the number of printed pages exceeds the memory capacity limit, printing with this function will cause a n error. In this
case, the p rint job will be canceled and a notice page will be out put.
This feature can only be used with certain paper sizes. These include letter, ledger, A3 and A4.
19

ADVANCED PRINTING TECHNIQ UES
“N-up” Printing
The printer can print more than one page of a document on a single sheet
of paper. This is called “N-Up” printing, where N is the number of pages
printed on each sheet.
“N-Up” printing can be used together with two-sided (duplex) printing,
allowing twice as many document pages to be printed on a single sheet of
paper. The printer automatically reduces or scales the size of “N-up”
pages so that the selected number of pages will appear on each sheet of
the printed document.
If desired, the ‘Border’ feature can be used to print a visible border
separating each document page printed on a sheet of “ N-Up” output.
Custom Paper Size
Additional custom paper sizes can be defined by users. You can define 1 to 7 extra sizes
depending on the printer drivers.
To define a custom paper size, select ‘Custom Paper’ under the Paper tab and click t he ‘Custom’
button if needed.
When a custom paper size is used:
• Stapling and duplex printing cannot be used.
• Printed sheets will be always delivered to the top tray.
• If auto paper selection has been selected, the ‘Bypass Tray (manual)’ will be automatically
selected. Printing will start when paper is set into the bypass tray. If t he paper is already in the
bypass tray, you should first remove the paper and then put the paper back into the bypass tray. At
this time, the paper will automatically start t o f eed. If the ‘Bypass Tray (manual)’ has been selected,
use the same operation as above.
• If another tray or the ‘Bypass Tr ay’ (not manual) is select ed, print ing will start aft er paper has been
loaded.
Paper Source
The printer supports printing on a variety of sizes and types of paper. A general paper source can
be selected in the ‘Paper Source’ section.
20

ADVANCED PRINTING TECHNIQ UES
If ‘Auto Select’ is selected, a paper source will be selected in accordance with the paper size
setting. If the same size paper in the same orientation is loaded in multiple trays, t he tray will be
selected in the following order of priority:
Large capacity tray (optional) → Tray 1 → Tray 2 → Tray 3 ( opt ional)
→ Tray 4 (optional) → Bypass Tray*
* If the key operator program “Enable Bypass-Tray Size Detection” is not set , t he bypass tray will
not be selected by ‘Auto Select’.
If both portrait and landscape paper of the same size are available, the paper in the portrait
orientation will have priority. However if only paper with landscape orientat ion is available, the print
image will be rotated and printed on t hat paper .
Once printing has started with either portrait or landscape paper and the paper tray becomes
empty, th e automatic tr ay switching featu re will only switch to a tray cont aining the sam e size and
orientation.
The bypass tray can operate in two modes:
1. ‘Bypass Tray’, which automatically draws the paper out of the bypass tray treat ing it as if it were a
standard paper tray.
2. ‘Bypass Tray (manual)’, which pauses and waits for t he user to insert paper int o the tray. If the
paper is already in the bypass tray, user should first r em ove t he paper and t hen put the paper back
into the bypass tray. At this time, the paper will automatically start to feed.
If a particular tray is explicitly select ed, the printer will pause and r equest paper to be added when
the tray is empty. To continue print ing by using another tray or cancel printing when the selected
tray becomes empty, perf or m the procedure below:
1. Press the PRINT key on the printer to select the printer mode.
2. Press the “PAPER SELECT” key on the touch panel to select the desired tray or t he CLEAR (
C
key to cancel printing.
3. Press the “ONLINE” key on the touch panel to select the online mode.
If you have selected the desired tray in step 2, printing will resume.
4. Press the COPY key to select the copier mode.
CAUTION
NOTE
Labels, traci ng paper, and other speci al pur pose papers other than SH ARP r ecomm ended tr ansparenc y fil m mus t
be fed individually.
Key operator progr am “Prohibit Bypass-Tr ay Selection” allows the user to specify whether the printer will use the
bypass tray when using automatic paper selection and automatic tray switching features
.
21
)

ADVANCED PRINTING TECHNIQ UES
Different Paper (Cover Sheet Printing)
The printer can print the first page of a document on different paper t han that used for printing the
remaining pages. For example, company letterhead can be loaded in one paper tray and white
paper in another. The printer can then be instr ucted to print only the first page of a docum ent on
the company letterhead. This feature is especially useful when printing multiple sorted copies of
documents.
NOTE
Use paper stock of appropriate size and weight when using the ‘2- sided (Duplex )’ printi ng feature in conjunc tion with
‘Different Paper’ (Cover Sheet Printing). See the copier operation manual.
Transparency Inserts (Interleaves)
The printer can be instructed to insert an ext ra sheet between each page of a printed document .
This is most useful when printing onto transparencies. Transparency stock can be fed into the
bypass tray while white paper is loaded into another tray. The transpar ency inser t s f eature can then
be used to interleave a sheet of white paper between each sheet of transparency stock. The
separator page can either be left blank, or printed with the same information appearing on the
document page, effectively producing a ‘carbon copy’.
When using this feature, specify ‘blank’ or ‘printed’ for insert sheet s and specify the ‘Paper Source’
for insert sheets.
CAUTION
Transparency stock should only be placed in the bypass tray.
Output
The printer can perform a variety of advanced output features, and can be configured to take full
advantage of optional finishers. If no optional finisher has been installed, documents can be out put
to either the ‘top tray’ or the ‘second tray’. When using an optional finisher, be sure to set the
configuration under the Configuration tab or Device Opt ions tab.
When an optional 2-tray finisher (AR-FN2) is installed, output can be direct ed t o either the ‘top tray’
or the ‘offset tray’. Output directed to the ‘offset tray’ can be st apled.
When an optional 3-tray finisher (AR-FN1) is installed, output can be
directed to the ‘top tray’, ‘second tray’ or ‘offset tray’. Output directed
to the ‘offset tray’ can be st apled.
If the offset tray is selected, the printer will offset stack each print
set. However if the stapling feature is used, the offset stack feature
Offset stack
will not operate.
22

ADVANCED PRINTING TECHNIQ UES
NOTE
The allowable paper s i zes v ar y wi t h the output tr ay s . If the s i ze of paper on w hi ch pr i nt i ng i s m ade i s not ac cept abl e to
the selected output tr ay, the paper and succeeding print ed sheets will be output to the top tray. Depending on the
selection of face up or face down, the print order may be reversed.
Face Up/Down
Specify face up or face down delivery. I f ‘Face Up’ is specified, printed pages will be stacked f aceup in the specified output tray. If ‘Face Down’ is specified, printed pages will be stacked face-down
in the specified output tray.
‘Face Down’ can only be specified to the offset tray of 2-tr ay finisher and the second and offset
trays of 3-tray finisher. Since face up delivery with the reversing order feature r equires storage of
image data in memory, it s printing speed will be slower than face down delivery. Face up delivery
with the reversing order featur e will also cause memory overflow if the number of pages exceeds
the limit. For document stapling, face up delivery m ust be select ed.
Stapling
If an optional 3-tray finisher (AR-FN1) or 2- tray finisher (AR-FN2) has been installed, st apling can
be made on printed sheets of paper. Stapling position (single stapling or double stapling) can also
be selected if the AR-FN1 has been installed.
If the AR-FN2 has been installed, only A4 and letter sized paper can be used for st apling.
•
Stapling with 2-tray finisher (AR-FN2):
For stapling, the offset t ray and face up must be specified f or output. The st apling position is
fixed as sho wn in the illustration b e lo w.
Print image
LandscapePortrait
Stapling position
Paper delivery
direction
Stapling position
23

ADVANCED PRINTING TECHNIQ UES
NOTES
•
Stapling with 3-tray finisher (AR-FN1):
All pages in a print job must be of the same size to be stapled.
For stapling at the proper position, portrait orientation is needed.
The number of pages must not exceed the stapling limit (30).
For stapling, the offset tray and f ace up must be specified f or output . The stapling positions can be
selected as shown in the illustration below.
A3, B4, A4, ledger,
legal, letter,
foolscap
A3, B4, A4, ledger,
legal, letter,
foolscap
A3, B4, A4, ledger,
legal, letter,
foolscap
Position 1
Position 2
Position 3
A4, B5,
letter
A4, B5,
letter
A4, B5,
letter
The stapling positions are specified with ‘1 staple’ or ‘2 staples’. The actual stapling positions on
printed sheets depend on the orientation of t he docum ent and paper size as shown below.
NOTES
Print
Portrait
Landscape
All pages in a print job must be of the same size to be stapled.
The number of pages must not exceed the stapling limit of 50 for A4 and letter, and 25 for other sizes.
Stapling positions Condition
• Long edge of paper is fed.
• Allowable paper sizes are A4, B5, and letter (up to 50 sheets).
• If the selected paper tray becomes empty and another tray with
1 staple
1 staple
1 staple
1 staple
2 staples
2 staples
2 staples
2 staples
the same paper size in the different orientation is selected,
printing can be continued but stapling will not be performed.
• Short edge of paper is fed.
• Allowable paper sizes are A3, B4, A4, and letter (up to 50
sheets for A4 and letter and 25 sheets for the other sizes).
• Long edge of paper is fed.
• Allowable paper sizes are A4, B5, and letter (up to 50 sheets).
• If the selected paper tray becomes empty and another tray with
the same paper size in the different orientation is selected,
printing can be continued but stapling will not be performed.
• Short edge of paper is fed.
• Allowable paper sizes are A3, B4, A4, and letter (up to 50
sheets for A4 and letter and 25 sheets for the other sizes).
24

ADVANCED PRINTING TECHNIQ UES
Right Edge Binding
Specify binding position, left or right, when ‘2-sided (Book)’ or ‘booklet-style ( portr ait)’ is specified in
the document style.
With the PCL5e and PS drivers, this setting appears under the Advance tab.
Image Quality (Extended imaging feature)
The following items for image quality can be set.
Resolution: 300 dpi or 600 dpi can be specified. This setting will not af fect the limit of th e
number of pages that can be stored in the printer memory. However, some
slight image degradation will take place.
Smoothing: Smoothing function can be enabled or disabled. (Even though this setting
exists, the smoothing function is not available with the AR-280/AR-285/AR-335
printers.)
Half Tone: ‘Photographic Image’ (no dithering), ‘Line Art’ (dithering with 16 x 16 pixels) or
‘Scanned Images’ (dithering with 8 x 8 pixels) can be selected. (PS driver only)
Graphics Mode: Raster graphics or HP-GL2 can be selected (PCL5e driver only).
Toner Save: Toner save mode can be set or canceled. If the toner save mode is set, the
printer will reduce toner consumption by printing half tone images for black
solid images. (Even though this setting exists, the t oner save function is not
available with the AR-280/AR-285/AR-335 printers. )
Font
The following items for font can be set.
Font Source: ‘Use Printer Fonts’ or ‘Download Soft Fonts’ (from computer ) can be select ed.
TrueType Mode: ‘Download as TrueType’ (as font) or ‘Download as Bitmap’ can be selected.
If ‘Download as TrueType’ is selected, the whole character set for each
TrueType font contained on the page will be sent to the print er in an outline
form. If ‘Download as Bitmap’ is selected, each TrueType character will be
sent as an individual bitmap download font.
Watermark
The watermark function is used to print specified text as a watermar k onto all pages in a job. The
following items can be specified for this function:
Position, size, angle, watermark text, color, font, transparent text , pr inted page, and outline printing.
Configuration
If any optional equipment is installed, be sure to set the configuration of the printer since functions
which require the equipment cannot be used unless the configuration is set proper ly.
25

ADVANCED PRINTING TECHNIQ UES
• Input Tray Options
Set an optional paper feed unit if installed.
• Large Capacity Tray
Specify whether an optional large capacity tray is installed.
• Duplex Module
Specify whether a duplex module is installed. In some models, the duplex module is installed as
standard equipment. Be sure to select t he ‘Duplex Module’ in the dialog box.
• Output Tray Options
Select an optional finisher if installed. ‘1 Exit Tray’, ‘2 Exit Trays’, ‘2-Tray Finisher’ (AR-FN2) or
‘3-Tray Finisher’ (AR-FN1) can be configured.
• Installed RAM
Specify the total capacity of the installed RAM in the Printer Expansion Kit. (To confirm the capacity
of the installed RAM, execute ‘PRINT CONFIGURATION PAGE’ in the printer configurat ion menu.
See page 28.)
• Extended Imaging Feature
Specify the toner save mode and/or smoothing feature you desire.
The extended imaging feature is not available with the AR-280/AR-285/AR-335 print er s.
• Copier HDD
Specify whet h e r a c o p ier HDD is installed.
Overlays
If the ‘Overlays’ tab is selected, the form overlay function can be set. This function overlays all
printed pages with the same form. The O verlays function can be used only with t he PCL5e printer
driver.
Overlays: Registered overlay files are displayed in this list box and a selected
overlay file is highlighted.
Create Overlay: Click to select an overlay file to create.
Delete Overlay: Click to delete a selected overlay file.
Delete All: Click to delete all over la y files.
Query Page Overlay: If this check box is checked, inquiry about downloading of an overlay
file is performed each time printing is executed.
Selected Overlay Status: The status of the selected over lay f ile is displayed in this box.
Overlay Creation Status: The st at us of overlay file creation is displayed in this box.
26

Chapter 4 Using the Operation Panel
Introduction
This chapter describes procedures for using the operation panel to set and/or adjust a variety of the
printer’s options and features. Information is provided on:
1. Accessing and using the printer configuration menus available from the operation panel
2. Switching from copier mode to printer mode
3. Accessing and using key operator programs
Figure 4-1 shows the available printer keys located on the operation panel with the touch panel basic
screen in the printer mode.
For additional printer configuration menu and key operator pr ogr am , see the separate supplemental
manual.
Uses of the Operation Panel
The operation panel provides access to many of the printer’s features and funct ions. Available options
include the ability to:
1. Print configurat ion, demonstr ation, and t est pages. These t est pages provide informat ion usef ul for
enhancing the printer’s performance or diagnosing printing problems.
2. Change the printer configuration parameters to work more efficiently with specific software
applications. Figure 4-2 provides a complete flow chart of the touch panel’s display menus.
3. Set up the network IP address and net work port operat ion. (If no networ k interface card has been
installed, these settings do not appear.)
4. Use key operator programs to adjust printer settings, such as the exposure setting to control
contrast on printed documents. Refer to
READY TO PRINT.
DATA
ON LINE
PRINT
COPY
ONLINE
OFFLINE
Key Operator Programs
1
8/ 11R
2
1
1.
8/ 11
2
2.
11 17
1
3.
8/ 14
2
4.
5/ 8/
212
PAPER SELECT MENU
1
5.
8/ 11
2
1
in this chapter.
2 3
1
4 5
7
8
AUDIT CLEAR
PROGRAM
0
6
9
P
INTERRUPT
CLEAR
C
CLEAR ALL
CA
START
The indications of the operation panel and touch panel depend on the countries and regions.
Figure 4-1. Operati on Panel Key Locations
27

USING THE OPERATION PANEL
Configuration from the Operation Panel
Accessing the Printer Configuration Menu
To access the printer configuration menu, f ollow the st eps below.
1. Press the PRINT key to select the printer mode. Make sur e the PRINT indicator lights up and
the basic screen is displayed on the touch panel (see Figure 4-1).
2. Press the “ONLINE” key on the touch panel to select the OFFLINE mode and press the
“MENU” key.
The printer configuration m enu screen will appear on the touch panel. The main menu items are:
PRINTER SETTINGS, INTERFACE SETTINGS, NETWO RK SETTING S, PRINT TEST PAG E, and
INITIALIZE AND/OR STORE SETTINGS. Use the UP/DOWN arrow (
screen.
,
) keys to scroll the
NOTES
If any printing dat a remains in t he memory, the pr inter confi guration menu will not appear. In t his case, access the
printer configuration menu after printing is complete or press the CLEAR (C) key to cancel printing and then continue
to access the menu.
If conflicting settings are made with the printer driver and the configuration menu, the printer driver will have priority.
Using the Printer Configuration Menu
Use steps 1 and 2 above to access the printer configurat ion menu.
3. Select the desired main menu item on the touch panel.
4. If a sub-menu appears, select the desired function. To scroll the touch panel screen, use the
UP/DOWN arrow (
5. Turn the sett ing of a function on or off by pressing its corresponding check box in front of the
function name. For functions without a check box, adjust the settings on each function setting
screen.
6. To exit t he configuration menu, return to the main menu by pressing the “OK” key and then
press the “ONLINE/O FFLINE” key to return to the online mode.
If a test print has been selected, once complete, the printer will automatically return to the
online mode.
) keys.
,
28

USING THE OPERATION PANEL
Example Configuration Task
The following procedure for changing the page orientation f r om ‘Portrait’ to ‘Landscape’ provides an
example of operating the operation panel.
Use steps 1 and 2 above to access the printer configurat ion menu.
Steps 3 through 6 demonstrate how t o change t he set t ing f r om ‘Port r ait’ t o ‘Landscape’.
3. Press the “PRINTER SETTINGS” key on t he m ain menu scr een.
4. Press the “ORIENTATION” key.
5. Press the “LANDSCAPE” key to highlight it and then press t he “ OK” key.
6. Press the “OK” key to r eturn to the m ain menu. Press the “ ONLINE/O FFLINE” key to return to
the online mode.
Printer Configuration Menus
A flow chart of the printer configuration menu is shown in Figure 4-2. The menu structure changes
depending on whether a network interface card is present in the copier/printer or not. The menus
inside the gray area are for a copier/printer with a network interface card (Print Server Card)
installed.
NOTE
Depending on the particular printer, some functions of the printer configuration menu cannot be set, for example,
smoothing and toner save mode.
29

USING THE OPERATION PANEL
Main Menu
PRINTER SETTINGS
INTERFACE SETTINGS
NETWORK SETTINGS
PRINT TEST PA GE
INITIALIZE AND/OR STORE
SETTINGS
PRINTER SETTINGS
SMOOTHING
TONER SAVE MODE
COPIES
ORIENTATION
STANDARD INPUT PAPER
SIZE
STANDARD OUTPUT TRAY
PRINT PS ERRORS
INTERFACE SETTINGS
HEXADECIMAL DUMP MODE
PARALLEL PORT
EMULATION SWITCHING
NETWORK PORT
EMULATION SWITCHING
I/O TIMEOUT
PORT SWITCHING METHOD
NETWORK SETTINGS
ENABLE TCP/IP
IP ADDRESS SETTING
ENABLE NetWare
ENABLE EtherTalk
(TokenTalk)
PRINT TEST P A GE
PRINT CONFIGURATION
PAGE
PRINT RESIDENT FONT
LIST
PRINT DEMO PAGE
PRINT NIC PAGE
INITIALIZE AND/OR STORE
SETTINGS
RESTORE FACTORY
DEFAULT
STORE CURRENT
CONFIGURATION
RESTORE CONFIGURATION
RESET THE NIC
COPIES (1* to 999)
ORIENTATION
PORTRAIT*
LANDSCAPE
STANDARD INPUT PAPER SIZE
A3 B4 A4* B5 A5 A6
11 x 17 8-1/2 x 14 8-1/2 x 13
8-1/2 x 11*
5-1/2 x 8-1/2 7-1/2 x 10-1/2
STANDARD OUTPUT TRAY
TOP TRA Y
SECOND TRA Y*
PARALLEL PORT EMULATION
SWITCHING
AUTOMATIC*
PostScript
PCL
NETWORK PORT EMULATION
SWITCHING
AUTOMATIC*
PostScript
PCL
I/O TIMEOUT (1 to 999, 20*)
PORT SWITCHING METHOD
SWITCH AT END OF JOB*
SWITCH AFTER I/O TIMEOUT
DISABLE PARALLEL PORT
DISABLE NETWORK PORT
NOTES
IP ADDRESS SETTING
IP ADDRESS (192 168 0 1)
IP SUBNET MASK (255 255 255 0)
IP GATEWAY (192 168 0 1)
Figure 4-2. Print er Menu Flow Chart
The menus inside the gray area (Figure 4-2) are for a printer with the network interface card option installed.
Denotes the default setting.
*
The default setting of STANDARD INPUT PAPER SIZE depends on the countries or regions.
The default setting of STANDARD OUTPUT TRAY depends on installation of optional finisher.
The values indicated with IP ADDRESS are examples.
30

USING THE OPERATION PANEL
Printer Setting s
Use the printer settings when printing without the proper printer driver installed (for example,
printing from an MS-DOS application, printing from a computer without the printer driver installed,
etc.). This menu allows detailed print conditions to be set.
SMOOTHING Enables or disables the smoothing function. This setting is enabled in the
default setting. (This function is not available with the AR-280/AR-285/
AR-335.)
TONER SAVE MODE Sets or cance ls the toner save mode. The toner save mode reduces toner
consumption. Printed images will be lighter but still adequate for general
use. This setting is disabled in the default setting. (This function is not
available with the AR-280/AR-285/AR-335.)
COPIES Number of copies to print can be set. 1 to 999 can be entered.
ORIENTATION Selects the default page orientation: portrait or landscape.
STANDARD INPUT
PAPER SIZE
STANDARD OUTPUT
TRAY
PRINT PS ERROR S Determines whether or not PostScript error information will be printed. This
Specifies a default input paper size. One of the following sizes can be
selected: A3, B4, A4, B5, A5, A6, 11 x 17, 8-1/2 x 14, 8-1/2 x 13, 8-1/2 x 11, 5-
1/2 x 8-1/2, 7-1/4 x 10-1/2
Specifies a default output tray. Top tray, second tray or offset tray can be
selected. The offset tray cannot be selected when no optional finisher
(AR-FN1 or AR-FN2) is installed. The second tray cannot be sel ected when an
optional 2-tray finisher (AR-FN2) is installed. Face up or f ace d own can also
be selected for certain trays in this menu.
setting is disabled in the default setting.
Interface Settings
Use the interface settings to configure the printer’s parallel and network interfaces.
HEXADECIMAL DUMP
MODE
PARALLEL PORT
EMULATION
SWITCHING
NETWORK PORT
EMULATION
SWITCHING
I/O TIMEOUT Use this function to set the amount of time to wait after end of data stream
PORT SWITCHING
METHOD
* If “AUTO” is set, the printer language will switch automatically in accor dance with the data from
the computer. It is recommended to set “AUTO” unless an error due to this setting occurs
frequently.
If this function is set, the print job will be outp ut in the hex dump form at. This
setting is disabled in the default setting.
Specifies a printer language to emulate for printing when the printer is
connected to the computer through a parallel port. “AUTO”*, “PostScript” or
“PCL” can be set.
Specifies a printer language to emulate for printing when the printer is
connected to the computer through network. “AUTO”*, “PostScript” or
“PCL” can be set.
before ending print job. This time can be entered using the
( , ) keys. The allowable range of the time is 1 to 999 seconds.
Determines which switching method to use for the interface port. “SWITCH AT
END OF JOB”, “SWITCH AFTER I/O TIMEOUT”, “DISABLE PARALLEL
PORT” or “DISABLE NETWORK PORT” can be selected.
UP/DOWN
arrow
31

USING THE OPERATION PANEL
Network Settings
Use the network settings when using this printer as a network printer. If an optional network
interface card (Print Ser ver Car d ) is not inst alled, t hese settings will not appear on the touch panel.
ENABLE TCP/IP Enables or disables the TCP/IP protocol. This setting is enabled in the default
setting. To use the printer with the TCP/IP protocol, set the IP address in
the next function.
IP ADDRESS SETTING IP ADDRESS: Manually set the printer’s IP address. Note that no number can
exceed 254. First digit of the number cannot be 0. Each item can be selected
directly with the touch key. The value can be input using the 10-key pad.
IP SUBNET MASK: Manually set the printer’s IP subnet mask. Note that no
number can exceed 255. First digit of the number cannot be 0. Each item can
be selected directly with the touch key. The value can be input using the 10-
key pad.
IP GATEWAY: Manually set the pri nter’s IP gateway. Note that no number can
exceed 254. First digit of the number cannot be 0. Each item can be selected
directly with the touch key. The value can be input using the 10-key pad.
ENABLE NetWare Enables or disables the NetWare protocol. This setting is enabled in the
default setting.
ENABLE EtherTalk
(TokenTalk)
Enables or disables the EtherTalk (TokenTalk if TokenRing network is
connected) protocol. This setting is enabled in the default setting.
NOTE
When the enable or disable setting of protocols (ENABLE TC P/IP, ENABLE NetWare, and ENABLE EtherTalk) is
changed, the new setting will be effective after resetting the printer. For resetting, follow the message by pressing “OK”,
turning the printer off and then back on after waiting a few seconds.
Print Test Page
Printing a test page verifies that the pr inter operat es properly. Also you can check the configur ation
settings, built-in fonts et c. When printing is complete, the printer will exit the printer configuration
menu and return to online mode.
PRINT CONFIGURATION
PAGE
PRINT RESIDENT FONT
LIST
PRINT DEMO PAGE If this key is pressed, the printer will return to the online mode and print a
PRINT NIC PAGE If this key is pressed, the printer will return to the online mode and print the
If this key is pressed, the printer will return to the online mode and print the
configuration list.
If this key is pressed, the printer will return to the online mode and print the
resident font list.
demonstration page.
NIC (Network Interface Card) configuration page. If an optional network
interface card (Print Server Card) is not installed, this function will not
appear on the touch panel.
32

Initialize and/or Store Settings
Use these functions to initialize or store printer set t ings.
USING THE OPERATION PANEL
RESTORE FACTORY
DEFAULTS
STORE CURRENT
CONFIGURATION
RESTORE
CONFIGURATION
RESET THE NIC When this key is pressed, a confirmation window will appear. If the “
NOTES
If configurati on set ti ngs ar e pr otec ted us i ng key oper ator programs (Pr ohi bi t C hanges to Printer Settings and Prohibit
Changes to Interface Settings), the settings cannot return to the factor y default set ting and stored s ettings cannot be
recalled.
Use the key operator programs to cancel protection mode.
If the setting of functions of enabling protocols (ENABLE TCP/IP, ENABLE NetWare, and ENABLE EtherTalk) is
changed by using the function “RESTORE FACTORY DEFAULTS” or “RESTORE CONFIGURATION”, the new
setting will be effective after resetting th e printer. To reset the printer, turn off the printer and then turn it on after a few
seconds.
The “Restore Factor y Default s” setting does not restore network set ti ngs . T o r etur n t he netw or k set ti ngs to the f act or y
default settings, use the “RESET THE NIC” function.
When this key is pressed, a confirmation window will appear. If the “
is pressed, all the printer configuration settings will r eturn to the facto ry defa ult
settings.
When this key is pressed, a confirmation window will appear. If the “
is pressed, the current printer configuration settings will be stored in the
printer’s nonvolatile memory.
When this key is pressed, a confirmation window will appear. If the “
is pressed, the printer configuration settings that have been stored in the
printer’s nonvolatile memory with the “STORE CURRENT CONFIGURATION”
function will be recalled.
key is pressed, the settings of the optional network interface card will
return to the factory default settings.
YES
YES
YES
” key
” key
” key
YES
”
Copier Mode and Printer Mode
The COPY and PRI NT keys can be used to set whether the copier/printer is in the copier mode or
printer mode. The PRINT indicator (see Figur e 4- 1) lights up when t he copier/printer is in the printer
mode; the COPY indicator (see Figure 4-1) lights up when the copier mode is in effect . The default
status is the mode that was selected at the time power was last t urned of f.
When the copier mode is in effect, pressing the PRINT key will change the sett ing to the printer
mode. If a document is sent t o the print er fr om a comput er when the copier mode is in effect and a
copying operation is not being performed, printing will be performed but t he copier mode r emains in
effect.
When the printer mode is in effect and no document is being printed, pressing t he COPY key will
change the setting to the copier mode.
33

USING THE OPERATION PANEL
When the printer mode is in effect and a document is being printed, pressing the COPY key will
change the setting to the copier mode but will not interrupt the current print job unt il the START key
is pressed. When the copying job is complete, the print job will resume automatically but t he copier
mode will remain in effect .
NOTE
If copying is performed, the print job will resume when no copier operation i s perform ed for a programm ed period of
time. To resume printing immediately after copying is complete, press the
PRINT
key.
Selecting the Online Mode
If the printer is in the off line mode, printing cannot be performed. To select the online mode, use
the procedure below.
1. If the printer is in the copier mode, pr ess t he PRINT key to select the printer mode.
The basic screen of the printer m ode will appear .
2. Press the “ONLINE/OFFLINE” key on the touch panel to switch the printer to t he online mode.
3. Press the COPY key to select the copier mode.
Tray Select and Job Cancel
Tray Selection
The “PAPER SELECT” key on the touch panel can be used to change paper trays when printing
has stopped for one of the following reasons.
• In ‘Auto Select’ paper source selection mode, all trays on the printer configured for the
requested paper size are out of paper or no trays on the printer are configured for the
requested paper size.
• If a paper source has been specified, t he r equest ed t r ay on the printer has run out of paper.
• If there are no paper trays in the printer configured with the paper size requested, the pr inter
will request that paper be loaded on the bypass t r ay.
In most cases it will be best to load or re-load the printer with the appropriate paper size and
continue printing. If it is preferable to continue print ing from a different tray ( possibly containing a
different size paper than requested by t he com put er ) , follow the procedure below.
34

USING THE OPERATION PANEL
Tray Change Procedure:
1. Press the “ONLINE/OFFLINE” key on the touch panel (Figure 4-1) to set the printer to an offline
state.
2. Press the “PAPER SELECT” key to select the desired paper tray.
3. Press the “ONLINE/OFFLINE” key to retur n the printer to an online state. The pr inter will begin
printing from the selected tray.
NOTES
Selecting a tray containing a different size or orientation of paper than that specified by the computer may result in
the pages being clipped to fit the physical paper size.
Note that using the “
the printer driver configuration menus.
PAPER SELECT
” key to select a new paper tray overrides any selection previously made using
Interrupting and Canceling Print Jobs
To interrupt a print job while the printer is print ing, press the “O NLINE/O FFLINE” key on the touch
panel (Figure 4-1). The printe r will go of f line and stop printing. A message will appear on t he touch
panel. To resume printing, press the “ONLINE/OFFLINE” key again to return the printer to the
online status. The printer will go online and r esum e pr inting.
While the printer is in the offline mode, the print job can be canceled by pressing the CLEAR key.
Lastly, press the “ONLINE/O FFLINE” key to return the printer to online status. Now the printer is
ready for the next print job.
Key Operator Programs
A variety of key operator programs are available which allow a key operator to adjust certain printer
features, functions, or operating conditions. These programs are listed in this section. (Refer to
Table 4-1.)
Key operator programs governing printer features and f unctions can be called in t he same manner
as the key operator programs gover ning copier features.
For general information on accessing key operator
KEY OPERATOR PROGRAMS
EXIT
programs, including registration of a key operator
code number, refer to the
Key Operator’s Guide
in
COPIER PRINTER
the copier manual.
If the printer expansion kit has been installed, the
“PRINTER” key will be displayed on t he touch panel
after the key operator code number is entered.
Press the “PRINTER” key to access the key
operator programs for t he pr inter features.
TOTAL COUNT.
PROGRAM LIST
PRINTOUT.
35

USING THE OPERATION PANEL
Table 4-1. Key Operator Pr ogr am Funct i ons
PROGRAM NAME FUNCTION PAGE NO.
Printer Exposure Level Lightens or darkens printouts.
Memory Reserved for Printer Specifies percentage of document memory
allocated to storage of printer jobs.
Output Method When Memory Is Full Specifies whether one set or multiple sets
will be printed when the printer memory
becomes full.
Enable Bypass-Tray Size Detection Enables or disables paper size detection
for the bypass tray.
Prohibit Notice Page Printing Specifies whether a notice page will be
printed when the printer memory becomes
full and divided printing is performed.
Prohibit Rotated Output Enables/disables rotation of print image for
printing onto A4R or 8-1/2" x 11"R paper.
Prohibit Bypass-Tray Selection Enables/disables bypass tray selection in
the ‘Auto Tray Switching’ mode.
Prohibit Auto Tray Switching Enables/disables automatic switching
between paper trays during printing when
paper runs out.
Prohibit Test Page Printing Enables/disables test page printing from
the printer configuration menu.
Prohibit Changes to Printer Settings Prohibits modification of basic printer
settings in the printer configuration menu.
Prohibit Changes to Interface Settings Prohibits modification of interface settings
in the printer configuration menu.
Prohibit Changes to Network Settings Prohibits modification of network settings
in the printer configuration menu.
36
37
37
38
38
39
39
39
39
40
40
40
Printer Exposure Level
This program is used to adjust the lightness or darkness of docum ents in the printer mode. The
factory d e fault is level ‘3’.
When the “
KEY OPERATOR PROGRAMS
PRINTER EXPOSURE LEVEL
PRINTER EXPOSURE LEVEL
” key is pressed, the following display will appear.
1. Set the desired density level using the
“
” and “ ” keys.
OK
2. Press the “OK” key.
36

USING THE OPERATION PANEL
Memory Reserved for Printer
This program is used to specify the percentage of document m emory allocated t o storage of printer
jobs. In the default setting, the memory capacity for printer jobs is 30% (60 pages for A4 or 8-1/ 2" x
11"). To print documents that exceed t his limit, increase t he per cent age using t his progr am .
When the “MEMORY RESERVED FO R PRINTER” key is pressed, the following display will appear.
NOTE
This program can be used onl y for model s wi th a 1 GB hard di sk dri ve. For m odels wi th a 2 GB har d disk dr ive or no
hard disk drive, this program cannot be used.
KEY OPERATOR PROGRAMS
MEMORY RESERVED FOR PRINTER
30%
45%
35%
50%
OK
40%
55%
1. Select the desired percentage.
2. Press the “OK” key.
60%
NOTES
If ‘30%’ is specified, the maximum number of pages in a block is 60 for A4, letter or smaller sizes. If ‘60%’ is
specified, the maximum number is 120 for A4, letter or smaller sizes.
Since the memor y in this printer is used for both copi er and printer featur es, the setting of this pr ogram will affect
copying performance. Assign an appropriate value.
Output Method When Memory Is Full
When multiple sets of a document have been requested and t he document memory cannot hold the
entire document, this program gives the option to print one set or multiple sets as illustrated on
page 38.
When the “OUTPUT METHOD WHEN MEMORY IS FULL” key is pres sed, t he f ollowing displa y will
appear.
KEY OPERATOR PROGRAMS
OUTPUT METHOD WHEN MEMORY IS
FULL
OK
1. Select “1 SET” or “MULTI-SET”.
2. Press the “OK” key.
1 SET
MULTI-SET
NOTE
When the document mem ory becomes full of print job pages, the printer will start printing the data which have been
stored in the mem ory. If multi ple sets of the document hav e been requested and “MULTI -SET” is speci fied with this
program, the sets will be printed as shown below. Each set of printed sheets will be stacked offset from the previous
set. Finally, the printer will output a notice page unless it is prohibited with a key operator program.
37

USING THE OPERATION PANEL
Notice page
Page 61
Page 120
Page 61
Page 120
Page 1
Page 60
Page 1
Page 60
Notice page
Separator
sheet
1 block
Page 61
Page 120
Page 1
Page 60
Example: One set of 120-page document is
printed in 60-page blocks.
Separator
sheet
Separator
sheet
Separator
sheet
1 block
Example: Two sets of 120-page document are
printed in 60-page blocks.
Enable Bypass-Tray Size Detectio n
This program is used to enable or disable paper size detection of the bypass tray in the printer
mode. This setting does not affect t he paper size detection in the copier mode.
To enable paper size detection of the bypass tray in the printer mode, press the “ENABLE
BYPASS-TRAY SIZE DETECTION” box to display a check mark.
To disable paper size detection, press the checked box again to clear the check mark.
NOTE
If size detection of the bypass tr ay is disabl ed, paper i n the bypass tray will always be treated as the largest allowable
size paper (either 11" x 17" or A3). If an i mage larger than the paper i n the bypass tr ay is pri nted, a malf unction may
occur. Be careful when disabling the size detection.
Prohibit Notice Page Printing
This program is used to specify whether a notice page and separator sheets will be print ed when
the printer memory becomes full and divided printing must be performed. If notice page printing has
been enabled, a notice page will be printed at the end of a print job and separat or sheets will be
printed between each block letting the user know that the job has been divided into blocks and t he
user must re-stack the document .
To prohibit notice page printing, press the “PROHIBIT NOTICE PAGE PRINTING” box to display a
check mark.
To restore notice page printing, press the checked box again t o clear t he check m ar k .
38

USING THE OPERATION PANEL
Prohibit Rotated Output
If this program is not set, the print image will be rotated when the orientation of the print image
does not match that of the available copy paper. If this pr ogram is set, a print image specif ied to be
printed on A4 or 8-1/2
even if the specified paper is not loaded in any tray.
To prohibit rotated output, pr ess t he “ PROHIBIT ROTATED OUTPUT” box to display a check mark.
To restore rotated output , press the checked box again to clear the check mark.
"
x 11" paper will not be rotated and print ed on A4R or 8-1/ 2" x 11"R paper
Prohibit Bypass-Tray Selectio n
If this program is set, the bypass tray will not be selected for a print job that specifies auto paper
selection or during auto tray switching.
To prohibit bypass tray selection, press the “PROHIBIT BYPASS-TRAY SELECTION” box to
display a check mark.
To restore bypass tray selection, press the checked box again to clear t he check mar k.
Prohibit Auto Tray Switching
This program prevents automatic switching between paper t rays in print jobs. This program does
not affect the auto t r ay switching funct ion in the copier m ode.
To prohibit automatic tray switching, press the “PROHIBIT AUTO TRAY SWITCHING” box to
display a check mark.
To restore automatic tray switching, press t he checked box again to clear t he check m ar k.
Prohibit Test Page Printing
This program prevents printing test pages from the printer conf iguration menu. If this program is
set, the test page print functions will not appear in the printer configur at ion m enu.
To prohibit test page printing, press the “PROHIBIT TEST PAGE PRINTING” box to display a
check mark.
To restore test page printing, press the checked box again t o clear t he check mar k.
39

USING THE OPERATION PANEL
Prohibit Changes to Printer Settings
This program prevents modification of basic printer sett ings in the printer configuration menu. If this
program is set, the pr int er set tings functions will not appear in the printer configurat ion m enu.
To prohibit modification of printer settings, press the “PROHIBIT CHANGES TO PRINTER
SETTINGS” box to display a check mark.
To enable modification of printer settings, press the checked box again to clear the check mark.
Prohibit Changes to Interface Settings
This program prevents modification of interface settings in the printer configuration menu. If this
program is set, the int er f ace settings functions will not appear in the printer configur ation menu.
To prohibit modification of interface settings, press the “PROHIBIT CHANGES TO INTERFACE
SETTINGS” box to display a check mark.
To enable modification of interface settings, pr ess t he checked box again to clear t he check m ar k.
Prohibit Changes to Network Settings
This program prevents modification of network settings in the printer configuration menu. If this
program is set, the net wor k settings functions will not appear in the printer configur ation menu.
To prohibit modification of network settings, press the “PROHIBIT CHANGES TO NETWORK
SETTINGS” box to display a check mark.
To enable modification of network settings, press t he checked box again to clear t he check m ar k.
40

Chapter 5 Printer Troubleshooting
Introduction
Always check for error messages on your computer’s monitor screen and the printer operation
panel anytime you are unable to complete a print job. These messages can give you easy-t o-follow
directions. If the messages do not give specific instructions, check the troubleshooting list on page
43.
NOTE
For problems rel ated to paper misfeed, toner empty, toner container full, and other related copier problems, see the
copier operation manual.
Notes on Printing Lengthy Documents
When printing a lengthy document, the document memory in the printer m ay become full of print
data. Also a lengthy document may exceed t he limit of the output tray. The printer will operate as
follows depending on the conditions.
1. If face down output is specified:
A. If printing one copy of a lengthy document is specified:
Printing will stop when the number of printed sheets reaches the limit of the output tray (if
the tray can detect the limit). When the printed paper is removed from the output tray,
printing will r es u me.
B. If printing multiple copies of a lengthy document is specified and the key operator program
“Output Method When Mem or y Is Full” (page 37) is set to “1 SET”:
The printer will print only one set f ollowed by a not ice page at the end of the job.
C. If printing multiple copies of a lengthy
NOTE
document is specified and the key
operator program “Output Method When
Memory Is Full” (page 37) is set to
“MULTI-SET”:
Printed sheets will be divided into blocks*
as shown in the illustration. A separator
sheet will be inserted between each
block. Finally, a notice page will be
output. The number of pages in a block
can be changed using the key operator
program “Memory Reserved for Printer”.
See page 37.
For the models without hard disk drive and the model s
with a 2 GB hard disk dr ive, the key operator program
“Memory Reserved for Printer” is not available. In case
of those without har d di sk dr i v e, t he num ber of pages in
a block is variable according to the memory use and
those with a 2 GB drive allow 320 pages in a block.
Separator sheet
Separator sheet
Separator sheet
1 block
Example
:
Two sets of 120-page document are
printed in 60-page blocks.
Notice page
Page 120
Page 61
Page 120
Page 61
Page 60
Page 1
Page 60
Page 1
41

PRINTER TROUBLESHOOTING
2. If face up output is specified:
A. If printing one copy of a lengthy docum ent is
specified:
Printed sheets will be divided into blocks* as
shown in the illustration. A separator sheet
will be inserted between each block. Finally,
a notice page will be output.
B. If printing multiple copies of a lengthy
document is specified and the key operator
program “Output Method When Memory Is
Full” (page 37) is set to “1 SET”:
The printer will print only one set in blocks*
as in 2-A and output a notice page at the end
of the job.
C. If printing multiple copies of a lengthy
document is specified and the key operator
program “Output Method When Memory Is
Full” (page 37) is set to “MULTI- SET” :
Printed sheets will be divided into blocks* as
shown in the illustration. A separator sheet
will be inserted between each block. Finally,
a notice page will be output. The number of
pages in a block can be changed using the
key operator program “Memory Reserved for
Printer”. See page 37.
* The number of pages in a block varies
with the paper size, setting of the key
operator program “Memory Reser ved for
Printer” and printer models.
NOTE
For the models wi t hout har d di s k drive and the models w i th
a 2 GB hard disk dr ive, the k ey oper ator progr am “M emor y
Reserved for Printer” is not available. In case of those
without hard dis k drive, the number of pages in a block i s
variable accor ding to the memory use and t hose with a 2
GB drive allow 320 pages in a block.
Notice page
Separator
sheet
1 block
Separator
sheet
1 block
Separator
sheet
Separator
sheet
Separator
sheet
1 block
61
120
1
60
Page 61
Page 120
Page 1
Page 60
Notice page
Page 61
Page 120
Page 1
Page 60
Notice page
Page 61
Page 120
Page 61
Page 120
Page 1
Page 60
Page 1
Page 60
Example:
Two sets of 120-page document are
printed in 60-page blocks.
42

PRINTER TROUBLESHOOTING
Notice Page Printing
If you find that a notice page has been printed at the end of a print job, the length of the document
exceeded the printer memory capacity as described above. The print data received from the
computer has not been printed as specified. Check the pr int order and ar range the order if needed.
If the specified number of copies have not been out put, you have remedies: 1) Pr int again sending
the job to the printer multiple times. 2) Change the key operator program “O utput Method When
Memory Is Full” to “MULTI-SET”.
Disabling Notice Page and Separator Sheet Printing
Notice page and separator sheet printing can be disabled using a key operator program. See page
38, “Prohibit Notice Page Printing”.
Troubleshooting
Problem: Pri nt er does not oper ate.
Check: Is the printer plugged in?
Solution: Plug the printer into a grounded outlet.
Check: Is the power switch on?
Solution: Tur n the power switch on.
Problem: Pri nt er i s on but dat a is not received. (Data indicator does not bl i nk. )
Check: Is the printer set to the ONLINE mode?
Solution: Use the “ONLINE/OFFLINE” key on the touch panel to select the “ONLINE” mode.
(page 34)
Check: Is the correct printer cable properly connected between the printer and your computer?
Solution: Check bot h ends of the printer cable and make sure you have a solid connection. Try a
known good cable.
Check: Is the correct printer driver installed?
Solution: Install the appropriate printer driver. (page 5)
Check: Is the printer not selected properly or not registered with the network?
Solution: Ensur e that this printer is selected on the application software or the printer is registered
on the network.
43

PRINTER TROUBLESHOOTING
Problem: Pri nt er i s on, data is received but is not printe d. ( Data i ndicator blinks.)
Check: Has an err or occur r ed?
Solution: Check t o see if an er r or m essage is displayed on the t ouch panel of the printer.
Check: Is the specified size paper loaded in the printer?
Solution: Load paper , select another paper size or cancel printing.
Check: Is printer memory set correctly? (Windows 95/98)
Solution: Set the printer memory which is actually installed in the configuration setting of the
printer driver. (page 25)
Check: Sufficient memory installed?
Solution: I f the PostScript error page indicates user memory error, the memory is not sufficient.
Add memory.
Problem: Pri nt er cannot be selected from computer.
Check: Is the printer driver installed correctly?
Solution: Install the printer driver correctly. (page 5)
Problem: Cannot pr i nt t est page f r om oper at ion panel.
Check: Paper tray empty?
Solution: Fill the paper tray.
Check: Paper jam?
Solution: Clear t he jam.
Check: Is there sufficient toner in the printer?
Solution: Add toner as specified in the copier manual.
Problem: Pr i nt ed docum ents are too light or too dark.
Check: Is the exposure control set properly?
Solution: Use key oper at or pr ogr am “ Pr inter Exposur e Level” to adjust the exposure.
Problem: Pri nt qual ity is unsatisfactory.
Check: Was the wrong printer driver installed?
Solution: Uninstall the wrong printer driver, and install Sharp AR-PB2 printer driver. Refer to
Chapter 2.
Problem: I ncor rect or i ent at ion
Check: Is the orientation setting in the printer driver correct ?
Solution: Cor r ect t he or ient at ion in the pr inter dr iver . ( page 18)
44

PRINTER TROUBLESHOOTING
Problem: Paper i m age i s clipped or off the edge of paper.
Check: Zoom pr int ing?
Solution: Use t he pr oper m agnif ication ratio for printing.
Check: Different paper size used?
Solution: From the AR-PB2 printer driver, select the paper size to be the same as the original
document, and make sure that t he pr int er has t he cor r ect paper in t he t r ay select ed.
Check: Different orientation used?
Solution: From the AR-PB2 printer driver, select the orientation to be the same as the original
document, and make sure that the printer has the correct paper orientation in the tray
selected.
Problem: Black pages
Check: Is color image data printed?
Solution: Color image m ay be pr int ed in black.
Check: Are the black and white areas reversed?
Solution: Cancel the negative image printing featur e in t he pr inter dr iver .
Problem: I m age l oss al ong edges
Check: Is the image loss outside the print area?
Solution: Check t he pr int ar ea inf or m at ion. ( page 48)
Problem: Pri nt er pr i nt s out bl ank pages.
Check: Is the print face down?
Solution: Face down or f ace up can be selected. (page 23)
Problem: Pri nt er pr i nt s i n r ever se order .
Check: Is reverse order selected in the printer driver?
Solution: Set reverse order with face up delivery. (page 18)
Problem: Pri nt i ng st ops in the middle of the print job.
Check: Too m uch paper in t he out put tray?
Solution: Rem ove t he paper f r om t he output tray.
Check: Has the paper run out?
Solution: Load paper.
Problem: Paper speci f i ed f r om appl i cat ion is not used.
Check: Is paper selection of driver “Auto”?
Solution: Ensur e that the desired paper is set in a paper tray of the pr int er and select “Auto” in t he
paper selection of the printer driver.
45

PRINTER TROUBLESHOOTING
Problem: St apling cannot be performed.
Check: I s f ace down selected?
Solution: Select f ace up f or stapling. (page 23)
Check: Different sized papers used?
Solution: Stapling cannot be performed on different sized papers. (page 23)
Check: Is the paper size acceptable for stapling?
Solution: Check the acceptable paper sizes for st apling ref er r ing to the copier operation manual.
Problem: Stapling cannot be performed on the desired locat i on.
Check: Is the desired location acceptable?
Solution: Stapling positions are limited. Check the locations. (page 23)
Problem: M i sf eed or l oadi ng paper m essage appears.
Check: Did a paper m isfeed occur , or did the paper in the selected tray run out?
Solution: Clear t he er r or r ef er r ing t o t he copier oper ation manual.
Problem: M i sf eed dur i ng cover sheet printing
Check: 2- sided pr inting f or cover s using heavy paper?
Solution: Use appr opr iate paper . See the copier operation manual for paper specifications.
Problem: Pri nt er w r i t e er r or occur s when using the printer as a local print er .
Check: Is the timeout time short?
Solution: Set a longer time in the timeout settings under the Details tab. (W indows)
NOTE
Even if a longer time is set, printer write error may occur when copying is being performed.
Problem: A not i ce page is printed.
Check: Does t he num ber of pages exceed t he m em or y capacity limit?
Solution: I ncrease the memory f or printer using the key operator pr ogram “Memory Reserv ed for
Printer”. (page 37)
Problem: Printed sheets will be output to the top tray when another tray is specified.
Check: Is the selected paper size proper for the specified output tray?
Solution: Check the acceptable paper sizes to the specified output tray referring to the copier
operation manual.
NOTES
If there is insufficient toner in the printer, the ‘Add Toner’ message will normally be displayed .
If you cannot resol ve a printi ng problem us ing the infor mation i n this chapter , contact your authoriz ed Sharp serv ice
center.
46

Chapter 6 Specifications
Specifications
Table 6-1. AR-PB2 Specifications
Model AR-PB2
Printing speed (up to)
Resolution 300 dpi, 600 dpi
Operating conditions Temperature: 15°C to 30°C (59°F to 86°F)
Printer option board power source Supplied from copier
Output color Black
Memory 16MB RAM standard
Optional memory Max. 2 pieces of 32 MB RAM
Page description languages PCL5e emulation; PostScript® Level 2 emulation
Platform IBM PC/AT (Windows)
General network card slot Available (In some countries and regions, network
Interface
Plug and Play Available under Windows 95 and Windows 98
Same as copying speed
Humidity: 20% to 85%
interface card is not available.)
IEEE 1284-compatible (parallel port), optional
network interface card (Print Server Card)
Specifications are subject to change without notice. Changes to the specifications will normally
reflect improvements or upgrades to AR-PB2 features and performance.
NOTE
Consult your authorized Sharp dealer for information on an optional memory card and network interface card.
47

Chapter 7 Appendix
Print Area
2.7mm (7/64")
2.7mm (7/64")
Printable area
2.7mm (7/64")
Y
X
2.7mm (7/64")
Paper size X Y
A3 6912 9824
B4 5952 8480
A4 6912 4864
B5 5952 4192
A5 4864 3392
A6 2368 3392
Ledger 6464 10080
Letter 6464 4992
Legal 4992 8288
Invoice 4992 3168
Executive 4224 6176
Foolscap 4992 7680
Japanese
Postcard
2240 3392
(dots in 600 dpi)
48

APPENDIX
Font List
Table 7-1. Resident Font Li st - 1
Font name Font name
Dutch 801TM SWA Swiss 721 Narrow SWA
Dutch 801 Italic SWA Swiss 721 Narrow Oblique SWA
Dutch 801 Bold SWA Swiss 721 Narrow Bold SWA
Dutch 801 Bold Italic SWA Swiss 721 Narrow Bold Oblique SWA
SwissTM 721 SWA Century 702 Century Schoolbook SWA
Swiss 721 Oblique SWA Century 702 Century Schoolbook Italic SWA
Swiss 721 Bold SWA Century 702 Century Schoolbook Bold SWA
Swiss 721 Bold Oblique SWA Century 702 Century Schoolbook Bold Italic SWA
Fixed Pitch 810 Courier® SWA Geometric 711 ITC Avant Garde Gothic® Book SWA
Fixed Pitch 810 Courier Italic SWA
Fixed Pitch 810 Courier Bold SWA Geometric 711 ITC Avant Garde Gothic Demi SWA
Fixed Pitch 810 Courier Bold Italic SWA
Symbol SWA (PS)
Zapf Calligraphic 801 SWA ITC Zapf Dingbats® SWA
Zapf Calligraphic 801 Italic SWA Swiss 742 Condensed SWC
Zapf Calligraphic 801 Bold SWA Swiss 742 Condensed Italic SWC
Zapf Calligraphic 801 Bold Italic SWA Swiss 742 Condensed Bold SWC
Revival 711 ITC Bookman® Light SWA Swiss 742 Condensed Bold Italic SWC
Revival 711 ITC Bookman Italic SWA DutchTM 801 SWC
Revival 711 ITC Bookman Demi SWA Dutch 801 Italic SWC
Revival 711 ITC Bookman Demi Italic SWA
Geometric 711 ITC Avant Garde Gothic Book Oblique SWA
Geometric 711 ITC Avant Garde Gothic Demi Oblique SWA
Chancery 801 ITC Zapf Chancery® Medium Italic SWA
All above resident fonts in the column are licensed from Bitstream Inc. Dutch and Swiss are
trademarks of Bitstream Inc. All other trademarks and copyrights are the property of their
respective owners.
The font examples can be printed from t he pr inter configuration menu. See page 28.
49

APPENDIX
Table 7-2. Resident Font Li st - 2
Font name Font name
Dutch 801 Bold SWC Fixed Pitch 810 Courier Bold Italic SWC
Dutch 801 Bold Italic SWC Fixed Pitch 850 Letter Gothic 12 pitch/text SWC
SwissTM 742 SWC
Swiss 742 Italic SWC
Swiss 742 Bold SWC Flareserif 821 SWC
Swiss 742 Bold Italic SWC Flareserif 821 Extra Bold SWC
Incised 901 SWC Clarendon 701 Clarendon Condensed SWC
Incised 901 Italic SWC Ribbon 131 SWC
Incised 901 Bold SWC Audrey Two SWC
Zapf Humanist 601 SWC Swiss 721 SWM
Zapf Humanist 601 Italic SWC Swiss 721 Oblique SWM
Zapf Humanist 601 Bold SWC Swiss 721 Bold SWM
Zapf Humanist 601 Bold Italic SWC Swiss 721 Bold Oblique SWM
Aldine 430 Original Garamond SWC Dutch 801 SWM
Aldine 430 Original Garamond Italic SWC Dutch 801 Italic SWM
Aldine 430 Original Garamond Bold SWC Dutch 801 Bold SWM
Aldine 430 Original Garamond Bold Italic SWC Dutch 801 Bold Italic SWM
Fixed Pitch 810 Courier Roman SWC Symbol SWA
Fixed Pitch 810 Courier Italic SWC Wingbats SWM
Fixed Pitch 810 Courier Bold SWC Line Printer
Fixed Pitch 850 Letter Gothic Bold 12 pit c h/ t ex t SWC
Fixed Pitch 850 Letter Gothic Bold I t alic 12 pit c h/ t ex t SWC
All above resident fonts in the column are licensed from Bitstream Inc. Dutch and Swiss are
trademarks of Bitstream Inc. All other trademarks and copyrights are the property of their
respective owners.
The font examples can be printed from t he pr inter configuration menu. See page 28.
50

APPENDIX
Supplement
• This printer is not equipped with a hard disk drive for additional fonts. Any downloaded fonts cannot
be stored permanently.
• If you try to start printing through the parallel interface bef ore the printer is turned on or while the
message “INITIALIZI NG. PLEASE WAIT.” is displayed on the touch panel immediately after the
printer is turned on, printing may not be performed properly. Be sure to star t printing through the
parallel interface after ensuring that the printer becomes online.
• Depending on printing data, “VM error” or “Mem ory Full” error m essage may be printed on a page
or improper printing (some images or characters are missing) may occur. This error occurs
because of insufficient memory when printing a lot of data or complicated data. This error may be
avoided by adding an additional memory to the printer kit. If this error occurs frequently, contact
your dealer.
• With the PPD driver for Windows NT 4.0, the printer resident fonts cannot be specified. Font
downloading, therefore, is always performed when printing is executed. To use the printer resident
fonts under Windows NT 4.0, install the PS or PCL5e driver.
• When printing multiple copies, this printer prints each set sequentially. (This printer does not print all
copies of each page at a time.)
• If the set ting “collate” exists in the print dialog box or application’s print sett ings, do not select this
setting. This setting is not necessary because this printer always perf orms collated pr inting. If this
setting is selected, two-sided printing or stapling with multiple copies may not be performed
properly.
• Take care to see the message on the touch panel when adding A4, B5 or 8-1/2" x 11" (letter) paper
in the bypass tray in a print job. If ‘R’ is added to the paper size, for example, “LOAD A4R
PAPER.”, set the paper narrow side into the feed slot. If ‘R’ is not added t o the paper size, set the
paper wide side into the feed slot.
• To pr int onto A4R, B5R or 8-1/2" x 11"R paper, specify the tray in which the desired paper has
been loaded. If the auto paper select function selects t hese sizes against your intention, consult
with your key operator about setting the key operator program “PROHIBIT ROTATED OUTPUT”.
• If paper must be added when paper has run out in the middle of a print job, be sure to set the paper
in the same orientation. If the orientation is changed in the middle of a print job, part of images m ay
not be printed. Image rotation will not occur in the middle of a print job.
• When setting A5 or 5-1/2" x 8-1/2" (invoice) size paper in a paper tray or in the bypass tray, be sure
to set the paper wide side into the feed slot. If not, part of images may not be printed.
• When setting A6, Japanese postcard, 10-1/2" x 7-1/4" ( executive) or cust om size paper in a paper
tray or in the bypass tray, be sure to set the paper narrow side into the feed slot. If not, part of
images may not be printed.
• If any tray is open when a print job is sent to the printer, part of images m ay not be printed. Be sure
to start printing after ensuring that all the trays are closed.
51

Index
Application software, 13, 14
Binding edge, 6, 19
Book style binding, 19
Booklet printing, 19
Bypass tray, 21
Configuration, 25, 28
Copier mode, 33
Copies, 15
COPY key, 27, 33
Cover sheet printing, 22
Custom paper size, 20
Different paper, 22
Document style, 19
Dots per inch (dpi), 25
Duplex printing, 19
Error messages, 41
Exposure control, 36
Face up/down, 23
Fit to page, 16
Font settings, 17
Fonts, 13, 17, 25, 49
General users, 2
Half tone, 25
Image quality, 25
Interleaves, 22
Inverted image. See negative image
Key operator programs, 35
Enable Bypass-Tray Size Detection, 38
Memory Rese rv ed for Printer, 37
Output Method When Memory is Full, 37
Printer Exposure Level, 36
Prohibit Auto Tray Switching, 39
Prohibit Bypass-Tray Selection, 39
Prohibit Changes to Interface Settings, 40
Prohibit Changes to Network Settings, 40
Prohibit Changes to Printer Settings, 40
Prohibit Notice Page Printing, 38
Prohibit Rotated Output, 39
Prohibit Test Page Printing, 39
Key operators, 3
Manual feed tray, 21
Negative image, 16
Network interface card, 4
Network interface configuration from operation panel, 32
N-Up printing, 20
ONLINE/OFFLINE key, 27, 34
Operating the operation panel, 27
Output, 22
Orientation, 18
Output quality, 6
Overlays, 26
Paper sizes, 16
Parallel printer inte rface, 3
Plug and play, 8
Pre-installed fonts, 49
Print borders, 20
PRINT key, 27, 33
Print qualit y, 6
Print Server Card, 4
Printer cable, 3
Printer configuration from operation panel, 28
Printer configuration menus, 29
Printer driver compatibility, 6
Printer driver features, 6
Printer drivers, 5, 6, 8
Compatibility, 6
Features, 6
Installing, 8
Selecting, 5
Printer interface cable, 3
Printer mode, 33
Printer resolution, 25
Printer troubleshooting, 43
Printing a test page, 12, 32
Printing features
Advanced, 14
Resolution, 25
Reverse order printing, 18
Right edge binding, 25
Selecting the best printer driver, 5
Smoothing, 25
Soft fonts, 25
Specifications, 47
Tablet style binding, 19
Test page, 12, 32
Toner, 25
Toner save, 25
Transparencies, 22
Transparency inserts, 22
Two-sided (duplex) printing, 19
Watermarks, 25
Windows 3.1x, 6, 11, 15
Windows 95, 6, 8, 10, 14
Windows 98, 6, 9, 10, 14
Windows NT 4.0, 6, 11, 14
52
99K DSC4
CINSE1779FC51

WARNING:
FCC Regulations state that any unauthorized changes or modifications to this
equipment not expressly approved by the manufacturer could void the user's
authority to operate this equipment.
Note:
This equipment has been tested and found to comply with the limits for a Class A
digital device, pursuant to Part 15 of the FCC Rules. These limits are designed to
provide reasonable protection against harmful interference when the equipment is
operated in a commercial environment. This equipment generates, uses, and can
radiate radio frequency energy and, if not installed and used in accordance with the
operation manual, may cause harmful interference to radio communications. Operation
of this equipment in a residential area is likely to cause harmful interference in which
case the user will be required to correct the interference at his own expense.
NOTICE
BE SURE TO ASK YOUR AUTHORIZ ED SHARP DEALER ABOUT THE WARRANTY THAT YOUR
SELLING DEALER EXTENDS TO YOU. In order to assure you, the end-user, of warranty protection,
Sharp extends a limited warranty to each of its authorized dealers and, in turn, requires each of its
authorized dealers to extend its own warranty to you on terms that are no less favorable than those
given to the dealer by Sharp. You should be aware, however, that Sharp does not itself extend any
warranties, either express or implied, directly to you, the end-user and no one is authorized to make
any representations or warranties on behalf of Sharp. Specifically, SHARP DOES NOT EXTEND TO
YOU, THE END-USER, ANY EXPRESS WARRANTY OR ANY IMPLIED WARRANTY OF
MERCHANTABILITY, FITNESS FOR USE OR FITNESS FOR ANY PARTICULAR PURPOSE IN
CONNECTION WITH THE HARDWARE, SOFTWARE O R FIRMWARE EMBODI ED IN, OR USED IN
CONJUNCTION WITH THIS PRODUCT. Sharp is not responsible for any damages or loss, either
direct, incidental or consequential, which you, the end-user, may experience as a result of your
purchase or use of the hardware, software or firmware embodied in or used in conjunction with this
Product. Your sole remedy, in the event that you encounter any difficulties with this Product, is
against the authorized dealer from which you purchased the Product.
In the event that this authorized dealer does not honor its warranty commitments, please contact the
General Manager , Business Products Group, Sharp Electronics Corporation, Sharp Plaza, Mahwah,
NJ 07430-2135, so that Sharp can try to help assure complete satisfaction of all the warranty rights to
which you are entitled from the authorized dealer.

AR-PB2
PRINTED IN JAPAN
99K DSC4
CINSE1779FC51
 Loading...