


AR-PB2
PRINTER EXPANSION KIT
SUPPLEMENTAL MANUAL
This manual describes the new installation method of
printer drivers and additional features for the AR-PB2
Printer Expansion Kit. Please read this manual in
conjunction with the AR-PB2 Operation Manual.
Contents
• Installing printer drivers from the CD-ROM
• PCL6 printer driver
• Printer driver for Macintosh
• Printer Status Monitor
• Printer Administration Utility
•NW Setup
• Additional printer configuration menu and
key operator program
.........................................................17
...........................................8
.............................9
....................................13
.........................16
.....................................18
Page
....4
Trademark Acknowledgments
Microsoft Windows and Windows NT are trademarks of Microsoft Corporation in the
U.S.A. and other countr ies.
Macintosh and AppleTalk are registered trademarks of Apple Comput er , Inc.
IBM, PC/AT, and PowerPC are trademarks of International Business Machines
Corporation.
PCL is a trademark of the Hewlett-Packard Company.
PostScript® is a registered trademark of Adobe Syst em s I ncor por at ed.
NetWare is a registered trademark of Novell, Inc.
All other trademarks and copyrights are t he pr oper t y of their respective owners.

PRINTER EXPANSION KIT AR-PB2
SOFTWARE LICENSE
PLEASE READ THIS LICENSE CAREFULLY BEFORE USING THE SOFTWARE. BY USING THE
SOFTWARE, YOU ARE AGREEING TO BE BOUND BY THE TERMS OF THIS LICENSE.
1. License. The application, demonstration, system and other software accompanying thi s License, whether on disk, in
read only memory, or on any other media (the "Software") and related documentation are licensed to you by SHARP.
You own the disk on which the Software is recorded but SHARP and/or SHARP’S Licensors retain title to the Software
and related documentation. This License allows you to use the Software on one or more computers connected to a single
printer and make one copy of the Software in machine-readable form for backup purposes only. You must reproduce on
such copy the SHARP copyright notice, the copyright notice of SHARP’S Licensors and any other proprietary legends of
SHARP and/or its Licensors that were on the original copy of the Software. You may also transfer all your license rights
in the software, the backup copy of the Software, the related documentation and a copy of this License to another party,
provided the other party reads and agrees to the terms and conditions of this License.
2. Restrictions. The Softwar e contains copyrighted material, tr ade secrets and other proprietary mater ial which is owned
by SHARP and/or its Licensors and in order to protect them you may not decompile, reverse engineer, disassemble or
otherwise reduce the Software to a human-perceivable form. You may not modif y, network, rent, lease, loan, distribute or
create derivative works based upon the Software in whole or in part. You may not electronically transmit the Software
from one computer to another or over a network.
3. Termination. This license is effective until terminated. You may terminate this License at any time by destroying the
Software and related documentation and all copies thereof. This License will terminate immediately without notice fr om
SHARP and/or SHARP’S Licensors if you fail to comply with any provision of this License. Upon termination you must
destroy the Software and related documentation and all copies thereof.
4. Export Law Assurances. You agr ee and certify that neither the Soft ware nor any other technical data received f rom
SHARP, nor the direct product thereof, will be exported outside the United States except as authorized and as permitted by
the laws and regulations of the United States. If the Software has been rightfully obtained by you outside of the United
States, you agree that you will not re-export the Software nor any other technical data received from SHARP, nor the
direct product thereof, except as permitted by the laws and regulations of the United states and the laws and the regulation
of the jurisdiction in which you obtained the Software.
5. Government End Users. If you are acquiring the Software on behalf of any unit or agency of the United States
Government, the following provisions apply. The Government agrees:
(i) if the Software is supplied to the Department of Defense (DoD), the Software is classified as "Commercial Computer
Software" and the Government is acquiring only "restricted rights" in the Software and its documentation as that term
is defined in Clause 252.227-7013 (c)(1) of the DFARS; and
(ii) if the Software is supplied to any unit or agency of the United States Government other than DoD, the Government’s
rights in the Software and its documentation will be as defined in Clause 52.227-19 (c)(2) of the FAR or, in the case of
NASA, in Clause 18-52.227-86 (d) of the NASA Supplement to the FAR.
6. Limited Warranty on Media. SHARP warrants the disks on which the Software is recorded to be free from defects
in materials and workmanship under normal use for a period of ninety (90) days from the date of pur chase as evidenced by
a copy of the receipt. The entire liability of SHARP and/or its Licensors and your exclusive remedy will be replacement
of the disk which fails to meet the limited warranty provided by this Clause 6. A disk will be replaced when it is returned
to SHARP or a SHARP authorized representative with a copy of the receipt. SHARP will have no responsibility to
replace a disk damaged by accident, abuse or misapplication.
ANY IMPLIED WARRANTIES ON THE DISKS, INCLUDING THE IMPLIED WARRANTIES OF
MERCHANTABILITY AND FITNESS FOR A PARTICULAR PURPOSE, ARE LIMITED IN DURATION TO
NINETY (90) DAYS FROM THE DATE OF DELIVERY. THIS WARRANTY GIVES YOU SPECIFIC LEGAL
RIGHTS, AND YOU MAY ALSO HAVE OTHER RIGHTS WHICH VARY FROM JURISDICTION TO
JURISDICTION.
2

7. Disclaimer of Warranty on Software. You expressly acknowledge and agree that use of the Software is at your sole
risk. The software and related documentation are provided "AS IS" and without warranty of any kind and SHARP and
SHARP’S Licensor(s) (for the purpose of provisions 7 and 8, SHARP and SHARP’S Licensor(s) shall be collectively
referred to as "SHARP") EXPRES S L Y DI S CLA I M ALL WARRANTIES, EXPRE SS OR I MPL I ED, INCLUDING, BUT
NOT LIMITED TO, THE IMPLIED WARRANTIES OF MERCHANTABILITY AND FITNESS FOR A
PARTICULAR PURPOSE. SHARP DOES NOT WARRANT THAT THE FUNCTIONS CONTAINED IN THE
SOFTWARE WILL MEET YOUR REQUIREMENTS, OR THAT T HE OP ERATI ON OF T HE SOF TWARE WI LL BE
UNINTERRUPTED OR ERROR-FREE, OR THAT DEFECTS IN THE SOFTWARE WILL BE CORRECTED.
FURTHERMORE, SHARP DOE S NOT WARRANT OR MAKE ANY RE PRESE NTAT IONS REGARDI NG T HE USE
OR THE RESULTS OF THE USE OF THE SOFTWARE OR RELATED DOCUMENTATION IN TERMS OF THEIR
CORRECTNESS, ACCURACY, RELIABILITY, OR OTHERWISE. NO ORAL OR WRITTEN INFORMATION OR
ADVICE GIVEN BY SHARP OR A SHARP AUTHORIZE D REPRESENTAT IVE SHALL CRE ATE A WARRANTY
OR IN ANY WAY INCREASE THE SCOPE OF THIS WARRANTY. SHOULD THE SOFTWARE PROVE
DEFECTIVE, YOU (AND NOT SHARP OR A SHARP AUTHORIZE D REP RESENT ATI VE) AS SUME THE ENT IRE
COST OF ALL NECESSARY SERVICI NG, RE PAIR OR CORRE CTION, SOME JURI SDICT IONS DO NOT ALL OW
THE EXCLUSION OF I MP L I E D WARRANT I E S , S O T HE ABOVE EXCLUSION MAY NOT APP L Y TO YOU.
8. Limitation of Liability. UNDER NO CIRCUMSTANCES INCLUDING NEGLIGENCE, SHALL SHARP BE
LIABLE FOR ANY INCI DENTAL , SP ECIAL OR CONSEQUE NTI AL DAMAGES T HAT RE SULT F ROM THE US E
OR INABILITY TO USE THE SOFTWARE OR RELATE D DOCUMENTATION, EVEN IF SHARP OR A SHARP
AUTHORIZED REPRESENT ATIVE HAS BEEN ADVISED OF THE POSSIBILITY OF SUCH DAMAGES. SOME
JURISDICTIONS DO NOT ALLOW T HE LIMITATION OR EXCLUSI ON OF LIABILITY FOR INCI DENTAL OR
CONSEQUENTIAL DAMAGES S O T HE ABOVE LIMITATION OR EXCL US I ON MAY NOT AP P L Y T O YOU.
In no event shall SHARP’S total liability to you for all damages, losses, and causes of action (whether in contract, tort
(including negligence) or otherwise) exceed the amount paid by you for the Softwar e.
9. Controlling Law and Severability. For a portion of the Software related with Apple Macintosh and Microsoft
Windows, this license shall be governed by and construed in accordance with the laws of the state of California and
Washington, respectively. If for any reason a court of competent jurisdiction finds any provision of this License, or
portion thereof, to be unenforceable, that provisi on of the L icense shall be enfo rced to the m aximum extent per missible so
as to effect the intent of the parties, and the remainder of this License shall continue in full force and effect.
10. Complete Agreement. T his License constitutes the entire agreement between the parties with respect to the use of
the Software and related documentation, and supersedes all prior or contemporaneous understandings or agreements,
written or oral, regarding such subject matter. No amendment to or modification of this License will be binding unless in
writing and signed by a duly authorized representative of SHARP.
3
Installing pr inter drivers from the CD-ROM
In the former version of the AR-PB2 Printer Expansion Kit, the printer drivers were supplied on
floppy disks. The printer drivers are currently supplied on a CD-ROM. Additional printer utilities
such as the Printer Status Monitor, Printer Adm inistrat ion Utilit y, and NW Set up are also included in
the CD-ROM. If you install these utilities, see their r espective sections before installing them (pages
13 to 17). For installing the printer driver for Macintosh, see page 9, “Printer dr iver for Macintosh”.
Using the installer in the CD-ROM (Windows 95/Windows 98/Windows NT 4.0)
NOTE
1. Start Windows.
2. Insert the supplied PRINTER UTILITIES CD-ROM into a CD-ROM drive.
x
3. On the ‘Start’ menu, click ‘Run’.
4. Enter the CD-ROM drive and setup command. Then click the ‘OK’ button.
Example: If the CD-ROM drive is designated as drive Q, type “Q:\Setup.exe” and click ‘OK’.
5. The license agreement will be displayed. Read it and click ‘Next’ if you accept the agreement.
6. Select English as a language for software to be installed and click ‘Next’.
x
The PPD printer dr i v er m ust be i nst al l ed usi ng t he plug & pl ay feat ur e or fr om the Add Printer W i z ar d. See “Instal l at i on
with Plug & Play or from the Add Printer Wizard” in the next section.
If your computer is configured for auto start on the CD-ROM, proceed to step 5.
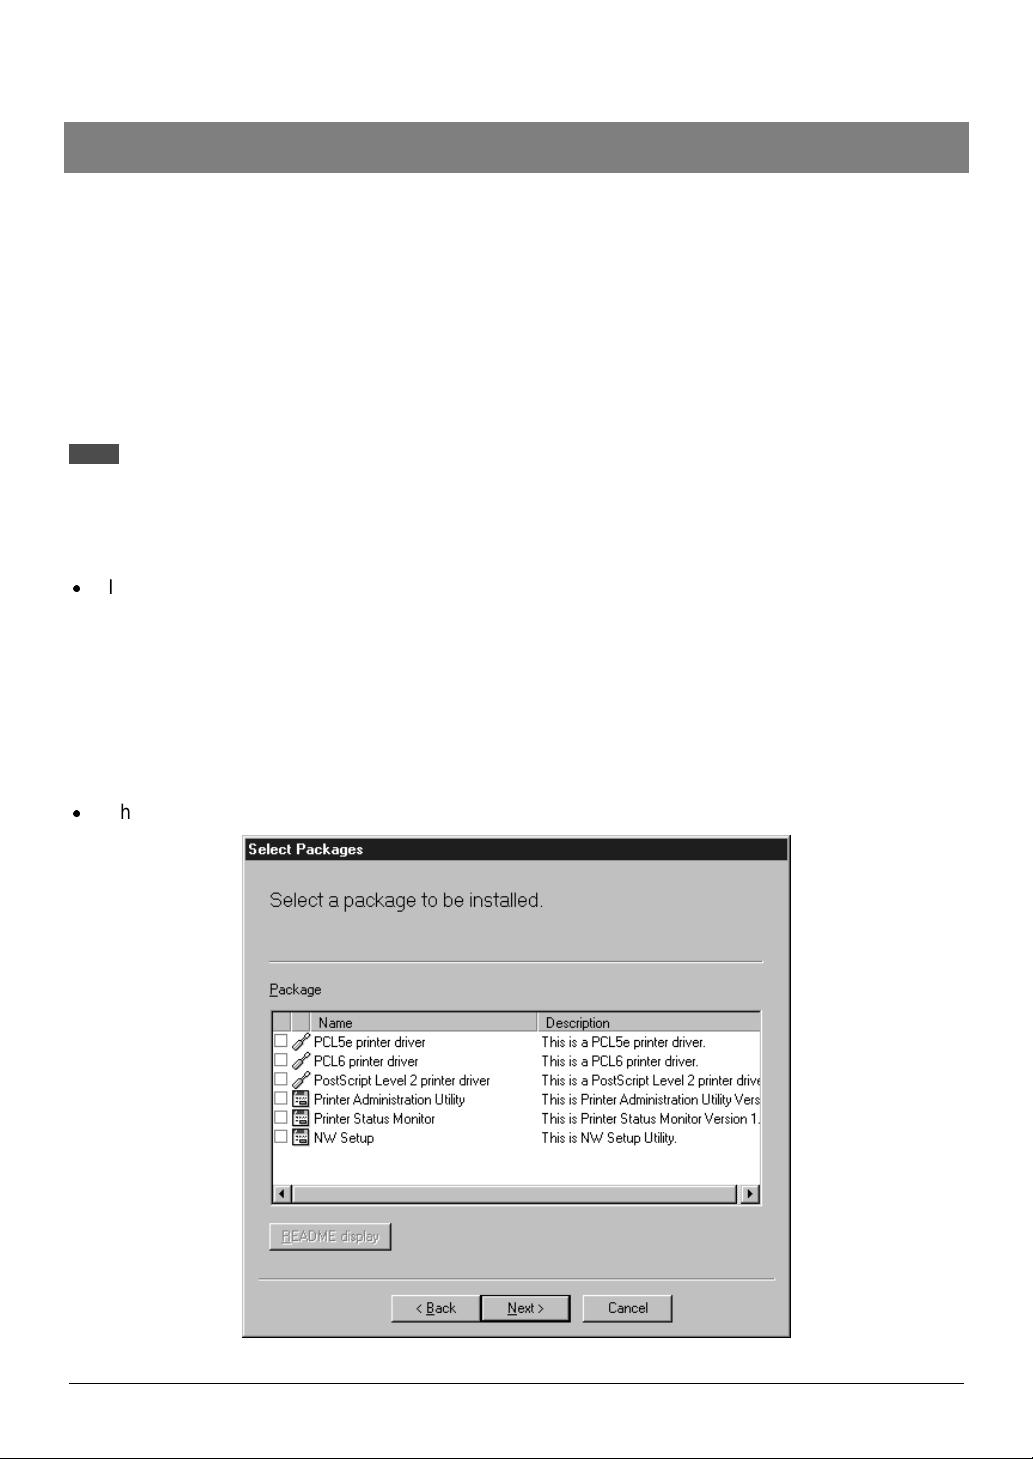
The printer drivers and utilities that can be installed from the CD-ROM will be displayed.
4

7. Select the desired printer drivers and utilities t o be installed by clicking the check boxes and then
click ‘Next’.
x
If a printer driver or a printer utility (except NW Setup) is highlighted by clicking the icon or the name
part, you can select the ‘README display’ button to display the information on the highlighted
driver or utility.
x
Printer Administration Utility, Printer Status Monitor, and NW Setup can be used only if the printer is
used as a network printer. See the installation requirements on pages 13, 16, and 17 before
installing them.
8. Click the ‘Start’ button.
9. Follow the instructions on your screen to install the selected printer drivers and utilities.
10. If restart of the computer is requested, click ‘Yes’.
x
Restart of the computer may be needed depending on t he pr ogram to be installed and the system
configuration.
Installation with Plug & Play or from the Add Printer Wizard
To install a printer driver with plug & play on Windows 95 or Windows 98 or to install a printer driver
from the Add Printer Wizard on Windows 95, Windows 98 or Windows NT 4.0, use the procedur e
described on pages 8 to 11 of the AR-PB2 Operation Manual. Insert t he PRINTER UTILITIES CDROM into a CD-ROM drive and specify the path shown below instead of the floppy disk drive. To
install a printer driver on a Windows 3.1x computer, use the procedure described on page 11 of the
AR-PB2 Operation Manual and specify the path shown below.
x
The plug & play feature is effective only if both the computer and peripheral equipment are
equipped with IEEE 1284 compliant parallel interface.
Example: The CD-ROM drive is designated as drive Q.
Printer driver Operating system Path
PCL5e Windows 95/Windows 98 Q:\Packages\English\Pcl5e9x
Windows NT 4.0 Q:\Packages\English\Pcl5ent
Windows 3.1x Q:\Win3x\English\Pcl5e3x
PCL6 Windows 95/Windows 98 Q:\Packages\English\Pcl69x
Windows NT 4.0 Q:\Packages\English\Pcl6nt
PostScript Windows 95/Windows 98 Q:\Packages\English\Ps9x
Windows NT 4.0 Q:\Packages\English\Psnt
Windows 3.1x Q:\ Win3x\English\Ps3x
PPD Windows 95/Windows 98 Q:\Packages\English\Psppd9x
Windows NT 4.0 Q:\Packages\English\Psppdnt
Installation with Plug & Play (parallel connections only)
Windows 95: See page 8 of the AR-PB2 Operation Manual.
Windows 98: See page 9 of the AR-PB2 Operation Manual.
5

Installati on f r om t he Add Pr inter Wizard
Windows 95/Windows 98: See page 10 of the AR-PB2 Operation Manual.
Windows NT 4.0: See page 11 of the AR-PB2 Operation Manual.
Installing the r esi dent f ont i nf or mat ion (only Windows 95/Windows 98)
After installing the PS PPD driver, install the resident font inf or m at ion as described below.
NOTES
Be sure to install the printer driver before installing the resident fonts.
When installing the resident fonts, be sure to close all open applications.
If the printer i s used i n t he netw or k envi r onment and ‘Print to t he fol l ow i ng por t’ i s c hanged i n the pr oper ti es s etti ng of
the printer driver, reinstall the resident fonts.
1. Start Windows.
2. Insert the supplied PRINTER UTILITIES CD-ROM into a CD-ROM drive.
x
If your computer is configured for auto start, the license agreement will be displayed. Click the
‘Cancel’ button.
3. On the ‘Start’ menu, click ‘Run’.
4. Enter the CD-ROM drive and “Packages\English\Psppd9x\Pfmsetup.exe”. Then click the ‘OK’
button.
Example: If the CD-ROM drive is designated as drive Q, type “Q:\Packages\English\Psppd9x\
Pfmsetup.exe” and click ‘OK’.
5. Click the ‘OK’ button.
x
If the printer driver has not been installed, installation of the resident fonts will not be performed.
6. Click the ‘OK’ button.
7. After the resident fonts have been installed, restart Windows.
Making floppy disks from CD-ROM
The printer drivers and print er utilities in the CD-ROM can be copied to floppy disks. To install a
printer driver on a computer without a CD-ROM drive, the printer driver must be copied to a floppy
disk. The copying procedure on a Windows 95, Windows 98 or Windows NT 4.0 computer is shown
as follows.
6

1. On the ‘Start’ menu, click ‘Run’.
2. Enter the CD-ROM drive, the desired folder, and “Mkdisk.bat”.
Example: The CD-ROM drive is designated as drive Q.
Windows NT PCL5e: Q:\Packages\English\Pcl5ent\Mkdisk.bat
Windows 95/98 PCL5e: Q:\Packages\English\Pcl5e9x\Mkdisk.bat
Windows 3.1 PCL5e: Q:\ Win3x\Engli sh\P cl 5e3x\Mkdi sk.bat
Windows NT PCL6: Q:\Packages\English\Pcl6nt\Mkdisk.bat
Windows 95/98 PCL6: Q:\Packages\English\Pcl69x\Mkdisk.bat
Windows NT PS: Q:\Packages\English\Psnt\Mkdisk.bat
Windows 95/98 PS: Q:\Packages\English\Ps9x\Mkdisk.bat
Windows 3.1 PS: Q:\ Win3x\English\Ps3x\Mkdisk.bat
Windows NT PPD: Q:\Packages\English\Psppdnt\Mkdisk.bat
Windows 95/98 PPD: Q:\Packages\English\Psppd9x\Mkdisk.bat
Printer Status Monitor: Q:\Packages\Engli sh\S mon\Mkdisk.bat
Printer Administration Utility: Q:\Packages\English\Sadmin\Mkdisk.bat
NW Setup: Q:\Packages\English\Nwsetup\Mkdi sk.bat
3. Click ‘OK’.
4. Follow the on-screen instructions.
For installation from a floppy disk, see the AR-PB2 Oper at ion Manual.
After installing the PPD driver on the Windows 95 or Windows 98 system, resident f ont infor mation
must be installed. See page 6.
Deleting printer drivers
To delete a printer driver, follow the procedure shown below.
1. On the ‘Start’ menu, highlight ‘Settings’, then highlight and click on ‘Printers’.
2. Right-click the printer to be deleted.
3. Click ‘Delete’ and then follow the instructions on your screen.
Uninstalling printe r ut ilit ies
To uninstall a printer utilit y, follow the procedure shown below.
1. On the ‘Start’ menu, highlight ‘Settings’, then highlight and click on ‘Control Panel’.
2. Double-click ‘Add/Remove Programs’.
3. Select the utility to be deleted and click ‘Add/Remove’.
4. Click ‘Yes’.
7

PCL6 printer driver
In addition to the printer drivers described in the AR-PB2 Operation Manual, on pages 6 and 7, the
PCL6 printer driver can be used on Windows 95, Windows 98, and Windows NT 4.0. The available
features of this driver are almost the same as those of t he PCL5e printer driver. PCL6 includes the
additional functions of N-up and half-tone setting.
8

Printer driver for Macintosh
Installing the PPD file
Checking the hardware and softw ar e re qui r em ent s
To use a SHARP printer with the AR-PB2 Printer Expansion Kit installed from a Macintosh
computer, the PPD file f or Ma cintosh must be installed t o the computer . You will need the following
hardware and software in order to install the PPD file for M acint osh.
Operating system: Mac OS 7.6 t o 8. 6
CPU: MC 68040 or PowerPC microprocessor
RAM: 16 MB or more for PowerPC microprocessor machine
12 MB or more for 68040 machine
Printer driver: LaserWriter 8 ver sion 8. 3. 3 or later
To use the printer with a Macintosh computer, an optional network interface card (Print Server
Card) is needed. Also the Macintosh computer must be equipped with an Ethernet port. If your
computer is not equipped with an Ethernet port , inst all an Ethernet interface.
If your operating system is prior to Mac OS 8.0, you should obtain LaserWr iter 8 version 8.3.3 or
later directly from Apple Computer hom e page.
Before installing the PPD file, check the hardware and software requirement s above. If LaserWr iter
8 is not installed in your computer, install it from the system CD-ROM supplied with your Macintosh
computer.
How to install the PPD file
1. Turn on your computer and start the operating system.
2. Insert the supplied PRINTER UTILITIES CD-ROM into a CD-ROM drive.
3. Double-click the AR-PB2 icon on the desktop.
4. Double-click the AR-PB2 Installer icon.
x
The following display will appear.
9

5. Select the desired language (Step 1).
6. Click the ‘Reference’ buttons of ‘Step 2’ and ‘Step 3’ to read the text.
After reading the text, close the file.
7. Click the ‘Install’ button to the right of ‘Step 4’.
8. Select the desired installation type and click the ‘Install’ button.
‘Easy Install’ is recommended. If you select ‘Custom Install’, follow the instructions on your screen.
When uninstalling the PPD file, select ‘Cust om Remove’, select the features t o be removed, and
click the ‘Remove’ button.
9. After the installation is complete, click the ‘Quit’ button and remove the CD-ROM.
Selecting the printer
To select this printer, follow the steps below.
1. Ensure that the printer is connected to the network to which your computer is connected.
2. Select ‘Chooser’ from the Apple Menu.
3. Click the ‘LaserWriter 8’ icon.
x
The names of connected printers are displayed in the right box.
NOTE
If multiple AppleTalk zones are displayed, select the zone which includes the desired printer.
10

4. Select the desired printer (Sharp Corporation Printer).
5. Click the ‘Setup’ or ‘Create’ button.
x
If the ‘Setup’ button is clicked, the m essage indicating curr ent print er descr iption file is selected will
appear. Click the ‘Auto Setup’ button.
x
The PPD file selection screen will appear.
6. Select the printer model name to be used and click the ‘Select’ button.
7. Click the ‘OK’ button.
8. Click the close box to close ‘Chooser’.
11

Controlling print er f eat ur es f r om t he pri nt er dr i ver
The setting method and print condition item names m ay vary with the operating system versions,
printer driver versions, and application software. To change the settings, use the file menu of
application software.
Paper setting:
1. Select ‘Page Setup’ from the ‘File’ menu of Finder.
x
The following display will appear.
2. Adjust each setting.
x
Paper size, reduction/enlargement, and orientation can be set.
3. Click the ‘OK’ button.
Print conditions:
1. Select ‘Print’ from the ‘File’ menu of application software.
(The display varies with the operating system versions, printer driver versions, and application
software.)
2. Adjust each setting.
x
Number of copies, page range, and the like can be set.
3. Click the ‘Print’ button.
12

Printer Status Monitor
If the Printer Status Monitor is installed, you can monitor the status of a SHARP printer that is
connected to the network. Be sure to check the system environment described below before
installing the Printer Status Monito r .
NOTE
To use the Printer Status Monitor, the printer must be equipped with the AR-PB2 Printer Expansion Kit and Print Server
Card (AR-NC1D or AR-NC3D).
Checking the hardware and software requirements
To use the Printer Status Monitor , the f ollowing hardware and software are needed. For upgrade of
installed software, use the supplied CD-ROM and the Microsoft Web Site.
Computer: IBM PC/AT or compat ible comput er
Operating system: Windows 95, Windows 98, Windows NT 4.0 with Service Pack 3 or later
Required software component: Winsock 2 or later, COMCTL32.DLL version 4.72 or later (included
with Internet Explorer 4.0 or lat er ) , and TCP/IP are definitely required.
CPU: Intel 486DX/ 66 MHz or better
RAM: 16 MB or more for Windows 95 and Windows 98 (24 MB or more is recom mended)
32 MB or more for Windows NT 4.0
Hard disk: 16 MB or more available space
NOTE
If you use the Windows 95 operating system, Winsock2 (Windows Socket2 update) must be installed on your
computer. Downl oad the Winsock2 setup fi le (filename: W95ws2s etup.exe) from the Micr osoft Web Site and install
Winsock2 on your computer.
When downloading of Winsock2 setup file W95ws2setup.exe is complete, install Winsock2 in the following procedure.
1.
Copy W95ws2setup.exe to a folder of your selection and execute it by double-clicking the icon.
2. A dialog will appear indicating completion of installation. Click ‘OK’ to restart the computer.
NOTE
To monitor a SHARP printer with the Printer Status Monitor, prepare the setting as below.
A. If printing is not per formed through a server:
To use the Printer Status Moni tor, pri nter setti ng must be made s o that the IP peer- to-peer pr inting sof tware (P2P-IP)
supplied with t he Print Server Car d (AR -N C1D or AR- NC3D ) i s used for pri nting. I n this c ase, the nam e of the ‘por t to
print to’ mus t be indi cated wi th an IP addr ess. T he setti ng method of the IP peer- to-peer pri nting s oftwar e is show n as
follows.
13

1. Install the IP peer-to-peer printing software referring to the “Print Server Card Quick Configuration Guide” supplied
with the Print Server Card.
2. Change the name of the ‘port to print to’ to an IP address. To change it, st ar t P2P- I P fr om the ‘Start’ menu to open
the setting scr een of the IP peer-t o-peer pri nting softw are and change ‘Pr inter N ames’ to ‘bas ed on IP Address ’.
The computer must be restarted after the change above is made.
3. Install the printer dri ver to be monitored ref er r i ng to “Ins tal l i ng pr i nt er dr i vers from the C D - R OM ” on page 4. At thi s
time, set the por t added with the IP peer- to-peer pri nting softwar e (P2P-IP) as ‘ Print to the fol lowing port’ . If the
driver has been already i nstal led, change the ‘ Pri nt to the fol low ing por t’ sett ing in t he ‘Det ails ’ tab to the por t that
has been added with the IP peer-to-peer printing software (P2P-IP).
Setting is complete. Start the Printer Status Monitor and check that the printer can be monitored.
The Printer Status Monitor, however, can be used without the above P2P-IP installed in the following case.
x
On the Windows N T 4.0 system, the printer can be monitored even if ‘TCP/IP Printing’ mounted to Windows NT
4.0 is used.
B. If printing is per formed through a server:
If the IP peer-to-peer printing softw are descr ibed above is not us ed, for exam ple, pri nting is per formed thr ough a print
queue of a Windows N T server or NetW are serv er, the pri nter status cannot be monit ored only by s tarting the Print er
Status Monitor. In this case, use the following procedure to monitor the printer.
Find the text file “Printers.txt” in the folder in which the Printer Status Monitor has been installed (C:\Program
Files\Sharp\ Printer Status Monitor in the def ault setting). Use a text editor such as Notepad to enter the name of the
printer to be m onitored and its IP address. T he name and IP address must be entered in one l ine per printer . The
printer name is the name that has been set when the printer driver has been installed. In the default setting, the name is
the printer model name followed by “PCL5e”, “PCL6”, “PS” or “PPD”.
Example 1: If the printer name is “SHARP AR-336 PCL5e” and the IP address is “192.168.1.100”,
192.168.1.100 SHARP AR-336 PCL5e
Example 2: If the printer name is “SHARP AR-505 PS” and the IP address is “10.1.1.1”,
10.1.1.1 SHARP AR-505 PS
As shown above, the IP address and printer name are entered with spaces as a delimiter.
x
Enter the IP address from the beginning of a line.
x
Any number of spaces can be entered between the IP addr ess and pr inter name but T AB charac ters must not be
entered. If a TAB is entered, the character TAB and following characters are regarded as a printer name.
x
Spaces can be entered in a printer name.
x
If “#” is entered at the beginning of a line, the line will be ignored. U se “ #” for wri ti ng c om m ent. U se t he sam pl e f i l e
by deleting “#” and rewriting the IP address and printer name.
14

NOTE
If Internet Explorer 4.0 or later is not installed on Windows 95 or Windows NT 4.0, use the supplied CD-ROM to update
the file COM CTL32.DLL. Fol low the steps below . (If you use the W indows 98 operati ng system, this operation is not
needed.)
1. Copy Comupd.exe in the Comctlud folder to a folder of your choice and execute it by double-clicking the icon.
2. Specify a proper folder for decompression of the compressed file and click ‘OK’.
3. 401comupd.exe will be restored in the folder you have chosen . Double-click the icon to execute the file.
4. A dialog asking about execution of installation will appear. Click ‘Yes’.
5. The License Agreemen t will be displayed. Please read accept it (click ‘Yes’).
6. A dialog will appear indicating completion of file copying. Click ‘OK’.
7. A dialog requesting restarting of the computer will appear. Click ‘Yes’ to restart the computer.
Update of COMCTL32.DLL is now complete.
How to install the Printer Status Monitor
See page 4, “Installing printer dr ivers from the CD-ROM ”.
NOTES
To install or uni nstall the Printer Status M onitor on the Windows NT system, use the ‘Administrator’ privileges. If
another user installs or uninstalls it, the settings may not be correct.
If a PCMCIA network card is removed or inser ted while the Pri nter Status Monitor is operating, a mal function may
occur. Be careful not to remove or insert a PCMCIA card in any case while the Printer Status Monitor is operating.
How to use the Printer S tatus M o n itor
The Printer Status Monitor is used to m onitor, display, and report the status of the print er that is
connected to a network. It can display the infor m ation such as:
x
Whether the printer is ready for printing
x
Which options are installed
x
Whether the printer contains sufficient paper and toner
Also a change of the printer status can be repor t ed when it occur s.
For starting the Printer St atus Monitor, select ‘Printer St atus Monitor’ from ‘Progr ams’ of the ‘Start’
menu.
For details of use of the Printer St at us M onitor , see the help file.
NOTE
Since the Printer Status Monitor acquires and displays the information that is held in the printer without any processing,
information types may differ and some types of information may not be displayed depending on the printer model.
15

Printer Administration Utility
If the Printer Administration Utility is installed, you can set and monitor a SHARP printer that is
connected to the network. Be sure to check the system environment described below before
installing th e Pr in ter Administration Ut ility.
Checking the hardware and software requirements
The hardware and software requirements for the Printer Administration Utility are the same as
those for the Printer St at us M onit or . See page 13.
NOTE
NOTE
If you use the Windows 95 operating system, Winsock2 (Windows Socket2 update) must be installed on your
computer. Downl oad the Winsock2 setup fi le (filename: W95ws2s etup.exe) from the Micr osoft Web Site and install
Winsock2 on your computer.
When downloading of Winsock2 setup file W95ws2setup.exe is complete, install Winsock2. The procedure is described
on page 13.
If Internet Explorer 4.0 or later is not installed on Windows 95 or Windows NT 4.0, use the supplied CD-ROM to update
the file COM CTL32.DLL. (If you use the Wi ndows 98 operating system, this operation is not needed.) The update
method is described on page 15.
How to install the Printer Administration Utility
See page 4, “Installing printer dr ivers from the CD-ROM ”.
NOTES
To install or u ninstall th e Printer Administration Utility on the Windows NT system, use the ‘Administrator’ privileges. If
another user installs or uninstalls it, the settings may not be correct.
If a PCMCIA network card is removed or inserted while the Printer Administration Utility is operating, a malf unction
may occur. Be careful not to remove or insert a PCMCIA card in any case while the Printer Administration Utility is
operating.
How to use the Printer Administration Utility
The Printer Administration Utility is used to set and monitor the printer*1 that is connected to a
network through the standard net work management prot ocol SNMP (Simple Network M anagement
Protocol). The Printer Adm inist r at ion Ut ilit y can be used on Windows 95, W indows 98 and Windows
NT 4.0.
*1 The Printer Administration Utility can be used with printers that are compatible with SNMP and
Printer MIB.
For starting the Printer Administ ra tion Utility, selec t ‘Pr int er Adm inist ra tion Utilit y’ fr om ‘Prog ram s’ of
the ‘Start’ menu.
For details of use of the Pr in ter Administration Utilit y, see the help file.
16

NW Setup
If the printer is used in NetWare environment, the NW Setup allows easy connection setup.
Outline of the NW Setup
The NW Setup is a setup tool for using a SHARP printer with a network card installed in a Novell
NetWare environment. Registration of printers to a NetW are server and parameter settings for a
network card can be performed by using a procedure with wizards.
For using the NW Setup, a Novell Client supplied by Novell must have been installed. Also before
starting the NW Setup, you must log in the NetWar e ser v er with t he ‘Administrator’ privileges.
Checking the hardware and software requirements
To use the NW Setup, the following hardware and software are needed.
NetWare server: Intranet War e (Net Ware 4. x)
NetWare client: Novell Client 4.5 for Windows NT
Novell Client v3.0 for Windows 95/98
Client PC operating system: Windows 95, Windows 98, Windows NT 4.0
Printer: SHARP p rinter with a Pr in t Server Car d (AR-NC1D or AR-NC3D) installed
17

Additional printer configuration menu and key operator
program
Printer configuration menu
The following three functions are added.
x
PCL SYMBOL SET SETTING (Printer Settings menu)
Specifies a PCL symbol set. (The symbol set is used to assign a part of character codes to
characters of a country.) See the table below. The factory default setting is 1 (Roman-8).
No. Symbol set No. Symbol set
1 Roman-8 19 Math-8
2 ISO 8859- 1 Latin 1 20 PS Math
3 PC-8 21 Pi Font
4 PC-8 Danish/Norwegian 22 ISO 8859-2 Latin 2
5 PC-850 23 ISO 8859-9 Latin 5
6 ISO 6 ASCI I 24 ISO 8859-10 Latin 6
7 Legal 25 PC-852
8 ISO 21 G er m a n 26 PC-775
9 ISO 17 Spanish 27 PC-Turkish
10 ISO 69 French 28 MC Text
11 ISO 15 Italian 29 Windows 3.1 Latin 1
12 ISO 60 Norwegian v1 30 Windows 3.1 Latin 2
13 ISO 4 United Kingdom 31 Windows 3.1 Latin 5
14 ISO 11 Swedish: names 32 Windows Baltic (not 3.1)
15 PC-1004 (OS/2) 33 Windows 3.0 Latin 1
16 DeskTop 34 Symbol
17 PS Text 35 Wingdings
18 Microsoft Publishing
18
200B DSC3
CINSE1940FC51

x
PRINT NIC PAGE AT POWER ON (Network Settings menu)
If this function is set, the print er will pr int the NIC (Network Int er f ace Car d ) conf igur ation page when
power is turned on. This setting is enabled in the default setting.
x
PRINT PCL SYMBOL SET LIST (Print Test Page menu)
If this key is pressed, the printer will return to the online mode and print the PCL symbol set list.
Key operator program
The following key operator program is added.
Give Priority to Print Speed in Staple Mode
This program is used to select one of the two image processing methods for print ing with stapling.
If this program is set , the printer will st art printing while storing im age data. The printing speed will
be higher. If improper paper size for stapling is found or the number of sheets exceeds the limit for
stapling, however, printing will stop. If this program is not set, the printer will start printing after
storing all image data. The print ing speed will be lower . I f an error data such as improper paper size
is received, however, the print er will continue printing without stapling. This program is set in the
factory default setting.
To give priority to printing speed, press the “GIVE PRIORITY TO PRINT SPEED IN STAPLE
MODE” box to display a check mark.
To cancel priority to printing speed, press the checked box again to clear t he check m ar k.
NOTE
This program can be applied to the AR-505.
19

AR-PB2 SUPPLEMENTAL MANUAL
SHARP CORPORATION
PRINTED IN JAPAN
2000B DSC3
CINSE1940FC51
 Loading...