

Page 1

AR-P27
ENGLISH
PRINTER EXPANSION KIT
SOFTWARE SETUP GUIDE
(for network printer)
ESPAÑOL FRANÇAIS
KIT DE EXPANSIÓN PARA IMSRESORA
GUÍA DE INSTALACIÓN DE SOFTWARE
(para la impresora de red)
KIT D'IMPRESSION MONOPOSTE
GUIDE D'INSTALLATION DU LOGICIEL
(pour imprimante réseau)
KIT DE EXPANSÃO PARA IMPRESSORA
MANUAL DE CONFIGURAÇÃO DO SOFTWARE
(da impressora de rede)
PORTUGUÊS
Page 2
For users in the USA
This device complies with Part 15 of the FCC Rules. Operation is
subject to the following two conditions: (1) This device may not cause
harmful interference, and (2) this device must accept any interference
received, including interference that may cause undesired operation.
WARNING:
FCC Regulations state that any unauthorized changes or modifications to
this equipment not expressly approved by the manufacturer could void the
user's authority to operate this equipment.
Note:
This equipment has been tested and found to comply with the limits for a
Class A digital device, pursuant to Part 15 of the FCC Rules. These limits are
designed to provide reasonable protection against harmful interference when
the equipment is operated in a commercial environment. This equipment
generates, uses, and can radiate radio frequency energy and, if not installed
and used in accordance with the instruction manual, may cause harmful
interference to radio communications. Operation of this equipment in a
residential area is likely to cause harmful interference in which case the user
will be required to correct the interference at his own expense.
Shielded interface cables must be used with this equipment to maintain
compliance with EMC regulations.
Se debe usar cables protegidos con el aparato para garantizar el cumplimiento
con las regulaciones EMC.
Afin de respecter la réglementation sur la compatibilité électromagnétique; il est
recommandé d'utiliser des câbles d'interface blindés.
Têm de ser utilizados com este equipamento cabos de interface blindados para
assegurar a conformidade com os regulamentos EMC.
Notice for Users in Canada
This Class A digital apparatus complies with Canadian ICES-003.
Cet appareil numérique de la classe A est conforme à la norme NMB-003 du Canada.
Page 3
CONTENTS
SETUP IN A WINDOWS ENVIRONMENT
ABOUT THE SOFTWARE..................................................................................................... 2
BEFORE INSTALLATION..................................................................................................... 3
● HARDWARE AND SOFTWARE REQUIREMENTS................................................................... 3
● INSTALLATION ENVIRONMENT AND INSTALLATION PROCEDURE.................................... 3
USING THE MACHINE AS A NETWORK PRINTER............................................................ 4
● CONNECTING TO A NETWORK ...............................................................................................4
● INSTALLING THE PRINTER DRIVER / PC-FAX DRIVER......................................................... 5
● INSTALLING THE PRINTER STATUS MONITOR ...................................................................11
USING THE MACHINE WITH A PARALLEL OR USB CONNECTION.............................. 12
● INSTALLING THE PRINTER DRIVER / PC-FAX DRIVER....................................................... 12
● CONNECTING TO A COMPUTER ........................................................................................... 19
USING THE MACHINE AS A SHARED PRINTER ............................................................. 20
INSTALLING THE PS DISPLAY FONTS............................................................................ 22
USING THE STANDARD WINDOWS PS PRINTER DRIVER (Windows 98/Me/NT 4.0)
CONFIGURING THE PRINTER DRIVER ............................................................................ 24
HOW TO USE THE ONLINE MANUAL............................................................................... 26
TROUBLESHOOTING......................................................................................................... 27
SETUP IN A MACINTOSH ENVIRONMENT
ABOUT THE SOFTWARE................................................................................................... 29
BEFORE INSTALLATION................................................................................................... 29
● HARDWARE AND SOFTWARE REQUIREMENTS................................................................. 29
● CONNECTING TO A NETWORK .............................................................................................29
MAC OS X............................................................................................................................ 30
MAC OS 9.0 - 9.2.2..............................................................................................................35
HOW TO USE THE ONLINE MANUAL............................................................................... 37
........ 23
ENGLISH
INTRODUCTION
This manual explains how to install and configure the software that is required for the printer function of the
SHARP digital multifunctional system. The procedure for viewing the online manual is also explained.
Note
SOFTWARE LICENSE
The SOFTWARE LICENSE will appear when you install the software from the CD-ROM. By using all or any portion of the
software on the CD-ROM or in the machine, you are agreeing to be bound by the terms of the SOFTWARE LICENSE.
The display screens, messages, and key names shown in the manual may differ from those on the actual
machine due to product improvements and modifications.
• The explanations of screens and procedures in this manual are primarily for Windows® XP in
Windows® environments, and Mac OS X v10.4 in Macintosh environments. The screens may
vary in other versions of the operating systems.
• The explanations in this manual are based on the North American version of the software.
Versions for other countries and regions may vary slightly from the North American version.
• This manual contains references to the fax function. However, please note that the fax function is
not available in some countries and regions.
• This manual contains explanations of the PC-Fax driver and PPD driver. However, please note
that the PC-Fax driver and PPD driver are not available and do not appear on the software for
installation in some countries and regions.
• Where "AR-XXXX" appears in this manual, please substitute the name of your model for "XXXX".
• This manual refers to the "Software CD-ROM" that accompanies the AR-M258/AR-M318 and the
printer expansion kit (AR-P27) simply as "CD-ROM".
• The PS3 expansion kit (AR-PK1N) mentioned in this manual is an option.
1
Page 4

SETUP IN A WINDOWS ENVIRONMENT
ABOUT THE SOFTWARE
The "Software CD-ROM" consists of 2 discs. The CD-ROM contains the following software:
Note
For users of Windows NT 4.0
The CD-ROM does not include software for Windows NT 4.0.
Contact your dealer or nearest authorized service representative if you want the software for
Windows NT 4.0.
Disc 1
• Printer driver
These allow the machine to be used as a printer.
- PCL6 and PCL5e printer driver
The machine supports the Hewlett-Packard PCL6 and PCL5e printer control languages. It is
recommended that you use the PCL6 printer driver. If you have a problem printing from older
software using the PCL6 printer driver, use the PCL5e printer driver.
- PS printer driver*
The PS printer driver supports the PostScript 3 page description language developed by Adobe
Systems Incorporated.
- PPD driver*
The PPD driver enables the machine to use the standard Windows PS printer driver.
• Printer Status Monitor*
This allows you to monitor the status of the machine on your computer screen.
1
1
2
Disc 2
• PC-Fax driver*
This enables you to send a file from your computer as a fax using the same procedure as when
printing the file. (When the fax option is installed.)
• Printer Administration Utility*
This allows the administrator to monitor the machine and configure machine settings from a
computer. To install and use the Printer Administration Utility, see the Readme file and the manual
in PDF format on the "Software CD-ROM" (Disc 2). The Readme file and manual are in the
following folder on the CD-ROM. (Substitute the letter of your CD-ROM drive for "R" in the
following path.)
R:\Sadmin\Documents\EnglishA*
3
2
4
*1 To use the PS printer driver or the PPD driver, the PS3 expansion kit must be installed.
*2 To use the Printer Status Monitor and the Printer Administration Utility, the printer must be connected to a
network running TCP/IP protocol.
*3 To use the PC-Fax driver, Internet Explorer 4.0 or later must be installed on your computer.
*4 "English A" in North America. "English" in Europe.
2
Page 5
BEFORE INSTALLATION
HARDWARE AND SOFTWARE REQUIREMENTS
Check the following hardware and software requirements before installing the software.
Computer type IBM PC/AT or compatible computer equipped with a USB 2.0/1.1*1, bi-directional
parallel interface (IEEE 1284), or 10Base-T/100Base-TX LAN card
Operating system Windows 98, Windows Me,
Windows NT Workstation 4.0 (Service Pack 5 or later)*
Windows 2000 Professional*
Windows XP Home Edition*2, Windows Server 2003*
Other hardware requirements An environment that allows any of the above operating systems to fully operate
*1 Compatible with Windows 98, Windows Me, Windows 2000 Professional, Windows XP Professional,
Windows XP Home Edition or Windows Server 2003 preinstalled models equipped with a USB interface as
standard.
*2 Administrator's rights are required to install the software using the installer.
2
, Windows XP Professional*2,
INSTALLATION ENVIRONMENT AND INSTALLATION
PROCEDURE
Follow the appropriate installation procedure for your operating system and type of cable as indicated
below.
2
,
2
ENGLISH
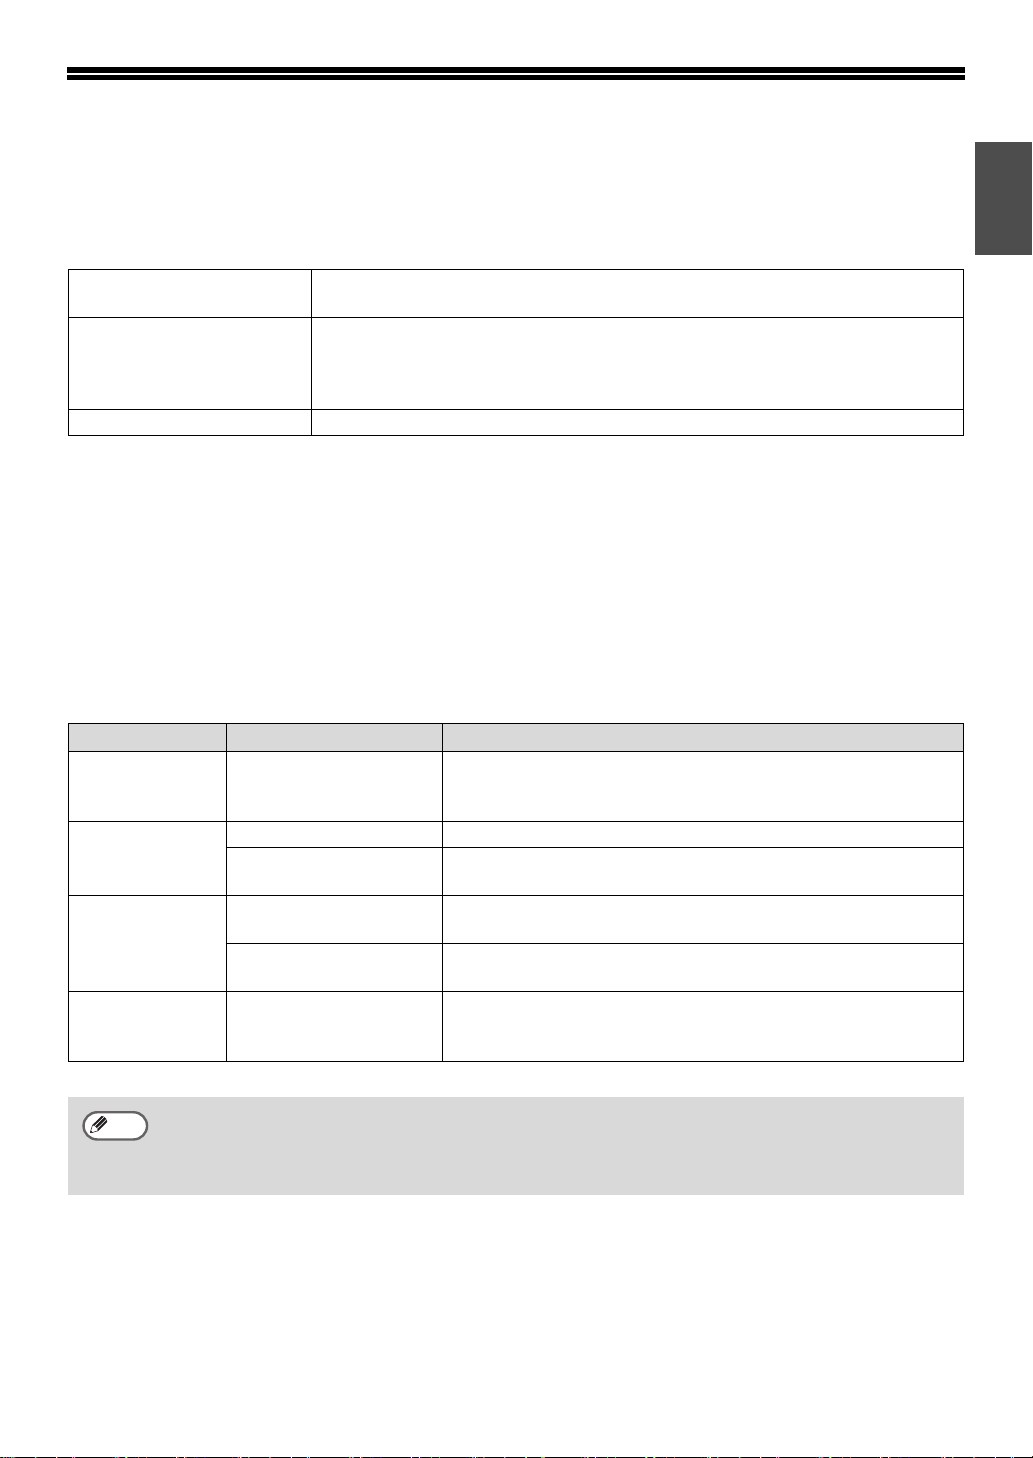
Cable Operating system Procedure to follow
LAN
USB
Parallel
Printer sharing
Note
For users of Windows NT 4.0
The CD-ROM does not include software for Windows NT 4.0.
Contact your dealer or nearest authorized service representative if you want the software for
Windows NT 4.0.
Windows 98/Me/
NT 4.0/2000/XP/
Server 2003
Windows 98/Me/2000 Installation in Windows 98/Me/2000 (USB cable) (page 14)
Windows XP/Server 2003
Windows 98/Me/
NT 4.0/2000
Windows XP/Server 2003
Windows 98/Me/
NT 4.0/2000/XP/
Server 2003
1. CONNECTING TO A NETWORK (page 4)
2. INSTALLING THE PRINTER DRIVER / PC-FAX DRIVER
(page 5)
Installation in Windows XP/Server 2003 (USB/parallel cable)
(page 12)
Installation in Windows 98/Me/NT 4.0/2000 (parallel cable)
(page 16)
Installation in Windows XP/Server 2003 (USB/parallel cable)
(page 12)
USING THE MACHINE AS A SHARED PRINTER (page 20)
3
Page 6
USING THE MACHINE AS A
NETWORK PRINTER
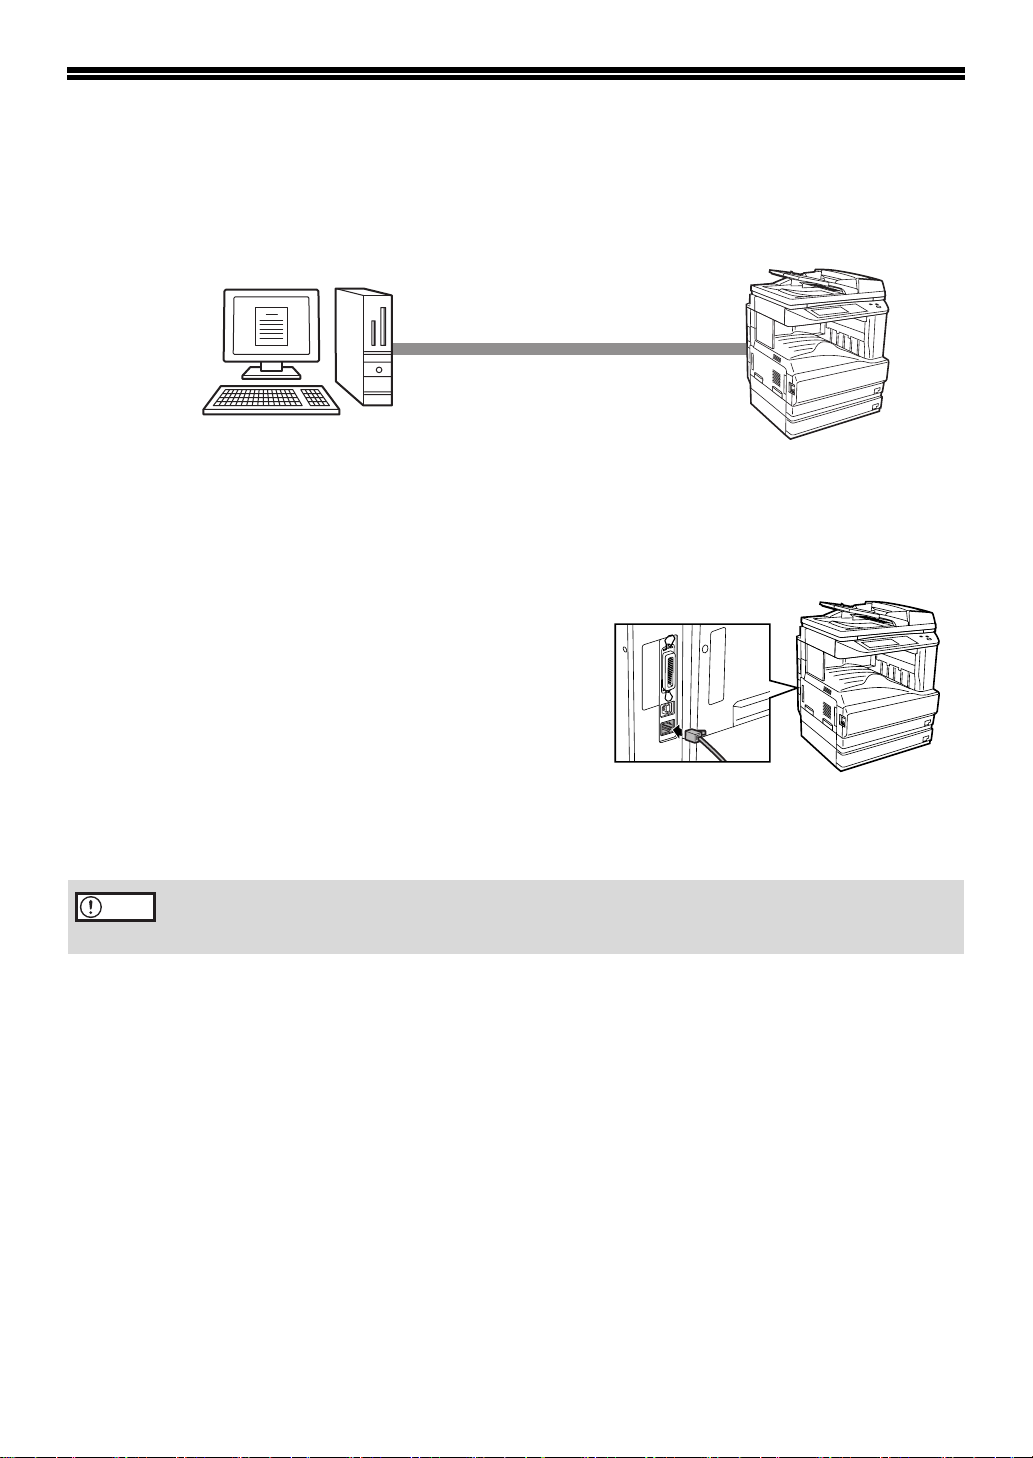
This section explains how to install the software when the machine is connected to a Windows
network (TCP/IP network).
TCP/IP network (Local area network)
Printing using LPR protocol
Windows computer connected to the
same network as the machine
CONNECTING TO A NETWORK
To connect the machine to a network, connect the LAN
cable to the machine's network connector. Use a shielded
LAN cable.
After connecting the machine to a network, be sure to
configure the IP address and other network settings
before installing the software. (The factory default setting
for the IP address is to receive the IP address
automatically when the machine is used in a DHCP
environment.)
Network settings can be configured using "NETWORK SETTINGS" in the key operator programs on
the machine.
Caution
If the machine is used in a DHCP environment, the IP address of the machine may change. If
this happens, printing will not be possible. This problem can be avoided by using a WINS
server or by assigning a permanent IP address to the machine.
Checking the IP address of the machine
You can check the IP address of the machine by printing out the "PRINTER SETTINGS LIST" in the
custom settings. Follow these steps to print out the "PRINTER SETTINGS LIST".
Press the [CUSTOM SETTINGS] key, touch the [LIST PRINT] key, touch the [PRINTER TEST PAGE]
key, and then touch the [PRINTER SETTINGS LIST] key.
4
Page 7
USING THE MACHINE AS A NETWORK PRINTER
INSTALLING THE PRINTER DRIVER / PC-FAX DRIVER
Supported operating systems: Windows 98/Me/NT 4.0*/2000*/XP*/Server 2003*
* Administrator's rights are required to install the software.
Note
1
2
• For users of Windows NT 4.0
• The CD-ROM does not include software for Windows NT 4.0.
Contact your dealer or nearest authorized service representative if you want the software for
Windows NT 4.0.
To use the machine as a network printer in Windows NT 4.0, "TCP/IP Protocol" must be installed on
•
your computer. If this is not installed, see Windows NT 4.0 Help to install "TCP/IP Protocol".
• The PS3 expansion kit is required to use the PS printer driver or the PPD driver.
• To install the PPD driver when Windows 98/Me/NT 4.0 is used, see "USING THE STANDARD
WINDOWS PS PRINTER DRIVER (Windows 98/Me/NT 4.0)" (page 23) and install the driver
using the Add Printer Wizard.
To print to the machine over the Internet using the IPP function when the machine is installed in a
•
remote location, or to print using the SSL (encrypted communication) function, see "Printing using the
IPP function and the SSL function" (page 8) and install the printer driver or the PC-Fax driver.
• The installation procedure in this section is for both the printer driver and the PC-Fax driver,
although the explanations are centered on the printer driver.
Insert the "Software CD-ROM" into
your computer's CD-ROM drive.
•
If you are installing the printer driver, insert
the "Software CD-ROM" that shows "Disc
1" on the front of the CD-ROM.
•
If you are installing the PC-Fax driver,
insert the "Software CD-ROM" that shows
"Disc 2" on the front of the CD-ROM.
Click the [start] button, click [My
Computer] ( ), and then double-click
the [CD-ROM] icon ( ).
In Windows 98/Me/2000, double-click [My
Computer] and then double-click the
[CD-ROM] icon.
Read the message in the "Welcome"
5
window and then click the [Next]
button.
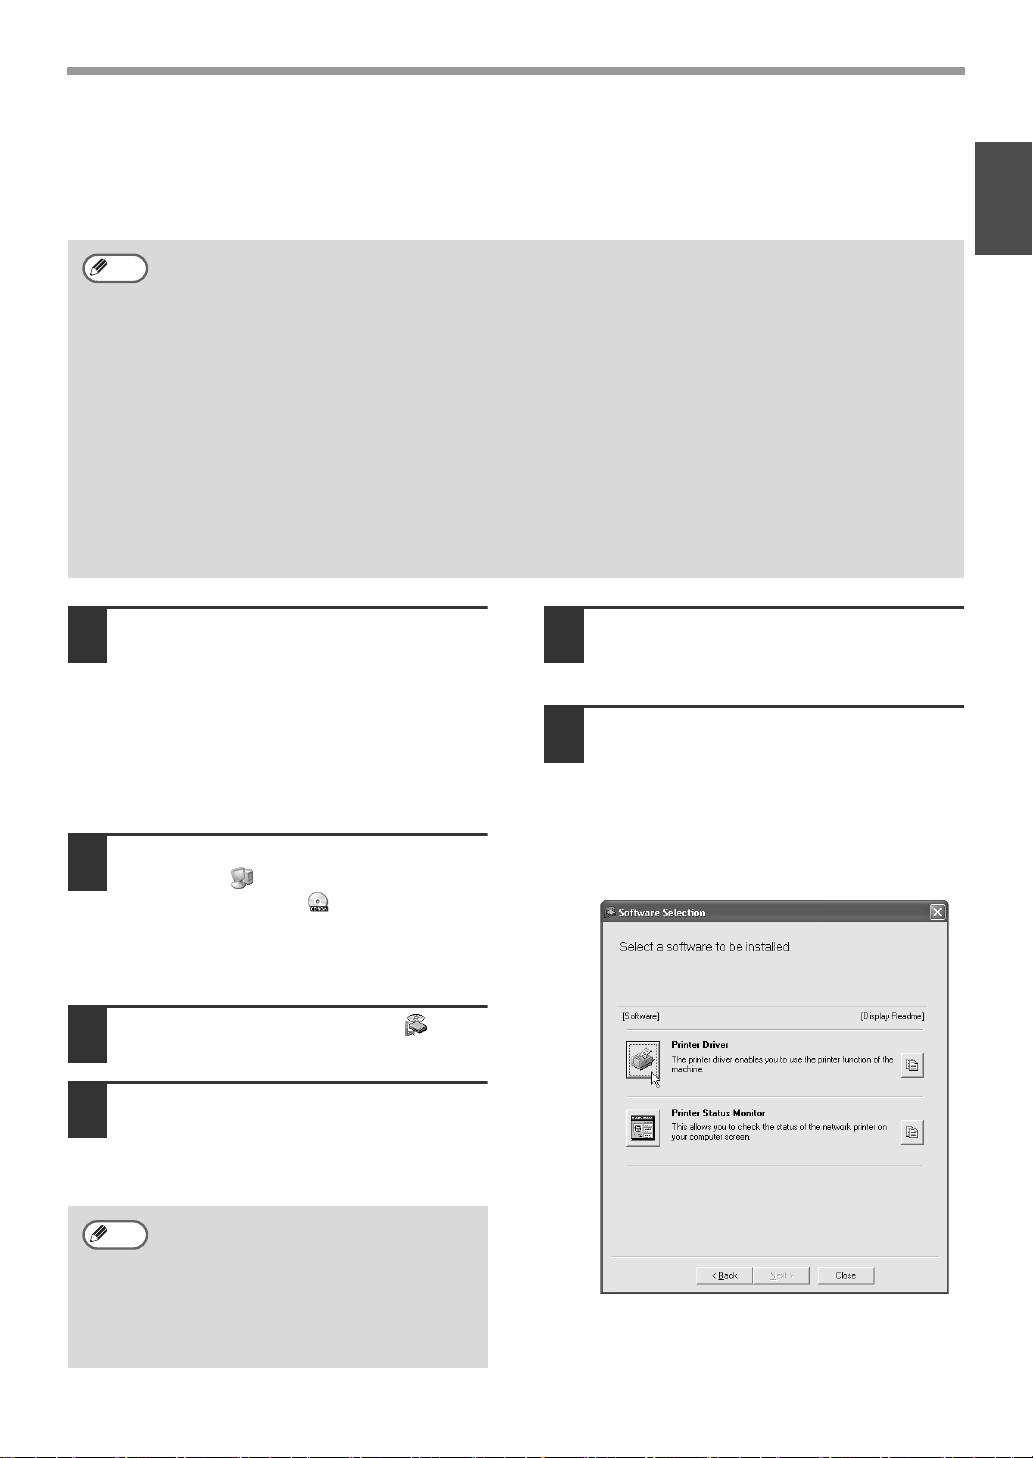
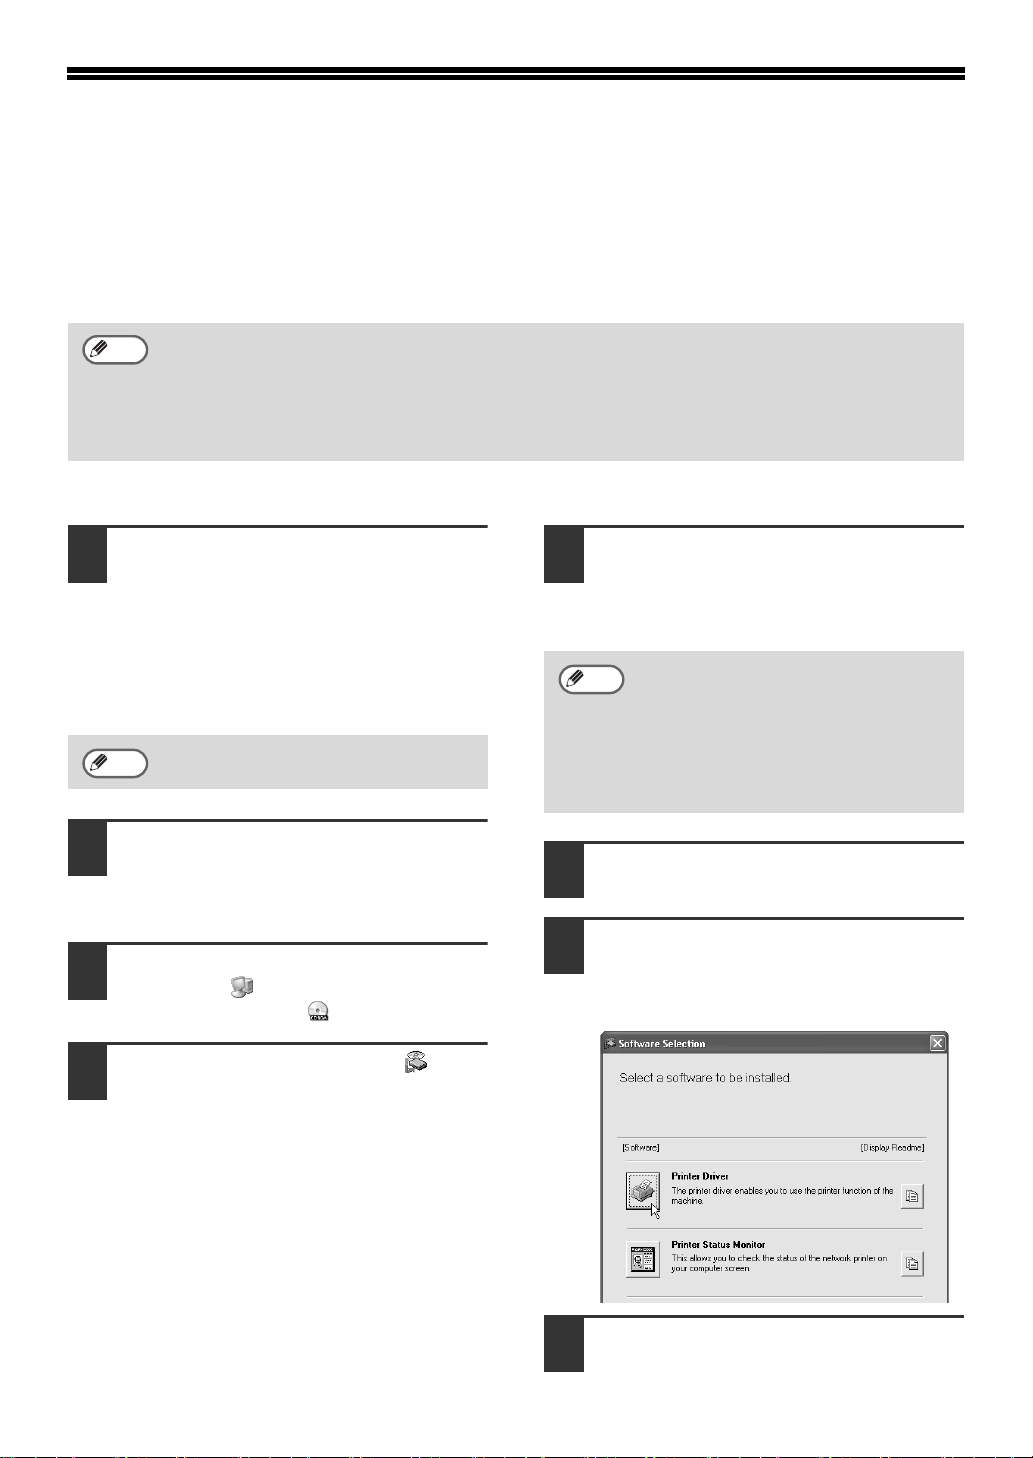
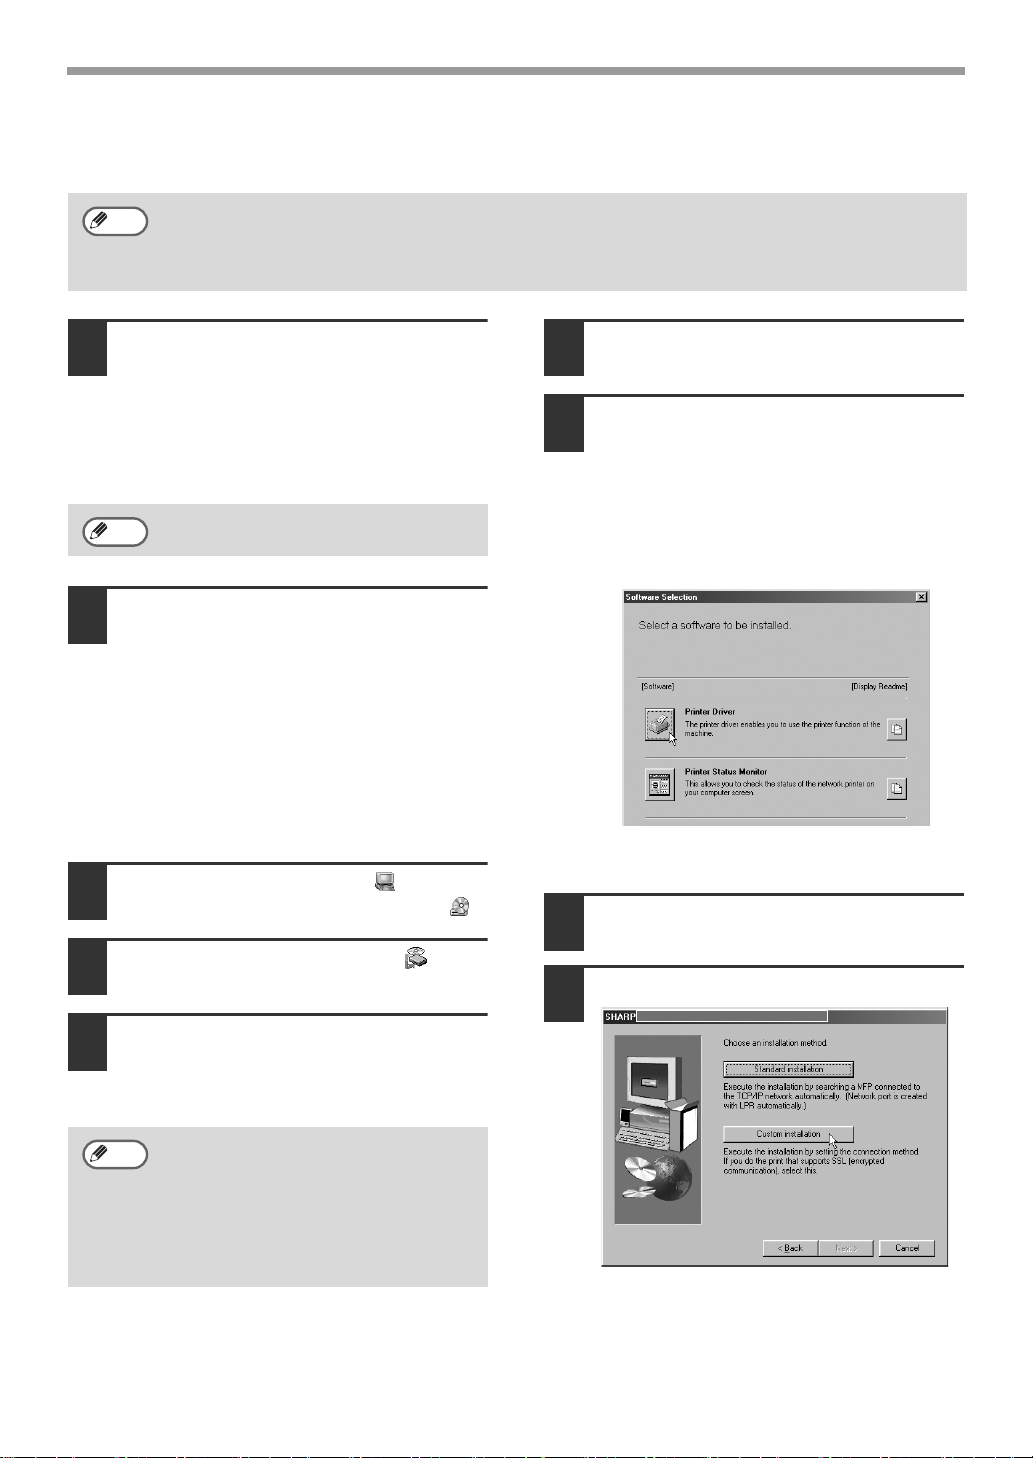
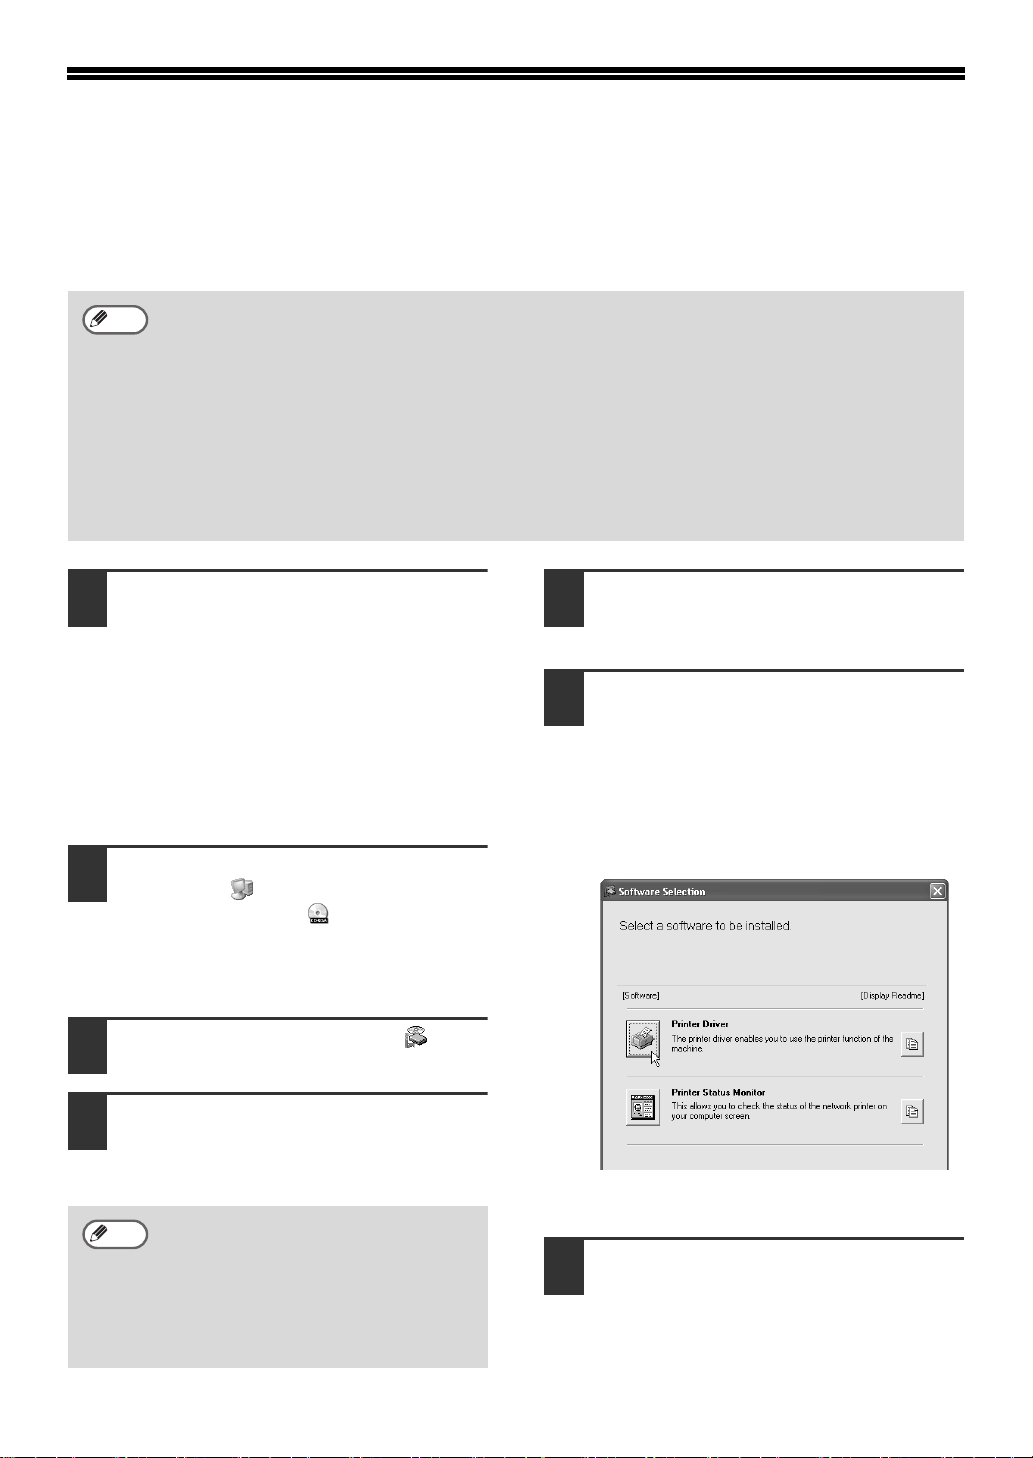
Click the [Printer Driver] button.
6
• To install the PC-Fax driver, click the
[PC-Fax Driver] button.
• Before installing the software, be sure to
click the [Display Readme] button and
view the detailed information on the
software.
ENGLISH
Double-click the [Setup] icon ( ).
3
The "SOFTWARE LICENSE" window will
4
appear. Make sure that you understand
the contents of the license agreement
and then click the [Yes] button.
Note
You can show the "SOFTWARE
LICENSE" in a different language by
selecting the desired language from
the language menu. To install the
software in the selected language,
continue the installation with that
language selected.
* The above screen appears when the printer
driver is being installed.
5
Page 8
USING THE MACHINE AS A NETWORK PRINTER
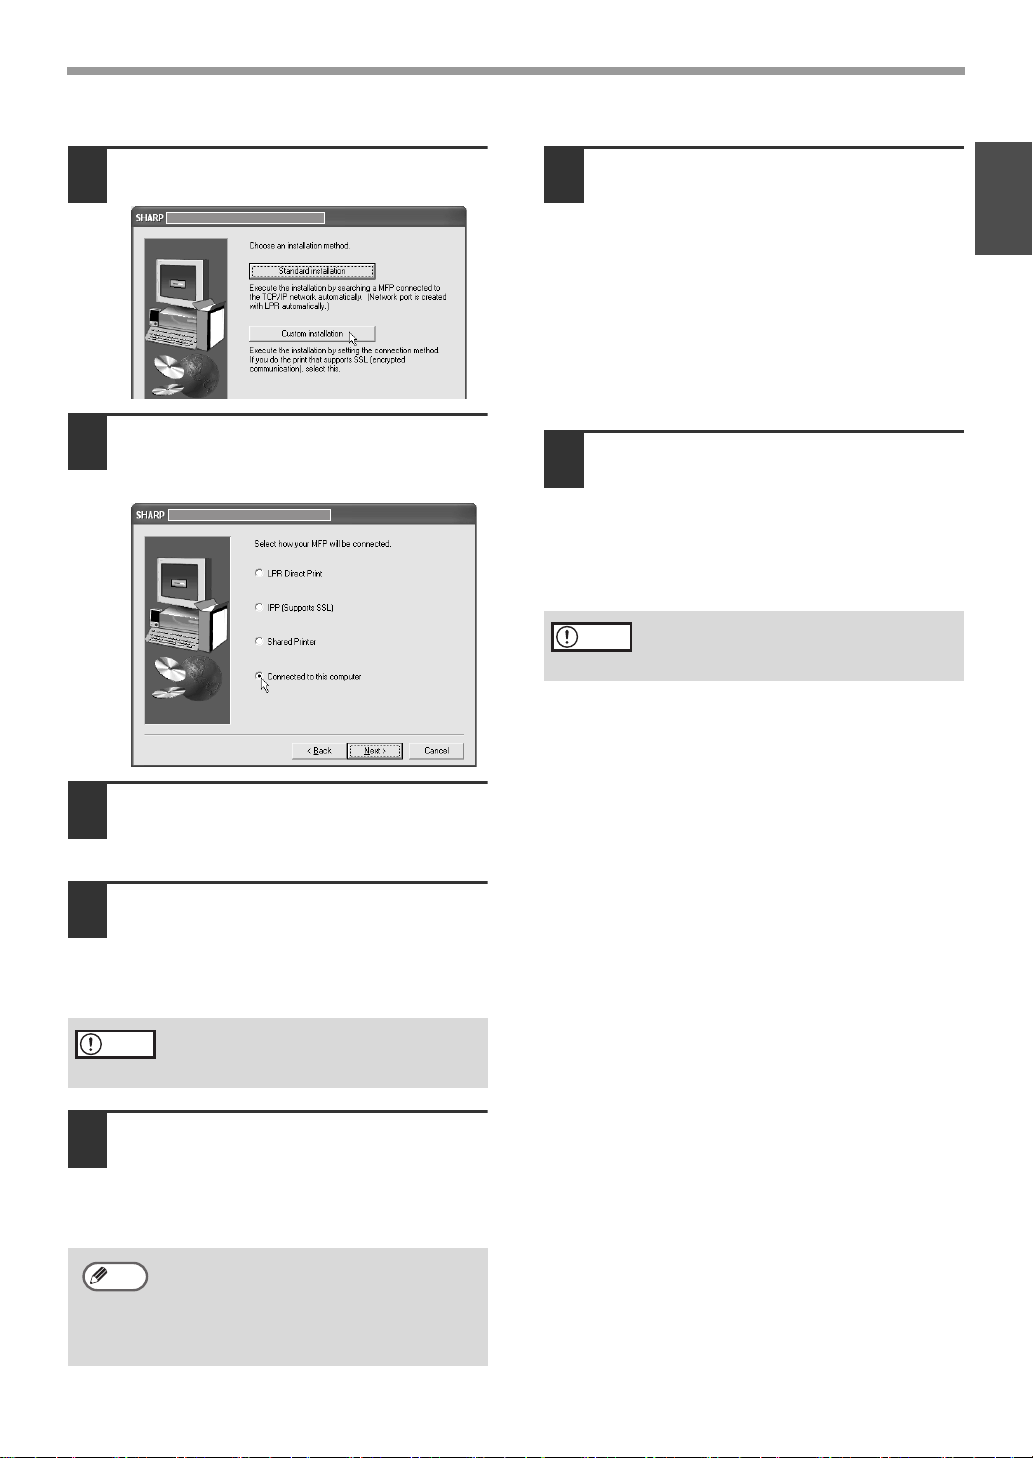
Click the [Next] button.
7
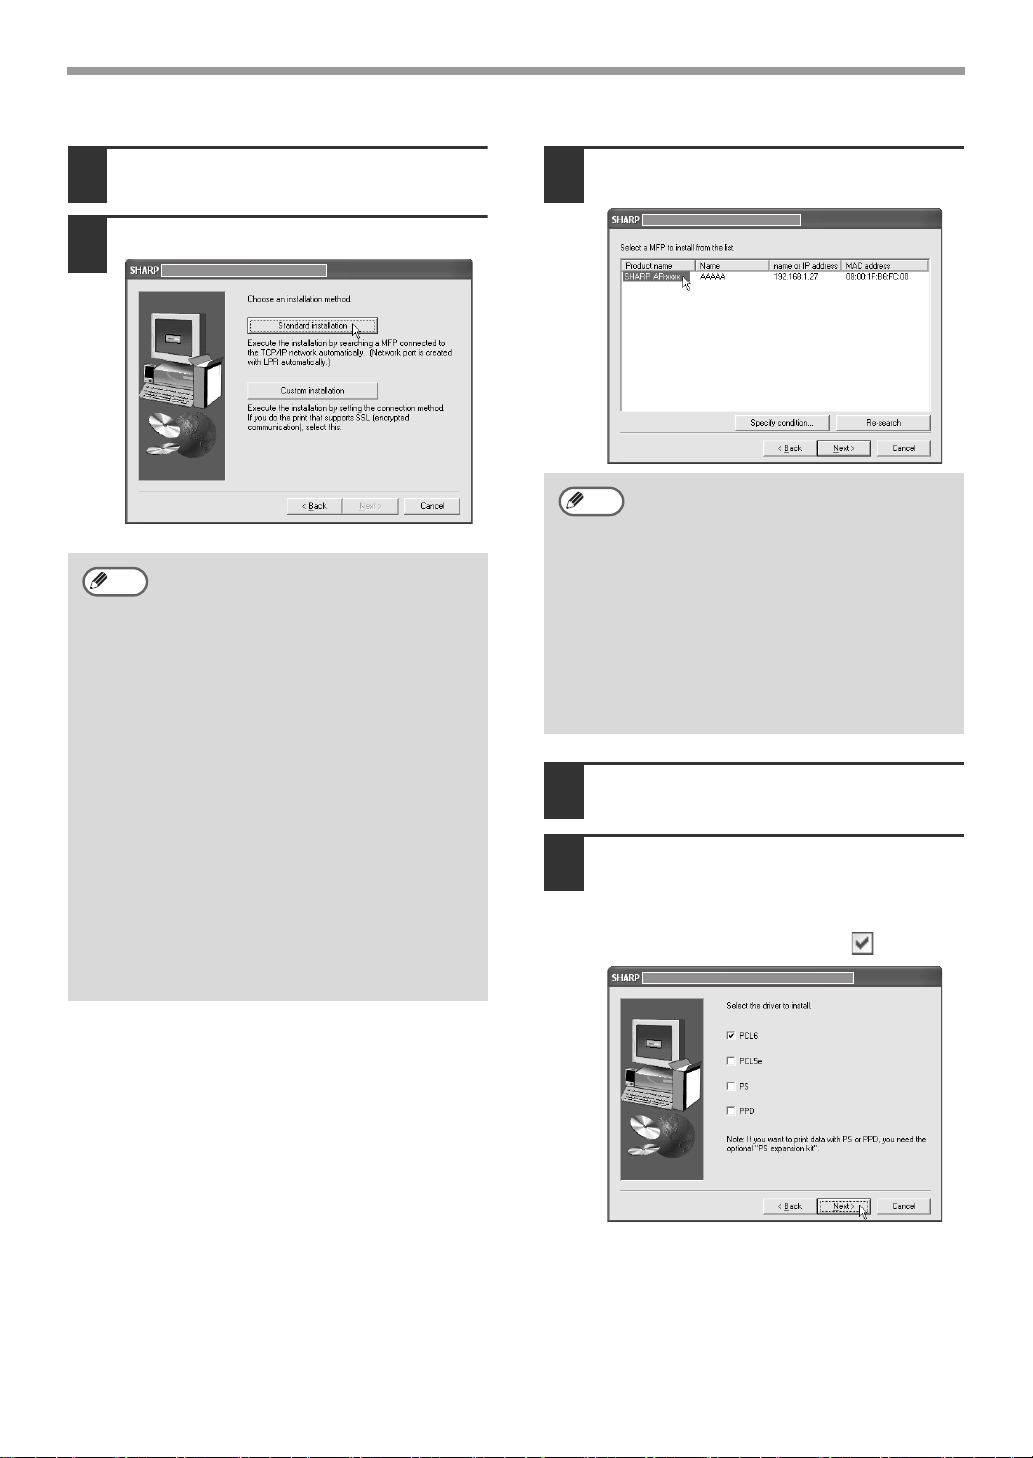
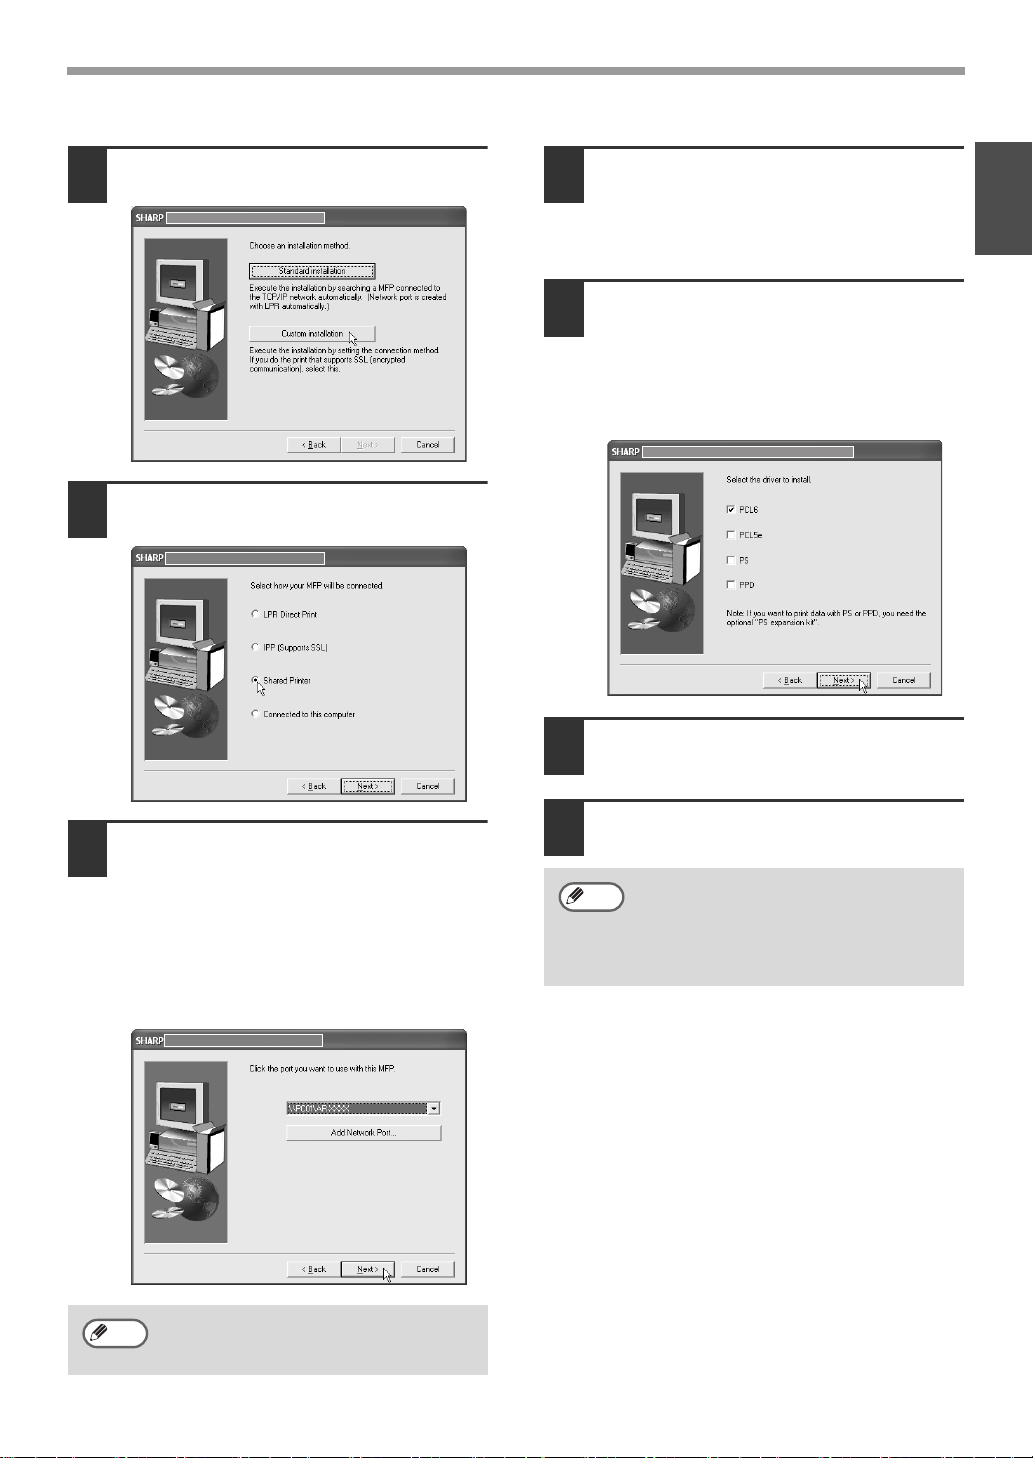
Click the [Standard installation] button.
8
Note
When [Custom installation] is
selected, you can change any of the
items below. When [Standard
installation] is selected, the installation
will take place as indicated below.
• Machine connection method: LPR
Direct Print
• Set as default printer: Yes (excluding
the PC-Fax driver)
• Printer driver name: Cannot be
changed
• PCL printer display fonts: Installed
If you selected [Custom installation],
select [LPR Direct Print] and click the
[Next] button. If you selected other
than [LPR Direct Print], see the
following pages:
• IPP: page 8
• Shared printer: page 20
Connected to this computer: page 12
•
Printers connected to the network are detected.
9
Select the machine and click the [Next] button.
Note
10
11
• If the machine is not found, make
sure that the machine is powered on
and that the machine is connected
to the network, and then click the
[Re-search] button.
• You can also click the [Specify
condition] button and search for the
machine by entering the machine's
name (host name) or IP address.
For information about checking the
IP address, see "Checking the IP
address of the machine" (page 4).
A confirmation window appears. Check the
contents and then click the [Next] button.
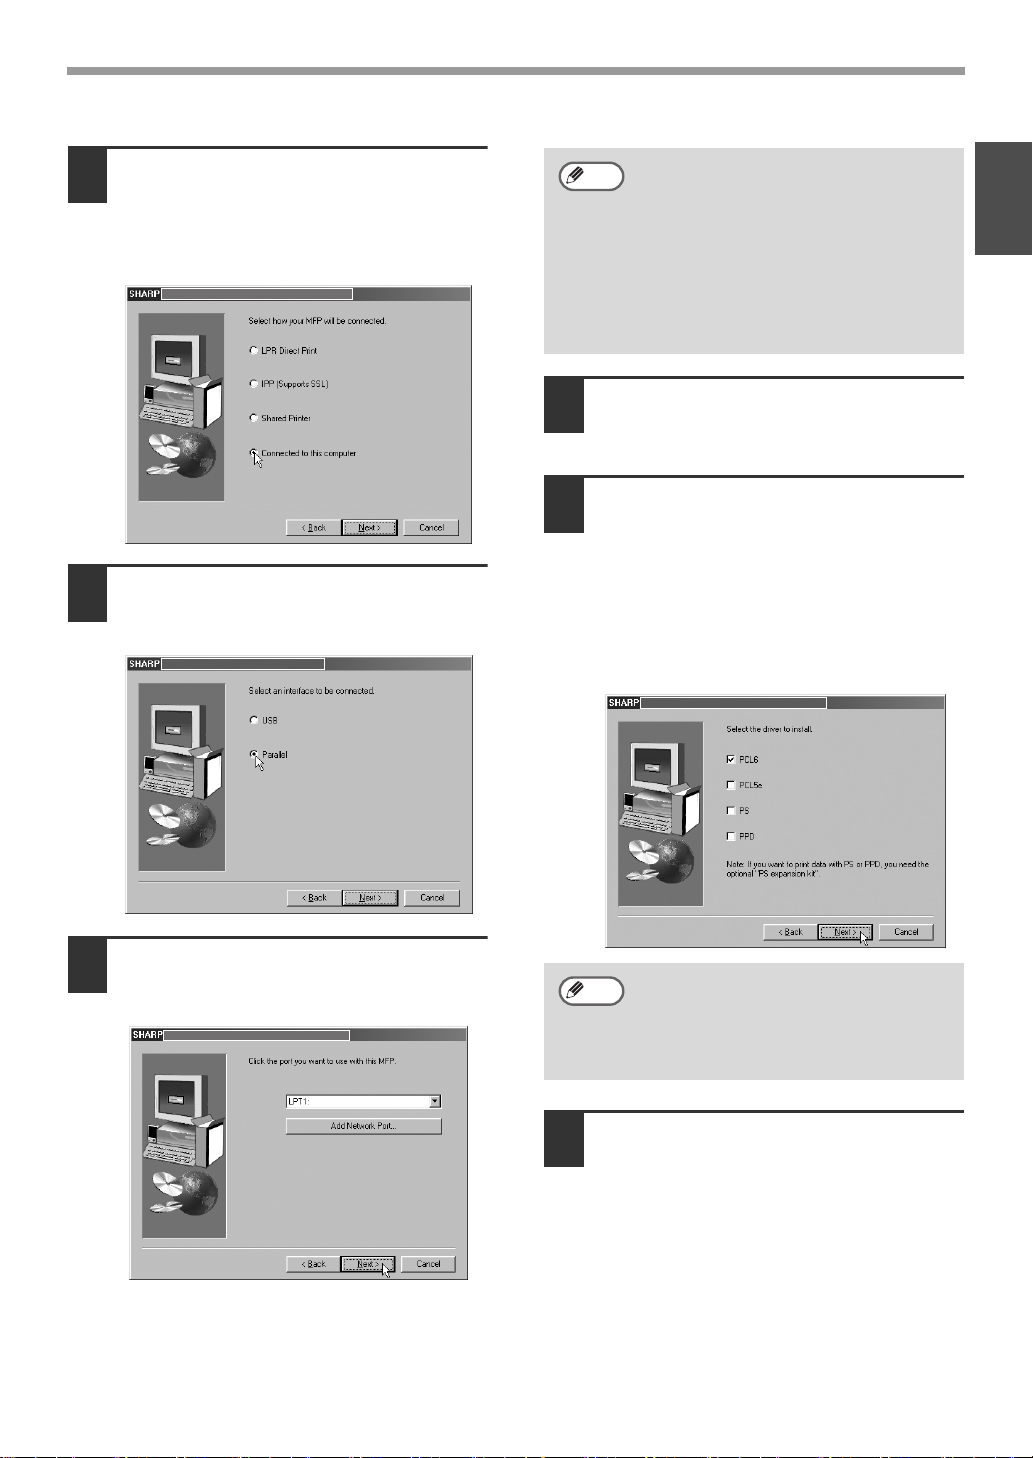
When the printer driver selection window
appears, select the printer driver to be
installed and click the [Next] button.
Click the checkbox of the printer driver to be
installed so that a checkmark ( ) appears.
6
Page 9

USING THE MACHINE AS A NETWORK PRINTER
Note
12
• When the PC-Fax driver is being
installed, this screen does not
appear. Go to the next step.
• The PS3 expansion kit is required to
use the PS printer driver or the PPD
driver.
The [PPD] checkbox only appears if you
•
are using Windows 2000/XP/Server 2003.
When you are asked whether or not
you want the printer to be your default
printer, make a selection and click the
[Next] button.
If you are installing multiple drivers, select
the printer driver to be used as the default
printer.
If you do not wish to set one of the printer
drivers as the default printer, select [No].
Note
If you clicked the [Custom installation]
button in step 8, the following windows
will appear.
• Printer name window
If you wish to change the printer
name, enter the desired name and
click the [Next] button.
• Window confirming installation of
the display fonts
To install the display fonts for the
PCL printer driver, select [Yes] and
click the [Next] button.
• When the PC-Fax driver is being
installed, this screen does not
appear. Go to the next step.
• If you are not installing the PCL
printer driver (you are installing
the PS printer driver or the PPD
driver), select [No] and click the
[Next] button.
When the installation completed
14
screen appears, click the [OK] button.
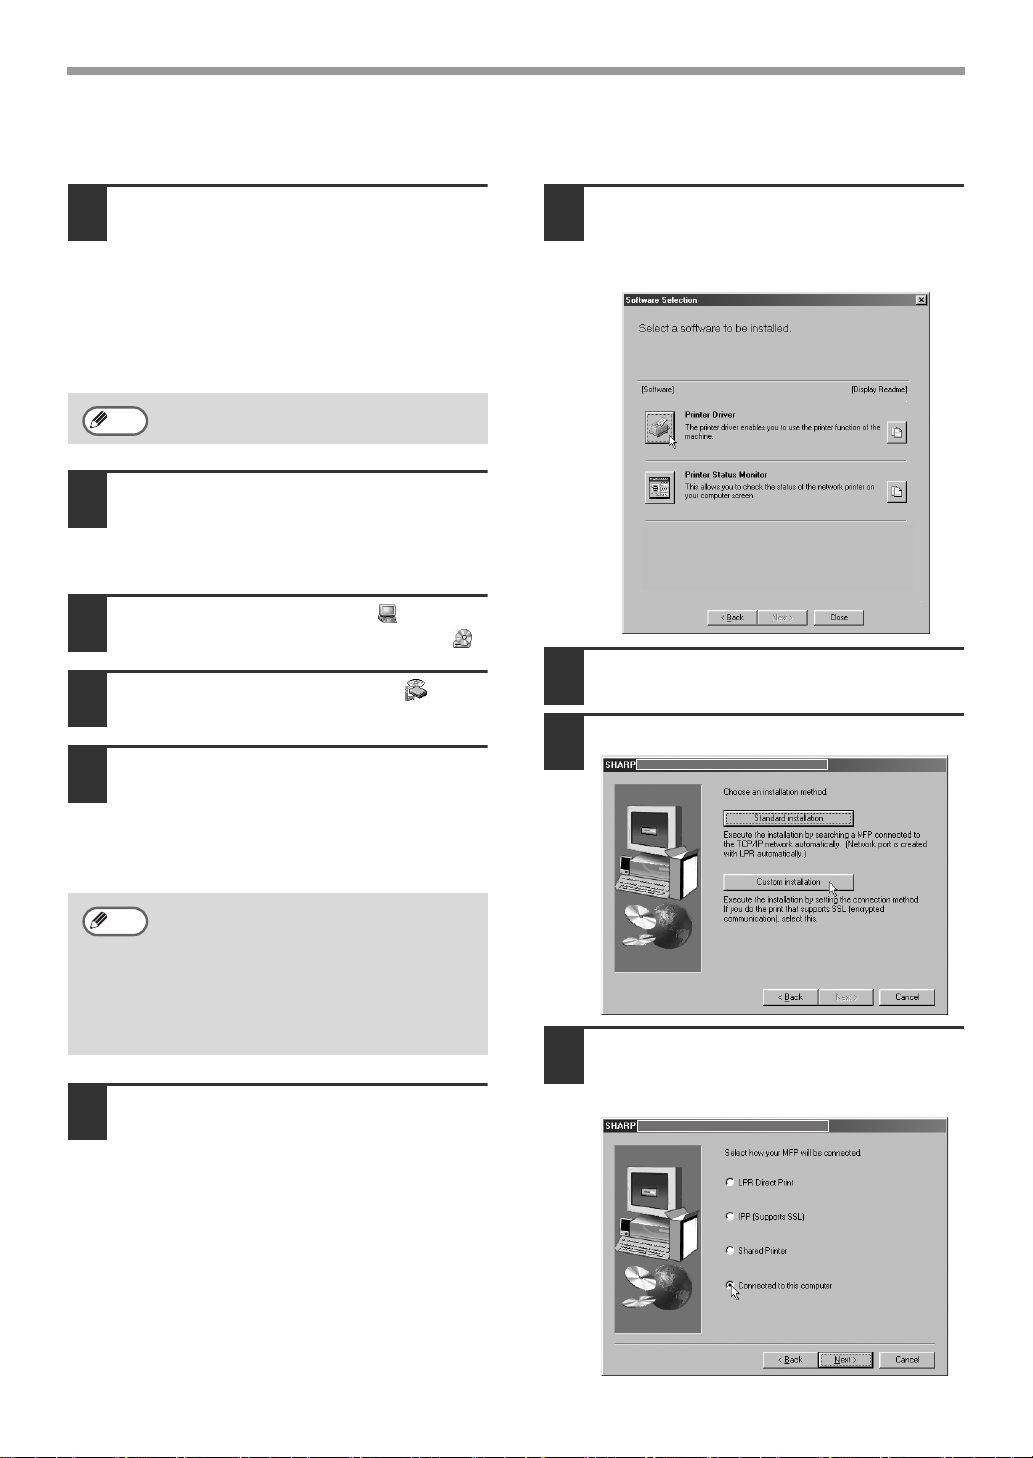
Click the [Close] button in the window
15
of step 6.
Note
After the installation, a message
prompting you to restart your
computer may appear. If this message
appears, click the [Yes] button to
restart your computer.
This completes the installation.
• After installation, see "CONFIGURING THE
PRINTER DRIVER" (page 24) to configure
the printer driver settings.
• If you installed the PS printer driver or the
PPD driver, the PS display fonts can be
installed from the "PRINTER UTILITIES"
CD-ROM that accompanies the PS3
expansion kit. See "INSTALLING THE PS
DISPLAY FONTS" (page 22).
• If you are using the machine as a shared
printer, see "USING THE MACHINE AS A
SHARED PRINTER" (page 20) to install the
printer driver on each of the client computers.
ENGLISH
Follow the on-screen instructions.
13
Read the message in the window that
appears and click the [Next] button.
Installation begins.
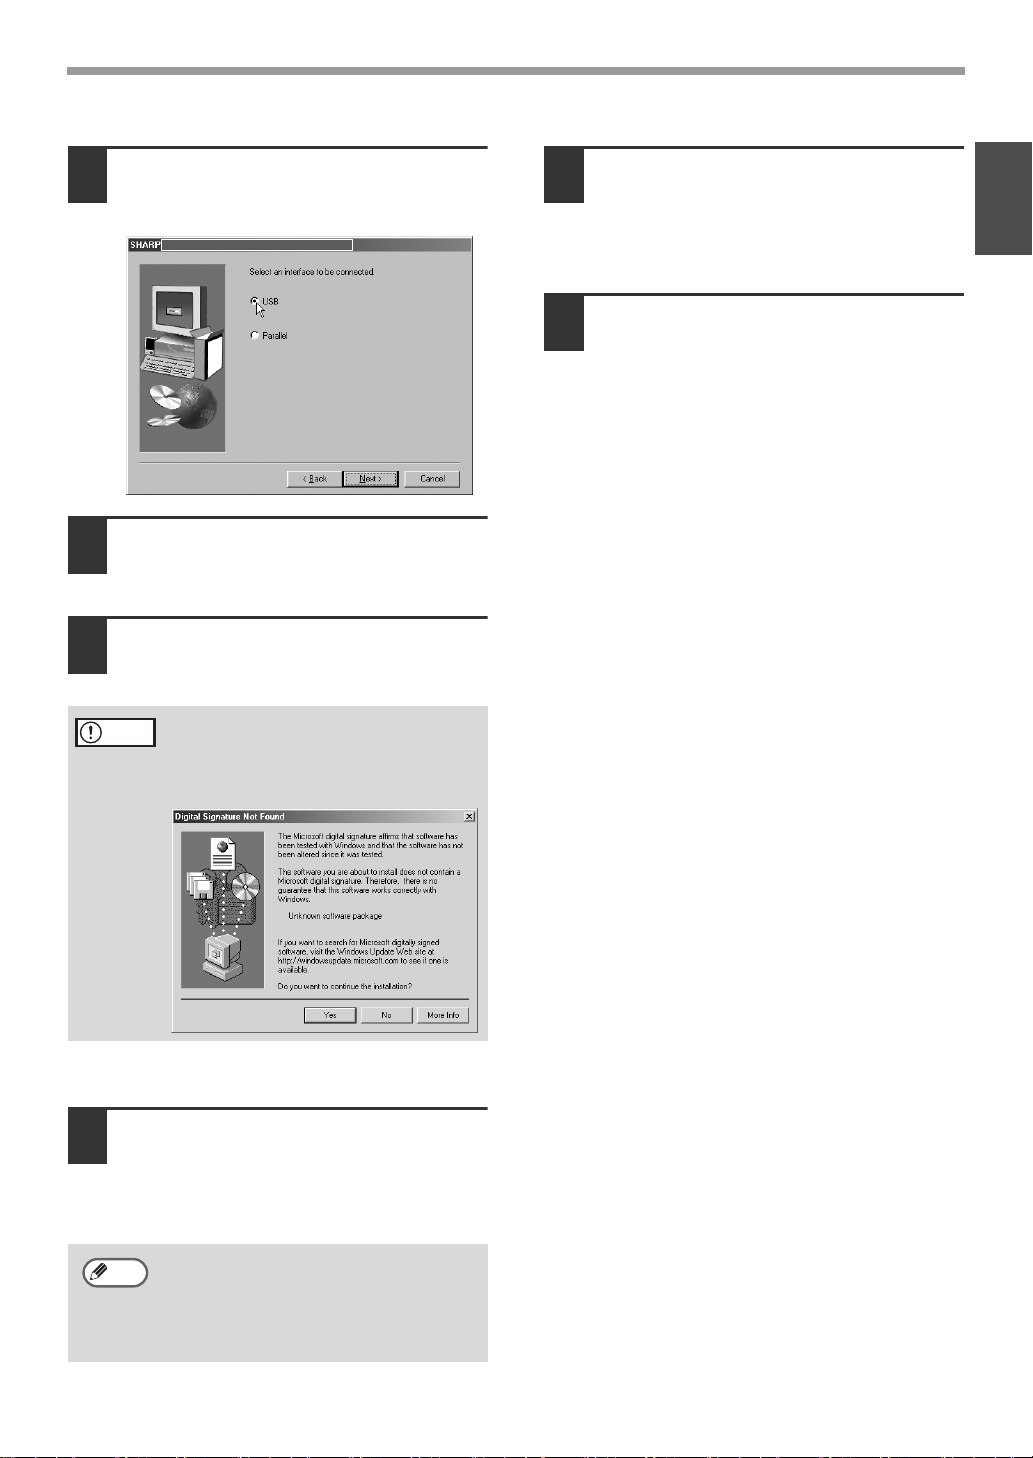
Caution
If you are using Windows
2000/XP/Server 2003
If a warning message regarding the
Windows logo test or digital signature
appears, be sure to click the [Continue
Anyway] or [Yes] button.
7
Page 10
USING THE MACHINE AS A NETWORK PRINTER
Printing using the IPP function and the SSL function
The IPP function can be used to print to the machine over a network using HTTP protocol.
When the machine is in a remote location, this function can be used in place of the fax function to print
a higher quality image than a fax. The IPP function can also be used in combination with the SSL
(encrypted communication) function to encrypt the print data. This enables secure printing with no
concern that the data will be leaked to others.
Note
1
2
3
To use the SSL function, configure the "SSL SETTINGS" in the key operator programs of the
machine. To configure the settings, see the "Key operator's guide".
Insert the "Software CD-ROM" into
your computer's CD-ROM drive.
• If you are installing the printer driver,
insert the "Software CD-ROM" that
shows "Disc 1" on the front of the
CD-ROM.
• If you are installing the PC-Fax driver,
insert the "Software CD-ROM" that
shows "Disc 2" on the front of the
CD-ROM.
Click the [start] button, click [My
Computer] ( ), and then double-click
the [CD-ROM] icon ( ).
In Windows 98/Me/2000, double-click [My
Computer] and then double-click the
[CD-ROM] icon.
Double-click the [Setup] icon ( ).
Click the [Printer Driver] button.
6
• To install the PC-Fax driver, click the
[PC-Fax Driver] button.
•
Before installing the software, be sure to
click the [Display Readme] button and view
the detailed information on the software.
The "SOFTWARE LICENSE" window will
4
appear. Make sure that you understand
the contents of the license agreement
and then click the [Yes] button.
Note
5
You can show the "SOFTWARE
LICENSE" in a different language by
selecting the desired language from
the language menu. To install the
software in the selected language,
continue the installation with that
language selected.
Read the message in the "Welcome"
window and then click the [Next] button.
8
* The above screen appears when the printer
driver is being installed.
Click the [Next] button.
7
Page 11

USING THE MACHINE AS A NETWORK PRINTER
Click the [Custom installation] button.
8
When you are asked how the printer is
9
connected, select [IPP] and click the
[Next] button.
Enter the machine's URL and click the
11
[Next] button.
Enter the URL in the following format:
Normal format:
http://<the machine's domain name or IP
address>:631*
*1 Normally "631" should be entered for
the port number. If the IPP port number
has been changed on the machine,
enter the new port number.
When SSL is used:
https://< the machine's domain name or IP
address>:<port number*
*2 Normally the port number and the colon
":" immediately preceding the port
number can be omitted. If the IPP port
number for SSL has been changed on
the machine, enter the new port
number.
1
/ipp
2
>/ipp
ENGLISH
If a proxy server is used, specify the
10
proxy server and click the [Next]
button.
To specify a proxy server, select [Print via
the proxy server] and then enter the
[Address] and [Port number].
Note
12
If your computer and the machine are
connected to the same local area
network, you can click the [Search]
button to search for the machine. The
machine's URL will appear. Select the
URL and click the [OK] button. You will
return to the above screen and the
machine's URL will be automatically
entered.
When the model selection window
appears, select the model name of your
machine and click the [Next] button.
9
Page 12

USING THE MACHINE AS A NETWORK PRINTER
When the printer driver selection window
13
appears, select the printer driver to be
installed and click the [Next] button.
Click the checkbox of the printer driver to be
installed so that a checkmark ( ) appears.
Note
14
15
• When the PC-Fax driver is being
installed, this screen does not
appear. Go to the next step.
• The PS3 expansion kit is required to
use the PS printer driver or the PPD
driver.
The [PPD] checkbox only appears if you
•
are using Windows 2000/XP/Server 2003.
Select whether or not you wish the
printer to be your default printer and
click the [Next] button.
If you are installing multiple drivers, select the
printer driver to be used as the default printer.
If you do not wish to set one of the printer
drivers as the default printer, select [No].
When the printer name window
appears, click the [Next] button.
If you wish to change the printer name,
enter the desired name.
Follow the on-screen instructions.
17
Read the message in the window that
appears and click the [Next] button.
Installation begins.
Caution
18
19
Note
This completes the installation.
• After installation, see "CONFIGURING THE
PRINTER DRIVER" (page 24) to configure
the printer driver settings.
• If you installed the PS printer driver or the
PPD driver, the PS display fonts can be
installed from the "PRINTER UTILITIES"
CD-ROM that accompanies the PS3
expansion kit. See "INSTALLING THE PS
DISPLAY FONTS" (page 22).
If you are using Windows
2000/XP/Server 2003
If a warning message regarding the
Windows logo test or digital signature
appears, be sure to click the [Continue
Anyway] or [Yes] button.
When the installation completed
screen appears, click the [OK] button.
Click the [Close] button in the window
of step 6.
After the installation, a message
prompting you to restart your
computer may appear. If this message
appears, click the [Yes] button to
restart your computer.
When you are asked if you wish to
16
install the display fonts, select an
answer and click the [Next] button.
• When the PC-Fax driver is being
installed, this screen does not appear.
Go to the next step.
• If you are not installing the PCL printer
driver (you are installing the PS printer
driver or the PPD driver), select [No] and
click the [Next] button.
10
Page 13
USING THE MACHINE AS A NETWORK PRINTER
INSTALLING THE PRINTER STATUS MONITOR
Note
Supported operating systems: Windows 98/Me/NT 4.0*/2000*/XP*/Server 2003*
* Administrator's rights are required to install the software.
1
2
3
The Printer Status Monitor cannot be used when printing to the machine using the IPP function.
Insert the "Software CD-ROM" into
your computer's CD-ROM drive.
Insert the "Software CD-ROM" that shows
"Disc 1" on the front of the CD-ROM.
Click the [start] button, click [My
Computer] ( ), and then double-click
the [CD-ROM] icon ( ).
In Windows 98/Me/2000, double-click [My
Computer] and then double-click the
[CD-ROM] icon.
Double-click the [Setup] icon ( ).
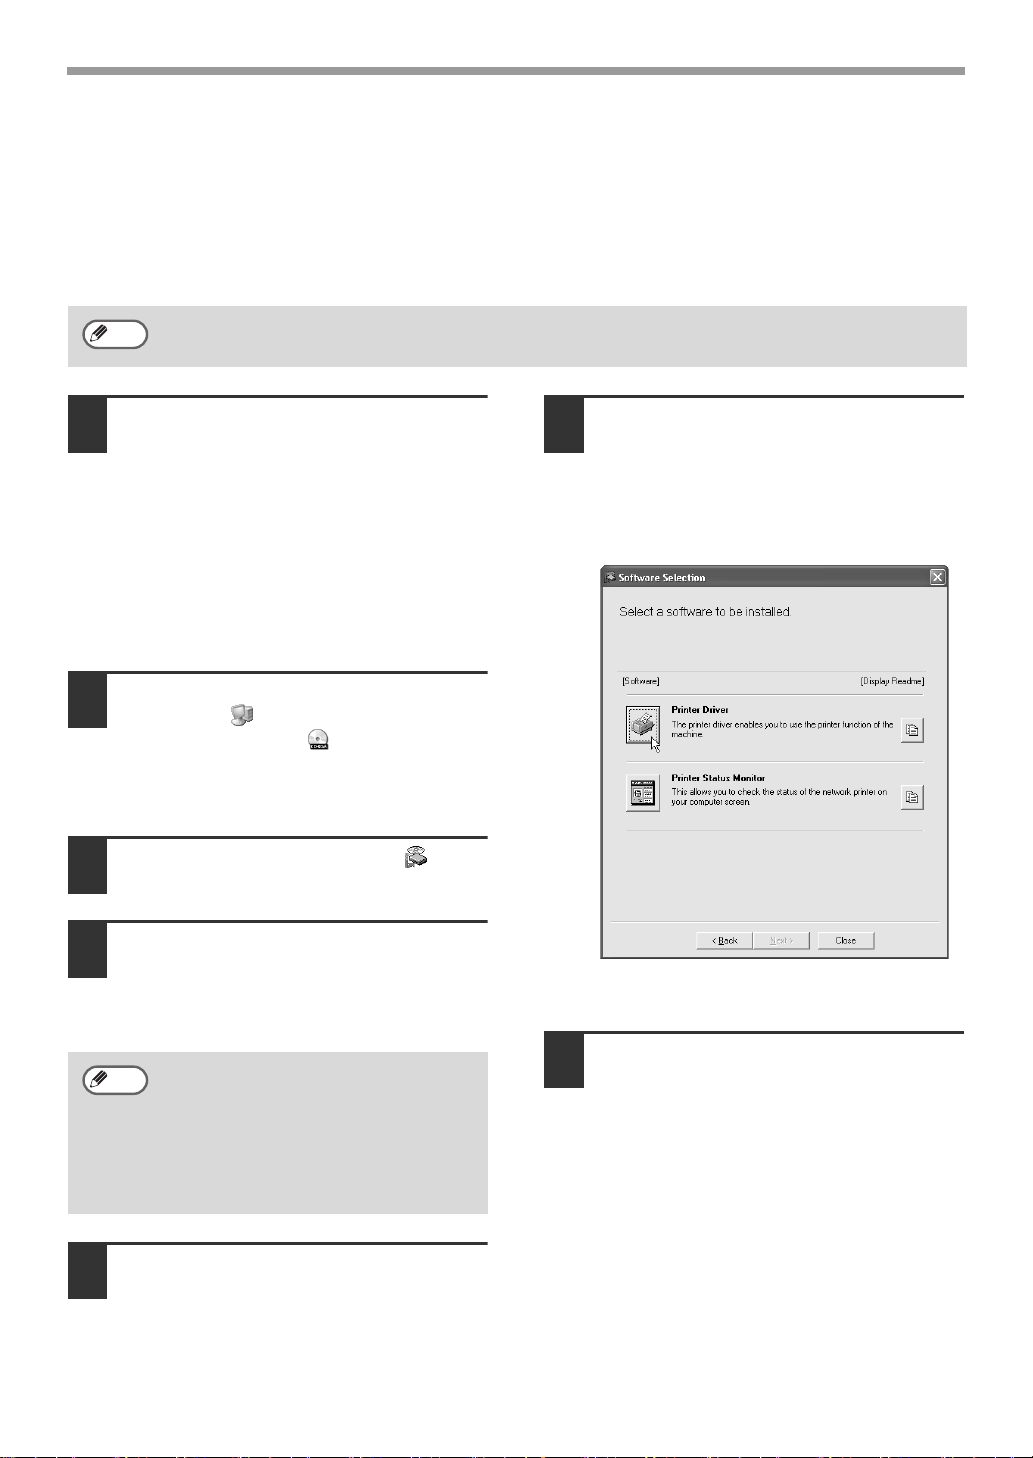
Click the [Printer Status Monitor] button.
6
Before installing the software, be sure to
click the [Display Readme] button and
view the detailed information on the
software.
ENGLISH
The "SOFTWARE LICENSE" window will
4
appear. Make sure that you understand
the contents of the license agreement
and then click the [Yes] button.
Note
5
This completes the installation.
For the procedures for using the Printer Status Monitor, see the Help file. Follow these steps to view
the Help file: Click the Windows [start] button, select [All Programs] ([Programs] in versions of Windows
other than Windows XP/Server 2003), select [SHARP Printer Status Monitor] and then select [Help].
You can show the "SOFTWARE
LICENSE" in a different language by
selecting the desired language from
the language menu. To install the
software in the selected language,
continue the installation with that
language selected.
Read the message in the "Welcome"
window and then click the [Next]
button.
Follow the on-screen instructions.
7
When the installation completed screen
8
appears, click the [Finish] button.
To have the Printer Status Monitor start
automatically when your computer is
started, select the [Add this program to
your Startup folder] checkbox and click
the [Finish] button.
Click the [Close] button in the window
9
of step 6.
Note
After the installation, a message prompting
you to restart your computer may appear. If
this message appears, click the [Yes]
button to restart your computer.
11
Page 14
USING THE MACHINE WITH A
PARALLEL OR USB CONNECTION
INSTALLING THE PRINTER DRIVER / PC-FAX
DRIVER
Note
• The PS3 expansion kit is required to use the PS printer driver or the PPD driver.
• To install the PPD driver when Windows 98/Me is used, see "USING THE STANDARD
WINDOWS PS PRINTER DRIVER (Windows 98/Me/NT 4.0)" (page 23) and install the driver
using the Add Printer Wizard.
• To use the port created when the printer driver is installed for fax data transfer, install the printer
driver first and then install the PC-Fax driver.
Installation in Windows XP/Server 2003 (USB/parallel cable)
The USB or parallel cable must not be
1
connected to the machine. Make sure
that the cable is not connected before
proceeding.
If a cable is connected, a Plug and Play
window will appear. If this happens, click
the [Cancel] button to close the window
and disconnect the cable.
Note
2
3
The cable will be connected in step 14.
Insert the "Software CD-ROM" into
your computer's CD-ROM drive.
Insert the "Software CD-ROM" that shows
"Disc 1" on the front of the CD-ROM.
Click the [start] button, click [My
Computer] ( ), and then double-click
the [CD-ROM] icon ( ).
The "SOFTWARE LICENSE" window will
5
appear. Make sure that you understand
the contents of the license agreement
and then click the [Yes] button.
Note
6
7
You can show the "SOFTWARE
LICENSE" in a different language by
selecting the desired language from
the language menu. To install the
software in the selected language,
continue the installation with that
language selected.
Read the message in the "Welcome"
window and then click the [Next] button.
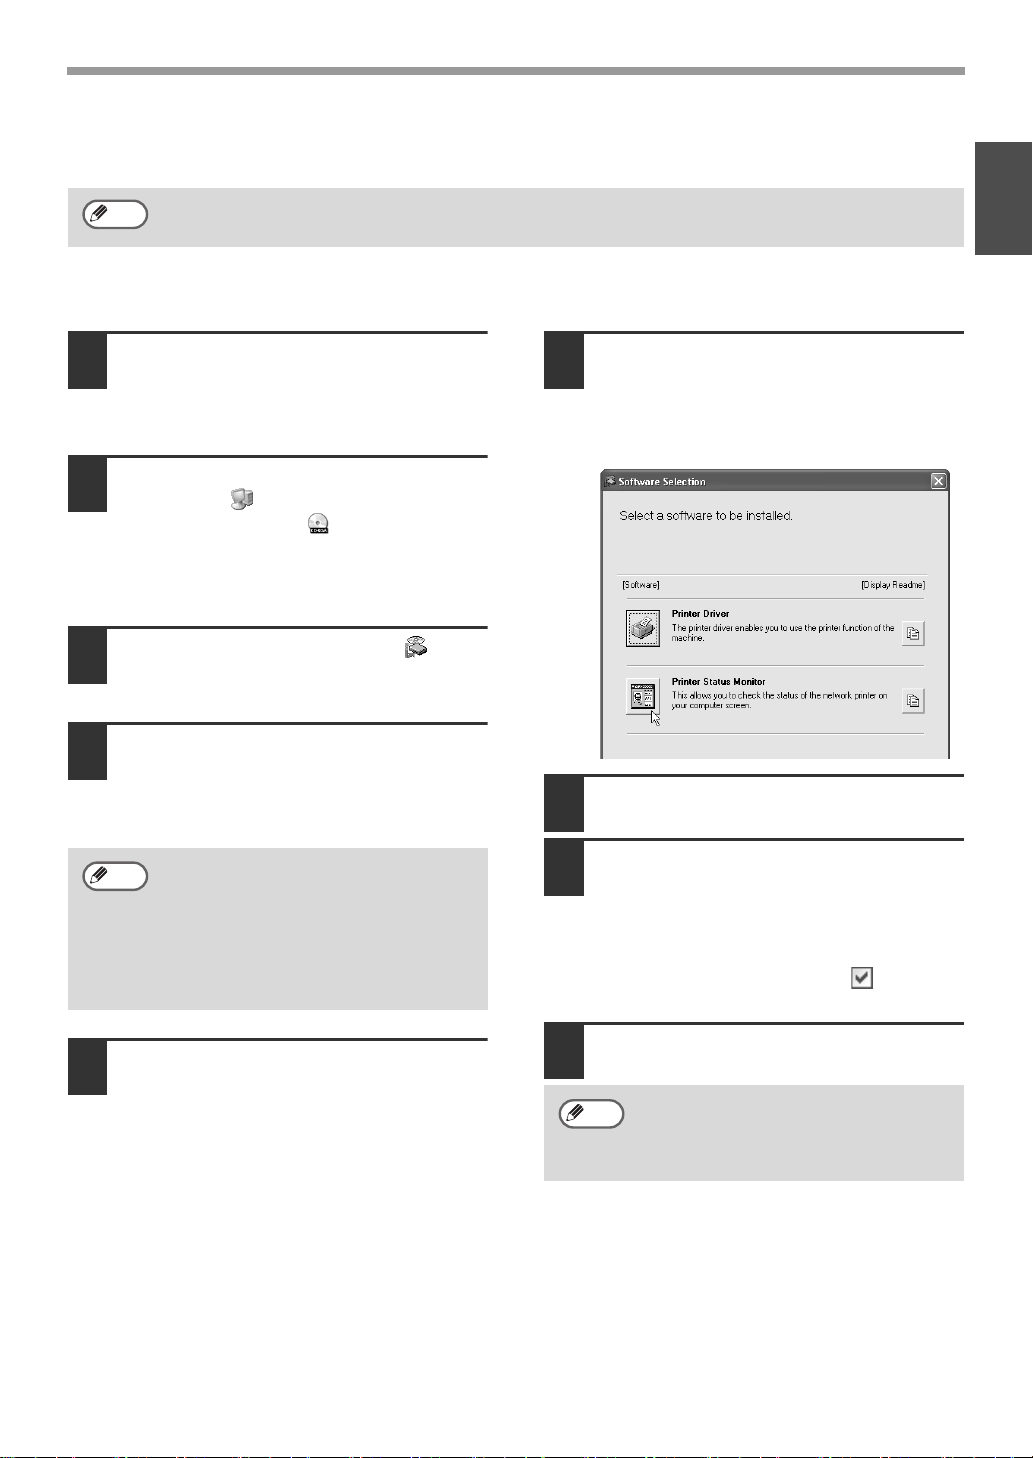
Click the [Printer Driver] button.
Before installing the software, be sure to
click the [Display Readme] button and view
the detailed information on the software.
Double-click the [Setup] icon ( ).
4
12
Click the [Next] button.
8
Page 15
USING THE MACHINE WITH A PARALLEL OR USB CONNECTION
Click the [Custom installation] button.
9
When you are asked how the printer is
10
connected, select [Connected to this
computer] and click the [Next] button.
When you are asked if you wish to
11
install the display fonts, select an
answer and click the [Next] button.
Follow the on-screen instructions.
12
Read the message in the window that
appears and click the [Next] button.
When the installation completed screen
appears, click the [OK] button.
Caution
13
Note
If a warning window appears regarding
the "Windows logo test", be sure to
click the [Continue Anyway] button.
Click the [Close] button in the window
of step 7.
When a message appears prompting you
to connect the machine to your computer,
click the [OK] button.
After the installation, a message
prompting you to restart your
computer may appear. If this message
appears, click the [Yes] button to
restart your computer.
Connect the interface cable to the
14
machine and your computer (page 19).
• If you are using a USB cable, make
sure the machine's power is turned on
and then connect the cable.
•
If you are using a parallel cable,
power of the machine and your computer,
connect the cable, turn on the power of the
machine, and then turn on your computer.
Windows will detect the machine and the
Plug and Play screen will appear.
Installation of the PCL6 printer driver
15
begins.
When the "Found New Hardware Wizard"
appears, select [Install the software
automatically (Recommended)], click the
[Next] button, and follow the on-screen
instructions.
Caution
After completing the above steps, repeat the
installation procedure from step 2 if you are
installing the PCL5e, PS, PPD, or PC-Fax driver.
1.
Repeat the installation procedure from step 2.
If you are installing the PC-Fax driver, insert
the "Software CD-ROM" that shows "Disc 2"
on the front of the CD-ROM and click the
[PC-Fax Driver] button in step 7.
2. When the select printer driver to install screen
appears, remove the checkmark from [PCL6]
and select the checkbox of the printer driver
that you wish to install.
This completes the installation.
• After installation, see "CONFIGURING THE
PRINTER DRIVER" (page 24) to configure
the printer driver settings.
• If you installed the PS printer driver or the
PPD driver, the PS display fonts can be
installed from the "PRINTER UTILITIES"
CD-ROM that accompanies the PS3
expansion kit. See "INSTALLING THE PS
DISPLAY FONTS" (page 22).
• If you are using the machine as a shared
printer, see "USING THE MACHINE AS A
SHARED PRINTER" (page 20) to install the
printer driver on each of the client computers.
If a warning window appears regarding
the "Windows logo test", be sure to
click the [Continue Anyway] button.
turn off the
ENGLISH
13
Page 16
USING THE MACHINE WITH A PARALLEL OR USB CONNECTION
Installation in Windows 98/Me/2000 (USB cable)
The USB cable must not be connected
1
to the machine. Make sure that the
cable is not connected before
proceeding.
If a cable is connected, a Plug and Play
window will appear. If this happens, click
the [Cancel] button to close the window
and disconnect the cable.
Note
2
3
4
5
The cable will be connected in step 15.
Insert the "Software CD-ROM" into
your computer's CD-ROM drive.
Insert the "Software CD-ROM" that shows
"Disc 1" on the front of the CD-ROM.
Double-click [My Computer] ( ), and
then double-click the [CD-ROM] icon ( ).
Double-click the [Setup] icon ( ).
The "SOFTWARE LICENSE" window
will appear. Make sure that you
understand the contents of the license
agreement and then click the [Yes]
button.
Click the [Printer Driver] button.
7
Before installing the software, be sure to
click the [Display Readme] button and view
the detailed information on the software.
Click the [Next] button.
8
Click the [Custom installation] button.
9
Note
6
You can show the "SOFTWARE
LICENSE" in a different language by
selecting the desired language from
the language menu. To install the
software in the selected language,
continue the installation with that
language selected.
Read the message in the "Welcome"
window and then click the [Next] button.
14
When you are asked how the printer is
10
connected, select [Connected to this
computer] and click the [Next] button.
Page 17
USING THE MACHINE WITH A PARALLEL OR USB CONNECTION
When the interface selection screen
11
appears, select [USB] and click the
[Next] button.
When you are asked if you wish to
12
install the display fonts, select an
answer and click the [Next] button.
Follow the on-screen instructions.
13
Read the message in the window that
appears and click the [Next] button.
Caution
In Windows 2000, if the following
screen appears while the files are being
copied (the message may appear more
than once), click the [Yes] button.
When the installation completed screen
appears, click the [OK] button.
Make sure that the power of the
15
machine is turned on, and then
connect the USB cable (page 19).
Windows will detect the machine and the
Plug and Play screen will appear.
Follow the instructions in the Plug and
16
Play screen that appears in your
version of Windows to begin the
installation.
After completing the above steps, repeat the
installation procedure from step 2 if you are
installing the PCL5e, PS, PPD, or PC-Fax
driver.
1.
Repeat the installation procedure from step 2.
If you are installing the PC-Fax driver, insert
the "Software CD-ROM" that shows "Disc 2"
on the front of the CD-ROM and click the
[PC-Fax Driver] button in step 7.
2. When the select printer driver to install
screen appears, remove the checkmark from
[PCL6] and select the checkbox of the printer
driver that you wish to install.
This completes the installation.
• After installation, see "CONFIGURING THE
PRINTER DRIVER" (page 24) to configure
the printer driver settings.
• If you installed the PS printer driver or the
PPD driver, the PS display fonts can be
installed from the "PRINTER UTILITIES"
CD-ROM that accompanies the PS3
expansion kit. See "INSTALLING THE PS
DISPLAY FONTS" (page 22).
• If you are using the machine as a shared
printer, see "USING THE MACHINE AS A
SHARED PRINTER" (page 20) to install the
printer driver on each of the client computers.
ENGLISH
Click the [Close] button in the window
14
of step 7.
When a message appears prompting you
to connect the machine to your computer,
click the [OK] button.
Note
After the installation, a message
prompting you to restart your
computer may appear. If this message
appears, click the [Yes] button to
restart your computer.
15
Page 18
USING THE MACHINE WITH A PARALLEL OR USB CONNECTION
Installation in Windows 98/Me/NT 4.0/2000 (parallel cable)
Note
1
Note
2
3
For users of Windows NT 4.0
The CD-ROM does not include software for Windows NT 4.0.
Contact your dealer or nearest authorized service representative if you want the software for
Windows NT 4.0.
The parallel cable must not be connected
to the machine. Make sure that the cable
is not connected before proceeding.
If a cable is connected, a Plug and Play
window will appear. If this happens, click
the [Cancel] button to close the window
and disconnect the cable.
The cable will be connected in step 20.
Insert the "Software CD-ROM" into
your computer's CD-ROM drive.
• If you are installing the printer driver,
insert the "Software CD-ROM" that
shows "Disc 1" on the front of the
CD-ROM.
• If you are installing the PC-Fax driver,
insert the "Software CD-ROM" that
shows "Disc 2" on the front of the
CD-ROM.
Double-click [My Computer] ( ), and
then double-click the [CD-ROM] icon ( ).
Read the message in the "Welcome"
6
window and then click the [Next] button.
Click the [Printer Driver] button.
7
• To install the PC-Fax driver, click the
[PC-Fax Driver] button.
• Before installing the software, be sure to
click the [Display Readme] button and
view the detailed information on the
software.
* The above screen appears when the printer
driver is being installed.
Click the [Next] button.
8
Double-click the [Setup] icon ( ).
4
The "SOFTWARE LICENSE" window will
5
appear. Make sure that you understand
the contents of the license agreement
and then click the [Yes] button.
Note
You can show the "SOFTWARE
LICENSE" in a different language by
selecting the desired language from
the language menu. To install the
software in the selected language,
continue the installation with that
language selected.
16
Click the [Custom installation] button.
9
Page 19
USING THE MACHINE WITH A PARALLEL OR USB CONNECTION
When you are asked how the printer is
10
connected, select [Connected to this
computer] and click the [Next] button.
If you are using Windows NT 4.0, go to
step 12.
When the interface selection screen
11
appears, select [Parallel] and click the
[Next] button.
Note
13
14
If "LPT1" does not appear, another
printer or peripheral device is using
LPT1. In this case continue the
installation, and after the installation is
finished, change the port setting so
that the machine can use LPT1. This
procedure is explained in "Another
printer is using the parallel port (when
using a parallel cable)" on page 27.
When the model selection window
appears, select the model name of your
machine and click the [Next] button.
When the printer driver selection window
appears, select the printer driver to be
installed and click the [Next] button.
• Select the checkboxes of the printer
drivers to be installed.
• When the PC-Fax driver is being
installed, this screen does not appear.
Go to the next step.
ENGLISH
Select the printer port and click the
12
[Next] button.
Select "LPT1" for the printer port.
Note
15
• To use the PS printer driver or the
PPD driver, the PS3 expansion kit
must be installed.
• The [PPD] checkbox only appears if
you are using Windows 2000.
Select whether or not you wish the
printer to be your default printer and
click the [Next] button.
If you are installing multiple drivers, select
the printer driver to be used as the default
printer.
If you do not wish to set one of the printer
drivers as the default printer, select [No].
17
Page 20
USING THE MACHINE WITH A PARALLEL OR USB CONNECTION
When the printer name window
16
appears, click the [Next] button.
If you wish to change the printer name,
enter the desired name.
When you are asked if you wish to
17
install the display fonts, select an
answer and click the [Next] button.
When the PC-Fax driver is being installed,
this screen does not appear. Go to the
next step.
Follow the on-screen instructions.
18
Read the message in the window that
appears and click the [Next] button. When
the installation completed screen appears,
click the [OK] button.
Click the [Close] button in the window
19
of step 7.
When a message appears prompting you
to connect the machine to your computer,
click the [OK] button.
Turn off the power of the machine and your
20
computer, and connect the machine to your
computer with the parallel cable (page 19).
After connecting the machine to your
computer, turn on the power of the
machine and then start up your computer.
This completes the installation.
• After installation, see "CONFIGURING THE
PRINTER DRIVER" (page 24) to configure
the printer driver settings.
• If you installed the PS printer driver or the
PPD driver, the PS display fonts can be
installed from the "PRINTER UTILITIES"
CD-ROM that accompanies the PS3
expansion kit. See "INSTALLING THE PS
DISPLAY FONTS" (page 22).
• If you are using the machine as a shared
printer, see "USING THE MACHINE AS A
SHARED PRINTER" (page 20) to install the
printer driver on each of the client computers.
Note
After the installation, a message
prompting you to restart your
computer may appear. If this message
appears, click the [Yes] button to
restart your computer.
18
Page 21
USING THE MACHINE WITH A PARALLEL OR USB CONNECTION
CONNECTING TO A COMPUTER
Follow the procedure below to connect the machine to your computer.
Interface cables for connecting the machine to your computer are not included with the machine.
Please purchase the appropriate cable for your computer.
Interface cable
USB cable
Shielded twisted pair cable, high-speed transmission equivalent (9 feet (3 m) max.)
If the machine will be connected using a USB 2.0 interface, please purchase a USB cable that
supports USB 2.0.
Parallel cable
IEEE 1284-Shielded type bi-directional parallel interface cable (9 feet (3 m) max.)
Caution
CONNECTING A USB CABLE
1
• USB is available on a PC/AT compatible computer that was originally equipped with USB
and had Windows 98, Windows Me, Windows 2000 Professional, Windows XP
Professional, Windows XP Home Edition or Windows Server 2003 preinstalled.
• Do not connect the interface cable before installing the printer driver. The interface cable
must be connected during installation of the printer driver.
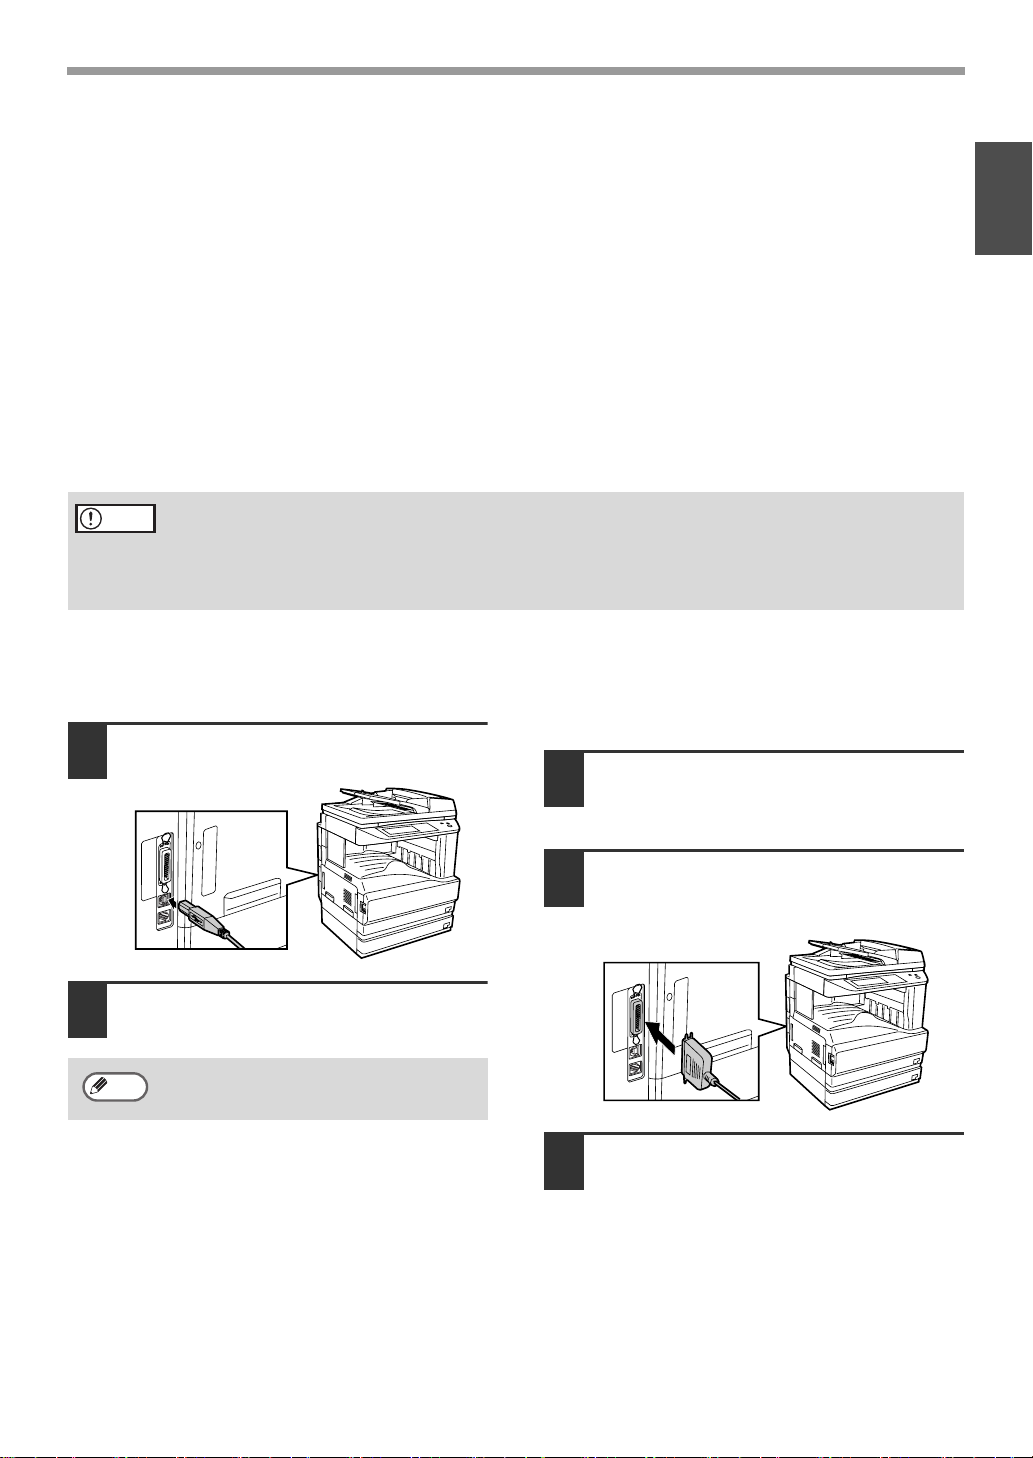
CONNECTING A PARALLEL
CABLE
Insert the cable into the USB connector
on the machine.
Ensure that your computer and the
1
machine are turned off.
ENGLISH
Insert the other end of the cable into
2
your computer's USB connector.
Note
The cable can also be inserted into a
USB 1.1 connector.
Insert the cable into the parallel
2
connector on the machine and fasten
with the clasps.
Insert the other end of the cable into
3
your computer's parallel connector.
19
Page 22
USING THE MACHINE AS A
SHARED PRINTER
If you are going to use the machine as a shared printer on a Windows network with the printer driver or
the PC-Fax driver installed on a print server, follow the steps below to install the printer driver or the
PC-Fax driver on the client computers.
Note
• Ask your network administrator for the server name and printer name of the machine on the
network.
• For the procedure for configuring settings on the print server, see the operation manual or the
Help file of the operating system. The "print server" explained here is a computer that is
connected directly to the machine, and "clients" are other computers connected to the same
network as the print server.
• Install the same printer driver on client computers as the printer driver that is installed on the print
server.
• If the PPD driver is installed on the print server and the client computers are running Windows
98/Me/NT 4.0, see "USING THE STANDARD WINDOWS PS PRINTER DRIVER (Windows
98/Me/NT 4.0)" (page 23) to install the printer driver using the Add Printer Wizard.
Insert the "Software CD-ROM" into
1
your computer's CD-ROM drive.
• If you are installing the printer driver,
insert the "Software CD-ROM" that
shows "Disc 1" on the front of the
CD-ROM.
• If you are installing the PC-Fax driver,
insert the "Software CD-ROM" that
shows "Disc 2" on the front of the
CD-ROM.
Click the [start] button, click [My
2
Computer] ( ), and then double-click
the [CD-ROM] icon ( ).
In Windows 98/Me/2000, double-click [My
Computer], and then double-click the
[CD-ROM] icon.
Double-click the [Setup] icon ( ).
3
The "SOFTWARE LICENSE" window will
4
appear. Make sure that you understand
the contents of the license agreement
and then click the [Yes] button.
Note
You can show the "SOFTWARE
LICENSE" in a different language by
selecting the desired language from
the language menu. To install the
software in the selected language,
continue the installation with that
language selected.
Read the message in the "Welcome"
5
window and then click the [Next]
button.
Click the [Printer Driver] button.
6
• To install the PC-Fax driver, click the
[PC-Fax Driver] button.
• Before installing the software, be sure to
click the [Display Readme] button and
view the detailed information on the
software.
* The above screen appears when the printer
driver is being installed.
Click the [Next] button.
7
20
Page 23
USING THE MACHINE AS A SHARED PRINTER
Click the [Custom installation] button.
8
Select [Shared Printer] and click the
9
[Next] button.
When the model selection window
11
appears, select the model name of your
machine and click the [Next] button.
If you are installing the PC-Fax driver, go
to step 13.
When the printer driver selection window
12
appears, select the printer driver to be
installed and click the [Next] button.
Be sure to select the same printer driver
as the printer driver used in the print
server (the machine).
ENGLISH
Select the name of the printer set as
10
the shared printer on the print server
from the list, and click the [Next]
button.
You can also click the [Add Network Port]
button and select the printer to be shared
(the machine) by browsing the network in
the window that appears.
Follow the on-screen instructions.
13
When the "Finish" screen appears,
14
click the [Close] button.
Note
This completes the installation.
• After installation, see "CONFIGURING THE
PRINTER DRIVER" (page 24) to configure
the printer driver settings.
• If you installed the PS printer driver or the
PPD driver, the PS display fonts can be
installed from the "PRINTER UTILITIES"
CD-ROM that accompanies the PS3
expansion kit. See "INSTALLING THE PS
DISPLAY FONTS" (page 22).
After the installation, a message
prompting you to restart your
computer may appear. If this message
appears, click the [Yes] button to
restart your computer.
Note
If the shared printer does not appear
in the list, check the settings in the
printer server.
21
Page 24
INSTALLING THE PS DISPLAY
FONTS
Fonts that can be used by the PS printer driver are contained on the "PRINTER UTILITIES" CD-ROM
that accompanies the PS3 expansion kit. Install these fonts as needed for the PS printer driver.
Insert the "PRINTER UTILITIES"
1
CD-ROM that accompanies the PS3
expansion kit into your computer's
CD-ROM drive.
If your computer is configured for auto
start on the CD-ROM, proceed to step 4.
Click the [start] button, click [My
2
Computer] ( ), and then double-click
the [CD-ROM] icon ( ).
If you are using Windows 98/Me/NT 4.0/2000,
double-click [My Computer], and then
double-click the [CD-ROM] icon.
Double-click the [Setup] icon ( ).
3
Note
If the language selection screen
appears after you double click the
[Setup] icon, select the language that
you wish to use and click the [Next]
button. (Normally the correct language
is selected automatically.)
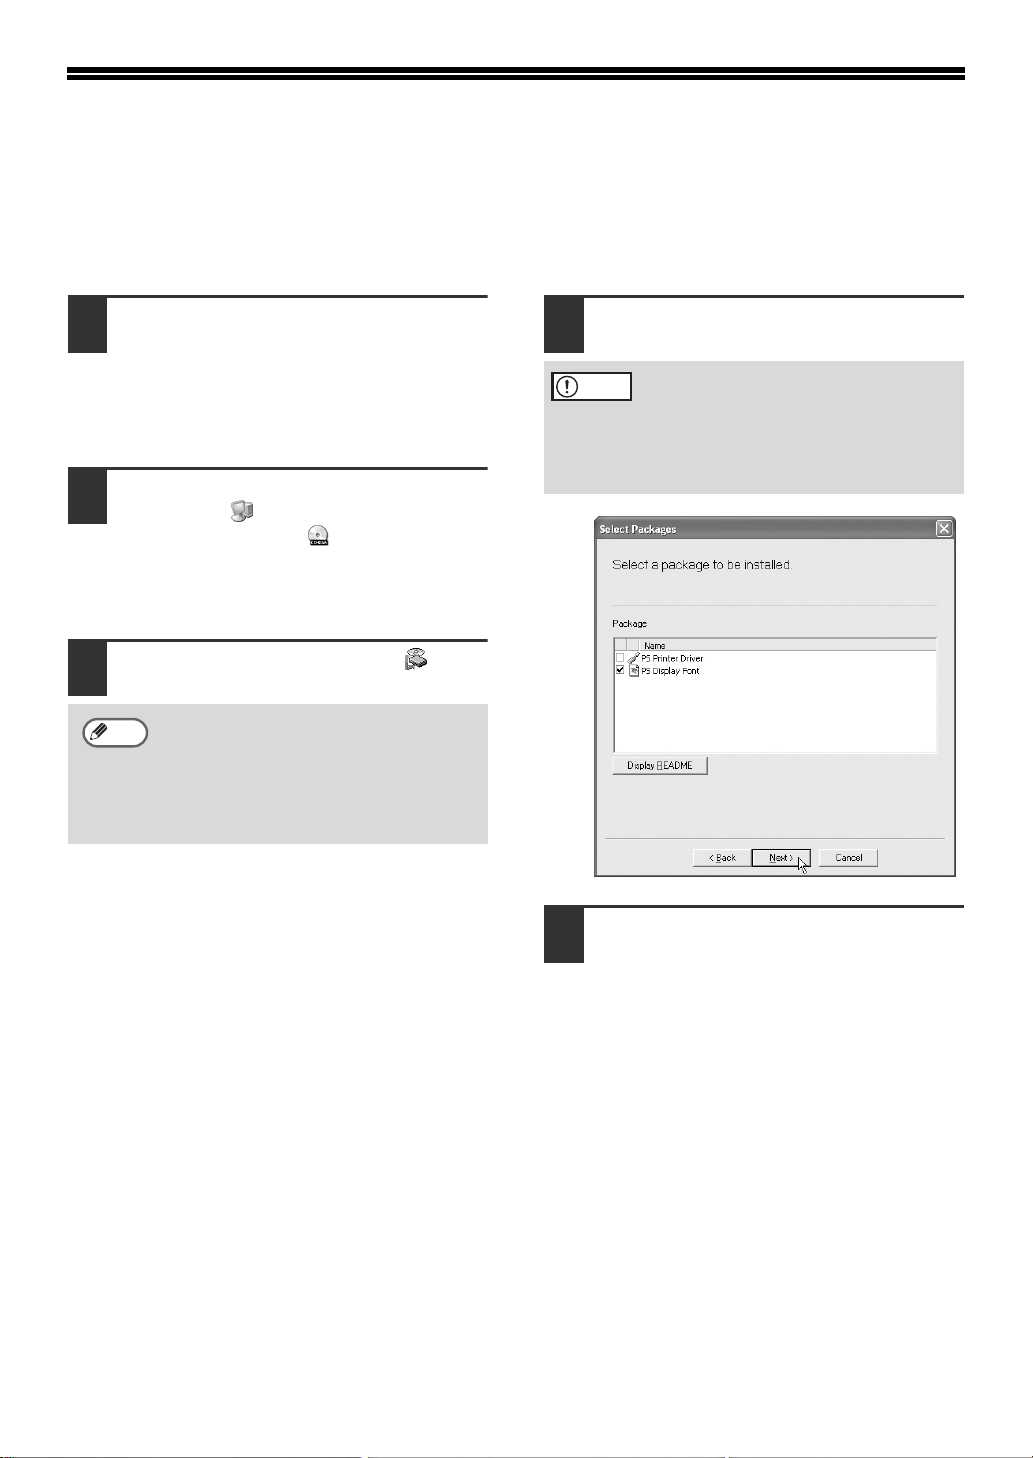
Select the [PS Display Font] checkbox
4
and click the [Next] button.
Caution
Do not select "PS Printer Driver".
The PS printer driver for the machine
should only be installed from the
CD-ROM that accompanies the
AR-M258/M318 and the AR-P27 printer
expansion kit.
22
Follow the on-screen instructions.
5
Page 25
USING THE STANDARD WINDOWS
PS PRINTER DRIVER (Windows
98/Me/NT 4.0)
If the PS3 expansion kit is installed on the machine and you wish to use the standard Windows 98/Me/NT
4.0 PS printer driver, follow the steps below to install the PPD driver using the Add Printer Wizard.
•
Note
The CD-ROM does not include software for Windows NT 4.0.
Contact your dealer or nearest authorized service representative if you want the software for Windows NT 4.0.
• If you are using Windows 2000/XP/Server 2003, you can install the PPD driver from the installer.
Be sure to view the Readme file (Readme.txt) before installing the PPD driver. If you are using Windows
•
98/Me, the Readme file is in the [EnglishA]* folder of the "Software CD-ROM". If you are using Windows NT
4.0, the Readme file will be in the [EnglishA]* folder inside the folder that contains the extracted files after
you get the software. For the location of the folder, see step 4.
ENGLISH
Insert the "Software CD-ROM" into
1
your computer's CD-ROM drive.
Insert the "Software CD-ROM" that shows
"Disc 1" on the front of the CD-ROM.
Click the [Start] button, select [Settings] and
2
then click [Printers].
Double-click the [Add printer] icon.
3
The "Add Printer Wizard" will appear.
Follow the on-screen instructions.
4
When you are asked to specify the path of
the PPD file, enter the path as follows.
(Substitute the letter of your CD-ROM
drive for "R" in the following paths.)
Operating system PPD file path
Windows 98/Me R:\Drivers\Printer
\EnglishA*\PPD\9XME
Windows NT 4.0 (Folder containing
extracted files)
\EnglishA*\PPD\NT40
* In regions other than the U.S., enter "English"
instead of "EnglishA".
Note
After installation, see "CONFIGURING
THE PRINTER DRIVER" (page 24) to
configure the printer driver settings.
Installing the resident font information (Windows 98/Me)
If you have installed the PPD driver on Windows 98/Me and will be using the resident fonts in the
machine, you must install the resident font information. Follow the procedure below to install the
resident font information.
Note
• Before installing the resident font information, be sure to install the PPD driver.
• In the event that a resident font cannot be selected in a software application, install the resident
font information again.
Insert the "Software CD-ROM" into
1
your computer's CD-ROM drive.
Insert the "Software CD-ROM" that shows
"Disc 1" on the front of the CD-ROM.
Double-click [My Computer] ( ) and
2
then double-click the [CD-ROM] icon
().
Double-click the [Drivers] folder, the
3
[Printer] folder, the [EnglishA] folder (for
regions other than the U.S., double-click the
[English] folder), the [PPD] folder, the
[9XME] folder, and then [PFMSetup.exe].
Follow the on-screen instructions.
4
After the resident font information has
been installed, restart your computer.
23
Page 26
CONFIGURING THE PRINTER
DRIVER
After installing the printer driver, you must configure the printer driver settings appropriately for the
options that have been installed and the size and type of paper loaded in the machine. Follow the
steps below to configure the printer driver.
Note
1
Note
2
3
4
If the PPD driver is installed, see "When the PPD driver is installed" (page 25).
Click the [start] button and then click
[Printers and Faxes].
In Windows 98/Me/NT 4.0/2000, click the
[Start] button, select [Settings], and then
click [Printers].
If [Printers and Faxes] does not appear in
the [start] menu in Windows XP, click the
[start] button, click [Control Panel], click
[Printers and Other Hardware], and then
click [Printers and Faxes].
Click the "SHARP AR-XXXX" printer
driver icon and select [Properties] from
the [File] menu.
If you are using Windows NT 4.0/2000/XP/
Server 2003, go to step 4.
In Windows 98/Me, click the [Setup]
tab.
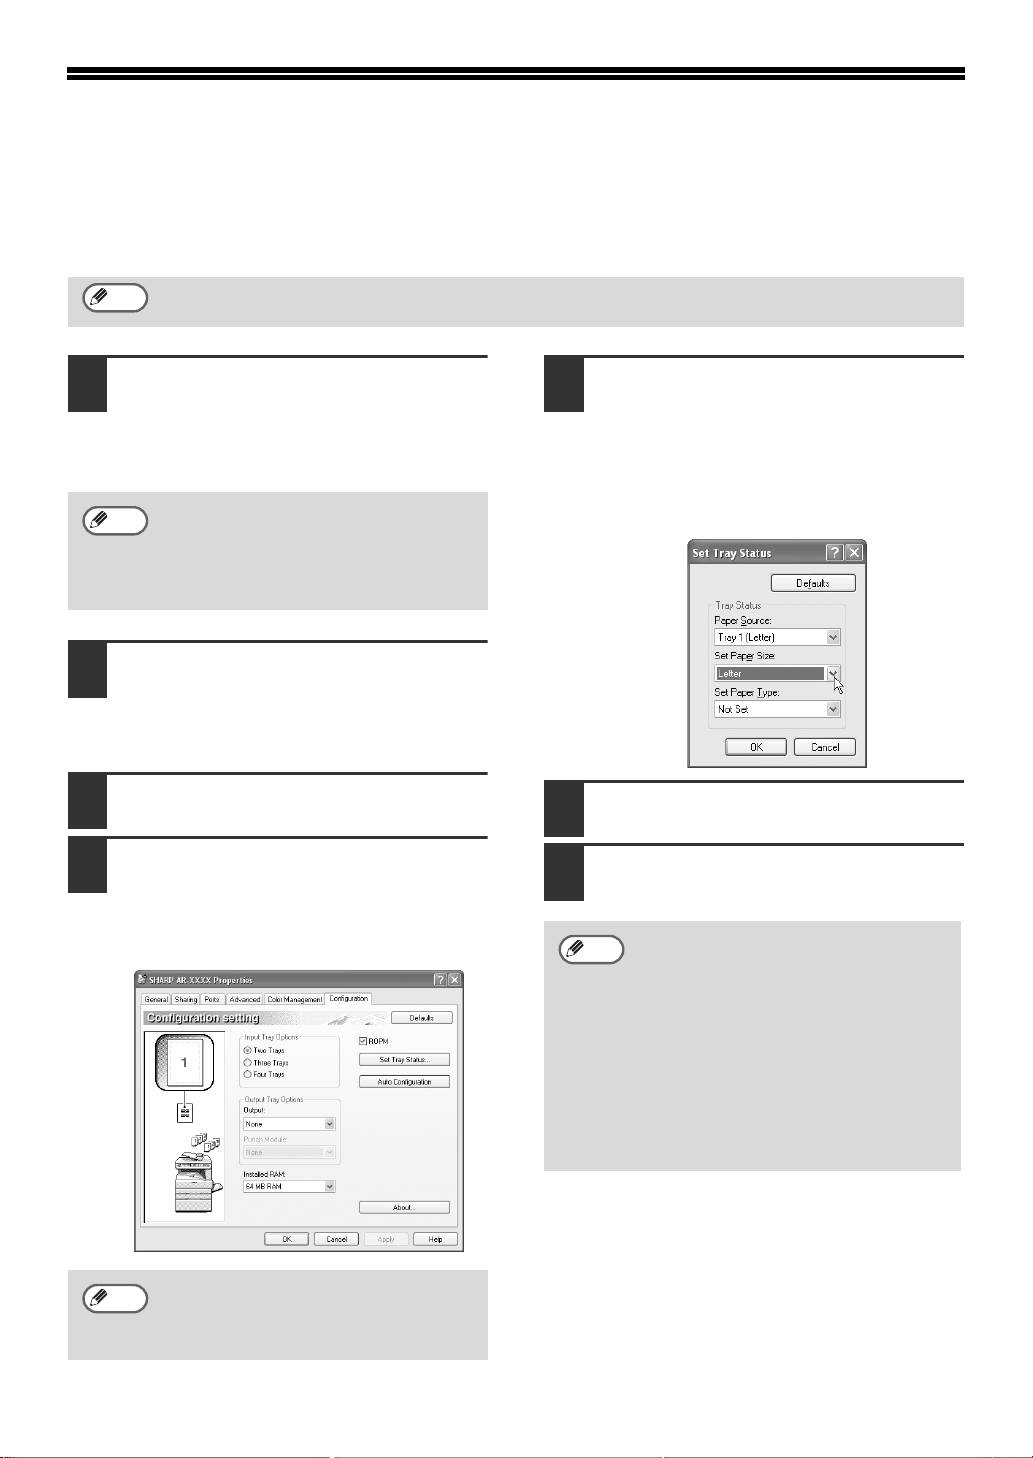
Click the [Configuration] tab and set
the printer configuration based on the
options that have been installed.
Set the printer configuration properly.
Otherwise, printing may not take place correctly.
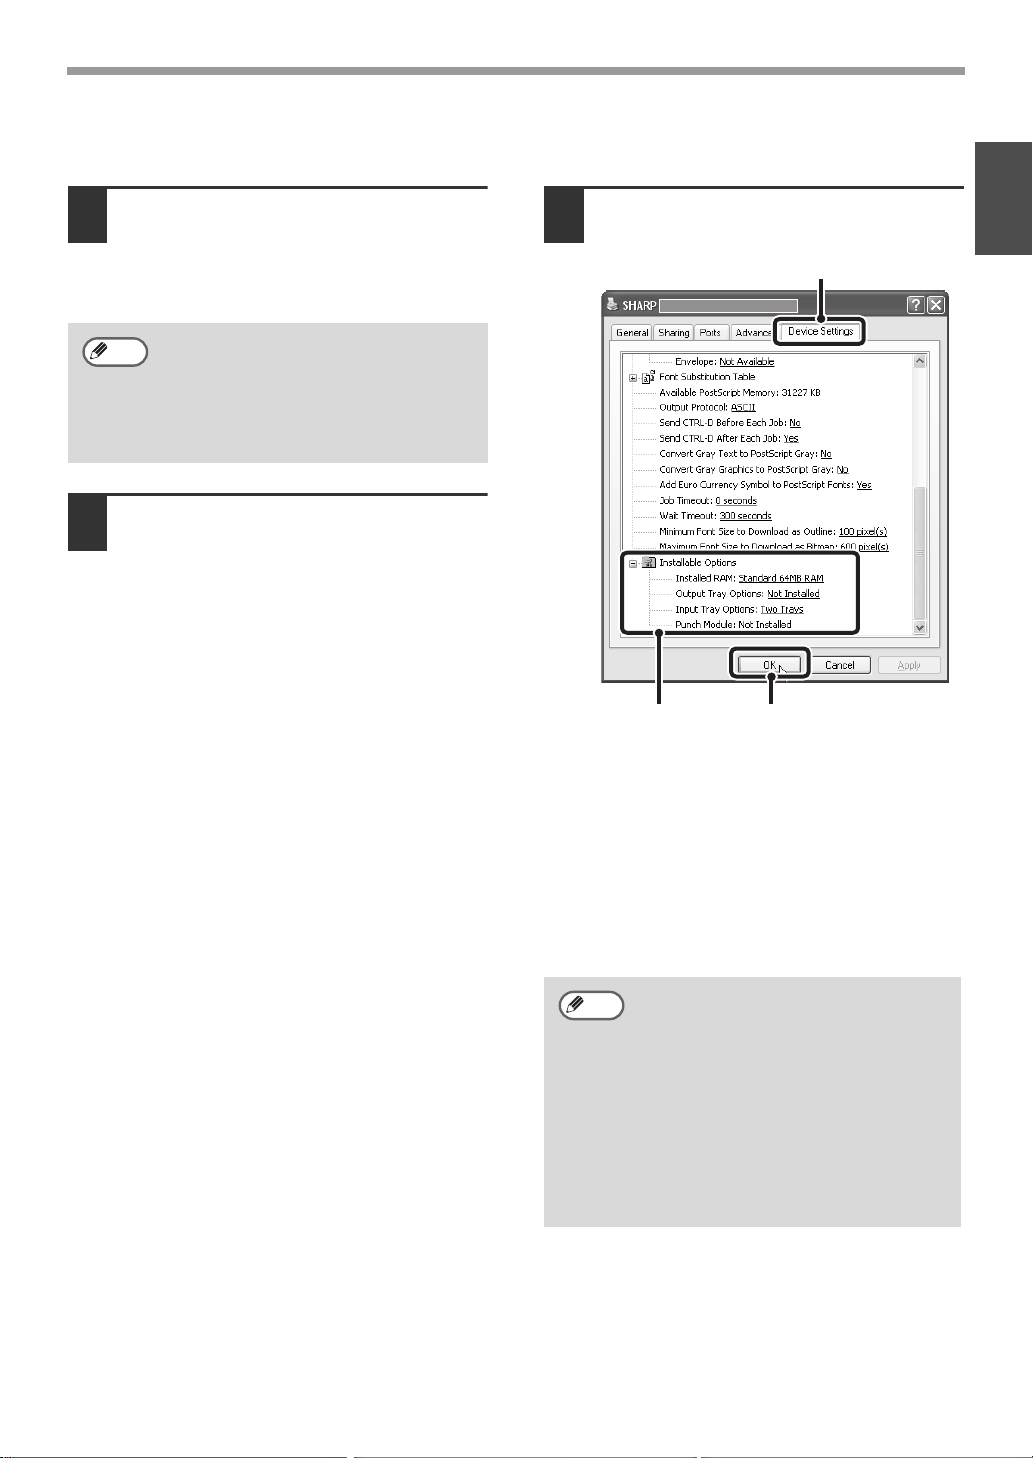
Click the [Set Tray Status] button and set the
5
size and type of paper loaded in each tray.
Select a tray from the "Paper source" menu,
set the size of paper loaded in the tray from
the "Set Paper Size" menu, and select the
type of paper from the "Set Paper Type"
menu. Repeat for each of the trays.
Click the [OK] button in the "Set Tray
6
Status" window.
Click the [OK] button in the printer
7
properties window.
Note
You can check the options that are
installed and the tray settings by
printing out the "PRINTER SETTINGS
LIST" in the custom settings of the
machine. Follow these steps to print
out the "PRINTER SETTINGS LIST":
Press the [CUSTOM SETTINGS] key,
touch the [LIST PRINT] key, touch the
[PRINTER TEST PAGE] key, and
then touch the [PRINTER SETTINGS
LIST] key.
24
Note
If the machine is used as a network printer,
you can click the [Auto Configuration] button
to automatically configure the settings
based on the detected machine status.
Page 27
CONFIGURING THE PRINTER DRIVER
When the PPD driver is installed
Click the [start] button and then click
1
[Printers and Faxes].
In Windows 98/Me/NT 4.0/2000, click the
[Start] button, select [Settings], and then
click [Printers].
Note
2
If [Printers and Faxes] does not
appear in the [start] menu in Windows
XP, click the [start] button, click
[Control Panel], click [Printers and
Other Hardware], and then click
[Printers and Faxes].
Click the "SHARP AR-XXXX" printer
driver icon and select [Properties] from
the [File] menu.
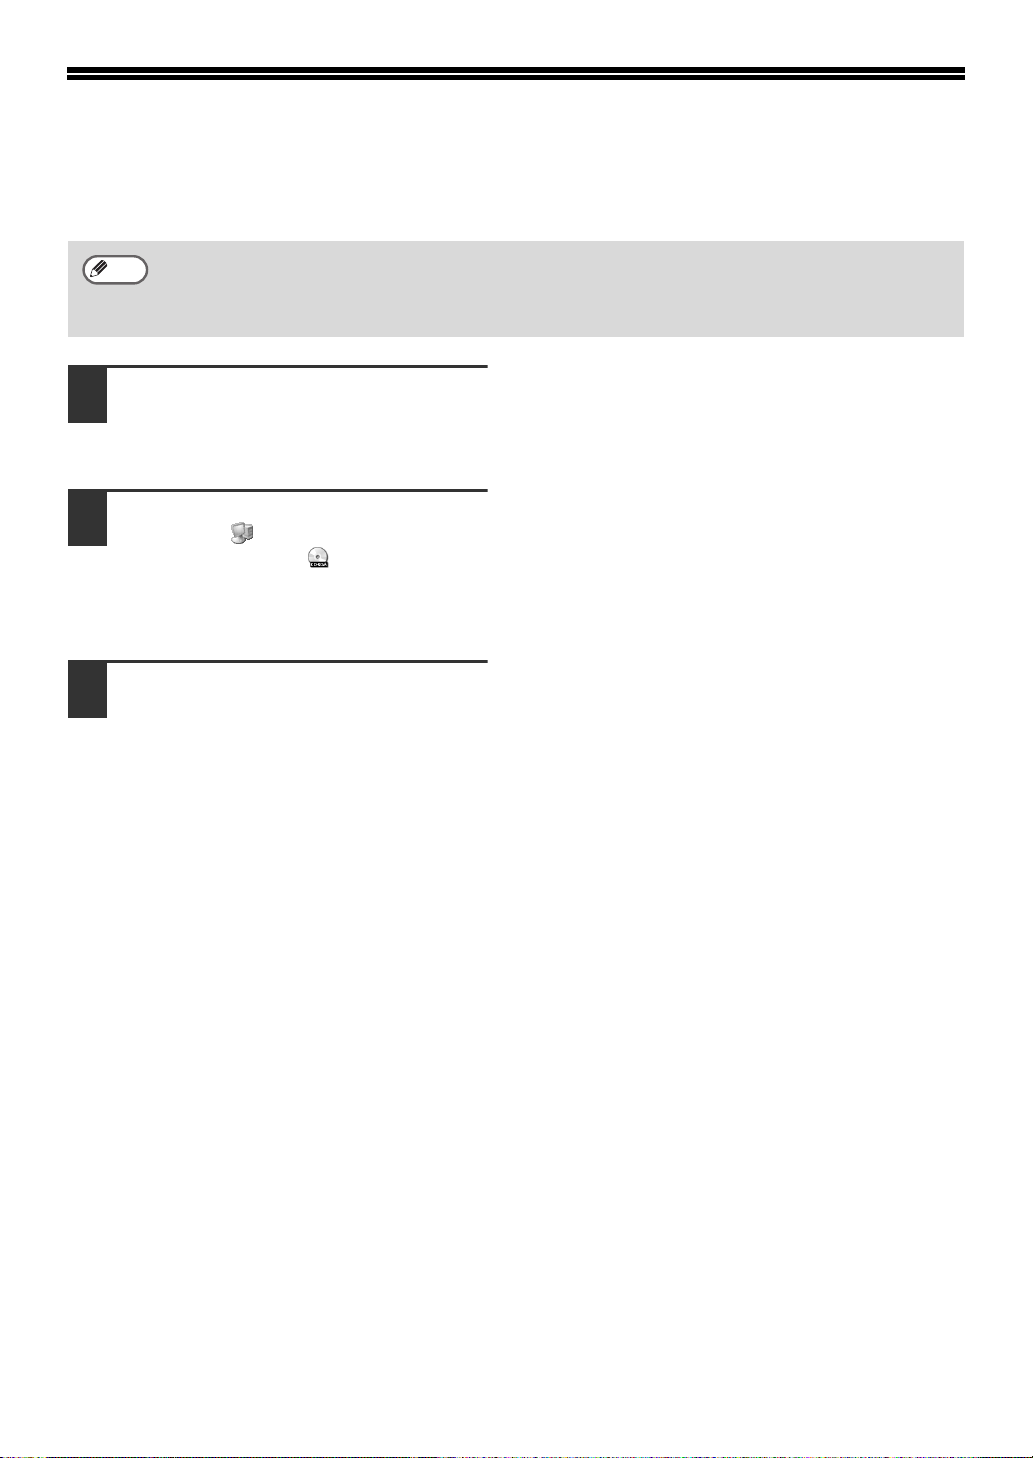
Configure the printer driver for the
3
options installed on the machine.
(1)
(2)
(1) Click the [Device Settings] tab.
In Windows 98/Me, click the [Device
Options] tab.
(2) Configure each item based on the
machine configuration.
The items and the procedures for
configuring the items vary depending on the
operating system version.
(3) Click the [OK] button.
(3)
ENGLISH
Note
You can check the options that are
installed and the tray settings by
printing out the "PRINTER SETTINGS
LIST" in the custom settings of the
machine. Follow these steps to print
out the "PRINTER SETTINGS LIST":
Press the [CUSTOM SETTINGS] key,
touch the [LIST PRINT] key, touch the
[PRINTER TEST PAGE] key, and
then touch the [PRINTER SETTINGS
LIST] key.
25
Page 28
HOW TO USE THE ONLINE MANUAL
The online manual provides detailed instructions for operating the machine as a printer. View the
online manual to use the printer function after the initial setup is completed.
Note
1
2
3
To view the manuals in PDF format, Acrobat® Reader or Adobe® ReaderTM of Adobe Systems
Incorporated is required. If neither program is installed on your computer, the programs can be
downloaded from the following URL:
http://www.adobe.com/
Insert the CD-ROM into your computer's
CD-ROM drive.
Insert the "Software CD-ROM" that shows
"Disc 2" on the front of the CD-ROM.
Click the [start] button, click [My
Computer] ( ), and then double-click
the [CD-ROM] icon ( ).
In Windows 98/Me/NT 4.0/2000,
double-click [My Computer] and then
double-click the [CD-ROM] icon.
Double-click the [Manual] folder,
double-click the [EnglishA] folder (for
regions other than the U.S.,
double-click the [English] folder), and
then double-click the [ARP27.pdf] icon.
The online manual will appear.
26
Page 29
TROUBLESHOOTING
If the software does not install correctly, check the following items on your computer.
To remove the software, see "Removing the software" in the online manual.
Troubleshooting information can also be found in the README files for each of the software programs.
To view a README file, click the [Display Readme] button in the "Software Selection" screen.
ENGLISH
Printer driver cannot be
installed (Windows
2000/XP/Server 2003)
If the printer driver cannot be installed in
Windows 2000/XP/Server 2003, follow these
steps to check your computer's settings.
Click the [start] button and then click
1
[Control Panel].
In Windows 2000, click the [Start] button,
select [Settings], and then click [Control
Panel].
Click [Performance and Maintenance],
2
and then click [System].
In Windows 2000, double-click the
[System] icon.
Click the [Hardware] tab and then click
3
the [Driver Signing] button.
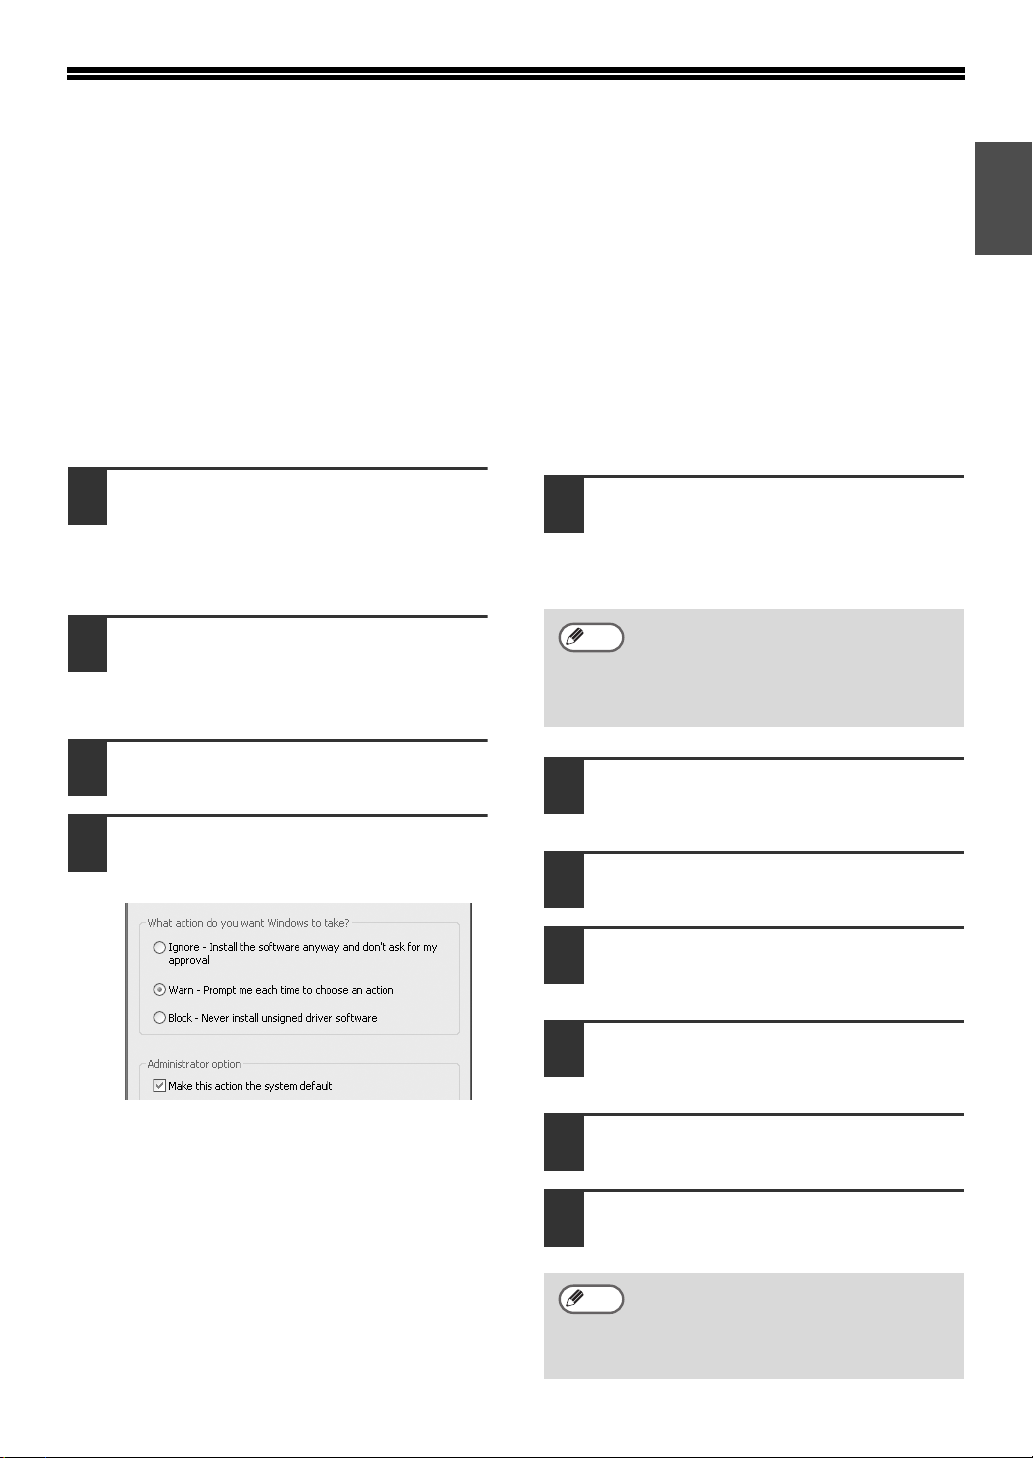
Check [What action do you want
4
Windows to take?] ([File signature
verification] in Windows 2000).
Another printer is using the parallel
port (when using a parallel cable)
If another printer is using the parallel port and
printing is not possible using the machine, follow
the steps below to change the port setting of the
other printer driver, and make sure that the port of
the printer driver for the machine is set to LPT1.
Click the [start] button and then click
1
[Printers and Faxes].
In Windows 98/Me/NT 4.0/2000, click the
[Start] button, select [Settings], and then
click [Printers].
Note
2
3
If [Printers and Faxes] does not appear
in the [start] menu in Windows XP, click
the [start] button, click [Control Panel],
click [Printers and Other Hardware],
and then click [Printers and Faxes].
Click the icon of the printer driver for which
you wish to change the port setting, and
select [Properties] from the [File] menu.
Click the [Ports] tab.
In Windows 98/Me, click the [Details] tab.
If the option [Block] has been selected, it
will not be possible to install the printer
driver. Select the option [Warn] and then
install the printer driver.
Select [FILE:] in the "Print to the
4
following port" list box, and click the
[OK] button.
Click the "SHARP AR-XXXX" printer
5
driver icon and select [Properties] from
the [File] menu.
Click the [Ports] tab.
6
In Windows 98/Me, click the [Details] tab.
Select [LPT1] in the "Print to the
7
following port" list box, and click the
[OK] button.
Note
In the event that you need to use the
other printer, repeat the above steps to
set the port of the machine to "FILE:",
and change the port setting of the
other printer back to "LPT1".
27
Page 30

TROUBLESHOOTING
The printer driver cannot be
correctly installed by Plug and
Play (Windows 2000/XP/Server
2003)
In Windows 2000/XP/Server 2003, if the printer
driver cannot be correctly installed by Plug and
Play (for example, Plug and Play takes place
without copying the required files for the printer
driver installation), follow these steps to remove
unneeded devices and then install the printer
driver as explained in "USING THE MACHINE
WITH A PARALLEL OR USB CONNECTION".
Click the [start] button, click [Control
1
Panel], and then click [Performance
and Maintenance].
In Windows 2000, click the [Start] button,
select [Settings], and then click [Control
Panel].
Click [System], click the [Hardware]
2
tab, and click the [Device Manager]
button.
Note
3
In Windows 2000, double-click the
[System] icon, click the [Hardware]
tab, and click the [Device Manager]
button.
Click the ( ) icon beside "Other
devices".
Plug and play screen does not
appear (when using a USB
cable)
If the Plug and Play screen does not appear
after you connect the machine to your computer
with a USB cable and turn on the machine,
follow the steps below to verify that the USB
port is available.
Click the [start] button, click [Control
1
Panel], and then click [Performance
and Maintenance].
In Windows 98/Me/2000, click the [Start]
button, select [Settings], and then click
[Control Panel].
Click [System], click the [Hardware] tab,
2
and click the [Device Manager] button.
"Universal Serial Bus controllers" will
appear in the list of devices.
Note
3
• In Windows 98/Me, double-click the
[System] icon and click the [Device
Manager] tab.
• In Windows 2000, double-click the
[System] icon, click the [Hardware]
tab, and click the [Device Manager]
button.
• If the [System] icon does not appear
in Windows Me, click [view all
Control Panel options].
Click the ( ) icon beside "Universal
Serial Bus controllers".
If "SHARP AR-XXXX" appears, select and
delete it.
Note
4
If "Other devices" does not appear,
close the "Device Manager" window.
Install the software.
28
Two items should appear: your controller
chipset type and Root Hub. If these items
appear, you can use the USB port. If the
"Universal Serial Bus controllers" shows a
yellow exclamation point or does not
appear, you must check your computer
manual for USB troubleshooting or contact
your computer manufacturer.
Once you have verified that the USB
4
port is enabled, install the software.
Page 31

SETUP IN A MACINTOSH ENVIRONMENT
Install the PPD file needed to use the machine as a printer from the Software CD-ROM that
accompanies the AR-M258/AR-M318 and the printer expansion kit (AR-P27).
ENGLISH
Note
• The PS3 expansion kit is required to use the machine as a printer in a Macintosh environment. In
addition, the printer function can only be used when the machine is connected to a network. The
printer function cannot be used when the machine is connected with a USB cable.
• The PC-Fax driver cannot be used in a Macintosh environment.
ABOUT THE SOFTWARE
The CD-ROM contains the following software:
Disc 2
• PPD file
This is the printer description file which enables the machine to be used as a PostScript 3
compatible printer. The PS3 expansion kit is required to use the machine in a Macintosh
environment.
MAC OS X (page 30)
(v10.1.5, v10.2.8, v10.3.9, v10.4 - v10.4.8)
MAC OS 9.0 - 9.2.2: page 35
BEFORE INSTALLATION
HARDWARE AND SOFTWARE REQUIREMENTS
You will need the following hardware and software in order to install the PPD file for Macintosh.
Operating system Mac OS 9.0 to 9.2.2, 10.1.5, 10.2.8, 10.3.9, 10.4 to 10.4.8
Other hardware requirements
CONNECTING TO A NETWORK
For the procedure for connecting to a network, see "CONNECTING TO A NETWORK" (page 4).
An environment in which any of the operating systems listed above can
fully operate (including Macintosh computers with an Intel processor).
29
Page 32

MAC OS X
Note
1
2
3
4
The explanations of screens and procedures are primarily for Mac OS X v10.4. The screens may
vary in other versions of the operating system.
Insert the "Software CD-ROM" into
your computer's CD-ROM drive.
Insert the "Software CD-ROM" that shows
"Disc 2" on the front of the CD-ROM.
Double-click the [CD-ROM] icon ( ) on
the desktop.
Double-click the [MacOSX] folder.
Before installing the software, be sure to
read "ReadMe First". "ReadMe First" is in
the [US-English] folder ([English] folder in
areas other than the U.S.) in the [Readme]
folder.
Double-click the folder corresponding
to the versions of the operating
system.
v10.1.5
v10.2.8
Double-click the [AR-B01] icon ( ).
5
Note
6
• If the "Authorization" window
appears in Mac OS X v10.1.5, click
the lock icon ( ), enter the
password, and click the [OK] button.
• If the "Authenticate" window
appears in Mac OS X v10.2.8, enter
the password and click the [OK]
button.
Click the [Continue] button.
30
v10.3.9
v10.4 - 10.4.8
Page 33

MAC OS X
The License Agreement window will
7
appear. Make sure that you understand
the contents of the license agreement
and then click the [Continue] button.
A message will appear asking you if you
agree to the terms of the license. Click the
[Agree] button.
Note
8
If the license appears in the different
language, change the language in the
language menu.
Select the hard drive where the PPD file
will be installed and click the
[Continue] button.
Be sure to select the hard drive on which
your operating system is installed.
When the message "The software was
10
successfully installed" appears in the
installation window, click the [Close]
button.
This completes the installation of the software.
Next, configure the printer driver settings.
Select [Utilities] from the [Go] menu.
11
If you are using Mac OS X v10.1.5 or
v10.2.8, select [Applications] from the [Go]
menu.
ENGLISH
Click the [Install] button.
9
Installation begins.
Note
If the "Authenticate" window appears,
enter the password and click the [OK]
button.
Double-click the [Printer Setup Utility]
12
icon ( ).
If you are using Mac OS X v10.1.5 or
v10.2.8, double-click the [Utilities] folder
and then double-click the [Print Center]
icon.
Note
13
If this is the first time you are installing
a printer driver on your computer, a
confirmation message will appear.
Click the [Add] button.
Click [Add].
If you are using Mac OS X v10.1.5, click
the [Add Printer] button.
31
Page 34

MAC OS X
Configure the printer driver.
14
• The procedure for configuring the printer driver varies depending on the operating system
version. The procedure for versions 10.4 - 10.4.8 and the procedure for other versions are
explained separately below.
• The machine can print using the IPP function. If you wish to use the IPP function, see "Printing
using the IPP function" (page 34) to configure the printer driver settings.
v10.4 - 10.4.8
(1) Click the [Default Browser] icon.
If multiple AppleTalk zones are displayed,
select the zone that includes the printer
from the menu.
(2) Click the machine's model name.
• The machine's model name usually
appears as [SCxxxxxx]. ("xxxxxx" is a
sequence of characters that varies
depending on your model.)
• The PPD file of the machine is
automatically selected.
(3) Make sure that the PPD file of your
model is selected.
(4) Click the [Add] button.
The PPD file of the machine is
automatically selected and the peripheral
devices installed on the machine are
detected and automatically configured.
(1)
(2)
(3)
(4)
v10.1.5, v10.2.8, v10.3.9
(1)
(2)
(3)
(4)
(1) Select [AppleTalk].
If multiple AppleTalk zones are displayed,
select the zone that includes the printer
from the menu.
(2) Click the machine's model name.
The machine's model name usually
appears as [SCxxxxxx]. ("xxxxxx" is a
sequence of characters that varies
depending on your model.)
(3) Select the PPD file of the machine.
• If you are using Mac OS X v10.1.5,
select [Other]. The PPD file selection
window will appear. Click [Startup disk
name] - [Library] - [Printers] - [PPDs] [Contents] - [Resources] - [en.lproj] "PPD file for your model", and then click
the [Choose] button.
• If you are using Mac OS X v10.2.8,
select [Sharp] and click the PPD file of
your model.
• If you are using Mac OS X v10.3.9,
select [Auto Select].
(4) Click the [Add] button.
If you are using Mac OS X v10.3.9, the
PPD file of the machine is automatically
selected and the peripheral devices
installed on the machine are detected and
automatically configured.
Note
The PPD file is installed in the following folders on the startup disk.
[Library] - [Printers] - [PPDs] - [Contents] - [Resources] - [en.lproj]
If you are using Mac OS X v10.1.5, this completes the configuration of the printer driver. If you
are using a version other than Mac OS X v10.1.5, go to the next step.
32
Page 35

MAC OS X
Display printer information.
15
(1) Click the machine's name.
(2) Click [Show Info].
If you are using Mac OS X v10.2.8, select
[Show Info] from the [Printers] menu.
(2)
(1)
Select the machine configuration.
16
If you selected [Auto Select] in (3) of step
14, the machine configuration is detected
and automatically configured. Check the
configured settings to make sure they are
correct.
(1) Select [Installable Options].
(2) Select the options that are installed on
the machine.
(3) Click the [Apply Changes] button.
(4) Click to close the window.
ENGLISH
(4)
(1)
(2)
(3)
Note
This completes the configuration of the
printer driver.
You can check the options that are
installed and the tray settings by
printing out the "PRINTER SETTINGS
LIST" in the custom settings of the
machine. Follow these steps to print
out the "PRINTER SETTINGS LIST":
Press the [CUSTOM SETTINGS] key,
touch the [LIST PRINT] key, touch the
[PRINTER TEST PAGE] key, and
then touch the [PRINTER SETTINGS
LIST] key.
33
Page 36

MAC OS X
Printing using the IPP function
The machine can print using the IPP function. When the machine is in a remote location, this function can
be used in place of the fax function to print a higher quality image than a fax. If you wish to use the IPP
function, follow these steps to select the PPD file when configuring the printer driver (step 14 on page 32).
v10.4 - 10.4.8
(1)
(2)
(3)
(4)
(1) Click the [IP Printer] icon.
(2) Select [Internet Printing Protocol] in
"Protocol". Enter the address of the
machine (IP address or domain name)
and the "Queue".
Enter "ipp" in "Queue".
(3) Select [Sharp] in "Print Using" and
click the PPD file of your model.
(4) Click the [Add] button.
v10.1.5, v10.2.8, v10.3.9
(1)
(2)
(3)
(4)
(1) Select [IP Printing].
If you are using Mac OS X v10.1.5, select
[LPR Printers using IP].
(2) Select [Internet Printing Protocol] in
"Printer Type". Enter the address of
the machine (IP address or domain
name) and the "Queue Name".
• If you are using Mac OS X v10.1.5, enter
the address of the machine (IP address
or domain name) in "LPR Printer's
Address".
• If you are using Mac OS X v10.2.8, enter
the address of the machine (IP address
or domain name) in "Printer's Address".
• Enter "ipp" in "Queue Name".
(3) Select [Sharp] in "Printer Model" and
click the PPD file of your model.
If you are using Mac OS X v10.1.5, select
[Other]. The PPD file selection window will
appear. Click [Startup disk name] - [Library]
- [Printers] - [PPDs] - [Contents] [Resources] - [en.lproj] - "PPD file for your
model", and then click the [Choose] button.
(4) Click the [Add] button.
34
Note
For information about checking the IP address, see "Checking the IP address of the machine"
(page 4).
Page 37

MAC OS 9.0 - 9.2.2
ENGLISH
Note
1
2
3
4
5
If you are using Mac OS 9.0 to 9.2.2, make sure that "LaserWriter 8" has been installed and that the
"LaserWriter 8" checkbox is selected ( ) in "Extensions Manager" in "Control Panels". If not,
install it from the system CD-ROM supplied with your Macintosh computer.
Insert the "Software CD-ROM" into
your computer's CD-ROM drive.
Insert the "Software CD-ROM" that shows
"Disc 2" on the front of the CD-ROM.
Double-click the [CD-ROM] icon ( ) on
the desktop.
Double-click the [MacOS] folder.
Before installing the software, be sure to
read "ReadMe First". "ReadMe First" is in
the [US-English] folder ([English] folder in
areas other than the U.S.) in the [Readme]
folder.
Double-click the [Installer] icon ( ).
Click the [Install] button.
Read the message in the window that
7
appears and click the [Continue]
button.
Installation of the PPD file begins.
After the installation, a message
prompting you to restart your computer
will appear. Click the [OK] button and
restart your computer.
This completes the installation of the
software. Next, configure the printer driver
settings.
Select [Chooser] from the Apple Menu.
8
Create a printer.
9
(1)
(2)
The License Agreement window will
6
appear. Make sure that you understand
the contents of the license agreement
and then click the [Yes] button.
(3)
(1) Click the [LaserWriter 8] icon.
If multiple AppleTalk zones are displayed,
select the zone that includes the printer.
(2) Click the machine's model name.
The machine's model name usually
appears as [SCxxxxxx]. ("xxxxxx" is a
sequence of characters that varies
depending on your model.)
(3) Click the [Create] button.
35
Page 38

MAC OS 9.0 - 9.2.2
Select the PPD file.
10
(1) Click the PPD file for your model.
(2) Click the [Select] button.
•
Note
If the above dialog box does not
appear and you return to the
"Chooser" dialog box, follow these
steps to select the PPD file manually.
(1) Make sure that the machine is
selected in the "Select a
PostScript Printer" list, and then
click the [Setup] button followed
by the [Select PPD] button.
(2) Select the PPD file for your
model and click the [Open]
button.
(3) Click the [OK] button.
• The PPD file is installed in the
[Printer Descriptions] folder in the
[Extensions] folder.
(1)
(2)
Select the machine configuration.
13
(1) Select the options that are installed on
the machine.
(2) Click the [OK] button.
Note
14
15
You can check the options that are
installed and the tray settings by
printing out the "PRINTER SETTINGS
LIST" in the custom settings of the
machine. Follow these steps to print
out the "PRINTER SETTINGS LIST":
Press the [CUSTOM SETTINGS] key,
touch the [LIST PRINT] key, touch the
[PRINTER TEST PAGE] key, and
then touch the [PRINTER SETTINGS
LIST] key.
Click the [OK] button in the window of
step 12 to close the window.
Click the close box ( ) to close the
"Chooser".
(1)
(2)
Make sure that the machine is selected
11
in the "Select a PostScript Printer" list
and then click the [Setup] button.
Click the [Configure] button.
12
Note
To automatically configure the settings
based on the installed machine
options that are detected, click the
[Auto Setup] button.
36
This completes the configuration of the
printer driver.
Installing the screen fonts
The screen fonts for Mac OS 9.0 - 9.2.2 are
contained in the [Font] folder of the "PRINTER
UTILITIES" CD-ROM that accompanies the
PS3 expansion kit. Copy the fonts that you wish
to install to the [System Folder] of the startup
disk.
Note
If you experience problems that may
be due to the installed screen fonts,
immediately delete the installed fonts
from the system.
Page 39
HOW TO USE THE ONLINE MANUAL
Follow the steps below to view the online manual. This manual contains information needed for using
the machine as a printer.
ENGLISH
Note
1
2
3
4
To view the manuals in PDF format, Acrobat® Reader or Adobe® ReaderTM of Adobe Systems
Incorporated is required. If neither program is installed on your computer, the programs can be
downloaded from the following URL:
http://www.adobe.com/
Insert the "Software CD-ROM" into
your computer's CD-ROM drive.
Insert the "Software CD-ROM" that shows
"Disc 2" on the front of the CD-ROM.
Double-click the [CD-ROM] icon ( ) on
the desktop.
Double-click the [Printer Manual]
folder.
Double-click the [EnglishA] folder (for
regions other than the U.S.,
double-click the [English] folder) and
then double-click the [ARP27] icon.
5
37
Page 40

Page 41
CONTENIDO
INSTALACIÓN EN UN ENTORNO WINDOWS
ACERCA DEL SOFTWARE .................................................................................................. 2
ANTES DE LA INSTALACIÓN.............................................................................................. 3
● REQUERIMIENTOS DE HARDWARE Y SOFTWARE...............................................................3
● ENTORNO Y PROCEDIMIENTO DE INSTALACIÓN ................................................................3
USANDO LA MÁQUINA COMO IMPRESORA DE RED ...................................................... 4
● CONEXIÓN A UNA RED ............................................................................................................4
● INSTALACIÓN DE LOS CONTROLADORES DE IMPRESORA Y DE PC-FAX........................ 5
● INSTALACIÓN DE PRINTER STATUS MONITOR .................................................................. 11
USANDO LA MÁQUINA CON UN UNA CONEXIÓN PARALELA O USB......................... 12
● INSTALACIÓN DE LOS CONTROLADORES DE IMPRESORA Y DE PC-FAX...................... 12
● CONECTANDO UN ORDENADOR .......................................................................................... 19
USO DE LA MÁQUINA COMO UNA IMPRESORA COMPARTIDA .................................. 20
INSTALACIÓN DE LAS FUENTES DE PANTALLA PS..................................................... 22
USO DEL CONTROLADOR DE IMPRESORA PS ESTÁNDAR DE WINDOWS (Windows 98/Me/NT 4.0)
CONFIGURANDO EL CONTROLADOR DE IMPRESORA
........................................................ 24
CÓMO USAR EL MANUAL EN LÍNEA ............................................................................... 26
RESOLUCIÓN DE PROBLEMAS ....................................................................................... 27
INSTALACIÓN EN UN ENTORNO MACINTOSH
ACERCA DEL SOFTWARE ................................................................................................ 29
ANTES DE LA INSTALACIÓN............................................................................................ 29
● REQUERIMIENTOS DE HARDWARE Y SOFTWARE.............................................................29
● CONEXIÓN A UNA RED ..........................................................................................................29
MAC OS X............................................................................................................................ 30
MAC OS 9.0 - 9.2.2..............................................................................................................35
CÓMO USAR EL MANUAL EN LÍNEA ............................................................................... 37
...... 23
ESPAÑOL
INTRODUCCIÓN
Este manual explica cómo instalar y configurar el software requerido para la función de impresión del sistema
multifuncional digital SHARP. También explica el procedimiento de visualización del manual en línea.
Nota
LICENCIA DEL SOFTWARE
La LICENCIA DEL SOFTWARE aparece cuando se instala el software desde el CD-ROM. Utilizando todo o
alguna parte del software del CD-ROM o en la máquina, acepta los términos de la LICENCIA DEL SOFTWARE.
Las pantallas, los mensajes y los nombres de las teclas que aparecen en este manual pueden variar con
respecto a los que aparecen en la máquina, debido a las mejoras y modificaciones realizadas en el producto.
• Las explicaciones de las pantallas y los procedimientos de este manual hacen referencia
principalmente a Windows
Macintosh. Las pantallas pueden diferir en otras versiones de estos sistemas operativos.
• Este manual contiene referencias a la función de fax. No obstante, observe que la función de fax
no está disponible en algunos países y regiones.
• Este manual contiene explicaciones del controlador PC-Fax y del controlador PPD. Sin embargo,
observe que el controlador PC-Fax y el controlador PPD no están disponibles y no se incluyen
con el software de instalación en algunos países y regiones.
•
Cuando aparezca "AR-XXXX" en este manual, por favor sustituya "XXXX" por el nombre de su modelo.
•
En este manual se hace referencia al "Software CD-ROM" que acompaña a la unidad
AR-M258/AR-M318 y al kit de expansión para impresora (AR-P27) simplemente como "CD-ROM".
• El kit de expansión PS3 (AR-PK1N) mencionado en este manual es opcional.
®
XP en entornos de Windows®, y Mac OS X v10.4 en entornos de
1
Page 42

INSTALACIÓN EN UN ENTORNO WINDOWS
ACERCA DEL SOFTWARE
El "Software CD-ROM" está formado por 2 discos. El CD-ROM contiene el siguiente software:
Nota
Para usuarios de Windows NT 4.0
El CD-ROM no incluye software para Windows NT 4.0.
Póngase en contacto con su concesionario o representante de servicio autorizado si desea el
software para Windows NT 4.0.
Disc 1
• Controlador de impresora
Permiten utilizar la máquina como impresora.
- Controlador de impresora PCL6 y PCL5e
La máquina admite los lenguajes de control de la impresora Hewlett-Packard PCL6 y PCL5e.
Se recomienda utilizar un controlador de impresora PCL6. Si tiene algún problema de impresión
con el software antiguo utilizando el controlador de impresora PCL6, utilice el controlador de
impresora PCL5e.
- Controlador de impresora PS*
El controlador de impresora PS admite el lenguaje de descripción de página PostScript 3
desarrollado por Adobe Systems incorporado.
- Controlador PPD*
El controlador PPD permite utilizar la máquina con el controlador de impresora PS estándar de
Windows.
• Printer Status Monitor*
Permite supervisar el estado de la máquina en la pantalla del ordenador.
1
2
1
Disc 2
• Controlador de PC-Fax*
Permite enviar un archivo desde el ordenador como un fax utilizando el mismo procedimiento que
cuando se imprime el archivo. (Cuando la opción de fax está instalada.)
• Printer Administration Utility*
Permite que el administrador supervise la máquina y ajuste su configuración desde un ordenador.
Para instalar la Printer Administration Utility, consulte el archivo Léame y el manual en formato
PDF incluidos en el "Software CD-ROM" (Disc 2). El archivo Léame y el manual se encuentran en
la siguiente carpeta del CD-ROM. (Sustituya "R" por la letra de su unidad de CD-ROM en la ruta
de acceso siguiente.)
R:\Sadmin\Documents\Spanish
3
2
*1 El kit de expansión PS3 es necesario para utilizar el controlador de impresora PS o el controlador PPD.
*2 Para usar el Printer Status Monitor y la Printer Administration Utility, la impresora debe estar conectada a
una red que funcione con protocolo TCP/IP.
*3 Para utilizar el controlador de PC-Fax, debe estar instalado Internet Explorer 4.0 o posterior en el
ordenador.
2
Page 43

ANTES DE LA INSTALACIÓN
REQUERIMIENTOS DE HARDWARE Y SOFTWARE
Consulte los siguientes requerimientos de hardware y software antes de instalar el software.
Tipo de ordenador Ordenador IBM PC/AT o compatible equipado con USB 2.0/1.1*1, interfaz paralelo
bidireccional (IEEE 1284) o tarjeta LAN 10Base-T/100Base-TX
Sistema operativo Windows 98, Windows Me,
Windows NT Workstation 4.0 (Service Pack 5 o posterior)*
Windows 2000 Professional*
Windows XP Home Edition*2, Windows Server 2003*
Otros requisitos de hardware Un entorno que permita el funcionamiento correcto de cualquiera de los sistemas
operativos anteriores
*1 Compatible con modelos con Windows 98, Windows Me, Windows 2000 Professional, Windows XP
Professional, Windows XP Home Edition o Windows Server 2003 preinstalados y equipados con un interfaz
USB estándar.
*2 Son necesarios los derechos del Administrador para instalar el software usando el instalador.
2
, Windows XP Professional*2,
ENTORNO Y PROCEDIMIENTO DE INSTALACIÓN
Siga el procedimiento de instalación adecuado para su sistema operativo y el tipo de cable, tal y
como se indica a continuación.
2
,
2
ESPAÑOL
Cable Sistema operativo Procedimiento a seguir
LAN
USB
Paralelo
Compartir la
impresora
Nota
Windows 98/Me/
NT 4.0/2000/XP/
Server 2003
Windows 98/Me/2000 Instalación en Windows 98/Me/2000 (cable USB) (página 14)
Windows XP/Server 2003
Windows 98/Me/
NT 4.0/2000
Windows XP/Server 2003
Windows 98/Me/
NT 4.0/2000/XP/
Server 2003
Para usuarios de Windows NT 4.0
El CD-ROM no incluye software para Windows NT 4.0.
Póngase en contacto con su concesionario o representante de servicio autorizado si desea el
software para Windows NT 4.0.
1. CONEXIÓN A UNA RED (página 4)
2. INSTALACIÓN DE LOS CONTROLADORES DE
IMPRESORA Y DE PC-FAX (página 5)
Instalación en Windows XP/Server 2003 (cable USB/paralelo)
(página 12)
Instalación en Windows 98/Me/NT 4.0/2000 (cable paralelo)
(página 16)
Instalación en Windows XP/Server 2003 (cable USB/paralelo)
(página 12)
USO DE LA MÁQUINA COMO UNA IMPRESORA
COMPARTIDA (página 20)
3
Page 44

USANDO LA MÁQUINA COMO
IMPRESORA DE RED
Esta sección explica cómo instalar el software cuando la máquina se conecta a una red de Windows
(red TCP/IP).
Red TCP/IP (Red de área local)
Impresión utilizando el
protocolo LPR
Ordenador Windows conectado a la
misma red que la máquina
CONEXIÓN A UNA RED
Para conectar la máquina a una red, conecte el cable LAN
al conector de red de la máquina. Utilice un cable LAN
blindado.
Después de conectar la máquina a una red, asegúrese de
configurar la dirección IP y otros ajustes de la red antes
de instalar el software. (El ajuste predeterminado de
fábrica para la dirección IP es recibir la dirección IP
automáticamente cuando la máquina se utiliza en un
entorno DHCP.)
La configuración de red se puede establecer por medio de "CONFIGURACIÓN DE RED" en los
programas de operador principal de la máquina.
Precaución
Si la máquina se utiliza en un entorno DHCP, puede cambiar la dirección IP de la máquina.
Si sucede esto, la impresión no será posible. Este problema se puede evitar utilizando un
servidor WINS o asignando una dirección IP fija en la máquina.
Comprobar la dirección IP de la máquina
Puede comprobar la dirección IP de la máquina imprimiendo la "LISTA AJUST. IMPRESORA" en los
ajustes personalizados. Siga estos pasos para imprimir el "LISTA AJUST. IMPRESORA".
Pulse la tecla [AJUSTES PERSONALIZADOS], toque la tecla [IMPRESIÓN DE LISTADOS], toque la
tecla [IMPRIMIR PÁGINA DE PRUEBA] y entonces toque la tecla [LISTA AJUST. IMPRESORA].
4
Page 45

USANDO LA MÁQUINA COMO IMPRESORA DE RED
I
NSTALACIÓN DE LOS CONTROLADORES DE
IMPRESORA Y DE PC-FAX
Sistemas operativos compatibles: Windows 98/Me/NT 4.0*/2000*/XP*/Server 2003*
* Es necesario tener derechos de administrador para instalar el software.
Nota
• Para usuarios de Windows NT 4.0
• El CD-ROM no incluye software para Windows NT 4.0.
Póngase en contacto con su concesionario o representante de servicio autorizado si desea el
software para Windows NT 4.0.
• Para utilizar la máquina como impresora de red en Windows NT 4.0, se debe instalar el
"Protocolo TCP/IP" en el ordenador. Si no está instalado, consulte la ayuda de Windows NT
4.0 para instalar "Protocolo TCP/IP".
•
El kit de expansión PS3 es necesario para utilizar el controlador de impresora PS o el controlador PPD.
• Para instalar el controlador PPD cuando se utiliza Windows 98/Me/NT 4.0, consulte "USO DEL
CONTROLADOR DE IMPRESORA PS ESTÁNDAR DE WINDOWS (Windows 98/Me/NT 4.0)"
(página 23) e instale el controlador utilizando el Asistente para agregar impresoras.
• Para imprimir con la máquina a través de Internet usando la función IPP cuando la máquina está
instalada en una ubicación remota, o imprimir utilizando la función SSL (comunicación cifrada),
consulte "Impresión utilizando la función IPP y SSL" (página 8) e instale el controlador de
impresora o el controlador de PC-Fax.
• El procedimiento de instalación en esta sección es para el controlador de impresora y el
controlador de PC-Fax, aunque las explicaciones se centran en el controlador de impresora.
ESPAÑOL
Inserte el "Software CD-ROM" en la
1
unidad de CD-ROM del ordenador.
•
Si va a instalar el controlador de impresora,
inserte el "Software CD-ROM" que muestra
"Disc 1" en la carátula del CD-ROM.
•
Si va a instalar el controlador PC-Fax,
inserte el "Software CD-ROM" que muestra
"Disc 2" en la carátula del CD-ROM.
Haga clic en el botón [Inicio],
2
seleccione [Mi PC] ( ), y entonces
haga doble clic en el icono [CD-ROM]
().
En Windows 98/Me/2000, haga doble clic
en [Mi PC] y, entonces, haga doble clic en
el icono [CD-ROM].
Haga doble clic en el icono [Setup]
3
().
Aparecerá la ventana "Contrato de
4
licencia". Asegúrese de que entiende el
contenido del acuerdo de licencia y,
entonces, haga clic en el botón [Sí].
Nota
Puede ver el "Contrato de licencia" en
un idioma distinto del seleccionado
seleccionando el idioma deseado en
el menú de idiomas. Para instalar el
software en el idioma seleccionado,
continúe la instalación con ese idioma
seleccionado.
Lea el mensaje en la ventana
5
"Bienvenido" y, entonces, haga clic en
el botón [Siguiente].
Haga clic en el botón [Controlador de
6
impresora].
•
Para instalar el controlador PC-Fax, haga
clic en el botón [Controlador PC-Fax].
•
Antes de instalar el software, asegúrese
de pulsar el botón [Mostrar LÉAME] y ver
la información detallada sobre el software.
* La pantalla anterior aparece durante la
instalación del controlador de impresora.
5
Page 46

USANDO LA MÁQUINA COMO IMPRESORA DE RED
Haga clic en el botón [Siguiente].
7
Haga clic en el botón [Instalación
8
típica].
Nota
Cuando haya elegido [Instalación
personalizada], puede cambiar
cualquiera de los elementos a
continuación. Cuando haya
seleccionado [Instalación típica], la
instalación se producirá según lo
indicado a continuación.
• Método de conexión de la máquina:
Impresión directa LPR
• Definir como la impresora
predeterminada: Sí (excepto el
controlador de PC-Fax)
• Nombre del controlador de
impresora: No se puede cambiar
• Fuentes de pantalla de la impresora
PCL: Instaladas (excepto los
modelos que requieren la
instalación del kit de expansión para
impresora)
Si ha seleccionado [Instalación
personalizada], seleccione [Impresión
directa LPR] y haga clic en el botón
[Siguiente]. Si ha seleccionado otra
opción distinta de [Impresión directa
LPR], consulte las páginas siguientes:
• IPP: página 8
• Impresora compartida: página 20
• Conectada a este ordenador:
página 12
Se detectan las impresoras conectadas a la
9
red. Seleccione la máquina y haga clic en el
botón [Siguiente].
Nota
10
11
• Si no se encuentra la máquina,
asegúrese de que la máquina está
encendida y conectada a la red, y
entonces haga clic en el botón
[Volver a buscar].
• Puede también hacer clic en el
botón [Especifique la condición] y
buscar la máquina escribiendo el
nombre de la máquina (nombre de
host) o la dirección IP. Para obtener
información sobre cómo comprobar
la dirección IP, consulte "Comprobar
la dirección IP de la máquina"
(página 4).
Aparece una ventana de confirmación.
Compruebe el contenido y entonces
haga clic en el botón [Siguiente].
Cuando aparezca la ventana de selección
del controlador de la impresora,
seleccione el controlador que desea
instalar y haga clic en el botón [Siguiente].
Haga clic en la casilla de verificación del
controlador de la impresora que desee
instalar de modo que aparezca una marca
de verificación ( ).
6
Page 47
•
Nota
Cuando se le pregunte si desea que la
12
Durante la instalación del
controlador de PC-Fax, esta pantalla
no aparece. Vaya al paso siguiente.
•
El kit de expansion PS3 es necesario
para utilizar el controlador de
impresora PS o el controlador PPD.
• La casilla de verificación [PPD] sólo
aparece si está utilizando Windows
2000/XP/Server 2003.
impresora sea la impresora
predeterminada, elija lo más
conveniente y haga clic en el botón
[Siguiente].
Si va a instalar varios controladores,
seleccione el controlador de impresora que
se utilizará como impresora predeterminada.
Si no desea definir ningún controlador de
impresora como impresora predeterminada,
seleccione [No].
Nota
Si ha hecho clic en el botón
[Instalación personalizada] en el paso
8, aparecerá la ventana siguiente.
Ventana del nombre de la impresora
•
Si elige cambiar el nombre de la
impresora, escriba el nombre deseado
y haga clic en el botón [Siguiente].
•
Ventana de confirmación de
instalación de la fuente de pantalla
Para instalar la fuente de pantalla
para el controlador de la impresora
PCL, seleccione [Sí] y haga clic en el
botón [Siguiente].
•
Durante la instalación del controlador
de PC-Fax, esta pantalla no aparece.
Vaya al paso siguiente.
•
Si no está instalando el controlador
de la impresora PCL (está instalando
el controlador de la impresora PS o el
controlador de PPD), seleccione [No]
y haga clic en el botón [Siguiente].
USANDO LA MÁQUINA COMO IMPRESORA DE RED
Cuando aparezca la pantalla de
14
instalación terminada, haga clic en el
botón [Aceptar].
Haga clic en el botón [Cerrar] en la
15
ventana del paso 6.
Nota
Después de la instalación, puede
aparecer un mensaje indicando que
debe reiniciar el ordenador. Si
aparece este mensaje, haga clic en el
botón [Sí] para reiniciar el ordenador.
Con esto finaliza la instalación.
• Después de la instalación, consulte
"CONFIGURANDO EL CONTROLADOR DE
IMPRESORA" (página 24) para configurar los
ajustes del controlador de la impresora.
• Si ha instalado el controlador de la impresora
PS o PPD, la fuente de pantalla de PS se
puede instalar desde el CD-ROM "PRINTER
UTILITIES" que se suministra con el kit de
expansión PS3. Consulte el apartado
"INSTALACIÓN DE LAS FUENTES DE
PANTALLA PS" (página 22).
• Si va a utilizar la máquina como una
impresora compartida, consulte "USO DE LA
MÁQUINA COMO UNA IMPRESORA
COMPARTIDA" (página 20) para instalar el
controlador de impresora en cada ordenador
de cliente.
ESPAÑOL
Siga las instrucciones en pantalla.
13
Lea el mensaje en la ventana que aparece y
haga clic en el botón [Siguiente].
La instalación comienza.
Precaución
Si está utilizando Windows
2000/XP/Server 2003
Si aparece un mensaje de aviso con
respecto a la prueba del logotipo de
Windows o a la firma digital, debe
hacer clic en el botón [Continuar] o [Sí].
7
Page 48

USANDO LA MÁQUINA COMO IMPRESORA DE RED
Impresión utilizando la función IPP y SSL
La función IPP se puede utilizar para imprimir usando la máquina sobre una red utilizando el
protocolo HTTP.
Cuando la máquina se encuentra en una ubicación remota, esta función se puede utilizar en lugar de
la función de fax para imprimir una imagen de mayor calidad que un fax. La función IPP también se
puede utilizar conjuntamente con la función SSL (comunicación cifrada) para cifrar los datos de la
impresión. Permite la impresión segura sin la preocupación de que los datos puedan estar a
disposición de terceros.
Nota
1
2
3
Para utilizar la función SSL, configure "AJUSTES SSL" en los programas de operador principal de
la máquina. Para configurar los ajustes, consulte la "Manual del operador principal".
Inserte el "Software CD-ROM" en la
unidad de CD-ROM del ordenador.
• Si va a instalar el controlador de
impresora, inserte el "Software
CD-ROM" que muestra "Disc 1" en la
carátula del CD-ROM.
• Si va a instalar el controlador PC-Fax,
inserte el "Software CD-ROM" que
muestra "Disc 2" en la carátula del
CD-ROM.
Haga clic en el botón [Inicio], seleccione
[Mi PC] ( ), y entonces haga doble clic
en el icono [CD-ROM] ( ).
En Windows 98/Me/2000, haga doble clic
en [Mi PC] y, entonces, haga doble clic en
el icono [CD-ROM].
Haga doble clic en el icono [Setup] ( ).
Haga clic en el botón [Controlador de
6
impresora].
• Para instalar el controlador PC-Fax,
haga clic en el botón [Controlador
PC-Fax].
•
Antes de instalar el software, asegúrese de
pulsar el botón [Mostrar LÉAME] y ver la
información detallada sobre el software.
Aparecerá la ventana "Contrato de
4
licencia". Asegúrese de que entiende el
contenido del acuerdo de licencia y,
entonces, haga clic en el botón [Sí].
Nota
5
Puede ver el "Contrato de licencia" en
un idioma distinto del seleccionado
seleccionando el idioma deseado en
el menú de idiomas. Para instalar el
software en el idioma seleccionado,
continúe la instalación con ese idioma
seleccionado.
Lea el mensaje en la ventana
"Bienvenido" y, entonces, haga clic en
el botón [Siguiente].
8
* La pantalla anterior aparece durante la
instalación del controlador de impresora.
Haga clic en el botón [Siguiente].
7
Page 49

USANDO LA MÁQUINA COMO IMPRESORA DE RED
Haga clic en el botón [Instalación
8
personalizada].
Cuando se le pregunte cómo se
9
conecta la impresora, seleccione [IPP]
y haga clic en el botón [Siguiente].
Seleccione el URL de la máquina y
11
haga clic en el botón [Siguiente].
Escriba el URL en el formato siguiente:
Formato normal:
http://<nombre de dominio de la máquina
o dirección IP>:631*
*1 Normalmente, debería introducirse
"631" como número de puerto. Si se ha
modificado el número de puerto IPP en
la máquina, introduzca el nuevo
número de puerto.
Cuando se utiliza SSL:
https://<nombre de dominio de la máquina
o dirección IP>:<número puerto*
*2 Normalmente, el número de puerto y
los dos puntos ":" que preceden al
número de puerto pueden omitirse. Si
se ha modificado el número de puerto
IPP para SSL en la máquina,
introduzca el nuevo número de puerto.
1
/ipp
2
>/ipp
ESPAÑOL
Si se utiliza un servidor proxy,
10
especifíquelo y haga clic en el botón
[Siguiente].
Para especificar un servidor proxy,
seleccione [Imprimir a través del servidor
proxy] y entonces escriba el valor de
[Dirección] y de [Número de puerto].
Nota
12
Si el ordenador y la máquina están
conectados a la misma red de área
local, puede hacer clic en el botón
[Buscar] para buscar la máquina.
Aparecerá el URL de la máquina.
Seleccione el URL y haga clic en el
botón [OK]. Volverá a la pantalla
anterior y el URL de la máquina se
habrá escrito automáticamente.
Cuando aparezca la ventana de
selección de modelo, seleccione el
nombre de modelo de su máquina y haga
clic en el botón [Siguiente].
9
Page 50

USANDO LA MÁQUINA COMO IMPRESORA DE RED
Cuando aparezca la ventana de selección
13
del controlador de la impresora, seleccione
el controlador que desea instalar y haga
clic en el botón [Siguiente].
Haga clic en la casilla de verificación del
controlador de la impresora que desee
instalar de modo que aparezca una marca
de verificación ( ).
•
Nota
Seleccione si desea que la impresora
14
sea la impresora predeterminada y
haga clic en el botón [Siguiente].
Si va a instalar varios controladores, seleccione
el controlador de impresora que se utilizará
como impresora predeterminada. Si no desea
definir ningún controlador de impresora como
impresora predeterminada, seleccione [No].
Cuando aparezca la ventana del
15
nombre de la impresora, haga clic en el
botón [Siguiente].
Si desea cambiar el nombre de la
impresora, escriba el nombre deseado.
Durante la instalación del
controlador de PC-Fax, esta pantalla
no aparece. Vaya al paso siguiente.
•
El kit de expansion PS3 es necesario
para utilizar el controlador de
impresora PS o el controlador PPD.
• La casilla de verificación [PPD] sólo
aparece si está utilizando Windows
2000/XP/Server 2003.
Siga las instrucciones en pantalla.
17
Lea el mensaje en la ventana que aparece
y haga clic en el botón [Siguiente].
La instalación comienza.
Precaución
18
19
Nota
Con esto finaliza la instalación.
• Después de la instalación, consulte
"CONFIGURANDO EL CONTROLADOR DE
IMPRESORA" (página 24) para configurar los
ajustes del controlador de la impresora.
• Si ha instalado el controlador de la impresora
PS o PPD, la fuente de pantalla de PS se
puede instalar desde el CD-ROM "PRINTER
UTILITIES" que se suministra con el kit de
expansión PS3. Consulte el apartado
"INSTALACIÓN DE LAS FUENTES DE
PANTALLA PS" (página 22).
Si está utilizando Windows
2000/XP/Server 2003
Si aparece un mensaje de aviso con
respecto a la prueba del logotipo de
Windows o a la firma digital, debe hacer
clic en el botón [Continuar] o [Sí].
Cuando aparezca la pantalla de
instalación terminada, haga clic en el
botón [Aceptar].
Haga clic en el botón [Cerrar] en la
ventana del paso 6.
Después de la instalación, puede
aparecer un mensaje indicando que
debe reiniciar el ordenador. Si
aparece este mensaje, haga clic en el
botón [Sí] para reiniciar el ordenador.
Cuando se le pregunte si desea instalar la
16
fuente de pantalla, seleccione una respuesta
y haga clic en el botón [Siguiente].
• Durante la instalación del controlador de
PC-Fax, esta pantalla no aparece. Vaya
al paso siguiente.
• Si no está instalando el controlador de
la impresora PCL (está instalando el
controlador de la impresora PS o el
controlador de PPD), seleccione [No] y
haga clic en el botón [Siguiente].
10
Page 51

USANDO LA MÁQUINA COMO IMPRESORA DE RED
INSTALACIÓN DE PRINTER STATUS MONITOR
Nota
Sistemas operativos compatibles: Windows 98/Me/NT 4.0*/2000*/XP*/Server 2003*
* Es necesario tener derechos de administrador para instalar el software.
1
2
3
4
Nota
5
La utilidad Printer Status Monitor no puede utilizarse cuando se imprime en la máquina con la
función IPP.
Inserte el "Software CD-ROM" en la
unidad de CD-ROM del ordenador.
Inserte el "Software CD-ROM" que
muestra "Disc 1" en la carátula del
CD-ROM.
Haga clic en el botón [Inicio], seleccione
[Mi PC] ( ), y entonces haga doble clic
en el icono [CD-ROM] ( ).
En Windows 98/Me/2000, haga doble clic
en [Mi PC] y, entonces, haga doble clic en
el icono [CD-ROM].
Haga doble clic en el icono [Setup] ( ).
Aparecerá la ventana "Contrato de
licencia". Asegúrese de que entiende el
contenido del acuerdo de licencia y,
entonces, haga clic en el botón [Sí].
Puede ver el "Contrato de licencia" en
un idioma distinto del seleccionado
seleccionando el idioma deseado en
el menú de idiomas. Para instalar el
software en el idioma seleccionado,
continúe la instalación con ese idioma
seleccionado.
Lea el mensaje en la ventana
"Bienvenido" y, entonces, haga clic en
el botón [Siguiente].
Haga clic en el botón [Printer Status
6
Monitor].
Antes de instalar el software, asegúrese
de pulsar el botón [Mostrar LÉAME] y ver
la información detallada sobre el software.
Siga las instrucciones en pantalla.
7
Cuando aparezca la pantalla de
8
instalación terminada, haga clic en el
botón [Finalizar].
Para hacer que Printer Status Monitor se
inicie automáticamente cuando se inicia
su ordenador, seleccione la casilla de
verificación [Ejecutar Printer Status
Monitor al Iniciar] y haga clic en el
botón [Finalizar].
Haga clic en el botón [Cerrar] en la
9
ventana del paso 6.
Nota
Después de la instalación, puede
aparecer un mensaje indicando que
debe reiniciar el ordenador. Si
aparece este mensaje, haga clic en el
botón [Si] para reiniciar el ordenador.
ESPAÑOL
Con esto finaliza la instalación.
Para más información sobre los procedimientos para utilizar Printer Status Monitor, consulte el archivo
de Ayuda. Siga estos pasos para ver el archivo de Ayuda: Haga clic en el botón [Inicio] de Windows,
seleccione [Todos los programas] ([Programas] en versiones de Windows distintas de Windows
XP/Server 2003), seleccione [SHARP Printer Status Monitor] y, entonces, seleccione [Ayuda].
11
Page 52

USANDO LA MÁQUINA CON UN
UNA CONEXIÓN PARALELA O USB
I
NSTALACIÓN DE LOS CONTROLADORES DE
IMPRESORA Y DE PC-FAX
•
Nota
Instalación en Windows XP/Server 2003 (cable USB/paralelo)
El kit de expansión PS3 es necesario para utilizar el controlador de impresora PS o el controlador PPD.
• Para instalar el controlador PPD cuando se utiliza Windows 98/Me, consulte "USO DEL
CONTROLADOR DE IMPRESORA PS ESTÁNDAR DE WINDOWS (Windows 98/Me/NT 4.0)"
(página 23) e instale el controlador utilizando el Asistente para agregar impresoras.
• Para utilizar el puerto creado cuando está instalado el controlador de impresora para la
transferencia de datos de fax, instale el controlador de impresora primero y, a continuación,
instale el controlador de PC-Fax.
El cable USB o paralelo no debe estar
1
conectado a la máquina. Asegúrese de
que el cable no está conectado antes
de proceder.
Si se conecta un cable, aparecerá una
ventana Plug and Play. Si sucede esto,
haga clic en el botón [Cancelar] para
cerrar la ventana y desconecte el cable.
Nota
2
3
4
El cable se conectará en el paso 14.
Inserte el "Software CD-ROM" en la
unidad de CD-ROM del ordenador.
Inserte el "Software CD-ROM" que
muestra "Disc 1" en la carátula del
CD-ROM.
Haga clic en el botón [Inicio],
seleccione [Mi PC] ( ), y entonces
haga doble clic en el icono [CD-ROM]
().
Haga doble clic en el icono [Setup]
().
Aparecerá la ventana "Contrato de
5
licencia". Asegúrese de que entiende el
contenido del acuerdo de licencia y,
entonces, haga clic en el botón [Sí].
Nota
6
7
Puede ver el "Contrato de licencia" en un
idioma distinto del seleccionado
seleccionando el idioma deseado en el menú
de idiomas. Para instalar el software en el
idioma seleccionado, continúe la instalación
con ese idioma seleccionado.
Lea el mensaje en la ventana
"Bienvenido" y, entonces, haga clic en
el botón [Siguiente].
Haga clic en el botón [Controlador de
impresora].
Antes de instalar el software, asegúrese
de pulsar el botón [Mostrar LÉAME] y ver
la información detallada sobre el software.
12
Haga clic en el botón [Siguiente].
8
Page 53

USANDO LA MÁQUINA CON UN UNA CONEXIÓN PARALELA O USB
Haga clic en el botón [Instalación
9
personalizada].
Cuando se le pregunte cómo se
10
conecta la impresora, seleccione
[Conectada a este ordenador] y haga
clic en el botón [Siguiente].
Cuando se le pregunte si desea instalar la
11
fuente de pantalla, seleccione una respuesta
y haga clic en el botón [Siguiente].
Siga las instrucciones en pantalla.
12
Lea el mensaje en la ventana que aparece y
haga clic en el botón [Siguiente].
Cuando aparezca la pantalla de instalación
terminada, haga clic en el botón [Aceptar].
Precaución
13
Nota
Si se muestra una ventana de alerta
sobre el "Instalación de hardware",
haga clic en el botón [Continuar].
Haga clic en el botón [Cerrar] en la
ventana del paso 7.
Cuando aparezca un mensaje que le pide
conectar la máquina a su ordenador, haga
clic en el botón [Aceptar].
Después de la instalación, puede
aparecer un mensaje indicando que
debe reiniciar el ordenador. Si
aparece este mensaje, haga clic en el
botón [Si] para reiniciar el ordenador.
Conecte el cable de interfaz a la
14
máquina y a su ordenador (página 19).
• Si usa un cable USB, asegúrese de
que la máquina está conectada y luego
conecte el cable.
• Si usa un cable paralelo, apague la
máquina y su ordenador, conecte el
cable, encienda la máquina y luego
encienda su ordenador.
Windows detectará la máquina y
aparecerá la pantalla Plug and Play.
Se inicia la instalación del controlador
15
de impresora PCL6.
Cuando aparezca "Asistente para hardware
nuevo encontrado", seleccione [Instalar
automáticamente el software (recomendado)],
haga clic en el botón [Siguiente], y siga las
instrucciones en pantalla.
Precaución
Después de realizar los pasos anteriores,
repita el procedimiento de instalación desde
el paso 2 si está instalando el controlador
PCL5e, PS, PPD, o PC-Fax.
1. Repita el procedimiento de instalación desde
el paso 2.
Si va a instalar el controlador PC-Fax, inserte
el "Software CD-ROM" que muestra "Disc 2"
en la carátula del CD-ROM y haga clic en el
botón [Controlador PC-Fax] en el paso 7.
2. Cuando se muestre la pantalla de instalación
del controlador de la impresora seleccionada,
quite la marca de [PCL6] y seleccione la casilla
del controlador de impresora que desea instalar.
Con esto finaliza la instalación.
• Después de la instalación, consulte
"CONFIGURANDO EL CONTROLADOR DE
IMPRESORA" (página 24) para configurar los
ajustes del controlador de la impresora.
•
Si ha instalado el controlador de la impresora PS
o PPD, la fuente de pantalla de PS se puede
instalar desde el CD-ROM "PRINTER UTILITIES"
que se suministra con el kit de expansión PS3.
Consulte el apartado "INSTALACIÓN DE LAS
FUENTES DE PANTALLA PS" (página 22).
•
Si va a utilizar la máquina como una impresora
compartida, consulte "USO DE LA MÁQUINA
COMO UNA IMPRESORA COMPARTIDA"
(página 20) para instalar el controlador de
impresora en cada ordenador de cliente.
Si se muestra una ventana de alerta
sobre el "Instalación de hardware",
haga clic en el botón [Continuar].
ESPAÑOL
13
Page 54

USANDO LA MÁQUINA CON UN UNA CONEXIÓN PARALELA O USB
Instalación en Windows 98/Me/2000 (cable USB)
El cable USB no debe estar conectado
1
a la máquina. Asegúrese de que el
cable no está conectado antes de
proceder.
Si se conecta un cable, aparecerá una
ventana Plug and Play. Si sucede esto,
haga clic en el botón [Cancelar] para
cerrar la ventana y desconecte el cable.
Nota
2
3
4
El cable se conectará en el paso 15.
Inserte el "Software CD-ROM" en la
unidad de CD-ROM del ordenador.
Inserte el "Software CD-ROM" que
muestra "Disc 1" en la carátula del
CD-ROM.
Haga doble clic en [Mi PC] () y
entonces haga doble clic en el icono
CD-ROM ( ).
Haga doble clic en el icono [Setup]
().
Haga clic en el botón [Controlador de impresora].
7
Antes de instalar el software, asegúrese de
pulsar el botón [Mostrar LÉAME] y ver la
información detallada sobre el software.
Haga clic en el botón [Siguiente].
8
Haga clic en el botón [Instalación personalizada].
9
Aparecerá la ventana "Contrato de
5
licencia". Asegúrese de que entiende el
contenido del acuerdo de licencia y,
entonces, haga clic en el botón [Sí].
Nota
6
Puede ver el "Contrato de licencia" en
un idioma distinto del seleccionado
seleccionando el idioma deseado en
el menú de idiomas. Para instalar el
software en el idioma seleccionado,
continúe la instalación con ese idioma
seleccionado.
Lea el mensaje en la ventana
"Bienvenido" y, entonces, haga clic en
el botón [Siguiente].
14
Cuando se le pregunte cómo se conecta la
10
impresora, seleccione [Conectada a este
ordenador] y haga clic en el botón [Siguiente].
Page 55

USANDO LA MÁQUINA CON UN UNA CONEXIÓN PARALELA O USB
Cuando aparezca la pantalla de
11
selección de la interfaz, seleccione
[USB] y haga clic en el botón [Siguiente].
Cuando se le pregunte si desea instalar
12
la fuente de pantalla, seleccione una
respuesta y haga clic en el botón
[Siguiente].
Siga las instrucciones en pantalla.
13
Lea el mensaje en la ventana que aparece
y haga clic en el botón [Siguiente].
Precaución
14
Nota
En Windows 2000, si aparece la
siguiente pantalla mientras se están
copiando los archivos (el mensaje
puede aparecer más de una vez), haga
clic en el botón [Sí].
Cuando aparezca la pantalla de instalación
terminada, haga clic en el botón [Aceptar].
Haga clic en el botón [Cerrar] en la
ventana del paso 7.
Cuando aparezca un mensaje que le pide
conectar la máquina a su ordenador, haga
clic en el botón [Aceptar].
Después de la instalación, puede
aparecer un mensaje indicando que
debe reiniciar el ordenador. Si
aparece este mensaje, haga clic en el
botón [Si] para reiniciar el ordenador.
Asegúrese de que la máquina esté
15
conectada y luego conecte el cable
USB (página 19).
Windows detectará la máquina y
aparecerá la pantalla Plug and Play.
Siga las instrucciones de la pantalla
16
Plug and Play que se muestra en su
versión de Windows para iniciar la
instalación.
Después de realizar los pasos anteriores,
repita el procedimiento de instalación desde
el paso 2 si está instalando el controlador
PCL5e, PS, PPD, o PC-Fax.
1. Repita el procedimiento de instalación desde
el paso 2.
Si va a instalar el controlador PC-Fax,
inserte el "Software CD-ROM" que muestra
"Disc 2" en la carátula del CD-ROM y haga
clic en el botón [Controlador PC-Fax] en el
paso 7.
2. Cuando se muestre la pantalla de instalación
del controlador de la impresora
seleccionada, quite la marca de [PCL6] y
seleccione la casilla del controlador de
impresora que desea instalar.
Con esto finaliza la instalación.
• Después de la instalación, consulte
"CONFIGURANDO EL CONTROLADOR DE
IMPRESORA" (página 24) para configurar los
ajustes del controlador de la impresora.
• Si ha instalado el controlador de la impresora
PS o PPD, la fuente de pantalla de PS se
puede instalar desde el CD-ROM "PRINTER
UTILITIES" que se suministra con el kit de
expansión PS3. Consulte el apartado
"INSTALACIÓN DE LAS FUENTES DE
PANTALLA PS" (página 22).
• Si va a utilizar la máquina como una
impresora compartida, consulte "USO DE LA
MÁQUINA COMO UNA IMPRESORA
COMPARTIDA" (página 20) para instalar el
controlador de impresora en cada ordenador
de cliente.
ESPAÑOL
15
Page 56

USANDO LA MÁQUINA CON UN UNA CONEXIÓN PARALELA O USB
Instalación en Windows 98/Me/NT 4.0/2000 (cable paralelo)
Nota
1
Nota
2
3
Para usuarios de Windows NT 4.0
El CD-ROM no incluye software para Windows NT 4.0.
Póngase en contacto con su concesionario o representante de servicio autorizado si desea el
software para Windows NT 4.0.
El cable paralelo no debe estar conectado a
la máquina. Asegúrese de que el cable no
está conectado antes de proceder.
Si se conecta un cable, aparecerá una
ventana Plug and Play. Si sucede esto,
haga clic en el botón [Cancelar] para
cerrar la ventana y desconecte el cable.
El cable se conectará en el paso 20.
Inserte el "Software CD-ROM" en la
unidad de CD-ROM del ordenador.
• Si va a instalar el controlador de
impresora, inserte el "Software
CD-ROM" que muestra "Disc 1" en la
carátula del CD-ROM.
•
Si va a instalar el controlador PC-Fax,
inserte el "Software CD-ROM" que muestra
"Disc 2" en la carátula del CD-ROM.
Haga doble clic en [Mi PC] ( ) y
entonces haga doble clic en el icono
CD-ROM ( ).
Haga clic en el botón [Controlador de
7
impresora].
• Para instalar el controlador PC-Fax,
haga clic en el botón [Controlador
PC-Fax].
• Antes de instalar el software, asegúrese
de pulsar el botón [Mostrar LÉAME] y
ver la información detallada sobre el
software.
* La pantalla anterior aparece durante la
instalación del controlador de impresora.
Haga clic en el botón [Siguiente].
8
Haga doble clic en el icono [Setup] ( ).
4
Aparecerá la ventana "Contrato de
5
licencia". Asegúrese de que entiende el
contenido del acuerdo de licencia y,
entonces, haga clic en el botón [Sí].
Nota
6
Puede ver el "Contrato de licencia" en
un idioma distinto del seleccionado
seleccionando el idioma deseado en
el menú de idiomas. Para instalar el
software en el idioma seleccionado,
continúe la instalación con ese idioma
seleccionado.
Lea el mensaje en la ventana
"Bienvenido" y, entonces, haga clic en
el botón [Siguiente].
16
Haga clic en el botón [Instalación
9
personalizada].
Page 57

USANDO LA MÁQUINA CON UN UNA CONEXIÓN PARALELA O USB
Cuando se le pregunte cómo se
10
conecta la impresora, seleccione
[Conectada a este ordenador] y haga
clic en el botón [Siguiente].
Si usa Windows NT 4.0, vaya al paso 12.
Cuando aparezca la pantalla de
11
selección de interfaz, seleccione
[Paralelo] y haga clic en el botón
[Siguiente].
Nota
13
14
Si no aparece "LPT1", otra impresora o
dispositivo periférico está usando LPT1. En
este caso, siga la instalación y, cuando haya
finalizado la instalación, cambie la
configuración del puerto de modo que la
máquina pueda usar LPT1. Este
procedimiento se explica en "Otra impresora
está usando el puerto paralelo (cuando se
usa un cable paralelo)" en la página 27.
Cuando aparezca la ventana de
selección de modelo, seleccione el
nombre de modelo de su máquina y
haga clic en el botón [Siguiente].
Cuando aparezca la ventana de selección
del controlador de la impresora, seleccione
el controlador que desea instalar y haga
clic en el botón [Siguiente].
•
Seleccione las casillas de los controladores
de impresora que quiere instalar.
• Durante la instalación del controlador de
PC-Fax, esta pantalla no aparece. Vaya
al paso siguiente.
ESPAÑOL
Seleccione el puerto de la impresora y
12
haga clic en el botón [Siguiente].
Seleccione "LPT1" para el puerto de la
impresora.
Nota
15
• El kit de expansión PS3 es
necesario para utilizar el controlador
de impresora PS o el controlador
PPD.
• La casilla de verificación [PPD] sólo
aparece si está utilizando Windows
2000.
Seleccione si desea que la impresora
sea la impresora predeterminada y
haga clic en el botón [Siguiente].
Si va a instalar varios controladores,
seleccione el controlador de impresora que
se utilizará como impresora predeterminada.
Si no desea definir ningún controlador de
impresora como impresora
predeterminada, seleccione [No].
17
Page 58

USANDO LA MÁQUINA CON UN UNA CONEXIÓN PARALELA O USB
Cuando aparezca la ventana del
16
nombre de la impresora, haga clic en el
botón [Siguiente].
Si desea cambiar el nombre de la
impresora, escriba el nombre deseado.
Cuando se le pregunte si desea instalar
17
la fuente de pantalla, seleccione una
respuesta y haga clic en el botón
[Siguiente].
Durante la instalación del controlador de
PC-Fax, esta pantalla no aparece. Vaya al
paso siguiente.
Siga las instrucciones en pantalla.
18
Lea el mensaje en la ventana que aparece
y haga clic en el botón [Siguiente].
Cuando aparezca la pantalla de
instalación terminada, haga clic en el
botón [Aceptar].
Haga clic en el botón [Cerrar] en la
19
ventana del paso 7.
Cuando aparezca un mensaje que le pide
conectar la máquina a su ordenador, haga
clic en el botón [Aceptar].
Apague la máquina y su ordenador, y
20
conecte la máquina a su ordenador con el
cable paralelo
Después de conectar la máquina a su
ordenador, encienda la máquina y luego
inicie su ordenador.
Con esto finaliza la instalación.
• Después de la instalación, consulte
"CONFIGURANDO EL CONTROLADOR DE
IMPRESORA" (página 24) para configurar los
ajustes del controlador de la impresora.
• Si ha instalado el controlador de la impresora
PS o PPD, la fuente de pantalla de PS se
puede instalar desde el CD-ROM "PRINTER
UTILITIES" que se suministra con el kit de
expansión PS3. Consulte el apartado
"INSTALACIÓN DE LAS FUENTES DE
PANTALLA PS" (página 22).
• Si va a utilizar la máquina como una
impresora compartida, consulte "USO DE LA
MÁQUINA COMO UNA IMPRESORA
COMPARTIDA" (página 20) para instalar el
controlador de impresora en cada ordenador
de cliente.
(página 19)
.
18
Nota
Después de la instalación, puede
aparecer un mensaje indicando que
debe reiniciar el ordenador. Si
aparece este mensaje, haga clic en el
botón [Si] para reiniciar el ordenador.
Page 59

USANDO LA MÁQUINA CON UN UNA CONEXIÓN PARALELA O USB
CONECTANDO UN ORDENADOR
Siga el procedimiento siguiente para conectar la máquina a su ordenador.
Los cables de interfaz para conectar la máquina a su ordenador no vienen incluidos con la máquina.
Compre el cable adecuado para su ordenador.
Cable de interfaz
Cable USB
Cable doble trenzado y blindado, equivalente con transmisión de alta velocidad (3 m máx.)
Si la máquina va a ser conectada con una interfaz USB 2.0, por favor compre un cable USB
compatible con USB 2.0.
Cable paralelo
Cable de interfaz paralelo bidireccional tipo IEEE 1284 blindado (3 m máx.)
ESPAÑOL
Precaución
• USB está disponible en ordenadores compatibles PC/AT que vienen equipados de fábrica
con USB y que tienen preinstalado Windows 98, Windows Me, Windows 2000
Professional, Windows XP Professional, Windows XP Home Edition o Windows Server
2003.
• No conecte el cable de interfaz antes de instalar el controlador de la impresora. El cable
de interfaz debe estar conectado durante la instalación del controlador de la impresora.
CONECTANDO UN CABLE USB
Introduzca el cable en el conector USB
1
del equipo.
Introduzca el otro extremo del cable en
2
el conector USB del ordenador.
CONECTANDO UN CABLE
PARALELO
Asegúrese de que su ordenador y la
1
máquina están apagados.
Conecte el cable en el conector
2
paralelo del equipo y sujételo bien con
los pasadores.
Nota
También se puede instar en un
conector USB 1.1.
Conecte el otro extremo del cable en el
3
conector paralelo del ordenador.
19
Page 60

USO DE LA MÁQUINA COMO UNA
IMPRESORA COMPARTIDA
Si desea utilizar la máquina como impresora compartida de una red de Windows con el controlador
de la impresora o el controlador de PC-Fax instalado en un servidor de impresión, siga los pasos a
continuación para instalar el controlador de la impresora o de PC-Fax en los ordenadores cliente.
Nota
• Pida al administrador de la red el nombre del servidor y el nombre de la impresora de la máquina
en la red.
• Para más información sobre el procedimiento para configurar el servidor de impresión, consulte
el manual de instrucciones o el archivo de ayuda del sistema operativo. El "servidor de
impresión" explicado aquí es un ordenador conectado directamente a la máquina, y los "clientes"
son otros ordenadores conectados a la misma red que el servidor de impresión.
• Instale el mismo controlador de impresora en los ordenadores cliente que el controlador de
impresora instalado en el servidor de impresión.
• Si el controlador PPD está instalado en el servidor de impresión y los ordenadores cliente están
ejecutando Windows 98/Me/NT 4.0, consulte "USO DEL CONTROLADOR DE IMPRESORA PS
ESTÁNDAR DE WINDOWS (Windows 98/Me/NT 4.0)" (página 23) para instalar el controlador de
impresora usando el Asistente para agregar impresoras.
Inserte el "Software CD-ROM" en la
1
unidad de CD-ROM del ordenador.
• Si va a instalar el controlador de
impresora, inserte el "Software
CD-ROM" que muestra "Disc 1" en la
carátula del CD-ROM.
• Si va a instalar el controlador PC-Fax,
inserte el "Software CD-ROM" que
muestra "Disc 2" en la carátula del
CD-ROM.
Haga clic en el botón [Inicio], seleccione
2
[Mi PC] ( ), y entonces haga doble clic
en el icono [CD-ROM] ( ).
En Windows 98/Me/2000, haga doble clic
en [Mi PC], y entonces, haga doble clic en
el icono [CD-ROM].
Haga doble clic en el icono [Setup] ( ).
3
Aparecerá la ventana "Contrato de
4
licencia". Asegúrese de que entiende el
contenido del acuerdo de licencia y,
entonces, haga clic en el botón [Sí].
Lea el mensaje en la ventana
5
"Bienvenido" y, entonces, haga clic en
el botón [Siguiente].
Haga clic en el botón [Controlador de
6
impresora].
• Para instalar el controlador PC-Fax,
haga clic en el botón [Controlador
PC-Fax].
• Antes de instalar el software, asegúrese
de pulsar el botón [Mostrar LÉAME] y
ver la información detallada sobre el
software.
20
Nota
Puede ver el "Contrato de licencia" en un
idioma distinto del seleccionado
seleccionando el idioma deseado en el
menú de idiomas. Para instalar el software
en el idioma seleccionado, continúe la
instalación con ese idioma seleccionado.
* La pantalla anterior aparece durante la
instalación del controlador de impresora.
Haga clic en el botón [Siguiente].
7
Page 61
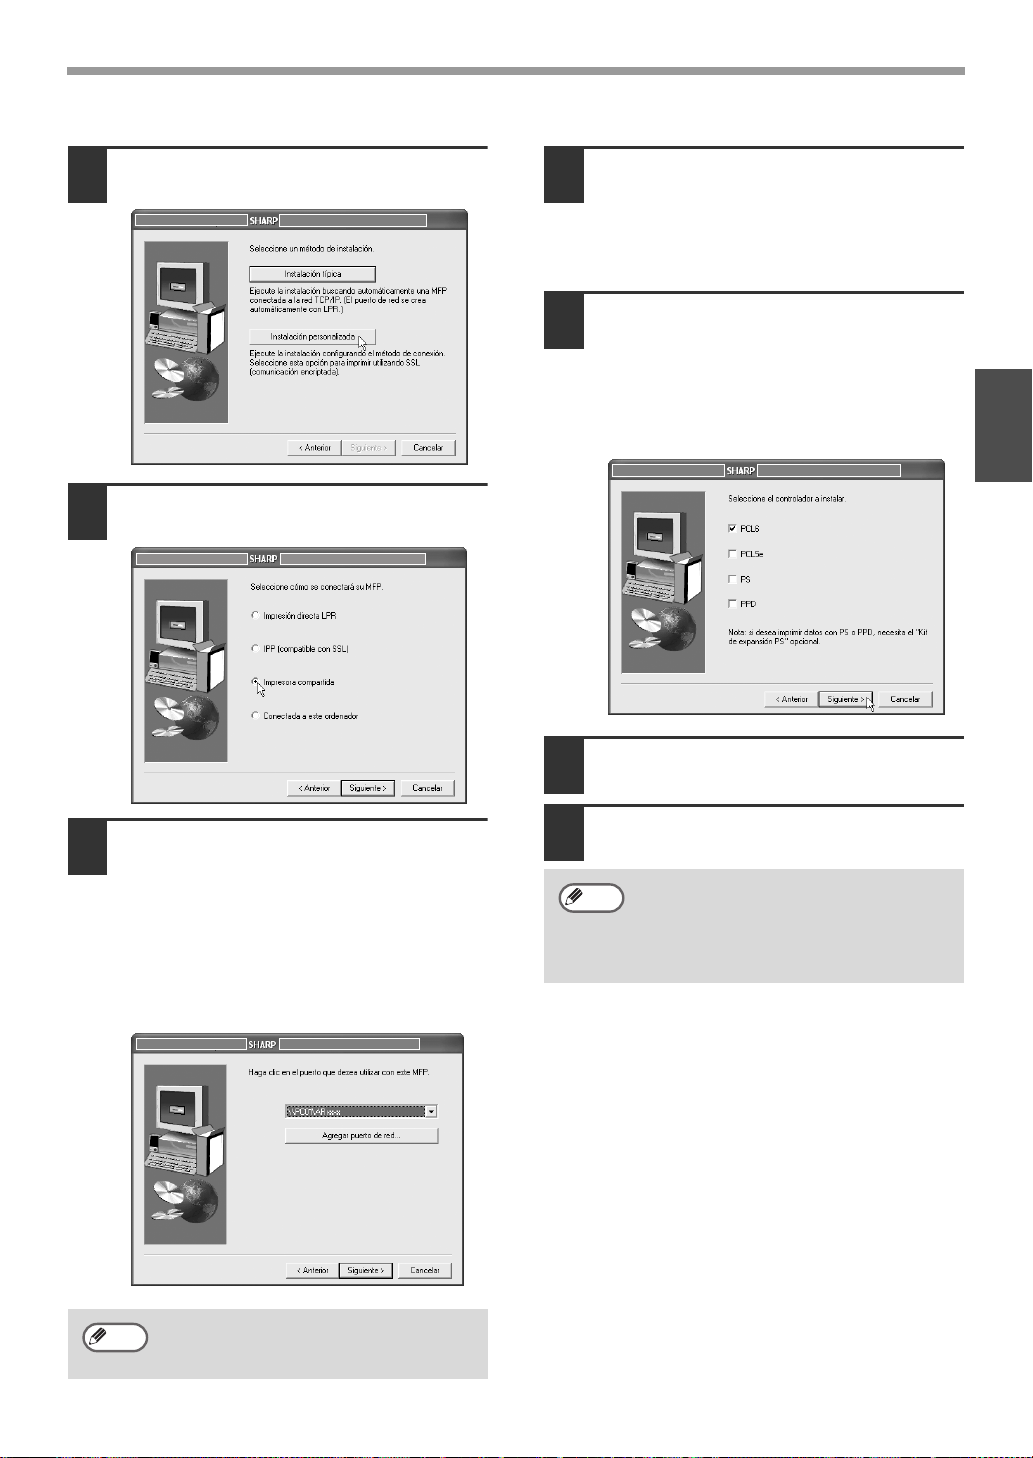
USO DE LA MÁQUINA COMO UNA IMPRESORA COMPARTIDA
Haga clic en el botón [Instalación
8
personalizada].
Seleccione [Impresora compartida] y
9
haga clic en el botón [Siguiente].
Cuando aparezca la ventana de
11
selección de modelo, seleccione el
nombre de modelo de su máquina y
haga clic en el botón [Siguiente].
Si está instalando el controlador de
PC-Fax, vaya al paso 13.
Cuando aparezca la ventana de selección
12
del controlador de la impresora, seleccione
el controlador que desea instalar y haga
clic en el botón [Siguiente].
Asegúrese de que selecciona el mismo
controlador de impresora que el del
servidor de impresión (la máquina).
ESPAÑOL
Seleccione el nombre de la impresora
10
definida como la impresora compartida
en el servidor de impresión en la lista
y, a continuación, haga clic en el botón
[Siguiente].
También puede hacer clic en el botón [Agregar
puerto de red] y seleccionar la impresora que
se compartirá (la máquina) explorando la red
en la ventana que aparece.
Nota
Si la impresora compartida no aparece
en la lista, compruebe la configuración
del servidor de impresión.
Siga las instrucciones en pantalla.
13
Cuando aparezca la pantalla "Inicio
14
Instalación", haga clic en el botón
Nota
Con esto finaliza la instalación.
• Después de la instalación, consulte
"CONFIGURANDO EL CONTROLADOR DE
IMPRESORA" (página 24) para configurar los
ajustes del controlador de la impresora.
• Si ha instalado el controlador de la impresora
PS o PPD, la fuente de pantalla de PS se
puede instalar desde el CD-ROM "PRINTER
UTILITIES" que se suministra con el kit de
expansión PS3. Consulte el apartado
"INSTALACIÓN DE LAS FUENTES DE
PANTALLA PS" (página 22).
Después de la instalación, puede
aparecer un mensaje indicando que
debe reiniciar el ordenador. Si
aparece este mensaje, haga clic en el
botón [Sí] para reiniciar el ordenador.
[
Cerrar].
21
Page 62

INSTALACIÓN DE LAS FUENTES DE
PANTALLA PS
Las fuentes que se pueden utilizar con el controlador de impresora PS se encuentran en el CD-ROM
"PRINTER UTILITIES" que se suministra con el kit de expansión PS3. Instale estas fuentes cuando
las necesite para el controlador de impresora PS.
Inserte el CD-ROM "PRINTER
1
UTILITIES" que se suministra con el kit
de expansión PS3 en la unidad de
CD-ROM del ordenador.
Si su ordenador está configurado para
iniciar automáticamente el CD-ROM, vaya
al paso 4.
Haga clic en el botón [Inicio],
2
seleccione [Mi PC] ( ), y entonces
haga doble clic en el icono [CD-ROM]
().
Si utiliza Windows 98/Me/NT 4.0/2000,
haga doble clic en [Mi PC] y, entonces,
haga doble clic en el icono [CD-ROM].
Haga doble clic en el icono [Setup]
3
().
Nota
Si la pantalla de selección de idioma
aparece después de hacer doble clic
en el icono [Setup] seleccione el
idioma que desea usar y haga clic en
el botón [Siguiente]. (Normalmente el
idioma se selecciona
automáticamente).
Seleccione la casilla [PS Fuentes de
4
Pantalla] y haga clic en el botón
[Siguiente].
Precaución
No seleccione "Controlador de
impresora PS".
El controlador de la impresora PS
para la máquina debería instalarse
sólo a partir del CD-ROM que
acompaña a la unidad
AR-M258/M318 y al kit de expansión
para impresora AR-P27.
22
Siga las instrucciones en pantalla.
5
Page 63

USO DEL CONTROLADOR DE
IMPRESORA PS ESTÁNDAR DE
WINDOWS (Windows 98/Me/NT 4.0)
Si el kit de expansión PS3 está instalado en la máquina y desea utilizar el controlador de impresora
estándar de Windows 98/Me/NT 4.0 PS, siga los pasos a continuación para instalar el controlador
PPD utilizando el Asistente para agregar impresoras.
Nota
• El CD-ROM no incluye software para Windows NT 4.0
Póngase en contacto con su concesionario o representante de servicio autorizado si desea el
software para Windows NT 4.0.
• Si está utilizando Windows 2000/XP/Server 2003, puede instalar el controlador PPD del
programa de instalación.
• Asegúrese de ver el archivo Readme (Readme.txt) antes de instalar el controlador PPD. Si utiliza
Windows 98/Me, el archivo Readme se encuentra en la carpeta [Spanish] del "Software
CD-ROM". Si utiliza Windows 98/Me, el archivo Readme se encuentra en la carpeta [Spanish]
del "Software CD-ROM". Para conocer la ubicación de la carpeta, consulte el paso 4.
ESPAÑOL
Inserte el "Software CD-ROM" en la
1
unidad de CD-ROM del ordenador.
Inserte el "Software CD-ROM" que muestra
"Disc 1" en la carátula del CD-ROM.
Haga clic en el botón [Inicio], seleccione
2
[Configuración] y entonces haga clic en
[Impresoras].
Haga doble clic en el icono [Agregar
3
impresora].
Aparecerá el "Asistente para agregar
impresoras".
Siga las instrucciones que aparecen en
4
la pantalla.
Cuando se le pida especificar la ruta del
archivo PPD, escriba la ruta como sigue.
(Sustituya la letra de su unidad de
CD-ROM por "R" en las siguientes rutas).
Sistema operativo Ruta del archivo PPD
Windows 98/Me R:\Drivers\Printer
\Spanish\PPD\9XME
Windows NT 4.0 (Carpeta que contiene
los archivos extraídos)
\Spanish\PPD\NT40
Nota
Después de la instalación, consulte
"CONFIGURANDO EL
CONTROLADOR DE IMPRESORA"
(página 24) para configurar los ajustes
del controlador de la impresora.
Instalación de la información sobre la fuente permanente (Windows 98/Me)
Si ha instalado el controlador PPD en Windows 98/Me y utiliza las fuentes permanentes de la
máquina, debe instalar la información de fuente permanente. Siga el procedimiento a continuación
para instalar la información de fuente permanente.
•
Nota
Antes de instalar la información de fuente permanente, asegúrese de instalar el controlador PPD.
• En caso de no poder seleccionar una fuente interna en una aplicación, instale otra vez la
información de fuente interna.
Inserte el "Software CD-ROM" en la
1
unidad de CD-ROM del ordenador.
Inserte el "Software CD-ROM" que muestra
"Disc 1" en la carátula del CD-ROM.
Haga doble clic en [Mi PC] ( ) y entonces
2
haga doble clic en el icono [CD-ROM] ( ).
Haga doble clic en la carpeta [Drivers],
3
la carpeta [Printer], la carpeta
[Spanish], la carpeta [PPD], la carpeta
[9XME] y, entonces, [PFMSetup.exe].
Siga las instrucciones en pantalla.
4
Después de haber instalado la información
de fuente permanente, reinicie el ordenador.
23
Page 64

CONFIGURANDO EL
CONTROLADOR DE IMPRESORA
Después de instalar el controlador de impresora, debe ajustar la configuración del controlador de la
impresora según las opciones instaladas, y el tamaño y el tipo de papel cargado en la máquina. Siga
los pasos a continuación para configurar el controlador de la impresora.
Nota
Si el controlador PPD está instalado, consulte "Cuando el controlador PPD está instalado" (página
25).
Haga clic en el botón [Inicio] y entonces
1
haga clic en [Impresoras y faxes].
En Windows 98/Me/NT 4.0/2000, haga clic en
el botón [Inicio], seleccione [Configuración], y
entonces seleccione [Impresoras].
Nota
2
3
4
En Windows XP, si no aparece [Impresoras y
faxes] en el menú [Inicio], haga clic en el
botón [Inicio], seleccione [Panel de control],
elija [Impresoras y otro hardware], y entonces
seleccione [Impresoras y faxes].
Haga clic en el icono del controlador de
impresora "SHARP AR-XXXX" y seleccione
[
Propiedades] en el menú [Archivo].
Si utiliza Windows NT 4.0/2000/XP/
Server 2003, vaya al paso 4.
En Windows 98/Me, haga clic en la
pestaña [Configuración].
Haga clic en la pestaña [Configuración]
y configure la impresora según las
opciones que que haya instalado.
Realice correctamente la configuración de
la impresora. En caso contrario, podría no
imprimir correctamente.
Haga clic en el botón [Configurar
5
bandejas] y determine el tamaño y el
tipo de papel cargado en cada bandeja.
Seleccione una bandeja del menú "Fuente
papel", fije el tamaño del papel cargado
en la bandeja de menú "Establecer
tamaño papel" y seleccione el tipo de
papel del menú "Establecer tipo de papel".
Repita para todas las bandejas.
Haga clic en el botón [Aceptar] de la
6
ventana "Configurar bandejas".
Haga clic en el botón [Aceptar] en la
7
ventana de propiedades de la
impresora.
24
Nota
Si la máquina se usa como impresora de
red, puede hacer clic en el botón
[Configuración automática] para configurar
automáticamente los ajustes basados en
el estado de la máquina detectado.
Nota
Puede comprobar las opciones
instaladas en la máquina imprimiendo
el "LISTA AJUST. IMPRESORA" en
los ajustes personalizados. Siga estos
pasos para imprimir el "LISTA AJUST.
IMPRESORA". Pulse la tecla
[AJUSTES PERSONALIZADOS],
toque la tecla [IMPRESIÓN DE
LISTADOS], toque la tecla [IMPRIMIR
PÁGINA DE PRUEBA] y entonces
toque la tecla [LISTA AJUST.
IMPRESORA].
Page 65

CONFIGURANDO EL CONTROLADOR DE IMPRESORA
Cuando el controlador PPD está instalado
Haga clic en el botón [Inicio] y entonces
1
haga clic en [Impresoras y faxes].
En Windows 98/Me/NT 4.0/2000, haga
clic en el botón [Inicio], seleccione
[Configuración], y entonces seleccione
[Impresoras].
Nota
2
En Windows XP, si no aparece
[Impresoras y faxes] en el menú
[Inicio], haga clic en el botón [Inicio],
seleccione [Panel de control], elija
[Impresoras y otro hardware], y
entonces seleccione [Impresoras y
faxes].
Haga clic en el icono del controlador de
impresora "SHARP AR-XXXX" y
seleccione
[
Archivo].
[
Propiedades] en el menú
Configure el controlador de la impresora
3
para las opciones instaladas en la
máquina.
(1)
(2)
(1) Haga clic en la ficha [Configuración
de dispositivo].
En Windows 98/Me, haga clic en la ficha
[Opciones de dispositivo].
(2) Configure cada elemento según la
configuración de la máquina.
Los elementos y procedimientos para
configurar cada elemento varían
dependiendo de la versión del sistema
operativo.
(3) Haga clic en el botón [Aceptar].
(3)
ESPAÑOL
Nota
Puede comprobar las opciones
instaladas en la máquina imprimiendo
el "LISTA AJUST. IMPRESORA" en
los ajustes personalizados. Siga estos
pasos para imprimir el "LISTA AJUST.
IMPRESORA". Pulse la tecla
[AJUSTES PERSONALIZADOS],
toque la tecla [IMPRESIÓN DE
LISTADOS], toque la tecla [IMPRIMIR
PÁGINA DE PRUEBA] y entonces
toque la tecla [LISTA AJUST.
IMPRESORA].
25
Page 66

CÓMO USAR EL MANUAL EN LÍNEA
El manual en línea proporciona instrucciones detalladas para el funcionamiento de la máquina como
impresora. Visualice el manual en línea para usar la función de impresión después de finalizar la
instalación inicial.
Nota
1
2
3
Para consultar los manuales en formato PDF, se requiere Acrobat® Reader o Adobe® ReaderTM de
Adobe Systems Incorporated. Si no tiene instalado ninguno de estos programas, puede
descargarlos en la siguiente dirección URL:
http://www.adobe.com/
Inserte el CD-ROM en la unidad de
CD-ROM de su ordenador.
Inserte el "Software CD-ROM" que
muestra "Disc 2" en la carátula del
CD-ROM.
Haga clic en el botón [Inicio],
seleccione [Mi PC] ( ), y entonces
haga doble clic en el icono [CD-ROM]
().
En Windows 98/Me/NT 4.0/2000, haga
doble clic en [Mi PC] y, entonces, haga
doble clic en el icono [CD-ROM].
Haga doble clic en la carpeta [Manual],
doble clic en la carpeta [Spanish] y
luego doble clic en el icono
[ARP27.pdf].
Aparecerá el manual en línea.
26
Page 67

RESOLUCIÓN DE PROBLEMAS
Si el software no se instala correctamente, compruebe los siguientes elementos de su ordenador.
Para eliminar el software, ver "Eliminar el software" en el manual en línea.
La información acerca de la resolución de problemas también puede encontrarse en los archivos
LEAME para cada uno de los programas de software. Para ver un archivo LÉAME, haga clic en el botón
[Mostrar LÉAME] en la ventana "Selección de software".
No se puede instalar el
controlador de impresora
(Windows 2000/XP/Server
2003)
Si no se puede instalar el controlador de
impresora en Windows 2000/XP/Server 2003,
siga los pasos siguientes para verificar la
configuración de su ordenador.
Haga clic en el botón [Inicio] y luego
1
haga clic en [Panel de control].
En Windows 2000, haga clic en el botón
[Inicio], seleccione [Configuración], y
luego haga clic en [Panel de control].
Haga clic en [Rendimiento y
2
mantenimiento] y luego haga clic en
[Sistema].
En Windows 2000, haga doble clic en el
icono [Sistema].
Haga clic en la pestaña [Hardware] y
3
luego haga clic en el botón [Firma de
controladores].
Otra impresora está usando el
puerto paralelo (cuando se usa
un cable paralelo)
Si otra impresora está usando el puerto paralelo y
no se puede imprimir utilizando la máquina, siga los
pasos siguientes para modificar la configuración del
puerto del controlador de la otra impresora, y
asegúrese de que el puerto del controlador de la
máquina está configurado como LPT1.
Haga clic en el botón [Inicio] y entonces
1
haga clic en [Impresoras y faxes].
En Windows 98/Me/NT 4.0/2000, haga clic en
el botón [Inicio], seleccione [Configuración], y
entonces seleccione [Impresoras].
Nota
2
En Windows XP, si no aparece [Impresoras
y faxes] en el menú [Inicio], haga clic en el
botón [Inicio], seleccione [Panel de control],
elija [Impresoras y otro hardware], y
entonces seleccione [Impresoras y faxes].
Haga clic en el icono del controlador de
la impresora para el que desea cambiar
el valor del puerto y seleccione
[Propiedades] en el menú [Archivo].
ESPAÑOL
Verifique [¿Qué acción desea que
4
realice Windows?] ([Comprobación de
la firma del archivo] en Windows 2000).
Si seleccionó la opción [Bloquear], no
será posible instalar el controlador de la
impresora. Seleccione la opción [Advertir]
y, a continuación, instale el controlador de
impresora.
Haga clic en la ficha [Puertos].
3
En Windows 98/Me, haga clic en la ficha [Detalles].
Seleccione [FILE:] en el cuadro de la lista
4
"Imprimir en los siguientes puertos" y
haga clic en el botón [Aceptar].
Haga clic en el icono del controlador de
5
impresora "SHARP AR-XXXX" y seleccione
[Propiedades] en el menú [Archivo].
Haga clic en la ficha [Puertos].
6
En Windows 98/Me, haga clic en la ficha [Detalles].
Seleccione [LPT1] en el cuadro de la lista
7
"Imprimir en los siguientes puertos" y
haga clic en el botón
Nota
En caso de que necesite utilizar la otra
impresora, repita los pasos anteriores para
configurar el puerto de la máquina como
"FILE:" y modifique la configuración del puerto
de la otra impresora otra vez como "LPT1".
[
Aceptar].
27
Page 68

RESOLUCIÓN DE PROBLEMAS
El controlador de impresora no
puede instalarse
correctamente con Plug and
Play (Windows 2000/XP/Server
2003)
En Windows 2000/XP/Server 2003, si el
controlador de la impresora no se puede
instalar correctamente con Plug and Play (por
ejemplo, Plug and Play no copia los archivos
necesarios para la instalación del controlador
de impresora), siga estos pasos para eliminar
elementos innecesarios y luego instale el
controlador de la impresora, tal como se
describe en "USANDO LA MÁQUINA CON UN
UNA CONEXIÓN PARALELA O USB".
Haga clic en el botón [Inicio], haga clic
1
en [Panel de control], y luego haga clic
en [Rendimiento y mantenimiento].
En Windows 2000, haga clic en el botón
[Inicio], seleccione [Configuración], y
luego haga clic en [Panel de control].
Haga clic en [Sistema], haga clic en la
2
pestaña [Hardware] y haga clic en el
botón [Administrador de dispositivos].
Nota
3
En Windows 2000, haga doble clic en
el icono [Sistema], haga clic en la
pestaña [Hardware] y haga clic en el
botón [Administrador de dispositivos].
Haga clic en el icono ( ) al lado de
"Otros dispositivos".
No aparece la pantalla Plug and
Play (cuando se utiliza un cable
USB)
Si la pantalla Plug and Play no aparece
después de conectar la máquina a su
ordenador con un cable USB y encender la
máquina, siga los pasos siguientes para
verificar si el puerto USB está libre.
Haga clic en el botón [Inicio], haga clic
1
en [Panel de control], y luego haga clic
en [Rendimiento y mantenimiento].
En Windows 98/Me/2000, haga clic en el
botón [Inicio], seleccione [Configuración] y
luego haga clic en [Panel de control].
Haga clic en [Sistema], haga clic en la
2
pestaña [Hardware] y haga clic en el
botón [Administrador de dispositivos].
Aparecerá "Controlador de bus serie
universal" en la lista de dispositivos.
Nota
3
• En Windows 98/Me, haga doble clic
en el icono [Sistema] y clic en la
pestaña [Administrador de
dispositivos].
• En Windows 2000, haga doble clic
en el icono [Sistema], haga clic en la
pestaña [Hardware] y haga clic en el
botón [Administrador de
dispositivos].
Si no aparece el icono [Sistema] en
•
Windows Me, haga clic en [vea todas
las opciones del Panel de control].
Haga clic en el icono ( ) al lado de
"Controlador de bus serie universal".
Si aparece "SHARP AR-XXXX",
selecciónelo y bórrelo.
Nota
4
Si no aparece "Otros dispositivos",
cierre la ventana "Administrador de
dispositivos".
Instale el software.
28
Deberían aparecer dos elementos: su tipo de
controlador de host abierto y el concentrador
de raíz. Si aparecen estos elementos, puede
usar el puerto USB. Si el "Controlador de bus
serie universal" muestra un punto de
exclamación amarillo o no aparece, debe
consultar el manual de su ordenador para
solucionar problemas de USB o contactar al
fabricante de su ordenador.
Cuando haya verificado que el puerto
4
USB está habilitado, instale el software.
Page 69

INSTALACIÓN EN UN ENTORNO MACINTOSH
Instale el archivo PPD necesario para utilizar la máquina como una impresora desde el Software
CD-ROM suministrado con la unidad AR-M258/AR-M318 y el kit de expansión para impresora
(AR-P27).
Nota
• El kit de expansión PS3 es necesario para poder utilizar la máquina como una impresora en un
entorno Macintosh. Asimismo, la función de impresora sólo se puede utilizar cuando la máquina
está conectada a una red. La función de impresora no puede utilizarse cuando la máquina está
conectada con un cable USB.
• El controlador PC-Fax no puede utilizarse en un entorno Macintosh.
ACERCA DEL SOFTWARE
El CD-ROM contiene el siguiente software:
Disc 2
• Archivo PPD
Es el archivo de descripción de la impresora que permite utilizar la máquina como impresora
compatible con PostScript 3. Es necesario el kit de expansión PS3 para utilizar la máquina en un
entorno Macintosh.
MAC OS X: página 30
(v10.1.5, v10.2.8, v10.3.9, v10.4 - v10.4.8)
MAC OS 9.0 - 9.2.2: página 35
ESPAÑOL
ANTES DE LA INSTALACIÓN
REQUERIMIENTOS DE HARDWARE Y SOFTWARE
Necesitará el hardware y software siguientes para poder instalar el archivo PPD para Macintosh.
Sistema operativo Mac OS 9.0 a 9.2.2, 10.1.5, 10.2.8, 10.3.9, 10.4 a 10.4.8
Otros requisitos de hardware
CONEXIÓN A UNA RED
Para conocer el procedimiento de conexión a una red, consulte "CONEXIÓN A UNA RED" (página 4).
Un entorno que permita el funcionamiento normal de cualquiera de los
sistemas operativos mencionados. (Incluyendo los ordenadores
Macintosh con procesador Intel).
29
Page 70

MAC OS X
Nota
1
2
3
4
Las explicaciones de las pantallas y los procedimientos hacen referencia principalmente a Mac OS
X v10.4. Las pantallas pueden variar en otras versiones del sistema operativo.
Inserte el "Software CD-ROM" en la
unidad de CD-ROM del ordenador.
Inserte el "Software CD-ROM" que
muestra "Disc 2" en la carátula del
CD-ROM.
Haga doble clic en el icono [CD-ROM]
( ) en el escritorio.
Haga doble clic en la carpeta
[MacOSX].
Antes de instalar el software, asegúrese
de leer el archivo "ReadMe First". El
archivo "ReadMe First" se encuentra en la
carpeta [Spanish] dentro de la carpeta
[Readme].
Haga doble clic en la carpeta
correspondiente a la versión del
sistema operativo instalado.
v10.1.5
v10.2.8
Haga doble clic en el icono [AR-B01]
5
().
Nota
6
• Si aparece la ventana "Autorización"
en Mac OS X v10.1.5, haga clic en
el icono de candado ( ), escriba la
contraseña y haga clic en el botón
[OK].
• Si aparece la ventana "Autenticar"
en Mac OS X v10.2.8, escriba la
contraseña y haga clic en el botón
[OK].
Haga clic en el botón [Continuar].
30
v10.3.9
v10.4 - 10.4.8
Page 71

MAC OS X
Aparecerá la ventana del Acuerdo de
7
Licencia. Lea y comprenda el
contenido del acuerdo de licencia y, a
continuación, haga clic en el botón
[Continuar].
Aparecerá un mensaje preguntando si
acepta las condiciones de la licencia.
Haga clic en el botón [Aceptar].
Nota
8
9
Si el contrato de licencia aparece en
un idioma diferente, puede cambiarlo
en el menú de idioma.
Seleccione el disco duro donde desea
instalar el archivo PPD y haga clic en el
botón [Continuar].
Asegúrese de seleccionar el disco duro
donde está instalado el sistema operativo.
Haga clic en el botón [Instalar].
La instalación comienza.
Cuando el mensaje "El software se ha
10
instalado correctamente" aparece en la
ventana de instalación, haga clic en el
botón [Cerrar].
De este modo se completa la instalación del
software. A continuación, configure los ajustes
del controlador de impresora.
Seleccione [Utilidades] en el menú [Ir].
11
Si está utilizando Mac OS X v10.1.5 o v10.2.8,
seleccione [Aplicaciones] en el menú [Ir].
Haga doble clic en el icono [Utilidad
12
Configuración Impresoras] ( ).
• Si está utilizando Mac OS X v10.1.5,
haga doble clic en la carpeta [Utilities] y,
a continuación, doble clic en el icono
[Print Center].
• Si está utilizando Mac OS X v10.2.8,
haga doble clic en la carpeta [Utilidades]
y, a continuación, doble clic en el icono
[Centro de Impresión].
ESPAÑOL
Nota
Si aparece la ventana "Autenticar",
escriba la contraseña y haga clic en el
botón [OK].
Nota
13
Si es la primera vez que instala un
controlador de impresora en el ordenador,
aparecerá un mensaje de confirmación.
Haga clic en el botón [Añadir].
Haga clic en [Añadir].
Si está utilizando Mac OS X v10.1.5, haga
doble clic en la carpeta [Añadir impresora].
31
Page 72

MAC OS X
Configure el controlador de impresora.
14
• El procedimiento para configurar el controlador de impresora varía según la versión del
sistema operativo. El procedimiento para las versiones 10.4 - 10.4.8 y el procedimiento para
otras versiones se describen más adelante por separado.
•
La máquina puede imprimir utilizando la función IPP. Si desea utilizar la función IPP, consulte el apartado
"Impresión utilizando la función IPP" (página 34) para configurar los ajustes del controlador de impresora.
v10.4 - 10.4.8
(1)
(2)
(3)
(4)
(1) Haga clic en el icono [Navegador por
omisión].
Si aparecen varias zonas de AppleTalk, seleccione
la zona que incluya la impresora en el menú.
(2) Haga clic en el nombre del modelo de
la máquina.
• El nombre del modelo de la máquina
aparece generalmente como
[SCxxxxxx]. ("xxxxxx" es una secuencia
de caracteres que varía dependiendo
del modelo.)
• El archivo PPD de la máquina se
selecciona automáticamente.
(3) Asegúrese de que está seleccionado
el archivo PPD de su modelo.
(4) Haga clic en el botón [Añadir].
El archivo PPD de la máquina se
selecciona automáticamente y los
dispositivos periféricos instalados en la
máquina se detectan y configuran
automáticamente.
v10.1.5, v10.2.8, v10.3.9
(1)
(2)
(3)
(4)
(1) Seleccione [AppleTalk].
Si aparecen varias zonas de AppleTalk, seleccione
la zona que incluya la impresora en el menú.
(2) Haga clic en el nombre del modelo de
la máquina.
El nombre del modelo de la máquina
aparece generalmente como [SCxxxxxx].
("xxxxxx" es una secuencia de caracteres
que varía dependiendo del modelo.)
(3)
Seleccione el archivo PPD de la máquina.
• Si va a utilizar Mac OS X v10.1.5,
seleccione [Otro]. Aparecerá la ventana
de selección del archivo PPD. Haga clic
en [El nombre del disco de inicio] [Library] - [Printers] - [PPDs] - [Contents]
- [Resources] - [es.lproj] – "Archivo PPD
para su modelo" y, a continuación, haga
clic en el botón [Escoger].
• Si está utilizando Mac OS X v10.2.8,
seleccione [Sharp] y pulse en el archivo
PPD de su modelo.
• Si está utilizando Mac OS X v10.3.9,
seleccione [Selección automática].
(4) Haga clic en el botón [Añadir].
Si está utilizando Mac OS X v10.3.9, el
archivo PPD de la máquina se selecciona
automáticamente y los dispositivos
periféricos instalados en la máquina se
detectan y configuran de forma automática.
Nota
El archivo PPD se instala en las siguientes carpetas del disco de arranque.
[Librería] ([Library]) - [Printers] - [PPDs] - [Contents] - [Resources] - [es.lproj]
Si utiliza Mac OS X v10.1.5, con este paso se completa la configuración del controlador de
impresora. Si utiliza una versión diferente de Mac OS X v10.1.5, continúe en el paso siguiente.
32
Page 73

MAC OS X
Muestre la información de la
15
impresora.
(1) Haga clic en el nombre de la máquina.
(2) Haga clic en [Mostrar información].
Si está utilizando Mac OS X v10.2.8,
seleccione [Mostrar información] en el
menú [Impresoras].
(2)
(1)
Seleccione la configuración de la
16
máquina.
Si ha seleccionado [Selección automática]
en (3) en el paso 14, la configuración de la
máquina se detecta y se define
automáticamente. Compruebe las
opciones configuradas para determinar
que son correctas.
(1) Seleccione [Opciones instalables].
(2) Seleccione las opciones que están
instaladas en la máquina.
(3) Haga clic en el botón [Aplicar
cambios].
(4) Haga clic para cerrar la ventana.
(4)
(1)
(2)
(3)
ESPAÑOL
Nota
De este modo se completa la configuración
del controlador de impresora.
Puede comprobar las opciones
instaladas en la máquina imprimiendo
el "LISTA AJUST. IMPRESORA" en
los ajustes personalizados. Siga estos
pasos para imprimir el "LISTA AJUST.
IMPRESORA". Pulse la tecla
[AJUSTES PERSONALIZADOS],
toque la tecla [IMPRESIÓN DE
LISTADOS], toque la tecla [IMPRIMIR
PÁGINA DE PRUEBA] y entonces
toque la tecla [LISTA AJUST.
IMPRESORA].
33
Page 74

MAC OS X
Impresión utilizando la función IPP
La máquina puede imprimir utilizando la función IPP. Cuando la máquina se encuentra en una ubicación
remota, esta función se puede utilizar en lugar de la función de fax para imprimir una imagen de mayor
calidad que un fax. Si desea utilizar la función IPP, siga los pasos descritos a continuación para
seleccionar el archivo PDD cuando configure el controlador de impresora (paso 14 de la página 32).
v10.4 - 10.4.8
(1)
(2)
(3)
(4)
(1) Haga clic en el icono [Impresora IP].
(2) Seleccione [Protocolo IPP] en
"Protocolo". Introduzca la dirección
de la máquina (dirección IP o nombre
de dominio) y el "Cola".
Introduzca "ipp" en "Cola".
(3) Seleccione [Sharp] en "Imprimir con"
y haga clic en el archivo PPD de su
modelo.
(4) Haga clic en el botón [Añadir].
v10.1.5, v10.2.8, v10.3.9
(1)
(2)
(3)
(4)
(1) Seleccione [Impresión IP].
Si va a utilizar Mac OS X v10.1.5,
seleccione [Impresoras LPR sobre IP].
(2) Seleccione [Protocolo de impresión
en internet] en "Tipo de impresora".
Introduzca la dirección de la máquina
(dirección IP o nombre de dominio) y
el "Nombre de la cola".
• Si utiliza Mac OS X v10.1.5, introduzca
la dirección de la máquina (dirección IP
o nombre de dominio) en "Dirección de
la impresora".
• Si utiliza Mac OS X v10.2.8, introduzca
la dirección de la máquina (dirección IP
o nombre de dominio) en "Dirección de
la impresora".
• Introduzca "ipp" en "Nombre de la cola".
(3) Seleccione [Sharp] en "Modelo de
impresora" y haga clic en el archivo
PPD correspondiente a su modelo.
Si va a utilizar Mac OS X v10.1.5,
seleccione [Otro]. Aparecerá la ventana de
selección del archivo PPD. Haga clic en [El
nombre del disco de inicio] - [Library] [Printers] - [PPDs] - [Contents] [Resources] - [es.lproj] – "Archivo PPD
para su modelo" y, a continuación, haga
clic en el botón [Escoger].
(4) Haga clic en el botón [Añadir].
34
Nota
Para obtener información sobre cómo comprobar la dirección IP, consulte "Comprobar la dirección
IP de la máquina" (página 4).
Page 75

MAC OS 9.0 - 9.2.2
Nota
1
2
3
4
Si está utilizando Mac OS 9.0 a 9.2.2, asegúrese de que está instalado "LaserWriter 8" y de que la
casilla de verificación "LaserWriter 8" esté seleccionada ( ) en "Gestor de Extensiones" dentro
de "Paneles de Control". Si no, debe instalarlo desde el CD-ROM de sistema suministrado con su
ordenador Macintosh.
Inserte el "Software CD-ROM" en la
unidad de CD-ROM del ordenador.
Inserte el "Software CD-ROM" que
muestra "Disc 2" en la carátula del
CD-ROM.
Haga doble clic en el icono [CD-ROM]
( ) en el escritorio.
Haga doble clic en la carpeta [MacOS].
Antes de instalar el software, asegúrese
de leer el archivo "ReadMe First". El
archivo "ReadMe First" se encuentra en la
carpeta [Spanish] dentro de la carpeta
[Readme].
Haga doble clic en el icono [Installer]
().
Lea el mensaje en la ventana que
7
aparece y haga clic en el botón
[Continuar].
Comienza la instalación del archivo PPD.
Después de la instalación, aparecerá un
mensaje indicando que debe reiniciar el
ordenador. Haga clic en el botón [OK] y
reinicie el ordenador.
De este modo se completa la instalación del
software. A continuación, configure los
ajustes del controlador de impresora.
Seleccione [Selector] en el Menú
8
Apple.
Cree una impresora.
9
ESPAÑOL
Haga clic en el botón [Instalar].
5
Aparecerá la ventana del Acuerdo de
6
Licencia. Lea y comprenda el
contenido del acuerdo de licencia y, a
continuación, haga clic en el botón [Sí].
(1)
(2)
(3)
(1) Haga clic en el icono [LaserWriter 8].
Si aparecen varias zonas de AppleTalk,
seleccione la zona que incluya la
impresora.
(2) Haga clic en el nombre del modelo de
la máquina.
El nombre del modelo de la máquina
aparece generalmente como [SCxxxxxx].
("xxxxxx" es una secuencia de caracteres
que varía dependiendo del modelo.)
(3) Haga clic en el botón [Crear].
35
Page 76

MAC OS 9.0 - 9.2.2
Seleccione el archivo PPD.
10
(1)
Haga clic en el archivo PPD para su modelo.
(2) Haga clic en el botón [Seleccionar].
Nota
• Si no aparece el cuadro de diálogo
anterior y vuelve al cuadro de
diálogo "Selector", siga estos pasos
para seleccionar al archivo PPD
manualmente.
(1) Asegúrese de que la máquina
esté seleccionada en la lista
"Seleccione una impresora
PostScript", y entonces haga clic
en el botón [Configurar] seguido
del botón [Seleccionar PPD].
(2) Seleccione el archivo PPD para
su modelo y haga clic en el
botón [Abrir].
(3) Haga clic en el botón [OK].
•
El archivo PPD está instalado en la
carpeta [Descripción de la impresora]
en la carpeta [Extensiones].
(1)
(2)
Seleccione la configuración de la
13
máquina.
(1) Seleccione las opciones que están
instaladas en la máquina.
(2) Haga clic en el botón [OK].
Nota
14
15
Puede comprobar las opciones
instaladas en la máquina imprimiendo
el "LISTA AJUST. IMPRESORA" en
los ajustes personalizados. Siga estos
pasos para imprimir el "LISTA AJUST.
IMPRESORA". Pulse la tecla
[AJUSTES PERSONALIZADOS],
toque la tecla [IMPRESIÓN DE
LISTADOS], toque la tecla [IMPRIMIR
PÁGINA DE PRUEBA] y entonces
toque la tecla [LISTA AJUST.
IMPRESORA].
Haga clic en el botón [OK] en la ventana
del paso 12 para cerrar la ventana.
Haga clic en el cuadro de cierre ( )
para cerrar el "Selector".
(1)
(2)
Asegúrese de que la máquina esté
11
seleccionada en la lista "Seleccione
una impresora PostScript" y entonces
haga clic en el botón [Configurar].
Haga clic en el botón [Configurar].
12
Nota
Para configurar automáticamente los
ajustes según las opciones instaladas
detectadas de la máquina, haga clic
en el botón [Config. automática].
36
De este modo se completa la configuración
del controlador de impresora.
Instalación de las fuentes de pantalla
Las fuentes de pantalla para Mac OS 9.0 -
9.2.2 se encuentran en la carpeta [Font] del
CD-ROM "PRINTER UTILITIES" que se
suministra con el kit de expansión PS3. Copie
las fuentes que desee instalar a la carpeta
[Carpeta del Sistema] del disco de arranque.
Nota
Si encuentra problemas que puedan
deberse a la fuente de pantalla
instalada, bórrela inmediatamente del
sistema.
Page 77

CÓMO USAR EL MANUAL EN LÍNEA
Siga los siguientes pasos para visualizar el manual en línea. Este manual contiene la información
necesaria para utilizar esta máquina como impresora.
Nota
1
2
3
4
Para consultar los manuales en formato PDF, se requiere Acrobat® Reader o Adobe® ReaderTM de
Adobe Systems Incorporated. Si no tiene instalado ninguno de estos programas, puede
descargarlos en la siguiente dirección URL:
http://www.adobe.com/
Inserte el "Software CD-ROM" en la
unidad de CD-ROM del ordenador.
Inserte el "Software CD-ROM" que
muestra "Disc 2" en la carátula del
CD-ROM.
Haga doble clic en el icono CD-ROM
( ) en el escritorio.
Haga doble clic en la carpeta [Printer
Manual].
Haga doble clic en la carpeta [Spanish]
y doble clic en el icono [ARP27].
ESPAÑOL
37
Page 78

Page 79

MATIERES
INSTALLATION SOUS ENVIRONNEMENT WINDOWS
A PROPOS DU LOGICIEL .................................................................................................... 2
AVANT L'INSTALLATION..................................................................................................... 3
● CONFIGURATION MATERIELLE ET LOGICIELLE REQUISE.................................................. 3
● ENVIRONNMENT D'INSTALLATION ET PROCEDURE ........................................................... 3
UTILISATION DE LA MACHINE EN TANT QU'IMPRIMANTE RESEAU............................. 4
● CONNEXION A UN RESEAU..................................................................................................... 4
● INSTALLATION DU PILOTE D'IMPRIMANTE ET DU PILOTE PC-FAX.................................... 5
● INSTALLATION DE PRINTER STATUS MONITOR.................................................................11
UTILISATION DE LA MACHINE AVEC UNE CONNEXION PARALLELE OU USB ......... 12
● INSTALLATION DU PILOTE D'IMPRIMANTE ET DU PILOTE PC-FAX.................................. 12
● RACCORDEMENT A UN ORDINATEUR ................................................................................. 19
UTILISATION DE LA MACHINE COMME IMPRIMANTE PARTAGEE.............................. 20
INSTALLATION DES POLICES D'AFFICHAGE PS........................................................... 22
UTILISATION DU PILOTE D'IMPRIMANTE WINDOWS PS STANDARD (Windows 98/Me/NT 4.0)
CONFIGURATION DU PILOTE D'IMPRIMANTE
...................................................................... 24
COMMENT UTILISER LE MANUEL EN-LIGNE ................................................................. 26
DEPANNAGE ...................................................................................................................... 27
INSTALLATION SOUS ENVIRONNEMENT MACINTOSH
A PROPOS DU LOGICIEL .................................................................................................. 29
AVANT L'INSTALLATION................................................................................................... 29
● CONFIGURATION MATERIELLE ET LOGICIELLE REQUISE................................................ 29
● CONNEXION A UN RESEAU................................................................................................... 29
MAC OS X............................................................................................................................ 30
MAC OS 9.0 - 9.2.2..............................................................................................................35
COMMENT UTILISER LE MANUEL EN-LIGNE ................................................................. 37
...... 23
FRANÇAIS
INTRODUCTION
Ce manuel décrit comment installer et configurer le logiciel nécessaire à la fonction imprimante du système
multifonctions numérique Sharp. Il décrit également la procédure de visualisation du manuel en ligne.
•
Remarque
ACCORD DE LICENCE
La LICENCE D'UTILISATION DU LOGICIEL s'affiche lorsque vous installez le logiciel depuis le
CD-ROM. En utilisant tout ou partie du logiciel sur le CD-ROM ou sur la machine, vous vous engagez
à respecter les clauses de la LICENCE D'UTILISATION DU LOGICIEL.
Le contenu des photos d'écran, les messages et les noms des touches utilisés dans le manuel pourraient être
différents de ceux utilisés sur la machine en cas d'améliorations ou de modifications du produit.
La description des écrans et procédures contenus dans ce manuel est principalement conçue pour
Windows
Ces écrans peuvent varier dans des versions différentes de ces systèmes d'exploitation.
• Ce manuel contient des références à la fonction fax. Cependant, notez que cette fonction n'est
pas disponible dans certains pays et certaines régions.
• Ce manuel fournit les explications relatives au pilote PC-Fax et au pilote PPD. Cependant, notez
que dans certains pays et certaines régions, les pilotes PC-Fax et PPD ne sont pas disponibles
et n'apparaissent pas dans le logiciel pour l'installation.
• Lorsqu'il est fait référence au modèle "AR-XXXX", la série de "XXXX" représente votre modèle.
• Ce manuel concerne le "Software CD-ROM" qui accompagne les modèles AR-M258/AR-M318
et le kit d'extension monoposte (AR-P27) simplement en tant que "CD-ROM".
• Le kit d'extension PS3 (AR-PK1N) mentionné dans ce manuel est une option.
®
XP en environnement Windows® et pour Mac OS X v10.4 en environnement Macintosh.
1
Page 80

INSTALLATION SOUS ENVIRONNEMENT WINDOWS
A PROPOS DU LOGICIEL
Le "Software CD-ROM" est composé de 2 disques. Le CD-ROM contient le logiciel suivant :
Remarque
Pour les utilisateurs de Windows NT 4.0
Le CD-ROM n'inclut pas de logiciel pour Windows NT 4.0.
Contactez votre fournisseur ou le représentant du service après-vente le plus proche si vous
souhaitez acquérir le logiciel pour Windows NT 4.0.
Disque 1 (Disc 1)
• Pilote d'imprimante
Les pilotes ci-dessous permettent d'utiliser la machine comme imprimante.
- Pilotes d'imprimante PCL6 et PCL5e
La machine accepte les langages de description de page PCL6 et PCL5e de Hewlett-Packard. Il
est recommandé d'utiliser le pilote d'imprimante PCL6. En cas de problème pour imprimer à
partir d'un logiciel plus ancien avec le pilote d'imprimante PCL6, utilisez le pilote PCL5e.
- Pilote d'imprimante PS*
Le pilote d'imprimante PS prend en charge le langage de description de page PostScript 3
développé par Adobe Systems Incorporated.
- Pilote PPD*
Le pilote PPD permet à la machine d'utiliser le pilote d'imprimante Windows PS standard.
1
• Printer Status Monitor*
Ce programme permet de contrôler l'état de la machine depuis un ordinateur.
1
2
Disque 2 (Disc 2)
• Pilote de PC-Fax*
Ce pilote permet d'envoyer un fichier depuis votre ordinateur comme s'il s'agissait d'un fax en
suivant la même procédure que celle utilisée pour imprimer un fichier (lorsque l'option fax est
installée).
• Printer Administration Utility*
Ce programme permet à l'administrateur de contrôler la machine et de configurer ses réglages
depuis un ordinateur. Pour savoir comment installer et utiliser Printer Administration Utility,
référez-vous au fichier Readme et au manuel PDF enregistrés sur le "Software CD-ROM" (Disc
2). Vous trouverez le fichier Readme et le manuel dans le dossier suivant. (Dans l'adresse
suivante, remplacez "R" par la lettre de votre lecteur de CD-ROM.)
R:\Sadmin\Documents\French
3
2
*1 Le kit d'extension PS3 est nécessaire pour utiliser le pilote d'imprimante PS ou le pilote PPD.
*2 Pour utiliser Printer Status Monitor et Printer Administration Utility, l'imprimante doit être connectée à un
réseau utilisant le protocole TCP/IP.
*3 Pour utiliser le pilote PC-Fax, Internet Explorer 4.0 ou ultérieur doit être installé sur votre ordinateur.
2
Page 81

AVANT L'INSTALLATION
CONFIGURATION MATERIELLE ET LOGICIELLE
REQUISE
Avant d'installer le logiciel, vérifiez que votre ordinateur dispose de la configuration requise.
Type d'ordinateur IBM PC/AT ou compatible disposant d'un port USB 2.0/1.1*1, interface parallèle
bi-directionnelle (IEEE 1284), ou carte 10Base-T/100Base-TX LAN
Système d'exploitation Windows 98, Windows Me,
Windows NT Workstation 4.0 (Service Pack 5 ou ultérieur)*
Windows 2000 Professionnel*2, Windows XP Professionnel*2,
Windows XP Edition familiale*2, Windows Server 2003*
Autres configurations
matérielles requises
*1 Ordinateur préinstallé compatible avec Windows 98, Windows Me, Windows 2000 Professionnel, Windows
XP Professionnel, Windows XP Edition familiale ou Windows Server 2003 disposant d'une interface USB
standard.
*2 Pour installer le logiciel à l'aide de l'installateur, des droits d'administrateur sont requis.
Environnement permettant le parfait fonctionnement des systèmes d'exploitations
cités plus haut
ENVIRONNMENT D'INSTALLATION ET PROCEDURE
Appliquez la procédure d'installation adaptée à votre système d'exploitation et aux types de câbles
dont vous disposez de la manière suivante.
2
,
2
FRANÇAIS
Câble
LAN
USB
Parallèle
Partage
d'imprimante
Remarque
Système
d'exploitation
Windows 98/Me/
NT 4.0/2000/XP/
Server 2003
Windows 98/Me/2000 Installation sous Windows 98/Me/2000 (câble USB) (page 14)
Windows XP/Server 2003
Windows 98/Me/
NT 4.0/2000
Windows XP/Server 2003
Windows 98/Me/
NT 4.0/2000/XP/
Server 2003
1. CONNEXION A UN RESEAU (page 4)
2. INSTALLATION DU PILOTE D'IMPRIMANTE ET DU PILOTE
PC-FAX (page 5)
Installation sous Windows XP/Server 2003 (câble USB/parallèle)
(page 12)
Installation sous Windows 98/Me/NT 4.0/2000 (câble parallèle)
(page 16)
Installation sous Windows XP/Server 2003 (câble USB/parallèle)
(page 12)
UTILISATION DE LA MACHINE COMME IMPRIMANTE
PARTAGEE (page 20)
Procédure à suivre
Pour les utilisateurs de Windows NT 4.0
Le CD-ROM n'inclut pas de logiciel pour Windows NT 4.0.
Contactez votre fournisseur ou le représentant du service après-vente le plus proche si vous
souhaitez acquérir le logiciel pour Windows NT 4.0.
3
Page 82

UTILISATION DE LA MACHINE EN
TANT QU'IMPRIMANTE RESEAU
Cette section explique comment installer le logiciel lorsque la machine est connectée à un réseau
Windows (réseau TCP/IP).
Réseau TCP/IP (réseau local)
Impression via le protocole LPR
Ordinateur Windows connecté au
même réseau que la machine
CONNEXION A UN RESEAU
Pour connecter la machine à un réseau, branchez le câble
LAN au connecteur réseau de la machine. Utilisez un
câble LAN blindé.
Après avoir connecté la machine à un réseau, veillez à
configurer l'adresse IP et les autres réglages réseau avant
d'installer le logiciel (l'adresse IP est configurée en usine
pour recevoir automatiquement une adresse IP lorsque la
machine est utilisée dans un environnement DHCP).
Les réglages réseau peuvent être configurés dans
"REGLAGES RESEAU" des programmes du responsable de la machine.
Mise en garde
Si vous vous servez de la machine dans un environnement DHCP, l'adresse IP de la machine
peut changer. Si tel est le cas, vous ne serez pas en mesure d'imprimer. Pour éviter ce
problème, utilisez un serveur WINS ou attribuez une adresse IP permanente à la machine.
Vérification de l'adresse IP de la machine
Vous pouvez vérifier l'adresse IP de la machine en imprimant la "LISTE PARAM. IMPRIMANTE" dans
les réglages personnalisés. Suivez ces étapes pour imprimer la "LISTE PARAM. IMPRIMANTE".
Appuyez sur la touche [REGLAGES PERSONNALISES], sur [IMPRESSION DES LISTES], sur
[PAGES DE TEST IMPRIMANTE], puis sur [LISTE PARAM. IMPRIMANTE].
4
Page 83

UTILISATION DE LA MACHINE EN TANT QU'IMPRIMANTE RESEAU
INSTALLATION DU PILOTE D'IMPRIMANTE ET DU PILOTE PC-FAX
Systèmes d'exploitation pris en charge : Windows 98/Me/NT 4.0*/2000*/XP*/Server 2003*
* Des droits administrateur sont requis pour installer le logiciel.
Remarque
1
2
• Pour les utilisateurs de Windows NT 4.0
• Le CD-ROM n'inclut pas de logiciel pour Windows NT 4.0.
Contactez votre fournisseur ou le représentant du service après-vente le plus proche si vous
souhaitez acquérir le logiciel pour Windows NT 4.0.
• Pour utiliser la machine comme imprimante réseau sous Windows NT 4.0, vous devez installer
le "Protocole TCP/IP" sur votre ordinateur. Si ce n'est pas le cas, consultez l'Aide Windows NT
4.0 pour installer le "Protocole TCP/IP".
• Le kit d'extension PS3 est nécessaire pour utiliser le pilote d'imprimante PS ou le pilote PPD.
• Pour installer le pilote PPD sous Windows 98/Me/NT 4.0, reportez-vous à la section
"UTILISATION DU PILOTE D'IMPRIMANTE WINDOWS PS STANDARD (Windows 98/Me/NT
4.0)" (page 23) et installez le pilote à l'aide de l'Assistant Ajout d'imprimante.
• Pour imprimer sur la machine via internet en utilisant la fonction IPP lorsque la machine est
installée à distance ou pour imprimer en utilisant la fonction SSL (communication cryptée),
reportez-vous à la section "Impression via les fonctions IPP et SSL" (page 8) et installez le pilote
d'imprimante ou PC-Fax.
• La procédure d'installation de cette section s'applique à la fois au pilote d'imprimante et au pilote
PC-Fax, bien que les explications soient axées sur le pilote d'imprimante.
Insérez le "Software CD-ROM" dans le
lecteur CD de votre ordinateur.
• Si vous installez le pilote d'imprimante et
que vous disposez de deux disques
"Software CD-ROM", insérez le "Disc 1".
• Si vous installez le pilote PC-Fax et que
vous disposez de deux disques
"Software CD-ROM", insérez le "Disc 2".
Cliquez sur le bouton [démarrer], sur
[Poste de travail] ( ), puis
double-cliquez sur l'icône [CD-ROM]
().
Sous Windows 98/Me/2000,
double-cliquez sur [Poste de travail] et
double-cliquez sur l'icône [CD-ROM].
Lisez le message dans la fenêtre
5
"Bienvenue" et cliquez sur le bouton
[Suivant].
Cliquez sur le bouton [Pilote
6
d'imprimante].
• Pour installer le pilote PC-Fax, cliquez
sur le bouton [Pilote de PC-Fax].
• Avant d'installer le logiciel, cliquez sur le
bouton [Affichage LISEZMOI] pour
afficher les informations détaillées du
logiciel.
FRANÇAIS
Double-cliquez sur l'icône [Setup] ( ).
3
La fenêtre "Accord de licence" apparaît.
4
Assurez-vous d'avoir compris le
contenu de l'accord de licence avant de
cliquer sur le bouton [Oui].
Remarque
Vous pouvez afficher l'"Accord de
licence" dans une autre langue en
sélectionnant celle de votre choix dans
le menu correspondant. Pour installer
le logiciel dans la langue sélectionnée,
poursuivez l'installation dans la langue
sélectionnée.
* L'écran ci-dessus apparaît lorsque le pilote
d'imprimante est en cours d'installation.
5
Page 84

UTILISATION DE LA MACHINE EN TANT QU'IMPRIMANTE RESEAU
Cliquez sur le bouton [Suivant].
7
Cliquez sur le bouton [Installation
8
standard].
Remarque
Lorsque [Installation personnalisée]
est sélectionné, vous pouvez modifier
les éléments ci-dessous. Lorsque
[Installation standard] est sélectionné,
l'installation a lieu comme indiqué
ci-dessous.
• Méthode de connexion de la
machine : Impression directe LPR
• Définir comme imprimante par
défaut : oui (à l'exception du pilote
PC-Fax)
• Nom du pilote d'imprimante : non
modifiable.
• Polices d'affichage de l'imprimante
PCL : Installées (sauf sur les
modèles qui requièrent l'installation
du kit d'extension imprimante)
Si vous avez sélectionné [Installation
personnalisée], sélectionnez
[Impression directe LPR] et cliquez sur
le bouton [Suivant]. Si vous n'avez pas
sélectionné [Impression directe LPR],
reportez-vous aux pages suivantes :
• IPP : page 8
• Imprimante partagée : page 20
• Connectée à cet ordinateur : page
12
Les imprimantes en réseau sont détectées.
9
Sélectionnez la machine et cliquez sur le bouton
[Suivant].
Remarque
10
11
• Si la machine est introuvable,
vérifiez qu'elle est sous tension et
qu'elle est connectée au réseau,
puis cliquez sur le bouton
[Rechercher de nouveau].
• Vous pouvez également cliquer sur
le bouton [Spécifiez la condition] et
rechercher la machine en tapant
son nom (nom d'hôte) ou son
adresse IP. Pour plus d'informations
concernant la vérification de
l'adresse IP, consultez "Vérification
de l'adresse IP de la machine"
(page 4).
Une fenêtre de confirmation apparaît.
Vérifiez le contenu et cliquez sur le bouton
[Suivant].
Lorsque la fenêtre de sélection du pilote
d'imprimante apparaît, sélectionnez le
pilote d'imprimante à installer et cliquez
sur le bouton [Suivant].
Sélectionnez la case du pilote d'imprimante
à installer de façon à ce qu'une coche ( )
apparaisse.
6
Page 85

UTILISATION DE LA MACHINE EN TANT QU'IMPRIMANTE RESEAU
Remarque
12
• Au cours de l'installation du pilote
PC-Fax, cet écran n'apparaît pas.
Passez à l'étape suivante.
• Le kit d'extension PS3 est
nécessaire pour utiliser le pilote
d'imprimante PS ou le pilote PPD.
•
La case [PPD] n'apparaît que si vous
utilisez Windows 2000/XP/Server 2003.
Lorsque l'on vous demande si vous
souhaitez faire de l'imprimante celle
par défaut, faites votre choix et cliquez
sur le bouton [Suivant].
Si vous installez plusieurs pilotes,
sélectionnez l'imprimante à utiliser par
défaut.
Si vous ne souhaitez définir aucun des
pilotes d'imprimante comme l'imprimante
par défaut, sélectionnez [Non].
Remarque
Si vous avez cliqué sur le bouton
[Installation personnalisée] à l'étape 8,
la fenêtre suivante apparaît.
• Fenêtre du nom de l'imprimante
Si vous souhaitez modifier le nom
de l'imprimante, entrez le nom de
votre choix et cliquez sur le bouton
[Suivant].
• Fenêtre de confirmation de
l'installation de la police
d'affichage
Pour installer la police d'affichage
destinée au pilote d'imprimante
PCL, sélectionnez [Oui] et cliquez
sur le bouton [Suivant].
• Au cours de l'installation du pilote
PC-Fax, cet écran n'apparaît pas.
Passez à l'étape suivante.
• Si vous n'installez pas le pilote
d'imprimante PCL (vous installez
alors le pilote d'imprimante PS ou
le pilote PPD), sélectionnez [Non]
et cliquez sur le bouton [Suivant].
Lorsque l'écran de fin de l'installation
14
apparaît, cliquez sur le bouton [OK].
Cliquez sur le bouton [Fermer] dans la
15
fenêtre de l'étape 6.
Remarque
Après l'installation, un message vous
invitant à redémarrer votre ordinateur
peut apparaître. Si c'est le cas, cliquez
sur le bouton [Oui] pour redémarrer
votre ordinateur.
Cela permet de terminer l'installation.
• Après l'installation, reportez-vous à la section
"CONFIGURATION DU PILOTE
D'IMPRIMANTE" (page 24) pour configurer
les réglages du pilote d'imprimante.
• Si vous avez installé le pilote d'imprimante
PS ou le pilote PPD, la police d'affichage PS
peut être installée depuis le CD-ROM
"PRINTER UTILITIES" qui accompagne le kit
d'extension PS3. Reportez-vous à la section
"INSTALLATION DES POLICES
D'AFFICHAGE PS" (page 22).
• Si vous utilisez la machine comme
imprimante partagée, consultez
"UTILISATION DE LA MACHINE COMME
IMPRIMANTE PARTAGEE" (page 20) pour
installer le pilote d'imprimante sur chacun des
ordinateurs clients.
FRANÇAIS
Suivez les instructions à l'écran.
13
Lisez le message dans la fenêtre qui
apparaît et cliquez sur le bouton [Suivant].
L'installation commence.
Mise en garde
Si vous utilisez Windows
2000/XP/Server 2003
Si un message d'avertissement
concernant le test permettant d'obtenir
le logo Windows ou concernant la
signature numérique apparaît, cliquez
sur [Continuer] ou sur le bouton [Oui].
7
Page 86

UTILISATION DE LA MACHINE EN TANT QU'IMPRIMANTE RESEAU
Impression via les fonctions IPP et SSL
Vous pouvez utiliser la fonction IPP pour imprimer sur la machine via un réseau à l'aide du protocole
HTTP.
Lorsque la machine est à distance, cette fonction peut être utilisée à la place de la fonction fax pour
imprimer une image de meilleure qualité qu'une image télécopiée. Vous pouvez également utiliser la
fonction IPP en association avec la fonction SSL (communication cryptée) pour crypter les données
imprimées. Cela permet de sécuriser les données imprimées sans que vous soyez préoccupé de
savoir si d'autres personnes tentent de les intercepter.
Remarque
1
2
3
Pour utiliser la fonction SSL, configurez les "PARAMETRES SSL" des programmes du responsable
de la machine. Pour configurer les paramètres, consultez le "Manuel du responsable".
Insérez le "Software CD-ROM" dans le
lecteur CD de votre ordinateur.
• Si vous installez le pilote d'imprimante et
que vous disposez de deux disques
"Software CD-ROM", insérez le "Disc 1".
• Si vous installez le pilote PC-Fax et que
vous disposez de deux disques
"Software CD-ROM", insérez le "Disc 2".
Cliquez sur le bouton [démarrer], sur
[Poste de travail] ( ), puis
double-cliquez sur l'icône [CD-ROM]
().
Sous Windows 98/Me/2000,
double-cliquez sur [Poste de travail] et
double-cliquez sur l'icône [CD-ROM].
Double-cliquez sur l'icône [Setup] ( ).
Cliquez sur le bouton [Pilote
6
d'imprimante].
• Pour installer le pilote PC-Fax, cliquez
sur le bouton [Pilote de PC-Fax].
•
Avant d'installer le logiciel, cliquez sur le
bouton [Affichage LISEZMOI] pour afficher
les informations détaillées du logiciel.
La fenêtre "Accord de licence" apparaît.
4
Assurez-vous d'avoir compris le
contenu de l'accord de licence avant de
cliquer sur le bouton [Oui].
Remarque
5
Vous pouvez afficher l'"Accord de
licence" dans une autre langue en
sélectionnant celle de votre choix dans
le menu correspondant. Pour installer
le logiciel dans la langue sélectionnée,
poursuivez l'installation dans la langue
sélectionnée.
Lisez le message dans la fenêtre
"Bienvenue" et cliquez sur le bouton
[Suivant].
8
* L'écran ci-dessus apparaît lorsque le pilote
d'imprimante est en cours d'installation.
Cliquez sur le bouton [Suivant].
7
Page 87

UTILISATION DE LA MACHINE EN TANT QU'IMPRIMANTE RESEAU
Cliquez sur le bouton [Installation
8
personnalisée].
Lorsque vous êtes invité à choisir le
9
type de connexion de l'imprimante,
sélectionnez [IPP] et cliquez sur le
bouton [Suivant].
Sélectionnez l'adresse URL de la
11
machine et cliquez sur le bouton
[Suivant].
Entrez l'adresse URL en respectant le
format suivant :
Format normal :
http://<nom d'hôte de la machine ou
adresse IP>:631*
*1 Normalement le numéro de port est
"631". Si le numéro de port IPP a été
changé sur la machine, entrez le
nouveau numéro.
Lorsque vous utilisez la fonction SSL :
https://<nom d'hôte de la machine ou
adresse IP>:<numéro de port*
*2 Normalement, le numéro de port et les
deux-points ":" précédant
immédiatement le numéro de port
peuvent être omis. Si le numéro de port
IPP pour SSL a été changé sur la
machine, entrez le nouveau numéro.
1
/ipp
2
>/ipp
FRANÇAIS
Si vous utilisez un serveur proxy,
10
spécifiez celui-ci et cliquez sur le
bouton [Suivant].
Pour spécifier un serveur proxy,
sélectionnez [Imprimer via le serveur
proxy] et remplissez les champs [Adresse]
et [Numéro de port].
Remarque
12
Si votre ordinateur et la machine sont
connectés au même réseau local,
cliquez sur le bouton [Rechercher]
pour rechercher la machine. L'adresse
URL de la machine apparaît.
Sélectionnez l'URL et cliquez sur le
bouton [OK]. L'écran ci-dessus
apparaît à nouveau et l'adresse URL
de la machine est insérée
automatiquement.
Lorsque la fenêtre de sélection du
modèle apparaît, sélectionnez le nom du
modèle de votre machine et cliquez sur
le bouton [Suivant].
9
Page 88

UTILISATION DE LA MACHINE EN TANT QU'IMPRIMANTE RESEAU
Lorsque la fenêtre de sélection du pilote
13
d'imprimante apparaît, sélectionnez le
pilote d'imprimante à installer et cliquez
sur le bouton [Suivant].
Sélectionnez la case du pilote d'imprimante
à installer de façon à ce qu'une coche ( )
apparaisse.
Remarque
14
15
• Au cours de l'installation du pilote
PC-Fax, cet écran n'apparaît pas.
Passez à l'étape suivante.
• Le kit d'extension PS3 est
nécessaire pour utiliser le pilote
d'imprimante PS ou le pilote PPD.
La case [PPD] n'apparaît que si vous
•
utilisez Windows 2000/XP/Server 2003.
Sélectionnez si vous souhaitez ou pas
que l'imprimante devienne celle par
défaut et cliquez sur le bouton [Suivant].
Si vous installez plusieurs pilotes,
sélectionnez l'imprimante à utiliser par
défaut. Si vous ne souhaitez définir aucun
des pilotes d'imprimante comme
l'imprimante par défaut, sélectionnez [Non].
Lorsque la fenêtre du nom de
l'imprimante apparaît, cliquez sur le
bouton [Suivant].
Si vous voulez modifier le nom de
l'imprimante, saisissez le nom de votre choix.
Suivez les instructions à l'écran.
17
Lisez le message dans la fenêtre qui
apparaît et cliquez sur le bouton [Suivant].
L'installation commence.
Mise en garde
18
19
Remarque
Cela permet de terminer l'installation.
• Après l'installation, reportez-vous à la section
"CONFIGURATION DU PILOTE
D'IMPRIMANTE" (page 24) pour configurer
les réglages du pilote d'imprimante.
• Si vous avez installé le pilote d'imprimante
PS ou le pilote PPD, la police d'affichage PS
peut être installée depuis le CD-ROM
"PRINTER UTILITIES" qui accompagne le kit
d'extension PS3. Reportez-vous à la section
"INSTALLATION DES POLICES
D'AFFICHAGE PS" (page 22).
Si vous utilisez Windows
2000/XP/Server 2003
Si un message d'avertissement
concernant le test permettant d'obtenir
le logo Windows ou concernant la
signature numérique apparaît, cliquez
sur [Continuer] ou sur le bouton [Oui].
Lorsque l'écran de fin de l'installation
apparaît, cliquez sur le bouton [OK].
Cliquez sur le bouton [Fermer] dans la
fenêtre de l'étape 6.
Après l'installation, un message vous
invitant à redémarrer votre ordinateur
peut apparaître. Si c'est le cas, cliquez
sur le bouton [Oui] pour redémarrer
votre ordinateur.
Lorsque vous êtes invité à installer la
16
police d'affichage, sélectionnez une
réponse et cliquez sur le bouton
[Suivant].
• Au cours de l'installation du pilote
PC-Fax, cet écran n'apparaît pas.
Passez à l'étape suivante.
• Si vous n'installez pas le pilote
d'imprimante PCL (vous installez alors
le pilote d'imprimante PS ou le pilote
PPD), sélectionnez [Non] et cliquez sur
le bouton [Suivant].
10
Page 89

UTILISATION DE LA MACHINE EN TANT QU'IMPRIMANTE RESEAU
INSTALLATION DE PRINTER STATUS MONITOR
Remarque
Systèmes d'exploitation pris en charge : Windows 98/Me/NT 4.0*/2000*/XP*/Server 2003*
* Des droits administrateur sont requis pour installer le logiciel.
1
2
3
4
Remarque
Printer Status Monitor ne peut pas être utilisé lors de l'impression en utilisant la fonction IPP.
Insérez le "Software CD-ROM" dans le
lecteur CD de votre ordinateur.
Insérez le "Software CD-ROM" où "Disc 1"
est écrit sur la face avant du CD-ROM.
Cliquez sur le bouton [démarrer], sur
[Poste de travail] ( ), puis
double-cliquez sur l'icône [CD-ROM]
().
Sous Windows 98/Me/2000,
double-cliquez sur [Poste de travail] et
double-cliquez sur l'icône [CD-ROM].
Double-cliquez sur l'icône [Setup] ( ).
La fenêtre "Accord de licence" apparaît.
Assurez-vous d'avoir compris le
contenu de l'accord de licence avant de
cliquer sur le bouton [Oui].
Vous pouvez afficher l'"Accord de
licence" dans une autre langue en
sélectionnant celle de votre choix dans
le menu correspondant. Pour installer
le logiciel dans la langue sélectionnée,
poursuivez l'installation dans la langue
sélectionnée.
Cliquez sur le bouton [Printer Status
6
Monitor].
Avant d'installer le logiciel, cliquez sur le
bouton [Affichage LISEZMOI] pour afficher
les informations détaillées du logiciel.
Suivez les instructions à l'écran.
7
Lorsque l'écran de fin de l'installation
8
apparaît, cliquez sur le bouton
[Terminer].
Pour que Printer Status Monitor démarre
automatiquement au démarrage de
l'ordinateur, cochez la case [Exécuter
Printer Status Monitor au démarrage]
et cliquez sur le bouton [Terminer].
FRANÇAIS
Cliquez sur le bouton [Fermer] dans la
Lisez le message dans la fenêtre
5
"Bienvenue" et cliquez sur le bouton
[Suivant].
Cela permet de terminer l'installation.
Pour connaître les procédures d'utilisation de Printer Status Monitor, reportez-vous au fichier d'aide.
Suivez ces étapes pour afficher le fichier d'aide : Sous Windows, cliquez sur le bouton [démarrer],
sélectionnez [Tous les programmes] ([Programmes] dans les versions de Windows autres que
Windows XP/Server 2003), sélectionnez [SHARP Printer Status Monitor] et [Aide].
9
fenêtre de l'étape 6.
Remarque
Après l'installation, un message vous
invitant à redémarrer votre ordinateur peut
apparaître. Si c'est le cas, cliquez sur le
bouton [Oui] pour redémarrer votre
ordinateur.
11
Page 90

UTILISATION DE LA MACHINE AVEC
UNE CONNEXION PARALLELE OU USB
INSTALLATION DU PILOTE D'IMPRIMANTE ET DU
PILOTE PC-FAX
Remarque
• Le kit d'extension PS3 est nécessaire pour utiliser le pilote d'imprimante PS ou le fichier PPD.
• Pour installer le fichier PPD sous Windows 98/Me, reportez-vous à la section "UTILISATION DU
PILOTE D'IMPRIMANTE WINDOWS PS STANDARD (Windows 98/Me/NT 4.0)" (page 23) et
installez le pilote à l'aide de l'Assistant Ajout d'imprimante.
• Pour utiliser le port créé lorsque le pilote d'imprimante est installé pour le transfert de données
par fax, installez d'abord le pilote d'imprimante, puis le pilote PC-Fax.
Installation sous Windows XP/Server 2003 (câble USB/parallèle)
Vous ne devez pas raccorder le câble
1
USB ou parallèle à la machine. Vérifiez
que le câble n'est pas branché avant de
commencer l'installation.
Si un tel câble est connecté, une fenêtre
Plug and Play apparaît. Si tel est le cas,
cliquez sur le bouton [Annuler] pour
fermer la fenêtre et débranchez le câble.
Remarque
2
3
Le câble sera raccordé à l'étape 14.
Insérez le "Software CD-ROM" dans le
lecteur CD de votre ordinateur.
Insérez le "Software CD-ROM" où "Disc 1"
est écrit sur la face avant du CD-ROM.
Cliquez sur le bouton [démarrer], sur
[Poste de travail] ( ), puis
double-cliquez sur l'icône [CD-ROM]
().
La fenêtre "Accord de licence" apparaît.
5
Assurez-vous d'avoir compris le
contenu de l'accord de licence avant de
cliquer sur le bouton [Oui].
Remarque
6
7
Vous pouvez afficher l'"Accord de
licence" dans une autre langue en
sélectionnant celle de votre choix dans
le menu correspondant. Pour installer
le logiciel dans la langue sélectionnée,
poursuivez l'installation dans la langue
sélectionnée.
Lisez le message dans la fenêtre
"Bienvenue" et cliquez sur le bouton
[Suivant].
Cliquez sur le bouton [Pilote
d'imprimante].
Avant d'installer le logiciel, cliquez sur le
bouton [Affichage LISEZMOI] pour afficher
les informations détaillées du logiciel.
Double-cliquez sur l'icône [Setup] ( ).
4
12
Cliquez sur le bouton [Suivant].
8
Page 91

UTILISATION DE LA MACHINE AVEC UNE CONNEXION PARALLELE OU USB
Cliquez sur le bouton [Installation
9
personnalisée].
Lorsque vous êtes invité à choisir le type
10
de connexion de l'imprimante,
sélectionnez [Connectée à cet ordinateur]
et cliquez sur le bouton [Suivant].
Lorsque vous êtes invité à installer la
11
police d'affichage, sélectionnez une
réponse et cliquez sur le bouton [Suivant].
Suivez les instructions à l'écran.
12
Lisez le message dans la fenêtre qui
apparaît et cliquez sur le bouton [Suivant].
Lorsque l'écran de fin de l'installation
apparaît, cliquez sur le bouton [OK].
Mise en garde
13
Remarque
Si une fenêtre d'alerte concernant
"Installation matérielle" s'affiche,
prenez soin de bien cliquer sur le
bouton [Continuer].
Cliquez sur le bouton [Fermer] dans la
fenêtre de l'étape 7.
Lorsqu'un message vous invite à
connecter la machine à votre ordinateur,
cliquez sur le bouton [OK].
Après l'installation, un message vous
invitant à redémarrer votre ordinateur
peut apparaître. Si c'est le cas, cliquez
sur le bouton [Oui] pour redémarrer
votre ordinateur.
Raccordez la machine à votre ordinateur
14
à l'aide du câble d'interface (page 19).
• Si vous utilisez un câble USB, vérifiez
que la machine est sous tension et
branchez le câble.
• Si vous utilisez un câble parallèle,
mettez la machine et votre ordinateur hors
tension, branchez le câble, allumez la
machine, puis votre ordinateur.
Windows détecte la machine et l'écran
Plug and Play s'affiche.
L'installation du pilote d'imprimante
15
PCL6 commence.
Lorsque la fenêtre "Assistant Matériel
détecté" apparaît, sélectionnez [Installer le
logiciel automatiquement (recommandé)],
cliquez sur [Suivant] et suivez les
instructions à l'écran.
Mise en garde
Une fois les étapes ci-dessus terminées,
répétez la procédure d'installation depuis
l'étape 2 si vous installez le pilote PCL5e, PS,
PPD, ou PC-Fax.
1. Répétez la procédure d'installation à partir
de l'étape 2.
Si vous installez le pilote PC-Fax et que vous
disposez de deux disques "Software
CD-ROM", insérez le "Disc 2" puis cliquez
sur le bouton [Pilote PC-Fax] à l'étape 7.
2. Lorsque l'écran de sélection du pilote
d'imprimante à installer s'affiche, désactivez
la case [PCL6] et sélectionnez la case à
cocher du pilote d'imprimante que vous
voulez installer.
Cela permet de terminer l'installation.
• Après l'installation, reportez-vous à la section
"CONFIGURATION DU PILOTE
D'IMPRIMANTE" (page 24) pour configurer
les réglages du pilote d'imprimante.
• Si vous avez installé le pilote d'imprimante
PS ou le pilote PPD, la police d'affichage PS
peut être installée depuis le CD-ROM
"PRINTER UTILITIES" qui accompagne le kit
d'extension PS3. Reportez-vous à la section
"INSTALLATION DES POLICES
D'AFFICHAGE PS" (page 22).
• Si vous utilisez la machine comme
imprimante partagée, consultez
"UTILISATION DE LA MACHINE COMME
IMPRIMANTE PARTAGEE" (page 20) pour
installer le pilote d'imprimante sur chacun des
ordinateurs clients.
Si une fenêtre d'alerte concernant
"Installation matérielle" s'affiche,
prenez soin de bien cliquer sur le
bouton [Continuer].
FRANÇAIS
13
Page 92

UTILISATION DE LA MACHINE AVEC UNE CONNEXION PARALLELE OU USB
Installation sous Windows 98/Me/2000 (câble USB)
Vous ne devez pas raccorder le câble
1
USB à la machine. Vérifiez que le câble
n'est pas branché avant de commencer
l'installation.
Si un tel câble est connecté, une fenêtre
Plug and Play apparaît. Si tel est le cas,
cliquez sur le bouton [Annuler] pour
fermer la fenêtre et débranchez le câble.
Remarque
2
3
4
5
Le câble sera raccordé à l'étape 15.
Insérez le "Software CD-ROM" dans le
lecteur CD de votre ordinateur.
Insérez le "Software CD-ROM" où "Disc 1"
est écrit sur la face avant du CD-ROM.
Double-cliquez sur [Poste de travail]
( ), puis sur l'icône du CD-ROM ( ).
Double-cliquez sur l'icône [Setup] ( ).
La fenêtre "Accord de licence"
apparaît. Assurez-vous d'avoir compris
le contenu de l'accord de licence avant
de cliquer sur le bouton [Oui].
Cliquez sur le bouton [Pilote d'imprimante].
7
Avant d'installer le logiciel, cliquez sur le
bouton [Affichage LISEZMOI] pour afficher
les informations détaillées du logiciel.
Cliquez sur le bouton [Suivant].
8
Cliquez sur le bouton [Installation personnalisée].
9
Remarque
6
Vous pouvez afficher l'"Accord de
licence" dans une autre langue en
sélectionnant celle de votre choix dans
le menu correspondant. Pour installer
le logiciel dans la langue sélectionnée,
poursuivez l'installation dans la langue
sélectionnée.
Lisez le message dans la fenêtre
"Bienvenue" et cliquez sur le bouton
[Suivant].
14
Lorsque vous êtes invité à choisir le type de
10
connexion de l'imprimante, sélectionnez
[Connectée à cet ordinateur] et cliquez sur
le bouton [Suivant].
Page 93
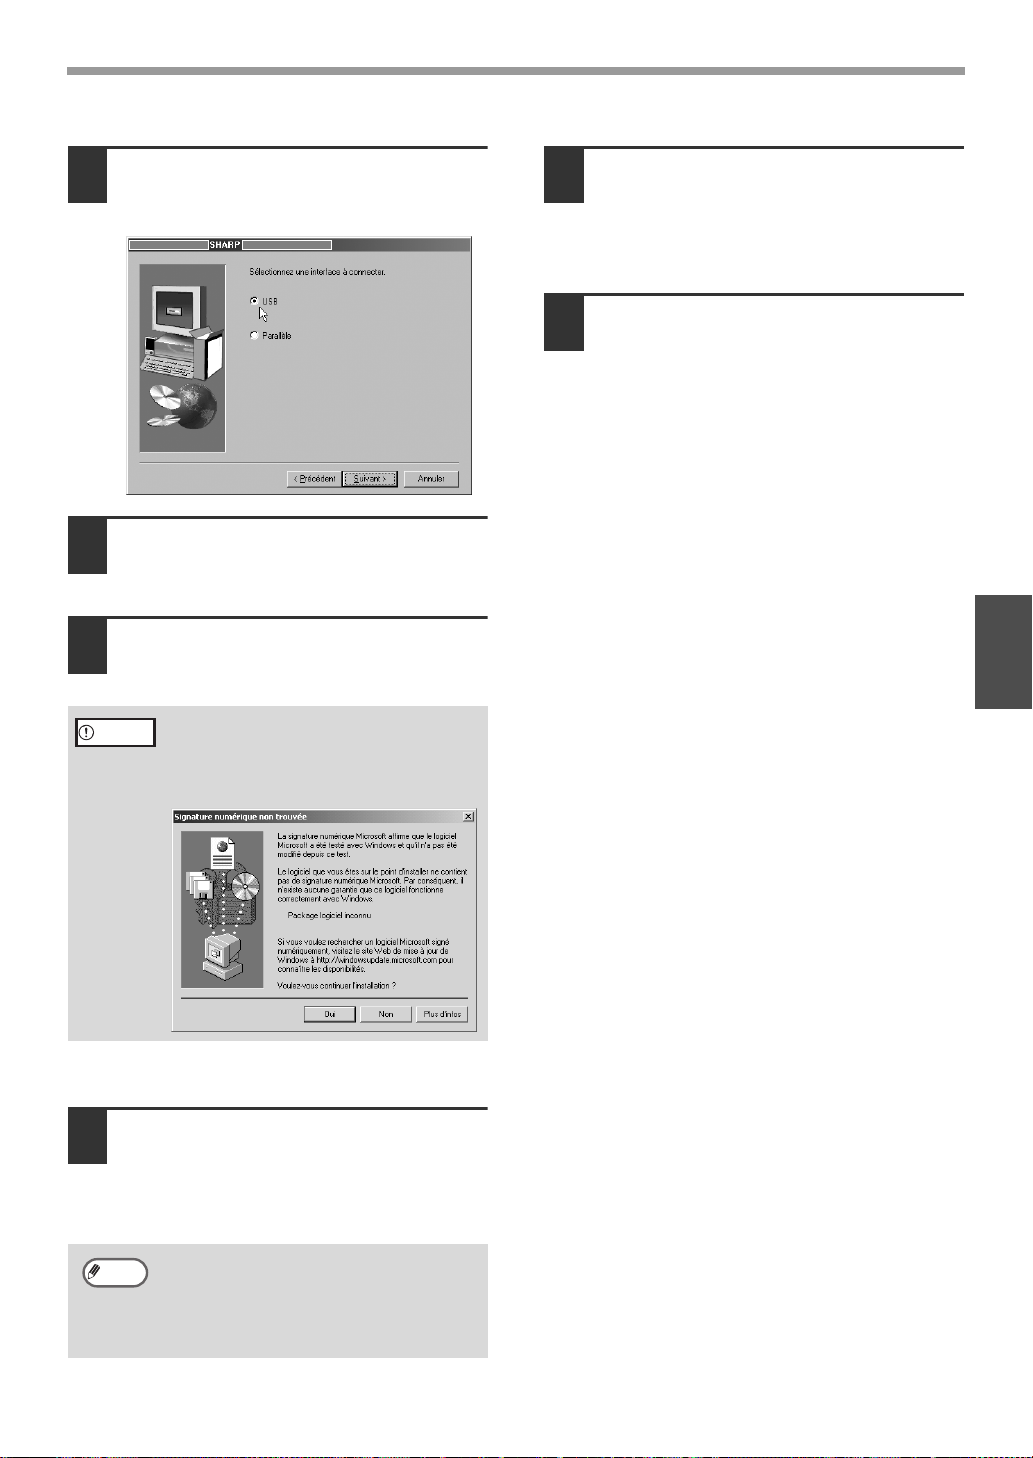
UTILISATION DE LA MACHINE AVEC UNE CONNEXION PARALLELE OU USB
Lorsque l'écran de sélection d'interface
11
s'affiche, sélectionnez [USB] et cliquez
sur le bouton [Suivant].
Lorsque vous êtes invité à installer la
12
police d'affichage, sélectionnez une
réponse et cliquez sur le bouton [Suivant].
Suivez les instructions à l'écran.
13
Lisez le message dans la fenêtre qui
apparaît et cliquez sur le bouton [Suivant].
Mise en garde
14
Remarque
Sous Windows 2000, si l'écran suivant
apparaît pendant la copie des fichiers (il
peut apparaître plusieurs fois), cliquez
sur le bouton [Oui].
Lorsque l'écran de fin de l'installation
apparaît, cliquez sur le bouton [OK].
Cliquez sur le bouton [Fermer] dans la
fenêtre de l'étape 7.
Lorsqu'un message vous invite à
connecter la machine à votre ordinateur,
cliquez sur le bouton [OK].
Après l'installation, un message vous
invitant à redémarrer votre ordinateur
peut apparaître. Si c'est le cas, cliquez
sur le bouton [Oui] pour redémarrer
votre ordinateur.
Vérifiez que la machine est sous
15
tension et branchez le câble USB (page
19).
Windows détecte la machine et l'écran
Plug and Play s'affiche.
Suivez les instructions de l'écran Plug
16
and Play qui s'affiche dans votre
version de Windows pour commencer
l'installation.
Une fois les étapes ci-dessus terminées,
répétez la procédure d'installation depuis
l'étape 2 si vous installez le pilote PCL5e,
PS, PPD, ou PC-Fax.
1. Répétez la procédure d'installation à partir
de l'étape 2.
Si vous installez le pilote PC-Fax et que vous
disposez de deux disques "Software
CD-ROM", insérez le "Disc 2" puis cliquez
sur le bouton [Pilote PC-Fax] à l'étape 7.
2. Lorsque l'écran de sélection du pilote
d'imprimante à installer s'affiche, désactivez
la case [PCL6] et sélectionnez la case à
cocher du pilote d'imprimante que vous
voulez installer.
Cela permet de terminer l'installation.
• Après l'installation, reportez-vous à la section
"CONFIGURATION DU PILOTE
D'IMPRIMANTE" (page 24) pour configurer
les réglages du pilote d'imprimante.
• Si vous avez installé le pilote d'imprimante
PS ou le pilote PPD, la police d'affichage PS
peut être installée depuis le CD-ROM
"PRINTER UTILITIES" qui accompagne le kit
d'extension PS3. Reportez-vous à la section
"INSTALLATION DES POLICES
D'AFFICHAGE PS" (page 22).
• Si vous utilisez la machine comme
imprimante partagée, consultez
"UTILISATION DE LA MACHINE COMME
IMPRIMANTE PARTAGEE" (page 20) pour
installer le pilote d'imprimante sur chacun des
ordinateurs clients.
FRANÇAIS
15
Page 94

UTILISATION DE LA MACHINE AVEC UNE CONNEXION PARALLELE OU USB
Installation sous Windows 98/Me/NT 4.0/2000 (câble parallèle)
Remarque
1
Remarque
2
Pour les utilisateurs de Windows NT 4.0
Le CD-ROM n'inclut pas de logiciel pour Windows NT 4.0.
Contactez votre fournisseur ou le représentant du service après-vente le plus proche si vous
souhaitez acquérir le logiciel pour Windows NT 4.0.
Vous ne devez pas raccorder le câble
parallèle à la machine. Vérifiez que le
câble n'est pas branché avant de
commencer l'installation.
Si un tel câble est connecté, une fenêtre
Plug and Play apparaît. Si tel est le cas,
cliquez sur le bouton [Annuler] pour
fermer la fenêtre et débranchez le câble.
Le câble sera raccordé à l'étape 20.
Insérez le "Software CD-ROM" dans le
lecteur CD de votre ordinateur.
• Si vous installez le pilote d'imprimante et
que vous disposez de deux disques
"Software CD-ROM", insérez le "Disc 1".
• Si vous installez le pilote PC-Fax et que
vous disposez de deux disques
"Software CD-ROM", insérez le "Disc 2".
Cliquez sur le bouton [Pilote
7
d'imprimante].
• Pour installer le pilote PC-Fax, cliquez
sur le bouton [Pilote de PC-Fax].
• Avant d'installer le logiciel, cliquez sur le
bouton [Affichage LISEZMOI] pour
afficher les informations détaillées du
logiciel.
* L'écran ci-dessus apparaît lorsque le pilote
d'imprimante est en cours d'installation.
Double-cliquez sur [Poste de travail]
3
( ), puis sur l'icône du CD-ROM ( ).
Double-cliquez sur l'icône [Setup] ( ).
4
La fenêtre "Accord de licence" apparaît.
5
Assurez-vous d'avoir compris le
contenu de l'accord de licence avant de
cliquer sur le bouton [Oui].
Remarque
6
Vous pouvez afficher l'"Accord de
licence" dans une autre langue en
sélectionnant celle de votre choix dans
le menu correspondant. Pour installer
le logiciel dans la langue sélectionnée,
poursuivez l'installation dans la langue
sélectionnée.
Lisez le message dans la fenêtre
"Bienvenue" et cliquez sur le bouton
[Suivant].
16
Cliquez sur le bouton [Suivant].
8
Cliquez sur le bouton [Installation
9
personnalisée].
Page 95

UTILISATION DE LA MACHINE AVEC UNE CONNEXION PARALLELE OU USB
Lorsque vous êtes invité à choisir le
10
type de connexion de l'imprimante,
sélectionnez [Connectée à cet
ordinateur] et cliquez sur le bouton
[Suivant].
Si vous utilisez Windows NT 4.0, allez à
l'étape 12.
Lorsque l'écran de sélection d'interface
11
s'affiche, sélectionnez [Parallèle] et
cliquez sur le bouton [Suivant].
Remarque
13
14
Si "LPT1" n'apparaît pas, cela signifie
qu'une autre imprimante ou un autre
périphérique utilise LPT1. Dans ce cas,
poursuivez l'installation et une fois cette
dernière terminée, modifiez le port de
telle sorte que la machine puisse
utiliser LPT1. Cette procédure est
expliquée dans "Une autre imprimante
utilise le port parallèle (si vous utilisez
un câble parallèle)" à la page 27.
Lorsque la fenêtre de sélection du
modèle apparaît, sélectionnez le nom
du modèle de votre machine et cliquez
sur le bouton [Suivant].
Lorsque la fenêtre de sélection du pilote
d'imprimante apparaît, sélectionnez le
pilote d'imprimante à installer et cliquez
sur le bouton [Suivant].
• Sélectionnez les cases à cocher des
pilotes d'imprimante à installer.
• Au cours de l'installation du pilote
PC-Fax, cet écran n'apparaît pas.
Passez à l'étape suivante.
FRANÇAIS
Sélectionnez le port d'imprimante et
12
cliquez sur le bouton [Suivant].
Sélectionnez "LPT1" pour le port
d'imprimante.
Remarque
15
16
• Le kit d'extension PS3 est
nécessaire pour utiliser le pilote
d'imprimante PS ou le pilote PPD.
• La case [PPD] n'apparaît que si
vous utilisez Windows 2000.
Sélectionnez si vous souhaitez ou pas
que l'imprimante devienne celle par
défaut et cliquez sur le bouton [Suivant].
Si vous installez plusieurs pilotes,
sélectionnez l'imprimante à utiliser par défaut.
Si vous ne souhaitez définir aucun des pilotes
d'imprimante comme l'imprimante par défaut,
sélectionnez [Non].
Lorsque la fenêtre du nom de l'imprimante
apparaît, cliquez sur le bouton [Suivant].
Si vous voulez modifier le nom de
l'imprimante, saisissez le nom de votre choix.
17
Page 96

UTILISATION DE LA MACHINE AVEC UNE CONNEXION PARALLELE OU USB
Lorsque vous êtes invité à installer la
17
police d'affichage, sélectionnez une
réponse et cliquez sur le bouton
[Suivant].
Au cours de l'installation du pilote PC-Fax,
cet écran n'apparaît pas. Passez à l'étape
suivante.
Suivez les instructions à l'écran.
18
Lisez le message dans la fenêtre qui
apparaît et cliquez sur le bouton [Suivant].
Lorsque l'écran de fin de l'installation
apparaît, cliquez sur le bouton [OK].
Cliquez sur le bouton [Fermer] dans la
19
fenêtre de l'étape 7.
Lorsqu'un message vous invite à
connecter la machine à votre ordinateur,
cliquez sur le bouton [OK].
Remarque
Après l'installation, un message vous
invitant à redémarrer votre ordinateur
peut apparaître. Si c'est le cas, cliquez
sur le bouton [Oui] pour redémarrer
votre ordinateur.
Mettez la machine et votre ordinateur hors
20
tension et raccordez-les ensemble à l'aide
du câble parallèle. (page 19)
Après avoir raccordé la machine à votre
ordinateur, mettez la machine sous
tension et démarrez votre ordinateur.
Cela permet de terminer l'installation.
• Après l'installation, reportez-vous à la section
"CONFIGURATION DU PILOTE
D'IMPRIMANTE" (page 24) pour configurer
les réglages du pilote d'imprimante.
• Si vous avez installé le pilote d'imprimante
PS ou le pilote PPD, la police d'affichage PS
peut être installée depuis le CD-ROM
"PRINTER UTILITIES" qui accompagne le kit
d'extension PS3. Reportez-vous à la section
"INSTALLATION DES POLICES
D'AFFICHAGE PS" (page 22).
• Si vous utilisez la machine comme
imprimante partagée, consultez
"UTILISATION DE LA MACHINE COMME
IMPRIMANTE PARTAGEE" (page 20) pour
installer le pilote d'imprimante sur chacun des
ordinateurs clients.
18
Page 97

UTILISATION DE LA MACHINE AVEC UNE CONNEXION PARALLELE OU USB
RACCORDEMENT A UN ORDINATEUR
Suivez la procédure ci-dessous pour raccorder la machine à votre ordinateur.
Les câbles d'interface destinés à raccorder la machine à votre ordinateur ne sont pas fournis avec la
machine. Veuillez vous procurer le câble approprié.
Câble d'interface
Câble USB
Câble blindé à paire torsadée, équivalent haut débit (3 m max.)
Si la machine doit être raccordée à l'aide d'une interface USB 2.0, veuillez vous procurer un câble
USB adapté au type USB 2.0.
Câble parallèle
Câble parallèle bi-directionnel blindé de type IEEE 1284 (3 m max.)
Mise en garde
• L'interface USB est disponible sur les ordinateurs compatibles PC/AT équipés d'origine
du port USB et sur lesquels Windows 98, Windows Me, Windows 2000 Professionnel,
Windows XP Professionnel, Windows XP Edition familiale ou Windows Server 2003 a été
préinstallé.
• Ne raccordez pas le câble d'interface avant d'installer le pilote d'imprimante. Le câble doit
être branché pendant l'installation de ce dernier.
RACCORDEMENT D'UN CABLE
USB
Insérer le câble dans le connecteur
1
USB de votre machine.
Insérer l'autre extrémité du câble dans
2
le connecteur USB de votre ordinateur.
RACCORDEMENT D'UN CABLE
PARALLELE
Vérifiez que la machine et votre
1
ordinateur sont hors tension.
Brancher le câble dans le connecteur
2
parallèle de la machine, et le fixer avec
les clips.
FRANÇAIS
Remarque
Ce câble peut aussi être inséré dans
un connecteur USB 1.1.
Brancher l'autre extrémité du câble
3
dans le connecteur parallèle de votre
ordinateur.
19
Page 98

UTILISATION DE LA MACHINE
COMME IMPRIMANTE PARTAGEE
Si vous souhaitez utiliser la machine comme imprimante partagée dans un réseau Windows et que le
pilote d'imprimante ou le pilote PC-Fax est installé sur un serveur d'impression, suivez les étapes
ci-dessous pour installer le pilote d'imprimante ou le pilote PC-Fax sur les ordinateurs clients.
Remarque
• Demandez le nom du serveur et le nom de l'imprimante de la machine en réseau à votre
administrateur réseau.
• Pour connaître la procédure de configuration des réglages sur le serveur d'impression,
reportez-vous au manuel d'utilisation ou au fichier d'aide du système d'exploitation. Le "serveur
d'impression" présenté ici est un ordinateur connecté directement à la machine et les "clients"
correspondent aux autres ordinateurs connectés au même réseau que le serveur d'impression.
• Installez le même pilote d'imprimante sur les ordinateurs clients que celui installé sur le serveur
d'impression.
• Si le pilote PPD est installé sur le serveur d'impression et que les ordinateurs clients utilisent
Windows 98/Me/NT 4.0, reportez-vous à la section "UTILISATION DU PILOTE D'IMPRIMANTE
WINDOWS PS STANDARD (Windows 98/Me/NT 4.0)" (page 23) pour installer le pilote
d'imprimante à l'aide de l'Assistant Ajout d'imprimante.
Insérez le "Software CD-ROM" dans le
1
lecteur CD de votre ordinateur.
• Si vous installez le pilote d'imprimante et
que vous disposez de deux disques
"Software CD-ROM", insérez le "Disc 1".
• Si vous installez le pilote PC-Fax et que
vous disposez de deux disques
"Software CD-ROM", insérez le "Disc 2".
Cliquez sur le bouton [démarrer], sur
2
[Poste de travail] ( ), puis
double-cliquez sur l'icône [CD-ROM]
().
Sous Windows 98/Me/2000,
double-cliquez sur [Poste de travail], et
double-cliquez sur l'icône [CD-ROM].
Double-cliquez sur l'icône [Setup] ( ).
3
La fenêtre "Accord de licence" apparaît.
4
Assurez-vous d'avoir compris le
contenu de l'accord de licence avant de
cliquer sur le bouton [Oui].
Lisez le message dans la fenêtre
5
"Bienvenue" et cliquez sur le bouton
[Suivant].
Cliquez sur le bouton [Pilote
6
d'imprimante].
• Pour installer le pilote PC-Fax, cliquez
sur le bouton [Pilote de PC-Fax].
• Avant d'installer le logiciel, cliquez sur le
bouton [Affichage LISEZMOI] pour
afficher les informations détaillées du
logiciel.
20
Remarque
Vous pouvez afficher l'"Accord de
licence" dans une autre langue en
sélectionnant celle de votre choix dans
le menu correspondant. Pour installer
le logiciel dans la langue sélectionnée,
poursuivez l'installation dans la langue
sélectionnée.
* L'écran ci-dessus apparaît lorsque le pilote
d'imprimante est en cours d'installation.
Cliquez sur le bouton [Suivant].
7
Page 99

UTILISATION DE LA MACHINE COMME IMPRIMANTE PARTAGEE
Cliquez sur le bouton [Installation
8
personnalisée].
Sélectionnez [Imprimante partagée] et
9
cliquez sur le bouton [Suivant].
Lorsque la fenêtre de sélection du
11
modèle apparaît, sélectionnez le nom
du modèle de votre machine et cliquez
sur le bouton [Suivant].
Si vous installez le pilote PC-Fax, passez
à l'étape 13.
Lorsque la fenêtre de sélection du pilote
12
d'imprimante apparaît, sélectionnez le
pilote d'imprimante à installer et cliquez
sur le bouton [Suivant].
Assurez-vous de sélectionner le même
pilote d'imprimante que celui utilisé dans
le serveur d'impression (la machine).
FRANÇAIS
Sélectionnez le nom de l'imprimante
10
définie comme imprimante partagée
dans le serveur d'impression depuis la
liste puis cliquez sur le bouton [Suivant].
Vous pouvez également cliquer sur le
bouton [Ajouter port réseau] et
sélectionner l'imprimante à partager (la
machine) en parcourant le réseau dans la
fenêtre qui apparaît.
Remarque
Si l'imprimante partagée ne figure pas
dans la liste, vérifiez les paramètres
dans le serveur d'impression.
Suivez les instructions à l'écran.
13
Lorsque l'écran "Démarrage de l'installation"
14
s'affiche, cliquez sur le bouton [Fermer].
Remarque
Cela permet de terminer l'installation.
• Après l'installation, reportez-vous à la section
"CONFIGURATION DU PILOTE
D'IMPRIMANTE" (page 24) pour configurer
les réglages du pilote d'imprimante.
• Si vous avez installé le pilote d'imprimante
PS ou le pilote PPD, la police d'affichage PS
peut être installée depuis le CD-ROM
"PRINTER UTILITIES" qui accompagne le kit
d'extension PS3. Reportez-vous à la section
"INSTALLATION DES POLICES
D'AFFICHAGE PS" (page 22).
Après l'installation, un message vous
invitant à redémarrer votre ordinateur
peut apparaître. Si c'est le cas, cliquez
sur le bouton [Oui] pour redémarrer
votre ordinateur.
21
Page 100

INSTALLATION DES POLICES
D'AFFICHAGE PS
Les polices utilisables par le pilote d'imprimante PS sont contenues dans le CD-ROM "PRINTER
UTILITIES" qui accompagne le kit d'extension PS3. Installez ces polices nécessaires au pilote
d'imprimante PS.
Insérez le CD-ROM "PRINTER
1
UTILITIES" qui accompagne le kit
d'extension PS3 dans le lecteur CD de
votre ordinateur.
Si votre ordinateur est configuré pour que
le CD-ROM démarre automatiquement,
allez à l'étape 4.
Cliquez sur le bouton [démarrer], sur
2
[Poste de travail] ( ), puis
double-cliquez sur l'icône [CD-ROM]
().
Si vous utilisez Windows 98/Me/NT
4.0/2000, double-cliquez sur [Poste de
travail] et double-cliquez sur l'icône
[CD-ROM].
Double-cliquez sur l'icône [Setup] ( ).
3
Remarque
Si l'écran de sélection de langue
apparaît après avoir double-cliqué sur
l'icône [Setup], sélectionnez la langue
de votre choix et cliquez sur le bouton
[Suivant] (normalement, la langue
appropriée est sélectionnée
automatiquement).
Sélectionnez la case à cocher [PS
4
Display Font] et cliquez sur le bouton
[Suivant].
Mise en garde
Ne sélectionnez pas "Pilote
d'imprimante PS".
Le pilote d'imprimante PS de la
machine ne doit être installé qu'à
partir du CD-ROM fourni avec les
modèles AR-M258/AR-M318 et le kit
d'extension monoposte AR-P27.
22
Suivez les instructions à l'écran.
5
 Loading...