

Page 1

SERVICE MANUAL
CODE: 00ZARNC5J/A1E
DIGITAL LASER COPIER/PRINTER OPTION
PRINT SERVER CARD
AR-NC5J
AR-NC5JG
MODEL
CONTENTS
[1] GENERAL. . . . . . . . . . . . . . . . . . . . . . . . . . . . . . . . . . . . . . . . . . . . . . .1
[2] ENVIRONMENT . . . . . . . . . . . . . . . . . . . . . . . . . . . . . . . . . . . . . . . . . .1
[3] MAJOR FUNCTIONS . . . . . . . . . . . . . . . . . . . . . . . . . . . . . . . . . . . . . .1
[4] IDENTIFICATION OF EACH SECTION AND FUNCTIONS . . . . . . . . .1
[5] INSTALLATION . . . . . . . . . . . . . . . . . . . . . . . . . . . . . . . . . . . . . . . . . . .2
[6] AR-NC5J STATUS CHECK. . . . . . . . . . . . . . . . . . . . . . . . . . . . . . . . . .3
AR-NC5JW
[7] TROUBLESHOOTING . . . . . . . . . . . . . . . . . . . . . . . . . . . . . . . . . . . . .6
[8] FLASH ROM VERSION UP PROCEDURE . . . . . . . . . . . . . . . . . . . . .6
Parts marked with “ ” are important for maintaining the safety of the set. Be sure to replace these parts with
specified ones for maintaining the safety and performance of the set.
This document has been published to be used
SHARP CORPORATION
for after sales service only.
The contents are subject to change without notice.
Page 2
[1] GENERAL
The AR-NC5J is a print server with Falcon 32bit RISC chip, which
automatically switches between 10BASE-T/100BASE-TX, conforming
to network protocols of TCP/IP (Windows95, Windows98, WindowsMe,
WindowsNT4.0, Windows2000, UNIX), IPX/SPX (Netware), AppleTalk
(Macintosh), and NetBEUI (Windows95, Windows98, WindowsMe,
WindowsNT4.0, Windows2000). The 32bit CPU, together with the
automatic switch of 10/100BASE, provides high-speed process. This
server allows to share printers in a wide range of network environments from a small-sized network by means of NetBEUI to a largescale network where two or more network protocols are intermingled.
[2] ENVIRONMENT
1. Items required for connection to a
network
• Shield-type, twisted-pair cable (A cable of Category 5 is required for
100BASE-TX.)
• Printer
2. Network computer
• Windows95/98/Me/NT4.0/2000
(One of TCP/IP, NetWare, or NetBEUI must be available.)
• UNIX
•NetWare
• Macintosh (AppleTalk must be available.)
• For operations of HTTP, it is recommendable to use a WWW
browser such as Internet Explore4.0 or later or Netscape
Navigator4.0 or later. If another browser is used, it must at least conform to HTTP1.0 (RFC1945) or HTML2.0 (RFC1866).
• To use HTTP, the TCP/IP protocol setup of the AR-NC5J must be
valid and the IP address of the AR-NC5J must be set.
2. Hardware specifications
CPU FALCON 32bit RISC chip
Memory RAM 4Mbyte
Flash ROM 1MByte
Network interface 10BASE-T/100BASE-TX 1 port (10/100BASE
auto recognition)
Printer interface Sharp's unique interface
Other LED lamp Status
10Base LINK,
100Base LINK
(3 pcs.)
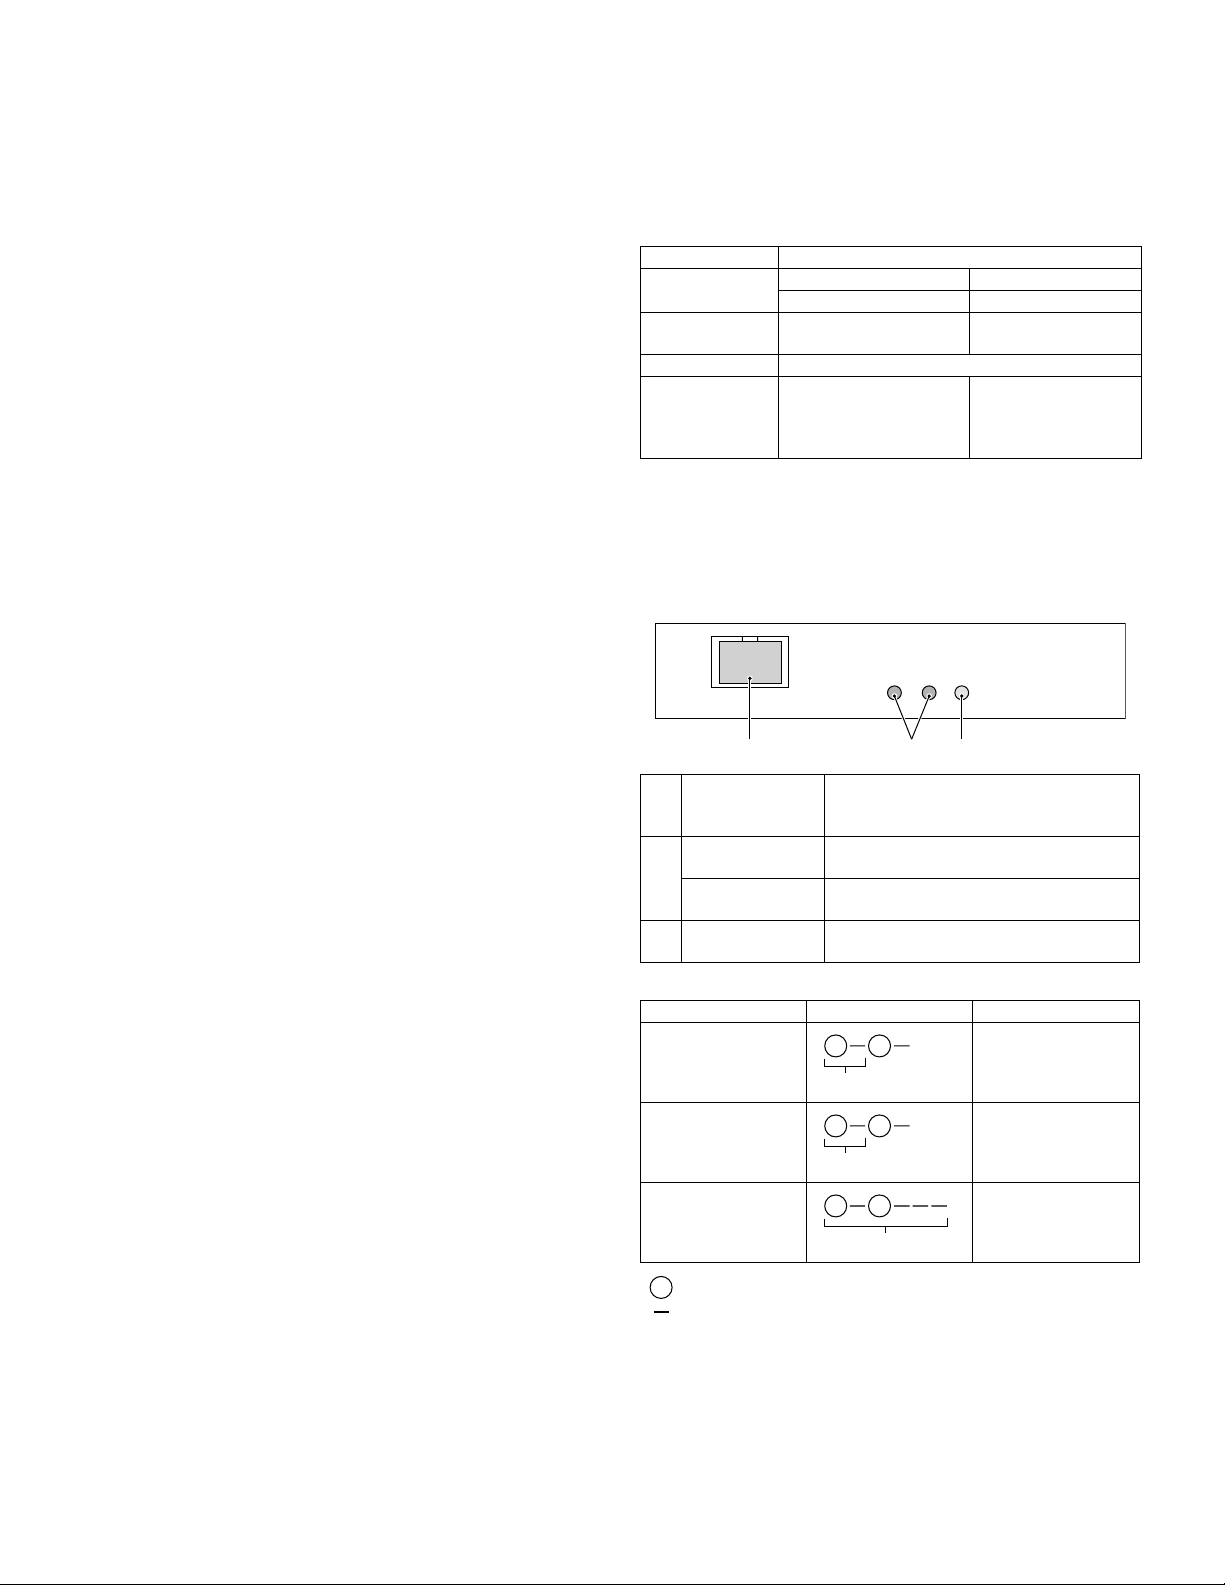
[4] IDENTIFICATION OF EACH
SECTION AND FUNCTIONS
1. Connector and LEDs
LINK
10B 100B STAT
10/100BASE
[3] MAJOR FUNCTIONS
1. Functions
A. Automatic IP address setup by DHCP, BOOTP,
RARP
(1) DHCP/BOOTP
The AR-NC5J, equipped with the DHCP/BOOTP protocols, allows to
make setups related to TCP/IP in a network where a DHCP/BOOTP
server is working.
By enabling the DHCP/BOOTP setup of the AR-NC5J, the information
related to TCP/IP which is valid in the DHCP/BOOTP server can be set
to the AR-NC5J.
• The DHCP protocol supported by the AR-NC5J basically conforms
to RFC2131/2132. It conforms to Windows NT DHCP servers.
• To utilize the DHCP function of the AR-CN5J, consult the network
manager.
(2) RARP
The AR-NC5J, equipped with the RARP protocol, allows to make setup
of IP address in a network where a RARP server is working.
By enabling the RARP setup of the AR-NC5J, the IP address set in the
RARP server can be assigned to the AR-NC5J.
B. IPP conformity (TCP/IP)
The AR-NC5J conforms to the Internet printing protocol (IPP Ver.1.0)
which allows to print via the Internet. By using the IPP, it allows to print
with a remote printer as well as Web access by HTTP.
C. WWW browser
The AR-NC5J, equipped with the HTTP server, can be accessed by a
WWW browser to display the printer status or to change the printer
setup.
123
1 Connector for
10BASE-T/
100BASE-TX
2 10BASE LINK LED
(Green)
100BASE LINK
LED (Green)
3STATUS LED
(Orange)
Connected with a shield-type, twisted-pair
cable. (For 100BASE-TX environment, use
a cable of Category 5.)
When a network connection is established
in 10BASE-T, this lamp lights up.
When a network connection is established
in 100BASE-TX, this lamp lights up.
During communication, this lamp flashes.
<Status LED flashing cycle>
Content of operation Lighting pattern Cycle
Error detection 0.2sec/rapid flashing
0.2 sec
Forcible loader mode 1sec/slow flashing
Refer to [8]-4-(a).
1 sec
Factory setup mode Repetition of 0.6sec/
0.6 sec
ON
OFF
2times flashing
AR-NC5J/NC5JG/NC5JW - 1
Page 3

2. Jumper switches
2. Parts included
1 2 3 4
10BASE-T/
100BASE-TX
connector
Jumper switch
The jumper switch has No. 1 and No. 2 pins, and ON/OFF is switched
by the jumper plug.
When getting started, No. 1 pin is ON and the flash memory loader is
started. When No. 2 is ON, the factory setting of the environmental
variable is performed.
Jumper witch ON OFF
1 Forcible loader mode Normal mode (When shipping)
2 Factory setup mode Normal mode (When shipping)
1
Jumper plug
Normal mode
2
1
2
Forcible loader mode Factory setup
1
2
(When shipping)
Print server card: 1 Screws (silver)
Spacers (unused): 2
M3 x 8: 2
CD-ROM: 1 Operation manual: 1 Installation manual: 1
3. Installation procedure
The AR-NC5J installing procedures in the AR-235/275 series are
described.
In this case, no spacer is used in the packed items of the AR-NC5J.
For the installing procedures of the AR-NC5J to another printer, refer to
the printer's Service Manual or Installation Manual.
Turn off the main switch of the copier and then remove the power
plug of the copier from the outlet.
1) Remove the shielding plate.
Remove five screws and remove the shielding plate.
Screws
NOTE:
• When setting the jumper switch, be sure to turn off the power of the
printer.
• For normal use, be sure to set No. 1 and No. 2 to OFF (Normal
mode).
• The factory setup can be set by the utility or Telnet as well as the
above jumper switch setup operations. Normally the utility or Telnet
is used. Setting by the jumper switch is used only when the unit cannot make communication with the AR-NC5J.
[5] INSTALLATION
1. Connection to a network
To connect the AR-NC5J to a network, the following items are required.
• For connection in the 100BASE-TX environment, a hub conforming
to 100BASE-TX and a shield-type, twisted-pair cable (Category 5)
are required.
8
7
6
5
4
3
2
1
Hub Shield-type, twisted-pair cable
1) Check that the printer power is off, and connect the shield-type,
twisted-pair cable to the 10/100BASE connector of the AR-NC5J.
2) Connect the other end of the cable to the hub.
3) Turn on the printer power, and check that the printer operates nor-
mally.
2) Cut and remove the cut-out portion from the left rear cabinet.
Cut and remove the cut-out portion from the left rear cabinet using
a tool such as nippers. (Be careful about the direction of the tool so
that the cut surface is flat.)
Cut-out portion
AR-NC5J/NC5JG/NC5JW - 2
Page 4
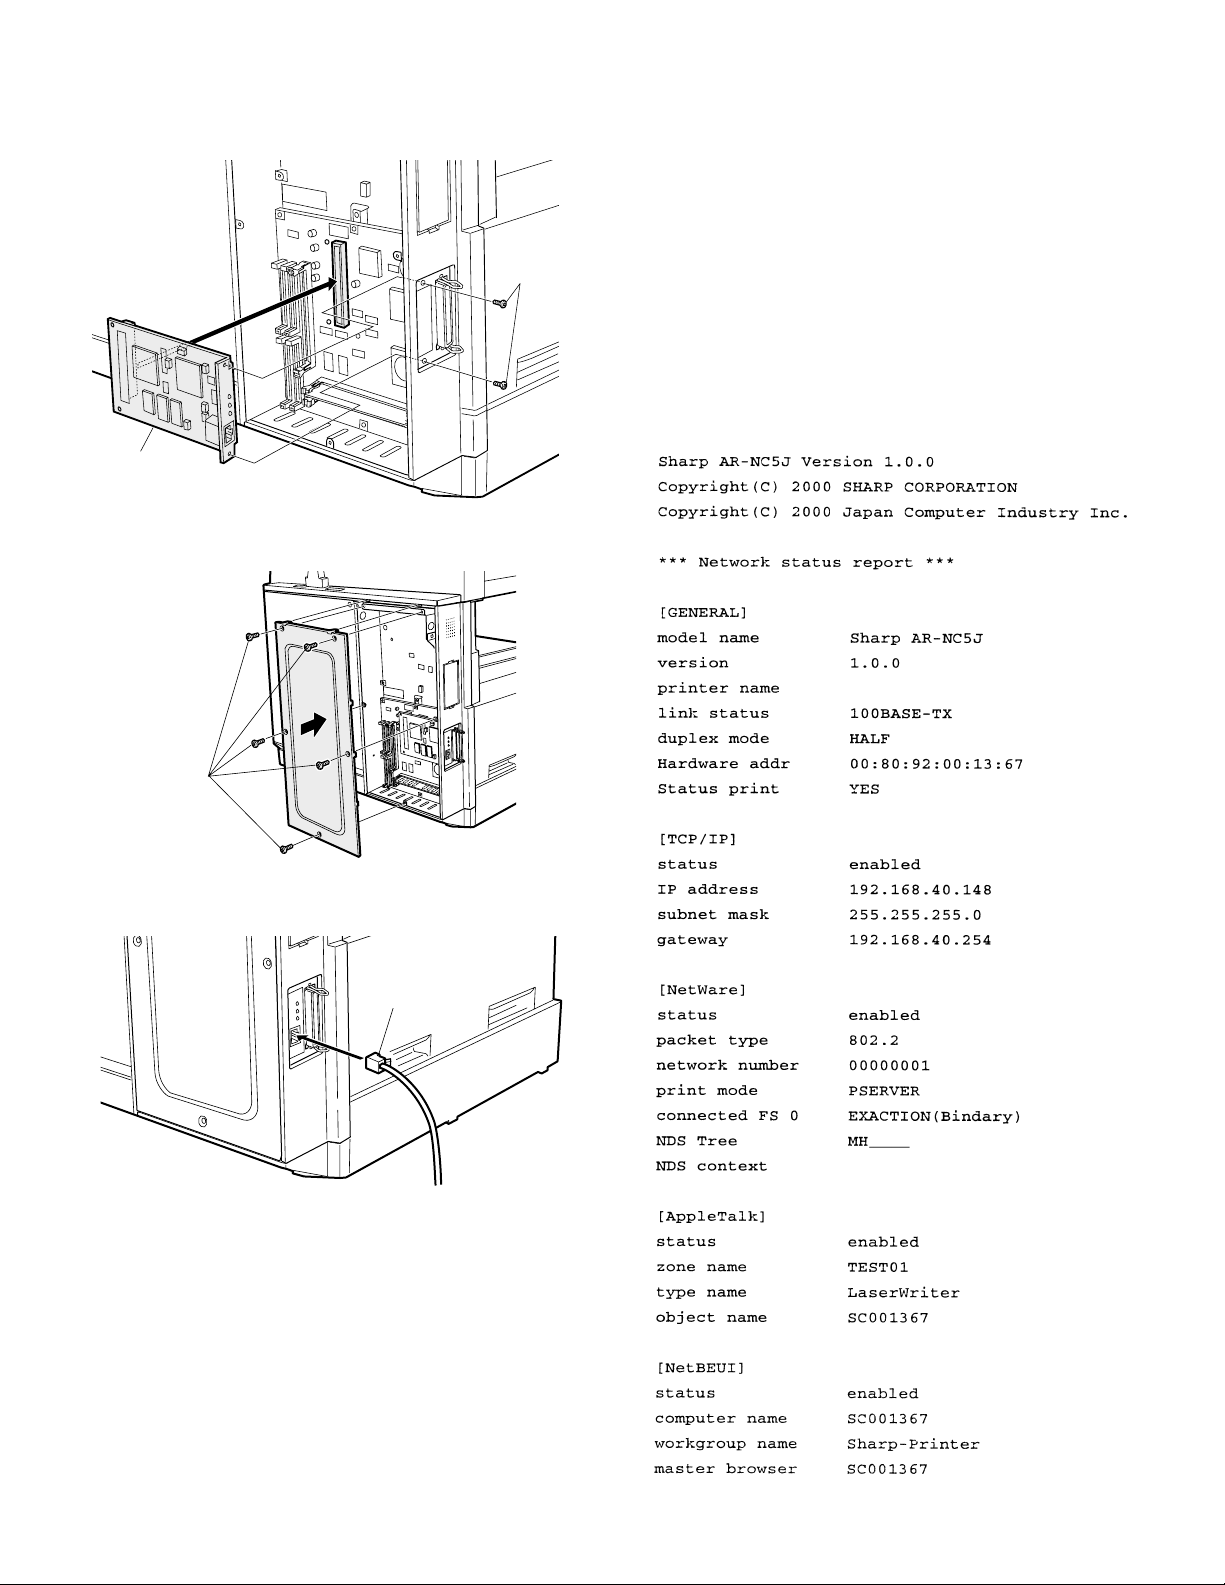
3) Attach the print server card.
Align the connector positions, connect the print server card, and
then secure the card to the option mounting plate in the main unit
using supplied two silver screws (M3 x 8).
Silver screws
(M3 x 8)
Print server card
4) Reattach the shielding plate.
Reattach the shielding plate using five screws.
[6] AR-NC5J STATUS CHECK
1. Printing the status page
The AR-NC5J status is checked by printing the status page.
A. Example of status page print
There are roughly two ways of printing the status page.
• Printing the status page is performed when starting the AR-NC5J.
→
Refer to the manual on the AR-NC5J setup.
• Perform printing of the status page from the operation panel of the
printer.
→
Some printers may not support it. Refer to the Operation Manual
of the printer.
∗
The same information as the status page print-out can be obtained
from the utility Web page.
<Example of the status page>
Screws
5) Connect the cable to the control PWB.
Connect a LAN cable to the connector of the print server card.
LAN cable
Insert the power plug of the copier to the outlet and turn on the
main switch. Then, carry out the following procedure.
6) Check for the print server card.
Use the keys on the operation panel to print a configuration page.
Check that the network interface card has been installed.
7) Check for printing.
Peform setup of the environmental variables. (refer to [6]-2)
(For installation of printer drivers on a computer and network set-
tings (IP address input), see the supplied operation manual.)
Execute printing to check to see if printing can be executed prop-
erly.
AR-NC5J/NC5JG/NC5JW - 3
Page 5

2. AR-NC5J setup items
After completion of installation, perform setup of the environmental variables. Explanations on the variables are given below.
A. General
Name
Telnet Web page NIC Manager
Change root
Password
Print status after
Boot-up
Change Admin
password
Print status after
Boot-up
Admin
Password
Print status after
Boot-up
B. TCP/IP and related items
Name
Telnet Web page NIC Manager
TCP/IP Protocol TCP/IP Protocol TCP/IP protocol
DHCP/BOOTP DHCP/BOOTP DHCP/BOOTP
RARP RARP RARP is used. ENABLE Use to disable/enable the RARP protocol operation. The RARP
IP Address IP Address IP Address 0.0.0.0 Used to set an IP address of the AR-NC5J. The set value is in the
Subnet Mask Subnet Mask Subnet Mask 0.0.0.0 Used to set the subnet mask of the AR-NC5J. The set value is in the
Default
Gateway
Use FTP/LPD
Banner
Default
Gateway
Use FTP/LPD
Banner
is used.
is used.
Default
Gateway
Use FTP/LPD
Banner
C. NetWare and related items
Name
Telnet Web page NIC Manager
Netware
Protocol
Frame Type Frame Type Frame Type 802.2 Used to set the default frame type which is used by the AR-NC5J. If
Operation Mode Operation Mode Operation Mode PSERVER Used to set the priority operation mode (print server/remote printer) of
Printer Name Printer Name Printer Name "SCxxxxxx-prn1"
Print Server
Name
Netware
Protocol
Print Server
Name
Use Netware
Protocol.
Print Server
Name
Factory setup Descriptions
Sharp The administrator password of the AR-NC5J is set with ASCII
character codes. This password is used for identification when
changing setup by Telnet, a Web page, or a setup utility.
Remark: Indicated as "*" for security.
NO When booting the AR-NC5J, select whether to print the status page or
Factory setup Descriptions
ENABLE Used to enable/disable TCP/IP protocol. This setup will affect the
ENABLE Used to enable/disable the operation of DHCP/BOOTP protocol. The
0.0.0.0 Used to set an IP address of the gateway. The set value is in the form
NO Used to set whether to output the banner page when printing with LPR
Factory setup Descriptions
ENABLE Used to disable/enable the NetWare protocol operation. This setup
(xxxxxx is the lower 6
digits of Mac address.)
"SCxxxxxx"
(xxxxxx is the lower 6
digits of Mac address.)
not.
operations of LPR, FTP, TELNET, SNMP, HTTP, and the setup utility
(for TCP/IP).
DHCP/BOOTP protocol acquires an IP address from the DHCP server
or the BOOTP server when booting. To set an IP address of the ARNC5J, a DHCP server or a BOOTP server which has been properly
set should be operating in the sub network. The AR-NC5J
automatically recognizes DHCP and BOOTP, and employs as its
address whichever replies to it first.
protocol acquires an IP address from the RARP server. To set an IP
address of the AR-NC5J by RARP, the RARP server which has been
properly set should be operating in the sub network.
form of decimal number of "xxx.xxx.xxx.xxx."
form of decimal number of "xxx.xxx.xxx.xxx." When "0.0.0.0" is set,
this item is disabled, and the subnet mask corresponding to the IP
address is automatically used.
of decimal number of "xxx.xxx.xxx.xxx." The gateway must exist in the
same sub network as the AR-NC5J. When "0.0.0.0" is set, this item is
disabled.
or FTP.
will affect the operations of the print server, the remote printer, and the
setup utility (for IPX/SPX).
the set frame type does not work, another frame type is automatically
selected.
the AR-NC5J. If the set mode does not work, another mode is
automatically selected and tried.
Used to set the printer name which is registered in the print server
information in the NetWare server. This setup must be identical to the
setup of the printer name registered in the NetWare server.
Used to set the print server name when the AR-NC5J is booted in the
print server mode. Since this setup is used as an identification
element in a network with the NetWare protocol, it must be different
from the other NetWare product names. It is used as the login name to
log in the NetWare server.
AR-NC5J/NC5JG/NC5JW - 4
Page 6

Name
Telnet Web page NIC Manager
Login Password Login Password Login Password No (No password) Used to set the password authenticated when the AR-NC5J logs in
Job Polling
(sec)
Bindary Mode Bindary Mode Bindary setup ENABLE Used to disable/enable the bindary mode operation. When disabled,
FSERVER
Name 1 – 8
NDS Tree NDS Tree name NDS Tree name "" Used to set the NDS tree to be connected. Since it is automatically
NDS Context NDS Context NDS Context "" Used to set the NDS context connected in the print server mode. In
PSERVER
Name 1 – 8
Job Timeout
(sec)
Job Polling
interval (sec)
File server
name 1 – 8
Print Server
name 1 – 8
Job Timeout
(sec)
Job Polling
interval
Filer server
name to be
connected
Print Server
name to be
connected
Job Timeout 10 Used to set the timeout for the AR-NC5J to judge the completion of a
Factory setup Descriptions
the file server as a print server. The password can be set in max. 31
characters. However, it is not recommendable to use Chinese
characters and Katakana character in a password. When a password
is set for the AR-NC5J, the same password must be set to the
corresponding file server. (Setup of a password on the file server is
made from "Print server information.") When connecting to two or
more file servers, the same password must be set to all of them.
*Note: The AR-NC5J uses a null character array for the default
password. That is, even though a password is set to the AR-NC5J and
no password is set to the print server information (a null character
array is set), connection and printing are allowed. This, however, is an
exceptional process. In the normal process, the password set to the
AR-NC5J must be identical to that for the print server information.
4 Used to specify the time interval (sec) between job inquiries from the
AR-NC5J to the filer server. Normally there is no need to change the
default setup, 4sec.
only the NDS mode operation is valid. This is set to DISABLE only
when only the NDS mode is used.
"" Used to set the priority file server name with max. 31 characters.
When operating in the print server mode, the file server specified in
this setup is logged in. If this setup is empty, the AR-NC5J
automatically retrieves a file server to log in.
acquired, there is no need to set in normal cases. If there are two or
more trees in a network, it must be set.
this item, the context which formed the print server on the file server is
set.
"" Used to set the print server name to be connected in priority. When
operating in the remote printer mode, connection is made to the print
server set in this setup. If this setup is empty, the AR-NC5J
automatically retrieves a print server to connect.
job when operating in the remote printer mode. Usually the default
value is used.
D. AppleTalk and related items
Name
Telnet Web page NIC Manager
AppleTalk
Protocol
Zone Name Zone Name Zone Name "*" Used to set the zone name which the AR-NC5J belongs to. If this
Printer Name Printer Name Printer Name "SCxxxxxx" (xxxxxx is
AppleTalk
Protocol
Use AppleTalk
Protocol.
Factory setup Descriptions
ENABLE Used to disable/enable the AppleTalk protocol operation.
setup is "*", The AR-NC5J belongs to the default zone set in the
AppleTalk router in the network.
the lower 6 digits of
Mac address.)
Used to set the AppleTalk printer name. The set printer name is visible
from the selector. The special codes (=:@*) of the AppleTalk protocol
cannot be used in this character array.
E. NetBEUI and related items
Name
Telnet Web page NIC Manager
NetBEUI
Protocol
Computer
Name
Work Group Work Group Work Group "Sharp-Printer" Used to set the work group which the AR-NC5J belongs to. Use the
Comment Comment Comment "Sharp AR-NC5J" Used to set the comment on the AR-NC5J. The set contents are
NetBEUI
Protocol
Computer
Name
Use NetBEUI
Protocol.
Computer name "SCxxxxxx" (xxxxxx is
Factory setup Descriptions
ENABLE Used to disable/enable the NetBEUI protocol operation.
the lower 6 digits of
Mac address.)
Used to set the computer name. The set name is displayed in
Window's Explorer. The name must be different from the other
computer names.
default work group name or an existing work group name. A new work
group name which does not exist in the network cannot be displayed
as a work group.
displayed as the comment on the AR-NC5J by Window's Explorer.
AR-NC5J/NC5JG/NC5JW - 5
Page 7

[7] TROUBLESHOOTING
1. Obstacles to introduction
A. Test print is not outputted.
Check that the printer is ready for printing. (Online/Offline, etc.)
Check that the data reception lamp of the printer is on. If it is on, turn it
off and press the paper exit button to discharge paper.
2. Obstacles in Windows environments
(TCP/IP)
Check that the printer port name is properly set. Check that the printer
port name set to the AR-NC5J is identical to the printer port name set
to the NetWare server. If there are two or more units of the AR-NC5J,
do not use the same name for different AR-NC5J, and do not use the
same port name for different ports.
Check that the NetWare login password is correct.
Check that the machine name is identical to the print server name.
D. Printing cannot be performed.
Check that the network cable is properly connected.
Check that the printer job lamp is on. If it is on, turn it off and press the
paper exit button to discharge.
A. NICManager retrieval cannot find out the AR-
NC5J.
Check that the network cable is properly connected.
In the NICManager menu bar "Option", select "Search by TCP/IP" and
perform retrieval.
B. Printing cannot be made.
Check that the network cable is properly connected.
When the TCP/IP protocol is used, check that there is a reply of ping
for the IP address assigned to the AR-NC5J.
Check that the printer JOB lamp is on. If it is on, turn it off and press
the paper exit button to discharge paper.
3. Obstacles in Windows environments
(NetBEUI)
A. Work Group of "Sharp Printer" is not found in the
entire network.
Check that the network group is properly connected.
Check the network setup of Windows.
It may take several minutes to find the work group in the network.
4. Obstacles in NetWare environments
A. NICManager retrieval cannot find out the AR-
NC5J.
Check that the network cable is properly connected.
In the NICManager menu bar "Option", select "Search by IPX/SPX"
and perform retrieval.
B. Cannot connect to the NetWare server in the
remote printer mode.
Check that the packet type and the NetWare operation mode are
proper.
The AR-NC5J switches automatically, however it may take some time
depending on the use environment.
Check that the print server which the AR-NC5J is registered in is normally working in the NetWare server.
Check that the print server name is properly set. If the print server
name registered in the AR-NC5J is specified, check that the print
server name is identical to what is working on the file server.
Do not use a same port name in different products.
C. Cannot connect to the NetWare server in the print
server mode.
Check that the packet type and the NetWare operation mode are
proper.
The AR-NC5J switches automatically, however it may take some time
depending on the use environment.
When a file server is specified to the AR-NC5J, check that the name of
the file server which is used is identical to the set name.
5. Obstacles in Macintosh environments
A. Not recognized with the selector.
Check that the network cable is properly connected.
When there is a zone in the network, check that the selector connects
to the proper zone (which the printer is connected to) and check that
the zone name is the same as what is set by a utility, etc.
Check that the printer conforming to the printer is selected.
Check that the AppleTalk indicated at the right lower side of the selec-
tor is set to "Use."
Check that "AppleTalk (*1) (Network)(*2) setup is proper to the use
environment.
*1: In the case of AppleTalk
Check that "Ethernet" is selected. When an AppleTalk router is
used to connect the AR-NC5J with LocalTalk, check that "Printer
port" or "MODEM port" is selected.
*2: In the case of Network
Check that "Ethernet" is selected. When an AppleTalk router is
used to connect the AR-NC5J with LocalTalk, check that "LocalTalk" is selected.
Print the setup contents and check that the AppleTalk protocol is not
disabled. Setup can be made by using Telnet, Windows utility, or setup
utility for Macintosh.
Print the setup content and check that the printer name is not empty.
B. When printing, "Insufficient memory" is
displayed and printing cannot be made./When
printing, only Chinese characters are printed or
blank paper is outputted.
It may be caused by insufficient memory capacity for the application.
Click the icon of the using application, select "See information" in the
file menu, and increase the use memory size of the application.
Terminate the other applications which are acting.
Increase the starting disk capacity.
[8] FLASH ROM VERSION UP
PROCEDURE
1. Operating environment
The version up tool requires the operating environment of Windows95/
98/Me/NT/2000.
• In the Windows NT/2000 environment, communication is performed
by use of the IPX/SPX protocol. So the IPX/SPX protocol must be
installed.
• In the Windows 95/98/Me environment, both the packet driver and
the IPX/SPX protocol are retrieved for use of communication, and an
available communication means is used to perform uploading. (If
both are available, the IPX/SPX protocol has priority.)
AR-NC5J/NC5JG/NC5JW - 6
Page 8

If the IPX/SPX protocol is available and there is a NetWare server in
the environment, a network number may be obtained from the NetWare server to allow communication (retrieval and upload) with a print
server card which is outside of the router. In the other environments,
communication with a device outside the router cannot be made.
2. Making of execution environment
The version up tool is provided in a form of self-extracting compression
files. You may extract necessary files in your desired folder without any
special installing program.
For multi language use, the self-extracting file is provided in each language. The tool is not provided with a UI for selection of language.
In addition, one PC cannot operate two or more displays simultaneously.
3. Procedures
A. Establishment of communication means
(In the case of Windows 95/98/Me)
When the tool is executed, if two or more network adapters are
installed, the network adapter selection menu is displayed. Select the
Ethernet network adapter in this menu and press the OK key, retrieval
will be executed. If, however, initialization of the packet driver is failed
with the selected network adapter, the machine returns to the network
adapter selection menu. Pressing the CANCEL key terminates the tool
operation.
When only one network adapter is installed, this selection menu is not
displayed.
Network adapter selection menu
(In the case of Windows NT/2000)
When this tool is executed, installation of the IPX/SPX protocol is
checked. If the IPX/SPX protocol is not installed, the error message is
displayed and the tool is terminated. If installed, retrieval is performed.
B. Main menu
When retrieval is completed, the main menu of the tool is displayed,
and the list of retrieval results is displayed.
Main menu
Clicking the heading of the list changes the sort conditions.
When a BIN file name is selected, it is displayed in the column below
the Browse button.
The menu is composed as shown in the table below. The names in [ ]
show buttons of the same function on the main menu.
Group name Sub menu name Function
File Open [Browse] Displays the file selection dialog
to select and change a BIN file to
write into.
Refresh
[Refresh]
Exit Terminates the program.
Communication Upload [Upload] Starts writing of the Bin file to the
Te s t p r i n t
[Test print]
Options Opens the option setup dialog.
Help About Opens the version information
Retrieves a printer on the network
and revises the list.
selected printer.
Sends the test print command to
the selected printer to perform test
printing.
display.
C. File selection dialog
In the main menu, select FILE a OPEN or press the Browse button,
and the file selection dialog will be opened. Select a BIN file to write
into the AR-NC5J.
If a BIN file which is not for the AR-NC5J is selected, an error occurs.
IPX not-installed error message
When the communication means is established, as described above,
the tool retrieves for the AR-NC5J installed in the network. During
retrieval, the process status bar is displayed.
Retrieval process status display
AR-NC5J/NC5JG/NC5JW - 7
File selection dialog
D. Firmware upload
Select a desired printer from the list and a Bin file. Under this condition,
select COMMUNCIATION a UPLOAD or press the UPLOAD button,
and the firmware will be uploaded. There are following three patterns
of writing procedures:
Page 9

1) Single selection
When only one printer is selected from the list on the main menu:
First the upload start confirmation display is shown. Selecting YES
in this menu deletes the firmware and starts uploading. During
uploading, the process indication bar is displayed on the firmware
upload menu.
After completion of uploading, the firmware upload menu is closed
and the control returns to the main menu.
2) Plural selection (without confirmation)
When two or more printers are selected from the list on the main
menu, and a check mark is not put to "When uploading to multiple
units, display a confirmation prompt for each unit."
In this case, the upload start confirmation menu is displayed only
once when starting the first writing. Selecting YES in this menu
starts writing the firmware to the selected printers continuously.
The operations during and after writing are the same as "Single
selection."
3) Plural selection (with confirmation)
When two or more printers are selected from the list on the main
menu, and a check mark is put to "When uploading to multiple
units, display a confirmation prompt for each unit."
In this case, the upload start confirmation menu is displayed and
delete/uploading of the firmware is made for each of the selected
printers. (This series of operations is repeated for each printer.) If
NO is selected in the confirmation menu, uploading is not performed and the control goes to the confirmation menu of the next
printer. The operations during and after writing are the same as
"Single selection."
E. Test print
After selecting a desired printer from the list, select COMMUNICATION
a TEST PRINT on the menu or press the TEST PRINT button, and the
test print of the selected printer will be performed. This function is used
for troubleshooting.
Similarly to the firmware uploading, there are three patterns: Single
selection, Plural selection (without confirmation), and Plural selection
(with confirmation).
If the test print packet that is sending fails, an error message is displayed. (Refer to "5. Error message list." In the case of normal completion, no message is displayed.
Test print confirmation menu
(Signal selection/Plural selection (with confirmation))
Test print confirmation menu
(Plural selection (without confirmation))
<Example of TEST PRINT>
(Single selection/Plural selection (with confirmation))
Upload start confirmation menu
Upload start confirmation menu
(Plural selection (without confirmation))
Firmware delete menu
4. Notes during/after uploading
During and after uploading, take care of the following notes:
(a) During uploading, the printer power should not be turned off and
the network cable should not be disconnected. If they should,
uploading will not performed normally and the firmware will be broken.
If the firmware should be broken due to an accident during uploading, retrieval by the version up tool may not be responded. In such
a case, reboot the printer with the jumper switch No. 1 at ON, and
the network card will be booted in the forcible loader mode to make
responding to retrieval.
This operation is performed similarly to both cases when the IPX/
SPX protocol is used and when the packet driver is used. There
are no limitations.
(b) When the composition of the setup information differs between dif-
ferent versions before and after uploading, the content of setup
may be broken after completion of uploading. (This information will
be given with version-up bin file.)
In such a case, the setup shadd be returned to the initial factory
setup. Then use the setup tool and a Web browser to make setup
again.
Firmware upload menu
AR-NC5J/NC5JG/NC5JW - 8
Page 10

5. Error message list
The table below shows the error messages list of the version up tool.
Error message Occurring conditions
Invalid firmware file. Select a
correct file.
Can’t operate more than 32
units at the same time.
Upload failed. A communication error occurred
Failed starting
communication with
XX:XX:XX:XX:XX:XX.
No response after sending
the commands to
XX:XX:XX:XX:XX:XX.
Timeout time is not available. A value other than 1 - 99 or a
Failed to initialize packet
driver.
Failed to initialize packet
driver. Do you want to use
other network adapter?
This program does not work
in WindowsNT/2000
environment where IPX
protocol is not installed.
Install IPX protocol or execute
in Windows95/98/Me
environment.
The Bin file of the selected firmware
was improper.
(Example: A BIN file of other unit than
the AR-NC5J was selected.)
Printers of over 32 units were selected
and Uploading or test print was
performed
during uploading.
Immediately after completion of
firmware uploading, the printer could
not enter the loader mode.
After sending the test print command,
there was no response from the ARNC5J.
character is entered for time out setup.
Initialization of the packet driver failed
when a single network adapter was
installed under Win95/98/Me
environment.
Initialization of the packet driver failed
in an adapter after selecting the
adapter when plural network adapters
were installed under Win95/98/Me
environment.
The version up tool was executed
under Windows NT/2000 without
installing the IPX/SPX protocol.
6. Check for defectiveness of the AR-NC5J
TEST PRINT Refer to [8]
Is the TEST PRINT
normal ?
NO
Use the cross cable
between AR-NC5J and PC.
Is the TEST PRINT
normal ?
NO
Return the setup to the
initial factory setup.
Is the TEST PRINT
normal ?
NO
Does the printer print
individually ?
(When the AR-NC5J is
removed from the machine.)
NO
AR-NC5J Normal
Troubles other than the AR-NC5J
YES
YES
Refer to [4]-2
YES
YES
AR-NC5J Normal
AR-NC5J Normal
Troubles other than the AR-NC5J
AR-NC5J Normal
Troubles other than the AR-NC5J
AR-NC5J Trouble
∗
∗
If there is another printer than those which conform to the AR-NC5J,
install the AR-NC5J to be checked, and perform the same procedures to check.
AR-NC5J/NC5JG/NC5JW - 9
Page 11

CAUTION FOR BATTERY REPLACEMENT
(Danish)
Lithiumbatteri – Eksplosionsfare ved fejlagtig håndtering.
Udskiftning må kun ske med batteri
Levér det brugte batteri tilbage til leverandoren.
(English)
Danger of explosion if battery is incorrectly replaced.
Replace only with the same or equivalent type
recommended by the manufacturer.
CONTAINS MANGANESE DIOXIDE LITHIUM BATTERY
MUST BE DISPOSED OF PROPERLY.
REMOVE THE BATTERY FROM THE PRODUCT AND
CONTACT FEDERAL OR STATE ENVIRONMENTAL
AGENCIES FOR INFORMATION ON RECYCLING
CONTAINS LITHIUM-ION BATTERY.
MUST BE DISPOSED OF PROPERLY.
REMOVE THE BATTERY FROM THE PRODUCT AND
CONTACT FEDERAL OR STATE ENVIRONMENTAL
AGENCIES FOR INFORMATION ON RECYCLING
(Finnish)
Paristo voi räjähtää, jos se on virheellisesti asennettu.
Vaihda paristo ainoastaan laitevalmistajan suosittelemaan
tyyppiin. Hävitä käytetty paristo valmistajan ohjeiden
(French)
Il y a danger d’explosion s’ il y a remplacement incorrect
de la batterie. Remplacer uniquement avec une batterie du
même type ou d’un type équivalent recommandé par
Mettre au rebut les batteries usagées conformément aux
(Swedish)
Explosionsfara vid felaktigt batteribyte.
Använd samma batterityp eller en ekvivalent
typ som rekommenderas av apparattillverkaren.
Kassera använt batteri enligt fabrikantens
(German)
Explosionsgefahr bei Verwendung inkorrekter Batterien.
Als Ersatzbatterien dürfen nur Batterien vom gleichen Typ oder
vom Hersteller empfohlene Batterien verwendet werden.
Entsorgung der gebrauchten Batterien nur nach den vom
Hersteller angegebenen Anweisungen.
ADVARSEL !
af samme fabrikat og type.
Caution !
“BATTERY DISPOSAL”
AND DISPOSAL OPTIONS.
“BATTERY DISPOSAL”
AND DISPOSAL OPTIONS.
VAROITUS
mukaisesti.
ATTENTION
le constructeur.
instructions du fabricant.
VARNING
instruktion.
Achtung
Page 12

All rights reserved.
Printed
No part of this publication may be reproduced,
stored in a retrieval system, or transmitted,
in any form or by any means,
electronic; mechanical; photocopying; recording or otherwise
without prior written permission of the publisher.
Trademark Acknowledgments
Microsoft Windows, MS-DOS, Windows NT, Windows 2000 are trademarks of Microsoft
Corporation in the U. S. A. and other countries.
Macintosh, Power Macintosh, Mac OS, LaserWriter, and AppleTalk are registered trademarks of
Apple Computer, Inc.
IBM, PC/ AT, and PowerPC are trademarks of International Business Machines Corporation.
Pentium is a registered trademark of Intel Corporation.
PCL is a trademark of the Hewlett- Packard Company.
PostScript is a registered trademark of Adobe Systems Incorporated.
NetWare is a registered trademark of Novell, Inc.
All other trademarks and copyrights are the property of their respective owners.
Digital Document Systems Group
Quality & Reliability Control Center
Yamatokoriyama, Nara 639-1186, Japan
2001 April Printed
 Loading...