


Page
●
INSTALLATION
●
INITIAL SETTINGS
●
CHOOSING SUITABLE
MEDIA
●
HOW TO USE THE FAX
FUNCTION
●
TROUBLESHOOTING
●
SPECIFICATIONS
●
GLOSSARY
●
INDEX
1-1
2-1
3-1
4-1
5-1
6-1
FACSIMILE OPERATION MANUAL
AR-F151
MODEL

Your fax machine and the telephone system
WARNING NOTICE:
NO calls can be made to or from this fax during a mains power f ailure .
WARNING — A ustralian Comm unications A uthority (ACA) regulations state that no
unauthorised changes or modifications to this equipment are permitted.
Note:Complies with the following standards,
ACA TS001-1997, AS/NZS 3260
ACA TS002-1997 and AS/NZS 3548.
These limits are designed to provide reasonable protection against interference in an
installation. This equipment generates , uses and can radiate radio frequency energy and, if
not installed and used in accordance with the instructions, may cause interf erence. Howev er ,
there is no guarantee that interference will not occur in a particular installation.
If this equipment does cause interference to radio or television reception, which can be
determined by turning the equipment off and on, the user is encouraged to try to correct the
interference by one or more of the f ollowing measures:
— Reorient or relocate the receiving antenna.
— Increase the separation between the equipment and the receiver.
— Connect the equipment to an outlet on a different circuit to that which the receiver is
connected.
— Consult the dealer or an experienced radio/TV technician for help .
The Ringer Equivalence Number (REN) for this equipment is written on the A-Tick label.
Important safety information
Installing or modifying telephone lines should only be done by an ACA licensed serviceman.
Note: In some areas a distinctive ring pattern can be provided by the telephone
companies for modems. The fax cannot use the distinctive ring pattern that is in use
for the modem.

i
1. INSTALLATION
Quick Reference Guide ...........................................................................................1-1
Introduction..............................................................................................................1-2
Choosing a Location................................................................................................1-2
Parts Identification ................................................................................................... 1-3
Connections ............................................................................................................ 1-4
Connecting the Telephone Line Cord...................................................................1-4
Final Preparations ................................................................................................... 1-5
Connecting Other Devices...................................................................................1-5
2. INITIAL SETTINGS
A Look at the Fax Control Panel ..............................................................................2-1
About the Liquid Crystal Display.............................................................................. 2-2
Using the Arrow Ke ys ..............................................................................................2-2
Adjusting the Beep Volume......................................................................................2-2
Adjusting the Ringing Volume ..................................................................................2-3
Setting the Length of Alarm Beeps ..........................................................................2-3
Turning Ke y Beeps Off.............................................................................................2-4
Fax Setup................................................................................................................ 2-5
How to Enter Characters ..................................................................................... 2-5
Entering Your Name and F ax Number .................................................................2-6
Setting the Date and Time................................................................................... 2-7
Selecting the Reception Mode.............................................................................2-8
Setting the Number of Rings for A uto Reception .................................................2-9
Setting the Number of Rings for Manual Reception............................................. 2-9
Selecting the Reception Paper Size................................................................... 2-10
Setting the Tray Paper Size................................................................................2-11
Setting the Dial Mode ........................................................................................2-12
Setting the Number of Recall Times .................................................................. 2-12
Setting the Recall Interval..................................................................................2-13
Setting the Index Function................................................................................. 2-14
Setting Fine Resolution Priority .........................................................................2-15
Setting Up the Unit for Use with a PC Modem ................................................... 2-15
Using the Remote Reception Function .............................................................. 2-16
Distinctive Ringing............................................................................................. 2-18
Storing Numbers for Automatic Dialling .............................................................2-19
Chain Dialling for Long Numbers................................................................... 2-21
Storing Numbers Under Group Ke ys .................................................................2-22
Using the Unit with an Answering Machine............................................................2-24
Quiet Detect Time..............................................................................................2-24
Answering Machine Backup ..............................................................................2-25
3. CHOOSING SUITABLE MEDIA
Originals Suitable for Faxing ....................................................................................3-1
Size and W eight................................................................................................... 3-1
Unsuitable Originals ............................................................................................3-2
TABLE OF CONTENTS

ii
4. HOW T O USE THE F AX FUNCTION
Sending Documents ................................................................................................ 4-1
Setting the Document ..........................................................................................4-1
Optional T r ansmission Settings............................................................................4-3
Resolution .......................................................................................................4-3
Contrast...........................................................................................................4-3
Cover Sheet ....................................................................................................4-4
Auto Cov er Sheet ............................................................................................4-5
Dialling and Transmitting......................................................................................4-6
Direct Keypad Dialling ..................................................................................... 4-6
Rapid Ke y Dialling ........................................................................................... 4-7
Speed Dialling .................................................................................................4-7
Chain Dialling ..................................................................................................4-8
Normal Dialling Using the SPEAKER key........................................................4-8
Using the SEARCH Ke y .................................................................................. 4-9
Redialling ........................................................................................................4-9
Receiving Faxes ....................................................................................................4-10
Using AUTO Mode............................................................................................. 4-10
Using MANUAL Mode ....................................................................................... 4-10
Using A.M. Mode ...............................................................................................4-10
Optional Reception Settings ..................................................................................4-11
Receive Reduce ................................................................................................4-11
Footer Printing...................................................................................................4-12
When using manual sending and receiving ........................................................... 4-12
Special Functions .................................................................................................. 4-13
Memory .............................................................................................................4-13
Substitute Reception into Memory.................................................................4-13
Data Transfer..................................................................................................... 4-14
Transmission Reservation ................................................................................. 4-15
Broadcasting ..................................................................................................... 4-17
P olling................................................................................................................ 4-19
Setting the Polling Key...................................................................................4-19
P olling Others................................................................................................ 4-19
Being Polled (Memory P olling).......................................................................4-20
Timer Operations............................................................................................... 4-22
Anti Junk Fax..................................................................................................... 4-24
Printing Out Reports..............................................................................................4-26
Activity Report Auto Listing................................................................................4-28
Printing T ransaction Reports.............................................................................. 4-28
5. TROUBLESHOO TING
Troubleshooting ....................................................................................................... 5-1
Messages and Signals ............................................................................................ 5-2
Display Messages ............................................................................................... 5-2
Audible Signals.................................................................................................... 5-3
6. SPECIFICATIONS
GLOSSARY
INDEX
TABLE OF CONTENTS

1-1
INSTALLATION
1. INSTALLATION
This page summarizes the operations you can perf orm with this unit. For detailed
information about each operation, refer to the appropriate section of this manual.
QUICK REFERENCE GUIDE
BROADCASTING
TRANSMITTING DOCUMENTS
Set RESOLUTION/CONTRAST
Normal Broadcasting
BROADCAST Enter Speed Dial number/
Press Rapid keys FAX START
Using Group Key
Press GROUP key
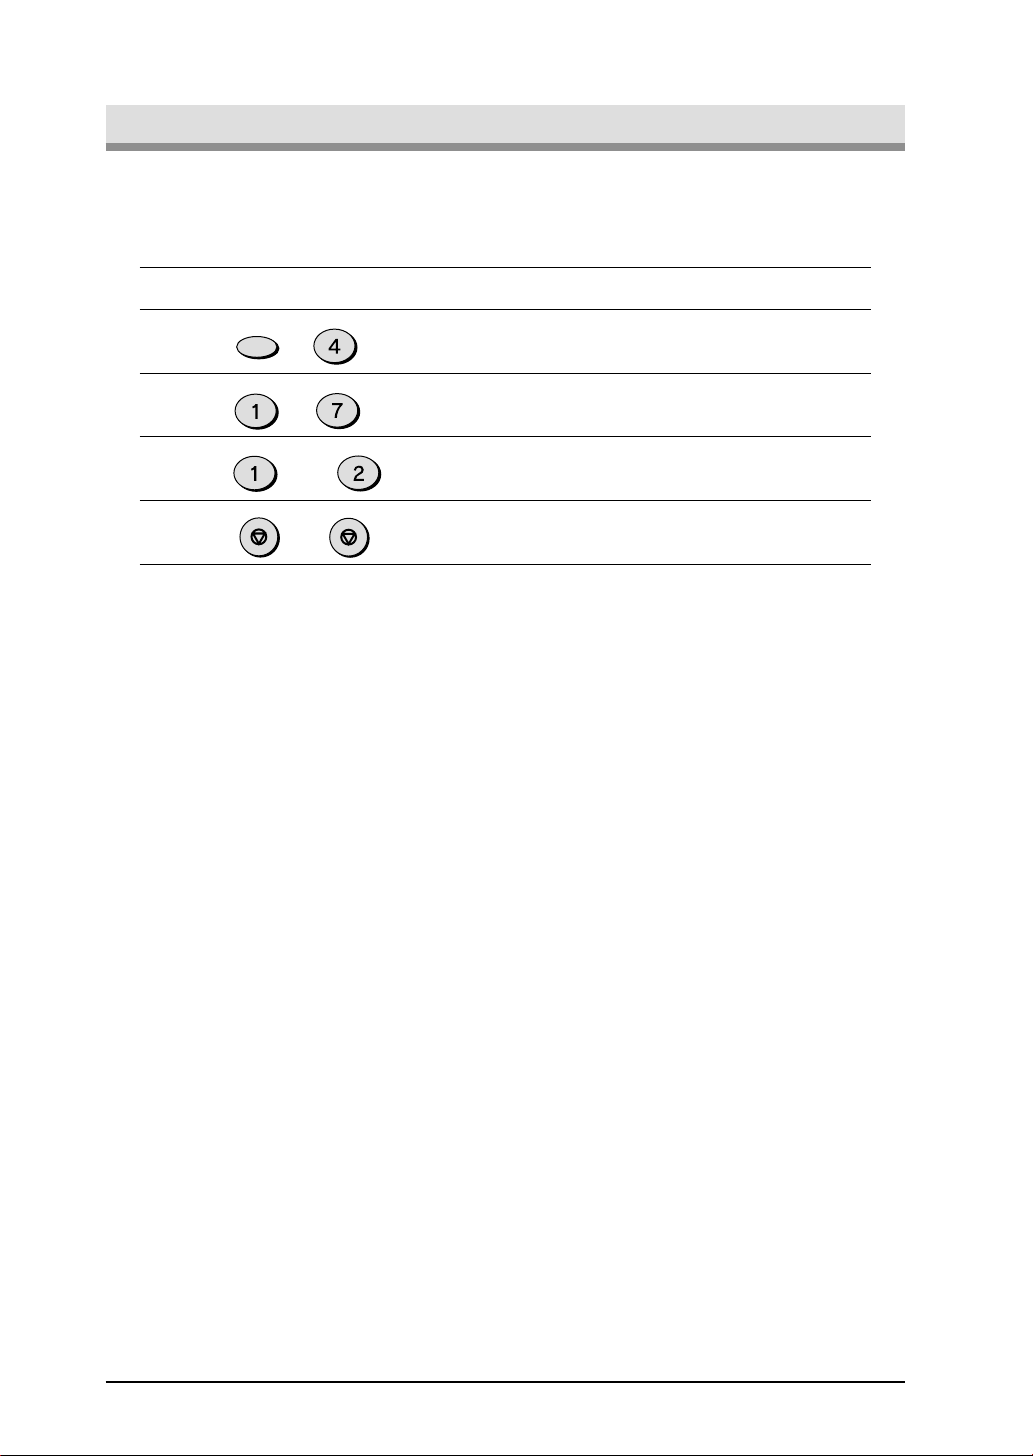
POLLING OTHERS
Set Rapid 20 key as polling key
(FUNCTION key 3 4 1 STOP STOP)
Direct Keypad Dialling
Dial (press NUM keys) POLLING (Rapid 20)
Speed Dialling
SPEED Enter Speed Dial number
POLLING (Rapid 20)
Normal Dialling
SPEAKER Dial (Press NUM keys)
Wait for reception tone POLLING (Rapid 20)
Load the document then follow
the appropriate procedure
Set RESOLUTION CONTRAST/Memory or Direct
Direct Keypad Dialling
Dial (press NUM keys) FAX START
Rapid Key Dialling
Press Rapid key
Speed Dialling
SPEED/ SEARCH
Enter Speed Dial number
FAX START
Nomal Dialling
SPEAKER Dial (Press NUM keys)
Wait for reception tone FAX START
Redialling
REDIAL Wait for reception tone FAX START
FAX
FUNCTION MODE
STEP 1
STEP 2
Press FUNCTION key
Press the menu number
from the list below
STEP 3
Press the option number
from the list below
1.OPERATION SET (SEND/POLLING) 2.OPERATION CLEAR
1.TRANSMISSIONS ACTIVITY REPORT 2.RECEPTIONS ACTIVITY REPORT
3.TIMER LIST 4.TELEPHONE LIST
5.OPTION SETTING LIST 6.GROUP LIST
7.ANTI JUNK FAX NUMBER LIST
1.FAX NUMBER MODE (SET/CLEAR) 2.DATE & TIME SET
3.OWN NUMBER SET 4.POLLING FUNCTION (ON/OFF)
01.OUTPUT PAPER SIZE SELECT 02.PAPER SIZE SETTING
03.FINE RESOLUTION PRIORITY 04.NUMBER OF RINGS AUTO RECEPTION
05.NUMBER OF RINGS MANUAL RECEPTION
07.TRANSACTION REPORT PRINT SELECT 08.RECALL TIMES
09.RECALL INTERVAL 10.FAX REMOTE NUMBER
11.REMOTE RECEPTION SELECT 12.FAX SIGNAL AUTO RECEIVE
13.AUTO COVER SHEET 14.RECEIVE REDUCE
15.BEEP LENGTH 16.BEEP VOLUME
17.KEY BEEPS 18.INCOMING RING VOLUME
19.DIAL MODE 20.DISTINCTIVE RINGING
21.FOOTER PRINT 22.BATCH INDEXING
1.GROUP SET MODE 2.GROUP CLEAR MODE
1.ANTI JUNK SELECT (ON/OFF) 2.JUNK FAX NUMBER MODE (SET/CLEAR)
1.COVER SHEET ON 2.COVER SHEET OFF
1.QUIET DETECT TIME 2.SELECT AUTO RECEIVE(ON/OFF)
1.1-TIME 2.REPEAT
1.TIMER MODE
2.LISTING MODE
3.ENTRY MODE
4.OPTION SETTING
5.GROUP ENTRY MODE
6.ANTI JUNK FAX MODE
7.COVER SHEET MODE
8.
ANSWERING MACHINE MODE
9.
MEMORY POLL MODE
0.
RECEIVE DATA TRANSFER MODE
1.DATA TRANSFER 2.FAX NUMBER
06.ACTIVITY REPORT AUTO LISTING

1-2
INSTALLATION
Choosing a Location
All electrical equipment is potentially dangerous if not installed and operated correctly.
Make sure that you meet the f o llowing requirements when y ou set up or mo ve the unit.
• The unit must be installed on a level
surface.
• Use only the rated voltage from a
properly grounded wall sock et.
• Keep the unit away from areas that are:
- Dusty or smoky
- Damp or humid
- Poorly v entilated
- In front of windows or extremely
bright light
- In direct sunlight
- Subject to other extreme conditions
• Provide ample room for easy access to
the front, back, and sides of the unit.
• Leave enough space around the
ventilation outlets f or heat from the f an
to dissipate properly. Bloc king these
outlets could cause the unit to
overheat, which can cause serious
damage to the internal parts.
• Use of extension cords is not
recommended.
Fan
This manual describes how to use the fax function of the unit.
Part names and functions shared with the copy function (f or e xample , the misf eed
indicator and add paper indicator), are described in the copier operation manual.
For more inf ormation, please read the copier operation manual.
Introduction

1-3
INSTALLATION
Par ts Identification
Fax control panel
1-4
INSTALLATION
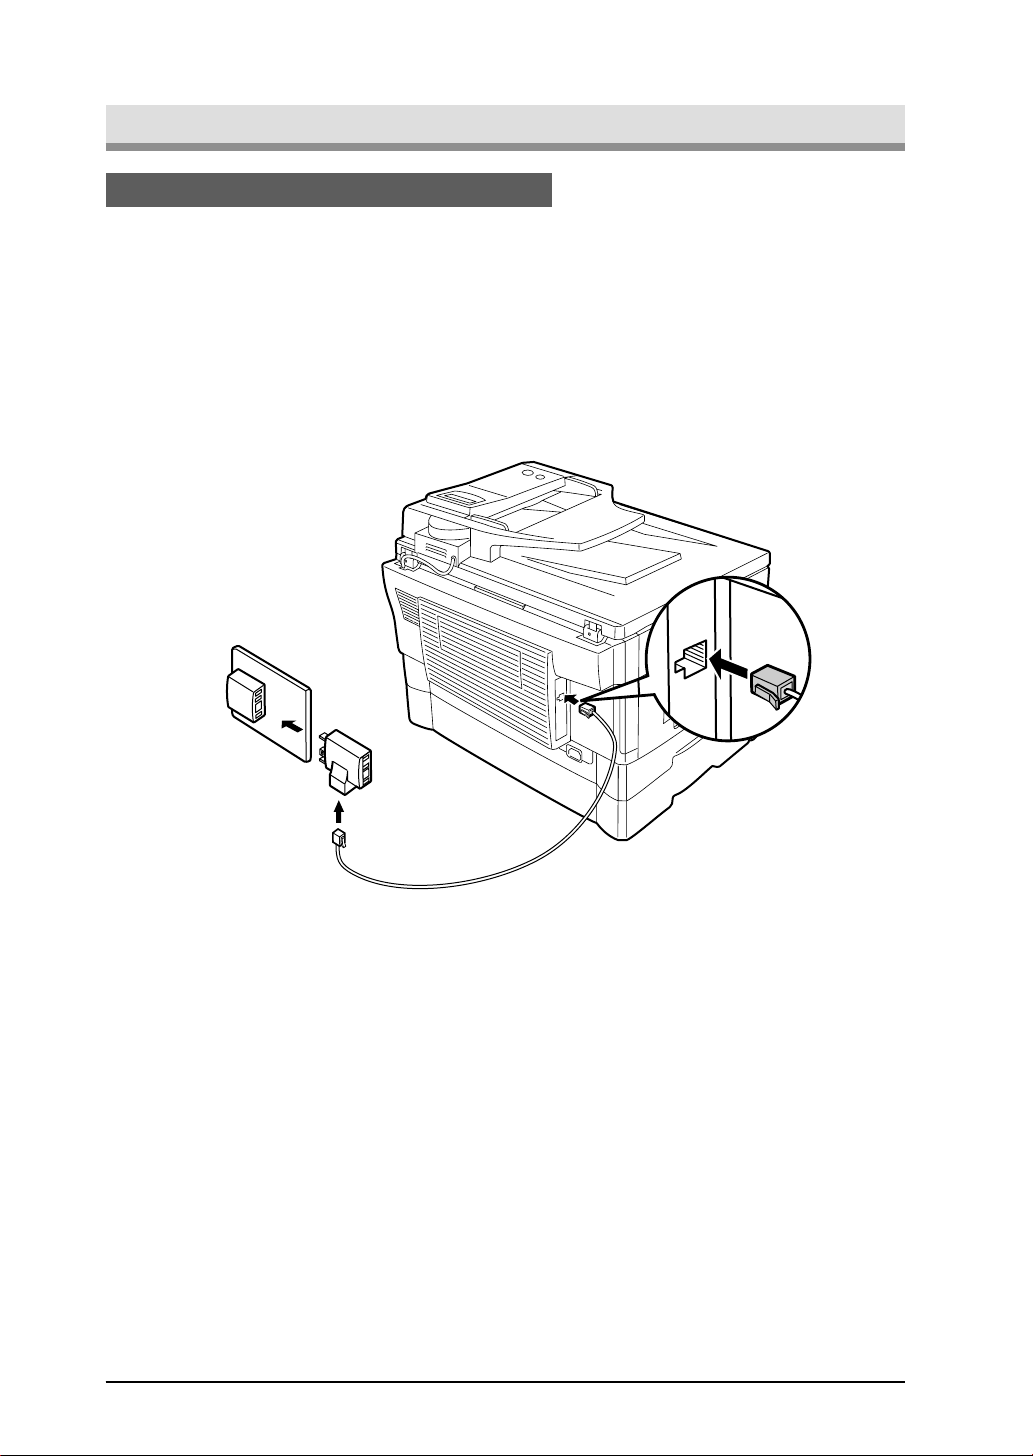
Connections
Plug one end of the telephone line cord into the socket on the unit marked “TEL LINE. ”
Plug the other side into the adapter.
Plug the adapter into the telephone socket on the w all.
Note: If your area experiences a high incidence of lightning or power surges, we
recommend that you install surge protectors for the po wer and telephone lines .
Surge protectors can be purchased from your dealer or at most telephone
specialty stores.
TEL
LINE
Connecting the Telephone Line Cord

1-5
INSTALLATION
Final Preparations
If desired, an answering machine or external telephone can be connected to the
adapter .
Connecting Other Devices
• Connecting an answering machine to the unit allows you to receive both voice and fax
messages when you are out. To use this feature, first change the outgoing message
of your answering machine, and then set the reception mode of the unit to “A.M.”
(Answering Machine mode) when you go out.
Note: If you are using distinctive ringing with an answ ering machine, y ou do not need
to follow the procedure described below. (Please note that when distinctive
ringing is used, the answering machine must be distinctive ring compatible.
The outgoing message of your answ ering machine should be changed to inform callers
who want to send a fax to press their FAX START key.
Comments:
1. It is advisable to keep the length of the message under 10 seconds. If it is too long,
you ma y ha v e difficulty receiving faxes sent by automatic dialling.
2. Your callers can even leave a voice message and send a fax message on the same
call. Modify y our outgoing message to explain that this can be done by pressing their
FAX ST ART key after leaving their voice message.
• You can connect an extension phone in series with the adapter to make and receive
calls. Ev en if you pick up the extension phone and hear a fax tone , the unit will
automatically cut in and take ov er the line. Note, however, if you also have a PC
modem on the same line with the extension phone, y ou must turn on the Remote
Reception function, and deactivate the F ax Signal Receiv e function. See “Setting Up
the Unit for Use with a PC Modem” and “Using the Remote Reception Function” in
Chapter 2.
Note: The Remote Reception function is initially set to “ON”.

1-6
INSTALLATION
Notes

INITIAL SETTINGS
2-1
A Look at the Fax Control Panel
01 02 03 04 05
06 07 08 09 10
11 12 13 14 15
16 17 18 19 20/POLL
AUTO
MANUAL
A.M.
DEF
MNO
WXYZ
ABC
JKL
TUV
GHI
PQRS
SPEAKER
BOOK SEND
DOCUMENT
FAX STARTSTOP
REDIAL/PAUSE
SPEED/SEARCH
ENTER
RESOLUTION CONTRAST BROADCAST
RECEPTION MODE
FUNCTION
Number keys
Press these keys to dial
numbers, and enter
numbers and letters
during number/name
storing procedures.
Rapid keys
Press one of these keys to
dial a fax or telephone
number automatically.
Press Rapid key 20 to start
polling if programmed.
(Note that you must attach
the Rapid key labels.)
FAX START key
Press this key to begin
sending a fax or manually
receiving a fax.
ENTER key
Press this key to decide an
item in a menu, or to enter
numbers and letters you
have typed in.
LCD contrast dial
Turn this dial to adjust the
contrast level of the LCD.
DOCUMENT key
Press this key to perform a
direct send fax transmission.
SPEED/SEARCH key
Press this key to dial a two
digit Speed Dial number.
During character inputting,
use this key to delete an
incorrect entry.
Also, press this key twice to
search for an automatic
dialling number.
RECEPTION MODE key
Press this key to select
the mode of reception.
REDIAL/PAUSE key
Press this key to
automatically redial the last
number you dialed. Also,
press this key to insert a
pause when entering
numbers.
FUNCTION key
Press this key to
enter function
mode.
Liquid crystal display
Shows various messages during fax
operation and programming.
BROADCAST key
Press this key to send
documents to a group of
receiving fax machines.
RESOLUTION key
Press this key to
adjust the resolution
before sending faxes.
SPEAKER key
Press this key to begin
manual dialling. (To close the
line, press the SPEAKER
key again.)
AUTO light
This light indicates that the
machine will answer
the call
automatically.
MANUAL light
This light indicates that
the
machine
must be answered
manually.
A.M. light
This light indicates the
answering machine will answer
the line if properly connected.
CONTRAST key
Press this key to adjust
the contrast before
sending faxes.
BOOK SEND key
Press this key to fax a
document from the
original table.
STOP key
Press this key to stop an operation
before it is completed, or to delete
the number that was last input.
This key is also used to close the
line when manually dialling.
/
Press these keys to enter
symbols during the name
storing procedure.
Press the " " key to
change
from pulse dialling to tone
dialling mode.
Left arrow key ( ) and right arrow key ( )
Press these keys to scroll through a menu. During input
mode, these keys are also sometimes used to move
the cursor.
2. INITIAL SETTINGS

INITIAL SETTINGS
2-2
STOP
About the Liquid Crystal Display
The unit is equipped with a two-line liquid crystal display (LCD) on the operation panel
for displa ying v arious messages and settings during operation. This LCD can display
up to 20 characters on each line. When the unit is idle, the LCD shows the date, time ,
and the stand-by memory availab le.
Example:
Adjust the volume of both key beeps and alarm beeps (emitted at the end of transmission
and reception) using the procedure below .
F actory setting: 3 (MEDIUM)
Step Press these keys Comments
1 “OPTION SETTING” will appear in
the display.
2 “BEEP VOLUME” will appear in the
display.
3 Press the or key to lower or raise
the volume to the desired level.
4 “STORED” will appear in the display.
5 Press the STOP key twice to exit.
FUNCTION
GHI
MNO
or
ENTER
STOP
Adjusting the Beep Volume
The left and right arrow (
) keys on the operation panel of the unit are very useful
for scrolling through the v arious function lists and settings. Once you have pressed the
FUNCTION key, you can scroll through the ten functions as desired. (See the Function
mode at the top of the Quick Reference Guide for the settings.) Pressing the ENTER
key chooses the displayed function. For many of the function lists, you can then use the
arrow keys again to scroll through the settings .
Using the Arrow Keys
Located to the upper right of the operation panel, the LCD contrast dial controls the
contrast of the display.
Turning the dial to the right darkens the LCD. Turning the dial to the left lightens the
LCD .

INITIAL SETTINGS
2-3
Adjust the ringing volume of the unit using the procedure below.
Factory setting: 3 (MEDIUM)
Step Press these keys Comments
1 “OPTION SETTING” will appear in
the display.
2 “RINGING VOLUME” will appear in
the display.
3 Press the or key to lower or raise
the volume to the desired lev el.
4 “STORED” will appear in the display.
5 Press the STOP key twice to exit.
Adjusting the Ringing Volume
FUNCTION
GHI
TUV
or
ENTER
STOP
STOP
You can select the length in seconds of the alarm beeps following the procedure
below .
Factory setting: 1 (3SEC)
Step Press these keys Comments
1 “OPTION SETTING” will appear in
the display.
2 “BEEP LENGTH” will appear in the
display.
3 Press the or key to set the alarm
beeps to the desired length or to turn
them off.
4 “STORED” will appear in the display.
5 Press the STOP key twice to exit.
Setting the Length of Alarm Beeps
FUNCTION
GHI
JKL
or
ENTER
STOP
STOP
INITIAL SETTINGS
2-4
If you prefer, you can choose to turn the key beeps off . To do this, follow the
procedure below:
F actory setting: 1 (ON)
Step Press these keys Comments
1 “OPTION SETTING” will appear in
the display.
2 “KEY BEEPS” will appear in the
display.
3 Press 1 to turn the key beeps on, or 2
to turn them off.
4 Press the STOP key twice to exit.
Turning Key Beeps Off
FUNCTION
GHI
PQRS
or
ABC
STOP
STOP

INITIAL SETTINGS
2-5
Fax Setup
You can enter letters with the number keys. Letters are marked above each of the
number keys “2” through “9”. To enter a letter, press the appropriate ke y repeatedly until
the desired letter appears (the number of the key appears first, followed by letters in the
order marked above the k ey). The keys used for entering characters are sho wn below.
• To enter tw o characters in succession which require using the same key, press the
right arrow (
) key once after entering the first character, and then enter the second
character .
• T o change one individual character to another, move the cursor to the character y o u
want to change and enter the new one. The new char acter will replace the old one .
• Symbols can also be entered by pressing the “#” and “ ” keys:
• Pressing the “1” key on the number keypad enters a space.
How to Enter Characters
GHI
PQRS
ABC
JKL
TUV
DEF
MNO
WXYZ

INITIAL SETTINGS
2-6
Note: You can view all of the items in the menu display by pressing the FUNCTION
key, then using the left and right arrow (
) keys to scroll through the function
list. Pressing the ENTER k e y chooses the displayed function. Procedures for
inputting various items (name, telephone number , date , etc.) are giv en as
follows.
To have your name and f ax number printed at the top of every page you transmit,
program them by pressing the operation panel keys as shown below.
• If you enter an incorrect character, press the left arrow ( ) key to mo ve the cursor
back to the mistake, then enter the correct character. (To move the cursor f orward,
press the right arrow (
) key.)
Use the following procedure to enter y our name and fax number:
Step Press these keys Comments
1 “ENTRY MODE” will appear in the
display.
2 “ENTER Y OUR FAX #” will appear in
the display.
3 Enter your own f ax number (maximum
20 digits) by pressing the number k eys .
To insert a space between digits, press
the “
” key. To insert a “+”, press the “# ”
key .
(example: 18002374277)
4 “ENTER Y OUR NAME” will appear in
the display.
5 Enter your name by pressing the
appropriate number keys as show n
on the left. Press each key repeatedly
until the desired letter appears in the
display (maximum of 24 characters).
To enter a space, press the 1 key
twice. To switch between lower case
and capital letters, press the REDIAL/
PAUSE key once.
(example: SHARP)
6 “STORED” will appear in the display.
7 Press the STOP key twice to exit.
Entering Your Name and Fax Number
FUNCTION
DEF
TUV
ABC
DEF
PQRS
ENTER
PQRS PQRS PQRS
PQRS
PQRS
GHI
ABC
PQRS PQRS PQRS
PQRS
GHI GHI
ABC
PQRS PQRS
STOP
STOP
ENTER
DEF
GHI
ABC
PQRS
PQRS
Fax Setup

INITIAL SETTINGS
2-7
The date and time that appear in the display are printed at the top of each page you
transmit. Set the date and time by pressing the keys on the operation panel as shown
below. To correct a mistake, press the ST OP key to move the cursor back to the
mistake, and then enter the correct number.
Note: The unit supports millennial dates (those from the year 2000 on). To program
such a date, enter the last two digits; for example, the year 2000 is programmed
by entering “00”.
Use the following procedure to set the date and time:
Step Press these keys Comments
1 “ENTRY MODE” will appear in the
display.
2 “ENTER YEAR” will appear in the
display.
3 Enter the last two digits of the year .
“ENTER MONTH” will appear in the
display.
(example: 1999)
4 Enter the month (2 digits: “01” for
January, “02” for February, “12” for
December, etc.). “ENTER DATE” will
appear in the display.
(example: July)
5 Enter the day of the month (“01” to
“31”). “PRESS ENTER KEY” will
appear in the display.
(example: the fifth)
6 “ENTER TIME” will appear in the
display.
7 Enter the hour (2 digits: “01” to “12”).
8 Enter the minute (2 digits: “00” to “59” ).
9 Press “ ” to select A.M., or “#” to
select P.M. “PRESS ENTER KEY” will
appear in the display.
10 The clock starts when you press this
button. “STORED” will appear in the
display.
11 Press the STOP key twice to exit.
DEF
ABC
or
STOP
STOP
ENTER
Setting the Date and Time
FUNCTION
DEF
JKL
WXYZ
WXYZ
ENTER
ABC
PQRS
Fax Setup
INITIAL SETTINGS
2-8
Your unit has three modes for receiving incoming calls and faxes:
• AUTO mode:
Select this mode when you only want to receiv e f axes on your telephone line. The unit
will automatically answer all calls and receiv e incoming f ax es .
• MANUAL mode:
This is the most convenient mode f or receiving phone calls if y ou have an extension
phone. To have true manual mode, the unit m ust be set to not ans wer while in MANUAL
mode (see “Setting the Number of Rings f or Manual Reception” on the next page). You
can also receive faxes; however, all calls m ust first be ans w ered b y pic king up the
receiver on the extension phone .
• A.M. mode:
Select this mode when an answering machine is connected to the unit and you want
the answering machine to answ er all calls. This allo ws y ou to receive both voice
messages and faxes while you are out.
Note: If you are using distinctive ringing as described in “Distinctive Ringing” in this
chapter , you must set the reception mode to AUTO. This is true, as well, if you
are using an answering machine with distinctive ringing (in this case, the
answering machine must be connected to a separate wall soc ket, not to your
unit).
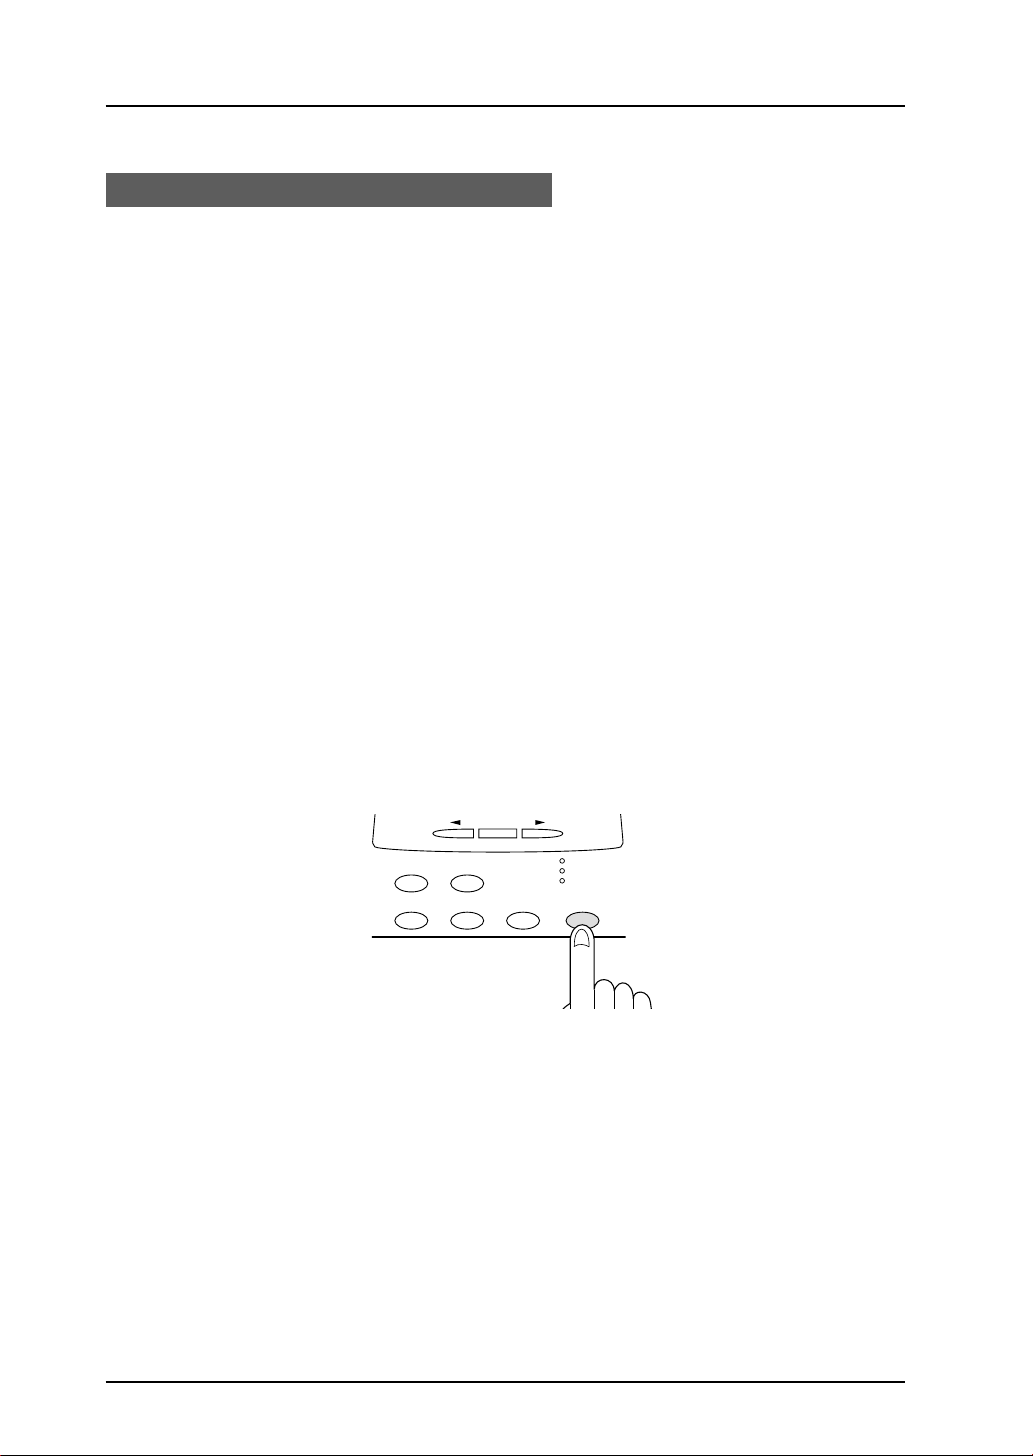
To set the reception mode, press the RECEPTION MODE key until the light next to the
desired mode comes on.
For more inf ormation on reception modes, ref er to Chapter 4.
AUTO
MANUAL
A.M.
BOOK SEND
RESOLUTION CONTRAST BROADCAST
FUNCTION
ENTER
RECEPTION MODE
Selecting the Reception Mode
Fax Setup

INITIAL SETTINGS
2-9
You can set the number of rings before the unit answers in A UTO mode using the
procedure below .
Factory setting: 2
Step Press these keys Comments
1 “OPTION SETTING” will appear in
the display.
2 “# OF RINGS(AUTO)” will appear in
the display.
3 Select the number of rings you would
like to use (0 to 9).
4 “STORED” will appear in the display.
5 Press the STOP key twice to exit.
Setting the Number of Rings for Auto Reception
FUNCTION
GHI
GHI
ENTER
STOP
STOP
WXYZ
to
The number of rings before the unit answ ers in MANUAL mode can also be set. If yo u
do not want the unit to answer at all in MANUAL Mode, select “0” in Step 3 below.
Factory setting: 0 (OFF)
Step Press these keys Comments
1 “OPTION SETTING” will appear in
the display.
2 “# OF RINGS(MAN.)” will appear in
the display.
3 Select the number of rings you would
like to use (0 to 9).
4 “STORED” will appear in the display.
5 Press the STOP key twice to exit.
Setting the Number of Rings for Manual Reception
FUNCTION
GHI
JKL
ENTER
STOP
STOP
WXYZ
to
Fax Setup
Note: If an external telephone is connected, the external telephone will ring one time
when auto reception is set to 0 rings.

INITIAL SETTINGS
2-10
Fax Setup
On the control panel, you can select the paper size that y ou w ant received faxes to be
printed on (AUTO, A4, Letter , Legal). If you select the AUTO setting the unit
automatically prints the fax out on the most appropriate size paper.
Follow the procedure belo w:
F actory setting: 4 (AUT O)
Step Press these keys Comments
1 “OPTION SETTING” will appear in
the display.
2 “PRINT PAPER SIZE” will appear in
the display.
3 Press 1 for letter, 2 for legal, 3 for A4,
or 4 for AUTO. “ STORED” will appear
in the display.
4 Press the STOP key twice to exit.
Note: If the size setting on the control panel differs from the size actually in the paper
trays , the error message “PAPER OUT (XX)” appears on the displa y (for
example, if y ou ha ve set A4 on the control panel and the paper trays contains
letter-size and legal-size paper). When this happens, the receiv ed fax is saved
in memory and printed when you do either of the following.
•
Correct the setting on the control panel
•
Put paper of the selected size in the paper tra y and set the siz e with function
(See the section “Setting the Tray P aper Siz e”)
Selecting the Reception Paper Size
FUNCTION
GHI
or
ABC
STOP
STOP
or
DEF
or
GHI

INITIAL SETTINGS
2-11
Setting the Tray Paper Size
FUNCTION
GHI
STOP
STOP
You must program the size of paper you have loaded in the unit so that Receive
Reduce functions can properly adjust the size of documents printed out. Follow the
steps below .
Note: If you are using A4-size paper, you do not need to make any changes, as this is
the factory setting.
Factory setting: 3 (A4)
Step Press these keys Comments
1 “OPTION SETTING” will appear in
the display.
2 Press 02 and “MAIN CASSETTE” will
appear in the display.
3
Press 1 for letter, 2 for legal, 3 for A4
size paper or 4 for other sizes.
“STORED” and then “SECOND
CASSETTE” will appear in the display.
4 Press 1 for letter, 2 for legal, 3 for A4
size paper or 4 for other sizes .
“STORED” will appear in the display.
5 Press the STOP key twice to exit.
Notes:
When the unit runs out of paper while receiving a fax:
•
If paper of the same size is availab le in another paper tra y, the unit automatically
switches to the other tra y and prints the f ax.
•
Select “4: O THER” f or the tra y that y ou do not want to use f or f ax printing.
•
If same size paper is not av ailable in the other tr ay, the error message “PAPER OUT
(XX)” appears on the display. The received fax is saved in memory and printed when
you add paper of the proper size.
Fax Setup
ABC
or
ABC
or
DEF
or
GHI
or
ABC
or
DEF
or
GHI

INITIAL SETTINGS
2-12
You can select the number of times the unit will try to recall a busy number. If you
enter 0, the unit will not try to recall. F ollow this procedure:
F actory setting: 2
Step Press these keys Comments
1 “OPTION SETTING” will appear in
the display.
2 “RECALL TIMES” will appear in the
display.
3 Enter the number of recall times (“0”
to “9”).
4 “STORED” will appear in the display.
5 Press the STOP key twice to exit.
Setting the Number of Recall Times
FUNCTION
GHI
TUV
ENTER
STOP
STOP
to
WXYZ
The unit can be used with both touch-tone and pulse telephone lines. Touch-tone uses
tones of different pitches f or each number key, while pulse lines use a series of pulses.
Your unit must be set to match the kind of telephone line you are using: touch-tone or
pulse.
F actory setting: 1 (TOUCH-TONE)
Step Press these keys Comments
1 “OPTION SETTING” will appear in
the display.
2 “DIAL MODE” will appear in the
display.
3 Press 1 for touch-tone , or 2 for pulse.
“STORED” will appear in the display .
4 Press the STOP key twice to exit.
Setting the Dial Mode
FUNCTION
GHI
WXYZ
or
ABC
STOP
STOP
Fax Setup
INITIAL SETTINGS
2-13
Fax Setup
Setting the Recall Interval
FUNCTION
GHI
WXYZ
ENTER
STOP
STOP
The recall interval, the time the unit waits in between attempts to re-send a fax to
a busy number, can be set from 1 to 15 minutes. F ollow this procedure:
Factory setting: 05 (5 min utes)
Step Press these keys Comments
1 “OPTION SETTING” will appear in
the display.
2 “RECALL INTERVAL” will appear in
the display.
3 Enter the recall interval (“01” to “15”).
4 “STORED” will appear in the display.
5 Press the STOP key twice to exit.
to
JKL

INITIAL SETTINGS
2-14
Fax Setup
You can print an index mark along the edge of the pages in each job. This makes it
easy to separate different jobs on the output tr a y.
Setting the Index Function
ABC
or
ABC ABC
STOP
STOP
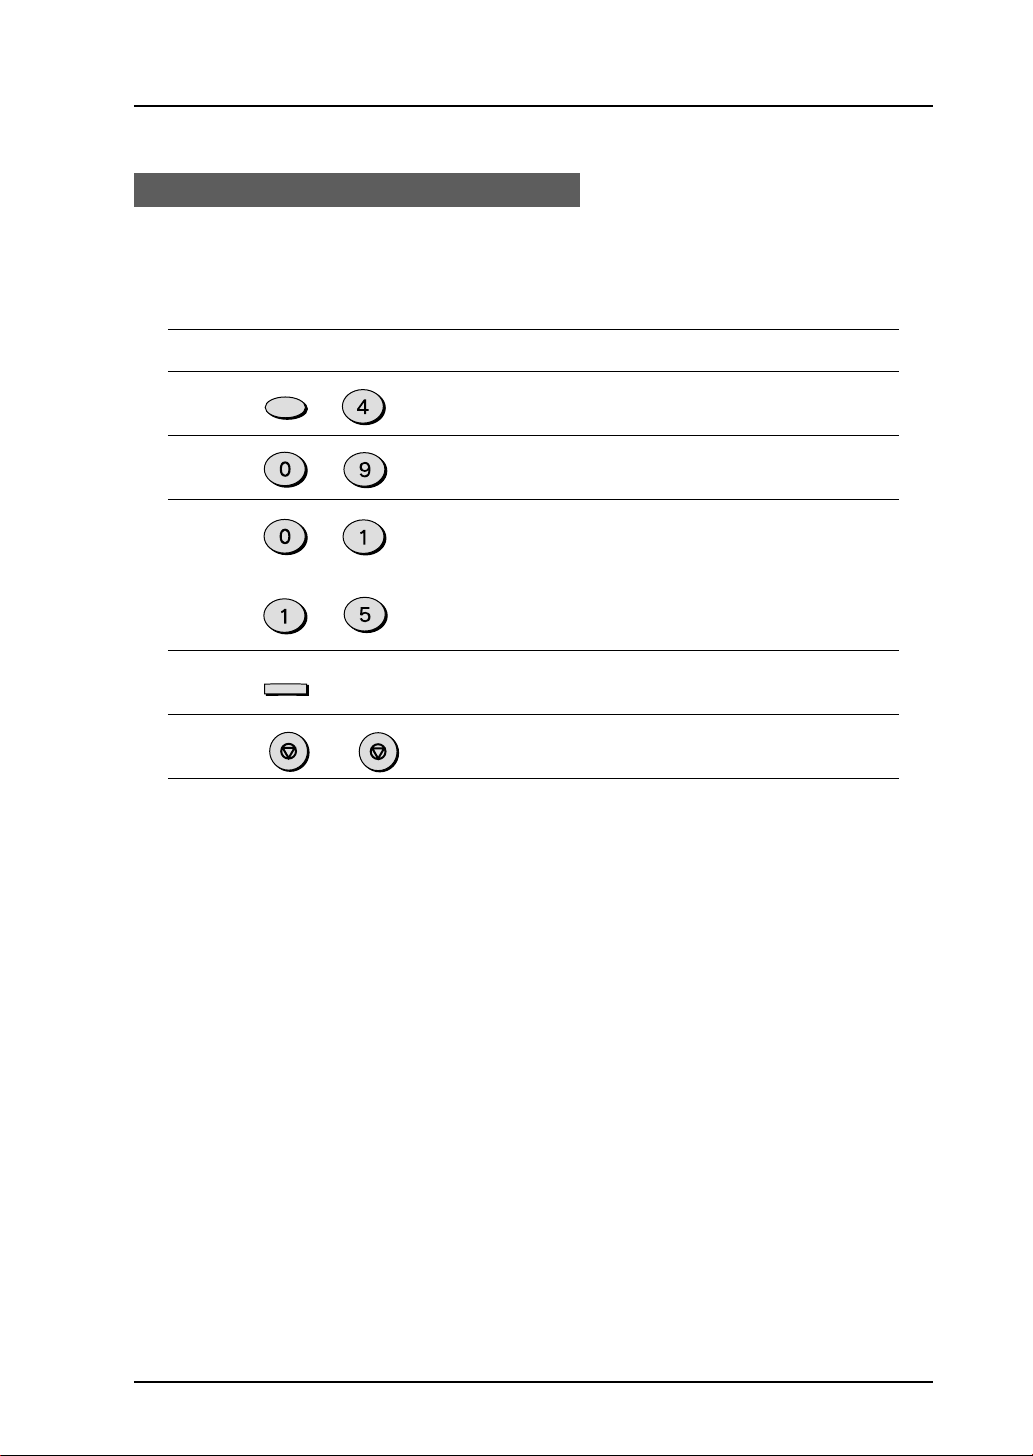
Use the following procedure to set the index function.
F actory setting: 1 (ON)
Step Press these keys Comments
1 “OPTION SETTING” will appear in
the display.
2 “BATCH INDEXING” will appear in the
display.
3 Press 1 to turn on the index function,
or 2 to turn it off.
4 Press the STOP key twice to exit.
FUNCTION
GHI
Separate faxes
with index marks.
 Loading...