

Page 1

CHAPTER 4
SUPPLIES
This chapter describes the supplies for this copier
such as paper and toner.
Page
●
PAPER .................................................. 4-2
Types and sizes of copy paper ................................. 4-2
Loading copy paper ......................................... 4-2
●
ADDING TONER........................................... 4-5
●
USED TONER DISPOSAL.................................... 4-7
CHAPTER
4
●
STORAGE OF SUPPLIES .................................... 4-8
4-1
Page 2

Types and sizes of copy paper
Paper trays A5 to A3 56 to 105 g/m
1 and 2 (5-1/2" x 8-1/2" (15 lbs. to 28 lbs.)
Bypass tray A6 to A3 52 to 128 g/m
●
* For paper weighing from 105 to 128 g/m2 (28 to 34 lbs.), A4 (8-1/2"
** Paper heavier than 128 g/m2 (34 lbs.) must be fed narrow side into the
CHAPTER
PAPER
Size Weight Capacity Special paper
(80 g/m2 (21lb.)
paper)
2
to 11" x 17")
2
(5-1/2" x 8-1/2" (14 lbs. to 34 lbs.)* tracing paper, cover stock**
to 11" x 17") (Ordinary paper) (200 g/m
For best results, use only paper recommended by SHARP.
x 11") is the maximum size that can be fed through the bypass tray.
feed slot of the bypass tray.
500 sheets
50 sheets Transparency film, labels,
2
(110 lbs.)), index
stock** (176 g/m
2
(65 lbs.))
4
SUPPLIES Paper
Loading copy paper
“OPEN TRAY
no copy paper in a selected paper feed station.
When a selected paper tray is not installed or is improperly installed,
“PUSH PAPER TRAY INTO THE MACHINE UNTIL IT
LATCHES.” will be displayed. Install it or push it back firmly into
place.
For best results, use only Sharp recommended paper.
AND ADD PAPER.” will be displayed when there is
4-2
Page 3
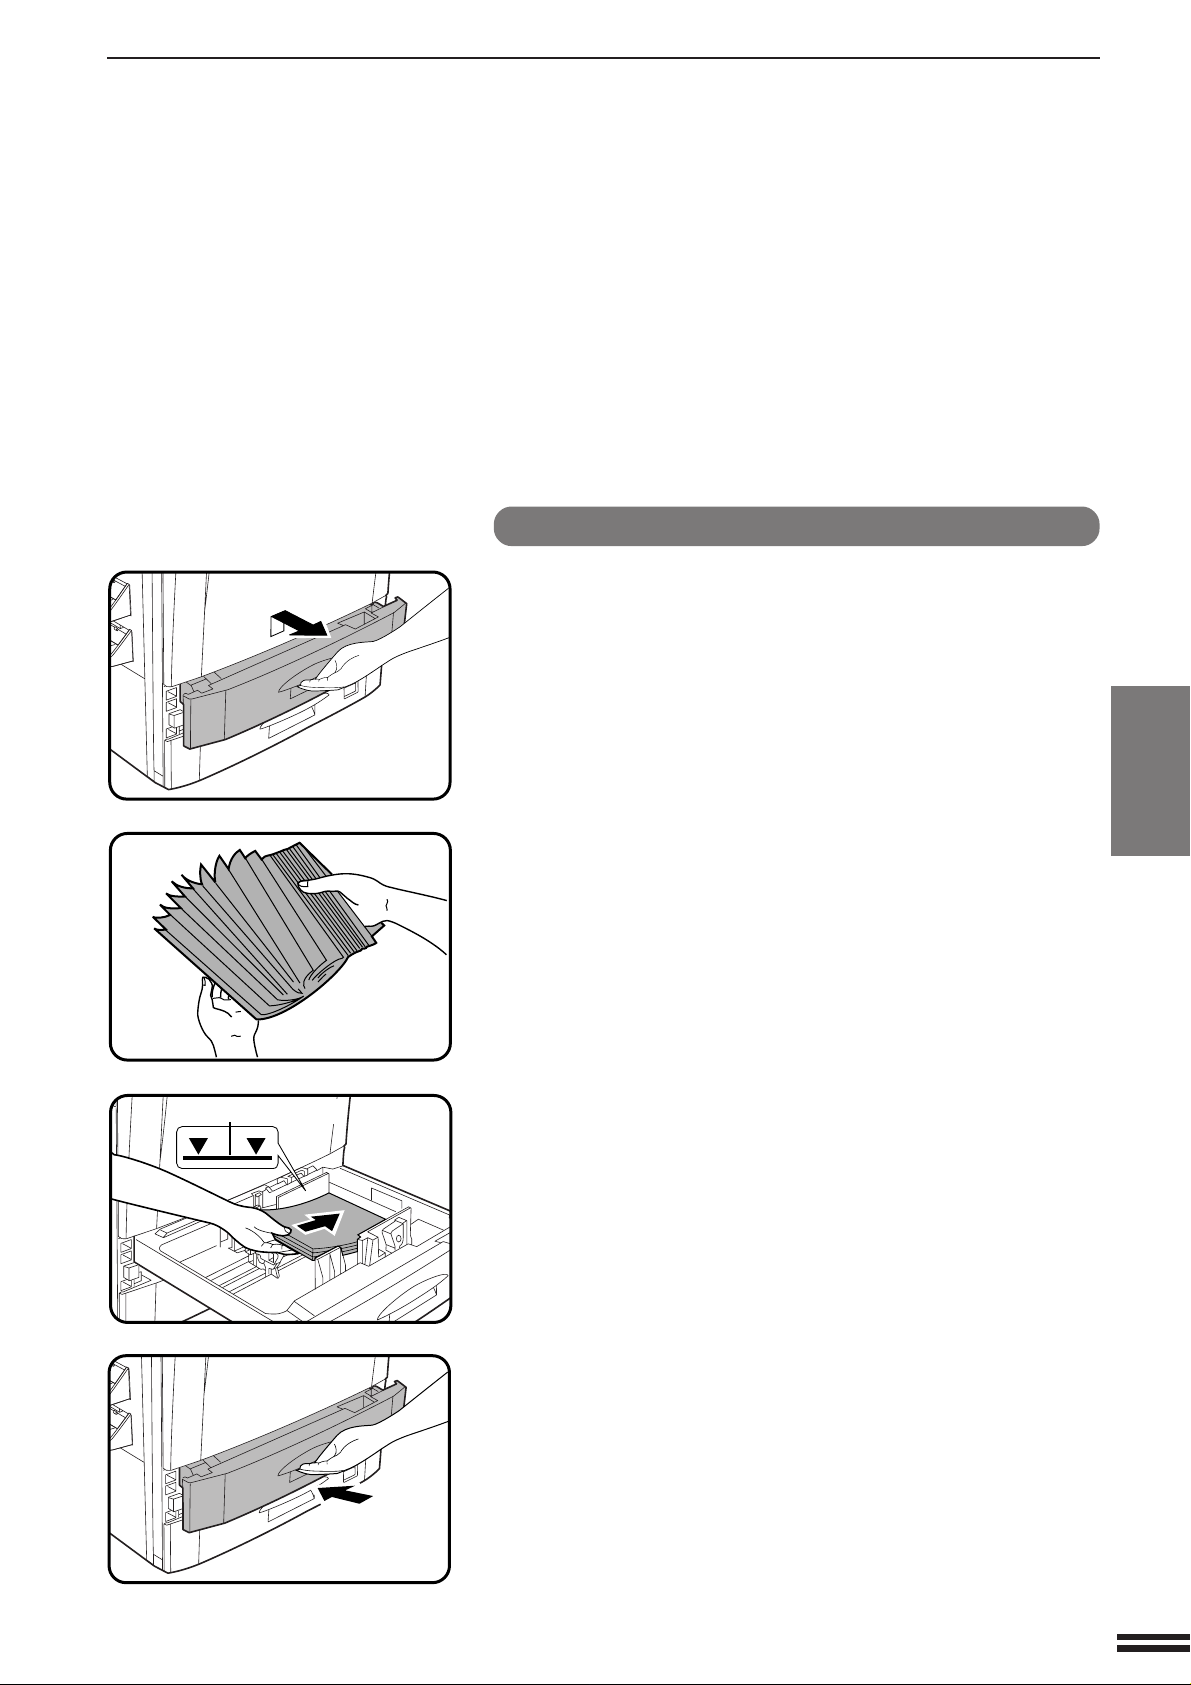
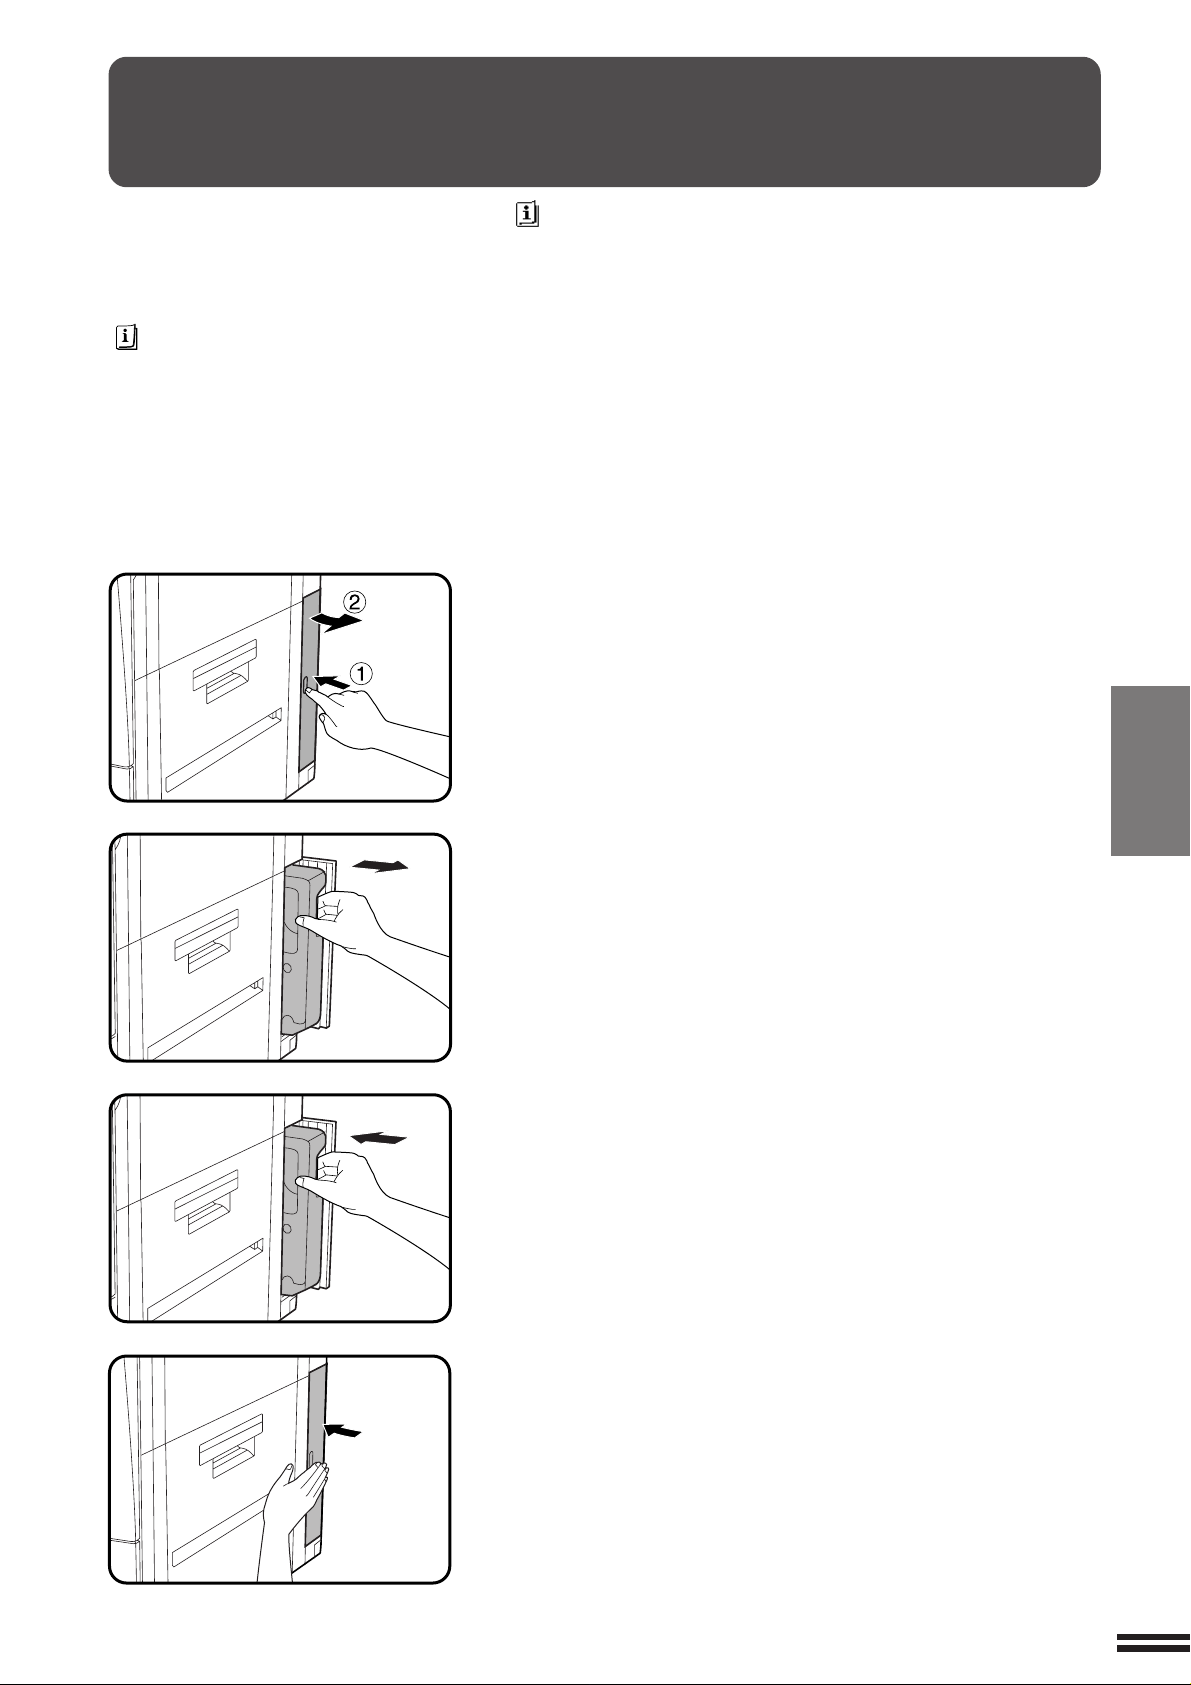
Loading paper in paper trays 1 and 2
Maximum height line
Gently lift and pull out the paper tray.
1
PAPER
Only use paper within the Sharp specification and
follow the paper manufacturer’s instructions regarding
2
fanning and loading the paper.
●
The tray holds 500 sheets of paper.
Do not load paper above the maximum height line.
CHAPTER
4
SUPPLIES Paper
Push the paper tray firmly back into the copier.
3
4-3
Page 4
PAPER
Maximum height line
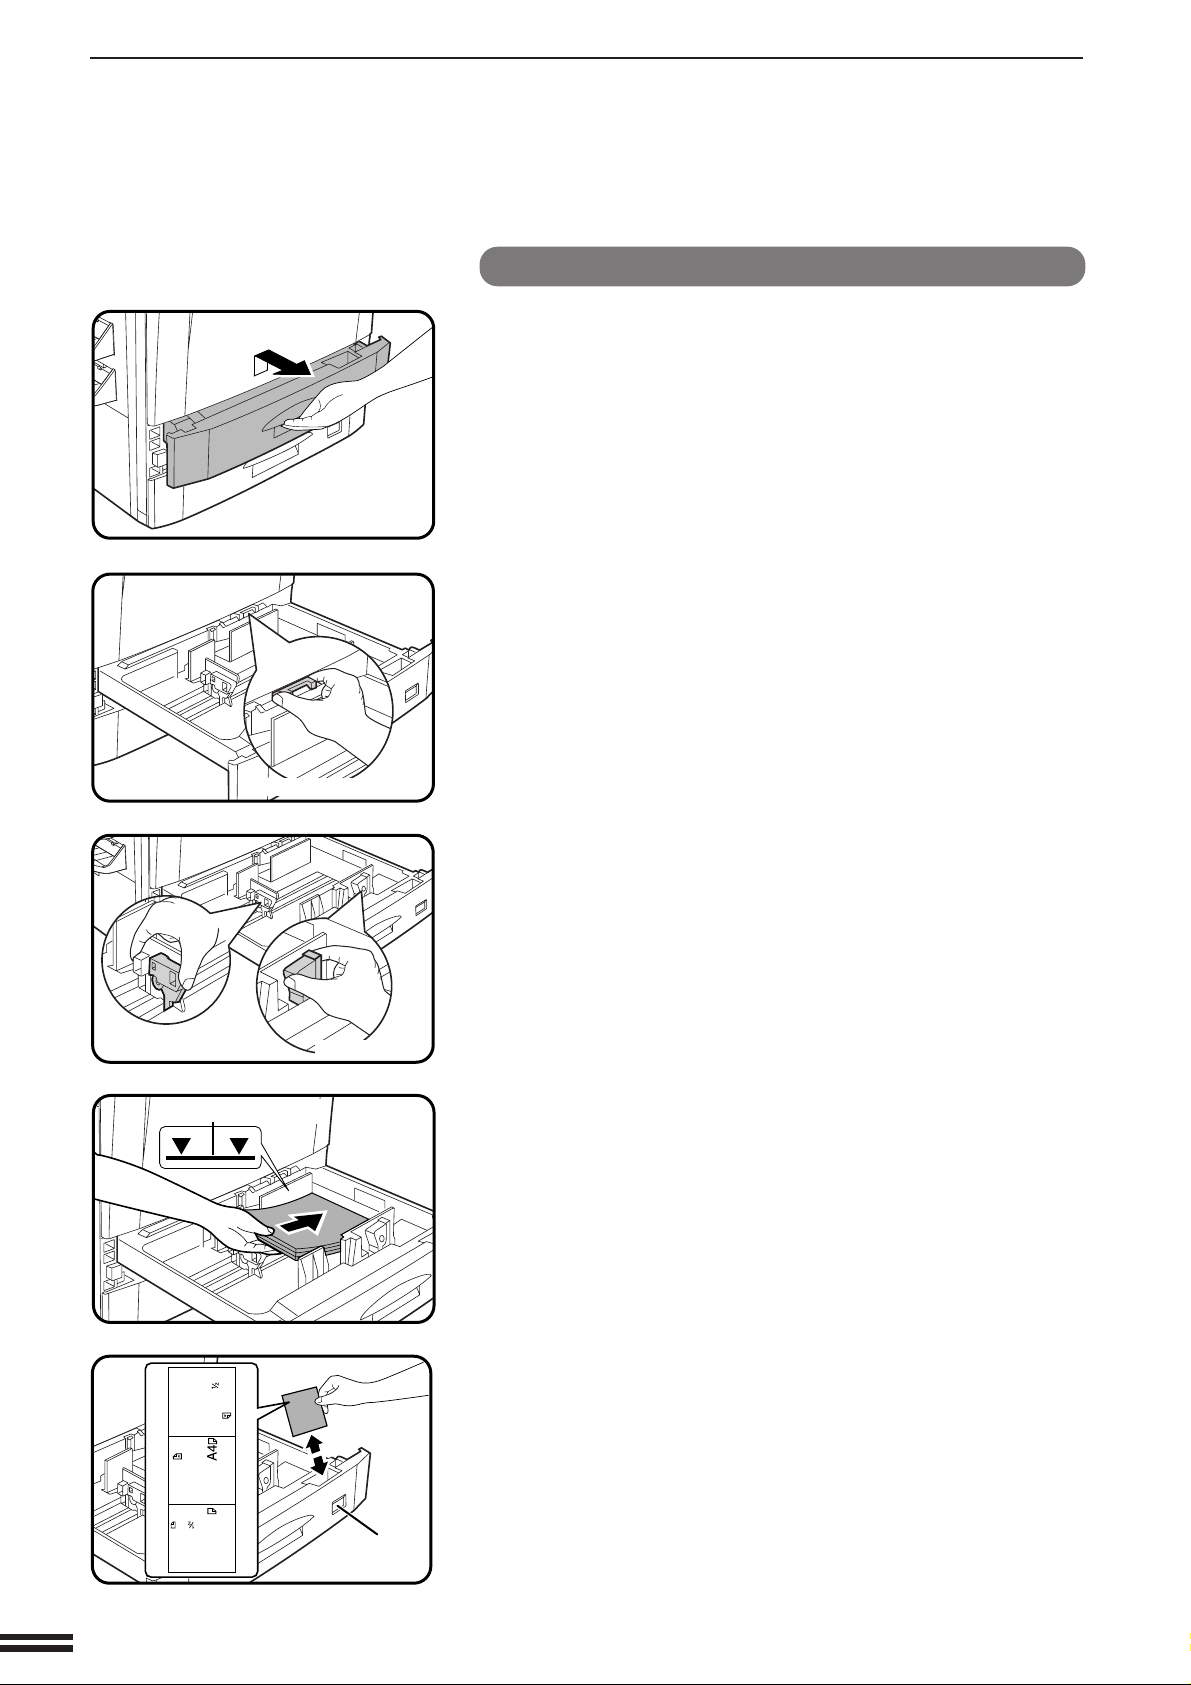
Changing the copy paper size in the tray
Gently lift and pull out the paper tray until it stops.
1
Adjust the paper size indicator to match the paper size
to be set.
2
●
Slide the paper size indicator to the right or left to match the
paper size.
CHAPTER
4
SUPPLIES Paper
Left guide
Paper size indicator
Front guide
Adjust the front guide and left guide while squeezing
their lock levers.
3
●
Slide the front and left guides to match the width and length of
the copy paper.
Load copy paper into the tray.
4
216x330
216x279
B5
A4
B4
8 x11
4-4
x13
8
A3
B5
A5
Paper size
card
Place the paper size card in the front of the paper tray.
5
●
The paper size card has three faces. Fold the card properly to
show the selected paper size. The paper size indication which
shows through the slot on the front of the copier should match
the selected paper size.
Push the paper tray firmly back into the copier.
6
Page 5
ADDING TONER
The message “(TONER SUPPLY IS LOW. PRESS FOR
GUIDANCE.)” will appear in the message display before the toner
supply is completely empty. If copying is continued, copies will
gradually become lighter until the copier stops and the message
display changes to “ADD TONER. PRESS FOR GUIDANCE.”
indicating that the toner supply is empty. Toner can be added any time
after the message “(TONER SUPPLY IS LOW. PRESS FOR
GUIDANCE.)” appears. To add toner, stop the copier and proceed as
below. When either message appears, you can use the INFORMATION
( ) key for detailed information as necessary.
During long copy runs of multiple originals containing many images
and/or dark shades, “TONER REPLENISHMENT IN PROGRESS.” will
appear and the copier will stop making copies even though toner is
left.
The copier will automatically cycle and replenish the toner to the
normal level and then the START ( ) key indicator will light up. Press
the START ( ) key to resume copying.
For best copying results, be sure to use
only Sharp products. The package of
Sharp toner has the Genuine Supplies
label.
GENUINE SUPPLIES
CHAPTER
4
5 x
20 x
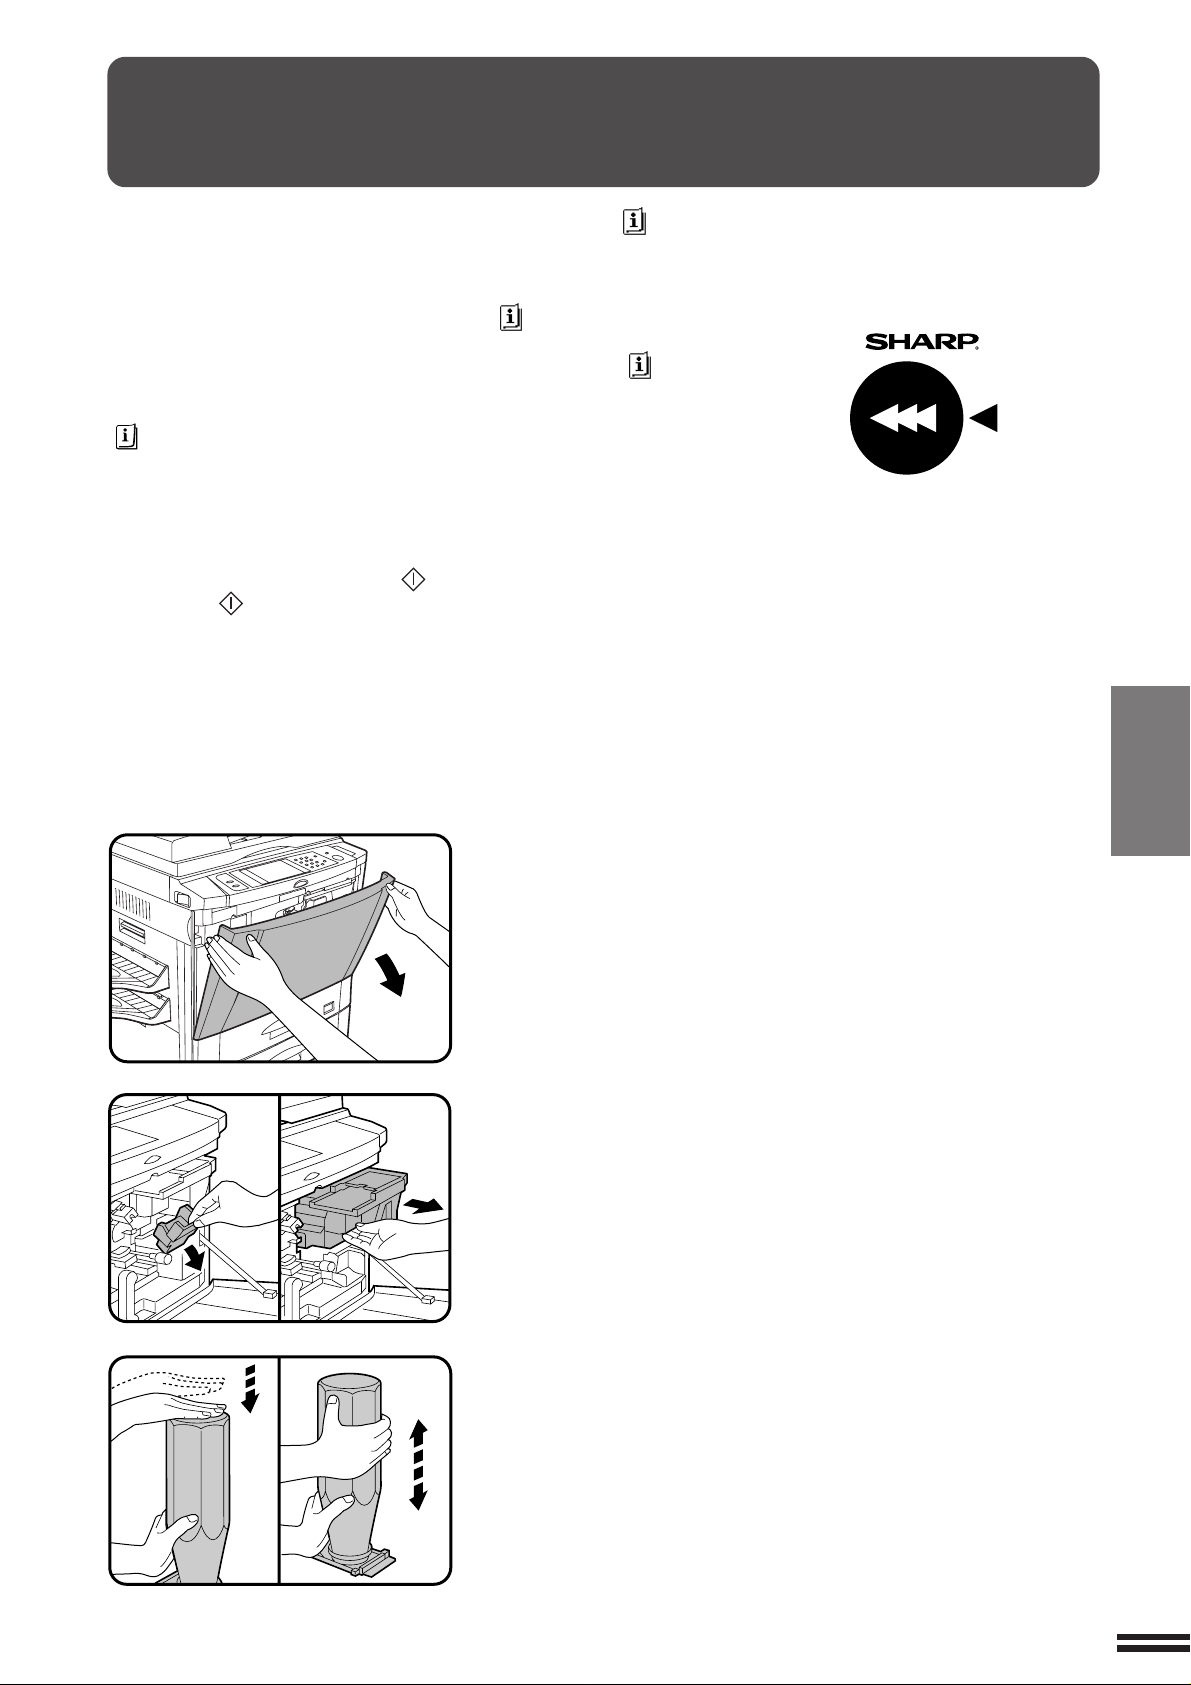
Open the front cover.
1
Pull down the toner hopper lock lever and pull the toner
hopper out slowly until it stops.
2
Tap on the top of the toner cartridge 5 times. Hold the
new toner cartridge vertically and vigorously shake it
3
up and down about 20 times, then invert the cartridge
and again shake it up and down about 20 times. This will
loosen the toner and allow it to flow more easily into the
toner hopper.
SUPPLIES Adding toner
4-5
Page 6
ADDING TONER
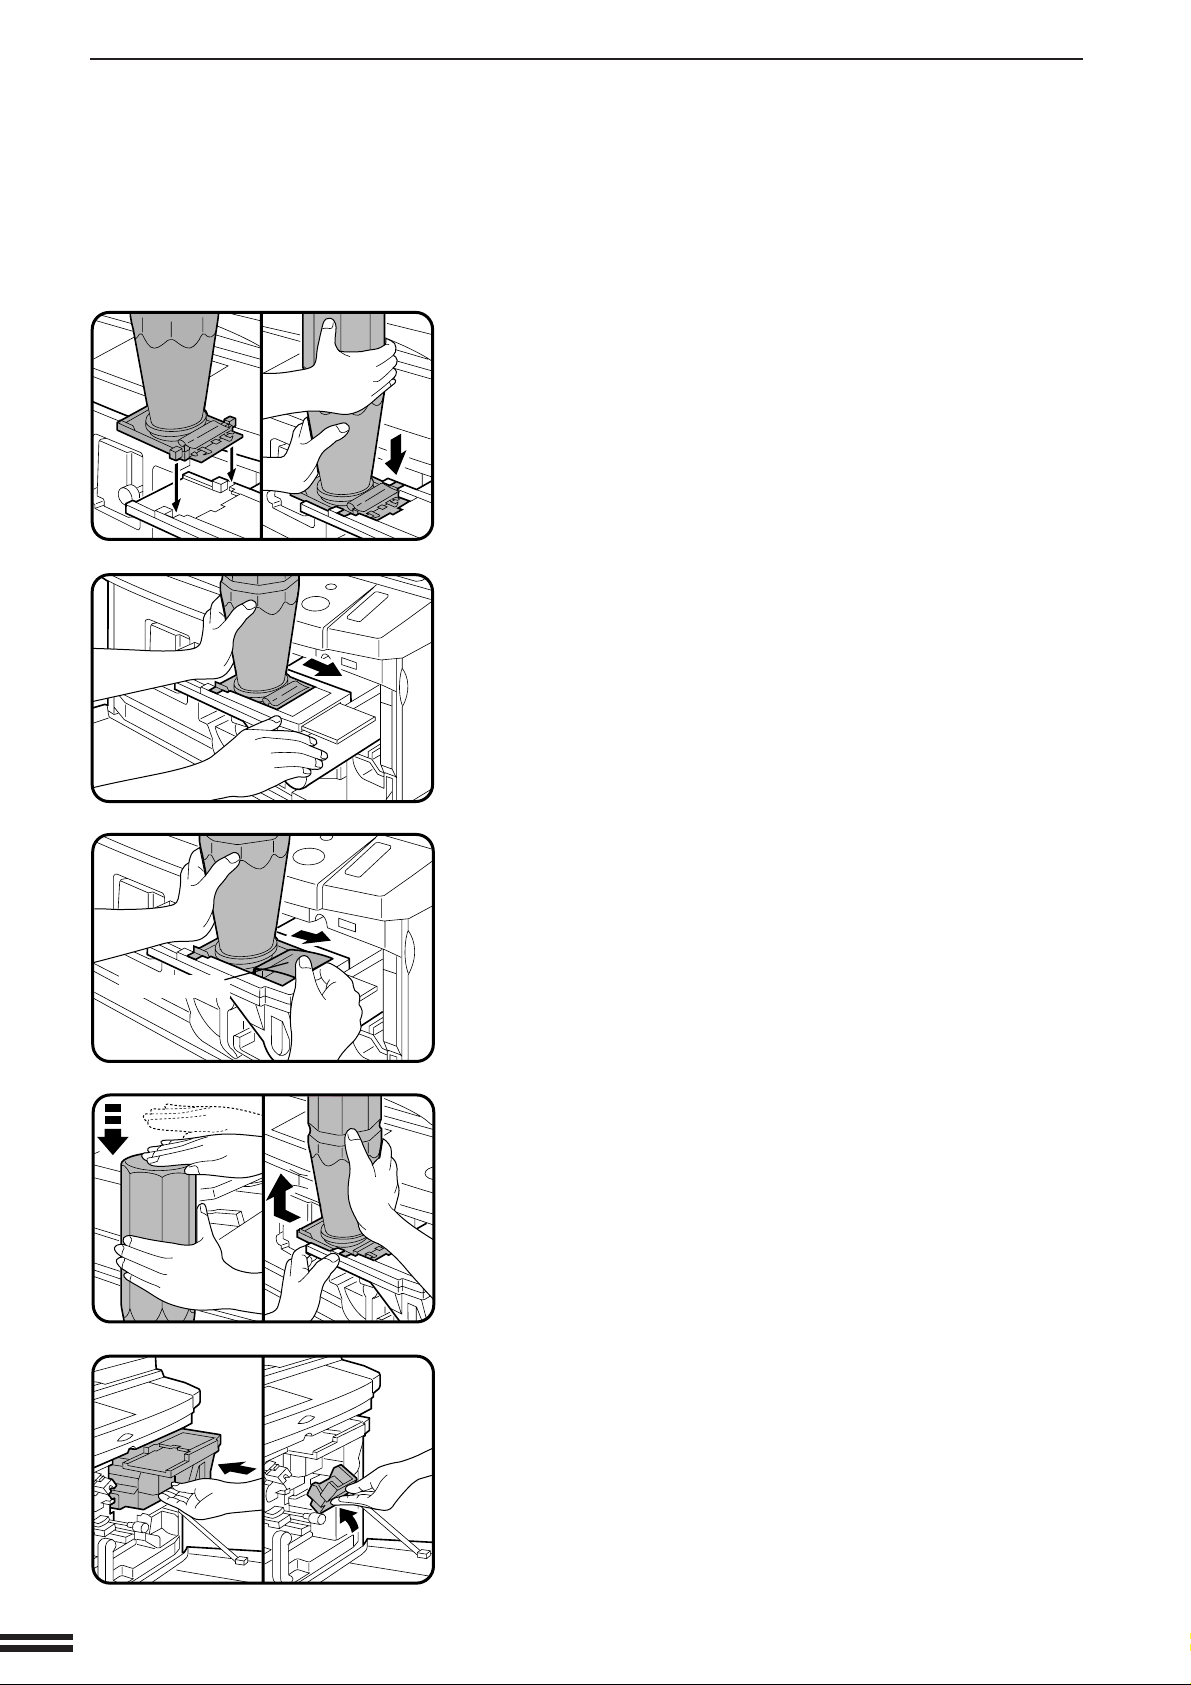
Place the new toner cartridge with the tabs in the
notches as shown.
4
Slide the toner cartridge along the guides over the toner
hopper.
5
CHAPTER
4
SUPPLIES Adding toner
Sealing tape
Hold the toner cartridge with one hand while pulling on
the sealing tape to remove it.
6
Tap on the top of the toner cartridge 5 times to start the
flow of toner into the toner hopper.
7
●
If the toner cartridge was sufficiently shaken as described in
step 3, it will take about 50 seconds for the cartridge to empty.
Do not remove the cartridge until it is empty. If not empty, tap on
the top of the cartridge again until empty.
Slide the empty toner cartridge back along the guides
and remove it.
8
●
The cartridge opening will be closed as it is moved back along
the guides.
4-6
9
10
Slide the toner hopper into the copier and return the
toner hopper lock lever into place.
Close the front cover.
NOTE:
Add only one cartridge of toner.
Page 7
USED TONER DISPOSAL
“REPLACE USED TONER CONTAINER. PRESS FOR GUIDANCE.”
will appear when the toner collecting container is full.
The copier will stop and will not operate until a new container has been
installed. Replace the toner collecting container as described below.
When the above message is displayed, you can use the INFORMATION
( ) key for detailed information as necessary.
Open the toner collecting container cover.
1
●
Push once on the door to unlatch and open it.
CHAPTER
Disengage and remove the container from the copier.
2
●
Toner cannot be reused. Do not transfer used toner to the toner
hopper.
●
Remove the cap from a new toner collecting container and use
it to cover the full toner collecting container.
●
Keep the full toner collecting container until the next regular
service call. Your authorised Sharp Service Technician will
collect the container for disposal.
Install a new toner collecting container until it clicks into
place.
3
Close the toner collecting container cover.
4
4
SUPPLIES Used toner disposal
4-7
Page 8

STORAGE OF SUPPLIES
The supplies of this copier replaced by the user include copy paper,
toner, toner collecting container, and staple cartridges for an optional
finisher (AR-FN1).
CHAPTER
4
For best copying results, be sure to use
only Sharp products. The package of
Sharp toner has the Genuine Supplies
label.
GENUINE SUPPLIES
Photoconductive drum
The AR-280/AR-285/AR-335 Copiers have advanced process control
technology which improves copy quality uniformity. This feature
stabilizes copy quality throughout the life of the photoconductive
drum by automatically compensating for the changes in drum
characteristics due to wear, operator use patterns, and environmental
conditions. The automatic adjustments are made in response to a
sensor that detects the reflectance characteristics of the drum.
SUPPLIES Storage of supplies
WARNING
This feature requires drums containing the special reflectance area
(recommended Sharp genuine photoconductive drum), to prevent
low image density copies from poor process control and possible
damage to the machine. If you use other drums, the process control
system cannot run properly.
Proper storage
Store the supplies in a location that is:
1
●
clean and dry,
●
at a stable temperature,
●
not exposed to direct sunlight.
Store copy paper in the wrapper and lying flat.
2
●
Paper stored in packages standing up or out of the wrapper may
curl or become damp, resulting in paper misfeeds.
4-8
Page 9

CHAPTER 5
COPIER TROUBLE?
This chapter describes how to remove misfed
originals and paper and other common trouble
remedies.
Page
●
MISFEED REMOV AL ....................................... 5-2
●
MAINTENANCE REQUIRED ................................. 5-12
●
TROUBLESHOOTING...................................... 5-13
CHAPTER
5
5-1
Page 10
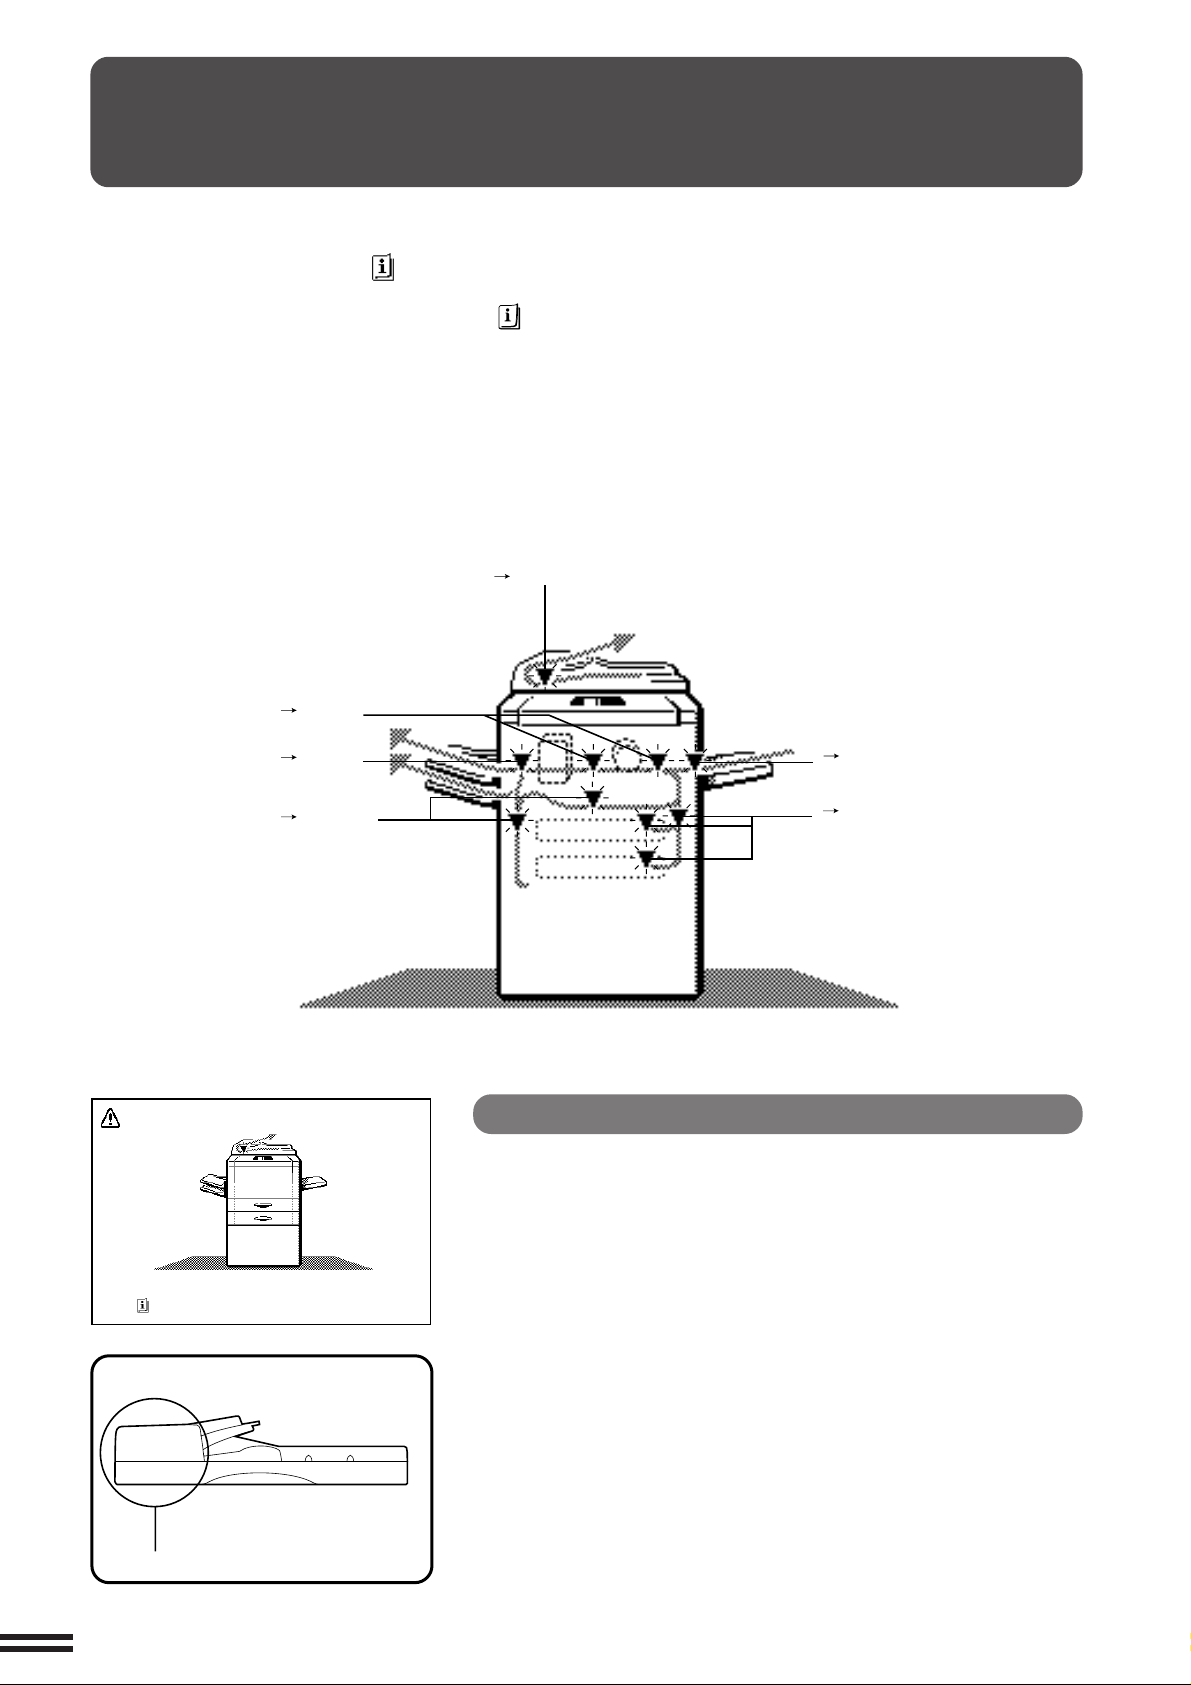
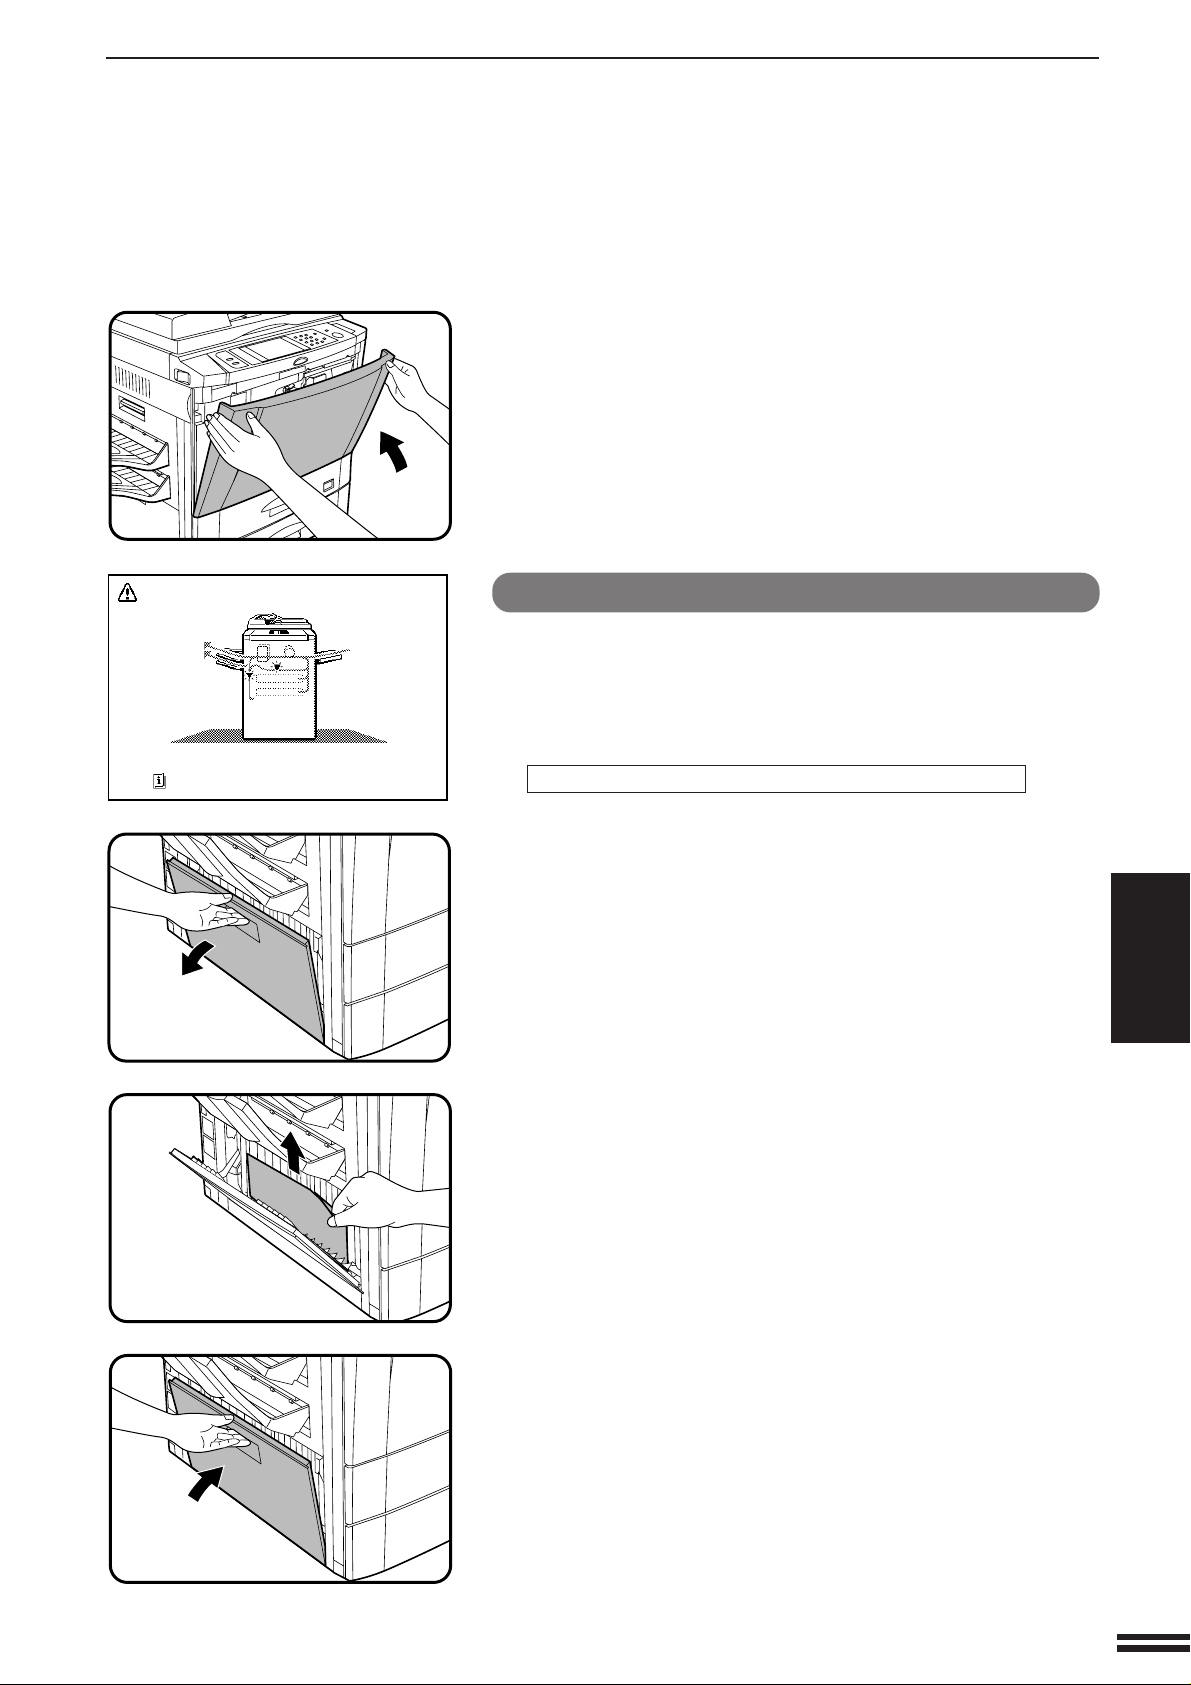
MISFEED REMOVAL
When a misfeed occurs, the copier will stop.
The message “A MISFEED HAS OCCURRED. CLEAR
INDICATED AREA. PRESS FOR RECOVERY
INSTRUCTIONS.” will appear with a display of paper
misfeed locations. Press the INFORMATION ( ) key
for more detailed information as necessary.
First confirm the misfeed locations.
For misfeeds in optional equipment, see their respective
sections. (pages 7-14, 7-22, and 7-26)
( P. 5-2, 5-3)
( P. 5-6)
( P. 5-7)
If paper becomes accidentally torn during removal, be
sure to remove all pieces. Be careful not to damage the
photoconductive drum or the corona wires.
( P. 5-4)
CHAPTER
5
COPIER TROUBLE? Misfeed removal
A MISFEED HAS OCCURRED.
CLEAR INDICATED AREA.
PRESS FOR RECOVERY INSTRUCTIONS.
( P. 5-9)
( P. 5-4)
Misfeed in the SPF (AR-280)
When the SPF misfeeds an original sheet, the copier will stop and the
misfeed message will appear.
An original misfeed may occur at location (A).
5-2
A
Page 11
Roller
MISFEED REMOVAL
(A) Open the document feeder cover and remove the original.
●
Rotate the roller in the direction indicated by the arrow to remove
the misfed original.
NOTE:
A message may appear indicating the number of originals which
must be returned to the document feeder tray. Return the originals
and press the START ( ) key to resume copying.
A MISFEED HAS OCCURRED.
CLEAR INDICATED AREA.
PRESS FOR RECOVERY INSTRUCTIONS.
ABC
Feeding roller cover
Misfeed in the RADF (AR-285 and AR-335)
When the RADF misfeeds an original sheet, the copier will stop and
the misfeed message will appear.
An original misfeed may occur at one of three locations:
(A) in the RADF feed section, (B) in the exit roller, or (C)
under the transport belt.
(A) Open the feeding roller cover and pull the original gently
to the right and out from the document feeder tray.
●
Be sure to open and close the document feeder cover to cancel
the misfeed display.
CHAPTER
5
COPIER TROUBLE? Misfeed removal
Exit roller cover
(B) Open the exit roller cover and gently pull the original
out.
●
Be sure to open and close the document feeder cover to cancel
the misfeed display.
5-3
Page 12
MISFEED REMOVAL
(C) Open the feeding roller cover and the document feeder
cover, and remove the original.
NOTE:
After misfed originals are removed from locations A, B and/or C, a
message may appear indicating the number of originals which
must be returned to the document feeder tray. Return the originals
and press the START ( ) key to resume copying.
A MISFEED HAS OCCURRED.
CLEAR INDICATED AREA.
PRESS FOR RECOVERY INSTRUCTIONS.
CHAPTER
5
COPIER TROUBLE? Misfeed removal
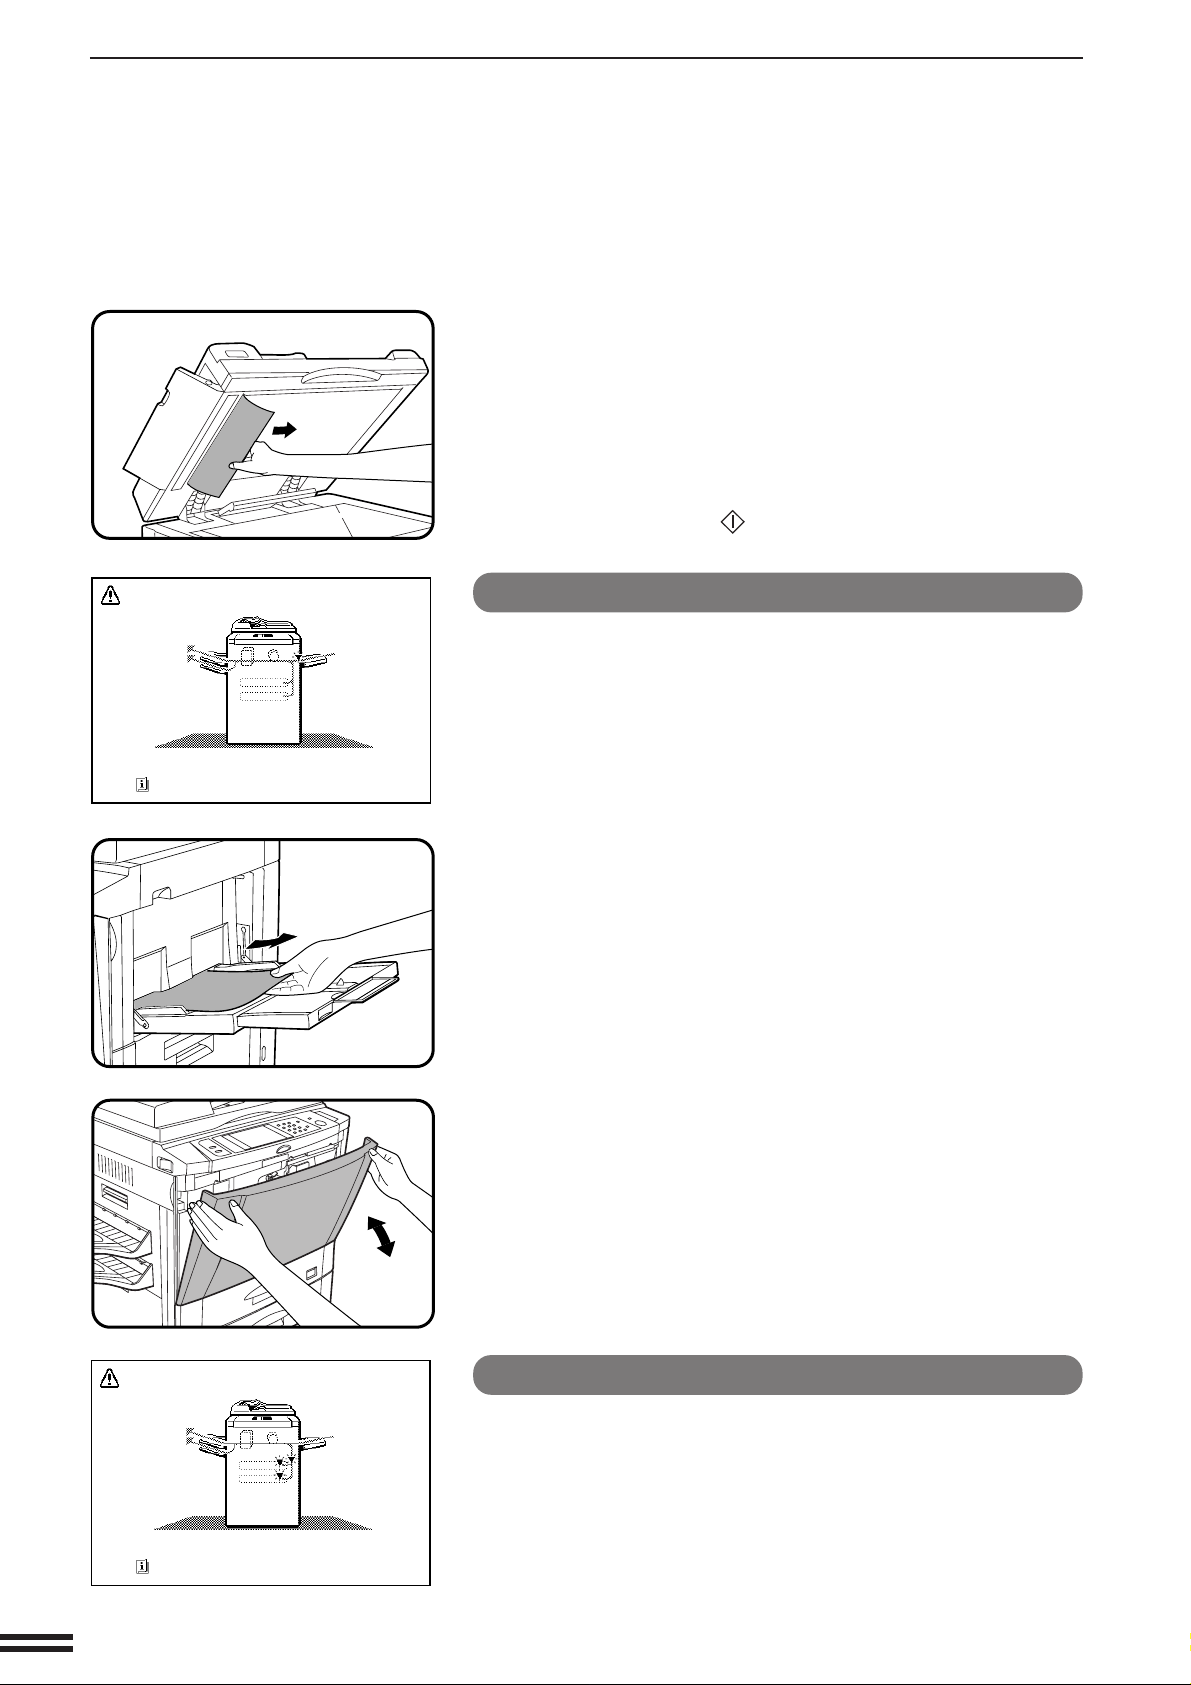
Misfeed in the bypass tray
Gently pull the misfed paper out.
1
Open and close the front cover to cancel the misfeed
display.
2
A MISFEED HAS OCCURRED.
CLEAR INDICATED AREA.
PRESS FOR RECOVERY INSTRUCTIONS.
5-4
Misfeed in paper trays 1 and 2
Page 13
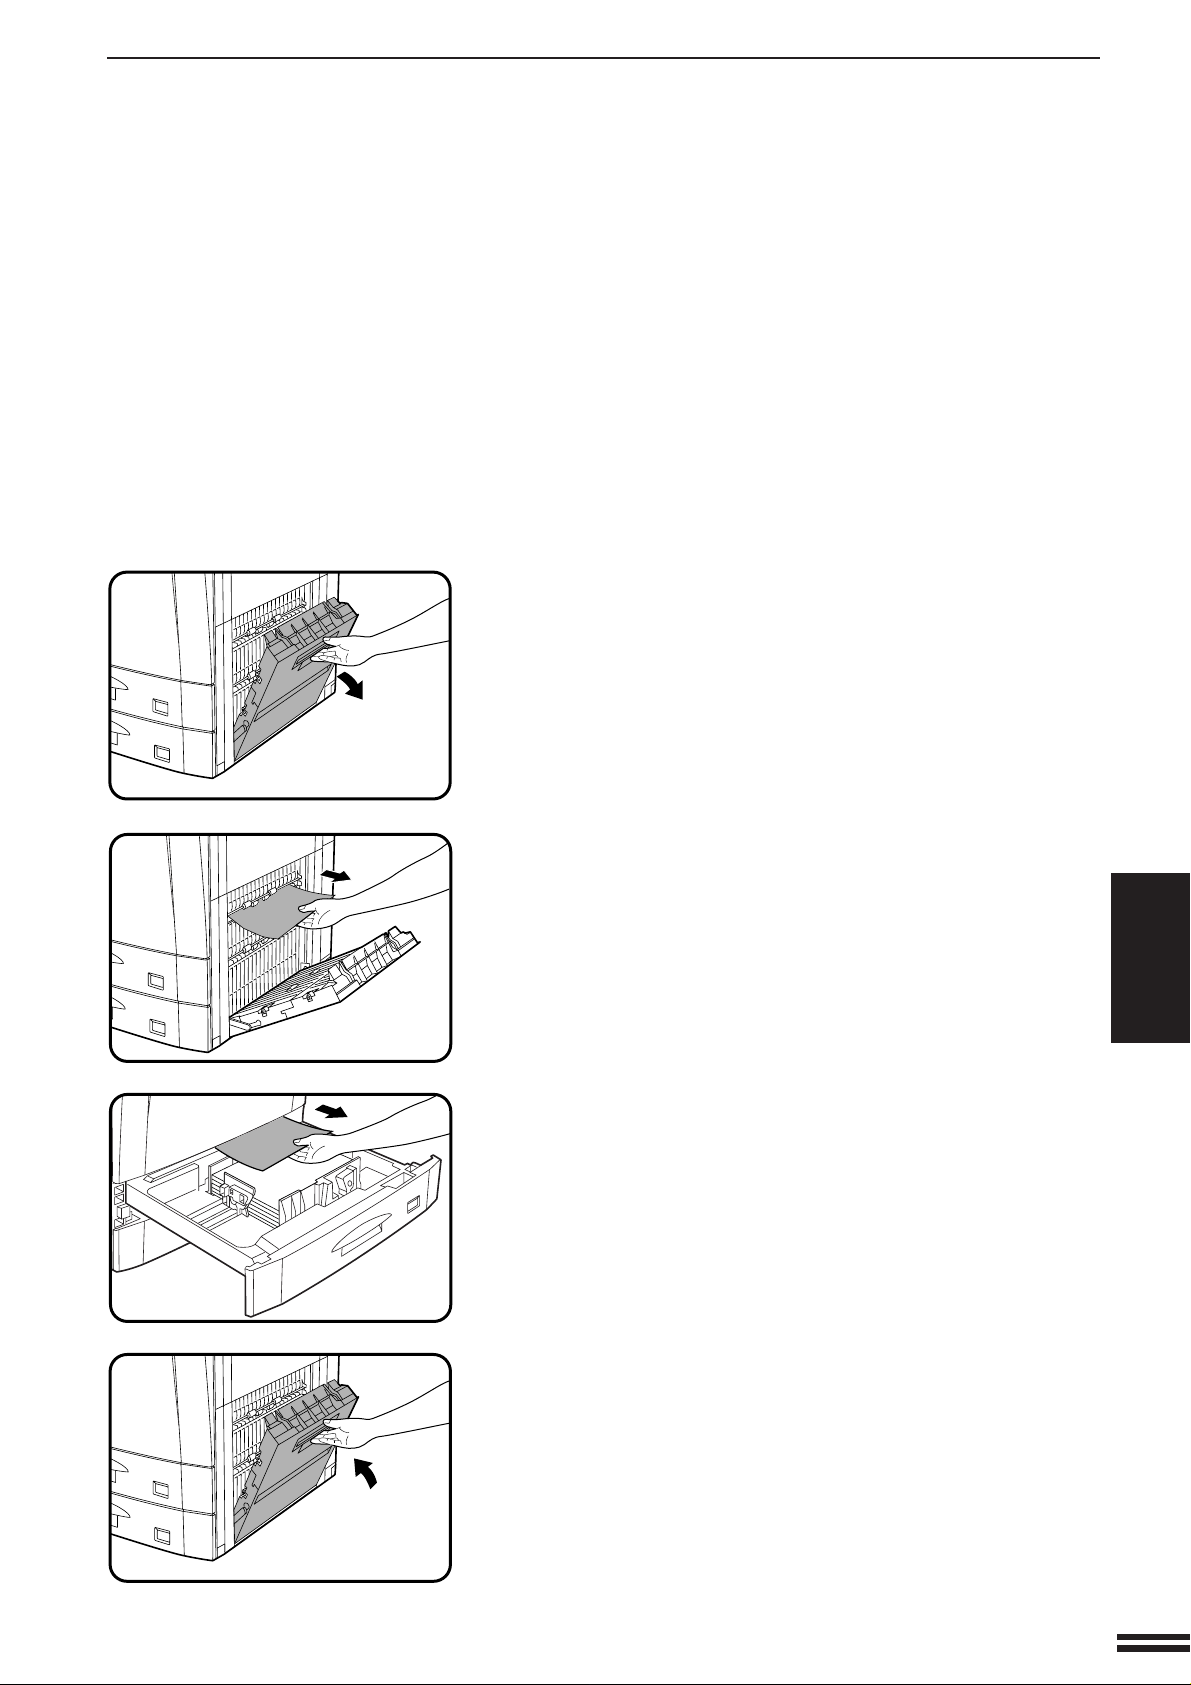
Open the right side cover.
1
●
Hold the handle and gently open the cover.
●
If any paper is set in the bypass tray, remove the paper and close
the bypass tray before opening the right side cover.
MISFEED REMOVAL
Remove the misfed paper.
2
●
Be careful not to tear the misfed paper during removal.
If the paper cannot be seen from the side, pull out the
paper tray which was in use and remove the misfed
3
paper.
●
Be careful not to tear the misfed paper during removal.
NOTE:
When the paper was misfed in tray 2 and the paper has dropped
beyond the tray, remove the tray and remove the misfed paper. To
remove the paper tray, pull the paper tray out until it stops and then
lift and remove the paper tray.
Close the paper tray and the side cover.
4
●
Confirm that the misfeed display is cleared.
CHAPTER
5
COPIER TROUBLE? Misfeed removal
5-5
Page 14
MISFEED REMOVAL
Paper guide
CLEAR INDICATED AREA.
PRESS FOR RECOVERY INSTRUCTIONS.
Transport lever
CHAPTER
A MISFEED HAS OCCURRED.
Misfeed in the transport area
Open the front cover.
1
Remove the misfed paper.
2
1
Turn the transport lever to the left.
5
COPIER TROUBLE? Misfeed removal
Roller rotating knob A
CAUTION
The area behind the transport lever is hot.
Use sufficient care in handling this lever.
Turn roller rotating knob A in the direction of the arrow to
2
remove the misfed paper.
●
Push down the paper guide and remove any misfed paper.
5-6
Page 15
Transport lever
3
Turn the transport lever back into place.
Close the front cover.
3
●
Confirm that the misfeed display is cleared.
MISFEED REMOVAL
A MISFEED HAS OCCURRED.
CLEAR INDICATED AREA.
PRESS FOR RECOVERY INSTRUCTIONS.
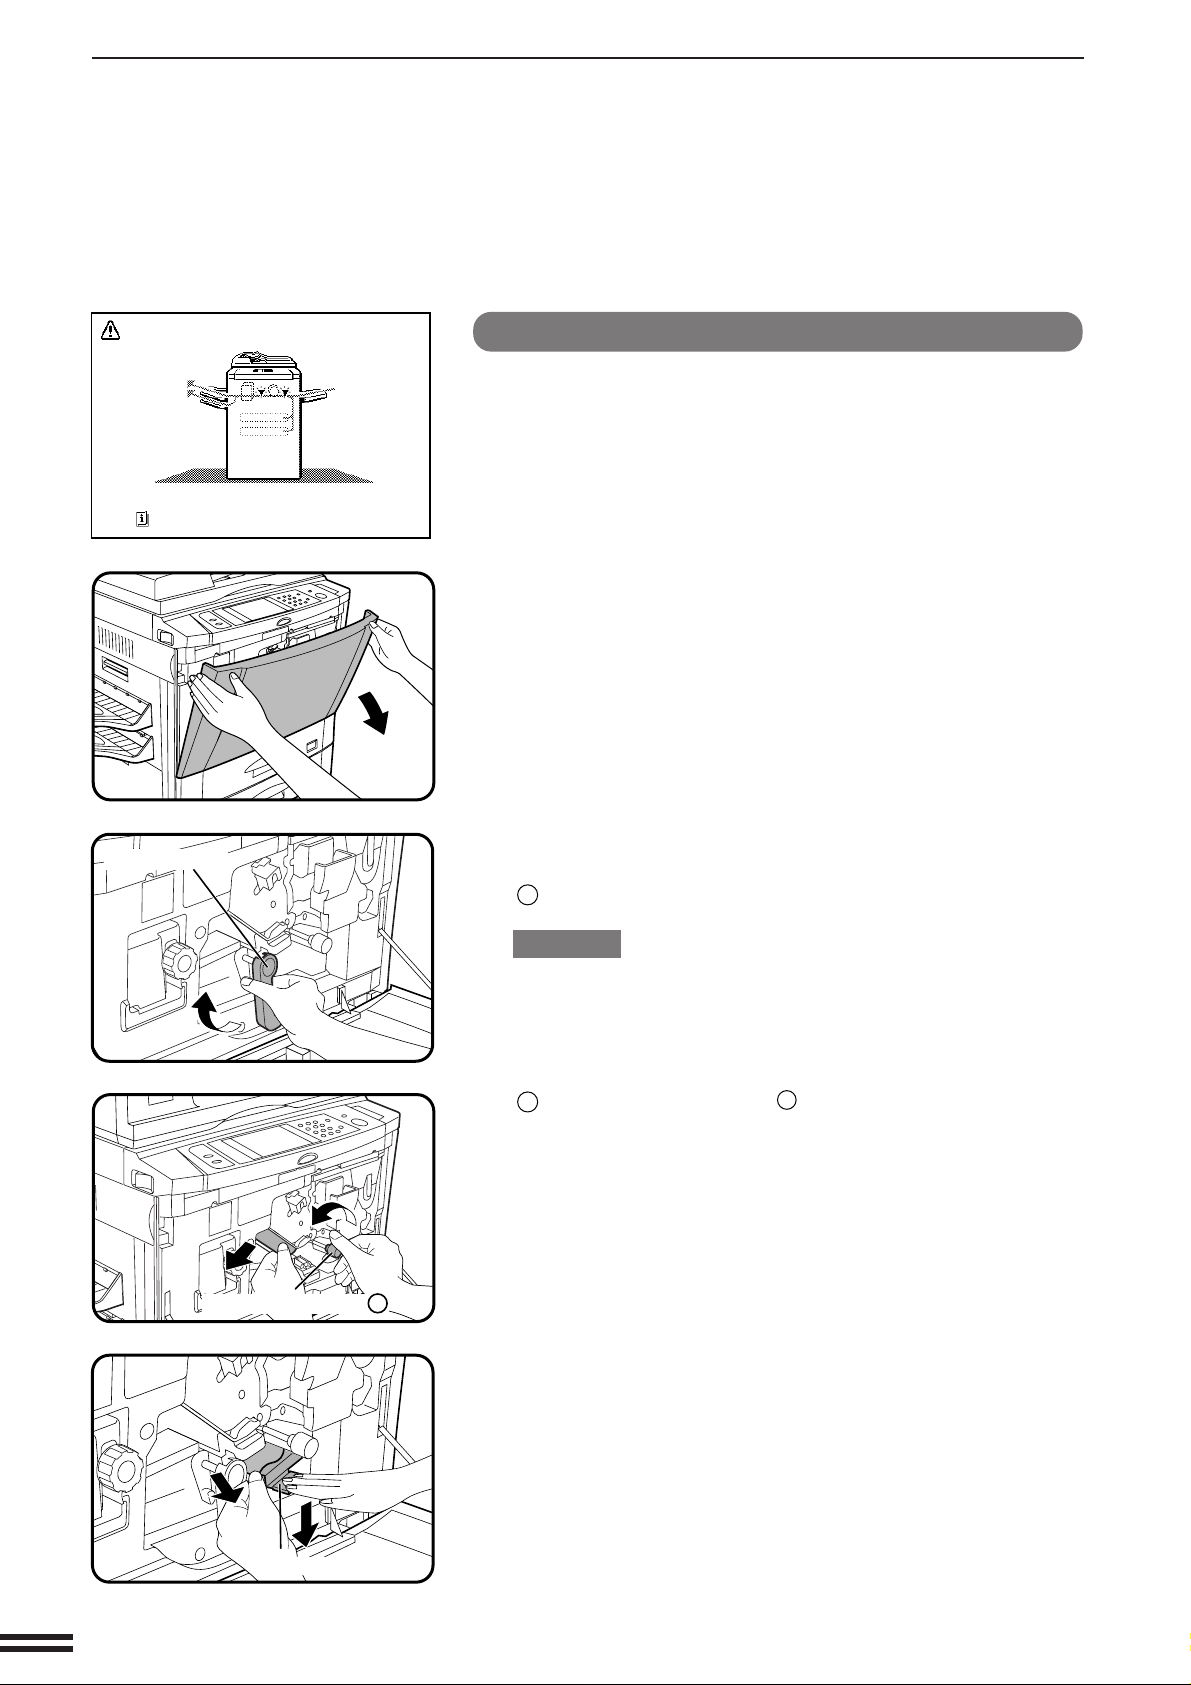
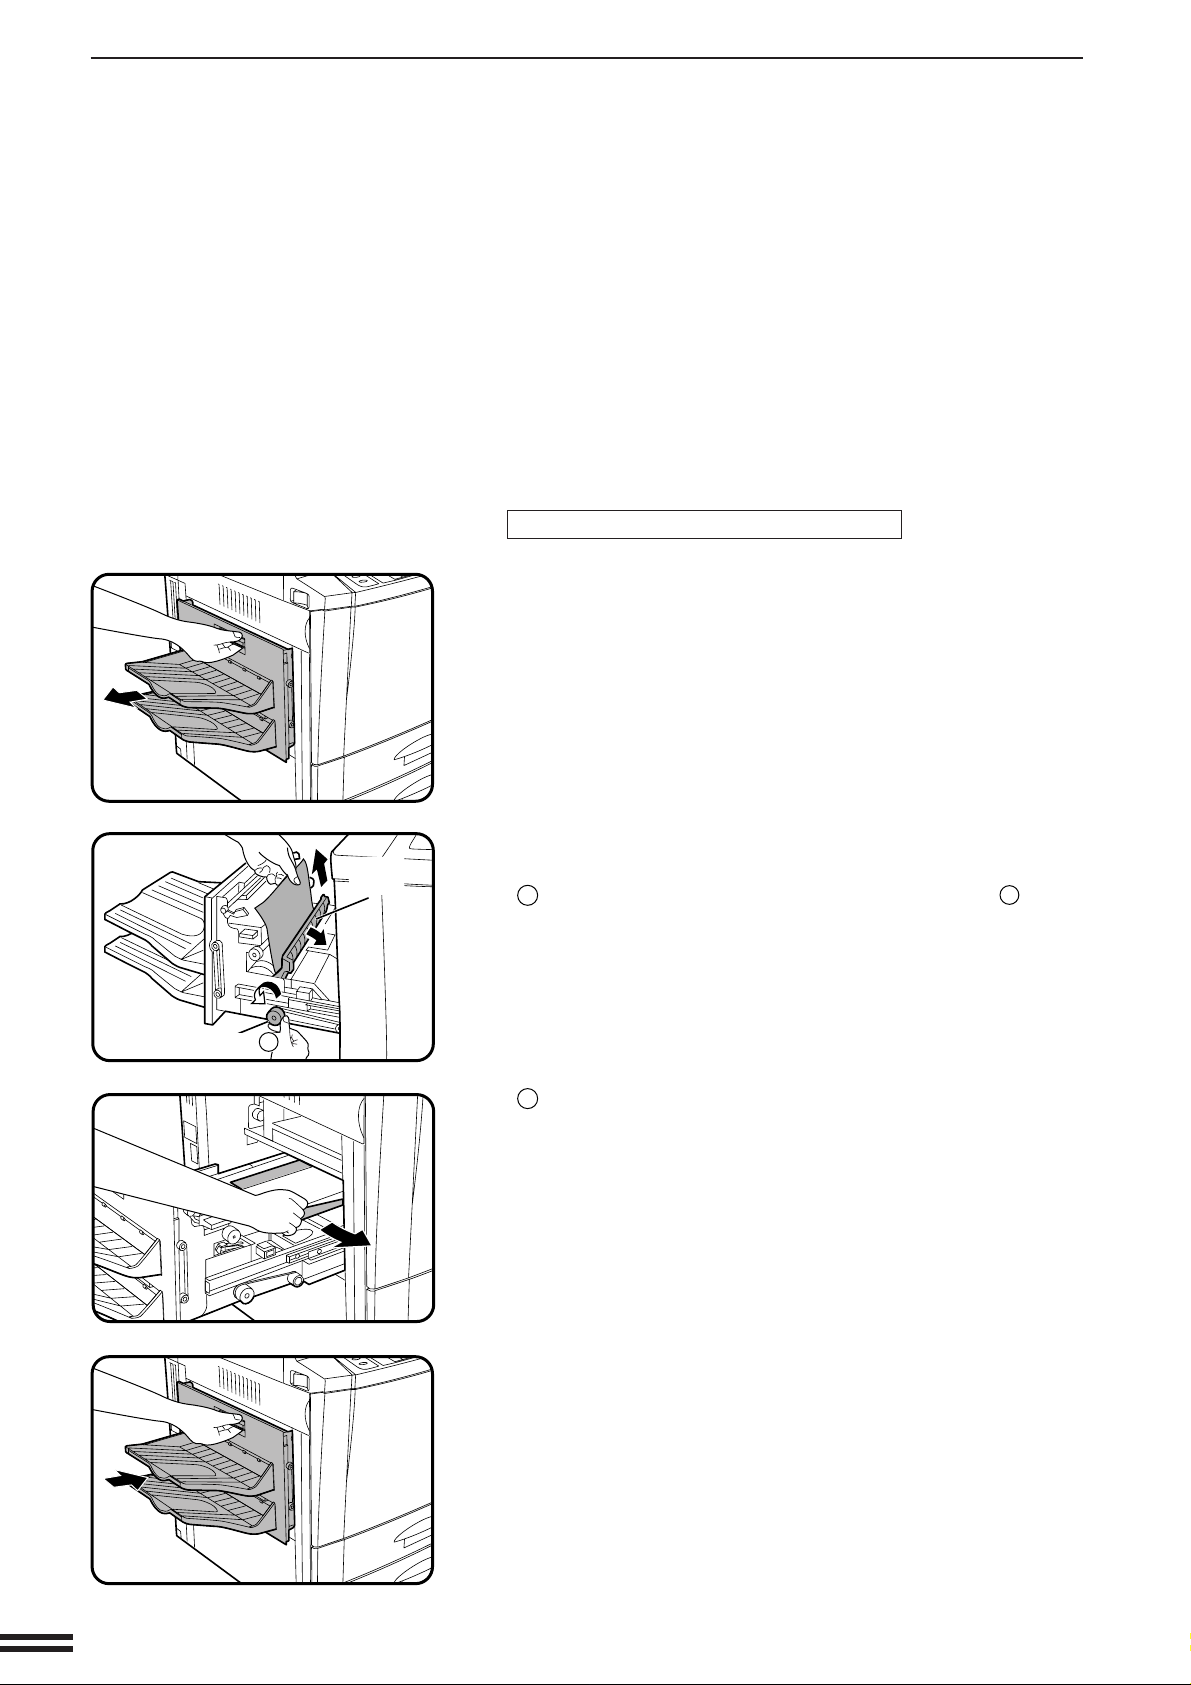
Misfeed around the fusing unit and exit area
CHAPTER
NOTE:
If an optional finisher (AR-FN1) is fitted, please refer to chapter 7
Optional Equipment for additional misfeed removal help.
5
COPIER TROUBLE? Misfeed removal
Open the front cover.
1
Open the exit area cover carefully.
2
5-7
Page 16
MISFEED REMOVAL
Fusing unit tab
Exit area lever C
Roller rotating knob B
Remove the misfed paper.
3
If the misfed paper is in the inner part of the exit area:
1
Turn roller rotating knob B in the direction of the arrow and
remove the paper.
2
If the misfed paper is deep in the fusing unit, lift the fusing unit
tab and remove any misfed paper.
CAUTION
The fusing unit is hot! Be sure to touch only the green tab or the
green roller rotating knob.
Do not touch these two levers.
CHAPTER
5
COPIER TROUBLE? Misfeed removal
Roller rotating knob C
NOTE:
The levers are operated by service personnel only. The user is not
allowed to touch them.
If the misfed paper is in the exit area:
1
Turn roller rotating knob C in the direction of the arrow and
remove the paper.
2
If the misfed paper cannot be removed in step 1, raise exit
area lever C and remove the paper.
5-8
Close the exit area cover.
4
Page 17
Close the front cover.
5
●
Confirm that the misfeed display is cleared.
MISFEED REMOVAL
A MISFEED HAS OCCURRED.
CLEAR INDICATED AREA.
PRESS FOR RECOVERY INSTRUCTIONS.
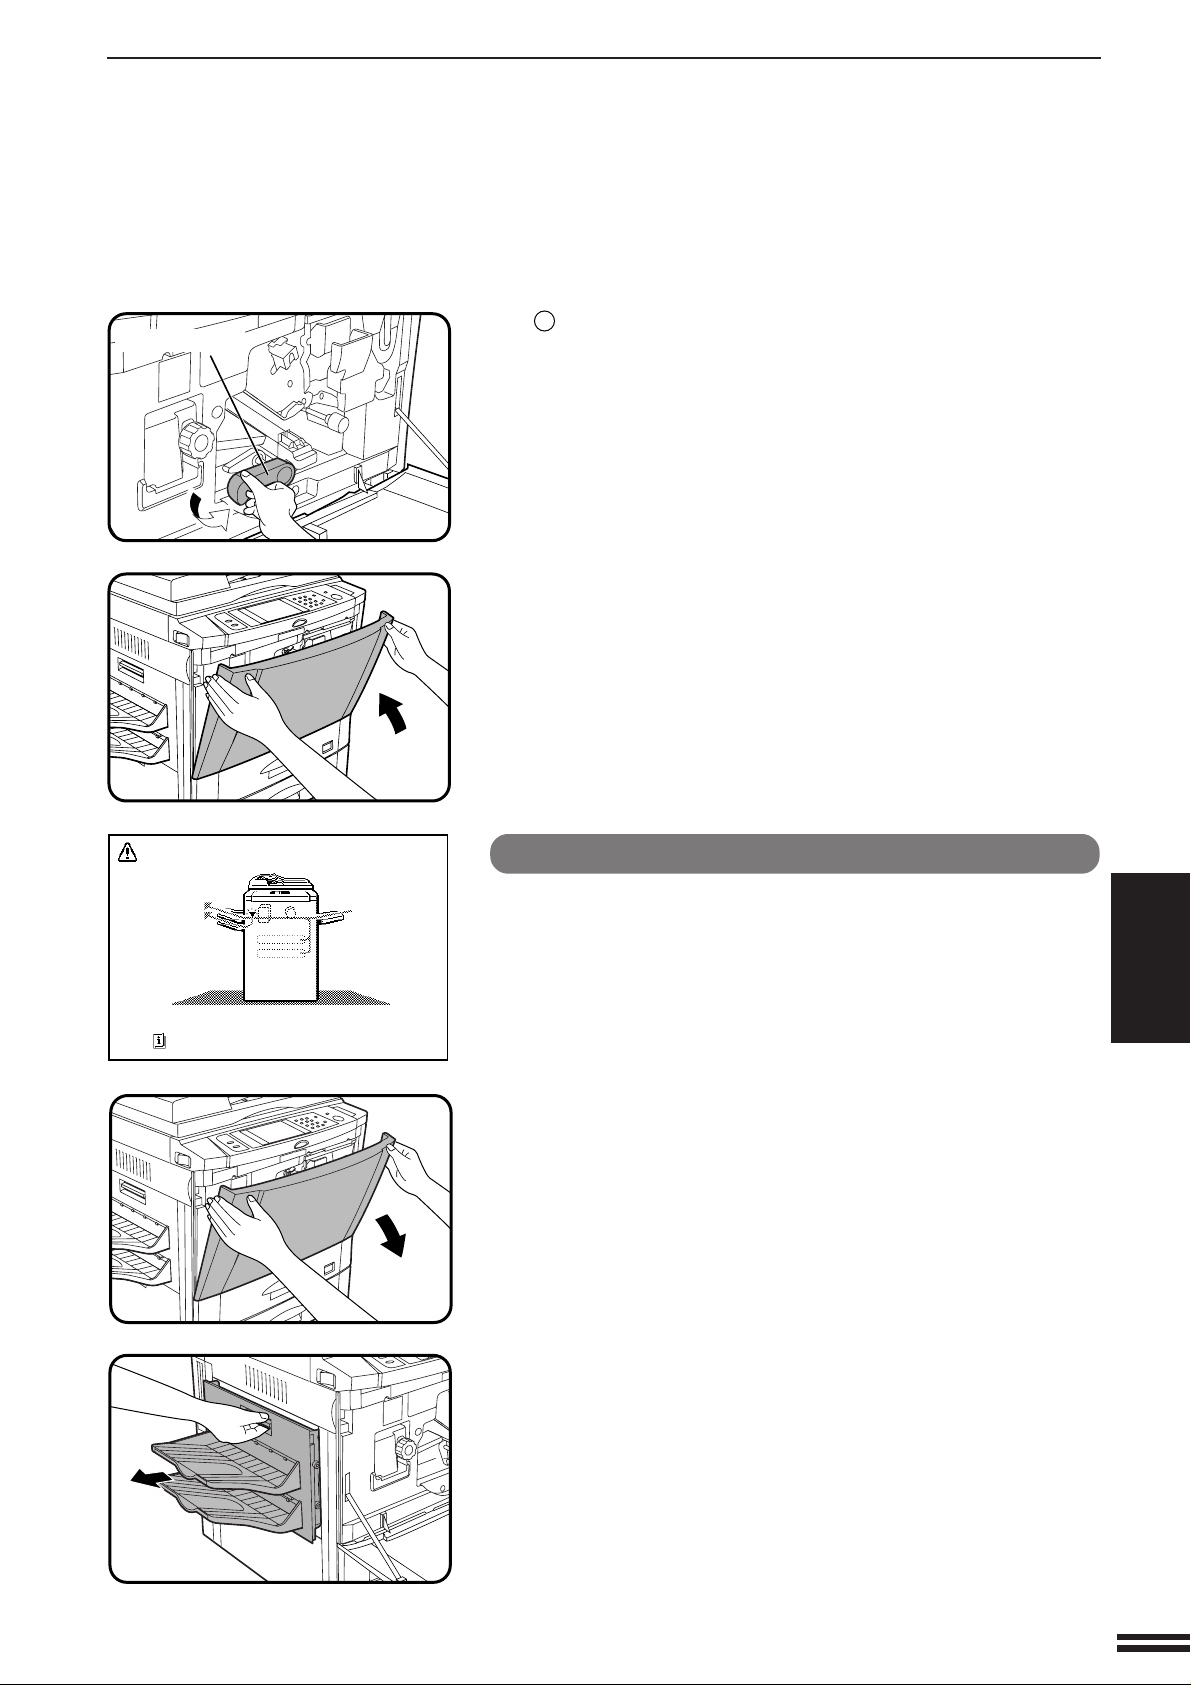
Misfeed in the duplex module
In the AR-280, the duplex module is provided as an optional component.
NOTE:
If an optional finisher (AR-FN1) is fitted, please refer to chapter 7
Optional Equipment for additional misfeed removal help.
If the misfed paper is in the section below the exit area:
Open the left side cover below the exit trays.
1
CHAPTER
5
COPIER TROUBLE? Misfeed removal
Remove the misfed paper.
2
Close the side cover.
3
5-9
Page 18
MISFEED REMOVAL
If the misfed paper is in the duplex module:
Open the exit area cover carefully.
1
CHAPTER
5
COPIER TROUBLE? Misfeed removal
Roller rotating knob D
Paper
guide
Remove the misfed paper.
2
1
Open the paper guide, turn roller rotating knob D in the
direction of the arrow and remove the misfed paper.
Close the paper guide.
2
Remove any misfed paper from the duplex module.
●
Be careful not to tear the misfed paper during removal.
Close the exit area cover.
3
5-10
Page 19

MISFEED REMOV AL
Paper feed area open/close lever
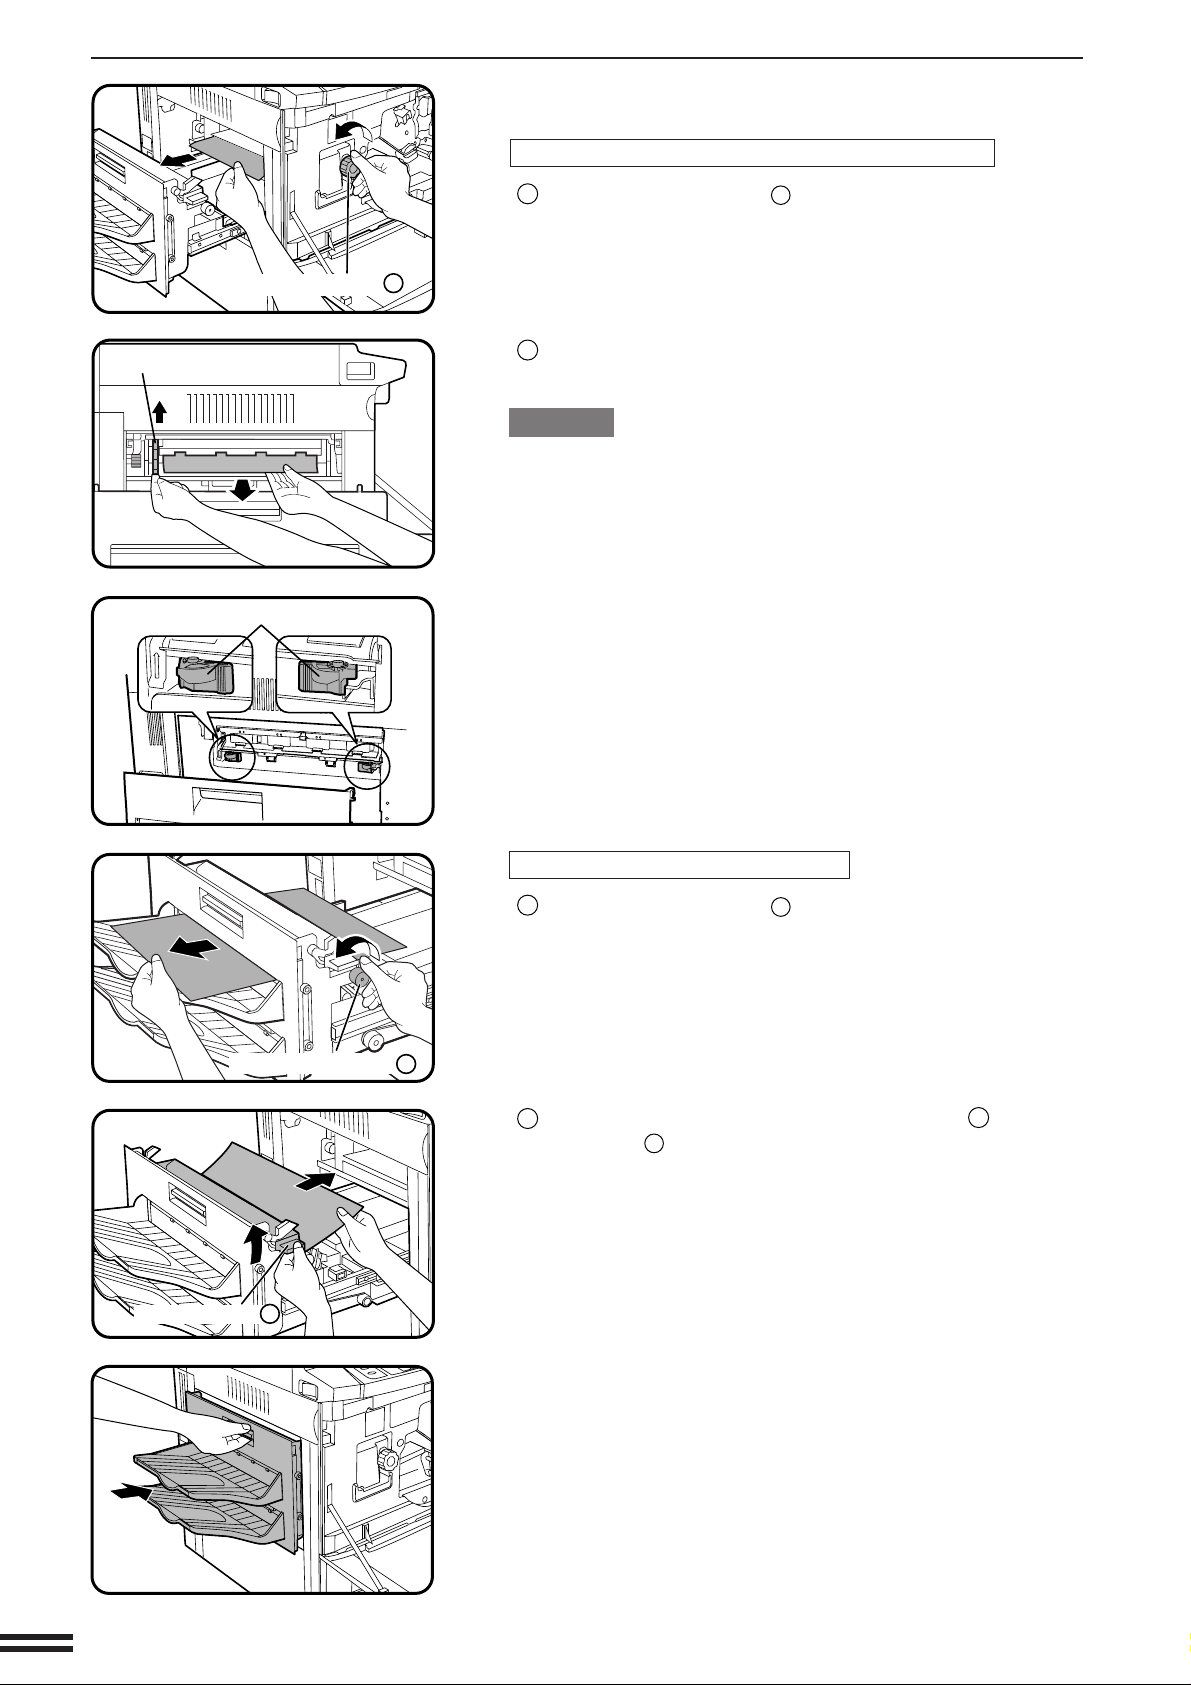
If the misfed paper is in the right side of the duplex module:
Open the right side cover.
1
●
Hold the handle and gently open the cover.
●
If any paper is set in the bypass tray, remove the paper and
close the bypass tray before opening the right side cover.
Remove the misfed paper.
2
●
Open the paper feed area open/close lever in the direction of
the arrow and remove the misfed paper.
Close the right side cover.
3
●
Confirm that the misfeed display is cleared.
CHAPTER
5
COPIER TROUBLE? Misfeed removal
5-11
Page 20

MAINTENANCE REQUIRED
When the message “READY TO COPY. (MAINTENANCE REQUIRED)”
appears in the message display, service by an authorised Sharp
Service Technician will be required soon. Contact your Service Centre
as soon as possible.
CHAPTER
5
COPIER TROUBLE? Maintenance required
5-12
Page 21

TROUBLESHOOTING
Always check the message display whenever the copier stops or
operation is not possible. The messages will give you easy-to-follow
directions. If the messages do not give specific instructions, check the
list below.
Problem Solution
Copier does not operate.
Copies are too dark or too
light.
Blank copies.
Copies smear if rubbed.
●
Copier plugged in?
●
Power switch on?
●
Copy density properly adjusted?
●
Is the original placed face down in
the document feeder tray
(AR-280), face up in the document
feeder tray (AR-285/AR-335) or
face down on the document glass?
●
Paper too heavy?
●
Paper damp?
Plug the copier into a grounded outlet.
Turn the power switch on.
See page 2-16.
Place the original face down in the
document feeder tray (AR-280), face
up in the document feeder tray
(AR-285/AR-335) or face down on the
document glass.
Use copy paper within the specified
range. See page 4-2.
Replace with dry copy paper. Be sure
to store copy paper in a dry location.
CHAPTER
5
COPIER TROUBLE? Troubleshooting
Copy size is different from
the selected paper size.
●
Paper size indicator properly set?
When changing the copy paper size in
a tray, be sure to adjust the paper size
indicator. See page 4-4.
5-13
Page 22

TROUBLESHOOTING
Problem Solution
●
Non-standard paper used?
Use standard paper.
If using special papers, feed the paper
through the bypass tray.
Paper misfeeds frequently.
Dust, dirt, smudges appear
CHAPTER
5
COPIER TROUBLE? Troubleshooting
on copies.
Touch panel is too dark or
too light.
●
Is paper properly installed?
●
Pieces of paper inside copier?
●
Paper curled or damp?
●
Document glass, document cover
(AR-280) or RADF transport belt
(AR-285/AR-335) dirty?
●
Is LCD contrast properly
adjusted?
If a problem persists after checking the above, please consult your key
operator prior to contacting your authorised Sharp Service Centre.
See pages 2-14 and 4-2.
Remove all pieces of misfed paper.
See page 5-2.
Store copy paper flat in the wrapper in
a dry location. See page 4-8.
Clean regularly. See page 6-6.
Adjust the LCD contrast.
See page 6-7.
5-14
Self-diagnostic function
An automatic self-diagnostic function is built into this copier. Should
the copier malfunction, the self-diagnostic function will locate the
problem and stop the copier to prevent damage. An alphanumeric
code will appear in the message display.
Example
Should the copier stop completely, and the message “CALL FOR
SERVICE. CODE: ” appear in the message display, contact your
authorised Sharp Service Centre.
★ KEY OPERATOR See page 8-28.
Page 23

CHAPTER 6
GENERAL INFORMATION
This chapter describes general information for using
this copier.
Page
●
PART NAMES AND FUNCTIONS .............................. 6-2
Exterior .................................................. 6-2
Interior .................................................. 6-3
Operation panel............................................ 6-4
Touch panel (Basic screen) ................................... 6-5
●
USER MAINTENANCE ...................................... 6-6
●
TOUCH PANEL CONTRAST ADJUSTMENT ...................... 6-7
●
SPECIFICATIONS ......................................... 6-8
6-1
CHAPTER6
Page 24

PART NAMES AND FUNCTIONS
Exterior
[AR-280]
[AR-285/AR-335]
Exit area cover
Open to remove misfed paper.
CHAPTER
6
GENERAL INFORMATION
Part names and functions
Power switch
Press to turn copier power on and off.
Second tray (optional)
Interrupt copies are deposited in the second tray.
Exit tray (optional)
Finished copies are deposited in the exit tray.
Operation panel
All copier controls are located here for easy
operation.
SPF/RADF exit area
Finished originals are output here.
Original guides
Adjust to the size of the originals.
Document feeder tray
Holds up to 30 (AR-280) or 50 (AR-285/AR-335)
originals.
Paper trays
Each tray holds 500 sheets of paper.
Front cover
Open to remove misfeeds and to service the
copier.
Handles
Right side cover
Open to remove misfeeds in the paper feed area.
Toner collecting container cover
Open to replace the toner collecting container.
Document glass
All originals which cannot be copied from the SPF/
RADF must be copied here.
Paper clip tray
Keep paper clips here.
Bypass tray paper guides
Adjust to the width of the copy paper.
6-2
Page 25

Interior
PART NAMES AND FUNCTIONS
Bypass tray
Special papers (including transparency film) and
copy paper can be fed from the bypass tray.
Document feeder indicators (AR-285/AR-335)
Original feed indicator
Indicates the originals in the tray will be fed.
Original reminder
Indicates an original is still on the document glass.
RADF exit roller cover (AR-285/AR-335)
Open to remove misfed originals.
RADF feeding roller cover (AR-285/AR-335)
Open to remove misfed originals.
1 Fusing unit
The fusing unit is hot. Exercise care in this area.
Transport lever
Turn to open the transport section.
Photoconductive drum
Copy images are formed on the photoconductive
drum.
Corona unit
The unit is used to charge the photoconductive
drum.
Toner hopper
Contains toner.
Roller rotating knobs
Turn to remove misfed paper.
Paper guide
Push down to remove misfed paper.
Accessories
Operation manual . . . . . . . . . . . . . . . . . . . . . . 1
Toner collecting containers
(including 1 pre-installed at the factory) . . . . . 3
CHAPTER6
GENERAL INFORMATION
Part names and functions
6-3
Page 26

PART NAMES AND FUNCTIONS
Operation Panel
The key and indicators
are not used for the
copier features.
LCD touch panel
Displays information to assist the operator.
Various operation keys are included in the touch
panel depending on the particular screen being
displayed.
10-key pad
Used to set the copy quantity.
INTERRUPT ( ) key and indicator (p. 2-20)
Interrupts a copy run.
CHAPTER
CLEAR ALL (CA) key
Clears all selected settings and returns the
copier to the initial settings.
6
COPY key
GENERAL INFORMATION
Part names and functions
Press during standby to display the total output
count.
DATA
DATA
PRINT
COPY
PRINT
COPY
ON LINE
ON LINE
1
4 5
7
AUDIT CLEAR
1
4 5
7
ACC.#-C
2 3
8
PROGRAM
0
2 3
8
0
6
9
P
6
9
P
INTERRUPT
CLEAR
C
C
CLEAR ALL
CA
START
CA
START ( ) key and indicator
Copying is possible when the indicator is on.
Press to start copying.
SPECIAL MODES key (p.3-1)
Press to select special functions.
Message display
Messages are displayed regarding copier status
and operation.
Paper size display
The sizes of loaded copy paper are displayed
and the selected paper feed location is
highlighted.
indicates the amount of copy paper.
Copy quantity display
Displays the specified number of copies.
AUDIT CLEAR ( ) key
Closes an open account.
PROGRAM (P) key (p. 2-18)
Press to select the job memory mode.
CLEAR (C) key
Press to clear the copy quantity display, or press
during a copy run to terminate copying. The
copier will stop after copies in progress are
finished.
6-4
Original size display
The original paper size is displayed.
INFORMATION ( ) key (p. 1-7)
Press for operation guidance on use of various
features of this copier.
Press for guidance when a misfeed occurs, when
adding toner, or when used toner must be
disposed of.
Page 27

Touch Panel (Basic screen)
ORIGINAL
READY TO COPY.
1.
A4
2.
A3
A4
AUTO
EXPOSURE PAPER SELECT
AUTO
ORIGINAL
A4
A4R
100%
COPY RATIO
PART NAMES AND FUNCTIONS
Inch system
1
8/ 11
1
8/ 11R
2
1
1.8/ 11
2
2.11 17
1
AUTO 8/ 11
2
Depending on the country or
area, some keys will be indicated
with either an English name or a
symbol.
2
CUSTOM SETTINGS ( ) key
Press to set key operator programs or adjust the
contrast of the touch panel.
2-SIDED COPY key
Press to select the 1-sided to 1-sided, 1-sided to
2-sided*, 2-sided to 1-sided (AR-285 and AR-335
only) or 2-sided to 2-sided (AR-285 and AR-335
only) copy mode.
*To select the 1-sided to 2-sided copy mode on
the AR-280, an optional duplex module
(AR-DU1) must be installed.
OUTPUT key
Press to select the finisher mode: SORT or
GROUP.
EXPOSURE display
Indicates the selected exposure mode.
EXPOSURE key (p. 2-16)
Press to select the exposure mode: AUTO,
TEXT, TEXT/PHOTO, or PHOTO.
PAPER SELECT display
Displays the selected paper size. When “AUTO”
is displayed, paper size matching the original and
copy ratio will be automatically selected.
PAPER SELECT key
Press to select the desired paper tray.
COPY RATIO display
Displays the copy ratios for reductions or
enlargements.
COPY RATIO key
Press to select a reduction or enlargement copy
ratio or select the automatic copy ratio selection
mode.
REVIEW ( ) key
Press to check the settings of selected functions.
Initial settings
The copier assumes the initial settings when the
CLEAR ALL (CA) key is pressed and approximately
1 minute after the last copy is made in any mode.
Except for the paper tray selection, the copier also
assumes the initial setting when it is turned on.
●
Copy ratio: 100%
●
Automatic exposure
●
Copy quantity: 0
●
All special copier modes are set to off.
●
Tray select: Paper tray 1 (At power on, the
previously selected tray will again be selected.)
Optional large capacity tray will be selected when
installed.
★ KEY OPERATOR Initial settings can be
programmed as desired. The auto clear time can also
be changed. See pages 8-17 and 8-21.
CHAPTER6
GENERAL INFORMATION
Part names and functions
6-5
Page 28

USER MAINTENANCE
The document glass and the document cover (RADF transport belt)
must be kept clean to avoid dirty areas from being copied onto the
copies.
Document glass and document cover
Wipe the document glass and the document cover
(RADF transport belt) with a soft, clean cloth.
●
If necessary, dampen the cloth with water. Do not use thinner,
benzene, or similar volatile cleaning agents.
CHAPTER
6
GENERAL INFORMATION
User maintenance
6-6
Page 29

TOUCH PANEL CONTRAST ADJUSTMENT
ETTINGS
DISPLAY
CONTRAST
KEY OPERATOR
PROGRAMS
LIGHTER DARKER
OK
DARKER
The contrast of the touch panel can be adjusted as below.
Press the CUSTOM SETTINGS ( ) key.
1
Press the “DISPLAY CONTRAST” key on the touch
panel.
2
Press the “LIGHTER” or “DARKER” key to adjust the
contrast.
3
Press the “OK” key.
4
CHAPTER6
GENERAL INFORMATION
Touch panel contrast adjustment
6-7
Page 30

SPECIFICATIONS
COPIER
AR-280 AR-285 AR-335
Type Desktop
Copy system Dry, electrostatic transfer system
Originals Sheets, bound documents
Original feed system Single pass feeder Reversing automatic document
(SPF) feeder (RADF)
Original sizes Max. A3 (11" x 17")
Copy sizes Max. A3 (11" x 17"), min. A6 (5-1/2" x 8-1/2")
Image loss: Max. 5 mm (13/64") (both leading and trailing edges)
Max. 5 mm (13/64") (along all other edges in total)
For paper weight, see page 4-2.
Copying speed 28 copies/min. (A4 (8-1/2" x 11")) 33 copies/min.
(at 100% copy ratio) (A4 (8-1/2" x 11"))
20 copies/min. (A4R (8-1/2" x 11"R)) 24 copies/min.
17 copies/min. (B4 (8-1/2" x 14")) 21 copies/min.
14 copies/min. (A3 (11" x 17")) 17 copies/min.
(A4R (8-1/2" x 11"R))
(B4 (8-1/2" x 14"))
(A3 (11" x 17"))
Continuous copy Max. 999 copies; subtractive counter
First-copy time Approx. 5.2 sec.
Warm-up time Approx. 65 sec.
Copy ratio Variable: 25 to 800% in 1% increments, total 776 steps
Exposure system Document glass: Moving optical source
CHAPTER
6
GENERAL INFORMATION
Specifications
Copy paper feed Two paper trays with automatic paper feed (500 sheets each);
Fusing system Heat rollers
Developer system Magnetic brush development
Light source Xenon lamp
Resolution Scan: 400 dpi
(can be set in the horizontal and vertical directions independently)
Fixed presets: 25%, 50%, 70%, 81%, 86%, 100%, 115%, 122%,
141%, 200%, 400%, 800% (25%, 50%, 64%, 77%, 95%, 100%,
121%, 129%, 141%, 200%, 400%, 800%)
(stationary platen) with automatic
exposure function
SPF: Moving original RADF: Same as above
one bypass tray with 50-sheet automatic feed capability
Output: 600 dpi
6-8
Gradation Scan: 256 levels
Output: 2 levels (normal copying)
256 levels (Hi-Fi copying)
Required power supply Local voltage ±10% (For this copier’s power supply requirements,
see the name plate located on the left hand side at the rear corner of
the copier.)
Page 31

SPECIFICATIONS
AR-280 AR-285 AR-335
Power consumption Max. 1.45 kW
Overall dimensions 1292 mm (W) x 695 mm (D) (50-7/8" (W) x 27-3/8" (D))
Weight Approx. 89 kg (197 lbs.) Approx. 101 kg (223 lbs.)
Copier dimensions 600 mm (W) x 600 mm (W) x 695 mm (D) x 750 mm (H)
695 mm (D) x 735 mm (H) (23-5/8" (W) x 27-3/8" (D) x 29-17/32" (H))
(23-5/8" (W) x 27-3/8" (D)
x 28-15/16" (H))
Operating conditions Temperature:15°C to 30°C (59°F to 86°F)
Humidity: 20% to 85%
Optional equipment Finisher (AR-FN1)
Large capacity tray (AR-LC1)
Stand/500-sheet paper drawer (AR-DE1)
500-sheet paper drawer (AR-CS1)
Exit tray (AR-TE1)
DOCUMENT FEEDER
AR-280 AR-285 AR-335
Type Single pass feeder Reversing automatic document feeder
(SPF) (RADF)
Acceptable originals 50 to 128 g/m
Weight: (14 to 34 lbs.) (14 to 34 lbs.)
Size: A5 to A3 (5-1/2" x 8-1/2" to 11" x 17")
Capacity: Up to 50 sheets for A5 and A4 (5-1/2" x
Up to 30 sheets for A5 and
A4 (5-1/2" x 8-1/2" and
8-1/2" x 11") originals
provided the total aggregate
thickness does not exceed
4.7 mm or 3/16"
Up to 15 sheets for B4 and
A3 (8-1/2" x 14" and
11" x 17") originals
2
Single-sided originals: 50 to 128 g/m
Two-sided originals: 50 to 128 g/m
(14 to 34 lbs.)
for A5 and A4 (5-1/2" x 8-1/2" and
8-1/2" x 11") originals.
50 to 110 g/m2 (14 to 29 lbs.) for B4
and A3 (8-1/2" x 14" and 11" x 17")
originals.
8-1/2" and 8-1/2" x 11") originals provided
the total aggregate thickness does not
exceed 6.5 mm or 1/4" (50 to 80 g/m
(14 to 20 lbs.)) or 5 mm or 3/16" (80 to
128 g/m2 (21 to 34 lbs.))
Up to 30 sheets for B4 and A3 (8-1/2" x 14"
and 11" x 17") originals
2
2
CHAPTER6
2
GENERAL INFORMATION
Specifications
DUPLEX MODULE (optional in AR-280)
Paper type Ordinary paper only
Number of copies 1 (trayless system)
Copy paper size A5, A4, A4R, B4, A3 (8-1/2" x 11", 8-1/2" x 11"R, 8-1/2" x 14", 11" x 17")
In some regions, 216 mm x 330 mm (8-1/2" x 13") size paper can be
used in place of B4 (8-1/2" x 14").
Copy paper weight 56 to 105 g/m2 (15 lbs. to 28 lbs.)
Specifications are subject to change for improvement without notice.
6-9
Page 32

Page 33

CHAPTER 7
OPTIONAL EQUIPMENT
This chapter describes operating instructions for
the Finisher (AR-FN1), Large Capacity Tray
(AR-LC1), and Stand/500-sheet Paper Drawer
(AR-DE1).
Page
●
SYSTEM CONFIGURATION .................................. 7-2
●
FINISHER (AR-FN1) ........................................ 7-3
●
Part names ............................................. 7-3
●
Offset stack ............................................. 7-4
●
Sort and group ........................................... 7-5
●
Staple sort .............................................. 7-6
●
Staple cartridge replacement................................ 7-10
●
Staple jam removal....................................... 7-12
●
Misfeed removal......................................... 7-14
●
Specifications........................................... 7-19
●
LARGE CAPACITY TRAY (AR-LC1) ........................... 7-20
●
Part names ............................................ 7-20
●
Specifications........................................... 7-20
●
Loading copy paper ...................................... 7-21
●
Misfeed removal......................................... 7-22
●
STAND/500-SHEET PAPER DRAWER (AR-DE1) ................. 7-24
●
Part names ............................................ 7-24
●
Specifications........................................... 7-24
●
Loading copy paper ...................................... 7-25
●
Misfeed removal......................................... 7-26
CHAPTER
7
7-1
Page 34

SYSTEM CONFIGURATION
The options which are available for this copier are shown below.
Finisher (AR-FN1)
Exit tray
(AR-TE1)
Large capacity tray (AR-LC1)
OPTIONAL EQUIPMENT
System configuration
Stand/500-sheet paper drawer (AR-DE1)
CHAPTER
7
In the AR-280, the duplex module
(AR-DU1) is provided as an
optional component.
500-sheet paper drawer (AR-CS1)
7-2
Page 35

FINISHER (AR-FN1)
The copier has two different finisher modes: one sorts copies into
sets matching the sequence of the originals and the second groups
copies by original. When the optional finisher (AR-FN1) is installed,
the copier can automatically staple the sorted copies. Each collated
set of copies or group of copies can be stacked offset from the
previous set.
PART NAMES
Top cover
Top tray
Second tray
(not used in the copy mode)
Offset tray
When copying onto size A3 (11” x 17”)
paper, lower the metal support located at
the tip of the offset tray.
Finisher release lever
Paper feed area cover
Paper transport area cover
OPTIONAL EQUIPMENT
Finisher (AR-FN1)
CHAPTER
Stapler unit
●
The top tray and second tray are each furnished with an extendable component, which is to be used when copying
onto size A3 (11” x 17”) paper.
7
7-3
Page 36

FINISHER (AR-FN1)
OUTPUT
TOP TRAY
OFFSET
SO
OFFSET
TRAY
AUTO AUTO
Offset stack
In the initial setting, the offset tray will move from side to side so that
each copy set is offset by approximately 30 mm (1.2 inch).
When the offset stack function is disabled, the offset tray will not
move from side to side.
The offset stack function can be enabled or disabled by pressing the
OUTPUT key and then the “OFFSET” check mark box on the touch
panel.
When the STAPLE SORT mode is selected, the offset stack function
will be disabled.
The top tray cannot be used to offset copies.
To select the top tray, press the “TOP TRAY” key on the touch panel.
3
2
1
OPTIONAL EQUIPMENT
Finisher (AR-FN1)
3
2
1
CHAPTER
7
1
1
1
OFFSET mode
When copying in the SORT mode, each collated set of
copies will be stacked offset approximately 30 mm (1.2
2
1
1
inch) from the previous set. When copying in the GROUP
mode, copies will be offset stacked in groups of multiple
copies from the same original.
NON-OFFSET mode
1
All copies will be aligned in one stack in the offset tray or
1
the top tray with no offset.
7-4
Page 37

Sort and group
When SORT is selected, the SORT ( ) icon will be indicated and
copies will be collated by sets.
When STAPLE SORT is selected, the STAPLE SORT ( ) icon
will be indicated and collated copies will be stapled automatically.
When the SORT or STAPLE SORT icon is not indicated on the touch
panel, copies will be grouped by originals.
To change the finisher mode, press the OUTPUT key and then
select the desired mode on the touch panel.
●
When an SPF or RADF is used for copying, copies will be collated
in the OFFSET mode as the default setting.
When the document glass is used for copying, copies will be
grouped in the OFFSET mode as the default setting.
FINISHER (AR-FN1)
1
2
3
3
2
1
1
2
3
1
2
3
SORT mode
Each set of copies will be sequentially delivered to the
offset tray or the top tray as selected.
OPTIONAL EQUIPMENT
Finisher (AR-FN1)
1
1
1
3
2
1
2
2
2
3
3
3
GROUP mode
All copies of the same original will be grouped in the offset
tray or the top tray.
CHAPTER
7
3
2
1
3
2
1
3
2
1
STAPLE SORT mode
Collated sets of copies will be stapled and delivered to the
offset tray.
●
See next page for details.
3
2
1
NOTE:
Rotation copy (image of original will be rotated when the orientation
of the original does not match that of the copy paper) will not
function when the STAPLE SORT mode is set.
7-5
Page 38

FINISHER (AR-FN1)
AUTO
EXPOSURE
Stapling position
READY TO COPY.(DOCUMENT FEEDER MODE)
OUTPUT
TOP TRAY
OFFSET
SORT
OFFSET
TRAY
STAPLE
SORT GROUP
OK
AUTO
EXPOSURE PAPER SELECT
100%
COPY RATIO
AUTO
A4
Staple sort
The STAPLE SORT mode staples A4, A4R, B4, and A3 (8-1/2" x
11", 8-1/2" x 11"R, 8-1/2" x 14", and 11" x 17") size copies. Stapled
sets cannot be delivered to the top tray.
●
In some regions, 216 mm x 330 mm (8-1/2" x 13") size paper can
be used in place of B4 (8-1/2" x 14").
NOTE:
Different size originals cannot be copied onto copy paper of their
respective sizes in the STAPLE SORT mode. The paper size selected
for the first scanned original will be used for all originals. To copy
different size originals in the STAPLE SORT mode, select the paper
size for the largest original.
Using the SPF/RADF
AR-280
Stapling position
Set the originals in the document feeder tray.
1
●
If the number of copies in one set is more than 50 for
A4 or A4R (8-1/2" x 11" or 8-1/2" x 11"R) paper or 25 for B4 or
A3 (8-1/2" x 14" or 11" x 17") paper, the copies will not be
stapled.
●
The stapling positions shown in the left figures are the factory
default positions for the AR-280 and AR-285/AR-335.
AR-285/AR-335
OPTIONAL EQUIPMENT
Finisher (AR-FN1)
CHAPTER
7
Press the OUTPUT key.
2
Press the “STAPLE SORT” key on the touch panel.
3
7-6
Page 39

Select the desired stapling position.
READY TO COPY.
(DOCUMENT FEEDER MODE)
OUTPUT
TOP TRAY
SORT
OFFSET
TRAY
STAPLE
SORT GROUP
OK
AUTO
EXPOSURE PAPER SELECT
100%
COPY RATIO
AUTO
A4
C
CLEAR
INTERRUPT
CA
CLEAR ALL
START
1
2 3
4 5
6
7
8
9
0
C
P
CLEAR
PROGRAM
AUDIT CLEAR
INTERRUPT
SORT
STAPLE
SORT GROUP
OK
4
●
The AR-FN1 finisher has three selectable stapling positions as
shown below.
FINISHER (AR-FN1)
Press the “OK” key.
5
Set the number of copies.
6
OPTIONAL EQUIPMENT
Finisher (AR-FN1)
CHAPTER
Press the START ( ) key.
●
7
When copying of one set is completed, the copies will be
automatically stapled and delivered to the offset tray.
7
7-7
Page 40

AUTO
EXPOSURE
FINISHER (AR-FN1)
SORT
STAPLE
SORT GROUP
OK
READY TO COPY.
OUTPUT
TOP TRAY
OFFSET
SORT
OFFSET
TRAY
STAPLE
SORT GROUP
OK
AUTO
EXPOSURE PAPER SELECT
100%
COPY RATIO
AUTO
A4
Stapling position
Using the document glass
Set the original on the document glass with the corner
to be stapled to the upper right.
1
●
Copy from the last page to the first page.
●
If the number of copies in one set is more than 50 for
A4 or A4R (8-1/2" x 11" or 8-1/2" x 11"R) paper or 25 for B4 or
A3 (8-1/2" x 14" or 11" x 17") paper, the copies will not be
stapled.
●
The stapling position shown in the left figure is the factory
default position.
OPTIONAL EQUIPMENT
Finisher (AR-FN1)
CHAPTER
7
Press the OUTPUT key.
2
Press the “STAPLE SORT” key on the touch panel.
3
Select the desired stapling position.
4
●
The AR-FN1 finisher has three selectable stapling positions as
shown below.
7-8
Page 41

Press the “OK” key.
1
2 3
4 5
6
7
8
9
0
C
P
CLEAR
PROGRAM
AUDIT CLEAR
INTERRUPT
C
CLEAR
INTERRUPT
CA
CLEAR ALL
START
AUTO
EXPOSURE PAPER SELECT
100%
COPY RATIO
READ-END
PLACE NEXT ORIGINAL. PRESS [START].
WHEN FINISHED, PRESS [READ-END].
AUTO
A4
READY TO COPY.
OUTPUT
TOP TRAY
SORT
OFFSET
TRAY
STAPLE
SORT GROUP
OK
AUTO
EXPOSURE PAPER SELECT
100%
COPY RATIO
AUTO
A4
5
FINISHER (AR-FN1)
Set the number of copies.
6
Press the START ( ) key.
7
Replace the finished original with the next original after
the START ( ) key indicator lights up, and then press
8
the START ( ) key. Repeat this step until all originals
have been scanned.
After all originals are scanned, press the “READ-END”
key on the touch panel.
9
●
Copying will start and each set of copies will be automatically
stapled and delivered to the offset tray.
OPTIONAL EQUIPMENT
Finisher (AR-FN1)
CHAPTER
7
7-9
Page 42

FINISHER (AR-FN1)
Staple cartridge replacement
The message “SLIDE THE FINISHER AWAY FROM THE COPIER
AND ADD STAPLES.” will appear when the staple cartridge is
empty. Replace the staple cartridge as follows:
While holding the finisher release lever, slide the finisher
away from the copier.
1
Turn the stapler unit to face up.
2
OPTIONAL EQUIPMENT
Finisher (AR-FN1)
CHAPTER
7
Hold the staple box release lever to unlatch the staple
box.
3
Remove the staple box.
4
Remove the empty staple cartridge from inside the
staple box.
5
7-10
Page 43

FINISHER (AR-FN1)
Insert the new staple cartridge into the box until it clicks
in place.
6
●
Insert the new cartridge by aligning the arrows on the cartridge
with those on the box. Check that the cartridge locks in place by
pulling it slightly.
●
The cartridge holds 5,000 staples.
Remove the rear paper and tape from the cartridge.
7
●
Pull them straight. If they are pulled obliquely, the tape may be
torn.
8
9
10
Insert the staple box to the stapler unit until it clicks into
place.
Return the stapler unit to face down.
Push the finisher toward the copier and latch it in place.
OPTIONAL EQUIPMENT
Finisher (AR-FN1)
CHAPTER
7
7-11
Page 44

FINISHER (AR-FN1)
Staple jam removal
If staples become jammed in the stapler, “CHECK STAPLER POSITION
OR STAPLE JAM.” will be displayed. Remove the jammed staples in the
manner described below.
While holding the finisher release lever, slide the finisher
away from the copier.
1
Turn the stapler unit to face up.
2
OPTIONAL EQUIPMENT
Finisher (AR-FN1)
CHAPTER
7
Hold the staple box release lever to unlatch the staple
box.
3
Remove the staple box.
4
Lower the lever at the end of the staple box and remove
the jammed staples.
5
7-12
Page 45

FINISHER (AR-FN1)
Return the lever to its original position.
6
Insert the staple box to the stapler unit until it clicks in
place.
7
Return the stapler unit to face down.
8
Push the finisher toward the copier and latch it in place.
9
OPTIONAL EQUIPMENT
Finisher (AR-FN1)
CHAPTER
7
7-13
Page 46

FINISHER (AR-FN1)
Misfeed removal
The copier will stop when a misfeed occurs.
The message “A MISFEED HAS OCCURRED. CLEAR INDICATED AREA.
PRESS FOR RECOVERY INSTRUCTIONS.” will appear with a display
of paper misfeed locations. Press the INFORMATION ( ) key for more
detailed information as necessary.
SF-S15 20-bin sorter
A MISFEED HAS OCCURRED.
CLEAR INDICATED AREA.
PRESS FOR RECOVERY INSTRUCTIONS.
OPTIONAL EQUIPMENT
Finisher (AR-FN1)
Misfeed in the upper transport area
While holding the finisher release lever, slide the finisher
away from the copier.
1
Remove the misfed paper.
2
CHAPTER
7
7-14
Page 47

FINISHER (AR-FN1)
If the misfed paper cannot be removed in step 2, open
the cover of the paper feed area of the finisher.
3
Remove the misfed paper.
4
If the misfed paper cannot be removed in step 4, close
the cover of the paper feed area and open the top cover.
5
Remove the misfed paper.
6
Close the top cover.
7
OPTIONAL EQUIPMENT
Finisher (AR-FN1)
CHAPTER
7
7-15
Page 48

FINISHER (AR-FN1)
Push the finisher toward the copier and latch it in place.
8
●
Confirm that the misfeed display is cleared.
A MISFEED HAS OCCURRED.
CLEAR INDICATED AREA.
OPTIONAL EQUIPMENT
PRESS FOR RECOVERY INSTRUCTIONS.
Finisher (AR-FN1)
CHAPTER
7
Misfeed in the lower transport area
While holding the finisher release lever, slide the finisher
away from the copier.
1
Remove the misfed paper from the paper transport area
as shown in the illustration.
2
7-16
Page 49

FINISHER (AR-FN1)
Open the paper transport area cover of the finisher.
3
Use the transport area lever to open the transport.
4
Remove the misfed paper.
5
Close the transport.
6
OPTIONAL EQUIPMENT
Finisher (AR-FN1)
CHAPTER
7
7-17
Page 50

FINISHER (AR-FN1)
Roller rotating knob
Remove the misfed paper.
7
●
Remove the misfed paper from the paper transport area.
OPTIONAL EQUIPMENT
Finisher (AR-FN1)
CHAPTER
7
●
If the misfed paper is not seen in the paper transport area, turn
the roller rotating knob to feed the paper.
Close the paper transport area cover.
8
Push the finisher toward the copier and latch it in place.
9
●
Confirm that the misfeed display is cleared.
7-18
Page 51

Specifications
FINISHER (AR-FN1)
Tray capacity Top tray: 500 sheets
Second tray: 500 sheets
Offset tray: 1,500 sheets (A4 (8-1/2" x 11"))
750 sheets
(larger than A4 (8-1/2" x 11"))
Paper size Top tray: A6 to A3 (5-1/2" x 8-1/2" to 11" x 17")
Second tray: A5 to A3 (5-1/2" x 8-1/2" to 11" x 17")
Offset tray: A4 to A3 (8-1/2" x 11" to 11" x 17")
Paper weight Top tray: 52 to 128 g/m2 (14 lbs. to 34 lbs.)
Second tray: 56 to 105 g/m2 (15 lbs. to 28 lbs.)
Offset tray: 52 to 128 g/m2 (14 lbs. to 34 lbs.)
For paper weighing more than 105 g/m2 (28 lbs.), A4
(8-1/2" x 11") is the maximum size.
Offset 30 mm (1.2 inch)
Paper size A4, A4R, B4, A3 (8-1/2" x 11", 8-1/2" x 11"R,
for stapling 8-1/2" x 14", 11" x 17")
In some regions, 216 mm x 330 mm (8-1/2" x 13")
size paper can be used in place of B4 (8-1/2" x 14").
Stapling capacity 50 sheets (80 g/m2 (21 lbs.))
(25 sheets for B4 and A3 (8-1/2" x 14" and 11" x 17")
paper)
Power supply Drawn from the copier
Weight Approx. 50 kg (111 lbs.)
Dimensions 590 mm (W) x 560 mm (D) x 998 mm (H)
(23-15/64"(W) x 22-1/16"(D) x 39-19/64"(H))
Specifications are subject to change for improvement without notice.
OPTIONAL EQUIPMENT
Finisher (AR-FN1)
7-19
CHAPTER
7
Page 52

LARGE CAPACITY TRAY (AR-LC1)
The large capacity tray provides the added convenience of having
3,000 additional sheets of A4 (8-1/2" x 11") paper available.
NOTE:
To install the large capacity tray, an optional stand/500-sheet paper
drawer (AR-DE1) or an equivalent stand must be installed.
PART NAMES
Paper tray control button
Large capacity tray (AR-LC1)
OPTIONAL EQUIPMENT
Specifications
CHAPTER
7
Paper size A4 (8-1/2" x 11")
Paper weight 56 to 105 g/m2 (15 lbs. to 28 lbs.)
Paper capacity 3,000 sheets
Weight Approx. 32 kg (70.6 lbs.)
Dimensions 330 mm (W) x 540 mm (D) x 583 mm (H)
(13" (W) x 21-17/64" (D) x 22-61/64" (H))
Specifications are subject to change for improvement without notice.
7-20
Page 53

LARGE CAPACITY TRAY (AR-LC1)
Loading copy paper
The large capacity tray will automatically lower when the tray runs out
of paper.
Press the paper tray control button on the large capacity
tray.
1
●
The button lamp will blink while the feed table is lowering and
will go out when the tray is ready to be opened.
Maximum height line
When the button lamp goes out, pull the paper tray out.
●
2
3
4
Do not pull the paper tray out before the button lamp goes out.
Only use paper within the Sharp specification and follow
the paper manufacturer’s instructions regarding fanning
and loading the paper.
Load the paper onto the feed table.
●
Be sure to load paper appropriate for the large capacity tray.
See page 7-20.
●
Do not exceed the maximum height line.
Large capacity tray (AR-LC1)
OPTIONAL EQUIPMENT
CHAPTER
Gently push the large capacity tray back into place.
●
5
The paper tray control button lamp will blink as the feed table
returns to the feed position and will light up steadily when it is
in position to feed.
7
7-21
Page 54

LARGE CAPACITY TRAY (AR-LC1)
Misfeed removal
A MISFEED HAS OCCURRED.
CLEAR INDICATED AREA.
PRESS FOR RECOVERY INSTRUCTIONS.
Release lever
The copier will stop when a misfeed occurs.
The message “A MISFEED HAS OCCURRED. CLEAR INDICATED
AREA. PRESS FOR RECOVERY INSTRUCTIONS.” will appear
with a display of paper misfeed locations. Press the INFORMATION
( ) key for more detailed information as necessary.
While holding the tray release lever, carefully slide the
large capacity tray away from the copier until it stops.
1
Large capacity tray (AR-LC1)
OPTIONAL EQUIPMENT
CHAPTER
7
Upper
right side
cover
Remove any misfed paper from the copier and the large
capacity tray.
2
●
Be sure not to tear the misfed paper during removal.
●
Open and close the upper right side cover of the copier after
removing the misfed paper from the copier.
If the misfed paper cannot be removed easily, open the upper
right side cover to remove the paper.
7-22
Page 55

LARGE CAPACITY TRAY (AR-LC1)
Push the large capacity tray toward the copier and latch
it into place.
3
If misfed paper is not found in step 2, pull the tray out.
4
●
When pulling the large capacity tray out, be sure to pull it out
after the paper tray control button lamp goes out.
Remove the misfed paper.
5
Gently push the tray back into place.
6
●
Confirm that the misfeed display is cleared.
Large capacity tray (AR-LC1)
OPTIONAL EQUIPMENT
CHAPTER
7
7-23
Page 56

STAND/500-SHEET PAPER DRAWER (AR-DE1
This optional stand with a paper tray provides the convenience of
increased paper capacity for the copier and a greater choice of
paper sizes readily available for copying. Even greater paper
capacity and size flexibility are available when the stand is equipped
with an optional auxiliary 500-sheet paper drawer (AR-CS1).
The AR-DE1 is available with a 500-sheet paper drawer alone or
with an optional auxiliary 500-sheet paper drawer for the additional
flexibility of two feeds with a total capacity of 1,000 sheets.
PART NAMES
Side cover
500-sheet paper drawer
)
Stand/500-sheet paper drawer (AR-DE1)
OPTIONAL EQUIPMENT
Optional 500-sheet paper
drawer position
Specifications
CHAPTER
7
Paper size A4 to A3 (8-1/2" x 11" to 11" x 17")
Paper weight 56 to 105 g/m2 (15 lbs. to 28 lbs.)
Paper capacity 500 sheets of paper
Total of 1,000 sheets of paper with an
optional 500-sheet paper drawer installed
Weight Approx. 25 kg (55.2 lbs.)
Dimensions 600 mm (W) x 604 mm (D) x 403 mm (H)
(23-5/8" (W) x 23-25/32" (D) x 15-7/8" (H))
7-24
Page 57

STAND/500-SHEET PAPER DRAWER (AR-DE1)
Loading copy paper
The method of loading of copy paper for the paper tray of the 500sheet paper drawer is the same as for the paper trays in the copier.
See page 4-3.
The method of changing the copy paper size is also the same for the
paper trays in the copier. See page 4-4.
Stand/500-sheet paper drawer (AR-DE1)
OPTIONAL EQUIPMENT
CHAPTER
7
7-25
Page 58

STAND/500-SHEET PAPER DRAWER (AR-DE1)
Misfeed removal
A MISFEED HAS OCCURRED.
CLEAR INDICATED AREA.
PRESS FOR RECOVERY INSTRUCTIONS.
The copier will stop when a misfeed occurs.
The message “A MISFEED HAS OCCURRED. CLEAR INDICATED
AREA. PRESS FOR RECOVERY INSTRUCTIONS.” will appear
with a display of paper misfeed locations. Press the INFORMATION
( ) key for more detailed information as necessary.
Open the lower right side cover and remove any misfed
paper.
1
●
Be sure to perform this step before pulling out the paper drawer.
If not, the paper may be torn as the drawer is opened.
●
Be sure not to tear the misfed paper during removal.
Stand/500-sheet paper drawer (AR-DE1)
OPTIONAL EQUIPMENT
CHAPTER
7
Gently lift and pull out the paper drawer. Remove any
misfed paper.
2
Close the paper drawer and the lower right side cover.
3
●
Confirm that the misfeed display is cleared.
7-26
 Loading...