

Page 1
MODEL
AR-235
AR-275
DIGITAL COPYING MACHINE
OPERATION MANUAL
Page
• GETTING STARTED
• MAKING COPIES
• SPECIAL FUNCTIONS
• COPIER TROUBLE?
• GENERAL INFORMATION
• OPTIONAL EQUIPMENT
5
23
41
65
77
91
Page 2

➢➣➢➣➢➣➢➣➢➣➢➣➢➣➢➣➢➣➢➣➢➣➢➣➢➣➢➣➢➣➢➣
➣
➢
➣
FOR YOUR RECORDS ...
To protect against loss or theft, record and retain for reference the
copier’s serial number located on the back of the unit.
Model Number
Serial Number
Date of Purchase
Place of Purchase
Authorized Sharp Copier
Service Department Number
➣➢➣➢➣➢➣➢➣➢➣➢➣➢➣➢➣➢
➢
➢
➣➢➣➢➣➢➣➢➣➢➣➢➣➢➣➢➣➢➣
➢
➣➢➣➢➣➢➣➢➣➢➣➢➣➢➣➢➣➢➣➢➣➢➣➢➣➢➣➢➣➢➣➢➣
Page 3

OUTLINE OF THIS MANUAL
1. GETTING STARTED
This chapter describes the basic information on the use of
this copier.
2. MAKING COPIES
This chapter describes the basic copying functions such
as normal copying, reduction or enlargement, and
exposure adjustments.
3. SPECIAL FUNCTIONS
This chapter describes special copying functions including
various image editing functions.
1
2
3
4. COPIER TROUBLE?
This chapter describes how to remove misfed paper and
how to remedy minor problems.
5. GENERAL INFORMATION
This chapter describes general information about the use
of the copier and the loading of paper and toner.
6. OPTIONAL EQUIPMENT
This chapter describes operating instructions for the
Single Pass Feeder (AR-SP4), the Reversing Single Pass
Feeder (AR-RP3), the Finisher (AR-FN5), the 500-Sheet
Paper Feed Unit (AR-D11), and the 2 x 500-Sheet Paper
Feed Unit (AR-D12).
4
5
6
1
Page 4

CONTENTS
CHAPTER 1 GETTING STARTED
INTRODUCTION . . . . . . . . . . . . . . . . . . . . . . . . . . . . . . . . . . . . . . . . . . . 6
CAUTIONS . . . . . . . . . . . . . . . . . . . . . . . . . . . . . . . . . . . . . . . . . . . . . . . 7
COPIER INSTALLATION. . . . . . . . . . . . . . . . . . . . . . . . . . . . . . . . . . . . . 8
MAIN FEATURES . . . . . . . . . . . . . . . . . . . . . . . . . . . . . . . . . . . . . . . . . 10
PART NAMES AND FUNCTIONS . . . . . . . . . . . . . . . . . . . . . . . . . . . . . 12
●
Exterior . . . . . . . . . . . . . . . . . . . . . . . . . . . . . . . . . . . . . . . . . . . . . . . . 12
●
Interior. . . . . . . . . . . . . . . . . . . . . . . . . . . . . . . . . . . . . . . . . . . . . . . . . 13
●
Operation panel . . . . . . . . . . . . . . . . . . . . . . . . . . . . . . . . . . . . . . . . . 14
POWER ON AND OFF . . . . . . . . . . . . . . . . . . . . . . . . . . . . . . . . . . . . . 16
●
Power on. . . . . . . . . . . . . . . . . . . . . . . . . . . . . . . . . . . . . . . . . . . . . . . 16
●
Power off. . . . . . . . . . . . . . . . . . . . . . . . . . . . . . . . . . . . . . . . . . . . . . . 16
●
Dehumidification heater switch (DH POWER) . . . . . . . . . . . . . . . . . . 16
●
Initial settings . . . . . . . . . . . . . . . . . . . . . . . . . . . . . . . . . . . . . . . . . . . 17
●
Power save modes . . . . . . . . . . . . . . . . . . . . . . . . . . . . . . . . . . . . . . . 17
FUNCTION ICONS . . . . . . . . . . . . . . . . . . . . . . . . . . . . . . . . . . . . . . . . 18
FUNCTION REVIEW . . . . . . . . . . . . . . . . . . . . . . . . . . . . . . . . . . . . . . . 19
AUDITING ACCOUNTS. . . . . . . . . . . . . . . . . . . . . . . . . . . . . . . . . . . . . 20
●
How to copy in the auditing mode . . . . . . . . . . . . . . . . . . . . . . . . . . . . 20
Page
CHAPTER 2 MAKING COPIES
NORMAL COPYING . . . . . . . . . . . . . . . . . . . . . . . . . . . . . . . . . . . . . . . 24
TWO-SIDED COPYING . . . . . . . . . . . . . . . . . . . . . . . . . . . . . . . . . . . . . 26
●
Two-sided copying from the platen glass . . . . . . . . . . . . . . . . . . . . . . 26
EXPOSURE ADJUSTMENT . . . . . . . . . . . . . . . . . . . . . . . . . . . . . . . . . 29
REDUCTION/ENLARGEMENT/ZOOM . . . . . . . . . . . . . . . . . . . . . . . . . 31
●
Automatic selection . . . . . . . . . . . . . . . . . . . . . . . . . . . . . . . . . . . . . . . 31
●
Manual selection . . . . . . . . . . . . . . . . . . . . . . . . . . . . . . . . . . . . . . . . . 33
ROTATION COPYING . . . . . . . . . . . . . . . . . . . . . . . . . . . . . . . . . . . . . . 35
BYPASS FEED (special paper) . . . . . . . . . . . . . . . . . . . . . . . . . . . . . . . 36
●
Acceptable paper for copying from the bypass tray . . . . . . . . . . . . . . 36
●
Copying from the bypass tray . . . . . . . . . . . . . . . . . . . . . . . . . . . . . . . 36
INTERRUPTING A COPY RUN. . . . . . . . . . . . . . . . . . . . . . . . . . . . . . . 39
CHAPTER 3 SPECIAL FUNCTIONS
SORT/GROUP . . . . . . . . . . . . . . . . . . . . . . . . . . . . . . . . . . . . . . . . . . . . 42
●
Copying in the sort or group mode . . . . . . . . . . . . . . . . . . . . . . . . . . . 42
MARGIN SHIFT . . . . . . . . . . . . . . . . . . . . . . . . . . . . . . . . . . . . . . . . . . . 45
ERASE . . . . . . . . . . . . . . . . . . . . . . . . . . . . . . . . . . . . . . . . . . . . . . . . . . 47
DUAL PAGE COPY . . . . . . . . . . . . . . . . . . . . . . . . . . . . . . . . . . . . . . . . 49
2 IN 1 OR 4 IN 1 . . . . . . . . . . . . . . . . . . . . . . . . . . . . . . . . . . . . . . . . . . 51
B/W REVERSE . . . . . . . . . . . . . . . . . . . . . . . . . . . . . . . . . . . . . . . . . . . 54
XY ZOOM . . . . . . . . . . . . . . . . . . . . . . . . . . . . . . . . . . . . . . . . . . . . . . . 56
TRANSPARENCY . . . . . . . . . . . . . . . . . . . . . . . . . . . . . . . . . . . . . . . . . 59
JOB MEMORY . . . . . . . . . . . . . . . . . . . . . . . . . . . . . . . . . . . . . . . . . . . . 61
●
Storing a job program . . . . . . . . . . . . . . . . . . . . . . . . . . . . . . . . . . . . . 61
●
Deleting a job program . . . . . . . . . . . . . . . . . . . . . . . . . . . . . . . . . . . . 62
●
Recalling a job program . . . . . . . . . . . . . . . . . . . . . . . . . . . . . . . . . . . 63
2
Page 5

CHAPTER 4 COPIER TROUBLE?
STATUS MESSAGES . . . . . . . . . . . . . . . . . . . . . . . . . . . . . . . . . . . . . . 66
MISFEED REMOVAL. . . . . . . . . . . . . . . . . . . . . . . . . . . . . . . . . . . . . . . 67
●
Misfeed in the bypass tray . . . . . . . . . . . . . . . . . . . . . . . . . . . . . . . . . 67
●
Misfeed in the copier . . . . . . . . . . . . . . . . . . . . . . . . . . . . . . . . . . . . . . 68
●
Misfeed in the center tray . . . . . . . . . . . . . . . . . . . . . . . . . . . . . . . . . . 71
●
Misfeed in the upper paper tray . . . . . . . . . . . . . . . . . . . . . . . . . . . . . 72
●
Misfeed in the lower paper tray. . . . . . . . . . . . . . . . . . . . . . . . . . . . . . 72
●
Misfeed in the upper exit area. . . . . . . . . . . . . . . . . . . . . . . . . . . . . . . 73
TROUBLESHOOTING . . . . . . . . . . . . . . . . . . . . . . . . . . . . . . . . . . . . . . 75
CHAPTER 5 GENERAL INFORMATION
PAPER . . . . . . . . . . . . . . . . . . . . . . . . . . . . . . . . . . . . . . . . . . . . . . . . . . 78
●
Types and sizes of copy paper . . . . . . . . . . . . . . . . . . . . . . . . . . . . . . 78
●
Loading copy paper . . . . . . . . . . . . . . . . . . . . . . . . . . . . . . . . . . . . . . 78
●
Changing the copy paper size in the tray . . . . . . . . . . . . . . . . . . . . . . 80
TONER CARTRIDGE REPLACEMENT . . . . . . . . . . . . . . . . . . . . . . . . 82
CHECKING THE TONER QUANTITY AND TOTAL OUTPUT COUNT 84
CLEANING THE PLATEN GLASS AND PLATEN COVER . . . . . . . . . . 85
CLEANING THE BYPASS TRAY PAPER FEED ROLLER . . . . . . . . . . 86
DISPLAY CONTRAST ADJUSTMENT . . . . . . . . . . . . . . . . . . . . . . . . . 87
STORAGE OF SUPPLIES . . . . . . . . . . . . . . . . . . . . . . . . . . . . . . . . . . . 88
●
Proper storage . . . . . . . . . . . . . . . . . . . . . . . . . . . . . . . . . . . . . . . . . . 88
SPECIFICATIONS . . . . . . . . . . . . . . . . . . . . . . . . . . . . . . . . . . . . . . . . . 89
CONTENTS
Page
CHAPTER 6 OPTIONAL EQUIPMENT
SYSTEM CONFIGURATION . . . . . . . . . . . . . . . . . . . . . . . . . . . . . . . . . 92
SINGLE PASS FEEDER (AR-SP4)/
REVERSING SINGLE PASS FEEDER (AR-RP3) . . . . . . . . . . . . . . . . . 93
●
Part names . . . . . . . . . . . . . . . . . . . . . . . . . . . . . . . . . . . . . . . . . . . . . 93
●
Specifications . . . . . . . . . . . . . . . . . . . . . . . . . . . . . . . . . . . . . . . . . . . 94
●
Acceptable originals . . . . . . . . . . . . . . . . . . . . . . . . . . . . . . . . . . . . . . 94
●
Unacceptable originals . . . . . . . . . . . . . . . . . . . . . . . . . . . . . . . . . . . . 94
●
Using the SPF or the RSPF . . . . . . . . . . . . . . . . . . . . . . . . . . . . . . . . 95
●
Misfeed removal . . . . . . . . . . . . . . . . . . . . . . . . . . . . . . . . . . . . . . . . 101
FINISHER (AR-FN5) . . . . . . . . . . . . . . . . . . . . . . . . . . . . . . . . . . . . . . 103
●
Part names . . . . . . . . . . . . . . . . . . . . . . . . . . . . . . . . . . . . . . . . . . . . 103
●
Specifications . . . . . . . . . . . . . . . . . . . . . . . . . . . . . . . . . . . . . . . . . . 104
●
Supplies . . . . . . . . . . . . . . . . . . . . . . . . . . . . . . . . . . . . . . . . . . . . . . 104
●
Finisher functions . . . . . . . . . . . . . . . . . . . . . . . . . . . . . . . . . . . . . . . 105
●
Staple sort. . . . . . . . . . . . . . . . . . . . . . . . . . . . . . . . . . . . . . . . . . . . . 106
●
Staple cartridge replacement . . . . . . . . . . . . . . . . . . . . . . . . . . . . . . 109
●
Staple jam removal . . . . . . . . . . . . . . . . . . . . . . . . . . . . . . . . . . . . . . 110
●
Misfeed removal . . . . . . . . . . . . . . . . . . . . . . . . . . . . . . . . . . . . . . . . 112
500-SHEET PAPER FEED UNIT (AR-D11)/
2x500-SHEET PAPER FEED UNIT (AR-D12). . . . . . . . . . . . . . . . . . . 114
●
Part names . . . . . . . . . . . . . . . . . . . . . . . . . . . . . . . . . . . . . . . . . . . . 114
●
Specifications . . . . . . . . . . . . . . . . . . . . . . . . . . . . . . . . . . . . . . . . . . 114
●
Loading copy paper . . . . . . . . . . . . . . . . . . . . . . . . . . . . . . . . . . . . . 115
●
Changing the copy paper size in the tray . . . . . . . . . . . . . . . . . . . . . 115
●
Misfeed removal . . . . . . . . . . . . . . . . . . . . . . . . . . . . . . . . . . . . . . . . 115
INDEX
3
Page 6

4
Page 7

CHAPTER 1
GETTING STARTED
This chapter describes the basic information on the use of this copier.
Page
●
INTRODUCTION . . . . . . . . . . . . . . . . . . . . . . . . . . . . . . . . . . . . . . . 6
●
CAUTIONS . . . . . . . . . . . . . . . . . . . . . . . . . . . . . . . . . . . . . . . . . . . . 7
●
COPIER INSTALLATION. . . . . . . . . . . . . . . . . . . . . . . . . . . . . . . . . 8
●
MAIN FEATURES . . . . . . . . . . . . . . . . . . . . . . . . . . . . . . . . . . . . . 10
●
PART NAMES AND FUNCTIONS . . . . . . . . . . . . . . . . . . . . . . . . . 12
Exterior . . . . . . . . . . . . . . . . . . . . . . . . . . . . . . . . . . . . . . . . . . . . . . 12
Interior. . . . . . . . . . . . . . . . . . . . . . . . . . . . . . . . . . . . . . . . . . . . . . . 13
Operation panel . . . . . . . . . . . . . . . . . . . . . . . . . . . . . . . . . . . . . . . 14
●
POWER ON AND OFF. . . . . . . . . . . . . . . . . . . . . . . . . . . . . . . . . . 16
Power on. . . . . . . . . . . . . . . . . . . . . . . . . . . . . . . . . . . . . . . . . . . . . 16
Power off. . . . . . . . . . . . . . . . . . . . . . . . . . . . . . . . . . . . . . . . . . . . . 16
Dehumidification heater switch (DH POWER) . . . . . . . . . . . . . . . . 16
Initial settings . . . . . . . . . . . . . . . . . . . . . . . . . . . . . . . . . . . . . . . . . 17
Power save modes . . . . . . . . . . . . . . . . . . . . . . . . . . . . . . . . . . . . . 17
●
FUNCTION ICONS . . . . . . . . . . . . . . . . . . . . . . . . . . . . . . . . . . . . . 18
●
FUNCTION REVIEW . . . . . . . . . . . . . . . . . . . . . . . . . . . . . . . . . . . 19
●
AUDITING ACCOUNTS . . . . . . . . . . . . . . . . . . . . . . . . . . . . . . . . . 20
How to copy in the auditing mode. . . . . . . . . . . . . . . . . . . . . . . . . . 20
1
5
Page 8

INTRODUCTION
This copier has been designed to provide convenient copying features in a minimum amount of office
space and with maximum operational ease. To get full use of all copier features, be sure to familiarize
yourself with this manual and the copier. For quick reference during copier use, keep this manual in a
handy location.
NOTES:
●
This copier can be used as a laser printer, a facsimile machine, and a scanner by installing
GETTING STARTED
Conventions used in this manual
optional components. However, this manual describes only the copier features. For description
of the other features, see the separate relevant manuals.
●
All descriptions in this manual are based on the assumption that the COPY mode has been
selected (the COPY indicator is on).
●
A separate KEY OPERATOR'S GUIDE is written especially for key operators. It contains the
programs and programming information that will enable the key operators to tailor functions for
maximum benefit.
●
The operation procedures and the display on the operation panel vary with installation of
optional devices. The descriptions and the illustrations in this manual are mainly for the copier
without any option installed.
WARNING:
Warns the user that injury to the user or damage to the copier may result if the contents of the
warning are not properly followed.
CAUTION:
Cautions the user that damage to the copier or one of its components may result if the contents
of the caution are not properly followed.
NOTE:
Notes provide information relevant to the copier regarding specifications, functions, performance,
operation and such, that may be useful to the user.
★KEY OPERATOR
Information which is relevant to key operator functions is described. The key operator must pay
close attention to these notes.
6
Page 9

CAUTIONS
Follow the cautions below when using this copier.
WARNING:
●
The fusing area is hot. Exercise care in this area when removing misfed paper.
●
Do not look directly at the light source. Doing so may damage your eyes.
CAUTION:
●
The socket-outlet should be installed near the equipment and shall be easily accessible.
●
Place the copier on a firm, level surface.
●
Do not install the copier in a humid or dusty location.
●
When the copier is not used for a long time, for example, during prolonged holidays, turn the
power switch off and remove the power cord from the outlet.
●
When moving the copier, be sure to turn the power switch off and remove the power cord from
the outlet.
●
Do not cover the copier with a dust cover, cloth or plastic film while the power is on. Doing so
may prevent heat dissipation, damaging the copier.
●
Do not drop the copier, subject it to shock or strike it against any object.
●
Store spare toner cartridges in a cool dry place without removing from the package before use.
If they are exposed to direct sunlight or excessive heat, poor copies may result.
●
Do not touch the photoconductive drum (green portion). Scratches or smudges on the drum will
cause dirty copies.
●
Use of controls or adjustments or performance of procedures other than those specified herein
may result in hazardous laser radiation exposure.
1
GETTING STARTED
SAFETY PRECAUTIONS
●
This Digital Copier is rated Class 1 and complies with 21 CFR 1040.10 and 1040.11 of the
CDRH standards. This means that the copier does not produce hazardous laser radiation. For
your safety, observe the precautions below.
●
Do not remove the cabinet, operation panel or any other covers.
●
The copier's exterior covers contain several safety interlock switches. Do not bypass any
safety interlock by inserting wedges or other items into switch slots.
"BATTERY DISPOSAL"
THIS MACHINE CONTAINS MANGANESE DIOXIDE BATTERY WHICH MUST BE DISPOSED
OF PROPERLY. CONTACT YOUR SHARP DEALER OR SERVICER FOR INSTRUCTIONS.
This product utilizes tin-lead solder, and a fluorescent lamp containing a small amount of mercury.
Disposal of these materials may be regulated due to environmental considerations.
For disposal or recycling information, please contact your local authorities or the Electronics
Industries Alliance: www.eia.org
7
Page 10
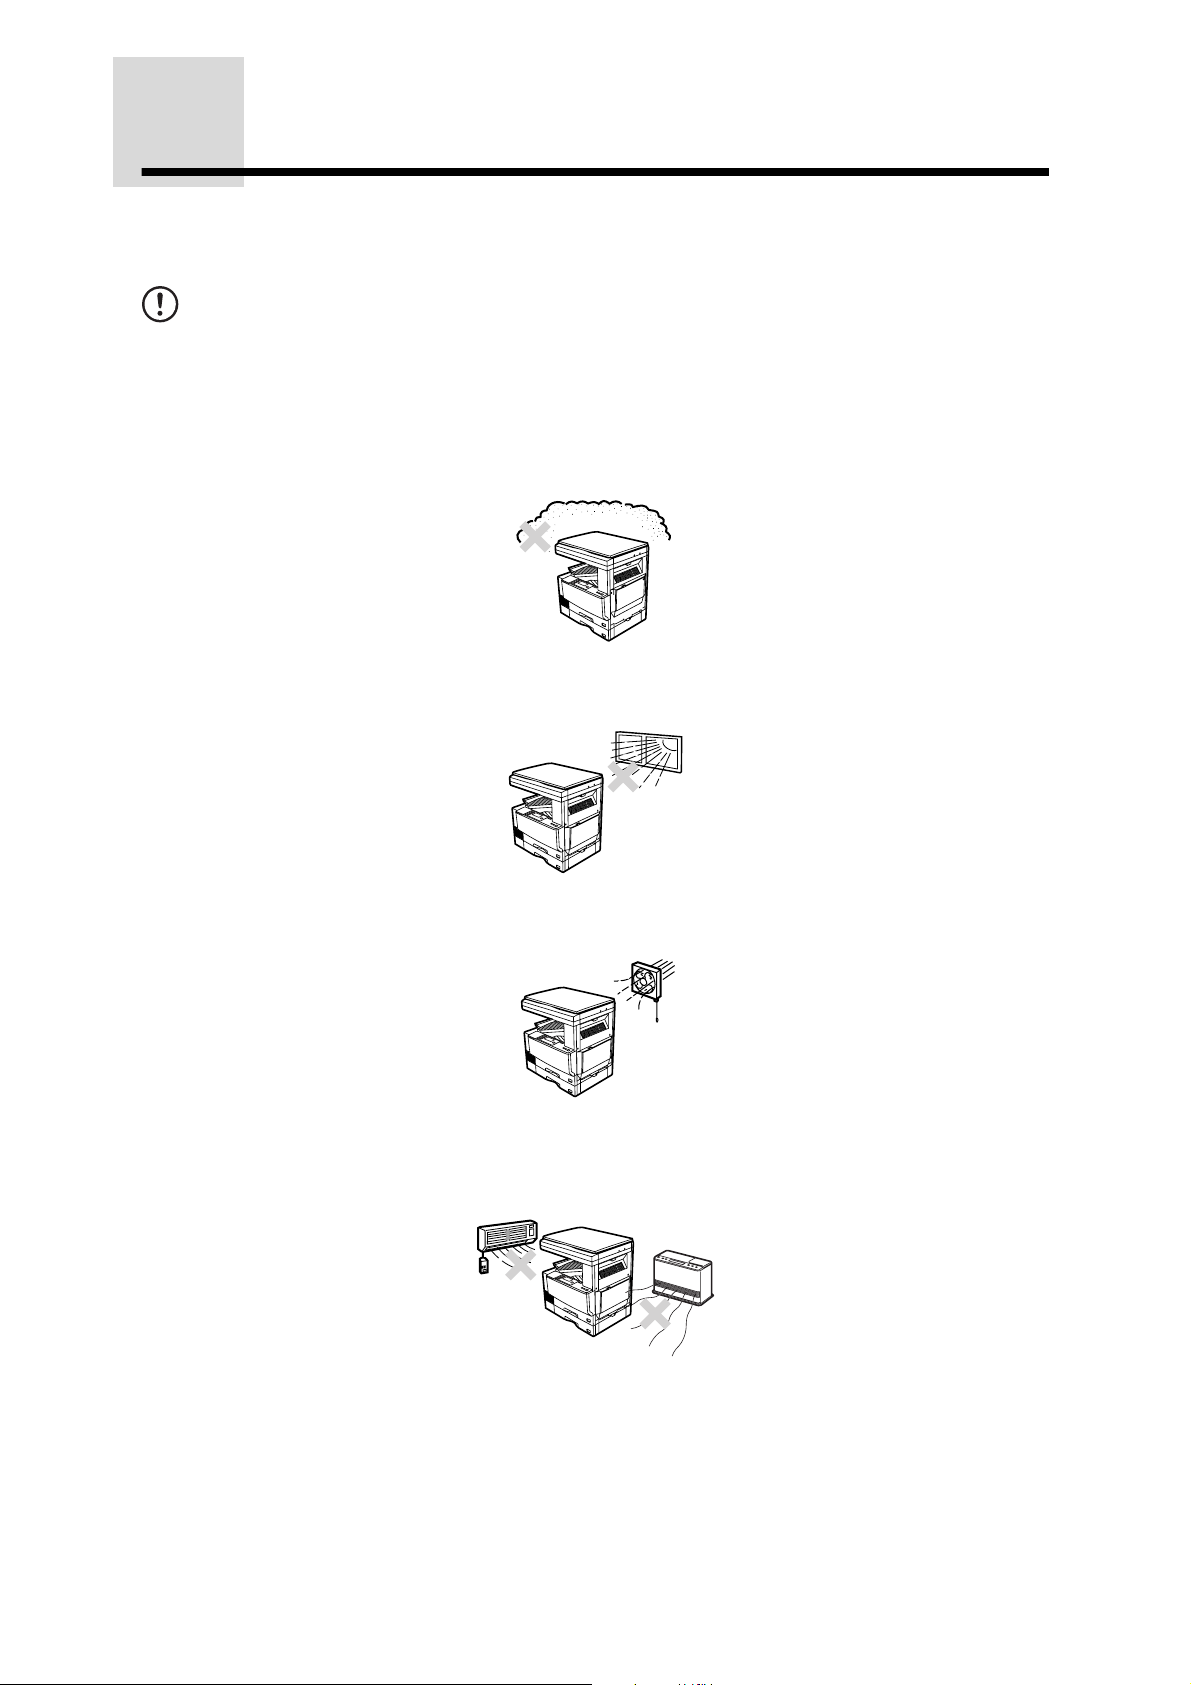
COPIER INSTALLATION
Improper installation may damage the copier. Please note the following during initial installation and
whenever the copier is moved.
CAUTION:
If the copier is moved from a cool place to a warm place, condensation may form inside the
copier. Operation in this condition will cause poor copy quality and malfunctions. Leave the
copier at room temperature for at least 2 hours before use.
GETTING STARTED
Do not install your copier in areas that are:
●
damp, humid, or very dusty
●
exposed to direct sunlight
●
poorly ventilated
●
subject to extreme temperature or humidity changes, e.g., near an air conditioner or
heater.
The copier should be installed near an accessible power outlet for easy
connection and disconnection.
8
Page 11
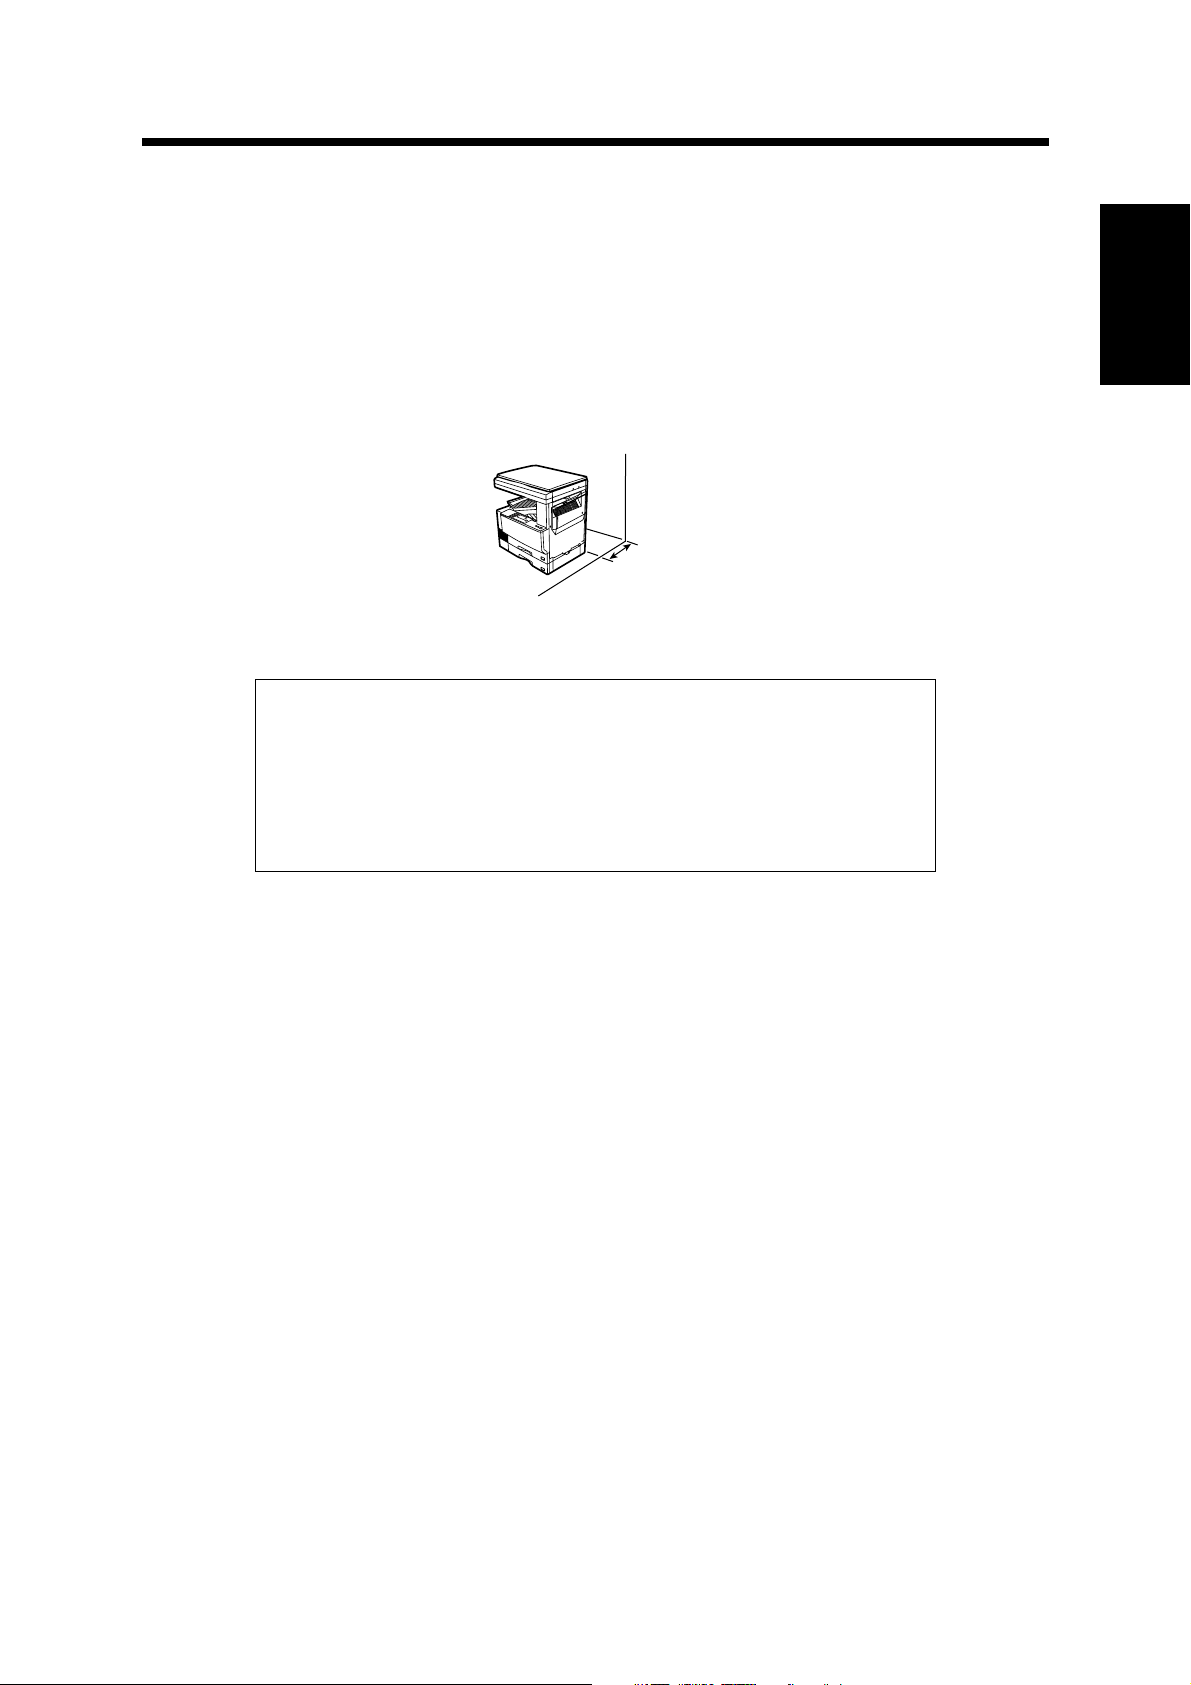
COPIER INSTALLATION
Be sure to connect the power cord only to a power outlet that meets the specified
voltage and current requirements (See page 89.). Also make certain the outlet is
properly grounded.
NOTE:
Connect the copier to a power outlet which is not used for other electric appliances. If a lighting
fixture is connected to the same outlet, the light may flicker.
Be sure to allow the required space around the machine for servicing and proper
ventilation.
12" (30 cm)
A small amount of ozone is produced within the copier during operation.
The emission level is insufficient to cause any health hazard.
NOTE:
The present recommended long term exposure limit for ozone is 0.1 ppm
3
(0.2 mg/m
However, since the small amount that is emitted may have an
objectionable odor, it is advisable to place the copier in a ventilated area.
) calculated as an 8 hr. time-weighted average concentration.
1
GETTING STARTED
9
Page 12
MAIN FEATURES
High-speed laser copying
1
●
First-copy time at 600 dpi (not in the super photo mode) is only 4.8 seconds
(except when recovering from a power save mode or immediately after power
on).
●
GETTING STARTED
2
Copying speed is 23 copies/min. (AR-235) or 27 copies/min. (AR-275) at 600
dpi (not in the super photo mode), which lends itself for business use, providing
improvement in working efficiency.
High-quality digital image
●
High-quality copying at 600 dpi or 1200 dpi (super photo mode) is performed.
●
In addition to the automatic exposure mode, the text, text/photo, photo, and
super photo exposure modes can be adjusted in five steps.
●
The photo mode and super photo mode copying functions allow clear copying
of delicate halftone original images such as monochrome photos and color
photos. These modes are adjustable in five steps. The super photo mode
allows high resolution copying at 1200 dpi.
Substantial copying features
3
●
Zoom copies can be made from 25% to 400% in 1% increments at 600 dpi.
(At 1200 dpi (super photo mode), the zoom copy ratio range is 50% to 200%.)
●
Up to 999 copies can be made in a single run.
●
Automatic two-sided copying can be performed.
●
Multiple sets of copies can be sorted without the aid of a sorter and each set
can be offset from the previous set.
●
Useful special features such as erase, margin shift, 2 in 1 and 4 in 1, XY zoom,
black and white reverse, and dual page copy are available.
A
●
Key operator programs allow the setting or modification of functions to meet
your specific needs. Also the key operator programs allow the internal auditor
to be controlled.
A
AA
10
Page 13
Scan once/ Print many
4
●
The copier is equipped with a memory buffer allowing the copier to scan an
original once and make up to 999 copies of the scanned image. This improves
workflow, reduces operating noise from the copier and reduces wear and tear
on the scanning mechanism, which provides for a higher reliability.
Optional features
5
●
An optional single pass feeder (SPF) allows automatic document feeding of up
to 30 sheets of single-sided originals.
●
An optional reversing single pass feeder (RSPF) allows automatic document
feeding of up to 30 two-sided originals.
●
An optional finisher allows automatic stapling of up to 30 sheets.
●
This copier can be used as a laser printer if an optional printer expansion kit is
installed.
●
This copier can be used as a facsimile machine if an optional facsimile
expansion kit is installed.
●
This copier can be used as a network scanner if an optional network scanner
expansion kit is installed.
MAIN FEATURES
1
GETTING STARTED
Environmentally friendly design
6
●
Center tray is housed in the copier for saving space.
●
Preheat and auto power shut-off modes are provided to reduce power
consumption when the machine is not in active use, and meet the ENERGY
STAR guidelines.
As an ENERGY STAR® Partner, SHARP has determined
that this product meets the
energy efficiency.
ENERGY STA R
®
guidelines for
11
Page 14

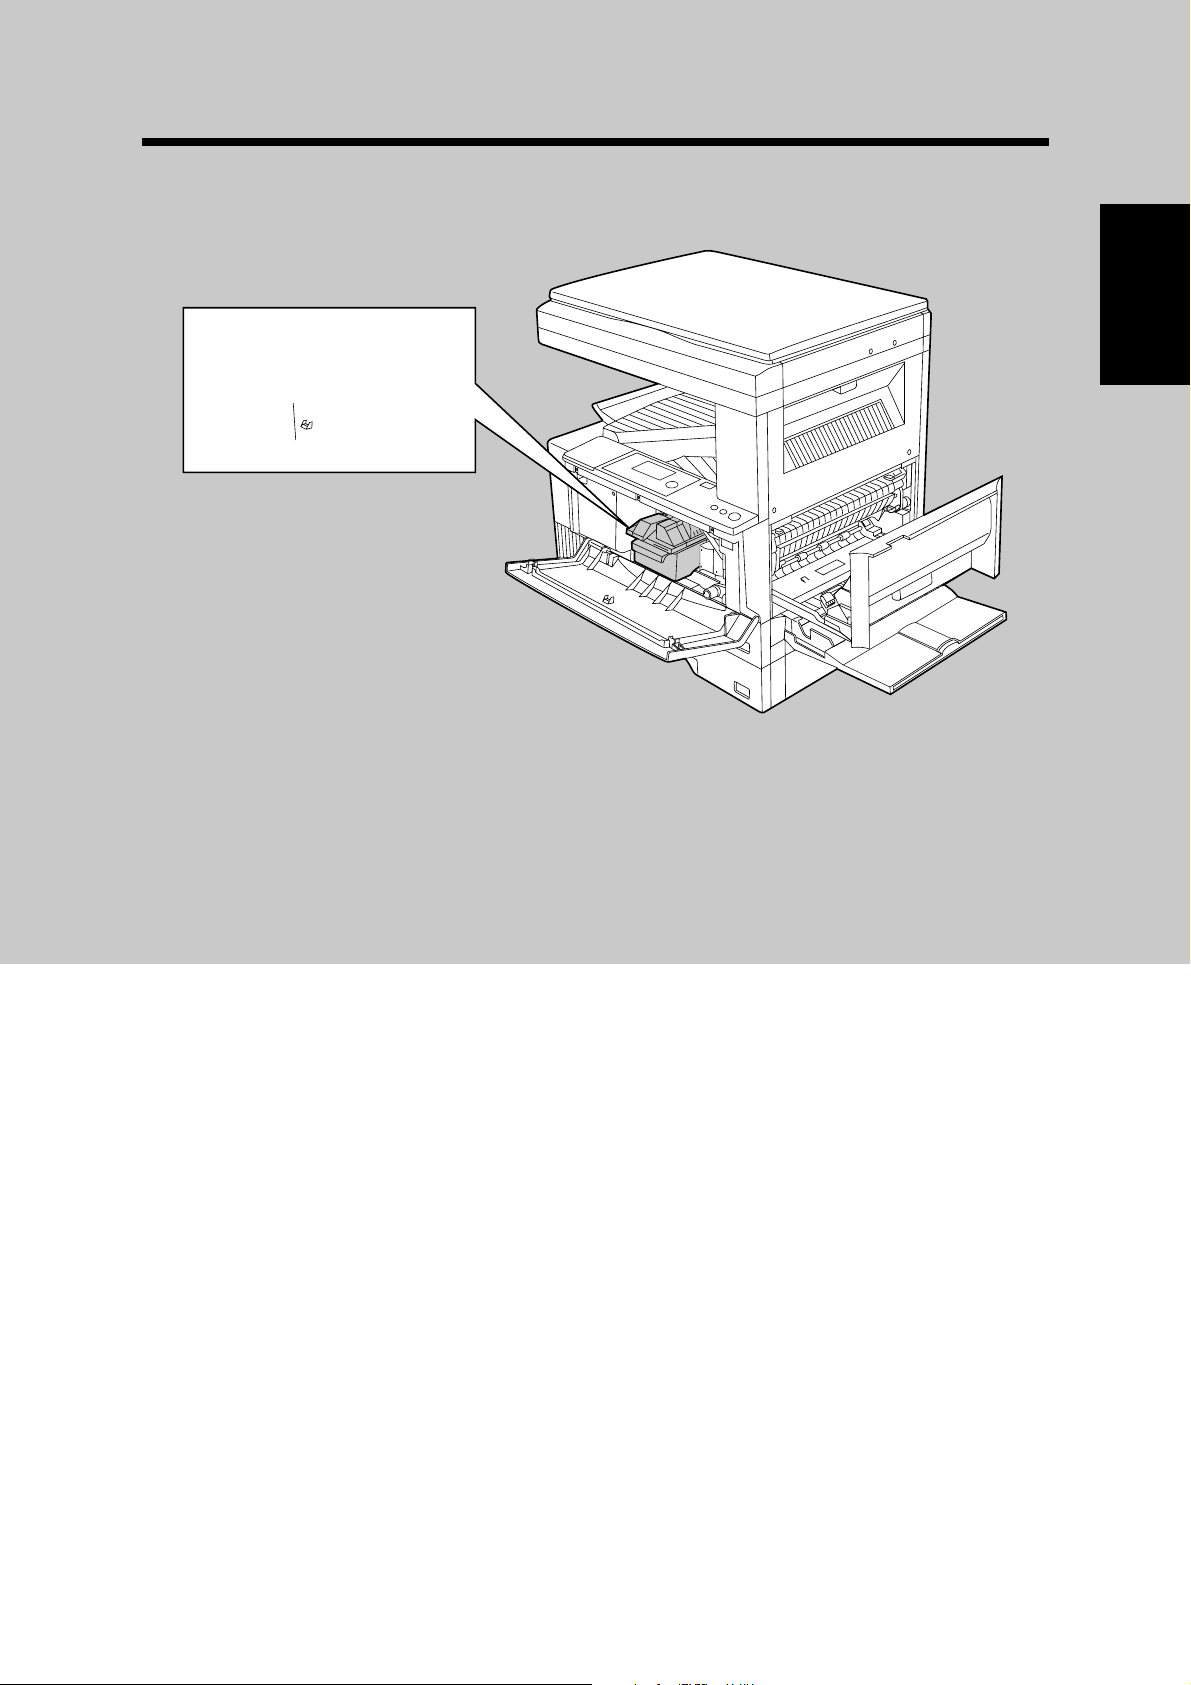
PART NAMES AND FUNCTIONS
Exterior
GETTING STARTED
12
Page 15
Interior
PART NAMES AND FUNCTIONS
1
GETTING STARTED
13
Page 16
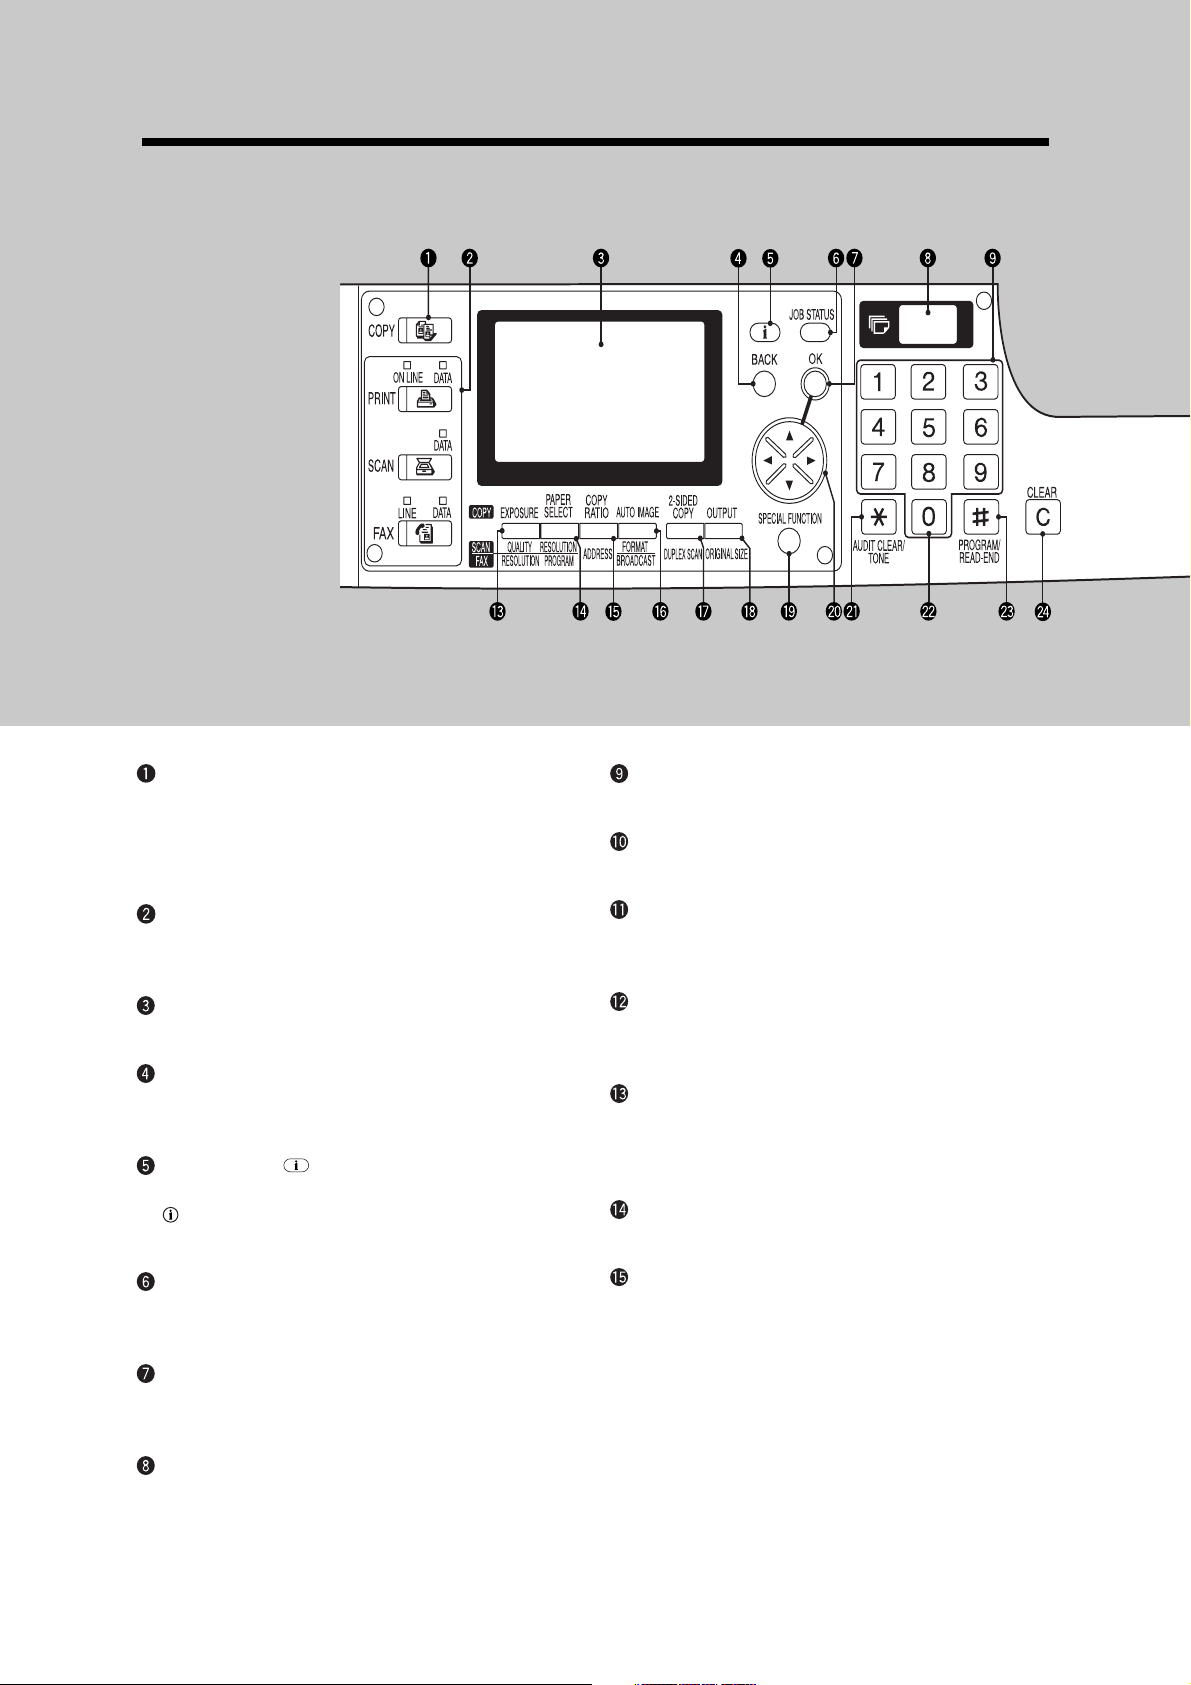
PART NAMES AND FUNCTIONS
Operation panel
GETTING STARTED
COPY key and indicator (p. 76, 84)
Press to select the COPY mode.
Press and hold during standby or during warmup to display the total output count and the
quantity of toner remaining.
Mode keys and indicators
Use these keys when relevant optional
components are installed.
Display
Displays information to assist the operator.
BACK key
Press to return the display to the previous
screen.
Information ( ) key (p. 66)
Press to display the detailed description when
is displayed in the upper right-hand corner of
the display.
JOB STATUS key (p. 19)
Press to check the settings of selected functions
or the status of reserved output jobs.
Numeric keys
Use to select the desired copy quantity.
INTERRUPT key and indicator (p. 39)
Interrupts a copy run.
CLEAR ALL key (p. 17)
Clears all selected settings and returns the
copier to the initial settings.
START key and indicator
Copying is possible when the indicator is on.
Press to start copying.
EXPOSURE key (p. 29)
Use to select the exposure modes: AUTO,
TEXT, TEXT/PHOTO, PHOTO or SUPER
PHOTO.
PAPER SELECT key (p. 24)
Use to manually select a paper tray.
COPY RATIO key (p. 33)
Press to select a reduction or enlargement copy
ratio.
OK key
Press to confirm the selected setting or entered
data.
Copy quantity display
Displays the specified copy quantity during
standby and displays the copy countdown as
copies are made.
14
Page 17

PART NAMES AND FUNCTIONS
1
GETTING STARTED
15
Page 18
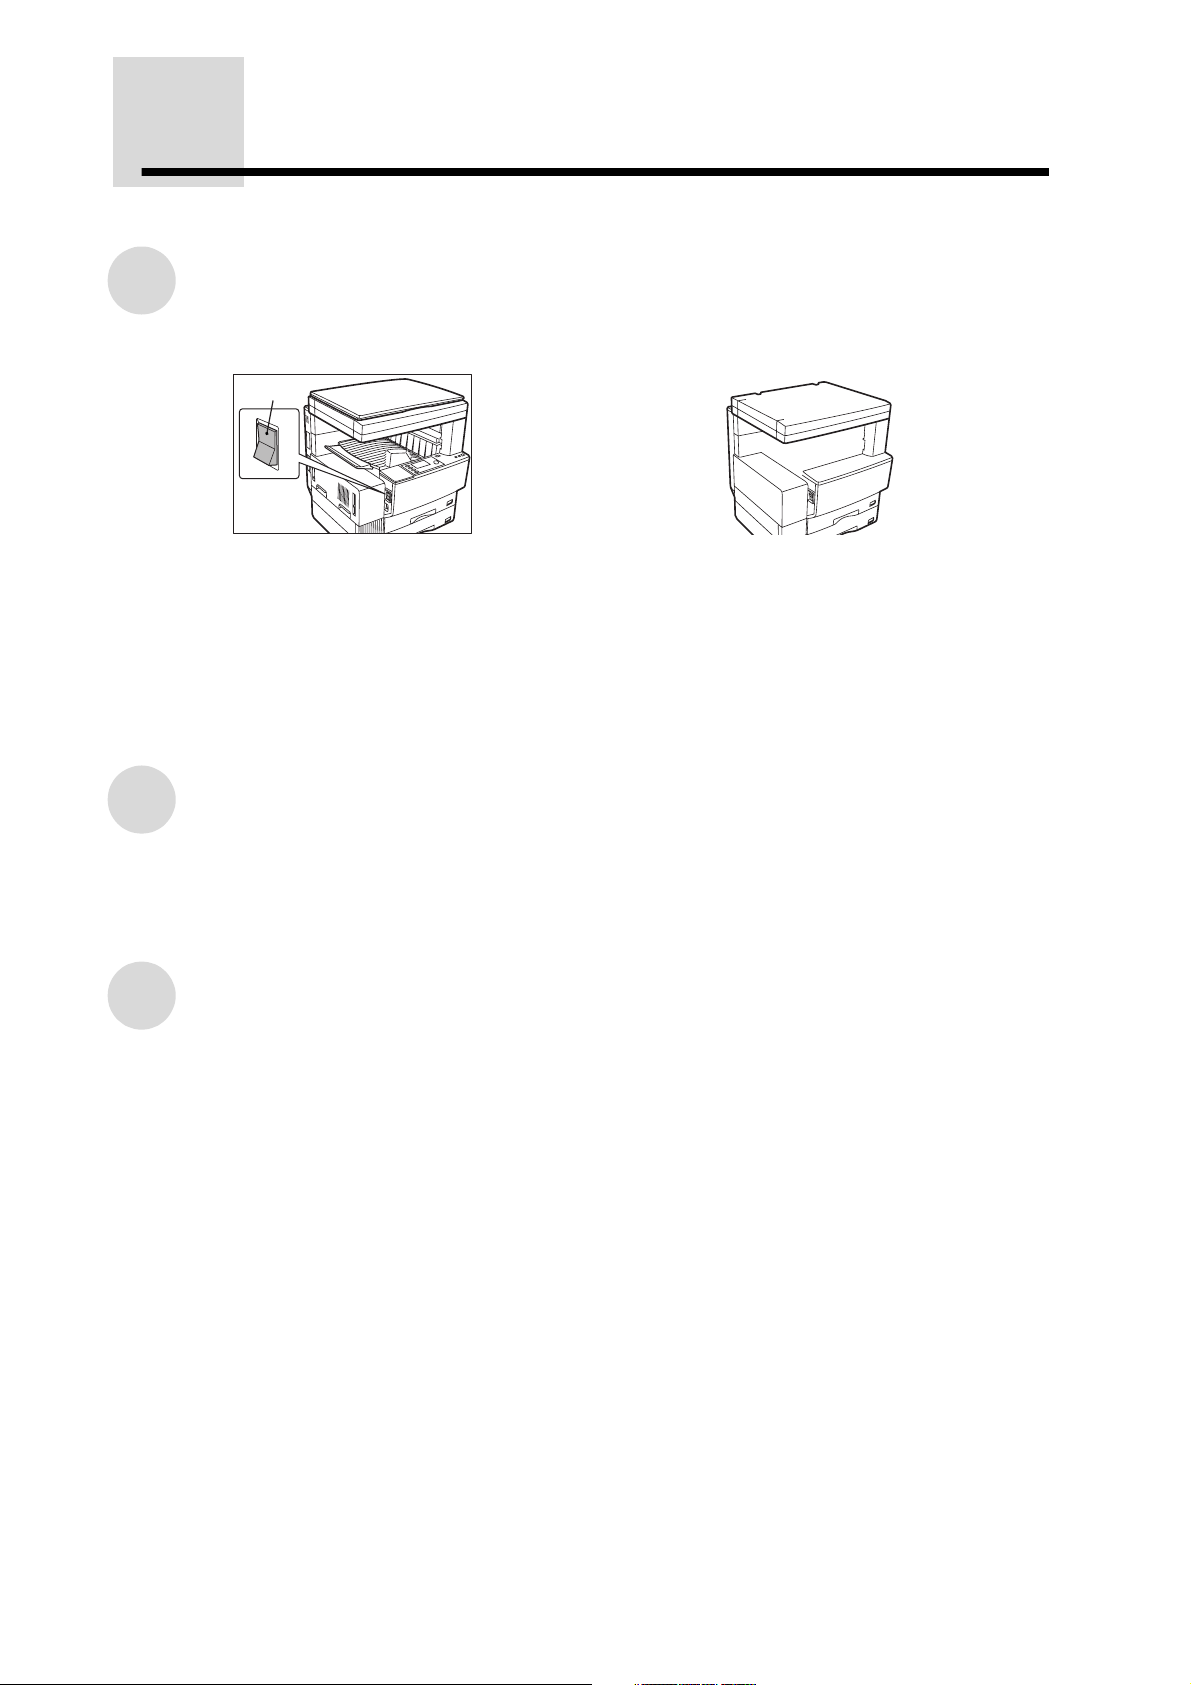
POWER ON AND OFF
The power switch is located on the left side of the copier.
Power on
Turn the power switch to the "ON" position.
GETTING STARTED
●
When the power switch is turned to the "ON" position, the message "System check." will appear in the
message display and warm-up will srart. During warm-up, you can select your desired job settings
and then by pressing the START key, your job will commence when the copier comes to "Ready to
copy." Once the copier has finished warming up, the message display will change to "Ready to
copy.", and the START key indicator will light up, indicating that copying is possible.
●
If the copier has been programmed in the auditing mode, the message "Enter your account number."
will appear after warming up. Once a valid account number has been entered, the message display
will change to "Ready to copy." and copying will be possible. See page 20.
Power on
Power off
When the copier is not used for a long time, be sure to turn it off.
Ensure that the machine is not operating and then turn the power switch to the "OFF" position.
If the power switch is turned off while the machine is operating, a misfeed may occur. Also the job that
was in progress will be totally canceled.
Dehumidification heater switch (DH POWER)
This copier is equipped with a dehumidification heater, which prevents dew condensation inside the
copier and moisture absorption of paper in the paper trays. If dew condensation occurs and causes
moisture absorption of paper, image quality may be deteriorated and paper misfeeds may occur
frequently. It is recommended that the dehumidification heater switch be left in the “ON” position in the
following cases even after the power switch is turned off.
●
In a low temperature season such as winter (When a sudden temperature change occurs, for
example, immediately after room heating is turned on, dew condensation may occur.)
●
In a high temperature and high humidity season such as summer or rainy season
●
In regions at a high temperature and a high humidity
NOTES:
●
When using the dehumidification heater, do not remove the power cord from the outlet. Doing
so will stop the heater.
●
If an optional 500-sheet paper feed unit or 2x500-sheet paper feed unit is installed, the heater
in the unit will also be turned on when the dehumidification heater switch of the copier is turned
on.
16
Page 19

POWER ON AND OFF
Initial settings
The copier assumes the initial settings when it is first turned on, when the CLEAR ALL key is pressed,
or a preset time (auto clear time) after the last copy is made in any mode. The initial settings that
appear in the display are shown below.
Ready to copy.
AUTO
100%
100%
1
/
8 11
2
●
Copy ratio: 100%
●
Exposure: Automatic
●
Auto paper selection: On.
●
Paper feed station: Paper tray 1 (At power on, the previously selected paper tray will again be
selected.)
●
Copy quantity: 0
●
All special copier modes: Off
★KEY OPERATOR The auto clear time can be changed. See page 15 of the KEY OPERATOR'S
GUIDE.
AUTO
1
/
8 11
2
1
GETTING STARTED
Power save modes
The copier has two power save modes to reduce overall power consumption and thereby reduce the
cost of operation and to conserve natural resources to help reduce environmental pollution. The two
power save modes are preheat mode and auto power shut-off mode.
★ KEY OPERATOR
The time to enter the preheat and auto power shut-off modes have been preset at the factory to 15 min.
for the preheat mode and 60 min. for the auto power shut-off mode. These times can be changed as
described in the key operator's guide. It is suggested that you set appropriate times according to the
actual usage of the copier.
Preheat mode
The copier will enter the mode once the set time has elapsed without any copier operation after the last
copy of a run is made or power is turned on and no copier operations have been made.
When the copier enters the preheat mode, the backlight of the display will be turned off. In this condition,
the fuser in the copier is maintained at a lower heat level thereby saving power. The preheat level is,
however, high enough to allow the copier to come to a ready condition or begin copying approximately
10 seconds after any key input is made.
To copy from the preheat mode, make desired copier selections and press the START key using the
normal copying procedure.
★★★★KEY OPERATOR See page 16 of the KEY OPERATOR'S GUIDE for information on setting the
preheat mode.
Auto power shut-off mode
If the auto power shut-off mode is enabled, the copier will enter the mode once the set time has elapsed
without any copier operation after the last copy of a run is made or the power is first turned on and no
copier operations have been made.
When the copier enters the auto power shut-off mode, the displays and all the indicators except the
mode indicators will be turned off. In this condition, the fuser in the copier will be turned off.
To turn the power back on, press the COPY key or another mode key that is lit. You can make desired
settings and press the START key after warm-up starts.
★★★★KEY OPERATOR See page 15 of the KEY OPERATOR'S GUIDE for setting the auto power shut-off
timer. See page 20 of the KEY OPERATOR'S GUIDE for enabling or disabling the auto power shut-
off.
17
Page 20
FUNCTION ICONS
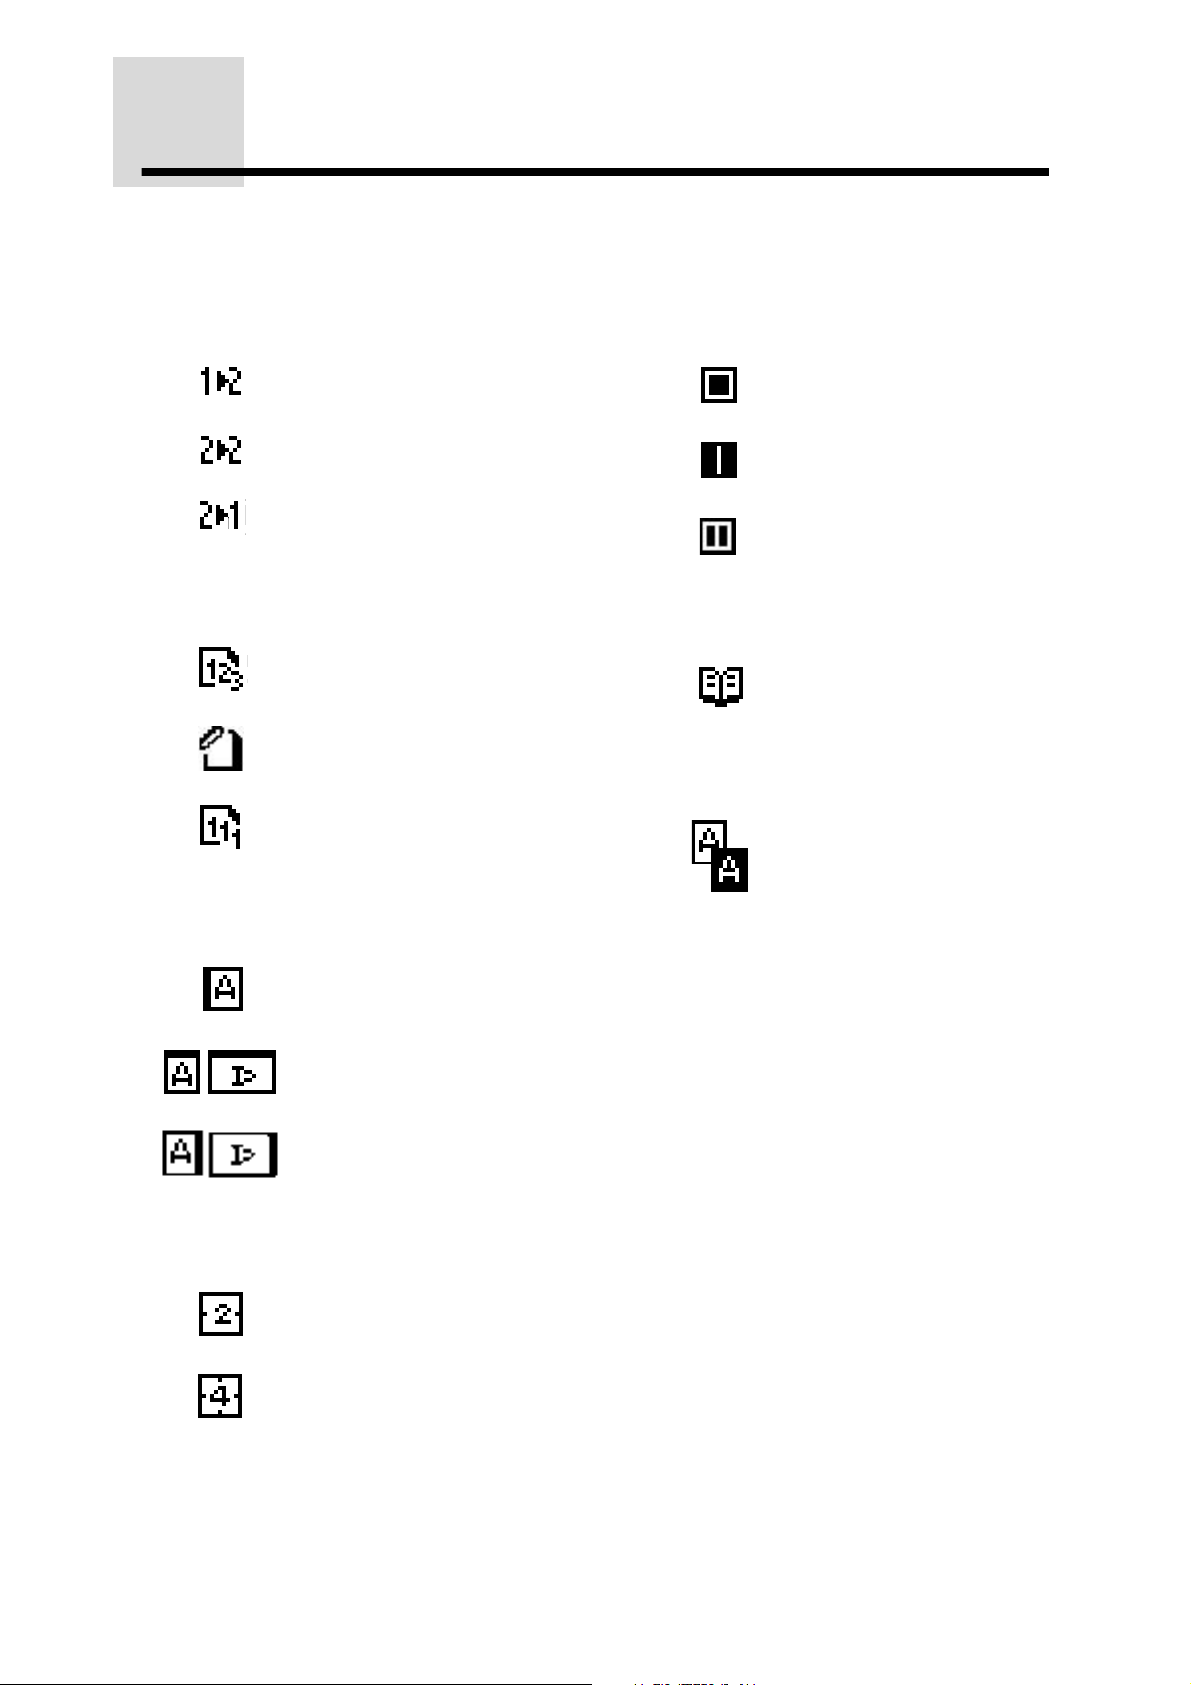
The following function icons will be indicated on the setting screen of each copier function.
2-sided copy mode:
One-sided to two-sided
GETTING STARTED
Output mode:
copying
Two-sided to two-sided
copying
Two-sided to one-sided
copying
Sort mode
Staple sort mode
Group mode
Erase:
Edge erase
Center erase
Edge + Center erase
Dual page copy:
B/W reverse:
Margin shift:
2 in 1 / 4 in 1:
Right
Down
Left
2 in 1
4 in 1
18
Page 21
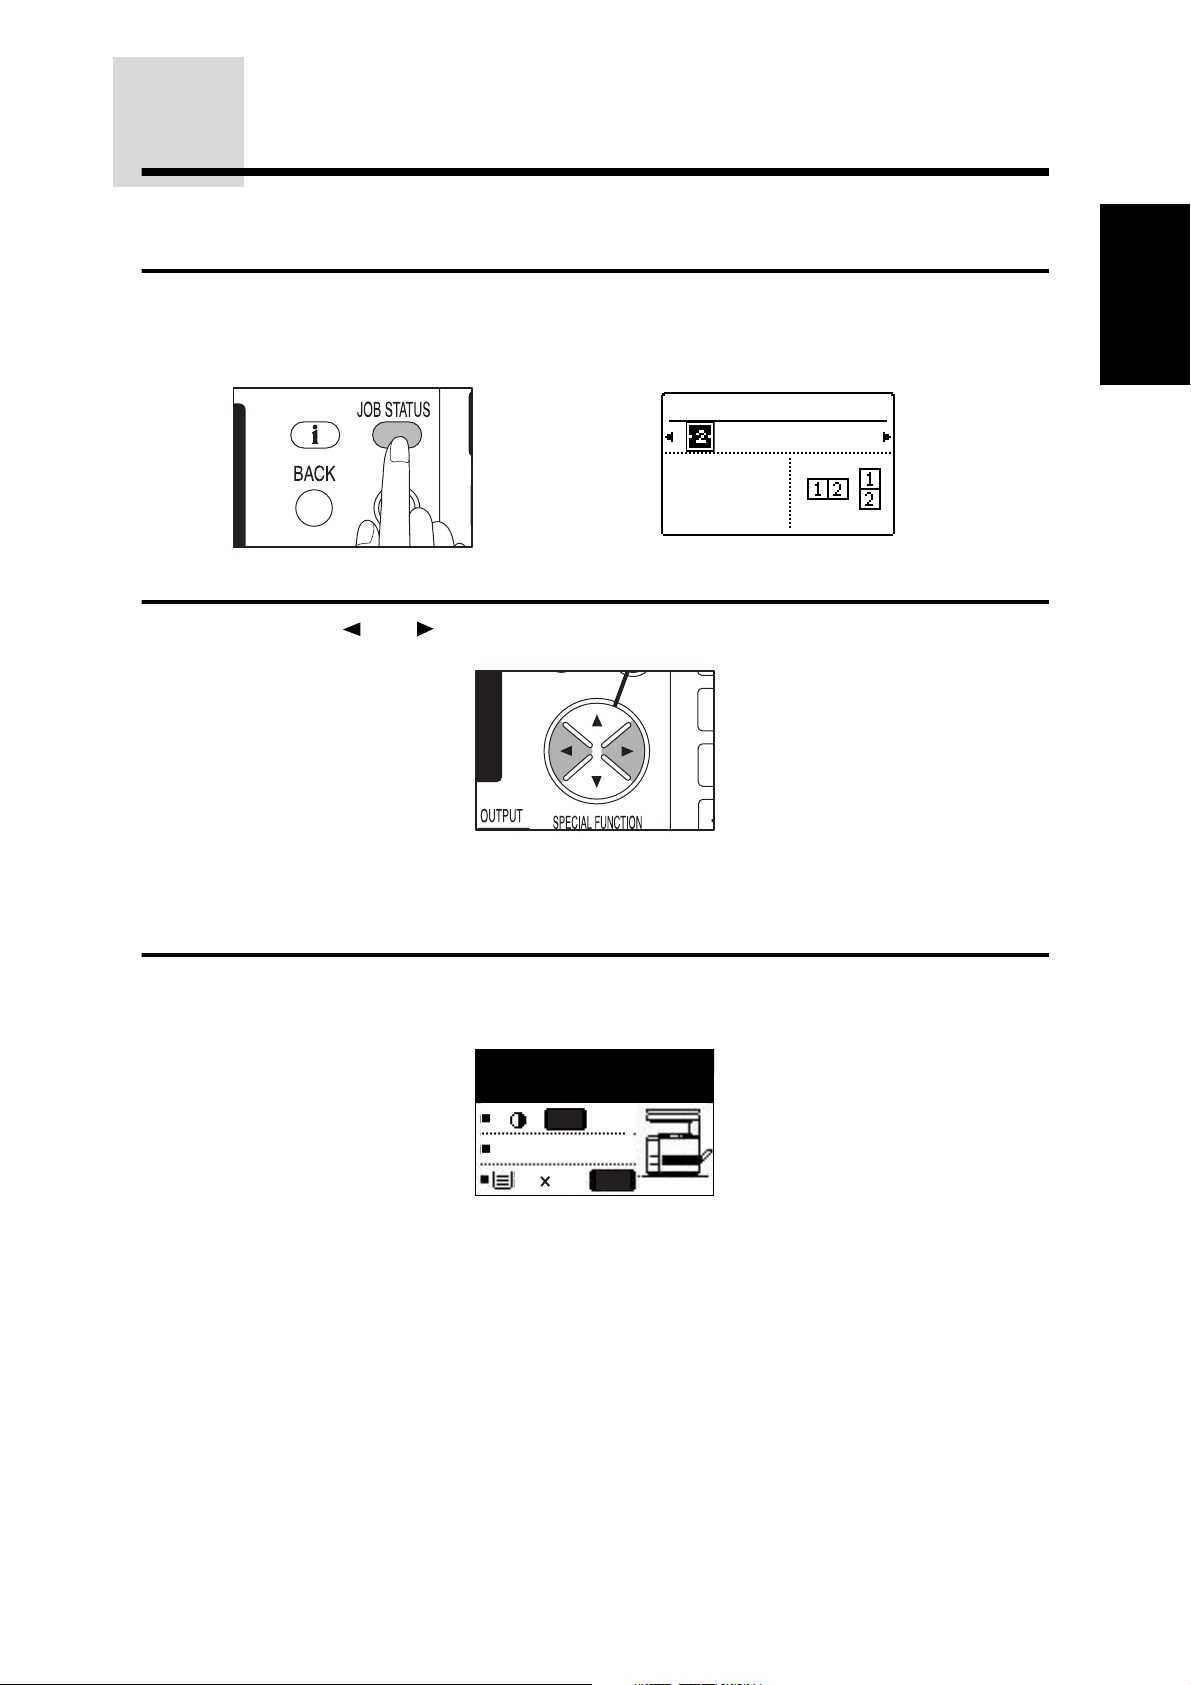
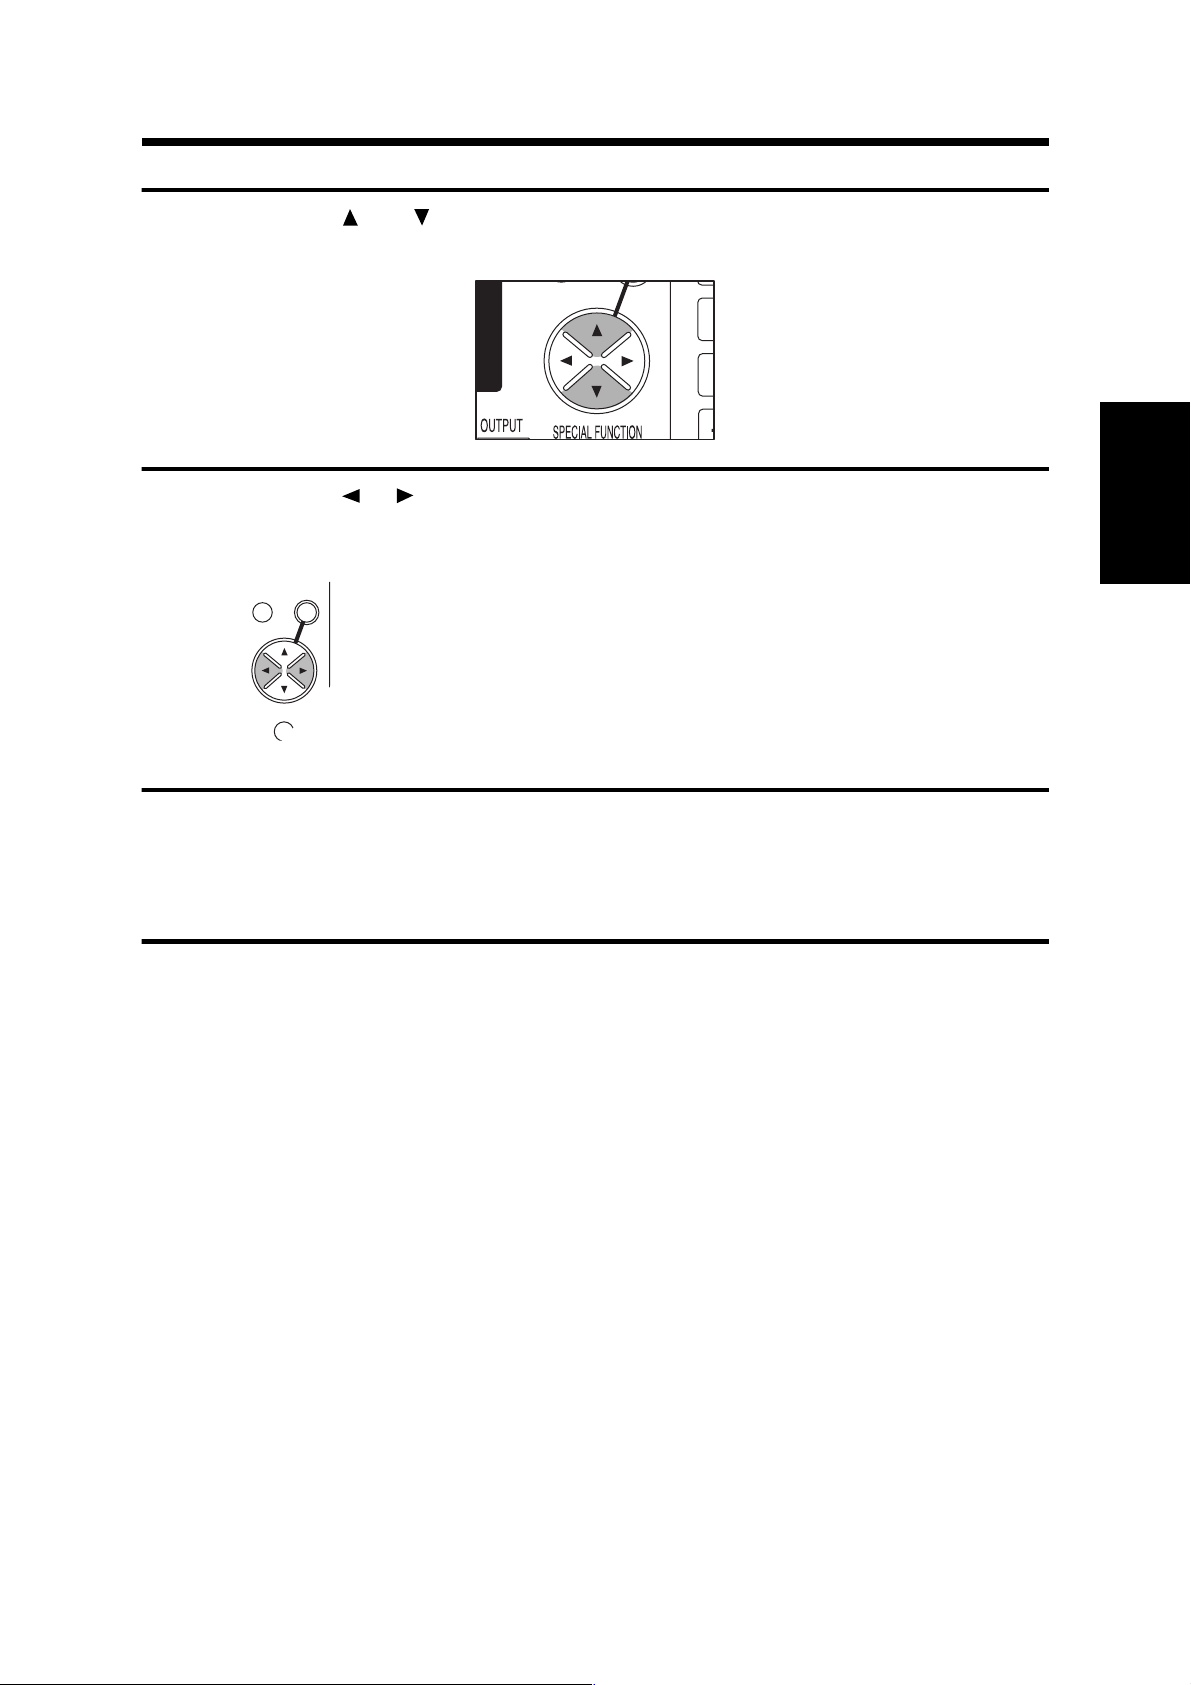
FUNCTION REVIEW
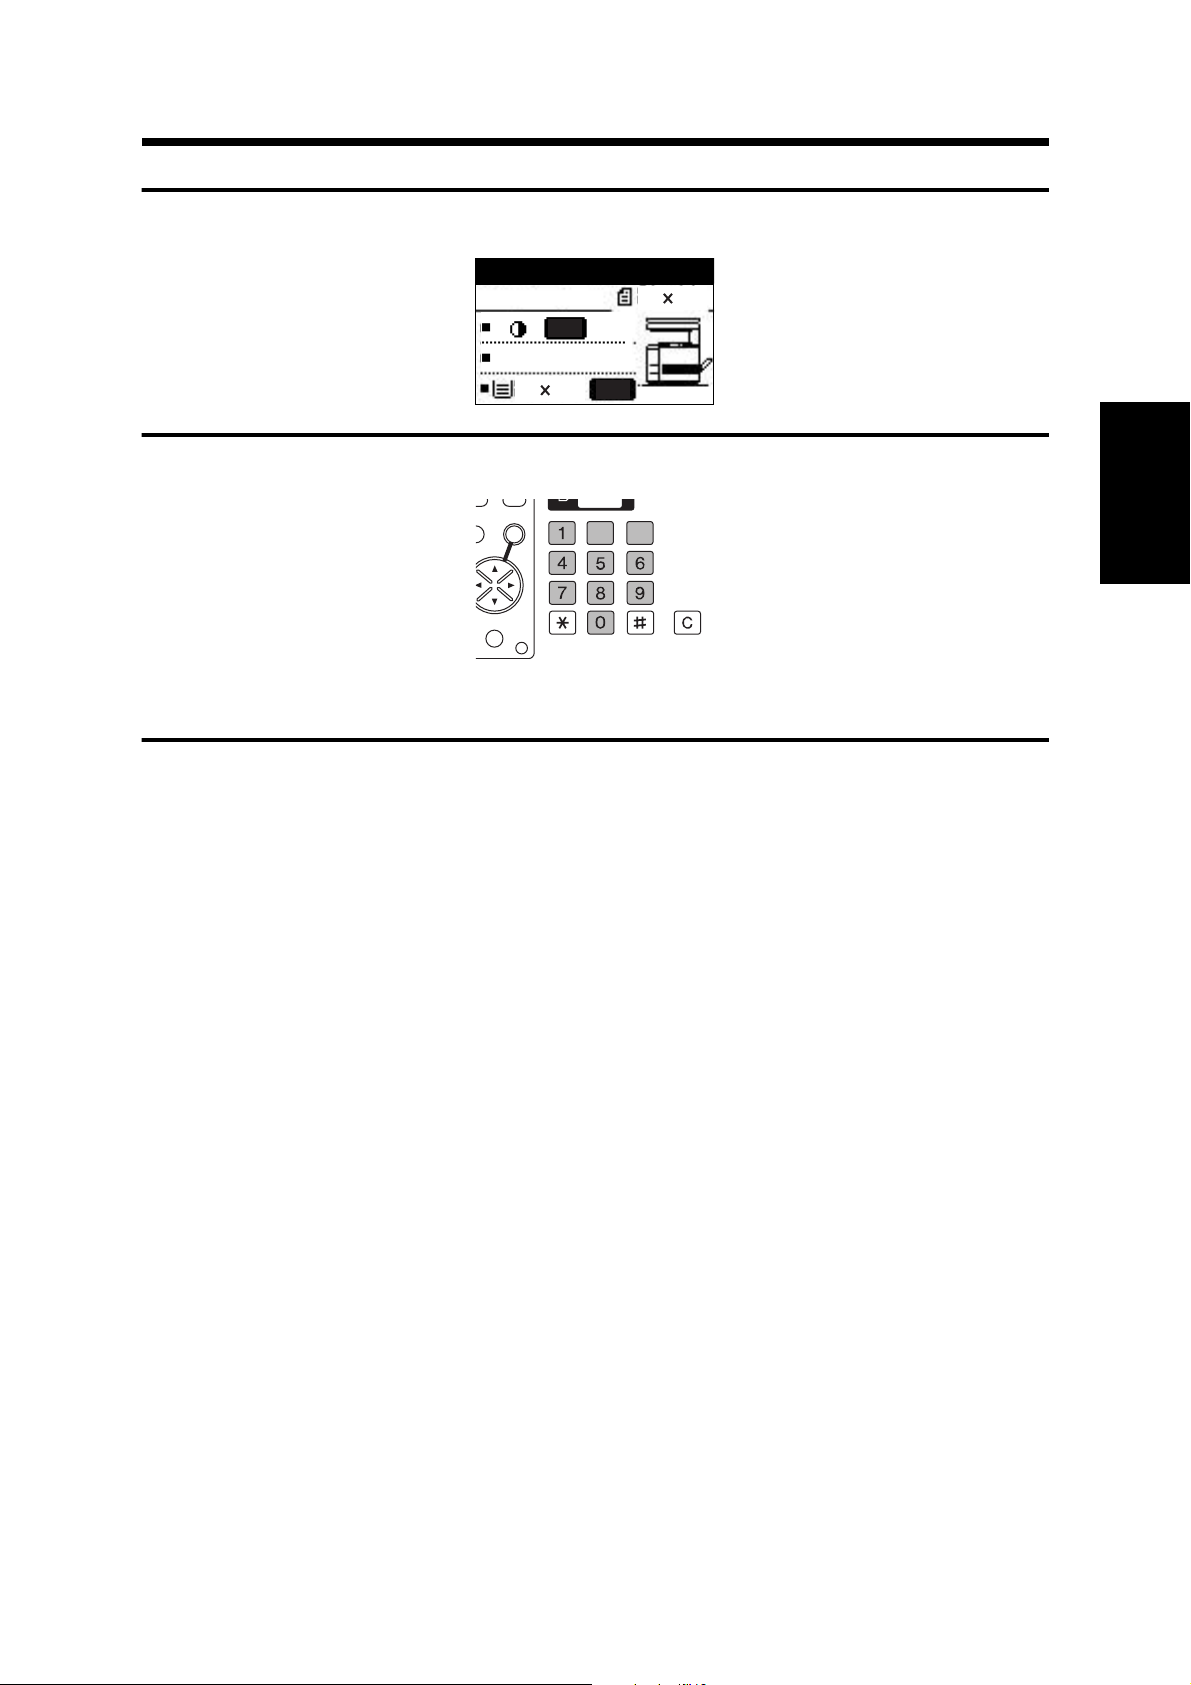
The current settings of copier functions that have been selected can be viewed in the display.
●
The XY ZOOM and TRANSPARENCY functions cannot be viewed on the function review screen.
Press the JOB STATUS key.
1
●
The review screen will appear.
Use the and keys to select a function.
2
●
The setting for the selected function will appear in the display.
●
The settings of the duplex copy mode (1-sided to 1-sided, etc.), sort/group mode, and
special functions can be displayed. Exposure, paper size, and copy ratio settings which
are normally displayed on the basic screen cannot be displayed on the review screen.
FUNCTION REVIEW
2in1
PATTERN1
NO
1
GETTING STARTED
To exit the review screen, press the BACK key.
3
●
The display will return to the basic screen.
Ready to copy.
1
/
8 11
2
AUTO
100%
100%
1
/
8 11
2
AUTO
19
Page 22
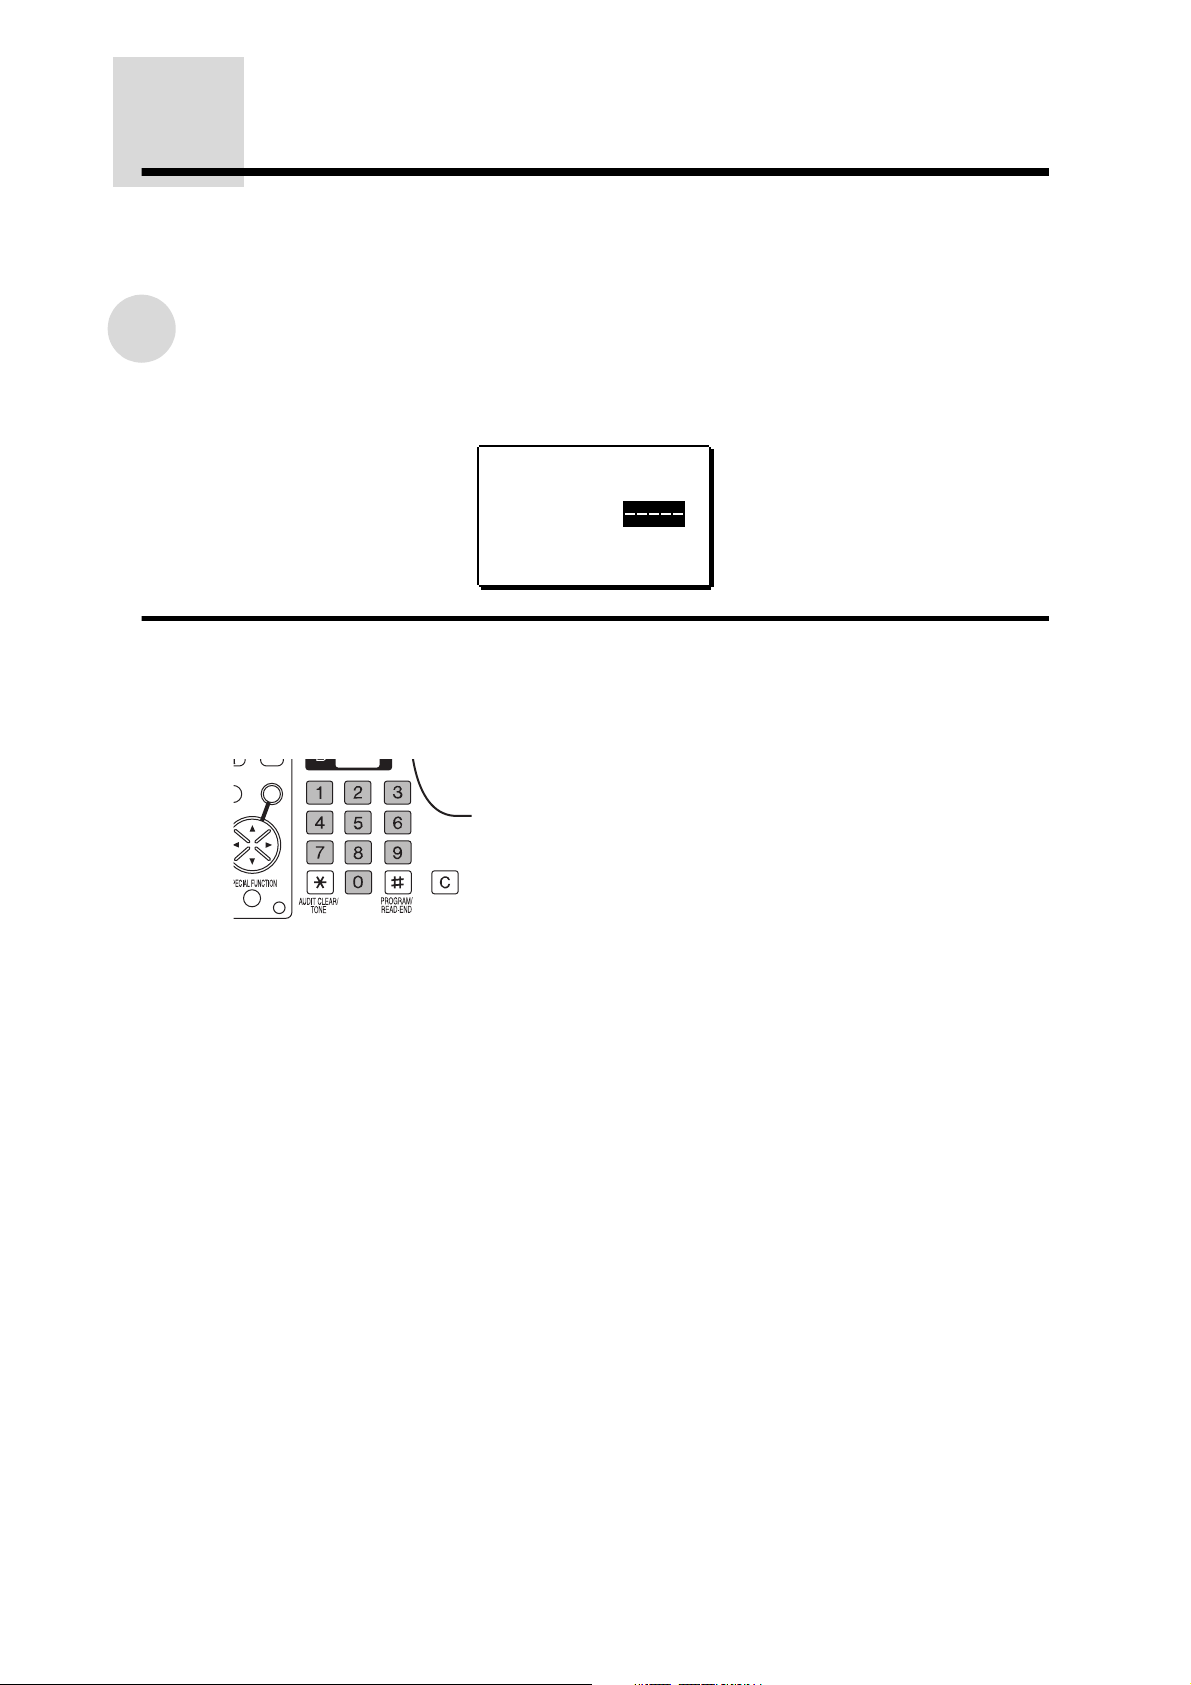
AUDITING ACCOUNTS
If this copier has been programmed in the auditing mode, it will not perform copier functions until an
assigned 5-digit account number has been entered.
★★★★KEY OPERATOR See page 21 of the KEY OPERATOR'S GUIDE for setting the auditing mode.
How to copy in the auditing mode
GETTING STARTED
If the copier has been programmed in the auditing mode, the following message will appear in the
display in place of the normal initial conditions display.
Enter your account
number.
ACCOUNT #:
Enter your account number using the numeric keys.
1
●
As each digit is entered, the dashes in the display will change to asterisks.
●
After the number is entered, the following message will appear in the display.
●
"REMAINING" will appear only if account limit has been set using a key operator
program.
★★★★KEY OPERATOR See page 24 of the KEY OPERATOR'S GUIDE for account limit.
●
The message will be displayed for several seconds, then change to the following
message.
20
Page 23

AUDITING ACCOUNTS
Please see your
key operator for
assistance.
When copying is completed, press the AUDIT CLEAR key.
2
NOTE:
If an unassigned number is entered, "Enter your account number." will appear again in the
display, indicating that the number was not accepted.
When the key operator program for account number security has been set and unassigned
numbers are entered three successive times, the copier will not accept another number for one
minute, and the following message will appear.
1
GETTING STARTED
★★★★KEY OPERATOR See page 24 of the KEY OPERATOR'S GUIDE for account number
security.
21
Page 24

GETTING STARTED
22
Page 25

CHAPTER 2
MAKING COPIES
This chapter describes the basic copying functions such as normal
copying, reduction or enlargement, and exposure adjustments.
Page
●
NORMAL COPYING. . . . . . . . . . . . . . . . . . . . . . . . . . . . . . . . . . . . 24
●
TWO-SIDED COPYING . . . . . . . . . . . . . . . . . . . . . . . . . . . . . . . . . 26
Two-sided copying from the platen glass. . . . . . . . . . . . . . . . . . . . 26
●
EXPOSURE ADJUSTMENT . . . . . . . . . . . . . . . . . . . . . . . . . . . . . 29
●
REDUCTION/ENLARGEMENT/ZOOM . . . . . . . . . . . . . . . . . . . . . 31
Automatic selection . . . . . . . . . . . . . . . . . . . . . . . . . . . . . . . . . . . . 31
Manual selection . . . . . . . . . . . . . . . . . . . . . . . . . . . . . . . . . . . . . . 33
●
ROTATION COPYING . . . . . . . . . . . . . . . . . . . . . . . . . . . . . . . . . . 35
●
BYPASS FEED (special paper) . . . . . . . . . . . . . . . . . . . . . . . . . . 36
Acceptable paper for copying from the bypass tray . . . . . . . . . . . . 36
Copying from the bypass tray . . . . . . . . . . . . . . . . . . . . . . . . . . . . 36
●
INTERRUPTING A COPY RUN . . . . . . . . . . . . . . . . . . . . . . . . . . . 39
2
23
Page 26
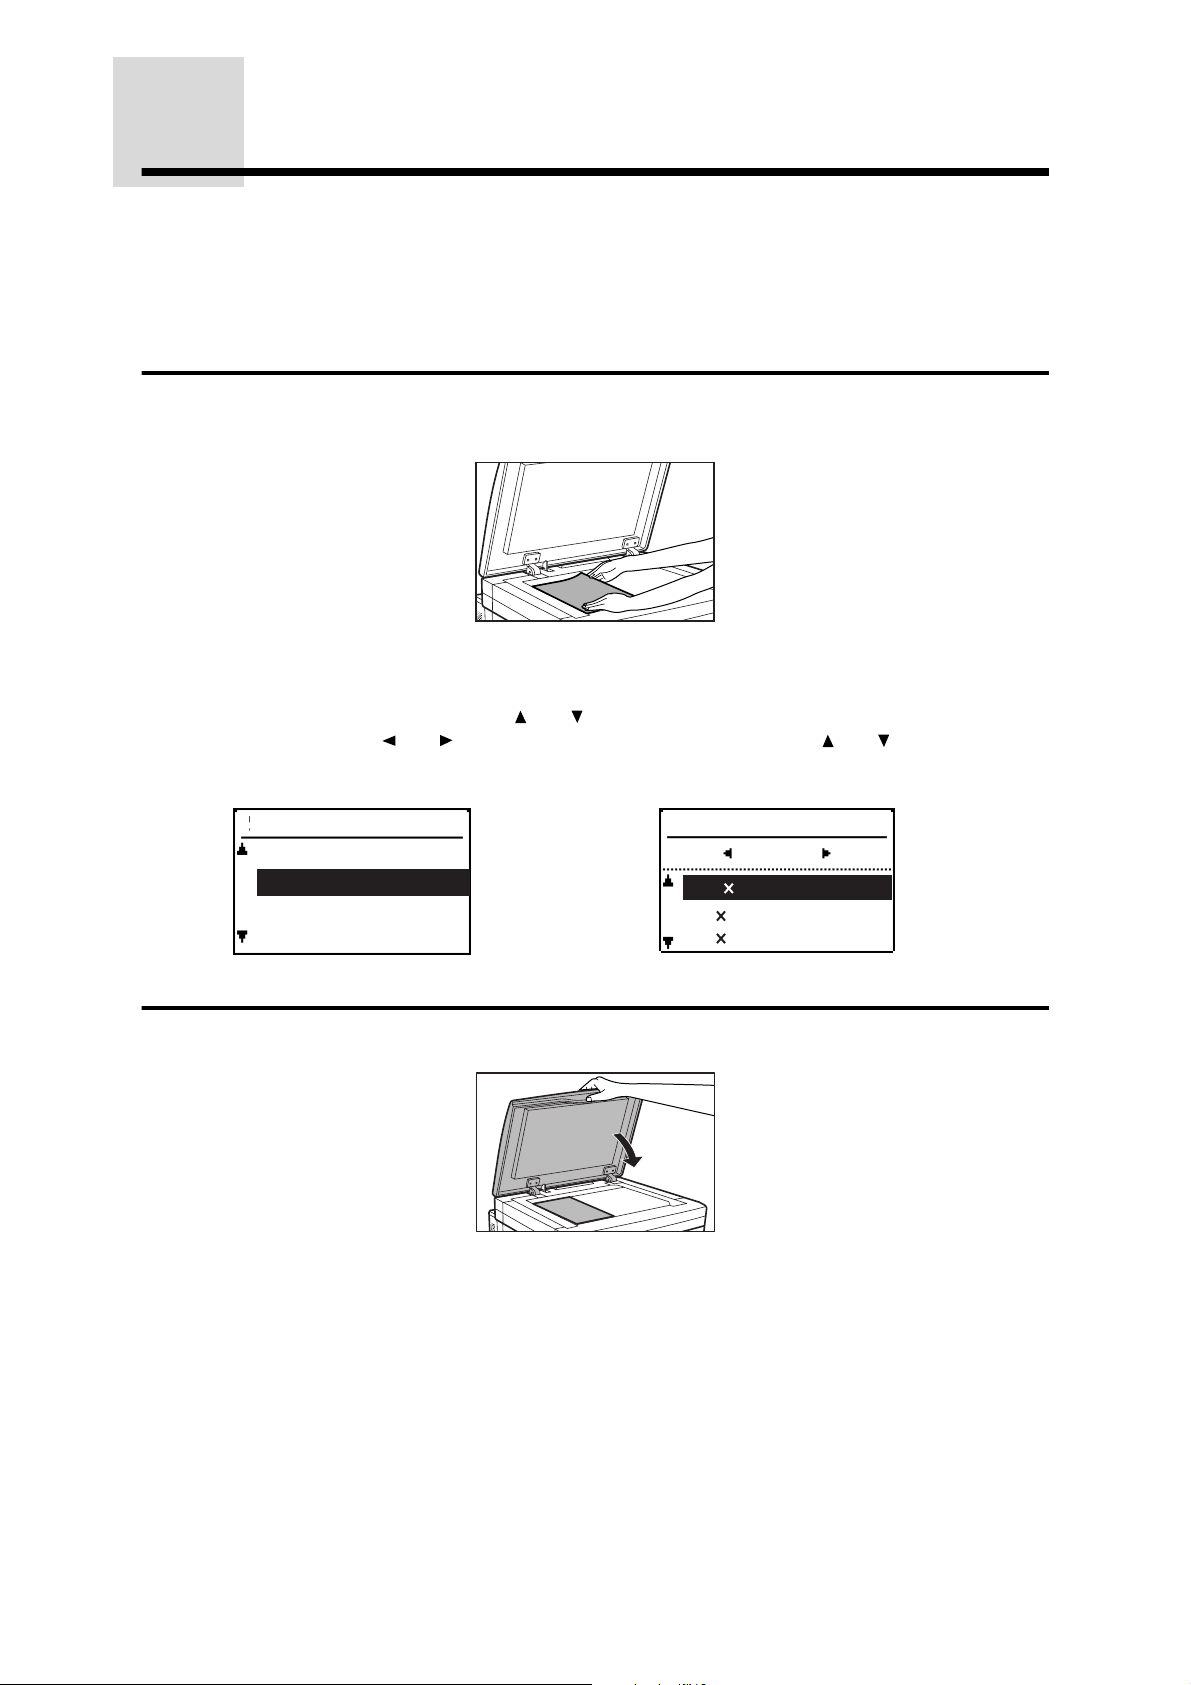
NORMAL COPYING
The basic copying procedure is described below.
●
Image loss (max. 5/32" (4 mm)) can occur at the leading and trailing edges of the copies. Also image
loss (max. 1/8" (3 mm)) can occur along the other edges of the copies.
NOTE:
If the copier has been programmed in the auditing mode, enter a 5-digit account number.
See page 20.
Place an original face down on the platen glass and align it with the
1
original size scale.
MAKING COPIES
●
The detected original size will be indicated in the display.
NOTE:
If the original size cannot be detected, the original size can be entered as follows. Press the
SPECIAL FUNCTION key. Use the and keys to select "ORIG. SIZE ENTER" and then press
the OK key. Use the and key to select "AB" or "INCH" and use the and keys to select the
desired original size. Press the OK key.
SPECIAL FUNCTION
SPECIAL MODES
ORIG. SIZE ENTER
PAPER SIZE SET
DISPLAY CONTRAST
Close the platen cover.
2
●
Paper matching the size of the original will be automatically selected when the auto
paper select function has been enabled. To copy onto paper of a different size, press the
PAPER SELECT key.
●
Paper of the different orientation may be selected if the auto paper select or auto image
function has been selected. In this case, the image of the original will be rotated and
copied. See page 35.
★KEY OPERATOR The auto paper select function can be disabled using a key operator
program. If this function is disabled, use the PAPER SELECT key to select the desired
paper tray. See page 18 of the KEY OPERATOR'S GUIDE.
ORIG. SIZE ENTER
INCH
11 17
1
/
8 14
2
1
/
8 13
2
24
Page 27
Ensure that the desired paper tray is selected.
3
NORMAL COPYING
Ready to copy.
1
1
/
/
8 11
2
8 11
2
AUTO
100%
100%
1
/
8 11
2
Set the number of copies using the numeric keys.
4
●
A single copy can be made even when "0" is displayed.
●
Press the CLEAR key to clear an entry if a mistake is made.
Press the START key.
5
AUTO
2
MAKING COPIES
●
The number in the copy quantity display will decrease by 1 each time a copy is made.
●
To repeat the same copy sequence for a different original, simply replace the original and
press the START key.
●
Press the CLEAR key to stop copying in the middle of a run.
NOTES:
●
When copying a book or an original which has been folded or a crumpled original, press down
lightly on the platen cover. This will reduce shadow lines caused by uneven contact between
the original and the platen glass.
●
The platen cover can be removed to allow copying of bulky objects. To remove it, open the
platen cover and lift it at a slightly backward angle. To reattach the platen cover, reverse the
above procedure.
The capacity of the center tray is 500 sheets (400 sheets for 11" x 17", 8-1/2" x 14", A3, and B4 sizes).
When the number of copies output reaches this limit, copying will stop and the START key indicator will
go out. Remove the copies from the center tray and press the START key to resume copying.
25
Page 28
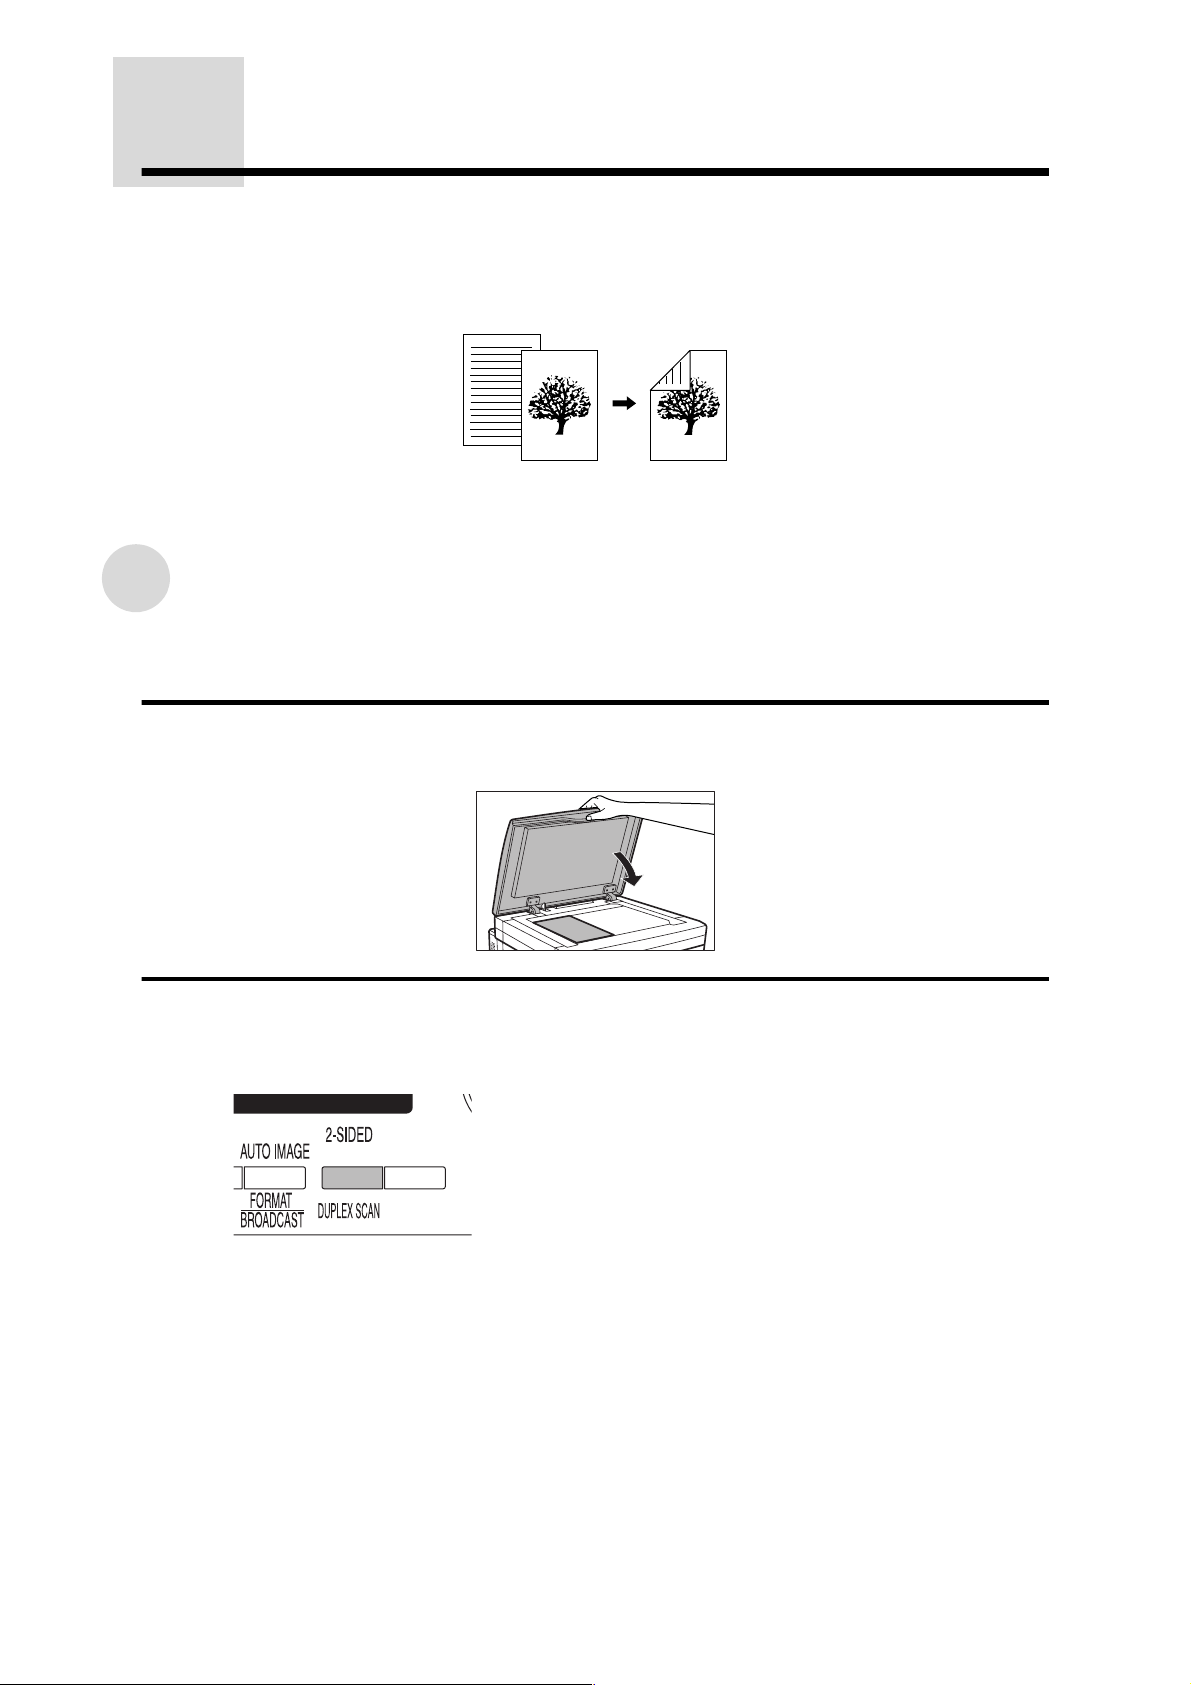
TWO-SIDED COPYING
Two-sided copies can be made by manually placing originals on the platen glass as described in the
procedure below. Fully automatic two-sided copies can be made from one-sided originals if either an
optional single pass feeder (SPF) or an optional reversing single pass feeder (RSPF) is installed. See
page 95. Additionally, fully automatic two-sided copying of two-sided originals or one-sided copying of
two-sided originals can be made if an optional RSPF is installed. See page 98.
NOTE:
The image for the second side can be rotated 180° top to bottom to allow tablet type binding.
MAKING COPIES
Two-sided copying from the platen glass
★KEY OPERATOR If two-sided copying is disabled using a key operator program, the procedure
below cannot be performed. See page 19 of the KEY OPERATOR'S GUIDE.
Place the first original face down on the platen glass and close the
1
platen cover.
Press the 2-SIDED COPY key.
2
●
The duplex copy mode selection screen will appear.
26
Page 29
TWO-SIDED COPYING
Use the and keys to select one-sided to two-sided copying.
3
●
Also the 2-SIDED COPY key can be used to select a duplex copy mode.
Use the or key to select binding change if desired. Then, press the
4
OK key.
Ensure that the desired paper tray is selected.
5
●
Paper sizes that can be used in the duplex copy mode are 8-1/2" x 11", 8-1/2" x 11"R, 81/2" x 13", 8-1/2" x 14", 11" x 17", A5, B5, B5R, A4, A4R, B4, and A3.
●
Neither the bypass tray nor 5-1/2" x 8-1/2" paper can be used for duplex copying.
Set the number of copies and press the START key.
6
2
MAKING COPIES
27
Page 30

TWO-SIDED COPYING
Place the second original face down on the platen glass and press the
7
START key again.
●
To stop a copy run during duplex copying, press the CLEAR key.
●
To cancel the duplex copy mode, press the 2-SIDED COPY key, select the one-sided to
one-sided mode, and press the OK key.
●
If an uneven number of originals are being copied, press the READ-END key after the
last original is scanned. The last copy will be output single-sided.
MAKING COPIES
28
Page 31

EXPOSURE ADJUSTMENT
This copier has five exposure modes to choose from: AUTO, TEXT, TEXT/PHOTO, PHOTO, and
SUPER PHOTO.
Auto
This is the standard initial setting for this copier. In this mode, the characteristics of an original being
copied are "read" by the exposure system, and exposure adjustments are made automatically. This
optimizes the contrast of the copied images by reducing the effect of colored or shaded background
areas.
AUTO
Text, text/photo, photo, and super photo
Text mode: This mode is useful for enhancing very low density areas of an original or suppressing
unusually high-density background areas.
Text/photo mode: This mode provides the best balance for copying an original which contains both
text and photos. This mode is also useful for copying printed photographs.
Photo mode: This mode is good for copying photographs with fine details.
Super photo mode: This is a high resolution mode (1200 dpi) for providing the best copies of
photographs.
Press the EXPOSURE key.
1
●
The exposure adjustment screen will appear.
EXPOSURE
AUTO
AUTO
TEXT
TEXT/PHOTO
2
MAKING COPIES
Use the and keys to select "TEXT", "TEXT/PHOTO", "PHOTO" or
2
"SUPER PHOTO" depending on the type of original to be copied.
●
Also the EXPOSURE key can be used to select an exposure mode.
29
Page 32

EXPOSURE ADJUSTMENT
Use the and keys to adjust the copy density as desired.
3
●
Copy density cannot be adjusted manually in the AUTO exposure mode.
EXPOSURE
AUTO
AUTO
TEXT
TEXT/PHOTO
Press the OK key.
4
MAKING COPIES
●
To return to the AUTO mode, press the EXPOSURE key, use the and key to select
"AUTO", and press the OK key.
NOTE:
When the SUPER PHOTO mode is selected, the copy ratio is limited to be within the 50% to
200% range when copying from the platen glass and within the 50% to 141% range when using
an optional SPF or RSPF.
30
Page 33

REDUCTION/
ENLARGEMENT/ZOOM
Reduction and enlargement ratios can be selected either automatically with the AUTO IMAGE key or
manually with the COPY RATIO key. The zoom function enables precise copy ratio selection from 25%
to 400% in 1% increments.
●
The allowable copy ratio range is limited to the following conditions:
Exposure mode Location of original Copy ratio range
Other than SUPER PHOTO SPF/RSPF (optional) 50% to 200%
SUPER PHOTO Platen glass 50% to 200%
SUPER PHOTO SPF/RSPF (optional) 50% to 141%
Automatic selection
●
When the auto image function is enabled, the reduction or enlargement ratio cannot be selected
manually.
Place an original on the platen glass and close the platen cover.
1
●
The original size will be automatically detected and indicated in the display. If the original
is a non-standard size, it cannot be detected. In this case, press the SPECIAL
FUNCTION key to enter the original size. See page 24.
Use the PAPER SELECT key to select the paper tray with the desired
2
paper size.
2
MAKING COPIES
●
This feature will not work when copy paper of non-standard size is used.
31
Page 34

REDUCTION/ENLARGEMENT/ZOOM
Press the AUTO IMAGE key.
3
●
The copy ratio will be automatically set.
●
If the original and the selected copy paper are not in the same orientation, the image will
be automatically rotated to match the copy paper. However, if enlargement is selected for
copying onto a paper size larger than 8-1/2" x 11" (A4), the image will not be rotated. In
this case a message indicating "Image edge loss" will appear.
★
KEY OPERATOR Rotation of the image can be disabled using a key operator program.
MAKING COPIES
See page 12 of the KEY OPERATOR'S GUIDE.
●
If the message "Image edge loss" is displayed, part of the original image may not be
copied.
Enter the number of copies and press the START key.
4
●
To cancel the automatic reduction/enlargement mode, press the AUTO IMAGE key
again.
●
When copying from an optional SPF or RSPF, the automatic reduction/enlargement
feature will be effective only for the current copy run.
32
Page 35

Manual selection
Place an original on the platen glass and close the platen cover.
1
Press the COPY RATIO key.
2
●
The copy ratio adjustment screen will appear.
REDUCTION/ENLARGEMENT/ZOOM
2
MAKING COPIES
COPY RATIO
AUTO
121%
100%
95%
ZOOM
Use the and keys to select a preset copy ratio or use the and
3
keys to select a zoom ratio.
A. Preset reduction ratios are: 95%, 77%, 64%, 50%, and 25%.
B. Preset enlargement ratios are: 121%, 129%, 141%, 200%, and 400%.
C. Zoom ratios: Any ratio from 25% to 400% can be set, in 1% increments. Use the
and keys to set the approximate ratio, then press the key to decrease the ratio
or the key to increase the ratio.
●
To decrease or increase the zoom ratio rapidly, press and hold down the or key.
However the value will stop at the preset reduction or enlargement ratios. To move
beyond these ratios, release the key and then press and hold it down again.
D. Same-size reset: Press the or key repeatedly until the copy ratio returns to
100%.
100%
NOTE:
If the COPY RATIO key is pressed, the copy ratio will be reset to 100%.
33
Page 36

REDUCTION/ENLARGEMENT/ZOOM
Press the OK key.
4
●
The display will return to the basic screen.
Ensure that the desired paper tray is selected.
5
●
If the auto paper select function has been enabled, the appropriate copy paper size will
have been automatically selected based on the original size and the selected copy ratio.
●
MAKING COPIES
If the auto paper select function has been disabled or if copying onto a different size
paper, use the PAPER SELECT key to select the paper feed station with the desired
paper size.
Set the number of copies and press the START key.
6
34
Page 37

ROTATION COPYING
If rotation of original image is enabled using a key operator program, the image of the original will rotate
when the orientation of the original does not match that of the copy paper. Rotation copying will function
only if the auto paper select mode or the auto image mode has been selected. Even if rotation of
original image is disabled using a key operator program, rotation copying will function when the 2 in 1 or
4 in 1 function is selected. However, if enlargement copying onto a paper size larger than 8-1/2" x 11"
(A4) is performed, the image cannot be rotated. In this case, the original must be rotated 90°.
If the margin shift feature is set, rotation copying will not function.
★KEY OPERATOR See page 12 of the KEY OPERATOR'S GUIDE for enabling/disabling rotation
copying.
Example: Copying from an 11" x 17" original onto 8-1/2" x 11" paper
Original Paper Copy
Place an original on the platen glass and close the platen cover.
1
Use the PAPER SELECT key to select the desired tray.
2
Press the AUTO IMAGE key.
3
2
MAKING COPIES
●
The appropriate copy ratio will be automatically selected for rotation copying.
Set the number of copies and press the START key.
4
NOTE:
Images of originals may also be rotated in the auto paper select mode.
35
Page 38

BYPASS FEED (special
paper)
The bypass tray must be used to feed special papers such as transparency film and labels but can also
be used to feed standard copy paper.
Acceptable paper for copying from the bypass
tray
Size Weight Capacity (21 lb. bond
paper)
Ordinary paper: 5-1/2" x 8-1/2"
MAKING COPIES
to 11" x 17"
Envelopes: Commercial 10
(4-1/8" x 9-1/2"), International
DL (110 x 220 mm),
International C5 (162 x 229
mm)
* For paper weighing from 28 to 34 lbs., 8-1/2" x 11" is the maximum size that can be fed through the
bypass tray.
**Do not use envelopes that have metal clasps, plastic snappers, string closures, windows, linings, self-
adhesive patches or synthetic materials. These will cause physical damage to the copier.
●
For best results, use only paper recommended by SHARP.
●
Special papers except SHARP recommended transparency film, labels, and envelopes must be fed
one sheet at a time through the bypass tray. Up to 40 sheets of SHARP recommended transparency
film and labels can be set at one time. Up to 5 envelopes can be set at one time.
●
When feeding two or three hole prepunched paper, load the paper so that the punched edge is not
positioned in the feed slot.
14 lbs. to 34 lbs.*
(Ordinary paper)
100 sheets Transparency
Special paper
film, labels,
envelopes**
Copying from the bypass tray
36
Unfold the bypass tray.
1
●
When feeding 8-1/2" x 11"R, 8-1/2" x 14" or 11" x 17" sized paper, extend the bypass tray
to support the paper.
Page 39

BYPASS FEED (special paper)
Set the paper guides to the copy paper width.
2
Insert the copy paper (print face down) all the way into the bypass
3
tray.
2
MAKING COPIES
●
For the number of sheets which can be loaded into the tray, see the previous page.
●
When adding paper, first remove any paper remaining in the tray, combine it with the
paper to be added and then reload as a single stack. The paper to be added must be the
same size and type as the paper already in the tray.
●
When loading envelopes, make sure that they are straight and flat and do not have
loosely glued construction flaps (not the closure flap).
Press the PAPER SELECT key to select the bypass tray.
4
NOTE:
When copying onto paper that is fed from the bypass tray, the print start position in the vertical
direction can be adjusted as follows. Press the SPECIAL FUNCTION key. Use the and key
to select "EXTRA IMAGE ADJ." and then press the OK key. Use the and key to adjust the
print start position to the front (+) or to the rear (-). Press the OK key. The position can be
adjusted from -0.5 inch to +0.5 inch in 0.02 inch increments.
This feature can be used only for extra size paper (indicated as "EXTRA" in the display) placed in
the bypass tray and cannot be used for standard size paper.
SPECIAL FUNCTION
ORIG. SIZE ENTER
PAPER SIZE SET
DISPLAY CONTRAST
EXTRA IMAGE ADJ.
EXTRA IMAGE ADJ.
0.00
inch
(-0.5~+0.5)
:TO FRONT (+)
:TO REAR (-)
37
Page 40

BYPASS FEED (special paper)
Set the number of copies and press the START key.
5
NOTE:
The bypass tray can be used to copy onto the two sides of paper manually.
When copying the second original, be sure to turn over the copy of the first original left to right
and place it into the bypass tray as shown in the illustration.
MAKING COPIES
Second original
Copy of first original
38
Page 41

INTERRUPTING A COPY RUN
INTERRUPT is used to interrupt a long copy run so that another job can be done.
●
Two-sided and 2 in 1/ 4 in 1 copying jobs cannot be interrupted.
●
Two-sided copying, sort, group, staple sort, job programs and 2 in 1/ 4 in 1 cannot be selected for
interrupt copying. Key operator programs cannot be used in the interrupt mode.
Press the INTERRUPT key.
1
●
If INTERRUPT is pressed during copying from the platen glass, the copier will stop and
return to the initial settings after the copy in progress has been completed.
●
If INTERRUPT is pressed during copying when an optional SPF or RSPF is being used,
the copier will stop after completing copying of any original which has been fed by the
SPF or RSPF.
●
If this copier has been programmed in the auditing mode, the account number entry
message will appear. Enter your account number using the numeric keys. The number of
copies of the interrupt copying will be accumulated against this account number. See
page 20.
2
MAKING COPIES
When the copier stops, remove the original(s) of the current job and
2
set an original for interrupt copying.
Select the desired available copier functions.
3
Set the number of copies and press the START key.
4
●
The interrupt copies will be offset from the previous copies unless the offset function is
disabled.
★
KEY OPERATOR See page 13 of the KEY OPERATOR'S GUIDE for the offset function.
39
Page 42

INTERRUPTING A COPY RUN
When all INTERRUPT copies are finished, press the INTERRUPT key
5
again to cancel the INTERRUPT mode, and remove the original used
for interrupt copying.
●
All settings for the interrupted job will be automatically restored.
Replace the original(s) for the interrupted job and press the START
6
key to resume copying.
MAKING COPIES
40
Page 43

CHAPTER 3
SPECIAL FUNCTIONS
This chapter describes special copying functions including various
image editing functions.
Page
●
SORT/GROUP . . . . . . . . . . . . . . . . . . . . . . . . . . . . . . . . . . . . . . . . 42
Copying in the sort or group mode. . . . . . . . . . . . . . . . . . . . . . . . . 42
●
MARGIN SHIFT . . . . . . . . . . . . . . . . . . . . . . . . . . . . . . . . . . . . . . . 45
●
ERASE . . . . . . . . . . . . . . . . . . . . . . . . . . . . . . . . . . . . . . . . . . . . . . 47
●
DUAL PAGE COPY . . . . . . . . . . . . . . . . . . . . . . . . . . . . . . . . . . . . 49
●
2 IN 1 OR 4 IN 1 . . . . . . . . . . . . . . . . . . . . . . . . . . . . . . . . . . . . . . . 51
●
B/W REVERSE. . . . . . . . . . . . . . . . . . . . . . . . . . . . . . . . . . . . . . . . 54
●
XY ZOOM . . . . . . . . . . . . . . . . . . . . . . . . . . . . . . . . . . . . . . . . . . . . 56
●
TRANSPARENCY . . . . . . . . . . . . . . . . . . . . . . . . . . . . . . . . . . . . . 59
●
JOB MEMORY . . . . . . . . . . . . . . . . . . . . . . . . . . . . . . . . . . . . . . . . 61
Storing a job program . . . . . . . . . . . . . . . . . . . . . . . . . . . . . . . . . . 61
Deleting a job program. . . . . . . . . . . . . . . . . . . . . . . . . . . . . . . . . . 62
Recalling a job program . . . . . . . . . . . . . . . . . . . . . . . . . . . . . . . . . 63
3
41
Page 44

SORT/GROUP
The copier has two sorter modes for different copying jobs: one sorts copies into sets matching the
sequence of the originals and the second groups copies by originals.
Sort mode
Sets of copies will be sequentially delivered to the center tray.
1
2
3
2
1
Group mode
Multiple copies of each original will be grouped in the center tray.
3
2
1
3
1
2
3
1
2
3
1
1
1
2
2
2
3
3
3
SPECIAL FUNCTIONS
Copying in the sort or group mode
When copying from the platen glass in the sort or group mode or from the document feeder tray in the
group mode, original images will be stored in the copier memory each time an original is scanned and
copying will start after all originals have been scanned. However, if originals are set in the document
feeder tray and the sort mode is selected, copying will start immediately after the first original is
scanned.
Place an original on the platen glass or in the document feeder tray.
1
Document feeder tray
●
If originals are placed in the document feeder tray, the sort mode will be automatically
selected. This setting, however, can be canceled using a key operator program.
★
KEY OPERATOR See page 13 of the KEY OPERATOR'S GUIDE for sort auto select.
42
Page 45

SORT/GROUP
Press the OUTPUT key.
2
●
The output mode selection screen will appear.
SORT
NO SORT
1
2
3
SORT
1
1
GROUP
1
Use the and keys to select the desired output mode and press the
3
OK key.
●
Also the OUTPUT key can be used to select an output mode.
Make all other desired copier selections and press the START key.
4
●
If originals have been set in an optional SPF or RSPF in step 1, copying will start. If an
original has been set on the platen glass, proceed to the next step.
Replace the finished original with the next original and press the
5
START key after it lights up. Repeat this step until all originals have
been scanned.
3
SPECIAL FUNCTIONS
●
If the non-sort mode has been selected in step 3, copying will start each time the START
key is pressed.
43
Page 46

SORT/GROUP
Offset stack
If the offset stack mode is enabled using a key operator program, each copy set will be offset by
approximately 1 inch (25 mm) from the previous set. When copying in the sort mode, collated sets of
copies will be made and each collated set of copies produced will be stacked offset from the previous
set in the center tray. When copying in the group mode, groups of multiple copies from the same
original will be made and each group produced will be stacked offset from the previous group in the
SPECIAL FUNCTIONS
center tray.
If the offset stack mode is disabled, copies will not be offset.
The offset stack mode is enabled in the factory default setting.
★ KEY OPERATOR See page 13 of the KEY OPERATOR'S GUIDE for the offset function.
After all originals have been scanned, press the READ-END key.
6
●
Copying will start.
●
If the memory becomes full of scanned original image data, a warning message will
appear. Press the START key to start copying the data in memory or the CLEAR ALL key
to cancel copying.
●
The memory can be extended to a maximum of 272 MB to increase the capacity for
storing image data by adding commercially available memory modules. Please contact
your service center for details.
44
Page 47

MARGIN SHIFT
The MARGIN SHIFT feature, in its initial setting, automatically shifts the text or image to increase the
margin by approximately 1/2".
Original
A
●
The location of the margin to be increased can be selected at the left edge, the right edge or the top
edge of the page. To select the location, see step 4 overleaf.
●
When making two-sided copies with this function, the margin on both sides will be increased in the
same way.
●
This feature cannot be used with the 2 in 1 or 4 in 1 feature and rotation copying.
●
This feature cannot be used with non-standard size copy paper.
●
The standard shift amount is 1/2", but can be changed from 1/4" to 1" in 1/4" increments.
★ KEY OPERATOR The initial shift setting can be changed from 1/4" to 1" in 1/4" increments. See
page 11 of the KEY OPERATOR'S GUIDE.
Increased
margin
Copy
A
Place an original on the platen glass or in the document feeder tray.
1
Original
Copy
AA
Increased margin Increased margin
Original
AA
Copy
3
SPECIAL FUNCTIONS
●
When copying from the platen glass and the margin is to be increased on the left side,
set the original face down so that the margin side is positioned to the right. If the margin
is to be increased on the right side, set the original face down so that the margin side is
positioned to the left.
●
If top is selected, set the original so that the margin to be increased is set to the rear side
of the platen glass or the document feeder tray.
Press the SPECIAL FUNCTION key. Then press the OK key.
2
●
The SPECIAL MODES screen will appear with MARGIN SHIFT highlighted.
45
Page 48

MARGIN SHIFT
Press the OK key.
3
●
The setting screen for MARGIN SHIFT will appear.
Use the and keys to select the shift direction and the and keys
4
to select the shift amount.
●
Select the shift direction from DOWN, RIGHT, and LEFT.
●
Select the shift amount from 1/4", 1/2", 3/4", and 1".
MARGIN SHIFT
OFF
DOWN
RIGHT
1/2 inch(1/4~1)
-----
SPECIAL FUNCTIONS
Press the OK key.
5
●
The display will return to the basic screen.
Make all other desired copier selections and press the START key .
6
●
To cancel the margin shift feature, select the margin shift feature again and select "OFF".
46
Page 49

ERASE
This copier has an edge erase mode and a center erase mode.
Edge erase
A
●
Edge erase can be used to eliminate shadow lines around the edges of copies which appear when
thick paper or a book is used as an original.
●
Center erase can be used to eliminate the shadow produced by the bindings of bound documents.
●
Edge + center erase can be used together to eliminate both types of shadow lines.
●
The standard erase width is 1/2", but can be changed from 1/4" to 1" in 1/4" increments.
★KEY OPERATOR The initial setting of the width for edge erase and center erase can be changed.
See page 11 of the KEY OPERATOR'S GUIDE.
●
This feature cannot be used with the 2 in 1 or 4 in 1 feature.
●
If the dual page copy feature has been set, center erase and edge + center erase cannot be set.
●
This feature cannot be used with non-standard size originals.
Place an original on the platen glass or in the document feeder tray.
1
A
A B
Center erase
A B
Document feeder tray
Edge + Center erase
A B
A B
3
SPECIAL FUNCTIONS
Press the SPECIAL FUNCTION key. Then press the OK key.
2
●
The SPECIAL MODES screen will appear.
SPECIAL MODES
MARGIN SHIFT
ERASE
DUAL PAGE COPY
[OK]:ADJUST
Use the and keys to select "ERASE" and press the OK key.
3
●
The setting screen for ERASE will appear.
ERASE
OFF
EDGE
CENTER
1/2 inch(1/4~1)
-----
47
Page 50

ERASE
4
5
Use the and keys to select the desired erase mode.
●
Select "EDGE", "CENTER" or "EDGE + CENTER".
Use the and keys to adjust the amount of erase if needed.
SPECIAL FUNCTIONS
Press the OK key.
6
●
The display will return to the basic screen.
Make all other desired copier selections and press the START key .
7
●
48
Page 51

DUAL PAGE COPY
The DUAL PAGE COPY feature produces individual copies of two documents placed side by side on
the platen glass. It is especially useful when copying books and other bound documents.
Original Copy
●
This feature can be used in the one-sided to two-sided copying mode.
●
This feature cannot be used with the 2 in 1 / 4 in 1, center erase, edge + center erase, enlargement
or staple sort features.
●
If this feature is selected when the auto image feature has been selected, the auto image feature will
be canceled.
●
When originals are set in an optional SPF or RSPF, this feature cannot be selected.
Place the originals on the platen glass with the center of the two pages
1
aligned with the paper size index ( ). Close the platen cover.
1
2
8
3
●
Set the page to be copied first to the right of the paper size index mark.
Press the SPECIAL FUNCTION key. Then press the OK key.
2
●
The SPECIAL MODES screen will appear.
SPECIAL MODES
MARGIN SHIFT
ERASE
DUAL PAGE COPY
[OK]:ADJUST
SPECIAL FUNCTIONS
49
Page 52

DUAL PAGE COPY
Use the and keys to select "DUAL PAGE COPY" and press the OK
3
key.
●
A check mark will appear to the left of "DUAL PAGE COPY", and the display will return to
the basic screen.
Check to be sure that 8-1/2" x 11" sized copy paper is selected.
4
●
8-1/2" x 11"R paper can also be used if the auto paper select mode is selected and
rotation copying has been enabled.
SPECIAL FUNCTIONS
5
50
Page 53

2 IN 1 OR 4 IN 1
The 2 in 1 or 4 in 1 feature is used to copy 2 or 4 originals, collectively in a specified order, onto one
sheet.
2 in 1 copying
Pattern Pattern Pattern Pattern
4 in 1 copying
Pattern Pattern Pattern Pattern
●
These features cannot be used with the dual page copying, XY zoom, erase or margin shift features.
●
Copies can be made with or without the border lines.
●
The order of originals which will be arranged on the copies can be selected. There are two patterns of
layout for 2 in 1 copying and four patterns of layout for 4 in 1 copying.
●
Non-standard size paper cannot be used with the 2 in 1 or 4 in 1 feature.
●
If this feature is set, the copy ratio will be automatically set and cannot be changed manually.
●
The 2 in 1 or 4 in 1 feature cannot be set for interrupt copying. While 2 in 1 or 4 in 1 is being set,
interrupt will not function.
3
Place an original on the platen glass or in the document feeder tray.
1
Document feeder tray
Use the PAPER SELECT key to select the paper tray with the desired
2
paper size.
SPECIAL FUNCTIONS
51
Page 54

2 IN 1 OR 4 IN 1
SPECIAL FUNCTIONS
Press the SPECIAL FUNCTION key. Then press the OK key.
3
●
The SPECIAL MODES screen will appear.
SPECIAL MODES
MARGIN SHIFT
ERASE
DUAL PAGE COPY
[OK]:ADJUST
Use the and keys to select "2in1/4in1" and press the OK key.
4
●
The selection screen for 2 in 1 / 4 in 1 will appear.
2in1/4in1
OFF
2in1
4in1
[OK]:CHANGE
-----
Use the and keys to select "2in1" or "4in1" and press the OK key.
5
●
The setting screen for 2 in 1 or 4 in 1 will appear.
Use the and keys to select the desired layout pattern.
6
●
Select the order of originals which will be arranged on the copies. For layout patterns,
see the previous page.
52
Page 55

Use the and keys to select a type of border line.
7
●
Select the solid line, broken line or no border line.
2in1
PATTERN 1
BORDER
Press the OK key.
8
2 IN 1 OR 4 IN 1
●
The display will return to the basic screen.
Make all other desired copier selections and press the START key .
9
●
The copy ratio will be calculated automatically.
●
If an optional SPF or RSPF is used, copying will start after originals are scanned.
●
If the platen glass is used, proceed to the next step.
Replace the finished original with the next original and press the
10
START key after it lights up. Repeat this step until all originals have
been scanned.
3
SPECIAL FUNCTIONS
●
Copies will be output each time two originals for 2 in 1 copy or four originals for 4 in 1
copy have been scanned.
●
To start copying before scanning all originals for a copy (after only one original for 2 in 1
or three originals or less for 4 in 1 have been scanned), press the READ-END key.
●
Portions of original images may not be copied depending on the original and copy paper
sizes and the number of images to be copied onto a page.
●
Depending on the number of originals and the orientation of the originals and copy paper,
the image of originals may be rotated.
●
To cancel the 2 in 1 / 4 in 1 feature, select the 2 in 1 / 4 in 1 feature again and select
"OFF".
53
Page 56

B/W REVERSE
The B/W REVERSE feature is used to reverse black and white areas.
Original Copy
●
When the B/W REVERSE feature is selected, the exposure mode will be automatically set to the
TEXT mode. Other exposure modes cannot be selected. Even if this feature is canceled, the TEXT
mode will not automatically be canceled.
Place an original on the platen glass or in the document feeder tray.
1
Document feeder tray
SPECIAL FUNCTIONS
Press the SPECIAL FUNCTION key. Then press the OK key.
2
●
The SPECIAL MODES screen will appear.
SPECIAL MODES
Use the and keys to select "B/W REVERSE" and press the OK key.
3
●
A check mark will appear to the left of "B/W REVERSE", and the display will return to the
basic screen.
54
Page 57

B/W REVERSE
Make all other desired copier selections and press the START key .
4
●
To cancel the B/W reverse feature, highlight "B/W REVERSE" with a check mark on the
SPECIAL MODES screen and press the OK key.
3
SPECIAL FUNCTIONS
55
Page 58

XY ZOOM
The XY ZOOM feature allows the horizontal and vertical copy ratios to be changed independently.
Example: Reduction only in the horizontal direction
Original Copy
●
This feature cannot be used with the 2 in 1 or 4 in 1 feature.
●
To use the XY ZOOM feature with the DUAL PAGE COPY feature, set the DUAL PAGE COPY
feature first and then the XY ZOOM feature. (Enlargement cannot be set.)
●
The copy ratios can be set from 25% to 400%. However, the allowable copy ratio range is limited to
the following conditions:
Exposure mode Location of original Copy ratio range
Other than SUPER PHOTO SPF/RSPF (optional) 50% to 200%
SUPER PHOTO Platen glass 50% to 200%
SUPER PHOTO SPF/RSPF (optional) 50% to 141%
●
If the auto image function has been set, the XY ZOOM feature cannot be set. If the XY ZOOM feature
is set, the auto image function cannot be set.
SPECIAL FUNCTIONS
Place an original on the platen glass or in the document feeder tray.
1
Press the SPECIAL FUNCTION key. Then press the OK key.
2
●
The SPECIAL MODES screen will appear.
SPECIAL MODES
MARGIN SHIFT
ERASE
DUAL PAGE COPY
[OK]:ADJUST
56
Page 59

Use the and keys to select "XY ZOOM" and press the OK key.
3
●
The setting screen for XY ZOOM will appear. The copy ratio in the horizontal direction
will be highlighted.
XY ZOOM
121%
100%
95%
ZOOM
X: 100%
Y: 100%
[]:X Y
Use the , , , and keys to change the copy ratio in the horizontal
4
direction.
XY ZOOM
●
Use the and keys to set the approximate ratio, then press the key to decrease the
ratio or key to increase the ratio.
Press the key.
5
●
The copy ratio in the vertical direction will be highlighted.
XY ZOOM
121%
100%
95%
ZOOM
X: 121%
Y: 100%
[]:X Y
Use the , , , and keys to change the copy ratio in the vertical
6
direction.
3
SPECIAL FUNCTIONS
●
To change the copy ratio in the horizontal direction again, press the key.
57
Page 60

XY ZOOM
7
Press the OK key.
●
The display will return to the basic screen.
SPECIAL FUNCTIONS
Ready to copy.
1
/
8 11R
2
X121% Y 99%
1
/
8 14
2
Ensure that the desired paper tray is selected.
8
●
If the auto paper select function has been enabled, the appropriate copy paper size will
have been automatically selected based on the original size and the selected copy ratios.
Image rotation may occur.
Make all other desired copier selections and press the START key .
9
●
To cancel the XY zoom feature, press the COPY RATIO key. A confirmation display will
appear. Select "OFF" and press the OK key. Set the copy ratio again if needed. If you
select "ADJUST" and press the OK key, the copy ratio for XY ZOOM can be set.
58
Page 61

TRANSPARENCY
The TRANSPARENCY feature is used to copy onto transparency film.
●
When copying onto transparency film, use this feature to obtain better copy quality. When this feature
is selected, the bypass tray will be automatically selected and "TRANSPARENCY" will appear in the
paper size display.
●
This feature cannot be used with duplex copying or staple sort copying.
●
Recommended transparency film is SF-85A.
Place an original on the platen glass or in the document feeder tray.
1
Document feeder tray
Press the SPECIAL FUNCTION key. Then press the OK key.
2
●
The SPECIAL MODES screen will appear.
3
SPECIAL MODES
MARGIN SHIFT
ERASE
DUAL PAGE COPY
[OK]:ADJUST
Use the and keys to select "TRANSPARENCY" and press the OK
3
key.
SPECIAL MODES
XY ZOOM
B/W REVERSE
TRANSPARENCY
[OK]:OFF ON
●
A check mark will appear to the left of "TRANSPARENCY", and the display will return to
the basic screen.
SPECIAL FUNCTIONS
59
Page 62

TRANSPARENCY
Load transparency film into the bypass tray.
4
●
Load transparency film one sheet at a time in the portrait orientation.
Make all other desired copier selections and press the START key .
5
●
To cancel the transparency feature, highlight "TRANSPARENCY" with a check mark on
the SPECIAL MODES screen and press the OK key.
SPECIAL FUNCTIONS
60
Page 63

JOB MEMORY
Nine frequently used job programs can be stored in each of nine storage registers. This is convenient
for quick job recall without losing time manually reprogramming each aspect of a job.
●
The following functions cannot be stored in the job memory: copy quantity, original size, document
station (platen glass or document feeder tray), paper size, interrupt, extra image adjustment.
●
If any function which has been stored in a job program is modified by a key operator program, the key
operator settings will supercede the previous setting.
●
The job memory feature cannot be used in the interrupt copy mode.
★KEY OPERATOR Job memory replacement/deletion can be prohibited. See page 18 of the KEY
OPERATOR'S GUIDE.
Storing a job program
Make all copier selections to be stored.
1
Press the PROGRAM key.
2
●
The JOB PROGRAMS screen will appear.
3
JOB PROGRAMS
RECALL
STORE
DELETE
Use the and keys to select "STORE" and press the OK key.
3
●
The STORE JOB PROGRAM screen will appear.
STORE JOB PROGRAM
123
456
789
[10-key]:SELECT
●
To cancel the job memory mode, press the BACK key or the CLEAR ALL key.
SPECIAL FUNCTIONS
61
Page 64

JOB MEMORY
Select a program number from 1 to 9 using the numeric keys.
4
●
A screen indicating that the settings have been stored will appear and then the display
will return to the basic screen.
●
The numbers with a check mark are program numbers which already contain job
programs. If a program number containing a job program is entered, the message
"Storage number selected is already used. Replace it?" will appear to confirm the
selection. To replace an existing program with the new program, select "YES" with the
and keys and press the OK key.
●
If the existing program is not to be replaced, select "NO" with the and keys, press the
OK key, and select another register number.
Deleting a job program
SPECIAL FUNCTIONS
Press the PROGRAM key.
1
●
The JOB PROGRAMS screen will appear.
JOB PROGRAMS
RECALL
STORE
DELETE
Use the and keys to select "DELETE" and press the OK key.
2
●
The DELETE JOB PROGRAM screen will appear.
62
●
To cancel the job memory mode, press the BACK key or the CLEAR ALL key.
Page 65

Select a program number from 1 to 9 using the numeric keys.
3
●
The numbers with a check mark are program numbers which contain job programs. If a
checked number is entered, the message "Delete job program?" will appear to confirm
the selection to delete the program. To delete the program, select "YES" with the and
keys and press the OK key.
●
If "NO" is selected, the previous screen will reappear.
Recalling a job program
JOB MEMORY
Press the PROGRAM key.
1
●
The JOB PROGRAMS screen will appear with RECALL highlighted.
Press the OK key.
2
●
The RECALL JOB PROGRAM screen will appear.
3
SPECIAL FUNCTIONS
JOB PROGRAMS
RECALL
STORE
DELETE
RECALL JOB PROGRAM
123
456
789
[10-key]:SELECT
63
Page 66

JOB MEMORY
Select a program number from 1 to 9 using the numeric keys.
3
●
The numbers with a check mark are program numbers which contain job programs. If a
checked number is entered, the settings for that job program will be recalled and the
display will return to the basic screen.
●
The recalled settings may be modified for a particular job run, but any changes made will
not be stored in the job memory. To store the new settings, follow the "Storing a job
program" procedure.
SPECIAL FUNCTIONS
64
Page 67

CHAPTER 4
COPIER TROUBLE?
This chapter describes how to remove misfed paper and how to remedy
minor problems.
Page
●
STATUS MESSAGES . . . . . . . . . . . . . . . . . . . . . . . . . . . . . . . . . . 66
●
MISFEED REMOVAL. . . . . . . . . . . . . . . . . . . . . . . . . . . . . . . . . . . 67
Misfeed in the bypass tray . . . . . . . . . . . . . . . . . . . . . . . . . . . . . . . 67
Misfeed in the copier . . . . . . . . . . . . . . . . . . . . . . . . . . . . . . . . . . . 68
Misfeed in the center tray. . . . . . . . . . . . . . . . . . . . . . . . . . . . . . . . 71
Misfeed in the upper paper tray . . . . . . . . . . . . . . . . . . . . . . . . . . . 72
Misfeed in the lower paper tray . . . . . . . . . . . . . . . . . . . . . . . . . . . 72
Misfeed in the upper exit area . . . . . . . . . . . . . . . . . . . . . . . . . . . . 73
●
TROUBLESHOOTING . . . . . . . . . . . . . . . . . . . . . . . . . . . . . . . . . . 75
4
65
Page 68

STATUS MESSAGES
If any of the following messages appears in the display, carry out the prescribed remedy.
Message Remedy
(Maintenance icon)
Maintenance required
soon.
Maintenance required.
Call for service.
Call for service. A malfunction has occurred which cannot be corrected by the
(Toner cartridge
replacement required icon)
Toner is low.
Check the toner cartridge. Check to see if the toner cartridge has been installed properly.
Can not continue.
Remove paper from the
center tray.
Please check paper in paper
tray<✼>.
Load <✼✼> paper into
tray <✼>. Or cancel job and
change the paper size setting.
COPIER TROUBLE?
Selected paper tray is out of
service.
Service by an authorized SHARP service technician will be
required soon. Contact your service center as soon as
possible.(This message will be displayed if the information key
is pressed when the information ( ) icon is displayed.)
Normal maintenance service by an authorized SHARP service
technician is needed. Contact your service center.
key operator. Contact your authorized SHARP service center
for service.
Replacement of the toner cartridge will be needed soon. (This
message will be displayed if the information key is pressed
when the information ( ) icon is displayed.) See page 82.
The number of copies on the center tray has reached the limit.
Remove the copies from the center tray.
Check to see if copy paper has been loaded properly.
The paper size specified for the tray is different from the actual
size. See page 78.
Contact your authorized SHARP service center for service.
Check stapler or staple jam. Staples become jammed or the staple box is not installed
properly (when an optional finisher is installed). Check the
staple box. See page 110 for staple jam removal. If the trouble
cannot be easily remedied, use key operator program
"DISABLE STAPLER" to prevent the use of the stapler until it
can be repaired. Contact your authorized SHARP service
center for service.
★ KEY OPERATOR See page 19 of the KEY OPERATOR'S
GUIDE for enabling/disabling stapler.
Please remove paper
from the stapler compiler.
<✼>: paper tray number
<✼✼>: paper size to be set
Paper is left in the stapler compiler. Remove it. See page 112.
66
Page 69

MISFEED REMOVAL
When a misfeed occurs, the copier will stop. The message "Clear paper path." will appear in the display
along with an illustration showing paper misfeed locations.
●
If paper becomes accidentally torn during removal, be sure to remove all pieces. Be careful not to
damage the photoconductive drum.
●
For misfeeds in optional equipment, see their respective sections of the operation manual.
★KEY OPERATOR If the backlight change of the display is enabled using a key operator program, the
color of the backlighting will change to orange when a misfeed occurs. See page 20 of the KEY
OPERATOR'S GUIDE.
First confirm the misfeed locations.
(p.73)
(p.71)
(p.67, 68, 72)
(p.72)
Misfeed in the bypass tray
Gently pull the misfed paper out from the bypass tray.
1
Open and close the side cover to cancel the misfeed display.
2
●
You can also cancel the misfeed display by opening and closing the front cover.
●
Confirm that the misfeed display has been cleared. If the misfeed display is not cleared,
remove the misfed paper referring to "A. Misfeed in the paper feed area".
4
COPIER TROUBLE?
67
Page 70

MISFEED REMOVAL
Misfeed in the copier
Check the misfeed location. Remove the misfed paper following the
instructions for each location in the illustration below.
If paper is misfed here,
proceed to “B. Misfeed
If the misfed paper is seen from this
side, proceed to “C. Misfeed in the
transport area”.
If paper is misfed here, proceed to
“A. Misfeed in the paper feed area”.
A. Misfeed in the paper feed area
in the fusing area”.
Open the bypass tray and the side cover.
1
COPIER TROUBLE?
Gently open the front cover.
2
68
Page 71

MISFEED REMOVAL
Carefully remove the misfed paper. Turn the roller rotating knob in the
3
direction of the arrow to assist in removing it.
WARNING:
The fusing unit is hot. Take care in removing paper.
CAUTION:
Do not touch the photoconductive drum (green portion) when removing the misfed paper.
Doing so may damage the drum and cause smudges on copies.
Close the front cover and the side cover.
4
●
Confirm that the misfeed display has been cleared.
B. Misfeed in the fusing area
Open the bypass tray and the side cover.
1
Gently open the front cover.
2
4
COPIER TROUBLE?
69
Page 72

MISFEED REMOVAL
Turn the roller rotating knob in the direction of the arrow.
3
Carefully remove the misfed paper. Lower the fusing unit release
4
levers to allow easier removal. After removal, return the release levers
to their operating positions.
Roller rotating knob
Fusing unit release lever
WARNING:
The fusing unit is hot. Take care in removing paper.
CAUTION:
●
Do not touch the photoconductive drum (green portion) when removing the misfed
paper. Doing so may damage the drum and cause smudges on copies.
●
Be careful, there may be unfused toner on the misfed paper which could soil your hands
or clothes.
COPIER TROUBLE?
Close the front cover and the side cover.
5
●
Confirm that the misfeed display has been cleared.
70
Page 73

C. Misfeed in the transport area
Open the bypass tray and the side cover.
1
Use the green tabs on either side of the paper guide to rotate the guide
2
open and remove the misfed paper
MISFEED REMOVAL
WARNING:
The fusing unit is hot. Take care in removing paper.
Close the side cover.
3
●
Confirm that the misfeed display has been cleared.
Misfeed in the center tray
Remove the paper by pulling it into the center tray.
1
4
COPIER TROUBLE?
71
Page 74

MISFEED REMOVAL
Misfeed in the upper paper tray
Before opening the upper paper tray, be sure to open the bypass tray and the side cover and then
perform steps 1 to 3 described in the "A. Misfeed in the paper feed area" section.
Pull out the upper paper tray and remove the misfed paper.
1
Close the paper tray.
2
Open and close the side cover to cancel the misfeed display.
3
COPIER TROUBLE?
●
You can also cancel the misfeed display by opening and closing the front cover.
●
Confirm that the misfeed display has been cleared.
Misfeed in the lower paper tray
Grasp the handle of the lower side cover and gently open the cover.
1
72
Page 75

MISFEED REMOVAL
Remove the misfed paper.
2
●
Be careful not to tear the misfed paper during removal.
If the misfed paper is not seen in step 2, pull out the lower paper tray
3
and remove the misfed paper.
●
Be careful not to tear the misfed paper during removal.
Close the paper tray.
4
Close the lower side cover.
5
●
Confirm that the misfeed display has been cleared.
Misfeed in the upper exit area
If an optional job separator tray kit or an optional finisher is installed, a misfeed may occur in the upper
exit area.
4
COPIER TROUBLE?
Open the upper exit area cover.
1
73
Page 76

MISFEED REMOVAL
Gently pull the misfed paper out.
2
Close the upper exit area cover.
3
●
Confirm that the misfeed display has been cleared.
COPIER TROUBLE?
74
Page 77

TROUBLESHOOTING
Always check the message display whenever the copier stops during an operation or operation is not
possible. Messages in the display will give you easy-to-follow directions. For other troubles not
described by messages, check the chart below.
Problem Solution
Copier does not operate.
Copies are too dark or too
light.
Blank copies
Copies smear if rubbed.
Paper misfeeds frequently.
●
Copier plugged in? Plug the copier into a grounded
outlet as specified. See page 89.
●
Power switch ON? Turn the power switch ON. See
page 16.
●
Copy density properly adjusted? Adjust the exposure. See page 29.
●
Is the original placed face down? Place the original face down on the
platen glass.
●
Paper too heavy? Use copy paper within the specified
range. See page 78.
●
Paper damp? Replace with dry copy paper. Be
sure to store copy paper in a dry
location. See page 88.
●
Non-standard paper used? Use standard paper. If using
special paper, feed the paper
through the bypass tray. See pages
36 and 78.
●
Paper properly installed? Make sure the paper is properly
installed. See pages 36 and 78.
●
Pieces of paper inside copier? Remove all pieces of misfed paper.
See page 67.
4
Original size not selected
automatically.
●
Paper curled or damp? Store copy paper flat in the wrapper
in a dry location. See page 88.
●
Has the platen cover been
completely opened when the
original is placed on the platen
glass?
●
Does the original include any
large black solid areas?
Open the platen cover completely
and then place the original on the
platen glass. Close the platen
cover.
If the original includes any large
black solid areas, the original size
may not be detected. Press the
SPECIAL FUNCTION key and
select "ORIG. SIZE ENTER" to
specify the original size. See page
24.
COPIER TROUBLE?
75
Page 78

TROUBLESHOOTING
Problem Solution
Copies are smudged or
dirty.
Black or white stripes
appear on copies.
Paper size for a paper tray
cannot be set.
Power is on but copying is
not possible.
Lighting fixture flickers.
●
Platen glass or platen cover
Clean regularly. See page 84.
dirty?
●
Original smudged or blotchy? Use a clean original.
●
Is the scanning window of an
Clean the scanning window.
optional SPF or RSPF dirty?
●
Is the COPY indicator off? Press the COPY key to select the
COPY mode. See page 14.
●
Is copying, printing or facsimile
printing being performed?
Set the paper size after copying,
printing or facsimile printing is
complete.
●
Are only the mode indicators
on?
The copier is in the auto power
shut-off mode. Press the COPY
key or another mode key that is lit.
●
Is the COPY indicator off? Press the COPY key to select the
COPY mode.
●
Is two-sided printing being
Wait until the printing job finishes.
performed?
●
Is the same power outlet used
for the lighting fixture and the
copier?
Connect the copier to a power
outlet which is not used for other
electric appliances.
CAUTION:
Be sure to use only genuine SHARP parts and supplies.
Please contact your SHARP service center immediately if a problem persists after checking the above.
COPIER TROUBLE?
76
Page 79

CHAPTER 5
GENERAL INFORMATION
●
PAPER . . . . . . . . . . . . . . . . . . . . . . . . . . . . . . . . . . . . . . . . . . . . . . 78
Types and sizes of copy paper . . . . . . . . . . . . . . . . . . . . . . . . . . . 78
Loading copy paper . . . . . . . . . . . . . . . . . . . . . . . . . . . . . . . . . . . . 78
Changing the copy paper size in the tray. . . . . . . . . . . . . . . . . . . . 80
●
TONER CARTRIDGE REPLACEMENT. . . . . . . . . . . . . . . . . . . . . 82
●
CHECKING THE TONER QUANTITY AND
TOTAL OUTPUT COUNT . . . . . . . . . . . . . . . . . . . . . . . . . . . . . . . 84
●
CLEANING THE PLATEN GLASS AND PLATEN COVER . . . . . 85
●
CLEANING THE BYPASS TRAY PAPER FEED ROLLER. . . . . . 86
●
DISPLAY CONTRAST ADJUSTMENT . . . . . . . . . . . . . . . . . . . . . 87
●
STORAGE OF SUPPLIES. . . . . . . . . . . . . . . . . . . . . . . . . . . . . . . 88
Proper storage . . . . . . . . . . . . . . . . . . . . . . . . . . . . . . . . . . . . . . . . 88
●
SPECIFICATIONS . . . . . . . . . . . . . . . . . . . . . . . . . . . . . . . . . . . . . 89
Page
77
5
Page 80

PAPER
Types and sizes of copy paper
Types and sizes of copy paper which can be fed from the paper trays are shown below.
For paper acceptable for feeding from the bypass tray, see page 36.
Size Weight Capacity (21 lb. bond paper)
5-1/2" x 8-1/2" to 11" x 17"
A5 to A3
●
5-1/2" x 8-1/2" and A5 copy papers cannot be fed from any tray except the uppermost tray. (including
trays in optional paper feed units)
●
B5 paper cannot be set for paper tray 2.
●
Special papers including transparency film must be fed through the bypass tray.
15 lbs. to 21 lbs. 500 sheets
Loading copy paper
To save space, this copier has been designed with adjustable front-loading trays, which are easily
opened for paper loading. For best results, use only SHARP recommended paper.
The message "TRAY<✼>: Add paper." will be displayed when there is no copy paper in the selected
paper feed station.
When the selected paper tray is not installed or is improperly installed, "Push paper tray <✼> into the
machine until it latches." will be displayed. Install it or push it back firmly into place.
NOTE:
When the paper size is changed in a paper tray, the size of the paper must be entered as
described on page 80. If not, the machine will stop copying and the message "Load <✼✼> paper
into tray <✼>. Or cancel job and change the paper size setting." will appear in the display. In this
case, either load the paper requested in the message or enter the paper size that is already
installed in the paper tray.
GENERAL INFORMATION
<✼> : paper tray number
<✼✼>: paper size to be set
Pull out the paper tray until it stops.
1
Squeeze the lock lever of the front guide and slide the front guide to
2
match the width of the paper.
Front guide
Left guide
78
Page 81

Move the left guide to the appropriate slot as marked on the tray.
3
●
When using 11" x 17" copy paper, store the left guide in the slot at the left front of the
paper tray.
Fan the copy paper and insert it into the tray.
4
PAPER
●
Set the paper along the guides.
●
The tray holds up to 500 sheets of 21 lb. bond paper.
●
Do not load paper above the maximum height line.
Push the paper tray firmly back into the copier.
5
●
If the paper size is changed in steps 3 and 4, place the paper size card in the front of the
paper tray to indicate the selected paper size. Proceed to the next section.
5
GENERAL INFORMATION
79
Page 82

PAPER
Changing the copy paper size in the tray
Paper size setting can only be done while the machine is not operating and the COPY mode has been
selected.
●
B5 paper cannot be set for paper tray 2.
Press the SPECIAL FUNCTION key.
1
●
The SPECIAL FUNCTION screen will appear.
SPECIAL FUNCTION
SPECIAL MODES
ORIG. SIZE ENTER
PAPER SIZE SET
DISPLAY CONTRAST
Use the and keys to select "PAPER SIZE SET" and press the OK
2
key.
●
The paper size setting screen will appear.
GENERAL INFORMATION
PAPER SIZE SET
1
/
8 11
2
11 17
Use the and keys to select the paper tray for which the paper size
3
is being changed.
Press the key.
4
11 17
1
/
2
8 14
1
/
2
8 13
1
/
2
8 11
PAPER SIZE SET
1
/
8 11
2
2
11 17
11 17
1
/
2
8 14
1
/
2
8 13
1
/
8 11
2
80
Page 83

Use the and keys to select the paper size that has been set.
5
●
To change the size of another paper tray, press the key and then repeat steps 3 to 5.
Press the OK key.
6
PAPER
●
A confirmation message for paper size setting will appear.
Press the OK key.
7
●
The specified paper size will be registered and the display will return to the basic screen.
5
GENERAL INFORMATION
81
Page 84

TONER CARTRIDGE
REPLACEMENT
The approximate quantity of toner remaining can be displayed by pressing and holding the COPY key
during standby or warm-up. See page 84. When the quantity of toner remaining is less than 25%,
obtain a new cartridge. When the toner cartridge replacement required icon ( ) appears in the display,
replacement of the toner cartridge will be needed soon. If you press the information key, the message
"Toner is low." will appear in the display. When the message "Add toner. Can not copy or print."
appears in the display, the toner cartridge must be replaced before copying can be resumed. Replace
the toner cartridge by following the procedure below.
NOTE:
During a long copy run of a dark original, the message "Toner replenishment in progress." may
appear and the copier will stop, even though toner is left. The copier will feed toner for up to 2
minutes and then the START key indicator will light up. Press the START key to restart copying.
For best copying results, be sure to use only SHARP Genuine
Supplies which are designed, engineered and tested to maximize the
life and performance of SHARP copiers. Look for the Genuine
Supplies label on the toner package.
GENERAL INFORMATION
GENUINE SUPPLIES
Gently open the front cover.
1
Push the toner cartridge lock release lever and pull the toner cartridge
2
out. Remove the toner cartridge while supporting it with the left hand
at the green label portion.
●
For disposal of the old toner cartridge, contact your dealer.
NOTE:
After removing the toner cartridge, do not shake it or tap on it. Doing so may cause toner to leak
from the cartridge. Put the old cartridge immediately in the bag contained in the box of the new
cartridge.
82
Page 85

TONER CARTRIDGE REPLACEMENT
Remove the new toner cartridge from the bag. Grasp the cartridge on
3
both sides and shake it horizontally approximately 20 times. After
shaking the cartridge, remove the tape.
NOTE:
Grasp the grip when holding the cartridge. Do not hold the cartridge by the shutter. Be sure to
only shake the cartridge before the tape is removed.
Gently insert the toner cartridge along the guides until it clicks in
4
place while pushing the lock release lever.
NOTE:
If dirt or dust is adhered to the toner cartridge, remove it before installing the cartridge.
Remove the tape from the shutter. Pull the shutter out of the toner
5
cartridge as shown in the illustration. Discard the shutter.
Close the front cover.
6
5
GENERAL INFORMATION
83
Page 86

CHECKING THE TONER QUANTITY
AND TOTAL OUTPUT COUNT
The approxmate quantity of toner remaining and the total output count can be displayed by the
procedure below. The total count value displayed is the output count in the copy, print, and fax modes
including the output count by the self-print function of the printer and facsimile features.
Press and hold the COPY key during standby or warm-up.
1
TOTAL OUTPUT
26,788
TONER REMAINING(%)
0 25 50 75 100
●
The toner quantity and the total output count will be displayed in the display while the key
is pressed.
NOTE:
An 11" x 17" or A3 sheet is counted as two sheets. A two-sided copy is also counted as two
sheets.
GENERAL INFORMATION
84
Page 87

CLEANING THE PLATEN
GLASS AND PLATEN COVER
Proper care is essential for clean, sharp copies. Please take a few minutes to regularly clean your
copier.
Stains or dirt on the platen glass or platen cover will also be copied. Wipe the platen glass and
platen cover with a soft, clean cloth.
●
If necessary, dampen the cloth with water. Do not use thinner, benzene, or similar volatile
cleaning agents.
●
If an optional SPF or RSPF is installed, wipe the platen cover portion of the SPF or RSPF and
the scanning window on the platen glass.
85
5
GENERAL INFORMATION
Page 88

CLEANING THE BYPASS
TRAY PAPER FEED ROLLER
If misfeeds occur frequently when feeding postcards, envelopes, thick paper, etc. through the
bypass tray, wipe the paper feed roller at the feed slot of the bypass tray with a soft, clean cloth
dampened with alcohol or water.
Paper feed roller
GENERAL INFORMATION
86
Page 89

DISPLAY CONTRAST
ADJUSTMENT
The contrast of the display can be adjusted as below.
Press the SPECIAL FUNCTION key.
1
●
The SPECIAL FUNCTION screen will appear.
SPECIAL FUNCTION
SPECIAL MODES
ORIG. SIZE ENTER
PAPER SIZE SET
DISPLAY CONTRAST
Use the and keys to select "DISPLAY CONTRAST" and press the
2
OK key.
●
The screen for contrast setting will appear.
Use the and keys to adjust the contrast.
3
●
To reset the contrast to the default setting, press the CLEAR key.
Press the SPECIAL FUNCTION key.
4
●
The display will return to the basic screen.
5
GENERAL INFORMATION
87
Page 90

STORAGE OF SUPPLIES
Standard supplies for this copier that are to be replaced by the user are copy paper, toner cartridge,
and staple cartridge for the optional finisher (AR-FN5).
For best copying results, be sure to use only SHARP Genuine
Supplies which are designed, engineered, and tested to maximize the
life and performance of SHARP copiers. Look for the Genuine
Supplies label on the toner package.
GENUINE SUPPLIES
Proper storage
Store the supplies in a location that is:
1
●
clean and dry,
●
at a stable temperature,
●
not exposed to direct sunlight.
GENERAL INFORMATION
Store copy paper in the wrapper and lying flat.
2
●
Paper stored in packages standing up or out of the wrapper may curl or become damp,
resulting in paper misfeeds.
88
Page 91

SPECIFICATIONS
AR-235 AR-275
Type Digital copying machine, desktop
Copy system Dry, electrostatic transfer
Originals Sheets, bound documents
Original sizes Max. 11" x 17"
Copy sizes Max. 11" x 17", Min. 5-1/2" x 8-1/2"
Image loss: Max. 5/32" (4 mm) (leading and trailing edges), Max. 1/8"
(3 mm) (along other edges)
Copying speed
(one-sided
copying at 100%
copy ratio)
Continuous copy Max. 999 copies; subtractive counter
First-copy time 4.8 s (600 dpi, except in a power save mode)✼
Warm-up time Approx. 40 s
Copy ratio Variable: 25% to 400%, in 1% increments (total 376 steps)
Exposure system Moving optical source, slit exposure (stationary platen) with automatic
600 dpi 23 copies/min. (8-1/2" x 11") 27 copies/min. (8-1/2" x 11")
16 copies/min. (8-1/2" x 11"R) 18 copies/min. (8-1/2" x 11"R)
13 copies/min. (8-1/2" x 14") 16 copies/min. (8-1/2" x 14")
12 copies/min. (11" x 17") 15 copies/min. (11" x 17")
1200 dpi 13.5 copies/min. (8-1/2" x 11")
9 copies/min. (8-1/2" x 11"R)
8 copies/min. (8-1/2" x 14")
7.5 copies/min. (11" x 17")
Fixed preset: 25%, 50%, 64%, 77%, 95%, 100%, 121%, 129%, 141%,
200%, 400%
At 1200 dpi, the copy ratio range is limited within 50% to 200%.
exposure function
Copy paper feed Two paper trays with automatic feed (500 sheets each), one bypass
tray with automatic feed (100 sheets)
Fusing system Heat rollers
Developer system Magnetic brush development
Light source Xenon lamp
Resolution Scan: 400 dpi
Output: 600 dpi (1200 dpi in the super photo mode)
Gradation Scan: 256 levels
Output: 2 levels
Power supply AC 120 - 127V, 60 Hz, 10 amperes
89
5
GENERAL INFORMATION
Page 92

SPECIFICATIONS
Power consumption Max. 1.2 kW
Overall dimensions (with
24-13/16" (W) x 23-3/64" (D) (628 mm (W) x 585.5 mm (D))
bypass tray folded)
Weight Approx. 105.2 lbs. (47.8 kg), toner cartridge included
Copier dimensions (without
platen cover)
24-13/16" (W) x 23-3/64" (D) x 25-21/64" (H)
(628 mm (W) x 585.5 mm (D) x 643 mm (H))
Operating conditions Temperature: 59°F to 86°F (15°C to 30°C)
Humidity: 20% to 85%
Noise level Sound Power Level L
WA
Copying: 6.3 [B], Standby: 3.9 [B]
Sound Pressure Level L
PA
(bystander positions)
Copying: 49 [dB (A)], Standby: 24 [dB (A)]
Noise emission measurement in accordance with ISO 7779.
Emission concentration
(measurement according to
RAL-UZ 62)
Ozone: 0.02 mg/m
Dust: 0.075 mg/m
Styrene: 0.07 mg/m
3
or less
3
or less
3
or less
Optional equipment Single pass feeder (AR-SP4)
Reversing single pass feeder (AR-RP3)
GENERAL INFORMATION
✼ First-copy time may differ depending on operating conditions, such as power-supply voltage and
room temperature.
Finisher (AR-FN5)
500-sheet paper feed unit (AR-D11)
2x500-sheet paper feed unit (AR-D12)
Platen cover (AR-VR3)
Printer expansion kit (AR-P11)
PS3 expansion kit (AR-PK1)
Barcode font kit (AR-PF1)
Job separator tray kit (AR-TR3)
Print server card (AR-NC5J)
Facsimile expansion kit (AR-FX4)
Network scanner expansion kit (AR-NS2)
NOTE:
As a part of our policy of continuous improvement, SHARP reserves the right to make design and
specification changes for product improvement without prior notice. The performance
specification figures indicated are nominal values of production units and there may be some
deviations from these values in individual units.
90
Page 93

CHAPTER 6
OPTIONAL EQUIPMENT
This chapter describes operating instructions for the Single Pass
Feeder (AR-SP4), the Reversing Single Pass Feeder (AR-RP3), the
Finisher (AR-FN5), the 500-Sheet Paper Feed Unit (AR-D11), and the 2
x 500-Sheet Paper Feed Unit (AR-D12).
Page
●
SYSTEM CONFIGURATION . . . . . . . . . . . . . . . . . . . . . . . . . . . . . 92
●
SINGLE PASS FEEDER (AR-SP4)/
REVERSING SINGLE PASS FEEDER (AR-RP3). . . . . . . . . . . . . 93
Part names. . . . . . . . . . . . . . . . . . . . . . . . . . . . . . . . . . . . . . . . . . . 93
Specifications . . . . . . . . . . . . . . . . . . . . . . . . . . . . . . . . . . . . . . . . . 94
Acceptable originals . . . . . . . . . . . . . . . . . . . . . . . . . . . . . . . . . . . . 94
Unacceptable originals. . . . . . . . . . . . . . . . . . . . . . . . . . . . . . . . . . 94
Using the SPF or the RSPF . . . . . . . . . . . . . . . . . . . . . . . . . . . . . . 95
Misfeed removal. . . . . . . . . . . . . . . . . . . . . . . . . . . . . . . . . . . . . . 101
●
FINISHER (AR-FN5). . . . . . . . . . . . . . . . . . . . . . . . . . . . . . . . . . . 103
Part names. . . . . . . . . . . . . . . . . . . . . . . . . . . . . . . . . . . . . . . . . . 103
Specifications . . . . . . . . . . . . . . . . . . . . . . . . . . . . . . . . . . . . . . . . 104
Supplies . . . . . . . . . . . . . . . . . . . . . . . . . . . . . . . . . . . . . . . . . . . . 104
Finisher functions . . . . . . . . . . . . . . . . . . . . . . . . . . . . . . . . . . . . . 105
Staple sort . . . . . . . . . . . . . . . . . . . . . . . . . . . . . . . . . . . . . . . . . . 106
Staple cartridge replacement . . . . . . . . . . . . . . . . . . . . . . . . . . . . 109
Staple jam removal . . . . . . . . . . . . . . . . . . . . . . . . . . . . . . . . . . . 110
Misfeed removal. . . . . . . . . . . . . . . . . . . . . . . . . . . . . . . . . . . . . . 112
●
500-SHEET PAPER FEED UNIT (AR-D11)/
2x500-SHEET PAPER FEED UNIT (AR-D12). . . . . . . . . . . . . . . 114
Part names. . . . . . . . . . . . . . . . . . . . . . . . . . . . . . . . . . . . . . . . . . 114
Specifications . . . . . . . . . . . . . . . . . . . . . . . . . . . . . . . . . . . . . . . . 114
Loading copy paper . . . . . . . . . . . . . . . . . . . . . . . . . . . . . . . . . . . 115
Changing the copy paper size in the tray. . . . . . . . . . . . . . . . . . . 115
Misfeed removal. . . . . . . . . . . . . . . . . . . . . . . . . . . . . . . . . . . . . . 115
6
91
Page 94

SYSTEM CONFIGURATION
A number of options are available for the copier which allow you to configure a copier system to meet
your particular needs. The options include the following.
OPTIONAL EQUIPMENT
92
Page 95

SINGLE PASS FEEDER (ARSP4)/REVERSING SINGLE
PASS FEEDER (AR-RP3)
The single pass feeder (SPF) and the reversing single pass feeder (RSPF) hold up to 30 originals each
for automatic document feeding.
If the RSPF is installed, two-sided originals can be copied automatically without having to manually turn
them over.
Part names
AR-SP4
Document feeder tray
Original guides
Feeding roller cover
Exit area
AR-RP3
Document feeder tray
Right side cover
Original guides
Feeding roller cover
Reversing tray
Exit area
93
6
OPTIONAL EQUIPMENT
Page 96

SINGLE PASS FEEDER (AR-SP4)/REVERSING SINGLE PASS FEEDER (AR-RP3)
Specifications
Acceptable originals Weight 15 to 23 lbs.
Size 5-1/2" x 8-1/2"* to 11" x 17"
* 5-1/2" x 8-1/2" size originals cannot be used in the duplex
copy mode.
Capacity Up to 30 sheets provided the total aggregate thickness does
not exceed 5/32"
Power supply Drawn from the copier
Detectable original
sizes
Weight SPF Approx. 11.1 lbs. (5.0 kg)
Dimensions 22-61/64" (W) x 17-1/8" (D) x 5-1/4" (H)
NOTE:
As a part of our policy of continuous improvement, SHARP reserves the right to make design and
specification changes for product improvement without prior notice. The performance
specification figures indicated are nominal values of production units and there may be some
deviations from these values in individual units.
5-1/2" x 8-1/2", 8-1/2" x 11", 8-1/2" x 11"R, 8-1/2" x 14", 11" x 17"
RSPF Approx. 11.9 lbs. (5.4 kg)
(583 mm (W) x 435 mm (D) x 133 mm (H))
Acceptable originals
Up to 30 originals ranging from 5-1/2" x 8-1/2" to 11" x 17" and from 15 lbs. to 23 lbs. can be used.
The total aggregate thickness must not exceed 5/32".
NOTES:
●
Be sure to remove any staples or paper clips from the originals.
●
Before placing curled or wavy originals into the document feeder tray, be sure to flatten them. If
not, original misfeeds may result.
●
For best feeding of originals which have binding holes punched into them, insert them so that
the holes are positioned to the right or along the original guides. In this case the settings for
margin shift may need to be changed. See page 45.
Unacceptable originals
The following types of paper cannot be used as originals:
●
Special papers including transparency film, photographs, and tracing paper
●
Damaged or crumpled originals
●
OPTIONAL EQUIPMENT
Paper with multiple punched holes (paper with two or three holes can be used)
●
5-1/2" x 8-1/2" size originals cannot be used in the 2-sided to 1-sided or 2-sided to 2-sided mode.
94
Page 97

SINGLE PASS FEEDER (AR-SP4)/REVERSING SINGLE PASS FEEDER (AR-RP3)
Stream feeding mode
If the stream feeding mode has been enabled using a key operator program, the message "Set
originals for stream feeding." will appear for approximately 5 seconds after feeding of all originals
is completed. While this message is displayed, any new originals placed in the SPF or RSPF will
be fed and copied automatically.
★KEY OPERATOR See page 12 of the KEY OPERATOR'S GUIDE for information on setting the
stream feeding mode.
Using the SPF or the RSPF
★KEY OPERATOR If SPF/RSPF is disabled using a key operator program, the SPF or the RSPF
cannot be used. See page 19 of the KEY OPERATOR'S GUIDE.
One-sided copies from one-sided originals
Ensure that no original is left on the platen glass.
1
Adjust the original guides to the size of the originals.
2
Set the originals face up in the document feeder tray.
3
●
The original size will be indicated in the display, and the paper tray with the
corresponding paper size will be automatically selected.
★KEY OPERATOR The auto paper select function can be disabled using a key operator
program. If this function has been disabled, use the PAPER SELECT key to select the
desired paper tray. See page 18 of the KEY OPERATOR'S GUIDE.
●
To copy onto a different size paper, use the PAPER SELECT key to make the selection.
6
OPTIONAL EQUIPMENT
95
Page 98

SINGLE PASS FEEDER (AR-SP4)/REVERSING SINGLE PASS FEEDER (AR-RP3)
Ensure that the one-sided to one-sided copying mode is selected.
4
Ready to copy.
1
/
8 11
2
AUTO
100%
1
/
8 11
2
●
When no icon indicating a duplex copy mode is displayed, the one-sided to one-sided
copying mode is selected.
Set the number of copies and press the START key.
5
●
Press the CLEAR key to stop copying in the middle of a run.
Two-sided copies from one-sided originals
AUTO
●
Paper sizes that can be used in the duplex copy mode are 8-1/2" x 11", 8-1/2" x 11"R, 8-1/2" x 13",
8-1/2" x 14", 11" x 17", A5, B5, B5R, A4, A4R, B4, and A3.
Ensure that no original is left on the platen glass. Adjust the original
1
guides to the size of the originals and set the originals face up in the
document feeder tray.
●
If an uneven number of originals are set, the last copy will be one-sided.
OPTIONAL EQUIPMENT
96
Page 99

SINGLE PASS FEEDER (AR-SP4)/REVERSING SINGLE PASS FEEDER (AR-RP3)
Press the 2-SIDED COPY key.
2
●
The duplex copy mode selection screen will appear.
COPY MODE
1 to 1
122
1 to 2
2
2 to 2
Use the and keys to select one-sided to two-sided copying.
3
●
Also the 2-SIDED COPY key can be used to select a duplex copy mode.
COPY MODE
1 to 1
122
1 to 2
2
2 to 2
BINDING CHANGE OFF
Use the or key to select binding change if desired. Then, press
4
the OK key.
●
The image of one side can be rotated 180º using the image rotation feature. This feature
can be useful depending on the orientation of the original image and the desired binding
position.
Set the number of copies and press the START key.
5
●
Press the CLEAR key to stop copying in the middle of a run.
6
OPTIONAL EQUIPMENT
97
Page 100

SINGLE PASS FEEDER (AR-SP4)/REVERSING SINGLE PASS FEEDER (AR-RP3)
Two-sided copies from two-sided originals
To copy in the two-sided to two-sided copy mode, an RSPF must be installed.
●
Paper sizes that can be used in the duplex copy mode are 8-1/2" x 11", 8-1/2" x 11"R, 8-1/2" x 13",
8-1/2" x 14", 11" x 17", A5, B5, B5R, A4, A4R, B4, and A3.
Ensure that no original is left on the platen glass. Adjust the original
1
guides to the size of the originals and set the originals face up in the
document feeder tray.
●
5-1/2" x 8-1/2" size originals cannot be used.
Press the 2-SIDED COPY key.
2
●
The duplex copy mode selection screen will appear.
COPY MODE
1 to 1
122
1 to 2
2
2 to 2
Use the and keys to select two-sided to two-sided copying and
3
press the OK key.
●
Also the 2-SIDED COPY key can be used to select a duplex copy mode.
COPY MODE
1 to 1
122
1 to 2
2
2 to 2
OPTIONAL EQUIPMENT
98
 Loading...