

Page 1

AR-122E
AR-122EN
AR-152E
AR-152EN
DIGITAL LASER COPIER
OPERATION MANUAL
DIGITALER LASERKOPIERER
BEDIENUNGSANLEITUNG
COPIEUR LASER NUMERIQUE
MODE D’EMPLOI
D GB NL F
DIGITAAL LASER KOPIEERAPPARAAT
GEBRUIKSAANWIJZING
COPIADORA LÁSER DIGITAL
MANUAL DE INSTRUCCIONES
COPIATRICE LASER DIGITALE
MANUALE DI ISTRUZIONI
I E
Page 2

CLASS 1 LASER PRODUCT
LASER KLASSE 1
LUKOAN 1 LASERLAITE
KLASS 1 LASERAPPARAT
LAITTEEN KÄYTTÄMINEN
VAROITUS!
MUULLA KUIN TÄSSÄ
KÄYTTÖOHJEESSA MAINITULLA
TAVALLA SAATTAA ALTISTAA
KÄYTTÄJÄN
TURVALLISUUSLUOKAN 1
YLITTÄVÄLLE
NÄKYMÄTTÖMÄLLE
LASERSÄTEILYLLE.
Laserstrahl
INVISIBLE LASER RADIATION WHEN OPEN AND INTERLOCKS DEFEATED.
CAUTION
AVOID EXPOSURE TO BEAM.
UNSICHTBARE LASERSTRAHLUNG WENN ABDECKUNG GEÖFFNET UND
VORSICHT
SICHERHEITSVERRIEGELUNG ÜBERERÜCKT. NICHT DEM STRAHL AUSSETZEN.
USYNLIG LASERSTRÅLING VED ÅBNING, NÅR SIKKERHEDSAFBRYDERE ER
ADVARSEL
UDE AF FUNKTION. UNDGA UDSAETTELSE FOR STRÅLING.
OM APPARATEN ANVÄNDS PÅ
VARNING
ANNAT SÄTT ÄN I DENNA
BRUKSANVISNING
SPECIFICERATS, KAN
ANVÄNDAREN UTSÄTTAS FÖR
OSYNLIG LASERSTRÅLNING,
SOM ÖVERSKRIDER GRÄNSEN
FÖR LASERKLASS 1.
USYNLIG LASERSTRÅLING NÅR DEKSEL ÅPNES OG SIKKERHEDSLÅS BRYTES.
UNNGÅ EKSPONERING FOR STRÅLEN.
ADVERSEL
OSYNLIG LASERSTRÅLNING NÄR DENNA DEL ÄR ÖPPNAD OCH SPÄRRAR ÄR
VARNING
URKOPPLADE. STRÅLEN ÄR FARLIG. BETRAKTA EJ STRÅLEN.
AVATTAESSA JA SUOJALUKITUS OHITETTAESSA OLET ALTTIINA NÄKYMÄTÖNTÄ
VARO!
LASERSÄTEILYLLE. ÄLÄ KATSO SÄTEESEEN.
CLASS 1
LASER PRODUCT
LASER KLASSE 1
Caution
This product contains a low power laser
device. To ensure continued safety do not
remove any cover or attempt to gain access
to the inside of the product. Refer all
servicing to qualified personnel.
Let op
Dit produkt bevat een laag-vermogen laserinrichting. Om veiligheidsredenen moen geen
onderdelen worden gedemonteerd om
toegang te verkrijgen tot het inwendige van
hetapparaat. Laat alle reparatiewerkzaamheden over aan de vakman.
Vorsicht
Dieses Produkt ist mit einem Niederleistungs
Laserabtaster ausgestattet. Aus Sicherheitsgründen keine Abdeckung entfernen
und nicht innenteile zu berühren versuchen.
Warungsarbeiten dürfen nur von geschultem Fachpersonal durchgeführt werden.
Precaución
Este producto viene provisto de un
dispositivo laser de baja potencia. Para
garantizar su seguridad en todo momento,
no quite ninguna tapa ni intente acceder al
interior del aparato. Consulte con el personal
técnico calificado cualquier problema de
servicio.
Attention
Ce produit contient un dispositif émettant
un laser à faible puissance. Pour assurer la
sécurité, ne pas enlever le couvercle, ni
accéder à l‘intérieur du produit. Pour toute
réparation, s‘adresser à une personne
qualifiée.
Attenzione
Questo prodotto contiene un dispositivo al
laser a bassa potenza. Per motivi di
sicurezza non si deve smonare il mobile per
l‘accesso all‘interno. Per qualsiasi
riparazione rivolgersi a personale
qualificato.
Page 3

CAUTIONS
Cautions on using
Follow the cautions below when using this unit.
Warning:
• The fusing area is hot. Exercise care in this area when removing misfed paper.
• Do not look directly at the light source. Doing so may damage your eyes.
• Do not switch the unit rapidly on and off. After turning the unit off, wait 10 to 15
seconds before turning it back on.
• Unit power must be turned off before installing any supplies.
Caution:
• Place the unit on a firm, level surface.
• Do not install the unit in a humid or dusty location.
• When the unit is not used for a long time, for example for consecutive holidays,
turn the power switch off and remove the power cord from the outlet.
• When moving the unit, be sure to turn the power switch off and remove the power
cord from the outlet.
• Do not cover the unit with a dust cover, cloth or plastic film while the power is on.
Doing so may prevent heat radiation, damaging the unit.
• Use of controls or adjustments or performance of procedures other than those
specified herein may result in hazardous radiation exposure.
• The socket-outlet shall be installed near the equipment and shall be easily
accessible.
Important points when selecting an installation site
Do not install your unit in areas that are:
• damp, humid, or very dusty
• exposed to direct sunlight
• poorly ventilated
• subject to extreme temperature or humidity changes, e.g., near an air conditioner
or heater.
Be sure to connect the power cord only to a power outlet that meets the
specified voltage and current requirements. Also make certain the outlet is
properly grounded.
Connect the unit to a power outlet which is not used for other electric
appliances. If a lighting fixture is connected to the same outlet, the light
may flicker.
Be sure to allow the required space around the
machine for servicing and proper ventilation.
10cm
20cm
10cm
1
Page 4

Cautions on handling
Be careful in handling the unit as follows to maintain the performance of this unit.
Do not drop the unit, subject it to shock or strike it against any object.
Store spare toner cartridges in a cool dry place without removing from the
package before use.
• If they are exposed to direct sunlight or excessive heat, poor copies may result.
Do not touch the photoconductive drum (green portion).
• Scratches or smudges on the drum will cause dirty copies.
Cautions on laser
Wave length 770 nm – 795 nm
Pulse times 11.82 µs / 7 mm
Output power 0.17 mW ± 0.01 mW
Proper storage for supplies
Store the supplies (paper and toner cartridges) in a location that is:
• clean and dry
• at a stable temperature
• not exposed to direct sunlight.
Store paper in the wrapper and lying flat.
• Paper stored out of the wrapper or in packages standing on end may curl or get
damp, resulting in paper misfeeds.
Trademark acknowledgements
• Microsoft and Windows are trademarks of Microsoft Corporation in the U.S.A. and
other countries.
• IBM and PC/AT are trademarks of International Business Machines Corporation.
• Adobe and Acrobat are trademarks of Adobe Systems Incorporated.
• All other trademarks and copyrights are the property of their respective owners.
As an ENERGY STAR
this product meets the ENERGY STAR® guidelines for energy
efficiency.
In some areas, the "POWER" switch positions are marked "I" and "O" on the copier
instead of "ON" and "OFF".
The symbol "O" denotes the copier is not completely de-energized but in a stand-by
condition at this "POWER" switch position.
If your copier is so marked, please read "I" for "ON" and "O" for "OFF".
Caution!
For a complete electrical disconnection, pull out the main plug.
The socket-outlet shall be installed near the equipment and shall be easily
accessible.
®
Partner, SHARP has determined that
2
Page 5

CONTENTS
1 INTRODUCTION
USING THE MANUAL ...................4
PART NAMES ............................... 5
OPERATION PANEL..................... 6
2 LOADING PAPER
PAPER........................................... 7
LOADING THE PAPER TRAY....... 8
BYPASS FEED (including special
paper) .......................................... 10
3 MAKING COPIES
COPY FLOW ............................... 11
CONNECTING THE POWER CORD 12
ORIGINAL PLACEMENT............. 14
SET THE COPY QUANTITY .......15
EXPOSURE ADJUSTMENT/
PHOTO COPYING ......................15
REDUCTION/ENLARGEMENT/
ZOOM ..........................................17
4 SPECIAL FUNCTIONS
DESCRIPTION OF SPECIAL
FUNCTIONS................................ 18
TONER SAVE MODE.................. 18
USER PROGRAMS.....................19
DISPLAYING TOTAL NUMBER OF
COPIES ....................................... 20
5 MAINTENANCE
TONER CARTRIDGE
REPLACEMENT..........................21
TONER CARTRIDGE LIFE ......... 23
CLEANING THE UNIT................. 24
6
TROUBLESHOOTING THE UNIT
TROUBLESHOOTING.................26
STATUS INDICATORS................27
MISFEED REMOVAL ..................28
DEVELOPER REQUIRED ........... 31
MAINTENANCE REQUIRED.......31
7
OPTIONAL EUIPMENT (AL-12PKM)
SOFTWARE FOR THE SHARP
PERSONAL MFP SERIES...........32
HARDWARE AND SOFTWARE
REQUIREMENTS ........................33
BEFORE INSTALLATION............33
INSTALLING THE SOFTWARE .........35
INDICATORS ON THE OPERATION
PANEL .........................................45
USING THE PRINTER MODE.....46
USING THE SCANNER MODE ...48
HOW TO USE THE ONLINE
MANUAL ......................................56
USING OTHER INSTALLED
DRIVERS .....................................58
CONNECTING THE INTERFACE
CABLE .........................................59
8 APPENDIX
SPECIFICATIONS .......................61
ABOUT SUPPLIES AND OPTIONS... 63
INDEX.................................................64
SOFTWARE LICENSE .......................67
1
2
3
4
5
6
7
8
3
Page 6

1
This chapter provides basic information for using the unit.
INTRODUCTION
USING THE MANUAL
The operation manual contains explanations of how to operate the unit, important
considerations, and maintenance procedures. To get the most out of the unit, please
read the operation manual. Please keep the operation manuals in a suitable location
that will allow for convenient future reference.
Conventions used in the manual
In this manual, the following icons are used to provide the user with information
pertinent to the use of the unit.
Warns the user that injury may result if the contents of the warning
are not properly followed.
Cautions the user that damage to the unit or one of its components
may result if the contents of the caution are not properly followed.
Notes provide information relevant to the unit regarding
specifications, functions, performance, operation and such, that
may be useful to the user.
Indicates a letter displayed in the display.
4
Page 7

PAR T N AM ES
1
2
3
4
Single bypass
1
5
6
7
13
5
8
9
10
11
12
3
Toner cartridge
Original table
1
Operation panel
2
Front cover
3
Paper tray
4
Side cover
5
Side cover open button
6
Bypass paper guides
7
Paper output tray
8
Paper output tray extension
9
14
15
Photoconductive drum
Power switch
10
Handle
11
Power cord socket
12
Fusing unit release lever
13
Transfer charger
14
Charger cleaner
15
5
Page 8

OPERATION PANEL
Exposure mode selector key and
1
indicators
Use to sequentially select the exposure
modes: AUTO, MANUAL or PHOTO.
Selected mode is shown by a lit
indicator. (p.15)
Light and dark keys and indicators
2
Use to adjust the MANUAL or PHOTO
exposure level. Selected exposure level is
shown by a lit indicator. (p.15) Use to start
and terminate user program setting. (p.19)
Alarm indicators
3
4
5
6
7
8
Developer replacement required
indicator (p.31)
Misfeed indicator (p.28)
Toner cartridge replacement
required indicator (p.21)
Maintenance indicator (p.31)
Copy ratio selector key and
indicators
Use to sequentially select preset
reduction/enlargement copy ratios.
Selected copy ratio is shown by a lit
indicator. (p.17)
Copy ratio display (%) key (p.17)
Display
Displays the specified copy quantity,
zoom copy ratio, user program code,
and error code.
SCANNER key and indicator
(p.45, p.52)
Can be used when the Printer/Scanner
Expansion Kit (AL-12PKM) is installed.
ONLINE key and indicator (p.45)
Can be used when the Printer/Scanner
Expansion Kit (AL-12PKM) is installed.
Power save indicator
9
Lights up when the unit is in a power
save mode. (p.18, p.19)
Paper feed location indicators
10
Light up to show the selected paper
feed station.
ZOOM keys and indicator
11
Use to select any reduction or
enlargement copy ratio from 25% to
400% in 1% increments. (p.17)
Copy quantity keys
12
• Use to select the desired copy
quantity (1 to 99). (p.15)
• Use to make user program entries.
(p.19)
Clear key
13
• Press to clear the display, or press
during a copy run to terminate
copying. (p.15)
• Press and hold down during standby
to display the total number of copies
made to date. (p.20)
Start key and indicator
14
• Copying is possible when the
indicator is on.
• Press to start copying.
• Use to set a user program. (p.19)
6
Page 9

2
Follow the steps below to load paper into the tray.
LOADING PAPER
PAP ER
For best results, use only paper recommended by SHARP.
Type of paper
feeding
Paper tray Standard paper A4
Single bypass Standard paper and
* Do not use non-standard envelopes, and envelopes that have metal clasps, plastic
snappers, string closures, windows, linings, self-adhesive, patches or synthetic
materials. Do not use envelopes that are filled with air or envelopes that have
labels or stamps attached. These will cause physical damage to the unit.
** For paper weighing from 104g/m
fed through the single bypass.
• Special papers such as transparency film, labels and envelope must be fed one
sheet at a time through the single bypass.
Type of media Size Weight
56g/m
thick paper
Special
media
A5
B5
Letter
Legal
Invoice
A4
A5
A6
B5
B6
Letter**
Legal
Invoice
Transparency
film
Envelope* International DL
A4
Letter
International C5
Commercial 10
Monarch
2
to 128g/m2, A4 is the maximum size that can be
80g/m
52g/m
128g/m2**
2
2
2
to
to
2
7
Page 10

LOADING THE PAPER TRAY
Raise the handle of the paper tray
1
and pull the paper tray out until it
stops.
Adjust the paper guides on the paper tray to the copy paper
2
width and length. Squeeze the lever of paper guide and slide
the guide to match with the width of the paper. Move paper
guide to the appropriate slot as marked on the tray.
B
A
Paper
guide B
Fan the paper and insert it into the tray. Make sure the edges go
3
under the corner hooks.
Do not load paper above the maximum height line ( ). Exceeding
the line will cause a paper misfeed.
Paper
guide A
8
Page 11

Gently push the paper tray back into the unit.
4
• After loading paper, to cancel the blinking without restarting
copying, press the clear ( ) key. The in the display will go out
and the start ( ) indicator will light up.
Be sure that paper is free of rips, dust, wrinkles, and curled or bent edges.
•
• Make sure all the paper in the stack is the same size and type.
• When loading paper, ensure there is no space between the paper and
the guide, and check if the guide is not set too narrow causing the
paper to bend. Loading paper in these ways will result in document
skew or a paper jam.
• When not using the unit for an extended period, remove all paper from
the paper tray and store it in a dry place. If paper is left in the unit for
an extended period, the paper will absorb moisture from the air,
resulting in paper jams.
When adding new paper to the paper tray, remove the old paper already
•
contained in the tray. Placing new paper on top of the paper already
contained in the tray may result in feeding two sheets at one time.
2
9
Page 12

BYPASS FEED (including special paper)
The single bypass can be used to feed standard paper, transparency film, labels,
envelopes, and other special purpose paper. Paper measuring from A6 to A4 and in
the weight range of 52g/m
from 104g/m2 to 128g/m2, A4 is the maximum size.)
• The single bypass can hold one sheet of paper.
• The original image must be smaller than the paper or media for
copying. If the original image is bigger than the paper or media, this
may cause smudges on the edges of the copies.
• If you insert a sheet of paper into the single bypass when multiple
copies have been set with the copy quantity setting (p.15), the copy
quantity setting will change to "0" and only one copy will be made.
• When copying onto transparency film, remove each copy promptly.
Do not let copies stack up.
Select copy settings before you begin the copy job.
1
For information on the copy settings, see "MAKING COPIES" (p.11)".
Set the paper guides to the paper width. Insert a single sheet of
2
copy (print face down) into the feed slot of the single bypass.
When you insert the paper,
the unit will automatically
draw in the paper and begin
copying.
2
to 128g/m2 can be used in this tray. (For paper weighing
10
Print face
Note for loading envelopes
• Envelopes must be fed narrow side into the feed slot one at a time.
• Do not use non-standard envelopes, and envelopes that have metal clasps, plastic
snappers, string closures, windows, linings, self-adhesive, patches or synthetic
materials. Do not use envelopes that are filled with air or envelopes that have labels
or stamps attached.
• Envelopes of which the surface is not flat because of embossing may cause the
copies/prints to become smudged.
• Under high humidity and temperature conditions the glue flaps on some envelopes
may become sticky and be sealed closed when copied/printed.
• Use only envelopes which are flat and crisply folded. Curled or poorly formed
envelopes may be poorly copied/printed or may cause misfeeds.
• It is recommended that you perform a test copy before performing the actual copied/
printed job.
• Be sure to select either Com 10, DL, C5 or Monarch on the paper size setting of the
printer driver. (For detailed information on printer driver, refer to the online manual.)
Page 13

3
This chapter explains basic and other copying functions.
The unit is equipped with a one-page memory buffer. This memory allows the unit to
scan an original once only and make up to 99 copies. This feature improves
workflow, reduces operation noise from the copier, and provides higher reliability by
reducing wear and tear on the scanning mechanism.
If the unit does not function properly during use, or if a function cannot
be used, see "TROUBLESHOOTING THE UNIT" (p.26).
MAKING COPIES
COPY FLOW
1 Make sure that paper has been loaded in the paper tray (p.8),
and check the paper size (p.7).
If paper is not loaded, see page 8. If you are using the single bypass, check
the paper size and then proceed to the next step without loading paper.
2 Turn on the unit (p.12).
3 Place the original.
If you are using the original table, see "ORIGINAL PLACEMENT" (p.14).
When copying onto A4 paper or a large size, pull out the paper output tray
extension.
4 Select the copy settings.
If you wish to copy using the initial settings (p.13), proceed to the next
step.
To set the number of copies, see page 15.
To adjust the resolution and contrast settings, see page 15.
To enlarge or reduce the copy, see page 17.
3
5 Start copying.
Press the start ( ) key.
If you are using the single bypass
Do not press the start ( ) key. Insert a
sheet of paper into the single bypass.
(Page 10)
Multiple copies are not possible
using the single bypass.
11
Page 14

Do not insert paper in the single bypass when a copy job from the paper
tray is in progress. This will cause a misfeed.
CONNECTING THE POWER CORD
If you use the unit in a country other than the country where the unit was
purchased, you will need to make sure that your local power supply is
compatible with your model. If you plug the unit into an incompatible
power supply, irreparable damage to the unit will result.
Ensure that the power switch of
1
the unit is in the OFF position.
Insert the attached power cord
into the power cord socket at the
rear of the unit.
Plug the other end of the power cord into the nearest outlet.
2
Only insert the power cord into a properly grounded wall socket.
Do not use extension cords or power strips.
12
Power on
Ensure that the power switch of the unit is
in the OFF position. Plug the other end of
the power cord into the nearest outlet.
Turn the power switch on the left side of
the unit to the "ON" position. The start
( ) indicator will light up and other
indicators which show the initial settings
of the operation panel will also light up to
indicate the ready condition. For the initial
settings, see the "Initial settings of
operation panel" described on the next page.
• The unit will enter a power save mode once the set time has elapsed
without any unit operation. The settings of the power save modes can
be modified. See "USER PROGRAMS" (p.19).
• The unit will return to the initial settings a preset amount of time after
the end of copy or scanning job. The preset amount of time (auto
clear time) can be changed. See "USER PROGRAMS" (p.19).
Page 15
About the scan head
The scan head lamp remains on constantly when the unit is in the ready condition
(when the start ( ) indicator is illuminated).
The unit adjusts the scan head lamp periodically to maintain copying quality. At this
time, the scan head moves automatically. This is normal and does not indicate unit
trouble.
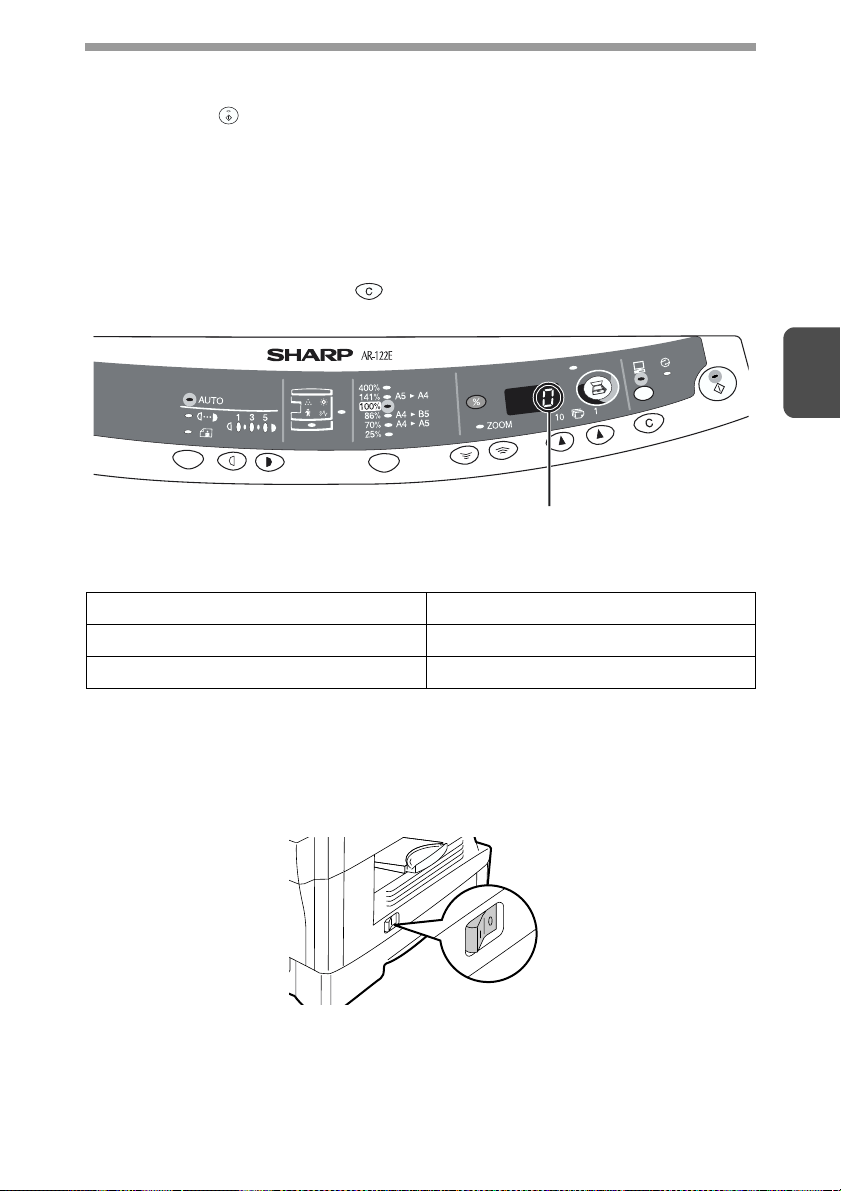
Initial settings of operation panel
When the unit power is on, the operation panel will revert to the initial settings when
the time set with the "Auto clear time" setting (p.18) elapses after a copy or scanner
job is finished, or when the clear ( ) key is pressed twice.
The initial settings of the operation panel are shown below.
"0" is displayed in the display.
When copying is begun in this state, the settings in the following table are used.
Copy quantity 1 copy
Exposure adjustment AUTO
Zoom 100%
3
Power off methods
If not used for a certain period of time, the unit will automatically enter auto power
shut-off mode (p.19) in order to minimise power consumption. In cases where the
machine will not be used for a long time, turn off the power switch and remove the
power cord from the outlet.
13
Page 16

ORIGINAL PLACEMENT
• The original table can read up to A4 original.
• Image loss 4mm can occur at the leading and trailing edges of the
copies. Also image loss 4.5mm in total can occur along the other
edges of the copies.
• When copying a book or an original which has been folded or a
crumpled original, press down the original cover lightly. If the original
cover is not securely closed, the copies may be striped or blurred.
Open the original cover, and place the original.
1
Place an original face down on the original table. Align it with
2
the original scale and the centring ( ) mark. Gently close the
original cover.
Original scale
mark
Setting a large original
The original cover can be removed to allow copying of bulky objects.
14
Simply lift the original cover straight
1
up.
To reattach the original cover, reverse the above procedure.
2
3
Page 17
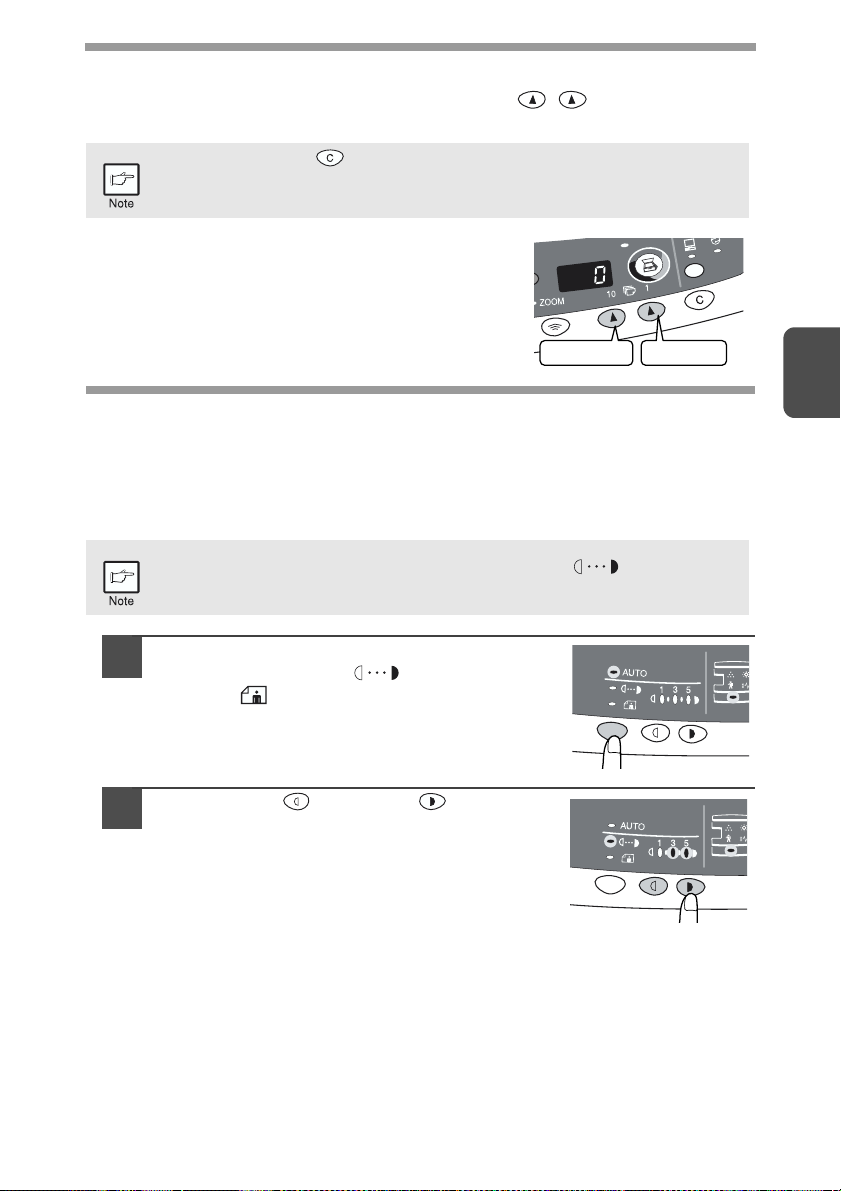
SET THE COPY QUANTITY
Set the number of copies using the two copy quantity ( , ) keys when copying
from the original table.
• Press the clear ( ) key to clear an entry if a mistake is made.
• A single copy can be made with the initial setting, i.e., when "0" is
displayed.
• Press the right copy quantity key to set the unit digit
from 0 to 9. This key will not change the tens digit.
• Press the left copy quantity key to set the tens digit
from 1 to 9.
Tens digit Unit digit
EXPOSURE ADJUSTMENT/PHOTO COPYING
Exposure adjustment
Copy density adjustment is not required for most originals in the automatic exposure
mode. To adjust the copy density manually or to copy photographs, the exposure
level can be adjusted in 2 steps manually.
The copy resolution used for AUTO and MANUAL ( ) mode can be
changed. (p.19)
Press the exposure mode selector key to
1
select the MANUAL ( ) mode or
PHOTO ( ) mode.
3
Use the light ( ) and dark ( ) keys to
2
adjust the exposure level. If exposure level
2 is selected, the two left-handmost
indicators for that level will light up
simultaneously. Also, if level 4 is selected,
the two right-handmost indicators for that
level will light up simultaneously.
15
Page 18

Automatic exposure adjustment
This automatic exposure level will remain in effect until you change it
again by this procedure.
The automatic exposure level can be adjusted to suit your copying needs. This level is
set for copying from the original table.
Press the exposure mode selector key to
1
select the PHOTO ( ) mode.
Press and hold down the exposure mode
2
selector key for approximately 5 seconds.
The PHOTO ( ) indicator will go out and
the AUTO indicator will begin to blink. One
or two light and dark indicators
corresponding to the automatic exposure
level which has been selected will light up.
Press the light ( ) or dark ( ) key to
3
lighten or darken the automatic exposure
level as desired. If exposure level 2 is
selected, the two left-handmost indicators
for that level will light up simultaneously.
Also, if level 4 is selected, the two righthandmost indicators for that level will
light up simultaneously.
16
Press the exposure selector key. The AUTO indicator will stop
4
blinking and light up steadily.
Page 19

REDUCTION/ENLARGEMENT/ZOOM
Three preset reduction ratios and two enlargement ratios can be selected. The zoom
function enables copy ratio selection from 25% to 400% in 1% increments.
Set the original and check the paper size.
1
Use the copy ratio selector key and/or ZOOM ( , ) keys to
2
select the desired copy ratio.
• To verify a zoom setting without changing the zoom ratio,
press and hold down the copy ratio display (%) key. When the
key is released, the display will return to the copy quantity
display.
• To reset the ratio to 100%, press the copy ratio selector key
repeatedly until the 100% indicator lights up.
Set the reduction/enlargement ratio.
3
To decrease or increase the zoom ratio rapidly, press and hold
down the ZOOM ( ) or ( ) key. However the value will
stop at the preset reduction or enlargement ratios. To move
beyond these ratios, release the key and then press and hold it
down again.
To select a preset copy ratio:
Preset reduction and enlargement ratios are:
25%, 70%, 86%, 141%, and 400%.
3
To select a zoom ratio:
When a ZOOM (
ZOOM indicator will light up and the zoom ratio will
be displayed in the display.
or ) key is pressed, the
17
Page 20

4
This chapter describes the special functions of this unit. Use these functions as
needed.
SPECIAL FUNCTIONS
DESCRIPTION OF SPECIAL FUNCTIONS
Toner save mode (page 18)
Reduces toner consumption by approximately 10%.
Power save modes (page 19)
The unit has two power save modes of operation: preheat mode and auto power
shut-off mode.
Preheat mode
When the unit enters the preheat mode, the power save ( ) indicator will light up
and other indicators will remain on or off as before. In this condition, the fuser in
the unit is maintained at a lower heat level, thereby saving power. To copy from
the preheat mode, make desired copier selections and press the start ( ) key
using the normal copying procedure.
Auto power shut-off mode
When the unit enters the auto power shut-off mode, the power save ( ) indicator
will light up and other indicators except the ONLINE indicator will go out. The auto
power shut-off mode saves more power than the preheat mode but requires a
longer time before starting copying. To copy from the auto power shut-off mode,
press the start ( ) key. Then make desired copier selections and press the start
( ) key using the normal copying procedure.
Auto clear (page 19)
The unit returns to the initial settings a preset amount of time after the end of copy, or
scanner job. This preset amount of time (auto clear time) can be changed.
Resolution of AUTO & MANUAL mode (page 19)
You can set the copy resolution used for AUTO and MANUAL ( ) exposure
mode.
18
TONER SAVE MODE
Press the exposure mode selector key
1
to select the MANUAL ( ) mode.
Page 21

Press and hold down the exposure mode
2
selector key for approximately 5 seconds.
The MANUAL ( ) indicator will go out
and the PHOTO ( ) indicator will begin
to blink. The light and dark indicator
marked "5" will light up, indicating the
standard toner mode is active.
To enter the toner save mode, press the
3
light ( ) key. The light and dark
indicator marked "1" will light up,
indicating the toner save mode is
selected.
Press the exposure mode selector key. The PHOTO ( )
4
indicator will stop blinking and will light up steadily. The light
and dark indicator marked "3" will light up. The toner save
mode is now active.
To return to the standard mode, repeat the procedure but use the dark
( ) key to select exposure level "5" in step 3.
USER PROGRAMS
The user programs allow the parameters of certain functions to be set, changed, or
cancelled as desired.
4
Setting the power save modes, auto clear time, stream
feeding mode and resolution of AUTO & MANUAL mode
Press and hold down the light ( ) and dark ( ) keys
1
simultaneously for more than 5 seconds until all the alarm
indicators ( , , , ) blink and " " appears in the
display.
Use the left copy quantity ( ) key to select a user program
2
number (1: auto clear time, 2: preheat mode, 3: auto power
shut-off timer, 5: auto power shut-off mode 6: resolution of
AUTO & MANUAL mode). The selected number will blink in the
left side of the display.
Press the start ( ) key. The entered program number will be
3
steadily lit and the currently selected parameter number for the
program will blink on the right side of the display.
Select the desired parameter using the right copy quantity ( )
4
key. The entered parameter number will blink on the right of the
display.
19
Page 22

Program
No.
1 Auto clear time
2 Preheat mode *0 30sec., 1 60sec., 2 90sec.
3
5
6
* Factory default settings are indicated with an asterisk (*).
Press the start ( ) key. The right-hand number in the display
5
will be steadily lit and the entered value will be stored.
Press the light ( ) or dark ( ) key to return to the normal
6
copy mode.
Mode Parameters
0 OFF, 1 10sec., 2 30sec.
*3 60sec., 4 90sec., 5 120sec.
Auto power shut- off
timer
Auto power shut- off
mode
Resolution of AUTO
& MANUAL mode
To change the setting or to set another mode, press the clear
( ) key. The unit will return to step 2.
0 2min., *1 5min., 2 15min.,
3 30min., 4 60 min., 5 120min.
0 OFF, *1 ON
*0 300dpi, 1 600dpi
DISPLAYING TOTAL NUMBER OF COPIES
Use the following procedure to display the total number of copies.
20
Press the clear ( ) key to reset the display to zero.
1
Press and hold down the clear ( ) key for approximately 5
2
seconds. The total number of copies will appear in two steps,
each with three digits.
Example: Total number of copies is 1,234.
Page 23

5
This chapter describes how to replace the toner cartridge and how to clean unit.
Be sure to use only genuine SHARP parts and supplies.
For best copying results, be sure to use only SHARP Genuine
Supplies which are designed, engineered, and tested to maximise the
life and performance of SHARP copiers. Look for the Genuine
Supplies label on the toner package.
MAINTENANCE
TONER CARTRIDGE REPLACEMENT
When the toner cartridge replacement required ( ) indicator lights up, replacement
of the toner cartridge will be needed soon. Obtain a new cartridge. When the toner
cartridge replacement required ( ) indicator blinks, the toner cartridge must be
replaced before copying can be resumed. Replace the toner cartridge by following
the procedure below.
During long copy run of a dark original, the start ( ) indicator may
blink, the indicator light up, and the unit stop, even though toner is left.
The unit will feed toner up to 2 minutes and then the start ( ) indicator
will light up. Press the start ( ) key to restart copying.
5
Open the side cover while
1
pressing the side cover open
button.
Push gently on both sides of
2
the front cover to open the
cover.
21
Page 24

Gently pull the toner cartridge
3
out while pressing the lock
release lever.
• After removing the toner cartridge, do not shake it or tap on it. Doing
so may cause toner to leak from the cartridge. Put the old cartridge
immediately in the bag contained in the box of the new cartridge.
• Dispose of the old toner cartridge in accordance with local regulations.
Remove the toner cartridge from the bag. Grasp the cartridge
4
on both sides and shake it horizontally four or five times. After
shaking the cartridge, remove the toner seal.
4 or 5 times
4 or 5 times
Shutter
Shutter
Toner cartridge lock
release lever
Toner seal
Toner seal
22
Grasp the toner cartridge as shown in the illustration. Do not hold the
cartridge by the shutter. Be sure to only shake the cartridge before the
toner seal is removed.
Gently insert the toner cartridge along
5
the guides until it locks in place while
pushing the lock release lever.
Remove the tape from the shutter. Pull
the shutter out of the toner cartridge
as shown in the illustration. Discard
the shutter.
Page 25

Close the front cover and
6
then the side cover by
pressing the round
projections near the side
cover open button. The
indicator will go out and the
start ( ) indicator will light
up.
When closing the covers,
be sure to close the front
cover securely and then
close the side cover. If the
covers are closed in the
wrong order, the covers
may be damaged.
Even after a new toner cartridge is installed, the start ( ) indicator
may not light up, indicating copying cannot be restarted (toner is not
sufficiently fed). In this case, open and close the side cover. The
copier will feed toner again approximately 2 minutes and then
copying can be restarted.
5
TONER CARTRIDGE LIFE
To find out the approximate quantity of toner remaining, follow the procedure
described below.
Press and hold down the light ( ) and dark ( ) keys
1
simultaneously for more than 5 seconds until all the alarm
indicators ( , , , ) blink and " " appears in the
display.
Press and hold down the copy ratio display (%) key for more thn
2
5 seconds.
The approximate quantity of toner remaining will be indicated in the display
as a percentage ("100", "75", "50", "25" or "10" is displayed). When the
percentage is less than 10%,
Press the light ( ) or dark ( ) key.
3
All alarm indicators wil go out.
() will be displayed.
23
Page 26

CLEANING THE UNIT
Proper care is essential in order to get clean, sharp copies. Be sure to take a few
minutes to regularly clean the unit.
• Before cleaning, be sure to turn the power switch off and remove the
power cord from the outlet.
• Do not use thinner, benzene or other volatile cleaning agents. Doing
so may cause deformation, discoloration, deterioration or malfunction.
Cabinet
Wipe the cabinet with a soft, clean cloth.
Original table and the back side of the original cover
Stains on the glass or cover will also be copied. Wipe the glass and cover with a soft,
clean cloth. If necessary, dampen the cloth with a glass cleaner.
Original table Original cover
24
Page 27

Transfer charger
If copies start becoming streaky or blotchy, the transfer charger may be dirty. Clean
the charger using the following procedure.
Turn the power switch off. (p.13)
1
Open the side cover while pressing the side cover open button.
2
Take the charger cleaner out by holding the tab. Set the charger
3
cleaner onto the right end of the transfer charger, gently slide
the cleaner to the left end, and then remove it. Repeat this
operation two or three times.
Slide the charger cleaner from the right end to the left end along
the groove of the transfer charger. If the cleaner is stopped on
the way, smudges on copies may occur.
Return the charger cleaner
4
to its original position.
Close the side cover by
pressing the round
projections near the side
cover open button.
5
Turn the power switch on. (p.12)
5
25
Page 28

6
TROUBLESHOOTING THE UNIT
This chapter describes misfeed removal and troubleshooting.
TROUBLESHOOTING
If any problem occurs, check the list below before contacting your authorised service
representative.
Problem Possible cause Solution Page
Unit plugged in? Plug the unit into a grounded outlet. 12
Unit does not
operate.
Blank copies
Copies are too
dark or too light.
Dust, dirt,
smudges appear
on copies.
Striped copies Is transfer charger clean? Clean the transfer charger. 25
Paper misfeeds
frequently.
Images rub off the
copy easily.
Power switch on? Turn the power switch on. 12
Side cover closed securely? Gently close the side cover. 23
Front cover closed? Gently close the front cover and then
Is the original placed face
down on the original table?
Is original image too dark or
too light?
Is the unit in the automatic
exposure mode?
Is the unit in the photo
exposure mode?
Original table or original
cover dirty?
Original smudged or
blotchy?
Non-standard paper used? Use standard paper. If using special
Paper curled or damp? Store paper flat in the wrapper in a
Pieces of paper inside unit? Remove all pieces of misfed paper. 28
Paper guides in the paper
tray not set properly?
Too much paper in the
paper tray?
Is the paper too heavy? Use paper within the specified range. 7
Paper damp? Replace with dry paper. If the unit is
close the side cover.
Place the original face down on the
original table.
Adjust the exposure manually.
Adjust the automatic exposure level.
Cancel the photo exposure mode.
Clean regularly.
Use a clean original.
papers, feed the paper through the
single bypass.
dry location.
Set the guides properly depending on
the paper size.
Remove excessive paper from the
tray.
not used for long time, remove the
paper from the paper tray and store it
in its wrapper in a dry location.
23
14
15
16
15
24
–
7
–
8
8
2
26
Page 29

STATUS INDICATORS
When the following indicators light up or blink on the operation panel or the following
alphanumeric codes appear in the display, solve the problem immediately referring
to both the table below and the relevant page.
Be sure to use only genuine SHARP parts and supplies.
Indication Cause and remedy Page
Developer
replacement
required indicator
Toner cartridge
replacement
required indicator
Misfeed indicator Blinking
Maintenance
indicator
Power save indicator is
steadily lit.
The paper tray indicator is
blinking.
"CH" is blinking in the
display.
"CH" is steadily lit in the
display.
"P" is blinking in the display.
A letter and a number appear
alternately.
Steadily
lit
Steadily
lit
Blinking
Steadily
lit
Developer is required. contact your authorised
service representative.
Replacement of Toner cartridge will be needed
soon. Prepare a new cartridge. (AR-152T)
Toner cartridge must be replaced. Replace it
with a new one. (AR-152T)
A misfeed has occurred. Remove the misfed
paper referring to the description of "MISFEED
REMOVAL".
Service by an authorised SHARP service
technician is required.
The unit is in the preheat mode. Press any key to
cancel the preheat mode.
The unit is in the auto power shut-off mode.
Press the start ( ) key to cancel the auto power
shut-off mode.
The paper tray is not installed properly. Push the
tray into the unit securely.
The toner cartridge is not installed. Check if the
cartridge is installed. If "CH" is blinking even if a
cartridge is installed properly, contact your
SHARP service centre immediately.
Side cover is open. Close the side cover
securely by pressing the round projections near
the side cover open button.
The paper tray is empty.
Load paper.
A misfeed has occurred in the paper tray, single
bypass. Remove the misfed paper.
Paper tray is not securely installed. Push the tray
in securely.
The scan head locking switch is locked. Unlock
the scan head locking switch and turn the power
switch off/on.
31
21
21
28
31
18
18
–
21
–
8
28
–
–
6
A letter and a number appear
alternately.
A letter and a number appear
alternately.
The unit will not function. Turn the power switch
off and then switch it on, and if there is again an
error, remove the power cord from the outlet, and
contact your authorized service representative.
You will not be able to use the toner cartridge
anymore (Toner Cartridge End of life). Contact
your authorised service representative.
–
–
27
Page 30

MISFEED REMOVAL
When the misfeed ( ) indicator blinks or blinks in the display, the unit will
stop because of a misfeed.
Open the side cover, in that order.
1
To open the side cover, see "TONER CARTRIDGE REPLACEMENT"
(p.21).
Check the misfeed location. Remove the misfed paper
2
following the instructions for each location in the illustration
below. If the misfeed ( ) indicator blinks, proceed to "A:
Misfeed in the paper feed area" (p.29).
If the misfed paper is seen from
this side, proceed to "C: Misfeed
in the transport area". (p.30)
If paper is misfed here, proceed to "B:
Misfeed in the fusing area". (p.29)
If paper is misfed here, proceed to "A:
Misfeed in the paper feed area". (p.29)
28
Page 31
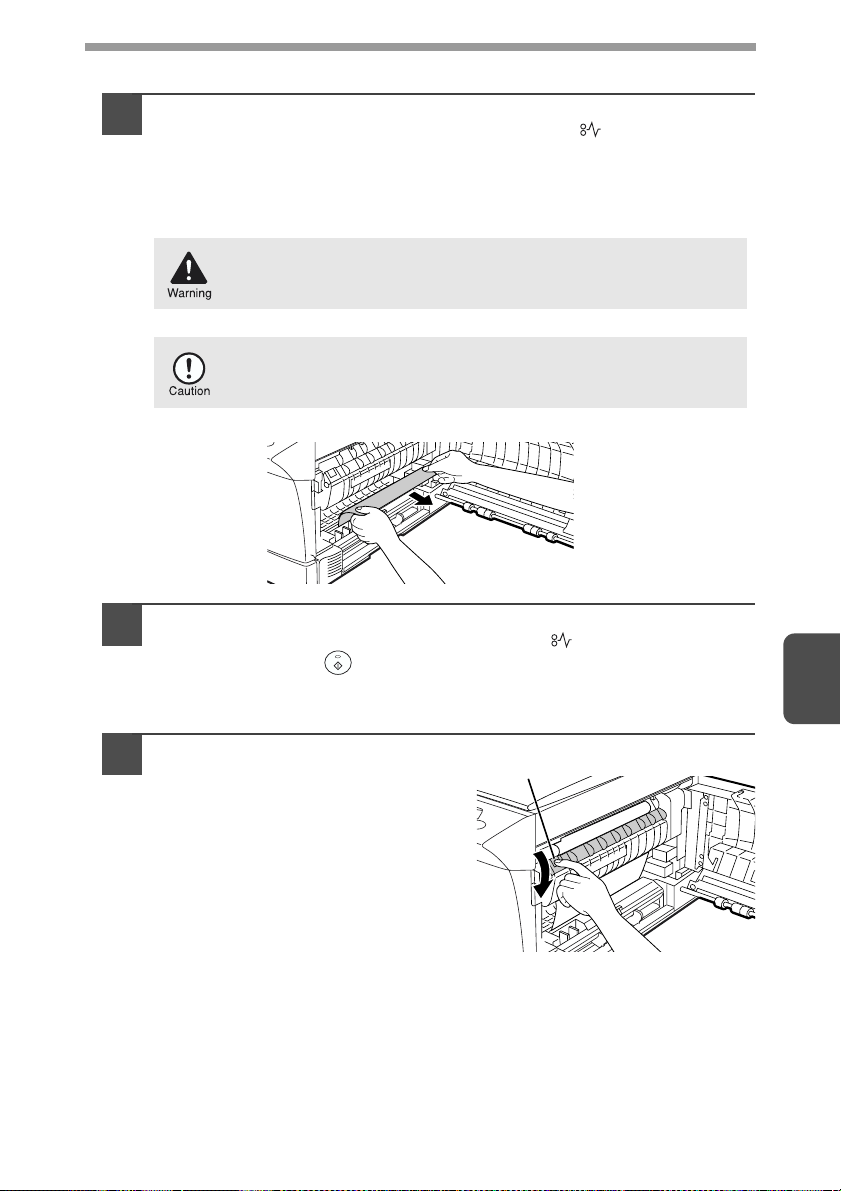
A: Misfeed in the paper feed area
Gently remove the misfed paper from the paper feed area as
1
shown in the illustration. When the misfeed ( ) indicator
blinks, and the misfed paper is not seen from the paper feed
area, pull out the paper tray and remove the misfed paper. If the
paper cannot be removed, proceed to "B: Misfeed in the fusing
area".
The fusing unit is hot. Do not touch the fusing unit when
removing misfed paper. Doing so may cause a burn or other
injury.
Do not touch the photoconductive drum (green portion) when
removing the misfed paper. Doing so may cause smudges on
copies.
Close the side cover by pressing the round projections near
2
the side cover open button. The misfeed ( ) indicator will go
out and the start ( ) indicator will light up.
B: Misfeed in the fusing area
6
Lower the fusing unit release
1
lever.
Fusing unit release lever
29
Page 32

Gently remove the misfed paper
2
from under the fusing unit as
shown in the illustration. If the
paper cannot be removed, proceed
to "C: Misfeed in the transport
area".
The fusing unit is hot. Do not
touch the fusing unit when
removing misfed paper. Doing
so may cause a burn or other
injury.
• Do not touch the photoconductive drum (green portion) when
removing the misfed paper. Doing so may cause smudges on
copies.
• Do not remove the misfed paper from above the fusing unit.
Unfixed toner on the paper may stain the paper transport
area, resulting in smudges on copies.
Raise the fusing unit release lever and then close the side
3
cover by pressing the round projections near the side cover
open button. The misfeed ( ) indicator will go out and the start
( ) indicator will light up.
C: Misfeed in the transport area
Lower the fusing unit release lever.
1
See "B: Misfeed in the fusing area" (p.29).
Open the front cover.
2
To open the front cover, see "TONER CARTRIDGE REPLACEMENT"
(p.21).
Rotate the feeding roller in
3
the direction of the arrow
and gently remove the
misfed paper from the exit
area.
Feeding roller
6
30
Page 33

Raise the fusing unit release lever, close the front cover and
4
then close the side cover by pressing the round projections
near the side cover open button. The misfeed ( ) indicator will
go out and the start ( ) indicator will light up.
DEVELOPER REQUIRED
When the developer replacement required ( ) indicator lights up, the developer
should be replaced. DEVELOPER REPLACEMENT SHOULD ONLY BE DONE BY
AN AUTORIZED SHARP SERVICE TECHNICIAN. Contact your service centre as
soon as possible.
MAINTENANCE REQUIRED
When maintenance ( ) indicator lights up, service by an authorised SHARP
service technician is required. Contact your service centre as soon as possible.
6
31
Page 34

7
OPTIONAL EQUIPMENT (AL-12PKM)
The procedure for installing the software for the optional Printer/Scanner Expansion
Kit (AL-12PKM) and the operation of the printer/scanner is explained here.
Information on how to use the online manual is also provided. For the procedure for
installing the AL-12PKM, see the setup guide that accompanies the AL-12PKM.
Illustrations of driver screens and other computer screens show the screens that
appear in Windows XP Home Edition. Some of the names that appear in these
illustrations may differ slightly from the screens that appear in other operating
systems.
The following term is used in this chapter.
CD-ROM
Means the supplied CD-ROM with the SHARP Personal MFP series software.
SOFTWARE FOR THE SHARP PERSONAL MFP
SERIES
The supplied CD-ROM includes software for this unit.
MFP driver
Scanner driver
Permits you to operate scanning function of this unit with TWAIN-compliant and
WIA-compliant application.
Printer driver
Enables you to use the printer function of this unit with your computer.
Print Status Window
The print state and information on current printing are displayed on the status
monitor window.
Sharpdesk
An integrated software environment that makes it easy to manage document and
image files and launch applications.
Button Manager
Button Manager enabling the SCANNER ( ) key located on the unit.
32
The scanning feature is only available with Windows 98/Me/2000/XP
using a USB connection. For users running Windows 95/NT 4.0 or using
a parallel connection, only printing is available.
Page 35

HARDWARE AND SOFTWARE REQUIREMENTS
Check the following hardware and software requirements in order to install the software.
Computer type IBM PC/AT or compatible computer equipped with a
USB1.1*
2
Operating system*
Display 800 x 600dots (SVGA) display with 256 colours (or better)
Hard disk free space
Other requirement
for hardware
*1Compatible with Windows 98, Windows Me, Windows 2000 Professional, Windows XP
Professional or Windows XP Home Edition preinstalled model with USB interface
equipped as standard.
2
Printing is unavailable in MS-DOS mode.
*
3
The administrator's authorisation is required to install this software using this installer.
*
Windows 95, Windows 98, Windows Me, Windows NT
Workstation 4.0 (ServicePack 5 or later)*
Professional, Windows XP Professional*
Home Edition*
150MB or more
An environment on which any of the operating systems listed
above can fully operate
1
or bi-directional parallel interface (IEEE 1284)
3
, Windows 2000
3
3
, Windows XP
BEFORE INSTALLATION
The following table shows the drivers and software that can be installed for each
version of Windows and interface connection method.
MFP Driver
Printer driver/
Print Status
Window
Users of Windows
98/Me/2000/XP who
will use the USB
interface connection
Users of Windows
98/Me/2000/XP who
will use the parallel
interface connection
Windows 95/NT 4.0
users
*1When the unit is connected through the parallel port, the Print Status Window can only
be used when the parallel port is set to ECP mode. To set the parallel port mode, refer
to your computer manual or ask the manufacturer of your computer.
2
Sharpdesk can be installed when using a parallel interface connection, however, the
*
unit’s scanner function cannot be used.
Is there another GDI printer driver or a Windows Printing System printer
driver already installed? If installed, change the printer port setting. For
the change of the printer port setting, see "USING OTHER INSTALLED
DRIVERS" (p.58).
Available*
Scanner driver
Available Available Available
1
Not Available
Button
Manager
Not
Available
Sharpdesk
Available*
2
7
33
Page 36

Flow of installation
Refer to the following table and then begin installation.
Operating
system
Windows XP
Windows 98
Windows Me
Windows 2000
Windows 95/
NT 4.0
Interface Reference pages for how to install
USB/
Parallel
USB
Parallel
USB
Parallel
USB
Parallel
Parallel
Installing onto Windows XP (USB/parallel interface)
(p.35)
Installing onto Windows 98/Me/2000 (USB interface) (p.39)
Installing onto Windows 95/98/Me/NT4.0/2000
(Parallel interface) (p.42)
Installing onto Windows 98/Me/2000 (USB interface) (p.39)
Installing onto Windows 95/98/Me/NT4.0/2000
(Parallel interface) (p.42)
Installing onto Windows 98/Me/2000 (USB interface) (p.39)
Installing onto Windows 95/98/Me/NT4.0/2000
(Parallel interface) (p.42)
Installing onto Windows 95/98/Me/NT4.0/2000
(Parallel interface) (p.42)
34
Page 37
INSTALLING THE SOFTWARE
The following term is used in this section.
MFP
Means the unit as a printer and scanner.
• For this description, it is assumed that the mouse is configured for
right hand operation.
• To print or scan, the MFP must be in the online state.
• The scanner feature only works when using a USB interface cable.
• If any error message appears, solve the problem following the
instructions on the screen. After your problem is solved, the installing
procedure will be continued. Depending on your problem, you may
have to exit the installer. In this case, click the "Cancel" button to exit
the installer. After solving your problem, reinstall the software from the
beginning.
Installing onto Windows XP (USB/parallel interface)
Before starting the installation, make sure the USB or parallel interface cable is not
connected to the MFP.
Insert the supplied CD-ROM into your CD-ROM drive.
1
Click the "start" button, click "My Computer" ( ), and then
2
double-click the CD-ROM ( ) icon.
When any of "Found New Hardware Wizard" messages appear during
the software installation, be sure to click the "Cancel" button.
Double-click the "setup" ( ) icon.
3
If the language selection screen appears after you double click the
"setup" icon, select the language you wish to use and click the "Next"
button. (Normally, the correct language is selected automatically.)
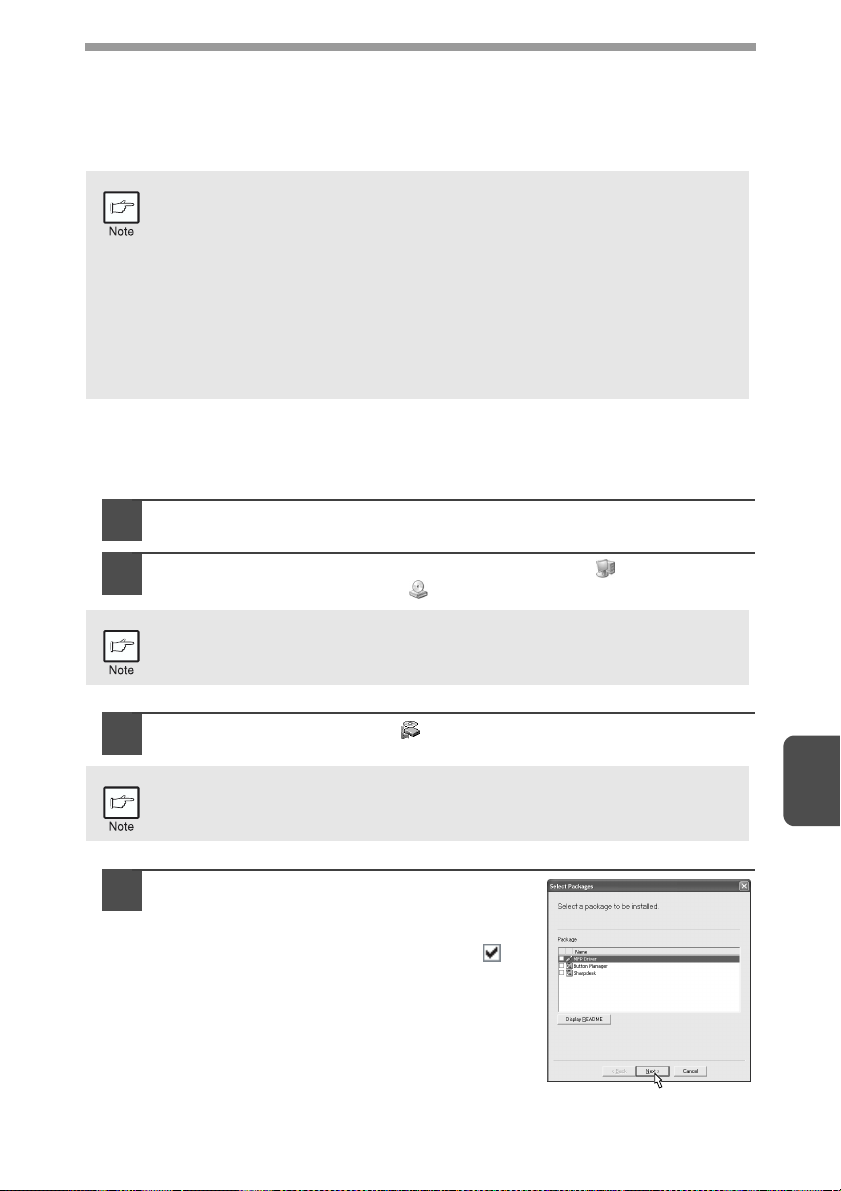
Select the software packages to be
4
installed, and then click the "Next"
button.
The software packages with checkmark ( )
on the list on the screen will be installed.
Click the "Display README" button to show
the information on the selected package.
7
35
Page 38

• If you are using the parallel interface connection, do not select the
Button Manager checkbox because this feature is not supported with
the parallel interface.
• If the following screen appears, click the "OK" button. Review the
contents in "BEFORE INSTALLATION" (p.33), and then select only
appropriate the software packages to be installed.
Review the software packages to be
5
installed on the screen, and then click
the "Start" button.
The software packages to be installed will be
displayed on the screen. If inappropriate
packages are displayed, click the "Back" button
to select appropriate packages again.
Copying files for MFP driver installation and parallel interface
6
setup (This step will start if it was selected in step 4).
After confirming the message in the "Welcome" window, click the
1
"Next" button.
A dialog box appears asking you to verify that the USB or parallel
2
interface cable is not connected to the MFP. Make sure that the
interface cable is not connected and click the "Next" button.
Click the "Next" button in the dialog box to
3
install the MFP driver or Cancel to quit the
installation.
The setup program will start to copy the files.
If the following screen appears while the files are
being copied (the message may appear more
than once), click "Continue Anyway".
When the "The MFP driver installation is complete." dialog box
4
appears, click the "OK" button.
The Button Manager installer will start.
36
Page 39
Begin installation of the Button Manager (This step will start if it
7
was selected in step 4).
After confirming the message in the "Welcome" window, click the
1
"Next" button.
Read the message in the "Please read the following information."
2
window, and then click the "Next" button.
When a message appears that lets you specify the location for the
3
software to be installed, click the "Next" button.
If the program displays "Do you want the Button Manager added to
4
Windows Startup?", check "Yes" and click the "OK" button.
The setup program will start to copy the files.
Click the "Finish" button when the message informs you that
5
setup is successful.
The Sharpdesk installer will start.
Begin installation of the Sharpdesk (This step will start if it was
8
selected in step 4).
After confirming the message in the "Welcome to Sharpdesk
1
installation" window, click the "Next" button.
Read the message in the "Information" window, and then click the
2
"Next" button.
When the "Choose Destination Location" window appears, click
3
the "Next" button.
When the "Select Program Folder" window appears, click the
4
"Next" button.
The setup program will start to copy the files.
Click the "Finish" button when the message informs you that
5
Setup is complete.
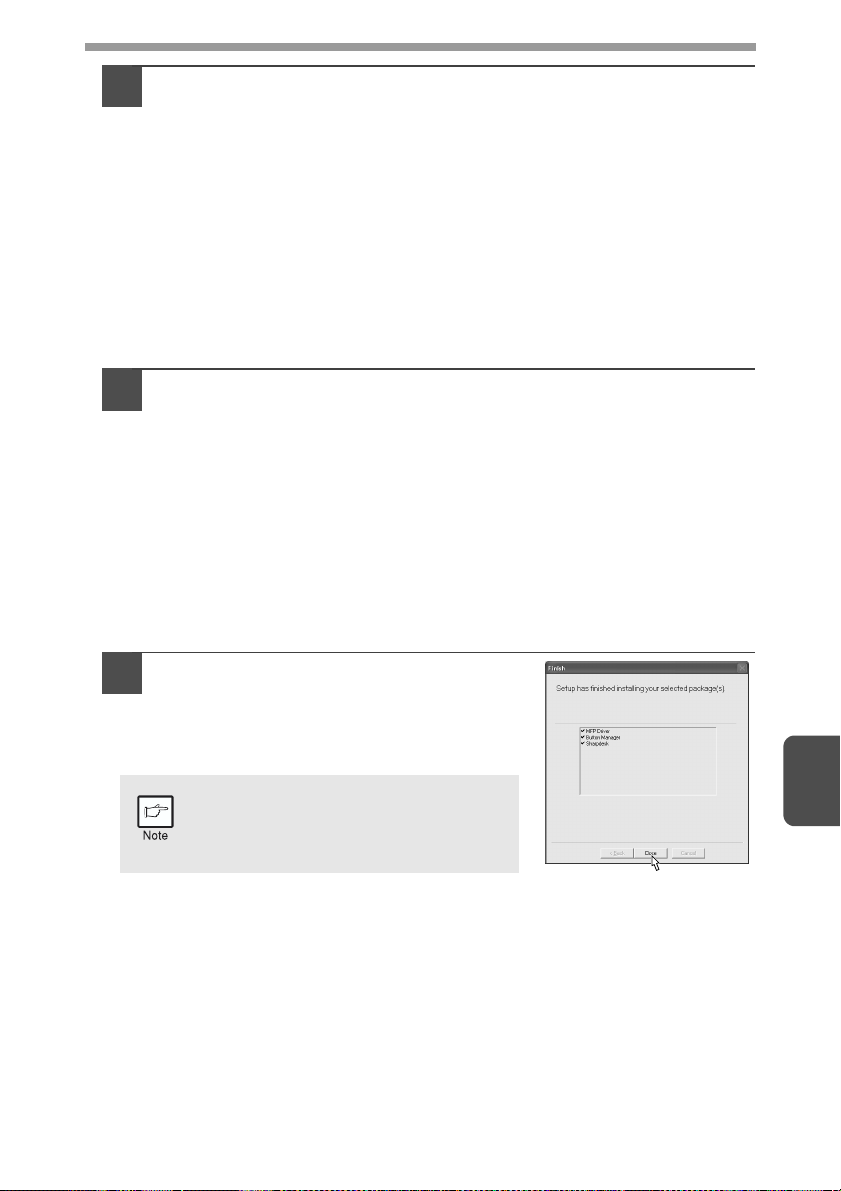
Click the "Close" button when the
9
message informs you that "Setup has
finished". When the "Now connect the
MFP interface cable to the PC" dialog
box appears, click the "OK" button.
After the installation, a message to
restart your computer may be
displayed. In this case, click the "Yes"
button to restart your computer.
7
37
Page 40

Connect the USB interface cable or parallel interface cable.
10
(p.59)
Windows will detect the MFP and the Plug and Play screen will appear. If
you are using Windows XP with the parallel interface, go to step 12.
Begin installation of the scanner driver.
11
12
"SHARP AR-xxxx" (where xxxx is the model name of your MFP)
1
will appear in the "Found New Hardware Wizard" dialog box.
Select "Install the software automatically (Recommended)" and
click the "Next" button.
The "Install hardware" dialog box will appear. Click the "Continue
2
Anyway" button.
When installation of the driver is completed, click the "Finish"
3
button to finish the scanner driver installation.
Begin installation of the printer driver.
"SHARP AR-xxxx" (where xxxx is the model name of your MFP)
1
will appear in the "Found New Hardware Wizard" dialog box.
Select "Install the software automatically (Recommended)" and
click the "Next" button.
The "Hardware Installation" dialog box will appear. Click the
2
"Continue Anyway" button.
When installation of the driver is completed, click the "Finish"
3
button to finish the printer driver installation.
You have completed the installation of all the software.
38
Page 41

Installing onto Windows 98/Me/2000 (USB interface)
Before starting the installation, make sure the USB interface cable is not connected
to the MFP.
Insert the supplied CD-ROM into your CD-ROM drive.
1
Double-click "My Computer" ( ), and then double-click the
2
CD-ROM ( ) icon.
When any of "Hardware Found", or "Found New Hardware Wizard"
messages appear during the software installation, be sure to click the
"Cancel" button.
Double-click the "setup" ( ) icon.
3
If the language selection screen appears after you double click the
"setup" icon, select the language you wish to use and click the "Next"
button. (Normally, the correct language is selected automatically.)
Select the software packages to be
4
installed, and then click the "Next"
button.
The software packages with checkmark ( )
on the list on the screen will be installed. Click
the "Display README" button to show the
information on the selected package.
If the following screen appears, click the "OK" button. Review the
contents in "BEFORE INSTALLATION" (p.33), and then select the
appropriate driver software packages to be installed.
Review the software packages to be installed on the screen,
5
and then click the "Start" button.
The software packages to be installed will be displayed on the screen. If
inappropriate packages are displayed, click the "Back" button to select
appropriate packages again.
7
39
Page 42

Copying files for MFP driver installation.
6
After confirming the message in the "Welcome" window, click the
1
"Next" button.
A dialog box appears asking you to verify that the interface cable
2
is not connected to the MFP. Make sure that the interface cable is
not connected and click the "Next" button.
Click the "Next" button in the dialog box
3
showing the files to be copied for installation
of the MFP driver.
The setup program will start to copy the files.
In Windows 2000, if the following screen appears
while the files are being copied (the message
may appear more than once), click "Yes" in
Windows 2000.
The following screen appears when all of the
4
files for the USB interface connection have
been copied. If you are not using a parallel
interface cable for connection to the MFP,
please click the "No" button.
When the "The MFP driver installation is complete." dialog box
5
appears, click the "OK" button.
The Button Manager installer will start.
Begin installation of the Button Manager (This step will start if it
7
was selected in step 4).
After confirming the message in the "Welcome" window, click the
1
"Next" button.
Read the message in the "Please read the following information."
2
window, and then click the "Next" button.
When a message appears that lets you specify the location for the
3
software to be installed, click the "Next" button.
If the program displays "Do you want to add Button Manager to
4
Startup program?", check "Yes" and click the "OK" button.
The setup program will start to copy the files.
Click the "Finish" button when the message to inform you of the
5
completion of the installation appears.
The Sharpdesk installer will start.
40
Page 43
Begin installation of the Sharpdesk (This step will start if it was
8
selected in step 4).
After confirming the message in the "Welcome to Sharpdesk
1
installation" window, click the "Next" button.
Read the message in the "Information" window, and then click the
2
"Next" button.
When the "Choose Destination Location" window appears, click
3
the "Next" button.
When the "Select Program Folder" window appears, click the
4
"Next" button.
The setup program will start to copy the files.
If the dialog box asking "If you have TIF files
saved using Photoshop or Imaging for
Windows you should hit Skip" appears,
answer the question to continue the
Sharpdesk installation.
Click the "Finish" button when the message
5
to inform you of the completion of the installation appears.
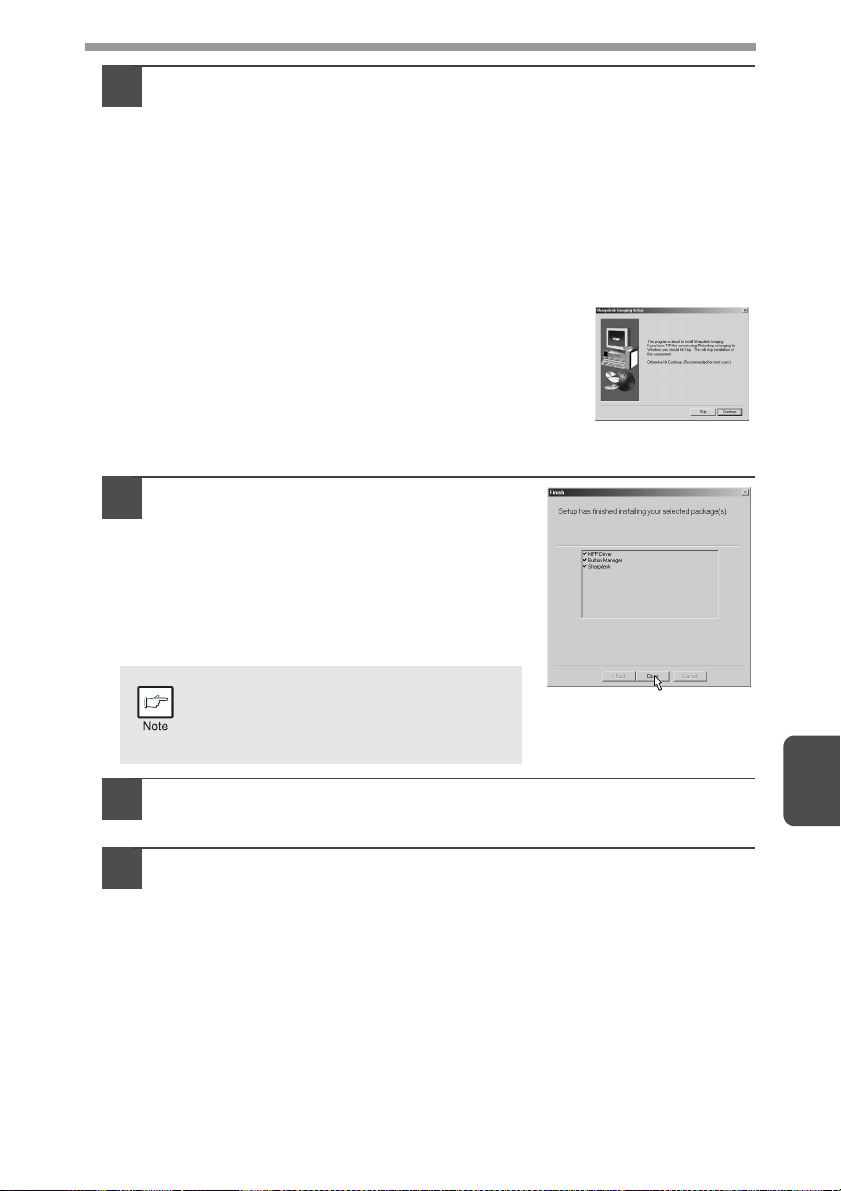
Click the "Close" button when the
9
message to inform you of the
completion of the installation appears.
When the "Now connect the MFP
interface cable to the PC. This will
finalize the drivers installation and
settings." dialog box appears, click the
"OK" button.
After the installation, a message to
restart your computer may be
displayed. In this case, click the "Yes"
button to restart your computer.
Connect the USB interface cable. (p.59)
10
Windows will detect the MFP and the Plug and Play screen will appear.
Follow the instructions in the Plug and Play screen that
11
appears in your version of Windows to begin the installation.
You have completed the installation of the software.
7
41
Page 44

Installing onto Windows 95/98/Me/NT4.0/2000
(Parallel interface)
Before starting the installation, make sure the USB or parallel interface cable is not
connected to the MFP.
Insert the supplied CD-ROM into your CD-ROM drive.
1
Double-click "My Computer" ( ), and then double-click the
2
CD-ROM ( ) icon.
When any of "Hardware Found", or "Found New Hardware Wizard"
messages appear during the software installation, be sure to click the
"Cancel" button.
Double-click the "setup" ( ) icon.
3
If the language selection screen appears after you double click the
"setup" icon, select the language you wish to use and click the "Next"
button. (Normally, the correct language is selected automatically.)
Select the software packages to be
4
installed, and then click the "Next"
button.
The software packages with checkmark ( )
on the list on the screen will be installed.
Click the "Display README" button to show
the information on the selected package.
In Windows 95/NT 4.0, "Button
Manager" does not appear. In
Windows 98/Me/2000, do not select
the "Button Manager" checkbox.
because this is not supported when
using the parallel interface.
42
The next screen appears. Make sure that the parallel interface
5
cable is not connected, and click "OK".
Windows 95/NT 4.0 Windows 98/Me/2000
Check the contents of the package on the screen, and then
6
click the "Start" button.
The software packages to be installed will be displayed on the screen. If
inappropriate packages are displayed, click the "Back" button to select only
appropriate software packages.
Page 45

Copying files for MFP driver installation and parallel interface
7
setup (This step will start if it was selected in step 4).
After confirming the message in the "Welcome" window, click the
1
"Next" button.
A dialog box appears asking you to verify that the USB or parallel
2
interface cable is not connected to the MFP. Make sure that the
interface cable is not connected and click the "Next" button.
Click the "Next" button in the dialog box to
3
install the MFP driver or Cancel to quit the
installation.
The setup program will start to copy the files.
In Windows 2000, if the following screen appears
while the files are being copied (the message
may appear more than once), click "Yes" in
Windows 2000.
The following screen appears. Click the "Yes" button, and then the
4
Model screen will appear. Select the model number that is the
same as the model name of your MFP and click the "Next" button.
Be sure to select the displayed model number that is the same as the
MFP's model name. If they are not the same, the driver will not be
installed correctly.
Establish the printer settings and click the
5
"Next" button.
Select "LPT1" for the port to be used. If "LPT1"
does not appear, it is likely that another printer or
peripheral device is using "LPT1". Check your
other printers and peripheral devices, and change
the port setting as needed so no device is using
"LPT1". If you wish the MFP to be your default
printer, select "Yes". If not, select "No".
When the "Setup has completed gathering all necessary installation
6
information" dialog box appears, click the "Yes" button.
The parallel interface driver is installed.
When the "The MFP driver installation is complete." dialog box
7
appears, click the "OK" button.
The Sharpdesk installer will start.
7
43
Page 46

Begin installation of the Sharpdesk (This step will start if it was
8
selected in step 4).
After confirming the message in the "Welcome to Sharpdesk
1
installation" window, click the "Next" button.
Read the message in the "Information" window, and then click the
2
"Next" button.
When the "Choose Destination Location" window appears, click
3
the "Next" button.
When the "Select Program Folder" window appears, click the
4
"Next" button.
The setup program will start to copy the files.
If the dialog box asking "If you have TIF files
saved using Photoshop or Imaging for
Windows you should hit Skip" appears,
answer the question to continue the
Sharpdesk installation.
Click the "Finish" button when the message
5
to inform you of the completion of the installation appears.
Click the "Close" button when the
9
message to inform you of the
completion of the installation appears.
After the installation, a message to
restart your computer may be
displayed. In this case, click the "Yes"
button to restart your computer.
44
Connect the parallel interface cable.
10
You have completed the installation of all the software.
Page 47

INDICATORS ON THE OPERATION PANEL
The ONLINE indicator and the start ( ) indicator indicate the state of the printer or
scanner.
SCANNER indicator
ONLINE indicator
Start indicator
Power save indicator
Start indicator
On: Indicates the unit is ready for copying or scanning is being performed.
Blinking: The indicator blinks in the following situations:
• When a print job is interrupted.
• During initialisation of the unit. (the cover has been opened and closed
or the power turned off and on.
• When a copy job is stored.
• When toner is being replenished during a copy or print job.
Off: The indicator is off in the following situations:
• During copying or scanning.
• The unit is in the auto power shut-off mode.
• When a misfeed or error has occurred.
ONLINE indicator
The ONLINE key is pressed and on line and off line are changed.
On: Indicates the unit is ready for printing or scanning is being performed.
(On line)
Blinking: Printing or data is being received from a computer.
Off: Copying is being performed. (Off line)
Power save indicator
On: Indicates the unit is in a power save mode.
Scanner indicator
On: The SCANNER ( ) key has been pressed and the unit is in scanner
mode.
Blinking: A scan job is being executed from the computer, or scan data is stored
in the unit's memory.
Off: The unit is in the copy mode.
7
45
Page 48

USING THE PRINTER MODE
For problems with the printer function, see the online manual or the help
file for the driver.
Opening the printer driver from the start menu
Open the printer driver setup screen by the method shown below.
Click the "start" button.
1
Click "Control Panel", select "Printers and Other Hardware",
2
and then click "Printers and Faxes".
On Windows 95/98/Me/NT4.0/2000, select "Settings" and click "Printers".
Click the "SHARP AR-xxxx" (where xxxx is the model name of
3
your unit) printer driver icon and from the "File" menu select
"Properties".
On windows NT 4.0, select "Document Defaults" to open the
printer driver setup screen.
Click "Printing Preferences" button in the "General" tab.
4
On Windows 95/98/Me, click the "Setup" tab.
The printer driver setup screen will appear.
Refer to the Windows manual or help file for more information
on the "General" tab, "Details" tab, "Color Management" tab and
"Sharing" tab.
46
How to print
Make sure that the paper of the desired size and type is loaded
1
in the tray.
The procedure for loading paper is the same as for loading copy paper. See
"LOADING PAPER" (p.7).
Open the document you intend to print, and select "Print" from
2
the application's "File" menu.
Make sure that "SHARP AR-xxxx" (where xxxx is the model
3
name of your unit) is selected as the current printer. If you
intend to change any print setting, click the "Preferences"
button to open the setting dialog.
On Windows 95/98/Me/NT 4.0, click the "Properties" button.
On Windows 2000, the "Properties" button does not appear. Set your
preferences by switching the tab in the "Print" dialog box.
When printing from the single bypass, configure the settings in
the printer driver first, execute printing, and then load the paper.
Page 49

Specify the print settings including the number of copies,
4
media type, and print quality, and then click the "Print" button
to start printing.
On Windows 95/98/Me/NT 4.0, click the "OK" button to start printing.
For details on print settings, see the online manual or the help file for the
printer driver.
When using the single bypass
After appears in the display, wait until the Paper feed location indicator
for the single bypass illuminates and insert the paper. The machine will
automatically draw in the paper and begin printing.
• If copying is being performed when printing is started, copying will
continue. After copying is complete, printing will be executed when the
clear ( ) key is pressed twice, the ONLINE key is pressed to switch
the unit to the online state or approximately 60 seconds (auto clear
time)* elapse.
* The auto clear time varies with a user program setting. See "USER
PROGRAMS" (p.19).
• Preheat mode and auto power shut-off mode will be cancelled when
printing is started.
• If the paper size specified from the software application is larger than
the paper size in the printer, part of the image that is not transferred to
the paper may remain on the surface of the drum. In this case, the
backside of the paper may become dirty. If this occurs, change to the
correct size paper and print two or three pages to clean the image.
• If you start a print job while a scan job is in progress, the print data will
be stored in the unit's memory. When the scan job is completed,
printing will begin.
About interrupt copying
If you press the start ( ) key to begin a copy job while a print job using the paper
tray is in progress, the copy job will begin automatically after the print data in the
unit's memory is printed (interrupt copying). When this is done, the print data
remaining in the computer is not sent to the unit. When the copy job ends, press the
clear ( ) key twice, or press the ONLINE key once to change the unit to the online
state (p.45), or wait until the set auto clear time (p.18) elapses. The remaining print
data will be sent to the unit and printing will resume. Interrupt copying is not possible
during a print job using the single bypass.
7
47
Page 50
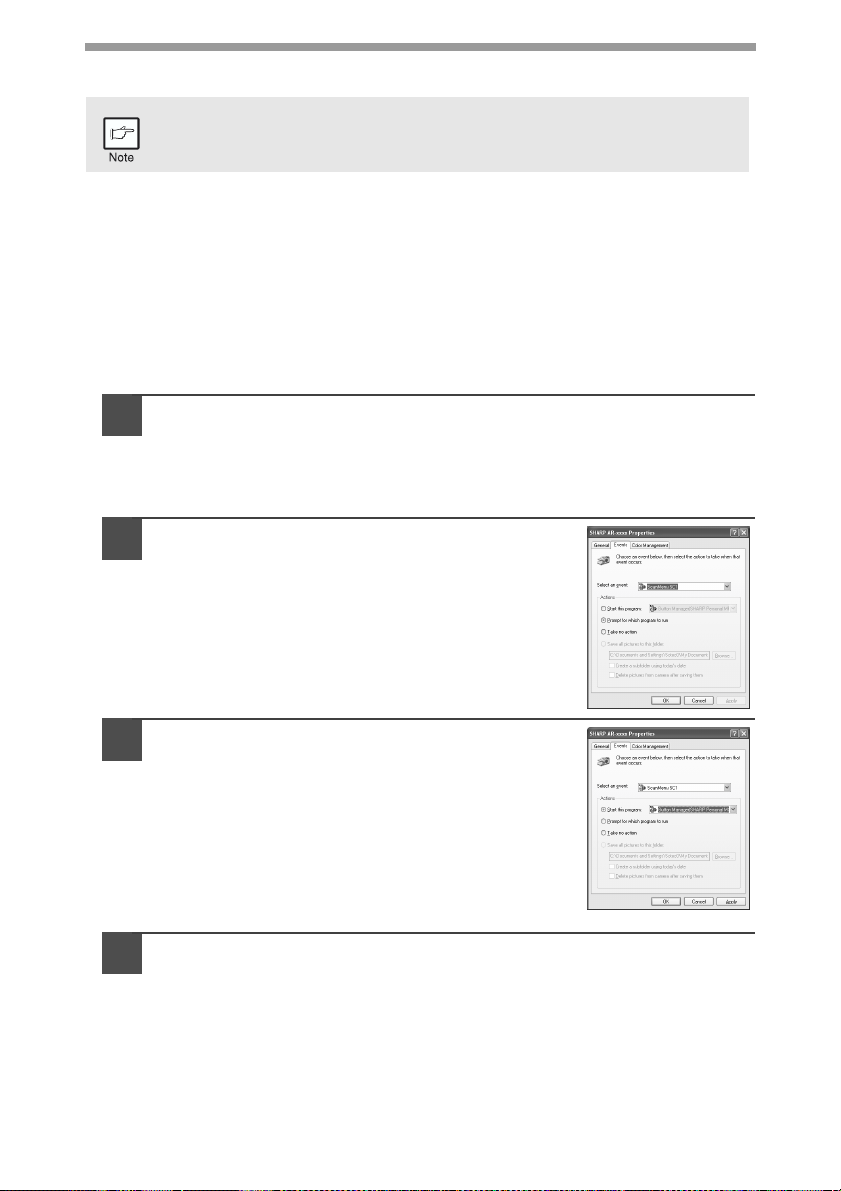
USING THE SCANNER MODE
For problems with the scanner function, see the online manual or the
help file for the driver.
Using the Button Manager
Setting up the Button Manager
The scanner driver for this unit includes an STI (Still image) driver and WIA
(Windows Image Acquisition) driver. You can install software that supports the STI
driver and WIA driver to enable scanning using only the operation panel of the unit.
The Button Manager accessory software supports the STI driver and WIA driver. Setup
that is required in Windows to use the Button Manager is explained in the following.
Windows XP
Click the "start" button, select "Control Panel" and click
1
"Printers and Other Hardware", and then click "Scanners and
Cameras" in the start menu. Right click the "SHARP AR-xxxx"
(where xxxx is the model name of your unit) icon and click
"Properties" in the menu that appears.
In the "Properties" screen, click the
2
"Events" tab.
48
Click the "Select an event" button and
3
select "ScanMenu SC1" from the pull-down
menu. Select "Button Manager (SHARP
Personal MFP series)" in "Start this
program" and click "Apply".
Repeat Step3 to set "ScanMenu SC2" through "ScanMenu SC6" .
4
Click the "Select an event" button and select "ScanMenu SC2" from the pulldown menu. Select "Button Manager (SHARP Personal MFP series)" in
"Start this program" and click "Apply". Do the same for each ScanMenu
through "ScanMenu SC6".
When the settings have been completed, click the "OK" button to close the
screen. When the settings have been completed in Windows, start the
Button Manager. Adjust detailed settings and then scan an image from the
unit. For the procedures for starting Button Manager and adjusting settings,
see "Scan Parameter Setting Dialog Box" (p.50).
Page 51

Windows 98/Me/2000
To scan directly into an application using the Button Manager on Windows 98,
Windows Me and Windows 2000. Set the Event Manager properties to send only to
Button Manager as shown below.
Click the "Start" button, select "Control Panel" from "Settings",
1
and open "Scanners and Cameras" in start menu.
In Windows Me, it occasionally happens that the "Scanners and
Cameras" icon does not appear immediately after installation of the
MFP driver is completed. If the icon does not appear, click "View all
Control Panel options" in the Control Panel and display the "Scanner
and Cameras" icon.
Select "AR-xxxx" (where "xxxx" is the model name of your
2
unit), and click the "Properties" button.
In Windows Me, right click "AR-xxxx" (where "xxxx" is model name of your
unit) and click "Properties" in the menu that appears.
In the "Properties" screen, click the
3
"Events" tab.
Click the "Scanner events" button and
4
select "ScanMenu SC1" from the pull-down
menu. Select "Button Manager (SHARP
Personal MFP series)" in "Send to this
application" and click "Apply".
If other application are shown,
deselect the checkboxes for the other
applications and leave only the Button
Manager checkbox selected.
Repeat Step4 to set "ScanMenu SC2" through "ScanMenu
5
SC6".
Click the "Scanner events" and select "ScanMenu SC2" from the pull-down
menu. Select "Button Manager (SHARP Personal MFP series)" in "Start this
program" and click "Apply". Do the same for each ScanMenu through
"ScanMenu SC6".
When the settings have been completed, click the "OK" button to close the
screen. When the settings have been completed in Windows, start the
Button Manager. Adjust detailed settings and then scan an image from the
unit. For the procedures for starting Button Manager and adjusting settings,
see "Scan Parameter Setting Dialog Box" (Next page).
7
49
Page 52

Scan Parameter Setting Dialog Box
After you have completed the Button Manager settings in
Windows, configure the scan settings in Button Manager.
To configure the scan settings in Button Manager, right click
the ( ) icon in the Taskbar and select "Setting" from the
menu that appears.
For details on configuring the scan settings in Button
Manager, see the online manual or the help file.
This is the corresponding setting in the Button
Manager to automatically send multiple images
in fullcolour at 75 dpi to Sharpdesk using the
operation panel "SC1" SCANNER ( ) key
selection.
This dialog shows the SC1 event set to go directly to Button Manager.
With the Button Manager set to send the image to Sharpdesk. (factory
default setting) Sharpdesk will open after acquiring the image
automatically.
Flow of the Button Manager setting
The Button Manager can directly handle a AR-xxxx (where xxxx is the model name
of your unit) series device event and start your selected application according to the
scan setting made on the AR-xxxx (where xxxx is the model name of your unit)
operation panel (SC1, SC2, SC3, SC4, SC5, SC6).
This will scan directly into your application from the device.
50
Scanner ARxxxx (where
xxxx is the
model name
of your unit)
SCANNER
key pressed.
Event
Manager
Windows OS
Button
Manager
No Selection
dialog is
displayed.
User
selected
application
The user
application
opens.
Page 53

The settings for the Windows Event Manager for
the SHARP AR-xxxx (where xxxx is the model
name of your unit) device allow the user to take
advantage of the Sharp Button Manager to take
control of events from Windows and send
scanned images to any of six different
applications according to the Button Manager
setting.
This can be done with the Windows OS showing
the Event Manager selection dialog or directly
into a selected application if the Button Manager
is the only allowed handler for device events
from the SHARP AR-xxxx (where xxxx is the
model name of your unit).
This is done by changing the Windows device
This is the Control Panel
Properties dialog for "Scanners and
Cameras".
settings for the AR-xxxx (where xxxx is the model
name of your unit) in the Scanner and Camera
device settings in the Control Panel.
All About The Windows Event Manager and scanner events in
Windows 98, Windows Me, Windows 2000 and Windows XP.
Windows Platforms provide a mechanism for software to handle external events for
a scanner device like the SHARP AR-xxxx (where xxxx is the model name of your
unit) series products. This mechanism is controlled by the device manager on a
device basis. Applications that can handle events from a scanner/camera device
register with the Windows Event Manager and shown as available in the registered
applications. The path an event takes to get to the user's selected application
depends upon the event settings for the device.
Scanner ARxxxx (where
xxxx is the
model name
of your unit)
SCANNER
key pressed.
Event
Manager
Windows OS
Event
Manager
selection
dialog
Displayed on
screen
This is the Windows Event Manager
Selection Dialog.
Shown are two applications registered
to handle the scanner event from the
AR-xxxx (where xxxx is the model name
of your unit) device.
User selects
an
application.
The user
application
opens.
7
51
Page 54

Using the SCANNER key to begin scanning
• Scanning is not possible during a copy job.
If the unit is used to begin a scan job during a print job, the scan job will be
•
stored and scanning will begin when the print job is completed.
Press the SCANNER ( ) key.
1
The unit enters scan mode.
Place the original you wish to scan on the original table.
2
For the procedure for placing the original, see "ORIGINAL PLACEMENT"
(p.14).
Press the right copy quantity key to
3
display the number of the application that
you wish to use for scanning.
The application numbers are initially as follows.
52
Application
number
SC1 Sharpdesk (if installed)
SC2
SC3 Fax (if a fax program is installed)
SC4 OCR (if an OCR program is installed)
SC5 Microsoft Word (if installed)
SC6 Any application set in Button Manager
E-mail (your standard e-mail program in the
Windows OS you are using)
Application launched
Page 55

Press the start ( ) key.
4
The selected application launches and scanning begins.
If the following screen appears, select Button
Manager and click "OK". Button Manager starts
and the application associated with Button
Manager starts. If you want only Button Manager
to start in this case, set up Button Manager for
use in Windows as explained in "Setting up the
Button Manager" (p.48).
Opening the scanner driver and scanning from your computer
Follow the steps below to open the scanner driver setup screen. As an example, this
instruction is given using Sharpdesk as an image capture application.
• Scanning is not possible during a copy and print job.
• The method for starting the scanner driver differs depending on the
type of application. Refer to the manual or the help file of your
application.
Using the SHARP TWAIN
Place the original you wish to scan on the original table.
1
For the procedure for placing the original, see "ORIGINAL PLACEMENT"
(p.14).
After starting Sharpdesk, click the
2
"File" menu and select "Select
Scanner".
Click here
7
53
Page 56

Select "SHARP Personal MFP
3
series", and click the "Select"
button.
If you use more than one scanning device, select the scanner
you want to use through the application. The method for
accessing the "Select Scanner" option, depends upon the
application. For more information, see the online manual or the
help file of your application.
Select "Acquire Image" from
4
the "File" menu, or click the
"Acquire" button ( ) .
Set the configuration for scanning (refer to the online manual
5
and help file), and click the "Scan" button.
Scan is started.
Click here
54
Page 57

Scanning with the "Scanner and Camera Wizard" in Windows XP
Windows XP includes as a standard feature an image scanning function. The
procedure for scanning with the "Scanner and Camera Wizard" is explained here.
To cancel scanning, click the "Cancel" button in the screen that is
displayed.
Click the "start" button , select
1
"Control Panel", and click "Printers
and Other Hardware", and then click
"Scanners and Cameras" in the start
menu. Click the "SHARP AR-xxxx"
(where xxxx is the model name of
your unit) icon and click "Get
picture" in "Imaging Tasks".
The "Scanner and Camera Wizard"
2
appears. Click "Next" and establish the
basic settings for scanning.
For information on the settings, see the
Windows XP help file. After completing each
setting, click "Next".
Select a name, format, and folder for the
3
scanned image.
For information on the image name, file format,
and folder, see the Windows XP help file.
Scanning begins. When scanning ends,
4
select the next task you wish to perform.
For information on each selection, see the
Windows XP help file. To quit the "Scanner and
Camera Wizard", select "Nothing. I’m finished
working with these pictures." and click "Next".
Click "Finish" in the screen that appears.
5
The "Scanner and Camera Wizard" closes and the scanned image is saved.
7
55
Page 58

HOW TO USE THE ONLINE MANUAL
The online manual provides detailed instructions for operating the unit as the printer
or scanner and a list of methods for dealing with printing or scanner problems.
To access the online manual, your computer must have Acrobat Reader 5.0 or a
later version. If it is not installed, refer to "Installing Acrobat Reader" (Next page).
Contents of the online manual
The contents of the online manual are as follows. Check the online manual when you use
this unit after all the initial setup is completed.
How to use the online manual
Explains how to use the online manual.
Print
Provides information on how to print a document.
Scan
Explains how to scan using the scanner driver and how to adjust the settings for
the Button Manager.
Troubleshooting
Provides instructions on how to solve driver or software problems.
Turn on your computer.
1
Insert the supplied CD-ROM into your CD-ROM drive.
2
Click the "start" button, click "My Computer" ( ), and then
3
double-click the CD-ROM ( ) icon.
On Windows 95/98/Me/NT 4.0/2000, double-click "My Computer" ( ), and
then double-click the CD-ROM ( ) icon.
Double-click the "Manual" folder,
4
double-click "English" folder, and
then double-click the
"AR_122E_122EN_152E_152EN.pdf"
icon.
The following window will appear.
AR-122E/AR-122EN/AR-152E/AR-152EN
56
Page 59

Click the to read the online manual.
5
To close the online manual, click the ( ) button located at the top-right of
the window.
• The online manual can be printed out using Acrobat Reader. SHARP
recommends printing out the sections which you refer to regularly.
• Refer to "Help" of Acrobat Reader for more details on the operation
and function of Acrobat Reader.
Installing Acrobat Reader
Turn on your computer.
1
Insert the CD-ROM into the CD-ROM drive.
2
Click the "start" button, click "My Computer" ( ), and then
3
double-click the CD-ROM ( ) icon.
Windows95/98/Me/NT4.0/2000, double-click "My Computer" ( ), and then
double-click the CD-ROM ( ) icon.
Double-click the "Acrobat" folder, and then double-click the
4
"ar500enu.exe" icon.
Follow the on-screen instructions to install Acrobat Reader.
7
57
Page 60

USING OTHER INSTALLED DRIVERS
If you use another GDI printer or a Windows Printing System printer, interference
between printers may occur and printing may not be performed properly. To use
another GDI printer or a Windows Printing System printer, you must change the port
setting of the printer driver using the following procedure.
If another printer does not operate properly when the SHARP Personal
MFP series printer driver is set to "FILE" as described below, uninstall
the SHARP Personal MFP series printer driver. To uninstall the printer
driver, see the online manual.
Click the "start" button.
1
Click "Control Panel", click "Printer and Other Hardware" and
2
then click "Printer and Faxes".
On Windows 95/98/Me/NT4.0/2000, select "Settings" and then click
"Printers".
Right-click the "SHARP AR-xxxx" (where
3
xxxx is the model name of your unit) icon in
the printer dialog box and then click
"Properties".
58
Click the "Port" tab ("Details" tab - on Windows 95/98/Me) in the
4
"Properties" dialog box, select "FILE": in the "Print to the
following port" list box, and click the "OK".
Right-click the icon of the printer to be used and click
5
"Properties".
Click the "Port" tab ("Details" tab - on Windows 95/98/Me) in the
6
"Properties" window, select "LPT1" (or the currently used
port), and click the "OK" button.
To use the SHARP Personal MFP series again, perform the same
procedure but select the port to be used (for example, LPT1) in step 4.
Page 61

CONNECTING THE INTERFACE CABLE
This unit includes both USB and parallel interface connectors.
Interface cables for connecting the unit to your computer are not included with this
unit. Please purchase the appropriate cable for your computer.
Interface cable
Parallel interface cable
IEEE 1284-Shielded type bi-directional parallel interface cable (2 m Max.)
USB interface cable
Shielded twisted pair cable, high-speed transmission equivalent (2 m Max.)
• If you intend to use the unit as a scanner, it must be connected
to your computer with a USB interface cable. The scanner
function cannot be used if the unit is connected with a parallel
cable.
• USB is available with a PC/AT compatible computer that was
originally equipped with USB and had Windows 98, Windows Me,
Windows 2000 Professional, Windows XP Professional or Windows
XP Home Edition preinstalled.
• Do not connect the interface cable before installing the MFP driver.
The interface cable should be connected during installation of the
MFP driver. (p.35)
Connecting the USB interface cable
Obtain a shielded USB interface cable.
1
Insert the cable into the USB interface
2
connector located on the rear of the
unit.
Insert the other end of the cable into the interface connector of
3
your computer, or the USB hub connected to your computer.
7
59
Page 62

Connecting the parallel interface cable
Obtain an IEEE1284 shielded parallel interface cable.
1
Ensure that your computer and unit are turned off.
2
Insert the cable into the parallel
3
interface connector located on the
rear of the unit, and fasten with
clasps.
Insert the other end of the cable into the interface connector of
4
your computer.
60
Page 63
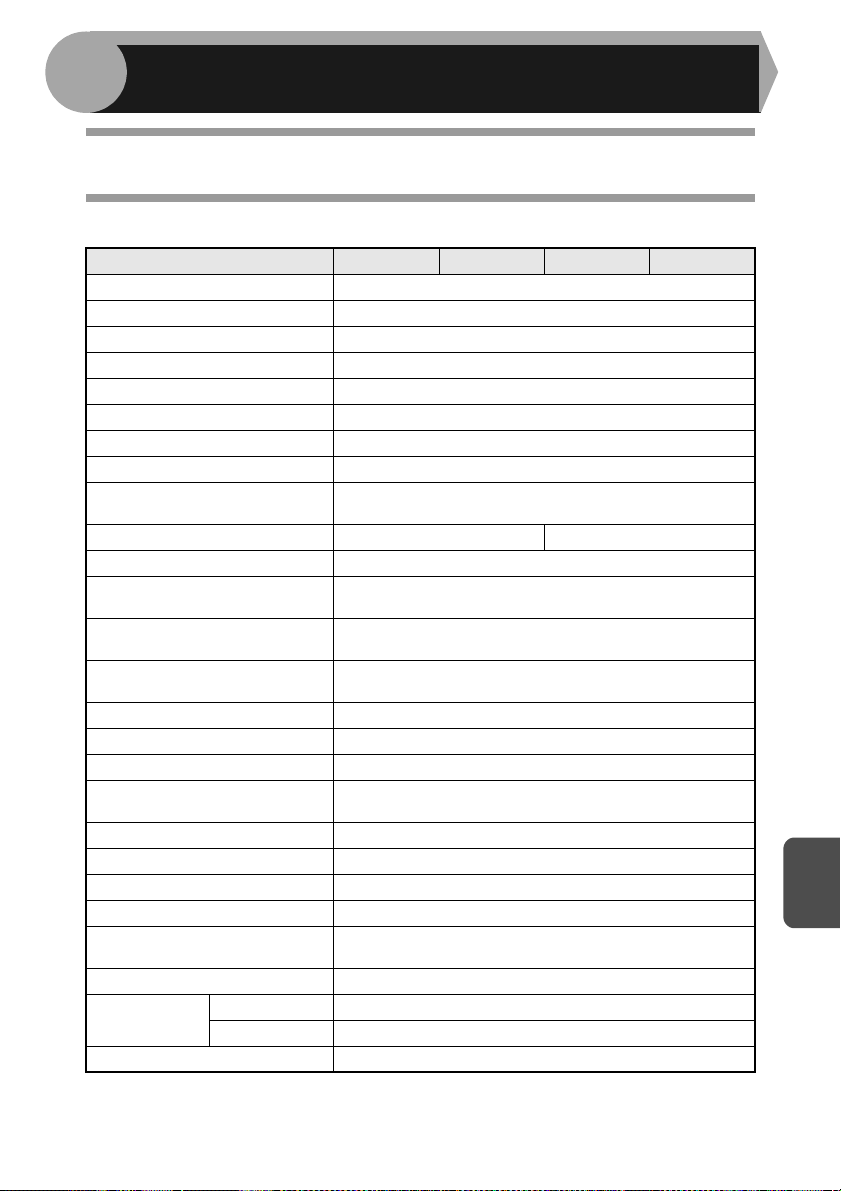
8
APPENDIX
SPECIFICATIONS
Model AR-122E AR-122EN AR-152E AR-152EN
Type Digital laser copier, desk-top type
Copy system Dry, electrostatic transfer
Originals Sheets, bound documents
Paper tray 250 sheets (Paper tray) 1 sheet (Single bypass)
Paper output tray 100 sheets
Original sizes Max. A4
Original feed 1 sheet
Copy size A6 to A4 *
Image loss
Copy speed 12 pages/min. 15 pages/min.
Continuous copying Max. 99 pages subtractive counter
First-copy time
(Approximately)
Copy ratio
Exposure system
Fusing system Heat rollers
Development system Magnetic brush development
Light source Cold cathode fluorescent lamp
Resolution
Gradation 2 levels
Bit depth 1 bit or 8 bit/pixel
Sensor Colour CCD
Memory 8 MB
Power supply
Power consumption 1000 W
Overall
dimensions
Weight (Approximately) *
Width 607.6mm
Depth 462.5mm
4
Max. 4mm *
Max. 4.5mm *
9.6 seconds
(paper:A4, exposure mode:AUTO, copy ratio:100% )
Variable:25% to 400% in 1% increments (total 376 steps)
Fixed: 25%, 70% 86%, 100%, 141%, 400%
Moving optical source, slit exposure (stationary platen)
with automatic exposure
600 x 300dpi (Auto/Manual mode)
600 x 600dpi (Photo mode)
Local voltage
name plate located on the back of the unit)
16kg
1
2
3
±10% (For this copier power supply, see the
8
61
Page 64

Model AR-122E AR-122EN AR-152E AR-152EN
Width 518mm
Unit dimensions
Operating conditions
Noise level
Emission concentration
(measurement according to
RAL-UZ 62)
Optional equipment Printer/Scanner Expansion Kit (AL-12PKM)
*1Feed paper lengthwise only.
2
*
Leading and trailing edges.
3
*
Along the other edges in totals.
4
*
Not includes toner and drum cartridges.
Depth 462.5mm
Height 295.6mm
Temperature: 10°C to 30°C
Humidity: 20% to 85%
Sound Power Level L
Copying: 6.0 [B], Standby: 3.7 [B]
Sound Pressure Level L
Copying: 46 [dB (A)], Standby: 23 [dB (A)]
Noise emission measurement in accordance with ISO 7779.
Ozone: less than 0.02 mg/m
Dust: less than 0.075 mg/m
Styrene: less than 0.07 mg/m
wA (1B=10dB)
pA (bystander positions)
3
3
3
Optional equipment
Printer/Scanner Expansion Kit (AL-12PKM)
Printing system Dry, electrostatic transfer
Printing size A6 to A4 *
Print speed Max. 12 pages/min. (A4)
Continuous printing Max. 99 pages subtractive counter
First-print time (Approximately) 9.6 seconds (Paper: A4)
Resolution
Emulation SHARP GDI
Page orientation Portrait or landscape
Interface port
*1Feed paper lengthwise only.
Printer 600 dpi
Scanner 600 x 1200 dpi
USB interface (USB1.1 Standard) /
IEEE1284-compliant bi-directional parallel interface (Only
for printer)
1
62
As a part of our policy of continuous improvement, SHARP reserves the
right to make design and specification changes for product improvement
without prior notice. The performance specification figures indicated are
nominal values of production units. There may be some deviations from
these values in individual units.
Page 65
ABOUT SUPPLIES AND OPTIONS
When ordering supplies, please use the correct part numbers as listed below.
Be sure to use only genuine SHARP parts and supplies.
For best copying results, be sure to use only SHARP Genuine
Supplies which are designed, engineered, and tested to maximize the
life and performance of SHARP copiers. Look for the Genuine
Supplies label on the toner package.
Supply list
Supply Part number Usable life
Toner cartridge AR-152T Approx. 8,000 sheets
*Based on copying onto A4-type paper at 5% toned area.
8
63
Page 66

INDEX
A
About supplies............................. 62, 63
Acrobat Reader .................................56
Alarm indicator
- Developer replacement required
indicator..............................6, 27, 31
- Maintenance indicator ........6, 27, 31
- Misfeed indicator ................6, 27, 28
- Toner cartridge replacement required
indicator..............................6, 22, 26
Appendix ........................................... 61
Auto clear time ..................................19
Auto power shut-off mode ................. 19
Automatic exposure adjustment ........16
B
Before installation..............................33
Button Manager........................... 32, 48
Bypass feed....................................... 10
Bypass paper guides ..................... 5, 10
C
Cautions
- Handling ......................................... 2
- Laser ..............................................2
- Using ..............................................1
Charger cleaner............................. 5, 25
CLEANING ........................................24
Cleaning the unit
- Cabinet ......................................... 24
- Original cover ...............................24
- Original table ................................ 24
- Transfer charger...........................25
Clear key .................................6, 15, 21
Connecting the interface cable
- Parallel interface cable ................. 60
- USB interface cable...................... 59
Conventions used in this manual ........ 4
Copy flow...........................................11
Copy quantity .................................... 15
Copy quantity key.................... 6, 15, 19
Copy ratio display key ................... 6, 17
Copy ratio selector indicator.......... 6, 17
Copy ratio selector key.................. 6, 17
D
Dark key ........................................ 6, 15
Developer replacement required
indicator ..................................6, 27, 31
Developer required............................31
Display................................................. 6
Displaying total number of copies ..... 20
E
Exposure adjustment......................... 15
Exposure mode indicator............... 6, 15
Exposure mode selector key ......... 6, 15
F
Flow of installation............................. 36
Front cover .......................................... 5
Fusing unit release lever ............... 5, 29
H
Handle ................................................. 5
Hardware and software
requirements ..................................... 33
How to print .......................................46
How to use the online manual ........... 56
I
Indicators on the operation panel ...... 45
Initial settings of operation panel....... 13
Installing the software........................ 35
Interface
- Parallel interface........................... 60
- USB interface ............................... 59
Interrupt copying................................ 47
Introduction..........................................4
L
Light and dark indicator .................6, 15
Light key ........................................ 6, 15
Loading paper ..................................... 7
Loading the paper tray ........................ 8
64
Page 67

M
Maintenance indicator ............. 6, 27, 31
Making copies ................................... 11
MFP driver
- Print Status Window ..................... 31
- Printer driver.................................31
- Scanner driver .............................. 31
Misfeed indicator ..................... 6, 26, 27
Misfeed removal
- Fusing area .................................. 29
- Paper feed area............................ 29
- Transport area..............................30
N
Name
- Operation panel..............................6
- Part names ..................................... 5
O
ONLINE indicator ..........................6, 45
ONLINE key .................................. 6, 45
Online manual ...................................56
Opening the printer driver.................. 45
Opening the scanner driver ...............53
Operation panel...................................5
Original placement ............................14
Optional equipment ........................... 32
Original table .......................................5
P
Paper................................................... 7
Paper feed location indicator............... 6
Paper output tray.................................5
Paper output tray extension ................5
Paper tray........................................5, 8
Parallel interface cable ................58, 59
Photo copying.................................... 15
Power cord socket............................... 5
Power off ...........................................13
Power on ...........................................12
Power save indicator ..................... 6, 45
Power save mode indicator ...............19
Power switch .................................5, 12
Preheat mode .................................... 19
Proper storage................................... 63
S
Scanner driver ................................... 32
Scanner indicator .......................... 6, 45
SCANNER key .............................. 6, 52
Scanning from your computer ...........53
Scanning with the "Scanner and
Camera Wizard" ................................ 55
Sharpdesk ......................................... 32
Side cover ........................................... 5
Side cover open button .......................5
Single bypass .................................... 10
Software for the SHARP Personal MFP
series................................................. 32
Specifications .................................... 61
Start indicator ................................ 6, 45
Start key .................................. 6, 11, 20
Status indicators................................27
T
Toner cartridge .................................. 21
Toner cartridge life ............................ 24
Toner cartridge replacement .............21
Toner cartridge replacement
indicator...................................6, 23, 27
Transfer charger............................ 5, 25
Troubleshooting................................. 26
Troubleshooting the unit.................... 26
U
USB interface cable........................... 59
Using other installed drivers ..............58
Using the manual ................................ 4
Using the printer mode ...................... 46
Using the scanner mode ................... 48
Using the SHARP TWAIN .................53
Z
ZOOM indicator ............................. 6, 17
ZOOM key ..................................... 6, 17
R
Reduction/enlargement/zoom ........... 17
65
Page 68

INDEX BY PURPOSE
Cleaning the unit
- Cabinet ......................................... 24
- Original cover ...............................24
- Original table ................................24
- Transfer changer ..........................25
Connecting the interface cable
- Parallel interface cable ................. 60
- USB interface cable...................... 59
Copying .............................................11
Displaying total number of copies...... 20
Enlarging/reducing copies .................17
Installing the software
- Acrobat ......................................... 57
- Button Manager............................ 32
- MFP driver....................................32
- Sharpdesk .................................... 32
Loading paper
- Paper tray....................................... 7
- Single bypass ............................... 10
Loading the original ........................... 14
Opening the printer driver.................. 46
Power off ...........................................13
Power on ...........................................12
Printing ..............................................46
Removing paper jams
- Fusing area .................................. 29
- Paper feed area............................29
- Transport area.............................. 30
Replacing the toner cartridge ............ 21
Scanning
- Button Manager............................ 52
- Scanner and Camera Wizard ....... 55
- SHARP TWAIN ............................ 53
Setting the copy quality
- AUTO ...........................................15
- MANUAL ...................................... 15
- PHOTO......................................... 16
Setting the copy quantity ................... 15
Setting the toner save mode .............18
Setting the user program................... 19
Setting up the Button Manager.......... 48
Storing the unit ....................................1
Using other installed drivers ..............58
Using the online manual.................... 56
66
Page 69

SOFTWARE LICENSE
PLEASE READ THIS LICENSE CAREFULLY BEFORE USING THE SOFTWARE. BY
USING THE SOFTWARE, YOU ARE AGREEING TO BE BOUND BY THE TERMS OF
THIS LICENSE.
1. License.
The application, demonstration, system and other software accompanying this License, whether on disk,
in read only memory, or on any other media (the "Software") and related documentation are licensed to
you by SHARP. You own the disk on which the Software is recorded but SHARP and/or SHARP'S
Licensors retain title to the Software and related documentation. This License allows you to use the
Software on one or more computers connected to a single printer and make one copy of the Software in
machine-readable form for backup purposes only. You must reproduce on such copy the SHARP
copyright notice, the copyright notice of SHARP’S Licensors and any other proprietary legends of
SHARP and/or its Licensors that were on the original copy of the Software. You may also transfer all
your license rights in the software, the backup copy of the Software, the related documentation and a
copy of this License to another party, provided the other party reads and agrees to the terms and
conditions of this License.
2. Restrictions.
The Software contains copyrighted material, trade secrets and other proprietary material which is owned
by SHARP and/or its Licensors and in order to protect them you may not decompile, reverse engineer,
disassemble or otherwise reduce the Software to a human-perceivable form. You may not modify,
network, rent, lease, loan, distribute or create derivative works based upon the Software in whole or in
part. You may not electronically transmit the Software from one computer to another or over a network.
3. Termination.
This license is effective until terminated. You may terminate this License at any time by destroying the
Software and related documentation and all copies thereof. This License will terminate immediately
without notice from SHARP and/or SHARP’S Licensors if you fail to comply with any provision of this
License. Upon termination you must destroy the Software and related documentation and all copies
thereof.
4. Export Law Assurances.
You agree and certify that neither the Software nor any other technical data received from SHARP, nor
the direct product thereof, will be exported outside the United States except as authorized and as
permitted by the laws and regulations of the United States. If the Software has been rightfully obtained by
you outside of the United States, you agree that you will not re-export the Software nor any other
technical data received from SHARP, nor the direct product thereof, except as permitted by the laws and
regulations of the United States and the laws and the regulation of the jurisdiction in which you obtained
the Software.
5. Government End Users.
If you are acquiring the Software on behalf of any unit or agency of the United States Government, the
following provisions apply. The Government agrees:
(i) if the Software is supplied to the Department of Defense (DoD), the Software is classified as
"Commercial Computer Software" and the Government is acquiring only "restricted rights" in the
Software and its documentation as that term is defined in Clause 252.227-7013 (c)(1) of the
DFARS; and
(ii) if the Software is supplied to any unit or agency of the United States Government other than DoD,
the Government's rights in the Software and its documentation will be as defined in Clause 52.22719 (c)(2) of the FAR or, in the case of NASA, in Clause 18-52.227-86 (d) of the NASA
Supplement to the FAR.
67
Page 70

6. Limited Warranty on Media.
SHARP warrants the disks on which the Software is recorded to be free from defects in materials and
workmanship under normal use for a period of ninety (90) days from the date of purchase as evidenced
by a copy of the receipt. The entire liability of SHARP and/or its Licensors and your exclusive remedy
will be replacement of the disk which fails to meet the limited warranty provided by this Clause 6. A disk
will be replaced when it is returned to SHARP or a SHARP authorized representative with a copy of the
receipt. SHARP will have no responsibility to replace a disk damaged by accident, abuse or
misapplication.
ANY IMPLIED WARRANTIES ON THE DISKS, INCLUDING THE IMPLIED WARRANTIES OF
MERCHANTABILITY AND FITNESS FOR A PARTICULAR PURPOSE, ARE LIMITED IN
DURATION TO NINETY (90) DAYS FROM THE DATE OF DELIVERY. THIS WARRANTY
GIVES YOU SPECIFIC LEGAL RIGHTS, AND YOU MAY ALSO HAVE OTHER RIGHTS WHICH
VARY FROM JURISDICTION TO JURISDICTION.
7. Disclaimer of Warranty on Software.
You expressly acknowledge and agree that use of the Software is at your sole risk. The software and
related documentation are provided "AS IS" and without warranty of any kind and SHARP and SHARP'S
Licensor(s) (for the purpose of provisions 7 and 8, SHARP and SHARP'S Licensor(s) shall be
collectively referred to as "SHARP") EXPRESSLY DISCLAIM ALL WARRANTIES, EXPRESS OR
IMPLIED, INCLUDING, BUT NOT LIMITED TO, THE IMPLIED WARRANTIES OF
MERCHANTABILITY AND FITNESS FOR A PARTICULAR PURPOSE. SHARP DOES NOT
WARRANT THAT THE FUNCTIONS CONTAINED IN THE SOFTWARE WILL MEET YOUR
REQUIREMENTS, OR THAT THE OPERATION OF THE SOFTWARE WILL BE
UNINTERRUPTED OR ERROR-FREE, OR THAT DEFECTS IN THE SOFTWARE WILL BE
CORRECTED. FURTHERMORE, SHARP DOES NOT WARRANT OR MAKE ANY
REPRESENTATIONS REGARDING THE USE OR THE RESULTS OF THE USE OF THE
SOFTWARE OR RELATED DOCUMENTATION IN TERMS OF THEIR CORRECTNESS,
ACCURACY, RELIABILITY, OR OTHERWISE. NO ORAL OR WRITTEN INFORMATION OR
ADVICE GIVEN BY SHARP OR A SHARP AUTHORIZED REPRESENTATIVE SHALL CREATE
A WARRANTY OR IN ANY WAY INCREASE THE SCOPE OF THIS WARRANTY. SHOULD
THE SOFTWARE PROVE DEFECTIVE, YOU (AND NOT SHARP OR A SHARP AUTHORIZED
REPRESENTATIVE) ASSUME THE ENTIRE COST OF ALL NECESSARY SERVICING, REPAIR
OR CORRECTION, SOME JURISDICTIONS DO NOT ALLOW THE EXCLUSION OF IMPLIED
WARRANTIES, SO THE ABOVE EXCLUSION MAY NOT APPLY TO YOU.
8. Limitation of Liability.
UNDER NO CIRCUMSTANCES INCLUDING NEGLIGENCE, SHALL SHARP BE LIABLE FOR
ANY INCIDENTAL, SPECIAL OR CONSEQUENTIAL DAMAGES THAT RESULT FROM THE
USE OR INABILITY TO USE THE SOFTWARE OR RELATED DOCUMENTATION, EVEN IF
SHARP OR A SHARP AUTHORIZED REPRESENTATIVE HAS BEEN ADVISED OF THE
POSSIBILITY OF SUCH DAMAGES. SOME JURISDICTIONS DO NOT ALLOW THE
LIMITATION OR EXCLUSION OF LIABILITY FOR INCIDENTAL OR CONSEQUENTIAL
DAMAGES SO THE ABOVE LIMITATION OR EXCLUSION MAY NOT APPLY TO YOU.
In no event shall SHARP'S total liability to you for all damages, losses, and causes of action (whether in
contract, tort (including negligence) or otherwise) exceed the amount paid by you for the Software.
9. Controlling Law and Severability.
For a portion of the Software related with Apple Macintosh and Microsoft Windows, this license shall be
governed by and construed in accordance with the laws of the state of California and Washington,
respectively. If for any reason a court of competent jurisdiction finds any provision of this License, or
portion thereof, to be unenforceable, that provision of the License shall be enforced to the maximum
extent permissible so as to effect the intent of the parties, and the remainder of this License shall continue
in full force and effect.
10. Complete Agreement.
This License constitutes the entire agreement between the parties with respect to the use of the Software and
related documentation, and supersedes all prior or contemporaneous understandings or agreements, written
or oral, regarding such subject matter. No amendment to or modification of this License will be binding
unless in writing and signed by a duly authorized representative of SHARP.
68
Page 71

ACHTUNG!
Warnhinweise zum Arbeiten mit dem Gerät
Beim Arbeiten mit diesem Gerät sind folgende Warnhinweise zu befolgen.
Warnhinweis:
• Der Fixierbereich ist heiß. Gehen Sie bei der Beseitigung eines Papierstaus in diesem
Bereich besonders vorsichtig vor.
• Blicken Sie nicht direkt in die Lichtquelle. Dies schadet den Augen.
• Schalten Sie das Gerät nicht schnell hintereinander ein und aus. Nach dem Ausschalten
des Geräts müssen Sie 10 bis 15 Sekunden warten, bevor Sie es wieder einschalten.
• Das Gerät muß ausgeschaltet werden, bevor Verbrauchsmaterial installiert wird.
Achtung:
• Stellen Sie das Gerät auf einer stabilen, ebenen Oberfläche auf.
• Stellen Sie das Gerät nicht an einem feuchten oder staubigen Ort auf.
• Wird das Gerät über längere Zeit nicht verwendet, beispielsweise an mehreren
aufeinanderfolgenden Feiertagen, muß der Netzschalter ausgeschaltet und das
Netzkabel aus der Steckdose gezogen werden.
• Wird das Gerät transportiert, muß der Netzschalter ausgeschaltet und das Netzkabel
aus der Steckdose gezogen werden.
• Decken Sie das eingeschaltete Gerät nicht mit einer Staubschutzhaube, einem Tuch
oder Plastikfolie ab. Dies würde die Wärmeabstrahlung verhindern und zur
Beschädigung des Geräts führen.
• Führen Sie keine Überprüfungen oder Einstellungen oder Maßnahmen durch, die in
diesem Handbuch nicht beschrieben sind, da Sie sich andernfalls gefährlichen
Strahlungen aussetzen könnten.
• Die Steckdose sollte sich in der Nähe des Geräts befinden und leicht zugänglich sein.
Wichtige Punkte bei der Auswahl des Aufstellplatzes
Stellen Sie das Gerät nicht in Bereichen auf, die
• feucht, naß oder sehr staubig sind,
• direktem Sonnenlicht ausgesetzt ist,
• schlecht belüftet sind,
• starken Schwankungen in der Umgebungstemperatur und der Umgebungsfeuchte
ausgesetzt sind, beispielsweise in der Nähe einer Klimaanlage oder eines Heizlüfters.
Das Netzkabel nur in eine Netzsteckdose stecken, die den auf dem Typenschild angegebenen
Anschlußleistungen entspricht. Netzstecker nur in eine geerdete Steckdose stecken.
Das Gerät an eine Stromquelle anschließen, die von keinen weiteren
Hinweis
Lassen Sie um das Gerät ausreichend Platz, damit
das Gerät gut belüftet und problemlos gewartet
werden kann.
Elektrogeräten genutzt wird. Wenn eine Lampe an die gleiche
Steckdose angeschlossen wird, kann es passieren, daß sie flackert.
10cm
20cm
10cm
1
Page 72

Warnhinweise zum Umgang mit dem Gerät
Um die hohe Leistungsfähigkeit des Geräts zu erhalten, befolgen Sie beim Umgang
mit dem Gerät folgende Warnhinweise.
Sie dürfen das Gerät nicht fallenlassen, es keinen Erschütterungen aussetzen
und nicht dagegen schlagen.
Austauschtonerkassetten an einem kühlen, trockenen Ort in ihrer Verpackung lagern.
• Wenn sie direkter Sonneneinstrahlung oder Hitze ausgesetzt werden, kann sich die
Kopienqualität verschlechtern.
Nicht die Fotoleittrommel (grüner Bereich) berühren.
• Kratzer oder Flecken auf der Trommel sind die Ursache für unsaubere Kopien.
Wichtige Hinweise beim Umgang mit dem Laserdrucker
Wellenlänge 770 nm 795 nm
Pulsdauer 11,82 µs / 7 mm
Ausgangsleitung 0,17 mW ± 0,01 mW
Richtige Lagerung von Verbrauchsmaterial
Lagern Sie Verbrauchsmaterial (Papier und Tonerkassetten) an folgenden Orten:
• sauber und trocken ist
• eine gleichmäßige Temperatur hat
• keinem direktem Sonnenlicht ausgesetzt ist
Lagern Sie das Papier flach, und lassen Sie es in seiner Verpackung.
• Papier in Packungen, die senkrecht gelagert werden, oder Papier, das nicht in der Verpackung
gelagert wird, kann sich wellen oder feucht werden, was einen Papierstau verursachen kann.
Verwendete Warenzeichen
• Microsoft und Windows sind Warenzeichen der Microsoft Corporation in den USA
und in anderen Ländern.
• IBM und PC/AT sind Warenzeichen der International Business Machines
Corporation.
• Adobe und Acrobat sind Warenzeichen der Adobe Systems Incorporated.
• Alle übrigen Warenzeichen sind Eigentum der jeweiligen Inhaber.
As an ENERGY STAR® Partner, SHARP has determined that
this product meets the ENERGY STAR® guidelines for energy
efficiency.
Die Netzsteckdose muß nahe dem Gerät angebracht und leicht zugänglich sein.In einigen
Ländern sind die Positionen des “POWER”-Schalters statt “ON” und “OFF” mit “I” und “O” auf
dem Gerät markiert.
Das Zeichen "O" bezeichnet, daß das Gerät nicht vollständig abgeschaltet ist, sondern es sich
bei dieser Position des "POWER"-Schalters in einem Wartezustand befindet.
Wenn Ihr Gerät so bezeichnet ist, halten Sie "I" für "ON" und "O" für "OFF".
VORSICHT:
Zur vollständigen elektrischen Trennung vom Netz, Netzstecker herausziehen.
Die Steckdose sollte sich in der Nähe des Geräts befinden und leicht zugänglich sein.
2
Page 73

INHALTSVERZEICHNIS
1 EINLEITUNG
BENUTZUNGSHINWEISE ZUM
HANDBUCH .................................. 4
BEZEICHNUNG DER TEILE ......... 5
BEDIENFELD ................................ 6
2 EINLEGEN VON PAPIER
PAPIER.......................................... 7
EINLEGEN IN DAS PAPIERFACH 8
MANUELLER EINZUG
(Spezialpapier).............................10
3 KOPIEREN
KOPIERVORGANG.....................11
ANSCHLIESSEN DES
NETZKABELS .............................12
EINLEGEN VON ORIGINALEN... 14
EINSTELLEN DER
KOPIENANZAHL......................... 15
BELICHTUNGSEINSTELLUNG/
PHOTOMODUS...........................15
VERKLEINERUNG/
VERGRÖSSERUNG/ZOOM........ 17
4 SONDERFUNKTIONEN
BESCHREIBUNG DER
SONDERFUNKTIONEN.............. 18
TONERSPARMODUS .................18
BEDIENERPROGRAMME ..........19
ANZEIGEN DER
KOPIENGESAMTANZAHL.......... 20
5 WARTUNG
AUSWECHSELN DER
TONERKASSETTE .....................21
LEBENSDAUER DER
TONERKASSETTE .....................23
REINIGEN DES GERÄTS ...........24
6
FEHLERSUCHE AM GERÄT
FEHLERSUCHE ..........................26
STATUSANZEIGEN ....................27
PAPIERSTAUBESEITIGUNG......28
ENTWICKLER ERFORDERLICH 31
ERFORDERLICHE
WARTUNGSARBEITEN..............31
7
OPTIONALE AUSSTATTUNG (AL-12PKM)
SOFTWARE FÜR DIE SHARP
PERSONAL MFP-SERIE.............32
HARDWARE- UND
SOFTWAREANFORDERUNGEN33
VOR DER INSTALLATION..........33
INSTALLIEREN DER SOFTWARE35
BEDIENFELDANZEIGEN............45
ARBEITEN IM DRUCKERMODUS46
ARBEITEN IM SCANNERMODUS48
BENUTZUNGSHINWEISE ZUM
ONLINE-HANDBUCH ..................56
VERWENDEN DER ANDEREN
INSTALLIERTEN TREIBER.........58
ANSCHLIESSEN DES
SCHNITTSTELLENKABELS .......59
8 ANHANG
TECHNISCHE DATEN ................61
VERBRAUCHSMATERIAL UND
OPTIONEN ..................................63
INDEX ..........................................64
SOFTWARELIZENZ ....................67
1
2
3
4
5
6
7
8
3
Page 74

1
Dieses Kapitel liefert grundlegende Informationen zum Arbeiten mit dem Gerät.
EINLEITUNG
BENUTZUNGSHINWEISE ZUM HANDBUCH
Das Bedienungshandbuch enthält Erläuterungen zum Betrieb des Geräts, wichtige
Hinweise, die zu beachten sind, sowie die erforderlichen Wartungsmaßnahmen.
Damit Sie das Gerät optimal nutzen können, sollten Sie das Handbuch aufmerksam
lesen. Bewahren Sie es so auf, daß Sie auch künftig schnell darin nachschlagen
können.
Hinweise in diesem Bedienungshandbuch
In dieser Bedienungsanleitung werden folgende Symbole verwendet, die
sachdienliche Informationen zum Gebrauch des Geräts hervorheben.
Werden die Angaben des Warnhinweises nicht richtig befolgt,
Warnung
Vorsicht
Hinweis
kann dies zu Verletzungen führen.
Werden die Angaben des Vorsichtshinweises nicht richtig befolgt,
kann dies zu Beschädigungen des Geräts oder einzelner
Komponenten führen.
Die Hinweise liefern wichtige Informationen zu dem Gerät
bezüglich der technischen Daten, der Funktionen, der Leistung
und des Betriebs sowie nützliche Informationen für den Anwender.
Gibt einen Buchstaben an, der auf der Anzeige erscheint.
4
Page 75

BEZEICHNUNG DER TEILE
1
2
3
4
Einzelblatteinzug
5
6
7
1
8
9
10
11
12
13
5
3
Tonerkassette
Vorlagenglas
1
Bedienfeld
2
Frontabdeckung
3
Papierfach
4
Seitenabdeckung
5
Verriegelungstaste der
6
Seitenabdeckung
Papierführungen des manuellen
7
Einzugs
Papierausgabefach
8
14
15
Fotoleittrommel
Verlängerung des
9
Papierausgabefachs
Netzschalter
10
Griff
11
Netzkabelanschluß
12
Entriegelungshebel der Fixiereinheit
13
Übertragungscorona
14
Coronareiniger
15
5
Page 76

BEDIENFELD
Wahltaste für Belichtungsmodus und
1
Anzeige
Für die Auswahl der Belichtungsarten
AUTO, MANUELL oder PHOTO. Die
gewählte Belichtungsart wird durch ein
leuchtendes Lämpchen angezeigt.
(S.15 )
Tasten Hell und Dunkel und
2
Anzeigen
Zur Einstellung der Belichtungsstärke bei
MANUELL- oder PHOTO-Belichtung. Die
gewählte Belichtungsstärke wird durch ein
leuchtendes Lämpchen angezeigt. (S.15)
Zum Starten und Beenden der
Bedienerprogrammeinstellungen. (S.19)
Alarmanzeigen
3
4
Anzeige Auswechseln der
Entwicklereinheit erforderlich (S.31)
Papierstauanzeige (S.28)
Anzeige Auswechseln der
Tonerkassette erforderlich (S.21)
Wartungsanzeige (S.31)
Kopiermaßstabtaste und Anzeigen
Für die Auswahl der voreingestellten
Verkleinerungs-/VergrößerungsKopiermaßstäbe. Der gewählte
Kopiermaßstab wird durch ein
leuchtendes Lämpchen angezeigt.
(S.17)
Taste zur Wiedergabe des
5
Kopienwiedergabefaktors (S.17)
Anzeige
6
Anzeige der gewählten Kopienanzahl,
des Zoom-Kopiermaßstabs,
Bedienerprogrammcodes und
Fehlercodes.
SCANNER-Taste und -Anzeige
7
(S.48, S.52)
Kann verwendet werden, wenn der
Drucker-/Scanner-Erweiterungssatz
(AL-12PKM) installiert wurde.
ON LINE-Taste und -Anzeige (S.45)
8
Kann verwendet werden, wenn der
Drucker-/Scanner-Erweiterungssatz
(AL-12PKM) installiert wurde.
Energiesparanzeige
9
Leuchtet auf, wenn sich das Gerät im
Energiesparbetrieb befindet. (S.18,
S.19)
Anzeige für den gewählten
10
Papiereinzug
Leuchtet auf, um die gewählte
Papiereinzugsstation anzuzeigen.
ZOOM-Tasten und Anzeige
11
Zur Auswahl eines beliebigen
Verkleinerungs- oder
Vergrößerungsmaßstabs zwischen
25% und 400% in Schritten von 1%.
(S.17)
Kopienanzahl-Tasten
12
• Zur Auswahl der gewünschten
Anzahl von Kopien (1 bis 99). (S.15)
• Für Bedienerprogrammeingaben.
(S.19)
Rückstelltaste
13
• Durch Drücken wird die Anzeige
gelöscht oder ein Kopierlauf
unterbrochen. (S.15)
• Durch Drücken und Halten wird im
Standby-Betrieb die Gesamtanzahl
der bis zu diesem Zeitpunkt erstellten
Kopien angezeigt. (S.20)
Starttaste und Anzeige
14
• Wenn die Anzeige leuchtet, ist
Kopieren möglich.
• Drücken Sie diese Taste, um den
Kopiervorgang zu starten.
• Zum Einstellen eines
Bedienerprogramms. (S.19)
6
Page 77
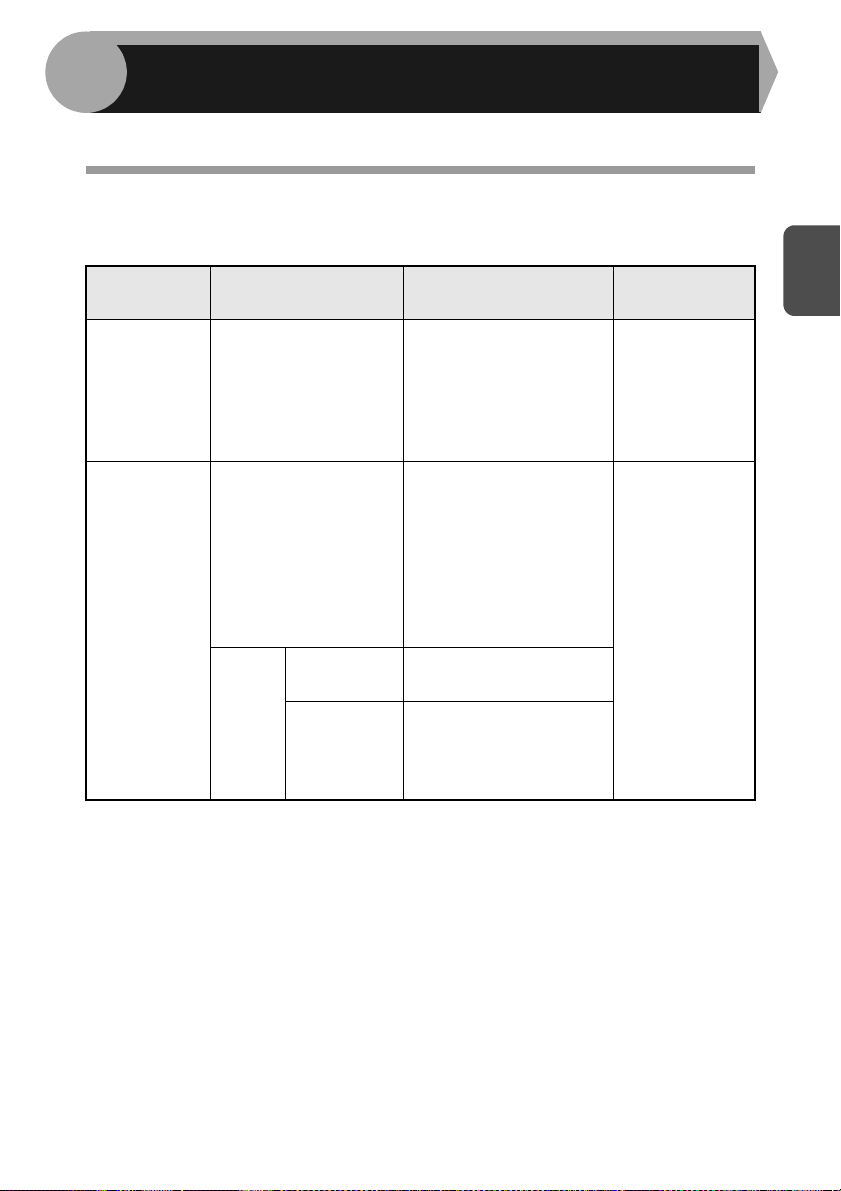
2
Legen Sie das Papier folgendermaßen in das Fach ein.
EINLEGEN DES PAPIERS
PAPIER
Optimale Ergebnisse werden bei Verwendung des von SHARP empfohlenen
Papiers erzielt.
Art des
Papiereinzugs
Papierfach Standardpapier A4
Einzelblatteinzug
*Verwenden Sie keine Spezialumschläge oder Umschläge mit Metallverschlüssen,
Kunststoffringen, Fadenverschlüssen, Fenstern, Futter, selbstklebenden
Verschlußklappen oder aus synthetischen Materialien. Verwenden Sie keine
luftgepolsterten Umschläge oder Umschläge mit aufgeklebten Etiketten oder
Briefmarken. Sie führen zur Beschädigung des Kopierers.
**Papier mit einem Gewicht zwischen 104 und 128 g/m
Format von A4 über den Einzelblatteinzug eingezogen werden.
• Spezialpapier wie transparente Folie, Etiketten und Briefumschläge muß Seite für
Seite über den Einzelblatteinzug eingezogen werden.
Standardpapier und
dickes Papier
Spezielle
Medien
Art des
Druckmediums
Transparente
Folie
Briefumschlag*
Format Gewicht
A5
B5
Letter
Legal
Invoice
A4
A5
A6
B5
B6)
Letter**
Legal
Invoice
A4
Letter
International DL
International C5
Commercial 10
Monarch
2
bis
56g/m
2
80g/m
2
bis
52g/m
2
128g/m
2
kann nur bis zu einem
2
7
Page 78

EINLEGEN IN DAS PAPIERFACH
f
Heben Sie den Griff des Papierfachs
1
an, und ziehen Sie das Papierfach
bis zum Anschlag heraus.
Stellen Sie die Papierführungen des Papierfachs auf die Länge
2
und Breite des Kopierpapiers ein. Drücken Sie dazu den Hebel
der Papierführung , und verschieben Sie die Führung
passend zur Breite des Kopierpapiers. Schieben Sie die
Papierführung zum geeigneten Schlitz, wie auf dem
Papierfach gekennzeichnet.
A
B
Papier-
ührung B
Fächern Sie das Papier auf, und legen Sie es in das Papierfach
3
ein. Achten Sie darauf, daß sich die Kanten unter den Haken an
den Ecken befinden.
Legen Sie Papier nur bis zur Markierung für die maximale Füllhöhe ein
Hinweis
( ). Zu hohe Füllung kann einen Papierstau verursachen.
Papierführung A
8
Page 79
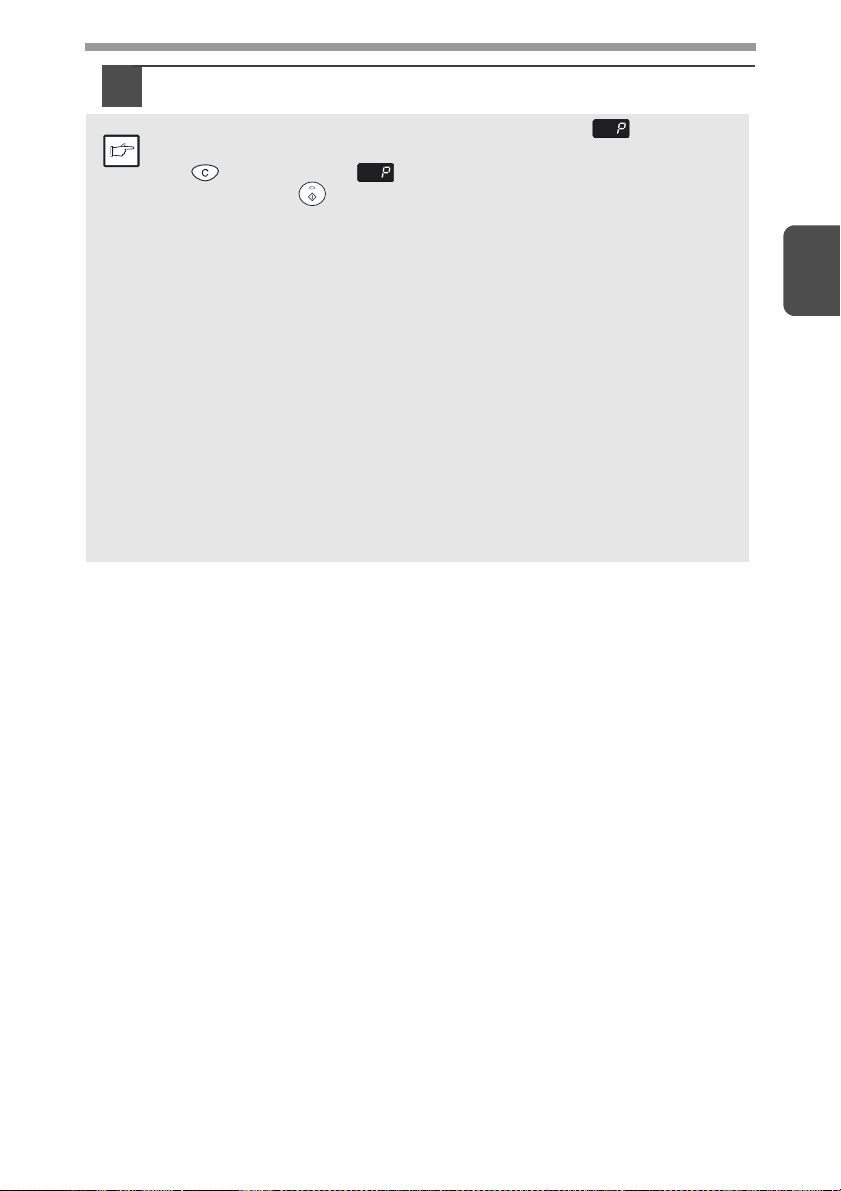
Schieben Sie das Papierfach vorsichtig in das Gerät zurück.
4
• Um nach dem Einlegen des Papiers das blinkende ohne Starten
eines Kopiervorgangs zu löschen, drücken Sie die Rückstelltaste
Hinweis
( ). Das blinkende auf der Anzeige erlischt, und die
Startanzeige ( ) leuchtet auf.
Das Papier darf keine Risse, Verschmutzung, Knicke und wellige oder
•
umgebogene Kanten aufweisen.
• Das gesamte Papier im Stapel muß das gleiche Format haben und
vom gleichen Typ sein.
• Beim Einlegen des Papiers achten Sie darauf, daß das Papier dicht an
der Führung anliegt. Prüfen Sie, daß die Führung jedoch nicht zu eng
eingestellt ist, damit sich das Papier nicht wellt. Ansonsten kommt es
zu Schrägeinzug des Papiers oder zu einem Papierstau.
• Wenn das Gerät längere Zeit nicht verwendet wird, nehmen Sie das
Papier aus dem Papierfach, und lagern Sie es an einem trockenen
Platz. Bleibt das Papier längere Zeit im Gerät, nimmt es Feuchtigkeit
aus der Luft auf. Die Folge sind Papierstaus.
Beim Einlegen von neuem Papier in das Papierfach muß das alte, bereits
•
eingelegte Papier entnommen werden. Wenn neues Papier über bereits
eingelegtes Papier gelegt wird, kann es passieren, daß zwei Blätter
gleichzeitig eingezogen werden.
2
9
Page 80

MANUELLER EINZUG (Spezialpapier)
Der Einzelblatteinzug kann für Standardpapier, transparente Folien, Etiketten, Briefumschläge
und anderes Spezialpapier verwendet werden. In dieses Fach kann Papier im Format A6 bis
g
A4 und mit einem Gewicht von 52
g
Gewicht von 104
Vor der Ausführung des Kopierauftrags müssen Sie die
1
/m2 bis 128 g/m2, darf das Format von A4 nicht überschritten werden.)
• In den Einzelblatteinzug kann nur ein Blatt Papier eingelegt werden.
• Das Originalbild muß kleiner als das verwendete Kopierpapier oder -
medium sein. Ist das Originalbild größer als das Papier oder Medium,
werden die Kopien an den Rändern unsauber.
• Wenn ein Blatt Papier in den Einzelblatteinzug eingelegt wird, aber
über die Einstellung der Kopienanzahl mehrere Kopien eingestellt
wurden (S. 15), ändert sich die Einstellung der Kopienanzahl in "0",
und es wird nur eine Kopie erstellt.
Wird auf transparente Folie kopiert, muß jede Kopie sofort entnommen
•
werden. Die Kopien sollten nicht übereinander zu liegen kommen.
Kopiereinstellungen auswählen.
Informationen zu den Kopiereinstellungen können Sie nachlesen unter
"KOPIEREN" (S.11)“.
Passen Sie die Papierführungen an das Papierformat an.
2
Schieben Sie ein einzelnes Blatt Papier (zu bedruckende Seite
nach unten) in den Einzugsschlitz des Einzelblatteinzugs ein.
Wenn das Blatt
eingeschoben wird, zieht das
Gerät dieses automatisch ein
und beginnt mit dem
Kopiervorgang.
/m2 bis 128 g/m2 eingelegt werden. (Bei Papier mit einem
Druckseite
10
Hinweis zum Einlegen von Umschlägen
• Umschläge müssen einzeln mit der schmalen Seite in den Einzug eingelegt werden.
• Verwenden Sie keine Spezialumschläge oder Umschläge mit Metallverschlüssen,
Kunststoffringen, Fadenverschlüssen, Fenstern, Futter, selbstklebenden
Verschlußklappen oder aus synthetischen Materialien. Verwenden Sie keine
luftgepolsterten Umschläge oder Umschläge mit aufgeklebten Etiketten oder
Briefmarken.
• Umschläge, deren Oberseite nicht glatt, sondern mit Prägungen versehen ist, können
fleckig ausgegeben werden.
• Bei hoher Luftfeuchtigkeit und hohen Temperaturen kann es passieren, daß die
selbstklebenden Umschlagklappen beim Kopieren/Ausdrucken zugeklebt werden.
• Verwenden Sie nur flache und richtig gefaltete Umschläge. Wellige oder nicht richtig
geformte Umschläge werden eventuell nicht richtig kopiert/bedruckt, oder es kommt
zu einem Papierstau.
• Vor der Ausführung des Kopier-/Druckauftrags sollten Sie eine Testkopie erstellen.
• Unter der Papierformateinstellung des Druckertreibers muß Com 10, DL, C5 oder
Monarch ausgewählt werden. (Ausführliche Informationen zum Druckertreiber können
dem Online-Handbuch entnommen werden.)
Page 81

3
In diesem Kapitel werden neben den grundlegenden Funktionen noch weitere Kopierfunktionen
beschrieben.
Das Gerät ist mit einem Speicher für eine Seite ausgestattet. Dadurch braucht das Gerät ein Original nur einmal zu scannen
und kann davon bis zu 99 Kopien erstellen. Dadurch verbessert sich der Arbeitsfluß, der Geräuschpegel des Kopierers
verringert sich, und aufgrund des geringeren Verschleißes des Scannermechanismus arbeitet das Gerät zuverlässiger.
Wenn das Gerät im Betrieb nicht richtig funktioniert oder eine Funktion nicht
Hinweis
verwendet werden kann, lesen Sie "FEHLERSUCHE AM GERÄT" (S.26).
KOPIEREN
KOPIERVORGANG
1
Sicherstellen, daß Papier in das Papierfach eingelegt wurde (S.
8), und das Papierformat prüfen (S. 7).
Wenn kein Papier eingelegt ist, lesen Sie Seite 8. Wenn Sie den Einzelblatteinzug verwenden,
prüfen Sie das Papierformat, und gehen Sie dann zum nächsten Schritt, ohne Papier einzulegen.
2 Gerät einschalten (S. 12).
3
Legen Sie das Original ein.
Wenn Sie auf Papier im Format A4 oder größer kopieren, ziehen Sie die
Verlängerung für das Papierausgabefach heraus.
3
4
Wählen Sie die Kopiereinstellungen aus.
Wenn Sie mit den anfänglichen Einstellungen (S. 13) kopieren möchten,
gehen Sie zum nächsten Schritt.
Wie Sie die Kopienanzahl einstellen, können Sie auf Seite 15 nachlesen.
Wie Sie Auflösung und Kontrast einstellen, können Sie auf Seite 15 nachlesen.
Wie Sie die Kopie vergrößern oder verkleinern, können Sie auf Seite 17 nachlesen.
5
Starten Sie den
Kopiervorgang.
Drücken Sie die Starttaste ( ).
Wenn Sie den Einzelblatteinzug verwenden
drücken Sie nicht die Starttaste ( ).
Legen Sie ein Blatt Papier in den
Einzelblatteinzug ein (Seite 10).
Über den Einzelblatteinzug können
nicht mehrere Kopien erstellt werden
Hinweis
.
11
Page 82

Legen Sie kein Papier in den Einzelblatteinzug, wenn gerade aus dem
Vorsicht
Papierfach kopiert wird. Dies könnte einen Papierstau hervorrufen.
ANSCHLIESSEN DES NETZKABELS
Wird das Gerät in einem anderen Land eingesetzt als demjenigen, in
Warnung
Vorsicht
dem es ursprünglich erworben wurde, müssen Sie überprüfen, ob Ihr
Modell mit der örtlichen Netzspannung betrieben werden kann. Der
Anschluß des Geräts an eine ungeeignete Spannungsquelle führt zu
einer irreparablen Beschädigung des Geräts.
Achten Sie darauf, daß der
1
Netzschalter des Geräts
ausgeschaltet ist (AUS/OFF).
Stecken Sie das mitgelieferte
Netzkabel in den Netzanschluß
an der Geräterückseite.
Stecken Sie das andere Ende des Netzkabels in die nächste
2
Wandsteckdose ein.
Das Netzkabel darf nur in eine ordnungsgemäß geerdete
Wandsteckdose eingesteckt werden.
Es dürfen keine Verlängerungskabel oder Steckerleisten verwendet werden.
3
Einschalten
Achten Sie darauf, daß der Netzschalter des
Geräts ausgeschaltet ist (AUS/OFF). Stecken Sie
das andere Ende des Netzkabels in die nächste
Wandsteckdose ein. Schalten Sie den Netzschalter
an der linken Seite des Geräts ein (EIN/ON). Die
Startanzeige ( ) und weitere Anzeigen zu den
anfänglichen Einstellungen des Bedienfelds
leuchten auf und zeigen die Betriebsbereitschaft
an. Die anfänglichen Einstellungen sind auf der
nächsten Seite unter „Anfängliche Einstellungen
des Bedienfelds“ beschrieben.
• Das Gerät geht in den Energiesparmodus über, sobald die
voreingestellte Zeit ohne irgendwelche Bedienereingaben verstrichen
Hinweis
ist. Die Einstellungen der Energiespar-Betriebsarten können
verändert werden. Siehe "BEDIENERPROGRAMME" (S.19).
Nach Ablauf der voreingestellten Zeit nach dem Ende des Kopier- oder
•
Scanvorgangs kehrt das Gerät zu den anfänglichen Einstellungen zurück.
Die voreingestellte Zeitdauer (automatische Rückstellzeit) kann geändert
werden. Siehe "BEDIENERPROGRAMME" (S.19).
12
Page 83
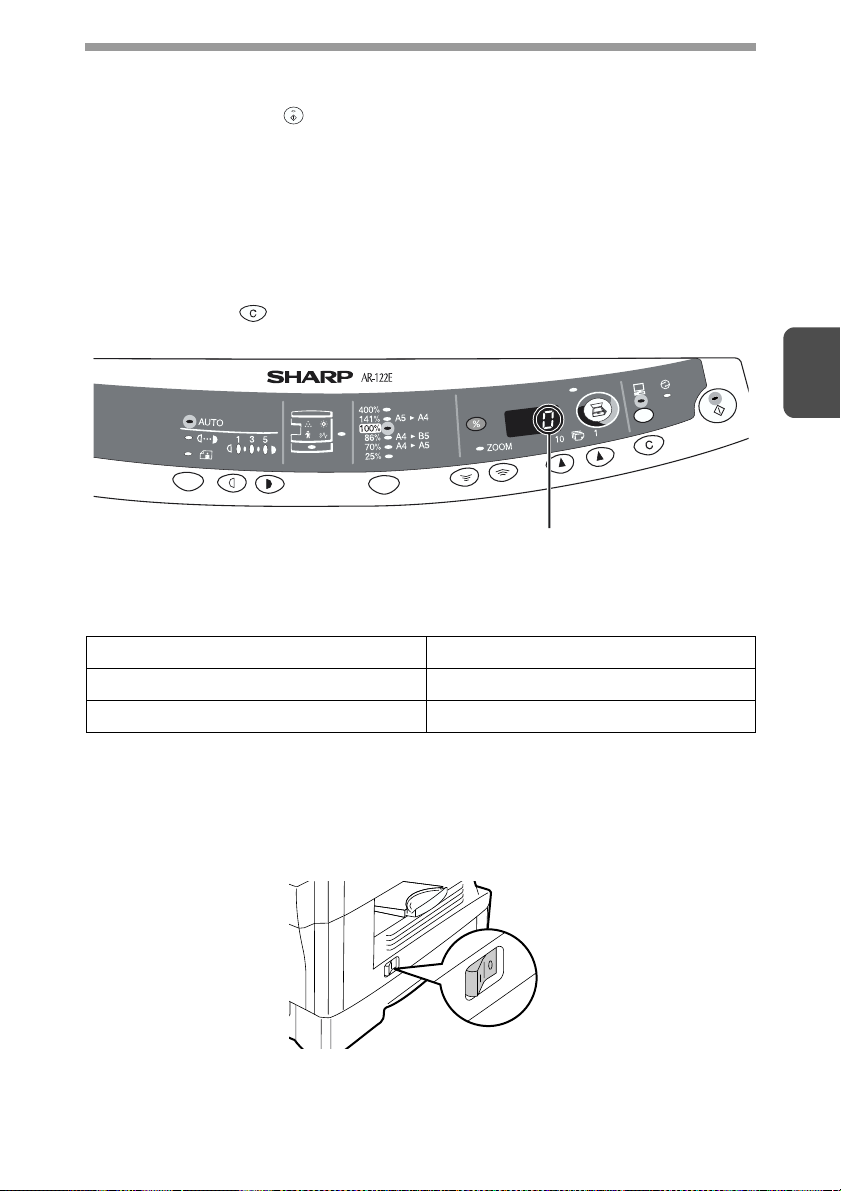
Der Abtastkopf
Die Lampe des Abtastkopfs leuchtet ständig, wenn das Gerät betriebsbereit ist
(wenn die Startanzeige ( ) leuchtet).
Das Gerät justiert die Abtastkopflampe von Zeit zu Zeit, um eine gleichbleibend hohe
Kopierqualität zu gewährleisten. Der Abtastkopf bewegt sich dann automatisch. Das
ist keine Fehlfunktion, sondern ein normaler Vorgang.
Anfängliche Einstellungen des Bedienfelds
Bei eingeschaltetem Gerät wird das Bedienfeld auf die anfänglichen Einstellungen
zurückgesetzt, wenn nach Beendigung eines Kopier- oder Scanauftrags die über die
Einstellung „automatische Rückstellzeit“ (S.18) eingestellte Zeit verstrichen ist oder
die Rückstelltaste (
Die anfänglichen Einstellungen des Bedienfelds sind unten abgebildet.
Wenn jetzt ein Kopiervorgang gestartet wird, werden die Einstellungen in der
folgenden Tabelle angewendet.
) zweimal gedrückt wurde.
"0" erscheint auf der Anzeige.
3
Kopienanzahl 1 Kopie
Belichtungseinstellung AUTO
Zoom 100%
Abschaltverfahren
Wenn das Gerät eine bestimmte Zeit lang nicht verwendet wird, geht es automatisch
in den automatischen Energiesparbetrieb (S.19), um den Energieverbrauch zu
verringern. Wenn das Gerät längere Zeit nicht verwendet wird, sollte der
Netzschalter ausgeschaltet und das Netzkabel gezogen werden.
13
Page 84

EINLEGEN VON ORIGINALEN
g
• Das Vorlagenglas kann Originale mit einem Format von bis zu A4
einlesen.
Hinweis
• Am oberen und unteren Rand der Kopie kann ein Streifen von max. 4
mm unbedruckt bleiben. An den anderen Rändern der Kopie kann ein
Bereich von insgesamt 4,5 mm unbedruckt bleiben.
• Drücken Sie leicht auf die Originalabdeckung, wenn ein Buch, ein
gefaltetes oder zerknittertes Original kopiert wird. Wenn die
Originalabdeckung nicht richtig geschlossen wird, können auf der
Kopie Streifen auftreten, oder sie kann verzerrt aussehen.
Öffnen Sie die Originalabdeckung, und legen Sie die Vorlage
1
ein.
Legen Sie das Original mit der Vorderseite nach unten auf das
2
Vorlagenglas. Richten Sie es an der Originalformatanlage und
an der Markierung für die Mitte ( ) aus. Schließen Sie die
Originalabdeckung vorsichtig.
Originalformatanlage
3
Markierun
Einlegen eines großen Originals
Die Originalabdeckung läßt sich abbauen, damit auch sperrige Gegenstände kopiert
werden können.
Heben Sie die Originalabdeckung
1
einfach gerade nach oben ab.
Zum Wiederanbringen der Originalabdeckung kehren Sie den
2
Vorgang um.
3
14
Page 85
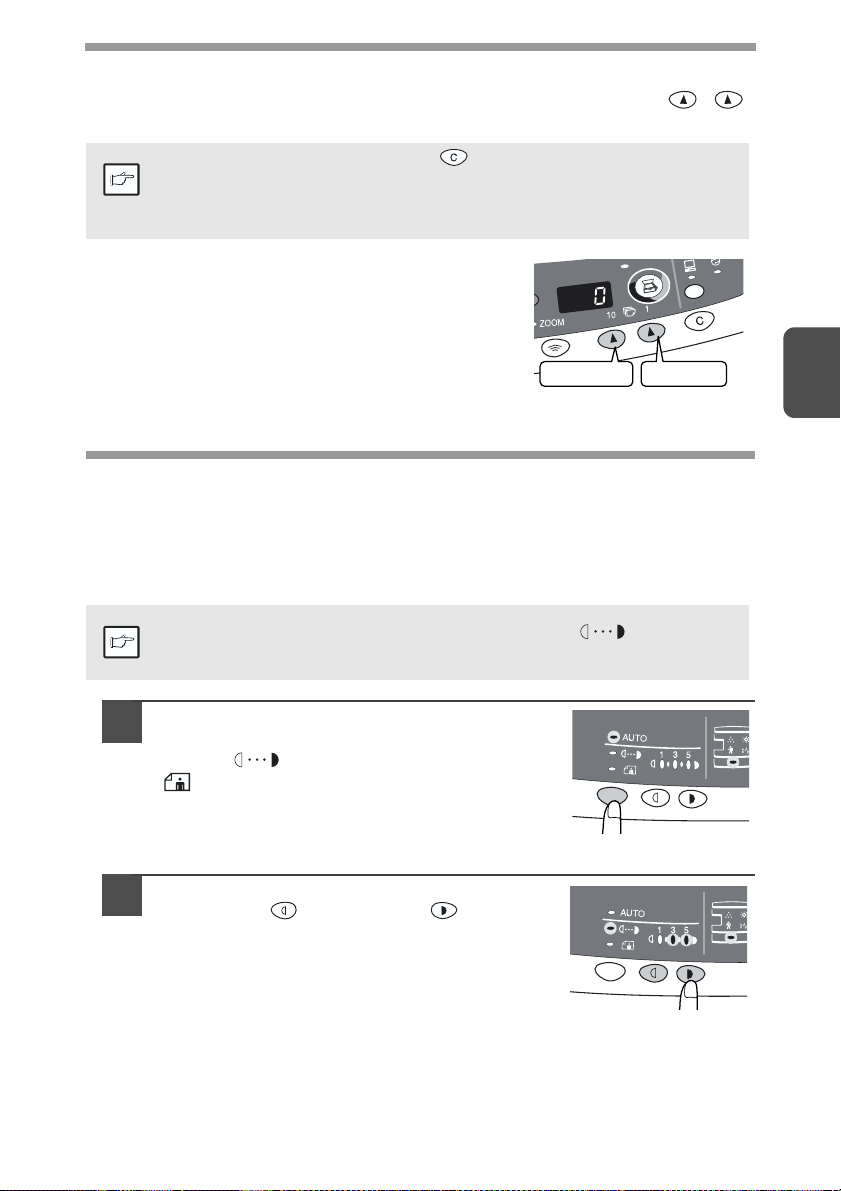
EINSTELLEN DER KOPIENANZAHL
Stellen Sie die Anzahl der Kopien über die beiden Kopienanzahl-Tasten ( , )
ein, wenn Sie vom Vorlagenglas aus kopieren.
• Drücken Sie die Rückstelltaste ( ), um eine fehlerhafte Eingabe zu
löschen.
Hinweis
• Drücken Sie die rechte Kopienanzahl-Taste, um
den Wert der Einerstelle von 0 bis 9 zu wählen. Die
Zehnerstelle kann über diese Taste nicht verändert
werden.
• Drücken Sie die linke Kopienanzahl-Taste, um den
Wert der Zehnerstelle von 1 bis 9 zu wählen.
• Mit der ursprünglichen Einstellung, d. h. wenn "0" angezeigt wird,
kann eine Einzelkopie erstellt werden.
Zehnerstelle
Einerstelle
BELICHTUNGSEINSTELLUNG/PHOTO-MODUS
Belichtungseinstellung
Im automatischen Belichtungsmodus ist bei den meisten Originalen eine Einstellung
der Kopienqualität nicht erforderlich. Die Belichtungsstärke kann manuell in 2 Stufen
korrigiert werden, um beispielsweise Fotografien zu kopieren.
Die Kopienauflösung für AUTO und den manuellen ( ) Modus kann
Hinweis
geändert werden. (S.19)
3
Drücken Sie die Wahltaste für den
1
Belichtungsmodus, um den manuellen
Modus ( ) oder den Photo-Modus
( ) zu wählen.
Stellen Sie die Belichtungsstärke mit den
2
Tasten Hell ( ) und Dunkel ( ) ein.
Wurde die Belichtungsstärke 2 gewählt,
leuchten die beiden linken äußeren
Anzeigelämpchen gleichzeitig auf. Bei
Auswahl von Belichtungsstärke 4 leuchten
die beiden rechten äußeren
Anzeigelämpchen gleichzeitig auf.
15
Page 86

Automatische Belichtungseinstellung
Diese automatische Belichtungsstärke bleibt so lange erhalten, bis Sie
Hinweis
Die automatische Belichtungsstärke kann Ihren Kopieranforderungen gemäß eingestellt
werden. Diese Belichtungsstärke ist für Kopiervorgänge vom Vorlagenglas aus
eingestellt.
sie erneut ändern.
Drücken Sie die Wahltaste für den
1
Belichtungsmodus, um den Photo-Modus
( ) zu wählen.
Halten Sie die Wahltaste für den
2
Belichtungsmodus ca. 5 Sekunden lang
gedrückt. Die Photo-Anzeige ( ) erlischt,
und die AUTO-Anzeige beginnt zu blinken.
Eine oder zwei der Anzeigen für Hell und
Dunkel leuchten auf, je nach der
gewählten Einstellung der
Belichtungsautomatik.
Drücken Sie die Taste Hell ( ) oder
3
Dunkel ( ), um die gewünschte
Belichtungsautomatik einzustellen.
Wurde die Belichtungsstärke 2 gewählt,
leuchten die beiden linken äußeren
Anzeigelämpchen gleichzeitig auf. Wurde
die Belichtungsstärke 4 gewählt, leuchten
die beiden rechten äußeren
Anzeigelämpchen gleichzeitig auf.
3
Drücken Sie die Wahltaste für den Belichtungsmodus. Die
4
AUTO-Anzeige blinkt nun nicht mehr, sondern leuchtet ständig.
16
Page 87

VERKLEINERUNG/VERGRÖSSERUNG/ZOOM
Es stehen drei voreingestellte Verkleinerungs- und zwei Vergrößerungsmaßstäbe
zur Auswahl. Die Zoom-Funktion ermöglicht die Einstellung des Kopiermaßstabs
von 25% bis 400% in Schritten von 1%.
Legen Sie das Original ein, und prüfen Sie das Papierformat.
1
Verwenden Sie die Kopiermaßstabtaste und/oder die ZOOM-
2
Tasten ( , ), um den gewünschten Kopiermaßstab
einzustellen.
• Um eine Zoom-Einstellung ohne Änderung des Zoom-
Maßstabs zu überprüfen, halten Sie die Taste zur Anzeige
Hinweis
Stellen Sie den Verkleinerungs-/Vergrößerungsmaßstab ein.
3
Hinweis
des Kopienwiedergabefaktors (%) gedrückt. Wenn Sie diese
Taste loslassen, erscheint wieder die Anzeige der
Kopienanzahl.
• Zum Rückstellen des Maßstabs auf 100% drücken Sie die
Kopiermaßstabtaste mehrfach, bis die 100%-Anzeige
aufleuchtet.
Um den Zoom-Maßstab schnell zu verringern oder zu erhöhen,
halten Sie die ZOOM-Taste ( ) oder ( ) gedrückt. Der
Wert stoppt jedoch bei den voreingestellten Werten für den
Verkleinerungs- oder Vergrößerungsmaßstab. Um diese Werte
zu überschreiten, lassen Sie die Taste los, und halten Sie sie
anschließend erneut gedrückt.
3
Auswahl eines voreingestellten Kopienmaßstabs:
Die voreingestellten Verkleinerungs- und
Vergrößerungsmaßstäbe sind: 25%, 70%, 86%,
141% und 400%.
Auswahl eines Zoom-Maßstabs:
Wenn Sie eine ZOOM-Taste (
drücken, leuchtet die ZOOM-Anzeige auf, und der
Zoom-Maßstab wird auf der Anzeige angezeigt.
oder )
17
Page 88
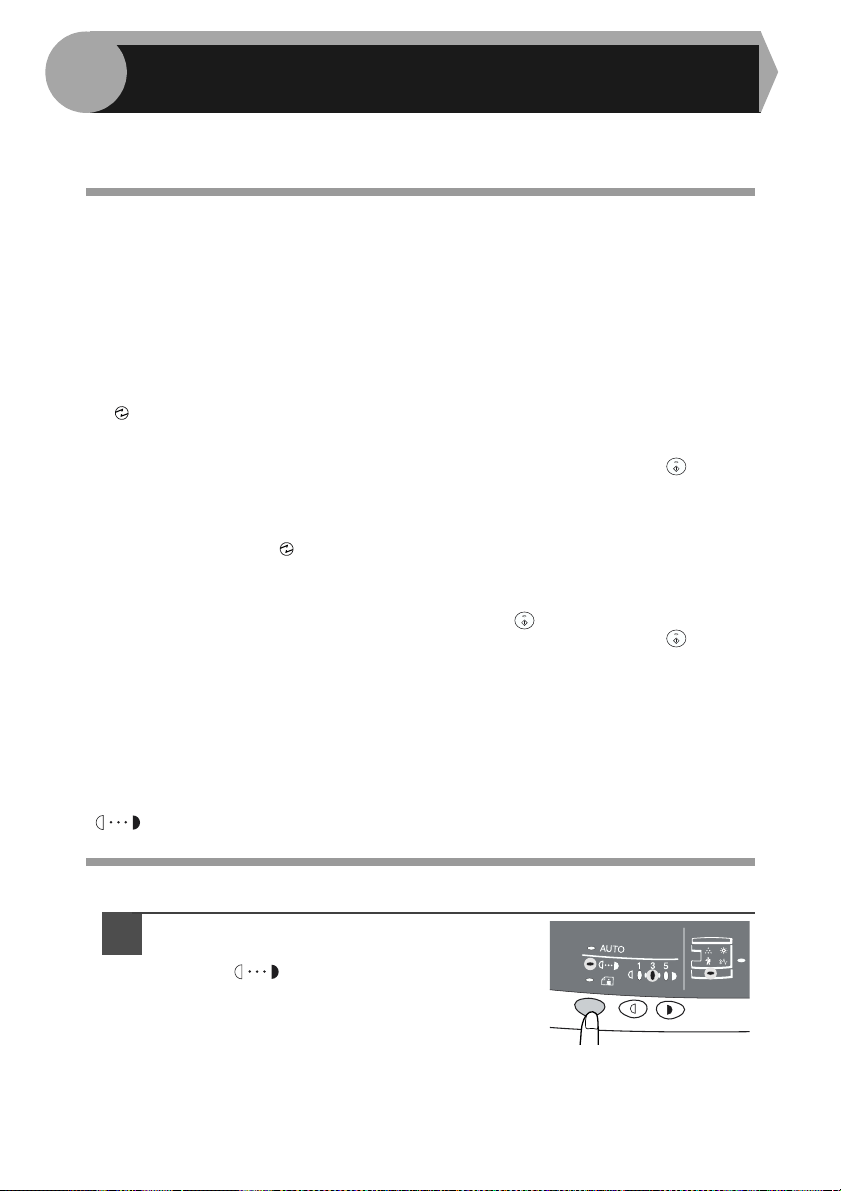
4
In diesem Kapitel werden die Sonderfunktionen des Geräts beschrieben. Verwenden
Sie diese Funktionen nach Bedarf.
SONDERFUNKTIONEN
BESCHREIBUNG DER SONDERFUNKTIONEN
Tonersparbetrieb (Seite 18)
Verringert den Tonerverbrauch um ca. 10%.
Energiesparbetrieb (Seite 19)
Das Gerät verfügt über zwei verschiedene Stromsparfunktionen: die Vorwärmphase
und den automatischen Energiesparbetrieb.
Vorwärmphase
Wenn das Gerät auf die Vorwärmphase schaltet, leuchtet die Energiesparanzeige
( ) auf, und alle anderen Anzeigen bleiben wie zuvor entweder an oder aus. In
diesem Zustand wird die Temperatur des Fixierers verringert und dadurch Energie
gespart. Um aus der Vorwärmphase eine Kopie zu erstellen, nehmen Sie die
gewünschten Kopiereinstellungen vor, und drücken Sie die Starttaste ( ).
Wenden Sie das normale Kopierverfahren an.
Automatischer Energiesparbetrieb
Wenn das Gerät auf automatischen Energiesparbetrieb schaltet, leuchtet die
Energiesparanzeige ( ) auf, und alle anderen Anzeigen außer der ON LINEAnzeige erlöschen. Im automatischen Energiesparbetrieb wird mehr Energie
gespart als in der Vorwärmphase, doch wird auch etwas mehr Zeit vor dem
nächsten Kopiervorgang benötigt. Um aus dem automatischen Energiesparbetrieb
eine Kopie zu erstellen, drücken Sie die Starttaste ( ). Nehmen Sie dann die
gewünschten Kopiereinstellungen vor, und drücken Sie die Starttaste ( ).
Wenden Sie das normale Kopierverfahren an.
Automatische Rückstellfunktion (Seite 19)
Nach Ablauf der voreingestellten Zeit nach dem Ende des Kopier- oder Scanauftrags
kehrt das Gerät zu den anfänglichen Einstellungen zurück. Die voreingestellte
Zeitdauer (automatische Rückstellzeit) kann geändert werden.
Auflösung im Modus AUTO & MANUELL (Seite 19)
Sie können die Kopierauflösung für den Belichtungsmodus AUTO und MANUELL
( ) einstellen.
18
TONERSPARMODUS
Drücken Sie die Wahltaste für den
1
Belichtungsmodus, um den manuellen
Modus ( ) zu wählen.
Page 89

Halten Sie die Wahltaste für den
2
Belichtungsmodus ca. 5 Sekunden lang
gedrückt. Die Manuell-Anzeige ( ) erlischt,
und die Photo-Anzeige ( ) beginnt zu
blinken. Zur Anzeige des normalen
Tonerbetriebs leuchtet die mit "5"
gekennzeichnete Hell- und Dunkel-Anzeige auf.
Wenn Sie den Tonersparbetrieb
3
aufrufen möchten, drücken Sie die
Taste Hell ( ). Zur Anzeige des
Tonersparbetriebs leuchtet die mit "1"
gekennzeichnete Hell- und DunkelAnzeige auf.
Drücken Sie die Wahltaste für den Belichtungsmodus. Die
4
Photo-Anzeige ( ) blinkt nun nicht mehr, sondern leuchtet
ständig. Die mit "3" gekennzeichnete Hell- und Dunkelanzeige
leuchtet auf. Der Tonersparmodus ist nun aktiviert.
Um zur Standardeinstellung zurückzukehren, wiederholen Sie die
obengenannten Schritte. Drücken Sie bei Schritt 3 die Taste Dunkel
Hinweis
( ), damit die Belichtungsstärke wieder mit "5" eingestellt ist.
BEDIENERPROGRAMME
Mit Hilfe der Bedienerprogramme können bestimmte Funktionen nach Bedarf
eingestellt, verändert oder gelöscht werden.
Einstellung des Energiesparbetriebs, der automatischen
Rückstellzeit, der fortlaufenden Dokumentzufuhr und der
Auflösung im Modus AUTO & MANUELL
Halten Sie die Tasten Hell ( ) und Dunkel ( ) gleichzeitig
1
länger als 5 Sekunden gedrückt, bis alle Alarmanzeigen ( ,
, , ) blinken und „ “ auf der Anzeige erscheint.
Wählen Sie mit der linken Kopienanzahl-Taste ( ) die
2
Nummer eines Bedienerprogramms aus (1: automatische
Rückstellzeit, 2: Vorwärmphase, 3: automatische Steuerung
des Energiesparbetriebs, 5: automatischer Energiesparbetrieb,
6: Auflösung im Modus AUTO & MANUELL). Die ausgewählte
Nummer blinkt auf der linken Seite der Anzeige.
Drücken Sie die Starttaste ( ). Die eingegebene Programmnummer
3
leuchtet ständig, und der gegenwärtig gewählte Parameter für das
Programm blinkt auf der rechten Seite der Anzeige.
4
Wählen Sie mit der rechten Kopienanzahl-Taste ( ) den
4
gewünschten Parameter aus. Der eingegebene Parameter
blinkt auf der rechten Seite der Anzeige.
19
Page 90

Program
mnr.
1
2 Vorwärmphase *0 30 s., 1 60 s., 2 90 s.
3
5
6
* Die werkseitigen Einstellungen sind durch einen Stern (*) gekennzeichnet.
Drücken Sie die Starttaste ( ). Die Zahl auf der rechten Seite
5
Modus Parameter
Automatische
Rückstellzeit
Automatische
Steuerung des
Energiesparbetriebs
Automatischer
Energiesparbetrieb
Auflösung im
Modus AUTO &
MANUELL
0 AUS, 1 10 s. 2 30 s.
*3 60 s., 4 90 s., 5 120 s.
0 2 min., *1 5 min., 2 15 min.,
3 4 30 min. 4 60 min., 5 120 min.
0 AUS, *1 EIN
*0 300 dpi, 1 600 dpi
der Anzeige leuchtet ständig, und der eingegebene Wert wird
gespeichert.
Wenn Sie die Einstellung ändern oder in einen anderen Modus
wechseln möchten, drücken Sie die Rückstelltaste ( ). Das
Hinweis
Drücken Sie die Taste Hell ( ) oder Dunkel ( ), um in den
6
Gerät kehrt zu Schritt 2 zurück.
normalen Kopierbetrieb zurückzukehren.
20
ANZEIGEN DER KOPIENGESAMTANZAHL
Gehen Sie folgendermaßen vor, um die Kopiengesamtanzahl anzuzeigen.
Drücken Sie die Rückstelltaste ( ), um die Anzeige auf Null
1
zurückzustellen.
Halten Sie die Rückstelltaste ( ) ca. 5 Sekunden lang
2
gedrückt. Die Kopiengesamtanzahl wird in zwei Schritten
jeweils dreistellig angezeigt.
Beispiel: Kopiengesamtanzahl: 1.234
Page 91
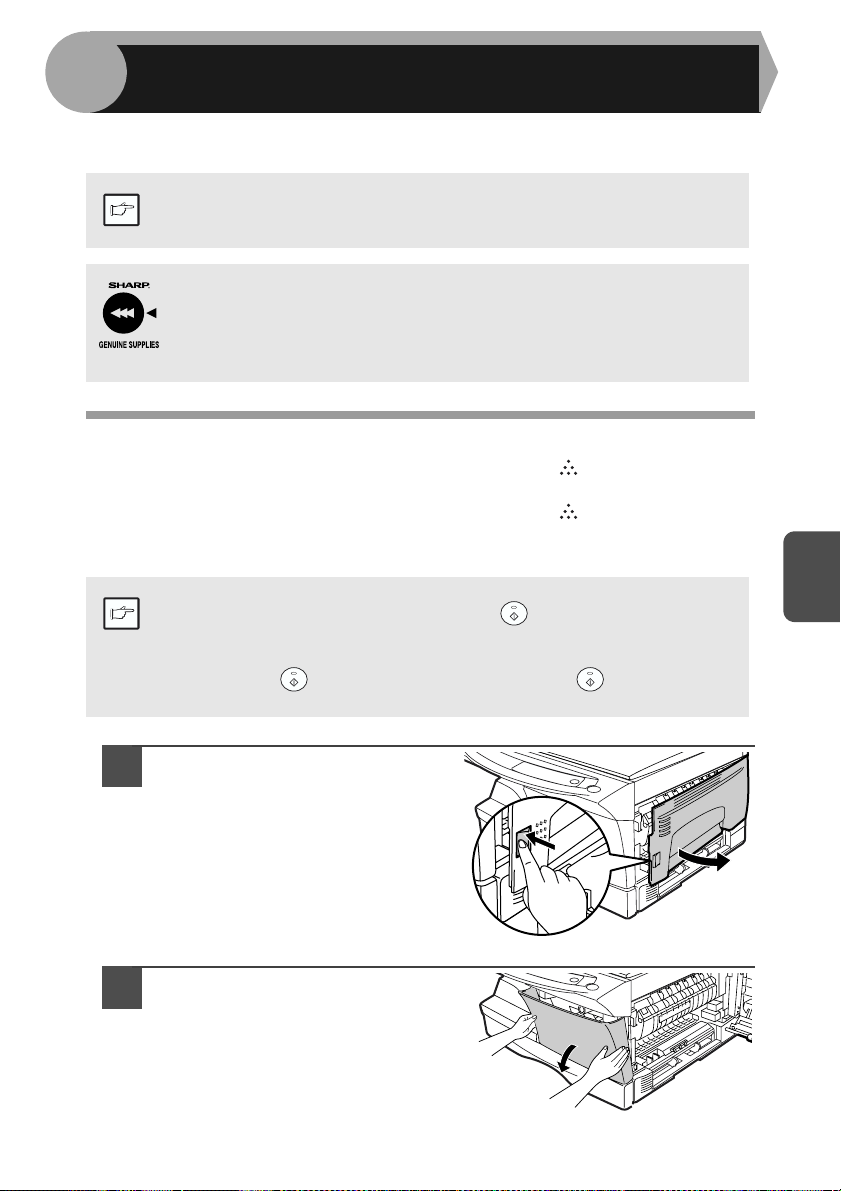
5
In diesem Kapitel wird das Auswechseln der Tonerkassette und das Reinigen des
Geräts beschrieben.
Verwenden Sie ausschließlich Originalteile und Originalzubehör von
Hinweis
SHARP.
Um Kopien in bester Druckqualität zu erhalten, sollten Sie
ausschließlich Originalverbrauchsmaterialien von SHARP verwenden,
die entwickelt, hergestellt und geprüft wurden, um die Lebensdauer
und die Leistung von Sharp-Kopierern wesentlich zu steigern. Achten
Sie auf das Originaletikett auf der Tonerpackung.
WARTUNG
AUSWECHSELN DER TONERKASSETTE
Wenn die Anzeige Auswechseln der Tonerkassette erforderlich ( ) aufleuchtet, muß die
Tonerkassette demnächst ausgewechselt werden. Legen Sie eine neue Kassette bereit.
Wenn die Anzeige Auswechseln der Tonerkassette erforderlich ( ) blinkt, muß die
Tonerkassette erst ausgewechselt werden, bevor weiter kopiert werden kann. Beachten Sie
beim Auswechseln der Tonerkassette die folgende Beschreibung.
Wird ein langer Kopierlauf mit einem dunklen Original durchgeführt,
beginnt möglicherweise die Startanzeige ( ) zu blinken, die Anzeige (
Hinweis
) leuchtet auf, und das Gerät stoppt, obwohl noch Toner vorhanden ist.
Das Gerät füllt max. 2 Minuten lang Toner auf, dann leuchtet die
Startanzeige ( ) auf. Drücken Sie die Starttaste ( ), um den
Kopiervorgang fortzusetzen.
5
Öffnen Sie die
1
Seitenabdeckung, indem Sie
auf die Öffnungstaste der
Seitenabdeckung drücken.
Drücken Sie vorsichtig auf
2
beide Seiten der
Frontabdeckung, um sie zu
öffnen.
21
Page 92

Drücken Sie den
3
Entriegelungshebel der
Entriegelungsknopf
Tonerkassette, und ziehen Sie
die Tonerkassette gleichzeitig
vorsichtig heraus.
• Nach dem Entfernen der Tonerkassette dürfen Sie sie nicht mehr
schütteln und auch nicht darauf klopfen. Ansonsten könnte der Toner
Hinweis
4
aus der Kassette fallen. Geben Sie die alte Kassette sofort in die
Hülle, die in der Schachtel der neuen Kassette enthalten ist.
• Entsorgen Sie die verbrauchte Tonerkassette gemäß den örtlichen Vorschriften.
Nehmen Sie die Tonerkassette aus der Hülle. Halten Sie die Einheit an
beiden Seiten, und schütteln Sie sie vier- bis fünfmal in horizontaler
Richtung. Ziehen Sie anschließend den Tonerdichtstreifen ab.
4- oder 5-mal
4- oder 5-mal
Lasche
Lasche
22
Halten Sie die Tonerkassette wie abgebildet. Halten Sie sie nicht an der
Lasche des Tonerdichtstreifens. Schütteln Sie die Kassette nur, bevor
Hinweis
Sie den Tonerdichtstreifen abziehen.
Schieben Sie die Tonerkassette
5
vorsichtig entlang den Führungen ein,
bis sie einrastet. Drücken Sie dabei
den Entriegelungshebel. Entfernen
Sie das Klebeband von der Lasche am
Tonerdichtstreifen. Ziehen Sie den
Streifen vollständig aus der
Tonerkassette heraus (siehe
Abbildung). Werfen Sie ihn weg.
Tonerdichtstreife
Tonerdichtstreife
Page 93

Schließen Sie die
6
Frontabdeckung und
anschließend die
Seitenabdeckung durch
Drücken der runden
Sicherungsknöpfe neben der
Verriegelungstaste der
Seitenabdeckung. Die Anzeige
erlischt, und die Startanzeige
( ) leuchtet auf.
Beim Schließen der
Abdeckungen sollte zuerst die
Vorsicht
Frontabdeckung und
anschließend die
Seitenabdeckung sicher
geschlossen werden. Durch
Schließen der Abdeckungen
in der falschen Reihenfolge
können sie beschädigt
werden.
Nach dem Einsetzen einer neuen Tonerkassette kann es
vorkommen, daß die Startanzeige ( ) nicht leuchtet. Das
Hinweis
bedeutet, daß der Kopiervorgang nicht fortgesetzt werden kann. (Es
wurde noch nicht ausreichend Toner zugeführt.) Öffnen und
schließen Sie in diesem Fall die Seitenabdeckung. Der Kopierer füllt
ca. 2 Minuten lang Toner nach. Anschließend kann der
Kopiervorgang fortgesetzt werden.
LEBENSDAUER DES KASSETTE
Gehen Sie folgendermaßen vor, um die ungefähre Tonerrestmenge zu ermitteln.
Halten Sie die Tasten Hell ( ) und Dunkel ( ) gleichzeitig
1
länger als 5 Sekunden gedrückt, bis alle Alarmanzeigen ( ,
, , ) blinken und „ “ auf der Anzeige erscheint.
Halten Sie die Taste zur Wiedergabe des
2
Kopienwiedergabefaktors
Die ungefähre Tonerrestmenge wird auf der Anzeige als Prozentwert
angegeben (Anzeige von „100“, „75“, „50“, „25“ oder „10“). Bei einem
Prozentwert unter 10 % wird,
Drücken Sie die Taste Hell ( ) oder Dunkel ( ).
3
Sämtliche Alarmanzeigen erlöschen.
(%) länger als 5 Sekunden gedrückt.
() angezeigt.
5
23
Page 94

REINIGEN DES GERÄTS
Richtige Pflege ist unerläßlich, um stets saubere und scharfe Kopien zu erhalten.
Nehmen Sie sich auf jeden Fall ein paar Minuten Zeit für die regelmäßige Reinigung
des Geräts.
• Vor der Reinigung muß der Netzschalter ausgeschaltet und das
Vorsicht
Gehäuse
Wischen Sie das Gehäuse mit einem weichen, sauberen Tuch ab.
Vorlagenglas und Rückseite der Originalabdeckung
Flecken auf Glas oder Abdeckung werden mitkopiert. Wischen Sie Glas und
Abdeckung mit einem weichen, sauberen Tuch ab. Feuchten Sie das Tuch bei
Bedarf mit etwas Glasreiniger an.
Netzkabel aus der Steckdose gezogen werden.
• Benutzen Sie weder Verdünner, Benzin noch andere flüchtige
Reinigungsmittel. Dies könnte Deformierungen, Verfärbungen,
Qualitätseinbußen oder Funktionsstörungen hervorrufen.
Vorlagenglas Originalabdeckung
24
Page 95

Übertragungscorona
Wenn die Kopien streifig oder fleckig werden, ist die Übertragungscorona
möglicherweise verschmutzt. Reinigen Sie die Corona folgendermaßen.
Schalten Sie den Netzschalter aus. (S.13)
1
Öffnen Sie die Seitenabdeckung, indem Sie auf die
2
Öffnungstaste der Seitenabdeckung drücken.
Fassen Sie den Coronareiniger an der Lasche, und nehmen Sie
3
ihn heraus. Setzen Sie den Coronareiniger auf das rechte Ende
der Übertragungscorona, und schieben Sie ihn vorsichtig nach
links ab. Wiederholen Sie diesen Vorgang zwei- bis dreimal
Schieben Sie den Coronareiniger entlang der Kerbe der
Übertragungscorona vom rechten zum linken Ende. Wird der
Hinweis
Reiniger dazwischen angehalten, können unsaubere Kopien
entstehen.
5
Setzen Sie den
4
Coronareiniger wieder an
seiner ursprünglichen
Position ein. Schließen Sie
die Seitenabdeckung durch
Drücken der runden
Sicherungsknöpfe neben
der Verriegelungstaste der
Seitenabdeckung.
Schalten Sie den Netzschalter ein. (S.12)
5
25
Page 96
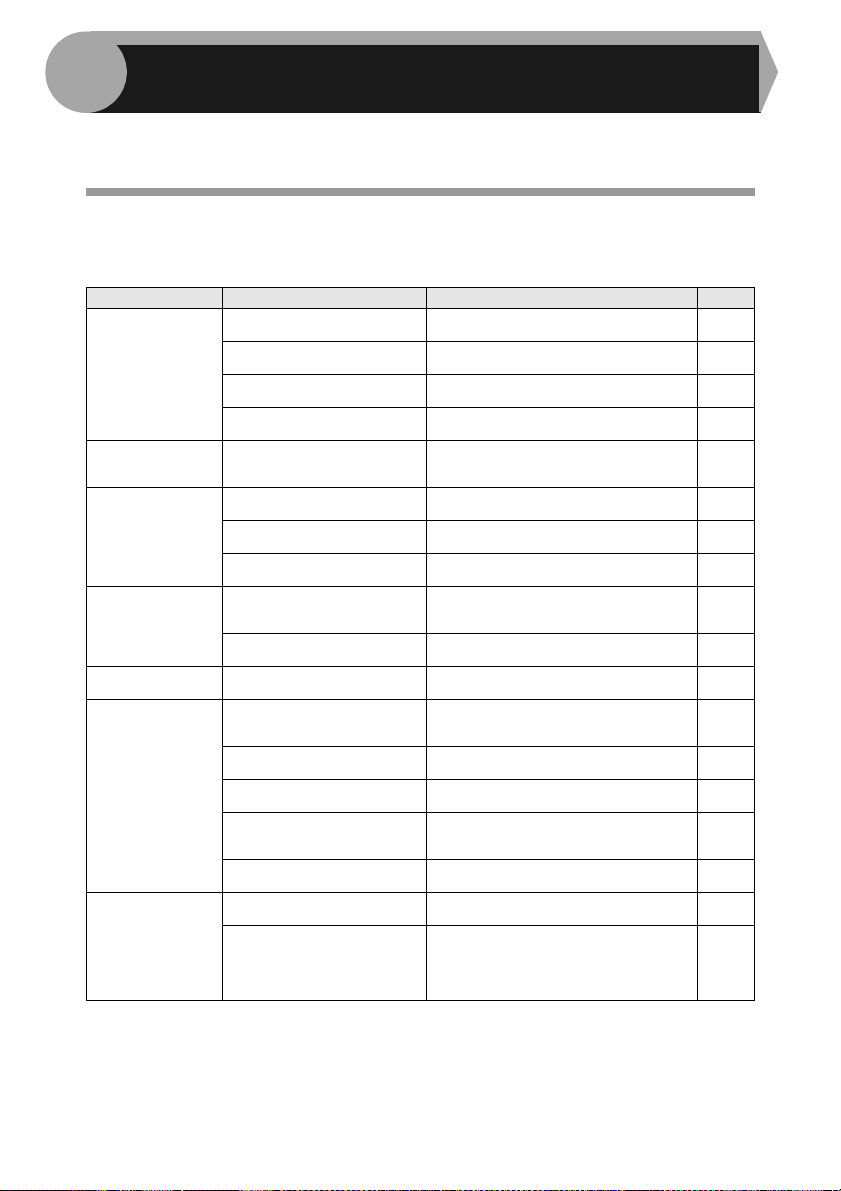
6
FEHLERSUCHE AM GERÄT
In diesem Kapitel wird die Beseitigung von Papierstau und die Fehlersuche
beschrieben.
FEHLERSUCHE
Sollte ein Problem auftreten, überprüfen Sie zunächst die nachfolgende Liste, bevor
Sie sich an Ihren autorisierten Kundendienst wenden.
Problem Mögliche Ursache Lösung Seite
Gerät funktioniert
nicht.
Leere Kopien
Kopien sind zu
dunkel oder zu hell.
Staub, Schmutz und
Schmierflecken auf
den Kopien.
Gestreifte Kopien
Häufige Papierstaus.
Das kopierte Bild
läßt sich leicht
abreiben.
Ist der Netzstecker des Geräts
eingesteckt?
Ist der Netzschalter
eingeschaltet?
Ist die Seitenabdeckung fest
geschlossen?
Ist die Frontabdeckung
geschlossen?
Liegt das Original mit der Schrift
nach unten auf dem
Vorlagenglas?
Ist das Original zu dunkel oder
zu hell?
Ist das Gerät im automatischen
Belichtungsmodus?
Ist das Gerät im PhotoBelichtungsmodus?
Ist das Vorlagenglas oder die
Originalabdeckung
verschmutzt?
Ist das Original verschmutzt
oder fleckig?
Ist die Übertragungscorona
sauber?
Wurde Spezialpapier
verwendet?
Ist das Papier wellig oder
feucht?
Befinden sich Papierstücke im
Gerät?
Sind die Papierführungen am
Papierfach nicht richtig
eingestellt?
Zu viel Papier im Papierfach?
Ist das Papier zu schwer?
Ist das Papier feucht?
Stecken Sie den Netzstecker des Geräts in
eine geerdete Steckdose ein.
Schalten Sie den Netzschalter ein. 12
Schließen Sie die Seitenabdeckung
vorsichtig.
Schließen Sie erst die Frontabdeckung
und dann die Seitenabdeckung vorsichtig.
Legen Sie das Original mit der Schrift nach
unten auf das Vorlagenglas.
Stellen Sie die Belichtung manuell ein. 15
Stellen Sie die Belichtungsautomatik
richtig ein.
Beenden Sie den PhotoBelichtungsmodus.
Regelmäßig reinigen. 24
Verwenden Sie ein sauberes Original. –
Reinigen Sie die Übertragungscorona. 25
Verwenden Sie Standardpapier.
Spezialpapier müssen Sie über den
Einzelblatteinzug zuführen.
Bewahren Sie das Papier flach und in der
Verpackung an einem trockenen Ort auf.
Beseitigen Sie alle Papierstückchen nach
einem Papierstau.
Stellen Sie die Papierführungen auf das
Papierformat ein.
Entfernen Sie überschüssiges Papier aus
dem Fach.
Verwenden Sie Kopierpapier entsprechend
den Gewichtsangaben.
Ersetzen Sie es durch trockenes Papier.
Wenn das Gerät längere Zeit nicht benutzt
wird, nehmen Sie das Papier aus dem
Fach, und lagern Sie es in seiner
Verpackung an einem trockenen Ort.
12
23
23
14
16
15
7
–
28
8
8
7
2
26
Page 97

STATUSANZEIGEN
Wen auf dem Bedienfeld die folgenden Anzeigen aufleuchten oder blinken oder
folgende alphanumerischen Codes erscheinen, lösen Sie das Problem sofort
anhand der nachfolgenden Tabelle und der entsprechenden Beschreibung
Verwenden Sie ausschließlich Originalteile und Originalzubehör von
Hinweis
SHARP.
Anzeige Ursache und Abhilfemaßnahme Seite
Anzeige
Auswechseln der
Entwicklereinheit
erforderlich
Anzeige
Auswechseln der
Tonerkassette
erforderlich
Papierstauanzeige Blinken
Wartungsanzeige
Energiesparanzeige leuchtet
ständig.
Die Papierfachanzeige blinkt.
CH blinkt auf der Anzeige.
CH leuchtet ständig auf der
Anzeige.
P blinkt auf der Anzeige.
Ein Buchstabe und eine Zahl
erscheinen im Wechsel.
Ein Buchstabe und eine Zahl
erscheinen im Wechsel.
Ständiges
Leuchten
Ständiges
Leuchten
Blinken
Ständiges
Leuchten
Entwickler muß nachgefüllt werden. Wenden Sie sich
an den autorisierten Kundendienst.
Das Auswechseln der Tonerkassette wird in
Kürze erforderlich. Legen Sie eine neue Einheit
(AR-152T)
bereit.
Die Tonerkassette muß ausgewechselt werden.
Ersetzen Sie sie durch eine neue Kassette. (AR-152T)
Ein Papierstau ist aufgetreten. Beseitigen Sie den
Papierstau wie unter "PAPIERSTAU ENTFERNEN"
beschrieben.
Ein autorisierter SHARP-Kundendienst muß
Wartungsarbeiten durchführen.
Das Gerät befindet sich in der Vorwärmphase. Drücken
Sie irgendeine Taste, um die Vorwärmphase
abzubrechen.
Das Gerät befindet sich im automatischen Energiesparbetrieb.
Drücken Sie die Starttaste ( ), um den automatischen
Energiesparbetrieb zu deaktivieren.
Das Papierfach ist nicht richtig eingesetzt. Schieben Sie
das Fach richtig in das Gerät ein.
Es ist keine Tonerkassette installiert. Prüfen Sie, ob
eine Kassette installiert ist. Wenn „CH“ blinkt, obwohl
die Kassette richtig eingesetzt ist, wenden Sie sich
umgehend an Ihren SHARP-Kundendienst.
Die Seitenabdeckung ist geöffnet. Schließen Sie die
Seitenabdeckung durch Drücken der runden
Sicherungsknöpfe neben der Verriegelungstaste der
Seitenabdeckung richtig.
Das Papierfach ist leer.
Legen Sie Papier ein.
Im Papierfach, Einzelblatteinzug, ist ein Papierstau
aufgetreten. Entfernen Sie den Papierstau.
Das Papierfach ist nicht richtig eingesetzt. Setzen Sie
das Fach richtig ein.
Der Verriegelungsschalter des Abtastkopfs ist
verriegelt. Entriegeln Sie den Verriegelungsschalter
des Abtastkopfs, und schalten Sie den Netzschalter
kurz aus und wieder ein.
Der Kopierer funktioniert nicht. Den Netzschalter
ausschalten, dann wieder einschalten. Wenn der
Fehler erneut auftritt, Netzdecker aus der
Steckdose ziehen. Wenden Sie sich an Ihre
autorisierte Kundendienstvertretung.
31
21
21
28
31
18
18
–
21
–
8
28
–
–
–
27
Ein Buchstabe und eine Zahl
erscheinen im Wechsel.
Sie können die Tonerkassette jetzt nicht mehr
verwenden (Lebensdauer der Tonerkassette erreicht).
Wenden Sie sich an Ihren autorisierten Kundendienst.
–
Page 98

PAPIERSTAU ENTFERNEN
Wenn die Papierstauanzeige ( ) oder auf der Anzeige blinkt, stoppt das
Gerät aufgrund eines Papierstaus.
Öffnen Sie die Seitenabdeckung.
1
Das Öffnen der Seitenabdeckung ist unter "AUSWECHSELN DER
TONERKASSETTE" (S.21) beschrieben.
Ermitteln Sie die Stelle, an der der Papierstau aufgetreten ist.
2
Beseitigen Sie das gestaute Papier anhand der Erläuterungen
in der nachfolgenden Abbildung. Wenn die Papierstauanzeige
( ) blinkt, gehen Sie zu "A: Papierstau im
Papiereinzugsbereich" (S.29).
Wenn das gestaute Papier von
dieser Seite aus gesehen werden
kann, bei "C Papierstau im
Transportbereich" (S.30)
fortfahren
Wenn hier Papier gestaut ist, bei "B:
Papierstau im Fixierbereich" (S.29) fortfahren.
Wenn hier Papier gestaut ist, bei "A
Papierstau im Papiereinzugsbereich"
(S.29) fortfahren.
6
28
Page 99

A: Papierstau im Papiereinzugsbereich
Entfernen Sie das gestaute Papier vorsichtig aus dem
1
Papiereinzugsbereich, wie in der Abbildung gezeigt. Wenn die
Papierstauanzeige ( ) blinkt und das gestaute Papier vom
Papiereinzugsbereich aus nicht gesehen werden kann, ziehen
Sie das Papierfach heraus, und entfernen Sie das gestaute
Papier. Wenn das Papier nicht entfernt werden kann, gehen Sie
zu „B: Papierstau im Fixierbereich“.
Die Fixiereinheit wird extrem heiß. Berühren Sie die
Warnung
Vorsicht
Fixiereinheit nicht, wenn Sie einen Papierstau beseitigen.
Andernfalls kann es zu Verbrennungen oder anderen
Verletzungen kommen.
Berühren Sie nicht die Fotoleittrommel (am grünen Teil), wenn
Sie den Papierstau beheben. Andernfalls werden die Kopien
unsauber.
29
Schließen Sie die Seitenabdeckung durch Drücken der runden
2
Sicherungsknöpfe neben der Verriegelungstaste der
Seitenabdeckung. Die Papierstauanzeige ( ) erlischt, und die
Startanzeige ( ) leuchtet auf.
B: Papierstau im Fixierbereich
Senken Sie den
1
Verriegelungshebel der
Fixiereinheit.
Verriegelungshebel der Fixiereinheit
Page 100

Entfernen Sie das gestaute Papier
2
vorsichtig von der Unterseite der
Fixiereinheit her, wie in der
Abbildung gezeigt. Wenn sich das
Papier nicht entfernen läßt, gehen
Sie zu „C: Papierstau im
Transportbereich“.
Die Fixiereinheit wird extrem heiß.
Warnung
Vorsicht
Heben Sie den Verriegelungshebel der Fixiereinheit an, und
3
schließen Sie dann die Seitenabdeckung durch Drücken der
runden Sicherungsknöpfe neben der Verriegelungstaste der
Seitenabdeckung. Die Papierstauanzeige ( ) erlischt, und die
Startanzeige ( ) leuchtet auf.
Berühren Sie die Fixiereinheit
nicht, wenn Sie einen Papierstau
beseitigen. Andernfalls kann es zu
Verbrennungen oder anderen
Verletzungen kommen.
• Berühren Sie nicht die Fotoleittrommel (am grünen Teil),
wenn Sie den Papierstau beheben. Andernfalls werden die
Kopien unsauber.
• Entfernen Sie das gestaute Papier nicht von der Oberseite der
Fixiereinheit her. Unfixierter Toner auf dem Papier könnte den
Papiertransportbereich verschmutzen und zu unsauberen Kopien
führen.
C: Papierstau im Transportbereich
6
Senken Sie den Verriegelungshebel der Fixiereinheit.
1
Siehe "B: Papierstau im Fixierbereich" (S.29).
Öffnen Sie die Frontabdeckung.
2
Das Öffnen der Frontabdeckung ist unter "AUSWECHSELN DER
TONERKASSETTE" (S.21) beschrieben.
Drehen Sie die Einzugsrolle
3
in Pfeilrichtung, und
entfernen Sie das gestaute
Papier vorsichtig aus dem
Ausgabebereich.
Einzugsrolle
30
 Loading...