

Sharp AL-2020,AL-2040 Online Manual
Start
Online Manual
AL-2020/AL-2040
AL-2020
AL-2040

Contents
How to Use the Online Manual 1
Printing Overview 2
Basic Printing 3
Starting the Printer Driver Using the "Start" Button 4
Printer Driver Settings 5
Printing a Watermark 6
Fitting the Printed Image to the Paper 7
Printing Multiple Pages on One Page 8
Two-sided Printing 9
Outline of the Print Status Window 10
Scanning Overview 11
Scanning an Image from a TWAIN-Compliant Application 12
Scanning an Image from a WIA-Compliant
Application (Windows XP/Vista) 16
Scanning an Image from the "Scanner and
Camera Wizard" (Windows XP/Vista) 18
Outline of Button Manager 21
Button Manager Settings 22
Identifying Unit Problems 23
Check the Connection between the Unit and Computer 24
Check Your Computer 25
Plug and Play Screen does not Appear (when the
USB is connected) 26
Failed to Install the MFP Driver (Windows 2000/XP) 27
Faint, Uneven or Smeared Print Output 28
Characters or Graphics are not Printed in Correct Position
29
Nothing Prints 30
Poor Scanning Result 31
The Scanned Image is Incorrectly Positioned 32
Unable to Scan the Image 33
Uninstalling the Software 34
Printer Driver Features 35
About the Web Page 37
Configuration via the Web Page 38
1
How to Use the Online Manual
2
Print
3
Scan
4
Troubleshooting
5
Printer Driver Features
6
Web Page in the Machine
7
Index

INDEX
CONTENTS
1
This Online Manual provides instruction for the operation of your new unit. Please read the following explanation of how
to use the Online Manual, and then search for the information that you need.
For more information about computers, operating systems and Acrobat Reader, please refer to the relevant manual or
help file.
How to Control the Online Manual
Following links
Links can connect parts of a document to other parts for further information. In this document, green colored letters are linked areas.
To follow a link, select a hand tool ( ), a zoom tool or a selection tool. Position the pointer over the linked area on the page until the pointer
changes to a hand with a pointing finger ( ). Then click the link.
Using Bookmarks
This online manual has Bookmarks on the main pages of each section. You can move to the desired pages by simply clicking its bookmark.
How to Print Out the Online Manual
I
n order to print out a hard copy of the Online Manual for your reference, go to Acrobat Reader, click the "File" menu, and
select "Print". After specifying the printer setting, click the "OK" button to print.
Note
z In this online manual, screen images and operating procedures are mainly for Windows XP. With other versions
of Windows, some screen images may be different from those in this manual.
z Wherever "AL-xxxx" appears in this manual, please substitute your model name for "xxxx".
z The SPF that is mentioned is only for AL-2040.
1
INDEX
CONTENTS
Click this button to display the Table of
Contents of the Online Manual. From the Table
of Contents you can jump to various pages.
Click this button to display the Index of the
Online Manual. From the Index you can
jump to various pages.
Takes you forward page by page.
Takes you back page by page. To return to the previous link,
click the ( ) button on the menu bar of the Acrobat Reader.
How to Use the Online Manual
1
INDEX
CONTENTS
2
2
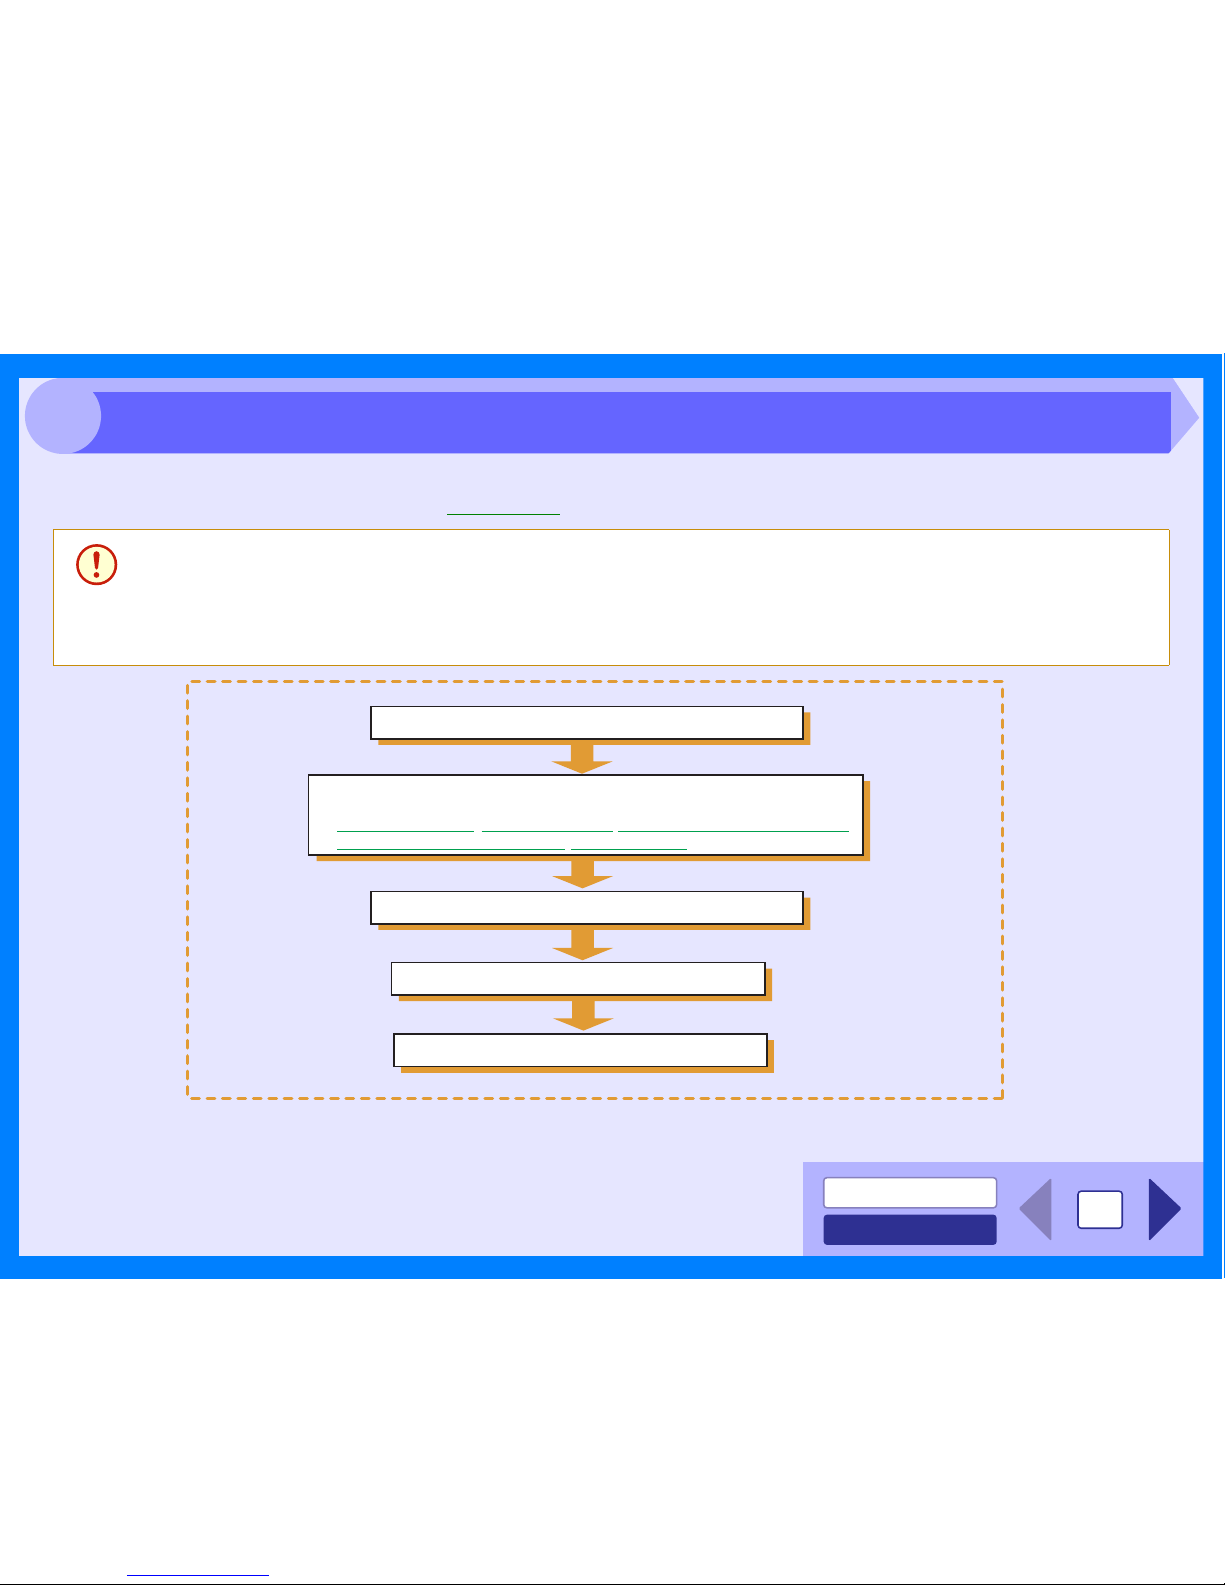
The flow chart shown below provides printing overview.
Reference: For more information on printing, see Basic Printing.
Caution
z The printer function is only available when the machine is connected to your computer using a USB cable. Printing
over a network connection is not possible.
z When the paper source is the paper tray or multi-bypass tray, verify that the paper has been loaded before starting
printing.
z Ensure printing has been completed before turning the power off. Do not remove the power cord before turning
the unit off.
Prepare the document you intend to print
Send print data from your computer
Printing
Exit printing
Open the printer driver setup screen and set the print preferences
Reference:
Printer Driver Settings, Printing a Watermark, Fitting the Printed Image to the Paper,
Printing Multiple Pages on One Page, Two-sided Printing
Printing Overview
INDEX
CONTENTS
3
2
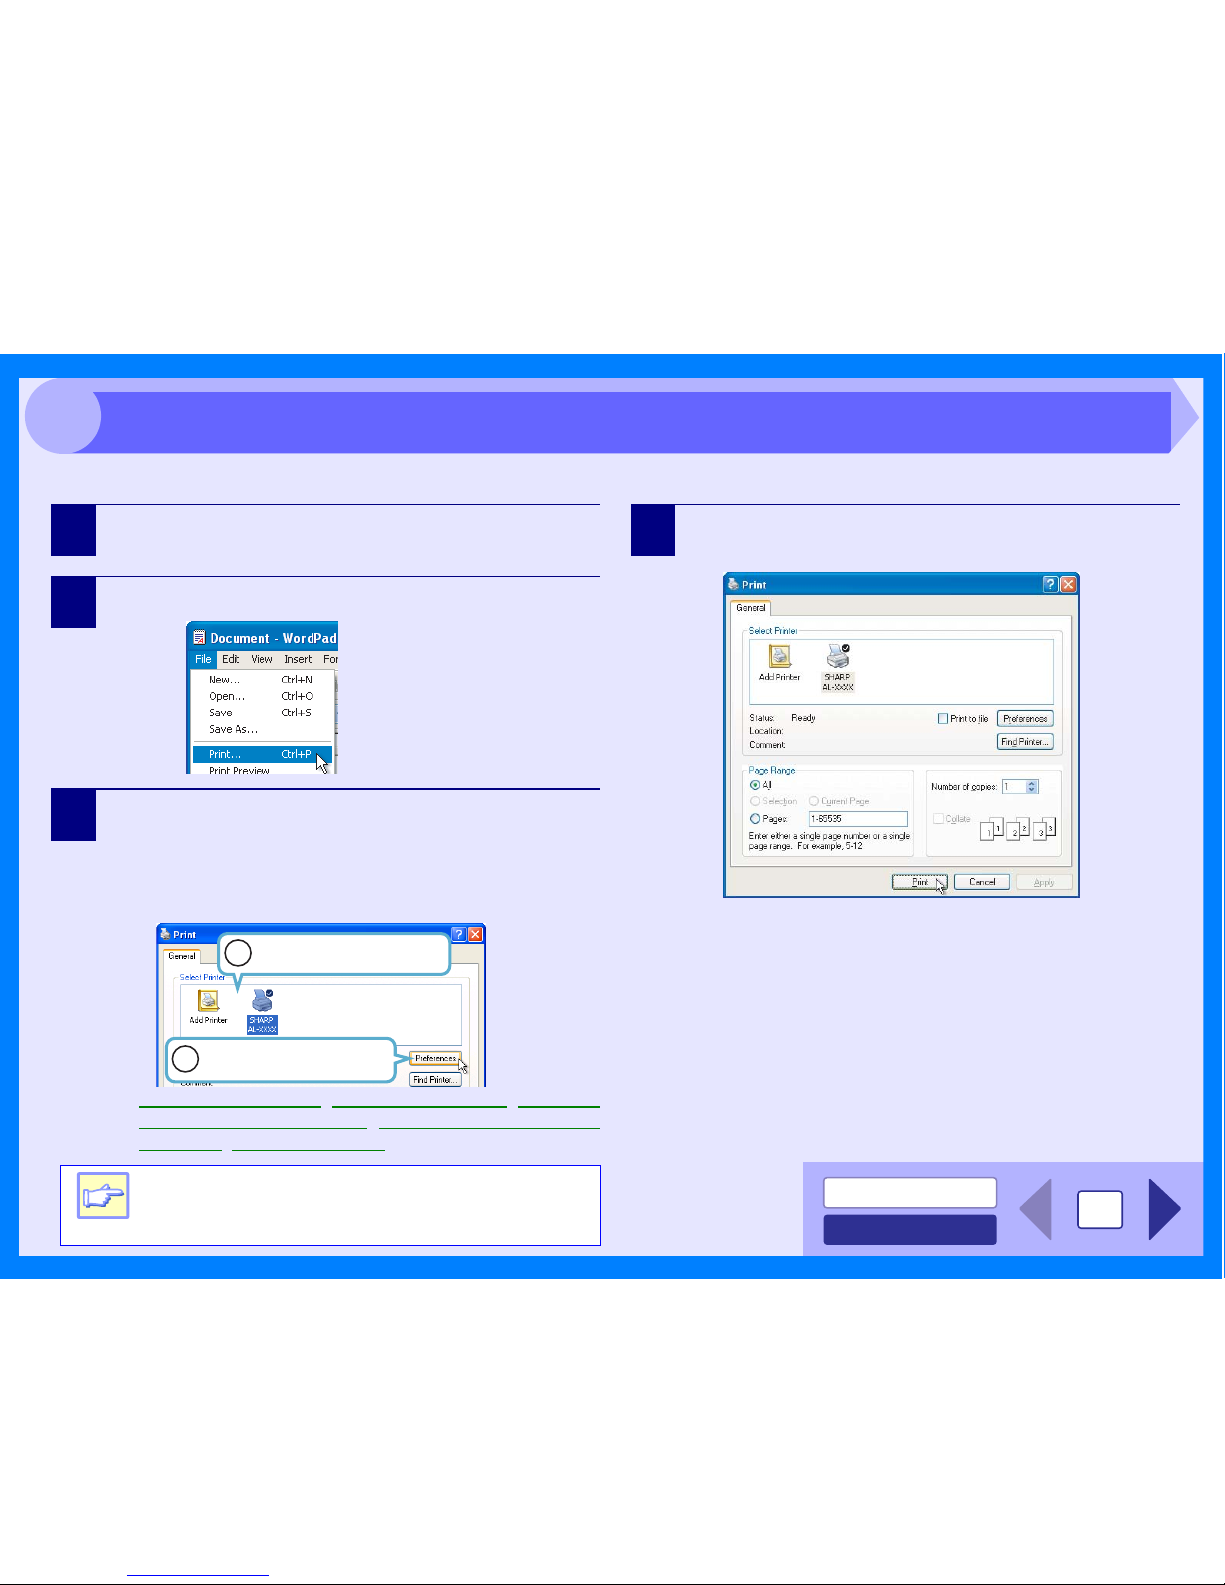
This is a printing example using WordPad to print a document onto A4 size paper.
1
Start WordPad, make a new file, and enter the text
you intend to print.
2
Select "Print" from the application's "File" menu.
3
Make sure that "SHARP AL-xxxx" is selected as the
current printer. If you intend to change any print
setting, click the "Preferences" button to open the
printer driver setup screen.
On Windows 98/Me, click the "Properties" button.
Reference: Printer Driver Settings, Printing a Watermark, Fitting the
Printed Image to the Paper, Printing Multiple Page s on
One Page, Two-sided Printing
4
Click the "Print" button in the "Print" dialog box.
On Windows 98/Me, click the "OK" button.
Printing starts according to your preferences.
Note
Windows 2000 does not have the "Preferences"
button on this dialog box. Switch to the desired
tab by clicking it to specify printer settings.
Identify the current printer
in this box.
1
2
Click this button to change
any print preference.
Basic Printing

INDEX
CONTENTS
4
2
You can open the printer driver and change the printer driver settings from the Windows "start" button. Settings adjusted
in this way will be the initial settings when you print from an application. (If you change the settings from the printer
driver setup screen at the time of printing, the settings will revert to the initial settings when you quit the application.)
Reference: Basic Printing
Windows 2000/XP/Vista
1
Click the "start" button, and then click "Control
Panel".
On Windows 2000, click the "Start" button and select
"Settings".
2
Click "Printers and Other Hardware", and then click
"Printers and Faxes".
• On Windows Vista, click "Printer".
• On Windows XP, click "Printers".
3
Click the "SHARP AL-xxxx" printer driver icon and
select "Properties" from the "File" menu.
On Windows Vista, click "Printer".
4
Click the "Printing Preferences" button in the
"General" tab.
The printer driver setup screen will appear.
Reference: Printer Driver Settings
Windows 98/Me
1
Click the "Start" button, select "Settings" and then
click "Printers".
2
Click the "SHARP AL-xxxx" printer driver icon and
select "Properties" from the "File" menu.
3
Click the "Setup" tab.
The printer driver setup screen will appear.
Reference: Printer Driver Settings
Starting the Printer Driver Using the "Start" Button

INDEX
CONTENTS
5
2
To view Help for a setting, click the ( ) button in the upper right-hand corner of the window and then click the setting.
Tab
Index which allows you to
switch between the various
setup screens.
( ) button
Click this button and then click a
setting to view Help for the setting.
Check button
Allows you to select one
item from a list of options.
"OK" button
Click this button to save
your settings, and exit the
dialog box.
The settings you made at
"N-Up Printing", "Document
Style", "Fit To Paper Size",
"Image Orientation" and
"Watermark" are shown in
this image.
The tray selected in
"Paper Selection" in the
"Paper" tab appears in
blue. You can also click
on a tray to select it.
"Cancel" button
Click this button to exit the dialog
box without making any changes to
the settings.
"Apply" button
Click to save your settings
without closing the dialog box.
"Help" button
The Help window will open to
let you view explanations of the
settings on the tab.
Drop-down list
Allows you to make one
selection from a list of choices.
Check box
Click this option to activate/
deactivate each function.
You can also view Help by
right-clicking the setting
with the mouse.
The "Apply" button does
not appear when you
open this window from
an application.
Note
Note
Printer Driver Settings
INDEX
CONTENTS
6
2
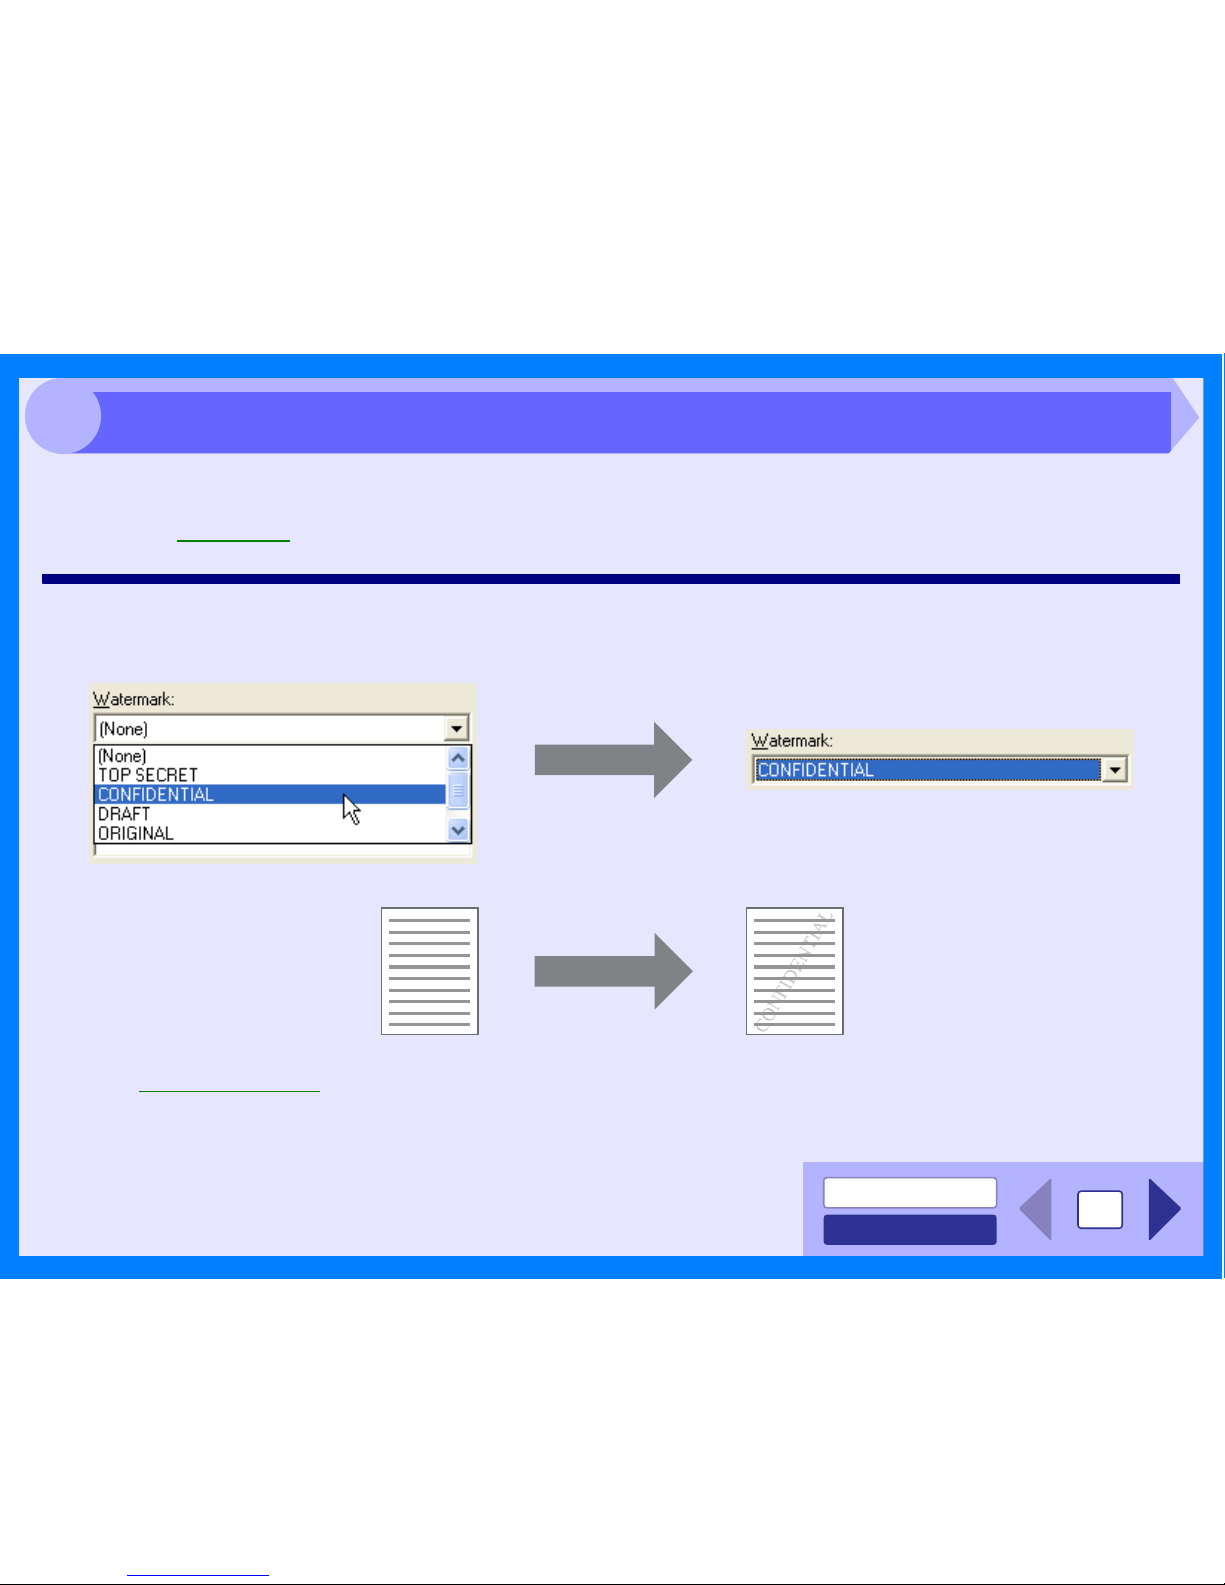
To print a watermark, for example "CONFIDENTIAL", on your document, refer to the following steps. Open the printer
driver and click the "Watermarks" tab.
Reference: See Basic Printing for details on how to open the printer driver.
How to Print a Watermark
From the "Watermark" drop-down list, select the watermark, for example "CONFIDENTIAL", you wish to print on your
document, and start printing.
For details on watermark settings, view printer driver Help.
Reference: Printer Driver Settings
Print sample
Printing a Watermark
INDEX
CONTENTS
7
2
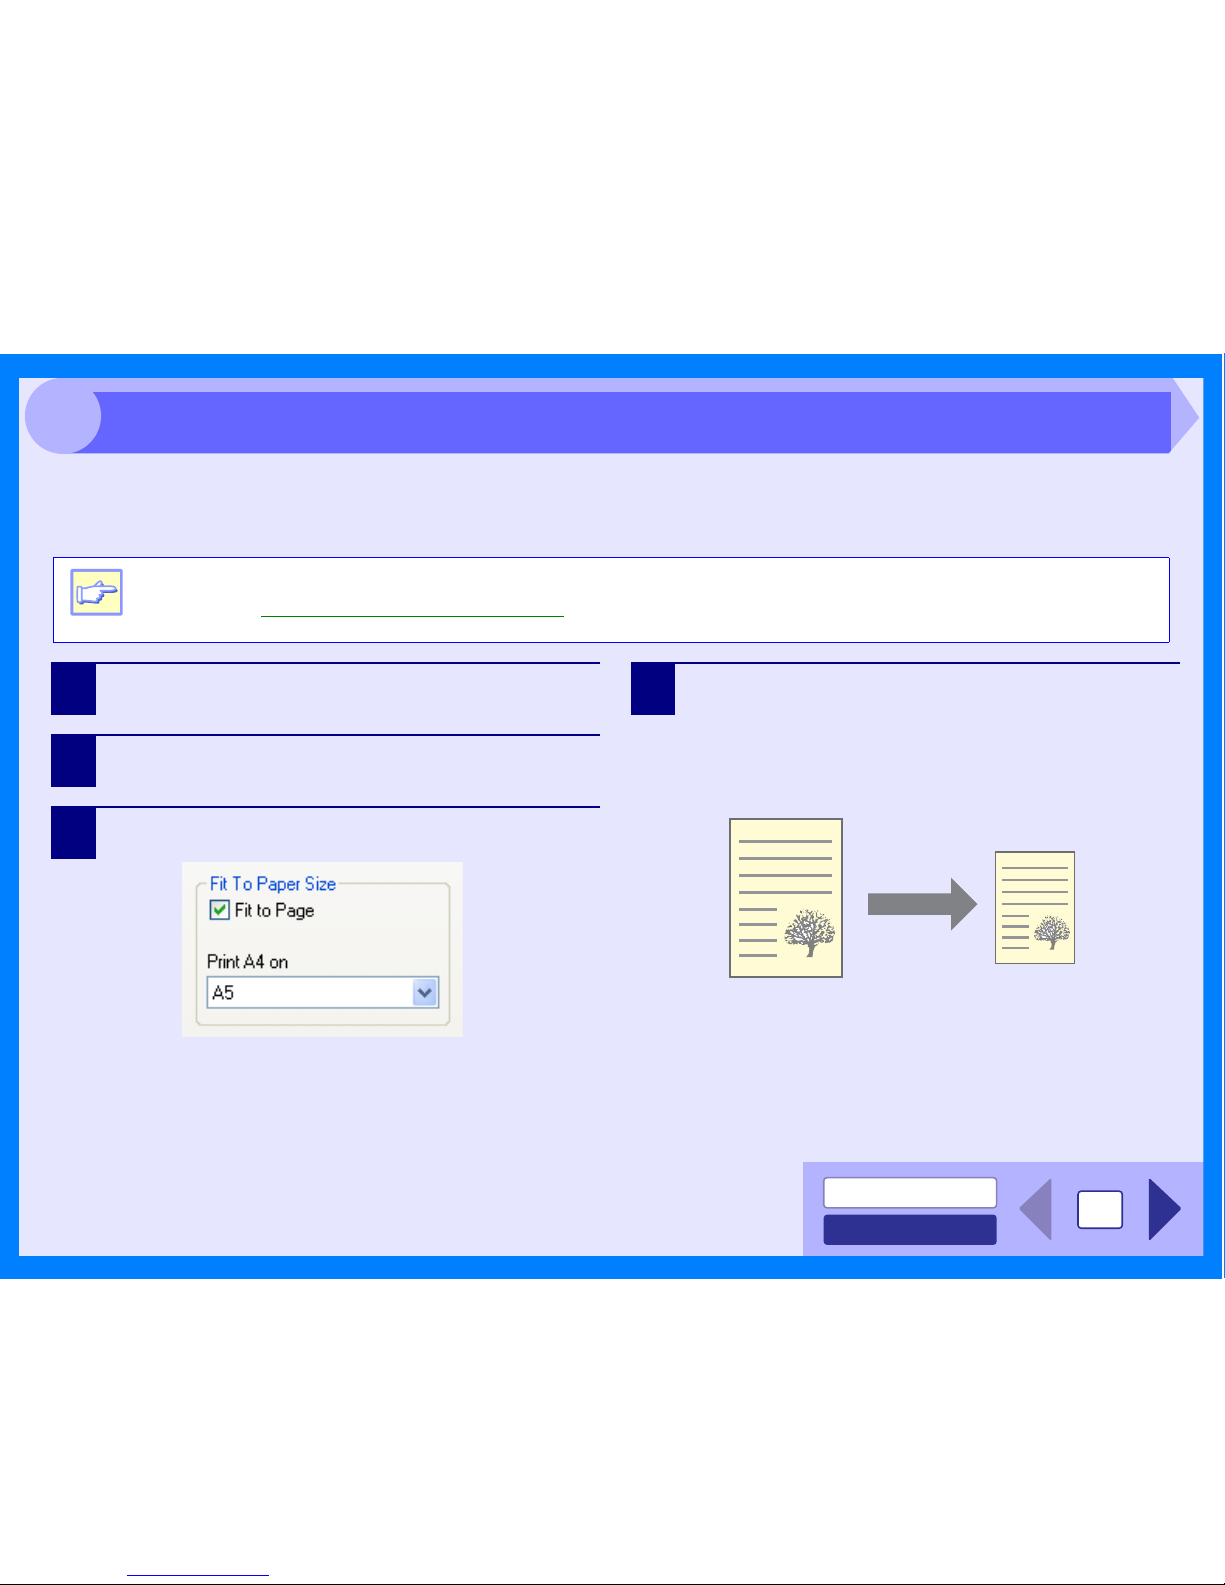
This printer driver can adjust the zoom ratio for printing according to the paper loaded in the unit.
Follow the steps shown below to use this function. The instruction below assumes that you intend to print an A4 size
document onto an A5 size paper.
1
Click the "Paper" tab in the printer driver setup
screen.
2
Select the paper size for the print data from "Paper
Size".
3
Check the "Fit To Page" box.
4
Select the paper size for "Fit To Paper Size", which
corresponds to the size of paper in the unit.
Now, the printed image will automatically fit the paper
set in the unit.
Note
The "Fit To Paper Size" setting is not available when "N-Up Printing" is selected.
Reference: Printing Multiple Pages on One Page
Paper Size: A4
Fit To Paper Size: A5
A4 size document
(Paper Size)
A5 size paper
(Fit To Paper Size)
Fitting the Printed Image to the Paper
INDEX
CONTENTS
8
2
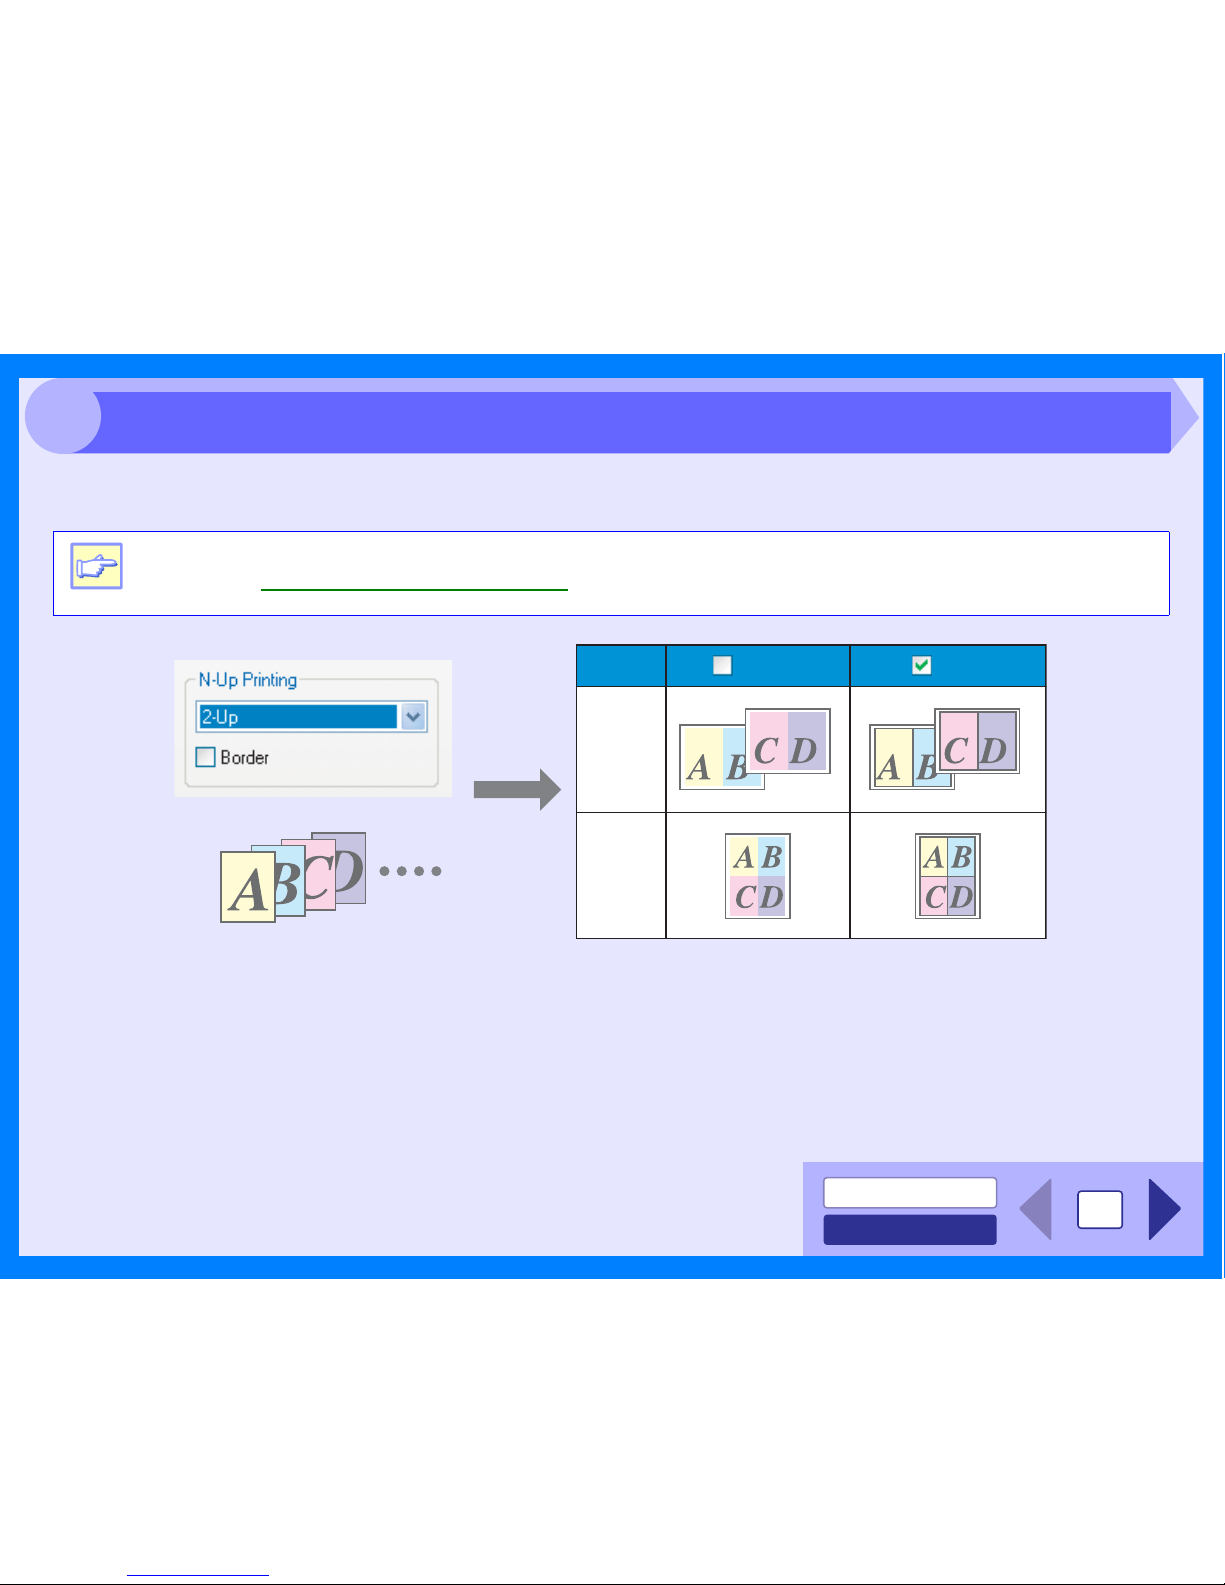
This feature allows you to print two or four document pages onto a single page.
To use this function, open the printer driver setup screen, select "2-Up" or "4-Up" for "N-Up Printing" on the "Main" tab.
If you select the "Border" checkbox, border lines will be printed on each page.
Note
The "N-Up Printing" setting is not available when "Fit To Paper Size" is selected.
Reference: Fitting the Printed Image to the Paper
"2-Up"
"4-Up"
BorderBorderN-Up
Printing Multiple Pages on One Page
INDEX
CONTENTS
9
2
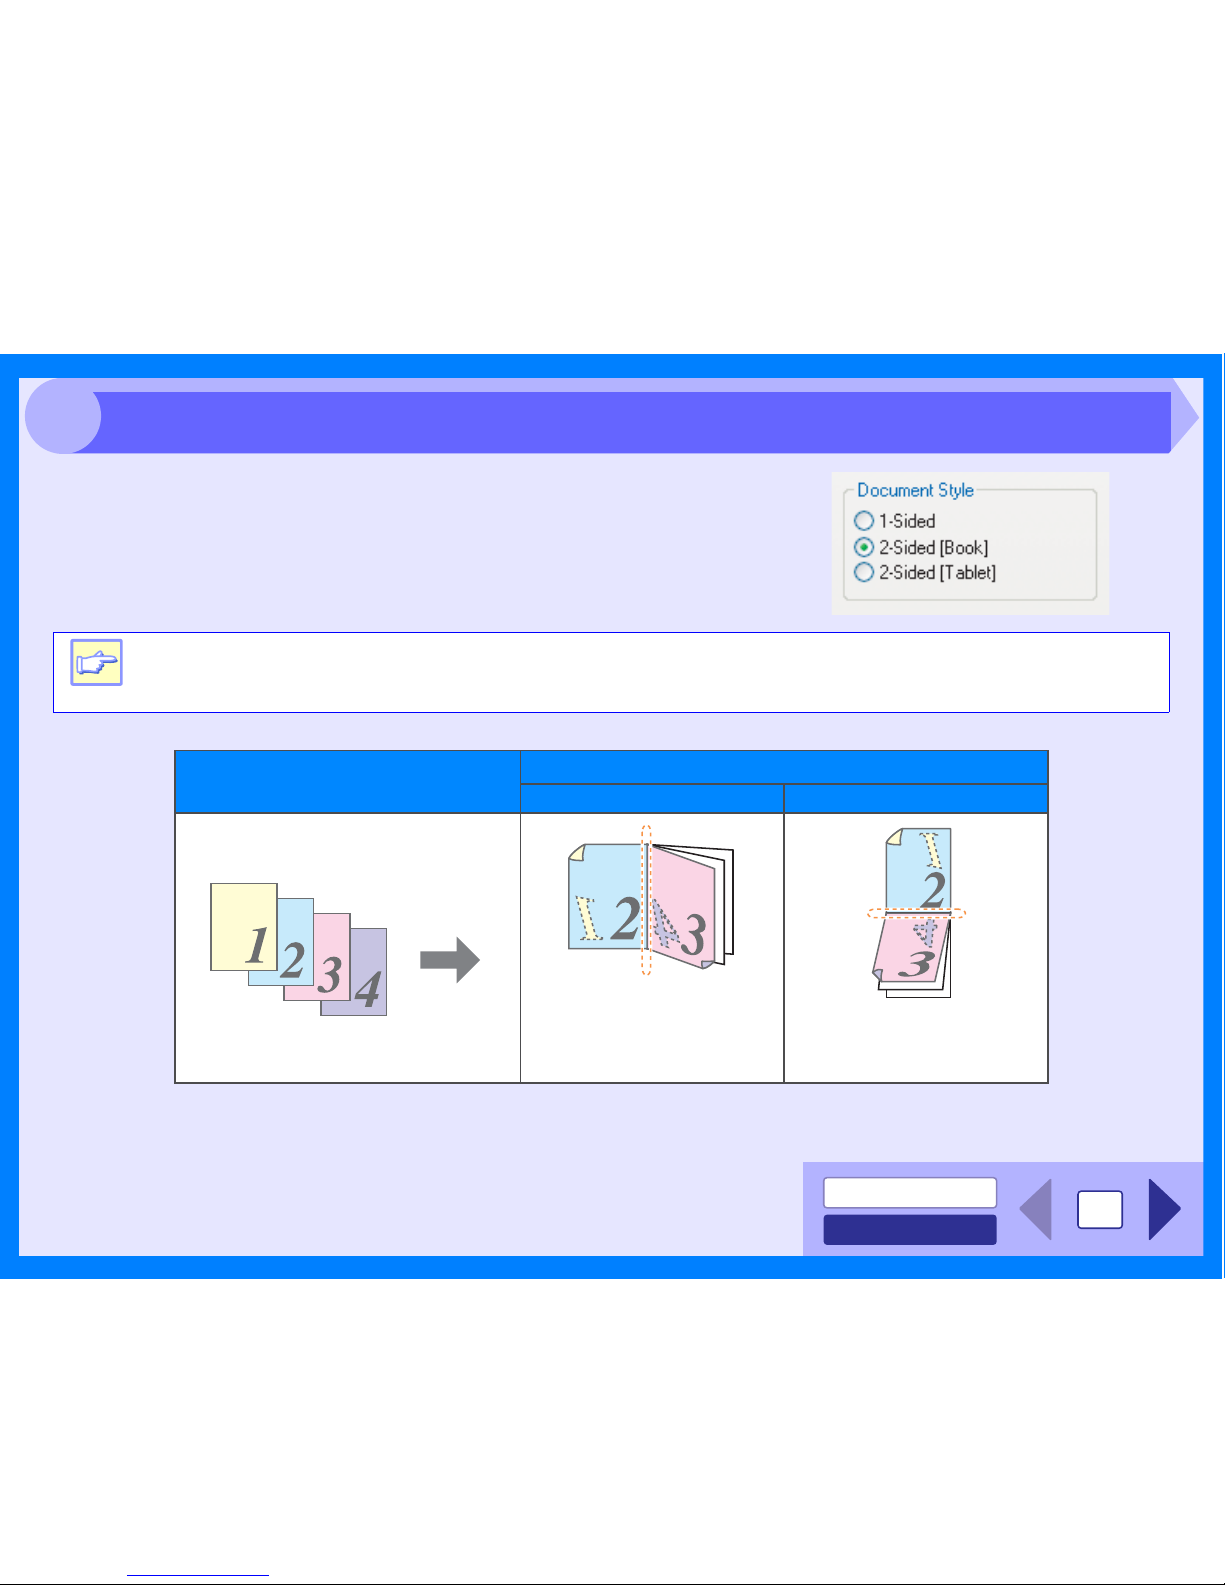
You can print on both sides of the paper.
To use this function, open the printer driver setup screen and select "2Sided (Book)" or "2-Sided (Tablet)" from "Document Style" in the "Main"
tab.
The following example shows the result when portrait data is printed on both sides of the paper.
Note
The multi-bypass tray can not be used for two-sided printing.
Printing result
Print data
2-Sided (Book) 2-Sided (Tablet)
The pages are printed so
that they can be bound at
the side.
The pages are printed so that
they can be bound at the top.
Two-sided Printing
INDEX
CONTENTS
10
2
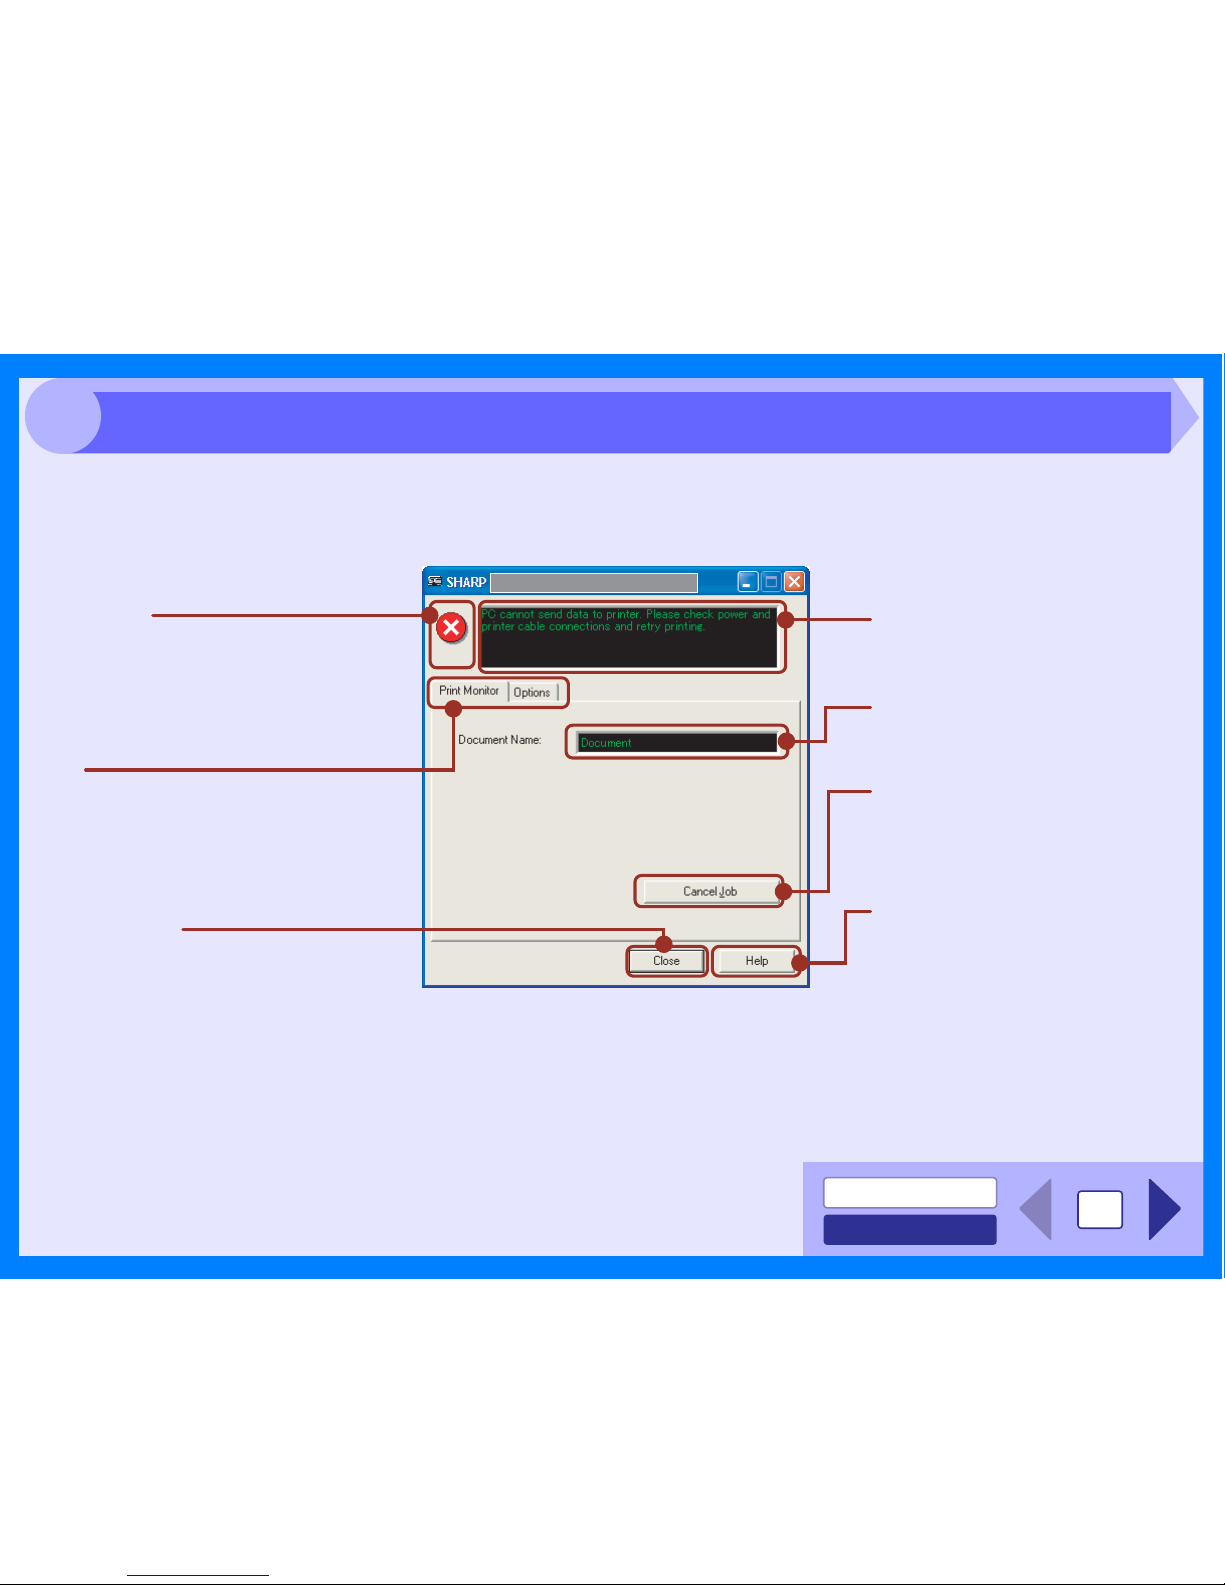
When printing begins, the Print Status Window activates and appears on the screen.
The Print Status Window is a program designed to show the current printer status including the document name being
printed and error messages.
Status window
Provides details on the current
status of the print job.
Document Name
Displays the name of the active print
job.
"Help" button
Click this button to display help file
for the Print Status Window.
Status icon
This icon informs you of the print status.
Tab
Index which allows you to switch
between the two setup screens.
"Cancel Job" button
Printing can be canceled by clicking
this button before the machine
receives the job.
"Close" button
Click this button to close the Print
Status Window.
Outline of the Print Status Window
INDEX
CONTENTS
11
3
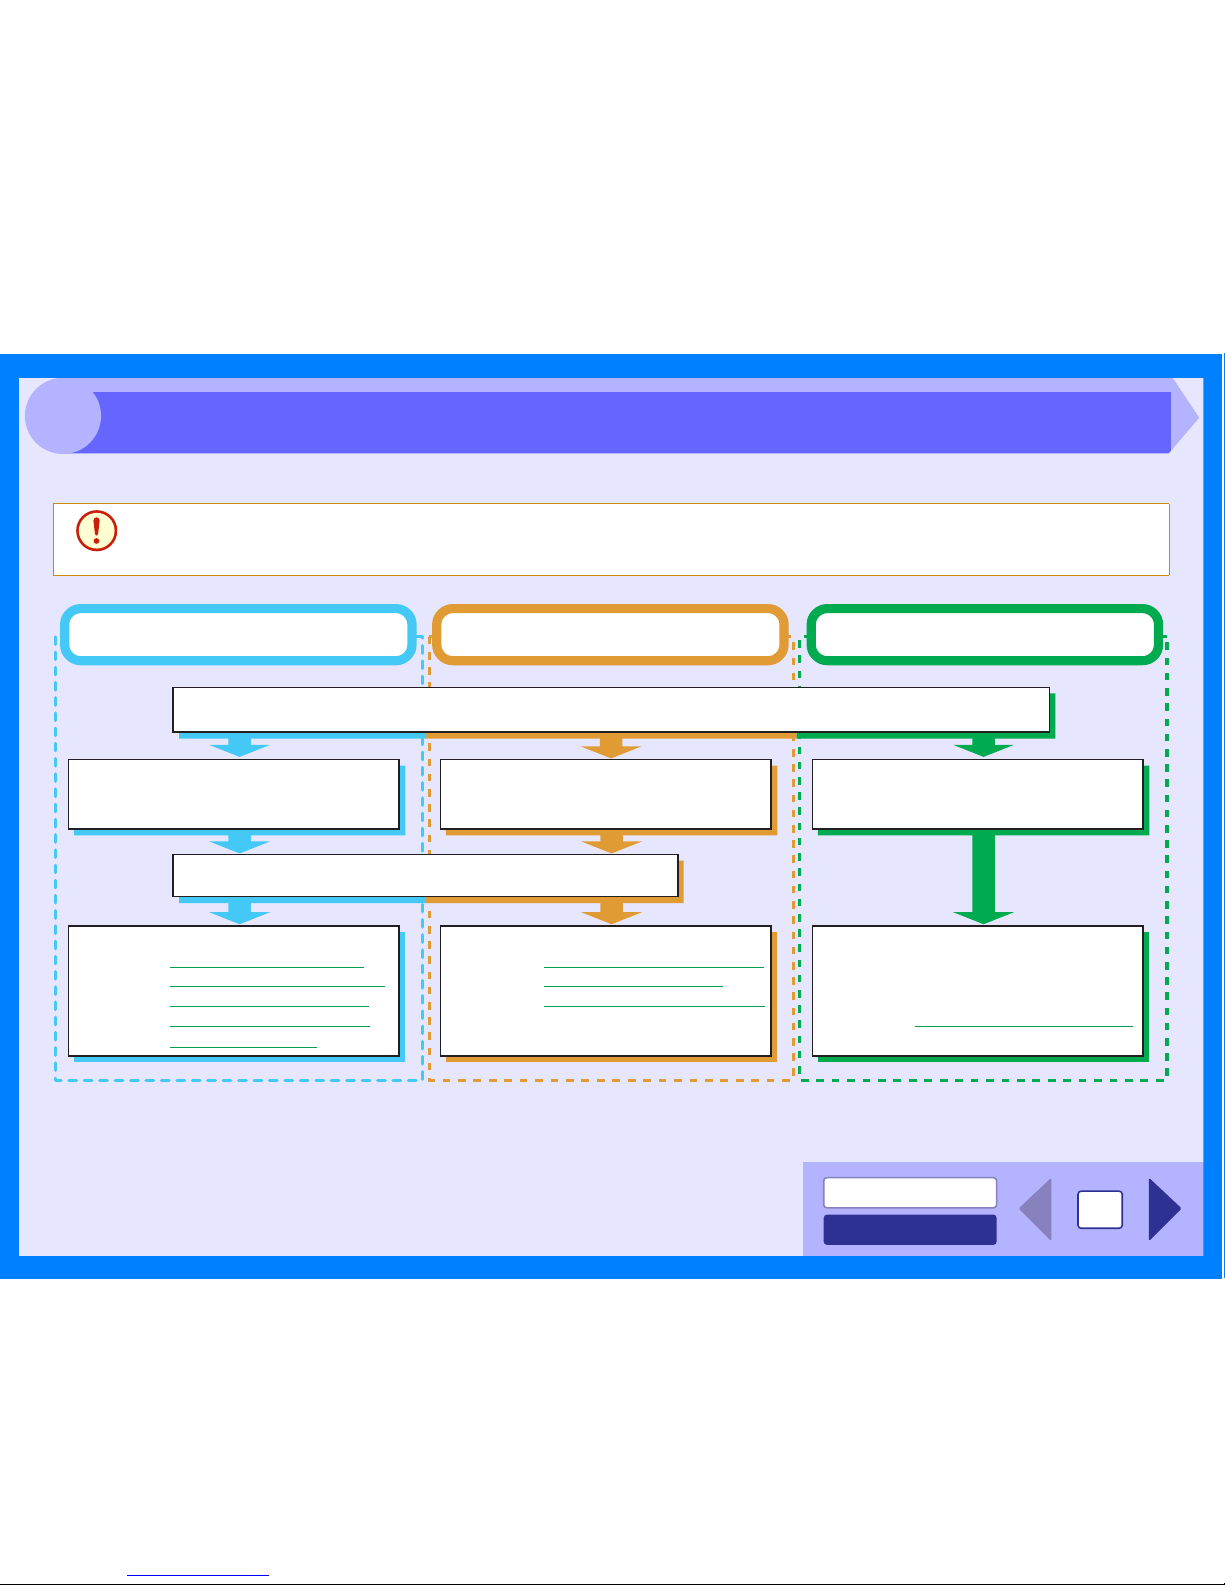
The flow chart shown below provides scanning overview.
*1:TWAIN is an industry standard for interface of image data processing devices including scanners. By installing a TWAIN driver onto your computer,
you can scan and work with images using a variety of TWAIN-compliant applications.
*2:WIA (Windows Imaging Acquisition) is a Windows function that allows a scanner, digital camera or other imaging device to communicate with an
image processing application. The WIA driver for this unit can only be used in Windows XP/Vista.
*3:To scan using the unit's operation panel, you must first install Button Manager and estab lish the
appropriate settings in the Control Panel. For details, see "USING THE SCANNER MODE" in
the Operation Manual.
Note that not all scanner functions are available using Button Manager.
Caution
The scanning feature can only be used with computers that are connected to the machine by a USB cable. If you
are connected to the machine by a LAN connection, only the printer function can be used.
Place the original in the scanning position
Reference: For more detail, refer to the "ORIGINAL PLACEMENT" in the Operation Manual.
Start up the "Scanner and Camera
Wizard" from "Control Panel" in
your computer.
Start up a Twain-compliant or WIAcompliant application, and select
the unit's scanner driver.
Change the unit to scanner mode
and select scan menu (SC1 to SC6)
on the operation panel.
Set the scan preferences
When scanning from TWAIN*1-compliant
or WIA*
2
-compliant application
When scanning from "Scanner and
Camera Wizard" (Windows XP/Vista)
Using the unit to begin scanning*
3
Scanning
Referenc
e: Scanning an Image from the
"Scanner and Camera
Wizard" (Windows XP/Vista)
Scanning
Reference:
Scanning an Image from a
TWAIN-Compliant Application,
Scanning an Image from a
WIA-Compliant Application
(Windows XP/Vista)
Scanning
Reference: "USING THE SCANNER
MODE" in the Operation
Manual,
Outline of Button Manager
Scanning Overview
 Loading...