

Page 1

21HT-15C
21HT-16C
COLOUR TELEVISION
BAREVNÝ TELEVIZOR
SZÍNES TELEVÍZIÓ
KOLORWY TELEWIZOR
ЦBETHOЙ TEЛEBNЗOP
RECEPTOR DE TELEVIZIUNE ÎN CULORI
FAREBNÝ TELEVÍZOR
OPERATION MANUAL
NÁVOD K OBSLUZE
HASZNÁLATI UTASÍTÁS
INSTRUKCJA OBSŁUGI
CБОPHИK ИHCTPУKЦИЯ
INSTRUC©IUNI DE UTILIZARE
NÁVOD NA OBSLUHU
TV
ENGLISHČESKY
MAGYARPOLSKI
SLOVENČINA
Page 2
Safety Precautions
;;;;;;;;
;;;;;;;;
;;;;;;;;
;;;;;;;;
;;;;;;;;
;;;;;;;;
;;;;;;;;
;;;;;;;;
This equipment complies with the requirements of Directives 89/336/EEC and 73/23/EEC as amended
by 93/68/EEC.
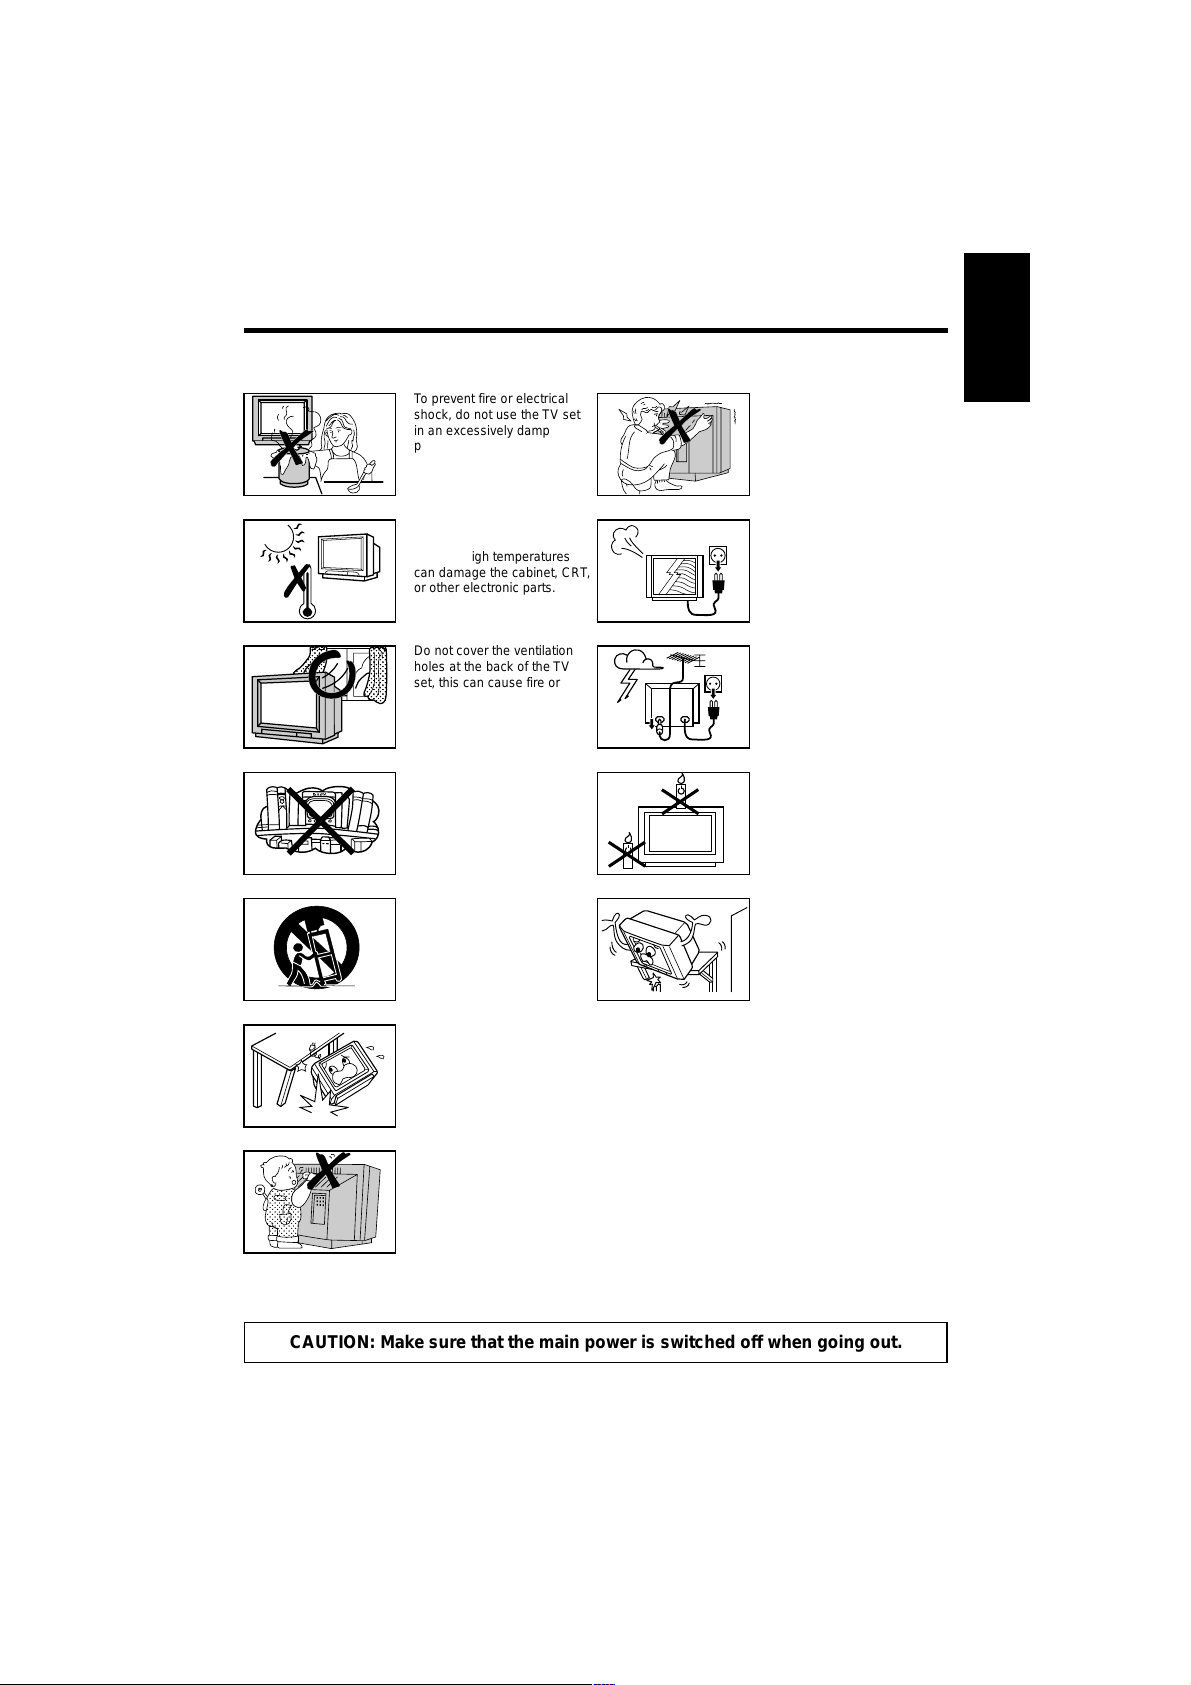
To prevent fire or electrical
shock, do not use the TV set
in an excessively damp
place.
Never remove the back of the
cabinet, as there is high
voltage inside the TV set.
Please call for service.
ENGLISH
Position the TV set out of
direct sunlight and away from
heat, as high temperatures
can damage the cabinet, CRT,
or other electronic parts.
Do not cover the ventilation
holes at the back of the TV
set, this can cause fire or
other serious problems. Leave
an adequate open space
behind the TV set for good
ventilation.
Do not install this equipment
in a confined space, such as a
bookcase or built-in cabinet.
Television equipment and cart
combination should be moved
with care. Quick stops,
excessive force, and uneven
surfaces may cause the
equipment and cart
combination to overturn.
Do not place this television equipment on an unstable cart, stand, or table. The television
equipment may fall, causing serious injury to a child or an adult, and serious damage to the
equipment.
Use only with a cart or stand recommended by the manufacturer, or sold with the television
equipment.
Unplug the power cord from
the wall outlet immediately if
the TV set begins to make
unusual noises or gives off
smoke or an odd smell, then
call your dealer for service.
Always disconnect your television
from the mains amd the aerial
cable during thunderstorms.
Ever if your television is switched
off, it can still be damaged by
lightning striking th mains and/or
aerial cable.
To prevent fire, never place
any type of candle or naked
flames on the top or near the
TV set.
Wall or shelf mounting should
follow the manufacturer’s
instructions, and should use a
mounting kit approved by the
manufacturer.
Never insert or drop any metallic or inflammable objects into the venitilation holes of the TV
set, this can cause fire, electrical shock or electrical failure. Do not place a flower vase or
anything else containing liquid on the TV set, as liquid spilt on the TV set can cause
serious problems.
CAUTION: Make sure that the main power is switched off when going out.
Web-site: www.sharp.co.uk/support Help Line (office hours only): 0990-274277
1
Page 3
Contents
General Information
Safety Precautions............ 1
Accessories.......................2
Battery Installation ............ 2
Installing your TV
Aerial Connections............ 3
Typical Connections .......... 3
Location of Controls .......... 4
Channel Setting
Auto T uning ....................... 5
Manual Tuning .................. 6
Fine Tuning ....................... 8
Skipping Programmes.......9
Manual Channel Sorting .. 1 1
Channel Sorting .............. 12
Basic Operation
Watching a TV programme ..
Useful Features
Other Functions
13
Reference
Picture Adjustment .......... 14
Timer Setting................... 15
Child Lock ....................... 17
Flashback & Sound Mute ...
TV/VIDEO & Call buttons ...
Teletext............................ 22
Troubleshooting .............. 25
Specifications.................. 26
Dear SHARP Customer
Congratulations! You are now the proud owner of a SHARP Colour Television Receiver. To
ensure proper operation, please read this manual carefully. After reading, keep this manual in a
safe place for future reference.
Accessories
21HT-15C
TV/VIDEO
1 2 3
4 5 6
7 8 9
0
MENU
CH
CH
?
I
XiS
LIST
TV/TEXT REMOTE CONTROL
Remote control Size-AA Dry battery
Operation Manual
21HT-16C
COLOUR TELEVISION
BAREVNÝ TELEVIZOR
SZÍNES TELEVÍZIÓ
KOLORWY TELEWIZOR
ЦBETHOЙ TEЛEBNЗOP
RECEPTOR DE TELEVIZIUNE ÎN CULORI
FAREBNÝ TELEVÍZOR
OPERATION MANUAL
NÁVOD K OBSLUZE
HASZNÁLATI UTASÍTÁS
INSTRUKCJA OBSŁUGI
CБОPHИK ИHCTPУKЦИЯ
INSTRUC©IUNI DE UTILIZARE
NÁVOD NA OBSLUHU
TV
ENGLISHČESKYMAGYARPOLSKI
SLOVENČINA
20
21
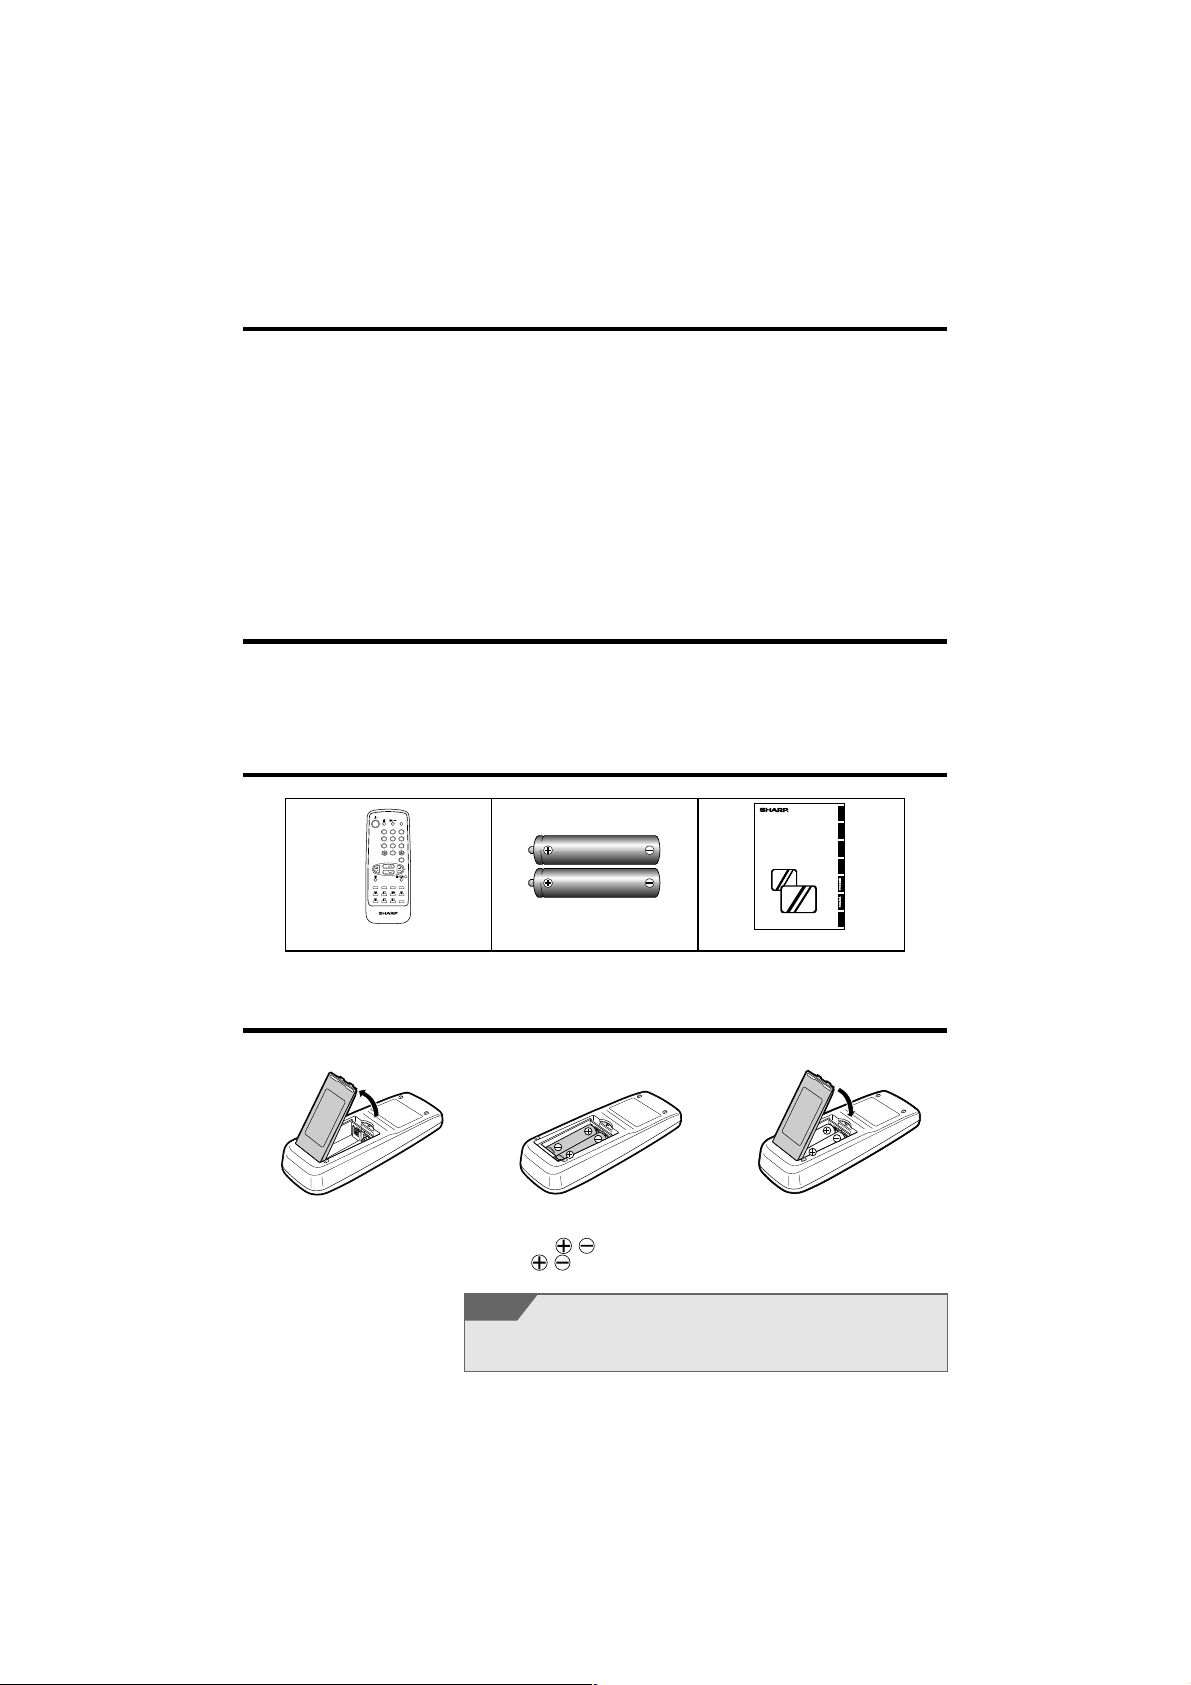
Remote Control Battery Installation
Before using the TV set for the first time, install the supplied dry batteries in the remote control.
the slit as indicated by the
arrow to remove the battery
cover.
2
@ Insert two batteries 1.5 V (size
“AA”). Be sure to match the
battery
the
/ terminals with
/ marks inside the
compartment.
NOTE
• Remove batteries if weak or if the unit is not in use for long periods.
• Do not mix old and new batteries.
• Incorrect installation of the batteries may damage the remote control.
# Replace the battery cover.! With your thumbnail, pull up
Page 4
Aerial Connections
L
I
N
E
2
I
N
/
D
E
C
O
D
E
R
LINE 1 IN/OUT
T
E
S
T
S
I
G
O
N
O
F
F
C
H
A
N
N
E
L
A
N
T
E
N
N
A
I
N
R
F
O
U
T
Back of VCR
Rear of TV
Scart Terminal
Aerial IN
Aerial Lead
(not supplied)
Aerial Lead
(not supplied)
Aerial Lead
(not supplied)
Antenna in
RF Out
SCART Lead
(not supplied)
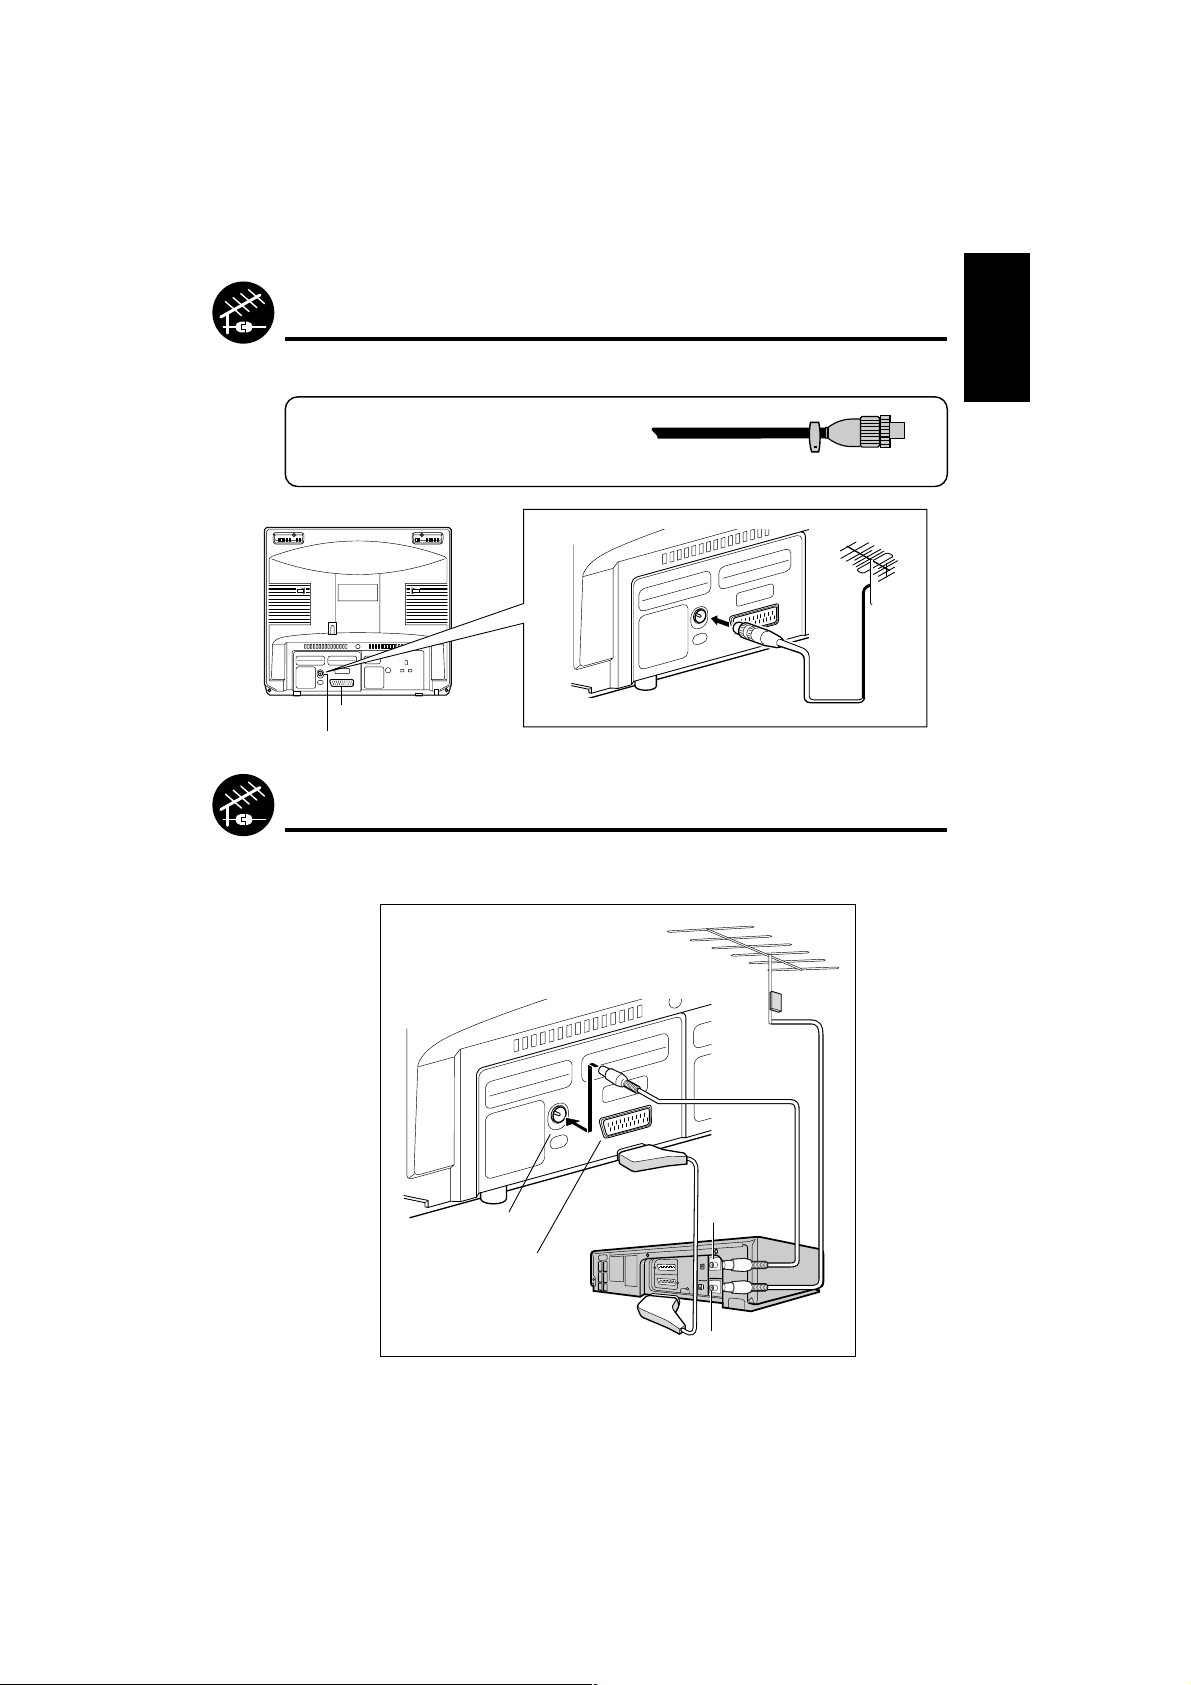
• To enjoy a clearer picture, we recommend that you use an outdoor aerial. The following is a brief
explanation of the types of connection that are used for coaxial:
Aerial Lead: Connect the cable from the aerial to a
standard DIN45325 plug (IEC169-2) and plug it
into the aerial terminal at the back of the TV set.
75-ohm coaxial cable (round cable)
Rear of TV
Outdoor aerial
(not supplied)
SCART-terminal
Aerial terminal
Typical Connections
Enjoy the stunning visuals of a VCR or DECODER by connecting them to this TV set through its EuroSCART 21-Pin terminal.
Please refer to the Operation Manual of your VCR for details.
Typical connection (VCR and TV)
through the RF terminal
ENGLISH
Web-site: www.sharp.co.uk/support Help Line (office hours only): 0990-274277
3
Page 5
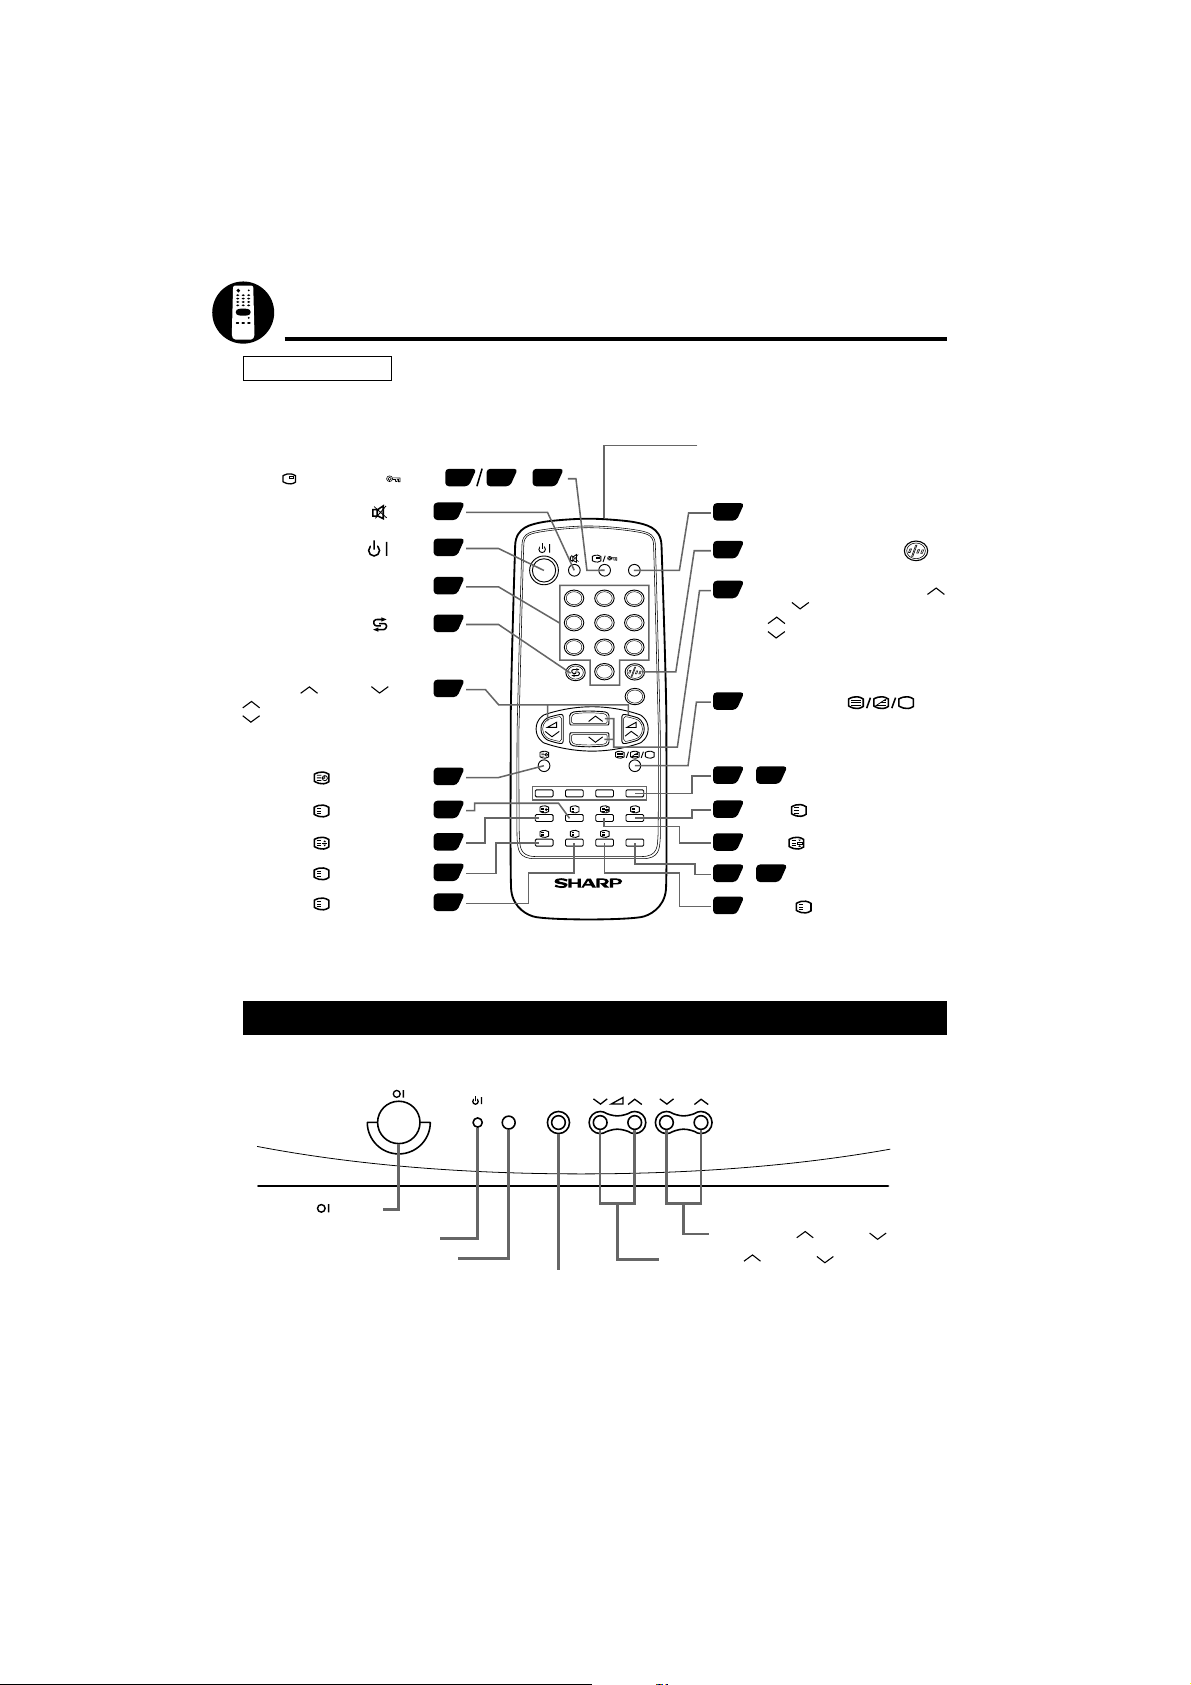
Location of Controls
Remote Control
CALL ( )/CHILD LOCK ( ) button ~
SOUND MUTE ( ) button
20
21
17 18
Infrared Transmitter Window
Aim this window at the infrared sensor
on your TV set
TV/VIDEO Select button
21
POWER/STANDBY ( ) button
Programme Select buttons
FLASHBACK ( ) button
Returns to previously viewed
programme
VOLUME UP ( )/DOWN ( ) button
( ) Increases sound
( ) Decreases sound
(These are also used for menu set up)
CLOCK ( ) button (Teletext)
REVEAL ( ) button (Teletext)
HALF PAGE ( ) button (Teletext)
CANCEL ( ) button (Teletext)
?
X
i
RESET ( ) button (Teletext)
TV Front
13
13
20
13
23
23
23
23
23
TV/VIDEO
1 2
4 5
7 8
XiS
TV/TEXT REMOTE CONTROL
MENU CH
3
6
9
0
MENU
CH
CH
?
I
LIST
Single/Double Entry button ( )
13
CHANNEL (PROGRAMME) UP ( )/
8
DOWN ( ) button
( ) Selects next higher programme
( ) Selects next lower programme
(These are also used for menu
set up)
Text/Mix/Picture ( ) Select
22
button (Teletext)
~ COLOUR buttons
22 24
I
INDEX ( ) button (Teletext)
23
HOLD ( ) button (Teletext)
23
~ LIST Select button (Teletext)
23 24
S
STORE ( ) button (Teletext)
23
Power ( ) button
Power/On Timer indicator
Remote Control Sensor
4
Channel Up ( )/Down ( ) buttons
Volume Up ( )/Down ( ) buttons
Menu button
Page 6
Channel Setting
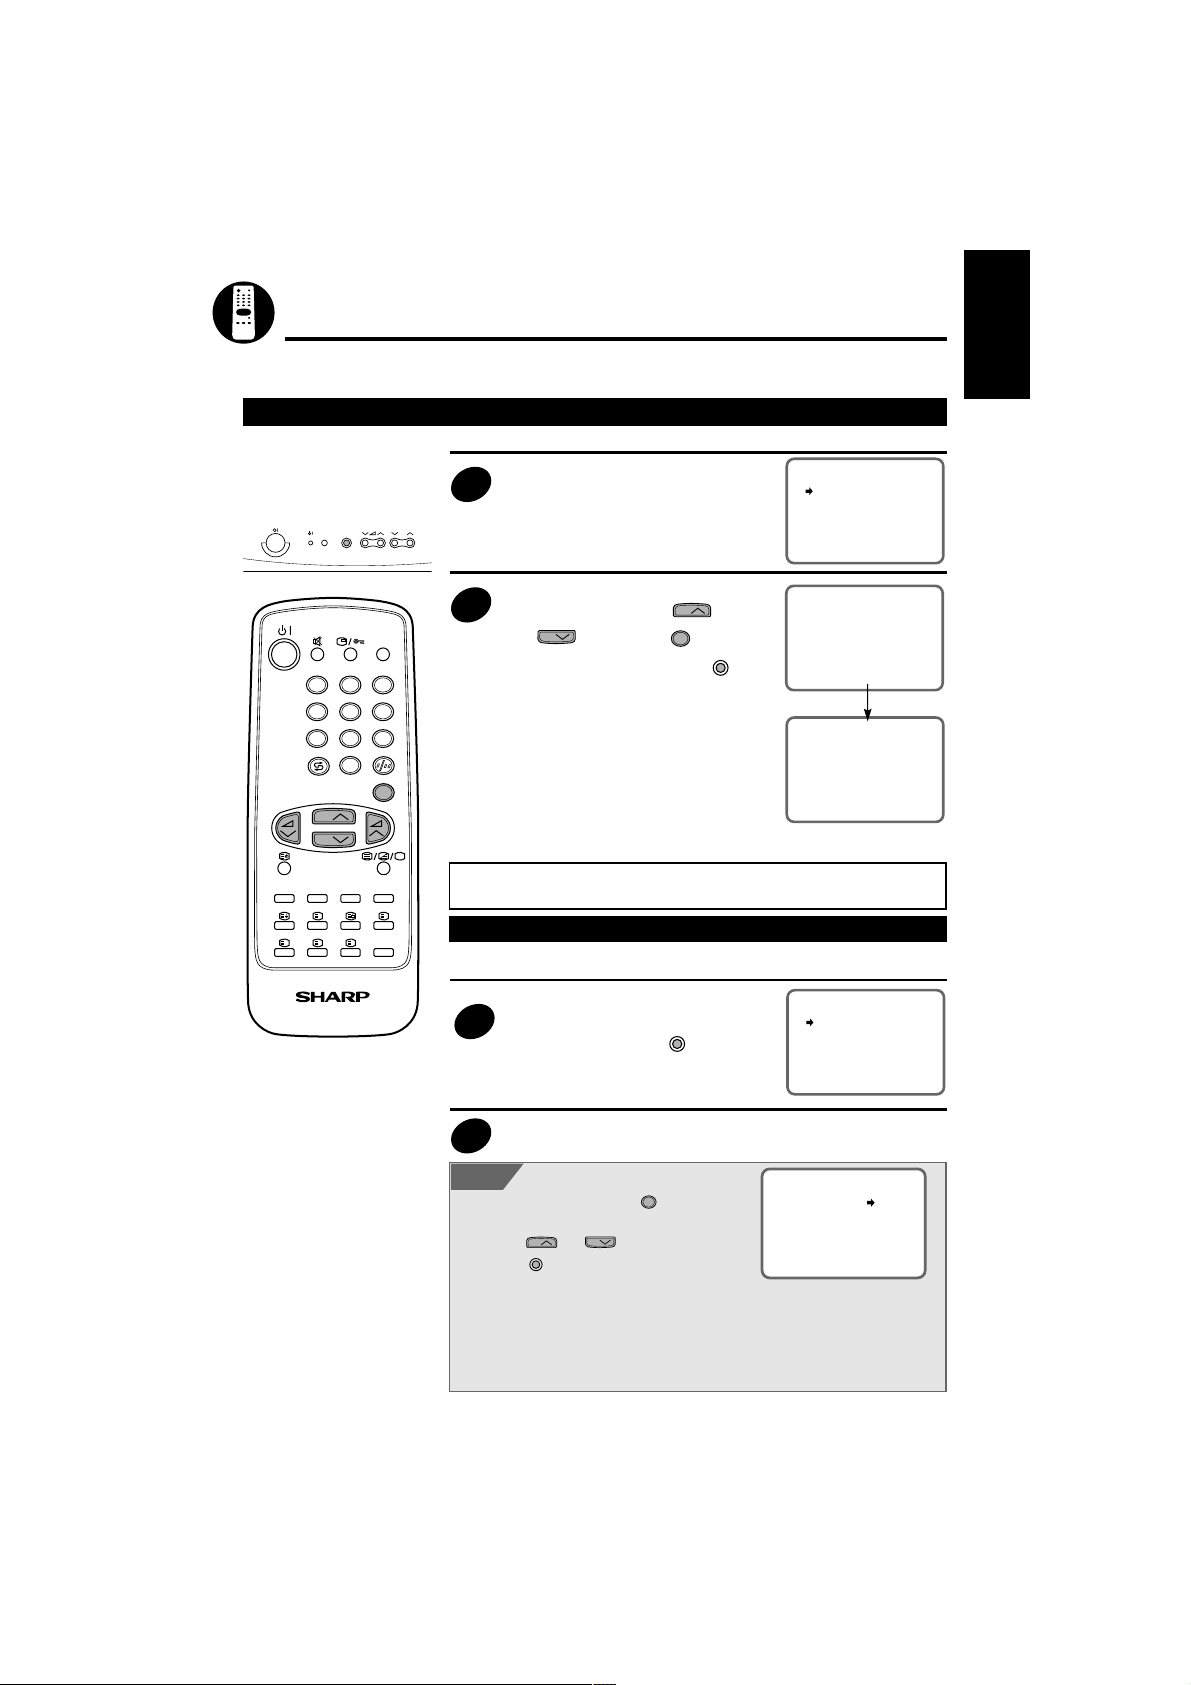
AUTO TUNING
START EXIT
This function will automatically tune all local channels for you.
The following steps are carried out using the remote control
Initial setting Auto Tuningtunes in and presets receivable TV stations
Automatically tunes in and presets receivable TV stations
MENU CH
1 2 3
4 5 6
7 8 9
0
CH
CH
?
XiS
TV/VIDEO
MENU
I
LIST
Press the main POWER button
on the TV.When you install the TV
1
at first time, it will appears this
picture.
AUTO TUNING will start when
selecting “START”, using
2
CH
and
and pressing
the remote control, or pressing
MENU
CH
on
MENU
on the TV.
All the TV stations in your area
that can be received by the TV set
are automatically preset between
programme position 1 to 99.
The screen shows whatever is on
programme position 1 when full
auto channel preset is finished.
NOTE:Make sure to execute AUTO TUNING until tuning is complete. When EXIT has been
selected during tuning or when the power has been turned off and then turned on again,
the AUTO TUNING screen will be displayed.
After initial setting Auto tuning
Automatically tunes in and presets receivable TV stations
AUTO TUNING
START EXIT
AUTO TUNING
PR
0
2 CH 0 2
ENGLISH
PR 1
TV/TEXT REMOTE CONTROL
The AUTO TUNING screen will
1
appear by holding down
MENU
on
AUTO TUNING
START EXIT
the TV for more than 2 seconds.
Repeat step 2 above from page 5 (Initial seting)
2
NOTE
• To stop AUTO TUNING, press
control.
• When AUTO TUNING is not done, select EXIT
• Make sure to start AUTO TUNING after connecting the antenna, as the AUTO TUNING
• Make sure to execute AUTO TUNING until tuning is complete. When EXIT has been
• When the Child Lock is set, it is not possible to enter the Tuning mode. This is to make
CH
by using
or press
screen.
screen will be displayed when the power is turned on for the first time.
selected during tuning or when the power has been turned off and then turned on again,
the AUTO TUNING screen will be displayed.
sure that Child Lock is not over-ridden by re-tuning the set. (To cancel Child Lock please
refer to page 19.)
and
MENU
on the TV to return to the TV
MENU
on the remote
CH
on the remote control
5
Page 7
Channel Setting (Continued)
PR1 CH1
SKIP OFF
FINE
OFF
EXIT
SYS D/K
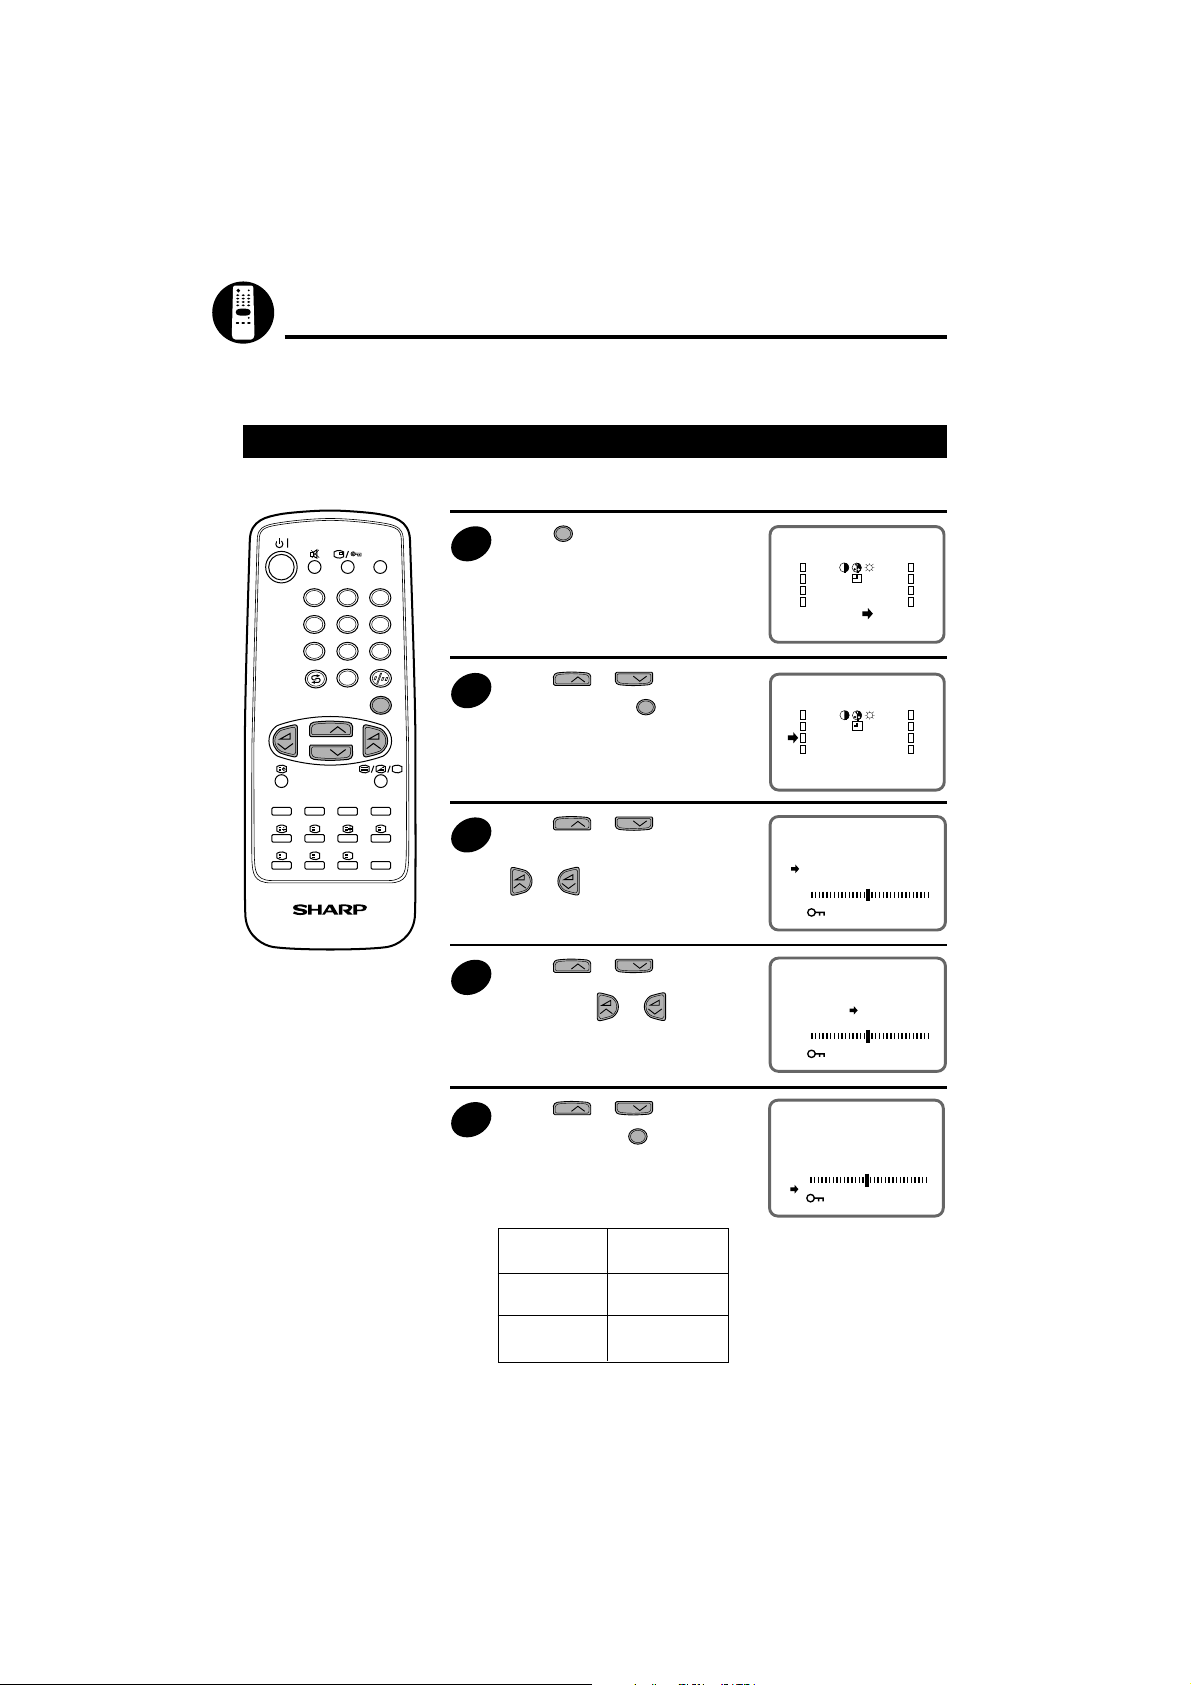
This section describes how to tune your TV manually and to store channels in the order you prefer.
The following steps are carried out using the remote control.
Manual Tuning
Setting a TV station to a desired programme position
MENU
TV/VIDEO
1
Press
screen.
to call the MAIN menu
1 2 3
4 5 6
7 8 9
0
MENU
CH
CH
?
XiS
TV/TEXT REMOTE CONTROL
LIST
<PR>
EXIT
CH
Press
2
“<PR>”, and press
CH
I
Press
“PR” position, and select the
3
programme number (1–99) with
or .
CH
Press
“CH”, and select the channel
4
number, with
CH
Press
5
“SYS”, and press
CH
or
MENU
CH
or
CH
or
or buttons.
CH
or
MENU
to change
to select
.
to select
to select
to select
EXIT
PR1 CH1
SKIP OFF
FINE
OFF
EXIT
PR1 CH1
SKIP OFF
FINE
OFF
EXIT
SORT
<PR>
SORT
SYS D/K
SYS D/K
the SYSTEM.
The system switches between
SECAM-B/G, D/K and PAL-B/G,
D/K
Sound System On screen
display
SECAM-D/K
PAL -D/K
SECAM-B/G
PAL-B/G
D/K
B/G
6
Page 8
PR1 CH1
SKIP OFF
FINE
OFF
EXIT
SYS D/K
PR1 CH1
SKIP OFF
FINE
OFF
EXIT
SYS D/K
Channel Setting (Continued)
Repeat steps 3 to 5 if you wish to
TV/VIDEO
1 2 3
4 5 6
7 8 9
0
CH
CH
MENU
set other channels.
6
Press
7
“EXIT”, and press
the normal screen.
or
CH
MENU
to return to
to select
CH
ENGLISH
?
XiS
TV/TEXT REMOTE CONTROL
LIST
I
NOTE
If there is no sound and the key mark ( ) is displayed after setting the channels, the
Child Lock Mode has been activated. To cancel the settings, make sure to set key mark
(
) to OFF.
7
Page 9
Channel Setting (Continued)
Fine Tuning
This function lets you easily fine-tune the TV set to improve reception and picture quality.
MENU
TV/VIDEO
1
Press
screen.
to call the MAIN menu
1 2 3
4 5 6
7 8 9
0
MENU
CH
CH
?
XiS
TV/TEXT REMOTE CONTROL
LIST
<PR>
EXIT
or
or
or
CH
MENU
CH
CH
MENU
to select
.
to select
to select
to return to
EXIT
PR1 CH1
SKIP OFF
FINE
OFF
EXIT
PR1 CH1
SKIP OFF
FINE
OFF
EXIT
PR1 CH1
SKIP OFF
FINE
OFF
EXIT
CH
Press
2
“<PR>”, and press
CH
I
Press
the “FINE” position.
3
Press and hold or until
4
the best tuning position is found.
CH
Press
5
“EXIT”, and press
the normal screen.
SORT
<PR>
SORT
SYS D/K
SYS D/K
SYS D/K
8
Page 10

Channel Setting (Continued)
Skipping Programmes
This function lets you skip vacant channels or channels that you never watch when you select
channels with
CH
TV/VIDEO
1 2 3
4 5 6
7 8 9
0
MENU
CH
CH
?
XiS
TV/TEXT REMOTE CONTROL
I
LIST
CH
or
Setting Skip
1
2
3
4
.
MENU
Press
to call the MAIN menu
screen.
or
or
CH
MENU
CH
CH
Press
“<PR>”, and press
CH
Press
the “PR” position, and select the
programme number (1–99) you
wish to skip with
or
CH
MENU
CH
Press
“SKIP”, and press
the “SKIP ON”.
The programme number will turn
from white to red.
to select
.
to select
or .
to select
to select
EXIT
EXIT
PR3 CH4
SKIP OFF
FINE
SYS D/K
OFF
EXIT
PR3 CH4
SKIP ON
FINE
SYS D/K
OFF
EXIT
<PR>
SORT
<PR>
SORT
ENGLISH
Repeat steps 3 to 4 if you wish to
skip other programme.
5
CH
Press
6
the “EXIT”, and press
or
to the normal screen.
CH
to select
MENU
to return
PR3 CH4
SKIP ON
FINE
SYS D/K
OFF
EXIT
9
Page 11

Channel Setting (Continued)
Cancelling Skip
MENU
TV/VIDEO
1 2 3
4 5 6
7 8 9
0
CH
CH
MENU
Press
screen.
1
Press
2
“<PR>”, and press
to call the MAIN menu
or
CH
to select
MENU
.
CH
<PR>
EXIT
EXIT
SORT
<PR>
SORT
?
XiS
TV/TEXT REMOTE CONTROL
LIST
or
CH
to select
PR1 CH1
SKIP ON
FINE
SYS D/K
OFF
EXIT
CH
Press
I
the “PR” position, and select the
3
programme number (1–99) for
which you wish to cancel skip with
or .
Select a skipped programme
number displayed in red.
or
CH
MENU
to select
to select
PR3 CH1
SKIP OFF
FINE
SYS D/K
OFF
EXIT
CH
Press
4
“SKIP”, and press
the “SKIP OFF”.
The displayed programme number
will turn from red to white.
Repeat steps 3 to 4 if you wish to
cancel skip other programme.
5
Press
6
the “EXIT”, and press
to the normal screen.
CH
or
CH
to select
MENU
to return
PR1 CH1
SKIP OFF
FINE
SYS D/K
OFF
EXIT
10
Page 12
SORT 1/6
1CH 2 7CH1 13CH7
2CH 3 8CH12 14CH71
3CH19 9CH13 15CC 1
4CH 5 1CH16 16CC 2
5CH 8 11CH17 17CC 3
6CH 9 12CH2 18CC 4
SELECTED:CH 2
MOVE DELETE
EXIT
3CC43
Channel Setting (Continued)
Manual Channel Sorting
When moving channel 20 from pre-set channel 12 to pre-set channel 30, follow the steps below:
MENU
TV/VIDEO
1 2 3
4 5 6
7 8 9
0
MENU
CH
CH
?
XiS
TV/TEXT REMOTE CONTROL
LIST
Press
screen.
1
Using
“SORT” by pressing
Select channel 20 of the preset
channel 12 using
2
and or and set it by
pressing
Move the cursor to “MOVE” using
I
3
and select it by pressing
Using
4
select preset channel 30.
to call the MAIN menu
MENU
or
.
CH
or
CH
, and select
MENU
.
CH
or
and or
CH
and or
CH
CH
or
CH
move to the next screen and
MENU
EXIT
CH
SORT 1/6
1CH 2 7CH1 13CH7
2CH 3 8CH12 14CH71
3CH19 9CH13 15CC 1
4CH 5 1CH16 16CC 2
5CH 8 11CH17 17CC 3
6CH 9 12CH2 18CC 4
EXIT
.
SORT 2/6
19CC9 25CC14 31CC44
2CC1 26CC18 32CC45
21CC11 27CC19 33CC46
22CC12 28CC21 34CC47
23CC13 29CC23 35CC48
24CH 6 3CC43
EXIT
<PR>
SORT
ENGLISH
36CC5
Pressing
in the preset channel 30 field.
5
Preset channels over pre-set
channel 31 will be automatically
sorted.
Select “EXIT” using
6
MENU
MENU
will insert channel 20
CH
CH
and or and press
to return to the TV Screen.
or
SORT 2/6
19CC1 25CC18 31CC44
2CC11 26CC19 32CC45
21CC12 27CC21 33CC46
22CC13 28CC23 34CC47
23CC 6 29CC43 35CC48
24CH14 3CH2 36CC5
EXIT
SORT 2/6
19CC1 25CC18 31CC44
2CC11 26CC19 32CC45
21CC12 27CC21 33CC46
22CC13 28CC23 34CC47
23CC 6 29CC43 35CC48
24CH14 3CC2 36CC5
EXIT
NOTE
If you are using a decoder (Premiere Decoder, Canal Plus, etc.) please
disconnect it before using the tuning (<PR>) and sort (SORT) menus.
11
Page 13

SORT 1/6
1CH 2 7CH1 13CH71
2CH 3 8CH12 14CC 1
3CH19 9CH16 15CC 2
4CH 5 1CH17 16CC 3
5CH 8 11CH2 17CC 4
6CH 9 12CH7 18CC 5
EXIT
Channel Setting (Continued)
Channel Sorting (Delete)
MENU
TV/VIDEO
1 2 3
4 5 6
7 8 9
0
CH
CH
MENU
Press
1
screen.
Using
“SORT” by pressing
Select channel 13 in the preset
channel 9 field using the
2
by pressing
to call the MAIN menu
or
MENU
CH
.
CH
CH
and or and set it
, select
MENU
.
<PR>
EXIT
CH
or
SORT 1/6
1CH 2 7CH1 13CH7
2CH 3 8CH12 14CH71
3CH19 9CH13 15CC
4CH 5 1CH16 16CC
5CH 8 11CH17 17CC
6CH 9 12CH2 18CC
EXIT
SORT
?
XiS
TV/TEXT REMOTE CONTROL
LIST
I
3
Using the
press
Pressing
4
13 in the preset channel 9 field
CH
or select “DELETE” and
MENU
.
MENU
and replace it by channel 16.
Select “EXIT” using the
5
CH
and or and press
MENU
to return to the TV Screen.
CH
or
and
will delete channel
CH
or
SORT 1/6
1CH 2 7CH1 13CH7
2CH 3 8CH12 14CH71
3CH19 9CH13 15CC
4CH 5 1CH16 16CC
5CH 8 11CH17 17CC
6CH 9 12CH2 18CC
SELECTED:CH 13
MOVE DELETE
EXIT
SORT 1/6
1CH 2 7CH1 13CH71
2CH 3 8CH12 14CC 1
3CH19 9CH16 15CC 2
4CH 5 1CH17 16CC 3
5CH 8 11CH2 17CC 4
6CH 9 12CH7 18CC 5
EXIT
12
Page 14

Basic Operation
Watching a TV Programme
Preparation | Turning on the power on the TV set.
If a picture appears on the screen, go to step 2.
POWER
button
POWER
indicator
1 2 3
4 5 6
7 8 9
0
CH
CH
CHANNEL UP or
DOWN button
VOLUME UP or
DOWN button
TV/VIDEO
MENU
If a picture does not appear on the screen, go to step 1.
Press .
Turning on the power
1
Press
A picture appears on the screen.
Selecting the programmes
2
Example:
When selecting programme
position 5
5
When selecting programme
position 23
2 3
PR 2-
ENGLISH
PR 1
PR 5
PR 23PR --
?
XiS
TV/TEXT REMOTE CONTROL
I
LIST
Adjusting the volume
3
Decreases
the volume
CH
CH
Increases
the volume
PR 1
NOTE
If you go away on a trip or will not be at home for a considerable length of time, as a
safety precaution, please unplug the cord from the outlet.
13
Page 15
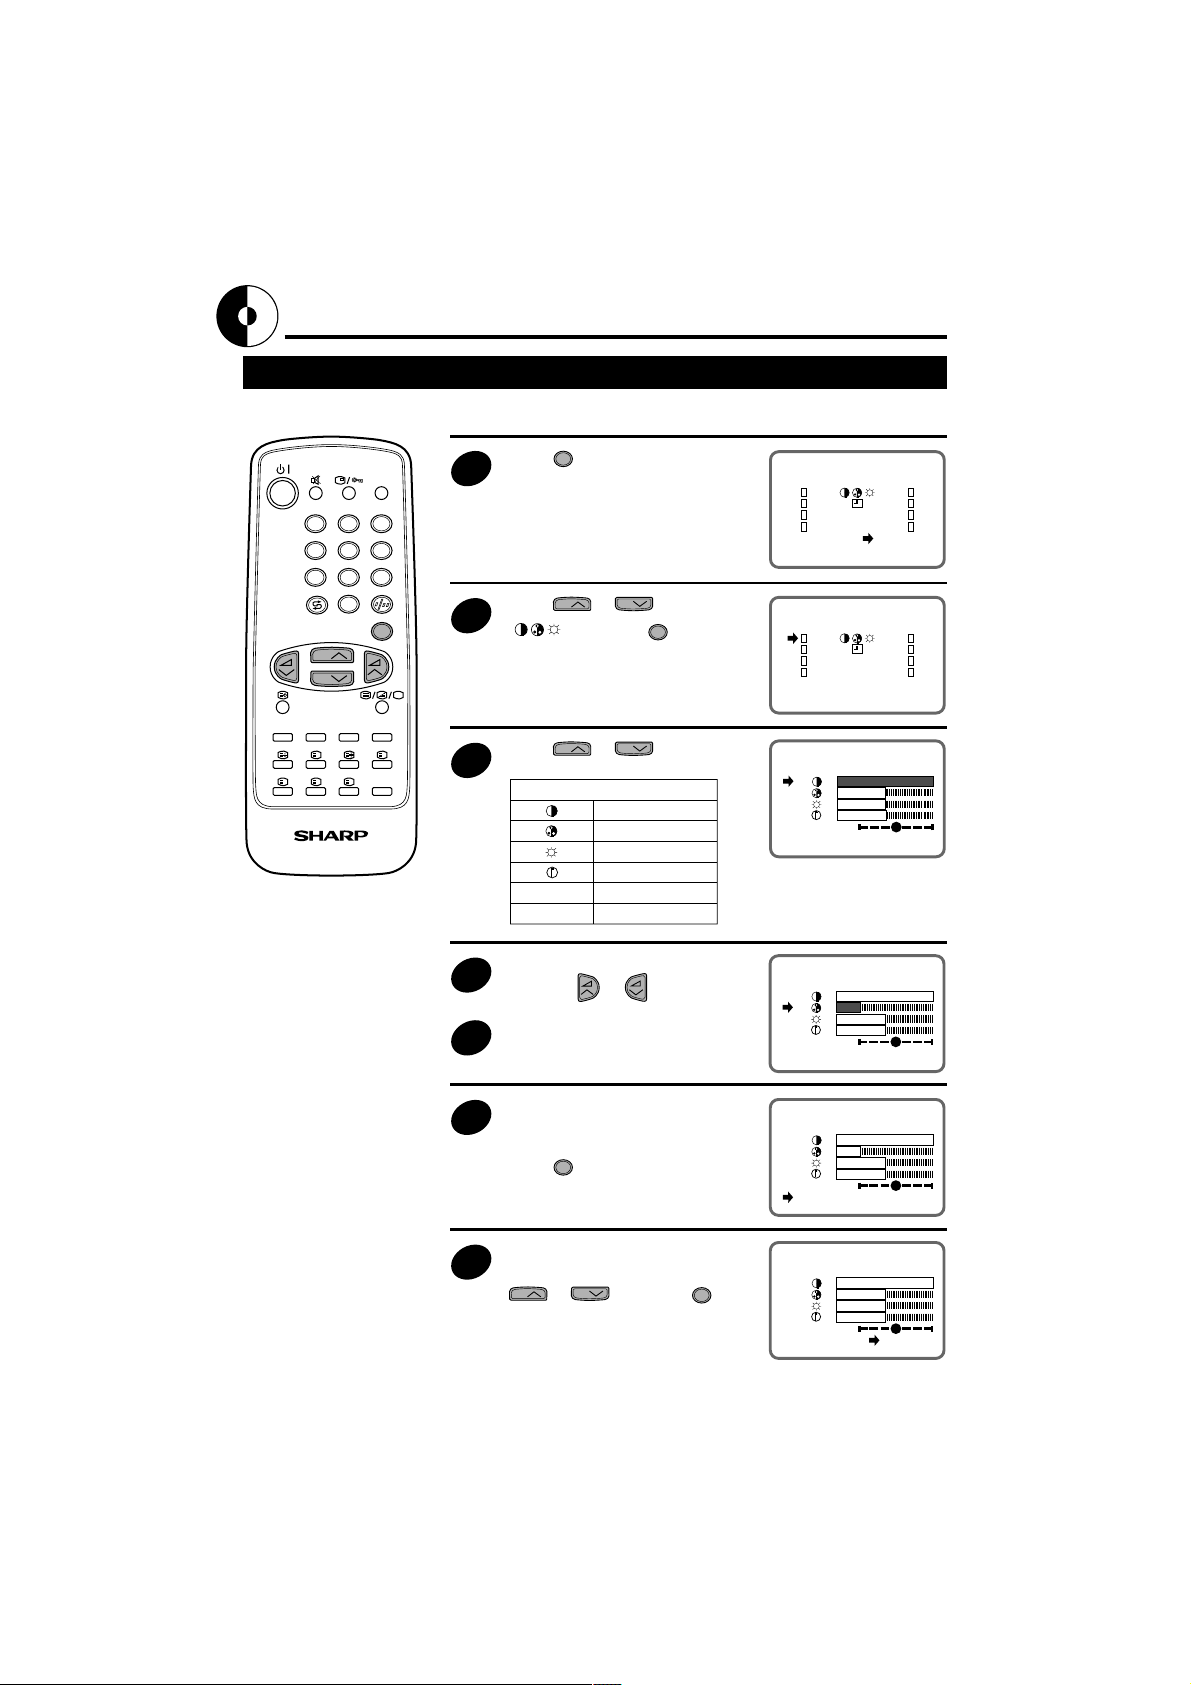
Picture Adjustment
TINT
N OFF EXIT
Adjusting the Picture
Picture quality (CONTRAST, COLOUR, BRIGHTNESS, SHARPNESS) are adjustable in this menu.
MENU
TV/VIDEO
1
Press
screen.
to call the MAIN menu
1 2 3
4 5 6
7 8 9
0
CH
CH
?
XiS
TV/TEXT REMOTE CONTROL
MENU
LIST
<PR>
EXIT
CH
Press
2
“
CH
I
Press
the items to adjust.
3
TINT
N ON
CH
or
”, and press
CH
or
Selected item
CONTRAST
COLOUR
BRIGHTNESS
SHARPNESS
TINT
NORMAL
to select
MENU
.
to select
EXIT
TINT
N ON EXIT
SORT
<PR>
SORT
Adjust the picture quality to your
4
liking with
or .
Repeat steps 3 and 4 above to
adjust other items.
5
14
By selecting “N” you can reset the
picture parameters to the factory
6
setting.
MENU
Press
to restore the factory
setting “N ON” mode.
You can clear the on-screen
display by selecting “EXIT” using
7
or
CH
, and press
CH
MENU
TINT
N OFF EXIT
.
TINT
N ON EXIT
Page 16

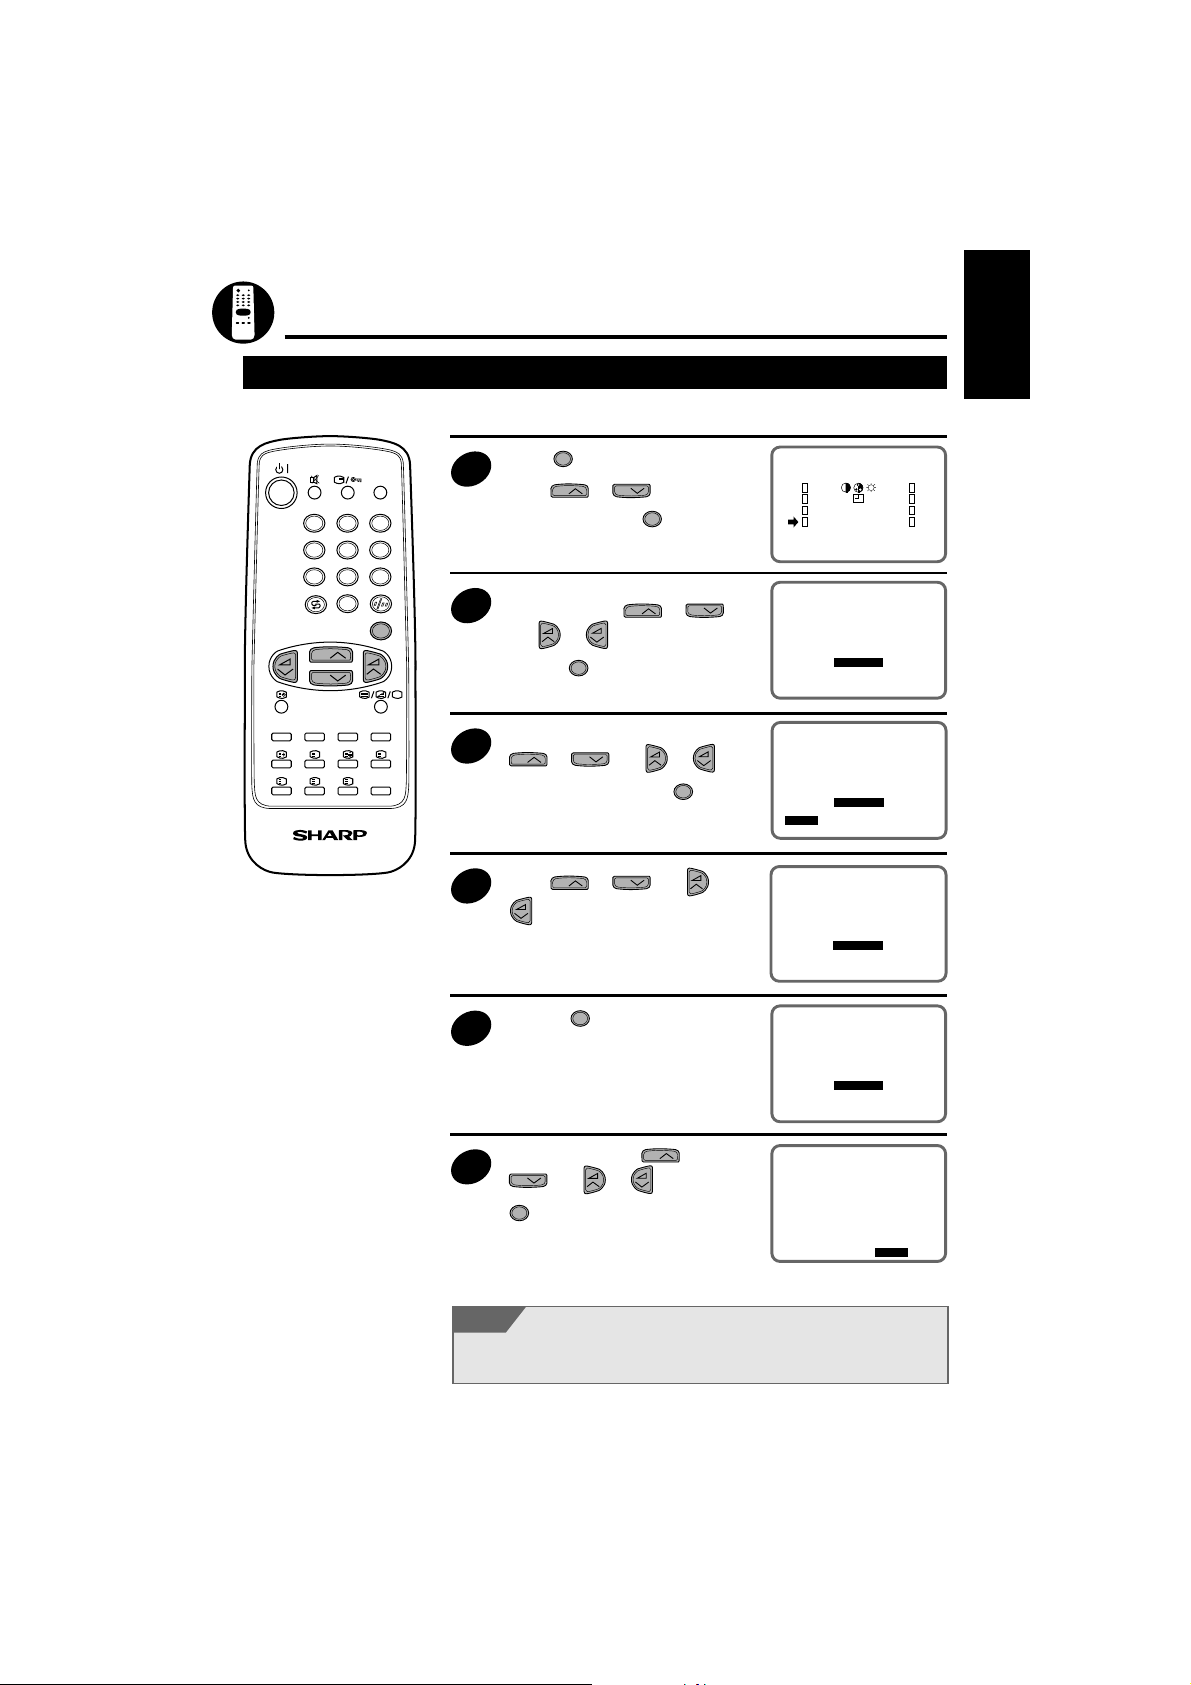
Timer Setting
ON Timer
Automatically turns the power ON after the set time has passed.
MENU
TV/VIDEO
1 2 3
4 5 6
7 8 9
0
MENU
CH
CH
?
XiS
TV/TEXT REMOTE CONTROL
LIST
Press
screen.
1
Press
2
Press
“
3
I
Press or to set the time.
4
(from 10 min. to 12 hour 50 min.,
in 10 min. increments)
Press to set the TV into
5
Standby mode. The Power
indicator flashes red.
When the preset time (in the
above example, 8 hours and 30
minutes) has passed, the power
turns ON and a picture appears
on the screen.
to call the MAIN menu
CH
or
, and press
MENU
CH
or
ON” mode.
CH
CH
.
to select
to select
<PR>
EXIT
ON .
OFF .
EXIT
ON 8.3
OFF .
EXIT
SORT
ENGLISH
NOTE
• In order to know when the ON Timer programme has been run properly, when the TV is
in the standby mode, the ON Timer indicator remains flashing in red.
• As a safety precaution, in case nobody is at home when the television switches on
automatically, the television will disconnect itself automatically within 120 minutes ; any
button of the remote control functions should be pressed, if it is to remain ON.
• In the event of a power cut, disconnection from the plug, or the television is switched off
at the mains switch, all the data in the ON Timer will be cancelled.
• The TIMER settings will remain if you exit the TIMER setting screen after setup.
15
Page 17

Timer Setting (Continued)
OFF Timer
Automatically turns the power OFF after the set time has passed.
MENU
TV/VIDEO
1 2 3
4 5 6
7 8 9
0
CH
CH
MENU
1
2
3
Press
screen.
Press
“
Press
“
to call the MAIN menu
or
or
CH
MENU
CH
CH
”, and press
CH
OFF” mode.
to select
.
to select
<PR>
EXIT
ON .
OFF .
EXIT
SORT
?
XiS
TV/TEXT REMOTE CONTROL
LIST
I
Press or to set the time.
4
(from 10 min. to 12 hour 50 min.,
in 10 min. increments)
The timer starts to count down.
After setting the time, select
5
“EXIT” by pressing
CH
and press
When the preset time (in the
above example, 1 hour and 30
minutes) has passed, the TV set
MENU
CH
or
.
ON .
OFF 1.3
EXIT
ON .
OFF 1.3
EXIT
turns to Stand-by mode.
NOTE
• In the event of a power cut, disconnection from the plug, or the television is switched off
at the mains switch, all the data on the OFF Timer will be cancelled.
• The TIMER settings will remain if you exit the TIMER setting screen using EXIT after
setup.
16
Page 18

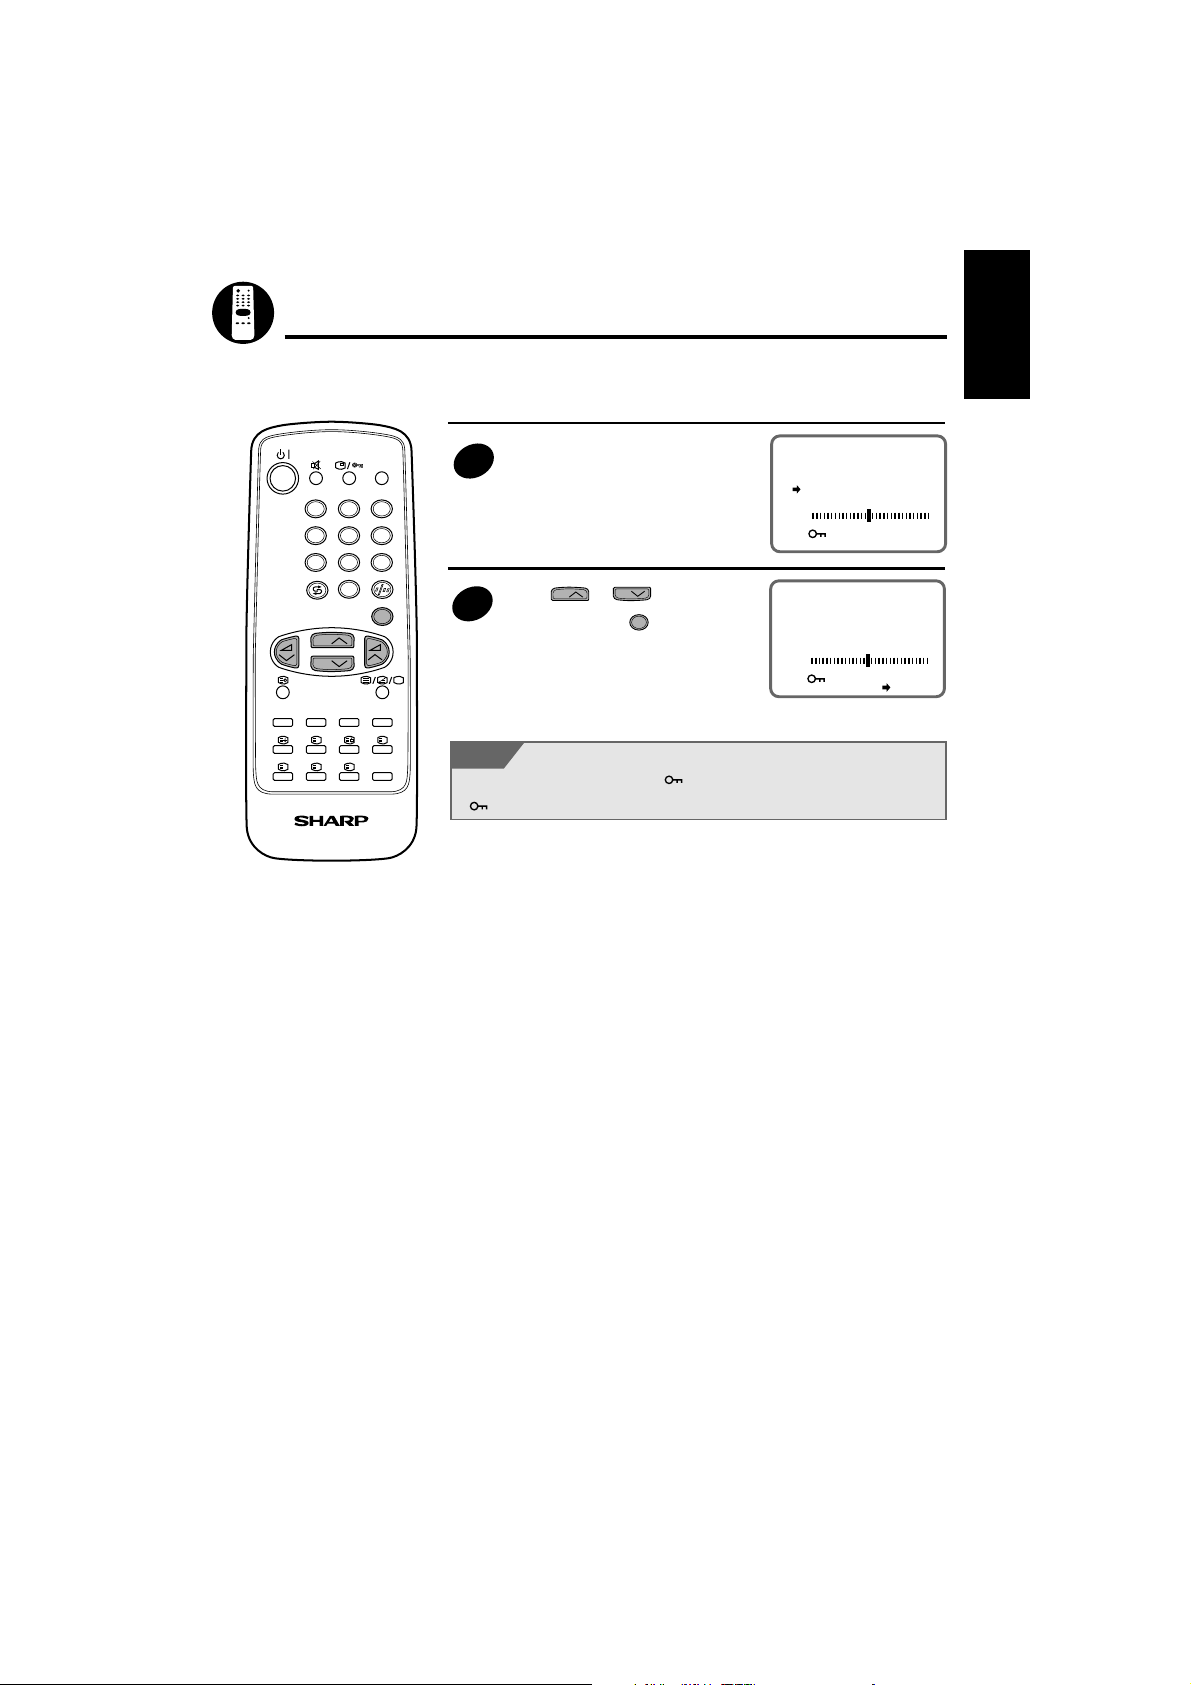
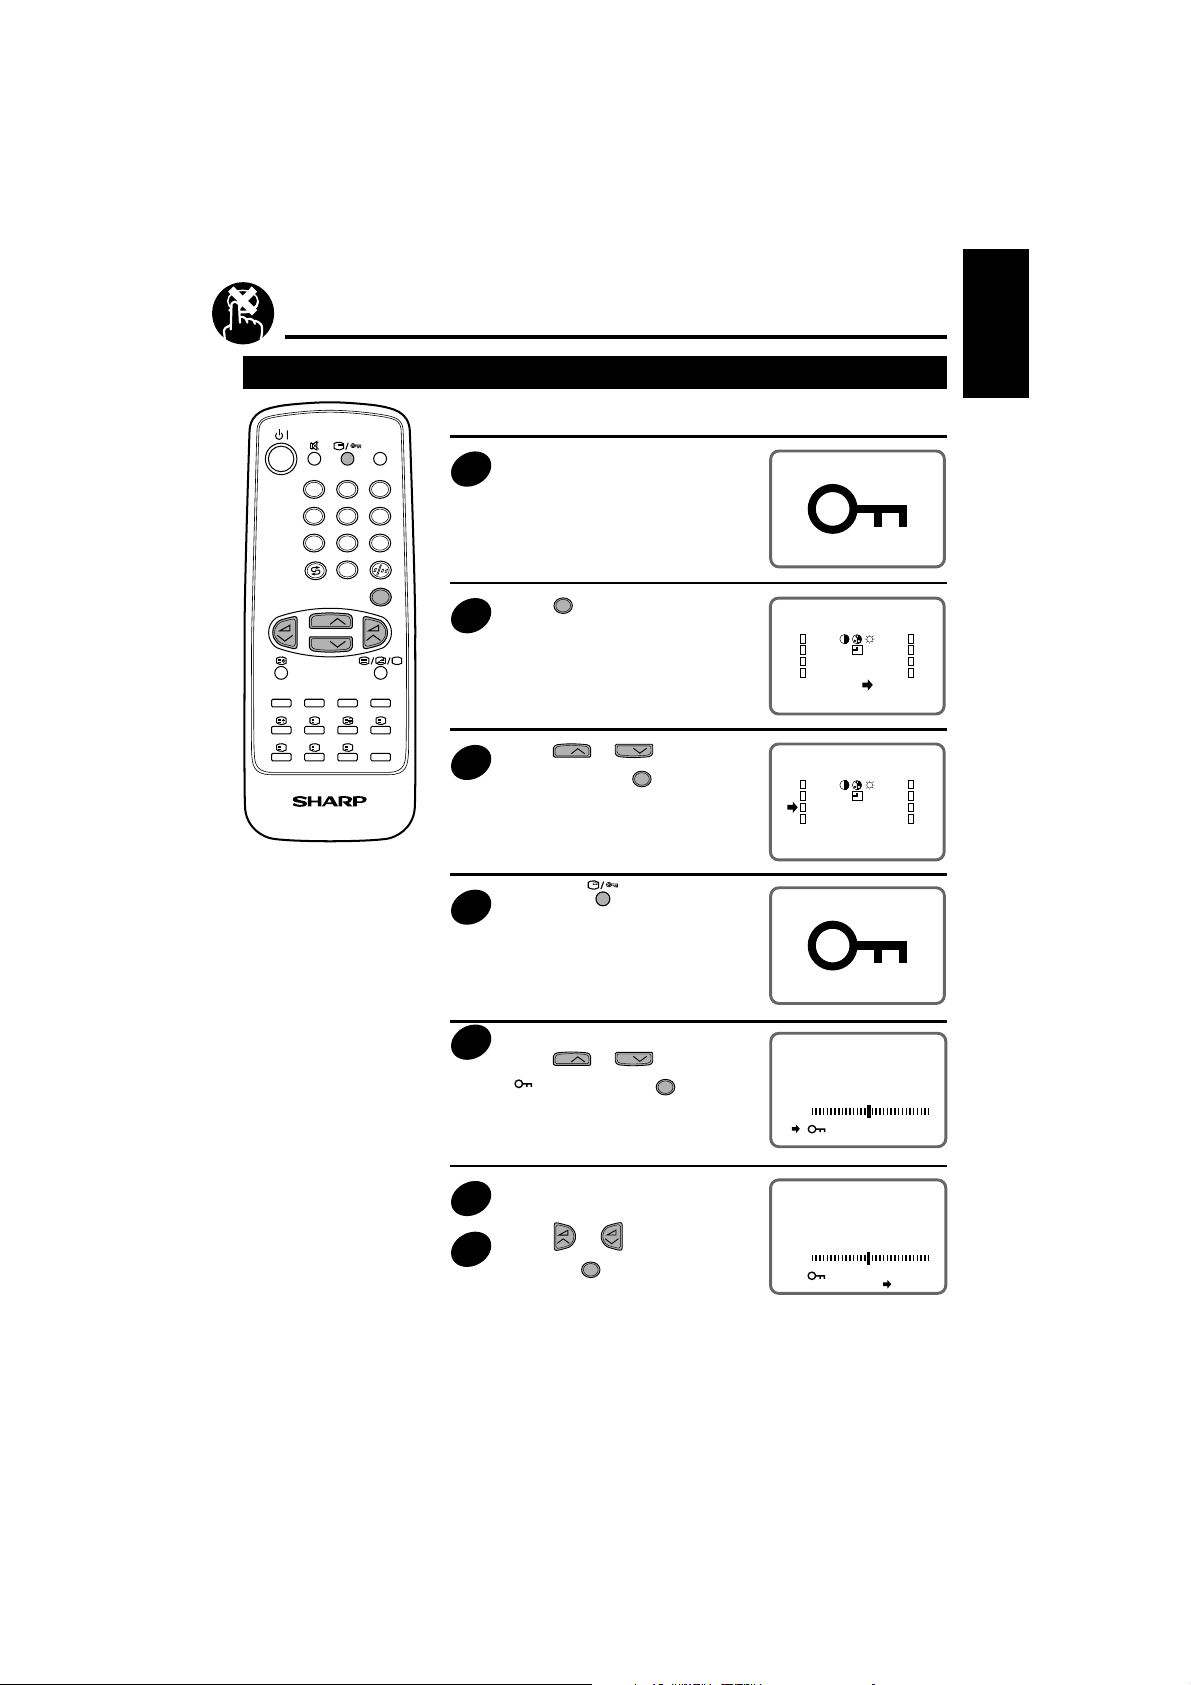
Child Lock (Channel Block)
You can lock a TV channel to prevent unsupervised TV viewing by following these procedures:
Setting Child Lock
MENU
TV/VIDEO
1 2 3
4 5 6
7 8 9
0
MENU
CH
CH
?
XiS
TV/TEXT REMOTE CONTROL
LIST
Press
screen.
1
Press
2
“<PR>” and press
Select the programme you want
3
to lock using
can also select the programme
using the 0~9 digit buttons.)
I
4
Press
“
Repeat steps 2~3 if you wish to
lock other programme.
5
Press
6
“EXIT” and press
to call the MAIN menu
or
CH
CH
or . (You
or
CH
CH
ON” then press
or
CH
MENU
CH
MENU
.
MENU
.
to select
to select
.
to select
EXIT
PR1 CH1
SKIP OFF
FINE
SYS D/K
OFF
EXIT
PR1 CH1
SKIP OFF
FINE
SYS D/K
ON
EXIT
PR1 CH1
SKIP OFF
FINE
SYS D/K
ON
EXIT
<PR>
SORT
ENGLISH
NOTE
You can also block the SCART connection.
CAUTION
• When you select a locked channel, the TV picture will be blue and the mark “ ” appears
on the screen.
• Press
• Since the remote control is the “Key” to unlock TV channel you must remember not to let
the remote control out of your supervision.
Web-site: www.sharp.co.uk/support Help Line (office hours only): 0990-274277
to unlock the channel.
17
Page 19

Child Lock (Continued)
PR 5
Opening Child Lock
Watching a programme position set with the Child Lock.
TV/VIDEO
1 2 3
4 5 6
7 8 9
0
MENU
CH
CH
?
XiS
TV/TEXT REMOTE CONTROL
LIST
Select the child lock programme
position.
1
Hold down for more than 2
seconds.
2
The screen of the child locked
programme is displayed.
I
18
Page 20
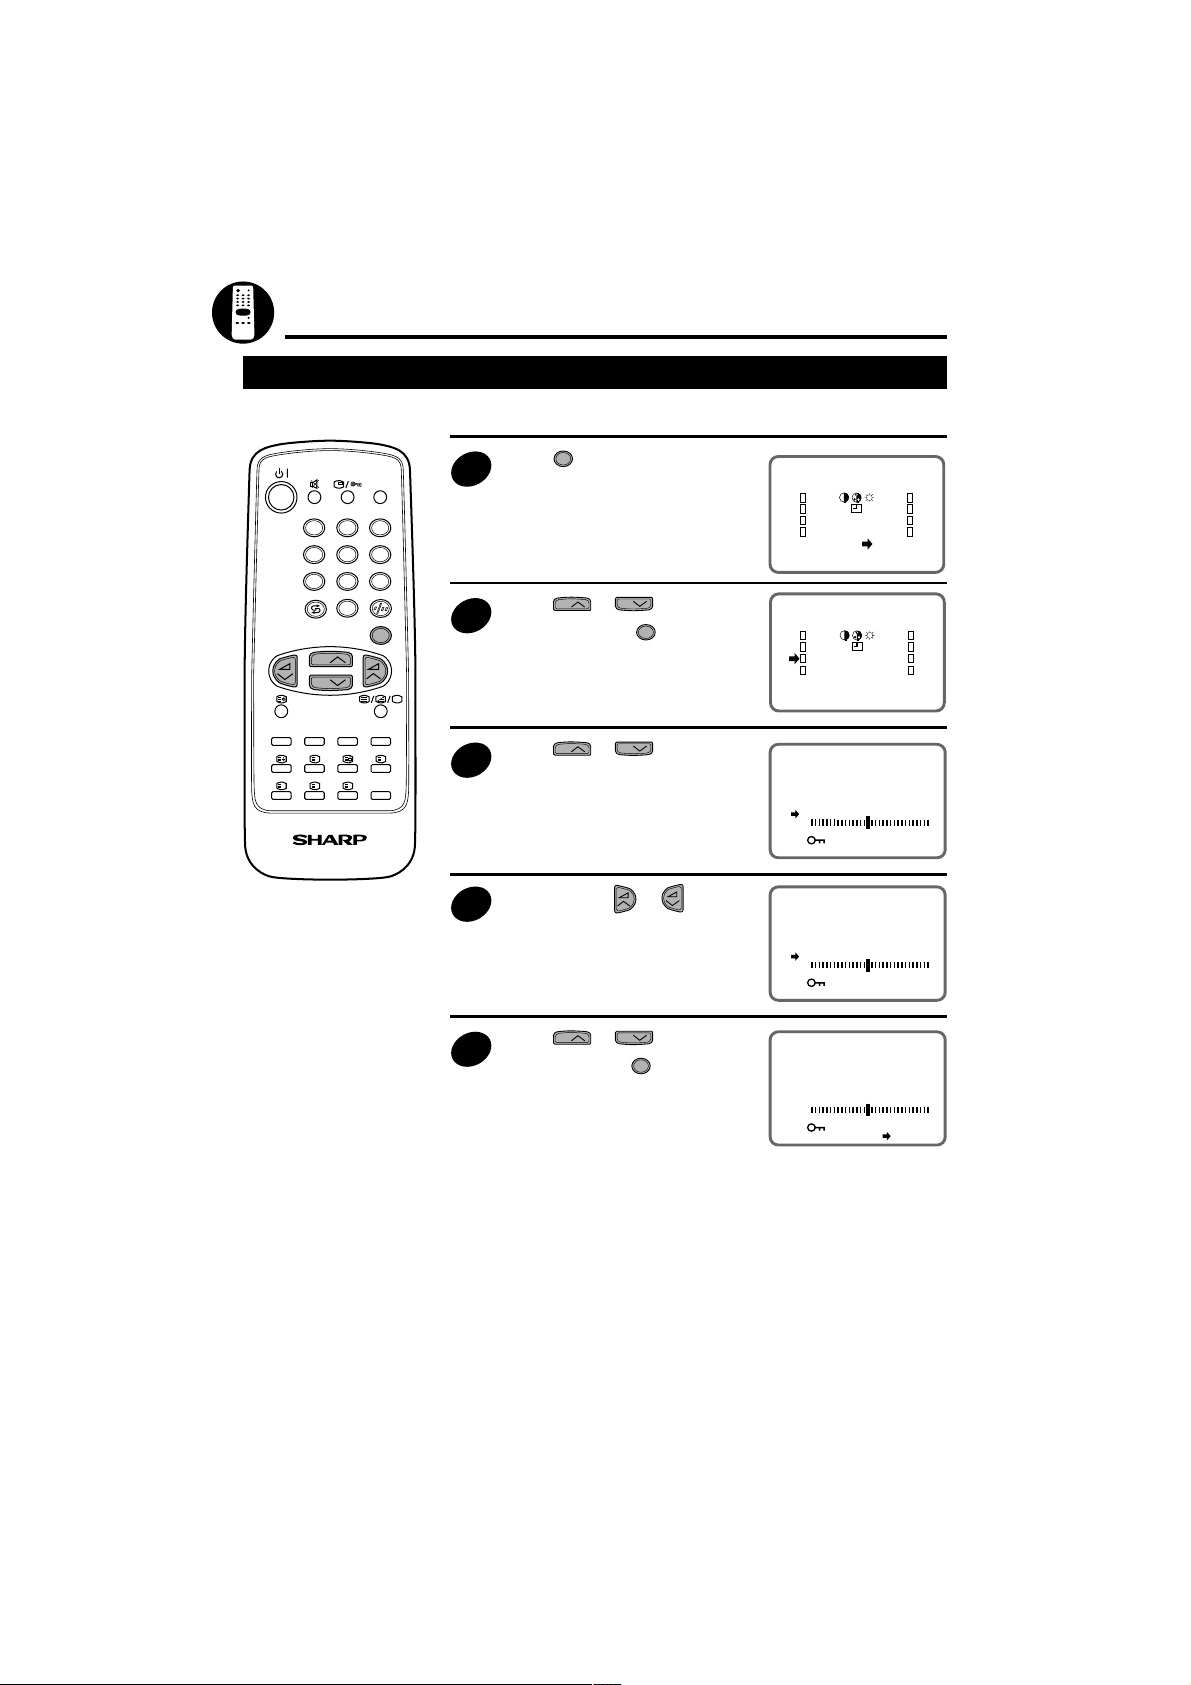
Child Lock (Continued)
Cancelling Child Lock
TV/VIDEO
1 2 3
4 5 6
7 8 9
0
MENU
CH
CH
?
XiS
TV/TEXT REMOTE CONTROL
I
LIST
G1060SA
Releasing the Child Locked programme.
Select the child lock programme
position.
1
MENU
Press
to call the MAIN menu.
2
or
CH
MENU
.
to select
CH
Press
3
“<PR>” and press
Hold down for more than 4
seconds.
4
<PR>
EXIT
EXIT
SORT
<PR>
SORT
ENGLISH
Tuning screen is displayed.
5
CH
Press
OFF” by pressing
“
or
CH
to select
MENU
.
PR1 CH1
SKIP OFF
FINE
SYS D/K
OFF
EXIT
Repeat steps 2~3 if you wish to
unlook other programme.
6
Press or to select “EXIT”
7
and press
MENU
.
PR1 CH1
SKIP OFF
FINE
SYS D/K
OFF
EXIT
Web-site: www.sharp.co.uk/support Help Line (office hours only): 0990-274277
19
Page 21

Press button 7
Press
Press
PR 5
PR 5
PR 7
PR 7
Press
PR 5
PR 5
Other functions
Flashback:
Switches back to the channel you were watching just before the
current programme.
TV/VIDEO
Press .
1 2 3
4 5 6
7 8 9
0
CH
CH
MENU
The channel previously viewed returns to
the screen.
Example:
is pressed, after switching from
If
channel 5 to channel 7, the programme
will change to programme 5.
Press
7.
again to return to programme
?
XiS
TV/TEXT REMOTE CONTROL
LIST
I
Sound Mute
Silences the sound.
Press .
1
The symbol “
screen, and the sound is silenced.
Press again.
2
The volume is turned on again.
” appears on the
20
Page 22

Other Functions (Continued)
TV/VIDEO
1 2 3
4 5 6
7 8 9
0
MENU
CH
CH
?
XiS
TV/TEXT REMOTE CONTROL
LIST
TV/VIDEO
Switches between TV broadcasts and AV input programmes.
Each time you press
toggles between SCART and TV
programmes.
TV/VIDEO
, the input
SCART
ENGLISH
PR 5
Call
I
Displays the current programme number, the timer and other
settings on the screen.
Press .
1
The time remaining on the ON
Timer, OFF Timer and Programme
number will appear on the screen.
(When no Timer is set, nothing
appears on the screen).
ON 8:3
OFF 1:3
PR 5
Press once again.
2
The programme number, ON
Timer and OFF Timer display
disappears from the screen.
The screen returns to the normal
screen.
21
Page 23

TEXT
Teletext Mode
Teletext is an information service, organized like a magazine, provided by some television stations in
addition to regular television broadcasting.
Basic Operation
To switch ON, select a page number and switch OFF the Teletext.
Select a TV channel, which is broadcasting the Teletext programme
you would like to watch.
TV/VIDEO
1
1 2 3
4 5 6
7 8 9
0
MENU
CH
CH
?
I
XiS
TV/TEXT REMOTE CONTROL
TV programme Press PressSelect pageTELETEXT Mode New page MIXED Mode
9 : 0 0
LIST
100
Press to select the TELETEXT Mode.
2
Enter three digits using the 0~9 digit buttons to select a page
number.
3
(The CHANNEL buttons
Press to superimpose a Teletext broadcast onto the
4
current TV programme screen (MIXED Mode).
Press to go out from the TELETEXT Mode.
CH
CH
/
can also be used.)
5
INDEX
NEWS........P 200
SPORTS.....P 300
MOVIE.......P 400
WE ATH ER...P 5 00
3 0 0
EXIT
300
SPORTS
Press
300
Fast Page Selection
SPORTS
22
Select a TV channel, which is broadcasting the Teletext
programme you would like to watch.
1
Press to select the TELETEXT Mode.
2
To recall a page number displayed in the coloured brackets, simply
press the corresponding coloured button
3
.
Page 24

TEXT
Teletext Mode (Continued)
Other Teletext Features
ENGLISH
1 2 3
4 5 6
7 8 9
0
CH
CH
TV/VIDEO
MENU
HALF PAGE button:
Press to magnity, the
upper/lower half of the
Teletext page.
REVEAL button:
Press to reveal or hide
information such as the
answer to a quiz.
RESET button:
Press to return to TV
mode.
HOLD button:
Press to hold or cancel
the hold on the current
page.
?
INDEX button:
Press to return back to
index page.
STORE button:
i
Press to store in the
memory the page
numbers in the LIST
mode [!].
?
XiS
I
LIST
LIST Select button:
Press to change the
system:
FLOF ↔ LIST [!].
LIST
COLOUR buttons:
To recall a page
displayed in the coloured
brackets, press the
TV/TEXT REMOTE CONTROL
corresponding coloured
button.
[!] More information on - How to Operate Page Memory - (page 24).
CLOCK button:
In TV Mode: Pressing this button when the TEXT data is received, the real time information will
appear on the screen.
In TELETEXT Mode: When a selected Teletext page has hidden subpages or timed pages, these
pages can be seen in the following manner:
1 Press
2 Enter 4 digits corresponding to the subpage desired. E.g. 0021 for subpage number 21.
3 Wait until the page appears.
NOTE: You can use this button together with
picture until the subpage has been found. The on screen icon
will change when the subpage has been found.
Press
. The screen will show <<SUBPAGE: - - - - >>
X
. This means that you can view the main TV
to view the subpage.
at the top left side of the screen
I
S
CANCEL button:
Cancel the Teletext information and restores the TV picture. Indication is shown on screen.
The TV programme cannot be changed, while in Teletext/Cancelled mode. When a change takes
place in the Teletext information, the upper time of the cancelled page or some other indication of
special pages is shown on screen.
To restore the teletext, press
NOTE: This button can be used together with
Web-site: www.sharp.co.uk/support Help Line (office hours only): 0990-274277
and the whole Teletext is shown.
while awaiting subpages.
X
23
Page 25

TEXT
Teletext Mode (Continued)
Teletext operation - LIST Mode -
How to Operate Page Memory
Your TV has 64 Teletext page number memories for fast recall of Teletext information.
Four Teletext page numbers can be stored in each position in programme positions 1 through 15; a total of
60 pages.
Only one programme with 4 page numbers can be stored in programme positions 16 through 99 and SCART.
If you try to store more than 4 page numbers in a programme position between 16 and 99,SCART, the
previously stored page numbers will be erased.
Select the programme channel number into which you want to
store Teletext page numbers.
TV/VIDEO
1 2 3
4 5 6
7 8 9
0
CH
CH
?
XiS
TV/TEXT REMOTE CONTROL
MENU
I
LIST
1
Press to select the TELETEXT Mode.
2
LIST
Press
to change from FLOF system to LIST Mode.
3
Press a coloured button corresponding to the coloured
brackets on the screen for page number storage.
4
Enter the Teletext page number using the 0 ~ 9 digit buttons (enter
three digits).
5
Repeat steps 4 and 5 until the numbers for the desired pages have
been entered.
6
Press S to store in memory the page numbers you wish.
“STORE” appears on the screen.
7
Press twice to exit the TELETEXT Mode.
8
P 100
(FLOF TELETEXT)
News Sports Movie Weather
Press
LIST
YELLOW
buttons
and
LIST
P 300
(LIST TELETEXT)
100 200 300 400
YELLOW
Input
4, 2, 5
4 2 5
P 425
100 200 425 400
If you want to store,
S
press .
Page Selection - LIST Mode -
1
Select the appropriate programme channel.
2
Press to select the TELETEXT Mode.
LIST
Press
3
4
To recall a page number displayed in the coloured brackets, simply press the corresponding coloured
button.
to change from FLOF system to LIST Mode.
24
Page 26
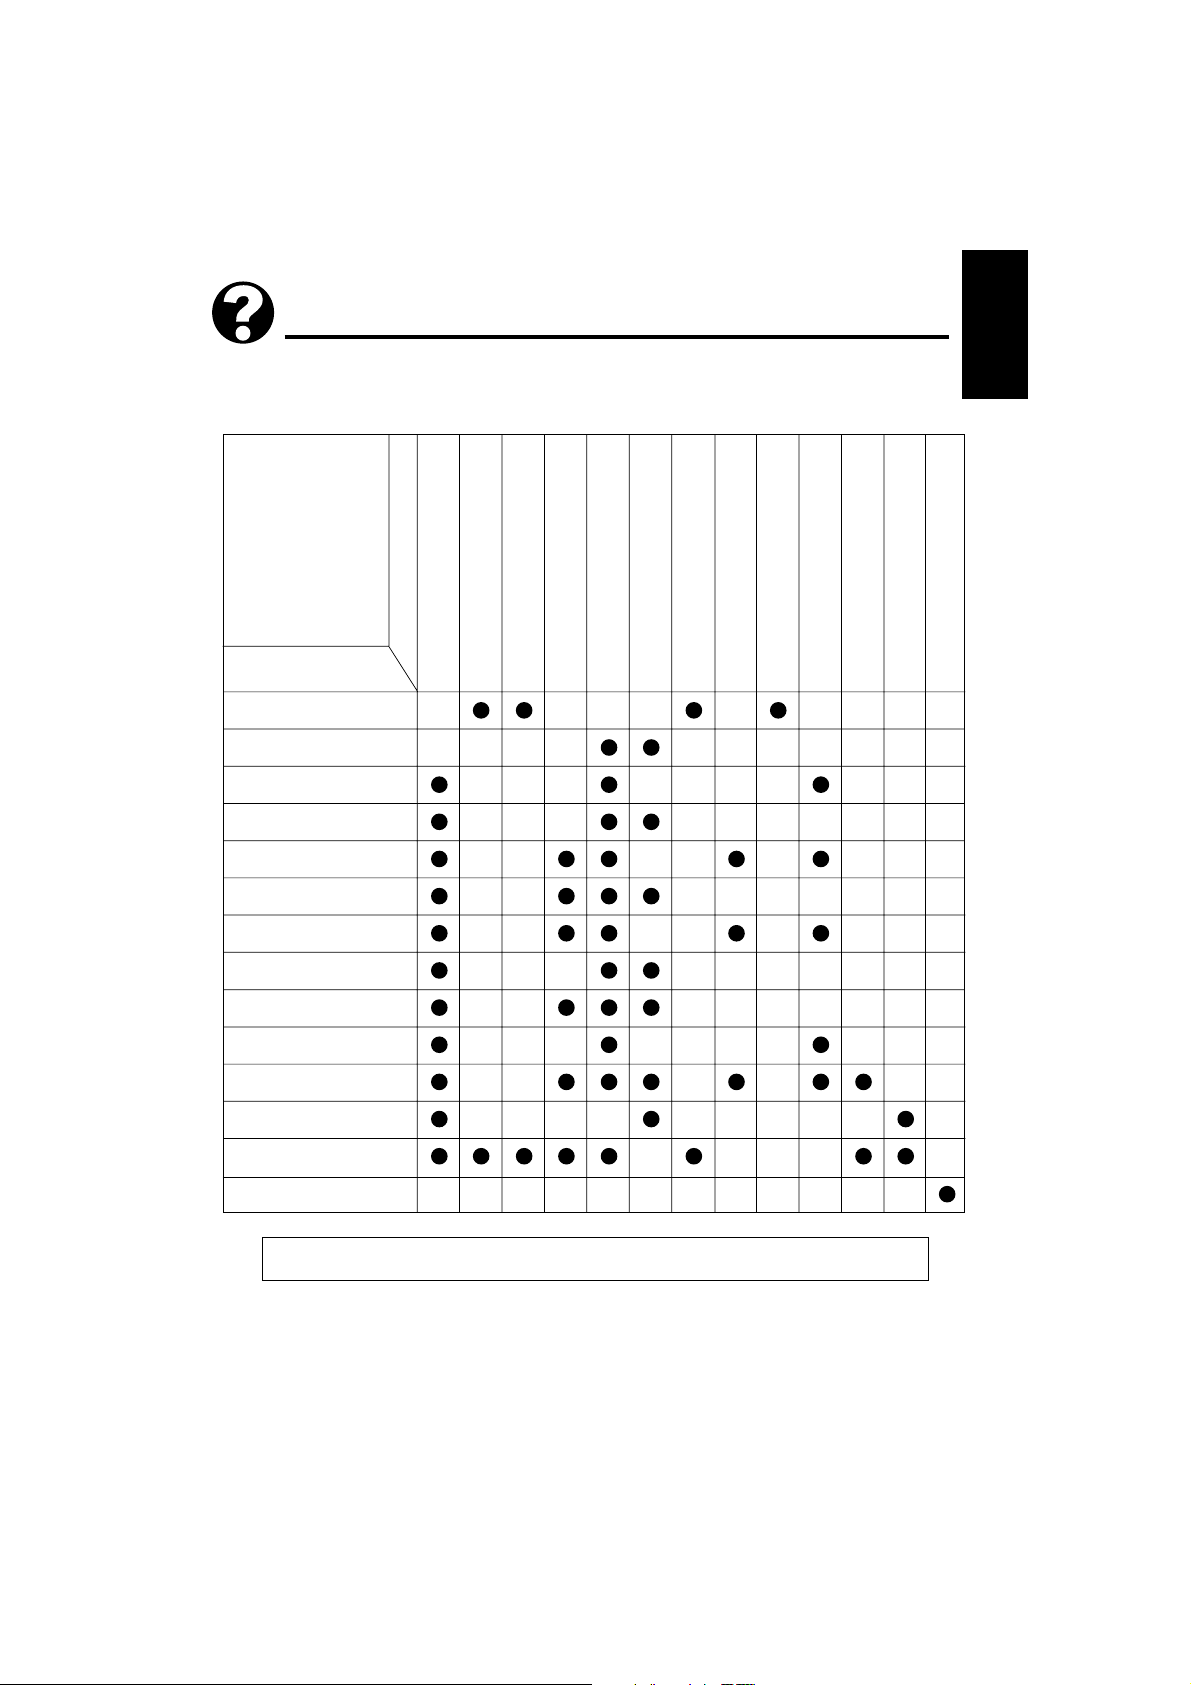
Troubleshooting
The following conditions do not always denote trouble. Therefore, performs the checks
described below before calling for service.
If the problem cannot be corrected by the use of this guide, pull the power plug out from the
electrical outlet and call for service.
Quick
Service
Check List
Possible Causes/Solutions
Problems
Remote control does not work
Bars on screen
Picture distorted
Picture rolls vertically
No colour
Poor reception on some channels
Picture weak
Try a new channel to check for possible
station trouble
TV not plugged in
Outlet power OFF
Main Power button of TV not ON
Antenna not connected to terminal at the
back of the TV set
If outside antenna is used, check for broken
wires
Check for local interference
Turn off using the Main Power button, then
turn ON again after a minute
Adjust COLOUR control
Check batteries in the Remote Control
Try fine tuning to correct
Check if the Brightness or Contrast setting in
the picture setting mode might be all the way
to the minus side.
Increase the volume
Check that Child Lock is not activated
ENGLISH
Picture lines or streaks
Picture ghosting
Picture blurred
Sound OK, picture poor
Picture OK, sound poor
No picture or sound
It is not possible to tune the set
This unit is equipped with a microprocessor. Its performance could be adversely affected by external electrical
noise or interference. If this should happen, unplug the unit and plug it in again after a few minutes.
25
Page 27

Specifications
Model
1. Receiving Broadcast Standard
2. Receiving System
3. Reception Channels
4. Power Source
5. Power Consumption at 240V AC 50Hz
6. Power Consumption at Stand-by
7. Audio Output (MPO)
8. Dimensions (approx.)
9. Viewing Area (diagonal measurement)
10. Weight (approx.)
11. Internal Speaker
12. Antenna Input Impedance
13. Safety
14. EMC
Design and specifications are subject to change without notice.
21HT-15C / 21HT-16C
CCIR TV Standard System PAL-D/K, B/G, SECAM-D/K, B/G
Colour System: PAL ,SECAM
Field Frequency: PAL 50/60 Hz Capability
VHF: E2 - E12CH, R1-R12 CH
UHF: E 21 - E 69 CH
CATV S1 - S20, S21 - S41 (Hyper)
AC220V-240V, 50Hz
43 W
3 W
4 W
Width: 505 mm
Height: 470 mm
Depth: 474 mm
54 cm (21")
19,6 Kg
9 cm × 5 cm Oval
75 ohms Unbalanced
CE - MARK
CE - MARK
Euro-SCART 21-Pin Terminal
For greater A/V enjoyment, various audio and video devices may be connected via the Euro-SCART
21-Pin T erminal.
For example, one can revel in the stunning visuals from a VCR and the dynamic sounds of an audio
system. For your interest, here is just one example of an integrated A/V system.
1. Audio right output
2. Audio right input
3. Audio left output
4. Common earth for audio
5. Earth for blue
6. Audio left input
7. Blue input
26
21-Pin Euro-SCART
8. Audio-video control
9. Earth for green
10. Not used
11. Green input
12. Not used
13. Earth for red
14. Not used
NOTE
Audio: Mono Input/Output.
15. Red input
16. Red/Green/Blue control
17. Earth for video
18. Earth for Red/Green/Blue control
19. Video output
20. Video input
21. Plug shield
Page 28

SHARP ELECTRONICS (EUROPE) GmbH
Sonninstraße 3, 20097 Hamburg, Deutschland
SHARP ELECTRONICA ESPAÑA, S.A.
Polígono Industrial Can Sant Joan
Sant Cugat del Vallés (Barcelona), España
PRINTED IN SPAIN
TINS-7185BMN0
02/02
 Loading...