

Shark SC618D, SC618D Deluxe Owner's Manual

OWNER’S MANUAL
MANUAL DEL USUARIO
MANUEL D'UTILISATION
Model/Modelo/Modèle: SC618D
120V., 60Hz., 1500 Watts
COPYRIGHT© EURO-PRO OPERATING LLC 2008
EURO-PRO Operating LLC
Boston, MA, 02465
www.sharkcompany.com
1 (800) 798-7398
STEAM BOTTLE
BOTELLA DE VAPOR
BOUTEILLE À VAPEUR
IMPORTANT SAFETY INSTRUCTIONS
SAVE THESE INSTRUCTIONS
For Household Use Only
1 Rev. 06/08
To reduce the risk of fire, electric shock, or
injury:
• Do not leave the Steam Bottle plugged
in when unattended. Unplug the electrical
cord when not in use and before servicing
or refilling water tank.
• Do not operate the steam cleaner while
under the influence of drugs, alcohol or
medications.
• Use only as described in this manual. Use
only manufacturer’s recommended
accessories.
• Do not pull cord, use cord as a handle,
close a door on cord, or pull cord around
sharp edges or corners. Keep cord away
from heated surfaces.
• Do not use extension cords or outlets with
inadequate current carrying capacity.
• Do not unplug by pulling on cord. To
unplug, grasp the plug, not the cord.
• Do not handle plug or steam cleaner with
wet hands or operate without shoes.
• Do not put any objects into openings. Do
not use with any opening blocked.
• Store your appliance indoors in a cool, dry
area.
• Keep your work area well lit.
• When in use, never turn the appliance
over or on its side. Never direct steam
towards people, animals or plants.
• Do not immerse the steam cleaner into
water or other liquids. Always unplug the
power cord from the electrical socket when
filling the steam cleaner.
• Do NOT
add cleaning solutions,
scented perfumes, oils or any other
chemicals to the water used in this
appliance as this may damage the unit
or make it unsafe for use. Use tap water
or distilled water if the tap water in your
area is very hard.
• NEVER attempt to fill this unit under a
water faucet, always use the filling flask
that is provided.
• Keep out of the reach of children.
When using your Deluxe Steam Bottle, basic safety precautions should always
be observed, including the following:
1. Read all instructions before using your
Steam Bottle.
2. Use the system only for its intended use.
3. Do not allow to be used as a toy. Close
attention is necessary when used by or
near children, pets or plants.
4. To protect against a risk of electric shock,
do not immerse any part of the system in
water or other liquids.
5. Never yank cord to disconnect from
outlet; instead, grasp plug and pull to
disconnect.
6. Do not allow cord to touch hot surfaces.
Let the system cool completely before
putting away. Wrap cord loosely around
system when storing.
7. Always disconnect system from electrical
outlet when filling with water or emptying
and when not in use.
8. Do not operate the system with a damaged
cord or plug, or if the appliance or any other
part of the system has been dropped or
damaged. To avoid the risk of electric
shock, do not disassemble or attempt to
repair the Steam Bottle. Return the
system to EURO-PRO Operating LLC for
examination and repair. Incorrect
reassembly or repair can cause a risk of
electrical shock or injury to persons when
the Steam Bottle is used.
9. Close supervision is necessary for any
appliance being used by or near children.
Do not leave the system unattended while
connected.
10. Burns can occur from touching hot metal
parts, hot water or steam. Use caution
when draining unit after use as there may
be hot water in the unit. Never direct
steam at any person. The steam is very
hot and can cause burns.
11. Do not operate in the presence of
explosive and/or flammable fumes.
12. This appliance is intended only for
household use. Follow all user instructions
in this manual.
13. Never use any chemicals or substance
other than tap water in the machine. Use of
chemicals may damage the machine. Use
of chemicals will automatically void your
warranty.
ADDITIONAL IMPORTANT SAFEGUARDS
2
SAVE THESE INSTRUCTIONS
FOR HOUSEHOLD USE ONLY
1. To avoid circuit overload, do not operate another appliance on the same socket
(circuit)
2. If an extension cord is absolutely necessary, a 15 ampere 14 gage grounded cord
should be used. Cords rated for less amperage may overheat. Care should be
taken to arrange cord so that it cannot be pulled or tripped over.
3. Do not leave unattended when the system is connected to a power supply/electrical
outlet.
CAUTION: The force and heat of the steam may adversely affect certain
materials. Always check the suitability of using the steam cleaner
on a surface by carrying out a preliminary test on a hidden area.
Examples for guidance only: - Varnished wood or glossy leather can
be bleached by the effects of steam.
-Shiny plastic materials risk being
tarnished.
-Acrylic, velvets and linen are very
sensitive to the temperature of steam.
The manufacturer accepts no responsibility for damage caused to objects,
materials, animals or persons due to the inappropriate use of steam, and through
ignoring the advice and recommendations set down in the Owner's Manual.
WARNING: To reduce the risk of electric shock, this appliance has a polariz ed
plug (one blade is wider than the other). This plug will fit in a polarized outlet only
one way. If the plug does not fit fully in the outlet, reverse the plug. If it still does
not fit, contact a qualified electrician to install the proper outlet. Do NOT modify
the plug in any way.
IMPORTANT: Do not add cleaning solutions, scented perfumes, oils or any
other chemicals to the water used in this appliance. Use regular water or
distilled water if the tap water in your area is very hard.
WARNING: Danger of Scalding. Please use caution when using the
steam cleaner. The steam emitted from the openings is very hot.
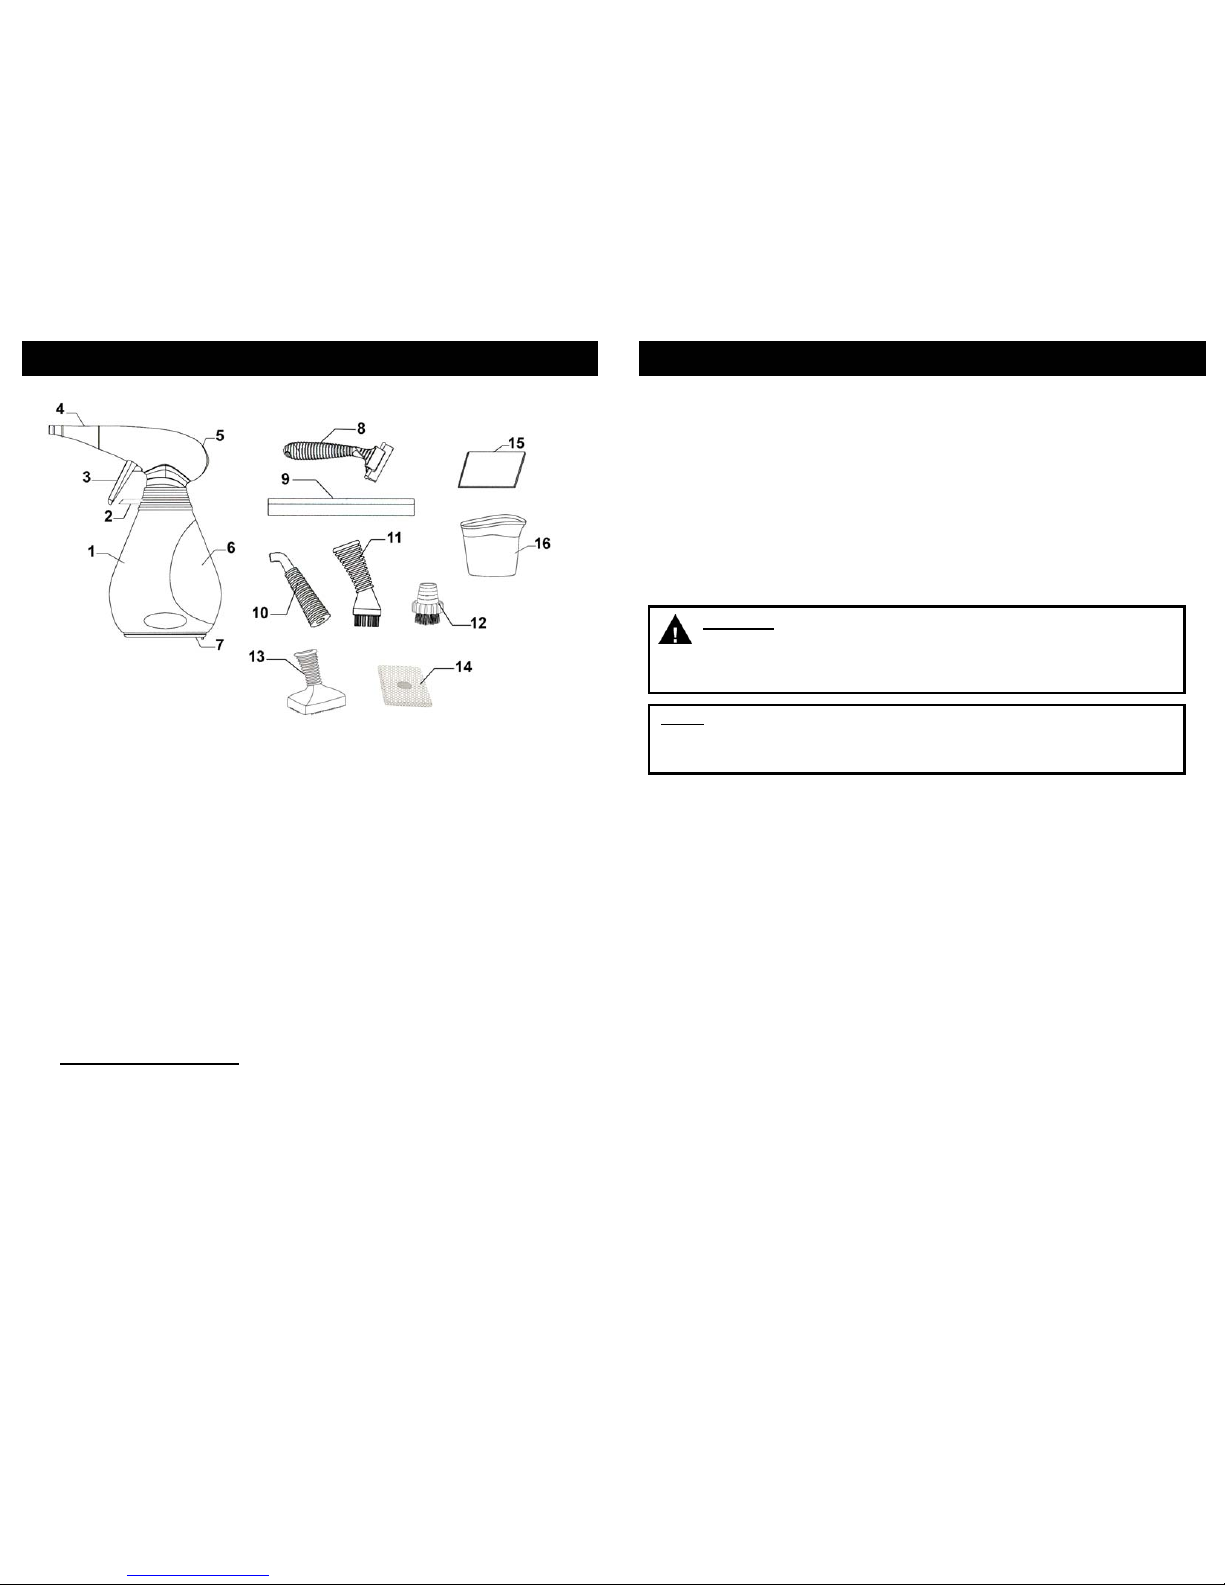
GETTING TO KNOW YOUR STEAM BOTTLE
3
1. Housing
2. Finger Guard
3. Steam Trigger
4. Concentrator Nozzle
(Non-Detachable)
5. Power On Light
6. Water Tank
7. Water Tank Filling Plug
8. Windo w Squeegee Handle
Technical Specifications
Voltage: 120V., 60Hz.
Power: 1500 Watts
Water Capacity: 8 US Fl. Oz. (240 ml.)
9. Window Squeegee
10. Angled Concentrator Nozzle
11. Large Round Brush
12. Small Round Brush
13. Sponge Pad Holder
14. Sponge Pad
15. Micro-Fiber Cloth
16. Filling Flask
*Note: Illustrations may differ from actual unit.
FEATURES OF STEAM BOTTLE
4
Your handheld steam cleaner is a very versatile tool. Used correctly it will help make
many household cleaning tasks faster and easier. Be sure to carefully read all the
information contained in this booklet before using this appliance.
High temperature steam can make it easier to remove stubborn household dirt from
hard surfaces such as ovens, stove tops, kitchen counters, sinks, tubs, bathroom tiles,
windows and mirrors without the need for harsh chemical cleaners. The appliance has
various attachments which enable it to be used for cleaning different types of surfaces
such as:
1. Upholstery, sealed grout, bathroom/kitchen tile, stovetops.
2. Easily cleans difficult to reach areas with the concentrator such as faucets, etc.
3. Ideal for windows, mirrors, glass doors, etc.
4. Fabrics, window coverings, pillows, bedding etc.
5. Hard surface areas such as counters, sinks, shower door tracks, etc.
NOTE:First usage may require 6-10 rapid pushes on steam push button before
steam exits. Keep pressing for a few seconds until steam has developed
from first rapid depressing of steam trigger, then you can continue
intermittent pressing of steam trigger as detailed above.
CAUTION: Press steam trigger intermittently no more than once every 1
or 2 seconds. Rapid pressing in succession will cause water leaking and
spitting. Wait for steam pressure to reduce before pressing steam trigger
again. By pressing intermittently you will note a rhythm for maintaining a
continuous flow of steam without any water dripping or leaking.
OPERATING INSTRUCTIONS
Components
Power “On” Light (green): This light
will illuminate when the unit is plugged
into the 120V wall outlet and will
remain on until the unit is unplugged.
CAUTION: Read the instructions for
“Filling the Steam Cleaner” before
removing the plug on the water tank.
CAUTION: Always unplug before
filling.
Filling Your Steam Cleaner With
Water
IMPORTANT: Always insure that the
unit is “UNPLUGGED” from the wall
receptacle prior to initial filling or refilling the water tank. Use tap water or
distilled water if the tap water in
your area is very hard.
WARNING: Never attempt to fill
this unit under a water tap, always
use the filling flask that is provided.
Failure to follow these steps will cause
the water tank to overfill and may pose
an electrical safety hazard.
Step 1: Before filling the steam
cleaner, make sure that the
unit is NOT plugged in.
Step 2: Hold unit upside down and
remove the water tank filling
plug.
Step 3: Using the filling flask add 8
US Fl. Oz. (240 ml) of water.
Do not overfill. Replace the
water tank filling plug making
sure that it is firmly in place.
5
IMPORTANT: When the steam
cleaner has run out of water, steam
output will decrease and then cease.
Using the Steam Bottle
The steam bottle is very useful for
cleaning surfaces that are difficult to
reach. It is ideal for radiators, door and
window jambs, shutters and sanitary
fixtures.
NOTE: If using the steam bottle with
the nozzle pointing downwards, you will
need to return the unit to an upright
position every now and again to enable
the tube inside the water tank to dip into
the water reservoir, thereby preserving
the flow of water to the heating
element.
NOTE: First usage may require 6-10
rapid pushes on steam push button
before steam exits. Keep pressing for a
few seconds until steam has developed
from first rapid depressing of steam
trigger, then you can continue
intermittent pressing of steam trigger as
detailed above.
IMPORTANT: Do NOT add cleaning
solutions, scented perfumes, oils or any
other chemicals to the water used in
this appliance. Use regular tap water
or distilled water if the tap water in
your area is very hard.
CAUTION: Press steam trigger
intermittently no more than once every
1 or 2 seconds. Rapid pressing in
succession will cause water leaking and
spitting. Wait for steam pressure to
reduce before pressing steam trigger
again. By pressing intermittently you
will note a rhythm for maintaining a
continuous flow of steam without any
water dripping or leaking.
Step 4: Plug the unit into a standard
(120 volt, grounded) wall
receptacle. The power light
will now illuminate.
Step 5: Allow approximately 30 - 60
seconds for the unit to reach
its working temperature.
Step 6: Upon initial us e, some water
will come out from the nozzle
of the attachment. This is
normal.
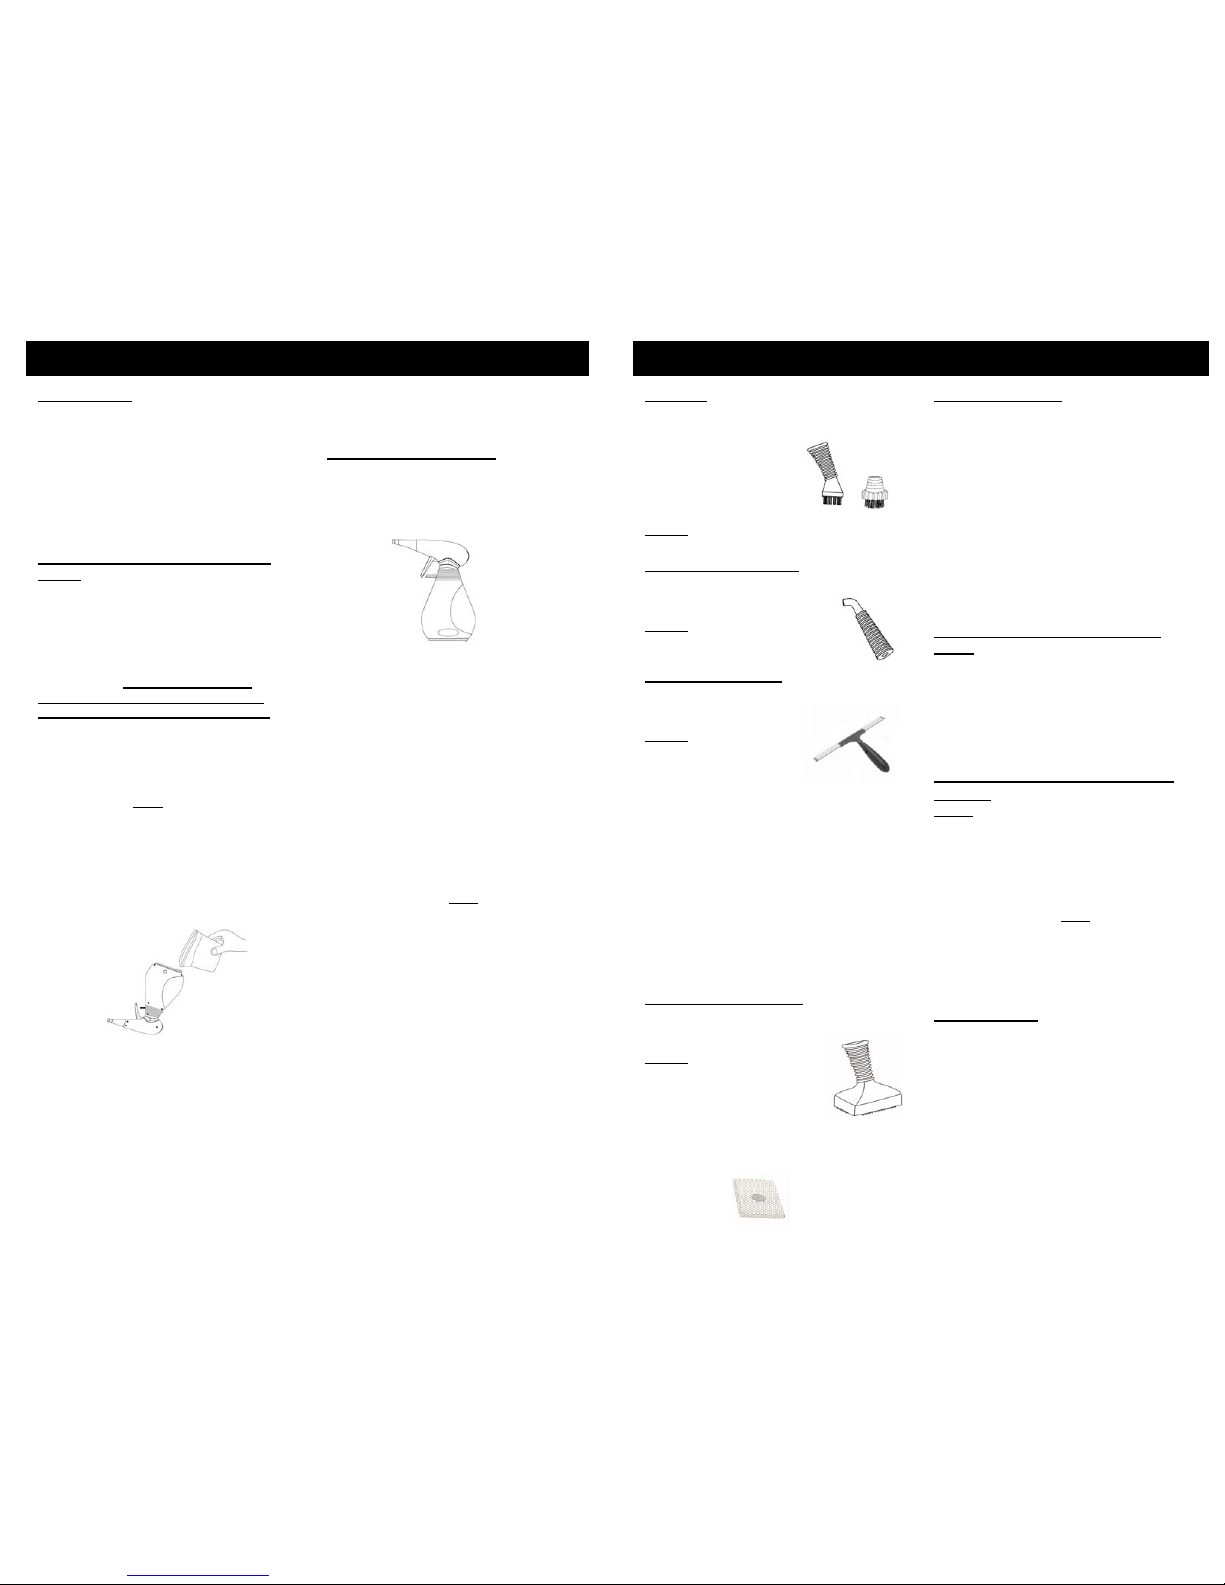
Brushes
These are best for any task requiring
concentrated medium-pressure steam
with additional rubbing
action to loosen
embedded dirt such as
cleaning grout in between
the tiles, ceramic and
marble.
To use: Push the nylon detail brush onto
the end of the concentrator nozzle.
Angled Concentrator
The angled concentrator can be used to
clean under toilet bowl rims
or in hard to reach places.
To use
: Push the angled
concentrator onto the end
of the concentrator nozzle.
Window Squeegee
This attachment is very useful for
cleaning large windows, plastic material,
ceramic, tiled or marble surfaces.
To use
: Attach the squeegee
to the window squeegee
handle. With the steam
cleaner, apply steam abundantly to the
surface and then remove excess water
and dirt with the wiping edge.
CAUTION: When cleaning windows,
always avoid any sudden changes in
temperature to prevent glass breakage
or cracks.
NOTE: If using the steam cleaner with
the nozzle pointing downwards, you will
need to return the unit to an upright
position every now and again to enable
the tube inside the water tank to dip into
the water reservoir, thereby preserving
the flow of water to the heating element.
Sponge Pad & Holder
This attachment is very useful for
cleaning counters, ceramic, tiled or
marble surfaces.
To use
: Attach the scrubbing
pad holder onto the
concentrator nozzle. Then
press the sponge pad
onto the base of the
sponge pad holder and
twist slightly. This will help the
sponge pad stay on more securely.
OPERATING INSTRUCTIONS
6
Tips On How To Use Your Steam
Cleaner
Water
• Use tap water for all your clea ning
needs.
• If you live in an area with hard water,
use distilled water when steaming
light colored fabrics to eliminate the
possibility of hard water stains.
IMPORTANT: Do NOT add cleaning
solutions, scented perfumes, oils or any
other chemicals to the water used in this
appliance. Use tap water or distilled
water if the tap water in your area is
very hard.
Efficient Work
• For vertical sur f aces, wipe always
from the top down, in this way the
dirty water will not soil surfaces
already cleaned.
• Avoid changi ng brushes back and
forth while cleaning. Start with the
smallest brush to clean tight spots
and corners first.
• Wipe dirt as soon as possible,
otherwise it will dry and re-adhere
to the surface.
Sponge Pad
Holder
Sponge Pad
Micro-Fiber Cloth
The micro-fiber cloth allows deep-down
streak-free cleaning with only water!
The cloth's static charge attracts more
dust and retains it. The result is a
gleaming smear free finish. The microfiber cloth can be used dry as a duster
or dampened with water for all dirty
surfaces. Use after steaming your
chrome fixtures for a gleaming streak
free shine
.
The micro-fiber cloth can be used on all
surfaces such as: bathroom tiles,
kitchen counters, mirrors, glass,
stainless steel, plastics, woods, etc.
Care & Cleaning of Micro-Fiber
Cloth
Before use: Wash in hot water with a
liquid detergent and rinse well and let
dry. Do not use fabric softeners or
bleach. Do not put in dryer or iron. Do
not use with cleaning products such as
glass cleaners, etc. If this happens,
wash the cloth and rinse well.

Care & Maintenance
CAUTION: This appliance must be
unplugged from the electrical outlet
before performing any cleaning or
maintenance tasks on the unit.
• Let the appliance cool down
completely before cleaning or storing.
• Empty all water from the water tank
after each use.
• Store in a dry, cool place with the
filling hole open.
• Store in a dry, cool place with the
filling hole open.
OPERATING INSTRUCTIONS
• Always allow the sponge pad to air dry
completely before storing.
• A periodic rinse of your steam cleaner
will free it from deposits. This is
recommended every 10 tankfulls to
free up any scale deposits. Fill the
water tank with water and shake
vigorously. Tilt the cleaner upside
down to empty the water tank and any
scale deposits.
7
Hints
The steam cleaner has many uses, many
of which will not be mentioned in this
owner's manual. This is meant only to
give you a general idea of what can be
achieved with the unit. However, the
ways in which to use the unit and the
accessories that come with it are in most
cases universal. It is most helpful to
always have a micro fiber cloth, a terry
cloth towel or paper towel ready to use for
removal of moisture and residue. 100%
white cotton towels work best.
You can clean the brushes with your
steam cleaner. When cleaning the
brushes, use a pair of pliers to hold the
brushes or place in the basket of your
dishwasher.
Note: Wipe immediately before the
cleaned area dries.
Window, Glass Surfaces and Mirrors
Use the squeegee. Work with the vapor
jet using top to bottom movements. Use
the squeegee to clear the water from the
glass. To do this without leaving streaks,
use lateral movements from the top to the
bottom of the surface. Do not use on cold
glass.
CAUTION: When cleaning windows,
always avoid any sudden changes in
temperature to prevent glass breakage or
cracks.
USAGE SUGGESTIONS FOR STEAM CLEANER
Fiberglass or Stainless Steel Surfaces
Use the small or large brush. Slowly
move the brush over the surface to be
cleaned. The vapor will emulsify the dirt
and grease on the surface. Follow behind
with the cloth towel over the brush to
remove excess moisture and residue.
Tip: An old idea for polishing stainless
steel is to wipe it down with seltzer soda
water after it is cleaned.
Blinds
Use the small brush to clean blinds. Move
the brush over the surface, allowing
enough time for the vapor to penetrate.
Work quickly on PVC blinds. Test for
color fastness on fabric blinds before
using.
Bathroom Areas
To clean the bathtub or shower area, use
the small or large brush for grout, shower
door tracks, hard to get areas and heavily
soiled areas. The squeegee will be the
most efficient way to clean the rest of the
area. Allow plenty of time for the heat to
penetrate the surface. This is especially
helpful in the shower area if there is tile or
grout.
To clean sanitary fixtures, use
concentrator nozzle with or without a
brush. Use a towel to wipe up excess
moisture and residue.
To clean the sink and faucets, use a
brush.
Soap Scum
Soap scum dissolves almost immediately
under a combination of heat and
moisture. Rinse the surface with a small
amount of water afterwards or go back
over it once more with a cloth towel.
Moving too slowly can dry out the soap
scum and cause it to granulate on the
surface. The surface will have a gritty
feel. If this happens, apply vapor to the
surface with the brush again and re-clean.
Note: Soap scum sometimes will develop
a hard surface from waterborne minerals.
If this is the case, use the brush to break
up this surface - or spray or wipe first with
lemon, vinegar or seltzer soda water to
soften the minerals.
Refrigerator
Use the concentrator nozzle alone to blow
away dirt in the ice machine and on door
seals. The vapor will not dry out or crack
the seals as chemicals often do. Can
openers and other kitchen equipment can
be easily cleaned with the nylon detail
brush on the concentrator nozzle to get
into all the nooks and crannies.
To clean microwaves
or other small
appliances use the nylon detail brush for
small areas. Do not inject steam into the
vent openings of the product.
CAUTION: When cleaning small
electrical appliances always unplug them
from the electrical outlet before cleaning.
USAGE SUGGESTIONS FOR STEAM CLEANER
Clothing
A vapor cleaning system is excellent for
removing wrinkles from fabrics. Simply
“vaporize” the surface from a distance
(12”-16”). The dry vapor removes
wrinkles without leaving the fabric wet
like ordinary fabric steamers do.
Upholstery
Use fast, light strokes, avoid getting the
fabric wet and follow with the micro-fiber
cloth. Be patient with stubborn spots;
work on a spot gently for no more than a
minute at a time, then wait five minutes
for the area to dry and repeat. Use
circular movements or back-and-forth
and side-to-side movements to get all
sides of surface fibers. Finish with a
brushing in one direction that will give the
fabric a uniform appearance.
CAUTION: Always determine the color-
fastness of any fabric-especially with
reds or blues - by taking a clean, moist,
warm towel and gently rubbing a small
area as far down on the back or other out
of the way place on the furniture as
possible. If color comes off on the towel,
you may need to have the piece dry
cleaned.
Exterior Areas
For detailing the wheels, use the
concentrator nozzle and the brush.
To clean bicycles, use the brush.
To clean tools or equipment , use the
brush, depending on the surface area.
To clean BBQ’s, use the brush to clean
the BBQ rack.
Garden Furniture
Use the brushes on the surface area.
Work quickly when cleaning resin
outdoor furniture.
8
 Loading...