

Page 1
Instruction manual
GB
Page 2

Table of contents
GB
1. General information ................................................ 3
1.1. Greeting ................................................................................ 3
1.2. Notices concerning the operating manual ............................3
2. For your safety ........................................................ 3
3. Technical data ......................................................... 4
4. Overview .................................................................. 4
4.1. Items included.......................................................................4
4.2. Accessories ..........................................................................4
4.3. Device ................................................................................... 5
5. Switching on for the rst time ............................... 6
6. Coffee preparation .................................................. 8
6.1. Switching on/off ....................................................................8
6.2. Operation .............................................................................. 8
6.3. Preparing coffee specialities ................................................. 9
6.3.1. Preparing coffee or espresso .................................... 10
6.3.2. Preparing coffee-milk specialities .............................. 10
6.4. Preparing coffee with coffee powder (ground coffee) .........12
7. Individual settings ................................................ 13
7.1. Setting the grinding neness ..............................................13
7.2. Making individual settings for coffee preparation ................ 14
7.2.1. Storing personal settings .......................................... 15
7.2.2. Making personal settings quickly
(Quick Select) ...........................................................15
7.3. Changing the device settings ..............................................15
7.3.1. Language .................................................................. 15
7.3.2. Water hardness ......................................................... 16
7.3.3. Water lter ................................................................. 16
7.3.4. Energy savings options ............................................. 16
7.3.5. Resetting the device ................................................. 17
8. Maintenance .......................................................... 18
8.1. Daily cleaning .....................................................................19
8.2. Cleaning programmes ........................................................19
8.2.1. Rinsing the device ..................................................... 19
8.2.2. Rinsing the milk system ............................................ 20
8.2.3. Cleaning the milk system .......................................... 21
8.2.4. Cleaning programme ................................................ 21
8.2.5. Descaling .................................................................. 22
8.2.6. Changing the water lter ........................................... 23
8.3. Cleaning the brewing unit ................................................... 24
8.4. Cleaning the bean container ............................................... 25
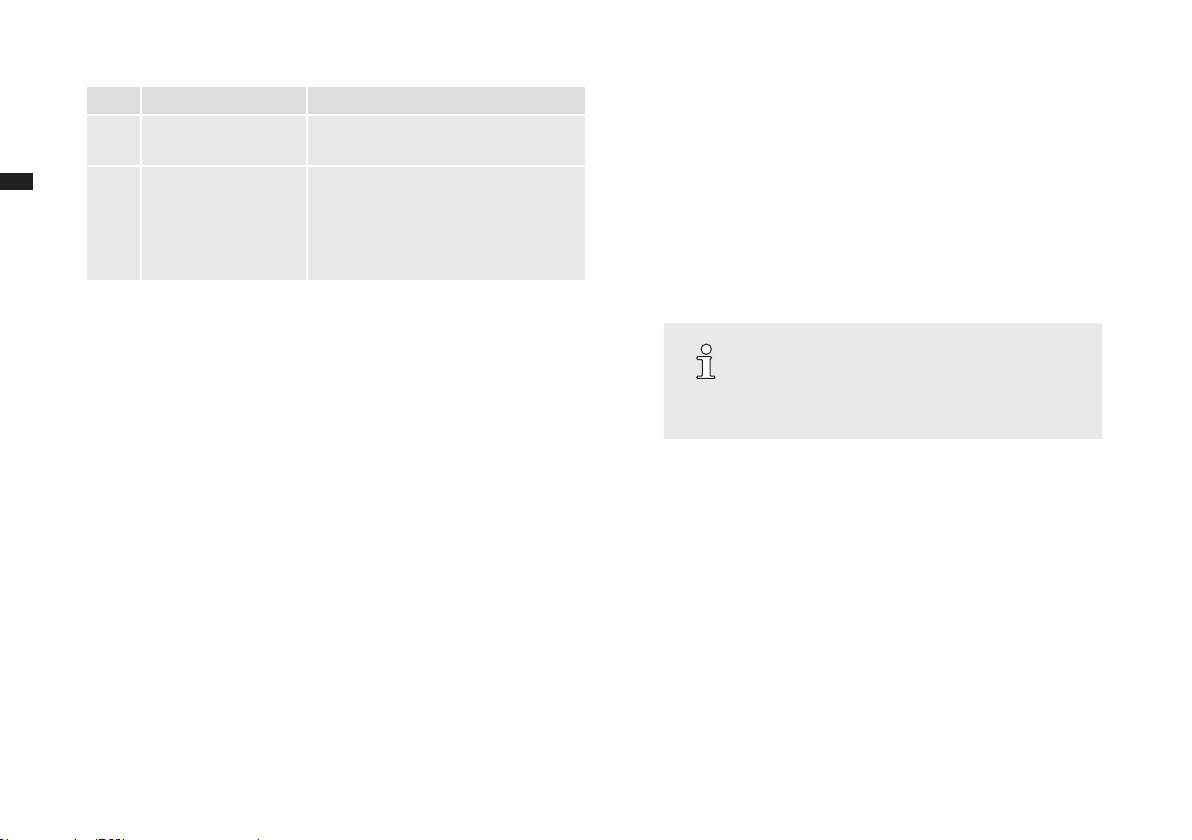
9. Troubleshooting .................................................... 26
9.1. Display device information .................................................. 27
10. Garantiebestimmungen ........................................ 28
10.1. The SEVERIN manufacturer’s warranty ........................... 28
10.2. Handling of warranty claims .............................................28
10.3. Warranty provisions .......................................................... 28
11. Disposal ................................................................. 29
12. Tips for perfect coffee enjoyment ....................... 29
13. Licence provisions ............................................... 31
2
Version 1 2013-06
Page 3
GB
1. General information
1.1 Greeting
Dear Customers, we are pleased that you have selected a SEVERIN fully
automatic coffee maker. Dive into the enjoyable world of coffee and milk
specialities. Before you start, please take some time to get to know your
machine with the help of the operating instructions. This will ensure that you
will get the best possible results.
1.2 Notices concerning the operating manual
WARNING!
Danger of severe injuries or damage to the device
due to failure to heed the safety instructions and
operating manual.
– Read the operating manual and the safety-re-
lated supplemental sheet in their entirety before
you use the device. Keep both documents in a
safe place.
– In case you pass this device on to a third party,
please also include the safety-relevant documents.
NOTE!
– SEVERIN assumes no liability for damage that
arises due to non-observance of this operating
manual.
– You can download the safety-related sup-
plemental sheet, this operating manual and
additional language versions on the Internet at
www.severin.de.
2. For your safety
Important notes for your safety are marked in a special fashion. Be sure to
follow these instructions to avoid accidents and damage to the appliance:
WARNING!
Indicates notes that must be heeded to prevent a
danger or injury or a danger to life.
CAUTION!
Indicates notes that must be heeded to prevent a
danger of slight injury.
CAUTION!
Indicates notes that must be heeded to prevent a
danger of property damage.
NOTE!
Emphasises tips and other useful information.
To ensure safe use of this automatic coffee maker, please take note of the
safety-related supplementary sheet before the appliance is rst put into
operation.
3
Version 1 2013-06
Page 4

GB
3. Technical data
Voltage 220–240 V~
Output/power consumption 1600 W
Pump pressure (max.) 15 bar
Capacity of water tank 1.35 l
Capacity of bean container 140 g
Capacity of grounds container 10 portions
Dimensions (W x H x D) 228 mm x 316 mm x 387 mm
Weight approx. 6.35 kg
4. Overview
4.1 Items included
The following components are included:
• Your fully automatic coffee maker
• CD-ROM with Operating instructions & Warranty provisions
• Safety-related supplemental sheet
• Water hardness test strips
• Water lter
• Milk tube
• Cleaning tablets
4.2 Accessories
The following accessories are available:
• Water lter
• Cleaning tablets
• Descaling tablets
• Milk tube
• Milk system cleaner
• Thermo milk-jug
4
Version 1 2013-06
Page 5

GB
4.3 Device
Overview
2
15
3
4
1
14
13
g. 1: Device overview
Item Designation Explanations
1 On/off switch
2 Water tank For adding drinking water.
6
5
3 Bean container For adding unground beans.
4 Grind regulator For adjusting the grinding of the coffee
variety.
5 Powder chamber For adding a cup portion of coffee
7
powder (e.g.decaffeinated coffee).
6 Bean container cover
8
9
7 Arrow keys For selecting a coffee speciality and for
selecting menu options and settings on
the menu.
8 OK button To start the brewing process and to
conrm menu selections and settings.
10
11
9 Display with operating
controls or menu
button
Shows details about beverage preparation and the menu. The buttons have
the function shown on the respective
display.
10 Coffee-milk dispenser
with height adjustment*
The coffee-milk dispenser can be
adjusted to the height of the container
(cup/glass) below.
* depending on the model
12
11 Water lter To improve the water quality.
12 Drip tray with cup tray
For catching water and coffee grounds.
and grounds container
13 Connection for milk
tube
For drawing milk for coffee specialities
with milk (e.g. cappuccino).
5
Version 1 2013-06
Page 6
GB
Item Designation Explanations
14 Milk tube with bracket The milk tube can be hung on the
bracket.
15 Brewing unit cover The cover of the brewing unit is on the
rear of the unit behind the water tank.
On the inside of the cover you will nd
all relevant phone numbers of your
SEVERIN service centre.
5. Switching on for the rst time
When you switch the appliance on for the rst time, it asks you for some
basic settings.
1. Insert the mains plug into the outlet.
2. Use the On/Off switch to turn the appliance on.
 The display shows "SEVERIN“, followed by:
Please select language
3. Press one of the arrow keys until the desired language appears, and
then conrm it by pressing the OK button.
NOTE!
If you have accidentally selected the wrong
language, you can change the setting later on
(► “7.3.1 Language”) and (► “7.3.5 Resetting
the device”).
 The display shows:
Please select water hardness
4. Check the water hardness on a tap using the water hardness test strip.
To do this, proceed according to the enclosed description of the test
strips.
5. Use the arrow keys to select the water hardness and conrm by
pressing the OK button.
 The display shows:
use water filter?
6. Rinse the water tank thoroughly with water.
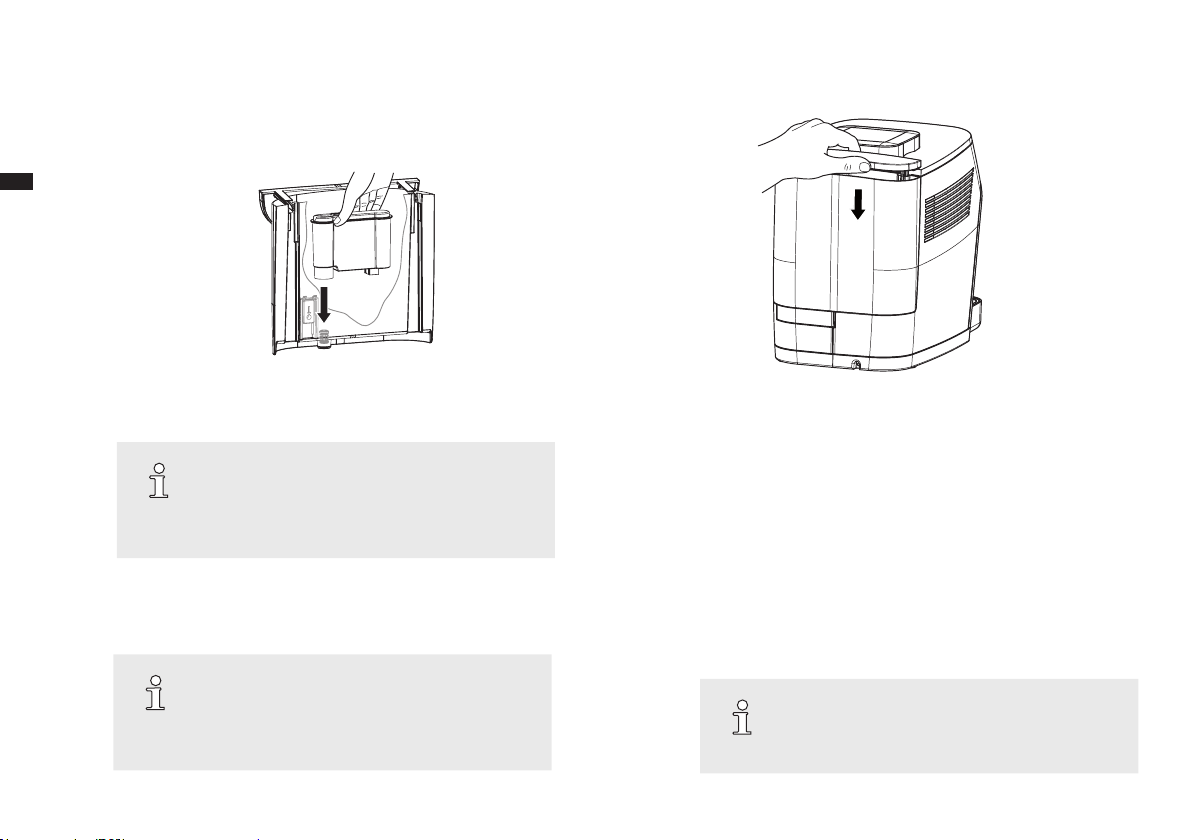
7. If desired, insert the water lter into the water tank (g. 2).
6
Version 1 2013-06
Page 7
GB
g. 2: Inserting the water lter g. 3: Fitting the water tank
NOTE!
A water lter improves the water quality of the water
used by removing contaminants and scale from the
water. SEVERIN recommends the use of a water
lter for high water quality starting with 12 °dH.
8. Fill the water tank with cold drinking water up to the “Max“ marking
and place it on the appliance (g. 3). However, make sure that the
water tank hooks into the top of the appliance and lies close against
the appliance.
NOTE!
The tank must be lled only with cold, clean, non-
carbonated water. Never put milk, instant-powders,
syrups or any other avourings or additives into the
tank.
7
9. Use the arrow keys to select
no, if you do not want to use a water lter or
•
Yes, if you want to insert a water lter
•
and conrm your selection by pressing the OK button.
 The display shows:
rinsing
Water runs from the coffee-milk dispenser into the drip tray.
As soon as the rinsing procedure is complete, the display shows
the "Beverage selection" view. The appliance is now ready for
operation.
NOTE!
Before preparing the rst specialty milk drink, the
air valve in the milk dispenser should be thoroughly
cleaned (►g. 10a).
Version 1 2013-06
Page 8
GB
6. Coffee preparation
6.1 Switching on/off
Each time you turn the machine on or off, the appliance rst rinses the
brewing unit.
1. Use the On/Off switch to turn the appliance on.
 The display shows the text "SEVERIN“ and then:
rinsing
Rinsing of the brewing unit is complete as soon as "Beverage
selection“ appears again.
NOTE!
The device switches off automatically after a programmable switch-off time (default setting: 1 hour).
By pressing the on/off switch, you can switch off the
device manually at any time.
6.2 Operation
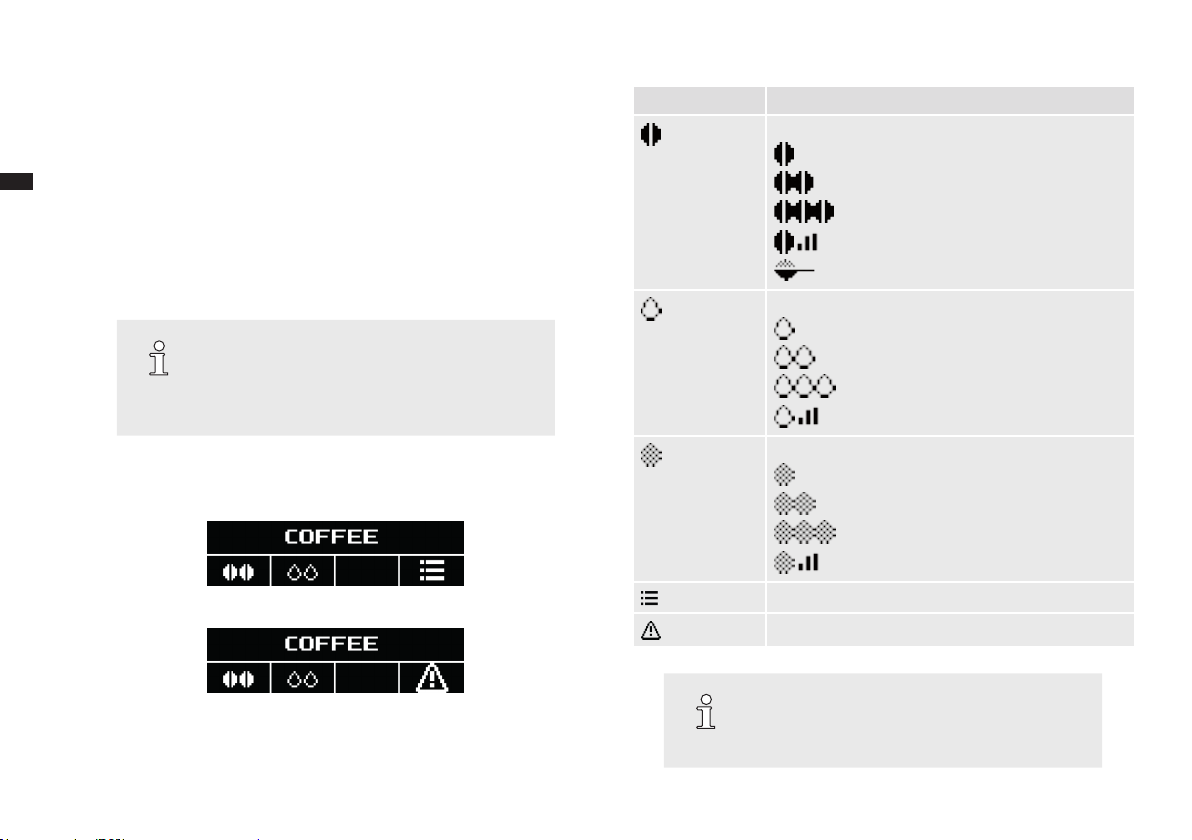
"Beverage selection" view
Symbols Meaning
To set the strength of the desired coffee.
weak coffee
normal coffee
strong coffee
individually-set quantity of beans
Preparation with ground coffee
To set the quantity of water.
small cup (100 ml)
medium cup (125 ml)
large cup (160 ml)
individually-set cup size
To set the milk/milk foam quantity of a milk speciality.
a little milk
an average quantity of milk
a lot of milk
individually-set quantity of milk
To call up and exit the menu.
Indicates an error message
NOTE!
All symbols are not shown for each beverage;
the symbols shown depend on whether or not the
beverage is prepared with milk/coffee beans.
8
Version 1 2013-06
Page 9

GB
g. 4: Loading the beans g. 5: Place the cup below the dispenser and adjust the outlet height*
The appliance is operated by using the arrow keys and control buttons, and
subsequently conrming the selection with the OK button.
• Use the arrow keys to select a beverage. Preparation starts when the OK
button is pressed.
• By pressing the control buttons below the display, you can adjust your
coffee speciality to suit your individual needs.
"Device menu" view
In this menu, you can choose settings, perform maintenance programmes
and display information.
9
• Pressing the menu button brings up the menu; you can exit it by pressing
the button again.
• The arrow keys allow you to select a menu option; conrm by pressing
the OK button.
• Use the button under the display eld
to return to the previous menu
without changing the setting.
6.3 Preparing coffee specialities
CAUTION!
Do not put your hand inside the unit to remove the
drip tray directly after a beverage has been prepared,
or directly following a cleaning cycle. There is a
danger of scalding!
1. Open the cover of the bean container and use a dry and lint-free cloth to
wipe the inside of the bean container.
* depending on the model
Version 1 2013-06
Page 10
GB
2. Fill the bean container with coffee beans (g. 4). Always ensure there
are enough beans in the container.
NOTE!
Do not use caramelised coffee beans!
3. Close the cover of the bean container.
6.3.1 Preparing coffee or espresso
To prepare a coffee or espresso, there must be enough beans in the bean
container and enough water in the water tank.
1. Place a cup on the cup tray below the coffee-milk dispenser and adjust
the height of the coffee-milk dispenser to the cup height (g. 5).
2. Use the arrow keys to select
3. If desired, you can use the button under the display eld
•
to change the set coffee strength
to change the set water quantity.
•
NOTE!
To prepare the coffee speciality with your own
settings, press the respective button until is
displayed after the corresponding symbol (►"7.2
Making individual settings for coffee preparation").
4. Conrm by pressing the OK button.
 The desired coffee speciality is being prepared.
5. To change the coffee quantity during dispensing, use the arrow keys
while the process is going on.
 The display shows a bar with the set quantity in "ml".
The coffee dispensing stops automatically after the selected
quantity has been prepared. It can also be stopped early by
pressing the OK button.
10
coffee or esPresso.
6.3.2 Preparing coffee-milk specialities
To prepare a cappuccino, a white coffee, hot milk or a latte macchiato, there
must be enough beans in the bean container and enough water in the water
tank. Also place a container lled with milk (e.g. SEVERIN thermo milk-jug)
next to the appliance.
NOTE!
Coffee specialities with milk are best prepared
using chilled milk with a high protein content.
1. Plug the milk tube onto the connection on the coffee-milk dispenser and
place the other end of the tube in the milk container (g. 6), or connect
the lled thermo milk-jug to the automatic coffee maker.
NOTE!
Make sure that the tube is submerged in the milk so
that the milk can be drawn correctly by the device.
2. Place a cup on the cup tray below the coffee-milk dispenser of
the appliance and adjust the height of the coffee-milk dispenser to
the cup height (g. 5).
3. Use the arrow keys to select
white coffee or milk.
4. If desired, you can use the button under the display eld
•
to change the pre-set coffee strength
to change the pre-set water quantity
•
to change the pre-set milk/milk froth quantity.
•
caPPuccino, latte macchiato,
Version 1 2013-06
Page 11

GB
g. 6: Connecting the milk tube g. 7: Putting ground coffee into the powder chamber
NOTE!
To prepare the coffee speciality with your own
settings, press the respective button until is
displayed after the corresponding symbol (►"7.2
Making individual settings for coffee preparation").
5. Conrm your selection by pressing OK.
 The desired coffee speciality is prepared.
6. The milk quantity may be changed by using the arrow keys while it is
being dispensed.
 The display shows a bar with the currently set milk dispensing
time in seconds.
7. In the same way, the coffee quantity may be changed by using the arrow
keys while the coffee is being dispensed.
 The display shows a bar with the set quantity in "ml".
Coffee dispensing stops automatically, or by pressing OK.
After preparation, the display indicates:
do You want to clean the milk sYstem?
8. Press
• the button under the display eld
to perform cleaning
(►"8.2.2 Cleaning milk system"), or
• the button under the display eld
if you want to perform
the cleaning later.
NOTE!
It is recommended that you clean the milk system
after each preparation.
11
Version 1 2013-06
Page 12

GB
6.4 Preparing coffee with coffee powder
You can also prepare a coffee speciality with coffee powder. This
is especially useful if you want to prepare a decaffeinated coffee,
for example.
CAUTION!
Incorrect lling can damage the device.
– Only add coffee when the device asks you to.
– Only add coffee made of ground beans (no
instant beverage powder, coffee granules,
cocoa, etc.).
– Fill the powder chamber only once for each cup
portion, not multiple times.
1. Proceed as described in chapters ►"6.3.1 Preparing coffee or
espresso" and ►"6.3.2 Preparing coffee-milk specialities" to select the
desired beverage.
2. Instead of selecting the strength of the coffee, use the button under the
display eld
3. After you have selected the desired water and milk quantities, press OK.
 After a short time, the display shows:
4. Open the powder chamber and put in the required amount of ground
coffee. (g. 7)
5. Close the powder chamber.
6. Press OK again.
 The desired coffee speciality is prepared.
to select the symbol .
Please fill coffee grounds.
7. To make changes to the liquid quantities while dispensing is on
progress, press the arrow keys as described in the sections ►"6.3.1
Preparing coffee or espresso" and ►„"6.3.2 Preparing coffee-milk
specialities".
12
Version 1 2013-06
Page 13

GB
1.
2.
g. 8: Setting the grind quality
7. Individual settings
7.1 Setting the grinding neness
The grinding neness affects the taste of the coffee. Select the grinding
neness according to the type of coffee you are using.
NOTE!
For a light roast, you should set a high neness;
for a dark roast a medium neness is optimal. The
roast is normally printed on the coffee package.
13
CAUTION!
If the neness setting is moved without grinding
coffee beans, the grinder can be damaged.
– Only shift the grinding neness while the grinder
is grinding.
Here's how to set the grinding neness:
1. Place a cup on the cup tray below the coffee-milk dispenser of
the appliance and adjust the height of the coffee-milk dispenser
to the cup height.*
2. Open the cover of the bean container.
3. Select a beverage using the arrow keys.
4. Press OK to conrm.
 The grinder starts operating.
* depending on the model
Version 1 2013-06
Page 14

GB
5. Now set the grinding level of the beans on the grinder regulator. To do
this, press the grinder regulator down and turn it (g. 8).
• to the left in order to increase the neness level.
• to the right in for a coarser neness.
 As soon as you release the grinder regulator, it snaps upward
automatically.
6. Close the cover of the bean container again.
7.2 Making individual settings for coffee preparation
You can adapt the coffee preparation individually to your personal preferences.
For each coffee speciality, the preparation variants listed below are available.
Preparation variants
Espresso/coffee
Quantity of coffee
(espresso)
Quantity of coffee
(coffee)
Coffee strength very weak, weak,
Temperature coffee very low, low, normal,
20 – 50 ml
50 – 250 ml
normal, strong, very
strong
high, very high
Cappuccino/Latte macchiato
Quantity Coffee 20 – 250 ml
Quantity Milk 10 – 30 seconds
Coffee strength very weak, weak,
Temperature coffee very low, low, normal,
Pause time
(only Latte macchiato)
White coffee
Quantity Coffee 20 – 250 ml
Quantity Milk 10 – 30 seconds
Coffee strength very weak, weak,
Temperature coffee very low, low, normal,
Milk/milk froth
Quantity Milk 10 – 30 seconds
normal, strong, very
strong
high, very high
15, 30, 45 seconds
normal, strong, very
strong
high, very high
14
Version 1 2013-06
Page 15

GB
NOTE!
– The total ll quantity of the cup for beverages
prepared with milk consists of the coffee quantity plus the milk/milk froth quantity! Take this
into account when selecting your cup.
– The pause time inuences the layering for a
latte macchiato.
7.2.1 Storing personal settings
Here’s how to programme your own settings for coffee preparation:
1. Press the menu button and use the arrow keys to select the menu
option
Bev. sett. menu.
 The display shows a list with the coffee specialities.
2. Select the coffee speciality whose settings you would like to change.
 The display shows the setting possibilities for the selected coffee
speciality (see previous table: "Preparation variants").
3. Select the setting that you would like to change.
 The display shows a bar with the currently selected setting.
4. Use the arrow keys to change the setting and
• conrm the change by pressing OK, or
• cancel the change with the button under the display eld
5. Then press the menu button to exit the menu.
 The display shows the "Beverage selection" view. The settings
are now saved. You can apply the settings by simply selecting the
symbol with the respective button (►"6.3 Preparing coffee
specialities").
7.2.2 Making personal settings quickly
(Quick Select)
You can also make the settings temporarily before the preparation:
1. In the "Beverage selection" view, press the button
•
to change the currently set coffee strength.
to change the currently set water quantity.
•
to change the currently set milk/milk foam quantity.
•
2. Select the desired setting using the arrow keys.
3. Press OK.
 The selected coffee speciality is prepared using the selected
settings. However, these settings are not saved.
7.3 Changing the device settings
7.3.1 Language
This is how to select the preferred language for the display.
1. Press the menu button and use the arrow keys to select the menu
option
device menu.
2. Then select the
language
menu option.
.
 The display shows the available languages.
3. Use the arrow keys to change the setting and
• conrm by pressing OK, or
• cancel the change with the button under the display eld
.
15
Version 1 2013-06
Page 16

GB
NOTE!
If you have accidentally selected the incorrect
language, you can reset the device to the factory
setting (►"7.3.5 Resetting the device in case of
incorrect language setting").
7.3.2 Water hardness
Select the water hardness according to the water hardness in your household. Depending on the setting, your appliance will inform you when it is time
to perform a descaling.
NOTE!
In order to operate your device optimally, set the
water hardness according to the specications of
your water utility. Use the included water test strip
to determine the water hardness.
Here's how to set the water hardness:
1. Press the menu button and use the arrow keys to select the menu
option
device menu.
2. Then select the
water hardness
menu option.
 The display shows:
hardness 4 Please select water hardness.
3. Use the arrow keys to change the setting and
• conrm by pressing OK, or
• cancel the change with the button under the display eld
.
7.3.3 Water lter
If you want to use a water lter, you must set the device accordingly.
The water lter improves the water quality and the appliance requires
less descaling if properly operated.
NOTE!
SEVERIN recommends the use of a SEVERIN
water lter for high water quality. The water lters
are effective for approx. 4 to 8 weeks before they
have to be changed.
This is how to set the device for the use of a water lter:
1. Press the menu button and use the arrow keys to select the menu
option
device menu.
2. Then select the
water filter
menu option.
 The display shows:
use water filter?
3. Use the arrow keys to select
•
Yes, if you want to insert a water lter in the water tank or
no, if you do not want to use a water lter
•
and press OK to conrm.
4. Follow the steps in section ►"8.2.6 Changing water lter.
7.3.4 Energy savings options
The appliance has an automatic power-off function. You can set this time
limit individually this way.
Here's how to set the energy savings options:
16
Version 1 2013-06
Page 17

GB
1. Press the menu button and use the arrow keys to select the menu
option
device menu.
2. Then select the
auto Power-off
menu option.
 The display shows the currently-set time for the automatic power-
off.
3. Use the arrow keys to change the setting and
• conrm by pressing OK, or
• cancel the change with the button under the display eld
7.3.5 Resetting the device
You can reset the device to the factory settings. All personal settings for
coffee preparation will be lost, and the device starts once again with the
commissioning (►„5. Switching on for the rst time").
Resetting the device via the menu
Here's how to reset the device to the factory settings:
1. Press the menu button and use the arrow keys to select the menu
option
device menu.
2. Then select the
factorY settings
menu option.
 The display shows:
reset to default
3. Press
• the button under the display eld
factory settings or
17
if you want to call up the
• the button under the display eld
if you want to keep your
personal settings.
 For a short while, the display shows the note:
device set to factorY defaults.
All programmed values are now reset. All basic settings must now
be adjusted again.
(►„5. Switching on for the rst time").
Resetting the device in case of incorrect language setting
If you have accidentally set an incorrect language and a resetting via the
.
menu is not possible, you can also reset the device to the delivery state as
follows:
1. Switch the appliance off.
2. Press the outer two buttons below the display and hold them down.
3. Switch the appliance on and continue to hold the buttons down until the
message
device set to factorY defaults
appears on the display.
 All programmed values are now reset. All basic settings must now
be adjusted again.
(►„5. Switching on for the rst time").
Version 1 2013-06
Page 18

GB
8. Maintenance
In order to enjoy your device for a long time and enjoy good coffee at any
time, you must clean the appliance regularly. Following is an overview of all
necessary cleaning activities. Some parts of the appliance are dishwashersafe or can be cleaned by hand, others are cleaned by the device itself
thanks to an appropriate cleaning programme.
Overview
daily
Empty and clean water tank, drip tray and grounds
container and clean coffee-milk dispenser and milk
foamer (►"8.1 Daily cleaning")
Rinse milk system
(►"8.2.2 Rinsing the milk system“)
Clean the milk system (►"8.2.3 Cleaning the milk
system")
when the device indicates
Run the cleaning program
(►"8.2.4 Cleaning program")
Descaling (►"8.2.5 Descaling")
Change water lter
(►"8.2.6 Changing the water lter")
weekly
Clean brewing unit
(►"8.3 Cleaning the brewing unit")
at the latest every 2 months
Change water lter
(►"8.2.6 Changing the water lter")
when necessary
Clean bean container
(►"8.4 Cleaning the bean container")
Dispose of the used milk tube and replace with a new
one.
Wipe the housing of the device with a damp soft cloth
without abrasives.
Maintenance tips
Your device informs you about important maintenance intervals via a message on the display (see overview). In this case, you can start the cleaning
programme directly:
• Press the button under the display eld
and perform the steps
described in the corresponding chapters of these instructions starting
with step 3.
• If you want to run the cleaning programme later, press the button under
the display eld
.
18
Version 1 2013-06
Page 19

GB
CAUTION!
If you do not run the cleaning program right away,
a warning symbol appears on the display as a reminder that you must still start a cleaning program.
You can continue to use the device without limitation after the display of a maintenance message.
However, the message will continue to be displayed
in order to remind you about the necessity of maintenance and to prevent damage to the device.
– Clean the machine as soon as you can.
NOTE!
Milk is a food that can spoil. For your health, you
should therefore always clean the milk unit as soon
as possible.
9. Remove the coffee-milk dispenser by pulling the whole part out of the
guide towards the bottom using the handles (g. 9).
10. Hold the milk frother nozzle at the supply connection and pull it out of
the coffee-milk dispenser towards the top (g. 10).
11. Clean all parts with clean water and mild detergent.
12. Put the drip tray (g. 11) and the other parts back together, and push the
drip tray and the coffee-milk dispenser back into the appliance.
NOTE!
– The drip tray including grounds container and
the coffee-milk dispenser can be put in the
dishwasher.
– The air valve (►g. 10a) may be cleaned with
a light circular motion, using the cleaning tool
provided.
8.1 Daily cleaning
Clean the water tank, the drip tray, the coffee-milk dispenser and the milk
frother every day.
1. Switch the appliance off and disconnect the mains plug.
2. Remove the water tank (and water lter if tted).
3. Clean the water tank with clean water and a mild detergent, and dry it
inside and outside with a lint-free cloth.
4. Re-insert the water lter if necessary.
5. Pull the drip tray out of the appliance.
6. If necessary, clean the interior of the appliance. Ensure, however, that it
has cooled down, is switched off and is disconnected from the mains.
7. Remove the grounds container and empty the coffee grounds.
8. Clean both parts and the cup tray with clear water and a mild detergent.
19
8.2 Cleaning programmes
The device has automatic cleaning programmes. These can be started from
the menu at any time.
8.2.1 Rinsing the device
The coffee system is rinsed automatically each time it is switched on/off in
order to guarantee evenly high quality of the coffee preparation. In addition,
you can manually start a rinsing cycle.
1. Press the menu button and use the arrow keys to select the menu
option
cleaning
2. Then select the
rinsing
menu option.
Version 1 2013-06
Page 20

GB
g. 10a
g. 9: Removing the coffee-milk dispenser g. 10: Removing the milk frother nozzle g. 11: Drip tray assembly
 The display shows:
rinsing
The rinsing is complete as soon as "Beverage selection" appears
again.
8.2.2 Rinsing the milk system
For hygienic reasons, as well as to ensure consistently high quality when
preparing milk coffee specialities, the milk system must be rinsed after each
cycle of use.
1. Press the menu button and use the arrow keys to select the menu
option
cleaning
2. Then select the
milk unit
menu option
20
 The display shows:
Please Place milk tuBe in water jar
3. Plug the milk tube onto the connection on the coffee-milk dispenser and
place the other end of the tube in a container lled with 200 ml clean,
cold water.
4. Press OK to conrm.
 The display shows:
Please Position container
5. Place a cup with a capacity of at least 200 ml on the cup tray below the
coffee-milk dispenser of the device and adjust the height of the coffeemilk dispenser to the cup height.*
6. Press OK to conrm.
* depending on the model
Version 1 2013-06
Page 21

GB
 The display shows:
milk unit
The rinsing of the milk system is complete as soon as "Beverage
selection" appears again.
8.2.3 Cleaning the milk system
The device has a milk cleaning programme that can remove any milk
residues with the SEVERIN milk system cleaner.
NOTE!
The cleaning process takes approx. 3 minutes.
1. Press the menu button and use the arrow keys to select the menu
option
cleaning
2. Select the
clean milk sYs.
menu option
 The display shows:
Please Place milk tuBe in cleaning liquid
3. Fill a container with 200 ml warm water and 20 ml SEVERIN milk
system cleanser. (mixing ratio 1:10)
4. Plug the milk tube onto the connection on the coffee-milk dispenser
and place the other end of the tube in the container lled with cleaning
solution.
5. Press OK to conrm.
 The display shows:
Please Position container
6. Place a cup with a capacity of at least 200 ml on the cup tray below the
coffee-milk dispenser of the device and adjust the height of the coffeemilk dispenser to the cup height.*
21
7. Press OK to conrm.
 The display shows:
CLEAN MILK SYS.
The cleaning of the milk system begins.
8. As soon as the command
Please Place milk tuBe in water jar
appears on the display, place the end of the milk tube in a container
lled with 200 ml clean, cold water.
9. Press OK to conrm.
 The display shows:
Please Position container
10. Empty the cup underneath and place it underneath the coffee-milk
dispenser of the device on the cup tray once again.
11. Press OK to conrm.
 The display shows:
rinsing
The rinsing of the milk system is complete once "Beverage
selection" appears again.
8.2.4 Cleaning programme
The device has a cleaning programme with which the coffee system can be
rinsed and cleaned intensively with a cleaning tablet.
NOTE!
If you carry out the cleaning program immediately
after the display of a cleaning message, steps 1
and 2 can be omitted.
1. Press the menu button and use the arrow keys to select the
cleaning
menu option.
* depending on the model
Version 1 2013-06
Page 22

GB
2. Then select the
cleaning
menu option
 The display shows:
Please fill water container
3. Fill the water tank with water up to the max. marking and place it on the
device.
4. Press OK to conrm.
 The display shows:
emPtY driP traY and grounds cont.
5. Remove the drip tray and empty it together with the grounds container.
6. Re-assemble all parts and push the drip tray back into the device.
7. Place a 500 ml container under the coffee-milk dispenser on the cup
tray.
8. Press the OK button.
 The display shows:
cleaning
9. Wait until the command
Please add cleaning taB
appears on the display, then open the powder chamber and insert the
cleaning tablet.
NOTE!
The SEVERIN cleaning tablets are optimally attuned to your device and can be purchased from
your SEVERIN dealer.
10. Close the powder chamber.
11. Press OK to continue.
 The display shows:
cleaning
NOTE!
The cleaning process can take as long as
15 minutes.
12. As soon as the command
emPtY driP traY and grounds cont.
appears on the display, repeat steps 5 and 6.
 The cleaning programme is complete as soon as the "Beverage
selection" view is displayed again.
8.2.5 Descaling
Depending on the water hardness of the drinking water used and the appli-
cation of a water lter, the appliance must be descaled at particular intervals
so that no scale builds up in the system.
CAUTION!
Due to unsuitable descaler and if the descaling
is not performed regularly, the device can be
damaged.
– Use SEVERIN descaler, never vinegar or other
acidic substances.
– Descale regularly.
22
Version 1 2013-06
Page 23

GB
NOTE!
– The descaling process can take as long as
45 minutes.
– No warranty is made for damage that is due to
devices which have not been descaled regularly.
– If you descale immediately after the display
of a cleaning message, steps 1 and 2 can be
omitted.
– If you use a water lter, remove it before
descaling.
1. Press the menu button and use the arrow keys to select the menu
option
cleaning
2. Then select the
descaling
menu option
 The display shows:
emPtY driP traY and grounds cont.
3. Remove the drip tray and empty it together with the grounds container.
4. Re-assemble all parts and push the drip tray back into the appliance.
5. Press OK to continue.
 The display shows:
Please add descaling solution
6. Fill the water tank halfway with lukewarm tap water and place the descaling tablets in the water tank.
7. Wait until the descaling tablets are completely dissolved, and then place
the water tank on the appliance.
8. Press OK to continue.
23
 The display shows:
descaling
9. As soon as the command
emPtY driP traY and grounds cont.
appears on the display, empty the drip tray and grounds container
again. Clean the parts with clear tap water and reinsert them into the
appliance.
10. Press OK to continue.
 The display shows:
rinse container and fill with water
11. Rinse the water tank thoroughly with clear tap water, then ll it to the top
and put it back on the appliance.
12. Press OK to continue.
 The display shows:
descaling
Descaling is complete as soon as "Beverage selection" appears
again.
8.2.6 Changing the water lter
For constant water quality, the water lter must be changed regularly.
NOTE!
If you change the water lter immediately after the
display of a cleaning message, steps 1 and 2 can
be omitted.
1. Press the menu button and use the arrow keys to select the menu
option
cleaning
2. Then select the
water filter
menu option
Version 1 2013-06
Page 24

GB
g. 12: Removing the water lter g. 13: Inserting the water lter
 The display shows:
insert new water filter
3. Remove the water lter.
4. Fill the water tank halfway with cold drinking water.
5. Insert a new water lter (g. 13).
6. Replace the water tank on the appliance.
7. Press OK.
 The display shows:
rinsing
 The lter change is complete as soon as the "Beverage selection"
view is displayed again.
24
8.3 Cleaning the brewing unit
In addition to an integral cleaning programme, the appliance also offers you
the opportunity to clean the brewing unit manually. For this purpose, the
brewing unit can be removed as follows:
1. Switch the appliance off and disconnect the plug.
2. Remove the water tank and pour out the remaining water.
3. Remove the cover of the brewing unit on the rear of the appliance by
pressing down on the tabs with your thumbs and pulling towards you
(g. 14).
 The brewing unit is now visible.
4. Pull the red lever of the brewing unit upwards and pull the brewing unit
downwards at an angle out of the machine (g. 15).
5. Clean the brewing unit under running water.
Version 1 2013-06
Page 25

GB
1.
2.
1.
2.
1.
2.
g. 14: Removing the cover of the brewing unit g. 15: Pulling out the brewing unit g. 16: Inserting the brewing unit
CAUTION!
Incorrect handling of the brewing unit can cause
damage to the brewing unit.
– Do not take the brewing unit apart or adjust it.
– Push the brewing unit in place from below.
6. Insert the brewing unit into the machine and push it in until, the locking
latches are aligned. (g. 16).
7. Press the red lever of the brewing unit down. If the lever does not move,
check the position.
8. Close the brewing unit again with the cover.
8.4 Cleaning the bean container
The bean container must be cleaned regularly to prevent contamination.
Ideally this is done when the supply of beans is used up and before new
beans are added.
CAUTION!
There is a danger of damage to the device if
objects fall into the bean feed.
– Switch the device off before starting cleaning.
– Do not let any objects fall into the bean feed.
Here's how to clean the bean container:
1. Switch the appliance off and disconnect the plug.
2. Wipe the bean container with a dry, lint-free cloth.
25
Version 1 2013-06
Page 26

GB
9. Troubleshooting
In addition to the cleaning messages, the display also shows an appropriate
message in case of a technical fault.
WARNING!
When opening a defective unit, there is a danger
of injury.
– Never repair a defective device yourself. In
case of a technical defect, contact SEVERIN
customer service.
Display Cause Remedy
Please
clean Brewing unit.
check Brewing unit and
insert.
sYstem
error.
Please refill coffee
Beans.
The brewing unit
must be cleaned.
The brewing unit is
not inserted correctly.
A system error has
occurred.
The bean container is
empty.
Clean the brewing unit (►"8.3
Cleaning the brewing unit").
Insert the brewing unit (►"8.3
Cleaning the brewing unit").
Switch the unit off for several
seconds, then turn it on again.
Disconnect the unit from the
mains for several seconds.
If the problem persists, contact
our customer service.
Fill the bean container with
beans
(►"6.3 Preparing coffee
specialities").
Display Cause Remedy
The grind mechanism
is blocked.
Set the grinder regulator on
the coarsest neness (►”7.1
Setting the grinding neness”)
and prepare another coffee
speciality.
If this solves the problem, set
the desired neness again for
the next beverage.
If problem persists, contact
customer service.
Brewing unit
door oPen.
rinsing
necessarY.
Please
Press
ok-Button.
The door of the brewing unit is not closed.
After the cover of
the brewing unit has
been opened, rinsing
becomes necessary.
Properly close the door of the
brewing unit.
Press OK; rinsing will start
automatically.
26
Version 1 2013-06
Page 27

GB
Display Cause Remedy
water suPPlY error.
There is not enough
water in the brewing
unit.
Make sure the water tank is
rmly tted.
Clean the water tank and
especially its water discharge
on the oor.
Fill the water tank halfway
with cold drinking water and if
necessary, remove the water
lter and replace it.
‘Bleed’ the water lter by lling
it with water and replacing it in
the tank.
If problem persists, also clean
the brewing unit (►"8.3
Cleaning the brewing unit").
grinder
Blocked.
Please
contact
service.
The grinder is
blocked.
Set the grinder regulator on
the coarsest neness (►"7.1
Setting the grinding neness")
and prepare another coffee
speciality.
If this solves the problem, set
the desired neness again for
the next beverage.
If problem persists, contact
customer service.
9.1 Display device information
For questions to customer service in case of a fault, you can display various
device information on the display.
This is how to display device information:
1. Press the menu button and use the arrow keys to select the menu
option
information
2. If you want to have the number of beverages prepared with the device
displayed, select the
quantitY info
menu option.
 The display shows the number of coffee specialities prepared
since the commissioning of the device.
3. If you want to have information about the device type displayed, select
the
device info
menu option.
 The display shows the serial number of the device, the device
version and the software version.
27
Version 1 2013-06
Page 28

GB
10. International warranty for fully automatic
coffee makers
10.1 The SEVERIN manufacturer’s warranty
By way of this warranty, SEVERIN guarantees that the product, which has
been designed and built exclusively for home use, is free of defects in materials and workmanship. The warranty period is 24 months, beginning on the
date of purchase by the end-customer. If problems are experienced during
the warranty period that are attributable to defects in materials or workmanship, the product or the defective components will be repaired or replaced
by the SEVERIN service department, international SEVERIN branches, or
authorised SEVERIN service locations or service dealers in accordance with
the terms and conditions set forth below.
10.2 Handling of warranty claims
If your SEVERIN fully automatic coffee maker requires warranty service,
please always phone the respective SEVERIN service centre rst. Specially
trained experts are on hand there to take your call and deal with your spe-
cic case quickly and professionally. We will strive to process your warranty
claim to your complete satisfaction. The telephone number for your SEVERIN
service centre can be found on the inside of the brewing unit cover.
If the appliance is taken out of the country in which it was purchased, warranty claims can still be handled by an authorised SEVERIN service location.
10.3 Terms and conditions of warranty
• The SEVERIN warranty is valid only if the purchase date and appliance
type can be veried from a purchase receipt.
• During the warranty period, SEVERIN will repair any defects in the product,
but is entitled to choose between repair, replacement of defective parts, or
replacement of the whole appliance.
• The warranty does not cover damage or defects caused by improper use,
improper electrical connection, attempted repairs by unauthorised individuals, or failure to follow the operating instructions. Also, the warranty does not
apply in the event that SEVERIN operating or maintenance instructions are
not followed and/or materials (water lters, cleaning products) are used that
do not comply with the original specications. The warranty does not cover
parts subject to wear (e.g. seals, grinding discs, valves) or damage to the
grinding mechanism caused by foreign objects (e.g. stones, paper clips), or
damage caused by accidents, lightning, water or re, insufcient ventilation,
or other damage over which SEVERIN has no control.
• SEVERIN service is available (both during the warranty and after its expiry)
in all countries in which SEVERIN ofcially sells the product.
• The warranty becomes invalid if the coffee maker needs to be modied or
adjusted to enable it to be used in a country other than the one for which it
was manufactured. This also means that the warranty does not cover the
repair of damage resulting from any such modications
28
Version 1 2013-06
Page 29

GB
11. Disposal
CAUTION!
Incorrect disposal can cause environmental damage.
– The device contains electronic components
and it therefore must not be disposed of in
household rubbish.
– For disposal, heed the local disposal regula-
tions and, in case of doubt, ask the responsible
authorities about proper disposal.
• Dispose of packaging materials that are no longer needed according to
local regulations.
• Dispose of the water lter in the normal household garbage.
• At the end of its life, hand the appliance over to a collection point for
electrical scrap.
12. Tips for perfect coffee enjoyment
Situation Tip
What kinds of coffee can I use? All types of coffee that are not
treated after roasting (e.g. with
sugar).
My espresso/coffee does not have
any foam.
My espresso tastes bitter. Use a different type of coffee.
Use the right beans.
The coffee is old. Use fresh coffee
beans.
Set a higher neness (►"7.1 Adjusting the grinding neness").
Increase the quantity of coffee
(►"6.3.1 Preparing coffee or
espresso").
Reduce the strength of the coffee
(►"6.3.1 Preparing coffee or
espresso").
Set a higher neness (►"7.1
Adjusting the grinding neness").
Set a lower brewing temperature
(►"7.2 Making individual settings
for coffee preparation").
29
Version 1 2013-06
Page 30

GB
Situation Tip
My espresso tastes sour. Use a different type of coffee.
Reduce the strength of the coffee
(►"6.3.1 Preparing coffee or
espresso").
Clean the water tank and ll it with
fresh water.
Set a higher brewing temperature
(►"7.2 Making individual settings
for coffee preparation").
My espresso tastes bland. Set a coarser neness
(►"7.1 Adjusting the grinding neness").
Increase the quantity of coffee
(►"6.3.1 Preparing coffee or
espresso").
The coffee ows very slowly out of
the coffee-milk dispenser.
Set a coarser neness
(►"7.1 Adjusting the grinding ne-
ness").
Clean the coffee-milk dispenser
(►"8.1 Daily cleaning").
Descale the device
(►"8.2.5 Descaling").
What type of milk is best for frothing?
Types of milk with a high protein
content. The fat content does not
matter. The milk should be slightly
cooled.
Situation Tip
My milk does not foam. Clean the milk system
(►"8.2.3 Cleaning the milk
system").
Check that the air valve in the milk
frother nozzle is correctly tted.
(►g. 10a).
Clean the air valve
(►8.1 Daily cleaning ).
When should I insert the water
lter?
Recommendation: starting at
12 °dH
30
Version 1 2013-06
Page 31

GB
13. Licence provisions
FreeRTOS
This product contains software which is linked to FreeRTOS V6.0.1 - Copyright (C) 2009 Real Time Engineers Ltd. FreeRTOS V6.0.1 is licensed by the
modied GNU General Public Licence (GPL) Version 2 (see the licensing
section of http://www.FreeRTOS.org for full details). FreeRTOS V6.0.1
source code can be provided upon request to our Customer Service Center
(email address) until October 2014. A charge for performing the request may
apply.
AVR-Libc
Portions of avr-libc are Copyright (c) 1999-2010 Werner Boellmann, Dean
Camera, Pieter Conradie, Brian Dean, Keith Gudger, Wouter van Gulik,
Bjoern Haase, Steinar Haugen, Peter Jansen, Reinhard Jessich, Magnus
Johansson, Harald Kipp, Carlos Lamas, Cliff Lawson, Artur Lipowski, Marek
Michalkiewicz, Todd C. Miller, Rich Neswold, Colin O’Flynn, Bob Paddock,
Andrey Pashchenko, Reiner Patommel, Florin-Viorel Petrov, Alexander
Popov, Michael Rickman, Theodore A. Roth, Juergen Schilling, Philip
Soeberg, Anatoly Sokolov, Nils Kristian Strom, Michael Stumpf, Stefan
Swanepoel, Helmut Wallner, Eric B. Weddington, Joerg Wunsch, Dmitry
Xmelkov, Atmel Corporation, egnite Software GmbH, The Regents of the
University of California.
All rights reserved.
Redistribution and use in source and binary forms, with or without modication, are permitted provided that the following conditions are met:
* Redistributions of source code must retain the above copyright notice, this
list of conditions and the following disclaimer.
* Redistributions in binary form must reproduce the above copyright notice,
this list of conditions and the following disclaimer in the documentation and/
or other materials provided with the distribution.
* Neither the name of the copyright holders nor the names of contributors
may be used to endorse or promote products derived from this software
without specic prior written permission.
THIS SOFTWARE IS PROVIDED BY THE COPYRIGHT HOLDERS AND
CONTRIBUTORS “AS IS” AND ANY EXPRESS OR IMPLIED WARRANTIES, INCLUDING, BUT NOT LIMITED TO, THE IMPLIED WARRANTIES
OF MERCHANTABILITY AND FITNESS FOR A PARTICULAR PURPOSE
ARE DISCLAIMED. IN NO EVENT SHALL THE COPYRIGHT OWNER OR
CONTRIBUTORS BE LIABLE FOR ANY DIRECT, INDIRECT, INCIDENTAL,
SPECIAL, EXEMPLARY, OR CONSEQUENTIAL DAMAGES (INCLUDING,
BUT NOT LIMITED TO, PROCUREMENT OF SUBSTITUTE GOODS OR
SERVICES; LOSS OF USE, DATA, OR PROFITS; OR BUSINESS INTERRUPTION) HOWEVER CAUSED AND ON ANY THEORY OF LIABILITY,
WHETHER IN CONTRACT, STRICT LIABILITY, OR TORT (INCLUDING
NEGLIGENCE OR OTHERWISE) ARISING IN ANY WAY OUT OF THE USE
OF THIS SOFTWARE, EVEN IF ADVISED OF THE POSSIBILITY OF SUCH
DAMAGE.
31
Version 1 2013-06
Page 32

www.severin.com
© 2013 SEVERIN Elektrogeräte GmbH
 Loading...