

Page 1

Gebrauchsanweisung
Kühl-Gefrierkombination
쮕
Instructions for use
Mode d'emploi
Gebruiksaanwijzing
Instrucciones de uso
Manuale d’uso
Brugsanvisning
Bruksanvisning
Käyttöohje
Instrukcja obsługi
Oδηγίε χρήσεω
Руководство по
эксплуатации
Fridge/freezer
Réfrigérateur/congélateur
Koelkast/Vriezer
Frigorífico/Congelador
Frigorífico/Congelador
Køle-/fryseskab
Kylskåp/Frys
Jääkaappi/pakastin
Lodówko-zamrażarka
Ψυγείο/Καταψύκτη
Холодильник-морозильник
FIN
ཚ
ও
RUS
Page 2

Lieber Kunde!
Sie haben sich für ein SEVERIN-Qualitätsprodukt entschieden, vielen
Dank für Ihr Vertrauen!
Seit 1952 werden Elektrogeräte der Marke SEVERIN produziert. Durch
diese jahrzehntelange Erfahrung und mehrere modernste
Produktionsstätten wird der hohe Qualitätsstandard der Produkte
garantiert.
Mit über 160 verschiedenen Produkten bietet SEVERIN wie kaum ein
anderer Hersteller dieser Branche ein nahezu komplettes Sortiment im
Bereich Elektrokleingeräte an.
So umfasst das SEVERIN-Sortiment neben den traditionellen
Küchengeräten wie Kaffeeautomaten, Toaster, Kochplatten oder
Waffelautomaten auch vielseitige Grillgeräte, Produkte für die Haarpflege
sowie verschiedene Heizgeräte und Ventilatoren.
Jedes Gerät, das die Marke SEVERIN trägt, wurde mit Sorgfalt hergestellt
und geprüft.
Bitte lesen Sie diese Gebrauchsanweisung sorgfältig durch, bevor Sie Ihr
Gerät in Betrieb nehmen.
Wir wünschen Ihnen an Ihrem SEVERIN-Gerät viel Freude!
Geschäftsleitung und Mitarbeiter
der SEVERIN-Unternehmen
Aktion zum Schutz der Umwelt:
Nehmen auch Sie aktiv am Umweltschutz teil.
Papier und Kartons, aber auch Glas, Kunststoff und Metalle sind wertvolle Rohstoffe, die wieder
aufbereitet werden können.
Achten Sie deshalb auf die örtlichen Sammelstellen, denn der sparsame Umgang mit Rohstoffen ist
aktiver Umweltschutz.
2
Page 3
쮕
Liebe Kundin, lieber Kunde,
jeder Benutzer muss vor dem Gebrauch die Gebrauchsanweisung aufmerksam durchlesen.
Anschluss
Das Gerät nur an eine vorschriftsmäßig installierte Schutzkontaktsteckdose anschließen. Die
Netzspannung muss der auf dem Typenschild des Gerätes angegebenen Spannung entsprechen. Das
Gerät entspricht den Richtlinien, die für die CE-Kennzeichnung verbindlich sind.
Das Gerät nicht an Wechselrichter oder zusammen mit anderen Geräten über ein ●
Verlängerungskabel anschließen.
Die Anschlussleitung sollte nicht die Rückseite, wie z.B. den Wärmetauscher berühren, um ●
eventuelle Vibrationsgeräusche zu vermeiden.
Allgemein
Das Gerät ist ein Kompressorkühlgerät mit 2 Kühlbereichen, welches für kurzfristiges Aufbewahren
von Lebensmitteln im Kühlteil und längerfristiges Aufbewahren im Gefrierteil geeignet ist.
Das Gerät ist eingeteilt in die Klimaklasse “N, ST” und ist für die Nutzung im Haushaltsbereich
vorgesehen. Das Gerät erfüllt alle Anforderungen, die an Haushaltskühlgeräte gestellt werden.
Sicherheitshinweise
Zur Vermeidung von Personen- und Sachschäden, das Gerät nur verpackt transportieren und ●
mit zwei Personen aufstellen.
Das Gerät enthält das umweltfreundliche, jedoch brennbare Kältemittel ●
Isobutan (R600a). Daher ist darauf zu achten, dass das Kältesystem beim
Transport und auch nach Aufstellung des Gerätes geschützt wird. Bei
Beschädigung des Systems darf das Gerät nicht in Betrieb genommen
werden. Offenes Feuer oder Zündquellen in der Nähe des Kältemittels
entfernen und den Raum gut lüften.
Warnung! ● Kühlkreislauf nicht beschädigen. Herausspritzendes Kältemittel kann zu
Augenverletzungen führen oder sich entzünden.
Warnung! ● Belüftungsöffnungen der Geräteverkleidung oder des Aufbaus von Einbaumöbeln
nicht verschließen. Es muss eine ausreichende Luftzirkulation gewährleistet sein.
Warnung! ● Zum Beschleunigen der Abtauung keine andere mechanischen Einrichtungen oder
sonstigen künstlichen Mittel, z.B. Heizgeräte, verwenden, als in dieser Anleitung beschriebenen.
Nehmen Sie nicht das Eis zu sich, das Sie aus dem Gerät entfernt haben. ●
Warnung! ● Keine elektrischen Geräte (z.B. Eisbereiter usw.) innerhalb des
Lebensmittellagerraumes betreiben, die nicht in der Anleitung beschrieben sind.
Vor dem Anschließen des Gerätes ist zu überprüfen, ob das Gerät und die Netzanschlussleitung ●
keine Transportschäden aufweisen.
Überprüfen Sie die Anschlussleitung regelmäßig auf Beschädigungen. Im Falle einer ●
Beschädigung darf das Gerät nicht benutzt werden.
Keine Elektrogeräte auf der Abstellfläche betreiben, um Brandgefahren zu vermeiden. Stellen Sie ●
auch keine Flüssigkeitsbehälter auf das Gerät, damit eventuell auslaufende Flüssigkeiten die
elektrische Isolierung nicht beeinträchtigen.
Nur für den Haushalt übliche Lebensmittel im Gerät lagern. ●
Kühl-Gefrierkombination
3
Page 4
Hochprozentigen Alkohol nur dicht verschlossen und stehend lagern. ●
Keine überlagerten Lebensmittel verzehren. Sie können zu einer Lebensmittelvergiftung führen. ●
Bereits aufgetaute Lebensmittel nicht erneut einfrieren.
Ablagen, Fächer, Tür usw. nicht als Trittfläche oder zum Aufstützen missbrauchen. ●
Im Geräteinnenraum nicht mit offenem Feuer oder Zündquellen hantieren. ●
Im Gefrierteil sind keine Glasflaschen mit gefrierbaren Flüssigkeiten oder mit ●
kohlensäurehaltigen Flüssigkeiten aufzubewahren, da diese während des Gefrierens zerplatzen
können.
Netzstecker ziehen, ●
bei Störungen während des Betriebes, vor dem Abtauen des Gerätes vor jeder Reinigung. -
Personen (einschließlich Kinder), die aufgrund ihrer physischen, sensorischen oder geistigen ●
Fähigkeiten oder ihrer Unerfahrenheit oder Unkenntnis nicht in der Lage sind, das Gerät sicher
zu benutzen, sollten dieses Gerät nicht ohne Aufsicht oder Anweisung durch eine verantwortliche
Person benutzen.
Kinder sollten beaufsichtigt werden, um sicherzustellen, dass sie nicht mit dem Gerät spielen. ●
Sind Reparaturen oder Eingriffe am Gerät erforderlich, müssen diese von einem autorisierten ●
Kundendienst durchgeführt werden, da Sicherheitsbestimmungen zu beachten sind und um
Gefährdungen zu vermeiden. Dies gilt auch für den Austausch der Anschlussleitung.
Technische Änderungen behalten wir uns vor. ●
Ist das Gerät für längere Zeit außer Betrieb, sollten die Gerätetüren geöffnet bleiben. ●
Bei Verkauf, bei Übergabe oder Abgabe zur Wiederverwertung ist auf das Treibmittel ●
Zyklopentan in der Isolation sowie das Kältemittel R 600 a hinzuweisen.
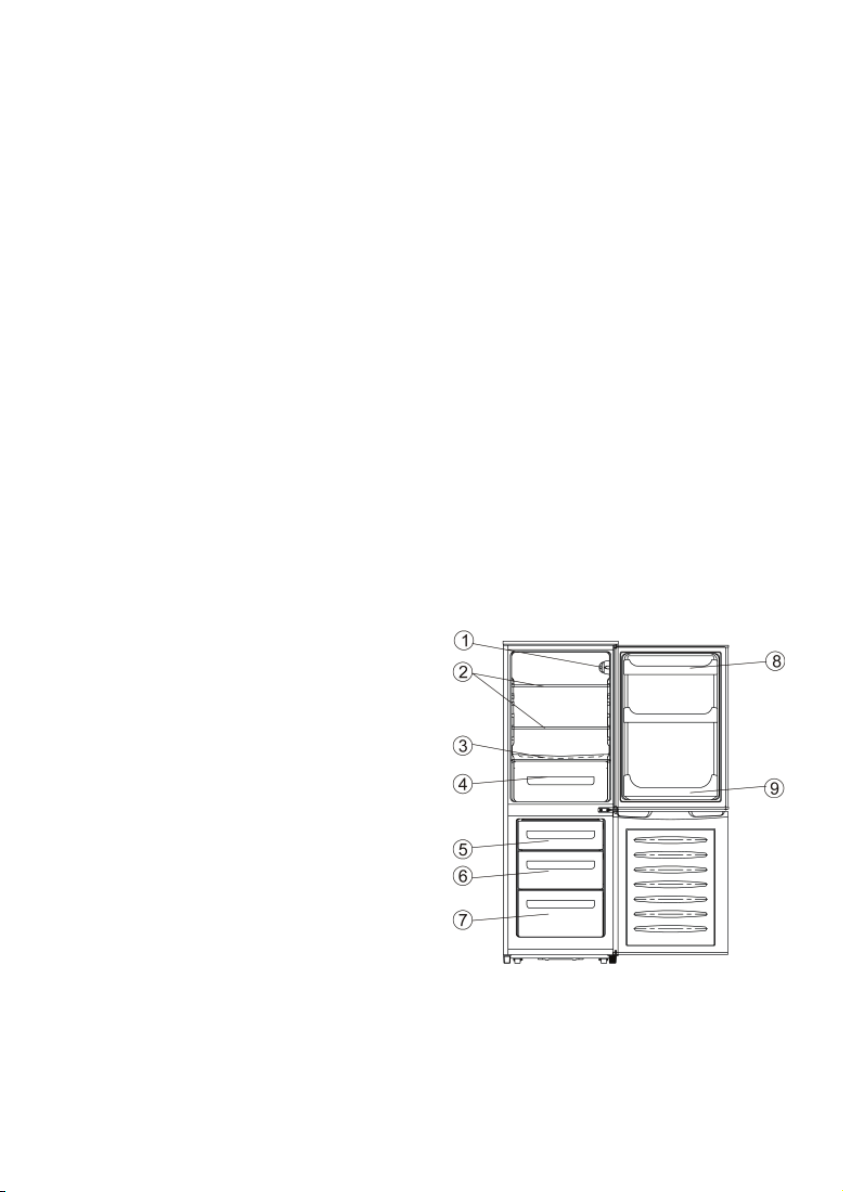
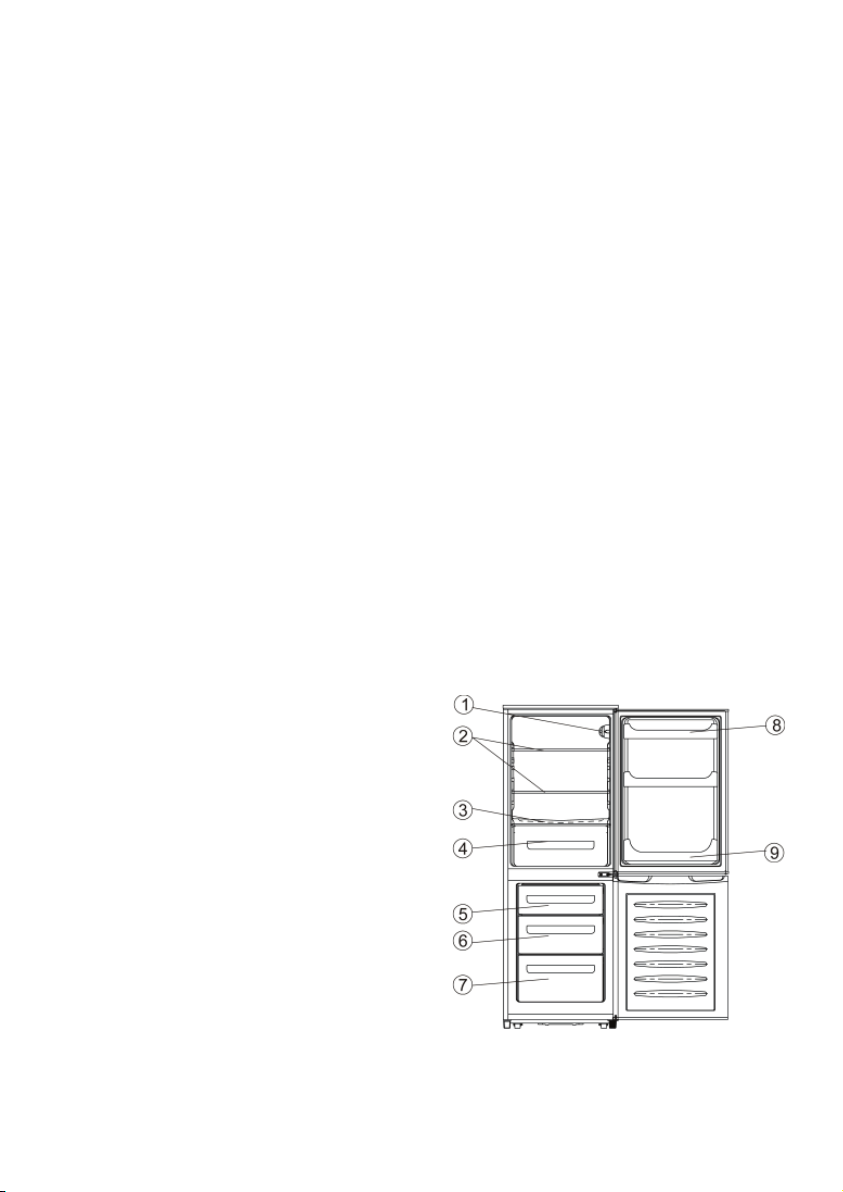
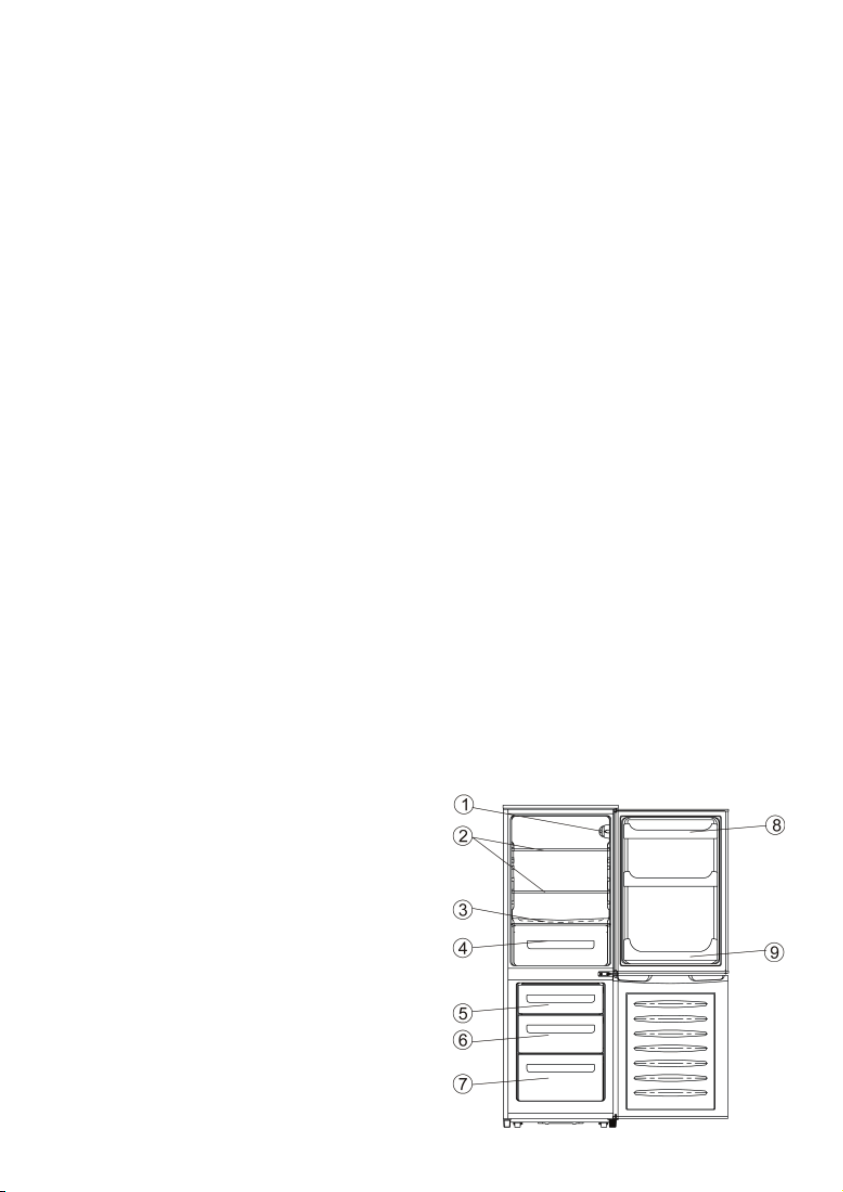
Aufbau
Das Gerät besteht aus zwei Teilen: Gefrierteil und
Kühlteil.
1. Temperaturregler und Innenbeleuchtung
2. Ablageflächen (höhenverstellbar)
3. Ablagefläche
4. Frischefach für Obst oder Gemüse
5. Schnellgefrierfach
6. Gefrierfach
7. Gefrierfach
8. Türablagen
9. Flaschenfach
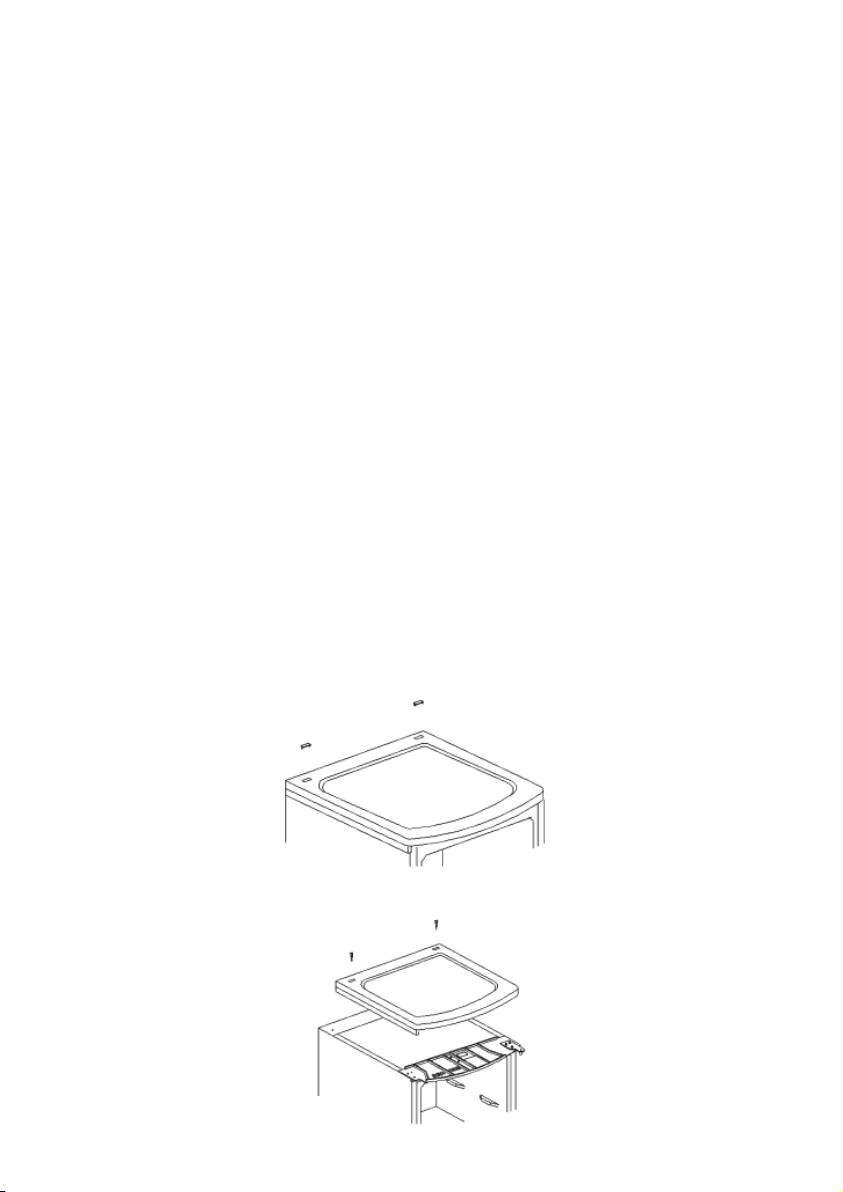
Vor Inbetriebnahme
Entfernen Sie sämtliches Verpackungsmaterial inkl. der Klebebänder aus dem Gerät. –
Achtung! – Halten Sie Kinder fern von Verpackungsmaterial. Es besteht u.a. Erstickungsgefahr!
Neigen Sie beim Aufstellen den Vorderteil des Kühlschrankes ein wenig nach hinten. Dann –
können Sie ihn auf den Transportrollen leicht an den gewünschten Platz rollen.
Entsorgen Sie die Verpackung fachgerecht. –
Vor dem Anschließen des Gerätes ist zu überprüfen, ob das Gerät und die Netzanschlussleitung ●
keine Transportschäden aufweisen.
4
Page 5
Gerät wie unter – Reinigung und Abtauen beschrieben reinigen.
Aufstellung
Für die Aufstellung des Gerätes sollte ein trockener und gut gelüfteter Raum ausgesucht werden. Das
Gerät kann bei Umgebungstemperaturen von 16 bis 38 °C und einer Luftfeuchtigkeit von max. 70 %
betrieben werden. Es ist vor direkter Sonneneinstrahlung zu schützen und sollte nicht in der Nähe
von Wärmequellen (Ofen, Radiator usw.) aufgestellt werden.
Die Rückseite und die Seitenteile müssen einen Abstand von 10 cm zur Wand haben. –
Das Gerät darf nicht in einem Schrank eingebaut werden. Die Montage des Gerätes direkt unter
einer Platte oder einem Schrank ist nicht erlaubt.
Die Tür muss sich in einem Winkel von bis zu 160° öffnen lassen.
Unebenheiten des Bodens können durch die justierbaren Füße ausgeglichen werden, damit eine
sichere Standfestigkeit gegeben ist. Damit sich die Türen des Gerätes von selbst schließen, muss das
Gerät so aufgestellt werden, dass es eine leichte Neigung nach hinten hat. Achten Sie beim Einstellen
jedoch darauf, dass die beiden vorderen Füße gleichhoch sind.
Lüftung
Die hinter dem Gerät aufgewärmte Luft muss frei zirkulieren können. Aus diesem Grunde die
Luftzirkulation hinter dem Gerät nicht beeinträchtigen.
Türanschlag
Die Konstruktion des Kühlgerätes lässt es zu, dass die Tür bei Bedarf von Rechts- auf Linksanschlag
geändert werden kann.
Legen Sie hierzu das Gerät auf die Rückseite. Achten Sie auf eine weiche Unterlage, um
Beschädigungen der Kapillarrohre zu verhindern.
Achtung! Schalten Sie das Gerät vorher aus, indem Sie den Netzstecker aus der Steckdose ziehen.
1. Entfernen Sie die Schraubenabdeckungen.
2. Lösen Sie die Schrauben und entfernen den Deckel.
5
Page 6
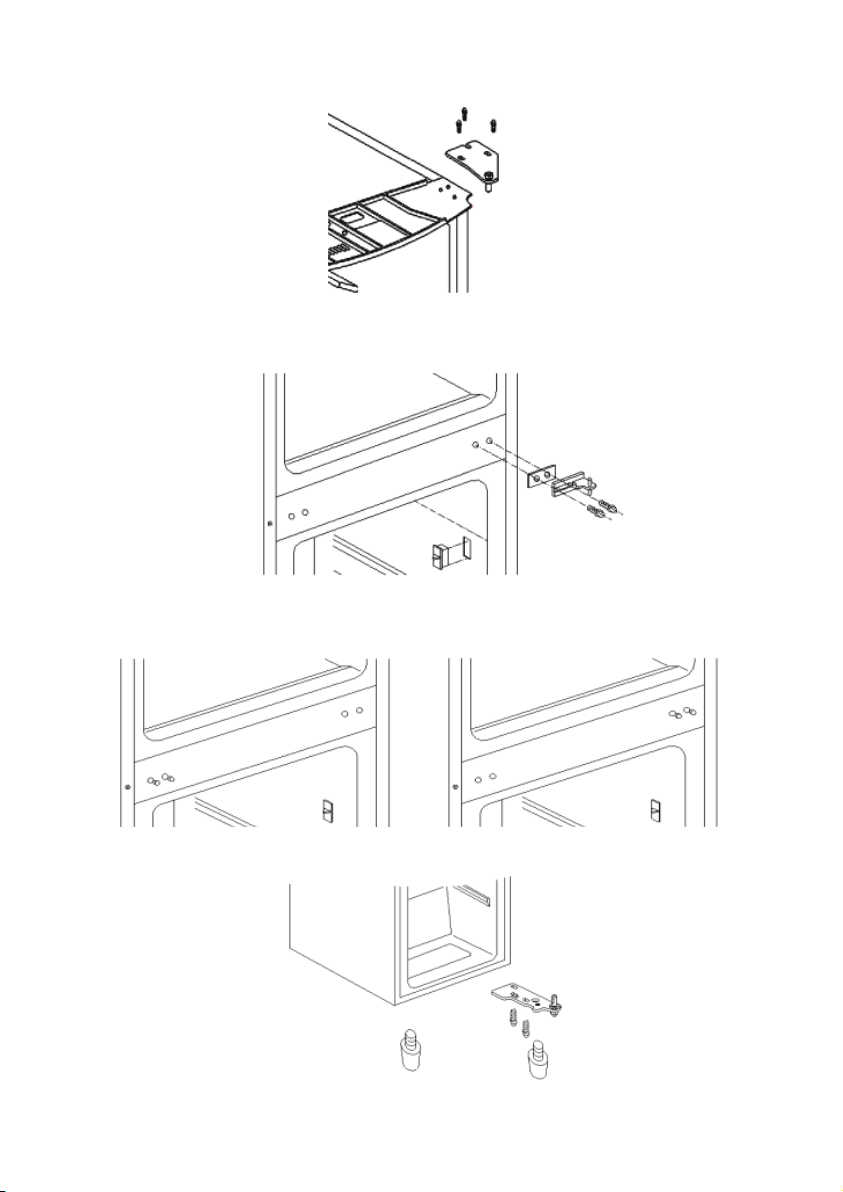
3. Entfernen Sie das obere Scharnier, indem Sie die drei Schrauben lösen. Entnehmen Sie die obere
Tür und legen Sie auf eine weiche Unterlage, damit sie nicht zerkratzt.
4. Lösen Sie die zwei Schrauben welche das mittlere Scharnier halten. Entnehmen Sie die untere
Tür und legen Sie ebenfalls auf eine weiche Unterlage. damit sie nicht zerkratzt.
5. Entnehmen Sie die beiden Scharnierlochabdeckungen auf der linken Seite und setzen Sie diese
auf der rechten Seite wieder ein.
6. Lösen Sie beide Stellfüße und die Schrauben des unteren Scharniers.
6
Page 7

7. Entfernen Sie das untere Scharnier. Drehen Sie das untere Scharnier um 180°. Schrauben Sie die
Achse ab und befestigen Sie diese auf der anderen Seite des Scharniers. Befestigen Sie das untere
Scharnier nun auf der linken Seite. Montieren Sie die beiden Stellfüße. Hängen Sie die Tür des
Gefrierteils auf die Achse des unteren Scharniers.
8. Drehen Sie das mittlere Scharnier um 180°. Wenn Sie die Achse des Scharniers in die
Achsöffnung der Tür des Gefrierteils gesteckt haben, fixieren Sie diese, indem Sie das mittlere
Scharnier am Gerät befestigen. Hängen Sie die Tür des Kühlteils auf die Achse des mittleren
Scharniers ein.
9. Lösen Sie die Schrauben auf der linken oberen Seite und montieren diese auf die rechte Seite des
Gerätes. Entnehmen Sie die Kunststoffecke von der linken Seite und setzen Sie diese auf der
rechten Seite wieder ein.
7
Page 8

10. Drehen Sie das obere Scharnier um 180°. Entfernen Sie die Achse und setzen Sie diese auf der
anderen Seite des Scharniers wieder ein.
11. Wenn Sie die Achse des Scharniers in die Achsöffnung der Tür gesteckt haben, fixieren Sie diese,
indem Sie das obere Scharnier am Gerät befestigen.
12. Setzen Sie den Deckel wieder auf das Gerät und verschrauben ihn. Anschließend die beiden
Schraubenabdeckungen wieder einsetzen.
Warnung !
Nachdem Sie das Gerät wieder aufgerichtet haben, darf es zwei Stunden nicht an das Stromnetz
angeschlossen werden.
Steuergeräte und Innenbeleuchtung
Das Gerät wird in Betrieb genommen, indem der Netzstecker in eine Steckdose gesteckt wird. Eine
komplette Ausschaltung erfolgt nur durch Ziehen des Netzsteckers.
Anmerkung: Der Temperaturregler schaltet in der Position „0“ nur den Kompressor ab.
Die Temperatur im Geräteinnenraum wird mit dem Temperaturreglerknopf eingestellt. Wir
empfehlen den Temperaturreglerknopf zunächst in der Stufe 3 einzustellen, mit einem Thermometer
die erreichte Temperatur im Innenraum zu ermitteln und falls erforderlich zu korrigieren. Wird der
Reglerknopf im Uhrzeigersinn gedreht, sinkt die Temperatur im Innenraum, umgekehrt steigt sie.
8
Page 9

Auswechseln der Kühlraumbeleuchtung
Schalten Sie das Gerät durch Ziehen des Netzsteckers aus. –
Lösen Sie die Schraube in der Lampenabdeckung. –
Schieben Sie die Abdeckung etwas nach hinten und nehmen sie ab. –
Ersetzen Sie die Glühbirne durch eine neue Glühbirne (max. 15 W, Sockel E 14). –
Setzen Sie die Abdeckung wieder ein und verschrauben sie. –
Stecken Sie den Netzstecker wieder in die Steckdose. –
Gefrieren und Lagerung von Lebensmitteln
In den Gefrierfächern können bei einer Gefriertemperatur von –18°C und niedriger Tiefkühlkost –
und Gefriergut mehrere Monate aufbewahrt, Eiswürfel bereitet und frische Lebensmittel
eingefroren werden.
Frische oder warme Lebensmittel dürfen nicht mit gefrorenem Gut zusammengelegt werden. –
Dies könnte dadurch angetaut werden.
Teilen Sie frische Lebensmittel (z.B. Fleisch, Fisch, Hackfleisch) vor dem Einfrieren in Portionen –
auf, die Sie auf einmal verwerten können.
Beim Lagern von fertiger Tiefkühlkost sind die Angaben auf den Packungen stets zu befolgen. –
Wenn keine Informationen angegeben sind, sollten Sie die Lebensmittel höchstens 3 Monate ab
Kaufdatum lagern.
Wenn Sie Tiefkühlkost kaufen, vergewissern Sie sich stets, dass diese ordnungsgemäß gefroren –
ist und dass die Verpackung im einwandfreien Zustand ist.
Damit die Qualität erhalten bleibt, sollte die Tiefkühlkost in geeigneten Behältern transportiert –
werden und so schnell wie möglich in das Gerät gelegt werden.
Wenn die Verpackung der Tiefkühlkost Feuchtigkeit aufweist bzw. auffällig gewölbt ist, besteht –
die Möglichkeit, dass diese bereits unsachgemäß gelagert wurde und der Inhalt verdorben ist.
Die Lagerdauer der Tiefkühlkost hängt von der Raumtemperatur, der Einstellung des –
Temperaturreglers, der Art der Kost, der Transportzeit zwischen Laden und Ihrem
Gefrierschrank und letztlich davon ab, wie oft Sie die Tür am Gerät öffnen. Befolgen Sie stets die
Anweisungen auf der Verpackung, und überschreiten Sie niemals die angegebene maximale
Mindesthaltbarkeit.
Als Verpackungsmaterial für Gefriergut können ungefärbte Kunststofffolien /-tüten, oder –
Aluminiumfolie verwendet werden. Die Verpackung vor dem Einfrieren gut entlüften und auf
Luftdichtheit prüfen. Wir empfehlen, jede Verpackung mit einem Etikett zu versehen, auf der
Inhalt, Einfrierdatum und Haltbarkeitsdatum angegeben sind. Legen Sie keine unverpackten
Nahrungsmittel ins Gefrierfach.
Die Gefrierzeit verkürzt sich, wenn die einzufrierenden Lebensmittel in kleine Portionen geteilt –
werden.
Frieren Sie keine kohlesäurehaltigen Getränke, keine warmen Nahrungsmittel oder Flüssigkeiten –
in Glasbehältnissen oder Flaschen ein.
Frische Lebensmittel sollen möglichst schnell bis auf den Kern eingefroren werden, damit der –
Nährwert, die Vitamine usw. nicht verloren gehen. Legen Sie deshalb die zum Einfrieren
vorbereiteten Nahrungsmittel in ein oder zwei Reihen ins Schnellgefrierfach. Bringen Sie diese
nicht mit bereits eingefrorenen Lebensmitteln in Berührung. Das Gefriervermögen von 3 kg pro
Tag nicht übersteigen. Stellen Sie den Temperaturregler auf Stufe 7 ein. Legen Sie nach Ablauf
von 24 Stunden die eingefrorenen Nahrungsmittel in die Gefrierfächer und drehen Sie den
Temperaturregler zurück in die ursprüngliche Position.
Tauen Sie die gefrorenen Produkte im Kühlteil auf. Die Lebensmittel bewahren, wenn sie –
9
Page 10
langsam auftauen, ihren Geschmack besser und die von ihnen ausgestrahlte Kälte kann zur
Aufrechterhaltung der vorgesehenen Temperatur im Kühlteil verwendet werden.
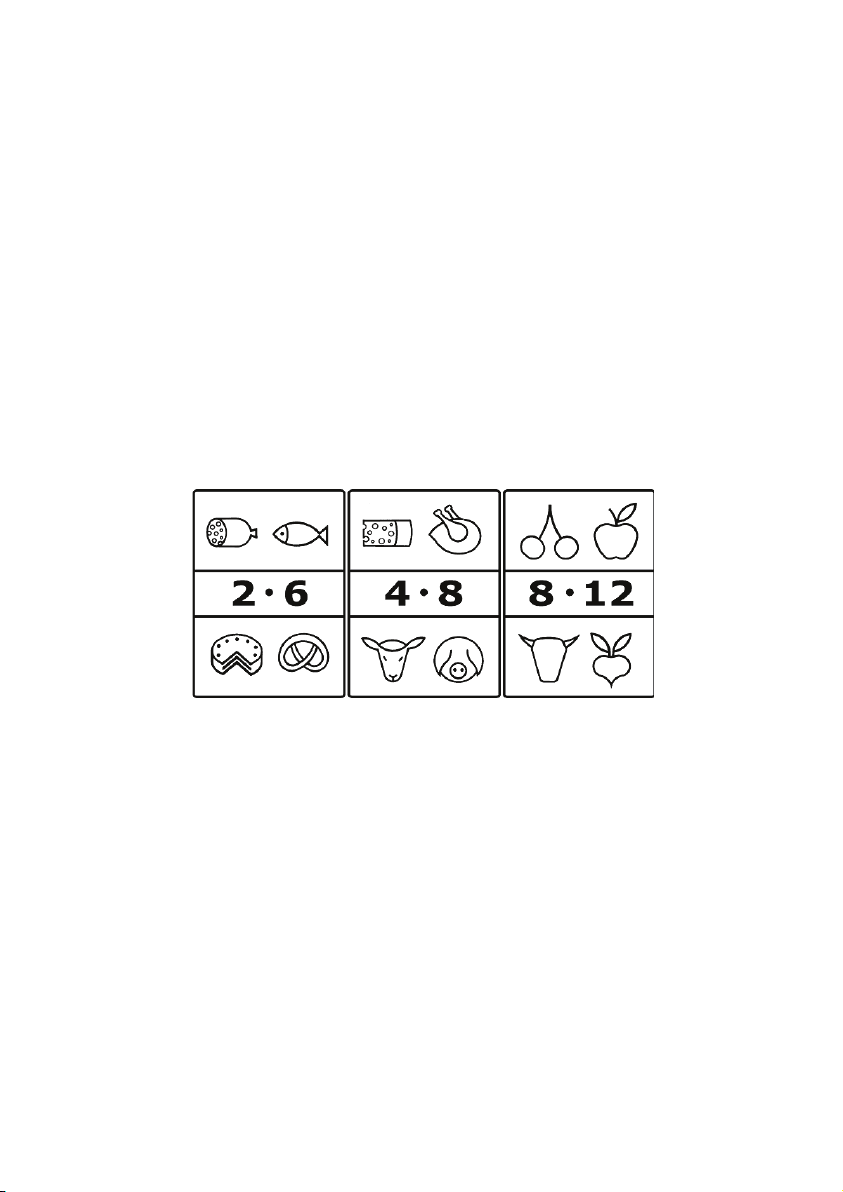
Haltbarkeitsdaten für gefrorene Lebensmittel sind in Monaten in der Tabelle angegeben. Das
Gefriergut nicht länger als die angegebene Zeit im Gefrierschrank aufbewahren. Beachten Sie auch
die Angaben des Herstellers der Nahrungsmittel.
Die Aufbewahrungszeit verringert sich, wenn die Innenraumtemperatur, z.B. aufgrund einer –
Störung, angestiegen ist.
Kühlraum
Die Temperatur im Kühlraum hängt u.a. von der Umgebungstemperatur, von der Stellung des –
Temperaturreglers, und von der Menge der Lebensmittel ab.
Stellen Sie den Temperaturreglerknopf zuerst in die Stellung – 3, bei zu starker Kühlung in den
Bereich 1-3 und bei zu schwacher Kühlung in den Bereich 4-7.
Wenn sich Reif auf der Hinterwand bildet, kann dies zur Ursache haben, dass die Tür offen
oder zu lange geöffnet war, sich warme Speisen im Gerät befanden oder der Temperaturregler
zu hoch eingestellt war.
Flüssige Nahrungsmittel und Nahrungsmittel, die einen starken Geruch haben oder leicht diesen –
Geruch aufsaugen (Käse, Fisch, Butter u.a.), voneinander isoliert oder in einem geschlossenen
Behälter aufbewahren. Bewahren Sie im Kühlschrank keine Bananen auf, denn diese Früchte
sind kälteempfindlich.
Warme Lebensmittel müssen vor Einlagerung in das Gerät auf Raumtemperatur abgekühlt –
werden.
Der Kühlraum hat durch die Luftzirkulation unterschiedliche Kältezonen. –
Die kälteste Zone befindet sich an der Rückwand und unten im Kühlraum. Lagern Sie dort
empfindliche Lebensmittel wie Fisch, Wurst, Fleisch.
Die wärmste Zone befindet sich an der Tür und oben im Kühlraum. Die Zone eignet sich zur
Lagerung von z.B. Käse und Butter. Dadurch behält der Käse sein Aroma und die Butter bleibt
streichfähig.
Achten Sie darauf, dass die Tür richtig geschlossen ist und nicht durch Kühlgut blockiert wird. –
Eiswürfelherstellung
Zur Herstellung von Eiswürfeln gibt es einen Eiswürfeleinsatz. Er wird bis zu ¾ mit Trinkwasser
gefüllt und anschließend ins Gefrierfach gestellt. Lassen Sie den Eiswürfeleinsatz vor dem
Herausnehmen der Eiswürfel 5 Minuten bei Raumtemperatur stehen. Die Eiswürfel lassen sich dann
besser herausschütteln.
10
Page 11

Reinigung und Abtauen
Ziehen Sie vor der Reinigung oder dem Abtauen den Netzstecker aus der Steckdose! –
Halten Sie die Innenflächen des Gerätes und alle Kunststoffteile frei von Fett, Säure, Soßen usw. –
Falls Sie diese Teile unabsichtlich doch verschmutzen, reinigen Sie diese sofort mit warmen
Seifenwasser oder Spülmittel. Reiben Sie anschließend die Teile wieder trocken.
Reinigen Sie die Türdichtungen regelmäßig. –
Der Kondensator des Gerätes muss mindestens einmal im Jahr mit einer weichen Bürste, mit –
elektrostatischen Tüchern oder mit einem Staubsauger gereinigt werden. Staubablagerungen
erhöhen den Energieverbrauch.
Die Zubehörteile können im Spülwasser gereinigt werden. Reinigen Sie die Teile nicht in der –
Spülmaschine!
Anmerkung: – Verwenden Sie bei der Reinigung keine körnigen, säure-, alkohol- oder
benzinhaltigen Reinigungsmittel bzw. auch keine Scheuerlappen oder Schwämme mit rauer
Oberfläche. Verwenden Sie auch keine elektrischen Geräte zum Auftauen oder Reinigen wie z.B.
Dampfreinigungsgeräte.
Kühlteil
Der Kühlteil taut automatisch ab. Die sich hinten im Kühlraum bildenden Eistropfen schmelzen
während der Betriebspausen des Kompressors. Das Schmelzwasser fließt durch die Ablaufrinne ins
Tauwasserverdunstungsgefäß auf dem Kompressor und verdunstet dort.
Achten Sie darauf, dass die Ablaufrinne und die Ablauföffnung nicht verstopft sind, damit das ●
entstehende Wasser im Kühlteil immer ungehindert abfließen kann. Reinigen Sie die Ablaufrinne
regelmäßig.
Um einen unangenehmen Geruch im Kühlraum zu vermeiden, den Kühlraum und die ●
Ablageflächen mindestens einmal im Monat mit Warmwasser, ggf. unter Zugabe von Spülmittel,
reinigen. Ziehen Sie vor der Reinigung immer den Netzstecker aus der Steckdose.
Das Typenschild im Geräteinnenraum bei der Reinigung nicht beschädigen oder gar entfernen.
Gefrierfach
Tauen Sie das Gefrierfach mindestens zweimal jährlich ab, damit die Eisschicht eine Dicke von 5 mm
nicht überschreitet. Der Gefrierteil wird wie folgt abgetaut:
Schalten Sie das Gerät aus, indem Sie den Netzstecker aus der Steckdose ziehen. –
Lebensmittel aus dem Gerät nehmen, in einer Kunststoffwanne lagern, gefrorene Kühlakkus –
hinzulegen und abdecken, um einen zu schnellen Kälteverlust zu vermeiden.
die Tür geöffnet lassen. –
Warnung! Zum Beschleunigen der Abtauung keine mechanischen Einrichtungen oder sonstige
Mittel, z.B. Heizgeräte, benutzen.
Nach dem Abtauen muss der Gefrierschrank mit Warmwasser, gegebenenfalls unter Zugabe von
Spülmittel, gereinigt werden. Anschließend gut trocknen und lüften.
Störungen
Es entstehen typische Betriebsgeräusche, wenn das Gerät eingeschaltet ist. Das sind:
11
Page 12
Geräusche des elektrischen Motors vom arbeitenden Kompressor. –
Bei Betriebsbeginn des Kompressors sind die Geräusche für kurze
Zeit etwas lauter.
Geräusche in den Röhrchen bei der Bewegung des Kältemittels. –
Nachfolgend eine Tabelle mit möglichen Störungen und Beseitigungsmethoden. Prüfen Sie, ob durch
die Beseitigungsmethoden die Störungen behoben werden können. Falls dies nicht der Fall ist, muss
das Gerät vom Netz getrennt und der Kundendienst benachrichtigt werden.
Störung Mögliche Ursache und Beseitigung
Das ans Netz angeschlossene
Gerät arbeitet nicht.
Die Steckdose ist nicht spannungsführend oder es gibt
Kontaktschwierigkeiten. Steckdose und Stecker prüfen!
Entweder ist das Gerät nicht richtig aufgestellt (z.B. unebener
Ungewöhnliche Geräusche
während des Betriebes.
Boden) oder der Kühlkreislauf an der Rückseite des Gerätes
berührt Wände, Gegenstände oder die Netzzuleitung. Prüfen
Sie, ob alle Angaben der Bedienungsanleitung über die
Aufstellung eingehalten wurden.
Im Gerät sammelt sich Wasser am
Boden.
Das Abführsystem des Tauwassers ist verstopft. Die
Ablaufrinne ist zu reinigen.
Transport des Gerätes
Das Gerät in der Vertikalarbeitsstellung transportieren.
Das Gerät um nicht mehr als 45° neigen. Während des Transportes das Gerät zuverlässig befestigen,
um Stöße und Verschiebungen zu vermeiden.
Entsorgung
Das Gerät wurde aus wiederverwertbaren Materialien hergestellt. Ziehen Sie den Netzstecker
aus der Steckdose und trennen Sie die Anschlussleitung vom Gerät. Die Entsorgung muss
gemäß den örtlichen Bestimmungen der Abfallbeseitigung erfolgen. Das Kältemittel und das
Treibmittel in der Isolation muss fachgerecht entsorgt werden. Beachten Sie, dass die Rohre des
Kühlkreislaufes bis zur fachgerechten Entsorgung nicht beschädigt werden dürfen.
Garantie
Severin gewährt Ihnen eine Herstellergarantie von zwei Jahren ab Kaufdatum. In diesem Zeitraum
beseitigen wir kostenlos alle Mängel, die nachweislich auf Material- oder Fertigungsfehlern beruhen
und die Funktion wesentlich beeinträchtigen. Weitere Ansprüche sind ausgeschlossen. Von der
Garantie ausgenommen sind: Schäden, die auf Nichtbeachtung der Gebrauchsanweisung,
unsachgemäße Behandlung oder normalen Verschleiß zurückzuführen sind, ebenso leicht
zerbrechliche Teile wie z. B. Glas, Kunststoff oder Glühlampen. Die Garantie erlischt bei Eingriff
nicht von uns autorisierter Stellen. Die gesetzlichen Gewährleistungsrechte gegenüber dem Verkäufer
und eventuelle Verkäufergarantien bleiben unberührt.
12
Page 13
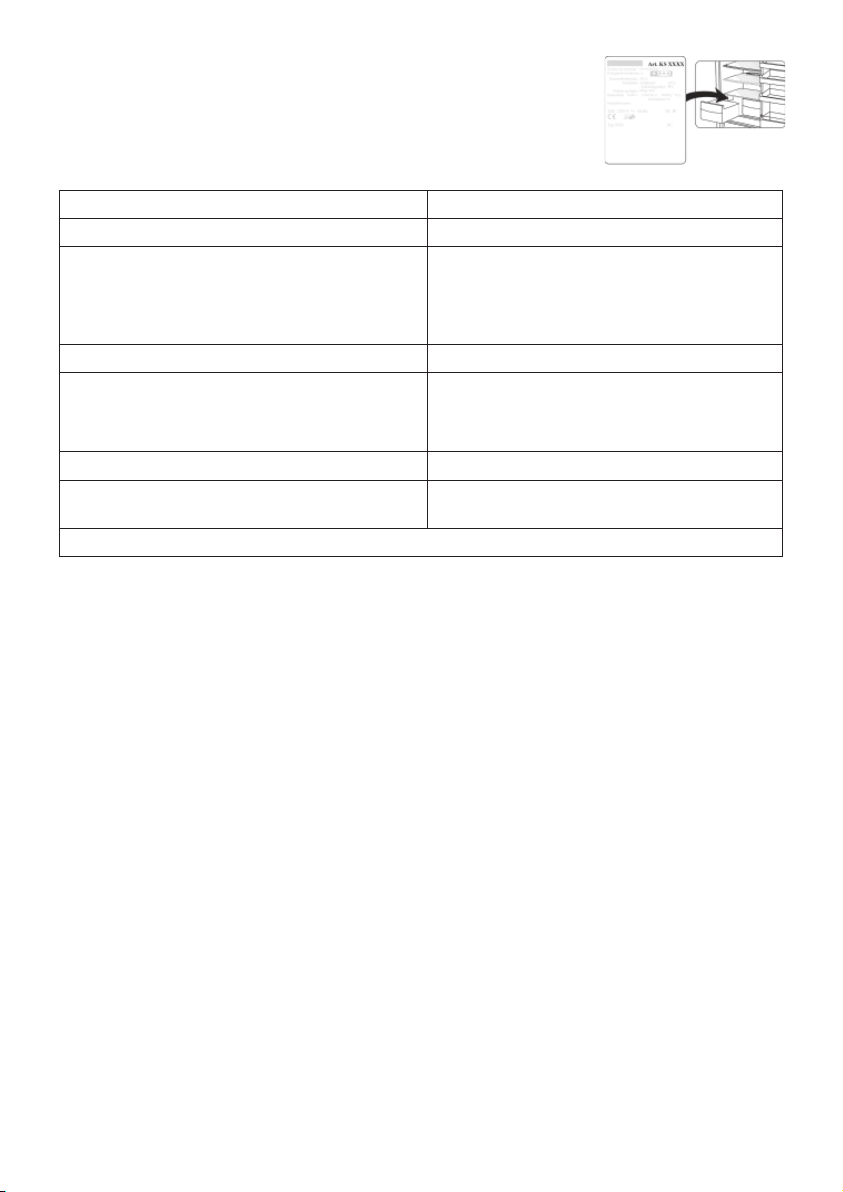
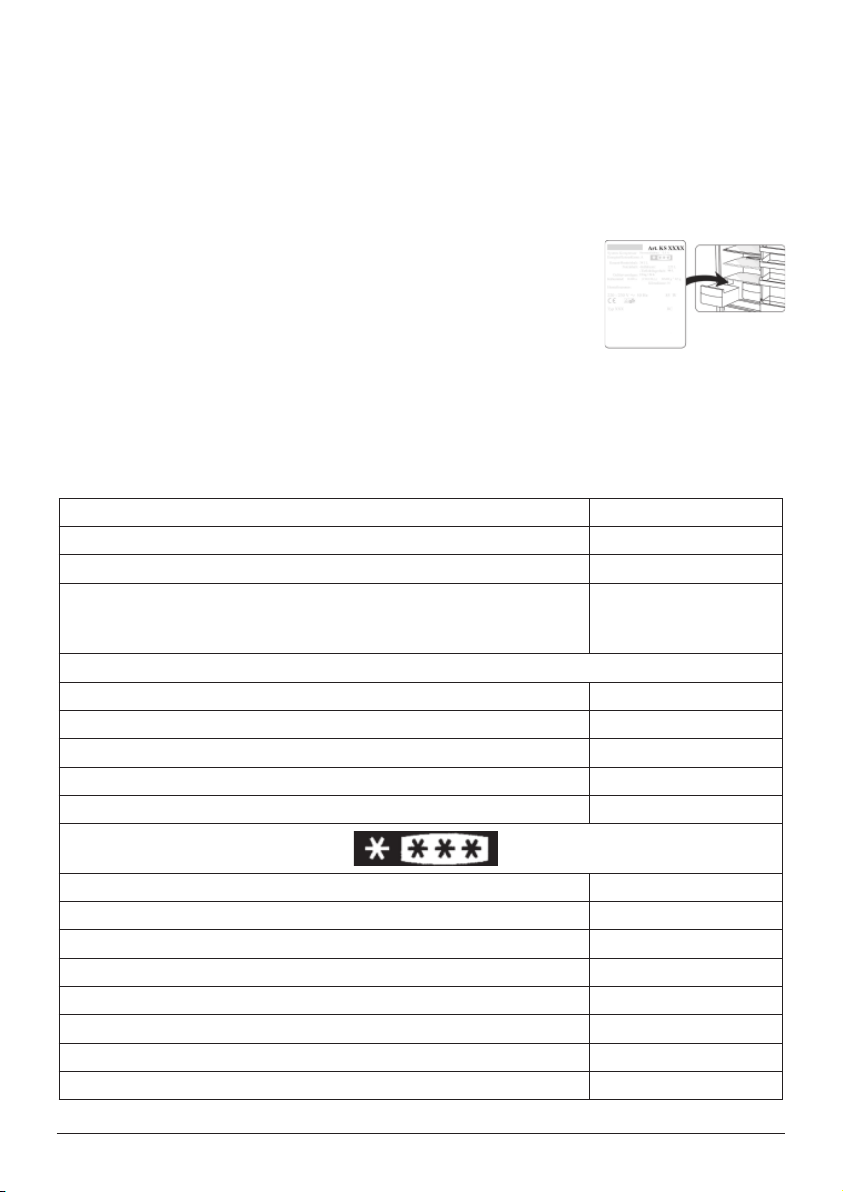
Angaben für Kundendienst
Sollte eine Reparatur erforderlich werden, wenden Sie sich mit
Fehlererklärung direkt an die Service-Hotline. Notieren Sie sich vorher
die Art.-Nr. KS ... vom Typenschild des Gerätes (siehe Abb.), da diese
für die optimale Abwicklung benötigt wird.
Hergestellt für: Vertrieb durch:
Deutschland Österreich
SEVERIN Elektrogeräte GmbH
Röhre 27
59846 Sundern
Degupa
Vertriebsgesellschaft m.b.H.
Niederalm 82
5081 Anif / Salzburg
Service-Hotline: Service-Hotline:
01805 / 190 000 (0,12 € / Min.)
werktags von 8 bis 19 Uhr,
samstags von 9 bis 12 Uhr
0820 / 520 052
werktags von 8 bis 19 Uhr,
samstags von 9 bis 12 Uhr
Ersatzteilbestellungen auch direkt unter
Tel.: 02104 / 987 440
Fax: 02104 / 987 984
Bitte wenden Sie sich bei Funktionsstörungen ausschließlich an die Service-Hotline!
13
Page 14
Technische Daten
Art.-Nr. KS 9780
Geräteart Kühl-Gefrierkombination
Energieeffizienzklasse entsprechend Richtlinien 94/2 EC A+
Energieverbrauch :
kWh/24 h
kWh/Jahr
0,64
234
Der tatsächliche Verbrauch hängt von der Nutzung und vom Standort des Gerätes ab
Gesamtbruttovolumen, l 216
Nutzinhalt Kühlteil, l 148
Nutzinhalt Gefrierteil, l 68
Klimaklasse N, ST
Umgebungstemperatur, °C 16 – 38
Lagerzeit bei Störung , h 12
Gefriervermögen, kg/24h 3
Gefriertemperatur, °C -18
Abmessungen, mm 1545 x 540 x 565
Masse, kg 54
Elektrische Daten siehe Typenschild
Isolationsschaum Zyklopentan
Geräuschemission 41 dB(A)
14
Page 15

Dear Customer,
Before using the appliance, the user must read the following instructions carefully.
Connection to the mains supply
The appliance should only be connected to an earthed socket installed in accordance with the
regulations. Make sure that the supply voltage corresponds with the voltage marked on the rating
label. This product complies with all binding CE labelling directives.
Do not operate this unit by means of a transformer or, together with other electrical appliances, ●
by means of an extension cable.
To prevent noise vibration, ensure that the power cord does not touch any part of the rear of the ●
unit (e.g. the heat-exchanger).
General information
This appliance is a compressor refrigerator with two separate cooling facilities, designed for shortterm storage of food in the refrigerator cabinet and long-term storage in the freezer.
The unit is rated as climate category ‘N, ST’ (normal, sub-tropical) and designed for domestic use. It
complies with all relevant norms for domestic refrigeration appliances.
Important safety instructions
To prevent the risk of personal injury or damage to the freezer, the unit must only be transported ●
while in its original packaging. For unpacking and installation, two people are needed.
The cooling circuit in this appliance contains the refrigerant isobutane ●
(R600a), a natural gas with a high level of environmental compatibility,
which is nevertheless flammable. Ensure, therefore, that none of the
components of the refrigerant circuit become damaged during transport and
installation of the appliance. If damage to the cooling circuit does occur, do
not switch on or connect the appliance to the mains power. In the case that
there is an open fire or any other sources of ignition in the vicinity of the refrigerant gas, make
sure it is removed immediately from this area and that the room is then thoroughly ventilated.
Warning: ● Do not damage the cooling circuit. Any escaping refrigerant causes damage to the
eyes; there is also a danger of the gas igniting.
Warning: ● Keep ventilation openings, in the appliance enclosure or in the built-in structure, clear
of obstruction. Sufficient ventilation must be ensured at all times.
Warning: ● Do not use any external device (e.g.; heaters or heating fans) to accelerate de-frosting;
follow only the methods recommended in this manual.
The ice removed from the unit during de-frosting is not suitable for human consumption. ●
Warning: ● Do not operate any electrical appliances (e.g. ice makers) inside the freezer’s food
storage compartment that are not specifically permitted in these instructions.
Before it is connected to the mains power, the unit must be thoroughly checked for transport ●
damage, including its power cord.
The power cord should be regularly examined for any signs of damage. In the event of such ●
damage being found, the appliance must no longer be used.
To avoid the risk of fire, do not place any thermo-electric appliances on top of the unit. Do not ●
place any liquid containers on top of the unit, to avoid any leaking or escaping liquid damaging
Fridge/freezer
15
Page 16
the electrical insulation.
Only food commonly used in domestic households should be stored in the unit. ●
Alcoholic substances may be stored only in properly sealed containers and in an upright ●
positions.
To avoid the risk of food poisoning, do not consume food after its storage time has expired. ●
Thawed foods must not be frozen a second time.
Do not lean or put undue weight on the shelves, compartments, door etc. ●
Protect the inside of the freezer at all times from open flames and any other sources of ignition. ●
Do not store any glass bottles containing carbonated or other freezable liquids in the unit - such ●
bottles may burst during the freezing process.
Remove the plug from the wall socket ●
in case of any malfunction, before de-frosting, during cleaning. -
This appliance is not intended for use by any persons (including children) with reduced physical, ●
sensory or mental capabilities, or lacking experience and knowledge, unless they have been given
supervision or instruction concerning the use of the appliance by a person responsible for their
safety.
Children should be supervised to ensure that they do not play with the appliance. ●
In order to comply with safety regulations and to avoid hazards, any repairs or modifications to ●
this unit must be carried out by our authorised service personnel, including the replacement of
the power cord.
We reserve the right to introduce technical modifications. ●
If the unit is not used for an extended period of time, we recommend keeping the door open. ●
If the unit is sold, handed over to a third party or disposed of at a suitable recycling facility, ●
attention must be drawn to the presence of the insulation agent ‘Cyclopenthane’ as well as to the
refrigerant R 600 a.
Familiarisation
The unit consists of two parts, the freezer cabinet
and the refrigerator cabinet.
1. Temperature control and interior lighting
2. Storage shelves (height-adjustable)
3. Storage shelf
4. Fruit/vegetable storage
5. Quick-freeze compartment
6. Freezer compartment
7. Freezer compartment
8. Door storage areas
9. Bottle storage
Before using for the first time
Remove any exterior and interior packaging materials completely, including the adhesive strips. –
Caution: – Keep any packaging materials well away from children, as there is a risk of
suffocation.
For positioning, we recommend that you tilt the unit slightly backwards. In this way, the –
16
Page 17
transport rollers can be used to move it to its intended place of installation.
Please ensure proper disposal of all packaging materials. –
Before it is connected to the mains, the unit must be thoroughly checked for transport damage, ●
including its power cord.
Clean the unit according to the instructions given in the – De-frosting and cleaning section below.
Installation
The appliance should be set up in a well-ventilated, dry room. It should be operated in an ambient
temperature of 16 to 38 °C and a relative humidity of max. 70 %. Do not expose the appliance to
direct sunlight, and do not position it next to any heat sources (radiators, cookers etc).
The rear and the sides should have a minimum clearance of 10 cm from the wall. –
The unit must not be installed inside a cabinet, nor directly below a hanging cupboard, shelf or
similar object.
Ensure that the door can swing open to an angle of 160°.
In the case of uneven floors, the adjustable feet on the unit can be used to compensate and ensure
optimum stability. The unit should be installed at a slight angle in such a way that it leans to the rear:
this will ensure that the door will close automatically and cannot be left open by mistake. Ensure,
however, that both front feet are set to the same height.
Ve nt i l at i on
The heated air around the rear of the unit must be able to circulate freely. Therefore, ensure that the
air circulation behind the unit is not obstructed.
Reversible door
The design provides for the door to be reversed, i.e. for right-hinged (default installation) to become
left-hinged.
Before reversing the door, place the unit on its rear. However, ensure that it is resting on a soft ,
smooth surface to prevent damage to the capillary tubes.
Caution: Before reversing the door, switch off the unit and disconnect it from the mains.
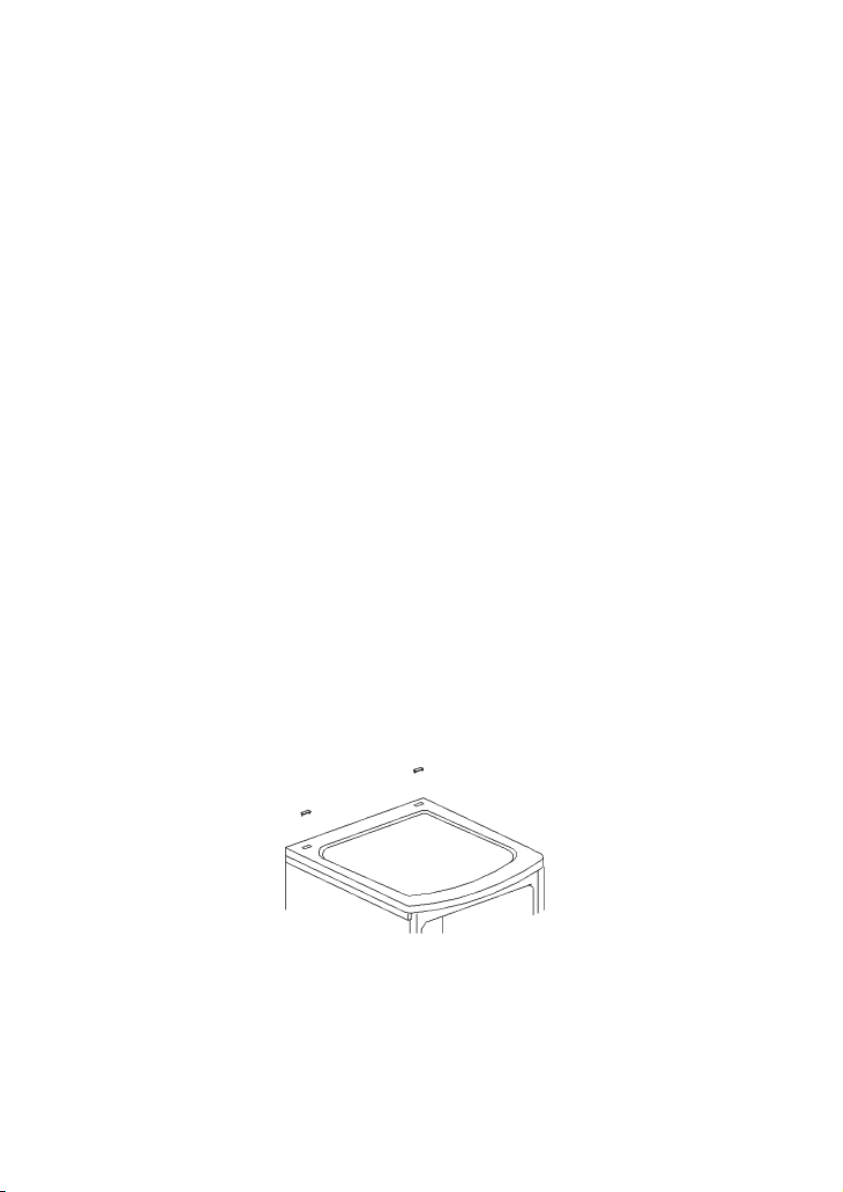
1. Remove the screw covers.
17
Page 18
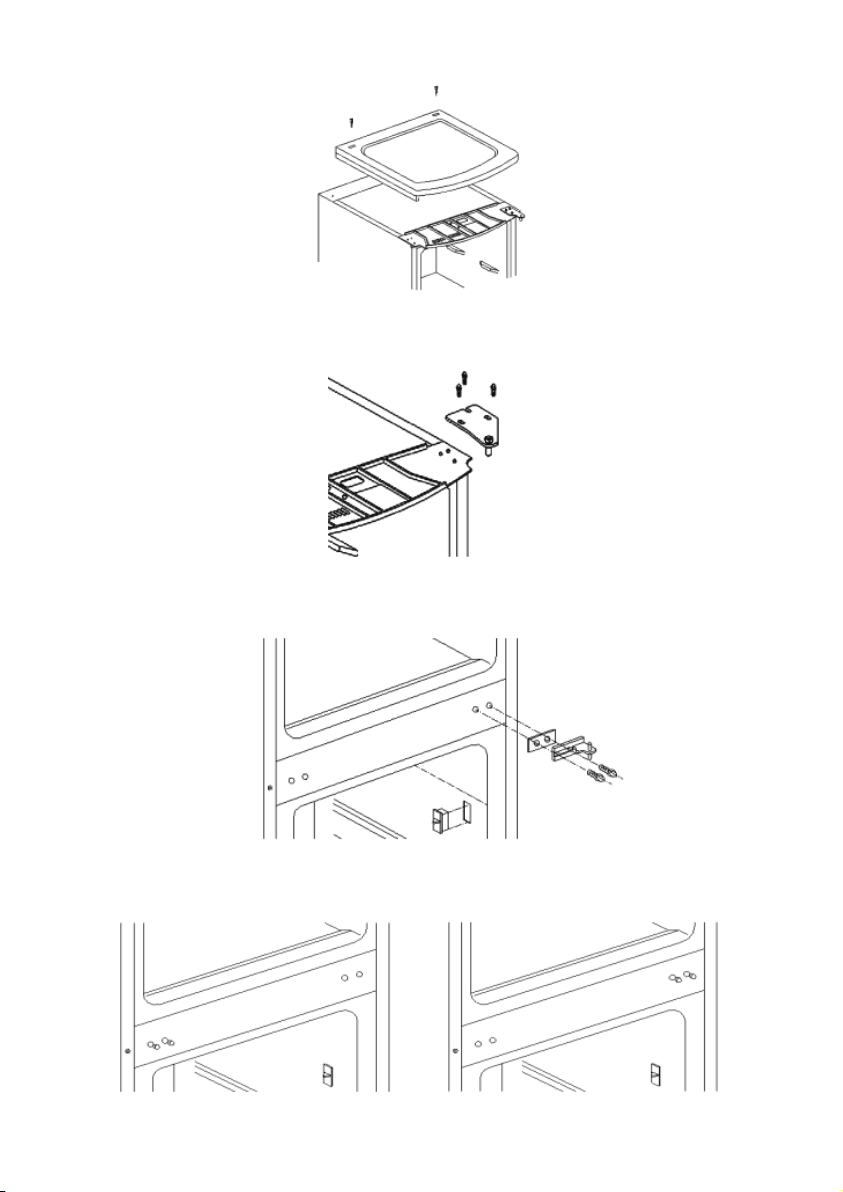
2. Take out the screws and remove the entire top cover.
3. Take off the upper hinge by removing the 3 screws. Take off the upper door and place it on a soft
surface to protect it from scratches.
4. Pull out the two bolts which hold the centre hinge in position. Take off the lower door and place
it also on a soft surface to protect it from scratches.
5. Remove both of the blind covers for the hinge mounting holes on the left, and replace them in
the corresponding places on the right.
18
Page 19
6. Remove both adjustable feet and the screws holding the lower hinge.
7. Remove the lower hinge and turn it round through 180°. Unscrew the hinge pin and mount it on
the opposite side of the hinge. Now fit the lower hinge on the left-hand side. Replace the two
adjustable feet. Fit the door of the freezer cabinet on to the lower hinge pin.
8. Turn the centre hinge round through 180°. Place the hinge pin into the corresponding opening
in the door of the freezer cabinet and secure it by fitting the centre hinge to the unit. Mount the
door of the refrigerator cabinet onto the centre hinge on the unit.
19
Page 20
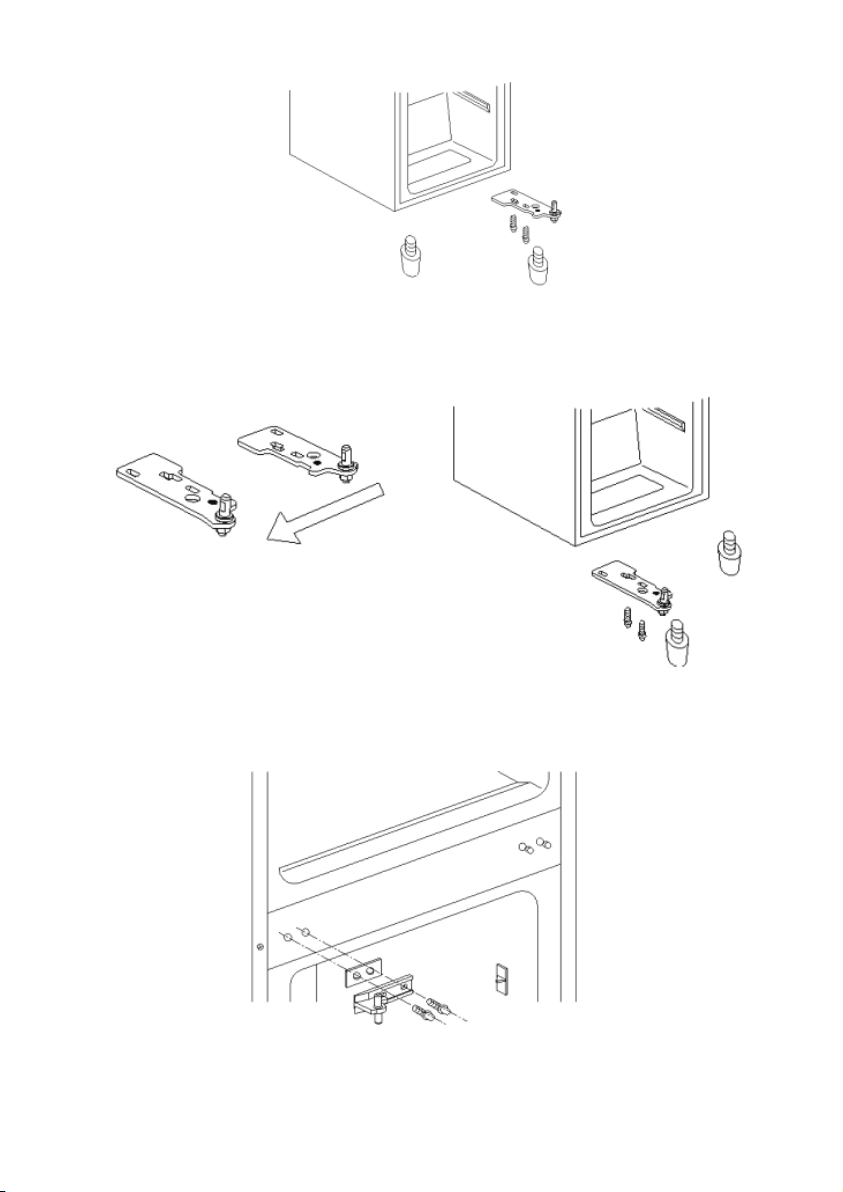
9. Remove the screws from the left-hand upper section and replace them on the opposite (ie the
right-hand) side of the unit. Take off the plastic corner piece from the left and replace it on the
right.
10. Turn the upper hinge round through 180°. Remove the pin and replace it on the opposite side of
the hinge.
11. Place the hinge pin into the corresponding opening in the door and secure it by fitting the upper
hinge to the unit.
12. Replace the top cover and insert and tighten the screws. Finally, replace the two screw covers.
20
Page 21

Warning
Once the unit has been put back in its upright position, it must not be connected to the mains for at
least two hours.
Controls and interior lighting
The unit is activated by connecting it to the mains. It is only switched off completely when the plug is
removed from the wall socket.
In position ‘0’, the cooling function is switched off, though the appliance is still connected to the
mains.
The temperature in the refrigerator cabinet can be adjusted by using the temperature control. We
recommend setting the control initially to position 3. After a certain time, the actual temperature
should then be checked with a thermometer, and adjustments made if necessary. Turning the
temperature control clockwise will decrease the temperature, while turning it anti-clockwise will
increase it.
Changing the interior light bulb
Switch off the unit by disconnecting it from the mains. –
Use a suitable screwdriver to remove the screw from the lamp cover. –
Slide the cover a little to the rear and take it off. –
Replace the defective bulb with a new one (max. 15 W, socket type E 14). –
Slide the cover back into position and replace the screw. –
Reconnect the unit to the mains. –
Deep-freezing and storing food
With an operating temperature of –18°C and below, the freezer compartments can be used to –
store frozen or pre-frozen food for several months, to make ice cubes and to freeze fresh food.
Fresh (i.e. non-frozen) or warm food must not come into contact with already frozen food; this –
prevents frozen food from becoming partially thawed.
Prior to freezing, fresh food (e.g. meat, fish, minced meat) should be divided into smaller –
portions suitable for use after thawing).
When storing pre-frozen food, strict attention should be paid to the manufacturer’s information –
provided on the packaging. If no such information is to be found, however, a storage period of 3
months from the date of purchase must not be exceeded.
When buying frozen food, verify that the food is properly frozen, and that the packaging does –
not show any sign of damage.
To maintain the quality of deep-frozen food, it should only be transported in suitable containers –
and then placed inside the freezer without delay.
Carefully check the packaging when buying frozen food: if the packaging shows signs of –
moisture, has bubbled up or is bulging, it indicates that the food may not have been stored
properly and has spoilt.
The storage times for frozen foods largely depend on the ambient temperature, the temperature –
control setting, the type of food and the time between shop and freezer, but mainly also on how
often the freezer door is opened and how long it remains open. Always follow the instructions
given on the food packaging, and do not exceed the specified maximum shelf life.
Suitable packaging materials for frozen food are transparent (i.e. non-coloured) plastic foil, bags –
or aluminium foil. The packaging materials should be well aired before use and then checked for
air-tightness before freezing the food. We strongly recommend that you label every item stored
21
Page 22
in the freezer with all relevant information such as type of food, freezing date and use-by date.
Do not put food inside the freezer compartments unless it has been properly packed.
The time required to freeze food may be shortened by dividing it into smaller portions. –
Do not attempt to deep-freeze carbonated beverages, warm food or any kind of bottled liquids. –
To ensure that nutritious elements such as vitamins are not lost, fresh food should be deep-frozen –
right through as quickly as possible. To that effect, the prepared food should be placed into the
quick-freeze compartment, properly spaced in one or two rows. Avoid contact with food that has
already been frozen. Do not deep-freeze more than 3 kg of fresh food per day. Set the
temperature control to 7. After 24 hours, once the food is well frozen, it can be moved into the
freezer compartments. Set the temperature control back to its original position.
Frozen food can be defrosted in the refrigerator. This way, the food is defrosted at a slower rate, –
retaining its taste. Furthermore, the frozen food helps to keep the temperature inside the
refrigerator at its intended level.
Use-by dates for frozen food are specified (in months) in the table below. Do not exceed these
storage times. Always observe the information provided by the manufacturer of the product in
question.
The storage time will decrease if the internal temperature has increased, e.g. as a result of a –
malfunction.
Refrigeration cabinet
The temperature inside the refrigerator depends mainly on the ambient temperature, the –
temperature control setting and the amount of food stored.
Initially, the temperature control should be set to position – 4. If the cooling effect is too strong,
lower it to position 1-3; if it is insufficient, raise it to 4-8.
If you notice frost on the rear wall, the most likely cause is that the door has been left open
for too long, or that warm food has been placed inside the refrigerator or that the
temperature control has been set too high.
Liquid or strong-smelling food, or food which is likely to absorb strong odours (e.g. cheese, fish, –
butter), should be stored separately or in hermetically sealed containers. Do not store bananas
inside the fridge, as they are sensitive to cold.
Warm food should be left to cool down to room temperature before being placed in the –
refrigerator.
Because of the way the air circulates, the different areas of the refrigerator cabinet are affected –
differently.
The coldest area is around the rear wall and in the lower part of the cabinet, and is most suitable
22
Page 23

for storing delicate food such as fish, cooked or fresh meats or cold-cuts.
The warmer area is around the door and in the higher part of the cabinet, and is suitable for
storing cheese, butter and similar items. In this way, the cheese will keep its flavour, and the
butter will remain spreadable.
Always ensure that the door is properly closed and that the seal is not obstructed by food stored –
inside the cabinet or door.
Making ice cubes
A special ice-cube tray is provided for making ice cubes. Fill the tray 3/4 full with drinking water and
place it in the freezer compartment. The ice cubes are easier to remove from the tray if the tray is left
standing at room temperature for 5 minutes.
De-frosting and cleaning
Caution: Always remove the plug from the wall socket before cleaning or defrosting the unit. –
Always keep the interior surfaces as well as all plastic parts free of fatty or acid substances, sauces –
etc. However, should any of those parts become unintentionally contaminated, they should be
cleaned immediately with warm, soapy water or a mild detergent. Wipe all parts thoroughly dry
afterwards.
The door seals should be frequently cleaned. –
The condenser of the unit should be cleaned at least once a year using a soft brush, electrostatic –
cleaning cloths or a vacuum cleaner. The build-up of dust will otherwise cause an increase in
energy consumption.
All accessory parts may be cleaned using warm, soapy water. Do not put them in a dish-washer. –
Remark: – Do not use grainy cleaning materials or any acid, alcohol or spirit-based cleaning
agents. We do not recommend the use of coarse cloths or sponges. Do not use any electrical
appliances, such as steam cleaners, for de-frosting or cleaning.
Refrigerator cabinet
The refrigerator de-frosts automatically during operation. Any ice accumulating at the rear of the
cabinet will melt during the periods when the compressor is not active. The melt-water runs through
the drain channel and is collected in the evaporation tray from where it is absorbed into the air.
To enable the melt-water to drain freely, always ensure that the channel and discharge opening in ●
the cabinet are free of any blockage. The drain channel should be frequently cleaned.
To prevent any unpleasant odour, the cabinet and shelves should be cleaned at least once a month ●
using warm water and, if necessary, a mild detergent. Always disconnect the unit from the mains
before cleaning.
Take care not to remove or damage the rating plate inside the cabinet during cleaning.
Freezer cabinet
To prevent the build-up of ice exceeding a thickness of 5 mm, the freezer cabinet should be
de-frosted at least twice a year. Proceed as follows:
Remove the plug from the wall socket to disconnect the unit from the mains power. –
Remove all food from the freezer, place it into a plastic container, add pre-frozen freezer-packs –
and cover the container to keep the inside temperature down.
Leave the door open. –
Warning: Do not use any external device or other means (e.g. heaters or heating fans) to accelerate
de-frosting.
23
Page 24
After de-frosting, the freezer cabinet should be thoroughly cleaned using warm water and, if
necessary, a mild detergent. Wipe thoroughly dry and air afterwards before using again.
Trouble-shooting
Certain typical sounds can be heard when the appliance is switched on. These sounds are:
caused by the electrical motor within the compressor assembly; –
during compressor start-up the sound level will be slightly higher
for a limited period of time.
caused by the cooling agent flowing through the circuit. –
The following table lists the possible malfunctions, their probable causes and solutions. In the event
of operational problems, check first whether a solution can be found using this table. If the problem
persists, disconnect the appliance from the mains power and contact our Customer Service
Department.
Problem Possible cause and solution
The appliance is connected to
the mains, but does not operate.
The wall socket has no power, or there are contact problems.
Check the wall socket and the plug.
Either the unit has been improperly set up (e.g. on an uneven
Abnormal noise can be heard
during operation.
floor) or there is contact between the rear-mounted cooling
circuit and the power cord, the wall or other object or surface.
Verify that all installation instructions in this manual have been
correctly complied with.
Water is collecting on the
bottom of the unit.
The melt-water drain system is blocked. Remove the blockage
and clean the system.
Transporting the unit
The unit must be transported only in its vertical position.
Do not tilt it to more than 45°. During transport, ensure that the unit is properly secured and
protected against shock, vibration and shifting.
Disposal
This appliance has been manufactured from recyclable materials. After removing the plug
from the wall socket, the unit should be rendered unusable by cutting off the power cord
before being disposed of through special waste collection points in accordance with local
regulations. The refrigerant and the chemical agent in the insulation foam must be disposed of
through a competent agency. Take special care not to damage the cooling circuit before the unit is
handed over for competent disposal.
Guarantee
This product is guaranteed against defects in materials and workmanship for a period of two years
from the date of purchase. Under this guarantee the manufacturer undertakes to repair or replace
any parts found to be defective, providing the product is returned to one of our authorised service
centres. This guarantee is only valid if the appliance has been used in accordance with the
instructions, and provided that it has not been modified, repaired or interfered with by any
24
Page 25
unauthorised person, or damaged through misuse.
This guarantee naturally does not cover wear and tear, nor breakables such as glass and ceramic
items, bulbs etc. This guarantee does not affect your statutory rights, nor any legal rights you may
have as a consumer under applicable national legislation governing the purchase of goods. If the
product fails to operate and needs to be returned, pack it carefully, enclosing your name and address
and the reason for return. If within the guarantee period, please also provide the guarantee card and
proof of purchase.
Information needed by the Customer Service
Should repairs to the appliance become necessary, please contact our
Customer Service, providing a detailed fault description and quoting
the model number KS ... on the rating plate of the appliance (see
picture). This information will help us to handle your request
efficiently.
In case of any malfunction or other problem, please contact our Customer Services Department.
The address can be found in the appendix to this manual.
Technical specifications
Model no. KS 9780
Type of appliance Fridge/Freezer
Energy efficiency classification in compliance with directive 94/2 EC A+
Energy consumption :
kWh/24 h
kWh/year
0,64
234
The actual consumption depends on the pattern of use and the location of the appliance
Total gross volume, (litres) 216
Usable refrigerator capacity (litres) 148
Usable freezer capacity (litres) 68
Climate classification N, ST
Ambient temperature range, °C 16 – 38
Safe storage time in case of malfunction, h 12
Freezing capacity, kg/24h 3
Freezing temperature, °C -18
Dimensions (mm) 1545 x 540 x 565
Weight (kg) 54
Electrical specifications See rating plate
Insulation foam Cyclopenthane
Noise emission 41 dB(A)
25
Page 26
Chère Cliente, Cher Client,
Avant d’utiliser cet appareil, nous vous conseillons vivement de lire attentivement les instructions
suivantes.
Branchement au secteur
Cet appareil doit être branché sur une prise de courant avec terre installée selon les normes en
vigueur. Assurez-vous que la tension d’alimentation correspond à la tension indiquée sur la plaque
signalétique de l’appareil. Ce produit est conforme à toutes les directives relatives au marquage “CE”.
Ne pas brancher cet appareil sur un transformateur, ni sur un prolongateur avec d‘autres ●
appareils électriques.
Pour éviter tout bruit de vibration, vérifiez que le cordon ne touche aucune partie à l‘arrière du ●
congélateur (ex. l‘échangeur de chaleur).
Informations générales
Cet appareil est un réfrigérateur à compresseur avec deux compartiments, conçu pour conserver des
aliments, à court terme dans la partie réfrigérateur et à long terme dans la partie congélateur.
Cet appareil est catalogué Classe climatique ‚N, ST‘ (Normal, Subtropical) et destiné à un usage
domestique. Il est conforme à toutes les normes relatives aux appareils de réfrigération domestiques.
Importantes consignes de sécurité
Pour prévenir tout risque de blessure corporelle ou de dommage au congélateur, l‘appareil doit ●
être transporté uniquement dans son emballage d‘origine. Le déballage et l‘installation nécessitent
deux personnes.
Le réfrigérant contenu dans le circuit de refroidissement de cet appareil est ●
l‘isobutane (R600a), un gaz naturel non polluant, mais qui est, cependant,
inflammable. Par conséquent, évitez d‘endommager les composants du
système de refroidissement pendant le transport et l‘installation de l‘appareil.
Si, toutefois, le circuit de refroidissement s‘avère endommagé, ne pas mettre
en marche l‘appareil et ne pas le connecter au secteur. Si une flamme ou
autre source d’allumage se trouve à proximité du gaz réfrigérant, retirez immédiatement l‘appareil
de la zone, puis aérez amplement la pièce.
Avertissement : ● Ne pas endommager le circuit de refroidissement. Le gaz qui s’en échappe peut
endommager les yeux; il existe également un risque d’incendie.
Avertissement : ● Ne pas obstruer les grilles de ventilation situées dans le caisson ou la structure.
Une ventilation suffisante doit être maintenue en continu.
Avertissement : ● Ne pas accélérer le dégivrage à l’aide d’un appareil externe (ex. chauffage
rayonnant ou soufflant); conformez-vous uniquement aux procédures recommandées dans ce
manuel.
Le givre issu du dégivrage est impropre à la consommation. ●
Avertissement : ● ne faire fonctionner aucun appareil électrique (ex. machine à glace) qui n’est pas
décrit dans la notice, à l’intérieur du compartiment congélateur.
Avant de le brancher sur le secteur, vérifiez minutieusement l‘appareil, y compris le cordon ●
d‘alimentation, pour tout signe de dommages survenus pendant le transport.
Examinez régulièrement le cordon pour vous assurer de son parfait état. Ne pas utiliser l’appareil ●
Réfrigérateur/congélateur
26
Page 27
si le cordon est endommagé.
Pour éviter tout risque d‘incendie, ne placez aucun appareil thermoélectrique sur le réfrigérateur. ●
Ne placez aucun récipient contenant des liquides sur l’appareil : ceci afin d’éviter tout risque de
fuite ou de renversement de liquide qui pourrait endommager l’isolation électrique.
Ne conserver dans le congélateur que les aliments ordinairement utilisés dans le foyer. ●
Les substances alcooliques doivent être conservées dans des récipients correctement fermés et à ●
la verticale.
Pour éviter tout risque d‘empoisonnement alimentaire, ne pas consommer les aliments au-delà ●
de leur date limite de conservation. Les aliments décongelés ne doivent jamais être re-congelés.
Ne pas s’appuyer sur les étagères, compartiments, porte etc., ni les surcharger. ●
Protégez l’intérieur du congélateur contre les flammes ou tout autre source susceptible de ●
provoquer des flammes.
Ne pas conserver dans le congélateur des bouteilles en verre contenant des liquides gazeux ou ●
autres liquides congelables car ces bouteilles pourraient exploser pendant le processus de
congélation.
Débranchez toujours la fiche de la prise murale ●
en cas de fonctionnement défectueux, avant de dégivrer l’appareil, avant de nettoyer l’appareil. -
Cet appareil ne doit pas être utilisé par une personne (y compris un enfant) souffrant d’une ●
déficience physique, sensorielle ou mentale, ou manquant d’expérience ou de connaissances, sauf
si cette personne a été formée à l’utilisation de l’appareil par une personne responsable de sa
sécurité, ou est surveillée par celle-ci.
Les enfants doivent être surveillés afin qu’ils ne jouent pas avec l’appareil. ●
Afin de se conformer aux normes de sécurité en vigueur et d’éviter tout risque, la réparation de ●
cet appareil ainsi que toute intervention, y compris le remplacement du cordon d’alimentation,
doit être effectuée par un de nos agents agréés.
Nous nous réservons le droit d’apporter à cet appareil toute modification technique quelconque. ●
Si l’appareil reste longtemps sans être utilisé, nous vous recommandons de laisser la porte ●
ouverte.
En cas de vente ou cession de l’appareil à un tiers, ou sa remise à un centre de recyclage agréé, il ●
est important de signaler la présence de la matière isolante ‘Cyclopentane’ et également du
réfrigérant R 600a.
Familiarisation
L’appareil comprend deux parties, le compartiment
réfrigérateur et le compartiment congélateur.
1. Thermostat et éclairage intérieur
2. Clayettes (réglables en hauteur)
3. Clayette
4. Bac pour fruits et légumes
5. Case de congélation rapide
6. Case congélateur
7. Case congélateur
8. Contre-porte aménagée
9. Emplacement pour bouteilles
27
Page 28
Première utilisation
Retirez tous les emballages extérieurs et intérieurs, y compris les bandes adhésives. –
Attention : – Tenez les enfants à l’écart des emballages, qui représentent un risque potentiel, par
exemple, de suffocation.
Pour l’installation, nous vous recommandons d’incliner l’appareil légèrement vers l’arrière. De –
cette façon, vous pouvez utiliser les roulettes de transport pour le mettre en place.
Débarrassez-vous des emballages de façon appropriée. –
Avant de le brancher sur le secteur, vérifiez minutieusement l’appareil, y compris le cordon ●
d’alimentation, pour tout signe de dommages survenus pendant le transport.
Nettoyez l’appareil en suivant les instructions figurant à la rubrique – Dégivrage et nettoyage
ci-après.
Installation
L’appareil doit être installé dans une pièce sèche et bien aérée. Il doit fonctionner par une température
ambiante d’entre 16 et 38 °C et une humidité relative maximum de 70 %. Ne pas exposer le
congélateur au soleil et ne pas le positionner à proximité d’une source de chaleur quelconque
(radiateur, cuisinière etc.).
Laissez un espace d’au moins 10 cm entre l’arrière et les côtés de l’appareil et le mur. –
L’appareil ne doit pas être installé à l’intérieur d’un meuble, ni directement sous un placard mural,
une étagère ou objet similaire.
Assurez une ouverture de la porte à 160°.
Les denivelés du sol peuvent être rattrapées à l‘aide des pieds réglables, assurant ainsi une stabilité
parfaite. Le congélateur doit être installé légèrement incliné vers l‘arrière, de façon à assurer la
fermeture automatique de la porte et éviter la déperdition du froid par une porte laissée entrouverte.
Vérifiez cependant que les deux pieds de devant maintiennent l‘appareil à niveau latéralement.
Ve nt i l at i on
L’air chauffée, à l’arrière du congélateur, doit pouvoir circuler librement. Vérifiez qu’aucun objet
derrière l’appareil n’entrave cette circulation.
Porte réversible
La porte peut être montée pour une ouverture à droite ou à gauche
Avant de changer le sens d’ouverture de la porte, couchez l’appareil sur l’arrière. Toutefois, assurezvous qu’il repose sur une surface plane et souple pour ne pas endommager les tubes capillaires.
Attention : avant de changer le sens d‘ouverture des portes, arrêtez l‘appareil et débranchez-le du
secteur.
1. Retirer les cache-vis.
28
Page 29

2. Ôtez les vis et enlevez complètement le panneau supérieur.
3. Démontez le gond supérieur en ôtant les 3 vis. Retirez la porte supérieure et placez-la sur une
surface douce pour ne pas la rayer.
4. Extrayez les deux vis qui maintiennent le gond central en position. Retirez la porte inférieure et
placez-la également sur une surface douce pour ne pas la rayer.
5. Retirez les deux bouchons des trous de fixation des gonds à gauche, et replacez-les à droite aux
endroits correspondants.
29
Page 30

6. Retirez les deux pieds réglables et les vis qui tiennent le gond inférieur.
7. Retirez le gond inférieur et retournez-le à 180°. Dévissez le pivot et montez-le sur le côté opposé
du gond. Maintenant, montez le gond inférieur du côté gauche. Replacez les deux pieds réglables.
Engagez la porte du compartiment congélateur sur le pivot du gond inférieur..
8. Retournez le gond central de 180°. Engagez le pivot du gond dans le logement correspondant de
la porte et montez-la en fixant le gond central sur l‘appareil. Engagez la porte du compartiment
réfrigérateur sur le pivot du gond central.
30
Page 31

9. Retirez les vis de la partie supérieure gauche et replacez-les du côté opposé (c‘est-à-dire à droite)
de l‘appareil. Retirez le coin en plastique de gauche et replacez-le à droite.
10. Retournez le gond supérieur de 180°. Retirez le pivot et remontez-le du côté opposé du gond.
11. Engagez le pivot du gond dans le logement correspondant de la porte et montez-la en fixant le
gond supérieur sur l‘appareil.
12. Replacez le panneau supérieur, introduisez les vis et serrez-les. Pour terminer, replacez les deux
cache-vis.
31
Page 32

Avertissement
Après avoir remis l‘appareil en position verticale, ne le branchez pas sur le secteur avant au moins un
délai de deux heures.
Thermostat et éclairage intérieur
Cet appareil est mis en marche automatiquement par son branchement au secteur. Il n’est éteint que
lorsque la fiche est retirée de la prise murale.
Sur la position ‘0’, la fonction de refroidissement est arrêtée, mais l’appareil reste branché au
secteur.
La température à l’intérieur de la cuve est réglable à l’aide du bouton du thermostat. Vous pouvez
régler la température à l’intérieur de l’appareil à l’aide du bouton de thermostat. Nous vous
recommandons de régler, dans un premier temps, la température sur la position 3. Veuillez par la
suite vérifier la température à l’aide d’un thermomètre et effectuer des changements si besoin est. Le
fait de tourner le bouton de thermostat dans le sens des aiguilles d’une montre fait baisser la
température. Si vous désirez faire monter la température, tournez le bouton de thermostat dans le
sens inverse des aiguilles d’une montre.
Remplacement de l’ampoule d’éclairage intérieur
Arrêtez l’appareil en le débranchant du secteur. –
Utilisez un tournevis adapté pour ôter la vis du protecteur de la lampe. –
Glissez le protecteur légèrement vers l’arrière et retirez-le. –
Remplacez l’ampoule défectueuse par une neuve (max. 15 W, culot type E 14). –
Remettez le protecteur en place en le glissant et replacez la vis. –
Rebranchez l’appareil au secteur. –
Congélation et conservation des aliments
Avec sa température de fonctionnement de –18 °C, et au delà, le compartiment congélateur –
convient à la conservation pendant plusieurs mois d‘aliments congelés et surgelés, à la fabrication
de glaçons et à la congélation d‘aliments frais.
Les aliments frais (c.à.d. non congelés) ou tièdes ne doivent pas entrer en contact avec les –
aliments déjà congelés; cette mesure évite la décongélation partielle des aliments congelés.
Avant de congeler les aliments frais (ex. viandes, poissons, viande hachée), divisez-les en portions –
pour faciliter leur utilisation une fois décongelés.
Lors de la conservation des aliments surgelés, lisez attentivement les informations fournies par le –
fabricant figurant sur l‘emballage. En l‘absence de telles informations cependant, ne pas conserver
les aliments au-delà des 3 mois de la date d‘achat.
A l‘achat, vérifiez que les aliments sont bien surgelés et que l‘emballage ne présente aucun signe –
de détérioration.
Pour assurer une qualité optimale des aliments surgelés, transportez-les uniquement dans un –
récipient adapté, puis placez-les immédiatement dans le congélateur.
Vérifiez soigneusement l‘emballage des aliments lors de l‘achat: si l‘emballage présente des signes –
d‘humidité, de bulles ou de gonflement, cela peut indiquer une mauvaise conservation et des
aliments abîmés.
Les durées limites de conservation des aliments congelés dépendent en grande partie de la –
température ambiante, le réglage de température de l‘appareil, le type d‘aliment et le délai entre
l‘achat et la mise au congélateur, mais également et principalement de la fréquence et la durée
d’ouverture de la porte du congélateur. Suivez toujours les instructions figurant sur les emballages
des aliments et ne dépassez jamais les dates de péremption indiquées.
Les emballages convenant aux aliments congelés sont le film plastique alimentaire transparent –
32
Page 33

(c.à.d. sans coloration), les sacs de congélation ou le papier aluminium. Les emballages doivent
être bien aérés avant utilisation; leur étanchéité doit être vérifiée avant de congeler les aliments.
Nous vous conseillons vivement d‘étiqueter chaque article congelé, en notant toutes les
informations utiles, telles que la nature de l‘aliment, la date de congélation et la date limite de
conservation. Ne placez jamais d’aliments qui n’auraient pas été convenablement emballés dans le
compartiment congélateur.
Vous pouvez réduire le temps de congélation en réduisant la taille des portions à congeler. –
N’essayez pas de congeler des boissons gazeuses, des aliments chauds ou des liquides en bouteilles –
quels qu’ils soient.
Afin de préserver la richesse de vos aliments en éléments nutritifs (comme les vitamines), les –
aliments frais doivent être congelés dès que possible. Pour cela, les aliments préparés doivent être
placés dans la case de congélation rapide, convenablement espacés en une ou deux rangées.
Évitez le contact avec des aliments déjà congelés. Ne congelez pas plus de 3 kg d‘aliments frais par
jour. Placez le thermostat sur la position 7. Après 24 heures, une fois les aliments bien congelés,
vous pouvez les déplacer dans les cases de congélation. Replacez le thermostat à sa position
d‘origine.
Les aliments congelés peuvent être décongelés dans le compartiment réfrigérateur. De cette –
façon, les aliments sont décongelés plus lentement et conservent leur goût. De plus, les aliments
congelés permettent de maintenir la température dans le réfrigérateur à son niveau voulu.
Les durées limites de conservation des aliments congelés (en mois) sont détaillées dans le tableau
suivant. Ne pas dépasser ces durées limites de conservation. Respectez toujours les indications
fournies par le producteur des aliments concernés.
Ces durées limites de conservation seront écourtées en cas de hausse de la température intérieure, –
par exemple, suite à une panne.
Compartiment réfrigérateur
La température à l‘intérieur du compartiment réfrigérateur dépend principalement de la –
température ambiante, de la position du thermostat et de la quantité d‘aliments conservés.
Pour commencer, mettez le thermostat sur la position – 4. Si la température devient trop froide,
mettez le thermostat sur 1 à 3; si la température n’est pas assez froide, mettez le thermostat sur 4
à 8.
Si vous constatez la formation de givre sur la paroi arrière de la cuve, ceci est probablement
dû à une ouverture prolongée de la porte, la mise au réfrigérateur d’aliments encore tièdes ou
à un réglage trop élevé de la température.
Les liquides ou aliments à forte odeur, ou les aliments susceptibles d‘absorber les odeurs fortes –
33
Page 34

(ex. fromages, poissons ou beurre), doivent être conservés dans des récipients fermant
hermétiquement. Ne conservez pas de bananes dans le réfrigérateur, car elles sont sensibles au
froid.
Laissez refroidir à température ambiante les aliments tièdes avant de les placer au –
réfrigérateur.
La circulation de l’air créé des zones de températures différentes dans les différentes parties de la –
cuve du réfrigérateur.
La zone la plus froide se situe contre la paroi arrière et en partie basse de la cuve ; c’est donc
l’endroit le plus adapté pour la conservation d’aliments délicats tels que le poisson ou les viandes
crues ou froides.
La zone la moins froide se situe près de la porte et en partie haute de la cuve ; c’est donc l’endroit
le plus adapté pour la conservation du beurre et du fromage etc. Ainsi, le fromage gardera toute
sa saveur et le beurre restera facile à tartiner.
Vérifiez toujours que la porte est bien fermée et que le joint n’est pas gêné par les aliments stockés –
dans la cuve ou la porte.
Fabrication de glaçons
Un bac est prévu pour la fabrication de glaçons. Remplissez le bac aux 3/4 d’eau potable, puis placezle dans le compartiment de congélation. Pour faciliter le démoulage des glaçons, laissez le bac 5
minutes à température ambiante.
Dégivrage et nettoyage
Avertissement : toujours débrancher la fiche de la prise murale avant de nettoyer ou de –
dégivrer l’appareil.
Ne laissez jamais de sauces, substances grasses ou acides, etc. se déposer sur les surfaces –
intérieures ni sur aucune surface en plastique. Toutefois, en cas de contamination accidentelle
des ces parties, nettoyez-les immédiatement à l’eau chaude savonneuse ou avec un détergent
doux. Ensuite, essuyez et séchez à fond toutes les parties.
Les joints de portes doivent être nettoyés fréquemment. –
Le condenseur de l’appareil doit être nettoyé au moins une fois par an au moyen d’un pinceau –
souple, de chiffons de nettoyage électrostatiques ou d’un aspirateur. L’accumulation de poussière
pourrait sinon entraîner une augmentation de la consommation d’énergie.
Tous les accessoires peuvent être nettoyés à l’eau chaude savonneuse. – Ne les mettez pas au lavevaisselle.
Remarque : – n’utilisez pas de détergents en poudre ou à base d’acide, d’alcool ou d’essence. Nous
ne recommandons pas l’usage de tampons ou d’éponges à gratter. N’utilisez aucun appareil
électrique, tel que nettoyeur à vapeur, pour dégivrer ou nettoyer.
Compartiment réfrigérateur
En fonctionnement, le réfrigérateur se dégivre automatiquement. Tout givre formé à l’arrière du
compartiment fond pendant les périodes où le compresseur ne tourne pas. L’eau de dégivrage s’écoule
à travers le canal d’évacuation et est collectée sur le plateau d’évaporation d’où elle est évacuée dans
l’air.
Pour permettre à l’eau de dégivrage de s’évacuer librement, assurez-vous que le canal et le trou ●
d’évacuation dans le compartiment réfrigérateur ne sont pas obstrués. Le canal d’évacuation doit
être nettoyé fréquemment.
Pour éviter toute odeur désagréable, la cuve et les clayettes doivent être nettoyées au moins une ●
fois par mois à l’aide d’eau chaude et, si nécessaire, d’un détergent doux. Débranchez toujours
l’appareil du secteur avant nettoyage.
34
Page 35

Prenez garde à ne pas arracher ou endommager la plaque signalétique pendant le nettoyage.
Compartiment congélateur
La cuve du congélateur doit être dégivrée au moins deux fois par an pour éviter que l’épaisseur de la
couche de givre dépasse 5 mm. Le congélateur se nettoie de la façon suivante :
Retirez la fiche de la prise murale pour débrancher l’appareil du secteur. –
Retirez tous les aliments du congélateur, placez-les dans un récipient en plastique, recouvrez-les –
d’accumulateurs de froid, puis couvrez le récipient afin d’y maintenir une basse température.
Laissez la porte du congélateur ouverte. –
Avertissement : N’utiliser aucun appareil (ex. ventilateur ou radiateur soufflant) ou autre moyen
pour tenter d’accélérer le dégivrage.
Après le dégivrage, nettoyez soigneusement le congélateur à l’eau tiède, additionnée si nécessaire
d’un détergeant doux ; séchez-le minutieusement, puis aérez-le avant de le remettre en marche.
Dépistage des pannes
Lors de la mise en marche, certains sons sont audibles. Ces sons sont dus :
au moteur électrique du bloc compresseur; lors de la mise en route –
du compresseur, le niveau du son reste élevé pendant un certain
temps.
au flux de réfrigérant dans le circuit de refroidissement. –
Le tableau suivant présente les pannes possibles, leurs causes et solutions. En cas de problème de
fonctionnement, vérifiez d‘abord si la solution figure dans ce tableau. Si le problème persiste,
débranchez l‘appareil du secteur, puis appelez notre Service Clientèle.
Problème Cause possible et solution
L’appareil est branché au secteur
mais ne fonctionne pas.
La prise murale n’est pas alimentée ou il y a un mauvais contact.
Vérifiez la prise et la fiche.
Soit l’appareil est mal installé (ex. sur un sol irrégulier), soit il y
Émission d’un bruit anormal en
fonctionnement.
a contact entre le système de refroidissement à l’arrière et le
cordon d’alimentation, le mur, ou un autre objet ou surface
quelconque. Vérifiez que toutes les consignes d’installation de ce
manuel ont été respectées.
De l’eau s’accumule dans le fond
de l’appareil.
Le tube d’évacuation d’eau est bouché. Retirez l’obstruction et
nettoyez le système.
Tr an sp or t
L’appareil doit être transporté en position verticale uniquement.
Ne pas le pencher plus de 45°. Pendant le transport, protégez l’appareil contre les chocs et vibrations
et vérifiez qu’il ne bouge pas pendant le voyage.
35
Page 36

Mise au rebut
Cet appareil est fabriqué à partir de matières recyclées. Après avoir retiré la fiche de la prise
murale, rendez l’appareil inutilisable en coupant le cordon d’alimentation. Apportez-le ensuite
à un centre de collecte, conformément à la réglementation locale en vigueur. Le réfrigérant et
le produit chimique contenu dans la mousse isolante doivent être traités par un service compétent
agréé. Prenez soin de ne pas endommager le circuit de refroidissement avant de remettre l’appareil
aux services compétents.
Garantie
Cet appareil est garanti par le fabricant pendant une durée de deux ans à partir de la date d’achat,
contre tous défauts de matière et vices de fabrication. Au cours de cette période, toute pièce
défectueuse sera remplacée gratuitement. Cette garantie ne couvre pas l’usure normale de l’appareil,
les pièces cassables telles que du verre, des ampoules, etc., ni les détériorations provoquées par une
mauvaise utilisation et le non-respect du mode d’emploi. Aucune garantie ne sera due si l’appareil a
fait l’objet d’une intervention à titre de réparation ou d’entretien par des personnes non-agréées par
nous-mêmes. Cette garantie n’affecte pas les droits légaux des consommateurs sous les lois nationales
applicables en vigueur, ni les droits du consommateur face au revendeur résultant du contrat de
vente/d’achat. Si votre appareil ne fonctionne plus normalement, veuillez l’adresser, sous emballage
solide, à une de nos stations de service après-vente agréées, muni de votre nom et adresse. Si vous
retournez votre appareil pendant la période de garantie, n’oubliez pas de joindre à votre envoi la
preuve de garantie (ticket de caisse, facture etc.) certifiée par le vendeur.
Informations à fournir au Service Clientèle
Si une réparation de l’appareil s’avère nécessaire, veuillez contacter
notre Service Clientèle, en leur fournissant un résumé détaillé du
défaut et le numéro d’article KS ... figurant sur la plaque signalétique
de l’appareil (voir schéma). Ces informations nous permettront de
traiter votre demande de manière efficace.
Veuillez contacter notre Service Clientèle en cas de problème ou de fonctionnement défectueux
de l’appareil. Vous trouverez l’adresse de ce service dans l’appendice de ce manuel.
36
Page 37

Caractéristiques techniques
Art.-No KS 9780
Type d’appareil Réfrigérateur/congélateur
Classe énergétique, conformément à la directive 94/2 EC A+
Consommation en énergie :
kWh/24 H
kWh/an
0,64
234
La consommation réelle dépend de l’usage quotidien et l’emplacement de l’appareil.
Volume total, (litres) 216
Capacité du réfrigérateur (litres) 148
Capacité du congélateur (litres) 68
Classe climatique N, ST
Plage de température ambiante, °C 16 – 38
Temps de conservation des aliments en cas de
panne, H
12
Capacité de congélation, kg/24 H 3
Température de congélation, °C -18
Dimensions (en mm) 1545 x 540 x 565
Poids, kg 54
Alimentation Voir plaque signalétique
Mousse isolante Cyclopentane
Émission de bruit 41 dB(A)
37
Page 38

Beste klant
Voordat het apparaat wordt gebruikt moet de gebruiker eerst de volgende instructies zorgvuldig
lezen.
Aansluiting
Dit apparaat mag alleen worden aangesloten op een volgens de wet geinstalleerd geaard stopcontact.
Zorg ervoor dat de op het typeplaatje aangegeven spanning overeenkomt met de netspanning. Dit
product komt overeen met de richtlijnen aangegeven op het CE-label.
gebruik dit apparaat nooit met een transformer of, samen met andere elektrische apparaten, over ●
een verlengingssnoer.
Om vibratie geluiden te voorkomen, zorg dat het snoer geen andere delen van de achterkant van ●
de vriezer aanraakt. (b.v. de warmtewisselaar).
Algemene informatie
Dit apparaat is een compressor koelkast met 2 aparte koelings faciliteiten, ontworpen voor het
opslaan van voedsel voor korte tijd in de koelkast en lange tijd in de vrieskast.
De unit is geclassificeert als een Klimaat Klas ‚N, ST‘ (Normaal, Sub-tropisch) en ontworpen voor
huishoudelijk gebruik. Het voldoet aan alle belangrijke normen voor huishoudelijk koelkast
apparaten.
Belangrijke veiligheidsaanwijzingen
Om gevaar van persoonlijke ongelukken te voorkomen of schade aan de vriezer, mag dit apparaat ●
alleen vervoert worden in de orginele verpakking. Voor het uitpakken en installeren zijn 2
personen nodig.
Het koelingscircuit in dit apparaat bevat het koelvriesmiddel isobutane ●
(R600a), een natuurlijk gas met een hoge level van milieu compatibility,
welke brandbaar is. Zorg er daarom voor, dat geen van de componenten van
het koelingscircuit beschadigt worden tijdens het transporteren of installeren
van het apparaat. Wanneer er toch schade aan het koelingscircuit ontstaat,
moet men het apparaat niet aanzetten of aansluiten op het stroomnet, maar
verwijder open vuur en andere bronnen van ontvlamming weg van het koelvries gas; laat de
kamer waar het apparaat geplaatst is goed ventileren.
Waarschuwing: ● Beschadig nooit het koelingscircuit. Ontsnappend koelvries gas kan
beschadigingen aan de ogen veroorzaken; er is ook gevaar voor ontbranding van het gas.
Waarschuwing: ● houd ventilatieopeningen, in het apparaat of in de ingebouwde structuur, vrij
van versperring. Voldoende ventilatie moet altijd aanwezig zijn.
Waarschuwing: ● gebruik geen externe middelen (b.v.; verwarming of verwarmingsfan) om het
ontdooien te versnellen; volg alleen de methode aangegeven in deze gebruiksaanwijzing.
Het ijs wat men verwijdert tijdens het ontdooien is niet geschikt voor menselijke consumptie. ●
Waarschuwing: ● Gebruik geen elektrische apparaten (b.v. ijsmakers) in de vriezers voedsel
opbergruimte welke niet speciaal toegestaan zijn in deze instructies.
Voordat men het apparaat aansluit op het stroomnet, moet de unit eerst goed gecontroleerd ●
worden op beschadigingen, snoer inbegrepen.
Het snoer moet regelmatig op eventuele beschadiging worden gecontroleerd. Wanneer een ●
Koelkast/Vriezer
38
Page 39

beschadiging wordt geconstateerd mag het apparaat niet meer worden gebruikt.
Om gevaar van brand te voorkomen, plaats geen thermo-elektrische apparaten boven op de ●
apparaat. Plaats nooit containers met vloeistoffen op de unit: dit om voorkomen dat lekken of
ontsnappen van vloeistoffen de elektrische isolatie beschadigd.
Alleen voedsel gebruikt in normale huishouden moet men opbergen in de vriezer. ●
Alcoholische dranken mogen alleen opgeborgen worden in gesloten containers en in ●
rechtopstaande positie.
Om gevaar van voedselvergiftiging te voorkomen, eet geen voedsel waarvan de opbergtijd ●
overschreden is. Ontdooit voedsel mag nooit opnieuw ingevroren worden.
Leun nooit en plaats geen onnodig gewicht op de rekken, vakken, deur enz. ●
Bescherm de binnenkant van de vriezer altijd tegen open vuur en andere vormen van ●
verbranding.
Plaats geen glazen flessen met carbonaat houdende of andere te vriezen vloeistoffen in de unit: ●
zulke flessen kunnen barsten tijdens het vriezen.
Verwijder de stekker uit het stopcontact wanneer ●
het apparaat niet juist werkt, voor het ontdooien, tijdens het schoonmaken. -
Dit apparaat is niet bestemd voor gebruik door personen (Kinderen inbegrepen) met ●
verminderde fysische, zintuiglijke of mentale bekwaamheid, of gebrek aan ervaring en
wetenschap, behalve wanneer men begeleiding of instructies van het apparaat gehad heeft van
een persoon verantwoordelijk voor hun veiligheid.
Kinderen moeten onder begeleiding zijn om ervoor te zorgen dat ze niet met het apparaat spelen. ●
Om te voldoen aan alle veiligheidsvoorschriften en om gevaar te voorkomen, reparaties en ●
modificaties aan dit apparaat mogen alleen uitgevoert worden door gemachtigd service
personeel, vervangen van snoer inbegrepen.
Wij hebben het recht om technische modificaties te introduceren. ●
Wanneer men de unit voor langere periodes niet gebruikt, bevelen wij aan dat men de deur open ●
houd.
Wanneer het apparaat verkocht word, en overgegeven wordt aan een derde of wanneer men het ●
apparaat weggooit in een daarvoor geschikte recycle faciliteit, attentie moet gegeven worden aan
de aanwezigheid van de insolatie agent ‚cyclopenthane‘ en tevens het koelvriesmiddel R 600 a.
Beschrijving
De unit bestaat uit twee delen, de vrieskast en de
koelkast.
1. Temperatuurcontrole en binnenverlichting
2. Opbergplaten (hoogteverstelbaar)
3. Opbergplaat
4. Fruit/groenten opbergruimte
5. Snel-vries ruimte
6. Vriezerruimte
7. Vriezerruimte
8. Deur opbergruimtes
9. Fles opbergruimte
39
Page 40

Voor het eerste gebruik
Verwijder eerst al het inwendige en uitwendige verpakkingsmateriaal, plakband inbegrepen. –
Waarschuwing: – houdt kinderen weg van inpakmateriaal, daar deze een bron van gevaar zijn b.v.
door verstikking.
Voor plaatsing, bevelen wij aan dat men de unit een klein beetje naar achteren helt. Op deze –
manier, kunnen de transport rollers gebruikt worden om het naar de daarvoor bestemde plaats te
brengen.
Zorg ervoor dat het inpakmateriaal juist weggegooit word. –
Voordat men het apparaat aansluit op het stroomnet, moet de unit eerst goed gecontroleerd ●
worden op beschadigingen, snoer inbegrepen.
Maak het apparaat goed schoon zoals aangegeven in de sectie – Ontdooien en schoonmaken
hieronder.
Installatie
Het apparaat moet geplaatst worden in een goed geventileerde, droge ruimte. Het moet gebruikt
worden in een omgevingstemperatuur van 16 tot 38 °C en met een maximale vochtigheid 70 %. Zorg
dat de vriezer niet in direct zonlicht geplaatst is, en plaats het nooit naast willekeurig welke andere
hittebronnen (verwarming, fornuis enz).
De achterkant en de zijkanten moeten minstens 10cm ruimte van de muur hebben. –
Deze unit moet niet in een kabinet geinstalleerd worden, eveneens niet direct onder een
hangende kast, boekenplank of gelijkwaardig object.
Zorg dat de deur kan openen tot een hoek van 160°.
In geval van ongelijke vloeren, kunnen de verstelbare voeren gebruikt worden voor compensatie en
optimale stabiliteit. De unit moet in een lichtelijke hoek geplaatst worden zodat het naar achteren
leunt: dit zal ervoor zorgen dat de deur automatisch sluit en zal niet per ongeluk open blijven. Zorg
ervoor, dat beide voeten aan de voorkant op dezelfde hoogte gezet zijn.
Ve nt i l at i e
De verwarmde lucht aan de achterkant van de vriezer moet vrij kunnen circuleren. Daarom, moet
men ervoor zorgen dat de circulatie achter de unit niet geblokkeerd is.
Omkeerbare deur
Het ontwerp geeft de mogelijkheid om de deur om te keren, d.w.z. rechter scharnier (default
installatie) wordt linker scharnier.
Voordat men de deur omkeert, moet men de unit eerst op de achterkant plaatsten. Hoe dan ook, zorg
ervoor dat de unit op een zachte, vlakke ondergrond rust om beschadiging aan de haarbuisjes te
voorkomen.
Waarschuwing: Voordat men de deur omkeert, schakel de unit uit en verwijder de stekker uit
het stopcontact.
40
Page 41

1. Verwijder de schroefafdekingen.
2. Neem er de schroeven uit en verwijder de gehele topplaat.
3. Neem er de bovenste scharnier af door de 3 schroeven te verwijderen. Neem er de bovenste deur
af en plaats deze op een zachte ondergrond om krassen te voorkomen.
4. Trek er de twee bouten uit welke het middelste scharnier op zijn plaats houden. Neem er de
onderste deur af en plaats deze op een zachte ondergrond om krassen te voorkomen.
41
Page 42

5. Verwijder de blinde afdeking van de scharnierbevestiging gaten aan de linkerkant en plaats deze
in de corresponderende plaats aan de rechterkant.
6. Verwijder de twee verstelbare voeten en de schroeven welke het onderste scharnier vasthouden.
7. Verwijder het onderste scharnier en draai het 180° om. Schroef de scharnierpin los en monteer
deze aan de andere kant van het scharnier. Plaats nu het onderste scharnier aan de linkerkant.
Plaats de twee verstelbare voeten terug. Pas de deur van de vrieskast op de onderste scharnier
pin.
42
Page 43

8. Draai het middelste scharnier 180° om. Plaats de scharnierpin in het overeenkomende gat in de
deur van de vrieskast en maak deze vast door het middelste scharnier in de unit te plaatsen.
Plaats de deur van de koelkast op het middelste scharnier van de unit.
9. Verwijder de schroeven van de secte aan de linker bovenzijde en plaats deze terug aan de
tegenovergestelde kant (de rechterkant) van de unit. Neem er het plastiek hoekstuk van de
linkerkant af en plaats het aan de rechterkant.
10. Draai het bovenste scharnier 180° om. Verwijder de pin en plaats deze aan de andere kant van
het scharnier.
43
Page 44

11. Plaats de scharnierpin in het overeenkomende gat in de deur en maak het vast door het bovenste
scharnier in de unit te plaatsen
12. Plaats de topplaat terug en draai de schroeven vast. Plaats hierna de twee schroefafdekingen
terug.
Waarschuwing
Wanneer men de unit weer echtop gezet heeft, moet het voor minstens twee uren niet op het
stroomnet aangesloten worden.
Bediening en binnenverlichting
Deze unit is geactiveerd door het aan te sluiten op het stroomnet. Het is alleen geheel uitgeschakeld
wanneer men de stekker uit het stopcontact verwijdert.
In positie ‘0’, de koelfunctie is uitgeschakeld, ondanks dat het apparaat nog aangesloten is op het
stroomnet.
De temperatuur in de koelkast kan versteld worden met gebruik van de temperatuurcontrole. De
temperatuur in de kast kan versteld worden met de temperatuurcontrole. Wij bevelen aan dat men de
temperatuurcontrole eerst in positie 3 zet. Na een bepaalde tijd, moet men de echte temperatuur
controleren met een thermometer, en deze verstellen wanneer dit nodig is. Draai de
temperatuurcontrole rechtsom om deze te verlagen, terwijl men het linksom zal verhogen.
Vervangen van het lampje voor de binnenverlichting
Schakel de unit uit en verwijder de stekker van het stopcontact. –
Gebruik een geschikte schroevendraaier om de schroef van de lampafdeking te verwijderen. –
Schuif de afdeking naar achteren en verwijder deze. –
Vervang het gebroken lampje met een nieuw lampje (max. 15 W, fitting type E 14). –
Schuif de afdeking terug op zijn plaats en draai de schroef vast. –
Sluit de unit aan op het stroomnet. –
44
Page 45

Vriezen en opbergen van voedsel
Met een gebruikstemperatuur van –18°C en lager, kunnen de vriesruimtes gebruikt worden voor –
het opbergen van gevroren of voorgevroren voor meerdere maanden, voor het maken van
ijsblokjes en het vriezen van vers voedsel.
Vers (d.w.z. niet gevroren) of warm voedsel moet niet in contact komen met voedsel wat al –
bevroren is; dit zal voorkomen dat bevroren voedsel gedeeltelijk zal ontdooien.
Voor het vriezen, moet men vers voedsel (b.v. vlees, vis, gehakt vlees) in kleine hoeveelheden –
verdelen geschikt voor gebruik na het ontdooien.
Wanneer men voorgevroren voedsel opbergt, moet men zeer goed op de informatie van de –
fabrikant letten welke aanwezig is op de verpakking. Wanneer zulke informatie niet aanwezig is,
moet men een opbergperiode van 3 maanden van de aankoopdatum niet overschrijden.
Wanneer men gevroren voedsel koopt, controleer dat het voedsel goed bevroren is, en dat de –
verpakking geen schade vertoont.
Om de kwaliteit van diepgevroren voedsel te bewaren, moet men het alleen transporteren in –
daarvoor geschikte containers, en moet men het onmiddelijk terugplaatsen in de vriezer.
Controleer voorzichtig de verpakking wanneer men bevroren voedsel koopt: wanneer de –
verpakking tekenen van vochtigheid vertoont, gebobbelt is of uitpuilt, geeft dit aan dat het
voedsel niet juist was opgeborgen en bedorven is.
De opbergtijd voor gevroren voedsel hangt af van de omgevende temperatuur, de temperatuur –
controle zetting, het type voedsel en de tijd tussen winkel en vriezer, maar voornamelijk hoe vaak
de vriezer deur geopent word en hoe lang deze openblijft. Volg altijd de instructies aangegeven
op de verpakking en overschrijd niet de maximaal aangegeven houdbaarheid.
Geschikte verpakkingsmaterialen voor gevroren voedsel zijn doorzichtig (d.w.z. niet gekleurt) –
plastiek folie of zakken of aluminium folie. Het verpakkingsmateriaal moet goed gelucht en
gecontroleert worden voor luchtdichtheid voor het vriezen van het voedsel. Wij bevelen aan dat
men een label plaatst op ieder item in de vriezer met alle belangrijke informatie zoals soort van
voedsel, datum van invriezen en houdbaarheidsdatum. Plaats geen voedsel in de vriezer wat niet
juist verpakt is.
De vriestijd kan verkort worden door het voedsel in kleine porties te verdelen. –
Probeer nooit carbonaat houdende dranken, warm voedsel of welke vloeistof dan ook in flessen –
in te vriezen.
Om te zorgen dat de voedzame elementen zoals vitaminen niet verloren gaan, moet men vers –
voedsel zo snel als mogelijk geheel invriezen. Daarom moet men het bereide voedsel in de
snelvries ruimte plaatsten, netjes uitgespreid in èèn of twee rijen. Voorkom contact met voedsel
wat al bevroren is. Diepvries niet meer dan 3kg vers voedsel per dag. Zet de temperatuurcontrole
naar 7. Na 24 uren, wanneer het voedsel goed bevroren is, kan het in de vriezerruimtes geplaatst
worden. Zet de temperatuurcontrole terug naar de originele positie.
Bevroren voedsel kan ontdooit worden in de koelkast. Op deze manier, is het voedsel langzaam –
ontdooit en zal de smaak bewaart blijven. Bovendien, zal het bevroren voedsel helpen met het
behouden van de voorgenomen temperatuurlevel in de koelkast.
Houdbaarheidsdatum voor gevroren voedsel is aangegeven (in maanden) in de tabel hieronder.
Overschrijd deze opbergtijden niet. Volg altijd de informatie verschaft door de fabrikant van dat
bepaalde product.
45
Page 46

De opbergtijd zal verminderen wanneer de binnentemperatuur vermeerderd b.v. als gevolg van –
een defect
Koelkast
De temperatuur in de koelkast unit hangt af van de omgevende temperatuur, de –
temperatuurcontrole zetting en het op te bergen voedsel.
Om te beginnen, zet de temperatuurcontrole naar positie – 4. Wanneer de koeling te hoog is,
verlaag het naar positie 1-3; wanneer dat onvoldoende is, verhoog het naar 4-8.
Wanneer men vorst waarneemt op de achtermuur, is het zeer goed mogelijk dat de deur te
lang open geweest is, dat warm voedsel in de koelkast geplaatst is, of dat de
temperatuurcontrole een te hoge stand heeft.
Vloeibaar of sterk ruikend voedsel, of voedsel wat gemakkelijk sterke geur absorbeert (b.v. kaas, –
vis, boter), moeten apart, of in luchtdichte containers opgeborgen worden. Berg nooit bananen
op in de koelkast, daar deze gevoelig zijn tegen de koude.
Warm voedsel moet men eerst laten afkoelen tot kamertemperatuur voordat men dit in de –
koelkast plaatst.
Vanwege verschillen in luchtcirculatie, zullen verschillende areas van de koelkast anders –
beinvloed worden.
De koudste area is rond de achtermuur en het laagste gedeelte van de kast, en is het meest
geschikt voor het opbergen van fijn voedsel zoals vis, gekookt of vers vlees of cold-cuts.
De warmste area is rond de deur en in het bovenste gedeelte van de kast, en is geschikt voor het
opbergen van b.v. kaas en boter. Op deze manier, zal de kaas zijn smaak behouden, en zal de
boter smeerbaar blijven.
Zorg er altijd voor dat de deur goed gesloten is en dat de afdichting niet geblokkeert word door –
voedsel wat opgeborgen is in de kast of de deur.
Maken van ijsblokjes
Een speciaal ijsblokjes bakje is bijgelevert voor het maken van ijsblokjes. Vul het bakje 3/4 vol met
drinkwater en plaats het in het vriezer compartiment. De ijsblokjes zijn gemakkelijk te verwijderen
van het bakje wanneer men het voor 5 minuten op kamertemperatuur laat staan.
Ontdooien en schoonmaken
Waarschuwing: Verwijder altijd de stekker uit het stopcontact voordat men de unit –
schoonmaakt of ontdooit.
Houd het interieur oppervlak zowel als de plastiek onderdelen vrij van vettige of zure stoffen, –
sauzen enz. Wanneer èèn van deze onderdelen toch besmet worden, moet het onmiddelijk met
warm water en zeep of een zacht schoonmaakmiddel schoongemaakt worden. Maak alle
onderdelen hierna zeer goed droog.
46
Page 47

De deurafdichting moet regelmatig schoongemaakt worden. –
De condensor van de unit moet tenminste èèn maal per jaar schoongemaakt worden met een –
zachte borstel, elektrostatische doeken of stofzuiger. De opbouw van stof zal anders een
vermeerdering in energiegebruik veroorzaken.
Alle accessories mogen schoongemaakt worden met warm water en zeep. Plaats nooit in de –
vaatwasmachine.
Opmerking: – Gebruik geen grove schoonmaakmiddelen of zuur, alcohol of spiritus houdende
agens. Wij bevelen geen grove doeken of schuursponsen aan. Gebruik geen elektrische apparaten,
zoals stoommachines, voor ontdooien of schoonmaken.
Koelkast
De koelkast ontdooit automatisch tijdens gebruik. Opbouw van ijs aan de achterkant van de kast zal
smelten tijdens de periodes dat de compressor niet actief is. Het smeltwater zal door het afvoerkanaal
lopen en opgevangen worden in de verdampingsplaat waar het in de lucht opgenomen zal worden.
Om te zorgen dat het smeltwater vrij doorloopt, moeten het kanaal en de uitloopopening van de ●
kast vrijgehouden worden van verstoping. Het afvoerkanaal moet regelmatig schoongemaakt
worden.
Om een onaangename geur te voorkomen, moeten de kast en de opbergplaten tenminste èèn ●
maal per maand schoongemaakt worden met warm water en zeep en wanneer nodig een zacht
schoonmaakmiddel. Ontkoppel de unit altijd van het stoomnet voor het schoonmaken.
Wees voorzichtig dat men niet de classificatie plaatje in de kast verwijderd of beschadigd tijdens het
schoonmaken.
Vrieskast
Om de opbouw van ijs over een dikte van 5mm te vookomen, moet de vrieskast tenminste twee maal
per jaar ontdooit worden. Ga verder als volgt:
Haal de stekker uit het stopcontact om de unit van het stroomnet te verwijderen. –
Verwijder al het voedsel uit de vriezer, plaats het in een plastiek container, voeg er voorgevrozen –
ijspakken bij en dek de container af om de binnentemperatuur laag te houden.
Laat de vriezerdeur open. –
Waarschuwing: gebruik geen externe middelen (b.v. verwarming of verwarmingsfan) om het
ontdooien te versnellen.
Na het ontdooien, moet de vriezer goed schoongemaakt worden met warm water en wanneer
nodig, een zachte zeep. Maak hierna goed droog en laat uitluchten voordat men opnieuw
gebruikt.
Probleemoplosser
Bepaalde typische geluiden kunnen gehoort worden wanneer het apparaat aangezet is. Deze geluiden
zijn:
veroorzaakt door de elektrische motor in de compressor opbouw; –
tijdens het opstarten van de compressor, zal de geluidslevel voor
korte tijd vermeerderen.
veroorzaakt door de koelvloeistof welke door het circuit stroomt. –
De volgende tabel geeft een lijst van mogelijke defecten aan, met mogelijke oorzaken en oplossingen.
47
Page 48

In geval van een gebruiksprobleem, controleer eerst of men een oplossing kan vinden met gebruik
van de tabel. Wanneer het probleem aanhoud, verwijder het apparaat van het stroomnet en contact
onze Klantenservice Afdeling.
Probleem Mogelijke oorzaak en oplossing
Het apparaat is aangesloten op het
stroomnet, maar werkt niet.
Het stopcontact heeft geen power, of er zijn contact
problemen. Controleer de stekker en het stopcontact.
De unit is niet juist geplaatst (b.v. een ongelijke vloer) of er is
Abnormaal lawaai zal men horen
tijdens gebruik.
contact met het koelingscircuit aan de achterkant en het
snoer, de muur of een ander voorwerp of oppervlak.
Controleer dat alle installatie instructies in deze
gebruiksaanwijzing juist gevolgt zijn.
Water verzameld zich op de bodem
van de unit.
Het smeltwater afvoer systeem is geblokkeerd. Verwijder de
blokkering and maak het systeem schoon.
Transporteren van het apparaat
Deze unit moet in verticale positie getransporteert worden.
Kantel niet meer dan 45°. Tijdens transporteren, zorg ervoor dat de unit goed vastgezet is en
beschermt is tegen schokken, vibraties en verschuiven.
Weggooien
Dit apparaat is gemaakt van recycleerbaar materialen. Nadat men de stekker uit het
stopcontact verwijderd, moet men de unit voor het weggooien onbruikbaar maken door het
snoer geheel te verwijderen voordat men het apparaat weggooit in de daarvoor speciaal
bestemde collectiepunten in overeenkomst met de plaatstelijke wet. Het koelvries gas en de
chemische agent in het isolatie schuim moeten weggegooit worden door een bevoegd agentschap. Pas
heel goed op dat men het koelingscircuit niet beschadigd voordat de unit is overgegeven voor het
weggooien.
Garantieverklaring
Voor dit apparaat geldt een garantie van twee jaar na de aankoopdatum voor materiaal- en
fabrieksfouten. Uitgesloten van garantie is schade die ontstaan is door het niet in acht nemen van de
gebruiksaanwijzing, normale slijtage en zeer breekbare onderdelen als glaskannen etc. Deze
garantieverklaring heeft geen invloed op uw wettelijke rechten, en ook niet op uw legale rechten
welke men heeft als een consument onder de toepasselijke nationale wetgeving welke de aankoop
van goederen beheerst. De garantie vervalt bij reparatie door niet door ons bevoegde instellingen.
Informatie nodig bij Klantenservice
Wanneer reparaties aan het apparaat nodig worden, neem dan contact
op met onze Klantenservice, verschaf een goede omschrijving over het
defect en het artikelnummer KS ... op de waarderingsplaat van het
apparaat (zie plaatje). Deze informatie zal ons helpen met het efficiënt
behandelen van het verzoek.
In geval van een defect of ander probleem, neem contact op met de Klantenservice Afdeling. Het
adres kan gevonden worden in het aanhangsel van dit manuaal.
48
Page 49

Technische specificaties
Art.-Nr. KS 9780
Type van apparaat Koelkast/Vriezer
Energie efficiency classificatie in overeenkomst met richtlijnen 94/2 EC A+
Energie gebruik
kWh/24 h
kWh/jaar
0.64
234
De eigenlijke consumptie hangt af van het gebruikspatroon en de locatie van het apparaat.
Totaal gros volume, (liters) 216
Bruikbare koelkast capaciteit (liters) 148
Bruikbare vriezer capaciteit (liters) 68
Klimaat classificatie N, ST
Omgevende temperatuur bereik, °C 16 – 38
Veilige opbergtijd in geval van een defect, uren 12
Vries capaciteit, kg/24h 3
Vries temperatuur, °C -18
Afmetingen (in mm) 1545 x 540 x 565
Gewicht, kg 54
Elektrische specificaties Zie waarderingsplaat
Isolatie schuim Cyclopenthane
Geluids emissie 41 dB(A)
49
Page 50

Estimado Cliente,
Antes de utilizar el aparato, el usuario debe leer detenidamente las siguientes instrucciones
Conexión a la red eléctrica
Debe conectar este aparato solamente a una toma de tierra instalada según las normas en vigor.
Asegúrese de que la tensión de la red coincide con la tensión indicada en la placa de características.
Este producto cumple con las directivas obligatorias que acompañan el etiquetado de la CEE.
No utilice el aparato con un transformador o, junto con otros aparatos eléctricos, mediante un ●
cable alargador.
Para evitar el sonido de vibraciones, compruebe que el cable eléctrico no toca ninguna pieza de la ●
parte posterior del congelador (por ejemplo el cambiador de calor).
Información
Este aparato es un frigorífico compresor con 2 prestaciones refrigerantes separadas, diseñado para la
conservación a corto plazo de alimentos en el frigorífico y a largo plazo en el congelador.
El aparato está clasificado como Clase de Clima ‘N, ST’ (Normal, Subtropical) y está diseñado para el
uso doméstico. Cumple todas las normas relevantes para aparatos frigoríficos domésticos.
Instrucciones importantes de seguridad
Para evitar el riesgo de accidentes personales o de averías en el aparato, este solo debe ser ●
transportado con el embalaje original. Para desembalar e instalar el aparato, son necesarias 2
personas.
El circuito de refrigeración del aparato contiene el refrigerante isobutano ●
(R600a), un gas natural de alta compatibilidad medioambiental, que sin
embargo es un gas combustible. Por ello, deberá asegurarse de que ninguno
de los componentes del circuito de refrigeración resulta dañado durante el
transporte y la instalación del aparato. Si el circuito de refrigeración resulta
dañado, no encienda ni conecte el aparato a la red eléctrica, y aleje cualquier
fuente de llamas o de ignición del entorno del gas refrigerante; después ventile sobradamente la
habitación donde está el aparato.
Advertencia: ● No dañe el circuito de refrigeración. Cualquier fuga de refrigerante podría dañar
los ojos; también existe peligro de que se produzca la combustión del gas.
Advertencia: ● mantenga los orificios de ventilación, del interior del aparato o de la estructura
incorporada, libres de obstrucciones. Debe asegurarse suficiente ventilación en todo momento.
Advertencia: ● no utilice ningún aparato externo (por ejemplo radiadores o radiadores de aire)
para acelerar el proceso de descongelación; siga únicamente los métodos recomendados en este
manual.
El hielo obtenido del aparato durante la descongelación no es adecuado para el consumo ●
humano.
Advertencia: ● No utilice ningún aparato eléctrico (por ejemplo fabricadores de cubitos de hielo)
en el interior del compartimento de conservación de alimentos del congelador, cuya utilización
no esté permitida en estas instrucciones.
Antes de conectar el aparato a la red eléctrica, este debe ser examinado con detalle para detectar ●
cualquier desperfecto durante el transporte, incluido el cable eléctrico.
Frigorífico/Congelador
50
Page 51

El cable eléctrico debería examinarse con regularidad para detectar si ha resultado dañado. Si ●
descubriera que está dañado, no debe utilizar el aparato.
Para evitar el riesgo de incendio, no coloque ningún aparato termoeléctrico sobre el frigorífico. ●
No colocar recipientes con líquido sobre el aparato: es importante evitar derramar o verter
cualquier líquido que podría dañar el aislamiento eléctrico.
En el congelador solo deberá conservar alimentos comúnmente utilizados para el consumo ●
doméstico.
Las sustancias alcohólicas se pueden conservar solo cuando están correctamente envasadas en ●
recipientes cerrados y en posición vertical.
Para evitar el riesgo de intoxicación, no consuma alimentos después de la fecha de caducidad ●
indicada. Los alimentos descongelados no se pueden congelar por segunda vez.
No se apoye ni coloque excesivo peso sobre las estanterías, los compartimentos, la puerta, etc. ●
Proteja siempre el interior del congelador de cualquier llama o fuente de ignición. ●
No almacene ninguna botella de cristal con bebidas carbonatadas u otro líquido congelable en el ●
aparato: estas botellas pueden explotar durante el proceso de congelación.
Desenchufe el cable eléctrico de la toma de pared ●
en caso de funcionamiento defectuoso, antes de descongelar el aparato, durante su limpieza. -
Este aparato no debe ser utilizado por ninguna persona (incluidos niños) con reducidas ●
facultades físicas, sensoriales o mentales y tampoco por personas sin experiencia ni
conocimiento, a menos que hayan recibido supervisión o instrucciones sobre el uso del aparato
por parte de una persona responsable y por su propia seguridad.
Los niños deben estar bajo supervisión para garantizar que no juegan con el aparato. ●
Para cumplir con las normas de seguridad y evitar peligros, cualquier reparación o modificación ●
del aparato debe ser realizada por personal del servicio técnico autorizado, incluida la sustitución
del cable eléctrico.
Nos reservamos el derecho de incorporar modificaciones técnicas. ●
Si el aparato no se utiliza durante un largo periodo de tiempo, recomendamos mantener la puerta ●
abierta.
Si el aparato se vende, se entrega a un tercero o se desecha en un punto de reciclaje apropiado, ●
debe advertirse de la presencia de la sustancia aislante ‘ciclopentano’ y del refrigerante R 600 a.
Descripción
El aparato se compone de dos partes, el
compartimento congelador y el compartimento
frigorífico.
1. Control de temperatura y luz interior
2. Estanterías para la conservación de alimentos
(de altura ajustable)
3. Estantería para la conservación de alimentos
4. Compartimento para fruta/verdura
5. Compartimento de congelación rápida
6. Compartimento del congelador
7. Compartimento del congelador
8. Zonas para la conservación de alimentos en la
puerta
9. Conservación de botellas
51
Page 52

Puesta en marcha
Retire por completo cualquier material de embalaje, incluidas las cintas adhesivas. –
Precaución: – mantenga a los niños alejados del material de embalaje, porque podría ser
peligroso, existe el peligro de asfixia.
Antes de conectar a la red eléctrica, el aparato debe ser examinado detenidamente por si hubiera ●
resultado dañado durante el transporte, incluido el cable eléctrico.
Limpie el aparato siguiendo las instrucciones de la sección – Descongelación y limpieza incluida a
continuación.
Instalación
El aparato se debe situar en una habitación seca y bien ventilada. Se debe poner en funcionamiento a
una temperatura ambiental de 16 a 38 °C y una humedad relativa máx del 70 %. No exponga el
congelador a la luz directa del sol, y no lo coloque cerca de ninguna fuente de calor (radiadores,
cocinas, etc).
La parte posterior y los lados deben estar separados de la pared al menos 10 cm. –
Este aparato no se debe instalar dentro de un armario, y tampoco directamente bajo un armario,
estantería u objeto similar enganchado en la pared.
Compruebe que la puerta puede abrirse con un ángulo de 160°.
Si existe un suelo irregular, los pies ajustables del aparato se pueden utilizar para compensar las
irregularidades y asegurar una estabilidad óptima. El aparato se debe instalar con un ligero ángulo de
modo que se incline hacia detrás: esto asegurará que la puerta cierre automáticamente y no
permanezca abierta por error. No obstante, debe comprobar que los dos pies delanteros están
ajustados a la misma altura.
Ventilación
El aire caliente de la parte posterior del congelador debe poder circular libremente. Por ello, debe
comprobar que no se obstruye la circulación de aire detrás del aparato.
Puerta reversible
El diseño permite invertir la dirección de apertura de la puerta, es decir, las bisagras pueden estar en
el lado derecho (instalación de fábrica) o en el izquierdo.
Antes de invertir la dirección de apertura de la puerta, apoyar el aparato sobre la parte posterior. Pero
deberá apoyarlo sobre una superficie blanda y uniforme para evitar dañar los tubos capilares.
Precaución: Antes de invertir la dirección de apertura de la puerta, deberá apagar el aparato y
desenchufar el cable eléctrico de la toma de corriente.
1. Retire la tapa de los tornillos.
52
Page 53

2. Extraiga los tornillos y retire la tapa superior del aparato.
3. Extraiga la bisagra superior extrayendo los 3 tornillos. Quite la puerta superior y apóyela en una
superficie blanda para evitar rayarla.
4. Extraiga los dos pernos que sujetan la bisagra central. Quite la puerta inferior y apóyela en una
superficie blanda para evitar rayarla.
5. Retire la cubierta de relleno de los dos orificios de instalación de las bisagras en el lado izquierdo,
y colóquelas en la posición correspondiente del lado derecho.
53
Page 54

6. Retire los dos pies ajustables y los tornillos que sujetan la bisagra inferior.
7. Extraiga la bisagra inferior y gírela 180°. Desenrosque el perno de la bisagra e instálelo en el lado
contrario de la bisagra. Ahora deberá instalar la bisagra inferior en el lado izquierdo. Vuelva a
colocar los dos pies ajustables. Instale la puerta del congelador sobre el perno de la bisagra
inferior.
8. Gire la bisagra central 180°. Coloque el perno de la bisagra en la apertura correspondiente de la
puerta del compartimento congelador y ajústela instalando la bisagra central en el aparato.
Instale la puerta del congelador sobre la bisagra central del aparato.
54
Page 55

9. Retire los tornillos de la sección superior izquierda y vuelva a instalarlos en el lado contrario (el
lado derecho) del aparato. Retire la pieza de plástico de la esquina izquierda y colóquela sobre la
esquina derecha.
10. Gire la bisagra superior 180°. Retire el perno y vuelva a colocarlo en el lado contrario de la
bisagra.
11. Coloque el perno de la bisagra en la apertura correspondiente de la puerta y ajústela instalando
la bisagra superior en el aparato
12. Vuelva a colocar la cubierta superior del aparato, instalando y ajustando los tornillos. Finalmente
instale las dos tapas de los tornillos.
55
Page 56

Advertencia
Después de colocar el aparato en posición vertical, deberá esperar al menos dos horas antes de
conectar el cable a la red eléctrica.
Controles y luz interior
El aparato se activa al conectarlo a la red eléctrica. Solo se apagará por completo al desenchufar el
cable eléctrico de la toma de la pared.
En la posición ‚0‘, la función de frío está desactivada, aunque el aparato todavía está conectado a
la red eléctrica.
La temperatura del compartimento principal del frigorífico se puede regular mediante el control de
temperatura. La temperatura del compartimento principal se puede ajustar usando el control de
temperatura. Recomendamos ajustar el control de temperatura primero en la posición 3. Después de
un breve intervalo de tiempo, deberá comprobarse la temperatura real con un termómetro, y ajustar
la temperatura si fuera necesario. Girando el control de temperatura en sentido de las agujas del reloj
se disminuirá la temperatura, y girando en sentido contrario a las agujas del reloj se incrementará.
Sustitución de la bombilla de la luz interior
Apague el aparato desenchufando el cable eléctrico. –
Utilice un destornillador adecuado para retirar los tornillos de la tapa de la bombilla. –
Empuje la tapa levemente hacia la parte posterior y retírela. –
Sustituya la bombilla defectuosa por otra nueva (máx. 15 W, tipo de casquillo E 14). –
Vuelva a colocar la tapa e instale el tornillo. –
Vuelva a conectar el aparato a la red eléctrica. –
Congelación y conservación de alimentos
Con una temperatura de funcionamiento de –18°C e inferior, los compartimentos del congelador –
se pueden utilizar para conservar alimentos congelados o precongelados durante varios meses,
para hacer cubitos de hielo y para congelar alimentos frescos.
Los alimentos frescos (no congelados) o calientes no deben entrar en contacto con los alimentos –
ya congelados; esto evitará que los alimentos congelados resulten parcialmente descongelados.
Antes de proceder a la congelación, los alimentos frescos (carne, pescado, carne picada) deberán –
ser divididos en porciones pequeñas adecuadas para el consumo después de la descongelación).
Para la conservación de alimentos precongelados, debe prestarse mucha atención a la –
información facilitada por el fabricante en el envase del alimento. Si esta información no se
encuentra, no deberá excederse el periodo de conservación de 3 meses a partir de la fecha de
compra.
Al comprar alimentos congelados, verifique que están correctamente congelados, y que el envase –
no está dañado.
Para mantener la calidad de los alimentos ultracongelados, estos deben transportarse solo en –
recipientes adecuados y después deben introducirse en el congelador sin demora.
Al comprar alimentos congelados compruebe el envase con atención: si el envase muestra signos –
de humedad, presenta burbujas o está abultado, esto indica que los alimentos no se han
conservado correctamente y están estropeados.
Los tiempos de conservación de los alimentos congelados dependen en gran medida de la –
temperatura ambiente, la posición del control de la temperatura, el tipo de alimento y el tiempo
transcurrido desde la tienda al congelador, pero sobre todo también de la frecuencia con la que
se abre la puerta del congelador y del tiempo que permanece abierta. Siempre deberá seguir las
instrucciones del envase del alimento, y no deberá exceder el periodo máximo de validez.
Los materiales de los envases adecuados para los alimentos congelados son film de plástico –
56
Page 57

transparente (sin color) o bolsas de plástico transparente o papel de aluminio. Los materiales de
los envases deben estar bien ventilados antes de su utilización y después deberá comprobarse su
hermetismo antes de congelar los alimentos. Recomendamos que incluya una etiqueta en cada
alimento conservado donde indique el tipo de alimento, la fecha de congelación y la fecha de
caducidad. No introduzca alimentos en el congelador que no estén correctamente envasados.
Los tiempos de congelación podrán disminuir dividiendo los alimentos en porciones inferiores. –
No intente congelar bebidas carbonatadas, alimentos calientes y tampoco líquidos embotellados. –
Para garantizar la conservación de las sustancias nutritivas, como las vitaminas, recomendamos –
congelar los alimentos frescos lo más rápidamente posible. Para ello, los alimentos preparados se
deben introducir en el compartimento de congelación rápida, debidamente separados en una o
dos filas. Evite el contacto con alimentos que ya estén congelados. No intente congelar más de 3
Kg de alimentos frescos por día. El control de temperatura se debe ajustar a la posición 7.
Después de 24 horas, cuando los alimentos ya estén debidamente congelados, se podrán
introducir en los compartimentos del congelador. Vuelva a colocar el control de temperatura en
la posición original.
Los alimentos congelados se pueden descongelar dentro del frigorífico. De este modo, los –
alimentos se descongelar lentamente conservando todo su sabor. Además, los alimentos
congelados ayudan a mantener la temperatura interior del frigorífico al nivel adecuado.
Las fechas de caducidad para los alimentos congelados se indican (en meses) en la siguiente
tabla. No exceda estos periodos de conservación. Respete siempre la información facilitada por el
fabricante del producto en cuestión.
El tiempo de conservación disminuirá cuando la temperatura interior haya incrementado, por –
ejemplo debido a un fallo de funcionamiento
Compartimento del frigorífico
La temperatura en el interior del frigorífico depende principalmente de la temperatura ambiental, –
la posición del control de temperatura y la cantidad de alimentos conservados.
Inicialmente, el control de temperatura se debe situar en la posición – 4. Si el efecto de frío es
demasiado potente, puede reducirlo a la posición 1-3; si no es suficiente, increméntelo a 4-8.
Si observa escarcha en la pared posterior, probablemente es debido a que la puerta se ha
mantenido abierta durante demasiado tiempo, o se han introducido alimentos calientes en el
frigorífico o el control de temperatura está en una posición demasiado alta.
Los alimentos líquidos o de fuertes olores, y alimentos que absorben fácilmente olores fuertes –
(por ejemplo queso, pescado, mantequilla), se deben conservar por separado o en recipientes
herméticamente cerrados. Los plátanos no se deben conservar en el frigorífico porque son muy
57
Page 58

sensibles al frío.
Los alimentos calientes deberán enfriarse a temperatura ambiental antes de introducirlos en –
el frigorífico.
Debido al modo de circulación del aire, distintas zonas del compartimento principal del –
frigorífico tendrán distintas temperaturas.
La zona más fría es la parte de la pared posterior y la parte inferior del compartimento principal,
y aquí se deben conservar los alimentos delicados como el pescado, la carne cocinada o cruda y
los embutidos.
La zona menos fría es alrededor de la puerta en la parte más alta del compartimento principal del
frigorífico, y es adecuada para conservar queso y mantequilla. De ese modo, el queso conservará
su sabor, y la mantequilla se podrá untar fácilmente.
Compruebe siempre que la puerta está correctamente cerrada y que la goma de la puerta no está –
obstruida por alimentos conservados en el compartimento principal ni en la puerta.
Hacer cubitos de hielo
Se incluye una bandeja especial para hacer cubitos de hielo. Llene la bandeja de agua potable hasta
3/4 de su capacidad total e introdúzcala en el congelador. Los cubitos de hielo se pueden extraer con
facilidad de la bandeja si ésta se mantiene a temperatura ambiente durante 5 minutos.
Descongelación y limpieza
Precaución: Desenchufe siempre el cable eléctrico de la toma de corriente antes de proceder a –
la limpieza o descongelación del aparato.
La superficie interior y todos las piezas de plástico deberán mantenerse limpias y sin restos de –
grasa, sustancias ácidas, salsas, etc. Sin embargo, si alguna de estas piezas se ensucia
accidentalmente, deberá limpiarse inmediatamente con agua templada y jabón o detergente
suave. Después secar todas las piezas con un paño seco.
Las zonas de cierre de la puerta se deben limpiar con frecuencia. –
El condensador del aparato se debe limpiar al menos una vez al año con un cepillo blanco, un –
paño limpiador electroestático o una aspiradora. En caso contrario, el polvo acumulado
incrementará el consumo de energía.
Todos los accesorios se pueden limpiar usando agua templada y detergente. – No introducir en el
lavavajillas.
Observación: – No utilizar sustancias limpiadoras granuladas y tampoco sustancias limpiadoras
ácidas o con alcohol. Recomendamos no utilizar paños o estropajos ásperos. No utilizar aparatos
eléctricos, como aparatos de limpieza al vapor, para descongelar o limpiar el frigorífico.
Compartimento del frigorífico
El frigorífico se descongela automáticamente durante su funcionamiento. Cualquier acumulación de
hielo en la parte posterior del compartimento se descongelará durante los periodos en que el
compresor no esté activo. El agua derretida pasará por el canal de drenaje y se acumulará en la
bandeja de evaporación desde donde se absorberá en el aire.
Para permitir que el agua derretida fluya libremente, siempre deberá comprobar que el canal y la ●
apertura de salida del compartimento están limpias. El canal de drenaje se debe limpiar con
frecuencia.
Para evitar la formación de olores desagradables, el compartimento y las estanterías se deben ●
limpiar al menos una vez al mes usando agua templada y, si es necesario, un detergente suave.
Desconecte siempre el aparato de la red eléctrica antes de proceder a su limpieza.
No retire ni dañe la placa de características del interior del compartimento durante la limpieza.
58
Page 59

Compartimento del congelador
Para evitar la acumulación de hielo con un grosor superior a 5mm, el compartimento del congelador
se debe descongelar al menos dos veces al año. Proceda del modo siguiente:
desenchufe el cable eléctrico de la toma de corriente para desenchufar el aparato de la red –
eléctrica.
extraiga todos los alimentos del congelador, colóquelos en un recipiente de plástico, añada bolsas –
reutilizables de hielo precongeladas y tape el recipiente para mantener la temperatura interior.
mantenga la puerta del congelador abierta. –
Advertencia: no utilice ningún aparato externo ni otros medios (radiadores o radiadores de aire)
para acelerar el proceso de descongelación.
Después de la descongelación, el congelador deberá limpiarse a fondo con agua templada, y si
fuera necesario, un detergente suave. Después deberá secarlo con un paño y ventilarlo antes de
utilizarlo de nuevo.
Resolución de problemas
Cuando el aparato esté encendido se escucharán ciertos sonidos típicos. Estos sonidos son:
producidos por el motor eléctrico en el interior del compresor; –
cuando el compresor esté funcionando el nivel del sonido será
ligeramente superior durante un periodo de tiempo.
producidos por el flujo del agente refrigerante a través del circuito. –
La siguiente tabla incluye los posibles fallos en el funcionamiento, las causas probables y las
soluciones. Si se presenta un fallo en el funcionamiento, compruebe primero si puede solucionarlo
usando esta tabla. Si el problema persiste, desconecte el aparato de la red eléctrica y póngase en
contacto con el Departamento de Servicio Técnico.
Problema Causa posible y solución
El aparato está conectado a la red
eléctrica, pero no funciona.
La toma eléctrica no tiene suministro, o existen problemas
de contacto. Compruebe la toma de pared y la clavija.
El aparato está incorrectamente instalado (por ejemplo está
Se escuchas sonidos anormales
durante el funcionamiento.
sobre un suelo irregular) o hay contacto entre el circuito
refrigerante posterior y el cable eléctrico, la pared u otro
objeto o superficie. Verifique que ha seguido correctamente
todas las instrucciones de instalación de este manual.
El agua se acumula en la parte
inferior del aparato.
El sistema de drenaje de agua está bloqueado. Retire la
obstrucción y limpie el sistema.
Transporte del aparato
El aparato se debe transportar solo en posición vertical.
No inclinarlo a más de 45°. Durante el transporte, compruebe que el aparato está perfectamente
sujeto y protegido contra golpes, vibraciones y desplazamientos.
59
Page 60

Desechar el aparato
Este aparato ha sido fabricado con materiales reciclables. Después de desenchufar el cable
eléctrico de la toma de la pared, el aparato deberá hacerse inservible cortando el cable
eléctrico antes de desechar el aparato en un punto de recogida de desechos especiales según la
regulación local. El refrigerante y el producto químico de la espuma aislante se deberán desechar a
través de una agencia competente. Extreme las precauciones para no dañar el circuito de refrigeración
antes de entregar el aparato en el punto de recogida competente.
Garantía
Este producto está garantizado por un período de dos años, contado a partir de la fecha de compra,
contra cualquier defecto en materiales o mano de obra. Esta garantía sólo es válida si el aparato ha
sido utilizado siguiendo las instrucciones de uso, sempre que no haya sido modificado, reparado o
manipulado por cualquier persona no autorizada o haya sido estropeado como consecuencia de un
uso inadecuado del mismo. Naturalmente esta garantía no cubre las averías debidas a uso o desgaste
normales, así como aquellas piezas de fácil rotura tales como cristales, piezas cerámicas, etc. Esta
garantía no afecta a los derechos legales del consumidor ante la falta de conformidad del producto
con el contrato de compraventa.
Información necesaria para el Servicio de Asistencia Técnica
Si es necesario reparar el aparato, póngase en contacto con nuestro
Servicio de Asistencia Técnica, facilitando información detallada sobre
el problema y citando el número de artículo KS ... incluido en la placa
de características del aparato (ver la imagen). Esta información
ayudará a gestionar su petición eficientemente.
Si el aparato no funciona correctamente o se presenta otro problema, póngase en contacto con el
Departamento de Atención al Cliente. La dirección se incluye en el apéndice de este manual.
60
Page 61

Especificaciones técnicas
Núm. de Artículo KS 9780
Tipo de aparato Frigorífico/Congelador
Clasificación de eficiencia energética según la directiva 94/2 EC A+
Consumo :
kWh/24 h
kWh/año
0.64
234
El consumo actual depende del tipo de uso y la ubicación del aparato.
Volumen total bruto, (litros) 216
Capacidad utilizable del frigorífico (litros) 148
Capacidad utilizable del congelador (litros) 68
Clasificación N, ST
Temperatura ambiental, °C 16 – 38
Tiempo máximo de conservación en caso de funcionamiento
defectuoso, h
12
Capacidad de congelación, kg/24h 3
Temperatura de congelación, °C -18
Dimensiones (en mm) 1545 x 540 x 565
Peso, kg 54
Especificaciones eléctricas Ver placa de características
Espuma aislante Ciclopentano
Emisión de ruido 41 dB(A)
61
Page 62

Gentile Cliente,
Vi ricordiamo che è assolutamente necessario leggere con estrema attenzione le seguenti istruzioni
d’uso, prima di utilizzare l’apparecchio.
Collegamento alla rete
L’apparecchio deve essere collegato esclusivamente ad una presa di corrente con messa a terra,
installata a norma di legge. Assicuratevi che la tensione d’alimentazione corrisponda alla tensione
indicata sulla targhetta portadati. Questo prodotto è conforme alle direttive vincolanti per
l’etichettatura CE.
Non mettete in funzione l‘apparecchio utilizzando convertitori di corrente o insieme a altri ●
apparecchi elettrici collegati da cavi di prolunga.
Per evitare il rumore delle vibrazioni assicuratevi che il cavo di alimentazione non tocchi nessun ●
elemento sul retro dell’apparecchio (per es. lo scambiatore di calore).
Informazioni generali
Questo apparecchio è un frigorifero a compressore con 2 vani di refrigerazione ideati per la
conservazione a breve termine di alimenti nel vano frigorifero e a lungo termine nella cella
congelatore.
L’apparecchio è classificato alla Classe climatica “N, ST” (normale, sub-tropicale) e specifico per l’uso
domestico. È conforme a tutte le principali normative per gli apparecchi di refrigerazione domestici.
Importanti norme di sicurezza
Per evitare il rischio di riportare ferite o di danneggiare l’apparecchio, questo deve essere ●
trasportato all’interno del suo imballaggio originale. Per togliere dall’imballaggio l’apparecchio e
per la sua installazione è necessaria la presenza di 2 persone.
Il circuito refrigerante di quest’apparecchio contiene il gas refrigerante ●
isobutano (R600a), un gas naturale a alto livello di compatibilità ambientale,
che però resta pur sempre altamente infiammabile. È consigliabile, pertanto,
assicurarsi che nessun elemento del circuito refrigerante subisca danni
durante il trasporto o l’installazione dell’apparecchio. Nel caso si verifichi
un danno al circuito, non accendete e non collegate l’apparecchio
all’alimentazione elettrica, ma eliminate ogni fiamma libera e ogni fonte di ignizione in
prossimità del gas refrigerante; poi areate perfettamente il locale in cui si trova l’apparecchio.
Avvertenza: ● Non provocate danni al circuito refrigerante. La fuga del refrigerante provoca danni
agli occhi; esiste anche il pericolo di ignizione del gas.
Avvertenza: ● le aperture di ventilazione, nella cassa dell’apparecchio o nella struttura di incasso,
devono sempre essere libere da ogni ostruzione. Garantite sempre una buona aerazione.
Avvertenza: ● non utilizzate mai apparecchi elettrici esterni (ad es. radiatori o termoventilatori)
per accelerare il processo di sbrinamento; seguite sempre le modalità descritte nel presente
manuale.
Il ghiaccio rimosso dall’apparecchio durante l’operazione di sbrinamento non è adatto al ●
consumo umano.
Avvertenza: ● All’interno dello scomparto per la congelazione degli alimenti non mettete in
funzione nessun apparecchio elettrico (per es. un apparecchio per la fabbricazione di cubetti di
Frigorifero/Congelatore
62
Page 63

ghiaccio) che non sia esplicitamente previsto in questo libretto di istruzioni.
Prima di collegare alla rete elettrica, controllate che l’apparecchio e il cavo di alimentazione non ●
abbiano subito danni durante il trasporto.
Controllate con regolarità che sul cavo di alimentazione non ci siano tracce di deterioramento. ●
Nell’eventualità che tali tracce siano rinvenute, l’apparecchio non va più usato.
Per evitare il rischio di incendi, non poggiate nessun apparecchio termoelettrico sul frigorifero. ●
Non poggiate nessun contenitore di liquidi sopra l’apparecchio: eviterete che eventuali perdite o
versamenti del liquido possano danneggiare l’isolamento termico dell’apparecchio.
Nel congelatore vanno conservati solo gli alimenti normalmente utilizzati per la cucina ●
domestica.
Le sostanze alcoliche possono essere conservate solo se chiuse in contenitori ermetici e in ●
posizione verticale.
Per evitare il rischio di intossicazioni alimentari, non consumate cibi dopo la data massima di ●
scadenza riportata sulla confezione. Cibi già scongelati non vanno congelati una seconda volta.
Non poggiate o sistemate pesi eccessivi sui ripiani, nei comparti, sullo sportello ecc. ●
Proteggete sempre l’interno dell’apparecchio da fiamme libere o da altre fonti di ignizione. ●
Non conservate nell’apparecchio bottiglie di vetro che contengano liquidi gassati o comunque ●
congelabili: potrebbero scoppiare durante il congelamento.
Disinserite sempre la spina dalla presa di corrente ●
in caso di cattivo funzionamento, prima di sbrinare, durante la pulizia. -
Questo apparecchio non è previsto per l’utilizzo da parte di persone (bambini compresi) con ●
ridotte capacità fisiche, sensoriali o mentali, o con scarsa esperienza o conoscenza, a meno che
non siano adeguatamente sorvegliate o istruite sull’uso dell’apparecchio dalla persona
responsabile della loro sicurezza.
È necessario sorvegliare che i bambini non giochino con l’apparecchio. ●
In conformità con le norme di sicurezza e per evitare rischi, ogni riparazione o modifica al ●
presente apparecchio, compresa la sostituzione del cavo di alimentazione, deve essere effettuata
solo dal personale di assistenza tecnica autorizzato.
Ci riserviamo il diritto di effettuare modifiche tecniche sull’apparecchio. ●
Se l’apparecchio non sarà utilizzato per un lungo periodo di tempo, consigliamo di lasciare ●
aperto lo sportello.
In caso di vendita dell’apparecchio, o comunque di passaggio a terzi o di smaltimento presso un ●
servizio di riciclaggio autorizzato, prestate molta attenzione alla presenza dell’agente isolante
“Ciclopentano” e anche del refrigerante R 600 A.
63
Page 64

Descrizione dell’apparecchio
L’apparecchio è composto da due parti, il vano
frigorifero e la cella congelatore.
1. Manopola di regolazione della temperature e
illuminazione interna
2. Ripiani di appoggio (regolabili in altezza)
3. Ripiano di appoggio
4. Cassetto frutta e verdure
5. Scomparto a congelazione rapida
6. Scomparto congelatore
7. Scomparto congelatore
8. Spazi di conservazione sulla controporta
9. Balconcini portabottiglie
Al primo utilizzo
Eliminate completamente tutto il materiale di imballaggio interno e esterno, comprese le strisce –
adesive.
Avvertenza: – Tutto il materiale di imballaggio deve essere tenuto fuori della portata dei bambini
a causa del rischio potenziale, per esempio di soffocamento, esistente.
Per la giusta collocazione, vi consigliamo di inclinare leggermente l’apparecchio verso dietro. In –
questo modo, potrete utilizzare le rotelle per il trasporto per muovere l’apparecchio sino al posto
designato per la sua installazione.
Assicuratevi di smaltire in modo appropriato tutto il materiale di imballaggio. –
Prima di procedere al collegamento elettrico controllate attentamente che l’apparecchio e il cavo ●
di alimentazione non abbiano subito danni durante il trasporto.
Pulite l’apparecchio seguendo le istruzioni riportate nella sezione – Sbrinamento e pulizia più
sotto.
Installazione
L’apparecchio deve essere sistemato in un locale asciutto ben aerato. Per il buon funzionamento deve
trovarsi a una temperatura ambientale compresa tra i 16 e i 38 °C e a un livello di umidità di
massimo 70%. Non esponete l’apparecchio alla luce diretta del sole e non mettetelo vicino a fonti di
calore (come radiatori, cucine, ecc.)
Sul retro e sui lati deve essere rispettata una distanza minima di 10 cm dalla parete. –
Questo apparecchio non è adatto per l’installazione ad incasso dentro un mobile, né direttamente
sotto uno stipo pensile, sotto una mensola o oggetti simili.
Assicuratevi che lo sportello possa aprirsi sino a un angolo di 160°.
In caso di pavimento non perfettamente a livello, potete compensare la diversità di altezza grazie ai
piedini regolabili, in modo da ottenere la stabilità migliore dell’apparecchio. L’apparecchio dovrebbe
essere installato con una leggera inclinazione rivolta verso la parte posteriore: in questo modo vi
assicurerete che lo sportello si chiuda automaticamente e non possa rimanere aperto per errore. In
ogni caso, però, assicuratevi che i due piedini anteriori si trovino alla stessa altezza.
Ventilazione
L’aria che si riscalda sulla parte posteriore del congelatore deve avere la possibilità di circolare
liberamente. A questo scopo, assicuratevi che la circolazione dell’aria dietro l’apparecchio non sia
ostruita.
64
Page 65

Reversibiltà dello sportello
Questo modello prevede la possibilità di invertire il verso di apertura dello sportello, spostare cioè le
cerniere da sinistra (installazione di configurazione) a destra.
Prima di invertire lo sportello, poggiate l’apparecchio sul suo retro. Assicuratevi, però, che poggi su
una superficie morbida e liscia per evitare di arrecare danni ai tubi capillari.
Attenzione: Prima di procedere all’inversione dello sportello, spegnete l’apparecchio e
disinseritelo dall’alimentazione elettrica.
1. Rimuovete i coperchietti delle viti.
2. Togliete le viti e rimuovete il pannello di copertura.
3. Togliete la cerniera superiore rimuovendo le 3 viti. Togliete lo sportello superiore e poggiatelo su
una superficie morbida proteggendolo da eventuali graffi.
65
Page 66

4. Tirate via i due bulloni che tengono ferma in posizione la cerniera centrale. Togliete lo sportello
inferiore e poggiate anche questo su una superficie morbida proteggendolo da graffi.
5. Rimuovete entrambi i coperchietti di protezione dei fori di montaggio della cerniera sulla sinistra
e risistemateli nei posti corrispondenti sulla destra.
6. Rimuovete i due piedini regolabili e le viti di bloccaggio della cerniera inferiore.
66
Page 67

7. Rimuovete la cerniera inferiore e ruotatela di 180°. Svitate il perno della cerniera e montatelo sul
lato opposto della cerniera. Ora inserite la cerniera inferiore sul lato sinistro. Risistemate i
piedini regolabili. Inserite lo sportello della cella congelatore sul perno della cerniera inferiore.
8. Ruotate la cerniera centrale di 180°. Sistemate il perno della cerniera nella corrispondente
apertura nello sportello della cella congelatore e bloccatelo inserendolo nella cerniera centrale
dell’apparecchio. Montate lo sportello del vano frigorifero sulla cerniera centrale sull’apparecchio.
9. Rimuovere le viti dalla sezione sulla sinistra superiore e risistematele sul lato opposto (cioè sulla
destra) dell’apparecchio. Togliete il pezzo di plastica ad angolo dalla sinistra e sistematelo sulla
destra.
67
Page 68

10. Ruotate la cerniera superiore di 180°. Rimuovete il perno e risistematelo sul lato opposto della
cerniera.
11. Mettete il perno della cerniera nell’apertura corrispondente sullo sportello e bloccatelo inserendo
la cerniera superiore sull’apparecchio.
12. Risistemate il pannello superiore e inserite e avvitate le viti. Infine, sistemate i due copriviti.
Avvertenza
Dopo aver rimesso in posizione verticale l’apparecchio, aspettate almeno due ore prima di collegarlo
all’alimentazione elettrica.
Interruttori e illuminazione interna
L’apparecchio si accende collegando la spina all’alimentazione elettrica. Si spegne completamente solo
disinserendo la spina dalla presa di corrente a muro.
Con la manopola in posizione ‘0’, la funzione di refrigerazione è disattivata, ma l’apparecchio è
ancora collegato all’alimentazione elettrica.
La temperatura nel vano frigorifero può essere regolata tramite l’apposita manopola di regolazione
della temperatura. Consigliamo di impostare inizialmente la manopola della temperatura sulla
posizione 3. Dopo un certo lasso di tempo, dovreste controllare la temperatura con un termometro e
effettuare le regolazioni del caso. Ruotando la manopola di regolazione della temperatura in senso
68
Page 69

orario si diminuirà la temperatura, invece la rotazione in senso antiorario porterà all’aumento della
temperatura.
Sostituzione della lampadina interna
Spegnete completamente l’apparecchio scollegandolo dall’alimentazione elettrica. –
Con un giravite adatto rimuovete la vite dal coperchio della lampadina. –
Fate scivolare il coperchio un po’ verso dietro e toglietelo. –
Sostituite la lampadina fulminata con una nuova (max. 15 W, tipo a spina E 14). –
Fate scivolare il coperchio di nuovo in sede e stingete la vite. –
Ricollegate l’apparecchio all’alimentazione elettrica. –
Congelamento e conservazione degli alimenti
Con una temperatura di esercizio di –18°C o inferiore, gli scomparti di refrigerazione possono –
essere utilizzati per conservare alimenti congelati o pre-congelati per diversi mesi, per ottenere
cubetti di ghiaccio e per congelare alimenti freschi.
Gli alimenti freschi (cioè non congelati) o caldi non devono venire a contatto con gli alimenti già –
congelati per evitare che questi ultimi si scongelino parzialmente.
Prima di congelare alimenti freschi (p. es. carne, pesce, tritato) è preferibile suddividerli in –
piccole porzioni più funzionali all’uso dopo lo scongelamento).
Per conservare alimenti surgelati, rispettate rigorosamente le indicazioni fornite dal produttore –
riportate sulla confezione. Se non dovessero essere riportate informazioni specifiche, si consiglia
di non superare il periodo di 3 mesi di conservazione dalla data di acquisto.
Quando acquistate surgelati, controllate che gli alimenti siano ben congelati e che la confezione –
non presenti segni di deterioramento.
Allo scopo di mantenere la qualità degli alimenti surgelati, questi devono essere trasportati solo –
in contenitori adatti e poi immediatamente conservati nel congelatore.
Controllate con attenzione la confezione quando acquistate alimenti surgelati: se questa mostra –
segni di umidità, se sembra che trabocchi o sia rigonfia, significa che gli alimenti non sono stati
conservati nel modo dovuto e sono deperiti.
I tempi di conservazione degli alimenti congelati dipendono largamente dalla temperatura –
ambientale, dall’impostazione del regolatore di temperatura, dal tipo di alimento e dal tempo
intercorso dal momento dell’acquisto sino alla conservazione nel congelatore, ma spesso possono
dipendere anche da quanto spesso si apre lo sportello del congelatore e da quanto tempo lo si
tiene aperto. Seguite sempre le istruzioni riportate sulla confezione degli alimenti e non superate
i termini indicati per la durata di stoccaggio.
I materiali di imballaggio più adatti per gli alimenti congelati sono pellicole o sacchetti di plastica –
trasparenti (cioè non colorati) o fogli di alluminio. I materiali di imballaggio devono essere ben
arieggiati prima dell’uso e poi controllati per la tenuta ermetica prima di congelare gli alimenti.
Vi consigliamo vivamente di apporre delle etichette sui sacchetti conservati nel congelatore su
cui riportare le informazioni più importanti come per esempio il tipo di alimento, la data di
congelamento e la data limite per il consumo. Non inserite nessun alimento negli scomparti del
congelatore se non sono stati impacchettati in modo appropriato.
È possibile ridurre i tempi di congelamento dividendo gli alimenti in porzioni più piccole. –
Non cercate di congelare bibite gasate, cibi caldi o bottiglie di liquidi di qualsiasi tipo. –
Per assicurarvi che gli alimenti non perdano i loro elementi nutrizionali come per esempio le –
vitamine, gli alimenti freschi devono essere congelati correttamente e il più presto possibile. A
questo scopo, i cibi preparati devono essere sistemati nello scomparto per la congelazione rapida,
ben spaziati su una o due file. Evitate il contatto con cibi già congelati. Non congelate più di 3 kg
69
Page 70

di alimenti freschi al giorno. Impostate il regolatore di temperatura sulla posizione 7. Dopo 24
ore, quando cioè gli alimenti sono ben congelati, possono essere spostati negli scomparti del
congelatore. Impostate di nuovo il regolatore di temperatura sulla sua posizione originale.
Gli alimenti congelati possono essere messi a scongelare nel vano refrigerazione. In questo modo, –
gli alimenti si scongelano lentamente, mantenendo inalterati tutti i loro sapori. Inoltre, gli
alimenti congelati contribuiscono a mantenere la temperatura all’interno del frigorifero al livello
prefissato.
Le date limite per il consumo degli alimenti congelati sono specificate (in mesi) nella tabella qui
di seguito. Non superate questi tempi di conservazione. Rispettate sempre le indicazioni fornite dal
produttore del prodotto in questione.
Il tempo di conservazione diminuisce se la temperatura interna aumenta, per esempio in seguito –
a un’anomalia nel funzionamento.
Vano refrigerazione
La temperatura interna all’apparecchio di refrigerazione dipende principalmente dalla –
temperatura ambientale, dall’impostazione del regolatore di temperatura e dalla quantità di
alimenti conservata.
Inizialmente, impostate la manopola di regolazione della temperatura sulla posizione – 4. Se il
livello di refrigerazione risulta essere eccessivo, abbassate l’impostazione alla posizione 1-3. Se
invece risulta insufficiente, alzate l’impostazione a 4-8.
La formazione di brina sulla parete posteriore, probabilmente è dovuta al fatto di aver tenuto
aperto lo sportello troppo a lungo o di aver inserito alimenti ancora caldi all’interno del
frigorifero o dall’aver impostato un livello troppo alto di refrigerazione.
Alimenti liquidi o con forti odori, o alimenti soggetti ad assorbire odori (per es. formaggi, pesce, –
burro) devono essere conservati separatamente o chiusi in contenitori ermetici. Non conservate
banane in frigorifero, perché sono molto sensibili al freddo.
Alimenti caldi devono raffreddarsi sino alla temperatura ambiente prima di essere conservati –
nel frigorifero.
Per le modalità di circolazione dell’aria, le varie zone interne al frigorifero sono influenzate in –
modi diversi.
La zona più fredda è vicino la parete posteriore e nella parte bassa dell’apparecchio, ed è ideale
per la conservazione di alimenti delicati come pesce, carne fresca o cotta o arrosti freddi.
La zona più calda è vicino allo sportello e nella parte alta del vano, ideale quindi per la
conservazione per esempio di formaggio e burro. In questo modo, il formaggio manterrà il suo
sapore e il burro sarà sempre morbido da spalmare.
Accertatevi sempre che lo sportello si chiuda bene e che la guarnizione non sia ostruita dagli –
70
Page 71

alimenti conservati nel vano frigorifero o nella controporta.
Produzione di cubetti di ghiaccio
L’apparecchio è dotato di un vassoio specifico per la produzione di cubetti di ghiaccio. Riempite di
acqua potabile i 3/4 della capacità del vassoio e sistematelo nel vano congelatore. Sarà molto facile
rimuovere i cubetti di ghiaccio dal vassoio se lasciato stemperare a temperatura ambiente per 5
minuti.
Sbrinatura e pulitura
Attenzione: disinserite sempre la spina dalla presa di corrente a muro prima di procedere –
alla pulitura o alla sbrinatura dell’apparecchio.
Mantenete sempre le superfici interne e le parti in plastica libere da sostanze grasse o acide, da –
salse, ecc. Ad ogni modo, se una delle parti dette dovesse sporcarsi inavvertitamente, deve essere
immediatamente pulita con acqua calda e un detergente delicato e asciugata accuratamente.
Pulite frequentemente la guarnizione dello sportello. –
Il condensatore dell’apparecchio deve essere pulito almeno una volta all’anno con una spazzola –
soffice, con panni elettrostatici o con un aspirapolvere. L’accumulo di polvere altrimenti potrebbe
causare un aumento nel consumo di energia.
Tutti gli elementi accessori possono essere lavati con acqua calda e sapone. – Non possono essere
lavati in lavastoviglie.
Nota: – Non usate materiali pulenti granulosi o agenti a base acida, alcolica o con spirito.
Sconsigliamo anche l’uso di panni ruvidi o spugne abrasive. Non usate nessun tipo di apparecchio
elettrico, come per esempio pulitori a vapore, per pulire o sbrinare l’apparecchio.
Vano di refrigerazione
Il refrigeratore si sbrina automaticamente durante il funzionamento. Gli accumuli di ghiaccio sul
retro del vano si scioglieranno nei periodi in cui il compressore non è attivato. L’acqua proveniente
dallo scioglimento della brina, scola attraverso il canaletto specifico ed è raccolta nel vassoietto di
evaporazione da cui poi evapora nell’aria.
Per consentire il drenaggio libero dell’acqua dello scioglimento della brina, assicuratevi sempre ●
che il canaletto di drenaggio e l’apertura di scarico nel vano siano liberi da ogni ostruzione. Il
canaletto di drenaggio deve essere pulito con una certa frequenza.
Per prevenire la formazione di cattivi odori, il vano e i ripiani devono essere puliti almeno una ●
volta al mese utilizzando acqua calda e, se necessario, un detergente delicato. Scollegate sempre
l’apparecchio dall’alimentazione elettrica prima di procedere alla pulitura.
Durante le operazioni di pulizia, attenzione a non rimuovere o danneggiare la targhetta portadati
all’interno del vano.
Cella congelatore
Per evitare che la formazione di ghiaccio superi lo spessore di 5 mm, dovrete procedure alla
sbrinatura del congelatore almeno due volte all’anno. Procedete in questo modo:
disinserite la spina dalla presa di corrente a muro per scollegare l’apparecchio –
dall’alimentazione elettrica.
togliete tutti gli alimenti dal congelatore, sistemateli in un contenitore di plastica, aggiungete –
delle mattonelle di ghiaccio sintetico e coprite il contenitore per mantenere bassa la temperatura
all’interno.
lasciate aperto lo sportello del congelatore. –
71
Page 72

Avvertenza: non utilizzate dispositivi esterni o altri metodi (per es. radiatori o termoventilatori) per
accelerare il processo di sbrinamento.
Dopo lo sbrinamento, pulite accuratamente il congelatore con acqua calda e, se necessario,
utilizzate un detersivo delicato. Asciugate perfettamente e fate arieggiare l’apparecchio prima di
rimetterlo in funzione.
Eventuali problemi
È possibile sentire dei rumori caratteristici quando accendete l’apparecchio. Questi rumori sono:
determinati dal motorino elettrico interno al gruppo compressore; –
durante l’avvio del compressore, il livello di rumorosità sarà
leggermente più alto per un limitato periodo di tempo.
determinati dall’agente refrigerante che fluisce nel circuito. –
La tabella che segue riporta i possibili problemi, l‘eventuale causa e i modi per risolverli. In caso di
problemi di funzionalità, controllate prima se sia possibile risolverli con l‘ausilio di questa tabella. Se
il problema persiste, scollegate l‘apparecchio dall‘alimentazione elettrica e rivolgetevi al Centro
Assistenza Clienti.
Problema Eventuale causa e sua risoluzione
L’apparecchio è collegato alla
rete elettrica ma non funziona.
La presa di corrente a muro non ha energia o ci sono problemi
di contatto elettrico. Controllate la presa di corrente a muro e la
spina elettrica.
Probabilmente l’apparecchio non è stato installato correttamente
(per esempio su una superficie non a livello) o si viene a creare
Durante il funzionamento si
sente un rumore eccessivo.
un contratto tra il circuito refrigerante montato sul retro, la
parete o qualche altro oggetto o superficie. Verificate che tutte le
istruzioni di installazione riportate in questo manuale siano
state rispettate puntualmente.
Si raccoglie dell’acqua sul fondo
dell’apparecchio.
Il sistema di scarico della brina sciolta è bloccato. Rimuovete
l’ostruzione e pulite il sistema.
Trasporto dell’apparecchio
L’apparecchio deve essere mantenuto in posizione verticale durante il trasporto.
Non sottoponetelo a inclinazioni superiori a 45°. Durante il trasporto, accertatevi di aver fissato bene
e protetto l’apparecchio da eventuali colpi, vibrazioni o spostamenti.
Smaltimento
Questo apparecchio è stato realizzato con materiali riciclabili. Dopo aver disinserito la spina
dalla presa di corrente a muro, l’apparecchio deve essere reso inutilizzabile tagliando il cavo di
alimentazione prima di smaltire l’apparecchio presso i punti di raccolta dei rifiuti in
conformità con le disposizioni locali. L’agente refrigerante e quello chimico della schiuma isolante
devono essere smaltiti presso i centri autorizzati. Prestate particolare attenzione a non danneggiare il
circuito refrigerante prima di consegnare l’apparecchio ai centri di smaltimento autorizzati.
72
Page 73

Dichiarazione di garanzia
La garanzia sui nostri prodotti ha validità di 2 anni dalla data di vendita (certificata da scontrino
fiscale) e comprende gli eventuali difetti del materiale o di particolari di costruzione. I danni
derivanti da un uso improprio, rotture da caduta o similari non vengono riconosciuti. La presente
garanzia non pregiudica i vostri diritti legali, né i diritti acquisiti in quanto consumatore e
riconosciuti dalla legislazione nazionale vigente che disciplina l'acquisto di beni. La garanzia decade
nel momento in cui gli apparecchi vengono aperti o manomessi da Centri non da noi autorizzati.
Dati da comunicare al Centro Assistenza Clienti
Nel caso in cui l’apparecchio richieda una riparazione, vi preghiamo di
mettervi in contatto con il nostro Centro Assistenza Clienti fornendo
una descrizione dettagliata del problema occorso e citando il numero
di articolo KS ... riportato sulla targhetta portadati dell’apparecchio
(ved. figura). Tali informazioni ci aiuteranno a gestire efficacemente la
vostra richiesta.
In caso di cattivo funzionamento o di altri problemi, vi raccomandiamo di mettervi in contatto
con il nostro Centro Assistenza Clienti il cui indirizzo si trova in appendice al presente manuale.
Dati tecnici
N° di Art. KS 9780
Tipo di apparecchio Frigorifero/Congelatore
Classe di efficienza energetica minima, in conformità con la direttiva
94/2 EC
A+
Consumo energetico:
kWh/24 h
kWh/anno
0.64
234
Il consumo reale dipende dal tipo di utilizzo e dal luogo di collocazione dell’apparecchio.
Capacità totale lorda (in litri) 216
Capacità netta del frigorifero (in litri) 148
Capacità netta della celletta congelatore (in litri) 68
Classe climatica N, ST
Temperatura ambiente, °C 16 – 38
Tempo di conservazione sicura in caso di anomalie, h 12
Capacità di congelamento, kg/24h 3
Temperatura di conservazione , °C -18
Dimensioni di ingombro (in mm.) 1545 x 540 x 565
Peso, kg 54
Dati elettrici Ved. targhetta portadati
Schiuma isolante Ciclopentano
Rumorosità 41 dB(A)
73
Page 74

Kære kunde!
Inden apparatet tages i brug bør denne brugsanvisning læses omhyggeligt.
El-tilslutning
Apparatet bør kun tilsluttes et stik, der er beskyttet mod jordfejl og installeret i overensstemmelse
med el-regulativet. Vær opmærksom på, om lysnettets spænding svarer til spændingen angivet på
typeskiltet. Dette produkt overholder direktiverne som gælder for CE-mærkning.
Tilslut aldrig dette apparat gennem en transformer eller sammen med andre elektriske apparater, ●
ved hjælp af en forlængerledning.
For at undgå vibrationslyde skal man sikre sig at ledningen ikke på noget sted berører bagsiden ●
af apparatet (f.eks. varmeveksleren).
Generel information
Dette apparat er et kompressorkøleskab med 2 separate kølerum, designet til kort tids opbevaring af
fødevarer i køleskabet og langtidsopbevaring i fryseren.
Køle-/fryseskabet er klassificeret som miljøklasse ’N, ST’ (Normal, Subtropisk) og er beregnet til
private husholdninger. Det overholder alle relevante normer for køleskabe af denne type.
Vigtige sikkerhedsregler
For at undgå risiko for personskade eller beskadigelse af køle-/fryseskabet, må apparatet kun ●
transporteres mens det er pakket ind i den originale emballage. Ved udpakning og installering er
det nødvendigt at 2 personer hjælpes ad.
Dette apparats kølende kredsløb indeholder kølevæsken isobutan (R600a), ●
en naturlig gas som er miljøvenlig, men alligevel let antændelig. Sørg derfor
altid for at ingen af komponenterne i det kølende kredsløb bliver beskadigede
ved transport eller installering af apparatet. Hvis kredsløbet alligevel skulle
blive beskadiget, må apparatet ikke tændes eller tilsluttes til
strømforsyningen, ligesom det er vigtigt da at flytte alt som kan være ophav
til antændelse langt væk fra køle-/fryseskabet; rummet som apparatet er placeret i må derefter
udluftes grundigt.
Advarsel: ● Undgå at beskadige det kølende kredsløb. Udslip af kølevæske kan forårsage
øjenskader; der er også risiko for antændelse af gassen.
Advarsel: ● Hold altid ventilationsåbninger i kabinettet eller i apparatets indvendige opbygning fri
for tilstopning. Der må altid være tilstrækkelig ventilation omkring apparatet.
Advarsel: ● Benyt aldrig andre genstande (som f.eks. varmeapparatet eller varmeblæsere) til at
fremskynde afrimning af apparatet; benyt kun de metoder som anbefales i denne brugsanvisning.
Den is som fjernes fra fryseren ved afrimning skal kasseres, den er ikke egnet til at blive spist. ●
Advarsel: ● Brug aldrig andre elektriske apparater (som f.eks. ismaskiner) indeni fryserens
opbevaringsrum, som ikke er specifikt godkendt til dette i denne brugsanvisning.
Inden tilslutning til strømforsyningen må køle-/fryseskabet og ledningen altid efterses grundigt ●
for mulige transportskader.
Ledningen bør jævnligt efterses for beskadigelse. Hvis man opdager fejl ved ledningen, må ●
apparatet ikke længere benyttes.
For at undgå brandfare, må man aldrig placere nogen form for termo-elektriske apparater ovenpå ●
Køle-/fryseskab
74
Page 75

køle-/fryseskabet. Placer heller aldrig nogen beholdere med væske ovenpå apparatet: Dette for at
undgå at lækage eller væskespild skal kunne beskadige isoleringen på det elektriske kredsløb.
Man bør kun opbevare fødevarer som er almindeligt benyttet i private husholdninger i denne ●
fryser.
Alkohol må kun opbevares i tæt forseglede beholdere og skal altid stå oprejst. ●
For at undgå risiko for madforgiftning, bør man aldrig spise fødevarer hvor holdbarhedsdatoen ●
er overskredet. Optøede madvarer må aldrig indfryses igen.
Man må aldrig hænge i eller lægge urimelig meget vægt på hylderne, skufferne, døren etc.. ●
Beskyt altid apparatets indre mod åben ild og alle andre kilder til antændelse. ●
Opbevar aldrig glasflasker med kulsyreholdige eller andre væsker, som kan indfryses i fryseren: ●
Den slags flasker kan sprænges under indfrysningen.
Tag altid stikket ud af stikkontakten ●
i tilfælde af fejlfunktion, inden afrimning, under rengøring. -
Dette apparat er ikke beregnet til brug af personer (inkl. børn) med reducerede fysiske, ●
sensoriske eller mentale evner, eller mangel på erfaring eller viden, med mindre de har fået
vejledning eller instruktion i brugen af dette apparat af en person som er ansvarlig for deres
sikkerhed.
Børn bør være under opsyn for at sikre at de ikke leger med apparatet. ●
For at overholde sikkerhedsregulativet og undgå fare, skal alle reparationer eller ændringer af ●
dette apparat udføres af vores autoriserede servicepersonel, dette inkluderer også udskiftning af
ledningen.
Vi forbeholder os ret til at ændre apparatets specifikationer. ●
Hvis apparatet ikke benyttes i en længere periode, anbefaler vi at døren står åben. ●
Hvis apparatet sælges, overdrages til tredjepart eller bortskaffes til en genbrugsstation, må man ●
gøre opmærksom på tilstedeværelse af både isoleringsmidlet ’cyclopenthan’ og kølevæsken R 600
a.
Oversigt
Apparatet består af to dele, fryseren og
køleskabsdelen.
1. Temperaturregulering og indvendigt lys
2. Opbevaringshylder (højde-justerbare)
3. Opbevaringshylde
4. Frugt/grøntsagsskuffe
5. Rum til hurtigindfrysning
6. Fryseskuffe
7. Fryseskuffe
8. Opbevaring i døren
9. Flaskehylde
Før brug
Fjern al ydre og indre emballage fuldstændig, inkl. klisterbåndene. –
Advarsel: – Hold børn væk fra emballeringen, da denne udgør en mulig risiko for tilskadekomst,
ved f.eks. kvælning.
Ved placeringen anbefaler vi at apparatet vippes let bagover. Derved kan transporthjulene –
75
Page 76

benyttes til at flytte apparatet til det sted hvor det skal installeres.
Sørg for korrekt bortskaffelse af al emballagen. –
Inden apparatet tilsluttes til strømforsyningen, må både apparatet og ledningen efterses grundigt ●
for transportskader.
Rengør apparatet i henhold til instruktionerne i afsnittet om – Afrimning og rengøring herunder.
Installering
Køle-/fryseskabet bør placeres i et godt ventileret, tørt rum. Det bør have en omgivelsestemperatur
på mellem 16 og 38 °C og en relativ fugtighed på max. 70 %. Udsæt aldrig apparatet for direkte
sollys, og placer det aldrig lige ved siden af nogen form for varmekilde (radiator, komfur etc.).
Både bagsiden og siderne bør have et frirum på minimum 10 cm fra væggen. –
Apparatet må aldrig installeres inde i et skab, heller ikke direkte under et overskab, en hylde eller
en tilsvarende genstand.
Sørg for at døren kan åbnes op til en vinkel på 160 °.
Hvis gulvet ikke er plant kan de justerbare ben benyttes til at kompensere for dette og sikre optimal
stabilitet. Apparatet bør placeres således at det står med en smule vinkel, så det læner bagover: Dette
vil sikre at døren vil lukke automatisk og ikke kan efterlades åben ved en fejltagelse. Sørg imidlertid
altid for at de to forreste ben er indstillet til den samme højde.
Ve nt i l at i on
Den opvarmede luft omkring apparatets bagside må kunne cirkulere frit. Sørg derfor altid for at
luftcirkulationen bag køle-/fryseskabet ikke obstrueres.
Vendbar dør
Køle-fryseskabets design gør det muligt at vende døren, dvs. at den højrehængslede dør (standard
placering) kan ændres til venstrehængslet.
Inden døren vendes, placeres apparatet med bagsiden nedad. Man må imidlertid sørge for at det
hviler på en blød, jævn flade for at undgå at beskadige kølerørene.
Advarsel: Inden døren vendes, må man altid slukke for apparatet og tage stikket ud af
stikkontakten.
1. Fjern skrueinddækningerne.
76
Page 77

2. Fjern skruerne og løft hele toppen af.
3. Tag det øverste hængsel af ved at fjerne de 3 skruer. Tag den øverste dør af og placer den på et
blødt underlag for at undgå at skramme den.
4. Fjern de to bolte som holder det midterste hængsel på plads. Tag den nederste dør af og placer
den på samme måde på et blødt underlag for at undgå at skramme den.
5. Tag dækpladerne over monteringshullerne på venstre side af og sæt dem over de tilsvarende
huller på højre side.
77
Page 78

6. Fjern begge de justerbare ben og skruerne der holder det nederste hængsel.
7. Tag det nederste hængsel af og vend det 180°. Løsn hængslets tap og monter den på den
modsatte side af hængslet. Sæt herefter det nederste hængsel fast på venstre side. Sæt de to
justerbare ben på igen. Placer fryserdelens dør på det nederste hængsels tap.
8. Drej det midterste hængsel 180°. Placer hængslets tap i den tilsvarende åbning i fryserdelens dør
og fastgør den ved at sætte det midterste hængsel på apparatet. Monter herefter køledelens dør
på apparatets midterste hængsel.
78
Page 79

9. Fjern skruerne på venstre side af den øverste sektion og sæt dem fast på den modsatte (dvs. den
højre) side af apparatet. Tag plastichjørnet på venstre side af og placer det på den højre side i
stedet.
10. Vend det øverste hængsel 180°. Tag tappen ud og placer den på den modsatte side af hængslet.
11. Placer hængslets tap i den tilsvarende åbning i døren og fastgør den ved at sætte det øverste
hængsel fast på apparatet.
12. Sæt toppen på igen og placer og stram skruerne. Sæt til sidst de to skrueinddækninger på igen.
79
Page 80

Advarsel
Når køle-/fryseskabet igen er blevet rejst op i lodret position, må det ikke tilsluttes til
strømforsyningen før der er gået mindst to timer.
Indstillinger og det indvendige lys
Apparatet tændes ved at tilslutte det til strømforsyningen. Det er kun slukket fuldstændigt, hvis
stikket er taget ud af stikkontakten.
På positionen ’0’ er kølefunktionen afbrudt, men apparatet er stadig tilsluttet strømforsyningen.
Temperaturen i kabinettet kan justeres ved hjælp af termostaten. Vi anbefaler at termostaten først
sættes på positionen 3. Efter et stykke tid må temperaturen i køleskabet tjekkes med et
køleskabstermometer, og om nødvendigt må termostaten justeres. Når termostaten drejes med uret
vil temperaturen sænkes, mens den vil stige når termostaten drejes mod uret.
Udskiftning af den indvendige lyspære
Sluk for apparatet ved at tage stikket ud af stikkontakten. –
Benyt en egnet skruetrækker til at fjerne skruen fra lampeinddækningen. –
Skub inddækningen en lille smule bagud og tag den af. –
Udskift den defekte pære med en ny (max. 15 W, fatningstype E 14). –
Skub inddækningen tilbage på plads og stram skruen igen. –
Tilslut køle-/fryseskabet til strømforsyningen igen. –
Indfrysning og opbevaring af fødevarer
Med en betjeningstemperatur på –18°C og derunder, kan frysedelen benyttes til at opbevare –
frosne fødevarer i adskillige måneder, samt til at lave isterninger og indfryse friske fødevarer.
Friske fødevarer (dvs. ikke frosne) eller varme retter må ikke komme i direkte kontakt med –
allerede dybfrosne fødevarer; dette for at forebygge at de dybfrosne varer kan blive delvist
optøede.
Forud for indfrysning bør de friske fødevarer (f.eks. kød, fisk, hakkekød) deles i mindre –
portioner afpasset til brug efter optøning.
Når man opbevarer allerede dybfrosne fødevarer må man være opmærksom på producentens –
information om holdbarhed på emballagen. Hvis dette ikke er oplyst, bør en opbevaringsperiode
imidlertid ikke overskride 3 måneder fra indkøbsdato.
Når der købes dybfrosne fødevarer skal man altid sikre sig at de er gennemfrosne og at –
emballagen ikke viser tegn til beskadigelse.
For at bibeholde kvaliteten på de dybfrosne fødevarer, bør de altid kun transporteres i dertil –
egnede frostposer og straks overføres til fryseren.
Tjek altid emballagen på dybfrosne varer omhyggeligt: Hvis emballagen viser tegn på fugt, er –
boblet op eller buler ud, kan det være tegn på at fødevaren ikke har været opbevaret korrekt og
kan være ødelagt.
Opbevaringsperioden for dybfrosne fødevarer afhænger stort set af den omgivende temperatur, –
termostatindstillingen, hvilken slags fødevare det drejer sig om, og tiden fra butik til fryser, men
også af hvor ofte døren til fryseren åbnes og hvor længe den står åben. Følg altid vejledningen på
emballagen og overskrid ikke den maksimale holdbarhedsdato.
Materialer der er egnet til emballering af dybfrosne fødevarer er gennemsigtig (dvs. ikke farvet) –
plasticfolie, plasticposer eller stanniol. Indpakningsmaterialet bør luftes godt før brug og tjekkes
for huller (lufttæthed) inden indfrysning af fødevaren. Vi anbefaler at man mærker alle varerne i
fryseren med relevant information såsom indhold, indfrysnings- samt holdbarhedsdato. Læg
aldrig fødevarer i fryseren som ikke er blevet emballeret korrekt.
Indfrysningstiden kan afkortes ved at dele maden op i mindre portioner. –
80
Page 81

Forsøg aldrig at dybfryse drikkevarer med kulsyre, varm mad eller flasker der indeholder væsker. –
For at sikre at næringsindhold såsom vitaminer ikke går tabt, bør friske fødevarer gennemfryses –
så hurtigt som muligt. Man kan med fordel placere den netop emballerede mad i
hurtigindfrysningsskuffen, med indbyrdes afstand i en eller to rækker. Undgå berøring med mad
som allerede er frosset. Indfrys ikke mere end 3 kg ad gangen. Sæt termostaten hen på 7. Efter 24
timer når alt er indfrosset, kan maden flyttes over i de andre fryseskuffer. Sæt termostaten tilbage
til den oprindelige position.
Frosne fødevarer kan tøs op i køleskabet. På denne måde bliver maden optøet langsomt og –
bevarer smagen. Endvidere vil de frosne madvarer hjælpe med til at holde temperaturen i
køleskabet nede.
Holdbarhed (i måneder) for dybfrosne fødevarer er specificeret i tabellen herunder. Overskrid
ikke disse opbevaringstider. Vær altid opmærksom på den information som oplyses af producenten
af fødevaren.
Opbevaringstiden vil formindskes hvis temperaturen i fryseren stiger, f. eks som følge af –
fejlfunktion.
Køleskabet
Temperaturen i køleskabsdelen er i høj grad afhængig af den omgivende temperatur, af –
termostatens indstilling og mængden af fødevarer der opbevares.
I udgangspunktet bør termostaten indstilles på positionen – 4. Hvis køleeffekten er for kraftig kan
indstillingen sænkes til positionen 1-3; hvis dette ikke er tilstrækkeligt hæves den til 4-8.
Hvis man opdager rim på bagvæggen, skyldes det mest sandsynligt at døren har stået åben
for længe, eller at varm mad er blevet placeret i køleskabet eller at termostaten er blevet sat
på en for høj indstilling.
Væsker eller stærktlugtende fødevarer, eller mad som vil optage stærke lugte (som f.eks. ost, fisk –
eller smør), bør altid opbevares separat eller i hermetisk lukkede beholdere. Bananer bør aldrig
opbevares i køleskab, da de er følsomme overfor kulde.
Varm mad bør altid stå og afkøle til rumtemperatur inden den placeres i køleskabet. –
Som følge af den måde luft cirkulerer på, vil forskellige områder i køleskabet påvirkes forskelligt. –
Det koldeste område vil være omkring bagvæggen og nederst i køleskabet, og vil være bedst
egnet til opbevaring af ømtålelige fødevarer såsom fisk, tilberedt eller råt kød eller afskåret
pålæg.
Varmere områder omkring døren og øverst i køleskabet vil være egnede til opbevaring af f.eks.
ost og smør. På denne måde kan osten beholde sin smag og smørret vil være smørbart.
Sørg altid for at døren er ordentligt lukket og at forseglingen ikke hindres af fødevarer som –
81
Page 82

opbevares inde i kabinettet eller på hylderne i døren.
Fremstilling af isterninger
En særlig isterningbakke medfølger til fremstilling af isterninger. Fyld isterningbakken 3/4 op med
drikkevand og placer den i frostboksen. Isterningerne er lettere at få ud af isterningbakken, hvis den
står 5 minutter i rumtemperatur først.
Afrimning og rengøring
Advarsel: – Sørg for altid at tage stikket ud af stikkontakten inden apparatet rengøres eller afrimes.
Hold altid apparatets indre flader og alle plasticdelene rene og fri for fedtede eller syreholdige –
substanser, saucer osv. Hvis nogle af delene alligevel skulle blive beskidte ved et uheld, er det
vigtigt at de straks rengøres med varmt sæbevand eller et mildt rengøringsmiddel. Aftør alle
delene omhyggeligt bagefter.
Dørenes forseglinger bør rengøres med jævne mellemrum. –
Apparatets kondensator bør rengøres mindst en gang om året ved hjælp af en blød børste, en –
elektrostatisk rengøringsklud eller en støvsuger. Ellers vil opbygningen af støv kunne forårsage et
øget energiforbrug.
Alle tilbehørsdelene kan rengøres med varmt sæbevand. Rengør dem – aldrig i opvaskemaskinen.
Bemærk: – Benyt aldrig nogen former for slibende, syreholdige, alkohol- eller spritbaserede
rengøringsmidler. Vi anbefaler heller ikke brug af grove klude eller skuresvampe. Benyt heller
aldrig andre elektriske apparatet såsom damprensere til optøning eller rengøring af apparatet.
Køleskabsdelen
Køleskabet vil afrime automatisk under brug. Hvis der dannes is på bagvæggen af kabinettet vil den
smelte næste gang kompressoren ikke er aktiv. Smeltevandet vil løbe gennem afrimningskanalen og
blive opsamlet i fordampningsbeholderen, hvorfra det vil blive absorberet af luften i rummet.
For at sikre at smeltevandet kan løbe frit, skal man sørge for at afrimningskanalen og åbningen i ●
kabinettet ikke blokeres. Afrimningskanalen bør rengøres jævnligt.
For at undgå dårlig luft bør kabinettet og hylderne rengøres mindst en gang om måneden med ●
varmt vand, og om nødvendigt et mildt rengøringsmiddel. Tag altid stikket ud af stikkontakten
inden apparatet rengøres.
Pas på ikke at fjerne eller beskadige typeskiltet indvendig i apparatet under rengøringen.
Fryseren
For at undgå at opbygningen af is skal overstige mere end 5 mm, bør fryseren afrimes mindst to
gange om året. Gør følgende:
Tag stikket ud af stikkontakten for at afbryde apparatet fra strømforsyningen. –
Tag al maden ud af fryseren og placer den i en plastkasse, fryseelementer lægges over og kassen –
tildækkes for at holde temperaturen nede.
Lad døren til fryseren stå åben. –
Advarsel: Benyt aldrig andre genstande eller apparater (f.eks. varmeapparater er varmeblæsere) til at
fremskynde afrimningen.
Efter afrimningen bør fryseren rengøres grundigt med varmt vand og om nødvendigt et mildt
opvaskemiddel. Tør den omhyggeligt af og lad den lufttørre inden den benyttes igen.
Praktiske tips
Visse typiske lyde kan høres når der tændes for apparatet. Disse lyde er:
82
Page 83

forårsaget af den elektriske motor inde i kompressoren; når –
kompressoren starter vil lydniveauet blive en smule højere i en
kortere periode.
forårsaget af at kølevæsken flyder gennem kredsløbet. –
Den følgende tabel viser en liste over mulige fejl, hvad der eventuelt forårsager den og løsningsforslag.
Ved problemer bør man først tjekke om en mulig løsning kan findes ved hjælp af denne oversigt.
Hvis problemet ikke bliver løst, må man afbryde strømforsyningen til apparatet og kontakte vores
afdeling for Kundeservice.
Problem Mulig årsag og løsning
Apparatet er tilsluttet til
strømforsyningen , men virker ikke.
Der er ikke strøm i stikkontakten, eller der er et problem
med stikket. Tjek stikket og stikkontakten.
Apparatet er enten ikke blevet installeret korrekt (står
f.eks. på et ujævnt gulv) eller også er der kontakt mellem
Apparatet har en unormal lyd når det
er tændt.
kølekredsløbet bag på apparatet og ledningen, væggen
eller andre genstande eller overflader. Se efter om alle
brugsanvisningens instruktioner i forbindelse med
installering af apparatet er blevet fulgt.
Der står vand i bunden af køleskabet.
Afløbskanalen er blokeret. Fjern blokeringen og rens
systemet.
Tr an sp or t
Apparatet må kun transporteres stående oprejst.
Tip aldrig apparatet mere end 45°. Under transporten skal man sørge for at køle-/fryseskabet står
sikkert fastspændt og er beskyttet mod stød, vibrationer og forskydning.
Bortskaffelse
Dette apparat er blevet fremstillet af genanvendelige materialer. Når stikket er taget ud af
stikkontakten, bør apparatet inden det i henhold til lokale aftaler afleveres på den lokale
genbrugsstation, gøres ubrugeligt ved at ledningen skæres over. Kølevæsken og det kemiske
virkestof i isoleringen må bortskaffes af en autoriseret organisation. Sørg derfor for ikke at beskadige
kølekredsløbet inden apparatet afleveres på genbrugsstationen.
Garantierklæring
På dette husholdningsprodukt overtager vi garantien i to år fra salgsdatoen. Garantien gælder for
materiale- og fabrikationsfejl. Skader, der er opstået som følge af forkert behandling, normalt slid
samt på skørbare dele som f.eks. glas, dækkes ikke af garantien. Denne garanti har ingen indvirkning
på dine lovmæssige rettigheder, heller ikke de nationale forbrugerrettigheder om anskaffelse af varer.
Hvis produktet ikke fungerer og må returneres, skal det pakkes forsvarligt ind, og navn, adresse samt
årsagen til returneringen skal vedlægges. Hvis dette sker mens garantien stadig dækker, må
garantibeviset og kvitteringen også lægges ved. Garantien bortfalder ligeledes ved indgreb på
produktet af folk, der ikke er autoriseret af os.
83
Page 84

Hvilken information har Kundeservice afdelingen brug for
Hvis det skulle blive nødvendigt at reparere apparatet, bør man først
tage kontakt med vores afdeling for Kundeservice, og sørge for at give
en detaljeret beskrivelse af fejlen og oplyse hvilket artikel nr. KS…. ,
der står på typeskiltet (se billedet). Denne information vil hjælpe os
med at behandle en forespørgsel mest mulig effektivt.
I tilfælde af fejlfunktion eller problemer med apparatet, bedes man tage kontakt til vores
afdeling for Kundeservice. Adressen findes i tillægget til denne brugsanvisning.
Tekniske specifikationer
Art. nr. KS 9780
Artikel type Køle-/fryseskab
Energiklasse i henhold til direktivet af 94/2 EC A+
Energiforbrug:
kWh/24 timer
kWh/år
0,64
234
Det faktiske forbrug afhænger af forbrugsmønstret og placeringen af apparatet.
Total brugskapacitet, (liter) 216
Køleskabets rumfang (liter) 148
Fryserens rumfang (liter) 68
Klimaklassificering N, ST
Omgivende temperaturområde, °C 16 – 38
Sikker opbevaring i tilfælde af fejlfunktion, timer 12
Indfrysningskapacitet, kg/24 timer 3
Frysertemperatur, °C -18
Dimensioner (i mm) 1545 x 540 x 565
Vægt, kg 54
Elektriske specifikationer Se typeskilt
Isoleringsskum Cyclopenthan
Støjniveau 41 dB(A)
84
Page 85

Bästa kund!
Innan du använder apparaten bör du läsa bruksanvisningen noga.
Anslutning till vägguttaget
Apparaten bör endast anslutas till ett felfritt jordat uttag installerat enligt gällande bestämmelser. Se
till att nätspänningen i vägguttaget motsvarar den som är märkt på apparatens skylt. Denna produkt
uppfyller de krav som är gällande för CE-märkning.
Använd inte denna enhet med hjälp av en transformator eller tillsammans med andra elapparater ●
genom att använda en förlängningssladd.
För att undvika ljudvibrationer bör du se till att elsladden inte vidrör några delar på apparatens ●
baksida (t.ex. värmeväxlaren).
Allmän information
Denna apparat är ett kompressorkylskåp med två separata kylavdelningar. Den är konstruerad för
kortvarig förvaring av livsmedel i kylskåpet och långtidsförvaring i frysen.
Enheten är klassificerad som klimatklass ’N, ST’ (Normal, Subtropisk) och ämnad för hushållsbruk.
Den uppfyller alla gällande normer för kylapparater i hushåll.
Viktiga säkerhetsföreskrifter
För att undvika risken för personlig skada eller skador på apparaten, bör den endast transporteras ●
i dess originalemballage. För uppackning och installation krävs 2 personer.
Apparatens kylkrets innehåller köldmediet isobutan (R600a), en naturgas ●
som har liten miljöpåverkan, men som dock är lättantändlig. Se därför till att
ingen av komponenterna i kylkretsen skadas vid transporten eller
installationen av apparaten. Om det uppstår en skada i kylkretsen bör du
inte koppla på apparaten eller ansluta den till elnätet, utan släck öppen eld
och hindra andra antändningskällor från att komma i närheten av
köldmediet; vädra därefter noga rummet där frysen är placerad.
Varning: ● Skada inte kylkretsen. Kylmedel som läckt ut skadar ögonen; det förekommer också
risk för att gasen antänds.
Varning: ● Håll ventilationsöppningarna i apparatens hölje eller i den inbyggda strukturen fria
från hinder. Se alltid till att vädra tillräckligt.
Varning: ● Använd inte externa apparater (t.ex. värmare eller värmefläktar) för att påskynda
avfrostningen; följ endast de åtgärder som rekommenderas i denna bruksanvisning.
Isen som du avlägsnar ur enheten vid avfrostningen lämpar sig inte för mänsklig konsumtion. ●
Varning: ● Använd inga elapparater (t.ex. ismaskiner) i frysens matförvaringsfack än de som är
specificerade i denna bruksanvisning.
Innan den kopplas till elnätet bör enheten och elsladden noga kontrolleras så att inga ●
transportskador uppstått.
Kontrollera regelbundet att elsladden inte blivit skadad. Om sladden har skadats får apparaten ●
inte längre användas.
På grund av brandrisken bör du inte placera termoelektriska apparater ovanpå apparaten. Placera ●
inte behållare innehållande vätska ovanpå enheten. Härigenom undviker du eventuellt läckage
eller att läckande vätska skadar den elektriska isoleringen.
Kylskåp/Frys
85
Page 86

Endast mat som normalt används i enskilda hushåll bör förvaras i frysen. ●
Ämnen som innehåller alkohol bör bevaras i väl tillslutna behållare och placeras i upprätt ●
position.
Undvik risken för matförgiftning genom att inte äta mat som förvarats för länge. Upptinad mat ●
får inte frysas på nytt.
Luta dig inte mot eller lägg oskälig vikt på hyllorna, förvaringsbackarna, dörren etc. ●
Skydda alltid enhetens insida från öppen eld och andra antändningskällor. ●
Förvara inte glasflaskor innehållande kolsyrade eller andra frysbara vätskor i frysen: sådana ●
flaskor kan spricka under frysprocessen.
Dra alltid stickproppen ur vägguttaget ●
om apparaten skulle uppvisa fel och, före avfrostning, samt före rengöring. -
Denna apparat bör inte användas av personer (inklusive barn) som har minskad fysisk ●
rörelseförmåga, reducerat sinnes- eller mentaltillstånd, eller som saknar erfarenhet och kunskap
att använda dylika apparater. Dessa personer bör antingen endast använda apparaten under
tillsyn av en person som är ansvarig för deras säkerhet eller också få tillräckliga instruktioner
beträffande apparatens användning.
Se till att barn inte leker med apparaten. ●
Följ säkerhetsföreskrifterna och undvik risker genom att låta behörig servicepersonal utföra ●
reparationer eller ändringar beträffande denna apparat, inklusive byte av elsladd.
Vi förbehåller oss rätten att introducera tekniska modifikationer. ●
Om inte enheten används under en lång tid rekommenderar vi att dörren hålls öppen. ●
Om enheten är såld, överlåten till tredje part eller lämnad till en lämplig återvinningsstation bör ●
man observera att apparaten innehåller blåsmedlet 'Cyclopentan' samt köldmediet R600a.
Beskrivning
Enheten består av två delar: frys och kylskåp.
1. Temperaturkontroll och invändig lampa
2. Förvaringshyllor (justerbar höjd)
3. Förvaringshylla
4. Frukt/grönsaksfack
5. Snabbinfrysningsfack
6. Frysfack
7. Frysfack
8. Dörrens förvaringsfack
9. Flaskförvaring
Innan första användningen
Tag bort allt ut- och invändigt förpackningsmaterial, inklusive tejp. –
Varning: – Håll barn på avstånd från apparatens förpackningsmaterial eftersom fara eventuellt
kan uppstå. Det finns t.ex. risk för kvävning.
För att få apparaten på sin plats rekommenderar vi att du lutar enheten något bakåt. På detta sätt –
kan du använda transporthjulen för att flytta den till den avsedda platsen.
Se till att bortskaffningen av förpackningsmaterialet sker enligt gällande sorteringsguide. –
Innan du ansluter apparaten till elnätet bör du noga kontrollera att den inte fått några ●
86
Page 87

transportskador; detta inkluderar elsladden.
Rengör apparaten enligt instruktionerna i avsnittet – Avfrostning och rengöring nedan.
Installation
Apparaten bör placeras i ett välventilerat, torrt rum. Den bör användas i en omgivningstemperatur
som ligger mellan 16 och 38°C och en relativ fuktighet på max. 70 %.
Enheten bör inte utsättas för direkt solljus och den får inte placeras i närheten av heta källor
(värmeelement, spisar etc.).
Från väggen till baksidan och sidorna bör det finnas ett tomrum på minst 10 cm. –
Enheten bör inte installeras inuti ett skåp eller direkt nedanför ett hängande väggskåp, hylla eller
liknande föremål.
Se till att du kan öppna dörren i en 160° vinkel.
Om golvet är ojämnt kan du ställa in de justerbara fötterna för att uppnå bästa möjliga stabilitet.
Enheten bör installeras i en lätt vinkel så att den lutar mot baksidan: på detta sätt ser du till att dörren
stängs automatiskt och inte öppnas i misstag. Se dock till att framkantens båda fötter ställs in på
samma höjd.
Ve nt i l at i on
Den uppvärmda luften runt baksidan av frysen måste kunna cirkulera fritt. Därför bör du se till att
luftcirkulationen bakom enheten inte hindras.
Omhängbar dörr
Dörren är konstruerad så att den öppnas åt höger men du kan ändra öppningsriktningen genom att
flytta gångjärnen till vänster sida.
Innan du påbörjar omhängningen av dörren bör du placera enheten på baksidan. Se till att den ligger
på en mjuk, jämn yta för att förhindra att kapillärrören skadas.
Varning: Innan du påbörjar omhängningen av dörren bör du stänga av enheten och dra
stickproppen ur vägguttaget.
1. Tag bort skuvlocken.
87
Page 88

2. Avlägsna skruvarna och hela övre höljet.
3. Tag bort det övre gångjärnet genom att lossa de tre skruvarna. Tag bort den övre dörren och
placera den på en mjuk yta för att skydda den från repor.
4. Dra ut de två bultarna som håller det mittersta gångjärnet på plats. Tag bort den nedre dörren
och placera också den på en mjuk yta för att skydda den från repor.
5. Avlägsna täckbitarna för den vänstra gångjärnsmonteringens hål och placera dem på
motsvarande plats på högra sidan.
88
Page 89

6. Tag loss de båda justerbara fötterna och skruvarna som fäster det lägre gångjärnet.
7. Avlägsna det lägre gångjärnet och vänd det 180°. Skruva upp gångjärnstappen och montera den
på gångjärnets motsatta sida. Montera nu det lägre gångjärnet på vänster sida. Sätt de justerbara
fötterna på plats. Placera frysens dörr på den lägre gångjärnstappen.
8. Vänd det mittersta gångjärnet 180°. Placera gångjärnstappen i motsvarande öppning i frysens
dörr och fäst den genom att montera det mittersta gångjärnet på sin plats. Montera
kylskåpsdörren på enhetens mittersta gångjärn.
89
Page 90

9. Tag loss skruvarna från den översta vänstra delen och sätt dem på enhetens motsatta sida (dvs.
höger). Tag bort den vänstra hörnbiten och placera den på höger sida.
10. Vänd det övre gångjärnet 180°. Tag bort tappen och montera den på motsatta sidan av
gångjärnet.
11. Placera gångjärnstappen i motsvarande hål i dörren och fäst den genom att montera det högra
gångjärnet på enheten.
12. Sätt tillbaka det övre höljet och fäst skruvarna. Sätt slutligen de två skruvlocken på plats.
90
Page 91

Varning
När enheten har placerats tillbaka i dess vertikala position får det inte anslutas till eluttaget förrän
tidigast om två timmar.
Kontrollinstrument och invändig belysning
Enheten aktiveras då du ansluter den till elnätet. För att helt stänga av enheten måste du dra
stickproppen ur vägguttaget.
I läge ’0’ är kylfunktionen avslagen trots att enheten ännu är ansluten till elnätet.
Temperaturen i kylskåpet kan justeras med hjälp av temperaturkontrollvredet. Temperaturen i
kylskåpet kan justeras med hjälp av temperaturkontrollen. Vi rekommenderar att du till att börja
med ställer in temperaturkontrollen på position 3. Efter en tid bör du kontrollera temperaturen med
en termometer och ställa om temperaturen vid behov. Om du vrider temperaturkontrollen medsols
kommer temperaturen att sjunka, medan den ökar om du vrider kontrollen motsols.
Byte av den invändiga lampan
Stäng av enheten genom att dra stickproppen ur vägguttaget. –
Använd en lämplig skruvmejsel för att ta bort lampskärmens skruv. –
För skärmen litet bakåt och tag loss den. –
Byt ut den söndriga lampan mot en ny (max. 15 W, sockel typ E 14). –
För tillbaka skärmen på sin plats och fäst skruven. –
Anslut enheten till vägguttaget igen. –
Infrysning och förvaring av mat
Vid en temperatur på -18°C och under kan frysen användas till att förvara djupfryst eller –
industrifryst mat i flera månader, att göra istärningar och att frysa in färsk mat.
Färsk (dvs. icke fryst) eller varm mat bör inte komma i kontakt med redan fryst mat; på detta sätt –
förhindrar du att fryst mat blir delvis upptinad.
Innan frysning bör färsk mat (t.ex. kött, fisk, köttfärs) delas i mindre portioner lämpliga för –
användning efter upptining.
Vid förvaring av tidigare fryst mat bör du noga uppmärksamma tillverkarens information på –
förpackningen. Om ingen sådan information finns, bör emellertid en förvaringsperiod på 3
månader från inköpsdatumet inte överskridas.
Vid inköp av fryst mat bör du försäkra dig om att maten är ordentligt fryst och att förpackningen –
inte är skadad.
För att upprätthålla kvaliteten av djupfryst mat bör den endast transporteras i lämpliga behållare –
och placeras i frysen utan dröjsmål.
Kontrollera förpackningen noggrant vid inköp av fryst mat: om förpackningen visar tecken på –
fukt, har blivit bucklig eller uppsvälld, kan maten ha förvarats felaktigt och blivit förstörd.
Förvaringstiden för fryst mat beror mycket på omgivningens temperatur, temperaturinställningen, –
typen av mat och tiden mellan butik och frys, men huvudsakligen också på hur ofta frysdörren
öppnas och hur länge den förblir öppen. Följ alltid instruktionerna givna på matens förpackning
och överskrid inte sista förbrukningsdag.
Lämpliga förpackningsmaterial för fryst mat är genomskinlig (dvs. icke färgad) plastfilm, –
fryspåsar av plast samt aluminiumfolie. Du bör lufta förvaringsmaterialen före användning och
kontrollera deras lufttäthet innan maten fryses. Vi rekommenderar att du märker varje produkt i
frysen med all relevant information, såsom typ av mat, frysdatum och bäst före datum. Lägg inte
mat i frysen utan att först ha packat den ordentligt.
Du kan förkorta infrysningstiden genom att dela maten i mindre portioner. –
Frys inte in kolsyrade drycker, varm mat eller vätskor i flaska. –
91
Page 92

Se till att matens näringsinnehåll såsom vitaminer bibehålls genom att frysa in färsk mat så –
snabbt som möjligt. Detta innebär att den tillagade maten bör placeras i snabbinfrysningsfacket,
placerat i en eller två rader. Undvik kontakt med mat som redan är infryst. Frys inte in mera än 3
kg färsk mat per dag. Ställ in temperaturkontrollen på 7. Efter 24 timmar och när maten är
ordentligt infryst, kan den flyttas till frysfacken. Ställ tillbaka temperaturkontrollen på dess
ursprungliga inställning.
Fryst mat kan tinas i kylskåpet. På detta sätt tinas maten långsammare och förlorar inte sin smak. –
Dessutom medverkar den frysta maten till att kylskåpets temperatur hålls på önskad nivå.
Bäst före datum för frysta matprodukter finns specificerade (i månader) i tabellen nedan.
Överskrid inte dessa förvaringstider. Observera alltid informationen som ges av respektive produkts
tillverkare.
Förvaringstiden förkortas om den interna temperaturen minskar, t.ex. på grund av –
funktionsstörning.
Ky ls kå p
Kylskåpets temperatur beror främst på omgivningens temperatur, temperaturkontrollens –
inställning samt mängden livsmedel som förvaras i enheten.
Börja med att vrida temperaturkontrollen till läge – 4. Om avkylningseffekten är för stark kan
kontrollvredet justeras till läge 1-3; om läge 4 inte är tillräckligt kallt kan det höjas till läge 4-8.
Om du märker att frost har bildats på bakre väggen är den mest förmodliga orsaken att
dörren har hållits öppen under alltför lång tid, att varm mat har placerats i kylskåpet eller att
temperaturkontrollen är inställd på för högt läge.
Vätska, starkt luktande livsmedel samt livsmedel som lätt drar åt sig lukter (t.ex. ost, fisk och –
smör) bör förvaras avskilt eller i tätt förslutna kärl. Förvara inte bananer i kylskåpet eftersom de
är köldkänsliga.
Varm mat bör stå och svalna i rumstemperatur innan den placeras i kylskåpet. –
På grund av det sätt luften cirkulerar påverkas de olika avdelningarna i kylskåpet på olika sätt. –
Det kallaste området är i närheten av den bakre väggen samt i den nedersta delen av
kylavdelningen och lämpar sig bäst för förvaring av känsliga livsmedel såsom fisk, tillrett eller
färskt kött och kallskuret kött/pålägg.
Det varmare området finns i närheten av dörren samt i den övre delen av avdelningen och
lämpar sig väl för förvaring av t.ex. ost och smör. Osten håller härmed sin smak och smöret är
lätt att breda ut.
Se alltid till att dörren är ordentligt stängd och att tätningen inte hindras av livsmedel som –
förvaras i avdelningen eller i dörrfacken.
92
Page 93

Så gör du istärningar
En särskild istärningsbricka för tillverkning av istärningar medföljer apparaten. Fyll brickan till 3/4
med dricksvatten och placera den inuti frysfacket. Istärningarna lossnar lättare från brickan om den
lämnas i rumstemperatur i 5 minuter.
Avfrostning och rengöring
Varning: Dra alltid stickproppen ur vägguttaget innan du påbörjar rengöring av enheten. –
Håll alltid de invändiga ytorna och plastdelarna rena från feta eller sura ämnen, såser etc. Om de –
invändiga delarna skulle råka bli smutsiga bör de genast rengöras med varmt vatten med
diskmedel eller ett milt rengöringsmedel. Torka alla delar torra efteråt.
Dörrpackningarna bör rengöras ofta. –
Enhetens kondensator bör rengöras minst en gång per år med en mjuk borste, elektrostatiska –
dukar eller en dammsugare. Dammet som samlas kan i annat fall öka energikonsumtionen.
Alla tillbehör kan rengöras med varmt diskvatten. Diska dem – inte i diskmaskin.
Anmärkning: – Använd inte repande rengöringsmaterial eller syra-, alkohol- eller spritbaserade
medel. Vi rekommenderar inte användning av grova dukar eller svampar. Använd inte
elapparater såsom ångtvättare för avfrostning eller rengöring.
Kylskåpet
Kylskåpet avfrostas automatiskt under användningen. Is som bildats på kylskåpets bakre vägg smälter
under perioder då kompressorn inte är aktiv. Smältvattnet rinner genom dräneringskanalen och
samlas upp på avdustningsfatet från vilket det absorberas i luften.
För att smältvattnet skall kunna rinna bort bör du se till att dräneringskanalen och kylskåpets ●
smältvattenöppning inte är blockerade. Kanalen bör rengöras ofta.
För att undvika en otrevlig lukt bör skåpet och hyllorna rengöras minst en gång per månad med ●
varmt vatten och vid behov ett milt rengöringsmedel. Dra alltid stickproppen ur vägguttaget
innan du påbörjar rengöringen.
När du rengör skåpet invändigt bör du se till att du inte avlägsnar eller skadar märkskylten.
Frysen
För att förhindra att is byggs upp till en tjocklek som överstiger 5 mm bör frysen avfrostas minst två
gånger per år. Avfrosta skåpet enligt följande:
dra stickproppen ur vägguttaget så att enheten inte är ansluten till elnätet. –
tag all mat ur frysen, placera den i en plastbehållare tillsammans med frysta frysförpackningar –
och täck behållaren för att hålla temperaturen nere.
lämna frysens dörr öppen. –
Varning: använd inga externa apparater eller andra sätt (t.ex. värmare eller värmefläktar) för att
accelerera avfrostningen.
Efter avfrostningen bör frysen rengöras noga med varmt vatten och vid behov med ett milt
diskmedel. Torka noggrant torrt och lufta frysen innan du kopplar på den igen.
Problemlösning
Ett typiskt ljud kan höras när apparaten är påkopplad. Detta ljud är:
93
Page 94

orsakat av elmotorn i kompressorutrustningen; när kompressorn –
startas upp är ljudnivån något högre under en kort tid.
orsakat av köldmediet som cirkulerar i systemet. –
I följande tabell finns möjliga funktionsstörningar, deras troliga orsaker och lösningar. Om det skulle
uppstå användningsproblem bör du först kontrollera om en lösning finns i denna tabell. Om
problemet kvarstår bör du dra stickproppen ur vägguttaget och kontakta vår kundserviceavdelning.
Problem Möjlig orsak och lösning
Apparaten är ansluten till elnätet
men fungerar inte.
Det finns ingen el i uttaget, eller också har det uppstått
kontaktproblem. Kontrollera vägguttaget and stickproppen.
Antingen har frysen placerats inkorrekt (t.ex. på ett ojämnt
Ett ovanligt ljud hörs när apparaten
är påkopplad.
golv) eller också har kylsystemet på baksidan kommit i
kontakt med elsladden, väggen eller något annat föremål
eller någon annan yta. Kontrollera att alla
installationsanvisningar i denna bruksanvisning har följts.
Vatten samlas på enhetens botten.
Smältvattnets dräneringssystem är blockerat. Avlägsna
blockeringen och rengör systemet.
Transport av apparaten
Enheten bör endast transporteras i dess vertikala position.
Luta inte enheten mer än 45°. Vid transport bör du se till att enheten är ordentligt fastsatt och den är
skyddad mot stötar, vibrationer och krängningar.
Bortskaffning
Denna apparat har tillverkats av återvinningsbart material. Efter att du har dragit stickproppen
ur vägguttaget bör frysen göras obrukbar genom att du klipper av elsladden innan du lämnar
apparaten vid den lokala återvinningsstationen. Köldmediet och det kemiska ämnet i
isoleringsskummet bör tas om hand vid en återvinningsstation som kan hantera kasserade kylmöbler.
Var särskilt noggrann med att inte skada kylsystemet innan apparaten lämnas för återvinning.
Garanti i Sverige och Finland
För material- och tillverkningsfel gäller 2 års garanti räknat från inköpsdagen mot uppvisande av
specificerat inköpskvitto i överensstämmelse med de allmänna garantivillkoren. Denna garanti
inverkar inte på dina lagstadgade rättigheter eller dina lagenliga rättigheter enligt den nationella
konsumentskyddslagstiftningen. Ifall apparaten används felaktigt, eller vårdslöst, ansvarar den som
använder apparaten för eventuella material- och personskador.
Tillverkas för: Severin Elektrogeräte GmbH, Tyskland.
Information som krävs vid kontakt med kundservice
Om reparation skulle bli nödvändig ber vi dig ta kontakt med vår
kundservice. Beskriv felet detaljerat och uppge produktnummer KS ...
på apparatens märkskylt (se bilden). Denna information gör det lättare
för oss att betjäna dig effektivt.
94
Page 95

Vänligen kontakta vår kundtjänstavdelning vid eventuella driftstörningar eller andra problem.
Adressen finns i bilagan till denna bruksanvisning.
Teknisk specifikation
Produktnr. KS 9780
Typ av apparat Kylskåp/Frys
Energieffektivitetsklass enligt direktivet 94/2 EC A+
Energiförbrukning:
kWh/24 h
kWh/år
0.64
234
Den faktiska elförbrukningen beror på hur apparaten används och hur den är placerad.
Total bruttovolym, (liter) 216
Brukbar kylskåpskapacitet (liter) 148
Brukbar fryskapacitet (liter) 68
Klimatklass N, ST
Omgivningens temperatur, °C 16 – 38
Kylhållningstid vid funktionsstörning, h 12
Fryskapacitet, kg/24h 3
Frystemperatur, °C -18
Mått, (mm) 1545 x 540 x 565
Vikt, kg 54
Elspecifikation Se märkskylt
Isoleringsskum Cyclopentan
Ljudnivå 41 dB(A)
95
Page 96

FIN
Hyvä asiakas,
Seuraavat ohjeet täytyy lukea huolellisesti ennen laitteen käyttämistä.
Verkkoliitäntä
Laite tulee liittää määräysten mukaisesti asennettuun, maadoitettuun pistorasiaan. Varmista, että
verkkojännite vastaa laitteen arvokilpeen merkittyä jännitettä. Tämä tuote on kaikkien voimassa
olevien CE-merkintöjä koskevien direktiivien mukainen.
Älä käytä tätä laitetta jännitemuuntimen kautta tai jatkojohdon kautta yhdessä muiden ●
sähkölaitteiden kanssa.
Tärinästä johtuvan melun välttämiseksi varmista, ettei virtajohto kosketa mitään pakastimen ●
takapuolen osaa (esim. jäähdytintä).
Yleistä tietoa
Tämä laite on kompressori-jääkaappi kahdella erillisellä jäähdytyslaitteella ja se on tarkoitettu
ruokien lyhytaikaiseen säilytykseen jääkaappiosassa ja pitkäaikaiseen säilytykseen pakastinosassa.
Laite on luokiteltu ilmastoluokkiin "N, ST" (normaali, subtrooppinen) ja suunniteltu
kotitalouskäyttöön. Se on kaikkien asiaankuuluvien normien mukainen, jotka koskevat kotitalouksiin
tarkoitettuja jääkaappeja.
Tärkeitä turvallisuusohjeita
Jotta henkilövammojen tai pakastimen vaurioitumisen vaara vältetään, laitetta saadaan kuljettaa ●
ainoastaan sen alkuperäispakkauksessa. Laitteen poistamiseen pakkauksesta sekä asennukseen
tarvitaan 2 henkilöä.
Tämän laitteen jäähdytyspiirissä käytetään kylmäaineena isobutaania ●
(R600a). Se on luonnonkaasu, jolla ei ole haitallisia ympäristövaikutuksia,
mutta se on tulenarkaa. Varmista siksi, ettei mikään jäähdytyspiirin osista
vahingoitu kuljetuksen ja laitteen asennuksen aikana. Jos jäähdytyspiiri
vahingoittuu, älä käynnistä laitetta äläkä kytke sitä verkkovirtaan, vaan siirrä
avoin tuli ja kaikki muut herkästi syttyvät lähteet pois kylmäkaasun
läheisyydestä ja tuuleta sitten huone, jossa laite sijaitsee.
Varoitus: ● Älä vahingoita jäähdytyspiiriä. Mikä tahansa määrä vuotavaa kylmäainetta
vahingoittaa silmiä. On olemassa myös kaasun syttymisen vaara.
Varoitus: ● Pidä laitteen rungossa tai siihen kuuluvassa rakenteessa olevat tuuletusraot
peittämättöminä. On taattava aina riittävä ilmanvaihto.
Varoitus: ● Älä käytä mitään ulkoista laitetta (esim. lämmityslaitteita tai lämpöpuhaltimia)
nopeuttamaan sulatusta. Noudata ainoastaan tässä oppaassa suositeltuja menetelmiä.
Laitteesta sulattamisen aikana poistettu jää ei sovellu ihmisten nautittavaksi. ●
Varoitus: ● Älä käytä pakastimen ruoansäilytysosastossa mitään sähkölaitteita (esim.
jääpalakoneita), joiden käyttöä ei ole erityisesti sallittu tässä käyttöohjeessa.
Koko laite, mukaan lukien sen virtajohto, on tarkastettava perusteellisesti kuljetusvaurioiden ●
varalta ennen kuin se liitetään verkkovirtaan.
Virtajohto on tarkistettava säännöllisesti vaurioiden varalta. Jos johdossa on vikaa, laitetta ei saa ●
enää käyttää.
Älä aseta tulipalon vaaran välttämiseksi mitään lämpöä tuottavia sähkölaitteita jääkaapin päälle. ●
Jääkaappi/pakastin
96
Page 97

Älä sijoita mitään nestettä sisältäviä astioita laitteen päälle. Siten estetään nesteiden valuminen
tai vuotaminen ja siten sähköeristyksen vaurioituminen.
Vain tavallisia kotitalouksissa käytettäviä elintarvikkeita saa säilyttää pakastimessa. ●
Alkoholipitoisia aineita saadaan säilyttää vain kunnolla suljetuissa pakkauksissa ja pystysuorassa ●
asennossa.
Jotta vältetään ruokamyrkytyksen vaara, älä nauti ruokaa sen säilytysajan umpeutumisen jälkeen. ●
Sulatettuja ruokia ei saa pakastaa uudelleen.
Älä nojaa äläkä kohdista kohtuutonta painoa hyllyihin, osastoihin ja oveen jne. ●
Suojaa pakastimen sisustaa aina avoimilta liekeiltä ja muilta syttymislähteiltä. ●
Älä säilytä pakastimessa lasipulloissa mitään hiilihapollisia tai muita pakastuskelpoisia nesteitä: ●
tällaiset pullot voivat haljeta pakastamisen aikana.
Irrota pistoke seinäpistorasiasta ●
kun ilmenee mikä tahansa vika. ennen laitteen sulattamista. puhdistuksen ajaksi. -
Tätä laitetta eivät saa käyttää henkilöt (mukaan lukien lapset), jotka eivät ole fyysisesti, aistillisesti ●
tai henkisesti täysin kehittyneitä tai joilla ei ole kokemusta ja tietoa laitteen käytöstä, paitsi jos
henkilöiden turvallisuudesta vastuussa oleva henkilö valvoo tai ohjaa heitä alussa.
Lapsia on valvottava, jotta estetään, etteivät he leiki laitteella. ●
Jotta turvallisuusmääräyksiä noudatetaan ja vaarat vältetään, vain valmistajan valtuuttama ●
huoltohenkilöstö saa tehdä laitteeseen korjauksia tai muutoksia mukaan lukien virtajohdon
vaihtamisen.
Valmistaja pidättää itsellään oikeuden teknisiin muutoksiin. ●
Ellei laitetta käytetä pitkään aikaan, suositellaan sen oven pitämistä auki. ●
Jos laite myydään, annetaan ulkopuoliselle tai hävitetään sopivassa kierrätyslaitoksessa, on ●
kiinnitettävä huomiota eristyskaasuna toimivan syklopentaanin sekä kylmäaineen (R 600 a)
olemassaoloon.
Tutustuminen
Laite koostuu kahdesta osasta, pakastimesta ja
jääkaapista.
1. Lämpötilansäädin ja sisävalo
2. Säilytyshyllyt (korkeussäädettävät)
3. Säilytyshylly
4. Hedelmä-/vihanneslaatikko
5. Pikapakastuslaatikko
6. Pakastuslaatikko
7. Pakastuslaatikko
8. Ovihyllyt
9. Pullohylly
Ennen ensimmäistä käyttöä
Poista kokonaan kaikki laitteen ulkopuolella ja sen sisällä oleva pakkausmateriaali sekä teipit. –
Varoitus: – Pidä lapset poissa pakkausmateriaalien luota potentiaalisen vaaratilanteen esim.
tukehtumisvaaran vuoksi.
Suosittelemme, että laitetta kallistetaan hieman taaksepäin sen paikalleen asennusta varten. Tällä –
tavoin laite voidaan siirtää kuljetinrullien avulla tarkoitettuun asennuspaikkaan.
97
Page 98

Varmista, että kaikki pakkausmateriaalit hävitetään oikein. –
Koko laite, mukaan lukien sen virtajohto, on tarkastettava perusteellisesti kuljetusvaurioiden ●
varalta ennen kuin se liitetään verkkovirtaan.
Puhdista laite jäljemmässä – Sulattaminen ja puhdistus -kappaleessa annettujen ohjeiden
mukaisesti.
Asennus
Laite tulee asentaa hyvin tuulettuvaan, kuivaan huoneeseen. Sen käyttöympäristön lämpötilan on
oltava 16 - 38 °C ja suhteellisen ilmankosteuden enintään 70 %. Älä altista pakastinta suoralle
auringonvalolle äläkä aseta sitä minkään lämmönlähteiden (lämmityslaitteiden, liesien jne.) viereen.
Laitteen takaosan ja sivujen etäisyyden seinään on oltava vähintään 10 cm. –
Laitetta ei saa asentaa kaappiin eikä suoraan seinälle ripustetun kaapin, hyllyn tai samankaltaisen
esineen alle.
Varmista, että ovi voidaan avata 160° kulmassa.
Jos lattiat ovat epätasaisia, laitteen säädettävää jalkaa voidaan käyttää epätasaisuuden kompensointiin
ja ihanteellisen tasapainon aikaansaamiseen. Pakastin on asennettava lievästi kulmaan niin, että se
nojaa taaksepäin. Siten varmistetaan, että ovi sulkeutuu automaattisesti eikä voi jäädä vahingossa
auki. Varmista kuitenkin, että etujalat asennetaan samalle korkeudelle.
Ilmanvaihto
Pakastimen takapuolella olevan kuumentuneen ilman on pystyttävä kiertämään vapaasti. Varmista
sen vuoksi, ettei laitteen takapuolen ilmankiertoa estetä.
Kaksipuolinen ovi
Mallin ansiosta ovi voidaan asentaa toiselle puolelle esim. oikeasaranaisesta (oletusasennus)
vasensaranaiseksi
Ennen oven kääntämistä sijoita laite selälleen. Varmista kuitenkin, että se lepää pehmeällä, tasaisella
alustalla, jotta vältetään kapillaariputkien vaurioituminen.
Varoitus: Sammuta laitteesta virta ja irrota virtapistoke pistorasiasta ennen oven kääntämistä.
1. Irrota ruuvien peitelevyt.
98
Page 99

2. Kierrä ruuvit auki ja irrota koko ylälevy.
3. Irrota yläsarana ruuvaamalla irti 3 ruuvia. Irrota ylempi ovi ja sijoita se naarmuilta suojaamiseksi
pehmeälle alustalle.
4. Vedä irti kaksi pulttia, jotka pitävät keskisaranaa paikallaan. Irrota alempi ovi ja sijoita sekin
naarmuilta suojaamiseksi pehmeälle alustalle.
5. Irrota saranan vasemmanpuoleisten asennusreikien molemmat peitelevyt ja siirrä ne vastaaviin
paikkoihin oikealle.
99
Page 100

6. Irrota molemmat säätöjalat ja alasaranaa kiinnipitävät ruuvit.
7. Irrota alasarana ja käännä sitä ympäri 180°. Ruuvaa saranatappi irti ja asenna se saranan
vastakkaiselle puolelle. Asenna nyt alasarana vasemmalle puolelle ja kaksi säädettävää jalkaa
paikalleen. Asenna pakastinkaapin ovi alasaranatappiin.
8. Käännä keskisaranaa ympäri 180°. Aseta saranatappi pakastinkaapin oven vastaavaan aukkoon ja
kiinnitä se asentamalla keskisarana yksikköön. Asenna jääkaapin ovi laitteen keskisaranan päälle.
100
 Loading...