

Page 1

Extended User Manual
eBee and eBee Ag
Revision 12 / September 2014
Copyright © 2010-2014 senseFly Ltd
Page 2

GENERAL INFORMATION
READ THIS USER MANUAL CAREFULLY BEFORE USING A SENSEFLYLTD PRODUCT.
senseFly Ltd products are intended forprofessional use only.
Applicable Regulations
senseFly Ltd products are subject to Civil Aviation regulations. Regulations may vary depending on the country
where you intend to operate yourproduct.
ANY USEOF SENSEFLYLTDPRODUCTSIN BREACH OFTHE LAW OFTHE COUNTRY WHEREYOUOPERATETHE PRODUCT
IS UNDER YOUR SOLE RESPONSIBILITY.
INFORM YOURSELF BEFORE USING THE PRODUCT. SOME COUNTRIES MAY HAVE LAWS THAT LIMIT THE USE OF UNMANNED AIRCRAFT TO ‘LINE-OF-SIGHT’ OPERATIONS AND/OR PROHIBIT THE USE OF UNMANNED AIRCRAFT AT ALL
OR IN SPECIFIC AREAS.
Privacy
Recording and circulating an image of an individual may constitute an infringement of their image and privacy for
which you can be liable. Ask for authorization before taking pictures of an individual, particularly if you want to keep
your recordings and/or circulate images on the Web or any other medium. Do not circulate degrading images or
ones that could undermine the reputation or dignity of an individual. Check that your use of the cameras on board
senseFly Ltd products comply with the legal provision on privacy in the country where you operate your product.
Limited Warranty
SenseFly Ltd warrants that the product will be free from defects in material and workmanship for a period of twelve
(12) months from the date of delivery. SenseFly Ltd further warrants that the product will perform substantially in
accordance with its specification. During the warranty period senseFly Ltd’s sole liability shall be at senseFly Ltd’s
sole option, either to repair or to replace the defective product with another product or a product with similar specifications, at no charge, or to reimburse the purchase price of the product, or if repair or replacement is not possible,
issue a credit note; provided however, that the defect has been confirmed by senseFly Ltd and that the defective
product is returned to senseFly Ltd in accordance with the support and repair form together with all required flight
logfiles.
Warranty does not apply, without limitation, in case: a) the products are not stored and used according to their
specifications, b) the products are damaged due to carelessness, negligence, or wrong use by the user, and c) for
defects due to normal wear and tear including, but not limited to, deterioration to the airframe after first flight,
normal degradation, misuse, moisture or liquids, proximity or exposure to heat, accidents, excessive strain, abuse,
neglect, misapplication, repairs or modifications made by third party other than senseFly Ltd, damage due to manual
operation, damage due to take-off or landing location with obstacles, damage due to low altitude flight, damage due
to loss of data radio connection, damage due to strong wind, rain or humidity, or other causes for which senseFly Ltd
has no control.
Page 3

THE FOREGOING WARRANTIES ARE IN LIEU OF ALL WARRANTIES, EITHER EXPRESSED OR IMPLIED, INCLUDING WITHOUT LIMITATIONANY IMPLIED WARRANTY OF MERCHANTABILITY OR FITNESS FOR A PARTICULAR PURPOSE, AND OF
ANY OTHER OBLIGATION ON THE PARTOF SENSEFLY LTD.
Limitation of liability
TO THE EXTENT PERMITTED BY APPLICABLE LAW,IN NO EVENT WILL SENSEFLY LTD BE LIABLE FOR ANY LOSS OF REVENUE, LOSS OF PROFIT, LOSS OF DATA, OR INDIRECT, SPECIAL, INCIDENTAL OR CONSEQUENTIAL DAMAGES, EVEN IF
SENSEFLY LTD HAS BEEN NOTIFIED OF THE POSSIBILITY OF SUCH DAMAGES, AND WHETHER THIS LIABILITY ARISES
FROM A CLAIM BASED ON CONTRACT, WARRANTY, TORT OR OTHERWISE, WITH THE EXCEPTION OF GROSS NEGLIGENCE AND DEATH.
YOU SHALL AT ALL TIMES OPERATE THE PRODUCT IN AREAS OR UNDER CIRCUMSTANCES SO AS TO GUARANTY SECURITY AND SAFETY OF PEOPLE, PROPERTY AND ANIMALS.
Copyrights
senseFly Ltd reserves the right to make changes to specifications and product descriptions contained in this document at any time without notice. Please consult www.sensefly.comfor the latest release.
Copyright © 2014 senseFly Ltd. All rights reserved. REPRODUCTION, USE OR DISCLOSURE OF ALL OR IN PARTOF THIS
MANUAL TO THIRD PARTIES WITHOUT THE PRIOR WRITTEN PERMISSION OF SENSEFLY LTDIS STRICTLY PROHIBITED.
Page 4

Address
senseFly Ltd
Route de Gen`eve 38
1033 Cheseaux-Lausanne
Switzerland
Website: http://www.sensefly.com
Technical support
If you have questions on your eBee or accompanying software please consult senseFly Ltd’s Technical
support website at the following address:
http://www.sensefly.com/support/
Page 5
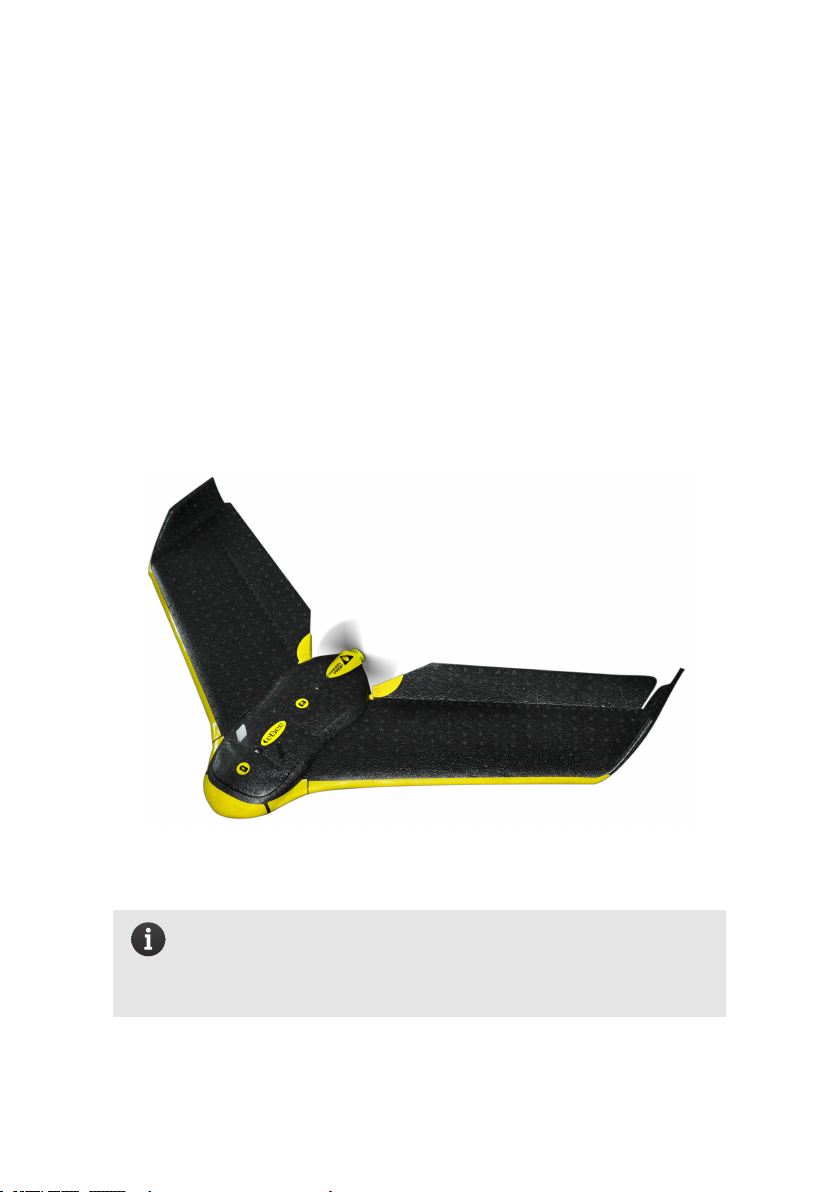
Welcome to your eBee
Congratulations on your purchase of the eBee, a complex and powerful yet intuitive autonomous mapping system. Wetake great care to develop and design the
best possible hardware and software tools for quick, high-quality and easy-to-use
2D and 3D aerial mapping.
Note: This manual refers to the version 2.4 of eMotion andversion 3.2
of Postflight Terra 3D software. Check the software version included
in your package and consult the Release Notes for potential changes
included in more recent versions of the software.
Page 6
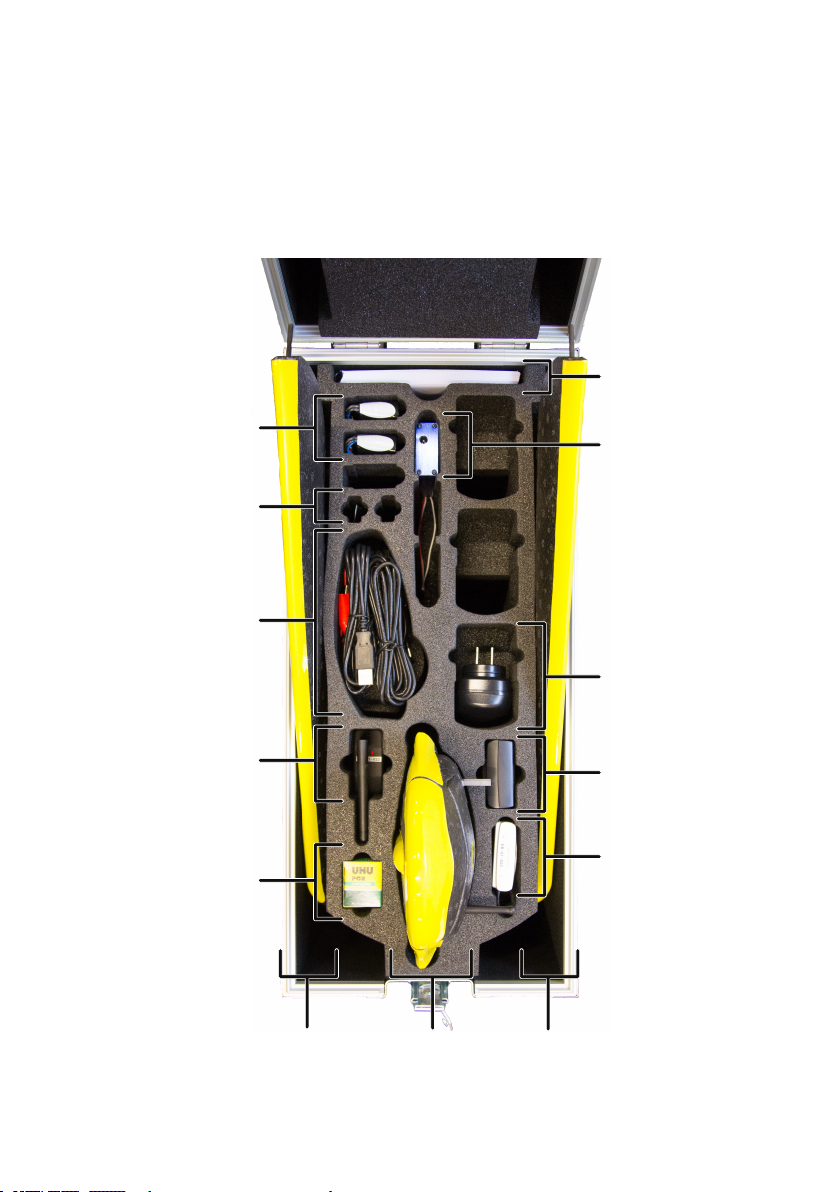
eBee
battery
packs
wing wingeBee
central body
spare
propeller
camera
User manual
ground
modem
battery
charger
EPP
glue
remote control,
cables and
propeller
attachment
bands
eBee
battery
charger
cable
camera
charger
Package contents
Page 7

The standard eBee package contains the following items:
• 1x carrying case with foam protection
• 1x eBee central body with built-in autopilot
• 1x pair of detachable wings
• 1x spare propeller
• 10x spare propeller attachment rubber bands
• 2x Lithium-Polymer battery packs
• 1x Lithium-Polymer battery charger (including cables)
• 1x 2.4 GHz USB ground modem for radio data link (including USB cable)
• 1x 2.4 GHz remote control (including including 3 AA batteries)
• 1x still camera (including memory card, battery and charger)
• 1x USB cable for interfacing with camera and on-board autopilot
• 1x EPP glue
• 1x eBee User Manual
• 1x camera User Manual
Depending on your order, your package may also include other items, such as
additional payloads. Please verify upon delivery that your package is complete.
In case of a missing item, please contact your eBee reseller immediately.
Note: Camera user manuals are also available to download from
sensefly.com/support/download.
Page 8
Hardware features
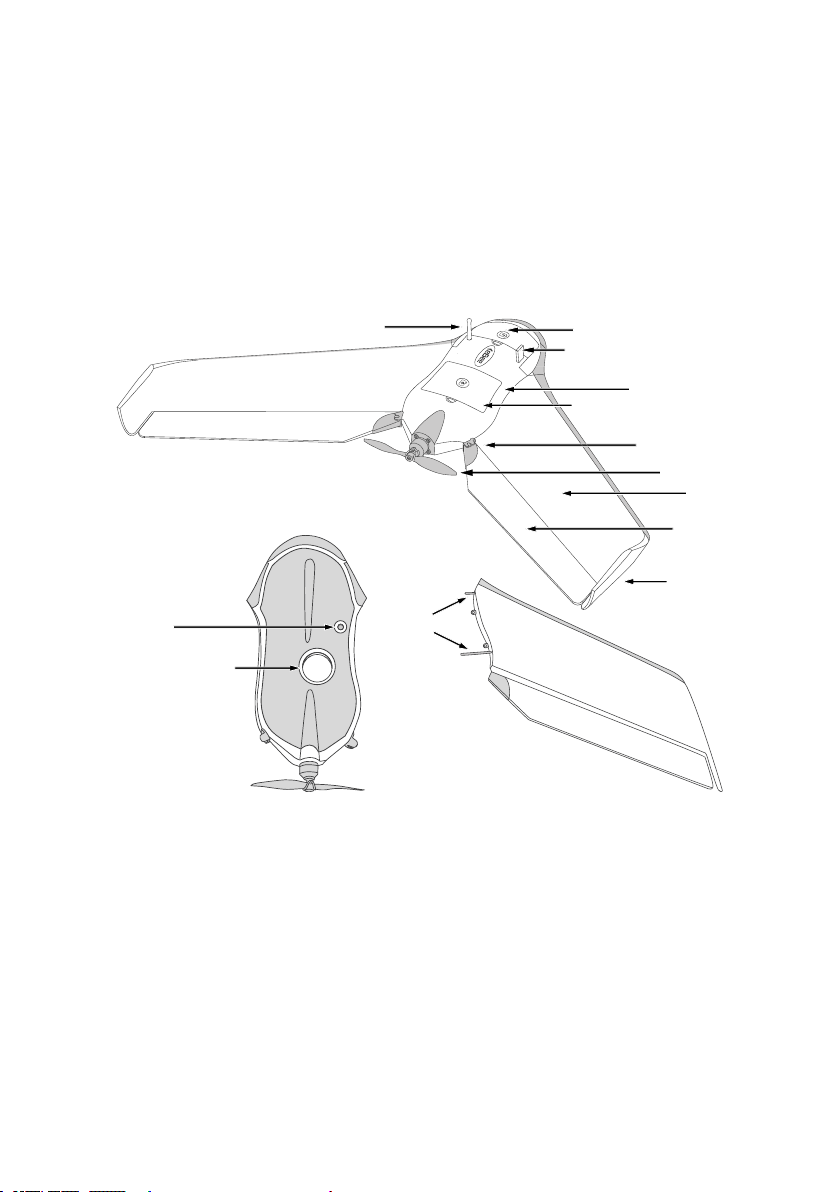
Top face of the eBee
batter
y compartment
aileron
winglet
propeller
rvo connection
mechanism
data link antenna
tot pr
obe, status LED
wing
ra compartment
central body
Bottom face of
the central body
ground
sensor
camera lens hole
Detachable
wing
wing
struts
se
pi
came
The eBee is an autonomous flying drone comprised of the followingcomponents:
• Central body: This is the core of the eBee and includes all the electronics,
actuators and communications hardware on-board the drone.
• Wing: The two wings of the eBee are detachable for storage and replace-
ment. Each wing has two wing strutsand twoclips tohold itin placewithin
the central body.
Page 9

• Winglets: These structures add aerodynamic stability to the drone while it
is in flight.
• Ailerons: Used to control the eBee while in flight.
• Servo connection mechanism: The ailerons are connected to the servo-
motors within the centralbody of the drone through this connection mechanism.
• Propeller: Used to generate thrust while it is in flight.
Caution: When attached to the motor the propeller spins at high
speeds and can be potentially dangerous if itcomes into contact with
exposed skin. Be sure to alwayskeep your hands clear of the propeller
when the battery is attached to the eBee.
• Battery compartment: The eBee is powered by a LiPo (Lithium Polymer)
battery stored within the battery compartment.
Caution: Proper care of your battery is essential. Please read section
‘Proper battery care’ on page 135 before using your drone for the first
time.
• Cameracompartment: The eBee featuresa built-in camera for taking aerial
images stored within the camera compartment.
• Data Link Antenna: Used by the drone to communicate with the eMotion
software through the USB ground modem.
• Pitot probe: This is the sensor used by the eBee to detect airspeed, wind
and altitude. It must be kept clean and clear of obstructions to function
properly.
• Status LED: This coloured LED displays the current state of the eBee. It is
housed underneath the pitot probe and thus illuminates the entire transparent probe in various colours depending on the drone’sstate.
Page 10

• Ground sensor: The ground sensor, composed of a high-speed optical
sensor and lens assembly, is used to detect the proximity of the ground.
Page 11
Software features
The eBee package allows for the download and use of eMotion * and Postflight
Terra 3D * at no extra cost.
eMotion is the integrated software package that allows you to interact with your
eBee. Its easy-to-use interface allows you to plan a mapping flight intuitivelyfrom
the comfort of your office or directly in the field. Once the drone is launched, you
can use eMotion’swireless connection withyour eBee to track its position, monitor
the progress of your mapping flight and send commands if desired.
Once your eBee returns after an aerial mapping flight it is the turn of Postflight
Terra 3D to process the captured images fully automatically. Postflight Terra 3D is
a full-featured mapping solution: with just a few mouse clicks it can create highquality geo-referenced2D and 3D orthomosaics and digital elevation/surface models (DEM/DSM). While youare still in the field PostflightTerra3D analyses the quality of the capturedimages and generates an easy to understand report, letting you
know immediately if the data you captured meets your mapping requirements.
∗ Software access terms and conditions apply. Postflight Terra 3D is limited to eBee images only.
Page 12

Page 13

Contents
I Quick start guide 17
1 Planning and simulating a flight 18
1.1 Installing eMotion, Postflight Terra 3D, and the ground modem
drivers . . . . . . . . . . . . . . . . . . . . . . . . . . . . . . . 18
1.2 The eMotion interface . . . . . . . . . . . . . . . . . . . . . . . 19
1.3 Creating a new flight plan . . . . . . . . . . . . . . . . . . . . . 21
1.4 The mission phase of a flight . . . . . . . . . . . . . . . . . . . . 22
1.5 Simulating your flight . . . . . . . . . . . . . . . . . . . . . . . 24
1.6 Getting ready for a mission . . . . . . . . . . . . . . . . . . . . 25
2 Executing a flight 27
2.1 Weather check . . . . . . . . . . . . . . . . . . . . . . . . . . . 27
2.2 Preparing the eBee for flight . . . . . . . . . . . . . . . . . . . . 28
2.3 The setup phase of a flight . . . . . . . . . . . . . . . . . . . . . 37
2.4 Take-off . . . . . . . . . . . . . . . . . . . . . . . . . . . . . . . 41
2.5 In-flight monitoring and control . . . . . . . . . . . . . . . . . . 44
2.6 Landing . . . . . . . . . . . . . . . . . . . . . . . . . . . . . . . 46
2.7 Potential in-flight errors . . . . . . . . . . . . . . . . . . . . . . 46
3 Processing image data 48
3.1 Importing images and flight data . . . . . . . . . . . . . . . . . 48
3.2 In-field image quality check . . . . . . . . . . . . . . . . . . . . 51
3.3 Creating advanced mapping products . . . . . . . . . . . . . . 53
Page 14

II Advanced functionalities 55
4 Understanding aerial mapping with the eBee 56
4.1 Waypoints and their properties . . . . . . . . . . . . . . . . . . 56
4.2 Advanced polygonal mission area . . . . . . . . . . . . . . . . . 60
4.3 3D mission planning using elevation data . . . . . . . . . . . . . 61
4.4 Flight visualization in Google EarthTM. . . . . . . . . . . . . . . 64
4.5 Autonomous controller and modes of flight . . . . . . . . . . . . 66
4.6 Linear landing . . . . . . . . . . . . . . . . . . . . . . . . . . . 70
4.7 Flying multiple drones at the same time . . . . . . . . . . . . . 75
4.8 Individual photo targets and oblique imagery . . . . . . . . . . 81
5 eMotion in-depth guide 83
5.1 Toolbar . . . . . . . . . . . . . . . . . . . . . . . . . . . . . . . 84
5.2 Simulator . . . . . . . . . . . . . . . . . . . . . . . . . . . . . . 87
5.3 Control Bar . . . . . . . . . . . . . . . . . . . . . . . . . . . . . 89
5.4 Flight Monitoring tab . . . . . . . . . . . . . . . . . . . . . . . 92
5.5 Setup Phase tab . . . . . . . . . . . . . . . . . . . . . . . . . . 96
5.6 Mission Planning tab . . . . . . . . . . . . . . . . . . . . . . . . 100
5.7 Mission Waypoints tab . . . . . . . . . . . . . . . . . . . . . . . 109
5.8 Camera tab . . . . . . . . . . . . . . . . . . . . . . . . . . . . . 111
5.9 Flight Parameters tab . . . . . . . . . . . . . . . . . . . . . . . 116
6 Manual control of the eBee 120
6.1 Enabling manual control . . . . . . . . . . . . . . . . . . . . . . 120
6.2 Pre-flight testing of the remote control . . . . . . . . . . . . . . 122
6.3 Full Manual mode . . . . . . . . . . . . . . . . . . . . . . . . . 123
Page 15

6.4 Assisted Manual mode . . . . . . . . . . . . . . . . . . . . . . . 124
Page 16

III Maintenance, Repair and Troubleshooting 127
7 Maintenance and repair of the eBee 128
7.1 Updating the eBee software . . . . . . . . . . . . . . . . . . . . 128
7.2 Cleaning and storage . . . . . . . . . . . . . . . . . . . . . . . . 131
7.3 Full airframe and sensor inspection . . . . . . . . . . . . . . . . 131
7.4 Repairing the eBee airframe . . . . . . . . . . . . . . . . . . . . 135
7.5 Proper battery care . . . . . . . . . . . . . . . . . . . . . . . . . 135
8 Troubleshooting 137
8.1 Pre-flight errors . . . . . . . . . . . . . . . . . . . . . . . . . . . 138
8.2 Take-off vetoes . . . . . . . . . . . . . . . . . . . . . . . . . . . 141
8.3 In-flight warnings . . . . . . . . . . . . . . . . . . . . . . . . . 143
8.4 Critical failures . . . . . . . . . . . . . . . . . . . . . . . . . . . 155
8.5 Resetting default camera settings . . . . . . . . . . . . . . . . . 158
8.6 Improving radio signal communication . . . . . . . . . . . . . . 158
8.7 Losing and locating your eBee in the field . . . . . . . . . . . . . 159
8.8 Reporting a problem with your eBee . . . . . . . . . . . . . . . . 160
IV Specifications 161
1 Software requirements 162
2 Drone specifications 163
Page 17

Part I
Quick start guide
The first part of this document introduces you to the eBee and contains the basic
informationyou will need toplan and execute a simple mapping project. A typical
mapping project can be divided into three main phases:
1. Planning and simulating a flight: Every project begins with careful planning, whether it is a quick flight over a small area or a multi-stage flight
in complex terrain. Section ‘Planning and simulating a flight’ on the next
page describes how to use theMission Planning feature to quickly generate
a flight plan and to test it using the built-in simulator.
2. Executing a flight: Once planning is complete, it is time for the drone to
perform its flight. In section ‘Executing a flight’ on page 27 you will learn
how to prepare your drone for flight, connect it to eMotion, and to monitor
it in flight while it gathers images. Though the eBee can complete a flight
fully autonomously from take-off to landing, you can also modify its flight
plan at any point during flight.
3. Processing image data: Thelast stepin aproject is converting the images
taken by your eBee into usable products such as precise geo-referenced orthomosaicsor 3D terrain models. section ‘Processingimage data’ on page 48
leads you through the process of transferring images from the drone to a
computer, checking if the image quality suits your needs while still in the
field and producing advanced 2D and 3D maps.
Page 18

Quick start guide
1 Planning and simulating a flight
Goal of this section: This section introduces the eMotion software
used to interface with the eBee. It describes the steps required to
plan, simulate, and save a simple mapping flight. A more detailed
description of eMotion and its advanced functions is presented in section ‘eMotion in-depth guide’ on page 83.
1.1 Installing eMotion,PostflightTerra3D, and the groundmodem drivers
You can download the latest version of eMotion and Postflight Terra 3D at:
www.sensefly.com/support/download
Use the password provided with your eBee to access the download section.
We recommend that you download and install Google EarthTMto take full advan-
tage of the features of eMotion. You can find more information at the following
address:
www.google.com/earth/
To install eMotion on Windows, simply execute the provided installers for eMotion
and Postflight Terra 3D and follow the on-screen instructions. The eMotion and
PostflightTerra3D software will be availablein the ‘Start’ menu. Drivers for the USB
groundstation ground modem will automatically be installed along with eMotion.
In case a problem arises after connecting the ground modem to the computer for
the first time you can find the drivers in one of the following directories (depending on your version of Windows):
C:\Program Files\senseFly\eMotion 2\usb driver\
C:\Program Files (x86)\senseFly\eMotion 2\usb driver\
18
Page 19
Planning and simulating a flight
See section ‘Updating the eBee software’ on page 128 if you have any difficulty
with software installation.
1.2 The eMotion interface
Thanks to the powerful tools available within eMotion, designinga mapping flight
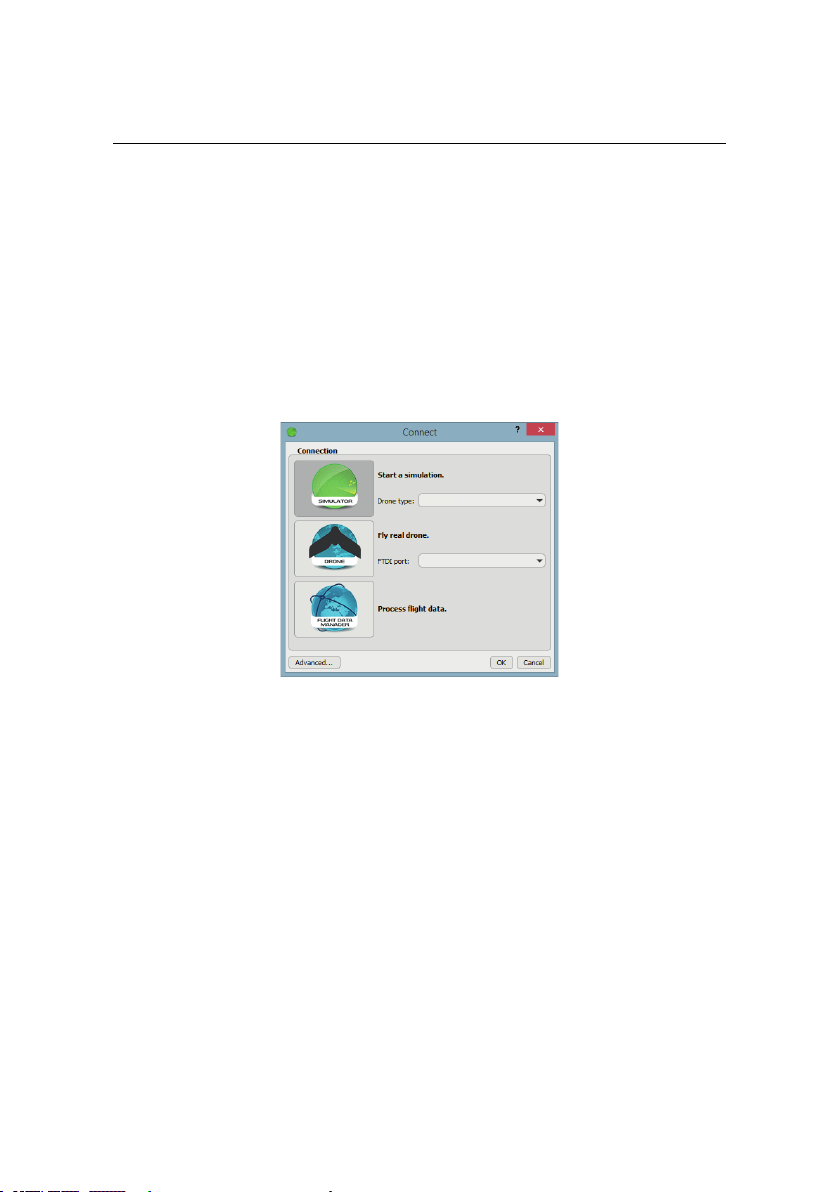
for your eBee is a simple process. To get started, launch eMotion and choose what
you would like to do...
• To run a simulation, select the simulator, choose the drone you want to
simulate and click OK.
• To fly a drone, connect your ground modem to your computer and select
Drone. Ifyou have more than one USB device connected to your PC , choose
the ground modem you want to connect to from the list and click OK. Otherwise, just click OK.
• To process flight data you already created, select the Flight Data Manager
and click OK.
We recommend that you plan flights using a simulated drone. Once connected to
a real or simulated drone you will see the main screen of eMotion.
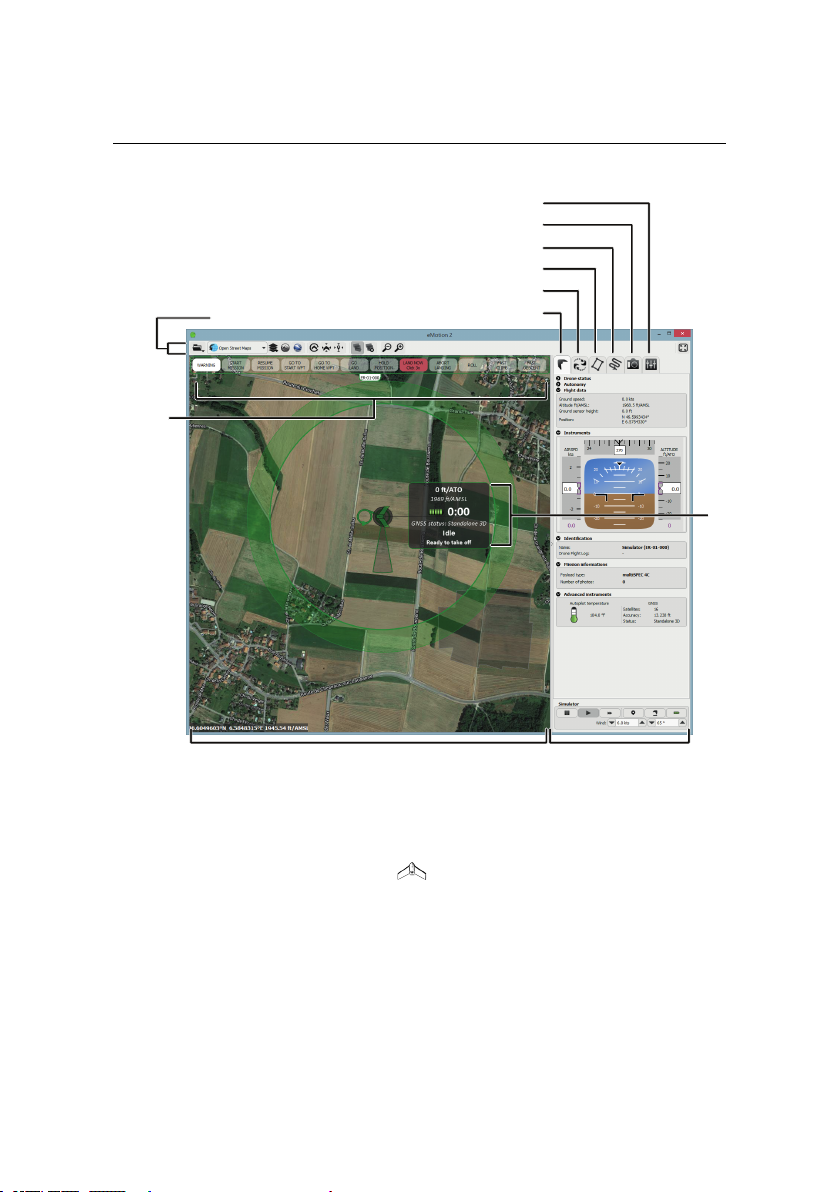
The main screen of eMotion is split into four sections:
19
Page 20
Quick start guide
SidebarMap Area
Control
Bar
Toolbar
Status
Panel
Flight Parameters tab
Camera tab
Mission Waypoints tab
Mission Planning tab
Setup Phase tab
Flight Monitoring tab
• Map Area: The Map Area of eMotion displays a map with the drone’s cur-
rent position, indicated by the symbol. A small Status Panel floats besidethe symbol, indicating important status information including the eBee’s
currentaltitude (both Above the Take-offAltitude, marked as ATO, and Above
Mean Sea Level, marked as AMSL),battery level, flight time, and status. The
Status Panel can be hidden by clicking on the drone. Moving around the
map is done by clicking and dragging at any place not occupied by a symbol (such as a waypoint or the drone symbol).
20
Page 21

Planning and simulating a flight
• ControlBar: The Control Bar is used to issue various commands to the eBee
while it is in flight, such as starting the mission phase or holding position.
It is also used to display and acknowledge warnings that may occur either
before or during a flight.
• Toolbar: The Toolbarcontains buttons to controlthe layers, sources or map
informationand other display options related to the Map Area. eMotion can
use many sources of mapping information.
• Sidebar: The Sidebar is split into several tabs, each with a particular func-
tion. The Flight Monitoring tab is used for monitoring the drone while in
flight. The Setup Phase tab controls the take-off and landing portions of
a flight plan (referred to as the ‘setup phase’) whereas the Mission Planning tab defines the image acquisition portion of the flight plan (referred
to as the ‘mission phase’). The last three tabs are used for advanced waypoint planning and parameter setting. You can hide the Sidebar by clicking
on its left edge. The Sidebar also contains controls for the simulator when
connected to a simulated drone.
1.3 Creating a new flight plan
Every mapping flight requires a flight plan, which is a path defined by a set of
waypoints, or points in 3D space, and a set of actions that can be performed at or
in between waypoints, such as taking images, proceeding to the next waypoint
or landing. A flight plan is shown in the Map Area using circles to represent waypoints, lines to represent the flight path andarrows to showthe directionof flight.
The large circle with a thick border illustrates the working area boundaries within
which the eBee will always remain. See section ‘Waypoints and their properties’
on page 56 for more information on waypoints and the various symbols presented
in the Map Area.
A complete flight plan for an eBee is divided into two separate phases: the setup
phase and the mission phase. The mission phase includes waypoints and actions
related to mapping and capturing images. The setup phase includes waypoints
and actions related to take-off and landing. This phase is usually planned directly
21
Page 22
Quick start guide
mission
area
Step 1: open tab and select
Step 2:
rotate,
resize,
move
Step 3:
choose
params
Step 4:
upload
Step 5: check in Google Earth
correct camera
in the field and is explained in detail in section ‘The setup phase of a flight’ on
page 37.
1.4 The mission phase of a flight
The easiest wayto create a mapping flight for the systematic coverage of an area is
to use the automatic mission planningfeature of eMotion. By simply positioning a
rectangle around the area you would like to cover,eMotion will generatea mission
plan optimised for the ground resolution that you desire.
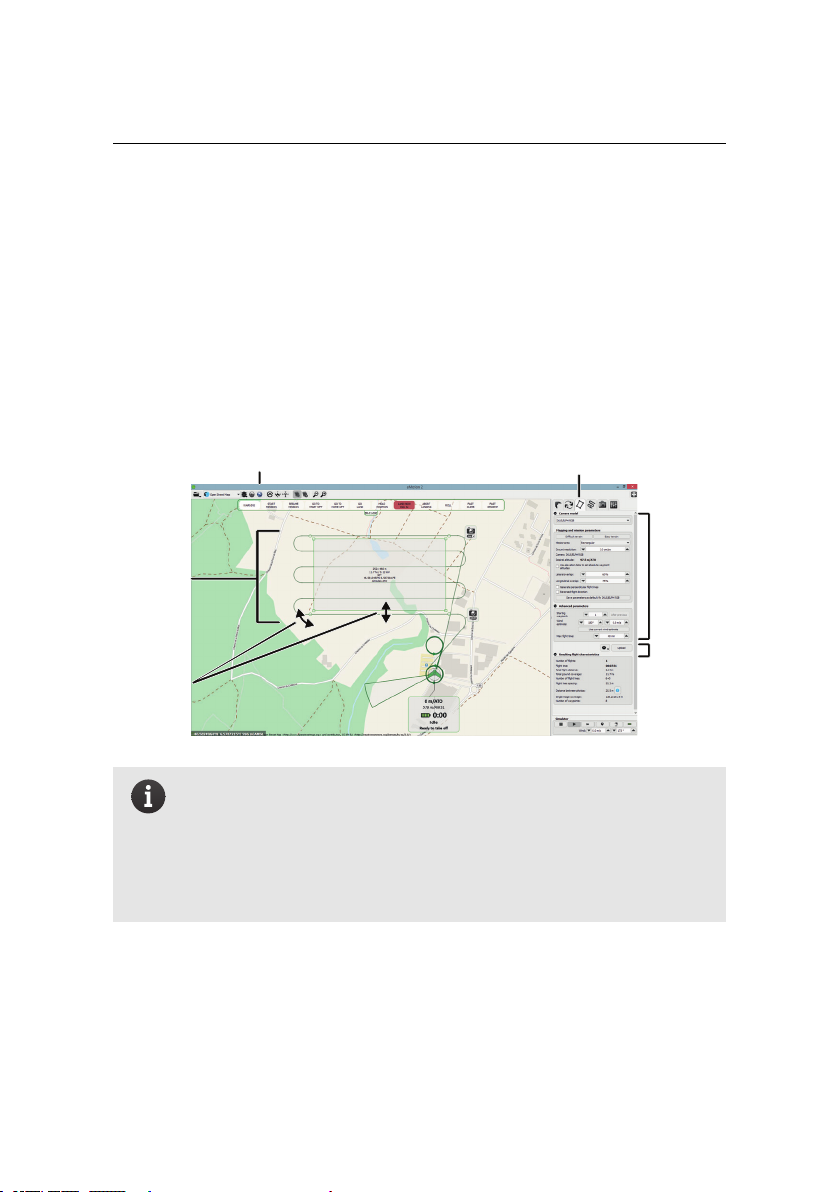
Follow these steps to automatically setup waypoints for a mapping mission:
1. Select the Mission Planning tab from the Sidebar. A grey zone will appear
22
Note: For more complex terrain and missions, eMotion has the abil-
ity to set polygonal mission areas of any size and shape, and to automatically adjust waypoint altitudes based on elevation data. These
powerful features are described in more detail in section ‘Advanced
polygonal mission area’ on page 60and section ‘3D mission planning
using elevation data’ on page 61, respectively.
in the Map Area to designate the mission area to cover. Information such
Page 23

Planning and simulating a flight
as size and position is overlaid on the area. A mission plan, including the
required waypoints, is automatically calculated and displayed to preview
the mission plan that will be created.
2. Adjust the location, size, and shape of the mission area. The area can be
relocated by draggingthe grayzone. The four squarehandles on the edges
of the area can be used to resize it and the round handles on the corners of
the area can be used to rotate it. As you adjust the area the mission plan
preview is continuously updated.
3. Adjust the mapping and mission parameters in the Mission Planning tab to
suit your terrain and quality requirements¹. As a first step,eMotion provides
two predefined set of parameters; ‘Easy terrain’are the default parameters
designed for simpler terrain, such as mines or agriculture,whereas ‘Difficult
terrain’ is designed for complex areas, such as forests, and provides higher
image overlap at the cost of a lower resolution. Be sure to include an estimated wind speed and direction, as this has an effect on the area that can
be covered in a single flight. Once again, the mission plan preview will be
continuously updated as you modify the parameters.
4. Check the resulting flight characteristics in the tab. Once you are satisfied,
upload the mission plan to the simulated drone by clicking the ‘Upload’
button.
5. Click the button in the Toolbar to open the flight plan in Google EarthTM².
Review the flight plan to ensure that there is sufficient clearance between
the flight plan and the ground. Any updates to the flight plan that you
make within eMotion will be reflected directly in Google EarthTM.
¹ see section ‘Mission Planning tab’ on page 100 for a complete description of available parameters
² see section ‘Flight visualization in Google EarthTM’ on page 64
23
Page 24
Quick start guide
re-position take-off location
initiate take-off
instant recharge of battery
fast-forward
play
pause
Caution: eMotion as well as the automatic mission planning tool are
not aware of any obstacles that may exist in the area. In addition,
when not using elevation data, the mission planning tool assumes
that the mission area is flat and at the same altitude than the take-off
location. It is also not aware of any legal restriction(such as minimum
or maximum altitude) that may exist in your region. The resulting
flight plan should be carefully reviewedin order to avoid any collision
with uneven terrain or tall objects such as buildings, and to comply
with local regulations.
The final step after you have prepared a flight plan is to save it to a file that you
can load into the eBee when you are in the field. Select the Setup Phase tab from
the Sidebar, click on ‘Save flight plan to file...’, choose a filename and location and
click ‘Save’.
1.5 Simulating your flight
Simulating your flight gives you an idea of the position and size of images that
will be taken during the flight. In addition, it allows you to learn to use advanced
functions, such as in-flight waypoint editing and camera control, without putting
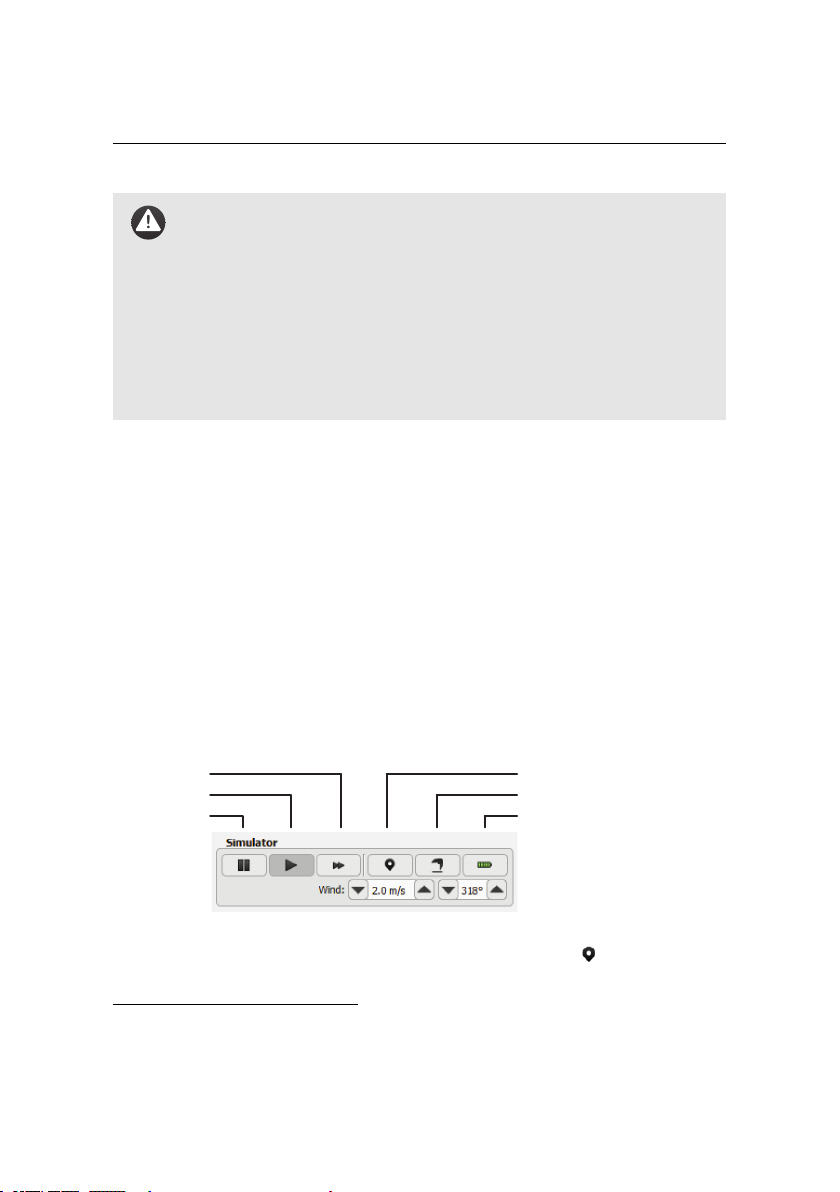
your eBee at risk³. When eMotion is connected to a simulated drone an extra set
of buttons appear in the Sidebar:
You can set the take-off location of the eBee by clicking on the icon and placing
the point on the map. This simulates the action of switching on the real drone
³ see section ‘Simulator’ on page 87 for a complete description of the simulator
24
Page 25
Planning and simulating a flight
eBee battery pack
power cable
3
2
1
Status
LiPo Balance
Charger
balance LEDs
(not to scale)
status LEDs
and letting it acquire GPS signals. You can test your flight plan by clicking the
icon, simulating a take-off manoeuvre. The eBee will then go through its flight
plan in the same way it would in the field. You can pause, play or speed up the
simulation by clicking the corresponding buttons in the Toolbar. You can monitor
the stateof the drone while in flight using the Flight Monitoring tab and the Status
Panel⁴. You may also monitor the flight in 3D in Google EarthTMby clicking on the
button in the Toolbar.
Caution: The simulator is a tool designed to aid with flight planning
and to familiarise you with the advanced functions of your eBee. The
simulated physics, however, are basic and do not always accurately
reflect the true behaviour of the drone in flight. In particular, estimates of battery level and reactions to wind are difficult to simulate
with high accuracy. You should in no case depend on behaviours
seen with a simulated drone to be reproduced exactly in real flight.
1.6 Getting ready for a mission
Before leaving for the field to perform a flight, be sure to fully charge all your eBee
batteries⁵. When delivered, the eBee battery may not be fully charged.
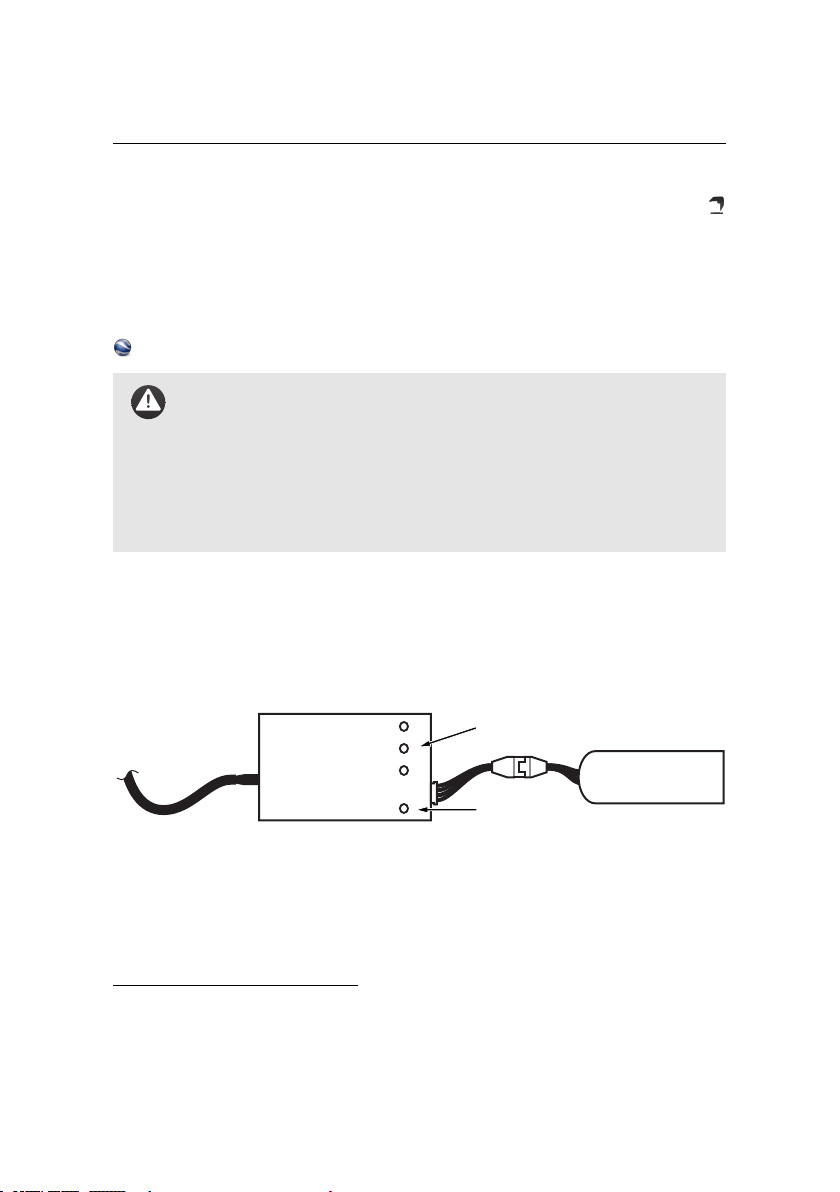
To charge an eBee battery pack, connect it to the battery charger as illustrated
above. During charge, the status LED on the charger is solid red. Charging is complete when the status LED turns green.
The charger provided independently balances the voltage of each of the 3 cells
contained in the battery pack to ensures optimal performance and battery life. If
⁴ see section ‘In-flight monitoring and control’ on page 44
⁵ Consult your payload user manual to know if the payload battery is necessary for the flight
25
Page 26

Quick start guide
any of the cells is unbalanced, its associated LED will be solid red during charging
until it is re-balanced. Charging can take up to an hour, depending on the charge
level of the battery and the required cell balancing work. See section ‘Proper battery care’ on page 135 for more information on maintaining your drone’sbatteries.
If you plan on performing a flight away from an Internet connection it is useful to
preload map tiles by selecting ‘Download maps...’ from the File menu. More
details on how to take advantage of the various map sources available in eMotion
can be found in section ‘Toolbar’ on page 84.
26
Page 27

Executing a flight
2 Executing a flight
Goal of this section: Thissection describes how to prepare your eBee
for flight, launch, monitor and control from the air, and initiate an
autonomous landing.
Note: We recommend that you perform your first flight in a large
obstacle-free area and limit the length of the mission in order to familiarise yourself with the eBee in flight.
2.1 Weather check
Before each flight, you should be aware of the weather conditions. The eBee is
a small drone that cannot fly in heavy rain or strong wind conditions. In case of
doubt, make sure to check a weather bulletin including wind estimations in the
flight area. Note that wind is often stronger at higher altitudes and that the wind
perceived at the surface is not always a good reference to estimate the wind at
flight altitude. Cloud velocity or tall tree movements can help youto estimate the
wind speed once you are out in the field.
Weather forecasts may use various units to measure wind speed. As a reference,
1 m/s = 3.6 km/h = 2.24 mph = 1.94 kts.
Caution: The eBee should not belaunched if the wind speed exceeds
12 m/s (in other units: 43.2 km/h, 26.8 mph, 23.3 kts).
Caution: TheeBee isnot designed to fly in temperatures above 35◦C.
Avoidexposing the drone to high temperature for prolonged periods
of time. In particular, leaving the drone exposed to the sun or in a car
should be avoided.
27
Page 28
Quick start guide
Central body
bottom view
Central body
top view
Wing - detached
3
4
2
5
6
2.2 Preparing the eBee for flight
The eBee’s simple design means it can go from the box to being ready for flight
in minutes. We recommend that you perform the following 6 steps before every
flight to ensure that the platform is best prepared for flight.
Note: Remove the red warning sticker from the motor before your
first flight.
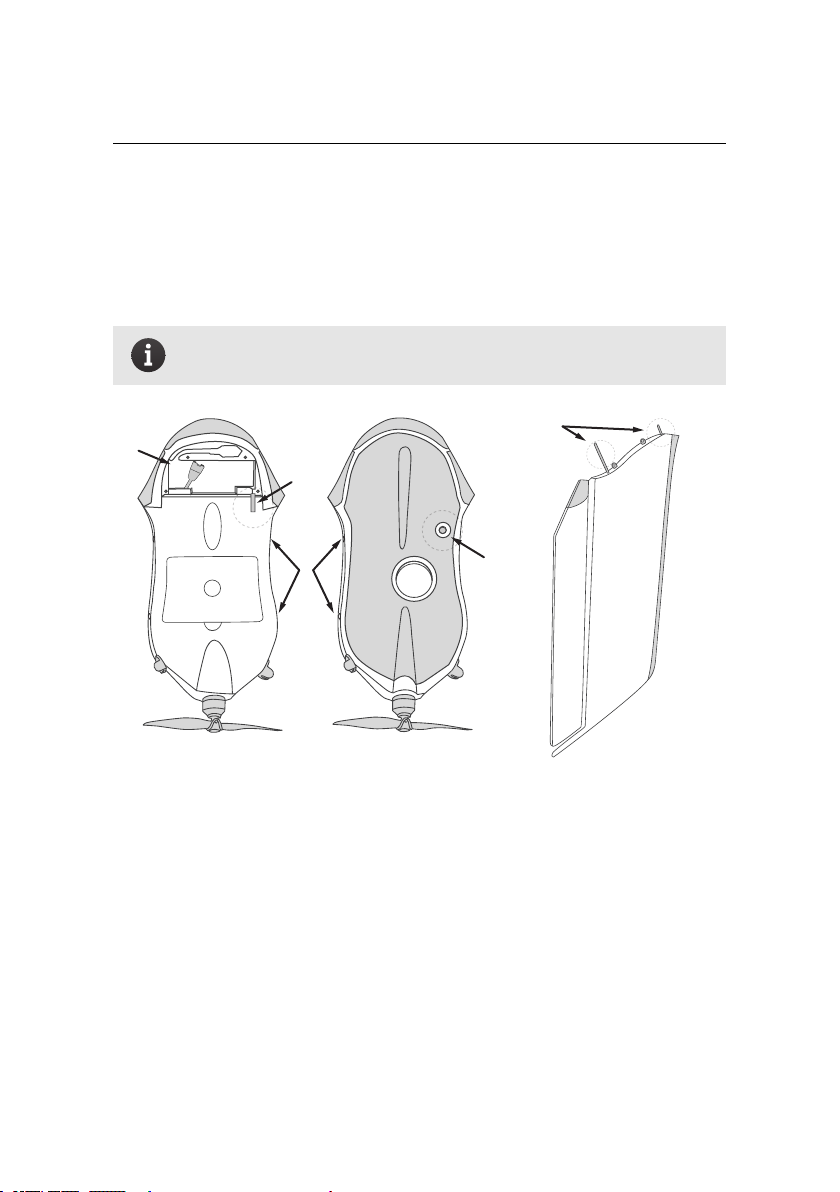
Step 1: Perform a general inspection
Visually inspect the drone for damage or wear using the following steps:
1. Check the foam central body and wings for cracks or other damage.
2. Verify that the pitot probe is properly attached to the airframe and that the
holes in the probe are free of obstructions.
3. Verify that the ground sensor is free of obstructions and that the sensor’s
lens is clean.
28
Page 29

Executing a flight
4. Verify that the wing struts are not split or damaged in any way.
5. Verify that the tubes within the Central Body that hold the wing struts are
not cracked or damaged in any way.
Caution: It is vital to carefully inspect the wing struts and tubes
within the Central Body beforeevery flight, as they may cause a crash
if they are damaged in any way. This is particularly important if the
wings were found separated from the Central Body after a previous
flight.
6. Verify that the power cables within the battery compartment are well insulated and not damaged.
Note: A general inspection should be performed before every flight.
It is also good practice to perform a full airframe check regularly to
keep your eBee in good shape. See section ‘Full airframe and sensor
inspection’ on page 131 for more details.
29
Page 30
Quick start guide
motor
propeller
propeller
attachment
rubber bands
motor
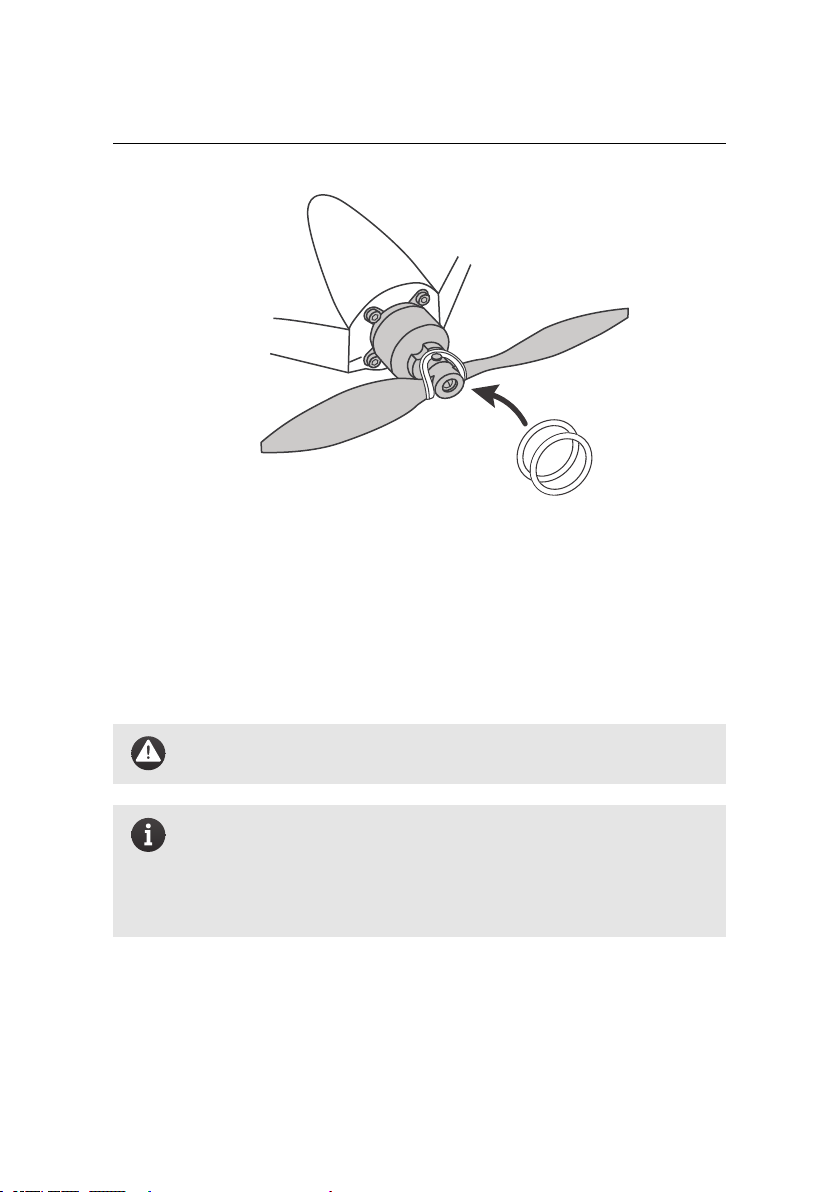
Step 2: Install the propeller
Mount the propeller on the motor axis. Secure the propeller using two attachment rubber bands as illustrated above. Ensure that the propeller is lying flat
against the motor mount, and that the rubber bands do not show cracks or any
other sign of aging.
Caution: Failureto use two rubberbands mayresult in the loss of the
propeller in flight!
Note: After extensive use, therubber bands may develop cracks. This
is normal and is caused by the ageing of therubber material. For maximum security, inspect the rubber bands regularly and discard them
if they show cracks. 10 spare rubber bands are included in the package.
30
Page 31
Executing a flight
insert camera into
compartment
plug in camera connector to camera plug
close camera
compartment lid
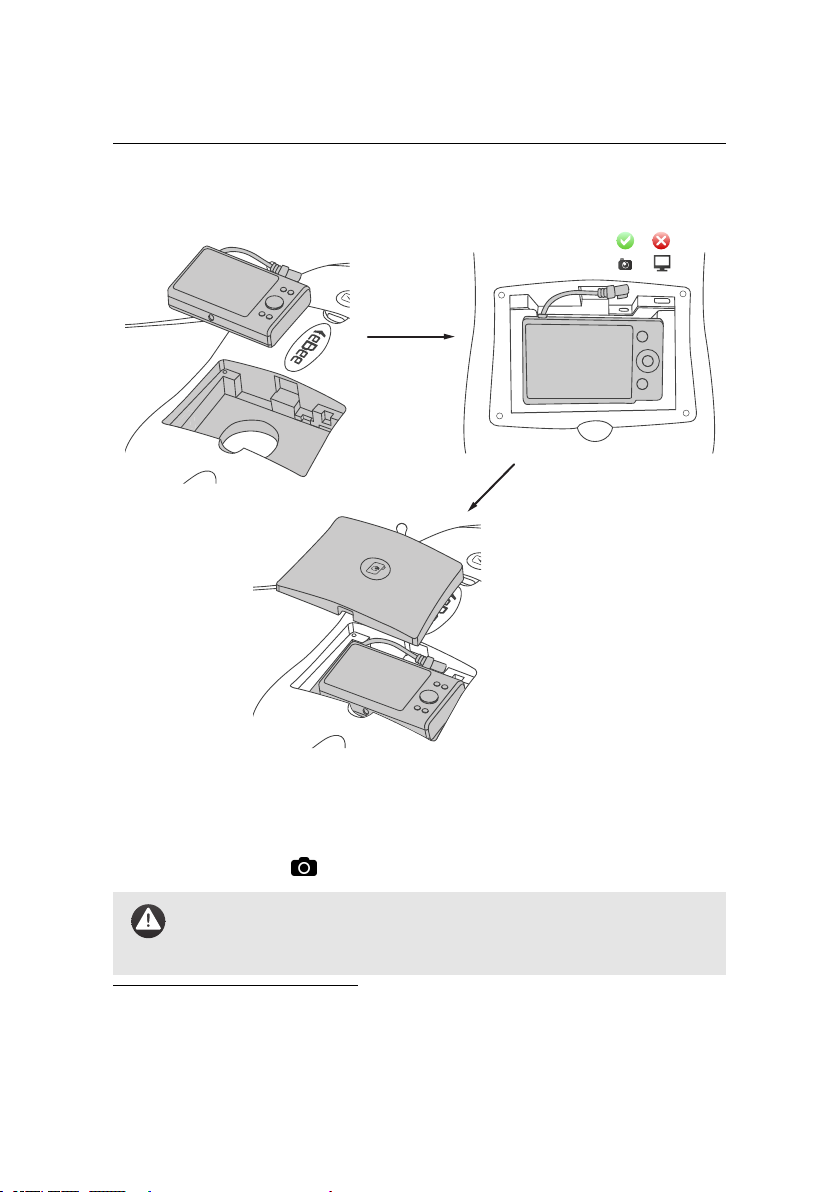
Step 3: Install the camera
Install the camera into the payload bay⁶ within the eBee and close the camera
compartment lid. If the camera connector is not already connected, plug it into
the connector with the icon on the eBee.
Caution: The eBee has not been designed to fly without the camera.
Attemptingto fly without thecamera may render the drone unstable,
which may eventually lead to a crash.
⁶ Some payloads may require a separate battery or SD card to operate properly. Please refer to the
User Manual of the camera or other payload for proper installation instructions.
31
Page 32
Quick start guide
ensure servo
connection
mechanism is
aligned
and engaged
insert wing struts into central
body
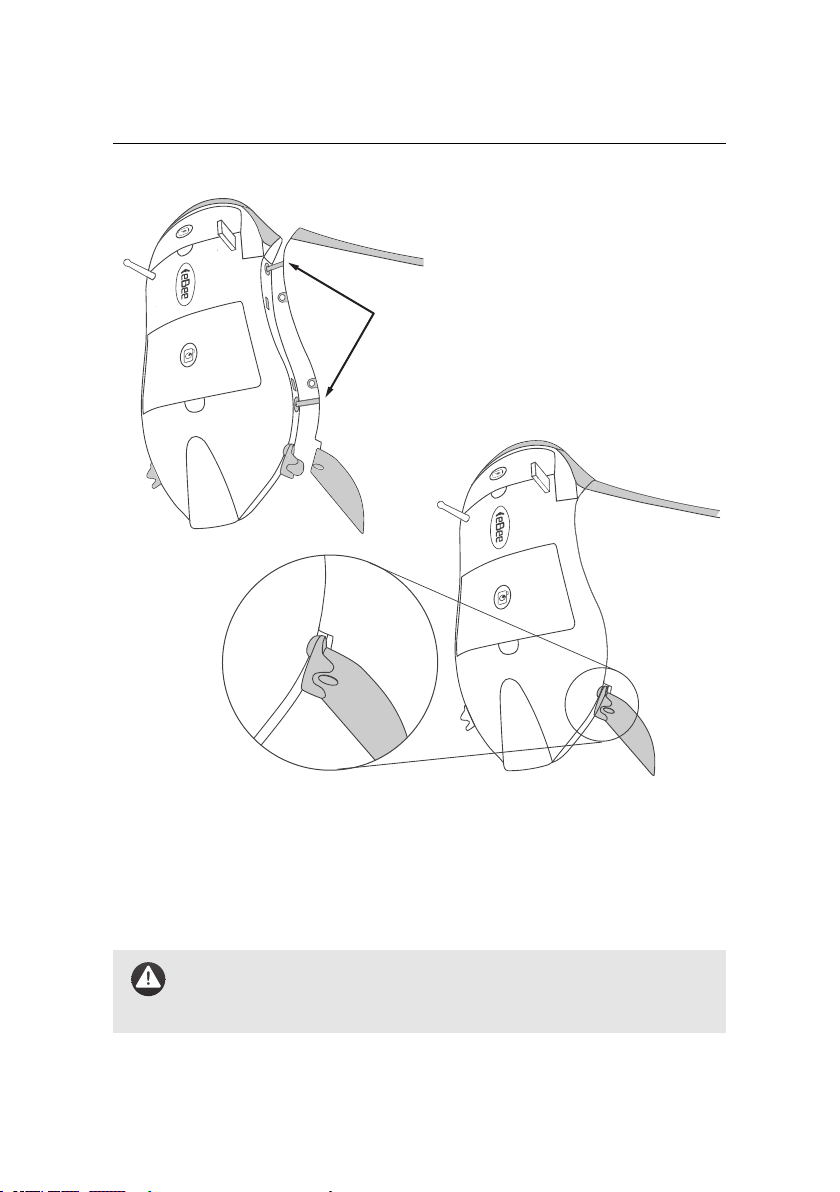
Step 4: Attach the wings
Attach the wings to the central body by inserting the wing struts into the receptacles in the central body. Ensure that the ailerons are properly aligned with
the servo connection mechanism before pushing the wings fully into the central
body.
Caution: Flying with damaged wing struts or a badly engaged servo
connection mechanism may cause erratic flight and ultimately a
crash. Be sure to properly inspect and attach the wings before flight.
32
Page 33
preflight checks failed
blue
pulse
status LED:
green
solid
status LED:
ready for startup
connect battery
red
blink
status LED:
disconnect battery
connect battery and
insert into
compartment
close battery
compartment
Startup
process:
Executing a flight
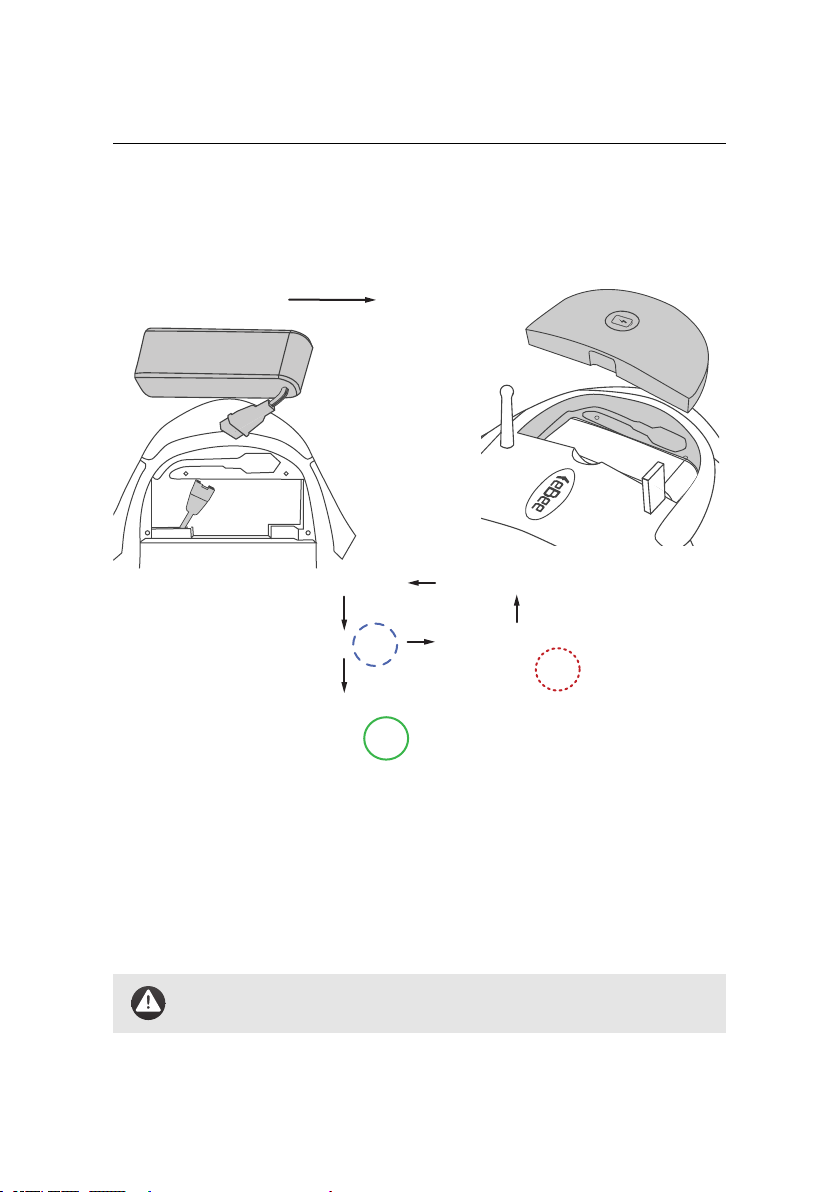
Step 5: Install and connect the battery
Lay the eBee horizontally on the ground outside in the vicinity of the take-off location, with the top face up. Toinstall the battery, begin by connecting the power
cables to the battery. Insert the connectors firmly to the end in order to avoid undesired disconnection when in flight. Once connected, insert the battery into its
compartment and close the compartment lid.
Caution: Take care to keep the propeller area clear, in case it suddenly starts spinning.
33
Page 34

Quick start guide
Note: Only connect the battery cables to the drone when you are
ready for start-up. Do not leave the battery connected for extended
periods of time when the drone is on the ground, as this may discharge the batteriesand cause irreparable damage. When connected
and not in flight, the eBee will briefly move its ailerons up and down
every minute as a reminder that it is switched on.
As soon as the battery is connected the eBee will perform an automatic self-check
of its sensors and acquireGPS signals. Be sure not to move the droneduring these
tests. Itis important that the drone is not inclined more than 10 degreesin order to
start up properly. Pre-flight checks may last from a few seconds to several minutes
in the case of poor GPS signal reception. As these satellite signals are required for
the checks to complete, be sure to place the eBee outside with a clear view of the
sky.
During the pre-flight checks the status LED will pulse blue. Once the pre-flight
checks are complete the eBee will flip its ailerons up and down and the status LED
will turn solid green to indicate it is ready. You may already connect the drone to
eMotion (Step 6) before pre-flight checks are complete to get a better idea of the
status of the checks.
Note: If there was any problem during the pre-flight checks performed by the drone this will be indicated by a Pre-flight error in eMo-
tion as well as a by the status LED blinking red. See section ‘Pre-flight
errors’ on page 138 for a description of possible Pre-flight errors and
how to handle them.
34
Page 35
Executing a flight
/ eBee Ag
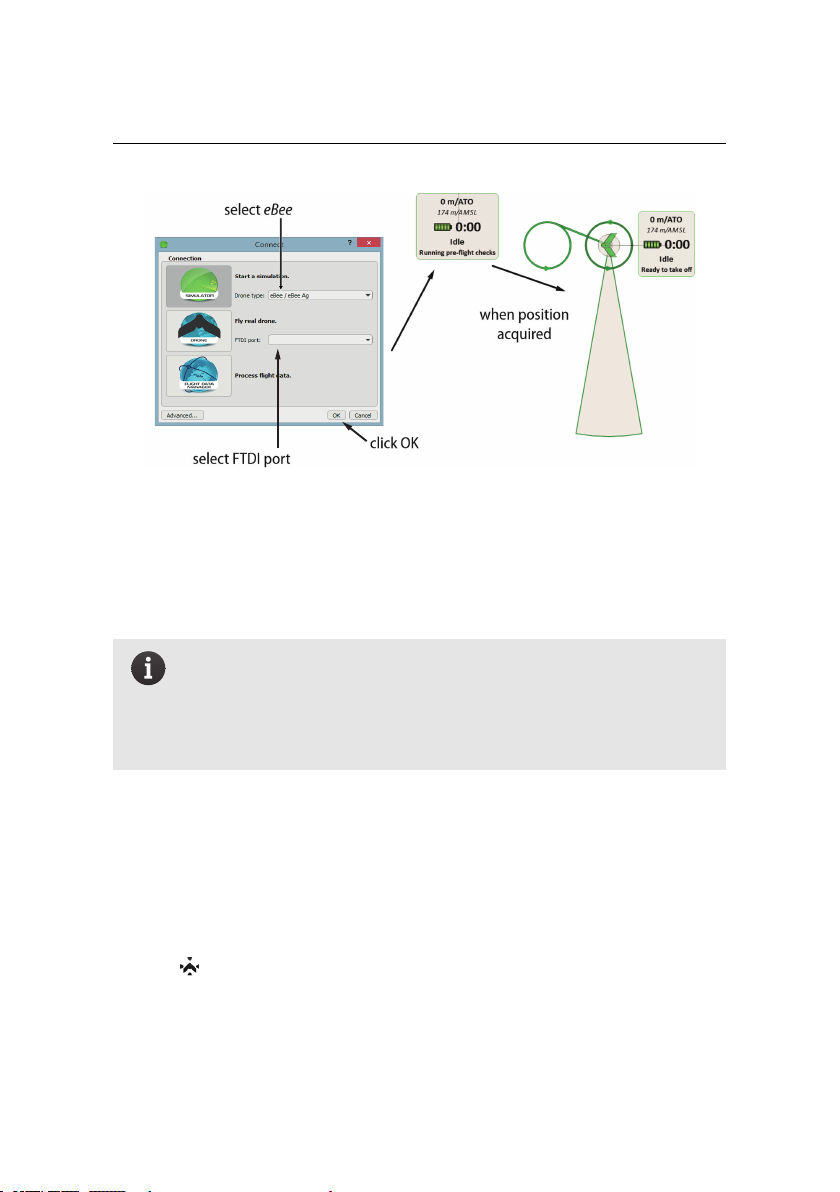
Step 6: Connect to eMotion
Start by connecting the USB ground modem to your computer. Then launch eMotion, which will display the Connection window. Select the eBee connection pro-
file, choose the corresponding FTDI port and click ‘OK’.
Note: Every eBee is paired with the ground modem it is delivered
with, and will only work with that particular modem. The name of the
FTDI port corresponding to the ground modem is labelled as ‘eBeeSERIAL’, where SERIAL is the serial number of the drone it is paired
with.
When a connection is established eMotion will display a map and the Status Panel
indicating the current state of the drone. If the eBee has not yet detected its location the Status Panel will appear in the top right corner of the Map Area with the
text ‘GPS: Waiting for signals...’. During this time the status LED on the drone will
pulse blue.
Once your drone has set its position using GPS signals, an icon of the drone will
appear at its location on the map. If the drone’slocation is not on the map you can
click the button from the Toolbar to centre the map on the drone. The drone’s
status on eMotion will be displayed as ‘Idle, Ready to take-off’ and the status LED
will become solid green.
35
Page 36

Quick start guide
You can now load a flight plan you prepared earlier by selecting the Setup Phase
tab from the Sidebar, clicking on ‘Load flight plan from file...’ and selecting your
flight plan file. Alternatively, you can plan the entire mission in the field, following
the same process outlined insection ‘Planning and simulating a flight’on page 18.
36
Page 37
Executing a flight
wind
direction
obstaclefree zones
40m
take-off
transition
altitude reached
10m
60m
Take-off
location
Home
waypoint
Start
waypoint
Approach
sector
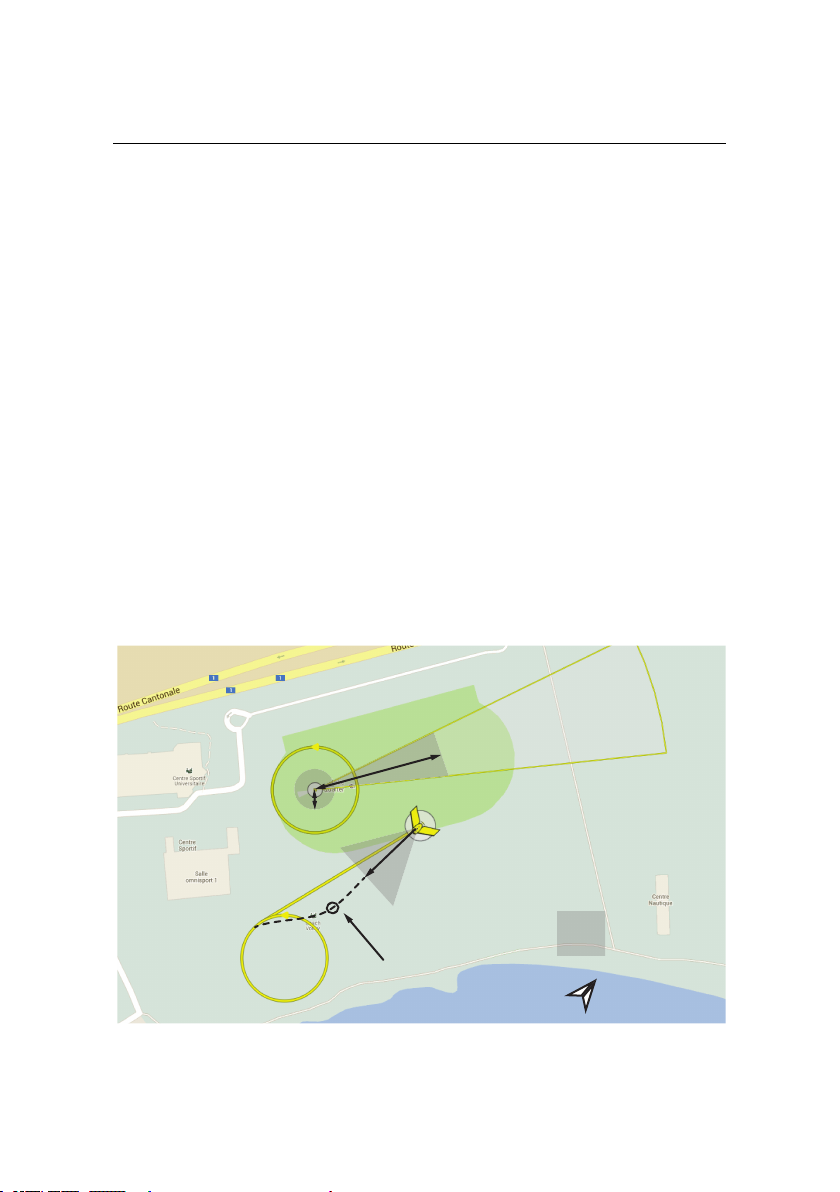
2.3 The setup phase of a flight
The setup phase of aflight includes the waypointsand actions related to the takeoff and landing of the eBee and includes the following locations:
• Take-off location: The point from which the drone is launched, automat-
ically set to the location calculated from GPS signals by the drone when
it is launched. This location defines the altitude of 0 m/ATO (ATO stands
for above take-off ); the altitudes of all other waypoints, when defined in
m/ATO, are referenced to the altitude of this location.
• Start waypoint: Thefirst point that the drone flies towardswhen launched
(once it reaches the take-off transition altitude).
• Home waypoint: The safe point for the drone to circle in case of emer-
gency, as well as its landing position at the end of a flight for both Linear
and Circular landings.
37
Page 38

Quick start guide
It is important to carefully select the take-off location, the Start waypoint and the
Home waypoint to ensure your drone remains at a safe distance from obstacles.
The eBee should always be launched against the wind. Select a take-off location
clear of obstacles (buildings, rocks, power lines, hills, trees, etc.) within a distance
of at least 40 m in the upwind direction. Immediately after takeoff it will keep
its wings level and climb in the general direction it was launched until it reaches
the take-off transition altitude⁷, at which point it will start flying towards the Start
waypoint.
By default, the Start waypoint is set to a distance of 80 m West of the initial position of the drone and an altitude of 75 m/ATO. It is good practice to move the Start
waypoint close to and upwind from the take-off location to allow asmooth transition between take-off and waypoint-directed flight. You can move waypoints by
clicking on them and dragging them within the Map Area⁸.
The Home waypoint is used both as the landing location and as a safety position
in case of an In-flight warning. The eBee can perform either a Linear or a Circular
landing. Linear landing is the default and recommended landing type, especially
in high winds. To prepare a Linear landing, place the Home waypoint centre at
a location that is at the same altitude as the take-off location and is clear of obstacles in a 10 m radius. Choose one or several approach sectors that are free of
obstacles for at least 60 m from the Home waypoint centre. You can drag the approachsectoraround the Home waypoint and change itswidth directly in the Map
Area or from within the Setup Phase tab. Make the approach sector(s) as wide as
possible to maximize the chance that the drone can subsequently land against
the direction of the wind. Ensure that the terrain within the approach sector is
flat and contains visual contrast to allow the ground sensor to function properly
during landing.
When a Linear landing is initiated (either automatically or by pressing the ‘Go
Land’ button in the control bar) the drone will fly towards the Home waypoint,
circle the waypoint (at 75 m/ATO by default) to measure the direction of the wind
⁷ By default the take-off transition altitude is set to 20 m. In difficult launch conditions you can set
both the take-off heading and the take-off transition altitude in the Setup Phase tab, as described
in section ‘Setup Phase tab’ on page 96.
⁸ see section ‘Waypoints and their properties’ on page 56 for a more detailed explanation on way-
points and how to modify them
38
Page 39

Executing a flight
at the landing location and choose an approach direction as much against the direction of the wind as possible. It will then fly downwind in the opposite direction
of the approach direction, turn 180◦and begin descending in the approach direction until it lands on the ground underneath the centre of the Home waypoint.
The approach angle is around 20° and the drone will reverse its thrust if needed
to maintain a suitable airspeed during this phase.
Note: There are a number of requirements that must be fulfilled
to ensure a successful Linear landing. Section ‘Linear landing’ on
page 70 describes in more detail the Linear landing process and how
to properly define approach sectors in more complex terrain. In
particular, in the case of strong-wind conditions, low light or lowcontrast terrain, the precision of the final landing location around
the Home waypoint is reduced. Therefore, it is safer to plan for more
clearance, especially along the possible landing axes.
If there are no suitable approach sectors to perform a Linear landing the drone
can also perform a Circular landing around the Home waypoint. When initiating
a Circular landing around the Home waypoint the drone will switch off its motor
and glide down while circling around the Home waypoint at the waypoint’s radius. During the Circular landing procedure the drone uses its ground sensor to
measure the height above the ground, if the ground is well textured and there is
enough light. When it reaches an altitude of 25 m above the ground the drone
will level out, estimate the direction of the wing and resume its descent so as to
touch down against the wind while remaining on the circle defined by the Home
waypoint.
Caution: The ground sensor can only provide usable feedback in
daylightconditions above flat terrain that containsenough visual texture. Ifthese conditions are not met the drone cannot ensure a touchdown against the direction of the wind. Landing in the direction
of the wind in strong-wind conditions may result in a high landing
speed and damage to the eBee.
39
Page 40

Quick start guide
To prepare a Circular landing, place the Home waypoint in a location that has no
obstacles within a radius of 50 m (or 20 m more than the Home waypoint radius)
to give the drone enough space to land. Ensure that the entire landing area is
flat to allow the ground sensor to function properly. By default, the radius of the
Home waypoint is 30 m. In high-wind conditions it is recommended to increase
this diameter⁹.
Caution: The radius of the Home waypoint, and thus of a Circular
landing, can be reduced to20 m but should only be done in low wind
conditions (<3 m/s). Reducing the radius of the Home waypoint below 30 m in moderate- or high-wind conditions can result in damage
to the drone when it contacts the ground during a landing. As indicative values, the Home waypoint radius should be set to 30 m for wind
speeds below 5 m/s, 40 m for wind speeds between 5-8 m/s, and to
50 m for wind speeds above 8 m/s.
Note: In case of strong-wind conditions, the drone may drift even
further than 50 m away from the center of the Home waypoint when
performing a Circular landing. Therefore, it is safer to plan for even
more clearance in the downwind direction.
By default, the Home waypoint is set to an altitude of 75 m/ATO. In case a Go to
Home Waypoint procedure is triggered during flight¹⁰ the drone will, by default,
determine the highest altitude between its current altitude and the Home waypoint’s altitude, and climb in a circle towards that highest altitude (if required).
Once it reaches this highest altitude it will then fly towards the Home waypoint.
Due to this behaviour, the altitude of the Home waypoint should be selected with
care; it should be at least 20 m higher than the surrounding obstacles to avoid the
risk of a crash, but should not be set too high to reduce the effect of potentially
high winds and altitude and to prevent the drone from getting lost. Alternatively,
you can change the altitude transition behaviour within the Setup Phase tab. See
section ‘Waypoints and their properties’ on page 56 for more information on alti-
⁹ see section ‘Setup Phase tab’ on page 96
¹⁰ either automatically due to an In-flight warning or manually using eMotion
40
Page 41
Executing a flight
n
o
h
o
l
d
i
n
g
z
o
n
e
d
a
n
g
e
r
z
o
n
e
green
solid
status LED:
blue
pulse
status LED:
Not horizontal!
tude transition behaviours and how to modify them.
2.4 Take-off
Once you’ve planned your mission and the eBee status LED is solid green you can
launch it using the procedure on the following pages.
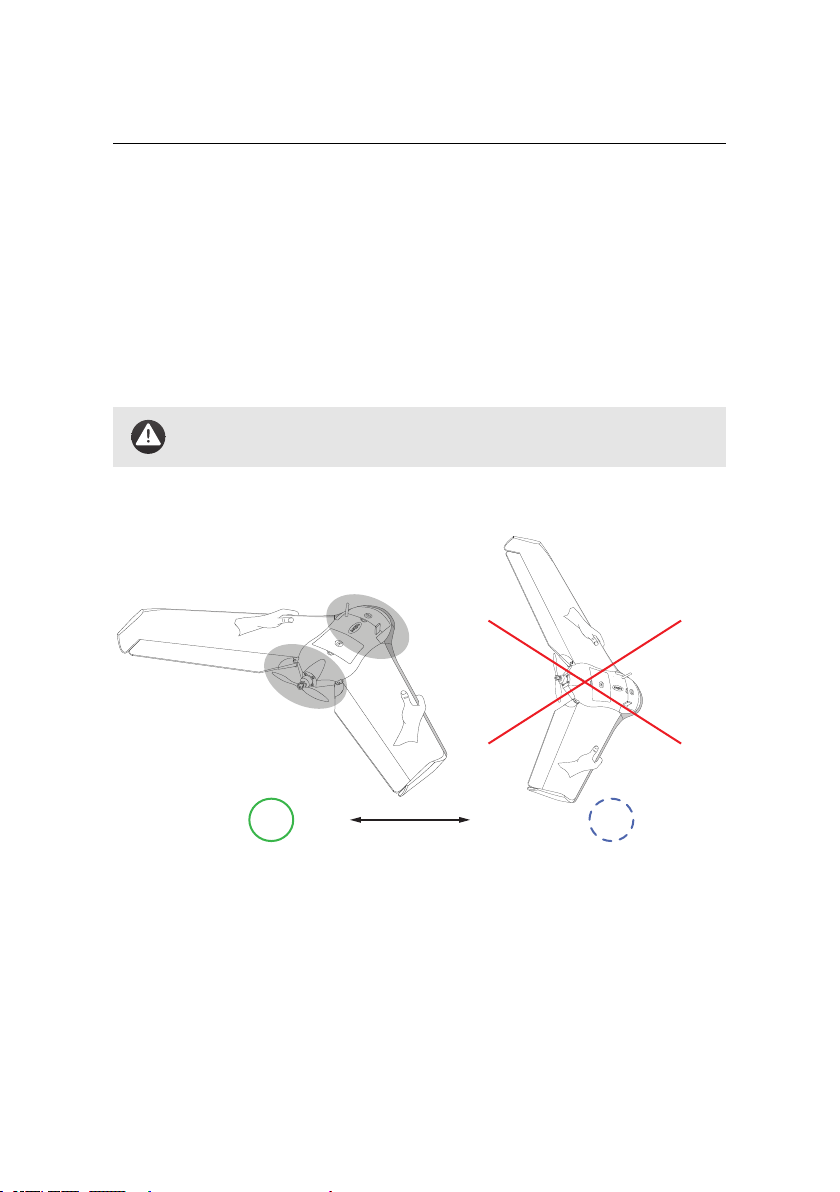
Caution: Make sure to keep the propeller area free of allobstructions
at all times during the launch procedure.
Step 1: Orient horizontally and against the wind
Orient yourself against the direction of the wind, and confirm that the take-off
direction in front of you is free of obstacles. Firmly grasp the drone with both
hands, one hand on the front of each wing as shown in the figure. Hold the drone
horizontally with the nose pointed against the wind and level wings.
41
Page 42
Quick start guide
shake 3x
n
o
h
o
l
d
i
n
g
z
o
n
e
d
a
n
g
e
r
z
o
n
e
shake 3x
motor startup begin
green
solid
status LED:
blue
pulse
status LED:
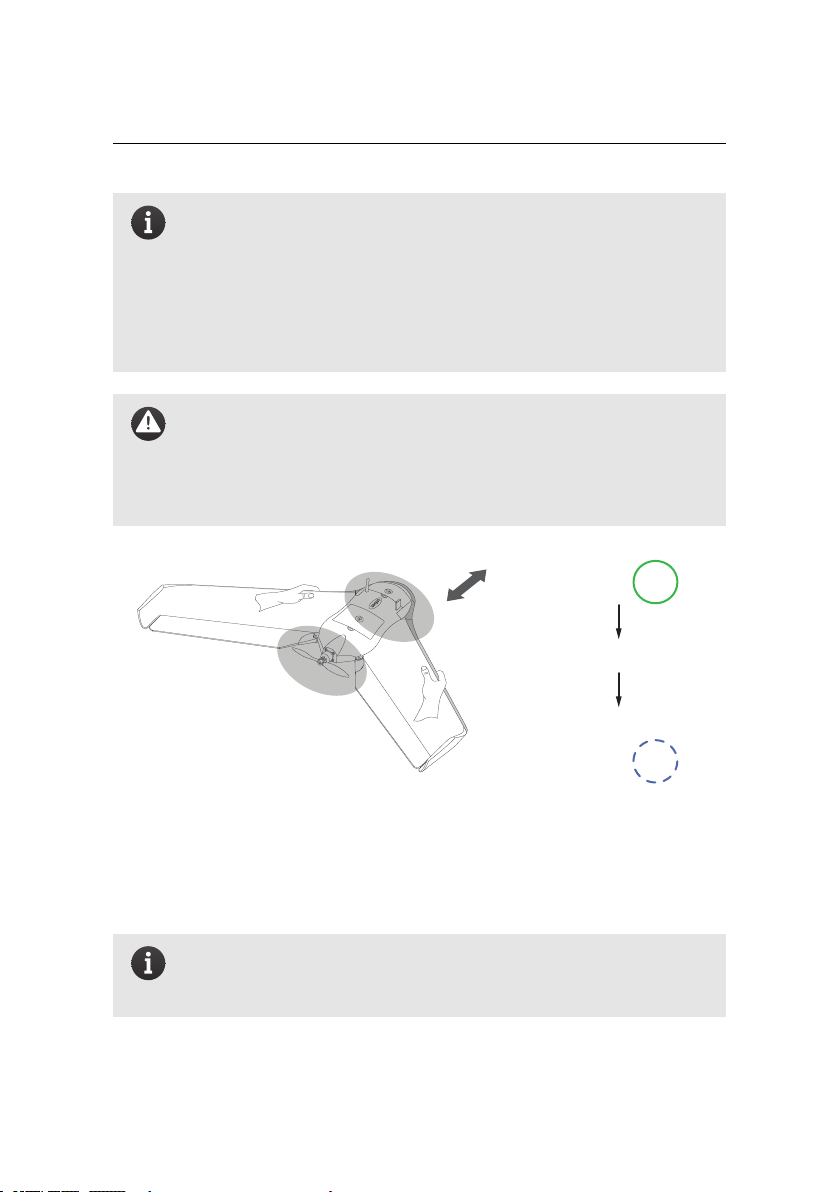
Note: If the drone detects a condition that prevents correct take-off
a Take-off veto will be displayed in eMotion and the status LED will
start pulsing blue. Section ‘Take-off vetoes’ on page 141 describes
the possible Take-off veto messages and the user action that should
be taken to remove them. For example, if the drone is not oriented
horizontally the status LED will start pulsing blue until you re-orient
it horizontally, at which point the status LED turns solid green again.
Caution: It is imperative to launch the drone directly against the
wind, otherwise it will be unable to gain enough speed during takeoff and likely crash. Likewise, launching the drone in high winds
above the specified safe wind speed of 12 m/s is dangerous and can
result in a crash.
Step 2: Switch the motor on
Shake the eBee back and forth 3 times longitudinally (within approx. 3 seconds)
to begin the motor power-up sequence. The status LED will pulse blue until the
motor is at full power and ready for take-off.
Note: You do not need to hurry to launch the drone. In case you want
toshut off the motor, just repeat the back and forth action three times
and the motor will stop.
42
Page 43
Executing a flight
motor ready for take-off
green
blink
status LED:
blue
pulse
status LED:
green
solid
status LED:
step forward and release
Caution: always orient the eBee
against the wind for take-off!
place nose up 10°
10°
d
a
n
g
e
r
z
o
n
e
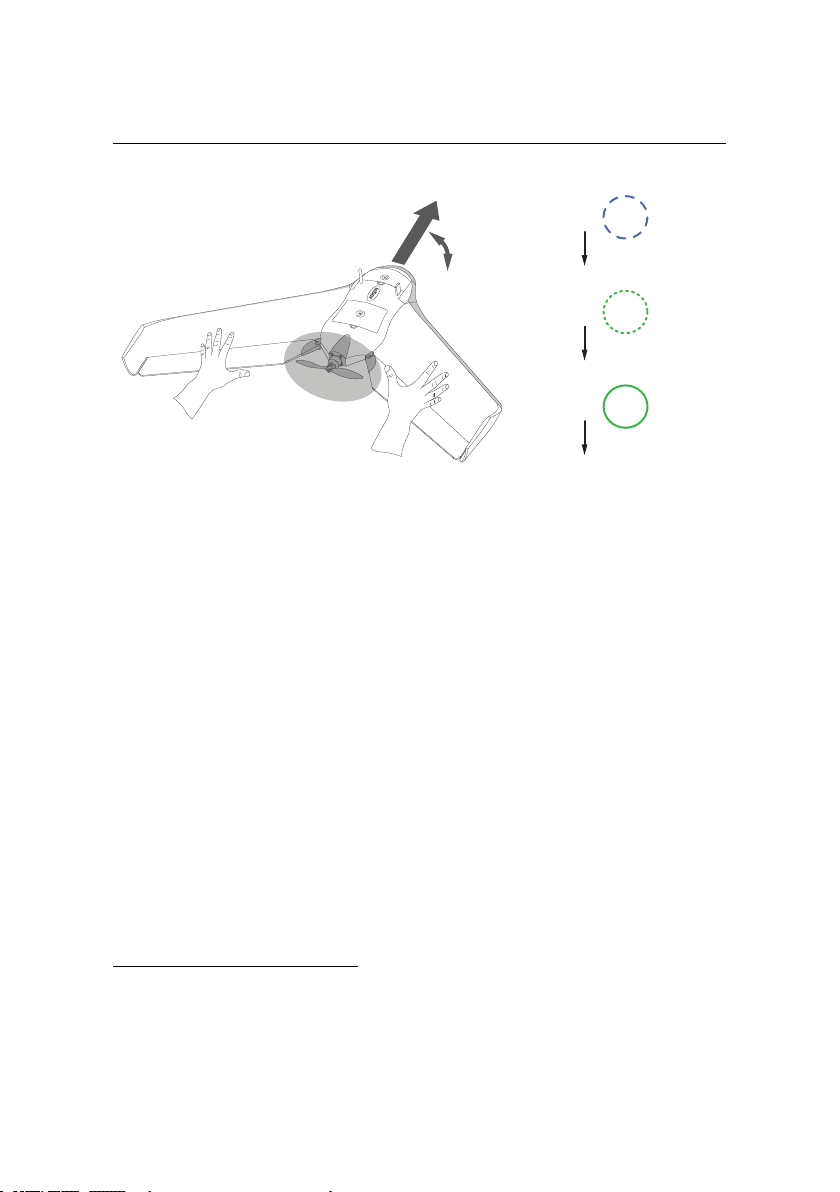
Step 3: Launch the eBee
Once the motor is at full power the status LED will blink green. Orient the drone
with approximately10 degrees nose up and level wings. When the angle is correct
the status LED will turn solid green, indicating that the drone is ready for take-off.
Launch the drone with a gentlepush bywalking 1-2steps forwardwhile releasing
it with both hands in a purely forward motion.
After take-off, the drone tries to maintain its initial direction, or follow the directional take-off heading you set, by keeping its wings level with full thrust until
reaching the take-off transition altitude, by default 20 m¹¹. At this point, it will
switch into waypoint navigation mode and fly towards the Start waypoint. Once
it reaches the Start waypoint location and altitude the drone will circle around the
waypoint 1-2 times to estimate the wind and calibrate its sensors before starting
the mapping mission¹².
¹¹ see section ‘Flight Parameters tab’ on page 116 to change this parameter
¹² The eBee may also be programmed to wait at the Start waypoint for a command before starting its
mapping mission. See section ‘Setup Phase tab’ on page 96 for more information.
43
Page 44
Quick start guide
Control Bar
Status
Flight Monitoring Tab
Wind speed and direction
Estimated
Panel
Picture
Footprint
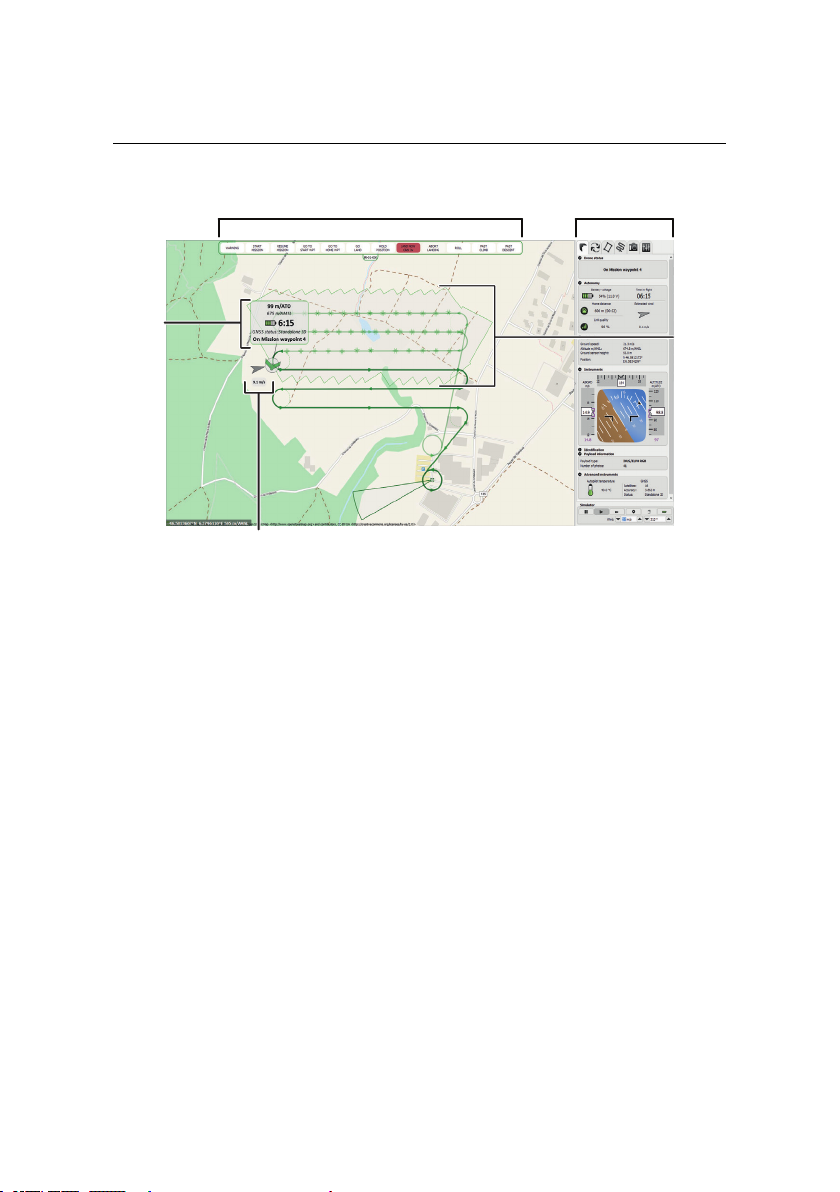
2.5 In-flight monitoring and control
You can monitor and controlyour drone while in-flight through eMotion using the
Map Area and the Flight Monitoring tab in the Sidebar.
The Map Area displays the current position of your drone, updated live as the
drone executes its flight. A small arrow and infobox show the speed and direction
of the wind as measured by the eBee. The Status Panel that follows the position of
the drone displays basic flight information including battery charge, flight time
and altitude, both above the take-off location (ATO) and above mean sea-level
(AMSL). This same information is reproduced in the Flight Monitoring tab, along
with other useful flight data .
44
Page 45

Executing a flight
Note: All waypoints, image locations and flight paths displayed in
eMotion are a reflection of the data contained within the drone autopilot. If at any point the connection between eMotion and the
drone is lost, the drone will by default continue its planned flight,
including the imaging mission and the selected automatic landing,
fully autonomously. If you would like the drone to return to the
Home waypoint instead of continuing its mission when it detects
a loss of connection you may set the appropriate parameter in the
Flight Parameters tab, as described in section ‘Flight Parameters tab’
on page 116.
During the Mission phase of the flight the eBee will automatically take pictures at
pre-defined moments based on the parameters thatwere defined during mission
planning. The estimated area captured on the ground is displayed in the form of
a continuously-updating polygon in the Map Area.
Note: The eBee will not take a picture unless it is in the correct loca-
tion and altitude. Some reasons for not taking an image are strong
head wind, large off-track distance or incorrect altitude. A corresponding message is displayed in the Status Panel if a picture is not
taken.
Atthe top of the Map Area is the Control Bar,which can be used at any time to send
commands to your drone as well as to acknowledge warning and failure messages
if they occur. During a fully autonomous flight the eBee will control its flight autonomously from take-off to landing and you do not need to use any of the control buttons. They can however be useful in unexpected situations to temporarily
hold position by pressing the ‘HOLD POSITION’ button or to send the drone to
the Home or Start waypoints with the ‘GO TO HOME WPT’ or ‘GO TO START WPT’
buttons, respectively. Alternatively, you can direct your drone to any location by
right-clicking in the Map Area and using the contextual menu. We recommend
you use the simulator to learn the effects of the buttons on the drone. Detailed
descriptions of the buttons and their effects on the drone are described in section
‘Control Bar’ on page 89.
45
Page 46

Quick start guide
2.6 Landing
After finishing a mapping mission the drone will, by default¹³, return to the Home
waypoint and automatically initiate a landing sequence. During a Linear landing,
the drone will land in a straight line according to the process described in section
‘Linear landing’ on page 70. In case of a Circular landing the drone will land in a
circle according to the process described in section ‘The setup phase of a flight’
on page 37.
Disconnect the battery from the drone before picking it up. We recommend you
immediately import the images and flight data after each flight (see section ‘Importing images and flight data’ on page 48) before putting the eBee back in its
case for storage. When disconnecting the wings, be sure to pull gently in the axis
of the wing struts to prevent damage to the wing struts. Check the wing struts for
any damage before putting them into the storage case. Remove the propeller if
you don’t plan on using the eBee for an extended period of time.
2.7 Potential in-flight errors
The drone can encounter two types of error messages while flying: In-flight warnings and Critical failures. In-flight warnings typically indicate a dangerous situation such as a low battery or strong winds and typically result in a Security action
such as a return to the Home waypoint. In-flight warnings appear in blue or yellow
in the Flight Monitoring tab. Critical failures occur only when the drone’s ability to
fly is severely compromised, such as a loss of GPS signals or an empty battery. The
situation will be displayed in redin theStatus section of the Flight Monitoring tab.
When a critical failure arises, the drone will immediately perform an emergency
landing.
¹³ see section ‘Setup Phase tab’ on page 96 for information on changing the default behaviours of the
drone
46
Page 47

Executing a flight
Caution: We recommend that you familiarise yourself with the possible in-flight errors to have a better understanding of what happens
if they occur in the field. A full list of possible In-flight warnings and
Critical failures and the drone’s reaction to them is described in section ‘In-flight warnings’ on page 143 and section ‘Critical failures’ on
page 155.
Note: It is important to keep track ofthe location of the drone during
a Critical failure until the moment it reaches the ground. Its position’s
coordinates can aid in finding it afterwards. Instructions on how to
find a lost drone can be found in section ‘Losing and locating your
eBee in the field’ on page 159.
47
Page 48

Quick start guide
3 Processing image data
Goal of this section: In this section you will learn how to import im-
ages and flight data from your eBee and create basic mapping products directly in the field to gauge the quality of the images that you
gathered.
3.1 Importing images and flight data
The next step to creating mapping products, after completing aflight, isto import
the rawimages and log files to a computer. TheeBee records flight dataonboard in
a special Drone Flight Log file. The Drone Flight Log tracks important information
throughout a flight, such as sensor data, location and control inputs. The file is
required for assigning location information (geotags) to the images taken by the
drone. The file is also required and must be sent to senseFly Ltd in case an issue
occurred during the flight¹⁴. A similar eMotion Flight Log file is created within
eMotion during a flight and serves as a backup in case the Drone Flight Log file
cannot be recovered.
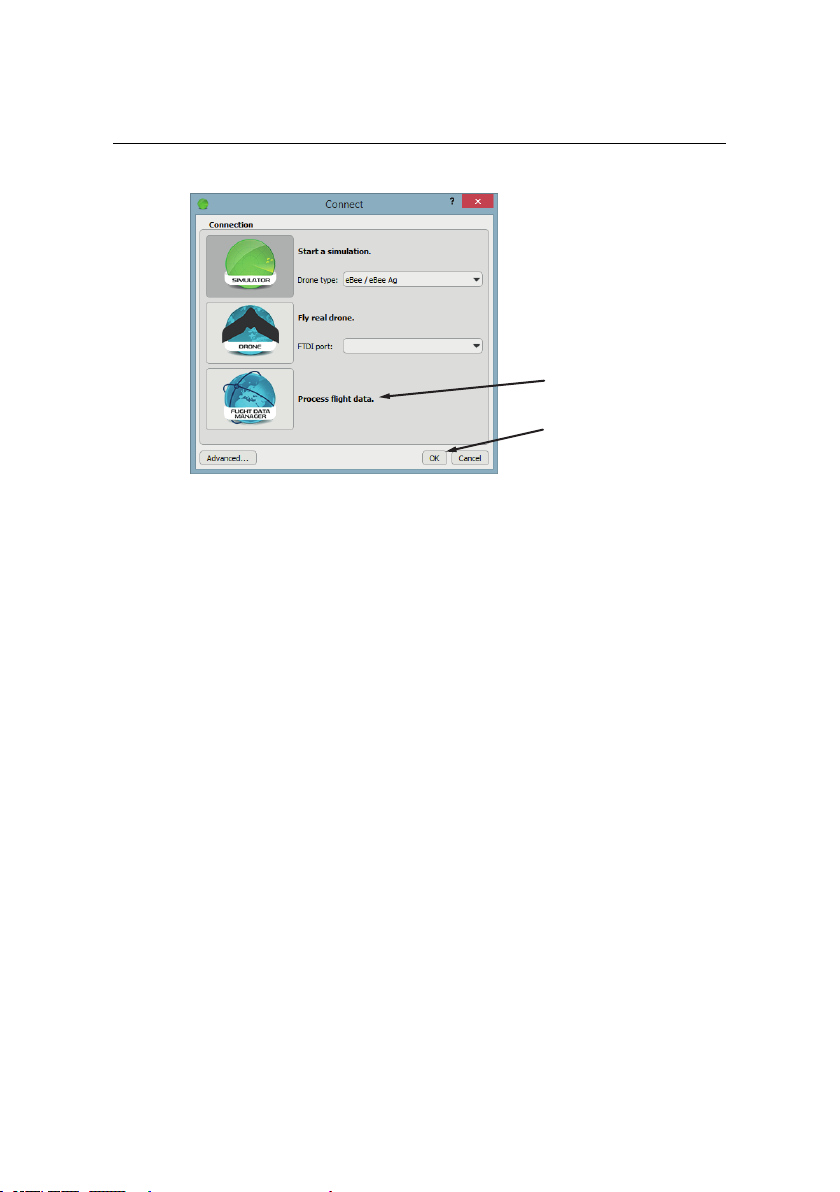
eMotion features a Flight Data Manager to help you transfer and consolidate all
the data related to a mapping mission. Open the Flight Data Manager by clicking
on the Flight Data Manager icon when you load eMotion. Alternatively, click on
the button in the Toolbar and select ‘Flight Data Manager...’.
¹⁴ see section ‘Reporting a problem with your eBee’ on page 160
48
Page 49
click OK
select Flight
Data Manager
Follow these steps to import data from the drone:
Processing image data
• Step 1 - Select a flight: If the flight was monitored from the computer
you are using to import images then the flight is saved within the local
database. Select the date that the flight took place. A list of flights (including number of images taken) from that date will appear in the combo
box, select the one you wish to import.
• Step 2 - Create a directory: Choose a directory name that uniquely iden-
tifies your flight (e.g. the date, the name of the area, etc.).
49
Page 50
Quick start guide
connect USB cable
to autopilot
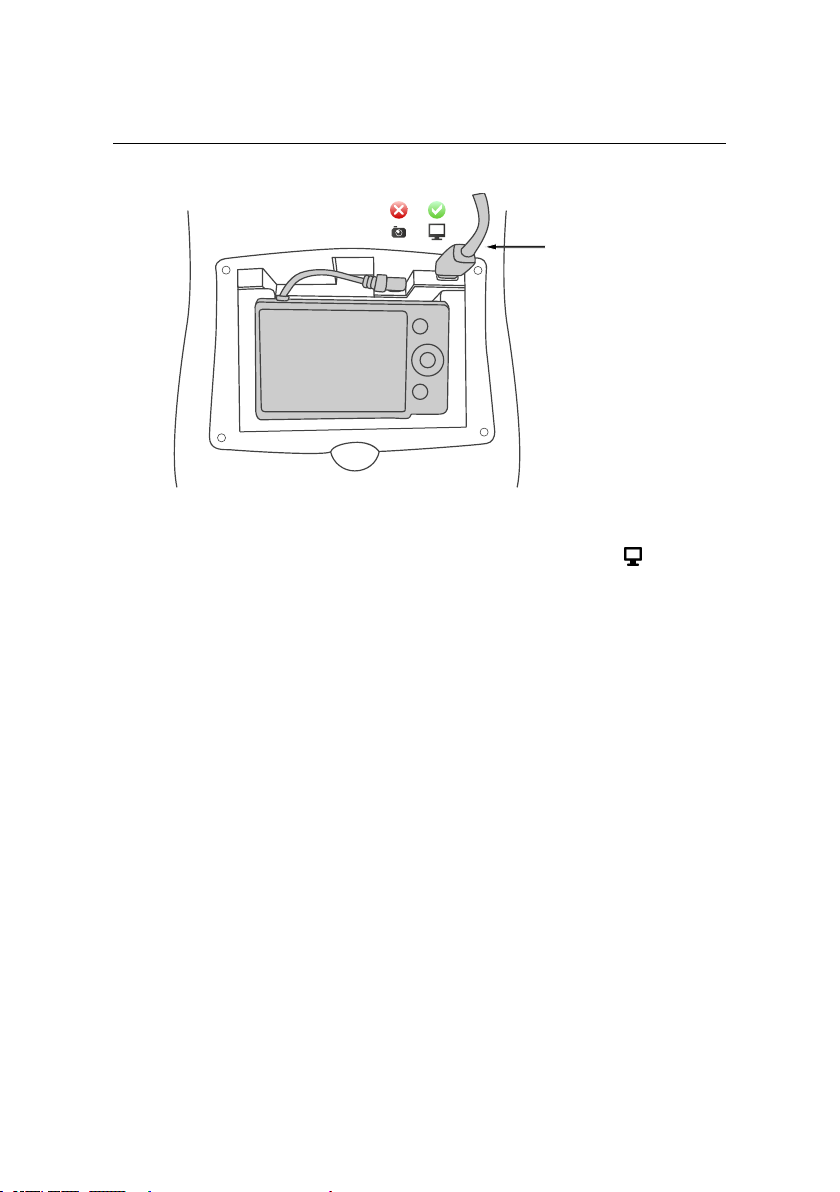
• Step 3 -Prepare data for import: Toimport the Drone Flight Log, connect
the supplied USB cable tothe eBee’s autopilot, marked with a icon. Connect the battery to the drone if it is not already connected. The status LED
will become white and a new storage drive will appear on your computer.
To import images, remove the SD card from the camera, insert it into the
SD card reader of your computer and select ‘Import from SD-card reader’.
Alternatively, transfer the images from the camera by lifting it out of its
compartment just enough toconnect a USB cable to it and turn the camera
on. Copy all the images into a temporary folder on your computer. Select
‘Import from a specific folder’ and choose the temporary folder.
• Step 4 - Import flight logs: Confirm that the Drone and eMotion Flight
Logs found by the Flight Data Manager are correct. You may select logs
manually if they are not correctly detected.
• Step 5 - Import images: Confirm that the images corresponding to your
flight were found and matched to the Drone Flight Log correctly.
• Step 6 - Select outputs: Choose the output actions to execute and files to
create. Geotagging images is necessary to create geoinfo, KML and Post-
flight Terra 3D files.
50
Page 51

Processing image data
• Step 7: Youmay now disconnect the drone. Eject theSD-card driveand the
drone drive before removing the SD-card and the USB cable, respectively.
Disconnect the battery and USB cable from the drone. Insert the SD-card
back into the camera, put it back properly into its compartment and ensure
that it is turned off. Youcan now open the KML file in Google EarthTMor the
project in Postflight Terra 3D for further processing.
3.2 In-field image quality check
Postflight Terra 3D software¹⁵, available as a free download with the eBee package,
can be used to rapidly create a Quality Report directly in the field. The Quality
Report that is automatically generated as well as the orthomosaic provide immediate feedback on the quality of the images gathered during your mission.
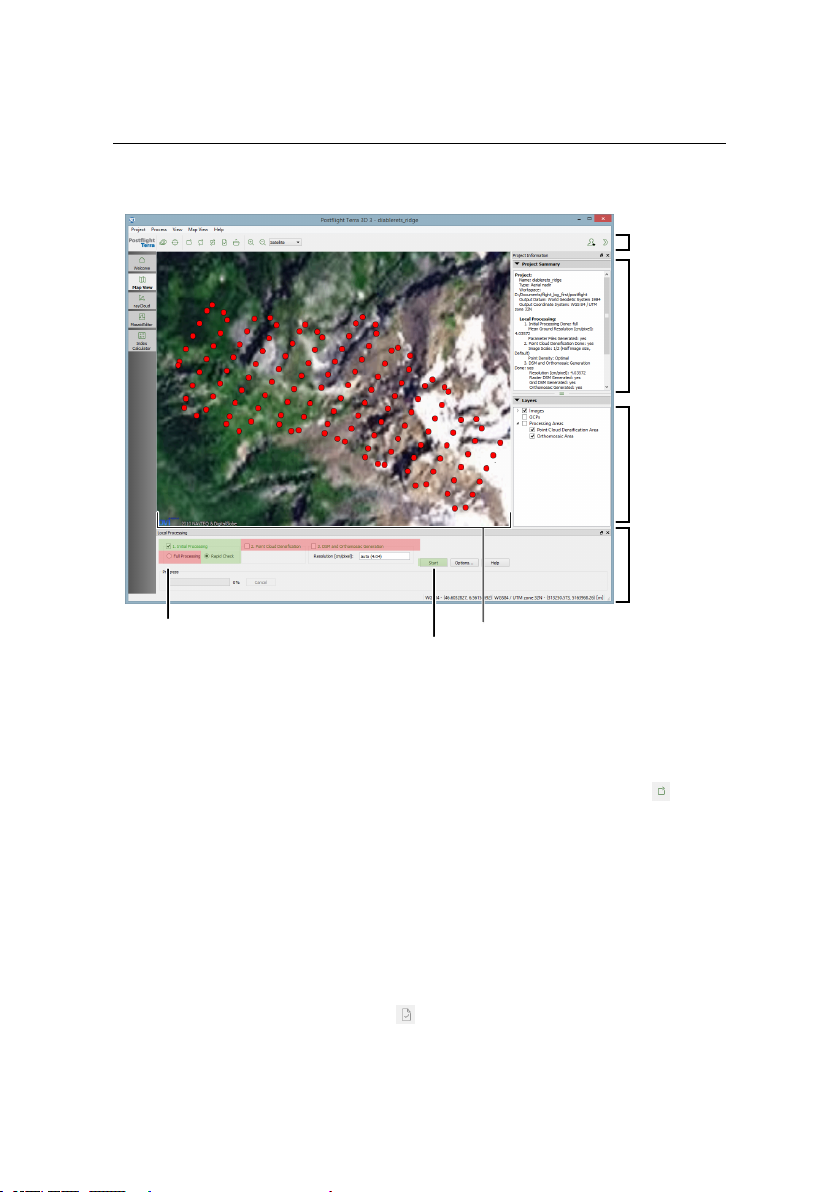
You can open a project for processingin PostflightTerra3D directly from the Flight
Data Manager after importing your data by clicking the ‘Open project in Terra’
button. You will now see the main Postflight Terra 3D window. The position of
your images will appear as red dots in the Map Area of Postflight Terra 3D.
¹⁵ powered by Pix4D, see section ‘Installing eMotion, Postflight Terra 3D, and the ground modem
drivers’ on page 18 for installation instructions
51
Page 52
Quick start guide
Map Area
Top Toolbar
Project
Summary
Local
Processing
panel
Layers
Step 1: select 1. Initial Processing,
Rapid Check
Step 2: click ‘Start’
Automatic Reconstruction Report generation
To create a Quality Report while in the field bring up the local processing panel by
selecting ‘Local processing’ from the ‘Process’ menu or by clicking the icon in
the Toolbar. Select only the ‘Initial project processing’ checkbox and the ‘Rapid’
button. If you wish to create a low-resolution orthomosaic while generating the
report, check the ‘Orthomosaic and DSM generation’ checkbox. Click ‘Start’ to
begin rapid processing.
Postflight Terra 3D will now process the data and produce a report that includes
the overall completeness and georeference quality of the images taken during
your last mission. You may use this information to decide whether further imaging flights are required while you are still in the field. The quality report will be
displayed in a new window (click the icon in the Toolbar if it does not appear).
52
Page 53

Processing image data
3.3 Creating advanced mapping products
Beyond Quality Reports and low-resolution orthomosaics, Postflight Terra 3D can
generate geo-referenced high-resolution 2D orthomosaics, 3D point clouds, triangle models and DSMs or export to common third-party photogrammetry software such as Bingo,Orima or Inpho. Ground Control Points (GCP) can be added to
increase the geo-referenceaccuracy. PostflightTerra3D also includes a mosaic and
a rayCloud editor, giving you more control on the quality of your final mapping
products, as well as measurement tools.
Theresulting orthomosaic and DSM may then be imported as custom background
map and elevation data layers in eMotion¹⁶. This data can be used for advanced
flight planning in complex or uneven terrain.
Note: You need to either enable tile set generation OR choose Generate Google Maps Tiles and KML from the Process menu before you
can push the tileset into eMotion by choosing Send Map to eMotion
from the Process menu. Alternatively, this data can be imported into
eMotion; choose Import custom map from eMotion’s File menu.
Note: The best way to learn how to use the various features of Post-
flight Terra 3D is to look atthe comprehensiveonline Knowledge Base
at my.sensefly.com
¹⁶ see section ‘Toolbar’ on page 84 for more information on importing layers into eMotion
53
Page 54

Page 55

Part II
Advanced functionalities
Page 56
Advanced functionalities
from previous
waypoint
to next
waypoint
Position (GPS coordinates)
Altitude:
Above Take-off location (m/ATO)
OR
Above Mean Sea Level (m/AMSL)
Radius
Direction
4 Understanding aerial mapping with the eBee
Goal of this section: Aerialmapping using the eBee is designed to be
simple and fully automatic, requiring very little input from the user.
Understanding the basics of aerial navigation, however, can help you
map more complex terrain and yield higher quality results. This section explains the basics of waypoint-based navigationand the control
strategies used by the drone for flight.
4.1 Waypoints and their properties
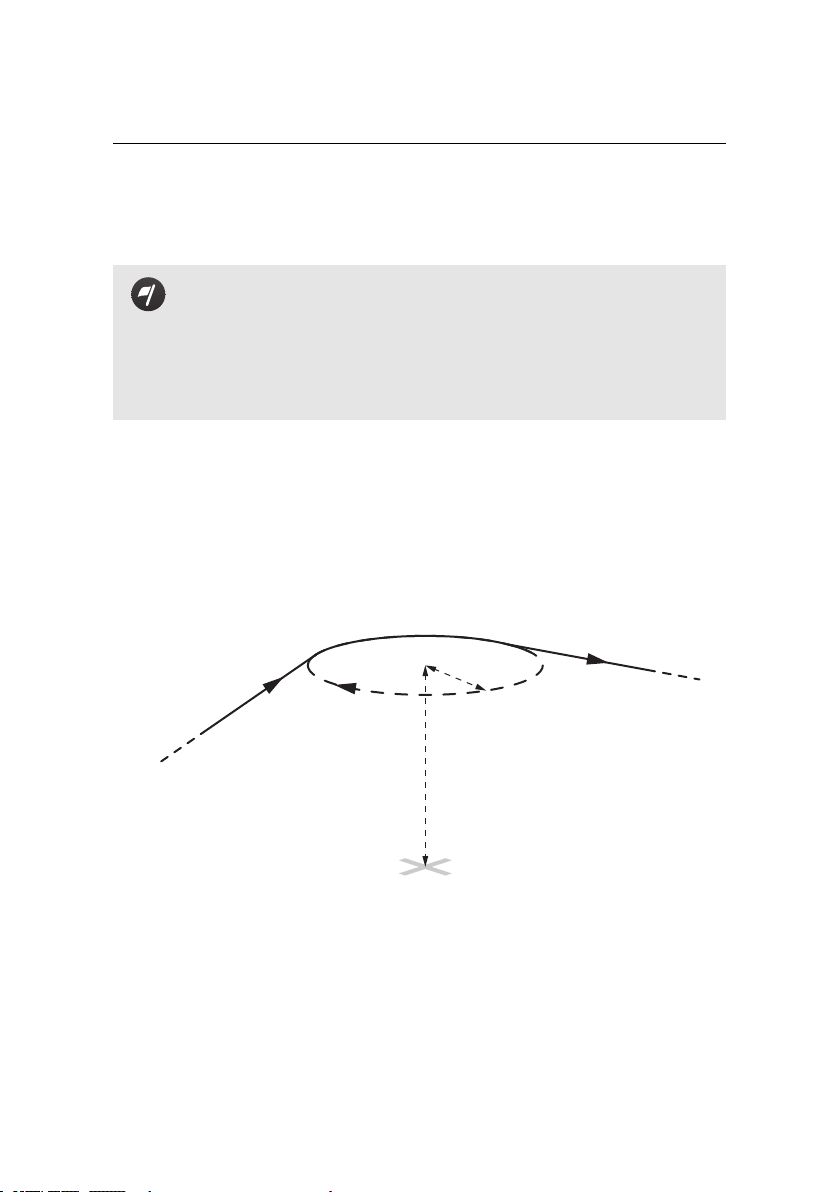
The eBee uses a flight plan consisting of a list of waypoints to navigate. A waypoint
essentially consists of a circle about a given position and information that defines
how the drone should behave when reaching them. The entire list of waypoints
is stored in the drone autopilot and can be remotely edited using eMotion.
In eMotion every waypoint is defined by the following parameters:
• ID: Every mission waypoint has a unique ID, beginning at 1. The eBee can
store up to50 mission waypoints. Setup phasewaypoints (Start and Home)
do not have an ID.
56
Page 57

Understanding aerial mapping with the eBee
• Active: Indicates whether the waypoint is active or not. Deactivating a
waypoint by clicking the checkbox beside its ID will remove it from the current flight plan. Setup phase waypoints (Start and Home) cannot be deactivated.
• Current: A status that indicates if the waypoint is currently being circled
or navigated toward (indicated by > < around the waypoint’sID). Only one
waypoint is marked Current at a time.
• Change altitude: This parameter defines the way the drone transitions to
the altitude of the current waypoint.
– During transit: The drone will fly in the direction of the currentway-
pointwhile simultaneously changing altitude by climbing or descending in a linear fashion. If the required climb or descent rate is beyond physical limits, the drone will reach the destination and keep
climbing/descending around the destination waypoint. This is typically used to achieve the best efficiency when the altitude between
waypoints is not constrained.
– Before transit: The drone will first climb or descend at its current
position until it reaches the altitude of the current waypoint, and then
fly in the direction of the waypoint at its altitude. This is typically used
for 3D mapping.
– Keep highest: The drone will first determine whether its current al-
titude or the current waypoint’s altitude is highest. If the drone’s current altitude is highest, it will first fly towards the waypoint and then
descent to the waypoint’s altitude in a circular fashion. If the current
waypoint’s altitude is highest, the drone will begin by climbing at its
current position until it reaches the waypoint’s altitude and then fly
towards the waypoint. This is typically useful to avoid hitting the terrain in mountainous landscapes and, in particular,for the Home waypoint when the mission altitude is below the take-off location.
• Altitude: The altitude of the waypoint above the altitude reference. The
waypoint is considered ‘reached’ only when the drone starts circling about
it at the waypoint’s altitude.
57
Page 58

Advanced functionalities
• Altitude reference: The reference point of the Altitude value. When set to
m/ATO, the Altitude value is an Above Take-off (ATO) altitude. When set to
m/AMSL,the Altitude value is a Above Mean Sea Level (AMSL). The altitudes
of Setup phase waypoints (Start and Home) are always set to m/ATO.
• Turndirection: The direction with which the drone circlesaround the way-
point (clockwise or counter-clockwise).
• Radius: The distance at which the drone circles around the waypoint.
Note: The eBee has a limited turning radius. Setting this parameter
lower than 20 m may cause the drone to significantly deviate fromits
desired flight path.
• Auto-next: Indicates whether the drone should remain on the waypoint
upon reaching it (until a new command is received) or automatically continue to the next active waypoint.
• Action: The action (if any) to be performed upon reaching the waypoint.
Supported actions include starting and stopping Continuousphoto mode¹⁷.
Setup phase parameters (Start and Home) do not have associated Actions.
• Position (coordinates): The precise latitude and longitude of the centre
of the waypoint.
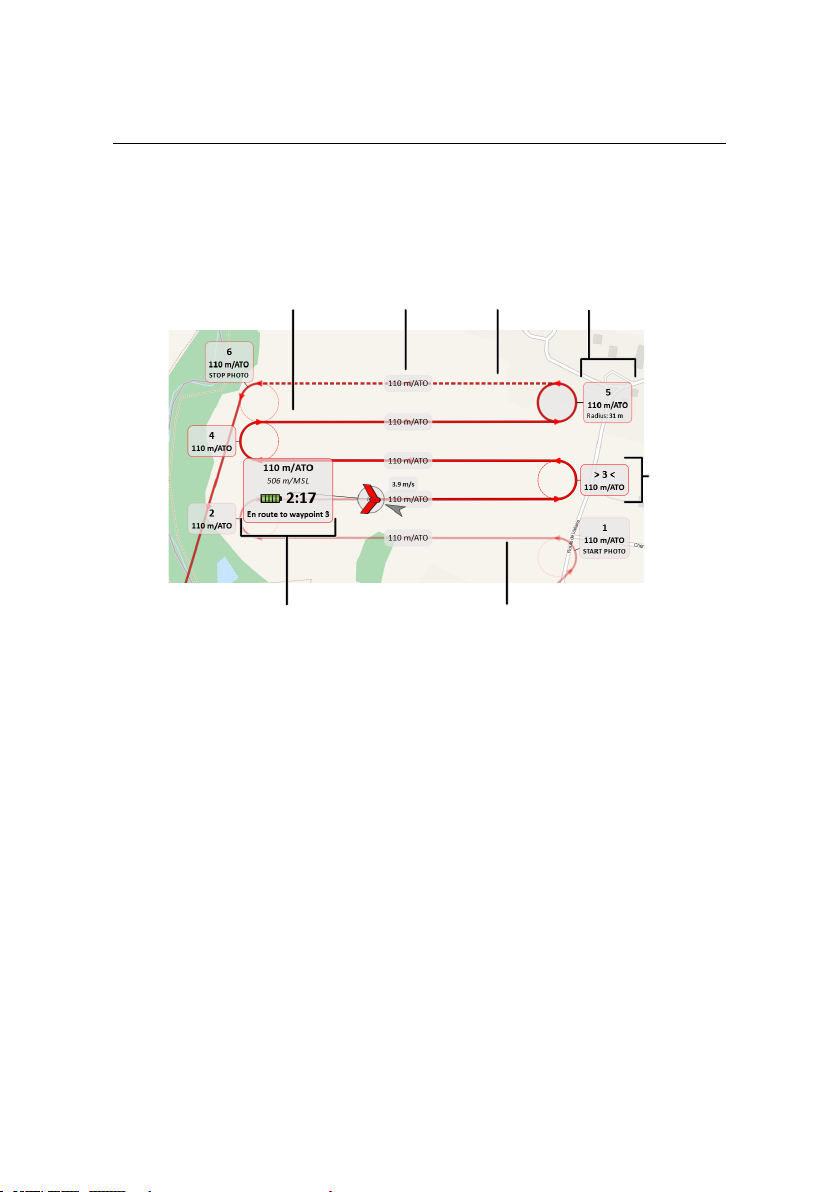
Waypoints are represented in the Map Area as circles with their actual radius and
an arrow to indicate their direction. The flight path of the drone around and in
between waypoints is drawn as a line of varying opacity; the path ahead of the
drone’s current position is dark, becoming lighter the further it is from the current
position in the flight plan. The path already traversed is a uniform light colour.
If a waypoint’s Auto-next parameter is disabled, the path directly after it will be
dashed, indicating that a command must be sent for the flight to continue.
Clicking a waypoint in the Map Area will display its characteristics (waypoint ID
for mission waypoints or name for setup waypoints, altitude, radius and action)
¹⁷ see section ‘Camera tab’ on page 111
58
Page 59
Understanding aerial mapping with the eBee
Current
waypoint
Selected
waypoint
Traversed flight path
Future
flight path
Inactive
flight path
Current status
Flight path
altitude
and will select it for modification. It will also activate the Mission Waypoints tab
and highlight the selected waypoint.
You can modify the waypoint’s parameters directly in the Map Area using your
mouse using the following actions:
• Position: Change the position by left-clicking on the waypoint and drag-
• Turn direction: Hold down the ‘Shift’ button while left-clicking on a way-
• Radius: Modify the radius by left-clicking on the waypoint’s perimeter and
• Altitude: Hold down the ‘Ctrl’ button while left-clicking on the waypoint
ging it around on the map. By default the waypoint snaps to a position inline with the current flight lines before and after the waypoint. Hold down
the ‘Alt’ button while dragging to disable the snapping feature.
point to toggle its turn direction.
dragging it.
and moving the mouse up or down to increase or decrease the altitude of
the waypoint, respectively.
59
Page 60

Advanced functionalities
• Createnew waypoint: Right-click anywhere in the Map Areathat does not
contain a symbol to bring up the context menu, then select ‘Add waypoint
here’ to add a new waypoint.
• Context menu: Right-click on a waypoint to bring up the context menu.
You can then select the following options:
– Go to: Select while the drone is in flight to make this the currentdes-
tination waypoint.
– Auto-next: Toggle the Auto-next parameter of the waypoint.
– Reverse turn direction: Toggle the Turn direction parameter of the
waypoint.
– Change altitude: Set the transition behaviour of the drone when
flying towards the selected waypoint.
– Remove waypoint: Remove the selected waypoint.
Any modification will besent directly to the drone to update its onboard waypoint
list. If the message is not acknowledged by the drone (for example due to a temporary loss of communication link), the waypoint will move back to its previous
position on the map to accurately reflect the current waypoint list status within
the drone’s autopilot.
Note: Modification of flight plan parameters can cause the drone to
react in unexpected ways. In particular, the drone may have trouble
following its flight path when the radius is set very low or if there
is high wind. We highly encourage you to test your entire flight plan
using the simulator to get familiar with the drone’s behaviours before
going out into the field.
4.2 Advanced polygonal mission area
The mission area defines the area of interest where the eBee will take photos. It
appears as a grey rectangle when you select the ‘Mission planning’ tab and to calculatethe flight plan of the drone. Formany cases the rectangular-shaped mission
60
Page 61

Understanding aerial mapping with the eBee
area provides the simplest way to quickly create a flight plan. It can be modified
as described in section ‘The mission phase of a flight’ on page 22.
For more complex areas eMotion has the option of using polygonal-shaped missions areas. Begin by converting a rectangular area into a polygonal area by setting the ‘Mission area’type to ‘Polygonal’ in the ‘Mission planning’ tab or by rightclicking on the area and selecting ‘Convert to polygon’.
A polygonal mission area is set slightlydifferently than a rectangular mission area:
• The edges of the rectangle now become vertices of the polygon. Left-click
on a vertex to drag and reposition the vertex.
• Left-click and drag anywhere on the edge of the polygon to create a new
vertex and reposition it.
• Right-click on vertex and select ‘Remove vertex’ to remove a vertex. Alternatively, hold down the ‘Ctrl’ button and left-click on a vertex to remove
it.
• Left-click and drag on the dark-grey area within the polygon to reposition
the entire polygon.
• Left-click and drag the circle on the corner of the light-grey rectangle surrounding the polygon to rotate the direction of the resulting flight lines.
You may also set a polygonal mission area directly from a KML file containing a
polygon, such as those created by Google EarthTM. Simply click on the icon in
the ‘Mission planning’ tab, select ‘Load mission area from KML file’ and choose a
KML file that contains the desired polygon.
4.3 3D mission planning using elevation data
eMotion has the ability to take into account elevation data to set the altitude of
mission waypoints and the resulting flight lines of a mapping mission. This not
only improves the resulting ground resolution but also increases mission safety
61
Page 62
Advanced functionalities
Elevation colourmap
Change opacityAuto-adjust colormap
(particularly in uneven terrain) by keepinga moreeven height between the drone
and the ground.
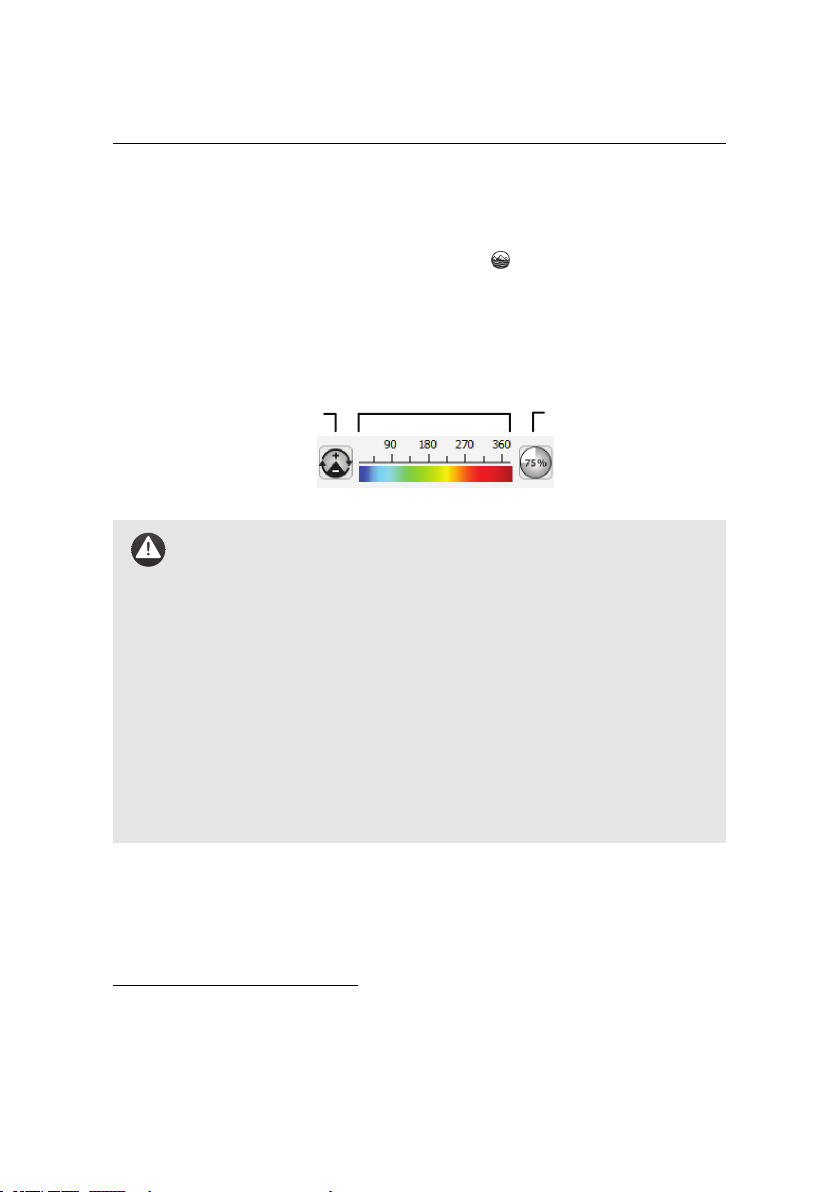
You can display elevation data by clicking on the button in the Toolbar. eMo-
tion’s default Improved SRTM elevation data will be downloaded as tiles from
senseFly Ltd servers and overlaid above the map as a colourmap¹⁸. You can adjust the scale and opacity of the colourmap by using the associated buttons in
the bottom-right corner of the Map Area.
Caution: eMotion’s default Improved SRTM elevation data uses a 3
arc-second (approx. 90 m resolution) digital elevation model derived
from the SRTM (Shuttle Radar Topography Mission) dataset version
2.1 combined with other data sources (ASTER GDEM, SRTM30, cartographic data, etc.). This data covers nearly all emerged land except
the territories below 56◦S latitude and the territory of the Russian
Federation above 60◦N latitude. This data may contain inaccuracies
of several meters, and does not contain data on obstacles such as
buildings or trees. We highly recommend that you check your flight
plan thoroughly in Google EarthTMand ensure sufficient clearance between the flight plan and the ground. SenseFly Ltd provides no guarantee regarding the accuracy of the elevation data and it is the operator’ssole responsibility to ensure a safe flight trajectory and altitude.
Activate the 3D mission planning feature by selecting the ‘Use elevation data to
set absolute waypoint altitudes’ parameterin the ‘Mission Planning’ tab. Elevation
data is used to adjust every mission waypoint altitude as follows:
1. The flight planner uses elevation data to find the maximal terrain elevation
¹⁸ eMotion must be connected to the internet. Once downloaded, elevation tiles are cached and can
then be used off-line.
62
Page 63

Understanding aerial mapping with the eBee
under the current waypoint, the previous waypoint and the flight line that
connects the two.
2. This maximum value is increased by the target altitude value, and the result
is set as the altitude of the current waypoint.
The altitude of every waypoint can always be manually adjusted in the Mission
Waypoints tab. By default, the ‘Change altitude’ parameter for the first mission
waypoint is set to ‘Keep highest’. For all other mission waypoints the ‘Change altitude’ parameter is set to ‘Before transit’ so that the drone climbs or descends to
the altitude of the next waypoint (and thus the next flight line) before transiting
and taking pictures.
It is important to understand that even if each flight line can have a different altitude, the altitude is constant along a given flight line. If the terrain altitude is
uneven along a flight line, the resulting imagery will have varying ground resolution and overlap. When the mission planner computes the altitudes of flight lines
it tries to ensure that the required amount of overlap is achieved, possibly leading to a lower ground resolution in some areas. During flight planning the range
of ground resolution computed by the mission planner is displayed. For optimal
results, it is best to set the orientation of the flight lines as parallel as possible to
the terrain’s contour lines.
One way to increase the resolution and accuracy of the elevation data is to fly a
first mission at high altitude and then create a dataset using Postflight Terra 3D.
You can then automatically import the data into eMotion by selecting ‘Send DSM
to eMotion’ from the ‘Process’ menu within Postflight Terra 3D. The dataset can
then be enabled using the menu in the Toolbar. eMotion will use this custom
dataset (wherever it is available) to set waypoint altitudes instead of its default
Improved SRTM elevation data.
Note: It is recommended to visually compare imported elevation
datasets with the default Improved SRTM elevation layer of eMotion
in order to detect possible mismatches. This comparison should be
done with a colourmap opacity value of 100%.
More advanced controls of imported datasets are available in the ‘Elevation data’
63
Page 64
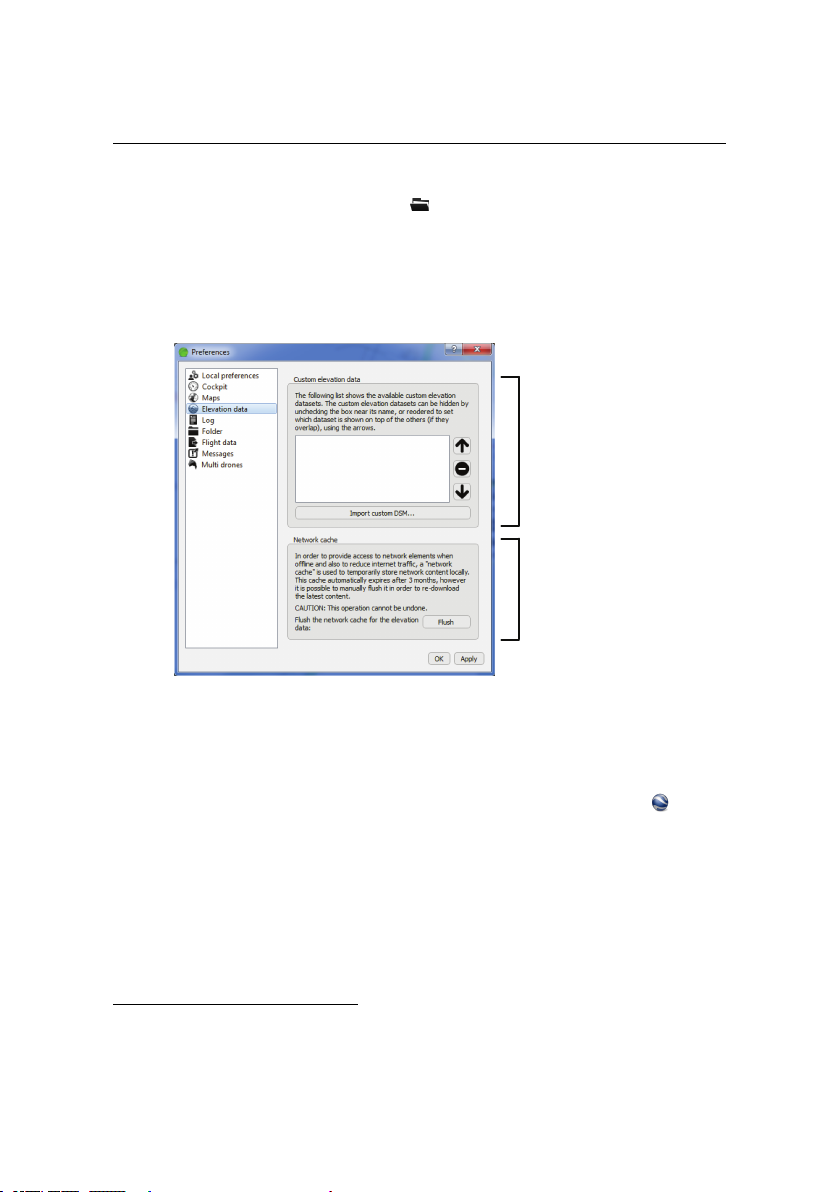
Advanced functionalities
Custom elevation
data
Network cache
panel of the Preferences pane of the menu. From this panel you can add,
remove, activate/deactivate or reorder overlays. eMotion uses the top-most elevation data layer to calculate altitude for each waypoint and flight line, with
eMotion’s default Improved SRTM elevation dataset always considered the bottom layer.
4.4 Flight visualization in Google Earth
TM
eMotion includes an interface with Google EarthTMto help with flight plan verifi-
cation and visualization, particularly in uneven terrain. Clicking on the button
in the Toolbar will open Google EarthTMand zoom to the current position of the
drone. The current position of drone, its planned trajectory, the working area circle and all waypoints currently uploaded to the drone (including Take-Off, Start
and Home) are displayed within Google EarthTM. Any changes to waypoints or
flight parameters within eMotion are updated accordingly within Google EarthTM.
The interface with Google EarthTMis particularly useful to check the drone’strajectory with respect to obstacles in the area¹⁹. The flight plan is projected onto the
¹⁹ While checking flight plans in Google EarthTMis a good safety practice, senseFly Ltd provides no
64
Page 65

Understanding aerial mapping with the eBee
ground in a darker colour, giving you an idea of the distance between the flight
path and the ground. If you connect to a simulated drone you can simulate the
entire flight and follow the drone within Google EarthTM.
Note: To use this feature Google EarthTMhas to be installed on the
ground station PC, as described in section ‘Installing eMotion, Post-
flight Terra 3D, and the ground modem drivers’ on page 18. We recommend to use the latest version of the Google EarthTMsoftware.
Caution: A flight trajectory visualized in Google EarthTMrepresents
the planned trajectory. The real flight trajectory can be different from
the planned due to flight conditions such as strong wind.
Caution: The terrain data within Google EarthTM, including hills and
buildings, may contain significant errors. When planning flights over
uneven terrain be sure to keep sufficient distance between the flight
plan and the terrain.
guarantee regarding the accuracy and completeness of the Google EarthTMterrain model.
65
Page 66
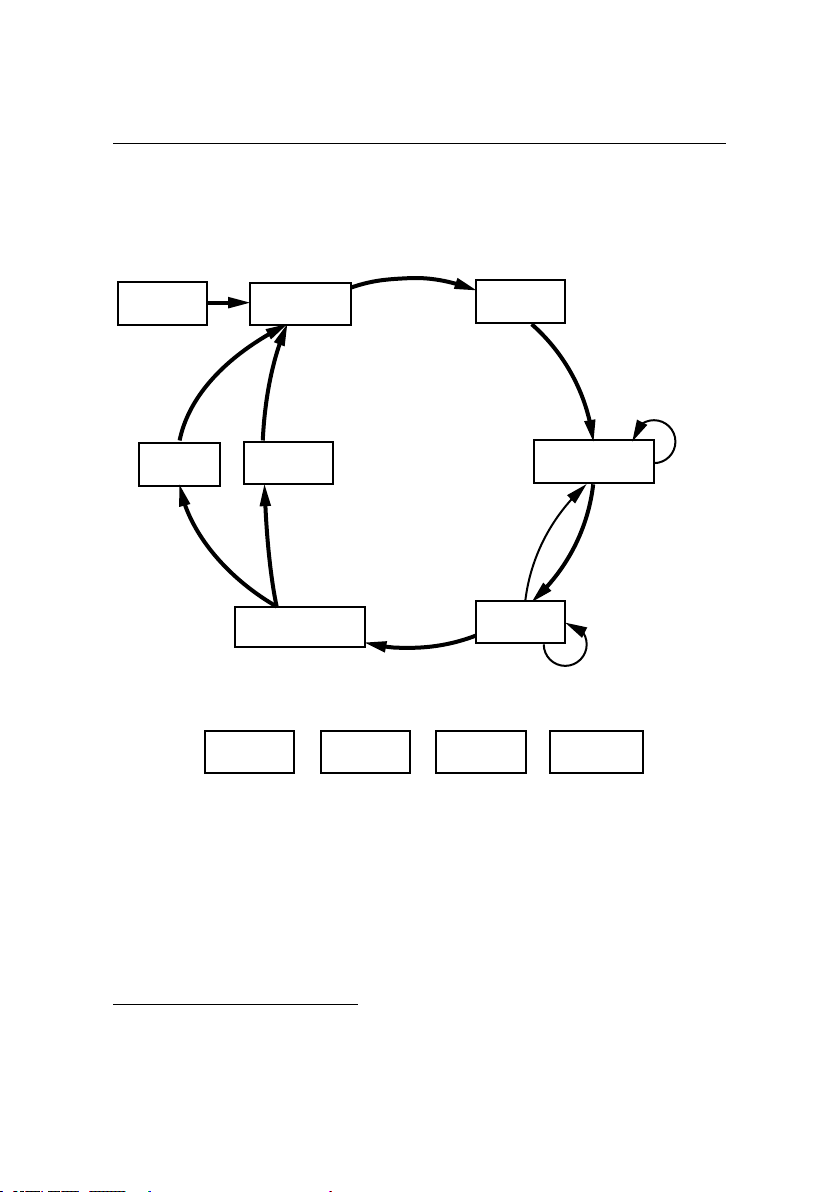
Advanced functionalities
Idle
(on ground)
Take-off
Circle
Start Waypoint
Perform
Mission
Circular
Landing
Switch On
after a few seconds
on ground
shake 3x
and release
after climbing
to take-off
transition height
automatically after
2 complete circles
if Circular
landing selected
if ‘Wait on Start
waypoint after
take-off’ is
enabled
if ‘Go to start waypoint
after mission’ is enabled
when mission is completed
Circle
Home Waypoint
Hold
Position
if ‘Restart mission
after mission’
is enabled
Emergency
Landing
Full
Manual
Assisted
Manual
Autonomous operation modes
Manual and emergency modes
Linear
Landing
if Linear
landing
selected
plug in battery
4.5 Autonomous controller and modes of flight
During a typical flightthe autonomous controller on the eBee will switch between
various modes depending on its flight plan and the commands that it receives
from the Control Bar²⁰. The controller changes between modes during a typical
mission as shown in the figure above, and as described in more detail in the following list:
• After being switched on and running pre-flight checks the drone will enter
Idle mode until it is ready to be launched. Shaking the drone back and forth
²⁰ see section ‘Control Bar’ on page 89 for details on the Control Bar
66
Page 67

Understanding aerial mapping with the eBee
three times initiates the take-off procedure²¹ and changes to the Take-off
mode.
• After take-off the drone climbs with level wings²², gaining altitude until it
reachesthe take-off transition altitude, by default 20 m²³ abovethe take-off
location. At this point the drone heads for the Start waypoint and changes
to Circle Start Waypointmode.
• Once it reaches the Start waypoint, the drone circles the waypoint several
times to estimate the strength of the wind. Once it calculates the estimated
wind the drone either:
– heads towards the first mission waypoint, if ‘Start mission’ is selected
in the ‘After take-off’ panel of the Setup Phase tab, and changes to
Perform Mission mode.
– continues circling the Start waypoint until a command is received
from the Control Bar (typically a ‘START MISSION’ command that is
sent once a flight plan is finalized).
• While in Perform Mission mode the drone flies between all enabled mission
waypoints, taking images of the ground below. Once it reaches the final
mission waypoint the drone either:
– heads towards the Home waypoint, if ‘Land’ or ‘Go to Home way-
point’ is selected in the ‘After mission’ panel of the Setup Phase tab,
and changes to Circle Home Waypointmode.
– heads towards the Start waypoint,if ‘Go toStart waypoint’ is selected
in the ‘After mission’ panel of the Setup Phase tab, and changes to
Circle Start Waypoint mode.
– heads towards the first mission waypoint, if ‘Restart mission’ is se-
lected in the ‘Aftermission’ panel of the SetupPhase tab, and remains
in Perform Mission mode.
²¹ as described in section ‘Take-off’ on page 41
²² or in a given direction when using the Directional take-off feature described in section ‘Setup Phase
tab’ on page 96
²³ see section ‘Flight Parameters tab’ on page 116 for details on changing this altitude
67
Page 68

Advanced functionalities
• Once it reaches the Home waypoint (if in Circle Home Waypointmode) the
drone will either:
– begina Linear landing procedure (as describedin section ‘Linear land-
ing’ on page 70) and change to Linear Landing mode, if ‘Land’ is selected in the ‘After mission’ list and ‘Linear landing’ is selected in the
Landing type list of the Setup Phase tab.
– begin a Circular landing procedure and change to Circular Landing
mode, if ‘Land’ is selected in the ‘After mission’ list and ‘Circular landing’ is selected in the Landing type list of the Setup Phase tab.
– circlesthe Home waypoint and remainsin Circle Home Waypointmode
until a command is sent.
• After completing a landing procedure and detecting that it hassuccessfully
landed, the drone changes to Idle mode.
• Turning on the remote control will cause the drone to enter either Assisted
Manual or Full Manual mode, depending on the setting in the Flight Parameters tab²⁴. Turning off the remote control will return the drone to its
previous mode.
• Clicking the ‘HOLD POSITION’ button in the Control Bar at any time will
cause the drone to start circling its current position and change to Hold
Position mode until it receivesa new command from the Control Bar. Alternatively,right-clicking in the Map Area and selecting ‘Hold here’ will direct
the drone towards the selected position and then circle around that position in Hold Position mode. This mode is also enabled automatically after
certain In-flight warning or Critical failure conditions²⁵.
• Clicking the ‘LAND NOW’ button in the Control Bar threetimes inquick succession will cause the drone to initiate a Circular landing procedure at its
²⁴ see section ‘Manual control of the eBee’ on page 120 for information on the various manual control
modes
²⁵ see section ‘Troubleshooting’ on page 137 for a full list of In-flight warning and Critical failure con-
ditions and the subsequent reactions of the drone
68
Page 69

Understanding aerial mapping with the eBee
current location with its motor disabled and change to Emergency Landing mode.
69
Page 70

Advanced functionalities
4.6 Linear landing
A typical Linear landing follows these steps:
1. The eBee flies towards the Home waypoint (defined by the user within eMo-
tion; default altitude is 75 m above the landing altitude). The altitude change
behaviour between the current location and the Home waypoint depends
on the ‘Altitude change’ parameter of the Home waypoint. By default, it is
defined as ‘Keep highest’, which means that the drone will fly at the highest altitude between its current altitude and the Home waypoint’saltitude,
climbing in a spiral first if needed.
2. Once the Home waypoint is reached the drone circles the waypoint and
descends to a fixed altitude of 75 m above the landing altitude.
3. Thedrone circles to estimatethe wind speed and direction. An approach direction isthen calculated as close to the upwind direction as possible within
the allowable approach sectors (defined by the user within eMotion).
4. The drone flies downwind against the approach direction. After flying for
a sufficient distance it turns around to align itself with the approach direction.
5. The drone glides down in the approach direction at a controlled speed and
descent angle of approximately 20◦, braking by spinning its propeller in
reverse if necessary.
6. When the drone detects a height of around 20 m to the ground it begins to
level out its descent.
7. When the drone detects a height of around 3 m to the ground it performs
a final brake to reduce its speed and lifts its nose.
8. The drone then glides for the final few metres in a deep stall until it lands.
70
Page 71
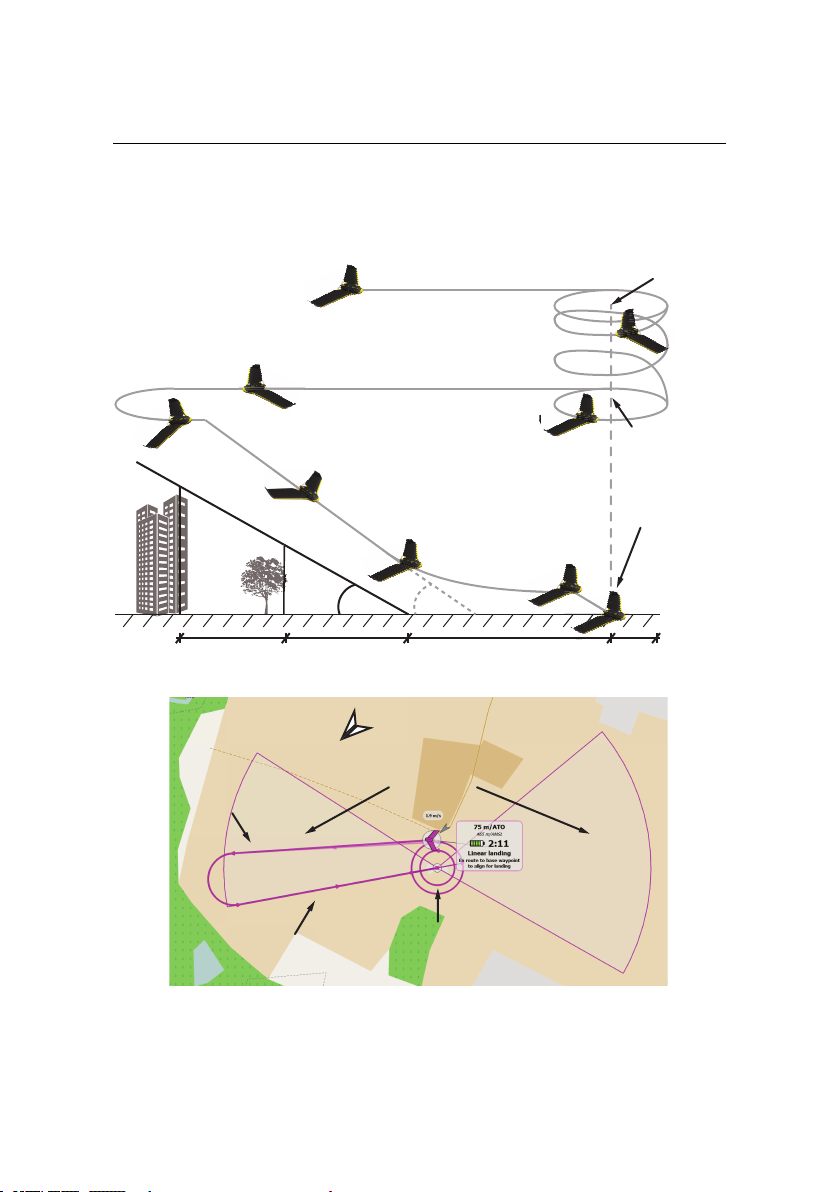
Understanding aerial mapping with the eBee
15˚ 20˚
Landing location
below Home waypoint
60m 10m
50m50m
13.4m
26.8m
3. Circle to
measure wind
4. Fly in calculated direction
5. Glide with controlled
angle and speed
7. Final brake
at 3m
8. Deep stall
to ground
6. Start level
out at 20m
approach sectors
Home
waypoint
calculated upwind
approach direction
calculated downwind
direction
estimated wind
direction
Home
waypoint
1. Aproach Home
waypoint
2. Descend to 75m
above landing
altitude
Linear landing procedure, seen from the side
Linear landing procedure, seen from above within
eMotion 2
75m above
landing altitude
71
Page 72

Advanced functionalities
The Linear landing process uses an optical-based sensor to detect the proximity
of the ground. A number of conditions on the environment and the positions of
the Home waypoint and approach sectors must be met in order for the ground
sensor to function correctly and ensure the accuracy of the Linear landing:
• If the Linear landing location is not at the same altitude as the Take-off location you must adjust the Landing altitude parameterin the ‘Setup Phase’
tab, as the drone uses this altitude to level out and slow down before landing (Steps 6-8). Enable the ‘Land at a differentaltitude than take-off’ checkbox and set the altitude as an absolute value in AMSL.
Note: When ‘Land at a differentaltitude than take-off’ is enabled the
Home waypoint’s altitude will be converted to AMSL instead of ATO
(by default 75m above the landing location).
Caution: Incorrectly setting the altitude of the Linear landing location will decrease the accuracy of the Linear landing and may result
in damage to the eBee.
• A Linear landing can only be performed over flat terrain. Ensure that the
ground is flat and at the same altitude as the Linear landing location for
a distance of at least 100 m from the Linear landing location within every
approach sector. It is also recommended to haveflat terrain in the opposite
direction of every approach sector in case a Linear landing is aborted in its
final stages.
Caution: Attempting a Linear landing on sloped terrain, the top of
a roof or the edge of a cliff or any other terrain that is not flat will
likely result in false detection of the height above the ground during
the approach and may result in damage to the eBee. In particular,
landing downhill may cause a large overshoot and should always be
avoided.
72
Page 73

Understanding aerial mapping with the eBee
• Ensure that there are no obstacles within 60 m of the Linear landing location within all approach sectors and within a radius of 10 m around the
Linear landing location. If there are some obstacles in the distance, ensure
that the top of the obstacles is at no more than a 15◦angle from the point
60 m from the Linear landing location, as indicated in the figure on page 71.
It is also recommended to not have any obstacles in the opposite direction
of all approach sectors, in case the Linear landing is aborted before completion.
Caution: It is not recommended to perform Linear landings between
tall obstacles, as they may disturb the GPS signals your eBee needs to
be able to navigate.
• In order to limit the ground speed when landing and to achieve the best
landing accuracy,the eBee should only performa Linear landing against the
direction of the wind. Approach sectors should be as large as possible and
in as many directions as possible to allow the drone to select the optimal
approach direction based on its estimate of the wind. If all of the available
approach sectors are in the direction of the wind an In-flight warning²⁶ will
appear in eMotion when the drone calculates its trajectory (Step 3).
Caution: Ifthe drone performsa Linear landing in the direction of the
wind during strong wind conditions or with certain In-flight warnings
or Critical failures it may not be able to slow enough during its descent. It will likely overshoot the Home waypoint location and land
at a high speed, potentially resulting in damage.
• The ground sensor must have sufficient light and texture to accurately detect the height above the ground. Ensure that the ground sensor lens is
clear of dirt or other obstructions. Only attempt Linear landings in full daylight conditions. Ensure that there is high-contrast surfaces in all the ap-
²⁶ see section ‘In-flight warnings’ on page 143
73
Page 74
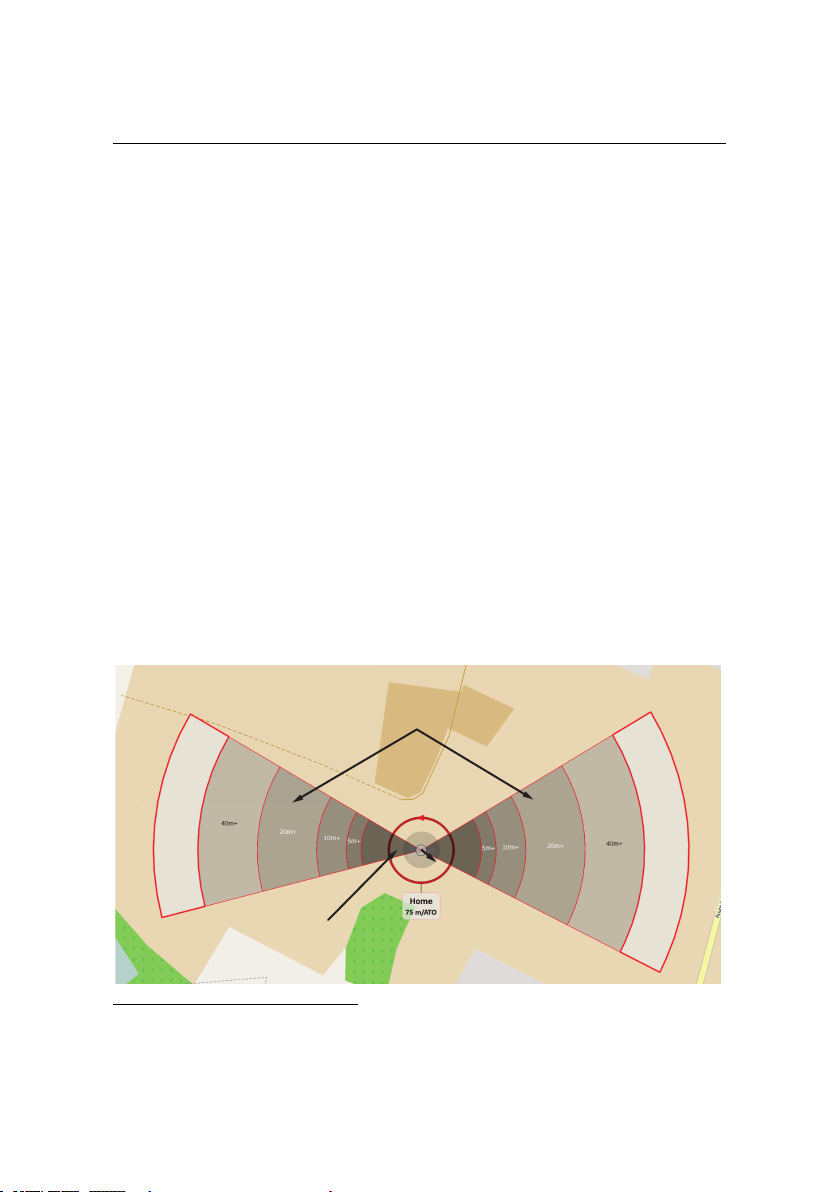
Advanced functionalities
10m
Approach sectors:
textured and flat terrain,
obstacle-free zones
Obstacle-free zone
below centre of Home waypoint
proach sectors. Do not define approach sectors over low-texture surfaces
such as large bodies of water, snow or sand.
• During a Linear landing the drone requires sufficient energy to slow down
its descent and perform its final brake (Steps 5-7). If the Linear landing option is active and the battery descends below 20% an In-flight warning will
appear²⁷ in eMotion.
To enable Linear landing select ‘Linear landing’ from the ‘Setup Phase’ tab. A single approach sector appears around the Home waypoint. Rotate and resize the
approach sector to define the directions around the Home waypoint that are completely clear of obstacles. You can add additional approach sectors from within
the ‘Setup Phase’ tab. These approach sectors will be used by the drone to plan
its landing path while taking into account the wind. Defining multiple possible
approachsectorscan increase the chance that the drone selects a favourablelanding against the direction of the wind. Be sure that there are also no obstacles in a
10 m radius circle around the Home waypoint, as the Linear landing process may
be effected by wind or positioning imprecision of the on-board GPS.
²⁷ see section ‘In-flight warnings’ on page 143
74
Page 75

Understanding aerial mapping with the eBee
Note: The eBee’sground sensor can typically begin detecting ground
proximity at a distance of 40 m. If the drone reaches an estimate altitude of 20 m/ATO (as estimated using the on-board GPS and pressure sensor) without a signal on its ground sensor it assumes there
is a malfunction with the ground sensor. This may be due to insufficient light or contrast in the environment, dirt on the sensor’s lens
assembly or a Linear landing location at a different altitude than the
Take-off Location. In this case the drone performs the braking and
stall manoeuvre at an altitude of 20 m instead of 3 m. This increased
time while stalled can greatly reduce the accuracy of the final landing
position and damage to the drone.
If the Linear landing process is aborted (by clicking on the ‘ABORTLANDING’ button in the Control Bar) before completion the drone will turn on its motor in full
thrust and gain altitude while continuing in a straight line in its approach direction. Once the altitude of 40 m/ATO is reached the drone will turn towards the
Home waypoint and continue climbing until it reaches an altitude of 75 m/ATO. It
then continues circling until it receives a further command.
Caution: Do not abort a Linear landing if there are obstacles in the
approach direction behind the Home location, as the drone will continue flying in a straight line after an abort sequence while it gains
altitude and may collide with those obstacles.
Caution: It is not recommended to abort a Linear landing when the
battery is low, as the drone may not have enough power to attempt
a second landing.
4.7 Flying multiple drones at the same time
Operating multiple drones at the same time enables the coverage of larger areas
in a shorter amount of time. This can be useful when the mission time must be
kept short, for example because of varying lighting conditions. To enable multi-
75
Page 76

Advanced functionalities
drone operation eMotion provides the following:
• When more than one drone is connected at a time, a dedicated interface
called the Multi-drone panelis displayedto monitor each drone and switch
between them.
• Anumber of settings are offered tokeep relevant flight configurations(such
asthe Start and Home waypoint) synchronised between all connected drones.
• Missions that require more than one flight can be automatically split and
uploaded individually among all connected drones.
• A new Control Bar appears at the bottom of the Map Area. Commands sent
using the buttons in this Control Bar, such as ‘START MISSION’ or ‘GO LAND,’
are sent to all the drones currently connected to your computer.
• Collision avoidance is provided by eMotion²⁸. This is done by automatically
changingthe altitude of the Start and Home waypoints for each dronein order to separate them. Also, the drones are automatically put on hold when
there is a collision risk during the mission.
When connecting to more than one drone at a time (real or simulated), a dedicated Multi-drone Panel is displayed next to the Sidebar. Each drone is displayed
with its name, battery leveland status andcan beselected. The rest of the Sidebar
and its various tabs are associated to the currently selected drone, as indicated
by the colour of the frame. The multi-drone interface also displays the relative
altitude of all drones with respect to the selected drone. Since this is a relative
altitude, a value close to 0 m means that a drone is at the same altitude as the
currently selected drone. Right-clicking on a drone’s tab in the Multi-drone Panel
allows you to disconnect the drone or change its colour.
²⁸ if the option is selected in the Multi-drones preference pane
76
Page 77
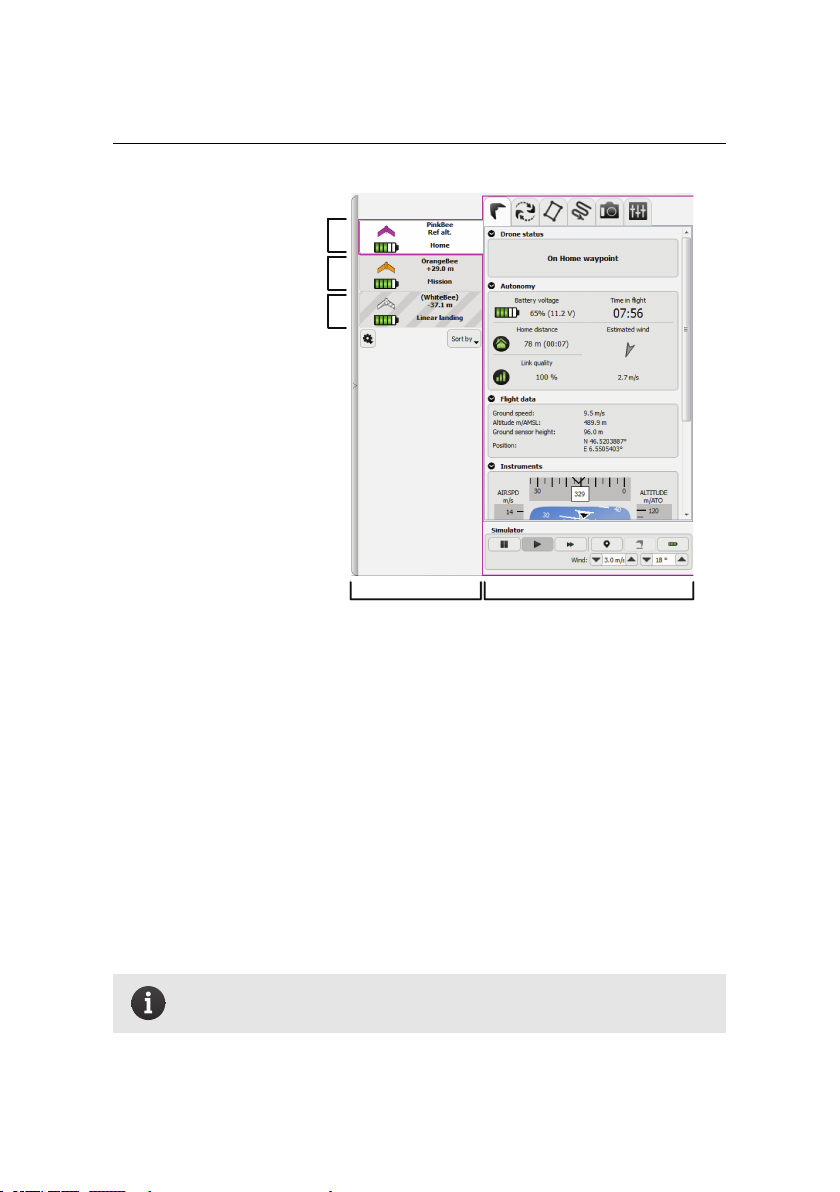
Understanding aerial mapping with the eBee
selected drone
SidebarMulti-drone panel
second drone connected
to this computer
drone shared through
network
One advantage of flyingmultiple drone drones at once is to cover more area in less
time. eMotion can automatically upload a multi-flight mission to all connected
drones in a single click. To achieve this, follow this procedure:
1. Go to the Mission Planning tab and prepare the required mission area (this
2. Select ‘Upload to all’ from the drop-down list of the ‘Upload button’.
can be done with any of the connected drone selected). Make sure that
the number of flights required matches the number of connected drones.
If needed, the ‘Max flight time’ option can be lowered to force the mission
planner to split the mission in several flights (see section ‘Mission Planning
tab’ on page 100).
Note: You can only split a mission between drones of the same model
and that are using the same camera.
77
Page 78
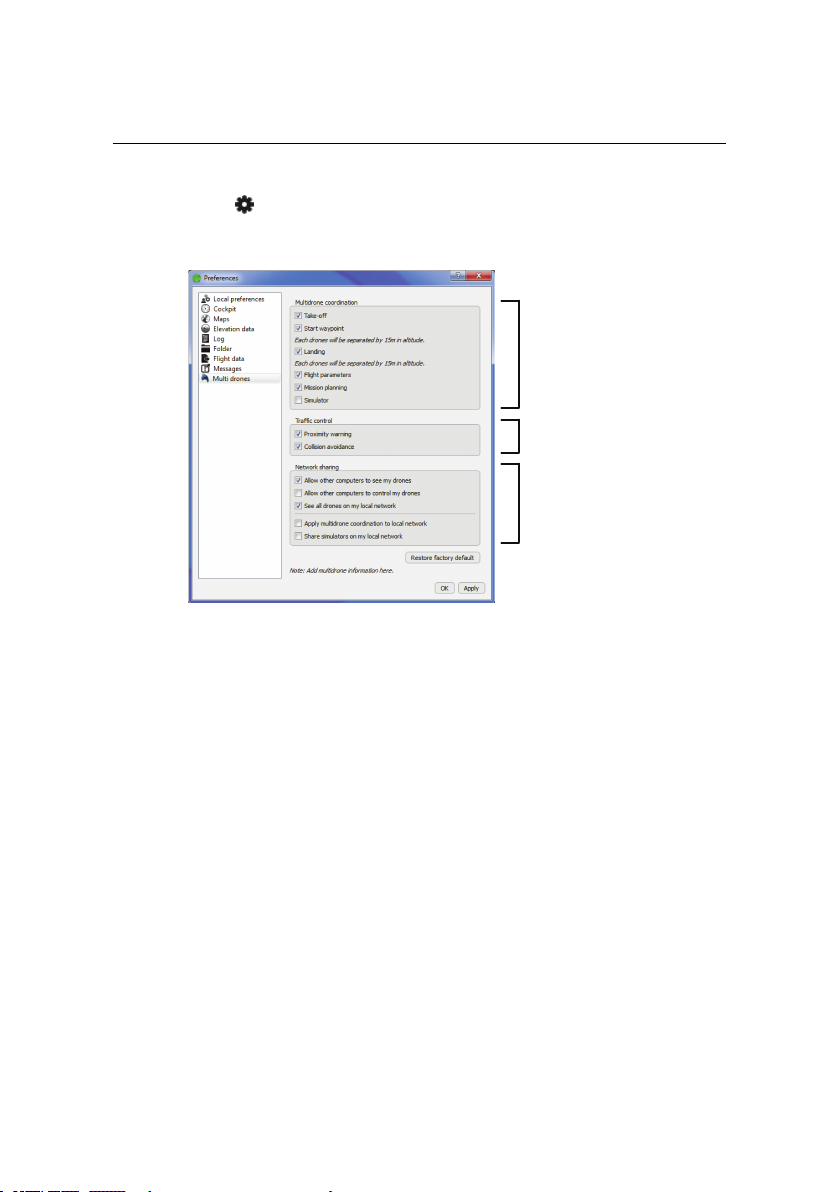
Advanced functionalities
Multi-drone
coordination
Traffic control
Network sharing
Clicking on the icon in the Multi-drone panel allows you to either connect a
new drone or to bring up the Multi-drones preferencespane.
eMotion provides Multi-drone coordination options to synchronise various waypoints and parameters among connected drones:
• Take-off: Synchronisingthe take-off applies specifically toDirectional take-
off heading and transition altitude.
• Start waypoint: When the Start waypoint is synchronised, eMotion will
use the same location and altitude for the Start waypoint ofeach connected
drone. Every modification to the Start waypoint of one drone is thus transferred to all other drones. To prevent collisions between drones, eMotion
will automatically create a stack by incrementing the altitude of eachdrone
that is currently circling the Start waypoints to ensure a 15 m separation.
The base altitude of the Start waypoint, which is the altitude of the lowest
drone in the stack, can be set in the Multi-drone Panel.
• Home waypoint and landing: Similarly to the Start waypoint, when the
Home waypoint is synchronised eMotion will us the same Home waypoint
78
Page 79

Understanding aerial mapping with the eBee
for all connected drones. A stack will also be created to avoid collisions
between multiple drones circling the Home waypoint.
Caution: As eMotion defines the Start and Home waypoints in ATO.
It is thereforecritical for all drones to take off from the exact same
location to achieve altitude separation and collision avoidance over
these two waypoints.
• Flight parameters: This option will synchronise all the parameters in the
‘Flight parameters’ tab across all drones. This includes the Working area
radius and ceiling, take-off transition altitude, Security action parameters,
etc.
• Mission planning: This option will share the same Mission Area among all
connected drones.
• Simulator: When checked, repositioning a simulated drone on the map
will reposition all simulated drones at the same time.
In addition to the altitude separation on the Start and Home waypoints described
above, eMotion provides two traffic control mechanisms to help avoid collision
between drones in flight:
• Proximity warning: When enabled, a visual and audible warning will be
emitted if two drones are on a trajectory potentially leading to a collision
in less than 7 seconds.
• Collision avoidance: When enabled, eMotion will constantly monitor the
trajectory of the connected drones and automatically put one drone in a
temporary hold pattern (similar to the HOLD POSITION function, see section ‘Control Bar’ on page 89) until it is safe to resume the flight. Priority is
given to drones with the lowest battery level, engaged in a landing procedure or with an active error or warning.
79
Page 80

Advanced functionalities
Caution: All collision avoidance mechanisms are implemented by
eMotion on the ground computer. The drones’ autopilot do not communicate between themselves and do not have knowledge of each
other’spositions. It is therefore critical to keep all drones connected
to eMotion at all times and remain well inside communication
range.
Note: While eMotion strives to avoid all collisions, the operator is ul-
timately responsible to ensure flight safety. In particular, situations
involving more that two drones in converging trajectories may not
always be handled automatically in a fully safe manner. It is recommended to use slightly different altitudes for each drone when flying
more than two drones at a time to limit the risk of collision.
In more advanced scenarios you maywish to share the position and eventhe control of a drone across a local area network. eMotion provides the following Network sharing options:
• Allow other computers to see my drones: All computers that are run-
ning eMotion and are connected to the same network will be able to display the position, status and other parameters of the drones connected to
your computer.
• Allow other computers to control my drones: All drones currently con-
nected to your computerare not only displayed, but can be fully controlled
by other computers running eMotion on the same network.
• See all drones on my local network: Check this box to display the po-
sition and other parameters of drones connect to other computers on the
same network.
• Apply multi-drone coordination to local network: Check this box to
synchronise all the selected parameters in the Multi-drone coordination
preferencesacross all drones that are connected to the same network (provided that they have checked the ‘Allow other computers to control my
drones’ option).
80
Page 81
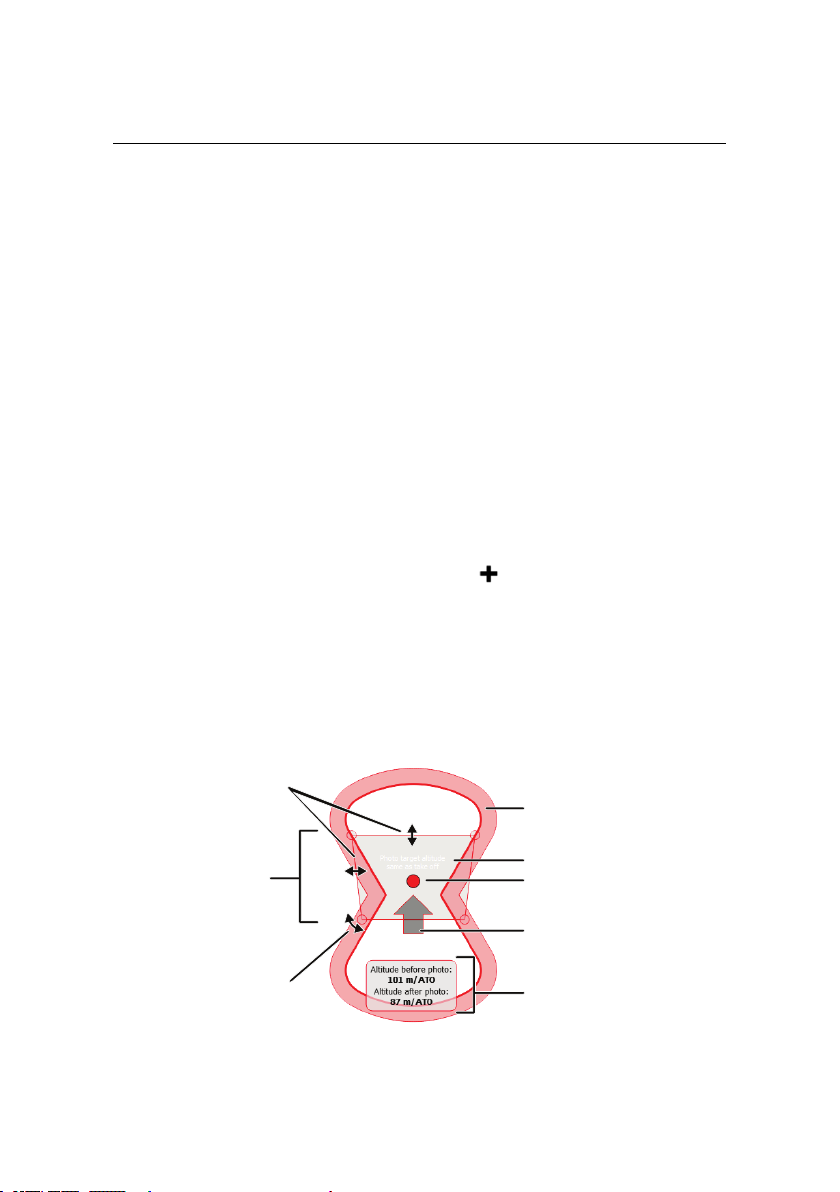
Understanding aerial mapping with the eBee
estimated
footprint
rotate to change
heading
move in the arrow direction
to change pitch/persepctive
estimated altitudes
before/after photo
manoeuvre zone
photo target
photo target altitude
resize to change
ground resolution
• Share simulators on my local network: If this boxis checked, allNetwork
sharing options apply to both real and simulated drones connected toyour
computer. In unchecked, they only apply to real drones.
4.8 Individual photo targets and oblique imagery
In some cases it may be interesting to take oblique photographs of objects, for
example to provide a nice image for documentation or to increase the quality
of 3D models that contain vertical facades and surfaces. eMotion includes a tool
for defining photo targets with a specific distance, heading and pitch angle. The
drone can then orient itself and capture the image using a patent-pending pitchdown manoeuvre.
Capturing an oblique image can be done easily by following these steps:
1. Add a new photo target by clicking on the button in the Camera tab. Use
the cross-hairs to place the photo target on the location of interest in the
Map Area. You may also right-click anywhere in the Map Area and select
‘Add photo target here’ from the contextual menu. The photo target will
appear as a circle in the Map Area with an estimated image footprint, a
manoeuvre zone and a status panel with estimated altitudes before and
after the image is taken.
81
Page 82

Advanced functionalities
2. Select the desired heading and pitch angles of the image by rotating the
image footprint and moving the photo target arrow, respectively. The estimated image footprint can help you choose the required angles. You can
also set the angles manually in the ‘Photo targets’ section of the Camera
tab.
3. Define the desired ground resolution at the photo target within the Camera tab. You can also adjust the ground resolution by resizing the photo
footprint in the Map Area.
Caution: Be sure to define a ground resolution that is high enough to
allow the drone to recover from its pitch manoeuvre by paying close
attention to the ‘Minimum altitude after photo’ parameter. We recommend that you do not define parameters that result in an ‘Minimum altitude after photo’ of less than 30 m, in particular when selecting a high pitch angle.
4. Define the altitude of the photo target, if it is not the same as the take-off
altitude. Youmay use elevation data to define this altitude by enabling the
‘Use elevation data to set absolute photo target altitudes’ checkbox.
Repeat the above steps to define multiple photo targets. After launching your
drone, click on the ‘Begin sequence’ button in the Camera tab at any time to begin taking the images. The eBee will fly to the location of the first photo location,
measure the wind above the location, and perform a dive (pitching down) manoeuvre to take the oblique photo. It will perform this for all photo targets until
it has completed the entire sequence.
Takinga series of oblique images of the same photo target at regularheading and
pitch intervals allows you to create a higher quality 3D model of a photo target.
You can use the ‘New photo target increment’ to define a desired increment angle.
Clicking on the button will then add a new photo target at the same location
as the previous target but with an incremented pitch and heading value.
A more detailed description of all the available options for taking images of individual photo targets can be found in section ‘Camera tab’ on page 111.
82
Page 83
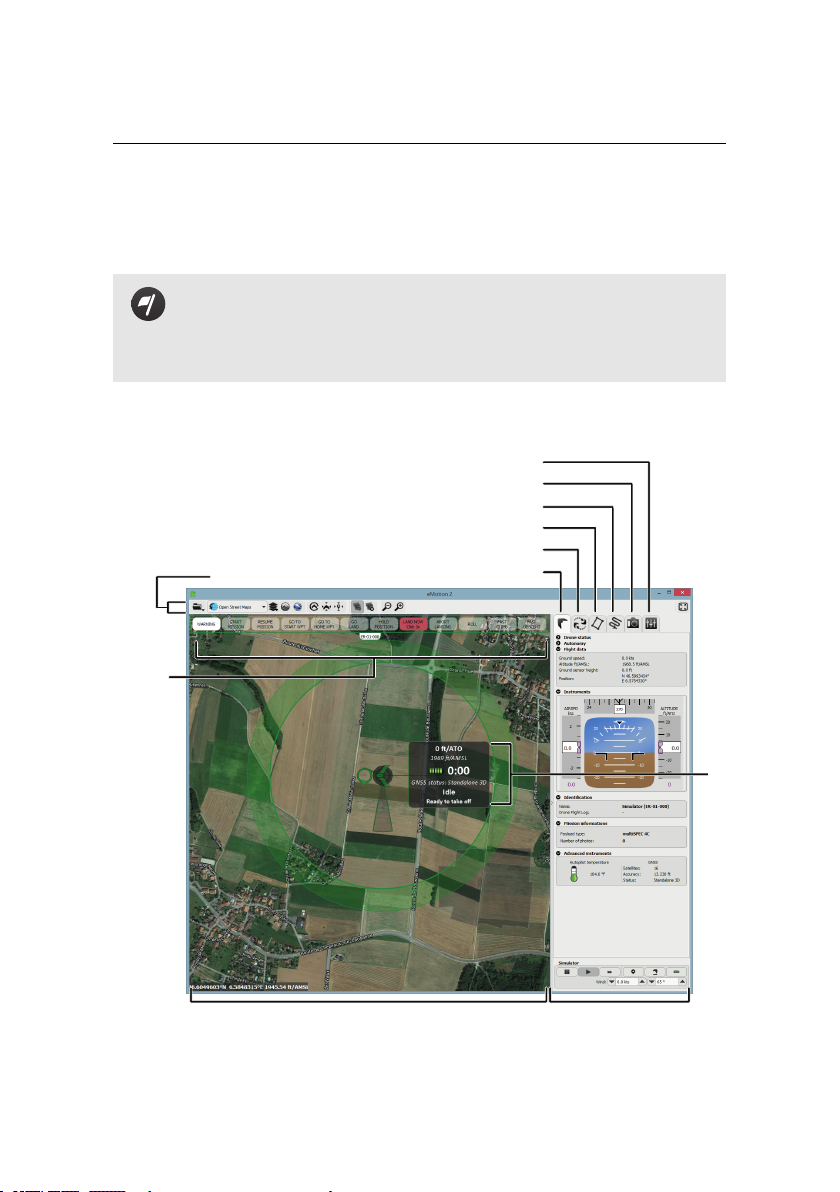
5 eMotion in-depth guide
SidebarMap Area
Control
Bar
Toolbar
Status
Panel
Flight Parameters tab
Camera tab
Mission Waypoints tab
Mission Planning tab
Setup Phase tab
Flight Monitoring tab
Goal of this section: eMotion is apowerful tool designed specifically
to work with your senseFly Ltd mini-drones. This section includes a
comprehensive guide to all the functionalities in eMotion to help you
plan, simulate and monitor your next mapping flight.
eMotion in-depth guide
83
Page 84
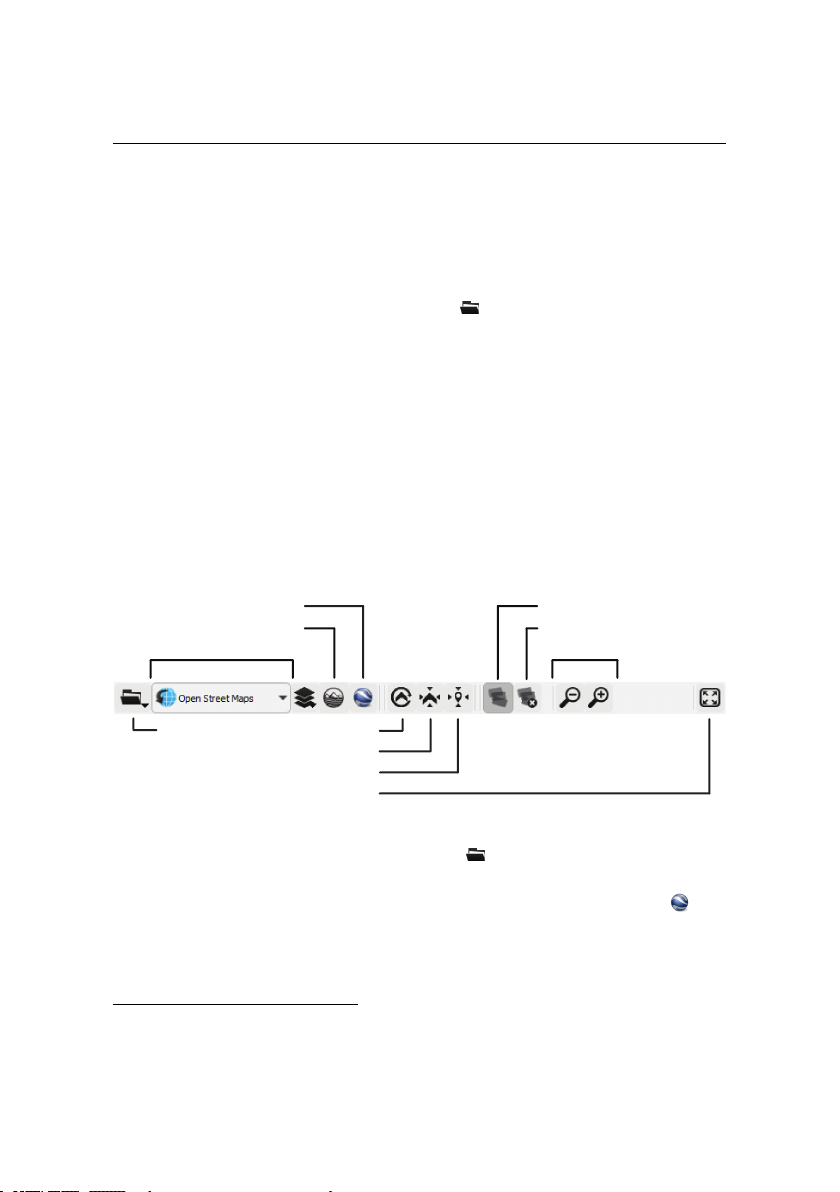
Advanced functionalities
Map source Zoom
Google Earth display
Custom map source
Follow drone position
Center on drone
Center on coordinate
Fullscreen
File
Show/hide footprints
Clear all footprints
The main eMotion interface is composed of a Map Area, a Toolbarand a Sidebar²⁹.
The Map Area displays the current location of the eBee, a Status Panel with important information on the drone’s current status, and a Control Bar used to send
commands to the drone (section ‘Control Bar’ on page 89).
The Toolbarabove the Map Area includes the File menu, controls for selecting
the sourceof map data, thedisplay of picture footprints and various other controls
(section ‘Toolbar’ ).
The Sidebar is separated into six individual tabs that are used during different
phases of planning and monitoring a flight. The Sidebar tabs can be hidden at
any time by clicking on the left-hand edge of the Sidebar. Each tab is described
in detail in the following chapter. The Sidebar also contains controls for the Simulator (section ‘Simulator’ on page 87)
5.1 Toolbar
You can access the File menu by clicking on the button in the Toolbar. Fromthis
menu you can connect to or disconnect from a drone, accessthe Flight Data Manager, change eMotion preferences or import custom maps. Clicking the icon
will launch Google EarthTMand display the current flight trajectories of drones connected toeMotion, as described in detail in section ‘Flight visualization inGoogle EarthTM’
on page 64.
²⁹ for an overview of the eMotion interface see section ‘The eMotion interface’ on page 19
84
Page 85
eMotion in-depth guide
You can select the backgroundmap source from the drop-down list in the Toolbar,
and adjust its zoom level using the and buttons. eMotion can use many
sources of commercially available and custom mapping information. Tiles from
map sources with the icon are downloaded by eMotion from the Internet as
required and locally cached on the hard drive. Due to regulatory restrictions, map
sources with the icon cannot be saved locally and are not recommended for
use in the field.
If you anticipate the use of eMotion in conditions where connecting to Internet is
impossible, you can preload the map data by selecting ‘Download maps...’ from
the File menu. Follow the instructions in the dialog box to select the zone of
interest, map tile source and start downloading.
eMotion can also import and display custom layers which may include KML files,
custom map tiles and elevation data. To import a KML file, select ‘Import KML...’
from the File menu and select your KML file. The resulting layer will now be
available in the Toolbar by clicking on the icon,and can be clicked to display or
hide it. eMotion can display lines, polygons, paths and points saved in KML format.
Note: KML files, including associatedicons or images included within
them, are not copied to the eMotion directory and will no longer appear in eMotion if the original KML files are deleted.
Custom map tiles can also be added as a layer in eMotion. Select ‘Import custom
map...’ from the File menu and select the folder that contains the tile set. The
tile set will then appear in the list of layers in the Toolbar, accessible by clicking
the button.
Note: If you use Postflight Terra 3D (see section ‘Processing image
data’ on page 48), a tile set can be generated for each project that
is directly compatible with eMotion. You can therefore create your
own map background using the eBee. You can generate the tile set
by selecting ‘Generate Google Maps tiles and KML’ from the ‘Process’
menu within Postflight Terra 3D.
Whenever the eBee takes a picture, eMotion records the location and orientation
of the drone and computes the approximate span of the photo on the ground (or
85
Page 86
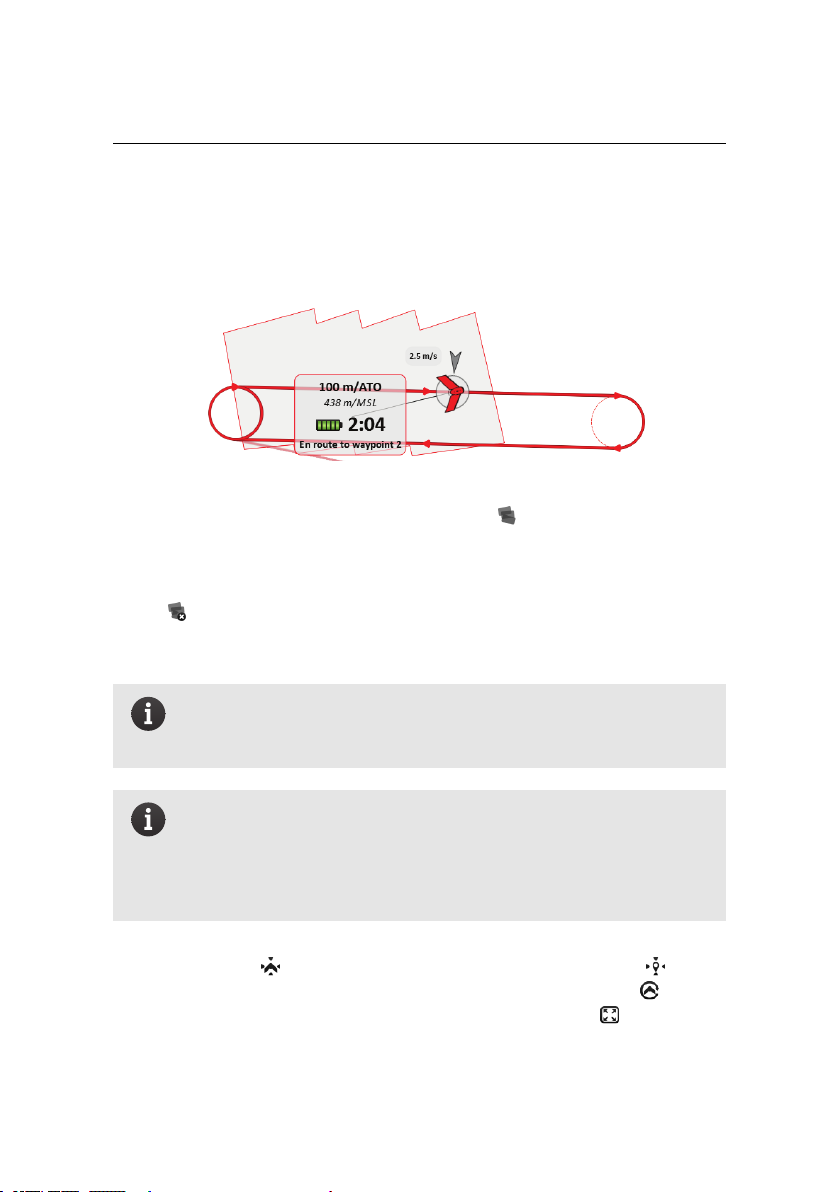
Advanced functionalities
‘footprint’). All the footprints taken by a drone are added to a shaded polygon
outlined with the drone’s colour and displayed in the Map Area. This polygon
represents an estimate of the area that has been photographed by the drone.
The footprints can be shown or hidden using the button. When hidden, the
footprints are kept in memory and newphotos continue to berecorded, but nothing is displayed in the Map Area. Footprints for all drones remain in the memory
of eMotion, even when a drone is disconnected or eMotion is shut down. Clicking
on the button removes all footprint polygons from the Map Area the memory
of eMotion. New picture footprints will be created for subsequent pictures that
are taken.
Note: Clearing or hiding the footprints has no influence on what is
logged by eMotion and on-board the drone during the flight, such as
the information required to geotag the images after the flight.
Note: The footprints displayed on the map are only an approximate
estimation of the actual ground coverage of the corresponding image. Cross-wind may introduce errors in the orientation of the displayed footprint compared to the actual coverage, whereas inaccurate elevation data may result inaccurate footprint size.
The Toolbar also contains buttons for centering the Map Area on the current position of the drone ( button), on a searchable location or coordinate( button)
or to continually follow the position of the drone while it is in flight ( button).
Finally you can view eMotion in full-screen mode by clicking the button.
86
Page 87
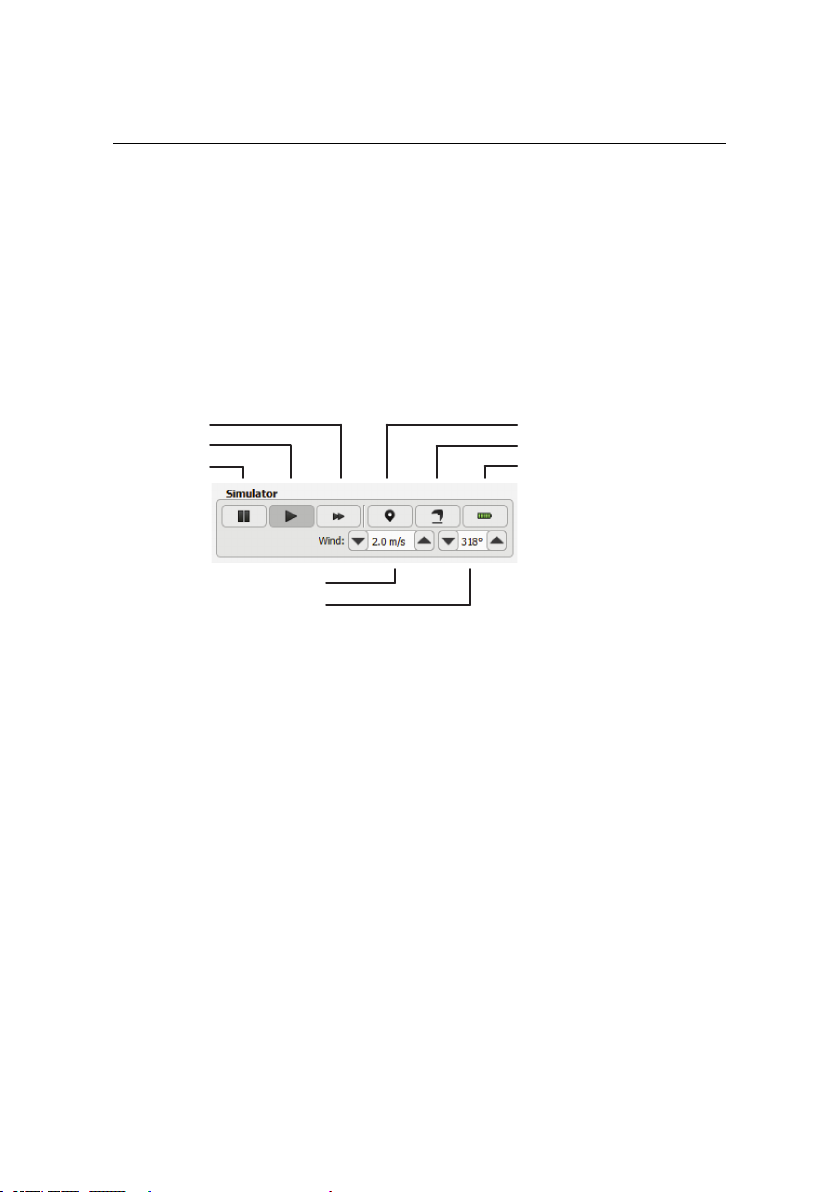
eMotion in-depth guide
re-position take-off location
initiate take-off
instant recharge of battery
wind speed
wind direction
fast-forward
play
pause
5.2 Simulator
Familiarising yourself with your eBee and its features will allow you to more efficiently plan and execute mapping flights, saving you time and improve your
imaging results. The Simulator in eMotion is designed to help you test the various
features of the drone and to better prepare a mapping mission before performing it in the field. Several simulated drones can be connected at the same time,
allowing you to test multi-drone functionalities.
The Simulator bar appears at the bottom of the Sidebar of eMotion when you connect to a simulated drone. The simulated drone will go through the same preflight checks as a real eBee, after which it will updatethe Home to its current position (typically the last position that was used within the simulator) and the Start
waypoint to 80 m West of the Home waypoint. The various buttons available in
the Simulator bar are described in table 1 on the next page.
Feel free to modify the wind speed, waypoint positions and other parameters in
the Toolbarand the various tabs of the Sidebar in eMotion to see their effecton the
eBee while it is in flight. Also be sure to explore the effects of the various buttons
in the Control Bar on the behaviour of your drone. Don’t be afraid to push the
boundaries! Aborting a flight or causing an emergency landing in the simulator
will better prepare you for unexpected circumstances while in the field.
87
Page 88

Advanced functionalities
Table 1: Simulator bar buttons
Button Description
Pause Clicking the pause button will pause the simulation
and thus stop the drone while in flight. This can be
useful when you wish to change parameters or waypoints while the drone is already in flight. Note: this
is a simulated action that is not possible with the
real eBee. Instead of pausing while in flight we
recommend that you use the ‘HOLD POSITION’
function to better simulate real flight conditions.
Play Clicking the play button returns the simulation to ac-
tual speed from the pause or fast-forward conditions.
Fast forward Clicking this button increases the speed of the simu-
lation to 4x actual speed. This allows you to shorten
the time required to simulate a complete mission.
Re-position
take-off location
Clicking this button and then clicking on a location
in the Map Area simulates the action of connecting the battery to the drone in a new location. The
drone is returned to the ground at the new location
and runs through its pre-flight checks before entering Idle mode.
Initiate take-off Clicking this button simulates a take-off procedure,
including the motor power-up sequence and the
hand launch³⁰.
³⁰ see section ‘Take-off’ on page 41 for a description of the take-off procedure
88
Page 89
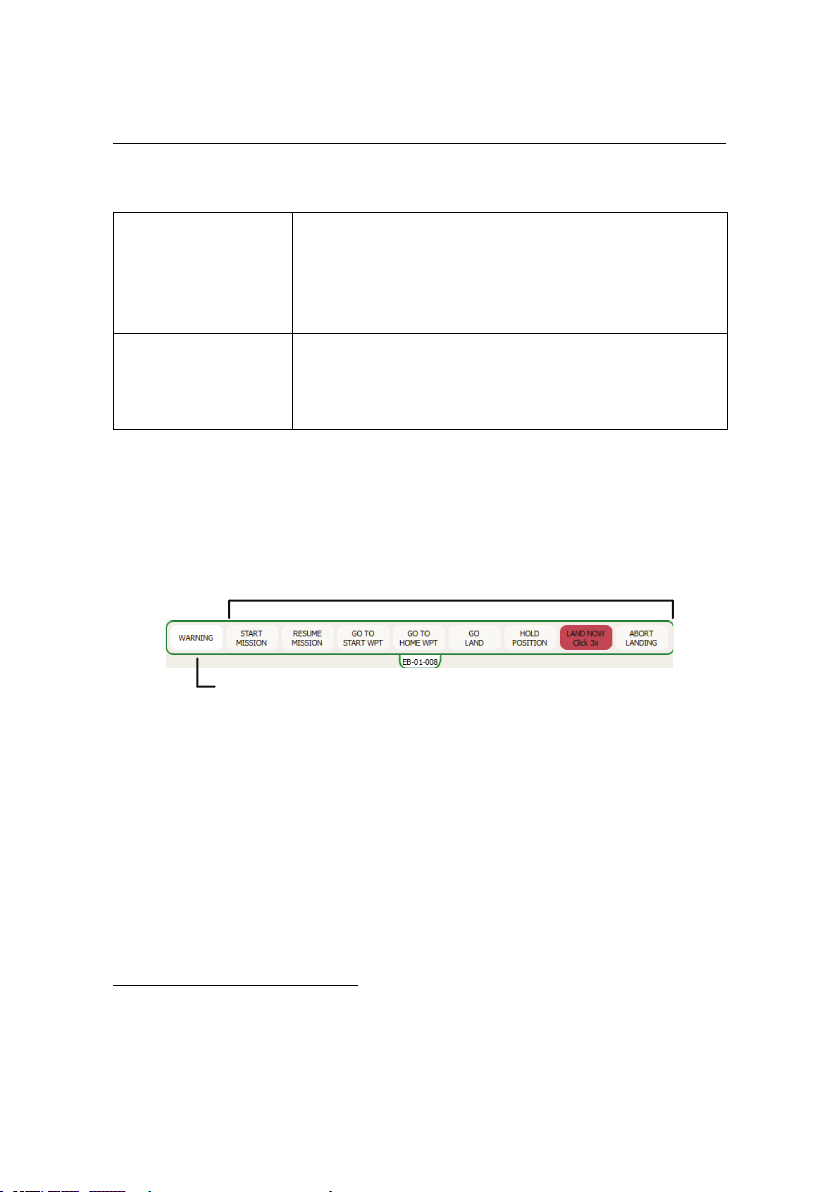
eMotion in-depth guide
Command buttons
Warning indicator
Instant rechargeof
battery
Clicking this button will instantly recharge the battery of the drone. Note: This is a simulated action
that is not possible with the real eBee while it is
in flight.
Wind speed and
direction
These fields are used to input a simulated wind speed
and direction. A random wind speed and direction is
set when eMotion connects to a simulated drone.
5.3 Control Bar
The Control Bar includes buttons for sending commands to the drone and for acknowledging warnings while it is in flight. Certain buttons can only be used during specific flight modes³¹.
The Command buttons allows the operator to directly control the drone while it
is in flight. The various buttons are described in table 2 on the following page.
³¹ see section ‘Autonomous controller and modes of flight’ on page 66 for more information on flight
modes
89
Page 90

Advanced functionalities
Table 2: Control Bar Buttons
Button Available Action
WARNING³² Active
warning
For yellow In-flight warnings, button text
changes to ‘ACK WARNING’ and clicking will
acknowledge the current warning. For red
Critical failures, button text changes to ‘CRITICAL FAILURE’ and cannot be clicked.
START
MISSION
No active
Security action
Fly towards the first active waypoint in the
waypoint list and start the mission from the
beginning.
RESUME
MISSION
GO TO
STARTWPT
GO TO
HOME WPT
Not in Perform
Mission mode
No active
Security action
Return to the last position reached during
the mission and continue the flight plan.
Fly towards the Start waypoint, circle and
wait for next command.
Anytime Fly towards the Home waypoint, circle and
wait for next command.
GO LAND Anytime Fly towards the Home waypoint and initiate
landing procedure.
HOLD
POSITION
No active
Security action
Create a virtual waypoint at the current location and altitude, circle around this point and
wait for next command.
³² see section ‘Troubleshooting’ on page 137 for a full description of In-flight warnings and Critical
failures that may occur
90
Page 91

eMotion in-depth guide
LAND NOW
Click 3x
ABORT
LANDING
Anytime Initiate a Circular landing around a 20 m ra-
dius waypoint at the current location. Must
be clicked 3 times in quick succession to
be engaged.
During Circular Landing, Linear
Landing, or
Emergency
Landing mode
(if no active
Critical failure)
Circular or Linear landing: abort current
landing procedure, return to the altitude of
the Home waypoint, circle the Home waypoint and wait for next command.
Emergency landing: (only available if there
is no active Critical failure) abort current
landing procedure, return to the location
wherethe Emergency landing was triggered,
circle and wait for next command.
91
Page 92
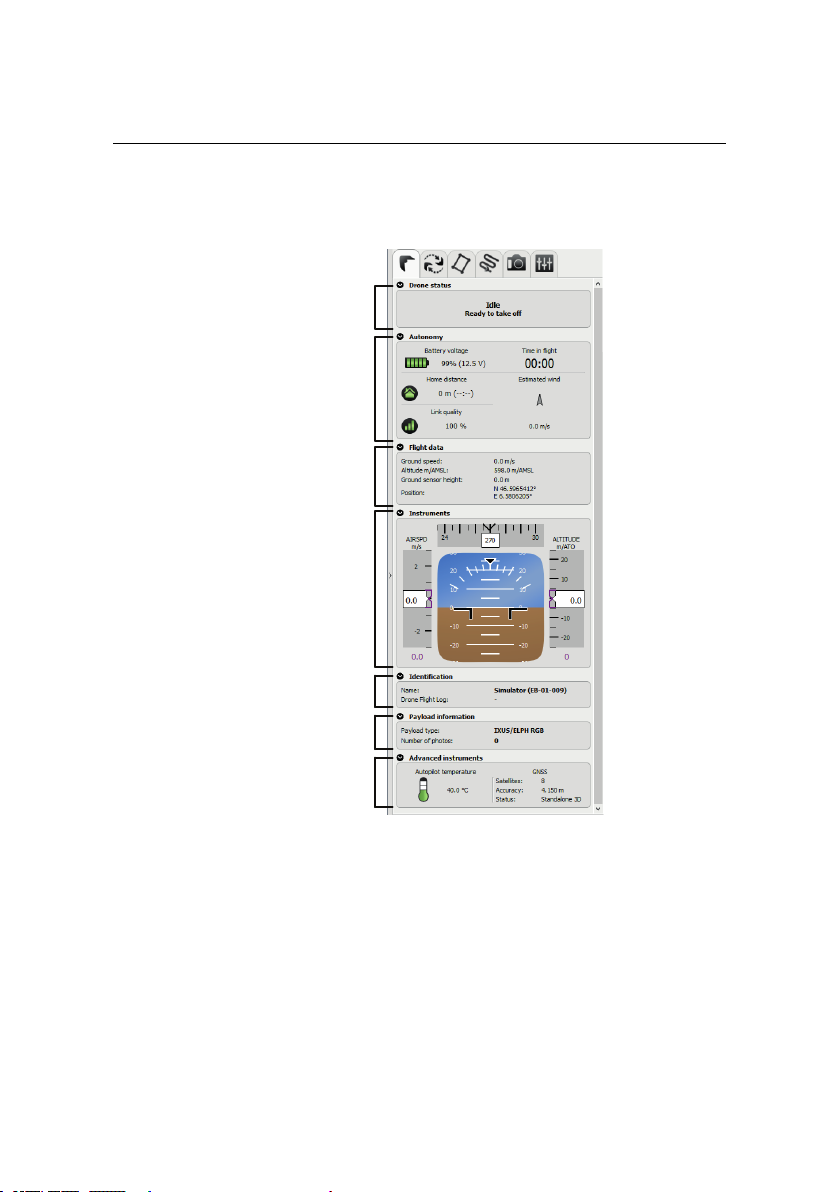
Advanced functionalities
Drone status
Instruments
Identification
Autonomy
Flight data
Payload information
Advanced
Instruments
5.4 Flight Monitoring tab
The Flight Monitoring tab can be used to monitor the eBee during a mapping mission and is the default tab that is displayed when you click anywhere on the map
area that does not have a symbol. The tab is split into the following sections:
• Drone Status: The status of the plane keeps you informed on what the
drone is currently doing. This can include mission actions such as ‘Taking
photo’ or ‘Going to waypoint’ as well as warning or failure messages such
92
Page 93

eMotion in-depth guide
as ‘Out of working area’ or ‘High wind’³³.
Note: The most important status and warning messages are reproduced in the Status Panel in the Map Area, and thus remain visible
even when the Sidebar is hidden.
• Autonomy: The battery level displays the current charge and voltage of
the battery. As the battery’s charge level decreases, the voltage decreases
as well. A fully charged battery has a voltage of 12.6 V and is fully discharged when it reaches about 9 V³⁴.
This section also displays the total time in flight, the straight-line distance
to the Home waypoint, the estimated time required to return to the Home
waypoint (based on estimated wind strength) and the quality of the radio
data link between the ground modem and the drone. The strength and
direction of the wind estimated by the drone is displayed with an arrow.
Caution: Lithium polymer batteries are chemical devices whose performance depends on a number of parameters, including temperature, lifetime, number of cycles, mechanical integrity, etc. Estimating
the remaining capacity of a battery can thus be tricky and the displayed value may occasionally be inaccurate. It is the operator’s responsibility to monitor battery voltage and flight time in addition to
the battery level to make sure that endurance is sufficient to complete the mission.
• Flight data: This section includes additional information that may be use-
ful during the flight, including ground speed and height, altitude Above
Mean Sea Level (AMSL) and the absolute position detected by the GPS onboard the eBee.
³³ see section ‘Troubleshooting’ on page 137
³⁴ see section ‘Proper battery care’ on page 135
93
Page 94
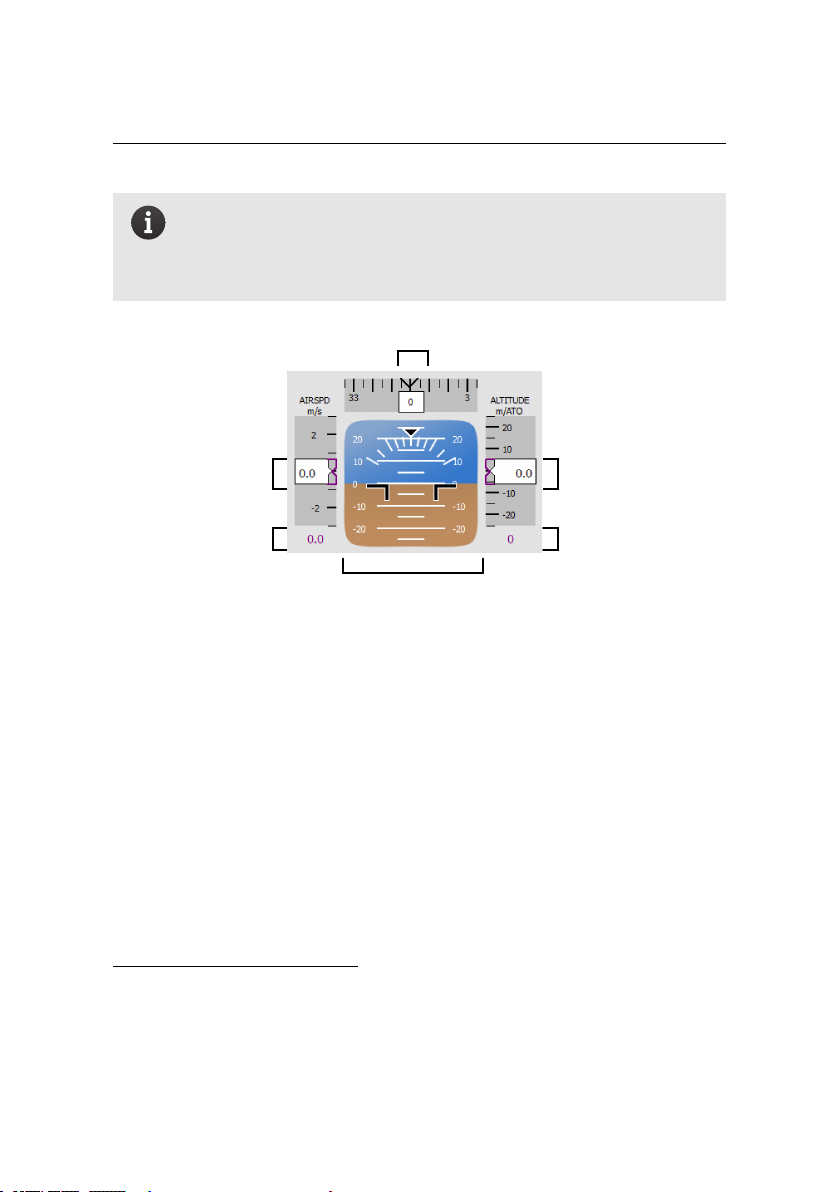
Advanced functionalities
current altitude over
take-off location
current heading in degrees
attitude with respect
to artificial horizon
desired altitude over
take-off location
current air speed
desired air speed
Note: The ground sensor height indicates the height above the
ground detected by the ground sensor. The sensor can typically detect distances below 60 m, depending on available light and surface
contrast.
• Instruments: This display mimics the classical primary flight display used
in manned aircraft. The column on the left displays the current air speed of
the eBee as well as the desired air speed, in metres per second. The column
on the right displays the drone’s current altitude over take-off location, as
well as the desired altitude over the take-off location, in metres. The bar at
the top displays the current heading of the drone³⁵. North is indicated as
0◦, East as 90◦, South as 180◦and West as 270◦.
• Identification: This displays the serial number of your eBee and the num-
ber of the Drone Flight log for the current flight. This number can be used
as a reference when importing flight data after a flight³⁶.
• Payloadinformation: This section displays the payloadcurrently selected
and the number of photos that has been taken since take-off³⁷.
³⁵ this feature is only accurate when in flight
³⁶ see section ‘Importing images and flight data’ on page 48
³⁷ see section ‘Camera tab’ on page 111 for instructions on changing the payload type
94
Page 95

eMotion in-depth guide
• Advanced Instruments: This section displaysthe current internal temper-
ature of the drone, the number of GPS signals detected and the estimated
accuracy of the the position.
95
Page 96
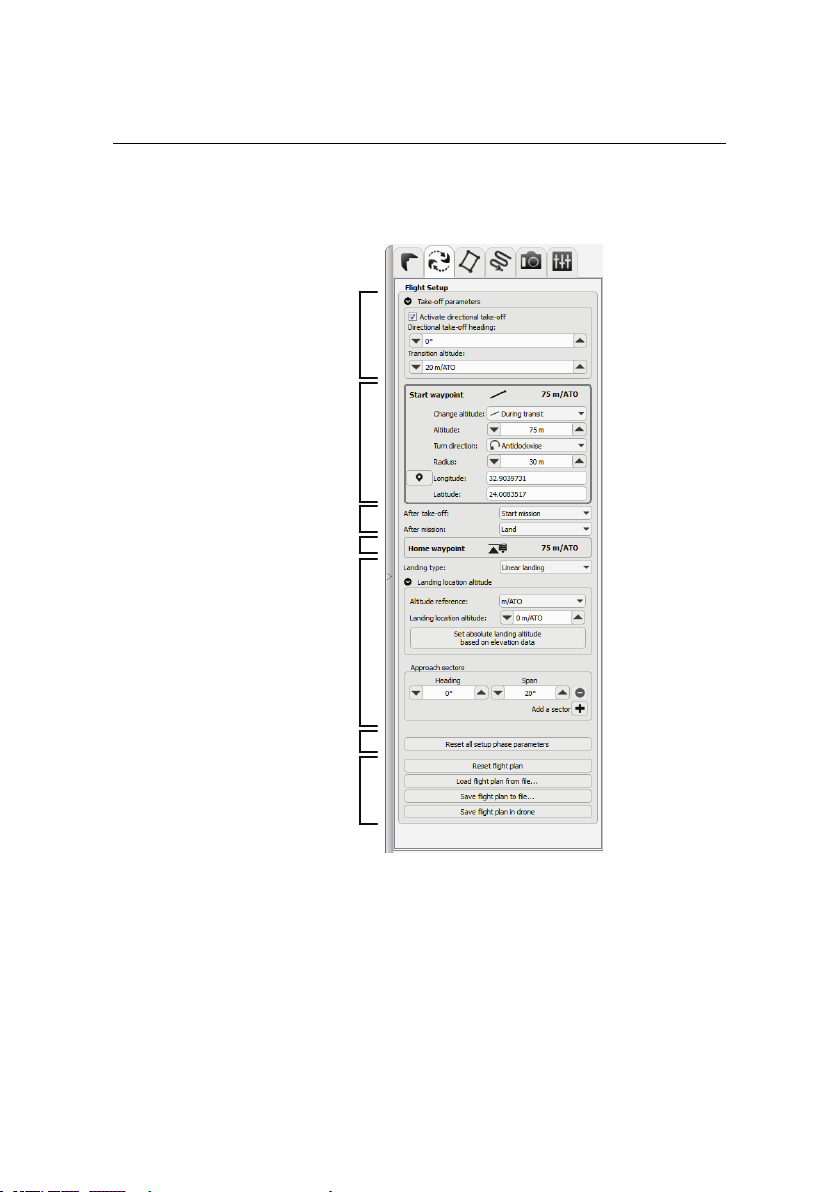
Advanced functionalities
Start waypoint
Landing
Home waypoint
After mission and
take-off actions
Take-off parameters
Flight plan actions
Setup phase reset
5.5 Setup Phase tab
The Setup Phase tab is used to define the setup phase of a flight plan. This phase
includes the definition of the Home and Start waypoints and the actions to be
taken before and after the mission phase of the flight plan.
The Setup Phase tab is divided into the following sections:
96
• Take-off parameters: You can predefine a take-off heading and transition
Page 97
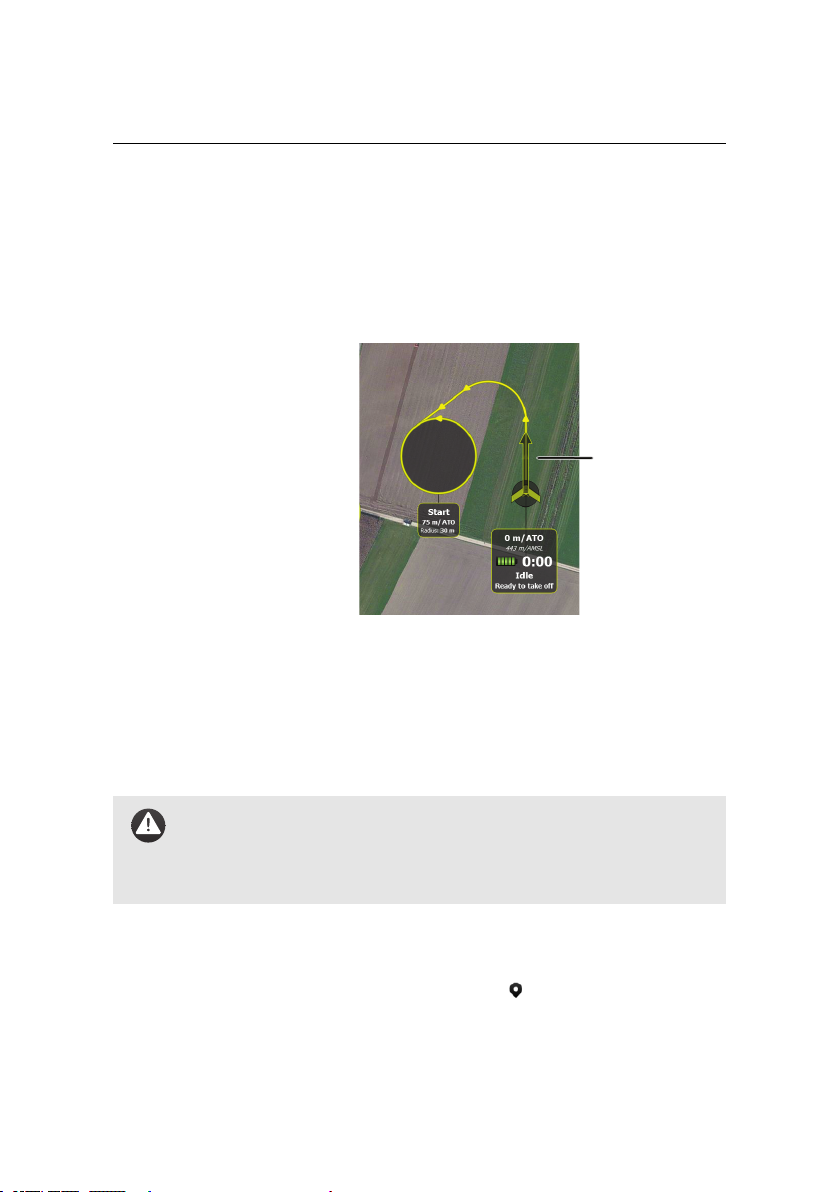
eMotion in-depth guide
desired takeoff
direction
altitude. To enable this feature, expand the ‘Take-off parameters’ box and
check the ‘Activate directional take-off’ check box. A new arrow is now displayed on the map. This arrow defines the take-off heading, the drone will
try to stay on the track defined by the arrow.
You can now grab the arrow on the map in order to modify the take-off
heading. Furthermore you can also pre-set the take-off direction and the
take-off transition altitude in the Setup Phase tab.
Default value: Unchecked, Heading: 0◦, Transition altitude: 20m/ATO
Caution: Setting the take-off transition altitude too low may cause
the drone to perform a change of direction too early and may result
in a crash. Setting the take-off transition altitude too high may cause
the drone to drift sideways after take-off if there is too much wind.
• Start waypoint: Here you set the position, change altitude parameter, al-
titude above take-off (m/ATO), turn direction and radius of the Start waypoint. You can set the location by clicking the button and clicking on the
desired location in the Map Area.
97
Page 98

Advanced functionalities
Default values: Change altitude: During transit, Altitude: 75 m/ATO, Turn
direction: anticlockwise, Radius: 30 m, Location: 80 m West of the position
calculated from satellite signals on start-up
• After take-off: You can either command the drone to start the mission
phase immediately after reaching the Start waypoint or to wait for a command from eMotion. This second option is useful if you want to modify the
flight plan while the drone is already in flight.
Default value: Start mission
• After mission: Use this panel to select the action you wish the drone to
executeonce itcompletes the mission phase. The eBee can either automatically go to the Home waypoint and land, go to the Home or Start waypoint
and wait for a command or to restart the mission phase.
Default value: Land
• Home waypoint: Here you set the position, change altitude parameter,
altitude (in m/ATO or m/AMSL if ‘Land at a different altitude than take-off’
is selected), turn direction and radius of the Home waypoint. You can set
the location by clicking the button and clicking on the desired location
in the Map Area.
Default values: Change altitude: Keep highest, Altitude: 75 m/ATO, Turn
direction: anticlockwise, Radius: 30 m, Location: position calculated from
GPS signals on start-up
• Landing: With this panel you can choose between a Circular landing or
a Linear landing on the Home waypoint. If you select ‘Linear landing’ the
panel expands to show options on approach sectors. You can define up to
four approach sectors, each of which has a heading and a span, either by
dragging in the map area or by manually setting parameters in the panel.
See section ‘Linear landing’ on page 70 for details how to correctly select
the Home waypoint and approach sectors.
Default value: Linear landing, Approach sectors: single sector with a Heading of 0◦and Span of 20
98
◦
Page 99

eMotion in-depth guide
• Landing location altitude: Youcan also configure the altitude of the land-
ing location if it is different from the Take-off altitude. Expand the ‘Landing
location altitude’ panel and select an altitude in m/AMSL or in m/ATO. It is
also possible to predefine the landing altitude based on elevation data by
clicking on the ‘Set absolute landing altitude based on elevation data’ button. This button will pre-set the altitude each time it is clicked (i.e. if the
landing position is changed, the altitude is not automatically pre-set based
on the Improved SRTM model, the user has to press the button each time
that the landing position is changed).
Default value: Landing location altitude: 0 m/ATO
• Setup phase reset: Pressing the ‘Reset all setup phase parameters’ will
reset the Home and Start waypoints to the take-off location and reset the
rest of the parameters on the tab to factory defaults. Clicking the ‘Reset
all waypoints and photo targets’ will remove all the waypoints and photo
targets in the currently loaded in the drone.
• Flight plan actions: A complete flight plan includes all the Setup phase
(Start and Home waypoints, Take-off and Landing parameters, etc.), Mission phase (waypoints), Camera (camera model, photo targets, etc.) and
Flight (working area radius and ceiling, Security actions, etc.) parameters.
The ‘Reset flight plan’ resets the current flight plan to default parameters³⁸.
The ‘Load flight plan from file...’ and ‘Save flight plan to file...’ buttons load
and save the current flight plan (both setup and mission phases) to a XML
file for later reuse. You can also save the current flight plan to the eBee’s
on-board memory byclicking the ‘Save flight plan in drone’ button. Once a
flight plan is saved in the drone’s memory, it will become the default flight
plan the next time the drone is started and appear in eMotion upon connection. The drone also keeps track of its last waypoint during a flight; you
can thus resume an incomplete flight after changing batteries.
Note: It is not necessary to save a flight to the autopilot in order to
fly! This is an advanced option meant to reduce the preparation time
required when the same flight is performed many times.
³⁸ this action is only available when the drone is not in flight
99
Page 100
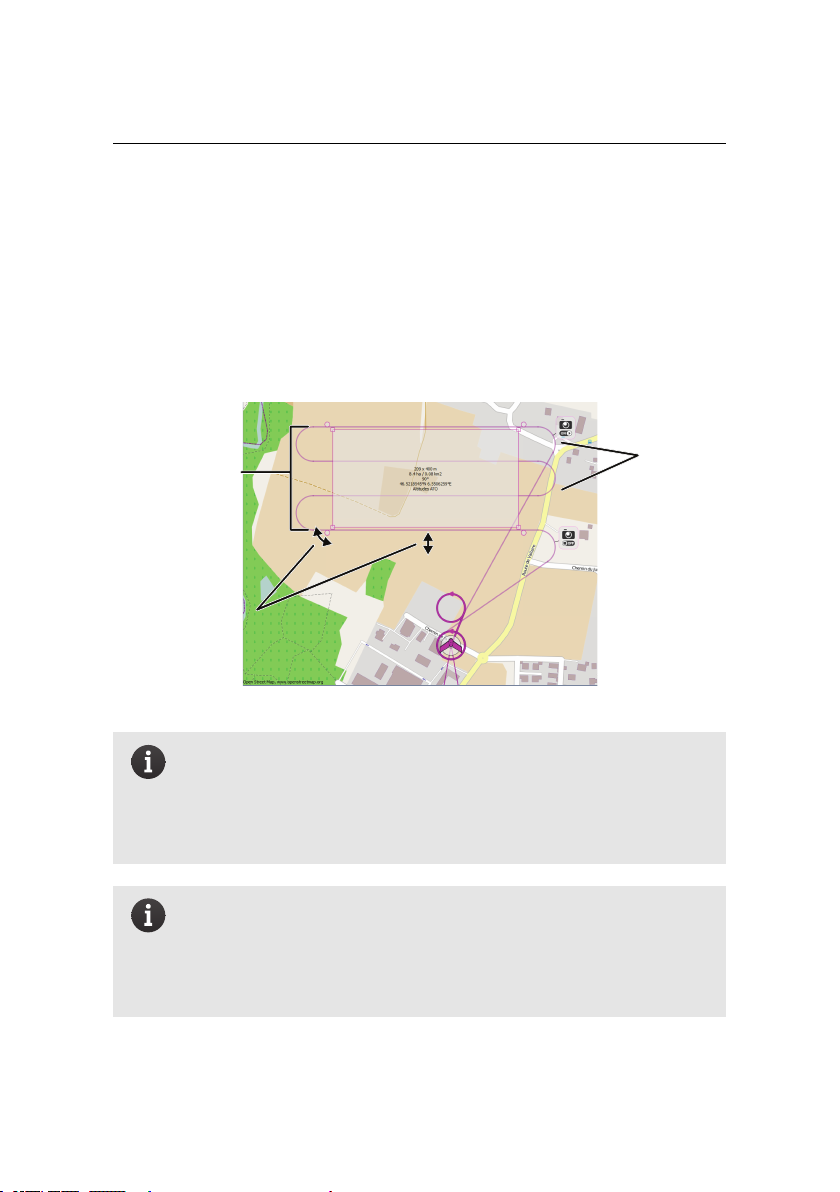
Advanced functionalities
mission
area
rotate,
resize,
displace
generated
flight
lines
5.6 Mission Planning tab
The Mission Planning tab is used to automatically define a set of waypoints based
on a mission area and a set of image parameters. Clicking on this tab will make a
grey box appear in the Map Area that represents the mission area to be mapped.
You can modify this area’s location, size and rotation using the handles around it,
as explained in section ‘The mission phase of a flight’ on page 22.
100
Note: The quality of the output orthomosaic is usually lower on the
outer edges of the area that is photographed, as there is less overlap
between images. The area photographed is thus always calculated
to be bigger than the mission area selected so as to ensure maximum
image overlap within the mission area itself.
Note: If there is no flight plan overlaid on the mission area rectangle
then the mission is too large and cannot be flown by the eBee. This
can be for two reasons: either the distance between two waypoints
is too long for the drone to cover in a single flight, or the waypoints
are too far from the Take-off and landing locations.
 Loading...