

Page 1
Set 860
Digital TV Listening System
Instruction manual
Set 860
Page 2

Contents
Contents
Important safety instructions ...................................................................... 3
Package contents ........................................................................................... 6
Product overview ........................................................................................... 7
Putting the Set 860 into operation ........................................................... 10
Setting up the transmitter ......................................................................... 10
Connecting the transmitter to an audio source .................................... 11
Connecting the transmitter to the power supply system ................... 15
Charging the stethoset receiver’s rechargeable battery ..................... 16
Displaying the remaining operating time of the rechargeable
battery ........................................................................................................... 17
Using the charging reminder function .................................................... 17
Selecting and replacing the ear pads ....................................................... 18
Using the Set 860 ........................................................................................ 19
Switching the wireless headphone system on ...................................... 19
Switching the wireless headphone system off ...................................... 20
Wearing the stethoset receiver ................................................................ 21
Adjusting the volume ................................................................................. 22
Adjusting the balance ................................................................................. 23
Selecting a hearing profile for sound enhancement ............................. 24
Activating/deactivating the speech intelligibility function ................ 26
Cleaning and maintaining the Set 860 ..................................................... 27
Replacing the stethoset receiver’s rechargeable battery .................... 28
Using additional functions ......................................................................... 29
Pairing one or several stethoset receivers with the transmitter ....... 29
Switching between stereo and mono operation ................................... 30
Advanced settings ....................................................................................... 31
Restoring the factory default settings .................................................... 34
Charging the rechargeable battery using the MCA 800 charging
adapter .......................................................................................................... 35
If a problem occurs ... .................................................................................. 36
Leaving the range of the transmitter ...................................................... 38
Specifications ............................................................................................... 39
Manufacturer Declarations ......................................................................... 41
2 | Set 860
Page 3

Important safety instructions
Important safety instructions
왘 Read this instruction manual carefully and completely before
using the product.
왘 Always include this instruction manual when passing the prod-
uct on to third parties.
왘 Do not use an obviously defective product.
왘 Only use the product in environments where wireless 2.4 GHz
transmission is permitted.
Preventing damage to health and accidents
왘 These headphones allow you to set higher volumes than conven-
tional headphones. Protect your hearing from high volume levels.
Permanent hearing damage may occur when headphones are
used at high volume levels for long periods of time. Sennheiser
headphones sound exceptionally good and provide clear speech
intelligibility at low and medium volume levels.
왘 To prevent hearing damage, set the volume to a low level before
passing the product on to third parties.
왘 Do not use the product in an environment that requires your spe-
cial attention (e.g. in traffic or when performing skilled jobs).
왘 Always keep the headphones/MCA 800 charging adapter at
least 3.94" (10 cm) from cardiac pacemakers or implanted
defibrillators. The headphones/MCA 800 charging adapter contain/s magnets that generate a magnetic field which could cause
interference with cardiac pacemakers and implanted defibrillators.
왘 Do not use the product near water. To reduce the risk of fire or
electric shock, do not expose the product to rain or moisture.
왘 Keep the product, accessories and packaging parts out of reach
of children and pets to prevent accidents and choking hazards.
왘 Only use the power supply units supplied by Sennheiser.
Preventing damage to the product and malfunctions
왘 Always keep the product dry and do not expose it to extreme
temperatures to avoid corrosion or deformation. The normal
operating temperature is from 5 to 40 °C/41 to 104 °F.
왘 Use the product with care and store it in a clean, dust-free envi-
ronment.
왘 Switch off the product after use to conserve battery power.
왘 Unplug the power supply unit from the wall socket
– to completely disconnect the product from the power source,
– during lightning storms or
– when not using the product for long periods of time.
Set 860 | 3
Page 4
Important safety instructions
왘 Always ensure that the power supply unit is
– in a safe operating condition and easily accessible,
– properly plugged into the wall socket,
– only operated within the permissible temperature range,
– not exposed to direct sunlight for longer periods of time in
order to prevent heat accumulation.
왘 Varnish or furniture polish may degrade the feet of the transmit-
ter, which could stain your furniture. You should therefore place
the transmitter on a non-slip pad to avoid potential staining of
furniture.
왘 Do not operate the product near heat sources.
왘 Clean the product only with a soft, dry cloth.
왘 Use only attachments/accessories/spare parts supplied or rec-
ommended by Sennheiser.
Safety instructions for lithium polymer
rechargeable batteries
WARNING
If abused or misused, the standard/rechargeable batteries may
leak. In extreme cases, they may even present a risk of
•explosion,
• fire development,
•heat generation,
• smoke or gas development.
Switch rechargeable battery-powered products off after
use.
Do not charge a product with a built-in rechargeable
battery if the product is obviously defective.
Only use rechargeable batteries and chargers
recommended by Sennheiser.
Only charge rechargeable batteries at ambient
temperatures between 5 to 40 °C/41 to 104 °F.
When not using rechargeable batteries for extended
periods of time, charge them regularly (about every three
months).
Do not heat above 70 °C/158 °F, e.g. do not expose to
sunlight or throw into a fire.
4 | Set 860
Dispose of batteries/rechargeable batteries at special
collection points or return them to your specialist dealer.
Page 5

Important safety instructions
Intended use/Liability
This wireless TV headphone system is suitable for use with TV sets,
hi-fi systems, and home cinema systems and can be connected to
analog and digital audio sources.
This product is intended for private domestic use only. It is not suitable for commercial use. This product is also not intended to be used
with portable audio devices.
It is considered improper use when the product is used for any application not named in the corresponding product documentation.
Sennheiser does not accept liability for damage arising from abuse
or misuse of this product and its attachments/accessories.
Before putting into operation, please observe the respective country-specific regulations.
Set 860 | 5
Page 6
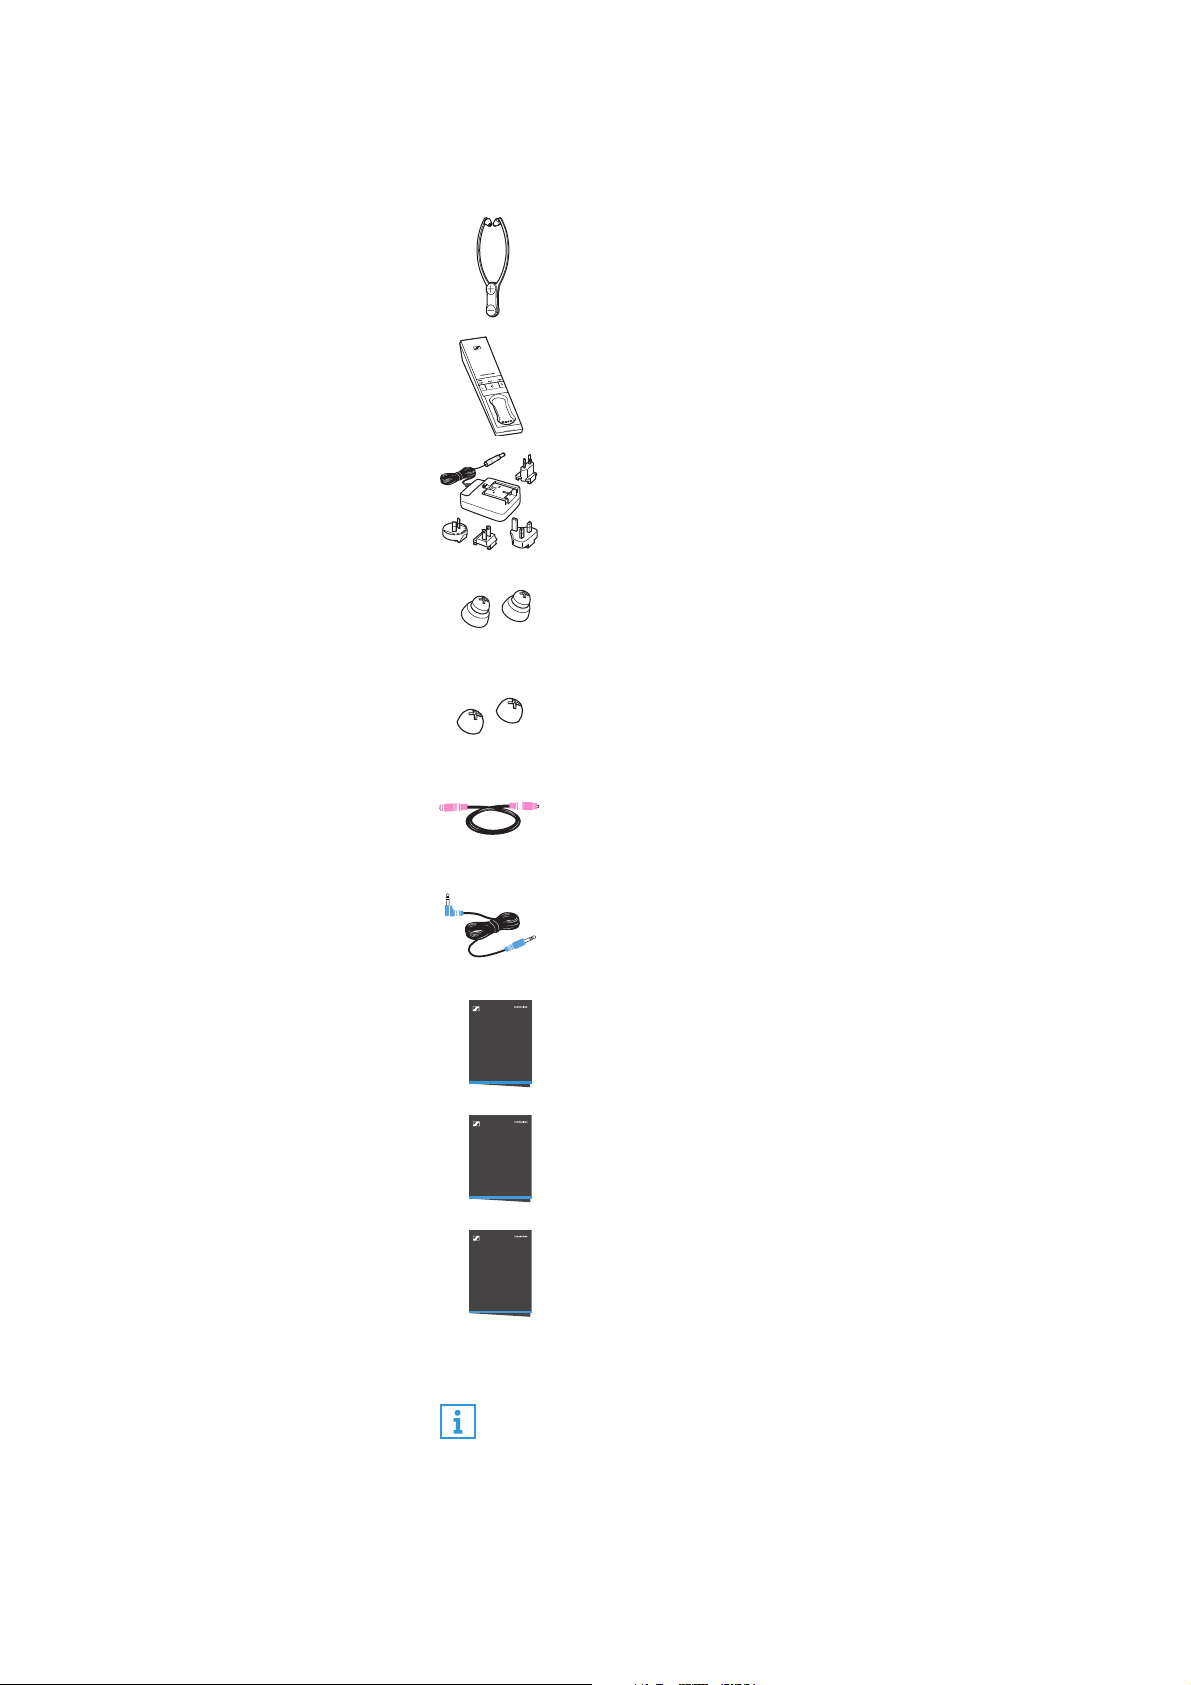
Package contents
Quick Guide
Instruction
Manual
Package contents
RR 800 stethoset receiver with
built-in rechargeable battery
TR 860 transmitter with charging station
NT 5-10AW power supply unit with
multi-country adapters (EU, UK, US, AU)
1 pair of ear pads for small ears
Safety Guide
1 pair of ear pads for pressure-sensitive ears
Optical digital cable, 1.5 m
Stereo audio cable with 3.5 mm jack plugs, 1.5 m
Safety guide
Quick guide
Instruction manual in English, German, French, and
Spanish
The instruction manual in other languages can be
downloaded as a PDF file at
www.sennheiser.com/download.
A list of accessories can be found on the Set 860 product page
at www.sennheiser.com. For information on suppliers, contact
your Sennheiser partner. To find a Sennheiser partner in your
country, search at www.sennheiser.com.
6 | Set 860
Page 7
Product overview
Product overview
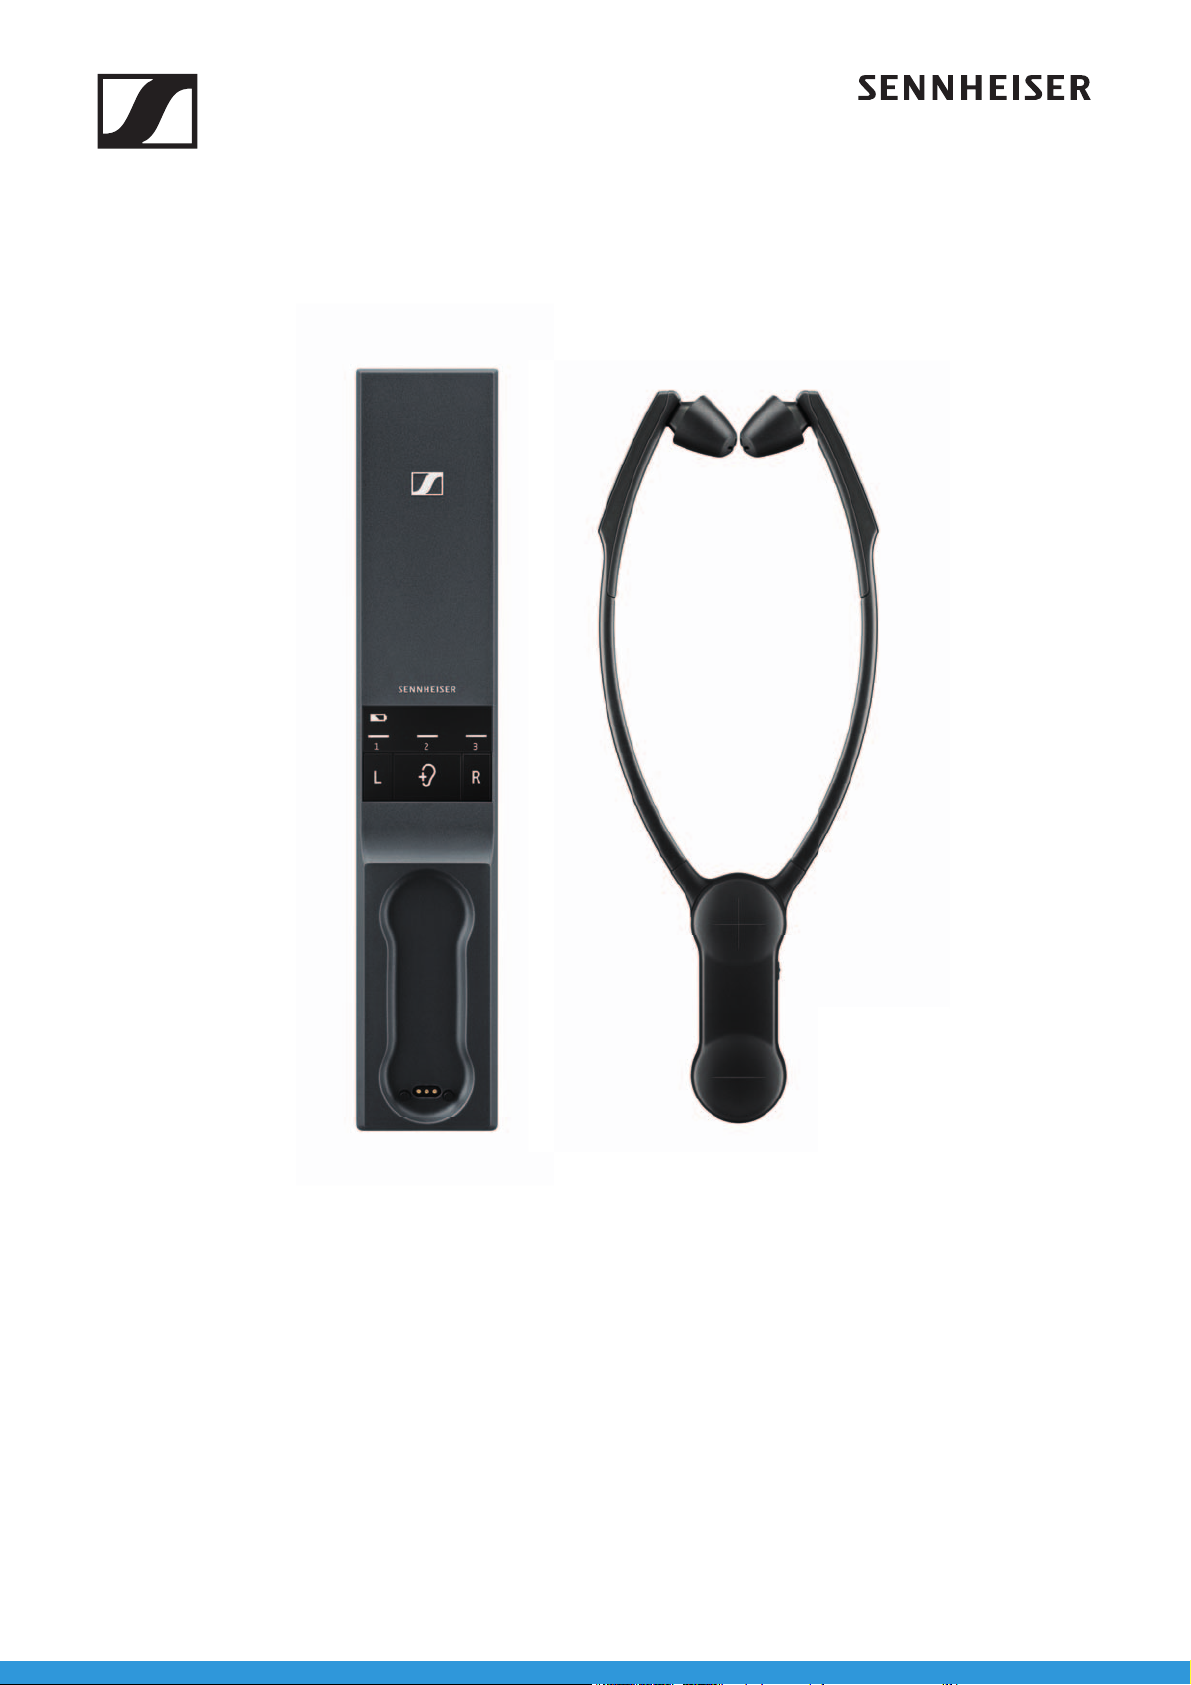
Overview of the RR 800 stethoset receiver
On
3
1
Off
2
5
4
6
7
1 Ear pads, replaceable
2 Ear bows with
on/off function
3 Volume buttons + and –
4
Speech intelligibility
button
5 R marking for the right ear
and
L marking for the left ear
6 Built-in rechargeable battery
7 Charging contacts
Set 860 | 7
Page 8
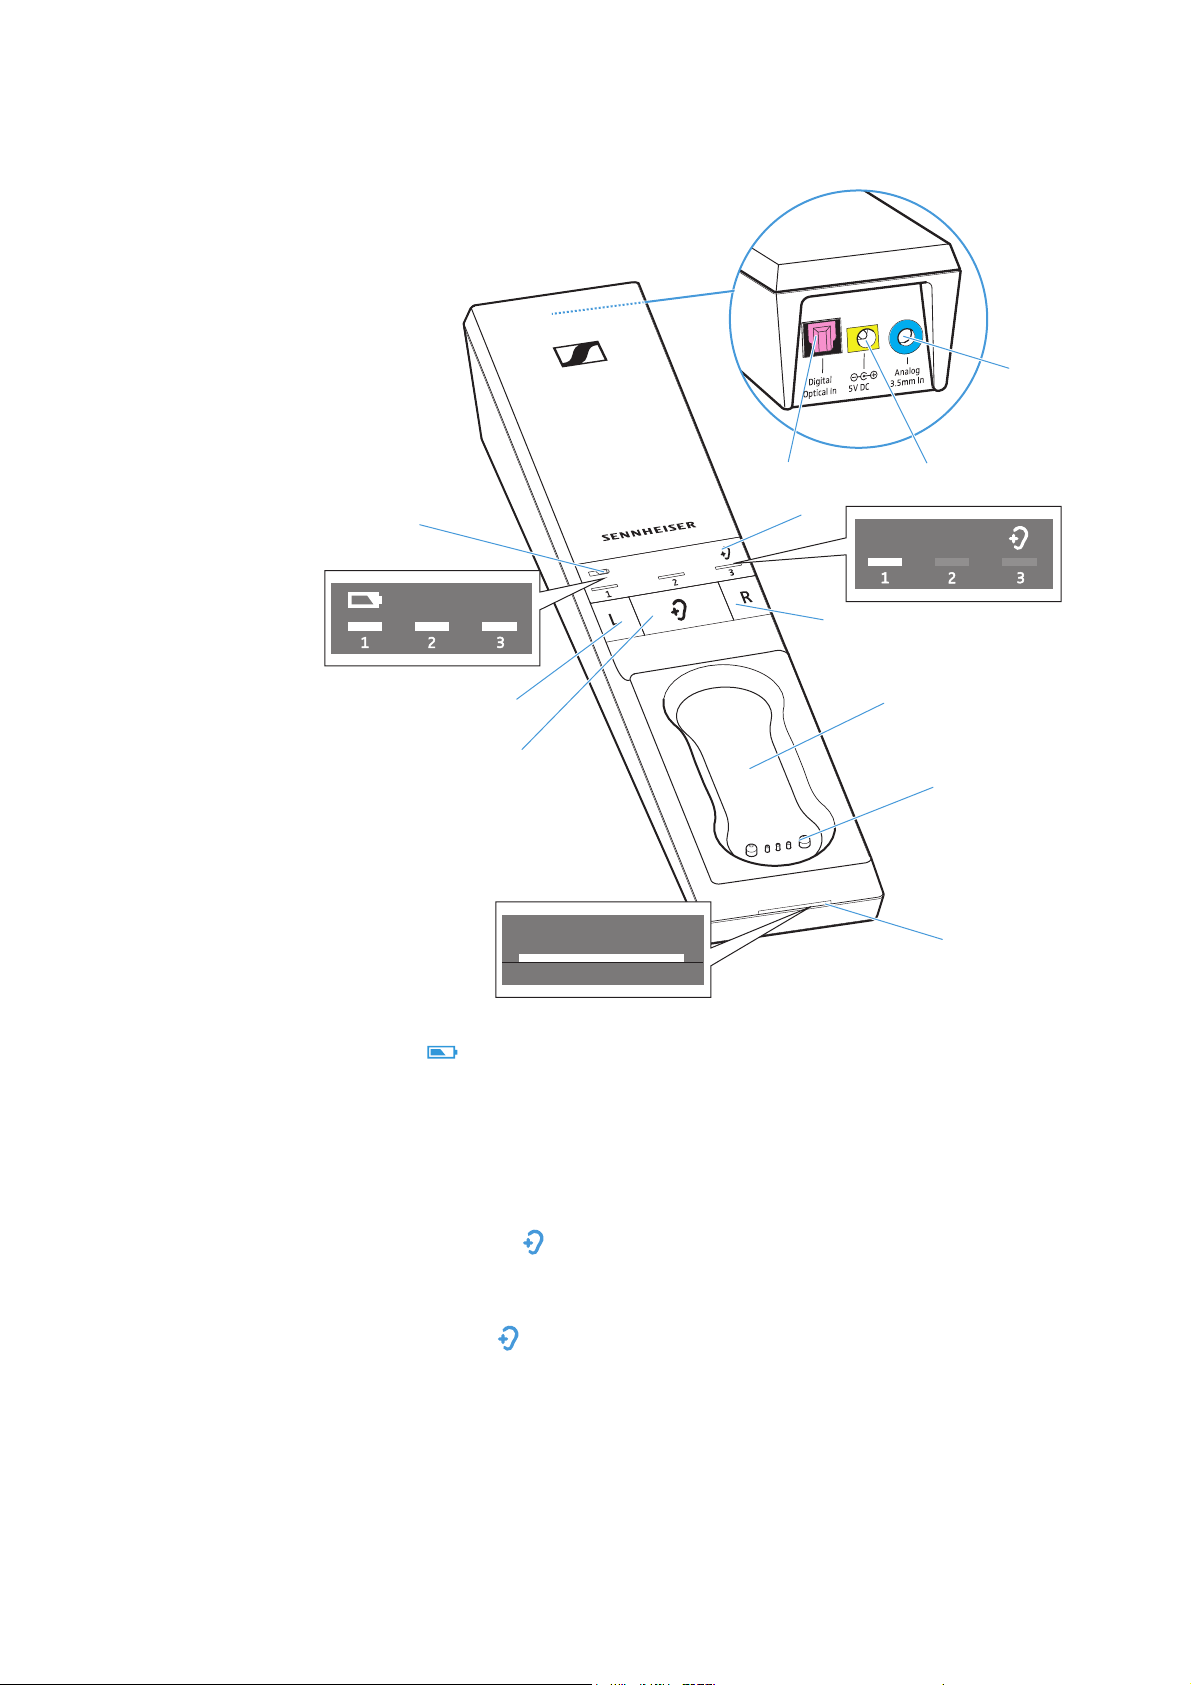
Product overview
Overview of the TR 860 transmitter
1
2
3
8
4
2
1A
0
9
5
6
7
8 | Set 860
1
Battery
indicating the charging process/
remaining operating time of the
receiver (see page 16 and 17)
2 Balance buttons
for right ear
3
Hearing profile
for selecting the hearing profiles
(see page 24)
4
Hearing profile
indicating the activated hearing
profile (see page 24)
5 Charging compartment for
stethoset receiver
LED ,
R and left ear L
button ,
LED,
6 Charging contacts for stethoset
receiver with holding magnets
7
Transmitter status
(see page 9)
8 Digital Optical In audio input
(marked pink) for connecting a
digital audio source (optical)
9 5V DC 1A socket (marked yellow) for
connecting the power supply unit
0 Analog 3.5 mm In audio input
(marked blue) for connecting an
analog audio source (3.5 mm jack
socket)
LED
Page 9
Product overview
Overview of the
Transmitter status
– ... is in standby mode.
lights up white
lights up blue
flashes blue and white
The LEDs on the transmitter indicate the current operating
state. If you are not pressing any button on the stethoset
receiver or the transmitter, the LEDs automatically dim after
approx. 30 seconds to not disturb you.
Transmitter status
LED The transmitter...
... and the stethoset receiver are
connected. The speech intelligibility
function is deactivated (see page 26).
... and the stethoset receiver are
connected. The speech intelligibility
function is activated (see page 26).
... has detected an incompatible digital
audio signal (see page 12).
LED
Overview of the acoustic signals/beeps
Beeps... Meaning
during operation,
2 beeps
during operation, no
audio transmission,
5 beeps
when changing the
volume
when changing the
balance setting
The rechargeable battery is almost
empty, recharge the rechargeable
battery (see page 16).
The receiver is outside the transmission
range (see page 38).
The maximum or minimum volume is
reached (see page 22).
The maximum or minimum balance
setting is reached (see page 23).
Set 860 | 9
Page 10
Putting the Set 860 into operation
Putting the Set 860 into operation
Setting up the transmitter
왘 Choose a suitable place near your sound source.
왘 Separate the transmitter from other wireless devices in the room
by at least 50 cm/20" to avoid interference.
왘 Do not place the transmitter close to metal objects such as shelf
bars, reinforced concrete walls, etc. as this can decrease the
transmitter’s range.
10 | Set 860
Page 11
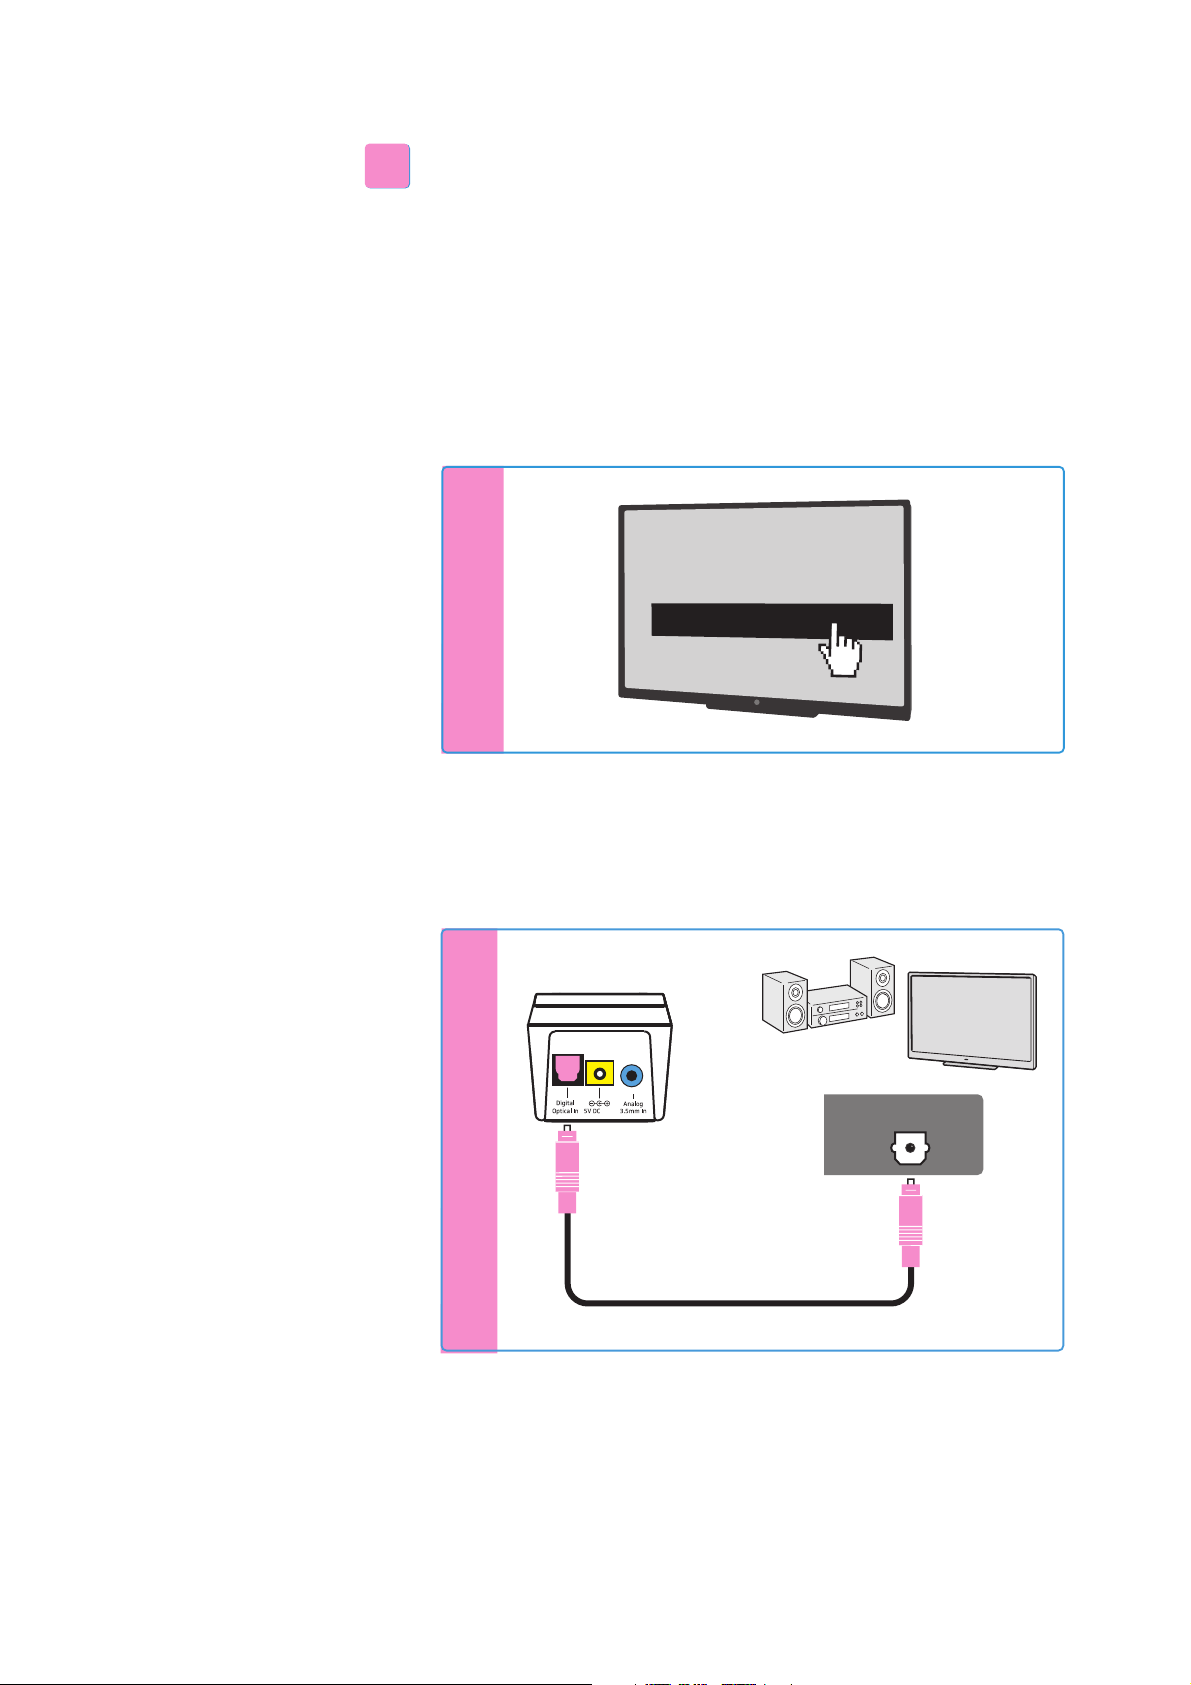
Putting the Set 860 into operation
A
D
Connecting the transmitter to an audio source
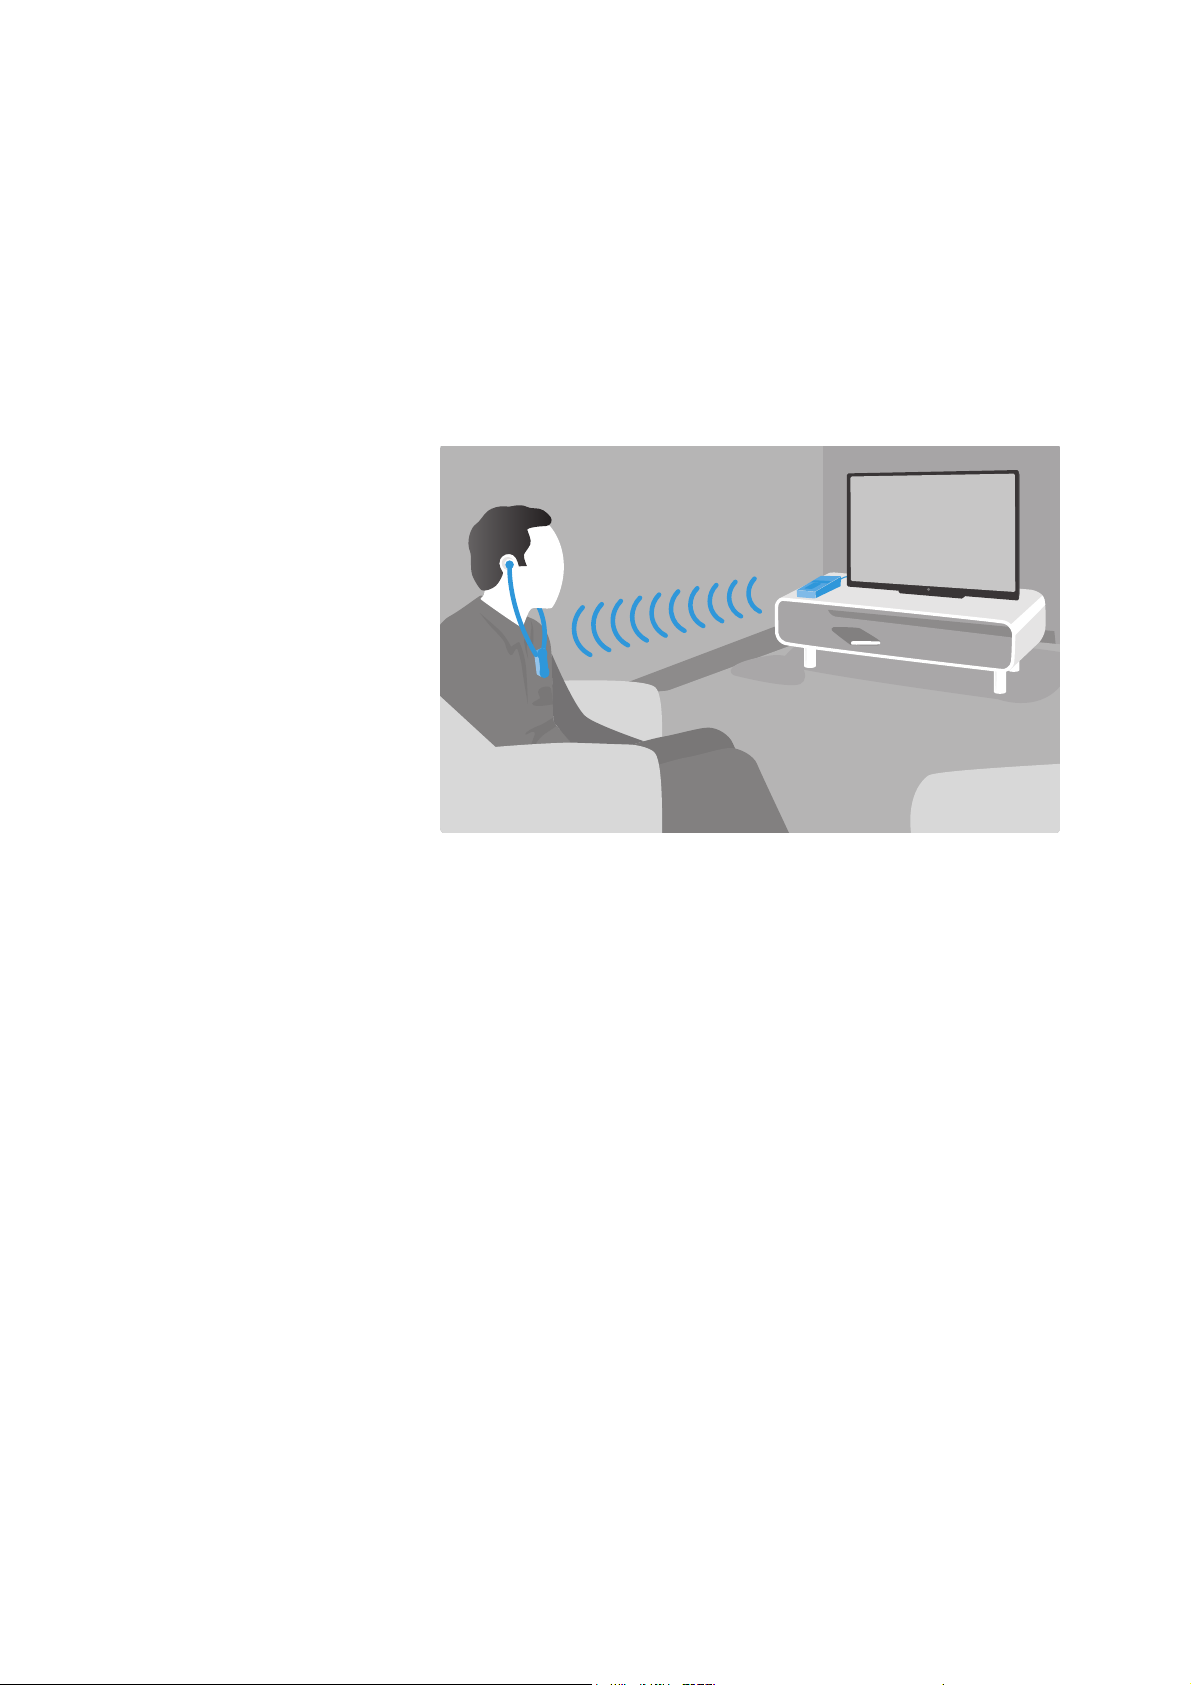
You can connect the transmitter either to a digital or an analog
audio source (e.g. a TV and a stereo hi-fi system).
If you connect an audio source to both inputs (digital and analog),
only the analog audio source will be reproduced.
You can also refer to the beginner’s video guides on how to
connect your digital wireless headphone system to a TV:
www.sennheiser.com/how-to-videos.
왘 Switch your audio source off before connecting the transmitter.
왘 Check the connection possibilities of your audio source (audio
output, usually marked “OUT”).
왘 Select the corresponding connection cable and, if necessary, a
suitable adapter
왘 To connect the transmitter to your audio source, refer to the con-
nection diagram suitable for your audio source (see the following chapters). Follow the color codings on the transmitter and on
the cables.
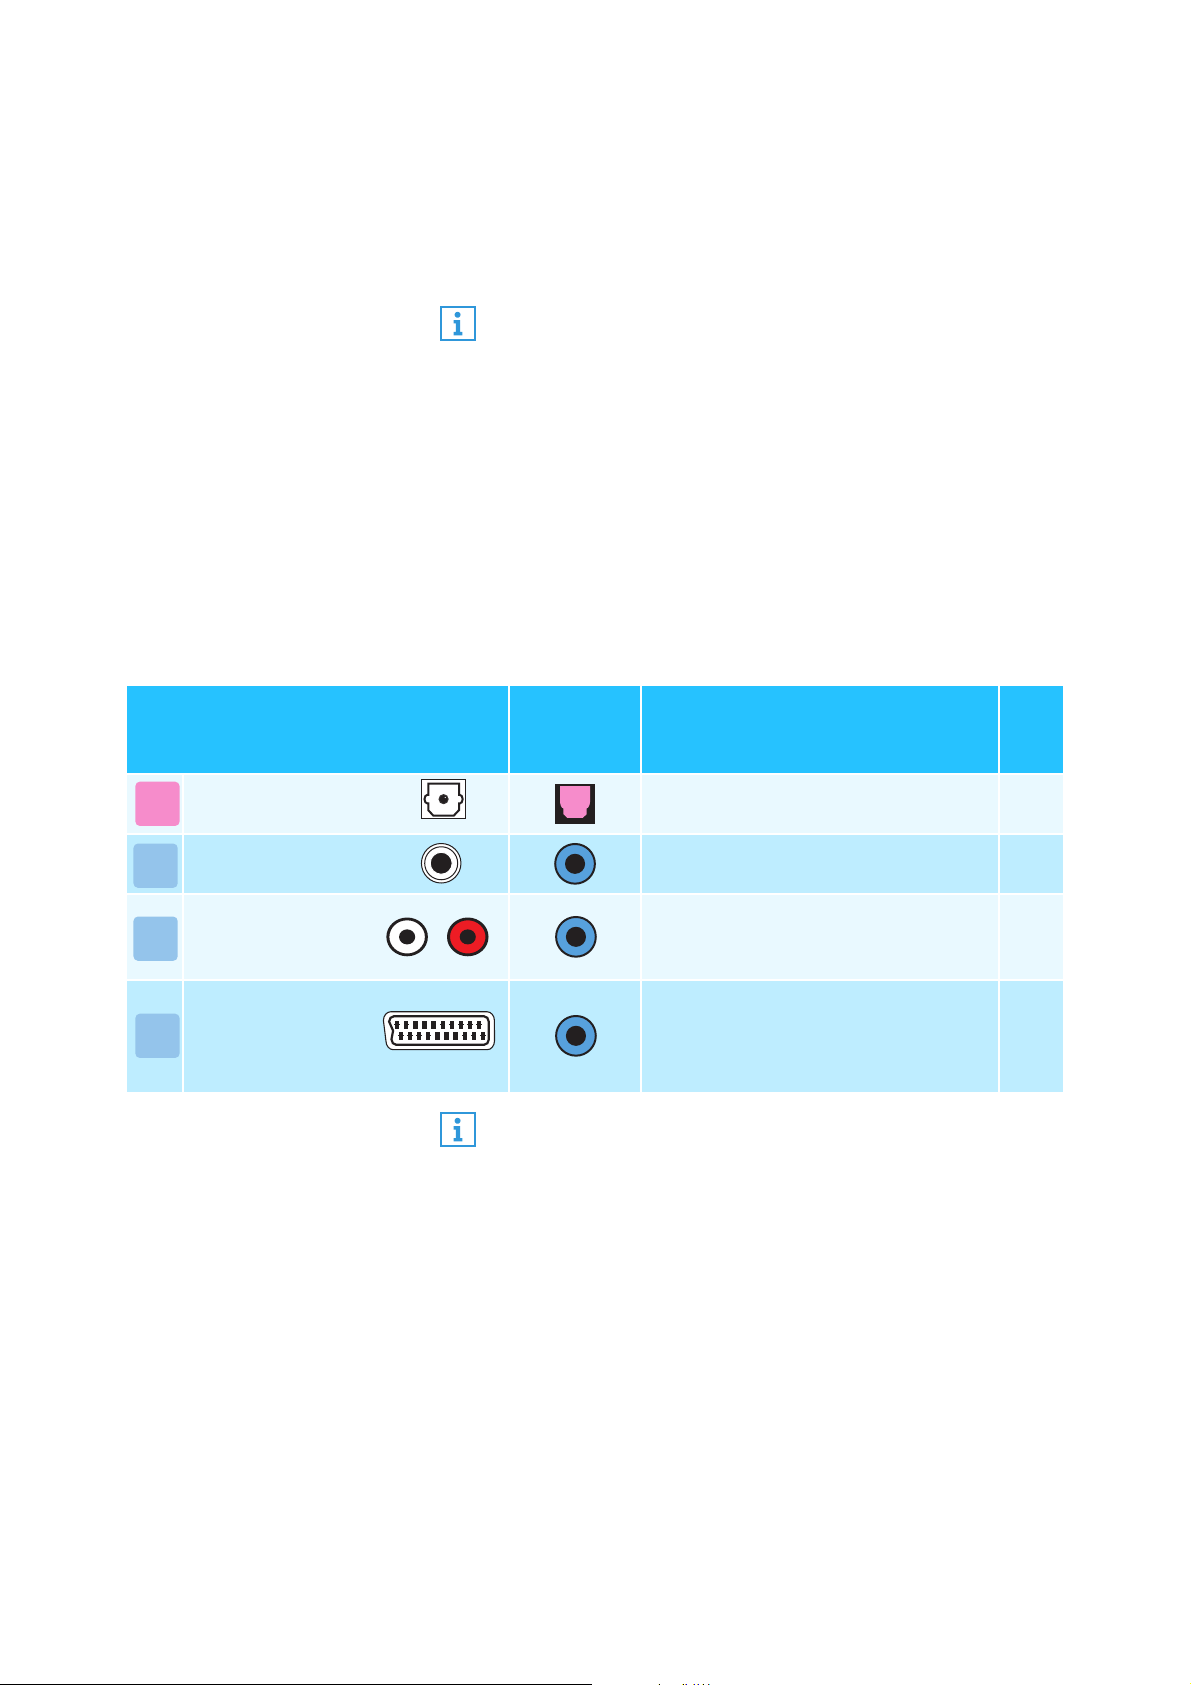
Connection possibilities of the
audio source
Optical (digital) Optical digital cable 12
3.5 mm jack socket
B
(analog)
RCA (analog)
C
SCART (analog)
Color coding
on the
transmitter
Accessories and adapters are available from your local Sennheiser partner.
Connection cable
Stereo audio cable 13
Stereo audio cable with RCA adapter
(3.5 mm jack socket to 2 RCA plugs;
optional accessory)
Stereo audio cable with SCART
adapter (3.5 mm jack socket to
SCART connector; optional accessory)
Page
14
14
Set 860 | 11
Page 12
Putting the Set 860 into operation
S
o
und
m
e
n
u
*
D
igital sound output
Bi
tstream
P
CM
Digital Audio
A
A
Connection possibility A: optical (digital)
To achieve the best possible listening experience, connect the transmitter to your TV or hi-fi system using the supplied optical digital
cable.
Note that your wireless headphone system only supports digital
signals coded in the
audio format of the connected audio source to PCM can be found in
the Sound menu or in the instruction manual of your device.
If an incompatible digital audio signal is being received, the
mitter status
duced.
LED flashes white and blue. Audio cannot be repro-
PCM format. Information on how to set the
Trans-
* The appearance of the Sound menu can vary depending on the
device you are using.
왘 Connect the optical digital cable to the pink Digital Optical In
audio input of the transmitter and to the optical output of your
audio source.
1A
OPTICAL OUT
Digital Audio
12 | Set 860
Page 13
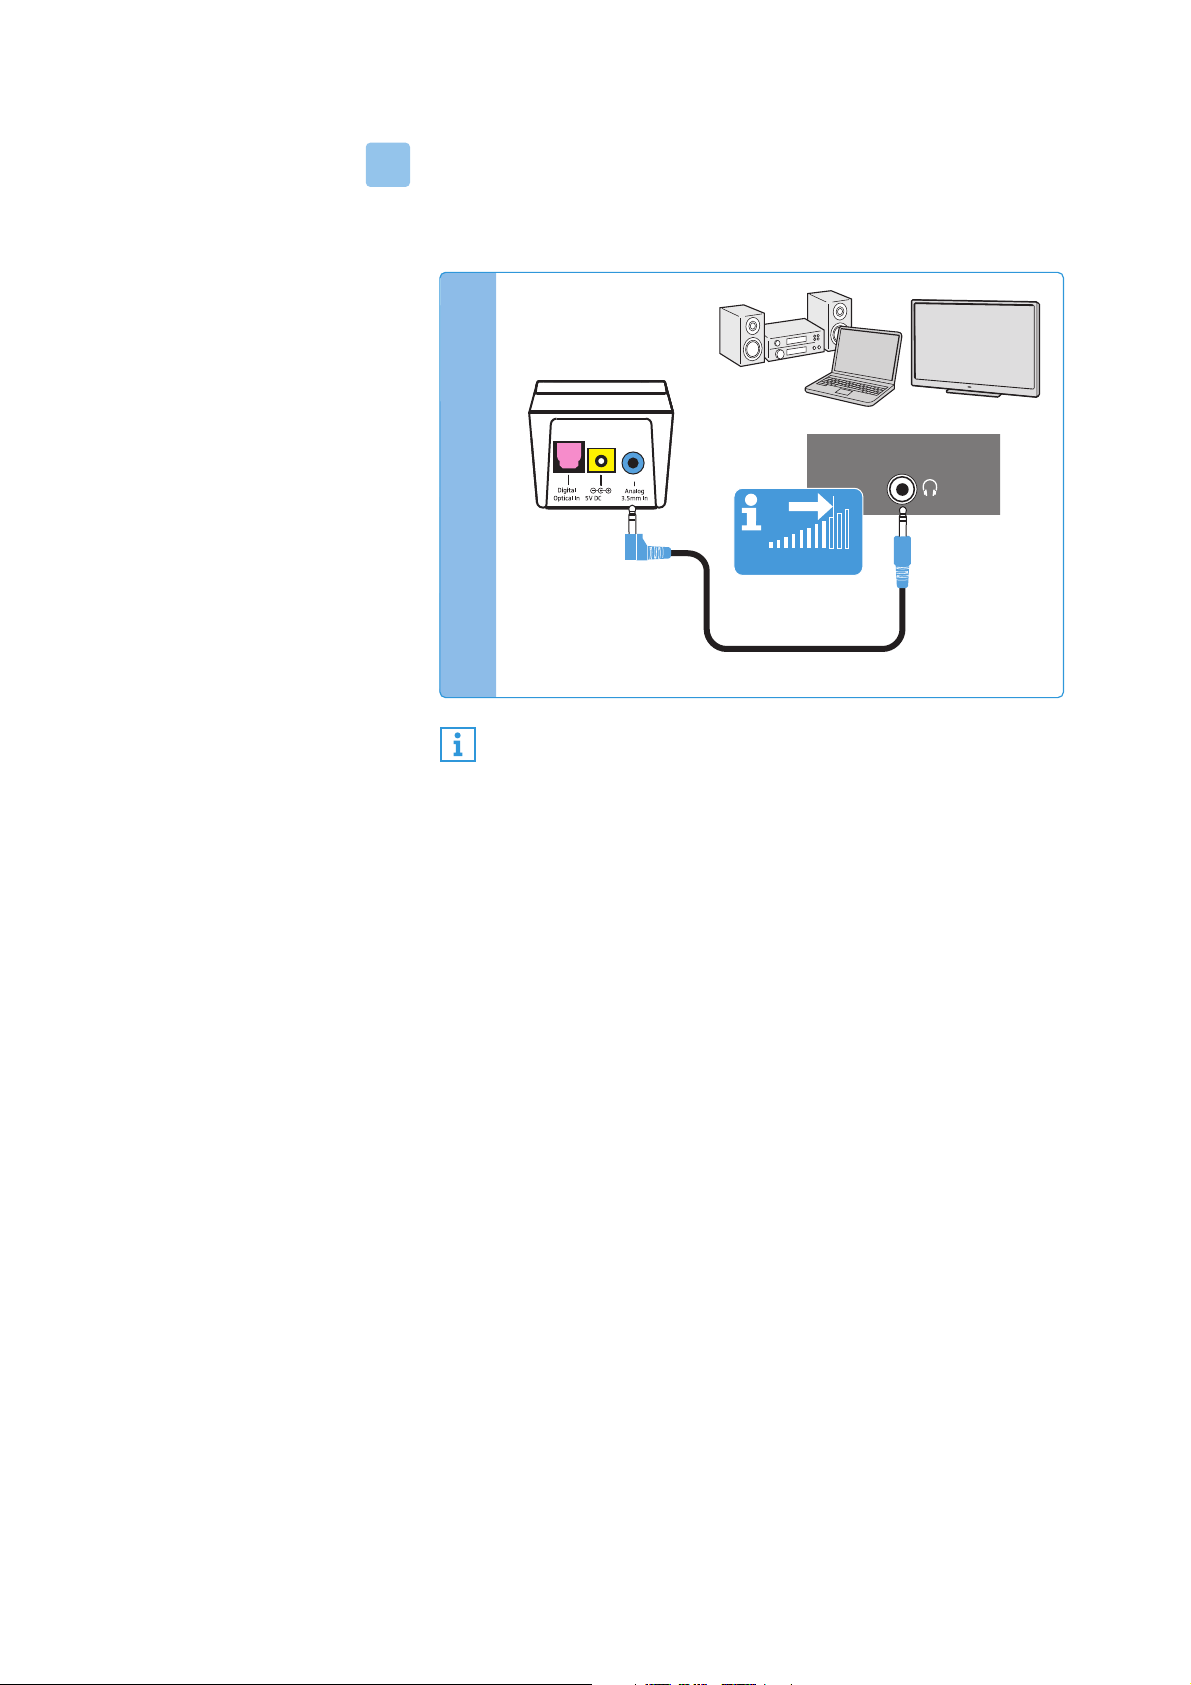
Putting the Set 860 into operation
B
TV VOLUME
Analog Audio
1A
Connection possibility B: 3.5 mm jack socket (analog)
왘 Connect the stereo audio cable to the blue Analog 3.5 mm In
audio input (3.5 mm jack socket) of the transmitter and to the
3.5 mm headphone socket of your audio source.
PHONES
Adjust the volume of the headphone socket on your TV/audio
source
to at least a medium level.
This improves the quality of wireless audio transmission. For
detailed information, please refer to the instruction manual of
your TV/audio source.
If the headphones socket on your audio source is a 6.3 mm/¼" jack
socket, you require an adapter (3.5 mm jack plug to 6.3 mm/¼" jack
plug, optional accessory) for the supplied 3.5 mm stereo audio
cable.
Some TV models mute the loudspeakers when you connect the
transmitter to the 3.5 mm headphone socket. Other TV models have
their own menu for adjusting the volume of the headphone socket.
Check the menu of your TV for information on how to deactivate the
muting function or adjust the volume. Alternatively, connect the TV
and the transmitter using a different connection possibility (A, C or
D).
Set 860 | 13
Page 14
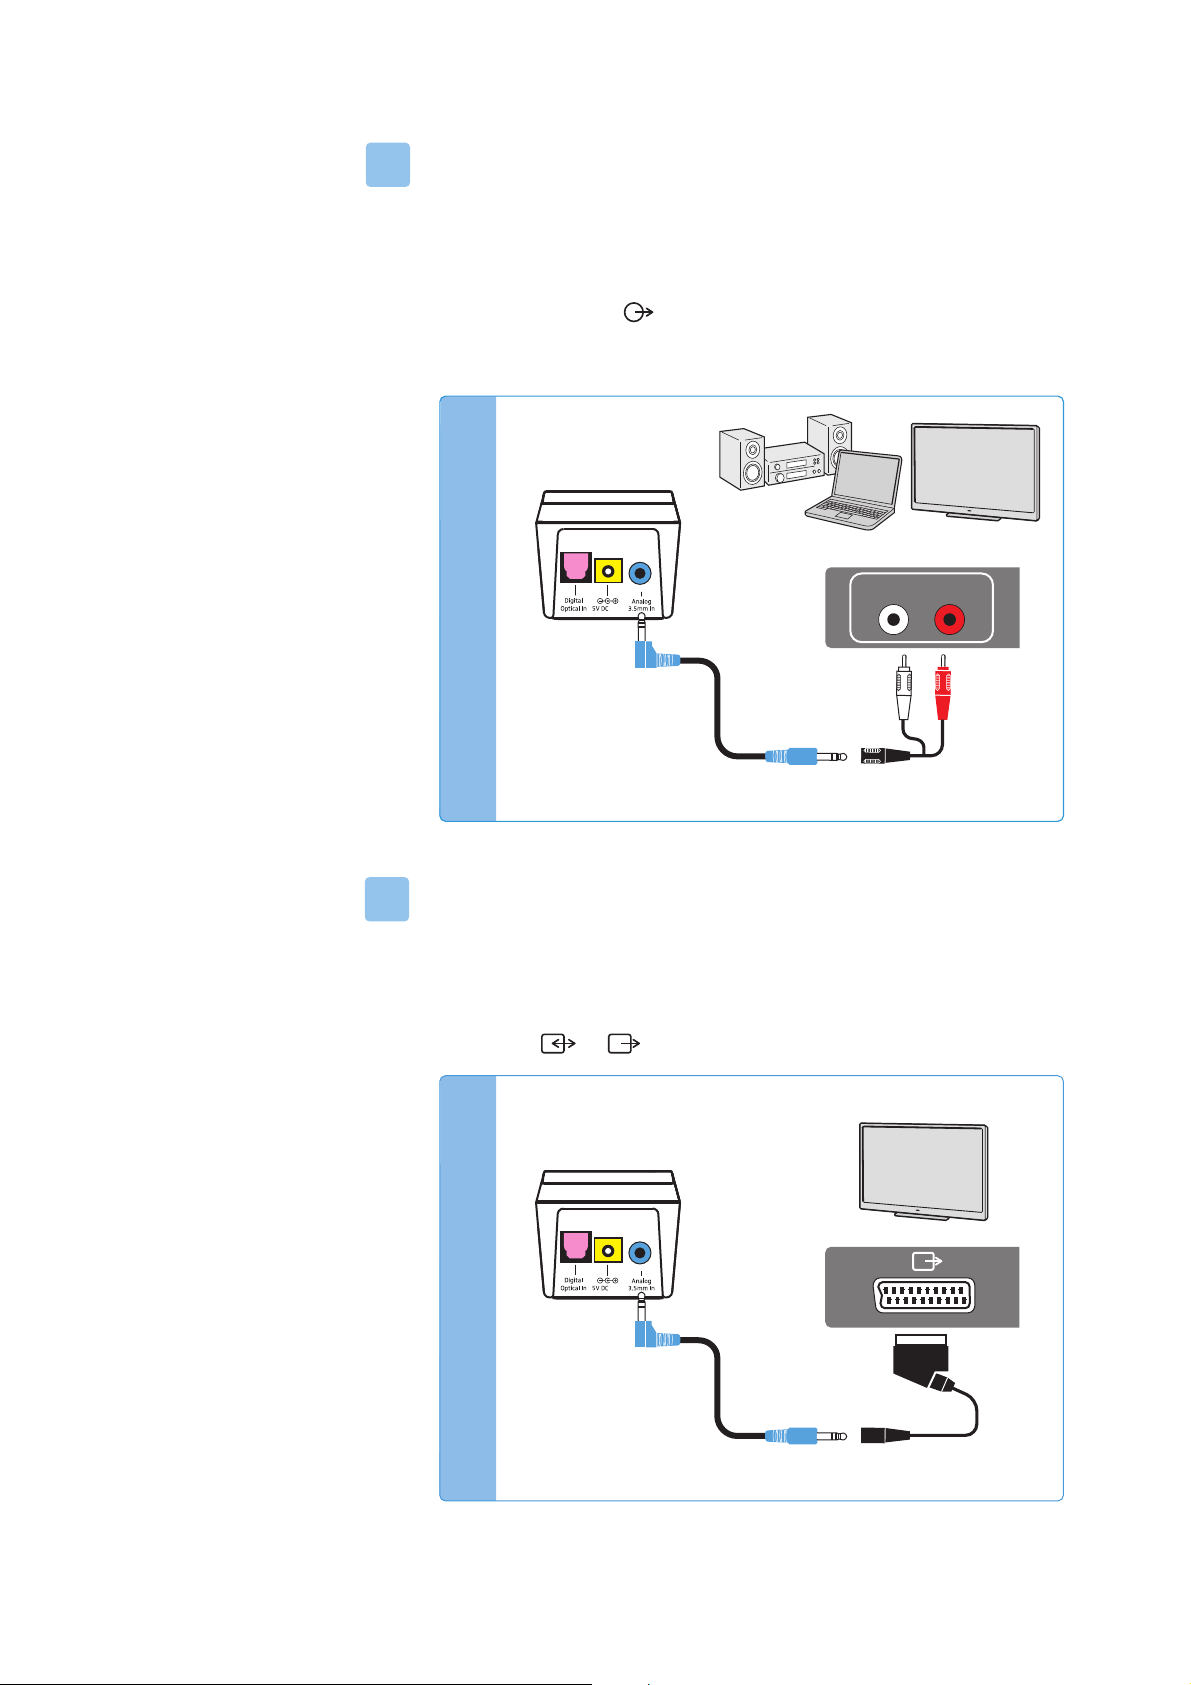
Putting the Set 860 into operation
C
Analog Audio
*
1A
D
Analog Audio
*
1A
Connection possibility C: RCA sockets (analog)
왘 Plug the RCA adapter* onto the stereo audio cable.
왘 Connect the stereo audio cable to the blue 3.5 mm jack socket of
the transmitter.
왘 Connect the RCA connectors to the RCA sockets (mostly labeled
“AUDIO OUT” or ) of your audio source. Connect the red connector to the red RCA socket and the white connector to the
white or black RCA socket.
AUDIO OUT
LR
* optional accessory
Connection possibility D: SCART socket (analog)
왘 Plug the SCART adapter* onto the stereo audio cable.
왘 Connect the stereo audio cable to the blue 3.5 mm jack socket of
the transmitter.
왘 Connect the SCART connector to the SCART socket (mostly
labeled or ) of your audio source.
14 | Set 860
* optional accessory
Page 15

Putting the Set 860 into operation
US
EU
UK
AU
2
1
3
Power
1A
1
A
Connecting the transmitter to the power supply system
1 Connect the connector of the power supply unit to the yellow
socket of the transmitter.
2 Select a suitable country adapter and slide it onto the power
supply unit until it clicks audibly into place.
3 Plug the power supply unit into the wall socket.
All LEDs on the transmitter light up for 5 seconds. The transmitter is in standby mode.
Set 860 | 15
Page 16

Putting the Set 860 into operation
3 h
100 %
Charging the stethoset receiver’s rechargeable battery
A complete charging cycle takes
about 3 hours
. Before using the
receiver for the first time, charge its rechargeable battery for a complete charging cycle without interruption.
When the rechargeable battery is almost empty, you hear 2 beeps
in the stethoset receiver. The
Battery
lights up white. The stethoset receiver switches off af
LED on the transmitter
ter a few min-
utes.
왘 Place the stethoset receiver into the transmitter’s charging com-
partment so that the volume buttons face upwards. The stethoset receiver is magnetically oriented to the correct position.
The stethoset receiver automatically switches off and the
LED on the transmitter lights up white. The LED seg-
tery
Bat-
ments display the charge status of the rechargeable battery.
When the rechargeable battery is fully charged, all LED segments
light up white.
Battery
16 | Set 860
LED Meaning
– The transmitter is not charging.
The rechargeable battery is being
1st LED segment flashes
charged. Less than 1/3 of the charge
capacity is reached.
1st LED segment lit,
nd
LED segment flashes
2
st
1
+ 2nd LED segments lit,
rd
3
LED segment flashes
All LED segments lit
Battery
LED flashes
rapidly
The rechargeable battery is being
charged. Up to 1/3 of the charge
capacity is reached.
The rechargeable battery is being
charged. Up to 2/3 of the charge
capacity is reached.
The rechargeable battery is fully
charged.
A charging error/battery error has
occurred (see page 28).
Page 17

Putting the Set 860 into operation
Always store the stethoset receiver in the transmitter’s
charging compartment to ensure that it is fully charged when
needed. The intelligent battery charging technology prevents
overcharging.
The display during charging can be set so that it automatically
switches off after 30 seconds (see page 32).
Displaying the remaining operating time of the rechargeable battery
When you switch the stethoset receiver on, the
plays the remaining operating time/charge status.
Battery
To indicate that the operating time is decreasing, each LED segment
slowly dims before it goes off completely.
If the actual operating time differs widely from the specified va
the rechargeable battery is probably exhausted and should be
replaced. Information on the rechargeable battery can be found on
page 28.
LED Meaning
Battery
flashes slowly
1st LED segment lit
1st + 2nd LED
segments lit
All LED segments lit
LED
Battery
Rechargeable battery is
empty;
recharge the rechargeable battery
approx. 6 hours of
operating time
approx. 12 hours of
operating time
approx. 18 hours of
operating time
LED dis-
lues,
The display of the remaining operating time can be set so that
it automatically switches off after 30 seconds (see page 32).
If more than one stethoset receiver is connected to the transmitter, the remaining operating time/charge status cannot be
displayed.
Using the charging reminder function
When the stethoset receiver is switched off and the transmitter
automatically switches off (standby mode), the
flash back and forth for 10 minutes to remi
thoset receiver.
왘 Charge the stethoset receiver by placing it into the transmitter’s
charging compartment (see page 16).
The LED stops flashing and the charging process starts.
You can also switch off the charging reminder function (see
page 32).
Battery
nd you to charge the ste-
LED will
Set 860 | 17
Page 18

Putting the Set 860 into operation
21
Selecting and replacing the ear pads
You can choose between:
• ear pads for larger ears (pre-mounted on delivery)
• ear pads for smaller ears
• ear pads for pressure-sensitive ears
To replace the ear pads:
1 Carefully remove the ear pads from the stethoset receiver.
2 Put the other ear pads on the stethoset receiver.
Spare ear pads in different materials and forms are available
from your Sennheiser partner.
18 | Set 860
Page 19

Using the Set 860
Vol +
Vol -
VOLUME
ON
ON
2
1
Using the Set 860
Switching the wireless headphone system on
WARNING
Danger of hearing damage due to high volumes!
This receiver allows you to set higher volumes than conventional
devices. Constant high-volume use can cause hearing damage.
왘 Before putting the stethoset receiver on, set the volume on the
receiver to a low level.
왘 Do not expose yourself to high volume levels for extended peri-
ods of time.
왘 Use a hearing profile (see page 24) that improves especially
speech intelligibility without the need for a high volume.
1 Switch your audio source on.
If the transmitter is connected to the headphone socket (see
page 13) of your TV/audio source, adjust the volume of the
headphone socket on your TV/audio source to at least a medium
level.
2 Take the stethoset receiver out of the transmitter’s charging
compartment and pull the ear bows apart so that you can put the
receiver on.
The stethoset receiver automatically switches on when you pull
the ear bows apart. The transmitter automatically switches on
and the
Transmitter status
LED lights up white or blue. The audio
transmission starts.
The remaining operating time of the stethoset receiver is dis-
played on the transmitter (see page 17).
Set 860 | 19
Page 20

Using the Set 860
OFF
Switching the wireless headphone system off
왘 Take the stethoset receiver off so that the ear bows fold inwards.
The stethoset receiver automatically switches off after 20 seconds. The transmitter automatically switches off (standby)
when there is no stethoset receiver connected. The
LED goes off.
status
왘 Always store the stethoset receiver in the transmitter’s charging
compartment to ensure that it is fully charged when needed.
The charging process starts (see page 16).
Transmitter
* LED goes off
If the stethoset receiver is outside the transmission range for
more than 5 minutes or if the transmitter receives no audio
signal for more than 30 minutes, the wireless headphone
system switches off automatically (standby).
To disconnect the transmitter from the power supply system (e.g.
when you are on holiday):
왘 Unplug the power supply unit from the wall socket.
20 | Set 860
Page 21

Using the Set 860
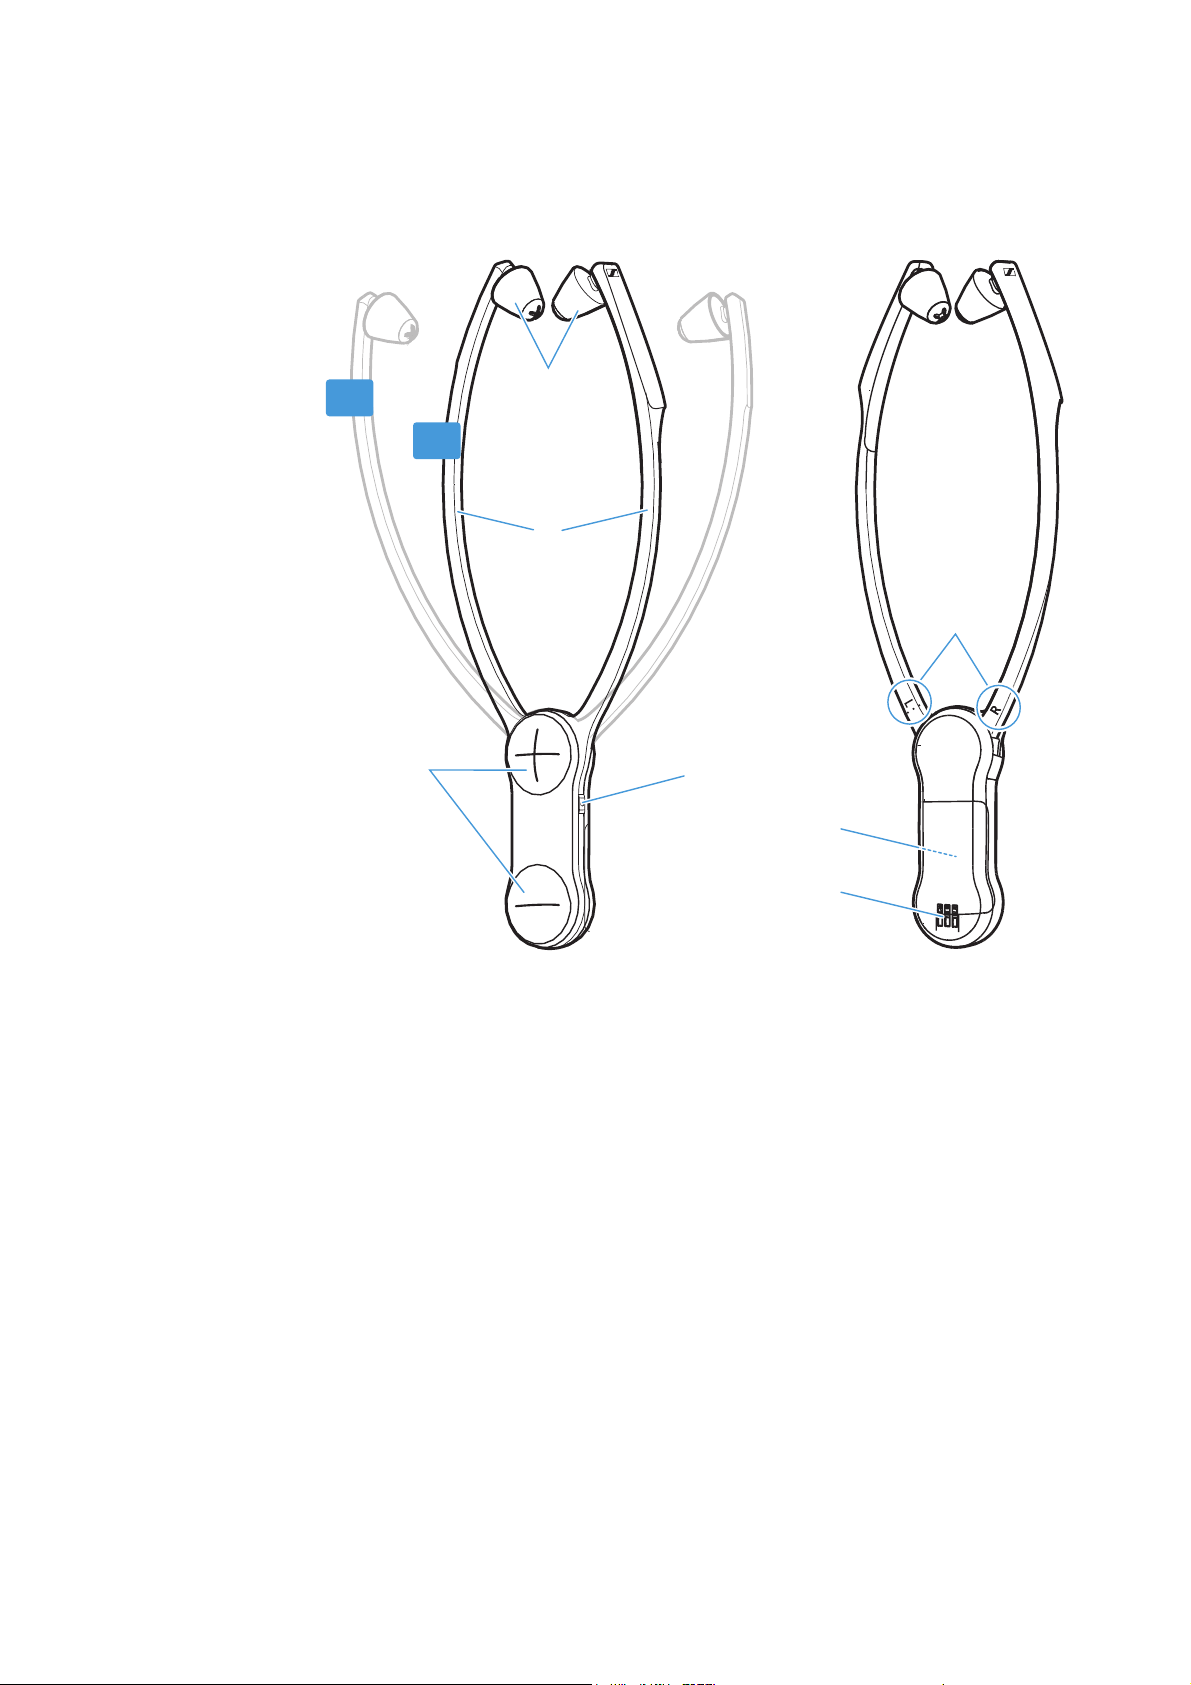
Wearing the stethoset receiver
왘 Wear the stethoset receiver so that it hangs freely from your
ears and rests lightly on your chest. When putting the stethoset
receiver on, observe the
rear of the ear bows. The volume buttons face away from your
body to facilitate ease of use.
왘 Wear the stethoset receiver so that
– the ear pads are positioned just in front of your ear canals.
– you feel a gentle pressure on your ears. The ear pads adapt to
your ear form. If you find the ear pads uncomfortable, try the
ear pads for smaller ears (Package contents, see page
– the stethoset receiver hangs freely from your ears and rests
lightly on your chest.
L (left) and R (right) markings on the
18).
Spare ear pads in different materials and forms are available
from your Sennheiser partner.
Set 860 | 21
Page 22

Using the Set 860
Vol +
Vol -
VOLUME
VOLUME
Adjusting the volume
WARNING
Danger of hearing damage due to high volumes!
왘 Before putting the stethoset receiver on, set the volume on the
receiver to a low level.
왘 Do not expose yourself to high volume levels for extended peri-
ods of time.
왘 Press the volume button + or the volume button – until the
volume is adjusted to a comfortable level. When the minimum or
maximum volume is reached, you hear a beep in the stethoset
receiver.
If you have set a very high volume level and switch the TV
headphone system off and on again, the volume is reset to a
moderate level to protect your hearing.
22 | Set 860
Page 23

Using the Set 860
3s
Adjusting the balance
The balance buttons allow for left/right volume adjustment. Adjust
the balance so that you hear equally well with both ears.
The balance setting is stored on the stethoset receiver. If you
are using several receivers with a transmitter, the respective
receivers are optimally adjusted to match the personal hearing preferences of the users (e.g. you and your partner).
Please note that the personal hearing preferences can only be
adjusted when only stethoset receiver is connected to the
transmitter.
You can switch your headphone system from stereo to mono
in order to be able to hear all details on either the right or left
ear (see page 30).
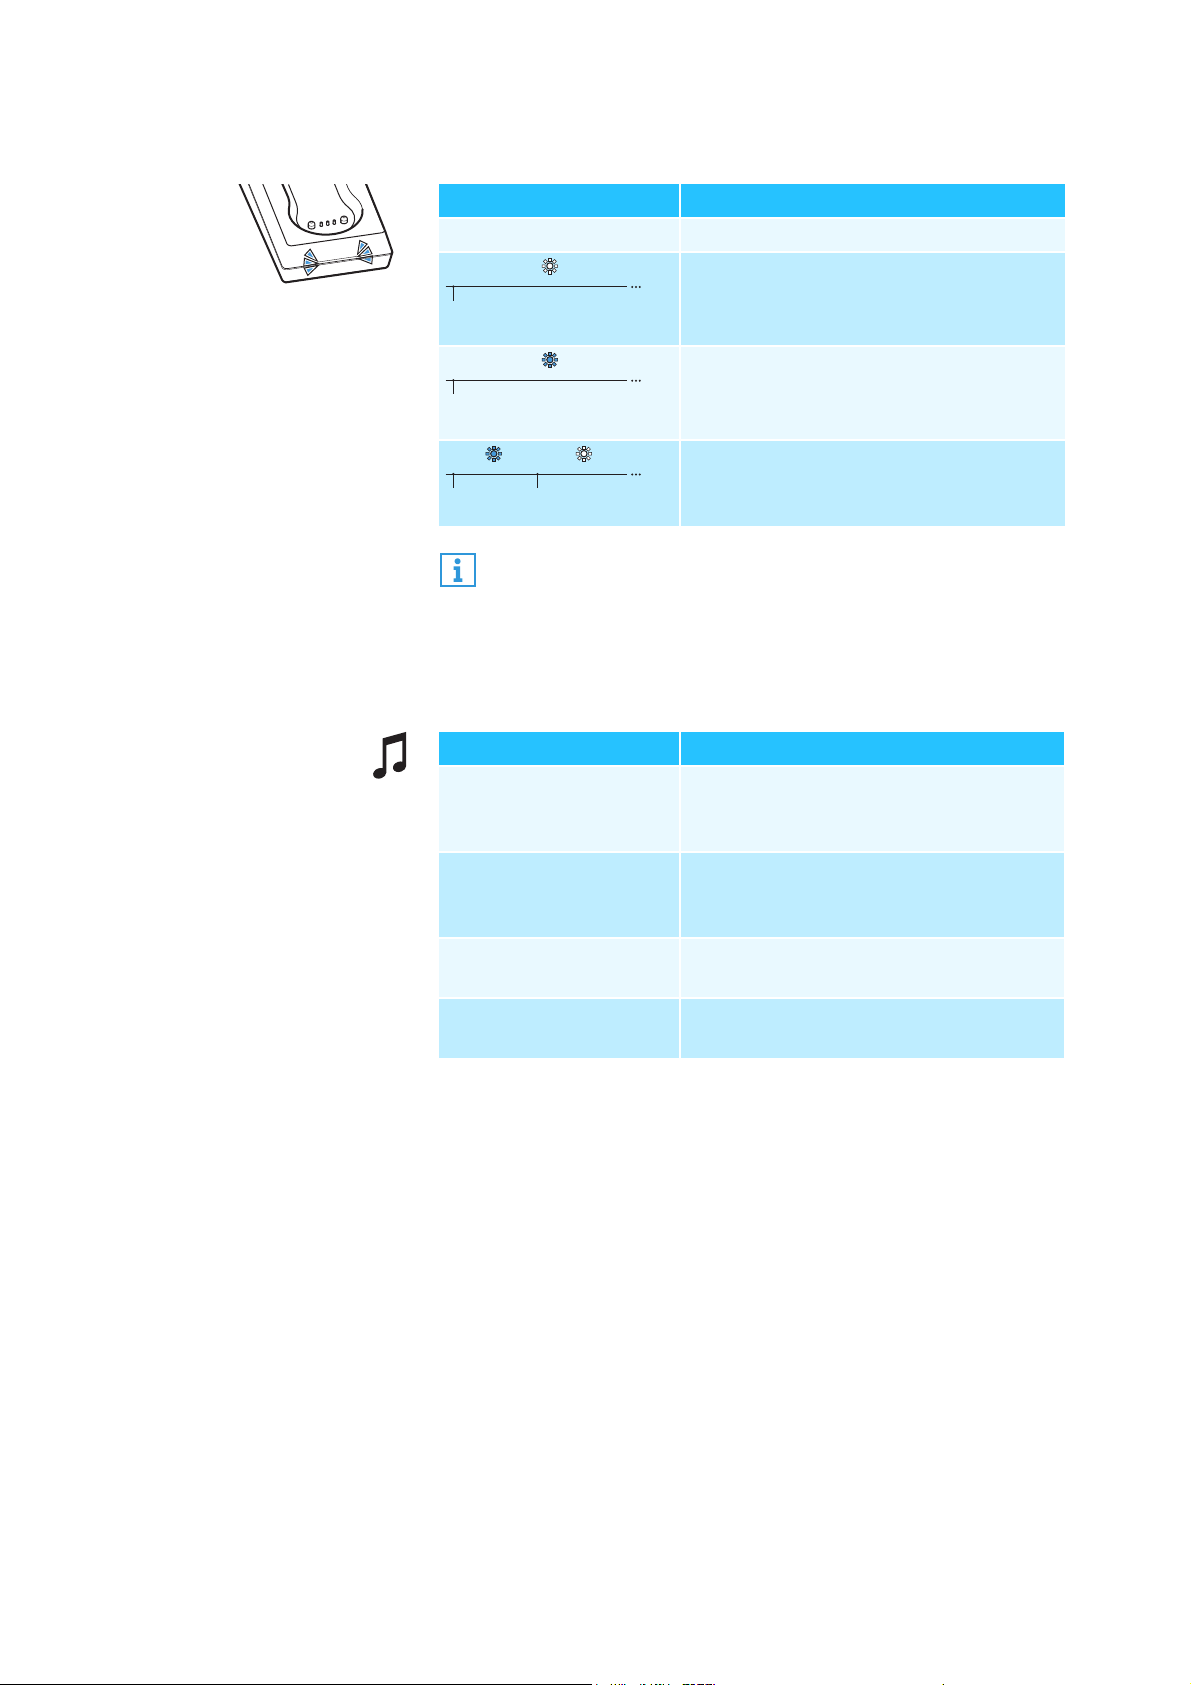
왘 Press the balance button R (right) or L (left) on the transmitter
to gradually increase or reduce the volume for your right or left
ear.
When the minimum or maximum balance setting is reached, you
hear a beep via the receiver.
L
BALANCE
To reset the balance setting to the middle setting:
왘 Simultaneously press the balance buttons R (right) and L (left)
on the transmitter for 3 seconds.
To prevent accidental adjustment of the balance settings, you
can activate the settings protection function (see page 33).
Set 860 | 23
Page 24

Using the Set 860
2s
Selecting a hearing profile for sound enhancement
The hearing profiles allow you to alter the sound of the audio signal
in order to improve the speech intelligibility and to adjust the sound
to suit your preferences. The profiles are used to specifically change
certain frequency ranges by e.g. boosting or attenuating low-fre
quency or high-frequency tones.
All hearing profiles feature a compression function which compensates for volume differences by boosting the volume of quiet passages and reducing the volume of loud passages if necessary.
The balance setting is saved on the stethoset receiver. If you
are using several receivers with a transmitter, the respective
receivers are optimally adjusted to match the personal hearing preferences of the users (e.g. you and your partner).
Please note that the personal hearing preferences can only be
adjusted when only stethoset receiver is connected to the
transmitter.
Displaying the activated hearing profile
-
Activated
hearing
profile
–
Hearing
profile 1
Hearing
profile 2
The activated hearing profile is not permanently displayed.
To check the activate hearing profile:
왘 Switch the stethoset receiver on by putting it on (see page 19).
왘 Briefly press the
Hearing profile
No LED segment lit
1st LED segment lit
2nd LED segment lit
LED
Hearing profile
The currently activated hearing profile is displayed for 10 seconds.
Sound enhancement Compression
The sound from the connected audio source
is reproduced unchanged.
Low-frequency tones are slightly boosted to
provide a warm, full sound.
High-frequency tones are reproduced less
piercing and clanking.
High-frequency tones are strongly boosted
to provide a crystal-clear sound, especially
for sibilants and high-frequency tones such
as twittering of birds.
button on the transmitter.
no
yes
yes
Hearing
profile 3
24 | Set 860
3rd LED segment lit
Low-frequency tones are attenuated so that
they cannot mask high-frequency tones.
A graphic representation of the hearing profiles can be found
on page 40.
yes
Page 25

Using the Set 860
Selecting a hearing profile
To select the hearing profile that best suits you, proceed as follows:
1 Switch your audio source on
and select a program where
speech is foregrounded.
ON
2 Put the stethoset receiver on
and make sure that only this
receiver is connected to the
transmitter. Otherwise, a hear-
2...4
ing profile cannot be adjusted.
3 Use the L and R buttons on the
transmitter to adjust the balance (see page 23). This
ensures that each subsequently
selected hearing profile is perfectly matched to your left/
right balance setting.
4 Press the
Hearing profile
button on the transmitter
for 2 seconds to select the next
hearing profile.
Press the button again for
2 seconds to switch to the next
hearing profile.
5 Test which of the hearing pro-
files (1, 2 or 3) gives you the
best sound quality and helps
you to hear best.
Your individual hearing profile
is adjusted and saved on the
stethoset receiver.
Since your level of hearing impairment may change over time,
we recommend that you repeat the selection of the hearing
profile from time to time.
If you switch to the next hearing profile, the speech intelligibility function is automatically deactivated so that you can
hear the hearing profile unchanged (see page 26).
2s
To prevent accidental adjustment of the hearing profile settings, you can activate the settings protection function (see
page 33).
Set 860 | 25
Page 26

Using the Set 860
Activating/deactivating the speech intelligibility function
When speech is mixed with annoying background noise, speech
may be difficult to understand.
The speech intelligibility function automatically detects and
reduces annoying background noise. The audio signal is perma
nently analyzed and adjusted accordingly so speech is foregrounded and easier to understand.
Application examples
Speech
Application
intelligibility
Advantage
function
TV motion
pictures, TV series
or audio books
Sportscasts activated The presentation muffled by
Music deactivated No speech, the speech
activated Dialogs muffled by
background music and noise
are easier to understand.
background noise in the
stadium is easier to
understand.
intelligibility function is not
needed.
-
왘 Press the
the function.
Speech intelligibility
Transmitter status
lights up blue
button to activate or deactivate
LED Speech intelligibility function
activated
Annoying background noise is
effectively reduced, speech becomes
clearer and easier to understand.
deactivated
26 | Set 860
lights up white
The speech intelligibility function can also be used in addition
to one of the hearing profiles 1-3.
If you are using several receivers with a transmitter, the
speech intelligibility function is activated or deactivated for all
receivers.
Page 27

Cleaning and maintaining the Set 860
Cleaning and maintaining the Set 860
CAUTION
Liquids can damage the electronics of the product!
Liquids entering the housing of the product can cause a short-circuit
and damage the electronics.
왘 Keep all liquids far away from the product.
왘 Do not use any solvents or cleansing agents.
To clean the wireless headphone system:
왘 Switch your wireless headphone system off and disconnect the
transmitter from the socket before cleaning.
왘 Clean the product only with a soft, dry cloth.
왘 Clean the charging contacts on the stethoset receiver and in the
charging compartment from time to time using e.g. a cotton
swab.
To clean the ear pads:
왘 Carefully remove the ear pads from the stethoset receiver.
왘 Clean the ear pads with warm soapy water and rinse thoroughly.
왘 Let the ear pads dry completely at room temperature.
왘 Put the ear pads back on the stethoset receiver.
For reasons of hygiene, you should replace your ear pads from
time to time. Spare ear pads in different materials and forms
are available from your Sennheiser partner.
Set 860 | 27
Page 28

Cleaning and maintaining the Set 860
Replacing the stethoset receiver’s rechargeable battery
The BAP 800 rechargeable battery of the stethoset receiver is compactly built into the receiver housing and does not have to be
replaced or removed.
If the operating time of the stethoset receiver decreases drastically
or if a charging error is displayed during charging (see page
rechargeable battery may be exhausted or defective and has to be
replaced.
CAUTION
Danger of damage to the product!
During the warranty period, the rechargeable batteries must only
be replaced or removed by an authorized Sennheiser service partner, otherwise the warranty will be null and void.
왘 Contact your Sennheiser service partner if the rechargeable bat-
teries need to be replaced or removed.
Outside the warranty period, the rechargeable batteries may be
replaced or removed by any qualified service center in an appropri
ate manner. Instructions for qualified service centers on how to
replace or remove the rechargeable batteries are available from
your Sennheiser service partner.
You need suitable tools for replacement. We therefore recommend
to have the rechargeable battery replaced by your Sennheiser ser
vice partner. To find a Sennheiser service partner in your country,
search at www.sennheiser.com.
16), the
-
-
28 | Set 860
Page 29

Using additional functions
1...4
2 31
ON
Using additional functions
The following additional functions are not required for normal use
of the wireless headphone system. You can, however, extend the
potential use of the system and adjust some of the functions to
your individual needs.
Pairing one or several stethoset receivers with the transmitter
The stethoset receiver and the transmitter of your wireless headphone system are factory pre-paired. The following steps are only
necessary if you want to pair additional stethoset receivers with the
transmitter.
You can simultaneously use up to 4 paired stethoset receivers with
your transmitter. All other paired and switched-on receivers cannot
connect to the transmitter.
If more than one stethoset receiver is connected to the transmitter, the remaining operating time/charge status and the
hearing profile cannot be displayed. In addition, the balance
and a hearing profile cannot be adjusted. These functions can
only be used/adjusted when only one stethoset receiver is
connected to the transmitter.
Option A (contact pairing)
왘 Place the stethoset receiver into the transmitter’s charging com-
partment.
The stethoset receiver is paired with the transmitter.
Option B (proximity pairing)
1
Place the stethoset receiver as close as possible to the transmitter.
2 Switch the stethoset receiver on by pulling the ear bows apart.
3 Simultaneously press and hold the volume buttons +/–. Once
paring is completed, the
Release the buttons.
Transmitter status
LED flashes white.
Set 860 | 29
Page 30

Using additional functions
2s
STEREO
2s
MONO
Switching between stereo and mono operation
With certain sound recordings, voice or audio signals are recorded
on one channel only (right or left stereo channel). This can result in
a loss of individually recorded voices or instruments, especially
when you have changed the balance setting.
In order to avoid this effect, you can switch between stereo and
mono operation.
This setting is saved on the transmitter, independent of the stethoset receiver you are using.
Activating stereo operation
왘 Simultaneously press the balance button R (right) and the
ing profile
The LED segment 1 and the
segment 3 and the
onds. Stereo operation is activated.
Activating mono operation
왘 Simultaneously press the balance button L (left) and the
profile
The LED segments 1, 2 and 3 light up for 10 seconds. Mono operation is activated.
button on the transmitter for 2 seconds.
Battery
Hearing profile
button on the transmitter for 2 seconds.
LED as well as the LED
LED light up for 10 sec-
Hearing
Hear-
30 | Set 860
Page 31

Using additional functions
3
1A
Advanced settings
The advanced settings allow you to adjust the wireless headphone
system to your individual needs and to protect the settings against
accidental changes.
Activating the protected
settings mode
You can change the advanced settings by activating the protected
settings mode:
1 Disconnect the transmitter from the power supply system by
unplugging the connector of the power supply unit.
2 Keep the
Hearing profile
button pressed and connect the
transmitter to the power supply system by connecting the connector of the power supply unit to the yellow socket of the transmitter.
21
A
1
1A
The protected settings mode is activated. The
LED flashes blue. The LED segments indicate the current settings as
specified in the following chapters:
• battery status display (see page 32)
• charging reminder function (see page 32)
Transmitter status
• settings protection function (see page 33)
Deactivating the protected
settings mode and saving the
advanced settings
To save the advanced settings and to deactivate the protected settings mode:
3 Disconnect the transmitter from the power supply system by
unplugging the connector of the power supply unit.
Set 860 | 31
Page 32

Using additional functions
Battery status display
This setting is saved on the transmitter, independent of the stethoset receiver you are using.
To change the battery status display:
왘 Make sure that the protected settings mode is activated (see
page 31).
왘 Press the Balance button L.
Status and display of
the
Battery
LED
permanently
activated (operation
and charging)*
Function/behavior
The current charge status is permanently
displayed during charging.
The remaining charge status is
permanently displayed during operation.
st
1
LED segment lit
activated for 30
seconds (operation
and charging)
The current charge status is displayed for
30 seconds during charging. Then all LEDs
go off. The charging process is continued.
The remaining charge status is displayed
st
1
LED segment off
for 30 seconds during operation. The
battery status display then goes off.
* factory setting
왘 Save the setting by disconnecting the transmitter from the
power supply system (see page 31).
Charging reminder function
This setting is saved on the transmitter, independent of the stethoset receiver you are using.
To activate or deactivate the function:
왘 Make sure that the protected settings mode is activated (see
page 31).
왘 Press the Balance button R.
Status and display of
the charging
Function/behavior
reminder function
activated*
When you switch the stethoset receiver off
and the transmitter switches to standby
mode, the battery status display will flash
rd
3
LED segment lit
for 10 minutes to remind you to charge the
stethoset receiver.
deactivated
After switching the wireless headphone
system off, all LEDs remain off.
rd
3
LED segment off
* factory setting
왘 Save the setting by disconnecting the transmitter from the
power supply system (see page 31).
32 | Set 860
Page 33

Using additional functions
Settings protection function
The settings protection function prevents accidental adjustment of
the hearing profile and the balance setting (this protection function
is saved on the
mono operation on the transmitter is no longer possible (this pro
stethoset receiver). Switching between stereo and
-
tection function is saved on the transmitter).
왘 Make sure that your stethoset receiver’s balance setting and
hearing profile are correctly adjusted (see page 23 and 24) and
that the transmitter is set to stereo or mono operation as desired
(see page 30).
왘 Make sure that the protected settings mode is activated (see
page 31).
왘 Place the stethoset receiver into the transmitter’s charging com-
partment.
왘 Press the volume button + on the stethoset receiver to activate
the settings protection function.
Status and display of
the settings protection
Function/behavior
function
The activated hearing profile and the
activated
balance setting for the stethoset
receiver cannot be changed/
deactivated. Switching between stereo
nd
2
LED segment lit
and mono operation on the transmitter
is not possible.
deactivated*
The hearing profiles can be changed at
any time (see page 24), the balance
setting can be changed (see page 23)
nd
2
LED segment off
and you can switch between stereo and
mono operation (see page 30).
* factory setting
왘 Save the setting by disconnecting the transmitter from the
power supply system (see page 31).
If you are using several stethoset receivers and want to protect the settings from accidental adjustment, you can place
the stethoset receivers, one after the other, into the transmitter’s charging compartment to activate the settings protection function (for the hearing profile, the balance setting and
stereo/mono operation).
Set 860 | 33
Page 34

Using additional functions
1
2
3
1
A
1
A
3s
Restoring the factory default settings
To restore the transmitter to the factory settings:
1 Disconnect the transmitter from the power supply system by
unplugging the connector of the power supply unit.
2 Simultaneously press and hold the buttons L, and R.
3 Connect the transmitter to the power supply system by connect-
ing the connector of the power supply unit to the yellow socket
of the transmitter while keeping the 3 buttons pressed for at
least 3 seconds.
All LEDs on the transmitter flash. The transmitter settings are
restored to the factory settings.
To restore a stethoset receiver to the factory settings:
왘 Place the stethoset receiver for 5 seconds into the transmitter’s
charging compartment.
The settings of the stethoset receiver, including the pairing settings, are also restored to the factory settings.
If you place the stethoset receiver into the transmitter’s
charging compartment at the very beginning of the restore
procedure, the factory settings of the transmitter and the
receiver are restored simultaneously.
A
1
왘 Disconnect the transmitter from the power supply system by
unplugging the connector of the power supply unit.
The factory settings are restored and you can use the wireless
headphone system again.
34 | Set 860
Page 35

Using additional functions
Charging the rechargeable battery using the
800 charging adapter
MCA
If you have purchased an additional stethoset receiver or an
optional MCA 800 charging adapter, you can also charge the ste
thoset receiver using the charging adapter.
WARNING
Interference due to magnetic fields!
The MCA 800 charging adapter generates stronger permanent magnetic fields that could cause interference with cardiac pacemakers
and implanted defibrillators (ICDs).
왘 Always maintain a distance of at least 3.94” (10 cm) between the
holding magnets of the charging adapter and the cardiac pacemaker or implanted defibrillator.
1 Select a suitable country adapter and slide it onto the power
supply unit until it clicks audibly into place.
2 Connect the connector of the power supply unit to the connec-
tion socket of the MCA 800 charging adapter.
-
3 Plug the power supply unit into the wall socket.
4 Connect the charging adapter to the charging contacts on the
stethoset receiver. The charging adapter is magnetically oriented to the correct position.
The rechargeable battery is being charged. The LED on the
charging adapter lights up red. When the rechargeable battery is
fully charged, the LED lights up green.
21
US
UK
AU
3 4
EU
3 h
100 %
You can also use the stethoset receiver during charging.
Please note, however, that the receiver can get slightly warm
during charging. The charge status of the rechargeable battery is displayed on the transmitter (see page 16).
If the LED on the charging adapter flashes red and green, a charging
error/battery error has occurred. In this case, disconnect the
charging adapter from the stethoset receiver. More information on
the rechargeable battery can be found on page
28.
Set 860 | 35
Page 36

If a problem occurs ...
If a problem occurs ...
Problem Possible cause Possible solution Page
The transmitter
does not switch
on
The headphones
cannot be
switched on
No sound
No audio signal
when a digital
audio source is
connected
No connection to the power supply
system.
The rechargeable battery is empty. Recharge the rechargeable battery.
The rechargeable battery is deep
discharged.
No connection to the power supply
system.
The audio plug is not properly connected.
The audio source is switched off. Switch the audio source on. –
The volume of the analog audio
source is either set to the minimum
or is on mute.
The audio cable is defective. Replace the audio cable. –
The stethoset receiver is not correctly paired with the transmitter
(e.g. additional stethoset receiver).
Cables are connected to both the
digital and the analog audio input.
The connected digital audio source
uses an incompatible audio format.
Transmitter status
The
white and blue.
LED flashes
Check the connections of the power
supply unit.
Recharge the rechargeable battery for
several hours. If the rechargeable battery is deep discharged, the charging
process might take a while to start
(up to 1 hour).
Check the connections of the power
supply unit.
Check the audio plug connection. 11
Increase the volume on the audio
source to at least a medium level/
deactivate the muting function on the
audio source.
Pair the stethoset receiver with the
transmitter again.
Remove the cable from the analog
audio input.
Set the audio format of your audio
source to “PCM”, with a sampling rate
of max. 96 kHz (see the instruction
manual of the audio source).
15
16
15
–
29
11
–
Occasional
sound dropouts,
it might be that
you hear 5
beeps via the
receiver
Sound too low
36 | Set 860
The stethoset receiver is out of the
transmitter’s range.
The signal is shielded.
There are interfering devices (e.g.
WiFi router, Bluetooth devices or
microwaves) in the vicinity.
The volume on the stethoset
receiver is adjusted too low.
The volume of the analog audio
source is adjusted too low.
Reduce the distance between the stethoset receiver and the transmitter.
Remove obstacles between the transmitter and the stethoset receiver.
Change the position of the transmitter
or of the receiver.
Separate the transmitter from other
wireless devices by at least 50 cm/
20".
Increase the volume on the stethoset
receiver.
Increase the volume of the analog
audio source to at least a medium
level (approx. 1 V
rms
).
–
–
10
22
–
Page 37

If a problem occurs ...
Problem Possible cause Possible solution Page
The balance is misadjusted. Adjust the balance. 23
Sound only on
one ear
Sound is less
spatial
Sound is distorted
You hear echoes
when using the
stethoset
receiver with a
TV
The battery
status display
goes off
2 beeps during
operation
The operating
time decreases
A hearing profile, the balance
or stereo/mono
operation
cannot be activated or
changed
The audio cable is not properly connected.
The TV has only a mono headphone
socket.
Check the audio plug connection. 11
Use an adapter (mono to stereo jack
socket) to connect the transmitter to
–
the TV.
Mono operation is activated. Activate stereo operation. 30
The audio cable is defective. Replace the audio cable. –
The signal of the audio source is
distorted.
The volume on the stethoset
receiver is adjusted too high.
Some TVs can adjust a delay or
latency of the audio signal for the
digital audio output.
The battery status display is set so
that it goes off after 30 seconds.
More than one stethoset receiver is
currently connected to the transmitter.
The rechargeable battery is almost
empty.
The rechargeable battery is
exhausted.
The settings protection function is
activated.
More than one stethoset receiver/
receiver is currently connected to
the transmitter.
Reduce the volume of the audio
source.
Reduce the volume on the stethoset
receiver.
Check the audio output settings of
your TV and set the latency to “0”.
Set the battery status display so that
it is permanently displayed.
–
22
–
32
This function is only possible when
only one stethoset receiver/receiver is
–
connected to the transmitter.
Recharge the rechargeable battery. 16
Have the rechargeable battery
replaced by an authorized Sennheiser
28
service partner.
Deactivate the settings protection
function (for the hearing profile, the
33
balance and stereo/mono operation).
This function is only possible when
only one stethoset receiver/receiver is
–
connected to the transmitter.
The stethoset
receiver does
not connect to
the transmitter
The stethoset receiver is not paired
with the transmitter.
The distance to the transmitter is
too large.
4 stethoset receivers are currently
connected to the transmitter.
Pair the stethoset receiver with the
transmitter.
Reduce the distance between the stethoset receiver and the transmitter.
Up to 4 stethoset receivers can be
simultaneously used with the transmitter.
29
–
–
If a problem occurs that is not listed in the above table or if the problem cannot be solved with the
proposed solutions, visit the Set
860 product page at www.sennheiser.com for the most up-to-date
list of frequently asked questions.
You may also contact your local Sennheiser partner for assistance. To find a Sennheiser partner in your
country, search at www.sennheiser.com.
Set 860 | 37
Page 38

If a problem occurs ...
Leaving the range of the transmitter
The range of the transmitter largely depends on environmental conditions such as wall thickness, wall composition etc. If the headphones leave the range of the transmitter, the audio first cuts out
occasionally until it finally cuts out completely. You hear alerts in
the stethoset receiver.
If you re-enter the transmission range within 5 minutes, the connection is automatically re-established.
If you spend more than 5 minutes outside the transmission range,
the stethoset receiver switches off automatically.
38 | Set 860
Page 39

Specifications
Set 860 system
Carrier frequency 2.4 to 2.4835 GHz
Modulation 8-FSK Digital
Signal-to-noise ratio
RF output power max. 10 dBm
Audio latency < 65 ms
Range up to 70 m (line of sight)
Stethoset receivers that can
be simultaneously connected
to the transmitter
Temperature range
Relative air humidity (noncondensing)
analog input: typ. 83 dBA at 1 V
digital input: > 90 dBA
4
operation: 5 °C to +40 °C
storage: -25 °C to +70 °C
operation: 10 to 80 %
storage: 10 to 90 %
Specifications
rms
RR 800 stethoset receiver
Type intra-aural, closed
Transducer principle dynamic, neodymium magnets
Ear pad material silicone
Frequency response 15 Hz to 16 kHz
Sound pressure level 125 dB at 1 kHz, 3 % THD
THD < 0.5 % at 1 kHz, 100 dB SPL
Operating time up to 18 hours
Charging time of recharge-
able battery
Power supply
Weight
(incl. rechargeable battery)
Dimensions
(switched off, W x H x D)
up to 3 hours
built-in BAP 800 lithium polymer
rechargeable battery, 3.7 V,
350 mAh
approx. 61 g
approx. 102 x 265 x 23 mm
Set 860 | 39
Page 40

Specifications
10
5
0
-5
-10
-15
-20
0 Hz 0.25 0.5 1 21.5 3 4
Frequency/kHz
6
Gain/dB
TR 860 transmitter
digital input: optical
supported data streams:
Connections
PCM, 32 - 96 kHz/16 - 24 bit
analog input: 3.5 mm jack socket
input voltage range: 0.15 to 4.0 V
Power supply 5 V , 1 A
operation: typ. 1 W
Power consumption
standby:
0.5 W
(without charging)
Dimensions (W x H x D) approx. 50 x 42 x 270 mm
NT 5-10AW power supply unit
pk
Nominal input voltage/
nominal input current
100 – 240 V~/300 mA
Power frequency 50 – 60 Hz
Nominal output voltage 5 V
Nominal output current 1 A
Temperature range
Relative air humidity
(non-condensing)
operation: 0 °C to +40 °C
storage: -25 °C to +70 °C
operation: 10 to 80 %
storage: 10 to 90 %
Hearing profiles 1-3
Lows Midrange Highs
40 | Set 860
Profile 1
Profile 2
Profile 3
Page 41

Manufacturer Declarations
Manufacturer Declarations
Warranty
Sennheiser electronic GmbH & Co. KG gives a warranty of 24 months
on this product.
For the current warranty conditions, please visit our website at
www.sennheiser.com or contact your Sennheiser partner.
FOR AUSTRALIA ONLY
Sennheiser goods come with guarantees that cannot be excluded
under the Australian Consumer Law. You are entitled to a replace
ment or refund for a major failure and compensation for any other
reasonably foreseeable loss or damage. You are also entitled to
have the goods repaired or replaced if the goods fail to be of accept
able quality and the failure does not amount to a major failure.
This warranty is in addition to other rights or remedies under law.
Nothing in this warranty excludes, limits or modifies any liability of
Sennheiser which is imposed by law, or limits or modifies any
remedy available to the consumer which is granted by law.
To make a claim under this warranty, contact Sennheiser Australia
Pty Ltd, Unit 3, 31 Gibbes Street Chatswood NSW 2067, Australia;
Phone: (02) 9910 6700, email: service@sennheiser.com.au
All expenses of claiming the warranty will be borne by the person
making the claim.
The Sennheiser International Warranty is provided by Sennheiser
Australia Pty Ltd (ABN 68 165 388 312), Unit 3, 31 Gibbes Street
Chatswood NSW 2067, Australia.
-
-
In compliance with the following requirements
EU declaration of conformity
• ErP Directive (2009/125/EC)
• RoHS Directive (2011/65/EU)
Hereby, Sennheiser electronic GmbH & Co. KG declares that the radio
equipment type TR 860, RR 800 is in compliance with the Radio
Equipment Directive 2014/53/EU.
The full text of the EU declaration of conformity is available at the
following internet address: www.sennheiser.com/download.
Notes on disposal
• WEEE Directive (2012/19/EU)
• Battery Directive (2006/66/EC & 2013/56/EU)
The symbol of the crossed-out wheeled bin on the product, the bat-
tery/rechargeable battery and/or the packaging indicates that
these products must not be disposed of with normal household
waste, but must be disposed of separately at the end of their ope
rational lifetime. For packaging disposal, please observe the legal
regulations on waste segregation applicable in your country.
Further information on the recycling of theses products can be
obtained from your municipal administration, from the municipal
collection points, or from your Sennheiser partner.
-
Set 860 | 41
Page 42

Manufacturer Declarations
SENNHEISER
Model No:
FCC Declaration of Conformity (DoC)
We,
Sennheiser Electronic Corporation
One Enterprise Drive • Old Lyme •
CT 06371 • USA
Tel: +1 (860) 434 9190
Fax: +1 (860) 434 1759
declare the above device comply with the requirements of Federal Communic ations Commis sion.
This device compli es with Part 15 of the FCC rules. Operation is s ubjected to t he following two c onditions :
1) This device may not cause harm ful interference, and
2) This device must accept any interference received, inc luding int erference that m ay c ause undesi red operation.
Respons ibl e Party : Michael Lieske
TR 860, RR 800
The separate collection of waste electrical and electronic equipment, batteries/rechargeable batteries and packagings is used to
promote the reuse and recycling and to prevent negative effects
caused by e.g. potentially hazardous substances contained in these
products. Herewith you make an important contribution to the pro
tection of the environment and public health.
Statements regarding FCC and Industry Canada
-
This device complies with Part 15 of the FCC rules and RSS-247 of
Industry Canada. Operation is subject to the following two condi
tions: 1) This device may not cause harmful interference, and 2)
This device must accept any interference received, including inter
ference that may cause undesired operation.
This equipment has been tested and found to comply with the limits
for a Class B digital device, pursuant to part 15 of the FCC rules and
RSS-247 of Industry Canada. These limits are designed to provide
reasonable protection against harmful interference in a residential
installation. This equipment generates, uses and can radiate radio
frequency energy and, if not installed and used in accordance with
the instructions, may cause harmful interference to radio communi
cations. However, there is no guarantee that interference will not
occur in a particular installation. If this equipment does cause harm
ful interference to radio or television reception, which can be determined by turning the equipment off and on, the user is encouraged
to try to correct the interference by one or more of the following
measures:
• Reorient or relocate the receiving antenna.
• Increase the separation between the equipment and receiver.
• Connect the equipment into an outlet on a circuit different from
that to which the receiver is connected.
• Consult the dealer or an experienced radio/TV technician for
help.
42 | Set 860
Changes or modifications made to this equipment not expressly
approved by Sennheiser electronic Corp. may void FCC authorization
to operate this equipment.
CAN ICES-3 (B)/NMB-3(B)
-
-
-
-
Page 43

Manufacturer Declarations
RF Radiation Exposure Information
Since the radiated output power of this device is far below the FCC
radio frequency exposure limits, it is not subjected to routine RF
exposure evaluation as per Section 2.1093 of the FCC rules.
This device meets FCC RF exposure guidelines for an uncontrolled
environment. The transmitter of this device should be installed and
operated at least 20 cm away from the user’s body. Use of other
accessories not verified by the manufacturer may not ensure com
-
pliance with FCC RF exposure guidelines.
This transmitter must not be co-located or operated in conjunction
with any other antenna or transmitter.
Information sur l’exposition aux rayonnements radio fréquence (RF)
La puissance RF rayonnée de cet appareil étant de loin inférieure
aux limites imposées par la FCC, il n’est pas soumis à la réglementa
tion sur l’exposition aux RF selon la section 2.1093 de la réglementation FCC.
Cet équipement est conforme aux limites d‘exposition aux rayonnements imposées par la FCC pour un environnement non réglementé.
L‘émetteur de cet équipement doit être installé et utilisé à une dis
tance minimale de 20 cm du corps de l‘utilisateur. L‘utilisation
d‘autres accessoires non homologués par le fabricant remet en
cause la conformité des normes imposées par la FCC.
Cet émetteur ne doit pas être positionné à proximité d‘une autre antenne ou d‘un autre émetteur, ni utilisé avec une autre antenne ou un autre émetteur.
Trademarks
Sennheiser is a registered trademark of
Sennheiser
electronic GmbH & Co. KG.
Other product and company names mentioned in this instruction
manual may be the trademarks or registered trademarks of their
respective holders.
Set 860 | 43
Page 44

Sennheiser electronic GmbH & Co. KG
Am Labor 1, 30900 Wedemark, Germany
www.sennheiser.com
Publ. 08/17, 570711/A02
 Loading...