

Page 1
S1 DIGITAL
Instruction manual
Page 2

Contents
Contents
Important safety information .................................................................................. 2
The S1 DIGITAL headset ............................................................................................. 4
Delivery includes ........................................................................................................ 5
Product overview ....................................................................................................... 6
Overview of the headset ............................................................................................6
Overview of the control unit .....................................................................................7
Putting the S1 DIGITAL into operation .................................................................... 8
Connecting the headset to the intercom ................................................................8
Powering the headset ................................................................................................8
Attaching the belt clip, the cable clip and the design caps ..............................10
Connecting the headset to a device ...................................................12
Using the S1 DIGITAL ............................................................................................... 15
Individually adjusting the headset and wearing it ............................................15
Switching the headset on/off ................................................................................17
Switching the Bluetooth function on/off .............................................................17
Adjusting the headset to the listening situation ...............................................18
Remote-controlling connected Bluetooth devices .............................................22
Resetting the settings of the headsets ................................................................25
Bluetooth
Transporting the S1 DIGITAL ..................................................................................26
Cleaning/maintaining the S1 DIGITAL ................................................................... 27
If a problem occurs ... ...............................................................................................29
Accessories and spare parts ...................................................................................30
Valuable information on NoiseGard
Specifications ............................................................................................................34
Manufacturer declarations .....................................................................................36
TM
/digital .....................................................31
S1 DIGITAL | 1
Page 3

Important safety information
Important safety information
왘 Please read this instruction manual carefully and completely before using the
product.
왘 Always include this instruction manual when passing the product on to third
parties.
왘 This instruction manual is also available on the Internet at
www.sennheiser-aviation.com or www.sennheiser.com.
Preventing health problems and accidents
왘 Always maintain a distance of at least 3.94“ (10 cm) between the ear cups and
the cardiac pacemaker or implanted defibrillator since the product generates
permanent magnetic fields.
왘 Keep product, accessory and packaging parts out of reach of children who
could swallow smaller pieces.
왘 Switch the product off after use to conserve battery power. Remove the
rechargeable batteries if the product will not be used for extended periods of
time.
왘 If during flight operation you, as the pilot, operate your connected Bluetooth
device using the headset, this can limit your attention. During flight operation,
do not use the headset for making phone calls or listening to music.
왘 With the NoiseGard
sounds (for example, those from engines, propellers, warning alarms, etc.) may
sound different to you. Before operating any aircraft, make sure that, with
NoiseGard
TM
/digital switched on, you can hear and recognize these sounds. Set
the volume to safe levels that do not interfere with your ability to hear informational sounds and warning alarms.
왘 The product is capable of producing sound pressure exceeding 85 dB(A). In
many countries 85 dB(A) is the maximum legally permissible level for continuous noise exposure during the working day. Do not listen at high volume
levels for long periods of time to prevent hearing damage.
TM
/digital noise compensation switched on, typical aircraft
®
Preventing damage to the product and dysfunctions
왘 Always keep the product dry and do not expose it to extreme temperatures
(hairdryer, heater, extended exposure to sunlight, etc.) to avoid corrosion or
deformation.
왘 Only use the product in environments where wireless Bluetooth transmission
is permitted.
왘 Only clean the product with a soft, dry cloth.
왘 Never repair or attempt to repair a defective product yourself. Contact your
Sennheiser partner or the Sennheiser Service Department.
2 | S1 DIGITAL
Page 4

Important safety information
왘 Only replace parts of the product whose replacement is described in this
instruction manual. All other parts of the product must be replaced by your
Sennheiser partner.
Information on active and passive noise attenuation
The S1 DIGITAL is a headset with digital adaptive noise compensation. As with
any complex electronic device, it is possible for the electronics of the headset to
fail during operation.
However, the S1 DIGITAL is designed to reduce the effects of such failures and to
allow for continued use of NoiseGard
TM
/digital. NoiseGardTM/digital is active when
the headset is switched on and the Power LED H lights up.
왘 Switch the headset off if you experience loud tones, distortion, or loss of com-
munications. You can then continue to use the S1 DIGITAL as a passive noise
attenuation headset.
Intended use
Intended use of the product includes
• having read and understood this instruction manual, especially the chapter
“Important safety information”,
• using the product within the operating conditions and limitations described in
this instruction manual.
“Improper use” means using the product other than as described in this instruction manual, or under operating conditions which differ from those described
herein.
S1 DIGITAL | 3
Page 5

The S1 DIGITAL headset
The S1 DIGITAL headset
The S1 DIGITAL aviation headset incorporates the latest in digital technology.
Featuring NoiseGard
TM
/digital noise compensation and excellent passive noise
attenuation, the headset is currently the only one on the market that provides
optimum protection against cockpit noise over the entire frequency range. The
S1 DIGITAL has been designed for use in noisy single- and multi-engine propeller
aircraft and helicopters.
The headset is characterized by its high-quality appearance and offers outstanding wearing comfort. With ear pads specially designed for spectacle
wearers, a contact pressure that is individually adjustable and a two-piece headband, the headset is always comfortable to wear even on long flights. In addition,
the headset has been designed with an emphasis on well-balanced weight
distribution.
Bluetooth
The S1 DIGITAL complies with the new Bluetooth 2.1 standard. Via its Bluetooth
interface, it can be connected to a wide variety of Bluetooth enabled devices.
Bluetooth wireless technology allows the S1 DIGITAL to communicate with your
Bluetooth enabled device (e.g. mobile phone, MP3 player, PC or PDA) within
a range of up to 10 meters.
Features
• Pilot’s headset with NoiseGard
TM
/digital, offering digital adaptive noise
compensation
• Superb passive noise attenuation
• Extremely comfortable to wear due to adjustable contact pressure and ear
pads specially designed for spectacle wearers
• Well-balanced low weight
• Foldable ear cups
• Excellent audio quality
• Crystal clear speech intelligibility due to 3-step treble boost/equalizer function
• Peak level protection safeguards your ears from volume peaks above 110 dB
• Control unit with Bluetooth technology for controlling audio devices and
mobiles phones
• “Auto shut-off” extends battery life
• Power supply for NoiseGard
TM
/digital via on-board DC power supply system
(optional)
• Fail safe operation – the headset can be used as a conventional, passive
headset in case of power failure
• Made in Germany
• Microphone BIAS – independent power supply for your headset allows for com-
munication outside the aircraft
4 | S1 DIGITAL
Page 6
Delivery includes
S1 DIGITAL
Manual
ON
OFF
Kurzanleitung
Guide rapide
Quick Guide
Setup | Inbetriebnahme | Mise en service
S1 DIGITAL
Switching the operating control
on/off | Bedienteil ein-/ausschalten |
Bedienteil ein-/ausschalten
Smart-Update nutzen |
Smart-Update nutzen |
Smart-Update nutzen
Andruckkraft einstellen | Andruckkraft einstellen | Andruckkraft
einstellen
45°
S1 DIGITAL
Manual
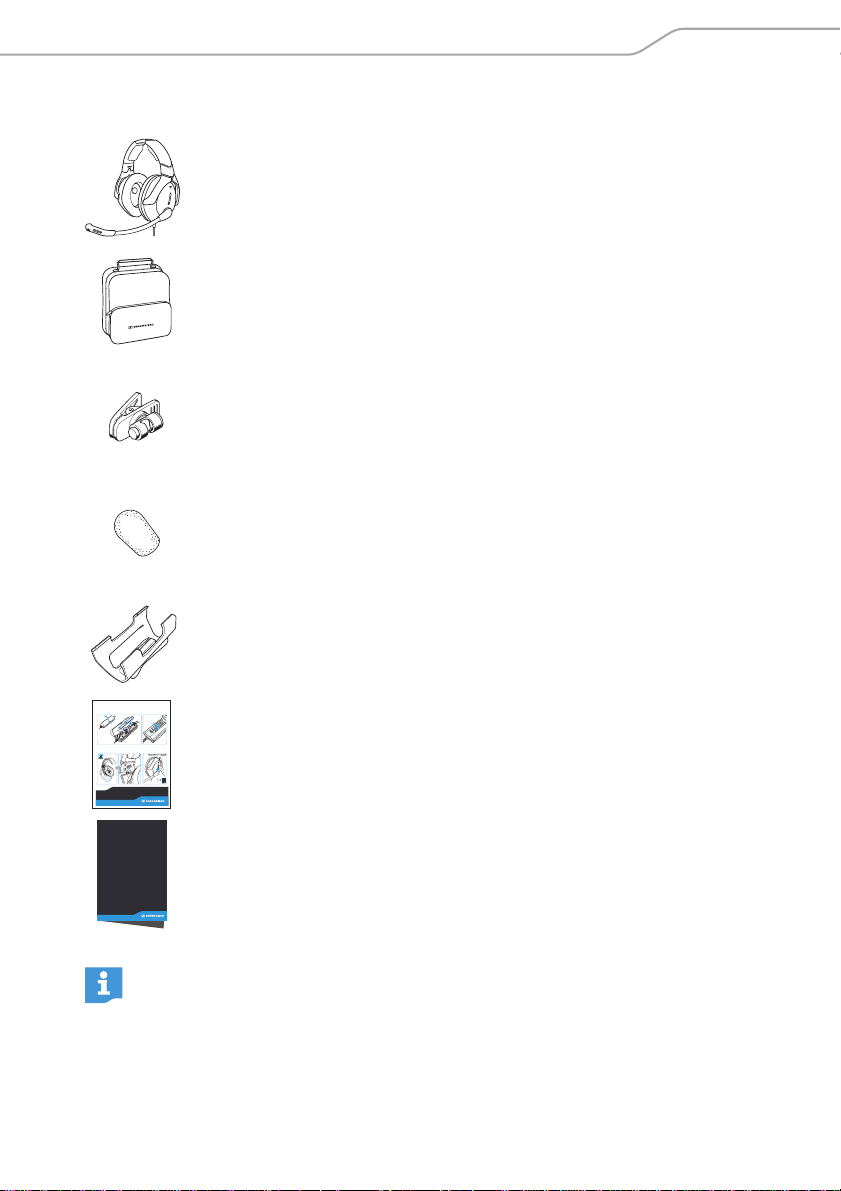
Delivery includes
S1 DIGITAL headset
Transport case for headset and accessories
Cable clip
Wind and pop screen
Belt clip
Quick Guide
Instruction manual
A list of accessories can be found on the S1 DIGITAL product page at
www.sennheiser-aviation.com or www.sennheiser.com.
For information on suppliers, contact your local Sennheiser partner:
• www.sennheiser-aviation.com > “Purchase Information”
• www.sennheiser.com > “Service & Support”
S1 DIGITAL | 5
Page 7
Product overview
Product overview
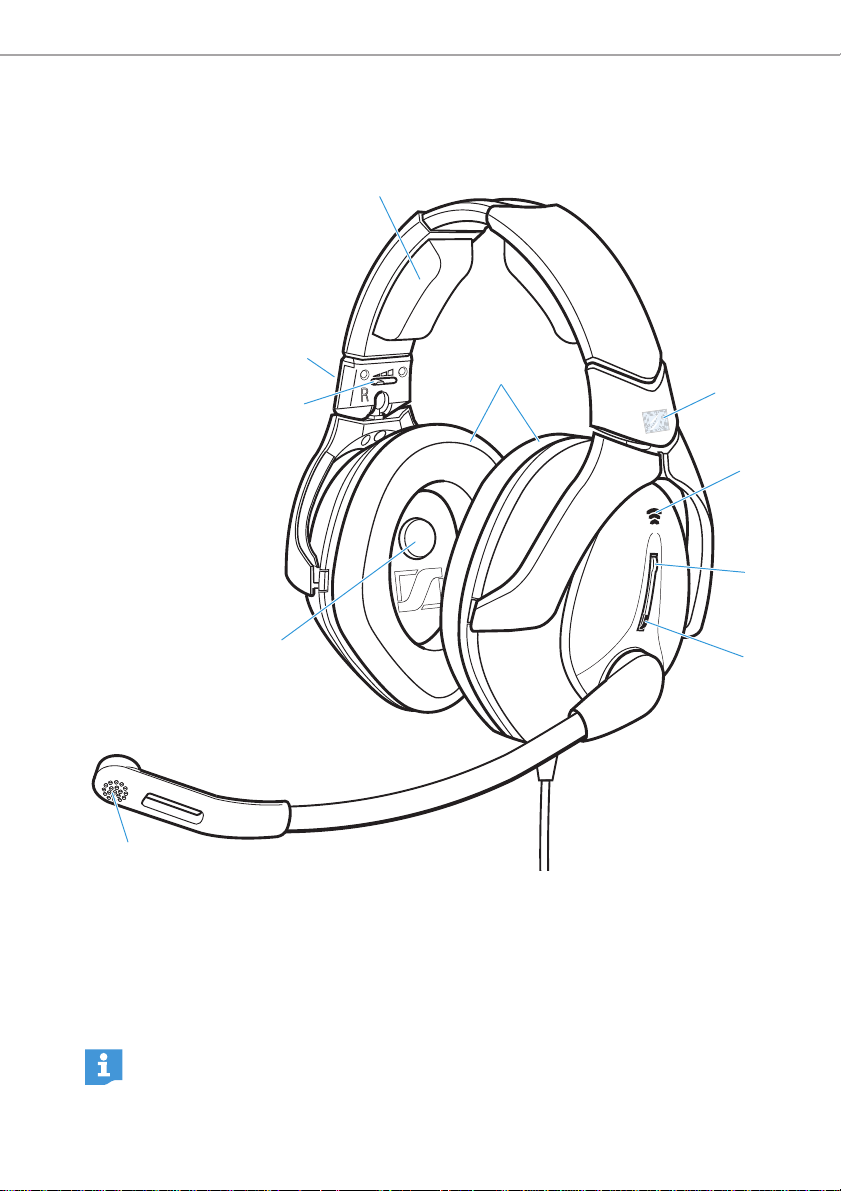
Overview of the headset
1
6
5
1 Headband padding
2 (Outer) NoiseGard
TM
microphone
3 Smart Update button
4 Smart Update LED
A
8
/digital
7
5 Microphone
6 (Inner) NoiseGard
TM
/digital
microphone
7 Ear pads
8 Contact pressure slide switch
A
2
3
4
Before wearing the headset, remove the protective foil A from the
Sennheiser logo.
6 | S1 DIGITAL
Page 8
Product overview
E
F
G
H
I
J
K
D
9
0
B
C
A
L
M
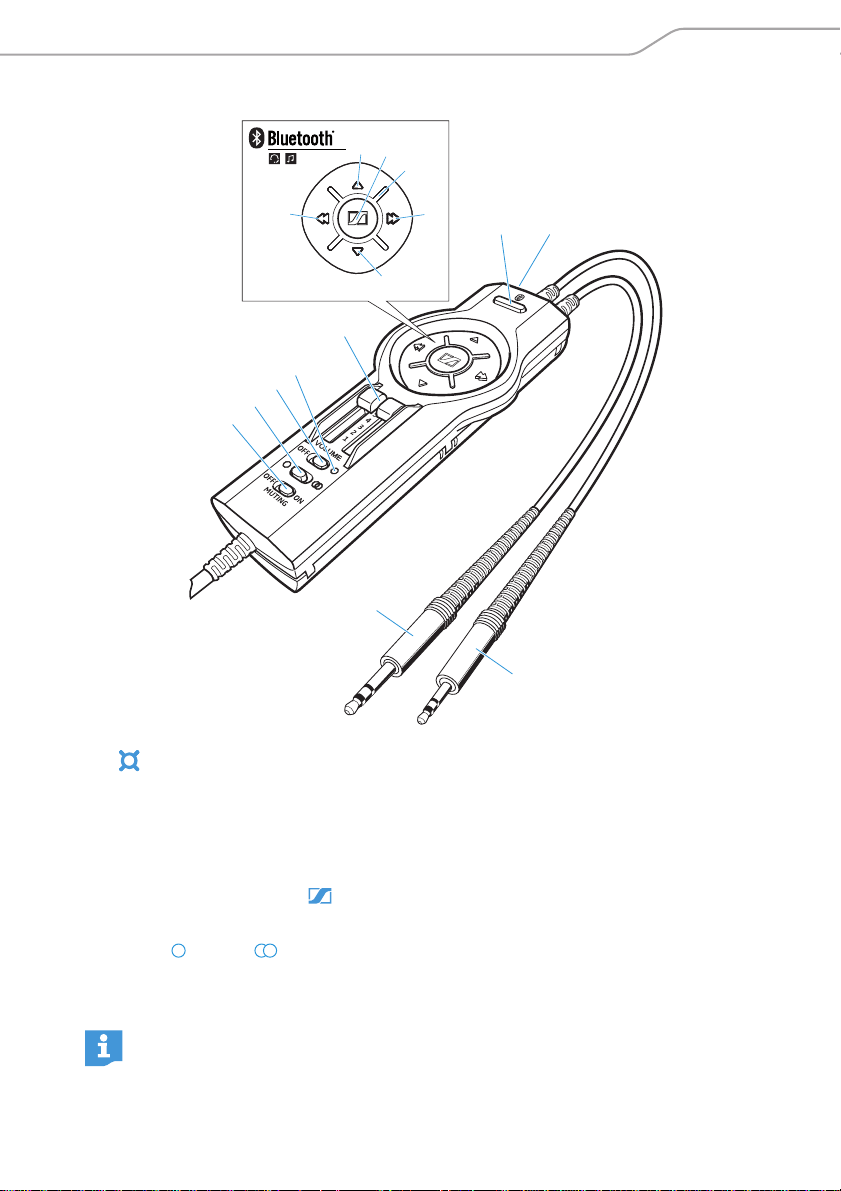
Overview of the control unit
9 LED
0 Fast-forward button
A Volume button
B Rewind button
C Volume button
D Multi-function button
E MUTING OFF/ON switch
F Mono /stereo switch
You can directly remote-control any Bluetooth device supporting the
AVRCP profile and connected to the S1 DIGITAL by using the operating
elements 9 to D.
G Power OFF/ON switch
H Power LED
I Master VOLUME slide control
J Phone button
K Hollow jack socket for
optional power supply
L 5.25 mm jack plug
(PJ-068 equivalent)
M ¼” (6.35 mm) jack plug
(PJ-055 equivalent)
S1 DIGITAL | 7
Page 9

Putting the S1 DIGITAL into operation
M
L
Putting the S1 DIGITAL into operation
Connecting the headset to the intercom
왘 Connect the jack plugs of the control unit
to the corresponding jack sockets of your
intercom.
Jack plug of the control unit Jack socket of the intercoms
5.25 mm jack plug L Microphone input
¼” (6.35 mm) jack plug M Headphone output
Powering the headset
CAUTION
Danger of short circuit!
Technical defects can cause a short circuit.
왘 Before putting the headset into operation, ensure that the socket of the on-
board DC power supply system is protected by a 1 A fuse.
There are different options for powering the headset:
• Connection to the on-board DC power supply system (12 – 35 V
a mounted 3-pole XLR socket or the cigarette lighter socket
• Power supply via two batteries/rechargeable batteries inserted in the control
unit (to be ordered separately)
Connection via a 3-pole XLR socket
The Adapter-P-XLR-3 adapter cable (optional accessory available from your
Sennheiser partner) allows you to connect the headset to the on-board DC power
supply system (12 – 35 V
) via a mounted 3-pole XLR socket.
DC
왘 Have a 3-pole XLR socket (optional accessory)
mounted by a technician qualified to perform this
type of installation.
왘 Connect the Adapter-P-XLR-3 adapter cable to the
mounted 3-pole XLR socket.
왘 Connect the hollow jack plug of the adapter cable
to the hollow jack socket on the control unit.
8 | S1 DIGITAL
DC
) via
Page 10
Putting the S1 DIGITAL into operation
Connection via the cigarette lighter socket
The Adapter-P-CIG adapter cable (optional accessory available from your
Sennheiser partner) allows you to connect the headset to the on-board DC power
supply system (12 – 35 V
) via the cigarette lighter socket.
DC
왘 Connect the cigarette lighter plug to the on-board
DC power supply system.
왘 Connect the hollow jack plug of the adapter cable
to the hollow jack socket on the control unit.
왘 Where required, connect an additional device to
the XLR-3 socket of the adapter cable (max. 1 A).
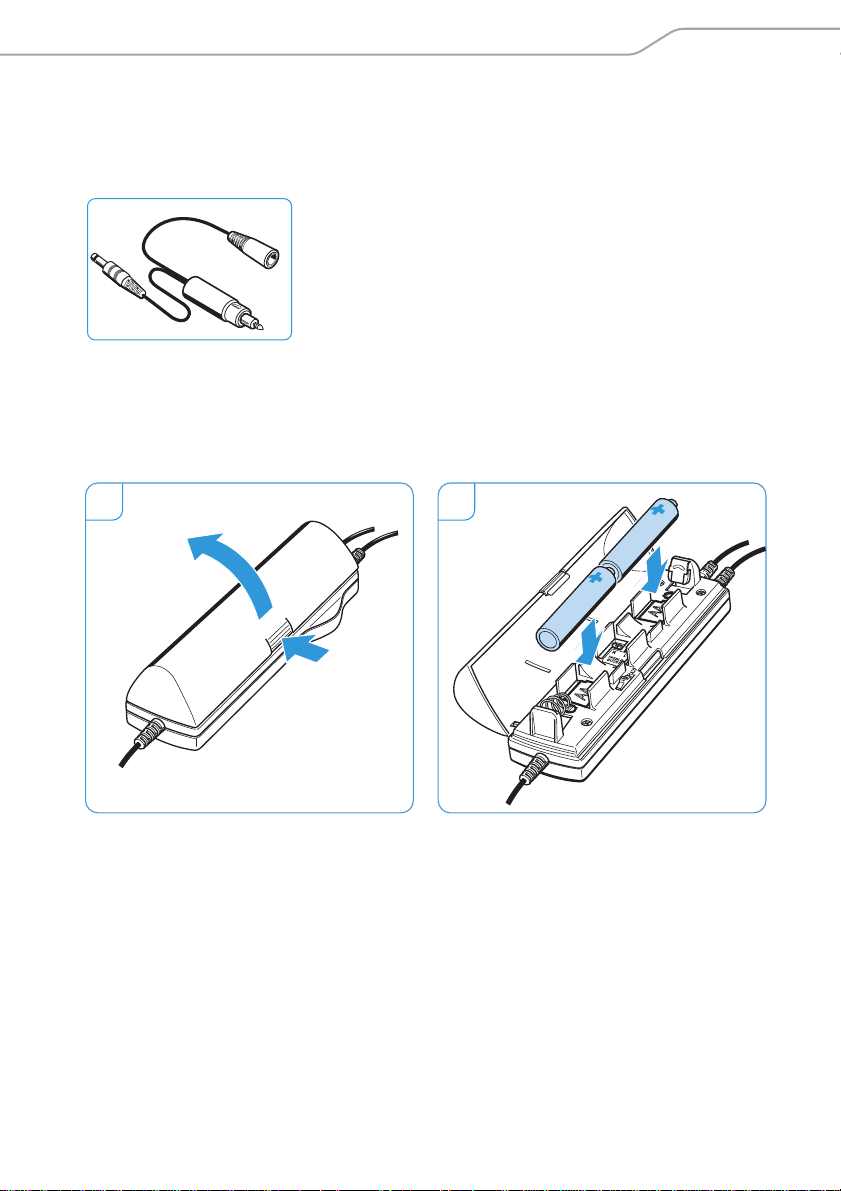
Power supply via two batteries/rechargeable batteries
1 Open the cover of the battery compartment on the control unit.
2 Insert two AA size batteries/rechargeable batteries. Observe correct polarity.
3 Close the cover of the battery compartment.
1 2
When you switch the headset on (see page 19), the Power LED H provides information on the remaining battery/rechargeable battery capacity.
LED lights up yellow: The battery/rechargeable battery capacity is sufficient.
LED lights up red: The batteries/rechargeable batteries are flat.
S1 DIGITAL | 9
Page 11
Putting the S1 DIGITAL into operation
1 2
Type of use Type Operating time
NoiseGardTM/digital Alkaline batteries/rechargeable
batteries
Lithium batteries approx. 40 hrs
NoiseGardTM/digital and
Bluetooth technology
If the battery capacity is low, the headset automatically switches off to protect
the batteries/rechargeable batteries from total discharge and leakage.
왘 Replace the batteries or recharge the rechargeable batteries.
Alkaline batteries/rechargeable
batteries
Lithium batteries approx. 25 hrs
approx. 25 hrs
approx. 15 hrs
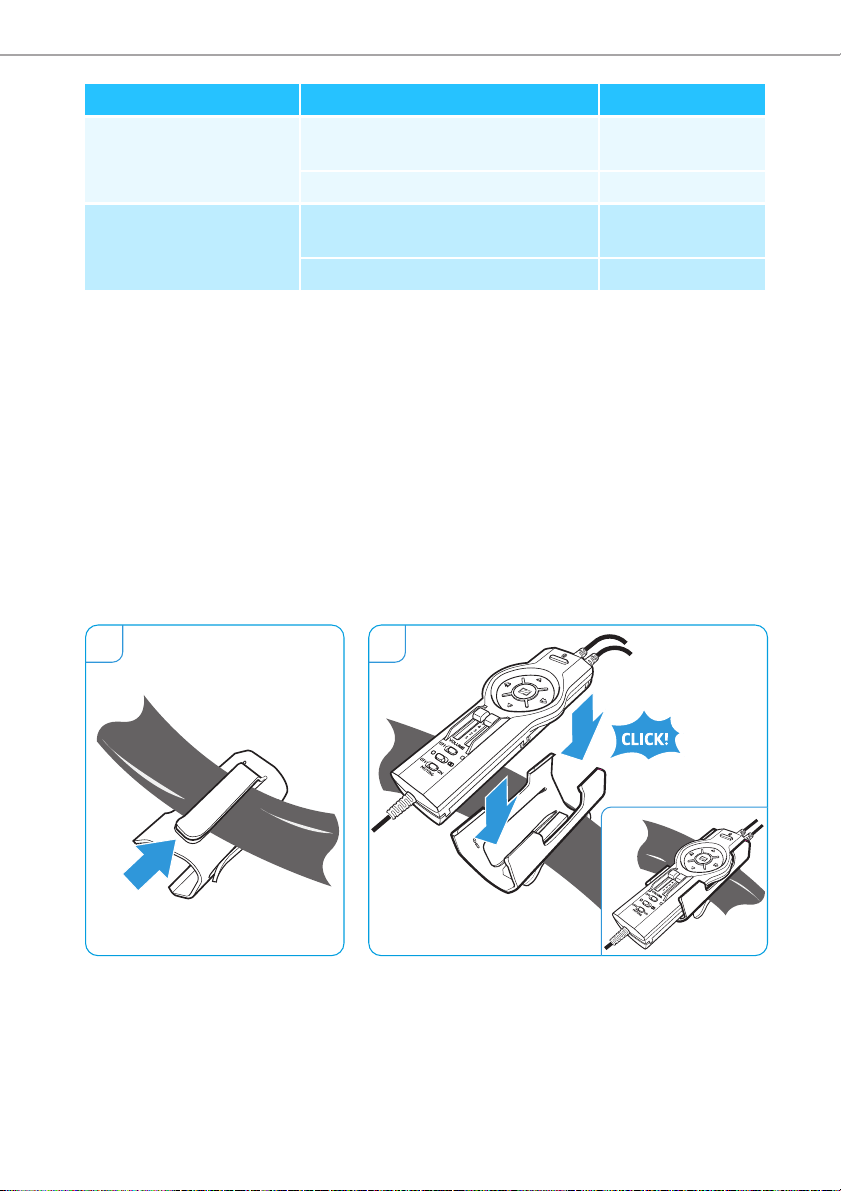
Attaching the belt clip, the cable clip and the design caps
Attaching the belt clip
The belt clip allows you to attach the control unit to the seat belt so that the
control unit doesn’t hinder you.
1 Slide the belt clip onto the seat belt.
2 Snap the control unit into the belt clip. Make sure not to squeeze any connec-
tion cable.
10 | S1 DIGITAL
Page 12

Putting the S1 DIGITAL into operation
1 2
1 2
Attaching the cable clip
The cable clip allows you to attach the headphone cable to your clothing so that
the cable doesn’t hinder or distract you.
1 Guide the headphone cable through the cable clip.
2 Attach the cable clip to your clothing.
3 Loop the cable through the clip so that the headphone cable doesn‘t hinder
you.
Attaching the design caps
Design caps in different finishes and with individual imprints are available from
your Sennheiser partner.
S1 DIGITAL | 11
Page 13

Putting the S1 DIGITAL into operation
BTD 300 Audio BTD 300i
Connecting the headset to a Bluetooth device
CAUTION
Danger of malfunction due to radio waves!
The transmitted radio waves of mobile phones can impair the operation of
sensitive and unprotected devices.
왘 Only make calls with the headset in environments where wireless Bluetooth
transmission is permitted.
The headset complies with the Bluetooth 2.1 standard. In order that data can be
transmitted wirelessly using Bluetooth technology, you have to pair your
headset with a Bluetooth device.
The headset can save the connection profiles of up to eight Bluetooth devices
with which it has been paired. After switch-on, the headset automatically tries to
connect to the last connected Bluetooth device.
If you pair the headset with a ninth Bluetooth device, the saved connection
profile of the first Bluetooth device will be overwritten. If you want to re-establish a connection with the first Bluetooth device, you have to pair the headset
with this Bluetooth device again.
왘 If your audio source does not have a Bluetooth inter-
face, use an optional dongle (see page 30).
12 | S1 DIGITAL
Page 14

ENFR DE
Putting the S1 DIGITAL into operation
Pairing the headset with a Bluetooth device
The following chapter describes, by way of example of a mobile phone, how to
pair the headset with a Bluetooth device.
왘 Make sure that
– the headset is connected to the on-board DC power supply system or that
the control unit is equipped with fully charged batteries/rechargeable
batteries,
– the mobile phone’s Bluetooth visibility is enabled (see the instruction
manual of the corresponding Bluetooth device),
– the headset is placed close to the mobile phone (approx. 50 cm or 19.7”).
왘 Switch the headset on by setting the Power OFF/ON switch G to the position
ON.
왘 Press and hold the multi-function button until the
LED alternately flashes blue and red.
왘 On your audio source, activate the Bluetooth function “Add a new device”.
왘 When the mobile phone prompts for a password or PIN code, enter the default
PIN code “0000”.
왘 Proceed as described in the instruction manual of the mobile phone.
Once the headset has found the mobile phone, the devices exchange
device identification information. The LED flashes 3 times blue.
You hear an ascending beep. The devices have identified each other
and the headset is paired with the mobile phone.
If no device is found within approx. 5 minutes, the LED flashes
3 times red and you hear a descending beep. The headset will then
try for 3 minutes to connect to one of the up to 8 previously paired
Bluetooth devices. If this fails, the Bluetooth function automatically
switches off after 10 minutes.
왘 In this case, repeat the necessary steps to pair the headset with the mobile
phone again.
S1 DIGITAL | 13
Page 15

Putting the S1 DIGITAL into operation
Switching the “Bluetooth connection” flashing on/off
To switch the flashing off during an existing Bluetooth connection:
왘 Switch the Bluetooth function off (see page 17).
왘 Press and hold the multi-function button until the
LED alternately flashes blue and red.
왘 Briefly press the Volume button.
왘 To make the new setting effective, press and hold
the multi-function button until the LED stops
flashing.
To switch the flashing on during an existing Bluetooth connection:
왘 Switch the Bluetooth function off (see page 17).
왘 Press and hold the multi-function button until the
LED alternately flashes blue and red.
왘 Briefly press the Volume button.
왘 To make the new setting effective, press and hold
the multi-function button until the LED stops
flashing.
14 | S1 DIGITAL
Page 16

Using the S1 DIGITAL
Using the S1 DIGITAL
Individually adjusting the headset and wearing it
Adjusting the headband
For good noise attenuation and best possible comfort, the headset has to be
adjusted to properly fit your head. To do so, you can adjust the headband.
1 Wear the headset so that the headband runs over the top of your head.
2 Adjust the length of the headband so that
– your ears are completely inside the ear pads,
– you feel even, gentle pressure around your ears,
– a snug fit of the headband on the head is ensured.
1 2
S1 DIGITAL | 15
Page 17

Using the S1 DIGITAL
1 2
45°
Adjusting the contact pressure
The S1 DIGITAL allows you to choose your preferred contact pressure setting,
which offers a good balance between best possible noise attenuation and still
comfortable contact pressure.
In order to achieve greater noise attenuation, a higher contact pressure is
required.
1 Tilt the ear cups by approx. 45° to release the mechanics of the slide switches.
2 Use the 3-step slide switches to change the contact pressure for each ear cup.
Positioning the microphone towards the corner of the mouth
The microphone boom is flexible, so you can position it individually.
왘 Bend the microphone boom so that the microphone is placed at the corner of
the mouth. Maintain a distance of approx. 2 cm between microphone and
mouth.
왘 Always use the supplied wind and pop screen.
16 | S1 DIGITAL
Page 18

Using the S1 DIGITAL
ON
OFF
Switching the headset on/off
왘 Set the Power OFF/ON switch to the position ON.
ON NoiseGard
TM
/digital is switched on. The Power LED lights up, indicating
the battery charge status or power supply via the on-board DC power
supply system.
OFF NoiseGard
TM
/digital is switched off. The Power LED goes off.
When the S1 DIGITAL, and thus NoiseGardTM/digital, is switched off, it can
be used as a conventional, passive headset.
Switching the Bluetooth function on/off
왘 Switch the headset on to use the Bluetooth function.
Switching the Bluetooth function on
왘 Press and hold the multi-function button until the
LED flashes blue. You hear an ascending beep.
When switching the Bluetooth function on for the first time, the headset will
automatically go into pairing mode.
When the headset is already paired with a Bluetooth device, the Bluetooth connection is automatically established. You hear a beep in the headset.
When the headset is already paired with a Bluetooth device but the Bluetooth
device is switched off or out of range, the LED flashes blue. The headset will try
for 3 minutes to connect to one of the up to 8 previously paired Bluetooth
devices. If this fails, the Bluetooth function automatically switches off after
10 minutes.
S1 DIGITAL | 17
Page 19

Using the S1 DIGITAL
1 2
Vol +
Vol –
Switching the Bluetooth function off
왘 Press and hold the multi-function button until the
LED flashes 3 times red.
You hear a descending beep.
The Bluetooth function is deactivated.
If you switch the Bluetooth function off, NoiseGardTM/digital remains
switched on.
Adjusting the headset to the listening situation
Adjusting the volume
WARNING
Danger of hearing damage!
Listening at high volume levels for long periods can lead to permanent
hearing defects.
왘 Before putting the headset on, set the volume to a low level.
왘 Do not continuously expose yourself to high volumes.
The control unit features a Master VOLUME slide control which allows you to
adjust the volume for the left and right channel separately. Using the Master
VOLUME slide control you simultaneously adjust the volume for both ATC commu-
nications and your connected Bluetooth device.
1 Use the Master VOLUME slide control to adjust the volume to a comfortable
level.
2 Use the Volume button and the Volume button to adjust the volume of
your connected Bluetooth device to the volume for ATC communications.
Vol +
Vol +
Vol –
Vol –
18 | S1 DIGITAL
Page 20

Using the S1 DIGITAL
Switching between mono and stereo mode
The control unit features a mono /stereo switch F which allows you to
switch between mono and stereo mode, depending on the intercom.
왘 Set the mono /stereo switch F to the desired position:
= mono
= stereo
Using Smart Update
The noise level in the cockpit changes depending on the flight situation. Whenever you perceive a change in the noise level (e.g. during take off and when the
cruise altitude is reached), you should perform the Smart Update in order to
ensure optimum noise compensation at any given time.
The outer and inner microphones measure the sound and NoiseGard
TM
/digital is
adjusted accordingly via the electronics. Smart Update only works when the
headset is switched on.
왘 Press the Smart Update button.
The Smart Update button lights up for approx.
4 seconds and you hear an acknowledgement
tone, indicating that NoiseGard
TM
/digital is
adjusted to the noise level.
S1 DIGITAL | 19
Page 21

Using the S1 DIGITAL
1 2
Activating the “auto shut-off” function
The “auto shut-off” function automatically switches the headset off when it is
disconnected from the intercom or when the aircraft avionics are switched off.
With the “auto shut-off” function activated, the operating time is increased. The
headset is delivered ex-works with the function deactivated.
1 Open the cover of the battery compartment on the control unit.
2 Set the Auto Shut-Off switch to the position ON.
3 Close the cover of the battery compartment.
Microphone BIAS – microphone supply for mobile phones
When used in the cockpit, the headset is powered via the intercom. If you want to
use the headset for making phone calls outside the cockpit, you have to deactivate the “auto shut-off” function.
왘 Set the Auto-Shut-Off switch to the position OFF.
Switching the 3-step treble boost on/off
The switches for the 3-step treble boost allow you to individually adjust the
speech intelligibility for the left and right channel separately. For this, you can
boost the frequency response in the approx. 1 kHz to 6 kHz region in three steps.
20 | S1 DIGITAL
Page 22

Using the S1 DIGITAL
The following switch positions apply to the left and right channel:
No treble boost Treble boost –
step 1
Treble boost –
step 2
Treble boost –
step 3
Adjusting the microphone sensitivity
The microphone sensitivity has been factory preset to 35 mV/Pa.
왘 Use a slotted screwdriver to adjust the microphone sensitivity.
S1 DIGITAL | 21
Page 23

Using the S1 DIGITAL
1 s
Remote-controlling connected Bluetooth devices
You can directly remote-control any Bluetooth device supporting the AVRCP
profile and connected to the S1 DIGITAL by using the buttons on the headset.
Please refer to the instruction manual of your audio source for information on
whether your Bluetooth device supports the AVRCP profile.
Adjusting the volume for connected devices
WARNING
Danger of hearing damage!
Listening at high volume levels for long periods can lead to permanent
hearing defects.
왘 Before putting the headset on, set the volume to a low level.
왘 Do not continuously expose yourself to high volumes.
왘 Use the Volume button and the Volume button to adjust the volume of
your connected Bluetooth device. When the minimum or maximum volume is
reached, you hear an acknowledgement tone.
Button Duration Function
Incrementally increases the volume
22 | S1 DIGITAL
1 s
Incrementally reduces the volume
Continuously increases the volume
Continuously reduces the volume
Page 24

Using the S1 DIGITAL
ON
OFF
1 s
Muting connected Bluetooth devices
If the MUTING OFF/ON switch is set to the position ON, any Bluetooth transmission is muted once ATC communications have been established. When the ATC
conversation is over, the muting is automatically canceled.
왘 Set the MUTING OFF/ON switch to the
desired position to mute your connected
Bluetooth device or to cancel the
muting:
OFF = muting is canceled
ON = muting is activated
Remote-controlling an audio source
If your headset has a Bluetooth connection to an audio source (e.g. iPod, MP3 or
CD player), you can use the S1 DIGITAL to remote-control the audio source as
follows:
Button Duration Function
Plays the track
Stops the track (acknowledgement tone)
Skips to the next track
Skips to the previous track
Fast-forwards the track
1 s
Rewinds the track
These functions are not supported by all connected Bluetooth devices.
S1 DIGITAL | 23
Page 25

Using the S1 DIGITAL
2s
1 s
Remote-controlling a mobile phone
If your S1 DIGITAL has a Bluetooth connection to your mobile phone,
the LED flashes blue when the mobile phone is ringing. You can
also hear the ring tone of your mobile phone in the headset if your
mobile phone supports this function.
When the mobile phones rings:
Button Duration Function
Accepts/ends the call
Rejects the call (acknowledgement tone)
When the mobile phone is switched on, does not ring and you do not make a
phone call:
Button Duration Function
Redials the last number (acknowledgement tone)
Activates voice dial
24 | S1 DIGITAL
Page 26

Using the S1 DIGITAL
5s
2s
During a call:
Button Duration Function
Transfers the ongoing call back to the mobile phone
Activates the muting function
(acknowledgement tone)
Any
button
Deactivates the muting function
Resetting the settings of the headsets
You can reset all settings of your headset to the factory default settings. In doing
so, the connection profiles of the Bluetooth devices used are deleted, thus pre-
venting that other users of the headset can access your Bluetooth enabled
devices.
왘 Press and hold the multi-function button until the
LED flashes 3 times red. The Bluetooth function is
switched off.
왘 Press and hold the multi-function button until the
LED alternately flashes blue and red.
왘 Press the Phone button for at least 5 seconds until the
settings of the headset are reset.
S1 DIGITAL | 25
Page 27

Transporting the S1 DIGITAL
Transporting the S1 DIGITAL
The headset comes with a transport case. To ensure optimum protection of the
headset when not in use or during transport, you should store the headset in the
supplied transport case.
Folding up the headset
For space-saving stowage, e.g. in your pilot’s case, you can fold the headset
compactly.
왘 Fold the right ear cup inwards.
26 | S1 DIGITAL
Page 28

Cleaning/maintaining the S1 DIGITAL
Cleaning/maintaining the S1 DIGITAL
CAUTION
Liquids can damage the electronics of the product!
Liquids entering the housing of the product can cause a short-circuit and damage
the electronics.
왘 Keep all liquids far away from the product.
왘 Do not use any solvents or cleansing agents.
왘 Before cleaning, pull out the plugs of the product from the connections in the
aircraft.
왘 Only use a soft, dry cloth to clean the product.
Replacing the headband padding, ear pads and wind screen
For reasons of hygiene, you should replace the headband padding, the ear pads
and the wind screen from time to time. Spare parts are available from your
Sennheiser partner.
Replacing the headband padding
1 Slightly lift the headband padding and carefully remove it from the holder.
2 Slide the new headband padding into the holder.
1 2
1
2
S1 DIGITAL | 27
Page 29

Cleaning/maintaining the S1 DIGITAL
1 2
1 2
Replacing the ear pads
1 Grasp the edge of the ear pad and peel it up and away from the ear cup.
2 Slide the new ear pad onto the ear cup.
Replacing the wind screen
1 Pull the wind screen from the microphone.
2 Carefully slide the new wind screen over the microphone.
28 | S1 DIGITAL
Page 30

If a problem occurs ...
If a problem occurs ...
Problem Possible cause Solution Page
Power LED H
does not light
up on switch-on
No audio
signal during
Bluetooth
connection
Headset cannot
be paired
Headset does
not react to any
button press
No active noise
compensation
Very low
volume communication even
though Noise-
TM
Gard
/digital is
switched on
Audio signal in
one ear only
The batteries/rechargeable batteries are flat.
Charge the rechargeable
batteries or replace the
batteries.
The aircraft fuse is
Check the aircraft fuse.
defective.
The headset is switched
off.
Switch the headset
and the Bluetooth
function on.
The headset is not paired
with a Bluetooth device.
The Bluetooth function
is switched off.
Pair the headset with
a Bluetooth device.
Switch the Bluetooth
function on.
The pairing does not work. Check if the audio source
supports the A2DP profile. If not, use one of the
optional stereo audio
transmitters.
The audio source is
switched off.
The operation of the
headset is faulty.
NoiseGardTM/digital is
switched off.
The aircraft fuse is
Switch the audio source
on
Change the batteries/
rechargeable batteries.
Switch NoiseGardTM/
digital on.
Check the aircraft fuse.
defective.
The volume is set too low. Increase the volume.
The headset is not con-
nected correctly.
You are receiving a mono
source but the headset is
Check the jack plugs of
the headset.
Set the headset to mono
operation.
set to stereo operation.
The Master VOLUME slide
control I is misadjusted.
Check the Master
VOLUME I slide control.
9
–
17
12
17
30
12
9
17
–
18
8
19
19
S1 DIGITAL | 29
Page 31

Accessories and spare parts
If a problem occurs that is not listed in the above table or if the problem cannot
be solved with the proposed solutions, please contact your local Sennheiser
partner for assistance.
To find a Sennheiser partner in your country, search at
www.sennheiser-aviation.com > “Purchase Information” or
www.sennheiser.com > “Service & Support”.
Accessories and spare parts
Accessories
Cat. No. Accessory
504987 Adapter-P-XLR-3 adapter cable
504988 Adapter-P-CIG adapter cable
502887 HZH 350 hygiene pads
502389 BTD 300i
wireless stereo audio transmitter for iPod and iPhone
502388 BTD 300 Audio
wireless stereo audio transmitter for audio/video devices
Spare parts
Leatherette ear pads, 1 pair
GEL ear pads, 1 pair
Wind and pop screen
Headband padding, 1 pair
Cover for inner NoiseGard microphone, 1 pair
Belt clip
HZC 08 cable clip
Transport case
30 | S1 DIGITAL
Page 32

Valuable information on NoiseGardTM/digital
Valuable information on NoiseGardTM/digital
Combination of two NoiseGard strategies
Active noise compensation (ANR, NoiseGard) is based on the principle of cancelling out unwanted sound using “anti-sound” (phase-inverted sound). There are
two distinct strategies: the feedback (FB) strategy and the feedforward (FF)
strategy .
Operating principle of the two ANR strategies
Feedback (FB) ANR uses microphones integrated inside the ear cups to pick up
the sound signal near the ear. This sound signal is processed by a FB control circuit
that calculates the required “anti-sound” and outputs it via the loudspeaker. This
is the “classic” NoiseGard strategy used in most headsets with analog NoiseGard
technology. FB-NoiseGard works especially well in the low-frequency range.
Feedforward (FF) ANR, on the other hand, uses microphones mounted on the
outside of the ear cups to directly pick up the unwanted noise. The FF control
circuit then calculates the required “anti-sound” and outputs it via the loudspeaker. The FF control circuit cannot become unstable at higher frequencies, and
therefore allows for a strikingly increased NoiseGard performance in the upper
frequency range.
NoiseGard
and outer microphones and a loudspeaker, allowing the advantages of both the
FB and FF strategies to be combined. As a result, the NoiseGard performance is
outstanding both in terms of the amount of noise attenuation and the wide
range of frequencies over which it is effective.
TM
/digital uses both ANR strategies. Each ear cup features its own inner
S1 DIGITAL | 31
Page 33

Valuable information on NoiseGardTM/digital
FF FB
Adap ta tio n
o
u
tsi
d
e
n
o
i
s
e
inside noise
anti noise
TM
The NoiseGard
approach. The sound captured by the sensing-microphones is analyzed to calculate the optimum control circuit settings. This calculation is carried out by a highperformance signal processor using a fully-adaptive algorithm. This fully-adaptive algorithm is the core of the NoiseGard
the currently dominant sound components are particularly well attenuated. The
attenuation curve resulting from the adaptation is therefore always optimised
for the current situation.
The dominat sounds components at the ear depend not only on the noise of the
aircraft but also on the user’s position in the cockpit and, above all, on how the
sound is transmitted through the headphones to the ear. This, in turn, depends
on the fit of the headphones, head and ear anatomy and on whether or not spectacles are worn.
/digital technology of the S1 DIGITAL uses an innovative
TM
/digital technology and ensures that
32 | S1 DIGITAL
Page 34

Valuable information on NoiseGardTM/digital
0,1
0
-5
-10
-15
-20
-25
-30
-35
kHz
dB
Noise Attenuation
110
Dig. FB
Dig. Adaptive FF
Passive
When compared with other adaptive technologies that are on the market, the
particular strength of the fully-adaptive FF-NoiseGard is its ability to cancel
broadband noise and not just individual tonal components. Cockpit noise consists
of a mixture of broadband noise components and individual tonal components
(e.g. the fundamentals and harmonics of propeller rotation). If only the tonal
components are canceled, the broadband noise remains unaffected and no significant noise reduction can be achieved in practice. Because it is fully adaptive, the
NoiseGard
TM
/digital technology is able to simultaneously cancel both broadband
and tonal sound components, resulting in excellent performance at all times.
Overall noise compensation (principle)
The attenuation curves of the passive attenuation and of the digital FB-ANR are
fixed, whereas the attenuation of the digital adaptive FF-ANR depends on the situation. This reveals the powerful effect of adaptivity, which always provides the
greatest attenuation of the loudest noise components.
S1 DIGITAL | 33
Page 35

Specifications
Specifications
Headset
Transducer principle dynamic, closed
Ear coupling circumaural
Frequency response 20 – 16,000 Hz
Impedance active/passive mono: 130 Ω passive/180 Ω active
stereo: 260 Ω passive/360 Ω active
Characteristic SPL 98 dB SPL at 1 kHz, 1 V
90 dB SPL at 1 kHz, 1 mW
Max. SPL 115 dB SPL at 1 kHz
THD < 1% at 98 dB SPL
Contact pressure, adjustable approx. 5 – 7 N
Microphone incl. preamplifier
Type BKE S1-P
Transducer principle pre-polarized condenser microphone,
noise-compensating
Frequency response 100 Hz – 10 kHz
Output voltage 20 – 80 mV/Pa, adjustable
35 mV/Pa (factory preset)
Terminating impedance 150 – 2,200 Ω
Supply voltage 8 – 16 V
DC
rms
General data
Ambient temperature operation: –15°C to +55°C
storage: –55°C to +70°C
Weight without cable approx. 410 g
Cable length approx. 1.90 m
Power supply for operation with
NoiseGard
TM
/digital
2.4 – 3.0 V
(batteries/rechargeable batteries),
4 V
/ max. 250 mA (via Adapter-P-XLR-3
DC
DC
or -P-CIG adapter cable,
Operating time
(NoiseGard
TM
/digital only)
at 12 – 35 V
Alkaline batteries/rechargeable batteries:
approx. 25 hrs
on-board DC power supply)
DC
Lithium batteries: approx. 40 hrs
34 | S1 DIGITAL
Page 36

Specifications
Bluetooth
Bluetooth version 2.1 + EDR
Range up to 10 m
Transmission frequency 2.4 GHz – 2.48 GHz
Transmission power 8 dBm
Profiles HSP, HFP, A2DP, AVRCP
Codec SBC
Connector assignment
5.25 mm jack plug (PJ-068 equivalent)
1 Not assigned
2 Microphone High
3 Microphone Low
¼” (6.35 mm) jack plug
1 Audio High left
2 Audio High right
3 Audio Low
Hollow jack socket on the Adapter-P-XLR-3 and -P-CIG adapter cable
1 Power supply (4 V
DC
)
2 Ground
XLR 3-pole socket (optional accessory)
1 Power supply for NoiseGard
(12–35 V
DC
)
2 Ground
3 Not assigned
S1 DIGITAL | 35
TM
/digital
Page 37

Manufacturer declarations
Manufacturer declarations
Warranty
Sennheiser electronic GmbH & Co. KG gives a warranty of 5 years on this product.
For the current warranty conditions, please visit our website at
www.sennheiser-aviation.com or www.sennheiser.com or contact your Sennheiser
partner.
In compliance with the following requirements
• RoHS Directive (2002/95/EC)
• WEEE Directive (2002/96/EC)
CE Declaration of Conformity
• R&TTE Directive (1999/5/EC)
The declaration is available at www.sennheiser.com. Before putting the product
into operation, please observe the respective country-specific regulations!
WEEE Declaration
Your Sennheiser product was developed and manufactured with highquality materials and components which can be recycled and/or reused.
This symbol indicates that electrical and electronic equipment must be
disposed of separately from normal waste at the end of its operational
lifetime.
Please dispose of this product by taking it to your local collection point or recycling centre for such equipment. This will help to protect the environment in
which we all live.
In compliance with:
USA FCC ID: DMOS1CW3011
Canada IC: 2099A-S1CW3011
Europe
Trademarks
Sennheiser and NoiseGard
TM
/digital are registered trademarks of Sennheiser
electronic GmbH & Co. KG.
The Bluetooth
®
word mark and logos are registered trademarks owned by Bluetooth SIG, Inc. and any use of such marks by Sennheiser electronic GmbH & Co. KG
is under license.
Other product and company names mentioned in this instruction manual may be
the trademarks or registered trademarks of their respective owners.
36 | S1 DIGITAL
Page 38

Manufacturer declarations
SENNHEISER
Model No:
FCC Declaration of C onformity (DoC)
We,
Sennheiser Electronic Corporation
One Enterprise Drive • Old Lyme •
CT 06371 • USA
Tel: + 1 (860) 434 9190, ext. 144
Fax: +1 (860) 434 1759
declare the above device comply with the requirements of Federal Communications Commiss ion.
This device complies with Part 15 of the FCC rules. Operat ion is subjected to the following two conditions:
1) This device may not cause harmful int erference, and
2) This device must accept any interference received, including interference that may caus e undesired operation.
Responsible Party: John Falcone
S1 DIGITAL
Statements regarding FCC and Industry Canada
This device complies with Part 15 of the FCC rules and RSS-210 of Industry
Canada. Operation is subjected to the following two conditions: 1) This device
may not cause harmful interference, and 2) This device must accept any interference received, includinginterference that may cause undesired operation.
This equipment has been tested and found to comply with the limits for a Class B
digital device, pursuant to part 15 of the FCC Rules and RSS-210 of Industry
Canada. These limits are designed to provide reasonable protection against
harmful interference in a residential installation. This equipment generates, uses
and can radiate radio frequency energy and, if not installed and used in accordance with the instructions, may cause harmful interference to radio communications. However, there is no guarantee that interference will not occur in a particular installation. If this equipment does cause harmful interference to radio or
television reception, which can be determined by turning the equipment off and
on, the user is encouraged to try to correct the interference by one or more of the
following measures:
• Reorient or relocate the receiving antenna.
• Increase the separation between the equipment and receiver.
• Connect the equipment into an outlet on a circuit different from that to which
the receiver is connected.
• Consult the dealer or an experienced radio/TV technician for help.
Changes or modifications made to this equipment not expressly approved by
Sennheiser electronic Corp. may void FCC authorization to operate this equipment. This Class B digital apparatus complies with Canadian ICES-003.
S1 DIGITAL | 37
Page 39

Manufacturer declarations
RF Radiation Exposure Information
Since the radiated output power of this device is far below the FCC radio frequency exposure limits, it is not subjected to routine RF exposure evaluation as
per Section 2.1093 of the FCC rules. This device complies with the US and Industry
Canada portable device RF exposure limits set forth for an uncontrolled environment and is safe for intended operation as described in the user manual. Further
RF exposure reduction can be achieved if the device can be kept as far as possible
from the user’s body or set to lower output power if such provision is available.
The base portion of this device should be installed and operated at least 20 cm
away from the user’s body. Use of other accessories not verified by the manufacturer may not ensure compliance with FCC and Industry Canada RF exposure
guidelines. This transmitter must not be co-located or operated in conjunction
with any other antenna or transmitter.
Industry Canada statement
This device complies with RSS-210 of Industry Canada. Operation is subjected to
the following two conditions: (1) This device may not cause harmful interference,
and (2) this device must accept any interference received, including interference
that may cause undesired operation.
38 | S1 DIGITAL
Page 40

Instrucciones de uso
Bedienungsanleitung
Notice d’emploi
Instruction manual
Istruzioni per l’uso
Gebruiksaanwijzing
Sennheiser electronic GmbH & Co. KG
Am Labor 1, 30900 Wedemark, Germany
www.sennheiser-aviation.com | www.sennheiser.com
Printed in Germany, Publ. 07/11, 545306/A01
 Loading...