

Page 1
LSP 500 PRO
Wireless Integrated PA System
Bedienungsanleitung
Instruction manual
Page 2

Content
Content
Important safety instructions ...................................................................................3
LSP 500 PRO .................................................................................................................6
Package contents .........................................................................................................7
Product overview .........................................................................................................8
Operating elements .....................................................................................................9
Using the LSP 500 PRO............................................................................................. 10
Installing the LSP 500 PRO ......................................................................................10
Mains and battery operation ..................................................................................11
Important information on battery operation ......................................................13
Switching the LSP 500 PRO on ................................................................................14
Basic operating functions ........................................................................................15
Basic indications and functions shown on the display panel ...........................16
Lock mode ...................................................................................................................18
Activating ground lift ...............................................................................................18
Connection possibilities ............................................................................................19
Installing devices in the expansion slots ..............................................................20
Operating the LSP 500 PRO via a tablet ................................................................ 23
The operating menu ................................................................................................. 28
Menu structure...........................................................................................................28
Equalizer ......................................................................................................................29
Master EQ ................................................................................................................30
EQ presets for the inputs ......................................................................................31
Virtual Bass .................................................................................................................32
Compressor .................................................................................................................32
Delay ............................................................................................................................34
USB player ...................................................................................................................35
Bluetooth ....................................................................................................................38
Settings .......................................................................................................................40
Test sound ...............................................................................................................40
Configuring the signal output to additional devices ......................................41
Display brightness .................................................................................................42
WLAN .......................................................................................................................42
Configuring the MIC input ....................................................................................50
Detecting devices in the expansion slots ..........................................................51
Resetting the settings ..........................................................................................52
Service .........................................................................................................................53
System information ..............................................................................................53
Updating the firmware .........................................................................................54
Cleaning and maintaining the LSP 500 PRO ......................................................... 55
Cleaning .......................................................................................................................55
Storage ........................................................................................................................55
If a problem occurs ... ............................................................................................... 56
Specifications ............................................................................................................ 59
Accessories ................................................................................................................ 61
Manufacturer Declarations ..................................................................................... 62
2 | LSP 500 PRO
Page 3

Important safety instructions
Important safety instructions
1. Read this instruction manual.
2. Keep this instruction manual. Always include this instruction manual when
passing the apparatus on to third parties.
3. Heed all warnings.
4. Follow all instructions.
5. Do not use this apparatus near water.
6. Only clean the apparatus when it is not connected to the mains power supply.
Clean only with a dry cloth.
7. Always ensure a free air flow around the cooling fins on the rear of the
product. Do not block any ventilation openings. Install in accordance with
the manufacturer’s instructions.
8. Do not install near any heat sources such as radiators, heat registers, stoves,
or other apparatus (including amplifiers) that produce heat.
9. Do not defeat the safety purpose of the polarized or grounding-type plug.
A polarized plug has two blades with one wider than the other. A grounding
type plug has two blades and a third grounding prong. The wide blade or
the third prong are provided for your safety. If the provided plug does not
fit into your outlet, consult an electrician for replacement of the obsolete
outlet.
10. Protect the power cord from being walked on or pinched, particularly at plugs,
convenience receptacles, and the point where it exits from the apparatus.
11. Only use attachments/accessories specified by Sennheiser.
12. Use only with the cart, stand, tripod, bracket, or table specified by the manufacturer, or sold with the apparatus. When a cart is used, use caution when
moving the cart/apparatus combination to avoid injury from tip-over.
13. Unplug this apparatus during lightning storms or when unused for long periods of time.
14. Refer all servicing to qualified service personnel. Servicing is required when
the apparatus has been damaged in any way, such as power supply cord or
plug is damaged, liquid has been spilled or objects have fallen into the apparatus, when the apparatus has been exposed to rain or moisture, does not
operate normally, or has been dropped.
15. To completely disconnect this apparatus from the AC mains, disconnect the
power supply cord plug from the AC receptacle.
16. WARNING: To reduce the risk of fire or electric shock, do not expose this apparatus to rain or moisture.
17. Do not expose this equipment to dripping or splashing and ensure that no
objects filled with liquids, such as vases, are placed on the equipment.
18. The mains plug of the power supply cord shall remain readily accessible.
LSP 500 PRO | 3
Page 4

Important safety instructions
www.sennheiser.com
Hazard warnings on the rear of the product
The label shown on the left is attached to the rear of the product. The symbols on
this label have the following meaning:
Presence of uninsulated dangerous voltage within the product’s enclosure that
may be of sufficient magnitude to constitute risk of electric shock.
Never open the product – there is a risk of electric shock. There are no user serviceable parts inside. Refer servicing to an authorized Sennheiser service partner.
Read and follow the safety and operating instructions contained in the instruction manual.
Risk of fire due to overloading
Do not overload wall outlets and extension cables as this may result in fire and
electric shock.
Danger of hearing damage due to high volumes
This product is used for commercial purposes. Commercial use is subject to the
rules and regulations of the trade association responsible. Sennheiser, as the
manufacturer, is therefore obliged to expressly point out possible health risks
arising from use.
The product can produce sound pressure exceeding 85 dB(A). 85 dB(A) is the
sound pressure corresponding to the maximum permissible volume which is
by law (in some countries) allowed to affect your hearing for the duration of
a working day. It is used as a basis according to the specifications of industrial
medicine. Higher volumes or longer durations can damage your hearing. At higher
volumes, the duration must be shortened in order to prevent hearing damage.
The following are sure signs that you have been subjected to excessive noise for
too long a time:
• You can hear ringing or whistling sounds in your ears.
• You have the impression (even for a short time only) that you can no longer
hear high notes.
Inform all operators about these facts and, if necessary, ask them to set the
volume to a medium level.
Intended use
Intended use of the product includes
• using the product for professional purposes,
• having read and understood this instruction manal, especially the chapter
“Important safety instructions”,
• using the product within the operating conditions and limitations described in
this instruction manual.
“Improper use” means using the product other than as described in this instruction manual, or under operating conditions which differ from those described
herein.
4 | LSP 500 PRO
www
Manual
This instruction manual is also availalble on the Internet at www.sennheiser.com.
Page 5
Important safety instructions
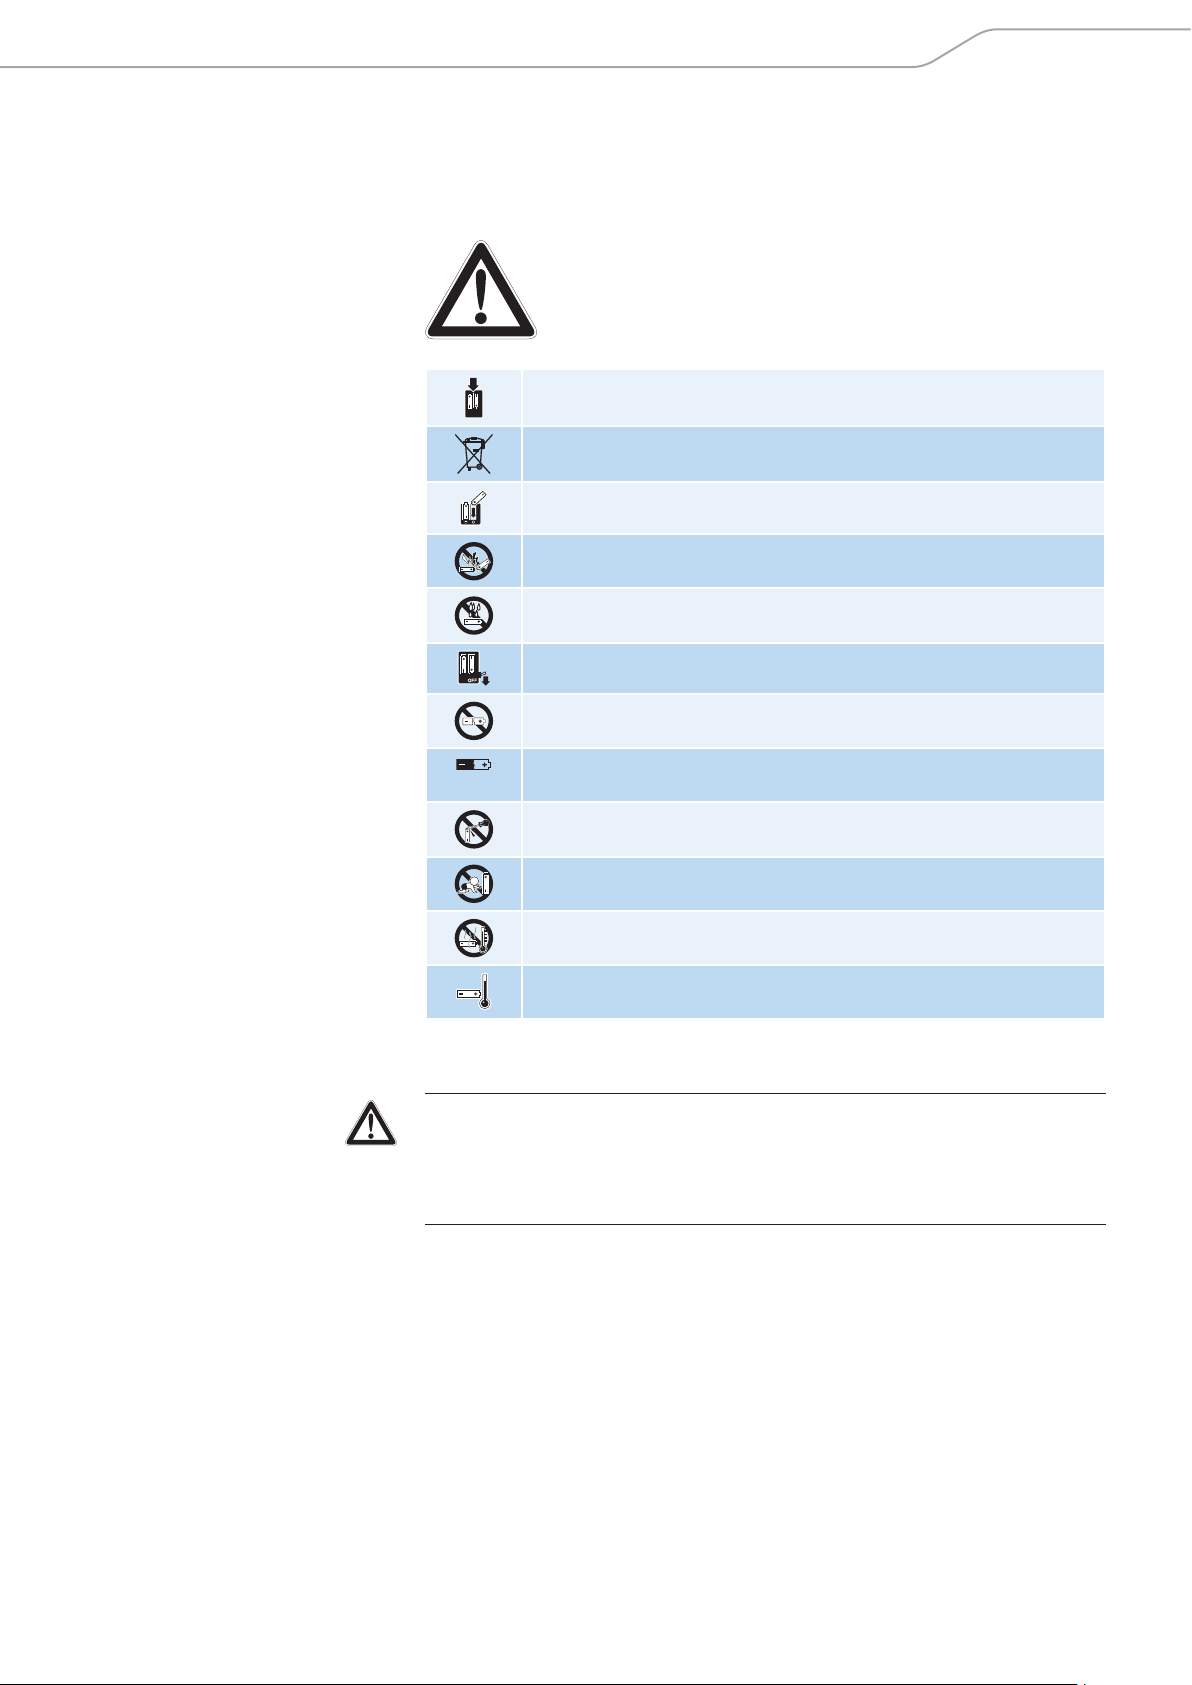
Safety instructions for lithium-ion rechargeable batteries
If abused or misused, rechargeable batteries may leak or be damaged. In extreme
cases, they may even present
• an explosion hazard,
• a fire hazard,
• a heat hazard,
• a smoke or gas hazard.
Only charge rechargeable batteries with the appropriate Sennheiser
chargers.
Dispose of rechargeable batteries at special collection points or
return them to your specialist dealer.
Observe correct polarity.
Do not short-circuit.
Do not expose to moisture.
Switch rechargeable battery-powered devices off after use.
Do not continue to use defective rechargeable batteries.
When not using rechargeable batteries for extended periods of
time, charge them regularly (about every three months).
Do not mutilate or dismantle.
Keep away from children.
Do not heat above 70°C/158°F, e.g. do not expose to sunlight or
throw into a fire.
Only charge rechargeable batteries at ambient temperatures
between 0°C/32°F and 45°C/113°F.
CAUTION
Danger of explosion due to incorrect rechargeable batteries!
X Only use lithium-ion rechargeable batteries.
X Only use Sennheiser accessories.
Disposal instructions
Properly dispose of electrical and electronic equipment according to your local
regulations. Do not dispose of electrical and electronic equipment in normal
household waste. Please help to protect and conserve the environment.
LSP 500 PRO | 5
Page 6
LSP 500 PRO
LSP 500 PRO
The Sennheiser Group, with its headquarters in Germany, is one of the world‘s
leading manufacturers of microphones, headphones and wireless transmission
systems. We are shaping today the audio world of tomorrow – that is the
ambition that we and our company live by from day to day. This vision statement
describes what we are hoping to achieve together. The foundation for this is our
history, our culture of innovation and our passion for excellence.
With our audio experience of more than 60 years we have designed this
LSP 500 PRO as a portable professional sound system for annual meetings, press
conferences, bigger events, galas, etc. under the following aspects:
• Very short setup time and long operating time
• The first remote-controlled integrated sound system
• Wireless connectivity
• High speech intelligibility for professional applications
• Understated design suitable for all environments
Beate
Sebastian
We wish you every success with your events.
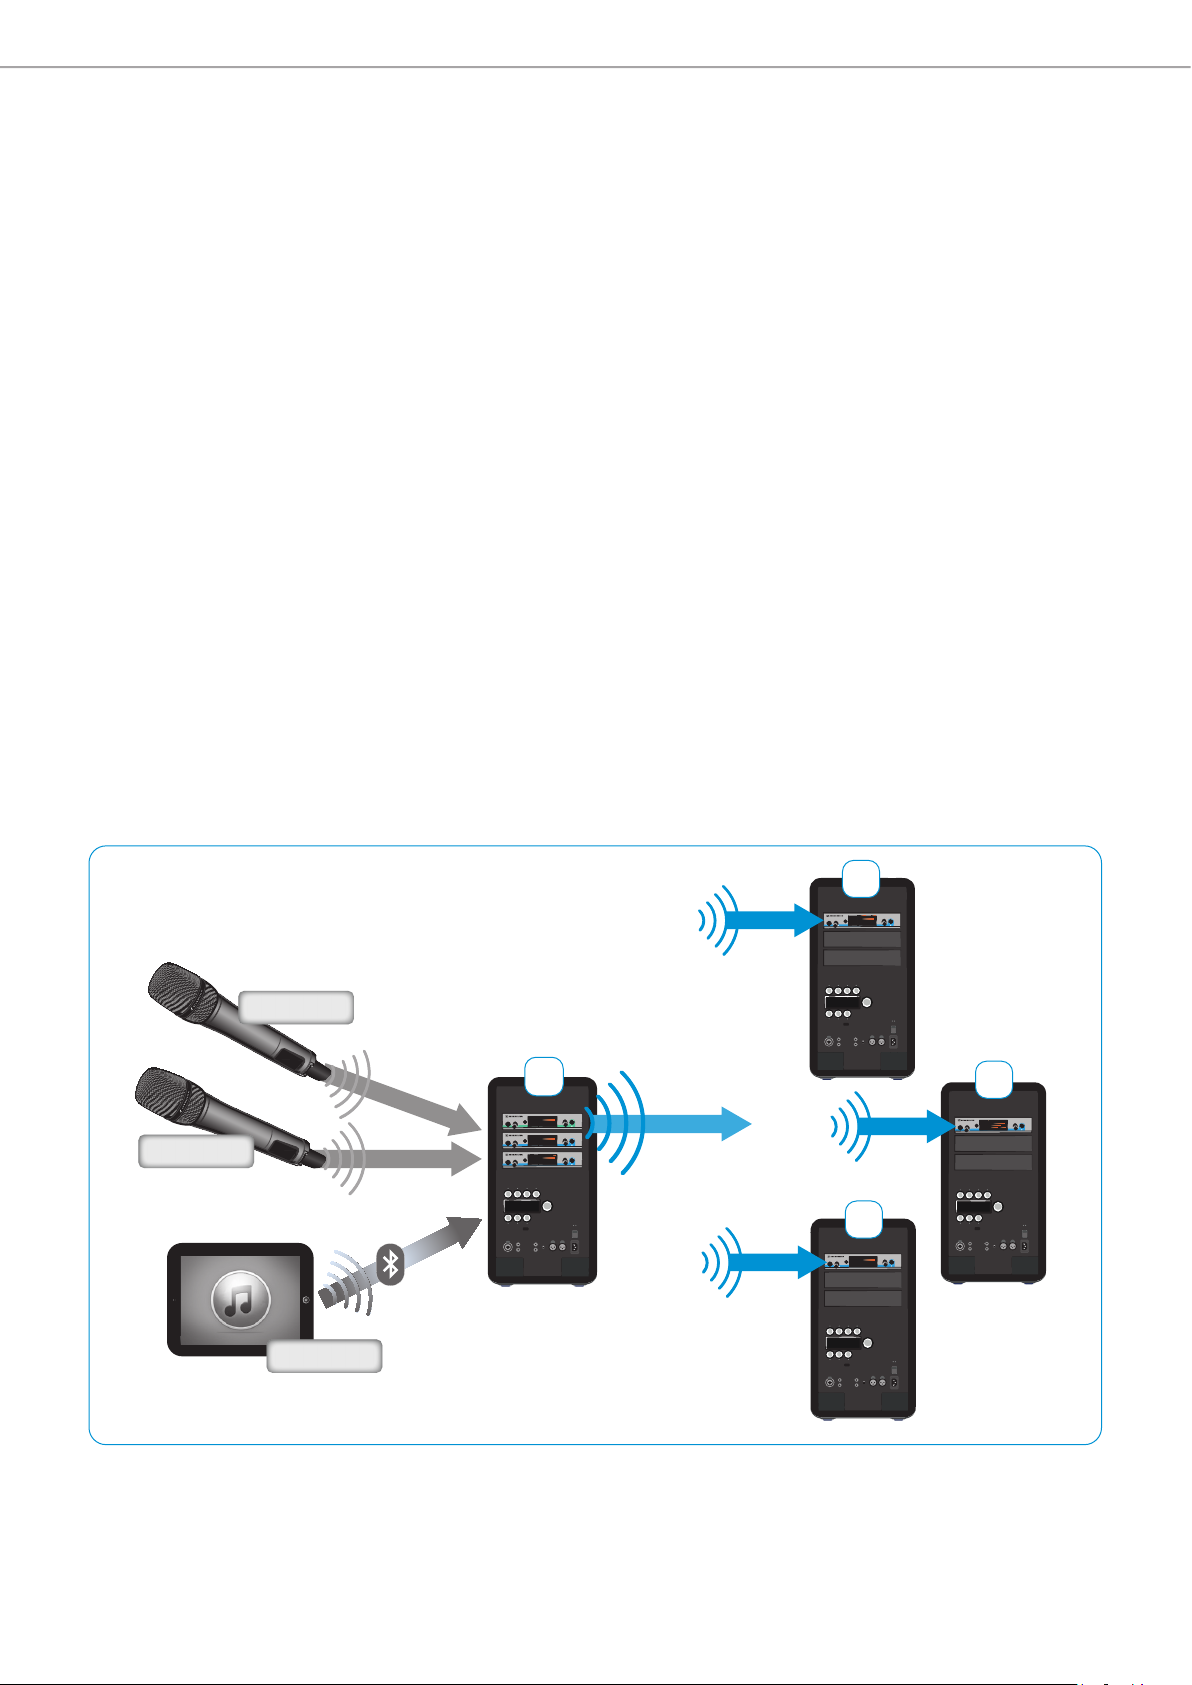
Application example
1
FM 1
FM 3
FM 2
2
FM 3
3
FM 3
4
6 | LSP 500 PRO
FM 3
DJ
Page 7

Package contents
Package contents
1 LSP 500 PRO wireless integrated PA system
1 mains cable
2 LBA 500 battery packs
6 rack mount “ears” for Sennheiser evolution wireless G3 devices
1 dust cover
1 quick guide
1 safety guide
1 CD-ROM
A list of accessories can be found on the LSP 500 PRO product page at
www.sennheiser.com and on page 61 in this instruction manual.
For information on suppliers, contact your local Sennheiser partner:
www.sennheiser.com > “Service & Support”
LSP 500 PRO | 7
Page 8

Product overview
Product overview
1
1
2
3
4
B
A
5
8 | LSP 500 PRO
C
A Front view
B Rear view
1 Carrying handle
2 Expansion slots (from top to bottom: slot 1, slot 2, slot 3)
3 Operating elements (see page 9)
4 Battery compartments
C Bottom view
5 Pole mount
Page 9
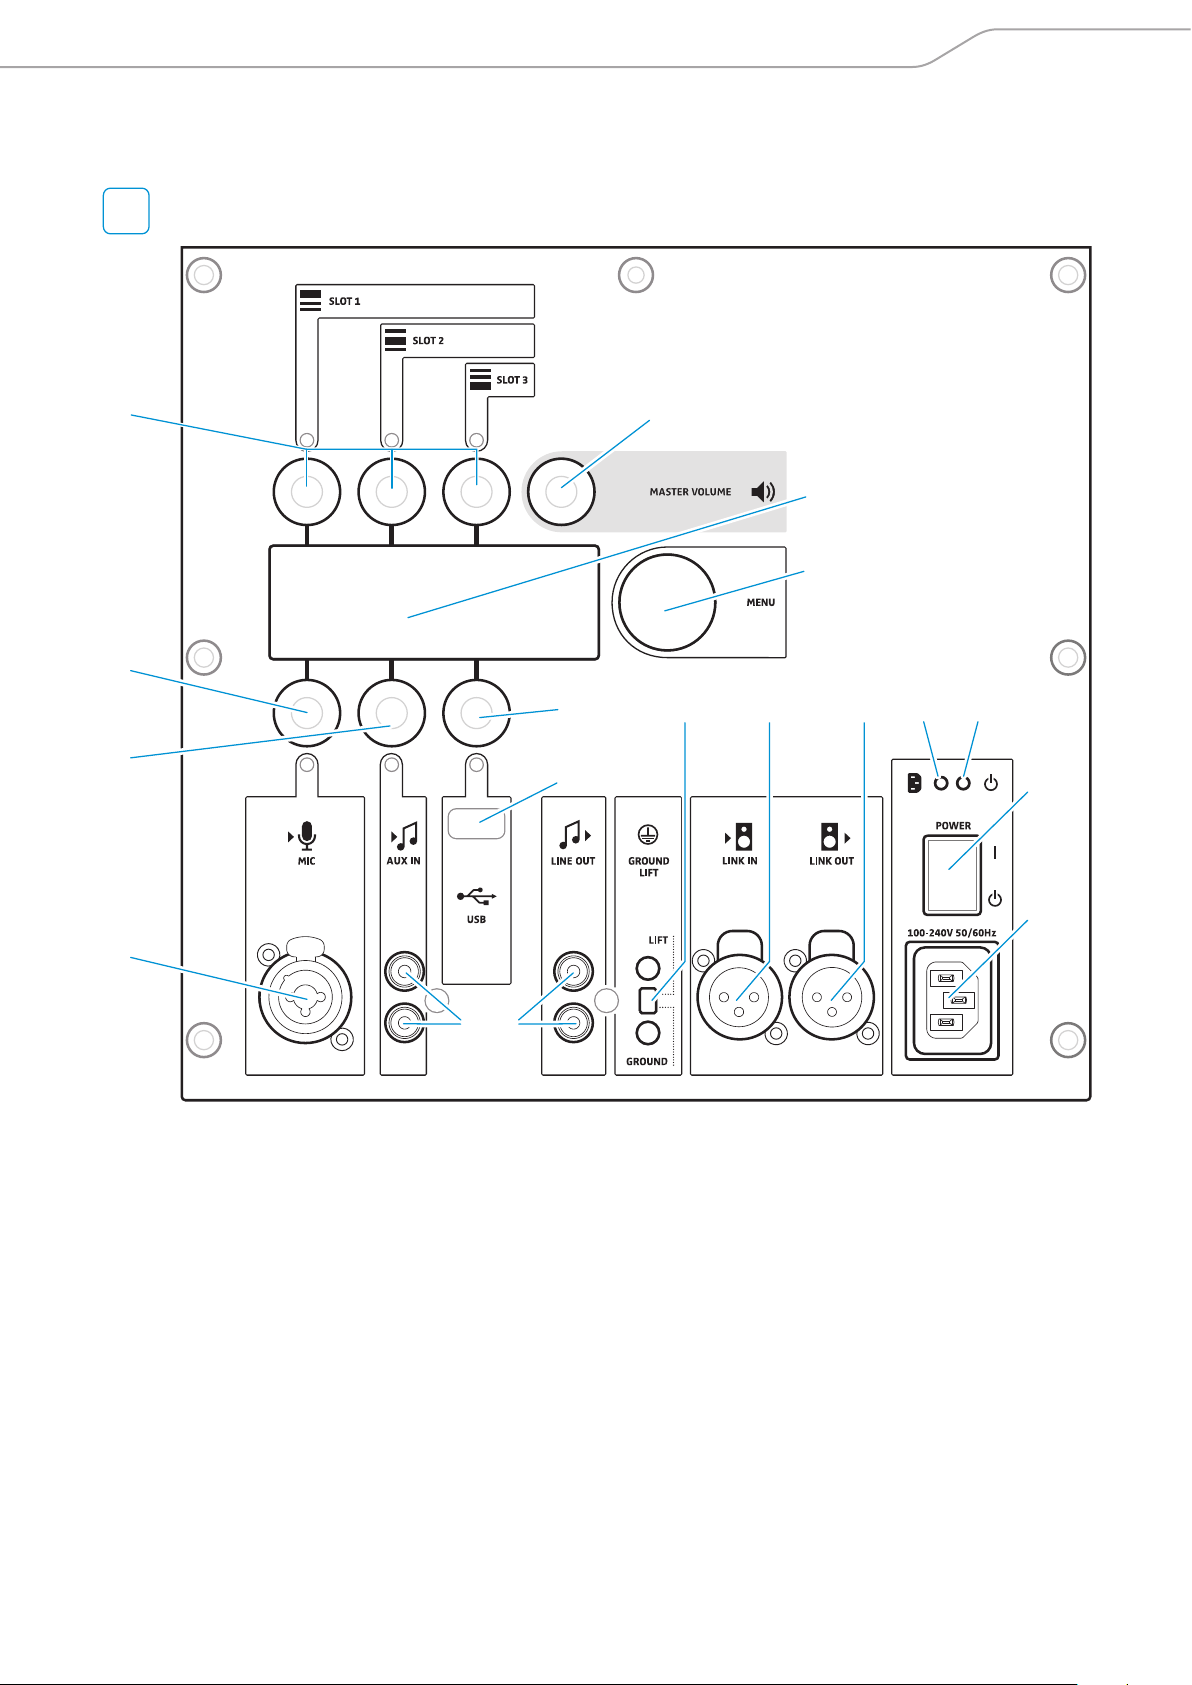
Operating elements
B
Operating elements
6
0
B
A
D
E
7
8
9
G H I
J K
L
M
C F
6 SLOT 1 / SLOT 2 / SLOT 3 input controls (jog dials)
7 MASTER VOLUME control (jog dial)
8 Display panel
9 MENU control (jog dial)
0 MIC input control (jog dial)
A MIC input (XLR-3F/¼“ (6.3 mm) jack combo socket)
B AUX IN input control (jog dial)
C AUX IN input (RCA socket)
D USB input control (jog dial)
E USB port
F LINE OUT output (RCA socket)
G GROUND LIFT switch
H LINK IN input (XLR-3F socket)
I LINK OUT output (XLR-3M socket)
J Power indicator
K Operation indicator
L POWER on/off switch
M Mains socket
LSP 500 PRO | 9
Page 10
Using the LSP 500 PRO
Using the LSP 500 PRO
Installing the LSP 500 PRO
X Place the product on a stable and horizontal surface.
X Install the product so that it is protected from moisture (rain) and direct
sunlight.
CAUTION
Danger of injury and material damage due to incorrectly laid cables!
X Make sure that all cables to the product are laid so that no one can stumble
over them and suffer injury or cause damage to the cables and the product.
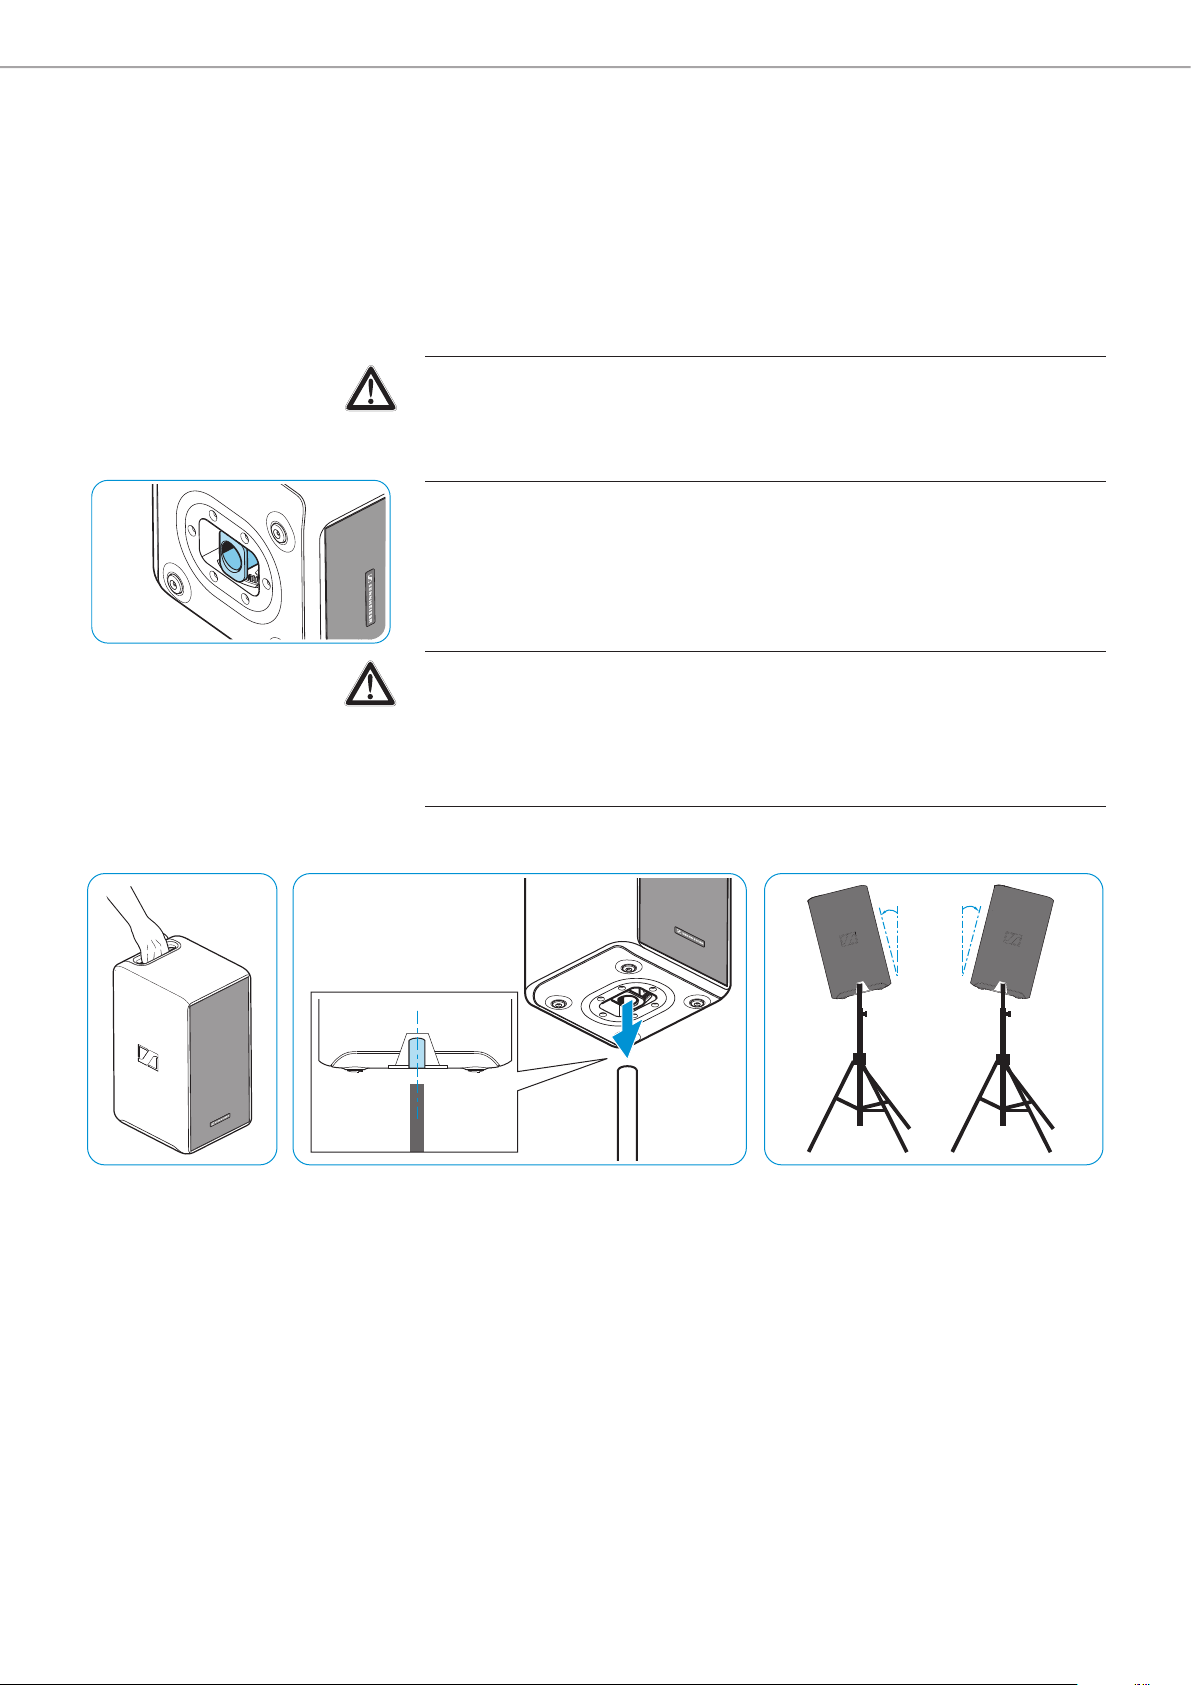
Pole mount with tilt function
The bottom of the LSP 500 PRO features a pole mount 5 with tilt function for
mounting the LSP 500 PRO on a standard loudspeaker stand. For the specifications of the pole mount, refer to page 59.
CAUTION
Danger of injury and material damage due to tipping/dropping of the product!
X When mounting the LSP 500 PRO, secure it against tipping or dropping.
X Make sure that the LSP 500 PRO or the loudspeaker stand cannot tip over or
drop down, even if the power or audio cables are pulled.
Mounting the LSP 500 PRO on a loudspeaker stand
+13.5°-13.5°
X Vertically align the pole mount 5 at the bottom of the LSP 500 PRO.
X Lift the LSP 500 PRO by the carrying handle 1 and place it on a loudspeaker
stand.
The pole mount is locked in place by engaging teeth.
X Slightly lift the LSP 500 PRO.
The pole mount‘s teeth disengage and you can tilt the LSP 500 PRO up to
+/- 13.5° in 4.5° steps.
X Lower the LSP 500 PRO in the desired tilt angle.
The pole mount locks in place.
10 | LSP 500 PRO
Page 11
Using the LSP 500 PRO
Mains and battery operation
The LSP 500 PRO can be mains or battery powered. When battery powered,
the LSP 500 PRO uses only one of the two battery packs, allowing a discharged
battery pack to be replaced during operation. The LSP 500 PRO automatically
switches to the second battery pack when the first one is depleted.
When replacing a battery pack during operation, observe the information
on page 13.
CAUTION
Product damage due to unsuitable mains cables or power outlets!
An unsuitable power supply can damage the product.
X Only use the supplied mains cable for connecting the product to the mains
power supply.
X Only use multi-outlet power strips or extension cables with protective ground
contacts.
Connecting the LSP 500 PRO to the mains power supply
X Make sure that the POWER on/off switch L is set to position “ ”.
X Connect the mains cable to the mains socket M of the LSP 500 PRO.
X Connect the mains plug of the mains cable to a power outlet.
Disconnecting the LSP 500 PRO from the mains power supply
X Set the POWER on/off switch L to position “ ”.
X Pull out the mains plug from the power outlet.
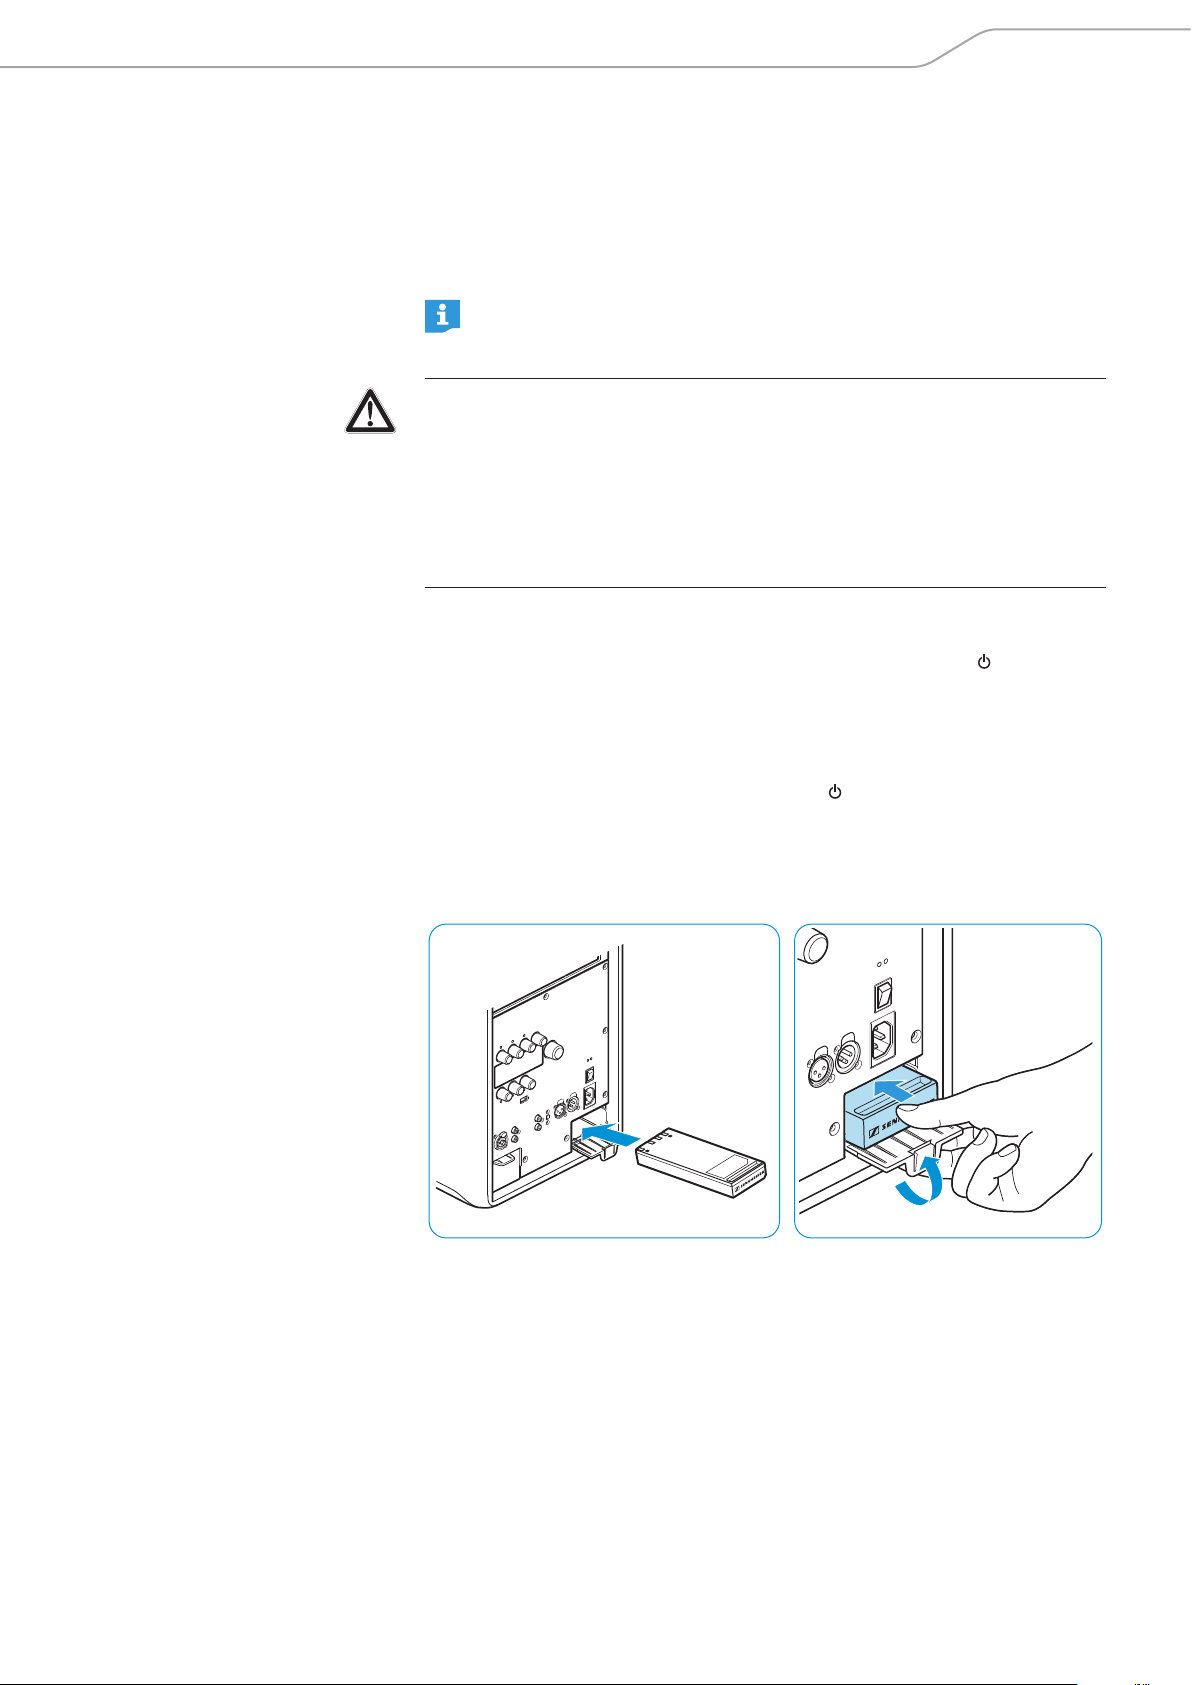
Inserting the battery packs
To insert the battery packs:
X Insert the battery pack slightly diagonally into the battery compartment 4.
When inserting, make sure that the charging contacts are located on the top
surface of the battery pack (see fig.).
X Close the battery compartment by sliding the battery pack into the compart-
ment as shown, while at the same time pushing the cover upwards.
X Repeat these two steps for the second battery pack.
LSP 500 PRO | 11
Page 12
Using the LSP 500 PRO
Charging/replacing the battery packs
To charge the battery packs:
X Insert the battery packs (see page 11).
X Connect the LSP 500 PRO to the mains power supply.
The operation indicator K flashes, the charging process starts. When the battery packs are fully charged, the operation indicator lights up permanently.
A complete charging cycle takes about 2.5 hours per battery pack when the
product is switched off. If you use the product during charging, the charging
time will be extended.
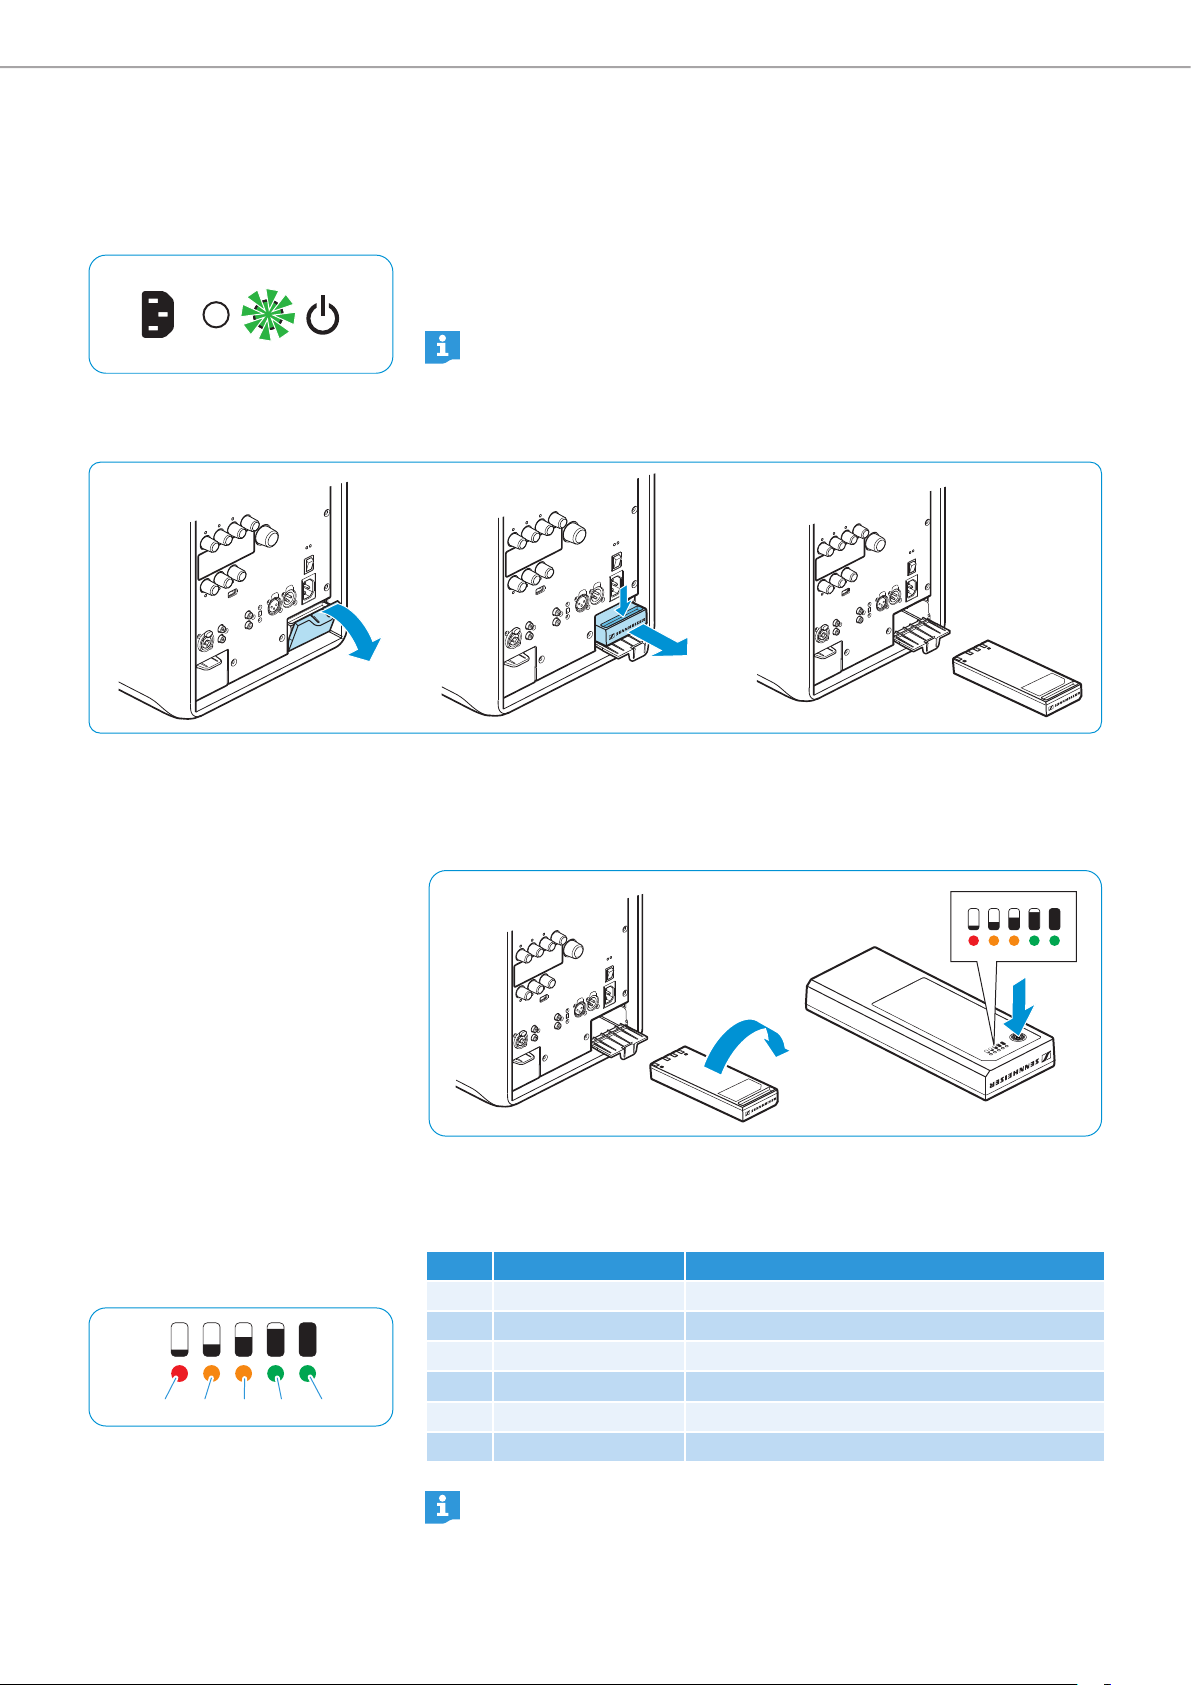
To remove the battery pack from the battery compartment:
Charge status display
on the battery pack
1 2
3
4 5
X Open the cover of the battery compartment (see fig.).
X Pull the battery pack out of the battery compartment using the recessed grip
(see fig.).
To check the battery charge status directly on the battery pack:
X Remove the battery pack.
X Press the button to the right of the charge status display.
The battery packs‘ current capacity is displayed for approx. 5 seconds.
LED Color Remaining capacity
1 red, flashing approx. 0-10% (critical)
1 red, permanently lit approx. 10-20%
2 orange approx. 20-40%
3 orange approx. 40-60%
4 green approx. 60-80%
5 green approx. 80-100%
12 | LSP 500 PRO
Upon delivery of the product, the capacity is approx. 30 - 50%.
Page 13
Using the LSP 500 PRO
Important information on battery operation
Replacing battery packs during operation
When two battery packs are installed in the LSP 500 PRO and you want to replace
one of the two battery pack during operation, make sure to only remove the battery pack that is not in use.
Before removing a battery pack during operation:
X Check the LSP 500 PRO‘s display panel to see which battery pack is currently
in use.
For information on the battery charge status display, refer to page 16.
X Only remove the battery pack that is not in use.
Deep discharge protection
The battery packs have a deep discharge protection. When unused for extended
periods of time, the battery packs automatically switch off to prevent deep
discharge.
To reactivate a battery pack:
X Insert the battery pack into the LSP 500 PRO and charge the battery pack (see
page 11).
USING THE BATTERY PACK AS SIGNAL BUFFER
At high volume levels, the LSP 500 PRO uses the battery pack to buffer signal
peaks. Therefore, if you want to drive a mains powered LSP 500 PRO at high
volume levels, at least one battery pack should be installed in the LSP 500 PRO.
LSP 500 PRO | 13
Page 14

Using the LSP 500 PRO
Switching the LSP 500 PRO on
If the LSP 500 PRO is not connected to the mains power supply, it will be
battery powered. For that to happen, the battery packs must be inserted
and charged.
To switch the LSP 500 PRO on:
X Set the POWER on/off switch L to position “”.
X The LSP 500 PRO switches on. The operation indicator K lights up green. After
a few seconds, the following start icon appears on the display panel:
After a few more seconds, the home screen is displayed:
14 | LSP 500 PRO
Page 15
Using the LSP 500 PRO
Basic operating functions
The operating functions of the LSP 500 PRO are similar to those of a mixing console. Using the LSP 500 PRO‘s six jog dials, you can adjust the input volume of the
corresponding input. The MASTER VOLUME jog dial 7 allows you to adjust the
overall volume of the LSP 500 PRO. The MENU jog dial 9 allows you to operate
the menu in order to configure the LSP 500 PRO.
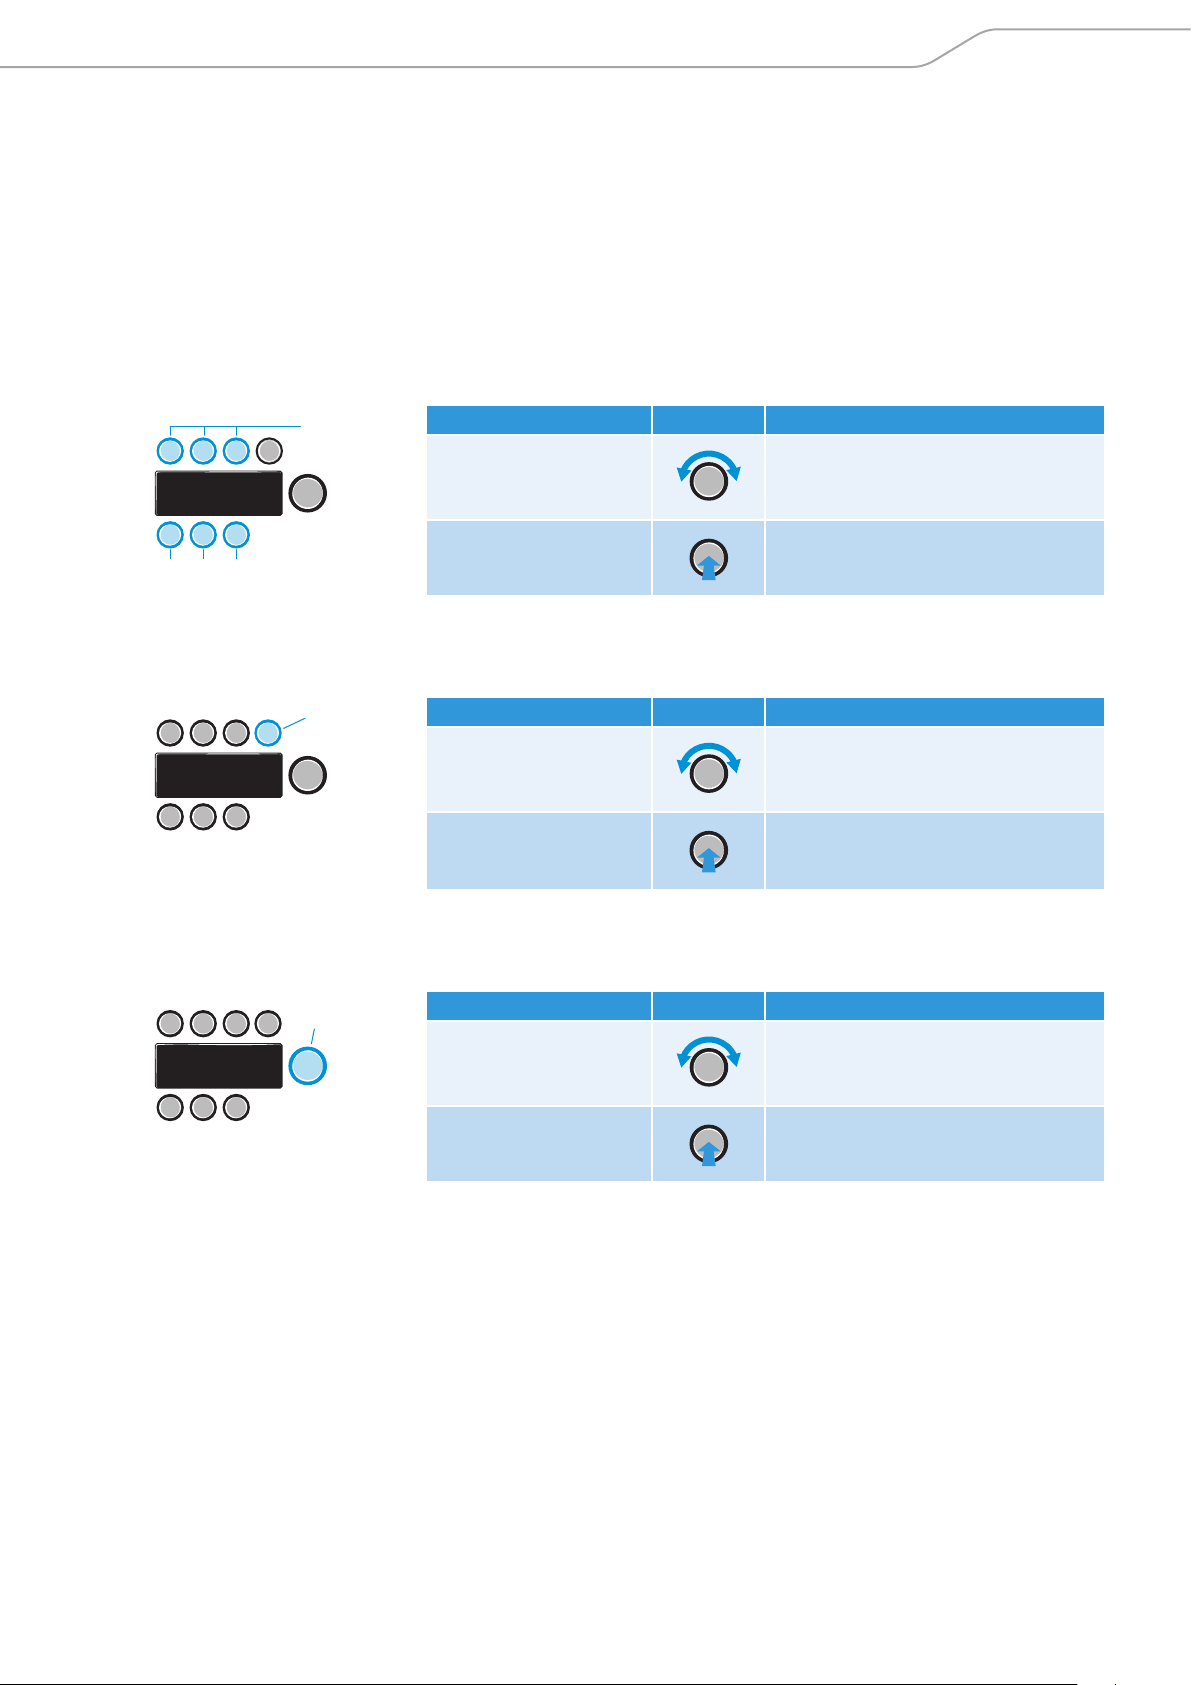
Functions of the SLOT 1/2/3 6, MIC 0, AUX IN B, USB D jog dials
0 B D
6
7
Action Icon Function
Turn a jog dial
Press a jog dial
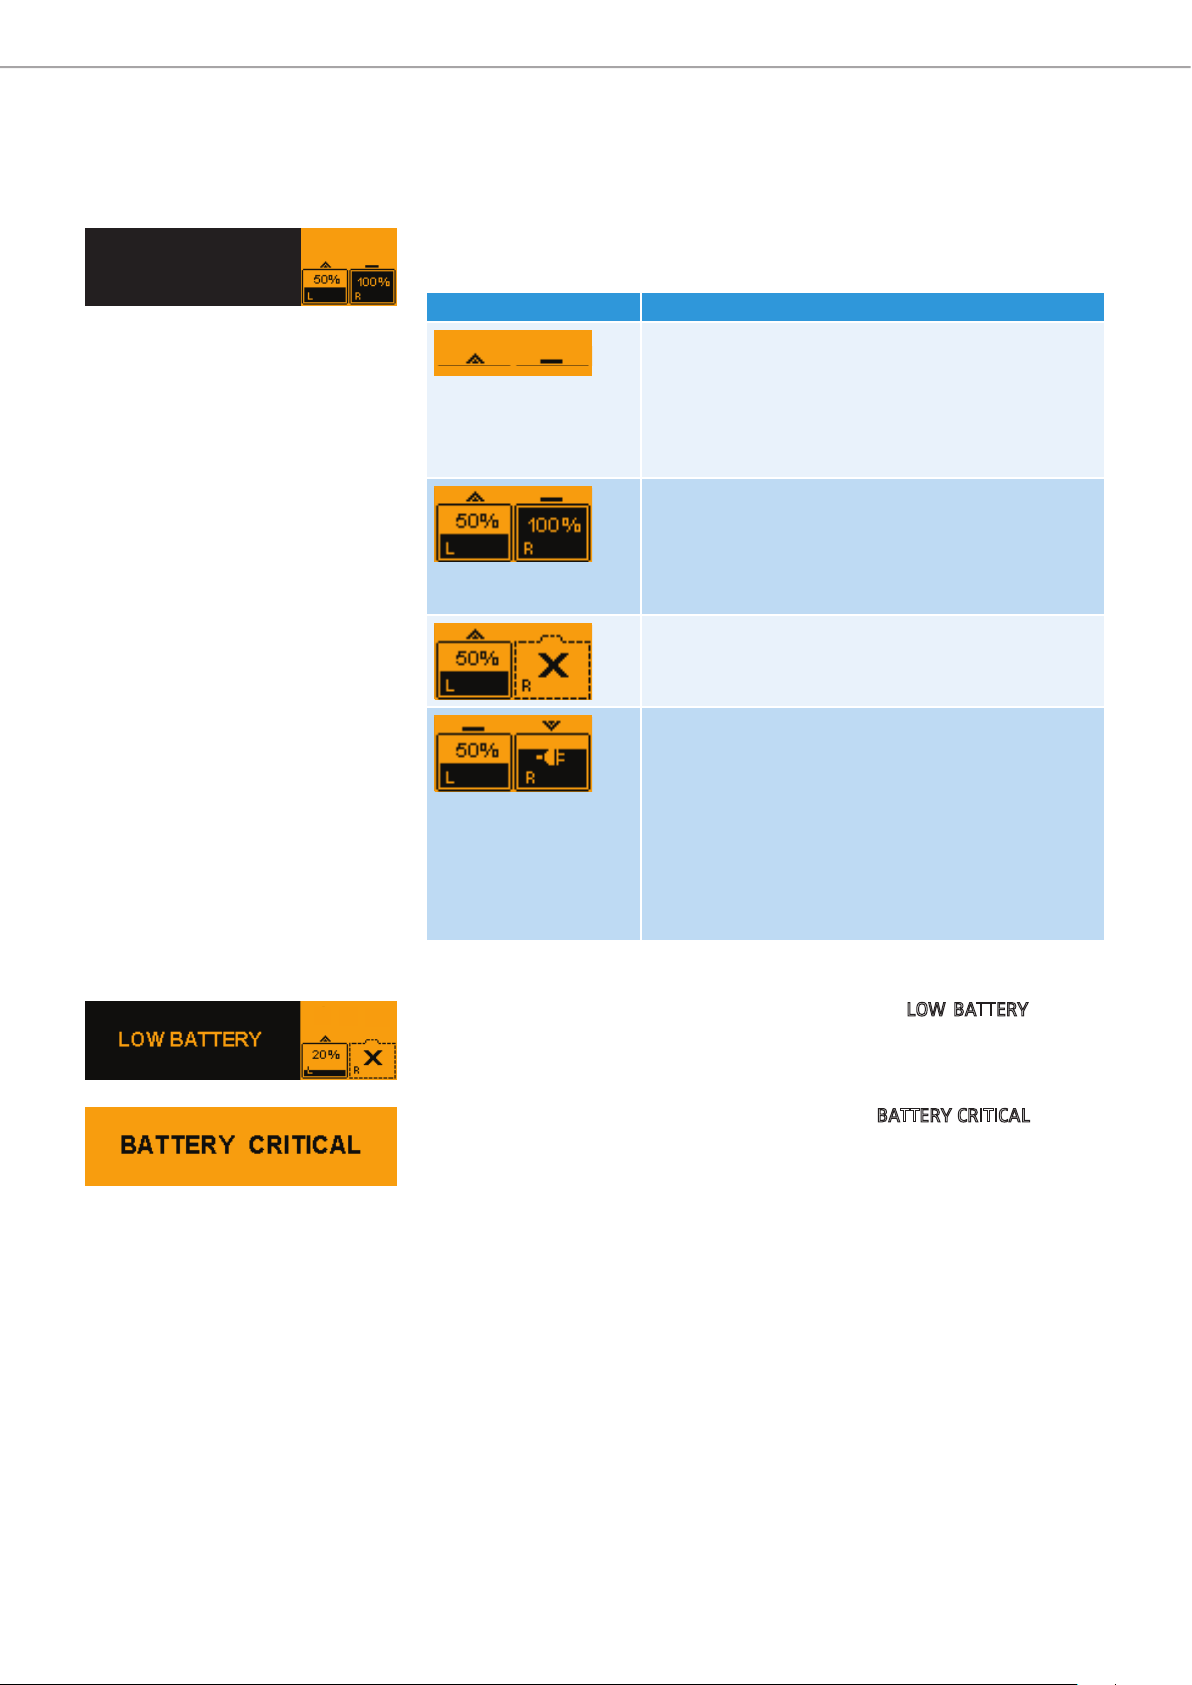
Functions of the MASTER VOLUME jog dial 7
Action Icon Function
Turn the
MASTER VOLUME jog
dial
Press the
MASTER VOLUME jog
dial
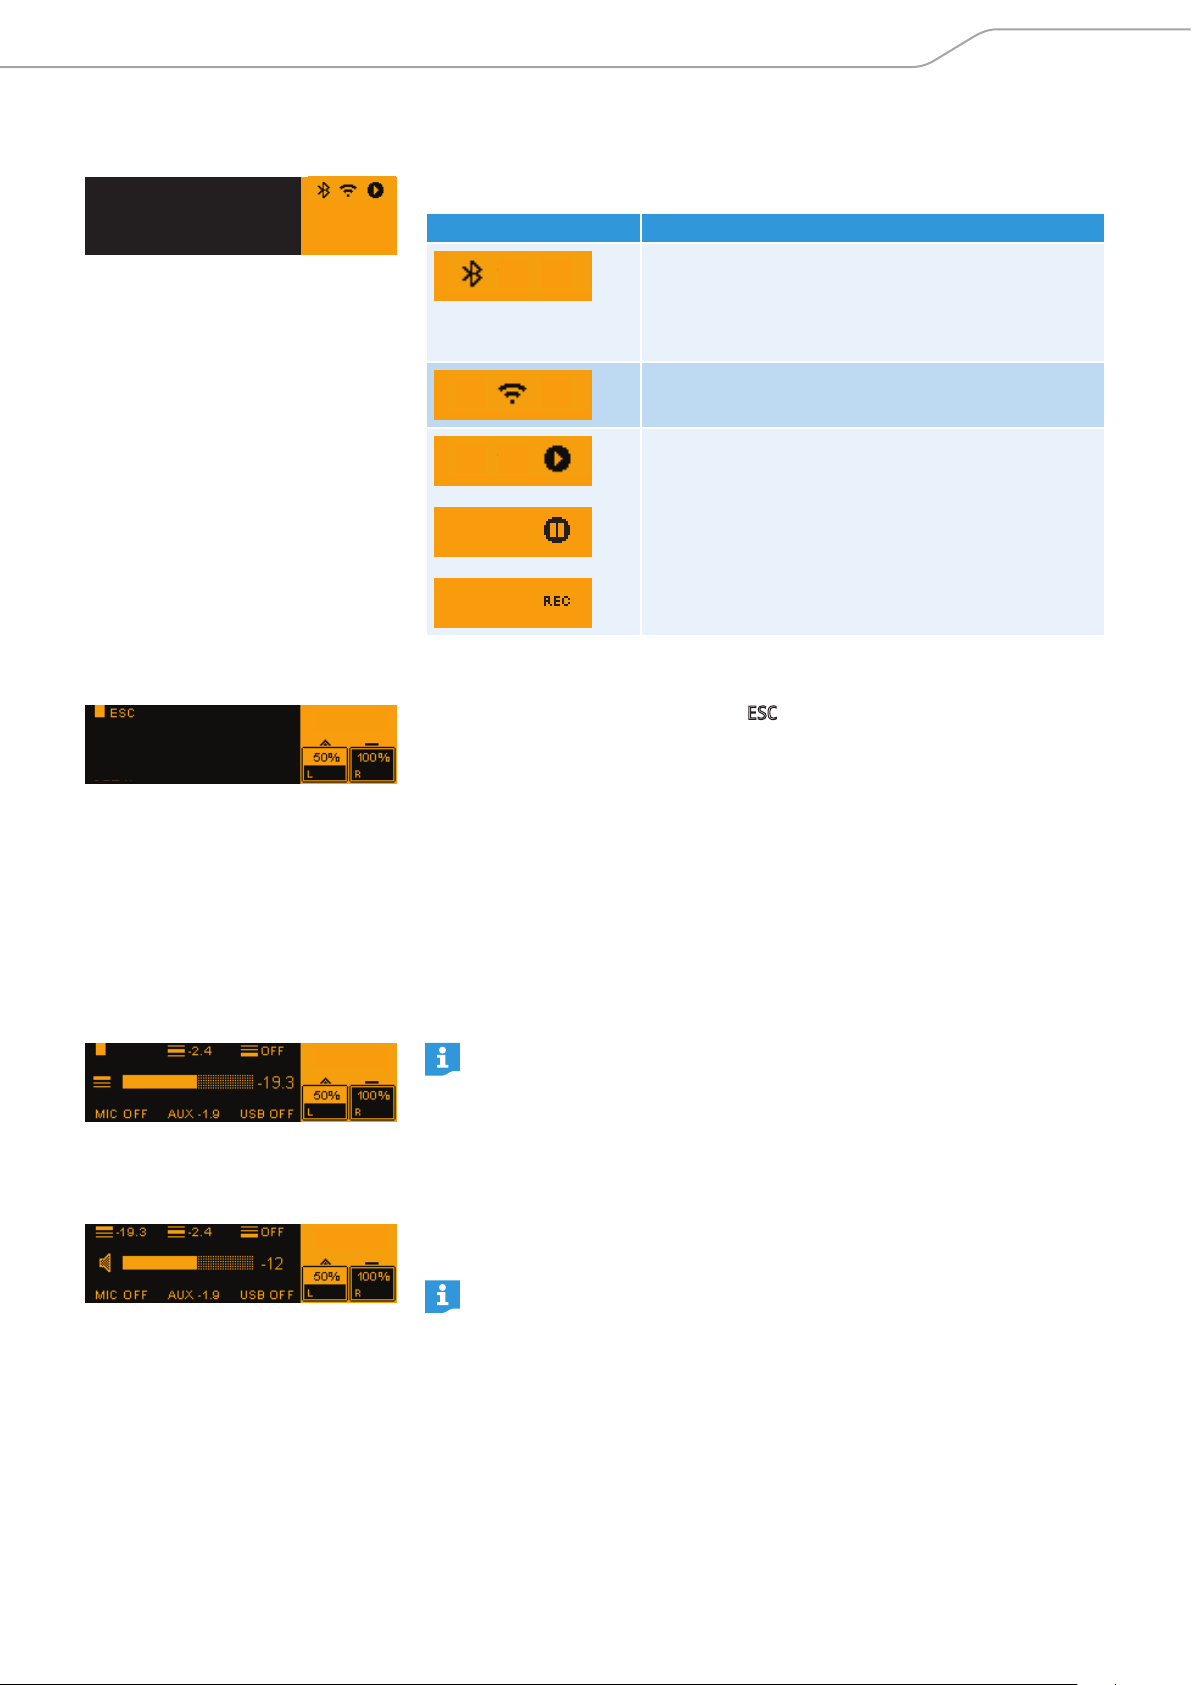
Functions of the MENU jog dial 9
• Adjusts the input volume of the
corresponding input
• Activates a function
• Adjusts the overall volume level
(possible from any menu level)
• Returns you directly to the home
screen from any menu level
9
Action Icon Function
Turn the MENU jog dial
Press the MENU jog dial
• Browses through the menu items
• Adjusts a value
• Calls up a menu item
• Stores a setting
LSP 500 PRO | 15
Page 16
Using the LSP 500 PRO
Basic indications and functions shown on the display panel
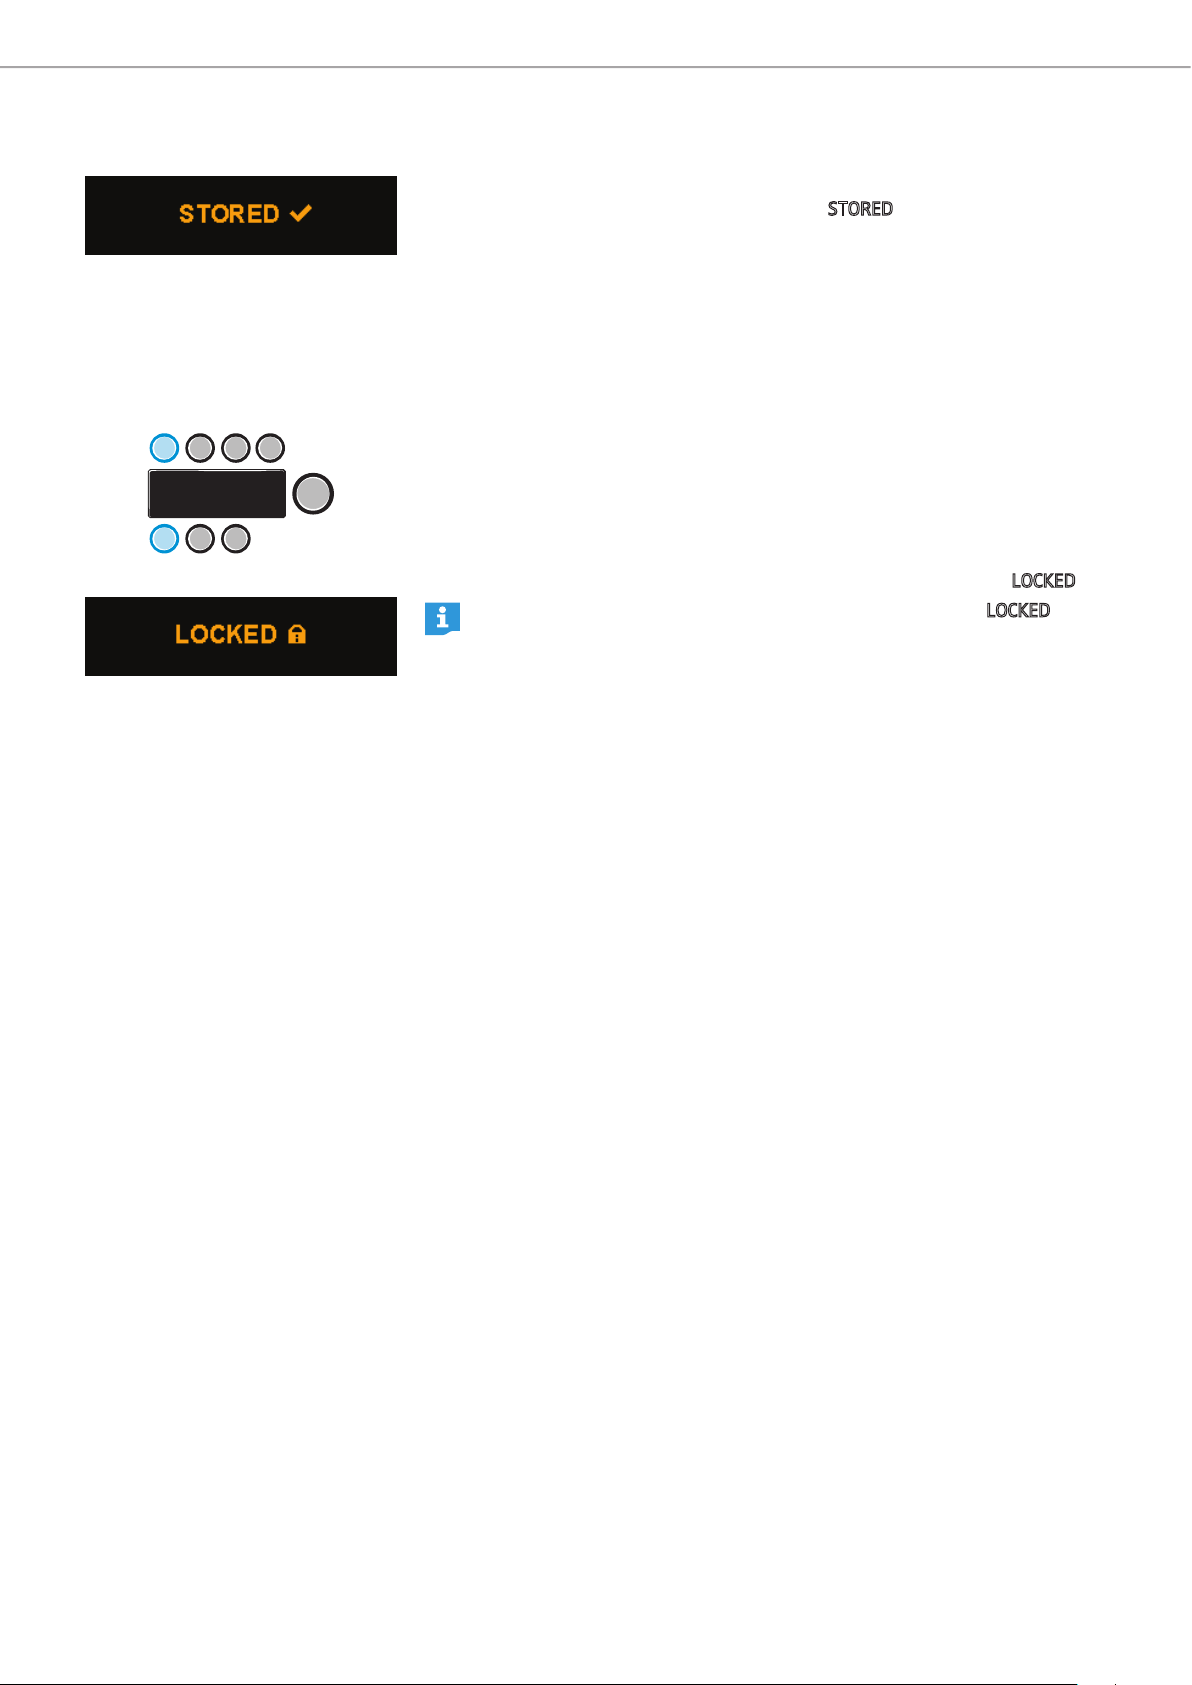
Status area
The status area (highlighted in orange) on the right-hand side of the display
panel indicates the battery charge status.
Icon Explanation
• The battery pack in use is depicted by the triangle.
The triangle is animated and shows if the battery
pack is being charged or in use (triangle pointing
upwards battery pack is in use; triangle pointing
downwards battery pack is being charged).
• The battery pack not in use is depicted by the bar.
• Both battery packs are inserted.
• The battery pack in the left battery compartment
is in use and has a remaining capacity of 50%.
• The battery pack in the right battery compartment
is fully charged and is currently not in use.
• The right battery compartment is empty.
• The battery pack in the left battery compartment
is in use and has a remaining capacity of 50%.
• The LSP 500 PRO is mains operated.
The mains plug icon is displayed.
• The battery pack in the right battery compartment
is being charged.
• The battery pack in the left battery compartment
is not in use. As soon as the battery pack in the
right battery compartment is fully charged, the
battery pack in the left battery compartment will
be charged.
“Low battery” warning messages
When the battery charge status is less than 21%, the
message flashes on the black area of the display panel.
When the battery charge status is less than 6%, the
message flashes on the display panel.
BATTERY CRITICAL warning
LOW BATTERY warning
16 | LSP 500 PRO
Page 17
Using the LSP 500 PRO
Additional indications in the status area
The following additional icons can appear in the status area of the display panel:
Icon Explanation
Icon is displayed steadily: Bluetooth is activated and
one device is paired.
Icon is displayed flashing: Pairing mode is activated
to allow Bluetooth devices to pair.
WLAN is activated and the LSP 500 PRO is connected
to a network.
Status of the USB player:
• Play
• Pause
• Record
Escape function
When you call up any menu item and
ESC is displayed in the upper left corner of
the display panel, you can exit the menu item without storing the settings made.
When navigating the operating menu, the escape function also allows you to
return to the previous menu level.
X Press the SLOT 1 jog dial to call up the escape function and to exit a menu
without storing the settings.
X Press the SLOT 1 jog dial to return to the previous menu level.
Adjusting the volume
To adjust the input volume of the inputs:
X Turn one of the six input jog dials (SLOT 1, SLOT 2, SLOT 3, MIC, AUX IN, USB).
The icon for the corresponding input is shown on the left of the volume bar.
The LEDs directly above the SLOT 1, SLOT 2, SLOT 3 jog dials and directly
below the MIC, AUX IN, USB jog dials indicate the level of the corresponding
input. If an LED flickers green, a signal is present at the input. If an LED
flickers or lights up red, the signal is overmodulated. The LED of the USB
input cannot light up red.
To adjust the overall volume.
X Turn the MASTER VOLUME jog dial.
The icon for the overall volume is shown on the left of the volume bar.
You can adjust the volume from -96 to +6 dB.
LSP 500 PRO | 17
Page 18
Using the LSP 500 PRO
Confirmation of stored settings
Once you have adjusted a setting in the menu and stored it or when you have
activated a function, the display panel displays
Display time out
Once you have finished adjusting settings in the menu, all open menu items are
automatically closed and the display panels returns to the home screen. The USB
player and the test sound menu are not affected by this and remain open.
STORED.
Lock mode
You can activate a lock mode that locks the jog dials against accidental use. This
prevents settings from being inadvertently changed during operation.
Activating the lock mode
X Simultaneously press the SLOT 1 and MIC jog dials for at least 2 seconds.
The lock mode is activated. The display panel temporarily displays
If you turn or press a jog dial when the lock mode is activated,
briefly displayed. However, when the lock mode is activated, the POWER
on/off switch can still be used.
LOCKED.
LOCKED is also
Deactivating the lock mode
X Simultaneously press the SLOT 1 and MIC jog dials for at least 2 seconds.
The lock mode is deactivated and the home screen is displayed.
Lock mode behavior when the LSP 500 PRO is operated using a tablet
If you operate the LSP 500 PRO using a tablet (see page 23), the lock mode
is automatically activated. When you deactivate the lock mode directly on the
LSP 500 PRO, and as long as you operate the LSP 500 PRO using the tablet, the
lock mode is automatically reactivated after 1 minute of inactivity.
Activating ground lift
If there is humming or buzzing noise coming from the input signal cables, you can
disconnect pin 1 of the LINK IN XLR input from the ground:
X Set the GROUND LIFT switch to position LIFT.
18 | LSP 500 PRO
Page 19
Using the LSP 500 PRO
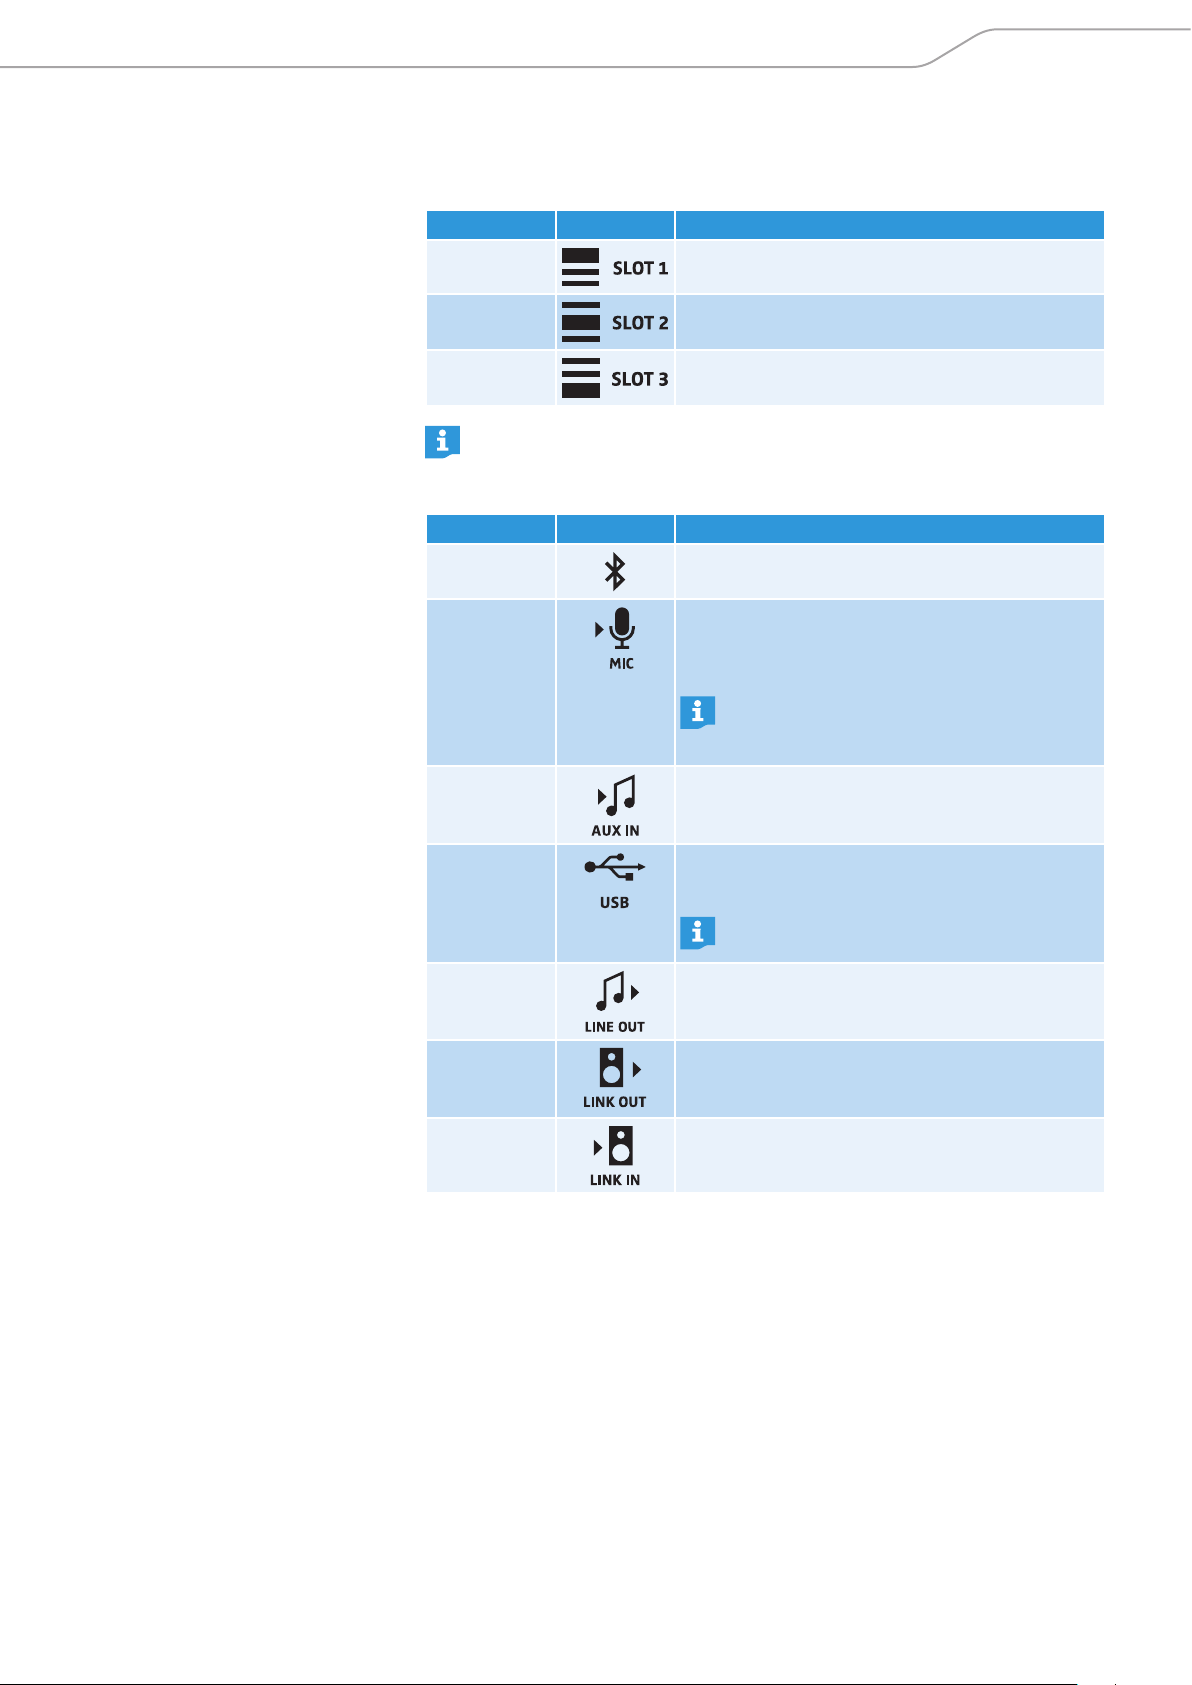
Connection possibilities
Expansion slots
Additional inputs and outputs
Label Icon Function
SLOT 1
SLOT 2
SLOT 3
If you want to install a transmitter into the LSP 500 PRO, it is recommended
to install it in SLOT 1 for mounting reasons.
Label Icon Function
BLUETOOTH
MIC
AUX IN
Expansion slot for installing a Sennheiser ew G3
device
Expansion slot for installing a Sennheiser ew G3
device
Expansion slot for installing a Sennheiser ew G3
device
Bluetooth interface for wireless connection to
audio sources (e.g. iPod, smartphone)
XLR-3F/¼" (6.3 mm) jack combo socket for connecting wired audio sources (e.g. microphone,
instrument)
The MIC input provides a switchable 48V
phantom power. The phantom power can
be activated via the menu.
RCA input for connecting wired audio sources
(e.g. CD player, laptop)
USB
LINE OUT
LINK OUT
LINK IN
USB port for playing audio files from USB storage
devices (e.g. USB flash drive, external hard disk)
For more information on the supported USB
storage devices, refer to page 35.
RCA output for outputting the audio signal to an
external device (e.g. recording device)
XLR-3M output for outputting the audio signal
to an additional LSP 500 PRO or an active
subwoofer
XLR-3F input for connection to the “Link” output
of an additional LSP 500 PRO
LSP 500 PRO | 19
Page 20
Using the LSP 500 PRO
Installing devices in the expansion slots
The 3 expansion slots of the LSP 500 PRO allow you to install devices of the
Sennheiser ew G3 series.
Using the media control protocol of
the ew G3 series
If you operate the LSP 500 PRO from your tablet using the required app
(see page 23), the integrated media control protocol of the installed ew
G3 devices sends device status information to the app. For this to happen,
a device needs to be detected only once after its installation. For more information, refer to page 51.
CAUTION
Danger of electric shock!
X Before installing devices in the expansion slots, switch the LSP 500 PRO off
and disconnect it from the mains power supply.
Required accessories and tools
• 2 rack mount “ears” per device (supplied with the LSP 500 PRO)
• 2.5 mm Allen key
• Recessed head screwdriver (PH 2)
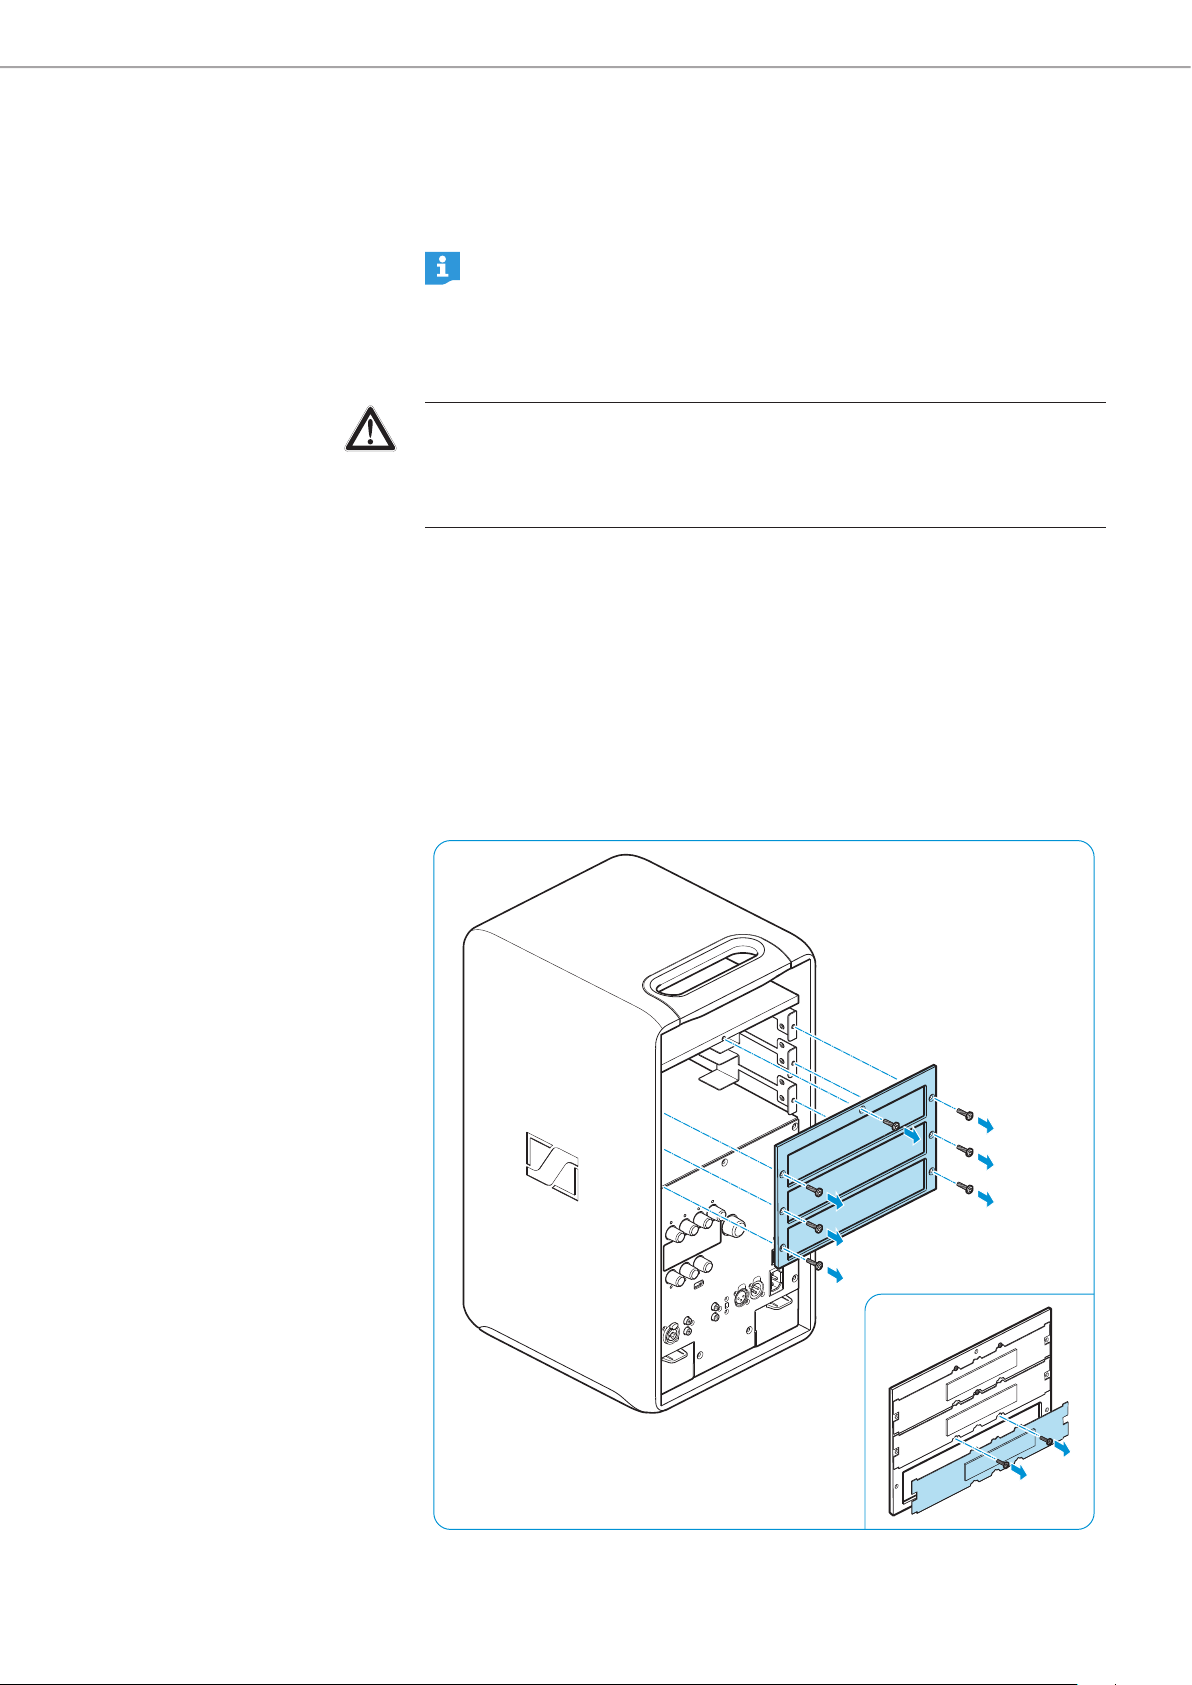
Opening the expansion slot
X Unscrew and remove the 7 Allen screws of the cover plate frame.
X Remove the cover plate frame.
X Unscrew and remove the screws at the rear of the cover plate frame.
X Remove the cover plate of the slot you want to use.
20 | LSP 500 PRO
Page 21

Using the LSP 500 PRO
Mounting the rack mount “ears”
X Unscrew and remove the 2 recessed head screws on each side of the receiver /
transmitter.
X Secure the rack mount “ears” (supplied with the LSP 500 PRO) to the sides
of the receiver / transmitter using the previously removed 4 recessed head
screws. You require 2 rack mount “ears” per receiver / transmitter.
X Tighten the screws on the rack mount “ears” using a recessed head screw-
driver (PH 2).
LSP 500 PRO | 21
Page 22

Using the LSP 500 PRO
Connecting and installing a receiver / transmitter
X If necessary, remove the rubber feet from the receiver / transmitter.
X Connect the cable of the corresponding expansion slot to the receiver /
transmitter.
The cables of the expansion slots are labeled to ensure proper connection andd
installation. The network plugs (RJ 45) are universal and are not labeled.
If you install a stereo transmitter (e.g. Sennheiser SR 300 IEM G3), you have
to set the transmitter to mono operation. For further information and for
information on the connection sockets of the stereo transmitter, refer to
the corresponding instruction manual.
X Connect the rod antennas of the receiver / transmitter and align them in
a V-shape.
X Make sure that the antennas are pointing away from each other and do not
cross to ensure optimum reception and full diversity performance.
X Carefully slide the receiver / transmitter into the expansion slot.
X Take care that no cables are pinched when inserting the receiver / transmitter.
X Screw the rack mount “ears” to the front of the LSP 500 PRO.
X Replace the cover plate frame and tighten the 7 Allen screws.
Leave unused cables in their plastic wraps and, if necessary, fix them to the
expansion slot. Due to the vibrations of the LSP 500 PRO, loose cables can
cause unwanted noise.
22 | LSP 500 PRO
Page 23

Operating the LSP 500 PRO via a tablet
Operating the LSP 500 PRO via a tablet
The optionally available “LSP 500 PRO” app allows you to operate the LSP 500 PRO
from your tablet. The app turns your tablet into a mobile mixing console and allows you to adjust the settings of an individual LSP 500 PRO and to also adjust
common settings for several LSP 500 PRO at the same time. The app supports the
operation of up to 20 LSP 500 PRO simultaneously.
Information on downloading and installing the app as well as information
on supported mobile devices can be found on the LSP 500 PRO product page
at www.sennheiser.com.
In order to be able to operate the LSP 500 PRO from your tablet using
the app, you first have to connect the LSP 500 PRO to a wireless network
(WLAN). For information on how to connect the LSP 500 PRO to a wireless
network, refer to page 42.
LSP 500 PRO | 23
Page 24

Operating the LSP 500 PRO via a tablet
Information on using the app
The app is available in the following languages: English, German, French, Italian,
Spanish, Dutch and Russian. The app opens automatically in the language you
have set up for your tablet. If the operating system on your tablet uses a language that is not supported by the app, the app opens in English.
“Positioning” screen
After opening the app, it will show all the LSP 500 PRO available in the network.
On this screen, you can perform the following actions:
X Position the boxes as desired by dragging them to any location on the screen.
X Drag the “Audience” to the desired position.
X Tap on a box to edit the settings of this box.
X Tap on the “Select multiple” option to select several boxes at the same time
and to edit their common settings.
X Tap on the “Select all” option to select all boxes and to edit their common
settings.
24 | LSP 500 PRO
Page 25

Operating the LSP 500 PRO via a tablet
“Edit box” screen
If you tap on an individual box on the “Positioning” screen, you can configure the
selected LSP 500 PRO. The following screen appears:
“Mixing Panel” screen
The “Mixing Panel” screen shows a summary of all activated inputs of all boxes.
You can activate a total of 7 inputs. The “Mixing Panel” screen allows you to configure the activated inputs.
LSP 500 PRO | 25
Page 26

Operating the LSP 500 PRO via a tablet
Selecting several boxes
On the “Positioning” screen, you can either tap on “Select all” to simultaneously
select all boxes or you can tap on “Select multiple” to simultaneously select certain boxes.
Adjusting common settings for several boxes
If you have selected several boxes on the previous screen, you can adjust common
settings for the selected boxes by tapping on “Edit” in the upper right corner of
the screen. The following screen appears:
26 | LSP 500 PRO
Page 27

Operating the LSP 500 PRO via a tablet
Equalizer
You can operate the equalizer of the LSP 500 PRO via the app.
Compressor
You can operate the compressor of the LSP 500 PRO via the app.
LSP 500 PRO | 27
Page 28

The operating menu
The operating menu
Menu structure
This overview shows the structure and functions of the LSP 500 PRO‘s menu
which can be operated using the MENU jog dial.
Equalizer
Virtual Bass
Compressor
Delay
Equalizer
Master
Slot 1
Slot 2
Slot 3
MIC
AUX
USB
Bluetooth
Compressor
Slot 1
Slot 2
Slot 3
MIC
Bluetooth
Pairing
Volume
USB Player
Bluetooth
Settings
Service
Pairing
Settings
Testton
Test Sound
Daisy Chain
Display Brightness
WLAN
MAC Address
IP Mode
IP Address
IP Net Mask
SSID List Selection
SSID Entry
WPA2 Key
MIC
Input Sensitivity
Phantom Power
Device Detection
Reset
Service
System Info
Maintenance
Firmware Update
28 | LSP 500 PRO
Page 29

The operating menu
To call up the operating menu:
X When the home screen is displayed, turn the MENU jog dial to the left or right
to browse up or down through the operating menu.
The menu items are displayed as follows:
The opened menu level or menu item is shown at the bottom left of the display
panel. The ESC function allows you to return to the previous menu level.
Menu
Equalizer
Equalizer
You can either open and configure a master EQ for the overall signal of the
LSP 500 PRO or you can open and configure an equalizer with 3 presets for each
individual input (SLOT 1, SLOT 2, SLOT 3, MIC, AUX IN, USB, BLUETOOTH).
To open the equalizer:
X At the first menu level, turn the MENU jog dial until the EQUALIZER menu item
is displayed.
X Press the MENU jog dial to open the EQUALIZER menu item.
X Turn the MENU jog dial to select the MASTER menu item for the master EQ or to
select one of the SLOT 1, SLOT 2, SLOT 3, MIC, AUX IN, USB or BLUETOOTH menu
items for the corresponding input EQ.
X Press the MENU jog dial to open the selected equalizer.
LSP 500 PRO | 29
Page 30

The operating menu
Master
Display example when EQ is
switched off
Display example when EQ is
switched on
Master EQ
The master EQ allows you to configure the overall signal of the LSP 500 PRO. The
master EQ is a semiparametric 3-band equalizer.
X Turn the MENU jog dial to switch the master EQ on or off.
X Configure the master EQ using the jog dials that are assigned the following
functions:
Jog dial Action Function
SLOT 1
Sets the cut-off frequency of the low frequency band
SLOT 2
SLOT 3
MIC
AUX IN
USB
X Press the MENU jog dial to store your settings.
Sets the cut-off frequency of the mid frequency band
Sets the cut-off frequency of the high frequency band
Sets the level of the low frequency band
Sets the level of the mid frequency band
Sets the level of the high frequency band
The app (see page 23) allows you to make more detailed settings (e.g.
notch filter) for the master EQ. The settings made in the app are also displayed on the display panel of the LSP 500 PRO. When you return to making
settings directly on the LSP 500 PRO, the display panel shows again the
simplified representation and all settings made in the app are overwritten.
30 | LSP 500 PRO
Page 31

The operating menu
EQ presets for the inputs
EQ On/Off
EQ Presets
Switching an input EQ on or off
To switch an input equalizer on or off:
X Select the desired input in the EQUALIZER menu and turn the MENU jog dial
until the EQ ON/OFF menu item is displayed.
X Press the MENU jog dial to open the EQ ON/OFF menu item.
X Turn the MENU jog dial to choose between ON and OFF.
X Press the MENU jog dial to activate your selection and to switch the input EQ
on or off.
The following menu items are only available when the input EQ is switched
on.
Selecting an EQ preset for an input
To select an EQ preset for an input:
X Select the desired input in the EQUALIZER menu and turn the MENU jog dial
until the EQ PRESETS menu item is displayed.
X Press the MENU jog dial to open the EQ PRESETS menu item.
3 presets are available for each input.
X Turn the MENU jog dial to choose between VOICE, MUSIC and FLAT.
EQ preset Explanation
VOICE Optimized for speech
MUSIC Optimized for music
FLAT No influence
X Press the MENU jog dial to activate the selected preset.
If none of the 3 presets is highlighted in orange on the display panel, the
equalizer settings have been made in the “LSP 500 PRO” app (see page 23).
If you select a preset, the settings made in the app are overwritten.
LSP 500 PRO | 31
Page 32

The operating menu
Menu
Low Cut
Virtual Bass
Activating the low-cut filter
To suppress unwanted noise such as, e.g., impact noise, you can activate a low-cut
filter for the inputs SLOT 1, SLOT 2, SLOT 3 and MIC.
To switch the low-cut for an input on or off:
X Select the desired input in the EQUALIZER menu and turn the MENU jog dial
until the LOW CUT menu item is displayed.
X Press the MENU jog dial to open the LOW CUT menu item.
X Turn the MENU jog dial to switch the low-cut filter on or off.
X Press the MENU jog dial to activate your selection.
Virtual Bass
You can activate a virtual bass function to enhance the perceived bass reproduction for the inputs AUX IN, USB and BLUETOOTH. The virtual bass function uses
the SRS WOW HD™ technology.
Menu
Compressor
To switch the virtual bass function on or off:
X At the first menu level, turn the MENU jog dial until the VIRTUAL BASS menu
item is displayed.
X Press the MENU jog dial to open the VIRTUAL BASS menu item.
X Turn the MENU jog dial to choose between ON and OFF.
X Press the MENU jog dial to activate your selection and to switch the virtual
bass function on or off.
Compressor
You can activate and configure a compressor for the inputs SLOT 1, SLOT 2, SLOT 3
and MIC.
To open the compressor:
X At the first menu level, turn the MENU jog dial until the COMPRESSOR menu
item is displayed.
X Press the MENU jog dial to open the COMPRESSOR menu item.
X Turn the MENU jog dial to select the desired input.
32 | LSP 500 PRO
Page 33

The operating menu
Display example when compressor is
switched off
Display example when compressor is
switched on
X Press the MENU jog dial to open the compressor for the selected input.
X Turn the MENU jog dial to switch the compressor for the selected input on or
off.
The dotted area in the TH slider displays the level of the audio signal.
Setting recommendations for the
compressor
X Configure the compressor using the jog dials that are assigned the following
functions:
Jog dial Action Function
SLOT 3
USB
X Press the MENU jog dial to store your settings.
Adjusts the compressor threshold (TH)
Adjusts the compressor ratio (RATIO)
Use as ... To ... Ratio Gain reduction
... leveler ... compensate for
volume differences, e.g.
due to different talking
1.2 to 2 The rain reduction
should be between
0 - 6 dB.
distances to the mic or
different speakers
... peak limiter ... compensate for
sudden signal peaks, e.g.
due to throat-clearing or
4 to 10 Normally, filesthere
should be no gain
reduction.
touching the sound inlet
basket
X First, set the threshold to +6 dB.
X Make the desired ratio settings according to the table.
X During operation, slowly lower the threshold until the desired acoustic effect
is achieved.
A gain reduction of more than 10 dB can cause an increased susceptibility to
feedback. This is why the gain reduction should be continuously monitored, and,
if necessary, adjusted during operation.
LSP 500 PRO | 33
Page 34

The operating menu
Menu
Delay
Delay
To open the delay function:
X At the first menu level, turn the MENU jog dial until the DELAY menu item is
displayed.
X Press the MENU jog dial to open the DELAY menu item.
X Turn the MENU jog dial to adjust a delay value.
The delay can be adjusted in the range from 0 to 34 m (0 to 112 ft), in steps
of 0.2 m (0.5 ft).
X Press the MENU jog dial to store the adjusted value.
34 | LSP 500 PRO
Page 35

The operating menu
Menu
USB Player
USB player
The USB player allows you to playback audio files or to record the audio signal of
the LSP 500 PRO.
All USB storage devices that are to be connected to the LSP 500 PRO have to
comply with the following requirements.
• File system FAT 32
• Maximum file size 4 GB
• Maximum memory 8 TB
• Maximum current consumption of external
hard disks
• Maximum number of audio files to be read in 2000
Due to the large number of different USB flash drives on the market, incompatibilities may still occur, even if the above requirements are complied
with.
To open the USB player:
X At the first menu level, turn the MENU jog dial until the USB PLAYER menu item
is displayed.
X Press the MENU jog dial to open the USB player.
The USB player has a playback and a recording mode. When opening the USB
player, the playback mode is displayed.
500 mA
LSP 500 PRO | 35
Page 36

The operating menu
Display example when USB player is
in playback mode
Display example when USB player
is in playback mode and during
playback
Playback mode
Using the USB player in
playback mode
Jog dial Action Icon Function
MENU
SLOT 1
SLOT 2
SLOT 3
MIC
AUX IN
AUX IN
Returns to the home screen
Selects a playback option:
Random
Sequence
Single track
Repeat function activated
Repeat function deactivated
Changes to recording mode
Short press: jumps to the previous track
Long press: rewinds the track
Browses through the playlist without
stopping the current track
Play
Pause
36 | LSP 500 PRO
USB
Short press: jumps to the next track
Long press: fast-forwards the track
Page 37

The operating menu
Display example when USB player is
in recording mode
Display example when USB player
is in recording mode and during
recording
Recording mode
The time display on the display panel indicates the remaining recording
time left on the storage device.
Using the USB player in
recording mode
Jog dial Action Icon Function
MENU
SLOT 3
Returns to the home screen
Stops the recording and changes to playback mode
AUX IN
Record
Pause
Notes on handling recording files
You can either create a new file for each recording or you can append additional
recordings to the same file. Recordings are saved as WAV files (stereo / 16 bit /
44.1 kHz).
To create a new recording file for each recording:
X Change from playback mode to recording mode.
X Press the AUX IN jog dial to start the recording.
X Press the SLOT 3 jog dial to end the recording and to change to playback mode.
X Change from playback mode to recording mode.
X Press the AUX IN jog dial to start the recording.
A new recording file is created. The number at the end of the file name is incremented by one for each new recording file.
To make multiple recordings in the same file:
X Change from playback mode to recording mode.
X Press the AUX IN jog dial to start the recording.
X Press the AUX IN jog dial to stop the recording.
X Press the AUX IN jog dial to resume recording to the same file.
As long as you do not stop recording mode by pressing the SLOT 3 jog dial, you
continue recording to the same file after recording has been stopped.
LSP 500 PRO | 37
Page 38

The operating menu
Menu
Bluetooth
Volume
Bluetooth
Via the Bluetooth menu, you can pair a mobile device (e.g. smartphone, tablet)
with the LSP 500 PRO in order to be able to play audio files. The LSP 500 PRO
supports the A2DP protocol (SBC and aptX®).
To open the Bluetooth menu:
X At the first menu level, turn the MENU jog dial until the BLUETOOTH menu item
is displayed.
X Press the MENU jog dial to open the BLUETOOTH menu item.
X Turn the MENU jog dial to choose between PAIRING and VOLUME.
X Press the MENU jog dial to open the selected menu item.
Adjusting the volume for the Bluetooth interface
To adjust the input volume for the Bluetooth interface:
X Open the VOLUME menu item.
X Turn the MENU jog dial to adjust the desired input volume for the Bluetooth
interface.
X Press the MENU jog dial to store the adjusted volume.
It is recommended to adjust the volume for the Bluetooth interface as high
as possible in order to minimize possible noise (hissing or similar). During
operation, adjust the volume on the Bluetooth device itself.
38 | LSP 500 PRO
Page 39

The operating menu
Pairing
Pairing Bluetooth devices
To pair a Bluetooth device with the LSP 500 PRO:
X Open the PAIRING menu item.
X Turn the MENU jog dial to choose between OFF and PAIR.
X Press the MENU jog dial to activate your selection.
X Select OFF to cancel pairing or to end an existing Bluetooth connection.
X Select PAIR to pair a Bluetooth device with the LSP 500 PRO:
Pairing mode is activated.
Bluetooth icon flashes in the status area.
X Pair your Bluetooth device with the LSP 500 PRO while pairing mode is active.
When the Bluetooth connection is successfully established,
appears on the display panel and the Bluetooth icon is displayed steadily in
the status area.
PAIRING NOW appears on the display panel and the
PAIRING SUCCESSFUL
When the Bluetooth connection is not made or after an automatic time-out of
30 seconds, PAIRING FAILED appears on the display panel.
X Press the SLOT 3 jog dial to retry pairing.
Your Bluetooth device displays the LSP 500 PRO as follows: LSP500-XXXXX.
XXXXX stands for the last 5 digits of the LSP 500 PRO‘s serial number.
The LSP 500 PRO supports automatic reconnection to the last connected
device. For information on whether your device supports this function, refer
to the instruction manual of your Bluetooth device.
LSP 500 PRO | 39
Page 40

The operating menu
Menu
Menu
Settings
Settings
Test Sound
Settings
The SETTINGS menu allows you to adjust the LSP 500 PRO settings.
To open the settings menu:
X At the first menu level, turn the MENU jog dial until the SETTINGS menu item
is displayed.
X Press the MENU jog dial to open the SETTINGS menu item.
The SETTINGS menu contains all the options and functions necessary for configuring the LSP 500 PRO.
Test sound
You can play a test sound to check the acoustic function of the LSP 500 PRO.
To play the test sound:
X In the SETTINGS menu, turn the MENU jog dial until the TEST SOUND menu item
is displayed.
X Press the MENU jog dial to open the TEST SOUND menu item.
X Turn the MENU jog dial to adjust the volume of the test sound.
X Press the MENU jog dial (or the SLOT 1 jog dial) to adjust the volume of the
test sound to 0 and to return to the previous menu level.
The overall volume of the LSP 500 PRO and the volume of the test sound
have no effect on one another. When the test sound is activated, the other
signals of the LSP 500 PRO are muted. After existing the
TEST SOUND menu
item, the previous volume settings are activated again.
40 | LSP 500 PRO
Page 41

The operating menu
Menu
Settings
Daisy Chain
Configuring the signal output to additional devices
You can send the signal of the LSP 500 PRO to one or several LSP 500 PRO – either
wired via the LINK OUT XLR output or wirelessly via a transmitter installed in the
SLOT 1 expansion slot. Via the LINK OUT output, you can also send the signal to
an active subwoofer.
To configure the signal output:
X In the SETTINGS menu, turn the MENU jog dial until the DAISY CHAIN menu
item is displayed.
X Press the MENU jog dial to open the DAISY CHAIN menu item.
X Turn the MENU jog dial to choose between MASTER, SLAVE and RIGHT-L.
Option Function
MASTER The overall signal of the LSP 500 PRO is available as a
mono signal at the LINK OUT output and at the SLOT 1
expansion slot.
X Select MASTER if you want to send the overall signal
of the LSP 500 PRO to one or several LSP 500 PRO –
either wired via the LINK OUT XLR output or wirelessly
via a transmitter installed in the SLOT 1 expansion
slot.
X Select MASTER if you want to connect an active sub-
woofer to the LINK OUT output.
SLAVE Only the signal of the LINK IN input is available at the
LINK OUT output and at the SLOT 1 expansion slot.
X Select SLAVE if you want to daisy-chain several
LSP 500 PRO and to adjust the volume only on one
box (master box).
X On the master box, select the MASTER option.
RIGHT-L Right link mode: The signal of the right channel of the
AUX IN, BLUETOOTH and USB stereo inputs is available
at the LINK OUT output and at the transmitter installed
in SLOT 1. The box that is set to RIGHT-L plays the left
stereo channel and the connected box plays the right
stereo channel. The mono signals of the SLOT 1, SLOT 2,
SLOT 3, MIC and LINK IN inputs are played on both boxes.
X Select RIGHT-L if you want to use 2 LSP 500 PRO in a
stereo PA system.
X Press the MENU jog dial to activate your selection.
LSP 500 PRO | 41
Page 42

The operating menu
Menu
Settings
Menu
Settings
Display Brightness
Display brightness
To adjust the display brightness:
WLAN
WLAN
To be able to operate the LSP 500 PRO from a tablet with the “LSP 500 PRO” app
in a wireless network, you first have to open the WLAN menu and connect the
LSP 500 PRO to the wireless network to which you also connect your tablet. For
information on how to operate the LSP 500 PRO via a tablet, refer to page 23.
Important information on WLAN operation
X In the SETTINGS menu, turn the MENU jog dial until the DISPLAY BRIGHTNESS
menu item is displayed.
X Press the MENU jog dial to open the DISPLAY BRIGHTNESS menu item.
X Turn the MENU jog dial to adjust the display brightness.
X Press the MENU jog dial to store your setting.
In order for you to be able to operate the LSP 500 PRO in a wireless network,
the following requirements have to be met. If you have questions, contact your
network administrator.
Only unencrypted networks or networks with WPA2 encryption are supported.
Only networks in the 2.4 GHz band are supported (802.11b/g).
The following address and port must be enabled on the network:
• Multicast address 239.255.12.42:1234
• Port 0xD011 (53265)
Basic changes to the WLAN settings of the LSP 500 PRO require a restart of
the WLAN module of the LSP 500 PRO. This can take up to 30 seconds.
A list of compatible access points can be found on the LSP 500 PRO product
page at en-de.sennheiser.com/lsp-500-pro
42 | LSP 500 PRO
Page 43

The operating menu
To open the WLAN menu:
X In the SETTINGS menu, turn the MENU jog dial until the WLAN menu item is
displayed.
X Press the MENU jog dial to open the WLAN menu item.
On/Off
MAC Address
Switching the WLAN function of the LSP 500 PRO on or off
X In the WLAN menu, turn the MENU jog dial until the WLAN ON/OFF menu item
is displayed.
X Press the MENU jog dial to open the WLAN ON/OFF menu item.
X Turn the MENU jog dial to choose between ON and OFF.
X Press the MENU jog dial to activate your selection and to switch the WLAN
function on or off.
When the WLAN function is switched on, you can connect the LSP 500 PRO to
a wireless network.
The following menu items are only available when the WLAN function is
switched on.
Displaying the MAC address
To display the MAC address of the LSP 500 PRO:
X In the WLAN menu, turn the MENU jog dial until the MAC ADDRESS menu item
is displayed.
X Press the MENU jog dial to open the MAC ADDRESS menu item.
The MAC address of the LSP 500 PRO is displayed.
X Press the MENU jog dial to return to the previous menu level.
LSP 500 PRO | 43
Page 44

The operating menu
IP Mode
Selecting the assignment mode for the IP address and the
IP subnet mask
The IP address and the subnet mask of the LSP 500 PRO can be assigned automatically or statically. If address assignment is static, you can enter the IP address
and the IP subnet mask yourself and change them. If address assignment is automatic, you cannot change the IP address and the IP subnet mask.
To select the assignment mode for the IP address and the IP subnet mask:
X In the WLAN menu, turn the MENU jog dial until the IP MODE menu item is
displayed.
X Press the MENU jog dial to open the IP MODE menu item.
X Turn the MENU jog dial to choose between AUTO or FIX.
Option Function
AUTO IP address and IP subnet mask are automatically
assigned via DHCP and cannot be changed.
FIX IP address and IP subnet mask can be changed.
X Press the MENU jog dial to activate your selection.
44 | LSP 500 PRO
Page 45

The operating menu
IP Address
AUTO assignment mode
FIX assignment mode
Displaying and changing the IP address
To display the IP address when AUTO is the selected assignment mode:
X In the WLAN menu, turn the MENU jog dial until the IP ADDRESS menu item is
displayed.
X Press the MENU jog dial to open the IP ADDRESS menu item.
The IP address is displayed.
X Press the MENU jog dial to return to the previous menu level.
To change the IP address when
X In the WLAN menu, turn the MENU jog dial until the IP ADDRESS menu item is
displayed.
X Press the MENU jog dial to open the IP ADDRESS menu item.
FIX is the selected assignment mode:
X Configure the IP address using the jog dials that are assigned the following
functions:
Jog dial Action Function
USB
MENU
Enters numbers from 0 to 255
Switches between the 4 number blocks
of the IP address
X Press the MENU jog dial to store the new IP address.
LSP 500 PRO | 45
Page 46

The operating menu
IP Net Mask
AUTO assignment mode
FIX assignment mode
Displaying and changing the IP subnet mask
To display the IP subnet mask when AUTO is the selected assignment mode:
X In the WLAN menu, turn the MENU jog dial until the IP NETMASK menu item is
displayed.
X Press the MENU jog dial to open the IP NETMASK menu item.
The IP subnet mask is displayed.
X Press the MENU jog dial to return to the previous menu level.
To change the IP subnet mask when
X In the WLAN menu, turn the MENU jog dial until the IP NETMASK menu item is
displayed.
X Press the MENU jog dial to open the IP NETMASK menu item.
FIX is the selected assignment mode:
X Configure the IP subnet mask using the jog dials that are assigned the fol-
lowing functions:
Jog dial Action Function
USB
MENU
Enters numbers from 0 to 255
Switches between the 4 number blocks
of the IP subnet mask
X Press the MENU jog dial to store the new IP subnet mask.
46 | LSP 500 PRO
Page 47

The operating menu
SSID List Selection
Selecting a network and connecting the LSP 500 PRO to the
selected network
To select a wireless network and to connect the LSP 500 PRO to the selected
network:
X In the WLAN menu, turn the MENU jog dial until the SSID LIST SELECTION menu
item is displayed.
X Press the MENU jog dial to open the SSID LIST SELECTION menu item.
The available networks are shown on the display panel. Encrypted networks
are marked with a lock icon.
X Turn the MENU jog dial to browse up or down through the available networks.
X Press the MENU jog dial to establish a connection to the selected network.
A tick () next to the network name indicates the network to which the
LSP 500 PRO is connected. The lock icon indicates a secure network.
If a network is not encrypted, the connection is established immediately. If
a network is WPA2-encrypted, you first have to enter the network key. For
information on how to enter the network key, refer to page 49.
LSP 500 PRO | 47
Page 48

The operating menu
SSID Entry
Manually entering a network name
When a network is hidden, but you know its name, you can manually enter the
network name to connect to this network.
X In the WLAN menu, turn the MENU jog dial until the SSID ENTRY menu item is
displayed.
X Press the MENU jog dial to open the SSID ENTRY menu item.
X Enter the network name using the jog dials that are assigned the following
functions:
Jog dial Action Function
MENU
SLOT 2
SLOT 3
Moves the cursor to the left or right
Enters a space at the cursor position
Deletes the character at the cursor
position
MIC
AUX IN
USB
Enters capital letters
Enters lower case letters
Enters numbers and special
characters
X Press the MENU jog dial to connect to the network whose name you entered.
If a network is not encrypted, the connection can be established immediately. If a network is WPA2-encrypted, you first have to enter the network
key. For information on how to enter the network key, refer to page 49.
48 | LSP 500 PRO
Page 49

The operating menu
WPA2 Key
Entering a network key
If you want to connect the LSP 500 PRO to a WPA2-encrypted wireless network,
you have to select the network (see page 47) and then enter the network key.
To enter the network key:
X In the WLAN menu, turn the MENU jog dial until the WPA2 KEY menu item is
displayed.
X Press the MENU jog dial to open the WPA2 KEY menu item.
X Enter the network key using the jog dials that are assigned the following
functions:
Jog dial Action Function
MENU
SLOT 2
SLOT 3
Moves the cursor to the left or right
Enters a space at the cursor position
Deletes the character at the cursor
position
MIC
AUX IN
USB
Enters capital letters
Enters lower case letters
Enters numbers and special
characters
X Press the MENU jog dial to confirm the entry of the network key.
The connection to the network is established.
LSP 500 PRO | 49
Page 50

The operating menu
Menu
Settings
MIC
Input Sensitivity
Configuring the MIC input
You can reduce the input sensitivity of the MIC input by 20 dB. If you are using a
condenser microphone, you can also activate the phantom power.
To open the configuration menu for the MIC input:
X In the SETTINGS menu, turn the MENU jog dial until the MIC menu item is
displayed.
X Press the MENU jog dial to open the MIC menu item.
Adjusting the input sensitivity
In the event of overmodulation/distortion (the red LED of the channel lights up),
you can reduce the sensitivity of the MIC input.
To adjust the input sensitivity:
X In the MIC menu, turn the MENU jog dial until the INPUT SENSITIVITY menu item
is displayed.
X Press the MENU jog dial to open the INPUT SENSITIVITY menu item.
Phantom Power
X Turn the MENU jog dial to choose between -20 dB and 0 dB.
X Press the MENU jog dial to activate your selection.
Activating the phantom power
To activate the phantom power for the MIC input:
X In the MIC menu, turn the MENU jog dial until the PHANTOM POWER menu item
is displayed.
X Press the MENU jog dial to open the PHANTOM POWER menu item.
X Turn the MENU jog dial to choose between ON and OFF.
X Press the MENU jog dial to activate your selection and to switch the phantom
power on or off.
Only activate the phantom power for microphones that require it. Otherwise, malfunctions may occur.
50 | LSP 500 PRO
Page 51

The operating menu
Menu
Settings
Device Detection
Detecting devices in the expansion slots
The Sennheiser devices of the ew 300 G3 and ew 500 G3 series feature a media
control protocol. The media control protocol sends, among other things, information on the battery and mute status of the associated transmitters and on the
names of the individual devices to the app.
In order for the “LSP 500 PRO” tablet app (see page 23) to be able to display
this status information, the devices have to be detected once they are installed
in the LSP 500 PRO. Device detection has to be performed only once after installation of a device.
To start the device detection process:
Device detection is only necessary if status information from the media
control protocol is to be displayed in the app. The devices installed in the
LSP 500 PRO also work properly if device detection is not performed.
X In the SETTINGS menu, turn the MENU jog dial until the DEVICE DETECTION
menu item is displayed.
X Press the MENU jog dial to open the DEVICE DETECTION menu item.
X Switch the installed ew devices on before starting the device detection process.
In order to avoid possible conflicts with the media control protocol, it is recommended to set the IP assignment mode of the installed ew G3 devices
to automatic. For more information, refer to the instruction manual of the
ew G3 device.
X Press the MENU jog dial to start the device detection process.
The device detection process is performed and the display panel displays the
slots in which a device with media control protocol has been detected.
LSP 500 PRO | 51
Page 52

The operating menu
Menu
Settings
Reset
Resetting the settings
You can either reset all settings of the LSP 500 PRO to the factory defaults
(FACTORY RESET) or you can reset only the audio settings (AUDIO RESET).
X In the SETTINGS menu, turn the MENU jog dial until the RESET menu item is
displayed.
X Press the MENU jog dial to open the RESET menu item.
X Turn the MENU jog dial to choose between NO, AUDIO and ALL.
X Press the MENU jog dial to activate your selection.
Option Function
NO No settings are reset.
AUDIO All audio settings (volume, EQ, compressor, delay, etc.) are
reset. The following confirmation message is displayed:
ALL All settings of the LSP 500 PRO are reset to the factory
defaults. The following confirmation message is displayed:
52 | LSP 500 PRO
Page 53

The operating menu
Menu
Menu
Service
Service
System Info
Service
The service menu allows you to retrieve system information and to update the
firmware of the LSP 500 PRO.
To open the service menu:
X At the first menu level, turn the MENU jog dial until the SERVICE menu item is
displayed.
X Press the MENU jog dial to open the SERVICE menu item.
System information
Via this menu item, you can display information on the 2 battery packs and on
the current firmware version of the LSP 500 PRO.
To display the system information:
X In the SERVICE menu, turn the MENU jog dial until the SYSTEM INFO menu item
is displayed.
X Press the MENU jog dial to open the SYSTEM INFO menu item.
Display of battery information
Display of firmware version
X Open the BATTERY INFO menu item.
The
BATTERY INFO menu item contains the following sub menu items:
Menu item Information displayed
BAT1 SERIAL NO /
Serial number of battery pack 1 / battery pack 2
BAT2 SERIAL NO
BAT1 PRODUCT DATE /
Production date of battery pack 1 / battery pack 2
BAT2 PRODUCT DATE
BAT1 CYCLE COUNT /
BAT2 CYCLE COUNT
BAT1 TEMPERATURE /
Number of charge cycles of battery pack 1 /
battery pack 2
Temperature of battery pack 1 / battery pack 2
BAT2 TEMPERATURE
X Open the FIRMWARE VERSION menu item.
The current firmware version of the LSP 500 PRO is displayed.
LSP 500 PRO | 53
Page 54

The operating menu
Menu
Service
Maintenance
Updating the firmware
To update the firmware of the LSP 500 PRO:
X Prepare a USB flash drive (FAT 32 formatting) that contains the new firmware.
X Connect the LSP 500 PRO to the mains power supply.
X Connect the USB flash drive containing the new firmware to the USB port of
the LSP 500 PRO.
X Open the SERVICE menu.
X Open the MAINTENANCE menu item.
X Open the FIRMWARE UPDATE menu item.
X Press the USB jog dial to start the firmware update.
CAUTION
Malfunction of the LSP 500 PRO due to an interruption during the firmware
update!
Once started, the firmware update must not be interrupted, as this will cause the
LSP 500 PRO to malfunction and render it inoperable.
X Do not disconnect the LSP 500 PRO from the mains power supply.
X Do not remove any battery pack.
X Do not pull the USB flash drive out of the USB port.
54 | LSP 500 PRO
Page 55

Cleaning and maintaining the LSP 500 PRO
Cleaning and maintaining the LSP 500 PRO
Cleaning
CAUTION
Damage to the product caused by liquids!
Liquids entering the product can short-circuit the electronics or damage the
mechanics.
Solvents or cleansing agents can damage the surface of the product.
X Keep all liquids away from the product.
X Do not use any solvents or cleansing agents.
X Before cleaning, switch the LSP 500 PRO off and disconnect it from the mains
power supply.
X Only use a dry and soft cloth to clean the LSP 500 PRO.
Storage
When not using the LSP 500 PRO for extended periods of time, observe the
following:
X Remove the battery packs and store them separately.
X Use the dust cover supplied with the LSP 500 PRO.
LSP 500 PRO | 55
Page 56

If a problem occurs ...
If a problem occurs ...
Problem Possible cause Possible solution See
The LSP 500 PRO cannot be
switched on and the green
operation indicator does not
light up
The LSP 500 PRO is connected
to the mains power supply but
the red power indicator does
not light up
No audio signal The overall volume is set to the
The audio signal from a
wireless microphone is too low
The audio signal from a wired
microphone is too low
The audio from a paired Bluetooth device is too low
The audio signal of an input is
distorted and the LED of the
input lights up red
Noise occurs at high volume
levels
The LSP 500 PRO produces
hissing but the overall volume
is to low. The green LED flickers
only occasionally
When turning the jog dial of
an expansion slot, the volume
level of a wireless microphone
does not change
No battery packs are inserted;
the battery packs are depleted.
The mains cable is not
connected.
The LSP 500 PRO‘s automatic
charging system does not
function.
The power outlet is defective. Check the power supply.
The mains cable is defective. Replace the mains cable.
The LSP 500 PRO‘s power
supply unit is defective.
minimum.
The volume of the inputs used
is set to the minimum.
A condenser microphone is
connected to the MIC input
and the phantom power is not
activated.
No signal is present at the
LINK IN input.
The mute function of the
installed receiver is activated.
The output volume of the
installed receiver is too low.
The input sensitivity of the MIC
input is set to -20 dB.
The volume of the paired
Bluetooth device is too low.
The output volume of the
connected device is too high.
The LSP 500 PRO is overloaded. Reduce the volume. page 17
The LSP 500 PRO is mains
operated and no battery pack
is inserted.
The output volume of the
connected device is too low.
The installed receiver is
incorrectly connected to the
LSP 500 PRO.
Insert/replace the battery
packs.
Connect the mains cable. page 11
Remove the battery packs and
disconnect the mains cable,
wait for 10 seconds and then
reinsert the battery packs.
Contact an authorized
Sennheiser service partner.
Adjust the overall volume. page 17
Adjust the input volume. page 17
Activate the phantom power. page 50
Check the signal chain.
Deactivate the mute function
on the installed receiver.
Increase the output volume of
the installed receiver.
Set the input sensitivity to
0 dB.
Increase the volume of the
paired Bluetooth device.
Reduce the output volume of
the connected device.
Insert at least one battery pack
that can buffer signal peaks.
Increase the output volume of
the connected device.
Check the cable connections of
the installed receiver.
page 11
instruction
manual of the
receiver
instruction
manual of the
receiver
page 50
instruction
manual of the
Bluetooth device
instruction
manual of the
connected device
page 13
instruction
manual of the
connected device
page 20
56 | LSP 500 PRO
Page 57

If a problem occurs ...
Problem Possible cause Possible solution See
Only the left channel of the
stereo signal is heard
A loud whistling sound or feedback is heard
The tablet app does not display the status information
of the associated wireless
microphones
Problems with the WLAN
connection
A USB storage device cannot
be detected or used
The charge status display on
the battery pack does not light
up when the corresponding
button is pressed
Bad reception on the installed
receiver, diversity reception
does not function properly
The radio transmission between 2 LSP 500 PRO is subject
to interference
The Right Link mode is
activated.
The distance between microphone and LSP 500 PRO is too
short.
The gain reduction of the compressor is set too high.
The EQ is incorrectly adjusted. Check the EQ settings. page 29
Device detection for the installed receivers has not been
performed.
The installed receiver is not
connected to the LSP 500 PRO.
The installed receiver does
not support the media control
protocol.
The IP address of the installed
receiver is not valid.
Divers causes Observe the information on
The USB storage device is not
formatted or not compatible.
The battery pack has activated
the deep discharge protection.
The battery pack is defective. Replace the battery pack by
The receiver antennas are not
optimally oriented.
The transmitter installed in
the first LSP 500 PRO is set
to stereo operation, the receiver installed in the second
LSP 500 PRO can only process
mono signals.
The 2 LSP 500 PRO are too far
away from one another; the
radio transmission is affected
by obstacles between the
2 LSP 500 PRO.
Check the signal output
configuration.
Increase the distance between
microphone and LSP 500 PRO.
Adjust the gain reduction of
the compressor.
Perform device detection. page 51
Check the cable connections of
the installed receiver.
The media control protocol is
onyl supported by devices of
the Sennheiser ew 300 G3 and
ew 500 G3 series.
Check the IP address of the
installed receiver.
WLAN operation.
Check if the USB storage device
complies with the requirements specified for use with
the LSP 500 PRO.
Recharge the battery pack. page 12
a new one and dispose of the
defective battery pack.
Check the orientation of the
antennas of the installed
receiver.
Set the transmitter to mono
operation.
Reduce the distance between
the 2 LSP 500 PRO; remove
obstacles that affect the radio
transmission between the
2 LSP 500 PRO.
page 41
page 32
page 20
instruction
manual of the
receiver
page 42
page 35
page 12
page 20
instruction
manual of the
transmitter
LSP 500 PRO | 57
Page 58

If a problem occurs ...
Error and warning messages on the display of the LSP 500 PRO
Indications on the display panel Meaning Possible solution See
Lock mode is activated Deactivate the lock mode. page 18
Battery charge status < 21% Replace the battery pack;
connect the LSP 500 PRO to
the mains power supply.
Battery charge status < 6% Replace the battery pack;
connect the LSP 500 PRO to
the mains power supply.
Critical temperature rise Reduce the volume; ensure
sufficient cooling.
Overheating; emergency
shutdown of the power
output stage
Ensure sufficient cooling;
switch off the LSP 500 PRO
and let it cool down.
page 11
page 11
58 | LSP 500 PRO
Page 59

Specifications
Specifications
Housing
Dimensions (W x H x D) 290 x 550 x 320 mm
(11.42" x 21.65" x 12.60")
Housing material crosswise glued plywood sealed with
polyurethane coating, black
Front acoustic foam, black
Bottom plastic base plate with rubber feet
Handle integrated carrying handle with
plastic coating
Pole mount 36 mm (1.42
tiltable to +/- 13.5° in steps of 4.5°
Weight (without expansion devices,
with battery packs)
Acoustics
Acoustic design 2-way system, closed
Drivers woofer: 8"
Sound pressure level max. 110 dB SPL (fullspace)
Frequency response 65 Hz to 18 kHz (-10 dB)
Dispersion (h x v) 80° x 60° (-6 dB)
approx. 13.6 kg (30.0 lb.)
tweeter: 3/4"
“
)
Electronics
Amplifier Class D
Output power 55 W continuous
120 W peak
Equalizer semiparametric, 3-band
Connections/interfaces
MIC input XLR-3F/¼“ (6.3 mm) jack combo
socket,
switchable 48 V phantom power
AUX IN input RCA stereo socket
LINE OUT output RCA stereo socket
LINK IN input XLR-3F
LINK OUT output XLR-3M
USB port USB 2.0
Supported file formats playback: mp3, wav, aac, flac
recording: wav
Bluetooth interface A2DP (SBC and aptX®)
WLAN interface IEEE 802.11b/g
WPA2 encryption
“
Slot 1/2/3 ¼
(6.3 mm) jack;
5.5/1.55 mm hollow jack plug; RJ45
LSP 500 PRO | 59
Page 60

Specifications
Power supply
Mains voltage / mains frequency 100 to 240 V~, 50/60 Hz
Battery packs 2x Sennheiser LBA 500, Li-Ion
Battery voltage / nominal charge 14.4 V / 4.4 Ah
Operating time approx. 6 h (speech)
(approx. 3 h per battery pack)
Charging time approx. 5 h
(approx. 2.5 h per battery pack)
Temperature
Operation 0°C to 50°C (32°F to 122°F)
Storage -20°C to 70°C (-4°F to 158°F)
Relative air humidity
Operation 10 to 80%
Storage 10 to 90%
In compliance with
Europe (CE): Radio:
EN 300 328
EN 301 489-1/17
Safety:
EN 60065
USA: Radio:
47 CFR 15 Subpart C
Canada: RSS 210
60 | LSP 500 PRO
Page 61

Accessories
Accessories
The following accessories for the LSP 500 PRO are available:
• LAS 500 slip cover
• LAP 500 protective cover
• LAB 500 trolley bag
• LBA 500 battery pack
Recommended accessories for the expansion slots:
• Devices of the Sennheiser ew G3 series
LSP 500 PRO | 61
Page 62

Manufacturer Declarations
Manufacturer Declarations
Warranty
Sennheiser electronic GmbH & Co. KG gives a warranty of 24 months on this
product.
For the current warranty conditions, please visit our website at
www.sennheiser.com or contact your Sennheiser partner.
In compliance with the following requirements
• Battery Directive (2006/66/EC)
CE Declaration of Conformity
• RoHS (2011/65/EU)
• Low Voltage Directive (2006/95/EC)
• R&TTE Directive (1999/5/EC)
The declarations are available on the product page at www.sennheiser.com.
204-360003
Certified by
Audio, Video and Similar Electronic Apparatus – Safety Requirements CAN/CSAC22.2 No. 60065:03 and UL 60065
Trademarks
Sennheiser is registered trademark of Sennheiser electronic GmbH & Co. KG.
Other company, product, or service names mentioned in this instruction manual
may be the trademarks, service marks, or registered trademarks of their respective owners.
SRS WOW HD® is a trademark of SRS Labs, Inc.
SRS WOW HD® technology is incorporated under license from SRS Labs, Inc.
aptX® is a trademark of CSR plc
Japanese Radio Law and Japanese Telecommunications Business Law
Compliance
62 | LSP 500 PRO
Japanese Radio Law and Japanese Telecommunications Business Law Compli-ance. This device is granted pursuant to the Japanese Radio Law (電波法) and
the Japanese Telecommunications Business Law (電気通信事業法)
This device should not be modified (otherwise the granted designation number
will become invalid)
Page 63

Manufacturer Declarations
FCC
This device complies with part 15 of the FCC Rules and RSS Standards. Operation
is subject to the following two conditions: (1) This device may not cause harmful
interference, and (2) this device must accept any interference received, including
interference that may cause undesired operation.
Changes or modifications not expressly approved by the party responsible for
compliance could void the user’s authority to operate the equipment.
This device complies with Part 15 of the FCC Rules and with Industry Canada
license-exempt RSS standard(s). Operation is subject to the following two conditions: (1) this device may not cause harmful interference, and (2) this device
must accept any interference received, including interference that may cause
undesired operation.
NOTE: This equipment has been tested and found to comply with the limits
for a Class B digital device, pursuant to part 15 of the FCC Rules. These limits
are designed to provide reasonable protection against harmful interference in
a residential installation. This equipment generates, uses and can radiate radio
frequency energy and, if not installed and used in accordance with the instructions, may cause harmful interference to radio communications. However, there
is no guarantee that interference will not occur in a particular installation. If this
equipment does cause harmful interference to radio or television reception, which
can be determined by turning the equipment off and on, the user is encouraged
to try to correct the interference by one or more of the following measures:
• Reorient or relocate the receiving antenna.
• Increase the separation between the equipment and receiver.
• Connect the equipment into an outlet on a circuit different from that to which
the receiver is connected.
• Consult the dealer or an experienced radio/ TV technician for help.
LSP 500 PRO | 63
Page 64

Sennheiser electronic GmbH & Co. KG
Am Labor 1, 30900 Wedemark, Germany
www.sennheiser.com
Publ. 02/13, 549168/A01
 Loading...