

Page 1
Tourguide Charger
L 2021-40
Instruction manual
Page 2

Page 3

Contents
Thank you for choosing Sennheiser!
We have designed this product to give you reliable operation over many
years. Over 60 years of accumulated expertise in the design and manufacture of high-quality electro-acoustic equipment have made Sennheiser
a world-leading company in this field.
Please take a few moments to read these instructions carefully, as we want
you to enjoy your new Sennheiser products quickly and to the fullest.
Contents
Important safety instructions ...................................................................... 2
Delivery includes ............................................................................................ 4
The L 2021-40 charger .................................................................................. 4
Product overview ........................................................................................... 5
Indications and displays on the charger ......................................................... 6
Putting the charger into operation ............................................................. 7
Placing the charger on a table or cabinet ....................................................... 7
Installing the charger .......................................................................................... 8
Connecting the charger to a PC ....................................................................... 10
Connecting the charger to and disconnecting it from the mains ............ 10
Using the charger ........................................................................................ 11
Switching the charger on/off .......................................................................... 11
Charging the receiver rechargeable batteries .............................................. 11
Specifications ............................................................................................... 13
Accessories for the Tourguide system ...................................................... 14
Manufacturer Declarations ......................................................................... 15
DE
EN
FR
IT
ES
NL
1
Page 4

DE
Important safety instructions
Important safety instructions
1. Read these instructions.
2. Keep these instructions. Always include these instructions when
passing the device on to third parties.
3. Heed all warnings.
4. Follow all instructions.
EN
FR
IT
ES
NL
5. Do not use the device near water.
6. Clean only with a dry cloth.
7. Do not block any ventilation openings. Install in accordance with these
instructions.
8. Do not install near any heat sources such as radiators, heat registers,
stoves, or other devices (including amplifiers) that produce heat.
9. The device should be operated only from the type of power source
indicated on the mains plug. The device must only be connected to
properly grounded power outlets.
10. Protect the mains cable from being walked on or pinched, particularly
at plugs, convenience receptacles, and the point where it exits from
the device.
11. Only use attachments/accessories specified by Sennheiser.
12. Use only with the cart, stand, tripod, bracket, or table specified by the
manufacturer, or sold with the device.
When a cart is used, use caution when moving the cart/device combination to avoid injury from tip-over.
13. Unplug the device during lightning storms or when unused for long
periods of time.
14. Refer all servicing to qualified service personnel.
15. Servicing is required if the device has been damaged in any way, such
as mains cable or plug damage, liquid has been spilled, objects have
fallen inside, the device has been exposed to rain or moisture, does not
operate properly or has been dropped.
16. To completely disconnect the device from the AC mains, disconnect the
mains plug from the AC receptacle.
17. WARNING: To reduce the risk of fire or electric shock, do not expose the
device to rain or moisture.
18. Do not expose the device to dripping or splashing and ensure that no
objects filled with liquids, such as vases or coffee cups, are placed on
the device.
19. The plug of the mains cable shall remain readily operable and easily
accessible.
2
Page 5
Important safety instructions
Hazard warnings on the rear of the charger
The label shown on the left is attached to the rear of the charger. The
symbols on this label have the following meaning:
This symbol is intended to alert the user to the presence of uninsulated
dangerous voltage within the device’s enclosure that may be of sufficient
magnitude to constitute risk of fire or electric shock.
This symbol is intended to alert the user to the risk of electric shock if the
device is opened. There are no user serviceable parts inside. Refer servicing
to qualified personnel only.
This symbol is intended to alert the user to the presence of important
operating and maintenance instructions in the literature accompanying
this device.
Overloading
Do not overload wall outlets and extension cables as this may result in fire
and electric shock.
If you switch on several chargers at the same time, you can blow the fuse
due to the high switch-on voltage! Therefore, never switch on more than
three chargers at the same time, e.g. via a switchable multi-outlet power
strip.
DE
EN
FR
IT
ES
Replacement parts
When replacement parts are required, be sure the service technician has
used replacement parts specified by Sennheiser or those having the same
characteristics as the original part. Unauthorized substitutions may result
in fire, electric shock, or other hazards.
Safety check
Upon completion of any service or repairs to this device, ask the service
technician to perform safety checks to determine that the device is in a
safe operating condition.
Intended use of the device
Intended use of the device includes:
• using the device for professional purposes,
• having read these instructions especially the chapter “Important safety
instructions” on page 2,
• using the device within the operating conditions and limitations
described in this instruction manual.
“Improper use” means using the device other than as described in these
instructions, or under operating conditions which differ from those
described herein.
NL
3
Page 6

Delivery includes
Delivery includes
1 L 2021-40 charger
1instruction manual
DE
EN
FR
IT
ES
NL
1 CD-ROM with:
– the instruction manual of the L 2021-40 charger
– the “Conference Control” software
– the instruction manual of the “Conference Control” software
You additionally require:
1mains cable
1network cable
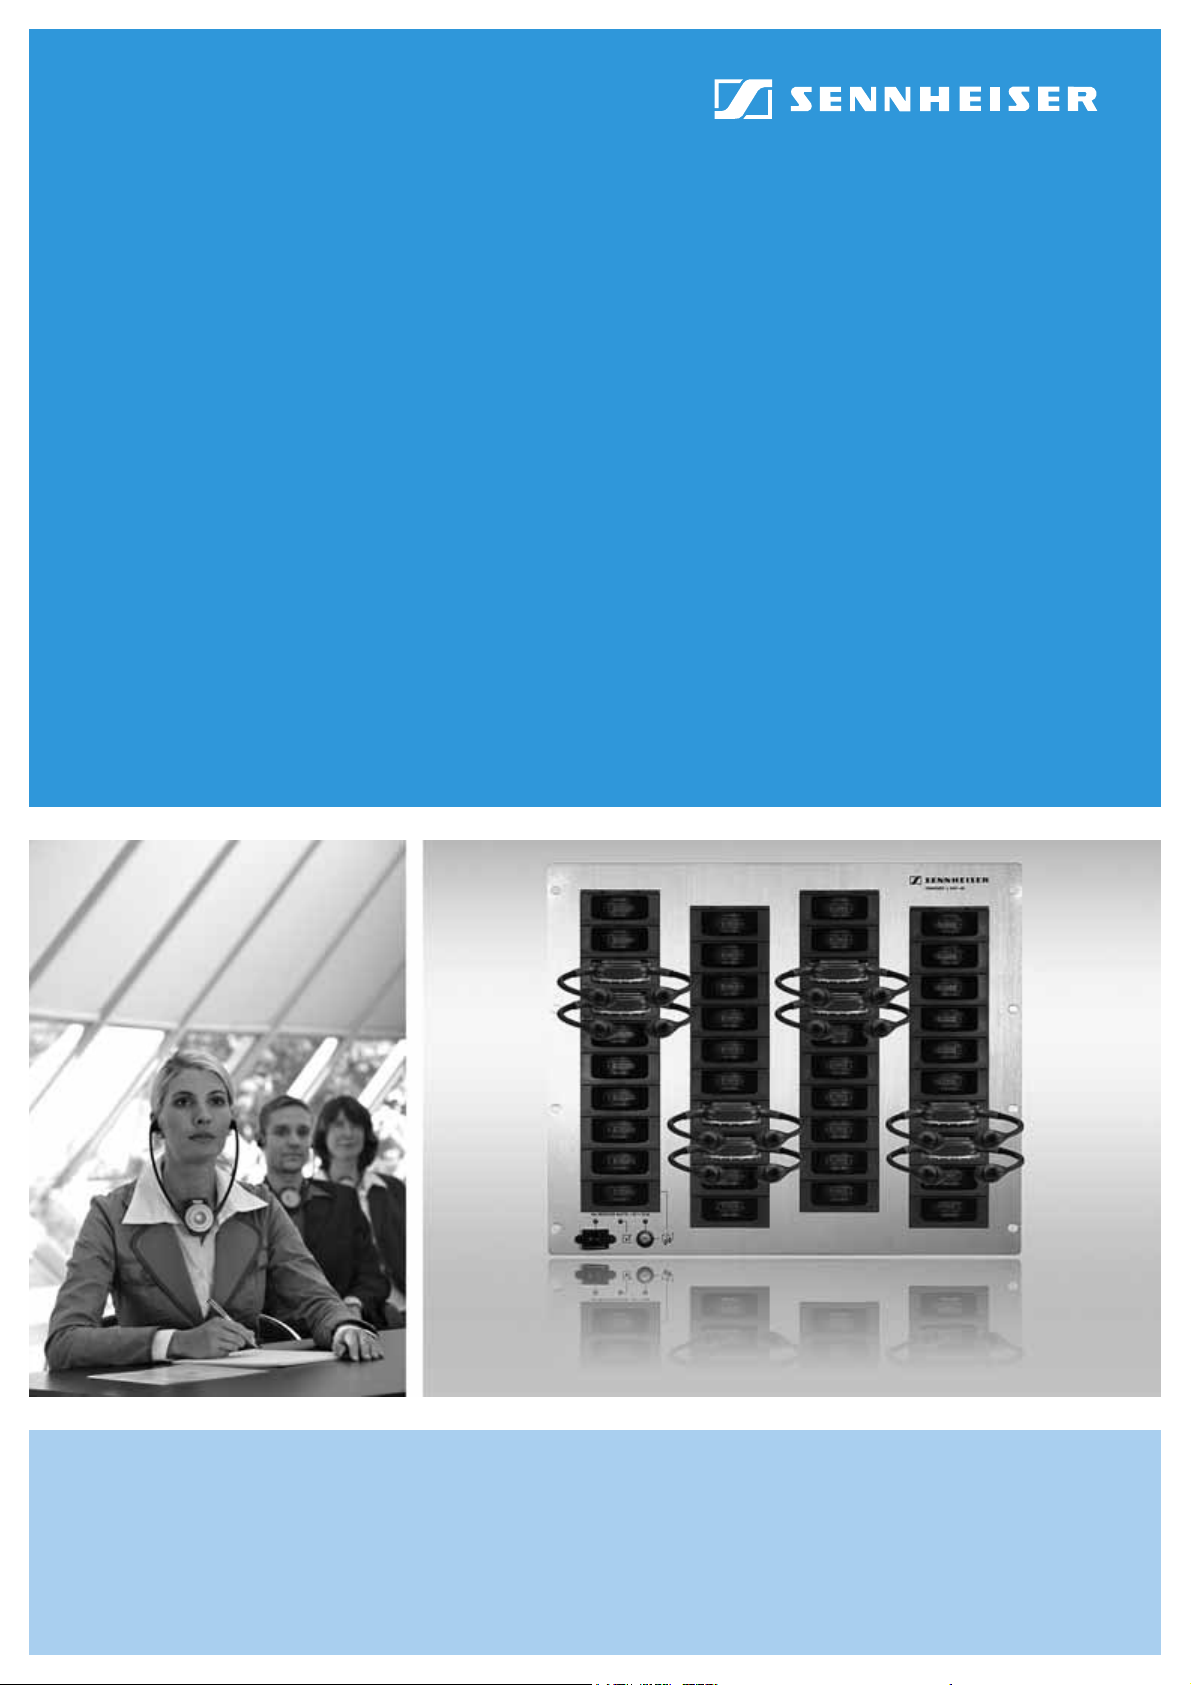
The L 2021-40 charger
The L 2021-40 charger is part of the Tourguide 2020 D system. The
Tourguide 2020 D system offers optimum digital speech transmission for
guided tours e.g. in factories or museums and during conferences. The
use of RF transmission allows freedom of movement for all members of
the group. Six fixed transmission frequencies in “Tourguide mode” and
eight transmission frequencies in “Conference mode“ offer high flexibility
and adaptability. The L 2021-40 charger simultaneously recharges up to
40 HDE 2020 D stethoset receivers with their built-in rechargeable
batteries. The channel copy function lets you set all receivers to the same
channel at the press of a button.
In addition, the charger allows you to directly configure the stethoset
receivers via a PC. You can connect up to 125 chargers to a single PC,
allowing you to simultaneously configure up to 5000 receivers.
Additional features of the charger:
• Quick charge of receiver rechargeable batteries
• Highest possible operational reliability, since temperature and voltage
of the rechargeable batteries are monitored during charging
4
Page 7

Product overview
Product overview
DE
EN
FR
IT
39 “slave” charging compartments
(light blue in the diagram)
“Master” charging compartment
(with channel copy function)
Green LED COPY AVAILABLE
COPY button
Yellow LED SELECT
Red LED POWER
ES
NL
Mains switch
Air vents
Network socket
Mains socket
Type plate
5
Page 8

DE
EN
Product overview
Indications and displays on the charger
Operation indication
LED POWER Meaning
lights up red The mains switch is in position “I”,
the mains supply is switched on.
is off The mains switch is in position “0”,
the mains supply is switched off.
Status indication
FR
IT
ES
NL
LED SELECT Meaning
flashes yellow You have just switched on the device (LED flashes for
a maximum of 2 seconds) or an error has occured.
lights up
yellow
is off Neither the charger nor a receiver have been selected
LED indication for “automatic copying” function
LED Copy
Available
lights up green The “automatic copying” function is available
if off The “automatic copying” function is not available
When the “automatic copying” function is available, the green LED COPY
AVAILABLE lights up. This is the case when
• at switch-on of the charger, a receiver is already placed into the
“master” charging compartment or
you place a receiver into the “master” charging compartment or
you switch on a receiver that is already placed into the “master”
charging compartment and
• at least one receiver is placed into one of the “slave” charging
compartments and
• no network connection exists.
The charger is connected to a PC and
the “Conference Control” software is running and has
established a network connection with the charger and
you have selected the charger or at least one receiver
placed into the charger via the “Conference Control”
software.
via the “Conference Control” software.
Meaning
(see below).
(see below).
When the “automatic copying” function is not available, the green LED
COPY AVAILABLE goes off. This is the case when
• you remove the receiver from the “master” charging compartment
or
• all “slave” charging compartments are empty or
• the “Conference Control” software accesses the charger or
• you do not press the COPY button within two minutes.
6
Page 9

Putting the charger into operation
Putting the charger into operation
NOTICE! Danger due to heat accumulation!
The charger and the receiver rechargeable batteries can get
very hot during charging. If the heat cannot dissipate, the
devices can be damaged.
왘 Make sure that the air vents of the charger are not covered
or blocked.
왘 Make sure that the ambient temperature of the charger
does not exceed 40°C. If necessary, provide additional
ventilation.
왘 Keep the charger away from heat sources and never expose
it to direct sunlight.
DE
EN
FR
The charger can be:
• placed on a table or cabinet
• installed in a 19” rack
• installed in a cabinet or similar
When using the “Conference Control” software, it automatically sorts its
charger displays according to ascending serial numbers. The assignment of
the charger displays of the software to the chargers becomes easier and
clearer if you install the chargers according to ascending serial numbers.
Placing the charger on a table or cabinet
The charger has four plastic feet to ensure that it cannot slip on the surface
on which it is placed.
NOTICE! Risk of staining of furniture surfaces!
Some furniture surfaces have been treated with varnish,
polish or synthetics which might cause stains when they
come into contact with other synthetics. Despite a thorough
testing of the synthetics used by us, we cannot rule out the
possibility of staining.
왘 Do not place the charger on delicate surfaces.
IT
ES
NL
왘 Place the charger on a table, cabinet or similar.
7
Page 10

Putting the charger into operation
Installing the charger
The housing of the charger is designed so that it fits into a 19” rack. The
charger can also be installed in a cabinet or similar.
CAUTION! Risks when rack mounting the charger!
DE
EN
FR
IT
ES
NL
When installing the device in a closed or multi-rack assembly,
please consider that, during operation, the ambient temperature, the mechanical loading and the electrical potentials
will be different from those of devices which are not
mounted into a rack.
왘 The ambient temperature within the rack, cabinet or
similar must not exceed the temperature limit specified in
the specifications.
왘 When installing the device, take good care not to affect
the ventilation required for safe operation. If necessary,
provide additional ventilation.
왘 Make sure the mechanical loading of the rack is even to
avoid a hazardous condition.
왘 When connecting the device to the power supply, observe
the information indicated on the type plate. Avoid circuit
overloading. If necessary, provide overcurrent protection.
왘 Ensure a reliable mains ground connection of the device
by taking appropriate measures – especially when you are
using an extension cable or a multi-outlet power strip.
왘 When installing the device in a closed or multi-rack
assembly, please note that intrinsically harmless leakage
currents of the individual devices may accumulate,
thereby exceeding the allowable limit value. As a remedy,
ground the rack via an additional ground connection.
왘 Use eight screws to fasten the charger.
8
Page 11

50
Putting the charger into operation
You can install the charger fixedly, e.g. in a cabinet or similar. For the
dimensions required for fixed installation, please refer to the below installation drawing.
30
465.1
DE
EN
FR
IT
ES
482.6
69.7
NL
70
120.6
438
258
10.3
7.2
38.7
399
101.7
120.6
12
3
156.7
9
Page 12

Putting the charger into operation
Connecting the charger to a PC
You can connect one or several chargers to a PC. The supplied “Conference
Control” software allows you to centrally and easily configure and monitor
several chargers and receivers.
DE
EN
FR
IT
ES
NL
For this, the charger requires a network connection with a PC. The charger
can be connected directly to an individual PC or integrated into an existing
network. The charger cannot communicate with several PCs at the same
time.
The charger also functions without connection to a PC.
Connecting the network cable
왘 Use a standard network cable (RJ45 CAT.5E, not included in the delivery)
to connect the network socket and an Ethernet socket of the
network.
왘 Install the “Conference Control” software.
왘 Configure the network communication between the “Conference
Control” software and the charger (the instruction manual of the
“Conference Control” software on the enclosed CD).
Connecting the charger to and disconnecting it from the mains
CAUTION! Danger due to electric current!
If you connect the charger to an unsuitable power supply, this
can cause damage to the device!
왘 Use a mains cable with a 3-pin IEC mains connector to
ensure a reliable mains ground connection of the charger –
especially when you are using an extension cable or a
multi-outlet power strip.
왘 Avoid circuit overloading. If necessary, provide overcurrent
protection.
To connect the charger to the mains:
왘 Connect the mains cable (not included in the delivery) to the mains
socket .
왘 Plug the mains connector into a wall socket.
To disconnect the charger from the mains:
왘 Pull out the mains connector from the wall socket.
10
Page 13

Using the charger
Using the charger
Switching the charger on/off
NOTICE! High switch-on voltage can blow the fuse!
If you switch on more than three chargers at the same time,
you can blow the fuse due to the high switch-on voltage!
왘 Only switch on a maximum of three chargers at the same
time, e.g. via a switchable multi-outlet power strip.
To switch the charger on:
왘 Set the mains switch to position “I”.
The red LED POWER
receivers in the charger are recharged. The “Conference Control” software detects the charger in the network.
To switch the charger off:
왘 Set the mains switch to position “0”.
The red LED POWER goes off. The charger is disconnected from the
mains. The rechargeable batteries of the receivers in the charger are no
longer recharged. The “Conference Control” software does not detect
the charger in the network.
lights up. The rechargeable batteries of the
DE
EN
FR
IT
ES
NL
If you do not use the charger for extended periods of time:
왘 Disconnect the charger for the mains by setting the mains switch to
position “0” or pull out the mains connector from the wall socket.
The red LED POWER goes off.
Charging the receiver rechargeable batteries
CAUTION! Danger of damage to the receivers due to over-heating!
The receivers’ built-in rechargeable batteries can get very hot
during charging and thus be damaged!
왘 Only use the charger for charging the HDE 2020 D receivers’
built-in rechargeable batteries. For more information on
the HDE 2020 receivers with their built-in Lithium-polymer
rechargeable batteries, please refer to the detailed instruction manual.
왘 Never try to charge other rechargeable batteries or non-
rechargeable batteries in the charger!
11
Page 14

DE
EN
FR
IT
ES
NL
Using the charger
왘 Place the receiver into any charging compartment. The LED on the
receiver indicates the charge status.
LED Meaning
lights up red The built-in rechargeable battery is being charged.
lights up green The built-in rechargeable battery is fully charged.
flashes red The temperature of the built-in rechargeable
battery is below 3°C or over 40°C. The charging
process will be interrupted until the temperature of
the built-in rechargeable battery is again between
3°C and 40°C.
lights up
orange
Charging a completely discharged rechargeable battery takes approx.
3.5 hours at room temperature. However, the charging process may take
longer if:
• the rechargeable battery is deep discharged and first has to be reconditioned by a deep discharge recovery charge,
• the temperature of the built-in rechargeable battery is below 3°C or
over 40°C, since, in order to protect the rechargeable battery, the
charging process will be interrupted until the temperature is again
within the permissible range and the LED lights up,
• the additional temperature protection of the charger interrupts the
charging process until the charger has cooled down.
The built-in rechargeable battery is defective.
Interrupt the charging process and contact your
Sennheiser service partner.
Setting the receiver channel(s) using the channel copy function
You can simultaneously set all receivers in the charger to the same
channel. The channel copy function allows you to copy the current channel
of the receiver placed into the “master” charging compartment to all
other receivers in the charger.
왘 Place all receivers which are to be set to the same channel into the
“slave” charging compartments (light blue in the diagram).
왘 Place the receiver whose channel you want to copy into the “master”
charging compartment .
The LED
copy function is available (see: LED indication for “automatic copying”
function on page 6).
Tip:
If you do not press the COPY button within 2 minutes, the LED
AVAILABLE
longer available. To reactivate this function, remove the receiver from
the “master” charging compartment and place it back again.
왘 Press the COPY button to start the channel copy function.
The LC displays of all receivers which are successfully set to the same
channel light up.
COPY AVAILABLE lights up green as long as the channel
COPY
goes off and the “automatic copying” function is no
12
Page 15

Specifications
Configuring chargers via a PC
The “Conference Control” software offers additional possibilities to
configure the receivers and to display the configurations in detail. The
“Conference Control” software and the corresponding instruction manual
are included on the supplied CD.
Using several Tourguide systems simultaneously
If you are using several Tourguide 2020 D systems to give more than one
guided tour or one conference at the same time, the systems can interfere
with one another. To prevent this happening, you have to set the simultaneously used systems (a system is one transmitter and any number of
receivers) to different channels.
DE
EN
FR
Specifications
Ambient temperature during charging +3°C to +40°C
Connector 3-pin, protection class I,
as per IEC/EN 60320-1
Mains voltage 100 to 240 V~
(50 or 60 Hz)
Primary power consumption max. 150 W
Charging voltage per charging compartment typ. 5 V
Charging current per charging compartment max. 400 mA
Charging time for receiver
rechargeable battery approx. 2.5 hrs
In compliance with EMC EN 301489-1/-9
Radio EN 300422-1/-2
Safety EN 60065
47 CFR 15 subpart B
Dimensions in mm (W × H × D) approx. 483 × 399 × 172
Weight (empty) approx. 8.8 kg
IT
ES
NL
13
Page 16

DE
EN
FR
IT
ES
NL
Accessories for the Tourguide system
Accessories for the Tourguide system
Product name Product description Cat. No.
HDE 2020 D Stethoset receiver 500543
HDE 2020 D-US Stethoset receiver (US) 500544
–
–
SK 2020 D Bodypack transmitter 500548
SK 2020 D-US Bodypack transmitter (US) 500549
EZL 2020-20 L Charging case 500542
BA 2015 Accupack 009950
L2015 Charger for two SK 2020 D bodypack trans-
CL 2 Microphone cable, 1.5 m 004840
CL 1 Connecting cable for external audio devices
ME 2-N Clip-on microphone 005018
ME 4-N Clip-on microphone 005020
MKE 2-EW
GOLD
ME 3-N Headmic 005019
HSP 2-EW Headmic 009866
HSP 4-EW Headmic 009867
HS 2-EW Headmic –
e 815 Cardioid hand-held microphone with
e 825 S Cardioid hand-held microphone with
e 835 Cardioid hand-held microphone with
e 840 Cardioid hand-held microphone with
e 845 Super-cardioid hand-held microphone with
Netzkabel EU Mains cable with EU plug, 2.5 m, black 054324
Netzkabel US Mains cable with US plug, 2.5 m, black 054325
Netzkabel UK Mains cable with UK plug, 2.5 m, black 057256
“Conference
Control” PC
software
Earbuds (black) for HDE 2020 D and
HDE 2020 D-US stethoset receivers
Earbuds (transparent) for HDE 2020 D and
HDE 2020 D-US stethoset receivers
mitters or two BA 2015 accupacks
(line input), 52 cm
Clip-on microphone 009831
connecting cable
connecting cable
connecting cable
connecting cable
connecting cable
Software for monitoring and configuring
L 2021-40 chargers and HDE 2020 D
stethoset receivers
037080
040949
009828
005022
009425
004511
004513
009894
004515
–
14
Page 17

Manufacturer Declarations
Manufacturer Declarations
Warranty
Sennheiser GmbH & Co. KG gives a warranty of 24 months on this product.
For the current warranty conditions, please visit our web site at
www.sennheiser.com or contact your Sennheiser partner.
DE
0682
CE Declaration of Conformity
This device is in compliance with the essential requirements and other
relevant provisions of Directives 2004/108/CE and 2006/95/CE. The
declaration is available on the internet site at www.sennheiser.com.
Statements regarding FCC and industry Canada
This device complies with Part 15 of the FCC Rules and with RSS-210 of
Industry Canada. Operation is subject to the following two conditions:
1. This device may not cause harmful interference, and
2. this device must accept any interference received, including interference that may cause undesired operation.
This equipment has been tested and found to comply with the limits for a
Class B digital device, pursuant to Part 15 of the FCC Rules. These limits are
designed to provide reasonable protection against harmful interference in
a residential installation. This equipment generates, uses and can radiate
radio frequency energy and, if not installed and used in accordance with
the instructions, may cause harmful interference to radio communications.
However, there is no guarantee that interference will not occur in a particular installation. If this equipment does cause harmful interference to
radio or television reception, which can be determined by turning the
equipment off and on, the user is encouraged to try to correct the interference by one or more of the following measures:
1. Reorient or relocate the receiving antenna.
EN
FR
IT
ES
NL
2. Increase the separation between the equipment and receiver.
3. Connect the equipment into an outlet on a circuit different from that
to which the receiver is connected.
4. Consult the dealer or an experienced radio/TV technician for help.
This class B digital apparatus complies with the Canadian ICES-003.
Warning: Changes or modifications made to this equipment not expressly
approved by Sennheiser electronic Corp. may void the FCC authorization to
operate this equipment.
15
Page 18

Sennheiser electronic GmbH & Co. KG Printed in Germany
Am Labor 1, 30900 Wedemark, Germany Publ. 06/2008
www.sennheiser.com 524164/A01
 Loading...