

Page 1

L 1039-10
Charger
Instruction manual
Page 2

Contents
Contents
Contents ............................................................................................................................... 1
Important safety instructions ........................................................................................ 2
Package contents ............................................................................................................... 3
The L 1039-10 charger ..................................................................................................... 3
Product overview ............................................................................................................... 4
Putting the charger into operation ............................................................................... 5
Installing the charger ..................................................................................................... 5
Connecting the charger to and disconnecting it from the mains ......................... 7
Charging the receivers ...................................................................................................... 8
Indications of the status LEDs ..................................................................................... 9
Charging times ................................................................................................................ 9
Cleaning and maintaining the L 1039-10 .................................................................... 9
If a problem occurs ... ...................................................................................................... 10
Specifications .................................................................................................................... 11
Manufacturer Declarations ............................................................................................ 12
L 1039-10|1
Page 3

Important safety instructions
Important safety instructions
• Read this instruction manual.
• Keep this instruction manual. Always include this instruction manual when
passing the product on to third parties.
• Heed all warnings and follow all instructions in this instruction manual.
• Only clean the product when it is not connected to the mains. Use a cloth for
cleaning.
• Only use attachments/accessories recommended by Sennheiser.
• Refer all servicing to qualified service personnel.
Servicing is required if the product has been damaged in any way, liquid has
been spilled, objects have fallen inside, the product has been exposed to rain or
moisture, does not operate properly or has been dropped.
• WARNING: To reduce the risk of short circuits, do not use the product near water
and do not expose it to rain or moisture. Do not place objects filled with liquids,
such as vases or coffee cups, on the product.
• Only use the supplied mains unit.
• Unplug the mains unit from the wall socket
– to completely disconnect the product from the mains,
– during lightning storms or
– when unused for long periods of time.
• Only operate the mains unit from the type of power source specified in the
chapter “Specifications” (see page 11).
• Ensure that the mains unit is
– in a safe operating condition and easily accessible,
– properly plugged into the wall socket,
– only operated within the permissible temperature range,
– not covered or exposed to direct sunlight for longer periods of time in order to
prevent heat accumulation (see “Specifications” on page 11).
• Do not block any ventilation openings. Install the product in accordance with the
instructions given in this instruction manual.
• Do not install the product near any heat sources such as radiators, stoves, or
other devices (including amplifiers) that produce heat.
• Do not overload wall outlets and extension cables as this may result in fire and
electric shock.
2|L 1039-10
Intended use
Intended use of the product includes:
• using the product for professional purposes,
• having read and understood this instruction manual, especially the chapter
“Important safety instructions” on page 2,
• using the product within the operating conditions and limitations described in
this instruction manual.
“Improper use” means using the product other than as described in this instruction
manual, or under operating conditions which differ from those described herein.
Page 4

Package contents
Package contents
1 L 1039-10 charger
1 NT 12-50C mains unit
3 mains cable (EU, UK, US)
1 instruction manual
A list of accessories can be found on the L 1039-10 product page at
www.sennheiser.com.
For information on suppliers, contact your local Sennheiser partner:
www.sennheiser.com > “Service & Support”.
The L 1039-10 charger
The L 1039-10 charger is part of the Tourguide 1039 system.
The Tourguide 1039 system consists of the EK 1039 receiver and a suitable transmitter of the evolution wireless G3 or 2000 series. The system offers optimum
speech transmission for guided tours, small conferences and interpretation applications with one or several speakers. The use of RF transmission allows freedom of
movement for all members of the group. Due to the possibility of combining the
EK 1039 receiver with different transmitters, the system can be optimally adapted
to your individual needs.
The L 1039-10 charger can charge up to ten EK 1039 receivers with their BA 2015
accupacks installed. In addition, the charger allows you to charge all bodypack
receivers or bodypack transmitters of the Sennheiser evolution wireless G3,
evolution wireless G2 or 2000 series.
L 1039-10|3
Page 5
Product overview
1
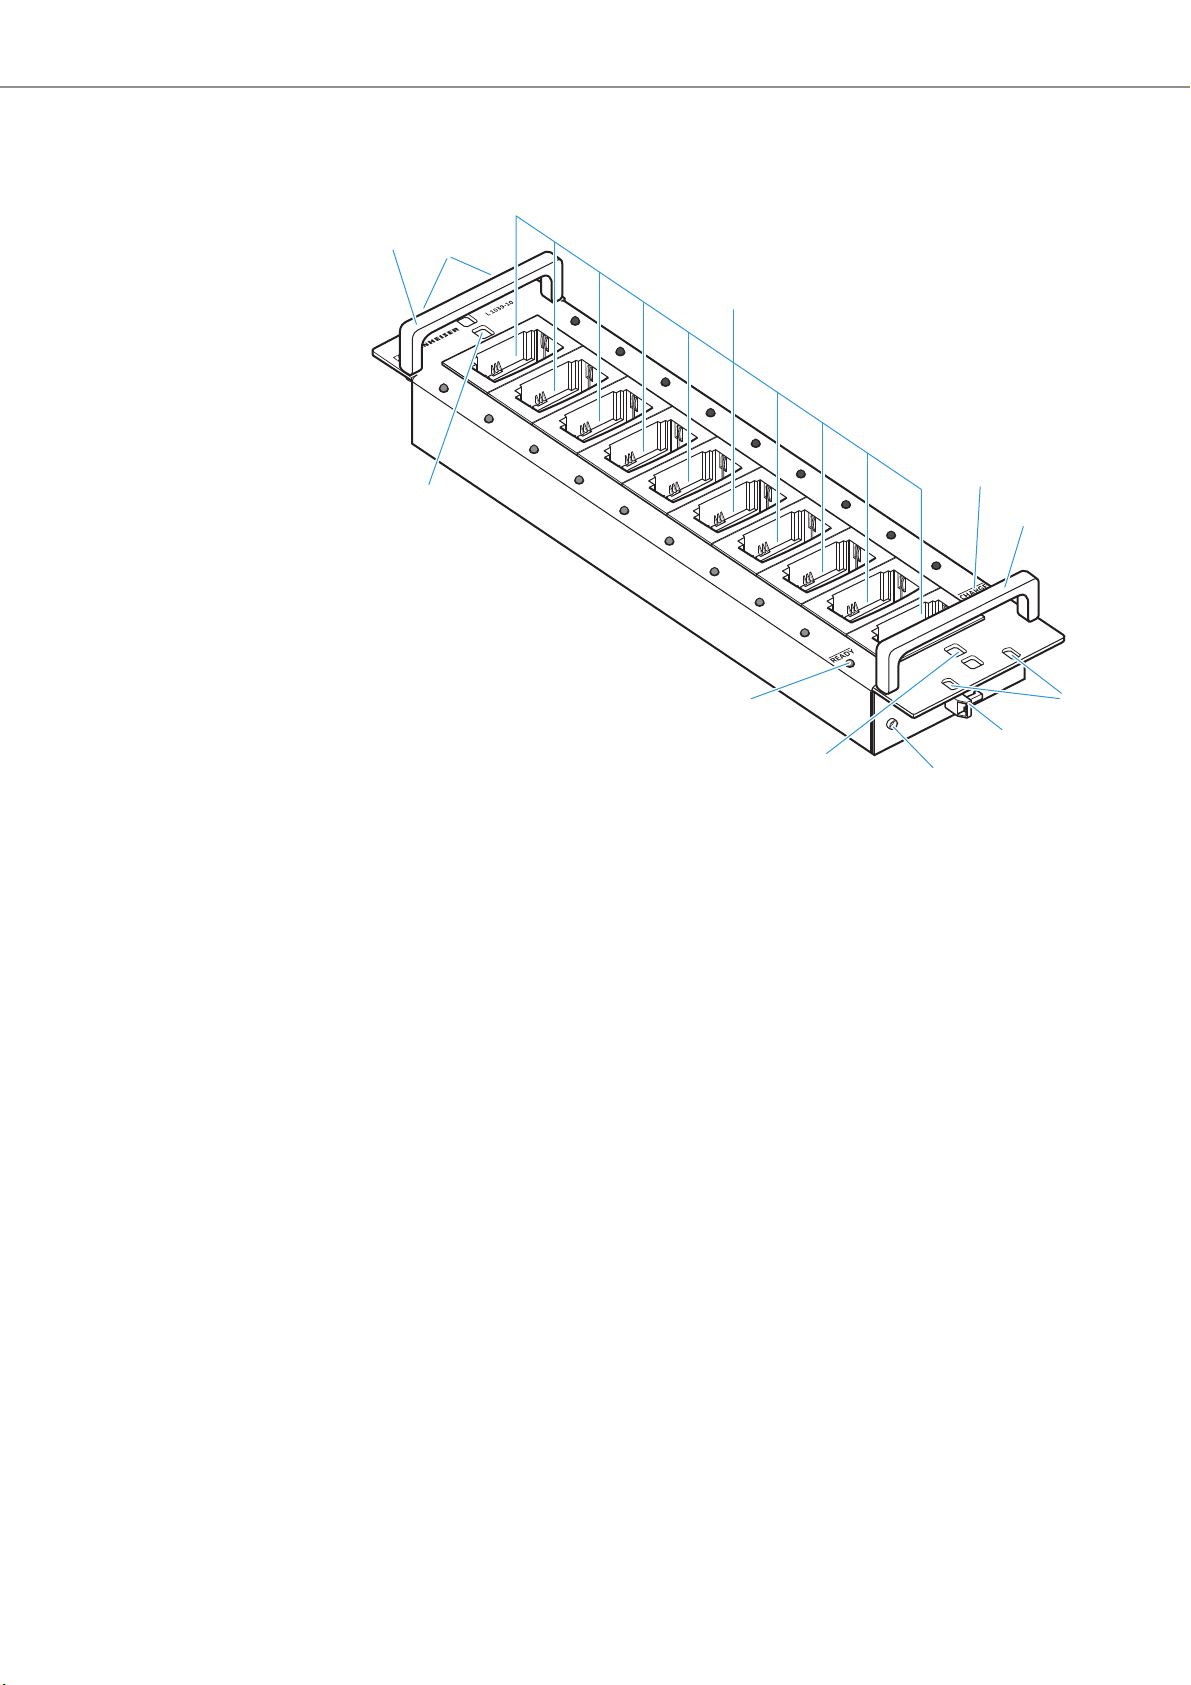
Product overview
4
2
7
1 Carrying handles
2 Charging compartments for up to 10 EK 1039
receivers (with the BA 2015 accupacks
installed)
3 Status LED CHARGE/ERROR, red
4 Mounting holes, e.g. for mounting the charger
into a 19" rack
3
8
7
5 Cable grip for mains cable
6 Hollow jack socket for connection of
NT 12-50C mains unit
7 Holes for optionally fixing/securing
the receivers
8 Status LED READY, green
6
1
4
5
4|L 1039-10
Page 6

Putting the charger into operation
Putting the charger into operation
CAUTION
Danger due to heat accumulation!
The charger and the receivers can get very hot during charging. If the heat cannot
dissipate, the products can be damaged.
왘 Provide sufficient ventilation so that the ambient temperature of the charger
does not exceed the temperature limit specified in the specifications (see
page 11).
왘 Keep the charger away from heat sources and never expose it to direct sunlight.
The charger can be:
• placed on a table or cabinet,
• installed in a 19" rack,
• fixedly installed in a cabinet or transport case.
Installing the charger
The housing of the charger is designed so that it fits into a 19" rack. The charger
can also be installed in a cabinet or transport case.
CAUTION
Risks when rack mounting the charger!
When installing the product in a closed or multi-rack assembly, please consider
that
• the ambient temperature within the rack may increase considerably,
• high mechanical loading may occur, e.g. acting on the housings and cables,
• intrinsically harmless leakage currents of the individual mains units may accumulate, thereby exceeding the allowable limit values.
This can cause material damage and electric shock.
왘 Make sure that the mechanical loading of the rack is even.
왘 Make sure that the ambient temperature within the rack does not exceed the
temperature limit specified in the specifications (see page 11). Ensure sufficient
ventilation; if necessary, provide additional ventilation.
왘 When connecting the charger to the mains, observe the information indicated
on the type plate. Avoid circuit overloading. If necessary, provide overcurrent
protection.
왘 Ground the rack via an additional ground connection.
왘 Slide the charger into the 19" rack.
왘 Fasten the charger to the rack by screwing 4 screws through the 4 mounting
holes 4.
왘 Attach the mains unit to the rack (e.g. using Velcro tape) so that the mains
cables are not mechanically loaded.
L 1039-10|5
Page 7

Putting the charger into operation
57.0 mm
132.5 mm
482 mm
465.6 mm
58.0 mm
70.0 mm
400 mm
40.1 mm40.1 mm
You can install the charger fixedly, e.g. in a cabinet or transport case. For the
dimensions required for fixed installation, please refer to the below installation
drawing.
6|L 1039-10
Page 8

Putting the charger into operation
NT 12-50C
EU
UK
US
6
5
Connecting the charger to and disconnecting it from the mains
To connect the charger to the mains and switch it on:
왘 Connect the hollow jack plug of the of the NT 12-50C mains unit to the hollow
jack socket 6 of the charger.
왘 Pass the cable of the mains unit through the cable grip 5 as shown.
왘 Connect the mains cable (EU, UK or US version) to the mains unit and to a wall
socket.
All status LEDs 3 and 8 light up for a brief moment. The charger is switched on
and in standby mode.
To switch the charger off and disconnect it from the mains:
왘 Pull out the mains plug from the wall socket.
L 1039-10|7
Page 9

Charging the receivers
Charging the receivers
왘 Insert the bodypack receiver/transmitter with the BA 2015 accupack installed
into any of the charging compartments 2 until it locks into place with an
audible click.
The accupack is being charged. The status LEDs 3 and 8 indicate the charging
process.
When an accupack is fully charged, the charging process stops automatically.
Accupacks that are left unused for extended periods of time lose a percentage of
their electrical charge. This is independent of whether the bodypack receivers/
transmitters are stored in the charger’s charging compartments or not.
To make sure that you always use fully charged accupacks, we recommend the
following steps:
왘 Fully charge the accupacks for about 4-5 hours before use. Recharge the accu-
packs every 2 months at the latest.
If you store the bodypack receivers/transmitters outside the charger:
왘 Insert the bodypack receivers/transmitters into the charger as desribed above.
왘 Switch the charger on.
If you store the bodypack receivers/transmitters in the charger’s charging
compartments:
왘 Switch the charger off and on again.
When the status LED 8 of a charging compartment lights up green, the accupack
of the corresponding bodypack receiver/transmitter is fully charged.
When the status LED lights up red, the accupack is being charged.
8|L 1039-10
Page 10
Cleaning and maintaining the L 1039-10
3
8
2
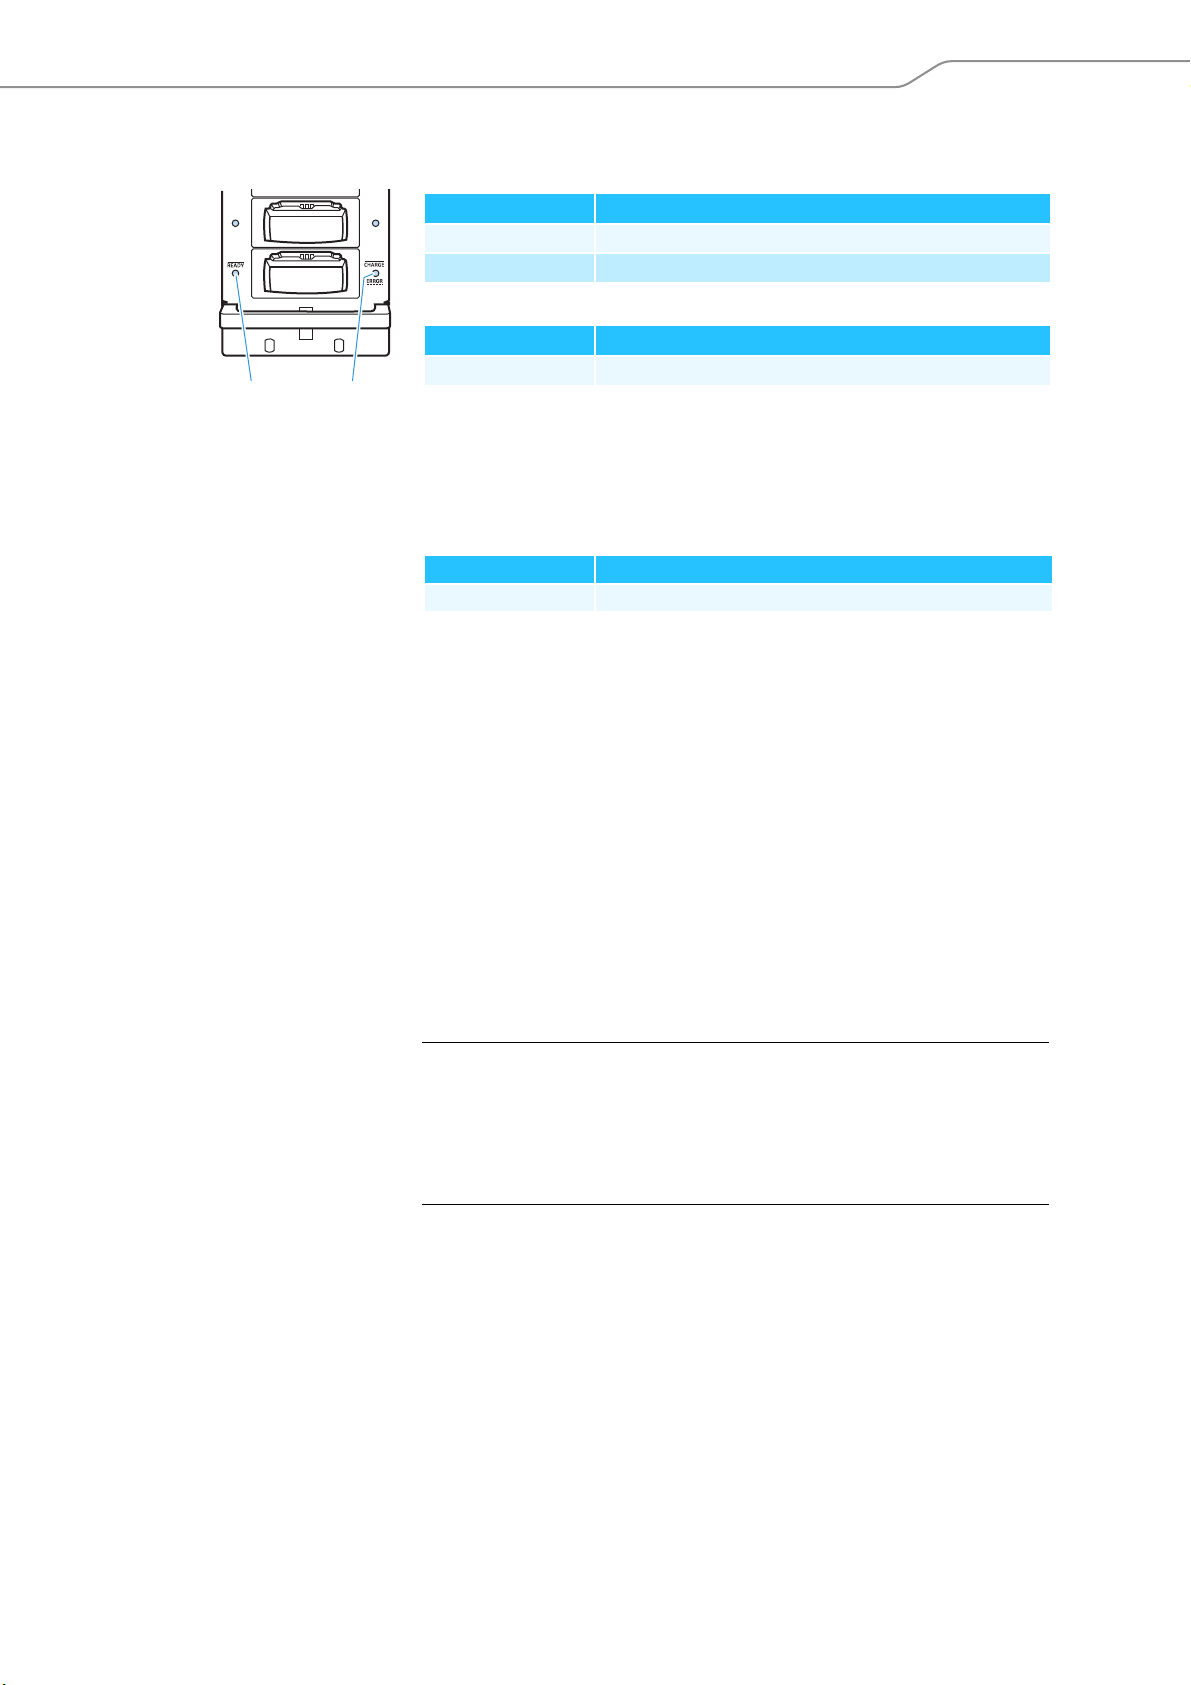
Indications of the status LEDs
Status LED 3 Meaning
lights up red receiver is being charged
flashes red error, charging compartment is deactivated (see page 10)
Status LED 8 Meaning
lights up green receiver is fully charged
Charging times
With a completely discharged accupack and at room temperature, the charging
times are as follows:
Capacity obtained Charging time
approx. 100% typ. 3-4 hours
However, charging may take longer under the following circumstances:
• The accupack is deep-discharged and first has to be reconditioned by a deep
discharge recovery charge.
• The ambient temperature is close to or over 45°C/113°F; in order to protect the
accupack, the charging power will be reduced until the accupack temperature
has dropped to an admissible value.
Charging will be aborted and the status LED 3 will start flashing red under the
following circumstances:
• The accupack temperature is too low or too high (see “Specifications” on
page 11); charging starts automatically when the accupack temperature is
within the charging temperature range.
• The accupack is defective.
Cleaning and maintaining the L 1039-10
CAUTION
Liquids can damage the electronics of the product!
Liquids entering the housing of the product can cause a short-circuit and damage
the electronics.
왘 Keep all liquids away from the product.
왘 Do not use any solvents or cleansing agents.
왘 Remove all bodypack receivers/transmitters from the charging compartments.
왘 Before cleaning, disconnect the mains unit from the mains.
왘 Use a soft, dry cloth for cleaning.
왘 Use a brush or similar to remove dust from the charging compartments.
L 1039-10|9
Page 11

If a problem occurs ...
If a problem occurs ...
Problem Possible cause Solution
The status LEDs
3 and 8 do
not light up
The status
LED 3 flashes
red
Charger is not connected
to the mains
Unstable voltage of the
mains unit
Mains unit or mains cable
is defective
No contact with the
accupack
Contacts of the receiver or
contacts of the charging
compartment are dirty
Accupack is defective
(overaged or defective
rechargeable battery cells)
Wrong accupack/individual rechargeable
batteries/batteries
(primary cells) have
been inserted
Accupack temperature is
too low or too high
Accupack is defective
(overaged or defective
rechargeable battery cells)
Check if the charger is connected
to the NT 12-50C mains unit and
if the mains unit is connected to
the mains (see page 7).
Replace the defective mains unit
or mains cable with a new one.
Insert the bodypack receiver/
transmitter –with the accupack
installed – correctly into the
charging compartment
(see page 8).
Clean the charging contacts of
the receiver and of the charging
compartment (see page 9).
Replace the defective accupack
with a new one.
Only charge BA 2015 accupacks
(installed in a bodypack receiver/
transmitter) with the L 1039-10
charger.
Always recharge the accupacks
within the operating temperature
range and the air humidity range
stated in the specifications
(see page 11).
Replace the defective accupack
with a new one.
10|L 1039-10
Page 12

Specifications
Specifications
L 1039-10 charger
Input voltage 12 ... 15 V
Input current max. 3.4 A
Pin assignment of DC input
hollow jack socket
Charging voltage per charging
compartment 3.7 ... 4.1 V
Charging current nom. 10 x 500 mA
Compatible accupacks Sennheiser BA 2015
Charging time with a completely discharged accupack and at
room temperature:
approx. 100% = typ. 3-4 hours
Temperature range operation: 0°C ... +40°C
storage: 20°C ... +70°C
Relative humidity,
non-condensing
Dimensions (L x H x D),
without carrying handles approx. 482 mm x 70 mm x 132 mm (3 U)
Weight (w/o mains unit and
accupacks) approx. 1750 g
operation: 20% ... 95%
storage: 5% ... 95%
In compliance with
Europe EMC EN 61000-3-1
EN 61000-3-3
Canada Industry Canada ICES 003
USA FCC 47 CFR Part 15 B
NT 12-50C mains unit
Nominal input voltge
Mains frequency 50 ... 60 Hz
Nominal output voltage 12 V
Nominal output current max. 5 A
Standby power consumption ≤
Energy efficiency level
(Energy Star) V
Temperature range operation: 0°C ... +40°C
Relative humidity,
non-condensing max. 95%
Dimensions (L x H x D) approx. 115 x 50 x 33 mm
Weight approx. 280 g
Cable lengths approx. 1.8 m to the mains plug
100 ... 240 V~
0.5 W
storage: 10°C ... +70°C
approx. 2.5 m to the hollow jack plug
In compliance with
Europe EMC EN 61204-3
Safety EN 60065
Canada Industry Canada ICES 003
USA FCC 47 CFR Part 15 B
L 1039-10|11
Page 13

Manufacturer Declarations
Manufacturer Declarations
Warranty
Sennheiser GmbH & Co. KG gives a warranty of 24 months on this product.
For the current warranty conditions, please visit our website at
www.sennheiser.com or contact your Sennheiser partner.
In compliance with the following requirements
• RoHS Directive (2002/95/EC )
• China RoHS
捷ↅ⚜䱿
(Parts)
摠⻭捷ↅ
(Metal Parts)
䟄恾㲰⧦
(Circuit Modules)
o:
表示该有毒有害物质在该部件所有均质材料中的含量均在SJ/T11363-2006 标准规定的限量要求以下。
x:
嫷䯉年㦘㹡㦘⹂䓸德咂⺠⦷年捷ↅ䤓㩟⧖德㧟㠨₼䤓⚺摞怔⒉ 6-7 㪖屓⸩䤓棟摞尐㻑ᇭ
• ErP Directive (2009/125/EC)
CE Declaration of Conformity
•
•EMC
Directive (2004/108/EC)
•
Low Voltage Directive (2006/95/EC)
The declaration is available at www.sennheiser.com.
NT 12-50C mains unit certified by
Audio, Video and Similar Electronic Apparatus – Safety Requirements CAN/
CSA-C22.2 No. 60950:03 and UL Std. No. 60950
杔
㻭
(Pb)
(Hg)
x o o o o o
x o o o o o
㦘㹡㦘⹂䓸德㒥⏒侯
⏼ↆ杻
柘
(Cd)
(Cr
6+
)
⮩䅃勣啾
(PBB)
⮩䅃ℛ啾搩
(PBDE)
12|L 1039-10
Page 14

Sennheiser electronic GmbH & Co. KG
Am Labor 1, 30900 Wedemark, Germany
www.sennheiser.com
Printed in Germany, Publ. 08/12, 549104/A01
 Loading...