

Sencor SCD-6500MR User Manual

SCD-6500MR
MODE
MUTE
POWER
Car Stereo CD/CDR/CDRW/MP3/WMA Player with PLL FM Stereo Radio
Radio Data System with PTY
Front AUX IN
USB / MMC / SD Card Input
Flip Down and Detachable Front Panel System
Stereo systém do automobilu s CD/CDR/CDRW/MP3/WMA přehrávačem a PLL FM stereo rádiem
RDS (Radio Data System) s funkcí PTY
Přední vstup AUX IN
Vstup pro USB a karty MMC/SD
Sklápěcí a odnímatelný systém čelního panelu
Stereo systém do automobilu s CD/CDR/CDRW/MP3/WMA prehrávačom a PLL FM stereo rádiom
RDS (Radio Data System) s funkciou PTY
Predný vstup AUX IN
Vstup pre USB a karty MMC/SD
Sklápací a odoberateľný systém čelného panelu
EN
CZ
SK
Autós sztereorendszer CD/CDR/CDRW/MP3/WMA lejátszóval és PLL FM sztereo rádióval
RDS (Radio Data System) PTY funkcióval
Elülső AUX IN bemenet
USB- és MMC/SD kártya-bemenettel
Lehajtható és levehető előlap
System stereo do samochodu z odtwarzaczem CD/CDR/CDRW/MP3/WMA i radiem stereo PLL FM.
RDS (Radio Data System) z funkcją PTY
Przednie wejście AUX IN
Port USB i wejście na karty MMC/SD
System przechylania i wyjmowania panelu przedniego
HU
PL
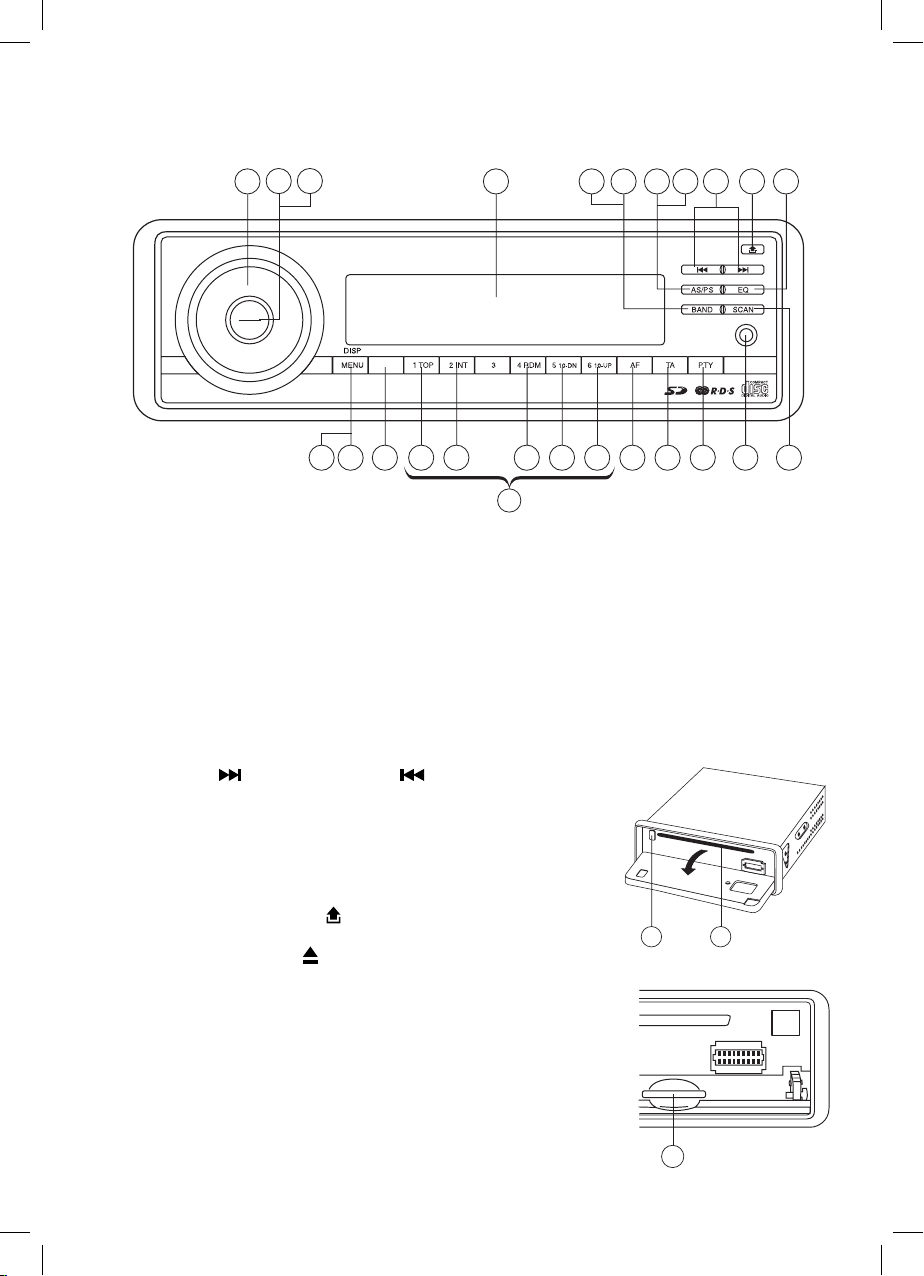
LOCATION OF PARTS AND CONTROLS
MODE
MUTE
9 14
POWER
2 1
8 20 22 24 25 26 5 6 7 27 13
16 1112 23 151021 173
4
(1-6)
1. POWER ON/OFF (POWER)
2. MENU BUTTON (MENU)
3. VOL UP/VOL DOWN FOR BASS/TREBLE/BALANCE/FADER AND FUNCTION SELECT
4. PRESET STATIONS (1,2,3,4,5,6)
5. ‘AF’ function (ALTERNATIVE FREQUENCIES)
6. ‘TA’ function (TRAFFIC ANNOUNCEMENT)
7. ‘PTY’ function (PROGRAM TYPE)
8. DISPLAY BUTTON (DISP)
9. MODE BUTTON (MODE)
10. BAND BUTTON (BAND)
11. AUTOMATIC OR MANUAL TUNING
(FREQ UP
OR FREQ DOWN /
CD TRACK/SEARCH BUTTON
12. AUTO SEEK SEARCH TUNING (AS/PS)
13. ‘SCAN’ AUTOMATIC TUNING CONTROL (SCAN)
14. MUTE BUTTON (MUTE)
15. EQUALIZER CONTROL (EQ)
16. LCD DISPLAY
17. OPEN PANEL BUTTON (
18. CD SLOT
19. CD EJECT BUTTON (
)
19 18
)
20. TOP BUTTON
21. PLAY/PAUSE BUTTON
22. INTRO BUTTON (Preview all Tracks)
23. REPEAT BUTTON
24. RANDOM BUTTON
25. -10 TRACK SEARCH DOWN
26. +10 TRACK SEARCH UP
27. FRONT AUX IN
28. MULTI-MEDIA CARD (MMC) / SD CARD SLOT
28
EN-1
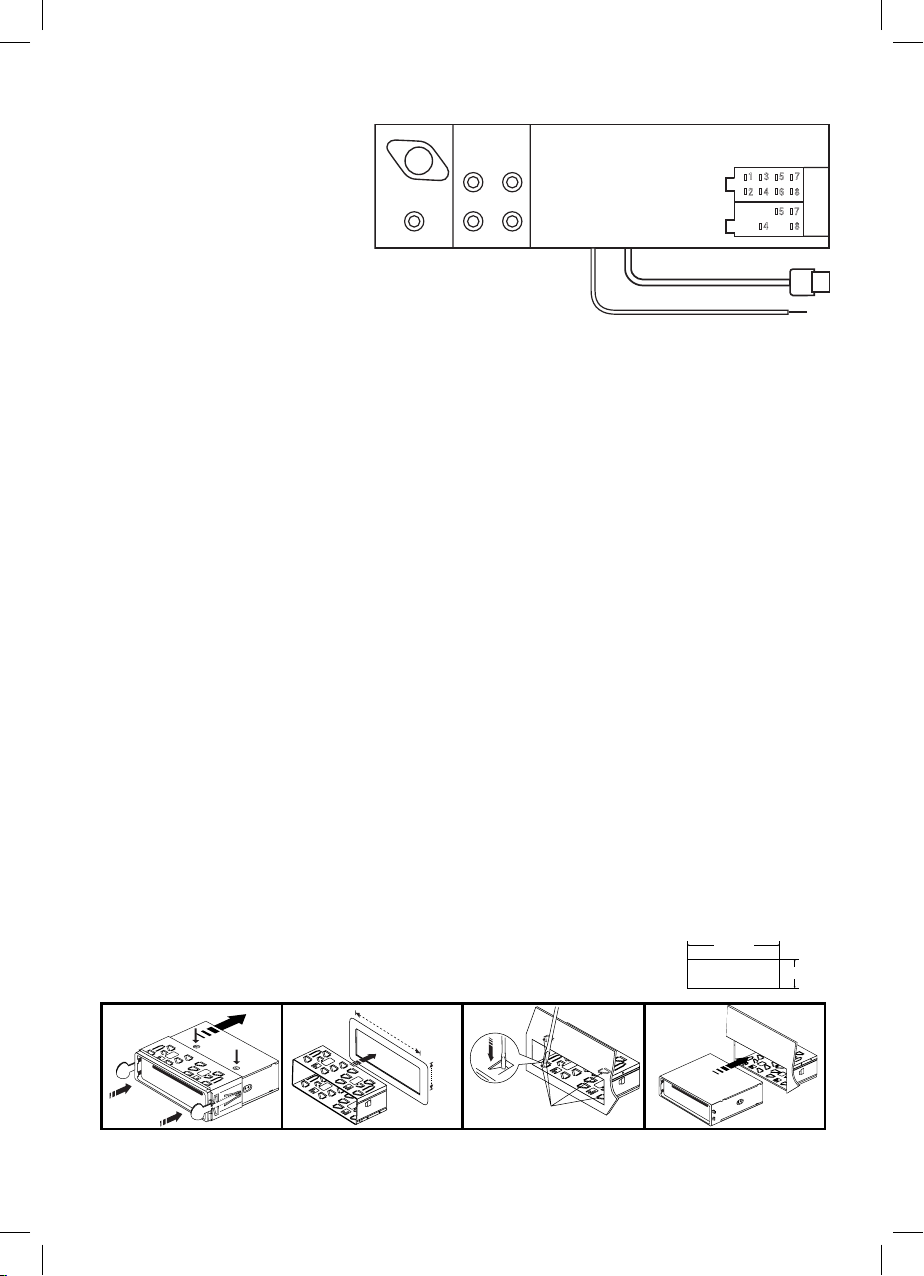
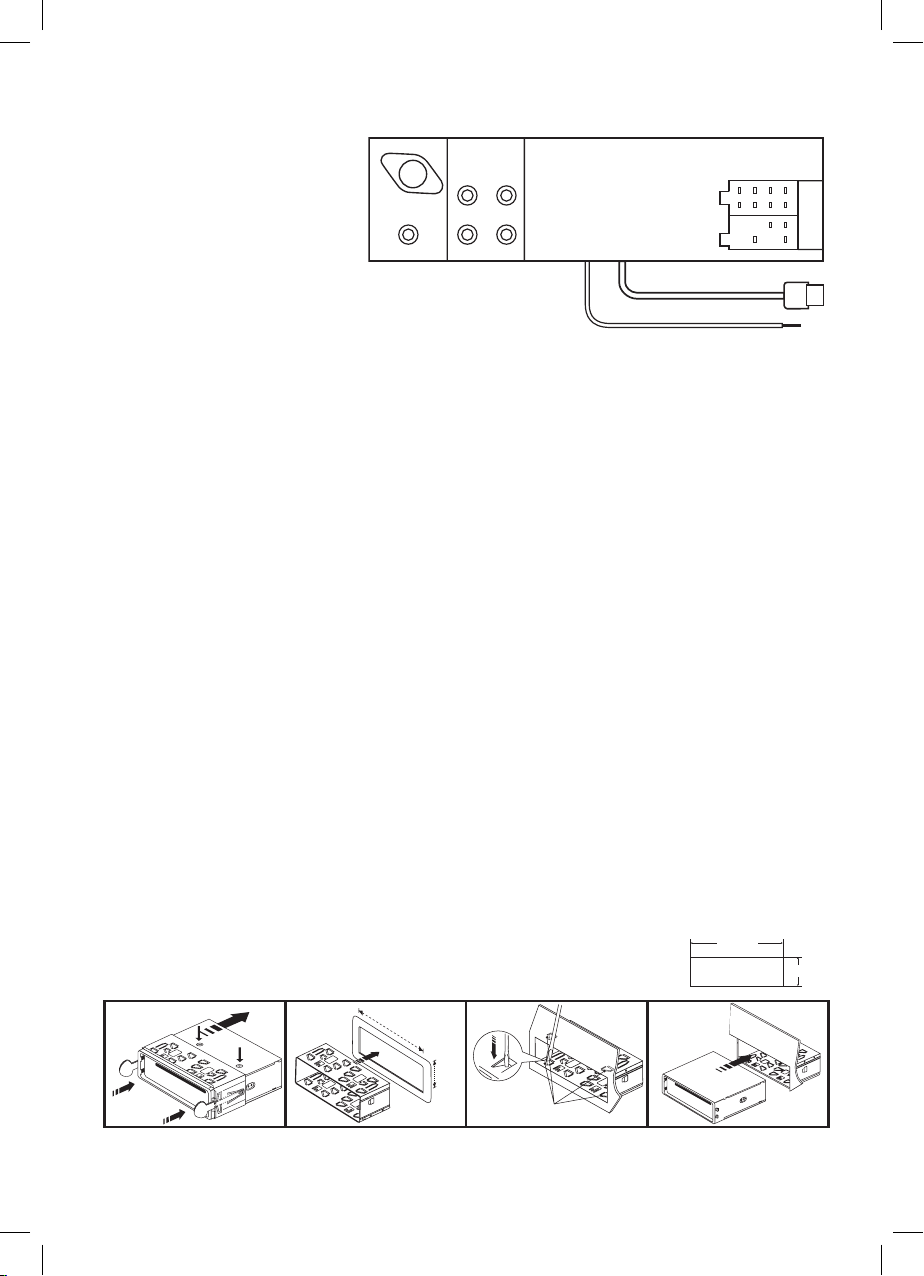
ISO CONNECTOR
RCA Jack Line Out (Front):
Red (right) White (left)
RCA Jack Line Out (Rear):
Red (right) White (left)
Subwoofer: (Orange)
Telephone Mute: (Black)
USB Port:
Connect Your Portable MP3 Player
ANTENNA
CONNECTOR
L (WHITE)
L (WHITE)SUBWOOFER
LINE OUT (REAR)
R (RED)
LINE OUT (FRONT)
R (RED)
CONNECT USB DRIVE
TELEPHONE MUTE
(BLACK)
ISO CONNECTOR
1 3 5 7
B
2 4 6 8
A
5 7
4 8
CONNECTOR A
4. MEMORY +12V
5. AUTO ANTENNA OUTPUT
7. +12V (TO IGNITION KEY)
8. GROUND
Note: (connectorA no. 7) must be connected bycar ignition key inorder to avoid that car battery becomes
weak when the car will be not used for long period.
CONNECTOR B
1. REAR RIGHT SPEAKER (+)
2. REAR RIGHT SPEAKER (-)
3. FRONT RIGHT SPEAKER (+)
4. FRONT RIGHT SPEAKER (-)
5. FRONT LEFT SPEAKER (+)
6. FRONT LEFT SPEAKER (-)
7. REAR LEFT SPEAKER (+)
8. REAR LEFT SPEAKER (-)
Maintenance
FUSE REPLACEMENT
If the fuse blows, check the power connection and replace the fuse. If the fuse blows again after the
replacement, there may be an internal malfunction. In this case, consult your nearest repairing center.
Warning
Use the specified amperage fuse for each lead. Use of a higher amperage fuse may cause serious
damage.
INSTALLATION
PRECAUTIONS
• Choose the mounting location carefully so that the unit will not interfere with the normal driving functions
of the driver.
• Avoid installing the unit where it would be subject to high temperatures, such as from direct sunlight
or hot air from the heater, or where it would be subject to dust, dirt or excessive vibration.
• Use only the supplied mounting hardware for a safe and secure installation.
• Be sure to remove the front panel before installing the unit.
NOTE : Inclination angle for car radio installation must not
exceed 30˚ otherwise the front panel will not open.
release screw and
1
1
bracket
2
3
182mm
2
3
53mm
Bend these
claws, if necessay
Note: Keep the release key in the safe place as you may need it in future to remove the unit from the
car.
EN-2
182mm
53mm
4
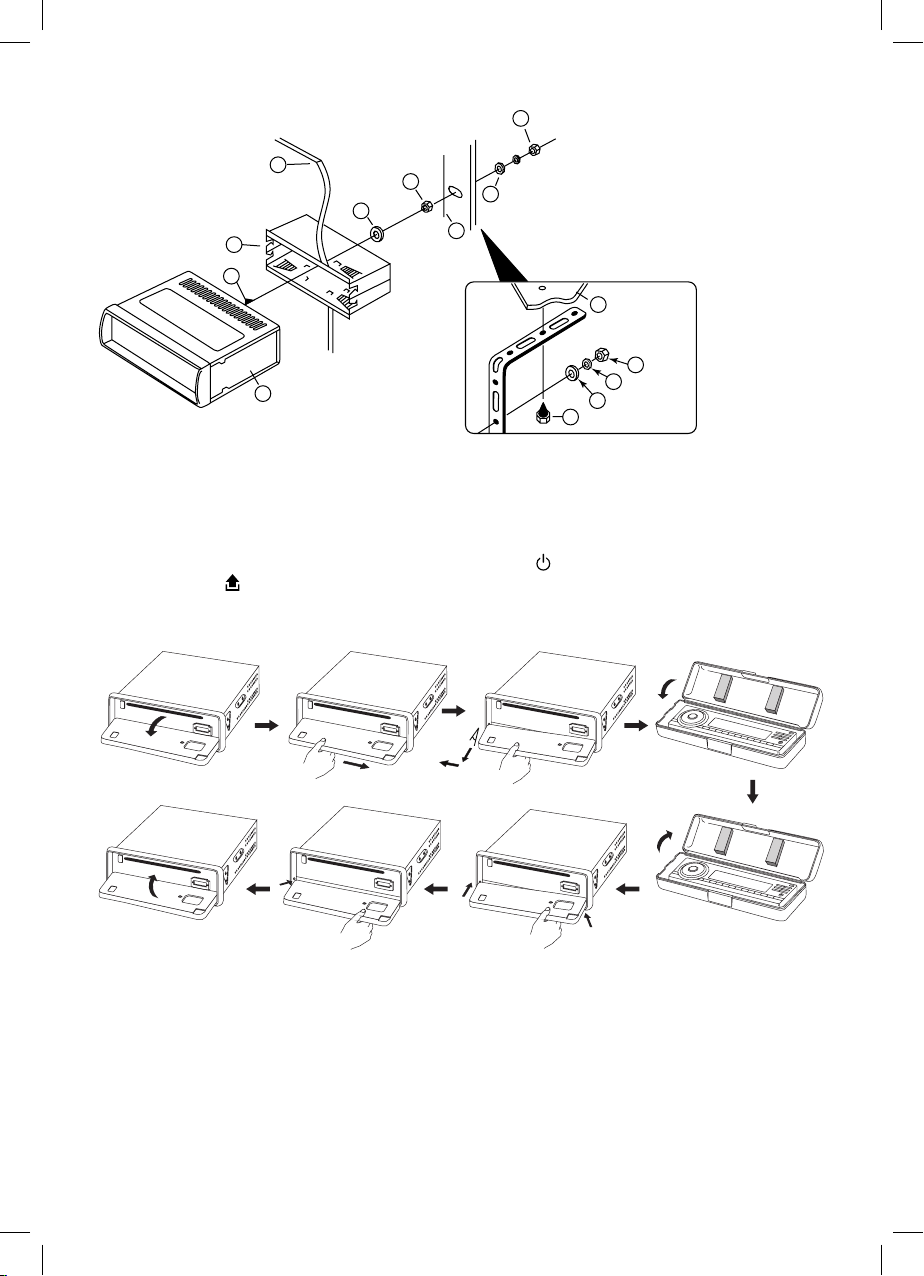
TO SUPPORT THE UNIT
4
1. UNIT
2. RELEASE CASE
3. DASH BOARD
4. HEX NUT
5. LOCK WASHER
6. PLAIN WASHER
7. CAR BODY
8. REAR SUPPORT STRAP
9. TAPPING SCREW
10. M5 X 15 HEX BOLT
7
4
5
6
9
Dashboard
2
10
3
1
4
5
6
8
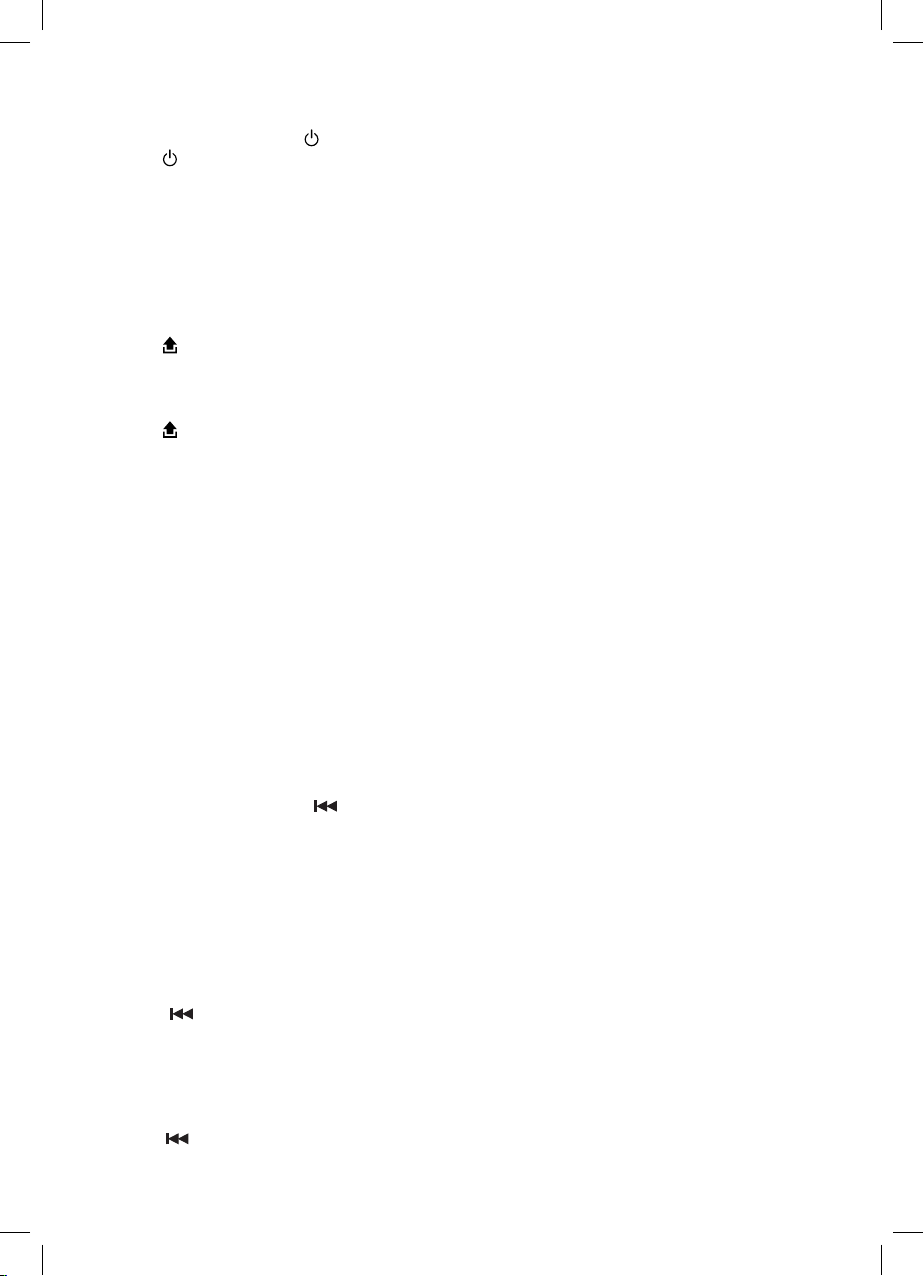
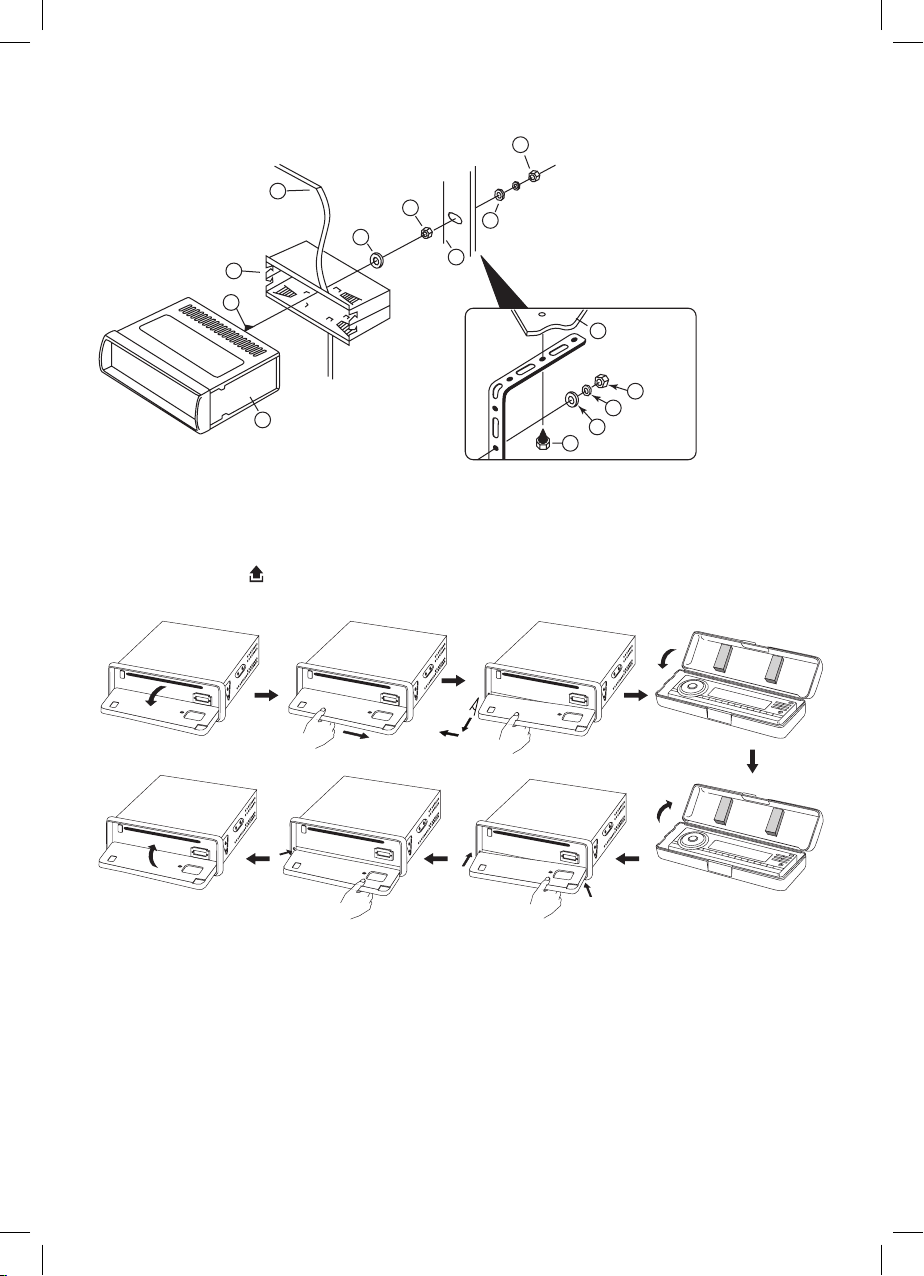
Detaching and attaching the front panel
The front panel of this unit can be detached in order to prevent the unit from being stolen.
FOLDING DOWN AND DETACHING/ATTACHING THE FRONT PANEL
Before detaching the front panel, be sure to press the
Then press the
button (17), let the Front Panel arrive in horizontal position and detach the
button (1) OFF first.
panel by pulling it towards you as illustrated.
<10°
2
1
Notes:
• Do not press the front panel hard against the unit when attaching it. It can be easily attached by pressing it lightly against the unit.
• When you carry the front panel with you, put it in the supplied front panel case.
• Do not press hard or give excessive pressure to the display window of the front panel when
attaching it to the unit.
EN-3
BASIC OPERATIONS
Turning the Unit ON/OFF ( )
1. Press to turn on the unit. To turn off, press and hold this button again.
Displaying Clock
1. Press DISP button and clock will be shown on the display.
Selecting a Source (MODE)
1. Press MODE repeatedly to switch between TUNER - CD/MP3 - USB DRIVE - MEMORY CARD – AUX
mode.
Note: The mode will only be available if the device is present and inserted.
Loading a Disc
1. Press
2. Insert a disc into the disc loading slot with label facing up
3. Close the front panel
Ejecting a Disc
1. Press button to open the front panel
2. Press EJECT button to eject disc
3. Close the front panel
Adjusting the Volume
1. Rotate VOL button right or left to increase or decrease volume.
Equalizer (EQ)
Press EQ to select between
Mute
Press and hold MUTE button to mute volume. Press and hold this button again to return to normal volume.
button to open the front panel
Off/Pop/Rock/Classic/Flat
equalizer modes.
SETTINGS
Clock Setting
1. Press MENU button longer than 2 sec to enter menu mode.
2. Rotate VOL button to go to clock mode .
3. Press MENU button. hours starts blinking. Rotate VOL button to set hour..
4. After adjusting hours , press MENU button , then minutes starts blinking
5. After adjusting minutes, press MENU button again.
6. To exit menu mode, press button.
Audio Settings
1. Press MENU button longer than 2 sec. to enter menu mode.
2. Rotate VOL button to select AUDIO menu and press MENU button again.
• Bass – to adjust the low tone.
• Treble – to adjust the high tone.
• Fader – to adjust the sound fade front and rear.
• Balance – to adjust the sound shift left or right.
• Equalizer – Off/Pop/Rock/Classic/Flat
• Loudness – to boost the sound quality
• Subwoofer – to engage subwoofer output
• Beep - to activate/deactivate beep sound when pressing buttons
3 Press
Display Settings
1. Press MENU button longer than 2 sec to enter menu mode.
2. Rotate VOL button and select DISPLAY mode, and press MENU button again.
• Contrast – to adjust the contrast of the display.
• View – select between Positive / Negative view type.
3. After selecting, press MENU button and adjust using VOL button.
4. Press
to exit one level.
to exit.
EN-4
LISTENING TO RADIO
Band button (BAND)
Press BAND button to toggle cyclically between FM1---FM2---FM3.
Auto Search and Save (AS/PS)
By pressing shortly, the radio searches for each preset station. By pressing longer than 1 sec, and then
6 strongest stations are preset to the corresponding preset number. When AS operation is finished, the
radio executes the preset scan.
What is RDS?
The RDS (Radio Data System) is a digital information system developed by the EBU (European Broadcast
Union). Piggy-backed on normal FM broadcasts, RDS offers a variety of information services and automatic retuning functions for RDS-compatible car stereos. In 1988, RDS became available in the United
Kingdom, France, West Germany, Ireland and Sweden. Test transmissions are being conducted in many
other European countries. It is expected that RDS will be available in most western European countries
in the near future.
Auto Search RDS Program Types
1. Press PTY button.
2. Rotate VOL button to select program type listed below and press MENU button to start program type
search.
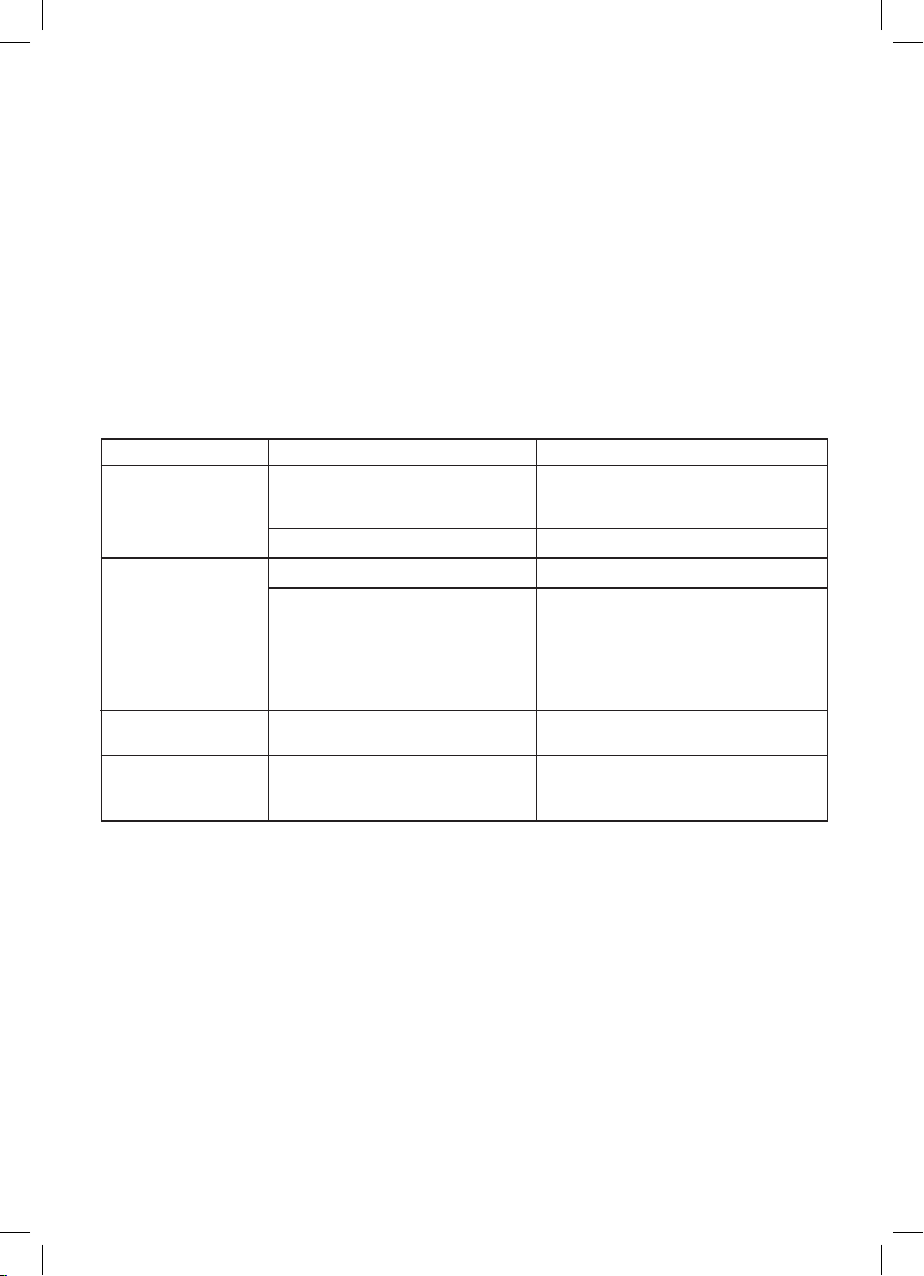
Specific Type of Program Specific Type of Program
Pop music Popular music Education Educational program
Rock music Contemporary modern music Drama Radio plays and serials
Easy Listening m. Easy Listening music Culture National or regional culture
Light Classical Light classical music Science Nature, science and technology
Serious Classical Serious Classical music Varied Light entertainment
Jazz music Jazz music Weather Weather reports
Country music Country music Finance Finance
National music National music Children Children
Oldies music Oldies music Social Affairs Social affairs
Folk music Folk music Religion Religious affairs or services
Other music Non-categorized music Phone In Phone In
News News Travel Travel programs
Current Affairs Current Affairs Leisure Hobbies and recreational activities
Information General information and advice Documentary Documentary
Sport Sports
RDS Options
1. Press MENU button longer than 2 sec and rotate VOL button repeatedly until Tuner appears. Press
MENU button.
2. Rotate VOL button and select RDS options settings. Press MENU knob to set.
AF mode
When AF mode is on, the radio checks the signal strength of the AF all the time and move to that sta-
tion if signal is better than current station.
Traffic alert
SEEK – when newly turned station does not receive TP information for 5 sec., the radio retunes to next
station which has not the same station (PI) as the last station, but has the TP information.
In TA seek mode, the current station can be changed to the completely different station because
the unit searches TP station when the field strength of the current station is very weak, or the
current station has no TP signal.
Alarm – turn on to receive announcements regarding emergencies such as natural disasters.
EN-5
Region
Region ON: AF switching or PI SEEK is implemented to the station which have all PI codes same as
current station.
Region OFF: The regional code in the format of PI code is ignored when AF switching or PI SEEK is
implemented.
Mask (Difference PI/All PI)
Select whether the search for alternative frequencies covers all broadcasting stations available
(ALL DPI) or only those of the currently turned station (DPI).
Retune (Short Time/ Long Time)
Here you can determine the time period your device will wait before it seeks a substitute radio channel,
which broadcasts traffic reports is lost. You must activate the TA operating mode before automatic
seeking can start.
Stereo / Mono
1. Press MENU button longer than 2 sec to enter MENU mode and turn VOL knob repeatedly until Tuner
appears. Press MENU button again.
2. Rotate VOL button and select Stereo / Mono settings. Press MENU button.
3. Select between Stereo / Mono settings. Press MENU button to save.
4. Press to exit one level.
Tuner Sensibility
1. Press MENU button longer than 2 sec to enter menu model and rotate VOL button repeatedly until
Tuner appears. Press MENU button.
2. Rotate VOL button repeatedly and select Tuner sensibility settings. Press MENU button.
3. Rotate VOL button to select between Local / Distant. Press MENU button to save.
Local – tune only to those radio stations with sufficient strong signals for good reception.
Distant – to listen to all stations including the distant ones.
4. Press button to exit one level.
Automatic or Manual tuning (FREQ UP OR FREQ DOWN )
When pressed short, these keys are operated as SEEK tuning mode.
When pressed longer than 1 sec., they are operated as MANUAL tuning mode.
Note: The unit automatically switches back to SEEK mode after 5 seconds if no input was detected during MANUAL tuning mode.
Storing and Recalling Stations
If you press any of the NUMBER (1-6) you can easily store up to six broadcast frequencies for later recall
with the touch of a button.
1. Choose a desired BAND FM1-FM2-FM3.
2. When you find a frequency that you want to store in memory, press and hold a NUMBER (1-6) until
the preset number shows and lit in the display.
3. The number you have pressed will remain lit. The selected radio station frequency has been stored in
memory. The next time you press the same NUMBER (1-6), the radio station’s frequency is recalled
from memory.
Note: Up to 18 FM stations can be stored in the memory.
EN-6
LISTENING TO CD / MP3 / USB / MEMORY CARD
Basic operations
1. To perform fast forward or reverse, press and hold or . Release the button to resume normal
playback at a desired point,
2. Pressing skips to the start of the next chapter. Pressing skips to the beginning of the chapter.
Pressing repeatedly skips to the previous chapter.
3. To pause playback, press BAND(PLAY/PAUSE) button. Press it again to resume.
Searching for particular track (MP3 only)
There are 2 modes to use for searching mp3 tracks to play.
1. Track - User enter track NO.
2. Character - User enter the first character of the filename.
3. File and Folder - This mode use list structure display.
How to use Track Mode
1. Press MENU button longer than 2 sec to enter menu mode and rotate VOL button repeatedly until
CD/FLASH appears. Press MENU button.
2. “Search” will be appeared, then press MENU button again.
3. Rotate VOL button to select TRACK and press MENU button again.
4. Using the VOL knob and MENU button, please set Track NO.
5. Press MENU button longer than 2 sec , then the tracks selected will start playing.
How to use character search mode
1. Press MENU button longer than 2 sec to enter menu mode and rotate VOL knob repeatedly until CD/
Flash appears and press MENU button again.
2. “Search” will be appeared, then press MENU button.
3. Rotate VOL button to select character and press MENU button again.
4. “ABC…” will be appeared, using VOL knob and select the character.
5. Press MENU button then the songs which has same character as a first letter will be displayed.
6. Rotate VOL button to select the song.
7. Press MENU button to confirm, the song will be played.
How to use File and Folder
1. Press MENU button longer than 2 sec to enter menu mode and rotate VOL button repeatedly until
CD/Flash appears and press MENU button again.
2. Search will be appeared and press MENU button again.
3. Rotate VOL button to select “File and Folder” and press MENU button again.
4. The first folder file name will be displayed.
5. Using
6. Press MENU button to confirm and the file will be played.
First Track Playback
Press TOP button to play first song of disc.
Preview all Tracks (INTRO)
During playback, press INT button to play the first 10 seconds of each track. Press the button again to
stop previewing.
Repeat tracks
You can choose between repeat playback of a single track or all tracks. Pressing AS/PS(RPT) button.
Random Playback
Press RDM during playback, you can play the tracks in random/shuffle order instead of normal progression.
Press again to turn off random mode.
Electronic Shock Protection (ESP)
You can set the ESP seconds for CD playback for uninterrupted listening.
1. Press MENU button longer than 2 sec to enter menu mode and rotate VOL button repeatedly until
CD/FLASH appears. Press MENU button.
2. Rotate VOL button repeatedly and select ESP settings. Press MENU button.
3. Select between ESP 10s / ESP 40s options. Press MENU button to confirm.
4. Press button to exit one level.
, and VOL button select the folder and file name.
EN-7
Playing Multi-session disc
You can set unit to play multi-session disc or not.
1. Press MENU button longer than 2 sec to enter menu mode and rotate VOL button repeatedly until
CD/FLASH appears. Press MENU button .
2. Rotate VOL button repeatedly and select Multi-session settings. Press MENU button.
3. Select one session / multi session options. Press MENU button to confirm.
4. Press to exit one level.
FRONT AUX IN (27)
Convenient easy to use front “AUX IN” input jack, allows easy connection of Portable Media and digital
MP3 Players.
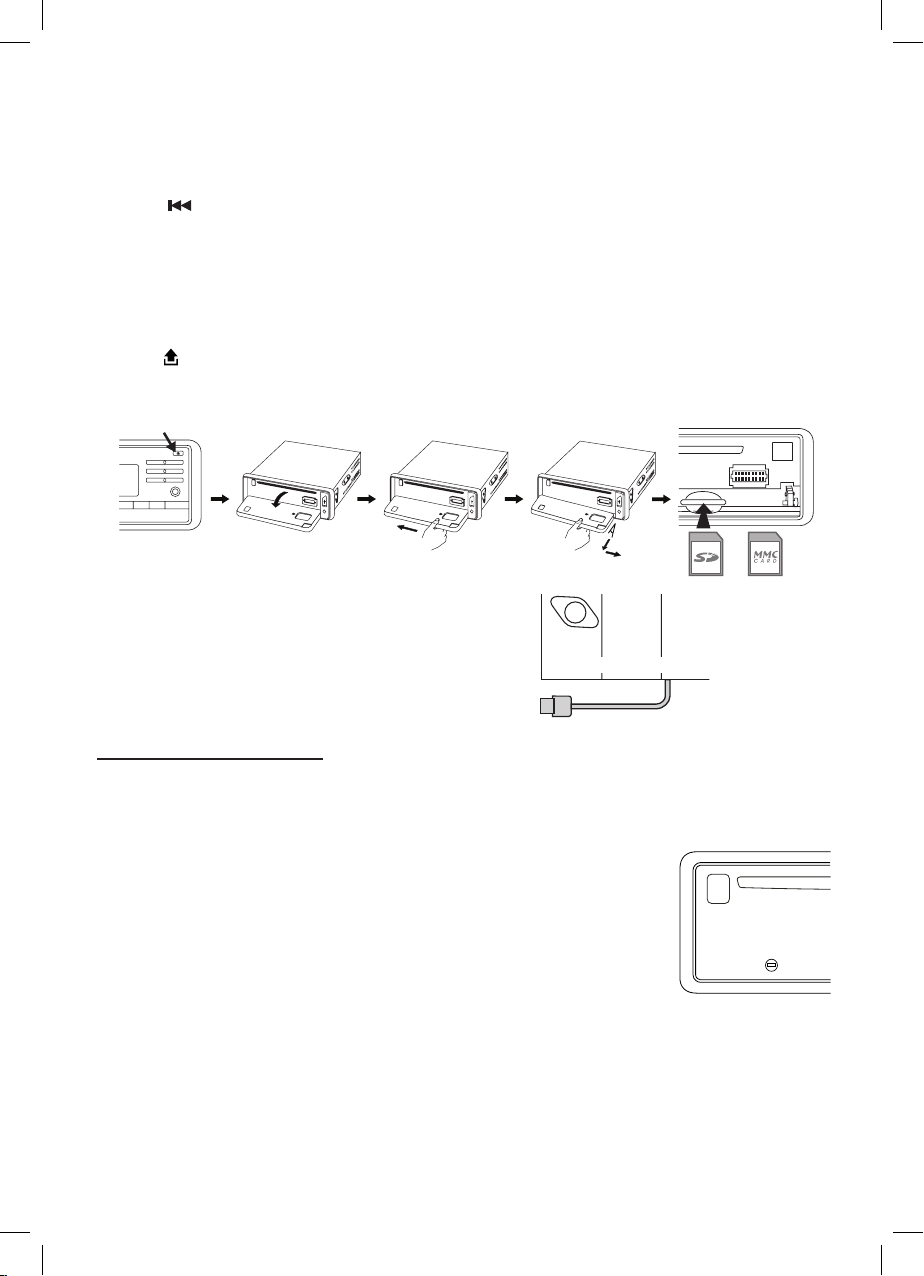
MULTI-MEDIA CARD (MMC) / SD CARD SLOT (28)
Support MP3/WMA ID3 format music only.
1. Turn OFF power.
2. Press
button and the the front panel will open.
3. Detach the panel by pulling it towards you.
4. Carefully insert the SD/MMC card into the disc slot, attach back the panel. Turn on power. Unit starts
playback automatically.
USB PORT
Plug your USB memory stick directly into the USB cable.
Unit starts playback automatically.
ANTENNA
CONNECTOR
CAR AUDIO (REAR SIDE)
CONNECT USB DRIVE
* IMPORTANT INFORMATION:
BECAUSE OF THE GREAT VARIETY OF PRODUCTS WITH USB, SD AND MMC CARD PORTS AND
THEIR SOMETIMES QUITE MANUFACTURER-SPECIFIC FUNCTIONS WE CAN NEITHER GUARANTEE THAT ALL DEVICES WILL BE RECOGNIZED NOR THAT ALL OPERATING OPTIONS THAT ARE
POSSIBLE IN THEORY WILL ACTUALLY WORK
• RESET
Reset button is placed on the housing.
The reset button is to be activated for the following reason:
• Initial installation of the unit when all wiring is completed.
• All the function button do not operate.
• Error symbol on the display.
RESET
EN-8
CAUTION & MAINTENANCE
The detachable panel FM car radio with CD player is an example of superior design and
craftsmanship. The following suggestions will help you care for the product so that you can
have many years of enjoyment.
1. Do not touch the contacts on the front panel or the unit body.
2. The product can only operate on 12V-14V DC power supply, negative ground.
3. Avoid exposing your product to high temperature and humidity.
4. Handle the product with care. Dropping it can damage circuit boards and cause the product
to malfunction.
5. Modifying or tampering with internal components can cause damage and invalidate the
warranty.
6. Always remove the CD from the unit when it has finished playing or not being used.
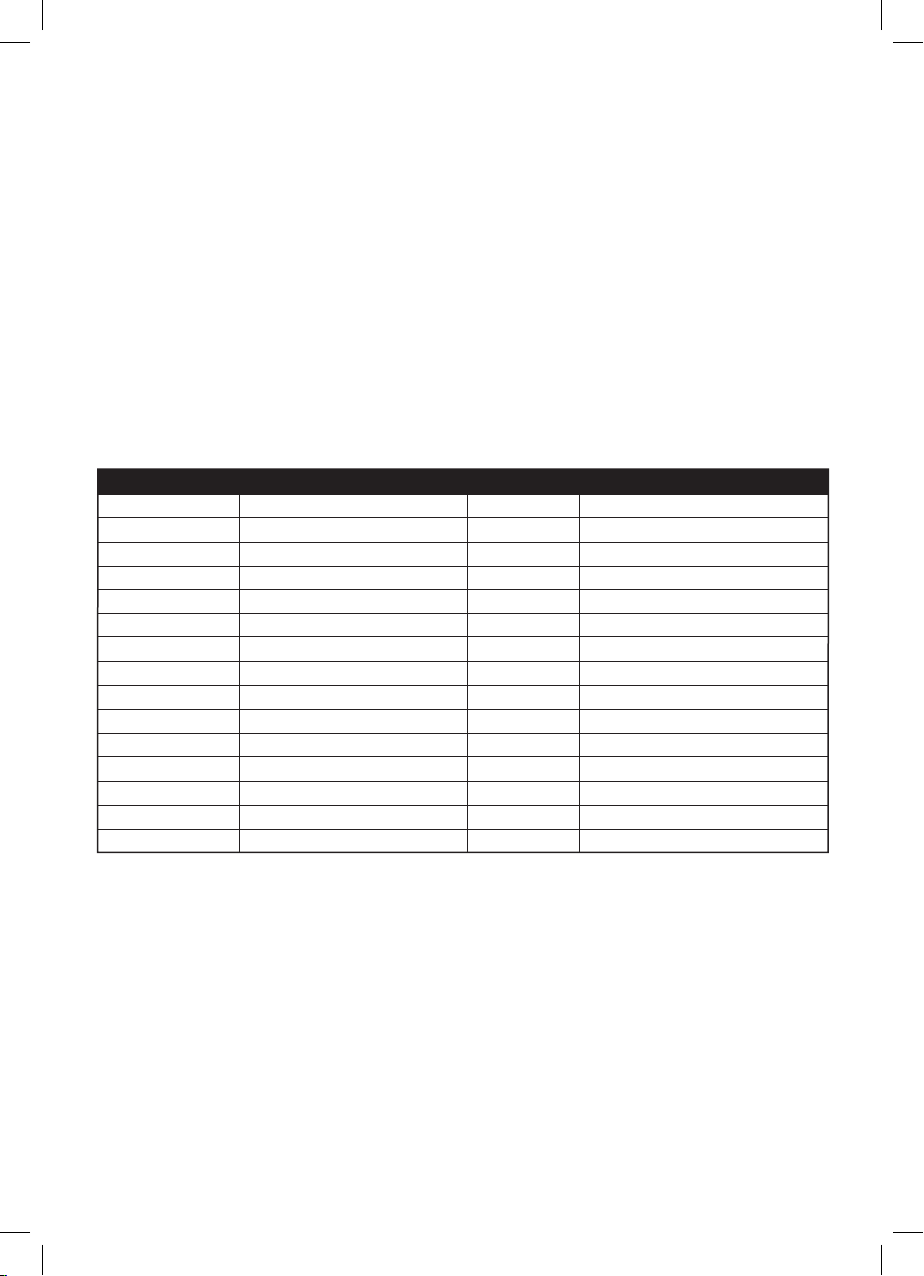
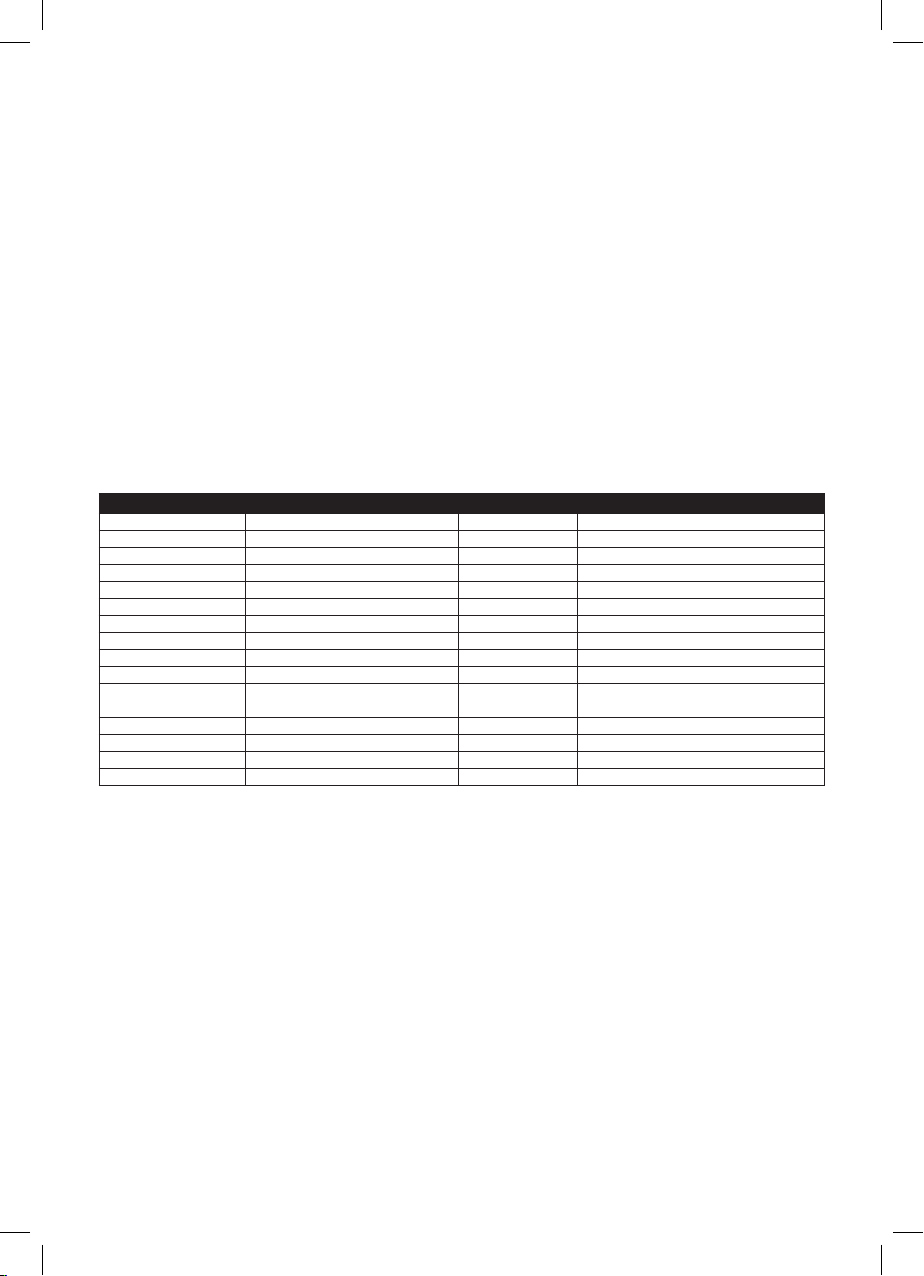
TROUBLESHOOTING GUIDE
SYMPTOM
No sound or power
No sound in one
channel
Poor FM reception
CD sound quality
poor
POSSIBLE CAUSE
Speaker cord disconnected.
Bad power connection.
Blown fuse.
Mis-adjusted balance control.
Damaged speaker wire
or speaker.
Insensitive or defective
antenna.
Disc reading malfunction.
Disc may be damaged or dirty.
Lens may need cleaning.
Check to see that all the power and
speaker leads are securely connected.
Replace fuse with same amperage.
Check balance control.
Reverse left and right channel
speaker leads If no sound from other
side, check or replace speaker wire.
If no sound from both sides, replace
both speakers.
Replace with a good sensitivity
antenna.
Try a different disc.
Clean Disc with a soft cloth.
Insert a quality lens cleaning disc.
SOLUTION
NOTE:
Good ground connections eliminate most electrical noise problems and require tight contact
with the metal vehicle chassis. Remove plastics, paint or rust for good electrical contact.
EN-9

TECHNICAL SPECIFICATIONS
CD/MP3/WMA PLAYER SECTION
Signal to Noise Ratio > 60 dB
Channel Separation > 50 dB (1kHz)
Frequency Response 20Hz - 20 kHz
TUNER (FM)
Frequency range 87.5-108 MHz
Channel step 50 kHz
Intermediate frequency 10.7 MHz
Sensitivity 2.8 μV
Stereo separation 30 dB
Signal to noise ratio 50 dB
LINE-OUT
Output 5 V (max.)
Impedance 10k Ohm
GENERAL
Power Supply 12V DC (10.8-15.6V allowable)
Speaker impedance 4 or 8 ohm
Output power 50W x 4CH
Note: Specification and the design are subject to possible modification without notice due to improvements.
DISPOSAL OF USED ELECTRICAL AND ELECTRONIC APPLIANCES
The meaning of the symbol on the product, its accessory or packaging indicates that this
product shall not be treated as household waste. Please, dispose of this equipment at your
applicable collection point for the recycling of electrical & electronic equipments waste. In the
European Union and Other European countries which there are separate collection systems
for used electrical and electronic product. By ensuring the correct disposal of this product, you
will help prevent potentially hazardous to the environment and to human health, which could
otherwise be caused by unsuitable waste handling of this product. The recycling of materials
will help conserve natural resources. Please do not therefore dispose of your old electrical
and electronic equipment with your household waste. For more detailed information about
recycling of this product, please contact your local city offi ce, your household waste disposal
service or the shop where you purchased the product.
EN-10
UMÍSTĚNÍ SOUČÁSTÍ A OVLÁDACÍCH PRVKŮ
MODE
MUTE
914
POWER
21
8 2022 242526 5 6 7 27 13
16 1112 23 151021 173
4
(1-6)
1. ZAPNUTÍ/VYPNUTÍ NAPÁJENÍ (POWER)
2. TLAČÍTKO NABÍDKY (MENU)
3. ZVÝŠENÍ/SNÍŽENÍ HLASITOSTI (VOL UP/DOWN) PRO HLOUBKY (BASS)/VÝŠKY (TREBLE)/
VYVÁŽENÍ LEVÉHO-PRAVÉHO KANÁLU (BALANCE)/VYVÁŽENÍ PŘEDNÍHO-ZADNÍHO
KANÁLU (FADER) A VOLBA FUNKCE
4. PŘEDVOLBY (1, 2, 3, 4, 5, 6)
5. FUNKCE „AF“ (ALTERNATIVNÍ FREKVENCE)
6. FUNKCE „TA“ (DOPRAVNÍ ZPRAVODAJSTVÍ)
7. FUNKCE „PTY“ (TYP PROGRAMU)
8. TLAČÍTKO DISPLEJE (DISP)
9. TLAČÍTKO REŽIMU (MODE)
10. TLAČÍTKO PRO VOLBU VLNOVÉHO PÁSMA (BAND)
11. TLAČÍTKO AUTOMATICKÉHO NEBO MANUÁLNÍHO LADĚNÍ
(DALŠÍ FREKVENCE NEBO PŘEDCHOZÍ FREKVENCE STOPA NA DISKU CD (CD
TRACK)/VYHLEDÁVÁNÍ (SEARCH))
12. AUTOMATICKÉ LADĚNÍ/PROHLEDÁVÁNÍ PŘEDVOLEB (AS/PS)
13. „PROHLEDÁVÁNÍ“ PŘI AUTOMATICKÉM LADĚNÍ (SCAN)
14. TLAČÍTKO ZTLUMENÍ ZVUKU (MUTE)
15. OVLÁDÁNÍ EKVALIZÉRU (EQ)
16. LDC DISPLEJ
17. TLAČÍTKO PRO OTEVŘENÍ PANELU ( )
18. OTVOR PRO ZASUNUTÍ DISKU CD
19. TLAČÍTKO PRO VYSUNUTÍ DISKU CD ()
20. TLAČÍTKO PRO PŘEHRÁNÍ PRVNÍ SKLADBY NA DISKU (TOP)
21. TLAČÍTKO PŘEHRÁVÁNÍ/PAUZA (PLAY/PAUSE)
19 18
22. TLAČÍTKO PŘEHRÁVÁNÍ ZAČÁTKŮ VŠECH STOP (INTRO)
23. TLAČÍTKO OPAKOVÁNÍ (REPEAT)
24. TLAČÍTKO NÁHODNÉHO PŘEHRÁVÁNÍ (RANDOM)
25. -10 STOP DOZADU
26. +10 STOP DOPŘEDU
27. PŘEDNÍ VSTUP AUX IN
28. SLOT PRO MULTI-MEDIA (MMC)/SD KARTY
CZ-1
28
KONEKTOR ISO
Konektor RCA Line Out
(Linkový výstup) (Front - přední):
Červená (pravý) Bílá (levý)
Konektor RCA Line Out
(Linkový výstup) (Rear - zadní):
Červená (pravý) Bílá (levý)
Subwoofer: (Oranžová)
Ztlumení zvuku telefonu: (Černá)
ANTENNA
CONNECTOR
SUBWOOFER
L (WHITE)
L (WHITE)
LINE OUT (REAR)
R (RED)
LINE OUT (FRONT)
R (RED)
PŘIPOJENÍ JEDNOTKY USB
Port USB:
Pro připojení přenosného MP3 přehrávače
ZTLUMENÍ ZVUKU TELEFONU
(ČERNÁ)
KONEKTOR A
4. PAMĚŤ +12 V
5. VÝSTUP ANTÉNY VOZIDLA
7. +12 V (K ZAPALOVÁNÍ)
8. UZEMNĚNÍ
Poznámka: Konektor A č. 7 musí být připojen prostřednictvím klíče zapalování vozidla, aby v případě,
že nebudete vozidlo delší dobu používat, nedošlo k vybití akumulátoru vozidla.
KONEKTOR B
1. PRAVÝ ZADNÍ REPRODUKTOR (+)
2. PRAVÝ ZADNÍ REPRODUKTOR (-)
3. PRAVÝ PŘEDNÍ REPRODUKTOR (+)
4. PRAVÝ PŘEDNÍ REPRODUKTOR (-)
5. LEVÝ PŘEDNÍ REPRODUKTOR (+)
6. LEVÝ PŘEDNÍ REPRODUKTOR (-)
7. LEVÝ ZADNÍ REPRODUKTOR (+)
8. LEVÝ ZADNÍ REPRODUKTOR (-)
Údržba
VÝMĚNA POJISTKY
Pokud se pojistka přetaví, zkontrolujte zapojení přívodu napájení a vyměňte pojistku za novou. Pokud
se pojistka po výměně opět přetaví, může se jednat o vnitřní poruchu. V takovém případě se obraťte na
nejbližší servisní středisko.
Varování
Pro jednotlivé vodiče používejte pojistky pro specifi kovaný proud (v ampérech). Při použití pojistky s
vyšší proudovou zátěží může dojít k vážnému poškození.
ISO CONNECTOR
1357
B
2468
A
57
48
INSTALACE
BEZPEČNOSTNÍ UPOZORNĚNÍ
• Vyberte místo pro instalaci pečlivě tak, aby přístroj neomezoval normální pohyby řidiče při řízení.
• Vyvarujte se instalace přístroje do míst, kde by mohl být vystaven vysokým teplotám (přímé sluneční
světlo, horký vzduch z topení apod.), prachu, nečistotám nebo nadměrným vibracím.
• Pro bezpečnou a správnou instalaci používejte pouze dodávané montážní příslušenství.
• Před instalací přístroje vyjměte čelní panel.
POZNÁMKA: Autorádio nesmí být po montáži nakloněno o více než 30˚,
jinak se neotevře čelní panel.
Uvolněte šrouby
1
1
a držák
2
3
182mm
2
3
53mm
Pokud to bude
nutné, ohněte tyto jazýčky
Poznámka: Uvolňovací klíč si uschovejte na bezpečném místě, protože jej můžete potřebovat při
budoucí demontáži přístroje z vozidla.
CZ-2
182mm
53mm
4
UPEVNĚNÍ PŘÍSTROJE
1. PŘÍSTROJ
4
2. SKŘÍŇKA
3. PALUBNÍ DESKA
Palubní deska
3
2
10
1
4
5
6
8
Odejmutí a nasazení čelního panelu
Čelní panel tohoto přístroje lze odejmout jako opatření před odcizením přístroje.
SKLOPENÍ A ODEJMUTÍ/NASAZENÍ ČELNÍHO PANELU
Před odejmutím čelního panelu nezapomeňte nejprve stisknout tlačítko (1) pro vypnutí přístroje (OFF).
Pak stiskněte tlačítko
(17), počkejte, než se čelní panel vysune do vodorovné polohy a
povytažením směrem k sobě panel oddělte - viz obrázek.
4. ŠESTIHRANNÁ MATICE
5. PRUŽNÁ PODLOŽKA
6. PLOCHÁ PODLOŽKA
7. KAROSÉRIE VOZIDLA
8. ZADNÍ PODPĚRNÝ PÁSEK
9. ZÁVITOŘEZNÝ ŠROUB
10. ŠESTIHRANNÝ ŠROUB M5 x 15
7
4
5
6
9
<10°
2
1
Poznámky:
• Při nasazování čelního panelu jej na autorádio netlačte příliš velkou silou. Panel lze snadno nasadit
lehkým zatlačením proti přístroji.
• Pokud si čelní panel berete s sebou, vložte jej do dodávaného přepravního pouzdra.
• Při nasazování čelního panelu netlačte na jeho displej, ani jej nevystavujte jinému tlaku.
CZ-3

ZÁKLADNÍ OVLÁDÁNÍ
Zapnutí/Vypnutí přístroje (POWER) ()
1. Pro zapnutí přístroje stiskněte tlačítko . Pro vypnutí přístroje znovu stiskněte a podržte toto tlačítko.
Zobrazení hodin
1. Stiskněte tlačítko DISP - na displeji se zobrazí hodiny.
Volba zdroje (MODE)
1.Opakovaným stisknutím tlačítka MODE se můžete přepínat mezi režimy TUNER (Rádio) - CD/MP3
(Přehrávání CD/MP3) - USB DRIVE (Jednotka USB) - MEMORY CARD (Paměťová karta) – AUX
(Externí vstup).
Poznámka: Režim bude k dispozici pouze tehdy, když zařízení existuje a je připojeno.
Vkládání disku
1. Stiskněte tlačítko
2. Vložte disk do otvoru pro disk tak, aby byla strana s potiskem obrácena nahoru.
3. Uzavřete čelní panel.
Vysouvání disku
1.Stiskněte tlačítko
2. Stiskněte tlačítko EJECT pro vysunutí disku.
3. Uzavřete čelní panel.
Nastavení hlasitosti (VOL)
1. Otočením ovladače VOL doprava nebo doleva zvyšte nebo snižte hlasitost.
Ekvalizér (EQ)
Stisknutím tlačítka EQ můžete vybírat mezi režimy ekvalizéru Off (Vypnuto)/Pop (Pop)/Rock (Rock)/
Classic (Klasická hudba)/Flat (Lineární).
Ztlumení zvuku (MUTE)
Pro ztlumení zvuku stiskněte a podržte tlačítko MUTE. Pro obnovení normální hlasitosti znovu stiskněte
a podržte toto tlačítko.
pro otevření čelního panelu.
pro otevření čelního panelu.
NASTAVENÍ
Nastavení hodin
1. Stisknutím tlačítka MENU na déle než 2 sekundy otevřete režim nabídek.
2. Otočením ovladače VOL se přepněte do režimu nastavování hodin.
3. Stiskněte tlačítko MENU - začne blikat údaj udávající hodiny. Otočením ovladače VOL nastavte počet hodin.
4. Po nastavení hodin stiskněte tlačítko MENU - začne blikat údaj udávající počet minut.
5. Po nastavení minut znovu stiskněte tlačítko MENU.
6. Pro ukončení režimu nabídek stiskněte tlačítko .
Nastavení zvuku (AUDIO)
1. Stisknutím tlačítka MENU na déle než 2 sekundy otevřete režim nabídek.
2. Otočením ovladače VOL vyberte nabídku AUDIO (Zvuk) a znovu stiskněte tlačítko MENU.
• Bass (Hloubky) – pro nastavení nízkých tónů.
• Treble (Výšky) – pro nastavení vysokých tónů.
• Fader (Vyvážení předního a zadního kanálu) – pro nastavení vyvážení zvuku mezi předním a
zadním kanálem.
• Balance (Vyvážení levého a pravého kanálu) – pro nastavení vyvážení zvuku mezi levým a
pravým kanálem.
• Equalizer (Ekvalizér) – Off (Vypnuto)/Pop (Pop)/Rock (Rock)/Classic (Klasická hudba)/Flat (Lineární).
• Loudness (Fyziologická hlasitost) – pro zvýšení kvality zvuku.
• Subwoofer – pro aktivaci výstupu na subwoofer.
• Beep (Zvukový signál) - pro aktivaci/deaktivaci zvukového signálu při stisknutím tlačítek.
3. Pro ukončení jedné úrovně stiskněte tlačítko .
Nastavení displeje (DISPLAY)
1. Stisknutím tlačítka MENU na déle než 2 sekundy otevřete režim nabídek.
2. Otočením ovladače VOL vyberte režim DISPLAY (Displej) a znovu stiskněte tlačítko MENU.
• Contrast (Kontrast) – pro nastavení kontrastu displeje.
• View (Zobrazení) – zvolte mezi typem zobrazení Positive (Pozitivní)/Negative (Negativní).
3. Po výběru položky stiskněte tlačítko MENU a pomocí ovladače VOL proveďte nastavení.
4. Pro ukončení stiskněte tlačítko .
CZ-4
POSLECH RÁDIA
Tlačítko pro volbu pásma (BAND)
Stisknutím tlačítka BAND můžete cyklicky procházet možnosti FM1---FM2---FM3.
Automatické prohledávání a ukládání (AS/PS)
Při krátkém stisknutím přijímač vyhledává stanice na předvolbách. Při stisknutím delším než 1 sekunda
je pod odpovídající čísla předvolby uloženo 6 nejsilnějších stanic. Po skončení operace AS aktivuje
přijímač prohledávání předvoleb.
Co je to RDS?
RDS (Radio Data System) je digitální informační systém vyvinutý organizací EBU (European Broadcast
Union). RDS systém využívá klasické FM vysílání k přenosu různých informací a poskytuje spoustu
služeb jako např. automatické přelaďování, které mohou využívat stereo systémy vozidel s podporou
RDS. V roce 1988 začalo RDS vysílání ve Velké Británii, Francii, západním Německu, Irsku a Švédsku.
Testovací vysílání probíhá v řadě dalších evropských zemí. Očekává se, že v nejbližší budoucnosti bude
signál RDS dostupný ve většině západoevropských zemí.
Automatické vyhledávání podle typu programu RDS
1. Stiskněte tlačítko PTY.
2. Otočením ovladače VOL vyberte některý z níže uvedených typů programu a stiskněte tlačítko MENU
pro spuštění vyhledávání typu programu.
Specifi kace Typ programu Specifi kace Typ programu
Pop music Populární hudba Education Vzdělávací program
Rock music Současná moderní hudba Drama Rozhlasové hry a seriály
Easy Listening m. Odpočinková hudba Culture Národní nebo regionální kultura
Light Classical Lehká klasická hudba Science Příroda, věda a technologie
Serious Classical Vážná klasická hudba Varied Nenáročná zábava
Jazz music Jazzová hudba Weather Zprávy o počasí
Country music Country hudba Finance Finance
National music Národní hudba Children Programy pro děti
Oldies music Oblíbené starší songy Social Affairs Sociální tématika
Folk music Folková hudba Religion Náboženská tématika nebo služby
Other music Nezařazená hudba Phone In
News Zprávy Travel Programy o cestování
Current Affairs Aktuality Leisure Koníčky a rekreační aktivity
Information Všeobecné informace a rady Documentary Dokumentární programy
Sport Sport
Programy s telefonickými vstupy
posluchačů
Možnosti RDS (RDS options)
1. Stisknutím tlačítka MENU na déle než 2 sekundy a opakovaným otočením ovladače VOL zobrazte
zprávu Tuner. Stiskněte tlačítko MENU.
2. Otočením ovladače VOL vyberte nastavení RDS options (Možnosti RDS). Pro nastavení stiskněte
tlačítko MENU.
Režim AF (AF mode)
Když je režim AF zapnutý, rádio neustále kontroluje sílu signálu automaticky naladěné stanice a
pokud je její signál lepší než signál aktuální stanice, přepne na tuto stanici.
Dopravní upozornění (Traffi c alert)
SEEK – pokud nově naladěná stanice nevysílá po dobu 5 sekund signál TP, přijímač automaticky
přeladí na další stanici, která není stejnou stanicí (PI) jako naposledy naladěná stanice, ale vysílá
signál TP.
V režimu TA Seek může dojít k přeladění aktuální stanice na úplně jinou stanici, protože rádio v
případě, že právě přijímaná stanice začne mít velmi slabý signál nebo z ní přestane být přijímán
signál TP, přeladí na jinou stanici, z níž lze signál TP přijímat.
Alarm – zapněte pro příjem nouzových hlášení typu přírodních pohrom apod.
CZ-5
 Loading...