

Page 1
Verpa Senco BV
Pascallaan 88
8218 NJ Lelystad
The Netherlands
EMEA: www.senco.eu
© 2016 by Senco Brands, Inc.
Operating Instructions
(Original Instructions)
Käyttöohjeet
(Alkuperäisten Ohjeiden Käännös)
Bruksvisning
(Översättning av de Ursprungliga Undervisningarna)
Mode d’Emploi
(Traduction des Instructions Originales)
S45CNR
Roofing Coilnailer
VPRC01M • 2/2/2016
Page 2

English 3
Deutsch 19
Nederlands 35
Suomi 13
Norsk
Svenska 23
Dansk 83
Français 33
Español 115
Italiano
Polskie 131
GB
D
NL
F
FIN
N
S
DK
E
I
PL
2
Page 3
English
Suomi
Svensk
IMPORTANT
TÄRKEÄÄ
VIKTIGT
Please make certain that the
person who is to use this
equipment
carefully reads and
understands these instructions
before starting operations.
Varmista, että tätä naulainta
käyttävä henkilö lukee tarkasti
ja ymmärtää nämä ohjeet
ennen käytön aloittamista.
Personen som ska använda
verktyget bör noga läsa
igenom
dessa instruktioner och förstå
dem innan arbetet påbörjas.
Français
IMPORTANT
Veuillez vous assurer que la
personne qui utilise
l'équipement
lit attentivement et comprend
les présentes instructions avant
toute utilisation.
TÄRKEÄÄ
VIKTIGT
IMPORTANT SAFETY INSTRUCTIONS
WARNING: When using pneumatic tools, basic safety precautions should always be followed to
reduce the risk of personal injury, including the following:
READ AND FOLLOW ALL INSTRUCTIONS.
1.KEEP WORKING AREA CLEAN. Cluttered areas invite injuries.
2.DON'T ALLOW CHILDREN AT THE WORKING AREA. Don't let them
handle the tool.
3.USE SAFETY GLASSES. To prevent eye injuries, the tool operator
and all persons in the working area must wear safety glasses with
permanently attached, rigid, plastic side shields. These safety
glasses must conform to ANSI Z87.1 requirements (approved
glasses have“Z87”printed or stamped on them) dessus)
4.USE EAR PROTECTION. The working area may be exposed to high
noise levels that can lead to hearing damage
5.DRESS SAFELY. Protective gloves and non-skid footwear or safety
shoes are recommended when working with and operating this tool.
Don't wear loose clothing or jewellery. They can get caught in
moving parts. Also, wear a protective hair covering to prevent long
hair from getting caught in the tool.
6.ONLY USE CLEAN, DRY AND REGULATED compressed air at 4.8 to
8.3 bar
7.NEVER USE OXYGEN, CARBON DIOXIDE, combustible gases or any
other bottled gas as a power source for this tool
8. DO NOT CONNECT TOOL to pressure that potentially exceeds
9,13 bar.
9. ONLY USE AIR HOSE THAT IS RATED for 150% of the maximum
system pressure. Please try to use a hose of ID 3/8”connecting
nailer with compressor.compresseur.
10.DON'T OPERATE TOOL NEAR ANY COMBUSTIBLE, or any other
easy explosive material and don't operate the tool under easy
producing corrosion, rust and having heavy powder
GB
3
Page 4
11. DISCONNECT TOOL FROM AIR SUPPLY HOSE before doing tool
maintenance, clearing a jammed fastener, leaving work area,
moving tool to another location, or handing the tool
to another person.
12.ONLY DISCONNECT QUICK CONNECTOR with the body tail
portion of the air inlet, no compressed air can be guaranteed when
disconnecting. If operating is not correct, the tool can remain
charged with air after being disconnected and still be able to drive a
fastener causing personal injury.
13.REPLACE PARTS AND ACCESSORIES. Only use same replacement
parts while servicing. Approved accessories and replacement parts
are available
14. BEFORE USING TOOL, carefully check if there is any part
damaged to obtain ideal results. Do not use the tool if the tool has
any air leaks, uncompleted, damaged parts or needs repairing.
15. NEVER USE TOOL if safety, trigger or spring is inoperable,
missing or damaged. Do not alter or remove safety, trigger or
springs. Make daily inspections for free movement of trigger
repairing.
16. ONLY USE PARTS AND FASTENERS, recommended by the seller.
17. CONNECT TOOL TO AIR SUPPLY BEFORE loading fasteners to
prevent a fastener from being fired during connection. The tool
driving mechanism may cycle when tool is connected to the air
supply. When not in use remove all fasteners from the nail housing.
18. ALWAYS ASSUME THE TOOL CONTAINS FASTENERS. Keep the
tool pointed away from yourself and others at all times. No
horseplay. Respect the tool as a working implement.
19. DO NOT LOAD FASTENERS with trigger or safety depressed to
prevent unintentional firing of a fastener.
20. REMOVE FINGER FROM TRIGGER when not driving fasteners.
Never carry tool with finger on trigger: tool will fire a fastener if
safety is bumped while trigger is depressed.
21. DO NOT USE ON SCAFFOLDINGS, LADDERS Tools equipped with
“contact actuation
” shall not be used:
-
if a change of driving locations is affected via stairs, ladders or
scaffolding.
–
for closing boxes or crates.
– for fitting transportation safety systems.
22.FIRE FASTENERS INTO WORK SURFACE ONLY: NEVER into
materials too hard to penetrate
23. GRIP TOOL FIRMLY TO MAINTAIN CONTROL while allowing tool
to recoil away from work surface as fastener is driven. If safety
bracket is allowed to contact work surface again before trigger is
released, an unwanted fastener will be fired.
GB
4
Page 5
24.DO NOT DRIVE FASTENERS on top of other fasteners, or with the
tool at too steep an angle: the fasteners can ricochet causing
personal injury.
25.DO NOT DRIVE FASTENERS CLOSE to the edge of the work piece.
The work piece is likely to split allowing the fastener to fly free or
ricochet causing personal injury.
26.KEEP ALERT. Watch what you are doing. Use common sense. Do
not operate any tool when you are tired.
27.KEEP HANDS AND BODY PARTS away from area shown in Fig. 13,
to avoid injury.
supply and rotate the knob of the adjuster by hand until it is
satisfactory.
29.WHEN NOT IN USE, tool should be cleaned and put it back into
the packing box. For safety, keep out of reach of children.
EMPLOYER’S RESPONSIBILITIES
Employer must enforce compliance with the safety warnings and all other instructions contained in
this manual.
Keep this manual available for use by all people assigned to use this tool. For personal safety and
proper operation of this tool, read and follow a of these instructions carefully.
FASTENERS SPECIFICATIONS
Min.
φ0.39˝
(φ10mm)
( φ3.1mm)
φ0.12˝
0.31˝
(8mm)
15o-16
o
Max.
φ0.39˝
(φ10mm)
15o-16
o
( φ3.1mm)
φ0.12˝
0.31˝
(8mm)
7/8" (22mm)
28.THIS TOOL IS EQUIPPED WITH ADJUSTER that can adjust driving
depth. When adjusting the driving depth, first disconnect from air
GB
5
Page 6

TECHNICAL PARAMETER
Characteristic
Value
Compressed Air pressure
4.8-8.3 bar
Outline Dimension (L×H×W)
300 × 310 × 110 mm
Nail Length Range
22-45 mm
Tool Weight
2.75Kg
Air Inlet
1/4"NPT
Air Consumption
68 l/min at 5.52 bar
PACKING LIST
Description
Q'ty
S45CNR coilnailer
1
S5 Hex Key
1
S4 Hex Key
1
S3 Hex Key
1
Air Tool Oil
1
Operating instruction
1
NOISE INFORMATION
These noise characteristic values are in accordance with EN 12549:1999
LpA, 1s, d=84dB
LwA, 1s, d=97dB
These values are tool-related characteristic values and do not represent noise developed at the
point of use. Workplace design can also serve to reduce noise levels, for example placing work
piece on sound-damping supports.
VIBRATION INFORMATION
These values are in accordance with ISO 8662-11:1999
Vibration characteristic value ( m/s2 ) = 8,22
This value is a tool-related characteristic value and does not represent the influence to the
hand-arm-system when using the tool.
Safety glasses
1
GB
6
Page 7

OPERATING INSTRUCTIONS
FOREWORD
S45CNR is a heavy duty, coil fed, pneumatic nailer using compressed air as a power source. It is
designed to install 22-45mm or 3,1mm diameter nails of various lengths. It is widely used for
connection of roofing frame and connection of roofing frame and felt.
POWER SOURCE
This tool is designed to operate on clean, dry, compressed air at regulated pressures 4.8 and 8.3
bar. The preferred system would include a filter, a pressure regulator, and automatic oiler
located as close to the tool as possible (within15 feet is ideal).
All compressed air contains moisture and other contaminates that are detrimental to internal
components of the tool. An air-line filter will remove most of these contaminates and
significantly prolong the life of the tool. If an in-line oiler is not available: place five or six drops
of tool oil into the tool’s air inlet at the beginning of each workday.
Only disconnect the quick connector with the body tail portion of the air inlet. No compressed air
can be guaranteed when disconnecting. If operation is not correct, the tool can remain charged
with air after being disconnected and still be able to drive a fastener causing personal injury.
CAUTION: All line components (hoses, connectors, filters, regulators, etc.) must meet
150% of the maximum system pressure. Please try to use a hose of ID 9,5mm
connecting the nailer with compressor when disconnecting.
Do not connect this tool to a system with maximum potential. Only disconnect quick connector
being connected with the connector of the body tail portion air inlet, no compressed air can be
guaranteed when disconnecting.
Disconnect tool from air supply before performing maintenance, c
learing a jammed fastener,
leaving work area, moving tool to another location, or handing the tool to another person.
GB
7
Page 8
PREPARING THE TOOL BEFORE DRIVING
After reading and understanding this entire manual, connect tool to air supply.
CAUTION: Keep tool pointed away from yourself and others at all times.
Always connect tool to air supply before loading fasteners. Do not load fasteners with
trigger or safety depressed. Always wear approved safety glasses, and hearing
protection when preparing or operating the tool. Never use a tool that leaks air or needs
repair.
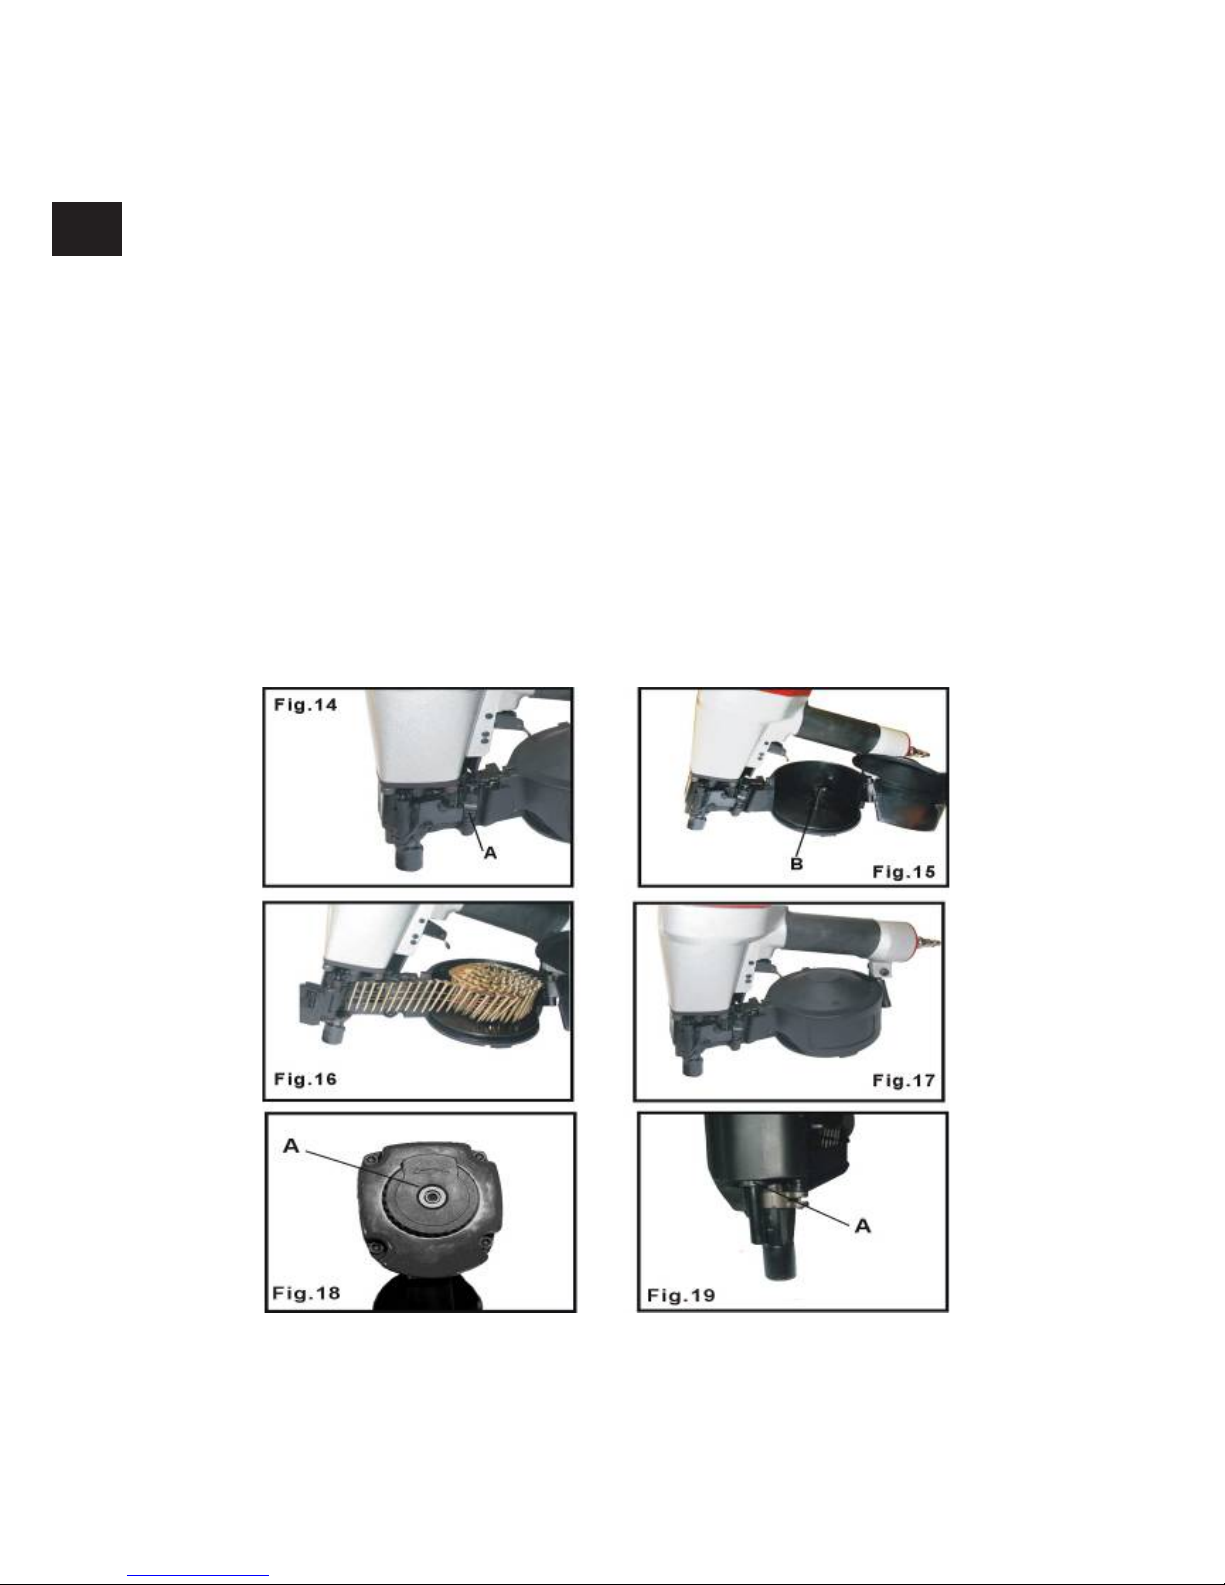
Depress Handle (See A Fig. 14) and open the Latch. Rotate the Upper Nail Housing to the side of
the Body.
The Adjuster Plate can be moved up and down when twisting the Adjuster Nut (see B Fig.15) .
According to the length of nail, the Adjuster Plate should be adjusted correctly to the position
indicated inside Lower Nail Housing.
Place a coil of nails over the Lower Nail Housing. Uncoil enough nails to reach the Feed Hook and
place the second nail between the teeth on the Feed Hook. (see Fig. 16).
Close the Upper Nail Housing and depress the Latch (see Fig. 17).
Adjust directional EXHAUST deflector (see Fig. 18), so that the exhaust air blast will be directed
away from the operator. Grasp the deflector and rotate it to the desired position for the current
application.
GB
8
Page 9
USING THE TOOL
Complete all steps of PREPARING THE TOOL before using the tool.
Trigger firing: Put the nose on the working surface, lightly push the tool toward the working
surface until the safety element is depressed, then, depress the trigger to drive the fasteners. This
‘trigger fire’ method provides the most accurate fastener placement. In this method, the safety
element can be adjust downwards with knob to avoid striking two nails at one time.
Manufacturer assumes no responsibility for any injuries and loss caused by any improper use of
this tool.
CAUTION: Remove finger from trigger when not driving fasteners. Never carry tool with
finger on trigger: tool will fire a fastener if safety is bumped. Keep tool pointed in a safe
direction at all times.
Never attempt to drive a fastener into material that is too hard, or at too steep an angle, or near
the edge of the work piece. The fastener can ricochet causing personal injury.
Disconnect tool from air supply before performing maintenance, clearing a jammed fastener,
leaving working area, moving tool to another location, or handing the tool to another person. Clean
and inspect tool daily. Carefully check for proper operation of trigger and safety mechanism.
Stands for mounting the fastener driving tools shall be safely designed. Do not disassemble or
modify parts such as the safety yoke.
Do not use the tool unless both the trigger and the safety mechanism are functional, or if the tool
is leaking air or needs any other repair.
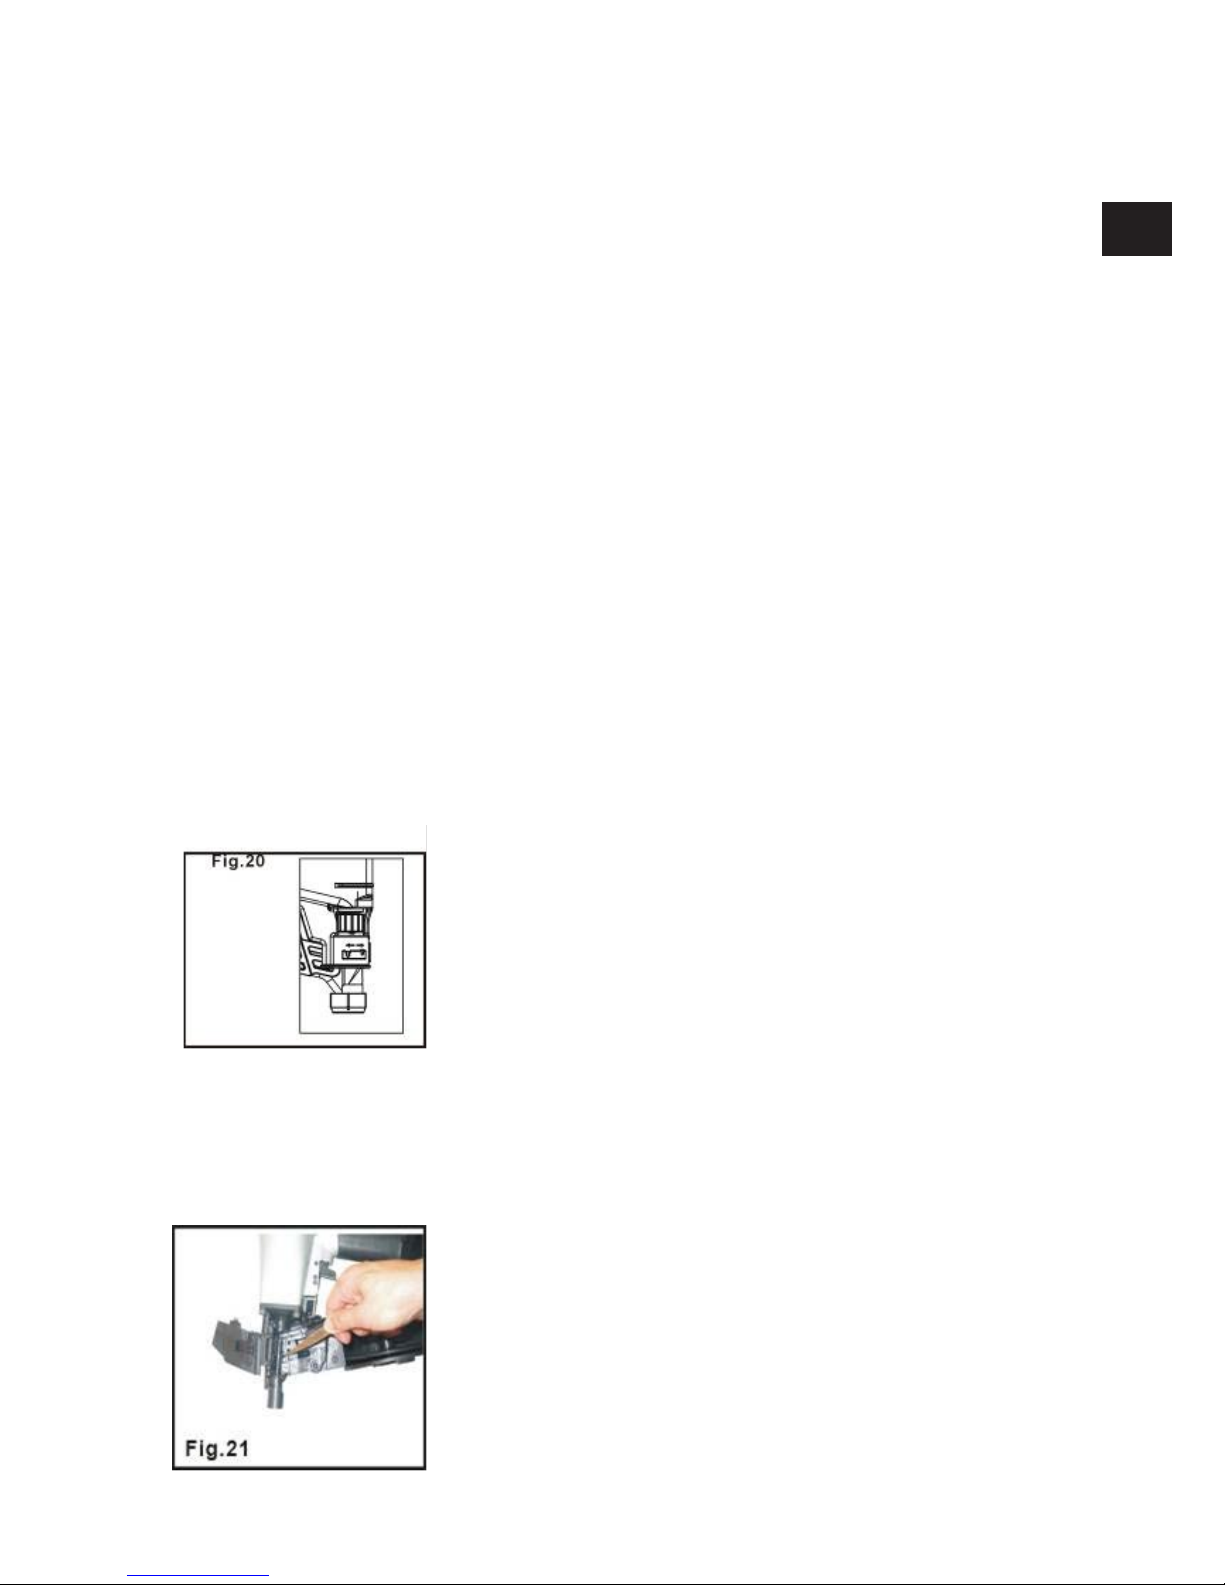
3. Driving depth will be increased or decreased by rotating the depth of drive knob or adjuster (A)
fig. 19. Test fire a fastener and check depth. If the nail is driven too deep, rotate the adjuster
clockwise to make the safety element push downward. Whereas, rotate the adjuster counter
clockwise to make the safety element push upward. Repeat this step to achieve desired results
(See Fig. 20).
CLEARING A JAMMED FASTENER
1.CAUTION: Disconnect tool from air supply .
2.Open latch, rotate lower housing and remove the nails of the lower housing.
3.Use a slender, soft steel rod to drive the drive blade to its uppermost position. Use needle nose
pliers to remove the jammed fastener (see Fig.21).
4.Follow instructions in PREPARING THE TOOL BEFORE DRIVING to reload fasteners.
GB
9
Page 10

MAINTENANCE
CLEAN AND INSPECT DAILY
CAUTION: Disconnect tool from air supply before cleaning and
inspection. Correct all problems before operating.
Check the filter of the compressor weekly and switch off manual valve to drain water and
contaminations out.
Do not soak tool with cleaning solutions. Such solutions can damage internal parts. The exposed
portion of the small piston rod and feed hook must be kept clean.
Inspect trigger and safety mechanism to assure system is complete and functional: no loose or
missing parts, no binding or sticking parts shall be found.
Keep all screws tight. Loose screws can cause personal injury or damage tool.
Check if there are worn and damaged parts. If any, please replace immediately.
If tool is used without an in-line oiler: place 5 or 6 drops of air tool oil into the air inlet of the tool
at the beginning of each workday.
SERVICE AND REPAIRS
All quality tool eventually require servicing of replacement parts due to wear from normal use.
Some user serviceable components are described in the TROUBLESHOOTING section. All repairs
made by local agencies are fully guaranteed against defective material and workmanship. We
cannot guarantee repairs made or attempted by anyone other than these agencies.
Should you have any questions about your tool, please contact your seller at any time. In any
communications, please give all information shown on the nameplate of your tool (model number,
type, serial number, etc.)
TROUBLESHOOTING
CAUTION: Disconnect tool from air supply before performing any Service Procedure.
PROBLEM
CAUSE
SOLUTION
Air leaking at trigger area
1. O-ring in trigger valve stem
is worn and damaged.
2. O-ring in trigger valve head
is worn and damaged.
3. Having foreign matters.
1.Check/replace O-
ring/lubricate.
2.Check/replace Oring/lubricate
3.Clean the tool/lubricate
Air leaking at the lower body
portion and nose
1.Screw is loose at connecting
portion of the nose and body.
2.O-ring is damaged between
body and nose.
3.Bumper is damaged.
4.Having foreign matters at
the contacting portion of the
bumper and body.
1. Tighten screw/recheck
2. Check/replace Oring/lubricate
3. Replace the bumper.
4. Disassemble and clean
Air leaking at the body
portion and cylinder cap
1.Screw is loose at the
connecting portion of the
cylinder and body.
2.Gasket is damaged.
1. Tighten the screw and
recheck.
2. Replace the gasket.
Failure to start tool.
1.Tool dry, lacks lubrication.
2.The spring in the cylinder
cap is damaged.
1. Use pneumatic tool oil
2.Replace the spring in the
cylinder cap.
Blade driving fasteners
too deeply
1.Safety element poison is not
correct.
2.Air pressure is too high.
1.Rotate knob of the adjuster
to move safety element down.
2.Decrease air pressure.
Skipping
fasteners/feeding
intermittently
1.Having foreign matters
between the small piston and
small cylinder.
2.O-ring on the small piston is
worn and damaged.
1.Disassemble/ clean/lubricate.
2.Check/replace O-ring /
lubricate
GB
10
Page 11

3.Tool dry and lacks
lubrication.
4.The spring on the small
piston is damaged.
5.Air pressure is low.
6.Connecting screw of nose
and body is loose.
7.Stopped hook can't stop the
fasteners.
8.Bent fasteners.
9.Wrong size fasteners.
10.Small piston bumper is
worn and damaged.
11.Feed hook is binding.
12.Nail length is not correct
with loading space of nail
housing.
13.Weld wires in nail coil are
broken.
3.Use pneumatic tool oil.
4.Replace small piston spring.
5.Increase the air pressure,
but don't exceed 8.3 bar.
6.Tighten all screws.
7.Replace taper spring of the
stopped hook.
8.Use recommended fasteners.
9.Use recommended fasteners
10.Replace bumper and
lubricate small piston.
11.Clean feed hook and torsion
spring.
12.Adjust adjuster plate at the
nail housing tail portion
according to the recommended
nail length to make arrow on
the nail housing tail point to
correct direction.
13.Stop using.
Runs slowly or has power loss
1. Tool dry, lacks lubrication
2. The spring in the cylinder
cap is damaged.
3.Having foreign matters
between piston assembly and
cylinder.
4.Have not assembled the
cylinder to home position.
5.O-ring on the valve is dry
after disassembly.
6.Air pressure is too low.
7.Driver is worn (sort)
8.Inner diameter of used hose
is small
1.Use pneumatic tool oil.
2.Replace the spring in the
cylinder cap.
3.Disassemble/clean/lubricate.
4.Reassemble after
disassembling.
5.Reassemble after lubricating
6.Increase the air pressure,
but don't exceed 8.3 bar.
7.Replace piston assembly.
8.Use bigger inner diameter of
the hose.
Fasteners are jammed
1.Fasteners are wrong size.
2.Weld wires in nail coil are
broken.
1.Use recommended fasteners.
2.Stop using.
GB
11
Page 12

12
Page 13
TÄRKEITÄ TURVALLISUUSTIETOJA
VAROITUS: Pneumaattisia työkaluja käytettäessä tulee aina noudattaa perusturvatoimia
henkilövahinkojen riskin vähentämiseksi. Näihin lukeutuvat seuraavat:
LUE KAIKKI OHJEET JA NOUDATA NIITÄ.
Tämä työkalu on suunniteltu tiettyihin toimiin. Suosittelemme tiukasti, että tätä työkalua EI
muunnella ja/tai käytetä mihinkään muuhun toimeen kuin mihin se on suunniteltu. Jos sinulla on
mitään kysymyksiä liittyen työkalun käyttöön, ota yhteys myyjääsi.
1. PIDÄ TYÖALUE PUHTAANA. Epäsiistit alueet aiheuttavat vammoja.
2. ÄLÄ PÄÄSTÄ LAPSIA TYÖALUEELLE.
Älä anna lasten käsitellä
yökalua.
3. ÄYTÄ SUOJALASEJA. Silmävahinkojen
välttämiseksi työkalun käyttäjän ja kaikkien työalueella
olevien henkilöiden tulee käyttää turvalaseja, joissa on
pysyvät, jäykät, muoviset sivusuojat. Näiden turvalasien tulee
noudattaa standardin ANSI Z87.1 vaatimuksia (hyväksytyissä
laseissa on merkintä Z87 tulosteena tai leimana).
4. KÄYTÄ KUULOSUOJAIMIA. Työalue voi altistua korkeille
äänitasoille, jotka voivat johtaa kuulon vahingoittumiseen.
5. PUKEUDU TURVALLISESTI. Suojahansikkaita ja liukumattomia
kenkiä tai turvajalkineita suositellaan käytettävän tätä työkalua
käytettäessä. Älä käytä löysiä vaatteita tai koruja. Ne voivat tarttua
liikkuviin osiin. Käytä myös suojaavaa hiuspeitettä, jotta pitkät
hiukset eivät jää kiinni työkaluun.
6. KÄYTÄ VAIN PUHDASTA, KUIVAA JA SÄÄNNELTYÄ
paineilmaa 4,8‐8,3 baarin
7. ÄLÄ KOSKAAN KÄYTÄ HAPPEA TAI HIILI
‐
DIOKSIDIA, räjähtäviä kaasuja tai muita pullotettuja kaasuja tämän
työkalun voimanlähteenä.
8. ÄLÄ LIITÄ TYÖKALUA paineistukseen, joka saattaa ylittää arvon
12.3
BAR.
9. KÄYTÄ VAIN ILMALETKUA, JOKA ON MÄÄRITELTY 150 %
järjestelmän enimmäispaineesta. Pyri käyttämään letkua, jonka Ø on
3/8” liitettäessä naulain kompressoriin.
10. ÄLÄ KÄYTÄ TYÖKALUA MINKÄÄN RÄJÄHTÄVÄN AINEEN
LÄHEISYYDESSÄ tai minkään helposti räjähtävän materiaalin
yhteydessä, äläkä käytä työkalua olosuhteissa, jotka tuottavat
helposti korroosiota, ruostetta tai erittäin pölyisessä ympäristössä.
11. IRROTA TYÖKALU ILMA‐LETKUSTA ennen sen huoltamista,
jumittuneen naulan poistamista, työalueelta lähtiessäsi, työkalua
siirrettäessä tai kun ojennat työkalun toiselle henkilölle.
FIN
13
Page 14
12. IRROTA PIKALIITIN
niin, että irrottamisen yhteydessä työkaluun
ei jää paineilmaa. Jos irrottamista ei tehdä oikein,
työkalussa voi yhä olla ilmaa sen jälkeen, kun se on irrotettu, jolloin
se pystyy yhä toimimaan ja saattaa aiheuttaa henkilövahingon.
13. KÄYTÄ VAIN alkuperäisiä varaosia ja
kiinnittimiä.
14. ENNEN TYÖKALUN KÄYT TÖÄ, tarkista varovaisesti, että mikään
osa ei ole vahingoittunut parhaan tuloksen aikaan saamiseksi. Älä
käytä työkalua,
jos siinä on ilmavuotoja, keskeneräisiä tai
vahingoittuneita osia tai jos se vaatii huoltoa.
15. ÄLÄ KOSKAAN KÄYTÄ TYÖKALUA,
jos osia puuttuu tai ne ovat
vaurioituneita. Tarkista varmistimen liikkuvuus päivittäin
siltä varalta,
että se kaipaa huoltoa
16. KÄYTÄ VAIN OSIA JA
KIINNITTIMIÄ,
joita myyjä suosittelee.
17. LIITÄ TYÖKALU ILMANLÄHTEESEEN ENNEN, kiinnittimien
lataamista, jotta työkalu ei voi laueta ennen liitäntää. Kun työkalua
ei käytetä, poista kaikki kiinnittimet.
18. OLETA AINA, ETTÄ TYÖKALUSSA
ON KIINNITTIMIÄ. Pidä
työkalua niin, että se osoittaa poispäin sinusta ja muista
kaikkina aikoina. Älä leiki työkalulla. Kunnioita sitä työkaluna
19. ÄLÄ LATAA KIINNITTIMIÄ,
jos liipaisin on painettuna
tahattoman kiinnittimen laukaisun estämiseksi
20. POISTA SORMESI LIIPAISIMELTA,
kun et laukaise kiinnittimiä.
Älä koskaan kanna työkalua niin, että sormesi on
liipaisimella; työkalu ampuu naulan, jos
varmistimeen osuu isku
liipaisimen ollessa painettuna
21. ÄLÄ KÄYTÄ telineillä, tikkailla Työkalut varustettu "contact
toiminta" ei saa käyttää:
- Jos muutos ajo paikoissa vaikuttaa portaita, tikkaita tai telineitä.
- Sulkemiseen laatikkojen.
- For kuljetuksen turvajärjestelmien kiinnittämiseen.
22. LAUKAISE KIINNITTIMIÄ VAIN TYÖPINTAAN: EI KOSKAAN
materiaaliin, joka on liian kovaa
23. PIDÄ TYÖKALUSTA HYVIN KIINNI JA SÄILYTÄHALLINTA
samalla,
kun kiinnittimen laukaisua seuraa rekyyli
24. ÄLÄ LAUKAISE KIINNITTIMIÄ, toisten kiinnittimien päälle tai niin,
että työkalun kulma on liian suuri. Kiinnittimet voivat kimmota ja
aiheuttaa henkilö‐ vahingon
25. ÄLÄ LAUKAISE KIINNITTIMIÄ, työstettävän kappaleen reunan
lähellä. Kappale saattaa haljeta, mikä saa kiinnittimet irtoamaan tai
kimpoamaan, aiheuttaen henkilövahingon.
FIN
14
Page 15

26. OLE TARKKAAVAINEN. Pidä silmällä tekemisiäsi. Käytä
maalaisjärkeä. Älä käytä työkalua väsyneenä.
27. PIDÄ KÄDET JA KEHON OSAT
kuvassa 13 näytetyn alueen ulkopuolella
28. TÄMÄ TYÖKALU ON VARUSTETTU SYVYYDENSÄÄDÖLLÄ,
jolla voi säätää iskunsyvyyttä. Syvyyttä säädettäessä irrota ensin
ilmanlähde ja käännä syvyydensäädön nuppia kunnes syvyys on
haluttu.
29. KUN TYÖKALU EI OLE KÄYTÖSSÄ, työkalu tulee puhdistaa ja
asettaa säilytyslaatikkoon. Turvasyistä säilytä lasten
ulottumattomissa.
TYÖANTAJA
N VASTUUT
Ty
önantajan tulee ylläpitä ä
tur v
allisuusvaroitusten ja mu iden
täm
än oppaan ohjeiden
nouda
tt
amist a . Pidä
täm
ä op a s k a i kkien
tät
ä
työk
alu a
käyttävie
n ulottuvissa .
Tu
rv
allisuuden ja
työk
alun oi kean
käyt
ön varmista
misek
s i,
lue
tark
asti ja noudata
näitä ohjeita.
KIINNIT T IMIEN MÄÄRITYKSET
Käytä vain suositeltuja kiinnittimiä:
Min.
φ0.39˝
(φ10mm)
( φ3.1mm)
φ0.12˝
0.31˝
(8mm)
15o-16
o
Max.
φ0.39˝
(φ10mm)
15o-16
o
( φ3.1mm)
φ0.12˝
0.31˝
(8mm)
7/8" (22mm)
FIN
15
Page 16

TEKNISETTIEDOT
Ominaispiirre
Arvo
Paineilman paine
4.8-8.3 bar
Koko (PxKxL)
300 × 310 × 110 mm
Naulan pituusalue
22-45 mm
Työkalun paino
2.75Kg
Ilman sisäänotto
1/4"NPT
Ilman käyttö
68 l/min at 5.52 bar
PAKKAUSLISTA
KUVAUS
Määrä
S45CNR naulain
1
S5 kuusioavain
1
S4 kuusioavain
1
S3 kuusioavain
1
Voiteluöljy
1
Käyttöohjeet
1
MELUTIEDOT
Nämä kohinaa arvot ovat standardin EN 12549:1999
LpA, 1s, d = 84dB
LwA, 1s, d = 97dB
Nämä arvot ovat työkaluja liittyviä arvoja eivätkä edusta melua kehitetty pisteen käyttöä.
Työpaikka suunnittelu voi myös vähentää melua, esimerkiksi asettamalla työn pala
äänenvaimennusmassaa tukee.
TIETOA TÄRINÄSTÄ
Nämä arvot ovat standardin ISO 8662-11:1999
Tärinä ominaisarvo (m/s2) = 8,22
Tämä arvo on työkalu-liittyvä arvo ei edusta vaikutusvaltaansa käsi-käsivarsijärjestelmää käytettäessä työkalua.
Tur valasit
1
FIN
16
Page 17

KÄYTTÖOHJEET
JOHDANTO
S45CNR on vaativaan harrastekäyttöön tarkoitettu pneumaattinen rullanaulain, joka
käyttää paineilmaa. Sitä käytetään paljon ulkoverhousten ja vastaavien kiinnittämiseen. Työkalun
runkomateriaalina käytetään magnesiumseosta.
VOIMANLÄHDE
Työkalu on suunniteltu käytettäväksi puhtaalla, kuivalla paineilmalla painealueiden
4,8 ‐ 8,3 bar välillä. Suositeltava järjestelmä käsittää suodattimen (C) kuva 2,
painesäätimen (A) kuva 2 ja automaattisen öljyäjän (B) kuva 2, joka sijaitsee niin
lähellä työkalua kuin mahdollista (n. 6 m päässä on paras).
Kaikki paineilma sisältää kosteutta ja muita materiaaleja, jotka vahingoittavat työkalun
sisäosia. Ilmaletkun suodatin poistaa näistä suurimman osan ja kasvattaa työkalun käyttöikää
huomattavasti. Jos öljyäjää ei ole saatavissa: lisää 5‐6 tippaa työkaluöljyä työkalun ilmanottoon
jokaisen työpäivän alussa. Irrota letkun pikaliitin rungon nipasta.
VAROITUS: Kaikkien linjan osien (letkut, liittimet, suodattimet, säätimet jne.) tulee
kestää 150 % järjestelmän enimmäispaineesta. Pyri käyttämään letkua kooltaan Ø 3/8”
liitettäessä naulain kompressoriin.
Irrota työkalu ilmanlähteestä ennen huoltoa, jumittuneen kiinnittimen irrottamista, työalueelta
poistumista, työk
alun siirtämistä.
FIN
17
Page 18

Liitä työkalu ilmanlähteeseen, kun olet lukenut ja ymmärtänyt koko käyttöohjeen.
VAROITUS: Osoita työkalu aina poispäin itsestäsi ja muista.
Liitä työkalu aina ilmanlähteeseen ennen kiinnittimen lataamista. Älä lataa kiinnittimiä
liipaisimen tai varmistimen ollessa painettuna. Käytä aina hyväksyttyjä turvalaseja ja
kuulo‐
suojaimia työkalua valmistellessa tai käytettäessä. Älä koskaan käytä työkalua,
joka vuotaa ilmaa tai vaatii huoltoa.
Paina lukitusvipua (katso A kuva 14) ja avaa luukku. Käännä makasiinin kansi rungon sivulle.
Pohjalevyä voidaan siirtää ylös ja alas säädinnupin avulla (katso B kuva 15). Naulan pituudesta
riippuen levy voidaan säätää oikeaan asentoon, joka on merkitty alemman naulakennon
sisäpuolelle.
Aseta naulat makasiinin pohjalle. Aseta rullanpää syöttäjän hampaisiin
(katso kuva 16).
Sulje makasiinin kansi ja paina luukku kiinni (katso kuva 17).
Käännä säädettävää POISTOILMAN ohjainta (katso kuva 18) niin, että ilmavirta on poispäin
käyttäjästä.
FIN
18
Page 19

TYÖKALUN KÄYT TÖ
Suorita kaikki kohdan TYÖKALUN VALMISTELU toimet ennen työkalun käyttöä.
Laukaisu: Aseta varmistin kappaletta vasten ja paina sitten liipaisinta.
Valmistaja ei ota vastuuta vammoista tai menetyksistä, jotka johtuvat työkalun väärästä käytöstä.
VAROITUS:
Poista sormi laukaisimelta, kun et käytä työkalua. Älä koskaan kanna työkalua
niin, että sormesi on liipaisimella. Se laukaisee kiinnittimen, jos varmistimeen osuu
isku.Osoita työkalu aina turvalliseen suuntaan.
Älä koskaan laukaise kiinnitintä liian kovaan pintaan tai
liian tiukassa kulmassa tai lähelle
työkappaleen reunaa. Kiinnittimet voivat kimmota ja aiheuttaa henkilövahingon.
Telineet asennus
Naulaimet on turvallisesti suunniteltu. Älä pura tai muokkaa osia kuten turvallisuus ikeestä.
Irrota työkalu ilmanlähteestä ennen puhdistamista,
jumittuneen kiinnittimen poistamista,
työalueelta poistumista, työkalun siirtämistä tai kun ojennat työkalun toiselle henkilölle. Puhdista ja
tarkista työkalu päivittäin. Tarkista laukaisimen ja turvamekanismin toiminta varovaisesti. Älä käytä
työkalua, elleivät sekä laukaisin että turvamekanismi toimi oikein tai jos työkalu vuotaa ilmaa tai
vaatii muuta huoltoa.
Iskusyvyys kasvaa tai vähenee säätönuppia kääntämällä (A), kuva 19. Testaa ja tarkista syvyys.
Jos naula on liian syvällä, käännä säädintä myötäpäivään työntääksesi varmistinta alaspäin.
Säätimen kääntäminen vastapäi
vään työntää varmistinta ylöspäin. Toista, kunnes lopputulos on
haluttu (katso kuva 20).
JUMIT
T UNEEN
KIINNIT
T IMEN
POIST A MINEN
1. VAROITUS: Irrota työkalu ilmanlähteestä.
2. Avaa salpa ja poista tukos.
3. Noudata kohdan
TYÖKALUN VALMISTELU ohjeita ladataksesi kiinnittimet uudelleen.
FIN
19
Page 20

YLLÄPITO
PUHDISTA JA TARKISTA PÄIVITTÄIN
VAROITUS: Irrota työkalu ilmanlähteestä ennen puhdistamista ja tarkistamista. Korjaa
kaikki ongelmat ennen käyttöä.
Tarkista kompressorin suodatin viikoittain ja poista kondenssiovesi säiliöstä. Älä liota työkalua
puhdistusaineissa. Ne voivat vahingoittaa sisäosia.
Tarkista laukaisin‐ ja turvamekanismit sen varmistamiseksi, että järjestelmä on kokonainen ja
käyttökunnossa: ei irtonaisia tai puuttuvia osia, eikä jumissa olevia tai juuttuvia osia.
Varmista, että kaikki ruuvit ovat tiukassa. Löysät ruuvit voivat aiheuttaa
henkilövahingon tai vahingoittaa työkalua.
Tarkista kuluneiden tai vaurioituneiden osien varalta. Vaihda tarvittaessa heti. Jos työkalua
käytetään ilman linjaöljyäjää: lisää 5‐6 tippaa työkaluöljyä työkalun
ilmanottoon jokaisen työpäivän alussa.
HUOLTO JA YLLÄPITO
Kaikki laatutyökalut vaativat vaihto‐osien huoltoa normaalin käytön aiheuttaman
kulumisen takia. Jotkin käyttäjän huollettavissa olevat osat on kuvattu kohdassa.
ONGELMANRATKAISU. Kaikki paikallisten edustajien tekemät korjaustoimenpiteet
on taattu kokonaisuudessaan viallisten materiaalien ja työn laadun varalta. Emme
voi taata korjaustoimia, jotka on tehnyt kukaan muu kuin nämä edustajat
Jos sinulla on kysyttävää työkalustasi, ota yhteys myyjääsi milloin vain. Anna työkalusi
tyyppikilvessä olevat tiedot (mallinumero, tyyppi, sarjanumero jne.) aina, kun
otat yhteyttä.
ONGELMANRATKAISU
VAROITUS: Irrota työkalu ilmanlähteestä ennen huoltotoimenpiteiden suorittamista
ONGELMA
SYY
RATKAISU
Liipaisin vuotaa.
1. Liipaisinventtiilin O‐rengas
kulunut ja vahingoittunut.
2. Liipaisinventtiilin pään
O‐rengas kulunut ja
vahingoittunut.
3. Laitteessa on
epäpuhtauksia.
1. Tarkista/vaihda
O‐rengas/voitele.
2. Tarkista/vaihda
O‐rengas/voitele.
3. Puhdista/voitele työkalu.
Työkalun rungon alaosasta
vuotaa ilmaa.
1. Rungon ja suuttimen
yhdistävän osan
ruuvi on irti.
2. Rungon ja suukappaleen
välinen O‐rengas on
vioittunut.
3. Männän pysäytin on
vioittunut.
4. Männän pysäyttimen ja
rungon yhdistävässä osassa
on epäpuhtauksia.
1. Tiukenna ruuvi ja tarkista
uudelleen.
2. Tarkista/vaihda
O‐rengas/voitele.
3. Vaihda puskuri.
4. Pura ja puhdista.
Työkalun rungon ja
kannen välisestä osasta
vuotaa
ilmaa.
1. Kannen ja rungon
yhdistävät ruuvit
ovat löysällä.
2.T iiviste on
vioittunut.
1. T iukenna ruuvi ja
tarkista uudelleen.
2. Vaihda tiiviste.
Työkalu ei toimi. 1. Työkalu on kuiva ja
vaatii voitelua.
1. Käytä
pneumaattista
työkaluöljyä.
FIN
20
Page 21

ONGELMA
SYY
RATKAISU
Kiinnittimet iskeytyvät liian
syvään.
1. Varmistimen säätö ei ole
oikea.
2. Ilmanpaine on liian korkea.
1. Käännä
syvyydensäädintä
säätääksesi
naulaussyvyyttä.
2. Vähennä ilmanpainetta.
Kiinnittimiä
jää väliin/syöttö
on katkonaista.
1. Työkalu on kuiva ja
vaatii voitelua.
2. Ilmanpaine on liian matala.
3. Kiinnittimet vääntyvät.
4. Kiinnittimet ovat
väärän kokoisia.
5. Naulojen pituus ei vastaa
makasiinin pohjalevyn
asetuksia.
1. Käytä
pneumaattista
työkaluöljyä.
2. Nosta ilmanpainetta,
mutta älä ylitä arvoa 120
PSI (8,3 bar).
3. Käytä suositeltuja
kiinnittimiä.
4. Käytä suositeltuja
kiinnittimiä.
5. Säädä asetusta
suositeltuun
naulapituuteen, jotta
makasiinin takaosan nuoli
osoittaa oikeaan suuntaan.
Työkalu toimii
tehottomasti.
1. Työkalu on kuiva ja
vaatii voitelua.
2. Ilmanpaine on liian matala.
3. Käytössä olevan
letkun sisähalkaisija
on pieni.
1. Käytä
pneumaattista
työkaluöljyä.
2. Nosta ilmanpainetta,
mutta älä ylitä arvoa 120
PSI (8,3 bar).
3. Käytä letkua, jonka
sisäläpimitta on
suurempi.
Kiinnittimet ovat jumissa. 1. Väärän kokoiset
kiinnittimet.
1. Käytä suositeltuja
kiinnittimiä.
FIN
21
Page 22

22
Page 23

VIKTIGA
SÄKERHETSINSTRUKTIONER
VA RNING: Vid användning av tryckluftsverktyg bör man alltid följa allmänna
säkerhetsanvisningar för att minska risken för personskada, bl a följande:
LÄS IGENOM OCH FÖLJ ALLA INSTRUKTIONER.
Detta verktyg är avsett för vissa ändamål. Vi uppmanar Dig strängt att INTE modifiera verktyget
och/eller använda det för anda ändamål än de avsedda. Om Du har några frågor om användning av
verktyget, var god kontakta Din återförsäljare.
1. HÅLL ARBETSOMRÅDET RENT.
Belamrade arbetsområden inbjuder till personskada
2.
BARN FÅR INTE VISTAS I ARBETSOMRÅDET.
Låt aldrig barn hantera verktyget.
3. ANVÄND SKYDDSGLASÖGON. För att undvika ögonskador bör
användaren och alla andra personer i arbetsområdet använda
skyddsglasögon med permanenta styva sidoskydd av plast. Dessa
skyddsglasögon bör uppfylla kraven enligt ANSI Z87.1
(godkändaskyddsglasögon har en påtryckt eller präglad märkning
“Z87”)
4. ANVÄND HÖRSELSKYDD. Höga ljudnivåer som kan leda till
hörselskada kan förekomma i arbetsområdet.
5. ANVÄND SÄKER KLÄDSEL Skyddshandskar och halkfria skor eller
säkerhetsskor rekommenderas vid
arbete med och hantering av verktyget. Ha inte på Dig löst sittande
kläder eller smycken. Dessa kan fastna i
rörliga detaljer. Täck även över håret för att undvika
att långt hår fastnar i verktyget.
6.
ANVÄND ENDAST REN, TORR OCH REGLERBAR
tryckluft med tryck på 4,8 till 8,3 BAR.
7. ANVÄND ALDRIG SYRE, KOLDIOXID,
brännbara gaser eller någon annan gas i flaska för att driva
verktyget
8. ANSLUT INTE VERKTYGET till tryck som eventuellt kan överskrida
12,3 BAR.
9. ANVÄND ENDAST LUFTSLANG SOM ÄR GODKÄND för 150% av
systemets maxtryck. Använd helst en slang ID 3/8”
för att ansluta spikpistolen till kompressorn.
10. VERKTYGET FÅR INTE ANVÄNDAS NÄRA ETT LÄTTANTÄNDLIGT
eller explosivt material eller i korrosiva eller
mycket dammiga miljöer.
11. KOPPLA LOSS VERKTYGET FRÅN LUFTSLANGEN innan Du utför
underhåll, tar ut en fastnad spik, lämnar arbetsområdet, flyttar
verktyget eller räcker över den
till någon annan.
S
23
Page 24

12. KOPPLA LOSS SNABBKOPPLINGEN BAKTILL PÅ
VERKTYGSKROPPEN
för att göra verktyget trycklöst.
Om verktyget inte fungerar korrekt kan det förbli trycksatt efter
frånkoppling, skjuta ut ett fästmedel och orsaka personskada.
13. RESERVDELAR OCH TILLBEHÖR. Använd endast
originalreservdelar vid service. Godkända tillbehör och reservdelar
är tillgängliga.
14. INNAN VERKTYGET ANVÄNDS, kontrollera noga att alla detaljer
är oskadade för att uppnå bästa resultat. Verktyget får
inte användas om det läcker luft, är ofullständigt monterat, har
skadade detaljer eller behöver reparation.
15. VERKTYGET FÅR INTE ANVÄNDAS om säkerhetsbygeln,
avtryckaren eller fjädern inte fungerar, saknas eller är skadade.
Säkerhetsbygeln, avtryckaren eller fjädrar
får inte modifieras eller avlägsnas. Kontrollera dagligen att
avtryckaren rör sig fritt.
16. ANVÄND ENDAST DETALJER OCH FÄSTMEDEL rekommenderade
av återförsäljaren.
17. VERKTYGET FÅR INTE ANSLUTAS TILL LUFTKÄLLAN INNAN
fästmedel laddas för att undvika oavsiktlig avfyrning
av fästmedel.
Verktygets drivmekanism kan
aktiveras medan verktyget ansluts till
luftkällan. Ta ut alla fästmedel ur magasinet när verktyget inte
används.
18. FÖRUTSÄTT ALLTID ATT VERKTYGET INNEHÅLLER FÄSTMEDEL.
Rikta alltid verktyget bort från Dig själv och andra.
Lek aldrig med verktyget. Respektera produkten som ett
arbetsredskap.
19. LADDA INTE FÄSTMEDEL med avtryckaren eller säkerhetsbygeln
nedtryckt för att undvika oavsiktlig avfyrning.
20. HÅLL FINGRET BORTA FRÅN AVTRYCKAREN medan Du inte
spikar. Håll aldrig fingret på avtryckaren medan Du bär verktyget:
verktyget kan skjuta ut en spik om säkerhetsbygeln stöter mot
något medan avtryckaren är nedtryckt.
21. ANVÄND INTE på ställningar, skall YRKESTRAPPSTEGAR Verktyg
försedda med "kontaktutlösare" inte användas:
- Om en förändring av kör platser påverkas via trappor, stegar eller
byggnadsställningar.
- För att stänga lådor eller lådor.
- För montering av transportsäkerhetssystem system.
22. SPIKA ENDAST I ARBETSYTAN: SPIKA ALDRIG i material som är
för hårda för spikar att tränga igenom.
23. HÅLL STADIGT I VERKTYGET FÖR ATT BEHÅLLA KONTROLLEN
vid rekyl av verktyget från arbetsytan under spikningen. Om
säkerhetsbygeln på
nytt stötet mot arbetsytan innan avtryckaren släpps skjuts en spik
ut oavsiktligt.
24. SPIKA ALDRIG ovanpå andra spikar eller med verktyget på en
S
24
Page 25

för stor vinkel: spiken kan rikoschettera och orsaka personskada.
25. SPIKA ALDRIG NÄRA arbetsstyckets kant. Arbetsstycket kan
spricka och spiken kan flyga iväg eller rikoschettera och orsaka
personskada.
26. SPIKA ALDRIG NÄRA arbetsstyckets kant. Arbetsstycket kan
spricka och spiken kan flyga iväg eller rikoschettera och orsaka
personskada.
27. HÅLL HÄNDERNA OCH ANDRA KROPPSDELAR borta från området
som visas på fig. 13 för att undvika personskada
28. VERKTYGET HAR ETT REGLAGE för justering av spikningsdjupet.
För att justera spikningsdjupet bör man först frånkoppla
luftförsörjningen och sedan vrida justeringsknappen manuellt till
lämpligt läge.
29. VERKTYGET HAR ETT REGLAGE för justering av spikningsdjupet.
För att justera spikningsdjupet bör man först frånkoppla
luftförsörjningen och sedan vrida justeringsknappen manuellt till
lämpligt läge.
ARBETSGIVARENS ANSVAR
Arbetsgivaren bör säkerställa efterlevnad av alla säkerhet sanvisningar och alla andra
instruktioner i denna bruksanvisning.
Förvara bruksanvisningen tillgänglig för alla som använder verktyget.
Läs noga igenom och följ alla här angivna instruktioner för att försäkra personsäkerhet och
korrekt funktion av verktyget.
TILLÅTNA
FÄSTMEDEL
Använd endast följande fästmedel.
Min.
φ0.39˝
(φ10mm)
( φ3.1mm)
φ0.12˝
0.31˝
(8mm)
15o-16
o
Max.
φ0.39˝
(φ10mm)
15o-16
o
( φ3.1mm)
φ0.12˝
0.31˝
(8mm)
7/8" (22mm)
S
25
Page 26

TEKNISKA SPECIFIKATIONER
Parameter
Värde
Lufttryck
4.8-8.3 bar
Yttermått (L×H×B)
300 × 310 × 110 mm
Spikmått
22-45 mm
Verktygets vikt
2.75Kg
Luftintag
1/4"NPT
Luftförbrukning
68 l/min at 5.52 bar
FÖRPACKNINGENS INNEHÅLL
BENÄMNING
ANTAL
Spikpistol S45CNR
1
Insexnyckel S5
1
Insexnyckel S4
1
Insexnyckel S3
1
Olja för tryckluftsverktyg
1
Bruksanvisning
1
BULLERINFORMATION
Dessa buller karakteristiska värden är i enlighet med EN 12549:1999
LpA, 1s, d = 84dB
LWA, 1s, d = 97dB
Dessa värden är verktyg-relaterade karakteristiska värden och representerar inte buller
utvecklats vid tidpunkten för utnyttjandet. Arbetsplatsens utformning kan också bidra till att
minska bullernivåerna, till exempel att placera arbetsstycket på ljuddämpande stöd.
VIBRATIONSINFORMATION
Dessa värden är i enlighet med ISO 8662-11:1999
Vibration karakteristiskt värde (m/s2) = 8,22
Detta värde är ett verktyg egenskapsvärde och representerar inte inflytandet på hand-armsystemet när verktyget används.
Skyddsglasögon
1
S
26
Page 27

BRUKSINSTRUKTIONER
FÖRORD
S45CNR är en hållbar rundbandad tryckluftsdriven spikpistol. Den är avsedd för spikning av spikar
med olika längder och diameter på 22-45 mm eller 3,1mm. Spikpistolen används främst för
remmontering och ihopmontering av ram och beklädnadsmaterial. Verktyget har en kropp av
magnesiumlegering och en lätt cylinderkåpa som försäkrar hög specifik hållfasthet och styvhet.
DRIVKÄLLA
Verktyget är avsett för ren och torr tryckluft med reglerbart tryck mellan 4,8 och 8,3 bar.
Systemet borde helst inkludera ett filter (C) fig. 2, ett tryckreglage (A) fig. 2 och en automatisk
smörjenhet (B) fig. 2 som är belägen så nära verktyget som möjligt (helst inom 15 fot).
Tryckluft innehåller alltid fukt och andra föroreningar som kan skada verktygets invändiga delar.
Ett filter på luftledningen avlägsnar de flesta föroreningar och ökar verktygets livslängd betydligt.
Om luftledningen inte har dimsmörjare bör man applicera fem-sex droppar olja i verktygets
tryckluftsintag i början av varje arbetsdag.
Luftförsörjningen bryts genom att lossa snabbkopplingen på luftintaget baktill på verktyget.
Frånkoppling av tryckluft gör verktyget trycklöst. Om verktyget inte fungerar korrekt kan det
dock hända att verktyget förblir trycksatt efter att tryckluften har frånkopplats, i så fall kan det
skjuta ut en spik och orsaka personskada.
VAR FÖRSIKTIG: Alla ledningskomponenter (slangar, kopplingar, filter, reglagen osv.) ska kunna
tåla 150% av systemets maxtryck. Använd helst en slang ID 3/8” för
anslutning av spikpistolen till
kompressorn.
Verktyget får inte anslutas till ett system vars tryck motsvarar verktygets maximala tillåtna tryck.
Luftförsörjningen bryts genom att lossa snabbkopplingen på luftintaget baktill på verktyget för att
göra verktyget trycklöst.
Koppla bort tryckluftsförsörjningen innan Du utför underhåll på verktyget, avlägsnar en fastnad
spik, lämnar arbetsområdet, flyttar verktyget eller räcker det över det till någon annan.
S
27
Page 28

FÖRBEREDELSE FÖRE ARBETET
När Du har läst igenom och förstått hela bruksanvisningen, anslut verktyget till luftkällan.
VAR FÖRSIKTIG: Rikta aldrig verktyget mot Dig själv eller någon annan.
Anslut aldrig verktyget till tryckluftsförsörjningen innan Du laddar spikar. Ladda
aldrig spikar med avtryckaren eller säkerhetsmekanismen nedtryckt. Använd alltid
märkta skyddsglasögon och hörselskydd medan Du förbereder eller använder
verktyget. Verktyget får inte användas om det läcker luft eller behöver reparation.
Tryck ned handtaget (se A på fig. 14) och öppna spärren. Vrid spikmagasinets överdel till sidan av
verktygets kropp.
Justeringsplattan kan flyttas uppåt eller nedåt genom att vrida justeringsmuttern (se B på fig. 15).
Ställ in justeringsplattan korrekt enligt spiklängden, så att dess position i spikmagasinets nederdel
motsvarar den angivna.
Placera en spikrulle i spikmagasinets nederdel. Dra ut spikrullens ände så att den når matarklon
och placera den andra spiken mellan matarklons tänder (se fig. 16).
Stäng spikmagasinets överdel och tryck ned spärren (se fig. 17).
Justera utblåsdeflektorn (se fig. 18) så att det utgående luftflödet riktas bort från användaren. Ta
tag i deflektorn och vrid den till det önskade läget.
S
28
Page 29

ANVÄNDNING AV VERKTYGET
Utför alla steg i avsnittet FÖRBEREDELSE FÖRE ARBETET innan verktyget används.
Verktyget kan avfyras på två olika sätt:
Avtryckarfunktion (singelskott): Vrid det vridbara skaftet så att dess ände hamnar uppåt (se
figur 18A).
Medan säkerhetsbygeln är tryckt mot arbetsstycket, tryck på avtryckaren upprepade gånger för att
avfyra spikar.
1. Serieskott: Placera munstycket på arbetsytan, tryck verktyget lätt mot arbetsytan tills
säkerhetsbygeln är nedtryckt, tryck sedan ner avtryckaren för att avfyra spikar. Denna
avfyringsmetod
möjliggör precisare spikning. I detta läge kan säkerhetsbygeln justeras nedåt med hjälp av
vridknappen för att undvika avfyrning av två spikar samtidigt.
1. Fabriksinställningen avser läget för singelskott.
2. Tillverkaren åtar sig inget ansvar för skada eller förlust pga felaktig användning av verktyget.
VAR FÖRSIKTIG: Håll aldrig fingret på avtryckaren medan Du inte spikar.
Bär aldrig verktyget med fingret på avtryckaren: en spik skjuts ut om säkerhetsbygeln stöter mot
någonting.
Rikta aldrig verktyget mot Dig själv eller någon annan.
Försök aldrig att skjuta fästmedel i för hårda material, med verktyget på en för stor vinkel eller
nära arbetsstyckets kant. Fästmedlet kan rikoschettera och orsaka personskada.
Koppla bort tryckluftsförsörjningen innan Du utför underhåll på verktyget, avlägsnar en fastnad
spik, lämnar arbetsområdet, flyttar verktyget eller räcker det över det till någon annan.
Rengör och granska verktyget dagligen. Kontrollera noga korrekt funktion av avtryckaren och
säkerhetsmekanismen.
Hållare för montering av verktyg för indrivning av fästanordningar skall
vara säkert utformade. Plocka inte isär eller modifiera delar såsom säkerhet oket. Verktyget får
inte användas om avtryckaren eller säkerhetsmekanismen inte fungerar korrekt, luftläckage
förekommer eller verktyget annars behöver reparation.
3. Spikningsdjupet ökas eller minskas genom att vrida justeringsknappen (A) på fig. 19.
Provspika och kontrollera djupet. Om spiken sitter för djupt, vrid knappen medurs för att
justera säkerhetsbygeln nedåt. Eller vrid knappen moturs för att justera säkerhetsbygeln uppåt.
Upprepa tills önskade resultat uppnås (se fig. 20).
ATT TA BORT EN FASTNAD SPIK
1.VAR FÖRSIKTIG: Koppla loss verktyget från luftkällan.
2.Öppna spärren, vrid spikmagasinets nederdel och ta ut spikarna ur spikmagasinets nederdel.
3.Använd en smal, mjuk stålpinne för att trycka drivbladet till dess översta läge. Använd spetstång
för att ta ut det fastnade
fästmedlet (se fig.21).
4.Följ instruktionerna i avsnittet FÖRBEREDELSE FÖRE ARBETET för att ladda spikarna i magasinet
igen.
S
29
Page 30

UNDERHÅLL
RENGÖR OCH KONTROLLERA DAGLIGEN
VAR FÖRSIKTIG: Koppla loss verktyget från luftkällan före rengöring och kontroll. Åtgärda alla
problem innan verktyget används igen.
Kontrollera kompressorns filter varje vecka och stäng av den manuella ventilen för att tömma ut
vatten och föroreningar.
Verktyget får inte vätas ner med rengöringslösningar. Dessa kan skada de invändiga detaljerna.
Den synliga delen av den lilla kolvpinnen och matarklon bör hållas rena.
Kontrollera avtryckaren och säkerhetsmekanismen för att försäkra att systemet är komplett och
funktionsdugligt: inga detaljer är lösa eller saknas, detaljer får inte fastna eller kärva.
Se till att alla skruvar är väl åtdragna. Lösa skruvar kan leda till personskada eller skada på
verktyget.
Kontrollera att inga detaljer är nötta eller skadade. Nötta eller skadade detaljer bör bytas ut
omgående.
Om verktyget används utan en dimsmörjare på luftledningen: applicera 5 eller 6 droppar
olja för tryckluftsverktyg i verktygets luftintag vid början av varje arbetsdag.
SERVICE OCH REPARATION
Alla verktyg med hög kvalitet kräver eventuellt byte av reservdelar pga normalt slitage. Vissa
komponenter som kan bytas av användaren beskrivs i avsnittet
FELSÖKNING. Alla reparationer utförda av lokala representanter har full garanti mot
materialfel- och arbetsfel. Vi kan dock inte lämna garanti på reparationer eller reparationsförsök
som utförs av andra än dessa representanter.
Om Du har några frågor om Ditt verktyg, var god kontakta Din återförsäljare. Var god ange all
information på maskinskylten av Ditt verktyg (modellnummer, typ, serienummer osv.)
FELSÖKNING
VAR FÖRSIKTIG: Koppla loss verktyget från luftkällan före varje serviceåtgärd.
PROBLEM
CAUSE
SOLUTION
Luftläckage vid avtryckaren
1. O-ringen i avtryckarens
ventilskaft är nött eller
skadad.
2. O-ringen i avtryckarens
ventilhuvud är nött eller
skadad.
3. Främmande partiklar.
1.Kontrollera/byt ut
O-ringen/smörj.
2.Kontrollera/byt ut
O-ringen/smörj.
3.Rengör/smörj verktyget.
Luftläckage vid kroppens
nederdel och mynningen
1.Lös skruv mellan
munstycket och
verktygskroppen.
2.Skadad O-ring mellan
kroppen och munstycket.
1.Dra åt skruven och
kontrollera på nytt
2.Kontrollera/byt ut
O-ringen/smörj.
S
30
Page 31

3.Skadad buffert.
4.Främmande partiklar
mellan bufferten och
verktygskroppen.
3. Byt ut bufferten.
4. Ta isär och rengör.
Luftläckage vid kroppen och
cylinderkåpan
1.Lös skruv mellan cylindern
och kroppen.
2.Skadad packning.
1. Dra åt skruven och
kontrollera på nytt.
2. Byt ut packningen.
Verktyget startar inte.
1.Verktyget är torrt,
otillräckligt smort.
2.Skadad fjäder i
cylinderkåpan.
1.Använd olja för
tryckluftsverktyg.
2.Byt ut fjädern i
cylinderkåpan.
Drivbladet skjuter in
fästmedel för djupt.
1.Fel läge av säkerhetsbygeln.
2.För högt lufttryck.
1.Vrid justeringsknappen
för att justera
säkerhetsbygeln nedåt.
2.Minska lufttrycket.
Verktyget hoppar över
fästmedel / avbruten
matning
1.Främmande partiklar mellan
den lilla kolven och den
lilla cylindern.
2.O-ringen på den lilla kolven
är nött eller skadad.
3. Ve rktyget är torrt,
otillräckligt smort.
4.Skadad fjäder på den
lilla kolven.
5.För lågt lufttryck.
6.Fästskruven mellan
munstycket och kroppen är
lös.
7.Stoppklon kan inte hindra
fästmedel.
8.Böjda fästmedel.
9.Fästmedel med fel storlek.
10.Den lilla kolvens buffert
är nött eller skadad.
11.Matarklon fastnar.
12.Fel spiklängd för
spikmagasinet.
13.Brustna svetstrådar i
spikrullen.
1.Ta isär / rengör /
smörj.
2.Kontrollera /byt ut Oringen / smörj.
3.Använd olja för
tryckluftsverktyg.
4.Byt ut fjädern på den lilla
kolven.
5.Öka lufttrycket men inte
över 8,3 bar.
6.Dra åt alla skruvar.
7.Byt ut fjädern på
stoppklon.
8.Använd rekommenderade
fästmedel.
9.Använd rekommenderade
fästmedel.
10.Byt ut bufferten och
smörj kolven.
11.Rengör matarklon och
torsionsfjädern.
12.Justera justeringsplattan i
spikmagasinets bakre del till
den rekommenderade
spiklängden så att pilen på
spikmagasinet pekar i rätt
riktning.
13.Avbryt användning av
verktyget.
Trög funktion eller
effektförlust
1. Ve rktyget är torrt,
otillräckligt smort.
2.Skadad fjäder i
cylinderkåpan.
3.Främmande partiklar
mellan kolvenheten och
cylindern.
4.Fel monterad cylinder.
5.O-ringen på ventilen är
torr efter isärmontering.
6.För lågt lufttryck.
7.Nött drivenhet
8.Slangens innerdiameter är
för liten.
1.Använd olja för
tryckluftsverktyg.
2.Byt ut fjädern i
cylinderkåpan.
3.Ta isär / rengör / smörj.
4.Montera ihop korrekt
efter isärmontering.
5.Montera ihop efter
smörjning.
6.Öka lufttrycket men inte
över 8,3 bar.
7.Byt ut kolvenheten.
8.Använd en slang med
större innerdiameter.
S
31
Page 32

32
Page 33

INSTRUCTIONS IMPORTANTES DE SÉCURITÉ
AVERTISSEMENT: Lors de l'utilisation d'outils pneumatiques, des précautions basiques de sécurité
doivent toujours être respectées pour réduire le risque de blessures physiques. Il faut notamment
respecter ce qui suit:
LIRE ET RESPECTER TOUTES LES INSTRUCTIONS.
1.GARDER UN ESPACE DE TRAVAIL PROPRE. Les zones encombrées
sont propices aux blessures.
2.NE PAS PERMETTRE AUX ENFANTS DE PÉNÉTRER DANS LA ZONE
DE TRAVAIL. Ne les laisser pas manipuler l'outil.
3.UTILISER LES LUNETTES DE SÉCURITÉ. Pour éviter les lésions
oculaires, l'opérateur de l'outil et toutes les personnes de la zone de
travail doivent porter des lunettes de sécurité avec des protections
latérales fixes, rigides, en plastique. Ces lunettes de sécurité doivent
être conformes aux exigences ANSI Z87.1 (les lunettes homologuées
doivent voir "Z87" imprimé ou étiqueté dessus)
4. UTILISER LA PROTECTION AUDITIVE. La zone de travail peut être
exposée à des niveaux sonores forts pouvant entraîner une perte
d'audition.
5. PORTER DES VÊTEMENTS DE SÉCURITÉ Les gants de protection
et les chaussures antidérapantes ou de sécurité sont recommandés
lors du travail avec et la commande de cet outil. Ne pas porter des
vêtements amples ou des bijoux. Ils peuvent être happés dans les
pièces mobiles. Porter également une protection de cheveux pour
éviter que les longs cheveux ne soient happés dans l'outil.
6. UTILISER UNIQUEMENT DE L'air comprimé PROPRE, SEC ET
RÉGULÉ de 4,8 à 8,3 bar
7. NE JAMAIS UTILISER DE L'OXYGÈNE, DU DIOXYDE DE CARBONE,
des gaz combustibles ou un autre gaz en bouteille comme source
d'énergie pour l'outil
8. NE PAS CONNECTER L'OUTIL à une pression pouvant dépasser
9,13 bar.
9. UTILISER UNIQUEMENT UN TUYAU D'AIR QUI EST HOMOLOGUÉ
pour 150 % de la pression maximale du système. Essayez d'utiliser
un tuyau d'ID 3/8" qui connecte la cloueuse à un compresseur.
10. NE PAS UTILISER L'OUTIL PRÈS D'UN COMBUSTIBLE, ou de
tout autre matériau facilement explosif et ne pas utiliser l'outil
dans un environnement produisant facilement de la corrosion, de
la rouille et très poussiéreux.
11. DÉCONNECTER L'OUTIL DU TUYAU D'AIR avant d'effectuer
une maintenance, de nettoyer une fixation bloquée, de quitter la
zone de travail, de déplacer l'outil dans un autre endroit ou de
remettre l'outil à une autre personne.
F
33
Page 34

12. DÉCONNECTER SEULEMENT LE CONNECTEUR RAPIDE avec la
portion arrière du carter de l'entrée d'air, aucun air comprimé ne
peut être garanti lors de la déconnexion. Si l'opération n'est pas
correcte, l'outil reste chargé en air après avoir été déconnecté et il
peut toujours entraîner une fixation et causer une blessure
corporelle.
13. REMPLACER LES PIÈCES ET LES ACCESSOIRES. Utiliser
uniquement les mêmes pièces de remplacement pour la
maintenance. Les accessoires et pièces de rechange homologués
sont disponibles
14. AVANT D'UTILISER L'OUTIL, vérifier prudemment s'il y a des
pièces endommagées pour obtenir des résultats parfaits. Ne pas
utiliser l'outil si celui entraîne des fuites, si des pièces sont
incomplètes, endommagées ou ont besoin d'être réparées.
15. NE JAMAIS UTILISER L'OUTIL si la sécurité, le déclencheur ou le
ressort sont inactifs, manquants ou endommagés. Ne pas modifier ou
retirer la sécurité, le déclencheur ou les ressorts. Effectuer des inspections
quotidiennes des mouvements libres de la réparation du déclencheur.
17. CONNECTER L'OUTIL À L'ALIMENTATION EN AIR AVANT de
charger les fixations pour éviter qu'une fixation ne soit éjectée
pendant la connexion: Le mécanisme d'entraînement de l'outil peut
tourner lorsque l'outil est connecté à l'alimentation en air. Lorsqu'il
n'est pas utilisé, retirer toutes les fixations du carter à clou.
18. TOUJOURS SUPPORTER QUE L'OUTIL CONTIENT DES FIXATIONS :
Toujours tenir l'outil éloigné de vous et des autres personnes en
permanence. Ne pas chahuter. Respecter l'outil comme un outil de
travail.
19. NE PAS CHARGER LES FIXATIONS avec le déclencheur ou la
sécurité enfoncée pour éviter l'éjection non intentionnelle d'une
fixation.
20. ÉLOIGNER LES DOIGTS DU DÉCLENCHEUR lorsqu'aucune
fixation n'est entraînée. Ne jamais porter l'outil avec un doigt sur
le déclencheur : l'outil éjectera une fixation si la sécurité est
déclenchée pendant que le déclencheur est enfoncé.
21. NE PAS UTILISER SUR LES ÉCHAFAUDAGES, les outils
D'ÉCHELLE équipées
d'une "activation par contact" ne doivent pas être utilisés :
- si un changement des emplacements d'entraînement est affecté
par des escaliers, des échelles ou des échafaudages.
- pour fermer les boîtes ou les caisses.
- pour fixer les systèmes de sécurité de transport.
22. ÉJECTER UNIQUEMENT LES FIXATIONS SUR UNE SURFACE DE
TRAVAIL : JAMAIS dans les matériaux trop durs
23. PRENDRE L'OUTIL FERMEMENT EN MAIN POUR GARDER LE
CONTRÔLE tout en permettant à l'outil de reculer de la surface de
travail lorsqu'une fixation est entraînée. Si le collier de sécurité est
autorisé à entrer en contact à nouveau avec la surface de travail
avant que le déclencheur ne soit relâché, une fixation indésirable sera
éjectée.
24.NE PAS ÉJECTER DES FIXATIONS par dessus d'autres fixations
ou avec l'outil à un angle trop abrupt : les fixations peuvent ricocher
et entraîner des blessures physiques.
25. NE PAS ÉJECTER DES FIXATIONS PRÈS DU bord de la pièce à
usiner. La pièce à usiner peut se rompre et faire voler la fixation ou
la faire ricocher et entraîner une blessure physique.
16. UTILISER UNIQUEMENT DES PIÈCES ET DES FIXATIONS
F
34
Page 35

26. RESTER ALERTE. Regardez ce que vous faites. Utiliser
votre bon sens. Ne pas utiliser un outil lorsque vous êtes
fatigué, évitez les blessures.
27. GARDER LES MAINS ET LES PARTIES DU CORPS éloignées de la
zone indiquée à l'ill. 13.
28. CET OUTIL EST ÉQUIPÉ D'UN AJUSTEUR qui peut être ajuster à la
profondeur d'entraînement. Lors de l'ajustement de la profondeur
d'entraînement, commencer par déconnecter l'alimentation d'air et
tourner le bouton de l'ajusteur manuellement.
29.LORSQU'IL N'EST PAS UTILISÉ, l'outil doit être nettoyé et replacé
dans l'emballage. Pour des raisons de sécurité, tenir hors de portée
des enfants.
RESPONSABILITÉS DE L'EMPLOYEUR
L'employeur doit garantir la conformité aux avertissements de sécurité et à toutes les autres
instructions de ce manuel.
Garder ce manuel disponible pour une utilisation par toutes les personnes autorisées à utiliser
cet outil. Pour la sécurité du personnel et une utilisation correcte de cet outil, lire et suivre
attentivement les présentes instructions.
SPÉCIFICATIONS DES FIXATIONS
Utiliser uniquement les fixations recommandées :
Min.
φ0.39˝
(φ10mm)
( φ3.1mm)
φ0.12˝
0.31˝
(8mm)
15o-16
o
Max.
φ0.39˝
(φ10mm)
15o-16
o
( φ3.1mm)
φ0.12˝
0.31˝
(8mm)
7/8" (22mm)
F
35
Page 36

PARAMÈTRES TECHNIQUES
Caractéristique Valeur
Pression de l'air comprimé 4.8-8.3 bar
Dimensions extérieures (Lxhxl) 300 × 310 × 110 mm
Plage de longueur des clous 22-45 mm
Poids de l'outil 2.75Kg
Entrée d'air
1/4"NPT
Consommation d'air 68 l/min à 5.52 bar
Description Qté
S45CNR Cloueuse à bobine
1
S5 Clé hexagonale
1
S4 Clé hexagonale
1
S3 Clé hexagonale
1
Huile pneumatique
1
Instructions d'utilisation 1
INFORMATIONS SONORES
Ces valeurs sonores caractéristiques sont conformes à la norme EN 12549:1999
LpA, 1s, d = 84dB
LwA, 1s, d = 97dB
Ces valeurs sont caractéristiques à l'outil et ne représentent pas le bruit développé sur
le point d'utilisation. Le design du poste de travail peut également servir à réduire les
niveaux sonores, par exemple en plaçant la pièce à usiner sur des supports isolants.
INFORMATIONS DE VIBRATION
Ces valeurs sont conformes à la norme ISO 8662-11:1999.
Valeur caractéristique de vibration ( m/s2 ) = 8,22
Cette valeur est une valeur caractéristique à l'outil et ne représente pas l'influence sur le
système main-bras lors de l'utilisation de l'outil.
CONTENU DE L'EMBALLAGE
Lunettes de sécurité
1
F
36
Page 37

PRÉAMBULE INSTRUCTIONS
D'UTILISATION
S45CNR est une cloueuse pneumatique solide, alimentée par une bobine qui utilise l'air
comprimé comme source d'énergie. Elle est conçue pour installer des clous de différentes
longueurs et de 22-45 mm ou 3,1 mm de diamètre. Elle est largement utilisée pour connecter
les cadres et connecter les cadres et le feutre. L'outil possède un corps en alliage de
magnésium et le capuchon cylindrique est léger et fournit une force et une rigidité spécifique.
SOURCE ÉLECTRIQUE
Cet outil est concu pour fonctionner avec de l'air comprimé propre, sec à des pressions régulées
de 4,8 et 8,3 bar. Le système privilégié inclut un filtre, un régulateur de pression et un huileur
automatique situé aussi près que possible de l'outil (idéalement à 15 pieds).
Tout air comprimé contient de l'humidité et d'autres contaminants pouvant nuire aux
composants internes de l'outil. Un filtre à air intégré éliminera la plupart de ces contaminants et
augmentera de manière significative la durée de vie de l'outil. Si un huileur intégré n'est pas
disponible: placer cinq ou six gouttes d'huile dans l'entrée d'air de l'outil au début de chaque
journée de travail.
Déconnecter uniquement le connecteur rapide de la portion arrière de l'entrée d'air. L'absence
d'air comprimé ne peut être garantie lors de la déconnexion. Si l'opération n'est pas correcte,
l'outil reste chargé en air après avoir été déconnecté et il peut toujours entraîner une fixation et
causer une blessure corporelle.
PRUDENCE : Tous les composants intégrés (tuyaux, connecteurs, filtres, régulateurs
etc.) doivent satisfaire 150 % de la pression maximale du système. Essayez d'utiliser
un tuyau d'ID 9,5 mm qui connecte la cloueuse à un compresseur lors de la
déconnexion.
Ne pas connecter cet outil à un système avec un potentiel maximum. Déconnecter uniquement
le connecteur rapide connecté au connecteur de l'entrée d'air arrière, l'absence d'air comprimée
ne peut pas être garantie lors du déplacement dans un autre endroit ou de la remise de l'outil à
une autre personne.
Déconnecter l'outil à l'alimentation d'air avant d'effectuer une maintenance, de nettoyer une
fixation bloquée, de quitter la zone de travail, de déplacer l'outil dans un autre endroit.
F
37
Page 38

PRÉPARER L'OUTIL AVANT L'ENTRAÎNEMENT
Après avoir lu et compris tout le manuel, connecter l'outil à l'alimentation d'air.
PRUDENCE: Toujours tenir l'outil éloigné de vous et des autres personnes.
Toujours connecter l'outil à l'alimentation d'air avant de charger les fixations. Ne pas
charger les fixations lorsque le déclencheur ou la sécurité sont activés. Toujours porter
des lunettes de sécurité homologuées et une protection auditive lors de la préparation ou
de l'utilisation de l'outil. Ne jamais utiliser un outil qui a une fuite d'air ou doit être
réparé.
Abaisser le levier (voir A, ill. 14) et ouvrir la languette. Faire pivoter le carter supérieur du clou vers
le côté du corps.
La plaque de l'ajusteur peut être déplacé de haut en bas lorsque l'écrou de l'ajusteur est tourné
(voir B ill. 15). En fonction de la longueur du clou, la plaque de l'ajusteur doit être ajustée
correctement sur la position indiquée à l'intérieur du carter inférieur du clou.
Placer une bobine de clous sur le carter inférieur du clou. Dérouler suffisamment de clous pour
atteindre le crochet d'alimentation et placer le second clou entre les dents sur le crochet
d'alimentation (voir illustration 16)
Fermer le carter inférieur du clou et abaisser la languette (voir ill. 17).
Ajuster le déflecteur directionnel de SORTIE (voir ill. 18) de sorte à ce que l'air expiré soit dirigé
loin de l'opérateur. Attraper le déflecteur et le faire tourner dans la position désirée pour
l'application en cours.
F
38
Page 39

34
UTILISER L'OUTIL
Effectuer toutes les étapes de PRÉPARATION DE L'OUTIL avant d'utiliser l'outil.
Déclencher l'outil : placer le nez sur la surface de travail, pousser légèrement l'outil vers la surface
de travail jusqu'à ce que l'élément de sécurité soit abaissé, ensuite, appuyer sur le déclencheur
pour éjecter les fixations. Cette méthode "de déclenchement" fournit le placement le plus précis
des fixations. Avec cette méthode, l'élément de sécurité peut être ajusté vers le bas avec le bouton
pour éviter de déclencher deux clous à la fois.
Le fabricant décline toute responsabilité pour les blessures et les pertes causées par une utilisation
incorrecte de cet outil.
PRUDENCE: Éloigner les doigts du déclencheur lorsque vous ne souhaitez pas éjecter de
fixations. Ne jamais porter l'outil avec un doigt sur le déclencheur : l'outil éjectera une
fixation si la sécurité est déclenchée. Toujours orienter l'outil dans une direction sûre.
Ne jamais essayer d'enfoncer une fixation dans un matériau qui est trop dur, à un angle trop
abrupt ou près du bord de la pièce à usiner. La fixation peut ricocher et entraîner une blessure
physique.
Déconnecter l'outil de l'alimentation d'air avant d'effectuer une maintenance, de nettoyer une
fixation bloquée, de quitter la zone de travail, de déplacer l'outil dans un autre endroit ou de
remettre l'outil à une autre personne. Nettoyer et inspecter l'outil chaque jour. Vérifier
prudemment que le déclencheur et le mécanisme de sécurité fonctionnent correctement.
Les supports pour le montage des outils de cloutage doivent être conçus de manière sûre. Ne pas
démonter ou modifier les pièces comme étrier de sécurité.
Ne pas utiliser l'outil à moins que le déclencheur et le mécanisme de sécurité soient fonctionnels ou
si l'outil a une fuite d'air ou a besoin de réparation.
3. La profondeur d'entraînement peut être augmentée ou diminuée en faisant tourner le bouton ou
l'ajusteur (A) ill. 19. Faites un test avec une fixation et vérifier la profondeur. Si le clou est enfoncé
trop profondément, faire tourner l'ajusteur dans le sens horaire pour que l'élément de sécurité soit
poussé vers le bas. Pendant ce temps, faire tourner le compteur de l'ajusteur dans le sens horaire
pour s'assurer que l'élément de sécurité est poussé vers le bas. Répéter cette étape pour atteindre
les résultats désirés (voir ill. 20).
NETTOYER UNE FIXATION BLOQUÉE
1. PRUDENCE: Déconnecter l'outil de l'alimentation d'air.
2. Ouvrir la languette, faire pivoter le carter inférieur et retirer les clous du carter inférieur.
3. Utiliser une corde en acier doux fuselée pour entraîner la lame dans sa position supérieure.
Utiliser une pince fine pour retirer la fixation bloquée (voir ill. 21).
4. Respecter les instructions de PRÉPARATION DE L'OUTIL AVANT ENTRAÎNEMENT pour recharger
les fixations.
F
39
Page 40

MAINTENANCE
NETTOYER ET INSPECTER CHAQUE JOUR
PRUDENCE: Déconnecter l'outil de l'alimentation d'air avant le nettoyage et
l'inspection. Corriger tous les problèmes avant utilisation.
Vérifier chaque semaine le filtre du compresseur et éteindre la valve manuelle pour drainer
l'eau et les contaminations.
Ne pas mouiller l'outil avec des solutions nettoyantes. Ces solutions peuvent endommager les
pièces internes. La portion exposée de la petite tige à piston et du crochet d'alimentation doit
être toujours propre.
Inspecter le déclencheur et le mécanisme de sécurité pour s'assurer que le système est
complet et fonctionnel: aucune pièce en vrac ou manquante, aucune pièce colmatée ou
collante.
Bien visser les vis. Les vis mal serrées peuvent entraîner des blessures corporelles ou des
dommages matériels. Vérifier s'il y a des pièces usées ou endommagées. Le cas échéant, les
remplacer immédiatement.
Si l'outil est utilisé sans un huileur intégré: placer 5 ou 6 gouttes d'huile dans l'entrée d'air de
l'outil au début de chaque jour de travail.
ENTRETIEN ET RÉPARATIONS
Tout outil de qualité a besoin de pièces de rechange en raison de l'usure due à une utilisation
normale. Certains composants pouvant être entretenus par l'utilisateur sont décrits dans le
paragraphe RÉSOLUTION DES DÉFAUTS. Toutes les réparations effectuées par des centres
locaux sont garanties du point de vue des vices matériels et de fabrication. Nous ne pouvons
pas garantir les réparations faites ou tentées par des personnes autres que ces centres.
Si vous avez des questions sur votre outil, veuillez contacter votre revendeur. Dans toute
communication, donnez toutes les informations indiquées sur la plaque signalétique de votre
outil (numéro de modèle, type, numéro de série etc.)
RÉSOLUTION DES DÉFAUTS
PRUDENCE : Déconnecter l'outil de l'alimentation d'air avant toute procédure de
maintenance.
PROBLÈME CAUSE SOLUTION
Fuite d'air dans la zone de
déclenchement
1. Le joint torique dans la tige
de vanne du déclencheur est
usée et endommagée.
2. Le joint torique dans la tête
de vanne du déclencheur est
usée et endommagée.
3. Autres problèmes.
1. Vérifier/remplacer le
joint torique/le lubrifiant.
2. Vérifier/remplacer le
joint torique/le lubrifiant.
3. Vérifier l'outil/le
lubrifiant
Fuite d'air sur la partie
inférieure du carter et le
nez
1. La vis est mal serrée sur la
portion de connexion du nez
et du carter.
2. Le joint torique est
endommagé entre le carter et
le nez.
3. Le tampon est endommagé.
4. Autres problèmes sur la
portion de contact du tampon
et du corps.
1. Visser la vis/revérifier
2. Vérifier/remplacer le joint
torique/le lubrifiant.
3. Remplacer le tampon.
4. Démonter et nettoyer
Fuite d'air sur la partie du
carter et le capuchon du
cylindre
1. Outil sec, manque de
lubrifiant.
2. Le ressort du capuchon du
cylindre est endommagé.
1. Utiliser de l'huile
pneumatique
2. Remplacer le ressort
dans le capuchon du cylindre.
L'outil ne démarre pas.
1. Outil sec, manque de
lubrifiant.
2. Le ressort du capuchon du
cylindre est endommagé.
1. Utiliser de l'huile pneumatique
2. Remplacer le ressort
dans le capuchon du cylindre.
F
40
Page 41

PROBLÈME CAUSE SOLUTION
La lame entraîne les
fixations trop
profondément
1. La position de l'élément de
sécurité n'est pas correcte.
2. La pression d'air est trop
élevée.
1. Faire tourner le bouton de
l'ajusteur pour déplacer l'élément
de sécurité vers le bas.
2. Faire baisser la pression de
l'air.
Des fixations/l'alimentation
sont passées par
intermittence
1. Autres problèmes
entre le petit piston et le petit
cylindre.
2. Le joint torique sur le petit
piston est usé et endommagé.
3. Outil sec, manque de
lubrifiant.
4. Le ressort du petit piston est
endommagé.
5. La pression d'air est trop
faible.
6. La vis de connexion du nez et
du carter n'est pas assez serrée.
7. Le crochet d'arrêt ne peut pas
arrêter les fixations.
8. Fixations pliées.
9. Mauvaise taille de fixations.
10. Le tampon du petit piston est
usé et endommagé.
11. Le crochet d'alimentation
colmate.
12. La longueur de clou n'est pas
correcte avec un espace de
chargement du carter du clou.
13. Les câbles soudés dans la
bobine de clous sont cassés.
1. Démonter/nettoyer/lubrifier.
2. Vérifier/remplacer le joint
torique/lubrifier
3. Utiliser de l'huile pneumatique.
4. Remplacer le ressort du petit
piston.
5. Augmenter la pression de l'air
mais ne pas dépasser 8,3 bar.
6. Serrer toutes les vis.
7. Remplacer le ressort du
crochet d'arrêt.
8. Utiliser les fixations
recommandées.
9. Utiliser les fixations
recommandées.
10. Remplacer le tampon et
lubrifier le petit piston.
11. Nettoyer le crochet
d'alimentation et le ressort de
torsion.
12. Ajuster la plaque de
l'ajusteur sur la portion arrière
du carter du clou en fonction de
la longueur de clou
recommandée pour que la flèche
de la partie arrière du carter du
clou pointe dans la bonne
direction.
13. Arrêter l'utilisation
Fonctionne plus lentement
ou a une perte de puissance
1. Outil sec, manque de
lubrifiant.
2. Le ressort du capuchon de
cylindre est endommagé.
3. Autres problèmes entre le
groupe de piston et le cylindre.
4. Le cylindre n'est pas assemblé
dans la position de départ.
5. Le joint torique de la vanne
est sec après le démontage.
6.La pression d'air est trop
faible.
7. L'entraînement est usé (trier)
8. Le diamètre intérieur du tuyau
utilisé est trop petit.
1. Utiliser de l'huile
pneumatique.
2. Remplacer le ressort dans le
capuchon du cylindre.
3. Démonter/nettoyer/lubrifier.
4. Remonter après le
démontage.
5. Remonter après la
lubrification.
6. Augmenter la pression de l'air
mais ne pas dépasser 8,3 bar.
7. Remplacer le groupe du
piston.
8. Utiliser un diamètre intérieur
supérieur de tuyau.
Les fixations sont colmatées.
1. Les fixations sont de la
mauvaise taille.
2. Les câbles soudés dans la
bobine de clous sont cassés.
1. Utiliser les fixations
recommandées.
2. Arrêter l'utilisation
F
41
Page 42

DECLARATION OF CONFORMITY
We Senco Brands, BV.
of Geurdeland 17E
6673 DR Andelst, The Netherlands
in accordance with the following direcve(s):
Machine Direcve 2006/42/EC
declare under our sole responsibility that:
Model(s): S45CNR Roong Coilnailer
is in conformity with the applicable essenal health
and safety requirements of the following docu-
ments:
EN792-13:2000+A1:2008
Signed by: Peter van der Wel
Posion: Director
Place of DOC: Senco Brands, BV.
Geurdeland 17E
6673 DR Andelst
The Netherlands
On Date: January 22, 2016
KONFORMITÄTSERKLÄRUNG
Wir Senco Brands, BV.
von Geurdeland 17E
6673 DR Andelst, The Netherlands
in Übereinsmmung mit den folgenden Richtlinien:
Maschinenrichtlinie 2006/42/EG
erklären in alleiniger Verantwortung, dass:
Modell/Modelle: S45CNR Roong Coilnailer
den geltenden Gesundheits- und Sicherheitsanforderungen entspricht, so wie sie in den folgenden
Dokumenten festgehalten werden:
EN792-13:2000+A1:2008
Unterschrieben von: Peter van der Wel
Posion: Director
Ort der Erklärung: Senco Brands, BV.
Geurdeland 17E
6673 DR Andelst
The Netherlands
Ursprüngliche Herausgabe:
22. Januar, 2016
CONFORMITEITSVERKLARING
Wij Senco Brands, BV.
uit Geurdeland 17E
6673 DR Andelst, The Netherlands
in overeenstemming met de volgende richtlijn(en):
Machinerichtlijn 2006/42/EC
verklaren onder onze eigen verantwoordelijkheid
dat:
Model(len): S45CNR Roong Coilnailer
in overeenstemming is met de toepasselijke essenele gezondheids-en veiligheidseisen van de volgende
documenten:
EN792-13:2000+A1:2008
Ondertekend door: Peter van der Wel
Funce: Directeur
Locae van doc.: Senco Brands, BV.
Geurdeland 17E
6673 DR Andelst
The Netherlands
Originale uitgave: 22 januari 2016
DÉCLARATION DE CONFORMITÉ
Nous, Senco Brands, BV.
sis au Geurdeland 17E
6673 DR Andelst, The Netherlands
conformément à la (aux) direcve(s) suivante(s):
Machine Direcve 2006/42/EC
déclarons, en vertu de notre responsabilité exclusive, ce qui suit :
Modèle(s) : S45CNR Roong Coilnailer
est conforme aux exigences essenelles applicables
en maère de santé et de sécurité, telles que spulées dans les documents ci-dessous :
EN792-13:2000+A1:2008
Signé par : Peter van der Wel
Poste : Directeur
Lieu du document : Senco Brands, BV.
Geurdeland 17E
6673 DR Andelst
The Netherlands
Version iniale : 22 janvier 2016
YHDENMUKAISUUSVAKUUTUS
Me Senco Brands, BV.
osoieesta Geurdeland 17E
6673 DR Andelst, The Netherlands
seuraavien direkivien mukaises:
Konedirekivi 2006/42/EY
julistamme yksinomaisella vastuullamme, eä:
Malli(t): S45CNR Roong Coilnailer
on seuraavien asiakirjojen soveltuvien olennaisten
työsuojeluvaamusten mukainen:
EN792-13:2000+A1:2008
Allekirjoitus: Peter van der Wel
Asema: Johtaja
Antopaikka: Senco Brands, BV.
Geurdeland 17E
6673 DR Andelst
The Netherlands
Alkuperäisjulkaisu: 22 tammikuu 2016
ERKLÆRING OM SAMSVAR
Vi, Senco Brands, BV.
med adresse Geurdeland 17E
6673 DR Andelst, The Netherlands
erklærer i henhold l følgende direkv(er):
Maskindirekv 2006/42/EF
under vårt eneansvar at:
modell(er): S45CNR Roong Coilnailer
er laget i henhold l gjeldende grunnleggende
bestemmelser for helse og sikkerhet i følgende
dokumenter:
EN792-13:2000+A1:2008
Underskrevet av: Peter van der Wel
Slling: Direktør
Dokumentets sted: Senco Brands, BV.
Geurdeland 17E
6673 DR Andelst
The Netherlands
Opprinnelig utstedt: januar 22, 2016
42
Page 43

FÖRSÄKRAN OM ÖVERENSSTÄMMELSE
Vi, Senco Brands, BV.
med adress Geurdeland 17E
6673 DR Andelst, The Netherlands
förklarar i enlighet med följande direkv:
Machindirekv 2006/42/EG
och under vårt eget ansvar a:
Modell(er): S45CNR Roong Coilnailer
uppfyller gällande hälso- och säkerhetsföreskrier
angivna i följande document:
EN792-13:2000+A1:2008
Undertecknat av: Peter van der Wel
Posion: Director
Plats för konformitetsbekräelsen:
Senco Brands, BV.
Geurdeland 17E
6673 DR Andelst
The Netherlands
Originalet utställt: 22 januar 2016
OVERENSSTEMMELSES DEKLARATIONEN
Vi Senco Brands, BV.
på Geurdeland 17E
6673 DR Andelst, The Netherlands
i overensstemmelse med følgende direkv(er):
Maskindirekv 2006/42/EF
erkærer under eget ansvar, at:
Model(ler): S45CNR Roong Coilnailer
er i overensstemmelse med de gældende, obligatoriske sundheds- og sikkerhedskrav i følgende
dokumenter:
EN792-13:2000+A1:2008
Underskrivet af: Peter van der Wel
Slling: Direktør
Stedet for DOC: Senco Brands, BV.
Geurdeland 17E
6673 DR Andelst
The Netherlands
Original udgave: 22 januari 2016
DICHIARAZIONE DI CONFORMITÀ
La società Senco Brands, BV.
indirizzo Geurdeland 17E
6673 DR Andelst, The Netherlands
conformemente alle seguen direve:
Direva macchine 2006/42/CE
dichiara soo la propria esclusiva responsabilità che:
Modelli: S45CNR Roong Coilnailer
è conforme ai requisi essenziali di salute e sicurezza
previs dai seguen documen:
EN792-13:2000+A1:2008
Firmato: Peter van der Wel
Posizione: Direori
Luogo di emissione: Senco Brands, BV.
Geurdeland 17E
6673 DR Andelst
The Netherlands
Edizione originale: 22 gennaio
DECLARACIÓN DE CONFORMIDAD
Nosotros, Senco Brands, BV.
dirección legal Geurdeland 17E
6673 DR Andelst, The Netherlands
y de acuerdo con la(s) direcva(s) siguiente(s):
Direcva 2006/42/EC sobre máquinas
declaramos bajo nuestra entera responsabilidad
que:
Modelo(s): S45CNR Roong Coilnailer
se ajusta a los requisitos esenciales de salud y segu-
ridad establecidos en los documentos siguientes:
EN792-13:2000+A1:2008
Firmada por: Peter van der Wel
Cargo: Director
Procedencia de
los documentos: Senco Brands, BV.
Geurdeland 17E
6673 DR Andelst
The Netherlands
Emisión original: 22 de enero 2016
DEKLARACJA ZGODNOŚCI
My Senco Brands, BV.
Z siedzibą w Geurdeland 17E
6673 DR Andelst, The Netherlands
w zgodzie z następującymi dyrektywami: Dyrektywa
Maszynowa 2006/42/EC
deklarujemy z pełną odpowiedzialnością, że
Modele: S45CNR Roong Coilnailer
są zgodne z normami bezpieczeństwa zawartymi w
następujących dokumentach:
EN792-13:2000+A1:2008
Podpisano: Peter van der Wel
Stanowisko: Dyrektor
Położenie dokumentu:
Senco Brands, BV.
Geurdeland 17E
6673 DR Andelst
The Netherlands
Data: 22 styczeń 2016
43
Page 44

1. Senco Professional End User Warranty Policy
Considering the following constraints Senco underwrites the reliability and the quality of its supplied authorised Senco
branded products.
1.1 Senco warrants to the end user that the following products will be free from defects in construction, assembly and material
for the warranty period specified below.
1.2 The warranty period starts on the day the end user purchases the product and/or 1 year after the tool has been deleted
from the product line, which ever date comes first.
1.3 To claim warranty the end user needs to send the defective products or their parts, including the serial number and the
original and dated sales receipt or proof of purchase from the original retailer or dealer, freight prepaid to the original
retailer or dealer.
1.4 Senco is not obliged to do any repairs or replacements on any products or their parts on site.
1.5 During the warranty period Senco or its distributors will repair or replace defective products or their parts, exclusively or
mainly as a result of an imperfection in construction, assembly or material, at Senco’s option and expense, subject to the
constraints of this warranty policy.
1.6 The repair or replacement of products or their parts under warranty, does in no case lead to prolongation of the warranty
period. For every replacement product or part, the remaining original warranty period of the replaced product or part is
applicable.
1.7 Senco will become the owner of the products or parts that have been replaced by Senco or its distributors as a result of
being compliant to Senco’s warranty, without being obligated any compensation in this matter.
1.8 Excluded from the warranty are:
normal wear and tear parts, for example rubber o-rings, seals, driver blades, piston stops, piston/driver assemblies,
isolators, drive belts, air filters and fuel systems, bits;
any imperfection that is a result of or has evolved from the fact that there has not been used clean, dry regulated
compressed air and/or the air pressure applied has exceeded the maximum indicated on the tool casting (pneumatic
tools);
any imperfection that is a result of or has evolved from normal wear, misapplication, abuse/misuse, improper
modifications or storage, shipping/transport, accidents, neglect, operation at other than recommended speeds or
voltage (electric units only);
any imperfection that is a result of or has evolved from explosions, fires and natural disasters, like hurricanes, floods
and earthquakes;
Any imperfection that is a result of or has evolved from not following operating instructions, specifications and / or
maintenance schedules. Read the Operator Manual for use, specifications and maintenance instructions;
Any imperfection that is caused by repairs, modifications to the product or attempts to do so by the end user or any
third party;
Labour charges or loss or damage resulting from improper operation, maintenance or repairs are not covered by this
warranty
Any warranty claims that have been received after the warranty period, as specified in this end user warranty, has
expired.
1.9 Additional costs like shipping/transport, special packaging requirements and costs of travel and accommodation, are at the
end users expense.
1.10 If a complaint is unfounded, all costs incurred thereby, including handling, inspection, shipping and administrative costs on
the side of Senco or its distributors, will be charged to the end user.
1.11 After expiration of the warranty period, all costs for repair or replacement, including handling, inspection, shipping and
administrative costs will be charged to the end user.
1.12 Notwithstanding legal limitation periods, the limitation of all claims and appeals against Senco and third parties involved by
Senco for the implementation of the agreement is one year.
1.13 If Senco fails to meet this agreement, it will not discharge the end user from the obligations arising under this or any other
contract.
1.14 When the warranty terms can not be met, due to for example import or export prohibitions, strikes or other unforeseen
circumstances, the warranty period will be extended accordingly.
1.15 Senco's liability is limited to the warranty. Senco is not liable for damage caused by the functioning or non-functioning of
the products as delivered, repaired or modified by Senco or its distributors, including but not limited to, production losses,
profit losses, reduced working range, commercial losses or consequential damages or indirect damages whatsoever.
Product Warranty period
Senco ® XP Series-Red Cap, pneumatic tools Five years
Senco ® XP Series-Black Cap, pneumatic tools Two years
Senco Pro Series, pneumatic tools One year
Senco Semi-Pro Series, pneumatic tools One year
Senco DuraSpin ® Series, electric and battery tools One year
Senco Cordless battery tools Two years
Senco batteries and chargers for tools One year
Senco gas tools Two years
Senco Reconditioned Products One year
Senco other tools One year
Senco Compressors One year
www.senco-emea.com
GB
D
NL
F
FIN
N
S
DK
E
I
PL
RUS
TR
44
Page 45

45
Page 46

46
 Loading...