

Page 1
MULTIPLE HITS
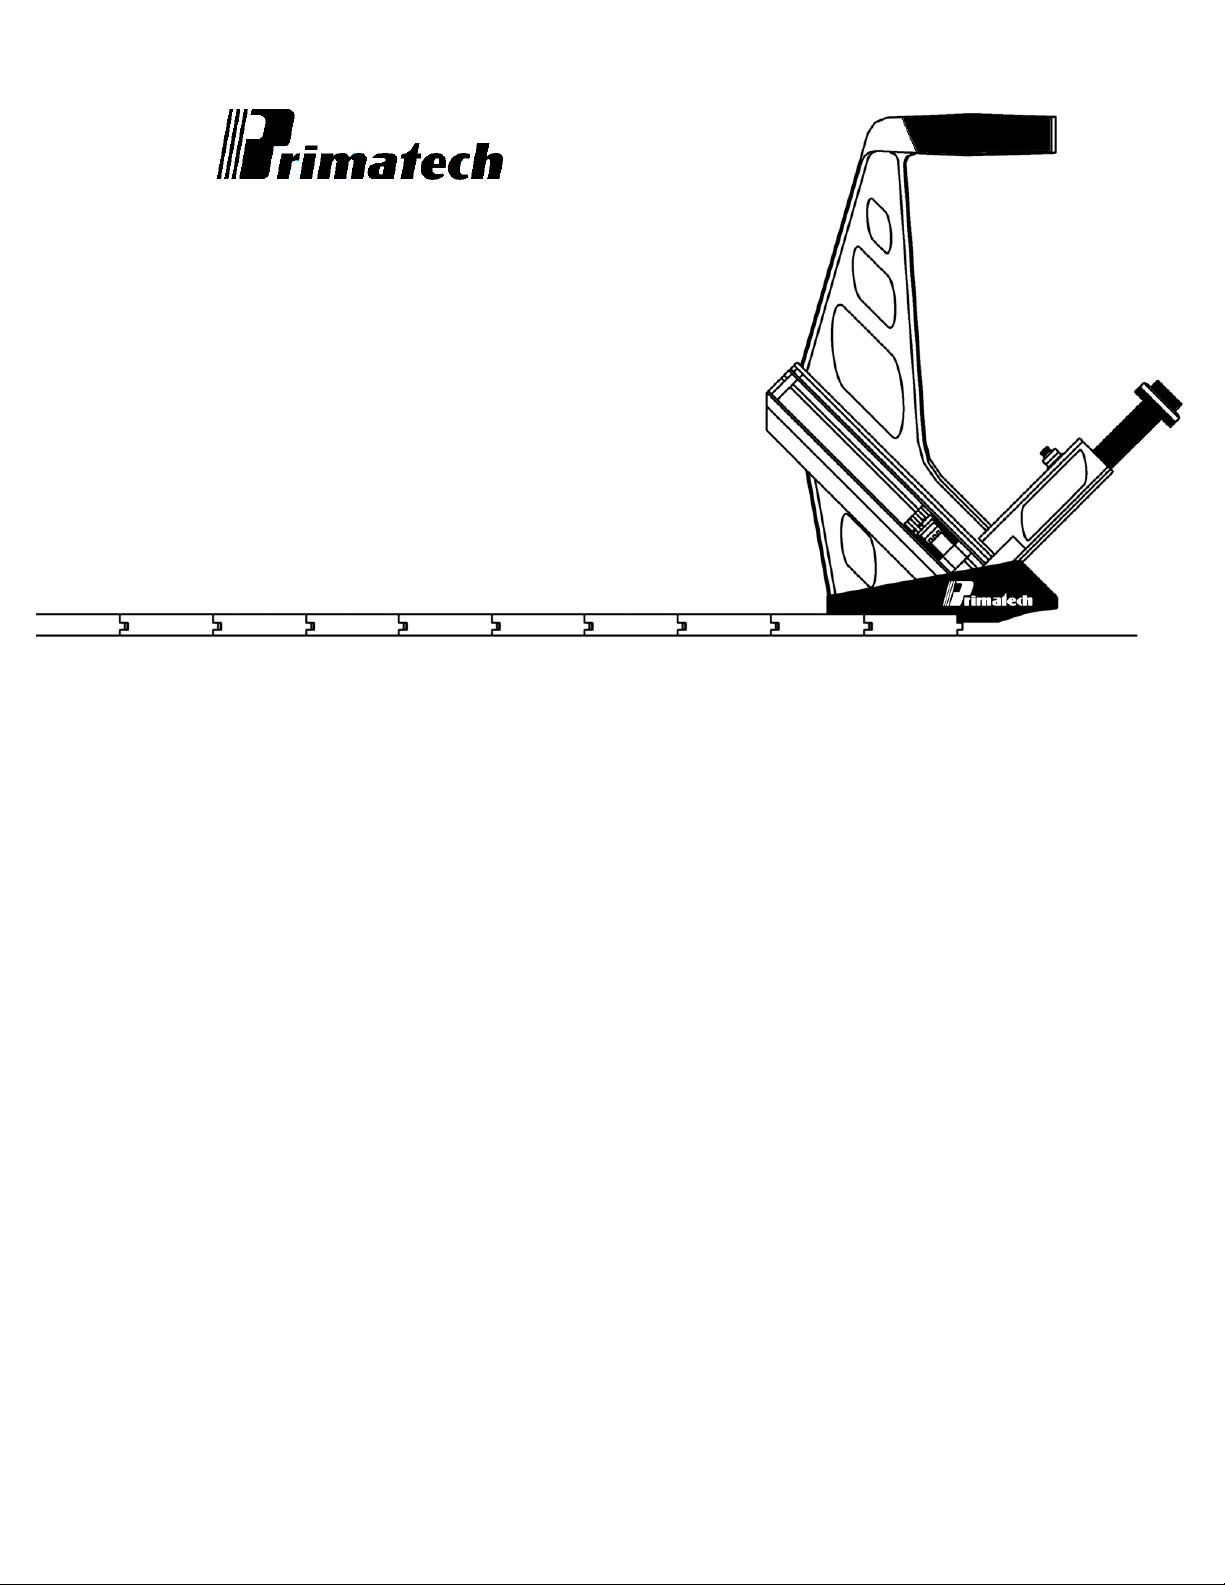
HARDWOOD FLOORING NAILER
MODEL H330
This improved version of our popular hardwood flooring nailer model H330 has been specially developed to address the
need of the professional as well as the DIY or novice floor installer. Its ratcheted design allows the user to strike the nailer
as many times as necessary to countersink the cleat. Hold the nailer in position until the plunger returns to its up position;
then move it to the next location. It's that easy!
The PRIMATECH H330 comes standard to accommodate 1½" (38 mm), 1¾" (44 mm) or 2" (50 mm) L-type cleats or may
be ordered or converted later to accommodate 2" T-type cleats. A unique design of the L guide and feed assembly
provide strong support to the cleat during operation, both front and back, allowing multiple strokes without bending.
For superior performance, use only PRIMATECH cleats
Cette version améliorée de notre populaire cloueur à rochet modèle H330 a été spécialement conçue autant pour les
professionnels qu'aux bricoleurs ou apprentis-installateurs. Cet outil permet à l'opérateur d'enfoncer un clou en donnant
plusieurs coups de marteau. Il suffit de tenir le cloueur en place jusqu'à ce que le piston remonte à sa position initiale.
C'est aussi simple que cela!
Le cloueur P RIMATECH H330 peut accommoder en configuration standard les clous en "L" de 2", 1¾" ou 1½". Il peut aussi
être commandée ou convertie pour accommoder les clous de 2" avec une tête en "T". Sa conception unique fournit un
support au clou durant l'opération, permettant l'enfoncement du clou en plusieurs coups, même dans les situations les
plus exigeante.
Pour un meilleur résultat, utiliser seulement les clous PRIMATECH
Primatech, Québec, QC, Canada, (418) 522-7744, fax: 522-7466
Printed in Canada / Imprimé au Canada 11/07
Page 2
OPERATION OF THE PRIMATECH H330 DIY NAILER
INSTRUCTIONS D'UTILISATION DU CLOUEUR H330
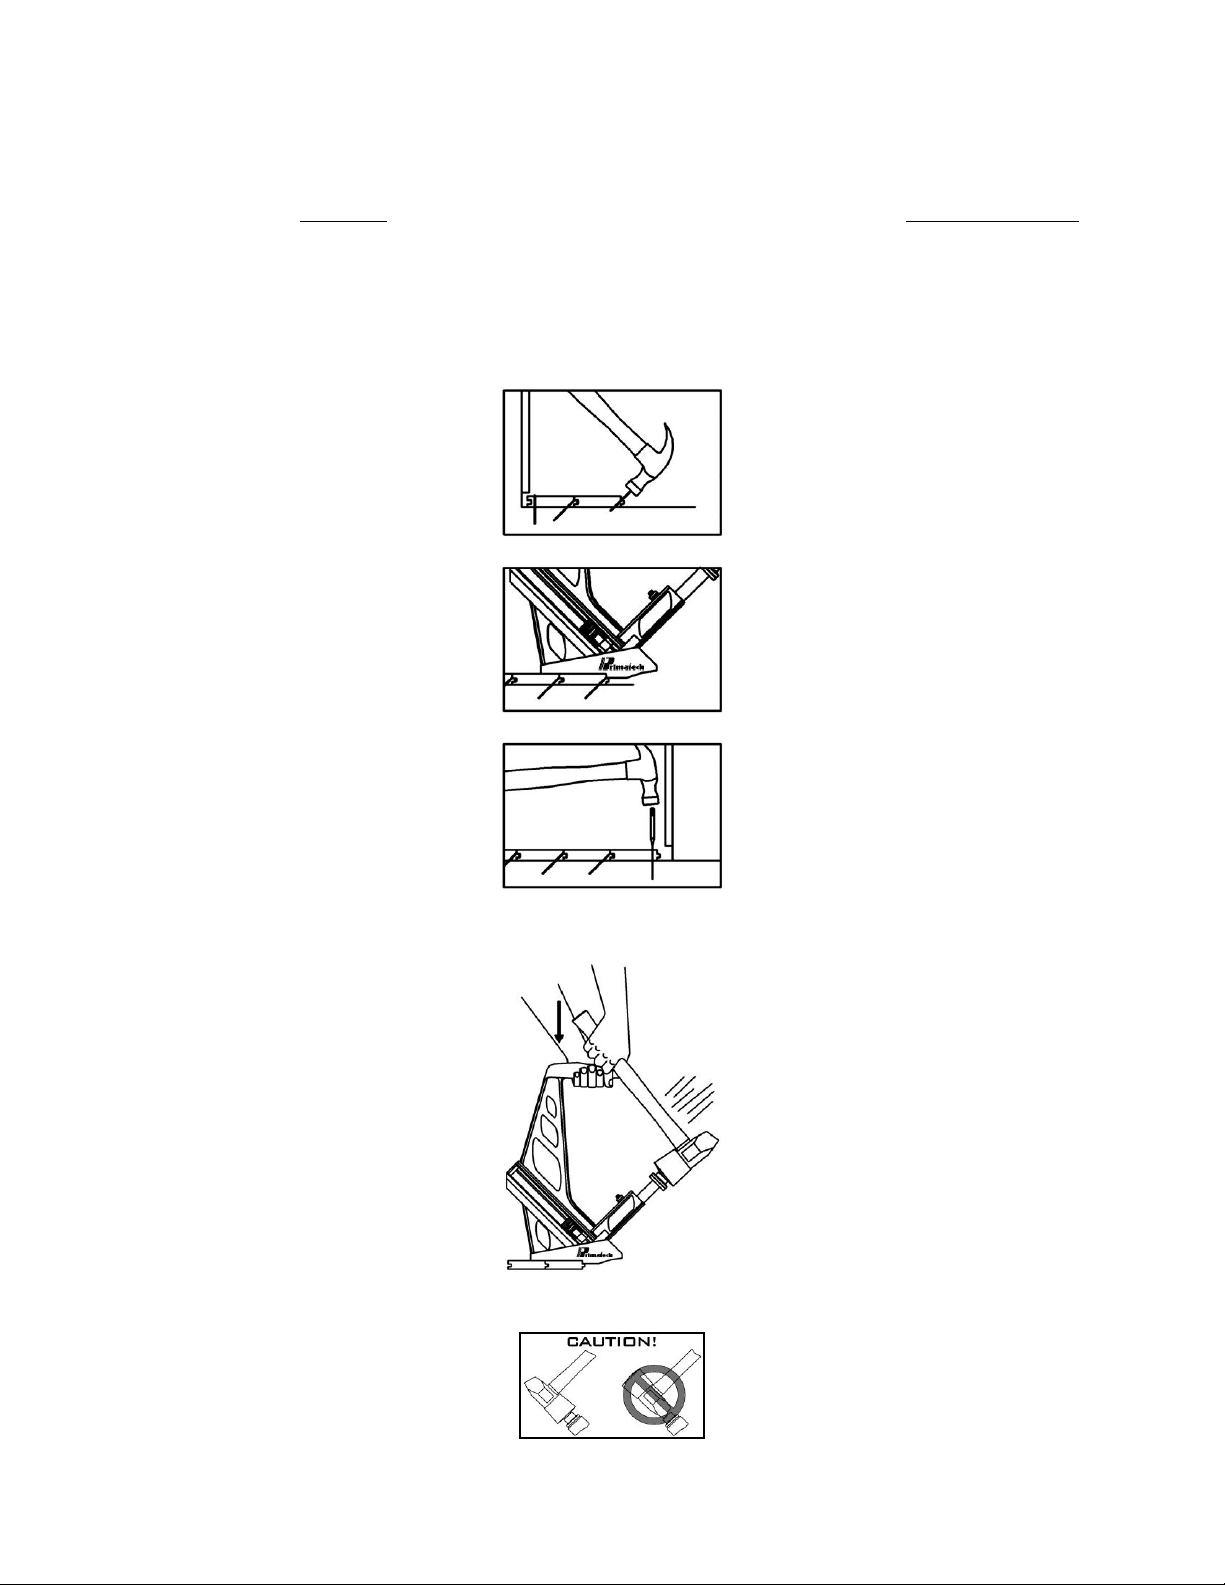
Using the rubber capped mallet that is provided with your nailer, tap the
flooring into place.
Strike the nailer plunger with the rubber end of the mallet to drive the
cleat. The PRIMATECH H330 is designed to be struck several times in
order to countersink the nail.
The nailer must be held firmly, flat on the surface of the hardwood floor
and hit repeatedly until the plunger returns to its upright position.
HARDWOOD FLOOR INSTALLATION
1. With an expansion space, drill the face of the
flooring and use finishing nails for the first row as
shown. Use a nail set to countersink the nails and
fill the hole with a matching putty.
2. For the next few rows, drill at 45° angle at the
tongue and use finishing nails as shown.
3. Using your DIY multiple hit nailer, fix the flooring
at the 45° pre-determined angle. Nail at 3" from the
ends and at every 10-12".
Utiliser la face caoutchoutée du marteau fourni avec le cloueur pour
bien placer le plancher.
Frapper le piston du cloueur avec l'embout caoutchouté du marteau.
Le cloueur PRIMATECH H330 est conçue pour être frappée à plusieurs
reprises afin de bien enfoncer le clou.
Le cloueur doit être maintenue fermement à plat sur la surface du
plancher et frappée à répétition jusqu'à ce que le piston remonte à sa
position initiale.
INSTALLATION DE PLANCHER DE BOIS FRANC
1. Prévoir un espace d'expansion et percer le bois
pour y enfoncer des clous de finition, tel que
montré. Noyer les clous à l'aide d'un chasse-clou
et masquer les trous avec un mastic assorti.
2. Percer le bois à 45° près de la languette et
utiliser des clous de finition pour les quelques
rangées suivantes.
3. Utiliser votre cloueur DIY H330 pour fixer les
planches à l'angle de 45° pré-déterminé. Clouer à
3" des bouts et à tous les 10-12".
4. At the other end when it is no longer possible to
use the nailer, repeat the procedure in [1] and [2]
for the last rows.
Take particular attention when striking the nailer.
Make sure that it seats firmly on the hardwood floor
by applying a vertical pressure to keep it well
seated on the floor. Sometimes, while striking the
nailer, the hand holding the nailer has a tendency
of lifting the front of the nailer for a moment. This
causes the nail to bend as the nailer moves during
the stroke. To prevent this, you may lean your foot
on the base.
CAUTION
RUBBER TO METAL
NEVER WITH THE STEEL END
4. En bordure des murs, lorsqu'il n'est plus
possible d'utiliser le cloueur, répéter la procédure
décrite en [1] pour les derniers rangs.
Il faut porter une attention particulière lorsqu'on
frappe pour enfoncer un clou. Il faut bien s'assurer
de bien appuyer le cloueur sur le plancher en
appliquant une pression verticale sur le cloueur
pour l'empêcher de se déplacer. Il peut arriver
que lorsqu'on frappe, la main tenant le cloueur
soulève involontairement la semelle du plancher.
Pour éviter que cela ne se produise, on peut
appuyer son pied sur la semelle.
ATTENTION
TOUJOURS FRAPPER AVEC
L'EMBOUT DE CAOUTCHOUC
JAMAIS AVEC LE MÉTAL
Page 3

ADJUSTING THE H330 NAILER FOR
HARDWOOD THICKNESS
AJUSTEMENT DU CLOUEUR H330
SELON L’ÉPAISSEUR DES PLANCHES
To fasten 3/4" or 25/32" flooring, no
adjustment to the tool is required. Use the
standard H-108 plastic base (black).
To fasten 1/2" flooring, install optional plastic
base H-188. If necessary, use one or two
shims (supplied) to insure that the gate/foot
do not sit on the tongue. Insert shims between
main body and plastic base as shown.
To fasten 33/32" flooring, remove plastic base
as shown. You may apply the self-adhesive
thin base P-986 (optional).
Aucun ajustement n’est requis pour clouer
des planches de 3/4" ou 25/32". Utilisez la
semelle standard H-108 (noire).
Pour clouer des planches de 1/2", enlevez la
semelle noire H-108 et installez la semelle
H-188. Insérez une ou deux cales (fournies) si
nécessaire, afin que les plaques ne
s’appuient pas sur la languette. Insérez les
cales entre le bâti principal et la semelle tel
qu’illustré.
Pour clouer des planches de 33/32", enlevez
la semelle. Vous pouvez appliquer la semelle
adhésive P-986 (fournie en option).
MAINTENANCE
Your nailer H330 should require little maintenance. In case the
driving blade, spring or blade retainer need to be replaced, follow
these instructions:
1)Remove the hitch pin H-034.
2)Pull out pin H-033, releasing plunger H-119
3)Change as required the driving blade H-038, the spring
H-045 or the blade retainer H-158
4)Depress the plunger H-119 and put pin H-033 back to its
position.
5)Replace the hitch pin H-034
IMPORTANT - The driving blade H-038 is made of the highest
quality steel. It is exposed to the full impact of the hammer. Even
under normal conditions, it is subjected to wear or damage and
may need to be replaced. Always keep some spares at the job
site.
For additionnal information, contact Primatech or consult our
24-hours On-Line Technical Support site at:
ENTRETIEN
Votre cloueur H330 requiert peu d'entretien. Voici la procédure
à suivre pour remplacer la tige de poussée, le ressort ou le
caoutchouc de retenue:
1)Enlever la goupille H-034.
2)Retirer la tige de butée H-033, libérant le piston H-119.
3)Remplacer si nécessaire la tige de poussée H-038, le
ressort H-045 ou le caoutchouc de retenu H-158.
4)Rabaisser le piston H-119 et remettre la tige de butée H-033
en place.
5)Replacer la goupille H-034.
IMPORTANT - La tige de poussée H-038 est soumise à la pleine
force de l'impact du marteau. Il est normal qu'elle s'use ou
même se brise à l'occasion. Il est recommandé de toujours
conserver quelques tiges de rechange.
Pour des informations supplémentaires, contactez Primatech ou
consultez le service en ligne à:
www.primatech.ca/support
www.primatech.ca/support
Page 4

H330
Body H-002 Bâti
Screws H-013 Vis
Ratchet assembly H-020 Rochet assemblé
Pin H-033 Tige de butée
Hitch pin H-034 Goupille
Dowel pins H-036 Goupilles
Bolts H-037 Boulons
Driving blade H-038 Tige de poussée
Spring H-045 Ressort
"T" feeder channel H-049 Magasin "T"
Spring/clip H-055 Coulisseau
Replacement band H-085 Élastique
Reinforcement block H-087 Bloc de renfort
Plastic base H-108 Semelle
Plunger H-119 Piston
Channel assembly H-130 Guide assemblé
Foot H-144 Pied
"L" feeder channel H-150 Magasin "L"
Grip H-154 Gaine
Blade retainer H-158 Caoutchouc de retenu
"T" gate H-241 Guide "T"
"L" gate H-343 Guide "L"
Ratchet pin assy H-922 Axe du rochet
 Loading...