


English
Motorcycle Bluetooth®
Communication System
www.sena.com |
User’s Guide |

10S
© 1998-2016 Sena Technologies, Inc. All rights reserved.
Sena Technologies, Inc reserves the right to make any changes and improvements to its product without providing prior notice.
Sena™ is a trademark of Sena Technologies, Inc. or its subsidiaries in the USA and other countries. Prism™, Bluetooth Audio Pack for GoPro®, Tufftalk™, 20S™, 10S™, 10C™, 10U™, 10R™, 3S™, SMH10™, SMH10R™, SMH5™, SMH5-FM™, SMH3™, SPH10™, SPH10H™, SPH10H-FM™, SPH10S™, Expand™, Bluetooth Mic&Intercom™, Handlebar Remote™, Wristband Remote™, SM10™, SR10™, SR10i™ are trademarks of Sena Technologies, Inc. or its subsidiaries. These trademarks may not be used without the express permission of Sena.
GoPro® is a registered trademark of Woodman Labs of San Mateo, California. Sena Technologies, Inc. (“Sena”) is not affiliated with Woodman
Labs. The Sena Bluetooth Pack for GoPro® is an after-market accessory specially designed and manufactured by Sena Technologies, Inc. for the GoPro® Hero3 and Hero4 allowing for Bluetooth capabilities.
The Bluetooth® word mark and logos are owned by the Bluetooth SIG, Inc. and any use of such marks by Sena is under license. iPhone, iPod touch are registered trademarks of Apple Inc. Zumo™ is a trademark of Garmin Ltd. or its subsidiaries. TomTom™ is the trademark or registered trademark owned by TomTom International B.V. Other trademarks and tradenames are those of their respective owners.

10S
CONTENTS
1 |
INTRODUCTION........................................................................................................ |
5 |
|
2 |
PACKAGE CONTENTS............................................................................................. |
6 |
|
3 |
INSTALLING THE 10S ON YOUR HELMET............................................................ |
8 |
|
|
3.1 |
Installing the Main Unit............................................................................................................ |
9 |
|
3.2 |
Installing the Speakers.......................................................................................................... |
11 |
|
3.3 |
Installing the Microphones.................................................................................................... |
12 |
4 |
GETTING STARTED.............................................................................................. |
14 |
|
|
4.1 |
Button Operation.................................................................................................................... |
14 |
|
4.2 |
Powering On and Off............................................................................................................. |
15 |
|
4.3 |
Charging................................................................................................................................ |
15 |
|
4.4 |
Low Battery Warning............................................................................................................. |
15 |
|
4.5 |
Checking the Battery Level................................................................................................... |
15 |
|
4.6 |
Volume Adjustment................................................................................................................ |
16 |
|
4.7 |
Sena Softwares...................................................................................................................... |
16 |
5 |
PAIRING THE 10S WITH BLUETOOTH DEVICES............................................... |
17 |
|
|
5.1 |
Mobile Phone Pairing - Mobile Phone, Bluetooth Stereo Device.......................................... |
17 |
|
5.2 |
Second Mobile Phone Pairing - Second Mobile Phone, GPS, and SR10............................ |
18 |
|
5.3 |
Advanced Selective Pairing - A2DP Stereo or Handsfree.................................................... |
19 |
|
5.4 |
Intercom Pairing..................................................................................................................... |
20 |
6 |
MOBILE PHONE, GPS, SR10................................................................................ |
22 |
|
|
6.1 |
Mobile Phone Call Making and Answering........................................................................... |
22 |
|
6.2 |
Speed Dialing........................................................................................................................ |
22 |
|
6.3 |
GPS Navigation...................................................................................................................... |
23 |
|
6.4 |
Sena SR10, Two-Way Radio Adapter.................................................................................... |
23 |
7 STEREO MUSIC..................................................................................................... |
24 |
|
7.1 |
By Bluetooth Wireless Stereo................................................................................................ |
24 |
7.2 |
By Stereo Audio Cable.......................................................................................................... |
25 |
7.3 |
Music Sharing........................................................................................................................ |
25 |
8 |
INTERCOM............................................................................................................. |
26 |
|
|
8.1 |
Two-way Intercom.................................................................................................................. |
26 |
|
8.2 |
Three-way Intercom............................................................................................................... |
27 |
|
8.3 |
Four-way Intercom................................................................................................................. |
29 |
9 |
THREE-WAY CONFERENCE PHONE CALL WITH INTERCOM |
30 |
|
|
PARTICIPANT........................................................................................................ |
||
10 |
GROUP INTERCOM............................................................................................... |
31 |
|
11 |
UNIVERSAL INTERCOM....................................................................................... |
31 |
|
|
11.1 |
Universal Intercom Pairing.................................................................................................... |
32 |
|
11.2 |
Two-way Universal Intercom.................................................................................................. |
33 |
|
11.3 |
Three-way Universal Intercom............................................................................................... |
33 |
|
11.4 |
Four-way Universal Intercom................................................................................................. |
34 |
12 |
FM RADIO............................................................................................................... |
36 |
|
|
12.1 |
FM Radio On and Off............................................................................................................. |
36 |
|
12.2 |
Preset Stations....................................................................................................................... |
36 |
|
12.3 |
Seek and Save....................................................................................................................... |
37 |
|
12.4 |
Scan and Save....................................................................................................................... |
37 |
|
12.5 |
Temporary Preset................................................................................................................... |
38 |
|
12.6 |
Region Selection.................................................................................................................... |
38 |
English

10S
13 |
FUNCTION PRIORITY........................................................................................... |
38 |
|
14 |
CONFIGURATION SETTING................................................................................. |
39 |
|
|
14.1 |
Assigning Speed Dial............................................................................................................ |
40 |
|
14.2 |
Enabling/Disabling Audio Boost............................................................................................ |
40 |
|
14.3 |
Enabling/Disabling Voice Activated Phone Answering........................................................ |
41 |
|
14.4 |
Enabling/Disabling Voice Activated Intercom....................................................................... |
41 |
|
14.5 |
Enabling/Disabling HD Intercom........................................................................................... |
42 |
|
14.6 |
Enabling/Disabling Voice Prompts........................................................................................ |
42 |
|
14.7 |
Enabling/Disabling RDS AF................................................................................................... |
43 |
|
14.8 |
Enabling/Disabling Sidetone................................................................................................. |
43 |
|
14.9 |
Enabling/Disabling Advanced Noise Control™ ................................................................... |
43 |
|
14.10 Delete All Bluetooth Pairing Information............................................................................. |
44 |
|
|
14.11 Remote Control Pairing....................................................................................................... |
44 |
|
|
14.12 Universal Intercom Pairing.................................................................................................. |
44 |
|
|
14.13 Exit Voice Configuration Menu............................................................................................ |
44 |
|
15 |
REMOTE CONTROL.............................................................................................. |
45 |
|
|
15.1 |
Pairing with the Handlebar Remote....................................................................................... |
45 |
|
15.2 |
Using the Handlebar Remote................................................................................................ |
46 |
16 |
FIRMWARE UPGRADE.......................................................................................... |
47 |
|
17 |
TROUBLESHOOTING............................................................................................ |
47 |
|
|
17.1 |
Intercom Failure..................................................................................................................... |
47 |
|
17.2 |
Intercom Reconnection......................................................................................................... |
47 |
|
17.3 |
Fault Reset............................................................................................................................. |
48 |
|
17.4 |
Factory Reset......................................................................................................................... |
48 |
CERTIFICATION AND SAFETY APPROVALS............................................................ |
50 |
• FCC Compliance Statement...................................................................................................... |
50 |
• FCC RF Exposure Statement..................................................................................................... |
51 |
• FCC Caution............................................................................................................................... |
51 |
• CE Declaration of Conformity..................................................................................................... |
51 |
• Industry Canada Statement ...................................................................................................... |
51 |
• Bluetooth License ...................................................................................................................... |
52 |
• WEEE (Waste Electrical and Electronic Equipment)................................................................. |
52 |
SAFETY INFORMATION.............................................................................................. |
52 |
• Product Storage and Management............................................................................................ |
52 |
• Product Use................................................................................................................................ |
53 |
• Battery........................................................................................................................................ |
53 |
PRODUCT WARRANTY AND DISCLAIMER............................................................... |
54 |
• Limited Warranty......................................................................................................................... |
54 |
• Warranty Exclusions................................................................................................................... |
56 |
• Warranty Service........................................................................................................................ |
58 |
18 OPERATION QUICK REFERENCE....................................................................... |
49 |

|
|
|
10S |
|
|
|
|
|
|
|
|||
|
|
|
The 10S features: |
|||
|
1 INTRODUCTION |
|
||||
|
|
• Bluetooth 4.1 |
||||
|
|
|
• Multi-way intercom up to 4 connections |
|||
|
|
|
||||
Thank you for choosing the Sena 10S, Motorcycle Bluetooth |
• Bluetooth intercom up to 1.6 kilometers (1.0 miles)* |
|||||
Communication System. With the 10S, you can call handsfree on your |
• Smartphone App for iPhone and Android |
|||||
Bluetooth mobile phone, listen to stereo music or voice instructions of |
• Universal Intercom™ |
|||||
GPS navigations wirelessly, and have intercom conversations in full |
||||||
• Music Sharing |
||||||
duplex with a passenger or other motorcycle riders. |
||||||
• Intuitive voice prompts |
||||||
|
|
|
||||
The 10S is compliant with the Bluetooth 4.1 supporting the following |
• Advanced Noise Control™ |
|||||
profiles: Headset Profile, Hands-Free Profile (HFP), Advanced Audio |
• Easy operation by versatile Jog Dial |
|||||
Distribution Profile (A2DP), and Audio Video Remote Control Profile |
• Can be used while charging on road trips |
|||||
(AVRCP). Please check with the manufacturers of other device to |
||||||
• Water resistant for use in inclement weather |
||||||
determine their compatibility with this headset. |
||||||
• Built-in FM radio tuner with a station scan and save function |
||||||
|
|
|
||||
Please read this User’s Guide carefully before using the headset. Also |
• Optional Handlebar Remote support (not included) |
|||||
check www.sena.com for the latest version of the User’s Guide and |
• Firmware upgradeable |
|||||
additional information related to Sena Bluetooth products. |
|
|
|
|||
|
|
|
* in open terrain |
|||
English
5

10S
Key Specifications:
•Bluetooth 4.1
•Supporting profiles: Headset Profile, Hands-Free Profile (HFP), Advanced Audio Distribution Profile (A2DP), and Audio Video Remote Control Profile (AVRCP).
2 PACKAGE CONTENTS
• Headset Main Unit
• Clamp Unit
• Glued Surface Mounting Adapter
6

10S
Speaker
• Speakers (2)
• Hook and Loop Fasteners for Speakers (4) 
•Speaker Pads (Thick) (2) 
•Speaker Pads (Thin) (2) 
Wired Microphone
• Wired Microphone
• Hook and Loop Fastener for Wired Microphone 
Wired Boom Microphone
•Wired Boom Microphone 
•Hook and Loop Fastener for Wired Microphone 
•Microphone Sponges (2) 
•Boom Microphone Holder 
•Hook and Loop Fastener for Boom Microphone Holder
English
7

10S
Others
• USB Power & Data Cable
•Allen Wrench 
•Cigarette Charger 


•2.5 to 3.5mm Male to Male Stereo Audio Cable
3 INSTALLING THE 10S ON YOUR HELMET

 MP3 Port
 Microphone Connector

 Left Speaker Connector
Earbud Port
Right Speaker Connector
10S Clamp Unit
8
10S
3.1 Installing the Main Unit
3.1.1 Using the Clamp Unit
1.Loosen the two screws on the back plate of the clamp unit with the included allen wrench.
 1
1

2
2.Insert the back plate of the clamp unit between the internal padding and external shell of the left side of the helmet.
3.Tighten the two screws until the clamp unit is fastened firmly to the helmet.
1 |
2
4.Attach the main unit to the clamp unit until you hear a click. The main unit is now fastened to the clamp unit.
2


1
English
9
10S
3.1.2 Using the Glued Surface Mounting Adapter
If you cannot install the clamp unit on the helmet, you can use the glued surface mounting adapter to attach the clamp unit to the surface of the helmet.
1.Clean the area on the left side of the helmet where you will attach the glued surface mounting adapter with a moistened towel and dry thoroughly.
2.Peel off the cover of adhesive tape of the glued surface mounting adapter and attach it to the helmet.
3.Make sure that the glued surface mounting plate sticks on the helmet firmly. Maximum adhesion occurs after 24 hours.
4.Attach the clamp unit on the glued surface mounting adapter using two screws.
 1
1
2
CAUTION:
Sena recommends using the clamp unit. The glued surface mounting adapter is provided for convenience, but is not the recommended mounting method. Sena is not responsible for its use.
5.Attach the main unit to the glued surface mounting adapter until you hear a click. The main unit is now fastened to the clamp unit.
10
10S
3.2 Installing the Speakers
1.Peel off each cover of the hook and loop fasteners for speakers to expose the adhesive surface. Then, attach the fasteners to the ear pockets inside the helmet.
2.Attach the speakers to the hook and loop fasteners for speakers inside the helmet.
3.Align the arrows on the clamp unit and speaker cables and insert speaker cables into each speaker connector.
Note:
1.Three cables connect to the clamp unit. The longest is the cable for the right speaker. The second longest cable is for the left speaker. The shortest cable is for the microphone.
2.If the helmet has deep ear pockets, you can use the speaker pads to bring the speakers closer to your ears.
English
11

10S
3.3 Installing the Microphones
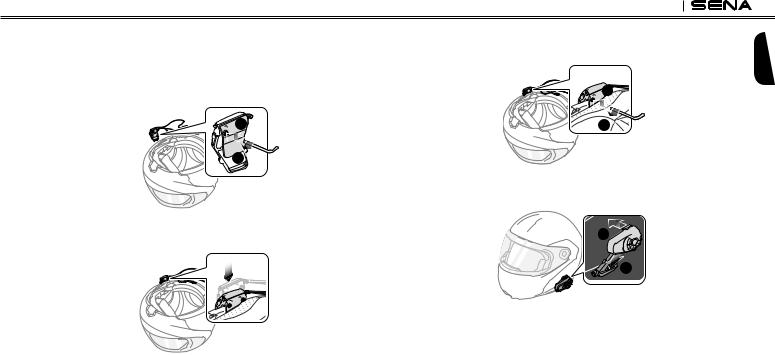
3.3.1 Using the Wired Boom Microphone
1.Peel off the cover of the hook and loop fastener for wired boom microphone to expose the adhesive tape. Then, attach the hook and loop fastener on the inside surface of the left external shell.
2.Attach the wired boom microphone’s mounting plate to the hook and loop fastener.
Note:
1.After you install the wired boom microphone, make sure you reinstall the helmet’s internal padding.
2.You can use the boom microphone holder after attaching the hook and loop fastener for boom microphone holder on it to ensure secure installation.
3.Make sure that the microphone’s receiver is located near your mouth.
12

10S
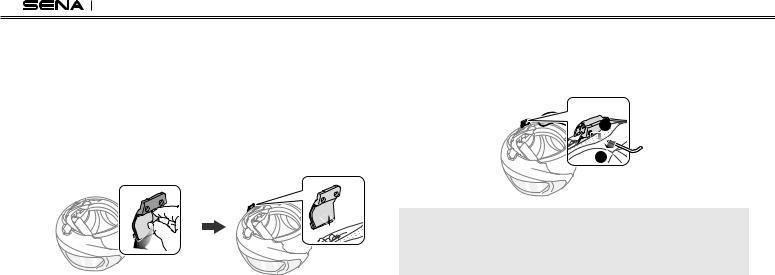
4.Adjust the head of the microphone so that the tab is facing away from your mouth.
Tab 

5.Align the arrows on the clamp unit and microphone cables and insert the microphone cable into the microphone connector.
Note:
Three cables connect to the main unit. The longest is the cable for the right speaker. The second longest cable is for the left speaker. The shortest cable is for the microphone.
3.3.2 Using the Wired Microphone
If you have a full face helmet, you can use the wired microphone.
1.Peel off the cover of the hook and loop fastener for wired microphone to expose the adhesive tape. Then, attach the hook and loop fastener on the inside of the helmet’s chin guard.
2.Attach the wired microphone to the hook and loop fastener for wired microphone.
English
13

10S
3.Align the arrows on the clamp unit and microphone cables and insert the microphone cable into the microphone connector.
Note:
1.After connecting all cables, store any excess cables behind the internal padding of helmet to prevent wires from becoming damaged.
2.Three cables connect to the main unit. The longest is the cable for the right speaker. The second longest cable is for the left speaker. The shortest cable is for the microphone.
CAUTION:
When you remove the headset, make sure that you first detach all cables from the clamp unit. Then it is safe to remove the main unit and clamp unit in order.
4GETTING STARTED
4.1Button Operation
|
Jog Dial |
Status LED |
• Answer and end a mobile phone call |
• Reject an incoming mobile phone call |
|
|
• Start and end an intercom conversation |
|
• Volume adjustment by rotating |
|
• Play and pause Bluetooth stereo device |
|
• Track-forward and track-back by rotating while |
|
pressing the button |
|
• Enter into intercom pairing mode |
|
• Enter into voice configuration setting |
|
• Navigate through configuration menu |
|
• Seek FM radio station |
Charging |
|
LED |
Phone Button |
|
• Answer and end a mobile phone call |
|
• Speed dial |
|
• Call transfer between mobile phone and headset |
DC Power Charging & |
• Enter into mobile phone pairing mode |
• Enter into Bluetooth stereo device pairing mode |
|
Firmware Upgrade Port |
• Enter into factory reset mode |
|
• Turn on/off FM radio |
10S Headset Buttons
14

10S
4.2 Powering On and Off
To power on the headset, press the Phone Button and the Jog Dial at the same time while hearing ascending beeps and a voice prompt, “Hello”. To power off the headset, press the Phone Button and the Jog Dial at the same time while hearing descending beeps and a voice prompt, “Goodbye”.
4.3 Charging
You can charge the headset by connecting the supplied USB power & data cable into a computer’s USB port or USB wall charger. You can use any standard micro USB cable to charge the units. You can also charge them on the road using the cigarette charger. The charging LED turns red while charging and turns blue when fully charged. It takes about 2.5 hours to be completely charged.
or
AC Adapter
4.4 Low Battery Warning
When the battery is low, the blinking blue LED in stand-by mode turns to red and you will hear mid-tone triple beeps and a voice prompt,
“Low battery”.
4.5 Checking the Battery Level
You can check the battery level in two different ways when the headset is powering on.
4.5.1 LED Indicator
When the headset is powering on, the red LED flashes rapidly indicating the battery level.
4 flashes = High, 70 ~ 100%
3 flashes = Medium, 30 ~ 70%
2 flashes = Low, 0 ~ 30%
4.5.2 Voice Prompt Indicator
When you power on the headset, keep pressing the Phone Button and the Jog Dial simultaneously for about 3 seconds until you hear three, high toned beeps. Then you will hear a voice prompt indicating the battery level. However, if you release the buttons as soon as the headset turns on, you will not hear a voice prompt for the battery level indication.
15
English

10S
4.6 Volume Adjustment
You can easily adjust the volume by rotating the Jog Dial. You will hear a beep when the volume reaches the maximum or minimum level. The volume is set and maintained independently at different levels for each audio source even when you reboot the headset. For example, once you set the volume for mobile phone handsfree, it will not change even if you adjust the volume for your Bluetooth MP3 music. However, if you adjust the volume during stand-by mode, it will affect volume levels of every audio source.
4.7 Sena Softwares
4.7.1 Sena Device Manager
The Sena Device Manager allows you to upgrade the firmware and configure the device settings directly from your PC. Using this software, you can assign speed dial presets, FM radio frequency presets and more. It is available for both Windows and Mac. For more information on downloading the Device Manager, please visit www. sena.com.
4.7.2 Sena Smartphone App
The Sena Smartphone App allows you to configure device settings and read the User’s Guide and the Quick Start Guide. Pair your phone with your 10S headset (please refer to section 5.1, “Mobile Phone Pairing - Mobile Phone, Bluetooth Stereo Device”). Run the Sena
Smartphone App and you can configure its settings directly from your smartphone. You can download the Sena Smartphone App for Android or iPhone from www.sena.com/headset-app/.
16

10S
5PAIRING THE 10S WITH BLUETOOTH DEVICES
Before using the 10S Bluetooth headset with any other Bluetooth devices for the first time, you will need to pair them together. You can pair the 10S with Bluetooth mobile phones, Bluetooth stereo devices such as MP3 players, or motorcycle specific Bluetooth GPS navigation, and with other Sena Bluetooth headsets. The pairing operation is required only once for each Bluetooth device. The headset remains paired with the devices and automatically reconnects to them when they are within range. You will hear a high toned single beep and a voice prompt whenever the headset reconnects to the paired device:
“Phone connected” to a mobile phone, “Media connected” to a Bluetooth stereo device.
5.1Mobile Phone Pairing - Mobile Phone, Bluetooth Stereo Device
1.Press and hold the Phone Button for 5 seconds until you hear a voice prompt, “Phone pairing”.
2.Search for Bluetooth devices on your mobile phone. Select the Sena 10S in the list of the devices detected on the mobile phone.
3.Enter 0000 for the PIN. Some mobile phones may not ask for the PIN.
4.The mobile phone confirms that pairing has been completed and the 10S is ready to use. You will hear a voice prompt, “Your headset is paired”.
5.If the pairing process is not completed within three minutes, the 10S will return to stand-by mode.
Note:
1.If the Bluetooth connection between the headset and a mobile phone is disconnected, tap the Phone Button to recover the Bluetooth connection immediately.
2.If the Bluetooth connection between the headset and a media player is disconnected, press the Jog Dial for 1 second to recover the Bluetooth connection and play.
English
17

10S
5.2Second Mobile Phone Pairing - Second Mobile Phone, GPS, and SR10
Typical Bluetooth headsets can connect with only one Bluetooth device, but a second mobile phone pairing allows the headset to connect with another Bluetooth device such as a second mobile phone, an MP3 Player, or the Sena SR10, the Bluetooth adapter.
1.To pair the second mobile phone, press and hold the Jog Dial for
5 seconds until the red LED flashes rapidly and you hear a voice prompt, “Intercom pairing”.
2.Within 2 seconds, tap the Phone Button again, then the LED flashes blue rapidly and you will hear a voice prompt, “Second mobile phone pairing”.
3.Search for Bluetooth devices on your mobile phone. Select the Sena 10S in the list of the devices detected on the mobile phone.
4.Enter 0000 for the PIN. Some mobile phones may not ask for the PIN.
5.The mobile phone confirms that the pairing has completed and the 10S is ready to use. You will hear a voice prompt, “Your headset is paired”.
Note:
1.If you have two audio (A2DP) devices connected to your headset then the audio from one device will interrupt the audio from the other device. For example, if you are playing music from the primary mobile phone, then it can be interrupted by playing music from the secondary mobile phone and vice versa.
2.You have to use a motorcycle specific GPS, which transmits turn-by-turn voice instructions to the headset by Bluetooth. Most automotive GPS systems do not have this feature.
3.The Sena SR10 is a Bluetooth two-way radio adapter for group communication, and uses Hands-Free Profile. The incoming audio from the two-way radio via SR10 is heard in the background while having an intercom conversation or a mobile phone call.
4.The GPS navigation or a radar detector could be connected to the SR10 by wire. The GPS voice instruction or the radar detector alarm is also heard in the background via SR10 while having an intercom conversation or a phone call. Please refer to the SR10 User’s Guide for details.
18
 Loading...