

Page 1

STUDIO DELUXE Ⅲ
L-398A
Operating Instructions
Page 2

Page 3
SAFETY PRECAUTION
This manual uses the following safety labels for WARNING and
CAUTION that you must follow.
WARNING
Indicates hazards or unsafe practices that can result in severe personal injury or death.
CAUTION
Indicates hazards or unsafe practices that can result in the personal injury or damage to your L-398A
exposure meter.
WARNING
Keep Lumisphere, Lumidisc, Lumigrid or High-
•
slide out of reach of young children, as swallowing such objects can cause suffocation.
Please place in a location where an infant can-
•
not reach and accidentally get the strap
wrapped around his or her neck. There is a
danger of strangulation.
CAUTION
This L-398A has a powerful magnet. Do not
•
place it close to the following materials, otherwise the data stored may be damaged or the
products may malfunction:
Cash cards, floppy disc, other magnetic cards,
TV Set, CRT display or LCD, and other apparatus sensitive to magnetic fields.
Page 4

CONTENTS
SAFETY PRECAUTION
CONTENTS
1. Features …………………………………………………… 1
2. Specifications ……………………………………………… 3
3. Part Designations …………………………………………… 4
4. Accessories ………………………………………………… 5
5. Basic Operation of Meter Unit …………………………… 6
1. Stopper Button Operation …………………………… 6
2. Zero Position Check and Adjustment ……………… 6
3. Memo Pointer Operation ……………………………… 7
6. Standard Accessory Operation …………………………… 8
Incident Light Measurement ……………………………… 8
1. Lumisphere …………………………………………… 8
2. Lumidisc …………………………………………… 11
Reflected Light Measurement ………………………… 12
1. Lumigrid ……………………………………………… 12
Other Operations ………………………………………… 14
1. Exposure Value (EV numbers) Readout ………… 14
2. Employing Cine Scale ……………………………… 14
3. Using Exposure Multipliers (-2, -1, +1, +2) ……… 15
7. Optional Accessories Operation ……………………… 16
1. Direct Reading Slides ……………………………… 16
2. Direct Reading Slide Application ………………… 17
8. Handling Cautions ……………………………………… 18
Page 5

1. FEATURES
Nearly all photographic subjects combine complex variations of
strongly reflecting surfaces (high reflectivity) and weakly reflecting
surfaces (low reflectivity). These variations delicately influence exposure determination and to which portion the exposure is set becomes
a vital factor that considerably affects the appearance of the finished
photograph.
Although risk of failure can be minimized by taking maximum and
minimum readings of all portions of the subject, then averaging the
values, such an approach is both time consuming and tedious. The
Studio Deluxe Ⅲ is the answer to this problem.
1. Optimum exposure meter for incident light measuring method (also
applicable for reflected light method.)
2. Freely rotatable light sensor section for very easily performed
measurements.
3. Meter stopper mechanism allows operation while hand is released
from meter.
4. Meter release mechanism is also included which allows the needle
to deflect freely. This provides greater convenience when determining light balance.
5. Memo pointer enables easier light balance setting.
6. Lumisphere detects the same light as strikes the subject. Since
subjects are normally 3-dimensional, according to the lighting conditions, brighter surfaces (highlights) and darker surfaces (shadows) are produced (illumination contrast). The Studio Deluxe Ⅲ
mechanism automatically takes into account the strength of light
from all directions, causing the meter to indicate a value applicable to photography. It is thus most convenient for determining
typical exposures.
7. After combining film sensitivity and shutter speed, direct reading
slides (optional) can be used for directly determining the aperture
valve.
8. AMORPHOUS PHOTOSENSOR is employed as light sensing
element, eliminating need for battery.
9. Wide selection of available accessories allows numerous photographic techniques to be enjoyed.
1
Page 6
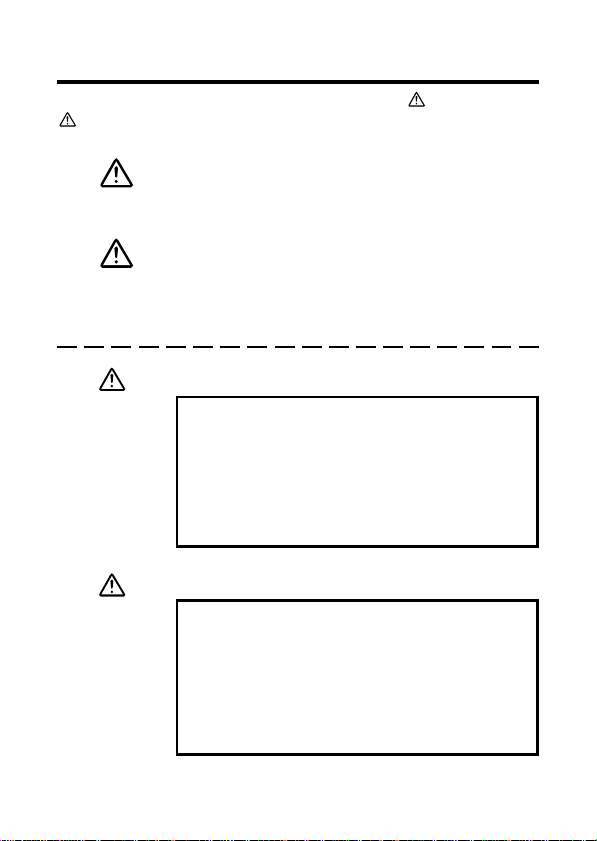
1. FEATURES
MAIN LIGHT
BACK LIGHT
LUMISPHERE
AMORPHOUS PHOTOSENSOR
FILL-IN LIGHT
160
051020
40
2
11.4
80
4
2.8
INCIDENT
5.6
LIGHT
320
8
640
1.25K
16
MICROAMMETER
MAGNET
Caution:
Your L-398A has a powerful magnet. Do not
•
place your L-398A close to the following
materials, otherwise the data stored may
be damaged or the product may malfunction: Cash cards and other magnetic cards,
floppy disk, TV Set, CRT display, and other
apparatus sensitive to magnetic fields.
2
Page 7

2. SPECIFICATIONS
Type
Light receiving method
Light receiving section
Measuring range
(ISO 100)
Film speed
Shutter speed
Aperture value
Cine speed (f/s)
EV (Exposure Value)
Calibration Constant
Operating temperature range
Storage temperature range
Dimensions
Weight
Note: Features and specifications are subject to change without notice.
Analog exposure meter for ambient light
Incident light and reflected light
Incident light: Lumisphere and Lumidisc
Reflected light: Lumigrid (30 deg. of light
receiving angle )
Incident light: EV4 to 17
Reflected light: EV9 to 17
ISO 6 to 12,000 (in 1/3 step)
60 sec. to 1/8000 sec. (in full step)
F0.7 to F128 (in 1/3 step)
8, 18, 24, 64, 128
EV1 to 20 (in 1/3 step)
Incident light: C=340 (Lumisphere),
C=250 (Lumidisc)
Reflected light: K=12.5
0℃ to 40℃
-20℃ to 60℃
112(H)×58(W) ×34(D) mm
Approx. 190g
3
Page 8
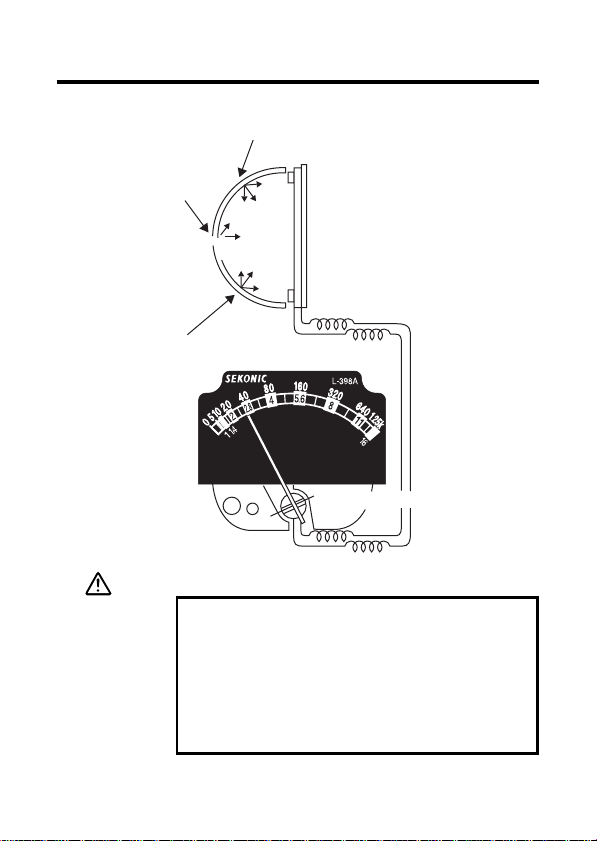
3. PART DESIGNATIONS
Front
Lumispherq
Light sensorw
Memo
pointer!7
Needle!8
“H” marko
EV marky
ISO mark!1
Stopper
button mark!9
Film sensitivity
selector knob@0
Strap eyelet@5
Rear
4
5
0
128
90
Footcandle scalee
Aperture value
Meter
scale
(for direct reading)r
8
0
4
4
0
2
28
0
1
64
2
11.4
1
5
15
8
45
u
t
S
8
0
4
0
2
1
+
0
H
2
1
・
・
1
1
1
-
・
・
0
2
-
60
200
30
100
50
ISO
4
2
1
2
4
32
22
16
3
2
0
56
8
6
4
e
D
l
u
x
o
i
e
d
6
1
0
0
3
2
-
-
2
1
+
V
E
18
8
8
30
15
11
0
0
60
64
6
4
128
125
5.6
0
1
.
+
1
+
1/SEC
CINE
250
4
2
5
k
2
k
8
k
k
2
k
1
500
11
4
2.8
1
.
2
5
k
16
F
0.7
1
1.4
2
Ⅲ
2
24
8
L-398A
1
6
0
0
EV scalet
Dial scaleu
Scale marki
ISO scale!0
Cine scale!2
Stopper button!3
Shutter speed scale!4
Aperture scale!5
Dial ring!6
Dial
scale
Zero adjust screw@1
Page 9

Lumisphereq
Lumidisc@3
Lumigrid@4
4. Accessories
High (H) slide@2
HIGH
Optional Accessories
(sold separately)
Direct reading slides.
No. 5
Total of 11 direct reading slides
(set of 11 slides in case).
Warning
Keep Lumisphere, Lumidisc, Lumigrid or
•
High-slide out of reach of young children,
as swallowing such objects can cause suffocation.
5
Page 10

5.
S
e
1
2
5
5
0
2
11
64
S
e
1
2
5
5
0
2
11
64
45
BASIC OPERATION OF METER UNIT
1.Stopper Button Operation
If the stopper button !3 is pressed
when the stopper button mark !9
・
is set to ○, the meter needle !8
deflects according to brightness.
Then when the button is released,
the needle remains fixed at the
indicated position.
By holding the stopper button depressed and turning it clockwise
so that the mark position becomes
・
○, the needle is released.
At this time, the meter will deflect
freely even if the stopper button
is released. To fix the needle, turn
the stopper button counter-clockwise to where the mark is posi-
・
tioned ○.
2.Zero Position Check and
Adjustment
With stopper button in released ○
position, cover light sensor with
hand or black cloth to completely
block light. Check that meter
needle !8 correctly indicates zero
position. If the indication deviates
from zero, while observing meter
indication, use a coin or similar
tool to turn the rear zero adjust
screw @1 and adjust for zero indication.
.
k
2
0
6
4
16
0
1
.
2
5
+
k
1
+
2
1/SEC
k
F
8
k
4
0.7
k
2
1
k
1
CINE
500
1.4
128
64
250
2
5
.
2
24
k
0
6
4
16
0
1
.
2
5
+
k
1
+
2
1/SEC
k
F
8
k
4
0.7
2k
1
k
1
CINE
500
1.4
128
64
250
2
5
128
90
128
90
11.4
5
11.4
5
1
6
0
0
3
8
0
4
0
2
-
-
2
1
2
+
1
+
0
V
E
H
1
2
1
・
・
1
1
1
-
・
・
0
2
-
60
200
30
100
15
50
ISO
8
4
2
0
1
1
-
2
-
60
30
15
8
4
2
1
2
ISO
24
18
1
6
0
0
3
8
0
4
0
2
-
-
2
1
+
1
+
V
E
H
2
1
・
・
1
1
・
・
0
200
100
50
1
18
Black cloth
・
4
0
2
0
1
2
5
0
11.4
0
1
-
5
2
-
60
30
15
128
8
4
90
2
64
L-398A
1
6
0
0
8
3
2
0
28
2
1
ISO
1
0
56
4
8
6
4
0
e
D
l
u
x
o
i
e
d
u
t
S
0
8
0
4
0
2
+
1
+
E
H
2
1
・
・
1
1
・
・
0
200
100
50
2
4
1
Ⅲ
.
2
11
5
k
6
1
0
3
2
0
6
4
16
0
2
-
1
-
1
.
2
5
V
k
+
1
+
2
1/SEC
F
k
8
k
4
0.7
k
2
1
k
1
CINE
1.4
500
128
64
2
250
24
18
8
125
60
2.8
0
6
Page 11

5. BASIC OPERATION OF METER UNIT
3.Memo Pointer Operation
Rotate both Dial Ring !6 and dial
of Memo Pointer !7 to align with
Needle !8 position or desirable
setting position.
※ See page 11 for actual use.
Dial
Memo Pointer
7
Page 12

6.
6
1
2
STANDARD ACCESSORY OPERATION
Incident Light Measurement
1. Lumisphere
a. Mount Lumisphere q to light
sensor w . To mount, align
white dots of Lumisphere
frame and light sensor, then
turn Lumisphere carefully
clockwise (approx. 45 deg.)to
secure.
b. Set film sensitivity knob @0 to
sensitivity value of employed
film. Set ISO value to right
side ISO mark !1.
Photo shows setting for ISO
100.
c. From position where subject
is to be measured, point
Lumisphere q in direction of
camera. (Light sensor w can
be turned freely.)
8
30
15
8
4
0
2
200
100
50
ISO
1
18
8
24
64
CINE
128
250
25
k
8
k
4
k
2
k
1
500
Page 13

6. STANDARD ACCESSORY OPERATION
6
D
l
4
0
2
1
0
2
2
O
0
4
0
4
56
d. Hold meter erect and press stopper button !3. Meter needle !8
deflects according to brightness. When the stopper button is released, the meter needle becomes fixed at the deflected position.
If the location is excessively bright and the meter needle deflects
beyond scale, insert the High slide @2.
e. Read the footcandle scale e
of the meter needle.
f. Transfer footcandle value to
the dial scale u. Rotate the
dial ring !6 and set the ▲
scale mark i. If the High slide
@2 has been inserted, set the
▲
mark o.
H
8
0
4
4
0
2
28
0
1
S
2
5
0
5
11.4
1
S
5
0
5
11.4
+
H
8
128
1
・
-
・
7
2
-
60
90
200
30
100
64
15
50
IS
0
2
28
0
1
S
2
5
0
5
11.4
0
2
0
1
128
90
0
6
1
0
8
1
+
0
4
H
・
3
1
1
・
-
・
2
60
2
-
200
30
100
15
50
ISO
8
4
2
1
2
4
64
45
3
2
0
56
8
6
4
e
-
x
e
4
1
-
16
0
1
Ⅲ
0
e
4
1
1
24
.
2
11
5
k
8
0
16
1
Ⅲ
0
Ⅲ
.
2
1
.
2
11
5
k
8
0
16
1
6
0
+
3
1
2
0
+
2
6
4
1/SEC
0
1
k
.
8
2
5
k
k
4
k
2
NE
8
6
4
0
1
.
2
11
5
k
128
125
11
+
1
CINE
1/SEC
k
500
250
8
k
16
F
0.7
1
8
k
4
1.4
k
2
2
k
1
2.8
4
5.6
5
64
60
e
D
l
u
x
o
i
d
u
t
2
0
0
1
2
-
2
+
e
u
o
i
d
u
t
2
0
0
1
2
-
2
+
1
V
E
9
・
・
e
D
l
u
x
o
i
d
u
t
6
4
0
0
2
3
2
-
-
1
2
+
V
E
4
1
・
18
8
8
30
15
32
22
L-398A
1
6
0
0
9
Page 14

6. STANDARD ACCESSORY OPERATION
g. At this time, the shutter speed scale !4 and aperture scale !5
combination becomes the correct exposure.
Example:With High slide inserted, meter indicates 80 footcancles.
h. By changing ISO setting, the set combination of shutter speed
At ISO 100, the proper exposure becomes 1/250 sec at F/
5.6, 1/30 sec at F/16 and 1 sec at F/90.
and aperture scale is automatically altered to the appropriate one
corresponding to the changed ISO value.
※ Meter scale intermediate values
※ Intermediate values for
Shutter speed and aperture scale
※ Film sensitivity intermediate
values
10
Footcandles
125
100
200
64
50
25
0
0
1
4
2
1
32
28
ISO
0
2
2
11.4
2
22
25
8
0
4
4
28
2.8
2
5
4
10
8
25
15
20
16
18
11
14
13
320
250
160
125
100
80
64
50
40
32
25
20
16
10
8
12
16
8
6
4
5
0
128
112
110
90
80
72
64
56
45
50
40
36
250
400
1
6
0
56
500
3
2
0
800
8
1k
6
4
0
1
.
2
11
5
k
16
1/SEC
8k
0.7F
0.9
4k
1
0.8
2k
1.1
1.6k
1.4
800
1k
400
500
200
100
50
250
30
125
60
4
5.6
8
4.5
10
9
640
500
400
200
12
6
3.6
6.4
5
7.1
2.5k
4k
2k
1.2k
3.2k
1k
1.6k
800
1.3
1.6
2
1.8
2.2
2.8
2.5
3.2
10k
8k
5k
6.4k
12k
Page 15

6. STANDARD ACCESSORY OPERATION
2.Lumidisc
Employ for illumination contrast adjustment and illuminance measurement.
Contrast measurement
•
a. Mount Lumidisc @3 to light
sensor w. Install in the same
manner as Lumisphere. (See
P. 8)
b. Hold meter at subject position
and point Lumidisc @3 directly
toward center of main light.
c. Press stopper button !3 and
read meter scale footcandle
indication e.
d. Turn the memo pointer dial
and set the memo pointer !7
at the footcandle value the
needle points to.
e. In the same manner, measure
the fill-in light. In this case,
take care that light from main
source does not enter sensor.
f. Read a difference between
the footcandle value the
memo pointer is set (see
above d) and the one for fillin light (= needle position).
Ratio between main and fill-in light footcandles becomes the contrast ratio.
Example:With main light at 640 footcandles, fill-in light reads 320 foot-
candles. Illumination contrast ratio becomes;
640 2
=
320 1
or 2 : 1
Main light
Fill-in light
11
Page 16

6. STANDARD ACCESSORY OPERATION
Illuminance (Lux) measurement
•
a. Mount Limidisc @3 to light sensor w in the same manner as
Lumisphere.
b. Place Lumidisc @3 parallel with the light source.
c. Press stopper button !3 and read meter scale footcandle indica-
tion e.
d. Multiply this value by 10.76 to obtain lux.
Example:80 x 10.76 = 860.8 lux
Example:80 x 32 = 2560 footcandles
If meter deflects beyond scale, insert High slide @2, then
multiply footcandle indication by 32.
2560 x 10.76 = 27545.6 lux
Reflected Light Measurement
1.Lumigrid
a. Mount Lumigrid to light
sensor w in the same man-
ner as Lumisphere q. (See
P.8)
b. Set sensitivity value of em-
ployed film. Setting is per-
formed in the same manner
as for incident light measure-
ment. (See P.8)
c. From camera position, point
Lumigrid @4 directly toward
part of subject to be mea-
sured.
d. In case of measuring narrow
areas, as close as possible to
the subject, measure re-
flected light from main point
of subject. Use adequate care
at this time that meter shadow
etc. does not interfere.
@4
12
Page 17

6. STANDARD ACCESSORY OPERATION
e. Press stopper button !3, and read meter scale footcandle indica-
tion e. However, since footcandles are units of incident light only,
this value becomes simply a reference.
f. Transfer indicated value to dial scale u. Rotate the dial ring !6
g. At this time, shutter speed scale !4 and aperture scale !5 combi-
Note:Do not employ slides for reflected light measurement.
※ More accurate results can be obtained for reflected light mea-
▲
and set mark o.
H
nation becomes the correct exposure.
surement by using a Gray card (optional accessory).
13
Page 18

6. STANDARD ACCESSORY OPERATION
5
k
0
22
k
7
Other Operations
1.Exposure Value (EV number) Readout
Reading this exposure value to
perform setting becomes convenient for cameras which employ
a light value system of shutter and
aperture combination.
a. Read meter needle !8 foot-
candle indication e.
b. Transfer this number to the
dial scale u. Rotate dial ring
!6 and set ▲ scale mark i.
If the High slide is inserted, set
▲
the mark o.
H
c. EV value indicated by EV
mark y becomes the correct
exposure value.
2.Employing Cine Scale
Incident and reflected light measurements during cine photography are performed in the same
manner as described previously.
However, since the cine scale !2
numerals correspond to cine camera film speed, read the aperture
scale !5 indication that pertains to
the employed film speed.
5
90
64
45
32
4
0
1
0
2
2
11.4
128
-
30
15
8
4
8
8
0
4
4
28
u
t
S
1
5
1
+
H
9
・
・
8
1
・
-
・
7
2
60
200
100
50
ISO
2
1
18
8
30
15
d
0
2
+
E
24
o
i
V
56
e
D
2
0
2
-
64
60
l
u
x
e
Ⅲ
4
0
-
1
24
18
128
125
.6
3
2
0
8
8
0
1
6
0
+
1
+
2
1/SEC
k
8
CINE
500
128
64
250
5
4
k
2
k
1
CINE
500
250
2.8
4
6
4
0
1
.
2
11
16
3
2
0
6
4
0
1
.
2
5
k
k
4
k
2
k
1
F
0.7
0.
1
1.4
2
L-398A
1
6
0
0
14
Page 19

6. STANDARD ACCESSORY OPERATION
6
Note: Some cine cameras possess faster exposure times due to a
narrower rotating shutter angle (angle of light transmitting portion). It
is important to know the accurate shutter angle value versus cine
speed for your camera in order to determine proper exposure. Refer
to the camera operating instructions, maker’s catalogue, etc. for shutter angle information.
Shutter angle and exposure calculation:
T =
θ
360×R
R = Frames exposed in 1 second
T = Exposure time
θ
= Shutter angle
3.Using Exposure Multipliers (-2, -1, +1, +2)
Exposure multiplier indications are provided at both sides of the
and ▲ marks of the dial scale. Use the -1 or -2 mark when desiring to
cut the exposure to 1/2 of 1/4 and +1 or +2 mark to multiply the exposure by 2 or 4.
Set the appropriate mark, instead of the or ▲ mark, to the dial
scale value.
-2
+2
+1
-1
-2
1
5
0
4
0
2
0
2
-
+
H
1
1
1
-
・
・
0
6
1
0
8
2
-
2
+
1
V
E
2
1
・
・
▲
H
-1
+1
0
3
2
0
6
4
0
-
1
1
.
2
5
k
+
1
+
2
1/SEC
▲
+2
H
15
Page 20

7. Optional Accessories Operation
1.Direct Reading Slides
A total of 11 slides are available, all of which may be used together
with the Lumisphere and Lumidisc. (Note that they cannot be used
with Limigrid.) The High slide, as mentioned previously, is employed
for varying the measuring range in 2 steps (high and low illumination),
however, it can also be used for direct reading.
Shutter
1151301401501601
Slide No.
1
2
3
4
5
6
7
8
9
10
11
HIGH
speed
ISO
64
50
40
32
25
20
16
ISO
125
100
80
64
50
40
32
25
20
16
ISO
160
125
100
80
64
50
40
32
25
20
12
ISO
200
160
125
100
80
64
50
40
32
25
16
ISO
250
200
160
125
100
80
64
50
40
32
20
12
400
320
250
200
160
125
100
12512501500
400
320
250
200
400
80
160
320
64
125
250
40
80
160
25
50
100
Note:
•HIGH slide can be used as a part of direct reading slide.
•One set of slides consists of slide numbers 1 to 11 in a case.
HIGH slide is standard accessory and not included in the slide
set, though there is a space to store it in the case of slide set.
16
Page 21

7. Optional Accessories Operation
2.Direct Reading Slide Application
When photographing, select slide
from the above table according to
film sensitivity and shutter speed.
Insert slide and perform measurement in the same manner as for
incident light. Read directly the aperture value r indicated by the
meter needle !8.
※ Since it is not necessary to ro-
tate the dial when employing
direct reading slides, setting
becomes extremely fast and
convenient.
17
Page 22

8. HANDLING CAUTIONS
Since the Studio Deluxe Ⅲ is a high precision instrument, use ample
care in regard to the following points.
•Avoid dropping or subjecting it to strong shock.
•Do not store in areas subject to magnetic fields or where insect
repellants are located (metal cabinets, clothing dressers, etc.).
•Keep Lumisphere and Lumidisc clean and protect from dust and
scratches.
•Wipe Lumisphere and Lumidisc with a dry soft cloth if it becomes
dirty. Never use organic cleaners (like Thinner or benzene).
18
Page 23

Page 24

7-24-14, OIZUMI-GAKUEN-CHO, NERIMA-KU,
TOKYO 178-8686 JAPAN
TEL:+81(0)3-3978-2335 FAX:+81(0)3-3978-5229
http://www.sekonic.co.jp/English
JG1297521
 Loading...