

Page 1
Cal. 7T86
INSTRUCTIONS (P. 3 )
BEDIENUNGSANLEITUNG (S. 35 )
INSTRUCTIONS (P. 67 )
ISTRUZIONI (P. 99 )
INSTRUCCIONES (P. 131)
INSTRUÇÕES (P. 163)
(195 )
Page 2

You are no w th e pr oud own er o f a SE IKO A nalog ue Quar tz Wat ch Cal. 7T 86 . To en sure its
7T86
opt imum p er for man ce, p lea se read the i ns tru cti ons in t his bookl et caref ull y bef ore using it.
Please keep this man ual han dy for r eady r efer enc e.
English
Si e sin d jet zt sto lz er Bes it zer ei ne s S EI KO An al og- Qu arz uh r Kal . 7T8 6. Les en Si e d ie se
Bedi enung sanl eitun g v or der Verw endun g a ufme rksam d urch , um Ihre Uhr o ptima l zu nu tze n.
Hebe n Sie die se Be dienu ngsa nleitung gu t auf, um je der zeit w iede r nachlese n zu könne n.
Vous voici l 'he ure ux propr iét aire d'u ne montr e quart z ana log iqu e SEI KO Ca l. 7T 86 . Pou r en
obtenir des per for mances optim ales , ve uille z li re attentiv emen t c ett e b rochure avant d'utilise r
la mont re. Co nser vez ce manuel p our vou s y réfé rer en c as de b esoin .
Gra zie di a ver acqui st ato q ues to or olog io SEIKO An al og ic o al Quar zo Cal . 7T8 6. Per poter
utili zzar e l ’orologio al mas simo delle sue pre sta zioni leggere attent amen te ques to manu ale di
istruzio ni prima di passare all ’uso dell’orologio stesso, e conservarlo poi per q ualsiasi eventuale
futura consultazione.
Uste d es ahora el orgulloso pro piet ario de un r eloj SEIKO anal ógic o de cuarzo C al. 7T8 6. Para
ase gurar el ópt imo ren di mie nto de su r eloj, sírv as e le er cuida do sam en te las in str uc ci one s
cont enida s en es te manu al ante s de su u so. Gua rde es te man ual en un l ugar mu y acc esib le para
la rápi da ref eren cia.
Você pode rá s enti r-se orgu lhoso de pos suir um Relóg io S EIKO Q uar tz Análo go C al. 7T8 6. Para
gara ntir o seu excelente ren dime nto, leia aten tamente as in struçõe s contida s n est e opús culo
ante s de usá -lo. C onse rve e ste ma nual à mã o para c onsul tas futura s.
2
Page
CONTENTS
FEATURES .................................................................................................... 4
DISPLAY & BUT TONS ................................................................................. 5
SCRE W LOCK T YPE CROWN ..................................................................... 7
HOW TO CHANGE THE DISPL AY MODE ................................................... 8
TIME SET TING AND
HAND POSI TION ADJUSTM ENT ........................................................... 9
PERPE TUAL CALENDAR ............................................................................. 16
HOW TO USE THE STOPWATCH ............................................................... 22
HOW TO USE THE AL AR M ........................................................................ 25
BATTERY CHA NGE ...................................................................................... 29
NECES SARY PROCEDURE AFTER BATTERY CHA NGE ........................... 31
SPECIFICATIONS ......................................................................................... 32
For the c are of your watch, s ee “TO PRES ERVE THE QUALITY O F YOUR
I
WATCH” in the attached Worldwide Guarantee and Instruction Booklet.
ENGLISH
3
Page 3

English
4
English
5
FEATURES DISPLAY & BUTTONS
TIME
n
• Hour, minute and small second hands.
STOPWATCH
n
• 24-hour stopwatch in 1/5-second increments.
• Split time measurement on demand.
• When the measur emen t reaches 24 hours, the s topwa tch au tomatically stops
and is reset .
SINGLE-TIME ALARM
n
• The al arm can be se t to sound only once at a de si gn at ed time wi thin 24
hours.
• The sound demonstrati on function is available.
PERPETUAL CALENDAR
n
• Date i s indic ated by the ce nter hand in the CALEN DAR /AL ARM m ode.
• Day of the week i s indicate d by the day hand at t he 12 o’clock pos ition.
• Ther e is no need to adjust th e date a t the end of the month up to
Februar y 28, 2100.
• Month and year can be c hecked on demand.
Hour hand
Small second hand
Alarm sub dial
(Stopwatch hour and
minute hands)
Calendar hand
(Stopwatch second hand)
Day hand ( mode ind icator)
Minute hand
A
CROW N
a b c
B
a. Normal position
b. First click position:
calendar setting,
alarm setting
c. Second click position:
time setting, hand
position adjustment
Page 4
English
6
English
7
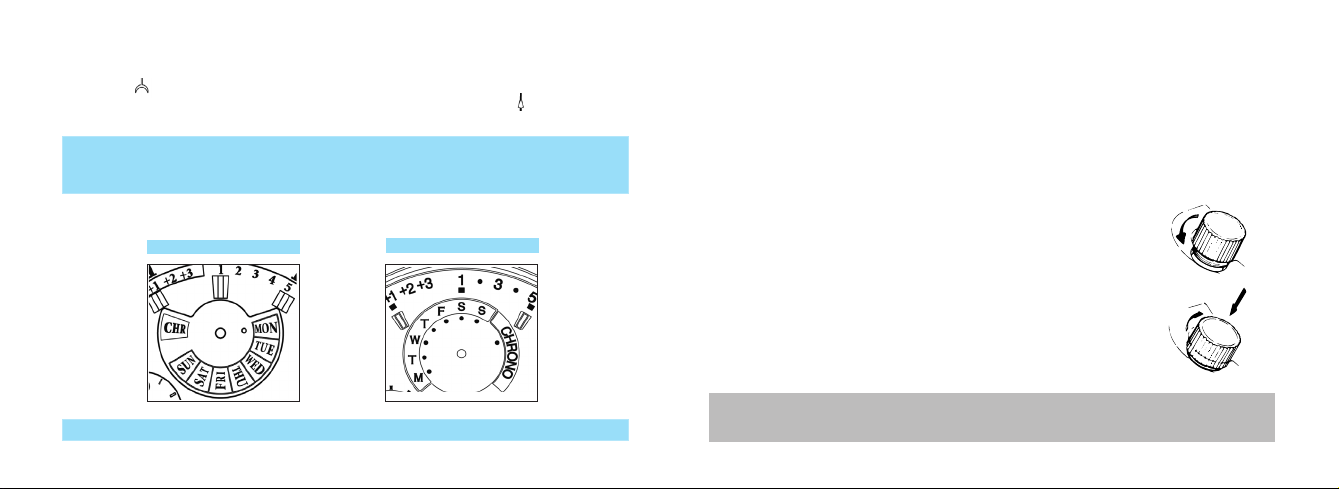
The center hand has dual functions:
◆
- In the C ALE NDAR /A LA RM mode, it indicates the date, month and leap year by its base
end ( )as a calendar hand.
-
In the STOPWATCH mode, it indic ates the second by its tip end ( )as a stop watch
second hand.
* Some models may have a screw lock type crown. If your watch has a screw lock type
crown, refer to “SCREW LOCK TYPE CROWN.”
*
Simplified illustrations may be used in the following sections of this manual.
The characters of mode indicator or date indicator and their orientation may differ
◆
depending on the model.
CHRONO model
CHR model
*
The model at the left will be used as an example in the following section of this m anual.
SCREW LOCK TYPE CROWN
Some mo dels may have a sc rew -lo ck mechanism that can se curely lock
◆
the crown by sc rew when they are not b eing operated.
Lo cking the crown will help to prevent any operational errors and enhance
◆
the water resistant quality of the watch.
It is nec essar y to unlock the scre w lock type crown before op era tin g it.
◆
Once you have finished operating the crown, make sure to relock it.
How to use the screw lock type crown
l
Keep the crown securely locked unless you need to operate it.
[How to unlock the sc rew lo ck type crown]
Turn the crow n counterclock wise.
The crown is unlocke d and can be operated.
[How to lock the screw loc k type crown]
On ce yo u have f inis he d oper atin g the crow n, tu rn it
clockwise w hile g ently pre ssing it in toward the wa tch
body until it s tops.
* When locking the crown, turn it slowly with care, ensuring that the screw is properly
engaged.
* Be careful not to forcibly push it in, as doing so may damage the screw hole in the case.
Page 5
English
8
English
9
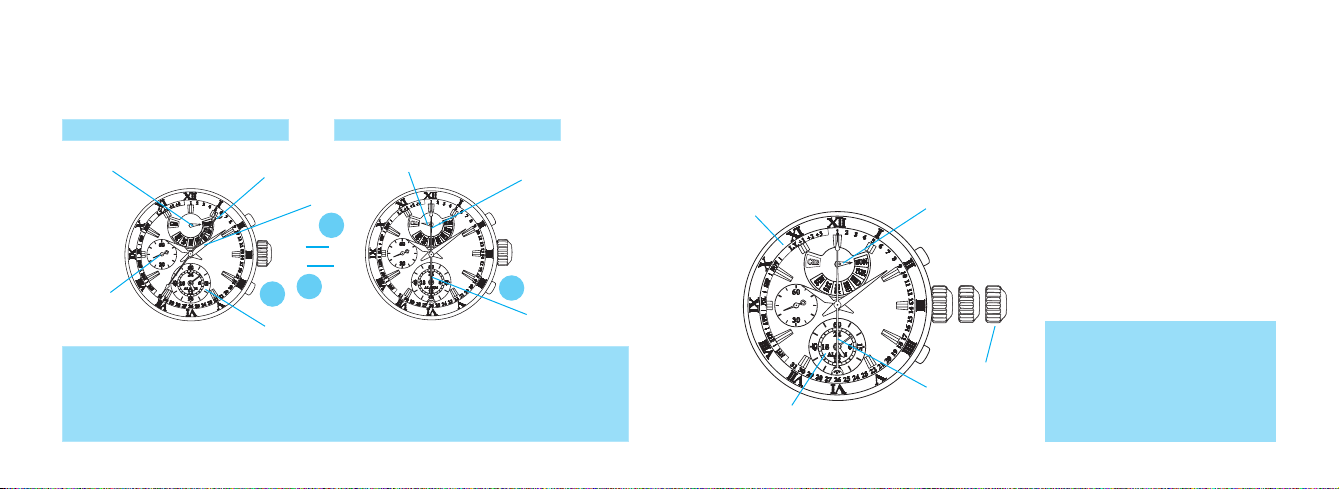
HOW TO CHANGE THE DISPLAY MODE
With each pressing of the button B, the display mode c hanges between the
◆
CALENDAR/AL ARM mode and the STOPWATCH mode alter nately.
CALENDAR/ALARM
Day hand
Small
second
hand
* When the disp lay mode is switched, the function of the hands will change accordingly.
* Before switching the display mode from the STOPWATCH mode to the CALENDAR/ALARM
mode, make sure that the stopwatch has been reset.
* While the stopwatch is counting , the button B is used for ”SPLIT,” “SP LIT RELEASE,” or
”RESET” functions.
MODE
Calendar hand
Minute hand
B
Alarm sub dial
STOPWATCH MODE
Mode ind icator
B
▲
▲
B
Stopwatch
second hand
B
Stopwatch
hour and
minute hands
TIME SETTING AND
HAND POSITION ADJUSTMENT
This watch is designed so that the following adjustments are made with the
◆
crown at the second click position.
1) Time settings for main dial and alarm sub dial.
2) Hand position adjustment for alarm hour and minute hands, day hand and
calendar hand.
Main dial
Alarm sub dial (Al arm hour
and minute han ds)
Day hand
* When all the hands are correctly
positioned, there is no need to
Second c lick
Calendar hand
adjust their positions.
*
When any han d requ ires i ts
posi tio n
adju stm ent, complet e
the hand position adjustment
procedure first, and then move on
to the time setting procedure.
Page 6
English
10
English
11
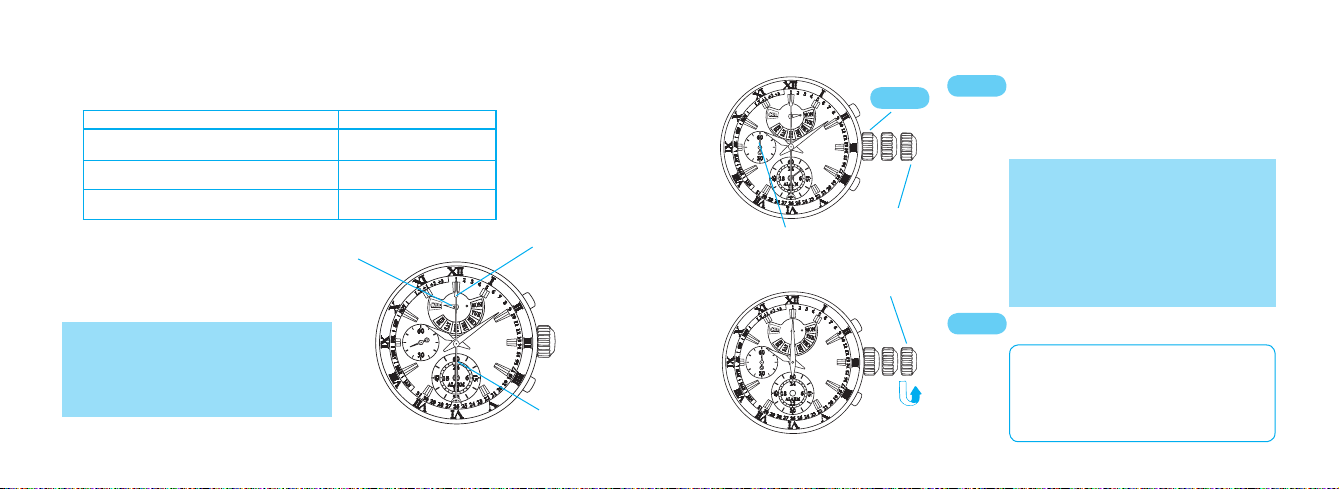
●
How to check the position of the hands
In the STOP WATCH mode, aft er res etting the stopwatch, check the position of ea ch
hand, referring to the table below:
Name of hand Correct position
Stopwatch hour and minute ha nds
(Alarm hour and minut e hands)
Stopwatch s econd hand
(Calendar hand)
Mode indicator hand
(Day hand)
* When using the watc h in a location with
a different time zone, only the time needs
to be set.
* It is necessary to set both the main dial
time and the alarm sub- dial time.
0: 00
0 second pos ition
CHR po sition
Mode ind icator hand
Stopwatch
second hand
Stopwatch
hour and
minute hands
●
Time settings for main dial and alarm sub dial
Pu ll out to sec o nd cli ck whe n t he
CROW N
CROW N
small second hand is at the 12 o’clock
t
position.
Th e small se con d hand wi l l s t op
immediately.
* If the crow n is pulle d out whil e th e
stopwatch is counting, the stopwatch will
Second c lick
Small second hand
Second c lick
CROW N
be automatic ally reset.
* If the crown is pulled out while the alarm
is set, the ala rm will be automatically
canceled.
*
This operation can be performed both
in the CALENDAR
STOPWATCH mode.
/ALAR M mode and
Turn to set the main dial time.
* It is recommen ded tha t the hand s be
set to a time a few minutes ahead of the
curre nt time, taking into consideration
the time required to complete the time
set ting f or ala rm sub dial, aft er whi ch
the crown is to b e pushed in.
Page 7

English
12
English
13
The main dial time should be set in the 12-hour format, regardless of whether it is
◆
AM or PM.
When setting the minute hand, first advance it 4 to 5 minutes ahead of the desired
◆
time, and then turn it back to the exact time.
Main dial
Alarm sub dial
* At th e moment whe n the alarm
sub- dial time indicat es 12 o’clock
midnight, the date change s.
Second c lick
B
Pre ss to s et the alarm sub - dia l ti me to
B
the current time in the 24-hour format.
t
* With each pressing of the button B, the alarm
sub- dial time is advanced by one minute.
* The hands move q uickly if the button B is kept
pressed.
* Make sure that the alarm sub-dial time is set
to exactly the same time as the main dial time,
which has been previously set, in the 24 -hou r
format.
Af t er time s e t ti ngs f or m ai n dia l
CROW N
and alarm sub dial ar e complete d,
push in to normal position.
Hand position adjustment for alarm hour and minute hands,
●
day hand and calendar hand
If any hand is not correctly positioned, adjust it by carrying out the following procedure.
◆
After completing the hand position adjustment procedure, it is necessary to set
◆
both the main dial time and the alarm sub-dial time.
CROWN
CROWN
Pull out to second click.
Second c lick
*
If the crown is pulled out while the stopwatch is counting, the stopwatch will be automatic ally
reset.
* If the crown is pulled out whil e the alarm is set, the alarm will be automatically canceled.
* This operation can be performed both in the CALENDAR /ALARM mode and STOPWATCH
mode.
Page 8

English
14
English
15
Stopwatch hou r and
minute hands
Stopwatch
second hand
A
B
Second c lick
A
B
Second c lick
Press for 5 se cond s.
A
The hands of the alarm sub dia l at the 6 o’clock
t
posit io n move for ward unt il they point at the 0
secon d position and sto p.
alarm sub dia l sho w the 0 positio ns of th e sto pwatch hour and minute hands.
Press to set the s topwatch hour and minute
B
hands to the 0:0 0 position.
The ha nds mo ve quickly if the butto n B is kept
pressed .
* When adjusting the position of the hand, the
hands can only be advanced in the clockwise
direction.
Pr ess onc e. T he s to pwa tch sec ond ha nd
A
turns a full circle.
t
Press to se t the stopwatch second hand to
B
the 0 position.
The ha nd moves qu ickly if the button B is kept
pressed .
N ow the hands of the
Day hand
A
B
The positio n of each hand can be readjusted in the following orde r b y p res sing the
but ton A.
STOPWATCH
hour and minute hands
▲
After all the adjus tmen ts are c ompleted, push in to normal posi tion.
CROWN
[ IMPO RTANT ]
After the po sitions of th e hands a re adju sted, make sure that t he main dial time and the
alarm s ub- dial time are both reset.
▲
Pres s once. The day hand co mp le tes on e
A
revolu tion
t
Pres s to set the day hand po in ting at th e
B
Monday indicator.
The ha nds mo ve quickly if the butto n B is kept
pressed .
To adjust the position of the day hand, advance the
l
day hand until it points at the dot “●” beside the
Monday indicator passing through the blank area.
STOPWATCH
second hand
.
▲
Day hand
Page 9

English
16
English
17
PERPETUAL CALENDAR
The date is indicated by the c alendar hand.
◆
The day of the wee k is indicat ed by the day hand .
◆
The calendar hand can also b e used to check the year and month.
◆
There is no need to adjust the date at the end o f the mon th up to February 28 , 2100.
◆
How to read the calendar
●
In the CALENDAR/ALARM mode, the day hand indicates the day of the week and the calendar hand
indicates the date.
Year (The number of
elapsed years since
the last leap year)
Month (from January
to Decemb er)
A
Calendar hand
Day of the week
Date (from 1 to 31)
How to check the year and month
●
In the CALENDAR/ALARM mode, with each pressing of the button A, the calendar hand turns to
indicate the date, month and year successively by its base end.
Date
▲
Afte r indicating the month and year, i f the button is left untouched for approximate ly 10
seconds, the calendar hand automatically returns to ind icate the d ate.
How to adjust the calendar
●
CROWN
▲
Month
A A
Pull out to first click.
First click
▲
Year
[ IMPO RTANT ]
It is esse ntial that all the hands ar e c orre ctly
po sit io ned , oth er wis e the wa tch may not
show th e calendar correctly.
* Do not press the button B at this point, as it
will lead the watch to the alarm set ting mode.
Page 10

English
18
English
19
* If the crown is pulled out whil e the stopwatch is c ounting, the sto pwatch will be
automatically reset.
If the crown is pulled out while the alarm is set, the ala rm will be automatically ca nceled.
*
* This operation can be performed both in the CALENDAR/ALARM mode and STOPWATCH
mode.
Calendar hand
Press for 5 se cond s.
A
▲
▲
B
Date (from 1 to 31)
A
t
The calendar hand turns a full circle.
Press to set the date.
B
* The hand moves quickly if the button B is
kept pressed.
* The d ate can be set to any numeral
between 1 and 31.
* If the button B is pressed after the calendar
hand points to “31,” the calendar hand
is fast-for warded and sto ps pointing to
“1”.
Day of the week
Day hand
A
Month (from
January to
Decemb er)
Press again.
A
The calendar hand is fast- forwarded and sto ps pointing to the month.
t
Press to set the month.
B
* The hand moves quickly if the button B is kept pressed.
* The month can be set to any month from January to December.
* If the button B is pressed after the calendar hand points to December, the calendar h and is
fast-forwarde d and stops po inting to Janu ary.
B
Calendar hand
Press again.
A
The day hand swings between the day
t
indicator and the “CHR” indicator.
Press to set the day of the week.
B
* The hand moves quickly if the button B
is kept pressed.
* The day of the week can be set to any day
of the week from Mond ay to Sunday.
* If the button B is pressed after the d ay
hand points to Sunday, the day hand
swi ngs back an d s top s poi nti ng to
Monday.
Page 11

English
20
English
21
L.Y.
+1
+2
+3
2008
2012
.
.
.
.
.
2096
2009
2013
.
.
.
.
.
2097
2010
2014
.
.
.
.
.
2098
2011
2015
.
.
.
.
.
2099
Year Indication
Year
Leap Year
One year
Two Years
Three Years
The number of elapsed years
since the last leap year
Year (The
number of
elapsed years
since the last
leap year)
Calendar hand
A
B
Press again.
A
Th e c al en da r hand is fa st -f or ward ed
t
and stops pointing to the year.
Press to set the year.
B
* The hand moves quickly if the button B is
kept pressed.
* The year can be set to any year among
“L.Y.” “+1” “+2” and “+3 .”
* If the button B is pressed after the calendar
hand points to “+3,” the calendar hand
is fast-for warded and sto ps pointing to
“L.Y.”
Press again.
A
t
* If the button A is pressed again, the watch
returns to the date setting mode.
With each pressing of the button A, the calendar can be readjusted in the following order.
Date
▲
Day of the
week
▲
Month
▲
Year
▲
CROWN
Af te r all th e adjust me nt s
are completed, push in to
normal position.
* When the date is set to a nonexistent day
such as February 30 or November 31 etc.,
such date will be automatically advanced to
the existent first date of the following month.
Page 12

English
22
English
23
HOW TO USE THE STOPWATCH
The mea sured time can be read up to 24 hours in 1/5 - sec ond increments .
◆
When the measurement reaches 24 hours, the stopwatc h au tomatically s tops and
◆
is res et.
Split time mea surement is p ossible.
◆
* If the stopwatch minute and hour hands do not return to the “0” position when
the stopwatch is reset to “0,” it will be necessary to adjust the positions of the
stopwatch hands.
* Refer to " SET TING THE T IME AND HAND POSITION ADJUST MENT."
Mode ind icator
Stopwatch
second hand
Stopwatch
hour and
minute
hands
▲
B
P r e s s to en te r th e STO P W ATC H
B
mode.
* While the stopwatch is counting, pressing
the button B c annot change the display
mode.
* While the stopwatch is counting, if the
crown is pulled out to the first or second
clic k positio n, the stopw atch will b e
automatically cancelled.
*
Refer to HOW TO CHANGE TH E DISPLAY
MODE.
How to reset the stopwatch
●
While the STOPWATCH hands are moving
1. Press But ton A to s top the stopwatch.
2. Press But ton B to reset the stopwatch.
Stopwatch
second hand
Stopwatch hou r
and minute han ds
While the STOPWATCH hands are stopped
[When the stopwatch is stopped]
1. Press But ton B to r eset the stopwatch.
[When the split time me asuremen t is displayed
A
while the stopwatch is measuring.]
1. Pr es s Button B to release the s plit time
display and re turn to the normal display.
2. Press But ton A to s top the stopwatch.
3. Press But ton B to r eset the stopwatch.
[When the sp lit time measur ement is display ed
and the s topwatch is stopped]
B
1. Pr es s Button B to release the s plit time
display.
2. Press But ton B to r eset the stopwatch.
Page 13

English
24
English
25
<STANDARD MEASUREMENT>
<ACCUMULATED ELAPSED TIME MEASUREMENT>
<SPLIT TIME MEASUREMENT>
<MEASUREMENT OF TWO COMPETITORS>
STOP
RESET
START
START
START
START
STOP
RESTART
STOP
RESET
SPLIT
SPLIT
RELEASE
STOP
RESET
FINISH TIME
OF 1ST
COMPETITOR
2ND
COMPETITOR
FINISHES
FINISH TIME
OF 2ND
COMPETITOR
RESET
�
�
�
�
�
�
�
�
�
�
�
�
�
�
A
B
A A
A
B
A
A
B
B
B
B
B
B
A
A
A
A
* Restart and stop
of the stopwatch
can be repeated by pressing button A.
* Measurement and release of split time can be repeated by pressing button B.
* If the time measured reaches 24 hours while the split time is being displayed, the stopwatch
automatically stops counting and releases the split time display, showing “00" 00.”
STOPWATCH OPERATION
HOW TO USE THE ALARM
T he ala rm sou nds o nl y o nc e a t the des ign a te d ala r m tim e and it is
◆
automatically disengaged.
T he alarm tim e can b e set wit hi n 24 hours f rom t he c ur r en t tim e in
◆
1-minute incremen ts.
The alarm s ound can be previewed.
◆
How to set the alarm time
●
Alarm sub dial
CROWN
B
First click
Pu l l o ut to f i r s t cl i ck in t he
CALENDAR /AL ARM mode
*
If the crown is pulled out while the alarm
the alarm will be auto matically
is set,
canceled.
* If the watch is in the STOPWATCH
mode, press the button B to change
to the CALENDAR /ALARM mode.
* Re fer to HOW TO CH ANG E T HE
DISPLAY MOD E.
.
Page 14

English
26
English
27
Press to set the alarm time.
B
* With each pressing of the button B, the alarm
How to stop the alarm manually while sounding
●
The alarm sounds for 20 seconds at the designated
◆
time.
To stop the alarm manually while sounding, press
◆
either button A or B.
* The alarm will be automatically canceled once it sounds
at the designated time.
t
sub- dial time advances by one minute.
* The hands move quickly if the button B is kept
pressed.
* The alarm hands stop when they indicate the
current time.
* If the alarm time is set to the c urrent time, the
alarm cannot be set.
CROWN
After alarm time setting is completed,
push in to normal position.
A
B
How to change the alarm time, which has already been set
●
Alarm sub dial
First click
B
CROWN
t
B
t
CROWN
Pul l ou t to fi r s t click in the
CALENDAR/AL ARM mode.
* Upon doing this, the set alarm time
is automatically canceled, and the
alarm sub -dial time c hanges to
indicate the current time.
Press to set a new alarm time.
* With each pressing of the button B,
the alarm sub- dial time advances
by one minute.
* The ha nds move quic kly if the
button B is kept pressed.
Af t e r al a r m ti m e se tt in g is
complete d, push in to normal
position.
Page 15

English
28
English
29
5
Years
How to cancel the alarm time
●
CROWN
Sound demonstration function
●
A
First click
CROWN
t
CROWN
A
Pu ll out t o fi rst cli c k in the
CALENDAR/AL ARM mode.
* Upon doing this, the set alarm time
is automatically canceled, and
the alarmsub -dia l time changes
to indicate the current time.
Push back in to normal p osition.
Press for 2 seconds in the CALENDA R
/AL ARM mode.
* The alarm sound can be heard whil e the
button A is kept pressed.
BATTERY CHANGE
The miniature battery which powers your watch should last approximately
5 years
. However, because the battery is inserted at the factory to
check the function and pe rformance of the wat ch, its actual life onc e
in your possession may be less than the spe cified period. Wh en the
battery expires, be sure to replace it as soon as possible to prevent any
malfunction. For battery replacement, we recommend that you contact an
AUTHORIZED SEIKO DEALER and request SEIKO SR927SW battery.
* If the display mode is changed more than once, the stopwatch is used
for longer than 1 hour, and the alarm sounds for 20 seconds per day, the
battery life may be less than the specified period.
Battery life indicator
●
When the battery nears its end, the small second hand moves at two-second intervals
◆
instead of normal one-second intervals. In that case, have the battery replaced with a
newone as soon as possible.
* The watch remains accurate while the small second hand is moving at two- second
intervals.
Page 16

English
30
English
31
WARNING
Do not remove the battery from the watch.
l
If it is neces sar y to take out the battery, keep it out of the reach of children.
l
If a child swallows it, consult a doc tor immediately.
CAUTION
Never short-circuit, tamper with or heat the battery, and never expose it to fire.
l
The battery may burst, become very hot or catch fire.
The battery is not rechargeable. Never attempt to recharge it, as this may
l
cause battery leakage or damage to the battery.
NECESSARY PROCEDURE AFTER
BATTERY CHANGE
After the bat ter y is replaced with a new one, or when an abnormal display appears,
follow the pro ce dures below to reset the buil t-i n IC . The watc h will resum e it s
normal operation.
How to reset the IC
l
1. Pull out the crown to the seco nd
click.
2. Press but ton A and B at the same
time for 2 seconds or longer.
3. Push the crown back in to normal
po sit io n and che c k if the sm all
second hand moves as normal.
CROWN
A
B
Second click
* Resetting the IC will initialize the watch. Before starting to use the watch, it will be necessary to set
the time and adjust each hands to the 0 position. Refer to ”TIME SETTING AND HAND
POSITION ADJUSTMENT” section of this manual.
Page 17

English
32
English
33
SPECIFICATIONS
1 Frequency of crystal oscillator ...... .... 3 2,768 Hz ( Hz = Hertz...Cycles per second)
2 Loss /gain (Monthly rate ) ................... Less tha n 15 seconds ( worn on the wr ist at
3 Operational temperature range.... ...... Between –10 ºC and + 60 º C
4 Driving system ................................ ... Step motor 4 pieces
5 Display system
Time ................................................ Hou r, min ute and sma ll seco n d h and s i n
Stopwatch ......................................
Stopwatch hour hand synchronizes with the
Alarm ..............................................
Alarm hour hand synchronizes with the minute
normal temperature range between 5 ºC and
35 ºC )
1-se cond increments
Stop watch se cond hand in 1/5- se con d in crements (60 seconds/ 360 degrees)
Stopwatch minute hand in 1-minute increments
(60 minutes/ 360 degrees)
minute hand ( 24 hours/ 360 degrees)
Alarm minute hand in 1- minute increments (60
minutes/ 360 degrees)
hand (24hours/ 360 degrees)
C alendar .......................................... Date indication by the calendar hand (month &
Day indication by the day hand
6 Batter y ............................................... SEIKO SR927SW, 1 piece
7 Batter y life ......................................... Approximately 5 years
8 IC (Integrated Circuit) ....... ................. C- MOS -IC: 1 piece
* The specifications are subject to change without prior notice for product improvements.
year can be checked on demand)
* If the display mode is changed only once, the
stopwatch is used for less than 1 hour and the
alarm sounds less than 20 seconds per day.
 Loading...