

Page 1

PowerLite® Home Cinema 8345
Home Theater Projector
User’s Guide
Page 2
Copyright Notice
All rights reserved. No part of this publication may be reproduced, stored in a retrieval system, or transmitted in
any form or by any means, electronic, mechanical, photocopying, recording, or otherwise, without the prior
written permission of Seiko Epson Corporation. The information contained herein is designed only for use with
this Epson product. Epson is not responsible for any use of this information as applied to other products.
Neither Seiko Epson Corporation nor its affiliates shall be liable to the purchaser of this product or third parties for
damages, losses, costs, or expenses incurred by purchaser or third parties as a result of: accident, misuse, or abuse of
this product or unauthorized modifications, repairs, or alterations to this product, or (excluding the U.S.) failure to
strictly comply with Seiko Epson Corporation’s operating and maintenance instructions.
Seiko Epson Corporation shall not be liable for any damages or problems arising from the use of any options or
any consumable products other than those designated as Original Epson Products or Epson Approved Products by
Seiko Epson Corporation.
Trademarks
Epson is a registered trademark, 1080Perfect and C2Fine are trademarks, and Epson Exceed Your Vision is a
registered logomark of Seiko Epson Corporation.
PowerLite and PrivateLine are registered trademarks, DigiScan and AccuCinema are trademarks, and Extra Care
and Epson Connection are service marks of Epson America, Inc.
HDMI, the HDMI logo, and High-Definition Multimedia Interface are registered trademarks
of HDMI Licensing, LLC.
Pixelworks, DNX, and the DNX logo are trademarks of Pixelworks, Inc.
x.v.Color is a trademark of Sony Corporation.
2
General Notice: Other product names used herein are for identification purposes only and may be trademarks of
their respective owners. Epson disclaims any and all rights in those marks.
This information is subject to change without notice.
© 2011 Epson America, Inc. 1/11
CPD-28279R1
Page 3

Contents
Introduction 6
Projector Parts 7
Remote Control 9
Optional Accessories 10
Registration and Warranty 10
Using This Manual 11
Setting Up the Projector 12
Choosing a Location 12
Installing the Projector 16
Connecting the Cables 18
Connecting Video and Computer Equipment 18
Making Other Connections 20
Installing Batteries in the Remote Control 21
Turning the Projector On and Off 21
Turning On the Projector 21
Turning Off the Projector 22
Selecting the Image Source 23
Positioning the Image 24
Making Basic Adjustments 26
Focusing and Zooming 26
Choosing the Aspect Ratio 27
Choosing the Color Mode 28
Advanced Color Adjustments 29
Adjusting the Gamma Setting 30
Adjusting RGBCMY 31
Locking the Projector 32
Contents 3
Page 4

Making Detailed Adjustments 33
Using the Menu System 33
Changing How the Menus Display 35
Adjusting the Picture Quality 35
Input Brightness Settings 35
Sharpness and Picture Quality Settings 37
Color Settings 39
Adjustments for Computer Images 41
Selecting Memory Settings and Resetting the Projector 42
Selecting Memory Settings 42
Creating Memory Settings 42
Deleting Saved Memory Settings 43
Resetting the Projector 43
Customizing Projector Features 44
Image Sizing 44
Screen Options 45
Other Setup Options 45
Maintenance 48
Cleaning the Lens 48
Cleaning the Projector Case 49
Cleaning and Replacing the Air Filter 49
Replacing the Lamp 51
Checking the Projector Status 54
Storing the Projector 55
Transporting the Projector 55
Problem Solving 56
What To Do When the Lights Come On or Flash 56
Solving Picture Problems 58
Solving Remote Control Problems 61
Where to Get Help 62
4 Contents
Resetting the Lamp Usage Timer 54
Page 5

Specifications 63
General 63
Lamp 63
Remote Control 63
Dimensions 64
Electrical 64
Environmental 64
Safety 64
Compatible Video Formats 65
ESC/VP21 Command Codes 67
Notices 68
Important Safety Information 68
FCC Compliance Statement 70
Declaration of Conformity 71
Epson America, Inc. Limited Warranty 71
Index 73
Contents 5
Page 6

Introduction
The PowerLite® Home Cinema 8345 projector lets you enjoy theater-quality images in the
relaxing environment of your own home. Designed especially for home cinema use, it offers
these outstanding features:
■ Native 1080p (1920 × 1080) resolution, dynamic contrast ratio up to 25000:1, and up to
1800 lumens of brightness (white light output and color light output) for incredibly rich,
sharp images in any room lighting
■ Auto Iris system that constantly controls the light output based on the gamma and
black/white levels of your projected content, for perfectly adjusted images and deepest
blacks
■ Epson C
and uniform colors
■ 1080Perfect
■ 10-bit color quality (digital only) for unmatched color accuracy, with over a billion colors
available
■ Epson AccuCinema
blocks out excess light for an expanded, purer color range and sophisticated grayscale
tracking
■ HDMI
digital video
2
Fine™ 3LCD technology for reliable picture quality, increased contrast ratio
™
video processing for more film-like images free of noise or artifacts
™
color management delivered by the built-in optical Cinema Filter
®
(High-Definition Multimedia Interface®) port for superior, uncompressed
■ True 16:9 wide-format projection
■ Flexible setup configurations, including front projection and ceiling mounted, with
vertical and horizontal offset lens shift
■ Five color modes, including x.v.Color
environments, and a vast array of custom color adjustments
6 Introduction
™
, to quickly optimize viewing for different lighting
Page 7
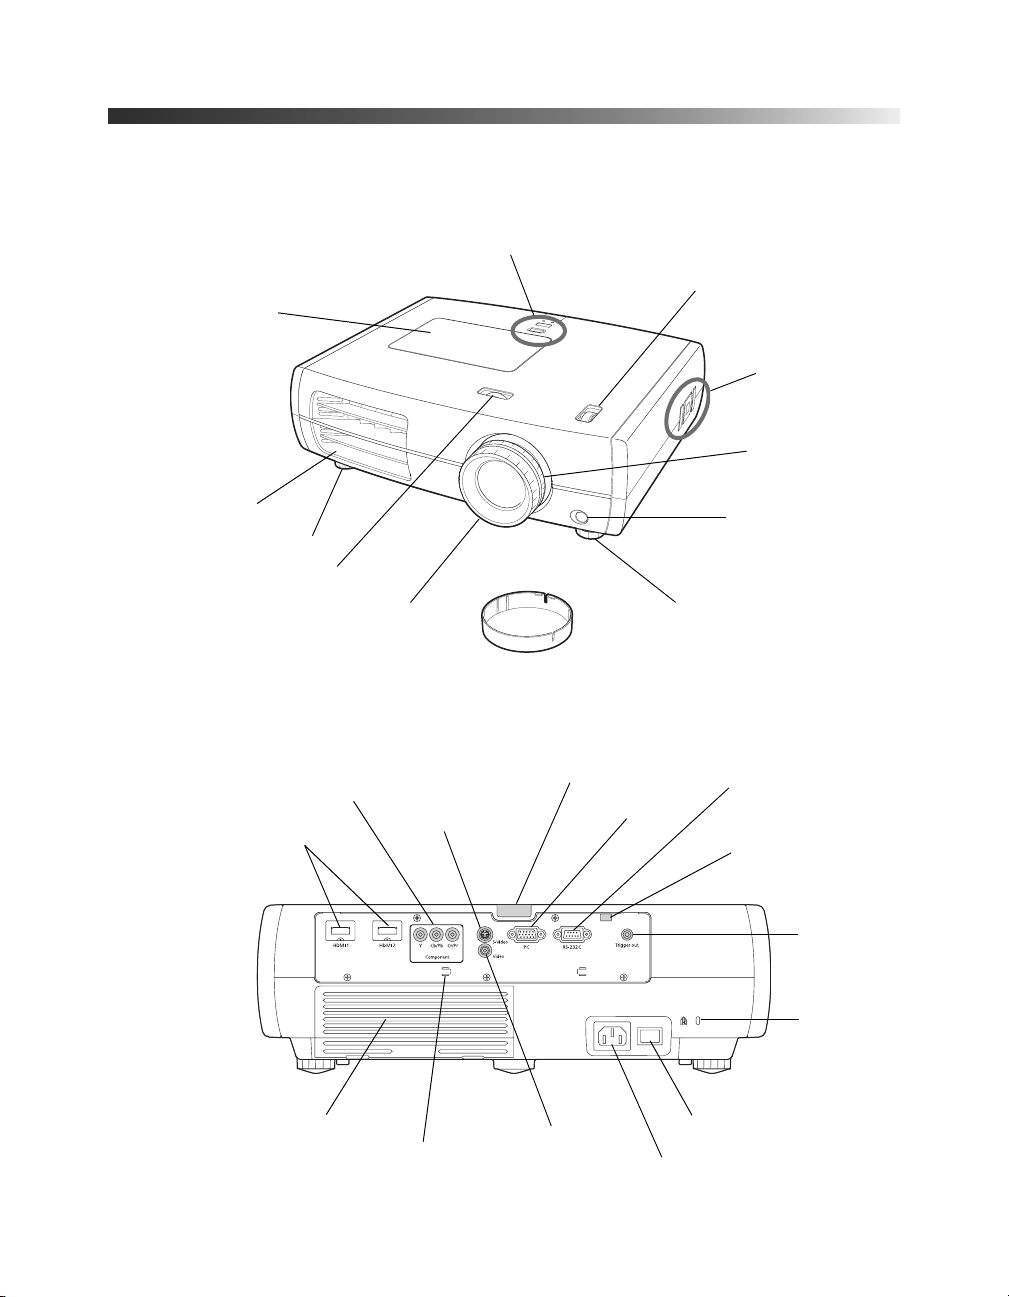
Projector Parts
Front
Lamp cover
Control panel (top)
Vertical lens shift dial
Control panel
(side)
Zoom ring
Ventilation slots
Adjustable foot
Horizontal lens shift dial
Back
Component
video port
HDMI ports
Focus ring
S-Video port
Lens cover
Infrared receiver
PC port
Infrared receiver
Adjustable foot
Control (RS-232C) port
Lamp cover release
Trigger out
port
Kensington
lock port
®
Air intake (filter)
Cable holder
Video port
Main power switch
AC power inlet
Introduction 7
Page 8
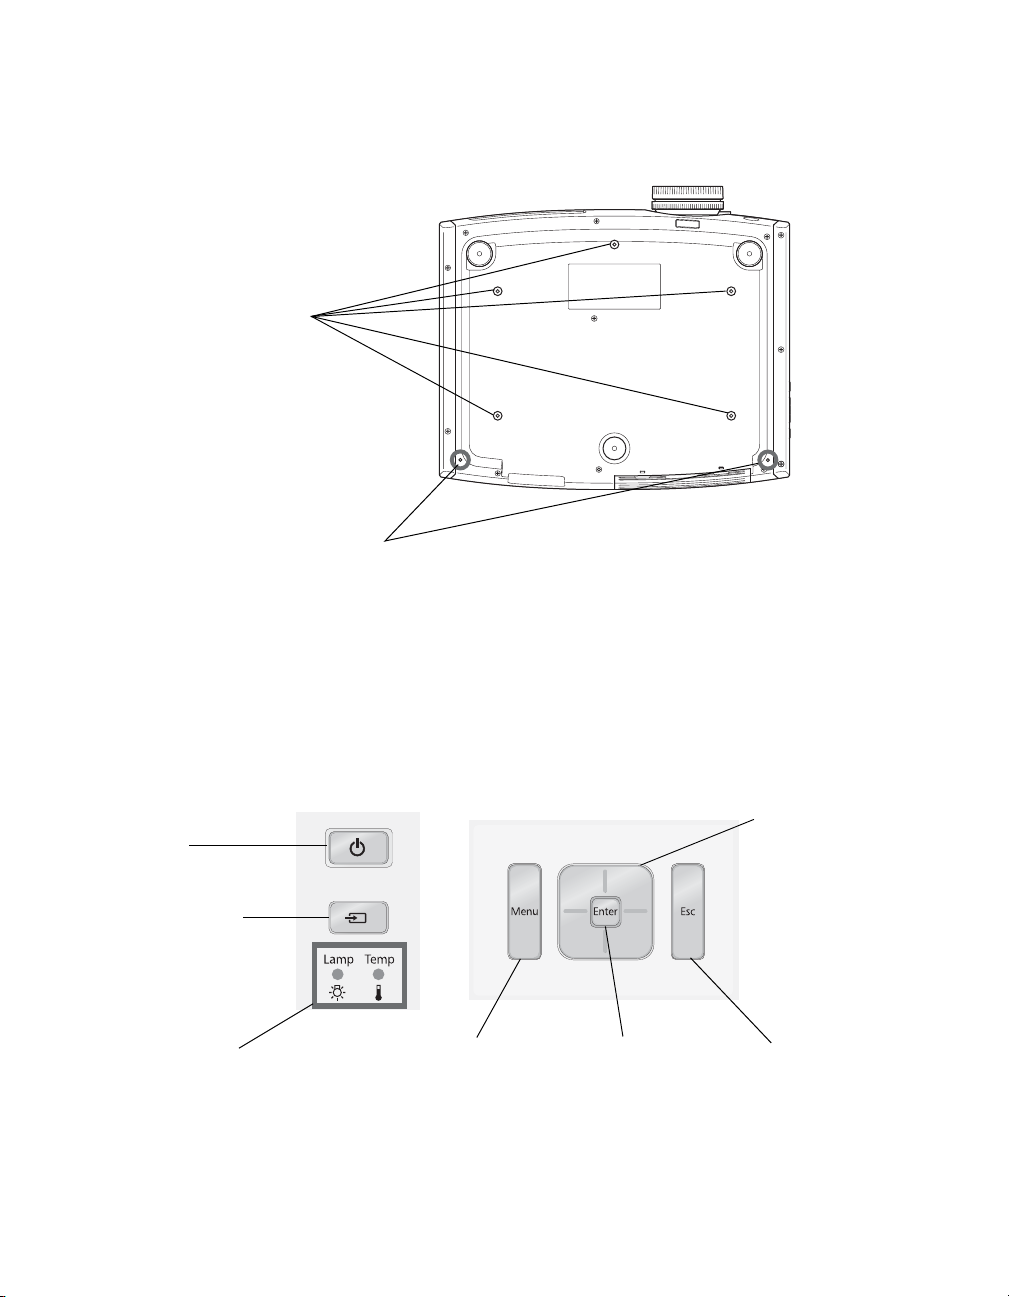
Bottom
Mounting bracket
attachment points
Optional cable cover
attachment points
(brass colored)
Projector Control Panel
Top control panel Side control panel
Power
button
Source button
Switches the
video input source
Warning lights
8 Introduction
Menu button
Displays the
menus
Enter button
Selects menu items or
opens the line menu
Menu navigation
button
Esc button
Exits the current
menu item
Page 9
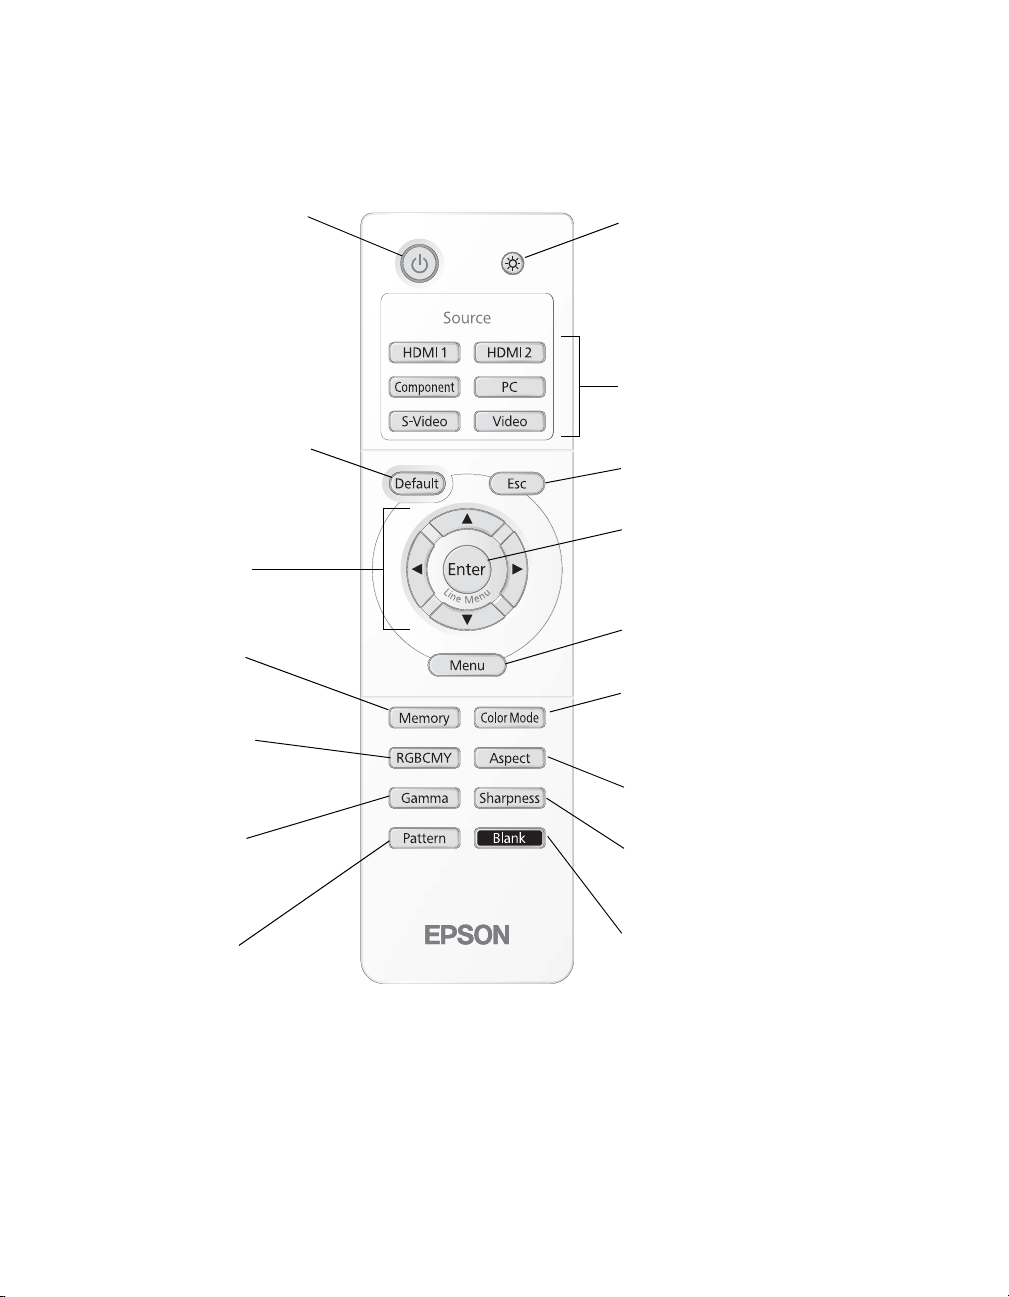
Remote Control
Power button
Turns projector on or off
Default button
Restores default settings
when menu is displayed
Menu navigation
buttons
Memory button
Recalls custom
picture settings
RGBCMY button
Adjusts the hue,
saturation, and brightness
for each color
Gamma button
Adjusts the gamma values
of the screen display
Illumination button
Lights the remote control
buttons for easy viewing
Source buttons
Switches between equipment
connected to the projector
Esc (escape) button
Exits the current menu item
Enter/Line Menu button
Selects menu items or opens
the line menu
Menu button
Displays the projector’s menus
Color Mode button
Optimizes viewing for
different lighting environments
Aspect button
Changes the picture’s aspect ratio
Sharpness button
Adjusts image sharpness
Pattern button
Displays test patterns
to adjust the image
Blank button
Temporarily stops projection or
hides the menu screen
Introduction 9
Page 10
Optional Accessories
Epson provides the following optional accessories for the projector:
Product Part number
Replacement lamp V13H010L49
Air filter replacement V13H134A21
Kensington security lock (anti-theft device) ELPSL01
Cable cover V12H003002
Projector mount ELPHB550
In addition to the accessories listed above, 1-year and 2-year extended service plans are
available. You can purchase these plans and other accessories from an authorized Epson
reseller. To find the nearest reseller, please call 800-GO-EPSON (800-463-7766). To
purchase online, visit www.epsonstore.com (U.S. sales) or www.epson.ca (Canadian sales).
Registration and Warranty
Your projector comes with a basic two-year carry-in warranty. For details, see page 71.
In addition, Epson offers free Extra Care
equipment failure, you won’t have to wait for your unit to be repaired. Instead, Epson will
ship you a replacement unit anywhere in the United States or Canada. See your Extra Care
Home Service brochure for details.
SM
Home Service. In the unlikely event of an
To register, simply follow the registration instructions on the CD, or register online at
epson.com/webreg. Registering also lets you receive special updates on new accessories,
products, and service.
10 Introduction
Page 11

Using This Manual
This book contains all the information you need to use the projector, in addition to basic
setup and maintenance instructions, troubleshooting tips, important safety instructions,
specifications, and warranty information.
Please follow these guidelines as you read through the manual:
WARNING: Must be followed carefully to avoid bodily injury.
Caution: Must be observed to avoid damage to your equipment.
Note: Contains important information about your projector.
Tip: Contains helpful projection tips.
Need additional help? Take advantage of Epson’s automated support services 24 hours a day
at epson.com/support (U.S.) or epson.ca/support (Canada). Use this site to view FAQs
(Frequently Asked Questions) or product information and e-mail your questions to Epson
support.
If you need more help, you can use the Epson PrivateLine
(800) 637-7661 and enter the PIN on the PrivateLine support card that came with your
projector.
®
Support service. Call
Introduction 11
Page 12
Setting Up the Projector
Follow the instructions in this section to choose a location for the projector, connect the
cables, and display an image.
Choosing a Location
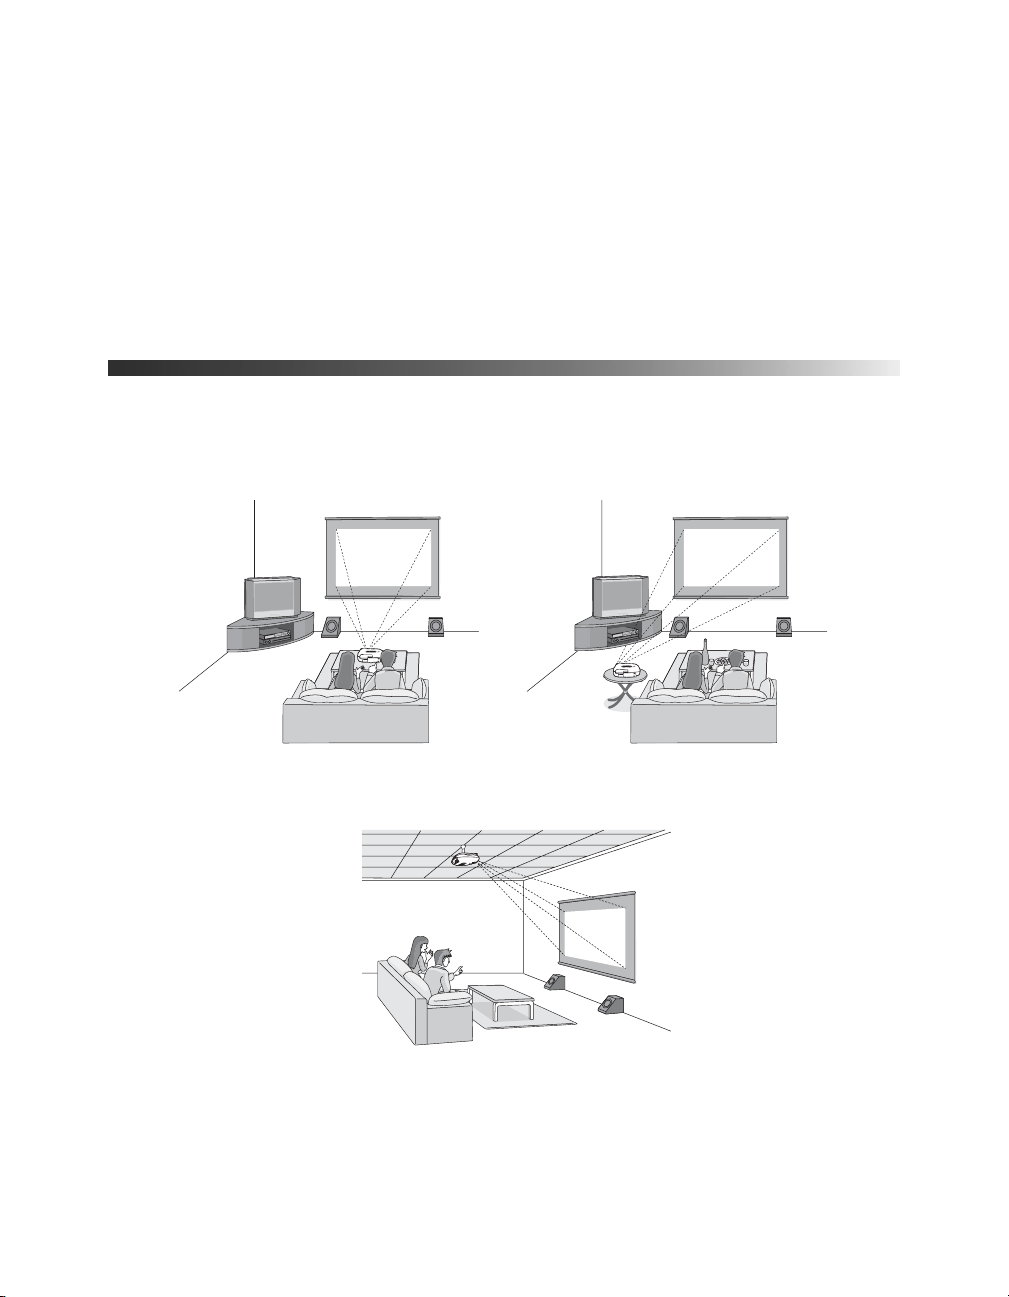
You can install the projector for the viewing setups shown below, as well as rear projection.
Center
Side
Ceiling
12 Setting Up the Projector
Page 13
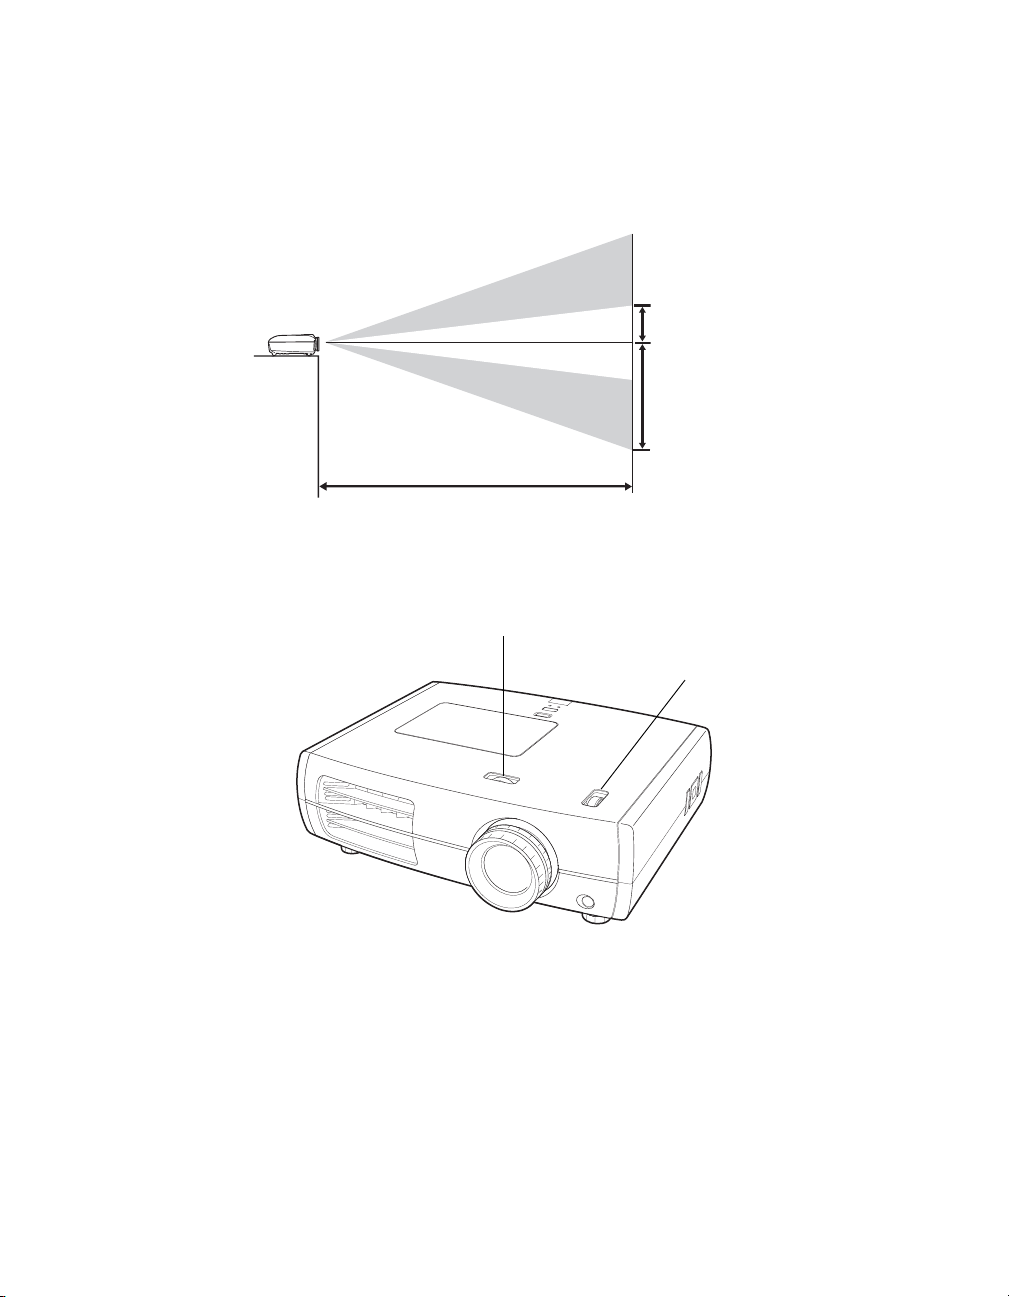
Ideally, keep the projector level and place it at a height so its lens is centered between the top
and bottom of the screen, as shown below. If this is not possible, use the lens shift dials to
reposition the image. As a rule of thumb, you can use lens shift to move the image up or down
by nearly its full height, and left or right by about one-half its width (for details, see page 25).
Offset A
Offset B
Offset refers to distance from
Projection distance
bottom of image to center of
lens using maximum lens shift.
If you place the projector off to the side, aim it straight ahead (rather than at the center of the
screen), then use the horizontal lens shift dial to center the image on the screen.
Horizontal lens shift dial
Vertical lens shift dial
Caution: Do not try to move the lens by hand, or you may damage the projector. Always use the
lens shift dials to change the lens position.
Setting Up the Projector 13
Page 14
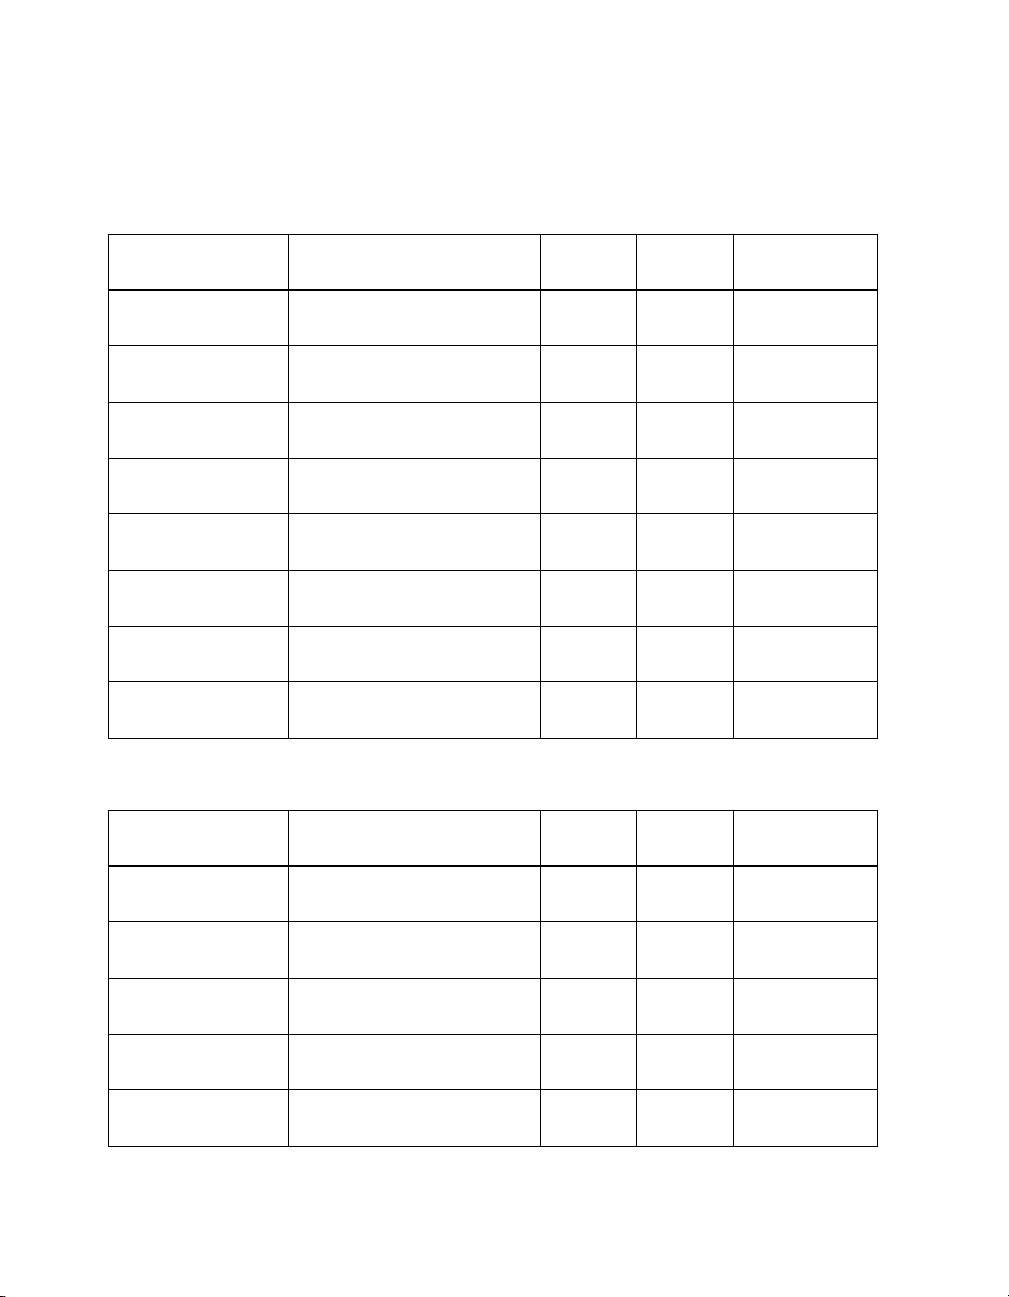
The size of the image is determined by the distance from the projector’s lens to the screen.
Depending on your display settings and how you use the Zoom ring, the actual size may
differ. Use these tables as a guide for projector placement:
16:9 aspect ratio
Projection distance
2.8 to 6.2 feet
0.87 to 1.88 m
3.8 to 8.3 feet
1.17 to 2.52 m
5.8 to 12.5 feet
1.77 to 3.80 m
7.8 to 16.7 feet
2.38 to 5.08 m
9.8 to 20.9 feet
2.98 to 6.36 m
11.8 to 25.1 feet
3.59 to 7.64 m
14.7 to 31.4 feet
4.50 to 9.56 m
19.7 to 41.9 feet
6.01 to 12.76 m
4:3 aspect ratio
Projection distance
3.5 to 7.6 feet
1.07 to 2.31 m
Diagonal image size
(width × height) Offset A Offset B
30 in. (26 × 15 in.)
76.2 cm (66 × 37 cm)
40 in. (35 × 20 in.)
101.6 cm (89 × 50 cm)
60 in. (51 × 28 in.)
152.4 cm (130 × 75 cm)
80 in. (71 × 39 in.)
203.2 cm (180 × 100 cm)
100 in. (87 × 47 in.)
254 cm (220 × 120 cm)
120 in. (106 × 59 in.)
305 cm (270 × 150 cm)
150 in. (130 × 75 in.)
381 cm (330 × 190 cm)
200 in. (173 × 98 in.)
508 cm (440 × 250 cm)
Diagonal image size
(width × height) Offset A Offset B
30 in. (24 × 18 in.)
76.2 cm (61 × 46 cm)
6.8 in.
17 cm
9.1 in.
23 cm
13.6 in.
35 cm
18.2 in.
46 cm
22.7 in.
58 cm
27.0 in.
69 cm
34.0 in.
86 cm
45.4 in.
115 cm
8.3 in.
21 cm
21.5 in.
55 cm
28.7 in.
73 cm
43.0 in.
109 cm
57.4 in.
146 cm
71.7 in.
182 cm
86.0 in.
219 cm
107.6 in.
273 cm
143.5 in.
364 cm
26.3 in.
67 cm
Horizontal
Offset
–11.5 to 11.5 in.
–29 to 29 cm
–15.4 to 15.4 in.
–39 to 39 cm
–23.1 to 23.1 in.
–59 to 59 cm
–30.8 to 30.8 in.
–78 to 78 cm
–38.5 to 38.5 in.
–98 to 98 cm
–46.1 to 46.1 in.
–117 to 117 cm
–57.7 to 57.7 in.
–147 to 147 cm
–76.9 to 76.9 in.
–195 to 195 cm
Horizontal
Offset
–14.1 to 14.1 in.
–36 to 36 cm
4.7 to 10.1 feet
1.44 to 3.09 m
7.2 to 15.3 feet
2.18 to 4.66 m
9.6 to 20.4 feet
2.92 to 6.23 m
12 to 25.6 feet
3.66 to 7.79 m
14 Setting Up the Projector
40 in. (32 × 24 in.)
101.6 cm (81 × 61 cm)
60 in. (47 × 35 in.)
152.4 cm (120 × 90 cm)
80 in. (63 × 47 in.)
203.2 cm (160 × 120 cm)
100 in. (79 × 59 in.)
254 cm (200 × 150 cm)
11.1 in.
28 cm
16.7 in.
42 cm
22.2 in.
56 cm
27.8 in.
71 cm
35.1 in.
89 cm
52.7 in.
134 cm
70.2 in.
178 cm
87.8 in.
223 cm
–18.8 to 18.8 in.
–48 to 48 cm
–28.2 to 28.2 in.
–72 to 72 cm
–37.6 to 37.6 in.
–96 to 96 cm
–47.1 to 47.1 in.
–120 to 120 cm
Page 15
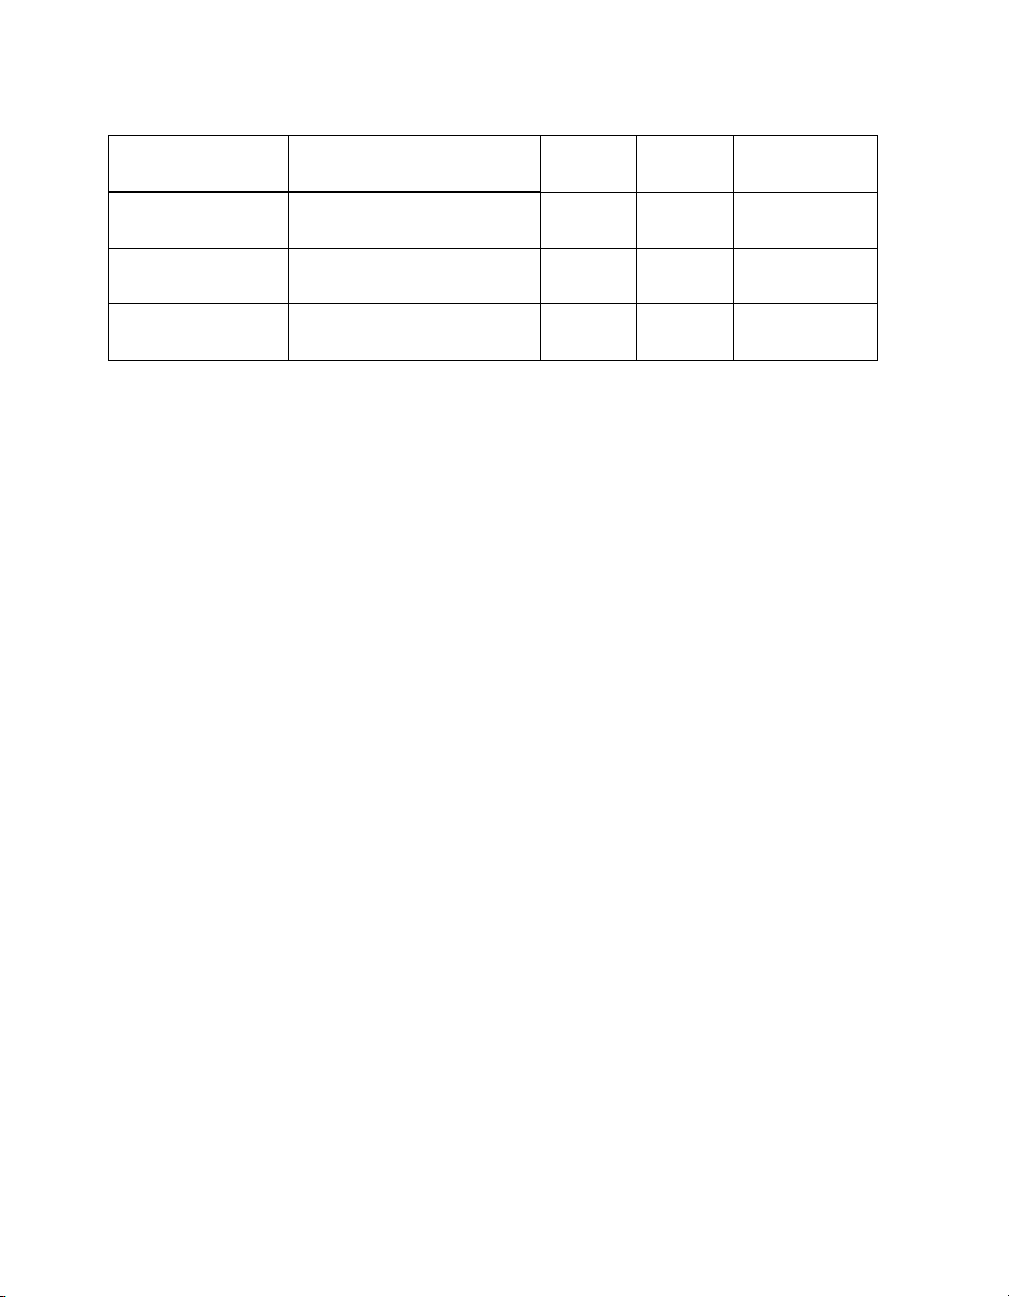
4:3 aspect ratio (continued)
Projection distance
14.4 to 30.7 feet
4.40 to 9.36 m
18.1 to 38.4 feet
5.51 to 11.71 m
24.1 to 51.2 feet
7.36 to 15.62 m
Diagonal image size
(width × height) Offset A Offset B
120 in. (94 × 71 in.)
305 cm (240 × 180 cm)
150 in. (118 × 91 in.)
381 cm (300 × 230 cm)
200 in. (161 × 118 in.)
508 cm (410 × 300 cm)
33.0 in.
85 cm
41.7 in.
106 cm
55.6 in.
141 cm
105.0 in.
268 cm
131.7 in.
334 cm
175.6 in.
446 cm
Horizontal
Offset
–56.5 to 56.5 in.
–143 to 143 cm
–70.6 to 70.6 in.
–179 to 179 cm
–94.1 to 94.1 in.
–239 to 239 cm
To determine the exact image size when you know the projection distance (or the exact
projection distance when you know the desired image size), you can use the Image Size
Calculator. This program is available on the Epson website at epson.com/support (U.S.) or
epson.ca/support (Canada).
Also keep these considerations in mind:
■ Make sure there is plenty of space for ventilation around and under the projector. Do not
set the projector on top of loose materials that could block the vents underneath.
■ Make sure the projector is within 9.8 feet (3 m) of a grounded electrical outlet or
extension cord.
Setting Up the Projector 15
Page 16

Installing the Projector
To install the projector, you first need to determine the location, based on the size of your
screen (maximum diagonal image size). Use the tables on page 14 as a guide to positioning the
projector.
To suspend the projector from a ceiling, you will need the optional projector mount designed
for the projector. See page 10 for ordering information. Follow the instructions included with
the mount to install the projector.
WARNING: When installing or adjusting the ceiling mount, do not use adhesives to prevent the
screws from loosening and do not use any type of oil or lubricant. These may cause the projector
casing to crack and the projector may fall, causing serious injury and serious damage to the
projector.
If you install the projector on the ceiling, you will need to invert the picture so that it appears
right side up. Follow these steps:
1. Press the
2. Open the
3. Select
4. Press the
Menu button on the remote control.
Settings menu, then select Projection.
Front/Ceiling.
Menu button when done.
Note that you can rotate the Epson logo plate
180 degrees when suspending the projector from a
ceiling.
If you are planning to use an AV controller with the
projector, refer to the table of ESC/VP21 command
codes on page 67. In addition, the projector’s
out
port can be used to lower a projection screen (see
Trigger
page 46).
16 Setting Up the Projector
Page 17
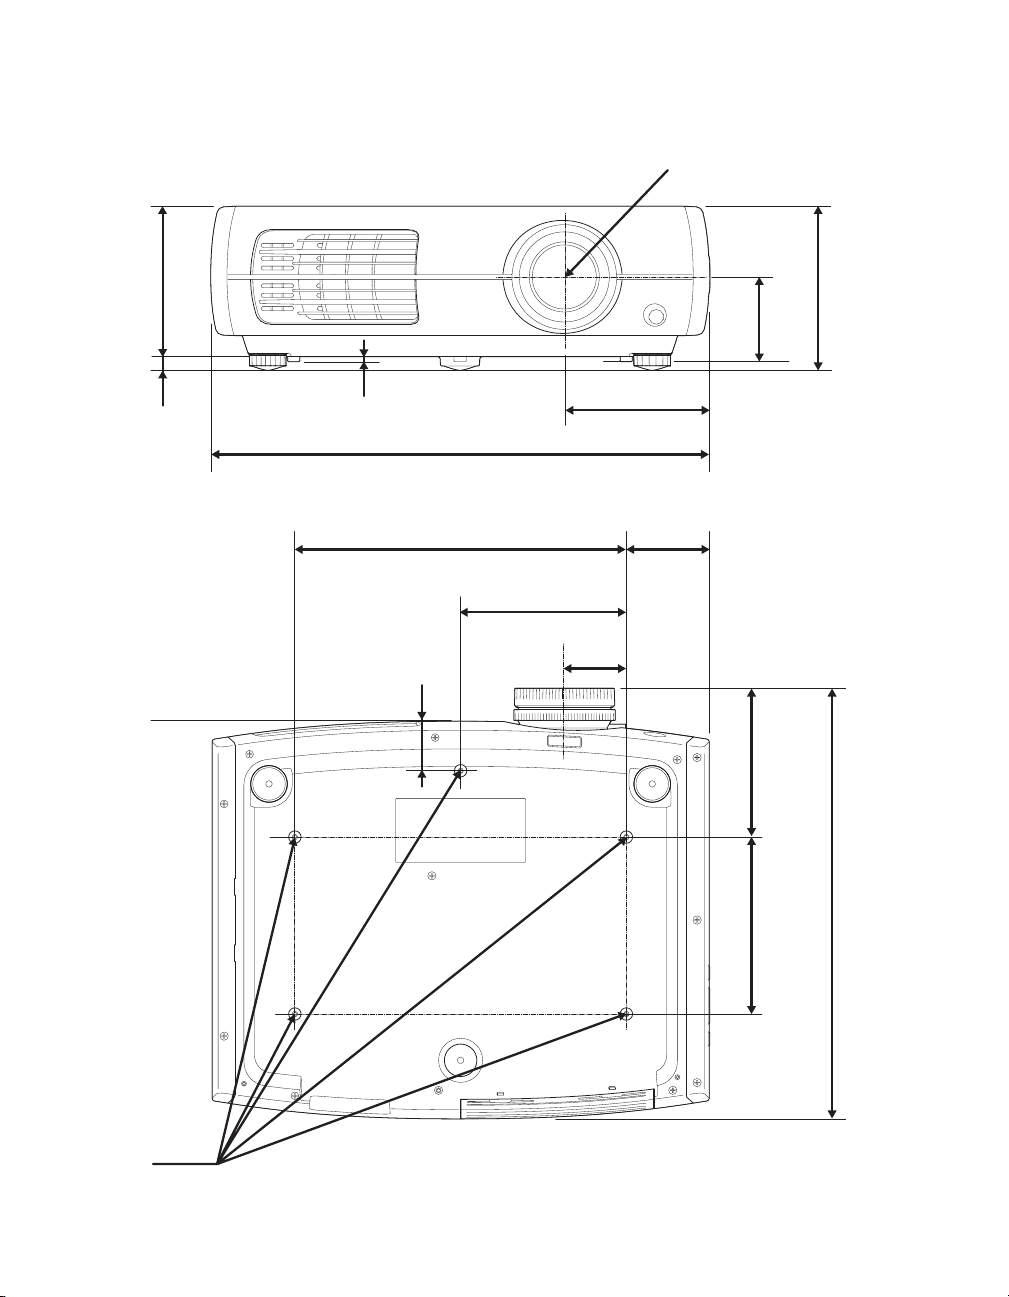
The following illustrations show the dimensions of the projector:
Center of lens
5.4 in.
136
mm
0.5 in.
12.3
mm
0.2 in.
4.5 mm
1.8 in.
45 mm
17.7 in.
450 mm
11.8 in.
300 mm
5.9 in.
150 mm
2.2 in.
56 mm
5.2 in.
131 mm
3.0 in.
75 mm
2.8 in.
72 mm
5.3 in.
134.7 mm
5.8 in.
148.3 mm
M4× 9 mm
15.3 in.
6.3 in.
160 mm
389.7
mm
Setting Up the Projector 17
Page 18
Connecting the Cables
Connecting Video and Computer Equipment
You can connect the projector to many types of video equipment, such as a Blu-ray
™
/DVD player, digital tuner, cable or satellite box, video game console, camcorder, or
Disc
digital camera. You can also connect it to a desktop or laptop PC or Apple
system. For details on compatible video formats, see page 65.
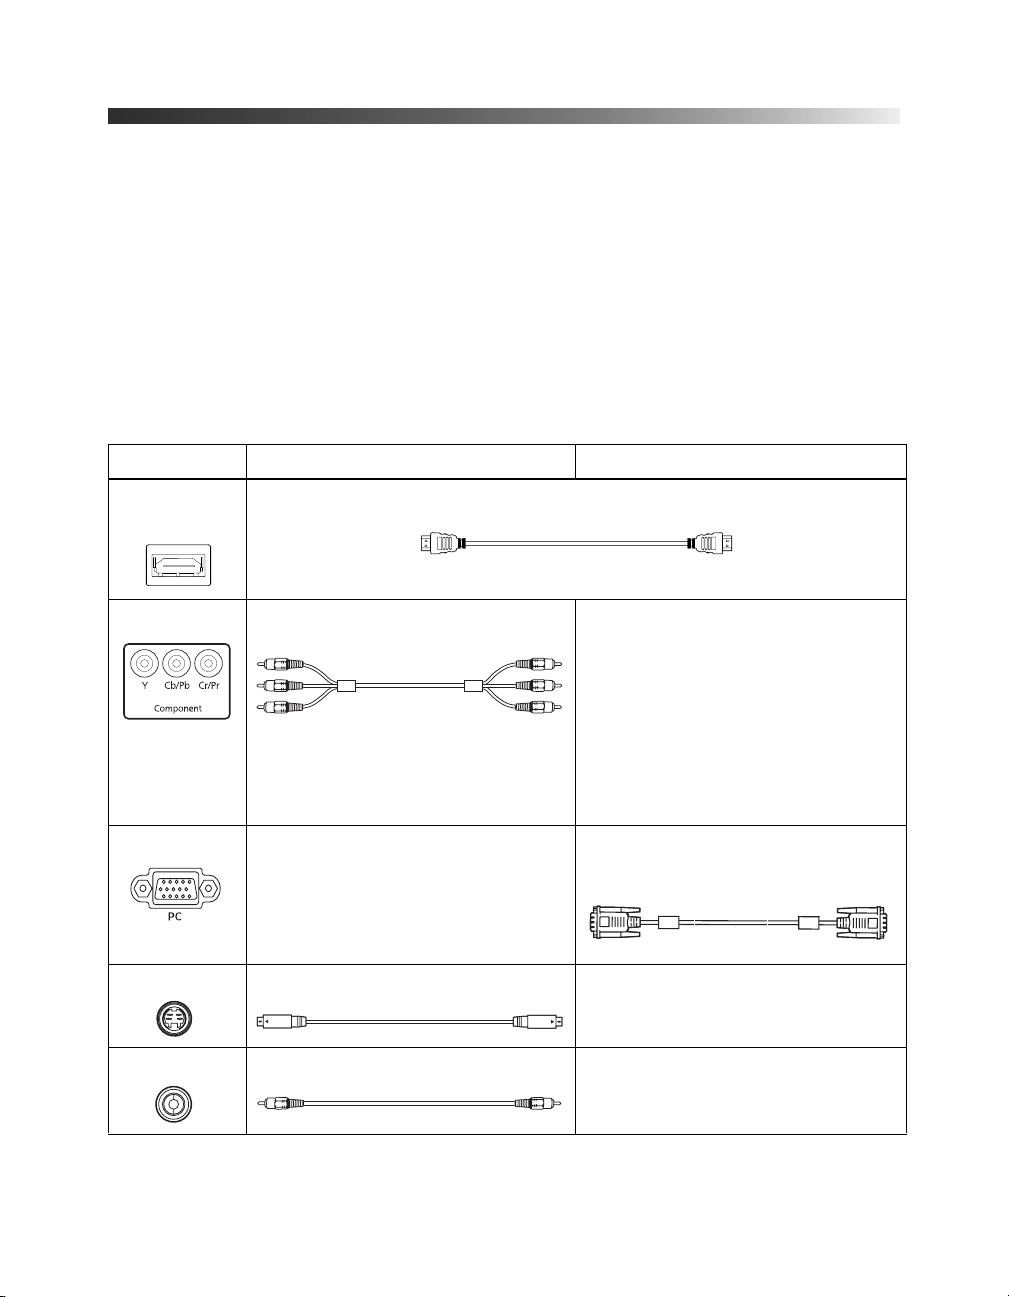
You can connect up to six pieces of video equipment at the same time, using any of the
commercially available cables shown below:
Port name Video equipment connection Computer connection
®
Macintosh®
HDMI 1/
HDMI 2
Component Use a component video cable
PC — Use a Mini D-sub, 15-pin monitor cable
S-Video Use an S-video cable: —
Video Use an RCA video cable: —
Use an HDMI cable:
—
(with RCA-style connectors):
Connect the cable to the three
component video ports. Match
corresponding colors between the
cable and the ports.
to connect to a computer RGB
(monitor) port:
18 Setting Up the Projector
Page 19
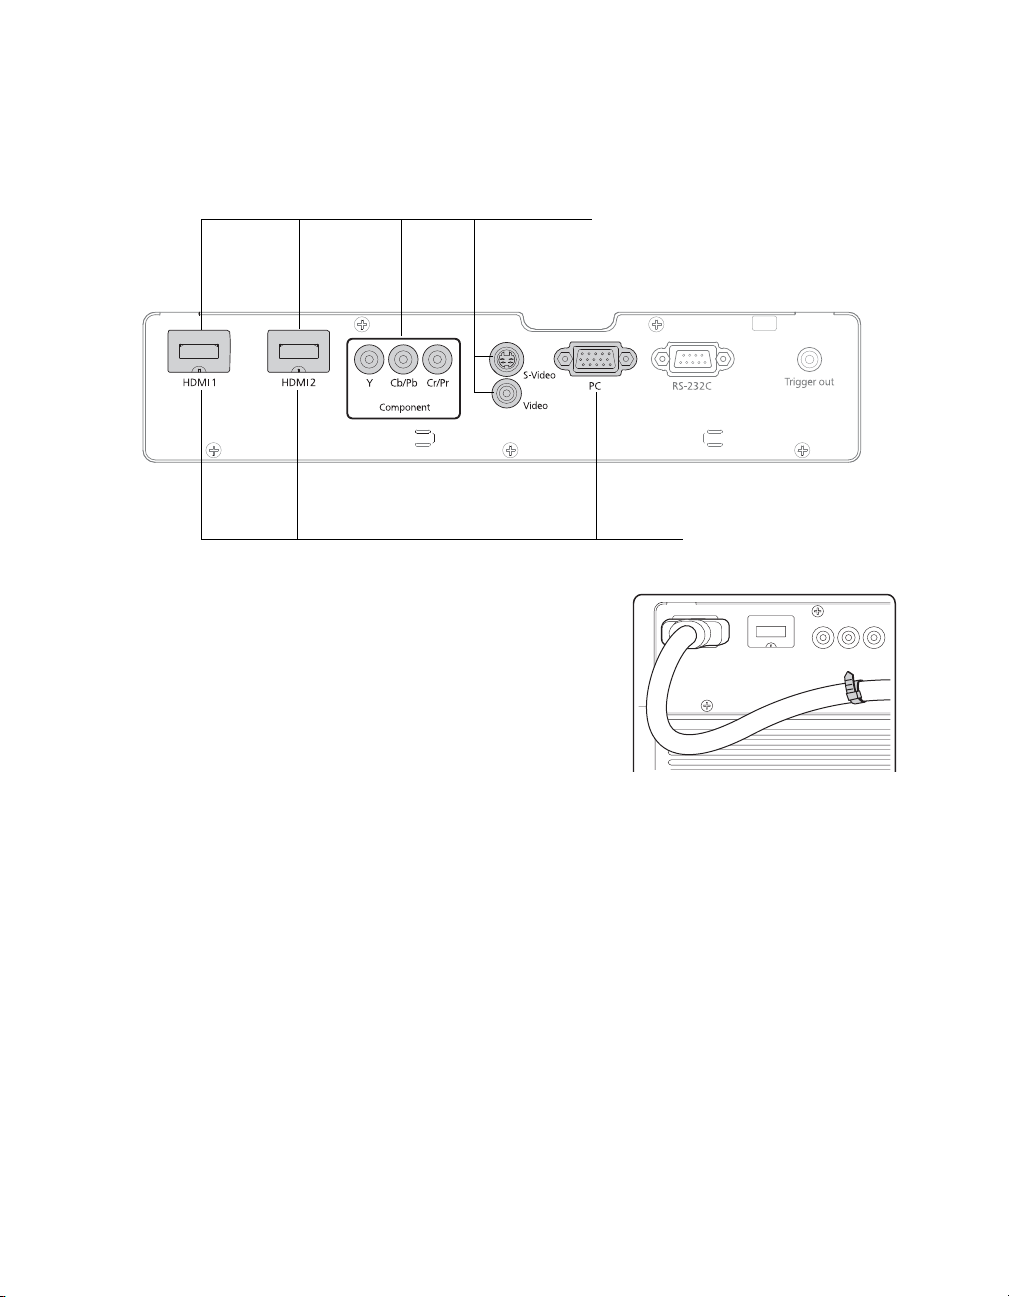
For best results, connect your video equipment to the HDMI port, if possible. If your
equipment doesn’t support HDMI, connect it to one of the following ports (highest quality
listed first):
Component (for component video), S-Video, or Video (for composite video).
Connect video equipment to one
of these ports
Connect a computer to one
of these ports
When you connect a large or heavy cable to the projector,
such as an HDMI cable, it is recommended that you fasten
it to one of the two cable holders using a commercially
available cable tie.
Setting Up the Projector 19
Page 20
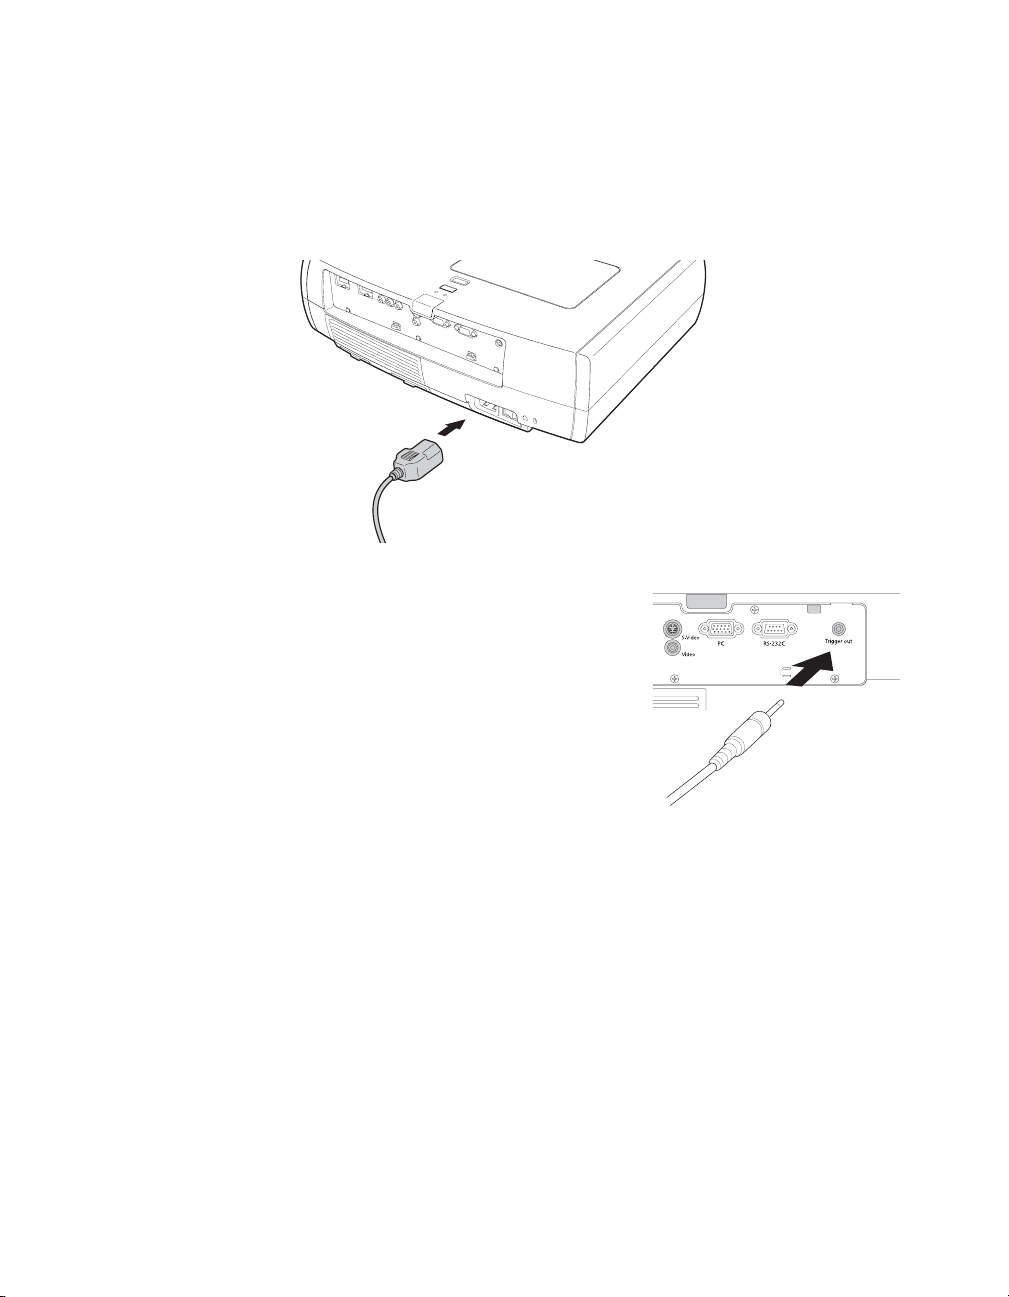
Making Other Connections
Connect the power cable and other cables described below, depending on how you plan to
use the projector.
■ Plug the power cable into the projector and a grounded electrical outlet.
■ The Trigger out port outputs a 12-volt DC signal
when the projector is turned on. This lets a central
control system monitor whether the projector is on
or off, and can be used to raise or lower your
projection screen automatically when the projector
is in use.
Connect a 3.5-mm mini jack to the port, as shown.
Use the
Trigger Out setting to enable the port (see
page 46).
■ To use an AV controller with the projector, connect a 9-pin null modem serial cable to
RS-232C port. Refer to the table of ESC/VP21 command codes on page 67.
the
20 Setting Up the Projector
Page 21
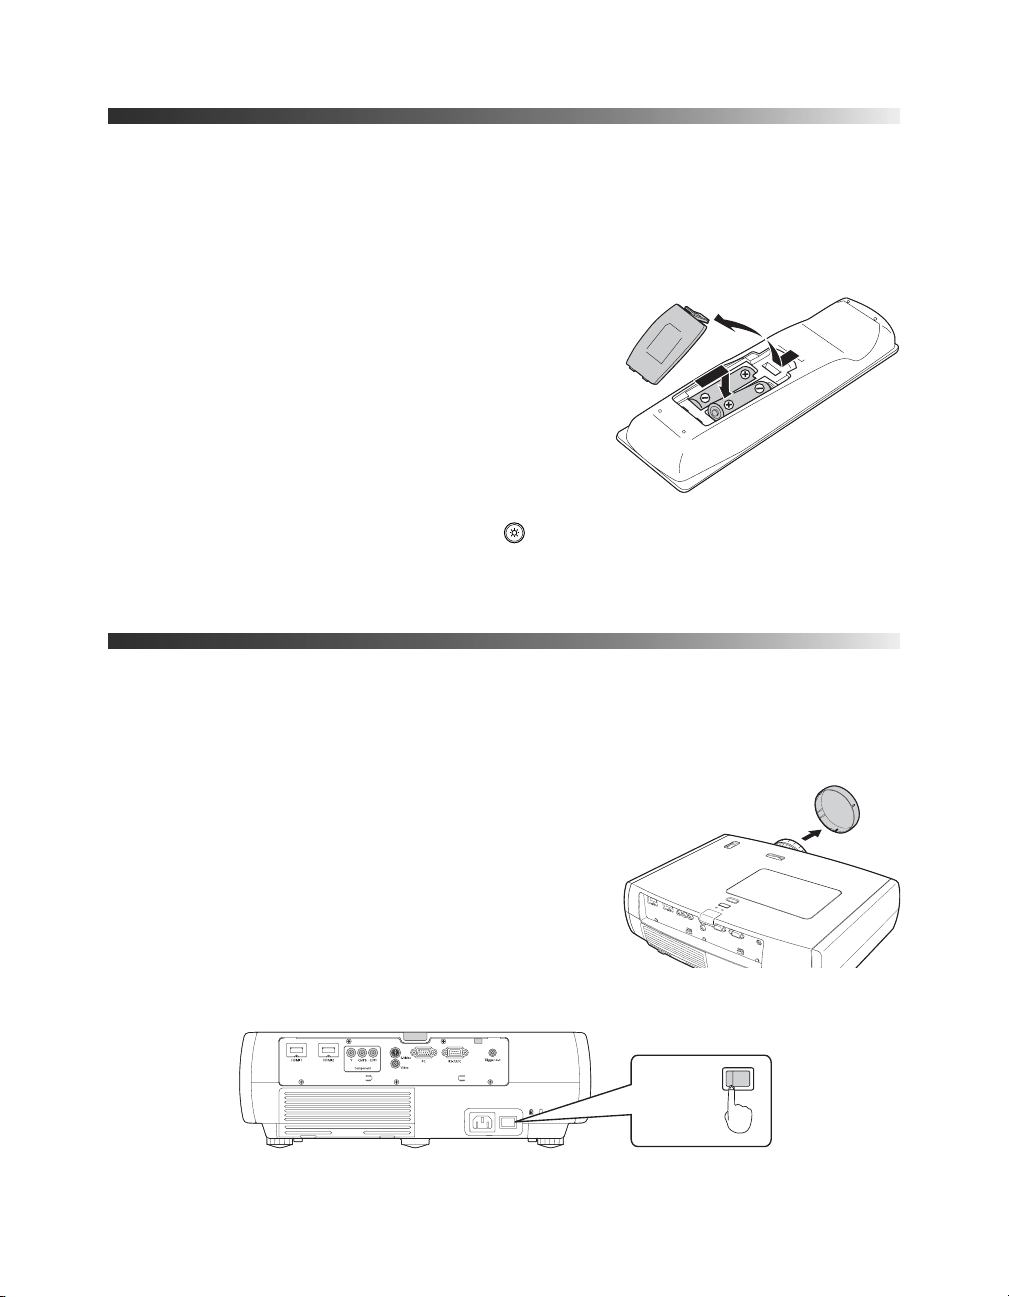
Installing Batteries in the Remote Control
The remote control uses two AA batteries.
WARNING: Keep batteries away from children. If a battery is swallowed, contact your doctor
immediately.
1. Release the tab and lift open the cover.
2. Insert two new AA batteries as shown.
3. Insert the tab on the cover and press it down until it
clicks into place.
Aim the remote control at the screen, or at the front or
back of the projector. Make sure you are within 30 feet
of the projector.
If you suspect the batteries are weak, press the illumination button. If the buttons do not
glow, replace the batteries.
Turning the Projector On and Off
Turning On the Projector
1. Remove the lens cap.
2. Turn on any connected equipment you plan to use.
3. Turn on the main power switch on the back of the projector.
ON
Setting Up the Projector 21
Page 22
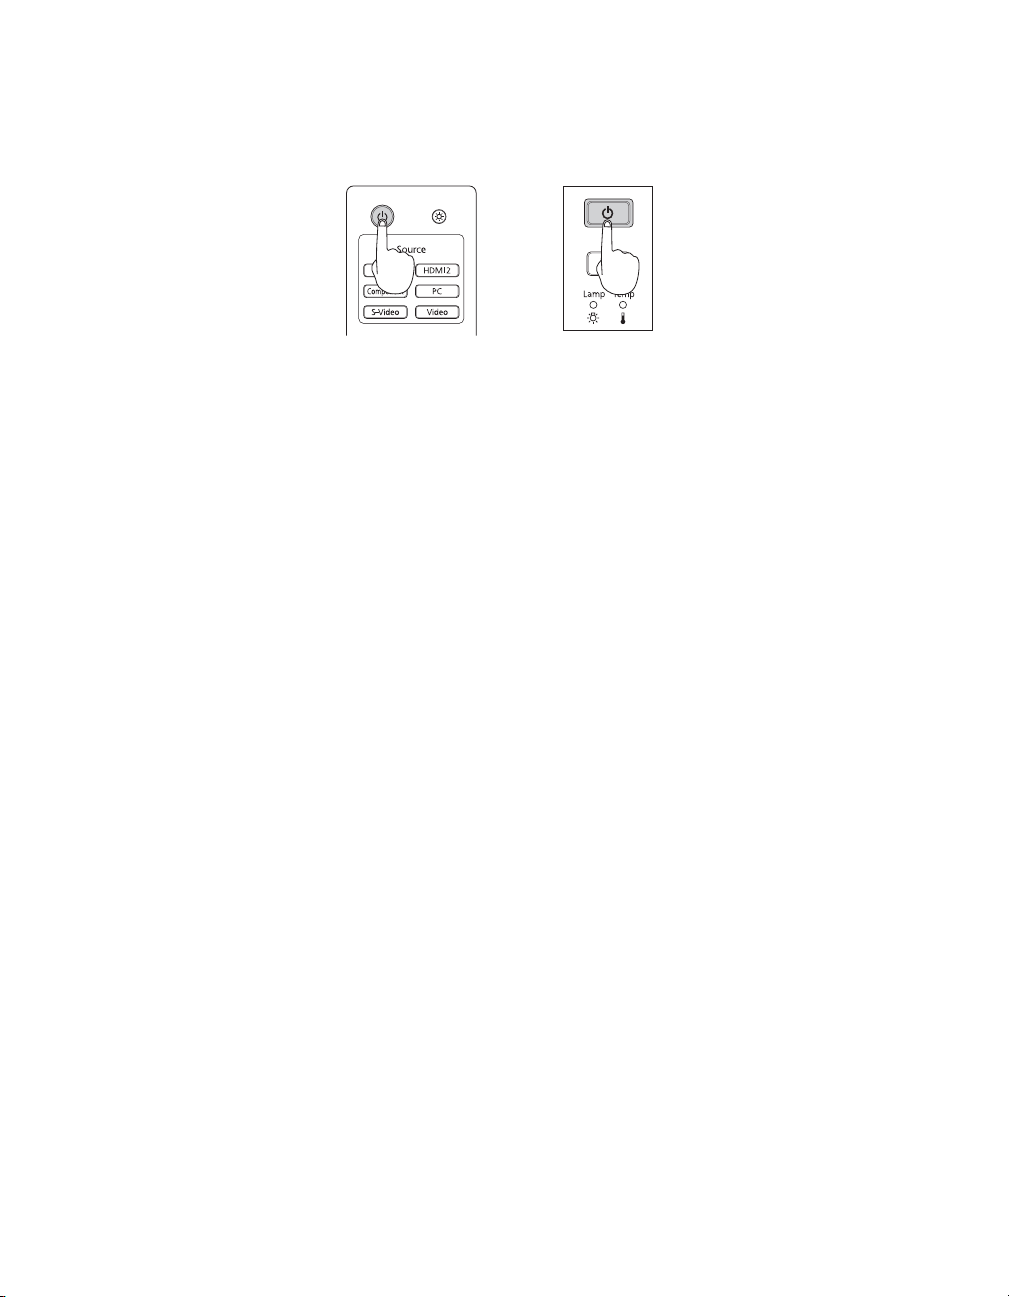
4. Press the Ppower button on the remote control or projector.
Remote control Projector
Note: To prevent children from turning on the projector, you can use the Child Lock feature. See
page 32 for details.
If you’ll be using the projector at an altitude above 4921 feet (1500 meters), turn on High Altitude
Mode so the fan can properly cool the projector at the high altitude air pressure. See page 47 for
details.
The projector takes about 30 seconds to warm up and display an image. If you don’t see a
picture, you may need to change the image source as described on page 23.
Turning Off the Projector
1. Turn off any equipment connected to the projector.
2. Press the Ppower button on the remote control or projector. When you see a
confirmation message, press the Ppower button again to turn the projector off.
Caution: Turn off this product when not in use to prolong the life of the projector. Continuous
24-hour-a-day use may reduce the overall life of the product.
3. If you need to move the projector, wait for the Ppower light to stop flashing, then turn
off the projector’s main power switch on the back. You can now unplug the projector.
Caution: Never turn off the main power switch without first turning off the projector and
letting it cool as described above, or you could damage it and reduce lamp life.
22 Setting Up the Projector
Page 23
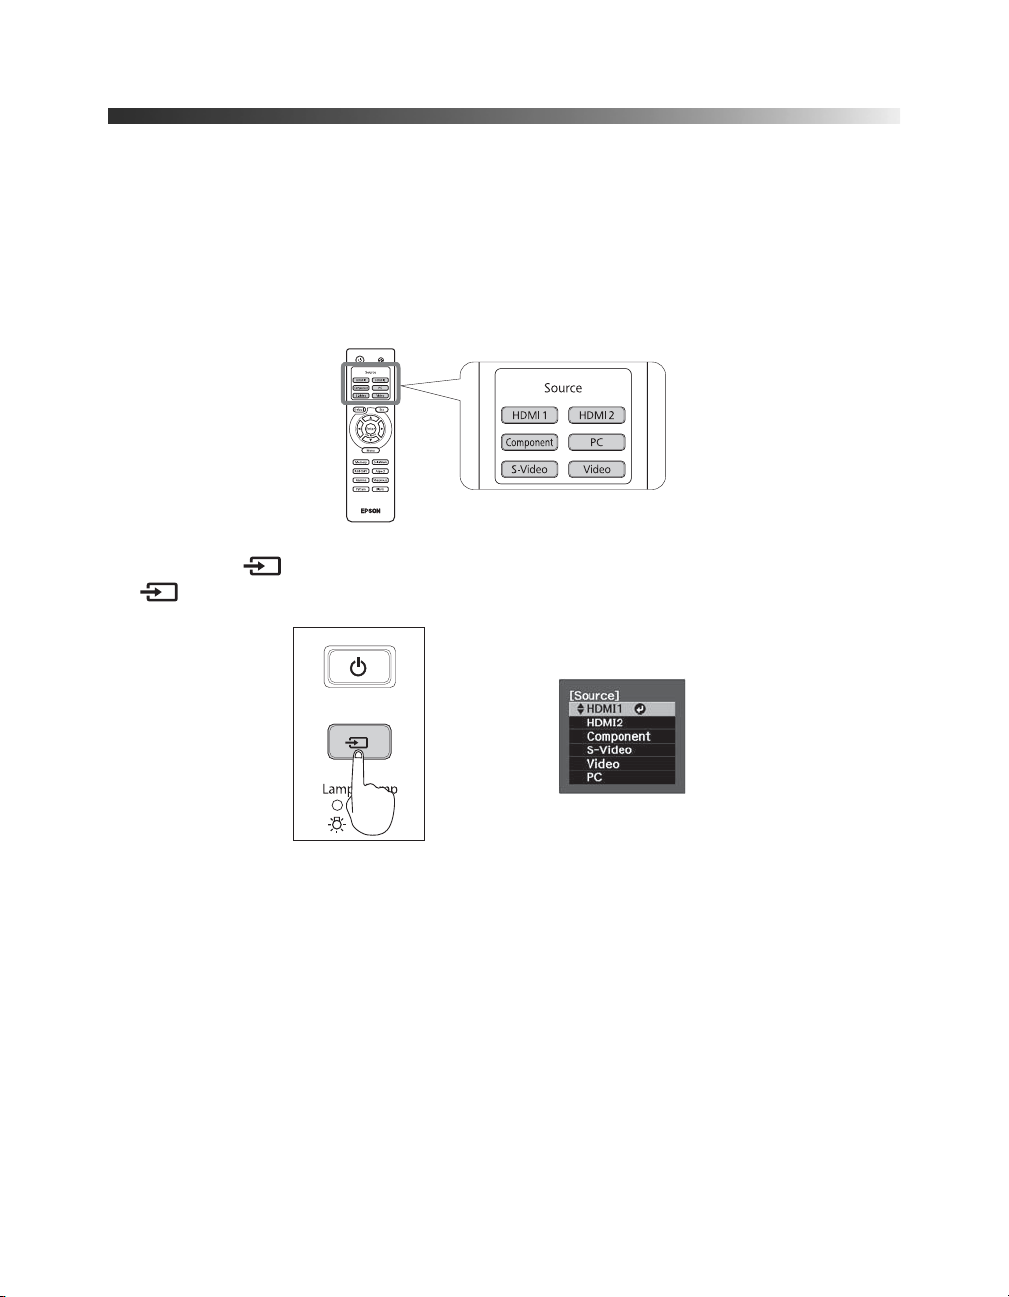
Selecting the Image Source
The source buttons on the projector and remote control let you switch between images from
different pieces of equipment connected to the projector (such as a Blu-ray Disc/DVD player,
cable or satellite box, or video game console).
Press the
Source button on the remote control that corresponds to the port to which your
video source is connected.
If you press the source button on the projector, you see a list of available sources. Press
the source button to move through the list and select the desired source.
Note: If an image does not appear, see “Problem Solving” on page 56.
To temporarily turn off the image and darken the screen, press the Blank button on the remote
control. Press the Blank button again to return to normal viewing.
Setting Up the Projector 23
Page 24
Positioning the Image
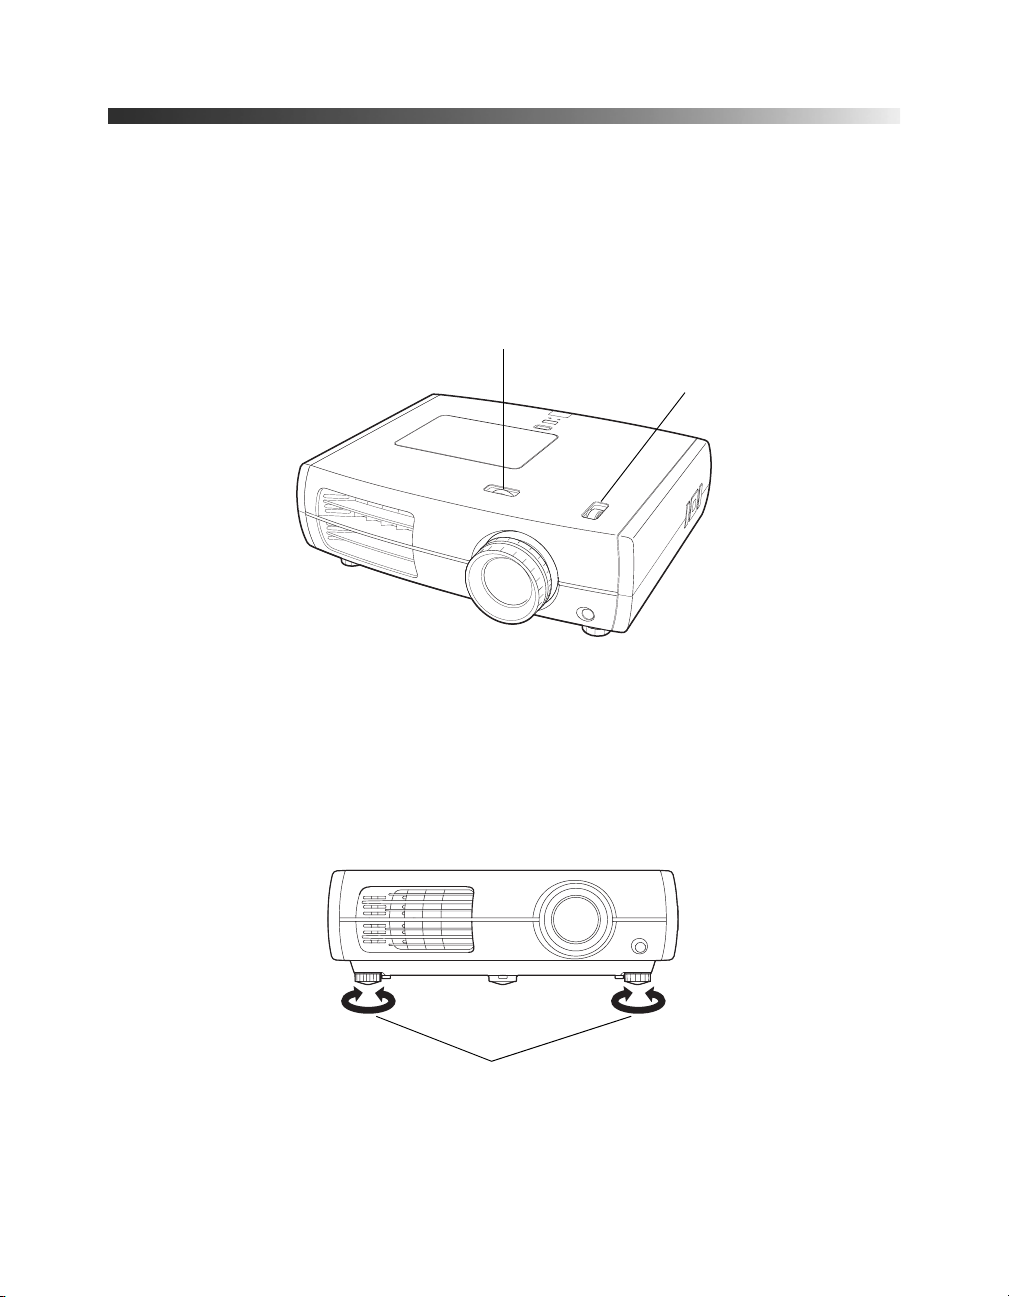
If the image is not centered on the screen, use the horizontal and vertical lens shift dials to
adjust its position.
Caution: Do not try to move the lens by hand, or you may damage the projector. Always use the
lens shift dials to change the lens position.
Horizontal lens shift dial
Vertical lens shift dial
Note: You can display a test pattern to help adjust the image position by pressing the Pattern
button on the remote control. Press the Pattern button again to turn off the test pattern.
When you hear a click, the lens position is almost centered. If the lens shift dial becomes
difficult to turn, you cannot adjust the position any further.
If one side of the image is taller than the other, make sure the projector is parallel to the
screen. If necessary, adjust the front feet so that the projector is horizontal.
24 Setting Up the Projector
Adjustable feet
Page 25
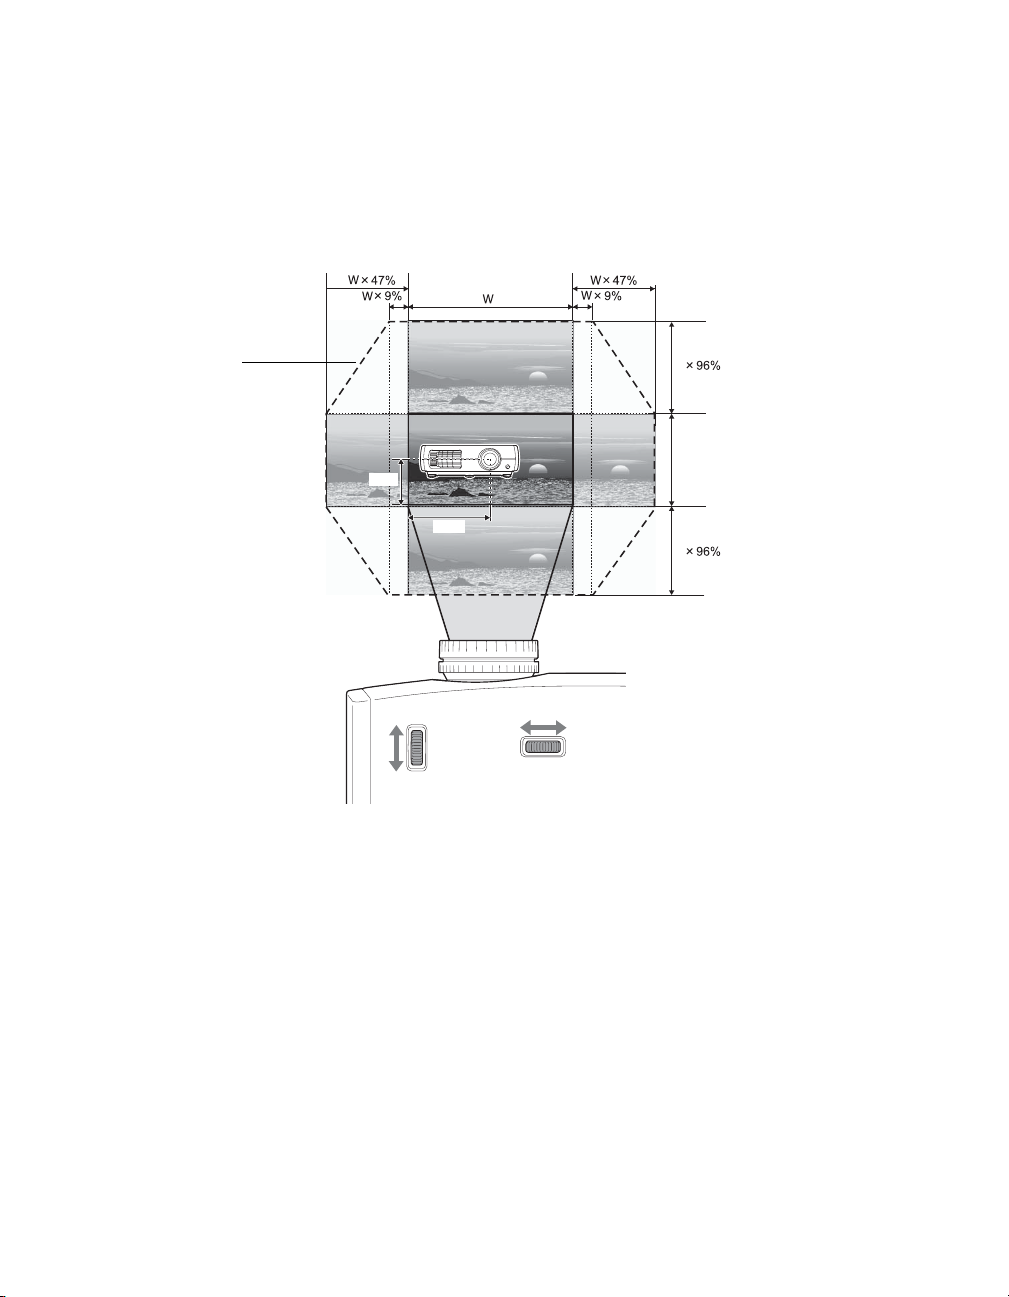
The image cannot be moved to the maximum distance in both the vertical and horizontal
directions. For example, the image cannot be shifted vertically when it has been shifted
horizontally by the full amount. When the image has been shifted vertically by the full
amount, it can be shifted up to 9 percent of the width of the image. The amount by which
you can shift the image is expressed in terms of the image width (W) and height (H), as
shown below:
Maximum lens
shift boundary
1/2H
Move
downwards
Move
upwards
1/2W
Move to
the left
Move to
the right
H
H
H
Setting Up the Projector 25
Page 26
Making Basic Adjustments
Follow the instructions in this chapter to make basic adjustments to the image shape, size,
color, and quality. For further refinements, see “Making Detailed Adjustments” on page 33.
Focusing and Zooming
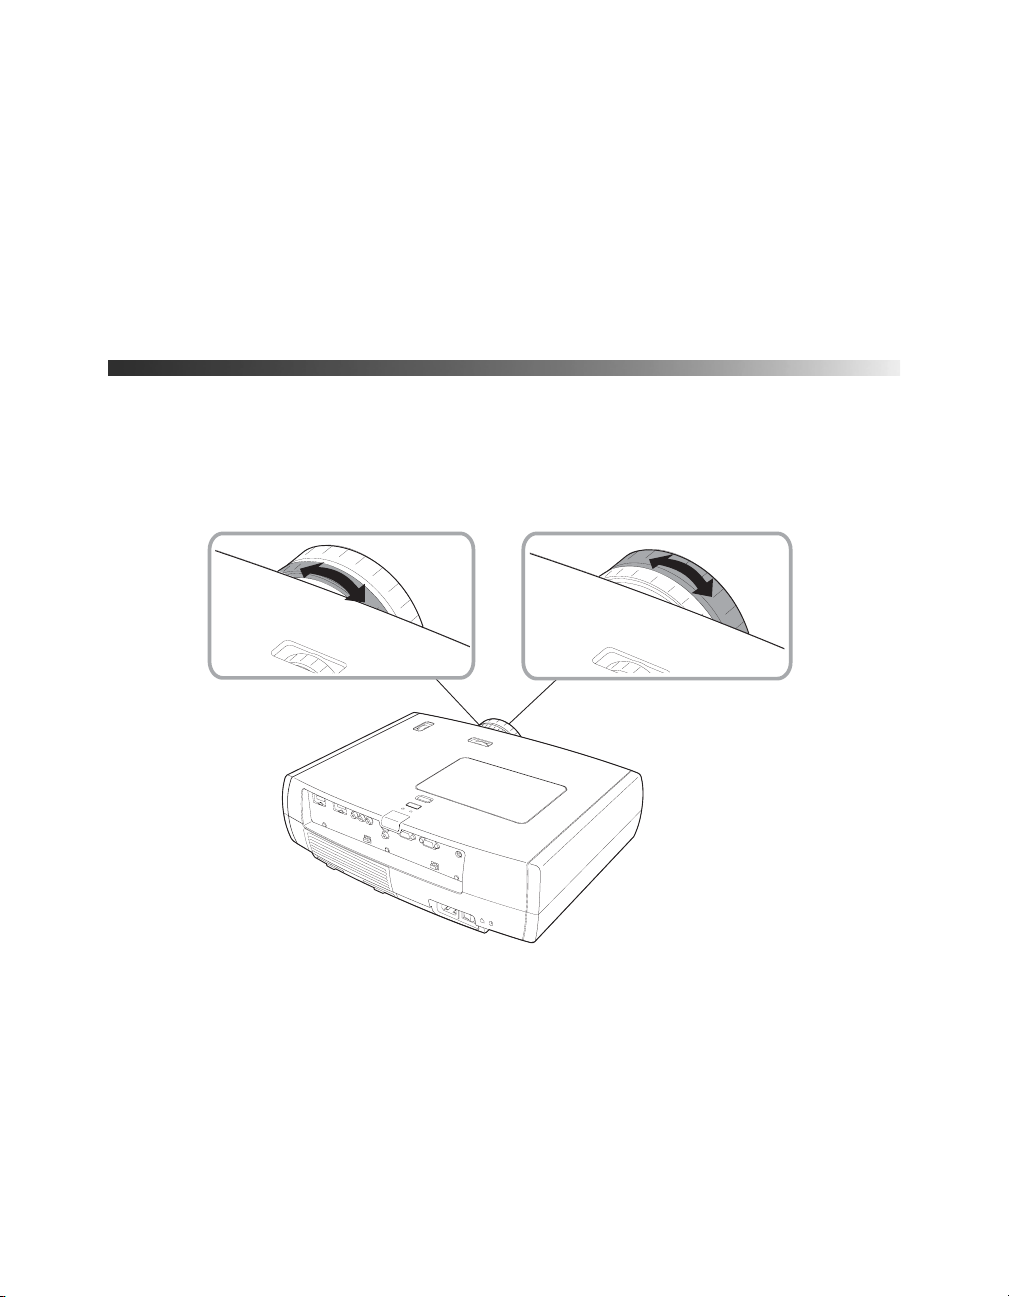
Use the focus ring to sharpen the image.
Use the zoom ring to reduce or enlarge the image.
Focus ring
Zoom ring
26 Making Basic Adjustments
Page 27
Choosing the Aspect Ratio
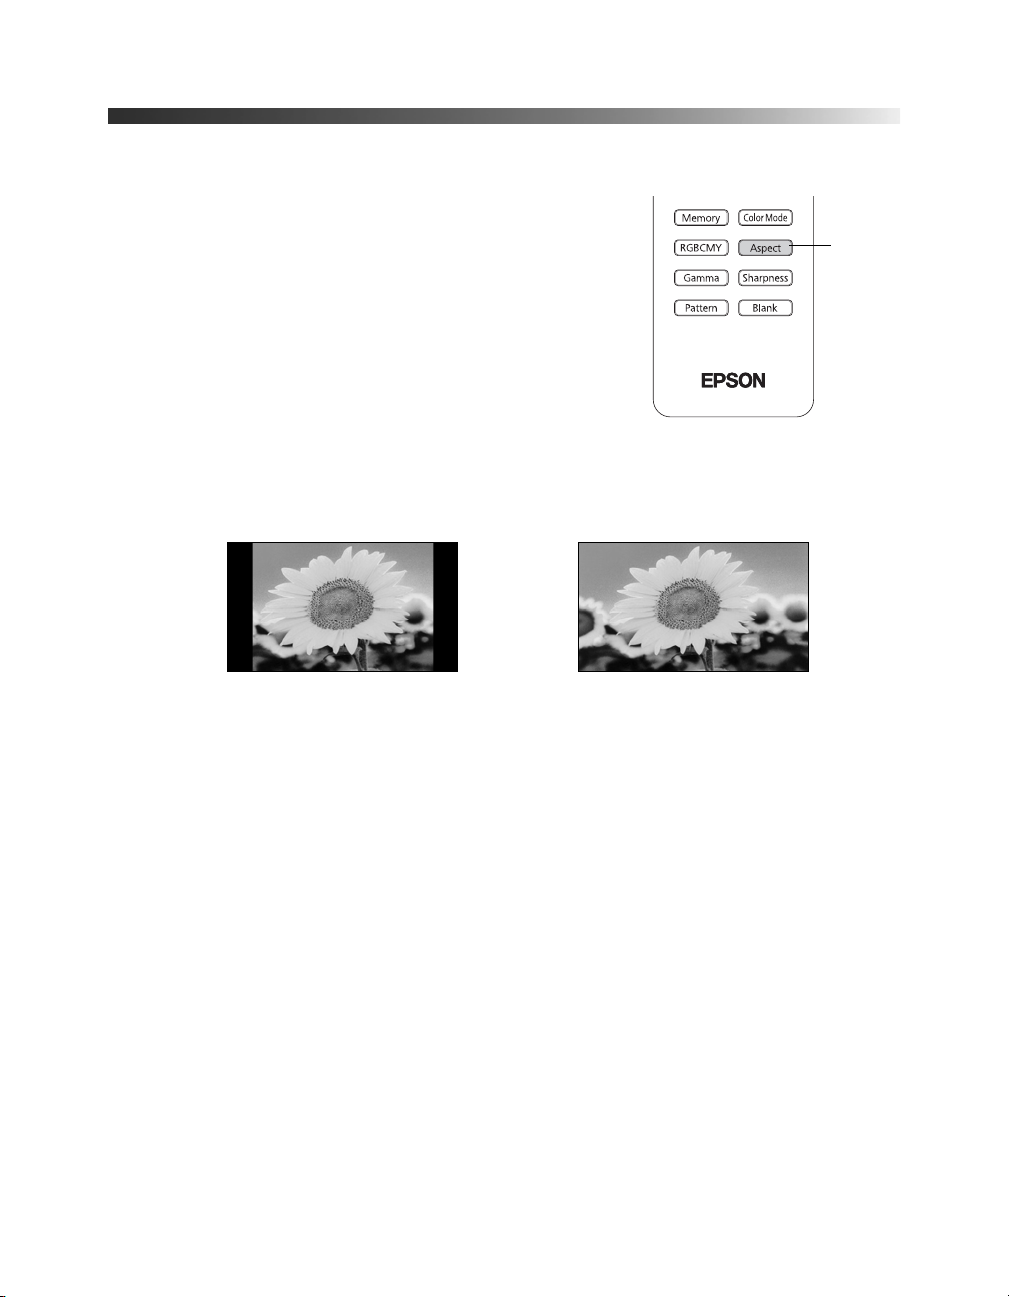
In many cases, video signals are automatically resized to fit
on your screen when
You may need to change the size of the image (or aspect
ratio) for certain image types by pressing the
on the remote control.
Select one of these settings:
■ Normal for standard TV broadcasts, computer images,
or images with a 4:3 aspect ratio.
■ Full for images recorded in squeeze mode.
■ Zoom for images recorded in 16:9 (wide-screen) format.
■ Wide for expanding a 4:3 image to 16:9 so it fills the whole screen. This stretches only
the right and left sides of the image; the central part is unchanged.
Auto is selected as the Aspect setting.
Aspect button
4:3 image using Normal setting 16:9 image using Zoom setting
Aspect
button
Note: When displaying 720p, 1080i, or 1080p signals through the HDMI or Component video port,
the aspect ratio is automatically selected and you cannot change it.
If you display a 4:3 image using the Zoom setting, the top and bottom will be cut off. You can use
the Zoom Caption Pos. option and other settings to resize and reposition the image. For details,
see page 45.
For details on how the projector resizes the picture when you choose an Aspect setting, see
page 65.
Making Basic Adjustments 27
Page 28
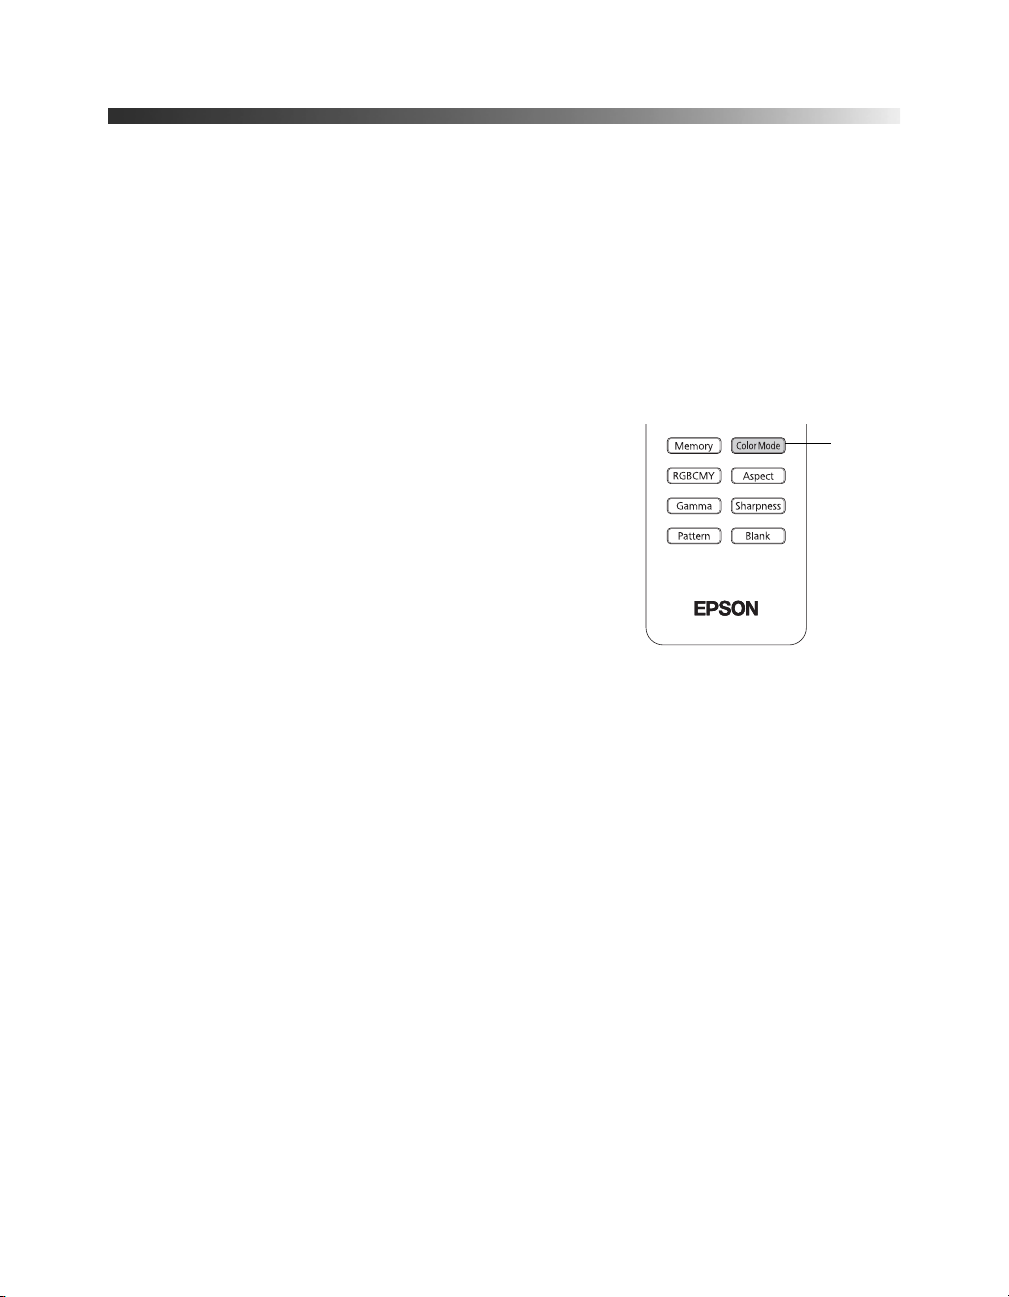
Choosing the Color Mode
You can change the Color Mode to automatically adjust brightness, contrast, and color,
letting you quickly optimize the projected image for various lighting environments. You can
also select a different color mode for each input source—which is useful if you view different
types of images from different sources. (For example, you might set the HDMI 1 source to
Living Room if it’s usually used for watching movies in the daytime with the blinds closed,
and the PC source to
Dynamic for playing video games with the blinds open.)
Select the image source you want to adjust, then press the
Color Mode button on the remote
control. Choose from these settings:
■ Dynamic for projecting the brightest picture available.
■ Living Room for watching television programs during
Color
Mode
button
the day.
■ Natural for projecting natural, accurate colors in a
dimly lit room.
■ Cinema for viewing movies in a dimly lit room.
■ x.v.Color for the most natural color reproduction
when viewing movies through HDMI.
The built-in Epson Cinema Filter automatically improves color reproduction in a darkened
room; it is not used when you select
Dynamic or Living Room.
28 Making Basic Adjustments
Page 29
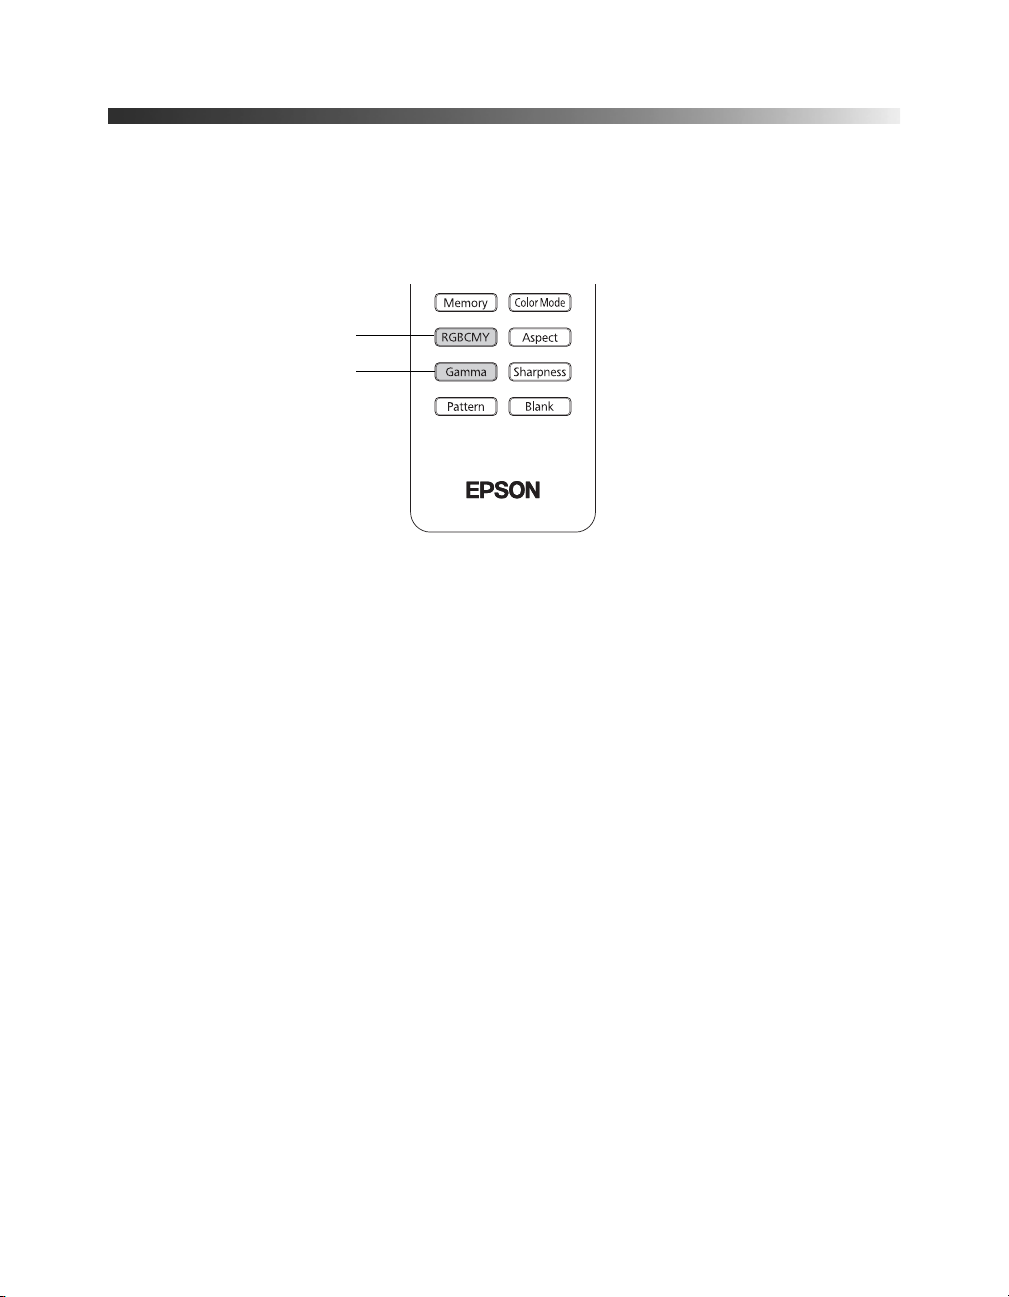
Advanced Color Adjustments
To further customize the color and image quality, you can adjust the gamma and individual
RGBCMY color tones using the
available when
Note: You can fine-tune these and other color and image quality settings using the projector’s
menu system (see page 33). You can also save combinations of picture settings with the Memory
feature for easy recall (see page 42). If you don’t like the settings you have selected on a particular
menu screen, you can press the Default button to restore the factory settings.
x.v.Color is selected as the Color Mode).
RGBCMY
Gamma
RGBCMY and Gamma buttons on the remote control (not
Making Basic Adjustments 29
Page 30
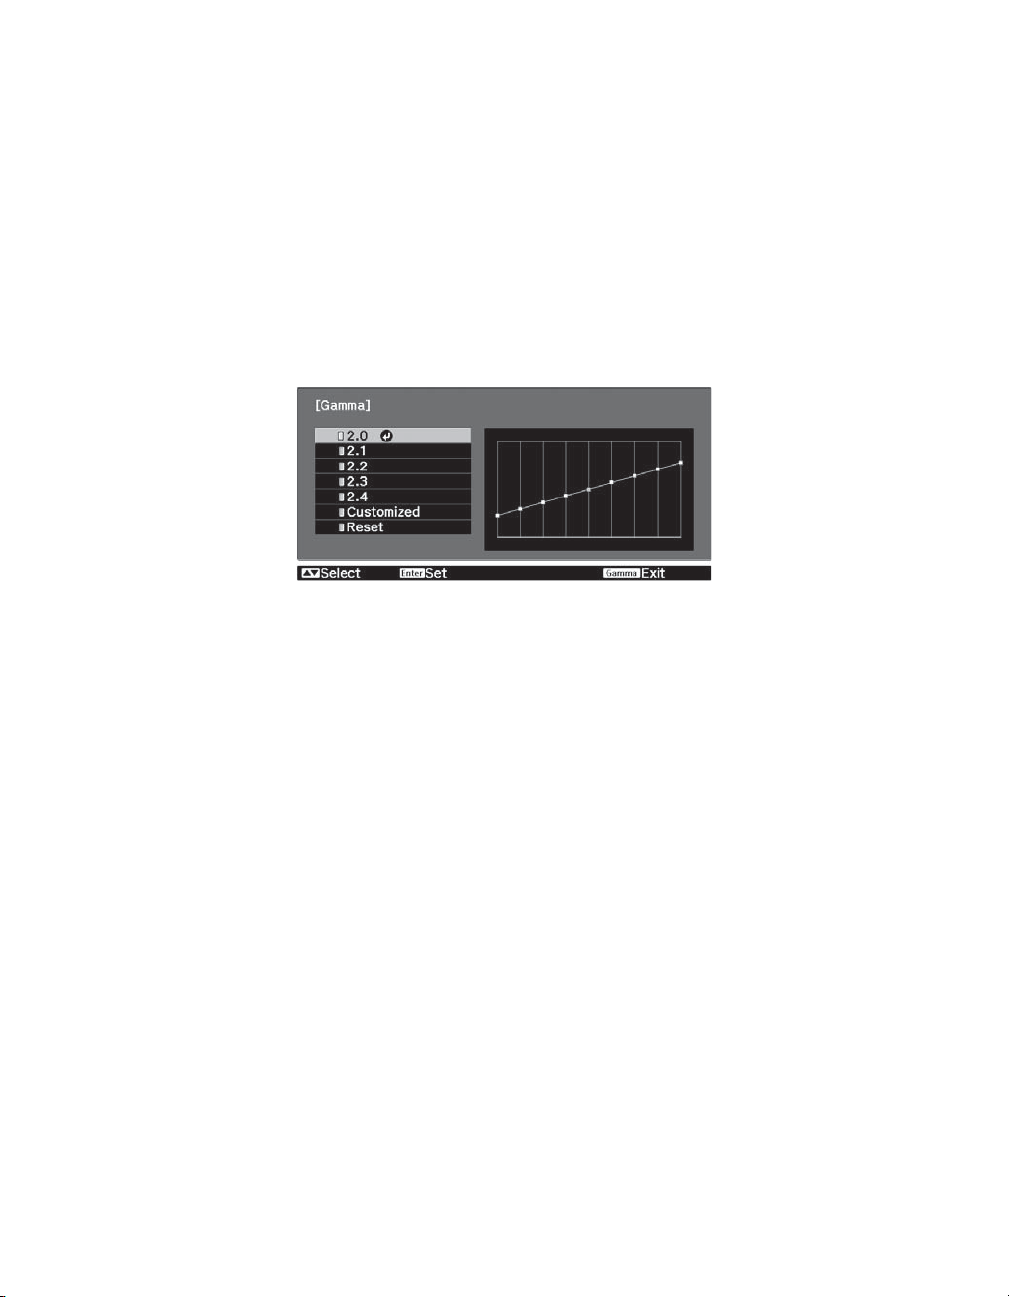
Adjusting the Gamma Setting
You can select from five gamma settings (2.0 to 2.4) or customize your own setting from your
image or a displayed graph. Lower values will increase the contrast of dark areas, but tend to
blur the bright areas. Higher values will darken the light areas. Gamma presets make minor
adjustments to mid-tone values. The larger the gamma preset, the lower the midtone values.
Changing these settings affects contrast which can be seen as a blur in bright areas.
Note: This setting cannot be used when the Color Mode is set to x.v.Color (see page 28).
1. Press the Gamma button. You see the following displayed on the screen:
2. Do one of the following:
■ Select one of the numeric correction values using the u or d button on the remote
control and press the
right. The horizontal axis represents the input signal level, and the vertical axis
represents the output signal level. Press the
Enter button. You see the setting reflected in the graph on the
Gamma button to exit.
■ Select Customized. Then continue with the next step.
3. Do one of the following:
■ Select Adjust it from the image. You see a gamma icon on the projected image. Use
the arrow buttons to move the icon to the area of brightness you want to adjust, then
press
Enter. The custom gamma graph appears with the channel selected for
adjustment. Press the u or d button to adjust and then press
■
Select Adjust it from the graph. When the gamma graph appears, use the l or r
button to select the point on the graph that you want to adjust, and then use the
u or d button to adjust the settings. Press
30 Making Basic Adjustments
Enter.
Enter to save your setting and exit.
Page 31
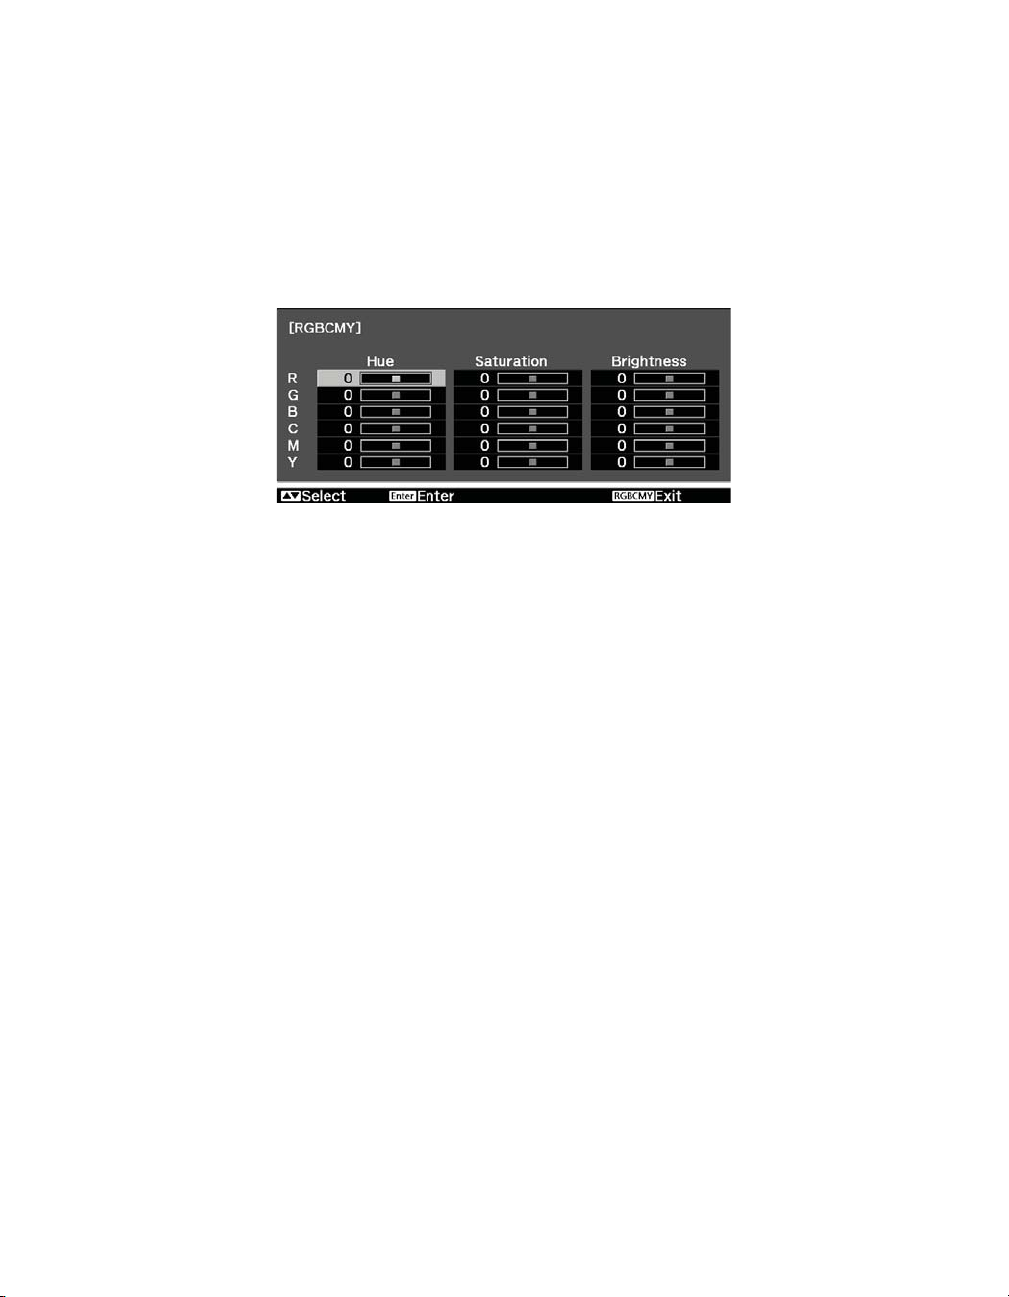
Adjusting RGBCMY
Use this feature to adjust the hue, saturation, and brightness for each of the red (R),
green (G), blue (B), cyan (C), magenta (M), and yellow (Y) color components.
Note: This setting cannot be used when the Color Mode is set to x.v.Color (see page 28).
1. Press the RBGCMY button. You see the following displayed on the screen:
2. Use the u or d button on the remote control to select the color you want to adjust, and
press the
Enter button.
3. Select the
Hue, Saturation, or Brightness for that color, and use the l or r button to
make the adjustment.
4. Press
Note: You can also adjust the offset and gain using the RGB setting in the projector’s menu
system (see page 40).
Esc to adjust another color, or press RGBCMY to exit.
Making Basic Adjustments 31
Page 32
Locking the Projector
The projector includes two lock settings to prevent the image from being accidentally
changed once it’s adjusted, and to keep children from turning on the projector without adult
supervision.
To access the lock settings, follow these steps:
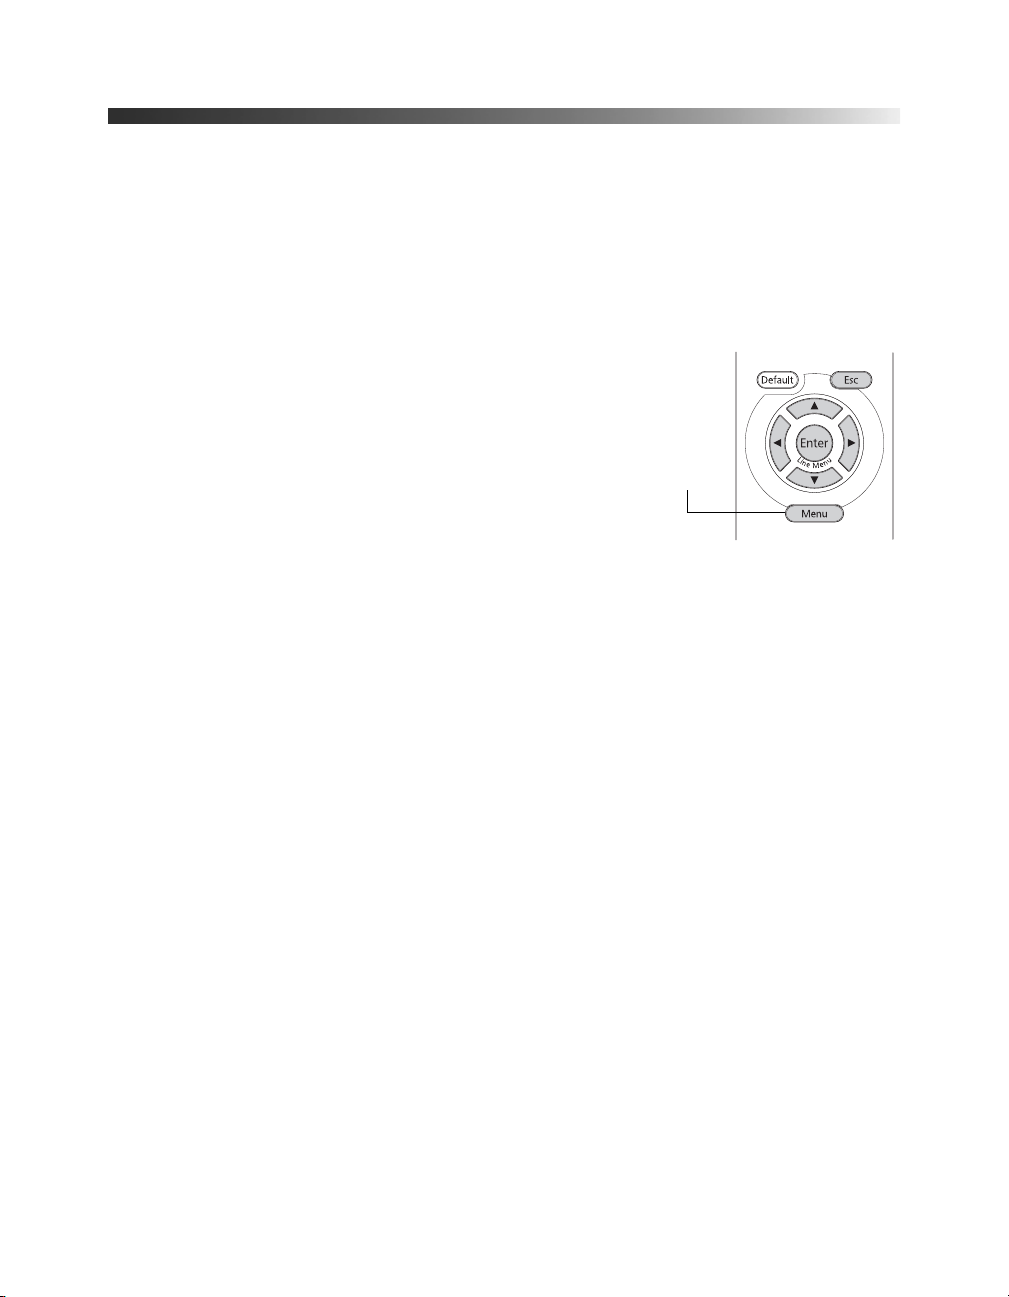
1. Press the
Menu button on the remote control.
2. Use the menu navigation buttons to open the
Settings
Menu
navigation
buttons
menu.
3. Choose from these options:
■ Child Lock to disable the Ppower button on the
Menu
button
projector’s control panel unless it is pressed for
about 3 seconds. (You can use the Ppower button
to turn it off, however.) Since you can still use the
remote control to turn on the projector, you may
want to keep it away from children’s reach.
■ Control Panel Lock to disable all the buttons on the projector’s control panel. A
lock icon appears on the screen whenever you press a button with Control Panel
Lock turned on. To operate the projector, you must use the remote control. To
cancel Control Panel Lock, press and hold the
Enter button on the projector’s
control panel for at least 7 seconds.
4. Press
Menu to exit the menu system.
If you turned on the Control Panel Lock, the projector buttons are now locked.
If you turned on the Child Lock, turn off the projector and let it cool down. The Child
Lock takes effect after the cool-down period.
Caution: If the Direct Power On setting is turned on (see page 46), using the main power
switch can cause the projector to start even though the Child Lock is in use.
32 Making Basic Adjustments
Page 33
Making Detailed Adjustments
You can use the projector’s on-screen menus to make detailed adjustments to the image
quality—such as the brightness, contrast, sharpness, and color. You can also change the menu
display, sleep mode settings, and other projector features.
Using the Menu System
You can access the menu system either from the remote control or the buttons on the
projector’s control panel. You can access the full menu or a line menu that lets you change
selected settings. You can also change the menu language and control how the menus display
(see page 35).
Note: If you press Blank on the remote control while a menu is being displayed, the menu screen
disappears. This is useful for checking the effects of your image adjustments. Press Blank again
to make the menu reappear.
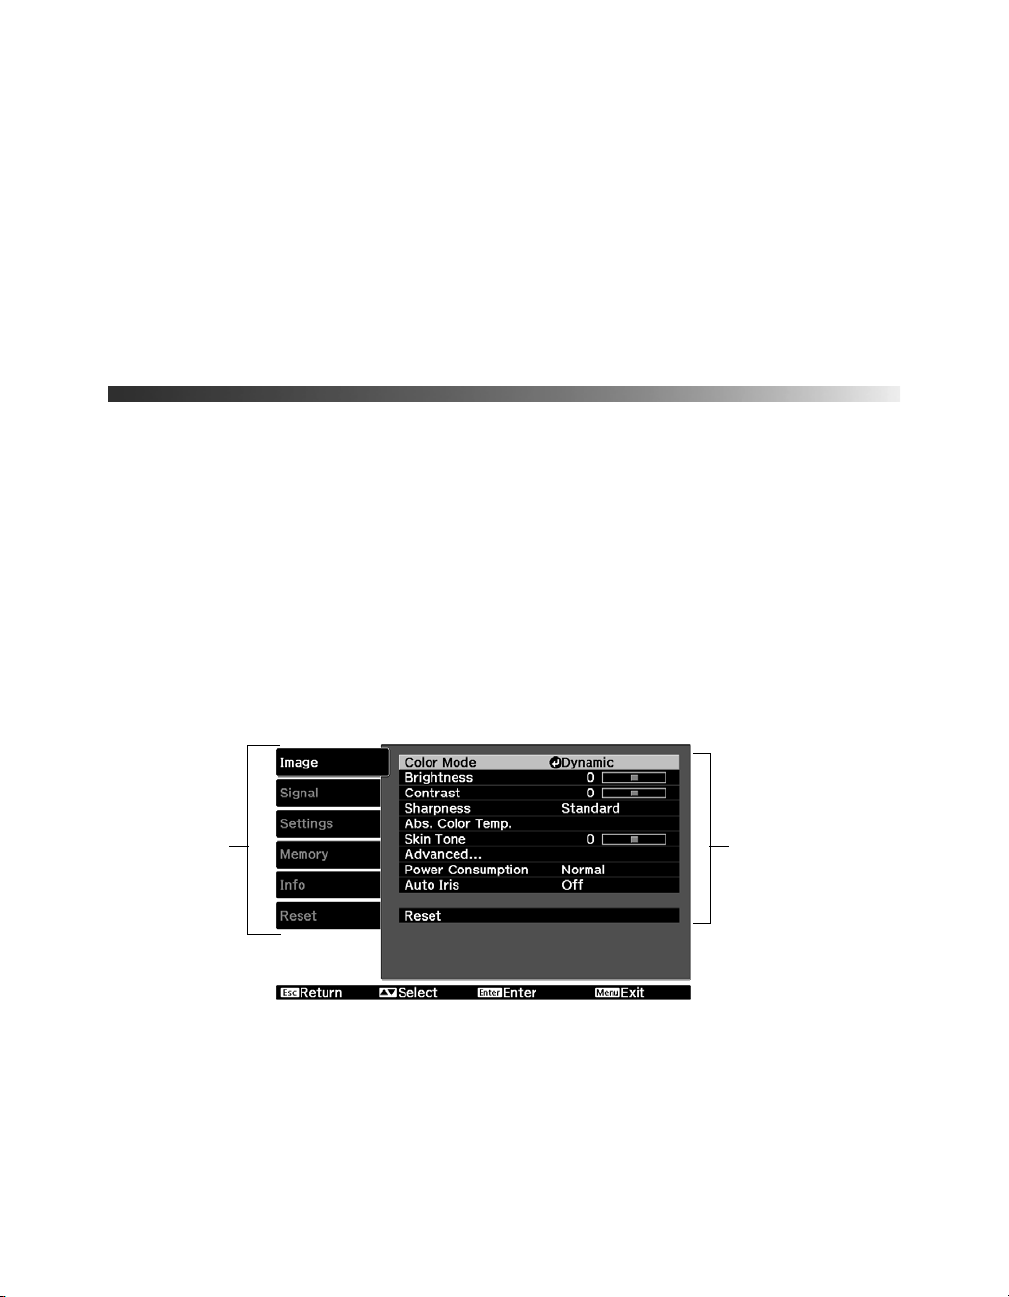
To display the full menu, press the Menu button on the projector or remote control. You see
a display like this one:
Main menu
options
Note: You may see different options, depending on how your equipment is connected to it.
Settings available
for the highlighted
menu
1. Press the u or d button to highlight a main menu option (Image, Signal, Settings,
Memory, Info or Reset), then press the Enter button to select it.
2. Press the u or d button to highlight a setting, then press the
Enter button.
Making Detailed Adjustments 33
Page 34
3. Press the u, d, l, or r button to change settings as necessary. You may have to press the
Enter button to confirm your choice.
4. When you’re finished, press the
Menu button to exit the menu system.
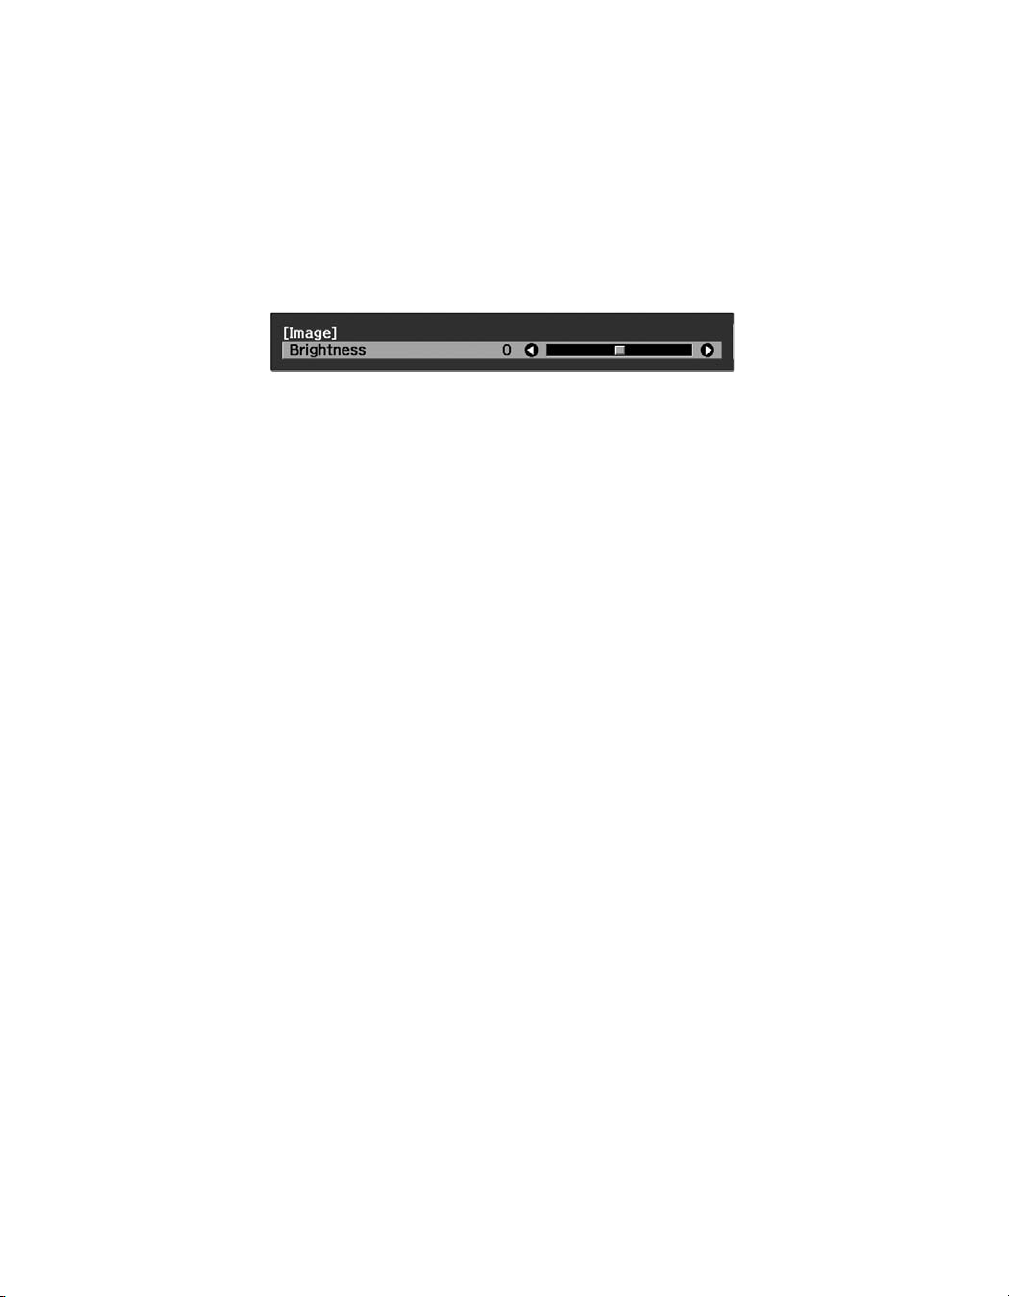
To display one of the line menus, press the
Esc button to return to the previous menu or press the
Enter button. You see a display like this at the
bottom of the image:
1. Press the u or d button to select the setting you want to adjust:
■ Brightness (see page 36)
■ Contrast (see page 36)
■ Sharpness (see page 37)
■ Color Saturation (see page 39)
■ Tint (see page 39)
■ Absolute Color Temperature (see page 39)
■ Skin Tone (see page 39)
2. Press the l or r button to adjust the setting.
3. Press the
Menu or Esc button to close the line menu when you’re done.
Note: When a line menu is displayed, you can press Default on the remote control to reset the
menu to its factory setting.
34 Making Detailed Adjustments
Page 35

Changing How the Menus Display
Use these options to control how the menus display.
■ Language
Settings > Language
Select from 21 languages to use in the menu system.
■ Menu Position
Settings > Display > Menu Position
Use the arrow buttons to choose a position on the screen for displaying the menu.
■ Menu Color
Settings > Display > Menu Color
Select a color scheme for displaying the menus.
Adjusting the Picture Quality
Before fine-tuning the image using these adjustments, make sure you have already selected the
best Color Mode for your picture and viewing environment, as described on page 28. Then
use the settings in this section to finish adjusting the picture to your liking.
Most image quality settings are saved independently for each input source (Video, S-Video,
HDMI, Component, PC) and color mode. After you finish adjusting the settings for one
input source, switch to the other input sources you’ll be using and make any necessary
adjustments.
Input Brightness Settings
If the signal from connected equipment is weak and images appear dark, you can adjust the
Brightness and Contrast settings. You can adjust brightness and contrast for each image
source and color mode.
The Brightness setting controls how much light is produced by the projector, and the
Contrast setting adjusts the difference between the bright and dark areas of the projected
image. The other settings in this section control how the projector interprets the light and
dark areas of the picture.
Making Detailed Adjustments 35
Page 36

■ Brightness
Image > Brightness
Note: This setting cannot be used when the Color Mode is set to x.v.Color (see page 28).
Adjust the brightness so it’s suitable for your viewing conditions. For example, if you’re
projecting in a brightly lit room or onto an especially large screen, you may need to
increase the brightness. Decrease the brightness for dark rooms or small screens; this also
reduces power consumption and fan noise, and helps to prolong the life of the lamp.
■ Contrast
Image > Contrast
Note: This setting cannot be used when the Color Mode is set to x.v.Color (see page 28).
This setting adjusts the difference between bright and dark areas.
■ Auto Iris
Image > Auto Iris
Note: This setting cannot be used when the Color Mode is set to x.v.Color (see page 28).
When this setting is on, the light output is automatically adjusted according to the
brightness of the image. Select either
Normal or High Speed to indicate how quickly
you would like the projector to respond to changes in the brightness of the image. The
setting is stored separately for each image source and color mode.
■ Setup Level
Signal > Advanced > Setup Level
Note: This setting can be used only when an NTSC signal is being input through the Video or
S-Video port, or when a video signal is being input through the Component video ports.
This setting adjusts the threshold at which dark areas of the image are rendered black
(0 IRE). For compatibility with most DVD and video equipment sold in the United
States, leave this setting at 0%. Check your video equipment’s specifications to be sure of
the correct setting.
■ EPSON Super White
Signal > Advanced > EPSON Super White
Note: This setting can be used only when the signal is input through the HDMI 1 or HDMI 2
ports with the Color Mode set to Natural or Cinema (see page 28).
If bright parts of the image are washed out or overexposed (when the input signal
contains values over 100 IRE), turn this setting on to compensate.
36 Making Detailed Adjustments
Page 37
■ HDMI Video Range
Signal > Advanced > HDMI Video Range
Note: This setting can be used only when HDMI 1 or HDMI 2 is selected as the image source
(see page 23). This setting cannot be used when the Color Mode is set to x.v.Color (see
page 28).
If your video equipment has an HDMI port and you’ve connected it to the projector
using an HDMI cable, set the level of the projector to match that of the video equipment.
■ Power Consumption
Image > Power Consumption
This setting controls the light output from the projector. On Normal, the projector
produces a brighter image and the lamp uses more power. To save power and extend the
life of the lamp, select
ECO.
Sharpness and Picture Quality Settings
If the image looks fuzzy, or if it contains noise or flickering, you can use these settings to
correct it.
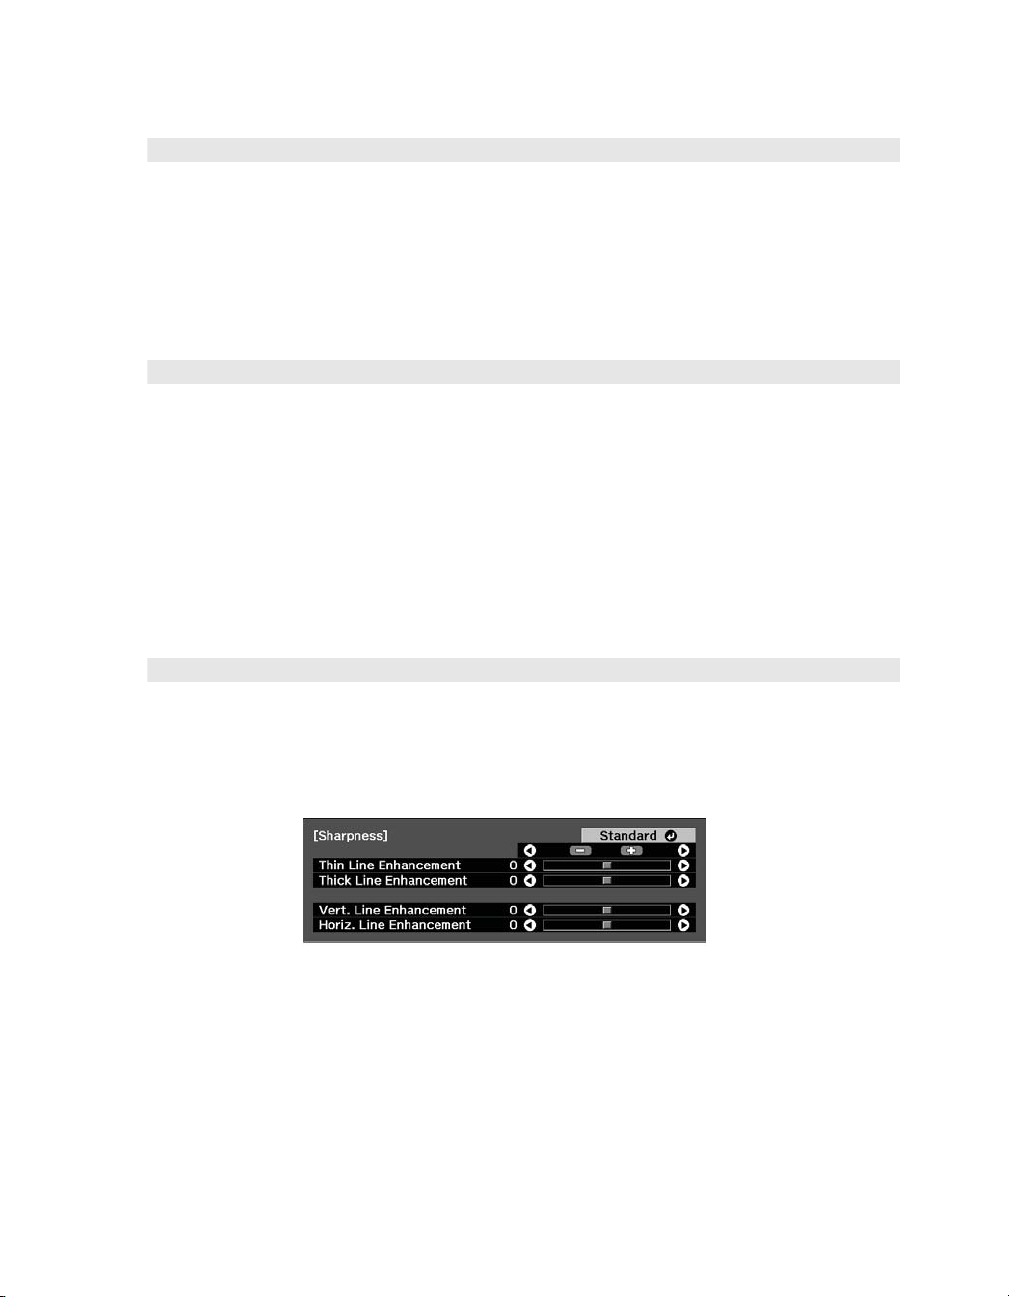
■ Sharpness
Image > Sharpness
Use this function to make lines and edges appear more distinct in the image. This setting
is stored separately for each image source and color mode setting. You can select
Standard to adjust the sharpness of the entire image, or select Advanced to access the
following submenu:
Note: The Advanced setting cannot be used with a signal input through the PC port.
Choose Thin-Line Enhancement to sharpen details such as hair and clothing. Choose
Thick-Line Enhancement to sharpen large contours and backgrounds. Choose Vert.
Line Enhancement
Enhancement
You can also access this setting by pressing the
to increase vertical image sharpness. Choose Horiz. Line
to increase horizontal image sharpness.
Sharpness button on the remote control.
Making Detailed Adjustments 37
Page 38

■ Progressive
Signal > Progressive
Note: This setting can be used only when viewing composite video or S-video signals, or 480i,
576i, or 1080i signals input through the Component, HDMI 1, or HDMI 2 ports (see page 65).
Converts interlaced to progressive signals. The projector uses 3D DigiScan™ HD
Circuitry Processing for video-sourced images. For film-sourced images, you can select
from 2-2 or 2-3 pulldown detection (see below).
Leave the setting on
output. Select
Film/Auto for viewing movies on a player that produces interlaced
Video for watching videos captured with a video camera. Set to Off when
viewing images with a large amount of movement.
■ Motion Detection
Signal > Motion Detection
Note: This setting can be used only when viewing composite video or S-Video signals, or 480i
or 576i, or 1080i signals input through the Component, HDMI 1, or HDMI 2 ports (see page 65).
This setting specifies how signals are converted to progressive signals. Select a lower
setting for slow-moving or still images (
images (
■ Noise Reduction
Note: This setting cannot be used with a signal input through the PC port.
M).
Signal > Advanced > Noise Reduction
S) or select a higher number for video
This setting reduces flickering of analog images. You can select from 3 levels of noise
reduction.
■ 2-2 Pull-down
Signal > 2-2 Pull-down
Note: This setting can be used only when viewing a 1080p/24Hz signal input through the
Component, HDMI 1, or HDMI 2 ports (see page 65). This setting cannot be used with a signal
input through the PC port.
This setting allows you to select whether images are projected with 2-2 pulldown
detection or 2-3 pulldown detection. Select
38 Making Detailed Adjustments
On for 2-2 pulldown detection.
Page 39

Color Settings
If the image colors don’t look correct, you can adjust them using these settings. Use the first
three settings described below to make the most visible changes. If you only need to make
slight adjustments, you can fine-tune the picture with the remaining settings. Most color
settings are stored separately for each image source and color mode.
Note: If you’re using a commercially available color calibration DVD, you can display a color-bar
test pattern and then filter colors in the image by pressing the Pattern button. Select one of the
Color Isolation options for the color you want to filter (R/G/B). This lets you adjust color settings
without holding a filter over your eyes while making adjustments. Press the Esc button when
you’re done.
■ Color Saturation
Image > Color Saturation
Note: This setting cannot be used when the Color Mode is set to x.v.Color (see page 28) or
with a signal input through the PC port.
Adjusts the color intensity of the image.
■ Tint
Image > Tint
Note: This setting cannot be used when the Color Mode is set to x.v.Color (see page 28) or
with a signal input through the PC port.
Shifts the color balance between magenta and green.
■ Abs. Color Temp.
Image > Abs. Color Temp.
Note: This setting cannot be used when the Color Mode is set to x.v.Color (see page 28).
Shifts the color balance between red and blue, making the image appear warmer or
cooler.
■ Skin Tone
Image > Skin Tone
Note: This setting cannot be used when the Color Mode is set to x.v.Color (see page 28).
Makes fine adjustments to the tint and controls the amount of magenta or green in the
image. Also useful for correcting black-and-white images, if they look tinted.
Making Detailed Adjustments 39
Page 40
■ RGB
Image > Advanced > RGB
Note: This setting cannot be used when the Color Mode is set to x.v.Color (see page 28).
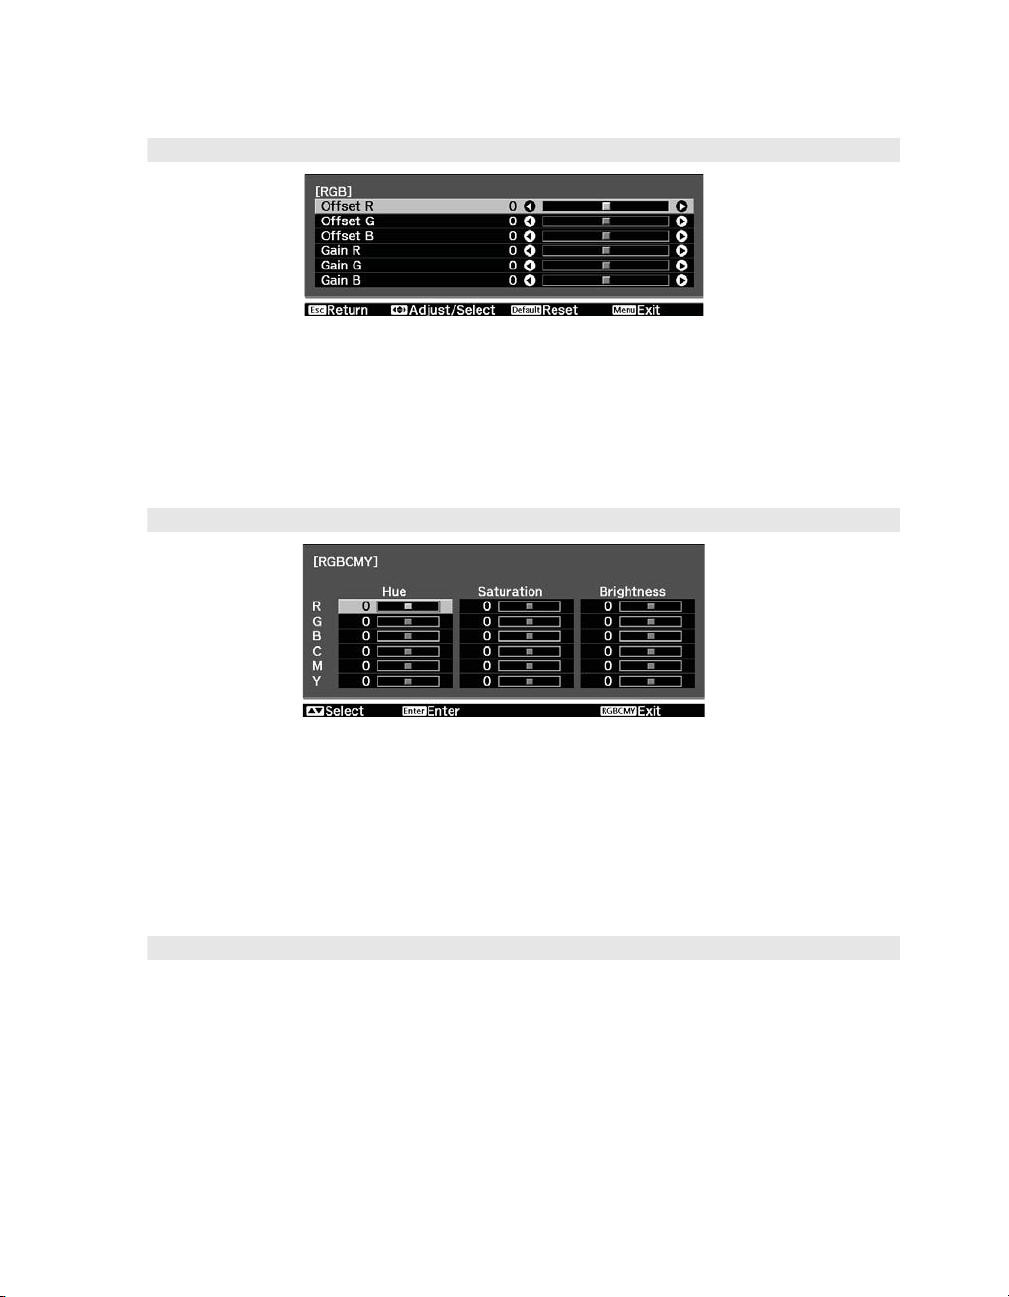
Use the RGB settings to fine-tune the color of the image. You can adjust the offset and
gain for each signal color (red, green, and blue). Use
Gain for the lightest shades.
■ RGBCMY
Image > Advanced > RGBCMY
Offset to adjust darker shades and
Note: This setting cannot be used when the Color Mode is set to x.v.Color (see page 28).
Use the RGBCMY settings to adjust the hue, saturation, and brightness of the six color
components (red, green, blue, cyan, magenta, yellow). After adjusting each color, press
Esc to move to another menu option. You can also access this setting by pressing the
RGBCMY button on the remote control. See page 31 for more information.
■ Gamma
Image > Advanced > Gamma
Note: This setting cannot be used when the Color Mode is set to x.v.Color (see page 28).
You can select from five gamma settings (2.0 to 2.4) or customize your own setting from
your image or a displayed graph. Lower values will increase the contrast of dark areas, but
tend to blur the bright areas. Higher values will darken the light areas.
You can also access this setting by pressing the
See page 30 for more information.
40 Making Detailed Adjustments
Gamma button on the remote control.
Page 41
Adjustments for Computer Images
In addition to the settings described previously, you can adjust the Tracking and Sync settings
for analog RGB computer images. Normally, these settings are adjusted automatically by the
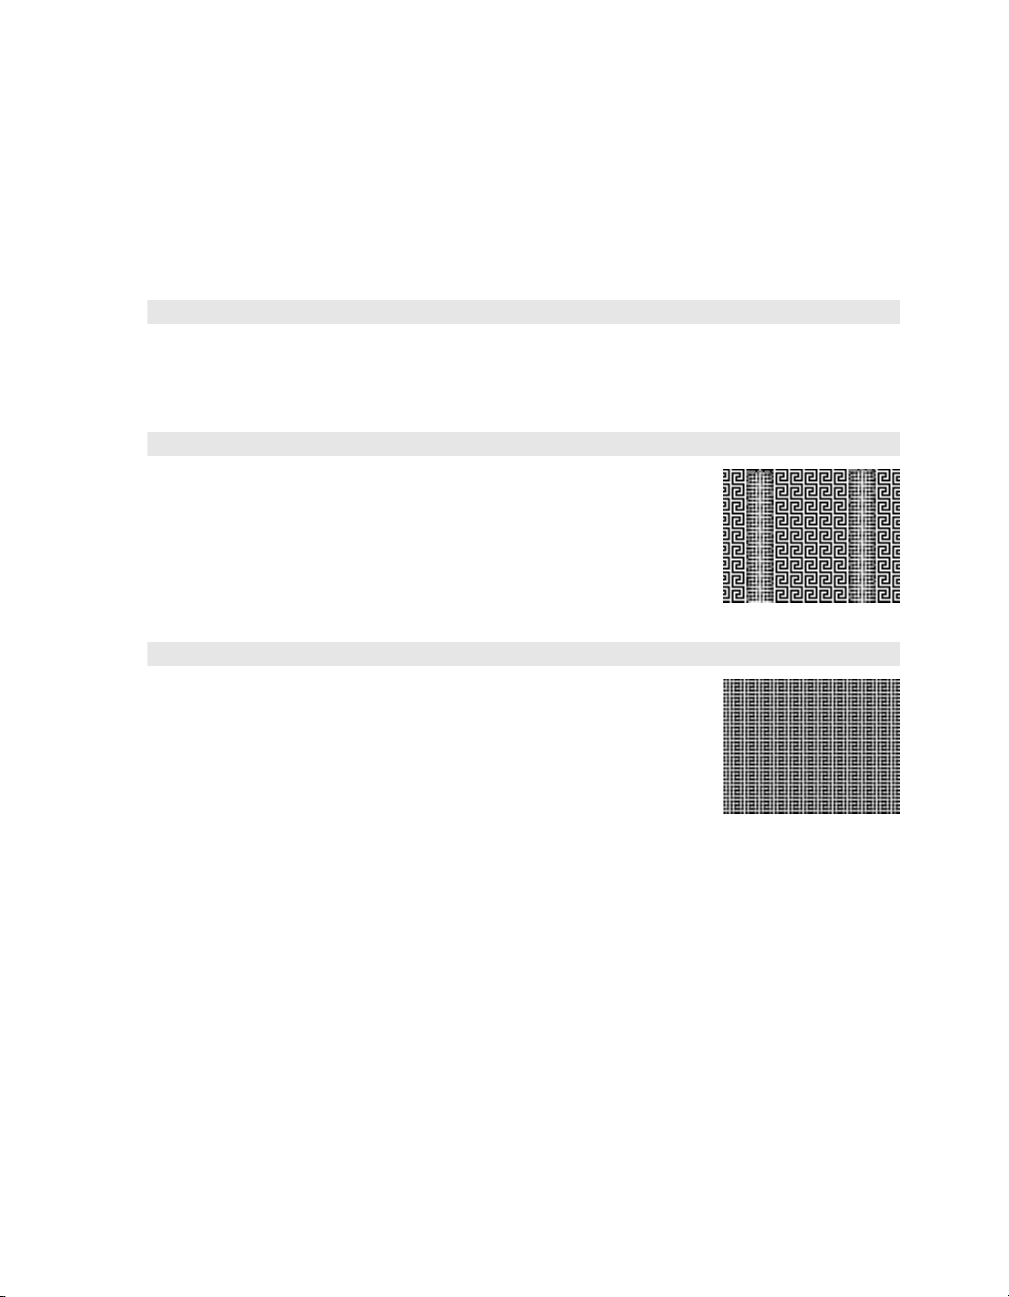
projector. If you notice that the image is blurry or contains dark vertical bands, you may need
to adjust the settings yourself.
■ Auto Setup
Signal > Auto Setup
Leave this setting on so that the projector automatically adjusts the tracking, sync, and
position of the image.
■ Tracking
Signal > Tracking
Adjust the tracking to eliminate vertical bands. It is easiest to
adjust the tracking when the image contains a lot of fine detail
(such as black text on a white background).
■ Sync.
Signal > Sync.
Adjust the synchronization to eliminate blurriness. For best results,
make sure the tracking is properly adjusted first.
Making Detailed Adjustments 41
Page 42
Selecting Memory Settings and Resetting the Projector
Your projector comes with 10 memory locations where you can save customized settings to
obtain the best picture quality for each of your video inputs.
Selecting Memory Settings
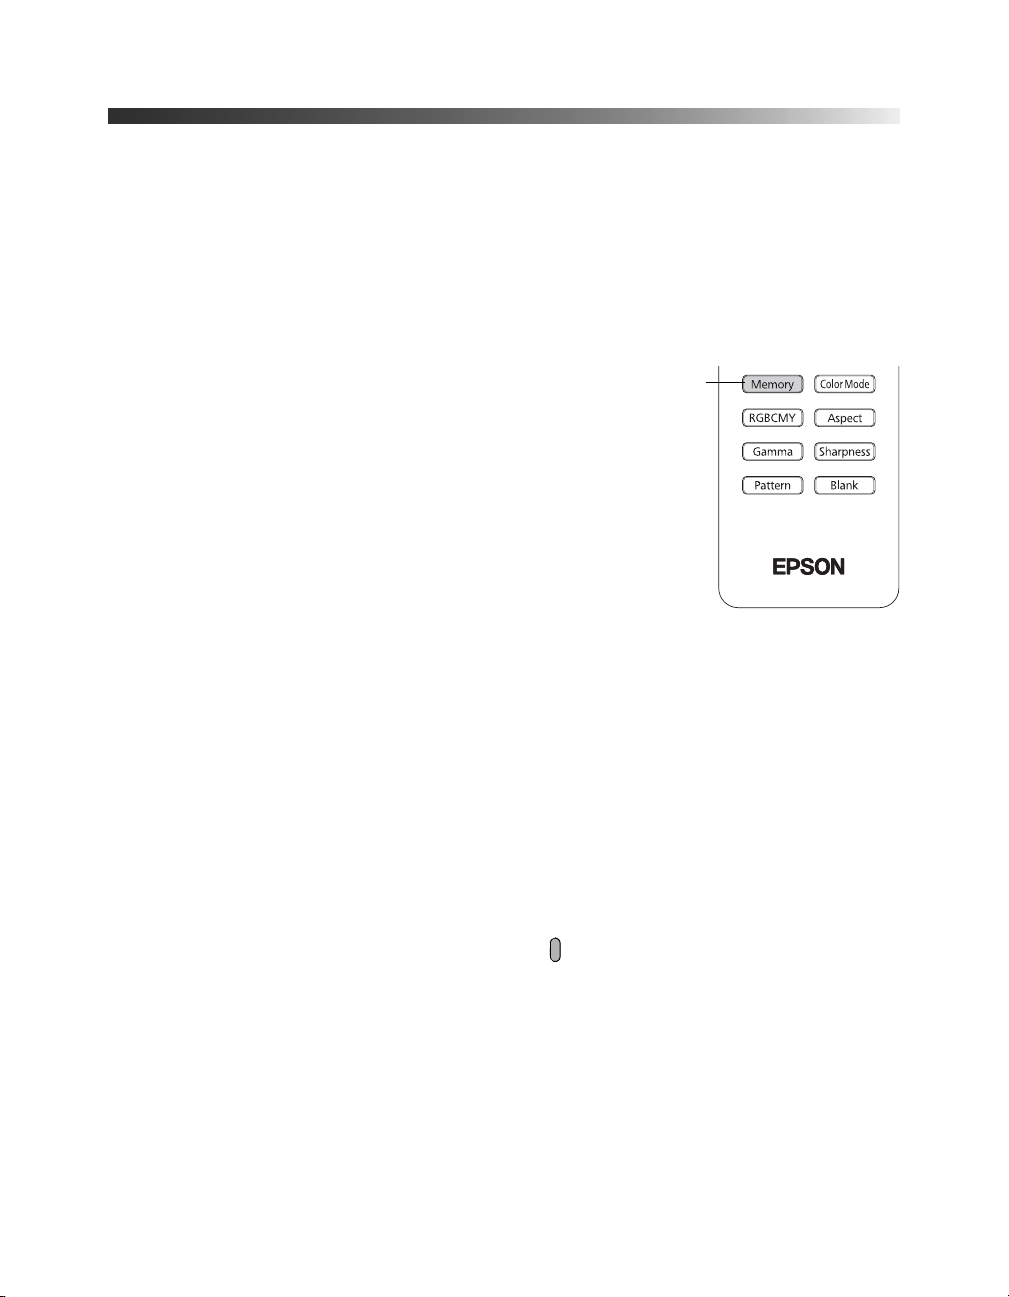
You can easily recall the memory settings by using the
memory button on the remote control.
1. Press the
2. Select
3. Use the arrow buttons to select the desired setting, then
press the
After a moment, the image appears on the screen using
the retrieved settings. Certain settings may not be
applied, depending on the input signal.
Memory button on the remote control.
Load Memory.
Enter button.
Memory
button
Creating Memory Settings
Memory settings can be used to store most of the picture quality settings on page 37 and color
settings on page 39. Before saving them to memory, adjust the settings to the desired levels.
1. Press the
2. Select
3. Select the memory name you want to use, then press the
settings.
Note: Saved settings are indicated by a green highlight next to the memory name. If you select
a name that is already in use, the existing settings will be erased and new ones saved in their
place.
Memory button on the remote control.
Save Memory.
Enter button to save your
42 Making Detailed Adjustments
Page 43
Deleting Saved Memory Settings
You can clear all your memory settings at once.
1. Press the
2. Open the
3. Select
Note: You can delete memory settings one at a time with the Erase Memory setting under the
Memory menu.
Menu button on the remote control.
Reset menu, then select Reset Memory.
Yes, then press the Enter button to delete the memory settings.
Resetting the Projector
If the image quality isn’t what you expect, one or more settings may be adjusted improperly.
If necessary, you can restore the projector to its factory-default (original) settings.
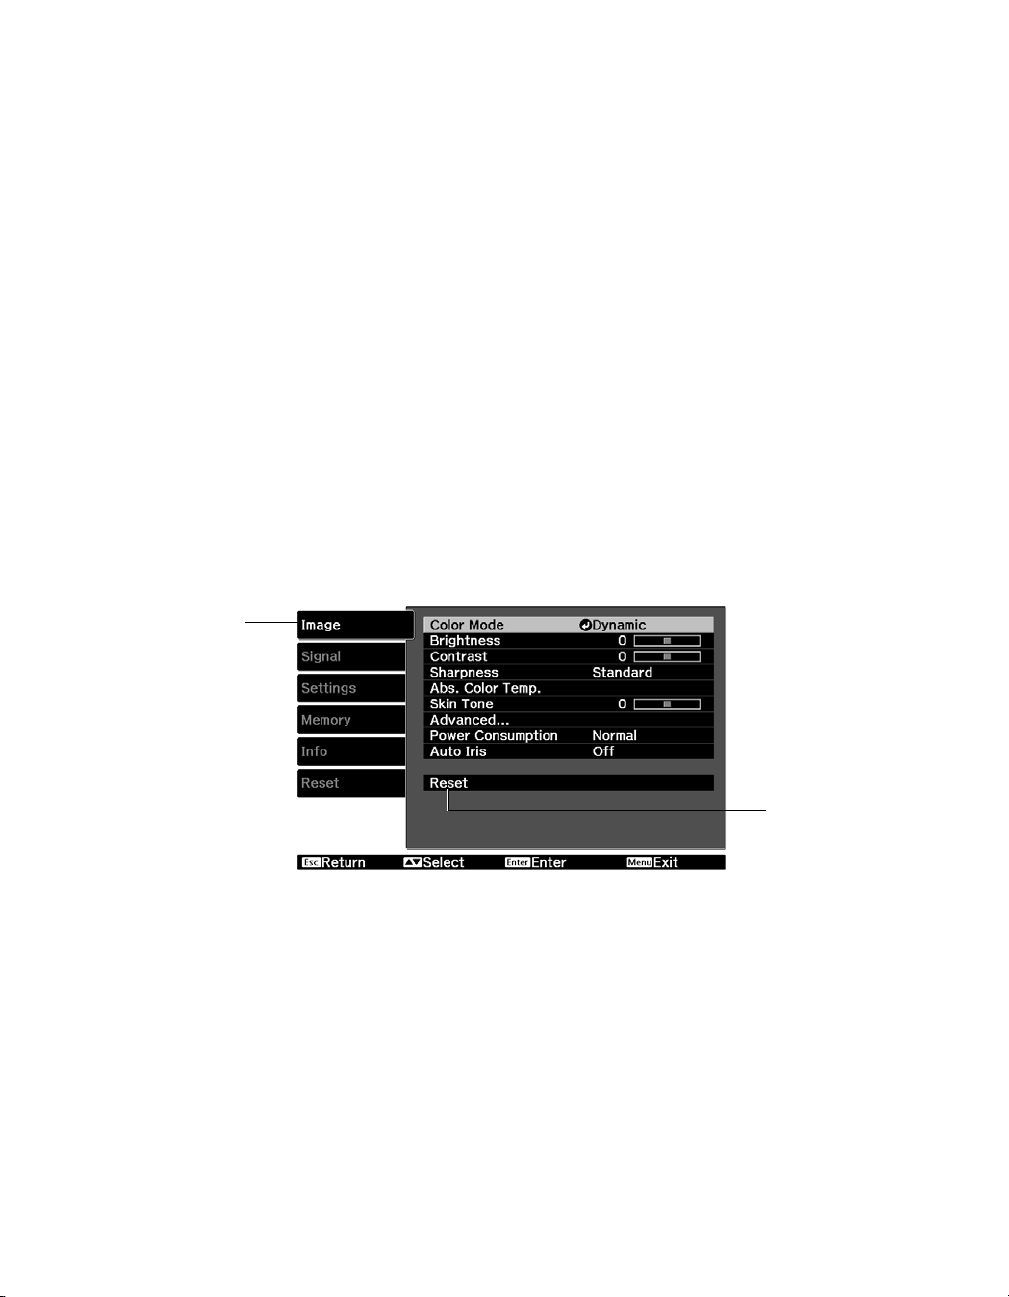
To restore the settings in a specific menu (such as the Image or Settings menu), open that
menu, select
Image menu settings:
Open the Image
menu . . .
Reset, and confirm as needed. The example below shows how to reset the
and select Reset
You can also reset the lamp usage timer or restore all the projector settings to their original
values. Follow these steps:
1. Press the
2. Open the
Menu button on the remote control.
Reset menu.
Making Detailed Adjustments 43
Page 44

3. Do one of the following:
■ Select Reset Lamp Hours to clear the lamp usage timer and reset it to zero.
You should reset the lamp timer only when you install a new projector lamp. See
page 54 for more information.
■ Select Reset Memory to clear all memory settings.
■ Select Reset All to return all projector settings to their original defaults (except
Component, Save Memory, Language, and Lamp Hours).
Customizing Projector Features
Use the settings in this section to adjust the image size and position, suppress on-screen text,
and select basic setup options.
Image Sizing
Before adjusting any of these settings, make sure you have already selected an appropriate
aspect ratio for the type of picture you’re viewing (see page 27).
■ Overscan
Signal > Advanced > Overscan
For component video formats, this setting lets you see the edges of the image that are not
normally visible in the picture (see page 65). If you see interference when you set
Overscan to 100%, try adjusting the Position as described below.
■ Position
Signal > Position
Note: This setting cannot be used with a signal input through the HDMI 1 or HMDI 2 port.
Use the arrow buttons to fine-tune the position of the image on the screen.
■ Aspect
Signal > Aspect
This setting lets you change the aspect ratio of your image, and works the same as
pressing the
Aspect button on the remote control. See page 27 for more information.
44 Making Detailed Adjustments
Page 45

■ Zoom Size
Signal > Zoom Size
Lets you reduce the image size in the vertical direction so that the top and bottom of the
image are visible (available only if the aspect ratio has been set to
■ Zoom Caption Pos.
Signal > Zoom Caption Pos.
Zoom).
Lets you adjust the position of the image so that subtitles are visible (available only if the
aspect ratio has been set to
Zoom). Use Zoom Caption Pos. to move the image up or
down. Adjust overscan before changing the zoom position.
Screen Options
■ Messages
Settings > Display > Messages
Turn this setting off if you want to prevent on-screen messages from appearing (such as
the no-signal message, or the identifying text that appears when you switch between
image sources or color modes).
■ Startup Screen
Settings > Display > Startup Screen
Turn this setting off if you want to prevent the startup screen from appearing while the
projector is warming up.
■ Display Background
Settings > Display > Display Background
Changes the screen that’s used when the projector is not receiving a signal or when you
press the
Blank button to temporarily stop projection.
Other Setup Options
■ Projection
Settings > Projection
You can select different options for projecting the image: Front, Front/Ceiling, Rear,
Rear/Ceiling.
Making Detailed Adjustments 45
Page 46

■ Direct Power On
Settings > Direct Power On
Sets projection to start when the main power switch is turned on, without pressing the
P power button on the remote control or the projector.
Note: When direct power on is enabled, power surges that occur after a power outage can
cause the projector to turn on.
■ Video Signal
Settings > Input Signal > Video Signal
Leave this setting on Auto so the projector can automatically interpret the format, such as
NTSC or PAL (for standard TV formats).
■ Component
Settings > Input Signal > Component
Change this setting to match the type of equipment connected to the Component port.
For component video, select
or select
■ Trigger Out
YCbCr or YPbPr to manually select your video equipment’s signal.
Settings > Trigger Out
Auto to let the projector automatically interpret the signal;
Turn on this setting to have the Trigger out port output a 12-volt signal to lower your
projection screen when the projector is running.
Note: If you change this setting, the new setting will take effect the next time you turn the
projector on.
■ Illumination
Settings > Illumination
Turn off this setting to deactivate the lights on the projector’s P power and source
buttons. Use this setting if you find the lights distracting in a darkened room.
■ Sleep Mode
Settings > Sleep Mode
Turn off this setting if you don’t want the projector to enter sleep mode. (Sleep mode
shuts the projector off automatically when there is no video signal.)
5min., 10min., or 30min. as the length of time before shutoff; decreasing the time
Select
conserves power and extends the life of the lamp.
To turn the projector back on, press the Ppower button on the remote control or the
projector.
46 Making Detailed Adjustments
Page 47

■ Child Lock
Settings > Child Lock
Lets you lock the Ppower button on the projector’s control panel to make it more
difficult for a child to turn on the projector. See page 32 for more information.
■ Control Panel Lock
Settings > Control Panel Lock
Lets you disable all the buttons on the projector’s control panel to prevent the image from
being accidentally changed once it is adjusted. See page 32 for more information.
■ High Altitude Mode
Settings > High Altitude Mode
Adjusts the speed of the fan so it can properly cool the projector at higher altitudes. Turn
this setting on if you are using the projector at an altitude of 4921 feet (1500 meters) or
higher.
Making Detailed Adjustments 47
Page 48
Maintenance
Your projector needs little maintenance. All you need to do on a regular basis is keep the lens
clean. You also may need to clean the air filter to prevent overheating.
WARNING: Before you clean any part of the projector, turn it off and unplug the power cord.
Never open any cover on the projector, except the lamp and filter covers. Dangerous electrical
voltages in the projector can injure you severely. Do not try to service this product yourself,
except as specifically explained in this User’s Guide.
The only parts you should replace are the air filter and the lamp. If another part needs
replacing, contact your dealer or a qualified servicer.
Cleaning the Lens
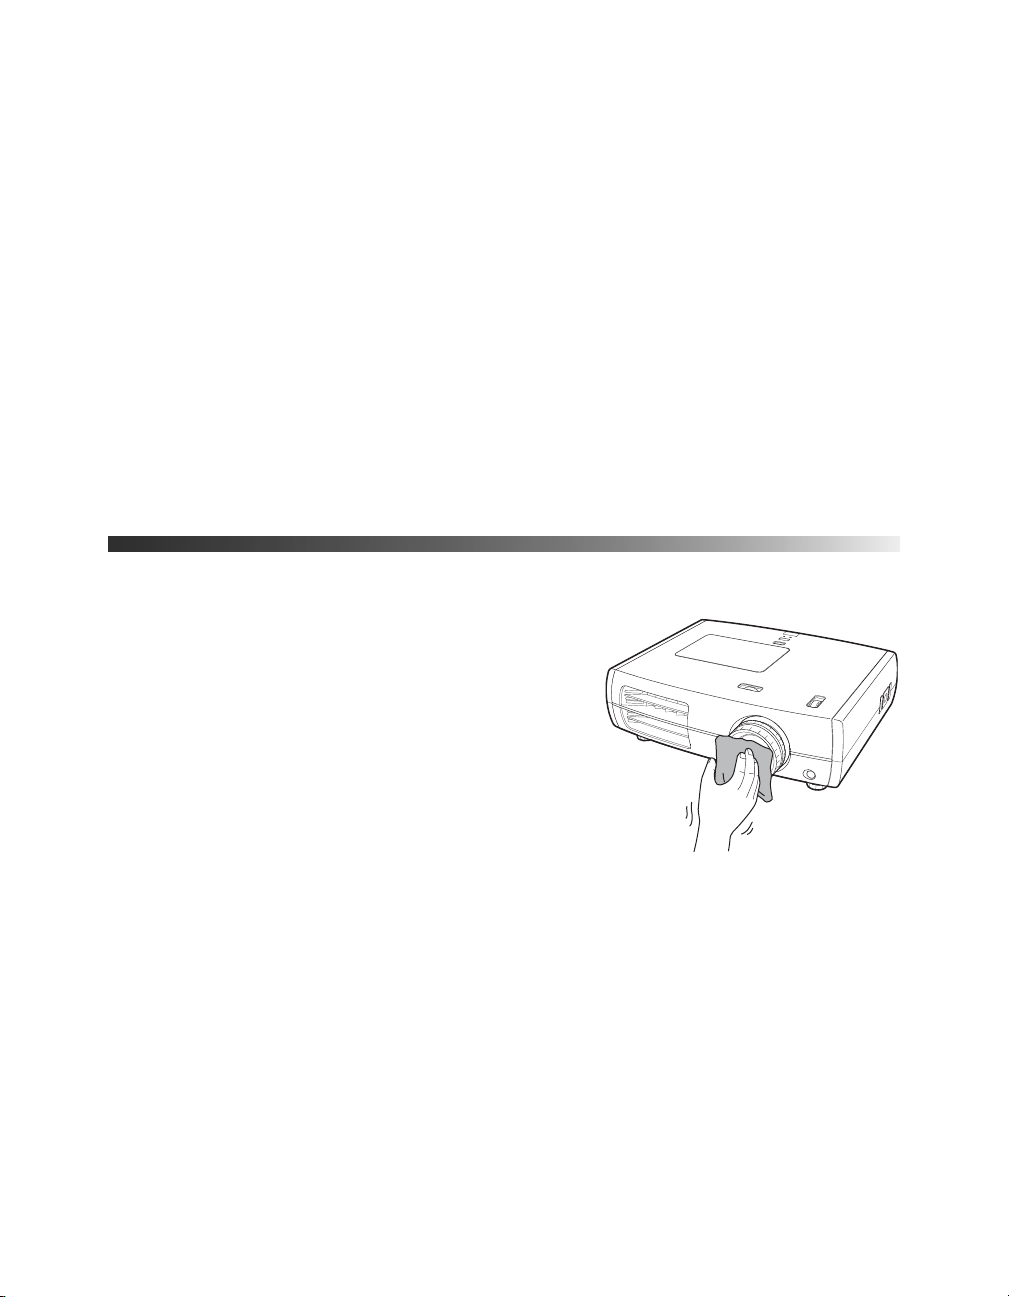
Clean the lens whenever you notice dirt or dust on
the surface.
■ Use a blower brush that is designed for camera
equipment to remove dust from the lens.
■ To remove dirt or smears, use a lens cloth or
tissue. If necessary, moisten the cloth with lens
cleaner and gently wipe the lens surface.
Caution: Never rub the lens with abrasive materials. Use
only lens cleaning fluids that are designed for cleaning
optics.
48 Maintenance
Page 49
Cleaning the Projector Case
Before you clean the case, turn off the projector and unplug the power cord.
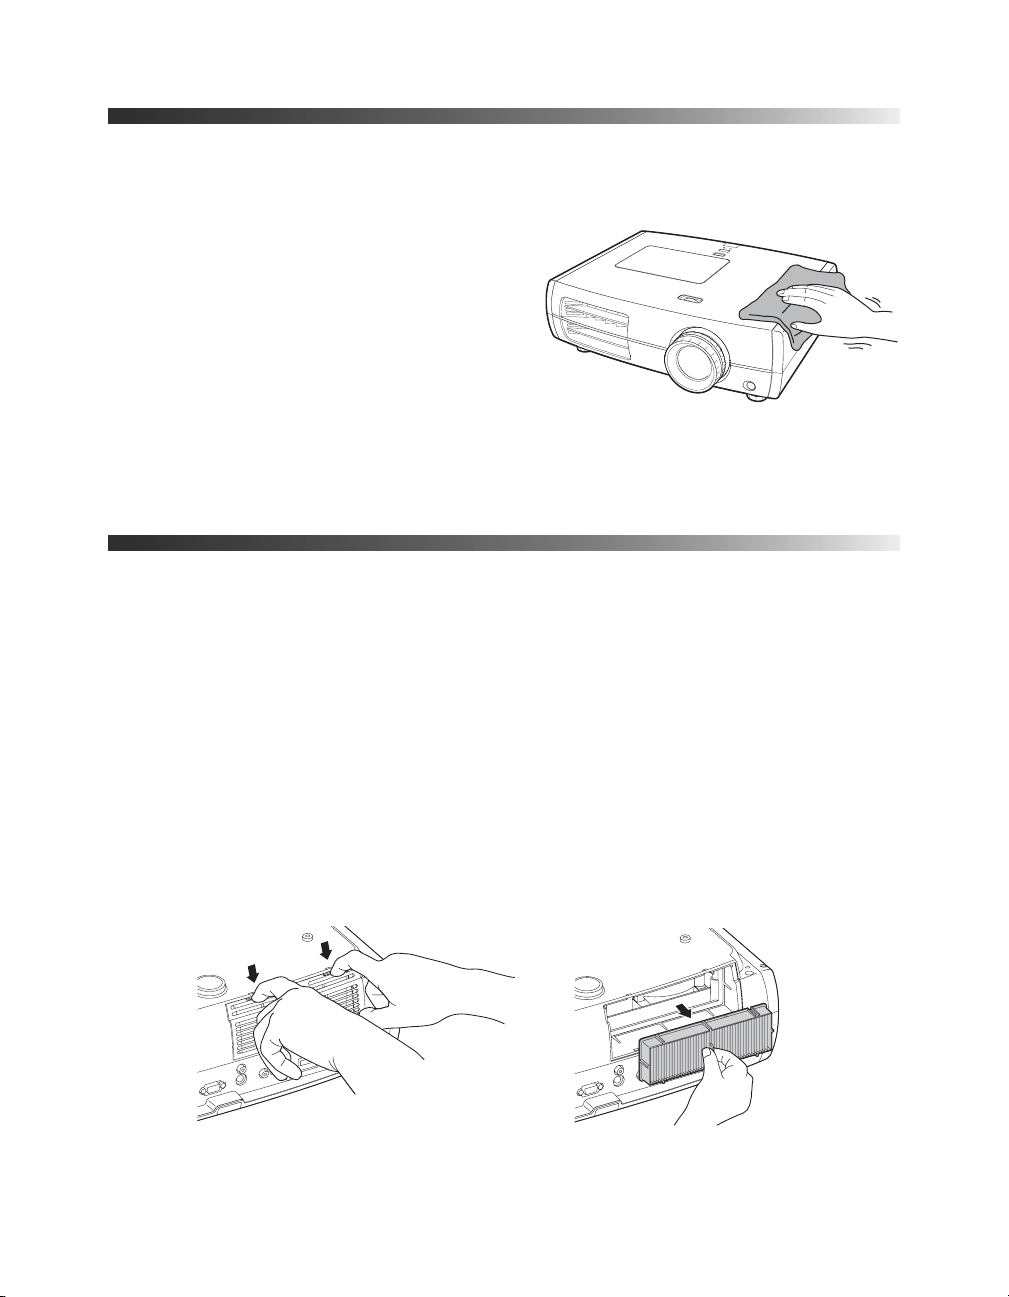
■ To remove dirt or dust, wipe the case
with a soft, dry, lint-free cloth.
■ To remove stubborn dirt or stains,
moisten a soft cloth with water and a
neutral detergent. Then wipe the case
and dry it with a dry cloth.
Caution: Never use wax, alcohol, benzene,
thinner, or other chemical detergents. These
can damage the case.
Cleaning and Replacing the Air Filter
Your projector includes an air filter to ensure the best performance. If dust collects on the air
filter, clean it as described below. Dust clogs prevent proper ventilation and cause overheating
and damage to the projector.
1. Press the Ppower button and wait for the Ppower light to stop flashing. The projector
cools down.
2. Turn off the projector using the power switch on the back.
3. Unplug the power cord and disconnect any cables.
4. Turn the projector over (unless it’s ceiling mounted).
5. Push down on the tabs on the filter cover to remove it.
6. Remove the air filter as shown.
Maintenance 49
Page 50
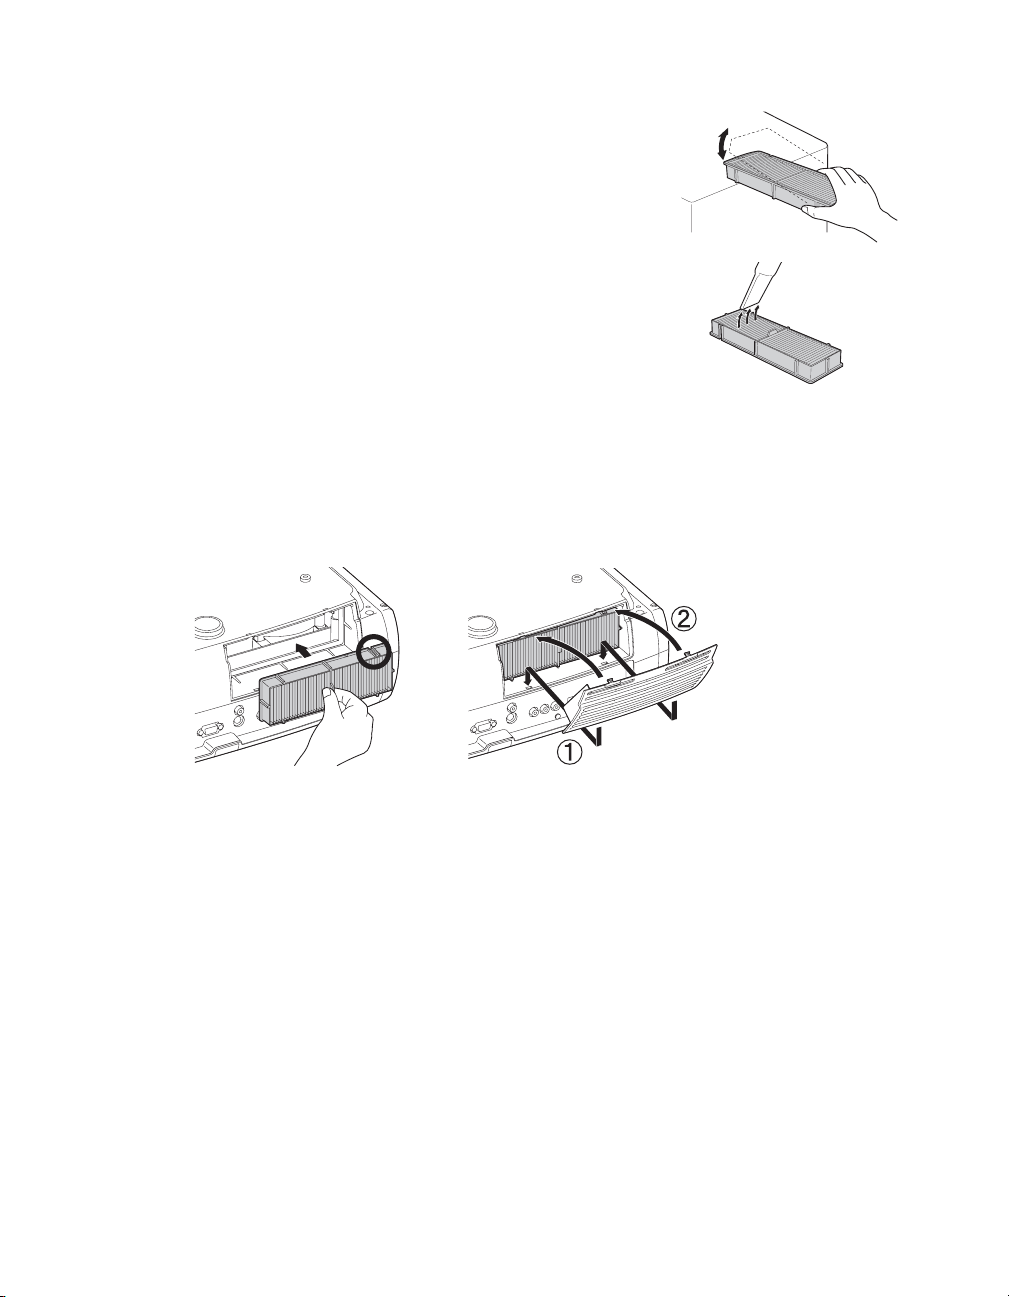
7. Gently tap both sides of the air filter against a hard surface
four or five times to remove loose dust from the air filter.
Note: Do not tap the filter too hard. This can cause it to bend
or break.
8. Use a small vacuum cleaner that is designed for computers
and other office equipment to remove any remaining dust
from the surface of the filter. If you don’t have one, gently
clean the filter using a very soft brush (such as a clean
artist’s paintbrush).
If the dirt is difficult to remove or the filter is broken,
replace it. You can purchase air filter part number V13H134A21 from an authorized
Epson reseller. To find the nearest reseller, please call 800-GO-EPSON (800-463-7766).
To purchase online, visit www.epsonstore.com (U.S. sales) or www.epson.ca (Canadian
sales).
9. Insert the air filter as shown with the groove on the right.
10. Reattach the air filter cover by inserting the tabs as shown and pressing the cover against
the projector until it clicks into place.
50 Maintenance
Page 51
Replacing the Lamp
The projection lamp lasts for up to 4000 hours. You can use the Info menu to check how
long it’s been in use (see page 54). It’s time to replace the lamp when:
■ The projected image gets darker or starts to deteriorate.
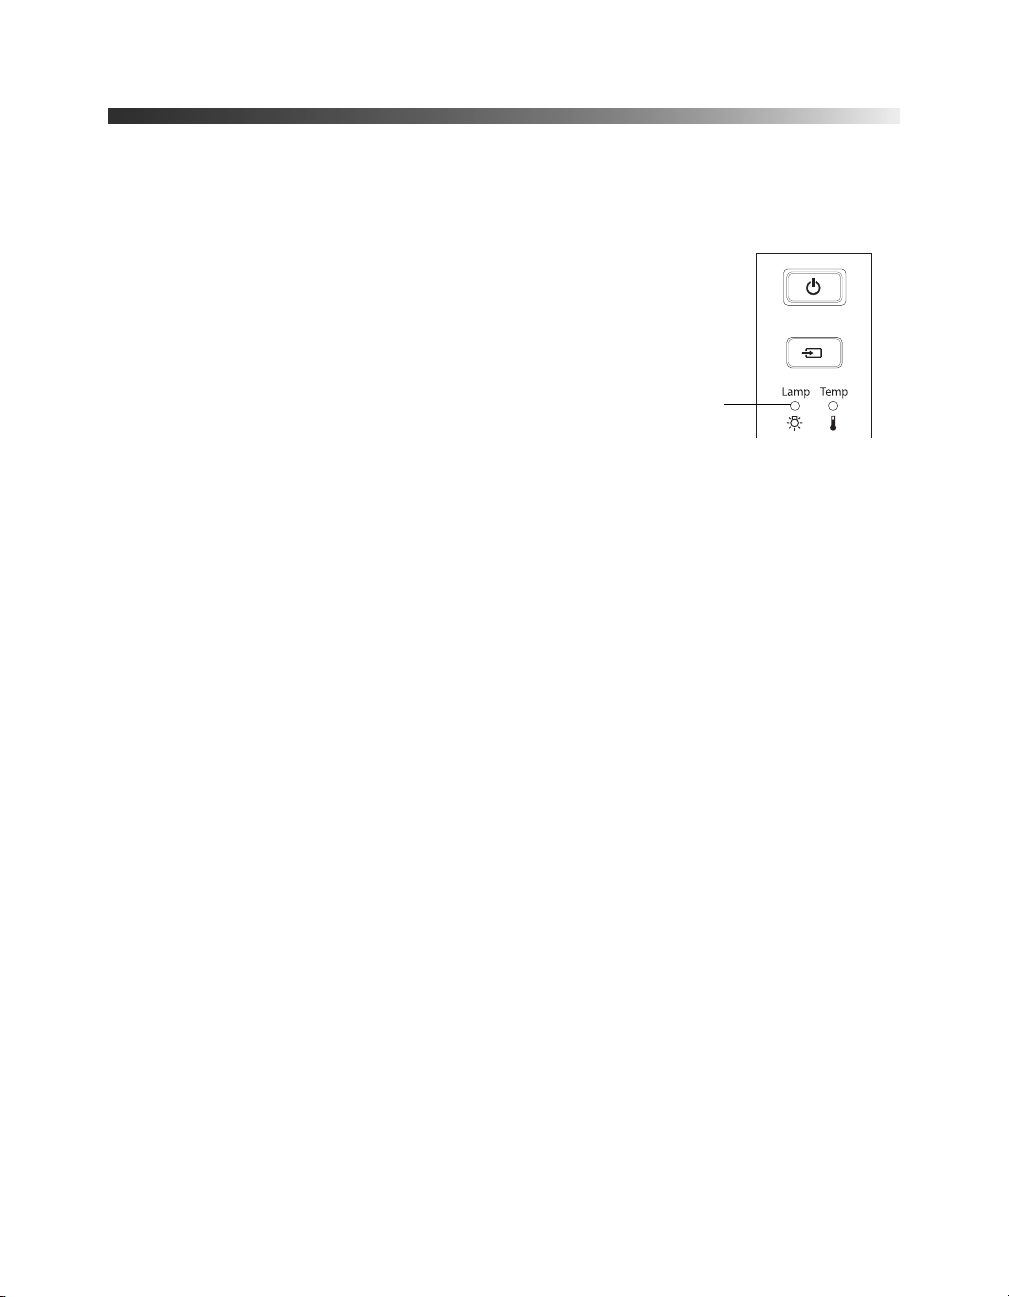
■ The projector’s lamp light flashes red at half-second
intervals.
■ The message Replace the lamp appears on the screen
when you start projecting.
Note: Lamp life results will vary depending on mode selected,
environmental conditions, and usage.
Turn off this product when not in use to prolong the life of the projector.
You can purchase lamp part number V13H010L49 from an authorized Epson reseller. To
find the nearest reseller, please call 800-GO-EPSON (800-463-7766). To purchase online,
visit www.epsonstore.com (U.S. sales) or www.epson.ca (Canadian sales).
Be sure to read the “Important Safety Information” on page 68 before replacing the lamp.
WARNING: Let the lamp cool fully (about 1 hour) before replacing it. In the unlikely event that the
lamp has broken, small glass fragments may be present and should be removed carefully to avoid
injury.
Lamp
light
Caution: Never touch the glass portion of the lamp with your bare hands; the invisible residue left
by the oil on your hands may shorten the lamp life. Use a cloth or glove to handle the new lamp.
Follow these steps to replace the lamp:
1. If the projector is on, press the P power button and wait for the light to stop flashing.
2. Turn off the power switch on the back of the projector.
3. Unplug the power cord and any cables.
4. Wait about an hour to make sure the lamp is no longer hot.
Maintenance 51
Page 52
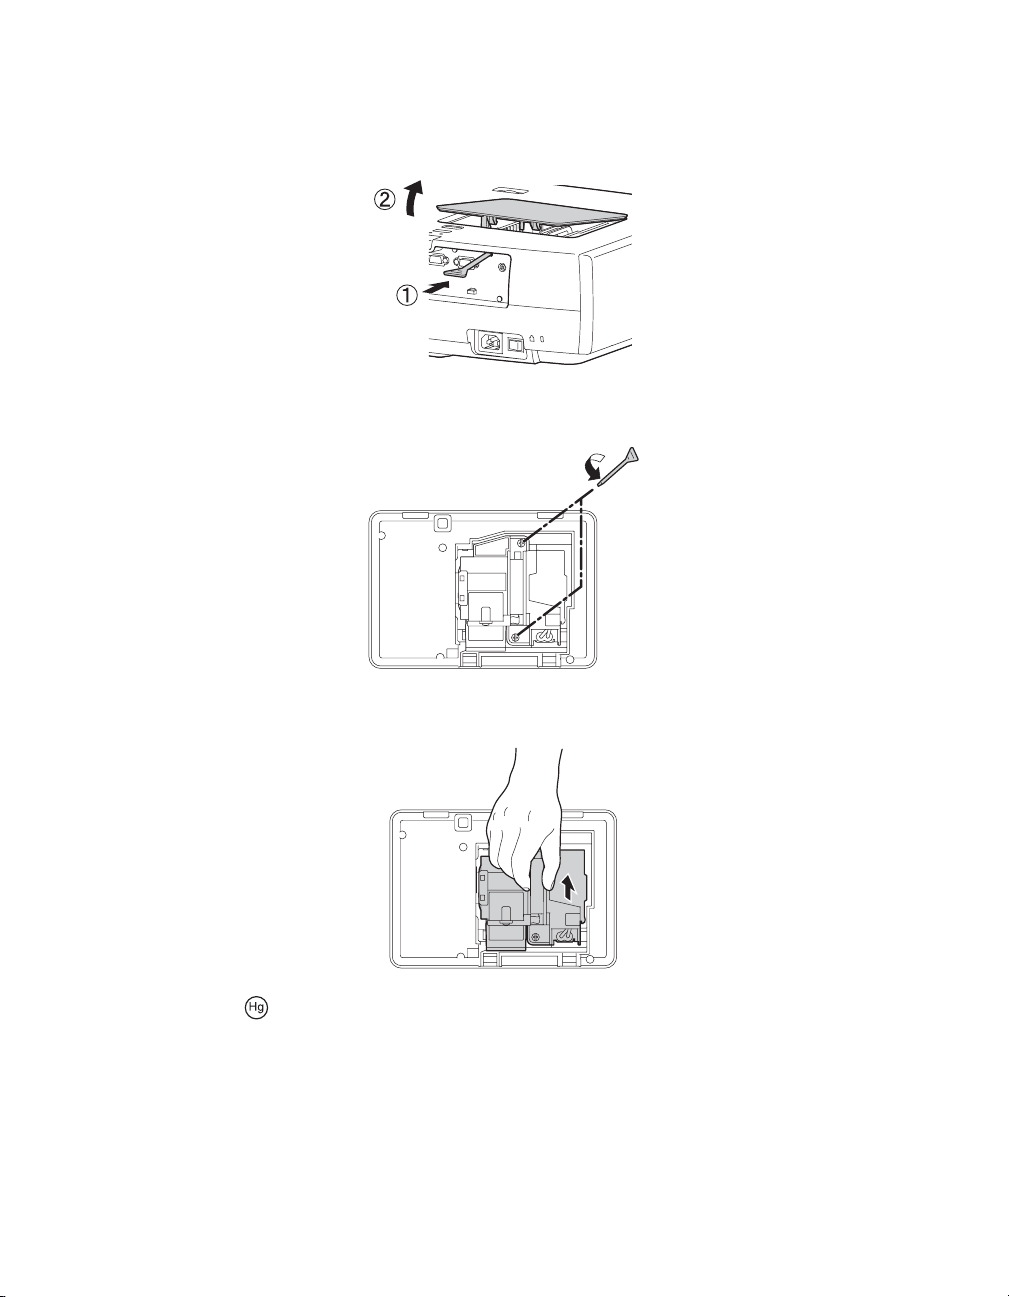
5. Insert the screwdriver that came with the lamp (or a similar tool) into the slot on the back
of the projector to release the lamp cover. Then lift up the cover to remove it.
6. Loosen the two screws securing the lamp (they don’t come all the way out).
7. Grasp the lamp as shown and pull it straight out.
WARNING: The lamp(s) in this product contain mercury. Please consult your state and
local regulations regarding disposal or recycling. Do not put in the trash.
52 Maintenance
Page 53
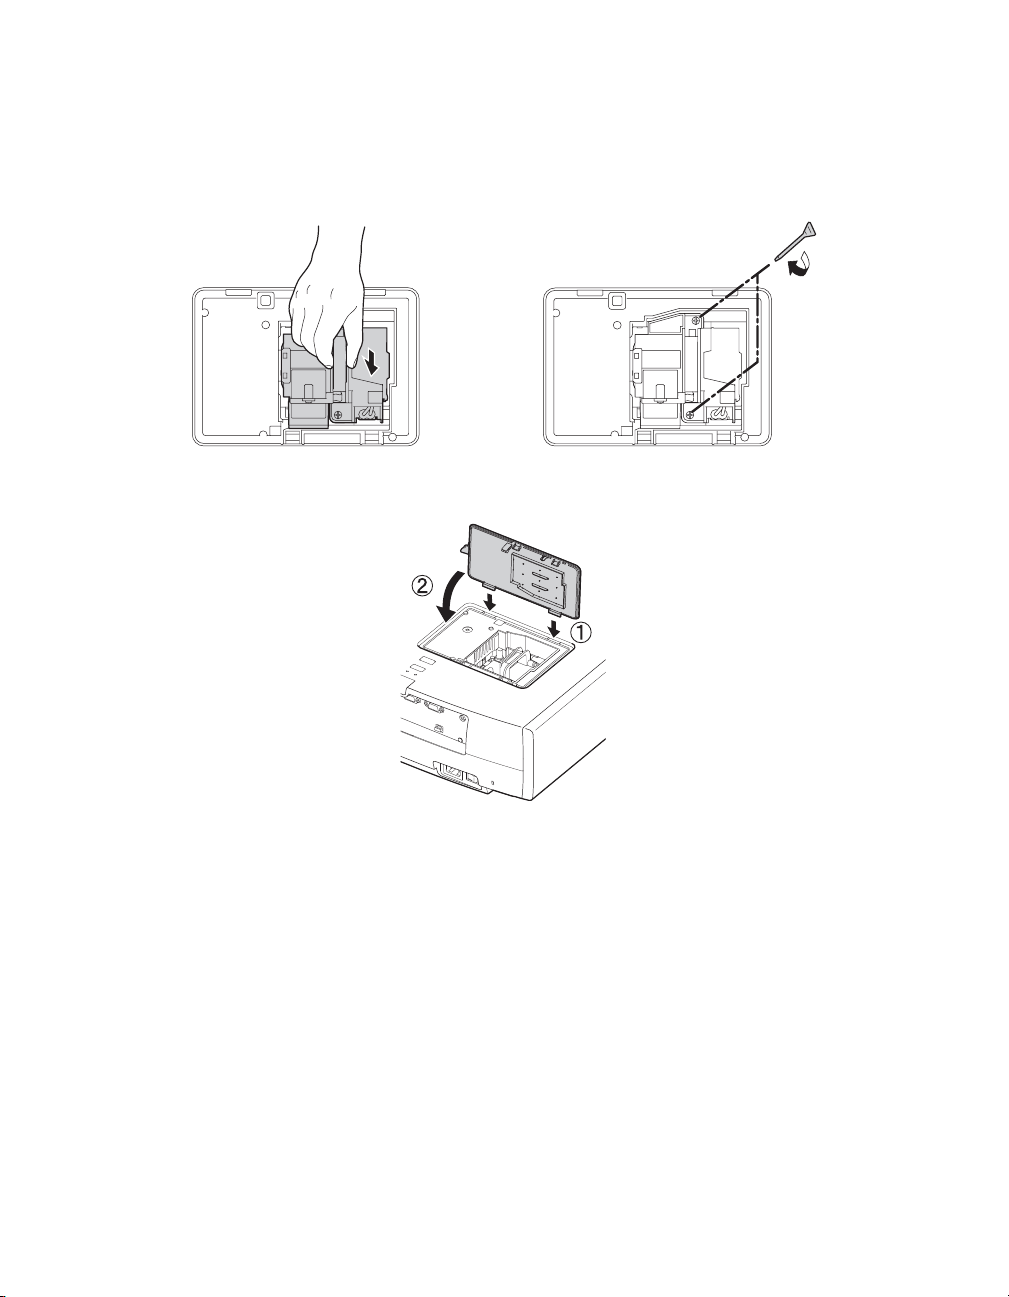
8. Gently insert the new lamp and tighten its screws.
Caution: Don’t touch the glass portion of the lamp assembly. Touching the glass could result
in premature lamp failure.
9. Replace the lamp cover. (The projector won’t work if the lamp cover is open or loose.)
10. Reset the lamp usage timer, as described on page 54.
Maintenance 53
Page 54

Resetting the Lamp Usage Timer
After replacing the lamp, plug the projector back in, turn on the power switch on the back,
and press the Ppower button. Then follow these steps to reset the lamp usage timer:
1. Press the
2. Use the menu navigation buttons to open the
Hours
3. When you see a confirmation prompt, highlight
4. When you’re finished, press the
Menu button on the projector or remote control.
Reset menu, then select Reset Lamp
.
Yes and press the Enter button.
Menu button to exit.
The lamp usage timer shows 0H until you’ve used the lamp for at least 10 hours.
Checking the Projector Status
You can use the Info menu to view information about the current display settings and how
long the projection lamp has been in use. To access the Info menu:
1. Press the
2. Use the menu navigation buttons to open the
appears:
■ Lamp Hours ■ Refresh Rate
■ Source ■ Sync Info
Menu button on the projector or remote control.
Info menu. The following information
■ Input Signal ■ Video Signal
■ Resolution ■ Deep Color (color depth)
■ Scan Mode ■ Status (error information)
Note: The information displayed depends on the currently selected image source. The Lamp
Hours shows 0H until you’ve used the lamp for at least 10 hours.
The resolution indicates the total number of scan lines in the source signal. The number of visible
scan lines depends on the signal format standard and selected display settings (see page 65).
54 Maintenance
Page 55

Storing the Projector
If you need to store the projector for an extended time, do the following:
■ Make sure the temperature of the storage area is within 14 to 140 °F (–10 to 60 °C).
■ Attach the lens cover and retract the feet.
■ Remove the batteries from the remote control.
■ Pack the projector in its original packaging or equivalent.
Transporting the Projector
Note: Epson shall not be liable for any damages incurred during transportation.
The projector contains many glass and precision parts. When shipping the projector for
repairs, use the original packaging material if possible. If you do not have the original
packaging, use equivalent materials. Do not use materials that can become lodged in the
projector vents. Be sure the carrier is capable of transporting fragile equipment and is aware
that the projector is fragile.
Before transporting the projector, make sure you center the lens from left to right by turning
the horizontal lens shift dial until it clicks. Then lower the lens all the way down by turning
the vertical lens shift dial until it stops.
Caution: Do not try to move the lens by hand, or you may damage the projector. Always use the
lens shift dials to change the lens position. If the lens shift dial becomes hard to turn, you cannot
adjust the position any further.
Maintenance 55
Page 56
Problem Solving
This section explains how to interpret the projector’s status lights, solve problems with the
picture and remote control, and contact technical support.
What To Do When the Lights Come On or Flash
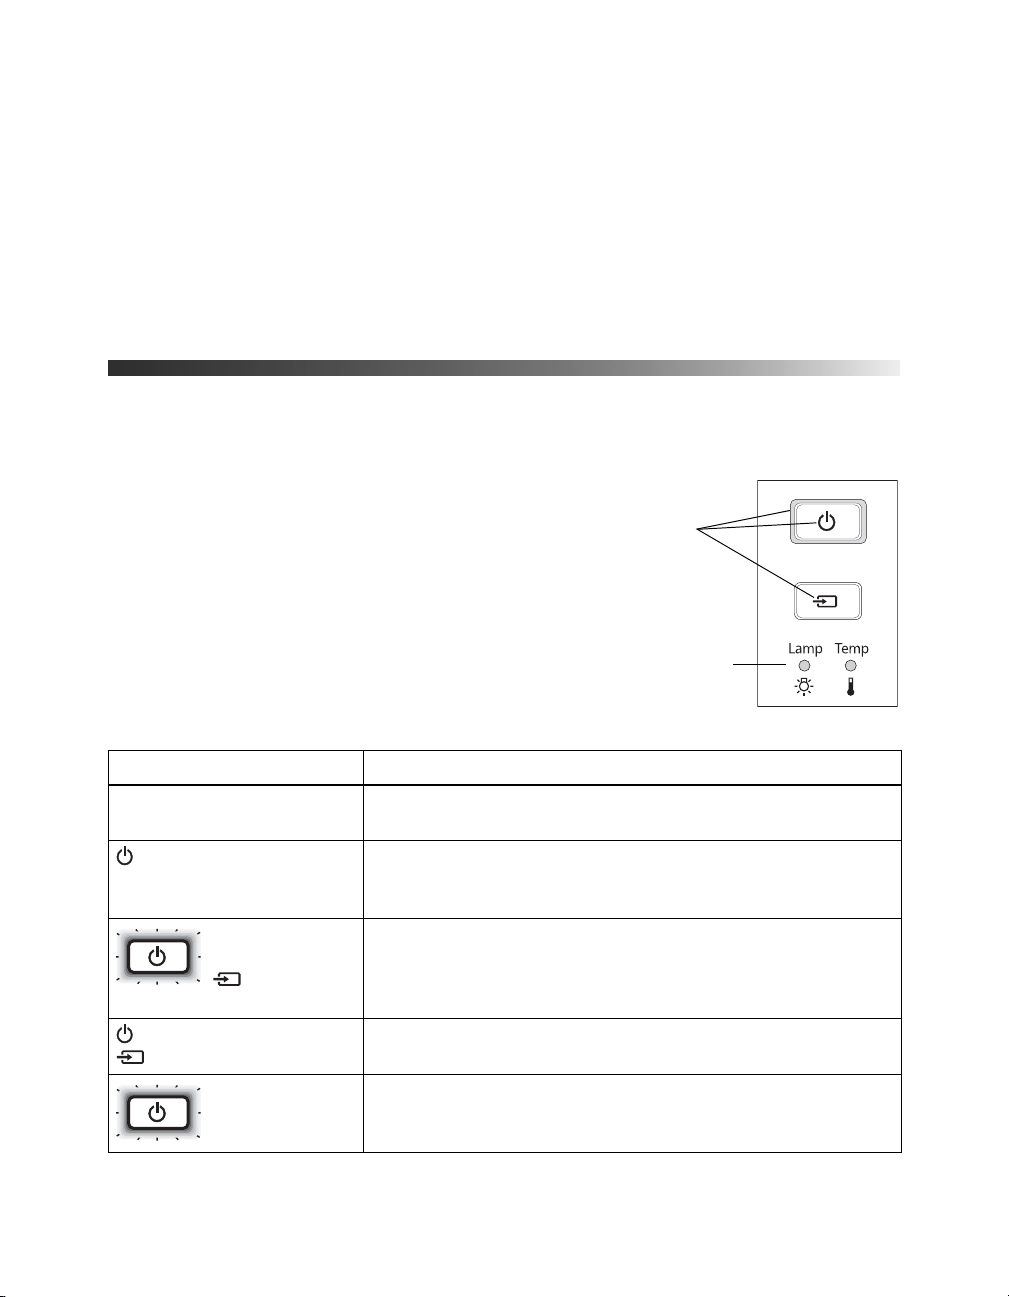
The lights on top of the projector indicate the projector’s
status and let you know when a problem occurs.
If the projector isn’t working correctly, first press the
P power button, let the projector cool down, turn off the
power switch on the back, and unplug the power cord.
Then plug the power cord back in and turn on the
projector. If this doesn’t solve the problem, check the
status lights on top of the projector.
Status
lights
Warning lights
Lights indicating normal operation
Light state Cause and solution
All lights are off The projector is turned off. If necessary, connect the power cord
Power light is on The projector is in standby (sleep) mode. Turn off the power
Power light and
source light are on
56 Problem Solving
Power light
flashes and
source light
is on
Power light
flashes; no other
lights are on
and turn on the power switch on the back of the projector.
switch in back to turn off the projector, or press the
button to turn it on.
The projector is warming up. Wait for the picture to appear.
Projection is in progress.
The projector is cooling down. Wait until the light stops flashing
and remains on. Then turn off the power switch in back to turn off
the projector, or press the
Ppower button to turn it back on.
Ppower
Page 57
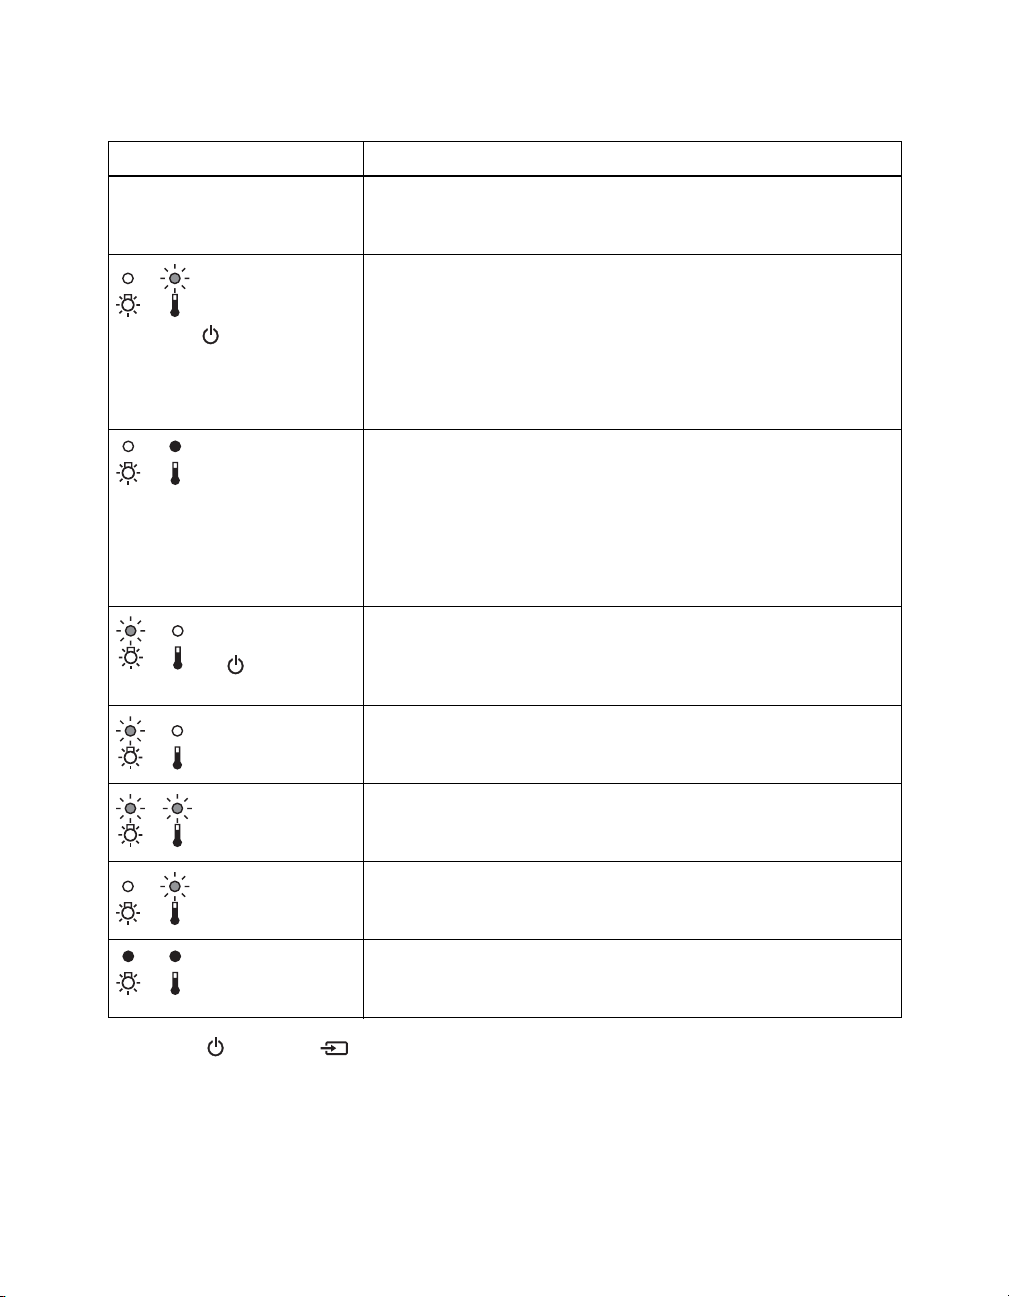
Lights indicating a problem
Light state Cause and solution
All lights are off The projector is not receiving power. Make sure the power switch
on the back of the projector is turned on and the power cord is
connected securely at both ends.
The temperature
light flashes
orange and the
power light is
flashing
High-speed cooling is in progress. If the temperature rises
further, projection will stop automatically. Make sure there is
plenty of space around the projector for ventilation. Clean or
replace the air filter if necessary (see page 49).
If you are using the projector at an altitude above 4921 feet (1500
meters), turn on High Altitude Mode so the fan can cool the
projector properly (see page 47).
The temperature
light is red
The lamp light
flashes orange and
the power light
is flashing
The lamp light
flashes red
Both warning
lights are flashing
red
The temperature
light flashes red
Both warning lights
are red
The projector is too hot, which turns off the lamp automatically.
Let the projector cool for five minutes, then turn it back on. Make
sure there is plenty of space around the projector for ventilation.
Also, clean or replace the filter if necessary (see page 49).
If you are using the projector at an altitude above 4921 feet (1500
meters), turn on High Altitude Mode so the fan can cool the
projector properly (see page 47).
The lamp needs to be replaced soon (see page 51). Make sure
you have a spare lamp handy. If you just replaced the lamp, you
may need to reset the lamp usage timer (see page 54).
The lamp needs to be replaced. If you just replaced the lamp,
make sure the lamp and its cover are securely installed (see
page 51). Clean the air filter if necessary (see page 49).
There is an internal problem.
back of the projector, and unplug it from the electrical outlet.
Then contact Epson for assistance (see page 62).
There is a fan or sensor problem. Turn off the power switch on
the back of the projector, and unplug it from the electrical outlet.
Then contact Epson for assistance (see page 62).
There is an internal problem.
back of the projector, and unplug it from the electrical outlet.
Then contact Epson for assistance (see page 62).
Turn off the power switch on the
Turn off the power switch on the
Note: If the power and source lights don’t come on, they may have been turned off using
the Illumination setting (see page 46).
Problem Solving 57
Page 58

Solving Picture Problems
You cannot turn on the projector.
■ Make sure the power cord is connected and the power switch in back of the projector is
turned on. Then wait a moment for the Ppower light to come on before pressing the
Ppower button.
■ If you’ve set the Control Panel Lock, the control panel buttons are disabled; you must
use the remote control to turn on the projector (see page 32).
■ If you’ve set the Child Lock, you have to press the Ppower button for 3 seconds to turn
on the projector, or use the remote control (see page 32).
No picture appears on the screen or you see the
■ Press one of the Source buttons on the remote control, or press the source button
No Signal message displayed.
on the projector, to select the correct input source. Allow a few seconds for the projector
to sync up after pressing the button.
■ Press the Blank button on the remote control to make sure the picture hasn’t been turned
off temporarily.
■ Check that the P power light is on, the P power light is not flashing, and the lens cover is
off.
■ The projector may be in standby (sleep) mode. If the Ppower light is on and the
source light is off, press the Ppower button to turn the projector back on.
■ Make sure your video equipment is turned on.
■ Make sure your cable(s) are connected correctly (see page 18).
Only part of the picture is displayed, or the picture is distorted.
■ Press the Aspect button to select a different aspect ratio (see page 27).
■ If the Aspect is set to Zoom, you may need to use the Zoom Caption Pos. option to see
the top or bottom section of the screen so that subtitles are visible (see page 45).
■ Check the Overscan to make sure it’s adjusted correctly (see page 44).
■ Use the Position setting to reposition the image on the screen (see page 44).
■ If you’ve connected a computer and you see only half the image, make sure the
computer’s Dual Display setting is turned off. If part of the image is cut off, reset the
projector settings (see page 43).
58 Problem Solving
Page 59
You’re using a computer and no picture appears on the screen.
If you’re using a Windows
■ Press the function key that lets you display on an external monitor. It’s often labeled with
an icon such as , but it may also be labeled
the
Fn key while pressing it. Check your laptop’s manual or online help.
®
laptop:
CRT/LCD. You may have to hold down
On most systems, the key lets you toggle between the LCD screen and the
projector, or display on both at the same time. Allow a few seconds for the projector to
sync up after pressing it.
■ If the function key doesn’t let you display simultaneously on both screens, you might
need to use the Display utility in the Windows Control Panel to make sure that both the
LCD screen and external monitor port are enabled. From the Windows Control Panel,
open the
then click
computer; you may need to click a
Display utility. In the Display Properties dialog box, click the Settings tab,
Advanced. The method for adjusting the setting varies from computer to
Monitor tab, then make sure the external Monitor
port is set as your primary display or enabled. See your computer manual or online help
for details.
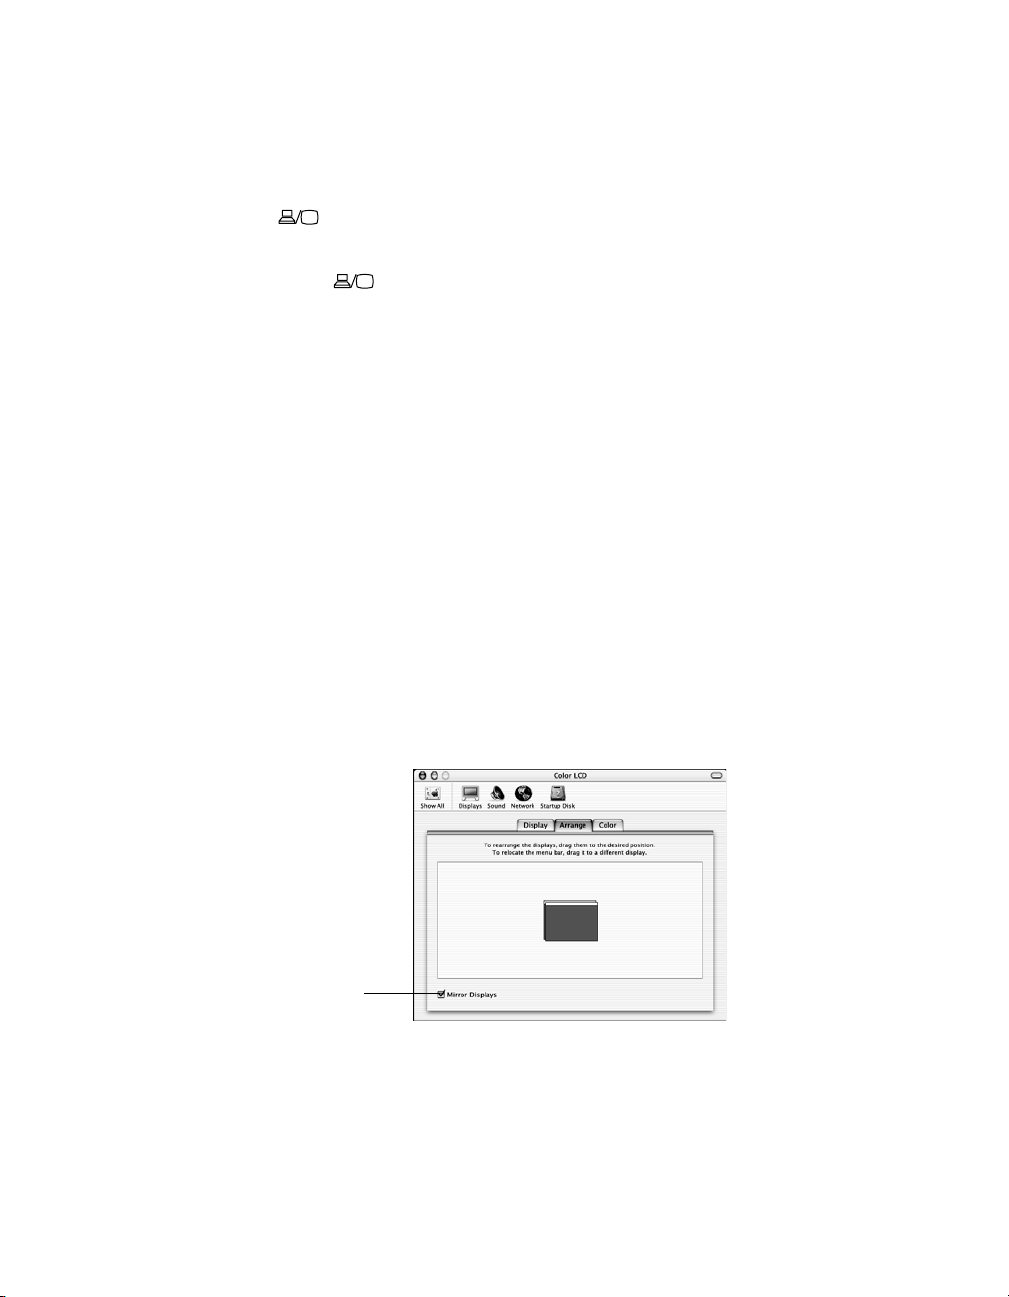
If you’re using Mac OS X:
1. Open the
2. Select
3. On the
System Preferences utility and select Displays.
Detect Displays.
Arrange or Arrangement screen, check the Mirror Displays checkbox. (See
your computer manual for details.)
Click here
The picture is upside-down or reversed.
Change the
Projection setting in the Settings menu (see page 45).
Problem Solving 59
Page 60

The picture isn’t rectangular.
■ If the image looks like or , the projector has been placed off to one side of the
screen and angled toward it. Face the projector straight ahead (instead of at the center of
the screen), then use the horizontal lens shift dial to center the image (see page 24).
■ If the image looks like or , make sure the projector is not tilted up or down.
The picture contains static or noise.
■ Make sure the Input Signal is set correctly for your connected video equipment (see
page 46).
■ If you’re viewing still images and you notice flickering or horizontal lines, turn on the
Progressive setting (see page 38).
■ Make sure your cables are securely connected at both ends.
■ If you’re using an extension cable, you may pick up interference if the cable is not
adequately shielded. You may need to use a signal amplifier for longer cables.
■ If you’re displaying the same image on your computer and projector screen, try turning
off your laptop’s LCD display (see page 59).
The picture is blurry.
■ Make sure the Input Signal is set correctly for your video equipment (see page 46).
■ There may be dirt on the lens. Clean the lens as described on page 48.
■ Adjust the focus (see page 26).
■ Make sure the lens is not fogged by condensation. If you’ve just moved the projector from
a cold environment, wait a couple of minutes before using it.
■ Adjust the Sharpness setting (see page 37).
■ If you’re projecting from a computer, you may need to adjust the Tracking and Sync
settings (see page 41).
The colors on the screen don’t look right.
■ Make sure the Input Signal is set correctly for your connected video equipment (see
page 46).
■ Press the Color Mode button on the remote control to select a different color mode (see
page 28).
■ Check the brightness and contrast settings (see page 35).
60 Problem Solving
Page 61
■ Fine-tune the colors with the settings listed on page 39.
■ If the picture looks dark, you may need to replace the lamp. Check the lamp usage timer
to see how long the lamp has been in use (see page 54). Replace the lamp if it’s close to
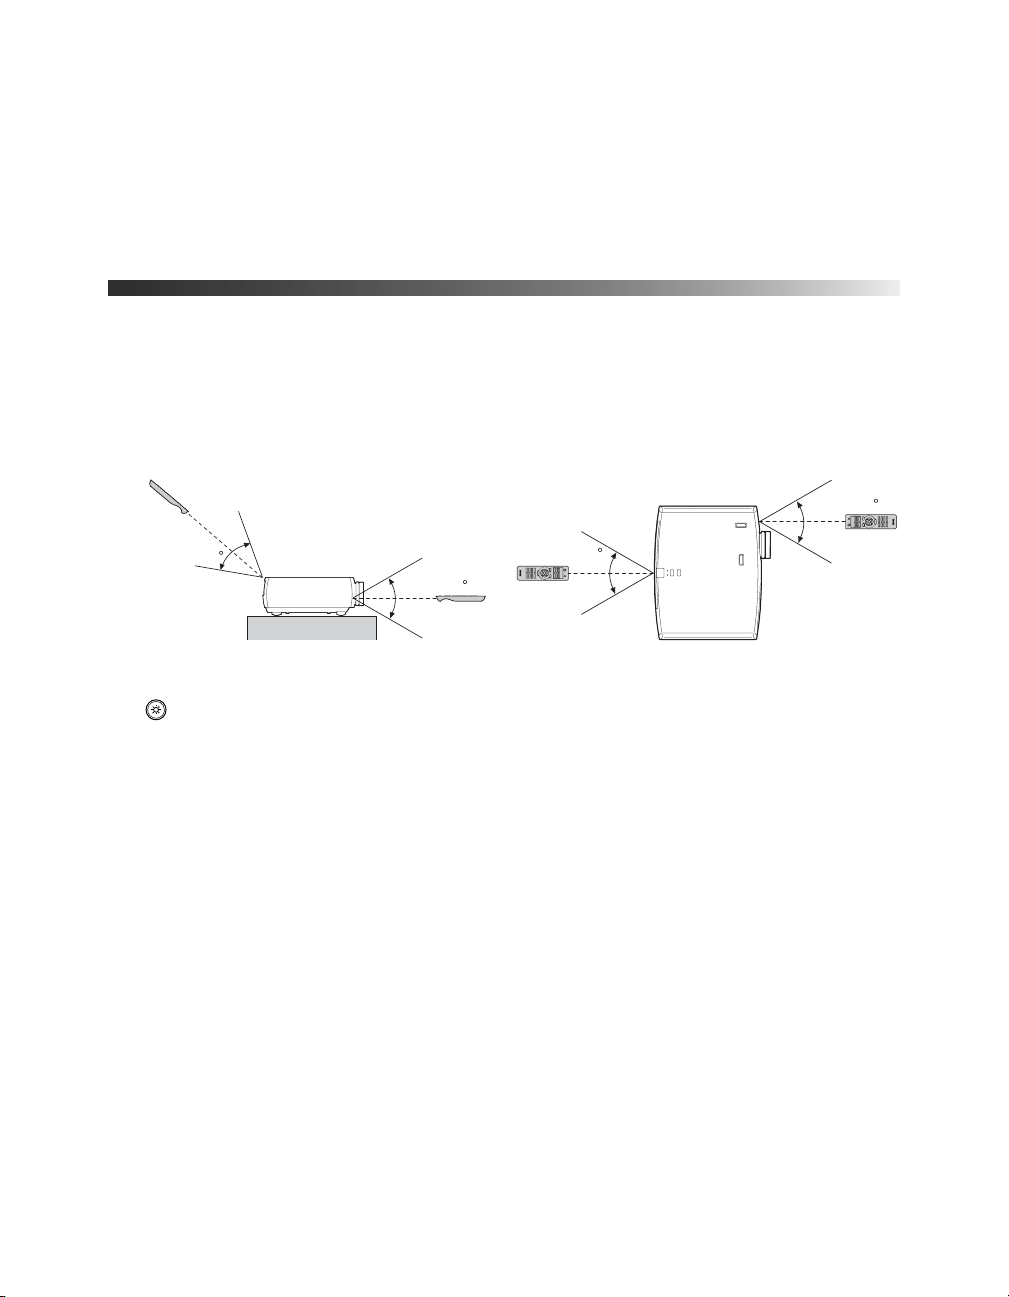
the end of its service life (see page 51).
Solving Remote Control Problems
The projector doesn’t respond to remote control commands.
■ Make sure you’re within about 30 feet of the projector, and the remote control is aimed at
the projector’s front or back sensor within the ranges shown below.
Approx.60
Approx.60
Approx.60
■ You may need to replace the remote control batteries (see page 21). Press the
Approx.60
illumination button and check if the buttons glow. If they don’t, replace the batteries.
■ Dim the room lights and turn off any fluorescent lights. Make sure the projector is not in
direct sunlight.
■ Turn off nearby equipment that emits infrared energy, such as a radiant room heater.
■ Make sure there are no objects between the remote control and the IR receiver.
Problem Solving 61
Page 62

Where to Get Help
Internet Support
Epson provides technical assistance 24 hours a day at epson.com/support (U.S.) or
epson.ca/support (Canada). Here you can access troubleshooting information, download
product documentation, and receive technical advice through e-mail.
Speak to a Support Representative
To use the Epson PrivateLine Support service, call (800) 637-7661 and enter the PIN on the
Epson PrivateLine Support card that came with your projector. This is the fastest way of
speaking to a live representative, and it’s free. This service is available 6
Time, Monday through Friday, for the duration of your warranty period.
You may also speak with a projector support specialist by dialing one of these numbers:
■ U.S.: (562) 276-4394, 6 AM to 6 PM, Pacific Time, Monday through Friday
■ Canada: (905) 709-3839, 6 AM to 6 PM, Pacific Time, Monday through Friday
Days and hours of support are subject to change without notice. Toll or long distance charges
may apply.
Before you call, please have the following information ready:
■ Product name (PowerLite Home Cinema 8345)
AM to 6 PM, Pacific
■ Product serial number (located on the bottom of the projector)
■ Computer configuration, if you’re connected to a computer
■ Description of the problem
Purchase Supplies and Accessories
You can purchase screens, carrying cases, or other accessories from an authorized Epson
reseller. To find the nearest reseller, call 800-GO-EPSON (800-463-7766). To purchase
online, visit www.epsonstore.com (U.S. sales) or www.epson.ca (Canadian sales).
62 Problem Solving
Page 63

Specifications
General
Type of display Poly-silicon TFT active matrix
Size of LCD panels 0.74 inch (18 mm) wide
Lens F=2.0 to 3.17
Resolution
(native format) 1920 × 1080 pixels, 1080p
Brightness Normal mode:
White light output 1800 lumens (ISO 21118 standard)
Color light output 1800 lumens
Dynamic contrast ratio 25000:1
Image size 30 to 300 inches
Projection distance 2.85 to 62.83 feet (0.87 to 19.15 m)
Zoom ratio 1 to 2.1
Aspect ratio 16:9
Fan noise level 22 to 28 dB
Lamp
Note: Lamp life will vary depending on mode selected, environmental conditions, and usage.
Brightness decreases over time.
Turn off this product when not in use to prolong the life of the projector.
Type UHE (Ultra High Efficiency), E-TORL
Power consumption 200 W
Lamp life 4000 hours
Part number V13H010L49
Remote Control
Range Approximately 30 feet (9 m)
Batteries AA × 2
Specifications 63
Page 64

Dimensions
Height 5.4 inches (136 mm), not including adjustable feet
Width 17.7 inches (450 mm)
Depth 14.2 inches (360 mm); not including lens protrusion
Weight 16.1 lb (7.3 kg)
Electrical
Rated frequency 50/60 Hz AC
Power supply 100 to 120 VAC: 3.1 A
200 to 240 VAC: 1.3 A
Power consumption 100 to 120 VAC:
Operating: 272 W
Standby: 0.2 W
220 to 240 VAC:
Operating: 261 W
Standby: 0.3 W
Environmental
Temperature Operating: 41 to 95 °F (5 to 35 °C)
Storage: 14 to 140 °F (–10 to 60 °C)
Humidity Operating: 20 to 80% RH, non-condensing
Storage: 10 to 90% RH, non-condensing
Operating altitude Up to 7500 feet (2286 meters);
Safety
United States FCC Part 15B Class B (DoC)
Canada ICES-003 Class B
64 Specifications
over 4921 feet (1500 meters), enable High Altitude mode
in the Settings menu (see page 47)
UL60950-1
CSA C22.2 No. 60950-1
Pixelworks DNX
™
ICs are used in this projector.
Page 65
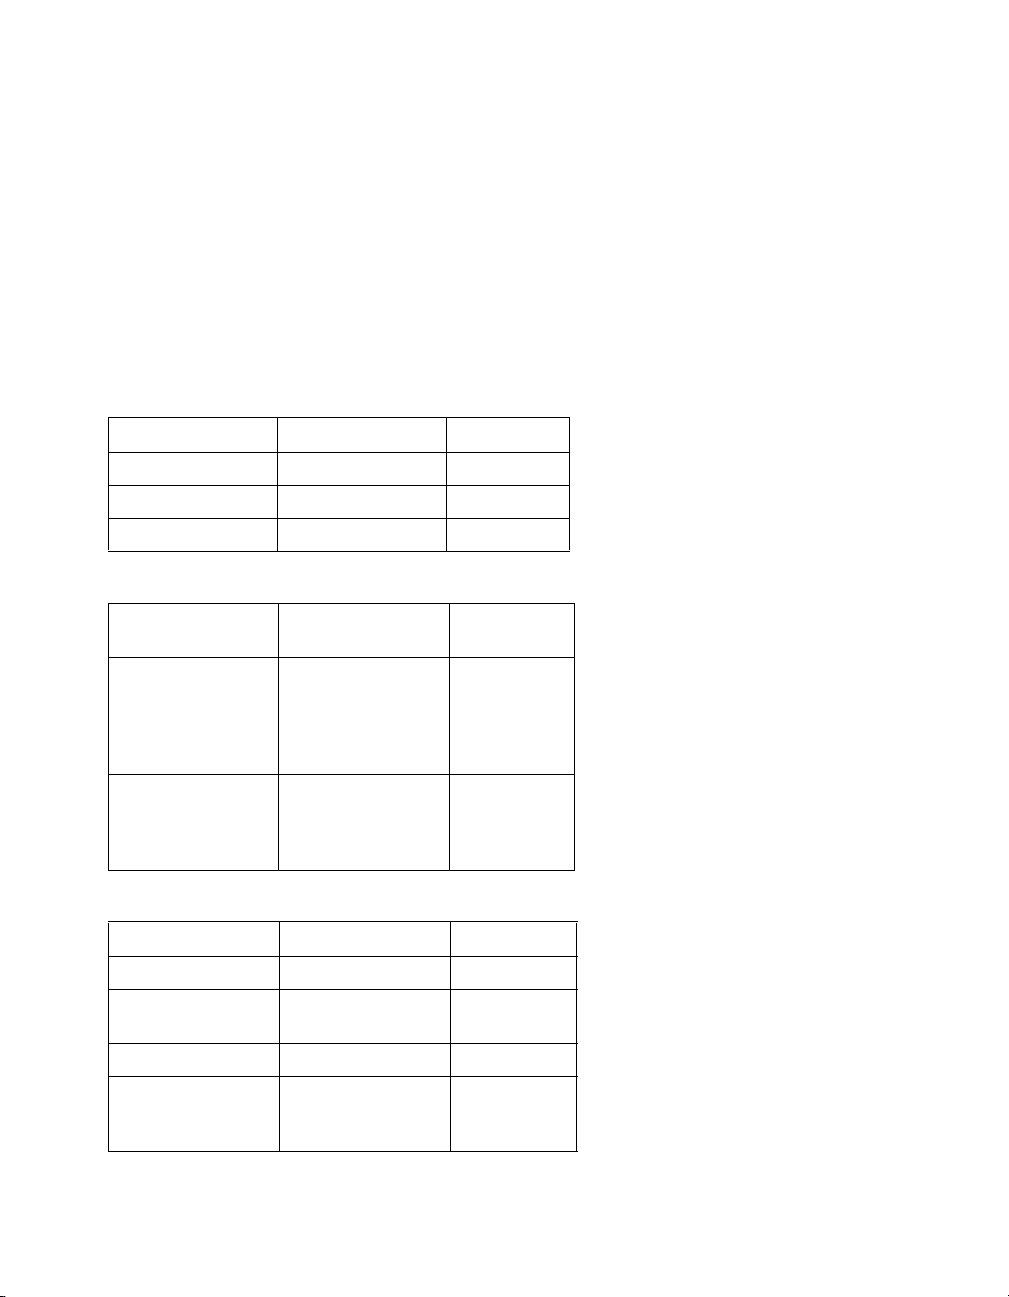
Compatible Video Formats
The projector supports analog video in NTSC, PAL, and SECAM formats, and it automatically adjusts
to the incoming signal. It can receive these formats as composite video, S-video, or component video—
which it accepts through the Video, S-Video, and Component ports, respectively.
The projector also supports digital video (SDTV, HDTV) and various monitor display formats. Digital
video is accepted by the HDMI and Component video ports. The PC port accepts analog RGB
computer monitor signals.
If necessary, you can select a different Aspect setting to optimize the image. The resolution at which the
image displays for a given setting depends on the currently active picture source, as listed in the
following tables.
Composite video or S-Video
Format
NTSC 60 720 × 480
PAL 50 720 × 576
SECAM 50/60 720 × 576
Component video
Format/
Signal
SDTV
480i
576i
480p
576p
HDTV
720p
1080i
1080p
Refresh rate (Hz)
Refresh rate (Hz)
60
50
60
50
50/60
50/60
50/60
Resolution
Resolution
720 × 480
720 × 576
720 × 480
720 × 576
1280 × 720
1920 × 1080
1920 × 1080
Analog RGB (computer display)
Signal Refresh rate (Hz) Resolution
VGA 60/72/75/85 640 × 480
56/60/72/
SVGA
XGA 60/70/75/85 1024 × 768
SXGA
75/85 800 × 600
70/75/85
60/75/85
60/75/85
1152 × 864
1280 × 960
1280 × 1024
Specifications 65
Page 66
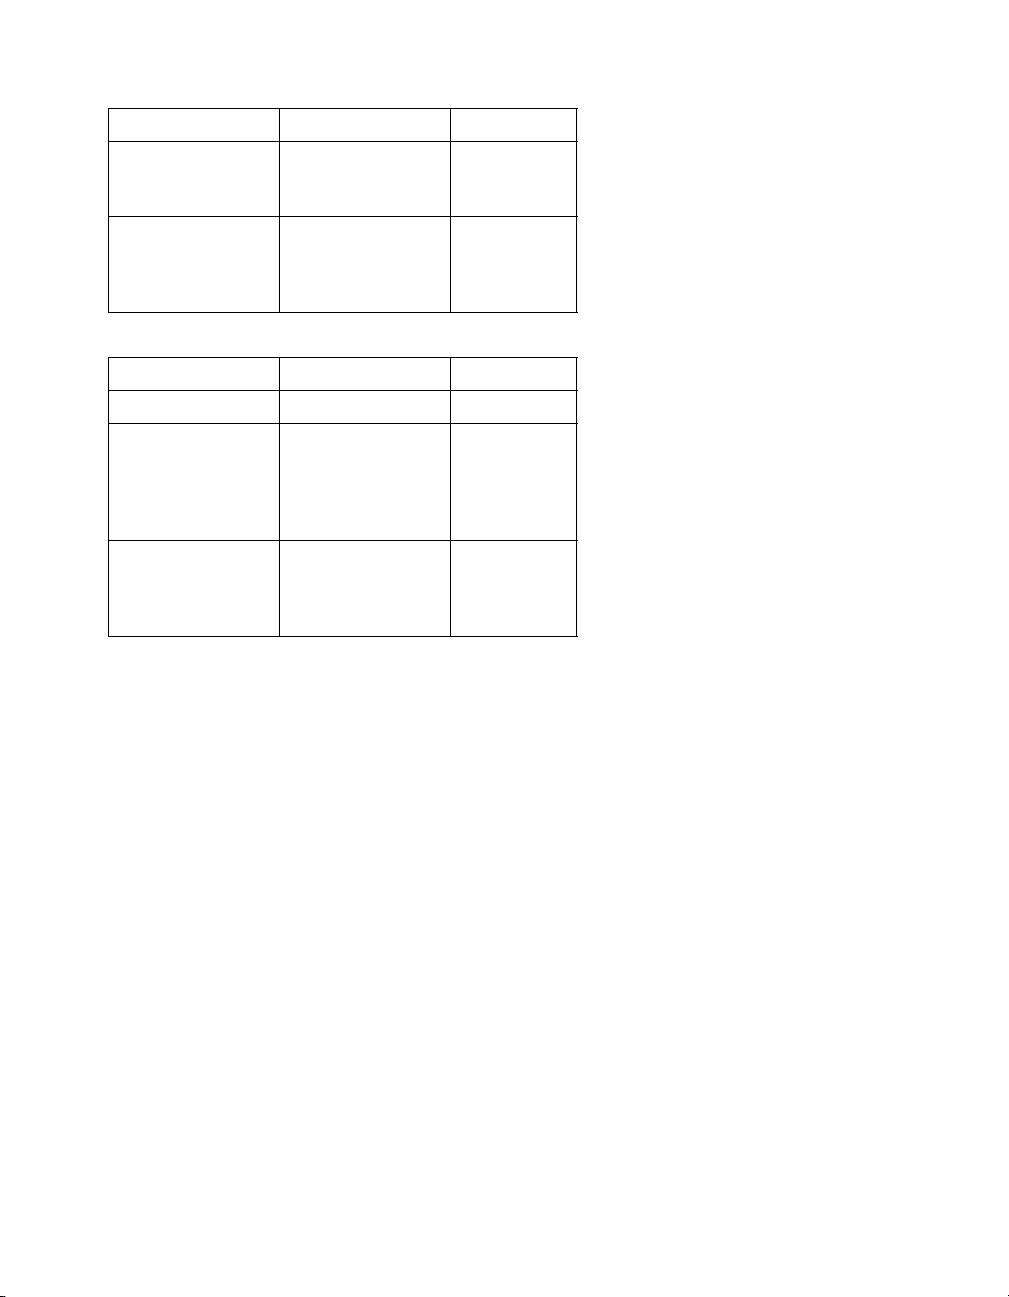
Signal Refresh rate (Hz) Resolution
1280 × 768
1360 × 768
1280 × 800
640 × 480
832 × 624
1024 × 768
1152 × 870
WXGA
MAC13”
MAC16”
MAC19”
MAC21”
60
60
60/75/85
67
75
59/75
75
HDMI
Signal Refresh rate (Hz) Resolution
VGA 60 640 × 480
SDTV
480i
576i
480p
576p
HDTV
720p
1080i
1080p
60
50
60
50
50/60
50/60
24/30/50/60
720 × 480
720 × 576
720 × 480
720 × 576
1280 × 720
1920 × 1080
1920 × 1080
66 Specifications
Page 67
ESC/VP21 Command Codes
You can use an AV controller with a 9-pin null modem serial cable to control the projector. You can
download the complete ESC/VP 21 Communication Manual for home theater projectors from the
Epson website at epson.com/support (U.S.) or epson.ca/support (Canada). Following are some of the
available codes:
Item Command
Power ON/OFF ON PWR ON
OFF PWR OFF
A/V Mute ON/OFF ON MUTE ON
OFF MUTE OFF
A/V Mute selection Black MSEL 00
Blue MSEL 01
Source
change
Color Mode Theatre CMODE 05
Aspect ratio
Terminal Signal name
Component Component video SOURCE 10
YCbCr SOURCE 14
YPbPr SOURCE 15
Auto SOURCE 1F
PC HDB15 SOURCE 20
RGB SOURCE 21
HDMI 1 HDMI 1 SOURCE 30
Video Video/S-Video SOURCE 40
Video (RCA) SOURCE 41
S-Video SOURCE 42
HDMI 2 HDMI 2 SOURCE A0
Dynamic CMODE 06
Natural CMODE 07
x.v.Color CMODE 0B
Living Room CMODE 0C
Normal ASPECT 00
Full ASPECT 40
Zoom ASPECT 50
Wide ASPECT 70
Specifications 67
Page 68

Notices
Important Safety Information
Follow these safety instructions when setting up and using the projector:
■ Never look into the projector lens when the lamp is turned on; the bright light can damage your
eyes. Never let children look into the lens when it is on.
■ Never open any cover on the projector, except the lamp and filter covers. Dangerous electrical
voltages inside the projector can severely injure you.
■ Except as specifically explained in this User’s Guide, do not attempt to service this product
yourself. Refer all servicing to qualified service personnel.
■ The projector and its accessories come packaged in plastic bags. Keep plastic bags away from small
children to avoid any risk of suffocation.
■ Don’t place the projector on an unstable cart, stand, or table. Also, don’t use the projector near
water or sources of heat.
■ Use the type of power source indicated on the projector. If you’re not sure of the power available,
consult your dealer or power company.
■ Place the projector near a wall outlet where the plug can be easily unplugged.
■ Don’t insert the plug into an outlet with dust present, and insert the plug firmly into the outlet.
Failure to do so could result in sparks or fire.
■ Don’t overload wall outlets, extension cords, or integral convenience receptacles. This can cause
fire or electric shock.
■ Don’t block the slots and openings in the projector case. They provide ventilation and prevent the
projector from overheating. Don’t operate the projector on a sofa, rug, or other soft surface, or in a
closed-in cabinet unless proper ventilation is provided.
■ Never push objects through the cabinet slots or spill liquid into the projector.
■ Unplug the projector from the wall outlet and refer servicing to qualified service personnel under
the following conditions: when the power cord or plug is damaged or frayed; if liquid has been
spilled into the projector, or if it has been exposed to rain or water; if it doesn’t operate normally
when you follow the operating instructions, or if it exhibits a distinct change in performance,
indicating a need for service; if it has been dropped or the housing has been damaged.
■ Don’t place the projector where the cord can be walked on. This may result in fraying or damage
to the plug.
■ Unplug the projector from the wall outlet before cleaning. Use a damp cloth for cleaning. Do not
use liquid or aerosol cleaners.
68 Notices
Page 69

■ The lamp(s) in this product contain mercury. Please consult your state and local regulations
regarding disposal or recycling. Do not put in the trash.
■ Allow the lamp to cool for one hour before replacing it.
■ Unplug the projector during lightning storms or when not in use for extended periods.
■ Don’t place the projector or remote control on top of heat-producing equipment.
■ If you use the projector in a country other than where you purchased it, use the correct power cord
for that country.
■ Don’t stand on the projector or place heavy objects on it.
■ Don’t use the projector outside of the required temperature range of 41 to 95 °F
(5 to 35 °C). Doing so may cause an unstable display and could lead to projector damage.
■ Don’t store the projector outside of the required temperature range of 14 to 140 °F
(–10 to 60 °C) or in direct sunlight for long periods of time. Doing so may cause damage
to the case.
WARNING: The cords included with this product contain chemicals, including lead, known to the
State of California to cause birth defects or other reproductive harm. Wash hands after handling. (This
notice is provided in accordance with Proposition 65 in Cal. Health & Safety Code § 25249.5 and
following.)
Notices 69
Page 70

FCC Compliance Statement
For United States Users
This equipment has been tested and found to comply with the limits for a Class B digital device,
pursuant to Part 15 of the FCC Rules. These limits are designed to provide reasonable protection
against harmful interference in a residential installation. This equipment generates, uses, and can
radiate radio frequency energy and, if not installed and used in accordance with the instructions, may
cause harmful interference to radio or television reception. However, there is no guarantee that
interference will not occur in a particular installation. If this equipment does cause interference to radio
and television reception, which can be determined by turning the equipment off and on, the user is
encouraged to try to correct the interference by one or more of the following measures:
■ Reorient or relocate the receiving antenna.
■ Increase the separation between the equipment and receiver.
■ Connect the equipment into an outlet on a circuit different from that to which the receiver is
connected.
■ Consult the dealer or an experienced radio/TV technician for help.
WARNING
The connection of a non-shielded equipment interface cable to this equipment will invalidate the FCC
Certification of this device and may cause interference levels which exceed the limits established by the
FCC for this equipment. It is the responsibility of the user to obtain and use a shielded equipment
interface cable with this device. If this equipment has more than one interface connector, do not leave
cables connected to unused interfaces. Changes or modifications not expressly approved by the
manufacturer could void the user’s authority to operate the equipment.
This Class B digital apparatus meets all requirements of the Canadian Interference-Causing Equipment
Regulations.
Cet appareil numérique de la classe B respecte toutes les exigences du Règlement sur le materiel brouilleur du
Canada.
70 Notices
For Canadian Users
Page 71

Declaration of Conformity
According to 47CFR, Part 2 and 15 for Class B Personal Computers and Peripherals; and/or CPU
Boards and Power Supplies used with Class B Personal Computers:
We: Epson America, Inc.
Located at: 3840 Kilroy Airport Way
MS 3-13
Long Beach, CA 90806-2469
Telephone: (562) 290-5254
Declare under sole responsibility that the product identified herein, complies with 47CFR Part 2 and
15 of the FCC rules as a Class B digital device. Each product marketed is identical to the representative
unit tested and found to be compliant with the standards. Records maintained continue to reflect the
equipment being produced can be expected to be within the variation accepted, due to quantity
production and testing on a statistical basis as required by 47CFR §2.909. Operation is subject to the
following two conditions: (1) this device may not cause harmful interference, and (2) this device must
accept any interference received, including interference that may cause undesired operation.
Trade Name: Epson
Type of Product: Projector
Model: H416A
Marketing Name: PowerLite Home Cinema 8345
Epson America, Inc. Limited Warranty
Two-Year Projector Limited Warranty and 90-Day Lamp Limited Warranty
What Is Covered: Epson America, Inc. (‘Epson’) warrants to the original retail purchaser of the Epson
projector product enclosed with this limited warranty statement that the product, if purchased new and
operated in the United States, Canada, or Puerto
materials for a period of two (2) years from the date of original purchase. This limited warranty applies
only to the projector and not to the projector lamp, which carries a limited warranty period of ninety
(90) days from the date of original purchase. For warranty service, you must provide proof of the date
of original purchase.
What Epson Will Do To Correct Problems: If your product requires service during the limited warranty
period, please call Epson at the number on the bottom of this statement and be prepared to provide the
model, serial number, and date of original purchase. Epson will, at its option, repair or replace the
defective unit, without charge for parts or labor. When warranty service involves the exchange of the
product or of a part, the item replaced becomes Epson property. The exchanged product or part may
be new or refurbished to the Epson standard of quality, and at Epson’s option, the replacement may be
another model of like kind and quality. Epson’s liability for replacement of the covered product will
not exceed the original retail selling price of the covered product. Exchange or replacement products or
Rico will be free from defects in workmanship and
Notices 71
Page 72

parts assume the remaining warranty period of the product covered by this limited warranty. If Epson
replaces the lamp as part of the warranty service, the replacement lamp carries the limited 90-day
warranty stated above.
What This Warranty Does Not Cover: This warranty covers only normal use in the United States,
Canada or Puerto Rico. Twenty-four hours per day or other excessive continual use is not considered
normal use. This warranty does not cover consumables such as filters. This warranty is not transferable.
Epson is not responsible for warranty service should the Epson label or logo or the rating label or serial
number be removed. Epson is not responsible for warranty service should the product fail to be
properly maintained or fail to function properly as a result of misuse, abuse, improper installation,
neglect, improper shipping, damage caused by disasters such as fire, flood, and lightning, improper
electrical current, software problems, interaction with non-Epson products, or service other than by
Epson or an Epson Authorized Servicer. Postage, insurance, or shipping costs incurred in presenting
your Epson product for carry-in warranty service are your responsibility. Epson will pay for all freight
charges if you choose to send your unit to Epson for repair. If a claimed defect cannot be identified or
reproduced in service, you will be held responsible for costs incurred.
THE WARRANTY AND REMEDY PROVIDED ABOVE ARE EXCLUSIVE AND IN LIEU OF
ALL OTHER EXPRESS OR IMPLIED WARRANTIES INCLUDING, BUT NOT LIMITED TO,
THE IMPLIED WARRANTIES OF MERCHANTABILITY OR FITNESS FOR A PARTICULAR
PURPOSE. SOME LAWS DO NOT ALLOW THE EXCLUSION OF IMPLIED WARRANTIES.
IF THESE LAWS APPLY, THEN ALL EXPRESS AND IMPLIED WARRANTIES ARE LIMITED
TO THE WARRANTY PERIOD IDENTIFIED ABOVE. UNLESS STATED HEREIN, ANY
STATEMENTS OR REPRESENTATIONS MADE BY ANY OTHER PERSON OR FIRM ARE
VOID. IN THE EVENT THE REMEDIES ABOVE FAIL, EPSON'S ENTIRE LIABILITY SHALL
BE LIMITED TO A REFUND OF THE PRICE PAID FOR THE EPSON PRODUCT
COVERED BY THIS LIMITED WARRANTY. EXCEPT AS PROVIDED IN THIS WRITTEN
WARRANTY, NEITHER EPSON AMERICA, INC. NOR ITS AFFILIATES SHALL BE LIABLE
FOR ANY LOSS, INCONVENIENCE, OR DAMAGE, INCLUDING DIRECT, SPECIAL,
INCIDENTAL, OR CONSEQUENTIAL DAMAGES, RESULTING FROM THE USE OR
INABILITY TO USE THE EPSON PRODUCT, WHETHER RESULTING FROM BREACH OF
WARRANTY OR ANY OTHER LEGAL THEORY.
In Canada, warranties include both warranties and conditions.
Some jurisdictions do not allow limitations on how long an implied warranty lasts and some
jurisdictions do not allow the exclusion or limitation of incidental or consequential damages, so the
above limitations and exclusions may not apply to you. This warranty gives you specific legal rights,
and you may also have other rights, which vary from jurisdiction to jurisdiction.
To find the Epson Authorized Reseller nearest you, please visit our website at: www.epson.com.
To find the Epson Customer Care Center nearest you, please visit www.epson.com/support.
To contact the Epson Connection
and (905) 709-3839 in Canada or write to Epson America, Inc., P.O. Box 93012, Long Beach, CA
90809-3012.
72 Notices
SM
, please call (800) 637-7661 + PIN or (562) 276-4394 in the U.S.
Page 73

Index
Numerics
2-2 Pull-down, 38
A
Abs. Color Temp. setting, 39
Accessories, 10, 62
Air filter
cleaning and replacing, 49 to 50
ordering, 10
Anti-theft device, 7, 10
Aspect button, 9, 27, 58
Aspect ratio, selecting, 27, 44
Auto Iris setting, 36
Auto Setup, 41
B
Batteries, remote control, 21
Blank button, 23
Blurry picture, 60
Brightness
setting, 36
specification, 63
Buttons
projector, 8
remote control, 9
Color
adjusting, 29 to 31, 39 to 40
isolating, 39
problems, 60
Color Mode, 9, 28, 60
Color Saturation setting, 39
Color temperature setting, 39
Component setting, 46
Component video connection, 18
Computer
adjusting image, 41
displaying image, 59
Contrast
button, 9
ratio, 63
setting, 36
Control Panel Lock, 47
Control panel lock, 32
Control panel, projector, 8
D
Declaration of Conformity, 71
Direct Power On, 46
Display Background setting, 45
Documentation, 11
E
C
Cables, connecting, 18 to 20
Child Lock, 32, 47
Cleaning
air filter, 49 to 50
lens, 48
projector case, 49
Codes, AV controller, 67
Electrical requirements, 64
Epson
accessories, 10, 62
Home Service, 10
PrivateLine Support, 11, 62
technical support, 11, 62
warranty, 10, 71 to 72
EPSON Super White setting, 36
ESC/VP21 command codes, 67
Index 73
Page 74

F
L
FCC Compliance Statement, 70
Filter, see Air filter
Flickering, 38, 60
Focus ring, 26
G
Gain, color, 40
Gamma, 29 to 30, 40
Gamma button, 9
H
HDMI, 18, 19, 36 to 37
Help, 62
High Altitude Mode, 47
Home Service, 10
I
Illumination of buttons
projector, 46, 56 to 57
remote control, 21
Illumination setting, 46, 57
Image
adjusting, 29 to 31, 35 to 41
changing aspect ratio, 27
inverting, 16, 45
positioning, 24 to 25, 44
resizing, 27, 44
selecting source, 23
size, 14 to 15
Image menu, 43
Image problems, 58 to 61
Image Size Calculator, 15
Info menu, 54
Installing projector, 16
Interference, signal, 60
K
Lamp
checking usage timer, 54
life, 63
ordering, 10, 51
replacing, 51 to 53
resetting usage timer, 54
safety instructions, 68 to 69
specifications, 63
Language setting, 35
Lens shift dials, 13, 24
Lens, cleaning, 48
Lights, projector, 46, 56 to 57
Line menu, 9
Lock
Child Lock, 32, 47
control panel lock, 32
Kensington, 7, 10
projector buttons, 32
M
Memory button, 9, 42
Memory settings
creating, 42
using, 42
Menu button, 9, 33
Menus
available settings, 35 to 47
customizing display, 35
line menu, 9
using, 33 to 35
Message setting, 45
Motion Detection, 38
Mounting projector, 16
Moving projector, 55
N
No image, 58 to 59
Noise Reduction, 38
Kensington anti-theft device, 7, 10
74 Index
Page 75

O
Offset, color, 40
Overscan, 44
P
Pattern button, 9, 24, 39
Picture problems, 58 to 61
Pixelworks, 64
Positioning image, 24 to 25, 44
Positioning projector, 12 to 15
Power Consumption setting, 37
PrivateLine Support, 11, 62
Problems
indicator lights, 56 to 57
picture, 58 to 61
remote control, 61
Progressive mode setting, 38
Projection distance, 14 to 15, 63
Projector
checking status, 54
cleaning, 49
control panel, 8
dimensions, 17, 64
installing, 16
lights, 46, 56 to 57
locking buttons, 32
menus, 35 to 47
parts, 7 to 8
positioning, 12 to 15
resetting menu options, 43
security lock, 7, 10
storing, 55
transporting, 55
turning on and off, 21 to 22, 58
Replacing lamp, 51 to 53
Resetting
lamp usage timer, 44, 54
projector settings, 43
Resolution
compatible formats, 65 to 66
projector, 54, 63
RGB settings, 40
RGBCMY setting, 29 to 31, 40
S
Safety approvals, 64
Safety instructions, 68 to 69
Setup level, 36
Sharpness, 37
Signal menu, 36
Skin Tone setting, 39
Sleep mode, 46
Source buttons, 8, 9
Source, selecting image, 23
Specifications
compatible video formats, 65 to 66
dimensions, 64
electrical, 64
environmental, 64
general, 63
lamp, 63
remote control, 63
Startup screen, selecting, 45
Static, 60
Storing projector, 55
Support, 11, 62
S-Video connection, 18
Sync (Synchronization) setting, 41
R
Registration, 10
Remote control
batteries, 21
buttons, 9
lighting up buttons, 21
problems, 61
T
Technical support, 11, 62
Test pattern, 24, 39
Tint, 39
Tracking, 41
Transporting projector, 55
Trigger out port, 20
Index 75
Page 76

Trigger out setting, 46
Turning on and off projector, 21 to 22, 58
V
Video Signal setting, 46
Video, compatible formats, 65 to 66
VP21 codes, 67
W
Warranty, 10, 71 to 72
Where to Get Help, 62
Wide setting, 27
X
x.v.Color setting, 28
Z
Zoom Caption Pos. setting, 27, 45
Zoom ring, 26
Zoom setting, 27
Zoom Size setting, 45
76 Index
 Loading...