

Seiko 5R66, 5R67 User Manual

Cal. 5R66, 5R67
INSTRUCTIONS (P. 3)
BEDIENUNGSANLEITUNG (S. 33)
INSTRUCTIONS (P. 63)
ISTRUZIONI (P. 93)
INSTRUCCIONES (P. 127)
INSTRUÇÕES (P. 157)
(187 )

You are now the proud owner of a Spring Drive Watch. For the best results, please read the
instructions in this booklet carefully before using your Spring Drive Watch. Please keep this manual
handy for ready reference.
Sie sind jetzt stolzer Besitzer einer „Spring Drive“-Uhr. Lesen Sie diese Bedienungsanleitung vor
English
der Verwendung Ihrer „Spring Drive“-Uhr aufmerksam durch, um ihre optimale Nutzung zu
gewährleisten. Heben Sie diese Bedienungsanleitung gut auf, um jederzeit wieder nachlesen zu
können.
Vous êtes maintenant l’heureux propriétaire d’une Montre Spring Drive. Pour en obtenir les
meilleurs résultats, veuillez lire attentivement les instructions de cette brochure avant d’utiliser
votre Montre Spring Drive. Veuillez conserver ce manuel à portée de la main pour pouvoir vous y
référer facilement.
Congratulazioni per l’acquisto di questo nuovo orologio con trascinamento a molla (“Spring
Drive”). Per ottenere i massimi risultati dall’orologio leggere attentamente questo manuale di
istruzioni prima di passare all’uso dell’orologio stesso, e conservarlo poi per qualsiasi eventuale
futura consultazione.
Usted es ahora un orgulloso propietario de un Reloj Spring Drive. Para los mejores resultados, por
favor, lea cuidadosamente las instrucciones de este panfleto antes de utilizar este Reloj Spring
Drive. Le rogamos guardar este manual a mano para futura referencia.
Você pode agora sentir-se orgulhoso de possuir um Relógio Spring Drive. Para obter os melhores
resultados, leia atentamente as instruções contidas neste opúsculo antes de usar o relógio.
Conserve este manual para consultas futuras.
ENGLISH
CONTENTS
Page
FEATURES .................................................................................................................. 4
NAMES OF THE PARTS ............................................................................................. 5
HOW TO USE ............................................................................................................. 7
HOW TO READ THE POWER RESERVE INDICATOR ................................................ 22
TO PRESERVE THE QUALITY OF YOUR WATCH ...................................................... 24
PLACES TO KEEP YOUR WATCH .............................................................................. 28
PERIODIC CHECKS .................................................................................................... 29
TROUBLESHOOTING. ................................................................................................ 30
SPECIFICATIONS ........................................................................................................ 32
2
3
Spring Drive, the unique mechanism made available only by SEIKO technology,
ensures high accuracy while using the mainspring as its sole power source.
English
The watch will work continuously for approximately 72 hours (three days) when the
mainspring is fully wound. The watch features a power reserve indicator to show the
winding state of the mainspring. The glide-motion second hand works in a perfectly
smooth movement.
This is an automatic watch equipped with a manual winding mechanism. When first
using the watch, manual winding is convenient.
Caliber 5R66, which is equipped with a 24-hour hand, features an hour-hand independent adjustment function (for time difference adjustment), offering several types
of 24-hour hand usage. For instance, if you set the 24-hour hand to show your home
time, you can independently set the hour hand to display the time of the place you are
staying at as well as easily check your home time by the 24-hour hand. Alternatively,
you can set the 24-hour hand to display the time in a different time zone. Caliber 5R67
features a moon phase display function.
CAUTION
This watch is powered by the mainspring. To ensure constant operation of
•
the watch, be sure to wind up the mainspring sufficiently before the power
reserve indicator points to “0.”
•
The watch may stop if the power reserve indicator is showing less than onesixth of the power reserve, especially if it is left at a temperature below 0ºC.
4
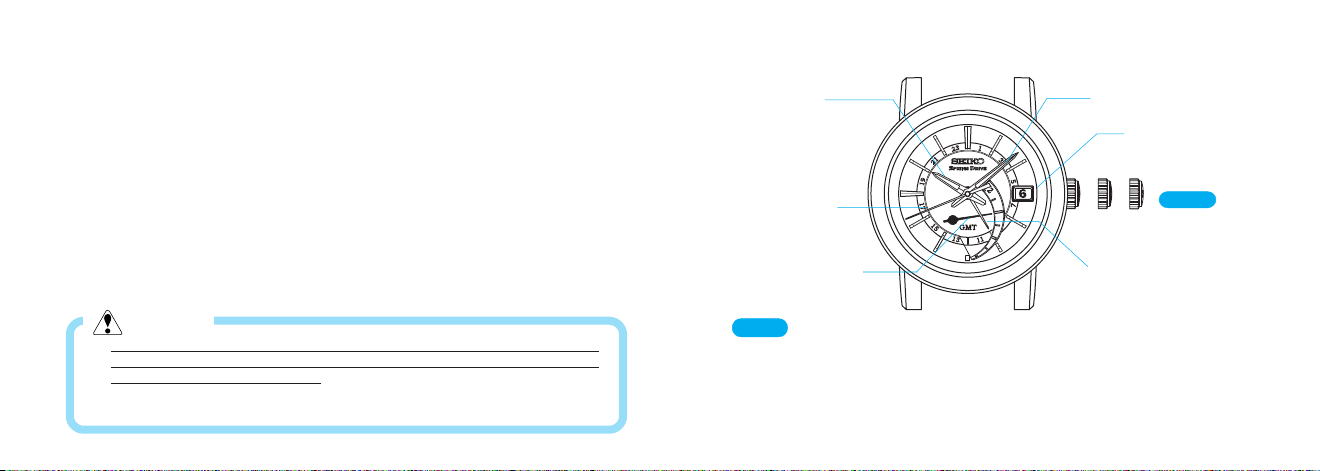
NAMES OF THE PARTSFEATURES
Hour hand
Second hand
Power reserve indicator
CROWN
a)
Normal position : winding up the mainspring (manual operation)
First click position : hour-hand independent adjustment, date setting
b)
c) Second click position : time setting
English
Minute hand
Date
CROWN
abc
24-hour hand
[Caliber 5R66]
5

English
Second hand
Power reserve indicator
Hour hand
Minute hand
a b c
Moon phase display
CROWN
HOW TO USE
This watch is an automatic watch equipped with a manual winding mechanism.
• When the watch is worn on the wrist, the motion of the wearer's arm winds the
mainspring of the watch.
• If your watch is completely stopped,
mainspring by turning the crown.
●
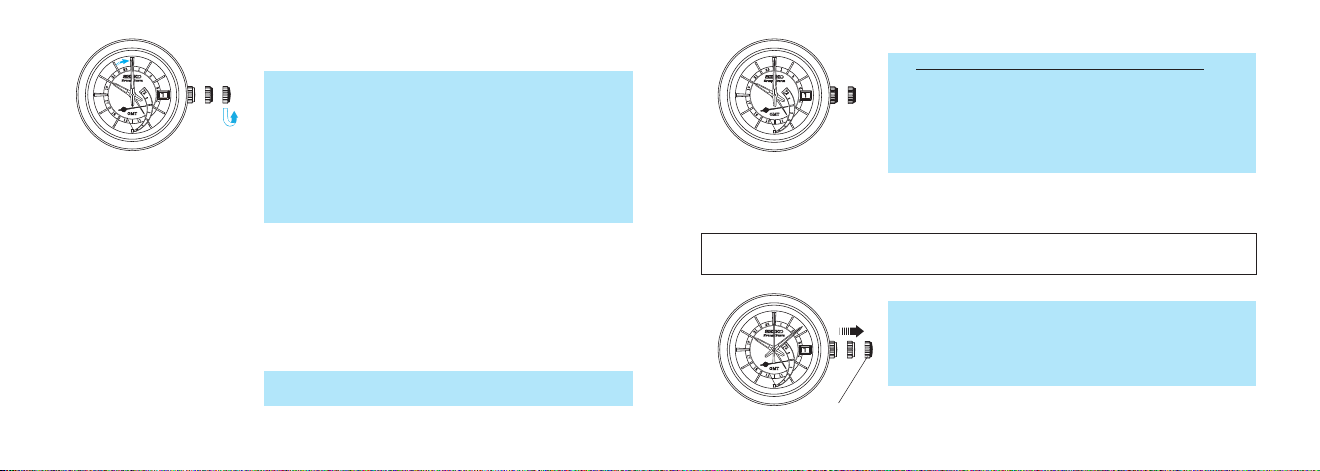
How to manually wind the mainspring by turning the crown (for Cal. 5R66 & 5R67)
1. Slowly turn the crown clockwise (the 12 o’clock direction) to wind the mainspring.
it is recommended that you manually wind the
* With manual winding, if you give the crown five full
rotations, it provides the power to run the watch for
approximately ten hours.
* Turning the crown counterclockwise (the 6 o’clock
direction) does not wind the mainspring.
English
CROWN
a)
Normal position : winding up the mainspring (manual operation)
First click position : moon phase setting
b)
c) Second click position : time settings
[Caliber 5R67]
6
2. Wind the mainspring until the power reserve indicator shows
The second hand will start moving.
* To check the winding state of the mainspring, refer to
"HOW TO READ THE POWER RESERVE INDICATOR"
on page 22.
* There is no need to turn the crown further when the
mainspring is fully wound. But the crown can be turned
without damaging the watch mechanism.
a fully-wound state.
7

➔ To move on to time setting, follow the instructions pertaining to the caliber
number of your watch.
Caliber 5R66 .. Refer to “● How to set the time and date, how to use the time
English
Caliber 5R67 .. Refer to “● How to set the time and moon phase (for Cal. 5R67)”
difference adjustment function (for Cal. 5R66)” at the bottom of
this page.
on page 19.
● How to set the time and date, how to use the time difference adjustment
function (for Cal. 5R66)
● How to set the time
• When setting the time, ensure that the watch is working: the main spring
is sufficiently wound.
• The 24-hour hand can be used in two ways. Since the time setting method
differs according to the usage,
time.
<Mode 1> Simply using the 24-hour hand to show the
8
24-hour time as an AM/PM indicator.
• This is the standard usage type for the 24hour hand.
please choose the mode before setting the
<Mode 2> Using the 24-hour hand to indicate the time
in a different time zone.
• For instance, by setting the 24-hour hand
to GMT while setting the hour and minute
hands to indicate the time in your area, you
can easily check GMT with the 24-hour
hand at any time.
How to set the 24-hour hand as a regular 24-hour indicator
<When the mode 1 usage is selected>
1. Pull out the crown to the second click.
* Pull the crown out when the second hand is at the
12 o’clock position and the second hand will stop on
the spot.
* When setting the time, ensure that the watch is
working: the mainspring is sufficiently wound.
Second click position
English
9
English
<Example>
To set to 10:00 A.M., adjust the 24hour hand to indicate “10” on the 24hour scale (5 o’clock position), and
the minute hand to the “0” minute
position.
To set to 6:00 P.M., adjust the 24-hour
hand to indicate “18” on the 24-hour
scale (9 o’clock position), and the
minute hand to the “0” minute position.
10
2. Turn the crown counterclockwise to set the 24-hour and
minute hands to the current time.
* Only the 24-hour and minute hands are to be set at this
stage. The hour hand is to be set later so it is not
necessary to adjust the hour hand yet, even if it is
indicating the wrong time.
* The date may be altered depending on the position of
the hour hand, however it should not cause any concern since it can also be adjusted later.
* Set the minute hand slightly behind the time you wish
to set, and then slowly advance it to the desired time.
3. Push the crown back in simultaneously with the time
signal.
* The setting of the 24-hour, minute and second hands
to the current time is now completed.
4. Pull out the crown to the first click.
5. Turn the crown to set the hour hand to the current hour.
* Also, adjust the date at this point if necessary.
*
The moment the date changes is midnight. When setting the hour hand, be sure that AM/PM is set correctly.
* Turn the crown slowly, checking that the hour hand
moves in one-hour increments.
* When adjusting the hour hand, the other hands may
move slightly. However, this is not a malfunction.
6. Push the crown back in upon completion of time setting.
How to set the 24-hour hand as a dual time indicator for a “different
time zone area” <when the mode 2 usage is selected>
1. Pull out the crown to the second click.
* Pull the crown out when the second hand is at the 12
o’clock position and the second hand will stop on the
spot.
* When setting the time, ensure that the watch is work-
ing: the mainspring is sufficiently wound.
Second click position
English
11
 Loading...