

Page 1
Cal. 5M65
INSTRUCTIONS (P. 3)
BEDIENUNGSANLEITUNG (S. 33)
INSTRUCTIONS (P. 63)
ISTRUZIONI (P. 93)
INSTRUCCIONES (P. 123)
INSTRUÇÕES (P. 153)
(183 )
Page 2

ィ
You are now the prou d owner of a SEIKO KINE TIC
read the inst ruc tions in this bookle t ca refu lly b efore us ing your S EIKO K INE TIC®.
Please keep this ma nual ha ndy fo r read y refe rence.
Si e sin d je t z t s tol zer B es i t ze r ein er S EI KO KI NE T IC® Ka l. 5 M6 5. L e s e n Si e dies e
Bedi enung sanl eitu ng vor der Verwendung Ihrer SEIKO K INETIC® aufme rksam durch, u m d ie
optim ale Nut zung dieser Uhr zu gewärleisten . H eben Sie die se Bedienun gsan leit ung gut auf,
um jederze it wie der na chle sen zu k önen .
Vous voic i l'heureux pr opri étaire d'une montre S EIKO KINETI C® Cal. 5M 65. Po ur en obt enir de
bonnes perf orman ces , v euillez lir e at ten tive ment les explicat ions de c e mo de d'e mplo i avant
d'util iser votre montre SEIKO KINETIC®. Con ser vez ce mode d'emploi pour toute référen ce
ultér ieur e.
Gra zie di aver a cq uis ta to quest o oro log io SEIKO K INE TI C® Cal . 5M6 5. P er ot tenern e i
miglio ri risultat i legge re attenta ment e le istruzio ni d i quest o li bretto pri ma d i passare all'us o
dell'o rologio stes so. Tenere poi il manuale a porta ta di mano, per ogni eventuale futura,
ulter iore c onsu ltaz ione.
Uste d es ahora un orgulloso propietario de un Reloj SEIKO KINETIC® Cal. 5M6 5. Para los
mejor es result ados, por favor lea las instr ucio nes de este librito cuida dosament e antes de
utili zar su Reloj SEIKO KINETIC®. Le roga mos que guard e este conve niente manual para
pronta ref eren cia.
Voc pode sent ir-se o rgulhoso de ter adquir ido um SEIKO KINETIC® Cal. 5M65. Para obter
dele os resultad os m imos, solicitamos-lh e que, antes de usar o seu SEIKO KINETIC®, leia
atenta mente as instruçõe s contidas neste opúsculo. E guarde este manual para referê ncias
futura s.
®
Cal. 5M65 . For bes t re sult s, ple ase
CONTENTS
Page
FEATURES .................................................................................................................................................. 4
NAMES OF THE PARTS ............................................................................................................................. 5
HOW TO CHARGE AND START THE WATCH............................................................................................. 6
POWER RESERVE INDICATOR ................................................................................................................... 8
SCREW LOCK TYPE CROWN ..................................................................................................................... 9
HOW TO SET THE TIME AND DATE, HOW TO USE THE TIME DIFFERENCE ADJUSTMENT FUNCTION.................... 10
WORLD TIME DISPLAY. .............................................................................................................................. 21
24-HOUR DISPLAY ...................................................................................................................................... 23
USING 24-HOUR HAND TO INDICATE DIRECTIONS ................................................................................. 26
IF THE SECOND HAND STARTS MOVING AT TWO-SECOND INTERVALS ............................................... 28
INSTANT-START FUNCTION ........................................................................................................................ 28
REMARKS ON THE KINETIC E.S.U. ............................................................................................................ 29
NOTES FOR USING THE WATCH ............................................................................................................... 30
SPECIFICATIONS ........................................................................................................................................ 32
For the care of your watch, see "TO PRESERVE THE QUALITY OF YOUR
I
WATCH" in the attached Worldwide Guarantee and Instruction Booklet.
ENGLISH
3
Page 3
English
4
English
5
FEATURES
Unlike the conventional quartz watch powered by the button -type bat ter y, the
KIN ETIC is a n analog quar tz watch eq uipped with an Automatic Gen erating
System, the unique technology developed by SEIKO, which generates electrical
energy to power the wa tch by utilizing the movement of the arm or wrist, and
sto res it in the KINE TIC ELEC TRIC IT Y ST OR AGE UNIT ( KINE TIC E.S.U.) The
watch is equipp ed with a 24-hour hand and features an hour-hand independent
adjus tment function (for time differenc e adjustment), offering several types of
24-hour hand usage. For in stance, if you set the 24-hour hand to show your home
time, you can independently set the hour hand to display the time of the place
you are s taying at as well as easily check your home time with the 24 -hour hand.
Alternatively, you can set the 24- hour hand to display the time in a dif ferent time
zone.
CAUTION
The movement of your arm while the watch is worn generates electrical
l
energy to power the watch. Even when the watch is worn on your arm, it
will not be charged if your arm is not in motion.
It is recommended that the watch be worn on your wrist daily for at least
l
10 hours.
THE KINETIC E.S.U. is an abbreviation for KINETIC ELECTRICITY STORAGE UNIT, which is
v
the name of the power source employed in the KINETIC movements.
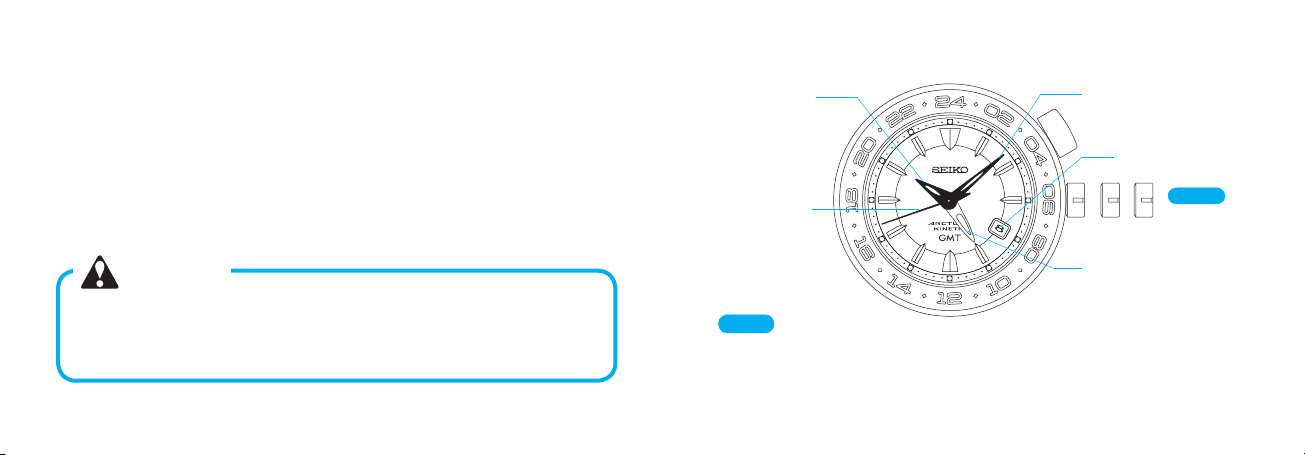
NAMES OF THE PARTS
Hour hand
Second hand
CROWN
a)
Normal position
b)
First click position: hour-hand independent adjustment, date setting
c) Second click position: time setting
Minute hand
Date
CROWN
a b c
24-hour hand
Page 4
English
6
English
7
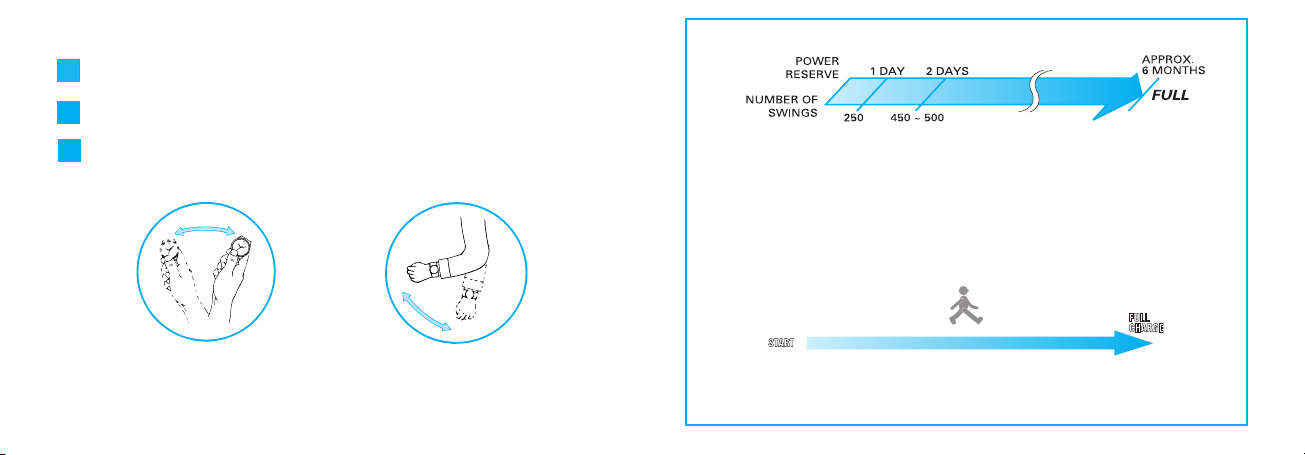
HOW TO CHARGE AND START THE WATCH
Wearing the watch.
2 days
Power reserve
720 m
Swing the watch from side to side.
1
* S wing rhythmic ally at a rate of twic e a second .
Charge the KINETIC E.S.U. suf ficiently.
2
Set the time /c alendar and put on the watch.
3
NUMBER O
1. When the watch stops completely, or if you find the second hand moving at two-
2. 250 swings will reserve up to 1 day of power. The second hand will start moving at
* It is recommended that th e watch be swung fu rther until 2 d ays of power is rese rved. As a
guideline for recha rging, an ad ditional 2 00 to 250 swings, ab out 450 to 500 swings in total will
reserve 2 days of p ower.
3. Wear the watch on your wrist.
F SWINGS AND POWER RESERVE
second intervals, swing the watch from side to side at a rate of twice a second.
one-second intervals.
POWER RESERVE ACCUMULATED WHILE YOU ARE WALKING
The illustrations above provide only general guidelin es of the relationsh ip between the power
P
reserve and the number of swi ngs/ the dista nce you walk. A ctual amo unt of power reserve differs
from person to pers on.
Page 5
English
8
English
9
POWER RESERVE INDICATOR
Press the button at the 2 o'clock p osition.
l
* To allow easy reading of the second hand, press the but ton whe n the seco nd ha nd is at the
12 o'clock position.
QUICK MOVEM ENT
POWE R
RESER VE
Th e second hand will resume normal movement after the indic ated 5, 10, 20 o r 30 seconds have
elapsed.
5 second s 10 seconds 20 seconds 30 seco nds
OF SECOND HAND
Between
1 and 7 days
Between 7 days
and 1 month
Approx .
1 month
Approx . betwe en
4 and 6 months
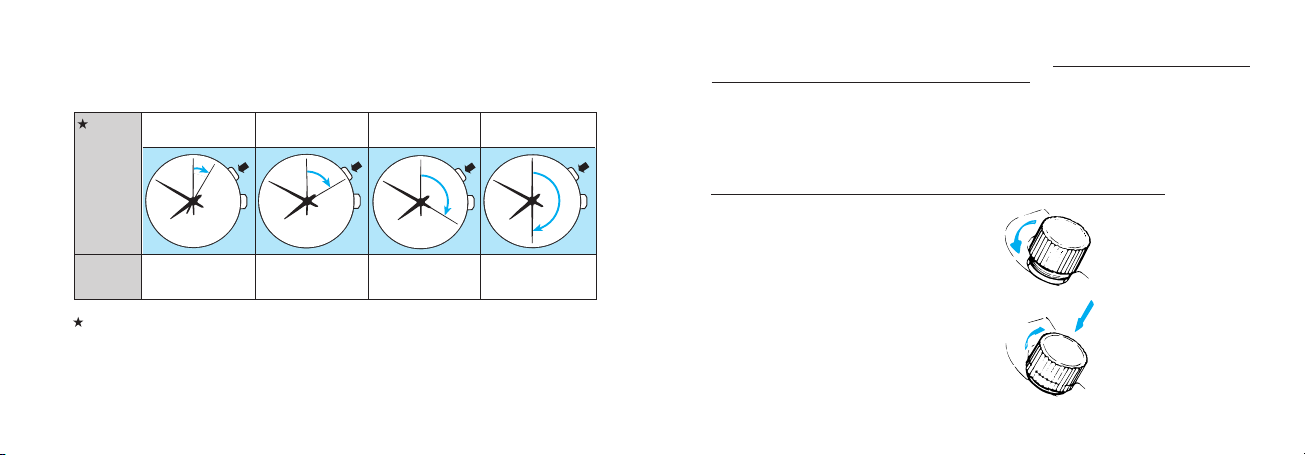
SCREW LOCK TYPE CROWN
Some models have the sc rew lock type crown, which can be locke d by the
l
screw when i t is not nece ssary to be operated .
Locking the c rown w ill prevent operating errors.
l
Unscrew the crown before any crown operation. When the operation is over,
l
screw the crown in to lock.
HOW TO OPERATE THE SCREW LOC
n
If your watch has a screw lock t ype crown, unscrew it b efore any crown operation.
Always keep the crown locked unless it is necessary for operating the crown.
v
[To unscrew the crown]
Tu r n t h e c r o w n co u nt e r c lo c k w i se
(downward) to unscrew it. The crown is
unlocked and can be opera ted.
[To screw the crown in]
Up on c o mp l eti on o f the c r ow n ope r ation, screw the crown in comple tely until
it stops by turning it clock wise (upward)
while gently pressing it back into the original position.
K TYPE CROWN
The crown can be pulled
out.
Turn the crown while
pressing it back in.
Page 6

English
10
English
11
HOW TO SET THE TIME AND DATE, HOW TO
USE THE TIME DIFFERENCE ADJUSTMENT
FUNCTION
How to set the time
l
When setting the time, ensure that the watch is working: the second hand is
•
moving at one-second intervals.
In a case that the watch is completely stopped due to a shortage of stored elec-
•
trical energy, recharge the watch until the second hand resumes the normal
one-second interval movement, and then reset the time and calendar. (Refer to
"IF THE SECOND HAND STARTS MOVING AT TWO-SECOND INTERVALS" on
page 28.)
The 24-hour hand can be used in two ways. Since the time setting procedure
•
differs according to the usage, please choose the method before setting the
time.
<Method 1> Simply using the 24 -hour hand to show
the 24-hour time as an AM/ PM indicator.
• This is the standard usage for the
24-hour hand.
<Method 2> Using the 24-hour hand to indicate the time
in a different time zone.
• For instance, by setting the 24-hour hand to
GMT while setting the hour and minute
hands to indicate the time in your area, you
can easily check GMT with the 24-hour hand
at any time.
How to set the 24-hour hand as a regular 24-hour indicator
<When method 1 usage is selected>
1. Pull out the c rown to the se cond c lick.
* Pull the crown out when the second hand is at the
12 o’clock position and the second hand will stop
on the spot.
* When setting the time, ensure that the watch is
working: the second hand is moving at one-second
intervals.
Second click position
Page 7

English
12
English
13
<Exampl e>
To set to 10:0 0 A.M., adjust the
24 -h ou r ha nd t o i ndi cat e “10 ”
on t he 2 4-hou r sc ale (5 o’cl oc k
positio n), and the minute hand to
the “0” m inute positio n.
To se t to 6:00 P. M., a dj ust t he
24-hou r hand to indicate “18” on
the 24-ho ur scale (9 o’clock position), and the minute hand to the “0”
minut e position.
2. Turn the cr own to set the 24-hour and minute hands to
the current time.
* Only the 24-hour and minute hands are to be set at
this stage. The hour hand is to be set later so it is not
necessary to adjust the hour hand yet, even if it is indicating the wrong time.
* The date may be altered depending on the position
of the hour hand, however it should not cause any
concern since it can also be adjusted later.
* Set the minute hand ahead of the time and then slow
ly turn it back to the desired time.
-
3. Pus h the crown back in simultaneously with a time
signal.
* The setting of the 24-hour, minute and second hands
to the current time is now completed.
4. Pull out the crown to the first click.
5. Turn the crown to set the hour hand to the current
hour.
* Also, adjust the date at this point if necessary.
The moment the date changes is midnight. When set-
*
ting the hour hand, be sure that AM/PM is set correctly.
* Turn the crown slowly, checking that the hour hand
moves in one-hour increments.
* When adjusting the hour hand, the other hands may
move slightly. However, this is not a malfunction.
6. Pus h the crow n back in upon completion of time setting.
How to set the 24-hour hand as a dual time indicator for a
"different time zone area” <when method 2 usage is selected>
1. Pull out the crown to the second click .
* Pull the crown out when the second hand is at the 12
o’clock position and the second hand will stop on the
spot.
* When setting the time, ensure that the watch is work
ing: the second hand is moving at one-second intervals.
Second click position
-
Page 8

English
14
English
15
<Exampl e>
To set the 24- hour hand to t he
time in New York while settin g
the hou r/minu te hand s to ind icate
the ti me in London.
W he n th e t i me in Lon don is
10:00 A.M., it is 5:0 0 A.M. in
New York.
Set the 24 -hou r hand to indic ate
“5” o n the 24 -hour s ca le (the
2.5 o’clock po sitio n), while the
minute h and is pointing at the “ 0”
minut e position.
* The t ime di ff erenc e adjus t-
me nt fu ncti on se rve s only
for a time i n a “different time
zo ne ar ea ” whe re t he ti me
dif feren ce f rom t he time i n
London is represented in onehour increme nts.
2. Turn the crown to se t the 24-hour and minute hands
to the time in the "dif ferent time zone area" you wish
to set.
* Only the 24-hour and minute hands are to be set at
this stage. The hour hand is to be set later so it is not
necessary to adjust the hour hand yet, even if it is indicating the wrong time.
* The date may be altered depending on the position of
the hour hand, however it should not cause any concern since it can also be adjusted later.
* Set the minute hand ahead of the time and then slow
ly turn it back to the desired time.
-
3. Pus h the crown back in simultaneously with a time
signal.
* The setting of the 24-hour, minute and second hands
to the time in the “ different time zone area” is now
completed.
4. Pull out the crown to the first click.
5. Turn the crown to set the hour hand to the current
hour. (In this example, the curr ent hour in London.)
* Also, adjust the date at this point if necessary.
* The moment the date changes is midnight. When
setting the hour hand, be sure that AM/PM is set correctly.
* Turn the crown slowly, checking that the hour hand
moves in one-hour increments.
* When adjusting the hour hand, the other hands may
move slightly. However, this is not a malfunction.
6. Pus h the crow n back in upon completion of time setting.
Page 9

English
16
English
17
How to set the date
l
This watch is designed so that the date changes one day by turning the hour hand two
•
full rotations in the same way as in "the time difference adjustment function."
The date advances one day by turning the hour hand two full rotations clockwise,
•
while the date is set back one day by turning the hour hand t wo full r otati ons
counterclockwise.
After setting the time, it is necessary to set the date. Manual date adjustment is required
•
on the first day after a month that has less than 31 days.
1. Pull out the crown to the first click.
2. Each time the hour hand makes two full rotations by turning the crown, the date is
adjusted one day.
Clockw ise: the hour hand t urn s cou nterclockwise. The date is
set back one day when the hou r hand makes two
full r otat ions cou nterclockw ise.
Count erclock wise: the hour hand turns clockwise. The date
advances one d ay wh en t he h our hand makes two
full r otat ions clockwise.
First click position
* The date can be adjusted either by advancing it or by setting it back. Choose
whichever requires fewer rotations.
* Turn the crown gently.
* To adjust the date without changing the time, turn the hour hand in two full
rotation increments.
* When adjusting the hour hand, the other hands may move slightly. However, this
is not a malfunction.
3. After completing the date setting, check the position of the hour hand once again and
push the crown back in.
How to adjust the time difference
l
While staying in a place in a different time zone area from where you live, you can
•
conveniently set the watch to indicate the local time in the place where you are staying
without stopping the watch.
The time difference adjustment function is interrelated with the date display. If the time
•
difference is correctly adjusted, the watch displays the correct date of the place where
you are staying.
1. Pull out the crown to the first click.
2. Turn the crown to set the hour hand to indicate the time of the place where you are
staying. The hour hand is independently set to the current hour.
Clockw ise: Sett ing the time back (The hour hand tur ns
count erclock wise .)
Count erclock wise: Adva ncing the ti me (The hour hand
First click position
tur ns clockwis e.)
* Turn the crown slowly, checking that the hour hand moves in one-hour increments.
Page 10

English
18
English
19
* Refer to "Time difference table" for time differences from GMT (UTC).
* When adjusting the time difference, make sure that AM/PM and the date are cor
rectly set.
* When adjusting the hour hand, the other hands may move slightly. However, this is
not a malfunction.
* When turning the crown clockwise to set the hour hand to indicate any time be
tween 9:00 P.M. and midnight, keep turning until the hour hand points to 8:00 P.M.,
and then advance it to the desired time.
3. After completing the time difference adjustment, check the position of the hour hand
once again and push the crown back in.
-
-
Time difference table
l
* Refer to the table below for time differences from GMT (UTC) in major cities in
the world.
Page 11

English
20
English
21
* Cities marked with " " use daylight saving time.
* The time differences and use of daylight saving time in each city are subject to
change according to the governments of the respective countries or regions.
WORLD TIME DISPLAY
(only for models with the rotating bezel for
world time display)
By using the 24-hour hand and rotating bezel, the times of 22 cities
l
in different time zones throughout the world can be read from the
dial.
City mark
Rotating bezel
24-hour hand
Turn the rotating bezel so that the
city mark corresponding to the area
who s e t i m e h as b e e n s e t in t h e
"How to se t the time" aligns with the
24-hour hand.
t
Each city mark on the bezel i ndic ates
the time of the city or area it represents.
Read the ti me s in t he v ar io us c it ie s,
referring to the 24-hour marks on the dial.
Page 12

English
22
English
23
Examples of marks on the bezel and names of cities/areas
l
Example of use
l
Marks
on the bezel
G M T
R O M
I S T
M O W
D X B
K H I
D A C
B K K
H K G
T Y O
S Y D
Name of city or area
Greenwich
Rome
Istanbul
Moscow
Dubai
Karachi
Dacca
Bangkok
Hong Kong
Tokyo
Sydney
Marks
on the bezel
N O U
W L G
H N L
A N C
L A X
D E N
C H I
N Y C
C C S
B U E
P D L
Name of city or area
Nouméa
Wellington
Honolulu
Anchorage
Los Angeles
Denver
Chicago
New York
Caracas
Buenos Aires
Azores
If you are in Rome and wish to know the time in New York:
Set "ROM" on the bezel to the 24-hour hand.
t
Read the time that "NYC" on the bezel points to in the 24-hour indication.
Rome: 17:08
New York: 11:08
Rome time:
5:08 p.m.
New York time:
11:08 a.m.
5:08 p.m.
→
11:08 a.m.
→
Page 13

English
24
English
25
24-HOUR DISPLAY
(only for models with the rotating bezel for 24-hour
display)
By using the 24-hour hand and rotating bezel, the times of areas in
l
different time zones throughout the world can be read from the
dial.
Example of use
l
If you are in Rome and wish to know the time of New York:
Check that "24" on the rotating bezel is at the 12 o'clock position.
t
Calculate the time difference between Rome and New York by referring to the example
below:
Ex.) When you move from Rome to New York:
[B] New York time : -5 hours from GMT
So the time difference between Rome and New York is:
[B] - [A] = (-5) - (+1) = -6 (hours)
You should move the hour hand back 6 hours.
[A] Rome time : +1 hour from GMT
t
Turn the rotating bezel clockwise by 6 hours.
* When the time of your area is ahead of the time of the desired place, turn the bezel
clockwi se. When the ti me of your area is be hind the time of the desired plac e, turn the
bezel counterclockwise.
t
Read the 24-hour mark on the rotating bezel that the 24-hour hand points to.
* Th e time of your area c an be known by reading the 24-hour mark on the dial that the
24-hour hand points to.
Rotating bezel
(rotated clockwise
by 6 hours)
Rome time: 10:08 a.m.
24-hour hand
New York time: 4:08 a.m.
Page 14

English
26
English
27
USING 24-HOUR HAND TO INDICATE
DIRECTIONS (only for models with the
rotating compass bezel or ring)
PRECAUTIONS ON USING THE COMPASS
Please use the compass in places where the sun is visible or its location is known.
•
Before using the compass, it is necessary to set the 24-hour hand to the current time of
•
your area.
The compass is so designed to provide only a rough indication of directions, and
•
should not be used where accuracy is critical.
If daylight saving time (summer time) is in effect in your area, be sure to set your watch
•
one hour behind the current time before using the rotating compass.
l
How to use the compass bezel (ring)
[In the Northern Hemisphere]
1 Set "N (North)" on the rotating compass bezel (ring) to the 12 o’clock marker. The
direction marks on the bezel (ring) are set as follows;
3 o’clock position: E (East)
6 o’clock position: S (South)
9 o’clock position: W (West)
2 While keeping the dial level, point the 24-hour hand in the direction of the sun. The direction
marks indicate the corresponding directions.
[In the Southern Hemisphere]
1 Set "S (South)" on the rotating compass bezel (ring) to the 24-hour hand.
2 While keeping the dial level, point the 12 o’clock marker in the direction of the sun.
The direction marks indicate the corresponding directions.
[In the Northern Hemisphere]
South
[In the Southern Hemisphere]
South
West
WestEast
East
12 o'clock marker
North
12 o'clock marker
North
Page 15

English
28
English
29
IF THE SECOND HAND STARTS MOVING AT
TWO-SECOND INTERVALS
(ENERG Y DEPLETION FOREWA RNING FUNCTION)
l
When the second hand star ts moving at two-second intervals whether it is
worn or left untouched, the watch may run down within approximately 24
hours .
l
In such a c ase, swing the watc h from side to side to suf ficiently charge the KINETIC E.S.U. (refer to "HOW TO CHARGE AND START THE WATCH" on page 6),
and then reset the time and calendar.
INSTANT-START FUNCTION
W hen a long time has passed since the watch stopped, you c an get it started
l
quick ly with only a f ew swings.
This function is available as long as the watch has been stopped for less than a
l
year.
* When this function is activated, the second hand will start moving at two-seco nd intervals.
Swing the watch from side to side to charge the KINETIC E.S.U. by referring to "NU MBER OF
SWING S AND POW ER RESERVE" on page 7.
* A fter the se cond ha nd starts m oving at on e-se cond inte rvals, p ut the watch on your wrist so that
it will be cha rged further.
* Th e watch remains a ccurate even whi le the seco nd hand is moving at two- seco nd interval s.
REMARKS ON THE KINETIC E.S.U.
The electric energy generate d while the watch is worn on your w rist is stored
l
in the KINETIC E.S.U. It is a power source comple tely different from conventional batteries for watches and does not require any periodic replacement.
W hen the KINETIC E.S.U. is fully charged, the watch will keep operating for
l
approximately 6 months without recharging the K INETIC E.S.U.
The duration of charge decrease s gradually over time. The extent of decrease,
l
however, varies depending on the environment and c onditions of use.
The KINETI C E.S.U. is a clean and environmentally friendly power source.
l
CAUTION
Never install a silver oxide battery for conventional watches in place of the
KINETIC E.S.U. The battery may burst, become very hot or catch fire.
Page 16

English
30
English
31
NOTES FOR USING THE WATCH
HOW TO CHARGE AND START THE WATCH
To charge the KINETIC E.S.U. efficiently, swing the watch from side to side, making an arc of about
l
20 cm.
No additional benefit is obtained by swinging the watch more quickly or with greater vigor.
l
When the watch is swung, the oscillating weight in the generating system rotates to drive the
l
mechanism. As it rotates, it gives out a sound, which is not a malfunction.
When the watch has been left untouched for more than one year after it has completely stopped,
l
the second hand may not start moving at normal one-second intervals even if the watch is swung
the number of times indicated in "NUMBER OF SWINGS AND POWER RESERVE" on page 7. In this
case, swing the watch further until the second hand starts moving at one-second intervals.
The watch is equipped with a system to prevent overcharge. Even if it is further swung after being
l
fully charged, no malfunction will result.
The watch is equipped with an instant-start function, and it may start operating after it is swung sev-
l
eral times. For details, see "INSTANT-START FUNCTION".
It is not necessary to charge the watch fully, as it is charged automatically while it is worn on your
l
wrist.
Wear the watch daily for at least 10 hours.
l
Even when the watch is worn on your arm, it will not be charged if your arm is not in motion.
l
POWER RESERVE INDICATOR
The power reserve indicator provides only a general guideline of the duration within which the watch
l
keeps operating without needing to be charged.
You can immediately press the button again to recheck the power reserve one more time. To do so a
l
third time, however, wait until the second hand resumes normal movement before pressing the button
again.
When the second hand moves at two-second intervals, the power reserve is very low and the indicator
l
does not function.
Immediately after the watch is swung to charge the KINETIC E.S.U., the second hand may not properly
l
indicate the power reserve. Please check again after 10 to 15 minutes have elapsed.
Precaution on see-through case-back models:
l
If your watch has a glass case back, do not expose the case back to strong light such as direct sunlight
or an incandescent light at close range, as this may temporarily increase the power consumption of the
watch circuit, thus reducing the power reserve in the KINETIC E.S.U. This condition, however, will be
corrected when the case back is turned away from the light.
TIME/CALENDAR SETTING
To set the exact time, pull out the crown all the way when the second hand is at the 12 o'clock position
l
and push it back in to the normal position in accordance with a time signal.
When setting the hour hand, pull out the crown to the first click, turn it to set the hour hand to the
l
current hour, and then check that AM/PM is correctly set. The watch is designed so that the calendar
changes once in 24 hours.
Turn the hand past the 12 o'clock marker to determine whether the watch is set for the A.M. or
P.M. period. If the calendar changes, the time is set for the A.M. period. If the calendar does not
change, the time is set for the P.M. period. Turn the crown slowly, checking that the hour hand
moves at one-hour intervals.
When setting the minute hand, pull out the crown all the way to turn the minute hand. Advance the
l
hand 4 to 5 minutes ahead of the desired time and then turn it back to the exact minute.
When setting the time, make sure that the second hand is moving at one-second intervals.
l
It is necessary to adjust the date at the end of February and 30-day months.
l
When setting the date, pull out the crown to the first click and turn it to rotate the hour hand until the
l
date changes. The date advances one day by turning the hour hand two full rotations clockwise, while
the date is set back one day by turning the hour hand two full rotations counterclockwise.
Page 17

SPECIFICATIONS
1 Frequency of crystal oscillator ................... 32,768 Hz (Hz = Hertz…Cycles per second)
2 Loss/gain (Monthly rate) ............................ Less than 15 seconds at normal temperature range
English
3 Operational temperature range .................. -10 ° C ~ +60 ° C (14° F ~ 140° F)
4 Display system
Calendar indication .................................. Date is displayed.
Time indication ........................................ 4 hands (hour, minute, second, and 24-hour hands)
5 Driving system ............................................ Step motor
6 Power reserve
Full charge .............................................. Approximately 6 months
7 Additional function ...................................... Power reserve indicator, energy depletion forewarning
8 IC (Integrated Circuit) .................................. C-MOS-IC, 1 piece
9 KINETIC ELECTRICITY STORAGE UNIT ..... Button type, 1 piece
* The specificatio ns are subject to change with out prior noti ce for product improvement.
32
(5° C ~ 35° C) (41° F ~ 95° F)
function and overcharge prevention function
 Loading...