

Page 1
SEIKI TM
USER MANUAL
MANUEL D' UTILISATION
MANUAL DEL USUARIO
[LEO
Read the User Manual carefully before using the TV and keep it for further reference.
Avant d'utiliser le t_l_viseur, lisez attentJvement le manuel d'utilisation et conservez-le
pour consultation future
Lea el ManuaJ del usuarJo antes de utJlizar el televisor y conserveJo para futuras ¢onsultas
Page 2
CONTENTS
Important Safety Instructions
Safety Information
Preparation
What's Included
Front View
Rear View
Installing the Base Stand
Removing the Stand for Wall-Mounting
Remote Control
Connecting External Devices
Customizing TV Settings
Initial Setup
Navigating the On screen Display
Selecting Input Source
Picture Settings
Audio Settings
Time Settings
Setup Settings
Lock Settings
Channel Settings
USB Multimedia
Parental Control
DVD Operation
DVD Functions
Troubleshooting
Maintaining
Specification
Limited Warranty
2
3
4
4
5
6
7
7
8
9
10
10
11
12
12
13
14
15
16
17
18
20
21
24
33
34
35
36
_=1
Page 3
IMPORTANT SAFETY INSTRUCTIONS
• Read these instructions - All the safety and
operating instructions should be read before
this product is operated.
• Keep these instructions - The safety and
operating instructions should be retained for
future reference.
• Heed all warnings - All warnings on the
appliance and in the operating instructions
should be adhered to.
• Follow all instructions -All operating and use
instructions should be followed.
• Do not use this apparatus near water - The
appliance should not be used near water or
moisture - for example, in a wet basement or
near a swimming pool, and the like.
. Clean only with dry cloth.
• Do not block any ventilation openings.
Install in accordance with the manufacturer's
instructions.
• Do not install near any heat sources such
as radiators, heat registers, stoves, or other
apparatus (including amplifiers) that produce
heat.
• Do not defeat the safety purpose of the
polarized or grounding-type plug. A polarized
plug has two blades with one wider than the
other. A grounding-type plug has two blades
and a third grounding prong. The wide blade or
the third prong are provided for your safety. If
the provided plug does not fit into your outlet,
consult an electrician for replacement of the
obsolete outlet.
. Protect the power cord from being walked on
or pinched particularly at plugs, convenience
receptacles, and the point where they exit from
the apparatus.
. Only use attachments/accessories specified by
the manufacturer.
. Use only with the cart, stand, tripod, bracket, or
table specified by the manufacturer, or sold with
the apparatus. When a cart is used, use caution
when moving the cart/apparatus combination to
avoid injury from tip-over.
. Unplug this apparatus during lightning storms
or when unused for long periods of time.
• Refer all servicing to qualified service
personnel. Servicing is required when the
apparatus has been damaged in any way,
such as the power-supply cord or plug is
damaged, liquid has been spilled or objects
have fallen into the apparatus, the apparatus
has been exposed to rain or moisture, does
not operate normally, or has been dropped.
• Please keep the unit in a well-ventilated
environment.
WARNING: To reduce the risk of fire or electric
shock, do not expose this apparatus to rain or
moisture. The apparatus should not be exposed
to dripping or splashing. Objects filled with
liquids, such as vases should not be placed on
apparatus.
WARNING: The batteries shall not be exposed
to excessive heat such as sunshine, fire or the
like.
WARNING: The mains plug is used as
disconnect device, the disconnect device shall
remain readily operable.
WARNING: To reduce the risk of electric shock,
do not remove cover (or back) as there are no
user-serviceable parts inside. Refer servicing to
qualified personnel.
RISQUE DE CHOC ELECTRIQUE NE
PAS OUVRIR
This lightning flash with arrowhead symbol
Z_ within an equilateral triangle is intended
to alert the user to the presence of non-
insulated "dangerous voltage" within the product's
enclosure that may be of sufficient magnitude to
constitute a risk of electric shock.
The exclamation point within an equilateral
//_ triangle is intended to alert the user to
the presence of important operating
and maintenance instructions in the literature
accompanying the appliance.
This equipment is a Class II or double
D insulated electrical appliance. It has been
designed in such a way that it does not
require a safety connection to electrical earth.
This product contains electrical or electronic
materials. The presence of these materials
may,if not disposed of properly, have potential
adverse effects on the environment and human
health.
Presence of this label on the product means it
should not be disposed of as unsorted waste and
must be collectedseparately. As a consumer, you
are responsible for ensuring that this product is
disposed of properly.
This product meets ENERGY STAR_)
guidelines for energy efficiency. ENERGY
STAR and the ENERGY STAR mark are
registered U.S. marks. ENERGY STAR is
a registered mark owned by the U.S.
government.
Page 4
SAFETY INFORMATION
To ensure reliable and safe operation of this equipment, please carefully read all the instructions in
this user guide, especially the safety information below.
Electrical Safety
• The TV set should only be connected to a main power supply with voltage that matches the
label at the rear of the product.
• To prevent overload, do not share the same power supply socket with too many other
electronic components.
• Do not place any connecting wires where they may be stepped on or tripped over.
• Do not place heavy items on any connecting wire, which may damage the wire.
• Hold the main plug, not the wires, when removing from a socket.
• During a thunderstorm or when not in using the television for long periods, turn off the power
switch on the back of the television.
• Do not allow water or moisture to enter the TV or power adapter. Do not use in wet, moist
areas, such as bathrooms, steamy kitchens or near swimming pools.
• Pull the plug out immediately, and seek professional help if the main plug or cable is damaged,
liquid is spilled onto the set, if the TV set accidentally exposed to water or moisture, if anything
accidentally penetrates the ventilation slots or if the TV set does not work normally.
• Do not remove the safety covers. There are no user serviceable parts inside. Trying to service
the unit yourself is dangerous and may invalidate the product's warranty. Qualified personnel
must only service this apparatus.
• To avoid a battery leakage, remove batteries from the remote control, when the remote is not
use for long period, or when the batteries are exhausted.
• Do not break open or throw exhausted batteries into a fire.
Physical Safety
• Do not block ventilation slots in the back cover. You may place the TV in a cabinet, but ensure
at least 5cm (2") clearance all around.
• Do not tap or shake the TV screen, or you may damage the internal circuits. Take good care
of the remote control.
• To clean the TV use a soft dry cloth. Do not use solvents or petroleum based fluids.
• Do not install near any heat sources such as radiators, heat registers, stoves or other
apparatus (including amplifiers) that produce heat.
• Do not defeat the safety purpose of the polarized or grounding-type plug. A polarized plug
has two blades with one wider than the other. A grounding plug has two blades and a third
grounding prong, the wide blade,or the third prong is provided for your safety. If the provided
plug does not fit into your outlet, consult an electrician for replacement of the obsolete outlet.
• Protect the power cord from being walked on or pinched particularly at plugs.
• Unplug the apparatus during lightning storms or when unused for long periods.
• Refer all servicing to a qualified service personnel.Servicing is required if the apparatus does
not operate normally or if the apparatus, including the power supply cord or pulg, has been
damaged in any way.
• Servicing is also required if liquid has been spilled, or objects have fallen into the apparatus;
when the apparatus has been exposed to rain or moisture; or if the apparatus has been
dropped.
• Always connect your television to a power outlet with protective ground connection.
_=3
Page 5
PREPARATION
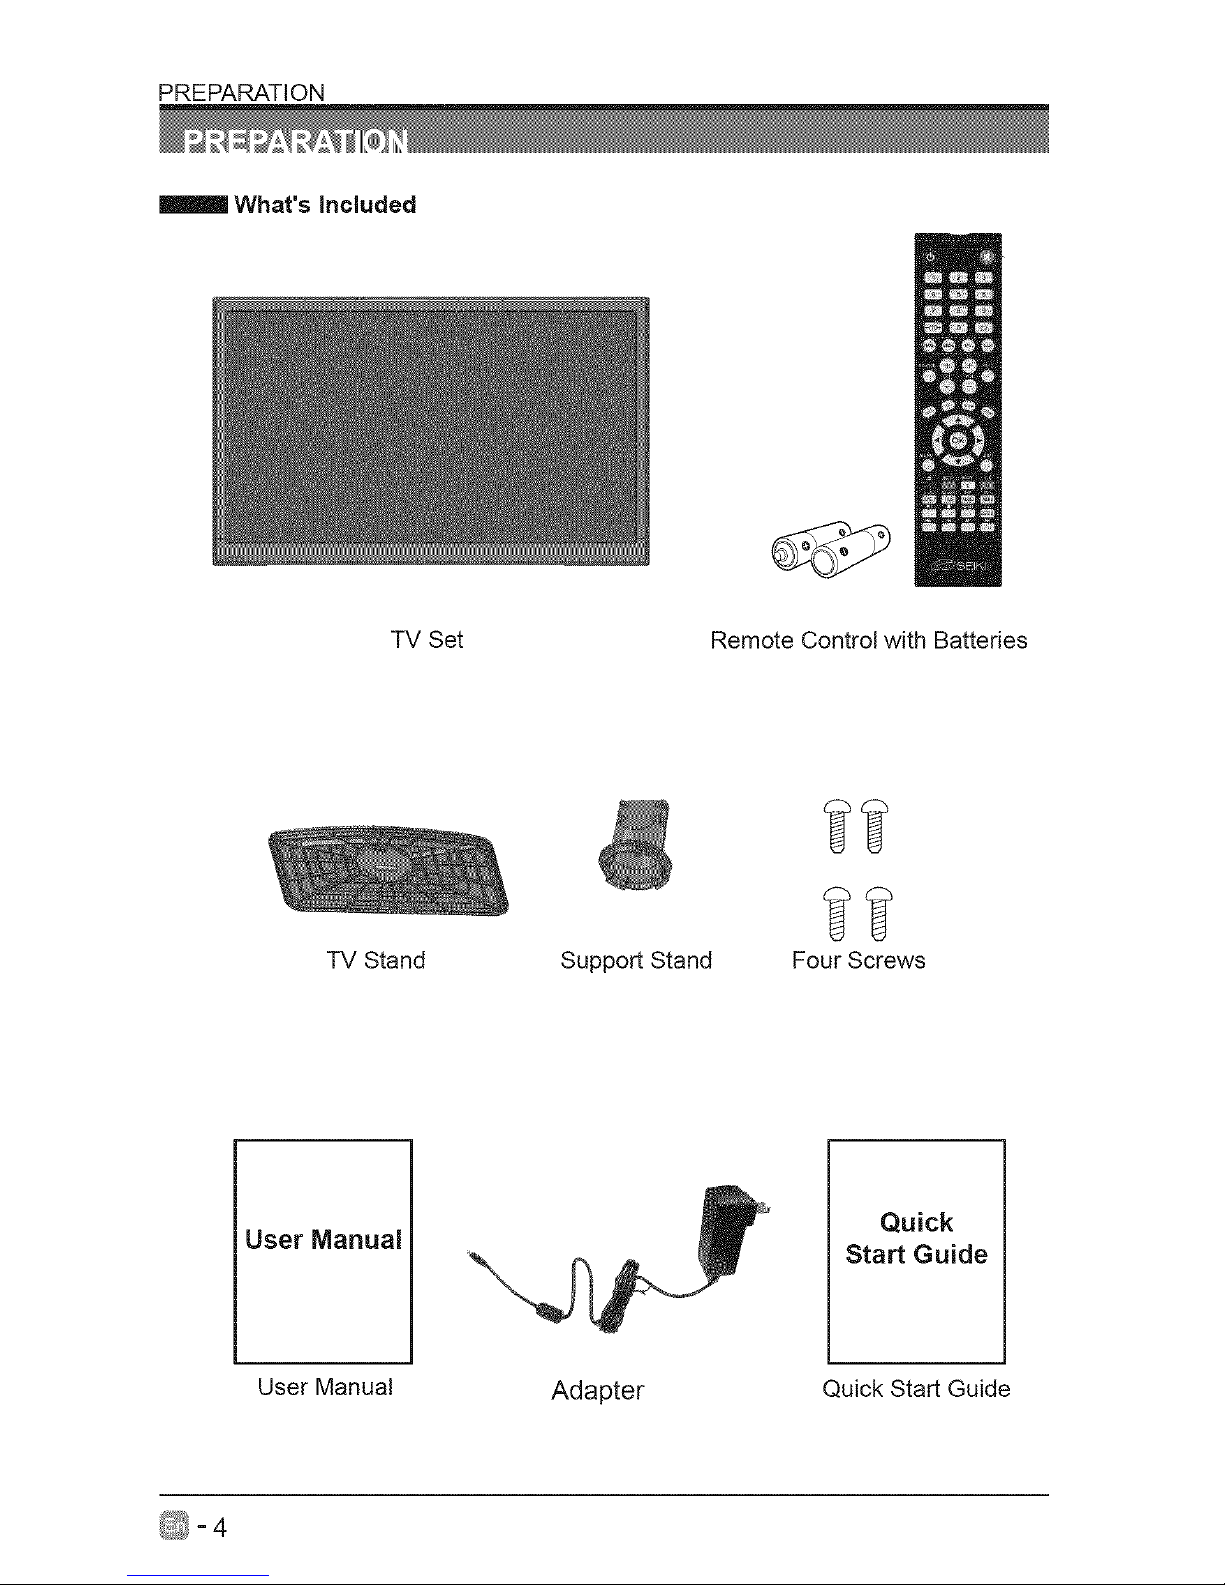
What's included
TV Set Remote Control with Batteries
TV Stand
Support Stand
Four Screws
User Manual
Quick
Start Guide
User Manual
Adapter
Quick Start Guide
_=4
Page 6
Front View
PREPARATION
--O
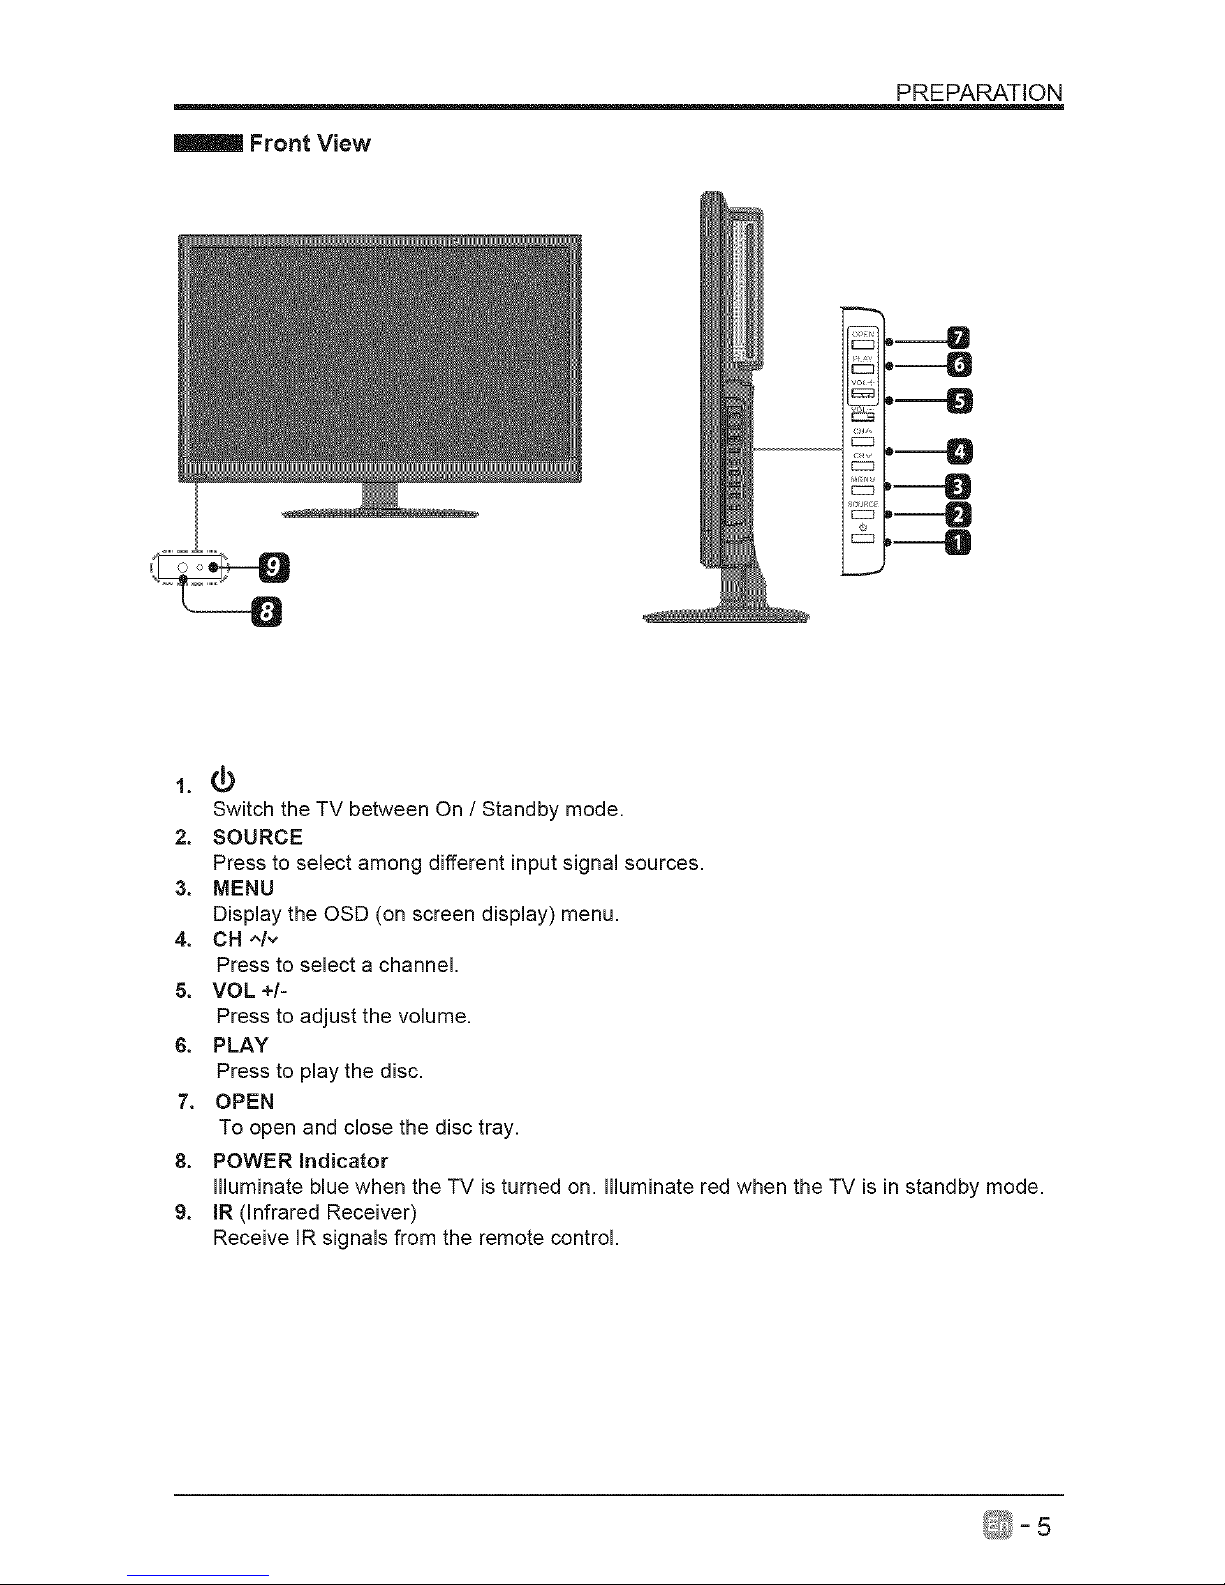
1.¢
Switch the TV between On / Standby mode.
2. SOURCE
Press to select among different input signal sources.
3. MENU
Display the OSD (on screen display) menu.
4. CH ^/,,
Press to select a channel.
5. VOL +/-
Press to adjust the volume.
6. PLAY
Press to play the disc.
7. OPEN
To open and close the disc tray.
8. POWER Indicator
illuminate blue when the -IV is turned on. illuminate red when the -iV is in standby mode.
9. IR (Infrared Receiver)
Receive IR signals from the remote control.
D
%/_=5
Page 7
PREPARATION
Rear View
-;°;;°
%_
,----O
,--O
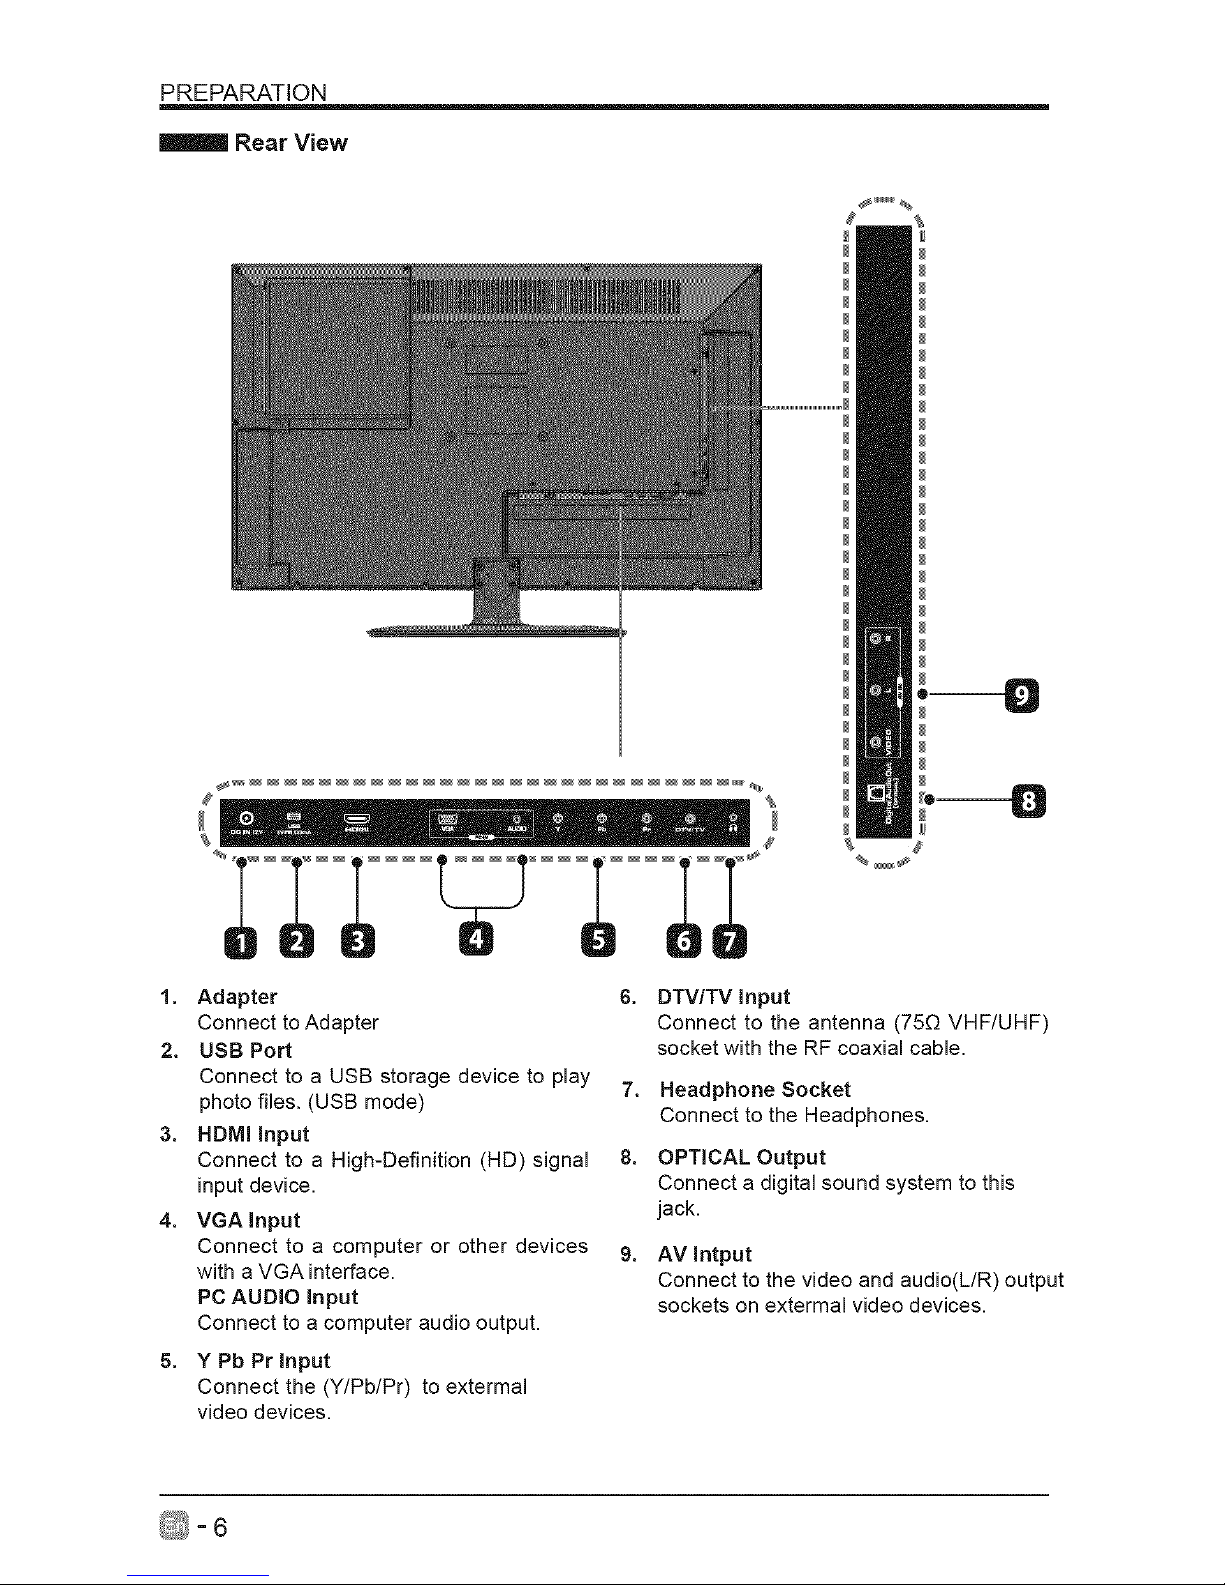
1. Adapter 6.
Connect to Adapter
2. USB Port
Connect to a USB storage device to play 7.
photo files. (USB mode)
3. HDMI input
Connect to a High-Definition (HD) signal 8.
input device.
4. VGA input
Connect to a computer or other devices 9.
with a VGA interface.
PC AUDIO Input
Connect to a computer audio output.
5. Y Pb Prlnput
Connect the (Y/Pb/Pr) to extermal
video devices.
DTV/TV input
Connect to the antenna (75[3 VHF/UHF)
socket with the RF coaxial cable.
Headphone Socket
Connect to the Headphones.
OPTICAL Output
Connect a digital sound system to this
jack.
AV Intput
Connect to the video and audio(L/R) output
sockets on extermal video devices.
_-6
Page 8
Installing the Base Stand
PREPARATION
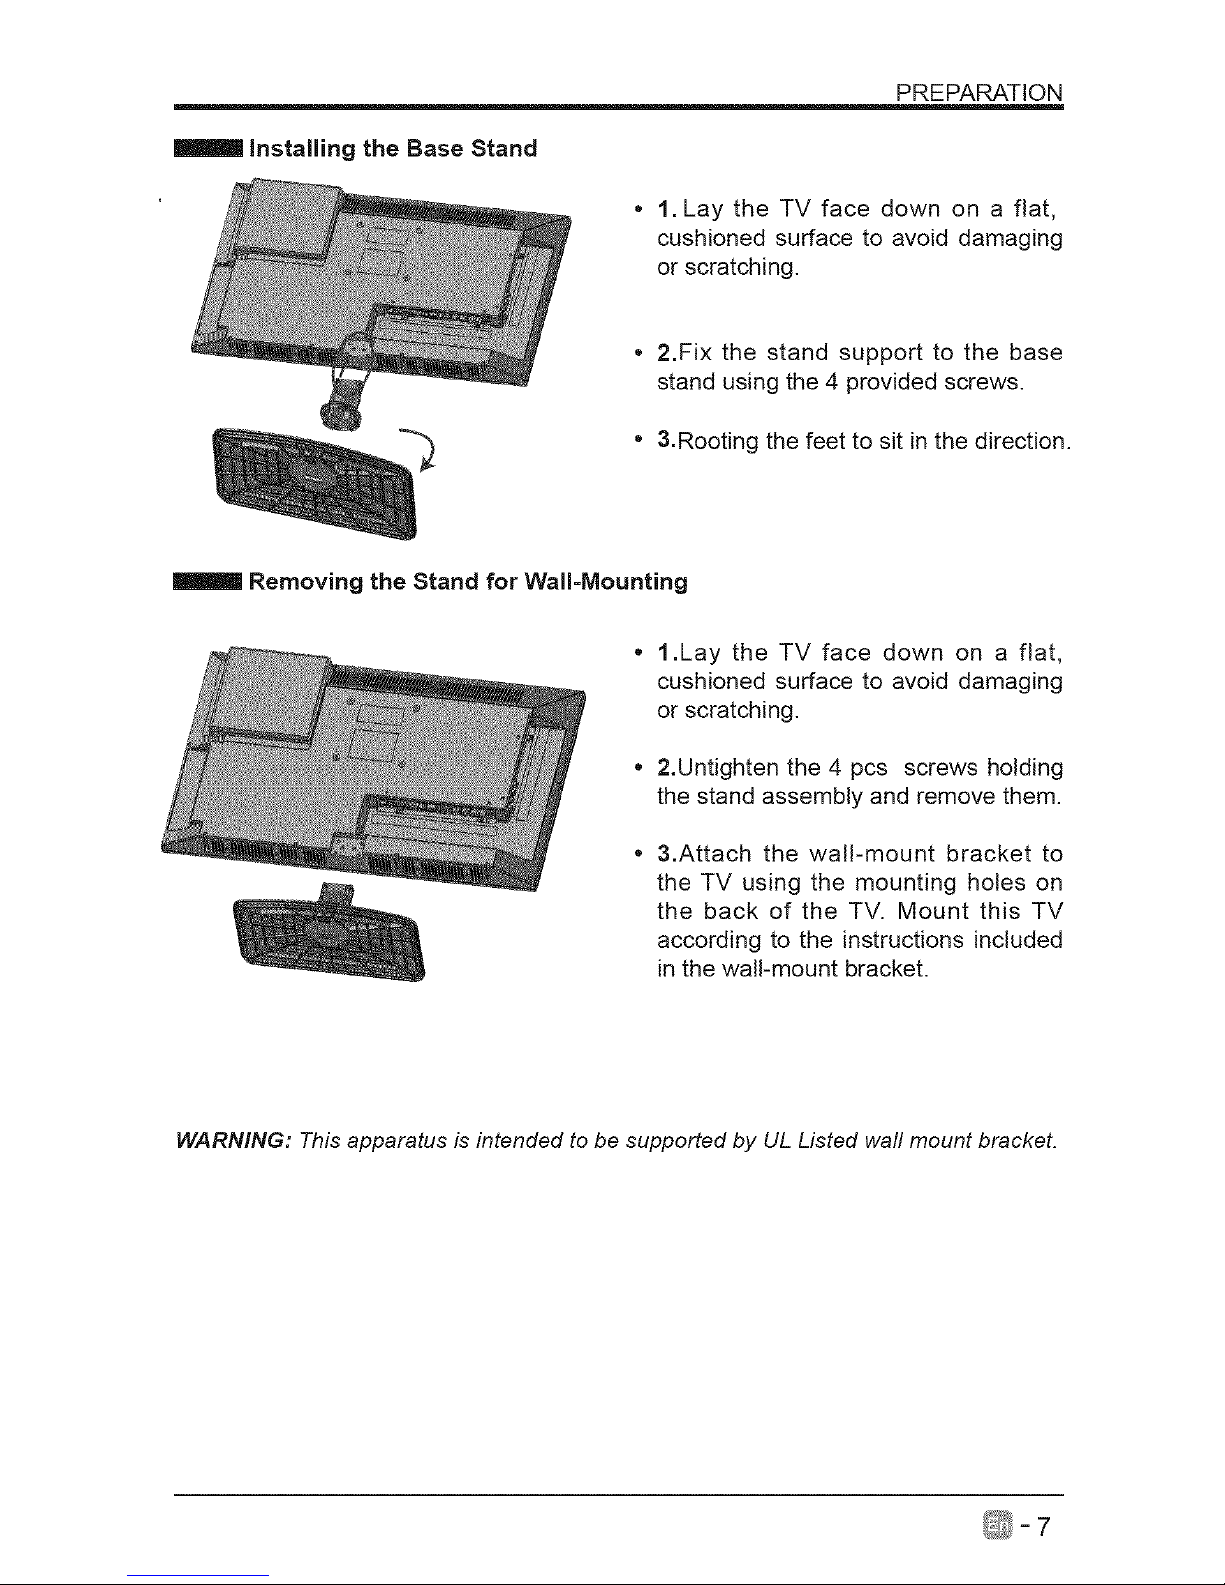
1. Lay the TV face down on a flat,
cushioned surface to avoid damaging
or scratching.
2.Fix the stand support to the base
stand using the 4 provided screws.
3.Rooting the feet to sit in the direction.
Removing the Stand for Wall=Mounting
1.Lay the TV face down on a flat,
cushioned surface to avoid damaging
or scratching.
2.Untighten the 4 pcs screws holding
the stand assembly and remove them.
3.Attach the walPmount bracket to
the TV using the mounting holes on
the back of the TV. Mount this TV
according to the instructions included
in the wall-mount bracket.
WARNING: This apparatus is intended to be supported by UL Listed wall mount bracket.
D
_- 7
Page 9
Remote Control
II--
v
_-_ _ _ NFO
souRcE_ _+_
--_'_ VOL,
"_ • GOTO @ SLOW _) A-B O"
HI O • _ REPEAT@ FAV @
_SEIKI
Ii
8D
PREPARATION
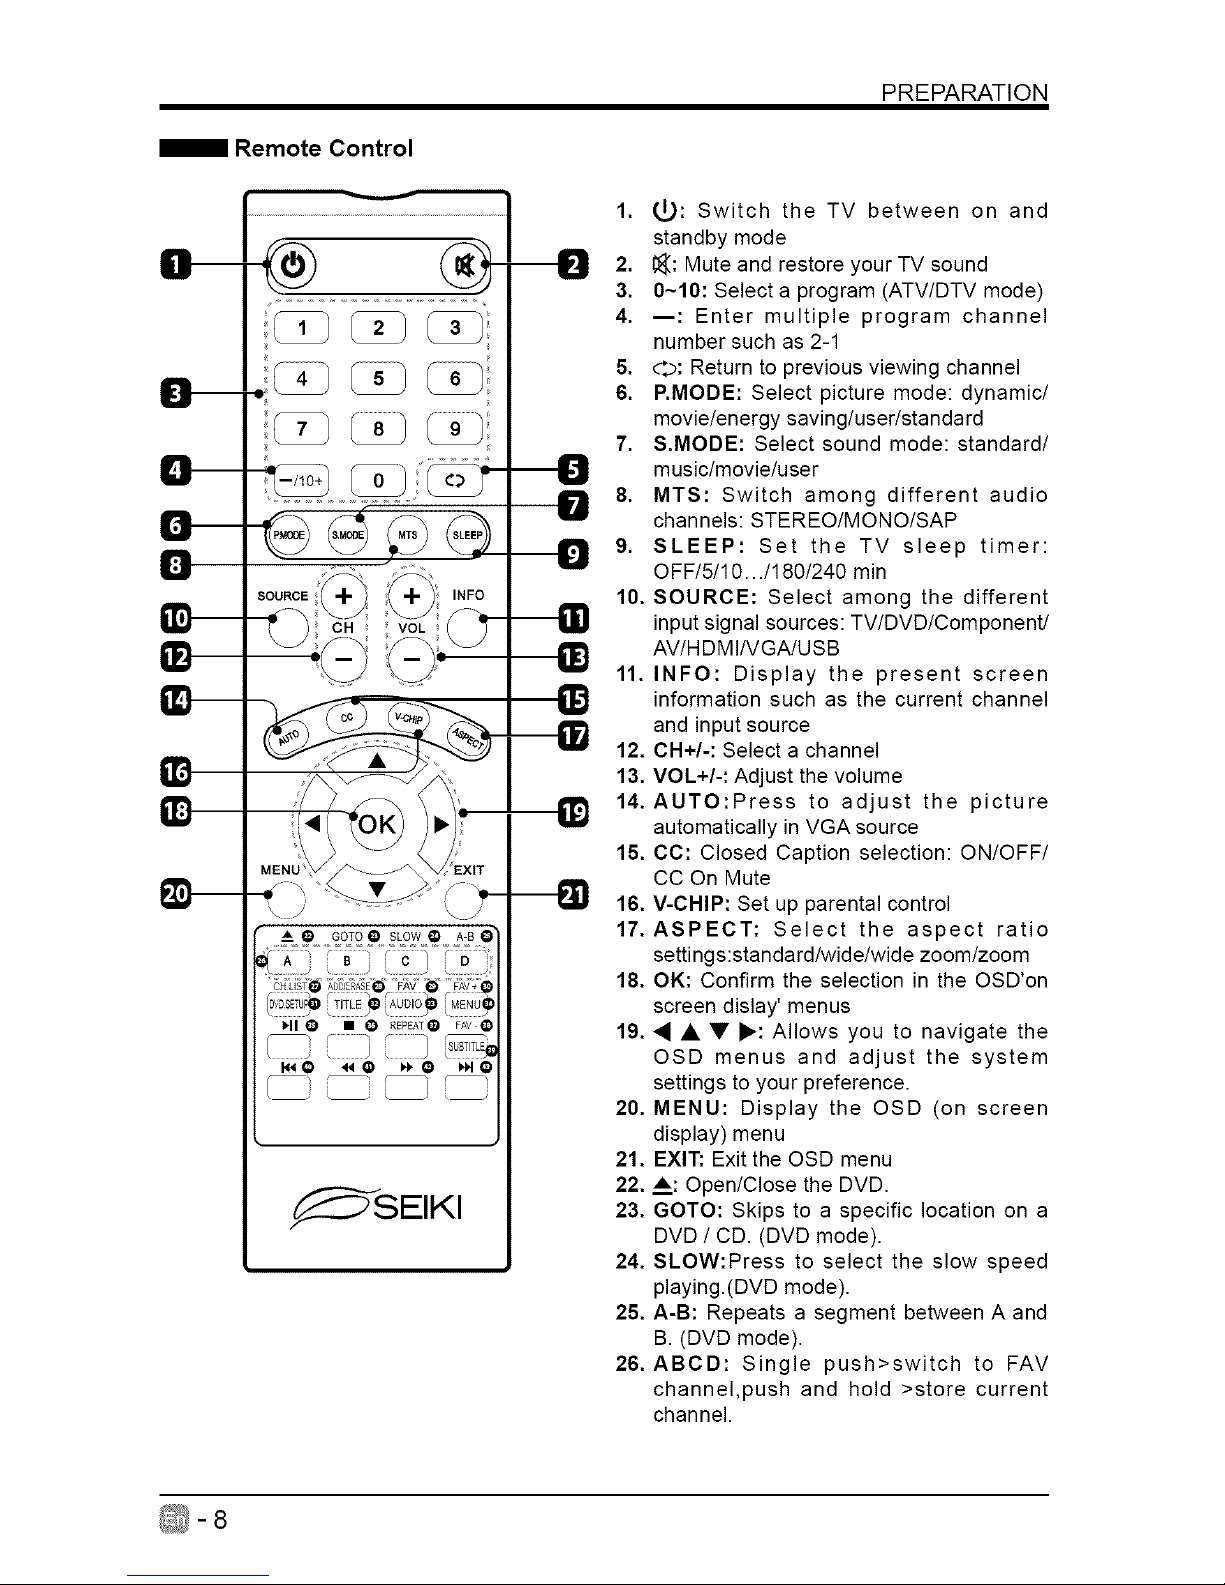
1. (_: Switch the TV between on and
standby mode
2. _: Mute and restore your TV sound
3. 0~10: Select a program (ATV/DTV mode)
4. --: Enter multiple program channel
number such as 2-1
5. d:p: Return to previous viewing channel
6. RMODE: Select picture mode: dynamic/
movie/energy saving/user/standard
7. S.MODE: Select sound mode: standard/
music/movie/user
8. MTS: Switch among different audio
channels: STEREO/MONO/SAP
9. SLEEP: Set the TV sleep timer:
OFF/5/10.../180/240 min
10. SOURCE: Select among the different
input signal sources: TV/DVD/Component/
AV/HDMI/VGA/USB
11. INFO: Display the present screen
information such as the current channel
and input source
12. CH+/-: Select a channel
13. VOL+/-: Adjust the volume
14. AUTO:Press to adjust the picture
automatically in VGA source
15. CC: Closed Caption selection: ON/OFF/
CC On Mute
16. V-CHIP: Set up parental control
17. ASPECT: Select the aspect ratio
settings:standard/wide/wide zoom/zoom
18. OK: Confirm the selection in the OSD'on
screen dislay' menus
19. • • • I_: Allows you to navigate the
OSD menus and adjust the system
settings to your preference.
20. MENU: Display the OSD (on screen
display) menu
21. EXIT: Exit the OSD menu
22. _: Open/Close the DVD.
23. GOTO: Skips to a specific location on a
DVD / CD. (DVD mode).
24. SLOW:Press to select the slow speed
playing.(DVD mode).
25. A-B: Repeats a segment between A and
B. (DVD mode).
26. ABCD: Single push>switch to FAV
channel,push and hold >store current
channel.
_-8
Page 10
PREPARATION
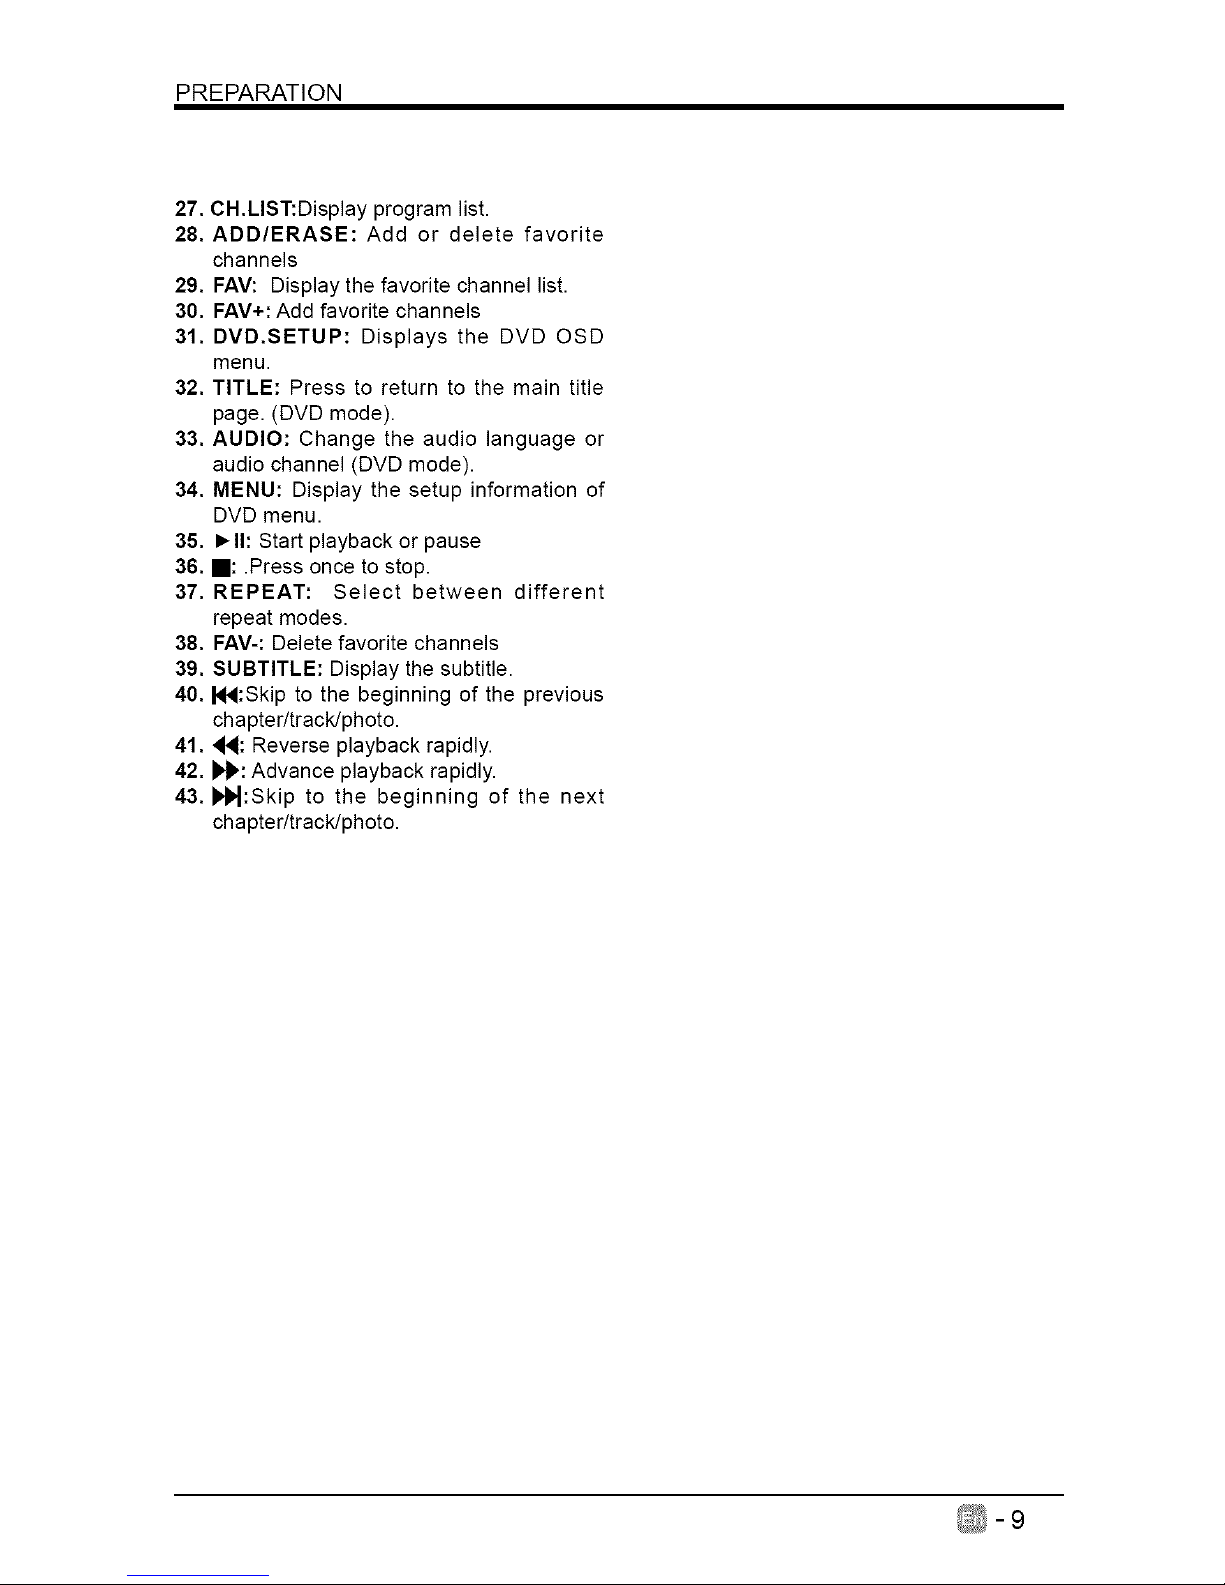
27. CH.LIST:Display program list.
28. ADD/ERASE: Add or delete favorite
channels
29. FAV: Display the favorite channel list.
30. FAV+: Add favorite channels
31. DVD.SETUP: Displays the DVD OSD
menu.
32. TITLE: Press to return to the main title
page. (DVD mode).
33. AUDIO: Change the audio language or
audio channel (DVD mode).
34. MENU: Display the setup information of
DVD menu.
35. I_11: Start playback or pause
36. ,: .Press once to stop.
37. REPEAT: Select between different
repeat modes.
38. FAV-: Delete favorite channels
39. SUBTITLE: Display the subtitle.
40. 144:Skip to the beginning of the previous
chapter/track/photo.
41.44: Reverse playback rapidly.
42. _: Advance playback rapidly.
43. l)l_:Skip to the beginning of the next
chapter/track/photo.
_-9
Page 11
CONNECTING EXTERNAL DEVICES
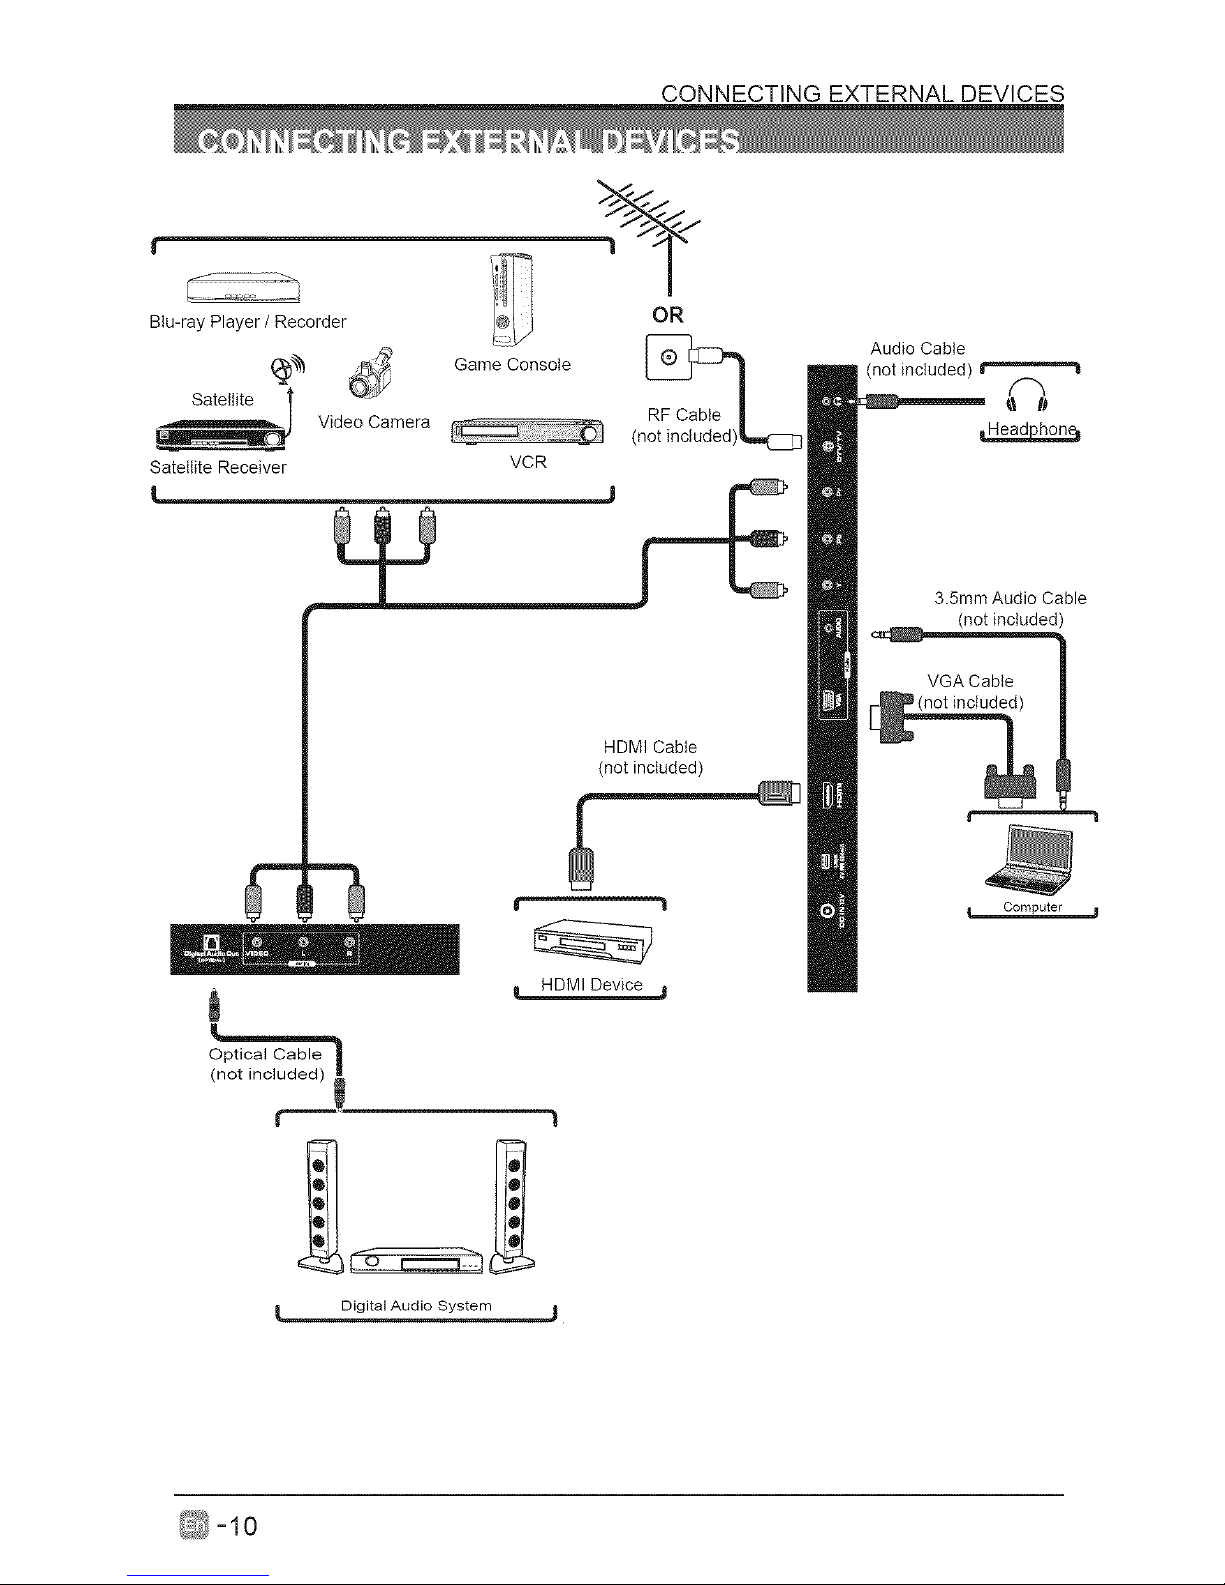
Blu-ray Player / Recorder
(_ Game Console
..... Video Camera
Satellite Receiver VCR
OR
HDMI Cable
(not included)
ir 1
J HDMI Device
Optical Cable _
(not included)
,
[ Digital Audio System j
Audio Cable
(not included)
3.5mm Audio Cable
(not included)
i
Computer
-10
Page 12
CUSTOMIZING TV SETTINGS
Initial Setup
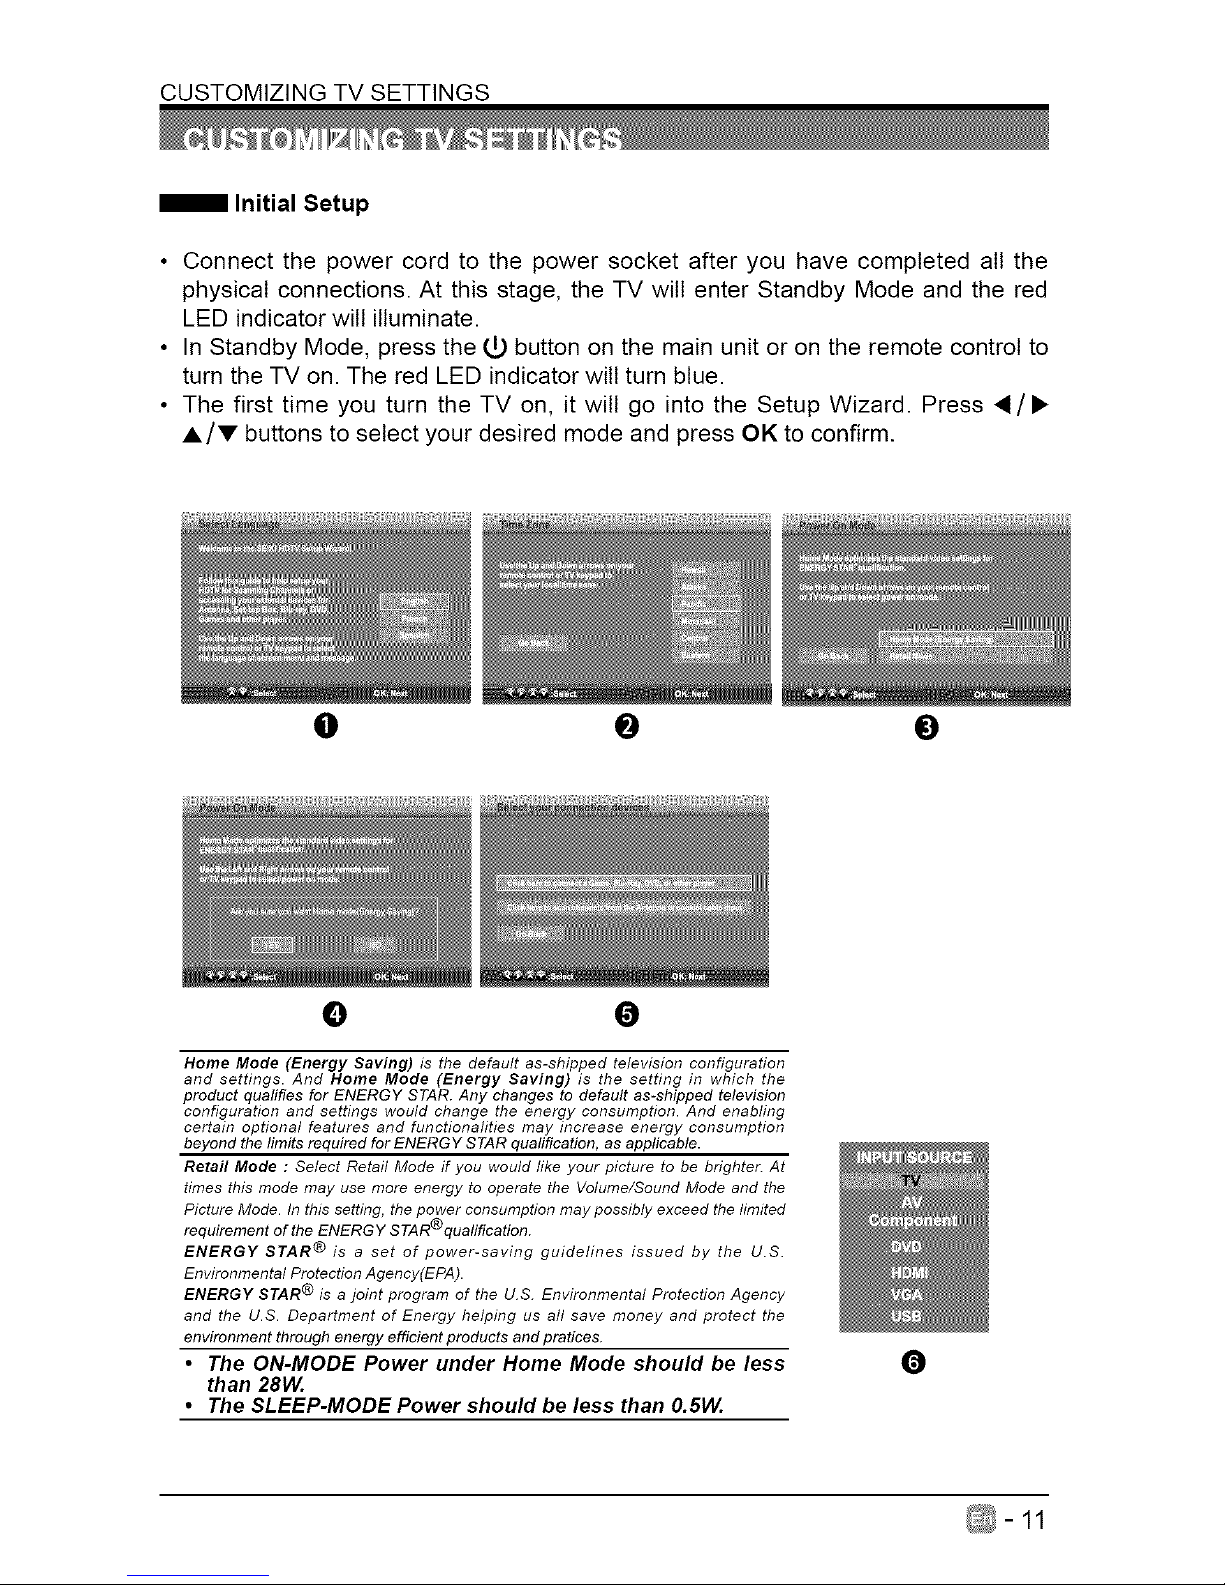
• Connect the power cord to the power socket after you have completed all the
physical connections. At this stage, the TV will enter Standby Mode and the red
LED indicator wilt illuminate.
• In Standby Mode, press the (_ button on the main unit or on the remote control to
turn the TV on. The red LED indicator wilt turn blue.
• The first time you turn the TV on, it will go into the Setup Wizard. Press 4/•
A/V buttons to select your desired mode and press OK to confirm.
0 @ 0
0 0
Home Mode (Energy Saving) is the default as-shipped television configuration
and settings. And Home Mode (Energy Saving) is the setting in which the
product qualifies for ENERGY STAR. Any changes to default as-shipped television
configuration and settings would change the energy consumption. And enabling
certain optional features and functionalities may increase energy consumption
beyond the limits required for ENERGY STAR qualification, as applicable.
Retail Mode : Select Retail Mode if you would fike your picture to be brighter. At
times this mode may use more energy to operate the Volume/Sound Mode and the
Picture Mode. In this setting, the power consumption may possibly exceed the limited
®
requirement of the ENERGY STAR qualification.
ENERGY STAR ® is a set of power-saving guidelines issued by the U.S.
Environmental Protection Agency(EPA).
ENERGY STAR ® is a joint program of the U.S. Environmental Protection Agency
and the U.S. Department of Energy helping us all save money and protect the
environment through energy efficient products and pratices.
• The ON-MODE Power under Home Mode should be less
than 28W.
• The SLEEP-MODE Power should be less than 0.5W.
0
Page 13
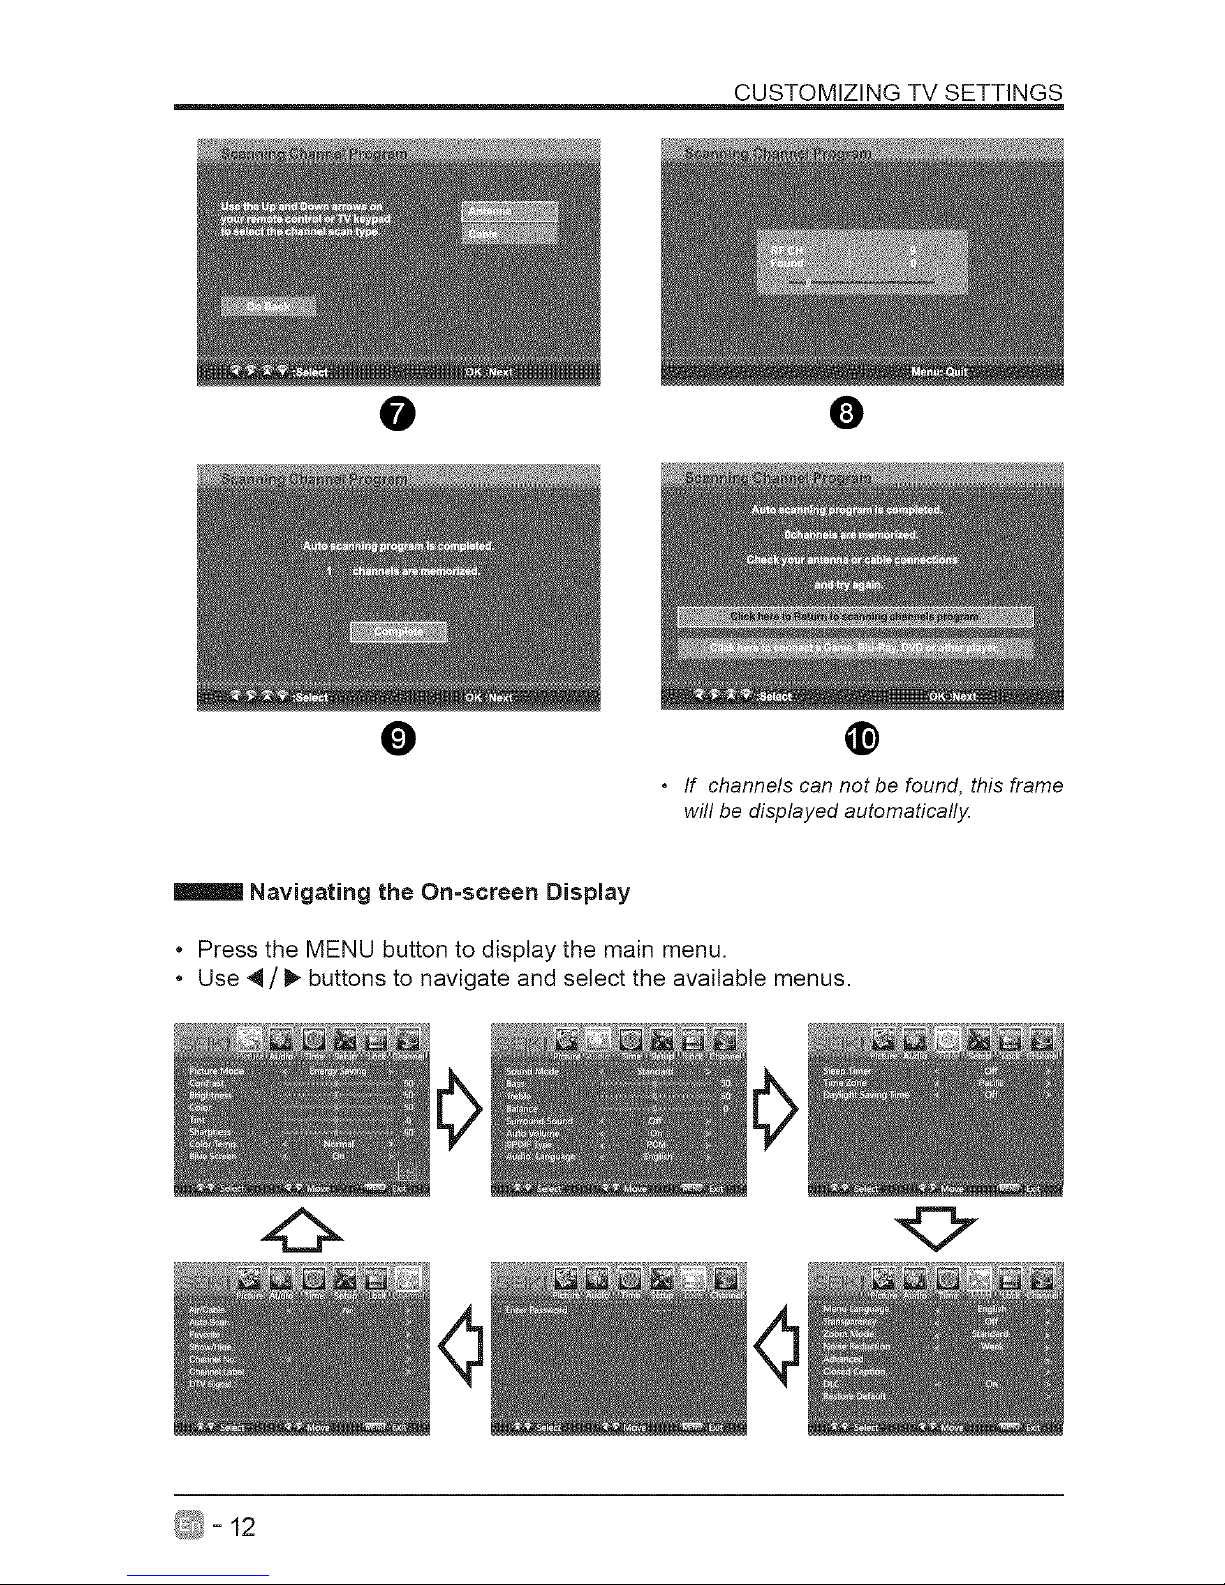
O
O
CUSTOMIZING TV SETTINGS
O
@
• If channels can not be found, this frame
will be displayed automatically.
Navigating the On=screen Display
* Press the MENU button to display the main menu.
* Use 4 / _ buttons to navigate and select the available menus.
_- 12
Page 14
CUSTOMIZING TV SETTINGS
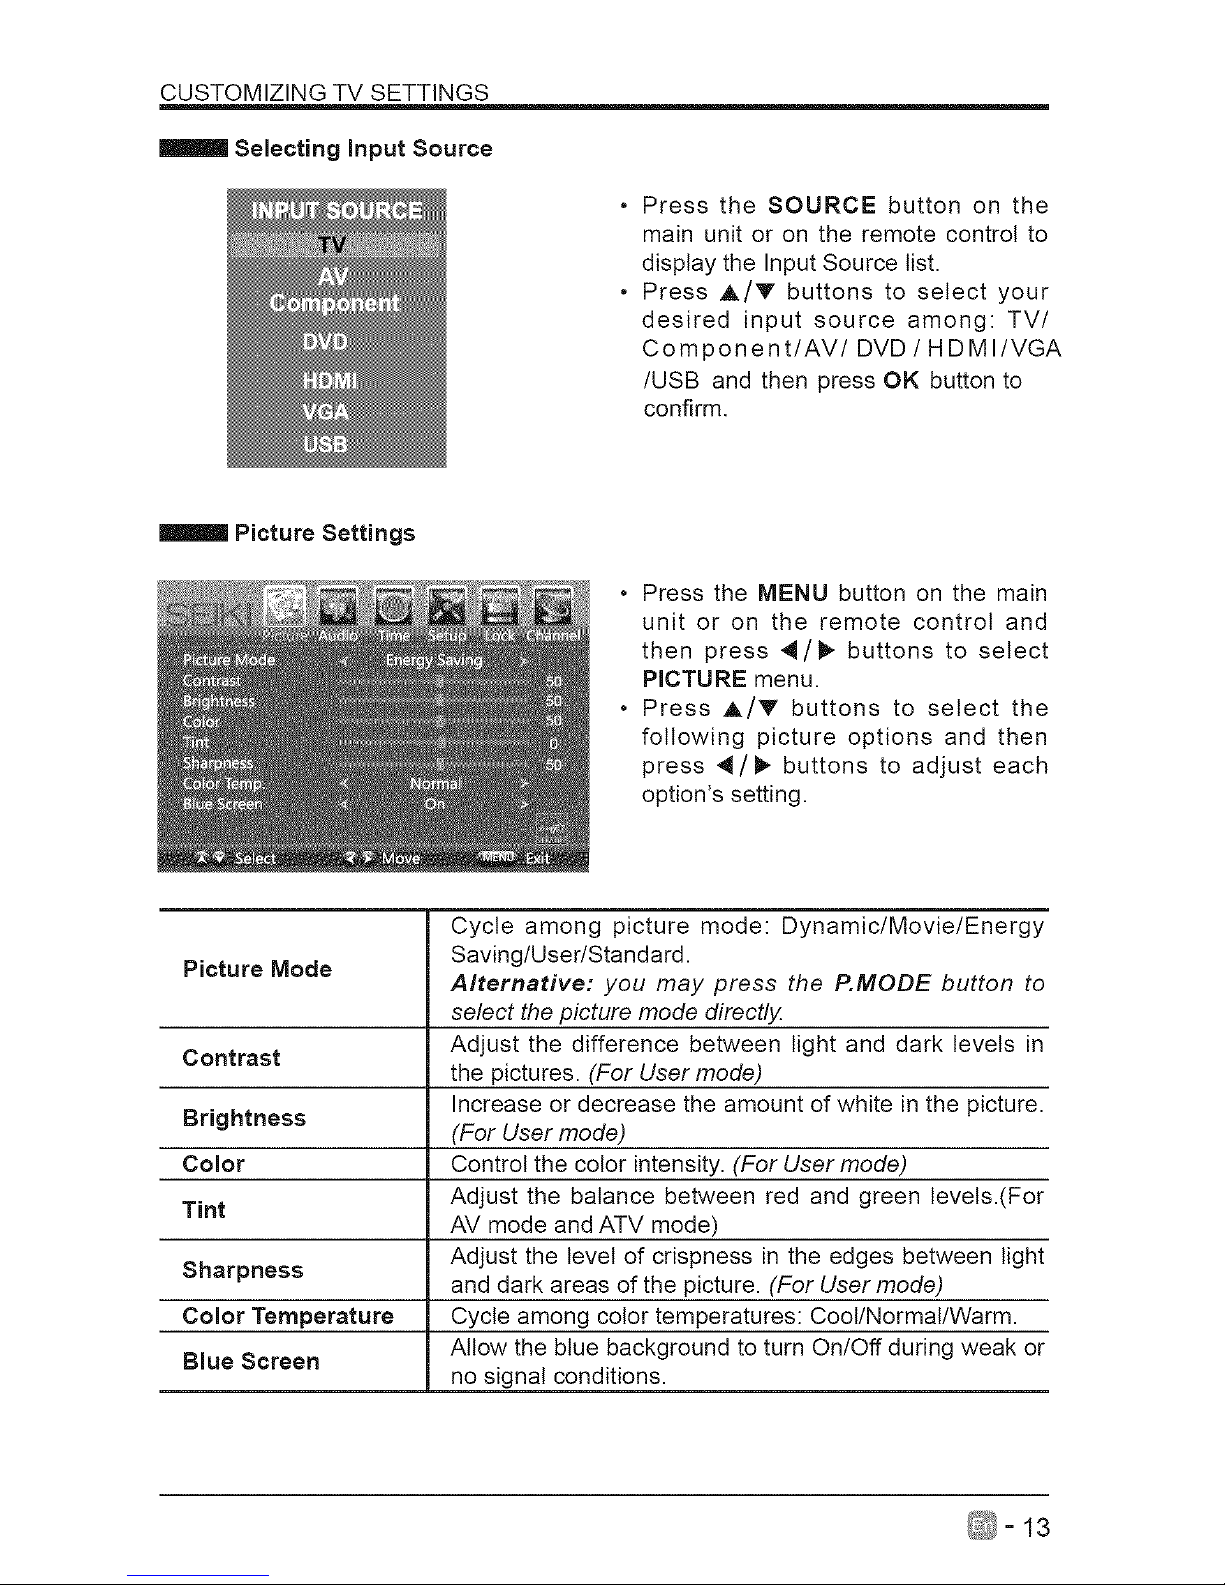
Selecting Input Source
• Press the SOURCE button on the
main unit or on the remote control to
display the Input Source list.
• Press A/V buttons to select your
desired input source among: TV/
Component/AV/DVD/HDMI/VGA
/USB and then press OK button to
confirm.
Picture Settings
• Press the MENU button on the main
unit or on the remote control and
then press 4/_ buttons to select
PICTURE menu.
• Press _/V buttons to select the
following picture options and then
press 4/_ buttons to adjust each
option's setting.
Cycle among picture mode: Dynamic/Movie/Energy
Picture Mode Saving/User/Standard.
Alternative: you may press the P.MODE button to
select the picture mode directly.
Contrast Adjust the difference between light and dark levels in
the pictures. (For User mode)
Increase or decrease the amount of white in the picture.
Brightness (For User mode)
Color Control the color intensity. (For User mode)
Tint Adjust the balance between red and green levets.(For
AV mode and ATV mode)
Sharpness Adjust the level of crispness in the edges between light
and dark areas of the picture. (For User mode)
Color Temperature Cycle among color temperatures: Cool/Normal/Warm.
Allow the blue background to turn On/Off during weak or
Blue Screen
no signal conditions.
_-13
Page 15
CUSTOMIZINGTVSETTINGS
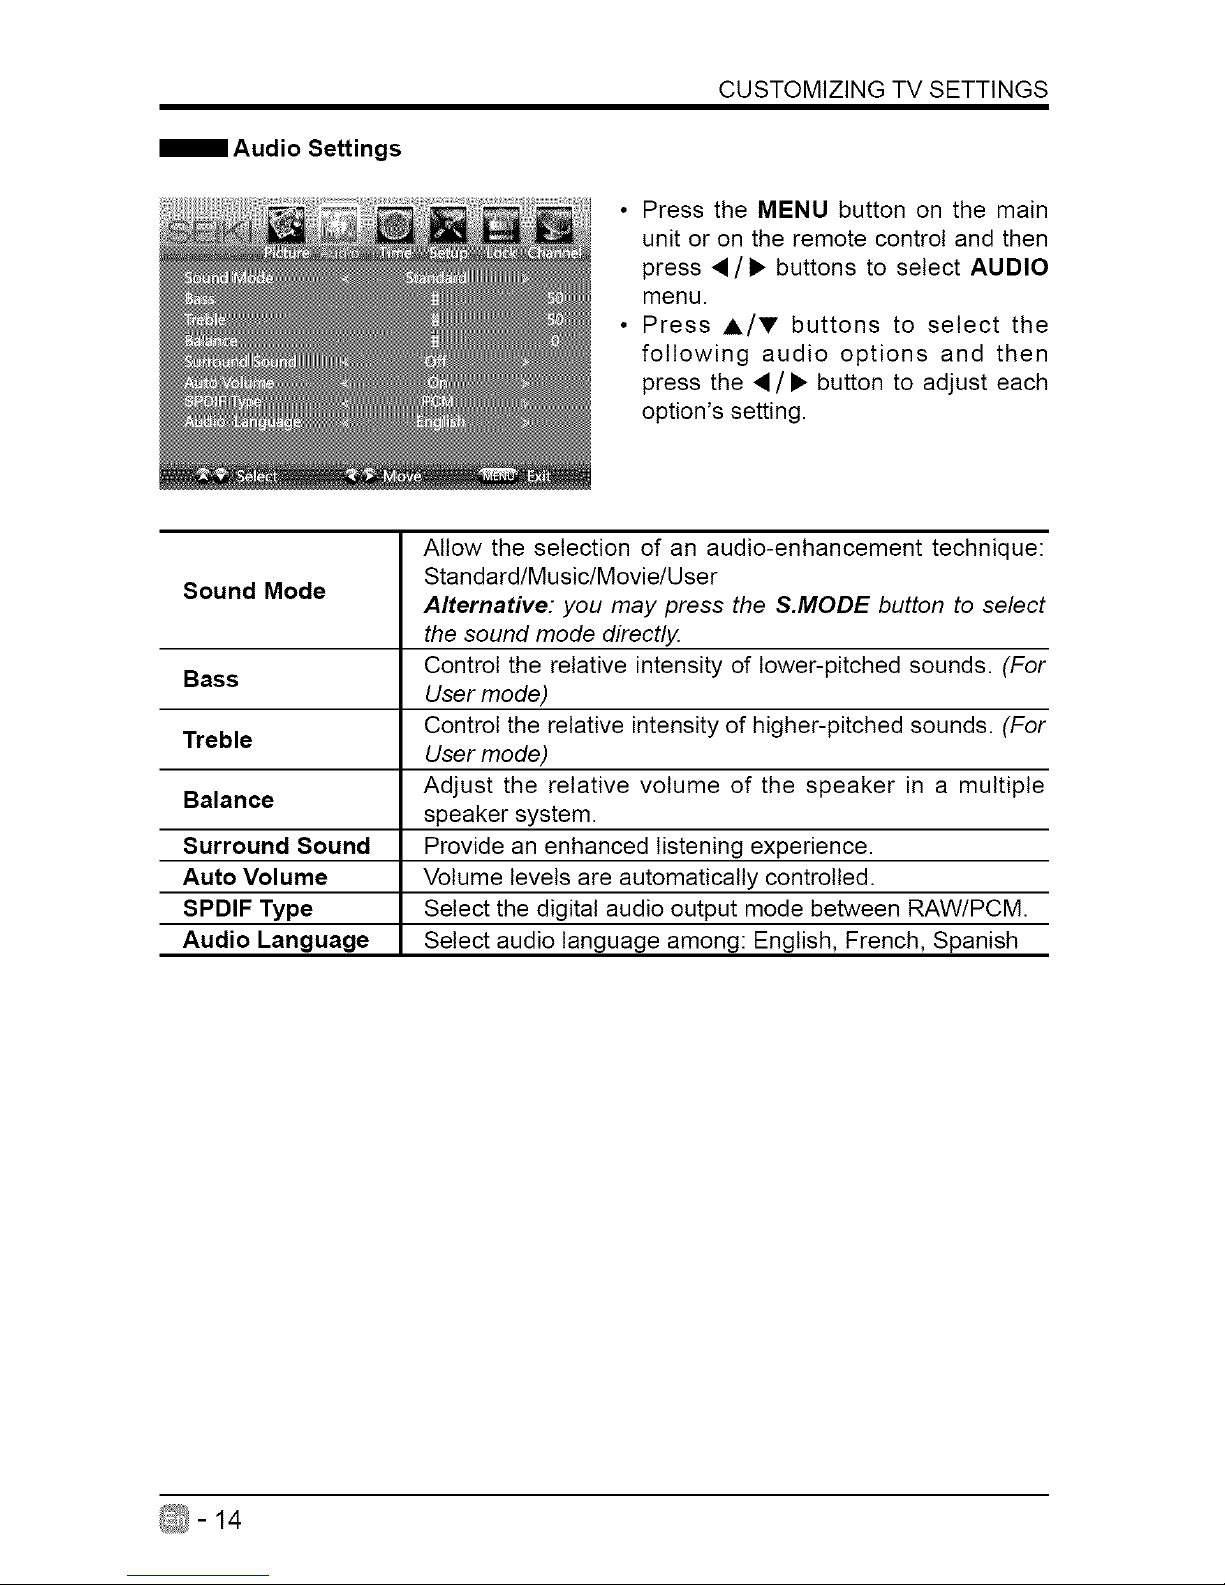
Audio Settings
• Press the MENU button on the main
unit or on the remote control and then
press •/• buttons to select AUDIO
menu.
• Press A/V buttons to select the
following audio options and then
press the •/• button to adjust each
option's setting.
Allow the selection of an audio-enhancement technique:
Standard/Music/Movie/User
Sound Mode
Alternative: you may press the S.MODE button to select
the sound mode directly.
Control the relative intensity of lower-pitched sounds. (For
Bass
User mode)
Control the relative intensity of higher-pitched sounds. (For
Treble
User mode)
Balance Adjust the relative volume of the speaker in a multiple
speaker system.
Surround Sound Provide an enhanced listening experience.
Auto Volume Volume levels are automatically controlled.
SPDIF Type Select the digital audio output mode between RAW/PCM.
Audio Language Select audio language among: English, French, Spanish
_-14
Page 16
CUSTOMIZING TV SETTINGS
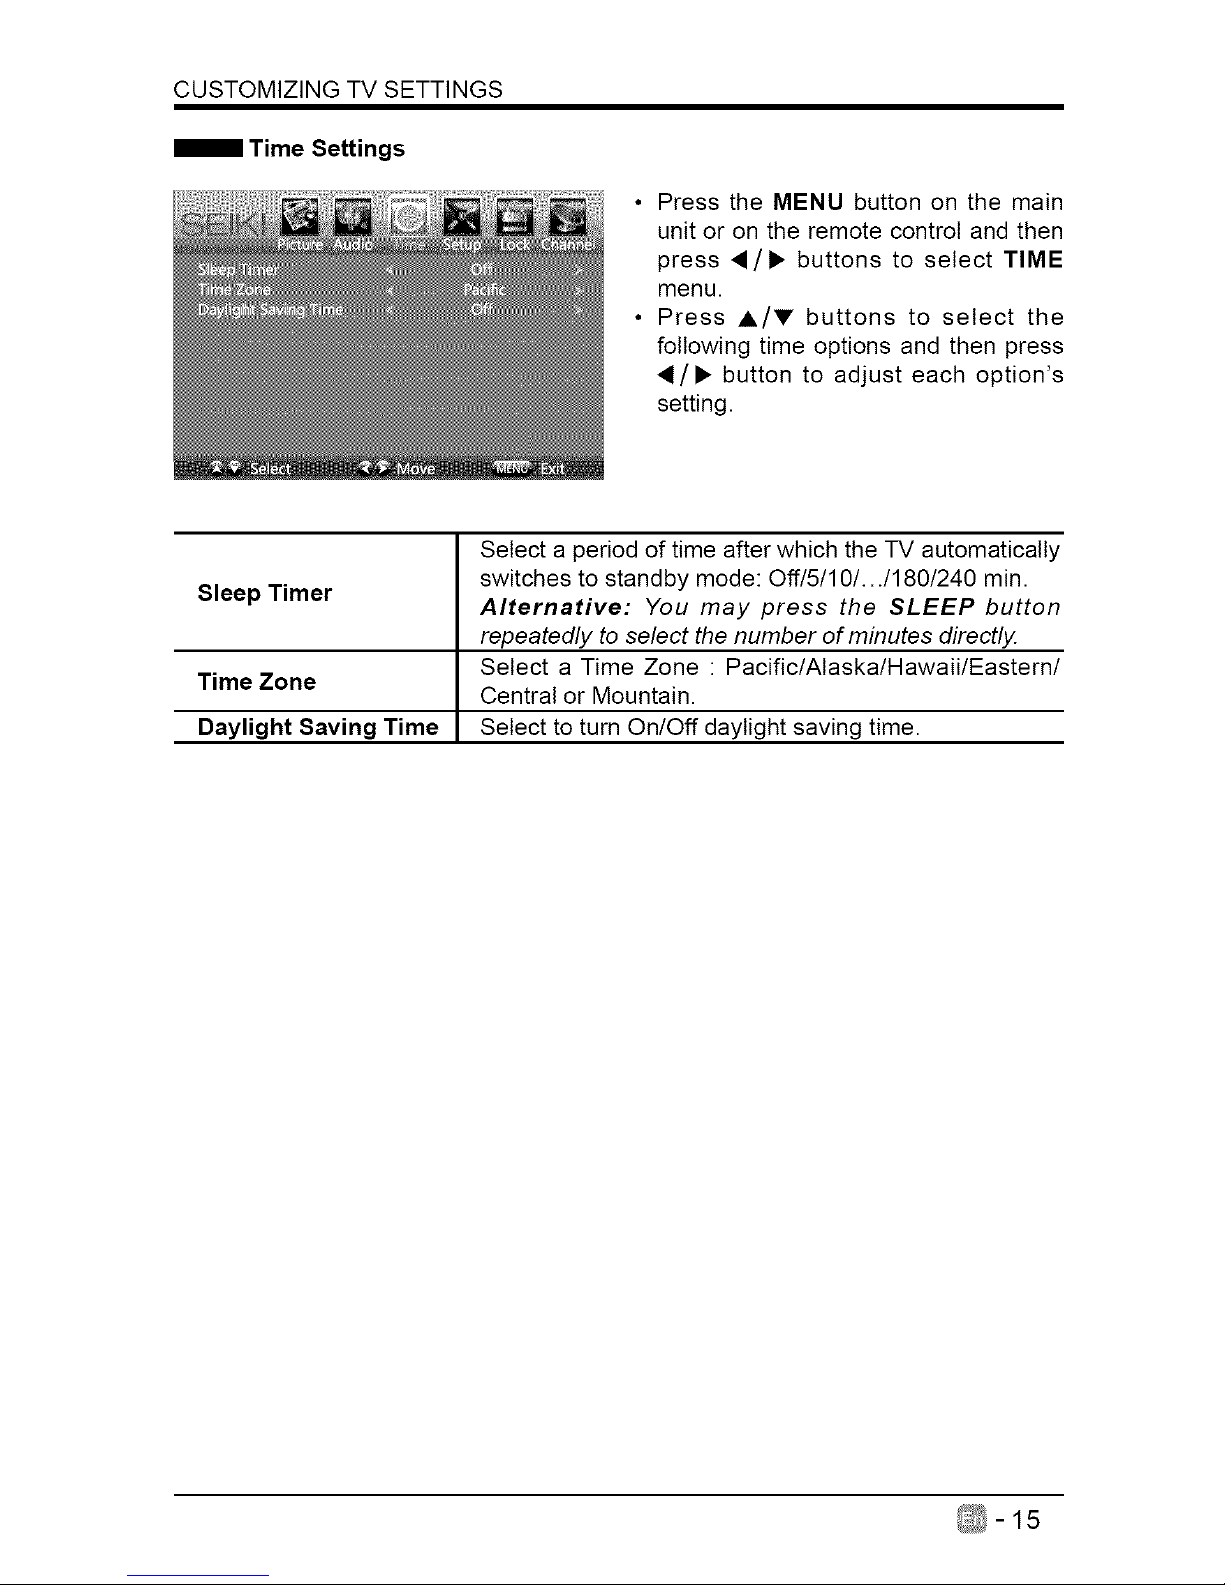
Time Settings
• Press the MENU button on the main
unit or on the remote control and then
press ,/• buttons to select TIME
menu.
• Press A/V buttons to select the
following time options and then press
/• button to adjust each option's
setting.
Select a period of time after which the -iV automatically
switches to standby mode: 0ff/5/10/.../180/240 min.
Sleep Timer
Alternative: You may press the SLEEP button
repeatedly to select the number of minutes directly.
Select a Time Zone : Pacific/Alaska/Hawaii/Eastern/
Time Zone
Central or Mountain.
Daylight Saving Time Select to turn On/Off daylight saving time.
_-15
Page 17
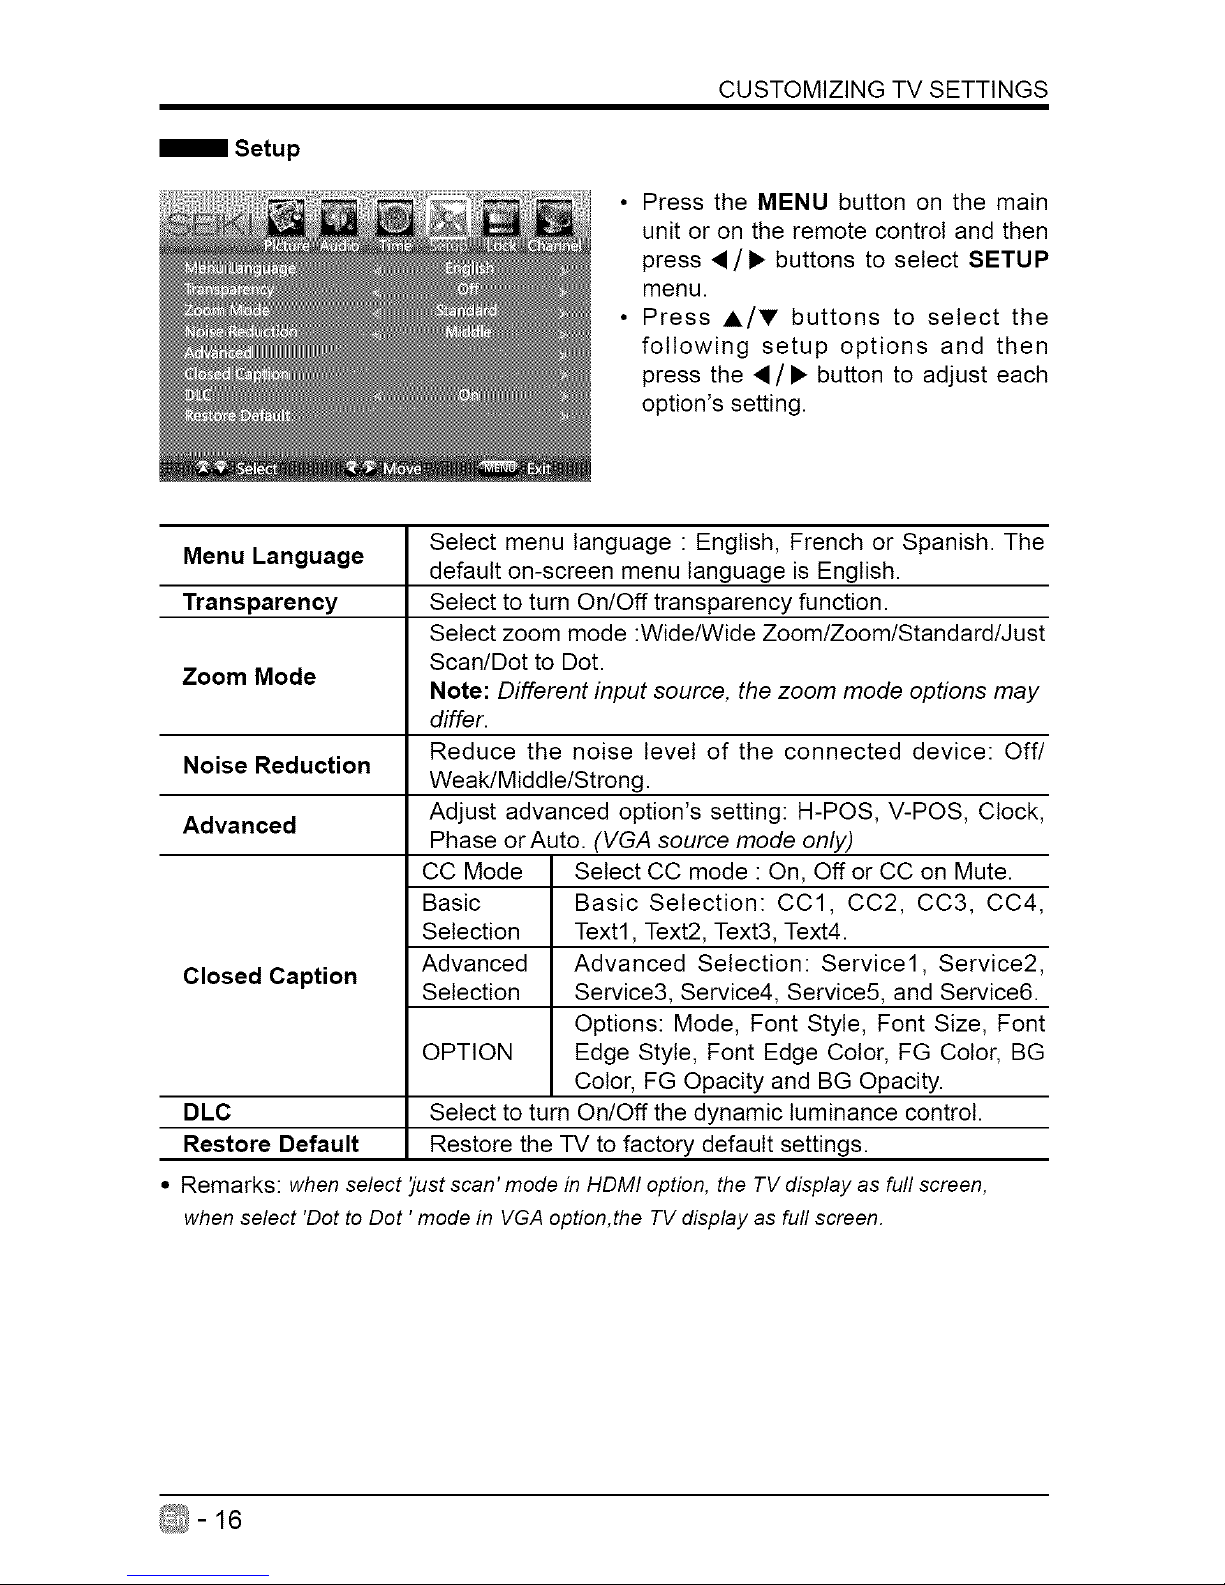
Setup
CUSTOMIZING TV SETTINGS
• Press the MENU button on the main
unit or on the remote control and then
press •/• buttons to select SETUP
menu.
• Press A/V buttons to select the
following setup options and then
press the •/• button to adjust each
option's setting.
Menu Language Select menu language " English, French or Spanish. The
default on-screen menu language is English.
Transparency Select to turn On/Off transparency function.
Select zoom mode :Wide/Wide Zoom/Zoom/Standard/Just
Scan/Dot to Dot.
Zoom Mode
Note: Different input source, the zoom mode options may
differ.
Reduce the noise level of the connected device: Off/
Noise Reduction
Weak/Middle/Strong.
Advanced Adjust advanced option's setting: H-POS, V-POS, Clock,
Phase orAuto. (VGA source mode only)
CC Mode Select CC mode : On, Off or CC on Mute.
Basic Basic Selection: CC1, CC2, CC3, CC4,
Selection Text1, Text2, Text3, Text4.
Closed Caption Advanced Advanced Selection: Service1, Service2,
Selection Service3, Service4, Service5, and Service&
Options: Mode, Font Style, Font Size, Font
OPTION Edge Style, Font Edge Color, FG Color, BG
Color, FG Opacity and BG Opacity.
DLC Select to turn On/Off the dynamic luminance control.
Restore Default Restore the TV to factory default settings.
• Remarks: when select 'justscan'mode in HDMIoption, the TV displayas full screen,
when select 'Dot to Dot 'mode in VGA option,the TVdisplayasfull screen.
_-16
Page 18
CUSTOMIZING TV SETTINGS
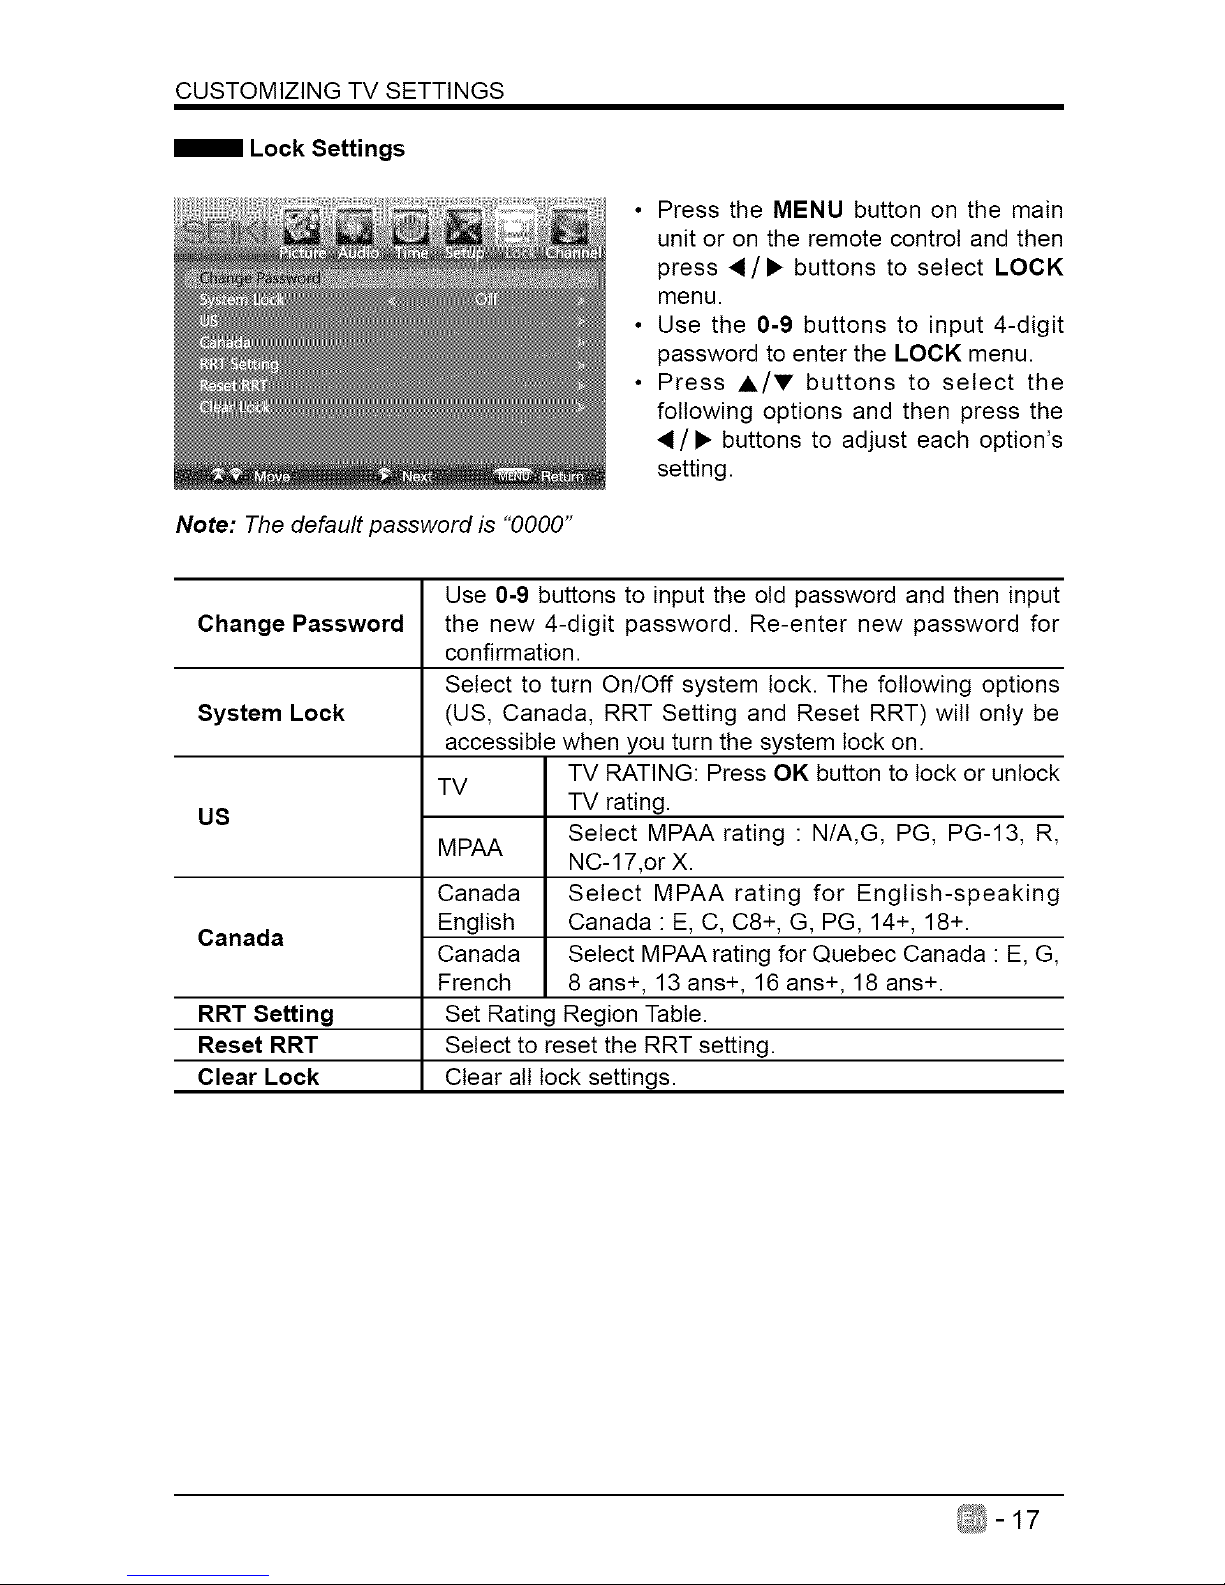
Note: The default password is "0000"
• Press the MENU button on the main
unit or on the remote control and then
press 4/• buttons to select LOCK
menu.
• Use the 0-9 buttons to input 4-digit
password to enter the LOCK menu.
• Press A/Y buttons to select the
following options and then press the
/• buttons to adjust each option's
setting.
Change Password
System Lock
US
Canada
RRT Setting
Reset RRT
Clear Lock
Use 0-9 buttons to input the old password and then input
the new 4-digit password. Re-enter new password for
confirmation.
Select to turn On/Off system lock. The following options
(US, Canada, RRT Setting and Reset RRT) will only be
accessible when you turn the system lock on.
TV RATING: Press OK button to lock or unlock
TV
TV rating.
Select MPAA rating : N/A,G, PG, PG-13, R,
MPAA
NC-17,or X.
Canada Select MPAA rating for English-speaking
English Canada : E, C, C8+, G, PG, 14+, 18+.
Canada Select MPAA rating for Quebec Canada : E, G,
French 8 ans+, 13 ans+, 16 ans+, 18 ans+.
Set Rating Region Table.
Select to reset the RRT setting.
Clear all lock settings.
_-17
Page 19
CUSTOMIZING TV SETTINGS
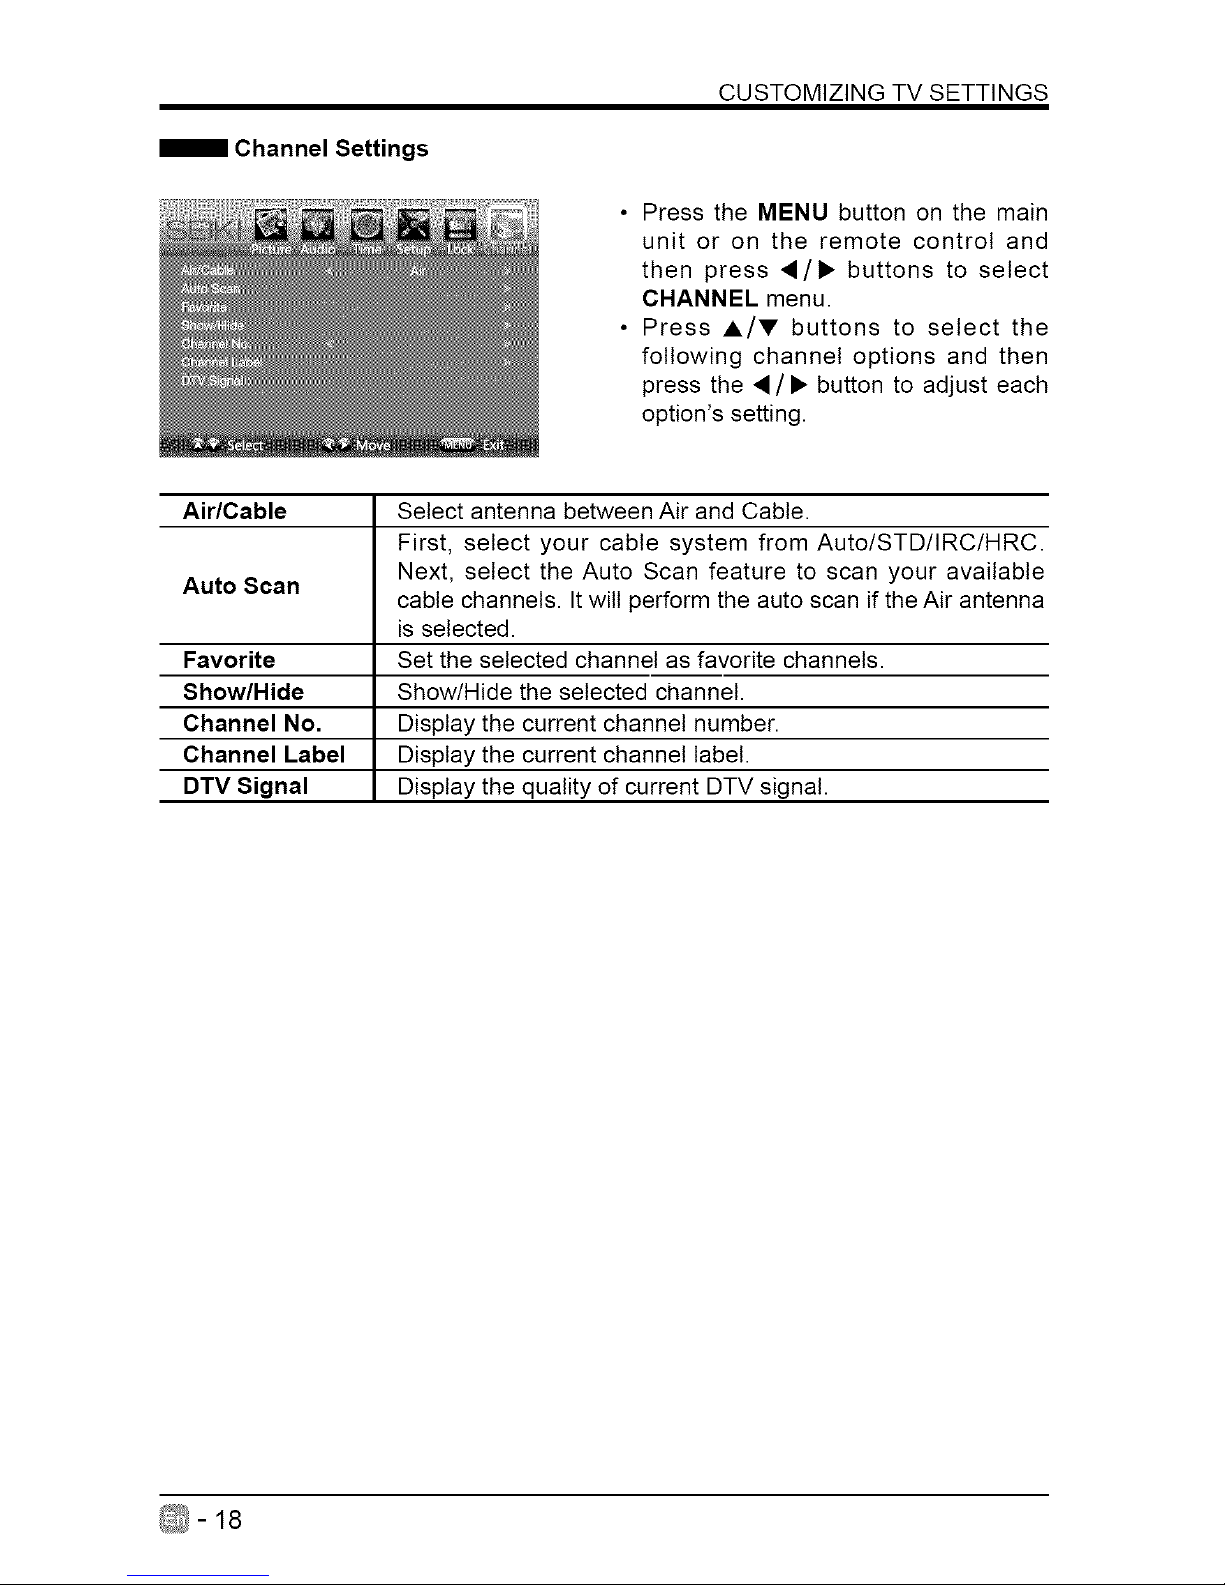
Channel Settings
• Press the MENU button on the main
unit or on the remote control and
then press •/• buttons to select
CHANNEL menu.
• Press A/V buttons to select the
following channel options and then
press the •/• button to adjust each
option's setting.
Air/Cable Select antenna between Air and Cable.
First, select your cable system from Auto/STD/IRC/HRC.
Auto Scan Next, select the Auto Scan feature to scan your available
cable channels. Itwill perform the auto scan if the Air antenna
is selected.
Favorite Set the selected channel as favorite channels.
Show/Hide Show/Hide the selected channel.
Channel No. Display the current channel number.
Channel Label Display the current channel label.
DTV Signal Display the quality of current DTV signal.
_-18
Page 20
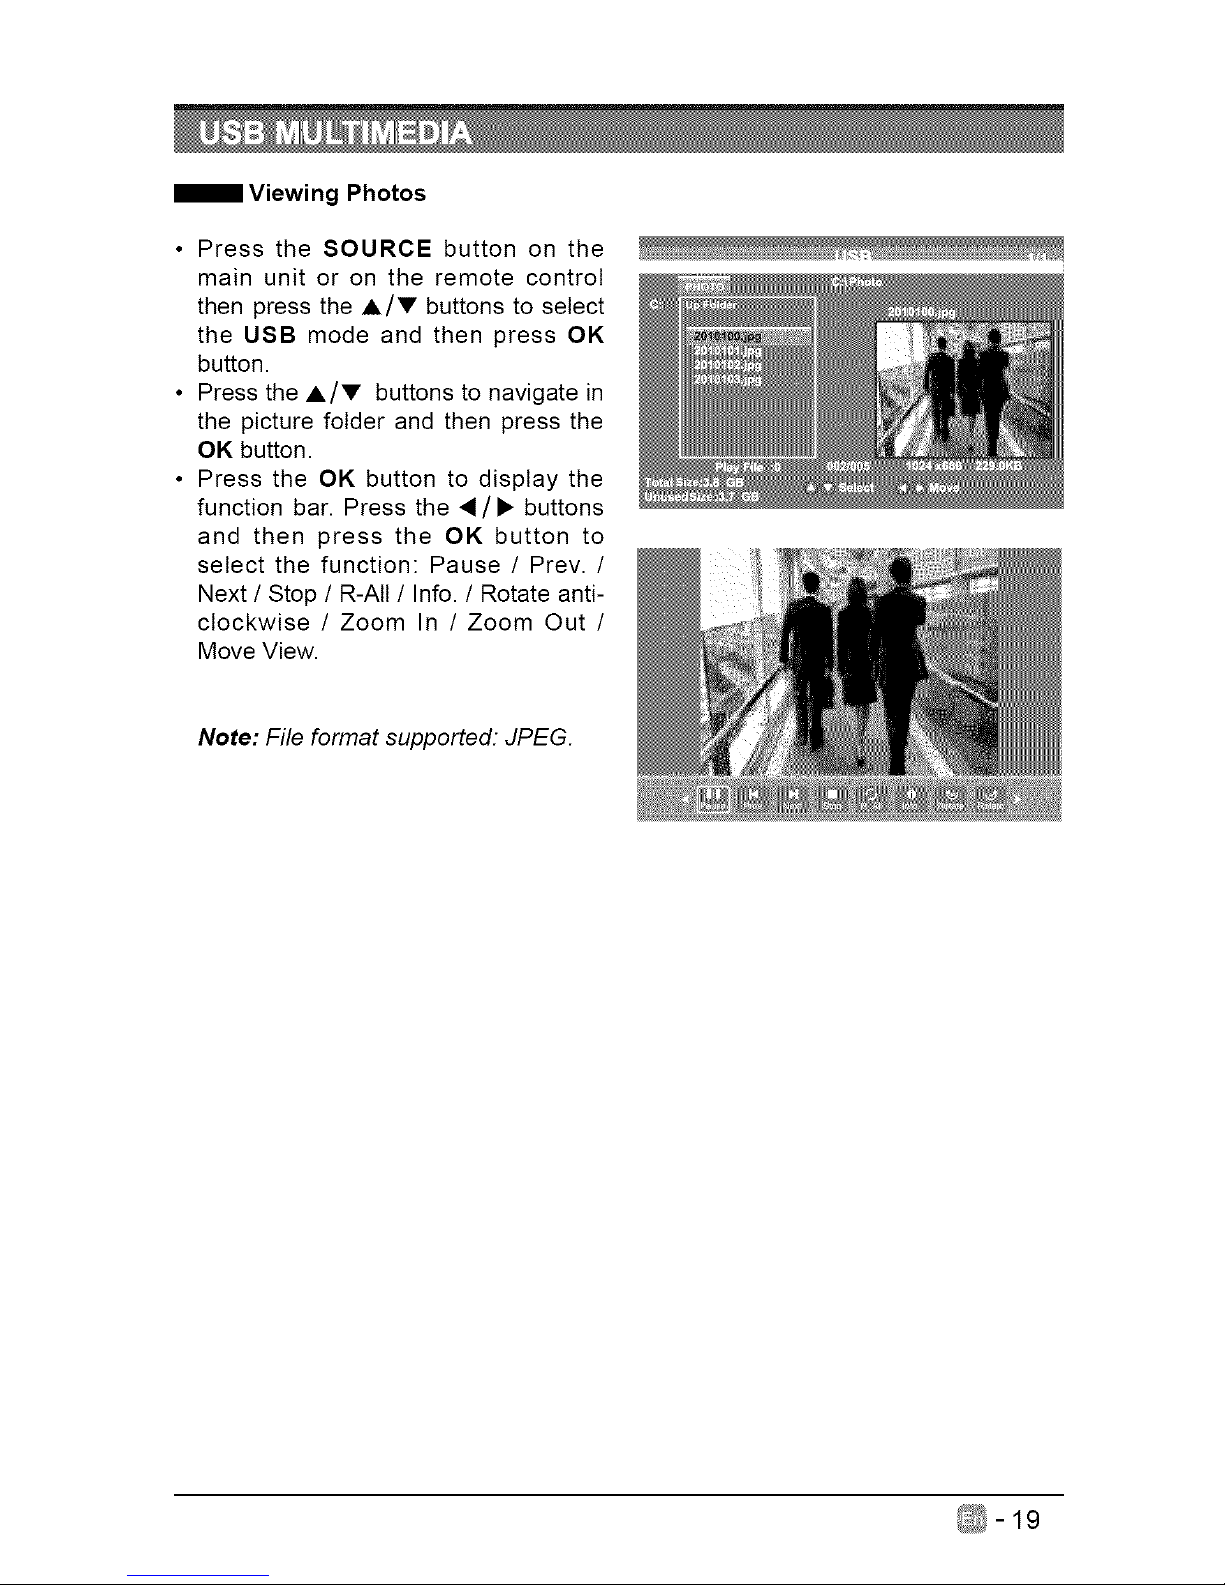
Viewing Photos
• Press the SOURCE button on the
main unit or on the remote control
then press the ,&/V buttons to select
the USB mode and then press OK
button
• Press the A/V buttons to navigate in
the picture folder and then press the
OK button
• Press the OK button to display the
function bar Press the ,_/• buttons
and then press the OK button to
select the function: Pause / Prev /
Next / Stop / R-All / Info / Rotate anti-
clockwise / Zoom In / Zoom Out /
Move View
Note: File format supported: JPEG
_-19
Page 21
Press the MENU button on the main unit or on the remote control and then press 4/1_
buttons to select LOCK menu. Use the 0-9 buttons to input the 4-digit password to enter
the LOCK menu. If used, this option feature can "block" undesirable programming from
appearing on the TV. Parental Control offers the user a wide variety of options and
settings that restrict or "block" the programming that can appear on the TV. Parental Control
allows the user to define which program rating they consider acceptable for younger more
sensitive viewer. It can be preset and turned either on or off by the user who specifies the
secret 4-number code, the password. The number of hours blocked are specified. General
audiences and children blocks should be both programmed into the TV's memory. Separate
different viewer ratings are specified for both TV and the motion picture Industry; both rating
systems should be used and based on the ages of children.
Overview
To ensure complete coverage for all TV programs, (movies and regular TV shows) choose
a rating for MPAA, from the selections below, as well as ratings from the TV Parental
Guidelines Rating Systems below, using the Age Block option for General Audiences, and
for children.In addition, you may wish to add additional restrictions from the content block
menu, and submenus examples below.
Things to Consider before Setting up Parental Control
Determine which rating you consider acceptable to the viewer. (For example,if you choose
TV-PG, more restrictive ratings will be automatically blocked; the viewer will not be able to
see: TV-PG,TV-14,or TV-MA rated programming.) You may block the auxiliary video source
entirely. (Blocks the signal sent by the equipment, such as VCR, connected to the TV Audio/
Video Input Jacks) or remain unblocked, then choose acceptable ratings. Block program
"Content" based on individual parameters such as: Strong Dialog, Bad Language, Sex
Scenes,Violence Scenes or Fantasy. Violent Scenes; in Content BIk option. Select a secret
password, in the Set Password option, using the numbers keys on the remote control.Save
the password, it is the only way to access the Parental Control menu and change rating
setting, or turn off Parental Control.
• You can set different Parental Control viewing restrictions for general audiences and for
children, both can be active at the same time.
• Simply specifying one content block such as Sex Scenes, will not automatically restrict
the programming that appears from the video sources.
• Even If you choose to leave the AUX Inputs unblocked, the ratings you specify will
automatically restrict the programming that appears from the video sources.
• You cannot disable Parental Control by disconnecting the TV from power. Block
hours will be automatically reset to the original block time setting specified if power is
disconnected.
-20
Page 22
Preparation before playing disc
• The display language is set to English. Please refer to setup operation.
• Most functions are operated by the remote control or use the buttons on the front panel.
Preparation
• Turn the TV on and select DVD as the TV input.
• Turn on any related system power if the player has been connected to amplifier equipment,
etc.
PLAY
1. Turn on the power, the display shows "LOADING". (Note: the disc information appears
after several
seconds if a disc has been inserted. Otherwise NO DISC appears.)
2. To insert a disc, place the disc with the printed label side facing the back, into the DVD
slot. The disc
will automatically be loaded into the player.
3. To remove the disc, press the OPEN/CLOSE button and the disc will eject.
4. Press PLAY on playback disc. You may also start playback according to the MENU
screen once the MENU displays. Press ENTER button to start playback. Some discs may
play automatically once loaded.
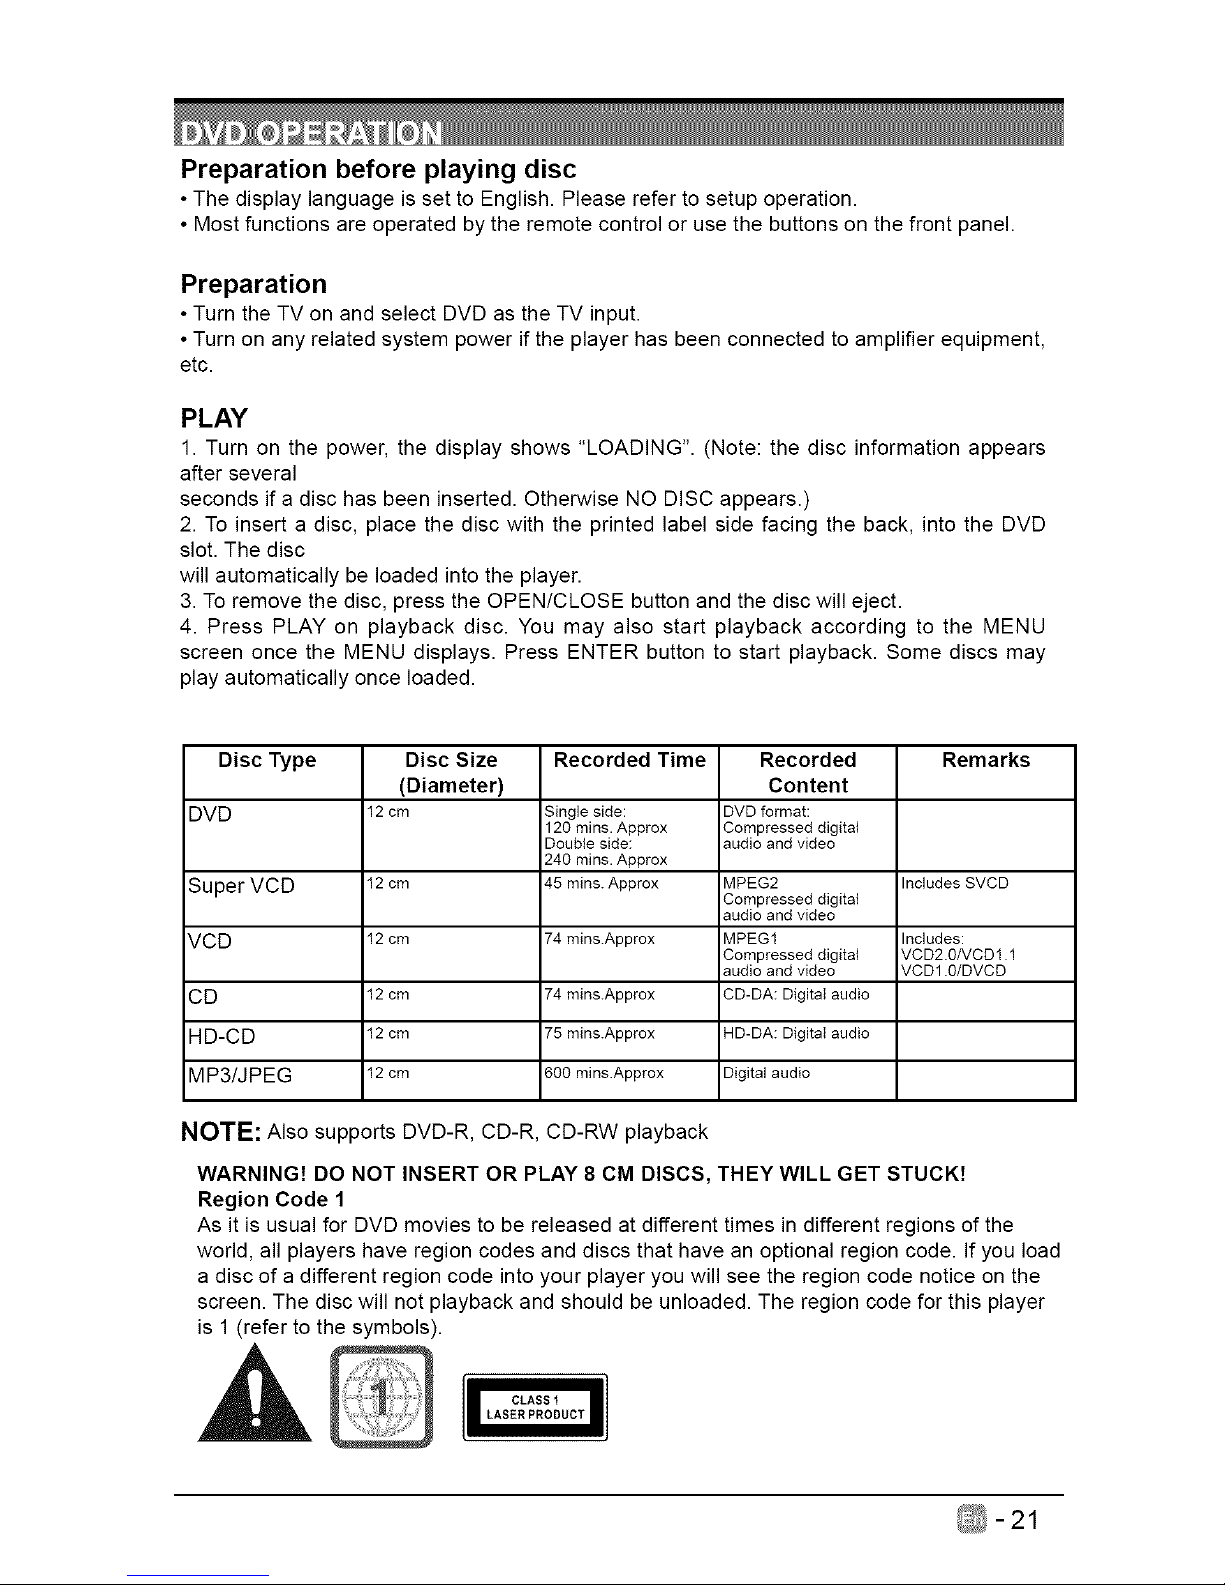
Disc Type Disc Size Recorded Time Recorded Remarks
(Diameter) Content
DVD 12 cm Single side: DVD format:
120 rains. Approx Compressed digital
Double side: audio and video
240 rains. Approx
Super VCD 12 cm 45 rains. Approx MPEG2 Includes SVCD
Compressed digital
audio and video
VOU 12 cm 74 mins.Approx MPEG1 Includes:
Compressed digital VCD2.0/VCD1.1
audio and video VCD1.0/DVCD
CU 12 cm 74 mins.Approx CD-DA: Digital audio
mU-OU 12 cm 75 mins.Approx HD-DA: Digital audio
MP3/JPEG 12 cm 600 mins.Approx Digital audio
NOTE: Also supports DVD-R, CD-R, CD-RW playback
WARNING! DO NOT INSERT OR PLAY 8 CM DISCS, THEY WILL GET STUCK7
Region Code 1
As it is usual for DVD movies to be released at different times in different regions of the
world, all players have region codes and discs that have an optional region code. If you load
a disc of a different region code into your player you will see the region code notice on the
screen. The disc will not playback and should be unloaded. The region code for this player
is 1 (refer to the symbols).
-21
Page 23

DVD Operation
• STOP
Press STOP button to stop playing (TV show "_- , I1"). When playback is stopped the unit keeps in
memory the point where STOP was pressed (resume function). Press PLAY again, and play will resume
again at this point. Press the STOP button twice, the resume function will be cancelled. The resume
function is suitable for discs showing playing time during playback.
• PRESS I_/NEXT H,I
Press PREV button or NEXT button on the remote control when playing a disc, a chapter (DVD) or a
track (CD) to skip backward or forward correspondingly each time the button is pressed.
Note: When skipping backward, playback starts at the beginning of the previous track, NOT the beginning
of the current track.
• FB<</FF_
Press the FB/FF button on the remote control during playback, the disc will be played forward or
backward correspondingly. The forward or reverse speed is relatively slow at first. When pressed again,
the speed becomes faster. The more times the buttons are pressed, the faster the Fast Forward or
Reverse speed will be. There are five levels of speed: X2, X4, X8, X16 and X32. To return to normal play,
press the PLAY button on the player or the remote control.
• SETUP
Press the SETUP button during play, the player will enter into still picture mode. If the button is pressed
again the disc is advanced by one frame (step). When the button is continually pressed, there will be
consecutive frame advance. To return to normal play, press the PLAY button on the player or the remote
control.
• PAUSE
Press the pause button to stop playing. Restore play by pressing the PLAY button again.
• NUMBER (0-9, 10+) Buttons
Press the number (0-9) buttons, to go directly to the desired track or chapters while a disc is being
played. For a track or chapter over 10, press 10+ first and then the 0-9 button.
• MUTE
Press the MUTE button during play, the player shows mute and there is no audio output (silence).
Press again to cancel MUTE.
• VOL+/VOL-Press
the VOL+/VOL- button to change the volume for audio output.
• A-B
Press the A-B button during playback at the point where repeat play is to commence (A), then press
again at the point where repeat play is to be concluded (B). Repeat playback between point (A) and point
(B) starts. Press A-B button once more where TV screen appears REP OFF to return to normal play.
• REPEAT
Press the repeat button to choose to repeat play chapter or title (DVD) and play single audio or full disc
(VCD, CD, MP3). Note: Some VCDs do not have repeat function with PBC ON state.
• SLOW
When playing SVCD, VCD, DVD discs, press SLOW to select slow speed playing. Press PLAY/PAUSE to
resume to normal play.
- 22
Page 24
DVD Operation
• GOTO
During play, press the GO TO button on the remote control. You can search the disc based on its title/
chapter/track. Press the GO TO button and a search menu will be displayed. Use the_ or _'button to
select the search item/time/title/chapter. The selection will be shown as highlighted. Use the number
button to select the search item time/title/chapter, and press the ENTER button to play.
For example:
• Time search (press "GO TO" button twice while playing a DVD): To search 16 min 50 seconds, input 1, 6,
5 and 0. To search 1 hour 14 minutes: input 1, 1,4, 0, 0. Title/chapter search: To search title 1, chapter 2,
input 1 inthe highlight title column, move the cursor right to the highlighted area and input 2.
Notes:
• For some DVD discs which cannot be searched, "invalid" will appear on the TV screen.
• Input the time, title and chapter of the disc to be searched.
• For VCDs with the PBC mode ON, it can only search for a time.
• AUDIO
Press AUDIO button to switch the audio output among L/L, R/R and L/R.
• MENU
Press MENU button to show the setup information of DVD disc source.
• A
Press OPEN/CLOSE when power is on and insert disc with label towards the back.
Press OPEN/CLOSE to close.
• TITLE
When playing the DVD, press TITLE to return to the main title page.
• SUBTITLE (FOR DVD AND SUPER VCD DISCS)
To change the subtitle language, refer to Language Setup (page 28).
-23
Page 25
• Supporting DVD Format
1. Play (for DVD/Super VCDIVCD/CD/CD-G/HD-CD and MP3/JPEG discs). For DVD disc, press the II
button from the root or title menu. While playing the DVD, play a favourite title directly by the title
selection by pressing the TITLE button. For Super VCD and VCD discs, while playing the disc, play a
favourite track by using numeric buttons. For CD, CD-G and HD-CD discs, while playing the disc, play a
favourite track by using numeric buttons. For MP3/JPEG discs, play a favourite track by using numeric
buttons from the content menu. If the input track numbers are not valid, it will not function.
Note: From track 1-10, use numeric buttons directly; for tracks over 10, Press 10+ button first.
(e.g. Track 15, press 10 + 5).
2. Previous/Next (for DVD/Super VCD/VCD/CD/CD-G/HD-CD and MP3/JPEG discs)
While playing the disc:
Press I_ button to play the previous Title/Chapter/Track.
Press I_ button to play the next Title/Chapter/Track.
For Super VCD and VCD discs, in PBC OFF status;
If current track is the first one, press _ button to stop the playback.
If the current track is the last one, press I_ button to stop the playback.
For DVD discs, the above functions may vary due to different DVD disc's structure.
3. Forward/Backward (for DVD/Super VCD/CD/CD-G/HD-CD and MP3)
While playing the disc, you can use the skip forward or backward function.
There are 4 speeds for forward. Press _ to toggle between different speeds in sequence.
(FORWARD X2/FORWARD x4/FORWARD X8/FORWARD X20/Play).
Press I_11to resume normal speed.
For CD, HD-CD, MP3, backward also has audio output.
For DVD discs, if moving backward to the first title/chapter, it will resume from the beginning.
For Super VCD and VCD discs, in PBC ON status, if moving backward to the first track, it will start from
the beginning.
NOTE: During Forward or Backward functions, the sound will be off.
4. Pause (for DVD/Super VCDIVCD/CD/CD-G/HD-CD and MP3/JPEG discs)
FOR CD, CD-G, HD-CD and MP3/JPEG discs, press the Ibll button to pause; press the Ibll button to
resume. For DVD, Super VCD, VCD discs, press the I,.11button to pause; press the I,.11button to resume.
5. Repeat (for DVD/Super VCD/VCD/CD/CD-G/HD-CD and MP3/JPEG discs)
Press REPEAT button once to display the current repeat mode.
For Super VCD, VCD, CD, CD-G, HD-CD, discs, while playing in sequence, you may use the repeat
playback. There are 2 repeat modes, press REPEAT to toggle between different modes in sequence.
(REPEAT (OFF)/REPEAT (1)/REPEAT (ALL)).
For DVD discs, you may setup the repeat playback mode. There are 3 repeat modes, press REPEAT to
toggle between different modes in sequence (REP: (OFF)/REP: (CHAPTER)/REP (TITLE)/REP: (ALL)).
For MP3/JPEG discs, while playing the disc, you may use the repeat playback. There are 3 repeat
modes, press REPEAT to toggle between different modes in sequence (REPEAT (OFF)/REPEAT (DIR)/
REPEAT(ALL).
6. INFO (for DVD/Super VCD/VCD/CD/CD-G/HD-CD and MP3/JPEG discs)
Press INFO button to activate the on screen roll-down menu for the current Title, Chapter, Time, and
other information.
- 24
Page 26
DVD Functions
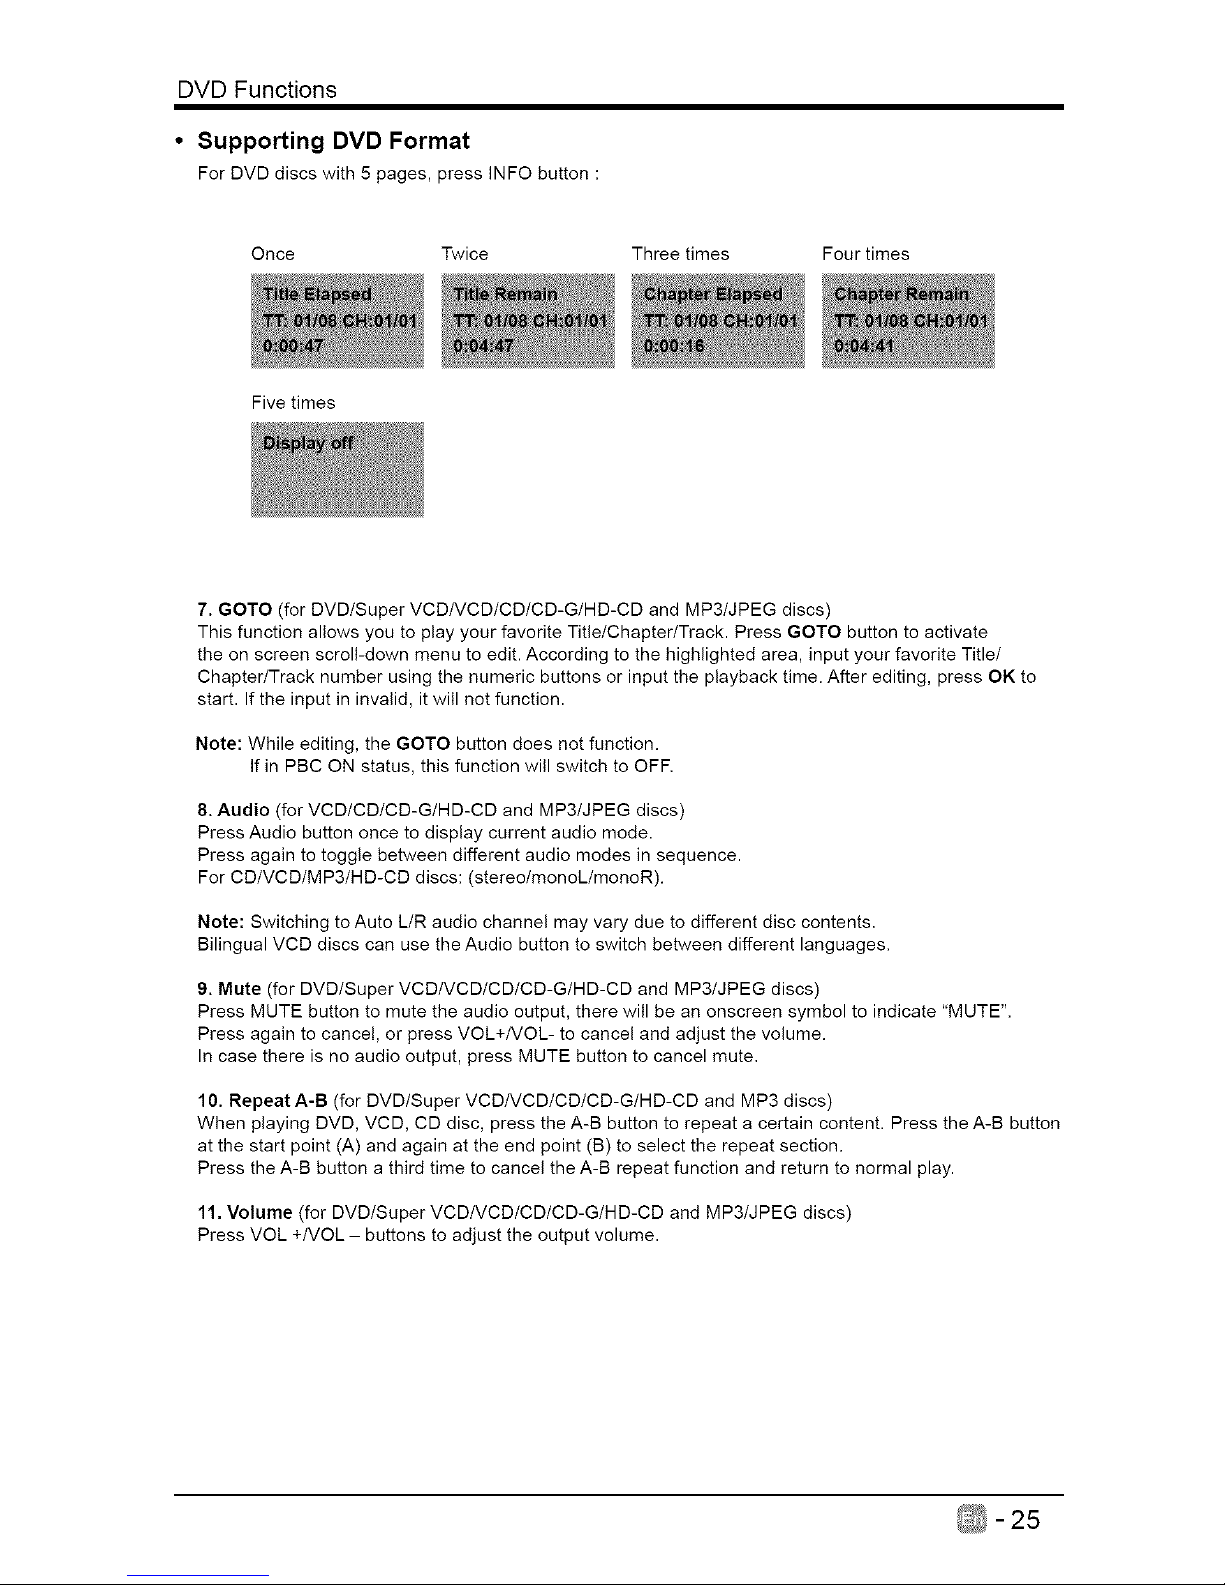
• Supporting DVD Format
For DVD discs with 5 pages, press INFO button :
Once Twice Three times Four times
Five times
7. GOTO (for DVD/Super VCDNCD/CD/CD-G/HD-CD and MP3/JPEG discs)
This function allows you to play your favorite Title/Chapter/Track. Press GOTO button to activate
the on screen scroll-down menu to edit. According to the highlighted area, input your favorite Title/
Chapter/Track number using the numeric buttons or input the playback time. After editing, press OK to
start. If the input in invalid, it will not function.
Note: While editing, the GOTO button does not function.
If in PBC ON status, this function will switch to OFF.
8. Audio (for VCD/CD/CD-G/HD-CD and MP3/JPEG discs)
Press Audio button once to display current audio mode.
Press again to toggle between different audio modes in sequence.
For CD/VCD/MP3/HD-CD discs: (stereotmonoL/monoR).
Note: Switching to Auto L/R audio channel may vary due to different disc contents.
Bilingual VCD discs can use the Audio button to switch between different languages.
9. Mute (for DVD/Super VCDNCD/CD/CD-G/HD-CD and MP3/JPEG discs)
Press MUTE button to mute the audio output, there will be an onscreen symbol to indicate "MUTE".
Press again to cancel, or press VOL+/VOL- to cancel and adjust the volume.
In case there is no audio output, press MUTE button to cancel mute.
10. Repeat A-B (for DVD/Super VCDIVCD/CD/CD-G/HD-CD and MP3 discs)
When playing DVD, VCD, CD disc, press the A-B button to repeat a certain content. Press the A-B button
at the start point (A) and again at the end point (B) to select the repeat section.
Press the A-B button a third time to cancel the A-B repeat function and return to normal play.
11. Volume (for DVD/Super VCD/VCD/CD/CD-G/HD-CD and MP3/JPEG discs)
Press VOL +/VOL - buttons to adjust the output volume.
-25
Page 27
DVD Functions
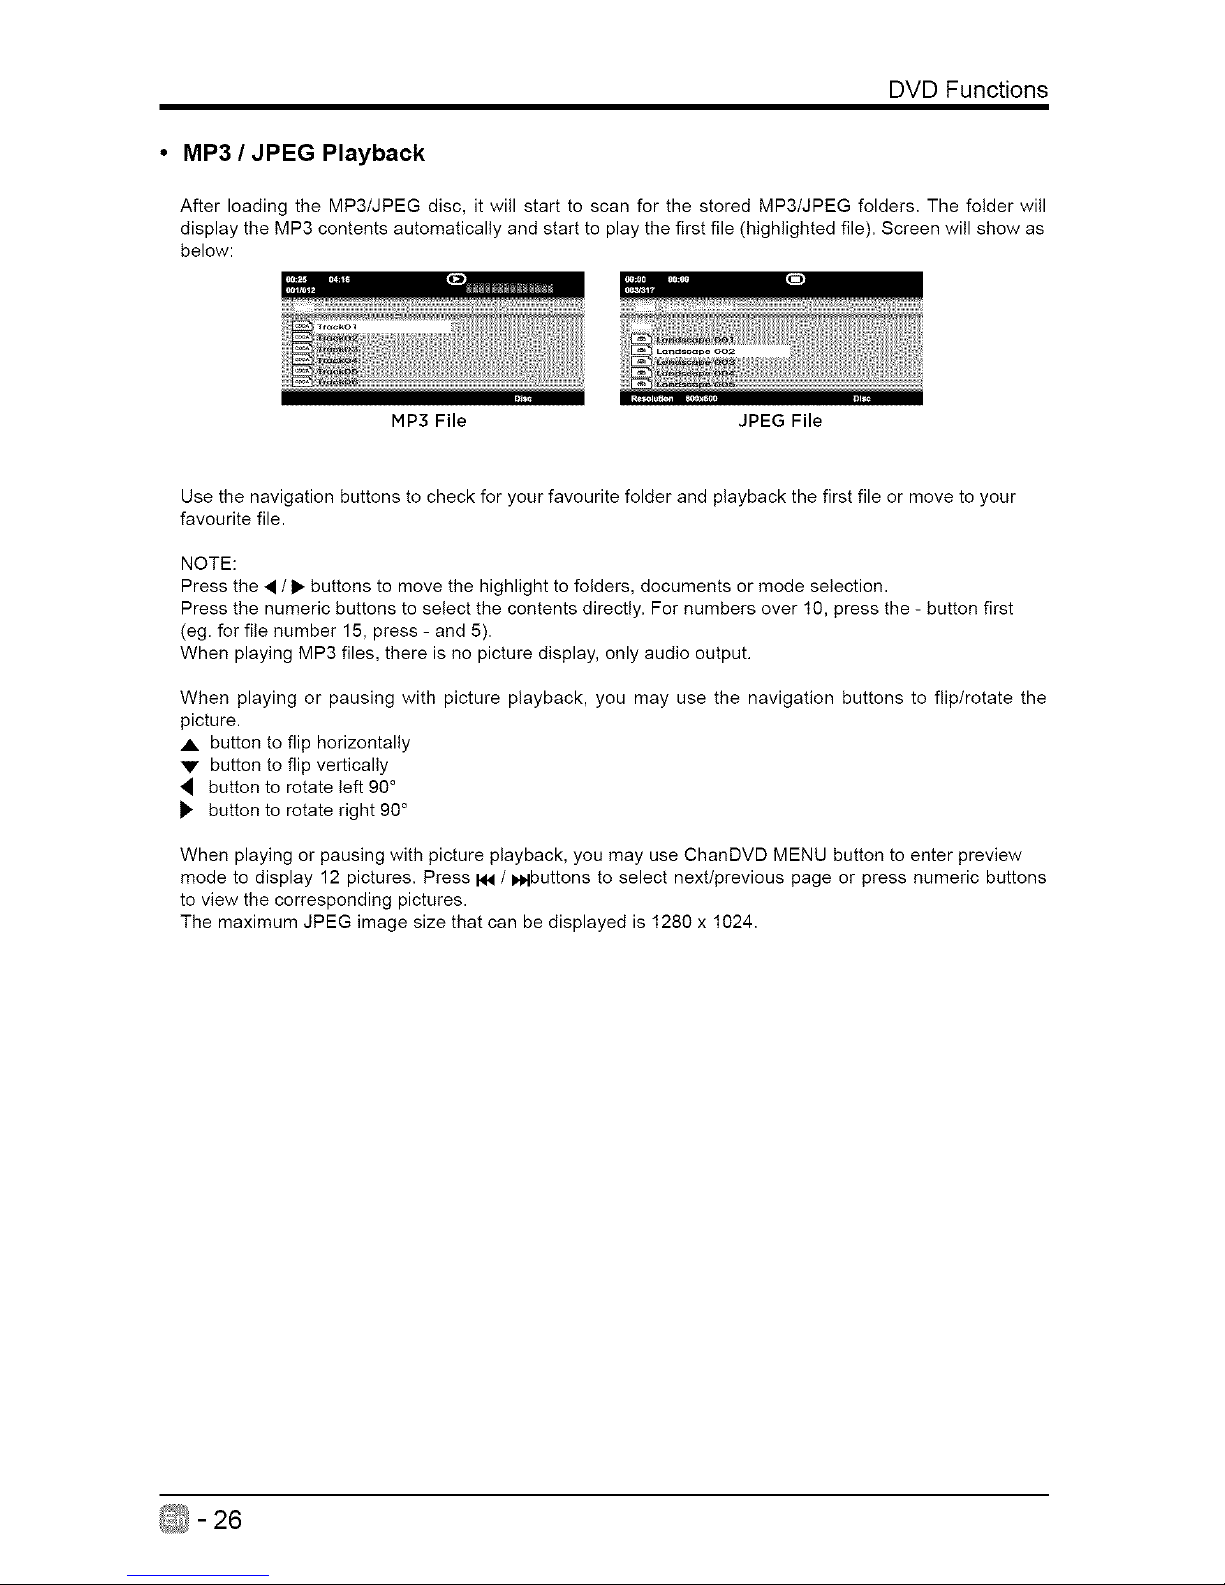
• MP3 / JPEG Playback
After loading the MP3/JPEG disc, it will start to scan for the stored MP3/JPEG folders, The folder will
display the MP3 contents automatically and start to play the first file (highlighted file), Screen will show as
below:
MP3 File JPEG File
Use the navigation buttons to check for your favourite folder and playback the first file or move to your
favourite file.
NOTE:
Press the • / I_ buttons to move the highlight to folders, documents or mode selection.
Press the numeric buttons to select the contents directly. For numbers over 10, press the - button first
(eg. for file number 15, press - and 5).
When playing MP3 files, there is no picture display, only audio output.
When playing or pausing with picture playback, you may use the navigation buttons to flip/rotate the
picture.
A. button to flip horizontally
V button to flip vertically
button to rotate left 90 °
_. button to rotate right 90 °
When playing or pausing with picture playback, you may use ChanDVD MENU button to enter preview
mode to display 12 pictures. Press I_ / i,_lbuttons to select next/previous page or press numeric buttons
to view the corresponding pictures.
The maximum JPEG image size that can be displayed is 1280 x 1024.
-26
Page 28
DVD Functions
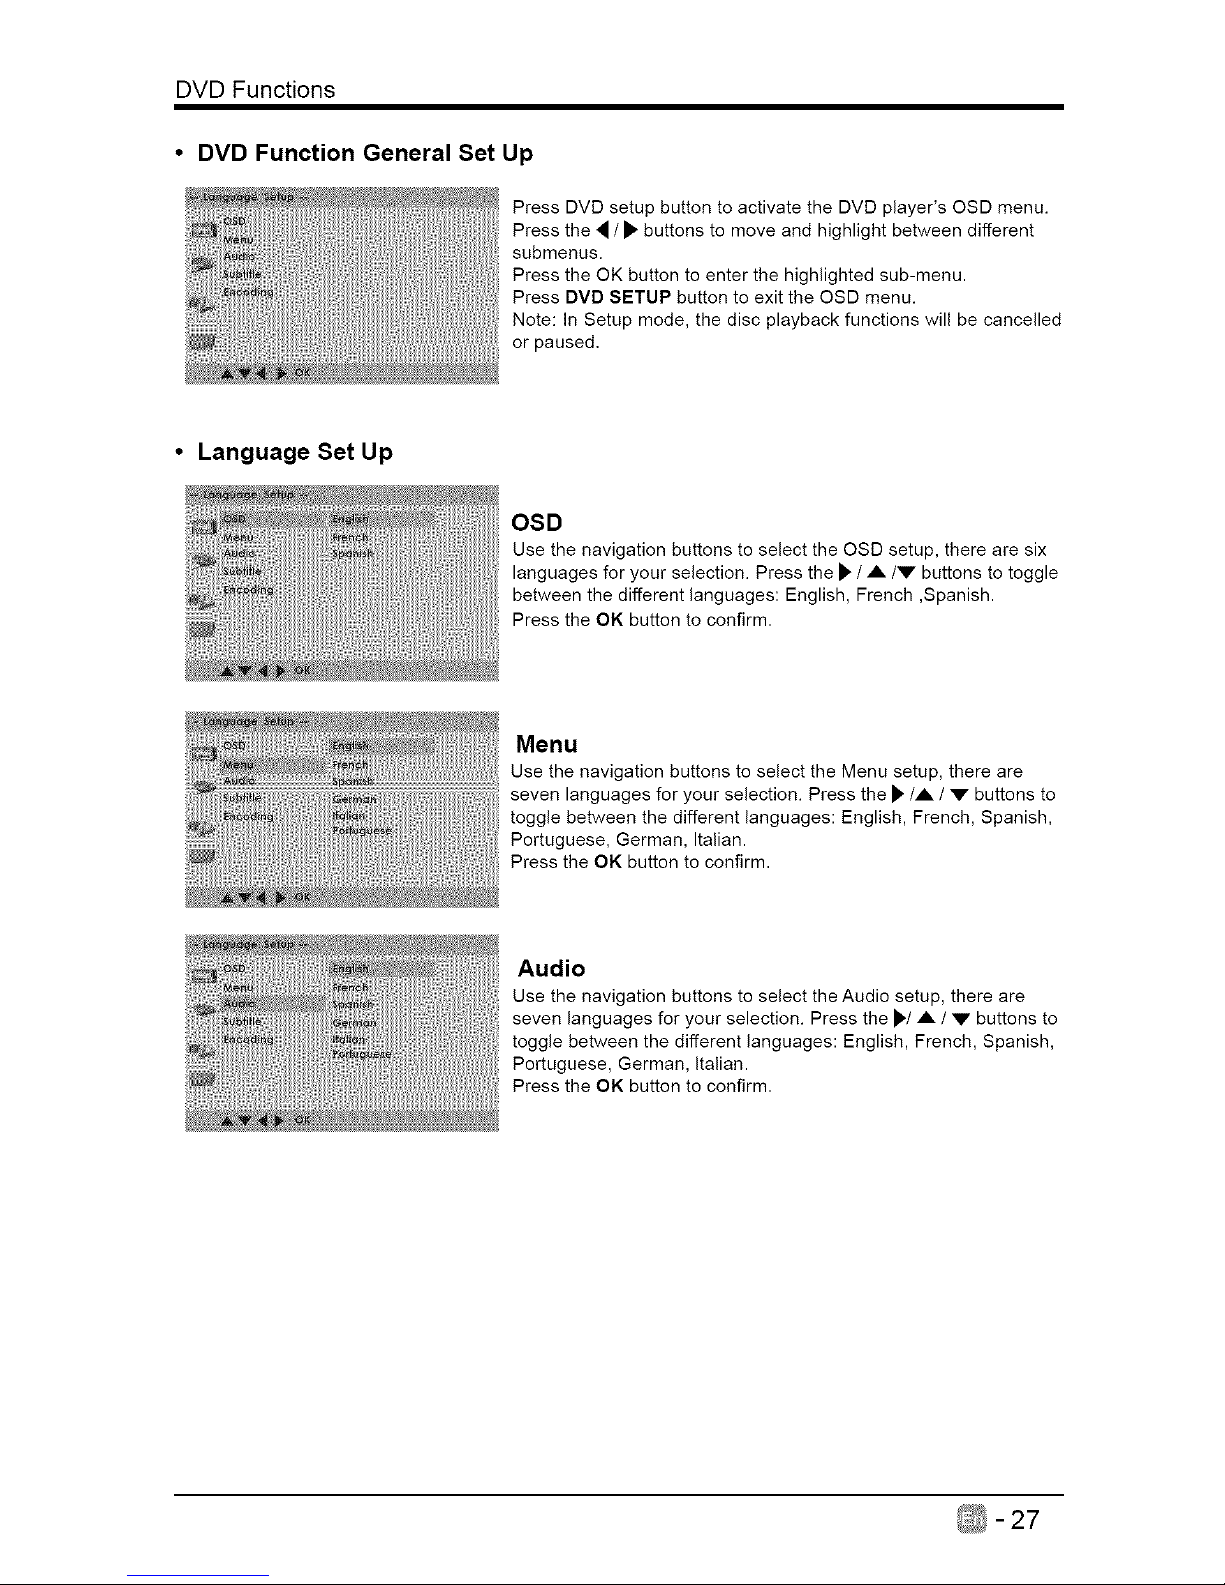
• DVD Function General Set Up
Press DVD setup button to activate the DVD player's OSD menu.
Press the 4 / • buttons to move and highlight between different
submenus.
Press the OK button to enter the highlighted sub-menu.
Press DVD SETUP button to exit the OSD menu.
Note: In Setup mode, the disc playback functions will be cancelled
or paused.
• Language Set Up
OSD
Use the navigation buttons to select the OSD setup, there are six
languages for your selection. Press the _ / A/V buttons to toggle
between the different languages: English, French ,Spanish.
Press the OK button to confirm.
Menu
Use the navigation buttons to select the Menu setup, there are
seven languages for your selection. Press the _/A / 'V" buttons to
toggle between the different languages: English, French, Spanish,
Portuguese, German, Italian.
Press the OK button to confirm.
Audio
Use the navigation buttons to select the Audio setup, there are
seven languages for your selection. Press the _./A / V buttons to
toggle between the different languages: English, French, Spanish,
Portuguese, German, Italian.
Press the OK button to confirm.
-27
Page 29
DVD Functions
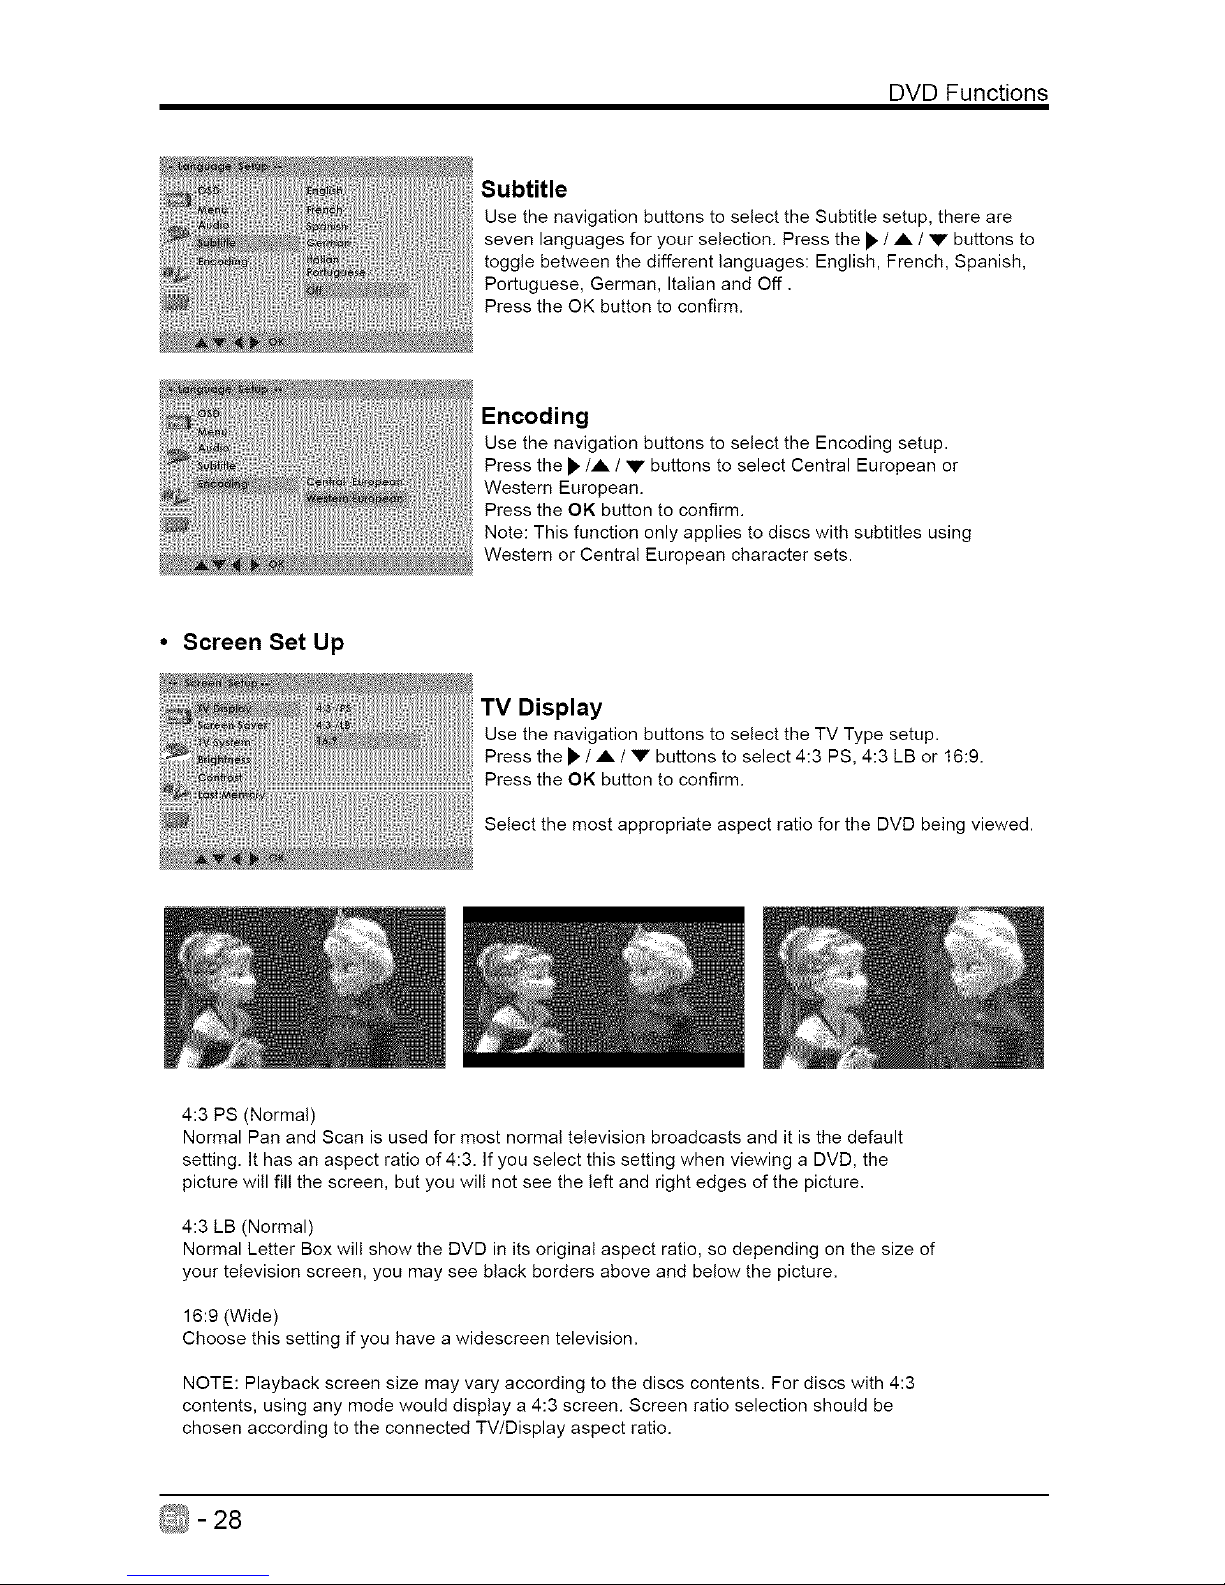
Subtitle
Use the navigation buttons to select the Subtitle setup, there are
seven languages for your selection. Press the _. / A / V buttons to
toggle between the different languages: English, French, Spanish,
Portuguese, German, Italian and Off.
Press the OK button to confirm.
Encoding
Use the navigation buttons to select the Encoding setup.
Press the _,/A / V buttons to select Central European or
Western European.
Press the OK button to confirm.
Note: This function only applies to discs with subtitles using
Western or Central European character sets.
• Screen Set Up
TV Display
Use the navigation buttons to select the TV Type setup.
Press the _, / A / V buttons to select 4:3 PS, 4:3 LB or 16:9.
Press the OK button to confirm.
Select the most appropriate aspect ratio for the DVD being viewed.
4:3 PS (Normal)
Normal Pan and Scan is used for most normal television broadcasts and it is the default
setting. It has an aspect ratio of 4:3. If you select this setting when viewing a DVD, the
picture will fill the screen, but you will not see the left and right edges of the picture.
4:3 LB (Normal)
Normal Letter Box will show the DVD in its original aspect ratio, so depending on the size of
your television screen, you may see black borders above and below the picture.
16:9 (Wide)
Choose this setting if you have a widescreen television.
NOTE: Playback screen size may vary according to the discs contents. For discs with 4:3
contents, using any mode would display a 4:3 screen. Screen ratio selection should be
chosen according to the connected TV/Display aspect ratio.
-28
Page 30
DVD Functions
iiiiiiiiiiii
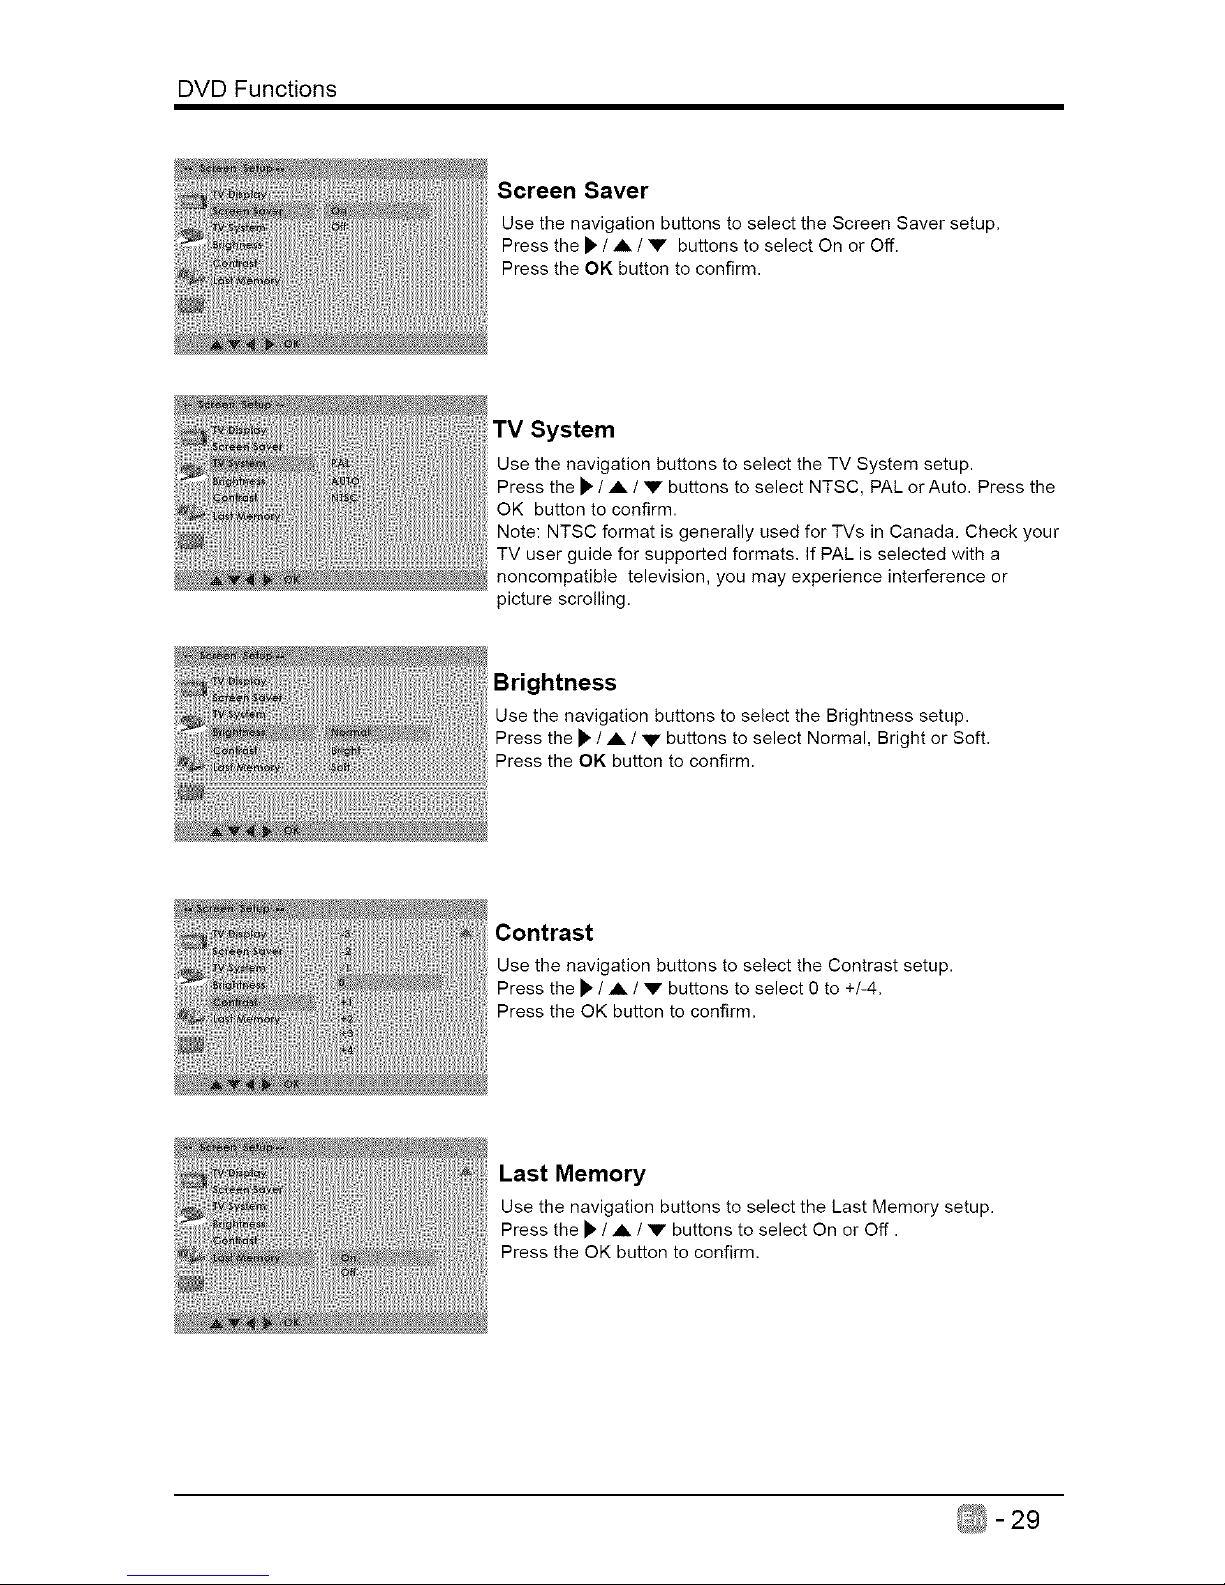
Screen Saver
Use the navigation buttons to select the Screen Saver setup.
Press the I_ / ,A / V buttons to select On or Off.
Press the OK button to confirm.
TV System
Use the navigation buttons to select the TV System setup.
Press the I_ / ,A / V buttons to select NTSC, PAL or Auto. Press the
OK button to confirm.
Note: NTSC format is generally used for TVs in Canada. Check your
TV user guide for supported formats, If PAL is selected with a
noncompatible television, you may experience interference or
picture scrolling.
Brightness
Use the navigation buttons to select the Brightness setup.
Press the I_/ A / V buttons to select Normal, Bright or Soft.
Press the OK button to confirm.
Contrast
Use the navigation buttons to select the Contrast setup.
Press the iI, / A / V buttons to select 0 to +/-4,
Press the OK button to confirm,
Last Memory
Use the navigation buttons to select the Last Memory setup.
Press the iI' / A / V buttons to select On or Off.
Press the OK button to confirm,
-29
Page 31

DVD Functions
• Audio Set Up
Downmix
Use the navigation buttons to select the Downmix setup.
Press the I_"/,A / V buttons to select Lt/Rt or Lo/Ro.
Press the OK button to confirm,
• Custom Set Up
Parental Control
Use the navigation buttons to select the Parental Control setup.
Press the II, button or OK to enter password, then select the V-chip
grade or Off.
Password
Use the navigation buttons to select the Password setup.
Press the I_ or OK button to change the password, then select the
V-chip grade or Off.
The default setting is 8899.
- 30
Page 32

DVD Functions
Default
Use the navigation buttons to select the Default setup.
Press the I_ button to select Reset.
Press the OK button to return to the factory setup,
-31
Page 33

PARENTAL CONTROL
• Motion Picture Association of America (MPAA) Rating System
G General Audiences Content not offensive to most viewers.
Parental Guidance Content is such that parents may not want their
PG
Suggested children to view the program.
Program is inappropriate for preteens, with a greater
Parents Strongly degree of offensive material suggested than a PG
PG-13 Cautioned
rated program.
Not for children under 17-contains strong element of
R Restricted
sex and/or violence.
No children under Not for children under 17-under any circumstances.
NC-17
age 17 Contains strong sexual content.
X Hard Core Films Same as NC-17 rating.
No Rating No Rating MPAA did not rate
• TV Parental Guideline Rating System
TV-Y All Children Content not offensive to most viewers.
Directed to Older Considered suitable for children over 7- may contain
TV-Y7
Children fantasy violence scenes.
Considered suitable for all audience; children may
TV-G General Audience
watch unattended.
Parental Guidance Suggested unsuitable for younger children-may
TV-PG Suggested contain suggestive language, bad language, sex and
violence scenes.
Parents Strongly unsuitable for children under 14 - may contain strong
TV-14
Cautioned language, bad language, sex, and violence scenes.
Mature Audience Adults only- may contain strong language, bad
TV-MA
Only language, sex, and violence scenes.
Canadian Rating:
Canadian English is used throughout all English-speaking Canada (C, C8+,G, PG, 14+, 18+).
Canadian French is used in Quebec (G,8 ans+, 13 ans+, 16 ans+, 18 ans+)
Note: The V-Chip will automatically block certain categories that are "more restrictive'.lf you block TV-Y
category, then TV-Y7 will be automatically blocked. Similarly, if you block TV-G category, then all the
categories in the "young adult" will be blocked (TV-G, TV-PG, TV-14,and TV-MA).
- 32
Page 34

If your TV does not operate normally or cannot be turned on, please check
the following troubleshooting questions. Remember also to check any other
connected electronic device, such as DVD or Btu-ray player to pinpoint the
problem. If the TV still fails to operate normally, please contact technical support.
The TV does not respond
when pressing any
buttons
TV cannot be switched on
The remote control does
not work
Power is suddenly turned
off
IIIIIIIIII
• The TV may freeze up during use. Disconnect the power
cord from the power socket for a few minutes. Reconnect the
power cord and try to operate it again as usual.
• Check that the TV is connected to the power supply.
• Make sure all connected AV devices are switched off before
switching on your TV.
• Check to see if there are any objects between the TV and the
remote control causing an obstruction. Ensure that you are
pointing the remote control directly at the TV.
• Ensure that the batteries are installed with the correct polarity
(+ to +, - to -).
• Install new batteries.
• Check the power of the TV. The power supply maybe
interrupted.
• Check if the sleep timer is set.
• Check whether the Auto Standby is activated.
• Check whether the TV is switched on.
No picture & No Sound • Try another channel. The problem may be caused by the
broadcaster.
• This is normal; the image is muted during the TV startup
Picture appears slowly
process. Please contact your service centre if the picture has
after switching on not appeared after five minutes.
• Adjust the settings in the PICTURE menu.
No or poor color or poor • Try another channel. The problem may be caused by the
picture broadcaster.
• Check if video cables are connected properly.
Horizontal/Vertical bar or • Check for local interference such as an electrical appliance
picture shaking or power tool.
• The station or cable channel may be experiencing problems;
tune to another station.
Poor reception on some • Station signal may be weak, reposition the antenna for better
channels
reception.
• Check for sources of possible interference.
Lines or streaks in
• Check antenna (change the position of the antenna.)
pictures
No pictures when
• Check if the input source is HDMI1/HDMI2/HDMI3.
connecting HDMI
Pictures appear in wrong • Adjust the Aspect Ratio settings in the SETUP menu or press
ratio the ASPECT button on the remote control.
_ -33
Page 35

TROUBLESHOOTING
Picture OK but no sound
• Press the VOL +/- buttons.
• Sound muted? Press the MUTE button.
• Try another channel. The problem may be caused by the
broadcaster.
No output from one of the
• Adjust the Balance settings in the AUDIO menu.
speakers
• A change in ambient humidity or temperature may result in
Unusual sound from
an unusual noise when the TV is switched on or off and does
inside the TV
not indicate a fault with the TV.
No sound when
• Check if the input source is HDMII/HDMI2/HDMI3.
connecting HDMI
• Keep the RF coaxial cable away from the other connected
Audio noise
cables.
• Select the SET Password setting in the LOCK menu, then
Lost password enter the following master password "8899". The master
password clears your previous password and allows you to
enter a new password.
• Adjust the resolution, horizontal frequency, or vertical
frequency.
The signal is out of range
(invalid format)
Vertical bar or stripe on
background & Horizontal
Noise & Incorrect position
Screen color is unstable
or show a single color
• Use Auto configures or adjust clock, phase, or H/V position.
• Check the signal cable.
• Reinstall the PC video card.
• Do not use your TV in areas that are too hot or too cold, because the cabinet may
warp or the screen may malfunction. Your TV works best in temperatures that are
comfortable to you.
• Storage temperatures are 32° to 122°F(0 ° to 50°C)
• Working temperatures are 32° to 95°F(0 °to 35°C)
• Do not place your TV in direct sunlight or near a heat source
- 34
Page 36

Panel Size 24 inch diagonally
Display Type LED
Panel Technology TFT
Panel 60 Hz Vs. 120 Hz 60 Hz
Display Resolution 1080P
HDMI Support Up to 1080P
Panel Resolution 1920 x 1080
Aspect Ratio 16:9
Dynamic Contrast Ratio-Panel 1000:1
Brightness (Centre Typ.) Cd/M 2 200
Response Time (G To G) 9.5 ms
Lamp Life (Typ. Hours) 30,000 hours
Horizontal Viewing Angle (At CR>I 0) 165
Vertical Viewing Angle (At CR>10) 160
Wall-mount(LxW-mm) 100"100 VESA(mm)
The FCC Wants You to Know
This equipment has been tested and found to comply with the limits for a Class B digital
device, pursuant to Part 15 of the FCC Rules. These limits are designed to provide reasonable
protection against harmful interference in a residential installation.
This equipment generates, uses, and can radiate radio frequency energy and, if not installed
or used in accordance with the instructions, may cause harmful interference to radio
communications. However, there is no guarantee that interference will not occur in a particular
installation.
If this equipment does cause harmful interference to radio or television reception, which can
be determined by turning the equipment off and on, the user is encouraged to try to correct
the interference by one or more of the following measures: 1) reorient or relocate the receiving
antenna; 2) increase the separation between the equipment and the receiver; 3) connect the
equipment to an outlet on a circuit different from that to which the receiver is connected; 4)
consult the dealer or an experienced radio/TV technician for additional suggestions.
Any changes or modifications not expressly approved by the party responsible for compliance
could void the user's authority to operate the equipment. Where shielded interface cables have
been provided with the product or specified additional components or accessories elsewhere
defined to be used with the installation of the product, they must be used in order to ensure
compliance with FCC regulation.
Canadian DOC statement
Standard Television Receiving Apparatus Canada BETS-7
This Class B digital apparatus complies with Canadian ICES-003.
-35
Page 37

52 inches and Under Screen Size Models (the"Product")
This Product (including any accessories included in the original packaging) as supplied and distributed in new condition, is
warranted by SEIKI LLC (SEIKI) to the original consumer purchaser against defects in material and workmanship CWarranty")
as follows:
1. REPLACEMENT : For a period of one (1) year from date of original consumer purchase, if this Product or any part is
determined by SEIKI, or a SEIKI authorized service provider, to be defective, SEIKI will replace the Product with new or re-
certified product of similar or better specification, at SEIKI's option, at no charge to the original consumen After the one (1)
year Warranty period, you must pay for all cost of Product replacement charges.
Once the Product is replaced, the warranty resume one (1) year period from the date of original consumer purchase; and
will not be extended for the replacement process. Advanced Replacement option is available only with avalid US credit card
for guarantee purpose.
2. PARTS : For a period of one (1) year from the date of original consumer purchase, SEIKI will supply, at no charge to the
original consumer, new, rebuilt or refurbished replacement parts in exchange for defective parts. After the one (1) year
Warranty period, you must pay for the costs of all parts.
3. SHIPPING COSTS: Notwithstanding the foregoing, the original consumer isresponsible forany shipping charges incurredto
ship the Product or part(s) to SEIKI or to an SEIKI authorized customer service provider, for diagnosis, repair or replacement.
The consumer is responsible for securely packing the Product and utilizing a reliable carrier to transport to SEIKI authorized
service providen
To obtain Warranty Service and Troubleshooting information call our toll free customer service line at:
1-855-MY-SEIKI (1-855-697-3454)
Please have your model and serial number available along with your date of purchase.
You can also visit us online and REGISTER your SEIKI product at:
www.SEIKI.com
To receive Warranty service, the original consumer purchaser must contact SEIKI for problem determination and service
proced ures. Proof of purchase in the form of a bill of sale or receipted invoice, evidencing that the Product is within the
applicable Warranty period(s), MUST be presented to SEIKI, or an authorized customer service provider, in order to
obtain the requested service.
Exclusions and Limitations
This Warranty covers manufacturing defects in materials and workmanship encountered in the normal, non-commercial use of
the Product, and does not cover (a) damage or failure caused by or attributable to abuse, misuse, failure to follow instructions,
improper installation or maintenance, alteration, accident, or excess voltage or current; (b) improper or incorrectly performed
repairs by non-authorized service facilities; (c) onsite consumer instruction or adjustments; (d) transportation, shipping, delivery,
insurance, installation or set-up costs; (e) costs of product removal, transportation or reinstallation costs; (f) ordinary wear and
tear, cosmetic damage or damage due to acts of nature, accident; (g) commercial use of the Product; (h) modification of, or to any
part of the Product. In addition, this Warranty does not cover images"burnt"into the screen. This Warranty applies to the original
consumer only and does not cover products sold AS IS or WITH ALL FAULTS, or consumables (e.g., fuses, batteries, bulbs etc.), and
the Warranty is invalid if the factory-applied serial number has been altered or removed from the Product. This Warranty is valid
only in the United States and Canada, and only applies to products purchased and serviced in the United States and Canada. All
replaced parts and products, and products on which a refund is made, become the property of theWarranton
NO WARRANTIES, WHETHER EXPRESS OR IMPLIED, INCLUDING, BUT NOT LIMITED TO, ANY IMPLIED WARRANTIES OF
MERCHANTABILITY OR FITNESS FOR A PARTICULAR PURPOSE, OTHER THAN THOSE EXPRESSLY DESCRIBED ABOVE
SHALL APPLY. THEWARRANTOR FURTHER DISCLAIMS ALL WARRANTIES AFTER THE EXPRESS WARRANTY PERIOD STATED
ABOVE. NO OTHER EXPRESS WARRANTY OR GUARANTY GIVEN BY ANY PERSON, FIRM OR ENTITY WITH RESPECT TO THE
PRODUCT SHALL BE BINDING ON THE WARRANTOR. REPAIR, REPLACEMENT, OR REFUND OF THE ORIGINAL PURCHASE
PRICE - AT THE WARRANTOR'S SOLE DISCRETION - ARE THE EXCLUSIVE REMEDIES OF THE CONSUMER. THE WARRANTOR
SHALL NOT BE LIABLE FOR ANY INCIDENTAL OR CONSEQUENTIAL DAMAGES CAUSED BY THE USE, MISUSE OR INABILITY
TO USE THE PRODUCT. NOTWITHSTANDING THE FOREGOING, CONSUMER'S RECOVERY SHALL NOT EXCEED THE
PURCHASE PRICE OF THE PRODUCT SOLD BY SEIKI. THIS WARRANTY SHALL NOT EXTEND TO ANYONE OTHER THAN THE
ORIGINAL CONSUMER WHO PURCHASED THE PRODUCT AND IS NOT TRANSFERABLE.
Some states do not allow the exclusion or limitation of incidental or consequential damages, or allow limitations on warranties, so
the above limitations or exclusions may not apply to you. This Warranty gives you specific rights, and you may have other rights,
which vary from state to state.
SEIKI LLC
c/o SEIKI Digital Customer Service
6880 Commerce Blvd., Canton, M148187 USA
customerservice@seikidigital.com
DO NOT SHIP PRODUCT TO THIS ADDRESS. PLEASE CONTACT CUSTOMER SERVICE TO
OBTAIN SHIPPING ADDRESSES FOR SERVICE.
- 36
Page 38

CONTENU
Consignes de s_curite importantes
Renseignements sur la s_curite
Preparation
1_16mentscompris
Vue avant
Vue arriere
Installation du socle
Retrait du socle en vue d'un montage mural
T616commande
4
4
5
6
7
7
8
Connexion des appareils externes
Personnalisation des param_tres du televiseur
Configuration initiale
Navigation a 1'6cran
Selection d'une source d'entr6e
Param6tres de I'image
Parametres audio
Parametres d'heure
Param6tres de configuration
Parametres de verrouillage
Parametres de canal
Multimedia - Mode USB
Contr61e parental
Fonctionnement du DVD
Fonctionnalites du DVD
D_pannage
Entretien
Caracteristiques technique
Garantie limitee
10
11
11
12
13
13
14
15
16
17
18
19
20
21
24
33
34
35
36
Page 39

CONSIGNES DE SFtCURITFt IMPORTANTES
LJsez cee coneignes - Avant d'utiliser ce produit,
vous devez lire toutes les consignes Iiees a la securite
et au fonctionnement de l'appareil.
Conservez cee eoneignes - Nous vous conseillons
de conserver les consignes liees a securite et au
fonctionnement de l'appareil pour consultation future.
Obeervez routes les raises en garde -Vous devez
suivre toutes les consignes tiees au fonctionnement et
I'utilisation de I'appareil.
Suivez toutes les consJgnes - Vous devez suivre
toutes les consignes liees au fonctionnement et
I'utilisation de I'appareil.
N'utilisez pas eet appareii pree de I'eau - L'appareil
ne doit pas etre utilise pres de I'eau ou dans un lieu
humide, par exemple dans un sous-sol humide ou
pres d'une piscine et autres.
Nettoyez uniquement a I'aide d'un chiffon sec.
N'obstruez pas les orifices de ventilation. Installez
I'appareil conformement aux consignes du fabriquant.
N'installez pas I'appareil a proximite d'une source de
chaleur comme un radiateur, une bouche de chaleur,
une cuisiniere ou d'autres appareils qui produisent de
la chaleur (y compris les amplificateurs).
Ne contournez pas le dispositif de securite de la
fiche polarisee ou de la fiche de mise a la terre.
Une fiche polarisee comporte deux lames dont I'une
est plus large que I'autre. Une fiche avec mise a la
terre comporte deux lames, en plus d'une broche de
masse. La lame plus large ou la broche de masse
vise a assurer votre securite. Si ta fiche fournie n'est
pas compatible avec votre prise, adressez-vous
un electricien pour faire remplacer la prise, qui est
probablement desuete.Protect the power cord from
being walked on or pinched particularly at plugs,
convenience receptacles, and the point where they
exit from the apparatus.
Placez te cordon d'alimentation de sorte qu'il ne
risque pas d'etre pietine ou coince, particulierement
au niveau de ta fiche et de la prise de courant, ainsi
qu'au point de sortie de t'appareil.
N'utilisez que les fixations et les accessoires
recommandes par le fabricant.
Utilisez t'appareil uniquement avec le chariot de
manutention, le support, le trepied ou la table
recommande par le fabricant ou vendu avec I'appareil.
Si vous utilisez un chariot, deplacez- I e avec
precaution afin d'eviter de le renverser et de vous
blesser.
Debranchez I'appareil en cas d'orage ou torsqu'il reste
inutilise pendant une periode prolongee.
Confiez toute reparation a un technicien qualifie.
Une reparation est necessaire si I'appareil a ete
endommage d'une maniere ou d'une autre, par
exemple torsque le cordon d'alimentation ou la fiche
est endommage, si un liquide a ete renverse sur
I'appareil, ou si des objets sont tombes sur celui-ci,
I'appareil a ete expose a la pluie ou a I'humidite, s'il
fonctionne mal ou s'il est tombe.Please keep the unit
in a well-ventilated environment.
• Veuillez installer I'appareil a unendroit bien acre.
MISE EN GARDE : pour reduire les risques d'incendie
et de choc electrique, n'exposez pas cet appareil a la
pluie ou a I'humidite. Ne I'exposez pas non plus aux
egouttements ou aux eclaboussures. Ne ptacez pas
d'objets remplis de liquide, par exemple un vase, sur le
dessus de I'appareil.
MISE EN GARDE : n'exposez pas les piles a une
chaleur excessive comme cetle induite par la lumiere du
soleil, un feu ou autrement.
MISE EN GARDE :la prise secteur sert de dispositif
de desaccouplage; elle dolt demeurer facilement
accessible,
MISE EN GARDE : afin de reduire les risques
d'electrocution, retirez pas le couvercle (ou le panneau
arriere), car il n'y a aucune piece reparable par
I'atilisateur a I'interieur. Confiez les reparations a un
technicien qualifie,
RISQUE DE CHOC ELECTR|QUE NE
PAS OUVRIR
Le symbole representant un eclair termine
Z_ par une fleche a I'interieur d'un triangle
equilateral vise a avertir I'utilisateur du danger
de la presence d'une<4ension dangereuse >>presentee
pardes pieces non isotees a I'interieur de I'appareil,
eventuetlement suffisante pour constituer un risque
d'electrocution.
Le symbole de point d'exclamation a l'interieur
///_ un triangle equilateral, vise a informer
I'utilisateur de la presence de consignes de
fonctionnement et de maintenance importantes
dans ta documentation qui accompagne l'appareil.
Cet equipement est un appareil electrique de
D lasse tl ou a double isolation, tl a 6t_ con9u de
sorte ane pas n_cessiter une connexion de s_curit_
mise a la terre.
Ce produit contient des composants electriques
ou electroniques. S'ils ne sont pas mis auxrebuts
adequatement, ces composants pourraient nuire
I'environnement ou a ta sante des humains.
La presence de cette etiquette sur le produit
signifie qu'il ne doit pas etre mis aux rebuts en
tantque dechet non trie, mais faire I'objet d'une
collecte selective. Comme consommateur, vous
devez vous assurer que ce produit est mis aux
rebuts de ta bonne maniere.
Ce produit est conforme aux directives
ENERGY STAR _ pour I'efficacite
energetique. ENERGY STAR et la
marque ENERGY STAR sont des
marques americaines deposees.
ENERGY STAR est une marque
deposee appartenant au gouvernement
des Etats-Unis.
_-2
Page 40

RENSEIGNEMENTS SUR LA S¢CURIT¢
Pour vous assurer du fonctionnement fiable et securitaire de cet equipement, veuillez lire avec attention les consignes de
ce guide d'utilisation, et plus particulierement les renseignements ci-dessous portant sur la s6curite.
S_curit_ _lectrique
° Le t61eviseur ne doit 6tre raccorde qu'a I'alimentation principate, a une tension correspondant a celle indiquee sur
I'etiquette a I'arriere de {'appareil.
* Pour eviter les surcharges, ne branchez pas plusieurs autres appareils electroniques sur la prise utilisee pour le
tel6viseu.
, Pour eviter le pietinement et les chutes, ne placez pas les c_bles de connexion a des endroits oO les gens circulent.
, Pour eviter d'endommager les c_bles de connexion, ne posez pas d'objets tourds sur ceux-ci.
, Lors du desaccouplement de la fiche d'une prise, tirez sur la fiche et non sur le c_ble.
, En cas d'orage ou Iorsque le tel6viseur reste inutilise pendant une periode prolongee, fermez I'interrupteur
d'alimentation a l'arriere de I'appareil.
, Evitez de laisser de I'eau ou de I'humidite pen6trer a I'interieur du telcviseur ou de l'adaptateur de courant. N'utilisez
PAS I'appareil dans une piece mouiIlee ou humide, comme une satle de bain ou une cuisine pleine de vapeur, ou
pres d'une piscine.
, Debranchez immediatement I'appareil et demandez I'aide d'un professionnel si la fiche ou le c_ble est endommage,
si du liquide a et6 renverse sur le tel6viseur, si celui-ci est expose accidentellement a de l'eau ou de I'humidite, si
un objet quelconque penetre dans les orifices de ventilation par inadvertance ou si le tel6viseur ne fonctionne pas
normalement.
, Laissez les couvercles de securit6 en place. II n'y a aucune piece reparable par I'utitisateur a I'interieur. II est
dangereux de tenter par vous-m6me de reparer l'appareil; en outre, cela pourrait annuler la garantie du produit. Seuls
des techniciens qualifies peuvent reparer cet appareil.
, Pour eviter qu'elles fuient, retirez les piles de la tel6commande si vous ne I'utilisez pas pendant une periode
prolongee ou si les piles sont epuis6es.
, N'ouvrez pas les piles et ne les jetez pas au feu Iorsqu'elles sont epuis6es..
S_curit_ physique
° N'obstruez pas les orifices de ventilation sur le panneau arriere. Vous pouvez placer le tet6viseur dans un meuble,
mais assurez-vous de. laisser un espace de degagement d'au moins 5 cm (2 po) tout autour.
° Ne tapez sur I'ecran du t61eviseur et ne le secouez pas; vous risqueriez d'endommager les circuits a I'interieur.
Prenez bien soin de {a telecommande.
° Pour nettoyer le televiseur, utilisez un chiffon doux sec. N'utilisez pas de solvants, ni de liquides a base de petrole.
° N'instatlez pas I'appareil a proximite d'une source de chateur comme un radiateur, une bouche de chaleur, une
cuisiniere ou d'autres appareils .quiproduisent de la chateur (y compris les amplificateurs).
° Ne contournez pas le dispositif de securite de ta fiche polarisee ou de la fiche de type raise a la terre. Une fiche
polarisee comporte deux lames dont I'une est plus large que I'autre. Une fiche avec raise a {a terre comporte deux
lames, en plus d'une broche de masse. La tame plus large ou la broche de masse vise a assurer votre securite. Si la
fiche fournie n'est pas compatible avec votre prise, adressez-vous a un electricien pour faire remplacer la prise, qui
est probablement desuete.
° Placez le cordon d'atimentation de so_te qu'il ne risque pas d'&tre pietine ou coince, particulierement au niveau de la
fiche.
° Confiez toute reparation a un technicien qualifie. Une reparation est necessaire si I'appareil fonctionne real ou s'iI a
ete endommage d'une maniere ou d'une autre (y compris le cordon d'alimentation ou la fiche).
° Une reparation est aussi necessaire lorsqu'un liquide a ete renverse sur I'appareil ou que des objets sont tombes sur
celui-ci, si l'appareil a ete expose a la ptuie ou a I'humidite, ou s'il est tombe.
° Raccordez toujours votre televiseur a une prise de courant protegee par une connexion de masse.
_-3
Page 41

PRI_PARATION
Elements compris
Poste de tel6vision
Tel6commande et piles
TV du socle
Support du socle
Four vis
User Manual
Quick
Start Guide
Manuel d'utilisation
Adaptateur Guide de demarrage rapide
_=4
Page 42

Vue avant
PRE_PARATION
--0
E ,-------a
_ ,-=----O
E
_ '====-O
1.¢
Pour faire basculer le tel6viseur entre les modes Sous tension et Veille.
2. SOURCE
Appuyez sur cette touche pour choisir la source du signal d'entree.
3. MENU
Pour afficher le menu OSD.
4. CH ^/,,
Appuyez sur cette touche pour choisir un canal.
5. VOL +/-
Appuyez sur cette touche pour regler le volume.
6. PLAY
Touche Lecture pour le DVD.
7. OPEN
Touche Ouvrir/Fermer pour le DVD.
8. T_moin de raise sous tension
Apparatt en bleu Iorsque le tel6viseur est allume. Apparatt en rouge Iorsque le tel6viseur
est en mode veille.
9. IR (Recepteur infrarouge)
Re9oit les signaux IR de la tel6commande.
_-5
Page 43

PRE_PARATION
Vue arriere
1. Adaptateur 6.
Connectez-vous a adaptateur.
2. Port USB
Se raccorde a un dispositif de stockage 7.
USB afin de lire des fichiers photos.
(mode USB)
3. Entr_es HDMI 8.
Se raccordent a un appareil avec signal
de sortie haute d6finition (HD).
4. Entree VGA
9.
Se raccorde a un ordinateur ou a d'autres
appareils dotes d'une interface VGA.
Entree PC AUDIO
Se raccorde a la sortie audio d'un
ordinateur.
5. Entr_eY Pb Pr
Connectez le (Y / Pb / Pr) a extermalvideo
dispositifs.
%_,
Entree DTV/TV
Se raccorde a la prise de I'antenne (750
VHF/UHF) a I'aide du c_ble coaxial RF,
Prise pour _couteurs
Se raccorde aux ecouteurs.
OPTIQUE
Raccorder la prise audio au syst_me
audio numerique
Entree AV
Connectez-vous a la video et audio (L / R)
outputsockets sur appareils video extermal.
_-6
Page 44

installation du socle
PRE_PARATION
1.Couchez le tel6viseur face vers le bas
sur une surface plate et coussinee pour
eviter de I'endommagerou de rayer I'ecran.
2.Fixer le support de socle au tel6viseur
I'aidedes 4 pieces foumiesvis.
3. Enracinement les pieds de s'asseoir
dans la direction.
Retrait du socle en vue d'un montage mural
1. Couchez le tel6viseur face vers le bas
sur une surface plate et coussinee pour
eviter de I'endommagerou de rayer I'ecran.
2. Desserrez les 4 vis en tenant le socle,
puisretirez-les..
3. Fixez le support mural au tel6viseur en
utilisant les trous de fixation & I'arriere du
t61eviseur.Installez ce t_6viseur en suivant
les consignes comprises avec le support
mural.
MISE EN GARDE : Cet appareil dolt _tre retenu par un support mural homologu_ UL.
_-7
Page 45

PR¢:PARATION
flti
v
"_//S'1
@ GOT0@ SLOW@ A-B@"
I_11 @ • @ REPEAT@ FAY @
_SEIKI
__I0,
11,
14,
_15,
16.
._17,
18,
20.
21.
22.
23,
24,
25,
26,
i
1. (_: Pour basculer le tel6viseur entre les modes
Sous tension et Veille.
i_: Pour activer ou desactiver le son du
tel6viseur.
0~9: Pour selectionner un canal. (Mode ATV/
DTV)
4. --: Pour entrer plusieurs num@os de canal, par
exemple 2-1.
5. (_D: Pour revenir au canal prec6dent.
6. P.MODE: Pour selectionner le mode de I'image :
dynamique/film/economies d'energie/utilisateur/
standard
S.MODE: Pour selectionner le mode audio :
standardlmusiquelfilmlutilisateur.
MTS: Pour basculer entre les diff@ents canaux
audio : STEREO/MONO/SAP.
SLEEP: pour regler le minuteur de mise en
veille du tel6viseur : 0FF/5110.../180/240 min
SOURCE: Pour choisir parmi les diff@entes
sources du signal d'entree. TV/DVDIComponent/
AV/HDMINGAIUSB.
INFO: Afficher de I'information sur la chaTne et
la source d'entree.
CH+/-: Pour regler le volume.
VOL+/-: Pour selectionner un canal.
AUTO:Appuyez sur cette touche pour regler
automatiquement I'image de la source VGA
CC: selection du sous-titrage : ACTIVE/
DESACTIVE/ST active sur son desactive.
V-CHIP:Pour configurer Ie contr61e parental.
ASPECT: Pour selectionner le format de I'image
: standard/wide/wide zoom/zoom.
OK: Confirme la selection dans les menus
affich_s.
19. _ • • I_:Vous permet de naviguer dans les
menus affiches et de regler les parametres du
syst_me en fonction de vos pref@ences.
MENU: Pour afficher le menu d'affichage
I'ecran.
EXIT: Pour quitter le menu QSD.
_,,: Ouvrir / Fermer le DVD
GOTO :Pour sauter a un endroit precis sur un
DVD/CD (mode DVD).
SLOW : Appuyez sur pour selectionner la lecture
vitesse lente (mode DVD).
A-B: RepUte un segment entre A et B (mode
DVD).
AIBIClD: Appuyez une fois > passe au canal
FAV; Maintenez enfonce>met en memoire le
canal actuel.
Page 46

27. CH.LIST: Liste du programme
d'affichage.
28. ADD/ERASE: Ajouter ou supprimer des
chaYnes favorites.
29. FAV: Afficher la liste des chaYnes
favorites.
30. FAV+: Ajouter des chaYnes favorites.
31. DVD.SETUP: Affiche le menu OSD du
DVD.
32. TITLE: Appuyez sur TITLE (TITRE) pour
retourner a la page du titre principal.
(mode DVD).
33. AUDIO: Changer la langue audio ou le
canal audio (mode DVD).
34. MENU: Afficher les informations de
configuration de mode DVD.
35. I_11: pour demarrer ou suspendre la
lecture.
36. ,: .Appuyer une fois pour arr_ter.
37. REPEAT : Choisissez entre les differents
modes de repetition.
38. FAV-: supprimer des chaYnes favorites.
39. SUBTITLE : Afficher le sous-titre.
40. H4:passer au debut de la section/piste/
photo precedente.
41.44: pour passer en mode de lecture
rapide.
42. _: pour inverser la lecture en mode
rapide.
43. l_]:pour passer au debut de la section/
piste/photo suivante.
_-9
Page 47

CONNEXION DES APPAREILS EXTERNES
Lecteur / Enregistreur Blu-ray
R6cepteur satellite
L
J
Console de jeu
Camera video
VCR
J
C&ble de composant
(non compris)
OR
C&ble de AV
(non compris)
C&ble HDMI
Appareil HDMI
L
| C&ble optique
__ (non compris)
£.______
I Systeme audio numerique j
C_ble Audio
(non compris) j_,,,,,,,,,,,m,._._
Ordinateur !1
_-10
Page 48

PERSONNALISATION DES PARAMC:TRES DU T¢:L¢:VISEUR
Configuration initiale
• Une fois toutes les connexions physiques etablies, branchez le cordon d'alimentation
dans ta prise de courant. ,ikcette etape, le tel6viseur passera en mode Veille et le
temoin DEL rouge s'altumera.
• Une fois sous ce mode, appuyez sur tatouches(_de rappareit ou de tatet6commande
pour allumer le t6teviseur. Le temoin DEL rouge passera au bleu.
• La premiere fois que vous altumez te t61eviseur, t'assistant de configuration s'affiche.
Appuyez sur tes touches • / _, A/Vpour selectionner le mode d6sire, puis appuyez
sur OK pour confirmer.
0 @ 0
0 0
Home Mode(economie d'energie) constitue la configuration par d_faut de la t_l_vision
au moment de la fivraison. Et Home Mode (economie d'energie) ect la configuration pour
laquelle le produit est certifi_ Energy Star. Toute modification apport_e _ la configuration
par d_faut du t_l_viseur entrafne des changements au niveau de la consommation d'_nergie.
Lactivation de certaines fonctions et foncbbnnalit_s facultatives peut augmenter la consommabbn
d'_nergie de ce produit au-del& des cdt&res requis pour I'appellation Energy Star.
Retail Mode (mode magasin) : S_lectionner le mode magasin pour une image plus
claire. Ce mode peut patrols consommer plus d'_nergie pour utitiser le Volume/Sound
Mode (mode volume/son) et le Picture Mode (mode image). Lorsque ce mode est
active, il est possible que la consommation d'_nergie aille au-del& des crit&res requis
pour I'appellation Energy Star®
®
Energy Star ect un ensemble de directives d'_conomie d'_nergie _mis par les Etats-Unis de
I'environnement Protection Agency (EPA).
Le programme Energy Star® est un programme de I_gence de protection de I'environnement
et du minist&re de I'E-nergie des Etats-Unis visant _ fournir des directives d'_conomie d'_nergie
et _ promouvoir les produits et pratiques _nerg_tiquement efficeces.
• La consommation d'energie du ON-MODE (mode marohe) du Home Mode
(mode domicile) devrait _tre inferieure a 28 W.
• La consommation d'energie du SLEEP-MODE (mode veille) devrait _tre
inferieure a 0.5 W.
0
W 11
Page 49

PERSONNALISATION DES PARAM¢:TRES DU Tg:Lg:VISEUR
O O
0 @
S'il est impossible de trouver des canaux, cette fen6tre
s'affiche automatiquement.
Navigation a recran
• Appuyez sur la touche MENU pour afficher le menu principal.
• Utitisez tes touches4 / _, pour parcourir tes menus offers et faire des selections.
_- 12
Page 50

PERSONNALISATION DES PARAM#TRES DU TE_LE_VISEUR
Selection d'une source d'entree
Appuyez sur la touche SOURCE de
rappareil principal ou de la telGcommande
pour affi_ la liste des sources d'entrGes.
Appuyez sur les touches A/Vpour
selectionner tasource souhaiteeparmi :TV/
Component/AV /DVD / HDMI/VGA/USB;
appuyez ensuite sur la touche OK pour
confirmer.
Parametres de rimage
• Appuyez sur la touche MENUde t'appareit
principal ou de la tGlecommande,puis sur
les touches4 / _pour setectionnerle menu
IMAGE.
• Appuyez sur tes touches,_,/Vpour
selectionner les options d'image suivantes,
puis appuyez surles touches A/Vpour
r6gter tespararr_tres de chaque optbn.
Permet de basculer entre les modes d'image : Dynamique/
Film/Economies d'energie/Utilisateur/Standard.
Mode image Alternative • vous pouvez appuyer sur la touche PMODE
pour selectionner le mode imagen directement.
Permet de regler I'ecart entre les parties eclairGes et
Contraste
sombres de I'image. (Pour le mode Utilisateur)
Permet d'accroftre ou de diminuer la quantite de blanc
Luminosit_
clans I'image.(Pour le mode Utilisateur)
Permet de regler I'intensite des couleurs. (Pour le mode
Couleur
Utilisateur)
Permet de regler I'equilibre entre les niveaux de rouge
Teinte
etde(Pour le mode AV et ATV)
Permet de regler le niveau de nettete des contours entre
Nettet_ les parties eclairGes et sombres de I'image. (Pour le mode
Utilisateur)
Temperature de Permet de basculer entre les temp@atures de couleur :
Couleur CoollNormallWarm (Froide/Normale/Chaude)
Permet l'affichage de I'arriGre-ptan en bteu si le signal est
lecran bleu
faible ou inexistant.
_-13
Page 51

PERSONNALISATION DES
Parametres audio
• Appuyez sur ta touche MENU de rappareil
principal ou de ta t61ecommande,puis sur
les touches • / •pour setectionnerlemenu
AUDIO.
• Appuyez sur les touchsA/Vpour
selectionner tes options audio, puis sur la
touches • / • pour regler les parametres
de chaque option.
Permet de selectionner une technique d'ametioration audio :
Mode Audio standard/musique/film/utilisateur
Alternative: vous pouvez appuyer sur la touche S.MODE
pour s_lectionner le mode audio directement
Pour r_<jlerrintensite relative des sons plus graves. (Pour
Notes graves le mode Utilisateur)
Pour r_<jlerrintensite relative des sons plus aigus. (Pour
Notes aigu_s le mode Utilisateur)
Pour regler le volume relatif des haut-parleurs dans un systeme
I_quilibrage qui en compte plusieurs.
Ambiophonie Pour ametiorer votre experience d'ecoute.
Volume
automatique Pour regler automatiquement les niveaux de volume.
Pour setectionner le mode de sortie audio numerique : RAW ou
Mode SPDIF
PCM.
Langue audio Pour setectionner la langue audio :anglais,frangais, espagnol.
-14
Page 52

PERSONNALISATIONDES
Parametres d'heure
• Appuyez sur ta touche MENU de rappareil
principal ou de la t61ecommande,puis sur
les touches, / •pour s_._tectbnnerle menu
HEURE.
• Appuyez sur tes touchesA/Vspour
selectionner tes options d'heure suivantes,
puis sur ta touches,/• pour regler les
pararr_tres de chaque option.
Minuteur de mise
en veille
Fuseau horaire
Heure avancee
Pour setectionner une duree au bout de laquelte
le t61eviseur passe automatiquement en mode
Vei_e:DESACTIV_10/.../180/240min
Alternative: vous pouvez appuyer b r#p#tition sur la
touche SLEEP pour s#lectionner le nombre de minutes
directement.
Pour selectionner un fuseau horaire:Pacific/Alaska/
Hawaii/Eastern/Central/Mountain
Pour activer ou desactiver l'heure avancee.
-15
Page 53

PERSONNALISATION DES
Parametres de configuration
Appuyez sur ta touche MENU de t'appareil
principal ou de ta t61ecommande,puis sur
les touche,q / •spour setectionnerle menu
CONFIGURATION.
Appuyez sur tes touches A/V
pour setectionner tes options de
configurationsuivantes, puis sur ta touches
/• pour regler les parametres de
chaque option.
Pour setectionner la langue des menus : anglais, frangais
Langue des menus ou espagnol. Par defaut, la langue des menus & l'ecran
est l'anglais.
Transparence Pour activer ou desactiver la fonction de transparence.
Pour setectionner te mode de zoom : Wide/
Wide Zoom/Zoom/Just Scan/Dot to Dot.
Mode Zoom Remarque : Source d'entr_e diff_rente, les options du
mode zoom peuvent varier.
Reducir el nivel de ruido del dispositivo conectado:
Reduction du bruit
Apagado / Bajo / Medio / Fuerte.
Pour regler les parametres des options avancees :
Avance H-POS,H-POS, V-POS, Horloge, Phase ou Auto. (Mode
Source VGA seulement)
Pour selectionner te mode S-T :Active,
Mode S-T
Desactiv6 ou S-T sur son desactiv6
Selection Selection de base : ST1, ST2, ST3, ST4,
de base Textel, Texte2, Texte3, Texte4
Sous-titrage Selection Selection avancee " Service1, Service2,
avancee Service3, Service4, Service5 et Service6.
Mode, Style de police, Taitle de police, Style
de bordure de police, Couleur de bordure de
OPTION
police, Couleur PP, Couleur AP, Opacite PP
et Opacite AP
Selectionnez cette option pour activer ou desactiver la
DLC
fonction de commande dynamique de la luminance
Restaurer les Pour restaurer les parametres par defaut du tel6viseur.
valeurs par defaut
• Remarques: Si le mode _ num#risation seule _ est s#lectionn# dans I'option
HDMI, le t#l#viseur affiche I'image en plein #cran.Si le mode _point par poinb_ est
s#lectionn# dans I'option VGA, le t#l#viseur affiche I'image en plein #cran.
-16
Page 54

PERSONNALISATIONDES
Parametres de verrouillage
• Appuyez sur ta touche MENU de rappareil
principal ou de ta tel6commande, puis sur
les touches 4/• pour setectionner le
menu VERROUlLLAGE
• Utiliseztes touches 0 a 9 pour entrer te mot
de passe & 4 chiffres qui vous permettra
d'ouvrir temenu VERROUlLLAGE.
• Appuyez sur les touches A/V pour
selectionner les options suivantes, puis
sur tes touches ,/• pour regler les
pararr_tres de chaque option.
Remarque: Le mot de passe par d#faut est "0000 ".
Utitisez tes touches 0 a 9 pour entrer t'ancien mot de
Changer le mot de passe, puis entrez te nouveau mot de passe & 4 chiffres.
passe Entrez te nouveau mot de passe une autre fois pour le
confirmer.
Selectionnez cette option pour activer ou desactiver te
Verrouillage du verrouittage du systeme. Les options suivantes [US, Canada,
RRT Setting and Reset RRT (€:-U., Canada, Reglage RRT et
systeme Reinitialisation RRT) ne seront accessibles que lorsque vous
activerez le verrouillage dusysteme.
CLASSEMENT T¢:L¢: -Appuyez sur ta
TV touche OK pour verrouiller ou deverrouiller le
US (I_.-U.) classement tel6.
Setectionner le classement de la MPAA : N/
MPAA
A,G, PG, PG-13, R, NC-17 ou X.
Permet de setectionner le classement de la
Canada
MPAA pour les anglophones
English Canada E, C, C8+, G, PG, 14+, 18+.
Canada
Permet de selectionner le classement de la
Canada
MPAA pour te Quebec E, G,
French
8 ans+, 13 ans+, 16 ans+, 18 ans+.
Reglage RRT Pour definir le tableau regional de classification.
Reinitialisation
Setectionnez cette option pour reinitialiser le reglage RRT.
RRT
Supprimer le
Effacer tousles parametres de verrouillage.
verrouillage
-17
Page 55

Parametres de canal
PERSONNALISATION DES
• Appuyez sur ta touche MENU de rappareil
principal ou de ta tel6commande, puis sur
les touches, / II_poursetectionner le menu
CANAl_.
• Appuyez sur les touches A/Vpour
selectbnner les options de canal suivantes,
puis sur la touche pour,/1_ regler les
parametres de chaque option.
Air/C_ble Pour setectionner l'antenne : Air ou C&ble.
Selectionnez d'abord votre systeme de c&blodistribution parmi tes
options Auto/STD/IRC/HRC. Ensuite, setectionnez la fonction de
Balayage auto balayage automatique pour balayer tes canaux de c&bbdistributbn
disponibtes.Le balayage s'effectuera si rantenneAir est setectbnn6e.
Favori Pour definir le canal s61ectionne comme canal favori.
Afficher/Masquer Pour afficher ou masquer ie canal s61ectionne.
Num_ro de canal Pour afficher le numero du canal actuel.
I_tiquette de canal Pour afficher l'etiquette du canal actuel.
Signal TVN Pour afficher ta qualite du signal -I-VN actuel.
-18
Page 56

Visionnement de photos
• Appuyez sur ta touche SOURCE de
rappareil principalou de ta t6tecommande,
puis sur tes touches ,&/V pour
setectionner le mode USB appuyez
ensuite sur latouche OK.
• Appuyez sur tes boutons A/V pour
naviguer dans te dossier des images,
puis appuyez sur te bouton OK.
• Appuyez sur te bouton OK our faire
afficher la barre de fonctions. Appuyez
sur les boutons •/1_, puis appuyez
sur le bouton OK pour setectionner
cette fonction " Pause/Prec./Suiv./
Stop/R_Att/Info. /Rotation sens
horaire/Rotation sens antihoraire/
Zoom avant/Zoom arriere/Deplacer
vue.
Remarque: Format de fichier pris en
charge JPEG.
-19
Page 57

Appuyez sur la touche MENU de I'appareil principal ou de la telecommande, puis sur les
touches4/• pour selectionner le menu VERROU, Utilisez les touches 0 a 9 pour entrer le
mot de passe a 4 chiffres qui vous permettra d'ouvrir le menu VERROU. Si vous utilisez
cette fonction, vous pouvez <<bloquer >>ladiffusion de la programmation televisuelle
indesirable. Le contr61e parental propose une vaste gamme d'options et de parametres
servant a restreindre ou a <<bloquer >>la programmation televisuelle. Le contr61e parental
permet a I'utilisateur de definir les classements d'emission qu'ils jugent acceptables pour les
telespectateurs plus jeunes et plus sensibles. L'utilisateur peut predefinir les classements
et les activer ou les desactiver en entrant le mot de passe secret a quatre chiffres. II peut
egalement indiquer a quelle heure bloquer la programmation. Les blocs pour grand public et
pour enfants doivent 6tre programmes dans la memoire du televiseur. II existe des syst_mes
de classement distincts pour les emissions de televisions et pour les films. On devrait utiliser
ces deux syst_mes de classement en fonction de I'_ge des enfants.
Vue d'ensemble
Pour vous assurer de couvrir toute la programmation televisuelle (films et emissions de tele),
choisissez un classement de la MPAA dans les listes ci-dessous, ainsi que les classements du
TV Parental Guidelines Rating Systems ci-dessous, en utilisant I'option de blocage en fonction
de I'_ge pour grand public et pour enfants. En outre, vous pouvez ajouter d'autres restrictions
depuis les exemples de menus et de sous-menus de blocs de contenu ci-dessous.
I_lements dont il faut tenir compte avant de configurer le contr61e
parental
Etablissez quel cote vous jugez acceptable pour le telespectateur. (Par exemple, si vous
choisissez la cote TV- PG, le syst_me bloquera automatiquement les cotes plus restrictives; le
telespectateur ne pourra pas regarder : les emissions classees TV-PG,TV-14 ou TV-MA.) Vous
pouvez bloquer enti_rement la source video auxiliaire. (Le signal envoye par I'equipement, par
exemple un magnetoscope, connecte a la prise d'entee Audio/Video est alors bloqu&) Vous
pouvez aussi laisser cette source debloquee, puis choisir les cotes acceptables. Vous pouvez
bloquer le <<contenu >>de la programmation en fonction de parametres individuels comme :
Dialogue muscl& Langage cru, sc_nes de sexe, sc_nes de violence ou fantasme. Sc_nes de
violence; option de blocage en contenu. Dans I'option Set Password (Definir le mot de passe),
selectionnez un mot de passe secret a I'aide des touches numeriques de la telecommande.
Enregistrez le mot de passe; c'est la seule mani_re d'acceder au menu Parental Control (Contr61e
parental) et de changer le parametre de classement, ou de desactiver le contr61e parental.
• Vous pouvez definir differentes restrictions de visionnement pour grand public et pour enfants;
celles-ci peuvent 6tre actives pour les deux types de telespectateurs en m6me temps.
• Indiquer simplement un blocage de contenu, par exemple les sc_nes de sexe, ne bloquera pas
automatiquement la programmation issue des sources video.
• M6me si vous decidez de ne pas bloquer les entrees AUX, les cotes que vous indiquez
bloqueront automatiquement la programmation issue des sources video.
• Vous ne pouvez pas desactiver le contr61eparental en debranchant le televiseur de la prise de
courant. Si ralimentation estcoupee, la plage d'heures bloquees sera automatiquement reinitialisee
sa valeur par defaut.
-20
Page 58

Preparation avant d'effectuer la lecture d'un disque DVD
• La langue d'affichage par defaut est I'anglais. Veuillez consulter les consignes de parametrages.
• La plupart des fonctions sont contr61ees par la tel6commande, ou en utilisant les boutons sur le panneau
avant.
Preparation
• Atlumez le tel6viseur et selectionnez DVD en tant qu'entree sur le tel6viseur.
• Placez sous tension tout syst_me d'alimentation si le lecteur est connecte a un equipement
amplificateur, etc.
LECTURE
1. Allumez I'unite, et I'ecran affichera <_LOADING >>(Chargement en cours). (Remarque : I'information
sur le disque apparaitra apres quelques secondes si un disque a et6 inser& Dans le cas oQaucun
disque n'ait et6 inset6, I'ecran affichera <<NO DISC >>(Pas de disque).
2. Pour inserer un disque, positionnez le disque avec t'etiquette faisant face a I'arri_re du lecteur, dans
la fente pour DVD. Le disque sera avale automatiquement par le lecteur.
3. Pour retirer le disque, appuyez sur le bouton OPEN/CLOSE (Ouvrir/Fermer), et le disque sera eject&
4. Appuyez sur PLAY (Lecture) sur <<Playback disc >>(Lecture du disque). Vous pouvez egalement
demarrer la lecture depuis le menu de I'ecran, une fois que le MENU s'affiche. Appuyez sur le bouton
ENTRER pour demarrer la lecture. Certains disques debute la lecture automatiquement une fois
qu'ilsont et6 charges.
Type de Taille Temps Format de contenu Remarque
disque (Diam_tre) d'enregistrement
DVD 12 cm Simple : Environ 120 Format DVD :
minutes Audio et video numerique
Double : Environ 240 compresse
minutes
Super VCD 12 cm Environ 45 minutes MPEG1 Inclus :
Audio et video numerique VCD2.0/VCD1.1
compresse VCDI.0/DVCD
VOU 12 cm Environ 74 minutes MPEG1 Includes:
Compressed digital VCD2.0/VCD1.1
audio and video VCDI.0/DVCD
CU 12 cm Environ 74 minutes CD-DA :Audio numerique
mu-ou 12 cm Environ 75 minutes HD-DA :Audio numerique
MP3/JPEG 12 cm Environ 600 minutes Audio numerique
REMARQUE : Soutient egalement les formats de lecture DVD-R, CD-R, et CD-RW.
ATTENTION! NE PAS INSleRER OU EFFECTUER LA LECTURE DE DISQUES DE 8 CM
QUI SE COINCERAIENT !
Remarque: Les films DVD etant en gen6ral mis en vente & differents moments dans les
diverses regions du monde, tousles lecteurs sont dotes d'un code de zone geographique
et lee dieques ont un code regional en option. Si vous inserez un dieque dote d'un code de
region different de celui de votre lecteur, vous verrez apparattre sur I'ecran un message
concemant le code de region.
Le disque ne pourra pas _tre lu et vous devrez le retirer du lecteur. Le code de region de ce
lecteur est 1 (faites ref6rence aux symboles).
-21
Page 59

Fonctionnement du lecteur DVD
• STOP (Arr_t)
Appuyez sur le bouton STOP (arr6t) pour arr6ter la lecture (Le tel6viseur indique <<D_,m>>). Lorsque la
lecture est interrompue, I'unite garde en memoire le point oQ I'arr6t a et6 effectue (reprendre la fonction).
Appuyez a nouveau sur le bouton de Lecture, et la lecture redemarrera depuis ce point precis. Appuyez
deux fois sur le bouton d'arr6t (STOP), et la fonction de reprise de lecture sera annul6e. La fonction de
reprise de lecture convient aux disques qui affichent le temps 6coul6 Iors de la lecture.
• APPUYEZ _/SUIVANT H,I
Sur la tel6commande, appuyez sur le bouton <<Pr6cedent >>,ou sur le bouton <<Suivant >>,lots de la
lecture d'un disque, d'un chapitre (DVD), ou d'une piste (CD) pour vous deplacer sur le disque.
Remarque : Lorsque vous effectuez un retour en arriere, la lecture debute au debut de la piste
prec6dente, et NON PAS au debut de la piste en cours.
• RETOUR EN ARRII_RE RAPIDE_ / AVANCE RAPIDE i_'
Sur la tel6commande, appuyez sur le bouton de retour rapide/avance rapide Iors de la lecture, et le
disque effectuera un retour ou une avance selon la commande correspondante. La vitesse d'avance ou
de retour est relativement lente au depart. Si vous appuyez _ nouveau, la vitesse de d6filement s'acc61_re.
Plus les boutons sont appuyes, plus la vitesse d'avance ou de retour en arriere est rapide. II y a cinq
vitesses disponibles : x2, x4, x8, x16, et x32. Pour retourner en mode de lecture normal, appuyez sur le
bouton delecture (PLAY) sur le lecteur ou sur la tel6commande.
• PARAMI_TRAGE
Appuyez sur le bouton du Menu DVD Iors de la lecture, et le lecteur passera en mode d'image fixe. Si le
bouton est appuye une seconde fois, le disque avancera d'une etape. Lorsque le bouton est appuye en
continu, les etapes defileront de fa#on consecutive. Pour retourner en mode de lecture normal, appuyez
sur le bouton de lecture (PLAY) sur le lecteur, ou sur la t616commande.
• PAUSE
Appuyez sur le bouton de Pause pour interrompre la lecture. Pour r6tablir la lecture, appuyez _ nouveau
sur le bouton de lecture (PLAY).
• Boutons NUMI_RIQUES (0 & 9, 10+)
Appuyez sur le bouton des chiffres num6riques (de 0 _ 9) pour vous rendre directement sur la piste ou
le chapitre souhaite Iorsqu'un disque est en train d'effectuer la lecture. Pour une piste, ou un chapitre
superieur a 10, appuyez en premier sur le bouton 10+, et ensuite sur I'un des boutons de 0 a 9.
• SOURDINE
Appuyez sur le bouton de la sourdine Iors de la lecture, le lecteur affichera <<sourdine >>et le son
sera coupe (silencieux). Appuyez _ nouveau sur le bouton de la sourdine pour annuler la fonction
d'interruption sonore.
• VOL+/VOL-Press
Appuyez sur le bouton VOL+/VOL- pour modifier le niveau du volume.
• A-B
Lors de la lecture, appuyez sur le bouton A-B _ I'endroit oQ la section a rep6ter devra commencer (A), et
appuyez a nouveau a I'endroit oQ la section _ r6peter devra s'arr6ter (B). La lecture r6pet6e entre le point
A et le point B commencera. Pour retoumer en mode de lecture normal, appuyez une fois de plus sur le
bouton A-B pour que I'ecran affiche <<R6peter d6sactive >>(REPEAT OFF).
• RI_PI_TER
Appuyez sur le bouton REPEAT (Rep6tition) pour selectionner la rep6tition d'un chapitre ou d'un titre
(DVD), et d'effectuer une lecture simple, ou du disque dans son int6gralit6 (VCD, CD, MP3).
Remarque : Certains disques VCD ne disposent pas de fonction de r6petition avec 1'6tat PBC ON.
• RALENTI
Lors de la lecture de disques VSCD, VCD, et DVD, appuyez sur le bouton SLOW (Ralenti) pour
s61ectionner la vitesse de la fonction de ralenti. Appuyez sur le bouton de lecture/pause pour repasser en
mode de lecture normal.
-22
Page 60

Fonctionnement du lecteur DVD
• GOTO
Lors de la lecture, appuyez sur le bouton GOTO sur la tel6commande. Vous pouvez consulter le disque
en fonction du titre, du chapitre, de la piste. Appuyez sur le bouton GOTO et un menu de recherche
s'affichera. Utilisez les boutons _1_ou _,_ pour selectionner I'item recherche, le temps ecoul6, le titre, ou le
chapitre. La selection sera indiquee par une zone en surbrillance. Utilisez les boutons numeriques pour
selectionner I'item recherche, le temps ecoul6, le titre, ou le chapitre, et appuyez sur le bouton ENTRER
pour effectuer la lecture.
Par exemple:
• Recherche du temps ecoul6 (Appuyez deux fois sur le bouton <<GOTO >>durant la lecture d'un DVD)
: Pour rechercher <<16 min 50 secondes >>,ins@ez 1,6, 5 et 0. Pour rechercher <<1 heure 14 minutes >>
inserez 1,1,4,0,0. Pour la recherche d'un titre ou chapitre : Pour rechercher le <<titre 1, chapitre 2 >>,
inserez 1 dans la colonne du titre place en surbrillance, faites bouger le curseur directement sur la zone
mise ensurbrillance, et inserez 2.
Remarque:
• Pour certains disques DVD qui ne peuvent pas _tre recherches, I'annonce <<Invalide >>apparattra sur
I'ecran du tel6viseur.
• Inserez le temps ecoul6, le titre et le chapitre d'un disque pour qu'il puisse _tre consult&
• Pour les VCD dont le mode PBC ON est active, il ne peut effectuer la recherche que pour un certain
temps.
AUDIO
Appuyez sur le bouton AUDIO pour changer la sortie AUDIO entre L/L (Gauche/Gauche), R/R (Droite/
Droite), et L/R (Gauche et Droite).
• MENU
Appuyez sur le bouton MENU pour afficher I'information sur les configurations de la source du disque
DVD.
• A.
Appuyez sur le bouton OUVRIR/FERMER Iorsque le systeme est sous tension, et ins@ez un disque dent
I'etiquette fait face _ I'arriere du lecteur. Appuyez sur le bouton OUVRIR/FERMER pour fermer.
• TITLE
Lors de la lecture d'un disque DVD, appuyez sur TITLE (TITRE) pour retourner a la page du titre
principal.
• SUBTITLE (FOR DVD AND SUPER VCD DISCS)
Pour modifier la langue des sous-titres, consultez le paragraphe _<Reglage du langage >>(page 28).
-23
Page 61

• Supportes par les formats DVD
1. PLAY (LECTURE) (pour disques DVD/Super VCD/VCD/CD/CD-G/HD-CD et MP3/JPEG). Pour les
disques DVD, appuyez sur le bouton HI depuis le ROOT Menu, ou Menu des Titres. Durant la lecture
d'un disque DVD,effectuez directement la lecture de I'un de vos titres pref6r6s par la s61ection du titre, en
appuyant sur le bouton des TITRES. Pour les disques Super VCD et VCD, Iors de ta lecture d'un disque,
effectuez la lecture de I'un de vos titres pr6f6res, en utilisant les boutons numeriques. Pour les disques
CD, CD-G et HD-CD, Iors de la lecture d'un disque, effectuez la lecture de I'un de vos titres pr6fer6s,
en utilisant les boutons numeriques. Pour les disques MP3/JPEG, effectuez la lecture de vos pistes
pr6fer6es en utilisant les boutons numeriques du menu du contenu. Si la saisie des numeros de pistes
est incorrecte, elle ne fonctionnera pas. REMARQUE: Pour les pistes de 1 & 10, utilisez directement
les boutons numeriques; pour les pistes superieuresa 10, Appuyez en premier sur le bouton 10+. (Par
exemple, pour la piste 15, appuyez sur 10+ et sur 5).
2. Previous/Next (Pour disques DVD/Super VCDNCD/CD/CD-G/HD-CD et MP3/JPEG) Lors de la
lecture d'un disque :
Appuyez sur le bouton _ pour effectuer la lecture du titre, chapitre, ou piste pr6cedente.
Appuyez sur le bouton _ pour effectuer la lecture du titre, chapitre, ou piste suivante.
Pour les disques Super VCD et VCD, en mode PBC desactiv6 (OFF);
Si la piste en cours est la premi6re, appuyez su _ pour arr6ter la lecture.
Si la piste en cours est la derni_re, appuyez sur _ pour arr6ter la lecture.
Pour les disques DVD, les fonctions ci-dessus peuvent varier selon les differentes structures de DVD.
3. AVANCER/RECULER _ / _ (Pour les disques DVD/Super VCD/CD/CD-G/HD-CD et MP3)
Lors de la lecture d'un disque, vous pouvez utiliser vous pouvez utiliser les fonctions d'avance rapide et
de retour.
II y a 4 vitesses d'avance rapide. Appuyez sur _, pour passer entre les differentes vitesses dans I'ordre.
(AVANCE X2, AVANCE X4, AVANCE X8, AVANCE X20/Lecture).
Appuyez sur _ I pour retourner en mode de vitesse normal.
Pour les CD, HD-CD, MP3, la fonction de retour dispose egalement de sortie audio.
Pour les disques DVD, si vous effectuez un retour vers le premier titre ou chapitre, il recommencera la
lecture depuis le debut.
Pour les disques Super VCD et VCD, en statut actif (ON) de PBC, si vous effectuez un retour vers le
premier titre ou chapitre, il recommencera la lecture depuis le debut.
REMARQUE:Lors des fonctions d'avance rapide et de retour, le son sera desactiv6.
4. PAUSE (pour disques DVD/Super VCD/VCD/CD/CD-G/HD-CD et MP3/JPEG).
Pour les disques CD, CD-G, HD-CD, MP3 et JPEG, appuyez sur le bouton I_11pour arr6t momentane
de lalecture; appuyez le bouton _11 pour effectuer la pause, appuyez & nouveau sur le bouton M I pour
reprendre la lecture. Pour les disques DVD, Super VCD et VCD, appuyez sur le bouton _1 pour effectuer
la pause, appuyez & nouveau sur le bouton _'11pour reprendre la lecture.
5. Repeat (RI_PI_TITION)(POUR DISQUES DVD/SUPER VCD/VCD/CD/CD-G/HD-CD ET MP3/JPEG).
Appuyez une lois sur le bouton REPEAT (Rep6tition) pour afficher le mode de rep6tition en cours. Pour
les disques Super VCD, VCD, CD, CD-G, HD-CD, Iors de la lecture dans I'ordre, vous pouvez utiliser la
fonction de lecture rep6t6e. II y a 2 modes de r6petitions; appuyez sur REPEAT pour passer entre les
differents modes dans I'ordre. (REPEAT (OFF) R6petition desactiv6e, REPEAT (1) (Rep6ter 1 piste) /
REPEAT (ALL) (Rep6tition dans I'int6gralit6).
Pour les disques DVD, vous pouvez parametrer le mode de rep6tition de la lecture. II y a 3 modes de
rep6tition; appuyez sur REPEAT pour passer entre les differents modes dans I'ordre. (REP : (OFF)
(Rep6tition desactiv6e)/REP : (CHAPTER) (Rep6tition d'un chapitre) / REP : (TITLE) (Rep6tition d'un
titre) / REP : (ALL) (Rep6tition dans I'integralit6).
Pour les disques MP3 et JPEG, vous pouvez parametrer le mode de rep6tition de la lecture. II y a 3
modes de r6petition; appuyez sur REPEAT pour passer entre les differents modes dans I'ordre. (REPEAT
: (OFF) (R6petition desactiv6e)/ REPEAT (DIR) (R6petition du fichier) / REP : (ALL) (Rep6tition dans
I'int6gralit6).
6. INFO(INFORMATION) (pour disques DVD/Super VCD/VCD/CD/CD-G/HD-CD et MP3/JPEG).
Appuyez sur le bouton INFO pour activer le menu d6roulant du titre, chapitre, duree en cours, et autre
information.
-24
Page 62

Fonctions du lecteur DVD
• Supportes par les formats DVD
Pour les disques DVD contenant 5 pages, appuyez sur le bouton INFO :
Une fois Deux fois Trois fois Quatre fois
Cinq fois
7, GOTO (Pour disques DVD/Super VCDIVCD/CD/CD-G/HD-CD et disques MP3/JPEG).
Pendant la lecture d'un disque cette fonction vous permet de selectionner votre Titre/Chapitre/
piste favor!. Appuyez sur le bouton GOTO pour act!vet le menu d'ecran pour edition. Dans la zone
selectionn6e, inserez le numero de votre Titre/Chapitre/piste favor! en utilisant les boutons numeriques
ou inserez le temps de lecture. Apres I'edition, appuyez sur OK pour commencer. Si le numero inscrit
estinvalide il ne fonctionnera pas.
REMARQUE:Pendant I'edition, le bouton GOTO ne fonctionne pas.
Dans la position PBC ON, cette fonction sera desactiv6e.
8, Audio (Pour les disques VCD/CD/CD-G/HD-CD et MP3/JPEG)
Appuyez une fois sur le bouton audio pour afficher le mode audio en cours.
Appuyez de nouveau pour basculer entre les modes differents audio en sequence.
Pour les disques CDIVCDIMP31HD-CD: (ster6otmonoL/monoR)
REMARQUE:Le changement entre les modes audio L/R (Gauche/Droit) peut varier selon les differents
contenus de disques. Les dieques VCD bilingues peuvent utiliser le bouton AUDIO pour passer entre les
differentes langues.
9. SOURDINE(for DVD/Super VCD/VCD/CD/CD-G/HD-CD and MP3/JPEG discs)
Press MUTE button to mute the audio output, there will be an onscreen symbol to indicate "MUTE".
Press again to cancel, or press VOL+/VOL- to cancel and adjust the volume.
In case there is no audio output, press MUTE button to cancel mute.
10, R!eP!eTITION A-B(Pour disques DVD/Super VCD/VCD/CD/CD-G/HD-CD et MP3)
Pendant la lecture d'un disque DVD, VCD ou CD appuyez sur le bouton A-B pour rep6ter une section
choisie. Appuyez sur le bouton A-B au point de depart (A) et & nouveau a la fin de la section desir6e (B)
pour selectionner la partie que vous souhaitez rep6ter. Appuyez le bouton A-B une troisi_me fois pour
annuler la rep6tition et pour retourner en mode de lecture normale.
11. VOLUME (Pour disques DVD/Super VCDIVCD/CD/CD-G/HD-CD et MP3/JPEG)
Appuyez sur VOL +/VOL - pour ajuster le volume.
-25
Page 63

Fonctions du lecteur DVD
• Lecture de MP3/JPEG
Une fois que le disque MP3/JPEG aura et6 charge, il effectuera un balayage des fichiers MP3/JPEG
stockes.Le fichier affichera automatiquement le contenu MP3, et commencera la lecture du premier
fichier (fichier en surbrillance). L'ecran sera affiche comme sur les illustrations ci-dessous :
MP3 File JPEG File
Utilisez les boutons de navigation pour consulter votre fichier favori et selectionner la lecture du premier
fichier ou de votre fichier favori.
REMARQUE :
Appuyez sur les boutons _ / • pour modifier la fonction de surbrillance des fichiers, documents ou mode
de selection.
Appuyez sur les boutons numeriques pour selectionner directement les contenus. Pour les chiffres au-
dessus de 10, appuyez en premier sur le bouton - (par exemple, pour le fichier 15, appuyez sur - et
ensuite sur 5)
Lots de la lecture de fichiers MP3, aucune image ne s'affiche; seule la sortie audio est diffusee.
Pendant la lecture ou I'arr_t momentane pour la lecture de photos, vous pouvez utiliser les boutons de
navigation pour basculer/faire tourner la photo.
Bouton A pour basculer horizontalement
Bouton V" pour basculer verticalement
Bouton '_ pour faire tourner I'image de 90° vers la gauche.
Bouton _" pour faire tourner I'image de 90° vers la droite.
Pendant la lecture ou I'arr_t momentane, vous pouvez utiliser le bouton DVD MENU pour passer en
mode de previsualisation pour afficher 12 images. Appuyez sur le bouton _ / •I_ pour selectionner
la page suivante/prec6dente ou appuyez sur les boutons numeriques pour visionner les images qui
correspondent.
La dimension maximale d'affichage pour une image JPEG est 1280 x 1024.
-26
Page 64

DVD Functions
• Reglage des fonctions generales du lecteur DVD
Appuyez sur le bouton du Configuration du DVD pour activer la fonction
de menu OSD (Affichage sur 1'6cran)du lecteur DVD.
Appuyez sur les boutons _ / _" pour vous deplacer dans les differents
sous-menus et les mettre en surbrillance.
Appuyez sur le bouton OK pour acceder ausous-menu en surbrillance.
Appuyez sur le bouton Configuration du DVD pour quitter le menu OSD.
REMARQUE : En mode de reglage, les fonctions de lecture du disque
seront annulees, ou pausees.
• Language Set Up
OSD (Affichage sur I'ecran)
Utilisez les boutons de navigation pour selectionner le reglage OSD. Vous
avez le choix entre six langues.
Appuyez sur les boutons _" / A /V pour defiler entre les langues
diff6rentes : Anglais, Francais, Espagnol.
Appuyez sur le bouton OK pour confirmer.
Menu
Utilisez les boutons de navigation pour selectionner le reglage du
MENU. Vous avez le choix entre sept langues. Appuyez sur les boutons
_,/A / 'V pour d_filer entre les langues differentes : Anglais, Frangais,
Espagnol ,Portugais ,Allemand, Italien.
Appuyez sur le bouton OK pour confirmer.
@
@
Audio
Utilisez les boutons de navigation pour selectionner le reglage de
I'AUDtO Vous avez le choix entre sept langues. Appuyez sur
les boutons _'/ A / V pour defiler entre les langues diff6rentes
: Anglais , Frangais, Espagnol ,Portugais ,Allemand, Italien.
Appuyez sur le bouton OK pour confirmer.
-27
Page 65

Fonctions du lecteur DVD
Sous-titres
Utilisez les boutons de navigation pour selectionner le reglage des
sous-titres; vous avez le choix entre sept langues. Appuyez sur les boutons
_. / A / V pour defiler entre les diff6rentes langues : Anglais, Fran(_ais,
Espagnol ,Portugais ,Allemand, Italien, et OFF.
Appuyez sur le bouton OK pour confirmer.
• Reglage de I'ecran
Encodage
Utilisez les boutons de navigation pour selectionner le reglage
d'encodage. Appuyez sur les boutons _,/A / V pour s61ectionner Europe
Occidentale, ou Europe Centrale.
Appuyez sur le bouton OK pour confirmer.
Reraarque : Cette fonction s'applique uniquement pour les disques
dont les sous-titres emploient des caract@es d'Europe Occidentale,
oud'Europe Centrale.
Type de televiseurs
Utilisez les boutons de navigation pour selectionner le reglage du type de
tel6viseur. Appuyez sur les boutons _,/ .A. / V' pour selectionner entre 4:3
PS, 4:3 LB, ou 16:9.
Appuyez sur le bouton OK pour confirmer.
Selectionnez le rapport de contraste le plus approprie pour le DVD que vous
souhaitez visionner
4:3 PS (Normal)
PS normal est utilise pour la plupart des d'emissions de tel6 et il est egalement selectionn6
comme le reglage pardefaut. Le rapport de cadre est 4:3. Si vous selectionnez le 4:3PS
pendant la lecture d'un DVD I'image remplira I'ecran mais vous neverrez pas les bords
gauches et droits de I'image.
4:3 LB (Normal)
Avec le mode LB normal, le DVD aura le rapport de cadre original pendant la lecture, et
selon la taille d'ecran de votre tel6viseur, des bandes noires pourront appara'_trreen haut et
en has de I'ecran.
16:9 (Grand ecran)
Selectionnez cette option si vous avez un tel6viseur a grand-angle.
REMARQUE : La taille de I'image pendant lalecture peut vafier selon le contenu du disque.
Pour les disques au rapport 4:3, n'importe quel mode sera diffuse en 4:3 pendant la lecture.
Selectionnez le rapport de cadre selon le rapport de cadre du tel6viseur.
-28
Page 66

DVD Functions
i!iiii_i_i_i/iiiii}iiiiiii,,,_i_!
@iiiliil
Ecran de veille
Utilisez les boutons de navigation pour selectionner le reglage de
I'ecran de veille.
Appuyez sur les boutons _. / A / V pour selectionner NTSC, PAL ou
Auto.
Appuyez sur le bouton OK pour confirmer.
Systeme de TV
Utilisez les boutons de navigation pour selectionner le reglage de
Systeme de TV.
Appuyez sur les boutons _' / A / V pour selectionnerNTSC, PAL ou
Auto.
Appuyez sur le bouton OK pour confirmer.
Remarque : Le format NTSC est utilise en principe pour les
tel6viseurs au Canada. Consultez le guide d'instructions de votre
concernant les formats soutenus. Si le mode PAL est
selectionn6 avec un tel6viseur qui n'est pas compatible, il se peut que
vous constatiez des interf6rences, ou un d_filement de rimage.
Luminosite
Utilisez les boutons de navigation pour selectionner le reglage de la
Luminosit& Appuyez sur les boutons _ / ,A, / V pour selectionner
entre Normal, Lumineux, ou Discret.
Appuyez sur le bouton OK pour confirmer.
Contrast
Utilisez les boutons de navigation pour selectionner le reglage du
Contraste. Appuyez sur les boutons _. / ,A, / Vpour selectionner de
0 _ +/-4.
Appuyez sur le bouton OK pour confirmer,
Last Memory
Utilisez les boutons de navigation pour selectionner le reglage du
Last Memory. Appuyez sur les boutons _, / A / Vpour selectionner
de On ou Off.
Appuyez sur le bouton OK pour confirmer.
-29
Page 67

Fonctions du lecteur DVD
Reglage du son
Donnees audio Downmix
Utilisez les boutons de navigation pour selectionner le reglage des
donnees audio Downmix. Appuyez sur les boutons _'/A / V pour
selectionner entre Lt/Rt et LotRo.
Appuyez sur le bouton OK pour confirmer.
Reglages personnalises
Contr61e parental
Utilisez les boutons de navigation pour selectionner le reglage
Contr61e parental.
Appuyez sur le bouton _ ou sur le bouton OK pour inserer le mot de
passe, et selectionnez ensuite la puce anti-violence V-chip, ou
Off (desactiv6).
Le reglage par defaut est 8899.
-30
Page 68

DVD Functions
!!i ii i,i llili;iiii!,lliii
Reglage par defaut
Utilisez les boutons de navigation pour selectionner le Reglage par
d_faut. Appuyez sur le bouton _' pour selectionner R_initialisation.
Appuyez sur OK pour reactiver les reglages d'usine.
-31
Page 69

PERSONNALISATION DES
• Systeme de classement de la MPAA (Motion Picture Association of America)
G Grand public Lecontenu n'offensera pas la majorite des tel6spectateurs.
Surveillanceparentale Les parents pourraient vouloir emp6cher leurs enfants de
PG
recommandee regarder remission en raison de son contenu.
Accord parental L'emission est inappropriee pour les preadolescents; son
PG-13 fortement recommand_ contenu est plus choquant que celui des emissions avec
unecote PG.
Not for children under 17-contains strong element of sex
R Reserve aux adultes
and!or violence.
Interdit aux moinsde 17 En aucun cas destine aux enfants de moins de 17 ans.
NC-17
ans Presente du contenu sexuel explicite.
X Filmspornographiques Equivalent a la cote NC-17.
Aucun
Aucun classement La MPAA n'a pas attribue de cote a cette emission
classement
• Systeme de classement TV Parental Guideline Rating System
TV-Y Tousles enfants Le contenu n'offensera pas lamajorite des telespectateurs.
TV-Y7 Enfants de 7 ans Juge convenable pour les enfants de plus de 7 ans; peut
contenir des sc_nes de violence fictive.
TV-G Grand public Convient a tousles auditoires; les enfants peuvent
regarder cette programmation sans supervision.
surveillance parentale e convient pas aux jeunes enfants; peut contenir des
TV-PG recommandee propos suggestifs, un langage grossier et des sc_nes de
sexe et de violence.
TV-14 Accord parental uNe convient pas aux enfants de moins de 14 ans; peut
fortement recommande contenir des propos abusifs, un langage.
Mature Audience Adults only- may contain strong language, bad
TV-MA
Only language, sex, and violence scenes.
Classement canadien:
Le classement canadien-anglais est utilise dans tout le Canada anglophone (C, C8+,G, PG,14+, 18+). Le
classement canadien-frangais est utilise au Quebec (G,8 ans+, 13 ans+,16 ans+, 18 ans+)
Nota: TLa puce V-Chip bloquera automatiquement certaines categories ¢ plus restrictive _. Si vous bloquez la
categorie TV-Y, la categorie TV-Y7 sera alors automatiquement bloquee. De la meme maniere, si vous bloquez la
categorie TV-G, alors toutes les categories du groupe _ jeunes adultes _ seront bloquees (TV-G, TV-PG,TV-14 et
TV-MA).
-32
Page 70

Si votre t61eviseur ne fonctionne pas normalement ou si vous n'arrivez pas & ralhmer,
veuitlez verifier les 61ementsde depannage suivants. Pour identifier te probleme, pensez
aussi & verifier tous tes autres appareils electroniques connectes, par exemple te tecteur
de DVD ou le tecteur Bh-ray. Site televiseurs ne fonctionne toujours pas normalement,
communiquez avec le service d'assistance technique.
Le televiseur ne repond pas
quand vous appuyez surles
touches
IIest impossibled'allumerle
televiseur
La telecommande ne
foncUonnepas
Le televiseur s'eteint
subitement
IIIIIIIIIIIIIIIIIIII
• IIarnve que le televiseur se fige en cours d'utilisation.Debranchez le
cordon d'alimentationde la prise de courant pendant quelqueminutes.
Rebranchez rappereil et tentez de rutiliserde la mani_re habituelle.
• Assurez-vous que le televiseur est branche dans la prise electrique.
• Assurez-vous que tousles appareils AV connectes sont eteints
avant d'allumer le televiseur.
• Verifiez si des objets situes entre le televiseur et la telecommande
peuvent bloquer le signal. Assurez-vous de viser directement le
televiseuravec la tel-_commanda.
• V_flez sila poladtedes pilesinstaleesest adC-=_quate(+vers +,- vers -).
• Installezde nouveles piles.
• Verifiez I'alimentationdu televiseur. La prise electrique est peut-6tre
Coupee.
• Verifiez si le mhuteur de mise enveilleest programm&
• V@ifiezsi la fonctbn de miseen veile automatiqueest activee.
• Verifiez si le televiseur est allum&
Pas d'image et pes de son • Essayez de changer de chafne. Le probl_me provient peut-6tre du
telediffuseur.
L'image apperaft lentement • C'est normal;rimage est cachee pendant le processus de demarrage
apr_s avoir allume le du televiseur. Veuillez communiquer avec le service d'assistance si
televiseur rimagen'apperaft pes au bout de dnq minutes.
• Reglez les parametres dans le menu PICTURE (IMAGE).
Aucune couleur,ou couleur • Essayez de changer de chafne. Le probl_me provient peut-6tre du
ou image de pi_tre qualite telediffuseur.
• Verifiez si les c_bles video sont bien raccordes.
Barre horizontale ou verticale • Cherchez une source d'interference locale, par exemple un appereil
ou tremblement de rimage menager ou unoutil electrique.
• La station ou la chafne c_blee eprouvent peut-6tre des difficultes;
Mauvaise reception sur changez de chafne.
certains canaux • Station signal may be weak, reposition the antenna for better
reception.
• Check for sources of possible interference.
Des lignes ou des stries dans
• Verifiez ranteme (changez sa position.)
les images
Aucune image Iors de la
• Verifiez si la source d'entree est HDMI1/HDMI2/HDMI3.
connexion
• Reglez les parametres de format d'image dans le menu SETUP
Le format de rimage semble (CONFIGURATION) ou appuyez sur la touche ASPECT de la
incorrect
telL_commande.
-33
Page 71

D6panna_e
L'image est bonne, mais il n'y
a pas de son
• Appuyez sur les touchesVOL +/-.
• Le son est-il desactive? Appuyez sur la touche MUTE.
• Essayez de changer de chafne. Le probl_me provient peut-
6tre du telediffuseur.
Aucune sortie de run des
• Reglez les parametres d'equilibragedans le menu AUDIO.
haut-parleurs
• Un changement de I'humiditeou de la temperature ambiante peut
Son inhabituel depuis provoquer un bruitinhabituelau moment d'allumerou d'eteindre le
I'interieur du televiseur
televiseur;cela n'indiquepas unedefaillance de rappareil.
Aucune son Iors de la
• Verifiez si la source d'entree est HDMI1/HDMI2/HDMB.
connexion HDMI
Bruit audio • Gardez le c_ble coaxial RF a I'ecartdes autres c_bles raccordes.
• S_ectionnez le parametre Set Password (D6finir le mot de passe)
Mot de passe perdu dans lemenu LOCK (VERROU), puisentrez le mot de passe maftre
suivant •<<8899 >>.Celui-ci efface votre mot de passe precedent et
vous permet d'entrer unnouveau mot de passe.
• Reglez la resolution, la frequence horizontale ou la frequence
verticale.
Le signal est hors de portee
(format non valide)
Barre verticale ou strie sur
rarri_re-plan, bruit horizontal
et position incorrecte
Couleur instable a I'ecran ou
une seule couteur affichee
Utilisezla configuration automatique, ou rg_31ezrhorloge,ta phase ou
la position H/V.
• V_fiez lec&ble d'interconnexion.
• Reinstallez la carte video du PC.
• Ne pas utitiser te tet6viseur dans des endroits trop chauds ou trop froids, car te
meuble pourrait se gauchir ou t'ecran pourrait ne pas fonctionner correctement. Le
televiseur fonctionne de fagon optimale & des temperatures dans lesquelles vous
_tes & t'aise.
• Conserver te teteviseur a une temperature variant entre 0 °C et 50 °C (soit entre
32 °F et 122 °F).
• La temperature de fonctionnement varie entre 0 °C et 35 °C (soit entre 32 °F et
95 °F).
• Ne pas installer te teteviseur dans un endroit expose directement a la lumiere du
soleil ou proche d'une source de chaleur.
-34
Page 72

Taille de I'ecran 24 pouces en diagonales
Type d'affichage LED
Technologie de I'ecran TFT
Ecran 60 Hz ou 120 Hz 60 Hz
Resolution d'affichage 1080P
support HDMI jusqu'a 1080P
Resolution de I'ecran 1920 x 1080
Format de I'image 16:9
Ratio de contraste dynamique de I'ecran 1000:1
Luminosite (Mesuree au centre de I'ecran) 200
Temps de reponse (G a G) 9.5 ms
Duree de vie de la lampe (Calculee enheures) 30,000 hours
Angle de visionnement horizontal D,CR>10) 165
Angle de visionnement vertical D,CR>10) 160
Montage mural (LxW-mm) 100"100 VESA(mm)
La FCC veut que vous sachiez
Cet appareil a ete teste et juge conforme aux limitations des appareils numeriques de classe Ben
vertu de la section 15 des r_glements de la FCC. Ces limitations sont congues pour fournir une
protection raisonnable contre les interferences nocives dans un environnement domestique.
Cet equipement produit, utilise et peut emettre de I'energie radio electrique et, s'il n'est pas
installe et utilise conformement aux presentes consignes, peut causer des interferences nuisibles
aux communications radio. II n'existe toutefois aucune garantie que de telles interferences ne se
produiront pas dans une installation particuli_re.
Si cet appareil cause des interferences nuisibles a la reception des signaux de radio ou de
television, ce qui peut 6tre determine en allumant et en eteignant I'appareil, I'utilisateur peut tenter
de resoudre le probl_me en prenant une ou plusieurs des mesures suivantes : 1 reorienter ou
deplacer I'antenne receptrice; 2 augmenter la distance separant I'equipement du recepteur; 3
brancher I'appareil sur un circuit different de celui du recepteur; 4 consulter le fournisseur ou un
technicien qualifi6 en radio/tel6vision pour obtenir d'autres suggestions.
Tout changement ou toute modification non express6ment approuv6s par le fabricant peuvent
annuler le droit de rutilisateur a se servir de I'equipement. La oQ des c_bles d'interface blindes ont
ete fournis avec le produit ou avec des composants ou accessoires supplementaires particuliers
d_finis ailieurs dans le but d'#tre utilis6s Iors de I'installation du produit, its doivent l'_tre de sorte
assurer la conformite avec les r_glements de la FCC.
Declaration Canadian DOC
Television standard Appareil de reception PARIS Canada-7
Cet appareil numerique de classe Best conforme a la norme NMB-003.
-35
Page 73

ModUles avec 6cran de 52 pouces et moins (le <<produit _)
Ce prod uit (y compris tout accessoi re compris dans I'emballage d'orig ine), tel q ue fourni et distribu_ _I'_tat neuf, est prot_g_ par une ga rantie
offerte par SEIKI LLC (SEIKI) a I'acheteur initial contre tout d_faut de fabrication (_ gara ntie _) selon les termes suiva nts :
1. REMPLACEMENT : Pendant une p_riode d'un (1) an a compter de la date de I'achat initial, si SEIKI ou I'un de ses fournisseur de services
autoris_ d_termine que le produit (ou I'une de ses pi_ces) est d_fectueux, SEIKI remplacera sans frais pour I'acbeteur initial le produit
par un produit neuf ou recertifi& (au choix de SEIKI) dont les caract_ristiques seront similaires ou sup&rieures. Une lois la p_riode de
garantie d'un (1) an expir_e, vous devrez payer pour tous les coots de remplacement du produit. Apr&s le remplacement du produit,
la garantie se poursuit selon les m&mes termes d'un (1) an a compter de la date de I'achat initial; elle n'est pas prolong&e en raison du
processus de remplacement. A des fins de garantie, I'option de remplacement avanc&e n'est offerte qu'aux clients qui poss&dent une
carte de credit am_ricaine.
2. PIECES : Pendant une p&riode d'un (1) an _ compter de la date de I'achat initial, SEIKI fournira sans frais pour I'acheteur initial des pieces
neuves, r&usin_es ou remises _ neuf contre les pi_ces d_fectueuses. Une lois la p_riode de garantie d'un (1) an expir_e, vous devrez
payer pour le coot de toutes les pieces.
3. COOTS D'EXPEDITION : Nonobstant ce qui precede, I'acheteur initial est responsable de tous les frais d'exp_dition, _ SEIKI ou _ I'un
de ses fournisseur de services autoris_, du produit ou des pi&ces en vue d'un diagnostic, d'une r_paration ou d'un remplacement. Le
client a la responsabilit& d'emballer le produit de maniere s_curitaire et de faire appel _ un transporteur fiable pour livrer le produit
un fournisseur de services SEIKI autoris&.
Pour obtenir de I'information sur le service de garantie et sur les mesures de d_pannage, t_l_phonez & notre ligne sans frais d'assistance & la
clientele au:
1-855-MY-SEIKI (1-855-697-3454)
PVeuillez avoir _ disposition le nom du module et le num_ro de s_rie de votre produit, ainsi que sa date d'achat.
Vous pouvez _galement visiter notre site Web et y ENREGISTRER votre produit SEIKI au:
WWWoSEIKI.com
Pour recevoir un service assur_ par la garantie, I'acheteur initial doit communiquer avec SEIKI afin d'identifier le probl&me et d'_tablir
les proc&dures. Pour obtenir le service demandS, vous DEVEZ presenter & SEIKI ou _ I'un de ses fournisseurs de services autoris_
une preuve d'achat sous la forme d'un contrat de vente ou d'une facture acquitt_e qui prouvera que le produit est couvert pas la
p_riode de garantie applicable.
Exclusions et limitations
Cette garantie couvre les d_fauts de fabrication r_v_l_s au cours de I'utilisation normale et non commerciale, du produit; elle ne couvre pas
: (a) les dommages ou les d_faillances caus_es par ou attribuable a une utilisation abusive ou incorrecte, au d_faut de suivre les instructions,
une installation ou _ un entretien inad_quats, _ une alteration, un accident, ou a une tension ou un courant trop fort; (b) les r_parations
inutiles ou mal effectu_es par des _tablissements de services non autoris_s; (c) les instructions aux clients ou les r_glages sur place; (d)
les coots li&s au transport, aux expeditions, aux livraisons, aux assurances, _ I'installation ou _ la configuration; (e) les coots d'enlevement,
de transport ou de r_installation du produit; (f) I'usure normale, les dommages esth_tiques ou provoqu_s par un acte de la nature ou un
accident; (g) I'utilisation commerciale du produit;(b) la modification du produit ou de I'une de ses pi_ces q uelconque. En outre, cette ga rantie
ne couvre pas les images (_incrust_es _>sur I'_cran. Cette garantie ne s'applique qu'_ I'acbeteur initial et ne couvre pas les produits vendus
TELS QUELS ou AVEC TOUS LES DEFAUTS, ni les prod uits non du rabies (ex. fusibles, piles, ampoules, etc.); en outre, la ga rantie n'est pas valide
si le num_ro de s_rie appos_ en usine a _t_ alt_r_ ou retir_ du produit. Cette garantie n'est valide qu'aux Etats-Unis et au Canada; elle ne
s'applique qu'aux produits acbet_s et r_par_s aux Etats-Unis ou au Canada.Tous les pi&ces et tous les produits remplac_s, ainsi que tous les
produits ayant fait I'objet d'un remboursement, deviennent la propri_t_ de I'_metteur de la garantie.
AUCUNE GARANTIB, QU'ELLE SOIT EXPLICITE OU IMPLICITE, Y COMPRIS, SANS S'Y LIMITER, LES GARANTIBS IMPLICITES DE
QUALITE MARCHANDE OU D'ADEQUATION A UN USAGE PARTICULIER, AUTRE QUE CELLES EXPLICITEMENT DECRITES CI-DESSUS,
NE S'APPLIQUERA. L'EMETTEUR DE LA GARANTIE EXCLUT EN OUTRE TOUTES LES GARANTIES APRES LA PERIODE DE GARANTIE
EXPRESSE ENONCEE CI-DESSUS. AUCUNE AUTRE GARANTIE EXPLICITE OU DONNEE PAR UN INDIVIDU, UNE FIRME OU UNE ENTITE
QUELCONQUE CONCERNANT LE PRODUIT NE LIBRA L'EMETTEUR DE LA GARANTIE. LES SEULS DEDOMMAGEMENTS OFFERTS AU
CONSOMMATEUR SONT LA REPARATION OU LE REMPLACEMENT DU PRODUIT, OU SON REMBOURSEMENT AU PRIX DE L'ACHAT
INITIAL, LE TOUT A LA SEULE DISCRETION DE L'EMETTEUR DE LA GARANTIE. L'EMETTEUR DE LA GARANTIE NE PEUT ETRE TENU
RESPONSABLE DE TOUT DOMMAGE ACCESSOIRE OU CONSECUTIF PROVOQU E PAR L'UTILISATION OU LA MAUVAISE UTILISATION DU
PRODUIT, OU PAR L'INCAPACITE A L'UTILISER. NONOBSTAND CE QUI PRECEDE, LE DEDOMMAGEMENT AU CONSOMMATEUR NE DOlT
PAS ETRE sUPERIEUR AU PRIX D'AC HAT DU PRODUIT VENDU PAR SEIKL CETTE GARANTIE NE S'ETEND A AUCUNE AUTRE PERSONNE
QUE LE CONSOMMATEUR QUI A ACHETE LE PRODUIT A L'ORIGINE ET N'EST PAS TRANSFERABLE.
Certains _tats ou certaines provinces n'autorisent pas les exclusions ou les limitations des dommages accessoires ou cons_quentiels; par
cons_quent, les limitations ou exclusions pr_c_dentes peuvent ne pas s'appliquer _ votre cas. Cette garantie vous accorde des droits pr_cis,
mais vous pouvez avoir d'autres droits qui varient selon les _tats et les provinces.
SEIKI LLC
c/o SEIKI Digital Customer
6880 Commerce Blvd., Canton, M148187 USA
customer service@seikidigita Lco m
N'EXPEDIEZ PAS DE PRODUITS A CETTE ADRESSE. VEUILLEZ COMMUNIQUER AVEC LE SERVICE A LA CLIENTELE POUR OBTENIR LES
ADRESSES O0 SONT EFFECTUEES LES REPARATIONS.
-36
Page 74

Instrucciones de seguridad importantes
CONTENIDO
Informaci6n de seguridad
Preparaci6n
Que se incluye
Vista frontal
Vista posterior
Instalaci6n del soporte de la base
Extracci6n del soporte para el montaje en la pared
Control remoto
Conexi6n de dispositivos externos
Personalizar la configuracibn del televisor
Configuraci6n inicial
Navegaci6n pot la visualizaci6n en pantalla
Selecci6n de la fuente de entrada
Configuraci6n de la imagen
Configuraci6n de audio
Configuraci6n de la hora
Ajustes de configuraci6n
Configuraci6n de bloqueo
Ajustes del canal
Multimedia USB
Control parental
Funcionamiento del DVD
Funciones del DVD
Soluci6n de problemas
Mantenimiento
Especificacion
Garantia limitada
4
4
5
6
7
7
8
11
11
12
13
13
14
15
16
17
18
19
2O
21
24
33
34
35
36
Page 75

INSTRUCCIONES DE SEGURIDAD IMPORTANTES
• Lea estas instrucciones - todas las instrucciones
de seguridad y sobre el funcionamiento se deben
leer antes de utilizar este producto.
• Guarde estas instrucciones - las instrucciones
de seguridad y sobre el funcionamiento se deben
conservar para futuras referencias.
• Tome en cuenta todas las advertencias -
todas las advertencias en el producto yen las
instrucciones sobre el funcionamiento se deben
cumplir.
• Follow all instructions - All operating and use
instructions should be followed.
• No use este aparato cerca del agua - el producto
no se debe usar cerca del agua o la humedad, por
ejemplo, en un s6tano hQmedo o cerca de una
piscina, y similares.
• Limpie s61ocon un patio seco.
• No bloquee las aberturas de ventilaci6n. Instate de
acuerdo con las instrucciones det fabricante.
• No Io instale cerca de fuentes de calor, como
radiadores, calefactores, estufas u otros aparatos
(incluyendo amplificadores) que produzcan calor.
• No anule et prop6sito de seguridad det enchufe
polarizado o con conexi6n a tierra. Un enchufe
polarizado tiene dos patas,una mas ancha que la
otra. Un enchufe con conexi6n a tierra tiene dos
patas y una tercera clavija con conexi6n a tierra.
La pata ancha o la tercera clavija se proporciona
para su seguridad. Si el enchufe proporcionado
no encaja en el tomacorriente, consulte a un
electricista para que reemptace et tomacorriente
obsoteto.
• Proteja el cable de alimentaci6n para que no sea
pisado o aplastado, especialmente en la parte de
los enchufes,receptaculos yen el punto en el que
salen del aparato.
• Use s61odispositivos/accesorios especificados por
el fabricante.
• Use s61o con un carro, base, tripode, soporte o
mesa especificados por el fabricante o vendidos
con et aparato. Cuando se utiliza un carro o
un estante, tenga cuidado cuando mueva la
combinaci6n de carro/aparato para evitar lesiones
si 6ste se vuelca.
• Desenchufe el aparato durante las tormentas
el_ctricas o cuando no los utilice durante periodos
de tiempo prolongados.
• Remita todo mantenimiento al personal calificado.
Se requiere servicio cuando el aparato ha sido
dafiado de cualquier manera, como cuando el
cable de alimentaci6n o et enchufe esta dafiado, se
ha derramado liquido o han caido objetos dentro
del aparato, et aparato ha sido expuesto a la Iluvia
o a la humedad, si no funciona normalmente o se
ha caido.
Mantenga la unidad en un ambiente bien ventilado.
ADVERTENClA: Para reducir el riesgo de incendio o
descarga el_ctrica, no exponga este aparato a la tluvia
ni a la humedad. El aparato no debe ser expuesto a
goteos o salpicaduras. No se deben colocar sobre et
aparato objetos Ilenos de Iiquido,como floreros.
ADVERTENCIA: Las pilas no se deben exponer a
un calor excesivo como el del sot, fuego o similares.
ADVERTENClA: EL enchufe de la red se utiliza
como dispositivo de desconexi6n, el dispositivo de
desconexi6n debe estar siempre disponibte.
ADVERTENClA: Para reducir et riesgo de descarga
el6ctrica, no retire ta cubierta (o parte posterior) ya que
no hay piezas que el usuario pueda reparar. Remita et
mantenimiento al personal califlcado.
RISQUE DE CHOC ELECTRIQUE NE
PAS OUVRIR
Este simbolo de rayo con punta de flecha
,_ dentro de un triangulo equilatero esta
destinado a alertar al usuario de la presencia
de"vottaje peligroso" sin aislamiento dentro
de la carcasa del producto que puede ser de suficiente
magnitud como para constituir un riesgo de descarga
el6ctrica.
///_ El signo de exclamaci6n dentro de un triangutoequilatero esta destinado a alertar al usuario
de la presencia de instrucciones importantes
de funcionamiento y mantenimiento en la informaci6n
que acompafia al aparato.
Este equipo es de Clase II o producto el6ctrico
de dobte aislamiento. Se ha disefiado de tal
manera que no requiere una conexi6n de
seguridad detierra el6ctrica.
Este producto contiene materiales el6ctricos o
_ electr6nicos. La de materiales
presencia
estos
pueden, si no se desechan adecuadamente,
m"tener posibles efectos adversos sobre el medio
ambiente y la salud humana.
La presencia de esta etiqueta en et producto
significa que no se debe desechar como
residuo dom6stico y se debe recoger por
separado. Como consumidor, es responsable
de asegurarse que este producto se deseche
adecuadamente.
Este producto cumple con las directrices de
ENERGY STAR_para la eficienciaenerg_tica.
ENERGYSTARylamarca ENERGYSTARson
marcasregistradasenEstadosUnidos.ENERGY
STAResur,amarcaregistadai:_pedaddetgobiemo
de los EE.UU.
_-2
Page 76

INFORMACION DE SEGURIDAD
Para garantizar que este equipo tenga un funcionamiento confiable y seguro, tea cuidadosamente todas
las instrucciones de esta guia del usuario, especialmente la siguiente informaci6n de seguridad.
Seguridad el_ctrica
. Et televisor s6to se debe conectar a una fuente de alimentaci6n principal con el voltaje que coincida
con ta etiqueta en ta parte trasera det producto.
. Para prevenir una sobrecarga, no comparta la misma toma de corriente con demasiados
componentes electr6nicos.
. No coloque los cables de conexi6n en donde puedan ser pisados o se puedan tropezar con e!los.
. No coloque objetos pesados sobre ningOn cable de conexi6n, ya que puede daSar el cable.
. Sostenga el enchufe principal, no los cables, al retirado de un enchufe.
. Durante una tormenta electrica o cuando no utilice el televisor durante un periodo prolongado,
desconecte el interruptor de encendido en la parte posterior det televisor.
. No permita que entre agua o humedad al televisor o al adaptador de corriente. NO lo use en 9teas
mojadas o hOmedas, como baSos, cocinas humeantes o cerca de piscinas.
. Extraiga el enchufe de inmediato y busque ayuda profesional si el enchufe o el cable se daSan,
se ha derramado Iiquido en el aparato, si el televisor accidentalmente se ha expuesto a agua o
humedad, si algo penetra accidentalmente por las ranuras de ventilaci6n o si el televisor no funciona
con normalidad.
. No retire las cubiertas de seguridad. No hay piezas que el usuario pueda reparar. Es peligroso y
puede anular la garantia del producto si intenta reparar la unidad usted mismo. S61o el personal
calificado debe realizar el mantenimiento de este aparato.
. Para evitar fugas de tas pilas, retire tas pilas del control remoto, cuando e! control remoto no se usa
durante mucho tiempo o cuando se agotan las pilas.
. No abra ni tire las pilas usadas al fuego.
Seguridad fisica
. No bloquee las ranuras de ventilaci6n en la cubierta posterior. Puede colocar el televisor en un
mueble, pero asegOrese de que haya 5 cm (2") de espacio por todos lados.
. No gotpee ni sacuda la pantalla de! televisor, ya que puede daSar los circuitos internes. Cuide bien
el control remoto.
. Para limpiar el televisor, use un paso suave y seco. No utilice solventes o fluidos a base de petr61eo.
. No Io instale cerca de fuentes de calor, come radiadores, calefactores, estufas u otros aparatos
(incluyendo amplificadores) que produzcan calor.
. No anule el prop6sito de seguridad del enchufe polarizado o con toma de tierra. Un enchufe
polarizado tiene dos patas, una m_s ancha que ta otra. Un enchufe con conexi6n a tierra tiene dos
patas y una tercera clavija con conexi6n a tierra. La pata ancha o la tercera clavija se proporciona
para su seguridad. Si el enchufe proporcionado no encaja en el tomacorriente, consulte a un
electricista para que reemplace el tomacorriente obsoleto.
. Proteja el cable de alimentaci6n para que no sea pisado o aplastado, especialmente en la parte de
los enchufes.
. Desenchufe el aparato durante las tormentas electricas o cuando no los utilice durante periodos
prolongados.
. Remita todo mantenimiento a un personal de servicio calificado. Se requiere servicio cuando el
aparato no funciona normalmente o si el aparato, incluyendo e! cable de alimentaci6n o e! enchufe,
se ha daSado de alguna manera.
. Tambi&n se requiere servicio si se ha derramado Iiquido o han caido objetos dentro del aparato,
cuando ha sido expuesto a la tluvia o a la humedad o si se ha caido.
. Siempre conecte el televisor a una toma de alimentaci6n con conexi6n de protecci6n a tierra.
Page 77

PREPARACION
Que se incluye
Televisor
Control remoto con pilas
soporte de la TV Sopo_e
Four tomillos
User Manual
Quick
Start Guide
Manual del usuano
Adaptador Guia de inicio rapido
_-4
Page 78

IlimVista frontal
PREPARACION
--O
,----4D
,----O
,---8
,---O
,--4D
,---O
,=--O
1.¢
Encienda el televisor entre modo Encendido / De espera.
2. FUENTE
Presione para seleccionar entre las diferentes fuentes de sepal de entrada.
3. MEN0
Visualice el menu OSD.
4. CH ,,Iv
Presiones para seleccionar un canal.
5. VOL +/-
Presione para ajustar el volumen.
6. PLAY
Bot6n Play del DVD.
7. OPEN
Bot6n Open/Close del DVD.
8. Indicador de POWER
I se iluminara en azul cuando el televisor este encendido. Se iluminara en rojo cuando el
televisor este en modo de espera.
9. IR (Receptor de infrarrojo)
Recibe las seSales del IR del control remoto.
_-5
Page 79

PREPARAClON
m=_uVista posterior
1. Adaptador
Conecte al adaptador.
2. Puerto USB
Conecte a un dispositivo de
almacenamiento USB para reproducir
archivos de fotos.(modo USB)
3. Entradas HDMI
Conecte a un dispositivo de salida de
se6al de alta definici6n (AD).
4. Entrada VGA
Se raccorde a un ordinateur ou a d'autres
appareils dotes d'une interface VGA.
Entrada de AUDIO de PC
Conecte a una salida de audio de la
computadora.
5. Entrada del YPbPr
Conecte el (Y / Pb / Pr) para extermalvideo
dispositivos.
6. Entrada DTV/TV
Conecte a la toma (75[3 VHF/UHF)
de antena con el cable coaxial RF.
7. Torna de auriculares
Conecte los audculares.
8. OPTICA
Conecte a la toma de audio en el sistema
de audio digital.
9. Entrada del AV
Conectar a los outputsockets de video y audio
(L / R) en los dispositivos de video extermal.
_-6
Page 80

PREPARACION
Instalacibn del soporte de la base
1.Coloque el televisor boca
abajo sobre una superficie lisa y
acolchonada para evitar que se daSe
o raye.
2.Fije le base al soporte de pie base
con los 4 tornillos proporcionados.
• 3.El enraizamiento de los pies para
sentarse en la direcci6n.
Removing the Stand for Wall=Mounting
1.Coloque el televisor boca
abajo sobre una superficie lisa y
acolchonada para evitar que se daSe
o raye.
2.Afloje los 4 tomillos que sujetan el
conjunto del soporte y eliminelos.
3.Fije el soporte del montaje en la
pared al televisor usando los agujeros
de montaje en la parte posterior
del televisor. Monte este televisor
de acuerdo con las instrucciones
incluidas en el soporte del montaje en
la pared.
ADVERTENCIA: Este aparato est& dise_ado para ser soportado por el soporte del
montaje en la pared enumerado UL.
_-7
Page 81

PREPARACION
I Control remoto
0
==
v
.,o
HI @ • O REPEAT@ FAV @
_SEIKI
0 z.
-_ 9.
__ 10.
11.
12.
13.
14.
15.
1. (,_,): Encienda el televisor entre modo
encendido y de espera
_: Silenciar y restaurar el sonido del
televisor
0~10: Seleccione un programa. (modo
ATV/DTV)
4. --: Ingrese el nQmero de canal de
programas mQltiples tales como 2-1
5. d',p:Regrese al canal de visualizaci6n
6. P.MODE: Seleccione modo de imagen:
dinamico/pelicula/ahorro de energia!
usuario ! estandar
S.MODE: Seleccione modo de sonido:
estandarlmQsicalpeliculalusuario
MTS: Cambie entre los diferentes
canales de audio: EST¢:REO/MONO!
SAP
SLEEP: Configure el temporizador del
televisor: OFF!5!10.../180!240 min
SOURCE: Seleccione entre las diferentes
fuentes de seSal de entrada: TV/DVD!
Component/AV/H DM I/VGA/USB.
INFO: Muestra la fuente de entrada y la
informaci6n del canal
CH+/-: Seleccione un canal.
VOL+/-: Ajuste el volumen.
AUTO:Presione para ajustar la imagen
de forma automatica en la entrada VGA
CC: ENCENDIDO/APAGADO!
SUBTiTULOS encendidos Silencio
16. V-CHIP: Configure et control parenta
17. ASPECT: Seleccione la configuraci6n
de la proporci6n de pantalla: estandar!
ancho/gran zoom/zoom
18. OK: Confirme Ia selecci6n en los menQs
OSD "visualizaci6n en pantalla"
19. _1 • • i_: Permite desplazarse por los
menQs OSD y ajustar la configuraci6n det
sistema segQn tus preferencias.
20. MENU: Visualice el menQ OSD
"visualizaci6n en pantalla"
21. EXIT: Salir delmenO OSD (Visualizaci6n en
pantalla)
22. ___.:Bot6n Open/Close del DVD.
_ 8
Page 82

23. GOTO: Salta a una parte especifica del
DVD / CD. (modo DVD)
24. SLOW: Pulse SLOW para seleccionar
una reproducci6n en velocidad lenta.
(modo DVD)
25. A-B: Repite un segmento entre A y B
(modo DVD).
26. ABCD: Una sola presi6n > cambiar al
canal FAV mantenga presionado>guardar
canal actual
27. CH.LIST: Visualice la lista de programas.
28. ADD/ERASE: Agrega o elimina los
canales favoritos.
29. FAV: Muestra la lista de canales
favoritos.
30. FAV+: Agrega los canales favoritos.
31. DVD.SETUP: Muestra el ment_ OSD del
DVD.
32. TITLE: Pulse TITLE para volver a la
pagina del titulo principal. (modo DVD)
33. AUDIO: Cambia el idioma de audio o el
canal de audio (modo DTV / DVD)
34. MENU: Configuraci6n de la pantalla de
informaci6n del modo DVD.
35. I_11: Inicie o pause la reproducci6n.
36. m: Pulse una vez para detener.
37. REPEAT: Seleccionar entre los diferentes
modos de repetici6n.
38. FAV-: elimina los canales favoritos.
39. SUBTITLE: Visualiza los subtitulos.
40. I_:Vaya al principio del capitulo/pista/
foto anterior.
41. _: Reproducci6n hacia atras
rapidamente.
42._:Haga avanzar la reproducci6n
rapidamente.
43. l_l:Vaya al principio del pr6ximo capitulo/
pista/foto.
_-9
Page 83

CONEXION DE DISPOSITIVOS EXTERNOS
Grabador Blu-ray/Reproductor
Satelite "_t
Receptor de satelite
l
Consola de juegos
Cable RF
OR (no se incluye)
VCR
J
Cable de componente
(no se incluye)
Dable de AV HDMI Cable
(no se incluye) (not included)
Cable HDMI
(no se incluye)
CableVG_ 1
(no seincluye)
t Dispositivo HDMI
Cable 6ptico !
(no se incluye)j
L Sistema de audio digital j
-10
Page 84

PERSONALIZAR LA CONFIGURACION DEL TELEVISOR
Configuracion inicial
• Conecte el cable de alimentaci6n a la toma de corriente despues de haber
completado todas tas conexiones fisicas. En esta etapa, el televisor pasara
al modo de espera y el indicador LED rojo se ituminara.
• En el modo de espera, presione el bot6n (_)de la unidad principal o en el control
remoto para encender el televisor. El indicador LED rojo cambiara a azul.
• La primera vez que encienda el televisor, ira al asistente de configuraci6n
Presione los botones, / _, A/V para seleccionar el modo deseado y presione
OK para confirmar.
0 @ 0
0 0
Home Mode (Ahorro de energia) es la configuraci6n y los ajustes predeterminados de
la televisi6n tal come rue despachada. Y Home Mode (Ahorro de energia) es la
configuraci6n en que el producto rebne los requisitos de Energy Star. Cualquier
cambio a la configuraci6n y a los ajustes predeterminados de la televisi6n tal come
rue despachada cambiarian el consume de energia. Y al permitir determinadas
caracteristicas y funcionalidades opcionales puede aumentar el consume de energia
m#s all# de los limites requeridos para la certificaci6n de Energy Star, segDn sea el caso.
Retail Mode (Modo Retail): Seleccione Modo retail si deseas que tu foto sea m#s
brillante. A veces, este modo puede utilizar m#s energia para operar el modo volumen/
sonido y el mode de imagen. En eeta configuraci6n, el consume de energia posiblemente
exceda el re_uerimiento limite de la certificaci6n Energy Star@
Energy Star _ es un conjunto de directricee de ahorro de energia emitidos por laEnvironmental
EE.UU. Agenda de Protecci6n Ambiental (EPA).
®
Energy Star es un programa conjunto de laAgencia de protecci6n ambiental de EE. UU. y
del Departamento de energia de los EE. UU. que nos ayuda a ahorrar dinero y a proteger
elmedio ambiente a tray, s de productos y pr#cficas energ#ticamente eficientes.
• El ON-MODE Power (modo de encendido de alimentacibn) bajo el Home Mode
(Modo de inicio) debe ser inferior a 28 W.
• E/SLEEP-MODE Power (modo de suspensi6n de alimentaci6n) debe set
inferior a 0.5 W.
0
D-11
Page 85

PERSONALIZAR LA CONFIGURACION DEL TELEVISOR
@ O
Si no se pueden encontrar los canales, este
marco se mostrara automatioamente.
Navegaci6n por la On=screen Display
• Pulse et bot6n MENU para visualizar et menO principal.
• Utitizar tos botones 4 / _ para navegar y seteccionar los menOs disponibles.
_- 12
Page 86

PERSONALIZAR LA CONFIGURACION DEL TELEVISOR
Seleccion de la fuente de entrada
Presione el bot6n SOURCE en la
unidad principal o en et control remote
para visualizar la lista de fuentes de
entrada.
Presione los botones A/V para
seleccionar ta fuente de entrada que
desea entre: TV/Component/AV/
DVD/HDMI/VGA/USB Y luego
presione et bot6n OK para confirmar.
Configuracibn de la irnagen
• Presione el bot6n MENU en la unidad
principal o en et control remote y
luego presione os botones 4/11_ para
seteccionar et menQ de IMAGEN.
• Presione os botones A/V para seteccionar
las siguientes opciones de imagen y luego
presione los botones 4/11_ para ajustar
cada configuraci6n de la opci6n.
Ciclo entre los modes de imagen: dinamico/pelicula/ahorro
de energia/usuario/estandar.
Mode de irnagen Alternative: puedes presionar el bot6n P.MODE para
seleccionar el mode de imagen directamente.
Contraste Ajuste la diferencia entre los niveles de luz y oscuridad en
las fetes. (Para mode de usuario)
Aumente o disminuya la cantidad de blanco en la imagen.
Brillo
(Para mode de usuario)
Color Controlar la intensidad del color. (Para mode de usuario)
Tinta Ajuste el balance entre los niveles de rojo y verde.
Nitidez Ajuste el nivel de nitidez en los bordes entre las zonas
claras y oscuras de la imagen. (Para mode de usuario)
Temperatura de color Ciclo entre las temperaturas de color: Frio/Normal/Calido.
Permite que el rondo azul se encienda/apague durante
Pantalla azul
condiciones de sepal debil o ninguna.
_=13
Page 87

PERSONALIZAR LA CONFIGURACION DEL TELEVISOR
Configuracion de audio
Presione el bot6n MENU en la unidad
principal o en el control remoto y
luego presione los botones _ / • para
seleccionar el menQ de AUDIO.
Presione los botones ,&/V para
seleccionar tas siguientes opciones de
audio y tuego presione el bot6n _/•
para ajustar cada configuraci6n de la
opci6n.
Permite ta selecci6n de una tecnica de mejora de audio:
EstandarlMQsicalPeliculalUsuario
odo de sonido
Alternativo: puedes presionar e/bot6n S.MODE.para
seleccionar el modo de audio directamente.
Controle la intensidad relativa de los sonidos de tono mas
Bajo bajos. (para modo de usuario)
Controle la intensidad relativa de los sonidos de tono mas
Triple altos. (para modo de usuario)
Balance Ajuste el volumen relativo de los altavoces en un sistema
de mQItiples altavoces.
Sonido surround Proporcione una experiencia de sonido mejorada.
Volurnen autom&tico Los niveles de volumen se controlan automaticamente.
Seleccione el modo de salida de audio digital entre RAW/
Modo SPDIF
PCM.
Seleccione et idioma de audio entre: Ingles, Frances,
Idioma de audio
Espafiol.
_ 14
Page 88

PERSONALIZAR LA CONFIGURACION DEL TELEVISOR
Configuracion de la hera
Presione el bot6n MENU en la unidad
principal o en el control remote y
luego presione los botones • / I_ para
seleccionar el menQ de TIEMPO.
Presione los botones A/V para
seleccionar tas siguientes opciones de
tiempo y tuego presione el bot6n • / I_
para ajustar cada configuraci6n de la
opci6n.
Temporizador
Zona horaria
Horario de verano
Seleccione un periodo de tiempo despues del cual el
televisor cambie automaticamente al mode de espera:
OFF/5/10/.../180/240 min.
Alternative: Puede presionar el bot6n de REPOSO
repetidamente para seleccionar el nbmero de minutes
directamente.
Seleccione una zona horaria: Pacifico/Alaska/Hawai/
Este/Central o MontaSa.
Seteccione para encender o apagar et horario de
verano.
_-15
Page 89

PERSONALIZAR LA CONFIGURACION DEL TELEVISOR
Configuracion
• Presione et bot6n MENU en ta
unidad principal o en et control
remoto y tuego presione los botones
_/• para seleccionar et menQ de
CONFIGURACION.
• Presione los botones A/V para
seleccionar tas siguientes opciones de
ajuste y tuego presione el bot6n 4/•
para ajustar cada configuraci6n de la
opci6n.
Menu idioma
Transparencia
Modo zoom
Reduccion de ruidc
Avanzado
Subtitulos
DLC
Restaure los valores
predeterminados
Seleccione el idioma del menO: Ingles, Frances o EspaSol. El
valor predeterminado en pantalla del idioma del menQ es el
Ingles.
Seleccione para ON/OFF la funcion de transparencia.
Seleccione el modo zoom: Ancho/Gran zoom/Zoom/
Estandar/Solo escanear/Punto a punto.
Nota: Diferentes fuentes de entrada pueden diferir de las
opciones del modo zoom
Reduce el nivel de ruido del dispositivo conectado: APAGADO/
D6bil/Medio/Fuerte.
juste la configuracion de opcion avanzada: H-POS, V-POS,
Reloj, Fase o Auto. (S61o en modo de fuente VGA)
Modo Seleccione el modo SUBTiTULOS: Encendido,
SUBTiTULOS Apagado o Subtitulos en silencio.
Seleccion Selecci6n basica: Subt.1, Subt.2, Subt.3,
basica Subt.4, Textol, Te xto2, Texto3, Texto4.
Seleccion Selecci6n avanzada: Serviciol, Servicio2,
avanzada Servicio3, Servicio4, Servicio5 y Servicio6.
Opciones: Modo, Estilo de fuente, TamaSo
OPClON de fuente, Estilo de borde de fuente, Color de
borde de fuente, Color FG, Color BG, opacidad
FG y BG.
Seleccione para On/Off la funcion de control de luminancia
dinamica.
Restaure el televisor a la configuracion predeterminados de
fabrica.
• Observaciones:cuando seleccione el modo 'solo escanear' en la opci6n HDMI,
el televisor se muestra en pantalla completa, cuando selecciona el modo 'punto a
punto' en la opci6n VGA, el televisor se muestra en pantalla completa.
_ 16
Page 90

PERSONALIZAR LA CONFIGURACION DEL TELEVISOR
Configuracion de bloqueo
Nora: La contrase#a predeterminada es
"0000".
• Presione el bot6n MENU en la unidad
principal o en el control remoto y
luego presione los botones •/I_ para
seleccionar el menQ de BLOQUEO.
• Use los botones 0-9 para introducir ta
contrasefia de 4 digitos para ingresar
al menQ de BLOQUEO.
• Presione los botones A/V para
seteccionar tas siguientes opciones
y tuego presione los botones 4/1_
para ajustar cada configuraci6n de la
opci6n.
Cambie la contraseSa
Bloqueo del sistema
US
Canada
Configuracion RRT
Restaure RRT
Borre el
Use los botones 0-9 para introducir ta contrasefia antigua
y tuego ingrese ta nueva contrasefia de 4 digitos. Vuelva
a introducir la nueva contrasefia para confirmarla.
Seleccione para ON/OFF el btoqueo del sistema. Las
siguientes opciones (Estados Unidos, Canada, la
Configuraci6n RRT y Restaurar RRT), s61o se podran
acceder al encender el bloqueo del sistema..
Clasificaci6n del televisor: Presione el bot6n OK
TELEVISOR
para bloquear o desbloquear
Seleccione ta clasifica, i6n MPAA: N/A, G, PG,
MPAA
PG-13, R, NC-17, oX.
Seleccione ta ctasificaci6n MPAA para los
Canada
hablantes en ingles
Ingles Canada: E, C, C8+, G, PG, 14% 18+.
Seleccione la ctasificaci6n de Quebec
Canada
Canada: E, G,8 ans+, 13 ans+, 16 ans+, 18
Frances
ans+.
Configure el vector de caracteristicas de la regi6n.
Seleccione para restaurar la configuraci6n RRT.
Borre todas las configuraciones de bloqueo.
_-17
Page 91

PERSONALIZAR LA CONFIGURACION DEL TELEVISOR
Ajustes del canal
Presione el bot6n MENU en la unidad
principal o en et control remoto y
luego presione los botones _ / • para
seleccionar el menQ del CANAL.
Presione los botones A/V para
seleccionar tas siguientes opciones
de canales y tuego presione el
bot6n 4/• para ajustar cada
configuraci6n de la opci6n.
Aire/Cable
Busqueda
automatica
Favoritos
Mostrar/Ocultar
Numero de canal
Nombre del canal
SePal
Seleccione la antena entre aire y cable.
Primero, selecciona tu sistema de cable entre Auto/STD/IRC/
HRC. A continuaci6n, seleccione ta funci6n de besqueda
automatica para escanear tos canales de cable disponibles.
Se tlevara a cabo la besqueda automatica si se selecciona la
antena aerea.
Configure el canal seleccionado como canales favoritos.
Mostrar/Ocultar el canal seleccionado.
Muestra el nOmero del canal actual.
Muestra el hombre del canal actual.
Muestra la calidad de la actual seSal DTV.
_ 18
Page 92

_Verimagenes
• Presione et bot6n SOURCE en
la unidad principal o en el control
remoto, tuego presione los botones
A/Y para seleccionar el modo USB y
luego presione el bot6n OK button.
• Presione los botones A/V para
desplazarse por ta carpeta de ta
imagen y luego presione el bot6n OK.
• Presione el bot6n OK ara visualizar
la barra de funciones. Presione los
botones ,_/1_ y luego presione el
bot6n OK para seleccionar ta funci6n:
Pausa / Ant. / Sig. / Detener / R_todos
/ Info. / Girar a ta derecha / Girar a la
izquierda / Acercar / Alejar / Mover la
vista.
Nora: Formato de archivo compatible:
JPEG.
_-19
Page 93

PPresione el bot6n MEN0 en la unidad principal o en el control remotoy luego presione
los 4/1_ botones para seleccionar el menQ de BLOQUEO. Use los botones 0-9 Para
introducir la contraseSa de 4 digitos para ingresar al menQ de BLOQUEO. Si se utiliza,
esta caracteristica de opci6n puede "bloquear" la programaci6n no deseada que aparezca
en el televisor. Control parental ofrece al usuario una amplia variedad de opciones y
configuraciones que restringen o "bloquean" la programaci6n que puede aparecer en
el televisor. El control parental permite al usuario definir que clasMcaci6n de programa
consideran aceptable para el espectador mas sensible y joven. Puede ser programado
y encendido o apagado por el usuario que especMca la contraseSa de 4 nQmeros. El
usuario puede especMcar a que hora bloquear la programaci6n. Los bloqueos para el
pQblico general y los niSos deben ser programados en la memoria del televisor. Separe
las diferentes clasificaciones de pQblico que se especifican con la televisi6n y la industria
cinematografica, ambos sistemas de clasificaci6n se deben usar yen base alas edades de
los niSos.
Descripci6n general
Para asegurar una cobertura completa de todos los programas de televisi6n, (peliculas
y programas regulares de TV) elige la clasMcaci6n de MPAA, a partir de las siguientes
selecciones, asi como los siguientes Sistemas de clasificaci6n paternales de TV, al usar
la opci6n Bloque por edad para todos los pQblicos y niSos. Ademas, es posible que desee
aSadir restricciones adicionales en el menQ de bloque de contenidos y los siguientes
ejemplos de submenQs.
Cosas a tener en cuenta antes de configurar el Control parental
Determine que clasMcaci6n se considera aceptable para el espectador. (Por ejemplo, si
elige TV-PG, las clasificaciones mas restrictivas seran bloqueados automaticamente; el
espectador no podra ver: programaci6n nominal TV-PG, TV-14, o TV-MA.) Puede bloquear
la fuente de video auxiliar en su totalidad. (Bloquee la seSal enviada por el equipo, tal
como VCR, conectado alas tomas de entrada de Audio/Video) o dejelas desbloqueadas, a
continuaci6n, elija clasificaciones aceptables. Programa de bloqueos "Contenido" basado
en parametros individuales tales como: Dialogo fuerte, lenguaje grosero, escenas de sexo,
escenas violentas o de fantasia. Escenas violentas; en la opci6n Contenido bloqueado.
Seleccione una contraseSa secreta, en la opci6n Establecer contraseSa con las teclas
de nQmeros del control remoto. Guarde la contraseSa, es la Qnica forma de acceder al
menQ de control parental y cambiar la configuraci6n de clasificaci6n o desactivar el Control
Parental.
• Puede establecer diferentes restricciones de visualizaci6n del Control Parental para
pQblico en general y niSos; ambos pueden estar activos al mismo tiempo.
• Especificar un bloque de contenido, como escenas de sexo, no restringira
automaticamente la programaci6n que se desprende de las fuentes de video.
• ncluso si decide dejar las entradas AUX desbloqueadas, las clasMcaciones que se
especMcan restringiran automaticamente la programaci6n que se desprende de las
fuentes de video.
• No puede desactivar el Control Parental desenchufando el televisor. Las horas de
bloqueo se restableceran automaticamente a la configuraci6n de la hora bloqueo
original que especifica si la alimentaci6n se ha desconectado.
_ - 20
Page 94

Preparaci6n antes de reproducir el disco
• El lenguaje de visualizaci6n esta configurado en ingles. Consulte la funci6n de
configuraci6n.
• La mayoria de las funciones se operan por control remoto o mediante los botones en el
panel frontal.
Preparaci6n
• Encienda el TV y selecci6n DVD como la entrada de TV.
• Encienda la alimentaci6n de cualquier sistema relacionado en caso de que el reproductor
se haya conectado a un equipo amplificador.
etc.
reproducci6n. AI unos discos se re
Tipo de disco "ramaSo de disco Tiempo de Recorded Remarks
(di&metro) grabaci6n Content
DVD 12 cm un solo lado: Formato de DVD:
120rain. _ideoy audio digital
aproximadamente comprimido
Ambos lados:
240rain.
aproximadamente
SUper VCD 12 cm 45rain. _ideo y audio digital en Inctuye SVCD
aproximadamente MPEG2 comprimido
YOU 12 cm 74min. _ideo y audio digital en Incluye: VCD2.0/
aproximadamente MPEG1 comprimido _/CDI.1/VCD 1.O/DVCD
CU 12 cm 74 rain. CD-DA: audio digital
aproximadamente
mU-OU 12 cm 75 rain. HD-DA: audio digital
aproximadamente
MP3/J PEG 12 cm 600 rnin. Audio digital
aproximadamente
PLAY
1. Encienda el equipo, la pantalla muestra "LOADING" (CARGANDO). (Nota: la informaci6n
del disco aparece despues de varios segundos de haber insertado el disco. De Io contrario,
se visualiza "NO DISC" (NO HAY DISCO).
2. Para insertar un disco, coloque el disco en la ranura del DVD con la etiqueta impresa
orientada hacia atras. El discose cargara automaticamente al reproductor.
3. Para retirar el disco, pulse el bot6n OPEN/CLOSE y el disco sera expulsado.
4. Pulse PLAY para reproducir el disco. Tambien puede comenzar la reproducci6n mediante
la pantalla del MENU una vez que esta aparece. Pulse el bot6n ENTER para iniciar la
)roducen automaticamente al cargarse.
NOTE: Tambien admite los formatos DVD-R, CD-R, CD-RW
iADVERTENCIA7 NO INSERTE O REPRODUZCA DISCOS DE 8 CM: iQUEDARAN
ATASCADOS7
C6digo de regi6n 1 Como suele suceder con las peliculas en DVD que se lanzan en
momentos diferentes dependiendo de la regi6n del mundo, todos los reproductores tienen
c6digos de regi6n y hay discos que tienen un c6digo de regi6n opcional. Si carga un disco
con un c6digo de regi6n diferente vera un aviso de c6digo de regi6n en lapantalla. El disco
no se reproducira y debe quitarse del reproductor. El c6digo de regi6n de este reproductor
es 1 (consulte los simbolos).
AD
_ -21
Page 95

Funcionamiento del DVD
• STOP
Pulse el bot6n STOP para detener la reproducci6n (show de TV "_1_, m"). Cuando se detiene la
reproducci6n la unidad mantiene en la memoria el punto de reproducci6n al momento de pulsar STOP
(funci6n de reanudar). Pulse PLAY nuevamente y la reproducci6n se reanudara en este punto. Pulse
el bot6n STOP dos veces; la funci6n de reanudar se cancela. La funci6n de reanudar es apta para los
discos que muestran el tiempo de reproducci6n durante la reproducci6n.
• PRESS I<_/NEXT I,H
Pulse el bot6n PREV o NEXT en el control remoto mientras se reproduce un disco, un capitulo (DVD) o
una pista (CD) para saltar hacia atras o a hacia adelante respectivamente cada ves que se pulsa el bot6n.
Nota: al saltar hacia atras, la reproducci6n comienza en el principio de la pista anterior, NO en el principio
de la pista actual.
• FB <4/FF i_
Pulse el bot6n FB/FF en el control remoto durante la reproducci6n; el disco se reproduce hacia adelante
o hacia atras respectivamente. La velocidad de avance o retroceso es relativamente lenta al principio.
AI volver a pulsar, la velocidad aumenta. Mientras mas veces se pulse el bot6n, mas rapida sera la
velocidad de avance o retroceso. Hay cinco niveles de velocidad: X2, X4, X8, X16 y X32. Para volver a
reproducir normalmente, pulse el bot6n PLAY en el reproductor o en el control remoto.
• SETUP
Pulse el bot6n SETUP durante la reproducci6n; el reproductor congela la imagen. Si se vuelve a pulsar
el bot6n, el disco avanza de a un cuadro (paso). AI seguir pulsando el bot6n, se avanza cuadro a cuadro.
Para volver a reproducir normalmente, pulse el bot6n PLAY en el reproductor o en el control remoto.
• PAUSE
Pulse el bot6n PAUSE para detener la reproducci6n. Pulse el bot6n PLAY para reanudar la reproducci6n.
• Botones de NUMEROS (0-9, 10+)
Pulse los botones de n0meros (0-9) para ir directamente a la pista o capitulos deseados mientras se
reproduce el disco. Para una pista o capitulo posterior al nQmero 10, pulse primero 10+ y luego un bot6n
del 0 al 9.
• MUTE
Pulse el bot6n MUTE durante la reproducci6n; el reproductor visualiza "mute" y no hay salida de audio
(silencio).
Vuelva a pulsar para cancelar el silencio (MUTE).
• VOL+/VOL-Press
el bot6n VOL+/VOL- para cambiar el volumen de la salida de audio.
• A-B
Pulse el bot6n A-B durante la reproducci6n en el punto donde debe comenzar la repetici6n (A),
luego vuelva a pulsar en el punto donde la repetici6n debe terminar (B). Comienza la repetici6n de la
reproducci6n entre el punto (A) y (B). Pulse el bot6n A-B una vez mas donde aparece REP OFF en la
pantalla del TV para volver a reproducir normalmente.
• REPEAT
Pulse el bot6n REPEAT para repetir un capitulo o titulo (DVD) y reproducir una sola pista o el disco
entero (VCD, CD, MP3). Nota: algunos VCD no tienen la funci6n de repetici6n en el estado PBC ON
(encendido).
• SLOW
AI reproducir discos formato SVCD, VCD, DVD pulse SLOW para seleccionar una reproducci6n en
velocidad lenta. Pulse PLAY/PAUSE para reanudar la reproducci6n normal.
_ - 22
Page 96

Funcionamiento del DVD
• GOTO
Durante la reproducci6n, pulse el bot6n GO TO en el control remoto. Puede buscar en el disco segt3n su
titulo/capitulo/pista. Pulse el hot6 GO TO y visualizara un mere3 de bQsqueda. Use el bet6n'_ e _.para
seleccionar la bt3squeda segQn item/tiempo/titulo/capitulo. La selecciona se muestra resaltada. Use los
botones de nQmero para seleccionar el item/tiempo/titulo/capitulo de bt3squeda y luego pulse el bot6n
ENTER para reproducir.
Por ejemplo:
• Bt3squeda por tiempo (pulse el bot6n "GO TO" des veces mientras se reproduce un DVD): Para buscar
16 rain 50 segundos, ingrese 1, 6, 5 y 0. Para buscar 1 hora 14 minutos: ingrese 1, 1, 4, 0, 0. Bt3squeda
por titulo/capitulo: Para buscar el titulo 1, capitulo 2, ingrese 1 en la columna de titulo resaltada, mueva
el curso a la derecha del area resaltada e ingrese 2
Notas:
• En ciertos discos DVD en los que no se pueden realizar bQsquedas, aparece el mensaje "invalid" (no
valido) en la pantalla del TV.
• Ingrese el tiempo, titulo y capitulo del disco que desea buscar.
• En los VCD con el mode PBC encendido, solo se puede buscar per el tiempo.
• AUDIO
Pulse el bot6n de AUDIO para cambiar la salida de audio entre I/I, D/D e I/D.
• MENU
Pulse el bot6n MENU para visualizar la informaci6n de configuraci6n de la fuente del disco DVD.
.A
m
Pulse OPEN/CLOSE cuando este encendido e inserte el disco con la etiqueta orientada hacia atras
Pulse OPEN/CLOSE para cerrar..
• TITLE
AI reproducir un DVD, pulse TITLE para volver a la pagina del titulo principal..
• SUBTITLE (PARA DVD Y DISCOS SUPER VCD)
Para cambiar el idioma de los subtitulos, consulte la Configuraci6n de idioma (pagina 28).
- 23
Page 97

• Formatos DVD admitidos
1.Play (para discos DVD/SL_per VCD/VCD/CD/CD-G/HD-CD y MP3/JPEG). Para discos DVD, pulse el
bot6n II desde el ment3 principal o el ment3 de titulo. AI reproducir un DVD, pulse el bot6n TITLE para ver
algOn titulo preferido directamente desde la selecci6n de titulos. Para discos SOper VCD y VCD, pulse
los botones de nOmeros para reproducir alguna pista preferida. Para discos de formate CD, CD-G y
HD-CD, pulse los botones de nOmeros para reproducir alguna pista preferida. Para discos MP3/JPEG,
pulse los botones de nt3meros desde el ment3 de contenido para reproducir alguna pista preferida. Si los
nOmeros de pista ingresados no son validos, no funcionara.
Note: para las pistas 1-10 use los botones de nt3meros directamente; para las pistas posteriores a 10,
pulse primero el bot6n 10+. (p.ej.: Pista 15, pulse 10 + 5).
2. Previous/Next (para discos DVD/SQper VCD/VCD/CD/CD-G/HD-CD y MP3/JPEG)
AI reproducir un disco:
pulse 144el bot6n para reproducir el Titu!o/Capitulo/Pista anterior.
pulse _1_el bot6n para reproducir el Titulo/Capitulo/Pista siguiente.
Para discos St3per VCD y VCD, en estado PBC apagado;
Si la pista actual es la primera, pulse 144 el bot6n para detener la reproducci6n.
Si la pista actual es la t31tima,pulse I_)'1el bot6n para detener la reproducci6n.
Para discos DVD, las funciones descritas anteriormente pueden variar dependiendo de la estructura del
disco DVD.
3. Forward/Backward(para DVD/St3per VCD/CD/CD-G/HD-CD y MP3)
AI reproducir el disco, puede usar la funci6n para saltar hacia adelante o hacia arras.
Hay 4 velocidades para adelantar. Pulse I_' para alternar entre las diferentes velocidades en secuencia.
(FORWARD X2/FORWARD x4/FORWARD X8/FORWARD X20/Play).
Pulse )11 para reanudar la velocidad normal.
En formatos CD, HD-CD, MP3, al ir hacia atras tambien se reproduce el audio.
En discos DVD, al ir hacia arras al primer titulo/capitulo, se reanuda desde el comienzo.
En discos SLOperVCD y VCD, con estado PBC encendido, al ir hacia arras a la primera pista, esta
comienza desde el principio.
NOTE:a1 utilizar las funciones para ir hacia adelanto o hacia atras, el sonido se apaga.
4. Pause (para discos DVD/SOper VCD/VCD/CD/CD-G/HD-CD y MP3/JPEG)
En discos CD, CD-G, HD-CD y MP3/JPEG pulse el bot6n )11 para pausar; pulse el bot6n )11 para
reanudar. En discos DVD, SQper VCD, VCD pulse el bot6n )'11 para pausar; pulse el bot6n )11 para
reanudar.
5. Repeat (para discos DVD/St3per VCD/VCD/CD/CD-G/HD-CD y MP3/JPEG)
Pulse el bot6n REPEAT una vez para visualizar el modo de repetici6n actual.
En discos SQper VCD, VCD, CD, CD-G, HD-CD, al reproducir una secuencia puede usar la repetici6n de
reproducci6n. Hay dos modos de repetici6n, pulse REPEAT para alternar entre los diferentes modos en
la siguiente secuencia. (REPEAT (APAGADO)/REPEAT (1)/REPEAT (TODOS).
En discos DVD, puede configurar el modo de reproducci6n en repetici6n. Hay 3 modos de repetici6n,
pulse REPEAT para alternar entre los diferentes modos en la siguiente secuencia: REP (APAGADO)/
REP: (CAPiTULO)/REP (TiTULO)/REP: (TODOS).En discos MP3/JPEG, al reproducir un disco puede 3
modos de repetici6n, pulse REPEAT para alternar entre los diferentes modos en la siguiente secuencia:
(REPEAT (APAGADO)/REPEAT (DIRECTORIO)/REPEAT (TODOS).
6. INFO (para discos DVD/SQper VCD/VCD/CD/CD-G/HD-CD y MP3/JPEG)
Pulse el bot6n INFO para activar el menO desplegable en pantalla para el Titulo, Capitulo y tiempo
actuales y otra informaci6n.
_ - 24
Page 98

Funciones del DVD
• Formatos DVD admitidos
En discos DVD con 5 paginas, pulse el bot6n INFO :
Una vez Dos veces Tres veces Cuatro veces
Cinco veces
7. GOTO (para discos DVD/St3per VCD/VCD/CD/CD-G/HD-CD y MP3/JPEG)
Esta funci6n le permite reproducir su Titulo/Capitulo/Pista preferido. Pulse el bot6n GOTO para activar el
menO desplegable en panta!la y editar. SegOn el area resaltada, ingrese el nt3mero de su Titulo/Capitulo/
Pista preferido usando los botones de nt3meros o ingrese el momento de reproducci6n. Tras finalizar la
edici6n, pulse OK para comenzar. Si los datos ingresados no son validos, no funcionar&
Note: al editar, el bot6n GOTO no funciona.
Si el estado PBC esta encendido, esta funci6n se apagar&
8. Audio (para discos VCD/CD/CD-G/HD-CD y MP3/JPEG)
Pulse el bot6n AUDIO una vez para visualizar el modo del audio actual.
Pulse nuevamente para alternar entre los diferentes modos de audio en secuencia.
En discos CD/VCD/MP3/HD-CD: (estereo/monol/monoD).
Note: cambiar al canal de audio Auto I/D puede variar segt3n los diferentes contenidos del disco.
En los discos VCD bilingLies pueden se puede usar el bot6n AUDIO para alternar entre los diferentes
idiomas.
9. Mute (para discos DVD/St]per VCD/VCD/CD/CD-G/HD-CD y MP3/JPEG)
Pulse el bot6n MUTE para silenciar la salida de audio; en la pantalla aparece "MUTE" para indicar el
silencio.
Pulse nuevamente para cancelar o pulse VOL+/VOL- para cancelar y ajustar el volumen.
En caso de no haber salida de audio, pulse el bot6n MUTE para cancelar el silencio.
10, Repeat A-B (para discos DVD/St3per VCD/VCD/CD/CD-G/HD-CD y MP3/JPEG)
AI reproducir discos DVD, VCD, CD, pulse el bot6n A-B para repetir un contenido determinado. Pulse
el bot6n A-B en el punto a comenzar (A) y nuevamente en el punto a finalizar (B) para seleccionar la
secci6n a repetir.
Pulse el bot6n A-B una tercera vez para cancelar la funci6n de repetici6n A-B y reproducir normalmente.
11. Volume (para discos DVD/SQper VCD/VCD/CD/CD-G/HD-CD y MP3/JPEG)
Pulse los botones VOL +/VOL - para ajustar el volumen de salida.
- 25
Page 99

Funciones del DVD
• Reproduccion de MP3 / JPEG
Despues de cargar el disco MP3/JPEG, comenzara a escanear las carpetas MP3/JPEG almacenadas.
La carpeta mostrara el contenido MP3 automaticamente y la reproducci6n comenzara desde el primer
archivo (archivo resaltado). La pantalla se vera de la siguiente manera:
MP3 File JPEG File
Use los botones de navegaci6n para seleccionar su carpeta preferida y reproducir el primer archivo o
pasar a su archivo preferido.
NOTE:
Pulse los botones • / I_ para pasar a otras carpetas, documentos o modo de selecci6n.
Pulse los botones de nQmeros para seleccionar el contenido directamente. Para nt3meros posteriores al
10, pulse primero el bot6n - (p. ej.: para el archivo numero 15, pulse - y 5).
AI reproducir archivos MP3, no se visualiza ninguna imagen, solo hay salida de audio.
AI reproducir o pausar una imagen, puede usar los botones de navegaci6n para voltear/girar la imagen.
,A. bot6n para voltear horizontalmente
V bot6n para voltear verticalmente
bot6n para girar 900 a la izquierda
_, bot6n para girar 900 a la derecha
AI reproducir o pausar una imagen, puede usar el bot6n ChanDVD MENU para ingresar al modo de
previsualizaci6n y vet 12 imagenes. Pulse los botones para seleccionar la pagina siguiente/anterior o
pulse los botones de nt3meros para ver las imagenes correspondientes.
El tamaRo de imagen JPEG maximo que puede visualizarse es de 1280 x 1024.
_ - 26
Page 100

Funciones del DVD
• Configuracion general de las funciones del DVD
Pulse el bot6n de configuraci6n del DVD para activar el ment3
OSD del reproductor de DVD.
Pulse los botones '_ / _ para moverse y resaltar los diferentes
subment_s.
Pulse el bot6n OK para ingresar al submenQ resaltado.
Pulse el bot6n DVD SETUP para salir del menu OSD.
Nota: en el modo de configuraci6n, las funciones de reproducci6n
se cancelan o se detienen.
• Configuracion de idioma
OSD
Use los botones de navegaci6n para seleccionar la configuraci6n
OSD; puede seleccionar entre seis idiomas.
Pulse los botones _ / A IV" para alternar entre los diferentes
idiomas: ingles,franc6s,espafiol.
Pulse el bot6n OK para confirmar.
Menu
Use los botones de navegaci6n para seleccionar la configuraci6n
de menQ; puede seleccionar entre siete idiomas. Pulse los botones
_,/A / V para alternar entre los diferentes idiomas: ingles,
frances, espafiol, portugues, aleman, italiano. Pulse el
bot6n OK para confirmar.
Audio
Use los botones de navegaci6n para seleccionar la configuraci6n
de audio; puede seleccionar entre siete idiomas. Pulse los botones
_./ ,A. / V para alternar entre los diferentes idiomas: ingles,
frances, espafiol, portugues, aleman, italiano. Pulse el
bot6n OK para confirmar.
- 27
 Loading...