

Page 1

NOTICE
When using this document, keep the following in mind:
1. This document may, wholly or partially, be subject to change without notice.
2. All rights are reserved: No one is permitted to reproduce or duplicate, in any form,
the whole or part of this document without SEGA’s permission.
3. SEGA will not be held responsible for any damage to the user that may result from
accidents or any other reasons during operation of the user’s equipment, or programs
according to this document.
4. Software, circuitry, and other examples described herein are meant merely to
indicate the characteristics and performance of SEGA’s products. SEGA assumes no
responsibility for any intellectual property claims or other problems that may result
from applications based on the examples describe herein.
5. No license is granted by implication or otherwise under any patents or other rights
of any third party or SEGA Enterprises, Ltd.
6. This document is confidential. By accepting this document you acknowledge that
you are bounded by the terms set forth in the non-disclosure and confidentiality
agreement signed separately and/in the possession of SEGA. If you have not signed
such a non-disclosure agreement, please contact SEGA immediately and return this
document to SEGA.
(4/20/94 - 001)
Page 2

TM
SEGA Saturn Target Box
User’s Manual
Programming Box/Graphics Box
(Provisional Version)
Doc. # ST-174-R2-090294
SEGA
© 1994 SEGA. All rights reserved.
Page 3

REFERENCES
In translating/creating this document, certain technical words and/or phrases were
interpreted with the assistance of the technical literature listed below.
1. KenKyusha New Japanese-English Dictionary
1974 Edition
2. Nelson's Japanese-English Character Dictionary
2nd revised version
3. Microsoft Computer Dictionary
4. Japanese-English Computer Terms Dictionary
Nichigai Associates
4th version
Page 4

(This page was blank in the Japanese original)
Page 5

History
Version 1: (July 15, 1994)
• New creations for use in the SEGA Saturn Programming Box/Graphics Box
Page 6

ST-174-R2-090294
i
SEGA Enterprises, Ltd.
Introduction
This manual describes the functions and usage of the SEGA Saturn Target Box
manufactured by SEGA Enterprises, Ltd. and applies to the SEGA Saturn Target Box
Programming Box and Graphics Box. Products and product specifications of the
SEGA Saturn Target Box may be changed without prior notice.
Language Description
The language used in this manual is described as follows.
Target Box
SEGA Saturn Target Box in this manual in shortened to just Target Box.
This system is used for developing SEGA Saturn game software.
This system has functions for efficient development, as well as the same functions
as the custom chip used in Saturn. The functions are divided as follows:
• Programming development environment function
• Graphics development environment function
Programming Box
This is the target box for SEGA Saturn program development. It supports a CD
drive, a virtual CD system interface connector, extended memory, etc.
Graphics Box
This is the target box for SEGA Saturn graphics development. Specifications are
nearly the same as the Programming Box; however, the following functions are not
supported:
• CD Drive
• Virtual CD System
• Extended memory
(RDJ, 7/18/94)
Page 7

ST-174-R2-090294
ii
SEGA Enterprises, Ltd.
Programming Development Environment
To emulate the SH-2 CPU on the main board, the main board can be connected to
EVA board and ICE.
The programming development environment is configured as described earlier.
Graphics Development Environment
The following functions are configured in the game graphics development
environment with multiple boards.
• VDP 1 function
• VDP 2 function
• DSP function
• System control function
Refer to the hardware manual for each function.
Sound Function
When loaded onto the main board, the sound function is an environment for
producing game sounds. The following functions can be used.
• SCSP function
• Sound board control CPU MC68EC000
A-Bus Board
The A-Bus board is for interfacing with the A-Bus in such cases as ROM cartridges,
etc. Cartridge connector, SCSI controller, and RS-232C controller are loaded.
Main Board
This board provides both a graphics development environment and program
development environment. Circuits for achieving graphics and program
development environment functions are loaded on this board. The main
board is connected with ICE, EVA board and CPU board.
ICE (In-Circuit Emulator)
The abbreviation for "In-Circuit Emulator". In this manual, this indicates E7000,
SH-2 POD and the emulator for emulating the main CPU SH-2 CPU of the Target
Box.
(RDJ, 7/18/94)
Page 8

ST-174-R2-090294
iii
SEGA Enterprises, Ltd.
POD
This unit is connected to the E7000 body with an interface cable. CPU is emulated by
inserting a PGA plug in front of the POD to the SH-2 CPU socket.
E7000
BODY
PGA (Pin Grid Array)
POD PGA plug
Main board
PGA comes from the grid-like array of male pins.
EVA Board (Evaluation Board)
This indicates SH-2 EVA board and the emulator for emulating main CPU (SH-2
CPU) of Target Box.
SH-2 Board
The SH-2 CPU, being the main control CPU, is mounted on this board. ICE (or the
EVA board) can be substituted for the SH-2 board.
The connector that links the SH-2 board to the main board uses the same connector
as is used for connecting the EVA board. The SH-2 board is normally loaded on the
slave side in the Programming Box and on the master side in the Graphics Box.
(RDJ, 7/18/94)
Page 9

SEGA Enterprises, Ltd.
iv
(This page was blank in the Japanese original)
ST-174-R2-090294
(RDJ, 7/18/94)
Page 10

ST-174-R2-090294
v
SEGA Enterprises, Ltd.
TABLE OF CONTENTS
Introduction i
Language Description i
List of Figures vii
List of Tables vii
Chapter 1 The Appearance 1
1.1 The Appearance and Name of Each Section 2
Front View 2
Right Side View 4
Rear View 5
Top View 6
Chapter 2 Unpacking and Installation 9
2.1 Unpacking and Inspecting Accessory Parts 10
2.2 Target Box Installation 11
Installation Environment 11
2.3 Connecting the ICE 12
Removing the Target Box Main Cover 12
Removing the SH-2 Board 14
ICE Connection 14
Installing the Main Cover of the Target Box 16
ICE Environment Settings 17
2.4 Connecting the EVA Board 18
Removing the Main Unit’s Cover on the Target Box 18
Removing the SH-2 Board 18
Connecting the EVA Board 19
2.5 Connecting the PAD Cable 21
(RDJ, 7/18/94)
Page 11

ST-174-R2-090294
vi
SEGA Enterprises, Ltd.
2.6 Power ON/OFF 22
Connecting the AC Cable 22
Power ON 22
Power OFF 22
Chapter 3 Description of Each Section 23
3.1 Panel Switch 24
SMPC Reset Switch 24
Power ON Reset Switch 24
Reset Switch 25
Master/Slave EVA Board Reset Switch 25
Summary of the Reset Relationships 25
3.2 Graphics/Program Development Environment 26
Connector Name 26
AV-OUT Signal Connector Pin Number 27
Environment Setting Switch 27
SCSI ID Setting 30
Increasing Extended Memory 30
Installing Extended Memory 31
Chapter 4 Customer Support Service 33
4.1 Customer Support Service Information 34
(RDJ, 7/18/94)
Page 12

vii
List of Figures
(Chapter 1 The appearance)
Figure 1.1 Programming Box-Front View 2
Figure 1.2 Graphics Box-Front View 2
Figure 1.3 Target Box-Right Side View 4
Figure 1.4 Target Box-Rear View 5
Figure 1.5 Programming Box-Top View 6
Figure 1.6 Graphics Box-Top View 6
(Chapter 2 Unpacking and Installation)
Figure 2.1 Package Contents 9
Figure 2.2 Removing the main cover on the Target Box 11
Figure 2.3 ICE/EVA board/SH-2 Board plug port cover 12
Figure 2.4 Location of PGA Socket for ICE Connection 13
Figure 2.5 Pin position of ICE and PGA sockets 14
Figure 2.6 Method for connecting ICE 14
Figure 2.7 Rear View 15
Figure 2.8 Location of connector for EVA board connections 18
Figure 2.9 Location of connector for PAD 20
ST-174-R2-090294
SEGA Enterprises, Ltd.
(Chapter 3 Description of Each Section)
Figure 3.1 Panel Switch Names 23
Figure 3.2 Graphics Connector Name 25
Figure 3.3 AV-Out Signal Connector Pin Number and Signal Name 26
Figure 3.4 Switches for Setting Environments 27
Figure 3.5 The Installation Location on Extended memory A-Bus board 30
Figure 3.6 Installation of SIMM Memory 31
List of Tables
(Chapter 3 Description of Each Section)
Table 3.1 Summary of Reset Relationships 24
Table 3.2 Environment Setting Switches SW1/SW2 28
Table 3.3 Table of Area Code Settings (SW1) 28
Table 3.4 Table of Work Station Type Settings (SW2) 28
Table 3.5 SCSI ID Settings 29
(RDJ, 7/18/94)
Page 13

SEGA Enterprises, Ltd.
viii
(This page was blank in the Japanese original)
ST-174-R2-090294
(RDJ, 7/18/94)
Page 14

1
Chapter 1 Appearance
ST-174-R2-090294
SEGA Enterprises, Ltd.
1.1 The Appearance and Name of Each Section..... .. . . . . . . . .. . . . . . . . . .. . . . . . . . .. . . . . . .2
Front View ........................................................................................2
Right Side View ...............................................................................4
Rear View .........................................................................................5
Top View 6
(RDJ, 7/18/94)
Page 15
ST-174-R2-090294
2
SEGA Enterprises, Ltd.
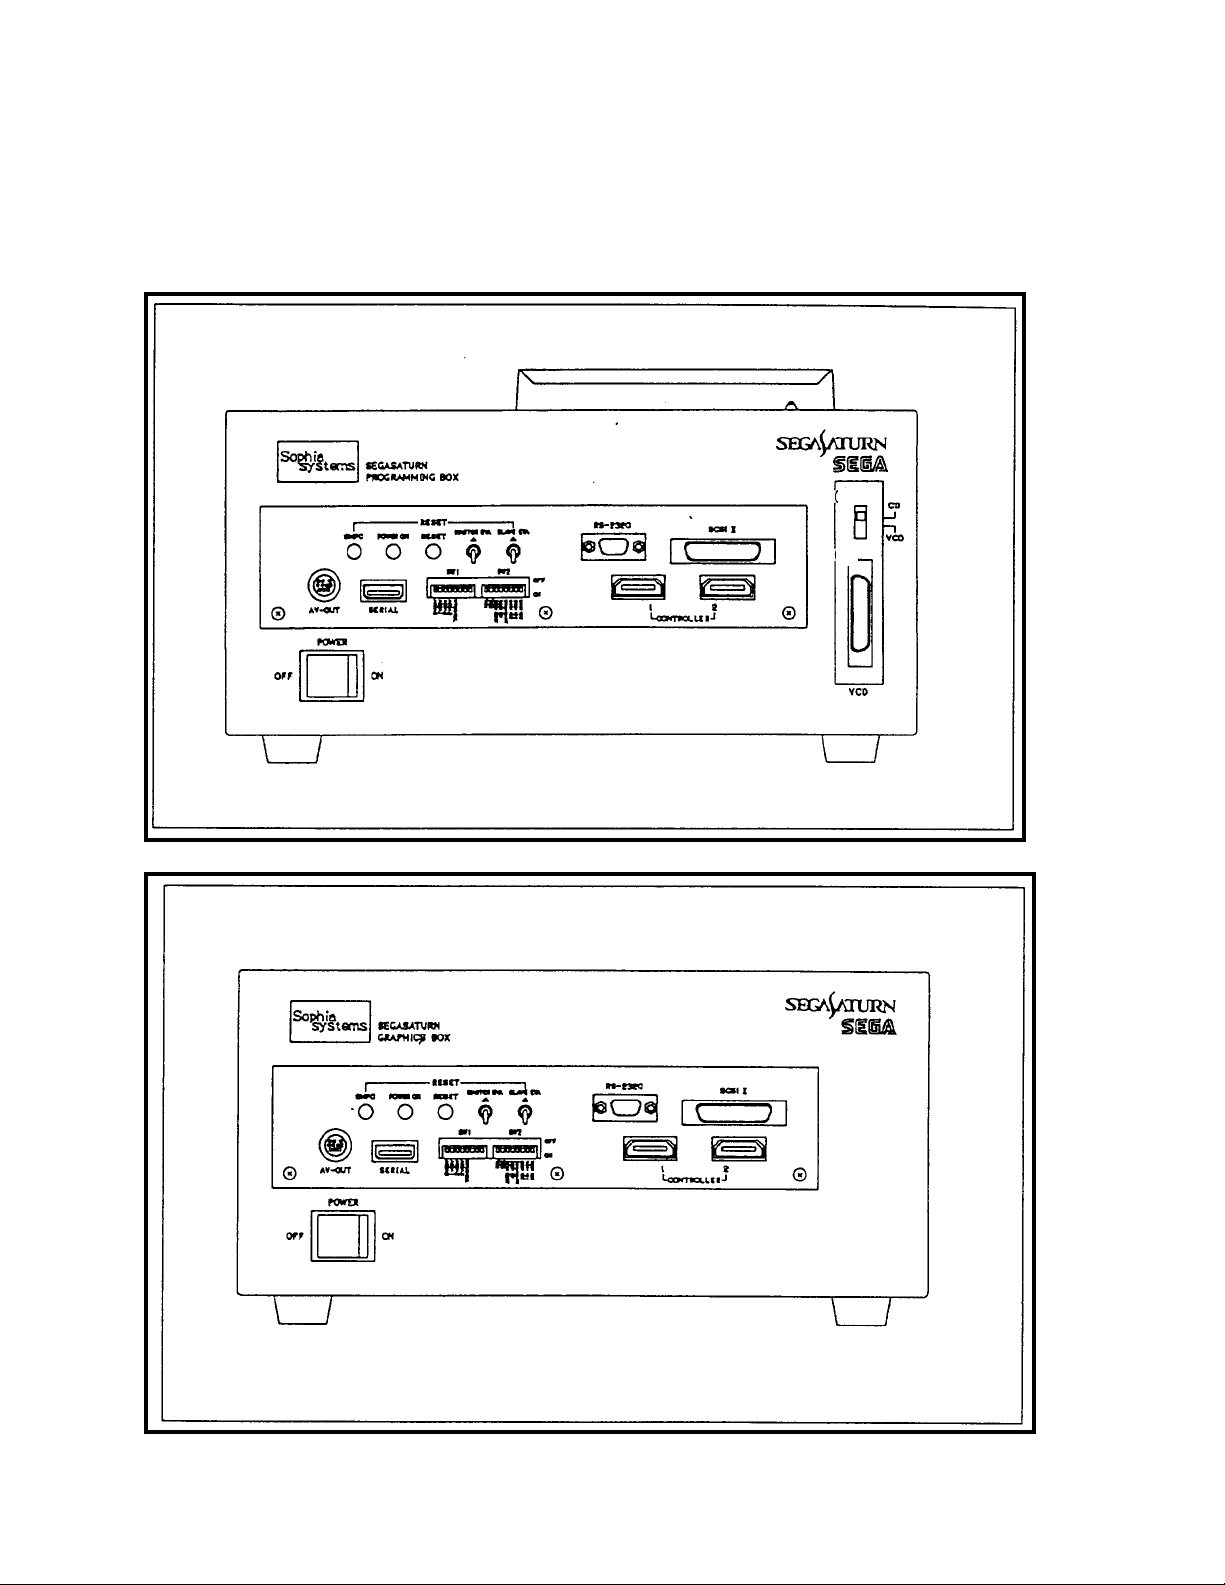
1.1 The Appearance and Name of Each Section
The appearance of Target Box is shown in Figures 1.1 - 1.6. See Chapter 3 for more
details on each section.
Front View
(10)
(1)
(4)
(7)
(6)
11)
(2)
(3)
(9)
(8)
(5)
Figure 1.1 Target Box Front View (Programming Box)
(1)
(4)
(7)
(2)
(6)
12)
(3)
(RDJ, 7/18/94)
(9)
(8)
(5)
Page 16

3
Figure 1.2 Target Box Front View (Graphics Box)
ST-174-R2-090294
SEGA Enterprises, Ltd.
(RDJ, 7/18/94)
Page 17

ST-174-R2-090294
4
SEGA Enterprises, Ltd.
Figures 1.1 and 1.2 show the names of each section, and are further explained in
Chapter 3.
<Name of each section>
(1) Target Box body
(2) AV-OUT connector
(3) Connector for PAD cable
* At the left side from front is a 1-player connector, and right side is a
2-player connector.
(4) Panel Switch
(5) Environment Setting Switch
(6) SCSI-II Connector
(7) RS-232C Connector
(8) Serial Connector
(9) Power Switch
(10) Built-in CD drive
(11) External virtual CD (CD emulator) connector for connection
(12) Built-in CD drive / external virtual CD select switch
* The CD system is loaded only in the Programming Box. Connectors and
switches (10) and (11) and CD drive (12) are not added to the Graphics Box.
(RDJ, 7/18/94)
Page 18

5
Right Side View
ST-174-R2-090294
SEGA Enterprises, Ltd.
Figure 1.3 Target Box (Right Side View)
(RDJ, 7/18/94)
Page 19

6
Rear View
ST-174-R2-090294
SEGA Enterprises, Ltd.
Figure 1.4 Target Box (Rear View)
Section names are shown in Figure 1.4, and are further explained in Chapter 3.
(1) AC Inlet
(2) ICE/EVA board / SH-2 Board insert
(RDJ, 7/18/94)
Page 20

7
Top View
ST-174-R2-090294
SEGA Enterprises, Ltd.
(3)
(4)
Figure 1.5 Programming Box (Top View)
Figure 1.6 Graphics Box (Top View)
(RDJ, 7/18/94)
Page 21

ST-174-R2-090294
8
SEGA Enterprises, Ltd.
Section names are shown in Figures 1.5 and 1.6, and are further explained in
Chapter 3.
(1) Cartridge connector connection segment
(2) CD drive
The CD drive is loaded only in the Programming Box.
(3) CD Access lamp
(4) CD Opener
(RDJ, 7/18/94)
Page 22

SEGA Enterprises, Ltd.
9
(This page was blank in the Japanese original)
ST-174-R2-090294
(RDJ, 7/18/94)
Page 23

ST-174-R2-090294
10
SEGA Enterprises, Ltd.
Chapter 2 Unpacking and Installation
Chapter 2 Unpacking and Installation.........................................................................................9
2.1 Unpacking and Inspecting Accessory Parts.....................................................10
2.2 Target Box Installation..........................................................................................11
Installation Environment................................................................................11
2.3 Connecting the ICE.............................................................................................12
Removing the Target Box Main Cover.......................................................12
Removing the SH-2 Board..........................................................................14
ICE Connection.............................................................................................14
Installing the Main Cover of the Target Box.................................................16
ICE Environment Settings...........................................................................17
2.4 Connecting the EVA Board...............................................................................18
Removing the Main Unit’s Cover on the Target Box.................................18
Removing the SH-2 Board..........................................................................18
Connecting the EVA Board........................................................................19
2.5 Connecting the PAD Cable...............................................................................21
2.6 Power ON/OFF...................................................................................................22
Connecting the AC Cable............................................................................22
Power ON......................................................................................................22
Power OFF....................................................................................................22
(RDJ, 7/18/94)
Page 24

ST-174-R2-090294
11
SEGA Enterprises, Ltd.
2.1 Unpacking and Inspecting Accessory Parts
Remove all items in the box, then make sure that all items in Figure 2.1 and in the
accompanying package list are included. Please contact our Customer Support Group
if there are any broken or missing items. See Chapter 4 for more information.
(2) AC Cable
(1) Target Box
(5) AV Cable
(4) Pad Cables (2 lengths)
(6) Eva Board Reset Cable (2 lengths) (8) Package List(7) PGA Plug
(3) Sega Saturn Target Box
User's Manual
Figure 2.1 Contents in package
(1) Target Box 1
(2) Power Cord 1
(3) Sega Saturn Target Box user's manual(this manual) 1
(4) Controller 2
(There is one controller attached to Graphics Box.)
(5) AV cable 1
(6) EVA board Reset Cable 2
(7) PGA Socket for SH2 Emulator 1
(8) Packing list 1
(RDJ, 7/18/94)
Page 25

ST-174-R2-090294
12
SEGA Enterprises, Ltd.
2.2 Target Box Installation
Installation Environment
The following should be observed after the Target Box is installed.
• Do not place the Target Box under direct sunlight or near any kind of heater.
• Do not use in extremely high or low temperature, or near strong vibration.
• Do not use the same AC outlet for the equipment which cause noise (i.e.
large motor, etc.).
• Do not place any objects on top of the Target Box.
Caution:
• Keep at least 5 cm of space open around the Target Box for ventilation.
• Target Box is designed to be used while it is resting in horizontally. Do not use it
while it is positioned vertically. (Especially, be aware of this when concerning the
Programming Box.)
(RDJ, 7/18/94)
Page 26

ST-174-R2-090294
13
SEGA Enterprises, Ltd.
2.3 Connecting the ICE
Removing the Target Box Main Cover
(1) Make sure the power supplies of all peripheral devices connected to the Target
Box are OFF.
(2) Remove the main cover of the Target Box. There are four screws to be
removed. See Figure 2.2.
(3) Loosen the two screws on the ICE/EVA board/SH-2 board plug port cover and
slide downward. See Figure 2.3 on the next page.
Figure 2.2 Removing the main cover on the Target Box
(RDJ, 7/18/94)
Page 27

ST-174-R2-090294
14
SEGA Enterprises, Ltd.
Loosen these screws
Note: When not connecting ICE(POD), make sure to close slide cover (secure on top).
Figure 2.3 ICE/EVA board/SH-2 board plug port cover
(RDJ, 7/18/94)
Page 28

ST-174-R2-090294
15
SEGA Enterprises, Ltd.
Removing the SH-2 Board
Remove the SH-2 board from the main board when the SH-2 board is connected to
the SH-2 board/EVA board connector on the side where the ICE is. Figure 2.6 shows
the SH-2 board connecting locations.
Note: A SH-2 board, under standard shipping conditions, is mounted in the Programming Box on the
slave side and in the Graphics Box on the master side. A new SH-2 board should be purchased
if you want to add one to a side without the SH-2 mounted to it. For more information, please
contact SEGA.
For details, refer to “chapter 4 support center.”
ICE Connection
The 171-pin PGA socket is visible when the SH-2 board is removed.
Main Board
<Slave> <Master>
Connectors for SH-2 Board/EVA
Board Connection
SH-2 Board Points of Connection
Outside Target Box
Figure 2.4 Location of PGA socket for ICE connection
PGA Sockets for ICE Connection
Connectors for SH-2 Board/EVA
Board Connection
Install attached ICE PGA to ICE POD tip PGA plug while care is paid to the
orientation.
Next, insert the PGA plug at the end of the ICE POD into the PGA socket on the
main board as shown in Figure 2.5.
(RDJ, 7/18/94)
Page 29

ST-174-R2-090294
16
SEGA Enterprises, Ltd.
Caution: (1) Be careful not to insert the plug backwards or incorrectly. Improperly inserting the
plug may damage the ICE and Target Box.
(2) When removing ICE from the main board, make sure to remove the attached ICE PGA
plug also. Otherwise, when installing EVA board, it could come in contact with the
bottom surface.
Main Board
Caution:
A1 Pin
PGA Socket
for ICE
Pin
ICE POD
Lead PGA
Plug
Figure 2.5 Pin position of ICE and PGA socket
• Be careful when inserting as PGA plug at POD end can easily be bent. •
If ICE can not access IO and memory of Target box, make sure the socket is firmly connected.
(RDJ, 7/18/94)
Page 30

ST-174-R2-090294
17
SEGA Enterprises, Ltd.
Installing the Main Cover of the Target Box
While referring to the procedure "Removing the Target Box Main Cover," install
the cover by the following steps.
(1) Put the main cover on the frame and tighten the four screws. See Figure 2.2.
(2) Adjust position (height) of the rear ICE/EVA board/SH-2 board plug port cover
so that ICE POD is in a horizontal position. ICE POD will then be secured to the
Target Box. See Figures 2.6 and 2.7.
Figure 2.6 Rear View
With ICE/EVA board/SH-2 board port plus
ICE POD Cable
input bar and POD stay, POD is maintained
in a horizontal position. (This is to ensure
that POD is secure in its place.)
(RDJ, 7/18/94)
Page 31

18
Figure 2.7 ICE Connection
ST-174-R2-090294
SEGA Enterprises, Ltd.
(RDJ, 7/18/94)
Page 32

ST-174-R2-090294
19
SEGA Enterprises, Ltd.
ICE Environment Settings
Connect the E7000 and accompanying interface cable to the POD.
The installation and operation method of ICE hereafter are listed in the manual
belonging to ICE and the debugger. Be sure to do the settings for the operating mode
after installation. An example of a setting is shown below. For more information,
see Hitachi Microcomputer Support Hardware SH7604 Emulator User's Manual,
SH-2 Operating Mode Settings, and MODE.
Example of Operating Mode Setting (for Programming Box/Graphics Box)
<When Master Side is ICE>
MODE ; C (RET)
:
E7000 MODE (MD5 - 0) = xx?
MODE SET (C:CONFIGURATION/U:USER/M:MASTER - SLAVE) = X?
CONFIGURATION WRITE OK? (Y/N)?
0E (RET)
C (RET)
Y (RET)
<When Slave Side is ICE>
: MODE ; C (RET)
E7000 MODE (MD5 - 0) = xx?
MODE SET (C:CONFIGURATION/U:USER/M:MASTER - SLAVE) = X?
CONFIGURATION WRITE OK? (Y/N)?
2E (RET)
C (RET)
Y (RET)
The underlined portions must be input. The above setting sets the operating mode
(0E or 2E) and registers it in the configuration file. After installation, once
registered, the operating mode is automatically read from the configuration file and
set. Therefore, the above procedure no longer is required.
Caution: Please read the "Power ON/OFF" procedure in section 2.6 for how to turn on the ICE
unit and Target Box power supplies.
(RDJ, 7/18/94)
Page 33

ST-174-R2-090294
20
SEGA Enterprises, Ltd.
2.4 Connecting the EVA Board
For more details on removing the cover on Target Box, the main board and the
SH-2 board, see “ICE Connection" in this chapter.
Removing the Main Unit’s Cover on the Target Box
(1) Check to make sure that power from all peripherals connected to the Target Box
is off.
(2) Remove the main cover on Target Box.
(3) Loosen the screws of the ICE/EVA board / SH-2 board plug port cover and
slide downward.
Removing the SH-2 Board
If an SH-2 board is mounted to the SH-2 board / EVA board connector of the EVA
board connection side, remove the SH-2 board from main board, and the power
cable from SH-2 board CN3.
Before installing the EVA board, make sure the attached ICE PGA plug is not
installed to the installing side PGA socket. Then proceed with the board installation.
Otherwise, PGA plug could contact the EVA board bottom.
(RDJ, 7/18/94)
Page 34

ST-174-R2-090294
21
SEGA Enterprises, Ltd.
Connecting the EVA Board
Attach the EVA board to the connector for connecting the SH-2 board/EVA board.
See Figure 2.8 for the connector location.
Main Board
PGA Sockets for ICE Connection
Connectors for SH-2 Board/EVA
Board Connection
Outside Target Box
Figure 2.8 Points of connection for EVA board
<Slave>
Connectors for SH-2 Board/EVA
Board Connection
SH-2 Board Points of Connection
<Master>
Next, refer to the information below to properly connect the EVA board power and
Reset cables.
• EVA board power cable
EVA board side connector CN8 (the lowermost board)—Connector to the Target Box CN10
• EVA board Reset Cable
When Eva board is connected to the Master Side
EVA board side connector CN8 (the uppermost board)—Connector to the Target Box CN5
When Eva board is connected to the Slave Side
EVA board side connector CN8 (the uppermost board)—Connector to the Target Box CN4
One end of the branched EVA board power cable is already connected to the SH-2
power supply in CN10. Therefore, the other unconnected power cable should be
connected to the EVA board power connector. Close the ICE/EVA board SH-2 plugin port cover, secure with srews at two locations, insert the interface cable that is
attached to EV7000 from the cover window, and connect to the EVA board
connector. See Figure 2.9.
(RDJ, 7/18/94)
Page 35

ST-174-R2-090294
22
SEGA Enterprises, Ltd.
E7000 Interface Cable
Figure 2.9 EVA board connections
Next, connect the following cables, which are attached to EVA board, to the
connector on main mother board.
See the manuals belonging to the EVA board or Debugger for the installation and
operating method of the EVA board itself. An example of how to set EVA board
short pins is shown below. For more information about short pin settings, see
"Short Pins" in the SH-2 small-size EVA board user's manual.
Example of Short Pin Setting Method (for Programming Box / Graphics Box)
No. 10 PSCB Clock setting → PSCB2 (J14=2-3 short, J15=1-2 short)
Other
Caution:
• When the EVA board is not set correctly, debugger may not start or it may operate erratically.
• Check that this connector is firmly connected if EVA board can not access the I/O of Target Box
→ J1~J13=OFF
and memory at all.
Note after connecting
In EVA board user's manual, it states that the EVA board is connected to the Target
Box with screws. Actually, this is not possible because of the Target Box casing.
Therefore, the Target Box should not be sent with the EVA board connected. Also,
extra precautions must be taken when moving within a room.
(RDJ, 7/18/94)
Page 36

ST-174-R2-090294
23
SEGA Enterprises, Ltd.
2.5 Connecting the Controller
Controller Connector Location
The connector for the controller cable is on a circuit board which is visible from the
front of the Target Box. See Figure 2.10.
Figure 2.10 Location of connector for Controller
(1) Controller cable connector For 1-pin
(2) Controller cable connector For 2-pin
(RDJ, 7/18/94)
Page 37

ST-174-R2-090294
24
SEGA Enterprises, Ltd.
2.6 Power ON/OFF
Connecting the AC Cable
To connect the attached AC cable:
1) Make sure the power switch on the Target Box is on "OFF".
2) Insert the female end of the attached cable to the AC inlet on the Target Box.
3) Connect three terminals of AC cable to the AC outlet.
The input specification of the Target Box are as follows:
[USA]
• AC85V~132V
• 47Hz~63Hz
• Drain current: 100W(MAX)
[Europe]
• AC170V~265V
• 47Hz~63Hz
• Drain current: 100W(MAX)
Power ON
(1) After the ICE or EVA board is connected,
(a) turn on the power for the host computer (PC/AT) that is connected to
ICE or EVA board;
(b) turn on the power of the E7000 body.
(2) Turn on the power of any peripherals connected to Target Box.
(3) Turn on the power of the Target Box by pushing the power switch
upward. The built in light switch will be on when the power is on.
Caution: If the power switch is not lit up, re-check that AC cable and other cables are correctly
connected, and then turn on the power again.
If the power does not turn on, contact SEGA Technical Support Center. For more
information, refer to “Chapter 4 Support Center.”
Power OFF
Turn off the power by the reverse procedures as described above.
Caution: It may cause damage on Target Box and its peripherals if the sequence for turning
powers on is not correct.
(RDJ, 7/18/94)
Page 38

ST-174-R2-090294
25
SEGA Enterprises, Ltd.
Chapter 3 Description of Each Section
Chapter 3 Description of Each Section...............................................................................................23
3.1 Panel Switch..................................................................................................................24
SMPC Reset Switch.........................................................................................24
Power ON Reset Switch...................................................................................24
Reset Switch......................................................................................................25
Master/Slave EVA Board Reset Switch..........................................................25
Summary of the Reset Relationships..............................................................25
3.2 Graphics/Program Development Environment.......................................................26
Connector Name...............................................................................................26
AV-OUT Signal Connector Pin Number........................................................27
Environment Setting Switch............................................................................27
SCSI ID Setting...................................................................................................30
Increasing Extended Memory.........................................................................30
Installing Extended Memory.............................................................................31
(RDJ, 7/18/94)
Page 39

26
3.1 Panel Switch
The functions of the panel switch are as follows:
• Reset each board
• Reset whole Target Box
• Set mode for each debugger
ST-174-R2-090294
SEGA Enterprises, Ltd.
Figure 3.1 Panel switch names
SMPC Reset Switch
This switch resets the SMPC (system manager). The real time clock (RTC) and
SMPC internal 4 byte backup memory (SMEM) are also initialized. 256K byte backup
memory is not affected.
Power On Reset Switch
The entire Target Box is reset to the same conditions as when the Target Box power
supply starts up. The system manager RAM is cleared but the EVA board and ICE
are not reset.
(RDJ, 7/18/94)
Page 40

ST-174-R2-090294
27
SEGA Enterprises, Ltd.
Reset Switch
Reset signal is issued to each device from the system manager. The system manager
RAM is not cleared.
Master/Slave EVA Board Reset Switch
Only the EVA board, which is connected to the Target Box, is reset. Main boards and
A-Bus boards are not reset. This switch is effective only when the internal EVA
board is connected to the Target Box, and the EVA board Reset cable is connected.
The Reset switch on top of the EVA board has the same function.
• MASTER EVA BOARD RESET SWITCH
Reset EVA board installed on the master side.
• SLAVE EVA BOARD RESET SWITCH
Reset EVA board installed on the slave side.
Summary of the Reset Relationships
Table 3.1 Summary of reset relationships
Master EVA
Panel Switches
Start up of Target Box X X X O X O
SMPC Reset X X X O O O
Power ON Reset X X X O X O
Reset X X X O X X
Master EVA Board Reset O X X X X X
Slave EVA Board Reset X O X X X X
Board
Slave EVA
Board
ICE Main Board System Manager
(SMPC)
CD Drive
Note 1: O Symbol=being reset; X symbol=not being reset
Note 2: The resetting for ICE and EVA board means that the debugger hardware,
ICE and EVA board, are reset. (Status: CPU Break in progress. When CPU
Run is in progress, power up and SMPC RESET, POWER ON RESET are
reset.)
Note 3: The main boards listed in the table indicate the main board and A-Bus
board.
Note 4: The CD drive in the above chart is loaded only in the programming box.
Note 5: The RESET in the above chart is dependent upon software setting. See
related library documents for more information.
(RDJ, 7/18/94)
Page 41

ST-174-R2-090294
28
SEGA Enterprises, Ltd.
3.2 Graphics/Program Development Environment
Connector Name
The name and description of the connector for graphics development environment
(graphics connector) is shown in Figure 3.2.
See the "Front View" and "Top View" sections in Chapter 1 for the locations of
these connectors.
Figure 3.2 Graphics connector names
(1) Cartridge Connector
Used for connecting external interface of the ROM cartridge circuit board. The ▲
symbol indicates the location of pin No. 1.
(RDJ, 7/18/94)
Page 42

ST-174-R2-090294
29
SEGA Enterprises, Ltd.
(2) SCSI-II
Used for connecting SCSI interface of the host machine (PC/AT, Mac, etc.). One
SCSI-II connector is provided. The ▲ symbol indicates the location of pin No. 1.
Both the Programming Box and Graphics Box support the SCSI - I/II. This
interface is terminated; therefore, make sure the setting is for at the terminated
end of the SCSI connection. For more information, please contact Sega
technical support center. (Also, please see support center in chapter 4.)
(3) AV-OUT Connector
Outputs the signal for displaying graphics.
Connect the attached AV cable and use.
AV-OUT Connector Pin Number
The pin number of the AV-OUT connector and signal name are shown in Figure
3.3.
Pin Number Signal Name
COMPOSITE SYNC
Figure 3.3 AV-OUT connector pin number and signal name
Environment Setting Switch
This switch sets the usage environment of the Target Box. The following functions
can be set.
• Area code used
• Image output format (NTSC/PAL)
• Type of work station used (PC, SUN, HP)
• SCSI ID
• Expanded memory
(RDJ, 7/18/94)
Page 43

ST-174-R2-090294
30
SEGA Enterprises, Ltd.
OFF= Return switch to
horizontal position
Figure 3.4 Switches for setting environments
ON= Push switch down
Side View
(RDJ, 7/18/94)
Page 44

SEGA Enterprises, Ltd.
31
Tables 3.2, 3.3, and 3.4 show switches used for setting.
Table 3.2 Environment Setting Switches SW 1/SW2
<SW1>
Switch No. Notation ON OFF
1 AREA 0
2 AREA 1 Area Code (0 - 1 5 )
3 AREA 2 Table 3. 3
4 AREA 3
5 NTSC/PAL PAL Format
(Europe Only)
6
7 (Reserved) OFF fixed
8
<SW2>
Switch No. Notation ON OFF
1 WS 0
2 WS 1
3 SCSI BOOT
4 SCSI ON
5 SIMM CART
Boot up from SCSI Do not boot up from SCSI
Layout SIMM cartridge area Do not layout SIMM cartridge
Type of work station
Table 3.4
Use SCSI Do not use SCSI
6 SCSI 2
7 SCSI 1
8 SCSI 0
SCSI ID Number
Table 3
NTSC Format
(Japan and USA Only)
area
ST-174-R2-090294
Note: Areas with double line frames are settings at shipment time.
Table 3.3 Table of Area Code Settings (SW 1)
Area Code*
1514131211109876543210
Switch No.
1
2
3
4
OFF ON OFF ON OFF ON OFF ON OFF ON OFF ON OFF ON OFF ON
OFF OFF ON ON OFF OFF ON ON OFF OFF ON ON OFF OFF ON ON
OFF OFF OFF OFF ON ON ON ON OFF OFF OFF OFF ON ON ON ON
OFF OFF OFF OFF OFF OFF OFF OFF ON ON ON ON ON ON ON ON
*For Japan use only area code 1, for USA use only area code 4, for Europe use only area code 12.
Table 3.4 Table of Work Station Type Settings (SW 2)
Switch No. Work Station Type
12
OFF OFF PC
OFF ON SUN
ON OFF (Reserved)
ON ON HP
(RDJ, 7/18/94)
Page 45

ST-174-R2-090294
32
SEGA Enterprises, Ltd.
SCSI ID Setting
The ID of the SCSI must be set in order to connect the graphics/program
development SCSI (main SCSI) to the Host computer (PC/AT, MAC, etc.).
A number (1~6) can be used for the ID of the SCSI. Use an ID which is not used for
the SCSI equipment (i.e. HDD, etc.) and that has already been connected.
See Figures 1.1 and 1.2 for the location of the switches. The switches are set as ID=1
when shipped.
Figure 3.4 explains how to set the ON, OFF, and switch numbers for setting
switches. Be sure to turn the power off before changing switch settings.
Table 3.5 SCSI ID settings
Switch No.
ID number
0 x ON * OFF OFF OFF
1 x ON * OFF OFF ON
2 x ON * OFF ON OFF
3 x ON * OFF ON ON
4 x ON * ON OFF OFF
5 x ON * ON OFF ON
6 x ON * ON O N OFF
7 x ON * ONONON
345678
Note 1: Boot from the SCSI when x mark is ON, and use graphics tool. When OFF, select the
setting where it does not boot up.
Note 2: Select the setting so that the SIMM is configured in the cartridge area when the * mark is
ON when the SIMM is loaded, and select the setting so that the SIMM is not configured in
the cartridge area when the * mark is OFF. (Only in the Programming Box, 8MB of SIMM is
installed as standard.)
Note 3: Areas indicated by double lines are settings at shipment time.
ID 0 and 7 are used on the MAC side, so do not set to these values.
Increasing Extended Memory
Extended memory is prepared, among other things, as the substitute memory of the
cartridge ROM. An 8 Mbyte SIMM (Single-In-Line-Memory Module) is mounted
into the SIMM socket in the Programming Box at shipment.
The user can add three 8 Mbyte SIMMs for a maximum of 32 Mbytes of memory.
Extended memory exists on the A-Bus board. Before adding extended memory be
sure to turn off the Target Box power first.
(RDJ, 7/18/94)
Page 46

ST-174-R2-090294
33
SEGA Enterprises, Ltd.
Installing Extended Memory
The installation location of the extended memory on the main board is shown in
Figure 3.5.
SCSI
Connector
Figure 3.5 The installation location on extended memory A-Bus board
RS-232C
Connector
Power Supply
Connector
A SIMM is installed on IC11 (see Figure 3.5) at the time the Programming Box is
shipped. The user can add SIMMs to SIMM sockets IC12, IC13, and IC14.
Expanded memory has been prepared as an option with our company’s software
system. For more information, please contact the SEGA technical support center.
(Also, please see support center in chapter 4.)
The following SIMM can be used.
Manufacturer: Samsung
Type: KMM5362000B2G-7
Spec: Access time 70ns
Capacity: 8M bytes
Figure 3.6 shows how to install a SIMM.
(RDJ, 7/18/94)
Page 47

34
<Installation>
ST-174-R2-090294
SEGA Enterprises, Ltd.
SIMM Socket
SIMM socket side view
SCSI
Connector
(1) Insert SIMM from the side and at an angle into the SIMM socket railing.
(2) After inserting SIMM into the railing, stand it upright.
RS-232C
Connector
SIMM Socket
Power Supply
Connector
Reset Switch
<Removal>
Lever
SIMM socket top view
(1) By lifting small silver levers at both sides of the socket, the SIMM can easily be removed.
Figure 3.6 Installation of SIMM memory
(RDJ, 7/18/94)
Page 48

ST-174-R2-090294
35
SEGA Enterprises, Ltd.
Chapter 4 Customer Support Service
Chapter 4 Customer Support Service........................................................................33
4.1 Customer Support Service Information..............................................34
(RDJ, 7/18/94)
Page 49

ST-174-R2-090294
36
SEGA Enterprises, Ltd.
4.1 Customer Support Service Information
If you have any technical questions, or missing or broken parts on the Saturn Target
Box, please contact the Technical Support Department.
(1) For Technical Inquires:
Company: SEGA of America
Department:Technical Support
Address: 275 Shoreline Drive/Ste. 500
Redwood City, CA
94070
FAX: (415) 802-3963
Service time: 10:00-11:45 am/1:30-6:00 pm
(Monday through Friday, except holidays)
(RDJ, 7/18/94)
 Loading...